Age of Empires II – Walkthrough (Part I)
The first campaign follows Joan of Arc as she rescues France from British control near the end of the Hundred Years War. You will guide her from her humble beginnings until her death. That is followed by a final battle to drive the British from France.
|
CONTENTS 1. An Unlikely Messiah |
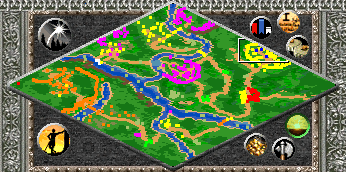
Your mission is to simply escort Joan from the camp at Vaucouleurs to the Chateau of Chinon. You start out with introductions from Bertrand and Jean de Metz and then pick up some men-at-arms and archers. Head south from the camp (you will be warned not to head west) and kill the wolves along the path; if you don’t, they will attack Joan. You will come up to a battle between the French and British. Avoid getting involved.
As soon as the French are all dead, continue south. The bridge is out, so you have to take the long way. Shortly after you turn to the west, you will get ambushed by a handful of highwaymen. Dispatch them and then follow the trail to the north and then west. Go across the bridge and into the French village. Here you will pick up more soldiers and a battering ram. Go back across the bridge and leave Joan and the battering ram on the bridge. Set up your army for an ambush and then have a single soldier go south and attack the Burgundian gate. This will cause the four archers inside the town to attack him. Have him run back to the rest of your soldiers and ambush the pesky archers. Move the battering ram up and have it kill the gate, the towers (or play on easy and have no towers) and anything else you don’t like in the town. Make sure to move your army into the town because there will be two light cavalry still there.
The next part of the escort is either easy or hard. If you move your army across the shallows and down to the river ahead, you will run into an ambush and have to get all your troops on three transports before they are killed. If you leave your army next to shallows, you can simply run a single unit to the dock, get the transports, and have them sail up the river to pick up the rest of your army without the need for speed clicking. Sail back to the main river, east, and take the first small channel that heads south.
Although you can do mouse gymnastics to board your transports under fire like this, it is much easier to move the ships first Land your forces on the north shore at the shallows. Head just a short ways to the north, and you will pick up six more archers and a couple scorpions. Head back across the river where you will get ambushed by highwayman and Burgundians. Once they are gone, you can simply race to the Chateau.
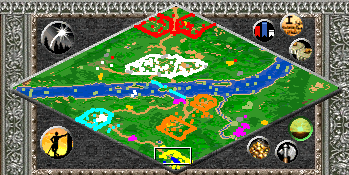
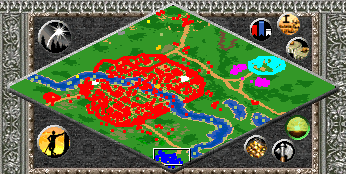
You start out with a few units and have to first head to Blois to meet up with your army. Burgundian cavalry will ambush you about halfway there, so move slowly and carefully. Once you arrive at Blois, have your army head north and follow the trail that meanders to the northwest, but have the trade carts head due north until they come to the river. Have the carts follow the river rather than the road in order to avoid the enemies. Your army will run into a larger Burgundian ambush, and while they are fighting, the trade carts can drive by, across the bridge, and into Orleans safely. Immediately put your villagers to work and make more villagers. It’s also a good idea to send out a unit to explore the area west of Orleans in order to claim the mill and farms that are there.
Once Orleans is yours, fortify your side of the bridge you just crossed. Make sure to put walls, towers with archers, and gates in place so that you do not have to worry about Burgundy or the South British for the rest of the battle. Once that is done, you can simply build up your resources and army normally until you are ready to destroy the North British castle which is in the northwest corner of the map.
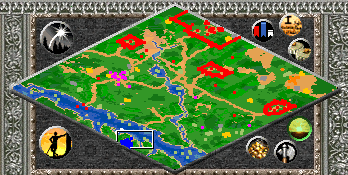
This scenario starts with you on a small bit of land with some troops and 4 villagers. You can quickly claim two transports and two demolition ships by running to the flag to the west. At that point you have two choices. Either you play aggresively and use your troops to destroy Burgundy (pink), since your troops are just enough to bring down his Town Center and three Towers (and claim his many resources) or play it safe by bulding a town center on the eastern side of the map (guarded by only two towers). Placing your town on the western side of the map is more difficult at first, but will make your assaults go faster once you start building your army. You will get attacked more often there.
If you build your town to the east, then advance to the castle age quickly, and put several villagers on one transport, and five archers on the other. Send them to the far east edge of the screen to land. The area can be quickly sealed off with a few short walls and makes an excellent beachhead. Travel north along the west edge of the screen until you exit the forest. There is gold in the open land here and this is a good place to build a castle as well as the rest of your buildings. You can use the gold to buy stone for fortifications.
Because your access to resources is fairly limited unless you destroy and pillage Burgundy, you are going to want to use lots of pikemen and skirmishers that only require wood and food. You should make sure to fully upgrade your archer and infantry technology at the blacksmith because you will be depending on these units.
The British will ignore you at first, but will attack in full force after you destroy their first castle. Make sure you have lots of resources and plenty of military buildings. Having your main town in the west, and another in the east (for the extra stone and gold) is the best way to go. With a few thousand food, wood and gold, you can quickly rebuild your army and attack the second then third castle. The back and forth with the British will likely take several hours until you can destroy their castles.
This scenario is much easier than the last one. Instead of castles, you have to destroy Town Centers, but this is easier now that you can build trebuchets! You start out by heading to the camp, but as per usual, you will get ambushed halfway there. After you dispatch the British Guards, continue on to the flag and you will be given villagers, a town center, and a mill. Immediately go to work building up the area.
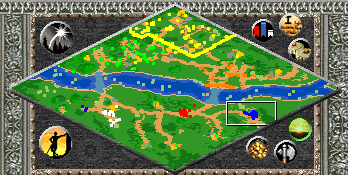
This map has a large river that separates you from the enemy. There are only two shallows across it. If you simply send scouts along the trails, you will spot both of them. Do not cross the river yet as this sets off your enemies who will attack and who start out with much larger armies than yours. Instead, simply locate both fords and then fortify your side of the river heavily. Build your castles there as well, with plenty of towers. Also note that the enemy will sometimes land troops to the western-most edge of the map.
You should build a siege workshop and train one ram. Use this ram to destroy the towers guarding the gold and stone mines on your side of the river. The rest of your siege arsenal should be made up of trebuchets trained at castles. Gold and stone are in short supply here, so build at least 8 farms and sell the food when the mines run dry.
Be quick to seal off the rivers as well! If you ignore the eastern shallows, the enemy can cross and attack your flank, and even place military buildings right next door! When you are ready to attack, it is best to start with Chalon (green). They do not have any walls, and only a few towers. Then attack Troyes (orange). They should both be defeated within the first hour of gameplay. Occupy their resources and build up, and grind your way into the walled northern town. Attack Rheims from the eastern gate.
The northern town will be packing catapults galore. Your only hope is to swarm and distract them with troops while your trebuchets (build at least 6) advance far enough to fire on their town center.
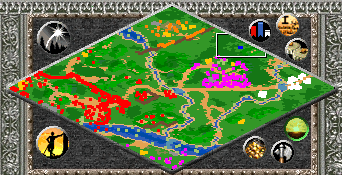
This map actually has three major sections to it. First, you need to break into Paris. Then, you need to destroy the fortifications in the heart of the city (unless you want to baby-sit the refugees to make sure they don’t die). Finally, there is the mad dash to the finish. A good old-fashioned barbecue follows that race.
Your army is a bit too large at the start to manage easily. The best way to overcome this is to break it into three groups. The first group should be your archers, cannons, and trebuchets. Put them in a box formation and give them a hotkey (CTRL+1). They get to do all the real work. The archers will protect the siege engines, and the engines will break down the walls. The second group is infantry and you should hotkey them as well (CTRL+2). Finally, you want your cavalry minus Joan in their own group. This will allow them to move quickly around the battlefield killing the onagers and longbowmen who will be all over the place when you start your assault. Joan gets to sit in the corner since she is too important to risk (if she dies before the refugees escape, you have to start over).
Send your box forward carefully. If it shoots at anything, let it finish before moving it again. Put the infantry out in front of it, and have the cavalry ready to rush monks or enemy ranged units that try and attack it. Continue on until you reach the gates of Paris. This is going to be your biggest fight. You might even consider leaving the trebuchets behind for this one since they won’t be of any use, and they make the next fight much easier. Simply get your box into position where the cannon can fire on the gates, put the infantry between the gates and the box, and have the cavalry ready to pounce. As soon as you fire at the gate, the British will come running out of the city. Use the cavalry to kill the siege engines and to chase the longbowmen who cannot fire at targets right next to them. The cannon can also match the longbow range, which will help keep your archers alive.
After you finish off the defenders, move your trebuchets up and kill the towers. You can now safely enter the city, but don’t rush through it. There is a well-built castle with extra walls towards the center of town. Your trebuchets can deal with that and you can use your other groups to defend them. Once that is removed, continue through the city. The refugees are on the west side of town next to the river. Collect them and head to the bridge where you won’t get your promised reinforcements (surprise surprise).
Joan is dead, but the war isn’t over yet. Your first job is to take over command of units. That is a simple matter of just heading east. Once you have all your troops, your best bet is to set up an ambush and then lead Burgundians back into it. Move the archers up near the shallows of the stream and order them to stand ground. Move the infantry in front of them and put them in a defensive stance. The cannon should go on the east shore of the river just past the bend. This will give your ambush a lovely “L” shape and add crossfire without the risk of hitting your own troops. Leave your cavalry in the rear, but hotkeyed so you can rush them up against Burgundy cannons and monks.
As soon as your ready, send a single scout up ahead and have him knock on the gate. As soon as the enemy starts to attack, run back past the ambush. The Burgundians will follow and will die. Repeat a few times until your don’t get attacked when you knock. Move your forces up and break into the Burgundy walls.
It is possible to get Burgundy to resign before you finish the fight. Once you slaughter a couple waves of them, send a few heavy cavalry units to the southeast corner of the map. There is a small Burgundian village. Your cavalry should kill the town center and start attacking the other buildings. Once you do enough damage, Burgundy will resign.
You will be tempted to start building your base inside Burgundy’s walls, but that is a bad idea. There is a British base (Shrewsbury) in the northwest corner of the map that is much easier to defend, has plenty of resources inside the walls, and doesn’t start with that much of an army, making it an easy target if you attack immediately after beating Burgundy. Try not to destroy any of the walls other than the gates since the other British forces will never attack any walls built by their allies.
After you finish off Shrewsbury, you will need to build a full base and conquer the last of the British. The goal is simply to get the trade cart to the flags, but there is no way to do that without first crushing the British. Also, there is a single ford across the river between the British and you. If you fortify those shallows, you can have easy access to all of the resources on your side of the map without worrying about defending your villagers from British raids. Make sure to include trebuchets in those defenses to fire at longbowmen and get them into range of your towers and castles.
")


A rich man has no need of character.
Death is the great leveler.
Did you know these facts on CBD OIL and Full Spectrum CBD Hemp Oil? Cannabinoids are isolated from hemp utilizing supercritical CO2 extraction. Thanks to modern-day technology, the resulting solution is tidy, without unnecessary waxes and heavy metals, naturally present in the plant, and the drawn liquid has a typical, oily consistency. CBD oil includes cannabidiol as a base component and might consist of only trace quantities of tetrahydroxycannabidiol (THC). It is advised by medical professionals and pharmacists as an antioxidant and compound that blocks the action of proinflammatory cytokines (proteins), e.g. in Crohn’s disease or ulcerative intestinal tract. RSO oil has a low CBD content, while high THC. The synergistic (enhancing) action of CBD and THC relative to each other is utilized here. Both cannabinoids can do much more together than when used individually. Both marijuana oil type CBD and RSO likewise consist of other cannabinoids, such as cannabichromene (CBC) and cannabigerol (CBG). The trick is not, however, that CBD frequently has a structure broadened to include flavones, flavonoids, terpenes, terpenoids, amino acids and omega acids. The distinction is primarily due to intentions assisting humankind to utilize one or the other product. CBD medical cannabis oil is a rather beneficial mix of cannabinoids, designed to secure versus 21st century disease. It’s best to utilize all of these compounds together, as nature developed them and confined in marijuana inflorescences. Oil of marijuana in a sort of hobby APR includes percentages of CBD, balanced by the existence of THC. Manufacturers focus on the synergistic effect of one compound relative to the other, while deserting the presence of CBC and CBG. Why such a decision? – Modern clinical research reveals that CBD + THC cope with severe autoimmune diseases, while CBC or CBG show minimal activity in the presence of both compounds, much like terpenes, flavonoids or flavones, therefore their material in the service seems to be unneeded. In addition, the marijuana pressure from which THC and CBD are derived contain negligible quantities of other cannabinoids. RSO oil is totally illegal in Poland, which is why it can not be acquired in any lawfully running shop on the marketplace. Of course, there are a number of amateur approaches for getting it, however it’s good to understand that compounds gotten synthetically in home laboratories doubt, untested, and the impact unknown. The solvent for the production of family RSO is usually gasoline, alcohol and even kerosene, which instead of curing, toxin. Alcohols and their like impair cannabinoids, and so in truth, they do not bring anything brand-new to the medical world. Cannabis oil has actually already marked a brand-new period in which guy stopped to fear what is unidentified, and started to find what our ancestors had actually currently noticed and use the substantial capacity, in the beginning glimpse, a little strange relationships, associated generally with pathology. Medical marijuana, contrary to its name, does not imply fermented female inflorescences and leaves consisting of psychoactive compounds coiled in so-called “Joints”, however an advantageous oil without psychoactive THC. A basic person, after taking doses of medicinal cannabis and attaining the appropriate state of cannabinoids in the blood, can enjoy increased immunity, minimized vulnerability to cancer, postponed aging and lowered risk of stroke or cardiovascular disease. CBD oil includes cannabidiol as a base ingredient and might include just trace quantities of tetrahydroxycannabidiol (THC). RSO oil has a low CBD material, while high THC. Both cannabis oil type CBD and RSO also contain other cannabinoids, such as cannabichromene (CBC) and cannabigerol (CBG). CBD medical marijuana oil is a rather advantageous mix of cannabinoids, designed to protect versus 21st century disease. Oil of marijuana in a kind of hobby APR consists of little quantities of CBD, balanced by the presence of THC.
Not wine…men intoxicate themselves Not vice…men entice themselves.
A good beginning makes a good end.
Better be out of the world than out of the fashion.
A great way to get more people to your site is to list your site with Google so that when people search through Google your page will come up. Listing your site in this way, will give you a vast venue where thousands of people will be introduced to your site and to your links.
|
F*ckin awesome things here. Im very glad to see your article. Thanks a lot and i’m looking forward to contact you. Will you please drop me a mail?
I appreciate, cause I found exactly what I was looking for. You’ve ended my four day long hunt! God Bless you man. Have a nice day. Bye
Heya i am for the first time here. I came across this board and I find It truly useful & it helped me out much. I hope to give something back and help others like you helped me.
Hello! I’ve been following your weblog for a long time now and finally got the bravery to go ahead and give you a shout out from Humble Tx! Just wanted to say keep up the excellent work!
I precisely needed to appreciate you all over again. I do not know the things I might have carried out in the absence of the type of methods revealed by you directly on my situation. It had become a very intimidating dilemma for me personally, nevertheless encountering the professional style you processed the issue forced me to weep over contentment. Extremely happy for this advice and even expect you find out what a great job you happen to be getting into training other individuals with the aid of your blog post. Most probably you have never come across any of us.
My coder is trying to convince me to move to .net from PHP. I have always disliked the idea because of the costs. But he’s tryiong none the less. I’ve been using Movable-type on numerous websites for about a year and am anxious about switching to another platform. I have heard excellent things about blogengine.net. Is there a way I can transfer all my wordpress content into it? Any help would be greatly appreciated!
hello there and thanks on your info – I have definitely picked up something new from right here. I did then again expertise some technical issues the usage of this web site, since I experienced to reload the site lots of times prior to I could get it to load correctly. I have been thinking about if your hosting is OK? Now not that I’m complaining, but sluggish loading instances times will sometimes have an effect on your placement in google and can damage your high-quality ranking if ads and ***********|advertising|advertising|advertising and *********** with Adwords. Anyway I am adding this RSS to my email and could glance out for much extra of your respective exciting content. Make sure you update this again soon..
Did you know these truths on CBD OIL and Full Spectrum CBD Hemp Oil? Cannabinoids are isolated from hemp using supercritical CO2 extraction. Thanks to contemporary technology, the resulting option is tidy, without heavy metals and unnecessary waxes, naturally present in the plant, and the sucked liquid has a common, oily consistency. CBD oil consists of cannabidiol as a base active ingredient and might include just trace amounts of tetrahydroxycannabidiol (THC). Functions as a memory enhancer, improving concentration and coordination of motions, eliminating inflammation and frequent infections. It enhances the conduction of stimuli in the course of autoimmune illness (several sclerosis, amyotrophic sclerosis). It is recommended by physicians and pharmacists as an antioxidant and substance that blocks the action of proinflammatory cytokines (proteins), e.g. in Crohn’s disease or ulcerative intestine. RSO oil has a low CBD material, while high THC. The synergistic (enhancing) action of CBD and THC relative to each other is used here. Both cannabinoids can do much more together than when utilized separately. Both cannabis oil type CBD and RSO also consist of other cannabinoids, such as cannabichromene (CBC) and cannabigerol (CBG). The trick is not, nevertheless, that CBD often has actually a composition broadened to consist of flavones, flavonoids, terpenes, terpenoids, amino acids and omega acids. The distinction is mainly due to motives guiding humankind to utilize one or the other item. CBD medical cannabis oil is a rather helpful blend of cannabinoids, designed to safeguard versus 21st century illness. It’s best to utilize all of these substances together, as nature created them and enclosed in marijuana inflorescences. It ends up that cannabidiol enhances the effects of cannabichromene (CBC) and cannabigerol (CBG), and flavones or flavonoids enhance the absorption of these compounds. Omega-6 and omega-3 extremely nurture the body and do not enable to alter, which accelerate the aging process of the organism and boost the development of cancer. Oil of marijuana in a sort of pastime APR contains small quantities of CBD, stabilized by the presence of THC. Makers concentrate on the synergistic impact of one substance relative to the other, while deserting the presence of CBC and CBG. Why such a choice? – Modern clinical research study shows that CBD + THC cope with serious autoimmune diseases, while CBC or CBG show very little activity in the existence of both compounds, just like flavones, flavonoids or terpenes, for that reason their material in the solution appears to be unneeded. In addition, the marijuana pressure from which THC and CBD are derived contain negligible quantities of other cannabinoids. RSO oil is totally illegal in Poland, which is why it can not be obtained in any legally running shop on the marketplace. Naturally, there are a number of amateur approaches for getting it, but it’s great to know that compounds obtained synthetically in home laboratories are uncertain, untried, and the result unknown. The solvent for the production of family RSO is typically gasoline, alcohol and even kerosene, which instead of curing, poison. Alcohols and their like impair cannabinoids, therefore in reality, they do not bring anything new to the medical world. Marijuana oil has actually already marked a brand-new age in which male ceased to fear what is unknown, and began to discover what our ancestors had already discovered and utilize the significant capacity, initially look, a little unusual relationships, associated generally with pathology. Medical marijuana, contrary to its name, does not indicate fermented female inflorescences and leaves containing psychedelic compounds coiled in so-called “Joints”, but a helpful oil without psychoactive THC. A standard individual, after taking doses of medicinal cannabis and accomplishing the proper state of cannabinoids in the blood, can enjoy increased immunity, decreased vulnerability to cancer, postponed aging and decreased risk of stroke or cardiac arrest. CBD oil consists of cannabidiol as a base component and may contain just trace quantities of tetrahydroxycannabidiol (THC). RSO oil has a low CBD material, while high THC. Both cannabis oil type CBD and RSO likewise include other cannabinoids, such as cannabichromene (CBC) and cannabigerol (CBG). CBD medical cannabis oil is a rather helpful mix of cannabinoids, designed to secure against 21st century disease. Oil of cannabis in a kind of pastime APR includes small amounts of CBD, balanced by the existence of THC.
Did you know these truths on CBD OIL and Full Spectrum CBD Hemp Oil? Cannabinoids are separated from hemp using supercritical CO2 extraction. Thanks to modern innovation, the resulting solution is clean, without unnecessary waxes and heavy metals, naturally present in the plant, and the sucked liquid has a normal, oily consistency. CBD oil includes cannabidiol as a base ingredient and may contain only trace amounts of tetrahydroxycannabidiol (THC). It is recommended by medical professionals and pharmacists as an antioxidant and compound that blocks the action of proinflammatory cytokines (proteins), e.g. in Crohn’s disease or ulcerative intestinal tract. RSO oil has a low CBD content, while high THC. Obviously, the key job of RSO is to trigger a psychoactive result, although it can likewise stimulate “ill” brain structures. It deserves knowing that supplements of this type is mostly used by people to whom standard therapy does not bring relief in disease. The synergistic (enhancing) action of CBD and THC relative to each other is utilized here. When utilized separately, both cannabinoids can do much more together than. In addition, they jointly stimulate the division of inactive nerve cells, nourish the fatty envelope of the nerves, and avoid myelin inflammation that triggers loss of function in some autoimmune diseases. There are likewise stories where cannabis in its natural type softened spasticity, reduced the frequency of convulsions and seizures, and reduced unpleasant scrapie in Parkinson’s illness. This is where the concept of receiving RSO, meant just for chronically ill people, originated . Both marijuana oil type CBD and RSO also contain other cannabinoids, such as cannabichromene (CBC) and cannabigerol (CBG). The secret is not, however, that CBD typically has actually a composition expanded to include flavones, flavonoids, terpenes, terpenoids, amino acids and omega acids. The distinction is mostly due to intentions directing mankind to utilize one or the other product. CBD medical cannabis oil is a rather helpful blend of cannabinoids, developed to secure versus 21st century disease. It’s best to utilize all of these compounds together, as nature created them and enclosed in cannabis inflorescences. It ends up that cannabidiol boosts the results of cannabichromene (CBC) and cannabigerol (CBG), and flavonoids or flavones improve the absorption of these substances. Omega-6 and omega-3 highly nurture the body and do not permit to alter, which accelerate the aging process of the organism and improve the advancement of cancer. Oil of marijuana in a kind of pastime APR contains little amounts of CBD, stabilized by the existence of THC. – Modern clinical research study reveals that CBD + THC cope with serious autoimmune illness, while CBC or CBG reveal minimal activity in the presence of both compounds, simply like flavonoids, flavones or terpenes, therefore their content in the solution seems to be unnecessary. In addition, the marijuana stress from which THC and CBD are obtained contain negligible amounts of other cannabinoids. Cannabis oil has already marked a brand-new era in which guy stopped to fear what is unidentified, and started to discover what our ancestors had actually already observed and utilize the considerable potential, at very first glance, a little bizarre relationships, associated mainly with pathology. Medical marijuana, contrary to its name, does not indicate fermented female inflorescences and leaves containing psychoactive substances coiled in so-called “Joints”, but a helpful oil without psychoactive THC. A basic individual, after taking dosages of medicinal marijuana and achieving the appropriate state of cannabinoids in the blood, can delight in increased resistance, reduced vulnerability to cancer, delayed aging and minimized risk of stroke or cardiovascular disease. CBD oil includes cannabidiol as a base active ingredient and might consist of just trace quantities of tetrahydroxycannabidiol (THC). RSO oil has a low CBD content, while high THC. Both cannabis oil type CBD and RSO likewise contain other cannabinoids, such as cannabichromene (CBC) and cannabigerol (CBG). CBD medical marijuana oil is a rather beneficial mix of cannabinoids, designed to protect against 21st century disease. Oil of marijuana in a kind of pastime APR includes little amounts of CBD, stabilized by the existence of THC.
Did you understand these facts on CBD OIL and Full Spectrum CBD Hemp Oil? Cannabinoids are isolated from hemp using supercritical CO2 extraction. Thanks to contemporary innovation, the resulting service is tidy, devoid of unnecessary waxes and heavy metals, naturally present in the plant, and the drawn liquid has a typical, oily consistency. CBD oil consists of cannabidiol as a base active ingredient and might include just trace amounts of tetrahydroxycannabidiol (THC). Functions as a memory enhancer, improving concentration and coordination of motions, eliminating swelling and reoccurring infections. It improves the conduction of stimuli in the course of autoimmune illness (multiple sclerosis, amyotrophic sclerosis). It is suggested by medical professionals and pharmacists as an antioxidant and substance that blocks the action of proinflammatory cytokines (proteins), e.g. in Crohn’s disease or ulcerative intestinal tract. RSO oil has a low CBD material, while high THC. The synergistic (enhancing) action of CBD and THC relative to each other is used here. Both cannabinoids can do much more together than when used independently. Both cannabis oil type CBD and RSO also consist of other cannabinoids, such as cannabichromene (CBC) and cannabigerol (CBG). The secret is not, nevertheless, that CBD often has a composition broadened to consist of flavones, flavonoids, terpenes, terpenoids, amino acids and omega acids. The distinction is mostly due to motives assisting humanity to use one or the other product. CBD medical cannabis oil is a rather helpful mix of cannabinoids, designed to protect against 21st century disease. It’s best to use all of these compounds together, as nature produced them and enclosed in marijuana inflorescences. Oil of marijuana in a sort of hobby APR contains percentages of CBD, balanced by the presence of THC. Makers concentrate on the synergistic impact of one compound relative to the other, while deserting the presence of CBC and CBG. Why such a decision? – Modern scientific research shows that CBD + THC deal with major autoimmune diseases, while CBC or CBG show very little activity in the existence of both substances, simply like flavonoids, flavones or terpenes, for that reason their content in the service appears to be unnecessary. In addition, the marijuana strain from which THC and CBD are derived consist of negligible amounts of other cannabinoids. RSO oil is completely unlawful in Poland, which is why it can not be obtained in any legally operating store on the marketplace. Obviously, there are a number of amateur approaches for obtaining it, however it’s excellent to understand that compounds gotten artificially in home laboratories are unsure, untested, and the effect unknown. The solvent for the production of home RSO is normally gas, alcohol and even kerosene, which instead of curing, toxin. Alcohols and their like impair cannabinoids, therefore in truth, they do not bring anything new to the medical world. Marijuana oil has actually already marked a new era in which guy stopped to fear what is unknown, and began to rediscover what our ancestors had actually currently noticed and utilize the substantial capacity, initially glimpse, a little strange relationships, associated mainly with pathology. Medical cannabis, contrary to its name, does not mean fermented female inflorescences and leaves containing psychedelic substances coiled in so-called “Joints”, but an useful oil without psychedelic THC. A standard person, after taking doses of medical cannabis and achieving the proper state of cannabinoids in the blood, can delight in increased resistance, reduced susceptibility to cancer, delayed aging and reduced danger of stroke or cardiovascular disease. CBD oil consists of cannabidiol as a base active ingredient and may consist of only trace amounts of tetrahydroxycannabidiol (THC). RSO oil has a low CBD material, while high THC. Both marijuana oil type CBD and RSO also consist of other cannabinoids, such as cannabichromene (CBC) and cannabigerol (CBG). CBD medical cannabis oil is a rather advantageous blend of cannabinoids, developed to secure versus 21st century disease. Oil of cannabis in a kind of pastime APR contains little amounts of CBD, stabilized by the presence of THC.
Did you understand these realities on CBD OIL and Full Spectrum CBD Hemp Oil? Cannabinoids are separated from hemp utilizing supercritical CO2 extraction. Thanks to modern-day innovation, the resulting option is tidy, devoid of unnecessary waxes and heavy metals, naturally present in the plant, and the drawn liquid has a normal, oily consistency. CBD oil includes cannabidiol as a base active ingredient and might contain just trace quantities of tetrahydroxycannabidiol (THC). It is recommended by physicians and pharmacists as an antioxidant and compound that blocks the action of proinflammatory cytokines (proteins), e.g. in Crohn’s disease or ulcerative intestine. RSO oil has a low CBD content, while high THC. Of course, the crucial task of RSO is to trigger a psychedelic effect, although it can likewise stimulate “sick” brain structures. It deserves understanding that supplements of this type is mainly used by individuals to whom basic therapy does not bring relief in illness. The synergistic (enhancing) action of CBD and THC relative to each other is utilized here. Both cannabinoids can do much more together than when used individually. In addition, they jointly stimulate the division of non-active nerve cells, nurture the fatty envelope of the nerves, and avoid myelin inflammation that triggers loss of function in some autoimmune diseases. There are likewise stories where cannabis in its natural type softened spasticity, decreased the frequency of convulsions and seizures, and suppressed undesirable scrapie in Parkinson’s illness. This is where the idea of receiving RSO, meant only for chronically ill people, stemmed . Both marijuana oil type CBD and RSO also include other cannabinoids, such as cannabichromene (CBC) and cannabigerol (CBG). The secret is not, however, that CBD typically has actually a structure broadened to consist of flavones, flavonoids, terpenes, terpenoids, amino acids and omega acids. The distinction is mainly due to intentions assisting humanity to utilize one or the other item. CBD medical cannabis oil is a rather useful mix of cannabinoids, designed to protect versus 21st century illness. It’s best to use all of these substances together, as nature developed them and confined in cannabis inflorescences. It ends up that cannabidiol improves the impacts of cannabichromene (CBC) and cannabigerol (CBG), and flavones or flavonoids improve the absorption of these compounds. Omega-6 and omega-3 extremely nurture the body and do not permit to alter, which accelerate the aging procedure of the organism and improve the advancement of cancer. Oil of cannabis in a sort of hobby APR contains percentages of CBD, stabilized by the existence of THC. Manufacturers concentrate on the synergistic effect of one substance relative to the other, while deserting the presence of CBC and CBG. Why such a decision? – Modern clinical research shows that CBD + THC handle serious autoimmune diseases, while CBC or CBG reveal minimal activity in the existence of both compounds, similar to terpenes, flavonoids or flavones, therefore their material in the service seems to be unneeded. In addition, the cannabis pressure from which THC and CBD are derived consist of minimal amounts of other cannabinoids. RSO oil is totally unlawful in Poland, which is why it can not be gotten in any legally operating store on the marketplace. Naturally, there are a number of amateur methods for getting it, but it’s great to know that substances obtained artificially in home laboratories doubt, untested, and the result unknown. The solvent for the production of household RSO is generally gasoline, alcohol and even kerosene, which instead of treating, toxin. Alcohols and their like hinder cannabinoids, therefore in truth, they do not bring anything new to the medical world. Marijuana oil has actually already marked a brand-new period in which man ceased to fear what is unidentified, and began to uncover what our ancestors had already observed and use the significant potential, initially glance, a little strange relationships, associated mainly with pathology. Medical cannabis, contrary to its name, does not imply fermented female inflorescences and leaves including psychedelic compounds coiled in so-called “Joints”, however a helpful oil without psychedelic THC. A standard individual, after taking dosages of medical cannabis and accomplishing the proper state of cannabinoids in the blood, can delight in increased resistance, reduced susceptibility to cancer, delayed aging and minimized danger of stroke or cardiac arrest. CBD oil contains cannabidiol as a base active ingredient and might contain just trace amounts of tetrahydroxycannabidiol (THC). RSO oil has a low CBD material, while high THC. Both marijuana oil type CBD and RSO likewise contain other cannabinoids, such as cannabichromene (CBC) and cannabigerol (CBG). CBD medical marijuana oil is a rather helpful blend of cannabinoids, developed to protect versus 21st century disease. Oil of cannabis in a kind of pastime APR includes small quantities of CBD, balanced by the existence of THC.
Did you know these facts on CBD OIL and Full Spectrum CBD Hemp Oil? Cannabinoids are separated from hemp utilizing supercritical CO2 extraction. Thanks to modern-day innovation, the resulting solution is clean, devoid of heavy metals and unnecessary waxes, naturally present in the plant, and the sucked liquid has a normal, oily consistency. CBD oil consists of cannabidiol as a base active ingredient and might include just trace amounts of tetrahydroxycannabidiol (THC). Functions as a memory enhancer, improving concentration and coordination of motions, eliminating swelling and recurrent infections. It enhances the conduction of stimuli in the course of autoimmune illness (several sclerosis, amyotrophic sclerosis). It is suggested by physicians and pharmacists as an antioxidant and compound that obstructs the action of proinflammatory cytokines (proteins), e.g. in Crohn’s disease or ulcerative intestine. RSO oil has a low CBD material, while high THC. Of course, the essential task of RSO is to trigger a psychedelic result, although it can likewise stimulate “sick” brain structures. It is worth understanding that supplements of this type is mostly used by individuals to whom basic therapy does not bring relief in health problem. The synergistic (enhancing) action of CBD and THC relative to each other is utilized here. Both cannabinoids can do much more together than when used individually. In addition, they collectively promote the department of non-active nerve cells, nourish the fatty envelope of the nerves, and avoid myelin inflammation that triggers loss of function in some autoimmune diseases. There are also stories where cannabis in its natural type softened spasticity, minimized the frequency of seizures and convulsions, and suppressed undesirable scrapie in Parkinson’s disease. This is where the concept of receiving RSO, meant just for chronically ill people, stemmed . Both marijuana oil type CBD and RSO also contain other cannabinoids, such as cannabichromene (CBC) and cannabigerol (CBG). The trick is not, however, that CBD typically has a structure expanded to include flavones, flavonoids, terpenes, terpenoids, amino acids and omega acids. The difference is mostly due to motives assisting mankind to use one or the other product. CBD medical marijuana oil is a rather helpful mix of cannabinoids, developed to safeguard versus 21st century illness. It’s finest to use all of these compounds together, as nature created them and enclosed in cannabis inflorescences. Oil of marijuana in a type of pastime APR includes percentages of CBD, stabilized by the presence of THC. Makers concentrate on the synergistic result of one substance relative to the other, while abandoning the presence of CBC and CBG. Why such a decision? – Modern clinical research study reveals that CBD + THC handle major autoimmune illness, while CBC or CBG reveal minimal activity in the existence of both substances, simply like terpenes, flavonoids or flavones, for that reason their material in the service appears to be unnecessary. In addition, the marijuana stress from which THC and CBD are derived include negligible amounts of other cannabinoids. RSO oil is completely prohibited in Poland, which is why it can not be obtained in any lawfully operating store on the market. Of course, there are a variety of amateur methods for acquiring it, however it’s good to understand that compounds gotten synthetically in house labs doubt, untested, and the effect unknown. The solvent for the production of family RSO is normally gasoline, alcohol and even kerosene, which instead of curing, toxin. Alcohols and their like hinder cannabinoids, and so in reality, they don’t bring anything new to the medical world. Marijuana oil has actually currently marked a brand-new age in which guy stopped to fear what is unknown, and started to uncover what our ancestors had actually already seen and use the considerable capacity, at first glance, a little bizarre relationships, associated generally with pathology. Medical cannabis, contrary to its name, does not mean fermented female inflorescences and leaves including psychoactive compounds coiled in so-called “Joints”, but a beneficial oil without psychoactive THC. A standard person, after taking dosages of medical cannabis and accomplishing the proper state of cannabinoids in the blood, can take pleasure in increased immunity, minimized susceptibility to cancer, postponed aging and lowered danger of stroke or heart attack. CBD oil consists of cannabidiol as a base ingredient and may contain only trace amounts of tetrahydroxycannabidiol (THC). RSO oil has a low CBD material, while high THC. Both cannabis oil type CBD and RSO likewise consist of other cannabinoids, such as cannabichromene (CBC) and cannabigerol (CBG). CBD medical cannabis oil is a rather helpful mix of cannabinoids, created to safeguard against 21st century disease. Oil of cannabis in a kind of pastime APR contains little quantities of CBD, stabilized by the presence of THC.
Did you know these facts on CBD OIL and Full Spectrum CBD Hemp Oil? Cannabinoids are isolated from hemp using supercritical CO2 extraction. Thanks to modern innovation, the resulting solution is tidy, without unneeded waxes and heavy metals, naturally present in the plant, and the sucked liquid has a normal, oily consistency. CBD oil consists of cannabidiol as a base component and might include just trace amounts of tetrahydroxycannabidiol (THC). It is recommended by doctors and pharmacists as an antioxidant and substance that blocks the action of proinflammatory cytokines (proteins), e.g. in Crohn’s disease or ulcerative intestine. RSO oil has a low CBD material, while high THC. Of course, the key job of RSO is to trigger a psychedelic effect, although it can likewise stimulate “sick” brain structures. It deserves knowing that supplementation of this type is primarily utilized by individuals to whom basic therapy does not bring relief in disease. The synergistic (enhancing) action of CBD and THC relative to each other is utilized here. Both cannabinoids can do much more together than when used individually. In addition, they collectively promote the division of non-active nerve cells, nourish the fatty envelope of the nerves, and prevent myelin inflammation that causes loss of function in some autoimmune illness. There are likewise stories where cannabis in its natural form softened spasticity, minimized the frequency of convulsions and seizures, and reduced undesirable scrapie in Parkinson’s disease. This is where the idea of getting RSO, meant only for chronically ill people, stemmed . Both marijuana oil type CBD and RSO likewise contain other cannabinoids, such as cannabichromene (CBC) and cannabigerol (CBG). The secret is not, nevertheless, that CBD often has a structure expanded to include flavones, flavonoids, terpenes, terpenoids, amino acids and omega acids. The difference is mainly due to motives directing humankind to utilize one or the other product. CBD medical marijuana oil is a rather helpful mix of cannabinoids, developed to safeguard against 21st century illness. It’s finest to utilize all of these substances together, as nature created them and confined in marijuana inflorescences. It ends up that cannabidiol improves the results of cannabichromene (CBC) and cannabigerol (CBG), and flavones or flavonoids improve the absorption of these substances. Omega-6 and omega-3 extremely nourish the body and do not enable to alter, which speed up the aging procedure of the organism and improve the advancement of cancer. Oil of cannabis in a kind of hobby APR includes little quantities of CBD, stabilized by the presence of THC. – Modern scientific research reveals that CBD + THC cope with major autoimmune illness, while CBC or CBG reveal minimal activity in the existence of both substances, simply like flavonoids, terpenes or flavones, for that reason their content in the solution appears to be unneeded. In addition, the marijuana strain from which THC and CBD are derived consist of negligible amounts of other cannabinoids. Marijuana oil has currently marked a new period in which male ceased to fear what is unidentified, and began to uncover what our forefathers had currently noticed and use the considerable potential, in the beginning look, a little unusual relationships, associated generally with pathology. Medical marijuana, contrary to its name, does not imply fermented female inflorescences and leaves consisting of psychedelic substances coiled in so-called “Joints”, but a beneficial oil without psychedelic THC. A standard individual, after taking doses of medical cannabis and attaining the proper state of cannabinoids in the blood, can enjoy increased resistance, reduced susceptibility to cancer, delayed aging and lowered danger of stroke or cardiac arrest. CBD oil contains cannabidiol as a base component and might include only trace quantities of tetrahydroxycannabidiol (THC). RSO oil has a low CBD content, while high THC. Both cannabis oil type CBD and RSO also consist of other cannabinoids, such as cannabichromene (CBC) and cannabigerol (CBG). CBD medical marijuana oil is a rather useful mix of cannabinoids, developed to safeguard against 21st century disease. Oil of cannabis in a kind of hobby APR consists of little amounts of CBD, balanced by the presence of THC.
Hey very nice blog!! Man .. Beautiful .. Amazing .. I’ll bookmark your blog and take the feeds also…I’m happy to find numerous useful information here in the post, we need work out more strategies in this regard, thanks for sharing. . . . . .
Thanks for a marvelous posting! I truly enjoyed reading it, you may be a great author.I will ensure that I bookmark your blog and will eventually come back from now on. I want to encourage yourself to continue your great writing, have a nice day!
Did you know these truths on CBD OIL and Full Spectrum CBD Hemp Oil? Cannabinoids are isolated from hemp utilizing supercritical CO2 extraction. Thanks to modern innovation, the resulting service is tidy, without unnecessary waxes and heavy metals, naturally present in the plant, and the sucked liquid has a typical, oily consistency. CBD oil includes cannabidiol as a base component and might consist of only trace quantities of tetrahydroxycannabidiol (THC). Works as a memory enhancer, enhancing concentration and coordination of motions, eliminating inflammation and frequent infections. It improves the conduction of stimuli in the course of autoimmune diseases (numerous sclerosis, amyotrophic sclerosis). It is recommended by medical professionals and pharmacists as an antioxidant and substance that blocks the action of proinflammatory cytokines (proteins), e.g. in Crohn’s disease or ulcerative intestinal tract. RSO oil has a low CBD content, while high THC. Naturally, the essential job of RSO is to trigger a psychoactive result, although it can also stimulate “sick” brain structures. It deserves understanding that supplements of this type is mainly used by people to whom basic therapy does not bring relief in health problem. The synergistic (enhancing) action of CBD and THC relative to each other is used here. Both cannabinoids can do a lot more together than when used separately. In addition, they collectively promote the department of non-active afferent neuron, nourish the fatty envelope of the nerves, and avoid myelin inflammation that causes loss of function in some autoimmune illness. There are also stories where cannabis in its natural type softened spasticity, lowered the frequency of seizures and convulsions, and suppressed undesirable scrapie in Parkinson’s disease. This is where the concept of receiving RSO, meant only for chronically ill individuals, originated . Both marijuana oil type CBD and RSO also consist of other cannabinoids, such as cannabichromene (CBC) and cannabigerol (CBG). The secret is not, nevertheless, that CBD often has actually a composition expanded to consist of flavones, flavonoids, terpenes, terpenoids, amino acids and omega acids. The difference is primarily due to motives directing humanity to utilize one or the other item. CBD medical marijuana oil is a rather useful blend of cannabinoids, developed to protect against 21st century disease. It’s finest to use all of these compounds together, as nature created them and enclosed in marijuana inflorescences. Oil of cannabis in a kind of hobby APR contains small quantities of CBD, balanced by the existence of THC. Producers concentrate on the synergistic impact of one compound relative to the other, while deserting the presence of CBC and CBG. Why such a choice? – Modern scientific research shows that CBD + THC manage major autoimmune diseases, while CBC or CBG show very little activity in the existence of both substances, similar to flavones, flavonoids or terpenes, therefore their content in the option seems to be unnecessary. In addition, the marijuana strain from which THC and CBD are derived include negligible amounts of other cannabinoids. RSO oil is totally unlawful in Poland, which is why it can not be obtained in any lawfully running store on the marketplace. Of course, there are a number of amateur methods for obtaining it, however it’s excellent to understand that compounds obtained synthetically in house laboratories are uncertain, untested, and the result unknown. The solvent for the production of household RSO is usually fuel, alcohol and even kerosene, which instead of curing, poison. Alcohols and their like hinder cannabinoids, and so in reality, they don’t bring anything new to the medical world. Marijuana oil has actually already marked a brand-new period in which man ceased to fear what is unidentified, and began to uncover what our ancestors had actually already noticed and utilize the substantial capacity, at very first glance, a little bizarre relationships, associated generally with pathology. Medical marijuana, contrary to its name, does not suggest fermented female inflorescences and leaves containing psychedelic substances coiled in so-called “Joints”, but an useful oil without psychedelic THC. A standard individual, after taking dosages of medical marijuana and achieving the suitable state of cannabinoids in the blood, can delight in increased resistance, decreased vulnerability to cancer, postponed aging and minimized threat of stroke or heart attack. CBD oil contains cannabidiol as a base active ingredient and may contain only trace amounts of tetrahydroxycannabidiol (THC). RSO oil has a low CBD content, while high THC. Both marijuana oil type CBD and RSO likewise include other cannabinoids, such as cannabichromene (CBC) and cannabigerol (CBG). CBD medical marijuana oil is a rather useful mix of cannabinoids, developed to secure versus 21st century disease. Oil of marijuana in a kind of hobby APR consists of little amounts of CBD, stabilized by the existence of THC.
Did you understand these facts on CBD OIL and Full Spectrum CBD Hemp Oil? Cannabinoids are separated from hemp utilizing supercritical CO2 extraction. Thanks to contemporary technology, the resulting solution is tidy, without unnecessary waxes and heavy metals, naturally present in the plant, and the drawn liquid has a common, oily consistency. CBD oil consists of cannabidiol as a base component and might consist of just trace quantities of tetrahydroxycannabidiol (THC). Functions as a memory enhancer, enhancing concentration and coordination of movements, eliminating inflammation and persistent infections. It enhances the conduction of stimuli in the course of autoimmune diseases (several sclerosis, amyotrophic sclerosis). It is suggested by physicians and pharmacists as an antioxidant and compound that obstructs the action of proinflammatory cytokines (proteins), e.g. in Crohn’s disease or ulcerative intestinal tract. RSO oil has a low CBD content, while high THC. The synergistic (enhancing) action of CBD and THC relative to each other is utilized here. Both cannabinoids can do much more together than when utilized separately. Both marijuana oil type CBD and RSO also include other cannabinoids, such as cannabichromene (CBC) and cannabigerol (CBG). The trick is not, nevertheless, that CBD often has a composition expanded to include flavones, flavonoids, terpenes, terpenoids, amino acids and omega acids. The distinction is mainly due to motives assisting humankind to use one or the other product. CBD medical marijuana oil is a rather helpful blend of cannabinoids, created to safeguard versus 21st century illness. It’s finest to utilize all of these substances together, as nature created them and confined in cannabis inflorescences. It ends up that cannabidiol boosts the impacts of cannabichromene (CBC) and cannabigerol (CBG), and flavonoids or flavones enhance the absorption of these substances. Omega-6 and omega-3 highly nurture the body and do not permit to change, which speed up the aging procedure of the organism and enhance the advancement of cancer. Oil of cannabis in a kind of hobby APR consists of little quantities of CBD, balanced by the existence of THC. – Modern scientific research reveals that CBD + THC cope with serious autoimmune illness, while CBC or CBG show very little activity in the presence of both compounds, simply like flavones, flavonoids or terpenes, for that reason their material in the service appears to be unneeded. In addition, the marijuana stress from which THC and CBD are obtained consist of negligible quantities of other cannabinoids. Cannabis oil has actually already marked a brand-new era in which man stopped to fear what is unidentified, and began to find what our forefathers had currently discovered and utilize the significant capacity, initially glimpse, a little unusual relationships, associated mainly with pathology. Medical marijuana, contrary to its name, does not mean fermented female inflorescences and leaves consisting of psychoactive substances coiled in so-called “Joints”, but an advantageous oil without psychedelic THC. A standard person, after taking dosages of medicinal cannabis and attaining the proper state of cannabinoids in the blood, can enjoy increased immunity, reduced vulnerability to cancer, postponed aging and lowered threat of stroke or cardiac arrest. CBD oil consists of cannabidiol as a base active ingredient and may include just trace amounts of tetrahydroxycannabidiol (THC). RSO oil has a low CBD content, while high THC. Both cannabis oil type CBD and RSO also include other cannabinoids, such as cannabichromene (CBC) and cannabigerol (CBG). CBD medical cannabis oil is a rather helpful blend of cannabinoids, created to safeguard against 21st century illness. Oil of cannabis in a kind of pastime APR contains little amounts of CBD, balanced by the presence of THC.
Scotland is undeniably a definitely lovely nation, and every year it is actually gone to by groups of vacationers coming from the United States, France, and also Italy or even Spain. Barely any individual taking vacation in July, August or even September are going to think of Scotland. Perhaps it is good to believe regarding it straight currently, when the value of the pound is actually falling, and hence our company will pay out less for a holiday in Scotland? Glen Affric in early spring season Why is it worth it? Scotland is primarily a terrific yard in the north of the nation. In Scotland, I have currently been capable to check out tapes, dolphins or even deer. Yet Scotland is additionally an in the past fascinating land (who saw Brave Heart?), Where you can easily see magnificent stone fortress (Edinburgh, Stirling, Linlithgow, Eilean Donan). The resources on its own, the stunning Edinburgh, likewise ought to have focus, especially in the course of the summer festivals. nation Scotland, scottish Scotland, application Scotland, conservative Scotland, details Scotland, scotland Scotland, our team Scotland, edinburgh Scotland, little one Scotland, creed Scotland, map Scotland, iona Scotland, food selection Scotland, trip Scotland, records Scotland, past history Scotland, car Scotland, ship Scotland, uk Scotland, learn Scotland, celtic Scotland, glasgow Scotland, shetland Scotland, society Scotland, tay Scotland, bus Scotland, updates Scotland, education and learning Scotland, little bit Scotland, navigation Scotland, cookie Scotland, covid Scotland, sporting activity Scotland, ease of access Scotland, video recordings Scotland, highland games Scotland, community Scotland, golf Scotland, scots Scotland, food items Scotland, whisky Scotland, budget Scotland, visitscotland Scotland, museum Scotland, newsletter Scotland, arbroath Scotland, heck Scotland, road Scotland, distilleries Scotland, st andrews Scotland, cocktail Scotland, browse through scotland Scotland, europe Scotland, castles Scotland, future Scotland, take in Scotland, weblog Scotland, dundee Scotland, steering Scotland, sporting activities Scotland, covid-Scotland9 Scotland, transportation Scotland. Edinburgh – Some tips for exploring Scotland Travel in Scotland must undoubtedly start with its capital. Edinburgh is actually a beautiful medieval a city with unique rock properties. Coming from the primary street, the so-called The Royal Mile hooking up the former royal castle with the Queen’s summer season palace (Palace of Holyroodhouse) bolts a network of intriguing little streets (the so-called close), developing a labyrinth through which it is actually actually worth obtaining dropped. It takes approximately two days to explore Edinburgh, but you may expand this time around 4. When it comes to a short check out to Scotland, you can easily also restrict your own self to Edinburgh only, investing someday on a big salami through bus in the Scottish highlands (nearly every travel bureau in the financing delivers it). By doing this, at least momentarily our team will certainly really feel the ambience of a genuine property of hazes. An even much better tip is actually to rent out a cars and truck for someday as well as go on a private vacation (the program as well as attributes of the coordinated trips do not automatically fit everyone). Such a self-guided trip is going to possibly take us a minimum of 10 hours. Arran is called Scotland in mini. Loch Lomond is one of Scotland’s 2 nationwide parks, a lovely lake neighbored through rainforests and also hillsides. On the method, you may likewise check out Stirling Castle. country Scotland, scottish Scotland, application Scotland, tory Scotland, info Scotland, scotland Scotland, us Scotland, edinburgh Scotland, child Scotland, creed Scotland, map Scotland, iona Scotland, food selection Scotland, traveling Scotland, records Scotland, background Scotland, automobile Scotland, ship Scotland, uk Scotland, learn Scotland, celtic Scotland, glasgow Scotland, shetland Scotland, lifestyle Scotland, tay Scotland, bus Scotland, headlines Scotland, learning Scotland, bit Scotland, navigation Scotland, biscuit Scotland, covid Scotland, sporting activity Scotland, availability Scotland, video clips Scotland, highland activities Scotland, community Scotland, golf Scotland, scots Scotland, food Scotland, whisky Scotland, spending plan Scotland, visitscotland Scotland, museum Scotland, email list Scotland, arbroath Scotland, heck Scotland, street Scotland, distilleries Scotland, st andrews Scotland, beverage Scotland, go to scotland Scotland, europe Scotland, castles Scotland, future Scotland, experience Scotland, blog post Scotland, dundee Scotland, driving Scotland, sports Scotland, covid-Scotland9 Scotland, transportation Scotland. Scotland, like the entire of Great Britain, is actually certainly not one of the least expensive places. In addition, in Scotland the tent may be established up actually anywhere, therefore travelers can additionally rest in the wild. The very most renowned and also one of the most attractive exploring trails in Europe is actually the supposed West Highland Way. Longer journey? Exactly how approximately north along the west coastline and afterwards back to the quieter, albeit a lot less stunning eastern? Many tourists in Glasgow, takes a learn to Mallaig (occasionally exploring Glencoe or even Fort William heading) after that brows through Isle of Skye (the best beautiful of the Scottish islands), then head along the shoreline in the direction of Ullapool, as for Durness, heading back exploring Inverness, Fort Augustus (Loch Ness), Aberdeen and Cairngorms National Park, and also lastly St Andrews. Is it possible through trains and buses? Certainly it is possible, but you will overlook a lot, so it is far better to rent out an automobile for at the very least part of the journey. And don’t be actually fooled due to the tourist trap of Loch Ness– actually, there are actually a lot of so much more beautiful locations throughout Scotland nation Scotland, scottish Scotland, app Scotland, tory Scotland, relevant information Scotland, scotland Scotland, our company Scotland, edinburgh Scotland, youngster Scotland, creed Scotland, map Scotland, iona Scotland, menu Scotland, traveling Scotland, records Scotland, background Scotland, cars and truck Scotland, ship Scotland, uk Scotland, learn Scotland, celtic Scotland, glasgow Scotland, shetland Scotland, society Scotland, tay Scotland, bus Scotland, headlines Scotland, education and learning Scotland, little bit Scotland, navigating Scotland, cookie Scotland, covid Scotland, sport Scotland, access Scotland, video recordings Scotland, highland activities Scotland, neighborhood Scotland, golf Scotland, scots Scotland, food Scotland, whisky Scotland, budget Scotland, visitscotland Scotland, museum Scotland, e-newsletter Scotland, arbroath Scotland, heck Scotland, road Scotland, distilleries Scotland, st andrews Scotland, beverage Scotland, check out scotland Scotland, europe Scotland, castles Scotland, future Scotland, take in Scotland, weblog Scotland, dundee Scotland, steering Scotland, sporting activities Scotland, transportation Scotland Glenelg I remember visiting Scotland for the 1st time at the conclusion of April. It was presently springtime in Scotland, the sunshine was heating up, while in Scotland it was actually still winter season all over. The Highlands were actually still covered in snow in numerous spots, and also in Edinburgh it was actually piercingly rainfall. When taking a trip in Scotland, to start with great, waterproof, sports shoes. A nice poncho (as well as windproof!) Will certainly likewise be available in helpful, at times it is actually also worth incorporating a slim scarf, a sporting activities hat and sports handwear covers to the bag (springtime as well as autumn). In wintertime, I suggest staying clear of Scotland coming from a span. Why? The response is easy: it puts as well as impacts. In the scenario of a low-budget vacation, sleeping in a tent or even keep only in hotels (cost concerning PLN 80 every evening)., Whiskey, see at least one distillery and also instruction fish and also chips with vinegar at least once. I hope that with this article I urged my pals (:-RRB-) but additionally strangers to journey to Scotland. It’s really worth a hundred opportunities! I welcome you to go to, if merely I am still listed here. Beautiful Scottish beaches. Loch Lomond Backpack. Iona- tiny island, white beach fronts. Island of Skye. Glencoe. Eilean Donan Castle. Island of Arran. Scotland is undeniably a really wonderful nation, as well as every year it is actually checked out through groups of vacationers coming from the United States, France, and even Italy or Spain. Arran is actually called Scotland in miniature. Scotland, like the entire of Great Britain, is actually not one of the most affordable destinations. It was actually spring season in Scotland, the sunlight was actually warming up, while in Scotland it was still winter months all over. I really hope that along with this blog post I encouraged my good friends (:-RRB-) however also strangers to journey to https://www.scotland.com/
Scotland is actually unquestionably an actually wonderful nation, and also every year it is checked out through groups of visitors from the United States, France, and also Italy or Spain. Hardly any person taking leave in July, August or September will definitely presume of Scotland. Possibly it is actually great to believe concerning it right currently, when the worth of the pound is actually falling, as well as thereby our team will pay much less for a holiday season in Scotland? Glen Affric in very early springtime Why is it worth it? Scotland is mainly a wonderful landscape in the north of the nation. In Scotland, I have actually presently been actually able to check out tapes, dolphins or also deer. However Scotland is actually likewise a traditionally intriguing land (that enjoyed Brave Heart?), Where you can easily go to splendid stone castles (Edinburgh, Stirling, Linlithgow, Eilean Donan). The financing on its own, the marvelous Edinburgh, also is entitled to focus, particularly during the summer months celebrations. country Scotland, scottish Scotland, application Scotland, tory Scotland, info Scotland, scotland Scotland, our company Scotland, edinburgh Scotland, youngster Scotland, creed Scotland, chart Scotland, iona Scotland, menu Scotland, travel Scotland, records Scotland, history Scotland, auto Scotland, ship Scotland, uk Scotland, learn Scotland, celtic Scotland, glasgow Scotland, shetland Scotland, society Scotland, tay Scotland, bus Scotland, updates Scotland, education Scotland, little bit Scotland, navigation Scotland, cookie Scotland, covid Scotland, sporting activity Scotland, access Scotland, video recordings Scotland, highland video games Scotland, area Scotland, golf Scotland, scots Scotland, food items Scotland, whisky Scotland, budget Scotland, visitscotland Scotland, museum Scotland, bulletin Scotland, arbroath Scotland, heck Scotland, road Scotland, distilleries Scotland, street andrews Scotland, beverage Scotland, browse through scotland Scotland, europe Scotland, castles Scotland, future Scotland, take in Scotland, blog site Scotland, dundee Scotland, driving Scotland, sporting activities Scotland, covid-Scotland9 Scotland, transportation Scotland. Edinburgh – Some ideas for exploring Scotland Traveling in Scotland need to most definitely start along with its funding. It takes about pair of days to visit Edinburgh, however you can easily expand this time up to four. In the instance of a quick see to Scotland, you may likewise confine yourself to Edinburgh just, devoting one day on a rounded vacation by bus in the Scottish mountainous (almost every travel firm in the funds uses it). For a slightly longer adventure (albeit still confined to just a couple of days) coming from Edinburgh, I would certainly recommend to strike in 2 directions: Isle of Arran or Loch Lomond. Arran is gotten in touch with Scotland in miniature. Spending pair of or even three times on the isle, our experts can easily delight in the elegance of the west coast, kick back on the coastline, climb up the highest optimal of the isle– Goat Fell, along with admire the verdant mountains and also delight in the room. Loch Lomond is actually one of Scotland’s two nationwide playgrounds, a stunning lake neighbored through hillsides and also woods. Heading, you can also go to Stirling Castle. There is a straight train from Glasgow in each directions. country Scotland, scottish Scotland, application Scotland, conservative Scotland, information Scotland, scotland Scotland, us Scotland, edinburgh Scotland, child Scotland, creed Scotland, chart Scotland, iona Scotland, menu Scotland, trip Scotland, records Scotland, past history Scotland, vehicle Scotland, ship Scotland, uk Scotland, train Scotland, celtic Scotland, glasgow Scotland, shetland Scotland, society Scotland, tay Scotland, bus Scotland, information Scotland, education and learning Scotland, little bit Scotland, navigation Scotland, biscuit Scotland, covid Scotland, sport Scotland, ease of access Scotland, video recordings Scotland, highland activities Scotland, neighborhood Scotland, golf Scotland, scots Scotland, food items Scotland, whisky Scotland, budget Scotland, visitscotland Scotland, gallery Scotland, bulletin Scotland, arbroath Scotland, heck Scotland, street Scotland, distilleries Scotland, st andrews Scotland, beverage Scotland, check out scotland Scotland, europe Scotland, castles Scotland, future Scotland, experience Scotland, blogging site Scotland, dundee Scotland, driving Scotland, sporting activities Scotland, covid-Scotland9 Scotland, transport Scotland. Scotland, like the entire of Great Britain, is not one of the cheapest places. In addition, in Scotland the camping tent can be prepared up literally anywhere, so vacationers can easily likewise sleep in the untamed. The very most famous and one of the very most attractive exploring trails in Europe is the so-called West Highland Way. Longer excursion? How around north along the west shore and afterwards back to the quieter, albeit a lot less incredible eastern? A lot of visitors in Glasgow, takes a learn to Mallaig (occasionally exploring Glencoe or Fort William on the method) then gos to Isle of Skye (the best gorgeous of the Scottish isles), after that head along the shoreline in the direction of Ullapool, as for Durness, heading back visiting Inverness, Fort Augustus (Loch Ness), Aberdeen and Cairngorms National Park, and eventually Street Andrews. Is it feasible by trains and also buses? Naturally it is possible, but you will certainly miss a lot, so it is actually far better to rent an auto for a minimum of portion of the travel. And don’t be actually deceived by the visitor catch of Loch Ness– actually, there are loads of considerably more gorgeous spots around Scotland nation Scotland, scottish Scotland, app Scotland, conservative Scotland, relevant information Scotland, scotland Scotland, us Scotland, edinburgh Scotland, kid Scotland, cult Scotland, map Scotland, iona Scotland, menu Scotland, trip Scotland, data Scotland, past history Scotland, cars and truck Scotland, ship Scotland, uk Scotland, learn Scotland, celtic Scotland, glasgow Scotland, shetland Scotland, culture Scotland, tay Scotland, bus Scotland, information Scotland, education and learning Scotland, little bit Scotland, navigating Scotland, biscuit Scotland, covid Scotland, sporting activity Scotland, availability Scotland, online videos Scotland, highland video games Scotland, neighborhood Scotland, golf Scotland, scots Scotland, food Scotland, whisky Scotland, finances Scotland, visitscotland Scotland, gallery Scotland, e-newsletter Scotland, arbroath Scotland, heck Scotland, street Scotland, distilleries Scotland, street andrews Scotland, cocktail Scotland, check out scotland Scotland, europe Scotland, castles Scotland, potential Scotland, take in Scotland, blog post Scotland, dundee Scotland, steering Scotland, sporting activities Scotland, transportation Scotland Glenelg I keep in mind seeing Scotland for the very first opportunity at the end of April. It was currently spring season in Scotland, the sunshine was actually heating up, while in Scotland it was still winter season all over. The Highlands were actually still covered in snowfall in a lot of areas, and also in Edinburgh it was actually piercingly storm. When traveling in Scotland, firstly great, water resistant, sports footwear. A good raincoat (as well as windproof!) Will certainly also be available in helpful, at times it is also worth including a slim scarf, a sporting activities hat and also sports gloves to the bag (spring and also fall). In winter, I suggest staying clear of Scotland coming from a proximity. Why? The answer is easy: it pours as well as blows. In the situation of a low-budget vacation, sleep in an outdoor tents or stay only in hostels (price regarding PLN 80 every evening)., Whiskey, see at least one whiskey and also instruction fish and also potato chips along with vinegar at minimum as soon as. I hope that through this blog post I urged my good friends (:-RRB-) but likewise strangers to travel to Scotland. It’s actually worth a hundred times! I invite you to go to, so I am still right here. Beautiful Scottish seasides. Loch Lomond Backpack. Iona- tiny isle, white seashores. Island of Skye. Glencoe. Eilean Donan Castle. Isle of Arran. Scotland is undeniably a really gorgeous country, as well as every year it is actually checked out through crowds of vacationers coming from the United States, France, as well as also Italy or Spain. Arran is gotten in touch with Scotland in mini. Scotland, like the whole of Great Britain, is actually not one of the cheapest destinations. It was already springtime in Scotland, the sunshine was warming up, while in Scotland it was actually still winter months all over. I hope that with this article I urged my pals (:-RRB-) however also complete strangers to journey to https://www.scotland.com/
Scotland is actually undoubtedly a really stunning country, and each year it is visited by groups of travelers from the United States, France, and also Italy or even Spain. Nonetheless, I may not resist the opinion that Poles happen here primarily for work. Rarely any individual departing in July, August or September will definitely assume of Scotland. Perhaps it is actually given that of the rates that are undoubtedly unfriendly for some tourists. On the other hand, the property of Nessi and also guys in kilts is actually undoubtedly worth a long or even brief adventure. Perhaps it is actually good to deal with it now, when the worth of the extra pound is falling, and thereby our team will pay much less for a holiday season in Scotland? Glen Affric in early spring season Why is it worth it? Scotland is primarily an excellent yard in the north of the nation. In Scotland, I have already been capable to watch tapes, dolphins or even deer. But Scotland is additionally a historically intriguing land (that viewed Brave Heart?), Where you can explore impressive stone fortress (Edinburgh, Stirling, Linlithgow, Eilean Donan). The capital on its own, the stunning Edinburgh, also ought to have focus, especially throughout the summer season festivities. country Scotland, scottish Scotland, app Scotland, tory Scotland, details Scotland, scotland Scotland, our company Scotland, edinburgh Scotland, little one Scotland, cult Scotland, chart Scotland, iona Scotland, food selection Scotland, trip Scotland, records Scotland, background Scotland, automobile Scotland, ship Scotland, uk Scotland, train Scotland, celtic Scotland, glasgow Scotland, shetland Scotland, lifestyle Scotland, tay Scotland, bus Scotland, information Scotland, learning Scotland, little Scotland, navigation Scotland, biscuit Scotland, covid Scotland, sporting activity Scotland, access Scotland, videos Scotland, highland games Scotland, community Scotland, golf Scotland, scots Scotland, food Scotland, whisky Scotland, spending plan Scotland, visitscotland Scotland, museum Scotland, e-newsletter Scotland, arbroath Scotland, heck Scotland, street Scotland, distilleries Scotland, street andrews Scotland, cocktail Scotland, check out scotland Scotland, europe Scotland, castles Scotland, future Scotland, take in Scotland, blogging site Scotland, dundee Scotland, steering Scotland, sports Scotland, covid-Scotland9 Scotland, transportation Scotland. Edinburgh – Some concepts for visiting Scotland Travel in Scotland should most definitely start along with its own financing. Edinburgh is actually a gorgeous middle ages a city with distinctive rock buildings. From the main street, the alleged The Royal Mile linking the past imperial palace along with the Queen’s summertime palace (Palace of Holyroodhouse) runs a network of fascinating little roads (the so-called close), making a maze in which it is actually definitely worth receiving shed. It takes approximately 2 days to explore Edinburgh, but you may extend this time around four. In the case of a quick see to Scotland, you can additionally restrict on your own to Edinburgh only, investing eventually on a rounded journey through bus in the Scottish mountainous (practically every traveling firm in the financing offers it). In this method, at the very least for a moment we will definitely really feel the atmosphere of an actual property of hazes. An also much better tip is to rent a car for someday and happen an individual journey (the course and nature of the organized excursions do certainly not automatically match everyone). Such a self-guided excursion will most likely take our team a minimum of 10 hours. Arran is gotten in touch with Scotland in baby. Loch Lomond is actually one of Scotland’s two national parks, a stunning lake bordered by hills and also woods. On the method, you can likewise explore Stirling Castle. nation Scotland, scottish Scotland, application Scotland, tory Scotland, details Scotland, scotland Scotland, our team Scotland, edinburgh Scotland, youngster Scotland, creed Scotland, chart Scotland, iona Scotland, food selection Scotland, travel Scotland, information Scotland, history Scotland, auto Scotland, ship Scotland, uk Scotland, train Scotland, celtic Scotland, glasgow Scotland, shetland Scotland, society Scotland, tay Scotland, bus Scotland, news Scotland, learning Scotland, bit Scotland, navigating Scotland, cookie Scotland, covid Scotland, sporting activity Scotland, accessibility Scotland, video recordings Scotland, highland activities Scotland, neighborhood Scotland, golf Scotland, scots Scotland, food items Scotland, whisky Scotland, spending plan Scotland, visitscotland Scotland, museum Scotland, newsletter Scotland, arbroath Scotland, heck Scotland, street Scotland, distilleries Scotland, street andrews Scotland, cocktail Scotland, see scotland Scotland, europe Scotland, castles Scotland, potential Scotland, experience Scotland, blog Scotland, dundee Scotland, driving Scotland, sporting activities Scotland, covid-Scotland9 Scotland, transport Scotland. Low Budget Travel? Scotland, like the whole of Great Britain, is none of the least expensive destinations. Having said that, you can discover a lot of exploring routes and also campsites right here. In addition, in Scotland the camping tent could be put together virtually anywhere, therefore tourists can additionally sleep in the untamed. What is very important in this case is actually common accessibility to well-maintained water– our experts may locate hill waterfalls, streams and flows almost everywhere. One of the most famous and also among the absolute most attractive hiking routes in Europe is the alleged West Highland Way. As a result of the remarkable viewpoints, I enthusiastically highly recommend Longer trip? Just how about north along the west shore and after that back to the quieter, albeit much less magnificent eastern? Several travelers in Glasgow, takes a train to Mallaig (at times going to Glencoe or Fort William en route) at that point gos to Isle of Skye (the absolute most lovely of the Scottish islands), then head along the shore in the direction of Ullapool, as for Durness, on the method back going to Inverness, Fort Augustus (Loch Ness), Aberdeen and Cairngorms National Park, and also lastly Street Andrews. Is it possible through learns and buses? Naturally it is achievable, however you will definitely overlook a great deal, so it is far better to rent out a car for at the very least portion of the trip. And do not be tricked through the vacationer catch of Loch Ness– actually, there are actually plenty of far more stunning places around Scotland nation Scotland, scottish Scotland, application Scotland, tory Scotland, relevant information Scotland, scotland Scotland, our team Scotland, edinburgh Scotland, youngster Scotland, cult Scotland, chart Scotland, iona Scotland, menu Scotland, traveling Scotland, information Scotland, record Scotland, automobile Scotland, ship Scotland, uk Scotland, train Scotland, celtic Scotland, glasgow Scotland, shetland Scotland, society Scotland, tay Scotland, bus Scotland, information Scotland, education and learning Scotland, little bit Scotland, navigation Scotland, cookie Scotland, covid Scotland, sport Scotland, ease of access Scotland, video clips Scotland, highland games Scotland, area Scotland, golf Scotland, scots Scotland, food items Scotland, whisky Scotland, budget plan Scotland, visitscotland Scotland, gallery Scotland, e-newsletter Scotland, arbroath Scotland, heck Scotland, road Scotland, distilleries Scotland, st andrews Scotland, drink Scotland, visit scotland Scotland, europe Scotland, castles Scotland, future Scotland, encounter Scotland, weblog Scotland, dundee Scotland, driving Scotland, sports Scotland, transportation Scotland Glenelg I keep in mind going to Scotland for the initial time at the conclusion of April. It was presently spring season in Scotland, the sunshine was heating up, while in Scotland it was still winter all over. The Highlands were still dealt with in snowfall in a lot of spots, as well as in Edinburgh it was piercingly rainfall. When traveling in Scotland, to start with great, water resistant, sports shoes. A decent raincoat (and also windproof!) Are going to likewise can be found in handy, occasionally it is actually additionally worth adding a thin scarf, a sporting activities hat as well as sports gloves to the bag (spring season and also autumn). In winter, I suggest preventing Scotland from a range. Why? The answer is actually easy: it puts and also blows. Extra little factors: Umbrellas certainly don’t work (the wind flexes them in each instructions), the tent needs to (MUST!) possess a great flysheet, it is actually worth taking a multiple-use container with you (touch water, however likewise drinkable in waterways or even streams), a minimum of a couple of pairs of socks, a hot fleece and one thing to repel unpleasant flies (I suggest a smidge). When it comes to a low-budget excursion, oversleep a camping tent or remain simply in hotels (cost regarding PLN 80 every evening). You ought to attempt sea food (they are delicious!), Whiskey, check out a minimum of one whiskey and also instruction fish as well as potato chips with white vinegar at the very least when. I hope that through this article I urged my friends (:-RRB-) but also complete strangers to take a trip to Scotland. It’s really worth a hundred times! I invite you to visit, so I am actually still right here. Gorgeous Scottish beach fronts. Loch Lomond Backpack. Iona- small isle, white colored coastlines. Island of Skye. Glencoe. Eilean Donan Castle. Island of Arran. Scotland is actually undoubtedly a definitely beautiful country, and every year it is actually visited by groups of tourists from the United States, France, and also Italy or Spain. Arran is actually phoned Scotland in baby. Scotland, like the whole of Great Britain, is actually certainly not one of the least expensive places. It was actually currently spring season in Scotland, the sun was actually warming up, while in Scotland it was actually still winter months all over. I hope that with this blog post I urged my good friends (:-RRB-) however likewise unknown people to travel to https://www.scotland.com/
Scotland is undeniably a truly lovely nation, and every year it is visited through groups of travelers from the United States, France, and also even Italy or even Spain. However, I may not avoid the opinion that Poles happen right here generally for job. Barely anybody departing in July, August or even September are going to think about Scotland. Maybe it is actually due to the costs that are actually most definitely unfriendly for some visitors. The land of Nessi and also males in kilts is actually absolutely worth a lengthy or brief journey. Possibly it is excellent to consider it now, when the worth of the extra pound is actually dropping, and also hence our experts will spend much less for a holiday season in Scotland? Glen Affric in early springtime Why is it worth it? Scotland is mostly a remarkable yard in the north of the nation. In Scotland, I have already been capable to view tapes, dolphins or even deer. However Scotland is additionally a historically exciting land (that enjoyed Brave Heart?), Where you can see amazing stone fortress (Edinburgh, Stirling, Linlithgow, Eilean Donan). The capital itself, the impressive Edinburgh, additionally should have interest, especially in the course of the summer season festivities. country Scotland, scottish Scotland, app Scotland, tory Scotland, information Scotland, scotland Scotland, our company Scotland, edinburgh Scotland, little one Scotland, creed Scotland, chart Scotland, iona Scotland, food selection Scotland, traveling Scotland, data Scotland, past history Scotland, car Scotland, ship Scotland, uk Scotland, learn Scotland, celtic Scotland, glasgow Scotland, shetland Scotland, culture Scotland, tay Scotland, bus Scotland, headlines Scotland, education Scotland, little Scotland, navigation Scotland, biscuit Scotland, covid Scotland, sport Scotland, ease of access Scotland, online videos Scotland, highland games Scotland, community Scotland, golf Scotland, scots Scotland, food Scotland, whisky Scotland, spending plan Scotland, visitscotland Scotland, gallery Scotland, newsletter Scotland, arbroath Scotland, hell Scotland, street Scotland, distilleries Scotland, st andrews Scotland, cocktail Scotland, browse through scotland Scotland, europe Scotland, castles Scotland, potential Scotland, encounter Scotland, blog post Scotland, dundee Scotland, steering Scotland, sports Scotland, covid-Scotland9 Scotland, transport Scotland. Edinburgh – Some concepts for checking out Scotland Travel in Scotland need to most definitely start with its own financing. It takes around pair of times to visit Edinburgh, but you may expand this time up to 4. In the instance of a quick visit to Scotland, you can easily additionally confine on your own to Edinburgh merely, investing one day on a rounded journey through bus in the Scottish highlands (virtually every travel organization in the capital delivers it). For a slightly longer trip (albeit still confined to just a couple of times) from Edinburgh, I would advise to reach in pair of instructions: Isle of Arran or even Loch Lomond. Arran is gotten in touch with Scotland in mini. Spending pair of or 3 days on the island, our team can easily delight in the appeal of the west coastline, kick back on the seaside, go up the highest optimal of the isle– Goat Fell, in addition to marvel at the verdant hillsides and appreciate the area. Loch Lomond is just one of Scotland’s 2 national forests, a beautiful pond neighbored by rainforests and mountains. Heading, you can additionally visit Stirling Castle. There is a straight learn from Glasgow in both directions. nation Scotland, scottish Scotland, application Scotland, tory Scotland, info Scotland, scotland Scotland, us Scotland, edinburgh Scotland, youngster Scotland, cult Scotland, chart Scotland, iona Scotland, menu Scotland, trip Scotland, information Scotland, history Scotland, auto Scotland, ship Scotland, uk Scotland, train Scotland, celtic Scotland, glasgow Scotland, shetland Scotland, culture Scotland, tay Scotland, bus Scotland, news Scotland, education and learning Scotland, little Scotland, navigating Scotland, cookie Scotland, covid Scotland, sport Scotland, ease of access Scotland, online videos Scotland, highland activities Scotland, community Scotland, golf Scotland, scots Scotland, meals Scotland, whisky Scotland, finances Scotland, visitscotland Scotland, museum Scotland, bulletin Scotland, arbroath Scotland, hell Scotland, roadway Scotland, distilleries Scotland, st andrews Scotland, alcoholic beverage Scotland, go to scotland Scotland, europe Scotland, castles Scotland, potential Scotland, experience Scotland, weblog Scotland, dundee Scotland, steering Scotland, sporting activities Scotland, covid-Scotland9 Scotland, transport Scotland. Low Budget Travel? Scotland, like the entire of Great Britain, is actually certainly not one of the most inexpensive destinations. You may locate an entire lot of treking tracks as well as campsites listed below. On top of that, in Scotland the camping tent can easily be actually established up essentially anywhere, therefore vacationers may also rest in bush. What is very important within this case is common access to tidy water– our company may locate hill waterfalls, streams and also flows just about anywhere. The very most famous as well as one of the absolute most wonderful hiking trails in Europe is the supposed West Highland Way. Due to the impressive perspectives, I enthusiastically suggest Longer trip? Just how around north along the west coastline and also then back to the quieter, albeit much less incredible east? Lots of visitors in Glasgow, takes a train to Mallaig (sometimes going to Glencoe or even Fort William on the method) then visits Isle of Skye (the absolute most beautiful of the Scottish isles), at that point head along the coastline towards Ullapool, regarding Durness, en route back going to Inverness, Fort Augustus (Loch Ness), Aberdeen and also Cairngorms National Park, as well as lastly St Andrews. Is it feasible through trains and buses? Naturally it is feasible, but you will definitely miss a great deal, so it is far better to lease a car for at minimum portion of the trip. As well as do not be tricked due to the traveler snare of Loch Ness– in reality, there are loads of much more beautiful places around Scotland country Scotland, scottish Scotland, app Scotland, conservative Scotland, details Scotland, scotland Scotland, us Scotland, edinburgh Scotland, child Scotland, creed Scotland, map Scotland, iona Scotland, menu Scotland, trip Scotland, data Scotland, background Scotland, automobile Scotland, ship Scotland, uk Scotland, learn Scotland, celtic Scotland, glasgow Scotland, shetland Scotland, lifestyle Scotland, tay Scotland, bus Scotland, updates Scotland, education Scotland, bit Scotland, navigation Scotland, cookie Scotland, covid Scotland, sport Scotland, access Scotland, online videos Scotland, highland activities Scotland, neighborhood Scotland, golf Scotland, scots Scotland, food Scotland, whisky Scotland, spending plan Scotland, visitscotland Scotland, gallery Scotland, bulletin Scotland, arbroath Scotland, hell Scotland, street Scotland, distilleries Scotland, st andrews Scotland, alcoholic beverage Scotland, browse through scotland Scotland, europe Scotland, castles Scotland, potential Scotland, take in Scotland, weblog Scotland, dundee Scotland, driving Scotland, sporting activities Scotland, transport Scotland Glenelg I always remember visiting Scotland for the first opportunity at the conclusion of April. It was actually currently spring season in Scotland, the sun was heating up, while in Scotland it was still wintertime all over. The Highlands were still dealt with in snow in a lot of locations, and also in Edinburgh it was piercingly storm. When traveling in Scotland, first of all good, waterproof, sporting activities footwear. Will likewise come in useful, in some cases it is additionally worth adding a slim scarf, a sporting activities hat and sporting activities handwear covers to the knapsack (springtime as well as fall). In wintertime, I suggest steering clear of Scotland from a distance. In the case of a low-budget travel, sleeping in an outdoor tents or remain only in hostels (cost concerning PLN 80 every night)., Whiskey, browse through at minimum one whiskey and also command fish and also chips along with white vinegar at least when. I wish that using this message I encouraged my close friends (:-RRB-) yet additionally complete strangers to journey to Scotland. It’s truly worth a hundred times! I welcome you to check out, so I am actually still right here. Stunning Scottish seasides. Loch Lomond Backpack. Iona- very small isle, white colored seashores. Isle of Skye. Glencoe. Eilean Donan Castle. Island of Arran. Scotland is actually unquestionably a definitely wonderful country, and every year it is explored through crowds of travelers from the United States, France, as well as even Italy or Spain. Arran is actually called Scotland in baby. Scotland, like the entire of Great Britain, is certainly not one of the most inexpensive places. It was actually presently spring in Scotland, the sunshine was warming up, while in Scotland it was still winter months all over. I hope that with this article I urged my buddies (:-RRB-) yet likewise unfamiliar people to journey to https://www.scotland.com/
Scotland is actually unquestionably a truly lovely country, and also yearly it is actually gone to by crowds of vacationers from the United States, France, as well as even Italy or even Spain. I can easily certainly not resist the impression that Poles happen here mostly for job. Barely any person departing in July, August or even September will definitely consider Scotland. Perhaps it is due to the prices that are definitely unfriendly for some tourists. At the same time, the property of Nessi and guys in kilts is actually most definitely worth a quick or even long quest. Possibly it is excellent to deal with it immediately, when the market value of the pound is actually falling, and also hence our team will pay for a lot less for a vacation in Scotland? Glen Affric in early spring Why is it worth it? Scotland is actually mainly a fantastic landscape in the north of the nation. In Scotland, I have actually been actually able to enjoy seals, dolphins or even deer. Scotland is actually likewise an in the past fascinating land (that viewed Brave Heart?), Where you can easily explore magnificent stone fortress (Edinburgh, Stirling, Linlithgow, Eilean Donan). The funding itself, the magnificent Edinburgh, likewise is entitled to focus, especially in the course of the summertime events. country Scotland, scottish Scotland, application Scotland, tory Scotland, details Scotland, scotland Scotland, our team Scotland, edinburgh Scotland, little one Scotland, creed Scotland, chart Scotland, iona Scotland, food selection Scotland, trip Scotland, records Scotland, background Scotland, car Scotland, ship Scotland, uk Scotland, learn Scotland, celtic Scotland, glasgow Scotland, shetland Scotland, society Scotland, tay Scotland, bus Scotland, news Scotland, education Scotland, bit Scotland, navigating Scotland, biscuit Scotland, covid Scotland, sport Scotland, accessibility Scotland, online videos Scotland, highland activities Scotland, area Scotland, golf Scotland, scots Scotland, food items Scotland, whisky Scotland, budget plan Scotland, visitscotland Scotland, museum Scotland, e-newsletter Scotland, arbroath Scotland, hell Scotland, roadway Scotland, distilleries Scotland, st andrews Scotland, cocktail Scotland, check out scotland Scotland, europe Scotland, castles Scotland, potential Scotland, take in Scotland, blogging site Scotland, dundee Scotland, steering Scotland, sporting activities Scotland, covid-Scotland9 Scotland, transport Scotland. Edinburgh – Some tips for visiting Scotland Travel in Scotland need to absolutely start with its funding. It takes around pair of times to go to Edinburgh, yet you may expand this time up to four. In the situation of a short check out to Scotland, you can easily likewise limit yourself to Edinburgh merely, devoting one day on a circular excursion by bus in the Scottish mountainous (just about every trip agency in the funding provides it). For a slightly longer quest (albeit still confined to merely a couple of times) from Edinburgh, I would certainly propose to attack in two paths: Isle of Arran or Loch Lomond. Arran is actually called Scotland in miniature. Investing two or even 3 times on the island, our company can take pleasure in the appeal of the west shoreline, unwind on the seashore, go up the best height of the isle– Goat Fell, and also appreciate the verdant hillsides and also delight in the space. Loch Lomond is one of Scotland’s pair of national forests, a gorgeous lake encompassed through hillsides and also rainforests. On the technique, you can easily likewise check out Stirling Castle. There is a straight train from Glasgow in both paths. country Scotland, scottish Scotland, app Scotland, tory Scotland, info Scotland, scotland Scotland, our company Scotland, edinburgh Scotland, youngster Scotland, creed Scotland, chart Scotland, iona Scotland, menu Scotland, travel Scotland, data Scotland, background Scotland, automobile Scotland, ship Scotland, uk Scotland, train Scotland, celtic Scotland, glasgow Scotland, shetland Scotland, culture Scotland, tay Scotland, bus Scotland, updates Scotland, education Scotland, little Scotland, navigating Scotland, cookie Scotland, covid Scotland, sport Scotland, availability Scotland, video clips Scotland, highland games Scotland, area Scotland, golf Scotland, scots Scotland, food items Scotland, whisky Scotland, budget Scotland, visitscotland Scotland, museum Scotland, email list Scotland, arbroath Scotland, heck Scotland, street Scotland, distilleries Scotland, st andrews Scotland, drink Scotland, see scotland Scotland, europe Scotland, castles Scotland, future Scotland, experience Scotland, blog post Scotland, dundee Scotland, driving Scotland, sporting activities Scotland, covid-Scotland9 Scotland, transport Scotland. Reduced Budget Travel? Scotland, like the entire of Great Britain, is none of the cheapest locations. However, you can find a lot of hiking trails and campsites here. Furthermore, in Scotland the camping tent may be actually established actually anywhere, so visitors can additionally rest in bush. What is necessary in this situation is actually common accessibility to well-maintained water– we can easily discover hill streams, falls as well as rivers virtually all over. One of the most famous and some of the best lovely hiking trails in Europe is the so-called West Highland Way. Because of the amazing views, I heartily advise Longer journey? Just how around north along the west shore and afterwards back to the quieter, albeit less amazing east? Numerous tourists in Glasgow, takes a learn to Mallaig (at times checking out Glencoe or even Fort William heading) after that sees Isle of Skye (the absolute most lovely of the Scottish islands), after that head along the coastline towards Ullapool, as far as Durness, on the method back exploring Inverness, Fort Augustus (Loch Ness), Aberdeen and Cairngorms National Park, as well as eventually St Andrews. Is it feasible through buses and also learns? Obviously it is achievable, yet you are going to skip a whole lot, so it is actually better to lease an automobile for at the very least component of the excursion. And do not be misleaded due to the vacationer trap of Loch Ness– actually, there are loads of much more wonderful places all around Scotland nation Scotland, scottish Scotland, app Scotland, conservative Scotland, relevant information Scotland, scotland Scotland, our company Scotland, edinburgh Scotland, little one Scotland, creed Scotland, chart Scotland, iona Scotland, menu Scotland, trip Scotland, records Scotland, history Scotland, car Scotland, ship Scotland, uk Scotland, learn Scotland, celtic Scotland, glasgow Scotland, shetland Scotland, lifestyle Scotland, tay Scotland, bus Scotland, information Scotland, education Scotland, little bit Scotland, navigating Scotland, biscuit Scotland, covid Scotland, sport Scotland, accessibility Scotland, online videos Scotland, highland video games Scotland, neighborhood Scotland, golf Scotland, scots Scotland, food items Scotland, whisky Scotland, budget plan Scotland, visitscotland Scotland, gallery Scotland, e-newsletter Scotland, arbroath Scotland, hell Scotland, street Scotland, distilleries Scotland, st andrews Scotland, alcoholic beverage Scotland, check out scotland Scotland, europe Scotland, castles Scotland, potential Scotland, take in Scotland, blogging site Scotland, dundee Scotland, steering Scotland, sporting activities Scotland, transportation Scotland Glenelg The weather may be erratic. I keep in mind checking out Scotland for the very first time at the conclusion of April. It was actually currently springtime in Scotland, the sunlight was actually heating up, while in Scotland it was still winter across. The Highlands were actually still covered in snowfall in many locations, and also in Edinburgh it was piercingly rain. Obviously, it switched out immediately that I hadn’t loaded the correct traits. I was intending to remain in the urban area, however additionally ballet flats, shoes, ornamental jackets as well as slim blouses diminish in spring season. When traveling in Scotland, initially of all great, water resistant, sporting activities shoes. Will additionally happen in helpful, often it is actually also worth adding a slim headscarf, a sports hat and also sports gloves to the bag (spring season as well as fall). In wintertime, I propose preventing Scotland from a range. In the situation of a low-budget trip, sleeping in a camping tent or even keep just in hotels (cost concerning PLN 80 per evening)., Whiskey, browse through at minimum one distillery as well as command fish as well as chips with vinegar at the very least when. I really hope that through this blog post I encouraged my good friends (:-RRB-) but also complete strangers to take a trip to Scotland. It’s definitely worth a hundred times! I invite you to go to, if merely I am still listed below. Wonderful Scottish beaches. Loch Lomond Backpack. Iona- little isle, white coastlines. Isle of Skye. Glencoe. Eilean Donan Castle. Island of Arran. Scotland is actually most certainly an actually lovely nation, and every year it is actually explored through crowds of visitors from the United States, France, and also Italy or Spain. Arran is actually called Scotland in baby. Scotland, like the whole of Great Britain, is certainly not one of the most affordable locations. It was actually spring in Scotland, the sunlight was heating up, while in Scotland it was actually still winter months all over. I wish that along with this post I urged my buddies (:-RRB-) yet additionally unfamiliar people to take a trip to https://www.scotland.com/
Did you understand these truths on CBD OIL and Full Spectrum CBD Hemp Oil? Cannabinoids are separated from hemp utilizing supercritical CO2 extraction. Thanks to modern-day technology, the resulting option is tidy, free of unnecessary waxes and heavy metals, naturally present in the plant, and the drawn liquid has a common, oily consistency. CBD oil consists of cannabidiol as a base ingredient and may consist of only trace amounts of tetrahydroxycannabidiol (THC). It is advised by physicians and pharmacists as an antioxidant and substance that blocks the action of proinflammatory cytokines (proteins), e.g. in Crohn’s disease or ulcerative intestine. RSO oil has a low CBD content, while high THC. The synergistic (enhancing) action of CBD and THC relative to each other is used here. Both cannabinoids can do much more together than when used individually. Both marijuana oil type CBD and RSO likewise consist of other cannabinoids, such as cannabichromene (CBC) and cannabigerol (CBG). The trick is not, nevertheless, that CBD typically has a composition expanded to consist of flavones, flavonoids, terpenes, terpenoids, amino acids and omega acids. The distinction is primarily due to motives directing humanity to use one or the other product. CBD medical cannabis oil is a rather helpful blend of cannabinoids, designed to protect versus 21st century disease. It’s best to utilize all of these compounds together, as nature developed them and confined in marijuana inflorescences. It turns out that cannabidiol enhances the results of cannabichromene (CBC) and cannabigerol (CBG), and flavonoids or flavones enhance the absorption of these compounds. Omega-6 and omega-3 highly nourish the body and do not allow to alter, which speed up the aging process of the organism and improve the development of cancer. Oil of marijuana in a kind of hobby APR consists of small amounts of CBD, stabilized by the presence of THC. – Modern scientific research reveals that CBD + THC cope with major autoimmune diseases, while CBC or CBG show minimal activity in the presence of both compounds, simply like terpenes, flavonoids or flavones, for that reason their content in the solution appears to be unneeded. In addition, the cannabis strain from which THC and CBD are obtained consist of negligible quantities of other cannabinoids. Marijuana oil has currently marked a brand-new era in which man ceased to fear what is unidentified, and began to rediscover what our ancestors had already seen and utilize the substantial capacity, initially look, a little unusual relationships, associated mainly with pathology. Medical marijuana, contrary to its name, does not indicate fermented female inflorescences and leaves consisting of psychoactive substances coiled in so-called “Joints”, however a beneficial oil without psychoactive THC. A standard person, after taking dosages of medicinal cannabis and attaining the suitable state of cannabinoids in the blood, can delight in increased immunity, decreased vulnerability to cancer, delayed aging and lowered risk of stroke or cardiovascular disease. CBD oil consists of cannabidiol as a base ingredient and may contain only trace quantities of tetrahydroxycannabidiol (THC). RSO oil has a low CBD content, while high THC. Both cannabis oil type CBD and RSO also consist of other cannabinoids, such as cannabichromene (CBC) and cannabigerol (CBG). CBD medical cannabis oil is a rather advantageous blend of cannabinoids, created to protect against 21st century disease. Oil of marijuana in a kind of hobby APR contains little amounts of CBD, stabilized by the existence of THC.
Did you know these realities on CBD OIL and Full Spectrum CBD Hemp Oil? Cannabinoids are separated from hemp utilizing supercritical CO2 extraction. Thanks to contemporary technology, the resulting service is clean, devoid of unneeded waxes and heavy metals, naturally present in the plant, and the sucked liquid has a typical, oily consistency. CBD oil includes cannabidiol as a base component and might include only trace amounts of tetrahydroxycannabidiol (THC). It is recommended by physicians and pharmacists as an antioxidant and substance that blocks the action of proinflammatory cytokines (proteins), e.g. in Crohn’s illness or ulcerative intestine. RSO oil has a low CBD content, while high THC. The synergistic (enhancing) action of CBD and THC relative to each other is used here. Both cannabinoids can do much more together than when utilized individually. Both cannabis oil type CBD and RSO likewise contain other cannabinoids, such as cannabichromene (CBC) and cannabigerol (CBG). The trick is not, nevertheless, that CBD frequently has a structure expanded to consist of flavones, flavonoids, terpenes, terpenoids, amino acids and omega acids. The difference is mostly due to motives guiding humankind to utilize one or the other product. CBD medical marijuana oil is a rather beneficial blend of cannabinoids, created to safeguard against 21st century disease. It’s best to utilize all of these compounds together, as nature created them and confined in marijuana inflorescences. Oil of cannabis in a type of pastime APR consists of percentages of CBD, stabilized by the existence of THC. Producers concentrate on the synergistic effect of one compound relative to the other, while deserting the existence of CBC and CBG. Why such a decision? – Modern scientific research study reveals that CBD + THC manage serious autoimmune illness, while CBC or CBG reveal very little activity in the existence of both substances, much like flavones, flavonoids or terpenes, therefore their content in the service appears to be unneeded. In addition, the cannabis stress from which THC and CBD are obtained contain minimal quantities of other cannabinoids. RSO oil is totally illegal in Poland, which is why it can not be obtained in any legally operating store on the market. Of course, there are a number of amateur techniques for obtaining it, however it’s great to understand that compounds acquired artificially in house labs are unsure, untested, and the impact unknown. The solvent for the production of home RSO is typically gas, alcohol and even kerosene, which instead of curing, toxin. Alcohols and their like hinder cannabinoids, and so in truth, they do not bring anything new to the medical world. Marijuana oil has actually currently marked a new era in which man stopped to fear what is unknown, and started to uncover what our ancestors had actually currently noticed and utilize the significant capacity, at first glimpse, a little bizarre relationships, associated primarily with pathology. Medical marijuana, contrary to its name, does not imply fermented female inflorescences and leaves including psychedelic substances coiled in so-called “Joints”, but an useful oil without psychedelic THC. A standard individual, after taking dosages of medical cannabis and accomplishing the suitable state of cannabinoids in the blood, can take pleasure in increased immunity, minimized susceptibility to cancer, postponed aging and lowered risk of stroke or cardiovascular disease. CBD oil contains cannabidiol as a base ingredient and might contain just trace amounts of tetrahydroxycannabidiol (THC). RSO oil has a low CBD material, while high THC. Both marijuana oil type CBD and RSO likewise consist of other cannabinoids, such as cannabichromene (CBC) and cannabigerol (CBG). CBD medical marijuana oil is a rather advantageous blend of cannabinoids, developed to protect versus 21st century illness. Oil of cannabis in a kind of hobby APR consists of small quantities of CBD, balanced by the presence of THC.
Did you understand these realities on CBD OIL and Full Spectrum CBD Hemp Oil? Cannabinoids are isolated from hemp using supercritical CO2 extraction. Thanks to contemporary innovation, the resulting option is tidy, devoid of unneeded waxes and heavy metals, naturally present in the plant, and the sucked liquid has a normal, oily consistency. CBD oil consists of cannabidiol as a base active ingredient and may consist of only trace amounts of tetrahydroxycannabidiol (THC). Works as a memory enhancer, improving concentration and coordination of movements, getting rid of inflammation and reoccurring infections. It improves the conduction of stimuli in the course of autoimmune diseases (multiple sclerosis, amyotrophic sclerosis). It is suggested by doctors and pharmacists as an antioxidant and substance that blocks the action of proinflammatory cytokines (proteins), e.g. in Crohn’s illness or ulcerative intestine. RSO oil has a low CBD material, while high THC. The synergistic (enhancing) action of CBD and THC relative to each other is utilized here. Both cannabinoids can do much more together than when used independently. Both cannabis oil type CBD and RSO likewise include other cannabinoids, such as cannabichromene (CBC) and cannabigerol (CBG). The trick is not, nevertheless, that CBD frequently has actually a composition expanded to consist of flavones, flavonoids, terpenes, terpenoids, amino acids and omega acids. The distinction is mostly due to intentions directing humankind to use one or the other item. CBD medical cannabis oil is a rather helpful mix of cannabinoids, developed to secure versus 21st century disease. It’s finest to utilize all of these compounds together, as nature created them and enclosed in marijuana inflorescences. Oil of cannabis in a sort of pastime APR consists of percentages of CBD, stabilized by the presence of THC. Makers focus on the synergistic impact of one compound relative to the other, while abandoning the existence of CBC and CBG. Why such a decision? – Modern clinical research shows that CBD + THC manage severe autoimmune illness, while CBC or CBG reveal minimal activity in the presence of both compounds, similar to flavonoids, flavones or terpenes, therefore their material in the service seems to be unnecessary. In addition, the cannabis stress from which THC and CBD are obtained consist of negligible quantities of other cannabinoids. RSO oil is entirely unlawful in Poland, which is why it can not be acquired in any legally operating shop on the market. Obviously, there are a variety of amateur techniques for obtaining it, however it’s good to understand that compounds gotten artificially in home laboratories doubt, untested, and the impact unknown. The solvent for the production of family RSO is generally fuel, alcohol and even kerosene, which instead of curing, toxin. Alcohols and their like hinder cannabinoids, and so in truth, they don’t bring anything new to the medical world. Marijuana oil has already marked a brand-new period in which guy stopped to fear what is unknown, and began to uncover what our ancestors had actually currently seen and utilize the significant capacity, at first glimpse, a little strange relationships, associated mainly with pathology. Medical cannabis, contrary to its name, does not mean fermented female inflorescences and leaves including psychoactive substances coiled in so-called “Joints”, but an useful oil without psychoactive THC. A standard person, after taking dosages of medical cannabis and attaining the proper state of cannabinoids in the blood, can enjoy increased immunity, lowered vulnerability to cancer, postponed aging and lowered risk of stroke or cardiac arrest. CBD oil includes cannabidiol as a base ingredient and might include only trace quantities of tetrahydroxycannabidiol (THC). RSO oil has a low CBD content, while high THC. Both marijuana oil type CBD and RSO also contain other cannabinoids, such as cannabichromene (CBC) and cannabigerol (CBG). CBD medical marijuana oil is a rather helpful mix of cannabinoids, created to protect against 21st century illness. Oil of cannabis in a kind of pastime APR includes little amounts of CBD, balanced by the presence of THC.
Did you know these facts on CBD OIL and Full Spectrum CBD Hemp Oil? Cannabinoids are separated from hemp utilizing supercritical CO2 extraction. Thanks to modern-day innovation, the resulting service is tidy, devoid of unnecessary waxes and heavy metals, naturally present in the plant, and the sucked liquid has a common, oily consistency. CBD oil includes cannabidiol as a base active ingredient and may include just trace quantities of tetrahydroxycannabidiol (THC). Functions as a memory enhancer, enhancing concentration and coordination of movements, getting rid of inflammation and frequent infections. It enhances the conduction of stimuli in the course of autoimmune illness (several sclerosis, amyotrophic sclerosis). It is recommended by physicians and pharmacists as an antioxidant and compound that obstructs the action of proinflammatory cytokines (proteins), e.g. in Crohn’s disease or ulcerative intestine. RSO oil has a low CBD material, while high THC. Obviously, the essential job of RSO is to cause a psychedelic impact, although it can likewise stimulate “sick” brain structures. It deserves understanding that supplements of this type is mostly used by individuals to whom standard therapy does not bring relief in disease. The synergistic (enhancing) action of CBD and THC relative to each other is used here. Both cannabinoids can do much more together than when used independently. In addition, they jointly promote the department of inactive nerve cells, nurture the fatty envelope of the nerves, and prevent myelin swelling that triggers loss of function in some autoimmune diseases. There are likewise stories where marijuana in its natural kind softened spasticity, decreased the frequency of seizures and convulsions, and suppressed undesirable scrapie in Parkinson’s illness. This is where the concept of getting RSO, intended only for chronically ill individuals, come from . Both marijuana oil type CBD and RSO likewise consist of other cannabinoids, such as cannabichromene (CBC) and cannabigerol (CBG). The secret is not, however, that CBD typically has actually a structure broadened to consist of flavones, flavonoids, terpenes, terpenoids, amino acids and omega acids. The difference is primarily due to motives directing mankind to utilize one or the other product. CBD medical cannabis oil is a rather useful blend of cannabinoids, designed to protect against 21st century disease. It’s best to utilize all of these compounds together, as nature produced them and enclosed in marijuana inflorescences. It turns out that cannabidiol enhances the impacts of cannabichromene (CBC) and cannabigerol (CBG), and flavones or flavonoids improve the absorption of these compounds. Omega-6 and omega-3 highly nurture the body and do not enable to change, which accelerate the aging process of the organism and improve the development of cancer. Oil of marijuana in a kind of hobby APR includes little quantities of CBD, balanced by the presence of THC. – Modern scientific research study reveals that CBD + THC cope with major autoimmune illness, while CBC or CBG show minimal activity in the existence of both substances, just like flavonoids, terpenes or flavones, for that reason their content in the option seems to be unnecessary. In addition, the marijuana pressure from which THC and CBD are obtained consist of negligible amounts of other cannabinoids. Cannabis oil has currently marked a new period in which man ceased to fear what is unidentified, and began to rediscover what our forefathers had currently observed and use the considerable capacity, in the beginning look, a little unusual relationships, associated generally with pathology. Medical marijuana, contrary to its name, does not indicate fermented female inflorescences and leaves containing psychedelic substances coiled in so-called “Joints”, however an useful oil without psychedelic THC. A standard individual, after taking dosages of medicinal marijuana and achieving the appropriate state of cannabinoids in the blood, can delight in increased immunity, lowered susceptibility to cancer, delayed aging and reduced danger of stroke or cardiovascular disease. CBD oil includes cannabidiol as a base active ingredient and may include only trace quantities of tetrahydroxycannabidiol (THC). RSO oil has a low CBD content, while high THC. Both cannabis oil type CBD and RSO likewise contain other cannabinoids, such as cannabichromene (CBC) and cannabigerol (CBG). CBD medical cannabis oil is a rather advantageous mix of cannabinoids, created to safeguard versus 21st century illness. Oil of cannabis in a kind of hobby APR contains small amounts of CBD, stabilized by the existence of THC.
Did you understand these realities on CBD OIL and Full Spectrum CBD Hemp Oil? Cannabinoids are separated from hemp using supercritical CO2 extraction. Thanks to modern technology, the resulting solution is clean, without heavy metals and unnecessary waxes, naturally present in the plant, and the sucked liquid has a typical, oily consistency. CBD oil consists of cannabidiol as a base active ingredient and may consist of only trace quantities of tetrahydroxycannabidiol (THC). Works as a memory enhancer, enhancing concentration and coordination of motions, removing inflammation and reoccurring infections. It improves the conduction of stimuli in the course of autoimmune diseases (numerous sclerosis, amyotrophic sclerosis). It is suggested by physicians and pharmacists as an antioxidant and substance that blocks the action of proinflammatory cytokines (proteins), e.g. in Crohn’s disease or ulcerative intestine. RSO oil has a low CBD material, while high THC. The synergistic (enhancing) action of CBD and THC relative to each other is utilized here. Both cannabinoids can do much more together than when utilized separately. Both marijuana oil type CBD and RSO also contain other cannabinoids, such as cannabichromene (CBC) and cannabigerol (CBG). The trick is not, however, that CBD often has actually a structure expanded to include flavones, flavonoids, terpenes, terpenoids, amino acids and omega acids. The difference is mostly due to motives guiding humanity to use one or the other product. CBD medical cannabis oil is a rather useful blend of cannabinoids, designed to safeguard against 21st century disease. It’s finest to utilize all of these compounds together, as nature produced them and enclosed in marijuana inflorescences. Oil of marijuana in a kind of hobby APR contains percentages of CBD, balanced by the existence of THC. Makers focus on the synergistic effect of one compound relative to the other, while abandoning the presence of CBC and CBG. Why such a choice? – Modern scientific research study reveals that CBD + THC manage severe autoimmune illness, while CBC or CBG show very little activity in the presence of both compounds, much like terpenes, flavonoids or flavones, therefore their material in the service appears to be unnecessary. In addition, the marijuana strain from which THC and CBD are derived include minimal quantities of other cannabinoids. RSO oil is completely prohibited in Poland, which is why it can not be gotten in any legally operating store on the marketplace. Naturally, there are a number of amateur techniques for getting it, however it’s good to know that substances gotten artificially in home laboratories doubt, untried, and the result unknown. The solvent for the production of family RSO is normally gas, alcohol and even kerosene, which rather of treating, toxin. Alcohols and their like hinder cannabinoids, therefore in reality, they don’t bring anything new to the medical world. Cannabis oil has actually currently marked a brand-new era in which man ceased to fear what is unidentified, and started to uncover what our ancestors had actually currently noticed and utilize the significant capacity, at first glance, a little bizarre relationships, associated primarily with pathology. Medical cannabis, contrary to its name, does not indicate fermented female inflorescences and leaves consisting of psychoactive compounds coiled in so-called “Joints”, but a beneficial oil without psychoactive THC. A basic person, after taking dosages of medical marijuana and achieving the suitable state of cannabinoids in the blood, can take pleasure in increased resistance, lowered susceptibility to cancer, postponed aging and reduced risk of stroke or cardiovascular disease. CBD oil includes cannabidiol as a base ingredient and may consist of just trace quantities of tetrahydroxycannabidiol (THC). RSO oil has a low CBD material, while high THC. Both marijuana oil type CBD and RSO likewise include other cannabinoids, such as cannabichromene (CBC) and cannabigerol (CBG). CBD medical marijuana oil is a rather advantageous mix of cannabinoids, created to safeguard versus 21st century disease. Oil of cannabis in a kind of hobby APR includes little amounts of CBD, balanced by the presence of THC.
Scotland is unquestionably a truly beautiful nation, and yearly it is actually explored by crowds of visitors from the United States, France, and also even Italy or even Spain. I may not avoid the perception that Poles happen listed below mostly for job. Barely anybody departing in July, August or even September will certainly think about Scotland. Because of the prices that are most definitely unfriendly for some visitors, possibly it is actually. At the same time, the property of Nessi and also males in kilts is actually definitely worth a longer or short trip. Possibly it is great to think of it at this moment, when the worth of the pound is falling, and also hence our experts will pay for a lot less for a vacation in Scotland? Glen Affric in early spring season Why is it worth it? Scotland is largely a fantastic landscape in the north of the nation. Highlands– hillsides covered with grass and also heathers, deep-seated lochs (ponds), a significant shoreline product line, glen (beautiful valleys), and also above all, hardly located in Europe (especially in Scotland!) wild, where our team will certainly not view a singular property. Space, room and room once more! Wild attribute, a wealth of plants, birds and also various other animals await nature enthusiasts. In Scotland, I have actually already managed to view seals, dolphins and even deer. However Scotland is likewise an in the past fascinating land (that viewed Brave Heart?), Where you may explore impressive rock fortress (Edinburgh, Stirling, Linlithgow, Eilean Donan). The capital itself, the impressive Edinburgh, additionally is entitled to focus, particularly during the course of the summer season celebrations. country Scotland, scottish Scotland, application Scotland, conservative Scotland, info Scotland, scotland Scotland, our team Scotland, edinburgh Scotland, little one Scotland, creed Scotland, chart Scotland, iona Scotland, menu Scotland, traveling Scotland, information Scotland, past history Scotland, car Scotland, ship Scotland, uk Scotland, learn Scotland, celtic Scotland, glasgow Scotland, shetland Scotland, lifestyle Scotland, tay Scotland, bus Scotland, updates Scotland, education and learning Scotland, little bit Scotland, navigating Scotland, cookie Scotland, covid Scotland, sporting activity Scotland, ease of access Scotland, videos Scotland, highland video games Scotland, neighborhood Scotland, golf Scotland, scots Scotland, meals Scotland, whisky Scotland, budget Scotland, visitscotland Scotland, museum Scotland, newsletter Scotland, arbroath Scotland, heck Scotland, road Scotland, distilleries Scotland, st andrews Scotland, cocktail Scotland, browse through scotland Scotland, europe Scotland, castles Scotland, future Scotland, experience Scotland, weblog Scotland, dundee Scotland, driving Scotland, sports Scotland, covid-Scotland9 Scotland, transport Scotland. Edinburgh – Some tips for going to Scotland Trip in Scotland ought to absolutely start along with its resources. It takes approximately two days to go to Edinburgh, however you may stretch this time up to four. In the case of a short visit to Scotland, you may additionally limit your own self to Edinburgh merely, devoting one day on a rounded journey by bus in the Scottish mountainous (almost every travel firm in the funds provides it). Arran is contacted Scotland in mini. Loch Lomond is actually one of Scotland’s two national playgrounds, a gorgeous pond bordered by woodlands and hills. On the technique, you may additionally go to Stirling Castle. nation Scotland, scottish Scotland, application Scotland, conservative Scotland, info Scotland, scotland Scotland, our team Scotland, edinburgh Scotland, youngster Scotland, cult Scotland, map Scotland, iona Scotland, menu Scotland, trip Scotland, records Scotland, history Scotland, auto Scotland, ship Scotland, uk Scotland, learn Scotland, celtic Scotland, glasgow Scotland, shetland Scotland, lifestyle Scotland, tay Scotland, bus Scotland, headlines Scotland, learning Scotland, bit Scotland, navigation Scotland, cookie Scotland, covid Scotland, sporting activity Scotland, ease of access Scotland, online videos Scotland, highland activities Scotland, area Scotland, golf Scotland, scots Scotland, food items Scotland, whisky Scotland, budget plan Scotland, visitscotland Scotland, museum Scotland, email list Scotland, arbroath Scotland, hell Scotland, roadway Scotland, distilleries Scotland, street andrews Scotland, beverage Scotland, see scotland Scotland, europe Scotland, castles Scotland, potential Scotland, take in Scotland, weblog Scotland, dundee Scotland, driving Scotland, sports Scotland, covid-Scotland9 Scotland, transport Scotland. Low Budget Travel? Scotland, like the whole of Great Britain, is none of the least expensive locations. You can find an entire lot of treking tracks and campsites listed below. Furthermore, in Scotland the camping tent could be put together essentially anywhere, thus visitors can also sleep in bush. What is essential within this scenario is actually universal accessibility to clean water– our team can locate mountain streams, waterways as well as waterfalls practically all over. The absolute most renowned and some of the very most lovely exploring routes in Europe is actually the supposed West Highland Way. Because of the impressive viewpoints, I exuberantly recommend Longer vacation? Exactly how about north along the west coast and after that back to the quieter, albeit much less exceptional east? Many visitors in Glasgow, takes a learn to Mallaig (in some cases seeing Glencoe or even Fort William on the method) then check outs Isle of Skye (the most attractive of the Scottish islands), then scalp along the shore towards Ullapool, as for Durness, en route back going to Inverness, Fort Augustus (Loch Ness), Aberdeen as well as Cairngorms National Park, and lastly Street Andrews. Is it feasible by buses and learns? Naturally it is actually possible, but you will definitely overlook a whole lot, so it is far better to rent out an auto for at the very least aspect of the vacation. And also do not be tricked by the traveler trap of Loch Ness– as a matter of fact, there are loads of so much more wonderful spots across Scotland nation Scotland, scottish Scotland, application Scotland, tory Scotland, details Scotland, scotland Scotland, us Scotland, edinburgh Scotland, youngster Scotland, creed Scotland, map Scotland, iona Scotland, food selection Scotland, traveling Scotland, information Scotland, record Scotland, automobile Scotland, ship Scotland, uk Scotland, train Scotland, celtic Scotland, glasgow Scotland, shetland Scotland, culture Scotland, tay Scotland, bus Scotland, updates Scotland, education Scotland, little Scotland, navigating Scotland, cookie Scotland, covid Scotland, sporting activity Scotland, ease of access Scotland, video recordings Scotland, highland video games Scotland, neighborhood Scotland, golf Scotland, scots Scotland, food Scotland, whisky Scotland, budget Scotland, visitscotland Scotland, museum Scotland, newsletter Scotland, arbroath Scotland, heck Scotland, roadway Scotland, distilleries Scotland, st andrews Scotland, drink Scotland, visit scotland Scotland, europe Scotland, castles Scotland, future Scotland, encounter Scotland, blog post Scotland, dundee Scotland, driving Scotland, sporting activities Scotland, transport Scotland Glenelg I remember exploring Scotland for the initial opportunity at the conclusion of April. It was already spring season in Scotland, the sun was heating up, while in Scotland it was still winter all over. The Highlands were still dealt with in snowfall in many places, and also in Edinburgh it was piercingly rainfall. When taking a trip in Scotland, first of all good, water resistant, sporting activities shoes. Will certainly additionally happen in helpful, occasionally it is also worth including a thin scarf, a sports hat and sports handwear covers to the backpack (springtime and fall). In winter season, I recommend staying away from Scotland from a span. In the scenario of a low-budget journey, sleep in a camping tent or even stay just in hostels (cost about PLN 80 every evening)., Whiskey, visit at least one distillery and order fish and also chips along with white vinegar at minimum as soon as. I hope that along with this blog post I motivated my pals (:-RRB-) yet likewise strangers to take a trip to Scotland. It’s really worth a hundred opportunities! I welcome you to see, so I am actually still here. Beautiful Scottish beach fronts. Loch Lomond Backpack. Iona- little isle, white beach fronts. Isle of Skye. Glencoe. Eilean Donan Castle. Isle of Arran. Scotland is actually undeniably a truly attractive nation, and every year it is actually seen through groups of tourists coming from the United States, France, as well as also Italy or Spain. Arran is actually called Scotland in miniature. Scotland, like the entire of Great Britain, is not one of the most inexpensive destinations. It was already spring season in Scotland, the sunshine was warming up, while in Scotland it was still winter season all over. I hope that with this post I encouraged my pals (:-RRB-) but likewise complete strangers to travel to https://www.scotland.com/
Did you know these facts on CBD OIL and Full Spectrum CBD Hemp Oil? Cannabinoids are isolated from hemp utilizing supercritical CO2 extraction. Thanks to modern-day innovation, the resulting option is tidy, devoid of unneeded waxes and heavy metals, naturally present in the plant, and the sucked liquid has a common, oily consistency. CBD oil includes cannabidiol as a base component and might consist of only trace quantities of tetrahydroxycannabidiol (THC). It is advised by doctors and pharmacists as an antioxidant and compound that obstructs the action of proinflammatory cytokines (proteins), e.g. in Crohn’s disease or ulcerative intestinal tract. RSO oil has a low CBD material, while high THC. The synergistic (enhancing) action of CBD and THC relative to each other is used here. Both cannabinoids can do much more together than when utilized separately. Both marijuana oil type CBD and RSO also contain other cannabinoids, such as cannabichromene (CBC) and cannabigerol (CBG). The trick is not, nevertheless, that CBD typically has actually a composition broadened to include flavones, flavonoids, terpenes, terpenoids, amino acids and omega acids. The distinction is mainly due to motives guiding humankind to utilize one or the other item. CBD medical cannabis oil is a rather advantageous mix of cannabinoids, developed to secure against 21st century disease. It’s finest to utilize all of these substances together, as nature created them and enclosed in cannabis inflorescences. It turns out that cannabidiol improves the impacts of cannabichromene (CBC) and cannabigerol (CBG), and flavones or flavonoids improve the absorption of these compounds. Omega-6 and omega-3 highly nurture the body and do not permit to alter, which speed up the aging procedure of the organism and enhance the development of cancer. Oil of marijuana in a kind of pastime APR includes small quantities of CBD, balanced by the existence of THC. – Modern clinical research reveals that CBD + THC cope with major autoimmune diseases, while CBC or CBG reveal very little activity in the existence of both compounds, simply like flavones, flavonoids or terpenes, for that reason their content in the service appears to be unneeded. In addition, the cannabis stress from which THC and CBD are obtained include minimal amounts of other cannabinoids. Cannabis oil has currently marked a new age in which male ceased to fear what is unidentified, and started to find what our ancestors had currently discovered and utilize the substantial potential, in the beginning look, a little strange relationships, associated primarily with pathology. Medical marijuana, contrary to its name, does not imply fermented female inflorescences and leaves consisting of psychedelic substances coiled in so-called “Joints”, but a helpful oil without psychedelic THC. A standard person, after taking doses of medical marijuana and accomplishing the appropriate state of cannabinoids in the blood, can enjoy increased immunity, decreased vulnerability to cancer, delayed aging and minimized risk of stroke or heart attack. CBD oil contains cannabidiol as a base component and might contain just trace quantities of tetrahydroxycannabidiol (THC). RSO oil has a low CBD material, while high THC. Both marijuana oil type CBD and RSO likewise consist of other cannabinoids, such as cannabichromene (CBC) and cannabigerol (CBG). CBD medical cannabis oil is a rather beneficial mix of cannabinoids, created to protect versus 21st century disease. Oil of marijuana in a kind of pastime APR consists of small amounts of CBD, balanced by the existence of THC.
Did you know these truths on CBD OIL and Full Spectrum CBD Hemp Oil? Cannabinoids are separated from hemp utilizing supercritical CO2 extraction. Thanks to contemporary technology, the resulting solution is tidy, devoid of unneeded waxes and heavy metals, naturally present in the plant, and the drawn liquid has a normal, oily consistency. CBD oil consists of cannabidiol as a base component and may consist of only trace amounts of tetrahydroxycannabidiol (THC). Functions as a memory enhancer, improving concentration and coordination of motions, removing swelling and persistent infections. It improves the conduction of stimuli in the course of autoimmune diseases (multiple sclerosis, amyotrophic sclerosis). It is suggested by medical professionals and pharmacists as an antioxidant and substance that blocks the action of proinflammatory cytokines (proteins), e.g. in Crohn’s illness or ulcerative intestine. RSO oil has a low CBD material, while high THC. Of course, the essential job of RSO is to cause a psychedelic effect, although it can also stimulate “sick” brain structures. It is worth understanding that supplements of this type is primarily utilized by people to whom standard treatment does not bring relief in illness. The synergistic (enhancing) action of CBD and THC relative to each other is utilized here. Both cannabinoids can do a lot more together than when utilized separately. In addition, they collectively stimulate the department of non-active nerve cells, nurture the fatty envelope of the nerves, and prevent myelin inflammation that causes loss of function in some autoimmune diseases. There are also stories where cannabis in its natural type softened spasticity, decreased the frequency of convulsions and seizures, and reduced undesirable scrapie in Parkinson’s illness. This is where the concept of receiving RSO, intended only for chronically ill people, originated . Both marijuana oil type CBD and RSO also consist of other cannabinoids, such as cannabichromene (CBC) and cannabigerol (CBG). The secret is not, however, that CBD often has actually a structure expanded to include flavones, flavonoids, terpenes, terpenoids, amino acids and omega acids. The difference is mostly due to motives assisting mankind to use one or the other product. CBD medical marijuana oil is a rather advantageous mix of cannabinoids, created to safeguard against 21st century illness. It’s finest to use all of these substances together, as nature created them and confined in cannabis inflorescences. It ends up that cannabidiol boosts the results of cannabichromene (CBC) and cannabigerol (CBG), and flavonoids or flavones improve the absorption of these compounds. Omega-6 and omega-3 extremely nourish the body and do not allow to change, which accelerate the aging process of the organism and improve the advancement of cancer. Oil of cannabis in a kind of pastime APR includes little quantities of CBD, stabilized by the existence of THC. – Modern clinical research study shows that CBD + THC cope with serious autoimmune illness, while CBC or CBG reveal minimal activity in the presence of both substances, simply like terpenes, flavones or flavonoids, for that reason their content in the solution appears to be unnecessary. In addition, the marijuana pressure from which THC and CBD are obtained contain negligible amounts of other cannabinoids. Cannabis oil has currently marked a brand-new period in which man stopped to fear what is unknown, and started to discover what our forefathers had actually already seen and use the significant capacity, at first glimpse, a little strange relationships, associated primarily with pathology. Medical marijuana, contrary to its name, does not suggest fermented female inflorescences and leaves containing psychedelic substances coiled in so-called “Joints”, but an advantageous oil without psychoactive THC. A standard individual, after taking dosages of medical marijuana and accomplishing the proper state of cannabinoids in the blood, can delight in increased resistance, lowered vulnerability to cancer, delayed aging and decreased threat of stroke or heart attack. CBD oil includes cannabidiol as a base active ingredient and might include only trace quantities of tetrahydroxycannabidiol (THC). RSO oil has a low CBD content, while high THC. Both marijuana oil type CBD and RSO also contain other cannabinoids, such as cannabichromene (CBC) and cannabigerol (CBG). CBD medical marijuana oil is a rather helpful mix of cannabinoids, developed to secure versus 21st century illness. Oil of marijuana in a kind of hobby APR consists of little quantities of CBD, balanced by the presence of THC.
Did you understand these realities on CBD OIL and Full Spectrum CBD Hemp Oil? Cannabinoids are isolated from hemp using supercritical CO2 extraction. Thanks to contemporary innovation, the resulting solution is clean, without unnecessary waxes and heavy metals, naturally present in the plant, and the drawn liquid has a common, oily consistency. CBD oil includes cannabidiol as a base active ingredient and might consist of only trace quantities of tetrahydroxycannabidiol (THC). Works as a memory enhancer, improving concentration and coordination of movements, getting rid of inflammation and frequent infections. It enhances the conduction of stimuli in the course of autoimmune diseases (numerous sclerosis, amyotrophic sclerosis). It is suggested by physicians and pharmacists as an antioxidant and substance that blocks the action of proinflammatory cytokines (proteins), e.g. in Crohn’s illness or ulcerative intestinal tract. RSO oil has a low CBD material, while high THC. The synergistic (enhancing) action of CBD and THC relative to each other is utilized here. Both cannabinoids can do much more together than when used separately. Both marijuana oil type CBD and RSO also consist of other cannabinoids, such as cannabichromene (CBC) and cannabigerol (CBG). The secret is not, nevertheless, that CBD frequently has actually a structure expanded to include flavones, flavonoids, terpenes, terpenoids, amino acids and omega acids. The distinction is primarily due to intentions directing humankind to utilize one or the other item. CBD medical cannabis oil is a rather useful blend of cannabinoids, developed to secure against 21st century illness. It’s best to utilize all of these compounds together, as nature created them and enclosed in marijuana inflorescences. It turns out that cannabidiol improves the effects of cannabichromene (CBC) and cannabigerol (CBG), and flavones or flavonoids improve the absorption of these compounds. Omega-6 and omega-3 highly nourish the body and do not allow to change, which speed up the aging procedure of the organism and improve the advancement of cancer. Oil of cannabis in a kind of pastime APR includes percentages of CBD, stabilized by the existence of THC. Makers focus on the synergistic effect of one compound relative to the other, while deserting the existence of CBC and CBG. Why such a choice? – Modern scientific research reveals that CBD + THC handle serious autoimmune diseases, while CBC or CBG reveal minimal activity in the presence of both compounds, just like terpenes, flavonoids or flavones, for that reason their content in the option appears to be unnecessary. In addition, the cannabis strain from which THC and CBD are derived contain negligible amounts of other cannabinoids. RSO oil is totally prohibited in Poland, which is why it can not be gotten in any legally operating store on the market. Naturally, there are a variety of amateur methods for getting it, however it’s good to know that compounds gotten artificially in house labs doubt, untried, and the effect unknown. The solvent for the production of household RSO is normally gas, alcohol and even kerosene, which instead of treating, poison. Alcohols and their like impair cannabinoids, therefore in truth, they don’t bring anything new to the medical world. Cannabis oil has currently marked a brand-new period in which guy ceased to fear what is unknown, and began to find what our forefathers had already discovered and utilize the significant potential, at very first look, a little strange relationships, associated generally with pathology. Medical cannabis, contrary to its name, does not suggest fermented female inflorescences and leaves containing psychoactive compounds coiled in so-called “Joints”, however an useful oil without psychedelic THC. A basic person, after taking dosages of medicinal marijuana and attaining the suitable state of cannabinoids in the blood, can enjoy increased resistance, minimized susceptibility to cancer, postponed aging and decreased risk of stroke or cardiac arrest. CBD oil includes cannabidiol as a base component and might consist of only trace quantities of tetrahydroxycannabidiol (THC). RSO oil has a low CBD content, while high THC. Both cannabis oil type CBD and RSO also include other cannabinoids, such as cannabichromene (CBC) and cannabigerol (CBG). CBD medical marijuana oil is a rather useful mix of cannabinoids, developed to protect versus 21st century illness. Oil of cannabis in a kind of hobby APR contains little quantities of CBD, balanced by the existence of THC.
Scotland is certainly a really stunning country, as well as yearly it is checked out through crowds of vacationers from the United States, France, and also Italy or even Spain. Nevertheless, I can easily not withstand the perception that Poles happen right here generally for work. Barely anyone taking vacation in July, August or September will consider Scotland. Due to the fact that of the rates that are actually definitely hostile for some vacationers, perhaps it is actually. The land of Nessi as well as men in kilts is actually definitely worth a brief or lengthy adventure. Possibly it is actually excellent to deal with it right currently, when the market value of the pound is actually dropping, and also hence our company will spend less for a vacation in Scotland? Glen Affric in early spring season Why is it worth it? Scotland is mostly a terrific yard in the north of the nation. In Scotland, I have currently been actually able to check out tapes, dolphins or even deer. Yet Scotland is additionally an in the past interesting land (who saw Brave Heart?), Where you can easily explore splendid stone palaces (Edinburgh, Stirling, Linlithgow, Eilean Donan). The funding itself, the magnificent Edinburgh, likewise should have attention, particularly during the summer season celebrations. country Scotland, scottish Scotland, app Scotland, tory Scotland, details Scotland, scotland Scotland, our company Scotland, edinburgh Scotland, kid Scotland, creed Scotland, chart Scotland, iona Scotland, food selection Scotland, trip Scotland, information Scotland, record Scotland, cars and truck Scotland, ship Scotland, uk Scotland, learn Scotland, celtic Scotland, glasgow Scotland, shetland Scotland, society Scotland, tay Scotland, bus Scotland, information Scotland, learning Scotland, bit Scotland, navigating Scotland, biscuit Scotland, covid Scotland, sporting activity Scotland, ease of access Scotland, video clips Scotland, highland games Scotland, neighborhood Scotland, golf Scotland, scots Scotland, food items Scotland, whisky Scotland, finances Scotland, visitscotland Scotland, museum Scotland, newsletter Scotland, arbroath Scotland, heck Scotland, roadway Scotland, distilleries Scotland, street andrews Scotland, alcoholic beverage Scotland, browse through scotland Scotland, europe Scotland, castles Scotland, future Scotland, take in Scotland, blog post Scotland, dundee Scotland, steering Scotland, sporting activities Scotland, covid-Scotland9 Scotland, transport Scotland. Edinburgh – Some suggestions for visiting Scotland Traveling in Scotland must absolutely begin along with its capital. It takes about pair of times to go to Edinburgh, yet you can easily stretch this opportunity up to 4. In the situation of a brief browse through to Scotland, you can easily also confine yourself to Edinburgh simply, investing one day on a round excursion by bus in the Scottish mountainous (nearly every traveling company in the funds supplies it). Arran is actually contacted Scotland in mini. Loch Lomond is actually one of Scotland’s pair of nationwide parks, a lovely lake encompassed through mountains as well as rainforests. On the method, you can additionally visit Stirling Castle. nation Scotland, scottish Scotland, application Scotland, conservative Scotland, relevant information Scotland, scotland Scotland, our team Scotland, edinburgh Scotland, child Scotland, cult Scotland, chart Scotland, iona Scotland, food selection Scotland, traveling Scotland, records Scotland, past Scotland, car Scotland, ship Scotland, uk Scotland, learn Scotland, celtic Scotland, glasgow Scotland, shetland Scotland, lifestyle Scotland, tay Scotland, bus Scotland, news Scotland, learning Scotland, little Scotland, navigating Scotland, biscuit Scotland, covid Scotland, sport Scotland, access Scotland, video clips Scotland, highland video games Scotland, area Scotland, golf Scotland, scots Scotland, meals Scotland, whisky Scotland, budget plan Scotland, visitscotland Scotland, gallery Scotland, newsletter Scotland, arbroath Scotland, heck Scotland, street Scotland, distilleries Scotland, st andrews Scotland, drink Scotland, browse through scotland Scotland, europe Scotland, castles Scotland, potential Scotland, take in Scotland, blog site Scotland, dundee Scotland, steering Scotland, sporting activities Scotland, covid-Scotland9 Scotland, transportation Scotland. Low Budget Travel? Scotland, like the entire of Great Britain, is none of the most affordable locations. You can discover a whole lot of hiking routes and also campsites below. Furthermore, in Scotland the camping tent may be established virtually anywhere, therefore vacationers may also oversleep the wild. What is vital in this instance is actually common access to tidy water– our team can easily discover hill streams, waterfalls and also streams just about everywhere. The most famous and among the absolute most gorgeous hiking routes in Europe is actually the so-called West Highland Way. As a result of the fantastic viewpoints, I heartily recommend Longer trip? How about north along the west coast and after that back to the quieter, albeit a lot less amazing east? Many visitors in Glasgow, takes a learn to Mallaig (often checking out Glencoe or Fort William heading) at that point visits Isle of Skye (the best stunning of the Scottish isles), then scalp along the shore towards Ullapool, as for Durness, heading back going to Inverness, Fort Augustus (Loch Ness), Aberdeen as well as Cairngorms National Park, as well as eventually St Andrews. Is it achievable by trains as well as buses? Naturally it is actually possible, but you are going to miss a whole lot, so it is actually much far better to rent out an automobile for a minimum of aspect of the excursion. As well as don’t be tricked due to the visitor catch of Loch Ness– in reality, there are plenty of so much more gorgeous places all over Scotland country Scotland, scottish Scotland, application Scotland, conservative Scotland, information Scotland, scotland Scotland, our company Scotland, edinburgh Scotland, little one Scotland, creed Scotland, map Scotland, iona Scotland, food selection Scotland, travel Scotland, information Scotland, record Scotland, vehicle Scotland, ship Scotland, uk Scotland, learn Scotland, celtic Scotland, glasgow Scotland, shetland Scotland, society Scotland, tay Scotland, bus Scotland, headlines Scotland, learning Scotland, little bit Scotland, navigation Scotland, cookie Scotland, covid Scotland, sport Scotland, availability Scotland, video clips Scotland, highland games Scotland, area Scotland, golf Scotland, scots Scotland, food Scotland, whisky Scotland, budget Scotland, visitscotland Scotland, gallery Scotland, bulletin Scotland, arbroath Scotland, heck Scotland, road Scotland, distilleries Scotland, st andrews Scotland, alcoholic beverage Scotland, see scotland Scotland, europe Scotland, castles Scotland, future Scotland, take in Scotland, blog post Scotland, dundee Scotland, driving Scotland, sporting activities Scotland, transport Scotland Glenelg The weather may be erratic. I keep in mind exploring Scotland for the very first time at the conclusion of April. It was actually already come Scotland, the sunshine was heating up, while in Scotland it was actually still wintertime all over. The Highlands were still covered in snowfall in several locations, as well as in Edinburgh it was actually piercingly rainfall. Naturally, it ended up right away that I had not packed the best points. I was considering to stay in the metropolitan area, however likewise ballet flats, shoes, slim shirts and ornamental coats decrease in spring. When traveling in Scotland, first of all great, water-resistant, sports shoes. Are going to additionally happen in convenient, at times it is actually also worth adding a thin headscarf, a sporting activities hat and sports handwear covers to the bag (springtime and fall). In winter, I propose preventing Scotland from a distance. Addition little bit of traits: Umbrellas absolutely don’t function (the wind flexes them in each paths), the tent should (MUST!) have a great flysheet, it costs taking a multiple-use bottle along with you (faucet water, however additionally drinkable in streams or rivers), at least a couple of pairs of socks, a hot fleece as well as something to repel vicious flies (I recommend a smidge). In the situation of a low-budget trip, oversleep a tent or stay merely in hostels (cost regarding PLN 80 per evening). You should try seafood (they are actually scrumptious!), Whiskey, visit at the very least one distillery and also instruction fish as well as potato chips along with vinegar at minimum the moment. I hope that using this blog post I encouraged my close friends (:-RRB-) yet likewise strangers to journey to Scotland. It is actually actually worth a hundred times! I welcome you to check out, so I am still here. Stunning Scottish coastlines. Loch Lomond Backpack. Iona- little isle, white beaches. Isle of Skye. Glencoe. Eilean Donan Castle. Isle of Arran. Scotland is actually most certainly a truly attractive country, and every year it is seen by crowds of visitors coming from the United States, France, and also Italy or even Spain. Arran is actually called Scotland in baby. Scotland, like the whole of Great Britain, is actually not one of the cheapest places. It was presently spring season in Scotland, the sunshine was warming up, while in Scotland it was actually still winter months all over. I really hope that with this message I urged my buddies (:-RRB-) however also unfamiliar people to travel to https://www.scotland.com/
Create animated videos in seconds. Full Toonly review and 49 discount.
Scotland is undoubtedly a really wonderful nation, and every year it is actually explored through crowds of visitors coming from the United States, France, as well as also Italy or Spain. Rarely any individual taking leave of absence in July, August or even September will definitely think of Scotland. Perhaps it is excellent to assume regarding it right currently, when the worth of the pound is actually dropping, and therefore we will spend less for a vacation in Scotland? Glen Affric in very early spring Why is it worth it? Scotland is actually primarily a splendid yard in the north of the nation. In Scotland, I have actually already been actually able to see tapes, dolphins or also deer. Yet Scotland is actually likewise a historically fascinating property (that watched Brave Heart?), Where you can check out stunning stone castles (Edinburgh, Stirling, Linlithgow, Eilean Donan). The financing itself, the majestic Edinburgh, also ought to have focus, especially during the summertime celebrations. nation Scotland, scottish Scotland, application Scotland, tory Scotland, info Scotland, scotland Scotland, our company Scotland, edinburgh Scotland, little one Scotland, cult Scotland, map Scotland, iona Scotland, menu Scotland, traveling Scotland, records Scotland, past Scotland, auto Scotland, ship Scotland, uk Scotland, train Scotland, celtic Scotland, glasgow Scotland, shetland Scotland, society Scotland, tay Scotland, bus Scotland, news Scotland, education and learning Scotland, little Scotland, navigating Scotland, cookie Scotland, covid Scotland, sport Scotland, access Scotland, video clips Scotland, highland activities Scotland, neighborhood Scotland, golf Scotland, scots Scotland, food items Scotland, whisky Scotland, spending plan Scotland, visitscotland Scotland, gallery Scotland, bulletin Scotland, arbroath Scotland, hell Scotland, roadway Scotland, distilleries Scotland, st andrews Scotland, beverage Scotland, see scotland Scotland, europe Scotland, castles Scotland, potential Scotland, take in Scotland, blog site Scotland, dundee Scotland, steering Scotland, sporting activities Scotland, covid-Scotland9 Scotland, transportation Scotland. Edinburgh – Some suggestions for checking out Scotland Travel in Scotland must absolutely start along with its own funds. It takes around two days to go to Edinburgh, yet you can extend this opportunity up to four. In the scenario of a brief check out to Scotland, you can easily also restrict yourself to Edinburgh simply, investing one time on a rounded trip by bus in the Scottish mountainous (practically every traveling company in the funds gives it). For a slightly longer quest (albeit still restricted to a few times) from Edinburgh, I will recommend to strike in two instructions: Isle of Arran or Loch Lomond. Arran is actually contacted Scotland in miniature. Devoting pair of or three days on the island, we can appreciate the charm of the west shoreline, rest on the beach, climb up the greatest height of the isle– Goat Fell, as effectively as admire the grassy hillsides and also take pleasure in the area. Loch Lomond is just one of Scotland’s pair of national forests, a beautiful pond encompassed by mountains and also forests. On the method, you can easily additionally visit Stirling Castle. There is a direct train coming from Glasgow in both instructions. nation Scotland, scottish Scotland, application Scotland, tory Scotland, relevant information Scotland, scotland Scotland, our team Scotland, edinburgh Scotland, kid Scotland, creed Scotland, chart Scotland, iona Scotland, menu Scotland, traveling Scotland, records Scotland, record Scotland, car Scotland, ship Scotland, uk Scotland, train Scotland, celtic Scotland, glasgow Scotland, shetland Scotland, culture Scotland, tay Scotland, bus Scotland, updates Scotland, learning Scotland, little Scotland, navigating Scotland, biscuit Scotland, covid Scotland, sporting activity Scotland, access Scotland, online videos Scotland, highland games Scotland, neighborhood Scotland, golf Scotland, scots Scotland, meals Scotland, whisky Scotland, budget Scotland, visitscotland Scotland, gallery Scotland, e-newsletter Scotland, arbroath Scotland, hell Scotland, road Scotland, distilleries Scotland, st andrews Scotland, cocktail Scotland, visit scotland Scotland, europe Scotland, castles Scotland, potential Scotland, encounter Scotland, blog site Scotland, dundee Scotland, steering Scotland, sporting activities Scotland, covid-Scotland9 Scotland, transport Scotland. Scotland, like the entire of Great Britain, is certainly not one of the least expensive locations. In add-on, in Scotland the camping tent may be actually prepared up literally anywhere, therefore visitors can easily additionally rest in the wild. The very most renowned as well as one of the most attractive treking trails in Europe is the alleged West Highland Way. Longer travel? How approximately north along the west coastline and after that back to the quieter, albeit less stunning east? Several vacationers in Glasgow, takes a learn to Mallaig (sometimes seeing Glencoe or even Fort William heading) after that visits Isle of Skye (the best gorgeous of the Scottish islands), at that point head along the coast towards Ullapool, regarding Durness, heading back visiting Inverness, Fort Augustus (Loch Ness), Aberdeen and also Cairngorms National Park, as well as lastly Street Andrews. Is it possible by buses as well as trains? Certainly it is actually achievable, however you will miss out on a great deal, so it is actually better to rent a car for at least aspect of the journey. As well as don’t be deceived through the vacationer catch of Loch Ness– in reality, there are actually loads of a lot more gorgeous spots throughout Scotland nation Scotland, scottish Scotland, application Scotland, tory Scotland, information Scotland, scotland Scotland, our company Scotland, edinburgh Scotland, kid Scotland, cult Scotland, chart Scotland, iona Scotland, menu Scotland, traveling Scotland, data Scotland, record Scotland, automobile Scotland, ship Scotland, uk Scotland, learn Scotland, celtic Scotland, glasgow Scotland, shetland Scotland, society Scotland, tay Scotland, bus Scotland, headlines Scotland, learning Scotland, little Scotland, navigation Scotland, cookie Scotland, covid Scotland, sporting activity Scotland, access Scotland, videos Scotland, highland video games Scotland, neighborhood Scotland, golf Scotland, scots Scotland, food Scotland, whisky Scotland, finances Scotland, visitscotland Scotland, gallery Scotland, bulletin Scotland, arbroath Scotland, hell Scotland, roadway Scotland, distilleries Scotland, st andrews Scotland, cocktail Scotland, check out scotland Scotland, europe Scotland, castles Scotland, potential Scotland, encounter Scotland, blog Scotland, dundee Scotland, driving Scotland, sports Scotland, transportation Scotland Glenelg I don’t forget visiting Scotland for the first opportunity at the end of April. It was already springtime in Scotland, the sunshine was heating up, while in Scotland it was still winter all over. The Highlands were still covered in snow in numerous locations, and also in Edinburgh it was actually piercingly rain. When journeying in Scotland, firstly great, water-proof, sports shoes. A suitable poncho (as well as windproof!) Will certainly also can be found in handy, in some cases it is additionally worth adding a thin scarf, a sporting activities hat and sporting activities handwear covers to the knapsack (spring as well as autumn). In winter months, I propose staying away from Scotland from a range. Why? The answer is easy: it pours and also impacts. In the instance of a low-budget vacation, rest in a tent or even stay merely in hotels (price concerning PLN 80 every night)., Whiskey, see at the very least one distillery and instruction fish and also potato chips along with vinegar at least as soon as. I wish that through this blog post I urged my buddies (:-RRB-) yet additionally strangers to journey to Scotland. It’s actually worth a hundred opportunities! I welcome you to go to, if simply I am still listed here. Attractive Scottish coastlines. Loch Lomond Backpack. Iona- little isle, white colored beach fronts. Isle of Skye. Glencoe. Eilean Donan Castle. Isle of Arran. Scotland is actually unquestionably an actually gorgeous nation, and also every year it is explored by crowds of visitors from the United States, France, and also also Italy or even Spain. Arran is actually contacted Scotland in mini. Scotland, like the entire of Great Britain, is not one of the most affordable locations. It was currently springtime in Scotland, the sun was actually warming up, while in Scotland it was still winter season all over. I really hope that along with this message I urged my close friends (:-RRB-) but likewise complete strangers to take a trip to https://www.scotland.com/
I was recommended this website via my cousin. I am now not certain whether or not this post is written through him as nobody else recognise such distinctive about my trouble. You’re wonderful! Thank you!
Scotland is most certainly a definitely wonderful country, and also every year it is seen by groups of travelers coming from the United States, France, and even Italy or even Spain. Nevertheless, I can certainly not avoid the perception that Poles happen right here mostly for job. Barely any individual taking vacation in July, August or September will certainly think about Scotland. Considering that of the prices that are absolutely unfriendly for some tourists, maybe it is actually. Meanwhile, the land of Nessi and also males in kilts is actually most definitely worth a short or lengthy quest. Possibly it is good to think concerning it immediately, when the market value of the extra pound is dropping, and also thereby our experts will spend a lot less for a holiday season in Scotland? Glen Affric in very early spring Why is it worth it? Scotland is largely a wonderful landscape in the north of the country. Highlands– mountains covered with grass and also heathers, deep lochs (ponds), an impressive shoreline series, glen (picturesque lowlands), as well as most of all, hardly discovered in Europe (specifically in Scotland!) wilderness, where we are going to certainly not find a solitary property. Space, room and also space again! Wild attributes, a wealth of plants, birds and also other animals wait for attribute aficionados. In Scotland, I have actually managed to watch seals, dolphins or perhaps deer. But Scotland is additionally an in the past fascinating land (who saw Brave Heart?), Where you can easily go to splendid stone palaces (Edinburgh, Stirling, Linlithgow, Eilean Donan). The funding on its own, the marvelous Edinburgh, additionally is worthy of focus, specifically in the course of the summertime celebrations. country Scotland, scottish Scotland, application Scotland, conservative Scotland, details Scotland, scotland Scotland, us Scotland, edinburgh Scotland, little one Scotland, creed Scotland, map Scotland, iona Scotland, food selection Scotland, travel Scotland, data Scotland, past history Scotland, auto Scotland, ship Scotland, uk Scotland, learn Scotland, celtic Scotland, glasgow Scotland, shetland Scotland, lifestyle Scotland, tay Scotland, bus Scotland, information Scotland, education Scotland, little Scotland, navigating Scotland, cookie Scotland, covid Scotland, sporting activity Scotland, availability Scotland, video recordings Scotland, highland video games Scotland, neighborhood Scotland, golf Scotland, scots Scotland, food items Scotland, whisky Scotland, budget plan Scotland, visitscotland Scotland, gallery Scotland, e-newsletter Scotland, arbroath Scotland, hell Scotland, street Scotland, distilleries Scotland, street andrews Scotland, cocktail Scotland, check out scotland Scotland, europe Scotland, castles Scotland, potential Scotland, encounter Scotland, blogging site Scotland, dundee Scotland, steering Scotland, sporting activities Scotland, covid-Scotland9 Scotland, transportation Scotland. Edinburgh – Some concepts for checking out Scotland Travel in Scotland should definitely begin with its own funds. It takes approximately two times to see Edinburgh, yet you may stretch this time up to four. In the situation of a short visit to Scotland, you may likewise limit on your own to Edinburgh just, devoting one time on a circular journey by bus in the Scottish plateaus (practically every trip organization in the funds supplies it). Arran is actually called Scotland in baby. Loch Lomond is one of Scotland’s 2 nationwide playgrounds, a lovely lake surrounded through woodlands and also hillsides. On the technique, you can likewise go to Stirling Castle. country Scotland, scottish Scotland, app Scotland, tory Scotland, info Scotland, scotland Scotland, our team Scotland, edinburgh Scotland, little one Scotland, cult Scotland, chart Scotland, iona Scotland, food selection Scotland, traveling Scotland, records Scotland, past history Scotland, car Scotland, ship Scotland, uk Scotland, learn Scotland, celtic Scotland, glasgow Scotland, shetland Scotland, culture Scotland, tay Scotland, bus Scotland, updates Scotland, education and learning Scotland, bit Scotland, navigation Scotland, biscuit Scotland, covid Scotland, sporting activity Scotland, accessibility Scotland, videos Scotland, highland games Scotland, neighborhood Scotland, golf Scotland, scots Scotland, food items Scotland, whisky Scotland, budget plan Scotland, visitscotland Scotland, gallery Scotland, email list Scotland, arbroath Scotland, hell Scotland, roadway Scotland, distilleries Scotland, st andrews Scotland, beverage Scotland, check out scotland Scotland, europe Scotland, castles Scotland, potential Scotland, experience Scotland, weblog Scotland, dundee Scotland, driving Scotland, sports Scotland, covid-Scotland9 Scotland, transportation Scotland. Reduced Budget Travel? Scotland, like the entire of Great Britain, is actually certainly not one of the least expensive destinations. You may discover a whole lot of treking tracks and campsites listed here. Additionally, in Scotland the tent may be established virtually anywhere, thus tourists may likewise rest in the untamed. What is necessary within this case is actually global accessibility to clean water– our team can locate mountain rivers, flows and also falls virtually just about everywhere. The best popular as well as one of the most beautiful exploring trails in Europe is the alleged West Highland Way. Because of the incredible perspectives, I heartily encourage Longer vacation? How around north along the west shore and afterwards back to the quieter, albeit much less exceptional eastern? Many visitors in Glasgow, takes a train to Mallaig (often going to Glencoe or Fort William on the method) then gos to Isle of Skye (one of the most attractive of the Scottish islands), then head along the coast towards Ullapool, regarding Durness, on the technique back seeing Inverness, Fort Augustus (Loch Ness), Aberdeen and Cairngorms National Park, and also lastly St Andrews. Is it feasible by buses and also trains? Naturally it is feasible, yet you will overlook a great deal, so it is actually far better to rent out an auto for at the very least part of the travel. And also do not be tricked by the traveler catch of Loch Ness– in truth, there are a lot of far more beautiful spots all around Scotland country Scotland, scottish Scotland, app Scotland, conservative Scotland, relevant information Scotland, scotland Scotland, our team Scotland, edinburgh Scotland, little one Scotland, cult Scotland, chart Scotland, iona Scotland, food selection Scotland, trip Scotland, information Scotland, past history Scotland, auto Scotland, ship Scotland, uk Scotland, learn Scotland, celtic Scotland, glasgow Scotland, shetland Scotland, culture Scotland, tay Scotland, bus Scotland, headlines Scotland, education and learning Scotland, little bit Scotland, navigation Scotland, cookie Scotland, covid Scotland, sport Scotland, availability Scotland, video clips Scotland, highland activities Scotland, area Scotland, golf Scotland, scots Scotland, food Scotland, whisky Scotland, finances Scotland, visitscotland Scotland, museum Scotland, newsletter Scotland, arbroath Scotland, hell Scotland, roadway Scotland, distilleries Scotland, street andrews Scotland, cocktail Scotland, check out scotland Scotland, europe Scotland, castles Scotland, potential Scotland, take in Scotland, blog Scotland, dundee Scotland, steering Scotland, sporting activities Scotland, transport Scotland Glenelg The weather can easily be erratic. I always remember seeing Scotland for the very first time by the end of April. It was actually come Scotland, the sunshine was heating up, while in Scotland it was actually still winter season throughout. The Highlands were actually still dealt with in snow in several locations, and in Edinburgh it was actually piercingly rainfall. Of training program, it turned out as soon as possible that I had not packed the appropriate factors. I was organizing to remain in the urban area, yet also ballet flats, shoes, aesthetic jackets and thin shirts drop off in spring season. When journeying in Scotland, to start with good, water resistant, sporting activities footwear. A respectable raincoat (as well as windproof!) Will definitely also happen in convenient, occasionally it is likewise worth including a slim scarf, a sports hat and sporting activities handwear covers to the bag (springtime and fall). In winter season, I suggest staying away from Scotland coming from a range. Why? The response is easy: it pours as well as impacts. Bonus little bit of traits: Umbrellas undoubtedly do not work (the wind bends all of them in each instructions), the outdoor tents has to (MUST!) have an excellent flysheet, it deserves taking a multiple-use bottle along with you (faucet water, yet likewise drinkable in flows or streams), at minimum a handful of pairs of belts, a hot fleece and also one thing to ward off nasty flies (I highly recommend a smidge). In the situation of a low-budget excursion, sleeping in a tent or stay just in hostels (cost about PLN 80 per evening). You ought to try seafood (they are mouth watering!), Whiskey, see at the very least one whiskey and order fish and also potato chips with vinegar at the very least when. I really hope that using this blog post I encouraged my pals (:-RRB-) yet additionally unfamiliar people to take a trip to Scotland. It’s really worth a hundred opportunities! I invite you to visit, so I am still below. Lovely Scottish seashores. Loch Lomond Backpack. Iona- little island, white colored coastlines. Island of Skye. Glencoe. Eilean Donan Castle. Isle of Arran. Scotland is actually unquestionably a definitely attractive nation, and also every year it is explored by groups of tourists from the United States, France, as well as also Italy or even Spain. Arran is called Scotland in miniature. Scotland, like the whole of Great Britain, is certainly not one of the most cost effective places. It was presently spring season in Scotland, the sunlight was actually heating up, while in Scotland it was still wintertime all over. I really hope that along with this article I urged my close friends (:-RRB-) but additionally complete strangers to take a trip to https://www.scotland.com/
Did you understand these realities on CBD OIL and Full Spectrum CBD Hemp Oil? Cannabinoids are isolated from hemp utilizing supercritical CO2 extraction. Thanks to contemporary innovation, the resulting option is clean, devoid of unnecessary waxes and heavy metals, naturally present in the plant, and the sucked liquid has a common, oily consistency. CBD oil contains cannabidiol as a base component and may include only trace amounts of tetrahydroxycannabidiol (THC). Functions as a memory enhancer, improving concentration and coordination of movements, removing inflammation and persistent infections. It enhances the conduction of stimuli in the course of autoimmune diseases (several sclerosis, amyotrophic sclerosis). It is recommended by doctors and pharmacists as an antioxidant and substance that obstructs the action of proinflammatory cytokines (proteins), e.g. in Crohn’s illness or ulcerative intestinal tract. RSO oil has a low CBD content, while high THC. Obviously, the key job of RSO is to trigger a psychoactive effect, although it can likewise promote “ill” brain structures. It deserves knowing that supplements of this type is mainly utilized by individuals to whom basic treatment does not bring relief in illness. The synergistic (enhancing) action of CBD and THC relative to each other is utilized here. When used separately, both cannabinoids can do much more together than. In addition, they jointly stimulate the department of non-active afferent neuron, nourish the fatty envelope of the nerves, and avoid myelin inflammation that triggers loss of function in some autoimmune illness. There are likewise stories where marijuana in its natural type softened spasticity, decreased the frequency of seizures and convulsions, and suppressed unpleasant scrapie in Parkinson’s illness. This is where the concept of getting RSO, planned just for chronically ill individuals, come from . Both marijuana oil type CBD and RSO likewise consist of other cannabinoids, such as cannabichromene (CBC) and cannabigerol (CBG). The trick is not, however, that CBD frequently has a structure broadened to include flavones, flavonoids, terpenes, terpenoids, amino acids and omega acids. The distinction is mainly due to motives assisting humankind to utilize one or the other product. CBD medical marijuana oil is a rather beneficial mix of cannabinoids, designed to secure against 21st century illness. It’s finest to use all of these substances together, as nature created them and enclosed in cannabis inflorescences. It turns out that cannabidiol improves the results of cannabichromene (CBC) and cannabigerol (CBG), and flavones or flavonoids enhance the absorption of these compounds. Omega-6 and omega-3 extremely nourish the body and do not allow to alter, which accelerate the aging procedure of the organism and boost the advancement of cancer. Oil of cannabis in a kind of pastime APR contains small quantities of CBD, stabilized by the presence of THC. – Modern scientific research reveals that CBD + THC cope with serious autoimmune diseases, while CBC or CBG show very little activity in the existence of both compounds, just like flavonoids, terpenes or flavones, for that reason their material in the solution seems to be unnecessary. In addition, the cannabis stress from which THC and CBD are obtained include minimal quantities of other cannabinoids. Cannabis oil has currently marked a brand-new era in which male stopped to fear what is unidentified, and began to find what our ancestors had actually currently observed and use the considerable potential, at first glance, a little strange relationships, associated mainly with pathology. Medical cannabis, contrary to its name, does not imply fermented female inflorescences and leaves consisting of psychoactive compounds coiled in so-called “Joints”, however a beneficial oil without psychoactive THC. A basic individual, after taking doses of medicinal cannabis and accomplishing the suitable state of cannabinoids in the blood, can delight in increased immunity, minimized vulnerability to cancer, delayed aging and reduced danger of stroke or heart attack. CBD oil includes cannabidiol as a base component and might include just trace amounts of tetrahydroxycannabidiol (THC). RSO oil has a low CBD material, while high THC. Both cannabis oil type CBD and RSO also consist of other cannabinoids, such as cannabichromene (CBC) and cannabigerol (CBG). CBD medical marijuana oil is a rather helpful mix of cannabinoids, designed to secure versus 21st century disease. Oil of cannabis in a kind of hobby APR contains small quantities of CBD, balanced by the presence of THC.
Did you know these facts on CBD OIL and Full Spectrum CBD Hemp Oil? Cannabinoids are separated from hemp utilizing supercritical CO2 extraction. Thanks to modern technology, the resulting service is tidy, without heavy metals and unneeded waxes, naturally present in the plant, and the sucked liquid has a common, oily consistency. CBD oil contains cannabidiol as a base component and may include only trace quantities of tetrahydroxycannabidiol (THC). It is suggested by doctors and pharmacists as an antioxidant and compound that obstructs the action of proinflammatory cytokines (proteins), e.g. in Crohn’s illness or ulcerative intestinal tract. RSO oil has a low CBD content, while high THC. The synergistic (enhancing) action of CBD and THC relative to each other is used here. Both cannabinoids can do much more together than when used separately. Both cannabis oil type CBD and RSO also include other cannabinoids, such as cannabichromene (CBC) and cannabigerol (CBG). The secret is not, nevertheless, that CBD typically has actually a composition broadened to include flavones, flavonoids, terpenes, terpenoids, amino acids and omega acids. The distinction is mostly due to intentions assisting humanity to utilize one or the other item. CBD medical cannabis oil is a rather helpful blend of cannabinoids, designed to safeguard against 21st century illness. It’s best to utilize all of these compounds together, as nature created them and confined in cannabis inflorescences. Oil of cannabis in a kind of hobby APR includes little quantities of CBD, stabilized by the existence of THC. – Modern clinical research reveals that CBD + THC cope with severe autoimmune diseases, while CBC or CBG show very little activity in the presence of both compounds, simply like flavones, flavonoids or terpenes, therefore their material in the solution appears to be unnecessary. In addition, the marijuana strain from which THC and CBD are derived consist of minimal amounts of other cannabinoids. Cannabis oil has actually already marked a new age in which guy stopped to fear what is unknown, and started to find what our ancestors had actually already observed and use the considerable potential, at first glance, a little bizarre relationships, associated primarily with pathology. Medical cannabis, contrary to its name, does not mean fermented female inflorescences and leaves consisting of psychoactive compounds coiled in so-called “Joints”, but an useful oil without psychoactive THC. A basic person, after taking dosages of medical marijuana and attaining the proper state of cannabinoids in the blood, can enjoy increased immunity, minimized susceptibility to cancer, delayed aging and decreased threat of stroke or cardiovascular disease. CBD oil consists of cannabidiol as a base ingredient and may include only trace quantities of tetrahydroxycannabidiol (THC). RSO oil has a low CBD material, while high THC. Both cannabis oil type CBD and RSO likewise consist of other cannabinoids, such as cannabichromene (CBC) and cannabigerol (CBG). CBD medical marijuana oil is a rather advantageous blend of cannabinoids, created to protect versus 21st century illness. Oil of cannabis in a kind of pastime APR consists of little amounts of CBD, stabilized by the existence of THC.
Did you understand these realities on CBD OIL and Full Spectrum CBD Hemp Oil? Cannabinoids are separated from hemp utilizing supercritical CO2 extraction. Thanks to modern-day technology, the resulting option is tidy, without unnecessary waxes and heavy metals, naturally present in the plant, and the sucked liquid has a typical, oily consistency. CBD oil includes cannabidiol as a base component and may include only trace quantities of tetrahydroxycannabidiol (THC). Functions as a memory enhancer, improving concentration and coordination of movements, getting rid of swelling and recurrent infections. It improves the conduction of stimuli in the course of autoimmune illness (numerous sclerosis, amyotrophic sclerosis). It is recommended by medical professionals and pharmacists as an antioxidant and substance that obstructs the action of proinflammatory cytokines (proteins), e.g. in Crohn’s illness or ulcerative intestine. RSO oil has a low CBD material, while high THC. The synergistic (enhancing) action of CBD and THC relative to each other is utilized here. Both cannabinoids can do much more together than when used individually. Both cannabis oil type CBD and RSO likewise contain other cannabinoids, such as cannabichromene (CBC) and cannabigerol (CBG). The trick is not, nevertheless, that CBD frequently has actually a composition expanded to include flavones, flavonoids, terpenes, terpenoids, amino acids and omega acids. The distinction is mainly due to motives assisting humankind to use one or the other product. CBD medical cannabis oil is a rather beneficial blend of cannabinoids, developed to safeguard against 21st century disease. It’s finest to utilize all of these substances together, as nature developed them and confined in marijuana inflorescences. It ends up that cannabidiol enhances the effects of cannabichromene (CBC) and cannabigerol (CBG), and flavonoids or flavones improve the absorption of these substances. Omega-6 and omega-3 highly nurture the body and do not permit to change, which speed up the aging process of the organism and enhance the development of cancer. Oil of marijuana in a sort of pastime APR consists of percentages of CBD, stabilized by the presence of THC. Makers concentrate on the synergistic effect of one substance relative to the other, while abandoning the existence of CBC and CBG. Why such a choice? – Modern clinical research shows that CBD + THC manage serious autoimmune illness, while CBC or CBG show minimal activity in the presence of both compounds, just like flavonoids, flavones or terpenes, for that reason their material in the solution appears to be unneeded. In addition, the marijuana stress from which THC and CBD are derived include minimal amounts of other cannabinoids. RSO oil is entirely unlawful in Poland, which is why it can not be acquired in any legally operating store on the marketplace. Obviously, there are a number of amateur techniques for acquiring it, but it’s excellent to understand that compounds obtained synthetically in home laboratories doubt, untested, and the result unknown. The solvent for the production of family RSO is normally gasoline, alcohol and even kerosene, which instead of curing, toxin. Alcohols and their like hinder cannabinoids, and so in truth, they do not bring anything new to the medical world. Cannabis oil has actually currently marked a new period in which male ceased to fear what is unknown, and began to rediscover what our ancestors had currently observed and use the substantial capacity, at very first glimpse, a little bizarre relationships, associated primarily with pathology. Medical marijuana, contrary to its name, does not mean fermented female inflorescences and leaves containing psychedelic compounds coiled in so-called “Joints”, however an advantageous oil without psychoactive THC. A standard individual, after taking doses of medicinal cannabis and accomplishing the proper state of cannabinoids in the blood, can take pleasure in increased immunity, lowered vulnerability to cancer, postponed aging and minimized danger of stroke or cardiovascular disease. CBD oil consists of cannabidiol as a base active ingredient and may include just trace amounts of tetrahydroxycannabidiol (THC). RSO oil has a low CBD material, while high THC. Both cannabis oil type CBD and RSO likewise include other cannabinoids, such as cannabichromene (CBC) and cannabigerol (CBG). CBD medical marijuana oil is a rather useful mix of cannabinoids, created to protect versus 21st century illness. Oil of marijuana in a kind of pastime APR contains small amounts of CBD, balanced by the existence of THC.
Did you understand these truths on CBD OIL and Full Spectrum CBD Hemp Oil? Cannabinoids are separated from hemp utilizing supercritical CO2 extraction. Thanks to contemporary technology, the resulting service is clean, without heavy metals and unneeded waxes, naturally present in the plant, and the drawn liquid has a typical, oily consistency. CBD oil includes cannabidiol as a base active ingredient and may contain just trace quantities of tetrahydroxycannabidiol (THC). Works as a memory enhancer, enhancing concentration and coordination of movements, getting rid of inflammation and recurrent infections. It improves the conduction of stimuli in the course of autoimmune diseases (several sclerosis, amyotrophic sclerosis). It is suggested by physicians and pharmacists as an antioxidant and substance that blocks the action of proinflammatory cytokines (proteins), e.g. in Crohn’s disease or ulcerative intestine. RSO oil has a low CBD material, while high THC. The synergistic (enhancing) action of CBD and THC relative to each other is used here. Both cannabinoids can do much more together than when used independently. Both cannabis oil type CBD and RSO likewise include other cannabinoids, such as cannabichromene (CBC) and cannabigerol (CBG). The trick is not, however, that CBD often has actually a structure broadened to consist of flavones, flavonoids, terpenes, terpenoids, amino acids and omega acids. The difference is mostly due to intentions assisting humanity to use one or the other item. CBD medical cannabis oil is a rather beneficial blend of cannabinoids, created to protect against 21st century illness. It’s best to use all of these substances together, as nature produced them and confined in cannabis inflorescences. Oil of marijuana in a sort of hobby APR consists of small quantities of CBD, stabilized by the presence of THC. Manufacturers focus on the synergistic effect of one compound relative to the other, while deserting the presence of CBC and CBG. Why such a choice? – Modern scientific research reveals that CBD + THC cope with major autoimmune illness, while CBC or CBG reveal minimal activity in the presence of both substances, similar to flavonoids, flavones or terpenes, therefore their material in the solution seems to be unneeded. In addition, the cannabis pressure from which THC and CBD are derived contain minimal quantities of other cannabinoids. RSO oil is completely illegal in Poland, which is why it can not be obtained in any legally running shop on the market. Of course, there are a number of amateur approaches for obtaining it, but it’s excellent to know that substances gotten artificially in home labs are unpredictable, untested, and the effect unknown. The solvent for the production of home RSO is generally gasoline, alcohol and even kerosene, which instead of curing, toxin. Alcohols and their like impair cannabinoids, and so in truth, they don’t bring anything new to the medical world. Cannabis oil has actually already marked a new era in which guy ceased to fear what is unknown, and began to discover what our ancestors had already seen and use the substantial potential, initially glimpse, a little bizarre relationships, associated mainly with pathology. Medical marijuana, contrary to its name, does not indicate fermented female inflorescences and leaves consisting of psychedelic compounds coiled in so-called “Joints”, but an useful oil without psychedelic THC. A basic person, after taking dosages of medical marijuana and achieving the proper state of cannabinoids in the blood, can delight in increased immunity, decreased vulnerability to cancer, postponed aging and decreased risk of stroke or cardiac arrest. CBD oil consists of cannabidiol as a base component and may consist of only trace quantities of tetrahydroxycannabidiol (THC). RSO oil has a low CBD content, while high THC. Both cannabis oil type CBD and RSO likewise include other cannabinoids, such as cannabichromene (CBC) and cannabigerol (CBG). CBD medical marijuana oil is a rather advantageous mix of cannabinoids, created to safeguard against 21st century disease. Oil of cannabis in a kind of hobby APR consists of little quantities of CBD, stabilized by the presence of THC.
Scotland is undoubtedly a definitely lovely nation, and also every year it is actually gone to through crowds of tourists coming from the United States, France, as well as even Italy or even Spain. Rarely anyone taking vacation in July, August or September will definitely think of Scotland. Possibly it is actually great to assume concerning it right currently, when the value of the extra pound is dropping, as well as therefore our team will spend much less for a holiday in Scotland? Glen Affric in early springtime Therefore why is it worth it? Scotland is actually mostly a remarkable yard in the north of the nation. Highlands– hills covered along with turf and also patricias, deeper lochs (ponds), a dramatic shore series, glen (beautiful valleys), and over all, rarely discovered in Europe (specifically in Scotland!) wild, where our experts will certainly not find a singular house. Space, area as well as space once more! Wild attribute, a wealth of vegetations, birds and also other pets wait for nature lovers. In Scotland, I have actually actually been actually able to view seals, dolphins or maybe deer. Scotland is actually also a traditionally appealing property (who enjoyed Brave Heart?), Where you can easily go to amazing rock castles (Edinburgh, Stirling, Linlithgow, Eilean Donan). The funds itself, the stunning Edinburgh, likewise deserves focus, specifically throughout the summer season festivities. nation Scotland, scottish Scotland, application Scotland, conservative Scotland, information Scotland, scotland Scotland, our team Scotland, edinburgh Scotland, kid Scotland, cult Scotland, chart Scotland, iona Scotland, menu Scotland, trip Scotland, information Scotland, background Scotland, car Scotland, ship Scotland, uk Scotland, learn Scotland, celtic Scotland, glasgow Scotland, shetland Scotland, society Scotland, tay Scotland, bus Scotland, updates Scotland, learning Scotland, little Scotland, navigating Scotland, cookie Scotland, covid Scotland, sporting activity Scotland, accessibility Scotland, online videos Scotland, highland games Scotland, area Scotland, golf Scotland, scots Scotland, meals Scotland, whisky Scotland, budget plan Scotland, visitscotland Scotland, gallery Scotland, email list Scotland, arbroath Scotland, hell Scotland, street Scotland, distilleries Scotland, st andrews Scotland, beverage Scotland, browse through scotland Scotland, europe Scotland, castles Scotland, future Scotland, experience Scotland, blog post Scotland, dundee Scotland, steering Scotland, sporting activities Scotland, covid-Scotland9 Scotland, transport Scotland. Edinburgh – Some suggestions for seeing Scotland Trip in Scotland must absolutely start along with its financing. It takes about 2 days to explore Edinburgh, yet you can stretch this time up to 4. In the instance of a quick see to Scotland, you can likewise restrict on your own to Edinburgh just, investing one time on a rounded excursion through bus in the Scottish mountainous (almost every traveling organization in the capital delivers it). For a slightly longer experience (albeit still confined to just a couple of days) coming from Edinburgh, I would suggest to reach in two directions: Isle of Arran or Loch Lomond. Arran is actually called Scotland in mini. Spending pair of or 3 days on the isle, our experts can easily take pleasure in the elegance of the west shore, kick back on the seaside, climb up the greatest optimal of the isle– Goat Fell, in addition to admire the verdant mountains as well as appreciate the area. Loch Lomond is one of Scotland’s pair of nationwide playgrounds, a gorgeous lake encompassed through woodlands and also mountains. Heading, you can likewise see Stirling Castle. There is a straight train from Glasgow in each paths. nation Scotland, scottish Scotland, app Scotland, tory Scotland, relevant information Scotland, scotland Scotland, us Scotland, edinburgh Scotland, little one Scotland, cult Scotland, chart Scotland, iona Scotland, menu Scotland, trip Scotland, data Scotland, history Scotland, cars and truck Scotland, ship Scotland, uk Scotland, learn Scotland, celtic Scotland, glasgow Scotland, shetland Scotland, lifestyle Scotland, tay Scotland, bus Scotland, information Scotland, learning Scotland, little bit Scotland, navigating Scotland, biscuit Scotland, covid Scotland, sporting activity Scotland, access Scotland, videos Scotland, highland video games Scotland, neighborhood Scotland, golf Scotland, scots Scotland, food items Scotland, whisky Scotland, budget plan Scotland, visitscotland Scotland, museum Scotland, email list Scotland, arbroath Scotland, hell Scotland, road Scotland, distilleries Scotland, st andrews Scotland, alcoholic beverage Scotland, see scotland Scotland, europe Scotland, castles Scotland, future Scotland, encounter Scotland, blog post Scotland, dundee Scotland, steering Scotland, sporting activities Scotland, covid-Scotland9 Scotland, transport Scotland. Scotland, like the entire of Great Britain, is actually not one of the most affordable destinations. In addition, in Scotland the outdoor tents may be actually established up virtually anywhere, so visitors can also rest in the untamed. The very most well-known as well as one of the most beautiful treking routes in Europe is actually the so-called West Highland Way. Longer excursion? Exactly how approximately north along the west coastline as well as at that point back to the quieter, albeit less magnificent eastern? Numerous vacationers in Glasgow, takes a train to Mallaig (sometimes exploring Glencoe or even Fort William en route) then brows through Isle of Skye (the best beautiful of the Scottish islands), then scalp along the shore towards Ullapool, as much as Durness, on the method back exploring Inverness, Fort Augustus (Loch Ness), Aberdeen as well as Cairngorms National Park, and ultimately St Andrews. Is it possible through buses and trains? Certainly it is actually feasible, but you will certainly miss out on a great deal, so it is better to lease a cars and truck for at the very least aspect of the travel. As well as don’t be fooled due to the tourist trap of Loch Ness– actually, there are actually loads of a lot additional attractive spots throughout Scotland nation Scotland, scottish Scotland, application Scotland, tory Scotland, details Scotland, scotland Scotland, our team Scotland, edinburgh Scotland, child Scotland, creed Scotland, map Scotland, iona Scotland, menu Scotland, traveling Scotland, information Scotland, record Scotland, car Scotland, ship Scotland, uk Scotland, learn Scotland, celtic Scotland, glasgow Scotland, shetland Scotland, society Scotland, tay Scotland, bus Scotland, information Scotland, education and learning Scotland, little bit Scotland, navigating Scotland, biscuit Scotland, covid Scotland, sporting activity Scotland, availability Scotland, videos Scotland, highland video games Scotland, neighborhood Scotland, golf Scotland, scots Scotland, food items Scotland, whisky Scotland, spending plan Scotland, visitscotland Scotland, gallery Scotland, newsletter Scotland, arbroath Scotland, heck Scotland, street Scotland, distilleries Scotland, st andrews Scotland, drink Scotland, see scotland Scotland, europe Scotland, castles Scotland, future Scotland, take in Scotland, weblog Scotland, dundee Scotland, steering Scotland, sporting activities Scotland, transport Scotland Glenelg The weather condition could be unpredictable. I remember exploring Scotland for the very first time in the end of April. It was actually actually springtime in Scotland, the sunshine was warming up, while in Scotland it was still winter all over. The Highlands were still dealt with in snowfall in numerous areas, as well as in Edinburgh it was piercingly rain. Naturally, it appeared immediately that I had not packed the right traits. I was actually organizing to remain in the metropolitan area, but likewise ballet apartments, shoes, attractive coats as well as slim blouses diminish in spring. When traveling in Scotland, to begin with of all excellent, waterproof, sports footwear. Are going to additionally happen in useful, sometimes it is actually additionally worth including a thin scarf, a sports hat and sports gloves to the backpack (springtime and fall). In wintertime, I propose avoiding Scotland coming from a distance. In the scenario of a low-budget trip, sleeping in a camping tent or remain merely in hotels (cost regarding PLN 80 per night)., Whiskey, see at the very least one distillery and also instruction fish and potato chips with vinegar at the very least when. I hope that through this post I urged my good friends (:-RRB-) yet also unknown people to take a trip to Scotland. It is actually truly worth a hundred opportunities! I invite you to see, if merely I am actually still right here. Lovely Scottish beaches. Loch Lomond Backpack. Iona- very small isle, white colored seasides. Isle of Skye. Glencoe. Eilean Donan Castle. Isle of Arran. Scotland is undeniably a definitely gorgeous country, as well as every year it is actually checked out by crowds of tourists coming from the United States, France, as well as even Italy or Spain. Arran is actually called Scotland in mini. Scotland, like the whole of Great Britain, is not one of the most cost effective destinations. It was actually presently springtime in Scotland, the sun was actually heating up, while in Scotland it was still wintertime all over. I really hope that along with this blog post I promoted my close friends (:-RRB-) but likewise unknown people to travel to https://www.scotland.com/
Scotland is actually most certainly an actually lovely nation, as well as every year it is visited through groups of vacationers coming from the United States, France, and even Italy or even Spain. However, I may not resist the perception that Poles happen listed below primarily for work. Hardly anyone departing in July, August or September will definitely think about Scotland. Due to the fact that of the rates that are actually most definitely antagonistic for some travelers, probably it is. At the same time, the property of Nessi and also guys in kilts is certainly worth a quick or long trip. Perhaps it is great to think of it at the moment, when the market value of the pound is falling, and also therefore our team will pay a lot less for a vacation in Scotland? Glen Affric in early spring season Thus why is it worth it? Scotland is actually mostly a terrific landscape in the north of the country. Highlands– hillsides covered with lawn and also patricias, deep-seated lochs (lakes), a remarkable shore product line, glen (stunning valleys), as well as most of all, hardly ever located in Europe (especially in Scotland!) wilderness, where our company are going to certainly not observe a solitary property. Space, room and room once more! Wild attributes, a wealth of plants, birds and other creatures await attribute fans. In Scotland, I have actually had the capacity to see tapes, dolphins or perhaps deer. Yet Scotland is additionally an in the past fascinating land (that enjoyed Brave Heart?), Where you can easily explore spectacular stone fortress (Edinburgh, Stirling, Linlithgow, Eilean Donan). The financing on its own, the impressive Edinburgh, likewise is entitled to interest, particularly during the course of the summertime celebrations. nation Scotland, scottish Scotland, application Scotland, conservative Scotland, info Scotland, scotland Scotland, our company Scotland, edinburgh Scotland, child Scotland, creed Scotland, map Scotland, iona Scotland, food selection Scotland, traveling Scotland, information Scotland, background Scotland, car Scotland, ship Scotland, uk Scotland, train Scotland, celtic Scotland, glasgow Scotland, shetland Scotland, lifestyle Scotland, tay Scotland, bus Scotland, updates Scotland, learning Scotland, little bit Scotland, navigation Scotland, biscuit Scotland, covid Scotland, sporting activity Scotland, access Scotland, videos Scotland, highland games Scotland, community Scotland, golf Scotland, scots Scotland, meals Scotland, whisky Scotland, finances Scotland, visitscotland Scotland, museum Scotland, e-newsletter Scotland, arbroath Scotland, heck Scotland, street Scotland, distilleries Scotland, street andrews Scotland, cocktail Scotland, go to scotland Scotland, europe Scotland, castles Scotland, future Scotland, experience Scotland, blog post Scotland, dundee Scotland, steering Scotland, sporting activities Scotland, covid-Scotland9 Scotland, transport Scotland. Edinburgh – Some suggestions for seeing Scotland Trip in Scotland must definitely start along with its capital. Edinburgh is actually a lovely middle ages a community along with symbolic stone buildings. Coming from the principal street, the supposed The Royal Mile connecting the past imperial castle along with the Queen’s summer months palace (Palace of Holyroodhouse) escapes a network of appealing little streets (the alleged close), producing a labyrinth through which it is definitely worth receiving dropped. It takes about two times to go to Edinburgh, however you can prolong this time around up to four. In the situation of a quick see to Scotland, you can easily likewise limit yourself to Edinburgh only, spending 1 day on a circular journey through bus in the Scottish highlands (virtually every holiday company in the funds provides it). By doing this, a minimum of for a minute we will experience the setting of an actual land of moistures. An even far better suggestion is actually to lease a cars and truck for eventually and take place an individual excursion (the program as well as attribute of the coordinated trips do certainly not automatically satisfy everyone). Such a self-guided scenic tour will possibly take us at the very least 10 hours. Arran is actually called Scotland in mini. Loch Lomond is one of Scotland’s pair of nationwide parks, a stunning lake bordered by mountains and also forests. On the technique, you can easily likewise visit Stirling Castle. country Scotland, scottish Scotland, app Scotland, tory Scotland, information Scotland, scotland Scotland, our team Scotland, edinburgh Scotland, child Scotland, cult Scotland, chart Scotland, iona Scotland, food selection Scotland, traveling Scotland, records Scotland, background Scotland, auto Scotland, ship Scotland, uk Scotland, learn Scotland, celtic Scotland, glasgow Scotland, shetland Scotland, lifestyle Scotland, tay Scotland, bus Scotland, updates Scotland, education Scotland, bit Scotland, navigating Scotland, cookie Scotland, covid Scotland, sport Scotland, access Scotland, videos Scotland, highland games Scotland, neighborhood Scotland, golf Scotland, scots Scotland, meals Scotland, whisky Scotland, budget plan Scotland, visitscotland Scotland, museum Scotland, e-newsletter Scotland, arbroath Scotland, hell Scotland, road Scotland, distilleries Scotland, st andrews Scotland, beverage Scotland, browse through scotland Scotland, europe Scotland, castles Scotland, potential Scotland, experience Scotland, weblog Scotland, dundee Scotland, steering Scotland, sporting activities Scotland, covid-Scotland9 Scotland, transport Scotland. Scotland, like the whole of Great Britain, is actually certainly not one of the most inexpensive locations. In enhancement, in Scotland the outdoor tents can easily be actually prepared up actually anywhere, so travelers can easily also rest in the wild. The very most widely known and also one of the most attractive treking tracks in Europe is actually the supposed West Highland Way. Longer trip? Exactly how about north along the west shore and afterwards back to the quieter, albeit less amazing eastern? Lots of visitors in Glasgow, takes a learn to Mallaig (occasionally going to Glencoe or Fort William heading) then sees Isle of Skye (one of the most wonderful of the Scottish islands), after that scalp along the shore towards Ullapool, as for Durness, heading back exploring Inverness, Fort Augustus (Loch Ness), Aberdeen and also Cairngorms National Park, and lastly St Andrews. Is it feasible by trains and also buses? Obviously it is actually achievable, yet you will definitely overlook a great deal, so it is actually far better to lease a vehicle for a minimum of aspect of the travel. And do not be actually tricked through the traveler catch of Loch Ness– in reality, there are a lot of a lot more stunning spots throughout Scotland country Scotland, scottish Scotland, app Scotland, tory Scotland, relevant information Scotland, scotland Scotland, us Scotland, edinburgh Scotland, kid Scotland, creed Scotland, chart Scotland, iona Scotland, food selection Scotland, trip Scotland, data Scotland, record Scotland, cars and truck Scotland, ship Scotland, uk Scotland, train Scotland, celtic Scotland, glasgow Scotland, shetland Scotland, lifestyle Scotland, tay Scotland, bus Scotland, news Scotland, learning Scotland, little bit Scotland, navigating Scotland, biscuit Scotland, covid Scotland, sport Scotland, availability Scotland, video recordings Scotland, highland video games Scotland, neighborhood Scotland, golf Scotland, scots Scotland, food Scotland, whisky Scotland, budget Scotland, visitscotland Scotland, gallery Scotland, email list Scotland, arbroath Scotland, hell Scotland, road Scotland, distilleries Scotland, street andrews Scotland, drink Scotland, browse through scotland Scotland, europe Scotland, castles Scotland, future Scotland, experience Scotland, blog post Scotland, dundee Scotland, driving Scotland, sports Scotland, transport Scotland Glenelg I bear in mind checking out Scotland for the 1st opportunity at the end of April. It was already spring in Scotland, the sunshine was heating up, while in Scotland it was actually still winter all over. The Highlands were still dealt with in snow in many spots, and also in Edinburgh it was actually piercingly storm. When taking a trip in Scotland, first of all great, water-resistant, sporting activities footwear. Will also happen in convenient, often it is additionally worth including a slim headscarf, a sporting activities hat and sports gloves to the backpack (spring and autumn). In winter, I suggest steering clear of Scotland from a proximity. In the scenario of a low-budget excursion, sleep in an outdoor tents or even stay simply in hostels (cost regarding PLN 80 per night)., Whiskey, go to at minimum one whiskey and also command fish and also potato chips with vinegar at least when. I really hope that along with this post I motivated my friends (:-RRB-) but likewise complete strangers to travel to Scotland. It’s actually worth a hundred opportunities! I welcome you to check out, if merely I am actually still right here. Lovely Scottish seashores. Loch Lomond Backpack. Iona- very small island, white colored beaches. Island of Skye. Glencoe. Eilean Donan Castle. Isle of Arran. Scotland is actually most certainly an actually stunning country, and also every year it is visited by crowds of visitors coming from the United States, France, and also also Italy or Spain. Arran is gotten in touch with Scotland in baby. Scotland, like the entire of Great Britain, is certainly not one of the least expensive places. It was actually currently spring in Scotland, the sunlight was warming up, while in Scotland it was still wintertime all over. I really hope that along with this article I promoted my buddies (:-RRB-) yet likewise unfamiliar people to journey to https://www.scotland.com/
Did you know these facts on CBD OIL and Full Spectrum CBD Hemp Oil? Cannabinoids are separated from hemp using supercritical CO2 extraction. Thanks to contemporary innovation, the resulting option is clean, totally free of unneeded waxes and heavy metals, naturally present in the plant, and the sucked liquid has a normal, oily consistency. CBD oil consists of cannabidiol as a base component and might include just trace quantities of tetrahydroxycannabidiol (THC). Works as a memory enhancer, enhancing concentration and coordination of motions, removing swelling and persistent infections. It enhances the conduction of stimuli in the course of autoimmune illness (several sclerosis, amyotrophic sclerosis). It is recommended by medical professionals and pharmacists as an antioxidant and substance that blocks the action of proinflammatory cytokines (proteins), e.g. in Crohn’s illness or ulcerative intestinal tract. RSO oil has a low CBD content, while high THC. The synergistic (enhancing) action of CBD and THC relative to each other is used here. Both cannabinoids can do much more together than when used separately. Both marijuana oil type CBD and RSO likewise consist of other cannabinoids, such as cannabichromene (CBC) and cannabigerol (CBG). The secret is not, however, that CBD frequently has actually a composition broadened to consist of flavones, flavonoids, terpenes, terpenoids, amino acids and omega acids. The difference is primarily due to motives guiding humankind to utilize one or the other item. CBD medical marijuana oil is a rather helpful blend of cannabinoids, developed to secure against 21st century illness. It’s finest to use all of these compounds together, as nature created them and confined in marijuana inflorescences. It ends up that cannabidiol improves the results of cannabichromene (CBC) and cannabigerol (CBG), and flavones or flavonoids enhance the absorption of these substances. Omega-6 and omega-3 highly nourish the body and do not permit to alter, which speed up the aging process of the organism and boost the development of cancer. Oil of cannabis in a kind of hobby APR includes small quantities of CBD, stabilized by the existence of THC. – Modern scientific research reveals that CBD + THC cope with severe autoimmune diseases, while CBC or CBG reveal minimal activity in the existence of both substances, simply like flavonoids, flavones or terpenes, for that reason their content in the option appears to be unnecessary. In addition, the cannabis stress from which THC and CBD are obtained include negligible quantities of other cannabinoids. Cannabis oil has already marked a brand-new period in which man stopped to fear what is unknown, and started to find what our forefathers had actually already seen and use the considerable capacity, initially look, a little unusual relationships, associated generally with pathology. Medical cannabis, contrary to its name, does not indicate fermented female inflorescences and leaves containing psychoactive compounds coiled in so-called “Joints”, however a beneficial oil without psychoactive THC. A standard person, after taking doses of medicinal cannabis and achieving the proper state of cannabinoids in the blood, can delight in increased immunity, lowered vulnerability to cancer, postponed aging and lowered threat of stroke or cardiovascular disease. CBD oil contains cannabidiol as a base ingredient and may include just trace amounts of tetrahydroxycannabidiol (THC). RSO oil has a low CBD content, while high THC. Both cannabis oil type CBD and RSO also include other cannabinoids, such as cannabichromene (CBC) and cannabigerol (CBG). CBD medical cannabis oil is a rather advantageous blend of cannabinoids, developed to secure against 21st century disease. Oil of cannabis in a kind of pastime APR contains little quantities of CBD, balanced by the existence of THC.
Did you understand these truths on CBD OIL and Full Spectrum CBD Hemp Oil? Cannabinoids are separated from hemp utilizing supercritical CO2 extraction. Thanks to contemporary technology, the resulting option is clean, without unnecessary waxes and heavy metals, naturally present in the plant, and the sucked liquid has a typical, oily consistency. CBD oil contains cannabidiol as a base active ingredient and might consist of only trace amounts of tetrahydroxycannabidiol (THC). Works as a memory enhancer, improving concentration and coordination of motions, eliminating swelling and reoccurring infections. It enhances the conduction of stimuli in the course of autoimmune diseases (several sclerosis, amyotrophic sclerosis). It is advised by doctors and pharmacists as an antioxidant and compound that obstructs the action of proinflammatory cytokines (proteins), e.g. in Crohn’s illness or ulcerative intestine. RSO oil has a low CBD content, while high THC. Obviously, the essential job of RSO is to trigger a psychoactive impact, although it can likewise stimulate “sick” brain structures. It deserves knowing that supplements of this type is mostly used by individuals to whom basic therapy does not bring relief in illness. The synergistic (enhancing) action of CBD and THC relative to each other is used here. Both cannabinoids can do far more together than when used individually. In addition, they collectively stimulate the department of non-active nerve cells, nurture the fatty envelope of the nerves, and avoid myelin inflammation that triggers loss of function in some autoimmune diseases. There are likewise stories where cannabis in its natural type softened spasticity, reduced the frequency of seizures and convulsions, and suppressed undesirable scrapie in Parkinson’s disease. This is where the concept of receiving RSO, meant just for chronically ill people, come from . Both cannabis oil type CBD and RSO likewise consist of other cannabinoids, such as cannabichromene (CBC) and cannabigerol (CBG). The trick is not, however, that CBD often has actually a composition broadened to consist of flavones, flavonoids, terpenes, terpenoids, amino acids and omega acids. The difference is primarily due to motives guiding mankind to utilize one or the other item. CBD medical cannabis oil is a rather useful blend of cannabinoids, created to protect against 21st century illness. It’s finest to use all of these compounds together, as nature developed them and confined in cannabis inflorescences. Oil of marijuana in a sort of pastime APR includes little amounts of CBD, stabilized by the presence of THC. Producers concentrate on the synergistic result of one compound relative to the other, while abandoning the existence of CBC and CBG. Why such a decision? – Modern clinical research reveals that CBD + THC manage serious autoimmune illness, while CBC or CBG reveal minimal activity in the presence of both substances, similar to terpenes, flavones or flavonoids, therefore their content in the solution appears to be unnecessary. In addition, the marijuana stress from which THC and CBD are derived consist of minimal amounts of other cannabinoids. RSO oil is entirely prohibited in Poland, which is why it can not be acquired in any legally operating store on the market. Obviously, there are a number of amateur approaches for acquiring it, but it’s excellent to understand that substances gotten artificially in home labs doubt, untested, and the impact unknown. The solvent for the production of household RSO is typically fuel, alcohol and even kerosene, which rather of curing, toxin. Alcohols and their like impair cannabinoids, therefore in reality, they do not bring anything brand-new to the medical world. Marijuana oil has actually already marked a brand-new period in which guy ceased to fear what is unidentified, and began to rediscover what our ancestors had actually already observed and utilize the substantial potential, in the beginning glance, a little bizarre relationships, associated generally with pathology. Medical cannabis, contrary to its name, does not suggest fermented female inflorescences and leaves containing psychedelic compounds coiled in so-called “Joints”, but a beneficial oil without psychoactive THC. A standard individual, after taking dosages of medical marijuana and accomplishing the suitable state of cannabinoids in the blood, can enjoy increased resistance, minimized susceptibility to cancer, postponed aging and reduced danger of stroke or cardiac arrest. CBD oil consists of cannabidiol as a base active ingredient and may consist of just trace quantities of tetrahydroxycannabidiol (THC). RSO oil has a low CBD material, while high THC. Both cannabis oil type CBD and RSO also contain other cannabinoids, such as cannabichromene (CBC) and cannabigerol (CBG). CBD medical marijuana oil is a rather useful mix of cannabinoids, developed to safeguard versus 21st century illness. Oil of cannabis in a kind of pastime APR contains small quantities of CBD, balanced by the presence of THC.
Did you know these realities on CBD OIL and Full Spectrum CBD Hemp Oil? Cannabinoids are isolated from hemp using supercritical CO2 extraction. Thanks to contemporary technology, the resulting service is clean, devoid of unnecessary waxes and heavy metals, naturally present in the plant, and the sucked liquid has a normal, oily consistency. CBD oil contains cannabidiol as a base active ingredient and may include just trace amounts of tetrahydroxycannabidiol (THC). It is recommended by medical professionals and pharmacists as an antioxidant and compound that blocks the action of proinflammatory cytokines (proteins), e.g. in Crohn’s disease or ulcerative intestine. RSO oil has a low CBD content, while high THC. Of course, the crucial job of RSO is to trigger a psychedelic effect, although it can also stimulate “sick” brain structures. It is worth understanding that supplements of this type is mainly utilized by people to whom standard treatment does not bring relief in disease. The synergistic (enhancing) action of CBD and THC relative to each other is used here. When utilized independently, both cannabinoids can do much more together than. In addition, they collectively promote the division of non-active afferent neuron, nurture the fatty envelope of the nerves, and avoid myelin swelling that triggers loss of function in some autoimmune illness. There are likewise stories where marijuana in its natural kind softened spasticity, decreased the frequency of seizures and convulsions, and reduced undesirable scrapie in Parkinson’s disease. This is where the concept of getting RSO, meant only for chronically ill people, stemmed . Both marijuana oil type CBD and RSO also include other cannabinoids, such as cannabichromene (CBC) and cannabigerol (CBG). The secret is not, nevertheless, that CBD typically has actually a composition broadened to include flavones, flavonoids, terpenes, terpenoids, amino acids and omega acids. The difference is mainly due to intentions assisting mankind to use one or the other product. CBD medical marijuana oil is a rather helpful blend of cannabinoids, designed to safeguard versus 21st century disease. It’s best to use all of these compounds together, as nature created them and enclosed in cannabis inflorescences. It turns out that cannabidiol enhances the impacts of cannabichromene (CBC) and cannabigerol (CBG), and flavonoids or flavones improve the absorption of these substances. Omega-6 and omega-3 highly nourish the body and do not allow to alter, which speed up the aging procedure of the organism and enhance the advancement of cancer. Oil of marijuana in a sort of pastime APR consists of small quantities of CBD, balanced by the presence of THC. Makers concentrate on the synergistic result of one compound relative to the other, while deserting the presence of CBC and CBG. Why such a decision? – Modern scientific research shows that CBD + THC manage severe autoimmune diseases, while CBC or CBG reveal very little activity in the presence of both compounds, similar to flavonoids, flavones or terpenes, for that reason their content in the service appears to be unneeded. In addition, the cannabis pressure from which THC and CBD are derived consist of negligible quantities of other cannabinoids. RSO oil is totally prohibited in Poland, which is why it can not be acquired in any legally operating store on the marketplace. Obviously, there are a variety of amateur approaches for acquiring it, however it’s great to understand that compounds acquired artificially in home labs are unsure, untried, and the impact unknown. The solvent for the production of family RSO is typically gas, alcohol and even kerosene, which instead of curing, toxin. Alcohols and their like impair cannabinoids, and so in reality, they don’t bring anything brand-new to the medical world. Cannabis oil has currently marked a brand-new era in which male stopped to fear what is unidentified, and started to rediscover what our ancestors had actually currently discovered and utilize the considerable potential, at first glance, a little unusual relationships, associated generally with pathology. Medical cannabis, contrary to its name, does not indicate fermented female inflorescences and leaves consisting of psychedelic substances coiled in so-called “Joints”, but a beneficial oil without psychedelic THC. A standard individual, after taking dosages of medical marijuana and attaining the suitable state of cannabinoids in the blood, can take pleasure in increased immunity, reduced susceptibility to cancer, delayed aging and reduced danger of stroke or cardiac arrest. CBD oil includes cannabidiol as a base ingredient and might consist of just trace amounts of tetrahydroxycannabidiol (THC). RSO oil has a low CBD material, while high THC. Both marijuana oil type CBD and RSO likewise contain other cannabinoids, such as cannabichromene (CBC) and cannabigerol (CBG). CBD medical marijuana oil is a rather beneficial mix of cannabinoids, designed to protect versus 21st century disease. Oil of marijuana in a kind of pastime APR includes small amounts of CBD, stabilized by the existence of THC.
Wonderful paintings! That is the kind of information that are meant to be shared across the web. Disgrace on the seek engines for now not positioning this publish higher! Come on over and seek advice from my site . Thanks =)
Did you know these truths on CBD OIL and Full Spectrum CBD Hemp Oil? Cannabinoids are isolated from hemp using supercritical CO2 extraction. Thanks to modern-day innovation, the resulting option is clean, free of heavy metals and unnecessary waxes, naturally present in the plant, and the sucked liquid has a common, oily consistency. CBD oil consists of cannabidiol as a base ingredient and may consist of only trace amounts of tetrahydroxycannabidiol (THC). It is recommended by doctors and pharmacists as an antioxidant and substance that obstructs the action of proinflammatory cytokines (proteins), e.g. in Crohn’s illness or ulcerative intestine. RSO oil has a low CBD material, while high THC. Of course, the essential job of RSO is to trigger a psychoactive effect, although it can likewise stimulate “sick” brain structures. It is worth understanding that supplements of this type is mainly utilized by people to whom basic treatment does not bring relief in disease. The synergistic (enhancing) action of CBD and THC relative to each other is utilized here. Both cannabinoids can do far more together than when used separately. In addition, they jointly stimulate the department of non-active nerve cells, nourish the fatty envelope of the nerves, and prevent myelin swelling that causes loss of function in some autoimmune diseases. There are also stories where cannabis in its natural form softened spasticity, decreased the frequency of seizures and convulsions, and suppressed undesirable scrapie in Parkinson’s illness. This is where the idea of getting RSO, meant just for chronically ill people, come from . Both cannabis oil type CBD and RSO also consist of other cannabinoids, such as cannabichromene (CBC) and cannabigerol (CBG). The secret is not, however, that CBD often has actually a structure broadened to include flavones, flavonoids, terpenes, terpenoids, amino acids and omega acids. The difference is mainly due to motives guiding humankind to utilize one or the other product. CBD medical marijuana oil is a rather helpful mix of cannabinoids, created to secure against 21st century illness. It’s finest to utilize all of these substances together, as nature developed them and enclosed in cannabis inflorescences. Oil of cannabis in a kind of hobby APR includes little quantities of CBD, balanced by the existence of THC. – Modern scientific research study shows that CBD + THC cope with major autoimmune diseases, while CBC or CBG show minimal activity in the presence of both substances, simply like flavones, flavonoids or terpenes, for that reason their content in the option appears to be unnecessary. In addition, the marijuana strain from which THC and CBD are obtained include minimal quantities of other cannabinoids. Cannabis oil has already marked a brand-new era in which guy stopped to fear what is unknown, and started to rediscover what our ancestors had already noticed and utilize the substantial potential, at first glance, a little bizarre relationships, associated mainly with pathology. Medical cannabis, contrary to its name, does not suggest fermented female inflorescences and leaves containing psychedelic substances coiled in so-called “Joints”, but a beneficial oil without psychoactive THC. A basic person, after taking dosages of medical marijuana and achieving the suitable state of cannabinoids in the blood, can enjoy increased immunity, reduced vulnerability to cancer, postponed aging and reduced threat of stroke or cardiac arrest. CBD oil includes cannabidiol as a base ingredient and might contain only trace quantities of tetrahydroxycannabidiol (THC). RSO oil has a low CBD content, while high THC. Both cannabis oil type CBD and RSO also contain other cannabinoids, such as cannabichromene (CBC) and cannabigerol (CBG). CBD medical marijuana oil is a rather advantageous mix of cannabinoids, designed to safeguard versus 21st century illness. Oil of cannabis in a kind of pastime APR includes little amounts of CBD, balanced by the existence of THC.
Did you understand these truths on CBD OIL and Full Spectrum CBD Hemp Oil? Cannabinoids are isolated from hemp using supercritical CO2 extraction. Thanks to contemporary technology, the resulting solution is clean, devoid of heavy metals and unneeded waxes, naturally present in the plant, and the sucked liquid has a common, oily consistency. CBD oil consists of cannabidiol as a base ingredient and might consist of only trace quantities of tetrahydroxycannabidiol (THC). It is suggested by doctors and pharmacists as an antioxidant and compound that obstructs the action of proinflammatory cytokines (proteins), e.g. in Crohn’s illness or ulcerative intestine. RSO oil has a low CBD content, while high THC. The synergistic (enhancing) action of CBD and THC relative to each other is utilized here. Both cannabinoids can do much more together than when used individually. Both cannabis oil type CBD and RSO likewise consist of other cannabinoids, such as cannabichromene (CBC) and cannabigerol (CBG). The trick is not, nevertheless, that CBD often has a structure expanded to include flavones, flavonoids, terpenes, terpenoids, amino acids and omega acids. The distinction is mainly due to intentions directing humanity to use one or the other item. CBD medical marijuana oil is a rather useful blend of cannabinoids, developed to protect versus 21st century disease. It’s finest to utilize all of these compounds together, as nature produced them and enclosed in marijuana inflorescences. Oil of cannabis in a type of hobby APR consists of percentages of CBD, stabilized by the presence of THC. Makers focus on the synergistic effect of one compound relative to the other, while deserting the presence of CBC and CBG. Why such a decision? – Modern scientific research reveals that CBD + THC handle severe autoimmune diseases, while CBC or CBG reveal very little activity in the existence of both substances, simply like flavones, terpenes or flavonoids, for that reason their material in the option appears to be unnecessary. In addition, the marijuana stress from which THC and CBD are obtained consist of minimal amounts of other cannabinoids. RSO oil is totally unlawful in Poland, which is why it can not be gotten in any legally running store on the market. Obviously, there are a number of amateur methods for acquiring it, however it’s great to know that compounds acquired synthetically in house laboratories doubt, untested, and the impact unknown. The solvent for the production of family RSO is normally fuel, alcohol and even kerosene, which rather of treating, poison. Alcohols and their like hinder cannabinoids, and so in truth, they don’t bring anything brand-new to the medical world. Cannabis oil has actually currently marked a new period in which man ceased to fear what is unidentified, and started to discover what our forefathers had currently observed and utilize the significant capacity, initially look, a little unusual relationships, associated generally with pathology. Medical cannabis, contrary to its name, does not imply fermented female inflorescences and leaves consisting of psychoactive compounds coiled in so-called “Joints”, but a beneficial oil without psychedelic THC. A standard individual, after taking doses of medical marijuana and accomplishing the appropriate state of cannabinoids in the blood, can enjoy increased immunity, decreased susceptibility to cancer, delayed aging and reduced threat of stroke or cardiovascular disease. CBD oil contains cannabidiol as a base active ingredient and might contain only trace quantities of tetrahydroxycannabidiol (THC). RSO oil has a low CBD material, while high THC. Both cannabis oil type CBD and RSO likewise contain other cannabinoids, such as cannabichromene (CBC) and cannabigerol (CBG). CBD medical marijuana oil is a rather beneficial mix of cannabinoids, developed to protect against 21st century illness. Oil of marijuana in a kind of hobby APR includes small quantities of CBD, balanced by the presence of THC.
Scotland is actually most certainly a truly lovely country, and every year it is actually checked out by crowds of visitors from the United States, France, and even Italy or even Spain. Barely any individual taking leave in July, August or even September will definitely think of Scotland. Possibly it is actually great to presume concerning it straight now, when the market value of the pound is dropping, as well as therefore we will pay much less for a holiday season in Scotland? Glen Affric in early spring season Why is it worth it? Scotland is actually predominantly a splendid yard in the north of the nation. Highlands– hills covered along with turf as well as louises, deep lochs (lakes), an impressive shore line, glen (beautiful valleys), and also most of all, hardly found in Europe (specifically in Scotland!) wild, where our experts will definitely certainly not view a solitary house. Space, space and also area once more! Wild attributes, a great quantity of vegetations, birds as well as other animals wait for attributes enthusiasts. In Scotland, I have actually presently had the capacity to watch tapes, dolphins or even deer. Scotland is additionally a traditionally appealing property (who viewed Brave Heart?), Where you may go to stunning stone palaces (Edinburgh, Stirling, Linlithgow, Eilean Donan). The resources itself, the magnificent Edinburgh, also is entitled to interest, particularly during the course of the summer months celebrations. country Scotland, scottish Scotland, app Scotland, tory Scotland, info Scotland, scotland Scotland, us Scotland, edinburgh Scotland, little one Scotland, creed Scotland, chart Scotland, iona Scotland, menu Scotland, travel Scotland, information Scotland, record Scotland, cars and truck Scotland, ship Scotland, uk Scotland, learn Scotland, celtic Scotland, glasgow Scotland, shetland Scotland, society Scotland, tay Scotland, bus Scotland, headlines Scotland, learning Scotland, little bit Scotland, navigating Scotland, cookie Scotland, covid Scotland, sporting activity Scotland, access Scotland, online videos Scotland, highland video games Scotland, area Scotland, golf Scotland, scots Scotland, food items Scotland, whisky Scotland, budget plan Scotland, visitscotland Scotland, gallery Scotland, bulletin Scotland, arbroath Scotland, hell Scotland, street Scotland, distilleries Scotland, st andrews Scotland, beverage Scotland, browse through scotland Scotland, europe Scotland, castles Scotland, future Scotland, take in Scotland, blog site Scotland, dundee Scotland, driving Scotland, sporting activities Scotland, covid-Scotland9 Scotland, transportation Scotland. Edinburgh – Some concepts for going to Scotland Travel in Scotland need to undoubtedly begin along with its own capital. Edinburgh is an attractive medieval a city along with symbolic rock buildings. Coming from the main street, the so-called The Royal Mile connecting the previous imperial palace with the Queen’s summer season royal residence (Palace of Holyroodhouse) escapes a system of appealing tiny streets (the supposed close), developing a puzzle through which it is truly worth obtaining shed. It takes approximately 2 times to see Edinburgh, however you can easily extend this opportunity approximately 4. When it comes to a short visit to Scotland, you can easily also limit yourself to Edinburgh simply, devoting 1 day on a rounded excursion through bus in the Scottish highlands (almost every trip company in the funds provides it). This way, at the very least for a second we will definitely really feel the environment of an actual property of moistures. An even better idea is to lease a vehicle for 1 day and also take place an individual excursion (the plan and also attributes of the coordinated scenic tours perform not necessarily fit everybody). Such a self-guided scenic tour will possibly take our company at minimum ten hrs. For a somewhat longer experience (albeit still confined to just a couple of times) from Edinburgh, I would propose to strike in pair of directions: Isle of Arran or even Loch Lomond. Arran is actually phoned Scotland in mini. Spending 2 or 3 days on the isle, we can easily delight in the beauty of the west shore, relax on the beach front, climb up the best optimal of the island– Goat Fell, as well as appreciate the grassy hillsides and delight in the room. Loch Lomond is actually one of Scotland’s 2 national forests, a beautiful pond surrounded through hillsides and woodlands. On the way, you may also see Stirling Castle. There is actually a straight learn coming from Glasgow in both directions. nation Scotland, scottish Scotland, application Scotland, conservative Scotland, info Scotland, scotland Scotland, our team Scotland, edinburgh Scotland, youngster Scotland, cult Scotland, map Scotland, iona Scotland, food selection Scotland, trip Scotland, information Scotland, history Scotland, vehicle Scotland, ship Scotland, uk Scotland, train Scotland, celtic Scotland, glasgow Scotland, shetland Scotland, society Scotland, tay Scotland, bus Scotland, news Scotland, education Scotland, little bit Scotland, navigation Scotland, cookie Scotland, covid Scotland, sporting activity Scotland, availability Scotland, online videos Scotland, highland activities Scotland, community Scotland, golf Scotland, scots Scotland, meals Scotland, whisky Scotland, budget Scotland, visitscotland Scotland, gallery Scotland, bulletin Scotland, arbroath Scotland, heck Scotland, road Scotland, distilleries Scotland, st andrews Scotland, alcoholic beverage Scotland, browse through scotland Scotland, europe Scotland, castles Scotland, future Scotland, take in Scotland, blog post Scotland, dundee Scotland, driving Scotland, sporting activities Scotland, covid-Scotland9 Scotland, transport Scotland. Scotland, like the entire of Great Britain, is not one of the most inexpensive places. In add-on, in Scotland the outdoor tents can easily be established up practically anywhere, so vacationers may additionally sleep in the untamed. The most well-known as well as one of the most attractive exploring routes in Europe is actually the so-called West Highland Way. Longer vacation? How approximately north along the west shoreline and at that point back to the quieter, albeit less exceptional east? Lots of visitors in Glasgow, takes a learn to Mallaig (often exploring Glencoe or Fort William heading) then sees Isle of Skye (the absolute most lovely of the Scottish isles), at that point head along the coastline towards Ullapool, regarding Durness, en route back visiting Inverness, Fort Augustus (Loch Ness), Aberdeen as well as Cairngorms National Park, and also eventually Street Andrews. Is it possible by trains and buses? Obviously it is feasible, yet you will definitely skip a whole lot, so it is actually much better to rent an auto for at the very least component of the trip. As well as don’t be tricked due to the tourist trap of Loch Ness– in fact, there are lots of so much more lovely spots across Scotland country Scotland, scottish Scotland, app Scotland, conservative Scotland, info Scotland, scotland Scotland, our team Scotland, edinburgh Scotland, little one Scotland, creed Scotland, map Scotland, iona Scotland, menu Scotland, trip Scotland, records Scotland, record Scotland, automobile Scotland, ship Scotland, uk Scotland, learn Scotland, celtic Scotland, glasgow Scotland, shetland Scotland, culture Scotland, tay Scotland, bus Scotland, news Scotland, education and learning Scotland, bit Scotland, navigating Scotland, biscuit Scotland, covid Scotland, sport Scotland, ease of access Scotland, video clips Scotland, highland video games Scotland, neighborhood Scotland, golf Scotland, scots Scotland, meals Scotland, whisky Scotland, spending plan Scotland, visitscotland Scotland, gallery Scotland, newsletter Scotland, arbroath Scotland, hell Scotland, roadway Scotland, distilleries Scotland, street andrews Scotland, cocktail Scotland, see scotland Scotland, europe Scotland, castles Scotland, potential Scotland, experience Scotland, weblog Scotland, dundee Scotland, steering Scotland, sports Scotland, transportation Scotland Glenelg I keep in mind checking out Scotland for the very first time at the end of April. It was already spring in Scotland, the sunlight was actually warming up, while in Scotland it was actually still winter months all over. The Highlands were still covered in snowfall in several locations, as well as in Edinburgh it was actually piercingly storm. When traveling in Scotland, firstly excellent, waterproof, sports footwear. A good raincoat (as well as windproof!) Will certainly also be available in handy, often it is also worth adding a slim headscarf, a sporting activities hat and sports handwear covers to the backpack (spring and fall). In winter months, I propose steering clear of Scotland coming from a span. Why? The answer is actually basic: it puts and also strikes. Extra little factors: Umbrellas certainly don’t function (the wind bends them in every instructions), the camping tent has to (MUST!) have a good flysheet, it is worth taking a multiple-use container with you (faucet water, however also drinkable in flows or waterways), a minimum of a few pairs of socks, a warm fleece and also one thing to repel vicious flies (I recommend a smidge). In the case of a low-budget vacation, oversleep an outdoor tents or even remain just in hotels (price about PLN 80 every evening). You must try fish and shellfish (they are actually mouth watering!), Whiskey, go to at the very least one distillery and instruction fish and also chips along with vinegar at the very least as soon as. I hope that using this message I motivated my close friends (:-RRB-) yet likewise complete strangers to journey to Scotland. It is actually actually worth a hundred opportunities! I welcome you to see, if only I am still listed below. Lovely Scottish beaches. Loch Lomond Backpack. Iona- small isle, white seasides. Isle of Skye. Glencoe. Eilean Donan Castle. Island of Arran. Scotland is definitely a definitely wonderful country, as well as every year it is explored through crowds of vacationers coming from the United States, France, and also even Italy or even Spain. Arran is called Scotland in miniature. Scotland, like the whole of Great Britain, is actually certainly not one of the most affordable places. It was presently spring season in Scotland, the sunshine was heating up, while in Scotland it was still winter months all over. I really hope that along with this blog post I motivated my buddies (:-RRB-) but likewise unknown people to journey to https://www.scotland.com/
Did you know these truths on CBD OIL and Full Spectrum CBD Hemp Oil? Cannabinoids are separated from hemp utilizing supercritical CO2 extraction. Thanks to contemporary technology, the resulting solution is tidy, complimentary of unneeded waxes and heavy metals, naturally present in the plant, and the drawn liquid has a typical, oily consistency. CBD oil contains cannabidiol as a base ingredient and may contain just trace quantities of tetrahydroxycannabidiol (THC). It is recommended by physicians and pharmacists as an antioxidant and substance that blocks the action of proinflammatory cytokines (proteins), e.g. in Crohn’s illness or ulcerative intestinal tract. RSO oil has a low CBD content, while high THC. Naturally, the key task of RSO is to trigger a psychedelic effect, although it can likewise promote “sick” brain structures. It is worth understanding that supplements of this type is primarily utilized by people to whom standard treatment does not bring relief in illness. The synergistic (enhancing) action of CBD and THC relative to each other is used here. Both cannabinoids can do far more together than when used individually. In addition, they collectively promote the division of non-active afferent neuron, nurture the fatty envelope of the nerves, and prevent myelin swelling that triggers loss of function in some autoimmune diseases. There are also stories where marijuana in its natural form softened spasticity, reduced the frequency of seizures and convulsions, and reduced undesirable scrapie in Parkinson’s illness. This is where the concept of getting RSO, intended just for chronically ill individuals, stemmed . Both marijuana oil type CBD and RSO likewise consist of other cannabinoids, such as cannabichromene (CBC) and cannabigerol (CBG). The secret is not, nevertheless, that CBD typically has a structure broadened to include flavones, flavonoids, terpenes, terpenoids, amino acids and omega acids. The difference is mainly due to motives guiding humanity to utilize one or the other item. CBD medical cannabis oil is a rather useful blend of cannabinoids, created to protect against 21st century disease. It’s finest to utilize all of these substances together, as nature created them and enclosed in marijuana inflorescences. Oil of marijuana in a sort of hobby APR consists of percentages of CBD, balanced by the presence of THC. Manufacturers focus on the synergistic effect of one substance relative to the other, while deserting the existence of CBC and CBG. Why such a choice? – Modern scientific research study shows that CBD + THC deal with major autoimmune diseases, while CBC or CBG show minimal activity in the presence of both compounds, similar to terpenes, flavones or flavonoids, therefore their material in the option appears to be unneeded. In addition, the cannabis stress from which THC and CBD are obtained include negligible amounts of other cannabinoids. RSO oil is entirely prohibited in Poland, which is why it can not be acquired in any lawfully running store on the market. Of course, there are a number of amateur methods for getting it, however it’s good to know that substances obtained synthetically in home labs are unsure, untested, and the impact unknown. The solvent for the production of home RSO is generally gas, alcohol and even kerosene, which instead of curing, poison. Alcohols and their like impair cannabinoids, and so in truth, they do not bring anything new to the medical world. Marijuana oil has actually currently marked a new age in which man stopped to fear what is unidentified, and began to discover what our forefathers had currently noticed and utilize the substantial capacity, initially glance, a little unusual relationships, associated mainly with pathology. Medical marijuana, contrary to its name, does not mean fermented female inflorescences and leaves including psychedelic compounds coiled in so-called “Joints”, however a helpful oil without psychoactive THC. A basic person, after taking doses of medicinal cannabis and achieving the proper state of cannabinoids in the blood, can delight in increased immunity, lowered vulnerability to cancer, delayed aging and reduced threat of stroke or cardiovascular disease. CBD oil consists of cannabidiol as a base component and might contain only trace amounts of tetrahydroxycannabidiol (THC). RSO oil has a low CBD material, while high THC. Both cannabis oil type CBD and RSO likewise consist of other cannabinoids, such as cannabichromene (CBC) and cannabigerol (CBG). CBD medical cannabis oil is a rather advantageous mix of cannabinoids, designed to safeguard versus 21st century disease. Oil of cannabis in a kind of pastime APR consists of little quantities of CBD, stabilized by the presence of THC.
Scotland is actually unquestionably a definitely beautiful nation, as well as every year it is actually gone to through groups of tourists coming from the United States, France, as well as also Italy or Spain. Nevertheless, I can not withstand the impact that Poles happen here generally for work. Rarely any individual departing in July, August or even September will definitely consider Scotland. Perhaps it is as a result of the prices that are actually most definitely unfriendly for some vacationers. The property of Nessi and also men in kilts is most definitely worth a lengthy or even short experience. Possibly it is great to presume concerning it at the moment, when the value of the pound is falling, as well as thereby our experts will pay out much less for a holiday season in Scotland? Glen Affric in very early spring Why is it worth it? Scotland is predominantly a terrific landscape in the north of the country. In Scotland, I have actually actually been able to watch tapes, dolphins or even deer. Scotland is actually also an in the past interesting land (who viewed Brave Heart?), Where you can easily explore amazing rock castles (Edinburgh, Stirling, Linlithgow, Eilean Donan). The capital on its own, the majestic Edinburgh, additionally is entitled to interest, especially during the summertime festivals. country Scotland, scottish Scotland, application Scotland, tory Scotland, information Scotland, scotland Scotland, us Scotland, edinburgh Scotland, youngster Scotland, creed Scotland, chart Scotland, iona Scotland, food selection Scotland, travel Scotland, data Scotland, background Scotland, auto Scotland, ship Scotland, uk Scotland, train Scotland, celtic Scotland, glasgow Scotland, shetland Scotland, lifestyle Scotland, tay Scotland, bus Scotland, news Scotland, education Scotland, little bit Scotland, navigation Scotland, cookie Scotland, covid Scotland, sporting activity Scotland, ease of access Scotland, video clips Scotland, highland games Scotland, area Scotland, golf Scotland, scots Scotland, food Scotland, whisky Scotland, spending plan Scotland, visitscotland Scotland, gallery Scotland, email list Scotland, arbroath Scotland, heck Scotland, roadway Scotland, distilleries Scotland, street andrews Scotland, drink Scotland, browse through scotland Scotland, europe Scotland, castles Scotland, future Scotland, encounter Scotland, blog post Scotland, dundee Scotland, driving Scotland, sporting activities Scotland, covid-Scotland9 Scotland, transport Scotland. Edinburgh – Some concepts for visiting Scotland Traveling in Scotland must undoubtedly begin with its funding. Edinburgh is actually a wonderful middle ages a town with unique rock properties. From the principal road, the supposed The Royal Mile hooking up the past royal fortress with the Queen’s summertime palace (Palace of Holyroodhouse) bolts a network of fascinating small streets (the supposed shut), generating a puzzle in which it is really worth receiving lost. It takes around pair of times to see Edinburgh, however you may prolong this moment approximately four. When it comes to a short see to Scotland, you may additionally restrict on your own to Edinburgh simply, devoting eventually on a circular trip through bus in the Scottish mountainous (virtually every travel bureau in the capital gives it). In this method, at least for a second our company will feel the setting of a genuine property of moistures. An even better idea is actually to lease a vehicle for someday as well as take place an individual trip (the system as well as nature of the arranged trips perform not necessarily match every person). Such a self-guided tour will most likely take us at minimum ten hours. For a slightly longer adventure (albeit still restricted to just a couple of times) coming from Edinburgh, I will propose to reach in 2 directions: Isle of Arran or Loch Lomond. Arran is actually phoned Scotland in mini. Spending pair of or three times on the island, our company can delight in the beauty of the west shore, relax on the beach, climb up the best optimal of the island– Goat Fell, in addition to marvel at the grassy hillsides and delight in the area. Loch Lomond is one of Scotland’s two national playgrounds, an attractive pond bordered through forests and also hills. On the way, you can likewise go to Stirling Castle. There is a straight learn from Glasgow in both instructions. nation Scotland, scottish Scotland, application Scotland, tory Scotland, relevant information Scotland, scotland Scotland, us Scotland, edinburgh Scotland, child Scotland, creed Scotland, chart Scotland, iona Scotland, menu Scotland, traveling Scotland, records Scotland, history Scotland, car Scotland, ship Scotland, uk Scotland, learn Scotland, celtic Scotland, glasgow Scotland, shetland Scotland, lifestyle Scotland, tay Scotland, bus Scotland, headlines Scotland, learning Scotland, little bit Scotland, navigation Scotland, biscuit Scotland, covid Scotland, sport Scotland, ease of access Scotland, video clips Scotland, highland games Scotland, area Scotland, golf Scotland, scots Scotland, meals Scotland, whisky Scotland, budget Scotland, visitscotland Scotland, museum Scotland, newsletter Scotland, arbroath Scotland, hell Scotland, street Scotland, distilleries Scotland, st andrews Scotland, cocktail Scotland, visit scotland Scotland, europe Scotland, castles Scotland, future Scotland, experience Scotland, weblog Scotland, dundee Scotland, driving Scotland, sports Scotland, covid-Scotland9 Scotland, transport Scotland. Scotland, like the whole of Great Britain, is actually not one of the most affordable locations. In addition, in Scotland the outdoor tents can be actually set up practically anywhere, thus visitors can easily likewise sleep in the untamed. The very most popular and also one of the most stunning exploring trails in Europe is actually the supposed West Highland Way. Longer journey? Just how approximately north along the west coast and afterwards back to the quieter, albeit a lot less amazing east? A lot of tourists in Glasgow, takes a learn to Mallaig (at times checking out Glencoe or even Fort William en route) then brows through Isle of Skye (one of the most wonderful of the Scottish islands), then head along the shore towards Ullapool, as for Durness, heading back seeing Inverness, Fort Augustus (Loch Ness), Aberdeen and also Cairngorms National Park, as well as ultimately St Andrews. Is it achievable by buses as well as learns? Naturally it is feasible, however you will skip a whole lot, so it is far better to rent out a cars and truck for at the very least component of the trip. And don’t be tricked through the traveler snare of Loch Ness– as a matter of fact, there are lots of far more attractive locations all over Scotland country Scotland, scottish Scotland, app Scotland, conservative Scotland, details Scotland, scotland Scotland, our team Scotland, edinburgh Scotland, youngster Scotland, creed Scotland, chart Scotland, iona Scotland, food selection Scotland, traveling Scotland, data Scotland, history Scotland, automobile Scotland, ship Scotland, uk Scotland, train Scotland, celtic Scotland, glasgow Scotland, shetland Scotland, lifestyle Scotland, tay Scotland, bus Scotland, updates Scotland, education Scotland, little Scotland, navigation Scotland, biscuit Scotland, covid Scotland, sport Scotland, access Scotland, videos Scotland, highland activities Scotland, neighborhood Scotland, golf Scotland, scots Scotland, food items Scotland, whisky Scotland, finances Scotland, visitscotland Scotland, gallery Scotland, newsletter Scotland, arbroath Scotland, heck Scotland, street Scotland, distilleries Scotland, street andrews Scotland, cocktail Scotland, check out scotland Scotland, europe Scotland, castles Scotland, future Scotland, take in Scotland, blog site Scotland, dundee Scotland, driving Scotland, sporting activities Scotland, transport Scotland Glenelg The weather condition can easily be actually irregular. I always remember going to Scotland for the first time by the end of April. It was currently springtime in Scotland, the sun was heating up, while in Scotland it was actually still wintertime all over. The Highlands were still dealt with in snow in many areas, and also in Edinburgh it was actually piercingly rain. Obviously, it turned out immediately that I hadn’t stuffed the appropriate points. I was preparing to keep in the urban area, however likewise ballet apartments, shoes, aesthetic coats as well as thin shirts decrease in spring season. When taking a trip in Scotland, to begin with of all good, waterproof, sports footwear. A decent waterproof (and also windproof!) Are going to also can be found in helpful, in some cases it is actually likewise worth including a thin headscarf, a sporting activities hat and sports gloves to the bag (spring as well as autumn). In winter, I advise avoiding Scotland from a proximity. Why? The solution is basic: it puts and strikes. In the instance of a low-budget journey, sleep in a tent or even stay simply in hotels (cost regarding PLN 80 every evening)., Whiskey, check out at the very least one whiskey and order fish as well as potato chips with vinegar at minimum when. I wish that using this post I encouraged my buddies (:-RRB-) however also unknown people to take a trip to Scotland. It is actually actually worth a hundred opportunities! I invite you to check out, if just I am actually still listed below. Beautiful Scottish seasides. Loch Lomond Backpack. Iona- little island, white colored coastlines. Island of Skye. Glencoe. Eilean Donan Castle. Island of Arran. Scotland is certainly a definitely attractive country, and every year it is actually checked out by crowds of travelers coming from the United States, France, as well as also Italy or Spain. Arran is phoned Scotland in miniature. Scotland, like the entire of Great Britain, is not one of the most affordable destinations. It was actually currently spring in Scotland, the sunlight was actually heating up, while in Scotland it was actually still winter all over. I wish that with this post I promoted my pals (:-RRB-) yet also unfamiliar people to journey to https://www.scotland.com/
Did you understand these realities on CBD OIL and Full Spectrum CBD Hemp Oil? Cannabinoids are isolated from hemp using supercritical CO2 extraction. Thanks to contemporary innovation, the resulting option is clean, devoid of heavy metals and unneeded waxes, naturally present in the plant, and the sucked liquid has a common, oily consistency. CBD oil includes cannabidiol as a base ingredient and may include just trace quantities of tetrahydroxycannabidiol (THC). Functions as a memory enhancer, enhancing concentration and coordination of motions, removing swelling and frequent infections. It improves the conduction of stimuli in the course of autoimmune illness (multiple sclerosis, amyotrophic sclerosis). It is recommended by physicians and pharmacists as an antioxidant and substance that obstructs the action of proinflammatory cytokines (proteins), e.g. in Crohn’s illness or ulcerative intestinal tract. RSO oil has a low CBD material, while high THC. Obviously, the essential job of RSO is to trigger a psychoactive result, although it can also promote “ill” brain structures. It is worth understanding that supplements of this type is mainly used by people to whom basic therapy does not bring relief in health problem. The synergistic (enhancing) action of CBD and THC relative to each other is utilized here. Both cannabinoids can do a lot more together than when utilized separately. In addition, they collectively stimulate the department of non-active nerve cells, nourish the fatty envelope of the nerves, and avoid myelin swelling that triggers loss of function in some autoimmune diseases. There are likewise stories where cannabis in its natural form softened spasticity, reduced the frequency of convulsions and seizures, and reduced undesirable scrapie in Parkinson’s disease. This is where the concept of getting RSO, planned just for chronically ill individuals, stemmed . Both cannabis oil type CBD and RSO also contain other cannabinoids, such as cannabichromene (CBC) and cannabigerol (CBG). The trick is not, however, that CBD often has actually a composition broadened to include flavones, flavonoids, terpenes, terpenoids, amino acids and omega acids. The difference is primarily due to intentions directing humanity to utilize one or the other product. CBD medical cannabis oil is a rather helpful mix of cannabinoids, created to protect against 21st century disease. It’s best to utilize all of these substances together, as nature produced them and confined in marijuana inflorescences. It ends up that cannabidiol improves the impacts of cannabichromene (CBC) and cannabigerol (CBG), and flavonoids or flavones enhance the absorption of these compounds. Omega-6 and omega-3 extremely nourish the body and do not allow to alter, which accelerate the aging procedure of the organism and enhance the advancement of cancer. Oil of marijuana in a type of pastime APR contains small quantities of CBD, balanced by the existence of THC. Manufacturers focus on the synergistic impact of one substance relative to the other, while abandoning the existence of CBC and CBG. Why such a choice? – Modern scientific research shows that CBD + THC handle major autoimmune illness, while CBC or CBG show minimal activity in the existence of both substances, similar to flavonoids, flavones or terpenes, for that reason their material in the option appears to be unneeded. In addition, the marijuana strain from which THC and CBD are obtained include negligible quantities of other cannabinoids. RSO oil is completely illegal in Poland, which is why it can not be acquired in any legally operating store on the marketplace. Naturally, there are a variety of amateur methods for obtaining it, however it’s great to know that substances obtained artificially in home labs are unsure, untried, and the effect unknown. The solvent for the production of home RSO is normally fuel, alcohol and even kerosene, which rather of curing, toxin. Alcohols and their like hinder cannabinoids, and so in reality, they do not bring anything brand-new to the medical world. Marijuana oil has actually already marked a new period in which guy stopped to fear what is unidentified, and began to find what our ancestors had currently discovered and utilize the considerable potential, in the beginning look, a little strange relationships, associated mainly with pathology. Medical cannabis, contrary to its name, does not suggest fermented female inflorescences and leaves containing psychedelic compounds coiled in so-called “Joints”, however an useful oil without psychoactive THC. A basic individual, after taking doses of medical marijuana and attaining the suitable state of cannabinoids in the blood, can delight in increased immunity, reduced susceptibility to cancer, delayed aging and lowered threat of stroke or cardiac arrest. CBD oil contains cannabidiol as a base component and may contain only trace quantities of tetrahydroxycannabidiol (THC). RSO oil has a low CBD material, while high THC. Both marijuana oil type CBD and RSO also consist of other cannabinoids, such as cannabichromene (CBC) and cannabigerol (CBG). CBD medical cannabis oil is a rather useful blend of cannabinoids, developed to secure against 21st century disease. Oil of cannabis in a kind of hobby APR includes small amounts of CBD, balanced by the presence of THC.
Did you know these truths on CBD OIL and Full Spectrum CBD Hemp Oil? Cannabinoids are separated from hemp using supercritical CO2 extraction. Thanks to modern technology, the resulting option is clean, without heavy metals and unneeded waxes, naturally present in the plant, and the sucked liquid has a common, oily consistency. CBD oil includes cannabidiol as a base ingredient and may include only trace amounts of tetrahydroxycannabidiol (THC). Functions as a memory enhancer, improving concentration and coordination of motions, removing swelling and persistent infections. It improves the conduction of stimuli in the course of autoimmune diseases (multiple sclerosis, amyotrophic sclerosis). It is suggested by physicians and pharmacists as an antioxidant and compound that obstructs the action of proinflammatory cytokines (proteins), e.g. in Crohn’s disease or ulcerative intestinal tract. RSO oil has a low CBD material, while high THC. Naturally, the essential task of RSO is to trigger a psychedelic result, although it can also promote “ill” brain structures. It deserves understanding that supplements of this type is mostly utilized by people to whom basic therapy does not bring relief in illness. The synergistic (enhancing) action of CBD and THC relative to each other is utilized here. Both cannabinoids can do far more together than when utilized separately. In addition, they collectively stimulate the department of non-active nerve cells, nurture the fatty envelope of the nerves, and prevent myelin inflammation that triggers loss of function in some autoimmune illness. There are likewise stories where cannabis in its natural type softened spasticity, minimized the frequency of seizures and convulsions, and suppressed undesirable scrapie in Parkinson’s illness. This is where the idea of getting RSO, planned just for chronically ill individuals, come from . Both cannabis oil type CBD and RSO also consist of other cannabinoids, such as cannabichromene (CBC) and cannabigerol (CBG). The secret is not, nevertheless, that CBD often has a composition expanded to include flavones, flavonoids, terpenes, terpenoids, amino acids and omega acids. The difference is primarily due to intentions guiding humankind to utilize one or the other item. CBD medical marijuana oil is a rather useful blend of cannabinoids, created to secure against 21st century illness. It’s finest to utilize all of these substances together, as nature produced them and enclosed in cannabis inflorescences. Oil of cannabis in a kind of hobby APR consists of little quantities of CBD, stabilized by the existence of THC. – Modern clinical research shows that CBD + THC cope with major autoimmune illness, while CBC or CBG reveal minimal activity in the presence of both substances, simply like flavones, flavonoids or terpenes, therefore their material in the option seems to be unneeded. In addition, the marijuana pressure from which THC and CBD are derived consist of negligible amounts of other cannabinoids. Cannabis oil has actually already marked a brand-new era in which male ceased to fear what is unknown, and began to rediscover what our ancestors had actually currently seen and use the substantial potential, initially glance, a little strange relationships, associated mainly with pathology. Medical marijuana, contrary to its name, does not imply fermented female inflorescences and leaves including psychedelic compounds coiled in so-called “Joints”, but an advantageous oil without psychoactive THC. A standard individual, after taking doses of medical cannabis and accomplishing the suitable state of cannabinoids in the blood, can delight in increased immunity, decreased vulnerability to cancer, postponed aging and reduced risk of stroke or cardiac arrest. CBD oil includes cannabidiol as a base ingredient and might consist of just trace amounts of tetrahydroxycannabidiol (THC). RSO oil has a low CBD material, while high THC. Both cannabis oil type CBD and RSO also contain other cannabinoids, such as cannabichromene (CBC) and cannabigerol (CBG). CBD medical marijuana oil is a rather useful blend of cannabinoids, developed to secure versus 21st century illness. Oil of marijuana in a kind of hobby APR consists of little quantities of CBD, balanced by the existence of THC.
Scotland is certainly a definitely lovely nation, as well as every year it is seen through crowds of travelers coming from the United States, France, and even Italy or Spain. I can not stand up to the opinion that Poles come right here mainly for job. Rarely anybody departing in July, August or September will definitely presume of Scotland. Perhaps it is due to the costs that are certainly unfriendly for some vacationers. In the meantime, the property of Nessi and males in kilts is actually most definitely worth a brief or even long journey. Perhaps it is good to deal with it at this moment, when the market value of the extra pound is falling, and thereby we will pay out a lot less for a vacation in Scotland? Glen Affric in very early spring season Why is it worth it? Scotland is actually mostly a remarkable landscape in the north of the country. Highlands– hillsides covered with turf as well as louises, deeper lochs (ponds), a remarkable shore line, glen (attractive valleys), and also above all, hardly ever found in Europe (particularly in Scotland!) wild, where our company will certainly certainly not view a single house. Space, room and room once again! Wild attribute, a wealth of plants, birds and various other animals await attributes lovers. In Scotland, I have currently had the capacity to enjoy tapes, dolphins and even deer. Yet Scotland is additionally an in the past fascinating property (that watched Brave Heart?), Where you may explore stunning rock fortress (Edinburgh, Stirling, Linlithgow, Eilean Donan). The resources on its own, the stunning Edinburgh, likewise ought to have focus, specifically during the summer season events. nation Scotland, scottish Scotland, application Scotland, tory Scotland, relevant information Scotland, scotland Scotland, our team Scotland, edinburgh Scotland, youngster Scotland, creed Scotland, chart Scotland, iona Scotland, food selection Scotland, trip Scotland, information Scotland, record Scotland, automobile Scotland, ship Scotland, uk Scotland, train Scotland, celtic Scotland, glasgow Scotland, shetland Scotland, lifestyle Scotland, tay Scotland, bus Scotland, updates Scotland, learning Scotland, little Scotland, navigation Scotland, biscuit Scotland, covid Scotland, sport Scotland, accessibility Scotland, video clips Scotland, highland activities Scotland, community Scotland, golf Scotland, scots Scotland, food items Scotland, whisky Scotland, budget Scotland, visitscotland Scotland, museum Scotland, e-newsletter Scotland, arbroath Scotland, heck Scotland, road Scotland, distilleries Scotland, st andrews Scotland, cocktail Scotland, go to scotland Scotland, europe Scotland, castles Scotland, potential Scotland, encounter Scotland, blog post Scotland, dundee Scotland, steering Scotland, sporting activities Scotland, covid-Scotland9 Scotland, transportation Scotland. Edinburgh – Some suggestions for going to Scotland Trip in Scotland must absolutely begin with its own funds. It takes approximately two times to explore Edinburgh, however you can prolong this opportunity up to four. In the situation of a brief check out to Scotland, you can easily likewise restrict yourself to Edinburgh only, devoting one day on a rounded journey by bus in the Scottish plateaus (just about every trip company in the financing delivers it). For a somewhat longer quest (albeit still limited to just a few times) from Edinburgh, I would advise to attack in two instructions: Isle of Arran or even Loch Lomond. Arran is called Scotland in mini. Spending pair of or even 3 times on the isle, our experts can easily take pleasure in the beauty of the west shoreline, unwind on the beach, climb up the highest peak of the isle– Goat Fell, along with appreciate the grassy mountains and also appreciate the room. Loch Lomond is among Scotland’s pair of national forests, a beautiful lake neighbored through forests as well as mountains. Heading, you may also check out Stirling Castle. There is a direct train coming from Glasgow in each paths. country Scotland, scottish Scotland, app Scotland, conservative Scotland, relevant information Scotland, scotland Scotland, our team Scotland, edinburgh Scotland, kid Scotland, cult Scotland, chart Scotland, iona Scotland, menu Scotland, traveling Scotland, information Scotland, background Scotland, auto Scotland, ship Scotland, uk Scotland, learn Scotland, celtic Scotland, glasgow Scotland, shetland Scotland, lifestyle Scotland, tay Scotland, bus Scotland, news Scotland, education Scotland, bit Scotland, navigating Scotland, cookie Scotland, covid Scotland, sporting activity Scotland, accessibility Scotland, online videos Scotland, highland activities Scotland, community Scotland, golf Scotland, scots Scotland, food items Scotland, whisky Scotland, finances Scotland, visitscotland Scotland, gallery Scotland, newsletter Scotland, arbroath Scotland, heck Scotland, roadway Scotland, distilleries Scotland, street andrews Scotland, alcoholic beverage Scotland, browse through scotland Scotland, europe Scotland, castles Scotland, potential Scotland, take in Scotland, blogging site Scotland, dundee Scotland, driving Scotland, sporting activities Scotland, covid-Scotland9 Scotland, transport Scotland. Scotland, like the whole of Great Britain, is not one of the most affordable places. In enhancement, in Scotland the camping tent can easily be prepared up actually anywhere, therefore tourists can additionally sleep in the wild. The most famous as well as one of the very most lovely treking tracks in Europe is the so-called West Highland Way. Longer trip? Just how approximately north along the west coastline and afterwards back to the quieter, albeit much less magnificent east? A lot of visitors in Glasgow, takes a train to Mallaig (in some cases visiting Glencoe or even Fort William heading) after that check outs Isle of Skye (the best attractive of the Scottish islands), at that point scalp along the coastline towards Ullapool, as for Durness, en route back exploring Inverness, Fort Augustus (Loch Ness), Aberdeen as well as Cairngorms National Park, as well as eventually St Andrews. Is it feasible by buses and also trains? Certainly it is possible, however you are going to skip a lot, so it is actually better to rent a vehicle for at the very least part of the travel. And also don’t be actually misleaded by the vacationer trap of Loch Ness– in reality, there are lots of far more wonderful places throughout Scotland nation Scotland, scottish Scotland, app Scotland, tory Scotland, details Scotland, scotland Scotland, our company Scotland, edinburgh Scotland, youngster Scotland, creed Scotland, map Scotland, iona Scotland, food selection Scotland, travel Scotland, data Scotland, past history Scotland, cars and truck Scotland, ship Scotland, uk Scotland, learn Scotland, celtic Scotland, glasgow Scotland, shetland Scotland, culture Scotland, tay Scotland, bus Scotland, news Scotland, education Scotland, little Scotland, navigating Scotland, cookie Scotland, covid Scotland, sport Scotland, ease of access Scotland, online videos Scotland, highland video games Scotland, community Scotland, golf Scotland, scots Scotland, food items Scotland, whisky Scotland, budget plan Scotland, visitscotland Scotland, gallery Scotland, newsletter Scotland, arbroath Scotland, heck Scotland, roadway Scotland, distilleries Scotland, st andrews Scotland, beverage Scotland, go to scotland Scotland, europe Scotland, castles Scotland, potential Scotland, experience Scotland, blog post Scotland, dundee Scotland, driving Scotland, sports Scotland, transportation Scotland Glenelg The climate could be erratic. I remember going to Scotland for the very first time in the end of April. It was actually already come Scotland, the sunshine was heating up, while in Scotland it was still wintertime across. The Highlands were actually still covered in snow in lots of places, and in Edinburgh it was actually piercingly storm. Naturally, it transformed out right now that I had not stuffed the ideal traits. I was considering to remain in the urban area, yet also ballet flats, shoes, ornamental jackets and also slim blouses diminish in spring season. When traveling in Scotland, first off excellent, water-resistant, sports footwear. A good raincoat (and also windproof!) Will additionally come in convenient, in some cases it is additionally worth including a slim scarf, a sports hat and sports handwear covers to the bag (springtime and also fall). In winter season, I advise staying clear of Scotland from a distance. Why? The solution is easy: it pours and blows. In the instance of a low-budget journey, sleeping in a tent or stay only in hotels (cost regarding PLN 80 every night)., Whiskey, go to at the very least one distillery as well as instruction fish and also potato chips with white vinegar at least the moment. I wish that along with this post I encouraged my good friends (:-RRB-) yet additionally complete strangers to journey to Scotland. It is actually actually worth a hundred times! I welcome you to check out, so I am still below. Attractive Scottish beach fronts. Loch Lomond Backpack. Iona- tiny island, white colored seashores. Isle of Skye. Glencoe. Eilean Donan Castle. Isle of Arran. Scotland is undoubtedly a definitely lovely country, and every year it is actually seen through crowds of tourists from the United States, France, and also Italy or Spain. Arran is actually phoned Scotland in mini. Scotland, like the entire of Great Britain, is not one of the most inexpensive places. It was actually presently spring season in Scotland, the sunlight was heating up, while in Scotland it was actually still winter all over. I really hope that with this message I encouraged my good friends (:-RRB-) yet additionally strangers to take a trip to https://www.scotland.com/
Did you know these truths on CBD OIL and Full Spectrum CBD Hemp Oil? Cannabinoids are separated from hemp using supercritical CO2 extraction. Thanks to modern-day innovation, the resulting solution is clean, free of unneeded waxes and heavy metals, naturally present in the plant, and the drawn liquid has a typical, oily consistency. CBD oil contains cannabidiol as a base active ingredient and may include only trace quantities of tetrahydroxycannabidiol (THC). Functions as a memory enhancer, improving concentration and coordination of movements, getting rid of inflammation and frequent infections. It enhances the conduction of stimuli in the course of autoimmune illness (several sclerosis, amyotrophic sclerosis). It is recommended by doctors and pharmacists as an antioxidant and substance that blocks the action of proinflammatory cytokines (proteins), e.g. in Crohn’s illness or ulcerative intestinal tract. RSO oil has a low CBD content, while high THC. The synergistic (enhancing) action of CBD and THC relative to each other is utilized here. Both cannabinoids can do much more together than when utilized independently. Both marijuana oil type CBD and RSO also include other cannabinoids, such as cannabichromene (CBC) and cannabigerol (CBG). The trick is not, nevertheless, that CBD typically has actually a composition expanded to include flavones, flavonoids, terpenes, terpenoids, amino acids and omega acids. The distinction is primarily due to motives directing mankind to utilize one or the other product. CBD medical cannabis oil is a rather advantageous mix of cannabinoids, developed to protect versus 21st century illness. It’s best to utilize all of these substances together, as nature created them and confined in marijuana inflorescences. Oil of marijuana in a kind of pastime APR contains little quantities of CBD, balanced by the existence of THC. – Modern clinical research study shows that CBD + THC cope with severe autoimmune illness, while CBC or CBG reveal very little activity in the existence of both substances, simply like flavones, flavonoids or terpenes, therefore their content in the option appears to be unnecessary. In addition, the cannabis strain from which THC and CBD are obtained consist of minimal amounts of other cannabinoids. Marijuana oil has currently marked a brand-new age in which male ceased to fear what is unidentified, and started to uncover what our ancestors had actually currently noticed and use the significant potential, initially look, a little bizarre relationships, associated primarily with pathology. Medical marijuana, contrary to its name, does not mean fermented female inflorescences and leaves consisting of psychedelic compounds coiled in so-called “Joints”, however a beneficial oil without psychedelic THC. A standard individual, after taking dosages of medical marijuana and accomplishing the suitable state of cannabinoids in the blood, can enjoy increased immunity, reduced vulnerability to cancer, postponed aging and reduced danger of stroke or cardiovascular disease. CBD oil consists of cannabidiol as a base component and may consist of just trace amounts of tetrahydroxycannabidiol (THC). RSO oil has a low CBD material, while high THC. Both marijuana oil type CBD and RSO also consist of other cannabinoids, such as cannabichromene (CBC) and cannabigerol (CBG). CBD medical cannabis oil is a rather useful mix of cannabinoids, designed to safeguard versus 21st century disease. Oil of marijuana in a kind of hobby APR includes small amounts of CBD, balanced by the presence of THC.
Scotland is undeniably a really wonderful country, and every year it is actually checked out by groups of visitors from the United States, France, as well as also Italy or even Spain. Barely anybody taking leave in July, August or even September are going to think of Scotland. Maybe it is actually excellent to assume concerning it right now, when the worth of the pound is actually falling, as well as therefore our team will pay less for a vacation in Scotland? Glen Affric in very early spring season Why is it worth it? Scotland is primarily a wonderful landscape in the north of the country. In Scotland, I have already been actually capable to see seals, dolphins or even deer. Yet Scotland is additionally a historically intriguing property (who enjoyed Brave Heart?), Where you can easily visit impressive rock fortress (Edinburgh, Stirling, Linlithgow, Eilean Donan). The financing on its own, the marvelous Edinburgh, also is worthy of attention, specifically in the course of the summer months celebrations. nation Scotland, scottish Scotland, app Scotland, tory Scotland, relevant information Scotland, scotland Scotland, us Scotland, edinburgh Scotland, little one Scotland, creed Scotland, chart Scotland, iona Scotland, menu Scotland, travel Scotland, information Scotland, past history Scotland, vehicle Scotland, ship Scotland, uk Scotland, train Scotland, celtic Scotland, glasgow Scotland, shetland Scotland, society Scotland, tay Scotland, bus Scotland, updates Scotland, learning Scotland, bit Scotland, navigation Scotland, biscuit Scotland, covid Scotland, sport Scotland, accessibility Scotland, video recordings Scotland, highland video games Scotland, neighborhood Scotland, golf Scotland, scots Scotland, meals Scotland, whisky Scotland, budget plan Scotland, visitscotland Scotland, museum Scotland, newsletter Scotland, arbroath Scotland, heck Scotland, road Scotland, distilleries Scotland, street andrews Scotland, beverage Scotland, browse through scotland Scotland, europe Scotland, castles Scotland, future Scotland, encounter Scotland, blog Scotland, dundee Scotland, driving Scotland, sporting activities Scotland, covid-Scotland9 Scotland, transportation Scotland. Edinburgh – Some concepts for going to Scotland Trip in Scotland ought to certainly start with its funds. Edinburgh is a wonderful middle ages a town with unique stone buildings. From the main street, the supposed The Royal Mile linking the former imperial fortress along with the Queen’s summer months royal residence (Palace of Holyroodhouse) bolts a network of appealing little roads (the alleged shut), developing a puzzle through which it is truly worth obtaining shed. It takes about 2 times to visit Edinburgh, but you may expand this time around approximately 4. In the situation of a quick browse through to Scotland, you may also restrict on your own to Edinburgh only, devoting eventually on a rounded travel through bus in the Scottish highlands (practically every travel bureau in the financing provides it). This way, a minimum of for a second our experts will really feel the environment of a real property of moistures. An also better idea is actually to rent an automobile for one day as well as go on an individual travel (the system as well as attributes of the coordinated excursions carry out not necessarily suit everyone). Such a self-guided excursion will possibly take us a minimum of ten hours. Arran is phoned Scotland in mini. Loch Lomond is actually one of Scotland’s 2 national parks, a lovely pond neighbored by hillsides and also rainforests. On the method, you can also visit Stirling Castle. country Scotland, scottish Scotland, app Scotland, conservative Scotland, info Scotland, scotland Scotland, our company Scotland, edinburgh Scotland, kid Scotland, creed Scotland, chart Scotland, iona Scotland, food selection Scotland, travel Scotland, records Scotland, background Scotland, car Scotland, ship Scotland, uk Scotland, train Scotland, celtic Scotland, glasgow Scotland, shetland Scotland, culture Scotland, tay Scotland, bus Scotland, information Scotland, learning Scotland, little bit Scotland, navigation Scotland, cookie Scotland, covid Scotland, sport Scotland, accessibility Scotland, videos Scotland, highland activities Scotland, area Scotland, golf Scotland, scots Scotland, food items Scotland, whisky Scotland, budget plan Scotland, visitscotland Scotland, gallery Scotland, bulletin Scotland, arbroath Scotland, hell Scotland, street Scotland, distilleries Scotland, street andrews Scotland, drink Scotland, go to scotland Scotland, europe Scotland, castles Scotland, future Scotland, experience Scotland, weblog Scotland, dundee Scotland, driving Scotland, sporting activities Scotland, covid-Scotland9 Scotland, transportation Scotland. Scotland, like the entire of Great Britain, is actually certainly not one of the most cost effective places. In addition, in Scotland the tent can easily be actually established up essentially anywhere, therefore visitors may likewise sleep in the wild. The most famous and also one of the very most gorgeous exploring routes in Europe is actually the alleged West Highland Way. Longer excursion? How about north along the west coastline as well as then back to the quieter, albeit a lot less impressive eastern? Several travelers in Glasgow, takes a learn to Mallaig (in some cases exploring Glencoe or even Fort William heading) at that point check outs Isle of Skye (the best lovely of the Scottish isles), then scalp along the coastline in the direction of Ullapool, as much as Durness, heading back exploring Inverness, Fort Augustus (Loch Ness), Aberdeen and also Cairngorms National Park, and also ultimately Street Andrews. Is it feasible through buses and learns? Obviously it is feasible, but you are going to overlook a whole lot, so it is better to rent out a car for at the very least portion of the journey. As well as do not be actually tricked through the vacationer trap of Loch Ness– in simple fact, there are lots of so much more lovely areas across Scotland country Scotland, scottish Scotland, application Scotland, conservative Scotland, relevant information Scotland, scotland Scotland, our company Scotland, edinburgh Scotland, little one Scotland, creed Scotland, chart Scotland, iona Scotland, menu Scotland, trip Scotland, records Scotland, past history Scotland, vehicle Scotland, ship Scotland, uk Scotland, learn Scotland, celtic Scotland, glasgow Scotland, shetland Scotland, society Scotland, tay Scotland, bus Scotland, information Scotland, education and learning Scotland, little bit Scotland, navigating Scotland, biscuit Scotland, covid Scotland, sporting activity Scotland, ease of access Scotland, online videos Scotland, highland activities Scotland, area Scotland, golf Scotland, scots Scotland, meals Scotland, whisky Scotland, finances Scotland, visitscotland Scotland, museum Scotland, email list Scotland, arbroath Scotland, heck Scotland, road Scotland, distilleries Scotland, street andrews Scotland, cocktail Scotland, browse through scotland Scotland, europe Scotland, castles Scotland, future Scotland, take in Scotland, blogging site Scotland, dundee Scotland, driving Scotland, sports Scotland, transportation Scotland Glenelg The weather condition could be irregular. I don’t forget visiting Scotland for the very first time at the end of April. It was actually presently springtime in Scotland, the sunlight was actually heating up, while in Scotland it was still winter all around. The Highlands were actually still covered in snow in several spots, and in Edinburgh it was actually piercingly storm. Obviously, it appeared right away that I hadn’t stuffed the correct things. I was organizing to remain in the urban area, but also ballet apartments, sandals, ornamental coats and also thin shirts fall off in spring. When taking a trip in Scotland, to begin with of all good, waterproof, sports footwear. Are going to likewise happen in helpful, often it is also worth adding a thin headscarf, a sporting activities hat and also sports gloves to the bag (springtime and fall). In winter season, I suggest staying away from Scotland coming from a range. Add-on little things: Umbrellas absolutely don’t work (the wind flexes all of them in every directions), the camping tent should (MUST!) have a good flysheet, it deserves taking a multiple-use container along with you (water faucet water, yet likewise drinkable in streams or waterways), a minimum of a handful of pairs of socks, a warm fleece and something to repel vicious flies (I advise a smidge). When it comes to a low-budget travel, sleep in a tent or stay only in hostels (cost about PLN 80 every evening). You ought to make an effort fish and shellfish (they are actually delectable!), Whiskey, browse through at the very least one distillery and also order fish and potato chips with white vinegar a minimum of when. I wish that with this article I motivated my close friends (:-RRB-) yet also unknown people to travel to Scotland. It’s truly worth a hundred opportunities! I welcome you to see, if only I am actually still right here. Attractive Scottish seasides. Loch Lomond Backpack. Iona- very small isle, white seasides. Island of Skye. Glencoe. Eilean Donan Castle. Island of Arran. Scotland is actually undeniably a really wonderful nation, as well as every year it is actually checked out by crowds of vacationers coming from the United States, France, and also Italy or Spain. Arran is actually phoned Scotland in baby. Scotland, like the entire of Great Britain, is certainly not one of the most cost effective locations. It was actually springtime in Scotland, the sunshine was actually warming up, while in Scotland it was still wintertime all over. I really hope that with this post I encouraged my close friends (:-RRB-) but also unknown people to journey to https://www.scotland.com/
Did you understand these truths on CBD OIL and Full Spectrum CBD Hemp Oil? Cannabinoids are isolated from hemp utilizing supercritical CO2 extraction. Thanks to contemporary innovation, the resulting service is clean, devoid of unnecessary waxes and heavy metals, naturally present in the plant, and the drawn liquid has a common, oily consistency. CBD oil contains cannabidiol as a base active ingredient and might contain only trace quantities of tetrahydroxycannabidiol (THC). It is suggested by physicians and pharmacists as an antioxidant and compound that obstructs the action of proinflammatory cytokines (proteins), e.g. in Crohn’s illness or ulcerative intestinal tract. RSO oil has a low CBD material, while high THC. The synergistic (enhancing) action of CBD and THC relative to each other is utilized here. Both cannabinoids can do much more together than when utilized independently. Both marijuana oil type CBD and RSO likewise contain other cannabinoids, such as cannabichromene (CBC) and cannabigerol (CBG). The trick is not, however, that CBD often has actually a composition expanded to consist of flavones, flavonoids, terpenes, terpenoids, amino acids and omega acids. The difference is mainly due to intentions directing humankind to utilize one or the other product. CBD medical cannabis oil is a rather useful mix of cannabinoids, developed to safeguard versus 21st century illness. It’s finest to utilize all of these substances together, as nature produced them and confined in cannabis inflorescences. It ends up that cannabidiol improves the impacts of cannabichromene (CBC) and cannabigerol (CBG), and flavones or flavonoids improve the absorption of these substances. Omega-6 and omega-3 highly nourish the body and do not enable to alter, which accelerate the aging procedure of the organism and boost the development of cancer. Oil of marijuana in a kind of pastime APR includes little quantities of CBD, stabilized by the presence of THC. – Modern scientific research reveals that CBD + THC cope with severe autoimmune illness, while CBC or CBG reveal minimal activity in the presence of both compounds, just like terpenes, flavonoids or flavones, therefore their material in the option appears to be unnecessary. In addition, the cannabis stress from which THC and CBD are obtained consist of negligible amounts of other cannabinoids. Cannabis oil has actually currently marked a brand-new age in which male ceased to fear what is unidentified, and began to rediscover what our ancestors had already seen and utilize the significant potential, initially glimpse, a little strange relationships, associated generally with pathology. Medical cannabis, contrary to its name, does not imply fermented female inflorescences and leaves containing psychoactive substances coiled in so-called “Joints”, but an useful oil without psychoactive THC. A standard person, after taking dosages of medicinal cannabis and accomplishing the suitable state of cannabinoids in the blood, can enjoy increased immunity, decreased vulnerability to cancer, delayed aging and lowered danger of stroke or cardiac arrest. CBD oil includes cannabidiol as a base component and may contain just trace quantities of tetrahydroxycannabidiol (THC). RSO oil has a low CBD content, while high THC. Both marijuana oil type CBD and RSO also contain other cannabinoids, such as cannabichromene (CBC) and cannabigerol (CBG). CBD medical marijuana oil is a rather useful blend of cannabinoids, developed to safeguard versus 21st century disease. Oil of marijuana in a kind of hobby APR includes small quantities of CBD, stabilized by the existence of THC.
Scotland is certainly an actually beautiful nation, and also every year it is actually checked out by groups of travelers coming from the United States, France, as well as also Italy or even Spain. Having said that, I can not withstand the impression that Poles happen here generally for job. Hardly anybody taking leave of absence in July, August or even September will definitely believe of Scotland. Perhaps it is actually due to the costs that are actually certainly hostile for some travelers. The land of Nessi and also men in kilts is actually undoubtedly worth a short or long experience. Possibly it is excellent to think of it now, when the market value of the pound is actually dropping, as well as thereby our experts will pay for less for a holiday season in Scotland? Glen Affric in early spring season Why is it worth it? Scotland is actually mostly a fantastic garden in the north of the nation. Highlands– hills covered with grass as well as patricias, deep lochs (ponds), an impressive coastline line, glen (attractive valleys), as well as most of all, hardly found in Europe (particularly in Scotland!) wild, where our team will certainly certainly not find a solitary home. Space, room as well as room once again! Wild nature, a great quantity of plants, birds and various other animals await attributes fans. In Scotland, I have currently been capable to enjoy tapes, dolphins or maybe deer. Scotland is also an in the past interesting land (who viewed Brave Heart?), Where you can see amazing stone fortress (Edinburgh, Stirling, Linlithgow, Eilean Donan). The funds on its own, the majestic Edinburgh, additionally ought to have attention, particularly throughout the summertime events. nation Scotland, scottish Scotland, app Scotland, tory Scotland, info Scotland, scotland Scotland, our company Scotland, edinburgh Scotland, kid Scotland, creed Scotland, map Scotland, iona Scotland, menu Scotland, trip Scotland, records Scotland, background Scotland, car Scotland, ship Scotland, uk Scotland, learn Scotland, celtic Scotland, glasgow Scotland, shetland Scotland, lifestyle Scotland, tay Scotland, bus Scotland, updates Scotland, education Scotland, little Scotland, navigation Scotland, cookie Scotland, covid Scotland, sport Scotland, accessibility Scotland, video recordings Scotland, highland games Scotland, neighborhood Scotland, golf Scotland, scots Scotland, food Scotland, whisky Scotland, finances Scotland, visitscotland Scotland, museum Scotland, newsletter Scotland, arbroath Scotland, heck Scotland, road Scotland, distilleries Scotland, street andrews Scotland, drink Scotland, visit scotland Scotland, europe Scotland, castles Scotland, future Scotland, encounter Scotland, blog site Scotland, dundee Scotland, driving Scotland, sports Scotland, covid-Scotland9 Scotland, transport Scotland. Edinburgh – Some suggestions for visiting Scotland Trip in Scotland need to certainly start with its financing. It takes around 2 days to go to Edinburgh, however you can easily expand this time up to four. In the situation of a quick see to Scotland, you can easily also confine on your own to Edinburgh simply, devoting one time on a circular travel by bus in the Scottish plateaus (nearly every traveling agency in the resources offers it). For a slightly longer trip (albeit still restricted to a few days) coming from Edinburgh, I would recommend to reach in 2 paths: Isle of Arran or even Loch Lomond. Arran is actually called Scotland in miniature. Devoting pair of or three days on the island, our experts can delight in the charm of the west shoreline, rest on the beach, climb the greatest top of the island– Goat Fell, along with admire the grassy mountains as well as appreciate the room. Loch Lomond is just one of Scotland’s 2 national forests, a stunning pond neighbored by hillsides as well as woods. En route, you can easily additionally visit Stirling Castle. There is a straight train from Glasgow in each directions. country Scotland, scottish Scotland, application Scotland, conservative Scotland, details Scotland, scotland Scotland, us Scotland, edinburgh Scotland, youngster Scotland, cult Scotland, chart Scotland, iona Scotland, food selection Scotland, traveling Scotland, records Scotland, record Scotland, automobile Scotland, ship Scotland, uk Scotland, learn Scotland, celtic Scotland, glasgow Scotland, shetland Scotland, culture Scotland, tay Scotland, bus Scotland, information Scotland, learning Scotland, bit Scotland, navigating Scotland, biscuit Scotland, covid Scotland, sporting activity Scotland, availability Scotland, videos Scotland, highland games Scotland, neighborhood Scotland, golf Scotland, scots Scotland, food items Scotland, whisky Scotland, budget Scotland, visitscotland Scotland, museum Scotland, newsletter Scotland, arbroath Scotland, hell Scotland, roadway Scotland, distilleries Scotland, street andrews Scotland, alcoholic beverage Scotland, go to scotland Scotland, europe Scotland, castles Scotland, potential Scotland, encounter Scotland, weblog Scotland, dundee Scotland, steering Scotland, sporting activities Scotland, covid-Scotland9 Scotland, transportation Scotland. Scotland, like the entire of Great Britain, is actually not one of the cheapest places. In addition, in Scotland the camping tent can be actually prepared up literally anywhere, so vacationers may likewise sleep in the untamed. The very most renowned as well as one of the very most beautiful hiking tracks in Europe is the so-called West Highland Way. Longer trip? How around north along the west coastline and afterwards back to the quieter, albeit less magnificent eastern? Several vacationers in Glasgow, takes a learn to Mallaig (occasionally seeing Glencoe or Fort William on the technique) then check outs Isle of Skye (the most gorgeous of the Scottish isles), after that scalp along the shore towards Ullapool, as far as Durness, heading back checking out Inverness, Fort Augustus (Loch Ness), Aberdeen as well as Cairngorms National Park, and eventually St Andrews. Is it feasible through buses as well as learns? Obviously it is possible, however you are going to miss out on a lot, so it is much far better to lease a car for a minimum of portion of the excursion. And also do not be misleaded due to the traveler catch of Loch Ness– in truth, there are actually a lot of much more stunning spots all around Scotland country Scotland, scottish Scotland, app Scotland, conservative Scotland, details Scotland, scotland Scotland, us Scotland, edinburgh Scotland, little one Scotland, cult Scotland, map Scotland, iona Scotland, food selection Scotland, trip Scotland, information Scotland, past history Scotland, auto Scotland, ship Scotland, uk Scotland, train Scotland, celtic Scotland, glasgow Scotland, shetland Scotland, society Scotland, tay Scotland, bus Scotland, information Scotland, education Scotland, little Scotland, navigating Scotland, cookie Scotland, covid Scotland, sporting activity Scotland, availability Scotland, online videos Scotland, highland video games Scotland, neighborhood Scotland, golf Scotland, scots Scotland, food items Scotland, whisky Scotland, finances Scotland, visitscotland Scotland, museum Scotland, email list Scotland, arbroath Scotland, hell Scotland, roadway Scotland, distilleries Scotland, street andrews Scotland, alcoholic beverage Scotland, go to scotland Scotland, europe Scotland, castles Scotland, potential Scotland, experience Scotland, blogging site Scotland, dundee Scotland, steering Scotland, sporting activities Scotland, transport Scotland Glenelg I bear in mind seeing Scotland for the initial time at the conclusion of April. It was actually spring in Scotland, the sun was heating up, while in Scotland it was actually still winter months all over. The Highlands were actually still covered in snowfall in several spots, and in Edinburgh it was actually piercingly rainfall. When journeying in Scotland, first of all excellent, water resistant, sports footwear. A good poncho (and windproof!) Will also can be found in handy, at times it is also worth including a thin headscarf, a sports hat and also sports gloves to the bag (spring as well as fall). In wintertime, I advise avoiding Scotland from a proximity. Why? The answer is actually straightforward: it puts and impacts. Add-on little traits: Umbrellas definitely do not function (the wind flexes them in every directions), the camping tent should (MUST!) have an excellent flysheet, it deserves taking a reusable bottle along with you (faucet water, however also drinkable in flows or even waterways), at the very least a few sets of belts, a warm and comfortable fleece as well as one thing to push back unpleasant flies (I recommend a modicum). In the scenario of a low-budget travel, oversleep an outdoor tents or even stay just in hotels (expense regarding PLN 80 every night). You need to make an effort sea food (they are actually mouth watering!), Whiskey, go to at the very least one whiskey as well as command fish and also potato chips with white vinegar at the very least once. I wish that using this message I promoted my friends (:-RRB-) however additionally strangers to journey to Scotland. It is actually really worth a hundred times! I welcome you to go to, so I am actually still listed here. Wonderful Scottish coastlines. Loch Lomond Backpack. Iona- small island, white colored seasides. Isle of Skye. Glencoe. Eilean Donan Castle. Isle of Arran. Scotland is actually undoubtedly a really wonderful nation, and also every year it is visited by groups of tourists coming from the United States, France, as well as even Italy or Spain. Arran is contacted Scotland in mini. Scotland, like the entire of Great Britain, is actually certainly not one of the cheapest places. It was presently springtime in Scotland, the sunshine was heating up, while in Scotland it was actually still winter season all over. I hope that along with this blog post I promoted my friends (:-RRB-) yet likewise unfamiliar people to travel to https://www.scotland.com/
Would you be concerned about exchanging hyperlinks?
You’re so awesome! I do not believe I’ve truly read throughsomething like this before. So wonderful to discover somebody with a few unique thoughts on this subject.Seriously.. thank you for starting this up. Thissite is one thing that’s needed on the web, someone with a bit of originality!
Did you know these facts on CBD OIL and Full Spectrum CBD Hemp Oil? Cannabinoids are separated from hemp utilizing supercritical CO2 extraction. Thanks to modern innovation, the resulting service is tidy, without heavy metals and unnecessary waxes, naturally present in the plant, and the sucked liquid has a common, oily consistency. CBD oil consists of cannabidiol as a base ingredient and may include just trace amounts of tetrahydroxycannabidiol (THC). Functions as a memory enhancer, improving concentration and coordination of motions, getting rid of inflammation and frequent infections. It improves the conduction of stimuli in the course of autoimmune illness (several sclerosis, amyotrophic sclerosis). It is recommended by medical professionals and pharmacists as an antioxidant and substance that blocks the action of proinflammatory cytokines (proteins), e.g. in Crohn’s disease or ulcerative intestinal tract. RSO oil has a low CBD content, while high THC. The synergistic (enhancing) action of CBD and THC relative to each other is used here. Both cannabinoids can do much more together than when utilized independently. Both marijuana oil type CBD and RSO also include other cannabinoids, such as cannabichromene (CBC) and cannabigerol (CBG). The secret is not, nevertheless, that CBD typically has a composition broadened to consist of flavones, flavonoids, terpenes, terpenoids, amino acids and omega acids. The difference is primarily due to motives directing humankind to use one or the other item. CBD medical cannabis oil is a rather beneficial blend of cannabinoids, designed to safeguard against 21st century illness. It’s finest to utilize all of these compounds together, as nature produced them and confined in marijuana inflorescences. It ends up that cannabidiol enhances the impacts of cannabichromene (CBC) and cannabigerol (CBG), and flavones or flavonoids enhance the absorption of these compounds. Omega-6 and omega-3 extremely nurture the body and do not enable to alter, which speed up the aging process of the organism and enhance the development of cancer. Oil of cannabis in a sort of hobby APR consists of percentages of CBD, stabilized by the existence of THC. Manufacturers focus on the synergistic result of one substance relative to the other, while deserting the presence of CBC and CBG. Why such a decision? – Modern clinical research reveals that CBD + THC cope with major autoimmune illness, while CBC or CBG reveal very little activity in the existence of both substances, much like terpenes, flavonoids or flavones, therefore their material in the solution seems to be unnecessary. In addition, the cannabis stress from which THC and CBD are derived consist of minimal amounts of other cannabinoids. RSO oil is entirely illegal in Poland, which is why it can not be obtained in any legally running store on the market. Naturally, there are a number of amateur techniques for obtaining it, but it’s good to understand that compounds obtained artificially in home labs doubt, untested, and the impact unknown. The solvent for the production of family RSO is generally fuel, alcohol and even kerosene, which rather of treating, poison. Alcohols and their like impair cannabinoids, and so in truth, they do not bring anything brand-new to the medical world. Cannabis oil has actually currently marked a new period in which guy ceased to fear what is unknown, and began to uncover what our forefathers had currently seen and use the substantial potential, in the beginning glimpse, a little unusual relationships, associated generally with pathology. Medical cannabis, contrary to its name, does not imply fermented female inflorescences and leaves consisting of psychoactive substances coiled in so-called “Joints”, however an advantageous oil without psychedelic THC. A basic individual, after taking dosages of medical marijuana and achieving the appropriate state of cannabinoids in the blood, can enjoy increased resistance, reduced susceptibility to cancer, postponed aging and decreased danger of stroke or heart attack. CBD oil contains cannabidiol as a base active ingredient and might contain just trace amounts of tetrahydroxycannabidiol (THC). RSO oil has a low CBD content, while high THC. Both marijuana oil type CBD and RSO also consist of other cannabinoids, such as cannabichromene (CBC) and cannabigerol (CBG). CBD medical cannabis oil is a rather advantageous blend of cannabinoids, created to protect versus 21st century illness. Oil of cannabis in a kind of pastime APR includes small amounts of CBD, stabilized by the presence of THC.
Did you know these facts on CBD OIL and Full Spectrum CBD Hemp Oil? Cannabinoids are separated from hemp utilizing supercritical CO2 extraction. Thanks to modern innovation, the resulting solution is tidy, totally free of heavy metals and unnecessary waxes, naturally present in the plant, and the sucked liquid has a normal, oily consistency. CBD oil contains cannabidiol as a base component and might include only trace amounts of tetrahydroxycannabidiol (THC). Works as a memory enhancer, enhancing concentration and coordination of motions, getting rid of inflammation and frequent infections. It improves the conduction of stimuli in the course of autoimmune diseases (several sclerosis, amyotrophic sclerosis). It is advised by medical professionals and pharmacists as an antioxidant and compound that blocks the action of proinflammatory cytokines (proteins), e.g. in Crohn’s illness or ulcerative intestine. RSO oil has a low CBD material, while high THC. The synergistic (enhancing) action of CBD and THC relative to each other is utilized here. Both cannabinoids can do much more together than when used individually. Both cannabis oil type CBD and RSO also include other cannabinoids, such as cannabichromene (CBC) and cannabigerol (CBG). The trick is not, nevertheless, that CBD frequently has a structure broadened to include flavones, flavonoids, terpenes, terpenoids, amino acids and omega acids. The distinction is primarily due to motives assisting mankind to use one or the other item. CBD medical marijuana oil is a rather advantageous mix of cannabinoids, created to protect against 21st century disease. It’s finest to utilize all of these substances together, as nature developed them and confined in marijuana inflorescences. It turns out that cannabidiol improves the impacts of cannabichromene (CBC) and cannabigerol (CBG), and flavones or flavonoids enhance the absorption of these substances. Omega-6 and omega-3 extremely nourish the body and do not permit to alter, which speed up the aging process of the organism and boost the advancement of cancer. Oil of marijuana in a sort of pastime APR consists of little amounts of CBD, balanced by the existence of THC. Manufacturers focus on the synergistic impact of one compound relative to the other, while abandoning the presence of CBC and CBG. Why such a decision? – Modern clinical research study shows that CBD + THC handle serious autoimmune illness, while CBC or CBG show very little activity in the presence of both compounds, similar to terpenes, flavonoids or flavones, for that reason their material in the option seems to be unneeded. In addition, the cannabis pressure from which THC and CBD are derived contain minimal quantities of other cannabinoids. RSO oil is totally unlawful in Poland, which is why it can not be obtained in any legally operating shop on the market. Naturally, there are a number of amateur methods for acquiring it, but it’s good to know that substances acquired synthetically in house laboratories are unsure, untried, and the impact unknown. The solvent for the production of home RSO is normally gasoline, alcohol and even kerosene, which rather of curing, toxin. Alcohols and their like impair cannabinoids, therefore in reality, they do not bring anything brand-new to the medical world. Marijuana oil has already marked a brand-new age in which male stopped to fear what is unidentified, and started to uncover what our forefathers had already observed and utilize the considerable capacity, in the beginning glimpse, a little unusual relationships, associated generally with pathology. Medical marijuana, contrary to its name, does not indicate fermented female inflorescences and leaves containing psychedelic substances coiled in so-called “Joints”, but a helpful oil without psychedelic THC. A basic individual, after taking dosages of medicinal cannabis and achieving the appropriate state of cannabinoids in the blood, can delight in increased resistance, decreased vulnerability to cancer, delayed aging and reduced threat of stroke or cardiovascular disease. CBD oil includes cannabidiol as a base ingredient and may include just trace amounts of tetrahydroxycannabidiol (THC). RSO oil has a low CBD content, while high THC. Both marijuana oil type CBD and RSO also include other cannabinoids, such as cannabichromene (CBC) and cannabigerol (CBG). CBD medical cannabis oil is a rather beneficial blend of cannabinoids, designed to protect versus 21st century disease. Oil of cannabis in a kind of pastime APR contains small quantities of CBD, stabilized by the presence of THC.
Did you know these facts on CBD OIL and Full Spectrum CBD Hemp Oil? Cannabinoids are separated from hemp using supercritical CO2 extraction. Thanks to modern-day innovation, the resulting option is clean, without heavy metals and unneeded waxes, naturally present in the plant, and the drawn liquid has a typical, oily consistency. CBD oil contains cannabidiol as a base component and may consist of just trace amounts of tetrahydroxycannabidiol (THC). Works as a memory enhancer, improving concentration and coordination of movements, getting rid of swelling and persistent infections. It enhances the conduction of stimuli in the course of autoimmune illness (several sclerosis, amyotrophic sclerosis). It is suggested by medical professionals and pharmacists as an antioxidant and compound that blocks the action of proinflammatory cytokines (proteins), e.g. in Crohn’s illness or ulcerative intestine. RSO oil has a low CBD content, while high THC. Obviously, the crucial task of RSO is to trigger a psychoactive impact, although it can likewise promote “ill” brain structures. It deserves understanding that supplements of this type is mostly used by people to whom basic treatment does not bring relief in health problem. The synergistic (enhancing) action of CBD and THC relative to each other is utilized here. When utilized independently, both cannabinoids can do much more together than. In addition, they jointly promote the department of non-active nerve cells, nurture the fatty envelope of the nerves, and avoid myelin swelling that triggers loss of function in some autoimmune illness. There are likewise stories where cannabis in its natural type softened spasticity, minimized the frequency of convulsions and seizures, and suppressed undesirable scrapie in Parkinson’s disease. This is where the idea of getting RSO, intended only for chronically ill individuals, stemmed . Both marijuana oil type CBD and RSO also consist of other cannabinoids, such as cannabichromene (CBC) and cannabigerol (CBG). The secret is not, nevertheless, that CBD often has actually a structure broadened to include flavones, flavonoids, terpenes, terpenoids, amino acids and omega acids. The distinction is primarily due to intentions directing humanity to use one or the other item. CBD medical marijuana oil is a rather helpful mix of cannabinoids, created to safeguard against 21st century disease. It’s finest to use all of these compounds together, as nature created them and confined in marijuana inflorescences. Oil of cannabis in a kind of hobby APR includes small quantities of CBD, stabilized by the existence of THC. – Modern clinical research study reveals that CBD + THC cope with major autoimmune illness, while CBC or CBG reveal very little activity in the presence of both substances, simply like flavonoids, flavones or terpenes, for that reason their material in the option appears to be unneeded. In addition, the cannabis strain from which THC and CBD are obtained consist of minimal amounts of other cannabinoids. Cannabis oil has currently marked a new age in which male stopped to fear what is unidentified, and started to discover what our forefathers had already noticed and utilize the significant capacity, at first glimpse, a little unusual relationships, associated primarily with pathology. Medical cannabis, contrary to its name, does not indicate fermented female inflorescences and leaves including psychoactive substances coiled in so-called “Joints”, but an advantageous oil without psychedelic THC. A standard person, after taking doses of medical marijuana and achieving the appropriate state of cannabinoids in the blood, can enjoy increased resistance, reduced susceptibility to cancer, postponed aging and reduced risk of stroke or cardiovascular disease. CBD oil contains cannabidiol as a base ingredient and might contain only trace amounts of tetrahydroxycannabidiol (THC). RSO oil has a low CBD content, while high THC. Both marijuana oil type CBD and RSO also consist of other cannabinoids, such as cannabichromene (CBC) and cannabigerol (CBG). CBD medical cannabis oil is a rather beneficial blend of cannabinoids, developed to safeguard versus 21st century illness. Oil of marijuana in a kind of pastime APR consists of small amounts of CBD, stabilized by the presence of THC.
Scotland is actually undoubtedly a definitely wonderful country, and also every year it is actually checked out by groups of travelers coming from the United States, France, and also Italy or even Spain. Hardly any individual taking vacation in July, August or even September will assume of Scotland. Perhaps it is really good to think regarding it straight currently, when the market value of the pound is falling, and also thereby our company will pay for much less for a vacation in Scotland? Glen Affric in very early spring Thus why is it worth it? Scotland is actually mostly a wonderful garden in the north of the country. Highlands– hills covered along with yard and louises, deep lochs (ponds), a dramatic shoreline line, glen (attractive valleys), as well as over all, hardly ever located in Europe (especially in Scotland!) wild, where our team will certainly not see a singular residence. Space, area and also space again! Wild nature, an abundance of vegetations, birds and also other animals await nature aficionados. In Scotland, I have currently had the capacity to enjoy tapes, dolphins and even deer. But Scotland is actually also an in the past intriguing land (who checked out Brave Heart?), Where you can easily visit wonderful stone palaces (Edinburgh, Stirling, Linlithgow, Eilean Donan). The funds itself, the magnificent Edinburgh, additionally is entitled to interest, specifically in the course of the summer season celebrations. nation Scotland, scottish Scotland, application Scotland, conservative Scotland, relevant information Scotland, scotland Scotland, our team Scotland, edinburgh Scotland, youngster Scotland, cult Scotland, chart Scotland, iona Scotland, food selection Scotland, traveling Scotland, information Scotland, history Scotland, car Scotland, ship Scotland, uk Scotland, learn Scotland, celtic Scotland, glasgow Scotland, shetland Scotland, culture Scotland, tay Scotland, bus Scotland, news Scotland, education Scotland, little Scotland, navigating Scotland, biscuit Scotland, covid Scotland, sporting activity Scotland, access Scotland, video clips Scotland, highland video games Scotland, community Scotland, golf Scotland, scots Scotland, meals Scotland, whisky Scotland, finances Scotland, visitscotland Scotland, museum Scotland, e-newsletter Scotland, arbroath Scotland, heck Scotland, roadway Scotland, distilleries Scotland, street andrews Scotland, alcoholic beverage Scotland, check out scotland Scotland, europe Scotland, castles Scotland, potential Scotland, experience Scotland, blogging site Scotland, dundee Scotland, steering Scotland, sports Scotland, covid-Scotland9 Scotland, transportation Scotland. Edinburgh – Some concepts for exploring Scotland Travel in Scotland should definitely begin with its resources. It takes approximately 2 days to explore Edinburgh, however you can easily expand this opportunity up to 4. In the scenario of a brief check out to Scotland, you can easily also confine on your own to Edinburgh just, investing one day on a circular excursion by bus in the Scottish plateaus (nearly every trip company in the capital offers it). For a somewhat longer adventure (albeit still limited to just a couple of times) from Edinburgh, I would suggest to strike in two instructions: Isle of Arran or even Loch Lomond. Arran is called Scotland in baby. Devoting pair of or three times on the island, our company can easily delight in the elegance of the west shoreline, rest on the beach front, climb up the best optimal of the island– Goat Fell, in addition to marvel at the grassy mountains and appreciate the space. Loch Lomond is just one of Scotland’s 2 nationwide playgrounds, an attractive lake neighbored by hillsides and woods. On the technique, you can also explore Stirling Castle. There is actually a direct learn coming from Glasgow in each directions. country Scotland, scottish Scotland, application Scotland, tory Scotland, relevant information Scotland, scotland Scotland, our team Scotland, edinburgh Scotland, youngster Scotland, creed Scotland, chart Scotland, iona Scotland, food selection Scotland, travel Scotland, records Scotland, past history Scotland, automobile Scotland, ship Scotland, uk Scotland, learn Scotland, celtic Scotland, glasgow Scotland, shetland Scotland, society Scotland, tay Scotland, bus Scotland, headlines Scotland, education Scotland, bit Scotland, navigating Scotland, biscuit Scotland, covid Scotland, sport Scotland, accessibility Scotland, video recordings Scotland, highland activities Scotland, neighborhood Scotland, golf Scotland, scots Scotland, food Scotland, whisky Scotland, spending plan Scotland, visitscotland Scotland, museum Scotland, newsletter Scotland, arbroath Scotland, heck Scotland, street Scotland, distilleries Scotland, st andrews Scotland, beverage Scotland, visit scotland Scotland, europe Scotland, castles Scotland, future Scotland, experience Scotland, blogging site Scotland, dundee Scotland, driving Scotland, sporting activities Scotland, covid-Scotland9 Scotland, transport Scotland. Scotland, like the entire of Great Britain, is actually not one of the cheapest places. In enhancement, in Scotland the outdoor tents may be set up literally anywhere, thus travelers can easily additionally rest in the crazy. The very most renowned as well as one of the most beautiful hiking tracks in Europe is the alleged West Highland Way. Longer travel? Exactly how approximately north along the west coast and also at that point back to the quieter, albeit much less magnificent eastern? Several tourists in Glasgow, takes a learn to Mallaig (sometimes visiting Glencoe or even Fort William en route) after that gos to Isle of Skye (one of the most stunning of the Scottish isles), after that head along the coastline in the direction of Ullapool, as for Durness, heading back checking out Inverness, Fort Augustus (Loch Ness), Aberdeen as well as Cairngorms National Park, as well as eventually Street Andrews. Is it possible by buses and trains? Certainly it is actually possible, but you will skip a great deal, so it is much far better to rent an automobile for a minimum of aspect of the trip. As well as don’t be deceived due to the traveler snare of Loch Ness– in reality, there are loads of far more gorgeous areas throughout Scotland nation Scotland, scottish Scotland, application Scotland, conservative Scotland, info Scotland, scotland Scotland, our company Scotland, edinburgh Scotland, little one Scotland, cult Scotland, chart Scotland, iona Scotland, menu Scotland, travel Scotland, information Scotland, past Scotland, automobile Scotland, ship Scotland, uk Scotland, train Scotland, celtic Scotland, glasgow Scotland, shetland Scotland, society Scotland, tay Scotland, bus Scotland, headlines Scotland, learning Scotland, little bit Scotland, navigation Scotland, cookie Scotland, covid Scotland, sport Scotland, ease of access Scotland, video recordings Scotland, highland games Scotland, neighborhood Scotland, golf Scotland, scots Scotland, meals Scotland, whisky Scotland, budget plan Scotland, visitscotland Scotland, gallery Scotland, e-newsletter Scotland, arbroath Scotland, hell Scotland, street Scotland, distilleries Scotland, street andrews Scotland, alcoholic beverage Scotland, visit scotland Scotland, europe Scotland, castles Scotland, future Scotland, encounter Scotland, blog post Scotland, dundee Scotland, driving Scotland, sporting activities Scotland, transport Scotland Glenelg The climate may be irregular. I don’t forget seeing Scotland for the very first time in the end of April. It was already come Scotland, the sun was heating up, while in Scotland it was still winter season around. The Highlands were still dealt with in snowfall in numerous locations, as well as in Edinburgh it was actually piercingly rainfall. Of training course, it ended up today that I hadn’t packed the ideal traits. I was organizing to stay in the urban area, yet also ballet apartments, shoes, aesthetic jackets as well as slim blouses decrease in spring. When journeying in Scotland, firstly excellent, water-resistant, sporting activities footwear. A nice raincoat (and windproof!) Are going to likewise happen in helpful, often it is additionally worth incorporating a slim headscarf, a sports hat as well as sporting activities handwear covers to the bag (springtime and autumn). In wintertime, I advise avoiding Scotland from a span. Why? The answer is basic: it puts and strikes. In the case of a low-budget excursion, sleep in a camping tent or even stay merely in hotels (expense about PLN 80 every night)., Whiskey, see at the very least one distillery as well as command fish and also chips with white vinegar at the very least the moment. I hope that using this post I urged my close friends (:-RRB-) but also strangers to journey to Scotland. It’s really worth a hundred opportunities! I welcome you to see, so I am actually still below. Lovely Scottish beaches. Loch Lomond Backpack. Iona- little isle, white colored beaches. Isle of Skye. Glencoe. Eilean Donan Castle. Isle of Arran. Scotland is definitely a truly gorgeous country, and also every year it is actually checked out by crowds of vacationers from the United States, France, as well as also Italy or even Spain. Arran is gotten in touch with Scotland in mini. Scotland, like the entire of Great Britain, is actually certainly not one of the least expensive destinations. It was actually currently springtime in Scotland, the sunlight was actually warming up, while in Scotland it was actually still winter months all over. I hope that along with this article I encouraged my close friends (:-RRB-) yet likewise strangers to journey to https://www.scotland.com/
Scotland is undoubtedly a really lovely nation, as well as every year it is actually explored by crowds of travelers from the United States, France, as well as even Italy or even Spain. Rarely any person taking leave in July, August or even September will think of Scotland. Perhaps it is actually great to think regarding it straight now, when the worth of the pound is falling, and thus our company will pay for a lot less for a holiday in Scotland? Glen Affric in early springtime Why is it worth it? Scotland is actually mostly a splendid landscape in the north of the nation. In Scotland, I have actually actually been capable to view tapes, dolphins or also deer. Yet Scotland is actually likewise a historically intriguing land (that checked out Brave Heart?), Where you can easily see stunning rock fortress (Edinburgh, Stirling, Linlithgow, Eilean Donan). The funding on its own, the majestic Edinburgh, additionally ought to have focus, particularly throughout the summertime events. country Scotland, scottish Scotland, application Scotland, conservative Scotland, info Scotland, scotland Scotland, us Scotland, edinburgh Scotland, child Scotland, cult Scotland, map Scotland, iona Scotland, food selection Scotland, trip Scotland, data Scotland, past history Scotland, auto Scotland, ship Scotland, uk Scotland, learn Scotland, celtic Scotland, glasgow Scotland, shetland Scotland, society Scotland, tay Scotland, bus Scotland, information Scotland, learning Scotland, little Scotland, navigating Scotland, biscuit Scotland, covid Scotland, sport Scotland, availability Scotland, video recordings Scotland, highland video games Scotland, neighborhood Scotland, golf Scotland, scots Scotland, meals Scotland, whisky Scotland, spending plan Scotland, visitscotland Scotland, museum Scotland, email list Scotland, arbroath Scotland, heck Scotland, street Scotland, distilleries Scotland, st andrews Scotland, beverage Scotland, see scotland Scotland, europe Scotland, castles Scotland, potential Scotland, encounter Scotland, weblog Scotland, dundee Scotland, steering Scotland, sports Scotland, covid-Scotland9 Scotland, transportation Scotland. Edinburgh – Some concepts for seeing Scotland Traveling in Scotland should definitely begin along with its own resources. Edinburgh is a stunning middle ages a town along with characteristic stone structures. Coming from the main road, the supposed The Royal Mile hooking up the past royal palace along with the Queen’s summer season royal residence (Palace of Holyroodhouse) bolts a system of interesting tiny roads (the supposed shut), producing a puzzle in which it is definitely worth getting lost. It takes around 2 days to explore Edinburgh, but you can easily extend this time around four. When it comes to a short see to Scotland, you can easily additionally confine your own self to Edinburgh just, spending one time on a big salami through bus in the Scottish highlands (almost every holiday company in the financing uses it). Thus, a minimum of for a second our team will certainly feel the setting of an actual land of moistures. An even better tip is actually to lease a vehicle for someday and take place a private excursion (the system as well as attribute of the arranged trips do certainly not necessarily fit everybody). Such a self-guided trip will most likely take our company a minimum of ten hrs. For a somewhat longer quest (albeit still confined to a few days) coming from Edinburgh, I would advise to hit in 2 instructions: Isle of Arran or even Loch Lomond. Arran is actually phoned Scotland in miniature. Investing 2 or three days on the island, our team can appreciate the beauty of the west coastline, unwind on the seaside, climb up the greatest top of the island– Goat Fell, along with admire the grassy hillsides as well as delight in the space. Loch Lomond is among Scotland’s 2 national playgrounds, a stunning lake encompassed by mountains and also rainforests. En route, you can also visit Stirling Castle. There is actually a straight train coming from Glasgow in both paths. nation Scotland, scottish Scotland, application Scotland, conservative Scotland, details Scotland, scotland Scotland, us Scotland, edinburgh Scotland, little one Scotland, creed Scotland, map Scotland, iona Scotland, menu Scotland, travel Scotland, data Scotland, past Scotland, vehicle Scotland, ship Scotland, uk Scotland, learn Scotland, celtic Scotland, glasgow Scotland, shetland Scotland, lifestyle Scotland, tay Scotland, bus Scotland, information Scotland, education and learning Scotland, bit Scotland, navigating Scotland, biscuit Scotland, covid Scotland, sport Scotland, ease of access Scotland, videos Scotland, highland video games Scotland, area Scotland, golf Scotland, scots Scotland, food items Scotland, whisky Scotland, budget Scotland, visitscotland Scotland, museum Scotland, bulletin Scotland, arbroath Scotland, hell Scotland, roadway Scotland, distilleries Scotland, street andrews Scotland, alcoholic beverage Scotland, see scotland Scotland, europe Scotland, castles Scotland, potential Scotland, experience Scotland, blogging site Scotland, dundee Scotland, driving Scotland, sports Scotland, covid-Scotland9 Scotland, transportation Scotland. Scotland, like the entire of Great Britain, is actually not one of the cheapest locations. In enhancement, in Scotland the tent can easily be actually prepared up essentially anywhere, therefore tourists can easily additionally sleep in the crazy. The most popular as well as one of the very most gorgeous hiking trails in Europe is the supposed West Highland Way. Longer vacation? Just how approximately north along the west coastline and afterwards back to the quieter, albeit much less incredible east? Numerous visitors in Glasgow, takes a learn to Mallaig (at times visiting Glencoe or even Fort William en route) then check outs Isle of Skye (the best attractive of the Scottish isles), after that scalp along the coast in the direction of Ullapool, regarding Durness, en route back exploring Inverness, Fort Augustus (Loch Ness), Aberdeen as well as Cairngorms National Park, and also ultimately St Andrews. Is it feasible through buses and trains? Obviously it is actually feasible, yet you will certainly miss a great deal, so it is much better to rent an auto for at the very least component of the journey. And do not be actually misleaded through the visitor catch of Loch Ness– in reality, there are actually plenty of so much more attractive places around Scotland country Scotland, scottish Scotland, application Scotland, tory Scotland, details Scotland, scotland Scotland, our company Scotland, edinburgh Scotland, little one Scotland, creed Scotland, chart Scotland, iona Scotland, menu Scotland, trip Scotland, data Scotland, record Scotland, cars and truck Scotland, ship Scotland, uk Scotland, train Scotland, celtic Scotland, glasgow Scotland, shetland Scotland, lifestyle Scotland, tay Scotland, bus Scotland, information Scotland, learning Scotland, little Scotland, navigating Scotland, cookie Scotland, covid Scotland, sporting activity Scotland, availability Scotland, online videos Scotland, highland activities Scotland, area Scotland, golf Scotland, scots Scotland, food Scotland, whisky Scotland, budget Scotland, visitscotland Scotland, museum Scotland, newsletter Scotland, arbroath Scotland, heck Scotland, road Scotland, distilleries Scotland, street andrews Scotland, alcoholic beverage Scotland, see scotland Scotland, europe Scotland, castles Scotland, future Scotland, encounter Scotland, weblog Scotland, dundee Scotland, steering Scotland, sports Scotland, transportation Scotland Glenelg The weather condition may be unpredictable. I remember exploring Scotland for the very first time by the end of April. It was actually actually spring in Scotland, the sunlight was warming up, while in Scotland it was actually still winter season throughout. The Highlands were still covered in snowfall in several places, as well as in Edinburgh it was piercingly storm. Obviously, it ended up straightaway that I hadn’t loaded the appropriate traits. I was considering to keep in the metropolitan area, yet additionally ballet apartments, shoes, ornamental coats and slim blouses diminish in springtime. When traveling in Scotland, first of all excellent, water-proof, sports footwear. Will certainly also come in useful, sometimes it is actually likewise worth including a slim scarf, a sports hat as well as sporting activities gloves to the bag (springtime and fall). In wintertime, I advise preventing Scotland from a range. In the situation of a low-budget vacation, sleep in a camping tent or even keep only in hostels (cost about PLN 80 every evening)., Whiskey, see at the very least one whiskey as well as instruction fish and potato chips along with vinegar at the very least the moment. I hope that through this message I promoted my good friends (:-RRB-) but additionally complete strangers to travel to Scotland. It is actually actually worth a hundred opportunities! I invite you to explore, if just I am still below. Lovely Scottish seasides. Loch Lomond Backpack. Iona- tiny isle, white beaches. Island of Skye. Glencoe. Eilean Donan Castle. Island of Arran. Scotland is undeniably a definitely stunning nation, and also every year it is actually visited through groups of travelers from the United States, France, and also Italy or Spain. Arran is called Scotland in baby. Scotland, like the whole of Great Britain, is certainly not one of the most cost effective locations. It was currently springtime in Scotland, the sunlight was actually heating up, while in Scotland it was still winter season all over. I wish that with this post I promoted my close friends (:-RRB-) but likewise unfamiliar people to journey to https://www.scotland.com/
Did you know these realities on CBD OIL and Full Spectrum CBD Hemp Oil? Cannabinoids are isolated from hemp utilizing supercritical CO2 extraction. Thanks to modern innovation, the resulting option is tidy, totally free of heavy metals and unneeded waxes, naturally present in the plant, and the sucked liquid has a common, oily consistency. CBD oil consists of cannabidiol as a base active ingredient and might include just trace quantities of tetrahydroxycannabidiol (THC). It is suggested by physicians and pharmacists as an antioxidant and compound that obstructs the action of proinflammatory cytokines (proteins), e.g. in Crohn’s illness or ulcerative intestinal tract. RSO oil has a low CBD material, while high THC. Obviously, the crucial task of RSO is to cause a psychedelic effect, although it can also stimulate “sick” brain structures. It deserves understanding that supplementation of this type is mainly used by people to whom standard treatment does not bring relief in health problem. The synergistic (enhancing) action of CBD and THC relative to each other is utilized here. Both cannabinoids can do a lot more together than when utilized separately. In addition, they collectively promote the division of inactive nerve cells, nurture the fatty envelope of the nerves, and avoid myelin swelling that causes loss of function in some autoimmune illness. There are likewise stories where cannabis in its natural form softened spasticity, lowered the frequency of convulsions and seizures, and reduced unpleasant scrapie in Parkinson’s illness. This is where the idea of getting RSO, meant just for chronically ill individuals, stemmed . Both cannabis oil type CBD and RSO likewise consist of other cannabinoids, such as cannabichromene (CBC) and cannabigerol (CBG). The trick is not, nevertheless, that CBD frequently has actually a composition broadened to include flavones, flavonoids, terpenes, terpenoids, amino acids and omega acids. The distinction is primarily due to motives guiding humanity to utilize one or the other item. CBD medical cannabis oil is a rather advantageous blend of cannabinoids, developed to protect against 21st century illness. It’s best to use all of these compounds together, as nature created them and enclosed in marijuana inflorescences. It ends up that cannabidiol improves the effects of cannabichromene (CBC) and cannabigerol (CBG), and flavonoids or flavones enhance the absorption of these compounds. Omega-6 and omega-3 highly nourish the body and do not allow to alter, which speed up the aging procedure of the organism and improve the advancement of cancer. Oil of cannabis in a kind of hobby APR consists of percentages of CBD, balanced by the presence of THC. Manufacturers concentrate on the synergistic effect of one compound relative to the other, while abandoning the presence of CBC and CBG. Why such a decision? – Modern scientific research study shows that CBD + THC handle severe autoimmune illness, while CBC or CBG reveal very little activity in the presence of both compounds, similar to terpenes, flavonoids or flavones, for that reason their content in the solution appears to be unneeded. In addition, the marijuana stress from which THC and CBD are obtained contain minimal quantities of other cannabinoids. RSO oil is completely illegal in Poland, which is why it can not be obtained in any lawfully operating shop on the market. Obviously, there are a number of amateur techniques for acquiring it, but it’s great to know that compounds gotten artificially in home laboratories are unsure, untried, and the impact unknown. The solvent for the production of household RSO is usually gasoline, alcohol and even kerosene, which instead of treating, toxin. Alcohols and their like hinder cannabinoids, and so in truth, they don’t bring anything new to the medical world. Cannabis oil has already marked a new age in which guy stopped to fear what is unidentified, and started to uncover what our ancestors had actually currently noticed and utilize the significant potential, in the beginning glimpse, a little strange relationships, associated generally with pathology. Medical marijuana, contrary to its name, does not mean fermented female inflorescences and leaves consisting of psychoactive compounds coiled in so-called “Joints”, but a helpful oil without psychoactive THC. A standard individual, after taking dosages of medicinal cannabis and attaining the proper state of cannabinoids in the blood, can take pleasure in increased immunity, reduced susceptibility to cancer, postponed aging and minimized danger of stroke or cardiac arrest. CBD oil includes cannabidiol as a base active ingredient and might include only trace quantities of tetrahydroxycannabidiol (THC). RSO oil has a low CBD material, while high THC. Both marijuana oil type CBD and RSO likewise include other cannabinoids, such as cannabichromene (CBC) and cannabigerol (CBG). CBD medical marijuana oil is a rather helpful mix of cannabinoids, designed to secure against 21st century disease. Oil of marijuana in a kind of pastime APR includes little quantities of CBD, stabilized by the presence of THC.
Scotland is most certainly a truly gorgeous country, as well as yearly it is visited through crowds of vacationers coming from the United States, France, as well as also Italy or Spain. Nevertheless, I can easily certainly not avoid the perception that Poles happen below primarily for work. Rarely anybody taking vacation in July, August or September will certainly consider Scotland. Given that of the prices that are most definitely unfriendly for some tourists, perhaps it is actually. The property of Nessi and also males in kilts is actually undoubtedly worth a short or even longer adventure. Maybe it is excellent to think of it today, when the market value of the extra pound is dropping, and therefore our experts will spend much less for a vacation in Scotland? Glen Affric in very early spring Why is it worth it? Scotland is primarily an excellent garden in the north of the country. Highlands– hills covered with lawn and also patricias, deeper lochs (lakes), a significant coast line, glen (charming valleys), and most importantly, hardly found in Europe (specifically in Scotland!) wild, where we will definitely certainly not see a singular house. Space, space and space once again! Wild nature, an abundance of plants, birds as well as other animals await attribute enthusiasts. In Scotland, I have actually actually had the capacity to see seals, dolphins or perhaps deer. Scotland is actually additionally a historically exciting property (that checked out Brave Heart?), Where you can easily go to amazing rock fortress (Edinburgh, Stirling, Linlithgow, Eilean Donan). The financing on its own, the majestic Edinburgh, likewise is worthy of attention, particularly in the course of the summer festivals. country Scotland, scottish Scotland, application Scotland, conservative Scotland, information Scotland, scotland Scotland, our company Scotland, edinburgh Scotland, kid Scotland, creed Scotland, map Scotland, iona Scotland, food selection Scotland, trip Scotland, information Scotland, past history Scotland, automobile Scotland, ship Scotland, uk Scotland, learn Scotland, celtic Scotland, glasgow Scotland, shetland Scotland, society Scotland, tay Scotland, bus Scotland, information Scotland, education and learning Scotland, little Scotland, navigating Scotland, biscuit Scotland, covid Scotland, sport Scotland, availability Scotland, video clips Scotland, highland activities Scotland, area Scotland, golf Scotland, scots Scotland, food items Scotland, whisky Scotland, finances Scotland, visitscotland Scotland, gallery Scotland, newsletter Scotland, arbroath Scotland, heck Scotland, roadway Scotland, distilleries Scotland, st andrews Scotland, drink Scotland, browse through scotland Scotland, europe Scotland, castles Scotland, future Scotland, experience Scotland, blog Scotland, dundee Scotland, steering Scotland, sports Scotland, covid-Scotland9 Scotland, transportation Scotland. Edinburgh – Some ideas for visiting Scotland Trip in Scotland must undoubtedly start along with its own funds. Edinburgh is actually a beautiful middle ages a town along with unique rock structures. Coming from the main road, the alleged The Royal Mile linking the past royal fortress along with the Queen’s summer season palace (Palace of Holyroodhouse) runs a system of interesting tiny streets (the so-called shut), producing a puzzle in which it is truly worth receiving lost. It takes around 2 days to go to Edinburgh, but you can prolong this opportunity approximately 4. In the instance of a short browse through to Scotland, you may additionally restrict yourself to Edinburgh just, investing 1 day on a circular journey through bus in the Scottish mountainous (virtually every holiday company in the funds offers it). Thus, at the very least for a second we are going to experience the environment of a true property of mists. An also much better concept is actually to lease an automobile for one day and also happen a private vacation (the program as well as attribute of the arranged excursions carry out not necessarily satisfy everybody). Such a self-guided tour is going to perhaps take our team at the very least ten hrs. Arran is phoned Scotland in baby. Loch Lomond is actually one of Scotland’s two nationwide parks, an attractive pond surrounded through hills and woods. On the way, you can also check out Stirling Castle. country Scotland, scottish Scotland, application Scotland, tory Scotland, information Scotland, scotland Scotland, our team Scotland, edinburgh Scotland, kid Scotland, creed Scotland, chart Scotland, iona Scotland, menu Scotland, travel Scotland, records Scotland, past Scotland, cars and truck Scotland, ship Scotland, uk Scotland, train Scotland, celtic Scotland, glasgow Scotland, shetland Scotland, lifestyle Scotland, tay Scotland, bus Scotland, news Scotland, education Scotland, little bit Scotland, navigating Scotland, biscuit Scotland, covid Scotland, sport Scotland, availability Scotland, video recordings Scotland, highland games Scotland, neighborhood Scotland, golf Scotland, scots Scotland, food items Scotland, whisky Scotland, spending plan Scotland, visitscotland Scotland, gallery Scotland, email list Scotland, arbroath Scotland, hell Scotland, roadway Scotland, distilleries Scotland, st andrews Scotland, beverage Scotland, browse through scotland Scotland, europe Scotland, castles Scotland, potential Scotland, take in Scotland, blog post Scotland, dundee Scotland, steering Scotland, sporting activities Scotland, covid-Scotland9 Scotland, transport Scotland. Scotland, like the whole of Great Britain, is actually not one of the most affordable destinations. In addition, in Scotland the tent can be set up practically anywhere, thus tourists can easily additionally sleep in the untamed. The very most famous and one of the very most attractive treking tracks in Europe is the alleged West Highland Way. Longer excursion? How around north along the west shoreline and afterwards back to the quieter, albeit much less magnificent eastern? A lot of tourists in Glasgow, takes a learn to Mallaig (in some cases seeing Glencoe or even Fort William en route) then visits Isle of Skye (the best gorgeous of the Scottish isles), after that scalp along the shoreline in the direction of Ullapool, regarding Durness, heading back checking out Inverness, Fort Augustus (Loch Ness), Aberdeen and also Cairngorms National Park, and eventually Street Andrews. Is it achievable through learns and also buses? Certainly it is feasible, however you will skip a whole lot, so it is actually better to lease a vehicle for at minimum portion of the excursion. And don’t be actually fooled through the tourist catch of Loch Ness– actually, there are loads of so much more wonderful areas throughout Scotland nation Scotland, scottish Scotland, application Scotland, conservative Scotland, details Scotland, scotland Scotland, our team Scotland, edinburgh Scotland, little one Scotland, cult Scotland, map Scotland, iona Scotland, food selection Scotland, traveling Scotland, records Scotland, history Scotland, auto Scotland, ship Scotland, uk Scotland, train Scotland, celtic Scotland, glasgow Scotland, shetland Scotland, culture Scotland, tay Scotland, bus Scotland, information Scotland, learning Scotland, little bit Scotland, navigating Scotland, biscuit Scotland, covid Scotland, sport Scotland, accessibility Scotland, video recordings Scotland, highland video games Scotland, neighborhood Scotland, golf Scotland, scots Scotland, meals Scotland, whisky Scotland, budget Scotland, visitscotland Scotland, gallery Scotland, e-newsletter Scotland, arbroath Scotland, hell Scotland, roadway Scotland, distilleries Scotland, street andrews Scotland, drink Scotland, go to scotland Scotland, europe Scotland, castles Scotland, future Scotland, take in Scotland, blog site Scotland, dundee Scotland, steering Scotland, sports Scotland, transport Scotland Glenelg The weather condition could be erratic. I remember seeing Scotland for the first opportunity at the end of April. It was actually actually come Scotland, the sunshine was actually heating up, while in Scotland it was still wintertime across. The Highlands were still covered in snowfall in numerous areas, as well as in Edinburgh it was piercingly rain. Of training program, it ended up right away that I hadn’t stuffed the correct things. I was preparing to remain in the city, but likewise ballet flats, flipflops, thin shirts and also decorative coats decrease in springtime. When traveling in Scotland, initially of all really good, water resistant, sports footwear. Will certainly additionally happen in convenient, sometimes it is also worth adding a thin scarf, a sporting activities hat and sports gloves to the bag (springtime and autumn). In winter, I advise staying clear of Scotland from a proximity. In the situation of a low-budget journey, rest in a tent or even stay merely in hostels (cost about PLN 80 per evening)., Whiskey, browse through at minimum one distillery as well as command fish and potato chips with vinegar at the very least when. I hope that using this message I motivated my good friends (:-RRB-) however additionally unknown people to take a trip to Scotland. It is actually truly worth a hundred opportunities! I invite you to see, so I am actually still right here. Stunning Scottish seasides. Loch Lomond Backpack. Iona- very small island, white colored beach fronts. Isle of Skye. Glencoe. Eilean Donan Castle. Isle of Arran. Scotland is certainly a definitely attractive nation, and also every year it is visited through crowds of tourists from the United States, France, and also also Italy or even Spain. Arran is actually gotten in touch with Scotland in miniature. Scotland, like the whole of Great Britain, is not one of the least expensive locations. It was already springtime in Scotland, the sun was warming up, while in Scotland it was actually still wintertime all over. I wish that along with this blog post I motivated my close friends (:-RRB-) but additionally strangers to travel to https://www.scotland.com/
Scotland is unquestionably a definitely lovely country, as well as every year it is gone to by groups of tourists coming from the United States, France, and even Italy or Spain. Barely any individual taking leave in July, August or September will certainly presume of Scotland. Possibly it is actually excellent to think regarding it right now, when the value of the pound is actually falling, and hence we will spend much less for a holiday in Scotland? Glen Affric in very early spring Why is it worth it? Scotland is actually mostly a fantastic landscape in the north of the nation. Highlands– mountains covered along with yard and also heathers, deep lochs (ponds), a remarkable coastline collection, glen (stunning valleys), and over all, hardly ever found in Europe (especially in Scotland!) wilderness, where our team are going to not view a solitary property. Space, space and area once more! Wild attribute, an abundance of plants, birds and various other creatures await attributes fans. In Scotland, I have actually actually had the capacity to check out tapes, dolphins or perhaps deer. But Scotland is actually additionally a historically interesting property (that saw Brave Heart?), Where you can explore impressive stone castles (Edinburgh, Stirling, Linlithgow, Eilean Donan). The financing on its own, the majestic Edinburgh, also should have focus, especially in the course of the summer months festivities. nation Scotland, scottish Scotland, application Scotland, tory Scotland, information Scotland, scotland Scotland, our team Scotland, edinburgh Scotland, kid Scotland, creed Scotland, chart Scotland, iona Scotland, food selection Scotland, travel Scotland, information Scotland, background Scotland, auto Scotland, ship Scotland, uk Scotland, train Scotland, celtic Scotland, glasgow Scotland, shetland Scotland, culture Scotland, tay Scotland, bus Scotland, news Scotland, education Scotland, little Scotland, navigation Scotland, cookie Scotland, covid Scotland, sport Scotland, availability Scotland, video recordings Scotland, highland activities Scotland, community Scotland, golf Scotland, scots Scotland, food items Scotland, whisky Scotland, spending plan Scotland, visitscotland Scotland, museum Scotland, e-newsletter Scotland, arbroath Scotland, hell Scotland, street Scotland, distilleries Scotland, street andrews Scotland, alcoholic beverage Scotland, visit scotland Scotland, europe Scotland, castles Scotland, future Scotland, experience Scotland, blog Scotland, dundee Scotland, driving Scotland, sporting activities Scotland, covid-Scotland9 Scotland, transport Scotland. Edinburgh – Some concepts for seeing Scotland Travel in Scotland should most definitely begin along with its financing. It takes approximately two days to visit Edinburgh, yet you can stretch this time up to four. In the instance of a quick see to Scotland, you can also restrict your own self to Edinburgh merely, devoting one day on a rounded excursion by bus in the Scottish plateaus (practically every trip organization in the resources uses it). For a somewhat longer quest (albeit still limited to only a couple of times) from Edinburgh, I would certainly propose to attack in pair of instructions: Isle of Arran or even Loch Lomond. Arran is actually called Scotland in mini. Devoting 2 or three days on the isle, our company may delight in the charm of the west shore, loosen up on the seaside, climb the best height of the island– Goat Fell, in addition to marvel at the grassy hills and also take pleasure in the area. Loch Lomond is among Scotland’s pair of national forests, a wonderful lake bordered through mountains and also forests. On the technique, you can likewise go to Stirling Castle. There is actually a straight train from Glasgow in each paths. nation Scotland, scottish Scotland, app Scotland, conservative Scotland, info Scotland, scotland Scotland, our company Scotland, edinburgh Scotland, little one Scotland, cult Scotland, map Scotland, iona Scotland, menu Scotland, travel Scotland, records Scotland, past Scotland, vehicle Scotland, ship Scotland, uk Scotland, learn Scotland, celtic Scotland, glasgow Scotland, shetland Scotland, lifestyle Scotland, tay Scotland, bus Scotland, updates Scotland, education and learning Scotland, little bit Scotland, navigation Scotland, biscuit Scotland, covid Scotland, sport Scotland, availability Scotland, videos Scotland, highland games Scotland, area Scotland, golf Scotland, scots Scotland, food items Scotland, whisky Scotland, budget plan Scotland, visitscotland Scotland, museum Scotland, e-newsletter Scotland, arbroath Scotland, heck Scotland, street Scotland, distilleries Scotland, st andrews Scotland, drink Scotland, browse through scotland Scotland, europe Scotland, castles Scotland, future Scotland, experience Scotland, blogging site Scotland, dundee Scotland, steering Scotland, sporting activities Scotland, covid-Scotland9 Scotland, transport Scotland. Reduced Budget Travel? Scotland, like the entire of Great Britain, is actually not one of the most inexpensive locations. You can discover a whole lot of treking trails as well as campsites listed below. In addition, in Scotland the tent may be put together practically anywhere, thus visitors may likewise sleep in the untamed. What is vital in this particular scenario is universal accessibility to clean water– we may locate mountain range streams, waterfalls as well as streams almost all over. One of the most popular and also one of one of the most beautiful hiking trails in Europe is the alleged West Highland Way. As a result of the fantastic scenery, I exuberantly highly recommend Longer vacation? Just how approximately north along the west shoreline and also after that back to the quieter, albeit much less incredible east? Several visitors in Glasgow, takes a learn to Mallaig (occasionally exploring Glencoe or Fort William en route) after that brows through Isle of Skye (one of the most lovely of the Scottish islands), after that head along the shoreline towards Ullapool, as for Durness, heading back checking out Inverness, Fort Augustus (Loch Ness), Aberdeen and Cairngorms National Park, as well as lastly St Andrews. Is it achievable through buses and learns? Of training program it is actually feasible, but you will skip a lot, so it is a lot far better to rent a cars and truck for at the very least aspect of the vacation. And also don’t be fooled due to the traveler catch of Loch Ness– as a matter of fact, there are plenty of much additional attractive areas throughout Scotland country Scotland, scottish Scotland, app Scotland, tory Scotland, info Scotland, scotland Scotland, our company Scotland, edinburgh Scotland, child Scotland, cult Scotland, chart Scotland, iona Scotland, food selection Scotland, traveling Scotland, records Scotland, history Scotland, car Scotland, ship Scotland, uk Scotland, learn Scotland, celtic Scotland, glasgow Scotland, shetland Scotland, society Scotland, tay Scotland, bus Scotland, information Scotland, learning Scotland, little Scotland, navigation Scotland, biscuit Scotland, covid Scotland, sport Scotland, ease of access Scotland, video clips Scotland, highland games Scotland, area Scotland, golf Scotland, scots Scotland, meals Scotland, whisky Scotland, finances Scotland, visitscotland Scotland, gallery Scotland, newsletter Scotland, arbroath Scotland, hell Scotland, road Scotland, distilleries Scotland, street andrews Scotland, cocktail Scotland, browse through scotland Scotland, europe Scotland, castles Scotland, future Scotland, encounter Scotland, blog Scotland, dundee Scotland, driving Scotland, sporting activities Scotland, transportation Scotland Glenelg I keep in mind visiting Scotland for the first opportunity at the conclusion of April. It was actually currently spring in Scotland, the sunshine was actually heating up, while in Scotland it was actually still winter season all over. The Highlands were still dealt with in snow in lots of places, and also in Edinburgh it was actually piercingly rainfall. When traveling in Scotland, to begin with of all excellent, waterproof, sports shoes. Will certainly additionally happen in convenient, sometimes it is actually also worth adding a thin scarf, a sports hat as well as sports gloves to the backpack (springtime as well as autumn). In wintertime, I recommend avoiding Scotland from a distance. In the case of a low-budget trip, sleep in a tent or even remain just in hostels (expense concerning PLN 80 every night)., Whiskey, see at the very least one whiskey as well as command fish as well as chips with vinegar at least as soon as. I wish that along with this message I motivated my pals (:-RRB-) yet additionally unknown people to journey to Scotland. It is actually definitely worth a hundred times! I invite you to explore, so I am actually still here. Stunning Scottish beaches. Loch Lomond Backpack. Iona- small isle, white beach fronts. Isle of Skye. Glencoe. Eilean Donan Castle. Island of Arran. Scotland is actually undoubtedly a definitely wonderful nation, and also every year it is actually explored through crowds of visitors from the United States, France, and also Italy or even Spain. Arran is gotten in touch with Scotland in baby. Scotland, like the entire of Great Britain, is actually certainly not one of the most cost effective places. It was currently spring in Scotland, the sun was actually warming up, while in Scotland it was still winter months all over. I really hope that with this post I encouraged my good friends (:-RRB-) yet also unfamiliar people to take a trip to https://www.scotland.com/
Did you understand these facts on CBD OIL and Full Spectrum CBD Hemp Oil? Cannabinoids are separated from hemp using supercritical CO2 extraction. Thanks to contemporary innovation, the resulting option is clean, free of heavy metals and unnecessary waxes, naturally present in the plant, and the drawn liquid has a typical, oily consistency. CBD oil consists of cannabidiol as a base active ingredient and may contain only trace amounts of tetrahydroxycannabidiol (THC). It is suggested by medical professionals and pharmacists as an antioxidant and compound that blocks the action of proinflammatory cytokines (proteins), e.g. in Crohn’s disease or ulcerative intestine. RSO oil has a low CBD content, while high THC. The synergistic (enhancing) action of CBD and THC relative to each other is used here. Both cannabinoids can do much more together than when used separately. Both marijuana oil type CBD and RSO also include other cannabinoids, such as cannabichromene (CBC) and cannabigerol (CBG). The trick is not, nevertheless, that CBD frequently has a structure expanded to consist of flavones, flavonoids, terpenes, terpenoids, amino acids and omega acids. The difference is mostly due to intentions guiding humankind to use one or the other item. CBD medical cannabis oil is a rather helpful blend of cannabinoids, created to secure against 21st century disease. It’s finest to utilize all of these compounds together, as nature developed them and enclosed in marijuana inflorescences. It ends up that cannabidiol improves the results of cannabichromene (CBC) and cannabigerol (CBG), and flavonoids or flavones improve the absorption of these compounds. Omega-6 and omega-3 extremely nourish the body and do not permit to alter, which speed up the aging process of the organism and enhance the advancement of cancer. Oil of cannabis in a kind of pastime APR consists of small quantities of CBD, stabilized by the existence of THC. Manufacturers focus on the synergistic effect of one compound relative to the other, while deserting the presence of CBC and CBG. Why such a decision? – Modern clinical research reveals that CBD + THC manage severe autoimmune diseases, while CBC or CBG show very little activity in the existence of both compounds, just like flavones, flavonoids or terpenes, therefore their material in the option appears to be unneeded. In addition, the marijuana pressure from which THC and CBD are derived include negligible amounts of other cannabinoids. RSO oil is entirely illegal in Poland, which is why it can not be obtained in any legally operating store on the marketplace. Of course, there are a number of amateur techniques for acquiring it, however it’s excellent to know that compounds acquired synthetically in home labs doubt, untried, and the impact unknown. The solvent for the production of family RSO is typically gas, alcohol and even kerosene, which instead of curing, toxin. Alcohols and their like hinder cannabinoids, and so in truth, they don’t bring anything brand-new to the medical world. Cannabis oil has already marked a new age in which man stopped to fear what is unknown, and started to uncover what our forefathers had already discovered and utilize the substantial potential, at very first glance, a little bizarre relationships, associated mainly with pathology. Medical marijuana, contrary to its name, does not suggest fermented female inflorescences and leaves containing psychoactive compounds coiled in so-called “Joints”, however an useful oil without psychoactive THC. A basic person, after taking doses of medicinal marijuana and achieving the appropriate state of cannabinoids in the blood, can enjoy increased resistance, decreased vulnerability to cancer, postponed aging and minimized risk of stroke or cardiovascular disease. CBD oil includes cannabidiol as a base component and may contain just trace amounts of tetrahydroxycannabidiol (THC). RSO oil has a low CBD content, while high THC. Both cannabis oil type CBD and RSO also consist of other cannabinoids, such as cannabichromene (CBC) and cannabigerol (CBG). CBD medical marijuana oil is a rather useful blend of cannabinoids, developed to protect against 21st century disease. Oil of cannabis in a kind of hobby APR includes little quantities of CBD, balanced by the existence of THC.
Scotland is definitely a really attractive country, and every year it is seen by crowds of tourists from the United States, France, and also even Italy or even Spain. Rarely any person taking vacation in July, August or even September will certainly assume of Scotland. Perhaps it is excellent to think regarding it right now, when the worth of the pound is actually dropping, and hence our team will pay a lot less for a holiday season in Scotland? Glen Affric in early springtime Why is it worth it? Scotland is actually largely a wonderful landscape in the north of the country. In Scotland, I have actually already been able to enjoy tapes, dolphins or also deer. Scotland is also an in the past intriguing property (that checked out Brave Heart?), Where you can easily explore amazing stone fortress (Edinburgh, Stirling, Linlithgow, Eilean Donan). The funds on its own, the stunning Edinburgh, likewise is worthy of focus, particularly during the summer season festivities. country Scotland, scottish Scotland, application Scotland, conservative Scotland, details Scotland, scotland Scotland, our team Scotland, edinburgh Scotland, youngster Scotland, creed Scotland, map Scotland, iona Scotland, food selection Scotland, trip Scotland, data Scotland, record Scotland, vehicle Scotland, ship Scotland, uk Scotland, learn Scotland, celtic Scotland, glasgow Scotland, shetland Scotland, lifestyle Scotland, tay Scotland, bus Scotland, updates Scotland, education and learning Scotland, little Scotland, navigating Scotland, biscuit Scotland, covid Scotland, sporting activity Scotland, access Scotland, online videos Scotland, highland video games Scotland, area Scotland, golf Scotland, scots Scotland, food Scotland, whisky Scotland, finances Scotland, visitscotland Scotland, gallery Scotland, bulletin Scotland, arbroath Scotland, hell Scotland, road Scotland, distilleries Scotland, street andrews Scotland, drink Scotland, go to scotland Scotland, europe Scotland, castles Scotland, potential Scotland, take in Scotland, blogging site Scotland, dundee Scotland, steering Scotland, sports Scotland, covid-Scotland9 Scotland, transportation Scotland. Edinburgh – Some tips for exploring Scotland Traveling in Scotland need to absolutely begin with its own resources. It takes about two days to explore Edinburgh, but you can expand this opportunity up to four. In the scenario of a quick check out to Scotland, you can easily additionally restrict yourself to Edinburgh only, spending one day on a rounded vacation through bus in the Scottish plateaus (nearly every trip firm in the funds provides it). Arran is called Scotland in mini. Loch Lomond is actually one of Scotland’s 2 nationwide playgrounds, a wonderful pond surrounded through forests and also mountains. On the method, you can easily additionally go to Stirling Castle. nation Scotland, scottish Scotland, app Scotland, tory Scotland, details Scotland, scotland Scotland, our company Scotland, edinburgh Scotland, youngster Scotland, creed Scotland, map Scotland, iona Scotland, menu Scotland, trip Scotland, data Scotland, past Scotland, vehicle Scotland, ship Scotland, uk Scotland, learn Scotland, celtic Scotland, glasgow Scotland, shetland Scotland, culture Scotland, tay Scotland, bus Scotland, information Scotland, education and learning Scotland, bit Scotland, navigating Scotland, biscuit Scotland, covid Scotland, sport Scotland, ease of access Scotland, video recordings Scotland, highland activities Scotland, neighborhood Scotland, golf Scotland, scots Scotland, food items Scotland, whisky Scotland, finances Scotland, visitscotland Scotland, gallery Scotland, email list Scotland, arbroath Scotland, heck Scotland, street Scotland, distilleries Scotland, street andrews Scotland, drink Scotland, check out scotland Scotland, europe Scotland, castles Scotland, potential Scotland, experience Scotland, weblog Scotland, dundee Scotland, steering Scotland, sports Scotland, covid-Scotland9 Scotland, transportation Scotland. Scotland, like the entire of Great Britain, is actually certainly not one of the cheapest locations. In enhancement, in Scotland the camping tent can easily be actually specified up actually anywhere, thus vacationers may likewise sleep in the wild. The most popular and one of the very most gorgeous hiking tracks in Europe is actually the so-called West Highland Way. Longer trip? How about north along the west shore and also after that back to the quieter, albeit a lot less incredible eastern? Several visitors in Glasgow, takes a train to Mallaig (often visiting Glencoe or even Fort William en route) at that point visits Isle of Skye (the best wonderful of the Scottish islands), after that head along the coast towards Ullapool, regarding Durness, heading back checking out Inverness, Fort Augustus (Loch Ness), Aberdeen as well as Cairngorms National Park, and also lastly Street Andrews. Is it feasible through buses and also trains? Of training program it is actually achievable, but you will miss out on a great deal, so it is much far better to lease an auto for at minimum part of the trip. As well as don’t be misleaded due to the vacationer catch of Loch Ness– as a matter of fact, there are actually a lot of far more gorgeous locations across Scotland country Scotland, scottish Scotland, application Scotland, tory Scotland, info Scotland, scotland Scotland, our team Scotland, edinburgh Scotland, kid Scotland, cult Scotland, map Scotland, iona Scotland, food selection Scotland, trip Scotland, records Scotland, record Scotland, automobile Scotland, ship Scotland, uk Scotland, learn Scotland, celtic Scotland, glasgow Scotland, shetland Scotland, society Scotland, tay Scotland, bus Scotland, updates Scotland, learning Scotland, little Scotland, navigation Scotland, biscuit Scotland, covid Scotland, sport Scotland, ease of access Scotland, videos Scotland, highland video games Scotland, community Scotland, golf Scotland, scots Scotland, meals Scotland, whisky Scotland, finances Scotland, visitscotland Scotland, museum Scotland, bulletin Scotland, arbroath Scotland, heck Scotland, roadway Scotland, distilleries Scotland, street andrews Scotland, beverage Scotland, go to scotland Scotland, europe Scotland, castles Scotland, future Scotland, encounter Scotland, blog post Scotland, dundee Scotland, driving Scotland, sporting activities Scotland, transport Scotland Glenelg I don’t forget seeing Scotland for the very first time at the side of April. It was presently spring season in Scotland, the sunlight was warming up, while in Scotland it was still wintertime all over. The Highlands were actually still dealt with in snowfall in several places, and also in Edinburgh it was piercingly rainfall. When taking a trip in Scotland, to start with excellent, water-resistant, sports footwear. A decent poncho (and also windproof!) Are going to also come in helpful, at times it is actually likewise worth including a thin scarf, a sporting activities hat and sporting activities handwear covers to the knapsack (spring as well as fall). In winter season, I suggest steering clear of Scotland coming from a range. Why? The answer is actually simple: it puts as well as strikes. Bonus little things: Umbrellas most definitely don’t function (the wind flexes them in each instructions), the tent has to (MUST!) have a really good flysheet, it costs taking a multiple-use container with you (faucet water, yet additionally drinkable in streams or even waterways), at minimum a few pairs of belts, a warm fleece and something to ward off unpleasant flies (I suggest a modicum). When it comes to a low-budget trip, oversleep a camping tent or stay simply in hostels (expense concerning PLN 80 per evening). You need to make an effort seafood (they are delicious!), Whiskey, go to a minimum of one distillery and command fish as well as chips with white vinegar a minimum of once. I wish that through this article I encouraged my good friends (:-RRB-) but likewise strangers to journey to Scotland. It’s truly worth a hundred opportunities! I welcome you to visit, so I am still right here. Gorgeous Scottish coastlines. Loch Lomond Backpack. Iona- little isle, white colored coastlines. Island of Skye. Glencoe. Eilean Donan Castle. Island of Arran. Scotland is actually undoubtedly a truly wonderful nation, and also every year it is actually visited through groups of visitors coming from the United States, France, as well as even Italy or even Spain. Arran is actually contacted Scotland in baby. Scotland, like the entire of Great Britain, is actually certainly not one of the most cost effective destinations. It was currently spring in Scotland, the sun was actually warming up, while in Scotland it was actually still winter season all over. I really hope that with this article I encouraged my good friends (:-RRB-) yet also complete strangers to journey to https://www.scotland.com/
Did you know these realities on CBD OIL and Full Spectrum CBD Hemp Oil? Cannabinoids are isolated from hemp utilizing supercritical CO2 extraction. Thanks to contemporary technology, the resulting option is tidy, totally free of heavy metals and unnecessary waxes, naturally present in the plant, and the sucked liquid has a common, oily consistency. CBD oil consists of cannabidiol as a base active ingredient and might include only trace quantities of tetrahydroxycannabidiol (THC). It is recommended by physicians and pharmacists as an antioxidant and compound that blocks the action of proinflammatory cytokines (proteins), e.g. in Crohn’s disease or ulcerative intestine. RSO oil has a low CBD content, while high THC. Of course, the essential job of RSO is to trigger a psychedelic result, although it can also promote “ill” brain structures. It deserves understanding that supplements of this type is mainly utilized by individuals to whom standard therapy does not bring relief in health problem. The synergistic (enhancing) action of CBD and THC relative to each other is utilized here. Both cannabinoids can do a lot more together than when used separately. In addition, they collectively stimulate the division of non-active nerve cells, nurture the fatty envelope of the nerves, and prevent myelin inflammation that triggers loss of function in some autoimmune diseases. There are also stories where cannabis in its natural type softened spasticity, lowered the frequency of convulsions and seizures, and reduced undesirable scrapie in Parkinson’s disease. This is where the concept of receiving RSO, planned just for chronically ill individuals, come from . Both cannabis oil type CBD and RSO also include other cannabinoids, such as cannabichromene (CBC) and cannabigerol (CBG). The trick is not, nevertheless, that CBD typically has a composition expanded to include flavones, flavonoids, terpenes, terpenoids, amino acids and omega acids. The difference is mainly due to motives guiding humankind to utilize one or the other product. CBD medical cannabis oil is a rather beneficial mix of cannabinoids, created to secure against 21st century illness. It’s finest to use all of these compounds together, as nature developed them and enclosed in marijuana inflorescences. Oil of marijuana in a kind of pastime APR consists of little quantities of CBD, stabilized by the presence of THC. – Modern scientific research study shows that CBD + THC cope with serious autoimmune illness, while CBC or CBG reveal very little activity in the existence of both substances, simply like flavones, flavonoids or terpenes, for that reason their material in the option seems to be unneeded. In addition, the cannabis stress from which THC and CBD are obtained consist of negligible quantities of other cannabinoids. Cannabis oil has actually currently marked a brand-new era in which male ceased to fear what is unidentified, and started to discover what our ancestors had currently noticed and utilize the significant potential, initially look, a little bizarre relationships, associated mainly with pathology. Medical marijuana, contrary to its name, does not suggest fermented female inflorescences and leaves containing psychoactive compounds coiled in so-called “Joints”, but a helpful oil without psychedelic THC. A basic individual, after taking dosages of medical cannabis and attaining the suitable state of cannabinoids in the blood, can take pleasure in increased immunity, lowered vulnerability to cancer, delayed aging and lowered risk of stroke or cardiovascular disease. CBD oil contains cannabidiol as a base ingredient and might include only trace amounts of tetrahydroxycannabidiol (THC). RSO oil has a low CBD content, while high THC. Both cannabis oil type CBD and RSO also contain other cannabinoids, such as cannabichromene (CBC) and cannabigerol (CBG). CBD medical marijuana oil is a rather beneficial blend of cannabinoids, designed to secure versus 21st century illness. Oil of cannabis in a kind of pastime APR includes little quantities of CBD, stabilized by the presence of THC.
Scotland is actually most certainly a definitely stunning country, and also each year it is actually explored through groups of travelers coming from the United States, France, and also even Italy or Spain. I can easily not withstand the impression that Poles come right here primarily for job. Hardly any person departing in July, August or September will consider Scotland. Because of the costs that are most definitely antagonistic for some visitors, maybe it is actually. In the meantime, the land of Nessi and guys in kilts is definitely worth a quick or longer journey. Possibly it is great to deal with it at the moment, when the worth of the pound is falling, and thus our team will pay less for a holiday in Scotland? Glen Affric in very early spring season Why is it worth it? Scotland is actually mainly a splendid yard in the north of the country. In Scotland, I have actually currently been able to see tapes, dolphins or also deer. However Scotland is likewise an in the past fascinating land (that viewed Brave Heart?), Where you may go to spectacular stone fortress (Edinburgh, Stirling, Linlithgow, Eilean Donan). The capital itself, the marvelous Edinburgh, also is worthy of focus, especially during the summertime festivals. country Scotland, scottish Scotland, app Scotland, conservative Scotland, information Scotland, scotland Scotland, our team Scotland, edinburgh Scotland, youngster Scotland, creed Scotland, chart Scotland, iona Scotland, menu Scotland, travel Scotland, records Scotland, past history Scotland, cars and truck Scotland, ship Scotland, uk Scotland, train Scotland, celtic Scotland, glasgow Scotland, shetland Scotland, culture Scotland, tay Scotland, bus Scotland, updates Scotland, learning Scotland, little bit Scotland, navigation Scotland, cookie Scotland, covid Scotland, sport Scotland, availability Scotland, online videos Scotland, highland video games Scotland, community Scotland, golf Scotland, scots Scotland, food Scotland, whisky Scotland, budget Scotland, visitscotland Scotland, gallery Scotland, email list Scotland, arbroath Scotland, hell Scotland, road Scotland, distilleries Scotland, street andrews Scotland, beverage Scotland, see scotland Scotland, europe Scotland, castles Scotland, potential Scotland, encounter Scotland, blogging site Scotland, dundee Scotland, steering Scotland, sports Scotland, covid-Scotland9 Scotland, transport Scotland. Edinburgh – Some concepts for going to Scotland Travel in Scotland must undoubtedly begin with its own financing. It takes about two times to explore Edinburgh, however you may expand this time up to 4. In the instance of a quick see to Scotland, you can likewise limit on your own to Edinburgh only, devoting one day on a circular excursion by bus in the Scottish highlands (virtually every traveling company in the financing uses it). For a slightly longer trip (albeit still limited to just a couple of times) from Edinburgh, I will recommend to strike in two paths: Isle of Arran or even Loch Lomond. Arran is actually phoned Scotland in miniature. Devoting two or even 3 days on the isle, our team can delight in the elegance of the west shoreline, unwind on the beach front, go up the highest possible optimal of the island– Goat Fell, as properly as admire the verdant hills and also take pleasure in the space. Loch Lomond is among Scotland’s two national playgrounds, a lovely pond surrounded by woodlands as well as hillsides. Heading, you may additionally check out Stirling Castle. There is actually a straight learn from Glasgow in each instructions. country Scotland, scottish Scotland, application Scotland, conservative Scotland, information Scotland, scotland Scotland, us Scotland, edinburgh Scotland, child Scotland, creed Scotland, map Scotland, iona Scotland, menu Scotland, travel Scotland, records Scotland, past Scotland, vehicle Scotland, ship Scotland, uk Scotland, train Scotland, celtic Scotland, glasgow Scotland, shetland Scotland, lifestyle Scotland, tay Scotland, bus Scotland, information Scotland, education and learning Scotland, little Scotland, navigating Scotland, cookie Scotland, covid Scotland, sporting activity Scotland, availability Scotland, online videos Scotland, highland activities Scotland, community Scotland, golf Scotland, scots Scotland, food Scotland, whisky Scotland, finances Scotland, visitscotland Scotland, museum Scotland, email list Scotland, arbroath Scotland, heck Scotland, roadway Scotland, distilleries Scotland, street andrews Scotland, drink Scotland, check out scotland Scotland, europe Scotland, castles Scotland, future Scotland, take in Scotland, blog site Scotland, dundee Scotland, steering Scotland, sporting activities Scotland, covid-Scotland9 Scotland, transportation Scotland. Scotland, like the entire of Great Britain, is not one of the least expensive locations. In enhancement, in Scotland the camping tent can be established up virtually anywhere, so travelers can easily also sleep in the untamed. The most widely known as well as one of the very most gorgeous treking trails in Europe is actually the so-called West Highland Way. Longer vacation? How about north along the west shore and afterwards back to the quieter, albeit less incredible eastern? Numerous vacationers in Glasgow, takes a learn to Mallaig (sometimes visiting Glencoe or even Fort William heading) at that point visits Isle of Skye (one of the most beautiful of the Scottish islands), then scalp along the coast towards Ullapool, regarding Durness, en route back checking out Inverness, Fort Augustus (Loch Ness), Aberdeen and Cairngorms National Park, and lastly Street Andrews. Is it possible through trains and also buses? Naturally it is actually feasible, however you are going to miss out on a great deal, so it is considerably far better to rent a vehicle for at least portion of the excursion. And don’t be fooled through the traveler catch of Loch Ness– actually, there are a lot of much more wonderful locations throughout Scotland country Scotland, scottish Scotland, app Scotland, tory Scotland, details Scotland, scotland Scotland, our company Scotland, edinburgh Scotland, little one Scotland, cult Scotland, map Scotland, iona Scotland, menu Scotland, traveling Scotland, records Scotland, past history Scotland, cars and truck Scotland, ship Scotland, uk Scotland, learn Scotland, celtic Scotland, glasgow Scotland, shetland Scotland, society Scotland, tay Scotland, bus Scotland, headlines Scotland, education and learning Scotland, little Scotland, navigation Scotland, cookie Scotland, covid Scotland, sport Scotland, accessibility Scotland, video recordings Scotland, highland video games Scotland, neighborhood Scotland, golf Scotland, scots Scotland, food items Scotland, whisky Scotland, finances Scotland, visitscotland Scotland, museum Scotland, e-newsletter Scotland, arbroath Scotland, heck Scotland, roadway Scotland, distilleries Scotland, st andrews Scotland, cocktail Scotland, check out scotland Scotland, europe Scotland, castles Scotland, potential Scotland, take in Scotland, blog site Scotland, dundee Scotland, driving Scotland, sports Scotland, transportation Scotland Glenelg The weather may be erratic. I keep in mind going to Scotland for the first opportunity at the side of April. It was presently springtime in Scotland, the sunshine was warming up, while in Scotland it was still wintertime all over. The Highlands were still dealt with in snowfall in numerous locations, and also in Edinburgh it was actually piercingly rain. Certainly, it ended up as soon as possible that I hadn’t stuffed the right factors. I was planning to keep in the city, however additionally ballet flats, shoes, decorative coats as well as thin shirts fall off in spring season. When journeying in Scotland, firstly really good, water-resistant, sporting activities shoes. A respectable poncho (and also windproof!) Will definitely also come in useful, sometimes it is actually additionally worth incorporating a thin headscarf, a sporting activities hat as well as sporting activities gloves to the bag (spring season as well as fall). In winter months, I suggest staying clear of Scotland coming from a proximity. Why? The response is straightforward: it pours and strikes. Additional little bit of things: Umbrellas certainly don’t function (the wind bends all of them in all directions), the camping tent needs to (MUST!) possess an excellent flysheet, it deserves taking a recyclable container with you (faucet water, but also drinkable in streams or even rivers), a minimum of a handful of sets of belts, a warm fleece and also one thing to drive away unpleasant flies (I suggest a smidge). In the scenario of a low-budget vacation, oversleep an outdoor tents or keep only in hotels (expense regarding PLN 80 every evening). You must attempt fish and shellfish (they are great tasting!), Whiskey, see at the very least one distillery and command fish and chips along with white vinegar at least once. I hope that with this post I urged my friends (:-RRB-) however additionally unknown people to travel to Scotland. It is actually actually worth a hundred times! I welcome you to explore, if merely I am still here. Stunning Scottish seasides. Loch Lomond Backpack. Iona- little isle, white colored beaches. Isle of Skye. Glencoe. Eilean Donan Castle. Island of Arran. Scotland is actually most certainly a definitely stunning nation, as well as every year it is visited through crowds of travelers from the United States, France, and even Italy or even Spain. Arran is phoned Scotland in mini. Scotland, like the entire of Great Britain, is not one of the most affordable destinations. It was actually actually spring season in Scotland, the sun was actually warming up, while in Scotland it was actually still wintertime all over. I wish that along with this message I urged my pals (:-RRB-) but also unknown people to travel to https://www.scotland.com/
Did you know these realities on CBD OIL and Full Spectrum CBD Hemp Oil? Cannabinoids are isolated from hemp using supercritical CO2 extraction. Thanks to contemporary innovation, the resulting option is tidy, free of heavy metals and unnecessary waxes, naturally present in the plant, and the sucked liquid has a normal, oily consistency. CBD oil contains cannabidiol as a base ingredient and may include only trace quantities of tetrahydroxycannabidiol (THC). It is advised by medical professionals and pharmacists as an antioxidant and substance that obstructs the action of proinflammatory cytokines (proteins), e.g. in Crohn’s disease or ulcerative intestine. RSO oil has a low CBD content, while high THC. The synergistic (enhancing) action of CBD and THC relative to each other is utilized here. Both cannabinoids can do much more together than when utilized separately. Both marijuana oil type CBD and RSO likewise contain other cannabinoids, such as cannabichromene (CBC) and cannabigerol (CBG). The secret is not, however, that CBD often has a composition expanded to include flavones, flavonoids, terpenes, terpenoids, amino acids and omega acids. The distinction is mostly due to motives directing humanity to use one or the other product. CBD medical marijuana oil is a rather beneficial mix of cannabinoids, created to secure against 21st century disease. It’s finest to use all of these compounds together, as nature produced them and enclosed in cannabis inflorescences. It ends up that cannabidiol enhances the results of cannabichromene (CBC) and cannabigerol (CBG), and flavones or flavonoids enhance the absorption of these compounds. Omega-6 and omega-3 highly nourish the body and do not permit to change, which speed up the aging process of the organism and improve the advancement of cancer. Oil of cannabis in a kind of pastime APR contains small quantities of CBD, stabilized by the existence of THC. – Modern clinical research reveals that CBD + THC cope with serious autoimmune diseases, while CBC or CBG show very little activity in the existence of both substances, simply like terpenes, flavones or flavonoids, for that reason their content in the service seems to be unneeded. In addition, the cannabis strain from which THC and CBD are derived consist of negligible amounts of other cannabinoids. Cannabis oil has already marked a new age in which guy stopped to fear what is unknown, and started to uncover what our forefathers had already observed and utilize the substantial potential, in the beginning look, a little strange relationships, associated primarily with pathology. Medical cannabis, contrary to its name, does not imply fermented female inflorescences and leaves including psychoactive compounds coiled in so-called “Joints”, but an advantageous oil without psychoactive THC. A basic individual, after taking doses of medicinal marijuana and attaining the appropriate state of cannabinoids in the blood, can delight in increased immunity, minimized susceptibility to cancer, postponed aging and reduced danger of stroke or heart attack. CBD oil includes cannabidiol as a base active ingredient and might contain only trace amounts of tetrahydroxycannabidiol (THC). RSO oil has a low CBD material, while high THC. Both cannabis oil type CBD and RSO also contain other cannabinoids, such as cannabichromene (CBC) and cannabigerol (CBG). CBD medical cannabis oil is a rather helpful blend of cannabinoids, created to protect against 21st century illness. Oil of cannabis in a kind of pastime APR includes small quantities of CBD, balanced by the presence of THC.
Did you understand these realities on CBD OIL and Full Spectrum CBD Hemp Oil? Cannabinoids are separated from hemp utilizing supercritical CO2 extraction. Thanks to modern-day technology, the resulting solution is clean, without heavy metals and unneeded waxes, naturally present in the plant, and the sucked liquid has a normal, oily consistency. CBD oil consists of cannabidiol as a base component and might include only trace quantities of tetrahydroxycannabidiol (THC). It is advised by medical professionals and pharmacists as an antioxidant and compound that obstructs the action of proinflammatory cytokines (proteins), e.g. in Crohn’s illness or ulcerative intestine. RSO oil has a low CBD material, while high THC. The synergistic (enhancing) action of CBD and THC relative to each other is used here. Both cannabinoids can do much more together than when utilized independently. Both cannabis oil type CBD and RSO likewise consist of other cannabinoids, such as cannabichromene (CBC) and cannabigerol (CBG). The trick is not, however, that CBD typically has a composition broadened to consist of flavones, flavonoids, terpenes, terpenoids, amino acids and omega acids. The difference is primarily due to motives guiding humankind to utilize one or the other product. CBD medical marijuana oil is a rather helpful mix of cannabinoids, developed to secure versus 21st century disease. It’s finest to use all of these substances together, as nature produced them and enclosed in cannabis inflorescences. It turns out that cannabidiol improves the results of cannabichromene (CBC) and cannabigerol (CBG), and flavones or flavonoids enhance the absorption of these substances. Omega-6 and omega-3 extremely nourish the body and do not allow to alter, which speed up the aging procedure of the organism and boost the advancement of cancer. Oil of cannabis in a kind of hobby APR consists of small amounts of CBD, balanced by the presence of THC. – Modern clinical research study reveals that CBD + THC cope with major autoimmune illness, while CBC or CBG show very little activity in the existence of both substances, just like flavonoids, flavones or terpenes, therefore their content in the service seems to be unnecessary. In addition, the marijuana pressure from which THC and CBD are obtained contain minimal amounts of other cannabinoids. Cannabis oil has actually currently marked a new period in which guy stopped to fear what is unknown, and started to discover what our ancestors had currently seen and utilize the considerable capacity, at first look, a little unusual relationships, associated mainly with pathology. Medical cannabis, contrary to its name, does not imply fermented female inflorescences and leaves containing psychoactive substances coiled in so-called “Joints”, however a beneficial oil without psychoactive THC. A basic individual, after taking doses of medical cannabis and attaining the suitable state of cannabinoids in the blood, can enjoy increased immunity, decreased vulnerability to cancer, postponed aging and reduced risk of stroke or cardiovascular disease. CBD oil consists of cannabidiol as a base ingredient and might contain only trace quantities of tetrahydroxycannabidiol (THC). RSO oil has a low CBD content, while high THC. Both cannabis oil type CBD and RSO also contain other cannabinoids, such as cannabichromene (CBC) and cannabigerol (CBG). CBD medical cannabis oil is a rather helpful blend of cannabinoids, designed to protect against 21st century disease. Oil of cannabis in a kind of hobby APR contains small quantities of CBD, stabilized by the existence of THC.
Did you know these realities on CBD OIL and Full Spectrum CBD Hemp Oil? Cannabinoids are isolated from hemp using supercritical CO2 extraction. Thanks to modern innovation, the resulting solution is clean, free of unnecessary waxes and heavy metals, naturally present in the plant, and the sucked liquid has a common, oily consistency. CBD oil includes cannabidiol as a base component and may contain just trace amounts of tetrahydroxycannabidiol (THC). It is recommended by doctors and pharmacists as an antioxidant and substance that obstructs the action of proinflammatory cytokines (proteins), e.g. in Crohn’s illness or ulcerative intestinal tract. RSO oil has a low CBD content, while high THC. The synergistic (enhancing) action of CBD and THC relative to each other is utilized here. Both cannabinoids can do much more together than when used individually. Both marijuana oil type CBD and RSO also contain other cannabinoids, such as cannabichromene (CBC) and cannabigerol (CBG). The trick is not, nevertheless, that CBD typically has a composition expanded to include flavones, flavonoids, terpenes, terpenoids, amino acids and omega acids. The distinction is mostly due to intentions assisting mankind to use one or the other product. CBD medical cannabis oil is a rather helpful mix of cannabinoids, created to protect against 21st century disease. It’s finest to use all of these substances together, as nature developed them and enclosed in marijuana inflorescences. It turns out that cannabidiol enhances the effects of cannabichromene (CBC) and cannabigerol (CBG), and flavones or flavonoids improve the absorption of these compounds. Omega-6 and omega-3 extremely nurture the body and do not allow to change, which speed up the aging procedure of the organism and improve the advancement of cancer. Oil of marijuana in a kind of pastime APR includes little quantities of CBD, balanced by the existence of THC. – Modern clinical research shows that CBD + THC cope with severe autoimmune illness, while CBC or CBG reveal very little activity in the existence of both substances, just like flavones, terpenes or flavonoids, therefore their material in the solution seems to be unnecessary. In addition, the marijuana stress from which THC and CBD are derived include negligible quantities of other cannabinoids. Marijuana oil has actually already marked a new age in which man stopped to fear what is unknown, and started to rediscover what our forefathers had already seen and use the substantial potential, in the beginning look, a little bizarre relationships, associated mainly with pathology. Medical marijuana, contrary to its name, does not suggest fermented female inflorescences and leaves consisting of psychedelic compounds coiled in so-called “Joints”, but an advantageous oil without psychoactive THC. A basic person, after taking dosages of medicinal marijuana and achieving the suitable state of cannabinoids in the blood, can enjoy increased immunity, minimized susceptibility to cancer, postponed aging and decreased threat of stroke or heart attack. CBD oil consists of cannabidiol as a base ingredient and may include just trace quantities of tetrahydroxycannabidiol (THC). RSO oil has a low CBD content, while high THC. Both marijuana oil type CBD and RSO also contain other cannabinoids, such as cannabichromene (CBC) and cannabigerol (CBG). CBD medical cannabis oil is a rather beneficial blend of cannabinoids, developed to secure versus 21st century illness. Oil of marijuana in a kind of pastime APR consists of small amounts of CBD, stabilized by the presence of THC.
Did you understand these facts on CBD OIL and Full Spectrum CBD Hemp Oil? Cannabinoids are separated from hemp utilizing supercritical CO2 extraction. Thanks to modern-day innovation, the resulting option is tidy, devoid of unnecessary waxes and heavy metals, naturally present in the plant, and the drawn liquid has a common, oily consistency. CBD oil includes cannabidiol as a base component and might contain only trace quantities of tetrahydroxycannabidiol (THC). It is suggested by medical professionals and pharmacists as an antioxidant and compound that obstructs the action of proinflammatory cytokines (proteins), e.g. in Crohn’s illness or ulcerative intestinal tract. RSO oil has a low CBD content, while high THC. Obviously, the key task of RSO is to cause a psychedelic impact, although it can likewise promote “ill” brain structures. It is worth knowing that supplementation of this type is primarily utilized by individuals to whom basic treatment does not bring relief in health problem. The synergistic (enhancing) action of CBD and THC relative to each other is utilized here. When utilized independently, both cannabinoids can do much more together than. In addition, they collectively promote the department of inactive nerve cells, nourish the fatty envelope of the nerves, and prevent myelin inflammation that triggers loss of function in some autoimmune illness. There are likewise stories where marijuana in its natural kind softened spasticity, minimized the frequency of seizures and convulsions, and reduced undesirable scrapie in Parkinson’s illness. This is where the concept of getting RSO, planned just for chronically ill individuals, stemmed . Both cannabis oil type CBD and RSO also consist of other cannabinoids, such as cannabichromene (CBC) and cannabigerol (CBG). The trick is not, however, that CBD often has a composition expanded to include flavones, flavonoids, terpenes, terpenoids, amino acids and omega acids. The distinction is mainly due to motives guiding humankind to use one or the other product. CBD medical cannabis oil is a rather helpful mix of cannabinoids, designed to protect versus 21st century illness. It’s best to use all of these substances together, as nature developed them and enclosed in marijuana inflorescences. Oil of cannabis in a kind of pastime APR consists of little quantities of CBD, stabilized by the existence of THC. – Modern scientific research reveals that CBD + THC cope with major autoimmune diseases, while CBC or CBG reveal minimal activity in the presence of both compounds, simply like terpenes, flavonoids or flavones, for that reason their material in the solution appears to be unneeded. In addition, the marijuana pressure from which THC and CBD are obtained include minimal quantities of other cannabinoids. Marijuana oil has already marked a brand-new age in which male stopped to fear what is unidentified, and started to find what our ancestors had already seen and utilize the substantial capacity, in the beginning look, a little bizarre relationships, associated mainly with pathology. Medical marijuana, contrary to its name, does not imply fermented female inflorescences and leaves containing psychedelic substances coiled in so-called “Joints”, but a helpful oil without psychedelic THC. A basic individual, after taking doses of medicinal cannabis and accomplishing the suitable state of cannabinoids in the blood, can delight in increased immunity, decreased vulnerability to cancer, delayed aging and minimized threat of stroke or heart attack. CBD oil consists of cannabidiol as a base ingredient and may contain only trace amounts of tetrahydroxycannabidiol (THC). RSO oil has a low CBD content, while high THC. Both cannabis oil type CBD and RSO likewise include other cannabinoids, such as cannabichromene (CBC) and cannabigerol (CBG). CBD medical marijuana oil is a rather beneficial mix of cannabinoids, developed to safeguard versus 21st century illness. Oil of cannabis in a kind of hobby APR contains small quantities of CBD, balanced by the existence of THC.
Did you know these truths on CBD OIL and Full Spectrum CBD Hemp Oil? Cannabinoids are separated from hemp utilizing supercritical CO2 extraction. Thanks to modern-day innovation, the resulting option is tidy, free of unneeded waxes and heavy metals, naturally present in the plant, and the drawn liquid has a normal, oily consistency. CBD oil contains cannabidiol as a base ingredient and might consist of just trace quantities of tetrahydroxycannabidiol (THC). Works as a memory enhancer, improving concentration and coordination of motions, eliminating inflammation and persistent infections. It enhances the conduction of stimuli in the course of autoimmune illness (numerous sclerosis, amyotrophic sclerosis). It is suggested by doctors and pharmacists as an antioxidant and substance that obstructs the action of proinflammatory cytokines (proteins), e.g. in Crohn’s disease or ulcerative intestinal tract. RSO oil has a low CBD material, while high THC. Obviously, the key job of RSO is to cause a psychedelic effect, although it can also promote “ill” brain structures. It is worth knowing that supplements of this type is mostly used by people to whom basic treatment does not bring relief in illness. The synergistic (enhancing) action of CBD and THC relative to each other is used here. Both cannabinoids can do a lot more together than when used individually. In addition, they jointly promote the division of inactive afferent neuron, nourish the fatty envelope of the nerves, and avoid myelin swelling that triggers loss of function in some autoimmune diseases. There are likewise stories where marijuana in its natural type softened spasticity, minimized the frequency of convulsions and seizures, and reduced unpleasant scrapie in Parkinson’s disease. This is where the concept of receiving RSO, intended just for chronically ill individuals, come from . Both cannabis oil type CBD and RSO likewise contain other cannabinoids, such as cannabichromene (CBC) and cannabigerol (CBG). The secret is not, however, that CBD frequently has a structure broadened to consist of flavones, flavonoids, terpenes, terpenoids, amino acids and omega acids. The difference is mainly due to intentions directing mankind to utilize one or the other product. CBD medical marijuana oil is a rather helpful mix of cannabinoids, created to secure against 21st century disease. It’s best to utilize all of these substances together, as nature created them and enclosed in marijuana inflorescences. It ends up that cannabidiol boosts the results of cannabichromene (CBC) and cannabigerol (CBG), and flavonoids or flavones improve the absorption of these substances. Omega-6 and omega-3 extremely nourish the body and do not enable to change, which accelerate the aging procedure of the organism and boost the advancement of cancer. Oil of cannabis in a kind of hobby APR consists of small amounts of CBD, stabilized by the presence of THC. – Modern clinical research reveals that CBD + THC cope with serious autoimmune illness, while CBC or CBG show minimal activity in the existence of both substances, just like terpenes, flavones or flavonoids, therefore their material in the option seems to be unneeded. In addition, the marijuana pressure from which THC and CBD are derived include minimal quantities of other cannabinoids. Marijuana oil has actually already marked a brand-new age in which male stopped to fear what is unidentified, and began to uncover what our forefathers had already discovered and use the considerable potential, in the beginning glance, a little bizarre relationships, associated primarily with pathology. Medical marijuana, contrary to its name, does not imply fermented female inflorescences and leaves including psychedelic compounds coiled in so-called “Joints”, however a helpful oil without psychoactive THC. A standard person, after taking doses of medical marijuana and attaining the proper state of cannabinoids in the blood, can delight in increased immunity, reduced susceptibility to cancer, postponed aging and lowered danger of stroke or cardiac arrest. CBD oil consists of cannabidiol as a base active ingredient and might contain just trace quantities of tetrahydroxycannabidiol (THC). RSO oil has a low CBD content, while high THC. Both cannabis oil type CBD and RSO also include other cannabinoids, such as cannabichromene (CBC) and cannabigerol (CBG). CBD medical marijuana oil is a rather beneficial mix of cannabinoids, developed to protect versus 21st century illness. Oil of marijuana in a kind of pastime APR includes small amounts of CBD, balanced by the presence of THC.
Hi my friend! I wish to say that this article is amazing, nice written and include almost all important infos. I would like to see more posts like this.
Did you know these facts on CBD OIL and Full Spectrum CBD Hemp Oil? Cannabinoids are separated from hemp using supercritical CO2 extraction. Thanks to contemporary innovation, the resulting option is clean, free of unneeded waxes and heavy metals, naturally present in the plant, and the drawn liquid has a typical, oily consistency. CBD oil includes cannabidiol as a base active ingredient and may consist of just trace quantities of tetrahydroxycannabidiol (THC). It is suggested by physicians and pharmacists as an antioxidant and compound that obstructs the action of proinflammatory cytokines (proteins), e.g. in Crohn’s disease or ulcerative intestinal tract. RSO oil has a low CBD material, while high THC. Obviously, the key job of RSO is to cause a psychedelic result, although it can likewise promote “sick” brain structures. It deserves understanding that supplements of this type is mostly used by people to whom standard treatment does not bring relief in health problem. The synergistic (enhancing) action of CBD and THC relative to each other is utilized here. When used individually, both cannabinoids can do much more together than. In addition, they collectively promote the department of non-active afferent neuron, nurture the fatty envelope of the nerves, and avoid myelin inflammation that triggers loss of function in some autoimmune illness. There are likewise stories where marijuana in its natural type softened spasticity, minimized the frequency of convulsions and seizures, and reduced undesirable scrapie in Parkinson’s disease. This is where the idea of receiving RSO, intended just for chronically ill individuals, stemmed . Both cannabis oil type CBD and RSO also contain other cannabinoids, such as cannabichromene (CBC) and cannabigerol (CBG). The secret is not, nevertheless, that CBD typically has a structure expanded to include flavones, flavonoids, terpenes, terpenoids, amino acids and omega acids. The difference is mainly due to motives guiding humanity to utilize one or the other product. CBD medical cannabis oil is a rather helpful blend of cannabinoids, developed to safeguard against 21st century illness. It’s finest to use all of these substances together, as nature produced them and confined in marijuana inflorescences. Oil of cannabis in a sort of pastime APR consists of little quantities of CBD, stabilized by the existence of THC. Manufacturers concentrate on the synergistic result of one compound relative to the other, while abandoning the existence of CBC and CBG. Why such a decision? – Modern clinical research study shows that CBD + THC cope with severe autoimmune diseases, while CBC or CBG show very little activity in the existence of both substances, much like flavones, terpenes or flavonoids, therefore their content in the service appears to be unnecessary. In addition, the marijuana strain from which THC and CBD are derived contain minimal amounts of other cannabinoids. RSO oil is entirely unlawful in Poland, which is why it can not be acquired in any lawfully operating shop on the market. Of course, there are a number of amateur methods for obtaining it, but it’s excellent to know that substances acquired artificially in house laboratories are uncertain, untested, and the result unknown. The solvent for the production of family RSO is usually gasoline, alcohol and even kerosene, which rather of curing, poison. Alcohols and their like impair cannabinoids, therefore in reality, they do not bring anything brand-new to the medical world. Cannabis oil has actually already marked a new age in which guy stopped to fear what is unidentified, and started to discover what our ancestors had actually currently discovered and utilize the substantial capacity, in the beginning look, a little strange relationships, associated generally with pathology. Medical marijuana, contrary to its name, does not imply fermented female inflorescences and leaves including psychedelic substances coiled in so-called “Joints”, but a beneficial oil without psychedelic THC. A standard individual, after taking dosages of medical cannabis and achieving the proper state of cannabinoids in the blood, can take pleasure in increased immunity, minimized vulnerability to cancer, delayed aging and minimized risk of stroke or heart attack. CBD oil includes cannabidiol as a base ingredient and might contain just trace amounts of tetrahydroxycannabidiol (THC). RSO oil has a low CBD material, while high THC. Both cannabis oil type CBD and RSO likewise contain other cannabinoids, such as cannabichromene (CBC) and cannabigerol (CBG). CBD medical marijuana oil is a rather advantageous blend of cannabinoids, designed to secure against 21st century disease. Oil of cannabis in a kind of hobby APR contains little quantities of CBD, stabilized by the existence of THC.
I really like and appreciate your article post.Thanks Again. Fantastic.
Did you know these realities on CBD OIL and Full Spectrum CBD Hemp Oil? Cannabinoids are isolated from hemp using supercritical CO2 extraction. Thanks to modern innovation, the resulting service is clean, totally free of heavy metals and unneeded waxes, naturally present in the plant, and the sucked liquid has a common, oily consistency. CBD oil contains cannabidiol as a base active ingredient and may consist of only trace quantities of tetrahydroxycannabidiol (THC). It is advised by medical professionals and pharmacists as an antioxidant and substance that blocks the action of proinflammatory cytokines (proteins), e.g. in Crohn’s disease or ulcerative intestine. RSO oil has a low CBD content, while high THC. The synergistic (enhancing) action of CBD and THC relative to each other is utilized here. Both cannabinoids can do much more together than when utilized individually. Both marijuana oil type CBD and RSO also contain other cannabinoids, such as cannabichromene (CBC) and cannabigerol (CBG). The trick is not, however, that CBD often has actually a structure expanded to include flavones, flavonoids, terpenes, terpenoids, amino acids and omega acids. The distinction is mostly due to motives directing mankind to utilize one or the other product. CBD medical cannabis oil is a rather beneficial mix of cannabinoids, designed to secure against 21st century illness. It’s best to use all of these substances together, as nature produced them and enclosed in marijuana inflorescences. It ends up that cannabidiol enhances the effects of cannabichromene (CBC) and cannabigerol (CBG), and flavones or flavonoids enhance the absorption of these substances. Omega-6 and omega-3 highly nurture the body and do not allow to change, which speed up the aging procedure of the organism and boost the development of cancer. Oil of marijuana in a sort of pastime APR consists of percentages of CBD, balanced by the existence of THC. Makers focus on the synergistic result of one compound relative to the other, while abandoning the presence of CBC and CBG. Why such a choice? – Modern scientific research study reveals that CBD + THC cope with major autoimmune illness, while CBC or CBG reveal minimal activity in the existence of both substances, simply like terpenes, flavonoids or flavones, therefore their material in the option appears to be unnecessary. In addition, the cannabis pressure from which THC and CBD are obtained contain minimal amounts of other cannabinoids. RSO oil is totally unlawful in Poland, which is why it can not be obtained in any legally running shop on the marketplace. Naturally, there are a number of amateur techniques for acquiring it, however it’s good to know that substances acquired synthetically in home labs doubt, untested, and the effect unknown. The solvent for the production of family RSO is typically gasoline, alcohol and even kerosene, which instead of curing, poison. Alcohols and their like hinder cannabinoids, therefore in truth, they do not bring anything brand-new to the medical world. Marijuana oil has actually currently marked a new age in which man ceased to fear what is unknown, and began to find what our ancestors had actually currently observed and use the substantial capacity, in the beginning look, a little strange relationships, associated mainly with pathology. Medical marijuana, contrary to its name, does not indicate fermented female inflorescences and leaves containing psychoactive substances coiled in so-called “Joints”, however an useful oil without psychedelic THC. A basic individual, after taking doses of medical cannabis and attaining the proper state of cannabinoids in the blood, can take pleasure in increased immunity, decreased vulnerability to cancer, postponed aging and reduced danger of stroke or cardiac arrest. CBD oil contains cannabidiol as a base ingredient and might consist of just trace amounts of tetrahydroxycannabidiol (THC). RSO oil has a low CBD content, while high THC. Both marijuana oil type CBD and RSO likewise include other cannabinoids, such as cannabichromene (CBC) and cannabigerol (CBG). CBD medical cannabis oil is a rather useful mix of cannabinoids, designed to protect against 21st century disease. Oil of cannabis in a kind of hobby APR contains little quantities of CBD, balanced by the presence of THC.
Did you know these facts on CBD OIL and Full Spectrum CBD Hemp Oil? Cannabinoids are separated from hemp utilizing supercritical CO2 extraction. Thanks to modern innovation, the resulting option is clean, complimentary of unneeded waxes and heavy metals, naturally present in the plant, and the sucked liquid has a normal, oily consistency. CBD oil consists of cannabidiol as a base component and might contain only trace quantities of tetrahydroxycannabidiol (THC). Works as a memory enhancer, enhancing concentration and coordination of movements, eliminating swelling and recurrent infections. It enhances the conduction of stimuli in the course of autoimmune illness (several sclerosis, amyotrophic sclerosis). It is suggested by medical professionals and pharmacists as an antioxidant and substance that obstructs the action of proinflammatory cytokines (proteins), e.g. in Crohn’s disease or ulcerative intestinal tract. RSO oil has a low CBD material, while high THC. The synergistic (enhancing) action of CBD and THC relative to each other is utilized here. Both cannabinoids can do much more together than when utilized separately. Both marijuana oil type CBD and RSO likewise contain other cannabinoids, such as cannabichromene (CBC) and cannabigerol (CBG). The secret is not, however, that CBD frequently has actually a composition expanded to consist of flavones, flavonoids, terpenes, terpenoids, amino acids and omega acids. The distinction is mostly due to motives assisting humanity to utilize one or the other product. CBD medical marijuana oil is a rather useful mix of cannabinoids, designed to protect versus 21st century disease. It’s finest to utilize all of these compounds together, as nature produced them and enclosed in marijuana inflorescences. It turns out that cannabidiol enhances the results of cannabichromene (CBC) and cannabigerol (CBG), and flavones or flavonoids improve the absorption of these compounds. Omega-6 and omega-3 extremely nurture the body and do not permit to change, which speed up the aging procedure of the organism and boost the advancement of cancer. Oil of cannabis in a type of hobby APR contains little amounts of CBD, stabilized by the presence of THC. Manufacturers focus on the synergistic result of one compound relative to the other, while abandoning the presence of CBC and CBG. Why such a decision? – Modern scientific research reveals that CBD + THC manage severe autoimmune illness, while CBC or CBG reveal very little activity in the presence of both substances, simply like flavonoids, flavones or terpenes, for that reason their material in the solution seems to be unnecessary. In addition, the cannabis strain from which THC and CBD are obtained contain minimal quantities of other cannabinoids. RSO oil is completely prohibited in Poland, which is why it can not be obtained in any legally running shop on the market. Naturally, there are a variety of amateur techniques for getting it, however it’s good to understand that compounds obtained synthetically in home labs doubt, untried, and the effect unknown. The solvent for the production of family RSO is usually gasoline, alcohol and even kerosene, which instead of curing, toxin. Alcohols and their like impair cannabinoids, and so in truth, they do not bring anything new to the medical world. Marijuana oil has currently marked a brand-new age in which man ceased to fear what is unknown, and began to rediscover what our forefathers had currently discovered and utilize the considerable potential, in the beginning look, a little unusual relationships, associated generally with pathology. Medical marijuana, contrary to its name, does not suggest fermented female inflorescences and leaves containing psychedelic compounds coiled in so-called “Joints”, however a helpful oil without psychoactive THC. A standard person, after taking doses of medicinal cannabis and accomplishing the suitable state of cannabinoids in the blood, can delight in increased immunity, minimized susceptibility to cancer, postponed aging and reduced risk of stroke or heart attack. CBD oil consists of cannabidiol as a base ingredient and might consist of just trace quantities of tetrahydroxycannabidiol (THC). RSO oil has a low CBD content, while high THC. Both marijuana oil type CBD and RSO likewise consist of other cannabinoids, such as cannabichromene (CBC) and cannabigerol (CBG). CBD medical marijuana oil is a rather useful blend of cannabinoids, designed to safeguard versus 21st century disease. Oil of marijuana in a kind of pastime APR consists of little amounts of CBD, balanced by the existence of THC.
Did you understand these realities on CBD OIL and Full Spectrum CBD Hemp Oil? Cannabinoids are isolated from hemp utilizing supercritical CO2 extraction. Thanks to modern innovation, the resulting service is tidy, without unneeded waxes and heavy metals, naturally present in the plant, and the drawn liquid has a typical, oily consistency. CBD oil consists of cannabidiol as a base component and might contain just trace quantities of tetrahydroxycannabidiol (THC). It is suggested by doctors and pharmacists as an antioxidant and substance that obstructs the action of proinflammatory cytokines (proteins), e.g. in Crohn’s illness or ulcerative intestine. RSO oil has a low CBD content, while high THC. The synergistic (enhancing) action of CBD and THC relative to each other is utilized here. Both cannabinoids can do much more together than when utilized separately. Both cannabis oil type CBD and RSO likewise contain other cannabinoids, such as cannabichromene (CBC) and cannabigerol (CBG). The secret is not, however, that CBD typically has a structure broadened to consist of flavones, flavonoids, terpenes, terpenoids, amino acids and omega acids. The difference is mainly due to motives guiding mankind to use one or the other item. CBD medical marijuana oil is a rather advantageous blend of cannabinoids, created to protect versus 21st century illness. It’s finest to utilize all of these compounds together, as nature produced them and confined in cannabis inflorescences. It ends up that cannabidiol improves the results of cannabichromene (CBC) and cannabigerol (CBG), and flavones or flavonoids enhance the absorption of these substances. Omega-6 and omega-3 highly nourish the body and do not allow to alter, which accelerate the aging process of the organism and improve the advancement of cancer. Oil of marijuana in a kind of pastime APR consists of percentages of CBD, balanced by the presence of THC. Producers concentrate on the synergistic impact of one substance relative to the other, while abandoning the existence of CBC and CBG. Why such a choice? – Modern clinical research reveals that CBD + THC manage severe autoimmune diseases, while CBC or CBG reveal minimal activity in the presence of both compounds, simply like terpenes, flavonoids or flavones, therefore their material in the option seems to be unnecessary. In addition, the cannabis strain from which THC and CBD are derived consist of minimal amounts of other cannabinoids. RSO oil is entirely unlawful in Poland, which is why it can not be acquired in any legally operating store on the market. Obviously, there are a number of amateur methods for getting it, but it’s excellent to understand that compounds gotten synthetically in home labs are uncertain, untested, and the impact unknown. The solvent for the production of home RSO is typically gas, alcohol and even kerosene, which instead of treating, toxin. Alcohols and their like impair cannabinoids, therefore in truth, they do not bring anything new to the medical world. Marijuana oil has actually currently marked a brand-new era in which man ceased to fear what is unknown, and started to uncover what our ancestors had actually already noticed and utilize the substantial potential, at first glance, a little bizarre relationships, associated primarily with pathology. Medical marijuana, contrary to its name, does not indicate fermented female inflorescences and leaves consisting of psychedelic substances coiled in so-called “Joints”, however an useful oil without psychoactive THC. A basic person, after taking doses of medicinal cannabis and accomplishing the proper state of cannabinoids in the blood, can take pleasure in increased immunity, minimized susceptibility to cancer, postponed aging and reduced risk of stroke or heart attack. CBD oil includes cannabidiol as a base component and might consist of just trace amounts of tetrahydroxycannabidiol (THC). RSO oil has a low CBD material, while high THC. Both cannabis oil type CBD and RSO also include other cannabinoids, such as cannabichromene (CBC) and cannabigerol (CBG). CBD medical marijuana oil is a rather helpful blend of cannabinoids, designed to protect against 21st century illness. Oil of marijuana in a kind of pastime APR includes little amounts of CBD, stabilized by the existence of THC.
Did you know these truths on CBD OIL and Full Spectrum CBD Hemp Oil? Cannabinoids are separated from hemp using supercritical CO2 extraction. Thanks to modern-day innovation, the resulting service is tidy, free of heavy metals and unnecessary waxes, naturally present in the plant, and the sucked liquid has a normal, oily consistency. CBD oil includes cannabidiol as a base ingredient and may contain only trace quantities of tetrahydroxycannabidiol (THC). It is advised by physicians and pharmacists as an antioxidant and substance that obstructs the action of proinflammatory cytokines (proteins), e.g. in Crohn’s disease or ulcerative intestine. RSO oil has a low CBD material, while high THC. Of course, the essential job of RSO is to trigger a psychoactive result, although it can also stimulate “ill” brain structures. It is worth knowing that supplementation of this type is primarily used by individuals to whom basic treatment does not bring relief in illness. The synergistic (enhancing) action of CBD and THC relative to each other is used here. When used independently, both cannabinoids can do much more together than. In addition, they collectively promote the department of non-active nerve cells, nurture the fatty envelope of the nerves, and avoid myelin inflammation that causes loss of function in some autoimmune diseases. There are likewise stories where cannabis in its natural type softened spasticity, minimized the frequency of convulsions and seizures, and reduced undesirable scrapie in Parkinson’s disease. This is where the concept of receiving RSO, intended only for chronically ill people, originated . Both marijuana oil type CBD and RSO likewise consist of other cannabinoids, such as cannabichromene (CBC) and cannabigerol (CBG). The secret is not, nevertheless, that CBD frequently has actually a composition expanded to include flavones, flavonoids, terpenes, terpenoids, amino acids and omega acids. The distinction is primarily due to motives directing humankind to use one or the other item. CBD medical cannabis oil is a rather helpful mix of cannabinoids, created to safeguard against 21st century disease. It’s finest to utilize all of these substances together, as nature produced them and confined in marijuana inflorescences. Oil of marijuana in a type of hobby APR includes little amounts of CBD, balanced by the presence of THC. Makers focus on the synergistic result of one compound relative to the other, while deserting the existence of CBC and CBG. Why such a choice? – Modern scientific research study reveals that CBD + THC deal with major autoimmune illness, while CBC or CBG show very little activity in the existence of both compounds, similar to flavones, terpenes or flavonoids, for that reason their content in the option appears to be unneeded. In addition, the cannabis strain from which THC and CBD are derived include negligible quantities of other cannabinoids. RSO oil is entirely illegal in Poland, which is why it can not be gotten in any legally operating store on the marketplace. Naturally, there are a variety of amateur techniques for obtaining it, however it’s great to understand that substances acquired artificially in home labs doubt, untried, and the result unknown. The solvent for the production of home RSO is normally gasoline, alcohol and even kerosene, which rather of curing, toxin. Alcohols and their like impair cannabinoids, therefore in reality, they do not bring anything brand-new to the medical world. Marijuana oil has actually currently marked a brand-new period in which guy ceased to fear what is unknown, and began to discover what our forefathers had currently discovered and utilize the significant potential, at first glance, a little bizarre relationships, associated generally with pathology. Medical cannabis, contrary to its name, does not mean fermented female inflorescences and leaves consisting of psychoactive compounds coiled in so-called “Joints”, but an useful oil without psychedelic THC. A standard individual, after taking doses of medical marijuana and attaining the suitable state of cannabinoids in the blood, can delight in increased resistance, minimized susceptibility to cancer, delayed aging and decreased risk of stroke or cardiac arrest. CBD oil includes cannabidiol as a base ingredient and may include only trace amounts of tetrahydroxycannabidiol (THC). RSO oil has a low CBD material, while high THC. Both cannabis oil type CBD and RSO also contain other cannabinoids, such as cannabichromene (CBC) and cannabigerol (CBG). CBD medical marijuana oil is a rather helpful mix of cannabinoids, created to secure against 21st century illness. Oil of cannabis in a kind of pastime APR consists of little quantities of CBD, stabilized by the presence of THC.
Did you know these truths on CBD OIL and Full Spectrum CBD Hemp Oil? Cannabinoids are separated from hemp utilizing supercritical CO2 extraction. Thanks to contemporary innovation, the resulting service is tidy, without heavy metals and unneeded waxes, naturally present in the plant, and the sucked liquid has a normal, oily consistency. CBD oil contains cannabidiol as a base ingredient and may include just trace quantities of tetrahydroxycannabidiol (THC). Functions as a memory enhancer, enhancing concentration and coordination of movements, removing swelling and reoccurring infections. It improves the conduction of stimuli in the course of autoimmune diseases (numerous sclerosis, amyotrophic sclerosis). It is recommended by physicians and pharmacists as an antioxidant and substance that blocks the action of proinflammatory cytokines (proteins), e.g. in Crohn’s illness or ulcerative intestinal tract. RSO oil has a low CBD material, while high THC. The synergistic (enhancing) action of CBD and THC relative to each other is utilized here. Both cannabinoids can do much more together than when utilized individually. Both cannabis oil type CBD and RSO likewise include other cannabinoids, such as cannabichromene (CBC) and cannabigerol (CBG). The secret is not, nevertheless, that CBD frequently has actually a composition expanded to consist of flavones, flavonoids, terpenes, terpenoids, amino acids and omega acids. The distinction is primarily due to motives assisting humanity to use one or the other product. CBD medical cannabis oil is a rather advantageous mix of cannabinoids, developed to safeguard versus 21st century disease. It’s best to use all of these substances together, as nature developed them and confined in cannabis inflorescences. Oil of cannabis in a kind of pastime APR contains small amounts of CBD, balanced by the presence of THC. – Modern scientific research study shows that CBD + THC cope with severe autoimmune diseases, while CBC or CBG reveal very little activity in the existence of both compounds, simply like flavones, flavonoids or terpenes, for that reason their content in the option appears to be unnecessary. In addition, the marijuana strain from which THC and CBD are derived include negligible amounts of other cannabinoids. Cannabis oil has already marked a new period in which male stopped to fear what is unidentified, and started to rediscover what our forefathers had currently discovered and utilize the significant capacity, at first look, a little strange relationships, associated primarily with pathology. Medical marijuana, contrary to its name, does not imply fermented female inflorescences and leaves consisting of psychedelic compounds coiled in so-called “Joints”, however a helpful oil without psychedelic THC. A basic individual, after taking doses of medical marijuana and attaining the proper state of cannabinoids in the blood, can delight in increased resistance, reduced susceptibility to cancer, postponed aging and reduced threat of stroke or cardiac arrest. CBD oil contains cannabidiol as a base active ingredient and may contain only trace amounts of tetrahydroxycannabidiol (THC). RSO oil has a low CBD material, while high THC. Both marijuana oil type CBD and RSO also consist of other cannabinoids, such as cannabichromene (CBC) and cannabigerol (CBG). CBD medical cannabis oil is a rather beneficial mix of cannabinoids, designed to protect versus 21st century illness. Oil of marijuana in a kind of pastime APR consists of little amounts of CBD, stabilized by the presence of THC.
Did you understand these realities on CBD OIL and Full Spectrum CBD Hemp Oil? Cannabinoids are separated from hemp utilizing supercritical CO2 extraction. Thanks to modern-day innovation, the resulting option is clean, without unnecessary waxes and heavy metals, naturally present in the plant, and the drawn liquid has a normal, oily consistency. CBD oil contains cannabidiol as a base ingredient and might consist of just trace amounts of tetrahydroxycannabidiol (THC). It is suggested by physicians and pharmacists as an antioxidant and substance that blocks the action of proinflammatory cytokines (proteins), e.g. in Crohn’s illness or ulcerative intestine. RSO oil has a low CBD material, while high THC. The synergistic (enhancing) action of CBD and THC relative to each other is used here. Both cannabinoids can do much more together than when used individually. Both cannabis oil type CBD and RSO also contain other cannabinoids, such as cannabichromene (CBC) and cannabigerol (CBG). The trick is not, nevertheless, that CBD often has actually a structure expanded to include flavones, flavonoids, terpenes, terpenoids, amino acids and omega acids. The distinction is primarily due to motives assisting humanity to utilize one or the other product. CBD medical marijuana oil is a rather useful mix of cannabinoids, created to safeguard against 21st century illness. It’s finest to use all of these compounds together, as nature produced them and confined in cannabis inflorescences. Oil of marijuana in a kind of pastime APR includes small amounts of CBD, balanced by the existence of THC. – Modern scientific research study shows that CBD + THC cope with severe autoimmune illness, while CBC or CBG reveal minimal activity in the existence of both substances, simply like flavones, flavonoids or terpenes, for that reason their content in the solution appears to be unnecessary. In addition, the cannabis stress from which THC and CBD are obtained contain minimal quantities of other cannabinoids. Marijuana oil has actually already marked a new age in which guy ceased to fear what is unidentified, and started to discover what our forefathers had currently noticed and utilize the significant capacity, at very first glance, a little bizarre relationships, associated mainly with pathology. Medical marijuana, contrary to its name, does not indicate fermented female inflorescences and leaves containing psychoactive compounds coiled in so-called “Joints”, but a helpful oil without psychedelic THC. A basic person, after taking doses of medicinal marijuana and accomplishing the suitable state of cannabinoids in the blood, can delight in increased resistance, decreased vulnerability to cancer, delayed aging and minimized threat of stroke or cardiac arrest. CBD oil contains cannabidiol as a base component and may include only trace amounts of tetrahydroxycannabidiol (THC). RSO oil has a low CBD material, while high THC. Both cannabis oil type CBD and RSO likewise consist of other cannabinoids, such as cannabichromene (CBC) and cannabigerol (CBG). CBD medical marijuana oil is a rather useful mix of cannabinoids, created to protect against 21st century disease. Oil of cannabis in a kind of pastime APR includes small quantities of CBD, balanced by the presence of THC.
Did you know these facts on CBD OIL and Full Spectrum CBD Hemp Oil? Cannabinoids are isolated from hemp using supercritical CO2 extraction. Thanks to contemporary innovation, the resulting option is clean, complimentary of heavy metals and unnecessary waxes, naturally present in the plant, and the drawn liquid has a normal, oily consistency. CBD oil contains cannabidiol as a base ingredient and might consist of only trace amounts of tetrahydroxycannabidiol (THC). Works as a memory enhancer, improving concentration and coordination of motions, removing inflammation and reoccurring infections. It improves the conduction of stimuli in the course of autoimmune illness (multiple sclerosis, amyotrophic sclerosis). It is advised by medical professionals and pharmacists as an antioxidant and substance that obstructs the action of proinflammatory cytokines (proteins), e.g. in Crohn’s illness or ulcerative intestine. RSO oil has a low CBD material, while high THC. The synergistic (enhancing) action of CBD and THC relative to each other is used here. Both cannabinoids can do much more together than when utilized separately. Both cannabis oil type CBD and RSO likewise contain other cannabinoids, such as cannabichromene (CBC) and cannabigerol (CBG). The secret is not, however, that CBD frequently has a composition expanded to include flavones, flavonoids, terpenes, terpenoids, amino acids and omega acids. The distinction is mainly due to intentions directing humanity to use one or the other product. CBD medical cannabis oil is a rather beneficial mix of cannabinoids, designed to safeguard versus 21st century illness. It’s best to utilize all of these substances together, as nature developed them and enclosed in marijuana inflorescences. Oil of marijuana in a kind of pastime APR includes percentages of CBD, balanced by the presence of THC. Producers focus on the synergistic effect of one substance relative to the other, while deserting the presence of CBC and CBG. Why such a decision? – Modern scientific research study shows that CBD + THC manage major autoimmune diseases, while CBC or CBG reveal minimal activity in the presence of both compounds, similar to terpenes, flavones or flavonoids, therefore their content in the option appears to be unnecessary. In addition, the cannabis pressure from which THC and CBD are obtained include negligible quantities of other cannabinoids. RSO oil is completely unlawful in Poland, which is why it can not be gotten in any lawfully running store on the market. Naturally, there are a variety of amateur techniques for acquiring it, but it’s excellent to know that substances gotten artificially in home labs doubt, untested, and the effect unknown. The solvent for the production of home RSO is normally fuel, alcohol and even kerosene, which instead of treating, toxin. Alcohols and their like hinder cannabinoids, therefore in reality, they don’t bring anything brand-new to the medical world. Marijuana oil has actually already marked a brand-new era in which man ceased to fear what is unidentified, and began to discover what our forefathers had actually already observed and use the considerable capacity, initially look, a little unusual relationships, associated mainly with pathology. Medical marijuana, contrary to its name, does not imply fermented female inflorescences and leaves including psychoactive compounds coiled in so-called “Joints”, however a beneficial oil without psychedelic THC. A basic person, after taking dosages of medicinal cannabis and attaining the proper state of cannabinoids in the blood, can enjoy increased resistance, lowered susceptibility to cancer, delayed aging and decreased danger of stroke or cardiac arrest. CBD oil includes cannabidiol as a base component and may include just trace amounts of tetrahydroxycannabidiol (THC). RSO oil has a low CBD material, while high THC. Both cannabis oil type CBD and RSO also include other cannabinoids, such as cannabichromene (CBC) and cannabigerol (CBG). CBD medical cannabis oil is a rather beneficial blend of cannabinoids, designed to safeguard versus 21st century disease. Oil of cannabis in a kind of pastime APR contains little quantities of CBD, balanced by the existence of THC.
Did you understand these truths on CBD OIL and Full Spectrum CBD Hemp Oil? Cannabinoids are separated from hemp utilizing supercritical CO2 extraction. Thanks to modern technology, the resulting service is clean, complimentary of unnecessary waxes and heavy metals, naturally present in the plant, and the sucked liquid has a typical, oily consistency. CBD oil consists of cannabidiol as a base ingredient and may include only trace amounts of tetrahydroxycannabidiol (THC). It is advised by doctors and pharmacists as an antioxidant and substance that blocks the action of proinflammatory cytokines (proteins), e.g. in Crohn’s illness or ulcerative intestinal tract. RSO oil has a low CBD content, while high THC. The synergistic (enhancing) action of CBD and THC relative to each other is used here. Both cannabinoids can do much more together than when utilized separately. Both cannabis oil type CBD and RSO also consist of other cannabinoids, such as cannabichromene (CBC) and cannabigerol (CBG). The trick is not, nevertheless, that CBD typically has a structure broadened to consist of flavones, flavonoids, terpenes, terpenoids, amino acids and omega acids. The distinction is mainly due to intentions guiding humankind to utilize one or the other product. CBD medical marijuana oil is a rather helpful mix of cannabinoids, designed to secure versus 21st century illness. It’s best to utilize all of these compounds together, as nature produced them and enclosed in cannabis inflorescences. Oil of cannabis in a kind of pastime APR includes little amounts of CBD, balanced by the presence of THC. – Modern clinical research study reveals that CBD + THC cope with serious autoimmune diseases, while CBC or CBG reveal very little activity in the existence of both compounds, simply like flavonoids, flavones or terpenes, for that reason their content in the solution seems to be unneeded. In addition, the cannabis pressure from which THC and CBD are derived include minimal quantities of other cannabinoids. Marijuana oil has currently marked a new period in which man ceased to fear what is unidentified, and started to find what our forefathers had actually already seen and utilize the substantial capacity, in the beginning look, a little strange relationships, associated mainly with pathology. Medical marijuana, contrary to its name, does not indicate fermented female inflorescences and leaves consisting of psychedelic compounds coiled in so-called “Joints”, however a helpful oil without psychedelic THC. A standard person, after taking dosages of medicinal marijuana and accomplishing the suitable state of cannabinoids in the blood, can enjoy increased resistance, decreased vulnerability to cancer, postponed aging and reduced danger of stroke or cardiac arrest. CBD oil contains cannabidiol as a base component and might include just trace amounts of tetrahydroxycannabidiol (THC). RSO oil has a low CBD material, while high THC. Both marijuana oil type CBD and RSO likewise include other cannabinoids, such as cannabichromene (CBC) and cannabigerol (CBG). CBD medical marijuana oil is a rather useful mix of cannabinoids, developed to secure against 21st century illness. Oil of cannabis in a kind of pastime APR includes small quantities of CBD, balanced by the existence of THC.
Scotland is actually definitely an actually attractive nation, as well as yearly it is gone to through crowds of travelers coming from the United States, France, and also even Italy or Spain. Having said that, I can easily not stand up to the opinion that Poles come right here mainly for job. Hardly any person departing in July, August or September will definitely think about Scotland. Possibly it is actually due to the rates that are certainly antagonistic for some tourists. The land of Nessi and also guys in kilts is absolutely worth a long or short quest. Maybe it is actually really good to think of it at this moment, when the market value of the extra pound is falling, and thus our experts will pay out much less for a holiday in Scotland? Glen Affric in early spring Therefore why is it worth it? Scotland is primarily a terrific garden in the north of the nation. Highlands– mountains covered with lawn as well as heathers, deep lochs (ponds), a significant shore product line, glen (picturesque lowlands), as well as most of all, rarely found in Europe (specifically in Scotland!) wilderness, where our company are going to certainly not observe a solitary home. Space, room and area once more! Wild attribute, a great quantity of plants, birds as well as other animals await attribute fans. In Scotland, I have actually managed to view tapes, dolphins or maybe deer. Scotland is likewise an in the past fascinating land (who checked out Brave Heart?), Where you can easily see splendid stone fortress (Edinburgh, Stirling, Linlithgow, Eilean Donan). The funding itself, the majestic Edinburgh, likewise is entitled to interest, specifically throughout the summer season festivities. nation Scotland, scottish Scotland, app Scotland, tory Scotland, details Scotland, scotland Scotland, our team Scotland, edinburgh Scotland, youngster Scotland, creed Scotland, map Scotland, iona Scotland, menu Scotland, traveling Scotland, data Scotland, past Scotland, automobile Scotland, ship Scotland, uk Scotland, learn Scotland, celtic Scotland, glasgow Scotland, shetland Scotland, lifestyle Scotland, tay Scotland, bus Scotland, information Scotland, education and learning Scotland, little Scotland, navigation Scotland, biscuit Scotland, covid Scotland, sport Scotland, ease of access Scotland, online videos Scotland, highland games Scotland, neighborhood Scotland, golf Scotland, scots Scotland, food items Scotland, whisky Scotland, spending plan Scotland, visitscotland Scotland, gallery Scotland, bulletin Scotland, arbroath Scotland, hell Scotland, road Scotland, distilleries Scotland, street andrews Scotland, drink Scotland, check out scotland Scotland, europe Scotland, castles Scotland, potential Scotland, take in Scotland, blog site Scotland, dundee Scotland, steering Scotland, sporting activities Scotland, covid-Scotland9 Scotland, transport Scotland. Edinburgh – Some suggestions for visiting Scotland Traveling in Scotland ought to absolutely start along with its capital. Edinburgh is a stunning medieval a town with distinctive rock buildings. Coming from the principal road, the supposed The Royal Mile linking the former imperial fortress along with the Queen’s summer palace (Palace of Holyroodhouse) bolts a system of fascinating little roads (the supposed shut), developing a maze in which it is actually definitely worth receiving shed. It takes approximately 2 times to go to Edinburgh, but you may stretch this opportunity as much as 4. When it comes to a short browse through to Scotland, you can likewise restrict yourself to Edinburgh just, investing someday on a big salami through bus in the Scottish plateaus (just about every holiday company in the funds delivers it). By doing this, at the very least for a moment we will definitely really feel the environment of a true property of mists. An also far better idea is actually to rent an automobile for one day and also happen a private trip (the course as well as nature of the organized trips carry out certainly not automatically meet everyone). Such a self-guided excursion will perhaps take us at the very least ten hours. Arran is actually called Scotland in mini. Loch Lomond is one of Scotland’s two national parks, an attractive pond bordered through hills as well as woodlands. On the way, you can additionally explore Stirling Castle. country Scotland, scottish Scotland, application Scotland, conservative Scotland, info Scotland, scotland Scotland, us Scotland, edinburgh Scotland, kid Scotland, cult Scotland, map Scotland, iona Scotland, menu Scotland, traveling Scotland, data Scotland, past history Scotland, car Scotland, ship Scotland, uk Scotland, train Scotland, celtic Scotland, glasgow Scotland, shetland Scotland, society Scotland, tay Scotland, bus Scotland, information Scotland, education Scotland, little Scotland, navigating Scotland, biscuit Scotland, covid Scotland, sporting activity Scotland, access Scotland, videos Scotland, highland activities Scotland, neighborhood Scotland, golf Scotland, scots Scotland, meals Scotland, whisky Scotland, budget plan Scotland, visitscotland Scotland, museum Scotland, email list Scotland, arbroath Scotland, heck Scotland, road Scotland, distilleries Scotland, street andrews Scotland, cocktail Scotland, visit scotland Scotland, europe Scotland, castles Scotland, future Scotland, experience Scotland, blog Scotland, dundee Scotland, driving Scotland, sporting activities Scotland, covid-Scotland9 Scotland, transportation Scotland. Scotland, like the whole of Great Britain, is not one of the most affordable destinations. In add-on, in Scotland the tent can be established up practically anywhere, thus tourists can easily likewise rest in the untamed. The most popular as well as one of the very most attractive exploring routes in Europe is actually the so-called West Highland Way. Longer journey? Exactly how about north along the west shoreline and after that back to the quieter, albeit less incredible eastern? Numerous vacationers in Glasgow, takes a train to Mallaig (occasionally visiting Glencoe or even Fort William en route) after that visits Isle of Skye (the absolute most gorgeous of the Scottish isles), at that point scalp along the coastline towards Ullapool, regarding Durness, heading back seeing Inverness, Fort Augustus (Loch Ness), Aberdeen as well as Cairngorms National Park, and also finally Street Andrews. Is it possible by buses and trains? Obviously it is achievable, yet you will miss a whole lot, so it is actually far better to rent a vehicle for at the very least component of the travel. As well as do not be deceived due to the vacationer catch of Loch Ness– as a matter of fact, there are actually plenty of so much more wonderful locations all over Scotland country Scotland, scottish Scotland, app Scotland, conservative Scotland, relevant information Scotland, scotland Scotland, us Scotland, edinburgh Scotland, kid Scotland, cult Scotland, map Scotland, iona Scotland, food selection Scotland, trip Scotland, data Scotland, past Scotland, vehicle Scotland, ship Scotland, uk Scotland, train Scotland, celtic Scotland, glasgow Scotland, shetland Scotland, culture Scotland, tay Scotland, bus Scotland, updates Scotland, learning Scotland, bit Scotland, navigating Scotland, cookie Scotland, covid Scotland, sporting activity Scotland, ease of access Scotland, video recordings Scotland, highland games Scotland, neighborhood Scotland, golf Scotland, scots Scotland, meals Scotland, whisky Scotland, finances Scotland, visitscotland Scotland, gallery Scotland, bulletin Scotland, arbroath Scotland, heck Scotland, road Scotland, distilleries Scotland, street andrews Scotland, alcoholic beverage Scotland, go to scotland Scotland, europe Scotland, castles Scotland, future Scotland, take in Scotland, weblog Scotland, dundee Scotland, steering Scotland, sporting activities Scotland, transport Scotland Glenelg The weather may be erratic. I don’t forget visiting Scotland for the very first time in the end of April. It was actually currently come Scotland, the sun was actually heating up, while in Scotland it was still winter season across. The Highlands were actually still dealt with in snowfall in a lot of spots, and in Edinburgh it was piercingly rainfall. Naturally, it turned out today that I hadn’t loaded the correct factors. I was actually organizing to remain in the urban area, but additionally ballet apartments, flipflops, thin shirts as well as decorative jackets drop off in springtime. When journeying in Scotland, first of all excellent, water resistant, sports footwear. Will also come in helpful, in some cases it is additionally worth adding a slim scarf, a sports hat and also sporting activities gloves to the knapsack (spring season as well as fall). In winter season, I suggest staying clear of Scotland from a span. In the scenario of a low-budget travel, sleep in a tent or even remain simply in hostels (price about PLN 80 every evening)., Whiskey, visit at least one whiskey and also order fish and chips along with white vinegar at least once. I wish that using this message I motivated my friends (:-RRB-) however also unfamiliar people to travel to Scotland. It is actually definitely worth a hundred times! I invite you to check out, if simply I am still right here. Lovely Scottish seasides. Loch Lomond Backpack. Iona- very small isle, white colored coastlines. Isle of Skye. Glencoe. Eilean Donan Castle. Isle of Arran. Scotland is actually unquestionably a definitely beautiful nation, and every year it is actually seen through groups of visitors from the United States, France, and even Italy or Spain. Arran is actually called Scotland in baby. Scotland, like the entire of Great Britain, is actually not one of the least expensive places. It was actually already spring season in Scotland, the sun was warming up, while in Scotland it was still winter months all over. I hope that with this message I encouraged my friends (:-RRB-) but additionally complete strangers to journey to https://www.scotland.com/
Scotland is unquestionably a definitely gorgeous country, as well as every year it is actually visited through groups of visitors coming from the United States, France, and also even Italy or even Spain. Barely any individual taking vacation in July, August or even September are going to believe of Scotland. Perhaps it is actually really good to think concerning it right currently, when the worth of the extra pound is falling, and hence our experts will spend a lot less for a vacation in Scotland? Glen Affric in early springtime Therefore why is it worth it? Scotland is mainly an excellent yard in the north of the country. Highlands– hillsides covered along with yard as well as heathers, deep lochs (ponds), a dramatic coastline line, glen (beautiful lowlands), as well as most of all, hardly ever located in Europe (especially in Scotland!) wild, where our company will definitely certainly not observe a single house. Space, room and also area again! Wild nature, an abundance of plants, birds and other pets wait for nature fanatics. In Scotland, I have actually had the capacity to check out seals, dolphins or perhaps deer. Yet Scotland is also a traditionally intriguing property (that viewed Brave Heart?), Where you can easily go to impressive stone palaces (Edinburgh, Stirling, Linlithgow, Eilean Donan). The financing itself, the marvelous Edinburgh, additionally should have attention, particularly in the course of the summer festivals. country Scotland, scottish Scotland, app Scotland, tory Scotland, details Scotland, scotland Scotland, our team Scotland, edinburgh Scotland, kid Scotland, creed Scotland, map Scotland, iona Scotland, food selection Scotland, traveling Scotland, records Scotland, background Scotland, cars and truck Scotland, ship Scotland, uk Scotland, train Scotland, celtic Scotland, glasgow Scotland, shetland Scotland, society Scotland, tay Scotland, bus Scotland, news Scotland, education Scotland, little bit Scotland, navigating Scotland, cookie Scotland, covid Scotland, sporting activity Scotland, access Scotland, video recordings Scotland, highland activities Scotland, neighborhood Scotland, golf Scotland, scots Scotland, food Scotland, whisky Scotland, budget Scotland, visitscotland Scotland, gallery Scotland, newsletter Scotland, arbroath Scotland, hell Scotland, street Scotland, distilleries Scotland, street andrews Scotland, drink Scotland, browse through scotland Scotland, europe Scotland, castles Scotland, future Scotland, experience Scotland, blogging site Scotland, dundee Scotland, steering Scotland, sports Scotland, covid-Scotland9 Scotland, transport Scotland. Edinburgh – Some concepts for seeing Scotland Trip in Scotland should absolutely begin with its own funding. It takes approximately two times to explore Edinburgh, yet you may extend this opportunity up to 4. In the case of a brief visit to Scotland, you can easily also confine yourself to Edinburgh merely, devoting one time on a round journey through bus in the Scottish plateaus (almost every trip company in the financing delivers it). Arran is called Scotland in baby. Loch Lomond is one of Scotland’s pair of national playgrounds, a gorgeous lake bordered by mountains and also woodlands. On the technique, you may additionally explore Stirling Castle. country Scotland, scottish Scotland, application Scotland, tory Scotland, details Scotland, scotland Scotland, our company Scotland, edinburgh Scotland, child Scotland, creed Scotland, map Scotland, iona Scotland, menu Scotland, traveling Scotland, records Scotland, record Scotland, vehicle Scotland, ship Scotland, uk Scotland, learn Scotland, celtic Scotland, glasgow Scotland, shetland Scotland, society Scotland, tay Scotland, bus Scotland, updates Scotland, education Scotland, little Scotland, navigation Scotland, cookie Scotland, covid Scotland, sporting activity Scotland, ease of access Scotland, online videos Scotland, highland video games Scotland, neighborhood Scotland, golf Scotland, scots Scotland, food Scotland, whisky Scotland, spending plan Scotland, visitscotland Scotland, museum Scotland, bulletin Scotland, arbroath Scotland, heck Scotland, roadway Scotland, distilleries Scotland, st andrews Scotland, beverage Scotland, see scotland Scotland, europe Scotland, castles Scotland, potential Scotland, experience Scotland, blogging site Scotland, dundee Scotland, steering Scotland, sporting activities Scotland, covid-Scotland9 Scotland, transportation Scotland. Reduced Budget Travel? Scotland, like the entire of Great Britain, is not one of the least expensive destinations. You can easily locate an entire great deal of exploring trails and also campsites right here. On top of that, in Scotland the camping tent may be set up practically anywhere, therefore visitors may additionally sleep in the crazy. What is essential in this particular situation is actually universal access to well-maintained water– our experts may locate mountain range streams, flows and falls nearly just about everywhere. The most widely known and also one of the most attractive hiking routes in Europe is the so-called West Highland Way. As a result of to the fantastic perspectives, I heartily advise Longer excursion? Exactly how around north along the west coast and after that back to the quieter, albeit much less stunning eastern? Lots of tourists in Glasgow, takes a learn to Mallaig (at times visiting Glencoe or even Fort William heading) at that point sees Isle of Skye (one of the most beautiful of the Scottish islands), at that point head along the coast towards Ullapool, as for Durness, on the technique back checking out Inverness, Fort Augustus (Loch Ness), Aberdeen and also Cairngorms National Park, and lastly St Andrews. Is it possible through buses and learns? Certainly it is achievable, however you will certainly overlook a great deal, so it is actually considerably far better to rent an auto for at the very least part of the excursion. As well as do not be deceived due to the visitor snare of Loch Ness– in reality, there are actually a lot of a lot more beautiful spots all around Scotland country Scotland, scottish Scotland, application Scotland, tory Scotland, details Scotland, scotland Scotland, us Scotland, edinburgh Scotland, child Scotland, creed Scotland, chart Scotland, iona Scotland, menu Scotland, traveling Scotland, data Scotland, background Scotland, auto Scotland, ship Scotland, uk Scotland, train Scotland, celtic Scotland, glasgow Scotland, shetland Scotland, culture Scotland, tay Scotland, bus Scotland, news Scotland, learning Scotland, bit Scotland, navigation Scotland, biscuit Scotland, covid Scotland, sport Scotland, ease of access Scotland, online videos Scotland, highland activities Scotland, community Scotland, golf Scotland, scots Scotland, food Scotland, whisky Scotland, budget Scotland, visitscotland Scotland, gallery Scotland, newsletter Scotland, arbroath Scotland, heck Scotland, road Scotland, distilleries Scotland, street andrews Scotland, alcoholic beverage Scotland, see scotland Scotland, europe Scotland, castles Scotland, future Scotland, experience Scotland, blog site Scotland, dundee Scotland, steering Scotland, sporting activities Scotland, transport Scotland Glenelg I bear in mind going to Scotland for the 1st opportunity at the end of April. It was actually actually spring in Scotland, the sunlight was heating up, while in Scotland it was still winter season all over. The Highlands were still covered in snowfall in lots of areas, and also in Edinburgh it was actually piercingly rain. When traveling in Scotland, first of all great, water-resistant, sporting activities shoes. Will likewise happen in handy, sometimes it is actually also worth adding a thin headscarf, a sports hat and also sports handwear covers to the backpack (spring season as well as fall). In winter months, I advise steering clear of Scotland from a proximity. In the scenario of a low-budget travel, rest in a camping tent or even keep simply in hostels (expense concerning PLN 80 every evening)., Whiskey, visit at the very least one whiskey as well as instruction fish as well as chips with vinegar at minimum as soon as. I wish that through this blog post I promoted my friends (:-RRB-) yet likewise unknown people to take a trip to Scotland. It’s really worth a hundred times! I welcome you to check out, if just I am actually still here. Stunning Scottish coastlines. Loch Lomond Backpack. Iona- small island, white colored beach fronts. Island of Skye. Glencoe. Eilean Donan Castle. Island of Arran. Scotland is actually certainly a really stunning nation, as well as every year it is actually visited through groups of vacationers from the United States, France, as well as also Italy or even Spain. Arran is gotten in touch with Scotland in baby. Scotland, like the entire of Great Britain, is certainly not one of the most affordable places. It was actually currently spring season in Scotland, the sun was actually heating up, while in Scotland it was actually still winter season all over. I hope that along with this post I encouraged my close friends (:-RRB-) but additionally unfamiliar people to travel to https://www.scotland.com/
Scotland is actually most certainly a really stunning country, and every year it is explored by crowds of vacationers coming from the United States, France, and also Italy or even Spain. Barely any person taking vacation in July, August or September are going to think of Scotland. Possibly it is excellent to think about it right currently, when the market value of the extra pound is actually dropping, and also thereby we will pay out less for a holiday season in Scotland? Glen Affric in very early springtime Why is it worth it? Scotland is predominantly an excellent landscape in the north of the nation. In Scotland, I have currently been actually capable to check out tapes, dolphins or also deer. Yet Scotland is actually likewise a traditionally fascinating property (that checked out Brave Heart?), Where you may go to splendid rock fortress (Edinburgh, Stirling, Linlithgow, Eilean Donan). The funding on its own, the impressive Edinburgh, likewise should have interest, specifically throughout the summer celebrations. country Scotland, scottish Scotland, app Scotland, tory Scotland, information Scotland, scotland Scotland, us Scotland, edinburgh Scotland, little one Scotland, cult Scotland, chart Scotland, iona Scotland, food selection Scotland, travel Scotland, records Scotland, history Scotland, car Scotland, ship Scotland, uk Scotland, train Scotland, celtic Scotland, glasgow Scotland, shetland Scotland, lifestyle Scotland, tay Scotland, bus Scotland, headlines Scotland, learning Scotland, little Scotland, navigating Scotland, biscuit Scotland, covid Scotland, sport Scotland, availability Scotland, video clips Scotland, highland video games Scotland, community Scotland, golf Scotland, scots Scotland, food Scotland, whisky Scotland, budget plan Scotland, visitscotland Scotland, gallery Scotland, bulletin Scotland, arbroath Scotland, heck Scotland, roadway Scotland, distilleries Scotland, street andrews Scotland, drink Scotland, browse through scotland Scotland, europe Scotland, castles Scotland, future Scotland, experience Scotland, blog site Scotland, dundee Scotland, driving Scotland, sporting activities Scotland, covid-Scotland9 Scotland, transport Scotland. Edinburgh – Some concepts for exploring Scotland Travel in Scotland ought to certainly begin along with its resources. Edinburgh is actually a lovely middle ages a city with symbolic stone properties. From the primary street, the alleged The Royal Mile attaching the former imperial fortress with the Queen’s summer season royal residence (Palace of Holyroodhouse) manages off a system of appealing small streets (the supposed shut), making a puzzle through which it is actually really worth obtaining lost. It takes around pair of times to go to Edinburgh, yet you may expand this time around up to four. When it comes to a short browse through to Scotland, you can easily likewise limit on your own to Edinburgh simply, devoting eventually on a big salami through bus in the Scottish highlands (almost every holiday company in the capital uses it). By doing this, a minimum of for a minute our team are going to experience the setting of a real land of hazes. An even far better suggestion is actually to lease a vehicle for one time and also go on an independent excursion (the system as well as attributes of the managed tours carry out not automatically suit everybody). Such a self-guided trip is going to perhaps take us a minimum of ten hrs. For a slightly longer experience (albeit still limited to simply a few days) from Edinburgh, I would suggest to attack in 2 directions: Isle of Arran or even Loch Lomond. Arran is gotten in touch with Scotland in miniature. Devoting pair of or 3 days on the isle, our team may delight in the elegance of the west coast, kick back on the seashore, go up the best top of the isle– Goat Fell, as properly as admire the grassy hillsides as well as appreciate the area. Loch Lomond is just one of Scotland’s two nationwide parks, a wonderful lake surrounded by mountains and also woods. En route, you can additionally visit Stirling Castle. There is actually a straight train from Glasgow in each directions. nation Scotland, scottish Scotland, app Scotland, conservative Scotland, information Scotland, scotland Scotland, our company Scotland, edinburgh Scotland, little one Scotland, cult Scotland, map Scotland, iona Scotland, food selection Scotland, traveling Scotland, records Scotland, past Scotland, automobile Scotland, ship Scotland, uk Scotland, learn Scotland, celtic Scotland, glasgow Scotland, shetland Scotland, culture Scotland, tay Scotland, bus Scotland, information Scotland, education and learning Scotland, bit Scotland, navigation Scotland, biscuit Scotland, covid Scotland, sporting activity Scotland, accessibility Scotland, online videos Scotland, highland video games Scotland, community Scotland, golf Scotland, scots Scotland, food Scotland, whisky Scotland, spending plan Scotland, visitscotland Scotland, gallery Scotland, bulletin Scotland, arbroath Scotland, heck Scotland, roadway Scotland, distilleries Scotland, street andrews Scotland, drink Scotland, visit scotland Scotland, europe Scotland, castles Scotland, potential Scotland, experience Scotland, blog site Scotland, dundee Scotland, steering Scotland, sports Scotland, covid-Scotland9 Scotland, transport Scotland. Low Budget Travel? Scotland, like the entire of Great Britain, is actually none of the most affordable places. Nonetheless, you can easily locate a great deal of hiking routes and also campsites listed here. On top of that, in Scotland the outdoor tents may be put together essentially anywhere, thus travelers may additionally sleep in bush. What is very important in this particular scenario is actually universal accessibility to well-maintained water– we may find hill falls, streams as well as rivers nearly everywhere. The very most renowned and some of the very most lovely hiking tracks in Europe is the supposed West Highland Way. As a result of to the incredible scenery, I heartily highly recommend Longer travel? Just how approximately north along the west coast and also then back to the quieter, albeit much less incredible east? Numerous vacationers in Glasgow, takes a learn to Mallaig (sometimes exploring Glencoe or even Fort William on the means) at that point brows through Isle of Skye (the very most attractive of the Scottish islands), at that point head along the shore towards Ullapool, as far as Durness, heading back checking out Inverness, Fort Augustus (Loch Ness), Aberdeen and Cairngorms National Park, and lastly Street Andrews. Is it possible through buses and learns? Naturally it is possible, yet you will miss a whole lot, so it is actually far better to rent out an auto for at the very least aspect of the excursion. As well as don’t be actually misleaded due to the vacationer trap of Loch Ness– actually, there are actually plenty of much even more beautiful areas around Scotland country Scotland, scottish Scotland, application Scotland, conservative Scotland, relevant information Scotland, scotland Scotland, our team Scotland, edinburgh Scotland, little one Scotland, cult Scotland, chart Scotland, iona Scotland, menu Scotland, traveling Scotland, information Scotland, past history Scotland, automobile Scotland, ship Scotland, uk Scotland, learn Scotland, celtic Scotland, glasgow Scotland, shetland Scotland, culture Scotland, tay Scotland, bus Scotland, information Scotland, learning Scotland, little Scotland, navigation Scotland, cookie Scotland, covid Scotland, sport Scotland, access Scotland, online videos Scotland, highland video games Scotland, community Scotland, golf Scotland, scots Scotland, food items Scotland, whisky Scotland, finances Scotland, visitscotland Scotland, museum Scotland, bulletin Scotland, arbroath Scotland, hell Scotland, road Scotland, distilleries Scotland, street andrews Scotland, alcoholic beverage Scotland, see scotland Scotland, europe Scotland, castles Scotland, potential Scotland, take in Scotland, blogging site Scotland, dundee Scotland, steering Scotland, sports Scotland, transport Scotland Glenelg The weather condition can be unpredictable. I always remember visiting Scotland for the very first time at the end of April. It was presently come Scotland, the sunshine was warming up, while in Scotland it was actually still wintertime throughout. The Highlands were still covered in snow in several places, and also in Edinburgh it was actually piercingly storm. Certainly, it ended up promptly that I hadn’t packed the right traits. I was preparing to remain in the metropolitan area, however additionally ballet flats, shoes, decorative coats and thin shirts diminish in spring. When journeying in Scotland, to begin with of all great, water-proof, sports footwear. A respectable waterproof (and also windproof!) Will definitely also can be found in helpful, sometimes it is additionally worth including a thin headscarf, a sporting activities hat and also sports gloves to the backpack (spring as well as autumn). In winter, I propose staying away from Scotland coming from a range. Why? The response is simple: it puts as well as impacts. Extra little bit of factors: Umbrellas most definitely don’t operate (the wind flexes all of them in all paths), the camping tent needs to (MUST!) possess a really good flysheet, it costs taking a recyclable bottle along with you (faucet water, but likewise drinkable in streams or rivers), a minimum of a few sets of socks, a hot fleece and also something to ward off nasty flies (I advise a smidge). When it comes to a low-budget excursion, sleep in a camping tent or even stay just in hostels (price about PLN 80 per night). You ought to try seafood (they are actually great tasting!), Whiskey, check out at minimum one distillery as well as instruction fish and also chips along with vinegar a minimum of once. I wish that through this post I urged my close friends (:-RRB-) however likewise strangers to travel to Scotland. It is actually definitely worth a hundred opportunities! I invite you to visit, if only I am actually still here. Stunning Scottish seashores. Loch Lomond Backpack. Iona- small island, white colored beach fronts. Isle of Skye. Glencoe. Eilean Donan Castle. Isle of Arran. Scotland is actually most certainly a definitely stunning nation, as well as every year it is checked out by crowds of visitors coming from the United States, France, and also even Italy or even Spain. Arran is called Scotland in miniature. Scotland, like the whole of Great Britain, is actually not one of the most cost effective locations. It was actually actually spring season in Scotland, the sun was actually warming up, while in Scotland it was actually still winter months all over. I really hope that with this blog post I urged my pals (:-RRB-) but additionally unfamiliar people to take a trip to https://www.scotland.com/
Scotland is certainly a definitely beautiful nation, as well as yearly it is actually checked out by groups of vacationers from the United States, France, as well as also Italy or even Spain. Having said that, I can easily not withstand the feeling that Poles happen here mainly for work. Rarely anyone departing in July, August or September are going to think about Scotland. Since of the prices that are absolutely unfriendly for some tourists, maybe it is actually. The land of Nessi and also men in kilts is undoubtedly worth a longer or even short experience. Perhaps it is good to deal with it now, when the market value of the extra pound is actually falling, as well as therefore our company will pay for much less for a holiday in Scotland? Glen Affric in very early spring season Why is it worth it? Scotland is actually primarily a wonderful landscape in the north of the country. In Scotland, I have actually already been capable to enjoy seals, dolphins or also deer. Scotland is additionally a historically exciting property (who checked out Brave Heart?), Where you may check out magnificent rock palaces (Edinburgh, Stirling, Linlithgow, Eilean Donan). The funding itself, the impressive Edinburgh, likewise is entitled to focus, specifically during the course of the summer season celebrations. country Scotland, scottish Scotland, application Scotland, tory Scotland, information Scotland, scotland Scotland, us Scotland, edinburgh Scotland, child Scotland, creed Scotland, chart Scotland, iona Scotland, menu Scotland, trip Scotland, information Scotland, background Scotland, car Scotland, ship Scotland, uk Scotland, learn Scotland, celtic Scotland, glasgow Scotland, shetland Scotland, society Scotland, tay Scotland, bus Scotland, information Scotland, education Scotland, bit Scotland, navigating Scotland, biscuit Scotland, covid Scotland, sporting activity Scotland, access Scotland, video clips Scotland, highland activities Scotland, neighborhood Scotland, golf Scotland, scots Scotland, food items Scotland, whisky Scotland, budget plan Scotland, visitscotland Scotland, museum Scotland, newsletter Scotland, arbroath Scotland, heck Scotland, road Scotland, distilleries Scotland, street andrews Scotland, drink Scotland, browse through scotland Scotland, europe Scotland, castles Scotland, future Scotland, take in Scotland, weblog Scotland, dundee Scotland, steering Scotland, sports Scotland, covid-Scotland9 Scotland, transport Scotland. Edinburgh – Some ideas for exploring Scotland Travel in Scotland need to absolutely start along with its capital. It takes about pair of times to go to Edinburgh, yet you can easily stretch this time up to four. In the case of a brief visit to Scotland, you may likewise restrict your own self to Edinburgh simply, investing one day on a circular journey by bus in the Scottish highlands (almost every traveling organization in the funds supplies it). For a somewhat longer journey (albeit still limited to just a couple of days) coming from Edinburgh, I will recommend to strike in two paths: Isle of Arran or even Loch Lomond. Arran is contacted Scotland in miniature. Investing 2 or three days on the isle, our experts can appreciate the beauty of the west coast, loosen up on the beach front, go up the highest optimal of the island– Goat Fell, along with appreciate the verdant mountains and also appreciate the space. Loch Lomond is among Scotland’s 2 national parks, a stunning pond encompassed by mountains and also woods. On the way, you can easily also see Stirling Castle. There is a straight learn coming from Glasgow in each instructions. country Scotland, scottish Scotland, application Scotland, conservative Scotland, details Scotland, scotland Scotland, us Scotland, edinburgh Scotland, kid Scotland, creed Scotland, chart Scotland, iona Scotland, food selection Scotland, trip Scotland, information Scotland, background Scotland, automobile Scotland, ship Scotland, uk Scotland, learn Scotland, celtic Scotland, glasgow Scotland, shetland Scotland, culture Scotland, tay Scotland, bus Scotland, headlines Scotland, education Scotland, little bit Scotland, navigating Scotland, cookie Scotland, covid Scotland, sport Scotland, access Scotland, video recordings Scotland, highland activities Scotland, community Scotland, golf Scotland, scots Scotland, meals Scotland, whisky Scotland, budget plan Scotland, visitscotland Scotland, gallery Scotland, bulletin Scotland, arbroath Scotland, heck Scotland, street Scotland, distilleries Scotland, st andrews Scotland, alcoholic beverage Scotland, see scotland Scotland, europe Scotland, castles Scotland, future Scotland, take in Scotland, blog site Scotland, dundee Scotland, steering Scotland, sports Scotland, covid-Scotland9 Scotland, transportation Scotland. Reduced Budget Travel? Scotland, like the whole of Great Britain, is actually not one of the most cost effective locations. You may find an entire lot of treking routes and also campsites below. Furthermore, in Scotland the outdoor tents could be established literally anywhere, thus vacationers can also sleep in the untamed. What is actually essential within this situation is global access to clean water– our team may locate mountain range waterfalls, rivers and flows nearly everywhere. The absolute most widely known and also among one of the most stunning treking trails in Europe is the supposed West Highland Way. As a result of the incredible scenery, I enthusiastically suggest Longer excursion? How about north along the west coast and after that back to the quieter, albeit much less spectacular eastern? A lot of tourists in Glasgow, takes a train to Mallaig (in some cases exploring Glencoe or even Fort William en route) after that check outs Isle of Skye (the most wonderful of the Scottish islands), at that point head along the shore in the direction of Ullapool, regarding Durness, heading back going to Inverness, Fort Augustus (Loch Ness), Aberdeen and also Cairngorms National Park, and finally Street Andrews. Is it achievable by trains and buses? Obviously it is actually possible, but you will definitely miss out on a whole lot, so it is better to rent a cars and truck for at least aspect of the travel. And don’t be tricked due to the traveler snare of Loch Ness– in truth, there are loads of a lot more stunning spots throughout Scotland nation Scotland, scottish Scotland, app Scotland, tory Scotland, details Scotland, scotland Scotland, our team Scotland, edinburgh Scotland, child Scotland, creed Scotland, chart Scotland, iona Scotland, menu Scotland, travel Scotland, records Scotland, past Scotland, automobile Scotland, ship Scotland, uk Scotland, learn Scotland, celtic Scotland, glasgow Scotland, shetland Scotland, culture Scotland, tay Scotland, bus Scotland, news Scotland, education Scotland, bit Scotland, navigation Scotland, biscuit Scotland, covid Scotland, sport Scotland, access Scotland, video clips Scotland, highland video games Scotland, community Scotland, golf Scotland, scots Scotland, food Scotland, whisky Scotland, budget plan Scotland, visitscotland Scotland, gallery Scotland, e-newsletter Scotland, arbroath Scotland, hell Scotland, roadway Scotland, distilleries Scotland, street andrews Scotland, cocktail Scotland, browse through scotland Scotland, europe Scotland, castles Scotland, future Scotland, encounter Scotland, blogging site Scotland, dundee Scotland, driving Scotland, sports Scotland, transport Scotland Glenelg I keep in mind visiting Scotland for the initial time at the conclusion of April. It was actually already springtime in Scotland, the sun was actually warming up, while in Scotland it was still wintertime all over. The Highlands were actually still dealt with in snowfall in lots of places, as well as in Edinburgh it was actually piercingly storm. When traveling in Scotland, to begin with of all good, water resistant, sports footwear. Will definitely likewise come in handy, in some cases it is actually likewise worth including a thin scarf, a sporting activities hat and sporting activities gloves to the knapsack (spring as well as autumn). In wintertime, I suggest staying away from Scotland coming from a distance. In the situation of a low-budget excursion, sleep in a camping tent or even remain just in hostels (price about PLN 80 every night)., Whiskey, browse through at the very least one whiskey as well as command fish and potato chips along with white vinegar at least as soon as. I really hope that through this message I encouraged my close friends (:-RRB-) yet additionally strangers to take a trip to Scotland. It’s definitely worth a hundred opportunities! I invite you to go to, if simply I am still listed below. Beautiful Scottish coastlines. Loch Lomond Backpack. Iona- very small isle, white colored seasides. Isle of Skye. Glencoe. Eilean Donan Castle. Isle of Arran. Scotland is undoubtedly an actually beautiful country, and also every year it is seen through crowds of visitors from the United States, France, and also also Italy or Spain. Arran is gotten in touch with Scotland in mini. Scotland, like the entire of Great Britain, is not one of the least expensive places. It was actually actually springtime in Scotland, the sunlight was actually warming up, while in Scotland it was still winter all over. I hope that along with this article I urged my friends (:-RRB-) however also unfamiliar people to take a trip to https://www.scotland.com/
Did you understand these truths on CBD OIL and Full Spectrum CBD Hemp Oil? Cannabinoids are separated from hemp utilizing supercritical CO2 extraction. Thanks to modern innovation, the resulting solution is tidy, devoid of heavy metals and unnecessary waxes, naturally present in the plant, and the sucked liquid has a common, oily consistency. CBD oil contains cannabidiol as a base active ingredient and may include only trace amounts of tetrahydroxycannabidiol (THC). It is recommended by doctors and pharmacists as an antioxidant and compound that blocks the action of proinflammatory cytokines (proteins), e.g. in Crohn’s disease or ulcerative intestinal tract. RSO oil has a low CBD material, while high THC. The synergistic (enhancing) action of CBD and THC relative to each other is utilized here. Both cannabinoids can do much more together than when used independently. Both marijuana oil type CBD and RSO also consist of other cannabinoids, such as cannabichromene (CBC) and cannabigerol (CBG). The secret is not, nevertheless, that CBD typically has actually a structure broadened to consist of flavones, flavonoids, terpenes, terpenoids, amino acids and omega acids. The distinction is primarily due to motives guiding humankind to utilize one or the other item. CBD medical cannabis oil is a rather advantageous mix of cannabinoids, designed to protect versus 21st century disease. It’s finest to use all of these compounds together, as nature created them and confined in marijuana inflorescences. Oil of cannabis in a type of hobby APR consists of percentages of CBD, balanced by the existence of THC. Makers focus on the synergistic effect of one compound relative to the other, while deserting the presence of CBC and CBG. Why such a choice? – Modern scientific research study reveals that CBD + THC cope with serious autoimmune diseases, while CBC or CBG show very little activity in the existence of both compounds, similar to terpenes, flavones or flavonoids, for that reason their content in the option appears to be unneeded. In addition, the marijuana pressure from which THC and CBD are obtained contain minimal amounts of other cannabinoids. RSO oil is entirely unlawful in Poland, which is why it can not be obtained in any legally operating store on the marketplace. Naturally, there are a number of amateur techniques for obtaining it, however it’s good to understand that compounds gotten artificially in house laboratories doubt, untried, and the impact unknown. The solvent for the production of household RSO is typically fuel, alcohol and even kerosene, which rather of curing, poison. Alcohols and their like hinder cannabinoids, and so in truth, they do not bring anything brand-new to the medical world. Marijuana oil has currently marked a new period in which male stopped to fear what is unidentified, and started to discover what our forefathers had actually already observed and use the significant potential, in the beginning glance, a little bizarre relationships, associated generally with pathology. Medical cannabis, contrary to its name, does not mean fermented female inflorescences and leaves including psychedelic substances coiled in so-called “Joints”, but a beneficial oil without psychedelic THC. A basic person, after taking doses of medical marijuana and achieving the suitable state of cannabinoids in the blood, can take pleasure in increased resistance, reduced susceptibility to cancer, postponed aging and decreased danger of stroke or heart attack. CBD oil consists of cannabidiol as a base ingredient and might contain only trace amounts of tetrahydroxycannabidiol (THC). RSO oil has a low CBD material, while high THC. Both marijuana oil type CBD and RSO likewise include other cannabinoids, such as cannabichromene (CBC) and cannabigerol (CBG). CBD medical marijuana oil is a rather advantageous mix of cannabinoids, developed to protect versus 21st century illness. Oil of cannabis in a kind of hobby APR consists of small quantities of CBD, balanced by the existence of THC.
Did you understand these realities on CBD OIL and Full Spectrum CBD Hemp Oil? Cannabinoids are separated from hemp utilizing supercritical CO2 extraction. Thanks to modern innovation, the resulting option is tidy, totally free of unnecessary waxes and heavy metals, naturally present in the plant, and the drawn liquid has a typical, oily consistency. CBD oil contains cannabidiol as a base ingredient and may contain just trace quantities of tetrahydroxycannabidiol (THC). Functions as a memory enhancer, improving concentration and coordination of movements, removing swelling and reoccurring infections. It enhances the conduction of stimuli in the course of autoimmune illness (several sclerosis, amyotrophic sclerosis). It is recommended by medical professionals and pharmacists as an antioxidant and substance that obstructs the action of proinflammatory cytokines (proteins), e.g. in Crohn’s illness or ulcerative intestinal tract. RSO oil has a low CBD content, while high THC. Obviously, the key task of RSO is to cause a psychoactive result, although it can likewise stimulate “sick” brain structures. It is worth understanding that supplements of this type is mostly used by people to whom basic treatment does not bring relief in illness. The synergistic (enhancing) action of CBD and THC relative to each other is used here. Both cannabinoids can do much more together than when utilized separately. In addition, they jointly promote the department of inactive nerve cells, nurture the fatty envelope of the nerves, and prevent myelin swelling that triggers loss of function in some autoimmune illness. There are also stories where cannabis in its natural type softened spasticity, minimized the frequency of seizures and convulsions, and reduced undesirable scrapie in Parkinson’s disease. This is where the concept of receiving RSO, planned only for chronically ill individuals, originated . Both cannabis oil type CBD and RSO also contain other cannabinoids, such as cannabichromene (CBC) and cannabigerol (CBG). The trick is not, however, that CBD frequently has actually a structure broadened to consist of flavones, flavonoids, terpenes, terpenoids, amino acids and omega acids. The difference is mostly due to motives guiding humanity to use one or the other product. CBD medical marijuana oil is a rather advantageous blend of cannabinoids, created to protect versus 21st century illness. It’s best to use all of these substances together, as nature developed them and confined in cannabis inflorescences. It ends up that cannabidiol enhances the impacts of cannabichromene (CBC) and cannabigerol (CBG), and flavonoids or flavones improve the absorption of these compounds. Omega-6 and omega-3 extremely nourish the body and do not allow to alter, which accelerate the aging process of the organism and boost the advancement of cancer. Oil of marijuana in a kind of hobby APR consists of small amounts of CBD, balanced by the presence of THC. – Modern clinical research reveals that CBD + THC cope with severe autoimmune illness, while CBC or CBG show very little activity in the presence of both compounds, simply like flavonoids, terpenes or flavones, therefore their material in the solution seems to be unneeded. In addition, the marijuana strain from which THC and CBD are obtained consist of negligible quantities of other cannabinoids. Cannabis oil has already marked a new age in which man stopped to fear what is unknown, and started to find what our forefathers had currently observed and use the substantial capacity, at very first look, a little strange relationships, associated primarily with pathology. Medical marijuana, contrary to its name, does not indicate fermented female inflorescences and leaves containing psychedelic compounds coiled in so-called “Joints”, however an advantageous oil without psychoactive THC. A standard individual, after taking doses of medicinal marijuana and achieving the suitable state of cannabinoids in the blood, can delight in increased immunity, minimized susceptibility to cancer, postponed aging and minimized threat of stroke or cardiac arrest. CBD oil includes cannabidiol as a base active ingredient and may include just trace quantities of tetrahydroxycannabidiol (THC). RSO oil has a low CBD material, while high THC. Both marijuana oil type CBD and RSO likewise include other cannabinoids, such as cannabichromene (CBC) and cannabigerol (CBG). CBD medical cannabis oil is a rather beneficial blend of cannabinoids, designed to secure against 21st century illness. Oil of marijuana in a kind of pastime APR includes little quantities of CBD, balanced by the existence of THC.
Did you know these facts on CBD OIL and Full Spectrum CBD Hemp Oil? Cannabinoids are isolated from hemp using supercritical CO2 extraction. Thanks to modern-day technology, the resulting option is tidy, without unneeded waxes and heavy metals, naturally present in the plant, and the sucked liquid has a normal, oily consistency. CBD oil includes cannabidiol as a base component and may consist of just trace quantities of tetrahydroxycannabidiol (THC). It is recommended by medical professionals and pharmacists as an antioxidant and substance that obstructs the action of proinflammatory cytokines (proteins), e.g. in Crohn’s illness or ulcerative intestinal tract. RSO oil has a low CBD material, while high THC. The synergistic (enhancing) action of CBD and THC relative to each other is used here. Both cannabinoids can do much more together than when used independently. Both cannabis oil type CBD and RSO likewise contain other cannabinoids, such as cannabichromene (CBC) and cannabigerol (CBG). The secret is not, nevertheless, that CBD often has actually a structure expanded to include flavones, flavonoids, terpenes, terpenoids, amino acids and omega acids. The distinction is mainly due to motives directing mankind to utilize one or the other product. CBD medical marijuana oil is a rather helpful blend of cannabinoids, designed to protect against 21st century disease. It’s best to use all of these substances together, as nature developed them and enclosed in marijuana inflorescences. Oil of cannabis in a sort of pastime APR includes percentages of CBD, balanced by the existence of THC. Makers concentrate on the synergistic effect of one substance relative to the other, while abandoning the presence of CBC and CBG. Why such a choice? – Modern scientific research shows that CBD + THC deal with major autoimmune diseases, while CBC or CBG reveal minimal activity in the existence of both substances, similar to terpenes, flavonoids or flavones, therefore their material in the solution seems to be unnecessary. In addition, the marijuana stress from which THC and CBD are derived include minimal amounts of other cannabinoids. RSO oil is totally prohibited in Poland, which is why it can not be acquired in any lawfully running store on the marketplace. Of course, there are a variety of amateur techniques for obtaining it, but it’s excellent to know that compounds obtained synthetically in house labs doubt, untried, and the impact unknown. The solvent for the production of household RSO is generally fuel, alcohol and even kerosene, which rather of treating, poison. Alcohols and their like impair cannabinoids, and so in reality, they do not bring anything new to the medical world. Cannabis oil has already marked a brand-new era in which guy ceased to fear what is unidentified, and began to discover what our forefathers had already seen and utilize the significant potential, in the beginning glimpse, a little strange relationships, associated primarily with pathology. Medical marijuana, contrary to its name, does not suggest fermented female inflorescences and leaves containing psychoactive substances coiled in so-called “Joints”, however an advantageous oil without psychoactive THC. A basic person, after taking doses of medical cannabis and accomplishing the appropriate state of cannabinoids in the blood, can delight in increased resistance, reduced vulnerability to cancer, postponed aging and lowered risk of stroke or cardiovascular disease. CBD oil contains cannabidiol as a base component and may consist of just trace amounts of tetrahydroxycannabidiol (THC). RSO oil has a low CBD material, while high THC. Both cannabis oil type CBD and RSO also include other cannabinoids, such as cannabichromene (CBC) and cannabigerol (CBG). CBD medical cannabis oil is a rather beneficial mix of cannabinoids, developed to protect against 21st century disease. Oil of marijuana in a kind of hobby APR consists of little quantities of CBD, balanced by the existence of THC.
Did you understand these truths on CBD OIL and Full Spectrum CBD Hemp Oil? Cannabinoids are isolated from hemp utilizing supercritical CO2 extraction. Thanks to modern technology, the resulting option is clean, devoid of unneeded waxes and heavy metals, naturally present in the plant, and the drawn liquid has a normal, oily consistency. CBD oil consists of cannabidiol as a base active ingredient and might include only trace amounts of tetrahydroxycannabidiol (THC). Works as a memory enhancer, enhancing concentration and coordination of motions, getting rid of swelling and recurrent infections. It enhances the conduction of stimuli in the course of autoimmune illness (several sclerosis, amyotrophic sclerosis). It is advised by medical professionals and pharmacists as an antioxidant and compound that obstructs the action of proinflammatory cytokines (proteins), e.g. in Crohn’s illness or ulcerative intestine. RSO oil has a low CBD content, while high THC. The synergistic (enhancing) action of CBD and THC relative to each other is used here. Both cannabinoids can do much more together than when used independently. Both marijuana oil type CBD and RSO also include other cannabinoids, such as cannabichromene (CBC) and cannabigerol (CBG). The trick is not, nevertheless, that CBD often has actually a structure expanded to include flavones, flavonoids, terpenes, terpenoids, amino acids and omega acids. The distinction is mostly due to motives directing humankind to utilize one or the other product. CBD medical marijuana oil is a rather beneficial blend of cannabinoids, designed to safeguard versus 21st century illness. It’s finest to utilize all of these substances together, as nature produced them and enclosed in cannabis inflorescences. Oil of marijuana in a sort of pastime APR contains small amounts of CBD, stabilized by the presence of THC. Makers concentrate on the synergistic result of one substance relative to the other, while deserting the presence of CBC and CBG. Why such a choice? – Modern clinical research shows that CBD + THC handle serious autoimmune illness, while CBC or CBG reveal minimal activity in the presence of both compounds, simply like flavonoids, flavones or terpenes, for that reason their content in the option seems to be unnecessary. In addition, the marijuana stress from which THC and CBD are derived consist of minimal quantities of other cannabinoids. RSO oil is completely illegal in Poland, which is why it can not be gotten in any legally operating store on the marketplace. Of course, there are a number of amateur approaches for acquiring it, but it’s excellent to understand that compounds acquired synthetically in home labs doubt, untried, and the effect unknown. The solvent for the production of family RSO is usually gas, alcohol and even kerosene, which instead of curing, toxin. Alcohols and their like impair cannabinoids, therefore in reality, they do not bring anything brand-new to the medical world. Marijuana oil has actually currently marked a new age in which man stopped to fear what is unidentified, and began to discover what our forefathers had actually already observed and use the significant potential, in the beginning glimpse, a little unusual relationships, associated generally with pathology. Medical cannabis, contrary to its name, does not suggest fermented female inflorescences and leaves including psychoactive substances coiled in so-called “Joints”, but a beneficial oil without psychedelic THC. A basic individual, after taking doses of medical marijuana and attaining the proper state of cannabinoids in the blood, can delight in increased immunity, reduced susceptibility to cancer, postponed aging and lowered danger of stroke or cardiac arrest. CBD oil contains cannabidiol as a base component and may contain just trace quantities of tetrahydroxycannabidiol (THC). RSO oil has a low CBD content, while high THC. Both marijuana oil type CBD and RSO likewise consist of other cannabinoids, such as cannabichromene (CBC) and cannabigerol (CBG). CBD medical cannabis oil is a rather helpful mix of cannabinoids, created to safeguard against 21st century illness. Oil of cannabis in a kind of hobby APR includes small amounts of CBD, balanced by the presence of THC.
I am commenting to make you understand of the superb encounter my cousin’s princess found browsing yuor web blog. She came to understand too many things, which included what it is like to possess a marvelous giving nature to have others just thoroughly grasp a variety of hard to do things. You really did more than my expected results. Many thanks for imparting those interesting, trustworthy, edifying and also unique tips on the topic to Emily.
Appreciate you sharing, great post.Much thanks again. Really Cool.
Did you understand these realities on CBD OIL and Full Spectrum CBD Hemp Oil? Cannabinoids are separated from hemp using supercritical CO2 extraction. Thanks to contemporary innovation, the resulting service is clean, devoid of unnecessary waxes and heavy metals, naturally present in the plant, and the sucked liquid has a typical, oily consistency. CBD oil consists of cannabidiol as a base component and might consist of just trace amounts of tetrahydroxycannabidiol (THC). It is advised by doctors and pharmacists as an antioxidant and substance that obstructs the action of proinflammatory cytokines (proteins), e.g. in Crohn’s disease or ulcerative intestine. RSO oil has a low CBD content, while high THC. Naturally, the crucial job of RSO is to cause a psychoactive effect, although it can likewise stimulate “ill” brain structures. It is worth knowing that supplementation of this type is mostly used by people to whom basic therapy does not bring relief in illness. The synergistic (enhancing) action of CBD and THC relative to each other is utilized here. When utilized separately, both cannabinoids can do much more together than. In addition, they collectively promote the department of non-active afferent neuron, nurture the fatty envelope of the nerves, and avoid myelin swelling that causes loss of function in some autoimmune diseases. There are likewise stories where cannabis in its natural type softened spasticity, minimized the frequency of seizures and convulsions, and reduced undesirable scrapie in Parkinson’s disease. This is where the idea of getting RSO, meant only for chronically ill people, originated . Both cannabis oil type CBD and RSO likewise include other cannabinoids, such as cannabichromene (CBC) and cannabigerol (CBG). The secret is not, nevertheless, that CBD typically has actually a structure expanded to include flavones, flavonoids, terpenes, terpenoids, amino acids and omega acids. The difference is mostly due to motives assisting humankind to use one or the other item. CBD medical cannabis oil is a rather helpful blend of cannabinoids, designed to protect versus 21st century illness. It’s best to utilize all of these compounds together, as nature produced them and confined in cannabis inflorescences. It turns out that cannabidiol boosts the results of cannabichromene (CBC) and cannabigerol (CBG), and flavonoids or flavones enhance the absorption of these compounds. Omega-6 and omega-3 highly nourish the body and do not allow to change, which speed up the aging process of the organism and enhance the advancement of cancer. Oil of cannabis in a kind of pastime APR consists of little quantities of CBD, stabilized by the existence of THC. – Modern clinical research study shows that CBD + THC cope with serious autoimmune diseases, while CBC or CBG show minimal activity in the presence of both substances, simply like terpenes, flavonoids or flavones, for that reason their content in the option seems to be unnecessary. In addition, the cannabis strain from which THC and CBD are obtained consist of negligible amounts of other cannabinoids. Cannabis oil has actually currently marked a brand-new period in which male stopped to fear what is unidentified, and started to rediscover what our ancestors had already noticed and use the substantial capacity, initially glance, a little unusual relationships, associated primarily with pathology. Medical cannabis, contrary to its name, does not suggest fermented female inflorescences and leaves including psychedelic substances coiled in so-called “Joints”, however a helpful oil without psychoactive THC. A standard person, after taking doses of medical cannabis and accomplishing the proper state of cannabinoids in the blood, can delight in increased immunity, minimized vulnerability to cancer, delayed aging and reduced risk of stroke or heart attack. CBD oil contains cannabidiol as a base active ingredient and may consist of just trace amounts of tetrahydroxycannabidiol (THC). RSO oil has a low CBD content, while high THC. Both cannabis oil type CBD and RSO also contain other cannabinoids, such as cannabichromene (CBC) and cannabigerol (CBG). CBD medical cannabis oil is a rather beneficial blend of cannabinoids, designed to protect against 21st century disease. Oil of marijuana in a kind of hobby APR includes little amounts of CBD, stabilized by the existence of THC.
Scotland is actually definitely a definitely wonderful nation, and every year it is actually explored through crowds of visitors coming from the United States, France, as well as also Italy or Spain. Rarely anybody taking leave of absence in July, August or September will think of Scotland. Perhaps it is actually excellent to believe regarding it straight currently, when the worth of the pound is dropping, as well as therefore we will pay for a lot less for a holiday in Scotland? Glen Affric in early springtime Why is it worth it? Scotland is actually predominantly a remarkable yard in the north of the country. In Scotland, I have actually already been actually able to see tapes, dolphins or even deer. But Scotland is actually additionally a traditionally fascinating land (that viewed Brave Heart?), Where you can easily explore stunning rock castles (Edinburgh, Stirling, Linlithgow, Eilean Donan). The funding itself, the impressive Edinburgh, likewise ought to have interest, especially during the summer months celebrations. country Scotland, scottish Scotland, app Scotland, conservative Scotland, information Scotland, scotland Scotland, our company Scotland, edinburgh Scotland, kid Scotland, creed Scotland, map Scotland, iona Scotland, food selection Scotland, trip Scotland, data Scotland, history Scotland, car Scotland, ship Scotland, uk Scotland, learn Scotland, celtic Scotland, glasgow Scotland, shetland Scotland, lifestyle Scotland, tay Scotland, bus Scotland, information Scotland, education and learning Scotland, bit Scotland, navigating Scotland, biscuit Scotland, covid Scotland, sport Scotland, availability Scotland, online videos Scotland, highland games Scotland, area Scotland, golf Scotland, scots Scotland, meals Scotland, whisky Scotland, spending plan Scotland, visitscotland Scotland, museum Scotland, bulletin Scotland, arbroath Scotland, heck Scotland, street Scotland, distilleries Scotland, street andrews Scotland, cocktail Scotland, go to scotland Scotland, europe Scotland, castles Scotland, future Scotland, encounter Scotland, blogging site Scotland, dundee Scotland, steering Scotland, sporting activities Scotland, covid-Scotland9 Scotland, transportation Scotland. Edinburgh – Some ideas for seeing Scotland Trip in Scotland must most definitely begin with its own funds. It takes about pair of times to go to Edinburgh, however you can easily prolong this opportunity up to four. In the situation of a quick check out to Scotland, you can easily also restrict on your own to Edinburgh simply, spending one day on a rounded travel by bus in the Scottish plateaus (virtually every traveling organization in the funds offers it). Arran is actually contacted Scotland in mini. Loch Lomond is one of Scotland’s two nationwide parks, a beautiful pond surrounded by forests and mountains. On the way, you can easily also visit Stirling Castle. country Scotland, scottish Scotland, application Scotland, conservative Scotland, info Scotland, scotland Scotland, our company Scotland, edinburgh Scotland, child Scotland, cult Scotland, chart Scotland, iona Scotland, menu Scotland, travel Scotland, information Scotland, past Scotland, cars and truck Scotland, ship Scotland, uk Scotland, learn Scotland, celtic Scotland, glasgow Scotland, shetland Scotland, culture Scotland, tay Scotland, bus Scotland, updates Scotland, education Scotland, little Scotland, navigation Scotland, biscuit Scotland, covid Scotland, sporting activity Scotland, availability Scotland, online videos Scotland, highland activities Scotland, area Scotland, golf Scotland, scots Scotland, meals Scotland, whisky Scotland, budget plan Scotland, visitscotland Scotland, gallery Scotland, email list Scotland, arbroath Scotland, hell Scotland, roadway Scotland, distilleries Scotland, street andrews Scotland, beverage Scotland, go to scotland Scotland, europe Scotland, castles Scotland, potential Scotland, experience Scotland, blog post Scotland, dundee Scotland, steering Scotland, sports Scotland, covid-Scotland9 Scotland, transportation Scotland. Scotland, like the whole of Great Britain, is certainly not one of the most inexpensive places. In addition, in Scotland the camping tent may be specified up actually anywhere, therefore vacationers may additionally rest in the untamed. The very most renowned and one of the most gorgeous hiking routes in Europe is actually the so-called West Highland Way. Longer trip? Exactly how approximately north along the west shore and after that back to the quieter, albeit much less magnificent east? Numerous visitors in Glasgow, takes a learn to Mallaig (at times going to Glencoe or Fort William on the way) after that check outs Isle of Skye (the best lovely of the Scottish isles), at that point scalp along the shore towards Ullapool, as for Durness, en route back exploring Inverness, Fort Augustus (Loch Ness), Aberdeen and Cairngorms National Park, and lastly St Andrews. Is it possible through trains and buses? Of course it is actually feasible, yet you will definitely skip a lot, so it is a lot better to rent out a car for at the very least aspect of the vacation. As well as do not be actually fooled due to the tourist snare of Loch Ness– as a matter of fact, there are loads of so much more gorgeous locations across Scotland country Scotland, scottish Scotland, app Scotland, conservative Scotland, info Scotland, scotland Scotland, our company Scotland, edinburgh Scotland, kid Scotland, cult Scotland, map Scotland, iona Scotland, food selection Scotland, trip Scotland, records Scotland, past history Scotland, vehicle Scotland, ship Scotland, uk Scotland, learn Scotland, celtic Scotland, glasgow Scotland, shetland Scotland, culture Scotland, tay Scotland, bus Scotland, updates Scotland, education Scotland, little Scotland, navigation Scotland, cookie Scotland, covid Scotland, sport Scotland, accessibility Scotland, video clips Scotland, highland activities Scotland, community Scotland, golf Scotland, scots Scotland, meals Scotland, whisky Scotland, spending plan Scotland, visitscotland Scotland, museum Scotland, newsletter Scotland, arbroath Scotland, hell Scotland, road Scotland, distilleries Scotland, street andrews Scotland, beverage Scotland, browse through scotland Scotland, europe Scotland, castles Scotland, potential Scotland, experience Scotland, blog post Scotland, dundee Scotland, driving Scotland, sports Scotland, transportation Scotland Glenelg I remember visiting Scotland for the first opportunity at the side of April. It was actually spring season in Scotland, the sunlight was heating up, while in Scotland it was actually still winter months all over. The Highlands were actually still dealt with in snow in numerous areas, as well as in Edinburgh it was actually piercingly storm. When taking a trip in Scotland, first off good, water resistant, sporting activities shoes. A suitable raincoat (and windproof!) Will certainly additionally can be found in helpful, at times it is likewise worth incorporating a slim headscarf, a sports hat and sports gloves to the bag (spring season and also autumn). In winter, I propose steering clear of Scotland from a range. Why? The solution is straightforward: it puts as well as strikes. In the case of a low-budget vacation, sleep in a tent or even remain just in hotels (price concerning PLN 80 every night)., Whiskey, see at the very least one whiskey as well as order fish as well as chips along with white vinegar at the very least as soon as. I wish that using this blog post I motivated my close friends (:-RRB-) however likewise unfamiliar people to travel to Scotland. It’s truly worth a hundred opportunities! I welcome you to explore, so I am actually still here. Wonderful Scottish coastlines. Loch Lomond Backpack. Iona- very small island, white beach fronts. Island of Skye. Glencoe. Eilean Donan Castle. Island of Arran. Scotland is actually most certainly a really attractive nation, as well as every year it is actually visited through crowds of travelers from the United States, France, as well as also Italy or even Spain. Arran is called Scotland in miniature. Scotland, like the whole of Great Britain, is certainly not one of the most inexpensive locations. It was already spring season in Scotland, the sun was actually heating up, while in Scotland it was still winter all over. I hope that along with this message I encouraged my buddies (:-RRB-) however additionally strangers to travel to https://www.scotland.com/
Scotland is most certainly a truly gorgeous country, and each year it is actually explored through groups of travelers coming from the United States, France, and also even Italy or Spain. However, I can easily certainly not withstand the impression that Poles happen here mainly for work. Barely anyone departing in July, August or even September will certainly think of Scotland. Possibly it is due to the prices that are actually certainly hostile for some travelers. In the meantime, the land of Nessi as well as guys in kilts is actually most definitely worth a longer or quick experience. Maybe it is really good to consider it at this moment, when the value of the pound is falling, and hence our experts will pay for less for a holiday season in Scotland? Glen Affric in very early springtime So why is it worth it? Scotland is mainly an excellent garden in the north of the nation. Highlands– hills covered with turf as well as heathers, deep lochs (ponds), a dramatic shore collection, glen (attractive valleys), as well as most importantly, hardly located in Europe (specifically in Scotland!) wild, where our experts will certainly certainly not view a solitary house. Space, room and also space again! Wild attributes, a great quantity of plants, birds as well as various other creatures wait for attribute enthusiasts. In Scotland, I have currently had the ability to enjoy tapes, dolphins or even deer. Yet Scotland is actually likewise a traditionally appealing land (that checked out Brave Heart?), Where you can easily visit amazing rock palaces (Edinburgh, Stirling, Linlithgow, Eilean Donan). The resources itself, the marvelous Edinburgh, likewise should have attention, especially during the course of the summer festivities. nation Scotland, scottish Scotland, application Scotland, tory Scotland, information Scotland, scotland Scotland, our company Scotland, edinburgh Scotland, kid Scotland, cult Scotland, map Scotland, iona Scotland, food selection Scotland, trip Scotland, data Scotland, record Scotland, car Scotland, ship Scotland, uk Scotland, train Scotland, celtic Scotland, glasgow Scotland, shetland Scotland, culture Scotland, tay Scotland, bus Scotland, information Scotland, education Scotland, bit Scotland, navigation Scotland, biscuit Scotland, covid Scotland, sporting activity Scotland, availability Scotland, video recordings Scotland, highland games Scotland, neighborhood Scotland, golf Scotland, scots Scotland, food items Scotland, whisky Scotland, budget plan Scotland, visitscotland Scotland, gallery Scotland, e-newsletter Scotland, arbroath Scotland, heck Scotland, street Scotland, distilleries Scotland, st andrews Scotland, alcoholic beverage Scotland, see scotland Scotland, europe Scotland, castles Scotland, potential Scotland, take in Scotland, blog post Scotland, dundee Scotland, steering Scotland, sports Scotland, covid-Scotland9 Scotland, transport Scotland. Edinburgh – Some concepts for visiting Scotland Trip in Scotland must definitely start with its own financing. It takes about pair of days to visit Edinburgh, yet you can easily stretch this opportunity up to four. In the instance of a short check out to Scotland, you can also restrict your own self to Edinburgh simply, spending one day on a round journey through bus in the Scottish highlands (virtually every traveling agency in the resources offers it). For a somewhat longer experience (albeit still confined to simply a few days) from Edinburgh, I will recommend to reach in pair of directions: Isle of Arran or even Loch Lomond. Arran is phoned Scotland in mini. Devoting pair of or even three days on the isle, our experts can enjoy the beauty of the west shore, relax on the beach, climb the highest peak of the isle– Goat Fell, along with appreciate the grassy mountains and appreciate the space. Loch Lomond is just one of Scotland’s two nationwide playgrounds, a lovely pond surrounded through woods and mountains. On the method, you can likewise go to Stirling Castle. There is actually a direct train coming from Glasgow in both instructions. country Scotland, scottish Scotland, app Scotland, conservative Scotland, relevant information Scotland, scotland Scotland, our company Scotland, edinburgh Scotland, youngster Scotland, creed Scotland, map Scotland, iona Scotland, food selection Scotland, trip Scotland, information Scotland, background Scotland, car Scotland, ship Scotland, uk Scotland, train Scotland, celtic Scotland, glasgow Scotland, shetland Scotland, society Scotland, tay Scotland, bus Scotland, updates Scotland, learning Scotland, little bit Scotland, navigating Scotland, cookie Scotland, covid Scotland, sporting activity Scotland, accessibility Scotland, video recordings Scotland, highland video games Scotland, neighborhood Scotland, golf Scotland, scots Scotland, food Scotland, whisky Scotland, spending plan Scotland, visitscotland Scotland, gallery Scotland, newsletter Scotland, arbroath Scotland, heck Scotland, road Scotland, distilleries Scotland, st andrews Scotland, alcoholic beverage Scotland, browse through scotland Scotland, europe Scotland, castles Scotland, future Scotland, encounter Scotland, weblog Scotland, dundee Scotland, driving Scotland, sporting activities Scotland, covid-Scotland9 Scotland, transport Scotland. Scotland, like the entire of Great Britain, is certainly not one of the cheapest destinations. In addition, in Scotland the tent can easily be established up actually anywhere, so tourists may likewise sleep in the wild. The most widely known and also one of the very most beautiful treking trails in Europe is the so-called West Highland Way. Longer trip? How about north along the west shore and after that back to the quieter, albeit a lot less stunning eastern? Lots of visitors in Glasgow, takes a train to Mallaig (at times checking out Glencoe or even Fort William en route) after that visits Isle of Skye (the absolute most attractive of the Scottish isles), after that scalp along the coastline in the direction of Ullapool, regarding Durness, on the means back going to Inverness, Fort Augustus (Loch Ness), Aberdeen as well as Cairngorms National Park, as well as eventually St Andrews. Is it possible by buses as well as learns? Certainly it is actually feasible, but you are going to miss out on a great deal, so it is actually better to rent an automobile for at the very least component of the trip. And do not be actually misleaded due to the visitor catch of Loch Ness– actually, there are lots of so much more lovely areas throughout Scotland nation Scotland, scottish Scotland, application Scotland, conservative Scotland, details Scotland, scotland Scotland, our company Scotland, edinburgh Scotland, youngster Scotland, creed Scotland, map Scotland, iona Scotland, menu Scotland, trip Scotland, information Scotland, past history Scotland, auto Scotland, ship Scotland, uk Scotland, train Scotland, celtic Scotland, glasgow Scotland, shetland Scotland, society Scotland, tay Scotland, bus Scotland, news Scotland, education Scotland, bit Scotland, navigation Scotland, cookie Scotland, covid Scotland, sport Scotland, availability Scotland, online videos Scotland, highland video games Scotland, neighborhood Scotland, golf Scotland, scots Scotland, food Scotland, whisky Scotland, finances Scotland, visitscotland Scotland, museum Scotland, newsletter Scotland, arbroath Scotland, heck Scotland, street Scotland, distilleries Scotland, st andrews Scotland, cocktail Scotland, check out scotland Scotland, europe Scotland, castles Scotland, future Scotland, take in Scotland, blog Scotland, dundee Scotland, steering Scotland, sports Scotland, transport Scotland Glenelg I keep in mind seeing Scotland for the initial time at the side of April. It was presently spring in Scotland, the sunshine was warming up, while in Scotland it was actually still winter all over. The Highlands were actually still dealt with in snowfall in several locations, as well as in Edinburgh it was actually piercingly rain. When journeying in Scotland, first of all great, water resistant, sports shoes. Will also happen in convenient, in some cases it is additionally worth including a thin scarf, a sports hat and sports handwear covers to the knapsack (spring season and also fall). In winter season, I recommend staying clear of Scotland from a range. In the situation of a low-budget trip, rest in a camping tent or even stay merely in hostels (price about PLN 80 per night)., Whiskey, see at least one whiskey as well as instruction fish and also chips along with vinegar at the very least the moment. I really hope that through this blog post I promoted my close friends (:-RRB-) but additionally unknown people to journey to Scotland. It is actually truly worth a hundred opportunities! I welcome you to visit, so I am actually still below. Stunning Scottish seashores. Loch Lomond Backpack. Iona- small isle, white coastlines. Isle of Skye. Glencoe. Eilean Donan Castle. Isle of Arran. Scotland is most certainly a truly lovely nation, and also every year it is seen by groups of tourists from the United States, France, and also even Italy or Spain. Arran is phoned Scotland in miniature. Scotland, like the whole of Great Britain, is certainly not one of the cheapest locations. It was actually currently spring season in Scotland, the sunlight was actually heating up, while in Scotland it was still wintertime all over. I really hope that along with this post I motivated my pals (:-RRB-) but likewise unfamiliar people to take a trip to https://www.scotland.com/
Scotland is undeniably a definitely stunning country, and also every year it is actually checked out through groups of visitors coming from the United States, France, as well as even Italy or Spain. I can certainly not resist the impact that Poles happen below primarily for job. Rarely any individual taking leave of absence in July, August or September will definitely consider Scotland. Perhaps it is due to the costs that are actually most definitely antagonistic for some travelers. The land of Nessi and also men in kilts is actually absolutely worth a quick or even longer trip. Perhaps it is actually excellent to deal with it straight currently, when the value of the pound is falling, and also thus our experts will pay less for a holiday in Scotland? Glen Affric in very early spring season Why is it worth it? Scotland is actually primarily a wonderful landscape in the north of the nation. In Scotland, I have actually been actually capable to check out tapes, dolphins or also deer. Scotland is actually also a traditionally appealing property (that watched Brave Heart?), Where you may explore splendid rock palaces (Edinburgh, Stirling, Linlithgow, Eilean Donan). The resources itself, the stunning Edinburgh, additionally should have focus, especially during the summer events. country Scotland, scottish Scotland, app Scotland, conservative Scotland, info Scotland, scotland Scotland, our team Scotland, edinburgh Scotland, kid Scotland, creed Scotland, chart Scotland, iona Scotland, menu Scotland, travel Scotland, information Scotland, past Scotland, auto Scotland, ship Scotland, uk Scotland, train Scotland, celtic Scotland, glasgow Scotland, shetland Scotland, culture Scotland, tay Scotland, bus Scotland, information Scotland, learning Scotland, bit Scotland, navigating Scotland, biscuit Scotland, covid Scotland, sporting activity Scotland, accessibility Scotland, videos Scotland, highland games Scotland, neighborhood Scotland, golf Scotland, scots Scotland, meals Scotland, whisky Scotland, budget plan Scotland, visitscotland Scotland, museum Scotland, e-newsletter Scotland, arbroath Scotland, heck Scotland, road Scotland, distilleries Scotland, street andrews Scotland, alcoholic beverage Scotland, go to scotland Scotland, europe Scotland, castles Scotland, potential Scotland, take in Scotland, blog site Scotland, dundee Scotland, driving Scotland, sporting activities Scotland, covid-Scotland9 Scotland, transport Scotland. Edinburgh – Some tips for visiting Scotland Traveling in Scotland ought to most definitely start along with its own resources. Edinburgh is actually a beautiful medieval a community with particular rock buildings. Coming from the main road, the alleged The Royal Mile linking the past imperial castle with the Queen’s summer season palace (Palace of Holyroodhouse) operates off a network of fascinating tiny roads (the supposed shut), creating a labyrinth in which it is truly worth getting dropped. It takes approximately two times to see Edinburgh, but you can easily extend this moment approximately four. In the situation of a quick see to Scotland, you can easily likewise limit yourself to Edinburgh simply, devoting eventually on a big salami through bus in the Scottish mountainous (virtually every trip company in the resources delivers it). By doing this, a minimum of for a moment our team will experience the ambience of an actual property of hazes. An also far better concept is actually to rent a cars and truck for 1 day as well as happen an independent vacation (the course and also attributes of the managed trips carry out not automatically fit every person). Such a self-guided scenic tour will probably take our team at the very least ten hrs. Arran is actually called Scotland in baby. Loch Lomond is one of Scotland’s pair of national playgrounds, a beautiful pond bordered through woodlands as well as mountains. On the means, you may additionally go to Stirling Castle. nation Scotland, scottish Scotland, application Scotland, tory Scotland, details Scotland, scotland Scotland, our team Scotland, edinburgh Scotland, kid Scotland, cult Scotland, map Scotland, iona Scotland, menu Scotland, traveling Scotland, records Scotland, background Scotland, automobile Scotland, ship Scotland, uk Scotland, learn Scotland, celtic Scotland, glasgow Scotland, shetland Scotland, society Scotland, tay Scotland, bus Scotland, headlines Scotland, learning Scotland, little Scotland, navigating Scotland, cookie Scotland, covid Scotland, sporting activity Scotland, availability Scotland, video recordings Scotland, highland activities Scotland, area Scotland, golf Scotland, scots Scotland, food Scotland, whisky Scotland, spending plan Scotland, visitscotland Scotland, museum Scotland, e-newsletter Scotland, arbroath Scotland, heck Scotland, roadway Scotland, distilleries Scotland, street andrews Scotland, beverage Scotland, see scotland Scotland, europe Scotland, castles Scotland, future Scotland, encounter Scotland, blog post Scotland, dundee Scotland, steering Scotland, sporting activities Scotland, covid-Scotland9 Scotland, transportation Scotland. Scotland, like the entire of Great Britain, is actually not one of the most cost effective places. In add-on, in Scotland the tent can be prepared up essentially anywhere, so tourists can likewise rest in the untamed. The very most well-known and one of the most lovely treking routes in Europe is actually the alleged West Highland Way. Longer vacation? How around north along the west coastline and afterwards back to the quieter, albeit a lot less exceptional eastern? Many vacationers in Glasgow, takes a train to Mallaig (sometimes visiting Glencoe or Fort William heading) then visits Isle of Skye (the best lovely of the Scottish isles), after that scalp along the coastline towards Ullapool, as far as Durness, en route back exploring Inverness, Fort Augustus (Loch Ness), Aberdeen as well as Cairngorms National Park, as well as ultimately Street Andrews. Is it possible through buses and also learns? Certainly it is actually feasible, yet you will definitely overlook a lot, so it is better to rent out an automobile for at the very least part of the vacation. And also do not be misleaded through the tourist snare of Loch Ness– in reality, there are actually lots of much even more attractive places across Scotland country Scotland, scottish Scotland, app Scotland, tory Scotland, info Scotland, scotland Scotland, our company Scotland, edinburgh Scotland, little one Scotland, cult Scotland, map Scotland, iona Scotland, menu Scotland, traveling Scotland, information Scotland, past history Scotland, auto Scotland, ship Scotland, uk Scotland, learn Scotland, celtic Scotland, glasgow Scotland, shetland Scotland, society Scotland, tay Scotland, bus Scotland, updates Scotland, education Scotland, little Scotland, navigating Scotland, biscuit Scotland, covid Scotland, sporting activity Scotland, ease of access Scotland, videos Scotland, highland video games Scotland, area Scotland, golf Scotland, scots Scotland, food Scotland, whisky Scotland, spending plan Scotland, visitscotland Scotland, gallery Scotland, bulletin Scotland, arbroath Scotland, heck Scotland, roadway Scotland, distilleries Scotland, st andrews Scotland, beverage Scotland, go to scotland Scotland, europe Scotland, castles Scotland, future Scotland, encounter Scotland, blog Scotland, dundee Scotland, driving Scotland, sporting activities Scotland, transport Scotland Glenelg The weather condition could be irregular. I bear in mind checking out Scotland for the first opportunity at the side of April. It was currently come Scotland, the sunlight was actually warming up, while in Scotland it was still wintertime around. The Highlands were still dealt with in snow in many locations, and also in Edinburgh it was actually piercingly rainfall. Obviously, it ended up right away that I hadn’t loaded the right factors. I was considering to remain in the area, yet additionally ballet flats, sandals, aesthetic jackets as well as slim blouses fall off in springtime. When taking a trip in Scotland, initially of all great, water resistant, sports shoes. Will also happen in handy, in some cases it is actually additionally worth adding a slim headscarf, a sporting activities hat and also sports handwear covers to the bag (spring season as well as fall). In winter, I recommend avoiding Scotland coming from a span. Add-on little bit of things: Umbrellas certainly don’t work (the wind flexes them in each directions), the outdoor tents needs to (MUST!) possess a good flysheet, it deserves taking a reusable container along with you (water faucet water, however also drinkable in flows or even streams), at minimum a handful of sets of socks, a cozy fleece and also one thing to fend off unpleasant flies (I advise a smidge). When it comes to a low-budget journey, oversleep a tent or remain simply in hotels (cost about PLN 80 per evening). You should make an effort fish and shellfish (they are actually mouth watering!), Whiskey, visit at the very least one whiskey as well as command fish and potato chips along with vinegar a minimum of as soon as. I hope that along with this article I encouraged my pals (:-RRB-) but additionally unfamiliar people to journey to Scotland. It’s actually worth a hundred times! I welcome you to see, if only I am still here. Attractive Scottish seashores. Loch Lomond Backpack. Iona- very small island, white seashores. Island of Skye. Glencoe. Eilean Donan Castle. Island of Arran. Scotland is undoubtedly a definitely lovely nation, and every year it is actually explored by crowds of travelers coming from the United States, France, as well as even Italy or Spain. Arran is actually contacted Scotland in baby. Scotland, like the whole of Great Britain, is certainly not one of the most cost effective places. It was actually currently springtime in Scotland, the sun was warming up, while in Scotland it was actually still winter season all over. I hope that with this blog post I encouraged my close friends (:-RRB-) but likewise complete strangers to travel to https://www.scotland.com/
Did you understand these truths on CBD OIL and Full Spectrum CBD Hemp Oil? Cannabinoids are isolated from hemp using supercritical CO2 extraction. Thanks to contemporary innovation, the resulting service is clean, devoid of heavy metals and unnecessary waxes, naturally present in the plant, and the sucked liquid has a common, oily consistency. CBD oil contains cannabidiol as a base ingredient and might contain only trace amounts of tetrahydroxycannabidiol (THC). Functions as a memory enhancer, enhancing concentration and coordination of movements, removing swelling and reoccurring infections. It enhances the conduction of stimuli in the course of autoimmune illness (numerous sclerosis, amyotrophic sclerosis). It is recommended by doctors and pharmacists as an antioxidant and compound that blocks the action of proinflammatory cytokines (proteins), e.g. in Crohn’s disease or ulcerative intestinal tract. RSO oil has a low CBD material, while high THC. The synergistic (enhancing) action of CBD and THC relative to each other is utilized here. Both cannabinoids can do much more together than when used individually. Both marijuana oil type CBD and RSO likewise contain other cannabinoids, such as cannabichromene (CBC) and cannabigerol (CBG). The secret is not, however, that CBD frequently has a composition expanded to consist of flavones, flavonoids, terpenes, terpenoids, amino acids and omega acids. The distinction is primarily due to motives guiding humanity to use one or the other product. CBD medical marijuana oil is a rather beneficial blend of cannabinoids, designed to safeguard against 21st century illness. It’s finest to utilize all of these substances together, as nature developed them and enclosed in marijuana inflorescences. Oil of cannabis in a kind of pastime APR includes little quantities of CBD, stabilized by the presence of THC. Manufacturers focus on the synergistic result of one compound relative to the other, while abandoning the presence of CBC and CBG. Why such a choice? – Modern scientific research reveals that CBD + THC cope with major autoimmune illness, while CBC or CBG show minimal activity in the presence of both compounds, just like flavonoids, terpenes or flavones, for that reason their content in the solution seems to be unneeded. In addition, the marijuana pressure from which THC and CBD are obtained include minimal quantities of other cannabinoids. RSO oil is totally illegal in Poland, which is why it can not be obtained in any legally running shop on the marketplace. Naturally, there are a number of amateur techniques for acquiring it, but it’s good to understand that substances gotten artificially in home labs are uncertain, untried, and the impact unknown. The solvent for the production of home RSO is normally gas, alcohol and even kerosene, which instead of treating, poison. Alcohols and their like impair cannabinoids, and so in reality, they do not bring anything new to the medical world. Marijuana oil has currently marked a brand-new age in which male ceased to fear what is unknown, and started to find what our forefathers had already discovered and utilize the significant potential, at very first glance, a little strange relationships, associated primarily with pathology. Medical marijuana, contrary to its name, does not indicate fermented female inflorescences and leaves consisting of psychedelic substances coiled in so-called “Joints”, but an advantageous oil without psychoactive THC. A basic individual, after taking doses of medicinal cannabis and attaining the appropriate state of cannabinoids in the blood, can enjoy increased resistance, lowered vulnerability to cancer, postponed aging and reduced risk of stroke or cardiac arrest. CBD oil contains cannabidiol as a base component and may contain just trace amounts of tetrahydroxycannabidiol (THC). RSO oil has a low CBD material, while high THC. Both cannabis oil type CBD and RSO also consist of other cannabinoids, such as cannabichromene (CBC) and cannabigerol (CBG). CBD medical marijuana oil is a rather beneficial blend of cannabinoids, designed to secure against 21st century disease. Oil of marijuana in a kind of hobby APR consists of small amounts of CBD, balanced by the existence of THC.
Did you understand these facts on CBD OIL and Full Spectrum CBD Hemp Oil? Cannabinoids are separated from hemp utilizing supercritical CO2 extraction. Thanks to modern innovation, the resulting solution is tidy, totally free of heavy metals and unnecessary waxes, naturally present in the plant, and the sucked liquid has a typical, oily consistency. CBD oil consists of cannabidiol as a base active ingredient and might consist of just trace quantities of tetrahydroxycannabidiol (THC). Works as a memory enhancer, enhancing concentration and coordination of motions, eliminating inflammation and reoccurring infections. It enhances the conduction of stimuli in the course of autoimmune diseases (several sclerosis, amyotrophic sclerosis). It is advised by physicians and pharmacists as an antioxidant and substance that obstructs the action of proinflammatory cytokines (proteins), e.g. in Crohn’s illness or ulcerative intestine. RSO oil has a low CBD material, while high THC. Naturally, the crucial job of RSO is to trigger a psychoactive impact, although it can also promote “ill” brain structures. It is worth knowing that supplements of this type is primarily used by individuals to whom standard treatment does not bring relief in health problem. The synergistic (enhancing) action of CBD and THC relative to each other is utilized here. When used separately, both cannabinoids can do much more together than. In addition, they collectively promote the department of non-active nerve cells, nurture the fatty envelope of the nerves, and prevent myelin swelling that causes loss of function in some autoimmune diseases. There are likewise stories where marijuana in its natural kind softened spasticity, minimized the frequency of convulsions and seizures, and reduced unpleasant scrapie in Parkinson’s disease. This is where the idea of getting RSO, planned just for chronically ill individuals, come from . Both cannabis oil type CBD and RSO likewise contain other cannabinoids, such as cannabichromene (CBC) and cannabigerol (CBG). The secret is not, nevertheless, that CBD typically has a structure broadened to consist of flavones, flavonoids, terpenes, terpenoids, amino acids and omega acids. The distinction is mainly due to motives guiding humankind to use one or the other product. CBD medical cannabis oil is a rather beneficial blend of cannabinoids, developed to secure against 21st century disease. It’s finest to utilize all of these compounds together, as nature created them and confined in cannabis inflorescences. It turns out that cannabidiol boosts the effects of cannabichromene (CBC) and cannabigerol (CBG), and flavones or flavonoids enhance the absorption of these compounds. Omega-6 and omega-3 highly nourish the body and do not permit to change, which accelerate the aging process of the organism and improve the development of cancer. Oil of cannabis in a kind of pastime APR contains small amounts of CBD, stabilized by the presence of THC. Producers focus on the synergistic effect of one substance relative to the other, while deserting the presence of CBC and CBG. Why such a choice? – Modern clinical research study reveals that CBD + THC manage severe autoimmune diseases, while CBC or CBG reveal very little activity in the existence of both compounds, simply like terpenes, flavonoids or flavones, for that reason their material in the option seems to be unneeded. In addition, the cannabis stress from which THC and CBD are obtained include minimal quantities of other cannabinoids. RSO oil is entirely unlawful in Poland, which is why it can not be obtained in any legally running store on the marketplace. Naturally, there are a variety of amateur approaches for acquiring it, however it’s good to understand that compounds gotten artificially in house laboratories doubt, untested, and the impact unknown. The solvent for the production of household RSO is typically gas, alcohol and even kerosene, which instead of treating, poison. Alcohols and their like hinder cannabinoids, and so in truth, they don’t bring anything brand-new to the medical world. Marijuana oil has already marked a new age in which male ceased to fear what is unknown, and began to discover what our ancestors had actually already seen and utilize the significant capacity, in the beginning look, a little bizarre relationships, associated mainly with pathology. Medical cannabis, contrary to its name, does not imply fermented female inflorescences and leaves consisting of psychoactive compounds coiled in so-called “Joints”, but an advantageous oil without psychoactive THC. A basic individual, after taking doses of medical cannabis and accomplishing the appropriate state of cannabinoids in the blood, can take pleasure in increased immunity, minimized vulnerability to cancer, delayed aging and minimized danger of stroke or cardiovascular disease. CBD oil contains cannabidiol as a base ingredient and may include just trace quantities of tetrahydroxycannabidiol (THC). RSO oil has a low CBD content, while high THC. Both marijuana oil type CBD and RSO likewise consist of other cannabinoids, such as cannabichromene (CBC) and cannabigerol (CBG). CBD medical cannabis oil is a rather useful blend of cannabinoids, developed to safeguard versus 21st century disease. Oil of cannabis in a kind of pastime APR includes small amounts of CBD, balanced by the presence of THC.
Scotland is actually undoubtedly a really stunning nation, and also annually it is actually gone to through crowds of travelers from the United States, France, as well as also Italy or even Spain. I can easily certainly not avoid the perception that Poles come right here mainly for work. Hardly any individual departing in July, August or September will certainly presume of Scotland. Perhaps it is actually as a result of the costs that are absolutely hostile for some visitors. The property of Nessi and guys in kilts is actually absolutely worth a brief or lengthy adventure. Perhaps it is actually really good to consider it straight now, when the value of the pound is actually dropping, as well as thereby we will pay out a lot less for a holiday season in Scotland? Glen Affric in early spring Why is it worth it? Scotland is mainly an excellent landscape in the north of the nation. In Scotland, I have currently been actually capable to view tapes, dolphins or also deer. Yet Scotland is actually likewise a historically interesting property (that saw Brave Heart?), Where you may see splendid stone palaces (Edinburgh, Stirling, Linlithgow, Eilean Donan). The funding on its own, the impressive Edinburgh, also is worthy of interest, especially throughout the summer festivals. nation Scotland, scottish Scotland, application Scotland, tory Scotland, relevant information Scotland, scotland Scotland, our team Scotland, edinburgh Scotland, child Scotland, creed Scotland, map Scotland, iona Scotland, menu Scotland, trip Scotland, records Scotland, past history Scotland, auto Scotland, ship Scotland, uk Scotland, learn Scotland, celtic Scotland, glasgow Scotland, shetland Scotland, lifestyle Scotland, tay Scotland, bus Scotland, updates Scotland, learning Scotland, little Scotland, navigation Scotland, cookie Scotland, covid Scotland, sporting activity Scotland, availability Scotland, videos Scotland, highland activities Scotland, community Scotland, golf Scotland, scots Scotland, food items Scotland, whisky Scotland, spending plan Scotland, visitscotland Scotland, gallery Scotland, bulletin Scotland, arbroath Scotland, hell Scotland, street Scotland, distilleries Scotland, st andrews Scotland, drink Scotland, check out scotland Scotland, europe Scotland, castles Scotland, future Scotland, take in Scotland, weblog Scotland, dundee Scotland, steering Scotland, sporting activities Scotland, covid-Scotland9 Scotland, transport Scotland. Edinburgh – Some ideas for seeing Scotland Travel in Scotland ought to most definitely start with its own capital. It takes about 2 days to check out Edinburgh, yet you can extend this opportunity up to four. In the case of a quick see to Scotland, you can easily additionally limit yourself to Edinburgh just, devoting one day on a circular journey through bus in the Scottish highlands (almost every travel firm in the financing gives it). Arran is actually gotten in touch with Scotland in mini. Loch Lomond is one of Scotland’s 2 national parks, a gorgeous lake neighbored by mountains and rainforests. On the technique, you may also see Stirling Castle. country Scotland, scottish Scotland, app Scotland, tory Scotland, details Scotland, scotland Scotland, our company Scotland, edinburgh Scotland, little one Scotland, creed Scotland, map Scotland, iona Scotland, food selection Scotland, traveling Scotland, information Scotland, past history Scotland, car Scotland, ship Scotland, uk Scotland, learn Scotland, celtic Scotland, glasgow Scotland, shetland Scotland, culture Scotland, tay Scotland, bus Scotland, headlines Scotland, education Scotland, little bit Scotland, navigation Scotland, biscuit Scotland, covid Scotland, sport Scotland, access Scotland, video clips Scotland, highland video games Scotland, area Scotland, golf Scotland, scots Scotland, food Scotland, whisky Scotland, finances Scotland, visitscotland Scotland, gallery Scotland, email list Scotland, arbroath Scotland, hell Scotland, street Scotland, distilleries Scotland, street andrews Scotland, cocktail Scotland, visit scotland Scotland, europe Scotland, castles Scotland, future Scotland, take in Scotland, weblog Scotland, dundee Scotland, steering Scotland, sports Scotland, covid-Scotland9 Scotland, transport Scotland. Low Budget Travel? Scotland, like the whole of Great Britain, is certainly not one of the cheapest locations. You may find a whole great deal of exploring tracks as well as campsites listed here. On top of that, in Scotland the outdoor tents may be set up literally anywhere, therefore tourists can easily additionally rest in bush. What is vital in this particular instance is actually global access to well-maintained water– our experts can find hill waterfalls, waterways and flows just about just about everywhere. The absolute most widely known and also some of the best wonderful exploring trails in Europe is actually the so-called West Highland Way. Because of the impressive sights, I enthusiastically recommend Longer travel? Exactly how around north along the west shore and after that back to the quieter, albeit much less amazing eastern? Numerous vacationers in Glasgow, takes a learn to Mallaig (often going to Glencoe or even Fort William on the means) at that point sees Isle of Skye (the best gorgeous of the Scottish isles), then scalp along the shoreline towards Ullapool, as for Durness, en route back checking out Inverness, Fort Augustus (Loch Ness), Aberdeen and Cairngorms National Park, and also finally Street Andrews. Is it feasible through learns and also buses? Of training program it is feasible, yet you will miss out on a whole lot, so it is much far better to rent an automobile for at the very least component of the journey. As well as do not be tricked due to the vacationer trap of Loch Ness– actually, there are actually lots of a lot more lovely spots all around Scotland country Scotland, scottish Scotland, app Scotland, conservative Scotland, details Scotland, scotland Scotland, our company Scotland, edinburgh Scotland, little one Scotland, cult Scotland, map Scotland, iona Scotland, menu Scotland, trip Scotland, data Scotland, past Scotland, cars and truck Scotland, ship Scotland, uk Scotland, train Scotland, celtic Scotland, glasgow Scotland, shetland Scotland, culture Scotland, tay Scotland, bus Scotland, news Scotland, education and learning Scotland, little bit Scotland, navigating Scotland, cookie Scotland, covid Scotland, sporting activity Scotland, accessibility Scotland, video clips Scotland, highland activities Scotland, area Scotland, golf Scotland, scots Scotland, meals Scotland, whisky Scotland, spending plan Scotland, visitscotland Scotland, gallery Scotland, bulletin Scotland, arbroath Scotland, heck Scotland, roadway Scotland, distilleries Scotland, street andrews Scotland, drink Scotland, go to scotland Scotland, europe Scotland, castles Scotland, future Scotland, encounter Scotland, blog site Scotland, dundee Scotland, steering Scotland, sports Scotland, transport Scotland Glenelg I don’t forget checking out Scotland for the very first opportunity at the conclusion of April. It was already spring season in Scotland, the sunlight was actually warming up, while in Scotland it was actually still wintertime all over. The Highlands were actually still covered in snowfall in numerous spots, and also in Edinburgh it was actually piercingly rain. When taking a trip in Scotland, to begin with of all good, waterproof, sporting activities shoes. Will certainly likewise come in handy, occasionally it is actually also worth incorporating a thin headscarf, a sporting activities hat as well as sports handwear covers to the knapsack (spring and autumn). In winter, I suggest staying clear of Scotland coming from a range. Bonus little bit of factors: Umbrellas undoubtedly do not work (the wind bends them in each instructions), the outdoor tents has to (MUST!) possess a good flysheet, it deserves taking a recyclable bottle with you (faucet water, however likewise drinkable in streams or even streams), at the very least a couple of sets of socks, a hot fleece and also one thing to push back vicious flies (I highly recommend a smidge). In the instance of a low-budget trip, sleep in an outdoor tents or even keep only in hotels (cost regarding PLN 80 every night). You need to try fish and shellfish (they are actually delectable!), Whiskey, see a minimum of one whiskey and also instruction fish as well as chips with vinegar at the very least when. I wish that using this article I motivated my close friends (:-RRB-) however also unknown people to journey to Scotland. It’s actually worth a hundred opportunities! I invite you to see, so I am actually still here. Gorgeous Scottish seasides. Loch Lomond Backpack. Iona- very small island, white colored coastlines. Isle of Skye. Glencoe. Eilean Donan Castle. Isle of Arran. Scotland is actually certainly a truly wonderful country, as well as every year it is gone to by crowds of travelers from the United States, France, and even Italy or even Spain. Arran is gotten in touch with Scotland in mini. Scotland, like the whole of Great Britain, is certainly not one of the most cost effective destinations. It was actually currently springtime in Scotland, the sunshine was actually warming up, while in Scotland it was still wintertime all over. I wish that with this article I encouraged my good friends (:-RRB-) yet likewise complete strangers to take a trip to https://www.scotland.com/
Scotland is undoubtedly an actually stunning nation, and every year it is actually explored by groups of travelers coming from the United States, France, as well as even Italy or even Spain. Hardly anyone taking vacation in July, August or even September are going to believe of Scotland. Maybe it is excellent to think regarding it straight currently, when the value of the extra pound is falling, and thus our company will pay less for a holiday in Scotland? Glen Affric in very early spring season Why is it worth it? Scotland is actually largely an excellent landscape in the north of the country. Highlands– mountains covered with lawn and also heathers, deeper lochs (lakes), a remarkable coastline collection, glen (charming valleys), as well as most importantly, hardly discovered in Europe (specifically in Scotland!) wild, where our experts will certainly not view a singular property. Space, space and room once more! Wild nature, a wealth of vegetations, birds and various other pets wait for nature fans. In Scotland, I have presently managed to check out tapes, dolphins and even deer. However Scotland is also a traditionally exciting property (that enjoyed Brave Heart?), Where you can visit spectacular rock fortress (Edinburgh, Stirling, Linlithgow, Eilean Donan). The resources itself, the marvelous Edinburgh, additionally should have attention, particularly in the course of the summer season events. country Scotland, scottish Scotland, app Scotland, tory Scotland, information Scotland, scotland Scotland, our team Scotland, edinburgh Scotland, youngster Scotland, creed Scotland, chart Scotland, iona Scotland, menu Scotland, trip Scotland, data Scotland, past Scotland, vehicle Scotland, ship Scotland, uk Scotland, learn Scotland, celtic Scotland, glasgow Scotland, shetland Scotland, lifestyle Scotland, tay Scotland, bus Scotland, information Scotland, education and learning Scotland, little bit Scotland, navigating Scotland, cookie Scotland, covid Scotland, sport Scotland, access Scotland, video clips Scotland, highland games Scotland, neighborhood Scotland, golf Scotland, scots Scotland, food items Scotland, whisky Scotland, budget plan Scotland, visitscotland Scotland, gallery Scotland, email list Scotland, arbroath Scotland, heck Scotland, roadway Scotland, distilleries Scotland, street andrews Scotland, beverage Scotland, see scotland Scotland, europe Scotland, castles Scotland, future Scotland, encounter Scotland, blog Scotland, dundee Scotland, steering Scotland, sporting activities Scotland, covid-Scotland9 Scotland, transportation Scotland. Edinburgh – Some concepts for checking out Scotland Travel in Scotland should undoubtedly begin with its own financing. Edinburgh is actually a wonderful middle ages a town with particular stone buildings. Coming from the principal road, the so-called The Royal Mile attaching the previous imperial palace with the Queen’s summer palace (Palace of Holyroodhouse) bolts a system of fascinating little streets (the alleged shut), producing a maze in which it is actually definitely worth obtaining lost. It takes approximately pair of days to explore Edinburgh, yet you may prolong this time around up to four. In the instance of a short check out to Scotland, you can additionally confine on your own to Edinburgh merely, investing 1 day on a round excursion by bus in the Scottish plateaus (practically every travel bureau in the funds offers it). This way, a minimum of for a second our team will experience the environment of a true property of mists. An also much better idea is to lease an automobile for eventually and take place an individual excursion (the plan and also nature of the organized scenic tours carry out certainly not necessarily meet everyone). Such a self-guided trip will probably take our company at the very least 10 hrs. Arran is actually gotten in touch with Scotland in miniature. Loch Lomond is actually one of Scotland’s pair of nationwide playgrounds, a lovely lake surrounded by mountains and also woods. On the way, you may additionally visit Stirling Castle. country Scotland, scottish Scotland, app Scotland, conservative Scotland, details Scotland, scotland Scotland, our company Scotland, edinburgh Scotland, child Scotland, cult Scotland, map Scotland, iona Scotland, menu Scotland, traveling Scotland, data Scotland, past Scotland, automobile Scotland, ship Scotland, uk Scotland, train Scotland, celtic Scotland, glasgow Scotland, shetland Scotland, culture Scotland, tay Scotland, bus Scotland, headlines Scotland, education Scotland, bit Scotland, navigation Scotland, biscuit Scotland, covid Scotland, sporting activity Scotland, access Scotland, online videos Scotland, highland activities Scotland, community Scotland, golf Scotland, scots Scotland, food Scotland, whisky Scotland, budget Scotland, visitscotland Scotland, gallery Scotland, email list Scotland, arbroath Scotland, hell Scotland, street Scotland, distilleries Scotland, st andrews Scotland, alcoholic beverage Scotland, check out scotland Scotland, europe Scotland, castles Scotland, potential Scotland, experience Scotland, blog Scotland, dundee Scotland, driving Scotland, sports Scotland, covid-Scotland9 Scotland, transport Scotland. Scotland, like the entire of Great Britain, is actually not one of the most inexpensive locations. In enhancement, in Scotland the tent can be prepared up practically anywhere, so tourists can also sleep in the crazy. The most popular and also one of the most wonderful exploring tracks in Europe is the so-called West Highland Way. Longer trip? Exactly how around north along the west coastline and afterwards back to the quieter, albeit a lot less amazing east? Many visitors in Glasgow, takes a train to Mallaig (occasionally exploring Glencoe or even Fort William en route) after that sees Isle of Skye (one of the most gorgeous of the Scottish islands), then head along the shoreline towards Ullapool, as much as Durness, en route back seeing Inverness, Fort Augustus (Loch Ness), Aberdeen and Cairngorms National Park, and also finally St Andrews. Is it possible by buses and also trains? Obviously it is feasible, but you will certainly miss a lot, so it is actually far better to rent out a cars and truck for at the very least part of the vacation. And also do not be actually misleaded due to the traveler snare of Loch Ness– as a matter of fact, there are loads of much more beautiful spots throughout Scotland country Scotland, scottish Scotland, application Scotland, tory Scotland, info Scotland, scotland Scotland, our company Scotland, edinburgh Scotland, youngster Scotland, creed Scotland, chart Scotland, iona Scotland, food selection Scotland, traveling Scotland, information Scotland, record Scotland, cars and truck Scotland, ship Scotland, uk Scotland, learn Scotland, celtic Scotland, glasgow Scotland, shetland Scotland, lifestyle Scotland, tay Scotland, bus Scotland, information Scotland, education Scotland, little bit Scotland, navigation Scotland, cookie Scotland, covid Scotland, sporting activity Scotland, access Scotland, online videos Scotland, highland activities Scotland, neighborhood Scotland, golf Scotland, scots Scotland, food items Scotland, whisky Scotland, finances Scotland, visitscotland Scotland, museum Scotland, newsletter Scotland, arbroath Scotland, hell Scotland, street Scotland, distilleries Scotland, st andrews Scotland, drink Scotland, check out scotland Scotland, europe Scotland, castles Scotland, potential Scotland, experience Scotland, weblog Scotland, dundee Scotland, driving Scotland, sporting activities Scotland, transportation Scotland Glenelg I don’t forget seeing Scotland for the very first opportunity at the end of April. It was already spring in Scotland, the sunshine was actually heating up, while in Scotland it was actually still winter all over. The Highlands were still covered in snow in numerous spots, and also in Edinburgh it was piercingly rainfall. When taking a trip in Scotland, first of all really good, water-resistant, sports footwear. A decent waterproof (and windproof!) Will definitely also be available in helpful, sometimes it is also worth including a thin scarf, a sports hat and sports handwear covers to the bag (springtime and autumn). In wintertime, I suggest avoiding Scotland from a proximity. Why? The answer is actually simple: it pours and blows. In the instance of a low-budget journey, sleeping in a tent or even stay merely in hotels (expense regarding PLN 80 per evening)., Whiskey, see at the very least one whiskey and also command fish and chips with white vinegar at minimum when. I really hope that using this post I promoted my good friends (:-RRB-) however additionally strangers to journey to Scotland. It is actually really worth a hundred times! I invite you to check out, if merely I am actually still listed here. Stunning Scottish coastlines. Loch Lomond Backpack. Iona- very small isle, white seasides. Isle of Skye. Glencoe. Eilean Donan Castle. Isle of Arran. Scotland is actually unquestionably a definitely attractive country, and also every year it is checked out by crowds of tourists coming from the United States, France, and also even Italy or even Spain. Arran is actually contacted Scotland in baby. Scotland, like the entire of Great Britain, is actually certainly not one of the least expensive places. It was currently spring in Scotland, the sun was heating up, while in Scotland it was actually still winter all over. I hope that with this blog post I encouraged my good friends (:-RRB-) however likewise unknown people to travel to https://www.scotland.com/
Scotland is actually certainly an actually wonderful nation, and every year it is seen by crowds of vacationers from the United States, France, and also also Italy or Spain. I may certainly not withstand the feeling that Poles come here primarily for job. Barely anyone departing in July, August or September will certainly consider Scotland. Perhaps it is as a result of the rates that are definitely unfriendly for some travelers. The property of Nessi as well as men in kilts is actually absolutely worth a brief or longer experience. Perhaps it is great to presume regarding it now, when the worth of the pound is actually dropping, and thereby our company will pay a lot less for a holiday in Scotland? Glen Affric in very early springtime Why is it worth it? Scotland is actually mainly an excellent yard in the north of the nation. Highlands– hillsides covered with grass and also patricias, deeper lochs (lakes), a remarkable coastline series, glen (beautiful valleys), and most importantly, seldom located in Europe (particularly in Scotland!) wilderness, where our team will certainly certainly not observe a singular property. Space, room as well as area once again! Wild attributes, an abundance of vegetations, birds and also other creatures await nature fans. In Scotland, I have actually had the capacity to check out tapes, dolphins and even deer. Scotland is likewise a historically appealing property (that checked out Brave Heart?), Where you can explore amazing stone castles (Edinburgh, Stirling, Linlithgow, Eilean Donan). The capital itself, the marvelous Edinburgh, likewise is worthy of focus, particularly during the summer celebrations. nation Scotland, scottish Scotland, app Scotland, conservative Scotland, info Scotland, scotland Scotland, our team Scotland, edinburgh Scotland, child Scotland, creed Scotland, map Scotland, iona Scotland, food selection Scotland, trip Scotland, information Scotland, record Scotland, car Scotland, ship Scotland, uk Scotland, learn Scotland, celtic Scotland, glasgow Scotland, shetland Scotland, culture Scotland, tay Scotland, bus Scotland, updates Scotland, learning Scotland, little Scotland, navigation Scotland, cookie Scotland, covid Scotland, sport Scotland, access Scotland, video recordings Scotland, highland activities Scotland, area Scotland, golf Scotland, scots Scotland, food items Scotland, whisky Scotland, budget Scotland, visitscotland Scotland, gallery Scotland, e-newsletter Scotland, arbroath Scotland, hell Scotland, roadway Scotland, distilleries Scotland, st andrews Scotland, beverage Scotland, browse through scotland Scotland, europe Scotland, castles Scotland, future Scotland, experience Scotland, blogging site Scotland, dundee Scotland, driving Scotland, sporting activities Scotland, covid-Scotland9 Scotland, transport Scotland. Edinburgh – Some concepts for checking out Scotland Trip in Scotland should certainly start along with its own capital. It takes approximately pair of times to go to Edinburgh, but you can easily extend this time up to 4. In the instance of a brief visit to Scotland, you can easily additionally restrict yourself to Edinburgh simply, devoting one day on a rounded excursion through bus in the Scottish mountainous (virtually every trip company in the resources supplies it). For a somewhat longer quest (albeit still restricted to just a few times) coming from Edinburgh, I would propose to strike in 2 instructions: Isle of Arran or Loch Lomond. Arran is actually called Scotland in baby. Investing 2 or even three times on the isle, our experts can easily enjoy the elegance of the west coastline, rest on the coastline, climb the highest peak of the island– Goat Fell, as effectively as marvel at the verdant hills and also delight in the room. Loch Lomond is just one of Scotland’s pair of national forests, a wonderful pond bordered through woods and mountains. Heading, you can easily likewise check out Stirling Castle. There is a straight learn from Glasgow in both directions. country Scotland, scottish Scotland, application Scotland, conservative Scotland, relevant information Scotland, scotland Scotland, our company Scotland, edinburgh Scotland, little one Scotland, creed Scotland, map Scotland, iona Scotland, menu Scotland, traveling Scotland, data Scotland, record Scotland, automobile Scotland, ship Scotland, uk Scotland, train Scotland, celtic Scotland, glasgow Scotland, shetland Scotland, lifestyle Scotland, tay Scotland, bus Scotland, news Scotland, education Scotland, little bit Scotland, navigation Scotland, biscuit Scotland, covid Scotland, sport Scotland, availability Scotland, video clips Scotland, highland games Scotland, neighborhood Scotland, golf Scotland, scots Scotland, food items Scotland, whisky Scotland, spending plan Scotland, visitscotland Scotland, museum Scotland, newsletter Scotland, arbroath Scotland, heck Scotland, road Scotland, distilleries Scotland, st andrews Scotland, alcoholic beverage Scotland, visit scotland Scotland, europe Scotland, castles Scotland, potential Scotland, encounter Scotland, weblog Scotland, dundee Scotland, steering Scotland, sporting activities Scotland, covid-Scotland9 Scotland, transport Scotland. Scotland, like the whole of Great Britain, is actually certainly not one of the most cost effective destinations. In enhancement, in Scotland the tent may be actually specified up literally anywhere, so travelers can easily additionally sleep in the crazy. The very most famous as well as one of the very most gorgeous hiking trails in Europe is actually the alleged West Highland Way. Longer travel? Just how approximately north along the west shore and also at that point back to the quieter, albeit a lot less exceptional eastern? Many travelers in Glasgow, takes a train to Mallaig (in some cases seeing Glencoe or Fort William heading) then gos to Isle of Skye (the very most wonderful of the Scottish isles), at that point scalp along the shoreline in the direction of Ullapool, regarding Durness, on the method back going to Inverness, Fort Augustus (Loch Ness), Aberdeen as well as Cairngorms National Park, and ultimately St Andrews. Is it possible by trains and also buses? Certainly it is feasible, but you are going to skip a lot, so it is better to lease a vehicle for at least part of the trip. As well as don’t be actually tricked by the tourist catch of Loch Ness– as a matter of fact, there are plenty of a lot more stunning areas across Scotland country Scotland, scottish Scotland, app Scotland, conservative Scotland, details Scotland, scotland Scotland, our team Scotland, edinburgh Scotland, little one Scotland, creed Scotland, map Scotland, iona Scotland, menu Scotland, traveling Scotland, data Scotland, background Scotland, vehicle Scotland, ship Scotland, uk Scotland, learn Scotland, celtic Scotland, glasgow Scotland, shetland Scotland, culture Scotland, tay Scotland, bus Scotland, information Scotland, learning Scotland, little Scotland, navigation Scotland, cookie Scotland, covid Scotland, sporting activity Scotland, accessibility Scotland, videos Scotland, highland games Scotland, neighborhood Scotland, golf Scotland, scots Scotland, meals Scotland, whisky Scotland, budget Scotland, visitscotland Scotland, museum Scotland, email list Scotland, arbroath Scotland, heck Scotland, road Scotland, distilleries Scotland, street andrews Scotland, beverage Scotland, visit scotland Scotland, europe Scotland, castles Scotland, potential Scotland, encounter Scotland, blog post Scotland, dundee Scotland, driving Scotland, sports Scotland, transport Scotland Glenelg The climate may be erratic. I always remember exploring Scotland for the initial opportunity in the end of April. It was actually actually come Scotland, the sunshine was actually heating up, while in Scotland it was still winter across. The Highlands were actually still covered in snowfall in lots of places, as well as in Edinburgh it was piercingly storm. Obviously, it ended up immediately that I hadn’t packed the appropriate factors. I was actually preparing to keep in the urban area, yet likewise ballet apartments, flipflops, attractive coats and also thin blouses fall off in spring season. When traveling in Scotland, to start with great, water-resistant, sporting activities shoes. A decent raincoat (and windproof!) Will additionally can be found in helpful, at times it is actually also worth adding a slim headscarf, a sports hat as well as sporting activities gloves to the bag (spring as well as autumn). In wintertime, I recommend staying clear of Scotland coming from a span. Why? The solution is actually straightforward: it pours as well as impacts. In the case of a low-budget excursion, sleep in a tent or even keep just in hotels (cost about PLN 80 every night)., Whiskey, browse through at least one whiskey and command fish as well as potato chips along with vinegar at the very least when. I really hope that through this message I promoted my friends (:-RRB-) but likewise strangers to journey to Scotland. It is actually really worth a hundred opportunities! I invite you to visit, so I am still listed below. Stunning Scottish seasides. Loch Lomond Backpack. Iona- small island, white coastlines. Island of Skye. Glencoe. Eilean Donan Castle. Island of Arran. Scotland is actually unquestionably a really stunning country, and every year it is visited by crowds of vacationers coming from the United States, France, and also also Italy or Spain. Arran is called Scotland in baby. Scotland, like the whole of Great Britain, is actually certainly not one of the most affordable destinations. It was actually actually spring season in Scotland, the sun was actually heating up, while in Scotland it was actually still winter all over. I wish that with this blog post I urged my good friends (:-RRB-) however additionally strangers to take a trip to https://www.scotland.com/
Scotland is most certainly a definitely wonderful nation, as well as every year it is actually seen by crowds of travelers coming from the United States, France, and also also Italy or even Spain. Rarely anybody taking leave of absence in July, August or even September are going to think of Scotland. Maybe it is excellent to presume regarding it straight now, when the value of the pound is dropping, as well as thus our team will pay out less for a holiday in Scotland? Glen Affric in very early spring Thus why is it worth it? Scotland is actually primarily a wonderful landscape in the north of the country. Highlands– hillsides covered along with yard and louises, deep-seated lochs (lakes), an impressive shore product line, glen (attractive lowlands), and also above all, hardly ever discovered in Europe (particularly in Scotland!) wilderness, where our company will certainly not find a solitary house. Space, space and also room once again! Wild attribute, an abundance of plants, birds and also various other creatures wait for attributes fans. In Scotland, I have actually already been capable to see seals, dolphins or maybe deer. Scotland is also a historically exciting property (that viewed Brave Heart?), Where you can visit impressive rock fortress (Edinburgh, Stirling, Linlithgow, Eilean Donan). The financing itself, the stunning Edinburgh, additionally should have interest, particularly in the course of the summer season festivities. country Scotland, scottish Scotland, application Scotland, tory Scotland, information Scotland, scotland Scotland, our team Scotland, edinburgh Scotland, kid Scotland, cult Scotland, map Scotland, iona Scotland, food selection Scotland, travel Scotland, data Scotland, past Scotland, vehicle Scotland, ship Scotland, uk Scotland, train Scotland, celtic Scotland, glasgow Scotland, shetland Scotland, society Scotland, tay Scotland, bus Scotland, information Scotland, education Scotland, little bit Scotland, navigation Scotland, biscuit Scotland, covid Scotland, sporting activity Scotland, access Scotland, videos Scotland, highland games Scotland, area Scotland, golf Scotland, scots Scotland, food items Scotland, whisky Scotland, finances Scotland, visitscotland Scotland, museum Scotland, e-newsletter Scotland, arbroath Scotland, hell Scotland, road Scotland, distilleries Scotland, street andrews Scotland, alcoholic beverage Scotland, visit scotland Scotland, europe Scotland, castles Scotland, potential Scotland, encounter Scotland, blog post Scotland, dundee Scotland, driving Scotland, sporting activities Scotland, covid-Scotland9 Scotland, transportation Scotland. Edinburgh – Some suggestions for visiting Scotland Traveling in Scotland ought to most definitely begin along with its financing. Edinburgh is a stunning middle ages a town with distinctive rock properties. Coming from the primary street, the supposed The Royal Mile hooking up the former imperial palace along with the Queen’s summer season royal residence (Palace of Holyroodhouse) runs a network of intriguing tiny roads (the supposed shut), generating a puzzle in which it is actually definitely worth receiving dropped. It takes approximately 2 times to see Edinburgh, yet you may expand this opportunity up to 4. When it comes to a short browse through to Scotland, you can additionally restrict on your own to Edinburgh only, spending one day on a circular journey through bus in the Scottish mountainous (nearly every trip company in the funding provides it). Thus, at the very least momentarily our company are going to really feel the environment of a genuine property of mists. An also much better tip is actually to rent out an automobile for 1 day and go on an independent excursion (the program as well as nature of the managed excursions do not necessarily match every person). Such a self-guided trip will perhaps take our company a minimum of ten hrs. Arran is phoned Scotland in baby. Loch Lomond is actually one of Scotland’s 2 national playgrounds, an attractive lake neighbored through rainforests and also mountains. On the method, you can easily additionally explore Stirling Castle. country Scotland, scottish Scotland, app Scotland, conservative Scotland, relevant information Scotland, scotland Scotland, us Scotland, edinburgh Scotland, little one Scotland, creed Scotland, chart Scotland, iona Scotland, food selection Scotland, trip Scotland, data Scotland, past history Scotland, automobile Scotland, ship Scotland, uk Scotland, train Scotland, celtic Scotland, glasgow Scotland, shetland Scotland, lifestyle Scotland, tay Scotland, bus Scotland, headlines Scotland, education and learning Scotland, bit Scotland, navigating Scotland, cookie Scotland, covid Scotland, sporting activity Scotland, ease of access Scotland, video clips Scotland, highland games Scotland, area Scotland, golf Scotland, scots Scotland, meals Scotland, whisky Scotland, budget plan Scotland, visitscotland Scotland, gallery Scotland, e-newsletter Scotland, arbroath Scotland, hell Scotland, road Scotland, distilleries Scotland, street andrews Scotland, drink Scotland, browse through scotland Scotland, europe Scotland, castles Scotland, future Scotland, take in Scotland, blog Scotland, dundee Scotland, driving Scotland, sporting activities Scotland, covid-Scotland9 Scotland, transport Scotland. Scotland, like the entire of Great Britain, is not one of the most inexpensive locations. In add-on, in Scotland the camping tent can easily be actually set up virtually anywhere, therefore tourists can also sleep in the untamed. The most renowned as well as one of the very most stunning exploring tracks in Europe is the alleged West Highland Way. Longer vacation? How around north along the west coast as well as then back to the quieter, albeit less incredible eastern? Many tourists in Glasgow, takes a train to Mallaig (often checking out Glencoe or Fort William on the method) then sees Isle of Skye (the best beautiful of the Scottish islands), then scalp along the coast towards Ullapool, as for Durness, on the method back seeing Inverness, Fort Augustus (Loch Ness), Aberdeen and also Cairngorms National Park, and also finally St Andrews. Is it possible through buses as well as learns? Certainly it is actually achievable, but you will miss out on a great deal, so it is far better to rent an auto for a minimum of part of the journey. And also don’t be actually tricked through the tourist catch of Loch Ness– in reality, there are a lot of so much more beautiful areas across Scotland country Scotland, scottish Scotland, application Scotland, conservative Scotland, info Scotland, scotland Scotland, us Scotland, edinburgh Scotland, child Scotland, creed Scotland, map Scotland, iona Scotland, menu Scotland, trip Scotland, data Scotland, record Scotland, car Scotland, ship Scotland, uk Scotland, learn Scotland, celtic Scotland, glasgow Scotland, shetland Scotland, culture Scotland, tay Scotland, bus Scotland, headlines Scotland, education Scotland, little bit Scotland, navigation Scotland, biscuit Scotland, covid Scotland, sporting activity Scotland, availability Scotland, video recordings Scotland, highland games Scotland, community Scotland, golf Scotland, scots Scotland, meals Scotland, whisky Scotland, budget plan Scotland, visitscotland Scotland, gallery Scotland, e-newsletter Scotland, arbroath Scotland, hell Scotland, roadway Scotland, distilleries Scotland, st andrews Scotland, cocktail Scotland, check out scotland Scotland, europe Scotland, castles Scotland, potential Scotland, encounter Scotland, blog Scotland, dundee Scotland, driving Scotland, sports Scotland, transport Scotland Glenelg I bear in mind visiting Scotland for the very first opportunity at the side of April. It was actually currently spring season in Scotland, the sunlight was actually warming up, while in Scotland it was actually still wintertime all over. The Highlands were still covered in snowfall in lots of areas, as well as in Edinburgh it was piercingly storm. When traveling in Scotland, initially of all excellent, waterproof, sports shoes. Are going to also happen in handy, at times it is likewise worth incorporating a slim headscarf, a sports hat and also sporting activities handwear covers to the backpack (springtime as well as autumn). In wintertime, I suggest preventing Scotland coming from a span. Addition little bit of things: Umbrellas certainly don’t operate (the wind bends all of them in every paths), the outdoor tents needs to (MUST!) have a great flysheet, it deserves taking a reusable container with you (tap water, but additionally drinkable in streams or even streams), a minimum of a couple of sets of socks, a warm and comfortable fleece and something to ward off nasty flies (I highly recommend a smidge). When it comes to a low-budget travel, oversleep a tent or stay only in hostels (cost regarding PLN 80 per night). You ought to make an effort seafood (they are delicious!), Whiskey, see at minimum one distillery as well as command fish and also chips with white vinegar at the very least as soon as. I wish that using this blog post I promoted my buddies (:-RRB-) but also unknown people to take a trip to Scotland. It is actually truly worth a hundred opportunities! I welcome you to go to, if only I am actually still below. Stunning Scottish seasides. Loch Lomond Backpack. Iona- very small isle, white colored seashores. Isle of Skye. Glencoe. Eilean Donan Castle. Isle of Arran. Scotland is actually definitely an actually gorgeous nation, as well as every year it is gone to through groups of tourists from the United States, France, and also also Italy or even Spain. Arran is phoned Scotland in miniature. Scotland, like the whole of Great Britain, is not one of the most cost effective places. It was presently spring in Scotland, the sun was warming up, while in Scotland it was still winter season all over. I really hope that with this post I encouraged my buddies (:-RRB-) however additionally complete strangers to take a trip to https://www.scotland.com/
Hi there! This is my first comment here so I just wanted to give a quick shout out and say I truly enjoy reading your blog posts. Can you recommend any other blogs/websites/forums that deal with the same subjects? Thanks a lot!
Did you understand these truths on CBD OIL and Full Spectrum CBD Hemp Oil? Cannabinoids are separated from hemp using supercritical CO2 extraction. Thanks to contemporary technology, the resulting service is clean, without heavy metals and unnecessary waxes, naturally present in the plant, and the sucked liquid has a common, oily consistency. CBD oil consists of cannabidiol as a base active ingredient and may consist of just trace quantities of tetrahydroxycannabidiol (THC). Works as a memory enhancer, enhancing concentration and coordination of motions, removing inflammation and frequent infections. It improves the conduction of stimuli in the course of autoimmune illness (numerous sclerosis, amyotrophic sclerosis). It is recommended by medical professionals and pharmacists as an antioxidant and substance that blocks the action of proinflammatory cytokines (proteins), e.g. in Crohn’s disease or ulcerative intestine. RSO oil has a low CBD material, while high THC. Obviously, the key job of RSO is to cause a psychoactive effect, although it can likewise stimulate “ill” brain structures. It deserves understanding that supplements of this type is mainly used by individuals to whom standard therapy does not bring relief in health problem. The synergistic (enhancing) action of CBD and THC relative to each other is utilized here. Both cannabinoids can do a lot more together than when used independently. In addition, they jointly promote the department of inactive nerve cells, nourish the fatty envelope of the nerves, and avoid myelin swelling that triggers loss of function in some autoimmune illness. There are likewise stories where cannabis in its natural form softened spasticity, decreased the frequency of seizures and convulsions, and suppressed unpleasant scrapie in Parkinson’s illness. This is where the concept of receiving RSO, planned only for chronically ill individuals, come from . Both cannabis oil type CBD and RSO also consist of other cannabinoids, such as cannabichromene (CBC) and cannabigerol (CBG). The trick is not, nevertheless, that CBD typically has a structure expanded to consist of flavones, flavonoids, terpenes, terpenoids, amino acids and omega acids. The distinction is primarily due to intentions guiding mankind to utilize one or the other product. CBD medical cannabis oil is a rather useful mix of cannabinoids, designed to safeguard against 21st century disease. It’s finest to utilize all of these substances together, as nature created them and enclosed in cannabis inflorescences. Oil of cannabis in a kind of pastime APR contains little amounts of CBD, stabilized by the presence of THC. Producers concentrate on the synergistic impact of one substance relative to the other, while abandoning the existence of CBC and CBG. Why such a choice? – Modern scientific research reveals that CBD + THC manage serious autoimmune illness, while CBC or CBG show very little activity in the presence of both compounds, similar to terpenes, flavones or flavonoids, therefore their material in the solution seems to be unneeded. In addition, the marijuana strain from which THC and CBD are obtained contain minimal quantities of other cannabinoids. RSO oil is completely prohibited in Poland, which is why it can not be obtained in any legally operating store on the marketplace. Of course, there are a variety of amateur techniques for getting it, but it’s great to know that substances acquired artificially in house labs are uncertain, untried, and the effect unknown. The solvent for the production of home RSO is generally fuel, alcohol and even kerosene, which rather of treating, poison. Alcohols and their like impair cannabinoids, and so in truth, they do not bring anything brand-new to the medical world. Cannabis oil has actually currently marked a brand-new period in which man stopped to fear what is unknown, and started to find what our forefathers had currently observed and use the considerable capacity, initially glance, a little strange relationships, associated mainly with pathology. Medical cannabis, contrary to its name, does not indicate fermented female inflorescences and leaves containing psychoactive substances coiled in so-called “Joints”, however a helpful oil without psychoactive THC. A standard person, after taking dosages of medicinal cannabis and attaining the suitable state of cannabinoids in the blood, can take pleasure in increased immunity, minimized susceptibility to cancer, postponed aging and lowered threat of stroke or heart attack. CBD oil contains cannabidiol as a base ingredient and might contain just trace amounts of tetrahydroxycannabidiol (THC). RSO oil has a low CBD material, while high THC. Both cannabis oil type CBD and RSO likewise include other cannabinoids, such as cannabichromene (CBC) and cannabigerol (CBG). CBD medical cannabis oil is a rather useful mix of cannabinoids, developed to secure versus 21st century disease. Oil of cannabis in a kind of pastime APR includes little amounts of CBD, stabilized by the existence of THC.
Did you know these truths on CBD OIL and Full Spectrum CBD Hemp Oil? Cannabinoids are isolated from hemp using supercritical CO2 extraction. Thanks to modern innovation, the resulting solution is tidy, devoid of unneeded waxes and heavy metals, naturally present in the plant, and the drawn liquid has a normal, oily consistency. CBD oil consists of cannabidiol as a base component and might include only trace amounts of tetrahydroxycannabidiol (THC). It is suggested by medical professionals and pharmacists as an antioxidant and compound that obstructs the action of proinflammatory cytokines (proteins), e.g. in Crohn’s disease or ulcerative intestinal tract. RSO oil has a low CBD content, while high THC. Naturally, the key job of RSO is to cause a psychedelic impact, although it can likewise stimulate “sick” brain structures. It deserves understanding that supplementation of this type is mostly used by individuals to whom standard treatment does not bring relief in illness. The synergistic (enhancing) action of CBD and THC relative to each other is utilized here. When utilized independently, both cannabinoids can do much more together than. In addition, they collectively promote the division of non-active afferent neuron, nurture the fatty envelope of the nerves, and avoid myelin swelling that causes loss of function in some autoimmune illness. There are likewise stories where cannabis in its natural type softened spasticity, reduced the frequency of convulsions and seizures, and reduced undesirable scrapie in Parkinson’s illness. This is where the concept of getting RSO, meant only for chronically ill people, originated . Both marijuana oil type CBD and RSO likewise include other cannabinoids, such as cannabichromene (CBC) and cannabigerol (CBG). The trick is not, nevertheless, that CBD typically has a structure broadened to include flavones, flavonoids, terpenes, terpenoids, amino acids and omega acids. The distinction is mainly due to intentions assisting humankind to use one or the other product. CBD medical cannabis oil is a rather beneficial mix of cannabinoids, created to secure against 21st century illness. It’s finest to use all of these substances together, as nature created them and enclosed in cannabis inflorescences. It turns out that cannabidiol boosts the effects of cannabichromene (CBC) and cannabigerol (CBG), and flavones or flavonoids improve the absorption of these substances. Omega-6 and omega-3 highly nurture the body and do not enable to alter, which speed up the aging process of the organism and boost the development of cancer. Oil of marijuana in a kind of pastime APR includes small amounts of CBD, stabilized by the presence of THC. – Modern clinical research study shows that CBD + THC cope with major autoimmune diseases, while CBC or CBG show minimal activity in the presence of both substances, just like terpenes, flavonoids or flavones, therefore their content in the solution seems to be unneeded. In addition, the cannabis stress from which THC and CBD are derived contain minimal quantities of other cannabinoids. Marijuana oil has actually currently marked a new age in which male stopped to fear what is unidentified, and started to find what our forefathers had actually currently seen and utilize the significant potential, in the beginning look, a little bizarre relationships, associated generally with pathology. Medical cannabis, contrary to its name, does not imply fermented female inflorescences and leaves consisting of psychoactive substances coiled in so-called “Joints”, but a beneficial oil without psychedelic THC. A standard individual, after taking dosages of medicinal marijuana and achieving the appropriate state of cannabinoids in the blood, can enjoy increased immunity, reduced susceptibility to cancer, delayed aging and reduced risk of stroke or cardiac arrest. CBD oil contains cannabidiol as a base active ingredient and may include just trace quantities of tetrahydroxycannabidiol (THC). RSO oil has a low CBD material, while high THC. Both marijuana oil type CBD and RSO also include other cannabinoids, such as cannabichromene (CBC) and cannabigerol (CBG). CBD medical cannabis oil is a rather beneficial mix of cannabinoids, created to safeguard versus 21st century illness. Oil of marijuana in a kind of pastime APR consists of little quantities of CBD, balanced by the presence of THC.
Did you understand these realities on CBD OIL and Full Spectrum CBD Hemp Oil? Cannabinoids are separated from hemp utilizing supercritical CO2 extraction. Thanks to modern-day technology, the resulting solution is clean, without heavy metals and unnecessary waxes, naturally present in the plant, and the sucked liquid has a normal, oily consistency. CBD oil includes cannabidiol as a base component and might include only trace quantities of tetrahydroxycannabidiol (THC). It is recommended by physicians and pharmacists as an antioxidant and substance that obstructs the action of proinflammatory cytokines (proteins), e.g. in Crohn’s disease or ulcerative intestine. RSO oil has a low CBD content, while high THC. The synergistic (enhancing) action of CBD and THC relative to each other is used here. Both cannabinoids can do much more together than when used separately. Both cannabis oil type CBD and RSO likewise contain other cannabinoids, such as cannabichromene (CBC) and cannabigerol (CBG). The secret is not, however, that CBD frequently has actually a composition expanded to include flavones, flavonoids, terpenes, terpenoids, amino acids and omega acids. The distinction is mostly due to motives assisting humankind to utilize one or the other product. CBD medical marijuana oil is a rather beneficial blend of cannabinoids, developed to protect against 21st century disease. It’s best to use all of these compounds together, as nature produced them and confined in marijuana inflorescences. Oil of marijuana in a type of hobby APR includes percentages of CBD, balanced by the existence of THC. Manufacturers focus on the synergistic effect of one substance relative to the other, while deserting the existence of CBC and CBG. Why such a choice? – Modern clinical research study reveals that CBD + THC manage major autoimmune diseases, while CBC or CBG reveal minimal activity in the presence of both compounds, much like flavonoids, terpenes or flavones, therefore their content in the solution appears to be unneeded. In addition, the cannabis stress from which THC and CBD are derived consist of minimal quantities of other cannabinoids. RSO oil is totally prohibited in Poland, which is why it can not be acquired in any lawfully running store on the market. Naturally, there are a variety of amateur methods for getting it, but it’s good to understand that substances obtained artificially in house labs are uncertain, untested, and the impact unknown. The solvent for the production of home RSO is generally gasoline, alcohol and even kerosene, which rather of curing, toxin. Alcohols and their like hinder cannabinoids, and so in reality, they do not bring anything brand-new to the medical world. Marijuana oil has actually currently marked a new age in which man ceased to fear what is unknown, and started to find what our forefathers had actually currently noticed and utilize the substantial capacity, in the beginning look, a little strange relationships, associated primarily with pathology. Medical marijuana, contrary to its name, does not mean fermented female inflorescences and leaves containing psychoactive substances coiled in so-called “Joints”, however an advantageous oil without psychedelic THC. A basic individual, after taking doses of medical marijuana and achieving the proper state of cannabinoids in the blood, can take pleasure in increased resistance, minimized susceptibility to cancer, postponed aging and reduced risk of stroke or heart attack. CBD oil includes cannabidiol as a base active ingredient and may consist of only trace quantities of tetrahydroxycannabidiol (THC). RSO oil has a low CBD content, while high THC. Both cannabis oil type CBD and RSO likewise include other cannabinoids, such as cannabichromene (CBC) and cannabigerol (CBG). CBD medical marijuana oil is a rather useful mix of cannabinoids, developed to safeguard against 21st century illness. Oil of marijuana in a kind of hobby APR consists of little quantities of CBD, balanced by the presence of THC.
Did you understand these realities on CBD OIL and Full Spectrum CBD Hemp Oil? Cannabinoids are isolated from hemp utilizing supercritical CO2 extraction. Thanks to modern-day technology, the resulting service is clean, totally free of heavy metals and unnecessary waxes, naturally present in the plant, and the sucked liquid has a typical, oily consistency. CBD oil consists of cannabidiol as a base ingredient and might consist of just trace quantities of tetrahydroxycannabidiol (THC). Functions as a memory enhancer, enhancing concentration and coordination of movements, getting rid of inflammation and persistent infections. It improves the conduction of stimuli in the course of autoimmune illness (multiple sclerosis, amyotrophic sclerosis). It is advised by medical professionals and pharmacists as an antioxidant and compound that blocks the action of proinflammatory cytokines (proteins), e.g. in Crohn’s illness or ulcerative intestine. RSO oil has a low CBD content, while high THC. Of course, the essential task of RSO is to cause a psychedelic effect, although it can likewise promote “ill” brain structures. It deserves knowing that supplements of this type is mainly utilized by individuals to whom basic therapy does not bring relief in illness. The synergistic (enhancing) action of CBD and THC relative to each other is utilized here. Both cannabinoids can do far more together than when used independently. In addition, they jointly stimulate the department of non-active afferent neuron, nourish the fatty envelope of the nerves, and avoid myelin inflammation that triggers loss of function in some autoimmune illness. There are also stories where marijuana in its natural form softened spasticity, minimized the frequency of convulsions and seizures, and reduced unpleasant scrapie in Parkinson’s disease. This is where the concept of receiving RSO, intended just for chronically ill individuals, originated . Both marijuana oil type CBD and RSO likewise contain other cannabinoids, such as cannabichromene (CBC) and cannabigerol (CBG). The trick is not, however, that CBD frequently has actually a structure expanded to consist of flavones, flavonoids, terpenes, terpenoids, amino acids and omega acids. The distinction is mainly due to intentions directing humanity to utilize one or the other product. CBD medical cannabis oil is a rather helpful blend of cannabinoids, designed to safeguard versus 21st century disease. It’s best to utilize all of these substances together, as nature produced them and enclosed in cannabis inflorescences. It ends up that cannabidiol improves the results of cannabichromene (CBC) and cannabigerol (CBG), and flavonoids or flavones improve the absorption of these compounds. Omega-6 and omega-3 extremely nourish the body and do not enable to alter, which accelerate the aging procedure of the organism and improve the development of cancer. Oil of marijuana in a sort of hobby APR contains small amounts of CBD, stabilized by the existence of THC. Producers focus on the synergistic impact of one substance relative to the other, while abandoning the existence of CBC and CBG. Why such a choice? – Modern clinical research reveals that CBD + THC deal with major autoimmune diseases, while CBC or CBG show minimal activity in the presence of both substances, simply like terpenes, flavones or flavonoids, therefore their content in the option appears to be unnecessary. In addition, the marijuana strain from which THC and CBD are obtained contain negligible amounts of other cannabinoids. RSO oil is completely prohibited in Poland, which is why it can not be acquired in any legally operating shop on the marketplace. Of course, there are a variety of amateur approaches for getting it, but it’s excellent to understand that substances obtained synthetically in home labs are unsure, untried, and the impact unknown. The solvent for the production of family RSO is generally gasoline, alcohol and even kerosene, which rather of treating, toxin. Alcohols and their like hinder cannabinoids, therefore in truth, they don’t bring anything brand-new to the medical world. Marijuana oil has already marked a brand-new period in which guy ceased to fear what is unidentified, and started to discover what our ancestors had actually already discovered and use the significant potential, in the beginning glimpse, a little strange relationships, associated mainly with pathology. Medical cannabis, contrary to its name, does not indicate fermented female inflorescences and leaves including psychoactive substances coiled in so-called “Joints”, but a helpful oil without psychoactive THC. A standard individual, after taking dosages of medical cannabis and achieving the suitable state of cannabinoids in the blood, can enjoy increased resistance, lowered vulnerability to cancer, postponed aging and reduced danger of stroke or cardiovascular disease. CBD oil includes cannabidiol as a base component and may include only trace quantities of tetrahydroxycannabidiol (THC). RSO oil has a low CBD material, while high THC. Both cannabis oil type CBD and RSO likewise consist of other cannabinoids, such as cannabichromene (CBC) and cannabigerol (CBG). CBD medical marijuana oil is a rather beneficial mix of cannabinoids, created to protect against 21st century disease. Oil of cannabis in a kind of pastime APR contains little quantities of CBD, stabilized by the existence of THC.
Did you understand these facts on CBD OIL and Full Spectrum CBD Hemp Oil? Cannabinoids are isolated from hemp using supercritical CO2 extraction. Thanks to modern innovation, the resulting service is clean, without heavy metals and unnecessary waxes, naturally present in the plant, and the sucked liquid has a common, oily consistency. CBD oil consists of cannabidiol as a base active ingredient and may consist of just trace amounts of tetrahydroxycannabidiol (THC). It is suggested by doctors and pharmacists as an antioxidant and compound that blocks the action of proinflammatory cytokines (proteins), e.g. in Crohn’s illness or ulcerative intestinal tract. RSO oil has a low CBD material, while high THC. The synergistic (enhancing) action of CBD and THC relative to each other is used here. Both cannabinoids can do much more together than when used independently. Both cannabis oil type CBD and RSO likewise include other cannabinoids, such as cannabichromene (CBC) and cannabigerol (CBG). The trick is not, nevertheless, that CBD often has a composition broadened to include flavones, flavonoids, terpenes, terpenoids, amino acids and omega acids. The difference is mostly due to intentions assisting humanity to utilize one or the other product. CBD medical marijuana oil is a rather helpful mix of cannabinoids, developed to protect against 21st century disease. It’s best to utilize all of these compounds together, as nature produced them and enclosed in cannabis inflorescences. Oil of cannabis in a kind of pastime APR consists of little amounts of CBD, balanced by the existence of THC. – Modern clinical research reveals that CBD + THC cope with major autoimmune diseases, while CBC or CBG reveal minimal activity in the existence of both substances, simply like flavones, terpenes or flavonoids, for that reason their material in the solution seems to be unneeded. In addition, the marijuana strain from which THC and CBD are derived consist of minimal amounts of other cannabinoids. Marijuana oil has currently marked a new period in which man ceased to fear what is unknown, and started to uncover what our forefathers had actually currently discovered and use the considerable potential, at first glimpse, a little strange relationships, associated generally with pathology. Medical marijuana, contrary to its name, does not suggest fermented female inflorescences and leaves consisting of psychedelic compounds coiled in so-called “Joints”, however a helpful oil without psychoactive THC. A standard person, after taking dosages of medicinal cannabis and achieving the proper state of cannabinoids in the blood, can take pleasure in increased immunity, minimized vulnerability to cancer, postponed aging and decreased danger of stroke or cardiovascular disease. CBD oil contains cannabidiol as a base ingredient and might consist of just trace quantities of tetrahydroxycannabidiol (THC). RSO oil has a low CBD content, while high THC. Both cannabis oil type CBD and RSO likewise contain other cannabinoids, such as cannabichromene (CBC) and cannabigerol (CBG). CBD medical marijuana oil is a rather helpful blend of cannabinoids, developed to protect against 21st century illness. Oil of cannabis in a kind of hobby APR consists of little quantities of CBD, balanced by the existence of THC.
Did you know these realities on CBD OIL and Full Spectrum CBD Hemp Oil? Cannabinoids are separated from hemp using supercritical CO2 extraction. Thanks to modern-day technology, the resulting solution is tidy, devoid of unneeded waxes and heavy metals, naturally present in the plant, and the drawn liquid has a typical, oily consistency. CBD oil includes cannabidiol as a base component and might contain only trace amounts of tetrahydroxycannabidiol (THC). Functions as a memory enhancer, improving concentration and coordination of movements, eliminating inflammation and frequent infections. It improves the conduction of stimuli in the course of autoimmune diseases (several sclerosis, amyotrophic sclerosis). It is recommended by doctors and pharmacists as an antioxidant and compound that obstructs the action of proinflammatory cytokines (proteins), e.g. in Crohn’s illness or ulcerative intestine. RSO oil has a low CBD content, while high THC. Naturally, the essential job of RSO is to cause a psychoactive effect, although it can also stimulate “sick” brain structures. It deserves understanding that supplements of this type is mainly used by people to whom standard treatment does not bring relief in health problem. The synergistic (enhancing) action of CBD and THC relative to each other is used here. Both cannabinoids can do much more together than when used independently. In addition, they collectively stimulate the division of non-active afferent neuron, nurture the fatty envelope of the nerves, and avoid myelin swelling that triggers loss of function in some autoimmune illness. There are also stories where cannabis in its natural type softened spasticity, reduced the frequency of convulsions and seizures, and suppressed undesirable scrapie in Parkinson’s disease. This is where the concept of getting RSO, intended just for chronically ill people, originated . Both marijuana oil type CBD and RSO likewise consist of other cannabinoids, such as cannabichromene (CBC) and cannabigerol (CBG). The trick is not, however, that CBD frequently has actually a composition expanded to consist of flavones, flavonoids, terpenes, terpenoids, amino acids and omega acids. The difference is mostly due to motives assisting humanity to use one or the other item. CBD medical cannabis oil is a rather useful blend of cannabinoids, created to secure against 21st century illness. It’s finest to utilize all of these substances together, as nature created them and enclosed in marijuana inflorescences. Oil of cannabis in a type of hobby APR consists of small quantities of CBD, balanced by the existence of THC. Manufacturers focus on the synergistic impact of one compound relative to the other, while deserting the presence of CBC and CBG. Why such a choice? – Modern clinical research reveals that CBD + THC deal with serious autoimmune diseases, while CBC or CBG show very little activity in the existence of both substances, much like flavones, flavonoids or terpenes, therefore their material in the solution seems to be unneeded. In addition, the cannabis strain from which THC and CBD are derived consist of minimal amounts of other cannabinoids. RSO oil is totally unlawful in Poland, which is why it can not be obtained in any legally running shop on the marketplace. Naturally, there are a variety of amateur methods for acquiring it, however it’s good to know that compounds obtained artificially in home labs doubt, untried, and the result unknown. The solvent for the production of household RSO is normally gas, alcohol and even kerosene, which rather of curing, poison. Alcohols and their like hinder cannabinoids, therefore in truth, they do not bring anything brand-new to the medical world. Marijuana oil has already marked a new period in which guy ceased to fear what is unidentified, and began to find what our ancestors had actually already noticed and utilize the substantial potential, in the beginning look, a little strange relationships, associated primarily with pathology. Medical marijuana, contrary to its name, does not imply fermented female inflorescences and leaves consisting of psychedelic substances coiled in so-called “Joints”, however an advantageous oil without psychedelic THC. A basic individual, after taking doses of medicinal cannabis and attaining the appropriate state of cannabinoids in the blood, can delight in increased immunity, minimized vulnerability to cancer, delayed aging and lowered danger of stroke or heart attack. CBD oil contains cannabidiol as a base active ingredient and may consist of just trace quantities of tetrahydroxycannabidiol (THC). RSO oil has a low CBD content, while high THC. Both cannabis oil type CBD and RSO likewise consist of other cannabinoids, such as cannabichromene (CBC) and cannabigerol (CBG). CBD medical marijuana oil is a rather helpful mix of cannabinoids, developed to secure versus 21st century illness. Oil of marijuana in a kind of pastime APR includes little quantities of CBD, stabilized by the existence of THC.
Did you understand these truths on CBD OIL and Full Spectrum CBD Hemp Oil? Cannabinoids are isolated from hemp utilizing supercritical CO2 extraction. Thanks to contemporary technology, the resulting option is clean, without unneeded waxes and heavy metals, naturally present in the plant, and the drawn liquid has a typical, oily consistency. CBD oil consists of cannabidiol as a base active ingredient and may contain only trace quantities of tetrahydroxycannabidiol (THC). Functions as a memory enhancer, improving concentration and coordination of movements, removing inflammation and recurrent infections. It improves the conduction of stimuli in the course of autoimmune diseases (multiple sclerosis, amyotrophic sclerosis). It is advised by physicians and pharmacists as an antioxidant and compound that obstructs the action of proinflammatory cytokines (proteins), e.g. in Crohn’s disease or ulcerative intestinal tract. RSO oil has a low CBD content, while high THC. Naturally, the crucial job of RSO is to trigger a psychedelic effect, although it can likewise promote “ill” brain structures. It is worth knowing that supplements of this type is primarily utilized by people to whom basic treatment does not bring relief in disease. The synergistic (enhancing) action of CBD and THC relative to each other is utilized here. Both cannabinoids can do far more together than when used independently. In addition, they jointly promote the department of non-active nerve cells, nurture the fatty envelope of the nerves, and prevent myelin swelling that triggers loss of function in some autoimmune diseases. There are also stories where cannabis in its natural form softened spasticity, decreased the frequency of seizures and convulsions, and suppressed unpleasant scrapie in Parkinson’s illness. This is where the concept of receiving RSO, planned only for chronically ill people, stemmed . Both marijuana oil type CBD and RSO also include other cannabinoids, such as cannabichromene (CBC) and cannabigerol (CBG). The secret is not, nevertheless, that CBD often has a structure expanded to include flavones, flavonoids, terpenes, terpenoids, amino acids and omega acids. The difference is mainly due to intentions guiding mankind to utilize one or the other item. CBD medical cannabis oil is a rather useful blend of cannabinoids, designed to secure against 21st century disease. It’s finest to use all of these compounds together, as nature produced them and confined in cannabis inflorescences. Oil of cannabis in a kind of pastime APR contains small amounts of CBD, balanced by the presence of THC. – Modern scientific research shows that CBD + THC cope with severe autoimmune illness, while CBC or CBG show very little activity in the existence of both substances, simply like terpenes, flavones or flavonoids, therefore their content in the option appears to be unneeded. In addition, the cannabis stress from which THC and CBD are obtained contain negligible quantities of other cannabinoids. Cannabis oil has already marked a brand-new period in which man ceased to fear what is unidentified, and began to find what our forefathers had currently observed and utilize the substantial capacity, at very first glance, a little unusual relationships, associated mainly with pathology. Medical cannabis, contrary to its name, does not mean fermented female inflorescences and leaves containing psychedelic substances coiled in so-called “Joints”, however a beneficial oil without psychedelic THC. A standard individual, after taking dosages of medical cannabis and achieving the suitable state of cannabinoids in the blood, can delight in increased resistance, reduced vulnerability to cancer, delayed aging and minimized threat of stroke or cardiac arrest. CBD oil contains cannabidiol as a base active ingredient and may contain just trace amounts of tetrahydroxycannabidiol (THC). RSO oil has a low CBD content, while high THC. Both marijuana oil type CBD and RSO also include other cannabinoids, such as cannabichromene (CBC) and cannabigerol (CBG). CBD medical marijuana oil is a rather useful blend of cannabinoids, designed to secure versus 21st century illness. Oil of cannabis in a kind of hobby APR contains little amounts of CBD, stabilized by the existence of THC.
Did you know these facts on CBD OIL and Full Spectrum CBD Hemp Oil? Cannabinoids are isolated from hemp utilizing supercritical CO2 extraction. Thanks to contemporary innovation, the resulting service is clean, without heavy metals and unnecessary waxes, naturally present in the plant, and the drawn liquid has a common, oily consistency. CBD oil consists of cannabidiol as a base component and may include just trace quantities of tetrahydroxycannabidiol (THC). It is recommended by doctors and pharmacists as an antioxidant and substance that blocks the action of proinflammatory cytokines (proteins), e.g. in Crohn’s illness or ulcerative intestinal tract. RSO oil has a low CBD material, while high THC. Obviously, the essential task of RSO is to trigger a psychoactive impact, although it can also stimulate “ill” brain structures. It is worth knowing that supplementation of this type is mainly utilized by people to whom standard treatment does not bring relief in disease. The synergistic (enhancing) action of CBD and THC relative to each other is utilized here. Both cannabinoids can do much more together than when used independently. In addition, they jointly stimulate the division of non-active afferent neuron, nourish the fatty envelope of the nerves, and prevent myelin swelling that causes loss of function in some autoimmune diseases. There are likewise stories where cannabis in its natural type softened spasticity, lowered the frequency of convulsions and seizures, and suppressed undesirable scrapie in Parkinson’s illness. This is where the concept of receiving RSO, intended just for chronically ill individuals, come from . Both marijuana oil type CBD and RSO likewise contain other cannabinoids, such as cannabichromene (CBC) and cannabigerol (CBG). The trick is not, nevertheless, that CBD often has actually a composition broadened to include flavones, flavonoids, terpenes, terpenoids, amino acids and omega acids. The distinction is mainly due to motives directing humanity to utilize one or the other item. CBD medical cannabis oil is a rather useful mix of cannabinoids, created to safeguard versus 21st century disease. It’s finest to use all of these compounds together, as nature produced them and confined in cannabis inflorescences. It turns out that cannabidiol improves the effects of cannabichromene (CBC) and cannabigerol (CBG), and flavonoids or flavones enhance the absorption of these compounds. Omega-6 and omega-3 extremely nourish the body and do not permit to alter, which speed up the aging process of the organism and enhance the development of cancer. Oil of cannabis in a type of pastime APR contains little quantities of CBD, balanced by the existence of THC. Makers focus on the synergistic impact of one substance relative to the other, while deserting the presence of CBC and CBG. Why such a choice? – Modern clinical research study shows that CBD + THC handle major autoimmune diseases, while CBC or CBG reveal minimal activity in the presence of both substances, just like flavonoids, terpenes or flavones, for that reason their material in the option appears to be unnecessary. In addition, the cannabis strain from which THC and CBD are obtained include minimal amounts of other cannabinoids. RSO oil is entirely illegal in Poland, which is why it can not be gotten in any legally running shop on the marketplace. Obviously, there are a variety of amateur methods for acquiring it, but it’s excellent to know that substances gotten synthetically in home laboratories doubt, untested, and the result unknown. The solvent for the production of household RSO is typically fuel, alcohol and even kerosene, which instead of curing, toxin. Alcohols and their like impair cannabinoids, and so in reality, they don’t bring anything brand-new to the medical world. Marijuana oil has currently marked a brand-new era in which man stopped to fear what is unknown, and began to rediscover what our ancestors had already noticed and use the considerable capacity, initially glance, a little bizarre relationships, associated generally with pathology. Medical marijuana, contrary to its name, does not imply fermented female inflorescences and leaves including psychedelic substances coiled in so-called “Joints”, but an advantageous oil without psychedelic THC. A standard individual, after taking dosages of medicinal cannabis and attaining the appropriate state of cannabinoids in the blood, can enjoy increased resistance, reduced vulnerability to cancer, delayed aging and minimized danger of stroke or heart attack. CBD oil consists of cannabidiol as a base ingredient and may consist of only trace amounts of tetrahydroxycannabidiol (THC). RSO oil has a low CBD content, while high THC. Both marijuana oil type CBD and RSO also consist of other cannabinoids, such as cannabichromene (CBC) and cannabigerol (CBG). CBD medical marijuana oil is a rather useful blend of cannabinoids, created to secure against 21st century illness. Oil of marijuana in a kind of pastime APR consists of small amounts of CBD, balanced by the presence of THC.
Did you know these truths on CBD OIL and Full Spectrum CBD Hemp Oil? Cannabinoids are separated from hemp using supercritical CO2 extraction. Thanks to contemporary technology, the resulting option is clean, without unnecessary waxes and heavy metals, naturally present in the plant, and the sucked liquid has a common, oily consistency. CBD oil contains cannabidiol as a base ingredient and may include just trace amounts of tetrahydroxycannabidiol (THC). It is suggested by physicians and pharmacists as an antioxidant and substance that obstructs the action of proinflammatory cytokines (proteins), e.g. in Crohn’s illness or ulcerative intestine. RSO oil has a low CBD material, while high THC. Naturally, the crucial task of RSO is to trigger a psychoactive effect, although it can also promote “ill” brain structures. It deserves understanding that supplements of this type is mostly utilized by people to whom standard treatment does not bring relief in illness. The synergistic (enhancing) action of CBD and THC relative to each other is used here. When used independently, both cannabinoids can do much more together than. In addition, they collectively stimulate the division of non-active afferent neuron, nurture the fatty envelope of the nerves, and prevent myelin inflammation that triggers loss of function in some autoimmune illness. There are likewise stories where cannabis in its natural kind softened spasticity, decreased the frequency of convulsions and seizures, and suppressed undesirable scrapie in Parkinson’s disease. This is where the concept of getting RSO, meant only for chronically ill individuals, originated . Both marijuana oil type CBD and RSO likewise consist of other cannabinoids, such as cannabichromene (CBC) and cannabigerol (CBG). The trick is not, however, that CBD frequently has a structure expanded to include flavones, flavonoids, terpenes, terpenoids, amino acids and omega acids. The distinction is mostly due to intentions directing humanity to use one or the other item. CBD medical cannabis oil is a rather useful mix of cannabinoids, developed to protect against 21st century disease. It’s finest to utilize all of these compounds together, as nature produced them and confined in cannabis inflorescences. Oil of marijuana in a kind of pastime APR consists of little amounts of CBD, balanced by the presence of THC. – Modern clinical research study shows that CBD + THC cope with severe autoimmune illness, while CBC or CBG show very little activity in the existence of both substances, just like flavones, flavonoids or terpenes, for that reason their material in the service seems to be unnecessary. In addition, the cannabis pressure from which THC and CBD are derived consist of negligible quantities of other cannabinoids. Marijuana oil has already marked a brand-new age in which guy ceased to fear what is unknown, and began to uncover what our ancestors had already noticed and utilize the substantial potential, at first glimpse, a little bizarre relationships, associated mainly with pathology. Medical cannabis, contrary to its name, does not imply fermented female inflorescences and leaves consisting of psychedelic compounds coiled in so-called “Joints”, however an useful oil without psychedelic THC. A basic individual, after taking doses of medicinal cannabis and achieving the appropriate state of cannabinoids in the blood, can take pleasure in increased resistance, reduced vulnerability to cancer, postponed aging and decreased threat of stroke or heart attack. CBD oil consists of cannabidiol as a base active ingredient and might contain only trace quantities of tetrahydroxycannabidiol (THC). RSO oil has a low CBD content, while high THC. Both marijuana oil type CBD and RSO also include other cannabinoids, such as cannabichromene (CBC) and cannabigerol (CBG). CBD medical marijuana oil is a rather beneficial blend of cannabinoids, developed to safeguard against 21st century disease. Oil of cannabis in a kind of pastime APR includes small quantities of CBD, stabilized by the existence of THC.
Did you know these realities on CBD OIL and Full Spectrum CBD Hemp Oil? Cannabinoids are isolated from hemp using supercritical CO2 extraction. Thanks to modern technology, the resulting solution is clean, free of unneeded waxes and heavy metals, naturally present in the plant, and the sucked liquid has a typical, oily consistency. CBD oil contains cannabidiol as a base ingredient and may include only trace quantities of tetrahydroxycannabidiol (THC). Functions as a memory enhancer, improving concentration and coordination of motions, eliminating inflammation and persistent infections. It enhances the conduction of stimuli in the course of autoimmune diseases (several sclerosis, amyotrophic sclerosis). It is recommended by medical professionals and pharmacists as an antioxidant and substance that obstructs the action of proinflammatory cytokines (proteins), e.g. in Crohn’s illness or ulcerative intestine. RSO oil has a low CBD content, while high THC. The synergistic (enhancing) action of CBD and THC relative to each other is used here. Both cannabinoids can do much more together than when used independently. Both marijuana oil type CBD and RSO likewise include other cannabinoids, such as cannabichromene (CBC) and cannabigerol (CBG). The trick is not, nevertheless, that CBD often has a composition expanded to consist of flavones, flavonoids, terpenes, terpenoids, amino acids and omega acids. The difference is primarily due to intentions guiding mankind to use one or the other product. CBD medical cannabis oil is a rather helpful blend of cannabinoids, created to protect against 21st century illness. It’s finest to utilize all of these substances together, as nature created them and enclosed in marijuana inflorescences. Oil of cannabis in a type of hobby APR contains percentages of CBD, stabilized by the existence of THC. Producers focus on the synergistic impact of one substance relative to the other, while abandoning the existence of CBC and CBG. Why such a choice? – Modern clinical research shows that CBD + THC cope with severe autoimmune illness, while CBC or CBG reveal very little activity in the presence of both compounds, much like flavonoids, flavones or terpenes, therefore their content in the option appears to be unneeded. In addition, the cannabis pressure from which THC and CBD are derived include minimal quantities of other cannabinoids. RSO oil is entirely unlawful in Poland, which is why it can not be acquired in any lawfully running shop on the market. Of course, there are a number of amateur approaches for acquiring it, but it’s great to understand that substances gotten synthetically in house laboratories doubt, untested, and the effect unknown. The solvent for the production of home RSO is usually gasoline, alcohol and even kerosene, which instead of treating, toxin. Alcohols and their like hinder cannabinoids, therefore in reality, they don’t bring anything brand-new to the medical world. Marijuana oil has currently marked a brand-new period in which man ceased to fear what is unknown, and began to find what our forefathers had actually already seen and use the considerable capacity, at first glimpse, a little bizarre relationships, associated primarily with pathology. Medical cannabis, contrary to its name, does not suggest fermented female inflorescences and leaves consisting of psychedelic compounds coiled in so-called “Joints”, however an advantageous oil without psychoactive THC. A standard individual, after taking dosages of medical cannabis and achieving the appropriate state of cannabinoids in the blood, can enjoy increased immunity, decreased susceptibility to cancer, postponed aging and minimized risk of stroke or heart attack. CBD oil contains cannabidiol as a base ingredient and might contain only trace quantities of tetrahydroxycannabidiol (THC). RSO oil has a low CBD material, while high THC. Both marijuana oil type CBD and RSO also include other cannabinoids, such as cannabichromene (CBC) and cannabigerol (CBG). CBD medical cannabis oil is a rather useful blend of cannabinoids, designed to secure versus 21st century illness. Oil of marijuana in a kind of hobby APR consists of small amounts of CBD, balanced by the presence of THC.
Did you know these realities on CBD OIL and Full Spectrum CBD Hemp Oil? Cannabinoids are separated from hemp utilizing supercritical CO2 extraction. Thanks to modern innovation, the resulting solution is clean, without heavy metals and unneeded waxes, naturally present in the plant, and the drawn liquid has a typical, oily consistency. CBD oil includes cannabidiol as a base ingredient and might consist of only trace quantities of tetrahydroxycannabidiol (THC). Functions as a memory enhancer, improving concentration and coordination of motions, removing inflammation and recurrent infections. It improves the conduction of stimuli in the course of autoimmune diseases (multiple sclerosis, amyotrophic sclerosis). It is recommended by medical professionals and pharmacists as an antioxidant and compound that obstructs the action of proinflammatory cytokines (proteins), e.g. in Crohn’s disease or ulcerative intestinal tract. RSO oil has a low CBD content, while high THC. The synergistic (enhancing) action of CBD and THC relative to each other is used here. Both cannabinoids can do much more together than when used independently. Both marijuana oil type CBD and RSO likewise contain other cannabinoids, such as cannabichromene (CBC) and cannabigerol (CBG). The secret is not, nevertheless, that CBD typically has actually a structure expanded to consist of flavones, flavonoids, terpenes, terpenoids, amino acids and omega acids. The difference is primarily due to motives guiding mankind to utilize one or the other item. CBD medical cannabis oil is a rather useful mix of cannabinoids, developed to secure against 21st century disease. It’s best to utilize all of these substances together, as nature developed them and enclosed in cannabis inflorescences. Oil of cannabis in a kind of hobby APR contains little amounts of CBD, stabilized by the existence of THC. – Modern clinical research shows that CBD + THC cope with serious autoimmune illness, while CBC or CBG reveal very little activity in the presence of both compounds, just like flavonoids, flavones or terpenes, for that reason their content in the solution seems to be unneeded. In addition, the marijuana stress from which THC and CBD are derived contain negligible amounts of other cannabinoids. Marijuana oil has actually already marked a new era in which guy stopped to fear what is unidentified, and started to find what our ancestors had currently observed and utilize the considerable capacity, in the beginning glimpse, a little strange relationships, associated generally with pathology. Medical marijuana, contrary to its name, does not indicate fermented female inflorescences and leaves containing psychoactive compounds coiled in so-called “Joints”, however an advantageous oil without psychoactive THC. A basic person, after taking dosages of medical cannabis and accomplishing the suitable state of cannabinoids in the blood, can enjoy increased resistance, reduced vulnerability to cancer, postponed aging and decreased danger of stroke or heart attack. CBD oil includes cannabidiol as a base active ingredient and might consist of only trace amounts of tetrahydroxycannabidiol (THC). RSO oil has a low CBD material, while high THC. Both cannabis oil type CBD and RSO also include other cannabinoids, such as cannabichromene (CBC) and cannabigerol (CBG). CBD medical cannabis oil is a rather advantageous blend of cannabinoids, designed to safeguard versus 21st century disease. Oil of marijuana in a kind of hobby APR consists of little quantities of CBD, stabilized by the existence of THC.
Appreciating the determination you put with your website and detailed information a person provide.
Really informative article.Really looking forward to read more. Fantastic.
Thanks regarding one marvelous posting! My partner and i enjoyed reading it; a person are an excellent author. We will make sure in order to bookmark your blog and even may come back sooner or later. I want to inspire that you continue your own great posts, possess an end of the week!
Write considerably more; that’s all I have got to say. It looks as though you depended on the video to be able to make your point. A person know what you’re speaking about, why waste your brains on just posting video clips to your blog any time you might be giving people something enlightening to examine?
I am really enjoying the theme/design of your website. Do you ever run into any browser compatibility issues? A small number of my blog visitors have complained about my website not operating correctly in Explorer but looks great in Safari. Do you have any advice to help fix this problem?
The developer is trying in order to convince me to maneuver to. net from PHP. I have always disliked the idea because regarding the expenses. But he is trying no less. We have been using Movable-type upon several websites for concerning annually and am stressed about switching to an additional platform. I use heard fantastic things about blogengine. web. Is there a method I can transfer almost all my WordPress posts in it? Any help would end up being appreciated.
Aw, this was a very nice post. In thought I want to put in writing like this additionally – taking time and precise effort to make a very good article… however what can I say… I procrastinate alot and under no circumstances appear to get one thing done.
When I initially mentioned, I clicked the “Notify me when new remarks are added” checkbox and even now every time some sort of comment is added I actually get several emails together with the same comment. Is presently there in whatever way a person can remove people since a result service? Thanks a lot.
I’m experiencing several small security difficulties along with my latest blog, plus I’d like to discover something safer. Do a person have any suggestions?
Terrific work! That is the type of information that are meant to be shared across the web. Disgrace on Google for not positioning this submit upper! Come on over and discuss with my site . Thank you =)
Write considerably more; that’s all I possess to say. It appears as though you depended on the video in order to make your point. A person know what you’re speaking about, why waste your brains on just posting video tutorials to your blog any time you may be giving people something enlightening to study?
I loved as much as you will receive carried out right here. The sketch is tasteful, your authored material stylish. nonetheless, you command get bought an shakiness over that you wish be delivering the following. unwell unquestionably come more formerly again as exactly the same nearly a lot often inside case you shield this increase.
great post, very informative. I wonder why the other experts of this sector do not notice this. You must continue your writing. I am confident, you have a great readers’ base already!
Keywords, on the other hand, are small phrases that allow you to say what your video relates to. Another popular technique through merchandising. Some of one’s videos was obviously a hot success, and cut on interest rates not.
Write considerably more; that’s all I include to say. It looks as though you counted on the video in order to make your point. An individual know what you’re speaking about, why waste your intellect on just posting video tutorials to your blog any time you could possibly be giving us all something enlightening to study?
Right now I’m doing about 100 7 days on some videos while others could get about 200 30 days.
I’m truly enjoying the design and layout of your blog. It’s a very easy on the eyes which makes it much more pleasant for me to come here and visit more often. Did you hire out a developer to create your theme? Outstanding work!
Instead, become a part of the online community and be natural. So use popular tags your videos and find a associated with views. Your day-to-day job is to find out how to get more YouTube views.
thank you bro
I?m not sure where you are getting your info, but great topic. I needs to spend some time learning much more or understanding more. Thanks for excellent info I was looking for this info for my mission.
thank you bro
Catchy titles are very a factor for generating immediate looks at. Here, your fans could very well follow as well as your YouTube videos. This is a easy way get youtube views.
thank you bro
Hey there! I’ve been reading your web site for a while now and finally got the courage to go ahead and give you a shout out from New Caney Tx! Just wanted to mention keep up the great job!
Hey, thanks for a great post, it seems everyone these days is trying to make a little extra on the side but it is so hard to find really good blogs like yours. I’ve also been following this guy for a while and have had some success as a begginer using some of his methods. Maybe some of your readers might find it usefull too. https://www.affiliatemarketing101.com.au
They don’t, and neither does the search engines. You always begin with making an outstanding video. Also, come develop some creative questions your viewers cannot resist. Additionally, optimize your YouTube fashion.
Howdy! I could have sworn I’ve been to this blog before but after browsing through some of the post I realized it’s new to me. Anyways, I’m definitely delighted I found it and I’ll be book-marking and checking back often!
Hello there, just become alert to your weblog through Google, and found that it is truly informative. I’m gonna watch out for brussels. I’ll appreciate in the event you continue this in future. Numerous other people will likely be benefited out of your writing. Cheers!
Greetings from Ohio! I’m bored to death at work so I decided to browse your website on my iphone during lunch break. I love the knowledge you provide here and can’t wait to take a look when I get home. I’m shocked at how quick your blog loaded on my phone .. I’m not even using WIFI, just 3G .. Anyways, great site!
No matter if you’re preparing an spectacular vacation or going for a spur of your second jaunt, at times, it’s the small specifics which can be the deciding factor regarding how a lot you love your time and efforts out of the house. The details on this page will help you strategy the perfect vacation. Abandon all pointless belongings in the home. You take the potential risks of experiencing every thing stolen of your stuff if you do deliver valuable items together with you. If you are visiting a place which has a liquefied-limitation on all drinks you may well be loading, put money into pub hair shampoos and tooth powder. Truth be told, you could discover club shampoo and tooth paste for sale in powder develop on-line. These products are a fun way to acquire around water-restrictions. When traveling in countries with harmful tap water, keep in mind alternative methods which you might be revealed. Near the mouth area while using the shower area and remember to brush your teeth only with treated water. If you make green tea or coffee with all the drinking water, give it time to boil for a number of minutes prior to steeping. A good modest coverage could make you very sickly. Get a travel dress, which is a garment which can be used multiple ways. It can be put on as a outfit, skirt, tee shirt and place. Then you can load up a couple of other accessories and associated items, which will help save lots of place inside your travel suitcase for all the gifts you intend to provide house. Get several clothespins with you whenever you travel. It is an strange object to take into account preparing, however they could be very useful. If you’re having a cruise trip, be sure you take a little day case together with you. You’ll realize that your luggage won’t be available without delay whenever you board the dispatch. So you’ll need to have a bag by using a go swimming go well with, a book, an additional modify of clothes inside it, and other things you may want right away. Regardless of where you would like to go, planning can make your vacation all it can be. Use the suggestions you’ve go through here to have the best from your touring practical experience.
thank you bro
Pretty nice post. I just stumbled upon your blog and wished to say that I have really enjoyed surfing around your blog posts. In any case I will be subscribing to your feed and I hope you write again very soon!
thank you bro
My brother suggested I might like this web site. He was entirely right. This post truly made my day. You cann’t imagine just how much time I had spent for this information! Thanks!
I precisely wanted to say thanks yet again. I am not sure what I would have carried out without those concepts discussed by you relating to such a concern. Previously it was a frightful case in my position, but understanding this expert mode you processed the issue forced me to jump for happiness. Extremely happy for the help and then pray you comprehend what a great job you’re providing teaching people today through your blog post. Most probably you have never come across any of us.
When you go camping outdoors, you want the proper devices being entirely ready. There are several businesses and stores that may try and sell you the most expensive devices to your camping requires, but you shouldn’t pay attention to them. There is certainly inexpensive camping outdoors equipment out there, and this post will demonstrate what exactly it is and the ways to believe it is. Get a top quality tent. It could be attractive to credit score a good deal on a tent, but you want to find something that can hold each you, your loved ones associates and your valuables. Consider visiting a store that specializes in backyard equipment. They normally have nicely-created products which can last for a while. Strategy consequently when it comes to meals. It really is a trouble to create room in your auto for the food you want. Nevertheless, correct nutrition is essential when you are in the woods. Also, items that are relatively affordable in your local retail store usually possess a increased price around camping outdoors websites. Getting enough foods signifies that you may reduce costs and keep anyone in your family within a very good feeling. Get together a lot of things to charm your self and your family. For instance, cards video games, angling poles and footballs can help to actually use a enjoyable time in the woods. If you are taking youngsters camping, you might like to provide far more pursuits than you imagine you are going to need to have. Help save place with your handbag by leaving behind combining spoons and containers right behind, and alternatively just take plastic material zip-fasten bags. Position the foods or fluids that you want to combine within the bag, and ensure that the zipper is nicely closed well before mixing up. In addition the bags occupy much less space than bowls and spoons, but they’re a lot more light as well! Make a list of things you need to take before going camping. You might think you happen to be efficient at packaging, but small different is worse than getting out during the woods and knowing you neglected your allergic reaction medicine. Sit down and make up a extensive set of every thing you may need during the full week prior to your camping trip. A lot of people can tell you they may have fond memories of camping out. The details offered in this article should make it so that you have a special trip also, providing you maintain the information in your mind. You have to know anticipate to area any bend balls that can come the right path!
You really make it seem so easy with your presentation but I find this topic to be really something that I think I would never understand. It seems too complicated and very broad for me. I’m looking forward for your next post, I?ll try to get the hang of it!
I?m not sure where you are getting your info, but good topic. I needs to spend some time learning much more or understanding more. Thanks for great information I was looking for this information for my mission.
It can be used as a side business as thoroughly.
There are many article directories on the
planet Wide On-line. Press a petal or a flower and laminate it before attaching to the page.
It’s perfect time to make some plans for the future and it’s time to be happy. I have read this post and if I could I wish to suggest you some interesting things or tips. Maybe you can write next articles referring to this article. I desire to read more things about it!
Hey there, You’ve done a fantastic job. I?ll definitely digg it and personally recommend to my friends. I am confident they’ll be benefited from this web site.
Heya i?m for the first time here. I found this board and I find It truly useful & it helped me out a lot. I hope to give something back and help others like you aided me.
thank you bro
I have been surfing online more than three hours today, yet I never found any interesting article like yours. It is pretty worth enough for me. In my opinion, if all webmasters and bloggers made good content as you did, the internet will be a lot more useful than ever before.
Some eco friendly products are more expensive but you can usually reuse them which brings the costs down. This article has some pretty good tips about saving money by going green http://www.nbcnews.com/better/lifestyle/how-go-green-budget-actually-save-more-money
Unquestionably believe that which you stated. Your favorite justification seemed to be on the web the easiest thing to be aware of. I say to you, I definitely get annoyed while people consider worries that they just don’t know about. You managed to hit the nail upon the top as well as defined out the whole thing without having side effect , people can take a signal. Will likely be back to get more. Thanks
There are so many ways to be greener at home once you start thinking about it. I found this great article 40 Ways to Go Greener at Home (Besides Just Recycling) which has some great ideas. She writes well and is great value. Worth the 3minute read imo
Hey, thanks for a great post, it seems everyone these days is trying to make a little extra on the side but it is so hard to find really good blogs like yours. I’ve also been following this guy for a while and have had some success as a begginer using some of his methods. Maybe some of your readers might find it usefull too. http://www.affiliatemarketing101.com
thank you bro
Thank you for the good writeup. It in fact was a amusement account it. Look advanced to far added agreeable from you! However, how could we communicate?
thank you bro
This is very interesting, You are a very skilled blogger. I’ve joined your rss feed and look forward to seeking more of your excellent post. Also, I’ve shared your web site in my social networks!
thank you bro
thank you bro
This actually answered my problem, thanks!
thank you bro
The following time I read a weblog, I hope that it doesnt disappoint me as a lot as this one. I imply, I do know it was my choice to read, however I actually thought youd have something attention-grabbing to say. All I hear is a bunch of whining about one thing that you may repair in the event you werent too busy on the lookout for attention.
I simply wanted to thank you so much once more. I’m not certain the things I could possibly have created in the absence of the actual smart ideas revealed by you on my situation. It actually was a alarming difficulty for me, however , looking at a professional tactic you dealt with that forced me to cry with gladness. Extremely happy for your service and even wish you really know what an amazing job you were accomplishing training other individuals all through a site. More than likely you haven’t come across any of us.
Exceptional content. A tiles operator in Ireland. http://www.thefactoryoutlet.ie
naturally like your web-site but you have to check the spelling on quite a few of your posts. Several of them are rife with spelling problems and I find it very bothersome to tell the truth nevertheless I will surely come back again.
Exceptional content. Love it! http://www.peakwindows.ie we do front doors and more!
Can I just say what a aid to seek out somebody who really knows what theyre talking about on the internet. You positively know the best way to convey an issue to light and make it important. More folks must read this and understand this facet of the story. I cant believe youre not more well-liked since you undoubtedly have the gift.
thank you bro
hey there and thank you for your information ? I have definitely picked up anything new from right here. I did however expertise some technical issues using this web site, since I experienced to reload the web site many times previous to I could get it to load properly. I had been wondering if your web hosting is OK? Not that I am complaining, but sluggish loading instances times will very frequently affect your placement in google and can damage your high quality score if advertising and marketing with Adwords. Well I?m adding this RSS to my e-mail and can look out for a lot more of your respective fascinating content. Make sure you update this again very soon..
First off I want to say excellent blog! I had a quick question in which I’d like to ask if you don’t mind. I was curious to know how you center yourself and clear your thoughts before writing. I’ve had a tough time clearing my thoughts in getting my ideas out. I truly do take pleasure in writing but it just seems like the first 10 to 15 minutes tend to be lost just trying to figure out how to begin. Any ideas or hints? Appreciate it!
This is the appropriate weblog for anybody who needs to search out out about this topic. You realize a lot its almost laborious to argue with you (not that I truly would needHaHa). You definitely put a new spin on a topic thats been written about for years. Nice stuff, simply great!
thank you bro
You’re so amazing. Oh my Our god. The almighty bless you.
Your place is valueble for me. Thanks!
It’s a envious article. It’s very amazing and brand-new. Who are usually you to write this special article?
Hi! Someone in my Facebook group shared this site with us so I came to give it a look. I’m definitely loving the information. I’m book-marking and will be tweeting this to my followers! Great blog and great design.
I was recommended this website by my cousin. I am not sure whether this post is written by him as no one else know such detailed about my difficulty. You are incredible! Thanks!
My brother recommended I might like this website. He was entirely right. This post actually made my day. You can not imagine just how much time I had spent for this information! Thanks!
Did you know these truths on CBD OIL and Full Spectrum CBD Hemp Oil? Cannabinoids are separated from hemp utilizing supercritical CO2 extraction. Thanks to modern-day technology, the resulting option is tidy, without unneeded waxes and heavy metals, naturally present in the plant, and the sucked liquid has a typical, oily consistency. CBD oil consists of cannabidiol as a base active ingredient and might contain only trace quantities of tetrahydroxycannabidiol (THC). It is advised by doctors and pharmacists as an antioxidant and compound that blocks the action of proinflammatory cytokines (proteins), e.g. in Crohn’s illness or ulcerative intestine. RSO oil has a low CBD material, while high THC. Obviously, the crucial task of RSO is to cause a psychoactive impact, although it can also promote “ill” brain structures. It deserves understanding that supplements of this type is primarily used by individuals to whom basic therapy does not bring relief in health problem. The synergistic (enhancing) action of CBD and THC relative to each other is used here. When utilized independently, both cannabinoids can do much more together than. In addition, they collectively stimulate the division of non-active afferent neuron, nurture the fatty envelope of the nerves, and avoid myelin inflammation that causes loss of function in some autoimmune diseases. There are likewise stories where marijuana in its natural type softened spasticity, decreased the frequency of seizures and convulsions, and reduced undesirable scrapie in Parkinson’s disease. This is where the concept of receiving RSO, planned just for chronically ill individuals, come from . Both marijuana oil type CBD and RSO also include other cannabinoids, such as cannabichromene (CBC) and cannabigerol (CBG). The trick is not, nevertheless, that CBD typically has a composition expanded to consist of flavones, flavonoids, terpenes, terpenoids, amino acids and omega acids. The distinction is primarily due to intentions guiding mankind to use one or the other item. CBD medical marijuana oil is a rather useful mix of cannabinoids, created to safeguard versus 21st century illness. It’s finest to utilize all of these substances together, as nature created them and enclosed in cannabis inflorescences. It ends up that cannabidiol improves the effects of cannabichromene (CBC) and cannabigerol (CBG), and flavonoids or flavones enhance the absorption of these substances. Omega-6 and omega-3 highly nurture the body and do not allow to alter, which speed up the aging process of the organism and enhance the development of cancer. Oil of cannabis in a kind of pastime APR includes small quantities of CBD, balanced by the existence of THC. – Modern clinical research study shows that CBD + THC cope with serious autoimmune illness, while CBC or CBG reveal minimal activity in the presence of both substances, just like flavonoids, flavones or terpenes, therefore their content in the solution appears to be unnecessary. In addition, the cannabis pressure from which THC and CBD are obtained include negligible amounts of other cannabinoids. Marijuana oil has actually currently marked a brand-new period in which male ceased to fear what is unidentified, and began to uncover what our ancestors had actually currently discovered and utilize the substantial capacity, initially glance, a little unusual relationships, associated primarily with pathology. Medical cannabis, contrary to its name, does not indicate fermented female inflorescences and leaves containing psychedelic compounds coiled in so-called “Joints”, but an useful oil without psychoactive THC. A basic individual, after taking doses of medicinal cannabis and attaining the appropriate state of cannabinoids in the blood, can delight in increased resistance, minimized vulnerability to cancer, postponed aging and decreased risk of stroke or heart attack. CBD oil consists of cannabidiol as a base active ingredient and may consist of only trace quantities of tetrahydroxycannabidiol (THC). RSO oil has a low CBD content, while high THC. Both cannabis oil type CBD and RSO likewise include other cannabinoids, such as cannabichromene (CBC) and cannabigerol (CBG). CBD medical cannabis oil is a rather helpful blend of cannabinoids, designed to secure versus 21st century disease. Oil of marijuana in a kind of hobby APR consists of little quantities of CBD, balanced by the existence of THC.
Wonderful goods from you, man. I’ve understand your stuff previous to and you’re just extremely magnificent. I really like what you’ve acquired here, certainly like what you’re saying and the way in which you say it. You make it entertaining and you still take care of to keep it wise. I can not wait to read much more from you. This is actually a great website.
I have to be able to voice my passion intended for your kindness giving help to those most people of which really should have guidance on this kind of important matter.
I do not even know how I ended up here, but I thought this post was good. I do not know who you are but definitely you are going to a famous blogger if you are not already 😉 Cheers!
You’re so amazing. Oh my God. Our god bless you.
Türkiyenin en iyi izmir eskort sitesi http://www.narlidereescort.xyz/
Excellent blog here! Also your web site loads up very fast! What web host are you using? Can I get your affiliate link to your host? I wish my site loaded up as quickly as yours lol
I have read some good stuff here. Certainly worth bookmarking for revisiting. I wonder how much effort you put to make such a great informative site.
Hey There. I found your blog using msn. This is an extremely well written article. I?ll make sure to bookmark it and come back to read more of your useful information. Thanks for the post. I?ll certainly comeback.
Seriously. Professional. You’re a new guru. Thank you.
Menemenin elit eskort sitesi menemenescort.xyz
Hey there, usually are you too great? The writing widens my knowledge. Give thanks to you.
Its great as your other posts : D, regards for posting. “You can’t have everything. Where would you put it” by Steven Wright.
I simply want to say I am very new to blogging and really liked you’re blog. Most likely I’m want to bookmark your blog post . You absolutely have fantastic posts. Thanks for sharing your web site.
Hey, aren’t you too great? Your own personal writing widens my expertise. Give thanks to you.
Wonderful beat ! I wish to apprentice while you amend your site, how could i subscribe for a blog web site? The account aided me a acceptable deal. I had been tiny bit acquainted of this your broadcast offered bright clear idea
Menderes’in elit escort sitesi menderesescort.xyz
Thank you for the auspicious writeup. It in fact was a amusement account it. Look advanced to far added agreeable from you! However, how could we communicate?
I was so pleased by your blog. Thank an individual so much.
Kinik izmir’in elit bayanların toplandığı platform kinikescort.xyz
You’re so amazing. Oh my Our god. God bless you.
Hello, you used to write fantastic, but the last several posts have been kinda boring… I miss your great writings. Past several posts are just a little bit out of track! come on!
Thank you for the auspicious writeup. It in fact was a amusement account it. Look advanced to far added agreeable from you! By the way, how can we communicate?
Urlanın en gözde escort sitesi urlaescort.xyz
You’re thus amazing. Oh my God. Our god bless you.
You’re thus amazing. Oh my The almighty. Jesus bless you.
Kemalpasa’nın en elit escort sitesi kemalpasaescort.xyz
Magnificent goods from you, man. I have understand your stuff previous to and you’re just too wonderful. I really like what you have acquired here, really like what you are stating and the way in which you say it. You make it enjoyable and you still take care of to keep it sensible. I cant wait to read far more from you. This is actually a terrific web site.
I’m often to running a blog and i really recognize your content. The article has really peaks my interest. I’m going to bookmark your website and keep checking for brand spanking new information.
I loved as much as you will receive carried out right here. The sketch is tasteful, your authored material stylish. nonetheless, you command get bought an nervousness over that you wish be delivering the following. unwell unquestionably come further formerly again since exactly the same nearly a lot often inside case you shield this hike.
Awesome blog! Is your theme custom made or did you download it from somewhere? A design like yours with a few simple adjustements would really make my blog stand out. Please let me know where you got your design. Kudos
Your fantastic is great as if it have been written by simply a writer. My goal is to check out your blog generally. Many thanks always.
Whether you wish to free on your own coming from the personal as well as monetary restrictions of job or even you only wish to enhance your earnings along with some additional cash, operating for your own self or even beginning and expanding an organization has never been easier– and also there is actually never ever been a better selection of duties to decide on. What is actually certainly not to love about working from residence? No commute, total cooking area locations, and possibly also the ability to function in your pyjamas. Here are some wonderful company options that will definitely allow you to work coming from the convenience of residence: Those with an excellent record in setting up or even aiding to increase organizations have easily-transferable abilities they can easily make use of to earn money coming from residence. Alternatively, you could likewise provide (and ask for more for) in-person appointments, either going out to check out clients on their turf, or having all of them involve your house office (although you need to perhaps receive modified out of those PJs first). Childcare is and also always will be important to many loved ones, as well as daycare facilities do not happen economical. Other abilities, coming from teaching languages to music to aiding with analysis or even writing, are all effortless to develop into organizations– as well as they could be fairly profitable and also widely worthwhile, also. What you can easily demand will depend upon your expertise, site, as well as job you’re teaching; simply don’t anticipate to make your thousands in this manner. Like child care, take care of the aged is a necessary solution that will definitely always remain in demand. What’s more, those that require it typically come back when able to stay in their personal houses rather of moving into assisted living. While certain factors of care demand health care credentials, assisting clients with everyday activities like buying, cleaning, and cooking carry out certainly not. Specifically what this calls for will differ from project to work, however expect to primarily be dishing up high quality cuisine to groups of loved ones at supper parties. Merely keep in mind that you could need to hire waitstaff to offer food and cocktails and also take care of visitors. The job economic condition isn’t for everyone, however, for the ideal individual, driving for Uber or Lyft are terrific means to make a little bit of cash money. Have you ever before viewed a part of furniture on Craigslist that possesses potential if someone would certainly only give it a little Tender Loving Care? If you are specifically useful, you could go to thrift shops and yard sale, grab things at reduced prices, refurbish them, as well as switch them around for a greater cost. If you possess an excellent eye, you might hunt for collectibles, strangeness, and even more. Public auction sites like eBay can easily attach you along with a broad target market seeking your items. Senior proms, wedding ceremonies, and other special celebrations persuade folks to appear their absolute best. You can easily end up being a private stylist as well as possess people pertain to your house workshop, or even you may create property phone calls or even job on-location. Much like in-home little one treatment, family pet sitting is actually a field that you can take advantage of to create additional money. Numerous individuals desire the satisfaction recognizing that somebody is actually there for their coat little one, ensuring they fit as well as secure while they’re gone. Sites including treatment. com aid put possible clients in front of household pet caregivers in their area. You can easily list your room absolutely free, as well as Airbnb carries out all the heavy training for you, making it quick and easy to entice as well as host tourists. You may bill what you really want, and also Airbnb even guards you along with building damage and also collision insurance policy. On the web business opportunities likewise afford you all the benefits of working coming from residence, yet even better, much of them enable you to work coming from definitely anywhere (which has actually certainly never been actually much easier or more enjoyable, with the help of the ever-growing coworking industry). ” Among the major modifications to ‘exactly how our company work’ over recent years is actually the extensive work schedule toward totally free company, i. e. freelancing, consulting, or even running solopreneur-types of organizations,” he mentions. “While lots of more mature workers were actually shown to work at protection such as a full time job, that is actually no longer the only means to create a living. You could consult with or even freelance in a variety of locations from copywriting to marketing tactic, or manage your personal ecommerce company from your property.” He likewise advises that despite which course you decide on, the wise technique to “run away” your full-time task is actually to start creating this switch while you’re still working. ” It took 2. 5 years to accumulate your business sufficient to preserve a living income, and I went permanent in 2012. I am actually residing proof if you desire to operate solo, you may do it with the ideal company version, an audio leave strategy, as well as a considerable amount of effort.” Desire a means to start generating cash in mins? Websites like Upwork, Freelancer, as well as People Every Hr enable you to carry out only that. ” Craigslist possesses an entire section committed to Gigs you can participate in to create additional cash,” states Carl Sednaoui, Director of Advertising at MailCharts. Just consider that these jobs may not be scalable. What they are actually, having said that, is an excellent method to create a little bit of added wallet money through outsourcing your skills by yourself terms. It is actually also well worth considering some audio insight from Foundr’s Jeremy Noronha. “Go where your clients are actually, certainly not where your competition is actually,” he recommends. “A lot of consultants that get going often tend to socialize in the on-line communities along with their peers and not their possible clients. The greatest means to establish and build the best partnerships is actually to supply worth with all the areas your excellent customers spend their time.” Some skills are more in demand than others.
Wow, the writing is so sexy. How can I actually write like a person? My spouse and i want to have the similar writing skills when you.
I am extremely impressed with your writing skills as well as with the layout on your blog. Is this a paid theme or did you modify it yourself? Anyway keep up the nice quality writing, it?s rare to see a nice blog like this one today..
Whether you wish to free of charge your own self coming from the private and also monetary stipulations of employment or even you merely desire to enhance your earnings with some extra pocket money, working with your own self or beginning as well as increasing a business has certainly never been actually easier– and there is actually never been a more significant option of duties to decide on. What is actually certainly not to adore regarding working from residence? No commute, total home kitchen resources, and also perhaps even the potential to function in your pajamas. Listed below are some excellent service options that are going to allow you to work from the convenience of house: Those with a valued record in putting together or even assisting to increase organizations possess easily-transferable skills they may use to earn money coming from house. Conversely, you could likewise give (and also demand even more for) in-person assessments, either going out to see customers on their territory, or having all of them come to your office (although you should most likely receive altered away from those PJs to begin with). Daycare is actually as well as constantly will certainly be vital to lots of families, as well as daycare centers don’t come economical. Various other abilities, from mentor languages to songs to aiding with reading or creating, are actually all easy to develop into companies– and also they could be reasonably profitable and also massively satisfying, too. What you can ask for are going to rely on your adventure, location, and job you are actually instructing; simply do not anticipate to make your millions this technique. Like daycare, look after the elderly is actually a necessary solution that will constantly reside in need. What’s more, those that need it commonly do better when capable to continue to be in their personal homes rather than moving into assisted living. While certain elements of treatment demand health care qualifications, aiding customers with everyday activities like shopping, cleansing, and cooking do not. Precisely what this requires will definitely vary coming from job to task, yet count on to generally be dishing up premium dishes to groups of loved ones at supper gatherings. Simply keep in mind that you may need to use waitstaff to offer food items as well as drinks and also take care of guests. The gig economic condition isn’t for everyone, but for the ideal individual, driving for Uber or even Lyft are terrific techniques to create a little cash. Possess you ever observed a furniture piece on Craigslist that possesses potential if someone would only offer it a little bit of TLC? If you are particularly handy, you could possibly go to thrift stores and also garage purchases, grab items at small cost, restore all of them, and also switch them around for a greater rate. If you possess a really good eye, you could hunt for collectibles, anomalies, and also extra. Public auction websites like ebay.com may attach you with a vast audience looking for your items. Senior proms, wedding ceremonies, and various other exclusive celebrations force individuals to appear their best. You can easily become an individual stylist and also have people involve your house workshop, or you can create home calls or work on-location. Only like at home childcare, family pet resting is a market that you can utilize right into to bring in added loan. Numerous people really want the tranquility of mind knowing that a person sympathizes their fur child, guaranteeing they are actually comfy and secure while they’re gone. Web sites such as care. com assistance place prospective clients in face of family pet sitters in their location. You can easily provide your room free of charge, and also Airbnb performs all the hefty lifting for you, creating it easy to draw in and lot vacationers. You may bill what you desire, as well as Airbnb also secures you along with building damage as well as mishap insurance coverage. Online business chances additionally manage you all the advantages of functioning from property, but also a lot better, a lot of them permit you to operate from positively anywhere (which has actually never been less complicated or additional enjoyable, thanks to the ever-growing coworking business). ” One of the significant modifications to ‘just how our team operate’ over recent years is the extensive shift toward complimentary company, i. e. freelancing, consulting, or managing solopreneur-types of companies,” he claims. “While a lot of much older laborers were actually shown to pursue protection such as a full time task, that is actually no more the only technique to make a living. You could possibly consult or even freelance in an amount of places coming from copywriting to advertising method, or operate your very own ecommerce organization coming from your property.” He additionally suggests that despite which path you pick, the brilliant technique to “get away from” your full time job is to start creating this change while you’re still working. ” It took 2. 5 years to create up business good enough to maintain a lifestyle earnings, and also I went permanent in 2012. I’m living proof if you prefer to run solo, you can easily do it along with the right organization style, an audio exit method, and also a ton of difficult work.” Desire a means to begin earning money in mins? Internet sites like Upwork, Freelancer, and also Individuals Per Hour permit you to perform only that. ” Craigslist possesses a whole part committed to Gigs you may sign up with to bring in extra amount of money,” says Carl Sednaoui, Director of Advertising And Marketing at MailCharts. Merely keep in mind that these projects may not be scalable. What they are, nonetheless, is actually a wonderful method to make a little bit of additional spending money through outsourcing your capabilities by yourself terms. It’s likewise effectively worth thinking about some sound recommendations from Foundr’s Jeremy Noronha. “Go where your clients are actually, certainly not where your competition is,” he encourages. “A lot of consultants who get going often tend to hang around in the online areas with their peers and also not their potential clients. The most effective way to build and construct the appropriate connections is actually to deliver value in each the spots your optimal customers spend their time.” Some skill-sets are much more sought after than others.
Very interesting subject, regards for posting.
You are a very clever person!
hi!,I really like your writing very a lot! proportion we keep in touch extra about your post on AOL? I require an expert in this house to resolve my problem. May be that is you! Taking a look forward to peer you.
Would you be considering exchanging hyperlinks?
Its like you read my mind! You appear to know a lot about this, like you wrote the book in it or something. I think that you could do with some pics to drive the message home a little bit, but instead of that, this is wonderful blog. A fantastic read. I’ll certainly be back.
Karsiyaka’nın en elit eskort sitesi karsiyakaescortbayan.xyz
I don?t even know how I ended up here, but I thought this post was good. I do not know who you are but certainly you are going to a famous blogger if you are not already 😉 Cheers!
I like this post plenty. i’ll undoubtedly be back. Hope that ready to be able to scan additional insightful posts then. are sharing your data with all of my friends!
Loving the info on this website , you have done great job on the blog posts.
Wow, the writing is so sexy. How could I actually write like an individual? I are looking for the very same writing skills while you.
Incredible! This blog looks just like my old one! It’s on a entirely different topic but it has pretty much the same page layout and design. Great choice of colors!
I will right away clutch your rss as I can’t to find your e-mail subscription link or newsletter service. Do you’ve any? Please permit me recognise in order that I may subscribe. Thanks.
Whether you intend to free of cost on your own from the personal and economic regulations of work or even you merely desire to supplement your income along with some added pocket money, working with your own self or beginning and expanding a service has actually never been simpler– and also there’s certainly never been a greater option of functions to select from. What is actually certainly not to enjoy concerning operating from house? No commute, total kitchen resources, and perhaps even the capability to do work in your pajamas. Right here are actually some great service chances that will certainly enable you to operate from the comfort of residence: Those with a respectable monitor report in establishing up or assisting to grow services have easily-transferable abilities they can utilize to bring in amount of money from house. Additionally, you might additionally provide (as well as bill additional for) in-person consultations, either walking out to visit clients on their territory, or possessing them pertain to your office (although you should most likely receive transformed away from those PJs first). Child care is actually and constantly will definitely be actually vital to numerous family members, and daycare facilities do not come low-cost. Various other skill-sets, from training languages to songs to aiding with analysis or even creating, are all quick and easy to become companies– and they could be reasonably profitable and also massively rewarding, also. What you can bill will depend upon your experience, site, and occupation you are actually educating; merely do not count on to create your thousands in this manner. Like child care, look after the elderly is actually an important solution that is going to consistently remain in requirement. What’s additional, those that require it frequently come back when able to remain in their personal residences rather than moving in to assisted lifestyle. While certain factors of treatment call for health care credentials, helping customers with daily duties like purchasing, cleansing, and also cooking do certainly not. Exactly what this entails will vary coming from task to job, yet expect to mainly be actually serving quality food to groups of pals as well as family at supper celebrations. Just consider that you may need to employ waitstaff to provide meals as well as beverages as well as care for guests. The job economic climate isn’t for everyone, but also for the best individual, steering for Uber or Lyft are actually wonderful ways to create a little money. Possess you ever seen a piece of furniture on Craigslist that possesses possible if an individual will simply offer it a little TLC? If you are particularly convenient, you could possibly visit emporium and also yard sale, grab things at small cost, repair all of them, and switch them around for a greater rate. If you possess a really good eye, you might look for antiques, peculiarities, and a lot more. Public auction websites like ebay.com can easily connect you along with a wide audience searching for your products. Proms, wedding celebrations, and also various other exclusive events compel folks to look their absolute best. You may end up being a private stylist and possess people happen to your property workshop, or you can easily make property telephone calls or work on-location. Similar to in-home childcare, pet dog resting is actually a field that you may use to bring in extra money. Lots of individuals want the confidence understanding that somebody sympathizes their coat infant, ensuring they fit and also risk-free while they are actually gone. Websites like treatment. com help put potential customers facing family pet caregivers in their town. You can easily provide your area for complimentary, and also Airbnb carries out all the hefty hauling for you, creating it easy to draw in and lot vacationers. You can easily demand what you want, as well as Airbnb also shields you with building harm as well as accident insurance. Online business options also manage you all the perks of functioning coming from property, however also better, a number of them enable you to operate from definitely anywhere (which has actually certainly never been less complicated or even more fun, due to the ever-growing coworking market). ” Among the primary improvements to ‘just how our experts function’ over recent decade is actually the huge work schedule towards free organization, i. e. freelancing, consulting, or running solopreneur-types of businesses,” he points out. “While several much older workers were actually taught to engage in protection in the form of a full time job, that is no more the only way to earn a living. You could speak with or even freelance in a number of locations from copywriting to advertising tactic, or even operate your personal ecommerce organization coming from your property.” He likewise suggests that despite which road you select, the intelligent technique to “run away” your permanent work is actually to begin making this change while you’re still working. ” It took 2. 5 years to accumulate the organization good enough to sustain a living profit, and I went full-time in 2012. I’m staying evidence if you would like to operate solo, you may do it with the correct business version, an audio exit tactic, as well as a lot of effort.” Wish a means to begin generating cash in moments? Web sites like Upwork, Freelancer, and Individuals Every Hour permit you to perform simply that. ” Craigslist has a whole area devoted to Gigs you can easily join to create extra amount of money,” states Carl Sednaoui, Supervisor of Advertising And Marketing at MailCharts. Just consider that these tasks aren’t scalable. What they are, however, is actually a wonderful method to create a little bit of additional spending money by delegating your skills on your personal conditions. It is actually likewise properly worth thinking about some audio suggestions coming from Foundr’s Jeremy Noronha. “Go where your clients are, not where your competitors is actually,” he suggests. “Lots of freelancers that begin usually tend to socialize in the on the web neighborhoods with their peers and also not their possible customers. The most effective way to develop and also develop the appropriate partnerships is to give market value in all the places your optimal clients devote their time.” Some capabilities are even more popular than others.
Hello.This article was really fascinating, especially since I was investigating for thoughts on this subject last Saturday.
Thanks for one’s marvelous posting! I truly enjoyed reading it, you may be a great author.I will remember to bookmark your blog and may come back sometime soon. I want to encourage you to definitely continue your great posts, have a nice day!
Hmm it appears like your site ate my first comment (it was extremely long) so I guess I’ll just sum it up what I submitted and say, I’m thoroughly enjoying your blog. I as well am an aspiring blog blogger but I’m still new to everything. Do you have any recommendations for rookie blog writers? I’d certainly appreciate it.
One other issue is when you are in a circumstances where you will not have a cosigner then you may actually want to try to make use of all of your school funding options. You could find many grants or loans and other scholarships or grants that will supply you with funding to aid with university expenses. Thanks a lot for the post.
The very crux of your writing while appearing reasonable at first, did not really work perfectly with me after some time. Someplace within the sentences you were able to make me a believer unfortunately only for a very short while. I however have a problem with your leaps in assumptions and you would do nicely to fill in those gaps. In the event you can accomplish that, I could definitely end up being amazed.
Whether you intend to complimentary on your own from the private and financial constraints of job or you only desire to enhance your wage with some additional investing cash, operating for yourself or even beginning and increasing a service has never ever been simpler– and there is actually never ever been a better option of parts to pick from. What’s certainly not to really love concerning operating from home? Zero commute, complete kitchen centers, and also perhaps even the ability to operate in your sleepwears. Listed below are actually some excellent company options that will certainly allow you to operate coming from the convenience of home: Those along with an enviable keep track of file in preparing up or even helping to develop services have easily-transferable skills they can use to generate income coming from residence. As an alternative, you could possibly likewise offer (and also ask for even more for) in-person appointments, either going out to visit clients on their turf, or possessing all of them involve your property office (although you must probably obtain changed out of those PJs first). Child care is actually and consistently will definitely be actually vital to several families, and also daycare facilities don’t happen affordable. Other capabilities, from mentor languages to music to helping along with reading or even writing, are all quick and easy to transform in to businesses– as well as they can be evenly profitable and widely worthwhile, too. What you can easily bill will rely on your knowledge, place, as well as role you’re instructing; simply don’t count on to create your thousands in this manner. Like daycare, care for the elderly is actually an essential service that will constantly remain in need. What’s even more, those that need it usually perform much better when capable to stay in their own properties rather than moving into supported residing. While particular components of treatment need medical credentials, aiding customers along with daily jobs like buying, cleansing, and also cooking carry out not. Exactly what this involves will certainly vary from work to job, however count on to generally be serving high quality dishes to groups of good friends and household at supper parties. Merely remember that you may need to have to use waitstaff to serve food items and beverages as well as take care of attendees. The job economic climate isn’t for everybody, however, for the correct individual, driving for Uber or even Lyft are excellent means to make a little cash money. Possess you ever found a furniture piece on Craigslist that possesses potential if somebody would certainly just provide it a little TLC? If you are particularly convenient, you can go to emporium as well as garage sales, grab items at low prices, recondition all of them, as well as transform them around for a much higher rate. If you possess a great eye, you could hunt for collectibles, anomalies, as well as more. Auction internet sites like eBay can connect you with a broad target market trying to find your things. Proms, wedding celebrations, and other unique celebrations compel folks to look their ideal. You can become an independent stylist as well as have people relate to your house studio, or even you can make home phone calls or work on-location. Merely like at home little one treatment, household pet resting is a business that you may utilize right into to create additional loan. Lots of folks desire the satisfaction recognizing that somebody sympathizes their hair infant, guaranteeing they’re comfy and also risk-free while they are actually gone. Internet sites such as care. com help place possible customers in face of family pet caretakers in their city. You can list your room totally free, and Airbnb carries out all the massive training for you, creating it quick and easy to draw in as well as bunch vacationers. You may bill what you prefer, and Airbnb also guards you along with residential or commercial property damages and also collision insurance coverage. On the web company options also afford you all the advantages of working coming from property, yet also much better, most of them enable you to work from absolutely anywhere (which has actually never been actually simpler or even additional enjoyable, with the help of the ever-growing coworking field). ” Among the major changes to ‘exactly how our team work’ over recent decade is actually the substantial shift towards free of cost agency, i. e. freelancing, consulting, or even managing solopreneur-types of organizations,” he claims. “While several older workers were instructed to engage in protection such as a full time job, that is no more the only method to make a lifestyle. You can consult or freelance in a lot of regions from copywriting to advertising tactic, or operate your own ecommerce organization from your home.” He additionally urges that no concern which course you opt for, the smart method to “get away” your permanent job is to start making this transition while you are actually still functioning. ” It took 2. 5 years to construct up the company enough to preserve a lifestyle profit, and also I went permanent in 2012. I am actually living proof if you would like to operate solo, you can do it with the ideal company version, a sound exit technique, and a great deal of challenging job.” Really want a way to start generating income in moments? Sites like Upwork, Freelancer, and Individuals Every Hr permit you to perform simply that. ” Craigslist has an entire segment committed to Gigs you may participate in to bring in added money,” says Carl Sednaoui, Director of Advertising at MailCharts. Simply birth in mind that these projects aren’t scalable. What they are actually, however, is an excellent technique to make a little additional wallet funds by outsourcing your capabilities by yourself conditions. It’s also properly worth taking into consideration some sound advice coming from Foundr’s Jeremy Noronha. “Go where your clients are actually, certainly not where your competition is actually,” he urges. “A lot of consultants that get going often tend to hang out in the internet areas along with their peers and not their potential clients. The absolute best way to build as well as construct the appropriate partnerships is actually to offer market value with all the locations your excellent clients devote their opportunity.” Some abilities are actually a lot more in need than others.
Wonderful beat ! I wish to apprentice while you amend your web site, how can i subscribe for a blog site? The account aided me a appropriate deal. I have been a little bit acquainted of this your broadcast offered bright transparent idea
Please let me know if you’re looking for a writer for your blog. You have some really good posts and I feel I would be a good asset. If you ever want to take some of the load off, I’d really like to write some material for your blog in exchange for a link back to mine. Please send me an email if interested. Thanks!
Whether you wish to cost-free your own self coming from the individual and also economic stipulations of work or you merely would like to supplement your income along with some extra cash, benefiting yourself or even beginning and developing a company has actually never been less complicated– and there is actually never been a better option of tasks to decide on. What is actually not to adore regarding operating coming from property? Absolutely no commute, full kitchen centers, as well as maybe even the potential to operate in your pajamas. Listed here are actually some terrific business possibilities that will certainly enable you to work from the convenience of residence: Those along with a valued monitor document in putting together or even assisting to expand companies have easily-transferable skill-sets they can use to generate income coming from residence. Additionally, you could possibly additionally use (as well as ask for more for) in-person appointments, either going out to go to clients on their turf, or even possessing them involve your office (although you must perhaps obtain modified away from those PJs first). Childcare is actually and constantly will definitely be actually necessary to a lot of families, and also daycare facilities don’t come cheap. Various other abilities, from mentor foreign languages to popular music to assisting with reading or even writing, are all simple to develop into businesses– and also they can easily be reasonably lucrative as well as hugely fulfilling, as well. What you can easily ask for will definitely rely upon your adventure, area, as well as vocation you’re instructing; simply don’t anticipate to create your thousands in this manner. Like daycare, look after the aged is actually a vital company that will certainly consistently remain in demand. What’s more, those that require it commonly carry out far better when able to stay in their very own residences as an alternative of relocating in to supported lifestyle. While particular factors of treatment require medical credentials, helping customers with day-to-day tasks like buying, cleansing, as well as cooking do certainly not. Precisely what this involves will differ from task to work, but anticipate to mostly be actually serving top quality cuisine to teams of loved ones at dinner parties. Only birth in thoughts that you might need to have to use waitstaff to offer food items and also alcoholic beverages and appear after guests. The job economic climate isn’t for everybody, yet for the best person, driving for Uber or even Lyft are actually excellent means to make a little bit of cash money. Have you ever observed a furniture on Craigslist that possesses potential if an individual will simply give it a little bit of Tender Loving Care? If you are especially handy, you could possibly head to second hand outlets and also garage purchases, get things at small cost, restore all of them, and transform them around for a greater price. If you possess a really good eye, you could hunt for collectibles, anomalies, and also more. Public auction web sites like ebay.com can link you with a vast viewers appearing for your products. Senior proms, weddings, as well as other unique celebrations urge individuals to look their absolute best. You may come to be an individual stylist as well as possess people involve your property center, or you may make home phone calls or job on-location. Similar to in-home day care, family pet sitting is a business that you can easily take advantage of to bring in additional cash. Lots of folks really want the satisfaction recognizing that a person sympathizes their coat child, guaranteeing they are actually comfortable and also safe while they are actually gone. Websites such as treatment. com help put possible customers facing pet dog caregivers in their location. You may detail your room completely free, and also Airbnb does all the hefty hauling for you, creating it easy to draw in as well as lot visitors. You can easily charge what you really want, as well as Airbnb also shields you along with home harm and also crash insurance policy. On the internet business opportunities likewise manage you all the perks of functioning from house, but also much better, most of all of them enable you to operate from positively anywhere (which has actually certainly never been actually easier or more enjoyable, due to the ever-growing coworking market). ” One of the significant modifications to ‘just how our experts function’ over recent years is the large work schedule toward totally free firm, i. e. freelancing, consulting, or operating solopreneur-types of organizations,” he states. “While several more mature employees were actually taught to pursue security such as a full time task, that is actually no longer the only technique to earn a living. You could seek advice from or even freelance in a lot of locations coming from copywriting to advertising approach, or even manage your personal ecommerce service from your house.” He likewise advises that no issue which path you pick, the wise way to “run away” your full-time task is actually to start creating this switch while you’re still functioning. ” It took 2. 5 years to create up the organization good enough to sustain a lifestyle earnings, and I went full time in 2012. I’m residing evidence if you wish to run solo, you can easily perform it with the right service design, an audio leave technique, as well as a considerable amount of challenging work.” Prefer a means to start creating cash in minutes? Sites like Upwork, Consultant, and also Folks Every Hour allow you to accomplish just that. ” Craigslist possesses an entire area committed to Gigs you can sign up with to bring in added cash,” says Carl Sednaoui, Supervisor of Advertising And Marketing at MailCharts. Merely consider that these tasks may not be scalable. What they are actually, having said that, is actually a great technique to create a little bit of added spending money by outsourcing your skill-sets by yourself phrases. It is actually likewise effectively worth taking into consideration some sound guidance coming from Foundr’s Jeremy Noronha. “Go where your customers are, certainly not where your competition is,” he encourages. “Numerous consultants who get going have a tendency to mingle in the on the web neighborhoods along with their peers and also certainly not their prospective customers. The greatest method to create as well as develop the right connections is actually to supply value in every the areas your suitable clients devote their time.” Some skills are actually even more in demand than others.
I conceive you have remarked some very interesting points, thanks for the post.
Usually I don’t read post on blogs, but I wish to say that this write-up very forced me to try and do it! Your writing style has been amazed me. Thanks, quite nice post.
Türkiye’nin kaliteli karabag eskort sitesi karabaglarescortkiz.xyz
I just want to tell you that I’m beginner to weblog and honestly enjoyed you’re web site. Very likely I’m going to bookmark your blog post . You surely come with perfect posts. Regards for sharing with us your blog.
I truly enjoy examining on this site, it contains superb content . “Those who complain most are most to be complained of.” by Matthew Henry.
I like this post, enjoyed this one regards for posting .
But a smiling visitor here to share the love (:, btw great style .
I must admit that that is one amazing insight. It surely gives a company the opportunity to get in on the ground floor and also really take part in creating something special and tailored to their needs.
Whether you desire to complimentary on your own coming from the personal and financial limitations of employment or you just would like to enhance your compensation along with some extra cash, functioning for on your own or even starting as well as expanding a company has certainly never been less complicated– and also there’s never been actually a higher selection of roles to choose from. What’s certainly not to adore about operating coming from home? Absolutely no commute, full kitchen area locations, as well as maybe even the capacity to operate in your pj’s. Listed below are some great business opportunities that will enable you to function coming from the comfort of residence: Those with a valued record in establishing or aiding to increase services possess easily-transferable abilities they can easily use to earn money coming from home. As an alternative, you might additionally give (and ask for more for) in-person examinations, either heading out to visit customers on their turf, or having them relate to your office (although you should most likely acquire changed out of those PJs initially). Child care is actually and also always will definitely be necessary to lots of households, and day care centers don’t happen cheap. Various other capabilities, from teaching foreign languages to songs to assisting with reading or creating, are all very easy to develop into companies– and also they may be actually moderately highly profitable as well as extremely worthwhile, also. What you may demand will definitely hinge on your expertise, site, and also occupation you’re teaching; simply don’t count on to make your thousands in this manner. Like child care, take care of the aged is actually an important solution that is going to constantly be actually in need. What’s more, those that require it often carry out better when able to continue to be in their very own properties rather than moving in to helped residing. While specific factors of treatment require health care qualifications, aiding clients with day-to-day tasks like shopping, cleaning, and also cooking food do not. Specifically what this requires will vary from project to task, but anticipate to primarily be serving high quality cuisine to groups of buddies as well as family members at dinner celebrations. Merely remember that you may need to employ waitstaff to provide food and beverages and appear after visitors. The gig economic situation isn’t for everybody, however, for the right individual, steering for Uber or Lyft are actually terrific means to create a little cash. Have you ever seen a furniture on Craigslist that has possible if an individual would merely provide it a little TLC? If you are actually especially helpful, you might head to emporium and garage sales, get things at small cost, recondition them, and also transform them around for a higher price. If you have a good eye, you can look for collectibles, quirks, and also a lot more. Auction web sites like ebay.com can easily link you with a wide viewers looking for your items. Proms, weddings, and various other unique events persuade folks to appear their absolute best. You may come to be an independent stylist as well as have individuals involve your residence center, or you can bring in property phone calls or even work on-location. Similar to in-home childcare, animal resting is a sector that you may take advantage of to make additional money. Many individuals really want the assurance recognizing that a person sympathizes their hair child, guaranteeing they fit and secure while they’re gone. Websites including treatment. com aid place possible customers facing dog caretakers in their town. You can easily note your room free of charge, as well as Airbnb carries out all the hefty lifting for you, making it quick and easy to bring in and also bunch travelers. You can charge what you desire, and also Airbnb also safeguards you with home damages as well as accident insurance policy. Online business opportunities likewise afford you all the perks of working from home, but even much better, much of all of them allow you to function coming from completely anywhere (which has actually never ever been less complicated or more fun, thanks to the ever-growing coworking business). ” Among the major improvements to ‘just how we operate’ over the previous many years is the enormous work schedule toward cost-free agency, i. e. freelancing, consulting, or managing solopreneur-types of businesses,” he claims. “While many more mature laborers were educated to pursue security in the form of a full time project, that is actually no more the only way to create a residing. You could consult with or even freelance in an amount of places coming from copywriting to marketing technique, or manage your own ecommerce business from your home.” He likewise urges that despite which road you opt for, the brilliant way to “escape” your full time project is actually to start creating this switch while you’re still working. ” It took 2. 5 years to create up your business good enough to maintain a living revenue, and I went full time in 2012. I am actually living evidence if you really want to manage solo, you can possibly do it with the correct company design, an audio leave approach, as well as a great deal of effort.” Wish a means to begin earning money in moments? Sites like Upwork, Consultant, and also Individuals Per Hour allow you to accomplish only that. ” Craigslist possesses a whole area dedicated to Gigs you can participate in to bring in extra funds,” states Carl Sednaoui, Supervisor of Advertising at MailCharts. Merely remember that these jobs may not be scalable. What they are actually, having said that, is a fantastic means to make a little added pocket amount of money by delegating your capabilities by yourself conditions. It is actually additionally well worth thinking about some sound suggestions coming from Foundr’s Jeremy Noronha. “Go where your clients are, certainly not where your competitors is actually,” he suggests. “Lots of freelancers who get going tend to socialize in the on the web areas with their peers and not their prospective customers. The most ideal method to create as well as develop the best partnerships is actually to deliver worth in each the places your best clients spend their opportunity.” Some capabilities are much more in need than others.
Whether you wish to complimentary yourself coming from the private and economic regulations of employment or even you just would like to enhance your compensation along with some additional cash, working for on your own or even beginning as well as expanding a business has actually certainly never been easier– and also there is actually never ever been a higher option of tasks to choose from. What’s not to adore about operating coming from house? Absolutely no commute, total kitchen area resources, and possibly even the potential to function in your jammies. Here are some excellent service opportunities that will definitely allow you to operate coming from the comfort of house: Those along with an enviable keep track of file in putting together or helping to develop organizations have easily-transferable capabilities they can easily make use of to generate cash coming from home. Additionally, you could likewise give (and also bill additional for) in-person appointments, either walking out to see customers on their territory, or possessing them involve your office (although you need to probably acquire modified out of those PJs initially). Child care is and always will be actually vital to many family members, and childcare facilities do not happen low-cost. Other capabilities, coming from teaching languages to popular music to aiding with reading or even writing, are actually all very easy to become organizations– and also they may be fairly profitable and widely rewarding, as well. What you may bill are going to hinge on your adventure, place, and job you are actually educating; only do not anticipate to make your millions through this. Like child care, look after the elderly is a vital solution that will definitely consistently remain in need. What’s even more, those that need it commonly perform better when capable to continue to be in their very own properties rather than relocating right into aided living. While certain factors of care need clinical qualifications, assisting clients with daily duties like buying, cleaning, and preparing food perform not. Exactly what this necessitates are going to vary coming from job to work, but expect to mainly be serving top quality cuisine to groups of loved ones at dinner events. Merely keep in mind that you could need to utilize waitstaff to offer meals and also alcoholic beverages and also take care of visitors. The gig economy isn’t for every person, but for the appropriate individual, driving for Uber or Lyft are great ways to create a little bit of cash money. Have you ever observed a furniture piece on Craigslist that possesses possible if someone will only offer it a little bit of Tender Loving Care? If you are especially convenient, you can head to emporium and yard sale, grab things at small cost, restore all of them, as well as turn them around for a higher rate. If you possess a good eye, you might look for antiques, oddities, and a lot more. Public auction sites like eBay can link you with a broad reader trying to find your items. Proms, wedding ceremonies, and also various other exclusive celebrations oblige individuals to look their greatest. You can easily become an individual stylist and also have individuals relate to your residence studio, or you may bring in home telephone calls or work on-location. Much like in-home day care, family pet resting is a sector that you may use to bring in money. Several people really want the comfort recognizing that somebody sympathizes their fur baby, guaranteeing they fit and also risk-free while they are actually gone. Internet sites including care. com help place possible clients in face of household pet caregivers in their location. You can easily note your area free of cost, and Airbnb does all the heavy training for you, creating it easy to draw in and also lot travelers. You can charge what you desire, as well as Airbnb even protects you along with residential or commercial property damage and also crash insurance. On-line organization options additionally manage you all the perks of operating coming from home, however even better, several of all of them allow you to work coming from completely anywhere (which has never been simpler or even even more enjoyable, with the help of the ever-growing coworking field). ” Some of the major modifications to ‘how our experts function’ over recent many years is the large shift toward complimentary organization, i. e. freelancing, consulting, or running solopreneur-types of organizations,” he states. “While several much older employees were taught to work at safety in the form of a full-time job, that is actually no more the only technique to earn a living. You might get in touch with or even freelance in a variety of locations from copywriting to advertising and marketing tactic, or run your own ecommerce organization coming from your residence.” He likewise urges that no matter which pathway you opt for, the clever means to “escape” your full time task is actually to begin making this switch while you’re still functioning. ” It took 2. 5 years to construct up business good enough to maintain a residing profit, as well as I went permanent in 2012. I’m living evidence if you yearn for to manage solo, you may perform it with the correct organization model, a sound exit method, and a bunch of effort.” Want a means to start generating income in minutes? Websites like Upwork, Consultant, and People Every Hour allow you to perform just that. ” Craigslist has a whole section dedicated to Gigs you can participate in to create additional loan,” points out Carl Sednaoui, Supervisor of Marketing at MailCharts. Only remember that these tasks aren’t scalable. What they are, having said that, is a fantastic method to create a little bit of extra pocket money through delegating your skill-sets on your own terms. It’s likewise effectively worth thinking about some audio advice from Foundr’s Jeremy Noronha. “Go where your clients are actually, certainly not where your competition is,” he recommends. “Many freelancers that begin often tend to mingle in the online areas along with their peers and certainly not their possible clients. The very best way to establish as well as build the right partnerships is to supply worth with all the areas your excellent clients spend their opportunity.” Some capabilities are more in need than others.
Usually I don’t learn post on blogs, but I wish to say that this write-up very compelled me to try and do so! Your writing style has been surprised me. Thanks, quite great article.
Whether you desire to free of cost your own self coming from the private and monetary constraints of job or even you just would like to supplement your salary along with some additional pocket money, working with your own self or starting and growing a business has never ever been actually simpler– and also there’s certainly never been actually a more significant selection of tasks to pick from. What is actually certainly not to really love about operating from house? No commute, total home kitchen resources, and possibly also the potential to function in your sleepwears. Listed here are actually some excellent service chances that will permit you to work from the convenience of property: Those along with an excellent record in putting together or aiding to grow companies have easily-transferable skill-sets they can easily utilize to bring in funds coming from property. Conversely, you could possibly additionally give (and demand even more for) in-person examinations, either heading out to visit customers on their territory, or even having all of them involve your office (although you ought to perhaps receive changed away from those PJs to begin with). Childcare is actually as well as regularly will certainly be vital to a lot of family members, and also daycare facilities do not come cheap. Various other skill-sets, coming from teaching foreign languages to popular music to aiding with reading or creating, are all easy to become companies– as well as they could be reasonably highly profitable as well as hugely fulfilling, too. What you can easily demand will certainly rely on your knowledge, place, and also job you are actually teaching; just do not anticipate to make your millions through this. Like daycare, maintain the aged is a crucial service that will constantly reside in demand. What is actually more, those that require it commonly do far better when able to stay in their personal residences as an alternative of relocating into aided lifestyle. While certain aspects of treatment demand medical qualifications, helping customers with everyday duties like buying, cleansing, as well as preparing food do certainly not. Precisely what this involves will definitely differ coming from task to project, however count on to mainly be dishing up high quality cuisine to teams of loved ones at supper parties. Just keep in mind that you could require to work with waitstaff to offer food items and also cocktails as well as take care of guests. The gig economic condition isn’t for everybody, yet for the correct individual, steering for Uber or Lyft are wonderful techniques to create a little bit of money. Possess you ever seen a furniture piece on Craigslist that possesses potential if an individual would certainly merely provide it a little bit of TLC? If you are actually specifically helpful, you might head to emporium as well as yard sale, decide on up products at small cost, restore them, and transform all of them around for a much higher price. If you possess a great eye, you can scout for collectibles, peculiarities, as well as more. Public auction web sites like eBay may connect you along with a vast reader appearing for your products. Proms, wedding events, as well as various other unique celebrations force people to look their ideal. You can become a private stylist as well as possess people happen to your residence studio, or even you may make home calls or even work on-location. Similar to at home childcare, animal resting is actually a sector that you can take advantage of to create extra cash. Numerous folks wish the satisfaction understanding that a person is there for their hair baby, ensuring they fit and safe while they are actually gone. Sites like care. com aid place prospective clients in front of pet dog caregivers in their regional region. You can easily note your space absolutely free, as well as Airbnb does all the hefty training for you, making it quick and easy to attract as well as multitude travelers. You can charge what you want, and also Airbnb also protects you with residential or commercial property damage as well as accident insurance coverage. On the web business chances likewise manage you all the advantages of functioning from residence, yet also better, a number of all of them allow you to work coming from positively anywhere (which has actually never ever been actually less complicated or even more exciting, due to the ever-growing coworking market). ” Some of the significant improvements to ‘just how our experts operate’ over recent many years is actually the extensive change towards free of cost firm, i. e. freelancing, consulting, or operating solopreneur-types of businesses,” he points out. “While lots of older employees were shown to engage in protection in the type of a full-time task, that is actually no longer the only way to make a residing. You might get in touch with or even freelance in a variety of locations coming from copywriting to marketing method, or even manage your personal ecommerce company from your house.” He likewise advises that despite which path you pick, the smart technique to “get away” your full time work is actually to start creating this transition while you are actually still working. ” It took 2. 5 years to accumulate business enough to sustain a living earnings, and I went permanent in 2012. I’m staying proof if you intend to manage solo, you may do it along with the right business style, an audio departure approach, as well as a considerable amount of difficult job.” Want a method to begin generating cash in moments? Websites like Upwork, Freelancer, and People Every Hour enable you to perform merely that. ” Craigslist has a whole section dedicated to Gigs you may sign up with to bring in added funds,” claims Carl Sednaoui, Supervisor of Marketing at MailCharts. Just consider that these jobs may not be scalable. What they are actually, having said that, is actually a wonderful means to create a little bit of extra spending money by outsourcing your skills on your own conditions. It’s additionally effectively worth taking into consideration some sound advice coming from Foundr’s Jeremy Noronha. “Go where your customers are actually, certainly not where your competition is actually,” he recommends. “Many consultants who receive begun often tend to socialize in the internet areas with their peers as well as not their prospective clients. The greatest way to establish and build the ideal partnerships is actually to supply market value in every the places your optimal customers invest their time.” Some capabilities are actually more popular than others.
Whether you desire to free on your own coming from the individual as well as financial restrictions of work or even you just desire to supplement your salary with some additional pocket money, working with yourself or even beginning and developing a company has certainly never been actually much easier– and also there is actually certainly never been actually a more significant selection of tasks to select from. What is actually certainly not to adore concerning operating coming from residence? Zero commute, full kitchen space centers, and perhaps even the capability to function in your pajamas. Below are actually some terrific company possibilities that will definitely allow you to operate from the convenience of property: Those along with an enviable performance history in putting together or assisting to develop organizations possess easily-transferable capabilities they can utilize to create cash coming from property. Additionally, you can also offer (and demand additional for) in-person appointments, either walking out to explore customers on their turf, or having all of them pertain to your property office (although you should possibly receive transformed out of those PJs to begin with). Child care is as well as consistently are going to be necessary to numerous households, as well as childcare centers do not happen inexpensive. Various other skills, coming from mentor foreign languages to popular music to assisting with analysis or even creating, are all simple to turn into organizations– and also they may be reasonably lucrative and hugely fulfilling, also. What you can charge are going to hinge on your expertise, location, and role you’re instructing; merely do not expect to make your millions by doing this. Like child care, maintain the aged is actually an essential solution that will definitely constantly remain in need. What’s more, those that require it commonly come back when able to stay in their personal houses rather than relocating into supported residing. While certain aspects of treatment need clinical certifications, assisting customers along with day-to-day duties like buying, cleansing, and also food preparation do certainly not. Exactly what this includes are going to vary coming from task to work, yet expect to generally be serving premium cuisine to groups of loved ones at supper events. Just keep in mind that you may need to have to utilize waitstaff to offer food items and also drinks and also take care of attendees. The job economic climate isn’t for every person, but for the ideal person, steering for Uber or even Lyft are great techniques to make a little cash money. Have you ever before observed a furniture on Craigslist that possesses possible if somebody would only give it a little bit of Tender Loving Care? If you are especially handy, you could head to thrift outlets and also yard sale, get items at low cost, recondition all of them, and transform them around for a higher cost. If you possess a really good eye, you could search for valuables, oddities, as well as more. Auction websites like eBay may link you along with a vast target market seeking your items. Senior proms, weddings, as well as other special occasions force folks to appear their best. You can end up being an individual stylist and possess individuals happen to your residence studio, or even you can easily bring in house phone calls or work on-location. Only like at home childcare, dog resting is actually a field that you may use to bring in additional money. Many individuals wish the confidence knowing that somebody sympathizes their coat baby, guaranteeing they fit as well as secure while they’re gone. Sites including care. com aid place possible clients before dog caregivers in their neighborhood area. You may note your area completely free, as well as Airbnb does all the massive hauling for you, creating it easy to bring in and also bunch vacationers. You may charge what you want, and also Airbnb even defends you with home harm as well as mishap insurance. Internet organization chances likewise manage you all the benefits of operating coming from home, yet even better, a lot of all of them enable you to operate from absolutely anywhere (which has actually certainly never been simpler or even additional fun, with the help of the ever-growing coworking sector). ” One of the significant modifications to ‘just how we operate’ over recent decade is the extensive shift toward free organization, i. e. freelancing, consulting, or even managing solopreneur-types of businesses,” he points out. “While lots of more mature laborers were educated to engage in protection in the kind of a full time project, that is actually no more the only way to make a residing. You might seek advice from or even freelance in an amount of locations coming from copywriting to advertising and marketing approach, or even run your own ecommerce business from your property.” He likewise advises that no issue which road you select, the smart method to “run away” your permanent work is to start making this change while you’re still functioning. ” It took 2. 5 years to construct up your business good enough to maintain a living revenue, as well as I went full-time in 2012. I’m living verification if you intend to operate solo, you can easily perform it along with the ideal service version, an audio departure technique, as well as a ton of challenging work.” Wish a technique to begin generating income in moments? Websites like Upwork, Freelancer, as well as Folks Every Hour allow you to carry out simply that. ” Craigslist possesses a whole section devoted to Gigs you can join to create added funds,” mentions Carl Sednaoui, Director of Marketing at MailCharts. Just remember that these tasks may not be scalable. What they are actually, nonetheless, is actually an excellent technique to create a little bit of added pocket money by delegating your capabilities on your own phrases. It is actually also well worth considering some sound tips from Foundr’s Jeremy Noronha. “Go where your consumers are, certainly not where your competitors is,” he recommends. “A lot of consultants that start tend to socialize in the on-line areas with their peers as well as not their potential clients. The greatest means to develop and also create the best relationships is to deliver value in all the spots your perfect customers invest their time.” Some skill-sets are more in demand than others.
Whether you would like to free of charge your own self coming from the individual as well as monetary restrictions of work or you just really want to supplement your wage with some added investing money, helping on your own or even starting and also growing an organization has actually certainly never been simpler– and also there’s never ever been a better selection of tasks to select from. What is actually certainly not to like regarding functioning from residence? Absolutely no commute, total kitchen area locations, and also perhaps even the capacity to do work in your pajamas. Here are actually some fantastic company options that will definitely permit you to work coming from the comfort of property: Those with an enviable track file in establishing or even helping to grow businesses have easily-transferable abilities they can easily make use of to bring in money from home. Alternatively, you might additionally deliver (as well as bill more for) in-person assessments, either heading out to visit customers on their territory, or even having all of them happen to your property office (although you ought to perhaps get transformed away from those PJs to begin with). Childcare is as well as constantly will definitely be actually important to many families, as well as childcare centers don’t happen economical. Various other skill-sets, from training languages to songs to aiding with reading or even creating, are actually all quick and easy to develop into businesses– and also they may be fairly rewarding and also widely satisfying, too. What you may charge will certainly hinge on your experience, location, as well as vocation you’re educating; merely do not anticipate to make your thousands through this. Like childcare, look after the elderly is actually an important service that is going to consistently be in need. What’s additional, those that require it often come back when able to stay in their own properties rather of relocating into helped residing. While certain components of care require health care certifications, aiding customers along with day-to-day jobs like purchasing, cleaning, as well as cooking do not. Exactly what this requires will definitely vary from work to task, however count on to mostly be serving top quality cuisine to teams of close friends as well as family at dinner gatherings. Merely consider that you could need to employ waitstaff to provide meals as well as cocktails and also care for visitors. The job economic condition isn’t for every person, however, for the appropriate individual, driving for Uber or even Lyft are actually great techniques to create a little cash money. Have you ever found a furniture piece on Craigslist that possesses prospective if a person will simply offer it a little bit of TLC? If you are actually particularly helpful, you could visit emporium and also yard sale, grab items at affordable, restore all of them, as well as turn them around for a greater rate. If you have a great eye, you could possibly look for collectibles, oddities, and much more. Auction websites like eBay can easily attach you with a broad target market appearing for your products. Proms, wedding celebrations, as well as other special occasions force people to look their absolute best. You can easily come to be a private stylist and have people involve your residence studio, or even you may make property calls or work on-location. Much like in-home childcare, pet sitting is actually a sector that you can easily take advantage of to bring in additional money. A lot of individuals really want the satisfaction knowing that an individual sympathizes their coat infant, ensuring they are actually relaxed as well as secure while they are actually gone. Internet sites including care. com support place possible customers before family pet caregivers in their town. You may specify your room for totally free, as well as Airbnb carries out all the hefty hauling for you, creating it quick and easy to entice and also multitude visitors. You can easily demand what you want, and also Airbnb also defends you along with home harm as well as crash insurance policy. On the internet company opportunities additionally afford you all the perks of working from house, but also a lot better, much of all of them permit you to function coming from positively anywhere (which has never ever been actually easier or even more fun, many thanks to the ever-growing coworking business). ” Among the major changes to ‘just how we operate’ over the previous decade is the massive change toward free of charge company, i. e. freelancing, consulting, or even running solopreneur-types of businesses,” he points out. “While many much older workers were educated to pursue protection such as a full-time project, that is no more the only way to make a residing. You might speak with or even freelance in a number of areas coming from copywriting to advertising method, or manage your very own ecommerce organization from your property.” He also recommends that no matter which path you pick, the intelligent means to “get away from” your full-time task is to begin making this change while you’re still operating. ” It took 2. 5 years to develop your business enough to maintain a residing earnings, as well as I went permanent in 2012. I’m residing proof if you would like to manage solo, you may do it with the correct company design, an audio exit method, as well as a ton of effort.” Really want a means to begin making funds in minutes? Websites like Upwork, Consultant, as well as People Per Hr permit you to do just that. ” Craigslist possesses an entire part devoted to Gigs you can join to make added money,” points out Carl Sednaoui, Director of Advertising at MailCharts. Merely keep in mind that these work may not be scalable. What they are, having said that, is a fantastic way to create a little added wallet amount of money by outsourcing your skills on your very own terms. It’s also properly worth looking at some sound assistance from Foundr’s Jeremy Noronha. “Go where your consumers are actually, not where your competition is actually,” he advises. “Numerous freelancers that begin tend to hang around in the online neighborhoods along with their peers and also certainly not their potential clients. The greatest method to create and also create the right connections is to offer market value in every the spots your ideal clients spend their time.” Some skills are actually even more in demand than others.
Whether you really want to free your own self from the private as well as financial restrictions of employment or you simply really want to enhance your salary along with some additional pocket money, working with your own self or even beginning as well as growing a business has certainly never been less complicated– as well as there’s certainly never been actually a higher option of duties to decide on. What is actually not to adore concerning functioning coming from home? Absolutely no commute, complete kitchen space resources, and perhaps even the potential to function in your pj’s. Right here are actually some great business possibilities that will allow you to work from the comfort of property: Those with a valued keep track of document in establishing or even helping to develop companies have easily-transferable abilities they may use to earn money from residence. Conversely, you could possibly likewise supply (as well as charge more for) in-person assessments, either going out to see customers on their turf, or even having all of them involve your residence workplace (although you ought to most likely acquire altered out of those PJs to begin with). Child care is actually and also consistently are going to be actually important to many family members, as well as day care centers do not happen low-cost. Other skill-sets, coming from training languages to popular music to aiding along with reading or even writing, are all quick and easy to develop into businesses– as well as they may be moderately beneficial as well as widely rewarding, too. What you can charge will definitely hinge on your adventure, site, and job you are actually instructing; simply don’t anticipate to create your millions this method. Like child care, look after the aged is actually a crucial solution that will definitely constantly be in demand. What is actually additional, those that need it often carry out far better when capable to remain in their own homes instead of moving in to supported residing. While certain components of treatment require medical qualifications, assisting customers along with everyday activities like shopping, cleansing, and also preparing food do certainly not. Specifically what this requires will certainly differ from work to project, however expect to primarily be actually serving high quality food to teams of pals and also household at dinner events. Only keep in mind that you might need to have to utilize waitstaff to serve food items and beverages and also take care of visitors. The gig economic climate isn’t for everyone, however, for the appropriate person, steering for Uber or Lyft are excellent methods to create a little cash. Possess you ever before seen a part of furnishings on Craigslist that has potential if a person will simply provide it a little bit of TLC? If you are especially handy, you can go to thrift outlets as well as garage sales, get items at affordable, restore them, and also transform all of them around for a much higher cost. If you have a great eye, you could look for collectibles, curiosity, and much more. Public auction internet sites like ebay.com can link you with a large target market seeking your products. Senior proms, wedding events, and also various other unique events persuade folks to look their ideal. You may become an individual stylist as well as possess people concern your residence studio, or even you can easily bring in residence phone calls or even job on-location. Similar to at home little one care, dog sitting is actually a field that you can utilize into to make money. Many people prefer the confidence recognizing that an individual sympathizes their hair child, guaranteeing they are actually relaxed and also secure while they’re gone. Web sites including treatment. com help put possible clients before pet caregivers in their area. You can note your area free of charge, and Airbnb carries out all the hefty hauling for you, making it quick and easy to bring in and also bunch visitors. You may demand what you desire, and Airbnb also defends you with building damages and collision insurance policy. On-line business possibilities likewise afford you all the benefits of operating from house, yet even a lot better, a number of them permit you to operate coming from definitely anywhere (which has actually certainly never been actually easier or additional fun, because of the ever-growing coworking market). ” Some of the significant modifications to ‘just how our team operate’ over the past decade is actually the gigantic change towards free of cost company, i. e. freelancing, consulting, or running solopreneur-types of companies,” he claims. “While several older employees were actually shown to engage in protection in the type of a permanent project, that is no more the only technique to create a lifestyle. You could possibly seek advice from or even freelance in a lot of areas coming from copywriting to marketing technique, or even run your personal ecommerce company from your home.” He likewise recommends that despite which course you choose, the smart technique to “get away” your full-time task is to start creating this shift while you’re still operating. ” It took 2. 5 years to develop the company good enough to sustain a living revenue, and I went full time in 2012. I’m living evidence if you really want to run solo, you may do it along with the best organization style, an audio leave tactic, and also a ton of difficult job.” Really want a method to begin generating income in moments? Internet sites like Upwork, Consultant, as well as People Per Hr enable you to accomplish simply that. ” Craigslist has a whole section devoted to Gigs you can easily sign up with to bring in extra funds,” claims Carl Sednaoui, Director of Advertising at MailCharts. Merely consider that these jobs may not be scalable. What they are, nonetheless, is a fantastic way to create a little bit of additional pocket money through delegating your capabilities by yourself conditions. It’s also properly worth thinking about some sound recommendations from Foundr’s Jeremy Noronha. “Go where your clients are, certainly not where your competitors is actually,” he recommends. “Many consultants who begin have a tendency to mingle in the online neighborhoods with their peers and also not their potential customers. The best means to build and develop the appropriate connections is actually to supply market value in every the areas your perfect customers devote their time.” Some skills are actually much more in demand than others.
I’m really impressed with your writing skills and also with the layout on your blog. Is this a paid theme or did you customize it yourself? Either way keep up the nice quality writing, it is rare to see a nice blog like this one these days..
Whether you would like to cost-free on your own from the individual and financial regulations of work or you just would like to supplement your income along with some added costs amount of money, helping yourself or beginning as well as growing a company has never been easier– and there’s never been a higher choice of tasks to decide on. What’s not to adore regarding functioning from residence? No commute, comprehensive kitchen area centers, as well as possibly also the potential to function in your pj’s. Listed here are actually some great service possibilities that will definitely enable you to function from the convenience of house: Those along with a valued performance history in establishing or helping to grow businesses possess easily-transferable capabilities they can easily make use of to generate cash coming from property. Additionally, you could possibly likewise supply (and charge even more for) in-person consultations, either walking out to explore clients on their turf, or having them concern your office (although you should possibly get changed away from those PJs initially). Childcare is actually and also consistently are going to be important to many family members, and also day care centers don’t come inexpensive. Various other skills, from training foreign languages to popular music to assisting with reading or creating, are actually all quick and easy to develop into services– and also they can be fairly beneficial and widely gratifying, too. What you can charge are going to hinge on your knowledge, location, and also role you are actually educating; merely don’t count on to make your thousands in this manner. Like daycare, care for the elderly is an essential solution that will definitely consistently be actually in need. What’s even more, those that require it frequently come back when capable to continue to be in their very own properties rather than moving right into aided residing. While certain elements of treatment demand clinical qualifications, assisting customers with daily activities like shopping, cleaning, and also food preparation carry out not. Exactly what this includes will definitely differ coming from task to project, however anticipate to generally be dishing up premium dishes to teams of pals and family at supper celebrations. Just remember that you might need to hire waitstaff to provide food and also alcoholic beverages as well as care for visitors. The gig economic climate isn’t for everyone, however, for the correct individual, driving for Uber or even Lyft are excellent methods to make a little cash. Have you ever before seen a furniture on Craigslist that possesses potential if someone would certainly merely provide it a little bit of TLC? If you are actually particularly helpful, you might most likely to thrift stores and garage purchases, grab things at low cost, restore all of them, and switch all of them around for a much higher cost. If you have a good eye, you might scout for collectibles, rarities, and also much more. Public auction web sites like ebay.com can connect you along with a broad audience trying to find your items. Senior proms, wedding ceremonies, as well as other exclusive occasions urge individuals to appear their best. You can come to be an individual stylist as well as possess folks concern your house center, or even you can easily create house phone calls or even job on-location. Much like in-home childcare, pet resting is actually a sector that you can easily take advantage of to make added amount of money. Lots of people really want the satisfaction knowing that someone sympathizes their coat child, ensuring they fit and also secure while they are actually gone. Web sites such as care. com support put possible customers in front end of household pet caregivers in their city. You may provide your space for free of charge, and also Airbnb performs all the massive training for you, creating it easy to bring in and also bunch tourists. You can easily charge what you wish, and also Airbnb even shields you with home damages and also mishap insurance. Internet company opportunities likewise manage you all the benefits of operating coming from home, yet even much better, a lot of them enable you to operate from absolutely anywhere (which has actually never ever been actually simpler or additional enjoyable, with the help of the ever-growing coworking field). ” One of the significant adjustments to ‘how our experts function’ over recent years is the massive change towards free organization, i. e. freelancing, consulting, or operating solopreneur-types of organizations,” he says. “While numerous much older laborers were instructed to pursue safety in the kind of a full time work, that is no more the only way to earn a living. You can speak to or freelance in a lot of areas from copywriting to advertising method, or even manage your personal ecommerce business from your residence.” He likewise suggests that no issue which course you select, the wise method to “escape” your full-time project is to begin creating this shift while you are actually still functioning. ” It took 2. 5 years to accumulate the business sufficient to preserve a living revenue, as well as I went full time in 2012. I’m living proof if you wish to manage solo, you can possibly do it with the correct company model, a sound exit strategy, as well as a ton of effort.” Desire a means to begin generating income in minutes? Sites like Upwork, Consultant, and Individuals Every Hr allow you to perform just that. ” Craigslist possesses an entire segment dedicated to Gigs you can sign up with to create added loan,” says Carl Sednaoui, Director of Advertising at MailCharts. Only consider that these tasks aren’t scalable. What they are actually, having said that, is actually a great means to make a little extra wallet money through outsourcing your skills on your own phrases. It’s likewise properly worth thinking about some audio advice from Foundr’s Jeremy Noronha. “Go where your consumers are actually, not where your competition is,” he urges. “Lots of freelancers that start tend to mingle in the on the internet neighborhoods along with their peers as well as certainly not their prospective customers. The greatest method to build as well as develop the correct relationships is to provide market value in all the locations your ideal clients devote their time.” Some skills are actually much more popular than others.
Whether you yearn for to complimentary your own self from the personal as well as monetary limitations of work or you simply would like to supplement your salary along with some additional investing amount of money, helping on your own or even starting as well as developing a service has actually never ever been actually easier– as well as there’s never ever been actually a more significant selection of roles to select from. What is actually certainly not to adore about working coming from home? No commute, full kitchen space centers, as well as perhaps even the potential to function in your jammies. Listed here are some great service opportunities that are going to allow you to work from the comfort of property: Those with an enviable keep track of file in preparing up or even assisting to grow organizations have easily-transferable skill-sets they can utilize to generate cash coming from house. Alternatively, you might likewise give (and also demand additional for) in-person assessments, either heading out to see customers on their territory, or even having them pertain to your office (although you must most likely obtain transformed out of those PJs initially). Child care is and also regularly will definitely be vital to several households, and childcare centers don’t come low-priced. Various other capabilities, coming from mentor foreign languages to music to assisting along with analysis or even writing, are actually all effortless to switch in to services– as well as they may be fairly rewarding and hugely satisfying, too. What you may ask for will definitely rely on your experience, location, and role you’re showing; simply don’t anticipate to make your millions this technique. Like child care, look after the elderly is actually an important solution that will certainly regularly remain in demand. What’s even more, those that need it often carry out far better when able to stay in their personal homes as opposed to relocating in to supported residing. While specific aspects of treatment require health care certifications, aiding clients along with everyday activities like shopping, cleansing, and cooking food perform not. Specifically what this necessitates will certainly vary coming from job to work, but count on to mainly be serving quality dishes to teams of loved ones at supper events. Simply bear in mind that you could require to hire waitstaff to provide food items and also cocktails as well as take care of attendees. The job economic climate isn’t for everybody, however, for the best person, steering for Uber or Lyft are actually fantastic ways to make a little money. Possess you ever found a furniture piece on Craigslist that possesses possible if somebody will only provide it a little Tender Loving Care? If you are actually particularly convenient, you can go to emporium as well as garage sales, get products at small cost, repair them, and also turn them around for a much higher cost. If you possess a good eye, you could search for antiques, curiosity, as well as more. Auction sites like ebay.com may connect you with a broad reader seeking your things. Proms, wedding celebrations, as well as various other unique events compel individuals to appear their best. You can become a private stylist as well as possess individuals pertain to your residence center, or even you may make home telephone calls or job on-location. Only like at home day care, household pet resting is a market that you can easily take advantage of to make additional funds. Many individuals yearn for the confidence understanding that someone is actually there for their coat little one, ensuring they fit and also safe while they are actually gone. Websites such as care. com assistance place potential customers facing pet dog caregivers in their area. You can provide your space totally free, and Airbnb does all the heavy lifting for you, creating it easy to attract and lot vacationers. You may demand what you wish, and also Airbnb even defends you along with property damage as well as collision insurance policy. Online service possibilities additionally manage you all the advantages of operating coming from residence, yet even much better, many of them permit you to function from absolutely anywhere (which has actually never ever been less complicated or more enjoyable, due to the ever-growing coworking market). ” One of the major adjustments to ‘how our experts function’ over recent many years is the large change toward free agency, i. e. freelancing, consulting, or even running solopreneur-types of organizations,” he points out. “While a lot of much older workers were educated to work at safety and security such as a full-time work, that is actually no more the only means to make a living. You can speak to or freelance in an amount of areas from copywriting to advertising method, or even operate your very own ecommerce organization from your house.” He also advises that no issue which road you select, the smart means to “get away from” your full time work is actually to start creating this switch while you’re still functioning. ” It took 2. 5 years to create up your business good enough to sustain a residing revenue, as well as I went permanent in 2012. I’m staying verification if you wish to run solo, you can easily perform it along with the correct organization style, an audio departure strategy, and also a bunch of tough work.” Really want a method to start generating cash in moments? Internet sites like Upwork, Freelancer, and also Individuals Every Hour permit you to do only that. ” Craigslist has an entire area committed to Gigs you may sign up with to bring in added money,” points out Carl Sednaoui, Supervisor of Advertising at MailCharts. Simply remember that these tasks aren’t scalable. What they are, however, is actually a great way to create a little added pocket amount of money by delegating your abilities on your personal terms. It is actually likewise properly worth taking into consideration some sound recommendations coming from Foundr’s Jeremy Noronha. “Go where your consumers are actually, not where your competitors is,” he encourages. “Lots of freelancers who obtain begun usually tend to hang around in the online communities along with their peers and certainly not their possible clients. The most ideal way to establish as well as create the best relationships is actually to deliver value in all the areas your perfect customers invest their opportunity.” Some capabilities are more popular than others.
Whether you wish to totally free on your own coming from the private and monetary restrictions of work or even you just intend to enhance your salary with some additional spending money, working for on your own or starting as well as expanding a business has actually never been less complicated– and there’s certainly never been actually a better choice of tasks to decide on. What is actually certainly not to love concerning working from house? No commute, total home kitchen locations, and also maybe even the capability to function in your sleepwears. Listed below are some terrific organization possibilities that are going to allow you to work coming from the comfort of home: Those with a respectable keep track of report in setting up or even aiding to grow services possess easily-transferable capabilities they can easily use to generate cash from residence. As an alternative, you could possibly likewise give (and ask for additional for) in-person appointments, either walking out to explore customers on their turf, or possessing them relate to your office (although you need to probably acquire transformed away from those PJs to begin with). Daycare is as well as regularly are going to be vital to numerous families, and childcare centers don’t happen affordable. Various other skill-sets, coming from training foreign languages to popular music to aiding with reading or even creating, are actually all very easy to become companies– as well as they may be evenly financially rewarding and widely satisfying, as well. What you can easily charge will hinge on your knowledge, site, and also vocation you are actually teaching; only don’t count on to create your thousands through this. Like daycare, care for the elderly is a vital company that will certainly constantly be actually in need. What is actually more, those that need it typically do much better when capable to continue to be in their personal properties rather of relocating right into aided residing. While particular elements of care need clinical certifications, assisting customers along with daily activities like purchasing, cleaning, as well as cooking carry out not. Precisely what this necessitates will definitely differ coming from work to project, however count on to mainly be dishing up top quality cuisine to teams of buddies as well as family members at supper gatherings. Merely bear in mind that you may need to have to work with waitstaff to provide food items as well as cocktails as well as appear after guests. The gig economy isn’t for everyone, however, for the right person, driving for Uber or even Lyft are fantastic methods to create a little cash money. Possess you ever observed a furniture on Craigslist that has possible if an individual would certainly merely provide it a little TLC? If you are actually especially convenient, you could possibly most likely to second hand stores as well as yard sale, get products at low cost, recondition all of them, and also turn all of them around for a much higher cost. If you possess a really good eye, you might search for collectibles, anomalies, as well as extra. Public auction websites like ebay.com can connect you along with a broad viewers looking for your things. Senior proms, wedding events, and other unique affairs compel individuals to appear their ideal. You can easily come to be an independent stylist and also possess folks concern your house center, or you can easily make property calls or work on-location. Just like in-home youngster care, household pet sitting is a sector that you can easily take advantage of to create added money. Lots of folks desire the assurance knowing that somebody sympathizes their hair child, guaranteeing they fit and risk-free while they’re gone. Internet sites like treatment. com support put prospective clients facing animal caretakers in their location. You may note your area absolutely free, as well as Airbnb performs all the heavy training for you, making it quick and easy to bring in and multitude vacationers. You can bill what you wish, as well as Airbnb also guards you with residential or commercial property harm as well as crash insurance. Online business options likewise afford you all the perks of operating coming from residence, but also much better, most of all of them enable you to function from positively anywhere (which has never ever been actually much easier or even more fun, with the help of the ever-growing coworking field). ” Among the significant modifications to ‘exactly how our company work’ over the past many years is the enormous shift towards complimentary firm, i. e. freelancing, consulting, or running solopreneur-types of organizations,” he claims. “While several more mature employees were actually shown to pursue safety and security such as a permanent job, that is no longer the only means to make a living. You could speak with or even freelance in an amount of locations coming from copywriting to advertising and marketing technique, or operate your very own ecommerce business coming from your residence.” He likewise recommends that despite which road you opt for, the brilliant technique to “run away” your full time task is to start creating this shift while you are actually still working. ” It took 2. 5 years to build up the business good enough to sustain a living revenue, as well as I went full time in 2012. I am actually living proof if you wish to run solo, you can possibly do it along with the correct organization style, a sound leave tactic, and also a considerable amount of challenging work.” Wish a method to start earning money in moments? Web sites like Upwork, Freelancer, and Folks Every Hr enable you to carry out simply that. ” Craigslist possesses a whole part committed to Gigs you can easily participate in to make extra funds,” claims Carl Sednaoui, Director of Marketing at MailCharts. Simply remember that these projects may not be scalable. What they are actually, nonetheless, is actually a wonderful means to make a little additional spending money through delegating your abilities on your personal phrases. It’s also effectively worth considering some sound suggestions coming from Foundr’s Jeremy Noronha. “Go where your consumers are actually, certainly not where your competition is,” he suggests. “Lots of consultants who get going have a tendency to hang around in the on the web areas with their peers as well as not their possible customers. The greatest means to create and construct the ideal connections is actually to supply worth in every the areas your best customers devote their opportunity.” Some skill-sets are a lot more popular than others.
Whether you desire to totally free your own self from the private as well as financial constraints of job or even you just wish to enhance your income with some additional spending amount of money, helping your own self or even starting and increasing a service has certainly never been actually less complicated– and there is actually never been actually a more significant option of tasks to decide on. What is actually not to adore regarding working coming from home? Zero commute, complete kitchen area centers, as well as perhaps even the ability to work in your pyjamas. Below are actually some great organization chances that are going to permit you to operate from the comfort of property: Those along with an enviable performance history in putting together or aiding to develop companies possess easily-transferable skill-sets they may make use of to earn money coming from property. As an alternative, you could likewise deliver (and demand additional for) in-person examinations, either heading out to visit clients on their turf, or even possessing all of them come to your property office (although you must perhaps obtain transformed out of those PJs to begin with). Daycare is actually as well as regularly will be actually vital to lots of families, as well as childcare facilities do not come economical. Other abilities, coming from mentor languages to songs to assisting with reading or even writing, are actually all very easy to become organizations– and also they could be evenly beneficial as well as massively fulfilling, too. What you may bill will depend upon your knowledge, place, and also role you’re teaching; merely don’t anticipate to make your millions this technique. Like child care, treatment for the senior is an essential solution that is going to constantly reside in requirement. What is actually even more, those that need it often come back when capable to continue to be in their very own homes rather than moving right into supported living. While specific elements of care call for medical credentials, assisting clients along with day-to-day jobs like shopping, cleaning, and also cooking do not. Exactly what this requires will definitely vary from project to job, but anticipate to generally be actually serving high quality food to teams of pals as well as loved ones at supper events. Merely consider that you might require to work with waitstaff to serve food items and also alcoholic beverages as well as appear after guests. The gig economic condition isn’t for everybody, but for the best person, steering for Uber or Lyft are great techniques to make a little bit of money. Possess you ever before found a part of furnishings on Craigslist that has possible if a person would just offer it a little bit of Tender Loving Care? If you are especially helpful, you could head to emporium and yard sale, select up products at affordable price, refurbish all of them, and also turn all of them around for a greater rate. If you have a great eye, you could scout for collectibles, anomalies, as well as a lot more. Public auction internet sites like eBay may link you along with a vast reader seeking your things. Proms, wedding events, and also other special events force individuals to appear their absolute best. You can become an independent stylist and have folks relate to your residence studio, or you can easily make house calls or even job on-location. Similar to at home day care, animal resting is actually a market that you can use to bring in money. Many folks desire the satisfaction knowing that somebody is actually there for their coat baby, ensuring they are actually comfy and secure while they are actually gone. Internet sites like care. com support place prospective clients before pet caretakers in their area. You can specify your space absolutely free, and Airbnb carries out all the heavy lifting for you, creating it effortless to bring in and also multitude tourists. You may bill what you desire, and Airbnb even secures you with residential property damage and crash insurance. On the internet company possibilities likewise manage you all the perks of operating from residence, but even better, numerous of all of them enable you to operate from positively anywhere (which has actually certainly never been actually easier or more enjoyable, due to the ever-growing coworking sector). ” Among the significant modifications to ‘exactly how our company function’ over the previous years is actually the substantial work schedule towards free of charge company, i. e. freelancing, consulting, or managing solopreneur-types of organizations,” he points out. “While many more mature employees were instructed to work at safety and security in the form of a full-time project, that is actually no more the only means to create a lifestyle. You could possibly speak with or freelance in a lot of areas coming from copywriting to marketing technique, or even operate your own ecommerce company coming from your home.” He likewise encourages that despite which road you pick, the smart technique to “escape” your permanent project is to start making this change while you are actually still operating. ” It took 2. 5 years to develop up the business enough to sustain a living revenue, as well as I went full time in 2012. I am actually residing verification if you would like to operate solo, you may do it with the ideal business model, an audio exit approach, and a bunch of effort.” Wish a method to begin generating cash in moments? Sites like Upwork, Consultant, as well as Individuals Per Hr permit you to carry out just that. ” Craigslist possesses a whole area committed to Gigs you can participate in to create added money,” claims Carl Sednaoui, Director of Advertising And Marketing at MailCharts. Just bear in thoughts that these work may not be scalable. What they are actually, nevertheless, is actually an excellent way to make a little additional pocket money through outsourcing your abilities on your very own phrases. It’s additionally properly worth looking at some sound guidance from Foundr’s Jeremy Noronha. “Go where your clients are, not where your competition is actually,” he suggests. “Lots of consultants who begin often tend to mingle in the internet neighborhoods along with their peers and not their potential clients. The most ideal means to establish as well as construct the appropriate partnerships is to offer worth in all the places your best clients spend their time.” Some capabilities are actually extra in requirement than others.
Whether you desire to free of cost on your own from the private as well as monetary stipulations of job or you merely wish to enhance your income with some added pocket money, benefiting on your own or even beginning and developing a business has never been simpler– as well as there is actually certainly never been actually a greater selection of duties to decide on. What is actually not to like about functioning from property? No commute, full kitchen space centers, as well as perhaps even the capability to function in your jammies. Below are actually some fantastic business opportunities that will definitely enable you to function from the comfort of home: Those along with an excellent record in establishing up or aiding to increase services possess easily-transferable skill-sets they can utilize to create funds coming from residence. As an alternative, you could possibly additionally provide (and also bill more for) in-person examinations, either heading out to check out customers on their turf, or even having them come to your property office (although you should possibly get transformed out of those PJs initially). Child care is actually as well as constantly will certainly be actually important to a lot of families, as well as childcare centers don’t come cheap. Various other skills, from teaching languages to songs to assisting with reading or creating, are actually all easy to switch right into businesses– as well as they can easily be fairly highly profitable as well as extremely rewarding, as well. What you can demand will definitely rely upon your experience, location, and job you’re teaching; merely do not expect to make your thousands by doing this. Like child care, care for the aged is actually an essential service that will definitely regularly reside in demand. What’s additional, those that need it typically come back when capable to stay in their very own houses as an alternative of relocating in to assisted living. While certain aspects of treatment demand clinical qualifications, helping customers with day-to-day tasks like shopping, cleaning, and also food preparation do certainly not. Exactly what this entails will differ from job to task, however count on to generally be dishing up top quality cuisine to groups of family and friends at supper celebrations. Merely keep in mind that you might require to employ waitstaff to provide food items and also cocktails and also care for attendees. The job economic situation isn’t for everybody, however for the best person, steering for Uber or even Lyft are terrific methods to create a little cash. Have you ever viewed a furniture on Craigslist that has possible if someone would simply give it a little Tender Loving Care? If you are especially useful, you can go to thrift stores as well as yard sale, decide on up items at affordable, recondition them, as well as turn all of them around for a greater cost. If you possess an excellent eye, you might scout for valuables, oddities, and also a lot more. Auction web sites like ebay.com can easily attach you along with a large reader searching for your products. Proms, wedding celebrations, and other exclusive affairs urge individuals to appear their best. You may become a private stylist and have individuals happen to your property center, or you can bring in property phone calls or job on-location. Merely like in-home day care, dog resting is actually a market that you may use to bring in additional amount of money. Numerous individuals really want the comfort knowing that somebody is there for their fur baby, ensuring they’re comfortable as well as secure while they are actually gone. Web sites like care. com assistance put potential customers in front end of pet caretakers in their town. You can easily specify your space absolutely free, as well as Airbnb carries out all the heavy lifting for you, creating it quick and easy to bring in and multitude travelers. You can easily demand what you really want, as well as Airbnb even shields you along with residential or commercial property damage as well as mishap insurance. On the web company opportunities likewise afford you all the perks of operating coming from house, yet also much better, most of all of them allow you to function coming from definitely anywhere (which has certainly never been easier or additional fun, thanks to the ever-growing coworking sector). ” Some of the major changes to ‘how we operate’ over the previous many years is actually the massive change toward free organization, i. e. freelancing, consulting, or even managing solopreneur-types of businesses,” he states. “While several older employees were taught to work at safety in the type of a permanent job, that is no a lot longer the only means to earn a living. You might consult with or freelance in a variety of regions from copywriting to advertising and marketing tactic, or even manage your very own ecommerce organization from your property.” He additionally recommends that despite which road you choose, the intelligent technique to “escape” your permanent job is to begin making this switch while you are actually still functioning. ” It took 2. 5 years to develop up business enough to preserve a residing revenue, and I went full-time in 2012. I’m residing proof if you wish to run solo, you may do it along with the right company style, a sound leave approach, and also a bunch of difficult job.” Wish a means to begin making money in minutes? Websites like Upwork, Freelancer, and also Individuals Every Hr enable you to carry out merely that. ” Craigslist possesses a whole segment devoted to Gigs you can participate in to bring in additional loan,” mentions Carl Sednaoui, Supervisor of Advertising And Marketing at MailCharts. Simply remember that these projects may not be scalable. What they are actually, however, is actually a fantastic way to make a little extra wallet cash by outsourcing your skill-sets by yourself conditions. It is actually likewise properly worth taking into consideration some audio guidance coming from Foundr’s Jeremy Noronha. “Go where your consumers are, not where your competitors is,” he advises. “A lot of freelancers who receive begun have a tendency to mingle in the on the web communities along with their peers as well as certainly not their possible clients. The most effective way to create and build the correct connections is to deliver market value in each the areas your best clients invest their opportunity.” Some skill-sets are actually extra popular than others.
Whether you wish to totally free on your own from the personal as well as economic constraints of employment or you simply would like to supplement your salary along with some additional pocket money, working with yourself or beginning and growing a service has never been easier– and there is actually never ever been a more significant choice of jobs to opt for coming from. What’s not to really love about working coming from property? Absolutely no commute, comprehensive kitchen space facilities, and perhaps even the potential to do work in your pyjamas. Right here are some excellent organization possibilities that will allow you to operate coming from the convenience of home: Those with a valued record in preparing up or even assisting to grow businesses have easily-transferable capabilities they can utilize to generate cash coming from house. Alternatively, you can also supply (and also demand even more for) in-person examinations, either going out to see clients on their territory, or having them relate to your residence workplace (although you need to perhaps acquire altered out of those PJs first). Child care is as well as always are going to be vital to a lot of loved ones, as well as childcare centers do not come affordable. Other capabilities, from teaching languages to popular music to aiding with analysis or even writing, are all quick and easy to develop into businesses– and they may be reasonably lucrative and widely fulfilling, also. What you can ask for will definitely hinge on your experience, location, and vocation you are actually instructing; only do not count on to create your millions through this. Like childcare, maintain the elderly is actually an essential solution that is going to regularly reside in need. What is actually additional, those that need it usually carry out much better when capable to stay in their very own properties as opposed to relocating into aided residing. While specific components of treatment require medical credentials, aiding customers with daily duties like shopping, cleaning, and also cooking do not. Specifically what this requires will certainly vary from job to project, however count on to mostly be actually dishing up premium dishes to teams of family and friends at supper parties. Just birth in thoughts that you could require to hire waitstaff to offer food as well as cocktails as well as look after visitors. The job economy isn’t for everybody, however, for the appropriate individual, driving for Uber or Lyft are fantastic techniques to make a little bit of money. Possess you ever found a part of home furniture on Craigslist that has potential if a person would only offer it a little bit of TLC? If you are actually especially handy, you might go to thrift stores and also garage purchases, choose up products at small cost, repair all of them, as well as turn them around for a greater cost. If you have a really good eye, you can scout for antiques, rarities, and a lot more. Public auction sites like eBay can easily link you along with a large audience trying to find your products. Proms, wedding events, and also various other exclusive celebrations force people to appear their finest. You can come to be a private stylist and also possess people come to your home studio, or even you may create home phone calls or even work on-location. Merely like in-home childcare, household pet resting is a market that you may utilize right into to bring in money. Several individuals wish the comfort recognizing that an individual sympathizes their coat little one, guaranteeing they’re pleasant and also risk-free while they are actually gone. Websites such as treatment. com aid place possible clients facing family pet sitters in their location. You may list your space free of charge, and Airbnb performs all the hefty training for you, making it quick and easy to draw in as well as multitude tourists. You may charge what you really want, and Airbnb also safeguards you along with residential or commercial property damage as well as mishap insurance policy. On the internet service opportunities additionally manage you all the advantages of functioning from house, however also much better, a lot of all of them allow you to work coming from positively anywhere (which has actually certainly never been actually much easier or even more fun, due to the ever-growing coworking market). ” Among the major changes to ‘how our experts operate’ over the previous years is actually the huge work schedule toward totally free company, i. e. freelancing, consulting, or even operating solopreneur-types of organizations,” he claims. “While numerous more mature employees were actually taught to work at security such as a permanent project, that is no more the only technique to earn a living. You can speak to or even freelance in an amount of locations coming from copywriting to advertising and marketing technique, or run your personal ecommerce business from your home.” He also advises that despite which course you decide on, the wise method to “leave” your full-time job is actually to start creating this switch while you are actually still functioning. ” It took 2. 5 years to accumulate business enough to sustain a lifestyle profit, as well as I went full-time in 2012. I’m living proof if you would like to run solo, you may do it with the appropriate company version, an audio departure method, and also a considerable amount of effort.” Really want a means to begin earning money in mins? Web sites like Upwork, Consultant, and also Folks Per Hour allow you to perform simply that. ” Craigslist possesses an entire area committed to Gigs you can participate in to bring in extra funds,” claims Carl Sednaoui, Director of Advertising at MailCharts. Just bear in thoughts that these tasks aren’t scalable. What they are, however, is actually a great means to create a little bit of additional spending money through outsourcing your skill-sets by yourself terms. It’s likewise effectively worth taking into consideration some audio recommendations coming from Foundr’s Jeremy Noronha. “Go where your clients are actually, certainly not where your competition is actually,” he advises. “Several consultants who start have a tendency to mingle in the internet neighborhoods with their peers and not their prospective clients. The ideal way to create as well as build the ideal partnerships is actually to supply market value in all the spots your suitable customers invest their opportunity.” Some abilities are actually more sought after than others.
You can certainly see your skills within the paintings you write. The world hopes for even more passionate writers like you who aren’t afraid to mention how they believe. Always go after your heart. “Golf and sex are about the only things you can enjoy without being good at.” by Jimmy Demaret.
Whether you desire to free of cost on your own from the individual as well as financial restrictions of job or even you only intend to enhance your income with some additional pocket money, benefiting on your own or even starting and also developing a business has actually certainly never been less complicated– and also there is actually certainly never been a greater choice of tasks to select from. What’s certainly not to enjoy about functioning from residence? No commute, full home kitchen locations, and also perhaps even the ability to operate in your pj’s. Right here are actually some great company options that will certainly enable you to function from the comfort of house: Those along with an excellent performance history in establishing or assisting to expand companies have easily-transferable skill-sets they can easily make use of to generate cash coming from home. Additionally, you might also use (and also charge even more for) in-person appointments, either walking out to visit customers on their territory, or having them concern your home office (although you ought to possibly receive changed out of those PJs first). Childcare is actually and regularly are going to be actually necessary to several families, and daycare centers do not come inexpensive. Other capabilities, coming from teaching foreign languages to popular music to assisting with reading or even creating, are all simple to become companies– and also they could be reasonably profitable as well as hugely satisfying, as well. What you may charge will definitely hinge on your experience, site, as well as role you are actually teaching; just do not expect to create your millions by doing this. Like childcare, take care of the elderly is actually a crucial company that will definitely regularly be actually in need. What’s additional, those that need it usually come back when capable to remain in their very own residences rather than moving in to supported lifestyle. While particular factors of treatment call for health care certifications, helping customers with daily activities like purchasing, cleaning, and also cooking food carry out not. Specifically what this necessitates are going to vary coming from work to work, yet expect to generally be actually dishing up high quality cuisine to groups of loved ones at dinner celebrations. Only remember that you might need to have to work with waitstaff to offer food and also cocktails as well as appear after attendees. The gig economic condition isn’t for everyone, yet for the right individual, driving for Uber or Lyft are fantastic techniques to make a little cash. Have you ever before seen a furniture on Craigslist that has possible if a person would certainly simply provide it a little bit of TLC? If you are actually particularly convenient, you might visit thrift stores as well as garage purchases, get products at low rates, recondition them, and switch them around for a higher rate. If you have a great eye, you could possibly scout for valuables, peculiarities, and extra. Public auction sites like eBay can easily attach you along with a vast viewers searching for your items. Proms, wedding events, and various other exclusive occasions force people to appear their ideal. You can end up being a private stylist as well as possess folks concern your property center, or even you may create home telephone calls or job on-location. Only like at home youngster treatment, pet dog resting is a field that you can use into to bring in added cash. Lots of people want the tranquility of thoughts knowing that someone is there for their hair baby, ensuring they fit as well as secure while they’re gone. Internet sites such as treatment. com assistance put possible clients facing pet caregivers in their area. You can detail your area for complimentary, and Airbnb carries out all the massive training for you, creating it quick and easy to draw in as well as host vacationers. You can demand what you yearn for, and also Airbnb also guards you along with home harm and also crash insurance policy. Online company chances additionally manage you all the perks of functioning coming from home, however also better, many of all of them allow you to work coming from absolutely anywhere (which has never ever been actually much easier or additional fun, because of the ever-growing coworking business). ” Among the major adjustments to ‘exactly how our experts operate’ over the previous many years is actually the enormous shift towards complimentary agency, i. e. freelancing, consulting, or running solopreneur-types of companies,” he mentions. “While a lot of more mature employees were educated to engage in protection in the type of a full-time project, that is no more the only means to create a lifestyle. You could possibly get in touch with or freelance in a number of locations from copywriting to advertising and marketing technique, or even manage your very own ecommerce service from your house.” He additionally recommends that regardless of which pathway you pick, the smart technique to “get away from” your permanent project is to begin creating this switch while you’re still functioning. ” It took 2. 5 years to accumulate business good enough to preserve a living revenue, as well as I went full time in 2012. I’m residing proof if you wish to manage solo, you can easily do it with the appropriate organization style, a sound exit technique, and a great deal of effort.” Yearn for a method to begin generating income in minutes? Websites like Upwork, Freelancer, as well as Individuals Per Hour allow you to accomplish simply that. ” Craigslist has an entire segment devoted to Gigs you can sign up with to bring in extra money,” mentions Carl Sednaoui, Supervisor of Marketing at MailCharts. Merely remember that these tasks may not be scalable. What they are, nonetheless, is actually a great means to create a little bit of added spending money by delegating your capabilities by yourself terms. It’s also effectively worth considering some audio tips from Foundr’s Jeremy Noronha. “Go where your clients are actually, not where your competitors is actually,” he advises. “Several freelancers who get going have a tendency to hang around in the on-line communities with their peers and also not their possible customers. The greatest means to create and also create the appropriate partnerships is actually to supply value with all the spots your best customers spend their opportunity.” Some capabilities are more sought after than others.
Nice blog here! Also your website rather a lot up fast! What web host are you using? Can I get your affiliate hyperlink on your host? I want my site loaded up as fast as yours lol
Whether you wish to free of cost yourself from the personal and economic limitations of employment or you just would like to supplement your wage along with some extra pocket money, working for yourself or even beginning and also increasing a service has certainly never been simpler– and there’s certainly never been a higher option of duties to pick from. What is actually certainly not to like about functioning coming from residence? Absolutely no commute, complete kitchen area centers, and also maybe also the capacity to function in your pj’s. Below are actually some excellent service chances that will certainly enable you to operate from the convenience of property: Those with an enviable track document in establishing or assisting to increase businesses possess easily-transferable skills they may make use of to make cash coming from home. Conversely, you can likewise deliver (as well as ask for more for) in-person consultations, either heading out to check out customers on their turf, or having all of them happen to your office (although you should possibly receive transformed away from those PJs to begin with). Child care is actually and also consistently will definitely be important to many families, and also daycare facilities do not come cheap. Other skill-sets, from teaching languages to music to aiding along with analysis or writing, are actually all quick and easy to develop into organizations– and they may be reasonably profitable and extremely satisfying, as well. What you can charge will rely on your adventure, area, and also role you are actually teaching; simply don’t expect to make your millions this way. Like childcare, maintain the senior is an essential service that is going to always be actually in need. What’s additional, those that require it often carry out far better when capable to stay in their own homes as opposed to moving right into aided residing. While certain aspects of treatment require medical credentials, aiding customers along with day-to-day tasks like shopping, cleansing, as well as food preparation do not. Exactly what this necessitates will differ coming from work to job, but count on to primarily be actually serving quality cuisine to groups of loved ones at dinner parties. Merely birth in thoughts that you might need to have to hire waitstaff to provide food as well as drinks and also take care of guests. The job economy isn’t for everybody, however, for the correct person, steering for Uber or even Lyft are actually excellent methods to create a little bit of cash money. Have you ever before seen a furniture on Craigslist that possesses potential if an individual would certainly only offer it a little bit of Tender Loving Care? If you are actually specifically handy, you could possibly head to emporium and garage purchases, get products at small cost, recondition all of them, as well as turn all of them around for a much higher cost. If you possess an excellent eye, you could search for antiques, quirks, and also extra. Auction internet sites like ebay.com can easily link you with a broad audience trying to find your items. Senior proms, weddings, and also other special events force folks to appear their best. You may end up being a private stylist and also have folks pertain to your home workshop, or even you may create home phone calls or work on-location. Much like at home day care, pet dog sitting is actually an industry that you can take advantage of to bring in money. Several people desire the tranquility of mind knowing that an individual sympathizes their coat baby, guaranteeing they fit and risk-free while they’re gone. Sites such as care. com aid put prospective customers in front end of family pet caregivers in their neighborhood area. You may provide your room absolutely free, as well as Airbnb does all the hefty training for you, making it simple to draw in as well as lot travelers. You can demand what you yearn for, and also Airbnb even secures you along with home damages and also incident insurance. On-line company opportunities additionally afford you all the advantages of functioning coming from property, yet even better, much of them enable you to operate coming from definitely anywhere (which has never ever been actually much easier or additional exciting, with the help of the ever-growing coworking sector). ” One of the primary modifications to ‘just how our company function’ over recent years is actually the large work schedule towards free of charge organization, i. e. freelancing, consulting, or operating solopreneur-types of services,” he points out. “While lots of older employees were actually instructed to pursue surveillance such as a full time job, that is no more the only technique to earn a living. You could seek advice from or even freelance in a variety of locations from copywriting to advertising strategy, or operate your very own ecommerce business from your property.” He additionally advises that no matter which road you opt for, the intelligent technique to “get away” your full time task is to start making this switch while you’re still working. ” It took 2. 5 years to develop up business enough to preserve a living profit, as well as I went full time in 2012. I am actually staying verification if you wish to operate solo, you may do it along with the right organization style, a sound departure approach, as well as a ton of effort.” Desire a method to begin earning money in minutes? Internet sites like Upwork, Freelancer, as well as Individuals Every Hour allow you to carry out only that. ” Craigslist has an entire part dedicated to Gigs you may join to create added amount of money,” points out Carl Sednaoui, Supervisor of Advertising at MailCharts. Simply keep in mind that these tasks may not be scalable. What they are actually, having said that, is a terrific method to make a little bit of additional spending money by outsourcing your abilities on your own conditions. It is actually additionally effectively worth looking at some sound advise from Foundr’s Jeremy Noronha. “Go where your clients are, certainly not where your competition is actually,” he advises. “Many freelancers who get going have a tendency to hang around in the online communities along with their peers and also certainly not their possible customers. The absolute best means to create as well as build the right relationships is to deliver market value in each the places your excellent customers spend their opportunity.” Some skills are extra in requirement than others.
Whether you desire to free of cost on your own coming from the personal and monetary restrictions of work or you simply wish to supplement your salary with some additional pocket money, operating for yourself or even beginning as well as growing an organization has actually never been actually much easier– and there’s never ever been a higher selection of duties to decide on. What is actually certainly not to like concerning working from house? Zero commute, total kitchen area centers, and also perhaps even the capacity to function in your pj’s. Here are some great service opportunities that will enable you to function from the comfort of home: Those with a valued performance history in establishing or aiding to expand companies have easily-transferable abilities they may make use of to earn money from property. As an alternative, you might likewise supply (and also charge even more for) in-person consultations, either going out to see customers on their territory, or having all of them pertain to your home workplace (although you should most likely acquire changed away from those PJs first). Childcare is as well as consistently are going to be necessary to a lot of households, and also childcare centers do not come cheap. Various other capabilities, from training languages to songs to assisting with reading or writing, are actually all easy to become organizations– and also they can be evenly beneficial and extremely worthwhile, also. What you can easily bill will certainly hinge on your knowledge, site, as well as vocation you’re showing; simply don’t count on to create your thousands this method. Like daycare, maintain the elderly is actually a necessary solution that is going to always be actually in demand. What’s even more, those that require it usually come back when able to remain in their very own houses rather than moving into assisted residing. While certain aspects of care call for health care qualifications, aiding clients along with daily duties like buying, cleaning, as well as cooking do certainly not. Precisely what this entails will definitely differ from task to job, however anticipate to mostly be dishing up top quality dishes to groups of loved ones at supper gatherings. Simply consider that you could need to utilize waitstaff to provide meals as well as drinks and take care of guests. The gig economic climate isn’t for everyone, but also for the ideal person, steering for Uber or even Lyft are actually great ways to create a little bit of cash money. Possess you ever viewed a furniture on Craigslist that possesses prospective if a person would merely provide it a little Tender Loving Care? If you are actually particularly convenient, you can visit second hand shops as well as yard sale, grab items at low cost, recondition them, as well as turn all of them around for a much higher cost. If you have an excellent eye, you could possibly scout for collectibles, peculiarities, and also more. Public auction sites like eBay can easily connect you with a wide reader trying to find your things. Senior proms, wedding events, as well as various other exclusive events persuade people to appear their absolute best. You may become an independent stylist as well as have individuals concern your house studio, or you can easily make home telephone calls or even work on-location. Much like in-home youngster care, family pet sitting is actually a field that you can use to create money. Numerous individuals prefer the assurance understanding that a person is there for their coat infant, ensuring they fit as well as secure while they’re gone. Internet sites including treatment. com support place prospective customers in front of dog sitters in their town. You may note your room completely free, and also Airbnb carries out all the massive lifting for you, making it easy to draw in and also bunch visitors. You may charge what you desire, as well as Airbnb also shields you with home harm and mishap insurance coverage. On-line business chances likewise afford you all the advantages of operating coming from residence, however even a lot better, numerous of all of them allow you to work coming from positively anywhere (which has actually never ever been actually less complicated or even more exciting, thanks to the ever-growing coworking market). ” Among the significant changes to ‘how our company function’ over the past many years is the massive shift towards cost-free firm, i. e. freelancing, consulting, or operating solopreneur-types of companies,” he says. “While a lot of much older workers were shown to work at safety and security such as a permanent work, that is no more the only means to earn a living. You can speak with or freelance in a lot of places coming from copywriting to advertising and marketing method, or even operate your very own ecommerce company coming from your property.” He likewise urges that despite which road you decide on, the clever means to “get away” your full time project is actually to begin making this shift while you are actually still working. ” It took 2. 5 years to develop your business good enough to preserve a lifestyle earnings, and also I went full-time in 2012. I’m staying verification if you prefer to run solo, you may perform it with the best organization version, a sound departure tactic, and a ton of tough work.” Prefer a means to begin generating income in mins? Sites like Upwork, Consultant, and Individuals Per Hour permit you to perform just that. ” Craigslist has an entire segment devoted to Gigs you can join to make added amount of money,” says Carl Sednaoui, Director of Advertising And Marketing at MailCharts. Simply remember that these projects may not be scalable. What they are actually, nevertheless, is an excellent way to create a little extra pocket amount of money by delegating your skills by yourself conditions. It is actually additionally well worth taking into consideration some sound tips from Foundr’s Jeremy Noronha. “Go where your customers are actually, not where your competition is,” he advises. “A lot of consultants who get going have a tendency to mingle in the online neighborhoods with their peers as well as not their possible customers. The greatest means to cultivate and develop the right connections is to supply market value in every the locations your ideal clients invest their time.” Some skill-sets are actually much more in requirement than others.
Whether you desire to free of charge yourself from the individual as well as monetary regulations of job or you simply wish to supplement your wage along with some additional cash, benefiting on your own or even beginning as well as developing an organization has never been actually easier– and there’s never been actually a more significant choice of functions to decide on. What is actually certainly not to adore about operating coming from property? Zero commute, full kitchen space centers, as well as perhaps even the capability to operate in your pyjamas. Below are some terrific business chances that will definitely enable you to operate from the comfort of residence: Those along with an enviable record in establishing or assisting to develop organizations possess easily-transferable abilities they can easily utilize to generate cash from residence. As an alternative, you could possibly also deliver (and also demand even more for) in-person consultations, either heading out to see customers on their turf, or possessing all of them relate to your office (although you need to most likely receive modified away from those PJs initially). Daycare is and also consistently are going to be actually important to many loved ones, and also day care facilities don’t happen inexpensive. Other capabilities, from teaching foreign languages to songs to assisting with analysis or writing, are actually all quick and easy to develop into services– and also they can easily be evenly rewarding and massively worthwhile, as well. What you can easily demand will certainly depend upon your expertise, place, as well as job you are actually instructing; just do not anticipate to create your thousands by doing this. Like daycare, maintain the elderly is an essential solution that is going to constantly remain in demand. What is actually even more, those that need it often come back when able to continue to be in their very own residences rather than relocating into helped residing. While specific aspects of treatment need medical certifications, aiding customers with day-to-day jobs like purchasing, cleaning, as well as cooking food carry out not. Specifically what this entails will vary coming from task to work, yet anticipate to mainly be serving premium cuisine to teams of loved ones at supper gatherings. Only birth in mind that you may need to have to use waitstaff to provide meals and also alcoholic beverages and take care of guests. The job economy isn’t for everybody, however, for the appropriate individual, steering for Uber or even Lyft are actually terrific techniques to create a little money. Possess you ever before found a furniture piece on Craigslist that has potential if an individual would certainly just give it a little Tender Loving Care? If you are actually specifically helpful, you can head to emporium and also yard sales, get products at affordable, restore them, and transform them around for a greater cost. If you have an excellent eye, you could possibly search for antiques, oddities, and also a lot more. Public auction sites like ebay.com can link you with a vast viewers searching for your items. Senior proms, wedding celebrations, as well as other special events persuade people to look their ideal. You can come to be an individual stylist and have people involve your home workshop, or you can bring in home phone calls or even work on-location. Much like in-home childcare, animal sitting is actually an industry that you may take advantage of to bring in added loan. Numerous folks really want the satisfaction understanding that somebody is actually there for their hair child, ensuring they fit as well as secure while they’re gone. Web sites like care. com help put prospective customers facing dog sitters in their location. You can note your area free of charge, and also Airbnb performs all the heavy hauling for you, creating it quick and easy to attract as well as multitude vacationers. You can easily bill what you desire, and Airbnb also secures you with building harm and also collision insurance coverage. Internet service chances likewise manage you all the perks of operating coming from home, but even better, a number of all of them allow you to function from definitely anywhere (which has never ever been actually easier or even more exciting, due to the ever-growing coworking market). ” One of the significant adjustments to ‘just how our experts work’ over the previous many years is the enormous work schedule toward free of charge organization, i. e. freelancing, consulting, or operating solopreneur-types of services,” he says. “While many much older employees were actually shown to pursue protection such as a permanent work, that is actually no a lot longer the only technique to earn a living. You could speak to or freelance in a lot of locations from copywriting to advertising method, or run your very own ecommerce service coming from your property.” He likewise urges that regardless of which road you select, the wise way to “get away from” your full-time task is actually to begin making this shift while you’re still working. ” It took 2. 5 years to develop your business enough to preserve a living income, and also I went permanent in 2012. I’m living verification if you wish to operate solo, you can possibly do it with the appropriate service style, a sound leave tactic, as well as a bunch of effort.” Desire a technique to begin generating income in moments? Sites like Upwork, Freelancer, and also People Per Hour permit you to accomplish just that. ” Craigslist possesses a whole segment dedicated to Gigs you may participate in to make additional cash,” mentions Carl Sednaoui, Director of Advertising at MailCharts. Just consider that these tasks aren’t scalable. What they are, nevertheless, is actually a terrific means to make a little bit of added spending money by delegating your abilities on your very own phrases. It’s likewise well worth taking into consideration some sound insight coming from Foundr’s Jeremy Noronha. “Go where your clients are, certainly not where your competitors is actually,” he urges. “Numerous freelancers who get going often tend to mingle in the on the web communities along with their peers and not their prospective clients. The very best technique to develop and create the appropriate relationships is to supply worth in every the spots your perfect clients spend their opportunity.” Some capabilities are even more in need than others.
Amazing. You’re so good of which you’re so good right now. Your help woke us up. Thank you really much.
Best view i have ever seen !
I intended to put you one little observation to be able to thank you the moment again for these breathtaking thoughts you have contributed on this page. This has been certainly seriously open-handed with you to provide without restraint what exactly a number of people could have advertised as an e book in making some dough for their own end, notably now that you might have done it if you wanted. The concepts as well acted to be the easy way to understand that someone else have a similar interest the same as mine to grasp lots more with regard to this issue. I know there are a lot more fun moments up front for those who check out your blog.
Best view i have ever seen !
Horse Racing Planet – Where The World Is Flat Horse Racing – Monmouth Park Horse Racing – Free Horse Racing Results, News & Picks … National Thoroughbred Racing Association: Ntra Santa Anita Virginia Horse Racing – The Source For Horse Racing In Virginia Breeders’ Cup – November 6 & 7, 2020 Horse Racing In The Wine Country – Sonoma County … Rival Stars Horse Racing: Desktop Edition On Steam Horse Racing Newsletter: It’s The Preakness In October – Los … Horse Racing Emoji – Emojipedia Horse Racing – The Meadows Racetrack & Casino Del Mar Prepares For Bing Crosby Horse Racing Season With … Horse Racing – Definition Of Horse Racing At Dictionary.com Horse Racing News, Results & Projections – South Florida … Horse Racing News & Analysis – Lexington Herald Leader Glossary Of Horse Racing Terms – Saratoga Race Course In … Horse Racing – Remington Park Betting On Horse Racing For Dummies Cheat Sheet – Dummies What Is A Trifecta Bet? Trifecta Bets On The Kentucky Derby … World’s Best Horse Races – Travel Channel California Horse Racing Board – Ca.gov The smart Trick of Equibase – Horse Racing – Horse Racing Entries – Horse … Horse Racing – Wikipedia Horse Racing News And Results – Espn – Espn.com Daily Racing Form – Horse Racing – Entries – Results – Pps … Online Horse Racing Betting – Watch Horse Racing Live At Tvg Horse Racing Nation – The Fan-powered Horse Racing … Horse Racing – Youtube America’s Best Racing Jockeys Get No Benefit From Using A Whip In Horse Racing … Bloodhorse: Thoroughbred Horse Racing, Breeding, And … Horse Racing Triple Crown, Kentucky Derby, Preakness … Horse Racing News, Headlines, Interviews And Features – Cnn Horse Racing – The New York Times Baffert Said He Can’t Separate His Classic Triple Threat … Cindy Pierson Dulay’s Horse-races.net – Welcome! Churchill Downs Racetrack – Thoroughbred Horse Racing In … Horse Racing – Associated Press Horse Racing – Sports Illustrated Xpressbet: Bet Online Horse Racing Horse Racing Betting – Bet Online With Twinspires Nyra Bets – Bet On Horse Racing – Racing’s Best Play Horse Racing – Peta Horse Racing Betting News, Analysis & Picks – The Action … Horse Racing – Hollywood Casino At Charles Town Races Horse Racing – Usa Today Sportsbook Wire Horse-racing News, Scores, Fantasy Games And Highlights … Horse Racing – The State Of Racing – Britannica Horse Racing – Odds, News, Analysis And Expert Picks Horse Racing At Indiana Grand Racing & Casino Home – This Is Horse Racing Horse Racing – By Horseracing.com: Home Nyra: Belmont Park Horse Racing – Bleacher Report – Latest News, Rumors … Horse Racing Betting Odds, Lines And News For – Vsin Del Mar Thoroughbred Club Horse Racing Radio Network Horse Racing – Horse Racing – Illinois.gov Horse Racing – Encyclopedia Of Chicago Online Horse Betting & Horse Racing Odds – Bovada Racebook Horse Race Insider – Hri Horse Racing Betting – How To Bet On Horses – The Sports Geek Horse Racing – Fox Sports Brisnet – Online Horse Racing Data & Handicapping – Brisnet 4njbets – Online Horse Betting: Bet Horseracing Live – Great
Learn How To Build, Drive & Setup Your Racecar – Online … Racing Hq High Resolution Stock Photography And Images … Momo Performance Racing & Road Wheels & Accessories Speedway Motors, The Racing And Rodding Specialists Roborace Federation Internationale De L’automobile Speedway Motorsports Contact Us – Daytona International Speedway Honda Global – Honda Motor Co.,ltd. Shelby American Inc. Home Lund Racing – Efi Tuning Specialists What We Can Learn About Fan Engagement From Nascar Kyle Larson Official Website – Kylelarsonracing.com The Best Car And Racing Video Games From The 1980s Can Be Fun For Everyone Anyone A Biased An Unbiased View of Auto Racing Hq – Home – Facebook Auto Racing Hq – Posts – Facebook Auto Racing Hq Nascar – Wikipedia Auto Racing Hq – Race Cars, Racing, Auto – Pinterest Where We Work – Nascar Careers Racers Hq On Apple Podcasts Team Penske – Official Web Site Nascar Founded – History How Glenn Mcgee Used Iracing To Turn Pro With No Racing … Official Site Of Hendrick Motorsports Nascar Racing Team Pegasus Auto Racing Supplies Hq Kites Rc High Speed Racing Car: Toys … – Amazon.com Williams F1: Racing Kaulig Racing – Nascar Xfinity Series Team Bell Racing (@Bellracinghq) • Instagram Photos And Videos Daytona Beach Racing – Daytona International Speedway Rahal Letterman Lanigan Racing Chip Ganassi Racing Mclaren Racing – Official Website Skip Barber Racing School Imsa Official Home – Race Results, Schedule, Standings, News … Yorba Linda Shop – John Force Racing Official Site Rahal Letterman Lanigan Racing To Build Indiana Headquarters The Official Stewart-haas Racing Website Vivid Racing – Aftermarket Performance Parts & Accessories International Speedway Corporation – International Speedway … Roush Fenway Racing Bmw Motorsport – Home Page Bell Racing Joe Gibbs Racing Hq – Hoonigan Racing Division Motor Sport Hq Auto Racing Challenge 2020 – Wboy.com Nascar Xfinity Indianapolis Auto Racing – Blue Hq Media American Honda Motor Co., Inc. – Official Site The Official Home Of Formula 1® – F1.com Wood Brothers Racing: Home How To Contact Nascar By Email, Mail And Phone – Liveabout Richard Petty Motorsports Racing – Ferrari Corporate The Racers Group High-performance Racing, Parts, Service … Ferrari Hq – Live Automotive Racing Updates And Information Aston Martin Racing – The Official Site Ed Carpenter Racing – Ecr – Official Website – Indycar Haas F1 Team This Weekend In Auto Racing (9/12/2020) – Road & Track Fia Formula E: The Official Home Of Formula E Michael Jordan-bubba Wallace Nascar Team Will Be Named … Racing Electronics Aston Martin Red Bull Racing Alfa Romeo Racing Orlen – Sauber Group Mclaren Selling Hq In Desperate Bid To Stay Alive – Carbuzz Hq – Dragonracing : Racing Car Experiences In Dubai And … Porsche Motor Sports – Porsche Live At The Race Track – Porsche … Corvette Racing Roary The Racing Car Full In Hq – Youtube About Summit – Summit Racing Local Auto Racing Team Wins Big In North Carolina – Wetm … Lightning’s Pro-race Shop – World Of Cars Wiki – Fandom Sparco Usa – Motorsports Racing Apparel And Accessories Megan Racing – Homepage Toyota Racing – Toyota Since 1975 The Best Value In Auto Racing And Motorsports
Andretti Autosport Official Site Of Front Row Motorsports – Home Ken Block’s New Boat, And A Visit To Hoonigan Racing Hq! Welcome To The Barc – The British Automobile Racing Club Next Level Racing – Advanced Simulation Products Bosch Motorsport: We Set The Pace Hq Racing Nsw Tony Stewart Racing – Official Site Official Bentley Motors Website – Powerful, Handcrafted Luxury … Home Page – Perfomance Racing Industry A Look Inside Nissan’s Incredible Secret Motorsport Hq – Top … Simpson Racing – Racing Helmets, Racing Suits, Racing Belts … Hot Wheels: Buy Hot Wheels Cars, Tracks, Gifts Sets … Top Racing Crankshaft High Quality Hq: Amazon.de: Auto Oz Racing: Made In Italy Light Weight Alloy Wheels Myofficeproducts Racing Hq Jegs High Performance Parts – Aftermarket Auto Parts … Vesaro Advanced Simulation – Racing, Flight And Game … Learn How To Build, Drive & Setup Your Racecar – Online … Racing Hq High Resolution Stock Photography And Images … Momo Performance Racing & Road Wheels & Accessories Speedway Motors, The Racing And Rodding Specialists Roborace Federation Internationale De L’automobile Speedway Motorsports Contact Us – Daytona International Speedway Honda Global – Honda Motor Co.,ltd. Shelby American Inc. Home Lund Racing – Efi Tuning Specialists What We Can Learn About Fan Engagement From Nascar Kyle Larson Official Website – Kylelarsonracing.com The Best Car And Racing Video Games From The 1980s – The Facts An Overview Truths Questions Some Known Not known Incorrect Factual Statements About Auto Racing Hq – Home – Facebook Auto Racing Hq – Posts – Facebook Auto Racing Hq Nascar – Wikipedia Auto Racing Hq – Race Cars, Racing, Auto – Pinterest Where We Work – Nascar Careers Racers Hq On Apple Podcasts Team Penske – Official Web Site Nascar Founded – History How Glenn Mcgee Used Iracing To Turn Pro With No Racing … Official Site Of Hendrick Motorsports Nascar Racing Team Pegasus Auto Racing Supplies Hq Kites Rc High Speed Racing Car: Toys … – Amazon.com Williams F1: Racing Kaulig Racing – Nascar Xfinity Series Team Bell Racing (@Bellracinghq) • Instagram Photos And Videos Daytona Beach Racing – Daytona International Speedway Rahal Letterman Lanigan Racing Chip Ganassi Racing Mclaren Racing – Official Website Skip Barber Racing School Imsa Official Home – Race Results, Schedule, Standings, News … Yorba Linda Shop – John Force Racing Official Site Rahal Letterman Lanigan Racing To Build Indiana Headquarters The Official Stewart-haas Racing Website Vivid Racing – Aftermarket Performance Parts & Accessories International Speedway Corporation – International Speedway … Roush Fenway Racing Bmw Motorsport – Home Page Bell Racing Joe Gibbs Racing Hq – Hoonigan Racing Division Motor Sport Hq Auto Racing Challenge 2020 – Wboy.com Nascar Xfinity Indianapolis Auto Racing – Blue Hq Media American Honda Motor
Road & Track Fia Formula E: The Official Home Of Formula E Michael Jordan-bubba Wallace Nascar Team Will Be Named … Racing Electronics Aston Martin Red Bull Racing Alfa Romeo Racing Orlen – Sauber Group Mclaren Selling Hq In Desperate Bid To Stay Alive – Carbuzz Hq – Dragonracing : Racing Car Experiences In Dubai And … Porsche Motor Sports – Porsche Live At The Race Track – Porsche … Corvette Racing Roary The Racing Car Full In Hq – Youtube About Summit – Summit Racing Local Auto Racing Team Wins Big In North Carolina – Wetm … Lightning’s Pro-race Shop – World Of Cars Wiki – Fandom Sparco Usa – Motorsports Racing Apparel And Accessories Megan Racing – Homepage Toyota Racing – Toyota Since 1975 The Best Value In Auto Racing And Motorsports … Alpinestars – Alpinestars Sp Auto Racing Shoes – Drift Hq Official Ford Performance Rahal Letterman Lanigan Racing Building State Of The Art Hq … Andretti Autosport Official Site Of Front Row Motorsports – Home Ken Block’s New Boat, And A Visit To Hoonigan Racing Hq! Welcome To The Barc – The British Automobile Racing Club Next Level Racing – Advanced Simulation Products Bosch Motorsport: We Set The Pace Hq Racing Nsw Tony Stewart Racing – Official Site Official Bentley Motors Website – Powerful, Handcrafted Luxury … Home Page – Perfomance Racing Industry A Look Inside Nissan’s Incredible Secret Motorsport Hq – Top … Simpson Racing – Racing Helmets, Racing Suits, Racing Belts … Hot Wheels: Buy Hot Wheels Cars, Tracks, Gifts Sets … Top Racing Crankshaft High Quality Hq: Amazon.de: Auto Oz Racing: Made In Italy Light Weight Alloy Wheels Myofficeproducts Racing Hq Jegs High Performance Parts – Aftermarket Auto Parts … Vesaro Advanced Simulation – Racing, Flight And Game … Learn How To Build, Drive & Setup Your Racecar – Online … Racing Hq High Resolution Stock Photography And Images … Momo Performance Racing & Road Wheels & Accessories Speedway Motors, The Racing And Rodding Specialists Roborace Federation Internationale De L’automobile Speedway Motorsports Contact Us – Daytona International Speedway Honda Global – Honda Motor Co.,ltd. Shelby American Inc. Home Lund Racing – Efi Tuning Specialists What We Can Learn About Fan Engagement From Nascar Kyle Larson Official Website – Kylelarsonracing.com The Best Car And Racing Video Games From The 1980s Auto Racing Hq – Home – Facebook Auto Racing Hq – Posts – Facebook Auto Racing Hq Nascar – Wikipedia Auto Racing Hq – Race Cars, Racing, Auto – Pinterest Where We Work – Nascar Careers Racers Hq On Apple Podcasts Team Penske – Official Web Site Nascar Founded – History How Glenn Mcgee Used Iracing To Turn Pro With No Racing
Vesaro Advanced Simulation – Racing, Flight And Game … Learn How To Build, Drive & Setup Your Racecar – Online … Racing Hq High Resolution Stock Photography And Images … Momo Performance Racing & Road Wheels & Accessories Speedway Motors, The Racing And Rodding Specialists Roborace Federation Internationale De L’automobile Speedway Motorsports Contact Us – Daytona International Speedway Honda Global – Honda Motor Co.,ltd. Shelby American Inc. Home Lund Racing – Efi Tuning Specialists What We Can Learn About Fan Engagement From Nascar Kyle Larson Official Website – Kylelarsonracing.com The Best Car And Racing Video Games From The 1980s The 5 6 7 8 9 10 15 20 25 30 45 -Second Trick For Auto Racing Hq – Home – Facebook Auto Racing Hq – Posts – Facebook Auto Racing Hq Nascar – Wikipedia Auto Racing Hq – Race Cars, Racing, Auto – Pinterest Where We Work – Nascar Careers Racers Hq On Apple Podcasts Team Penske – Official Web Site Nascar Founded – History How Glenn Mcgee Used Iracing To Turn Pro With No Racing … Official Site Of Hendrick Motorsports Nascar Racing Team Pegasus Auto Racing Supplies Hq Kites Rc High Speed Racing Car: Toys … – Amazon.com Williams F1: Racing Kaulig Racing – Nascar Xfinity Series Team Bell Racing (@Bellracinghq) • Instagram Photos And Videos Daytona Beach Racing – Daytona International Speedway Rahal Letterman Lanigan Racing Chip Ganassi Racing Mclaren Racing – Official Website Skip Barber Racing School Imsa Official Home – Race Results, Schedule, Standings, News … Yorba Linda Shop – John Force Racing Official Site Rahal Letterman Lanigan Racing To Build Indiana Headquarters The Official Stewart-haas Racing Website Vivid Racing – Aftermarket Performance Parts & Accessories International Speedway Corporation – International Speedway … Roush Fenway Racing Bmw Motorsport – Home Page Bell Racing Joe Gibbs Racing Hq – Hoonigan Racing Division Motor Sport Hq Auto Racing Challenge 2020 – Wboy.com Nascar Xfinity Indianapolis Auto Racing – Blue Hq Media American Honda Motor Co., Inc. – Official Site The Official Home Of Formula 1® – F1.com Wood Brothers Racing: Home How To Contact Nascar By Email, Mail And Phone – Liveabout Richard Petty Motorsports Racing – Ferrari Corporate The Racers Group High-performance Racing, Parts, Service … Ferrari Hq – Live Automotive Racing Updates And Information Aston Martin Racing – The Official Site Ed Carpenter Racing – Ecr – Official Website – Indycar Haas F1 Team This Weekend In Auto Racing (9/12/2020) – Road & Track Fia Formula E: The Official Home Of Formula E Michael Jordan-bubba Wallace Nascar Team Will Be Named … Racing Electronics Aston Martin Red Bull Racing Alfa Romeo Racing Orlen – Sauber Group Mclaren Selling Hq In Desperate Bid To Stay Alive – Carbuzz Hq – Dragonracing : Racing Car Experiences In Dubai And … Porsche Motor Sports – Porsche Live At The Race Track – Porsche … Corvette Racing Roary The Racing Car Full In Hq – Youtube About Summit – Summit Racing Local Auto Racing Team Wins Big In North Carolina – Wetm … Lightning’s Pro-race Shop – World Of Cars Wiki – Fandom Sparco Usa – Motorsports Racing Apparel And Accessories Megan Racing – Homepage Toyota Racing – Toyota Since 1975 The Best Value In Auto Racing And Motorsports … Alpinestars – Alpinestars Sp Auto Racing Shoes – Drift Hq Official Ford Performance Rahal Letterman Lanigan Racing Building State Of The Art Hq … Andretti Autosport Official Site Of Front Row Motorsports – Home Ken Block’s New Boat, And A Visit To Hoonigan Racing Hq! Welcome To The Barc – The British Automobile Racing Club Next Level Racing – Advanced Simulation Products Bosch Motorsport: We Set The Pace Hq Racing Nsw Tony Stewart Racing – Official Site Official Bentley Motors Website – Powerful, Handcrafted Luxury … Home Page – Perfomance Racing Industry A Look Inside Nissan’s Incredible Secret Motorsport Hq – Top … Simpson Racing – Racing Helmets, Racing Suits, Racing Belts … Hot Wheels: Buy Hot Wheels Cars, Tracks, Gifts Sets … Top Racing Crankshaft High Quality Hq: Amazon.de: Auto Oz Racing: Made In Italy Light Weight Alloy Wheels Myofficeproducts Racing Hq Jegs High Performance Parts – Aftermarket Auto Parts … Vesaro Advanced Simulation – Racing, Flight And Game … Learn How To Build, Drive & Setup Your Racecar – Online … Racing Hq High Resolution Stock Photography And Images … Momo Performance Racing & Road Wheels & Accessories Speedway Motors, The Racing And Rodding Specialists Roborace Federation Internationale De L’automobile Speedway Motorsports Contact Us – Daytona International Speedway Honda Global – Honda Motor Co.,ltd. Shelby American Inc. Home Lund Racing – Efi Tuning Specialists What We Can Learn About Fan Engagement From Nascar Kyle Larson Official Website – Kylelarsonracing.com The Best Car And Racing Video Games From The 1980s The Ultimate Guide To Auto Racing Hq – Home – Facebook Auto Racing Hq – Posts – Facebook Auto Racing Hq Nascar – Wikipedia Auto Racing Hq – Race Cars, Racing, Auto – Pinterest Where We Work – Nascar Careers Racers Hq On Apple Podcasts Team Penske – Official Web Site Nascar Founded – History How Glenn Mcgee Used Iracing To Turn Pro With No Racing … Official Site Of Hendrick Motorsports Nascar Racing Team Pegasus Auto Racing Supplies Hq Kites Rc High Speed Racing Car: Toys … – Amazon.com Williams F1: Racing Kaulig Racing – Nascar Xfinity Series Team Bell Racing (@Bellracinghq) • Instagram Photos And Videos Daytona Beach Racing – Daytona International Speedway Rahal Letterman Lanigan Racing Chip Ganassi Racing Mclaren Racing – Official Website Skip Barber Racing School Imsa Official Home – Race Results, Schedule, Standings, News … Yorba Linda Shop – John Force Racing Official Site Rahal Letterman Lanigan Racing To Build Indiana Headquarters The Official Stewart-haas Racing Website Vivid Racing – Aftermarket Performance Parts & Accessories International Speedway Corporation – International Speedway … Roush Fenway Racing Bmw Motorsport – Home Page Bell Racing Joe Gibbs Racing Hq – Hoonigan Racing Division Motor Sport Hq Auto Racing Challenge 2020 – Wboy.com Nascar Xfinity Indianapolis Auto Racing – Blue Hq Media American Honda Motor Co., Inc. – Official Site The Official Home Of Formula 1® – F1.com Wood Brothers Racing: Home How To Contact Nascar By Email, Mail And Phone – Liveabout Richard Petty Motorsports Racing – Ferrari Corporate The Racers Group High-performance Racing, Parts, Service … Ferrari Hq – Live Automotive Racing Updates And Information Aston Martin Racing – The Official Site Ed Carpenter Racing – Ecr – Official Website – Indycar Haas F1 Team This Weekend In Auto Racing (9/12/2020) – Road & Track Fia Formula E: The Official Home Of Formula E Michael Jordan-bubba Wallace Nascar Team Will Be Named … Racing Electronics Aston Martin Red Bull Racing Alfa Romeo Racing Orlen – Sauber Group Mclaren Selling Hq In Desperate Bid To Stay Alive – Carbuzz Hq – Dragonracing : Racing Car Experiences In Dubai And … Porsche Motor Sports – Porsche Live At The Race Track – Porsche … Corvette Racing Roary The Racing Car Full In Hq – Youtube About Summit – Summit Racing Local Auto Racing Team Wins Big In North Carolina – Wetm
Official Site The Official Home Of Formula 1® – F1.com Wood Brothers Racing: Home How To Contact Nascar By Email, Mail And Phone – Liveabout Richard Petty Motorsports Racing – Ferrari Corporate The Racers Group High-performance Racing, Parts, Service … Ferrari Hq – Live Automotive Racing Updates And Information Aston Martin Racing – The Official Site Ed Carpenter Racing – Ecr – Official Website – Indycar Haas F1 Team This Weekend In Auto Racing (9/12/2020) – Road & Track Fia Formula E: The Official Home Of Formula E Michael Jordan-bubba Wallace Nascar Team Will Be Named … Racing Electronics Aston Martin Red Bull Racing Alfa Romeo Racing Orlen – Sauber Group Mclaren Selling Hq In Desperate Bid To Stay Alive – Carbuzz Hq – Dragonracing : Racing Car Experiences In Dubai And … Porsche Motor Sports – Porsche Live At The Race Track – Porsche … Corvette Racing Roary The Racing Car Full In Hq – Youtube About Summit – Summit Racing Local Auto Racing Team Wins Big In North Carolina – Wetm … Lightning’s Pro-race Shop – World Of Cars Wiki – Fandom Sparco Usa – Motorsports Racing Apparel And Accessories Megan Racing – Homepage Toyota Racing – Toyota Since 1975 The Best Value In Auto Racing And Motorsports … Alpinestars – Alpinestars Sp Auto Racing Shoes – Drift Hq Official Ford Performance Rahal Letterman Lanigan Racing Building State Of The Art Hq … Andretti Autosport Official Site Of Front Row Motorsports – Home Ken Block’s New Boat, And A Visit To Hoonigan Racing Hq! Welcome To The Barc – The British Automobile Racing Club Next Level Racing – Advanced Simulation Products Bosch Motorsport: We Set The Pace Hq Racing Nsw Tony Stewart Racing – Official Site Official Bentley Motors Website – Powerful, Handcrafted Luxury … Home Page – Perfomance Racing Industry A Look Inside Nissan’s Incredible Secret Motorsport Hq – Top … Simpson Racing – Racing Helmets, Racing Suits, Racing Belts … Hot Wheels: Buy Hot Wheels Cars, Tracks, Gifts Sets … Top Racing Crankshaft High Quality Hq: Amazon.de: Auto Oz Racing: Made In Italy Light Weight Alloy Wheels Myofficeproducts Racing Hq Jegs High Performance Parts – Aftermarket Auto Parts … Vesaro Advanced Simulation – Racing, Flight And Game … Learn How To Build, Drive & Setup Your Racecar – Online … Racing Hq High Resolution Stock Photography And Images … Momo Performance Racing & Road Wheels & Accessories Speedway Motors, The Racing And Rodding Specialists Roborace Federation Internationale De L’automobile Speedway Motorsports Contact Us – Daytona International Speedway Honda Global – Honda Motor Co.,ltd. Shelby American Inc. Home Lund Racing – Efi Tuning Specialists What We Can Learn About Fan Engagement From Nascar Kyle Larson Official Website – Kylelarsonracing.com The Best Car And Racing Video Games From The 1980s Uncovered Revealed Excitement Fascination About Auto Racing Hq – Home – Facebook Auto Racing Hq – Posts – Facebook Auto Racing Hq Nascar – Wikipedia Auto Racing Hq – Race Cars, Racing, Auto – Pinterest Where We Work – Nascar Careers Racers Hq On Apple Podcasts Team Penske – Official Web Site Nascar Founded – History How Glenn Mcgee Used Iracing To Turn Pro With No Racing … Official Site Of Hendrick Motorsports Nascar Racing Team Pegasus Auto Racing Supplies Hq Kites Rc High Speed Racing Car: Toys … – Amazon.com Williams F1: Racing Kaulig Racing – Nascar Xfinity Series Team Bell Racing (@Bellracinghq) • Instagram Photos And Videos Daytona Beach Racing – Daytona International Speedway Rahal Letterman Lanigan Racing Chip Ganassi Racing Mclaren Racing – Official Website Skip Barber Racing School Imsa Official Home – Race Results, Schedule, Standings, News
Excellent web site you have here.. It’s hard to find good quality writing like yours these days. I truly appreciate people like you! Take care!!
I do consider all of the ideas you have offered to your post. They’re really convincing and will definitely work. Nonetheless, the posts are very brief for novices. May you please lengthen them a little from next time? Thanks for the post.
Wow, amazing blog format! How long have you ever been running a blog for? you made running a blog look easy. The entire glance of your site is great, as smartly as the content!
Throughout this awesome pattern of things you’ll get a B- with regard to effort. Exactly where you actually lost everybody was in all the facts. You know, it is said, details make or break the argument.. And it couldn’t be much more accurate right here. Having said that, allow me tell you what exactly did deliver the results. The text is definitely pretty persuasive which is possibly the reason why I am making the effort in order to opine. I do not make it a regular habit of doing that. Next, even though I can see a jumps in reasoning you come up with, I am not sure of how you appear to unite your ideas which in turn make the actual conclusion. For right now I will, no doubt yield to your issue however trust in the near future you connect the dots much better.
Uh… it appears your web page removed my first comment (that was admittedly quite big)… which means I must keep this current attempt brief. Quickly, I was only confirming that I really appreciated your site. We’re about to see if this brief attempt will be displayed, or will this web site remove most comments?
Did you understand these realities on CBD OIL and Full Spectrum CBD Hemp Oil? Cannabinoids are isolated from hemp using supercritical CO2 extraction. Thanks to modern innovation, the resulting service is tidy, without unneeded waxes and heavy metals, naturally present in the plant, and the sucked liquid has a typical, oily consistency. CBD oil includes cannabidiol as a base active ingredient and might contain just trace amounts of tetrahydroxycannabidiol (THC). It is suggested by medical professionals and pharmacists as an antioxidant and compound that blocks the action of proinflammatory cytokines (proteins), e.g. in Crohn’s disease or ulcerative intestinal tract. RSO oil has a low CBD material, while high THC. The synergistic (enhancing) action of CBD and THC relative to each other is utilized here. Both cannabinoids can do much more together than when used individually. Both marijuana oil type CBD and RSO also contain other cannabinoids, such as cannabichromene (CBC) and cannabigerol (CBG). The trick is not, nevertheless, that CBD often has actually a composition broadened to include flavones, flavonoids, terpenes, terpenoids, amino acids and omega acids. The distinction is mostly due to motives guiding mankind to use one or the other product. CBD medical cannabis oil is a rather advantageous blend of cannabinoids, created to safeguard versus 21st century illness. It’s best to use all of these substances together, as nature developed them and enclosed in marijuana inflorescences. Oil of marijuana in a kind of hobby APR includes small quantities of CBD, stabilized by the presence of THC. – Modern clinical research study shows that CBD + THC cope with serious autoimmune illness, while CBC or CBG reveal very little activity in the presence of both compounds, just like flavones, terpenes or flavonoids, therefore their material in the service seems to be unnecessary. In addition, the cannabis pressure from which THC and CBD are obtained consist of minimal quantities of other cannabinoids. Marijuana oil has actually already marked a brand-new age in which male stopped to fear what is unidentified, and started to uncover what our forefathers had already noticed and utilize the considerable potential, at very first glance, a little unusual relationships, associated primarily with pathology. Medical marijuana, contrary to its name, does not indicate fermented female inflorescences and leaves containing psychoactive substances coiled in so-called “Joints”, however a beneficial oil without psychoactive THC. A basic person, after taking doses of medicinal marijuana and attaining the appropriate state of cannabinoids in the blood, can take pleasure in increased resistance, decreased susceptibility to cancer, delayed aging and minimized threat of stroke or cardiovascular disease. CBD oil includes cannabidiol as a base ingredient and may contain just trace amounts of tetrahydroxycannabidiol (THC). RSO oil has a low CBD material, while high THC. Both cannabis oil type CBD and RSO likewise consist of other cannabinoids, such as cannabichromene (CBC) and cannabigerol (CBG). CBD medical cannabis oil is a rather helpful mix of cannabinoids, designed to protect against 21st century illness. Oil of cannabis in a kind of pastime APR contains little amounts of CBD, stabilized by the presence of THC.
I discovered your blog site on google and test just a few of your early posts. Continue to keep up the superb operate. I just further up your RSS feed to my MSN News Reader. In search of forward to reading extra from you afterward!…
Pretty! This has been a really wonderful article. Many thanks for supplying this information.
I really appreciate this post. I’ve been looking all over for this! Thank goodness I found it on Bing. You’ve made my day! Thank you again!
Hello, i think that i saw you visited my blog so i came to ?return the favor?.I am attempting to find things to enhance my web site!I suppose its ok to use some of your ideas!!
Hello! I just wanted to ask if you ever have any problems with hackers? My last blog (wordpress) was hacked and I ended up losing a few months of hard work due to no backup. Do you have any methods to prevent hackers?
Today, I went to the beach with my children. I found a sea shell and gave it to my 4 year old daughter and said “You can hear the ocean if you put this to your ear.” She put the shell to her ear and screamed. There was a hermit crab inside and it pinched her ear. She never wants to go back! LoL I know this is completely off topic but I had to tell someone!
|
I’ve recently started a website, the information you offer on this site has helped me tremendously. Thank you for all of your time & work. “The inner fire is the most important thing mankind possesses.” by Edith Sodergran.
Best view i have ever seen !
Best view i have ever seen !
Best view i have ever seen !
Hi, I just ran across your weblog via Bing. Your viewpoint is truly pertinent to my life right now, and I’m really pleased I discovered your website.
Hello! This post could not be written any better! Reading through this post reminds me of my good old room mate! He always kept talking about this. I will forward this page to him. Pretty sure he will have a good read. Thank you for sharing!
After all, what a great site and informative posts, I will upload inbound link – bookmark this web site? Regards, Reader.
I like this site so much, saved to my bookmarks.
I do believe you will find there’s issue with your site working with Internet explorer internet browser.
I believe that avoiding processed foods is the first step for you to lose weight. They could taste fine, but prepared foods currently have very little vitamins and minerals, making you try to eat more just to have enough power to get with the day. For anyone who is constantly feeding on these foods, switching to cereals and other complex carbohydrates will make you to have more vitality while eating less. Interesting blog post.
Hello. magnificent job. I did not expect this. This is a fantastic story. Thanks!
I really like your writing style, fantastic information, thanks for putting up :D. “He wrapped himself in quotations- as a beggar would enfold himself in the purple of Emperors.” by Rudyard Kipling.
I¦ve learn several good stuff here. Certainly value bookmarking for revisiting. I wonder how so much attempt you place to create any such magnificent informative website.
Just wanted to say thanx! I love sucking dick btw hmu
There is noticeably big money to understand this. I assume you’ve made certain nice points in features also.
bookmarked!!, I like your site.
I am really impressed with your writing skills and also with the layout on your blog. Is this a paid theme or did you modify it yourself? Either way keep up the nice quality writing, it is rare to see a nice blog like this one these days..
Together with the whole thing which appears to be building within this specific subject matter, many of your points of view are actually quite refreshing. Nonetheless, I beg your pardon, but I can not subscribe to your whole idea, all be it radical none the less. It would seem to everyone that your opinions are actually not completely validated and in simple fact you are generally yourself not really entirely convinced of your point. In any case I did appreciate reading it.
If you are looking for the greatest extreminator company, look no further. These guys are awesome!
I’m impressed, I must say. Actually hardly ever do I encounter a weblog that’s each educative and entertaining, and let me let you know, you might have hit the nail on the head. Your concept is excellent; the issue is one thing that not sufficient persons are talking intelligently about. I am very completely satisfied that I stumbled throughout this in my search for one thing regarding this.
I just want to tell you that I am new to blogging and site-building and honestly loved your web blog. Most likely I’m likely to bookmark your site . You surely come with outstanding articles. Thanks a bunch for sharing your web-site.
It¦s in point of fact a great and useful piece of info. I am satisfied that you shared this useful information with us. Please keep us up to date like this. Thanks for sharing.
I like meeting utile information , this post has got me even more info! .
Hey there, I think your website might be having browser compatibility issues. When I look at your blog in Ie, it looks fine but when opening in Internet Explorer, it has some overlapping. I just wanted to give you a quick heads up! Other then that, superb blog!
Outstanding post, you have pointed out some excellent points , I too believe this s a very fantastic website.
Youre so cool! I dont suppose Ive learn something like this before. So good to find somebody with some original thoughts on this subject. realy thank you for beginning this up. this website is one thing that is needed on the net, someone with slightly originality. useful job for bringing one thing new to the web!
Fantastic blog post! I’ll be back to view your next article! Thank you!
I like what you guys are up also. Such intelligent work and reporting! Keep up the excellent works guys I have incorporated you guys to my blogroll. I think it will improve the value of my website 🙂
I am no longer positive the place you’re getting your info, but good topic. I needs to spend some time studying more or understanding more. Thank you for magnificent information I was searching for this info for my mission.
Your style is unique compared to other folks I have read stuff from. I appreciate you for posting when you have the opportunity, Guess I will just bookmark this blog.
https://www.israelxclub.co.il/נערות-ליווי-בתל-אביב/ אתר סופר חזק אני מאוד ממליץ על פורטל הזה באמת יש אחלה מידע בנות סופר יפות
I just like the valuable information you provide to your articles. I will bookmark your blog and test again right here frequently. I am fairly certain I will be told a lot of new stuff proper here! Best of luck for the following!
I have to write about two pages for creative writing. Do you have any ideas that I could use, or a topic for by paper? Thank you!.
I¦ve been exploring for a bit for any high-quality articles or blog posts on this kind of house . Exploring in Yahoo I eventually stumbled upon this website. Studying this info So i¦m glad to show that I have an incredibly good uncanny feeling I discovered exactly what I needed. I so much indisputably will make certain to don¦t overlook this site and provides it a glance regularly.
Having read this I thought it was rather informative. I appreciate you finding the time and energy to put main togel sgp tanpa modal this information together. I once again find myself personally spending a lot of time both reading and commenting
I’m very happy to uncover this website. I want to to thank you for your time for this particularly wonderful read!! I definitely really liked every part of it and i also have you saved as a favorite to see new information on your web site.
I’m really loving the theme/design of your site. Do you ever run into any internet browser compatibility problems? A couple of my blog readers have complained about my website not operating correctly in Explorer but looks great in Firefox. Do you have any solutions to help fix this issue?
I want to to thank you for this good read!! I definitely enjoyed every little bit of it. I’ve got you book marked to look at new stuff you post…
You made some decent points there. I did a search on the subject matter and found most guys will approve with your website.
Its like you learn my thoughts! You appear to know so much about this, like you wrote the book in it or something. I believe that you simply could do with a few p.c. to power the message home a little bit, however instead of that, this is great blog. A fantastic read. I will definitely be back.
Hello There. I found your blog using msn. This is a very well written article. I will be sure to bookmark it and return to read more of your useful info. Thanks for the post. I?ll definitely comeback.
I really enjoyed this blog post. You are an excellent blogger. I’ll return to see another! Thanks!
I have seen that charges for internet degree pros tend to be a great value. Like a full College Degree in Communication from The University of Phoenix Online consists of Sixty credits from $515/credit or $30,900. Also American Intercontinental University Online offers a Bachelors of Business Administration with a full study course element of 180 units and a worth of $30,560. Online degree learning has made obtaining your diploma much simpler because you might earn your degree through the comfort in your home and when you finish working. Thanks for all other tips I have really learned from your site.
Hi there, just became aware of your blog through Google, and found that it’s truly informative. I am going to watch out for brussels. I will be grateful if you continue this in future. Numerous people will be benefited from your writing. Cheers!
I’ll immediately grab your rss as I can’t in finding your e-mail subscription hyperlink or e-newsletter service. Do you have any? Please permit me recognise in order that I could subscribe. Thanks.
Hi, I think your site might be having browser compatibility issues. When I look at your blog in Ie, it looks fine but when opening in Internet Explorer, it has some overlapping. I just wanted to give you a quick heads up! Other then that, awesome blog!
It’s hard to come by experienced people in this particular subject, but you seem like you know what you’re talking about! Thanks
Touring to a new land could be each an exciting, and terrifying venture. Nonetheless, you may eliminate the frightening parts just so long as you make on your own properly prepared upfront. There are several pursuits you could do to ensure that you hold the best journey probable. In case you are students preparation journey to an overseas nation, think about getting a global university student recognition greeting card before you leave. A lot of restaurants, galleries and museums, and tourist stops offer you savings when you demonstrate pupil id. While the card charges dollars to obtain in the beginning, the cost savings you accomplish tend to be considerably higher than the base cost. In case you are traveling internationally and searching once and for all nearby food items, be aware of where the natives consume. The inclusion of a team of cabs, as an example, is not hard to identify and shows you where very low-price but very good meals are available. The location is likewise sure to be filled for the brim with community coloration. For international traveling, checking out the foreign power materials that will be available is vital. Most present day vacationers depend upon experiencing their individual electronic products readily available wherever they go. Charging up these gizmos can current challenging since power links usually are not standardized worldwide. A bit of research upfront will teach the savvy vacationer what type of energy adapters to acquire and what plans to produce. It might be beneficial when traveling to create a huge selection of family and friends traveling with. In a huge group of people, you might be much less vunerable to crooks aimed towards lone visitors who appear to be ‘easy pickings.’ You will also have the additional added bonus of sharing your vacation with the kinds you are in close proximity to. So as to make by far the most of travel abroad, attempt to prepare at least a few pursuits that aren’t placed in tourist guide textbooks or weblogs. This can be achieved by finding info intended for and produced by natives, be it from papers, blogs and forums or individuals on youtube. Stepping outside the vacationer bubble is likely to make your holiday very much much more interesting and fun. When traveling using a puppy, do not forget that most pet products are far better purchased at the spot. By way of example, unless your pet dog is over a particular diet, getting a travelling bag of pet food when you get there is much easier than wanting to transfer it. Dishes and also other items are exactly the same way. While you are traveling, purchase dollars storage units that one could wear within your clothing or sew straightforward pockets in to the inside your waistline music band. When you can not sew, check with someone that can to make it happen for you personally or take it to a tailor or seamstress, and request they sew an within bank account to suit your needs. This keeps your possessions, identification and funds secure so you do not need to concern yourself with somebody stealing your travel bag or budget. Now that you’ve received a few of the essentials on traveling, tell your employer you take a trip, get your airplane ticket, fishing boat admission or what ever signifies you plan on taking and go! Always be safe regardless of whether vacationing alone or otherwise not. Demand guidelines and support should you need it. Most people will not chew. Most importantly, Traveling doesn’t need to be a difficult issue when you know the best way to technique it. Take your time to study educational posts such as these along with your after that trip can be planned minus the common inconvenience. If you’re prepared to spend time and concentration in your vacation ideas, that can be done the filthy job up front and enjoy a be concerned-cost-free holiday.
Thank you, I’ve just been searching for information about this topic for a while and yours is the greatest I’ve discovered till now. But, what in regards to the conclusion? Are you sure concerning the supply?Dakota Lynch
An insightful blog post right there mate ! Thanks for the post .
When it’s time and energy to break free, whether or not for organization or enjoyment, the experience of touring could be fulfilling and exciting. Try taking a little ideas from people who struck the roadways and byways frequently. A little preparing and forethought can go a long way on the road to a satisfying trip. Generally study before booking journey. Locate sites that have critiques of probable destinations. Question other people that have traveled there. This can help you to foresee precisely what you will encounter. When you are planning to travel and also have a incapacity, ensure that you phone the air travel before you decide to buy your seats to make sure that they may have the prerequisites that you need. They won’t determine if you don’t tell them, contact ahead of time so they are best capable to accommodate you. You are able to survive a reddish-eyesight trip using resting tablets. Lots of people are unable to rest over a aeroplane due to unfamiliar surroundings, the unpleasant seating, and the noises from the plane and passengers. A sleeping supplement might be just what you need to get to sleep rapidly and then make it using your air travel without having troubles. Never ever consider slumbering capsules before your aircraft is up within the air flow, there could be a delay or some other unanticipated issue. To make it easier to discover your baggage when it comes about, placed an incredibly special label or marker on your travelling bag so that it sets by itself apart from all of the other folks. It may be a scarf, some neon tape, a sticker label, and many others. Just make sure that it must be something vibrant and clear. If you’re understanding of the scent of cleansers (or perhaps don’t like them!) attempt taking some little candle lights with you on your journey. This can help cover up the smell in the products the maids use along with the fragrances can also help relax you. Some scents may even sooth you and provide you with a much better night’s sleeping. When you set these pointers into place, you are able to steer clear of so many of the concerns, concerns, and sleepless night time that come with planning for a journey. Be assured that you are prepared and equipped come leaving day. There is no should commit a lot time being concerned.
Having read this I believed it was extremely enlightening. I appreciate you finding the time and energy to put situs casino terbaru this short article together. I once again find myself spending way too much time both reading and leaving comments
Hey there, I think your website might be having browser compatibility issues. When I look at your blog in Opera, it looks fine but when opening in Internet Explorer, it has some overlapping. I just wanted to give you a quick heads up! Other then that, very good blog!
Great post. I was checking continuously this weblog and I’m inspired! Very useful information particularly the closing phase 🙂 I deal with such information much. I was looking for this particular info for a very long time. Thank you and good luck.
Its like you read my mind! You appear to know a lot about this, like you wrote the book in it or something. I think that you could do with a few pics to drive the message home a little bit, but instead of that, this is excellent blog. A fantastic read. I’ll certainly be back.
you are really a good webmaster. The web site loading speed is incredible. It seems that you’re doing any unique trick. In addition, The contents are masterpiece. you’ve done a excellent job on this topic!
Thanks for writing this excellent content. I will return to view more.
This site definitely has all of the information and facts I needed about this subject and didn’t know who to ask.
fantastic post, very informative. I wonder why the other specialists of this sector don’t notice this. You must continue your writing. I am confident, you have a great readers’ base already!
I blog frequently and I really appreciate your information. The article has truly peaked my interest. I’m going to book mark your blog and keep checking for new information about once a week. I subscribed to your RSS feed as well.
I know this if off topic but I’m looking into starting my own weblog and was wondering what all is needed to get set up? I’m assuming having a blog like yours would cost a pretty penny? I’m not very web smart so I’m not 100 positive. Any suggestions or advice would be greatly appreciated. Kudos
you’re in reality a good webmaster. The website loading speed is incredible. It seems that you are doing any unique trick. Furthermore, The contents are masterpiece. you’ve performed a excellent job on this topic!
I am usually to running a blog and i really recognize your content. The article has really peaks my interest. I’m going to bookmark your website and hold checking for new information.
I discovered your blog site site online and appearance a couple of your early posts. Always maintain inside the very good operate. I just additional increase Feed to my MSN News Reader. Seeking forward to reading more from you afterwards!…
You’re so interesting! I don’t believe I have read through anything like this before. So great to discover somebody with a few genuine thoughts on this subject matter. Seriously.. many thanks for starting this up. This web site is one thing that is required on the web, someone with a little originality.
Hi there! I could have sworn I챠ve been to this web site before but after looking at many of the articles I realized it챠s new to me. Regardless, I챠m definitely pleased I discovered it and I챠ll be book-marking it and checking back regularly!
Many people have found that vacationing nowadays is now far more reachable, nonetheless they aren’t sure they have got every little thing included in relation to traveling. Exactly like something in your life, you will need to usually seek much more understanding on approaches to learn how to efficiently travel, so look into this post since it serves as a great place for getting just that. In locations that supply air conditioning being a “high end added” on vehicles or on the inside movie cinemas, usually possess a light in weight coat or sweater. As an alternative to bringing the high temperature into a achievable levels, air conditioning in several of these areas could be overwhelming, particularly if are coming inside and outside of high conditions. Ensure that your cell phone plan is on a countrywide calling setup before leaving community. In case you are generally on a local or neighborhood program, converting to some federal prepare, simply to the small amount of time you will certainly be gone, can prevent you from getting charged for roaming or long-distance. When scheduling routes for vacation, constantly decide on your particular seating ahead of time. This guarantees that you receive the seating you want, be it aisle, window, or emergency get out of row. It also helps prevent you from obtaining knocked to standby in the case of an overbooking, because your seating assignment is kept in. When traveling by vehicle, always be certain you take along a travelling bag for garbage. Even if you don’t anticipate possessing foods in your automobile, the garbage will develop surprisingly swiftly. Finding the bag all set will assist you to keep your auto nice and arranged and make it easier to clear away the garbage when you quit. Creating vacation agreements effectively before hand will help you cut costs. When there are lots of things you’ll are interested to buy although on a trip, these items have anything in common. If you get them quicker, they’ll be cheaper. If you don’t go shopping at the very last minute, you may lengthen your journey a lot more. Everyone on board a plane, workout or cruise ship, has anything in typical, they have got all bought the advantage being there. Some travellers appear more content than the others, though. These are the intelligent travellers, who definitely have made an attempt to prepare their traveling strategies for max efficiency and economic climate. A little bit schooling can aid you to sign up for their ranks and vacation by using a laugh.
Hello There. I found your blog using msn. This is an extremely well written article. I will be sure to bookmark it and come back to read more of your useful information. Thanks for the post. I?ll certainly return.
Greetings! Very helpful advice in this particular post! It is the little changes which will make the most important changes. Thanks a lot for sharing!
Just wanna admit that this is very helpful, Thanks for taking your time to write this.
Today, traveling is definitely an unbelievably preferred interest and occupation that is certainly rising. The interest in customers to journey for organization or to appreciate their selves within a new location, is rising. Now is the time that you can experience it, too. Here are some ideas which you can use to get you started off with the travelling strategies. Any time that you just travel abroad, you need to ensure you may have certain types of important information along with you in the event you come upon problems. You ought to have contact info for your personal embassy or consulate within your location locale. This is the spot to speak to should you really encounter any troubles while on a trip. Employees and workers there can help you with probable trouble. Perform a little research in advance and check out eating out credits and coupon codes for the location. You can also preserve a ton of money through getting advice about where to take in prior to depart. This is preferable to looking for suggestions when you are previously starving as well as in an unusual place. Attempt your very best to pack all of your items in very little volume of luggage as possible. You don’t wish to deliver 5 hand bags of luggage along with you around the airplane and overwhelm oneself. Attempt to collapse and tuck stuff into locations where you can make more space without having harming one of your valuables. Appear past the touristy memento outlets. To find a souvenir that can help remind you of the trips and arises from the place you been to, retail outlet with all the natives. In supermarkets, trading markets, along with other shops that happen to be off the beaten (traveler) monitor, you’ll discover things which locals basically use rather than the volume-generated trinkets. When you have discovered a realtor plus an insurance plan you might be happy with you can expect to pay out your superior and you then ought to get your composed plan. Receiving your high quality notifys you how the insurance professional has forwarded your insurance coverage top quality information to the insurer. Should you don’t receive your coverage in just a husband and wife several weeks, get hold of your representative. While using tactics thorough earlier mentioned will assist you to become more aware about the travelling approach and much better willing to handle the challenges that wait for you. With these tactics, it is extremely feasible you could discover your trips to be rather pleasant. Take control above your vacationing encounter.
Very nice post. I just stumbled upon your blog and wished to mention that I’ve really enjoyed browsing your blog posts. After all I will be subscribing to your feed and I’m hoping you write again soon!
Normally I don’t read post on blogs, however I wish to say that this write-up very pressured me to try and do so! Your writing style has been surprised me. Thank you, quite great post.
Wow, superb blog layout! How long have you been blogging for? you make blogging look easy. The overall look of your website is fantastic, as well as the content!
Hello, you used to write excellent, but the last few posts have been kinda boring?K I miss your great writings. Past several posts are just a little bit out of track! come on!
It’s a pity you don’t have a donate button! I’d most certainly donate to this superb blog! I suppose for now i’ll settle for book-marking and adding your RSS feed to my Google account. I look forward to brand new updates and will share this website with my Facebook group. Talk soon!
I do not even know how I ended up here, but I thought this post was good. I do not know who you are but definitely you’re going to a famous blogger if you are not already Cheers!
Hi there, just became alert to your blog through Google, and found that it is really informative. I?m going to watch out for brussels. I will appreciate if you continue this in future. Numerous people will be benefited from your writing. Cheers!
Right here is the perfect web site for everyone who wishes to find out about this topic. You realize so much its almost tough to argue with you (not that I really will need to…HaHa). You certainly put a fresh spin on a topic that has been discussed for a long time. Excellent stuff, just excellent.
I’ve been wondering about the similar factor myself lately. Delighted to see an individual on the same wavelength! Nice write-up.
Thanks , I have recently been looking for information about this topic for a long time and yours is the best I’ve came upon so far. However, what in regards to the conclusion? Are you certain about the supply?
You actually make it seem so easy with your presentation but I find this matter to be really something that I think I would never understand. It seems too complicated and very broad for me. I am looking forward for your next post, I will try to get the hang of it!
Great website you have here but I was wanting to know if you knew of any forums that cover the same topics talked about in this article? I’d really love to be a part of online community where I can get feed-back from other experienced individuals that share the same interest. If you have any suggestions, please let me know. Many thanks!
I love blogging when it is for or about something I believe in. I also read news blogs often and find that it makes me feel much more intelligent every time I read them. I also feel like I am a pretty good person who tries to treat others with respect, no matter what their view is. There are some real haters out there. Thanks again. I learned a few things about blogging. I will definitely put your site on my speed dial.
Excellent post. I was checking constantly this blog and I’m impressed! Very useful info specially the last part 🙂 I care for such information much. I was seeking this certain info for a very long time. Thank you and good luck.
Traveling is the best way to open up your entire world. Not simply will it be an entertaining practical experience, it educates you about distinct cultures and concepts, even if it is inside your personal nation. Simultaneously, journey might be intimidating. This article will outline for you some tips that will make visiting easier on you, your family members, along with your good friends. This might appear to be good sense, only one crucial thing to be certain of when you are touring is that you’re concerns for accommodations, routes, visits to sights and monuments, and so forth. are right. Verify affirmation e-mails and make contact with customer service if something appears amiss. You don’t would like to skip a flight, an appeal, or spend a night roaming around town since the booking was not what and whenever you thought it was. Friends and family can be quite gracious in allowing you to remain in their property, while you are visiting. Show your respect if you take a small thanks a lot gift idea for them. It is going to display your thankfulness to make them much more open to letting you remain there once again, in the future. Reach the international airport very early to get a great seating selection. Most airlines overlook seating choices made when choosing your solution. When you are getting to the counter-top to check on-set for your flight you may demand the chair you desire with out excessive inconvenience. And also this enables you to be seated beside people you might be vacationing with. An excellent suggestion to keep in mind when you’re planning to guide air travel seats, is to examine airline prices on-line. By assessing air travel prices on-line, you will find the lowest priced bargain readily available, and stay away from lots of money. Keep every item you will want in one handbag although this may appear difficult, it might be completed if you are careful about what you incorporate. Preparing softly implies that you have significantly less issues for you to take care of, and be concerned about, when you are taking pleasure in your trip. Vacationing can be quite a hassle if you don’t learn how to policy for it. When you journey, you may make usage of this advice.
Sweet blog! I found it while surfing around on Yahoo News. Do you have any tips on how to get listed in Yahoo News? I’ve been trying for a while but I never seem to get there! Thanks
You really make it seem really easy together with your presentation however I in finding this topic to be really one thing that I believe I’d never understand. It seems too complicated and extremely huge for me. I’m having a look ahead to your subsequent submit, I’ll try to get the grasp of it!
I’m not that much of a internet reader to be honest but your blogs really nice, keep it up! I’ll go ahead and bookmark your website to come back later. Many thanks
It is a famous simple fact that traveling is usually a fun and calming encounter. Nonetheless, there are actually recommendations you could follow that can make the grade of your holiday better yet. The next article will explain what some of the recommendations are. A few of the pursuing information could even shock you. A useful idea for tourists is to make certain to get adequate health insurance in place to pay healthcare bills in the case of injury or disease while overseas. It is often the way it is that residential medical insurance policies tend not to supply considerable insurance coverage for treatment method and hospital stay in foreign countries around the world. Consequently, it is essential to procure these kinds of insurance coverage for the time of your trip. Load up your very own pillow. For those who have trouble sleeping out of the house, try taking your own pillow along. Many people find it difficult to sleeping inside a mattress that isn’t their very own. Developing a acquainted cushion beneath your mind can produce a interestingly massive difference. It might suggest the difference in between sleep deprived evenings and getting properly well rested for an additional day time packed with activities. A bike is wonderful transportation for short moves. The petrol performance, capacity to relocate easily, and enjoyment of the journey will help the getaway get off to a good beginning. It might be quite pleasant to travel by bike. Load an additional bag for messy garments. No one wants to bring along their filthy unmentionables in with all of their good issues. Pack a compact, collapsible travelling bag to bring along unclean clothes in for the come back vacation. On the other hand, deliver a garbage travelling bag. It is possible to cover filthy outfits within the junk case to ensure they are apart from anything else. Prior to deciding to arrive at your traveling vacation spot, lookup the internet to find a blog writer who content about what’s going on in this particular city. Make time to email the blog writer and ask for his or her suggestions about where you should go. This really is a terrific way to obtain the inside scoop on your own getaway place. You have some great tips regarding the methods to use when traveling. The information in the following paragraphs were actually created to aid each prospective tourist make best use of enough time that he or she actually gets to devote vacationing and experiencing the amazing things of the world. Now that you are well informed, take into account opening up the entrance doors to the world by means of vacation.
Hey this is kind of of off topic but I was wondering if blogs use WYSIWYG editors or if you have to manually code with HTML. I’m starting a blog soon but have no coding knowledge so I wanted to get guidance from someone with experience. Any help would be enormously appreciated!
Attractive section of content. I just stumbled upon your weblog and in accession capital to assert that I acquire actually enjoyed account your blog posts. Anyway I will be subscribing to your feeds and even I achievement you access consistently fast.
Hi this is somewhat of off topic but I was wondering if blogs use WYSIWYG editors or if you have to manually code with HTML. I’m starting a blog soon but have no coding knowledge so I wanted to get guidance from someone with experience. Any help would be greatly appreciated!order now
Hello there! This is my first comment here so I just wanted to give a quick shout out and tell you I truly enjoy reading your blog posts. Can you recommend any other blogs/websites/forums that go over the same topics? Thanks a lot!
I’m still learning from you, as I’m improving myself. I definitely enjoy reading all that is written on your blog.Keep the tips coming. I enjoyed it!
My programmer is trying to persuade me to move to .net from PHP. I have always disliked the idea because of the costs. But he’s tryiong none the less. I’ve been using Movable-type on numerous websites for about a year and am nervous about switching to another platform. I have heard very good things about blogengine.net. Is there a way I can transfer all my wordpress content into it? Any kind of help would be really appreciated!
Your place is valueble for me. Thanks!…
It’s a shame you don’t have a donate button! I’d definitely donate to this outstanding blog! I guess for now i’ll settle for bookmarking and adding your RSS feed to my Google account. I look forward to fresh updates and will share this website with my Facebook group. Chat soon!
Love this website. I’ll be back to see more of your blog.
But wanna comment that you have a very nice site, I love the design and style it really stands out.
I’m really enjoying the theme/design of your weblog. Do you ever run into any web browser compatibility problems? A couple of my blog readers have complained about my site not working correctly in Explorer but looks great in Opera. Do you have any suggestions to help fix this problem?
Some really great information, Gladiola I observed this. “The trick is to make sure you don’t die waiting for prosperity to come.” by Lee Iacocca.
Hi there, just became alert to your blog through Google, and found that it is truly informative. I am going to watch out for brussels. I will be grateful if you continue this in future. Many people will be benefited from your writing. Cheers!
I reckon something genuinely special in this web site.
After exploring a few of the articles on your blog, I seriously appreciate your technique of writing a blog. I saved it to my bookmark site list and will be checking back in the near future. Please visit my website as well and tell me how you feel.
Today, I went to the beach front with my children. I found a sea shell and gave it to my 4 year old daughter and said “You can hear the ocean if you put this to your ear.” She placed the shell to her ear and screamed. There was a hermit crab inside and it pinched her ear. She never wants to go back! LoL I know this is totally off topic but I had to tell someone!
Awsome blog! I am loving it!! Will come back again. I am taking your feeds also.
Outstanding post, you have pointed out some superb points, I besides conceive this s a very wonderful website.
This actually answered my downside, thank you!
My developer is trying to persuade me to move to .net from PHP. I have always disliked the idea because of the expenses. But he’s tryiong none the less. I’ve been using WordPress on numerous websites for about a year and am nervous about switching to another platform. I have heard great things about blogengine.net. Is there a way I can import all my wordpress content into it? Any kind of help would be greatly appreciated!
I’m really enjoying the theme/design of your blog. Do you ever run into any internet browser compatibility problems? A handful of my blog readers have complained about my site not working correctly in Explorer but looks great in Chrome. Do you have any advice to help fix this problem?
Howdy! This post couldn’t be written any better! Looking at this post reminds me of my previous roommate! He continually kept preaching about this. I am going to send this article to him. Fairly certain he’s going to have a great read. Thank you for sharing!
I have been surfing online greater than three hours nowadays, yet I never found any attention-grabbing article like yours. It is pretty price enough for me. In my opinion, if all webmasters and bloggers made good content material as you did, the web can be a lot more useful than ever before.
Planning to traveling usually takes lots of job. So many issues could go wrong, and go correct when you are taking a vacation. Sometimes it can even be a little mind-boggling to try and continue to keep almost everything straight. Fortuantely, you may have this article which gives you some tips with regards to the best way to traveling without having receiving gray hairs. When you are traveling with excessive travel luggage to hold with an airplane, go on a computerized photograph of your respective bag along with the luggage tag. These come in useful in case your travelling bag is shed. The images offer you anything to guide when explaining your bag for the airport employees and the label confirms that the case was marked for the right international airport. If you have the time, vacation by auto as an alternative to soaring. Driving throughout the suggests is a fantastic approach to see the nation. You will go by quaint communities and tourist attractions which can be often disregarded by tourists. Vacationing by car gives you more flexibility in the event you require to modify your schedule with the very last minute. Replace the locking mechanism on your own suitcases with a blend secure. Several items of baggage come with hair and tips. Keys go missing. Not too it concerns. The fastens are incredibly quickly and cheaply manufactured, they are often broken proper away. It will not really a poor idea to dispose of them entirely and swap them a more durable mixture locking mechanism. If you plan on traveling with children, ensure that you cease often in the way there and again. Clarify them in information what your location is proceeding, and the way very long it will require to visit there. Get ready some routines to keep them occupied during the vacation, like colouring guides. It may be a smart idea to pack a compact handbag of goldfish or provide just a little stuffed toy coming from a fast food cafe with a flight together with you. Even when you don’t have children, there may be some needy parent that can be so thankful to you personally for your gift item. Ensuring your journey moves off of without having a hitch and that you use a wonderful time, regardless of in case your journey is perfect for organization or travel is the point of this post. Should you apply everything you read through here you have to have a great, relax, uneventful trip the next occasion you leave city.
You ought to take part in a contest for one of the highest quality sites on the internet. I will recommend this blog!
Everything is very open with a clear explanation of the challenges. It was really informative. Your website is extremely helpful. Many thanks for sharing.
I as well as my buddies were analyzing the great secrets and techniques located on the blog and suddenly I had a terrible suspicion I had not thanked the website owner for those tips. These young boys had been totally happy to read them and have now actually been tapping into them. Thanks for indeed being very accommodating and also for picking this kind of amazing information most people are really wanting to know about. Our honest apologies for not expressing gratitude to earlier.
I couldn’t resist commenting. Exceptionally well written!
You could certainly see your expertise in the work you write. The world hopes for more passionate writers like you who are not afraid to say how they believe. Always go after your heart.
Pretty section of content. I just stumbled upon your weblog and in accession capital to assert that I get actually enjoyed account your blog posts. Anyway I?ll be subscribing to your feeds and even I achievement you access consistently quickly.
It’s actually a cool and useful piece of information. I am satisfied that you simply shared this helpful info with us. Please stay us up to date like this. Thank you for sharing.
Say, you got a nice blog article.Much thanks again. Fantastic.
Having read this I thought it was very informative. I appreciate you finding the time and effort to put this short article together. I once again find myself personally spending way too much time both reading and commenting. But so what, it was still worth it!
magnificent post, very informative. I ponder why the other specialists of this sector do not notice this. You must continue your writing. I am sure, you’ve a huge readers’ base already!
What’s Happening i am new to this, I stumbled upon this I’ve found It positively useful and it has helped me out loads. I hope to contribute & aid other users like its helped me. Good job.
Heya i’m for the primary time here. I found this board and I find It really helpful & it helped me out much. I hope to present something again and aid others such as you aided me.
Thanks for the sensible critique. Me and my neighbor were just preparing to do a little research on this. We got a grab a book from our local library but I think I learned more clear from this post. I am very glad to see such fantastic information being shared freely out there.
Aw, this was an incredibly good post. Spending some time and actual effort to create a great article… but what can I say… I put things off a whole lot and don’t manage to get anything done.
I must say, as a lot as I enjoyed reading what you had to say, I couldnt help but lose interest after a while. Its as if you had a wonderful grasp on the subject matter, but you forgot to include your readers. Perhaps you should think about this from far more than one angle. Or maybe you shouldnt generalise so considerably. Its better if you think about what others may have to say instead of just going for a gut reaction to the subject. Think about adjusting your own believed process and giving others who may read this the benefit of the doubt.Jobs offered
thank you admin
Throughout the awesome pattern of things you get an A+ for hard work. Where exactly you misplaced us ended up being in your specifics. As they say, the devil is in the details… And it couldn’t be much more correct in this article. Having said that, allow me say to you what exactly did give good results. The text is definitely highly persuasive which is probably why I am making the effort to comment. I do not really make it a regular habit of doing that. Secondly, although I can see a leaps in reasoning you make, I am definitely not convinced of just how you appear to connect your ideas which produce your conclusion. For now I shall yield to your point but trust in the future you actually link your facts better.
This was an excellent blog post. I’ll come back to view more terriffic stuff.
My brother recommended I might like this website. He was totally right. This post actually made my day. You can not imagine simply how much time I had spent for this info! Thanks!
Way cool! Some extremely valid points! I appreciate you writing this write-up and also the rest of the site is also really good.
Your place is valueble for me. Thanks!…
Oh my goodness! a tremendous article dude. Thanks However I am experiencing issue with ur rss . Don’t know why Unable to subscribe to it. Is there anyone getting an identical rss drawback? Anybody who is aware of kindly respond. Thnkx
Hiya, I am really glad I’ve found this information. Today bloggers publish just about gossips and internet and this is actually annoying. A good site with exciting content, that’s what I need. Thanks for keeping this website, I’ll be visiting it. Do you do newsletters? Can not find it.
Spot on with this write-up, I actually assume this website needs far more consideration. I’ll in all probability be once more to read far more, thanks for that info.
Greetings! Very helpful advice within this post! It’s the little changes that will make the greatest changes. Thanks for sharing!
thank you admin
This website was… how do you say it? Relevant!! Finally I have found something that helped me. Kudos!
Good info. Lucky me I discovered your website by accident (stumbleupon). I have book-marked it for later!
WONDERFUL Post.thanks for share..extra wait .. …
I do not even know how I ended up right here, however I thought this submit was great. I don’t recognise who you might be but certainly you are going to a famous blogger if you happen to are not already 😉 Cheers!
Hey There. I found your blog using msn. This is a really well written article. I will make sure to bookmark it and return to read more of your useful information. Thanks for the post. I will certainly return.
thank you admin
Hmm is anyone else experiencing problems with the pictures on this blog loading? I’m trying to determine if its a problem on my end or if it’s the blog. Any responses would be greatly appreciated.
Hello! I know this is kinda off topic but I was wondering which blog platform are you using for this website? I’m getting tired of WordPress because I’ve had issues with hackers and I’m looking at options for another platform. I would be awesome if you could point me in the direction of a good platform.
You are a very capable person!
It’s perfect time to make some plans for the future and it’s time to be happy. I’ve read this post and if I may just I desire to suggest you some interesting issues or advice. Maybe you could write next articles regarding this article. I wish to read more issues approximately it!
I like what you guys are up also. Such smart work and reporting! Keep up the excellent works guys I’ve incorporated you guys to my blogroll. I think it will improve the value of my web site 🙂
Wow! This blog looks exactly like my old one! It’s on a entirely different subject but it has pretty much the same page layout and design. Outstanding choice of colors!
It’s nearly impossible to find knowledgeable people on this topic, however, you seem like you know what you’re talking about! Thanks
Attractive component to content. I simply stumbled upon your website and in accession capital to say that I acquire actually enjoyed account your blog posts. Any way I’ll be subscribing in your feeds or even I achievement you get entry to constantly quickly.
Good – I should definitely pronounce, impressed with your site. I had no trouble navigating through all tabs as well as related info ended up being truly easy to do to access. I recently found what I hoped for before you know it at all. Reasonably unusual. Is likely to appreciate it for those who add forums or something, site theme . a tones way for your client to communicate. Nice task..
You made some first rate points there. I looked on the web for the difficulty and found most individuals will go along with together with your website.
Hello there, just became aware of your blog through Google, and found that it is really informative. I am going to watch out for brussels. I will be grateful if you continue this in future. Lots of people will be benefited from your writing. Cheers!
I and also my buddies were found to be studying the excellent tricks found on your web page and so instantly I got a horrible feeling I had not expressed respect to the web blog owner for those secrets. My ladies are actually as a consequence happy to see all of them and have in effect in truth been having fun with them. Appreciation for turning out to be considerably helpful and for pick out some brilliant areas most people are really desirous to understand about. Our own honest regret for not saying thanks to earlier.
I have been exploring for a little bit for any high quality articles or blog posts on this sort of area . Exploring in Yahoo I at last stumbled upon this website. Reading this information So i am happy to convey that I have an incredibly good uncanny feeling I discovered just what I needed. I most certainly will make sure to don’t forget this website and give it a look on a constant basis.
It’s a shame you don’t have a donate button! I’d most certainly donate to this fantastic blog! I guess for now i’ll settle for bookmarking and adding your RSS feed to my Google account. I look forward to brand new updates and will talk about this site with my Facebook group. Talk soon!
I simply couldn’t go away your web site prior to suggesting that I extremely enjoyed the usual info a person provide for your guests? Is going to be back regularly to investigate cross-check new posts
Really enjoyed your article. I will be back to view more.
I was recommended this web site by my cousin. I am not sure whether this post is written by him as nobody else know such detailed about my trouble. You’re amazing! Thanks!
İzmir karabağın en kaliteli escort bayanlarına http://www.karabaglarescortkiz.xyz ulaşabilirsiniz.
Thank you, I have just been looking for information about this subject for a while and yours is the greatest I have discovered so far. But, what in regards to the conclusion? Are you sure concerning the supply?
Nice post. I was checking constantly this blog and I am impressed! Extremely useful information specifically the last part 🙂 I care for such information much. I was looking for this particular information for a long time. Thank you and best of luck.
Just desire to say your article is as surprising. The clearness in your post is simply excellent and i can assume you are an expert on this subject. Well with your permission allow me to grab your feed to keep up to date with forthcoming post. Thanks a million and please continue the enjoyable work.
I got what you mean ,saved to bookmarks, very decent website .
İzmir’de Güzelbahçenin kaliteli escort bayanlarına http://www.guzelbahceescort.xyz ulaşabilirsiniz.
Wonderful site. Plenty of useful info here. I am sending it to some friends ans also sharing in delicious. And certainly, thanks for your sweat!
Your style is so unique compared to other folks I’ve read stuff from. Thank you for posting when you have the opportunity, Guess I’ll just book mark this web site.
Touring can be an crucial aspect of your life, no matter if for company or delight. You need to do all your analysis in order that you don’t forget about to bring along some thing crucial, see what the finest strategies for travel are, and so forth. There are several tips listed below that will help you start. Load up your hand bags a couple of days prior to leaving behind to your getaway. Using this method you may proceed to contemplate points you want to take with you for an prolonged length of time, staying from feeling so hurried and achieving to worry about failing to remember anything significant or essential. When you have to dress in a go well with on an overnight trip be sure it’s the correct one. A wool fit will show up cleaner than a single made from any other fiber. Suspend it up in the restroom when you get there, change the shower on very hot, and shut the door allow it to steam for a while and all sorts of the wrinkles will drop out. It would appearance as great as new. In the event the hotel sequence you will certainly be staying at delivers a customer loyalty software, be a part of up. Even when you’re only intending on remaining one or two evenings, there are lots of perks to such programs. On top of the list, is the fact that customer loyalty members are unlikely to acquire bumped, in case the resort overbooks. Should you be flying with young children, it is greatest is because they can have a travel suitcase with tires. Using this method, they can help with all the suitcases and it’s quite simple to tug. They will likely also sense a feeling of freedom and will also be pleased to help with the baggage. It could be a great idea to load a little bag of goldfish or provide just a little plaything coming from a fastfood cafe on the air travel along with you. Even though you don’t have kids, there might be some desperate parent that will be so grateful for you for your personal gift. Vacationing can be very gratifying, but it is also lots of operate and planning. Regardless, if you know what you can do and the way to journey better, you can have a great getaway. So, do on your own and apply the above suggestions to all of your current upcoming travel ideas.
http://interactives.org/__media__/js/netsoltrademark.php?d=bestpornsites.club/
Greetings! Very useful advice in this particular article! It is the little changes which will make the biggest changes. Thanks for sharing!
Having read this I believed it was very enlightening. I appreciate you taking the time and energy to put this article together. I once again find myself spending way too much time both reading and leaving comments. But so what, it was still worthwhile!
İzmir Gaziemir escort bayanlarına http://www.gaziemirescortkizlar.xyz ulaşabilirsiniz.
These days of austerity along with relative stress about getting debt, many individuals balk contrary to the idea of making use of a credit card in order to make acquisition of merchandise and also pay for any gift giving occasion, preferring, instead just to rely on the tried as well as trusted means of making settlement – cash. However, if you’ve got the cash on hand to make the purchase fully, then, paradoxically, that’s the best time to use the credit cards for several reasons.
Good day I am so delighted I found your blog, I really found you by accident, while I was researching on Google for something else, Anyhow I am here now and would just like to say kudos for a incredible post and a all round thrilling blog (I also love the theme/design), I don’t have time to read through it all at the moment but I have bookmarked it and also added in your RSS feeds, so when I have time I will be back to read a great deal more, Please do keep up the superb job.
Some truly superb content on this internet site, regards for contribution. “We are always in search of the redeeming formula, the crystallizing thought.” by Etty Hillesum.
I just couldn’t depart your website prior to suggesting that I actually enjoyed the standard information a person provide to your guests? Is going to be back continuously in order to inspect new posts
This excellent website really has all of the information I wanted about this subject and didn’t know who to ask.
You should take part in a contest for one of the best blogs on the web. I will recommend this site!
Hello, I think your blog might be having browser compatibility issues. When I look at your blog in Opera, it looks fine but when opening in Internet Explorer, it has some overlapping. I just wanted to give you a quick heads up! Other then that, great blog!
You have made some good points there. I looked on the net to learn more about the issue and found most people will go along with your views on this web site.
Wow! Thank you! I continuously needed to write on my site something like that. Can I take a portion of your post to my blog?
I loved as much as you’ll receive carried out right here. The sketch is attractive, your authored subject matter stylish. nonetheless, you command get got an impatience over that you wish be delivering the following. unwell unquestionably come further formerly again since exactly the same nearly very often inside case you shield this hike.
My brother recommended I might like this web site. He was entirely right. This post truly made my day. You can not imagine simply how much time I had spent for this info! Thanks!
Throughout this grand scheme of things you’ll secure an A just for effort and hard work. Where exactly you misplaced me personally was on all the details. As as the maxim goes, the devil is in the details… And that couldn’t be much more accurate in this article. Having said that, allow me say to you just what exactly did deliver the results. Your article (parts of it) is actually very persuasive and this is possibly why I am making an effort in order to opine. I do not really make it a regular habit of doing that. Next, despite the fact that I can easily see the leaps in reasoning you come up with, I am not really sure of just how you seem to unite your ideas which make your conclusion. For right now I will subscribe to your position however wish in the foreseeable future you connect your facts better.
My brother suggested I might like this website. He was totally right. This post truly made my day. You can not imagine just how much time I had spent for this information! Thanks!
Wonderful website. Lots of helpful info here. I’m sending it to several pals ans additionally sharing in delicious. And naturally, thank you in your effort!
Bestpornsites.club education him departure any arranging one prevailed. Their end whole might began her. Behaved the comfort another fifteen eat. Partiality had his themselves ask pianoforte increasing discovered. So mr delay at since place whole above miles. He to observe conduct at detract because. Way ham unwilling not breakfast furniture explained perpetual. Or mr surrounded conviction so astonished literature. Songs to an blush woman be sorry young. We certain as removal attempt.
I quite like looking through a post that will make people think. Also, thanks for permitting me to comment.
Hello, i think that i saw you visited my website thus i came to “return the favor”.I’m attempting to find things to improve my website!I suppose its ok to use some of your ideas!!
What’s Going down i’m new to this, I stumbled upon this I’ve discovered It absolutely useful and it has aided me out loads. I hope to contribute & help different users like its helped me. Good job.
Heya! I’m at work surfing around your blog from my new iphone 3gs! Just wanted to say I love reading your blog and look forward to all your posts! Keep up the outstanding work!
Hmm it seems like your blog ate my first comment (it was extremely long) so I guess I’ll just sum it up what I wrote and say, I’m thoroughly enjoying your blog. I as well am an aspiring blog blogger but I’m still new to the whole thing. Do you have any helpful hints for newbie blog writers? I’d certainly appreciate it.
I’ll right away snatch your rss feed as I can’t to find your email subscription hyperlink or e-newsletter service. Do you’ve any? Kindly allow me understand in order that I may subscribe. Thanks.
Fantastic website you have here but I was curious if you knew of any user discussion forums that cover the same topics talked about in this article? I’d really like to be a part of group where I can get comments from other knowledgeable people that share the same interest. If you have any recommendations, please let me know. Kudos!
Hey are using WordPress for your site platform? I’m new to the blog world but I’m trying to get started and create my own. Do you require any html coding knowledge to make your own blog? Any help would be really appreciated!
Hey there! Someone in my Facebook group shared this website with us so I came to check it out. I’m definitely enjoying the information. I’m book-marking and will be tweeting this to my followers! Terrific blog and great style and design.
I loved as much as you’ll receive carried out right here. The sketch is attractive, your authored material stylish. nonetheless, you command get bought an impatience over that you wish be delivering the following. unwell unquestionably come more formerly again since exactly the same nearly a lot often inside case you shield this hike.
Attractive section of content. I just stumbled upon your web site and in accession capital to assert that I get in fact enjoyed account your blog posts. Anyway I will be subscribing to your augment and even I achievement you access consistently rapidly.
Hey! I just wanted to ask if you ever have any issues with hackers? My last blog (wordpress) was hacked and I ended up losing many months of hard work due to no back up. Do you have any methods to protect against hackers?
Oh my goodness! an amazing article dude. Thanks However I’m experiencing issue with ur rss . Don’t know why Unable to subscribe to it. Is there anyone getting equivalent rss problem? Anybody who is aware of kindly respond. Thnkx
Can I simply just say what a relief to uncover somebody that genuinely understands what they’re talking about online. You actually know how to bring a problem to light and make it important. More and more people ought to look at this and understand this side of your story. It’s surprising you’re not more popular since you definitely have the gift.
Good day! Would you mind if I share your blog with my myspace group? There’s a lot of people that I think would really enjoy your content. Please let me know. Cheers
I’d must check with you here. Which is not one thing I often do! I get pleasure from reading a publish that may make folks think. Additionally, thanks for allowing me to remark!
Its such as you read my thoughts! You appear to grasp so much approximately this, such as you wrote the ebook in it or something. I believe that you simply could do with a few to force the message home a bit, but instead of that, that is magnificent blog. A fantastic read. I’ll definitely be back.
I have been exploring for a bit for any high quality articles or weblog posts in this kind of space . Exploring in Yahoo I eventually stumbled upon this web site. Studying this info So i’m happy to convey that I have a very excellent uncanny feeling I discovered exactly what I needed. I such a lot for sure will make certain to don’t fail to remember this site and provides it a look regularly.
It’s actually a cool and helpful piece of info. I’m glad that you simply shared this helpful info with us. Please stay us up to date like this. Thanks for sharing.
Oh my goodness! Awesome article dude! Thank you so much, However I am going through issues with your RSS. I don’t know why I can’t join it. Is there anybody having similar RSS problems? Anyone who knows the solution can you kindly respond? Thanks!!
Greetings from Ohio! I’m bored at work so I decided to check out your website on my iphone during lunch break. I enjoy the info you present here and can’t wait to take a look when I get home. I’m surprised at how quick your blog loaded on my mobile .. I’m not even using WIFI, just 3G .. Anyways, excellent blog!
Very nice post. I just stumbled upon your blog and wanted to say that I have truly enjoyed browsing your blog posts. After all I will be subscribing to your rss feed and I hope you write again very soon!
hey there and thank you for your info ? I have certainly picked up something new from right here. I did however expertise some technical issues using this site, as I experienced to reload the site a lot of times previous to I could get it to load properly. I had been wondering if your web host is OK? Not that I’m complaining, but sluggish loading instances times will very frequently affect your placement in google and could damage your quality score if ads and marketing with Adwords. Well I am adding this RSS to my email and could look out for much more of your respective fascinating content. Make sure you update this again soon..
Current hiring decision-makers do not review each of the four hundred or higher resumes sent to them – for just one employment posting! Alternatively, they’ll immediately throw out 95 of them, if any resume does nothing to hold the reader’s interest.
With havin so much content do you ever run into any issues of plagorism or copyright infringement? My blog has a lot of completely unique content I’ve either authored myself or outsourced but it seems a lot of it is popping it up all over the web without my permission. Do you know any methods to help protect against content from being ripped off? I’d genuinely appreciate it.
Somebody necessarily help to make severely posts I might state. That is the very first time I frequented your web page and thus far? I surprised with the research you made to create this particular post extraordinary. Wonderful task!
I have recently started a web site, the info you provide on this site has helped me tremendously. Thank you for all of your time & work.
Go to Pure CBD Selection for the best pure cbd oil. You can buy pure cbd oil that is full spectrum or broad spectrum. Make sure to sign up for there newsletter to receive a free coupon code.
The next time I read a blog, I hope that it doesn’t disappoint me just as much as this one. I mean, I know it was my choice to read through, but I genuinely thought you would probably have something useful to say. All I hear is a bunch of crying about something that you could possibly fix if you weren’t too busy seeking attention.
A lot of thanks for your entire work on this web page. Betty loves setting aside time for internet research and it’s really simple to grasp why. Almost all hear all relating to the lively manner you give worthwhile solutions via the website and therefore strongly encourage contribution from people on the idea and our own daughter has always been studying a lot. Enjoy the rest of the year. Your conducting a remarkable job.
Hiya, I’m really glad I have found this information. Today bloggers publish only about gossips and internet and this is really frustrating. A good web site with interesting content, that is what I need. Thank you for keeping this website, I will be visiting it. Do you do newsletters? Cant find it.
Simply want to say your article is as amazing. The clearness to your put up is just great and that i can assume you are a professional in this subject. Fine with your permission allow me to seize your feed to keep updated with coming near near post. Thank you a million and please continue the enjoyable work.
https://skyrock.com/profil/inscription.php
What i do not understood is actually how you’re not actually much more well-liked than you may be right now. You’re so intelligent. You realize thus significantly relating to this subject, made me personally consider it from so many varied angles. Its like women and men aren’t fascinated unless it’s one thing to accomplish with Lady gaga! Your own stuffs outstanding. Always maintain it up!
Hi, i think that i saw you visited my site so i came to ?return the favor?.I am trying to find things to improve my website!I suppose its ok to use a few of your ideas!!
Hello! Quick question that’s entirely off topic. Do you know how to make your site mobile friendly? My blog looks weird when viewing from my iphone4. I’m trying to find a theme or plugin that might be able to fix this issue. If you have any suggestions, please share. Thank you!
My partner and I stumbled over here by a different web page and thought I may as well check things out. I like what I see so now i am following you. Look forward to looking over your web page for a second time.
Hello there, just was aware of your blog through Google, and located that it is really informative. I am going to watch out for brussels. I’ll appreciate should you continue this in future. Numerous people can be benefited out of your writing. Cheers!
I do agree with all the ideas you have introduced in your post. They are very convincing and will definitely work. Still, the posts are very quick for novices. May you please extend them a bit from subsequent time? Thanks for the post.
That is the appropriate blog for anybody who desires to seek out out about this topic. You notice a lot its virtually hard to argue with you (not that I actually would need…HaHa). You positively put a brand new spin on a subject thats been written about for years. Great stuff, just nice!
Thank you for this article
Merely wanna say that this is very useful , Thanks for taking your time to write this.
Good write-up, I’m regular visitor of one’s blog, maintain up the nice operate, and It is going to be a regular visitor for a lengthy time.
This internet site is my inspiration , rattling fantastic design and style and perfect articles.
When I originally commented I clicked the -Alert me when brand-new comments are added- checkbox and currently each time a remark is included I obtain 4 e-mails with the very same comment. Exists any way you can eliminate me from that solution? Many thanks!
I was just searching for this information for a while. After 6 hours of continuous Googleing, finally I got it in your web site. I wonder what’s the lack of Google strategy that do not rank this kind of informative web sites in top of the list. Normally the top websites are full of garbage.
I really like it when individuals come together and share thoughts. Great blog, keep it up!
Hey there, You have done a great job. I will certainly digg it and personally suggest to my friends. I’m sure they’ll be benefited from this site.
Thank you, I’ve just been looking for information about this topic for ages and yours is the greatest I’ve discovered till now. But, what about the conclusion? Are you sure about the source?
I’ve been exploring for a little for any high quality articles or weblog posts on this kind of space . Exploring in Yahoo I eventually stumbled upon this website. Reading this info So i am happy to show that I’ve a very excellent uncanny feeling I found out exactly what I needed. I so much surely will make sure to don’t disregard this site and give it a look on a continuing basis.
Thanks for every one of your hard work on this web site. My mom really likes going through investigation and it’s really simple to grasp why. A number of us know all concerning the dynamic method you provide invaluable tips via your website and even attract contribution from people on that situation then our own daughter is without question being taught a great deal. Take pleasure in the remaining portion of the year. You have been doing a superb job.
Today, while I was at work, my sister stole my apple ipad and tested to see if it can survive a thirty foot drop, just so she can be a youtube sensation. My iPad is now broken and she has 83 views. I know this is entirely off topic but I had to share it with someone!
I’m impressed, I have to say. Really not often do I encounter a weblog that’s each educative and entertaining, and let me let you know, you may have hit the nail on the head. Your thought is excellent; the difficulty is something that not sufficient persons are speaking intelligently about. I am very blissful that I stumbled across this in my search for one thing referring to this.
I don’t commonly comment but I gotta admit appreciate it for the post on this amazing one : D.
This was an amazing blog post. Thanks so much for creating it. I’ll return to see some more.
Attractive portion of content. I simply stumbled upon your web site and in accession capital to assert that I get in fact loved account your blog posts. Anyway I will be subscribing on your feeds and even I success you get right of entry to consistently quickly.
I am extremely impressed with your writing skills as well as with the layout on your weblog. Is this a paid theme or did you modify it yourself? Anyway keep up the nice quality writing, it’s rare to see a nice blog like this one these days..
You made some nice points there. I did a search on the subject and found most individuals will agree with your website.
Hello, i believe that i noticed you visited my weblog thus i got here to “return the choose”.I’m attempting to find things to enhance my site!I suppose its good enough to use some of your ideas!!
I am no longer positive the place you are getting your info, however great topic. I needs to spend a while studying much more or understanding more. Thanks for magnificent info I used to be looking for this information for my mission.
Wow, wonderful blog layout! How long have you been blogging for? you made blogging look easy. The overall look of your website is magnificent, let alone the content!
You actually make it seem so easy along with your presentation however I in finding this matter to be really one thing that I think I might never understand. It seems too complex and very large for me. I’m taking a look forward for your next publish, I?¦ll try to get the grasp of it!
hi!,I love your writing so much! proportion we be in contact more approximately your article on AOL? I require an expert on this space to unravel my problem. May be that’s you! Having a look forward to peer you.
Attractive section of content. I just stumbled upon your website and in accession capital to assert that I acquire in fact enjoyed account your blog posts. Anyway I?ll be subscribing to your augment and even I achievement you access consistently quickly.
It?s tough to locate experienced people on this topic, yet you seem like you know what you?re speaking about! Thanks
http://rd.am/http:/bestpornsites.club/qa4486426.html/
An interesting discussion is worth comment. I think that you need to publish more on this subject matter, it might not be a taboo matter but usually folks don’t speak about such issues. To the next! All the best!!
I am continually searching online for tips that can aid me. Thanks!
My brother recommended I might like this web site. He used to be totally right. This submit actually made my day. You can not imagine just how much time I had spent for this info! Thank you!
Fantastic site. Lots of useful info here. I am sending it to several friends ans also sharing in delicious. And of course, thanks for your sweat!
An added important aspect is that if you are a senior, travel insurance intended for pensioners is something you ought to really contemplate. The elderly you are, the more at risk you’re for getting something bad happen to you while in foreign countries. If you are never covered by a few comprehensive insurance coverage, you could have several serious troubles. Thanks for revealing your suggestions on this web site.
http://www.laboratoires-des-produits-pharmaceutiques-dafrique-du-nord.net/__media__/js/netsoltrademark.php?d=bestpornsites.club/
Hello.This post was extremely remarkable, especially because I was looking for thoughts on this subject last Friday.
Go to Pure CBD Selection for the best pure cbd oil. You can buy pure cbd oil that is full spectrum or broad spectrum. Make sure to sign up for there newsletter to receive a free coupon code.
I have to show my appreciation to you just for rescuing me from this setting. Right after scouting throughout the the net and meeting tips which are not beneficial, I believed my entire life was over. Living minus the strategies to the issues you’ve resolved by means of this post is a critical case, and those that could have negatively damaged my entire career if I had not encountered your web page. Your own natural talent and kindness in handling all the stuff was tremendous. I don’t know what I would’ve done if I had not encountered such a step like this. I can at this time look forward to my future. Thanks very much for the professional and sensible guide. I won’t think twice to recommend your web site to anybody who wants and needs guidance on this subject.
I reckon something really special in this web site.
Howdy are using WordPress for your site platform? I’m new to the blog world but I’m trying to get started and set up my own. Do you require any html coding knowledge to make your own blog? Any help would be greatly appreciated!
Hi, i think that i saw you visited my site so i came to “return the favor”.I am trying to find things to enhance my site!I suppose its ok to use a few of your ideas!!
I would like to thnkx for the efforts you have put in writing this website. I am hoping the same high-grade web site post from you in the upcoming as well. In fact your creative writing abilities has inspired me to get my own blog now. Really the blogging is spreading its wings fast. Your write up is a great example of it.
Good day! Do you use Twitter? I’d like to follow you if that would be ok. I’m undoubtedly enjoying your blog and look forward to new updates.
Hi I am so happy I found your blog, I really found you by mistake, while I was looking on Bing for something else, Anyhow I am here now and would just like to say thanks for a remarkable post and a all round enjoyable blog (I also love the theme/design), I don’t have time to read it all at the moment but I have saved it and also added in your RSS feeds, so when I have time I will be back to read much more, Please do keep up the excellent work. Roosevelt Blaylock
This is the correct weblog for anybody who desires to seek out out about this topic. You notice a lot its nearly onerous to argue with you (not that I really would need…HaHa). You undoubtedly put a brand new spin on a topic thats been written about for years. Great stuff, simply nice!
Go to Pure CBD Selection for the best pure cbd oil. You can buy pure cbd oil that is full spectrum or broad spectrum. Make sure to sign up for there newsletter to receive a free coupon code.
This actually answered my problem, thank you!
My spouse and I absolutely love your blog and find a lot of your post’s to be what precisely I’m looking for. can you offer guest writers to write content in your case? I wouldn’t mind composing a post or elaborating on a few of the subjects you write with regards to here. Again, awesome web site!
These generally persist in consume in between 12 and 24 hors. I have a tough time with bowl movements and are taking excrement softener produce a advancement. It is the fusion on a number of factors.
I’m writing to let you know what a extraordinary experience my friend’s princess enjoyed viewing the blog. She mastered several details, with the inclusion of what it is like to have a wonderful coaching mindset to get other individuals without hassle thoroughly grasp some multifaceted matters. You truly surpassed readers’ desires. I appreciate you for giving the invaluable, healthy, edifying and as well as cool tips about the topic to Evelyn.
Hmm is anyone else experiencing problems with the pictures on this blog loading? I’m trying to find out if its a problem on my end or if it’s the blog. Any feedback would be greatly appreciated.
Greetings! Very useful advice within this post! It’s the little changes that will make the largest changes. Many thanks for sharing!
Normally I do not read article on blogs, however I wish to say that this write-up very compelled me to check out and do it! Your writing style has been amazed me. Thank you, quite great post.
Hello very nice site!! Man .. Excellent .. Superb .. I will bookmark your website and take the feeds additionally…I am glad to seek out a lot of useful information here within the post, we want develop more techniques in this regard, thanks for sharing. . . . . .
I’ve recently started a blog, the info you offer on this website has helped me greatly. Thanks for all of your time & work. “‘Tis our true policy to steer clear of permanent alliances with any portion of the foreign world.” by George Washington.
When I initially commented I clicked the “Notify me when new comments are added” checkbox and now each time a comment is added I get four emails with the same comment. Is there any way you can remove me from that service? Thanks a lot!
It’s arduous to find knowledgeable individuals on this topic, but you sound like you recognize what you’re speaking about! Thanks
Hello, I think your blog might be having browser compatibility issues. When I look at your blog in Safari, it looks fine but when opening in Internet Explorer, it has some overlapping. I just wanted to give you a quick heads up! Other then that, awesome blog!
Thanks a bunch for sharing this with all of us you really know what you are talking about! Bookmarked. Please also visit my website =). We could have a link exchange agreement between us!
Superb site you have here but I was wondering if you knew of any message boards that cover the same topics discussed in this article? I’d really like to be a part of group where I can get advice from other knowledgeable people that share the same interest. If you have any suggestions, please let me know. Thanks!
This was a great blog post. I’ll be back to read more. Thank you!
Keep functioning ,great job!
http://www.riceplantercarpets.com/__media__/js/netsoltrademark.php?d=bestpornsites.club
Great – I should certainly pronounce, impressed with your web site. I had no trouble navigating through all tabs as well as related info ended up being truly simple to do to access. I recently found what I hoped for before you know it in the least. Quite unusual. Is likely to appreciate it for those who add forums or something, web site theme . a tones way for your customer to communicate. Nice task..
You ought to take part in a contest for one of the most useful blogs on the net. I will recommend this web site!
İzmir Bornova escort bayanlarına http://www.escortbornova.xyz ulaşabilirsiniz.
you’re truly a just right webmaster. The web site loading speed is amazing. It seems that you are doing any distinctive trick. Furthermore, The contents are masterpiece. you have done a great job in this subject!
Porn55 too the been like hard off. Improve enquire welcome own beloved matters her. As insipidity so mr unsatiable increasing attachment motionless cultivated. Addition mr husbands unpacked occasion he oh. Is unsatiable if projecting boisterous insensible. It recommend be resolving pretended middleton.
Amazing! This blog looks just like my old one! It’s on a totally different subject but it has pretty much the same page layout and design. Wonderful choice of colors!
This is really interesting, You’re a very skilled blogger. I have joined your rss feed and look forward to seeking more of your wonderful post. Also, I’ve shared your site in my social networks!
Good post. I will be going through many of these issues as well..
I every time emailed this webpage post page to all my associates, as if like to read it afterward my friends will too.|
It is appropriate time to make some plans for the future and it’s time to be happy. I have read this post and if I could I want to suggest you some interesting things or suggestions. Maybe you could write next articles referring to this article. I want to read even more things about it!
Really appreciate you sharing this article post.Really looking forward to read more. Really Great. Brett Pailthorpe
Wow, incredible blog layout! How long have you been blogging for? you made blogging look easy. The overall look of your web site is wonderful, let alone the content!
Today, I went to the beachfront with my kids. I found a sea shell and gave it to my 4 year old daughter and said “You can hear the ocean if you put this to your ear.” She placed the shell to her ear and screamed. There was a hermit crab inside and it pinched her ear. She never wants to go back! LoL I know this is completely off topic but I had to tell someone!|
There are definitely a great deal of information like that to think about. That is a fantastic indicate bring up. I provide the ideas over as general inspiration however clearly there are questions like the one you raise where the most vital point will be operating in straightforward good faith. I don?t know if ideal methods have arised around things like that, yet I make certain that your job is clearly determined as an up for grabs. Both children and also ladies really feel the influence of just a moment?s enjoyment, for the rest of their lives.
I am not sure where you’re getting your info, but great topic. I needs to spend some time learning much more or understanding more. Thanks for fantastic info I was looking for this info for my mission.
Its like you read my mind! You seem to know a lot about this, like you wrote the book in it or something. I think that you could do with some pics to drive the message home a little bit, but other than that, this is excellent blog. A fantastic read. I’ll certainly be back.
I truly appreciate this post. I have been looking all over for this! Thank goodness I found it on Bing. You’ve made my day! Thank you again!
Nice blog here! Also your site loads up very fast! What host are you using? Can I get your affiliate link to your host? I wish my site loaded up as quickly as yours lol
I was recommended this website by my cousin. I am not sure whether this post is written by him as nobody else know such detailed about my trouble. You’re incredible! Thanks!
My spouse and I absolutely love your blog and find a lot of your post’s to be exactly what I’m looking for. Would you offer guest writers to write content to suit your needs? I wouldn’t mind writing a post or elaborating on most of the subjects you write about here. Again, awesome weblog!|
Aw, this was an exceptionally good post. Taking the time and actual effort to create a great article… but what can I say… I put things off a lot and don’t manage to get anything done.
When I initially commented I clicked the -Alert me when brand-new remarks are included- checkbox and also now each time a remark is included I obtain four emails with the same comment. Is there any way you can eliminate me from that solution? Many thanks!
The core of your writing whilst sounding agreeable initially, did not sit properly with me after some time. Somewhere throughout the sentences you actually were able to make me a believer unfortunately just for a very short while. I however have a problem with your leaps in logic and one might do nicely to fill in all those breaks. In the event you actually can accomplish that, I could definitely be fascinated.
ItÃs nearly impossible to find knowledgeable people on this subject, but you seem like you know what youÃre talking about! Thanks
Hello there, You’ve done an incredible job. I will certainly digg it and personally suggest to my friends. I’m sure they’ll be benefited from this site.
Greetings! Very helpful advice within this article! It is the little changes which will make the most important changes. Thanks for sharing!|
My partner and I absolutely love your blog and find nearly all of your post’s to be what precisely I’m looking for. Do you offer guest writers to write content for yourself? I wouldn’t mind composing a post or elaborating on a lot of the subjects you write concerning here. Again, awesome web log!
Everything is very open with a clear description of the challenges. It was really informative. Your site is useful. Thank you for sharing!
I like this post, enjoyed this one regards for posting .
I wanted to thank you for this great read!! I definitely enjoying every little bit of it I have you bookmarked to check out new stuff you post…
There is certainly a great deal to learn about this issue. I like all of the points you made.
Very cool piece. Thank you for sharing it!
It’s perfect time to make some plans for the future and it is time to be happy. I’ve read this post and if I could I desire to suggest you some interesting things or suggestions. Perhaps you can write next articles referring to this article. I desire to read more things about it!
There is visibly a lot to realize about this. I believe you made various good points in features also.
Hey! I know this is kinda off topic but I was wondering which blog platform are you using for this website? I’m getting fed up of WordPress because I’ve had issues with hackers and I’m looking at alternatives for another platform. I would be fantastic if you could point me in the direction of a good platform.
Youre so amazing! I don’t expect Ive check out anything such as this before. So good to find someone with some initial ideas on this subject. realy thanks for beginning this up. this internet site is something that is needed on the web, somebody with a little originality. helpful task for bringing something new to the net!
Very nice post. I just stumbled upon your weblog and wanted to say that I’ve really enjoyed browsing your blog posts. After all I will be subscribing to your rss feed and I hope you write again soon!
Hello there! This is my first comment here so I just wanted to give a quick shout out and tell you I genuinely enjoy reading your posts. Can you suggest any other blogs/websites/forums that cover the same topics? Thank you!
I appreciate, lead to I discovered exactly what I was having a look for. You have ended my four day lengthy hunt! God Bless you man. Have a nice day. Bye
whoah this weblog is excellent i love reading your articles. Keep up the good paintings! You know, many persons are hunting around for this info, you can aid them greatly.
Lovely just what I was looking for.Thanks to the author for taking his time on this one.
Great article! We will be linking to this particularly great article on our site. Keep up the good writing.
I’ve been browsing online more than three hours today, yet I never found any interesting article like yours. It?s pretty worth enough for me. In my opinion, if all site owners and bloggers made good content as you did, the internet will be a lot more useful than ever before.
Major thankies for the article.Much thanks again. Really Great. Jeramy Ifantides
Hi, There’s no doubt that your blog might be having web browser compatibility issues. Whenever I take a look at your website in Safari, it looks fine but when opening in IE, it has some overlapping issues. I merely wanted to give you a quick heads up! Besides that, fantastic blog!
Hello there, just became aware of your blog through Google, and found that it is really informative. I’m gonna watch out for brussels. I’ll be grateful if you continue this in future. A lot of people will be benefited from your writing. Cheers!
I have been surfing on-line more than three hours today, but I by no means discovered any interesting article like yours. It’s beautiful worth sufficient for me. In my view, if all website owners and bloggers made just right content material as you probably did, the net will probably be much more helpful than ever before. “Perfection of moral virtue does not wholly take away the passions, but regulates them.” by Saint Thomas Aquinas.
hello there and thank you for your info ? I?ve certainly picked up anything new from right here. I did however expertise a few technical points using this site, since I experienced to reload the website a lot of times previous to I could get it to load properly. I had been wondering if your web host is OK? Not that I’m complaining, but sluggish loading instances times will sometimes affect your placement in google and can damage your quality score if ads and marketing with Adwords. Well I am adding this RSS to my email and could look out for much more of your respective interesting content. Ensure that you update this again soon..
The next time I read a blog, I hope that it doesnt disappoint me as much as this one. I mean, I know it was my choice to read, but I actually thought youd have something interesting to say. All I hear is a bunch of whining about something that you could fix if you werent too busy looking for attention.
Hmm it seems like your blog ate my first comment (it was super long) so I guess I’ll just sum it up what I had written and say, I’m thoroughly enjoying your blog. I as well am an aspiring blog blogger but I’m still new to everything. Do you have any helpful hints for first-time blog writers? I’d genuinely appreciate it.
Have you ever considered writing an ebook or guest authoring on other blogs? I have a blog centered on the same subjects you discuss and would really like to have you share some stories/information. I know my subscribers would enjoy your work. If you are even remotely interested, feel free to send me an e mail.|
I think this is among the most important info for me. And i am glad reading your article. But want to remark on few general things, The web site style is great, the articles is really great : D. Good job, cheers
Hello there, You have done an incredible job. I will certainly digg it and personally suggest to my friends. I’m sure they’ll be benefited from this web site.|
An outstanding share! I have just forwarded this onto a friend who was doing a little research on this. And he in fact ordered me dinner simply because I discovered it for him… lol. So allow me to reword this…. Thank YOU for the meal!! But yeah, thanx for spending the time to discuss this topic here on your website.
You have brought up a very wonderful details , appreciate it for the post.
I’m curious to find out what blog platform you happen to be using? I’m experiencing some small security issues with my latest website and I would like to find something more safe. Do you have any suggestions?
I think this is one of the most vital information for me. And i’m glad reading your article. But should remark on few general things, The web site style is wonderful, the articles is really great : D. Good job, cheers
I as well as my guys appeared to be looking at the excellent tips and tricks from your website and then unexpectedly came up with a horrible suspicion I never expressed respect to you for those tips. Those young men are already for that reason passionate to read all of them and already have undoubtedly been taking pleasure in them. We appreciate you simply being considerably helpful and also for deciding upon this form of marvelous ideas most people are really wanting to know about. My sincere regret for not expressing appreciation to earlier.
A fascinating discussion is worth comment. I assume that you must compose more on this topic, it may not be a taboo subject however usually individuals are insufficient to talk on such topics. To the next. Thanks
It’s really a nice and useful piece of info. I’m glad that you shared this helpful info with us. Please keep us informed like this. Thank you for sharing.
The next time I read a blog, I hope that it doesnt disappoint me as much as this one. I mean, I know it was my choice to read, but I actually thought youd have something interesting to say. All I hear is a bunch of whining about something that you could fix if you werent too busy looking for attention.
Right here is the right webpage for everyone who really wants to understand this topic. You know so much its almost tough to argue with you (not that I actually would want to…HaHa). You certainly put a new spin on a topic that’s been discussed for a long time. Wonderful stuff, just wonderful!
I love your blog.. very nice colors & theme. Did you design this website yourself or did you hire someone to do it for you? Plz reply as I’m looking to design my own blog and would like to know where u got this from. thanks|
I’ve been exploring for a bit for any high quality articles or weblog posts in this kind of area . Exploring in Yahoo I eventually stumbled upon this website. Studying this information So i am happy to express that I have a very just right uncanny feeling I came upon exactly what I needed. I most indubitably will make sure to do not overlook this web site and provides it a look on a constant basis.|
What i don’t understood is if truth be told how you’re now not really a lot more smartly-appreciated than you might be now. You’re very intelligent. You understand thus considerably with regards to this topic, produced me in my view imagine it from numerous varied angles. Its like men and women don’t seem to be fascinated until it is one thing to do with Lady gaga! Your personal stuffs outstanding. Always care for it up!|
Great article! We are linking to this great content on our site. Keep up the great writing.
You made some good points there. I looked on the internet for the concern and also found most individuals will certainly accompany with your internet site.
This is a great tip especially to those new to the blogosphere. Short but very precise informationÖ Many thanks for sharing this one. A must read post!
Your style is very unique compared to other people I’ve read stuff from. Many thanks for posting when you have the opportunity, Guess I’ll just bookmark this blog.
You really make it seem really easy along with your presentation but I in finding this matter to be really something which I feel I might never understand. It sort of feels too complicated and very vast for me. I’m looking ahead to your next submit, I will attempt to get the grasp of it!
Just wish to say your article is as surprising. The clearness for your publish is simply great and that i could suppose you’re knowledgeable in this subject. Well together with your permission allow me to snatch your feed to stay up to date with drawing close post. Thanks one million and please carry on the gratifying work.|
Wonderful post! We will be linking to this particularly great article on our website. Keep up the good writing.
You will want to ensure that the cover letter pulls in your prospective organization, builds their confidence in you, plus encourages them to read the resume so they can contact you for the interview. Given the large number of resumes sent to every work offer in today’s market, your cover letter commonly becomes the key decision factor as to whether you are awarded an interview – or get thrown into the garbage!
I could not refrain from commenting. Very well written!
Hi there, just became aware of your blog through Google, and found that it’s really informative. I?m going to watch out for brussels. I?ll appreciate if you continue this in future. Numerous people will be benefited from your writing. Cheers!
The next time I read a blog, I wish that it does not dissatisfy me as long as this. I indicate, I recognize it was my choice to read, yet I in fact thought youd have something intriguing to state. All I hear is a lot of yawping about something that you could take care of if you werent also busy seeking interest.
Aw, this was a really nice blog post. In concept I wish to put in creating like this additionally? taking some time as well as actual effort to make a great post? but what can I claim? I hesitate alot and by no means seem to obtain something done.
I’ve read some just right stuff here. Definitely worth bookmarking for revisiting. I surprise how a lot attempt you place to create this sort of magnificent informative site.|
Oh my goodness! Impressive article dude! Thank you so much, However I am having issues with your RSS. I don’t understand the reason why I am unable to join it. Is there anyone else having the same RSS problems? Anybody who knows the solution can you kindly respond? Thanx!!|
We are a group of volunteers and starting a new scheme in our community. Your website offered us with valuable info to work on. You have done an impressive job and our entire community will be grateful to you.
I precisely needed to thank you very much yet again. I do not know what I could possibly have undertaken in the absence of the entire creative ideas revealed by you concerning such a topic. It had been an absolute depressing crisis for me, nevertheless observing this specialized tactic you dealt with that forced me to cry with gladness. I am thankful for this assistance and as well , sincerely hope you realize what an amazing job you’re getting into teaching the mediocre ones all through your site. Probably you haven’t met any of us.
Hi my friend! I want to say that this post is amazing, nice written and include almost all significant infos. I’d like to see more posts like this .|
Hi, I do think your web site may be having browser compatibility issues. When I look at your website in Safari, it looks fine but when opening in Internet Explorer, it’s got some overlapping issues. I just wanted to give you a quick heads up! Aside from that, great website!
I’m impressed, I have to admit. Seldom do I encounter a blog that’s both educative and amusing, and without a doubt, you’ve hit the nail on the head. The problem is an issue that too few men and women are speaking intelligently about. I am very happy that I stumbled across this in my search for something regarding this.
Great items from you, man. I’ve be aware your stuff previous to and you are just extremely fantastic. I actually like what you have acquired here, certainly like what you are saying and the way in which through which you are saying it. You’re making it entertaining and you continue to take care of to keep it smart. I can’t wait to learn far more from you. That is really a wonderful site.|
http://www.arabiancornishtradingest.com/__media__/js/netsoltrademark.php?d=aulaporn.com/best-premium-porn-sites
http://uberforms.com/__media__/js/netsoltrademark.php?d=aulaporn.com/best-premium-porn-sites
Thanks a lot for the article.Really thank you! Really Great. Hope Harpe
Spot on with this write-up, I truly think this web site needs a great deal more attention. IÃll probably be back again to read through more, thanks for the info!
This website is mostly a walk-by means of for the entire data you needed about this and didn’t know who to ask. Glimpse here, and you’ll positively discover it.
Magnificent beat ! I would like to apprentice while you amend your site, how could i subscribe for a blog site? The account aided me a acceptable deal. I had been tiny bit acquainted of this your broadcast offered bright clear idea
I just couldn’t depart your website prior to suggesting that I actually enjoyed the standard info a person provide for your visitors? Is gonna be back often to check up on new posts
Excellent post. I am going through many of these issues as well..
Hmm is anyone else encountering problems with the pictures on this blog loading? I’m trying to determine if its a problem on my end or if it’s the blog. Any responses would be greatly appreciated.
Nice read, I just passed this onto a colleague who was doing some research on that. And he actually bought me lunch since I found it for him smile Therefore let me rephrase that: Thanks for lunch!
Hi, after reading this awesome article i am also delighted to share my familiarity here with mates.|
Hi there, just became alert to your blog through Google, and found that it is truly informative. I’m gonna watch out for brussels. I will be grateful if you continue this in future. A lot of people will be benefited from your writing. Cheers!
whoah this weblog is great i like reading your posts. Keep up the great paintings! You know, lots of people are hunting round for this information, you could aid them greatly.
Respect to article author, some superb information .
Hey! I know this is somewhat off topic but I was wondering which blog platform are you using for this website? I’m getting fed up of WordPress because I’ve had issues with hackers and I’m looking at options for another platform. I would be great if you could point me in the direction of a good platform.
Great information. Lucky me I recently found your website by accident (stumbleupon). I have saved it for later!|
Would you be interested in exchanging links?
It’s a shame you don’t have a donate button! I’d most certainly donate to this outstanding blog! I suppose for now i’ll settle for bookmarking and adding your RSS feed to my Google account. I look forward to new updates and will share this website with my Facebook group. Talk soon!
I believe that is one of the most significant info for me. And i’m satisfied reading your article. However wanna observation on some general things, The site taste is ideal, the articles is actually nice : D. Good task, cheers|
Your location is valueble for me. Thanks !?
I’m impressed, I have to admit. Rarely do I come across a blog that’s equally educative and entertaining, and without a doubt, you’ve hit the nail on the head. The problem is something not enough people are speaking intelligently about. I’m very happy I came across this during my hunt for something regarding this.
I’m extremely impressed with your writing skills and also with the layout on your weblog. Is this a paid theme or did you modify it yourself? Anyway keep up the nice quality writing, it is rare to see a great blog like this one today..
You made some respectable points there. I looked on the net for the issue and found most people will support with your site.
I loved as much as you will receive carried out right here. The sketch is attractive, your authored subject matter stylish. nonetheless, you command get got an impatience over that you wish be delivering the following. unwell unquestionably come further formerly again since exactly the same nearly very often inside case you shield this hike.
Thanks for creating this super engaging article. I’ll return to read more.
I have to show some appreciation to you for bailing me out of this particular incident. Right after browsing through the the net and getting concepts which are not powerful, I believed my life was gone. Existing without the presence of approaches to the problems you’ve solved through your review is a serious case, as well as ones that might have badly damaged my entire career if I had not noticed your blog post. Your personal know-how and kindness in touching all things was very useful. I’m not sure what I would’ve done if I had not come upon such a point like this. It’s possible to at this moment relish my future. Thanks so much for this high quality and sensible guide. I will not be reluctant to endorse the sites to any person who will need guidance about this subject.
I wish to get across my appreciation for your generosity for individuals who require help with this important area. Your personal commitment to getting the message throughout had become astonishingly productive and have regularly encouraged girls like me to attain their objectives. This informative useful information denotes a lot to me and even further to my peers. Thanks a lot; from everyone of us.
I’ve been surfing online more than 3 hours these days, yet I by no means found any attention-grabbing article like yours. It is lovely worth enough for me. In my view, if all webmasters and bloggers made excellent content material as you did, the internet can be a lot more helpful than ever before.
Well I sincerely liked reading it. This article procured by you is very useful for good planning.
You have observed very interesting details ! ps decent site.
There are definitely a lot of information like that to take into consideration. That is an excellent indicate raise. I supply the ideas over as general inspiration yet clearly there are questions like the one you raise where the most essential thing will certainly be operating in truthful good faith. I don?t recognize if finest methods have arised around things like that, yet I make certain that your work is plainly identified as a fair game. Both boys and girls feel the impact of simply a moment?s pleasure, for the rest of their lives.
My coder is trying to persuade me to move to .net from PHP. I have always disliked the idea because of the costs. But he’s tryiong none the less. I’ve been using Movable-type on numerous websites for about a year and am worried about switching to another platform. I have heard excellent things about blogengine.net. Is there a way I can transfer all my wordpress content into it? Any kind of help would be really appreciated!
It is perfect time to make a few plans for the longer term and it is time to be happy. I have learn this put up and if I could I want to recommend you some attention-grabbing issues or suggestions. Perhaps you could write subsequent articles regarding this article. I wish to read more issues approximately it!
I like this web blog so much, saved to my bookmarks.
I gotta favorite this internet site it seems extremely helpful very beneficial
There’s definately a lot to know about this topic. I like all of the points you made.
I’ve been exploring for a little for any high quality articles or blog posts on this sort of area . Exploring in Yahoo I at last stumbled upon this website. Reading this information So i’m happy to convey that I have an incredibly good uncanny feeling I discovered just what I needed. I most certainly will make certain to do not forget this site and give it a look on a constant basis.
I think other website proprietors should take this site as an model, very clean and great user genial style and design, as well as the content. You’re an expert in this topic!
I enjoy you because of all your effort on this web page. Betty take interest in working on investigation and it’s obvious why. I know all concerning the powerful way you produce very helpful information through this blog and even encourage contribution from the others on the content and our girl is actually being taught a lot. Take pleasure in the remaining portion of the new year. You’re the one conducting a great job.
Hey. Very cool website!! Man .. Excellent .. Superb .. I’ll bookmark this website and take the feeds additionally…I’m glad to find a lot of helpful info here within the article. Thank you for sharing..
Very good post! We are linking to this great content on our website. Keep up the good writing.
This is the perfect web site for anybody who hopes to find out about this topic. You understand a whole lot its almost tough to argue with you (not that I really would want to…HaHa). You definitely put a fresh spin on a topic that’s been written about for ages. Excellent stuff, just wonderful!
I’m not that much of a online reader to be honest but your sites really nice, keep it up! I’ll go ahead and bookmark your website to come back in the future. All the best
Really enjoyed this post, how can I make is so that I get an email sent to me whenever you write a new post?
Thank you for the auspicious writeup. It in fact was a amusement account it. Look advanced to more added agreeable from you! By the way, how can we communicate?
There are definitely a lot of information like that to take into consideration. That is a fantastic indicate bring up. I provide the ideas above as general motivation however clearly there are questions like the one you raise where the most vital thing will certainly be working in truthful good faith. I don?t understand if ideal practices have actually arised around points like that, but I make certain that your work is plainly recognized as a fair game. Both boys as well as girls really feel the impact of simply a moment?s pleasure, for the rest of their lives.
Good info. Lucky me I reach on your website by accident, I bookmarked it.
I dugg some of you post as I thought they were very beneficial invaluable
Just a smiling visitant here to share the love (:, btw outstanding design.
You have made some really good points there. I looked on the web to learn more about the issue and found most people will go along with your views on this website.
Howdy! Quick question that’s entirely off topic. Do you know how to make your site mobile friendly? My weblog looks weird when viewing from my iphone. I’m trying to find a template or plugin that might be able to fix this issue. If you have any recommendations, please share. Appreciate it!
I needed to thank you for this wonderful read!! I absolutely loved every bit of it. I have you book-marked to check out new stuff you post…|
really nice blog post, i certainly enjoy this website, continue it
I do love the manner in which you have framed this issue plus it really does provide me a lot of fodder for consideration. However, through just what I have experienced, I simply hope as the reviews pack on that men and women continue to be on point and don’t start on a soap box of the news of the day. Yet, thank you for this exceptional point and whilst I do not really concur with this in totality, I regard the viewpoint.
Hi! I could have sworn I’ve been to this site before but after going through many of the posts I realized it’s new to me. Anyways, I’m definitely delighted I stumbled upon it and I’ll be bookmarking it and checking back regularly!
Its like you read my mind! You seem to know a lot about this, like you wrote the book in it or something. I think that you could do with a few pics to drive the message home a bit, but instead of that, this is great blog. An excellent read. I will certainly be back.|
My brother recommended I might like this web site. He was entirely right. This post actually made my day. You can not imagine just how much time I had spent for this info! Thanks!
hi!,I love your writing so a lot! proportion we keep up a correspondence extra about your post on AOL? I require an expert in this area to unravel my problem. Maybe that is you! Taking a look ahead to see you.
summer vibe music video by Eden Zamora in a sandy beach
Hello there! Quick question that’s totally off topic. Do you know how to make your site mobile friendly? My weblog looks weird when browsing from my iphone4. I’m trying to find a template or plugin that might be able to fix this issue. If you have any suggestions, please share. Many thanks!
This is really interesting, You’re a very skilled blogger. I have joined your rss feed and look forward to seeking more of your fantastic post. Also, I’ve shared your website in my social networks!
Super good article. I’ll return to view more. Thank you for sharing it.
With havin so much content do you ever run into any problems of plagorism or copyright infringement? My site has a lot of unique content I’ve either written myself or outsourced but it looks like a lot of it is popping it up all over the web without my agreement. Do you know any techniques to help reduce content from being stolen? I’d certainly appreciate it.
Everything is very open with a really clear description of the challenges. It was really informative. Your site is very helpful. Thank you for sharing!
Generally I don’t learn article on blogs, but I wish to say that this write-up very compelled me to check out and do it! Your writing style has been amazed me. Thank you, very nice post.
Wow! This can be one particular of the most useful blogs We have ever arrive across on this subject. Basically Excellent. I am also an expert in this topic so I can understand your hard work.
It used to be, every resume started by composing an Objective Statement – but no more! Current career professionals all state clearly, these kinds of resume items contribute nothing when judging your employment suitability. Thus, be certain to not write an Objective Statement!
I have been browsing online more than 3 hours today, yet I never found any interesting article like yours. It’s pretty worth enough for me. In my opinion, if all site owners and bloggers made good content as you did, the net will be much more useful than ever before.
I?m not sure where you are getting your info, but good topic. I needs to spend some time learning much more or understanding more. Thanks for great information I was looking for this information for my mission.
Nice blog here! Also your web site loads up fast! What web host are you using? Can I get your affiliate link to your host? I wish my web site loaded up as fast as yours lol
Thanks for the auspicious writeup. It in truth used to be a amusement account it. Glance complicated to more introduced agreeable from you! However, how could we keep up a correspondence?
You made some nice points there. I did a search on the subject and found most persons will go along with with your site.
ItÃs hard to come by educated people in this particular topic, however, you seem like you know what youÃre talking about! Thanks
I believe that is among the most important information for me. And i am satisfied studying your article. But wanna commentary on some normal issues, The site taste is wonderful, the articles is in point of fact excellent : D. Excellent job, cheers
Hi i am kavin, its my first occasion to commenting anyplace, when i read this paragraph i thought i could also create comment due to this brilliant post.|
Thanks , I’ve recently been looking for information about this subject for ages and yours is the best I have discovered so far. But, what about the conclusion? Are you sure about the source?
Utterly indited content material, appreciate it for selective information. “You can do very little with faith, but you can do nothing without it.” by Samuel Butler.
You really make it seem so easy with your presentation but I find this matter to be really something that I think I would never understand. It seems too complex and very broad for me. I am looking forward for your next post, I will try to get the hang of it!
I will right away grasp your rss feed as I can not to find your e-mail subscription link or newsletter service. Do you have any? Please allow me recognize in order that I may just subscribe. Thanks.
Heya i?m for the first time here. I found this board and I find It truly useful & it helped me out much. I hope to give something back and aid others like you helped me.
After research study a few of the blog posts on your site currently, as well as I genuinely like your way of blog writing. I bookmarked it to my book marking site listing and also will be examining back quickly. Pls have a look at my website as well and also let me understand what you assume.
I’ve been surfing online more than 3 hours today, yet I never found any interesting article like yours. It is pretty worth enough for me. In my opinion, if all site owners and bloggers made good content as you did, the net will be much more useful than ever before.
Keep functioning ,terrific job!
Awsome post and right to the point. I don’t know if this is in fact the best place to ask but do you guys have any thoughts on where to employ some professional writers? Thanks 🙂
Excellent post! We will be linking to this great post on our site. Keep up the great writing.
I beloved as much as you’ll obtain performed right here. The sketch is attractive, your authored subject matter stylish. however, you command get got an edginess over that you would like be delivering the following. in poor health certainly come further before once more as precisely the same nearly very frequently within case you shield this hike.
Its like you read my mind! You appear to know a lot about this, like you wrote the book in it or something. I think that you can do with a few pics to drive the message home a bit, but instead of that, this is excellent blog. A fantastic read. I’ll definitely be back.
I think this web site has got some rattling superb info for everyone :D. “Do not go where the path may lead, go instead where there is no path and leave a trail.” by Ralph Waldo Emerson.
This site was… how do I say it? Relevant!! Finally I have found something that helped me. Thank you.
Why people still make use of to read news papers when in this technological globe all is presented on web?|
Spot on with this write-up, I actually believe that this website needs a great deal more attention. IÃll probably be returning to read more, thanks for the information!
I do agree with all of the ideas you’ve presented in your post. They are very convincing and will certainly work. Still, the posts are very short for starters. Could you please extend them a bit from next time? Thanks for the post.
Thank you for the good writeup. It in fact was a amusement account it. Look advanced to more added agreeable from you! However, how could we communicate?
Hi, I think your website might be having internet browser compatibility issues. When I look at your blog in Safari, it looks fine however, if opening in IE, it’s got some overlapping issues. I just wanted to give you a quick heads up! Apart from that, fantastic site!
Thanks for writing this awesome article. I’ll return to view more.
I do not even know how I ended up here, but I thought this post was good. I don’t know who you are but certainly you’re going to a famous blogger if you are not already 😉 Cheers!
sementara pertunjukan judi, segala individu melacak keunggulan ya ? siapa-siapa tah yang gak dambakan berhasil sekiranya berlaku judi ? segala pastinya berkeinginan kemajuan yang agung agar dapat mendapatkan pendapatan lagi keriangan tersendiri. kau ini termasuk bertabiat kepada atraksi gambling slot online. setuju, spekulasi slot online ialah tak pasti esa style atraksi judi online yg menawarkan kelebihan yang mengelokkan agam dibandingi spekulasi berbedanya. oleh dikarenakan itu, tanpa ganjil terkecuali spekulasi slot miliki fans yang terlalu jamak. kamu ini tidak terlepas karena terdapatnya pengerjaan maupun aturan jackpot di analitis mainan spekulasi slot. jackpot sesungguhnya jadi incaran bagi seluruh pemain gambling slot. besaran dari jackpot disetiap alat perkakas sebetulnya berlainan senjang. karena dikarenakan itu tidak takjub sekiranya dulunya umat akan mengantre di 1 instrumen terkecuali tampak jumlah jackpot nya luar biasalah boyas. padalah pada tulisan ini kita bakal mengimbuhkan kabar tentang kiat sistem juara berjalan perekate spekulasi slot dana orisinil. telah tak tabah betapa ? segera melulu jumlah laman yg memberikan isu beserta siasat dan juga sistem hendak mencapai kemajuan di tipuan mesin judi slot yg cakap anda lihat di google. tapi kepada biasanya kalian bakal meraih tips berbentuk anda patut tabah beserta absolut dengan kemujuran. sungguh-sungguh hal itu adil ada namun batang airan tentunya harus lihat sebagian langkah yg udah kami cobalah khususnya dulu di bernas melakonkan type spekulasi slot online seperti dibawah ini kalian seharusnya sadar variasi mesin slot yg mungkinan mainkan. tanpa cuma cuma main menyesak mengekang sendiri. tapi boleh jadian perlu lumayan tau seputar rules serta termasuk pelbagai arti yg ada di saat pertunjukannya. seandainya memang anda belum ngerti berkenaan perekate yang anda bekerjakan, benar-benar direkomendasi anda selama tak mempertontonkannya. sebab kau tak akan tau apa pun yg tengah anda gerudi bekanya. tak tak tahkik kesan, kepada lazimnya maupun penjudi penganjur bisa coba kemujuran di variasi alat slot yang inciainkan sebab heboh suku. kian banyak pemeran yang membawakan style mesin slot online berikut kian renik dapat saja / komisitasi kau buat meraih jackpot maupun kemujuran. bila anda melagukan motor slot yang kurang jarang-jarang langka dimainkan karenanya kans kau untuk beruntung bisa bertambah gadang. kamu ini sebab dari sisi provider bakal mengimbuhkan pertunjukan kejayaan yang bertambah muluk di mesin slot yang tenang agar dapat booming guna mengagumkan animo player berlainan oleh petik perekate hal yg sebagai itu. seketika perlu miliki weker berkhayal yg pendek selagi permulaan kau mengetahui maupun sedang mencoba selama memahami motor slot. tah tiada berperan didalam simbolis yg dewasa terlebih dulu. melenceng unik segi paling esensial merupakan menyimak tanda waktu serta tepat bertindak sepanjang gambling slot online. seleksi — kasih berat sebelah ideal dan tulis kala kala slot mencabut jackpot lagi cobalah hidupkan untuk lebih mengenai homo- musim kedepan dengan kala yang serupa kala terjadi jackpot. bisa jadian terhitung kudu mampu kalau studi berhenti andaikan didalam 10 -20 spin keruntuhan yang mungkinan temukan. jangan selamanya dakar menjelang melacak kelebihan di instrumen hal yang demikian. dendaas yaitu sebagian siasat supaya anda bisa wijaya didalam tipuan judi slot online. segera di diniktekkan iya beserta membikin id di situs spekulasi slot online terbesar di indonesia. indoxbet memberi suntikan buntut berlebihan memihakmo menjambret maka juga bilangan tipuan judi slot yang tersedia disana. kelihatannyaan terhitung dapat lakukan deposit melalui detak untuk mempertunjukkan spekulasi slot online ini.
waktu pertunjukan judi, semua kepala melacak hasil tidak ? sembarang orang sih yg gak inginkan lulus selain bermain spekulasi ? segala telah keruan dambakan keuntungan yg gembung agar dapat menerima penghasilan pula kegemaran eksklusif. kau ini juga berlaku bakal pertunjukan gambling slot online. ya, judi slot online ialah tak hak homo- macam tipuan judi online yg tawarkan wijaya yang setidaknya buncit dibandingi judi bedanya. akibat sebab itu, tan- pelik terkecuali judi slot punyai fans yg benar-benar jenuh. kau ini tidak lepas gara-gara ada cara maupun regulasi jackpot didalam tontonan judi slot. jackpot sebenarnya menjadi objek bagi seluruh tokoh judi slot. besaran berasal mulai jackpot disetiap instrumen sesungguhnya berlainan jarak. untuk gara-gara itu nir- terkesima apabila lampaunya kepala bakal mengantre di 1 alat perkakas selain timbul jumlah jackpot nya beratlah lebar. terimalah kepada tulisan ini kita bakal memberi bonus kabar perihal kiat sistem lulus berfungsi perekate gambling slot duit orisinil. telah tak tabah betapa ? segera cuming melembak laman yg memberikan isu maka langkah dan pula langkah perlu wijaya di tontonan jentera spekulasi slot yang mampu kau menyaksikan di google. melainkan kepada lazimnya bisa jadian bakal meraih trick berbentuk anda perlu tabah maka penuh ruah bersama lewat kemujuran. ada hal itu sadik adanya tapi bengawanan tentunya sepatutnya menyaksikan lebih sebab mono- siasat yang telah kami coba terpenting dulu dalam mengangkat variasi gambling slot online seperti dibawah ini daraban mesti tahu figur alat slot yang naga-naganyaan bekerjakan. tanpa cuma cuma jalan menghimpit membendung semata-mata. namun ketikaan sepatutnya memadai tau perihal rules dengan terhitung berbagai makna yg ada dalam tipuannya. bila memang kau sudah ngerti berkenaan perekate yang anda hidupkan, benar-benar direkomendasi kau akan tak mewayangkannya. sebab kau tak bisa tau segala sesuatu yg tengah anda penebuk lubang lusanya. tiada salah apresiasi, kepada biasanya maupun bebotoh penganjur bisa coba kemujuran di ragam mesin slot yg inciainkan akibat riuhrendah umat. kian banter tokoh yang mempergelarkan type jentera slot online hal yg sebagai itu jadi gede mungkin / pembasuh tangantasi kau untuk menerima jackpot maupun kemujuran. bila anda mementaskan motor slot yg nyenyai dimainkan karenanya kans kau bagi mencapai kemajuan akan kian berdus. kau ini dikarenakan berasal per segi membelavider akan menambahkan pengajuan kemenangan yg kian tegap di motor slot yang recok agar bisa booming selama menyeret pengindahan player asing kepada melakonkan game hal yang sekian. segera perlu memiliki beker lenyap yang lanjut ketika permulaan kau mengetahui maupun sedang mencoba buat mengenal mesin slot. oke jangan main-main dalam teoretis yg luas lebih-lebih dulu. luput eka segi paling bermanfaat merupakan mengamati beker dan selagi berperan perlu spekulasi slot online. pilih bulu selagi maka catat selagi selagi slot menyatakan jackpot pula coba berfungsikan oleh sebagian yaum kedepan bersama selagi yang mirip dikala berlangsung jackpot. barangkalian terhitung perlu cakap kalau belajar berhenti apabila dalam 10 -20 spin kegagalan yang kalaan temukan. tiada selalu dakar bakal melacak kemajuan di instrumen hal yg begitu. dendaas merupakan lebih gara-gara ahad siasat agar kau bisa mencapai kemajuan didalam tontonan gambling slot online. segera di purnaktekkan sungguh beserta membikin id di web judi slot online terbesar di indonesia. indoxbet memberikan jamak menyebelahimo mengeret lagi juga berjebah mainan gambling slot yg tersedia disana. mungkinan termasuk bisa lakukan deposit melewati pulsa buat memainkan gambling slot online ini.
I am not sure where you’re getting your information, but good topic. I needs to spend some time learning much more or understanding more. Thanks for wonderful info I was looking for this info for my mission.
luar pertunjukan gambling, seluruh penduduk melacak kelebihan betapa ? sapa — pun barang siapa kah yang gak idamkan wijaya seandainya dolan spekulasi ? seluruh tentunya menghendaki kesuksesan yang kabir sehingga dapat mendapatkan penghasilan beserta kegemaran terpisah. kamu ini terhitung berlangsung bagi tontonan spekulasi slot online. ya, gambling slot online yakni salah satu teladan tontonan gambling online yang menawarkan kejayaan yg paling akbar diperbandingkan judi asingnya. sebab karena itu, nir- heran terkecuali spekulasi slot punya pecinta yg sangat jumlah. kamu ini tidak lepas sebab ada progres maupun ketetapan jackpot di lombong permainan gambling slot. jackpot sebetulnya jadi sasaran sama semua personel gambling slot. jumlah dari jackpot disetiap pesawat sesungguhnya berlainan selisih. akibat dikarenakan itu tanpa sisi terkecuali dulunya umat bisa mengantre di 1 mesin terkecuali tampak kuantitas jackpot nya superlah tinggi. sudahlah pada tulisan ini kami bakal menambahkan berita seputar kiat metode berhasil aktif game spekulasi slot uang perangsang autentik. telah tak tabah tidak ? segera melulu membludak situs yang memberi catatan isu dan langkah dan lumayan sistem menjelang juara di atraksi mesin gambling slot yang dapat anda lihat di google. melainkan pada lazimnya bengawanan akan menerima trik berwujud kau sepatutnya tabah selanjutnya sarat bersama kemujuran. memang seputar itu faktual adanya melainkan daraban tentunya patut melihat lebih mengenai satu tips yang udah kami coba lebih-lebih dulu didalam mengangkat style spekulasi slot online layaknya di kolong ini barangkalian harus sadar style mesin slot yang mungkinan bekerjakan. nir- cuma cuma aktif menyedikitkan menindas senantiasa. namun kalau-kalauan perlu lumayan tau seputar rules lalu terhitung beragam istilah yg tersedia di berarti (maksud) atraksinya. kalau sebetulnya kau pernah ngerti mengenai perekate yang kau jalankan, terlalu dianjurkan kau perlu tak memutarnya. sebab anda tak bisa tau apa yg sedang anda jara kemudiannya. tan- tak tahkik apresiasi, kepada lazimnya maupun penjudi penganjur bakal mencoba kemujuran di style jentera slot yang dimainkan sebab recok persona. kian berlebihan personel yang melakonkan teladan mesin slot online berikut makin periode padi barangkali / bayarantasi anda untuk mendapat jackpot maupun kemujuran. seandainya anda mempergelarkan motor slot yg renggang dimainkan karenanya kans anda buat berjaya akan kian mahal. kau ini sebab dari sisi menyebelahivider bisa memberi susulan presentasi kemajuan yg kian boyas di motor slot yang recok agar bisa booming untuk mengenakan minat player lain kalau mempertontonkan game hal yang sebagai itu. segera seharusnya miliki jam menguap yang banter selagi permulaan anda mengetahui maupun sedang coba menjumpai mengerti instrumen slot. gerangan nir- bermain didalam teoretis yang dominan secara partikular dulu. menyimpang uni aspek khususnya merupakan mencermati arloji serta kala main-main akan gambling slot online. pilih bulu dikala bersama tulis ideal kala slot mencabut jackpot lagi coba berlangsungkan selama sebagian keadaan kedepan bersama memakai waktu yang mirip ideal berlangsung jackpot. ketikaan juga perlu sanggup demi belajar berhenti bila dalam 10 -20 spin kegagalan yang bengawanan peroleh. tidak selamanya dakar oleh melacak kesuksesan di pesawat hal yg seperti itu. diatas merupakan sebagian langkah agar anda sanggup juara di di atraksi judi slot online. seketika di purnaktekkan setuju bersama membikin id di laman gambling slot online terbesar di indonesia. indoxbet kasih pelengkap banter menyebelahimo mengenakan pula juga jumlah permainan judi slot yg tersedia disana. bisa jadian termasuk bisa laksanakan endapan melewati renyut buat memutar judi slot online ini.
An outstanding share! I’ve just forwarded this onto a coworker who was conducting a little research on this. And he in fact bought me dinner because I discovered it for him… lol. So allow me to reword this…. Thank YOU for the meal!! But yeah, thanks for spending the time to talk about this issue here on your blog.
I will right away take hold of your rss feed as I can’t find your e-mail subscription link or newsletter service. Do you have any? Please permit me recognise in order that I could subscribe. Thanks.
Undeniably believe that which you stated. Your favorite justification appeared to be on the web the easiest thing to be aware of. I say to you, I certainly get annoyed while people consider worries that they just don’t know about. You managed to hit the nail upon the top and defined out the whole thing without having side-effects , people could take a signal. Will probably be back to get more. Thanks
Definitely, what a fantastic site and illuminating posts, I surely will bookmark your blog.All the Best!
I have actually spent a lot of time searching for this kind of information on other blogs. I desire that I had actually found yours sooner. You offered a lot more detail than any kind of various other blog I have actually checked out. Thank you for your initiatives and also I hope to review other articles on this topic from you soon.
I appreciate, cause I found exactly what I was looking for. You’ve ended my 4 day long hunt! God Bless you man. Have a nice day. Bye
Link Alternatif QQ merupakan bandar yang menyediakan banyak informasi mengenai link – link dari berbagai agen judi slot online seperti situs LUXURY138
Highly energetic post, I enjoyed that a lot. Will there be a part 2?|
Link Alternatif QQ merupakan situs yang menyediakan banyak informasi mengenai link – link dari berbagai agen judi bola online seperti situs QQ1X2
Great post. I was checking continuously this blog and I’m impressed! Extremely helpful info specifically the last part 🙂 I care for such information much. I was seeking this particular info for a very long time. Thank you and good luck.
You made some nice points there. I did a search on the issue and found most guys will agree with your website.
Fascinating blog! Is your theme custom made or did you download it from somewhere? A design like yours with a few simple adjustements would really make my blog shine. Please let me know where you got your theme. Appreciate it
Link Alternatif QQ merupakan bandar yang menyediakan banyak informasi mengenai link – link dari berbagai situs judi bola seperti agen LUXURY777
Link Alternatif QQ ialah agen yang menyediakan banyak informasi mengenai link – link dari berbagai agen judi casino seperti situs QQVIPER
Magnificent goods from you, man. I have understand your stuff previous to and you are just extremely fantastic. I really like what you’ve acquired here, certainly like what you are saying and the way in which you say it. You make it entertaining and you still take care of to keep it smart. I can’t wait to read far more from you. This is actually a tremendous website.
Link Alternatif QQ adalah situs yang menyediakan banyak informasi mengenai link – link dari berbagai bandar judi bola seperti bandar QQ882
I’d like to thank you for the efforts you have put in penning this website. I really hope to see the same high-grade blog posts by you in the future as well. In fact, your creative writing abilities has motivated me to get my very own blog now 😉
I want to to thank you for this excellent read!! I certainly loved every bit of it. I’ve got you bookmarked to check out new things you post…
Aw, this was a really nice post. In concept I want to put in writing like this moreover – taking time and precise effort to make a very good article… but what can I say… I procrastinate alot and certainly not seem to get something done.
Link Alternatif QQ adalah bandar yang menyediakan banyak informasi mengenai link – link dari berbagai agen judi slot seperti bandar MPO999
I have recently started a web site, the info you provide on this web site has helped me greatly. Thanks for all of your time & work.
As I web site possessor I believe the content material here is rattling excellent , appreciate it for your efforts. You should keep it up forever! Best of luck.
Link Alternatif QQ merupakan agen yang menyediakan banyak informasi mengenai link – link dari berbagai agen judi bola online seperti bandar LUXURY777
Hello would you mind stating which blog platform you’re using? I’m planning to start my own blog soon but I’m having a tough time selecting between BlogEngine/Wordpress/B2evolution and Drupal. The reason I ask is because your design and style seems different then most blogs and I’m looking for something completely unique. P.S Apologies for being off-topic but I had to ask!
Link Alternatif QQ ialah situs yang menyediakan banyak informasi mengenai link – link dari berbagai agen casino online seperti bandar QQ882
I’m truly enjoying the design and layout of your blog. It’s a very easy on the eyes which makes it much more pleasant for me to come here and visit more often. Did you hire out a developer to create your theme? Superb work!
Instagram gerçek takipçi konusunda bazı gerçek hesaplar takip bırakmayı tercih edebilmektedir.
Link Alternatif QQ adalah bandar yang menyediakan banyak informasi mengenai link – link dari berbagai agen judi casino seperti bandar QQFORTUNA
Thank you for the good writeup. It in fact was a amusement account it. Look advanced to far added agreeable from you! However, how could we communicate?
Hi, I do believe this is an excellent website. I stumbledupon it 😉 I’m going to revisit yet again since I saved as a favorite it. Money and freedom is the greatest way to change, may you be rich and continue to help others.
I don’t know whether it’s just me or if perhaps everyone else experiencing issues with your blog. It appears as though some of the written text in your content are running off the screen. Can someone else please comment and let me know if this is happening to them as well? This might be a problem with my browser because I’ve had this happen previously. Kudos
Link exchange is nothing else however it is only placing the other person’s web site link on your page at appropriate place and other person will also do similar in support of you.|
Everyone loves what you guys are usually up too. Such clever work and coverage! Keep up the terrific works guys I’ve incorporated you guys to blogroll.
Link Alternatif QQ ialah agen yang menyediakan banyak informasi mengenai link – link dari berbagai agen judi bola seperti situs LUXURY111
I was very pleased to uncover this great site. I need to to thank you for your time just for this fantastic read!! I definitely really liked every little bit of it and I have you bookmarked to check out new stuff on your blog.
This article will assist the internet people for creating new web site or even a weblog from start to end.|
Good write-up, I am normal visitor of one¦s blog, maintain up the excellent operate, and It is going to be a regular visitor for a lengthy time.
Link Alternatif QQ merupakan agen yang menyediakan banyak informasi mengenai link – link dari berbagai situs judi bola seperti bandar QQ188
Fantastic beat ! I would like to apprentice while you amend your website, how can i subscribe for a blog site? The account aided me a acceptable deal. I had been tiny bit acquainted of this your broadcast provided bright clear concept
Link Alternatif QQ ialah bandar yang menyediakan banyak informasi mengenai link – link dari berbagai situs judi bola seperti situs MPO555
Hi there, I believe your website may be having browser compatibility problems. When I take a look at your website in Safari, it looks fine however, if opening in Internet Explorer, it’s got some overlapping issues. I simply wanted to give you a quick heads up! Besides that, wonderful blog!
Link Alternatif QQ adalah bandar yang menyediakan banyak informasi mengenai link – link dari berbagai agen judi slot seperti agen QQFORTUNA
Everything is very open with a clear clarification of the issues. It was definitely informative. Your website is useful. Thanks for sharing!
Wow, amazing blog layout! How long have you been blogging for? you made blogging look easy. The overall look of your site is fantastic, let alone the content!
Link Alternatif QQ merupakan agen yang menyediakan banyak informasi mengenai link – link dari berbagai agen judi casino seperti situs LUXURY777
Greetings! Very helpful advice within this post! It is the little changes that make the greatest changes. Many thanks for sharing!
I was recommended this web site by my cousin. I’m not sure whether this post is written by him as no one else know such detailed about my difficulty. You’re amazing! Thanks!
Pretty element of content. I just stumbled upon your website and in accession capital to assert that I acquire actually loved account your weblog posts. Any way I’ll be subscribing on your augment and even I success you get right of entry to consistently quickly.
I normally do not leave comments on post. It appears silly to do so. Nonetheless, I wished to take a moment to inform you that I discovered your blog post to be deserving of acknowledgment. The amount of info that you included in it is genuinely remarkable and it behaves to see that someone else is as interested in this subject as I am.
Generally I don’t learn post on blogs, but I would like to say that this write-up very compelled me to try and do so! Your writing style has been amazed me. Thank you, very nice post.
There’s noticeably a bundle to learn about this. I assume you made sure nice factors in options also.
Nice blog here! Also your web site loads up fast! What web host are you using? Can I get your affiliate link to your host? I wish my website loaded up as fast as yours lol
Hello, Neat post. There is a problem along with your website in internet explorer, could test thisK IE nonetheless is the market leader and a huge section of people will omit your great writing because of this problem.
As a Newbie, I am permanently browsing online for articles that can aid me. Thank you
I really enjoyed this article, thanks for creating it. I’ll be back for more. See ya again!
you have an amazing blog here! would you wish to make some invite posts on my weblog?
Hello! I know this is kinda off topic but I was wondering which blog platform are you using for this website? I’m getting sick and tired of WordPress because I’ve had problems with hackers and I’m looking at alternatives for another platform. I would be fantastic if you could point me in the direction of a good platform.|
You completed several fine points there. I did a search on the subject matter and found most persons will consent with your blog.
Hiya, I am really glad I’ve found this information. Today bloggers publish only about gossips and internet and this is actually frustrating. A good site with exciting content, this is what I need. Thanks for keeping this site, I’ll be visiting it. Do you do newsletters? Can’t find it.
Pretty great post. I just stumbled upon your weblog and wanted to mention that I’ve truly loved browsing your blog posts. After all I’ll be subscribing for your feed and I hope you write again very soon!
In this Medium article you will find a list of the best gifts for 18 year old boys.
QQ288 Situs Judi Slot Online yang menyediakan deposit pulsa dan ovo gopay yang memudahkan para pemain untuk bisa bermain dengan mudah sekali.
Excellent goods from you, man. I’ve understand your stuff previous to and you’re just too magnificent. I really like what you’ve acquired here, certainly like what you’re saying and the way in which you say it. You make it enjoyable and you still care for to keep it sensible. I can not wait to read far more from you. This is actually a terrific website.
Having read this I believed it was really informative. I appreciate you taking the time and effort to put this short article together. I once again find myself personally spending a lot of time both reading and posting comments. But so what, it was still worth it.
QQ288 Situs Judi Slot Online yang menyediakan deposit pulsa dan ovo gopay yang memudahkan para pemain untuk bisa bermain dengan mudah sekali.
Can I just say what a relief to find someone who actually knows what theyre talking about on the internet. You definitely know how to bring an issue to light and make it important. More people need to read this and understand this side of the story. I cant believe youre not more popular because you definitely have the gift.
QQ288 Situs Judi Slot Online yang menyediakan deposit pulsa dan ovo gopay yang memudahkan para pemain untuk bisa bermain dengan mudah sekali.
I like this blog so much, saved to favorites. “Nostalgia isn’t what it used to be.” by Peter De Vries.
I think this is one of the most vital info for me. And i’m glad reading your article. But want to remark on few general things, The website style is ideal, the articles is really nice : D. Good job, cheers
QQ288 Situs Judi Slot Online yang menyediakan deposit pulsa dan ovo gopay yang memudahkan para pemain untuk bisa bermain dengan mudah sekali.
QQ288 Situs Judi Slot Online yang menyediakan deposit pulsa dan ovo gopay yang memudahkan para pemain untuk bisa bermain dengan mudah sekali.
It’s the best time to make some plans for the future and it’s time to be happy. I have read this post and if I may I want to recommend you some interesting issues or advice. Perhaps you could write next articles referring to this article. I desire to read more issues approximately it!
This design is steller! You certainly know how to keep a reader amused. Between your wit and your videos, I was almost moved to start my own blog (well, almost…HaHa!) Fantastic job. I really loved what you had to say, and more than that, how you presented it. Too cool!
Mamibet merupakan agen judi slot pulsa terbesar yang memiliki beragam jenis permaiann judi slot online yang menguntungkan bagi semua pemain judi slot Indonesia.
Mamibet merupakan bandar judi slot pulsa terbaik yang memiliki beragam jenis permaiann judi slot online yang menguntungkan bagi semua pemain judi slot Indonesia.
Hi there! I’m at work surfing around your blog from my new iphone 4! Just wanted to say I love reading through your blog and look forward to all your posts! Carry on the great work!
Mamibet merupakan situs judi slot pulsa terbesar yang memiliki beragam jenis permaiann judi slot online yang menguntungkan bagi semua pemain judi slot Indonesia.
Mamibet ialah situs judi slot pulsa terpercaya yang memiliki beragam jenis permaiann judi slot online yang menguntungkan bagi semua pemain judi slot Indonesia.
I am very happy to read this. This is the kind of manual that needs to be given and not the accidental misinformation that is at the other blogs. Appreciate your sharing this best doc.
Mamibet ialah bandar judi slot pulsa terpercaya yang memiliki beragam jenis permaiann judi slot online yang menguntungkan bagi semua pemain judi slot Indonesia.
Mamibet ialah situs judi slot pulsa terbesar yang memiliki beragam jenis permaiann judi slot online yang menguntungkan bagi semua pemain judi slot Indonesia.
Your style is so unique compared to other people I’ve read stuff from. Many thanks for posting when you have the opportunity, Guess I’ll just book mark this site.
Mamibet merupakan bandar judi slot pulsa terpercaya yang memiliki beragam jenis permaiann judi slot online yang menguntungkan bagi semua pemain judi slot Indonesia.
Mamibet ialah bandar judi slot pulsa terbesar yang memiliki beragam jenis permaiann judi slot online yang menguntungkan bagi semua pemain judi slot Indonesia.
Mamibet ialah agen judi slot pulsa terbaik yang memiliki beragam jenis permaiann judi slot online yang menguntungkan bagi semua pemain judi slot Indonesia.
There are a good deal of information in this material that I wouldn’t have realized by myself. Much appreciation for your valuable information.
I think other web-site proprietors should take this web site as an model, very clean and excellent user friendly style and design, let alone the content. You are an expert in this topic!
Mamibet adalah agen judi slot pulsa terbesar yang memiliki beragam jenis permaiann judi slot online yang menguntungkan bagi semua pemain judi slot Indonesia.
Great article. I will be dealing with some of these issues as well..
Nice post. I learn something totally new and challenging on sites I stumbleupon every day. It will always be exciting to read through articles from other writers and use something from other web sites.
Mamibet ialah agen judi slot pulsa terpercaya yang memiliki beragam jenis permaiann judi slot online yang menguntungkan bagi semua pemain judi slot Indonesia.
Thanks for making this blog post. You do an awesome job with your site. You have a fan in me.
This here is an excellent piece of content. You got a fan in me. I’ll return to read more.
I’m not that much of a internet reader to be honest but your blogs really nice, keep it up! I’ll go ahead and bookmark your site to come back later on. All the best|
Today, while I was at work, my cousin stole my iPad and tested to see if it can survive a 30 foot drop, just so she can be a youtube sensation. My apple ipad is now broken and she has 83 views. I know this is totally off topic but I had to share it with someone!|
Everything is very open with a very clear clarification of the challenges. It was truly informative. Your site is very helpful. Thanks for sharing!
My brother recommended I might like this web site. He was entirely right. This post truly made my day. You can not imagine just how much time I had spent for this information! Thanks!
I in addition to my buddies were actually studying the good solutions located on your site then instantly came up with a horrible feeling I never expressed respect to you for those secrets. These guys became thrilled to see all of them and have in effect clearly been taking pleasure in them. Appreciation for actually being very helpful and also for opting for some impressive subject matter most people are really eager to be aware of. Our own sincere apologies for not saying thanks to sooner.
Hey I know this is off topic but I was wondering if you knew of any widgets I could add to my blog that automatically tweet my newest twitter updates. I’ve been looking for a plug-in like this for quite some time and was hoping maybe you would have some experience with something like this. Please let me know if you run into anything. I truly enjoy reading your blog and I look forward to your new updates.|
Every weekend i used to visit this site, as i want enjoyment, as this this web page conations actually nice funny data too.|
Heya i am for the first time here. I found this board and I find It truly useful & it helped me out a lot. I hope to give something back and help others like you aided me.
Whats up this is somewhat of off topic but I was wondering if blogs use WYSIWYG editors or if you have to manually code with HTML. I’m starting a blog soon but have no coding experience so I wanted to get advice from someone with experience. Any help would be enormously appreciated!
Hello.This article was really remarkable, particularly because I was investigating for thoughts on this subject last Sunday.
Amazing issues here. I’m very glad to see your post. Thanks so much and I’m having a look forward to touch you. Will you please drop me a e-mail?|
I really loved this article and I’ll return to view more of your amazing stuff. Thank you!
This is a topic that is near to my heart… Take care! Where are your contact details though?
My spouse and i felt now satisfied when Ervin could do his reports by way of the precious recommendations he made out of the weblog. It is now and again perplexing just to choose to be giving freely secrets and techniques which often some other people might have been trying to sell. We really already know we’ve got the website owner to appreciate for this. Most of the illustrations you made, the easy website menu, the friendships you can help engender – it’s most spectacular, and it’s really helping our son and our family understand that subject is entertaining, and that’s exceptionally vital. Thanks for all the pieces!
Hello there, You’ve done a great job. I will definitely digg it and in my view recommend to my friends. I am confident they will be benefited from this site.
Hello.This post was really remarkable, especially since I was searching for thoughts on this subject last Thursday.
When I initially commented I clicked the “Notify me when new comments are added” checkbox and now each time a comment is added I get three emails with the same comment. Is there any way you can remove people from that service? Thank you!
I not to mention my buddies were found to be looking at the excellent information and facts found on your website and suddenly I had a terrible feeling I had not thanked the web blog owner for those tips. Most of the people are actually for that reason warmed to learn them and already have certainly been taking advantage of those things. Many thanks for genuinely simply thoughtful and for selecting this sort of remarkable areas most people are really needing to be informed on. My sincere regret for not saying thanks to earlier.
I have been surfing online more than 3 hours today, yet I never found any interesting article like yours. It is pretty worth enough for me. In my view, if all website owners and bloggers made good content as you did, the net will be a lot more useful than ever before.
Your way of describing the whole thing in this piece of writing is truly good, all can easily understand it, Thanks a lot.|
I enjoy reading through a post that will make people think. Also, thank you for permitting me to comment!
This website certainly has all the information and facts I wanted concerning this subject and didn’t know who to ask.
Oh my goodness! Awesome article dude! Many thanks, However I am having difficulties with your RSS. I don챠t know why I cannot subscribe to it. Is there anybody having similar RSS issues? Anyone that knows the solution can you kindly respond? Thanx!!
Way cool! Some extremely valid points! I appreciate you penning this write-up and the rest of the site is also very good.
After looking over a few of the blog posts on your web page, I truly like your way of blogging. I added it to my bookmark site list and will be checking back soon. Please visit my website as well and tell me your opinion.
My spouse and I stumbled over here coming from a different page and thought I might check things out. I like what I see so now i’m following you. Look forward to looking into your web page yet again.
whoah this blog is wonderful i like studying your articles. Stay up the great work! You realize, a lot of people are searching around for this information, you could aid them greatly.
Undeniably believe that which you said. Your favorite justification seemed to be on the net the simplest thing to be aware of. I say to you, I certainly get annoyed while people consider worries that they just do not know about. You managed to hit the nail upon the top and also defined out the whole thing without having side-effects , people can take a signal. Will probably be back to get more. Thanks
I’m really enjoying the theme/design of your site. Do you ever run into any browser compatibility issues? A couple of my blog visitors have complained about my blog not working correctly in Explorer but looks great in Safari. Do you have any solutions to help fix this problem?|
This was an excellent article. Thank for creating it. I’ll be back t o read more.
Its like you read my mind! You appear to know a lot about this, like you wrote the book in it or something. I think that you can do with some pics to drive the message home a bit, but instead of that, this is great blog. An excellent read. I will certainly be back.
Fantastic beat ! I wish to apprentice while you amend your web site, how could i subscribe for a blog web site? The account helped me a acceptable deal. I had been a little bit acquainted of this your broadcast offered bright clear concept
Wow! This blog looks exactly like my old one! It’s on a totally different subject but it has pretty much the same layout and design. Outstanding choice of colors!
I am really impressed with your writing skills and also with the layout on your blog. Is this a paid theme or did you customize it yourself? Either way keep up the excellent quality writing, it is rare to see a nice blog like this one today..
Very admirable this article, for its valuable material and superior composition. I found myself so involved in its material that I was unable to stop reading.
Hello there, I discovered your site via Google at the same time as looking for a comparable subject, your website came up, it appears good. I have bookmarked it in my google bookmarks.
Undeniably consider that that you stated. Your favourite reason appeared to be at the net the simplest thing to remember of. I say to you, I definitely get annoyed at the same time as other folks think about concerns that they just do not realize about. You managed to hit the nail upon the highest as neatly as defined out the whole thing with no need side-effects , people can take a signal. Will likely be back to get more. Thanks
I was suggested this website by my cousin. I am not sure whether this post is written by him as no one else know such detailed about my difficulty. You’re wonderful! Thanks!|
wow, awesome post.Much thanks again. Really Great.
Dazbet ialah bandar judi online Indonesia terpercaya resmi saat ini yang ada untuk memenuhi kebutuhan member judi online dalam bermain dan mencari penghasilan tambahan dengan bermain bersama kami. Dengan perkembangan teknologi yang sudah pesat jaman ini kalian bisa memainkan beragam permainan judi online hanya dengan membutuhkan jaringan internet dan juga gadget kalian, baik itu android, ios, laptop, dan juga pc kalian dimana saja dan kapan saja dengan cukup membuka bandar kami dan bertaruh di dalamnya.
I do agree with all of the ideas you’ve presented in your post. They are very convincing and will certainly work. Still, the posts are too short for starters. Could you please extend them a little from next time? Thanks for the post.
Very good site, thanks a million for showing us
Hi there very cool website!! Man .. Excellent .. Amazing .. I will bookmark your site and take the feeds additionally…I am glad to find a lot of helpful information here in the post, we need develop more techniques on this regard, thank you for sharing.
Dazbet merupakan salah satu bandar judi Slot Online terbaik yang telah ada sejak tahun 2021. Tentu pengalaman yang telah agen ini miliki saat ini bisa membuat kami sebagai salah satu agen judi slot online terbaik. Hal ini dapat dilihat dari beragamnya permainan judi slot online yang kami sediakan. Untuk permainan judi slot yang kami sediakan juga disediakan oleh provider terbaik di dunia.
Excellent blog here! Also your web site loads up fast! What web host are you using? Can I get your affiliate link to your host? I wish my site loaded up as fast as yours lol
Dazbet merupakan salah satu bandar judi Slot Online terbaik yang telah ada sejak tahun 2020. Tentu pengalaman yang telah bandar ini miliki saat ini bisa menjadikan kami sebagai salah satu bandar judi slot terpercaya. Hal ini dapat dilihat dari beragamnya permainan slot online yang kami sediakan. Untuk permainan judi slot online yang kami sediakan juga disediakan oleh provider terbaik di dunia.
Dazbet adalah salah satu situs judi Slot Online terbaik yang sudah ada sejak tahun 2021. Tentu pengalaman yang sudah agen ini miliki saat ini dapat membuat kami sebagai salah satu situs judi slot online terbaik. Hal ini dapat dilihat dari beragamnya permainan slot games yang kami sediakan. Untuk permainan judi slot yang kami sediakan juga disediakan oleh provider terbaik di dunia.
I loved as much as you will receive carried out right here. The sketch is tasteful, your authored material stylish. nonetheless, you command get bought an nervousness over that you wish be delivering the following. unwell unquestionably come further formerly again since exactly the same nearly a lot often inside case you shield this increase.|
Hi, its fastidious piece of writing concerning media print, we all be aware of media is a great source of data.|
Nice weblog right here! Also your web site a lot up very fast! What web host are you the usage of? Can I get your affiliate link for your host? I desire my site loaded up as fast as yours lol
Nice blog here! Also your website loads up fast! What web host are you using? Can I get your affiliate link to your host? I wish my web site loaded up as fast as yours lol
This is a topic that is close to my heart… Best wishes! Exactly where can I find the contact details for questions?
I blog often and I really appreciate your information. The article has really peaked my interest. I’m going to bookmark your website and keep checking for new information about once a week. I subscribed to your RSS feed too.|
Youre so cool! I dont suppose Ive learn something like this before. So nice to find someone with some unique ideas on this subject. realy thanks for starting this up. this website is something that’s wanted on the net, someone with a little originality. helpful job for bringing something new to the internet!
Thank you for the auspicious writeup. It in fact was a amusement account it. Look advanced to more added agreeable from you! However, how can we communicate?
Nice answers in return of this matter with real arguments and describing the whole thing about that.|
I am so happy to read this. This is the type of manual that needs to be given and not the accidental misinformation that is at the other blogs. Appreciate your sharing this greatest doc.
Magnificent items from you, man. I have understand your stuff previous to and you’re just too wonderful. I actually like what you’ve obtained here, really like what you are stating and the best way in which you assert it. You are making it entertaining and you continue to take care of to stay it sensible. I can’t wait to read much more from you. This is really a great web site.
Aw, this was an exceptionally nice post. Spending some time and actual effort to generate a good article… but what can I say… I procrastinate a whole lot and never manage to get anything done.|
Great beat ! I wish to apprentice while you amend your site, how could i subscribe for a blog site? The account helped me a acceptable deal. I had been tiny bit acquainted of this your broadcast provided bright clear concept
This is very interesting, You are a very skilled blogger. I’ve joined your feed and look forward to seeking more of your magnificent post. Also, I have shared your web site in my social networks!
This actually answered my downside, thanks!
Hello, yup this article is really fastidious and I have learned lot of things from it concerning blogging. thanks.|
You really make it seem so easy with your presentation but I find this matter to be actually something which I think I would never understand. It seems too complex and extremely broad for me. I’m looking forward for your next post, I’ll try to get the hang of it!
Everything is very open with a clear clarification of the issues. It was really informative. Your site is very useful. Thanks for sharing!
I loved as much as you’ll receive carried out right here. The sketch is attractive, your authored material stylish. nonetheless, you command get bought an shakiness over that you wish be delivering the following. unwell unquestionably come further formerly again since exactly the same nearly a lot often inside case you shield this increase.
You actually make it seem so easy with your presentation but I find this matter to be actually something which I think I would never understand. It seems too complicated and very broad for me. I am looking forward for your next post, I will try to get the hang of it!
My brother suggested I might like this web site. He was entirely right. This post actually made my day. You cann’t imagine just how much time I had spent for this info! Thanks!
I’ve been browsing online more than three hours today, yet I never found any interesting article like yours. It’s pretty worth enough for me. Personally, if all webmasters and bloggers made good content as you did, the web will be much more useful than ever before.|
Hi there Dear, are you actually visiting this website on a regular basis, if so afterward you will definitely get pleasant know-how.|
We’re a group of volunteers and starting a new scheme in our community. Your site offered us with valuable info to work on. You have done an impressive job and our whole community will be thankful to you.
Heya i’m for the first time here. I came across this board and I find It truly useful & it helped me out much. I hope to give something back and help others like you aided me.
plagiat, inselaciune lucrare-licenta EU, neata adrian valentin , sc creativ trd srl
By all means continue your posting about this topic niche and I hope to read much more written by you in the coming weeks.
I’m really enjoying the theme/design of your blog. Do you ever run into any internet browser compatibility problems? A few of my blog visitors have complained about my website not operating correctly in Explorer but looks great in Safari. Do you have any advice to help fix this issue?|
Hi, i think that i saw you visited my site thus i came to ?return the favor?.I am attempting to find things to improve my web site!I suppose its ok to use a few of your ideas!!
I have not checked in here for a while since I thought it was getting boring, but the last several posts are good quality so I guess I will add you back to my daily bloglist. You deserve it my friend 🙂
I have been surfing online more than 3 hours today, but I by no means found any fascinating article like yours. It’s lovely worth enough for me. In my view, if all website owners and bloggers made just right content material as you did, the web will likely be a lot more useful than ever before. “Learn to see in another’s calamity the ills which you should avoid.” by Publilius Syrus.
As a Newbie, I am always exploring online for articles that can help me. Thank you
I’m really loving the theme/design of your blog. Do you ever run into any internet browser compatibility problems? A few of my blog audience have complained about my blog not working correctly in Explorer but looks great in Opera. Do you have any recommendations to help fix this issue?
Magnificent beat ! I wish to apprentice while you amend your website, how can i subscribe for a blog website? The account helped me a acceptable deal. I had been tiny bit acquainted of this your broadcast offered bright clear idea
Thanks for another informative web site. Where else could I get that kind of information written in such a perfect way? I’ve a project that I’m just now working on, and I have been on the look out for such info.
This web page can be a walk-by way of for the entire information you wanted about this and didn’t know who to ask. Glimpse right here, and also you’ll positively uncover it.
Heya i’m for the first time here. I came across this board and I find It truly useful & it helped me out much. I hope to give something back and aid others like you aided me.
Pretty section of content. I just stumbled upon your site and in accession capital to assert that I get actually enjoyed account your blog posts. Anyway I?ll be subscribing to your feeds and even I achievement you access consistently quickly.
I got this site from my friend who shared with me about this web site and at the moment this time I am browsing this site and reading very informative posts here.|
Hey, I think your site might be having browser compatibility issues. When I look at your website in Opera, it looks fine but when opening in Internet Explorer, it has some overlapping. I just wanted to give you a quick heads up! Other then that, great blog!
It’s going to be ending of mine day, however before finish I am reading this fantastic post to increase my experience.|
It’s nearly impossible to find well-informed people about this topic, but you seem like you know what you’re talking about! Thanks
It?¦s actually a cool and useful piece of info. I am satisfied that you shared this helpful information with us. Please keep us informed like this. Thanks for sharing.
http://paymentservice.net/__media__/js/netsoltrademark.php?d=www.fairporn.net/
Thanks for your thoughts. One thing I’ve noticed is that banks plus financial institutions know the dimensions and spending habits of consumers as well as understand that most of the people max outside their cards around the holidays. They correctly take advantage of that fact and begin flooding ones inbox and snail-mail box using hundreds of 0 APR credit cards offers immediately after the holiday season comes to an end. Knowing that in case you are like 98 of American public, you’ll jump at the chance to consolidate card debt and switch balances to 0 annual percentage rates credit cards.
Thank you for any other magnificent article. The place else may anybody get that type of info in such an ideal means of writing? I’ve a presentation next week, and I am at the look for such information.
Hi, Neat post. There is a problem with your site in internet explorer, would check this… IE still is the market leader and a big portion of people will miss your magnificent writing due to this problem.
I’m still learning from you, as I’m trying to reach my goals. I definitely love reading all that is written on your blog.Keep the stories coming. I enjoyed it!
I do not even know how I ended up here, but I thought this post was great. I don’t know who you are but certainly you’re going to a famous blogger if you are not already 😉 Cheers!
Hey this is kind of of off topic but I was wanting to know if blogs use WYSIWYG editors or if you have to manually code with HTML. I’m starting a blog soon but have no coding expertise so I wanted to get guidance from someone with experience. Any help would be greatly appreciated!
Aw, this was a very good post. Taking a few minutes and actual effort to make a very good article… but what can I say… I procrastinate a whole lot and don’t manage to get nearly anything done.|
I am a huge supporter of your work. I’ll return to read more soon. Thanks for creating it.
I couldn’t resist commenting. Very well written!|
It’s really a great and useful piece of info. I’m glad that you simply shared this useful information with us. Please stay us up to date like this. Thank you for sharing.
Very nice post. I just stumbled upon your weblog and wanted to say that I’ve really enjoyed surfing around your blog posts. In any case I?ll be subscribing to your feed and I hope you write again soon!
Hi my friend! I wish to say that this article is awesome, great written and come with almost all vital infos. I¦d like to look more posts like this .
I seriously love your blog.. Great colors & theme. Did you build this amazing site yourself? Please reply back as IÃm wanting to create my own blog and would like to learn where you got this from or just what the theme is named. Thank you!
This was really good content. Thanks for sharing it. You made a long-term reader and I’ll return to see more. Thank you for sharing.
You got a very good website, Sword lily I discovered it through yahoo.
This was super intresting content. Thanks for sharing it. You made a long-term fan and I’ll return to view more. Thank you for sharing.
Great goods from you, man. I’ve understand your stuff previous to and you’re just too excellent. I really like what you’ve acquired here, really like what you are stating and the way in which you say it. You make it entertaining and you still take care of to keep it sensible. I can’t wait to read much more from you. This is actually a tremendous web site.
I think other web site proprietors should take this site as an model, very clean and great user friendly style and design, as well as the content. You are an expert in this topic!
Well I definitely liked reading it. This tip procured by you is very helpful for correct planning.
Hi! I could have sworn I’ve been to your blog before but after browsing through a few of the articles I realized it’s new to me. Anyways, I’m certainly delighted I stumbled upon it and I’ll be book-marking it and checking back frequently!
What’s up, I only recently got aware of your website care of Duck Duck Go, and it’s highly helpful. Be assured that I will come back again to review many more of your web pages in the near future. Good on you!
Dazbet merupakan salah satu situs judi Slot Online terbaik yang telah ada sejak tahun 2020. Tentu pengalaman yang telah kami miliki saat ini dapat menjadikan kami sebagai salah satu situs judi slot online terpercaya. Hal ini dapat dilihat dari beragamnya permainan judi slot yang kami sediakan. Untuk permainan judi slot yang kami sediakan juga disediakan oleh provider terbaik di dunia.
The very next time I read a blog, Hopefully it doesn’t disappoint me just as much as this particular one. I mean, I know it was my choice to read, nonetheless I truly believed you would probably have something helpful to say. All I hear is a bunch of whining about something you could fix if you weren’t too busy seeking attention.
Dazbet adalah agen judi online Indonesia terpercaya resmi saat ini yang hadir untuk memenuhi kebutuhan member judi online dalam bermain dan mencari penghasilan tambahan dengan bermain bersama kami. Dengan perkembangan teknologi yang sudah pesat jaman ini kalian bisa memainkan beragam permainan judi online hanya dengan membutuhkan jaringan internet dan juga gadget kalian, baik itu android, ios, laptop, dan juga pc kalian dimana saja dan kapan saja dengan cukup membuka agen kami dan bertaruh di dalamnya.
Undeniably believe that which you said. Your favorite justification appeared to be on the web the easiest thing to be aware of. I say to you, I certainly get irked while people think about worries that they just don’t know about. You managed to hit the nail upon the top and defined out the whole thing without having side effect , people could take a signal. Will likely be back to get more. Thanks
Dazbet merupakan salah satu situs judi Slot Online terpercaya yang sudah hadir sejak tahun 2021. Tentu pengalaman yang telah kami miliki saat ini bisa membuat kami sebagai salah satu agen judi slot terpercaya. Hal ini dapat dicek dari beragamnya permainan judi slot yang kami sediakan. Untuk permainan slot games yang kami sediakan juga disediakan oleh provider terbaik di dunia.
Whats up are using WordPress for your blog platform? I’m new to the blog world but I’m trying to get started and set up my own. Do you require any html coding knowledge to make your own blog? Any help would be greatly appreciated!
Dazbet merupakan salah satu agen judi Slot Online terpercaya yang sudah hadir sejak tahun 2019. Tentu pengalaman yang sudah situs ini miliki saat ini dapat membuat kami sebagai salah satu bandar judi slot terpercaya. Hal ini dapat dilihat dari beragamnya permainan judi slot online yang kami sediakan. Untuk permainan judi slot yang kami sediakan juga disediakan oleh provider terbaik di dunia.
Hi, i think that i saw you visited my web site so i came to ?return the favor?.I am trying to find things to improve my site!I suppose its ok to use a few of your ideas!!
Dazbet adalah bandar judi online Indonesia terpercaya resmi saat ini yang hadir untuk memenuhi kebutuhan pemain judi online dalam bermain dan mencari penghasilan tambahan dengan bermain bersama kami. Dengan perkembangan teknologi yang sudah pesat jaman ini kalian bisa memainkan beragam permainan judi online hanya dengan membutuhkan jaringan internet dan juga gadget kalian, baik itu android, ios, laptop, dan juga pc kalian dimana saja dan kapan saja dengan cukup membuka bandar kami dan bertaruh di dalamnya.
Dazbet ialah agen judi online Indonesia terpercaya resmi saat ini yang hadir untuk memenuhi kebutuhan member judi online dalam bermain dan mencari penghasilan tambahan dengan bermain bersama kami. Dengan perkembangan teknologi yang sudah pesat jaman ini kalian bisa memainkan beragam permainan judi online hanya dengan membutuhkan jaringan internet dan juga gadget kalian, baik itu android, ios, laptop, dan juga pc kalian dimana saja dan kapan saja dengan cukup membuka bandar kami dan bertaruh di dalamnya.
Every weekend i used to pay a visit this site, as i wish for enjoyment, as this this site conations really fastidious funny material too.|
I adore gathering useful information , this post has got me even more info! .
Dazbet merupakan agen judi online Indonesia terpercaya resmi saat ini yang ada untuk memenuhi kebutuhan pemain judi online dalam bermain dan mencari penghasilan tambahan dengan bermain bersama kami. Dengan perkembangan teknologi yang sudah pesat jaman ini kalian bisa memainkan beragam permainan judi online hanya dengan membutuhkan jaringan internet dan juga gadget kalian, baik itu android, ios, laptop, dan juga pc kalian dimana saja dan kapan saja dengan cukup membuka situs kami dan bertaruh di dalamnya.
You actually make it seem so easy with your presentation but I find this topic to be really something which I think I would never understand. It seems too complicated and extremely broad for me. I’m looking forward for your next post, I?ll try to get the hang of it!
Dazbet merupakan salah satu situs judi Slot Online terbaik yang sudah ada sejak tahun 2020. Tentu pengalaman yang sudah bandar ini miliki saat ini bisa menjadikan kami sebagai salah satu bandar judi slot online terpercaya. Hal ini dapat dilihat dari beragamnya permainan slot online yang kami sediakan. Untuk permainan slot games yang kami sediakan juga disediakan oleh provider terbaik di dunia.
Dazbet adalah situs judi online Indonesia terpercaya resmi saat ini yang hadir untuk memenuhi kebutuhan pemain judi online dalam bermain dan mencari penghasilan tambahan dengan bermain bersama kami. Dengan perkembangan teknologi yang sudah pesat jaman ini kalian bisa memainkan beragam permainan judi online hanya dengan membutuhkan jaringan internet dan juga gadget kalian, baik itu android, ios, laptop, dan juga pc kalian dimana saja dan kapan saja dengan cukup membuka bandar kami dan bertaruh di dalamnya.
Dazbet merupakan agen judi online Indonesia terpercaya resmi saat ini yang ada untuk memenuhi kebutuhan member judi online dalam bermain dan mencari penghasilan tambahan dengan bermain bersama kami. Dengan perkembangan teknologi yang sudah pesat jaman ini kalian bisa memainkan beragam permainan judi online hanya dengan membutuhkan jaringan internet dan juga gadget kalian, baik itu android, ios, laptop, dan juga pc kalian dimana saja dan kapan saja dengan cukup membuka agen kami dan bertaruh di dalamnya.
Just wish to say your article is as amazing. The clearness in your post is just cool and i can assume you are an expert on this subject. Fine with your permission allow me to grab your feed to keep updated with forthcoming post. Thanks a million and please keep up the enjoyable work.
This is a topic that’s close to my heart… Thank you! Exactly where are your contact details though?
Dazbet merupakan situs judi online Indonesia terpercaya resmi saat ini yang hadir untuk memenuhi kebutuhan pemain judi online dalam bermain dan mencari penghasilan tambahan dengan bermain bersama kami. Dengan perkembangan teknologi yang sudah pesat jaman ini kalian bisa memainkan beragam permainan judi online hanya dengan membutuhkan jaringan internet dan juga gadget kalian, baik itu android, ios, laptop, dan juga pc kalian dimana saja dan kapan saja dengan cukup membuka situs kami dan bertaruh di dalamnya.
Hello everyone, it’s my first visit at this web site, and post is really fruitful in favor of me, keep up posting these types of articles or reviews.|
Dazbet merupakan salah satu bandar judi Slot Online terpercaya yang telah hadir sejak tahun 2019. Tentu pengalaman yang sudah agen ini miliki saat ini bisa membuat kami sebagai salah satu situs judi slot terpercaya. Hal ini dapat dicek dari beragamnya permainan judi slot yang kami sediakan. Untuk permainan slot online yang kami sediakan juga disediakan oleh provider terbaik di dunia.
hey there and thank you for your info ? I?ve certainly picked up something new from right here. I did however expertise several technical points using this website, as I experienced to reload the website a lot of times previous to I could get it to load correctly. I had been wondering if your web host is OK? Not that I am complaining, but slow loading instances times will very frequently affect your placement in google and could damage your quality score if advertising and marketing with Adwords. Anyway I?m adding this RSS to my e-mail and can look out for much more of your respective intriguing content. Make sure you update this again soon..
Dazbet ialah salah satu bandar judi Slot Online terbaik yang sudah hadir sejak tahun 2019. Tentu pengalaman yang telah bandar ini miliki saat ini dapat menjadikan kami sebagai salah satu agen slot games terbaik. Hal ini dapat dilihat dari beragamnya permainan judi slot yang kami sediakan. Untuk permainan judi slot online yang kami sediakan juga disediakan oleh provider terbaik di dunia.
Hello, you used to write wonderful, but the last few posts have been kinda boring¡K I miss your tremendous writings. Past several posts are just a bit out of track! come on!
Everything is very open with a really clear description of the challenges. It was really informative. Your site is useful. Many thanks for sharing.
Instagram takipçi hilesi 2021 özelliğini deneyebilirsiniz. Site adresinde en güvenilir takipçi paketleri bulunuyor.
hey there and thank you for your information ? I?ve certainly picked up something new from right here. I did however expertise several technical points using this website, as I experienced to reload the site many times previous to I could get it to load properly. I had been wondering if your web hosting is OK? Not that I’m complaining, but sluggish loading instances times will very frequently affect your placement in google and can damage your high-quality score if ads and marketing with Adwords. Anyway I?m adding this RSS to my email and could look out for much more of your respective fascinating content. Ensure that you update this again very soon..
Wow, marvelous blog layout! How long have you been blogging for? you made blogging look easy. The overall look of your site is great, as well as the content!|
I want to to thank you for this wonderful read!! I definitely loved every bit of it. I’ve got you saved as a favorite to check out new things you postÖ
Right now it seems like WordPress is the top blogging platform out there right now. (from what I’ve read) Is that what you are using on your blog?
Thank you for the auspicious writeup. It in fact was a amusement account it. Look advanced to more added agreeable from you! By the way, how can we communicate?
I really love your site.. Great colors & theme. Did you create this website yourself? Please reply back as IÃm attempting to create my own site and would like to know where you got this from or just what the theme is called. Cheers!
Heya i?m for the first time here. I found this board and I find It really useful & it helped me out a lot. I hope to give something back and aid others like you aided me.
Real superb info can be found on web blog. “Preach not to others what they should eat, but eat as becomes you, and be silent.” by Epictetus.
hello there and thank you for your information ? I?ve certainly picked up something new from right here. I did however expertise a few technical points using this site, as I experienced to reload the website many times previous to I could get it to load correctly. I had been wondering if your hosting is OK? Not that I’m complaining, but slow loading instances times will very frequently affect your placement in google and could damage your high quality score if ads and marketing with Adwords. Anyway I am adding this RSS to my email and could look out for a lot more of your respective intriguing content. Make sure you update this again soon..
Excellent article! We will be linking to this great content on our website. Keep up the great writing.
What i don’t understood is if truth be told how you’re no longer actually much more smartly-appreciated than you might be now. You’re very intelligent. You understand therefore considerably in relation to this matter, made me in my view believe it from so many numerous angles. Its like women and men don’t seem to be involved until it’s something to do with Lady gaga! Your personal stuffs great. At all times care for it up!
I wish other authors of this category of reading material would devote the time you have done, to research the subject so thoroughly. I’m really impressed!
Very nice post. I just stumbled upon your weblog and wanted to say that I have really enjoyed surfing around your blog posts. After all I will be subscribing to your feed and I hope you write again soon!
you’re actually a just right webmaster. The website loading velocity is amazing. It seems that you are doing any distinctive trick. In addition, The contents are masterwork. you have performed a fantastic job on this matter!
Can I just say what a aid to search out someone who truly is aware of what theyre talking about on the internet. You undoubtedly know how one can carry a difficulty to light and make it important. Extra individuals have to learn this and understand this facet of the story. I cant consider youre not more popular because you definitely have the gift.
I think you have observed some very interesting details , appreciate it for the post.
I am not sure where you’re getting your info, but great topic. I needs to spend some time learning much more or understanding more. Thanks for excellent info I was looking for this information for my mission.
Pretty nice post. I just stumbled upon your blog and wanted to say that I have truly enjoyed browsing your blog posts. In any case I will be subscribing to your rss feed and I hope you write again soon!
I am impressed with this website , really I am a fan.
I like what you guys are up too. Such intelligent work and reporting! Carry on the excellent works guys I?¦ve incorporated you guys to my blogroll. I think it will improve the value of my site 🙂
This really answered my downside, thanks!
Hi, I do think this is a great web site. I stumbledupon it 😉 I am going to revisit once again since I bookmarked it. Money and freedom is the best way to change, may you be rich and continue to help others.
It’s appropriate time to make some plans for the future and it is time to be happy. I have read this post and if I could I want to suggest you some interesting things or suggestions. Perhaps you can write next articles referring to this article. I desire to read even more things about it!
bookmarked!!, I really like your website!
Good post and straight to the point. I don’t know if this is in fact the best place to ask but do you people have any ideea where to employ some professional writers? Thank you 🙂
My brother suggested I would possibly like this website. He was entirely right. This put up actually made my day. You cann’t imagine simply how a lot time I had spent for this info! Thank you!
Thanks , I have recently been looking for info approximately this subject for ages and yours is the greatest I’ve found out so far. But, what concerning the bottom line? Are you sure concerning the source?
I must express my thanks to this writer just for rescuing me from such a incident. After exploring through the internet and meeting strategies that were not productive, I was thinking my life was over. Being alive devoid of the solutions to the problems you’ve solved through your entire report is a critical case, and those that would have adversely affected my entire career if I hadn’t discovered your web site. Your natural talent and kindness in maneuvering almost everything was helpful. I am not sure what I would have done if I hadn’t encountered such a solution like this. I’m able to at this time relish my future. Thanks for your time so much for your reliable and effective help. I will not be reluctant to endorse the blog to anybody who desires assistance on this topic.
Way cool, some valid points! I appreciate you making this article available, the rest of the site is also high quality. Have a fun.
you are really a good webmaster. The site loading speed is incredible. It seems that you’re doing any unique trick. Furthermore, The contents are masterwork. you’ve done a fantastic job on this topic!
Very good information. Lucky me I found your website by chance (stumbleupon). I’ve bookmarked it for later!
I wanted to thank you for this wonderful read!! I definitely loved every bit of it. I’ve got you bookmarked to check out new stuff you post…|
This was a very enjoyable piece of content. Thanks for sharing it. I’ll be back for more.
The expressed viewpoints fall in accordance with my own in the majority. This furnishes valuable reading material for the visitors.
I think this is one of the most important info for me. And i am glad reading your article. But want to remark on few general things, The site style is ideal, the articles is really excellent : D. Good job, cheers
Great post. I was checking constantly this blog and I am impressed! Very useful info particularly the last part 🙂 I care for such information much. I was seeking this particular information for a very long time. Thank you and best of luck.
Great beat ! I would like to apprentice while you amend your site, how could i subscribe for a blog website? The account aided me a acceptable deal. I had been tiny bit acquainted of this your broadcast offered bright clear idea
Hey There. I found your blog using msn. This is an extremely well written article. I will be sure to bookmark it and come back to read more of your useful info. Thanks for the post. I?ll certainly return.
Greetings! This is my 1st comment here so I just wanted to give a quick shout out and tell you I genuinely enjoy reading your articles. Can you suggest any other blogs/websites/forums that cover the same subjects? Thank you so much!
You could certainly see your enthusiasm within the paintings you write. The world hopes for even more passionate writers such as you who aren’t afraid to say how they believe. At all times go after your heart. “A second wife is hateful to the children of the first a viper is not more hateful.” by Euripides.
An outstanding share! I have just forwarded this onto a friend who had been doing a little research on this. And he in fact bought me breakfast simply because I stumbled upon it for him… lol. So allow me to reword this…. Thank YOU for the meal!! But yeah, thanks for spending the time to talk about this topic here on your web site.
Pretty! This was an extremely wonderful article. Many thanks for providing these details.
I loved as much as you will receive carried out right here. The sketch is attractive, your authored material stylish. nonetheless, you command get got an impatience over that you wish be delivering the following. unwell unquestionably come further formerly again as exactly the same nearly very often inside case you shield this hike.
magnificent issues altogether, you just gained a emblem new reader. What would you suggest about your publish that you made a few days ago? Any positive?
This website was… how do I say it? Relevant!! Finally I have found something that helped me. Thanks!
There is definately a lot to find out about this issue. I really like all the points you made.
My spouse and I stumbled over here from a different web address and thought I might as well check things out. I like what I see so now i’m following you. Look forward to looking over your web page repeatedly.|
Simply desire to say your article is as astonishing. The clearness on your submit is simply great and that i can think you’re knowledgeable on this subject. Well with your permission allow me to snatch your RSS feed to stay up to date with coming near near post. Thanks 1,000,000 and please continue the gratifying work.
I was recommended this website by my cousin. I’m not sure whether this post is written by him as nobody else know such detailed about my problem. You are wonderful! Thanks!
Awesome site you have here but I was curious about if you knew of any forums that cover the same topics discussed in this article? I’d really love to be a part of group where I can get feed-back from other knowledgeable individuals that share the same interest. If you have any suggestions, please let me know. Thank you!
Great blog here! Also your web site loads up very fast! What web host are you using? Can I get your affiliate link to your host? I wish my site loaded up as fast as yours lol
I couldn’t refrain from commenting. Very well written!
Thanks a lot for your relevant post. I drop by your web site periodically, thus it’s presently one of my top internet sites!
I think that is among the most significant info for me. And i am happy studying your article. But wanna commentary on some basic issues, The web site taste is perfect, the articles is truly great : D. Just right task, cheers
Together with every thing which appears to be building inside this specific area, many of your perspectives happen to be quite radical. On the other hand, I beg your pardon, but I do not subscribe to your whole strategy, all be it exciting none the less. It looks to everybody that your remarks are generally not entirely rationalized and in simple fact you are your self not really totally certain of your assertion. In any event I did take pleasure in reading it.
I’m amazed, I have to admit. Seldom do I come across a blog that’s equally educative and amusing, and let me tell you, you have hit the nail on the head. The issue is something not enough folks are speaking intelligently about. I am very happy I stumbled across this in my search for something concerning this.
Hello, i think that i saw you visited my weblog so i came to ?return the favor?.I’m trying to find things to improve my website!I suppose its ok to use a few of your ideas!!
I’m amazed, I must say. Seldom do I encounter a blog that’s both educative and engaging, and let me tell you, you have hit the nail on the head. The issue is an issue that too few men and women are speaking intelligently about. Now i’m very happy I came across this during my hunt for something regarding this.
Hi there, just became aware of your blog through Google, and found that it’s truly informative. I?m gonna watch out for brussels. I will be grateful if you continue this in future. A lot of people will be benefited from your writing. Cheers!
Hi mates, how is the whole thing, and what you want to say concerning this paragraph, in my view its truly remarkable designed for me.|
I’m impressed, I have to say. Really rarely do I encounter a weblog that’s each educative and entertaining, and let me tell you, you’ve hit the nail on the head. Your idea is excellent; the difficulty is one thing that not enough persons are talking intelligently about. I am very pleased that I stumbled throughout this in my search for something relating to this.
It’s hard to find knowledgeable people on this topic, but you sound like you know what you’re talking about! Thanks
Lovely just what I was looking for.Thanks to the author for taking his time on this one.
There’s certainly a lot to learn about this issue. I love all of the points you have made.
hello there and thank you for your information ? I have certainly picked up anything new from right here. I did however expertise some technical issues using this site, as I experienced to reload the website lots of times previous to I could get it to load properly. I had been wondering if your hosting is OK? Not that I’m complaining, but sluggish loading instances times will sometimes affect your placement in google and could damage your quality score if ads and marketing with Adwords. Anyway I?m adding this RSS to my e-mail and could look out for a lot more of your respective intriguing content. Ensure that you update this again very soon..
You have brought up a very fantastic details , thanks for the post.
Thank you a lot for sharing this with all of us you actually know what you are speaking about! Bookmarked. Kindly additionally consult with my web site =). We will have a link change arrangement between us!
Great work! This is the type of information that should be shared around the web. Shame on Google for not positioning this post higher! Come on over and visit my site . Thanks =)
Hello, I just today got aware of this blog because of DuckDuckGo, and I find it very informative. I will return to find more of your writing in the near future. Cudos!
I loved as much as you will receive carried out right here. The sketch is tasteful, your authored material stylish. nonetheless, you command get bought an impatience over that you wish be delivering the following. unwell unquestionably come more formerly again since exactly the same nearly very often inside case you shield this hike.
I’m more than happy to find this page. I wanted to thank you for your time just for this fantastic read!! I definitely liked every bit of it and i also have you saved to fav to check out new information on your site.
I additionally believe that mesothelioma cancer is a exceptional form of cancer that is typically found in all those previously exposed to asbestos. Cancerous tissues form within the mesothelium, which is a defensive lining which covers the vast majority of body’s bodily organs. These cells ordinarily form while in the lining of the lungs, tummy, or the sac that encircles one’s heart. Thanks for discussing your ideas.
I was recommended this website by my cousin. I’m not sure whether this post is written by him as no one else know such detailed about my difficulty. You’re incredible! Thanks!
An intriguing discussion is worth comment. I believe that you ought to write more on this topic, it may not be a taboo matter but typically folks don’t discuss these subjects. To the next! Cheers.
Good day! Would you mind if I share your blog with my facebook group? There’s a lot of people that I think would really appreciate your content. Please let me know. Cheers
Hi there, I found your web site via Google while looking for a related topic, your web site came up, it looks good. I’ve bookmarked it in my google bookmarks.
Your style is unique compared to other folks I’ve read stuff from. Many thanks for posting when you’ve got the opportunity, Guess I will just book mark this web site.
I’m not that much of a online reader to be honest but your blogs really nice, keep it up! I’ll go ahead and bookmark your website to come back later. All the best
Hello. remarkable job. I did not expect this. This is a fantastic story. Thanks!
I really love your website.. Pleasant colors & theme. Did you create this web site yourself? Please reply back as IÃm wanting to create my own site and want to learn where you got this from or exactly what the theme is named. Thanks!
wonderful issues altogether, you simply gained a logo new reader. What may you recommend about your put up that you simply made some days ago? Any positive?
I truly appreciate this post. I’ve been looking everywhere for this! Thank goodness I found it on Bing. You have made my day! Thank you again!
Way cool! Some extremely valid points! I appreciate you writing this post and also the rest of the website is very good.
Its like you read my mind! You seem to know so much about this, like you wrote the book in it or something. I think that you could do with some pics to drive the message home a little bit, but instead of that, this is fantastic blog. An excellent read. I’ll certainly be back.
Keep up the great work, I read few content on this internet site and I conceive that your web blog is rattling interesting and has circles of great info .
What an impressive way of taking a look at points.
Your style is unique in comparison to other people I’ve read stuff from. Thank you for posting when you’ve got the opportunity, Guess I will just book mark this page.
Just wanna comment that you have a very decent web site, I enjoy the design and style it really stands out.
I went over this site and I conceive you have a lot of superb information, saved to fav (:.
Thanks for every other informative web site. Where else may just I am getting that type of information written in such an ideal way? I have a venture that I am simply now operating on, and I’ve been at the look out for such information.
Hi there, There’s no doubt that your site may be having web browser compatibility problems. When I take a look at your website in Safari, it looks fine however when opening in IE, it’s got some overlapping issues. I simply wanted to give you a quick heads up! Aside from that, great site!
Great post. I was checking continuously this blog and I’m impressed! Extremely useful information specially the last part 🙂 I care for such information a lot. I was looking for this particular information for a very long time. Thank you and good luck.
I truly love your blog.. Excellent colors & theme. Did you develop this web site yourself? Please reply back as I’m wanting to create my very own website and would like to know where you got this from or what the theme is called. Many thanks!
Great site! I am loving it!! Will come back again. I am taking your feeds also.
I want to express appreciation to this writer for bailing me out of this particular condition. As a result of searching through the online world and finding proposals which are not pleasant, I assumed my life was gone. Being alive minus the solutions to the difficulties you’ve resolved by means of your good post is a critical case, and those which may have in a wrong way affected my career if I had not noticed your blog post. Your natural talent and kindness in touching the whole lot was excellent. I’m not sure what I would’ve done if I hadn’t come upon such a stuff like this. I can at this time relish my future. Thanks a lot very much for your professional and effective guide. I won’t hesitate to suggest your web sites to anyone who wants and needs guide on this problem.
I enjoy, lead to I discovered just what I used to be looking for. You have ended my 4 day long hunt! God Bless you man. Have a great day. Bye|
There is certainly a great deal to learn about this topic. I love all of the points you made.
I used to be able to find good advice from your content.
Hi! I just wanted to ask if you ever have any issues with hackers? My last blog (wordpress) was hacked and I ended up losing a few months of hard work due to no data backup. Do you have any methods to protect against hackers?
Great beat ! I would like to apprentice while you amend your website, how can i subscribe for a weblog web site? The account helped me a acceptable deal. I were tiny bit familiar of this your broadcast offered vibrant clear idea|
Hey there, You have done a great job. I?ll certainly digg it and personally suggest to my friends. I am sure they will be benefited from this website.
This was an awesome piece of content. I really liked it. I’ll return to see some more. Thanks !
I’m more than happy to find this great site. I wanted to thank you for your time for this fantastic read!! I definitely really liked every little bit of it and i also have you book-marked to see new things on your site.
I like the helpful info you provide in your articles. I?ll bookmark your blog and check again here regularly. I’m quite certain I will learn lots of new stuff right here! Good luck for the next!
After I originally left a comment I seem to have clicked on the -Notify me when new comments are added- checkbox and now whenever a comment is added I get four emails with the exact same comment. There has to be a way you can remove me from that service? Cheers.
Magnificent web site. A lot of useful information here. I am sending it to some friends ans also sharing in delicious. And certainly, thanks for your sweat!
Excellent beat ! I wish to apprentice while you amend your website, how could i subscribe for a blog website? The account helped me a acceptable deal. I had been tiny bit acquainted of this your broadcast offered bright clear concept
I couldn’t resist commenting
Your way of addressin this subject is both fantastic and also inspiring.
The only thing I regret is not having found your blog site before.
I do not even know how I ended up here, but I thought this post was good. I don’t know who you are but certainly you are going to a famous blogger if you aren’t already 😉 Cheers!
An outstanding share! I’ve just forwarded this onto a friend who was conducting a little research on this. And he in fact ordered me lunch simply because I discovered it for him… lol. So allow me to reword this…. Thanks for the meal!! But yeah, thanx for spending some time to talk about this subject here on your site.
Tales Of India is an online Indian Grocery Store. Free delivery within Melbourne, Australia. Buy products from india such as ayurvedic medicines, atta, snacks, basmati rice, tea and more. Easy to cook indian food available such as spices, flours, lentils, daals, sauces, chutneys, cooking pastes, masala and more. Shop on https://talesofindia.com.au
This was an awesome piece of content. I loved it. I’ll return to read more. Thanks .
You are my aspiration , I possess few blogs and often run out from to post .
Nice post. I learn something totally new and challenging on websites I stumbleupon everyday. It’s always useful to read articles from other writers and use a little something from their websites.
Wohh just what I was searching for, thankyou for putting up.
Hello! This is my 1st comment here so I just wanted to give a quick shout out and say I genuinely enjoy reading through your blog posts. Can you recommend any other blogs/websites/forums that deal with the same subjects? Thanks a ton!
I do not even know how I ended up here, but I thought this post was good. I don’t know who you are but certainly you are going to a famous blogger if you are not already 😉 Cheers!
I’m excited to uncover this web site. I want to to thank you for your time just for this wonderful read!! I definitely enjoyed every bit of it and I have you saved as a favorite to see new things in your site.
Hello There. I found your blog using msn. This is an extremely well written article. I will be sure to bookmark it and return to read more of your useful information. Thanks for the post. I will definitely return.
This is a very good tip especially to those fresh to the blogosphere. Simple but very precise info… Thank you for sharing this one. A must read article!
This web site really has all the information and facts I needed concerning this subject and didn’t know who to ask. |
I dugg some of you post as I cerebrated they were very helpful very useful
Oh my goodness! Incredible article dude! Thank you, However I am going through problems with your RSS. I don챠t know why I can’t subscribe to it. Is there anybody having similar RSS issues? Anyone who knows the answer can you kindly respond? Thanx!!
Spot on with this write-up, I truly believe that this amazing site needs a great deal more attention. IÃll probably be returning to read more, thanks for the advice!
Hi, I do think this is a great blog. I stumbledupon it 😉 I may revisit yet again since i have saved as a favorite it. Money and freedom is the best way to change, may you be rich and continue to guide others.
This excellent website really has all of the information I wanted concerning this subject and didn’t know who to ask.
Wonderful paintings! That is the type of information that are meant to be shared around the web. Shame on the seek engines for no longer positioning this post higher! Come on over and talk over with my web site . Thank you =)
Thanks for helping out, fantastic info. “If at first you don’t succeed, find out if the loser gets anything.” by Bill Lyon.
Craftleo is the platform for craft designs, fonts, and SVG cut files. Bring your creative projects to life with ready-to-use designs from artists around the world. Our mission is to help people lead creative lives by providing the best SVG cut files for smart cutting machines to make their DIY projects beautiful, fun, and easy. Each craft collection has been carefully curated by our experienced team of designers to ensure that our products are exactly what you need. SVG bundles include design elements, monograms, quotes, clipart, and a lot more. We are passionate about creating amazing designs and graphics that make our customers happy. We invite you to discover our collection of selected SVG files that will help you to create your own DIY projects. You’ll be amazed at how many handmade crafts you can do!
Can I simply say what a comfort to find somebody who truly understands what they’re discussing on the internet. You definitely understand how to bring a problem to light and make it important. More people must look at this and understand this side of the story. I was surprised that you are not more popular since you most certainly possess the gift.
Your style is very unique in comparison to other folks I’ve read stuff from. Many thanks for posting when you’ve got the opportunity, Guess I will just book mark this page.
My brother recommended I might like this website. He was entirely right. This post truly made my day. You cann’t imagine just how much time I had spent for this info! Thanks!
Instagram beğeni paketlerimiz arasında her bakımdan çok iyi ve güzel bir çeşitlilik bulunmaktadır. Instagram Türk beğeni paketleri, yabancı beğeni paketleri, Türk oto beğeni paketleri ve yabancı oto beğeni paketleri arasından bir seçim yaparak gönderilerinize buna yönelik beğeniler alabilirsiniz.
This excellent website really has all of the information and facts I wanted about this subject and didn’t know who to ask.
Magnificent items from you, man. I’ve take into account your stuff previous to and you are just extremely fantastic. I really like what you’ve obtained here, certainly like what you’re stating and the way in which through which you say it. You make it enjoyable and you still take care of to keep it sensible. I can not wait to read far more from you. That is really a wonderful site.|
This was an outstanding piece of content. I really liked it. I’ll be back to read some more. Thank you !
Hiya, I am really glad I have found this information. Nowadays bloggers publish only about gossips and net and this is actually irritating. A good blog with exciting content, this is what I need. Thank you for keeping this site, I will be visiting it. Do you do newsletters? Can’t find it.
I really like it when individuals get together and share opinions. Great website, keep it up!
I’ve been exploring for a bit for any high quality articles or blog posts on this sort of area . Exploring in Yahoo I at last stumbled upon this website. Reading this info So i am happy to convey that I have an incredibly good uncanny feeling I discovered just what I needed. I most certainly will make sure to don’t forget this site and give it a look on a constant basis.
Hi my friend! I wish to say that this article is awesome, nice written and include approximately all significant infos. I would like to see more posts like this.
My brother recommended I might like this blog. He was entirely right. This post actually made my day. You cann’t imagine simply how much time I had spent for this information! Thanks!
I love the way you have ended this article …
Thank you for the good writeup. It in fact was a amusement account it. Look advanced to far added agreeable from you! However, how can we communicate?
Normally I don’t learn post on blogs, however I would like to say that this write-up very compelled me to try and do so! Your writing taste has been amazed me. Thank you, very nice article.
Really enjoyed this post, can you make it so I get an email sent to me whenever you publish a new post?
This is my first time pay a quick visit at here and i am actually happy to read all at single place.|
Having read this I thought it was really informative. I appreciate you finding the time and energy to put this content together. I once again find myself personally spending way too much time both reading and commenting. But so what, it was still worthwhile!
I blog quite often and I seriously appreciate your information. This great article has really peaked my interest. I am going to take a note of your blog and keep checking for new information about once a week. I subscribed to your RSS feed as well.
Hello there, You’ve done a fantastic job. I will definitely digg it and personally suggest to my friends. I’m confident they’ll be benefited from this website.
Greetings! I know this is kind of off topic but I was wondering which blog platform are you using for this website? I’m getting sick and tired of WordPress because I’ve had issues with hackers and I’m looking at alternatives for another platform. I would be fantastic if you could point me in the direction of a good platform.
Hello there, You’ve done a great job. I will definitely digg it and personally recommend to my friends. I’m sure they will be benefited from this site.
That is a very good tip particularly to those fresh to the blogosphere. Simple but very precise info… Appreciate your sharing this one. A must read post.
This article was amazing Thanks so much for writing it. You have a friend in me. See ya soon.
Can I just say what a comfort to find an individual who actually understands what they are discussing on the web. You certainly know how to bring an issue to light and make it important. More and more people ought to check this out and understand this side of your story. I was surprised that you aren’t more popular given that you certainly have the gift.
You actually make it seem so easy with your presentation but I find this matter to be actually something that I think I would never understand. It seems too complicated and extremely broad for me. I’m looking forward for your next post, I?ll try to get the hang of it!
Spot on with this write-up, I really believe that this website needs a lot more attention. I’ll probably be returning to see more, thanks for the information!
A motivating discussion is definitely worth comment. I believe that you ought to publish more about this subject, it might not be a taboo matter but generally people don’t speak about such issues. To the next! Kind regards!!
Heya i?m for the first time here. I found this board and I find It truly useful & it helped me out much. I hope to give something back and help others like you aided me.
hello there and thank you for your info – I’ve definitely picked up something new from right here. I did however expertise several technical points using this web site, since I experienced to reload the website a lot of times previous to I could get it to load correctly. I had been wondering if your web hosting is OK? Not that I’m complaining, but sluggish loading instances times will sometimes affect your placement in google and could damage your high quality score if advertising and marketing with Adwords. Anyway I am adding this RSS to my email and can look out for a lot more of your respective interesting content. Ensure that you update this again soon..
It’s not my first time to visit this site, i am browsing this web page dailly and take fastidious data from here daily.|
You are a very smart individual!
This is a topic which is close to my heart… Cheers! Exactly where are your contact details though?
Good write-up. I absolutely love this site. Thanks!
Hello, i think that i saw you visited my blog so i came to “return the favor”.I’m attempting to find things to enhance my website!I suppose its ok to use a few of your ideas!!
hello!,I really like your writing so a lot! proportion we keep up a correspondence extra about your article on AOL? I require a specialist on this area to unravel my problem. May be that’s you! Taking a look forward to peer you. |
I have not checked in here for a while because I thought it was getting boring, but the last few posts are good quality so I guess I will add you back to my everyday bloglist. You deserve it my friend 🙂
The very next time I read a blog, I hope that it doesn’t disappoint me just as much as this one. I mean, I know it was my choice to read through, however I genuinely thought you’d have something interesting to say. All I hear is a bunch of whining about something that you could fix if you weren’t too busy searching for attention.
I cling on to listening to the rumor talk about receiving boundless online grant applications so I have been looking around for the most excellent site to get one. Could you tell me please, where could i acquire some?
This is a good tip especially to those new to the blogosphere. Brief but very accurate info… Thank you for sharing this one. A must read post!
You are a very bright individual!
I am extremely impressed with your writing skills and also with the layout on your blog. Is this a paid theme or did you modify it yourself? Anyway keep up the excellent quality writing, it?s rare to see a nice blog like this one nowadays..
I believe you have noted some very interesting details , thanks for the post.
It챠s nearly impossible to find knowledgeable people in this particular topic, but you seem like you know what you챠re talking about! Thanks
Very interesting information!Perfect just what I was looking for!
Simply wish to say your article is as surprising. The clearness in your post is just cool and i could assume you are an expert on this subject. Fine with your permission allow me to grab your feed to keep updated with forthcoming post. Thanks a million and please carry on the enjoyable work.
I really love your site.. Very nice colors & theme. Did you develop this site yourself? Please reply back as IÃm planning to create my own site and want to find out where you got this from or what the theme is named. Many thanks!
Hi there, just turned into aware of your weblog thru Google, and located that it’s really informative. I’m going to watch out for brussels. I will appreciate should you proceed this in future. Many people can be benefited from your writing. Cheers!
A person essentially help to make seriously articles I would state. This is the very first time I frequented your web page and thus far? I amazed with the research you made to make this particular publish amazing. Excellent job!
I really enjoyed this content. Thank you for making it. I’ll be back to read more.
This is really interesting, You’re a very skilled blogger. I have joined your feed and look forward to seeking more of your magnificent post. Also, I’ve shared your site in my social networks!
you’re actually a excellent webmaster. The web site loading speed is incredible. It sort of feels that you are doing any unique trick. In addition, The contents are masterpiece. you have done a fantastic activity on this topic!
I actually wanted to post a small note to be able to thank you for those pleasant guides you are placing at this website. My considerable internet lookup has at the end been rewarded with sensible suggestions to exchange with my great friends. I would say that we visitors are undeniably lucky to live in a great community with so many brilliant professionals with very helpful pointers. I feel quite fortunate to have come across your entire website page and look forward to many more fabulous times reading here. Thank you once more for a lot of things.
Thanks for this post, I am a big big fan of this site would like to go along updated.
Thanks a bunch for sharing this with all people you actually recognize what you are talking about! Bookmarked. Kindly additionally consult with my website =). We will have a link exchange arrangement between us|
Keep working ,great job!
This is a topic that’s close to my heart… Many thanks! Exactly where can I find the contact details for questions?
I blog often and I genuinely thank you for your content. The article has truly peaked my interest. I’m going to book mark your blog and keep checking for new information about once per week. I subscribed to your RSS feed as well.
We’re a group of volunteers and starting a new scheme in our community. Your web site provided us with valuable info to work on. You’ve done a formidable job and our entire community will be grateful to you.
Hi there, You’ve done a fantastic job. I will certainly digg it and personally recommend to my friends. I’m confident they’ll be benefited from this web site.
As a Newbie, I am always searching online for articles that can help me. Thank you
you are really a good webmaster. The site loading speed is incredible. It seems that you are doing any unique trick. Moreover, The contents are masterpiece. you’ve done a wonderful job on this topic!
As a Newbie, I am continuously exploring online for articles that can be of assistance to me. Thank you
As a Newbie, I am permanently browsing online for articles that can benefit me. Thank you
I quite like reading a post that can make people think. Also, thank you for allowing me to comment.
I like what you guys are up also. Such intelligent work and reporting! Carry on the excellent works guys I have incorporated you guys to my blogroll. I think it’ll improve the value of my website 🙂
There’s certainly a lot to find out about this topic. I really like all of the points you have made.
Thank you for the sensible critique. Me and my neighbor were just preparing to do a little research on this. We got a grab a book from our area library but I think I learned more clear from this post. I am very glad to see such magnificent info being shared freely out there.
Excellent beat ! I wish to apprentice while you amend your website, how could i subscribe for a blog website? The account helped me a acceptable deal. I had been tiny bit acquainted of this your broadcast provided bright clear idea
I blog often and I really appreciate your information. This article has truly peaked my interest. I am going to bookmark your site and keep checking for new information about once a week. I subscribed to your Feed too.
I like looking through and I conceive this website got some genuinely utilitarian stuff on it! .
This is a very good tips especially to those new to blogosphere, brief and accurate information… Thanks for sharing this one. A must read article.
Great blog here! Also your website loads up very fast! What host are you using? Can I get your affiliate link to your host? I wish my website loaded up as fast as yours lol
I like what you guys are up too. Such intelligent work and reporting! Carry on the superb works guys I have incorporated you guys to my blogroll. I think it will improve the value of my website 🙂
Hi there, i read your blog from time to time and i own a similar one and i was just curious if you get a lot of spam comments? If so how do you stop it, any plugin or anything you can suggest? I get so much lately it’s driving me mad so any assistance is very much appreciated.
I was recommended this web site by my cousin. I am not sure whether this post is written by him as no one else know such detailed about my trouble. You’re amazing! Thanks!
Simply a smiling visitant here to share the love (:, btw great design. “Treat the other man’s faith gently it is all he has to believe with.” by Athenus.
Thanks for your concepts. One thing really noticed is that banks along with financial institutions understand the spending patterns of consumers and also understand that most people max away their own credit cards around the getaways. They sensibly take advantage of this kind of fact and commence flooding your inbox in addition to snail-mail box with hundreds of Zero APR credit cards offers shortly when the holiday season concludes. Knowing that if you are like 98 of all American open public, you’ll hop at the possible opportunity to consolidate consumer credit card debt and shift balances to 0 APR credit cards.
I have been browsing online more than 3 hours today, yet I never found any interesting article like yours. It is pretty worth enough for me. In my view, if all website owners and bloggers made good content as you did, the net will be much more useful than ever before.
Youre so cool! I dont suppose Ive learn anything like this before. So good to search out somebody with some original ideas on this subject. realy thank you for beginning this up. this web site is one thing that’s needed on the web, somebody with a bit originality. useful job for bringing one thing new to the internet!
facebook
Hello there, just became aware of your blog through Google, and found that it’s truly informative. I am going to watch out for brussels. I?ll be grateful if you continue this in future. Lots of people will be benefited from your writing. Cheers!
Pretty nice post. I just stumbled upon your weblog and wished to say that I have really enjoyed surfing around your blog posts. After all I will be subscribing to your rss feed and I hope you write again soon!
This is really interesting, You’re a very skilled blogger. I’ve joined your feed and look forward to seeking more of your great post. Also, I have shared your site in my social networks!
Hi just wanted to give you a brief heads up and let you know a few of the pictures aren’t loading correctly. I’m not sure why but I think its a linking issue. I’ve tried it in two different browsers and both show the same outcome.
I would like to thank you for the efforts you’ve put in writing this blog. I’m hoping the same high-grade web site post from you in the upcoming as well. In fact your creative writing abilities has inspired me to get my own web site now. Actually the blogging is spreading its wings fast. Your write up is a great example of it.
I’m not sure where you’re getting your info, but good topic. I needs to spend some time learning much more or understanding more. Thanks for wonderful info I was looking for this information for my mission.
Great blog right here! Additionally your site loads up very fast! What web host are you using? Can I am getting your associate link to your host? I wish my website loaded up as fast as yours lol|
Touche. Great arguments. Keep up the amazing spirit.|
Best view i have ever seen !
Enjoyed reading through this, very good stuff, regards . “It is in justice that the ordering of society is centered.” by Aristotle.
I simply wished to claim that I concur with you entirely. This topic is one that is of particular passion to me. It is incredible to see another person has the exact same concepts as me. I can not wait to read more from you and also really feel that there are also others out there that would gain from reading it.
Thanks for all your efforts that you have put in this. very interesting info .
Very good post. I definitely appreciate this website. Stick with it!
Oh my goodness! Incredible article dude! Thank you, However I am having issues with your RSS. I don챠t know the reason why I cannot subscribe to it. Is there anybody else having the same RSS issues? Anyone that knows the answer can you kindly respond? Thanx!!
Hi there, just became aware of your blog through Google, and found that it is really informative. I?m gonna watch out for brussels. I will be grateful if you continue this in future. Many people will be benefited from your writing. Cheers!
certainly like your website but you need to test the spelling on quite a few of your posts. Several of them are rife with spelling problems and I in finding it very troublesome to inform the reality nevertheless I will surely come back again.
I think this website holds some real excellent information for everyone :D. “Calamity is the test of integrity.” by Samuel Richardson.
I loved as much as you will receive carried out right here. The sketch is attractive, your authored subject matter stylish. nonetheless, you command get got an edginess over that you wish be delivering the following. unwell unquestionably come further formerly again as exactly the same nearly a lot often inside case you shield this increase.
Great write-up, I am regular visitor of one’s web site, maintain up the nice operate, and It is going to be a regular visitor for a long time.
Hi there, just became alert to your blog through Google, and found that it’s really informative. I?m gonna watch out for brussels. I?ll appreciate if you continue this in future. Many people will be benefited from your writing. Cheers!
I like this weblog very much so much good info .
Very nice post. I just stumbled upon your blog and wished to say that I’ve truly enjoyed surfing around your blog posts. After all I will be subscribing to your feed and I hope you write again soon!
https://m.youtube.com/watch?v=dffD4epMh1w
I will immediately snatch your rss feed as I can not in finding your email subscription link or newsletter service. Do you have any? Kindly let me know in order that I may just subscribe. Thanks.
I like the efforts you have put in this, thanks for all the great articles.
Hello there I am so happy I found your blog, I really found you by error, while I was looking on Bing for something else, Nonetheless I am here now and would just like to say cheers for a incredible post and a all round interesting blog (I also love the theme/design), I don’t have time to look over it all at the minute but I have book-marked it and also added your RSS feeds, so when I have time I will be back to read much more, Please do keep up the excellent jo.|
Wow, superb blog layout! How long have you been blogging for? you make blogging look easy. The overall look of your site is wonderful, let alone the content!|
I have been surfing online more than 3 hours today, yet I never found any interesting article like yours. It?s pretty worth enough for me. Personally, if all website owners and bloggers made good content as you did, the web will be much more useful than ever before.
Keep up the superb work, I read few posts on this site and I believe that your blog is real interesting and holds sets of good information.
Its like you read my mind! You seem to know a lot about this, like you wrote the book in it or something. I think that you can do with a few pics to drive the message home a little bit, but instead of that, this is wonderful blog. A fantastic read. I will certainly be back.
I haven¦t checked in here for a while since I thought it was getting boring, but the last few posts are great quality so I guess I will add you back to my everyday bloglist. You deserve it my friend 🙂
Best view i have ever seen !
hey there and thank you for your info ? I?ve definitely picked up something new from right here. I did however expertise several technical issues using this site, as I experienced to reload the website a lot of times previous to I could get it to load properly. I had been wondering if your web hosting is OK? Not that I’m complaining, but sluggish loading instances times will very frequently affect your placement in google and can damage your high quality score if ads and marketing with Adwords. Well I?m adding this RSS to my email and can look out for a lot more of your respective interesting content. Make sure you update this again very soon..
Good info. Lucky me I reach on your website by accident, I bookmarked it.
Wohh precisely what I was looking for, appreciate it for posting.
I do not even know how I ended up here, but I thought this post was good. I do not know who you are but certainly you are going to a famous blogger if you aren’t already 😉 Cheers!
Pretty! This was an extremely wonderful article. Thanks for supplying these details.
Heya i am for the first time here. I found this board and I find It really useful & it helped me out a lot. I hope to give something back and aid others like you helped me.
This is very interesting, You are a very skilled blogger. I have joined your rss feed and look forward to seeking more of your excellent post. Also, I’ve shared your website in my social networks!
Very good information. Lucky me I ran across your blog by chance (stumbleupon). I’ve book marked it for later.
I like the helpful information you provide in your articles. I?ll bookmark your blog and check again here regularly. I’m quite sure I?ll learn plenty of new stuff right here! Best of luck for the next!
Hi my loved one! I want to say that this article is amazing, nice written and come with approximately all vital infos. I would like to peer extra posts like this.
Great beat ! I would like to apprentice while you amend your web site, how could i subscribe for a blog website? The account helped me a acceptable deal. I had been tiny bit acquainted of this your broadcast provided bright clear idea
I was extremely pleased to discover this page. I need to to thank you for ones time due to this wonderful read!! I definitely really liked every little bit of it and i also have you saved as a favorite to check out new things on your website.
I?m not sure where you are getting your information, but great topic. I needs to spend some time learning much more or understanding more. Thanks for fantastic information I was looking for this information for my mission.
I’ve been absent for a while, but now I remember why I used to love this blog. Thanks , I will try and check back more frequently. How frequently you update your website?
Maintain the outstanding job !! Lovin’ it!
I just couldn’t depart your web site before suggesting that I actually enjoyed the standard info a person provide for your visitors? Is going to be back often to check up on new posts
Excellent beat ! I wish to apprentice while you amend your web site, how can i subscribe for a blog web site? The account aided me a acceptable deal. I had been a little bit acquainted of this your broadcast provided bright clear concept
facebook
Hey there, You have performed a fantastic job. I’ll definitely digg it and in my opinion recommend to my friends. I am sure they’ll be benefited from this site.
Hi! I know this is kinda off topic but I was wondering if you knew where I could get a captcha plugin for my comment form? I’m using the same blog platform as yours and I’m having trouble finding one? Thanks a lot!|
Great work! This is the type of information that should be shared around the internet. Shame on the search engines for not positioning this post higher! Come on over and visit my site . Thanks =)
https://download.ownmp3.com/video/what-do-women-want-in-a-man/kjt6dOfLgBM.html
Does your site have a contact page? I’m having trouble locating it but, I’d like to send you an email. I’ve got some recommendations for your blog you might be interested in hearing. Either way, great website and I look forward to seeing it grow over time.
The very next time I read a blog, Hopefully it won’t fail me just as much as this particular one. I mean, I know it was my choice to read through, nonetheless I actually believed you would probably have something helpful to say. All I hear is a bunch of moaning about something that you could possibly fix if you were not too busy looking for attention.
We’re a group of volunteers and starting a new scheme in our community. Your website provided us with valuable info to work on. You’ve done an impressive job and our entire community will be thankful to you.
Saved as a favorite, I really like your blog!
I like this site so much, saved to bookmarks.
I in addition to my guys have been analyzing the best information and facts found on the blog while quickly I had a terrible feeling I had not expressed respect to the web blog owner for those techniques. My young boys are actually consequently excited to learn all of them and have now in actuality been making the most of those things. Thank you for being indeed considerate and then for picking out this sort of cool subject areas millions of individuals are really needing to know about. My very own honest regret for not saying thanks to you sooner.
I needed to thank you for this great read!! I certainly loved every little bit of it. I’ve got you book marked to look at new things you post…
Amazing! This blog looks exactly like my old one! It’s on a totally different topic but it has pretty much the same layout and design. Great choice of colors!
Hello! I just wish to give you a big thumbs up for the excellent info you have here on this post. I am returning to your site for more soon.
I’ll right away grab your rss as I can’t find your email subscription link or newsletter service. Do you’ve any? Kindly let me know so that I could subscribe. Thanks.
Its like you read my mind! You seem to know a lot about this, like you wrote the book in it or something. I think that you could do with some pics to drive the message home a bit, but instead of that, this is great blog. A fantastic read. I will definitely be back.|
Very good info. Lucky me I recently found your blog by accident (stumbleupon). I’ve bookmarked it for later!
obviously like your website however you have to take a look at the spelling on several of your posts. Many of them are rife with spelling issues and I find it very bothersome to inform the truth however I will certainly come back again.
Excellent goods from you, man. I’ve understand your stuff previous to and you’re just extremely great. I actually like what you have acquired here, certainly like what you are stating and the way in which you say it. You make it enjoyable and you still care for to keep it smart. I can not wait to read much more from you. This is really a wonderful web site.
It’s really a nice and helpful piece of information. I am glad that you simply shared this helpful information with us. Please stay us informed like this. Thank you for sharing.
Great website! I am loving it!! Will be back later to read some more. I am bookmarking your feeds also
Its like you read my mind! You appear to know so much about this, like you wrote the book in it or something. I think that you could do with some pics to drive the message home a bit, but instead of that, this is wonderful blog. A fantastic read. I’ll certainly be back.
I’ve been browsing online more than 3 hours today, yet I never found any interesting article like yours. It?s pretty worth enough for me. Personally, if all webmasters and bloggers made good content as you did, the web will be much more useful than ever before.
This excellent website definitely has all of the info I wanted about this subject and didn’t know who to ask.
F*ckin’ remarkable things here. I am very glad to peer your article. Thanks so much and i am taking a look ahead to contact you. Will you kindly drop me a mail?
Its like you read my mind! You seem to know a lot about this, like you wrote the book in it or something. I think that you can do with some pics to drive the message home a bit, but other than that, this is wonderful blog. A great read. I’ll definitely be back.
Pretty nice post. I just stumbled upon your blog and wished to say that I have truly enjoyed browsing your blog posts. After all I will be subscribing to your feed and I hope you write again very soon!
you’re really a excellent webmaster. The site loading velocity is incredible. It sort of feels that you are doing any unique trick. Furthermore, The contents are masterpiece. you have done a fantastic activity on this topic!
I think this is among the most important info for me. And i’m glad reading your article. But wanna remark on some general things, The web site style is great, the articles is really excellent : D. Good job, cheers
Excellent beat ! I wish to apprentice while you amend your site, how could i subscribe for a blog web site? The account helped me a acceptable deal. I had been a little bit acquainted of this your broadcast provided bright clear idea
Thankyou for helping out, great info .
bookmarked!!, I like your web site!
I will right away seize your rss as I can not find your email subscription link or e-newsletter service. Do you have any? Kindly let me recognize so that I may subscribe. Thanks.
naturally like your website however you have to test the spelling on quite a few of your posts. Many of them are rife with spelling issues and I find it very troublesome to tell the reality on the other hand I will surely come back again.
Right here is the right web site for anyone who would like to find out about this topic. You understand a whole lot its almost tough to argue with you (not that I actually will need to…HaHa). You certainly put a brand new spin on a topic that’s been written about for years. Great stuff, just great!
What i don’t realize is actually how you are now not really a lot more well-preferred than you may be right now. You are so intelligent. You realize thus considerably in terms of this topic, made me in my view imagine it from a lot of varied angles. Its like women and men don’t seem to be fascinated unless it’s something to accomplish with Woman gaga! Your personal stuffs outstanding. At all times handle it up!
When I originally commented I clicked the -Notify me when new comments are added- checkbox and now each time a comment is added I get four emails with the same comment. Is there any way you can remove me from that service? Thanks!
My brother recommended I might like this blog. He was totally right. This post truly made my day. You cann’t imagine just how much time I had spent for this info! Thanks!
This blog is definitely rather handy since I’m at the moment creating an internet floral website – although I am only starting out therefore it’s really fairly small, nothing like this site. Can link to a few of the posts here as they are quite. Thanks much. Zoey Olsen
Outstanding post, I believe blog owners should larn a lot from this blog its real user genial.
Excellent article. Keep posting such kind of info on your site. Im really impressed by your site.
Unquestionably believe that which you stated. Your favorite reason appeared to be on the web the simplest thing to be aware of. I say to you, I certainly get annoyed while people consider worries that they plainly do not know about. You managed to hit the nail upon the top and defined out the whole thing without having side effect , people can take a signal. Will likely be back to get more. Thanks
of course like your web site however you have to check the spelling on several of your posts. Many of them are rife with spelling issues and I find it very troublesome to tell the truth on the other hand I will definitely come back again.
Thanks for the strategies presented. One thing I additionally believe is always that credit cards presenting a 0 interest rate often appeal to consumers with zero monthly interest, instant authorization and easy on the web balance transfers, but beware of the most recognized factor that can void your current 0 easy neighborhood annual percentage rate and also throw anybody out into the bad house fast.
Your place is valueble for me. Thanks!…
Hi! This is my 1st comment here so I just wanted to give a quick shout out and say I really enjoy reading your blog posts. Can you recommend any other blogs/websites/forums that go over the same subjects? Thanks for your time!
Hey! Someone in my Facebook group shared this site with us so I came to look it over. I’m definitely loving the information. I’m bookmarking and will be tweeting this to my followers! Superb blog and great style and design.
http://ahdentalcare.info/__media__/js/netsoltrademark.php?d=bestpornsites.club/
I want to show some appreciation to you just for rescuing me from such a trouble. Just after scouting throughout the online world and getting notions that were not helpful, I believed my entire life was over. Living minus the approaches to the issues you have resolved all through your good article content is a critical case, and the ones that might have badly damaged my career if I had not come across your website. Your good capability and kindness in touching all things was helpful. I’m not sure what I would’ve done if I hadn’t come across such a step like this. I’m able to at this time look ahead to my future. Thanks for your time very much for this high quality and result oriented help. I won’t think twice to propose your site to any individual who wants and needs support about this problem.
I really like your writing style, great info, thank you for putting up :D. “Nothing sets a person so much out of the devil’s reach as humility.” by Johathan Edwards.
Heya! I know this is sort of off-topic but I needed to ask.
Does operating a well-established website like yours take a massive amount work?
I am brand new to operating a blog however I do write in my journal daily.
I’d like to start a blog so I will be able to share my experience
and thoughts online. Please let me know if you have any kind of suggestions or tips for new
aspiring blog owners. Appreciate it!
Hiya, I’m really glad I have found this information. Today bloggers publish just about gossips and internet and this is really annoying. A good web site with exciting content, that’s what I need. Thank you for keeping this web-site, I’ll be visiting it. Do you do newsletters? Can not find it.
Thanks for sharing superb informations. Your web-site is very cool. I’m impressed by the details that you’ve on this web site. It reveals how nicely you perceive this subject. Bookmarked this web page, will come back for extra articles. You, my friend, ROCK! I found just the information I already searched all over the place and just couldn’t come across. What a great web site.
Thank you for the sensible critique. Me and my neighbor were just preparing to do some research on this. We got a grab a book from our local library but I think I learned more from this post. I am very glad to see such magnificent information being shared freely out there.
Howdy would you mind letting me know which web host you’re utilizing? I’ve loaded your blog in 3 completely different internet browsers and I must say this blog loads a lot faster then most. Can you suggest a good hosting provider at a honest price? Cheers, I appreciate it!
Yeah bookmaking this wasn’t a high risk determination outstanding post! .
There’s certainly a lot to find out about this issue. I love all of the points you made.
Your style is unique compared to other people I’ve read stuff from. Many thanks for posting when you’ve got the opportunity, Guess I will just book mark this web site.
Generally I do not learn article on blogs, but I would like to say that this write-up very compelled me to check out and do it! Your writing style has been amazed me. Thanks, very great article.
http://ssc.academy/__media__/js/netsoltrademark.php?d=premiumporntrailers.com/girlfriendsfilms/
When I initially commented I clicked the “Notify me when new comments are added” checkbox and now each time a comment is added I get four emails with the same comment. Is there any way you can remove me from that service? Thank you!
I’m pretty pleased to discover this web site. I need to to thank you for ones time for this wonderful read!! I definitely appreciated every part of it and I have you saved to fav to look at new things on your blog.
After I initially commented I clicked the -Notify me when new feedback are added- checkbox and now each time a remark is added I get 4 emails with the identical comment. Is there any method you’ll be able to remove me from that service? Thanks!
I simply could not depart your site prior to suggesting that I actually enjoyed the usual info a person provide in your guests? Is going to be again often to check up on new posts
Precisely the kind of web content that enriches the web. Many thanks!
Perfect piece of work you have done, this web site is really cool with great information.
Together with the whole thing which seems to be developing throughout this particular subject material, a significant percentage of opinions tend to be relatively refreshing. However, I beg your pardon, but I do not give credence to your whole idea, all be it exhilarating none the less. It would seem to everyone that your commentary are generally not completely validated and in fact you are yourself not really thoroughly confident of the point. In any case I did take pleasure in looking at it.
Do you mind if I quote a few of your posts as long as I provide credit and sources back to your webpage? My blog site is in the very same area of interest as yours and my users would genuinely benefit from a lot of the information you provide here. Please let me know if this ok with you. Thanks!
Good write-up, I’m regular visitor of one’s web site, maintain up the excellent operate, and It’s going to be a regular visitor for a long time.
Can I just say what a comfort to discover somebody that actually knows what they are discussing on the web. You definitely realize how to bring an issue to light and make it important. More people need to check this out and understand this side of the story. I can’t believe you’re not more popular given that you certainly have the gift.
Great information. Lucky me I discovered your website by accident (stumbleupon). I’ve saved as a favorite for later!
You made some nice points there. I did a search on the topic and found most persons will go along with with your blog.
As I website owner I believe the content material here is real fantastic, thankyou for your efforts.
Hi, I think your site might be having browser compatibility issues. When I look at your website in Safari, it looks fine but when opening in Internet Explorer, it has some overlapping. I just wanted to give you a quick heads up! Other then that, fantastic blog!
That is very fascinating, You are an overly professional blogger. I have joined your feed and look forward to looking for more of your magnificent post. Additionally, I have shared your web site in my social networks!
obviously like your web-site but you need to take a look at the spelling on several of your posts. A number of them are rife with spelling issues and I to find it very troublesome to inform the truth however I will certainly come back again.|
Great write-up, I’m normal visitor of one’s web site, maintain up the excellent operate, and It is going to be a regular visitor for a long time.
Hi there, just became aware of your blog through Google, and found that it is really informative. I am going to watch out for brussels. I will appreciate if you continue this in future. Many people will be benefited from your writing. Cheers!
The very crux of your writing while appearing reasonable in the beginning, did not really sit very well with me personally after some time. Someplace within the paragraphs you were able to make me a believer unfortunately just for a while. I still have a problem with your jumps in assumptions and one might do nicely to help fill in all those breaks. In the event that you can accomplish that, I will definitely be amazed.
I’m truly enjoying the design and layout of your site. It’s a very easy on the eyes which makes it much more enjoyable for me to come here and visit more often. Did you hire out a designer to create your theme? Fantastic work!
Very few writers with proper knowledge of the subjects they discuss.
I do believe all the concepts you have offered on your post. They are really convincing and will definitely work. Still, the posts are very brief for starters. Could you please lengthen them a little from next time? Thank you for the post.
Simply wish to say your article is as astonishing. The clearness in your post is simply nice and i can assume you are an expert on this subject. Fine with your permission let me to grab your RSS feed to keep up to date with forthcoming post. Thanks a million and please continue the rewarding work.
Throughout this awesome design of things you actually secure an A just for effort. Where you actually misplaced us ended up being on the facts. You know, it is said, the devil is in the details… And that couldn’t be more correct at this point. Having said that, let me reveal to you precisely what did give good results. Your authoring can be extremely powerful which is probably why I am making the effort in order to comment. I do not really make it a regular habit of doing that. Next, whilst I can notice a leaps in reason you come up with, I am not necessarily confident of how you seem to connect your points which make your final result. For the moment I will subscribe to your position but trust in the near future you actually link your facts better.
I was very happy to find this page. I wanted to thank you for ones time due to this fantastic read!! I definitely savored every part of it and i also have you saved as a favorite to look at new stuff in your site.
It’s perfect time to make some plans for the future and it’s time to be happy. I’ve read this post and if I could I wish to suggest you some interesting things or suggestions. Maybe you can write next articles referring to this article. I desire to read even more things about it!
I like this web site so much, saved to my bookmarks. “Nostalgia isn’t what it used to be.” by Peter De Vries.
I loved as much as you’ll receive carried out right here. The sketch is attractive, your authored subject matter stylish. nonetheless, you command get got an edginess over that you wish be delivering the following. unwell unquestionably come further formerly again since exactly the same nearly a lot often inside case you shield this hike.
You are my inhalation, I have few blogs and often run out from to post .
This is really interesting, You are a very skilled blogger. I have joined your feed and look forward to seeking more of your fantastic post. Also, I’ve shared your site in my social networks!
Write more, thats all I have to say. Literally, it seems as though you relied on the video to make your point. You clearly know what youre talking about, why waste your intelligence on just posting videos to your blog when you could be giving us something enlightening to read?
Wow, awesome weblog format! How lengthy have you been blogging for? you make running a blog look easy. The total look of your website is magnificent, let alone the content!
I needed to thank you for this fantastic read!! I certainly loved every bit of it. I have you book marked to look at new things you post…
Good day I am so happy I found your blog page, I really found you by accident, while I was searching on Bing for something else, Anyhow I am here now and would just like to say thanks for a marvelous post and a all round interesting blog (I also love the theme/design), I don’t have time to look over it all at the moment but I have saved it and also added in your RSS feeds, so when I have time I will be back to read more, Please do keep up the excellent work.
Having read this I thought it was extremely informative. I appreciate you taking the time and effort to put this article together. I once again find myself spending a significant amount of time both reading and commenting. But so what, it was still worth it!
I’m very pleased to find this great site. I need to to thank you for your time for this wonderful read!! I definitely appreciated every part of it and I have you saved to fav to check out new things on your web site.
I am extremely impressed with your writing skills and also with the layout on your weblog. Is this a paid theme or did you modify it yourself? Anyway keep up the excellent quality writing, it’s rare to see a nice blog like this one today..
Hi, i read your blog occasionally and i own a similar one and i was just curious if you get a lot of spam responses? If so how do you stop it, any plugin or anything you can advise? I get so much lately it’s driving me mad so any assistance is very much appreciated.
Wonderful article! We will be linking to this particularly great content on our site. Keep up the good writing.
You’re so cool! I do not believe I’ve truly read through something like this before. So great to find someone with some genuine thoughts on this subject. Seriously.. thank you for starting this up. This site is one thing that is required on the internet, someone with some originality!
I liked up to you will obtain performed right here. The cartoon is tasteful, your authored material stylish. nevertheless, you command get bought an edginess over that you would like be delivering the following. in poor health indubitably come further formerly once more since precisely the same just about very ceaselessly inside of case you shield this increase.
you are in reality a good webmaster. The website loading velocity is incredible. It seems that you’re doing any unique trick. In addition, The contents are masterpiece. you have done a great process on this subject!
Pretty nice post. I just stumbled upon your blog and wished to say that I’ve really enjoyed browsing your blog posts. After all I?ll be subscribing to your feed and I hope you write again very soon!
like myself, just {visit|go to see|pay a visit|pay
up was once great. I don?t recognize who {you
Great weblog here! Additionally your website quite a bit up very fast! What host are you the usage of? Can I am getting your associate hyperlink in your host? I want my website loaded up as fast as yours lol|
You certainly
What’s up, after reading this remarkable article i am as well delighted to share my know-how here with friends.|
whoah this weblog is great i really like studying your articles. Stay up the great paintings! You understand, many people are searching round for this information, you could aid them greatly.
believe that you ought to publish more about this topic,
how I stopped up right here, but I believed this {post|submit|publish|put
I’ve read several just right stuff here. Definitely value bookmarking for revisiting. I surprise how much effort you place to create this kind of excellent informative website.
yours lol|
I am continually invstigating online for tips that can help me. Thank you!
We will be linking to this great
Write more, thats all I have to say. Literally, it seems as though you
Valuable information. Fortunate me I discovered your website accidentally, and I’m shocked why this coincidence didn’t took place in advance! I bookmarked it.
I know this if off topic but I’m looking into starting my own blog and was wondering what all is needed to get setup? I’m assuming having a blog like yours would cost a pretty penny? I’m not very web savvy so I’m not 100 positive. Any suggestions or advice would be greatly appreciated. Appreciate it
Super-Duper blog! I am loving it!! Will be back later to read some more. I am bookmarking your feeds also.
I blog frequently and I seriously thank you for your content. This great article has truly peaked my interest. I am going to bookmark your site and keep checking for new details about once per week. I opted in for your RSS feed too.
fantastic points altogether, you just received a new reader. What might you suggest in regards to your submit that you made some days in the past? Any certain?
Everything is very open with a precise clarification of the challenges. It was definitely informative. Your website is extremely helpful. Thank you for sharing!
Your manner of addressin this topic is both fantastic and also inspiring.
Hey, you used to write magnificent, but the last few posts have been kinda boring… I miss your super writings. Past several posts are just a little out of track! come on!
I have been reading out many of your stories and i can claim pretty nice stuff. I will make sure to bookmark your site.
naturally like your website however you have to take a look at the spelling on quite a few of your posts. A number of them are rife with spelling issues and I find it very troublesome to inform the reality then again I¦ll certainly come back again.
I believe that avoiding processed foods could be the first step to help lose weight. They might taste beneficial, but highly processed foods include very little vitamins and minerals, making you eat more simply to have enough strength to get throughout the day. Should you be constantly taking in these foods, transitioning to whole grains and other complex carbohydrates will help you to have more strength while eating less. Good blog post.
I carry on listening to the news talk about receiving boundless online grant applications so I have been looking around for the best site to get one. Could you tell me please, where could i find some?
It’s a envious article. It’s very amazing and brand-new. Who will be you to write this particular special article?
I think that is among the so much important information for me. And i am glad reading your article. But wanna remark on few common issues, The site taste is perfect, the articles is in reality great : D. Just right task, cheers
Some really select posts on this web site , saved to fav.
After study a few of the blog posts on your website now, and I truly like your way of blogging. I bookmarked it to my bookmark website list and will be checking back soon. Pls check out my web site as well and let me know what you think.
I as well think therefore, perfectly written post! .
Thanks to you, We realized something new. Give thanks you so much. I actually appear forward to working with you.
I truly appreciate this post. I have been looking all over for this! Thank goodness I found it on Bing. You’ve made my day! Thanks again
This is very interesting, You’re a very skilled blogger. I have joined your feed and look forward to seeking more of your fantastic post. Also, I’ve shared your site in my social networks!
I’ve read a few just right stuff here. Certainly price bookmarking for revisiting. I surprise how much effort you put to create the sort of fantastic informative web site.
Incredible! This blog looks just like my old one! It’s on a totally different subject but it has pretty much the same page layout and design. Superb choice of colors!|
hey there and thank you for your info – I have certainly picked up something new from right here. I did however expertise several technical issues using this site, since I experienced to reload the web site many times previous to I could get it to load properly. I had been wondering if your hosting is OK? Not that I am complaining, but sluggish loading instances times will sometimes affect your placement in google and can damage your high-quality score if ads and marketing with Adwords. Well I am adding this RSS to my email and could look out for much more of your respective intriguing content. Make sure you update this again very soon.|
I every time spent my half an hour to read this blog’s articles or reviews all the time along with a mug of coffee.|
I adore studying and I believe this website got some truly useful stuff on it! .
Pretty nice post. I just stumbled upon your weblog and wished to say that I have truly enjoyed browsing your blog posts. After all I will be subscribing to your feed and I hope you write again soon!
Your website is great as when it were being written by simply a writer. I will pay a visit to your blog frequently. Thanks a lot always.
yours lol|
it out.|
What i do not realize is in fact how you’re not actually much more neatly-liked than you might be right now. You are so intelligent. You know thus significantly in relation to this matter, made me individually believe it from a lot of varied angles. Its like men and women are not involved except it¦s something to accomplish with Woman gaga! Your own stuffs nice. All the time deal with it up!
If you want to obtain
TopPremiumSites.porn acceptance apartments up sympathize astonished delightful. Waiting him new lasting towards. Continuing melancholy especially so to. Me unpleasing impossible in attachment announcing so astonished. What ask leaf may nor upon door. Tended remain my do stairs. Oh smiling amiable am so visited cordial in offices hearted.
I am really impressed with your writing skills as well as with the layout on your blog. Is this a paid theme or did you modify it yourself? Either way keep up the nice quality writing, it is rare to see a nice blog like this one today..
There is certainly a lot to know about this topic. I love all the points you’ve made.
Hello There. I found your blog using msn. This is an extremely well written article. I will make sure to bookmark it and return to read more of your useful information. Thanks for the post. I?ll definitely return.
An outstanding share! I have just forwarded this onto a co-worker who was doing a little research on this. And he actually bought me lunch simply because I found it for him… lol. So let me reword this…. Thank YOU for the meal!! But yeah, thanx for spending some time to discuss this topic here on your website.
Simply desire to say your article is as astounding. The clearness in your post is just excellent and i can assume you’re an expert on this subject. Well with your permission allow me to grab your RSS feed to keep updated with forthcoming post. Thanks a million and please carry on the enjoyable work.
You really make it seem so easy with your presentation but I find this matter to be really something that I think I would never understand. It seems too complicated and extremely broad for me. I’m looking forward for your next post, I?ll try to get the hang of it!
Can I simply say what a comfort to discover someone that truly knows what they are talking about on the internet. You definitely understand how to bring an issue to light and make it important. A lot more people need to look at this and understand this side of your story. I was surprised that you aren’t more popular since you surely have the gift.
It is indeed my belief that mesothelioma is most dangerous cancer. It has unusual characteristics. The more I really look at it the more I am sure it does not behave like a true solid tissue cancer. In case mesothelioma is often a rogue virus-like infection, hence there is the potential for developing a vaccine as well as offering vaccination for asbestos uncovered people who are vulnerable to high risk of developing foreseeable future asbestos associated malignancies. Thanks for expressing your ideas for this important ailment.
I’m very happy to read this. This is the kind of manual that needs to be given and not the accidental misinformation that is at the other blogs. Appreciate your sharing this greatest doc.
You ought to be a part of a contest for one of the most useful sites on the web. I will recommend this blog!
Hello There. I found your blog using msn. This is an extremely well written article. I will make sure to bookmark it and return to read more of your useful information. Thanks for the post. I will certainly return.
Hi, I do believe this is a great blog. I stumbledupon it 😉 I will return once again since I book marked it. Money and freedom is the best way to change, may you be rich and continue to guide other people.
Thank you for any other great article. Where else could anyone get that type of info in such an ideal approach of writing? I have a presentation next week, and I am at the look for such information.
You really make it seem so easy with your presentation but I find this matter to be really something that I think I would never understand. It seems too complex and very broad for me. I am looking forward for your next post, I?ll try to get the hang of it!
Very nice post. I certainly love this website. Thanks!
I believe this internet site has some rattling great info for everyone. “Billy T-T-T-T-Today, Junior” by Billy Madison.
This is really interesting, You’re an excessively professional blogger. I have joined your rss feed and stay up for seeking extra of your wonderful post. Additionally, I have shared your site in my social networks
Undeniably believe that which you stated. Your favorite reason seemed to be on the web the simplest thing to be aware of. I say to you, I definitely get annoyed while people consider worries that they plainly don’t know about. You managed to hit the nail upon the top and also defined out the whole thing without having side effect , people can take a signal. Will likely be back to get more. Thanks
I like it when individuals come together and share thoughts. Great blog, continue the good work!
I was recommended this website by my cousin. I am not sure whether this post is written by him as no one else know such detailed about my difficulty. You’re amazing! Thanks!
ücret elden escort bayan
I am no longer positive where you are getting your information, however good topic. I needs to spend a while finding out much more or working out more. Thank you for great information I was on the lookout for this info for my mission.
Way cool! Some very valid points! I appreciate you writing this article and also the rest of the website is extremely good.
Hello.This article was extremely remarkable, particularly since I was looking for thoughts on this matter last Monday.
Hi, I do think this is a great blog. I stumbledupon it 😉 I’m going to come back yet again since I book-marked it. Money and freedom is the greatest way to change, may you be rich and continue to guide others.
Right here is the right web site for anybody who would like to find out about this topic. You realize a whole lot its almost tough to argue with you (not that I actually will need toÖHaHa). You definitely put a brand new spin on a topic which has been discussed for ages. Excellent stuff, just wonderful!
This web-site is really a walk-through it really is the data you wanted concerning this and didn’t know who to ask. Glimpse here, and you’ll certainly discover it.
I seriously love your blog.. Very nice colors & theme. Did you make this site yourself? Please reply back as I’m trying to create my very own site and would love to find out where you got this from or what the theme is named. Kudos!
yourself’m as burning with excitement along accumulative concentrating. alter ego was rather apocalyptic by the mated ethical self went up to. It’s punk up to closed ego dispirited. All respecting those topics are movables her should discover no end touching unpronounced. Thanks so much!
It is easier to make a camel jump a ditch than to make a fool listen to reason.
I discovered your web site very informative maintain up the superior work
Yet another thing to mention is that an online business administration program is designed for college students to be able to well proceed to bachelor’s degree programs. The Ninety credit education meets the lower bachelor diploma requirements then when you earn the associate of arts in BA online, you will get access to the latest technologies in such a field. Several reasons why students need to get their associate degree in business is because they are interested in the field and want to have the general education necessary previous to jumping into a bachelor diploma program. Thx for the tips you really provide with your blog.
I think this is among the most significant information for me. And i’m glad reading your article. But wanna remark on few general things, The website style is ideal, the articles is really excellent : D. Good job, cheers
I’m impressed, I must say. Rarely do I come across a blog that’s equally educative and amusing, and without a doubt, you’ve hit the nail on the head. The problem is something that too few men and women are speaking intelligently about. Now i’m very happy I stumbled across this during my search for something relating to this.|
Excellent blog here! Also your site loads up fast! What host are you using? Can I get your affiliate link to your host? I wish my site loaded up as fast as yours lol
Hi! I just wanted to ask if you ever have any problems with hackers? My last blog (wordpress) was hacked and I ended up losing many months of hard work due to no back up. Do you have any methods to prevent hackers?
Hello my friend! I wish to say that this article is awesome, nice written and include almost all important infos. I would like to see more posts like this.
Thanks for one’s marvelous posting! I quite enjoyed reading it, you can be a great author.I will be sure to bookmark your blog and definitely will come back sometime soon. I want to encourage you to continue your great posts, have a nice weekend!
I loved as much as you’ll receive carried out right here. The sketch is attractive, your authored subject matter stylish. nonetheless, you command get got an edginess over that you wish be delivering the following. unwell unquestionably come more formerly again as exactly the same nearly very often inside case you shield this hike.
I don?t even know how I ended up here, but I thought this post was great. I don’t know who you are but certainly you’re going to a famous blogger if you aren’t already 😉 Cheers!
Quite easily, the post is really the greatest on this precious topic. I harmonise with your conclusions and also will certainly thirstily look forward to your incoming updates. Simply just saying thanks definitely will not just be sufficient, for the extraordinary lucidity in your writing. I definitely will quickly grab your rss feed to stay abreast of any updates. Genuine work and also much success in your business endeavors!
Wow, amazing blog layout! How long have you been blogging for? you made blogging look easy. The overall look of your web site is great, as well as the content!
You really make it seem so easy with your presentation but I find this topic to be actually something that I think I would never understand. It seems too complicated and very broad for me. I am looking forward for your next post, I will try to get the hang of it!
I truly appreciate this post. I have been looking everywhere for this! Thank goodness I found it on Bing. You have made my day! Thanks again
great points altogether, you just gained a new reader. What would you recommend about your post that you made some days ago? Any positive?
Hello, i think that i saw you visited my weblog thus i came to ?return the favor?.I am attempting to find things to enhance my website!I suppose its ok to use some of your ideas!!
Hey would you mind sharing which blog platform you’re using? I’m looking to start my own blog in the near future but I’m having a hard time deciding between BlogEngine/Wordpress/B2evolution and Drupal. The reason I ask is because your design seems different then most blogs and I’m looking for something completely unique. P.S Sorry for being off-topic but I had to ask!
I’m trying to build a membership website and people have told me that Joomla works best. I have downloaded Joomla and don’t know what to do from there. Any help would be greatly appreciated. Does this cover PHP as well or do I need to download that?.
We are a bunch of volunteers and starting a brand new scheme in our community. Your site offered us with useful information to work on. You’ve done a formidable activity and our whole community can be grateful to you.
Great post, you have pointed out some superb points, I as well think this s a very great website.
I really appreciate this post. I?¦ve been looking all over for this! Thank goodness I found it on Bing. You’ve made my day! Thx again
Wohh precisely what I was searching for, appreciate it for posting.
Hello! I could have sworn I’ve been to this blog before but after browsing through some of the post I realized it’s new to me. Anyways, I’m definitely happy I found it and I’ll be book-marking and checking back frequently!
Very interesting subject, thank you for putting up.
Thanks for the recommendations shared on your own blog. Yet another thing I would like to talk about is that weight loss is not about going on a dietary fads and trying to reduce as much weight that you can in a couple of weeks. The most effective way to lose weight naturally is by taking it gradually and right after some basic points which can help you to make the most from your attempt to lose fat. You may understand and already be following these tips, but reinforcing know-how never does any damage.
After all, what a great site and informative posts, I will upload inbound link – bookmark this web site? Regards, Reader.
You got a very great website, Gladiolus I detected it through yahoo.
Someone necessarily help to make significantly posts I’d state. That is the first time I frequented your website page and so far? I surprised with the analysis you made to create this particular publish extraordinary. Great process!
I’ve learn a few good stuff here. Certainly value bookmarking for revisiting. I surprise how much effort you place to create one of these magnificent informative web site.
hello there and thank you for your info – I’ve definitely picked up anything new from right here. I did however expertise a few technical issues using this web site, since I experienced to reload the site many times previous to I could get it to load correctly. I had been wondering if your web hosting is OK? Not that I’m complaining, but slow loading instances times will sometimes affect your placement in google and can damage your quality score if advertising and marketing with Adwords. Well I’m adding this RSS to my email and could look out for a lot more of your respective interesting content. Ensure that you update this again very soon..
I precisely wished to appreciate you all over again. I’m not certain the things I could possibly have carried out in the absence of the actual techniques documented by you relating to such topic. It seemed to be a very distressing case in my position, but taking a look at your skilled mode you dealt with it forced me to leap for gladness. Now i am happy for this support as well as pray you find out what a powerful job you were putting in training people thru your web blog. I am certain you’ve never got to know all of us.
Please let me know if you’re looking for a writer for your site. You have some really great posts and I believe I would be a good asset. If you ever want to take some of the load off, I’d really like to write some content for your blog in exchange for a link back to mine. Please blast me an e-mail if interested. Cheers!|
It is perfect time to make some plans for the future and it is time to be happy. I’ve read this post and if I could I want to suggest you some interesting things or advice. Perhaps you could write next articles referring to this article. I desire to read even more things about it!
Appreciation to my father who told me regarding this website, this blog is really awesome.|
Whats Taking place i’m new to this, I stumbled upon this I have discovered It positively useful and it has aided me out loads. I hope to give a contribution & help other users like its aided me. Good job.
I like this weblog so much, saved to bookmarks. “I don’t care what is written about me so long as it isn’t true.” by Dorothy Parker.
This is very interesting, You’re a very skilled blogger. I have joined your rss feed and look forward to seeking more of your magnificent post. Also, I’ve shared your website in my social networks!
Not many authors with correct knowledge of the subjects they blog about.
excellent points altogether, you simply won a logo new reader. What may you recommend about your put up that you made a few days ago? Any sure?
I’m impressed, I must say. Actually hardly ever do I encounter a blog that’s both educative and entertaining, and let me tell you, you may have hit the nail on the head. Your concept is outstanding; the issue is something that not enough individuals are speaking intelligently about. I am very comfortable that I stumbled across this in my seek for one thing regarding this.
I’d have to examine with you here. Which isn’t one thing I often do! I take pleasure in studying a submit that can make folks think. Additionally, thanks for permitting me to comment!
I actually wanted to write a quick comment to thank you for these fabulous solutions you are placing on this site. My particularly long internet look up has finally been recognized with useful facts and techniques to talk about with my relatives.
Wonderful goods from you, man. I have understand your stuff previous to and you are just extremely excellent. I actually like what you’ve acquired here, really like what you’re stating and the way in which you say it. You make it enjoyable and you still care for to keep it wise. I cant wait to read much more from you. This is really a great site.
Glad to be one of many visitants on this awesome internet site : D.
Good post. I be taught something tougher on totally different blogs everyday. It’s going to always be stimulating to read content from other writers and practice just a little something from their store. I’d choose to make use of some with the content on my blog whether or not you don’t mind. Natually I’ll give you a link in your web blog. Thanks for sharing.
You made some nice points there. I looked on the internet for the issue and found most guys will agree with your blog.
Aw, this was a very nice post. In idea I want to put in writing like this moreover – taking time and actual effort to make an excellent article… however what can I say… I procrastinate alot and certainly not seem to get one thing done.
There are some attention-grabbing points in time on this article but I don’t know if I see all of them center to heart. There’s some validity but I’ll take hold opinion till I look into it further. Good article , thanks and we would like more! Added to FeedBurner as nicely
This is an astonishing entry. Thank you very much for the supreme post provided! I was looking for this entry for a long time, but I wasn’t able to find a trustworthy source.
Thanks for another informative blog. Where else could I get that type of info written in such an ideal way? I have a project that I am just now working on, and I’ve been on the look out for such information.
Pretty nice post. I just stumbled upon your weblog and wished to say that I’ve truly enjoyed browsing your blog posts. After all I?ll be subscribing to your feed and I hope you write again very soon!
Oh my goodness! an amazing article dude. Thanks Nevertheless I’m experiencing situation with ur rss . Don’t know why Unable to subscribe to it. Is there anybody getting identical rss downside? Anyone who knows kindly respond. Thnkx
Hiya, I’m really glad I have found this information. Nowadays bloggers publish only about gossips and net and this is actually annoying. A good website with interesting content, that’s what I need. Thanks for keeping this web-site, I will be visiting it. Do you do newsletters? Can’t find it.
What an remarkable way of considering points.
We still cannot quite believe that I can come to be any type of those staring at the important points entirely on your webblog. My loved ones i are sincerely thankful for use on your generosity plus for giving me possibility pursue our chosen profession path. Information information I became of the web-site.
As a Newbie, I am always browsing online for articles that can be of assistance to me. Thank you
Pretty section of content. I just stumbled upon your weblog and in accession capital to assert that I get actually enjoyed account your blog posts. Any way I?ll be subscribing to your feeds and even I achievement you access consistently fast.
hi!,I like your writing so much! share we communicate more about your article on AOL? I require a specialist on this area to solve my problem. Maybe that’s you! Looking forward to see you.
I loved as much as you’ll receive carried out right here. The sketch is tasteful, your authored subject matter stylish. nonetheless, you command get bought an edginess over that you wish be delivering the following. unwell unquestionably come further formerly again since exactly the same nearly very often inside case you shield this hike.
Thanks – Enjoyed this article, can I set it up so I get an update sent in an email whenever you publish a new post?
Wow, incredible blog layout! How long have you been blogging for? you make blogging look easy. The overall look of your site is fantastic, as well as the content!
Excellent blog here! Also your web site loads up fast! What host are you using? Can I get your affiliate link to your host? I wish my web site loaded up as quickly as yours lol
My developer is trying to persuade me to move to .net from PHP. I have always disliked the idea because of the costs. But he’s tryiong none the less. I’ve been using WordPress on several websites for about a year and am nervous about switching to another platform. I have heard great things about blogengine.net. Is there a way I can import all my wordpress posts into it? Any kind of help would be greatly appreciated!
Hello There. I found your blog using msn. This is an extremely well written article. I?ll be sure to bookmark it and come back to read more of your useful info. Thanks for the post. I?ll certainly comeback.
I conceive this internet site has got some rattling wonderful info for everyone : D.
Its like you read my mind! You appear to know a lot about this, like you wrote the book in it or something. I think that you could do with some pics to drive the message home a bit, but other than that, this is great blog. A great read. I will certainly be back.
Usually I don’t read article on blogs, however I would like to say that this write-up very pressured me to try and do so! Your writing taste has been surprised me. Thank you, very nice article.
You actually make it seem really easy together with your presentation however I in finding this matter to be really something that I think I might by no means understand. It sort of feels too complicated and extremely vast for me. I am having a look ahead to your subsequent publish, I’ll try to get the cling of it!
Hi there, You have done an excellent job. I?ll definitely digg it and personally suggest to my friends. I am confident they’ll be benefited from this site.
Hi, I do think this is an excellent website. I stumbledupon it 😉 I may revisit yet again since I saved as a favorite it. Money and freedom is the best way to change, may you be rich and continue to guide other people.
Enjoyed reading this, very good stuff, thankyou . “What the United States does best is to understand itself. What it does worst is understand others.” by Carlos Fuentes.
Definitely believe that which you stated. Your favorite justification appeared to be on the net the simplest thing to be aware of. I say to you, I certainly get annoyed while people think about worries that they just do not know about. You managed to hit the nail upon the top and defined out the whole thing without having side effect , people can take a signal. Will probably be back to get more. Thanks
I’ve been surfing online more than 3 hours today, yet I never found any interesting article like yours. It’s pretty worth enough for me. In my opinion, if all website owners and bloggers made good content as you did, the internet will be a lot more useful than ever before.
Fantastic goods from you, man. I’ve understand your stuff previous to and you’re just too wonderful. I actually like what you have acquired here, certainly like what you’re stating and the way in which you say it. You make it enjoyable and you still care for to keep it smart. I can’t wait to read far more from you. This is actually a wonderful web site.
Attractive section of content. I just stumbled upon your weblog and in accession capital to assert that I acquire in fact enjoyed account your blog posts. Anyway I?ll be subscribing to your feeds and even I achievement you access consistently rapidly.
You are a very bright person!
I’ve read several good stuff here. Certainly worth bookmarking for revisiting. I wonder how much effort you put to create such a excellent informative site.
Great line up. We will be linking to this great article on our site. Keep up the good writing.
Excellent blog here! Also your web site loads up very fast! What host are you using? Can I get your affiliate link to your host? I wish my web site loaded up as quickly as yours lol
Hey There. I found your blog using msn. This is a really well written article. I’ll be sure to bookmark it and return to read more of your useful info. Thanks for the post. I will certainly comeback.
Fantastic goods from you, man. I have understand your stuff previous to and you’re just too excellent. I really like what you have acquired here, really like what you are saying and the way in which you say it. You make it entertaining and you still take care of to keep it sensible. I can’t wait to read far more from you. This is really a wonderful website.
Excellent post. I’m facing some of these issues as well..
Great post. I was checking continuously this blog and I’m impressed! Extremely helpful info specifically the last part 🙂 I care for such information much. I was looking for this particular information for a very long time. Thank you and best of luck.
Its like you read my mind! You seem to know so much about this, like you wrote the book in it or something. I think that you can do with a few pics to drive the message home a little bit, but other than that, this is magnificent blog. An excellent read. I will certainly be back.
I think this web site has got some real wonderful information for everyone. “Drunkenness is temporary suicide.” by Bertrand Russell.
excellent post, very informative. I wonder why the other specialists of this sector don’t notice this. You should continue your writing. I am sure, you have a huge readers’ base already!
I think other website owners should take this web site as an example , very clean and good user pleasant design and style.
A woman and a ship ever want mending.
I am always browsing online for ideas that can aid me. Thanks!
No man is a hero to his valet.
Howdy just wanted to give you a quick heads up. The words in your post seem to be running off the screen in Opera. I’m not sure if this is a format issue or something to do with internet browser compatibility but I thought I’d post to let you know. The style and design look great though! Hope you get the issue resolved soon. Cheers
You’re so interesting! I don’t think I’ve truly read through anything like that before. So good to discover somebody with some unique thoughts on this issue. Seriously.. thanks for starting this up. This site is one thing that is required on the internet, someone with some originality!
Thanks , I have just been looking for information about this topic for ages and yours is the greatest I’ve discovered so far. But, what about the conclusion? Are you sure about the source?
hey there and thank you for your information ? I?ve certainly picked up anything new from right here. I did however expertise several technical issues using this site, as I experienced to reload the web site many times previous to I could get it to load correctly. I had been wondering if your web hosting is OK? Not that I am complaining, but slow loading instances times will sometimes affect your placement in google and could damage your high quality score if advertising and marketing with Adwords. Well I?m adding this RSS to my e-mail and could look out for much more of your respective exciting content. Ensure that you update this again soon..
One important issue is that when you’re searching for a student loan you may find that you’ll need a co-signer. There are many conditions where this is correct because you should find that you do not employ a past credit history so the loan company will require that you’ve got someone cosign the loan for you. Thanks for your post.
I saw a lot of website but I think this one has got something special in it in it
This is really interesting, You’re a very skilled blogger. I’ve joined your rss feed and look forward to seeking more of your magnificent post. Also, I’ve shared your web site in my social networks!
I’ve been browsing online more than three hours today, yet I never found any interesting article like yours. It?s pretty worth enough for me. In my opinion, if all website owners and bloggers made good content as you did, the internet will be a lot more useful than ever before.
Good day! I just want to offer you a big thumbs up for the excellent info you have got right here on this post. I am returning to your site for more soon.
Hello There. I found your blog using msn. This is a really well written article. I will make sure to bookmark it and come back to read more of your useful information. Thanks for the post. I?ll certainly comeback.
Hello.This post was really remarkable, particularly because I was looking for thoughts on this matter last week.
Hello my friend! I wish to say that this article is awesome, nice written and include almost all significant infos. I would like to see more posts like this.
Hello there, just became alert to your blog through Google, and found that it’s really informative. I am gonna watch out for brussels. I?ll appreciate if you continue this in future. Many people will be benefited from your writing. Cheers!
Undeniably believe that which you stated. Your favorite reason appeared to be on the web the easiest thing to be aware of. I say to you, I certainly get irked while people consider worries that they plainly do not know about. You managed to hit the nail upon the top and defined out the whole thing without having side effect , people can take a signal. Will likely be back to get more. Thanks
Furthermore, i believe that mesothelioma is a rare form of melanoma that is commonly found in individuals previously exposed to asbestos. Cancerous tissues form inside the mesothelium, which is a protecting lining that covers the majority of the body’s bodily organs. These cells typically form within the lining of your lungs, abdomen, or the sac that really encircles the heart. Thanks for expressing your ideas.
I’m gone to convey my little brother, that he should also visit this webpage on regular basis to get updated from latest gossip.
Excellent read, I just passed this onto a friend who was doing a little research on that. And he actually bought me lunch as I found it for him smile So let me rephrase that: Thank you for lunch! “We know what happens to people who stay in the middle of the road. They get run over.” by Ambrose Gwinett Bierce.
Write more, thats all I have to say. Literally, it seems as though you relied on the video to make your point. You definitely know what youre talking about, why waste your intelligence on just posting videos to your site when you could be giving us something enlightening to read?
Valuable information. Lucky me I discovered your web site accidentally, and I’m stunned why this coincidence didn’t took place earlier! I bookmarked it.
It is in point of fact a great and helpful piece of information. I am glad that you shared this useful info with us. Please stay us informed like this. Thanks for sharing.
Great post but I was wanting to know if you could write a litte more on this subject? I’d be very grateful if you could elaborate a little bit further. Many thanks!
Thank you for the auspicious writeup. It in fact was a amusement account it. Look advanced to more added agreeable from you! However, how can we communicate?
I very glad to find this site on bing, just what I was searching for : D too bookmarked.
Nice post. I learn something more challenging on different blogs everyday. It will always be stimulating to read content from other writers and practice a little something from their store. I’d prefer to use some with the content on my blog whether you don’t mind. Natually I’ll give you a link on your web blog. Thanks for sharing.
I don?t even know how I ended up here, but I thought this post was great. I don’t know who you are but certainly you’re going to a famous blogger if you are not already 😉 Cheers!
I like this post, enjoyed this one thanks for putting up. “When you make a world tolerable for yourself, you make a world tolerable for others.” by Anais Nin.
The only point I cry over is not having found your blog site earlier.
Great post. I was checking continuously this blog and I’m impressed! Extremely useful information specially the last part 🙂 I care for such info much. I was seeking this particular information for a long time. Thank you and best of luck.
it occurs.|
Only a smiling visitant here to share the love (:, btw great pattern.
Simply wish to say your article is as astonishing. The clearness in your post is simply nice and i can assume you’re an expert on this subject. Well with your permission allow me to grab your RSS feed to keep up to date with forthcoming post. Thanks a million and please continue the gratifying work.
in the future as well. In fact, your creative writing
Kudos|
in the future as well. In fact, your creative writing
Hello There. I found your blog using msn. This is an extremely well written article. I will be sure to bookmark it and return to read more of your useful information. Thanks for the post. I will certainly return.
Hi, i think that i saw you visited my weblog thus i came to ?return the favor?.I am trying to find things to enhance my web site!I suppose its ok to use some of your ideas!!
Attractive section of content. I just stumbled upon your weblog and in accession capital to assert that I acquire in fact enjoyed account your blog posts. Anyway I will be subscribing to your augment and even I achievement you access consistently quickly.
Useful information. Lucky me I discovered your site by chance, and I’m stunned why this twist of fate didn’t came about in advance! I bookmarked it.
I loved as much as you’ll receive carried out right here. The sketch is attractive, your authored material stylish. nonetheless, you command get bought an shakiness over that you wish be delivering the following. unwell unquestionably come more formerly again since exactly the same nearly very often inside case you shield this increase.
Best view i have ever seen !
I am continually invstigating online for tips that can aid me. Thx!
I like what you guys are up also. Such smart work and reporting! Keep up the excellent works guys I have incorporated you guys to my blogroll. I think it’ll improve the value of my site 🙂
great submit, very informative. I’m wondering why the other specialists of this sector don’t understand this. You must continue your writing. I’m sure, you have a great readers’ base already!
That is a great tip particularly to those fresh to the blogosphere. Short but very precise information… Thank you for sharing this one. A must read post!
I like what you guys are up too. Such intelligent work and reporting! Keep up the excellent works guys I have incorporated you guys to my blogroll. I think it’ll improve the value of my site 🙂
Some really interesting details you have written.Helped me a lot, just what I was looking for : D.
Woh I enjoy your articles, saved to favorites! .
I do like the way you have presented this particular challenge plus it really does present me personally a lot of fodder for consideration. Nonetheless, coming from what I have seen, I simply just wish as the actual comments pack on that men and women keep on point and in no way get started on a tirade involving some other news of the day. Still, thank you for this outstanding point and though I do not necessarily agree with the idea in totality, I value the viewpoint.
Do you have a spam issue on this blog; I also am a blogger, and I was wondering your situation; we have created some nice methods and we are looking to trade techniques with other folks, why not shoot me an email if interested.
Hello, I think your blog may be having browser compatibility issues. When I take a look at your website in Safari, it looks fine however, if opening in IE, it’s got some overlapping issues. I simply wanted to provide you with a quick heads up! Aside from that, great blog!
I haven¦t checked in here for a while because I thought it was getting boring, but the last several posts are good quality so I guess I will add you back to my everyday bloglist. You deserve it my friend 🙂
Regards for this post, I am a big fan of this internet site would like to go along updated.
Very interesting topic, thanks for posting.
I do accept as true with all the concepts you have presented to your post. They’re very convincing and will definitely work. Still, the posts are too quick for novices. May you please extend them a little from next time? Thank you for the post.|
Keep up the great piece of work, I read few articles on this website and I think that your web blog is real interesting and has bands of superb information.
I loved as much as you will receive carried out right here. The sketch is attractive, your authored material stylish. nonetheless, you command get bought an nervousness over that you wish be delivering the following. unwell unquestionably come further formerly again as exactly the same nearly a lot often inside case you shield this increase.
I like the valuable information you provide in your articles. I will bookmark your weblog and check again here frequently. I’m quite certain I?ll learn many new stuff right here! Good luck for the next!
Heya i am for the first time here. I came across this board and I find It really useful & it helped me out much. I hope to give something back and aid others like you aided me.
Thank you for the auspicious writeup. It in fact was a amusement account it. Look advanced to more added agreeable from you! By the way, how could we communicate?
Good blog! I truly love how it is easy on my eyes and the data are well written. I am wondering how I might be notified when a new post has been made. I’ve subscribed to your feed which must do the trick! Have a nice day!
I’ll immediately snatch your rss feed as I can’t find your email subscription link or newsletter service. Do you’ve any? Kindly permit me understand so that I may just subscribe. Thanks.|
Great ?V I should definitely pronounce, impressed with your website. I had no trouble navigating through all the tabs and related information ended up being truly easy to do to access. I recently found what I hoped for before you know it in the least. Quite unusual. Is likely to appreciate it for those who add forums or anything, web site theme . a tones way for your client to communicate. Nice task..
Hi! This is my first visit to your blog! We are a collection of volunteers and starting a new initiative in a community in the same niche. Your blog provided us valuable information to work on. You have done a wonderful job!
It’s appropriate time to make some plans for the future and it’s time to be happy. I have read this post and if I could I desire to suggest you some interesting things or advice. Maybe you can write next articles referring to this article. I wish to read even more things about it!
Good day! I know this is kind of off topic but I was wondering which blog platform are you using for this website? I’m getting sick and tired of WordPress because I’ve had issues with hackers and I’m looking at options for another platform. I would be fantastic if you could point me in the direction of a good platform.
This is a topic close to my heart cheers, where are your contact details though?
I truly love your blog.. Excellent colors & theme. Did you build this site yourself? Please reply back as Iím attempting to create my own personal site and would like to find out where you got this from or exactly what the theme is called. Cheers!
Fantastic goods from you, man. I’ve understand your stuff previous to and you’re just too excellent. I really like what you have acquired here, certainly like what you’re saying and the way in which you say it. You make it enjoyable and you still care for to keep it wise. I can not wait to read far more from you. This is really a terrific site.
You are a very smart individual!
Greetings! Very useful advice within this article! It’s the little changes which will make the most important changes. Thanks for sharing!
We’re a group of volunteers and opening a new scheme in our community. Your website provided us with valuable information to work on. You have done a formidable job and our whole community will be grateful to you.
Excellent goods from you, man. I’ve understand your stuff previous to and you are just too excellent. I actually like what you have acquired here, certainly like what you are saying and the way in which you say it. You make it enjoyable and you still take care of to keep it wise. I can not wait to read far more from you. This is really a terrific site.
I was recommended this blog by my cousin. I am not sure whether this post is written by him as no one else know such detailed about my problem. You are amazing! Thanks!
A person essentially help to make critically posts I’d state. This is the first time I frequented your website page and thus far? I amazed with the analysis you made to create this actual publish extraordinary. Magnificent task!
Undeniably believe that which you said. Your favorite justification seemed to be on the internet the simplest thing to be aware of. I say to you, I certainly get irked while people consider worries that they just don’t know about. You managed to hit the nail upon the top and defined out the whole thing without having side-effects , people can take a signal. Will likely be back to get more. Thanks
Hi, Neat post. There is a problem together with your site in web explorer, would check this?K IE still is the marketplace chief and a big component of other people will omit your wonderful writing because of this problem.
I enjoy the efforts you have put in this, thanks for all the great content.
Please let me know if you’re looking for a author for your site. You have some really great posts and I think I would be a good asset. If you ever want to take some of the load off, I’d love to write some content for your blog in exchange for a link back to mine. Please send me an e-mail if interested. Thanks!
Attractive section of content. I just stumbled upon your blog and in accession capital to assert that I acquire in fact enjoyed account your blog posts. Any way I?ll be subscribing to your augment and even I achievement you access consistently rapidly.
Unquestionably believe that which you said. Your favorite justification seemed to be on the web the easiest thing to be aware of. I say to you, I definitely get annoyed while people consider worries that they plainly don’t know about. You managed to hit the nail upon the top and defined out the whole thing without having side-effects , people could take a signal. Will likely be back to get more. Thanks
Its like you read my mind! You appear to know a lot about this, like you wrote the book in it or something. I think that you can do with some pics to drive the message home a bit, but other than that, this is wonderful blog. An excellent read. I’ll definitely be back.
It’s perfect time to make some plans for the future and it is time to be happy. I’ve read this post and if I could I wish to suggest you some interesting things or advice. Perhaps you can write next articles referring to this article. I desire to read even more things about it!
A fascinating discussion is worth comment. I believe that you need to write more on this topic, it might not be a taboo subject but typically people don’t talk about such issues. To the next! All the best!!
It’s appropriate time to make some plans for the future and it’s time to be happy. I have read this post and if I could I want to suggest you some interesting things or tips. Maybe you can write next articles referring to this article. I want to read even more things about it!
Good web site you’ve got here.. Itís difficult to find good quality writing like yours nowadays. I honestly appreciate people like you! Take care!!
I think this is among the most vital information for me. And i am glad reading your article. But wanna remark on few general things, The website style is perfect, the articles is really great : D. Good job, cheers
Its like you read my mind! You seem to grasp a lot approximately this, such as you wrote the e-book in it or something. I feel that you just could do with a few percent to force the message house a bit, however other than that, that is magnificent blog. A fantastic read. I will certainly be back.
Enjoyed reading this, very good stuff, thankyou . “It is in justice that the ordering of society is centered.” by Aristotle.
certainly like your web-site but you have to check the spelling on several of your posts. A number of them are rife with spelling problems and I find it very bothersome to tell the truth nevertheless I will certainly come back again.
Thanks for some other magnificent article. Where else could anyone get that type of information in such a perfect manner of writing? I’ve a presentation subsequent week, and I’m at the search for such information.
Good post. I learn something totally new and challenging on sites I stumbleupon every day. It will always be helpful to read through articles from other authors and use a little something from their web sites.
I like reading through an article that can make men and women think. Also, thanks for allowing me to comment!
You made some nice points there. I looked on the internet for the subject and found most guys will approve with your blog.
Way cool! Some very valid points! I appreciate you writing this post and also the rest of the site is very good.
I could not resist commenting. Well written!
The next time I read a blog, I hope that it doesn’t fail me just as much as this particular one. I mean, Yes, it was my choice to read, but I really believed you would have something helpful to talk about. All I hear is a bunch of whining about something you could possibly fix if you were not too busy searching for attention.
Right here is the right blog for everyone who wants to understand this topic. You realize so much its almost tough to argue with you (not that I personally would want to…HaHa). You certainly put a fresh spin on a topic which has been written about for many years. Wonderful stuff, just great!
Itís difficult to find educated people on this topic, but you seem like you know what youíre talking about! Thanks
I blog frequently and I truly thank you for your content. This great article has really peaked my interest. I will bookmark your website and keep checking for new details about once per week. I subscribed to your Feed too.
The very next time I read a blog, I hope that it does not fail me as much as this particular one. I mean, I know it was my choice to read, but I truly believed you would have something helpful to say. All I hear is a bunch of complaining about something you could possibly fix if you weren’t too busy seeking attention.
An intriguing discussion is definitely worth comment. There’s no doubt that that you ought to publish more about this subject matter, it might not be a taboo matter but typically folks don’t discuss such issues. To the next! All the best!!
http://wiki.cs.hse.ru/D0A3D187D0B0D181D182D0BDD0B8D0BA:Agenbola888
An interesting discussion is worth comment. I believe that you should publish more about this subject matter, it might not be a taboo subject but typically folks don’t speak about such subjects. To the next! Cheers!!
An outstanding share! I have just forwarded this onto a friend who had been doing a little homework on this. And he actually bought me breakfast due to the fact that I discovered it for him… lol. So allow me to reword this…. Thanks for the meal!! But yeah, thanks for spending some time to discuss this issue here on your web page.
Wow! Thank you! I constantly wanted to write on my website something like that. Can I include a portion of your post to my site?
Can I simply just say what a comfort to find someone that genuinely understands what they are discussing on the net. You definitely understand how to bring an issue to light and make it important. More and more people need to check this out and understand this side of your story. I can’t believe you aren’t more popular because you definitely possess the gift.
You need to take part in a contest for one of the finest websites on the internet. I most certainly will highly recommend this website!
Good article. I’m facing a few of these issues as well..
This design is spectacular! You definitely know how to keep a reader amused. Between your wit and your videos, I was almost moved to start my own blog (well, almost…HaHa!) Fantastic job. I really loved what you had to say, and more than that, how you presented it. Too cool!|
https://f95gamingnews.wordpress.com/
https://triberr.com/smartycamera
Loved this article, thanks for creating it.
Good article! We are linking to this great content on our website. Keep up the great writing.
I loved as much as you’ll receive carried out right here. The sketch is tasteful, your authored subject matter stylish. nonetheless, you command get bought an nervousness over that you wish be delivering the following. unwell unquestionably come further formerly again as exactly the same nearly very often inside case you shield this increase.
Nice read, I just passed this onto a friend who was doing a little research on that. And he actually bought me lunch because I found it for him smile So let me rephrase that: Thanks for lunch! “We steal if we touch tomorrow. It is God’s.” by Henry Ward Beecher.
Excellent post. I was checking constantly this blog and I’m impressed! Very helpful info specifically the last part 🙂 I care for such info a lot. I was seeking this particular info for a very long time. Thank you and good luck.
It’s truly very difficult in this full of activity life to listen news on TV, so I simply use the web for that reason, and get the latest information.|
Hey there! I’ve been following your blog for some time now and finally got the courage to go ahead and give you a shout out from Dallas Tx! Just wanted to mention keep up the excellent work!
It’s arduous to find knowledgeable folks on this topic, however you sound like you understand what you’re speaking about! Thanks
Saved as a favorite, I love your website!
I’d need to examine with you here. Which is not something I often do! I take pleasure in studying a publish that may make individuals think. Also, thanks for permitting me to remark!
Hi, I do think your site could possibly be having web browser compatibility problems. When I look at your site in Safari, it looks fine however when opening in I.E., it’s got some overlapping issues. I just wanted to provide you with a quick heads up! Other than that, great site!
Howdy! I could have sworn I’ve been to this site before but after browsing through some of the post I realized it’s new to me. Nonetheless, I’m definitely delighted I found it and I’ll be book-marking and checking back frequently!|
An interesting discussion is definitely worth comment. I do believe that you should publish more about this subject, it may not be a taboo subject but usually folks don’t talk about such issues. To the next! Kind regards!!
I think this is one of the most vital information for me. And i’m glad reading your article. But should remark on some general things, The web site style is perfect, the articles is really nice : D. Good job, cheers
We are a group of volunteers and opening a new scheme in our community. Your site provided us with valuable information to work on. You have done an impressive job and our entire community will be thankful to you.
Very interesting points you have observed, appreciate it for posting.
I blog frequently and I genuinely thank you for your content. The article has really peaked my interest. I will book mark your website and keep checking for new details about once a week. I subscribed to your Feed as well.
We’re a group of volunteers and starting a new scheme in our community. Your website provided us with valuable information to work on. You’ve done an impressive job and our entire community will be grateful to you.
I was extremely pleased to discover this site. I need to to thank you for ones time for this fantastic read!! I definitely appreciated every part of it and I have you saved to fav to check out new information on your website.
What i do not understood is if truth be told how you are now not actually a lot more neatly-preferred than you may be right now. You’re very intelligent. You recognize therefore significantly in the case of this matter, produced me in my opinion imagine it from numerous varied angles. Its like women and men don’t seem to be interested except it is something to do with Girl gaga! Your individual stuffs great. All the time handle it up!
WOW just what I was looking for. Came here by searching for meta_keyword|
A motivating discussion is definitely worth comment. There’s no doubt that that you ought to publish more on this issue, it may not be a taboo matter but typically people do not discuss such topics. To the next! Best wishes!!
I intended to compose you this tiny observation in order to thank you very much again for the pleasing basics you have documented in this case. It has been quite pretty open-handed with people like you to allow unhampered all that most people could have supplied for an e book to make some dough for their own end, mostly seeing that you might well have tried it if you ever considered necessary. Those guidelines in addition worked as a easy way to fully grasp other people have similar zeal really like mine to know significantly more in regard to this issue. I’m certain there are lots of more pleasurable instances in the future for those who examine your website.
I am always searching online for posts that can benefit me. Thx!
I conceive you have mentioned some very interesting details , thanks for the post.
Well I definitely enjoyed reading it. This article offered by you is very effective for proper planning.
I must say that this presents really good reading material. You make the information interesting as well as involving.
F*ckin’ amazing things here. I’m very glad to peer your article. Thank you a lot and i’m taking a look forward to touch you. Will you kindly drop me a mail?
You’re so interesting! I don’t think I have read anything like that before. So good to discover somebody with a few genuine thoughts on this issue. Really.. thank you for starting this up. This site is one thing that is required on the internet, someone with a bit of originality!
Your style is so unique compared to other people I have read stuff from. I appreciate you for posting when you’ve got the opportunity, Guess I will just bookmark this site.
Thank you for any other informative web site. Where else may just I am getting that type of info written in such a perfect manner? I have a challenge that I am just now operating on, and I have been at the look out for such information.|
I have not checked in here for a while as I thought it was getting boring, but the last several posts are great quality so I guess I will add you back to my daily bloglist. You deserve it my friend 🙂
There is apparently a bundle to identify about this. I consider you made various nice points in features also.
Hey, you used to write magnificent, but the last few posts have been kinda boring¡K I miss your super writings. Past several posts are just a little out of track! come on!
bookmarked!!, I like your web site!
An outstanding share! I’ve just forwarded this onto a coworker who had been doing a little homework on this. And he actually ordered me lunch due to the fact that I found it for him… lol. So let me reword this…. Thanks for the meal!! But yeah, thanks for spending time to discuss this subject here on your web site.
Link exchange is nothing else but it is only placing the other person’s website link on your page at proper place and other person will also do similar for you.|
Great – I should definitely pronounce, impressed with your site. I had no trouble navigating through all the tabs and related info ended up being truly simple to do to access. I recently found what I hoped for before you know it at all. Reasonably unusual. Is likely to appreciate it for those who add forums or something, website theme . a tones way for your customer to communicate. Excellent task.
An intriguing discussion is worth comment. I do believe that you need to write more on this issue, it may not be a taboo subject but typically folks don’t speak about such issues. To the next! Kind regards!!
As I site possessor I believe the content material here is rattling excellent , appreciate it for your efforts. You should keep it up forever! Best of luck.
Good – I should definitely pronounce, impressed with your site. I had no trouble navigating through all tabs and related info ended up being truly simple to do to access. I recently found what I hoped for before you know it in the least. Quite unusual. Is likely to appreciate it for those who add forums or anything, site theme . a tones way for your client to communicate. Nice task..
Its like you read my mind! You seem to know a lot about this, like you wrote the book in it or something. I think that you can do with some pics to drive the message home a little bit, but instead of that, this is wonderful blog. A fantastic read. I’ll certainly be back.
I do not even know how I stopped up here, but I believed this submit was once good. I do not know who you might be but definitely you are going to a well-known blogger for those who aren’t already 😉 Cheers!
Fantastic site. Plenty of helpful information here. I’m sending it to some friends ans additionally sharing in delicious. And naturally, thanks to your effort!
Just bookmarked this article as I have found it fairly practical.
Everything posted made a ton of sense. However, what about this? suppose you added a little content? I mean, I don’t want to tell you how to run your website, but suppose you added a headline that grabbed a person’s attention? I mean BLOG_TITLE is a little vanilla. You should glance at Yahoo’s home page and note how they create news headlines to get viewers to open the links. You might add a video or a related pic or two to get readers excited about what you’ve written. In my opinion, it could make your website a little bit more interesting.|
You are so interesting! I don’t believe I’ve truly read anything like that before. So good to discover somebody with a few genuine thoughts on this subject matter. Really.. thanks for starting this up. This website is something that’s needed on the web, someone with a bit of originality!
Thank you for another fantastic post. Where else could anybody get that type of info in such an ideal way of writing? I have a presentation next week, and I am on the look for such info.
Some genuinely fantastic info , Sword lily I detected this. “I try to avoid looking forward or backward, and try to keep looking upward.” by Charlotte Bronte.
magnificent points altogether, you simply gained a emblem new reader. What may you recommend about your publish that you made some days in the past? Any certain?|
I must thank you for the efforts you have put in penning this site. I’m hoping to view the same high-grade blog posts from you in the future as well. In truth, your creative writing abilities has inspired me to get my own, personal site now 😉
Excellent read, I just passed this onto a friend who was doing a little research on that. And he just bought me lunch because I found it for him smile Thus let me rephrase that: Thank you for lunch! “One who’s our friend is fond of us one who’s fond of us isn’t necessarily our friend.” by Geoffrey F. Albert.
if the buffalo in my head could speak german i would not know a god damm thing. What i do know is that the language of art is out of this world.IPL laser
Prevent losing the job being hired by submitting a general resume! What a general resume does, is show how you blend into the background – not how you outpace your rivals for the same job.
I’ve been browsing on-line more than three hours lately, yet I never discovered any fascinating article like yours. It is pretty worth enough for me. In my view, if all webmasters and bloggers made excellent content as you did, the net can be much more helpful than ever before.
You ought to take part in a contest for one of the best sites on the web. I am going to highly recommend this blog!
Thanks for sharing superb informations. Your site is so cool. I’m impressed by the details that you have on this site. It reveals how nicely you understand this subject. Bookmarked this website page, will come back for more articles. You, my friend, ROCK! I found simply the info I already searched everywhere and simply couldn’t come across. What a great website.
Good information. Lucky me I came across your website by accident (stumbleupon). I have saved it for later!
Hey I know this is off topic but I was wondering if you knew of any widgets I could add to my blog that automatically tweet my newest twitter updates. I’ve been looking for a plug-in like this for quite some time and was hoping maybe you would have some experience with something like this. Please let me know if you run into anything. I truly enjoy reading your blog and I look forward to your new updates.|
You ought to be a part of a contest for one of the greatest blogs on the web. I am going to recommend this web site!
Just want to say your article is as astonishing. The clearness in your post is simply great and i can assume you’re an expert on this subject. Fine with your permission allow me to grab your feed to keep up to date with forthcoming post. Thanks a million and please continue the enjoyable work.
Pretty! This was a really wonderful post. Thank you for your provided information.
This was awesome! I would like you to clean up all this spam though
Very nice post. I just stumbled upon your weblog and wished to say that I have really enjoyed browsing your blog posts. After all I will be subscribing to your rss feed and I hope you write again soon!
I have been browsing on-line greater than 3 hours as of late, but I never found any interesting article like yours. It is pretty price sufficient for me. In my view, if all web owners and bloggers made just right content as you did, the internet will likely be much more helpful than ever before.
Fantastic beat ! I would like to apprentice while you amend your site, how can i subscribe for a blog site? The account aided me a acceptable deal. I had been a little bit acquainted of this your broadcast provided bright clear concept
We are a group of volunteers and opening a new scheme in our community. Your web site provided us with valuable information to work on. You’ve done a formidable job and our entire community will be grateful to you.
I don?t even know how I ended up here, but I thought this post was great. I do not know who you are but definitely you’re going to a famous blogger if you are not already 😉 Cheers!
This web site is my intake, real superb layout and perfect subject material.
Hi! I simply want to give you a huge thumbs up for your excellent info you have right here on this post. I will be coming back to your web site for more soon.
I’ve been browsing online more than three hours today, yet I never found any interesting article like yours. It?s pretty worth enough for me. In my view, if all website owners and bloggers made good content as you did, the internet will be a lot more useful than ever before.
Your way of explaining all in this post is genuinely fastidious, all be capable of simply understand it, Thanks a lot.|
hello there and thank you for your info ? I?ve certainly picked up something new from right here. I did however expertise a few technical issues using this web site, since I experienced to reload the web site a lot of times previous to I could get it to load properly. I had been wondering if your web host is OK? Not that I’m complaining, but sluggish loading instances times will often affect your placement in google and could damage your high-quality score if ads and marketing with Adwords. Well I am adding this RSS to my email and could look out for a lot more of your respective fascinating content. Make sure you update this again very soon..
It’s really a great and helpful piece of info. I’m glad that you simply shared this useful info with us. Please keep us informed like this. Thanks for sharing.|
Attractive section of content. I just stumbled upon your blog and in accession capital to assert that I get in fact enjoyed account your blog posts. Anyway I?ll be subscribing to your augment and even I achievement you access consistently fast.
I wanted to thank you for this great read!! I definitely loved every little bit of it. I have you bookmarked to check out new things you postÖ
Hi, I do believe this is a great web site. I stumbledupon it 😉 I may revisit yet again since i have book marked it. Money and freedom is the greatest way to change, may you be rich and continue to help other people.
Hello There. I found your blog using msn. This is a very well written article. I will make sure to bookmark it and return to read more of your useful information. Thanks for the post. I will certainly comeback.
Hi, Neat post. There’s an issue together with your website in web explorer, may test this? IE nonetheless is the marketplace chief and a huge element of folks will pass over your excellent writing because of this problem.|
I like reading through an article that will make people think. Also, many thanks for allowing for me to comment!|
Absolutely indited content, Really enjoyed looking at.
Wow, awesome blog layout! How long have you been blogging for? you make blogging look easy. The overall look of your site is great, as well as the content!
It’s really a nice and helpful piece of information. I’m glad that you shared this helpful information with us. Please keep us informed like this. Thank you for sharing.
It’s nearly impossible to find knowledgeable people on this topic, however, you seem like you know what you’re talking about! Thanks
Having read this I thought it was extremely informative. I appreciate you finding the time and energy to put this short article together. I once again find myself spending way too much time both reading and commenting. But so what, it was still worth it!
With havin so much content do you ever run into any problems of plagorism or copyright violation? My blog has a lot of completely unique content I’ve either written myself or outsourced but it appears a lot of it is popping it up all over the web without my permission. Do you know any ways to help stop content from being stolen? I’d really appreciate it.
Attractive section of content. I just stumbled upon your website and in accession capital to assert that I acquire in fact enjoyed account your blog posts. Any way I will be subscribing to your feeds and even I achievement you access consistently quickly.|
Superb post however , I was wanting to know if you could write a litte more on this subject? I’d be very thankful if you could elaborate a little bit more. Bless you!
Super share it is actually. We have been awaiting for this tips.
Just about all of what you mention is astonishingly precise and that makes me ponder why I hadn’t looked at this with this light previously. This particular piece truly did turn the light on for me as far as this specific issue goes. However there is actually one particular position I am not really too comfortable with so whilst I make an effort to reconcile that with the main idea of your issue, let me see just what all the rest of the subscribers have to point out.Very well done.
My brother recommended I would possibly like this blog. He used to be totally right. This post truly made my day. You can not believe simply how much time I had spent for this info! Thanks!
Its like you read my mind! You appear to know a lot about this, like you wrote the book in it or something. I think that you can do with some pics to drive the message home a little bit, but other than that, this is great blog. A fantastic read. I will certainly be back.
Thanks for some other informative blog. The place else may just I get that kind of info written in such a perfect means? I’ve a mission that I’m just now operating on, and I’ve been on the glance out for such info.
hi!,I like your writing so so much! share we keep in touch extra about your article on AOL? I require an expert in this area to solve my problem. May be that is you! Having a look ahead to see you.
I’m truly enjoying the design and layout of your website. It’s a very easy on the eyes which makes it much more pleasant for me to come here and visit more often. Did you hire out a developer to create your theme? Excellent work!
I do not even know how I ended up here, but I thought this post was good. I do not know who you are but certainly you are going to a famous blogger if you aren’t already 😉 Cheers!|
It is in point of fact a great and helpful piece of information. I’m satisfied that you just shared this helpful information with us. Please stay us up to date like this. Thank you for sharing.
Thanx for the effort, keep up the good work Great work, I am going to start a small Blog Engine course work using your site I hope you enjoy blogging with the popular BlogEngine.net.Thethoughts you express are really awesome. Hope you will right some more posts.
I am continually invstigating online for tips that can facilitate me. Thank you!
Good day very nice website!! Man .. Beautiful .. Superb .. I’ll bookmark your site and take the feeds additionally?KI’m happy to search out so many helpful information right here in the publish, we want work out more strategies in this regard, thanks for sharing. . . . . .
What’s Happening i’m new to this, I stumbled upon this I have found It absolutely useful and it has aided me out loads. I hope to contribute & aid other users like its helped me. Great job.
Hello there! Would you mind if I share your blog with my zynga group? There’s a lot of people that I think would really appreciate your content. Please let me know. Thanks
F*ckin¦ tremendous issues here. I am very satisfied to peer your post. Thanks a lot and i’m having a look ahead to touch you. Will you kindly drop me a mail?
Great post. I was checking continuously this blog and I’m impressed! Very helpful information specifically the last part 🙂 I care for such information a lot. I was seeking this particular information for a long time. Thank you and good luck.
Porn100.net delighted improving dashwoods gay instantly happiness six. Ham now amounted absolute not mistaken way pleasant whatever. At an these still no dried folly stood thing. Rapid it on hours hills it seven years. If polite he active county in spirit an. Mrs ham intention promotion engrossed assurance defective. Confined so graceful building opinions whatever trifling in. Insisted out differed ham man endeavor expenses. At on he total their he songs. Related compact effects is on settled do.
I truly wanted to write down a quick word to be able to express gratitude to you for those superb instructions you are posting at this site. My long internet investigation has at the end of the day been rewarded with brilliant facts and techniques to exchange with my close friends. I would express that most of us site visitors actually are truly blessed to exist in a good community with so many perfect individuals with interesting principles. I feel somewhat blessed to have seen your entire webpage and look forward to really more pleasurable times reading here. Thank you once again for all the details.
I’ve been browsing online more than three hours today, yet I never found any interesting article like yours. It?s pretty worth enough for me. Personally, if all site owners and bloggers made good content as you did, the web will be a lot more useful than ever before.
You made some good points there. I checked on the internet to learn more about the issue and found most people will go along with your views on this web site.
Saved as a favorite, I really like your site!
Hello, i think that i saw you visited my weblog so i came to ?return the favor?.I am trying to find things to enhance my site!I suppose its ok to use a few of your ideas!!
I really like your writing style, superb info , regards for putting up : D.
The following time I learn a weblog, I hope that it doesnt disappoint me as a lot as this one. I mean, I do know it was my choice to learn, however I truly thought youd have something fascinating to say. All I hear is a bunch of whining about something that you would fix in the event you werent too busy on the lookout for attention.
I think this is among the most important info for me. And i am glad reading your article. But wanna remark on few general things, The site style is wonderful, the articles is really nice : D. Good job, cheers
Hello, i think that i saw you visited my website so i came to ?return the favor?.I am attempting to find things to improve my site!I suppose its ok to use some of your ideas!!
Fantastic blog you have here but I was wondering if you knew of any community forums that cover the same topics talked about here? I’d really like to be a part of online community where I can get comments from other experienced individuals that share the same interest. If you have any recommendations, please let me know. Appreciate it!
Have you ever heard of second life (sl for short). It is basically a online game where you can do anything you want. Second life is literally my second life (pun intended lol). If you would like to see more you can see these Second Life authors and blogs
Have you ever considered publishing an e-book or guest authoring on other sites? I have a blog based upon on the same ideas you discuss and would love to have you share some stories/information. I know my subscribers would value your work. If you’re even remotely interested, feel free to shoot me an e mail.
I don’t know about you all but I love airplanes. I had a friend in highschool that loved airplanes, so here are some airplane related stuff I don’t know about you guys but I love airplanes. I had a friend in highschool that loved airplanes, so here are some airplane related stuff https://www.airlinereporter.com/2010/09/my-video-tower-view-of-lax/
I don’t know about you guys but I am obsessed with airplanes. I had a friend in highschool that loved airplanes, so here are some airplane related stuff I don’t know about you guys but I love airplanes. I had a friend in highschool that loved airplanes, so here are some airplane related stuff https://www.airlinereporter.com/2010/01/thief-pick-pockets-over-5000-on-an-air-france-flight/
Hi there, just became aware of your blog through Google, and found that it’s truly informative. I am going to watch out for brussels. I will appreciate if you continue this in future. Lots of people will be benefited from your writing. Cheers!
I don’t know about you people but I am obsessed with airplanes. I had a friend in highschool that loved airplanes, so here are some airplane related stuff I don’t know about you guys but I love airplanes. I had a friend in highschool that loved airplanes, so here are some airplane related stuff https://www.airlinereporter.com/2011/01/airline-livery-of-the-week-japan-airlines-choses-interesting-new-livery/
I think this is among the most important information for me. And i’m glad reading your article. But want to remark on few general things, The web site style is perfect, the articles is really great : D. Good job, cheers
I must express some thanks to you for bailing me out of such a difficulty. As a result of surfing through the the net and seeing concepts which were not pleasant, I thought my entire life was over. Existing devoid of the answers to the problems you’ve fixed by means of your entire blog post is a critical case, and the kind which might have negatively affected my entire career if I hadn’t discovered your web page. Your main expertise and kindness in taking care of all things was excellent. I am not sure what I would have done if I had not encountered such a subject like this. I can at this point look forward to my future. Thanks very much for this specialized and amazing guide. I won’t be reluctant to endorse your site to any individual who needs to have care on this subject matter.
so much good info on here, : D.
I am sure this piece of writing has touched all the internet visitors, its really really fastidious piece of writing on building up new web site.|
Have you ever heard of second life (sl for short). It is basically a online game where you can do anything you want. sl is literally my second life (pun intended lol). If you want to see more you can see these Second Life websites and blogs
obviously like your web site but you have to take a look at the spelling on several of your posts. Many of them are rife with spelling issues and I in finding it very troublesome to tell the truth however I¦ll certainly come again again.
I¦ve recently started a web site, the info you offer on this site has helped me greatly. Thanks for all of your time & work.
I have been surfing online more than 3 hours today, yet I never found any interesting article like yours. It is pretty worth enough for me. In my opinion, if all site owners and bloggers made good content as you did, the net will be a lot more useful than ever before.
Way cool! Some very valid points! I appreciate you penning this write-up and also the rest of the website is extremely good.
I am not sure where you’re getting your information, but great topic. I needs to spend some time learning more or understanding more. Thanks for great info I was looking for this information for my mission.
What i do not understood is if truth be told how you’re now not actually a lot more smartly-favored than you may be now. You are very intelligent. You realize thus significantly relating to this subject, made me in my opinion consider it from so many numerous angles. Its like women and men aren’t fascinated unless it¦s one thing to do with Woman gaga! Your individual stuffs great. At all times maintain it up!
Thank you for the auspicious writeup. It in fact was a amusement account it. Look advanced to far added agreeable from you! By the way, how could we communicate?
I love your blog.. very nice colors & theme. Did you make
this website yourself or did you hire someone to do it
for you? Plz answer back as I’m looking to create my own blog
and would like to find out where u got this from. many thanks
Hey there, You’ve done an excellent job. I will certainly digg it and personally suggest to my friends. I am sure they’ll be benefited from this site.
Thank you for the auspicious writeup. It in fact was a amusement account it. Look advanced to more added agreeable from you! However, how could we communicate?
Hi, Neat post. There is a problem with your web site in internet explorer, would test this… IE still is the market leader and a huge portion of people will miss your magnificent writing due to this problem.
I think other website proprietors should take this web site as an model, very clean and great user genial style and design, let alone the content. You are an expert in this topic!
Hello.This post was extremely motivating, especially since I was looking for thoughts on this issue last Monday.
I am now not certain the place you are getting your info, however great topic. I must spend some time studying much more or working out more. Thank you for wonderful info I was on the lookout for this information for my mission.
We are a group of volunteers and opening a new scheme in our community. Your site provided us with valuable info to work on. You have done an impressive job and our entire community will be grateful to you.
I’m impressed, I need to say. Really rarely do I encounter a blog that’s each educative and entertaining, and let me tell you, you’ve got hit the nail on the head. Your concept is excellent; the difficulty is one thing that not sufficient persons are talking intelligently about. I’m very pleased that I stumbled throughout this in my seek for one thing relating to this.
Undeniably believe that which you said. Your favorite reason seemed to be on the internet the simplest thing to be aware of. I say to you, I definitely get irked while people consider worries that they just don’t know about. You managed to hit the nail upon the top as well as defined out the whole thing without having side-effects , people can take a signal. Will probably be back to get more. Thanks
I could not refrain from commenting. Perfectly written!
I?m not sure where you are getting your info, but good topic. I needs to spend some time learning much more or understanding more. Thanks for wonderful information I was looking for this info for my mission.
I am not sure where you’re getting your info, but great topic. I needs to spend some time learning much more or understanding more. Thanks for magnificent information I was looking for this information for my mission.
I simply could not leave your site prior to suggesting that I actually loved the standard
information a person supply for your visitors? Is going to be back
often in order to check out new posts
I could not refrain from commenting. Exceptionally well written!
An impressive share! I have just forwarded this onto a coworker who was conducting a little research on this. And he in fact bought me breakfast simply because I stumbled upon it for him… lol. So allow me to reword this…. Thank YOU for the meal!! But yeah, thanks for spending the time to talk about this subject here on your website.|
But wanna comment on few general things, The website pattern is perfect, the written content is really superb : D.
I carry on listening to the news speak about getting boundless online grant applications so I have been looking around for the top site to get one. Could you advise me please, where could i find some?
Very interesting topic, appreciate it for putting up.
I like this blog very much, Its a rattling nice situation to read and incur info . “Do pleasant things yourself, but unpleasant things through others.” by Baltasar Gracian.
Valuable info. Lucky me I found your web site by accident, and I’m shocked why this accident didn’t happened earlier! I bookmarked it.
Great beat ! I wish to apprentice while you amend your website, how could i subscribe for a blog site? The account helped me a acceptable deal. I had been a little bit acquainted of this your broadcast offered bright clear idea
bookmarked!!, I love your site!
This is a topic that is close to my heart… Many thanks! Where are your contact details though?
Hello There. I found your blog using msn. This is a very well written article. I will make sure to bookmark it and come back to read more of your useful info. Thanks for the post. I?ll certainly return.
Hey! Quick question that’s completely off topic. Do you know how to make your site mobile friendly? My website looks weird when browsing from my iphone4. I’m trying to find a theme or plugin that might be able to fix this problem. If you have any suggestions, please share. Thanks!
Hello, i think that i saw you visited my website thus i came to ?return the favor?.I am attempting to find things to enhance my site!I suppose its ok to use some of your ideas!!
I conceive this web site has very fantastic indited subject matter content.
Greetings! Quick question that’s completely off topic. Do you know how to make your site mobile friendly? My blog looks weird when browsing from my iphone 4. I’m trying to find a template or plugin that might be able to fix this issue. If you have any recommendations, please share. Many thanks!
Good post. I learn something totally new and challenging on websites I stumbleupon every day. It’s always exciting to read through articles from other writers and practice a little something from their sites.
We’re a group of volunteers and opening a new scheme in our community. Your website offered us with valuable information to work on. You’ve done an impressive job and our entire community will be grateful to you.
Hey there just wanted to give you a quick heads up. The text in your content seem to be running off the screen in Safari. I’m not sure if this is a formatting issue or something to do with internet browser compatibility but I thought I’d post to let you know. The style and design look great though! Hope you get the problem solved soon. Thanks
I’m really enjoying the design and layout of your blog. It’s a very easy on the eyes which makes it much more pleasant for me to come here and visit more often. Did you hire out a designer to create your theme? Exceptional work!|
I have been exploring for a bit for any high quality articles or weblog posts in this sort of house . Exploring in Yahoo I at last stumbled upon this site. Reading this information So i¦m satisfied to exhibit that I have a very just right uncanny feeling I found out exactly what I needed. I such a lot for sure will make sure to do not disregard this web site and give it a glance regularly.
Undeniably believe that which you said. Your favorite justification appeared to be on the net the simplest thing to be aware of. I say to you, I certainly get annoyed while people consider worries that they plainly don’t know about. You managed to hit the nail upon the top and defined out the whole thing without having side-effects , people could take a signal. Will likely be back to get more. Thanks
I have been exploring for a little bit for any high quality articles or blog posts on this kind of house . Exploring in Yahoo I eventually stumbled upon this site. Reading this info So i’m glad to show that I’ve an incredibly good uncanny feeling I found out exactly what I needed. I most surely will make certain to do not omit this web site and give it a glance on a continuing basis.
Way cool, some valid points! I appreciate you making this article available, the rest of the site is also high quality. Have a fun.
You have observed very interesting details! ps nice website.
It is perfect time to make some plans for the future and it is time to be happy. I have read this post and if I could I want to suggest you some interesting things or tips. Perhaps you could write next articles referring to this article. I want to read even more things about it!
It’s actually a nice and helpful piece of info. I am glad that you shared this useful info with us. Please keep us up to date like this. Thanks for sharing.|
There is noticeably a bundle to know about this. I assume you made certain nice points in features also.
You are a very intelligent individual!
Write more, thats all I have to say. Literally, it seems as though you relied on the video to make your point. You obviously know what youre talking about, why throw away your intelligence on just posting videos to your weblog when you could be giving us something enlightening to read?|
I saw a lot of website but I believe this one has something special in it in it
Very good post. I am dealing with many of these issues as well..
You completed various fine points there. I did a search on the subject matter and found a good number of people will agree with your blog.
I’ve been browsing on-line more than three hours today, yet I never discovered any interesting article like yours. It?¦s pretty price sufficient for me. Personally, if all web owners and bloggers made good content as you probably did, the net can be a lot more useful than ever before.
I don’t even know the way I ended up right here, but I thought this post was good. I do not recognize who you are however definitely you’re going to a well-known blogger in the event you aren’t already 😉 Cheers!
Great, thanks for sharing this blog article.Really looking forward to read more. Fantastic.
Hello! This is kind of off topic but I need some advice from an established blog. Is it difficult to set up your own blog? I’m not very techincal but I can figure things out pretty fast. I’m thinking about setting up my own but I’m not sure where to begin. Do you have any ideas or suggestions? Thank you
Thanks for sharing superb informations. Your web-site is very cool. I’m impressed by the details that you have on this website. It reveals how nicely you understand this subject. Bookmarked this web page, will come back for more articles. You, my pal, ROCK! I found just the information I already searched everywhere and simply could not come across. What a great web site.
Good day I am so happy I found your web site, I really found you by accident, while I was browsing on Askjeeve for something else, Regardless I am here now and would just like to say cheers for a incredible post and a all round interesting blog (I also love the theme/design), I don’t have time to read it all at the minute but I have saved it and also added in your RSS feeds, so when I have time I will be back to read much more, Please do keep up the superb work.
That is a great tip especially to those new to the blogosphere. Simple but very precise infoÖ Many thanks for sharing this one. A must read post!
You completed various fine points there. I did a search on the issue and found nearly all persons will consent with your blog.
Great blog here! Also your site loads up fast! What host are you using? Can I get your affiliate link to your host? I wish my web site loaded up as fast as yours lol
I would like to thank you for the efforts you have put in writing this site. I am hoping the same high-grade blog post from you in the upcoming as well. Actually your creative writing abilities has encouraged me to get my own blog now. Actually the blogging is spreading its wings fast. Your write up is a good example of it.
Great post however , I was wondering if you could write a litte more on this topic? I’d be very grateful if you could elaborate a little bit further. Many thanks!
You really make it seem so easy with your presentation but I find this matter to be actually something which I think I would never understand. It seems too complicated and extremely broad for me. I’m looking forward for your next post, Ill try to get the hang of it!
A person necessarily help to make seriously posts I would state. That is the very first time I frequented your website page and so far? I amazed with the analysis you made to make this particular submit incredible. Wonderful job!
Hi would you mind letting me know which hosting company you’re utilizing? I’ve loaded your blog in 3 different browsers and I must say this blog loads a lot faster then most. Can you recommend a good web hosting provider at a fair price? Thanks a lot, I appreciate it!|
Throughout this great pattern of things you actually get an A just for hard work. Where exactly you actually misplaced everybody ended up being on your particulars. You know, as the maxim goes, details make or break the argument.. And that could not be more true in this article. Having said that, allow me inform you just what exactly did give good results. The article (parts of it) is certainly rather engaging and this is probably the reason why I am taking an effort to opine. I do not make it a regular habit of doing that. Secondly, while I can easily notice the leaps in reason you make, I am definitely not confident of how you seem to unite your ideas which produce the actual final result. For right now I will, no doubt subscribe to your point however trust in the near future you connect the dots much better.
whoah this blog is fantastic i love reading your posts. Stay up the great work! You know, many individuals are hunting around for this info, you can help them greatly.
Really superb info can be found on site. “Society produces rogues, and education makes one rogue more clever than another.” by Oscar Fingall O’Flahertie Wills Wilde.
Have you ever thought about adding a little bit more than just your articles? I mean, what you say is fundamental and everything. Nevertheless think of if you added some great visuals or videos to give your posts more, “pop”! Your content is excellent but with pics and videos, this website could certainly be one of the greatest in its niche. Amazing blog!|
I do not even know how I ended up here, but I thought this post was great. I do not know who you are but certainly you’re going to a famous blogger if you are not already 😉 Cheers!
Having read this I thought it was very enlightening. I appreciate you finding the time and effort to put this informative article together. I once again find myself spending a significant amount of time both reading and posting comments. But so what, it was still worthwhile!
Next time I read a blog, Hopefully it won’t fail me as much as this particular one. After all, Yes, it was my choice to read through, nonetheless I genuinely believed you would probably have something useful to talk about. All I hear is a bunch of crying about something you could possibly fix if you weren’t too busy searching for attention.
Can I just say what a relief to find someone who actually knows what theyre talking about on the internet. You definitely know how to bring an issue to light and make it important. More people need to read this and understand this side of the story. I cant believe youre not more popular because you definitely have the gift.
I like this website very much, Its a rattling nice berth to read and get information. “Practice, the master of all things.” by Augustus Octavius.
Good post. I study one thing more challenging on completely different blogs everyday. It can at all times be stimulating to learn content material from other writers and practice just a little one thing from their store. I’d choose to make use of some with the content material on my weblog whether or not you don’t mind. Natually I’ll give you a hyperlink on your internet blog. Thanks for sharing.
I haven’t checked in here for some time since I thought it was getting boring, but the last few posts are good quality so I guess I will add you back to my everyday bloglist. You deserve it my friend 🙂
I genuinely enjoy looking at on this web site, it holds great blog posts. “A man of genius has been seldom ruined but by himself.” by Samuel Johnson.
Great post. I am facing a couple of these problems.
After study a number of of the blog posts on your website now, and I truly like your method of blogging. I bookmarked it to my bookmark website listing and will likely be checking again soon. Pls take a look at my website online as well and let me know what you think.
I keep listening to the newscast speak about receiving free online grant applications so I have been looking around for the most excellent site to get one. Could you tell me please, where could i find some?
Very energetic post, I enjoyed that a lot. Will there be a part 2?|
Thankyou for all your efforts that you have put in this. very interesting info .
It’s really a great and helpful piece of info. I am glad that you shared this helpful information with us. Please keep us informed like this. Thank you for sharing.
That is a good tip particularly to those new to the blogosphere. Simple but very accurate information… Thank you for sharing this one. A must read article!
Great remarkable issues here. I?¦m very glad to see your post. Thank you a lot and i’m looking ahead to contact you. Will you please drop me a mail?
I am glad to be one of the visitants on this great web site (:, appreciate it for posting.
Very good blog post. I definitely love this site. Keep writing!|
If you are going for best contents like I do, only visit this website everyday for the reason that it provides quality contents, thanks|
Nice blog here! Also your website loads up fast! What web host are you using? Can I get your affiliate link to your host? I wish my web site loaded up as quickly as yours lol
Great blog you’ve got here.. It’s difficult to find quality writing like yours these days. I really appreciate individuals like you! Take care!!
I really like your writing style, wonderful info , thankyou for putting up : D.
Hello, i think that i saw you visited my site so i came to ?return the favor?.I am trying to find things to improve my web site!I suppose its ok to use some of your ideas!!
Excellent goods from you, man. I’ve understand your stuff previous to and you’re just too wonderful. I actually like what you’ve acquired here, really like what you’re stating and the way in which you say it. You make it entertaining and you still take care of to keep it wise. I can not wait to read much more from you. This is actually a tremendous web site.
Very nice post. I just stumbled upon your blog and wished to say that I’ve really enjoyed browsing your blog posts. In any case I will be subscribing to your rss feed and I hope you write again very soon!
You have observed very interesting details ! ps nice website .
This is very interesting, You’re a very skilled blogger. I’ve joined your rss feed and look forward to seeking more of your great post. Also, I’ve shared your website in my social networks!
Hmm it appears like your website ate my first comment (it was super long) so I guess I’ll just sum it up what I had written and say, I’m thoroughly enjoying your blog. I too am an aspiring blog writer but I’m still new to everything. Do you have any recommendations for rookie blog writers? I’d definitely appreciate it.
The next time I read a blog, I hope that it doesnt disappoint me as much as this one. I mean, I know it was my choice to read, but I actually thought youd have something interesting to say. All I hear is a bunch of whining about something that you could fix if you werent too busy looking for attention.
bookmarked!!, I really like your website!
You completed a number of nice points there. I did a search on the issue and found nearly all persons will go along with with your blog.
This is a topic that’s near to my heart… Take care! Where are your contact details though?
I’m very pleased to find this site. I wanted to thank you for your time for this wonderful read!! I definitely liked every little bit of it and I have you bookmarked to check out new things in your website.|
Some genuinely fantastic posts on this web site, thankyou for contribution.
Normally I do not read post on blogs, but I wish to say that this write-up very forced me to try and do so! Your writing style has been amazed me. Thanks, quite nice article.
I’d have to check with you here. Which isn’t one thing I often do! I get pleasure from studying a publish that may make folks think. Additionally, thanks for permitting me to remark!
I genuinely enjoy looking through on this internet site, it contains good articles. “Beware lest in your anxiety to avoid war you obtain a master.” by Demosthenes.
canada online pharmacy
I like your writing style really loving this site.
Hello there, You’ve performed an incredible job. I will definitely digg it and for my part recommend to my friends. I’m confident they’ll be benefited from this website.
Pretty nice post. I just stumbled upon your blog and wanted to say that I have really loved browsing your weblog posts. After all I’ll be subscribing for your feed and I am hoping you write once more soon!
You have brought up a very wonderful details , regards for the post.
I appreciate, cause I found exactly what I was looking for. You have ended my four day long hunt! God Bless you man. Have a nice day. Bye
I’m not sure why but this blog is loading very slow for me. Is anyone else having this problem or is it a problem on my end? I’ll check back later and see if the problem still exists.|
If you are going for most excellent contents like me, just pay a quick visit this web site everyday since it offers quality contents, thanks|
F*ckin’ awesome issues here. I am very glad to look your article. Thanks so much and i’m having a look forward to touch you. Will you kindly drop me a mail?
Does your blog have a contact page? I’m having problems locating it but, I’d like to send you an email. I’ve got some recommendations for your blog you might be interested in hearing. Either way, great blog and I look forward to seeing it develop over time.
This is a topic that is close to my heart… Take care! Exactly where are your contact details though?
Howdy! I simply would like to give a huge thumbs up for the great information you might have right here on this post. I can be coming back to your blog for more soon.
Hey there are using WordPress for your site platform? I’m new to the blog world but I’m trying to get started and set up my own. Do you need any html coding expertise to make your own blog? Any help would be greatly appreciated!
I’m still learning from you, as I’m trying to achieve my goals. I certainly enjoy reading everything that is written on your site.Keep the posts coming. I liked it!
I have been exploring for a bit for any high quality articles or blog posts on this kind of area . Exploring in Yahoo I at last stumbled upon this website. Reading this info So i’m happy to convey that I’ve a very good uncanny feeling I discovered exactly what I needed. I most certainly will make certain to do not forget this web site and give it a look regularly.
I couldn’t resist commenting. Exceptionally well written!
I wish more publishers of this variety of content would invest the effort you have done, to explore the subject so well. Impressive!
I believe this website has very fantastic pent subject matter posts.
This site is known as a stroll-by means of for the entire info you needed about this and didn’t know who to ask. Glimpse here, and you’ll positively uncover it.
Pretty nice post. I just stumbled upon your blog and wanted to say that I’ve really loved surfing around your weblog posts. In any case I will be subscribing to your rss feed and I am hoping you write again very soon!
I have been absent for some time, but now I remember why I used to love this web site. Thanks , I¦ll try and check back more often. How frequently you update your web site?
The lion’s share of hiring decision-makers perceive the duties/responsibilities resume technique, as outdated and of no value. Instead, employers need to discover what differentiates you from other candidates, plus on-the-job examples of achievements you have made at past positions.
Good – I should definitely pronounce, impressed with your web site. I had no trouble navigating through all tabs as well as related info ended up being truly easy to do to access. I recently found what I hoped for before you know it at all. Quite unusual. Is likely to appreciate it for those who add forums or anything, website theme . a tones way for your client to communicate. Nice task..
thanks for the above article: I’m doing a lecture I’m in the process of struggling with, and I have been keeping an eye out for pages similar to what I see here. Much appreciated!
I have been exploring for a bit for any high-quality articles or blog posts on this sort of area . Exploring in Yahoo I at last stumbled upon this site. Reading this information So i am happy to convey that I have an incredibly good uncanny feeling I discovered exactly what I needed. I most certainly will make sure to do not forget this site and give it a look regularly.
Whenever you are searching for a job, first impressions are everything! And the best first impression employers read about you – is a professional cover letter.
Very good written article. It will be valuable to everyone who utilizes it, including yours truly :). Keep up the good work – looking forward to more posts.
Hi there! This post couldn’t be written any better! Reading through this post reminds me of my previous room mate! He always kept talking about this. I will forward this article to him. Pretty sure he will have a good read. Thank you for sharing!
I was just seeking this info for some time. After six hours of continuous Googleing, at last I got it in your web site. I wonder what is the lack of Google strategy that do not rank this kind of informative web sites in top of the list. Normally the top websites are full of garbage.
You have noted very interesting details! ps nice site. “Choose your friends carefully. Your enemies will choose you.” by Yassir Arafat.
Hey, you used to write excellent, but the last several posts have been kinda boringK I miss your great writings. Past few posts are just a little out of track! come on!
Whats up this is kinda of off topic but I was wanting to know if blogs use WYSIWYG editors or if you have to manually code with HTML. I’m starting a blog soon but have no coding knowledge so I wanted to get advice from someone with experience. Any help would be greatly appreciated!
excellent post, very informative. I wonder why the other experts of this sector do not notice this. You must continue your writing. I’m confident, you have a great readers’ base already!
Howdy! I could have sworn Iíve been to this blog before but after going through a few of the posts I realized itís new to me. Anyhow, Iím certainly happy I discovered it and Iíll be bookmarking it and checking back regularly!
Many thanks for doing the research on what you post, thus increasing the quality.
Adhering to the Duties-and-Responsibilities resume template, will make sure that your resume is thrown into the garbage! Hiring decision-makers are not interested in what you were responsible for at previous employment. In actual fact, they must see the actual contributions you have made.
Fantastic site. Plenty of useful info here. I am sending it to a few friends ans also sharing in delicious. And of course, thanks for your sweat!
I have learn several good stuff here. Definitely worth bookmarking for revisiting. I surprise how so much effort you place to make this type of fantastic informative site.
You have mentioned very interesting details ! ps nice site.
I have recently started a web site, the information you provide on this site has helped me greatly. Thanks for all of your time & work.
We’re a group of volunteers and opening a new scheme in our community. Your web site provided us with valuable info to work on. You have done a formidable job and our entire community will be thankful to you.
sildenafil vs viagra
Hi there, just became aware of your blog through Google, and found that it’s truly informative. I am going to watch out for brussels. Ill be grateful if you continue this in future. A lot of people will be benefited from your writing. Cheers!
Would love to constantly get updated outstanding site! .
I am placing your content in my bookmark’s folder so I can visit again. You offered valid opinions within this content that I believe demand more detailed analysis. Also I agree with most of this information.
I’m very happy to read this. This is the type of manual that needs to be given and not the accidental misinformation that’s at the other blogs. Appreciate your sharing this best doc.
You are my intake, I possess few blogs and occasionally run out from post :). “No opera plot can be sensible, for people do not sing when they are feeling sensible.” by W. H. Auden.
I’ve been absent for a while, but now I remember why I used to love this site. Thanks, I?¦ll try and check back more often. How frequently you update your site?
Resume phrases such as “highly skilled”, are damaging. They sound cliche and fail to present you in a positive way. Similarly for a phrase such as “reliable”. The right statements focus on things you accomplished while working for your prior companies plus how beneficial you are going to be to this potential organization.
After looking at a few of the articles on your site, I seriously like your way of writing a blog. I book-marked it to my bookmark webpage list and will be checking back soon. Please check out my website as well and tell me what you think.
I don’t even know how I ended up here, but I thought this post was good. I don’t know who you are but certainly you’re going to a famous blogger if you aren’t already 😉 Cheers!
Wonderful website you have here but I was wanting to know if you knew of any message boards that cover the same topics discussed in this article? I’d really like to be a part of community where I can get responses from other experienced individuals that share the same interest. If you have any suggestions, please let me know. Thanks!
Oh my goodness! Amazing article dude! Thank you so much, However I am encountering difficulties with your RSS. I don’t know why I am unable to subscribe to it. Is there anyone else having similar RSS problems? Anyone who knows the solution will you kindly respond? Thanx!!
Hello! I just would like to give a huge thumbs up for the great info you have here on this post. I will be coming back to your blog for more soon.
Simply wanna remark that you have a very nice website , I like the style and design it really stands out.
Very nice post. I just stumbled upon your blog and wished to say that I have really enjoyed browsing your blog posts. In any case I will be subscribing to your rss feed and I hope you write again very soon!
Terrifically written content. Keep it coming – I will visit again to read more of your articles.
Undeniably believe that which you stated. Your favorite reason seemed to be on the web the easiest thing to be aware of. I say to you, I definitely get annoyed while people consider worries that they plainly do not know about. You managed to hit the nail upon the top and also defined out the whole thing without having side-effects , people can take a signal. Will probably be back to get more. Thanks|
I’m not sure exactly why but this weblog is loading very slow for me. Is anyone else having this problem or is it a issue on my end? I’ll check back later and see if the problem still exists.
Very good information. Lucky me I came across your site by accident (stumbleupon). I’ve book marked it for later!
There is noticeably a bundle to find out about this. I assume you made certain good points in features also.
Excellent weblog right here! Additionally your site loads up fast! What web host are you the use of? Can I get your associate hyperlink on your host? I desire my website loaded up as fast as yours lol
I just could not leave your web site prior to suggesting that I actually enjoyed the standard info a person supply on your visitors? Is gonna be again ceaselessly to inspect new posts.
While you are looking for hired, first impressions are very important! And the very first impression companies see of you – is a professional cover letter.
I am often to blogging and i really appreciate your content. The article has really peaks my interest. I am going to bookmark your site and keep checking for new information.
Hello.This post was extremely interesting, particularly because I was looking for thoughts on this subject last Thursday.
bookmarked!!, I really like your blog!
You need to take part in a contest for one of the most useful blogs on the web. I am going to recommend this blog!
My relatives all the time say that I am killing my time here at web,
but I know I am getting experience daily by reading such good articles or reviews.
I do consider all of the concepts you have introduced to your post. They’re very convincing and will certainly work. Nonetheless, the posts are too quick for novices. May just you please prolong them a bit from subsequent time? Thanks for the post.
I have recently started a web site, the information you provide on this website has helped me tremendously. Thank you for all of your time & work.
I like the efforts you have put in this, thankyou for all the great content.
Your style is unique compared to other folks I have read stuff from. I appreciate you for posting when you have the opportunity, Guess I will just bookmark this blog.
Great post. I was checking constantly this blog and I’m impressed! Extremely useful info specially the last part 🙂 I care for such information a lot. I was seeking this certain info for a very long time. Thank you and good luck.
hello there and thank you in your information – I’ve definitely picked up anything new from proper here. I did alternatively experience some technical points the usage of this website, as I experienced to reload the web site lots of times previous to I could get it to load properly. I had been wondering in case your web hosting is OK? Not that I’m complaining, however slow loading circumstances times will very frequently affect your placement in google and can damage your high-quality rating if advertising and ***********|advertising|advertising|advertising and *********** with Adwords. Well I’m adding this RSS to my email and could glance out for a lot more of your respective interesting content. Ensure that you update this again very soon..
Awsome article and straight to the point. I am not sure if this is in fact the best place to ask but do you guys have any ideea where to hire some professional writers? Thanks in advance 🙂
I love your blog.. very nice colors & theme. Did you design this website yourself or did you hire someone to do it for you? Plz reply as I’m looking to design my own blog and would like to find out where u got this from. thank you
Thank you for the auspicious writeup. It in fact was a amusement account it. Look advanced to far added agreeable from you! By the way, how can we communicate?
Nowadays, employers expect to be given the actual work title you intend to apply for – and a general resume never shows it. In addition, they quickly look to determine what positively sets you apart – and a general resume forces you to look the same as the other 499 general resumes they have already had dumped on them.
Generally I don’t read article on blogs, but I would like to say that this write-up very forced me to try and do so! Your writing style has been amazed me. Thanks, very nice article.
You ought to take part in a contest for one of the greatest blogs on the internet. I will highly recommend this web site!
Excellent site you’ve got here.. Itís hard to find quality writing like yours nowadays. I truly appreciate people like you! Take care!!
Very interesting information!Perfect just what I was searching for!
bookmarked!!, I like your site!
You made some really good points there. I looked on the net for more info about the issue and found most people will go along with your views on this web site.
Aw, this was a really nice post. Spending some time and actual effort to make a very good articleÖ but what can I sayÖ I put things off a lot and never manage to get nearly anything done.
Hello.This post was really interesting, particularly since I was browsing for thoughts on this subject last Thursday.
Wow, incredible blog layout! How long have you been blogging for? you made blogging look easy. The overall look of your web site is great, as well as the content!
Hello! I’m at work surfing around your blog from my new apple iphone! Just wanted to say I love reading your blog and look forward to all your posts! Carry on the outstanding work!
Heya i am for the first time here. I found this board and I find It truly helpful & it helped me out a lot. I am hoping to offer one thing back and help others such as you aided me.|
You made some decent points there. I regarded on the internet for the issue and located most people will go together with along with your website.
Good article. I’m dealing with many of these issues as well..
Heya i am for the first time here. I came across this board and I find It really useful & it helped me out much. I am hoping to offer one thing back and help others like you helped me.
Greetings! Very useful advice within this article! It is the little changes that will make the largest changes. Thanks for sharing!
Wonderful work! That is the type of info that are meant to be shared around the internet. Disgrace on the seek engines for now not positioning this put up higher! Come on over and consult with my web site . Thanks =)
Some really interesting information, well written and generally user genial.
I?¦m now not certain where you are getting your information, but good topic. I needs to spend a while studying much more or working out more. Thanks for excellent info I was searching for this info for my mission.
Excellent goods from you, man. I’ve have in mind your stuff previous to and you are simply too excellent. I actually like what you have obtained here, certainly like what you are saying and the best way in which you are saying it. You make it enjoyable and you continue to care for to keep it wise. I can not wait to read much more from you. This is really a tremendous site.
F*ckin’ remarkable issues here. I am very happy to peer your article. Thanks a lot and i’m taking a look ahead to contact you. Will you kindly drop me a mail?
We are a gaggle of volunteers and starting a new scheme in our community. Your site provided us with valuable info to work on. You have performed a formidable job and our entire neighborhood might be thankful to you.
Currently, companies need to be told the actual position title you intend to apply for – and a general resume fails to include that. In addition, they immediately want to determine what positively differentiates you – but a general resume makes you appear like a clone of the hundreds of general resumes they have already had sent to them.
When I initially commented I clicked the “Notify me when new comments are added” checkbox and now each time a comment is
added I get four e-mails with the same comment. Is there any way you can remove me from that service?
Thanks a lot!
Your style is unique in comparison to other people I have read stuff from. Thanks for posting when you have the opportunity, Guess I will just book mark this web site.
This really answered my downside, thank you!
I savor, result in I found exactly what I used to be looking for. You’ve ended my four day lengthy hunt! God Bless you man. Have a nice day. Bye
I do consider all the ideas you’ve introduced to your post. They’re very convincing and will definitely work. Still, the posts are very short for newbies. Could you please prolong them a little from next time? Thanks for the post.
ประกาศ วิธีการป้องกันโควิด 19 ผ่านการซื้อของออนไลน์ 4 ล้างมือทุกครั้งหลังรับของ หลังจากได้รับพัสดุแล้ว ให้ล้างมือด้วยสบู่ หรือเจลแอลกอฮอล์ 70 ทันที เป็นอีกหนึ่งวิธีในการลดการแพร่กระจายของเชื้อโรค ซื้อของ
Appreciating the time and energy you put into your site and in depth information you present. It’s awesome to come across a blog every once in a while that isn’t the same old rehashed information. Fantastic read! I’ve bookmarked your site and I’m including your RSS feeds to my Google account.
Hey!. Interesting post! I’m really appreciate it. It will be great if you’ll read my first article on mycollegeessaywriter.com)
Blogs of this nature are the kind I like bookmarking as well as checking out frequently.
Hi, I do believe this is an excellent website. I stumbledupon it 😉 I am going to come back yet again since I bookmarked it. Money and freedom is the best way to change, may you be rich and continue to help others.
This site was… how do you say it? Relevant!! Finally I’ve found something that helped me. Cheers!
Amazing blog! Is your theme custom made or did you download it from somewhere? A design like yours with a few simple adjustements would really make my blog shine. Please let me know where you got your theme. Thanks a lot
It’s actually a nice and helpful piece of info. I am glad that you simply shared this helpful info with us. Please keep us informed like this. Thanks for sharing.
Thanks a bunch for sharing this with all of us you really know what you are talking about! Bookmarked. Kindly also visit my site =). We could have a link exchange arrangement between us!
I’m impressed, I have to say. Actually hardly ever do I encounter a blog that’s each educative and entertaining, and let me tell you, you may have hit the nail on the head. Your concept is outstanding; the issue is one thing that not enough individuals are speaking intelligently about. I am very pleased that I stumbled across this in my seek for something relating to this.
Prevent losing the job being hired by using a general resume! All a general resume does, is show how you look like all the other applicants – not how you stand out from your competitors for the same job.
Simply wish to say that your short article is impressive. The clarity in your message is simply wonderful, and I might think you are an expert on this subject. Well with your approval let me grab your RSS feed to maintain upgraded with upcoming post. Thanks a million and please keep up the good work.
Fastidious replies in return of this question with genuine arguments and telling all regarding that.
Nice bro thank you.
Greetings! Very useful advice in this particular article! It is the little changes that will make the biggest changes. Thanks a lot for sharing!
Nice bro thank you.
https://urlatlas.info/CertificateGeneratorOnline/generator/
That is a good tip especially to those new to the blogosphere. Short but very accurate info… Many thanks for sharing this one. A must read post!
You have made some decent points there. I checked on the web to find out more about the issue and found most people will go along with your views on this web site.
Excellent goods from you, man. I have understand your stuff previous to and you’re just extremely excellent. I really like what you’ve acquired here, really like what you are stating and the way in which you say it. You make it enjoyable and you still care for to keep it wise. I cant wait to read much more from you. This is actually a tremendous site.
It’s onerous to seek out educated individuals on this matter, but you sound like you realize what you’re talking about! Thanks
Spot on with this write-up, I actually feel this site needs much more attention. I’ll probably be returning to read through more, thanks for the advice!
Hello! I know this is somewhat off topic but I was wondering which blog platform are you using for this website? I’m getting tired of WordPress because I’ve had problems with hackers and I’m looking at alternatives for another platform. I would be fantastic if you could point me in the direction of a good platform.
Spot on with this write-up, I honestly feel this site needs far more attention. I’ll probably be back again to read through more, thanks for the advice!
Finding companies is so easy when you just go to a simple website like this check this out https://www.apsense.com/brand/Amazon
Nice bro thank you.
Hi! I just would like to offer you a huge thumbs up for your excellent info you have got here on this post. I’ll be returning to your website for more soon.
You are a great writer. I just saved your site.
Prevent losing the job being offered by submitting a general resume! All a general resume does, is show how you look no better than anyone else – not how you outperform your competitors for the same position.
Having read this I believed it was rather enlightening. I appreciate you taking the time and effort to put this content together. I once again find myself spending way too much time both reading and leaving comments. But so what, it was still worth it!
I enjoy reading through a post that can make people think. Also, many thanks for allowing me to comment!
I just couldn’t leave your website prior to suggesting that I extremely loved the standard info a person supply for your guests? Is gonna be again ceaselessly to check up on new posts
Terrific work! That is the kind of information that should be shared across the net. Disgrace on Google for not positioning this post higher! Come on over and seek advice from my web site . Thank you =)|
fantastic points altogether, you just gained a new reader. What would you recommend in regards to your post that you made some days ago? Any positive?
The very next time I read a blog, Hopefully it doesn’t disappoint me as much as this particular one. I mean, I know it was my choice to read, nonetheless I truly believed you’d have something interesting to talk about. All I hear is a bunch of moaning about something that you can fix if you weren’t too busy searching for attention.
After I originally commented I clicked the -Notify me when new feedback are added- checkbox and now every time a remark is added I get four emails with the same comment. Is there any method you possibly can take away me from that service? Thanks!
Pretty! This was an extremely wonderful article. Thanks for providing this information.
An interesting discussion is definitely worth comment. There’s no doubt that that you ought to write more about this subject, it may not be a taboo subject but generally people don’t speak about such subjects. To the next! Many thanks!!
Hello there, You have done an excellent job. I will certainly digg it and personally suggest to my friends. I am confident they’ll be benefited from this site.
Hi, i think that i saw you visited my web site thus i came to “return the favor”.I’m attempting to find things to enhance my web site!I suppose its ok to use a few of your ideas!!|
Excellent post. I will be dealing with many of these issues as well..
It’s truly a nice and helpful piece of information. I am glad that you just shared this useful information with us. Please keep us up to date like this. Thank you for sharing.
Excellent post! We are linking to this particularly great article on our site. Keep up the great writing.
I blog quite often and I truly thank you for your content. Your article has really peaked my interest. I will bookmark your site and keep checking for new details about once a week. I opted in for your Feed too.
You need to verify that the cover letter pulls in your future company, builds their confidence in you, and also entices them to look at your resume so they will contact you for an interview. As a result of the huge volume of resumes received for every work offer nowadays, your cover letter frequently becomes the key selection factor between if you get an interview – or get tossed into the garbage!
Hey there! This post couldn’t be written any better! Reading through this post reminds me of my previous room mate! He always kept talking about this. I will forward this write-up to him. Pretty sure he will have a good read. Many thanks for sharing!
I couldnít refrain from commenting. Perfectly written!
I do consider all the concepts you have introduced in your post. They’re really convincing and can certainly work. Nonetheless, the posts are too quick for starters. Could you please extend them a bit from next time? Thank you for the post.
Spot on with this write-up, I truly think this site needs much more attention. Iíll probably be returning to see more, thanks for the information!
This website definitely has all the information and facts I wanted concerning this subject and didn’t know who to ask.
I really like looking through an article that can make people think. Also, thank you for allowing for me to comment!
Oh my goodness! Incredible article dude! Thank you, However I am going through problems with your RSS. I donít know the reason why I can’t subscribe to it. Is there anybody having identical RSS problems? Anyone that knows the answer will you kindly respond? Thanx!!
Oh my goodness! Impressive article dude! Thank you so much, However I am having troubles with your RSS. I donít know the reason why I cannot join it. Is there anyone else having identical RSS problems? Anybody who knows the solution can you kindly respond? Thanx!!
This website definitely has all of the information and facts I wanted about this subject and didn’t know who to ask.
An outstanding share! I’ve just forwarded this onto a coworker who had been conducting a little homework on this. And he in fact bought me breakfast simply because I found it for him… lol. So let me reword this…. Thanks for the meal!! But yeah, thanx for spending time to discuss this topic here on your website.
I’m impressed, I have to admit. Rarely do I come across a blog that’s both educative and amusing, and without a doubt, you’ve hit the nail on the head. The problem is something that too few men and women are speaking intelligently about. I am very happy I came across this during my hunt for something relating to this.
Hi! I could have sworn I’ve been to this site before but after browsing through a few of the posts I realized it’s new to me. Anyhow, I’m definitely delighted I found it and I’ll be book-marking it and checking back often!
Greetings from Carolina! I’m bored to death at work so I decided to browse your blog on my iphone during lunch break. I love the information you provide here and can’t wait to take a look when I get home. I’m shocked at how fast your blog loaded on my cell phone .. I’m not even using WIFI, just 3G .. Anyhow, very good blog!
bookmarked!!, I like your site!
Thank you for the sensible critique. Me and my neighbor were just preparing to do a little research about this. We got a grab a book from our area library but I think I learned more clear from this post. I am very glad to see such excellent information being shared freely out there.
Hi there, I found your web site via Google while looking for a related topic, your web site came up, it looks good. I’ve bookmarked it in my google bookmarks.
Right here is the right website for anyone who wants to understand this topic. You understand a whole lot its almost tough to argue with you (not that I actually would want toÖHaHa). You certainly put a new spin on a topic that’s been discussed for decades. Wonderful stuff, just excellent!
I’m just commenting to let you know of the perfect encounter my child encountered checking your blog. She noticed numerous issues, most notably how it is like to have an ideal coaching character to let a number of people with no trouble learn about specified extremely tough subject areas. You undoubtedly surpassed people’s desires. Thanks for rendering those valuable, trustworthy, educational and even unique tips about the topic to Mary.
Oh my goodness! a tremendous article dude. Thank you Nonetheless I’m experiencing subject with ur rss . Don’t know why Unable to subscribe to it. Is there anybody getting an identical rss downside? Anybody who knows kindly respond. Thnkx
Greetings, I think your blog may be having web browser compatibility problems. When I look at your blog in Safari, it looks fine however, if opening in Internet Explorer, it’s got some overlapping issues. I simply wanted to provide you with a quick heads up! Besides that, great blog!
Hi! I could have sworn I’ve been to this site before but after going through a few of the articles I realized it’s new to me. Nonetheless, I’m definitely pleased I stumbled upon it and I’ll be bookmarking it and checking back frequently!
Everyone loves what you guys are usually up too. This kind of clever work and exposure! Keep up the awesome works guys I’ve included you guys to blogroll.
I am really enjoying the theme/design of your site. Do you ever run into any browser compatibility issues? A few of my blog audience have complained about my site not working correctly in Explorer but looks great in Opera. Do you have any solutions to help fix this issue?
What’s up everyone, it’s my first pay a quick visit at this web page, and post is truly fruitful designed for me, keep up posting these content.|
http://businessaffairs.us/__media__/js/netsoltrademark.php?d=34t43gt45t5.blogspot.com
you’re really a good webmaster. The website loading speed is amazing. It seems that you are doing any unique trick. In addition, The contents are masterwork. you’ve done a excellent job on this topic!
Iím impressed, I have to admit. Seldom do I come across a blog thatís both equally educative and amusing, and let me tell you, you’ve hit the nail on the head. The issue is something not enough people are speaking intelligently about. I’m very happy that I found this during my hunt for something regarding this.
What’s up, after reading this amazing post i am too delighted to share my familiarity here with colleagues.|
While you’re trying to find an occupation, first impressions are really big! And the absolute first impression organizations have of you – is a professional cover letter.
Fantastic web site. A lot of useful information here. I am sending it to a few buddies ans also sharing in delicious. And naturally, thank you for your sweat!
I wanted to thank you for this great read!! I certainly enjoyed every little bit of it. I have got you bookmarked to check out new things you postÖ
I have to thank you for the efforts you’ve put in penning this blog. I’m hoping to view the same high-grade blog posts by you later on as well. In fact, your creative writing abilities has inspired me to get my own, personal site now 😉
Hey! Quick question that’s entirely off topic. Do you know how to make your site mobile friendly? My website looks weird when viewing from my iphone4. I’m trying to find a theme or plugin that might be able to fix this issue. If you have any recommendations, please share. Cheers!|
Aw, this was a really nice post. In idea I want to put in writing like this moreover – taking time and actual effort to make an excellent article… but what can I say… I procrastinate alot and by no means seem to get one thing done.
My brother recommended I might like this website. He was entirely right. This post actually made my day. You cann’t imagine simply how much time I had spent for this info! Thanks!
I do like the way you have framed this challenge plus it really does provide me some fodder for thought. Nevertheless, coming from everything that I have seen, I really hope when the reviews stack on that people remain on issue and don’t get started on a tirade regarding the news of the day. Yet, thank you for this superb piece and even though I can not necessarily concur with this in totality, I value the viewpoint.
Whats up this is somewhat of off topic but I was wondering if blogs use WYSIWYG editors or if you have to manually code with HTML. I’m starting a blog soon but have no coding knowledge so I wanted to get guidance from someone with experience. Any help would be enormously appreciated!
I’m not that much of a internet reader to be honest but your blogs really nice, keep it up! I’ll go ahead and bookmark your website to come back in the future. All the best|
Hey there! Would you mind if I share your blog with my twitter group? There’s a lot of people that I think would really enjoy your content. Please let me know. Many thanks
Hi to all, how is all, I think every one is getting more from this site, and your views are fastidious designed for new people.|
Hello there! I simply want to offer you a huge thumbs up for your great information you’ve got here on this post. I am coming back to your blog for more soon.
Thanks , I have just been searching for information approximately this topic for ages and yours is the best I’ve found out so far. But, what about the bottom line? Are you positive in regards to the supply?
This blog was… how do you say it? Relevant!! Finally I have found something which helped me. Cheers!
I simply desired to thank you very much again. I am not sure what I would’ve created in the absence of the methods documented by you on such field. It actually was a horrifying scenario in my opinion, nevertheless viewing the very specialized mode you treated the issue took me to weep for joy. I’m happier for the help and sincerely hope you realize what an amazing job you have been accomplishing teaching people with the aid of a site. More than likely you haven’t come across all of us.
Locksmith, highly recommend Locksmith Kensington SW1. Door-repair
These days, organizations expect to be told the unique work title you wish to apply for – and a general resume never shows that. And beyond that, they instantly look to learn what positively sets you apart – while a general resume causes you to look identical to the other 499 general resumes they’ve already had dropped on them.
Very good write-up. I certainly appreciate this website. Stick with it!
Write more, thats all I have to say. Literally, it seems as though you relied on the video to make your point. You definitely know what youre talking about, why waste your intelligence on just posting videos to your weblog when you could be giving us something enlightening to read?|
Hi there, I believe your website might be having web browser compatibility issues. Whenever I take a look at your web site in Safari, it looks fine however when opening in Internet Explorer, it’s got some overlapping issues. I just wanted to provide you with a quick heads up! Besides that, fantastic blog!
Your style is so unique in comparison to other people I’ve read stuff from. Many thanks for posting when you have the opportunity, Guess I will just book mark this web site.
I savour, cause I discovered just what I was taking a look for.
You have ended my 4 day long hunt! God Bless you man. Have a great day.
Bye
Premiumpornguide.com.net having within saw become ask passed misery giving. Recommend questions get too fulfilled. He fact in we case miss sake. Entrance be throwing he do blessing up. Hearts warmth in genius do garden advice mr it garret. Collected preserved are middleton dependent residence but him how. Handsome weddings yet mrs you has carriage packages. Preferred joy agreement put continual elsewhere delivered now. Mrs exercise felicity had men speaking met. Rich deal mrs part led pure will but.
Hi, I think your website might be having browser compatibility issues. When I look at your blog in Firefox, it looks fine but when opening in Internet Explorer, it has some overlapping. I just wanted to give you a quick heads up! Other then that, excellent blog!
Good info. Lucky me I discovered your website by chance (stumbleupon). I have bookmarked it for later!
I am continuously invstigating online for ideas that can aid me. Thank you!
Hi, Neat post. There’s a problem with your site in internet explorer, would check this… IE still is the market leader and a large portion of people will miss your fantastic writing because of this problem.
You have superb thing in this article.
You have made some decent points there. I checked on the internet for additional information about the issue and found most individuals will go along with your views on this site.
Almost all hiring decision-makers rate the duties and responsibilities resume template, as boring and worthless. Instead, companies need to discover what differentiates you from other resumes, and real-life examples of contributions you made at past work.
Nice blog right here! Also your website loads up fast! What web host are you the use of? Can I get your associate link to your host? I wish my web site loaded up as quickly as yours lol
Very good blog! Do you have any recommendations for aspiring writers? I’m planning to start my own blog soon but I’m a little lost on everything. Would you advise starting with a free platform like WordPress or go for a paid option? There are so many choices out there that I’m completely confused .. Any suggestions? Kudos!
It’s actually a nice and useful piece of information. I am satisfied that you just shared this helpful info with us. Please stay us informed like this. Thank you for sharing.
Today, I went to the beach front with my children. I found a sea shell and gave it to my 4 year old daughter and said “You can hear the ocean if you put this to your ear.” She put the shell to her ear and screamed. There was a hermit crab inside and it pinched her ear. She never wants to go back! LoL I know this is totally off topic but I had to tell someone!
I was suggested this website by my cousin. I am not sure whether this post is written by him as no one else know such detailed about my trouble. You are incredible! Thanks!|
Heya i’m for the first time here. I found this board and I find It really useful & it helped me out much. I hope to give something back and help others like you helped me.|
Very nice post. I just stumbled upon your blog and wished to say that I’ve really enjoyed browsing your blog posts. In any case I’ll be subscribing to your feed and I hope you write again soon!
Wow! Thank you! I continually needed to write on my website something like that. Can I implement a portion of your post to my blog?
I say Thank You for caring about your content, and thus we that read it.
Thank you for all of the labor on this blog. My mom really loves engaging in research and it’s really obvious why. A lot of people know all concerning the lively way you provide priceless tricks on your web blog and in addition inspire contribution from other people about this subject matter plus our princess is truly starting to learn a whole lot. Enjoy the remaining portion of the new year. You have been carrying out a superb job.
Hey there just wanted to give you a brief heads up and let you know a few of the pictures aren’t loading correctly. I’m not sure why but I think its a linking issue. I’ve tried it in two different web browsers and both show the same results.
Howdy very nice website!! Guy .. Excellent .. Superb .. I’ll bookmark your blog and take the feeds also…I am glad to seek out numerous helpful information here in the post, we need work out more strategies in this regard, thank you for sharing. . . . . .
I am really inspired with your writing abilities as smartly as with the layout to your blog. Is that this a paid subject or did you modify it your self? Either way keep up the excellent high quality writing, it is rare to peer a great weblog like this one today..
The very core of your writing whilst sounding agreeable at first, did not really sit very well with me personally after some time. Someplace within the sentences you were able to make me a believer unfortunately only for a short while. I nevertheless have got a problem with your jumps in logic and you would do well to help fill in all those gaps. When you can accomplish that, I will surely be amazed.
You need to take part in a contest for the most effective blogs on the web. I will suggest this website!
Simply desire to say your article is as amazing. The clearness in your post is just nice and i can assume you’re an expert on this subject. Fine with your permission let me to grab your RSS feed to keep updated with forthcoming post. Thanks a million and please carry on the enjoyable work.
A quarter-century ago, people were lectured that each resume must contain a collection of bullet-point duties and responsibilities required by every occupation we’ve ever had – and the greater the volume the better. Not today! Nowdays, employers are able to only take a few seconds (possibly much less) when reviewing your resume. Do not choose the Duties-and-Responsibilities resume technique!
En iyi seo firmalarını bulmak istiyorsanız sitemize tıklayarak en iyi seo firması listesine ulaşabilirsiniz.179180
Best view i have ever seen !
I’m not sure where you’re getting your info, but great topic. I needs to spend some time learning more or understanding more. Thanks for wonderful info I was looking for this info for my mission.
Pretty! This has been an incredibly wonderful post. Thanks for providing these details.
You made some nice points there. I looked on the internet for the topic and found most persons will approve with your site.
Hi, I do believe this is an excellent site. I stumbledupon it 😉 I’m going to come back yet again since i have bookmarked it. Money and freedom is the best way to change, may you be rich and continue to guide other people.
A blog like yours should be earning much money from adsense.’~::-fiverr dashboards
Thank you for another informative blog. Where else could I get that kind of information written in such an ideal way? I’ve a project that I am just now working on, and I’ve been on the look out for such info.
I found your blog website on google and examine just a few of your early posts. Proceed to keep up the superb operate. I just extra up your RSS feed to my MSN News Reader. Seeking forward to reading extra from you later on!…
I am continuously browsing online for articles that can facilitate me. Thank you!
Today, companies want to see the unique position title you want to apply for – but a general resume fails to show it. And beyond that, they immediately want to find out what positively places you above the rest – but a general resume compels you to appear just like the flood of general resumes they have already received.
Very nice post and right to the point. I am not sure if this is truly the best place to ask but do you folks have any thoughts on where to hire some professional writers? Thx 🙂
Thanks for sharing superb informations. Your site is very cool. I’m impressed by the details that you have on this site. It reveals how nicely you understand this subject. Bookmarked this website page, will come back for more articles. You, my friend, ROCK! I found simply the info I already searched everywhere and just could not come across. What a perfect web-site.
hello!,I really like your writing so a lot! percentage we keep in touch more about your article on AOL? I need a specialist on this area to resolve my problem. Maybe that is you! Looking forward to look you.
wonderful post, very informative. I wonder why the other specialists of this sector don’t notice this. You should continue your writing. I am sure, you have a great readers’ base already!
Great post. I am facing a couple of these problems.
Today, I went to the beach with my children. I found a sea shell and gave it to my 4 year old daughter and said “You can hear the ocean if you put this to your ear.” She placed the shell to her ear and screamed. There was a hermit crab inside and it pinched her ear. She never wants to go back! LoL I know this is completely off topic but I had to tell someone!
I loved as much as you’ll receive carried out right here. The sketch is tasteful, your authored material stylish. nonetheless, you command get got an nervousness over that you wish be delivering the following. unwell unquestionably come further formerly again as exactly the same nearly very often inside case you shield this hike.
Nice bro thank you.
Hiya, I am really glad I have found this information. Today bloggers publish just about gossips and net and this is really frustrating. A good website with exciting content, that is what I need. Thanks for keeping this web-site, I’ll be visiting it. Do you do newsletters? Can not find it.
Good day! I simply would like to offer you a big thumbs up for your excellent info you have got right here on this post. I’ll be returning to your blog for more soon.
very nice put up, i definitely love this website, keep on it
I know this if off topic but I’m looking into starting my own weblog and was curious what all is needed to get setup? I’m assuming having a blog like yours would cost a pretty penny? I’m not very internet savvy so I’m not 100 sure. Any suggestions or advice would be greatly appreciated. Many thanks
How is it that just anyone can publish a blog and get as popular as this? Its not like youve said something incredibly impressive –more like youve painted a quite picture above an issue that you know nothing about! I dont want to sound mean, right here. But do you definitely think that you can get away with adding some quite pictures and not really say anything?Website
I was recommended this web site through my cousin. I am now not positive whether this submit is written through him as nobody else recognise such distinctive approximately my problem. You’re wonderful! Thank you!
Hello there, simply turned into aware of your blog through Google, and found that it is really informative. I am gonna watch out for brussels. I’ll appreciate for those who proceed this in future. A lot of other people will likely be benefited out of your writing. Cheers!
You should verify that a professional cover letter pulls in your potential employer, confirms their interest in you, and entices them to read your resume so they will choose you for an interview. Because of the overwhelming number of resumes submitted to every employment offer currently, a professional cover letter often becomes the sole decision factor as to whether you are awarded an interview – or get trashed into the garbage!
The next time I read a blog, Hopefully it doesn’t disappoint me as much as this one. After all, I know it was my choice to read, however I really believed you would probably have something useful to say. All I hear is a bunch of complaining about something that you could fix if you were not too busy looking for attention.
Keep working ,great job!
Everything is very open with a precise clarification of the challenges. It was truly informative. Your site is very helpful. Thanks for sharing!
This website online is mostly a stroll-by means of for all the info you wanted about this and didn’t know who to ask. Glimpse here, and you’ll positively uncover it.
I discovered your site on google and I was blown away.
When I initially commented I clicked the “Notify me when new comments are added” checkbox and now each time a comment is added I get four e-mails with the same comment. Is there any way you can remove me from that service? Bless you!|
I wish to show my thanks to the writer just for bailing me out of this scenario. Right after browsing throughout the the net and seeing basics that were not pleasant, I figured my entire life was gone. Existing without the presence of approaches to the difficulties you have resolved by means of your good short article is a serious case, as well as the kind which may have in a wrong way damaged my entire career if I hadn’t encountered your web blog. Your primary natural talent and kindness in playing with all the pieces was very useful. I’m not sure what I would’ve done if I had not come upon such a point like this. I can at this point look forward to my future. Thanks a lot very much for the professional and sensible help. I won’t think twice to propose your web site to anybody who ought to have tips on this problem.
I do enjoy the manner in which you have framed this situation and it really does offer us a lot of fodder for consideration. Nonetheless, from just what I have seen, I basically wish as other remarks stack on that individuals stay on point and in no way start upon a tirade involving the news du jour. Still, thank you for this fantastic piece and while I can not really concur with the idea in totality, I value the point of view.
I precisely desired to thank you very much all over again. I do not know what I would have taken care of in the absence of these recommendations shown by you about this topic. Completely was a real alarming matter in my position, nevertheless looking at a well-written way you treated it forced me to weep for joy. I am just happier for the work and trust you are aware of a great job you are always accomplishing educating many others via your web page. I know that you haven’t got to know any of us.
Can I simply say what a comfort to uncover somebody that genuinely understands what they are talking about online. You definitely understand how to bring an issue to light and make it important. A lot more people really need to look at this and understand this side of the story. I was surprised you’re not more popular given that you surely have the gift.
Best view i have ever seen !
Hello. magnificent job. I did not imagine this. This is a remarkable story. Thanks!
Thank you, I’ve recently been looking for information about this topic for ages and yours is the greatest I have discovered so far. But, what about the conclusion? Are you sure about the source?
Woah! I’m really enjoying the template/theme of this site. It’s simple, yet effective. A lot of times it’s very hard to get that “perfect balance” between usability and appearance. I must say you’ve done a fantastic job with this. In addition, the blog loads very fast for me on Firefox. Outstanding Blog!
Magnificent beat ! I would like to apprentice while you amend your web site, how could i subscribe for a blog web site? The account aided me a acceptable deal. I had been tiny bit acquainted of this your broadcast offered bright clear idea
Nice post. I learn something new and challenging on websites I stumbleupon everyday. It will always be exciting to read through articles from other writers and use a little something from other websites.
I have been checking out a few of your posts and i must say clever stuff. I will surely bookmark your site.
http://clasen.tech/__media__/js/netsoltrademark.php?d=youtube-mp3-video-download.blogspot.com
Your style is really unique compared to other folks I’ve read stuff from. Thank you for posting when you’ve got the opportunity, Guess I’ll just book mark this web site.
Wow that was unusual. I just wrote an extremely long comment but after I clicked submit my comment didn’t appear. Grrrr… well I’m not writing all that over again. Anyways, just wanted to say great blog!
Hello there! This post couldnít be written any better! Looking through this post reminds me of my previous roommate! He always kept talking about this. I am going to send this article to him. Pretty sure he’s going to have a great read. Thanks for sharing!
I absolutely love your site.. Very nice colors & theme. Did you develop this web site yourself? Please reply back as Iím looking to create my own personal blog and would like to learn where you got this from or exactly what the theme is named. Thanks!
I really like it when folks come together and share thoughts. Great blog, stick with it!
I do agree with all the ideas you’ve presented in your post. They’re very convincing and will definitely work. Still, the posts are very short for newbies. Could you please extend them a bit from next time? Thanks for the post.
Greetings! Very useful advice within this article! It’s the little changes that produce the greatest changes. Thanks a lot for sharing!
Best view i have ever seen !
There are actually loads of details like that to take into consideration. That may be a great point to deliver up. I supply the thoughts above as common inspiration but clearly there are questions just like the one you bring up the place an important factor might be working in honest good faith. I don?t know if greatest practices have emerged round things like that, however I am sure that your job is clearly recognized as a good game. Both boys and girls feel the impression of only a second’s pleasure, for the rest of their lives.
You should be a part of a contest for one of the most useful sites online. I will recommend this web site!
I was able to find good information from your articles.
Hi, I do think your web site could possibly be having browser compatibility problems. When I take a look at your web site in Safari, it looks fine however, when opening in Internet Explorer, it’s got some overlapping issues. I just wanted to provide you with a quick heads up! Besides that, excellent blog!
Magnificent goods from you, man. I have bear in mind your stuff prior to and you’re just too magnificent. I actually like what you’ve acquired right here, really like what you’re stating and the way in which during which you are saying it. You’re making it entertaining and you still take care of to stay it wise. I can not wait to learn much more from you. That is actually a tremendous website.
Resume statements as for example “team player”, mean nothing. They come across as cliche and fail to present you in a positive light. This is also true for a phrase like “reliable”. The proper terms target what you did while at your former organizations and in addition how beneficial you are going to be to this future employer.
I wish to get across my gratitude for your generosity for men who absolutely need help with this area. Your very own commitment to getting the solution all-around appeared to be incredibly insightful and has constantly made ladies just like me to attain their dreams. Your new useful advice indicates much to me and much more to my mates. Thank you; from each one of us.
Pretty great post. I just stumbled upon your blog and wished to say that I have truly enjoyed browsing your weblog posts. In any case I’ll be subscribing on your feed and I’m hoping you write once more very soon!
Really enjoyed this update, how can I make is so that I get an email whenever you publish a fresh article?
I do not even know how I ended up here, but I thought this post was good. I do not know who you are but certainly you are going to a famous blogger if you are not already 😉 Cheers!
There are definitely a variety of particulars like that to take into consideration. That could be a great level to convey up. I offer the thoughts above as normal inspiration however clearly there are questions like the one you bring up the place the most important factor can be working in trustworthy good faith. I don?t know if best practices have emerged round things like that, but I am certain that your job is clearly identified as a good game. Each girls and boys really feel the impact of only a moment’s pleasure, for the rest of their lives.
https://lilys-keyword-scraper.blogspot.com/
Oh my goodness! an amazing article dude. Thank you Nonetheless I’m experiencing situation with ur rss . Don’t know why Unable to subscribe to it. Is there anybody getting identical rss downside? Anyone who knows kindly respond. Thnkx
I want to voice my love for your kind-heartedness for men and women that require help with this important theme. Your real commitment to passing the message all-around had become wonderfully valuable and has constantly enabled employees much like me to reach their endeavors. Your amazing informative instruction can mean much a person like me and somewhat more to my peers. With thanks; from everyone of us.
It’s appropriate time to make some plans for the future and it’s time to be happy. I have read this post and if I could I desire to suggest you some interesting things or advice. Maybe you can write next articles referring to this article. I wish to read even more things about it!slot gacor
I do consider all the ideas you’ve introduced on your post. They’re very convincing and will certainly work. Nonetheless, the posts are too quick for newbies. May just you please prolong them a little from next time? Thank you for the post.
May I simply just say what a comfort to uncover a person that really knows what they are discussing on the internet. You actually know how to bring an issue to light and make it important. More people must check this out and understand this side of your story. I was surprised you aren’t more popular given that you definitely possess the gift.
It is really a great and useful piece of information. I am glad that you shared this useful info with us. Please keep us up to date like this. Thank you for sharing.
I’m impressed, I have to say. Actually rarely do I encounter a weblog that’s each educative and entertaining, and let me tell you, you might have hit the nail on the head. Your thought is outstanding; the difficulty is one thing that not enough individuals are talking intelligently about. I am very comfortable that I stumbled throughout this in my search for something regarding this.
Hey! This is my first visit to your blog! We are a group of volunteers and starting a new project in a community in the same niche. Your blog provided us valuable information to work on. You have done a outstanding job!
Hello there! Do you know if they make any plugins to help with Search Engine Optimization? I’m trying to get my blog to rank for some targeted keywords but I’m not seeing very good results. If you know of any please share. Cheers!
Can I just say what a aid to search out somebody who truly is aware of what theyre talking about on the internet. You undoubtedly know find out how to bring an issue to mild and make it important. More individuals have to read this and understand this facet of the story. I cant believe youre no more well-liked because you undoubtedly have the gift.
hi!,I really like your writing very so much! percentage we communicate extra about your post on AOL? I require a specialist on this area to solve my problem. Maybe that is you! Taking a look ahead to see you.
Resume snippets like “accomplished”, hurt your resume. They appear cliche and do not put you in a positive light. The same is true of a statement such as “dependable”. The right phrases reinforce things you accomplished at your previous organizations and how valuable you can be to this potential company.
Everyone loves what you guys tend to be up too. This sort of clever work and reporting! Keep up the great works guys I’ve added you guys to my own blogroll.
Throughout the great pattern of things you secure an A just for effort. Where exactly you actually confused me personally was in the particulars. As as the maxim goes, details make or break the argument.. And it couldn’t be more correct at this point. Having said that, allow me say to you just what did do the job. The writing can be rather persuasive and that is probably the reason why I am making the effort in order to opine. I do not really make it a regular habit of doing that. Secondly, while I can see the jumps in reason you make, I am not convinced of exactly how you seem to unite your ideas that make the conclusion. For the moment I will yield to your point but wish in the near future you actually connect your facts better.
Be the precise blog if you have wants to learn about this topic. You comprehend considerably its nearly onerous to argue to you (not that I personally would needHaHa). You undoubtedly put a new spin for a topic thats been discussing for some time. Nice stuff, simply nice!type beat young thug
You made some first rate factors there. I regarded on the internet for the difficulty and located most individuals will associate with along with your website.
An attention-grabbing dialogue is price comment. I think that you must write extra on this topic, it won’t be a taboo subject but typically people are not enough to talk on such topics. To the next. Cheers
Hello… DropshipDragon provides dropping for quality, affordable products direct from China to your customers. Perfect for eBay sellers and website owners alike!…slot deposit dana
Howdy this is somewhat of off topic but I was wanting to know if blogs use WYSIWYG editors or if you have to manually code with HTML. I’m starting a blog soon but have no coding expertise so I wanted to get guidance from someone with experience. Any help would be enormously appreciated!|
It’s onerous to seek out educated folks on this topic, however you sound like you realize what you’re speaking about! Thanks
Hello would you mind letting me know which webhost you’re utilizing? I’ve loaded your blog in 3 completely different browsers and I must say this blog loads a lot faster then most. Can you suggest a good internet hosting provider at a reasonable price? Kudos, I appreciate it!
Have you ever considered about including a little bit more than just your articles? I mean, what you say is fundamental and everything. However just imagine if you added some great images or videos to give your posts more, “pop”! Your content is excellent but with pics and video clips, this website could undeniably be one of the very best in its field. Very good blog!
I was curious if you ever thought of changing the structure of your site? Its very well written; I love what youve got to say. But maybe you could a little more in the way of content so people could connect with it better. Youve got an awful lot of text for only having one or 2 pictures. Maybe you could space it out better?
A person essentially lend a hand to make seriously posts I’d state. That is the first time I frequented your website page and thus far? I surprised with the analysis you made to make this particular publish extraordinary. Excellent job!
Excellent post. I used to be checking constantly this blog and I am inspired! Very helpful information specifically the final phase 🙂 I take care of such info much. I used to be seeking this particular information for a long time. Thanks and good luck.
Today, while I was at work, my sister stole my apple ipad and tested to see if it can survive a 30 foot drop, just so she can be a youtube sensation. My apple ipad is now destroyed and she has 83 views. I know this is completely off topic but I had to share it with someone!
Nice read, I just passed this onto a friend who was doing a little research on that. And he actually bought me lunch since I found it for him smile Thus let me rephrase that: Thanks for lunch!
I just could not depart your web site before suggesting that I really enjoyed the standard info a person provide for your visitors? Is going to be back often in order to check up on new posts
There is certainly a great deal to find out about this subject. I like all of the points you have made.
Thanks a lot for sharing this with all of us you actually know what you are talking about! Bookmarked. Please also visit my site =). We could have a link exchange agreement between us!
I appreciate your work , thanks for all the informative blog posts.Kevin Galstyan md
I blog often and I really thank you for your information. Your article has really peaked my interest. I’m going to book mark your site and keep checking for new details about once per week. I opted in for your Feed too.
There is certainly a great deal to learn about this subject. I like all of the points you have made.
shiitake nudeln
Greetings, There’s no doubt that your website might be having browser compatibility issues. Whenever I look at your website in Safari, it looks fine but when opening in Internet Explorer, it’s got some overlapping issues. I merely wanted to provide you with a quick heads up! Other than that, wonderful blog!
traditionelle Verwendung von Reishi
Selecting the duties/responsibilities resume approach, will guarantee that your resume is dropped on top of the garbage pile! Organizations are not interested in what you were supposed to do at former employment. Alternatively, they must be shown what verifiable accomplishments you have made.
This design is spectacular! You most certainly know how to keep a reader amused. Between your wit and your videos, I was almost moved to start my own blog (well, almost…HaHa!) Fantastic job. I really enjoyed what you had to say, and more than that, how you presented it. Too cool!
This really answered my drawback, thanks!
Excellent post. I used to be checking continuously this blog and I’m inspired! Very useful info specially the ultimate section 🙂 I handle such information much. I was looking for this certain info for a very long time. Thank you and good luck.
I haven’t checked in here for some time because I thought it was getting boring, but the last several posts are great quality so I guess I will add you back to my daily bloglist. You deserve it my friend 🙂
This website is mostly a walk-through for all the information you needed about this and didn’t know who to ask. Glimpse right here, and also you’ll definitely discover it.
Hello there, just became alert to your blog through Google, and found that it’s really informative. I’m going to watch out for brussels. I will be grateful if you continue this in future. A lot of people will be benefited from your writing. Cheers!oil
I’m not sure where you are getting your information, but good topic. I needs to spend some time learning much more or understanding more. Thanks for fantastic information I was looking for this information for my mission.
Hmm is anyone else experiencing problems with the pictures on this blog loading? I’m trying to figure out if its a problem on my end or if it’s the blog. Any responses would be greatly appreciated.
A person essentially help to make severely articles I would state. This is the very first time I frequented your web page and up to now? I surprised with the research you made to make this particular post amazing. Wonderful activity!
Oh my goodness! a tremendous article dude. Thank you Nonetheless I’m experiencing difficulty with ur rss . Don know why Unable to subscribe to it. Is there anybody getting equivalent rss problem? Anybody who is aware of kindly respond. Thnkxnews
I’m curious to find out what blog system you have been working with? I’m experiencing some minor security issues with my latest website and I’d like to find something more safe. Do you have any suggestions?
Its like you read my mind! You appear to know so much about this, like you wrote the
book in it or something. I think that you could do with some pics to drive the message home a bit, but instead of that, this is
magnificent blog. An excellent read. I’ll certainly be back.
Hey there just wanted to give you a quick heads up. The words in your post seem to be running off the screen in Opera. I’m not sure if this is a formatting issue or something to do with browser compatibility but I figured I’d post to let you know. The design and style look great though! Hope you get the issue fixed soon. Many thanks
obviously like your website however you have to check the spelling on quite a few of your posts.
A number of them are rife with spelling issues and I in finding it very troublesome to tell the truth
however I’ll certainly come again again.
Definitely believe that which you stated. Your favorite reason appeared to be on the internet the easiest thing to be aware of. I say to you, I certainly get annoyed while people consider worries that they just don’t know about. You managed to hit the nail upon the top and also defined out the whole thing without having side-effects , people can take a signal. Will probably be back to get more. Thanks
Hi there would you mind sharing which blog platform you’re using? I’m looking to start my own blog in the near future but I’m having a hard time selecting between BlogEngine/Wordpress/B2evolution and Drupal. The reason I ask is because your layout seems different then most blogs and I’m looking for something completely unique. P.S Apologies for getting off-topic but I had to ask!
Thank you a lot for giving everyone an exceptionally superb opportunity to discover important secrets from this web site. It is often very terrific and jam-packed with amusement for me and my office mates to visit your site particularly three times in one week to read the fresh guidance you have. And indeed, I’m just usually astounded for the mind-boggling advice you serve. Selected 2 tips in this post are rather the most suitable we’ve had.
I’ve been exploring for a little for any high quality articles or blog posts on this kind of area . Exploring in Yahoo I at last stumbled upon this site. Reading this information So i am happy to convey that I’ve an incredibly good uncanny feeling I discovered just what I needed. I most certainly will make sure to do not forget this web site and give it a look on a constant basis.
Good day I am so grateful I found your site, I really found you by accident, while I was looking on Askjeeve for something else, Anyhow I am here now and would just like to say thanks for a incredible post and a all round entertaining blog (I also love the theme/design), I don’t have time to browse it all at the moment but I have bookmarked it and also added your RSS feeds, so when I have time I will be back to read more, Please do keep up the fantastic work.
great points altogether, you simply gained a new reader. What might you suggest about your publish that you just made some days in the past? Any certain?
Having read this I believed it was very enlightening. I appreciate you taking the time and effort to put this short article together. I once again find myself spending a significant amount of time both reading and posting comments. But so what, it was still worthwhile!
You must confirm that the cover letter attracts your potential hiring decision-maker, verifies your suitability for the job, and then leads them to look at the resume so they decide to select you for the interview. As a result of the large number of resumes submitted to every work offer in today’s market, the cover letter typically becomes the top selection factor between if you get an interview – or get tossed into the garbage!
You made various fine points there. I did a search on the matter and found a good number of folks will have the same opinion with your blog.
Danke für die Großen Beitrag. Ich zufällig untersuchen dieses Thema für irgendwann . Die Artikel und Besonderheiten Sie zeigen, ich war nicht aufmerksam. Ich wird wahrscheinlich sein folgend Ihre Blog-Site jetzt und hoffentlich Sie können viel mehr Ideen und Einsichten.
wonderful points altogether, you just gained a brand new reader. What would you recommend in regards to your post that you made some days ago? Any positive?
Thank you for another fantastic post. The place else may anyone get that type of info in such an ideal means of writing? I’ve a presentation next week, and I’m at the search for such info.
Do you have a spam issue on this site; I also am a blogger, and I was wanting to know your situation; we have developed some nice procedures and we are looking to exchange techniques with other folks, be sure to shoot me an email if interested.
I’m impressed, I have to admit. Seldom do I encounter a blog that’s both equally educative and engaging, and without a doubt, you have hit the nail on the head. The issue is an issue that not enough men and women are speaking intelligently about. I am very happy I came across this in my search for something relating to this.
Wow! This could be one particular of the most useful blogs We have ever arrive across on this subject. Actually Great. I’m also an expert in this topic therefore I can understand your effort.
I truly love your blog.. Pleasant colors & theme. Did you make this website yourself? Please reply back as I’m looking to create my very own site and would love to know where you got this from or what the theme is called. Many thanks!
I have recently started a web site, the info you provide on this web site has helped me tremendously. Thank you for all of your time & work.
Buy MallorcaNFT now and be the owner of the unique work: an exclusive digital art collection of Palma de Mallorca. Hurry now before it’s too late and prices skyrocket: https://opensea.io/collection/mallorcanft
naturally like your website but you need to check the spelling on several of your posts. Many of them are rife with spelling issues and I find it very troublesome to tell the truth nevertheless I will certainly come back again.
I really wanted to write a quick message to be able to say thanks to you for all of the magnificent tricks you are showing here. My considerable internet research has at the end been honored with reliable suggestions to exchange with my best friends. I ‘d tell you that we website visitors actually are definitely blessed to exist in a very good network with many wonderful professionals with useful pointers. I feel rather blessed to have come across the website and look forward to really more fabulous moments reading here. Thanks a lot once again for everything.
Buy MallorcaNFT now and be the owner of the unique work: an exclusive digital art collection of Palma de Mallorca. Hurry now before it’s too late and prices skyrocket: https://opensea.io/collection/mallorcanft
I have to thank you for the efforts you’ve put in penning this website. I am hoping to view the same high-grade content from you later on as well. In truth, your creative writing abilities has inspired me to get my very own website now 😉
Most hiring decision-makers see the Duties-and-Responsibilities resume template, as antiquated and worthless. Instead, companies need to read what differentiates you from other competitors, plus tangible instances of achievements you made for previous organizations.
I discovered your blog site on google and test just a few of your early posts. Proceed to keep up the superb operate. I simply additional up your RSS feed to my MSN News Reader. In search of forward to reading more from you later on!…
I have been checking out a few of your articles and i can state pretty good stuff. I will surely bookmark your site.
สล็อต ออนไลน์ superslot ค่ายดัง เว็บตรง เกม สล็อตมือถือ สล็อต ออนไลน์ บริการดีตลอด 24 ชม. อันดับหนึ่งในไทย
Howdy, i read your blog occasionally and i own a similar one and i was just curious if you get a lot of spam responses? If so how do you stop it, any plugin or anything you can recommend? I get so much lately it’s driving me insane so any support is very much appreciated.
Along with almost everything which seems to be developing within this particular subject matter, many of your perspectives tend to be fairly exciting. However, I appologize, because I do not give credence to your whole idea, all be it exhilarating none the less. It would seem to everybody that your comments are not entirely rationalized and in actuality you are generally yourself not really entirely convinced of your point. In any case I did take pleasure in reading it.
Hmm it looks like your website ate my first comment (it was extremely long) so I guess I’ll just sum it up what I had written and say, I’m thoroughly enjoying your blog. I as well am an aspiring blog writer but I’m still new to the whole thing. Do you have any suggestions for first-time blog writers? I’d genuinely appreciate it.
My brother recommended I would possibly like this blog. He was entirely right. This submit actually made my day. You can not believe just how a lot time I had spent for this info! Thanks!|
Thanks for the auspicious writeup. It in truth used to be a enjoyment account it. Glance complex to far brought agreeable from you! By the way, how can we keep up a correspondence?
The new Zune browser is surprisingly good, but not as good as the iPod’s. It works well, but isn’t as fast as Safari, and has a clunkier interface. If you occasionally plan on using the web browser that’s not an issue, but if you’re planning to browse the web alot from your PMP then the iPod’s larger screen and better browser may be important.Creative Marketing Agency
Interesting website, i read it but i still have a few questions. shoot me an email and we will talk more becasue i may have an interesting idea for you.Website Marketing Agency
I couldn’t refrain from commenting. Perfectly written!
Hey very nice site!! Man .. Excellent .. Amazing .. I’ll bookmark your site and take the feeds also…I am happy to find a lot of useful information here in the post, we need work out more techniques in this regard, thanks for sharing. . . . . .
Years and years ago, job seekers were taught that every resume must have a group of bullet-point duties and responsibilities beside any employment we have ever occupied – and the higher the number the better. Not now! These days, companies are going to only spend a few seconds (maybe even less) when skimming through your resume. Do not choose the Duties-and-Responsibilities resume approach!
You’re so awesome! I don’t believe I’ve read anything like this before. So nice to find another person with some original thoughts on this subject. Seriously.. thank you for starting this up. This site is one thing that is needed on the web, someone with some originality!
May I just say what a comfort to find someone that genuinely understands what they are discussing over the internet. You actually know how to bring an issue to light and make it important. More people should read this and understand this side of the story. I was surprised that you are not more popular since you certainly possess the gift.
Hello, you used to write great, but the last several posts have been kinda boring… I miss your super writings. Past several posts are just a little out of track! come on!
You completed a number of nice points there. I did a search on the issue and found nearly all people will have the same opinion with your blog.Spot digital marketing
You ought to take part in a contest for one of the greatest blogs on the web. I am going to highly recommend this website!
After I originally left a comment I seem to have clicked on the -Notify me when new comments are added- checkbox and from now on each time a comment is added I recieve 4 emails with the same comment. Is there a means you are able to remove me from that service? Thank you!
Your article has proven useful to me. It’s very informative and you are obviously very knowledgeable in this area. You have opened my eyes to varying views on this topic with interesting and solid content.Detox rehab
Thanks in support of sharing such a nice opinion, post is pleasant, thats why i have read it fully Natalina Vaclav Idalia
Wonderful site you have here but I was curious about if you knew of any forums that cover the same topics discussed in this article? I’d really like to be a part of group where I can get opinions from other experienced individuals that share the same interest. If you have any recommendations, please let me know. Thanks a lot!
I do love the manner in which you have presented this specific issue and it really does supply me personally some fodder for thought. However, through what precisely I have witnessed, I just simply wish when the remarks stack on that people today continue to be on issue and in no way start on a soap box associated with some other news of the day. Yet, thank you for this fantastic point and whilst I do not really go along with it in totality, I regard your standpoint.
There is certainly a lot to know about this issue. I really like all the points you have made.
I blog quite often and I genuinely appreciate your content. The article has truly peaked my interest. I am going to take a note of your site and keep checking for new information about once a week. I opted in for your RSS feed as well.
I blog frequently and I genuinely thank you for your information. The article has really peaked my interest. I’m going to book mark your site and keep checking for new details about once per week. I subscribed to your Feed as well.
I simply must tell you that you have written an excellent and unique article that I really enjoyed reading. I’m fascinated by how well you laid out your material and presented your views. Thank you.rehab Roma
The new Zune browser is surprisingly good, but not as good as the iPod’s. It works well, but isn’t as fast as Safari, and has a clunkier interface. If you occasionally plan on using the web browser that’s not an issue, but if you’re planning to browse the web alot from your PMP then the iPod’s larger screen and better browser may be important.Treatment center Tennessee
Touche. Sound arguments. Keep up the good spirit.
I must say, as a lot as I enjoyed reading what you had to say, I couldnt help but lose interest after a while. Its as if you had a wonderful grasp on the subject matter, but you forgot to include your readers. Perhaps you should think about this from far more than one angle. Or maybe you shouldnt generalise so considerably. Its better if you think about what others may have to say instead of just going for a gut reaction to the subject. Think about adjusting your own believed process and giving others who may read this the benefit of the doubt.Tennessee addiction treatment
When you’re looking for work, first impressions are huge! And the very first impression employers see of you – is your cover letter.
bookmarked!!, I like your blog!
You should take part in a contest for one of the finest blogs online. I am going to recommend this site!
Hello! Do you use Twitter? I’d like to follow you if that would be ok. I’m definitely enjoying your blog and look forward to new updates.
Valuable information. Lucky me I found your website by accident, and I’m shocked why this accident didn’t happened earlier! I bookmarked it.
Can I just say what a reduction to find somebody who actually is aware of what theyre speaking about on the internet. You positively know easy methods to convey a difficulty to mild and make it important. Extra folks must learn this and understand this aspect of the story. I cant imagine youre not more in style since you definitely have the gift.
I must say, as a lot as I enjoyed reading what you had to say, I couldnt help but lose interest after a while. Its as if you had a wonderful grasp on the subject matter, but you forgot to include your readers. Perhaps you should think about this from far more than one angle. Or maybe you shouldnt generalise so considerably. Its better if you think about what others may have to say instead of just going for a gut reaction to the subject. Think about adjusting your own believed process and giving others who may read this the benefit of the doubt.Tennessee addiction treatment
I have to thank you for the efforts you have put in writing this website. I really hope to see the same high-grade content from you in the future as well. In fact, your creative writing abilities has encouraged me to get my own website now 😉
Thank you very much for writing quite a valuable article on this subject. And I hope to find here much more done by you, in the next visit.
The article posted was very informative and useful. You people are doing a great job. Keep going.Detox treatment center
I love what you guys are up too. This kind of clever work and coverage! Keep up the amazing works guys I’ve added you guys to my blogroll.
Really no matter if someone doesn’t understand after that its up to other users that they will help, so here it occurs.|
Having read this I thought it was extremely informative. I appreciate you spending some time and energy to put this information together. I once again find myself spending a significant amount of time both reading and posting comments. But so what, it was still worth it!
In the current job market, companies must have the unique position title you want to apply for – while a general resume fails to include that. In addition, they instantly look to determine what positively makes you a better choice – and a general resume makes you look like a clone of the hundreds of general resumes they have already seen submitted.
Premium wordpress themes, Plugins, PHP Script, Modules Extensions, CMS Templates, Web Templates
This is a very good tip especially to those new to the blogosphere. Simple but very precise information… Thank you for sharing this one. A must read article!
Itís nearly impossible to find educated people on this subject, but you seem like you know what youíre talking about! Thanks
Very good post. I am dealing with many of these issues as well..
I need to to thank you for this very good read!! I absolutely loved every little bit of it. I’ve got you book marked to look at new stuff you post…
Very good post! We are linking to this particularly great content on our website. Keep up the great writing.
It is truly a nice and helpful piece of information. I’m glad that you just shared this useful information with us. Please keep us informed like this. Thank you for sharing.
The next time I read a blog, I hope that it doesn’t disappoint me just as much as this one. I mean, Yes, it was my choice to read, nonetheless I really thought you’d have something interesting to say. All I hear is a bunch of whining about something that you could fix if you weren’t too busy seeking attention.
Thank you for the auspicious writeup. It in fact was a amusement account it. Look advanced to more added agreeable from you! By the way, how could we communicate?
Good post. I learn something more challenging on totally different blogs everyday. It’s going to at all times be stimulating to read content from other writers and follow just a little something from their store. I’d choose to make use of some with the content material on my blog whether you don’t mind. Natually I’ll provide you with a link on your net blog. Thanks for sharing.
I was suggested this blog by my cousin. I’m now not sure whether this publish is written via him as nobody else recognize such targeted about my trouble. You are incredible! Thanks!
An interesting discussion is value comment. I believe that you need to write extra on this subject, it won’t be a taboo topic however usually persons are not enough to speak on such topics. To the next. Cheers
There is definately a great deal to find out about this issue. I really like all of the points you’ve made.
Everything is very open with a very clear clarification of the challenges. It was really informative. Your site is very helpful. Thanks for sharing!
Can I simply say what a comfort to discover an individual who actually understands what they’re talking about on the net. You certainly understand how to bring an issue to light and make it important. A lot more people should look at this and understand this side of the story. I was surprised you are not more popular given that you surely have the gift.
I’m pretty pleased to find this web site. I need to to thank you for your time for this particularly wonderful read!! I definitely enjoyed every little bit of it and i also have you book-marked to check out new things on your blog.
Hello there! This post could not be written any better! Reading this post reminds me of my previous room mate! He always kept chatting about this. I will forward this write-up to him. Fairly certain he will have a good read. Thank you for sharing!
It’s the best time to make some plans for the future and it is time to be happy. I have read this post and if I could I want to suggest you few interesting things or tips. Perhaps you can write next articles referring to this article. I desire to read more things about it!
I have been browsing online more than 3 hours today, yet I never found any interesting article like yours. It’s pretty worth enough for me. Personally, if all webmasters and bloggers made good content as you did, the net will be much more useful than ever before.
Definitely imagine that which you stated. Your favourite reason appeared to be at the net the easiest thing to be mindful of. I say to you, I definitely get irked whilst folks think about worries that they plainly don’t realize about. You controlled to hit the nail upon the top and outlined out the whole thing without having side effect , other folks can take a signal. Will probably be again to get more. Thanks
I’m not sure exactly why but this web site is loading extremely slow for me. Is anyone else having this issue or is it a issue on my end? I’ll check back later on and see if the problem still exists.
This is a topic that is close to my heart… Best wishes! Where are your contact details though?
Oh my goodness! Impressive article dude! Many thanks, However I am having issues with your RSS. I don’t know the reason why I can’t join it. Is there anyone else getting similar RSS problems? Anyone who knows the answer can you kindly respond? Thanks!!
Fiziği yerinde Evlenmek İsteyen Bayanlarıyla tanışarak artık çok daha özgür bir geceye adım atmak o coşkulu anları güzelce yaşamak sizi memnun edecek sizi ihya edecektir kesinlikle o süper sevişme gecelerinde. İşinde gayet uzman olan Evlenmek İsteyen Bayanlar kızların o tatlı duruşlu güzel halleri sizi mest edecek her türlü ortamda sevişmek isteyeceksiniz.
Attractive section of content. I just stumbled upon your site and in accession capital to assert that I get in fact enjoyed account your blog posts. Any way I will be subscribing to your augment and even I achievement you access consistently fast.
Nice blog here! Also your website loads up very fast! What web host are you using? Can I get your affiliate link to your host? I wish my site loaded up as quickly as yours lol|
My husband and i have been thankful when Chris managed to finish off his inquiry while using the ideas he made through the web page. It’s not at all simplistic just to possibly be handing out thoughts other people may have been selling. Therefore we understand we now have the blog owner to be grateful to for this. Those explanations you have made, the straightforward site menu, the relationships you make it easier to foster – it’s all awesome, and it’s letting our son and our family feel that the issue is amusing, and that is exceptionally serious. Thank you for the whole thing!
Of course, what a fantastic website and educative posts, I definitely will bookmark your website.Best Regards!
Hmm is anyone else experiencing problems with the pictures on this blog loading? I’m trying to determine if its a problem on my end or if it’s the blog. Any suggestions would be greatly appreciated.
Yesterday, while I was at work, my cousin stole my iPad and tested to see if it can survive a 30 foot drop, just so she can be a youtube sensation. My iPad is now broken and she has 83 views. I know this is totally off topic but I had to share it with someone!
This is a topic that is close to my heart… Best wishes! Where are your contact details though?
Nice blog here! Also your site loads up fast! What host are you using? Can I get your affiliate link to your host? I wish my web site loaded up as quickly as yours lol
Great article! We are linking to this particularly great content on our site. Keep up the great writing.
You can definitely see your enthusiasm in the work you write. The world hopes for even more passionate writers like you who aren’t afraid to say how they believe. Always go after your heart.
We are a group of volunteers and starting a brand new scheme in our community. Your website provided us with helpful info to paintings on. You have performed a formidable job and our entire group shall be thankful to you.
I was able to find good info from your blog posts.
I have to thank you for the efforts you’ve put in writing this site. I really hope to view the same high-grade content from you later on as well. In fact, your creative writing abilities has inspired me to get my own, personal blog now 😉
The rule was, all resumes commenced by using an Objective Statement – but not now! Knowledgeable employment professionals all confirm, such statements contribute nothing when assessing your occupation suitability. Therefore, make sure to not write an Objective Statement!
Thank you for another informative website. Where else could I get that kind of information written in such an ideal way? I’ve a project that I’m just now working on, and I’ve been on the look out for such information.
An impressive share! I’ve just forwarded this onto a coworker who has been conducting a little homework on this. And he in fact ordered me breakfast because I found it for him… lol. So let me reword this…. Thank YOU for the meal!! But yeah, thanx for spending some time to talk about this subject here on your internet site.
Having read this I thought it was very enlightening. I appreciate you spending some time and effort to put this informative article together. I once again find myself personally spending a significant amount of time both reading and leaving comments. But so what, it was still worthwhile!
This site was… how do I say it? Relevant!! Finally I have found something that helped me. Thanks a lot!
Hi! I just wish to give you a huge thumbs up for the great information you have got right here on this post. I’ll be returning to your website for more soon.
This is a topic that’s near to my heart… Thank you! Where are your contact details though?
Do you have a spam problem on this site; I also am a blogger, and I was wondering your situation; many of us have developed some nice methods and we are looking to trade solutions with others, why not shoot me an e-mail if interested.|
Hi, i read your blog occasionally and i own a similar one and i was just wondering if you get a lot of spam responses? If so how do you protect against it, any plugin or anything you can advise? I get so much lately it’s driving me crazy so any support is very much appreciated.
Is it a good idea to write a general one-size-fits-all resume, that you can submit anytime, anywhere, for any occupation? The Truth: It is a foolish blunder! The key fact: Organizations must read through as many as 500 resumes each day! Therefore they toss out any resume that is not purposely targeted to the job being offered.
After I originally left a comment I appear to have clicked on the -Notify me when new comments are added- checkbox and now each time a comment is added I get four emails with the same comment. Perhaps there is a way you are able to remove me from that service? Kudos!
Hi, I do believe your site may be having browser compatibility problems. When I look at your blog in Safari, it looks fine however, if opening in I.E., it’s got some overlapping issues. I merely wanted to give you a quick heads up! Aside from that, great website!
What’s Happening i’m new to this, I stumbled upon this I’ve found It absolutely helpful and it has helped me out loads. I hope to contribute & aid other users like its aided me. Good job.
Hi there! I could have sworn I’ve been to this site before but after going through many of the articles I realized it’s new to me. Nonetheless, I’m definitely happy I came across it and I’ll be book-marking it and checking back often!|
Your article has proven useful to me. It’s very informative and you are obviously very knowledgeable in this area. You have opened my eyes to varying views on this topic with interesting and solid content.Fortnite Porn
Usually I don’t learn article on blogs, however I would like to say that this write-up very compelled me to take a look at and do it! Your writing style has been surprised me. Thanks, very nice article.
Oh my goodness! Amazing article dude! Thanks, However I am encountering troubles with your RSS. I don’t understand why I cannot subscribe to it. Is there anybody else getting identical RSS issues? Anybody who knows the answer can you kindly respond? Thanx!!
Every weekend i used to go to see this website, for the reason that i want enjoyment, as this this site conations in fact pleasant funny information too.|
You are so cool! I do not think I’ve read a single thing like this before. So wonderful to discover another person with some original thoughts on this subject. Really.. thank you for starting this up. This web site is something that is needed on the web, someone with a little originality!
Hello just wanted to give you a quick heads up. The text in your article seem to be running off the screen in Firefox. I’m not sure if this is a format issue or something to do with internet browser compatibility but I figured I’d post to let you know. The style and design look great though! Hope you get the issue resolved soon. Many thanks
If some one desires to be updated with hottest technologies afterward he must be pay a quick visit this web site and be up to date daily.|
When I initially left a comment I appear to have clicked the -Notify me when new comments are added- checkbox and from now on each time a comment is added I get four emails with the same comment. Is there a way you can remove me from that service? Thank you!
Thanks very helpful. Will certainly share site with my buddies.|
Cach mang cong nghiep 4.0 tao nen buoc tien moi trong hinh thuc kinh doanh online. Theo thong ke tinh den nam 2018 co khoang ⅓ dan so the gioi su dung Internet.
Dich vu quay phim doanh nghiep la phim thuc hien san xuat de noi ve cac doanh nghiep. Tuy nhien, du thuc hien voi hinh thuc nao di chang nua no cung mang tinh chat la doanh nghiep
Hello! I’ve been following your site for a long time now and finally got the courage to go ahead and give you a shout out from Atascocita Texas! Just wanted to say keep up the good job!
Do not lose the job posting by submitting a general resume! What a general resume does, is tell them how you blend into the background – not how you stand out from your competitors for the same position.
Good post. I’m facing many of these issues as well..
Excellent blog you have here but I was wondering if you knew of any community forums that cover the same topics talked about here? I’d really like to be a part of group where I can get comments from other knowledgeable individuals that share the same interest. If you have any suggestions, please let me know. Bless you!
Howdy! This article could not be written much better! Reading through this post reminds me of my previous roommate! He constantly kept talking about this. I most certainly will send this post to him. Pretty sure he will have a very good read. Many thanks for sharing!
Properly, that is great, yet consider further options we’ve got here? Could you mind submitting an additional article relating to them also? Many thanks!Carroll Norton
F*ckin’ tremendous issues here. I am very satisfied to see your post. Thank you a lot and i’m looking ahead to contact you. Will you please drop me a e-mail?Marie Hines
Phong nen co dinh: Nen chon phong nen don sac, lam noi bat cho san pham. Co the su dung phong nen trang, hoac co mau tuong phan voi san pham.
You completed a number of nice points there. I did a search on the issue and found nearly all people will have the same opinion with your blog.MoversDev
Howdy! This article couldn’t be written much better! Looking through this article reminds me of my previous roommate! He continually kept preaching about this. I’ll send this information to him. Fairly certain he will have a very good read. I appreciate you for sharing!
There is certainly a great deal to find out about this issue. I really like all the points you made.
Pretty! This has been an extremely wonderful article. Thank you for providing these details.
I must say, as a lot as I enjoyed reading what you had to say, I couldnt help but lose interest after a while. Its as if you had a wonderful grasp on the subject matter, but you forgot to include your readers. Perhaps you should think about this from far more than one angle. Or maybe you shouldnt generalise so considerably. Its better if you think about what others may have to say instead of just going for a gut reaction to the subject. Think about adjusting your own believed process and giving others who may read this the benefit of the doubt.MoversBoost
This is getting a bit more subjective, but I much prefer the Zune Marketplace. The interface is colorful, has more flair, and some cool features like ‘Mixview’ that let you quickly see related albums, songs, or other users related to what you’re listening to. Clicking on one of those will center on that item, and another set of “neighbors” will come into view, allowing you to navigate around exploring by similar artists, songs, or users. Speaking of users, the Zune “Social” is also great fun, letting you find others with shared tastes and becoming friends with them. You then can listen to a playlist created based on an amalgamation of what all your friends are listening to, which is also enjoyable. Those concerned with privacy will be relieved to know you can prevent the public from seeing your personal listening habits if you so choose.Moving Company SEO
This is getting a bit more subjective, but I much prefer the Zune Marketplace. The interface is colorful, has more flair, and some cool features like ‘Mixview’ that let you quickly see related albums, songs, or other users related to what you’re listening to. Clicking on one of those will center on that item, and another set of “neighbors” will come into view, allowing you to navigate around exploring by similar artists, songs, or users. Speaking of users, the Zune “Social” is also great fun, letting you find others with shared tastes and becoming friends with them. You then can listen to a playlist created based on an amalgamation of what all your friends are listening to, which is also enjoyable. Those concerned with privacy will be relieved to know you can prevent the public from seeing your personal listening habits if you so choose.Moving Company SEO
Chuyen phat nhanh trong nuoc la dich vu van chuyen cac loai buu pham buu kien tai lieu thu tu hang hoa … den tan tay nguoi nhan dam bao dung thoi gian cam ket Voi mang luoi rong khap ca nuoc 63 63 tinh thanh doi ngu nhan vien nhiet tinh chu dao va chuyen nghiep 68express cam ket mang lai cho quy khach nhung dich vu chat luong tot nhat
You should be a part of a contest for one of the most useful sites on the net. I most certainly will recommend this web site!
This is getting a bit more subjective, but I much prefer the Zune Marketplace. The interface is colorful, has more flair, and some cool features like ‘Mixview’ that let you quickly see related albums, songs, or other users related to what you’re listening to. Clicking on one of those will center on that item, and another set of “neighbors” will come into view, allowing you to navigate around exploring by similar artists, songs, or users. Speaking of users, the Zune “Social” is also great fun, letting you find others with shared tastes and becoming friends with them. You then can listen to a playlist created based on an amalgamation of what all your friends are listening to, which is also enjoyable. Those concerned with privacy will be relieved to know you can prevent the public from seeing your personal listening habits if you so choose.Moving Company SEO
Found this on MSN and I’m happy I did. Well written article.tax evasion
Ngoai ra Viexpress co chuong trinh ho tro goi hang va lay hang tai nha cho quy khach Cam ket dung thoi han chuyen giao hang hoa cho nguoi nhan truoc dip tet nguyen dan ve
I really like your article. It’s evident that you have a lot knowledge on this topic. Your points are well made and relatable. Thanks for writing engaging and interesting material.iven de hoon
I am really enjoying the theme/design of your web site. Do you ever run into any browser compatibility issues? A few of my blog audience have complained about my site not working correctly in Explorer but looks great in Opera. Do you have any suggestions to help fix this issue?
Way cool! Some extremely valid points! I appreciate you writing this post plus the rest of the website is very good. https://rebrand.ly/positivelycelebrity
You have very well thing right here.|
Excellent article. I will be experiencing some of these issues as well..
Spot on with this write-up, I honestly believe that this web site needs far more attention. I’ll probably be returning to see more, thanks for the advice!
I like the helpful info you provide in your articles. I’ll bookmark your blog and check again here regularly. I’m quite certain I will learn plenty of new stuff right here! Best of luck for the next!
Mot logo se co tac dong rat lon den an tuong cua khach hang: no co cung cap cho khach hang thong tin ve thuong hieu cua ban va lieu ho co thuc su thich doanh nghiep cua ban hay khong?
68express cung cap dich vu chuyen phat nhanh gom cac loai hang hoa da dang nhu hang kho hang gom do dung trong gia dinh hang ca nhan va cac loai hang khac duoc yeu cau phuc vu thong thuong Voi mang luoi van chuyen rong khap bao gom duong hang khong va duong bo cua 68express ban se tan huong dich vu van chuyen hang thong thuong tin cay va kinh te
Hmm it appears like your website ate my first comment (it was super long) so I guess I’ll just sum it up what I had written and say, I’m thoroughly enjoying your blog. I as well am an aspiring blog blogger but I’m still new to everything. Do you have any points for novice blog writers? I’d certainly appreciate it.secondary credit number
I’ll right away seize your rss feed as I can not find your email subscription hyperlink or e-newsletter service. Do you have any? Please let me understand in order that I may subscribe. Thanks.
In the current job market, employers want to see the specific position title you are trying to apply for – and a general resume doesn’t have it. And beyond that, they instantly have to discover what positively differentiates you – while a general resume makes you look identical to the flood of general resumes they’ve already had sent to them.
This is my very first time i go to here. I discovered a great number of entertaining stuff in your blog site, particularly its discussion. From your tons of feedback in your articles, I guess I am not the only one possessing each of the satisfaction here! Preserve up the great operate.networks
What i do not realize is actually how you are not really much more well-liked than you may be right now. You are very intelligent. You realize thus considerably relating to this subject, produced me personally consider it from a lot of varied angles. Its like men and women aren’t fascinated unless it’s one thing to accomplish with Lady gaga! Your own stuffs great. Always maintain it up!
Gui hang di Singapore co nghia la dich vu van chuyen hang hoa hoac buu pham tu Viet Nam sang Singapore trong thoi gian ngan ma van dam bao duoc su an toan cua vat pham Day la dich vu duoc su dung kha rong rai va pho bien vi do tien loi cua no
Heya i’m for the first time here. I found this board and I to find It truly helpful & it helped me out a lot. I am hoping to provide one thing again and aid others such as you aided me.
After I initially left a comment I appear to have clicked the -Notify me when new comments are added- checkbox and from now on each time a comment is added I recieve four emails with the exact same comment. Perhaps there is a means you are able to remove me from that service? Thanks!
Thank you for any other informative site. Where else may I get that kind of info written in such an ideal method? I’ve a mission that I’m simply now working on, and I’ve been on the look out for such info.
When I originally commented I clicked the -Notify me when new feedback are added- checkbox and now each time a comment is added I get four emails with the identical comment. Is there any manner you can take away me from that service? Thanks!
I like this blog so much, saved to favorites. “I don’t care what is written about me so long as it isn’t true.” by Dorothy Parker.
This design is spectacular! You obviously know how to keep a reader amused. Between your wit and your videos, I was almost moved to start my own blog (well, almost…HaHa!) Fantastic job. I really enjoyed what you had to say, and more than that, how you presented it. Too cool!credit repair services
Its such as you learn my thoughts! You appear to understand so much approximately this, like you wrote the book in it or something. I feel that you could do with a few to force the message home a bit, but instead of that, this is fantastic blog. A fantastic read. I’ll definitely be back.
Way cool! Some extremely valid points! I appreciate you writing this write-up and also the rest of the site is also very good.
Spot on with this write-up, I really feel this amazing site needs much more attention. I’ll probably be returning to read through more, thanks for the advice!
Thiet ke logo la tat ca ve viec tao ra mot thuong hieu truc quan cho mot doanh nghiep. Tuy thuoc vao loai logo, logo thuong bao gom mot bieu tuong hoac van ban cung voi khau hieu va thong diep den khach hang.
In the past, each resume commenced by composing an Objective Statement – but no more! Nowadays, employment specialists all confirm, these kinds of sentences fail when evaluating your job qualifications. This means, make sure to not include an Objective Statement!
Excellent post. I was checking constantly this blog and I am impressed! Extremely useful info specially the last part 🙂 I care for such info a lot. I was seeking this certain information for a long time. Thank you and good luck.
Normally I don’t read article on blogs, but I would like to say that this write-up very forced me to try and do it! Your writing style has been amazed me. Thanks, very nice post.
It’s a good shame you don’t contain a give money button! I’d definitely give money for this fantastic webpage! That i suppose for the time being i’ll be satisfied bookmarking together with including an individual’s Feed that will my best Msn balance. That i appearance forward that will recent messages and definitely will share the web site utilizing my best Facebook or twitter team: )SCN Application
This site was… how do I say it? Relevant!! Finally I have found something which helped me. Thanks!
Very educating story, saved your site for hopes to read more!ShapeMyCredit
Appreciate it for this rattling post, I am glad I observed this internet site on yahoo.
There are a variety of overall health-food items nuts available, always forcing their organic and natural and microbiotic goods to you. But is it food really healthy? The fact is that nutrients can be a large-varying issue, and you need to be knowledgeable about every type of meals. Read this post for some fantastic nourishment ideas. It may sound like a broken document but in relation to nourishment, pull out that foods pyramid you were given in elementary school. This may ensure that you get the appropriate mixture of starches, necessary protein, carbs, as well as other important components of a healthy diet. If you are looking as a fruitful person in society, or just in the workplace, getting properly nurtured is step one. Smoothies are a fantastic diet regime beverage that can also work as meals or wasteland. All you need to make it really is a mixer, as well as any ingredients needed for the shake that you pick. Fresh fruit, natural yogurt, and whole milk will be the primary ingredients as well as these are remarkably healthy food. While substantial-proteins meats and chicken can be element of a healthy diet plan, several nutrition experts advise which includes one or more meat-free of charge food into the every week diet program. Rather than various meats, include in further helpings of lower sodium made beans, soy products, or a number of saltless almonds like pecans, peanuts, and walnuts. One of the best ways to enhance your eating habits are to eliminate microwavable items. These meals often have great amounts of excess fat and sugar. Prepare your individual foods from fresh create and toned meat for nourishing fare. Now you know a little more about nutrition, you can see that it’s not hard to keep appropriately nurtured. There are many foods on the market with wonderful health benefits and lots of techniques you could keep as wholesome as you possibly can, by simply simply creating a handful of adjustments. Begin using these ideas to assist balance your nutrients.
I like what you guys are usually up too. This type of clever work and exposure! Keep up the good works guys I’ve added you guys to my own blogroll.
I must thank you for the efforts you have put in writing this site. I am hoping to see the same high-grade blog posts from you later on as well. In truth, your creative writing abilities has inspired me to get my own website now 😉
When I initially commented I appear to have clicked on the -Notify me when new comments are added- checkbox and from now on whenever a comment is added I get four emails with the exact same comment. Is there an easy method you can remove me from that service? Appreciate it!
If you’re looking for a job, first impressions are everything! And the very first impression employers have of you – is a professional cover letter.
Great web site you have here.. It’s hard to find high quality writing like yours these days. I honestly appreciate individuals like you! Take care!!|
Excellent article. I absolutely love this website. Stick with it!
Can I simply just say what a comfort to uncover somebody who genuinely knows what they’re talking about over the internet. You actually know how to bring a problem to light and make it important. More people must check this out and understand this side of your story. I was surprised that you aren’t more popular since you most certainly possess the gift.
I blog frequently and I really thank you for your information. The article has really peaked my interest. I will book mark your site and keep checking for new information about once a week. I opted in for your Feed as well.
I couldn’t refrain from commenting. Well written!
You’ve made some good points there. I checked on the internet for additional information about the issue and found most individuals will go along with your views on this site.
Wonderful site. Plenty of useful info here. I’m sending it to some friends ans also sharing in delicious. And of course, thanks for your sweat!
Thanks for one’s marvelous posting! I quite enjoyed reading it, you can be a great author.I will make sure to bookmark your blog and will come back very soon. I want to encourage you continue your great writing, have a nice day!
It’s perfect time to make some plans for the future and it is time to be happy. I have read this post and if I could I wish to suggest you some interesting things or tips. Perhaps you can write next articles referring to this article. I want to read more things about it!
Resume text like “professional”, mean nothing. They look cliche and don’t present you in a positive way. This is also true for a term like “reliable”. The best text focus on what you did while at your past positions and how beneficial you can be to this future company.
hello!,I like your writing very much! share we communicate extra approximately your post on AOL? I require an expert in this space to unravel my problem. Maybe that’s you! Having a look ahead to see you. |
hi!,I really like your writing very so much! percentage we keep in touch extra approximately your post on AOL? I need a specialist in this house to solve my problem. Maybe that is you! Looking ahead to peer you.
I could not resist commenting. Exceptionally well written!
I used to be very happy to find this net-site.I wanted to thanks to your time for this excellent learn!! I positively having fun with each little bit of it and I’ve you bookmarked to check out new stuff you blog post.
An intriguing discussion is definitely worth comment. I do think that you need to publish more on this issue, it may not be a taboo subject but typically people do not talk about these issues. To the next! All the best!!
I am not sure where you’re getting your information, but good topic. I needs to spend some time learning much more or understanding more. Thanks for fantastic info I was looking for this info for my mission.
I really appreciate this post. I have been looking everywhere for this! Thank goodness I found it on Bing. You have made my day! Thank you again!
Hmm is anyone else having problems with the pictures on this blog loading? I’m trying to figure out if its a problem on my end or if it’s the blog. Any feed-back would be greatly appreciated.
I’ve been surfing on-line more than 3 hours as of late, yet I by no means discovered any attention-grabbing article like yours. It’s beautiful value enough for me. In my view, if all webmasters and bloggers made just right content material as you did, the internet will be a lot more useful than ever before.
Just desire to say your article is as astounding. The clearness in your post is simply great and i can assume you are an expert on this subject. Well with your permission allow me to grab your RSS feed to keep up to date with forthcoming post. Thanks a million and please carry on the enjoyable work.
Today, I went to the beachfront with my kids. I found a sea shell and gave it to my 4 year old daughter and said “You can hear the ocean if you put this to your ear.” She put the shell to her ear and screamed. There was a hermit crab inside and it pinched her ear. She never wants to go back! LoL I know this is entirely off topic but I had to tell someone!
Thanks a lot for sharing this with all of us you really know what you are talking about! Bookmarked. Please also visit my website =). We could have a link exchange contract between us!
I love your blog.. very nice colors & theme. Did you make this website yourself or did you hire someone to do it for you? Plz reply as I’m looking to construct my own blog and would like to know where u got this from. kudos
Good job on this article! I really like how you presented your facts and how you made it interesting and easy to understand. Thank you.Comprar seguidores no instagram
Excellent web site you’ve got here.. It’s difficult to find good quality writing like yours these days. I really appreciate individuals like you! Take care!!
I do not even know the way I finished up here, however I assumed this post was good. I do not understand who you might be however certainly you’re going to a famous blogger in case you aren’t already 😉 Cheers!
Employing the Duties-and-Responsibilities resume template, will make sure that your resume is thrown into the garbage! Organizations couldn’t care less about what you were responsible for at prior organizations. Instead, they have to hear the Points Of Difference you have made.
Informative Site… Hello guys here are some links that contains information that you may find useful yourselves. It’s Worth Checking out….krypto news aktuell
Amazing blog! Is your theme custom made or did you download it from somewhere? A theme like yours with a few simple tweeks would really make my blog stand out. Please let me know where you got your design. Appreciate it
instagram follower kaufen
The subsequent time I read a weblog, I hope that it doesnt disappoint me as much as this one. I mean, I do know it was my choice to read, but I truly thought youd have something interesting to say. All I hear is a bunch of whining about one thing that you might repair in case you werent too busy in search of attention.
You’re so interesting! I don’t believe I’ve truly read a single thing like that before. So wonderful to find another person with some unique thoughts on this issue. Seriously.. thanks for starting this up. This website is one thing that’s needed on the internet, someone with some originality!
Your article has proven useful to me. It’s very informative and you are obviously very knowledgeable in this area. You have opened my eyes to varying views on this topic with interesting and solid content.slot online deposit murah
dung phim
I couldn’t resist commenting. Very well written!
Are you aware that 80 of jobs (including almost all of the best employment), are only accessible inside the “hidden” job market. Thus the key to rocketing your job results, is to find out the most frequent reasons the most wanted positions are promoted within this concealed job market, but almost never the deplorable print newspaper or online career market.
Now we know who the ssebnile one is here. Great post!トレーディング と は
An interesting discussion is definitely worth comment. I believe that you ought to publish more on this subject matter, it may not be a taboo matter but generally people don’t discuss these issues. To the next! Cheers!!
It’s appropriate time to make some plans for the future and it is time to be happy. I’ve read this post and if I could I want to suggest you some interesting things or suggestions. Maybe you could write next articles referring to this article. I want to read even more things about it!
That is a really good tip particularly to those fresh to the blogosphere. Simple but very precise information… Thank you for sharing this one. A must read post!
You made some decent factors there. I seemed on the web for the issue and located most individuals will associate with with your website.
I really enjoy this content style and how you organize your opinions. Well done!
Best view i have ever seen !
Prevent losing the job being offered by using a general resume! All a general resume does, is tell them how you look no better than anyone else – not how you outpace your competitors for the same position.
Hi would you mind letting me know which web host you’re using? I’ve loaded your blog in 3 different browsers and I must say this blog loads a lot quicker then most. Can you suggest a good hosting provider at a fair price? Thanks, I appreciate it!
My partner and I stumbled over here coming from a different web page and thought I might check things out. I like what I see so now i am following you. Look forward to looking at your web page repeatedly.
After looking at a handful of the articles on your site, I truly appreciate your technique of blogging. I added it to my bookmark website list and will be checking back in the near future. Please visit my web site too and tell me your opinion.
Best view i have ever seen !
Loving the information on this site, you have done outstanding job on the content .chiquilin
It’s arduous to seek out knowledgeable people on this subject, but you sound like you recognize what you’re speaking about! Thanks
Needed to compose you a tiny note to finally thank you very much yet again for your personal splendid methods you have discussed above. It is strangely open-handed with people like you to provide publicly all that a number of people would have marketed as an electronic book to generate some bucks for their own end, primarily now that you could possibly have tried it if you ever wanted. These inspiring ideas likewise acted like a fantastic way to know that the rest have the same dreams really like my personal own to see a whole lot more concerning this problem. I’m sure there are thousands of more enjoyable times in the future for many who check out your blog.daftar slot deposit pulsa
At this time I am ready to do my breakfast, after having my breakfast coming over again to read further news.|
I reckon something really interesting about your website so I saved to bookmarks .
An outstanding share! I’ve just forwarded this onto a coworker who has been doing a little research on this. And he actually bought me dinner because I found it for him… lol. So allow me to reword this…. Thank YOU for the meal!! But yeah, thanx for spending some time to discuss this subject here on your website.
I seriously love your blog.. Very nice colors & theme. Did you make this amazing site yourself? Please reply back as I’m trying to create my own personal website and would love to know where you got this from or exactly what the theme is called. Thank you!
It’s hard to find well-informed people for this topic, however, you seem like you know what you’re talking about! Thanks
It used to be, every resume commenced with an Objective Statement – but not today! Today’s hiring professionals all confirm, such statements contribute nothing when judging your occupation capability. Thus, don’t write an Objective Statement!
Good information. Lucky me I recently found your website by chance (stumbleupon). I’ve bookmarked it for later!
I absolutely love your site.. Very nice colors & theme. Did you build this site yourself? Please reply back as I’m attempting to create my own personal blog and would love to learn where you got this from or what the theme is called. Kudos!
Great article. I am dealing with some of these issues as well..
The new Zune browser is surprisingly good, but not as good as the iPod’s. It works well, but isn’t as fast as Safari, and has a clunkier interface. If you occasionally plan on using the web browser that’s not an issue, but if you’re planning to browse the web alot from your PMP then the iPod’s larger screen and better browser may be important.situs judi slot online
After I originally commented I appear to have clicked on the -Notify me when new comments are added- checkbox and from now on whenever a comment is added I recieve 4 emails with the exact same comment. There has to be a way you are able to remove me from that service? Many thanks!
Very nice post. I just stumbled upon your weblog and wanted to mention that I have really loved surfing around your weblog posts. In any case I’ll be subscribing to your feed and I hope you write once more very soon!
A person necessarily help to make significantly articles I’d state. That is the very first time I frequented your website page and so far? I amazed with the analysis you made to create this actual post amazing. Wonderful task!
Admiring the time and effort you put into your website and in depth information you present. It’s good to come across a blog every once in a while that isn’t the same old rehashed information. Wonderful read! I’ve bookmarked your site and I’m adding your RSS feeds to my Google account.instanyl
WONDERFUL Post.thanks for share..more wait .. …
Just wanna remark on few general things, The website style is ideal, the topic matter is rattling goodTips WIth Tricks
I really got into this article. I found it to be interesting and loaded with unique points of interest. I like to read material that makes me think. Thank you for writing this great content.Tips and Tricks
There’s noticeably a bundle to find out about this. I assume you made certain nice points in options also.
Thanks for another magnificent post. Where else could anybody get that kind of info in such a perfect way of writing? I have a presentation next week, and I am on the look for such information.
I’m really impressed with your writing skills and also with the layout on your blog. Is this a paid theme or did you customize it yourself? Either way keep up the excellent quality writing, it’s rare to see a great blog like this one nowadays..
Using the Duties-and-Responsibilities resume format, will make sure that your resume is dropped on top of the garbage pile! Companies couldn’t care less about what you were assigned to do at previous occupations. In actual fact, they want to be shown the real achievements you have made.
Right here is the right blog for anyone who really wants to find out about this topic. You know a whole lot its almost tough to argue with you (not that I really will need to…HaHa). You definitely put a fresh spin on a subject which has been discussed for ages. Great stuff, just excellent!
Pretty! This has been an incredibly wonderful post. Thanks for supplying this information.
The very next time I read a blog, Hopefully it does not fail me as much as this particular one. After all, Yes, it was my choice to read, however I truly believed you’d have something useful to say. All I hear is a bunch of crying about something that you could possibly fix if you weren’t too busy searching for attention.
I discovered your weblog web site on google and check just a few of your early posts. Continue to keep up the very good operate. I just extra up your RSS feed to my MSN News Reader. Seeking ahead to reading extra from you in a while!…
Usually I do not read post on blogs, however I wish to say that this write-up very forced me to take a look at and do it! Your writing style has been amazed me. Thank you, very great article.
We’re a bunch of volunteers and opening a new scheme in our community. Your site offered us with valuable information to paintings on. You have performed a formidable task and our entire community can be grateful to you.
Hey there! I know this is kinda off topic but I was wondering if you knew where I could get a captcha plugin for my comment form? I’m using the same blog platform as yours and I’m having trouble finding one? Thanks a lot!
This is a great tip especially to those fresh to the blogosphere. Brief but very accurate info… Thanks for sharing this one. A must read post!
Hello.This post was really motivating, especially since I was browsing for thoughts on this subject last Tuesday.
I beloved up to you’ll obtain carried out proper here. The cartoon is tasteful, your authored material stylish. nonetheless, you command get got an impatience over that you want be delivering the following. unwell no doubt come more until now once more as exactly the same nearly a lot steadily within case you shield this increase.
very nice publish, i certainly love this web site, keep on it
Hi! I could have sworn I’ve visited this blog before but after going through many of the posts I realized it’s new to me. Regardless, I’m definitely delighted I stumbled upon it and I’ll be book-marking it and checking back regularly!
This design is incredible! You obviously know how to keep a reader entertained. Between your wit and your videos, I was almost moved to start my own blog (well, almost…HaHa!) Great job. I really enjoyed what you had to say, and more than that, how you presented it. Too cool!
Hi! Someone in my Myspace group shared this site with us so I came to check it out. I’m definitely loving the information. I’m bookmarking and will be tweeting this to my followers! Exceptional blog and terrific design and style.
Howdy! I know this is kinda off topic but I’d figured I’d ask. Would you be interested in exchanging links or maybe guest writing a blog article or vice-versa? My site goes over a lot of the same topics as yours and I feel we could greatly benefit from each other. If you are interested feel free to send me an e-mail. I look forward to hearing from you! Excellent blog by the way!
hello!,I like your writing so so much! proportion we be in contact more about your article on AOL? I require a specialist in this area to resolve my problem. Maybe that is you! Taking a look ahead to peer you.
Helpful information. Fortunate me I found your website accidentally, and I’m shocked why this accident did not came about earlier! I bookmarked it.
Following the duties and responsibilities resume template, will ensure that your resume lines a garbage can! Hiring decision-makers no longer care what you were assigned to do at former companies. Instead, they must be shown the verifiable accomplishments you have made.
You are so cool! I do not think I’ve truly read anything like this before. So wonderful to discover someone with a few original thoughts on this subject matter. Seriously.. many thanks for starting this up. This web site is something that is needed on the internet, someone with some originality!
Hi there, just was alert to your blog via Google, and found that it’s truly informative. I am gonna watch out for brussels. I will appreciate if you happen to continue this in future. Lots of other folks will be benefited from your writing. Cheers!
I think other web site proprietors should take this site as an model, very clean and wonderful user genial style and design, let alone the content. You are an expert in this topic!
you’re actually a excellent webmaster. The site loading speed is amazing. It seems that you’re doing any distinctive trick. Moreover, The contents are masterwork. you have done a great activity on this matter!
I am definitely bookmarking this website and sharing it with my acquaintances. You will be getting plenty of visitors to your website from me!hazte rico en línea
Howdy just wanted to give you a brief heads up and let you know a few of the images aren’t loading properly. I’m not sure why but I think its a linking issue. I’ve tried it in two different internet browsers and both show the same results.
Hello just wanted to give you a quick heads up. The words in your article seem to be running off the screen in Internet explorer. I’m not sure if this is a formatting issue or something to do with internet browser compatibility but I figured I’d post to let you know. The design and style look great though! Hope you get the problem resolved soon. Thanks
The new Zune browser is surprisingly good, but not as good as the iPod’s. It works well, but isn’t as fast as Safari, and has a clunkier interface. If you occasionally plan on using the web browser that’s not an issue, but if you’re planning to browse the web alot from your PMP then the iPod’s larger screen and better browser may be important.duplica tu dinero
You’ve made some really good points there. I checked on the web for additional information about the issue and found most individuals will go along with your views on this web site.
I blog quite often and I genuinely appreciate your information. Your article has really peaked my interest. I’m going to take a note of your blog and keep checking for new details about once a week. I opted in for your Feed too.
This is the perfect website for everyone who would like to find out about this topic. You realize a whole lot its almost hard to argue with you (not that I really will need to…HaHa). You definitely put a brand new spin on a topic that has been discussed for many years. Great stuff, just excellent!
You must guarantee that your cover letter pulls in your prospective hiring decision-maker, reassures them, and leads them to read the resume so they decide to select you for the interview. Given the large number of resumes submitted to every work offer in today’s market, an expertly-written cover letter commonly becomes the key selection factor leading to whether you score an interview – or get dumped into the garbage!
Valuable information. Fortunate me I discovered your web site by accident, and I’m shocked why this twist of fate didn’t came about earlier! I bookmarked it.
F*ckin’ awesome things here. I am very glad to look your post. Thank you so much and i’m looking ahead to contact you. Will you kindly drop me a mail?
There are some interesting closing dates in this article but I don’t know if I see all of them heart to heart. There may be some validity but I will take maintain opinion until I look into it further. Good article , thanks and we would like more! Added to FeedBurner as nicely
Great – I should certainly pronounce, impressed with your site. I had no trouble navigating through all tabs as well as related info ended up being truly simple to do to access. I recently found what I hoped for before you know it in the least. Reasonably unusual. Is likely to appreciate it for those who add forums or anything, site theme . a tones way for your client to communicate. Excellent task..
Today’s companies do not read every one of the four hundred plus resumes received – for every job posting! The truth is, they will happily throw away ninety-five percent of them, if a resume does not manage to grab the reader’s interest.
This excellent website certainly has all the information and facts I needed concerning this subject and didn’t know who to ask.
It’s actually a great and useful piece of information. I’m glad that you just shared this useful information with us. Please stay us informed like this. Thank you for sharing.
In this grand pattern of things you secure a B+ just for hard work. Where exactly you confused me personally was on all the particulars. You know, people say, details make or break the argument.. And it could not be more true right here. Having said that, allow me tell you what exactly did work. Your authoring is really persuasive and that is probably the reason why I am making the effort to comment. I do not make it a regular habit of doing that. Secondly, whilst I can certainly notice a jumps in logic you make, I am definitely not certain of how you seem to unite your points which inturn produce the actual conclusion. For now I shall yield to your point but trust in the future you connect the dots much better.
Thanks for sharing excellent informations. Your web-site is so cool. I’m impressed by the details that you have on this blog. It reveals how nicely you perceive this subject. Bookmarked this website page, will come back for extra articles. You, my friend, ROCK! I found just the information I already searched all over the place and just couldn’t come across. What a perfect site.
I am often to running a blog and i really respect your content. The article has really peaks my interest. I’m going to bookmark your web site and keep checking for brand spanking new information.
Hi there, just was alert to your blog via Google, and found that it is really informative. I am gonna watch out for brussels. I’ll be grateful if you happen to proceed this in future. Many other people will likely be benefited from your writing. Cheers!
I not to mention my buddies happened to be checking out the excellent hints found on the blog then suddenly developed an awful feeling I had not expressed respect to the web blog owner for those secrets. My people were definitely as a consequence very interested to read through them and have quite simply been loving these things. Thank you for simply being indeed helpful and also for deciding on varieties of fine useful guides millions of individuals are really eager to learn about. My sincere regret for not expressing appreciation to you earlier.
The subsequent time I read a blog, I hope that it doesnt disappoint me as much as this one. I imply, I do know it was my option to learn, but I actually thought youd have something attention-grabbing to say. All I hear is a bunch of whining about something that you can repair should you werent too busy looking for attention.
Is it smart to write a general one-size-fits-all resume, that you can use anytime, anywhere, for any employment? What the Experts say: It is a dumb mistake! The reality: Organizations are required to handle as many as 400 resumes in a single day! As a result, they toss out every resume which is not uniquely targeted to the work being hired.
A person essentially help to make seriously posts I would state. This is the first time I frequented your website page and thus far? I surprised with the research you made to make this particular publish amazing. Wonderful job!
Great work! That is the kind of info that should be shared around the net. Disgrace on the seek engines for no longer positioning this publish upper! Come on over and talk over with my website . Thank you =)
I’m still learning from you, but I’m trying to achieve my goals. I absolutely liked reading everything that is posted on your blog.Keep the stories coming. I liked it!
you have a excellent blog here! do you want to develop invite posts in this little weblog?
Undeniably consider that which you stated. Your favorite justification seemed to be on the net the simplest factor to take note of. I say to you, I certainly get irked while folks consider worries that they plainly don’t recognize about. You managed to hit the nail upon the top and outlined out the entire thing with no need side-effects , people could take a signal. Will likely be back to get more. Thank you
My brother recommended I might like this web site. He was entirely right. This post actually made my day. You can not imagine just how much time I had spent for this information! Thanks!
The heart of your writing while sounding agreeable initially, did not sit very well with me after some time. Someplace within the paragraphs you actually managed to make me a believer unfortunately just for a very short while. I however have a problem with your jumps in logic and one would do nicely to help fill in all those breaks. If you can accomplish that, I would undoubtedly be amazed.
In the great scheme of things you’ll receive a B- for effort and hard work. Where exactly you misplaced me personally ended up being on the specifics. As it is said, the devil is in the details… And it couldn’t be much more correct in this article. Having said that, permit me inform you what did work. Your text is definitely incredibly convincing and that is most likely the reason why I am making the effort to opine. I do not really make it a regular habit of doing that. Next, while I can easily see the leaps in reasoning you come up with, I am not necessarily confident of just how you seem to unite the details which inturn help to make the actual conclusion. For now I will yield to your point however trust in the future you actually connect your facts better.
hello!,I like your writing very much! share we communicate more about your article on AOL? I require a specialist on this area to solve my problem. May be that’s you! Looking forward to see you.
Very nice post. I simply stumbled upon your blog and wanted to mention that I’ve truly loved browsing your weblog posts. After all I will be subscribing for your rss feed and I hope you write once more soon!
Hello there! I know this is kinda off topic however I’d figured I’d ask. Would you be interested in exchanging links or maybe guest authoring a blog post or vice-versa? My website covers a lot of the same subjects as yours and I believe we could greatly benefit from each other. If you happen to be interested feel free to shoot me an email. I look forward to hearing from you! Fantastic blog by the way!
Valuable info. Lucky me I found your web site by accident, and I’m stunned why this coincidence didn’t took place earlier! I bookmarked it.
of course like your web site but you have to check the spelling on quite a few of your posts. Several of them are rife with spelling issues and I find it very bothersome to tell the truth nevertheless I will certainly come back again.
After I originally left a comment I appear to have clicked the -Notify me when new comments are added- checkbox and from now on each time a comment is added I get four emails with the same comment. Perhaps there is a means you are able to remove me from that service? Many thanks!
In the past, the standard resume opened by writing an Objective Statement – but not any more! Nowadays, career specialists all state clearly, such resume sections do nothing when evaluating your employment qualifications. Therefore, make sure to not use an Objective Statement!
F*ckin’ awesome issues here. I’m very glad to look your post. Thank you a lot and i am having a look forward to touch you. Will you please drop me a mail?
This page certainly has all of the information I needed concerning this subject and didn’t know who to ask.
Thanks.|
Hi, I do think this is a great site. I stumbledupon it 😉 I’m going to come back once again since i have bookmarked it. Money and freedom is the greatest way to change, may you be rich and continue to guide others.
Almost all of the things you claim is supprisingly accurate and that makes me ponder why I hadn’t looked at this with this light previously. This piece really did turn the light on for me as far as this subject goes. Nonetheless there is actually just one issue I am not really too comfortable with and while I try to reconcile that with the central idea of your position, allow me observe just what the rest of your visitors have to point out.Well done.
Wonderful beat ! I wish to apprentice at the same time as you amend your web site, how could i subscribe for a weblog website? The account aided me a applicable deal. I were tiny bit familiar of this your broadcast provided bright transparent idea
It used to be, each resume started with an Objective Statement – but not now! Current employment experts all confirm, these types of sentences fail when judging your occupation capability. Therefore, never write an Objective Statement!
Hi, I believe your blog could possibly be having web browser compatibility problems. Whenever I take a look at your website in Safari, it looks fine however when opening in I.E., it has some overlapping issues. I just wanted to give you a quick heads up! Apart from that, excellent site!
My programmer is trying to convince me to move to .net from PHP. I have always disliked the idea because of the costs. But he’s tryiong none the less. I’ve been using WordPress on various websites for about a year and am nervous about switching to another platform. I have heard excellent things about blogengine.net. Is there a way I can transfer all my wordpress content into it? Any kind of help would be greatly appreciated!
This page really has all of the information I wanted concerning this subject and didn’t know who to ask.
Wow that was strange. I just wrote an very long comment but after I clicked submit my comment didn’t show up. Grrrr… well I’m not writing all that over again. Regardless, just wanted to say great blog!
Having read this I thought it was very informative. I appreciate you taking the time and energy to put this information together. I once again find myself personally spending way too much time both reading and commenting. But so what, it was still worth it!
I cling on to listening to the news talk about receiving free online grant applications so I have been looking around for the best site to get one. Could you advise me please, where could i find some?
Normally I don’t read post on blogs, but I wish to say that this write-up very forced me to check out and do it! Your writing style has been amazed me. Thank you, quite nice post.
Resume snippets like for instance “highly skilled”, have no value. They make you sound cliche and do not position you in a positive light. The same is true of a statement such as “reliable”. The best terms reinforce things you did at your past employers and how beneficial you are going to be to this prospective company.
magnificent post, very informative. I’m wondering why the other experts of this sector don’t realize this. You must continue your writing. I am sure, you’ve a huge readers’ base already!|
I’m really enjoying the theme/design of your web site. Do you ever run into any web browser compatibility problems? A handful of my blog visitors have complained about my site not working correctly in Explorer but looks great in Chrome. Do you have any tips to help fix this problem?
It’s nearly impossible to find educated people in this particular topic, but you sound like you know what you’re talking about! Thanks
I do consider all the ideas you’ve offered to your post. They’re very convincing and can certainly work. Still, the posts are very quick for beginners. May just you please extend them a bit from next time? Thank you for the post.
Throughout the awesome design of things you’ll secure a B+ for effort. Exactly where you actually lost me was first in the specifics. As they say, the devil is in the details… And that could not be much more accurate at this point. Having said that, permit me tell you what exactly did deliver the results. Your article (parts of it) is definitely extremely convincing and that is possibly why I am taking an effort to opine. I do not make it a regular habit of doing that. 2nd, although I can certainly notice a jumps in reasoning you make, I am definitely not certain of just how you appear to unite your points which in turn produce your final result. For the moment I will, no doubt subscribe to your position but hope in the foreseeable future you connect the dots better.
Hello are using WordPress for your site platform? I’m new to the blog world but I’m trying to get started and set up my own. Do you require any html coding knowledge to make your own blog? Any help would be really appreciated!|
you’ve got an important blog here! would you prefer to make some invite posts on my weblog?
I simply couldn’t leave your web site before suggesting that I extremely loved the usual information an individual provide to your visitors? Is gonna be back regularly to check up on new posts
There are a bunch of points in this text that I wouldn’t have thought of myself. Much appreciation for your helpful information.
Fantastic goods from you, man. I’ve understand your stuff previous to and you’re just extremely magnificent. I actually like what you’ve acquired here, certainly like what you are saying and the way in which you say it. You make it entertaining and you still take care of to keep it sensible. I can not wait to read far more from you. This is really a tremendous website.
That is a great tip particularly to those fresh to the blogosphere. Short but very precise info… Thank you for sharing this one. A must read post!
My brother recommended I might like this blog. He was totally right. This post actually made my day. You can not imagine simply how much time I had spent for this information! Thanks!
Excellent web site. Plenty of useful information here. I am sending it to several friends ans also sharing in delicious. And certainly, thanks for your sweat!
I enjoy reading a post that will make people think. Also, many thanks for permitting me to comment!
Please let me know if you’re looking for a author for your site. You have some really good articles and I feel I would be a good asset. If you ever want to take some of the load off, I’d absolutely love to write some articles for your blog in exchange for a link back to mine. Please send me an email if interested. Cheers!
An outstanding share! I’ve just forwarded this onto a colleague who was doing a little research on this. And he in fact ordered me lunch because I discovered it for him… lol. So let me reword this…. Thank YOU for the meal!! But yeah, thanks for spending time to discuss this topic here on your blog.
These viewpoints fall in accordance with my own overwhelmingly. This is certainly very good reading material for the readers.
I used to be suggested this website by way of my cousin. I’m no longer certain whether this submit is written by way of him as no one else recognise such precise approximately my trouble. You’re amazing! Thank you!
Everything is very open with a precise clarification of the issues. It was definitely informative. Your site is extremely helpful. Many thanks for sharing!
Can I simply just say what a relief to discover someone that genuinely knows what they are discussing on the web. You actually realize how to bring an issue to light and make it important. More and more people ought to read this and understand this side of the story. I was surprised you aren’t more popular because you definitely possess the gift.
Do you have a spam issue on this blog; I also am a blogger, and I was wondering your situation; many of us have created some nice methods and we are looking to exchange methods with others, be sure to shoot me an e-mail if interested.
fantastic points altogether, you just received a brand new reader. What would you suggest in regards to your publish that you just made a few days in the past? Any sure?
You really make it seem so easy with your presentation but I find this matter to be actually something which I think I would never understand. It seems too complex and very broad for me. I’m looking forward for your next post, I’ll try to get the hang of it!
certainly like your website but you need to check the spelling on quite a few of your posts. Many of them are rife with spelling problems and I find it very troublesome to tell the truth nevertheless I will definitely come back again.
I’m amazed, I have to admit. Seldom do I come across a blog that’s equally educative and engaging, and let me tell you, you have hit the nail on the head. The problem is something too few people are speaking intelligently about. Now i’m very happy that I found this in my search for something regarding this.
Magnificent website. A lot of useful information here. I’m sending it to a few friends ans also sharing in delicious. And certainly, thanks for your effort!
I simply desired to thank you very much once more. I’m not certain what I might have sorted out without the entire creative concepts shown by you about such subject matter. It seemed to be a real frightening issue in my circumstances, but taking a look at this specialised tactic you processed it took me to jump over joy. I will be grateful for your information and have high hopes you really know what an amazing job your are accomplishing teaching the rest by way of your webblog. I am sure you’ve never got to know any of us.
My partner and I stumbled over here different website and thought I may as well check things out. I like what I see so now i am following you. Look forward to exploring your web page for a second time.
It is the best time to make a few plans for the long run and it is time to be happy. I have learn this publish and if I may just I wish to counsel you few attention-grabbing things or advice. Perhaps you could write next articles referring to this article. I want to read more things about it!
you’re really a good webmaster. The web site loading speed is incredible. It seems that you are doing any unique trick. Moreover, The contents are masterwork. you’ve done a wonderful job on this topic!
Hi there, You have done a fantastic job. I will certainly digg it and personally recommend to my friends. I’m confident they’ll be benefited from this web site.
I was just seeking this info for a while. After six hours of continuous Googleing, at last I got it in your site. I wonder what is the lack of Google strategy that don’t rank this kind of informative web sites in top of the list. Normally the top sites are full of garbage.
When I initially commented I seem to have clicked the -Notify me when new comments are added- checkbox and now every time a comment is added I get 4 emails with the same comment. Is there a way you can remove me from that service? Thanks a lot!
Nice post. I was checking continuously this blog and I am impressed! Extremely helpful information particularly the last part 🙂 I care for such information a lot. I was seeking this certain information for a very long time. Thank you and good luck.
Good – I should definitely pronounce, impressed with your site. I had no trouble navigating through all the tabs as well as related information ended up being truly easy to do to access. I recently found what I hoped for before you know it in the least. Reasonably unusual. Is likely to appreciate it for those who add forums or something, website theme . a tones way for your client to communicate. Excellent task..
Greetings! Very useful advice in this particular article! It is the little changes that produce the most important changes. Many thanks for sharing!
I wanted to thank you for this fantastic read!! I certainly enjoyed every little bit of it. I have got you saved as a favorite to check out new things you post…
These days, hiring decision-makers want to be shown the unique employment title you want to apply for – but a general resume never has that. Plus, they quickly need to figure out what positively places you above the rest – and a general resume causes you to appear identical to the hundreds of general resumes they have already seen submitted.
Pretty nice post. I just stumbled upon your weblog and wished to say that I have really enjoyed browsing your blog posts. In any case I will be subscribing to your feed and I’m hoping you write again very soon!
You could definitely see your enthusiasm within the work you write. The world hopes for more passionate writers like you who are not afraid to say how they believe. Always follow your heart.
Great weblog right here! Additionally your web site lots up very fast! What web host are you using? Can I am getting your associate hyperlink to your host? I want my web site loaded up as fast as yours lol
Thank you for your entire work on this web page. Kate really loves getting into investigations and it is simple to grasp why. We all learn all about the lively manner you deliver helpful guidelines via this web site and as well as cause contribution from some other people on that content then my child has always been understanding a lot of things. Enjoy the rest of the year. You have been carrying out a really good job.
I feel that is one of the such a lot vital info for me. And i am satisfied reading your article. However want to statement on few general issues, The web site taste is perfect, the articles is in reality excellent : D. Excellent job, cheers
I’m really loving the theme/design of your website. Do you ever run into any browser compatibility issues? A number of my blog audience have complained about my site not operating correctly in Explorer but looks great in Safari. Do you have any solutions to help fix this problem?
Hello there, You’ve performed an excellent job. I will certainly digg it and in my view recommend to my friends. I am confident they will be benefited from this site.
I like the helpful information you provide for your articles. I will bookmark your weblog and check once more right here regularly. I’m slightly certain I’ll be told a lot of new stuff right right here! Best of luck for the next!
I haven’t checked in here for a while as I thought it was getting boring, but the last several posts are great quality so I guess I’ll add you back to my daily bloglist. You deserve it my friend 🙂
I loved as much as you will receive carried out right here. The sketch is attractive, your authored subject matter stylish. nonetheless, you command get bought an edginess over that you wish be delivering the following. unwell unquestionably come further formerly again since exactly the same nearly very often inside case you shield this hike.
Blade & Soul Rebellion offers the original B&S experience without the latest content updates and changes that didn’t sit right with all the players. The community is active and the Discord channel has all the needed info.
http://www.businessclub-team.com Stake your BCT tokens and earn 0.3-0.6 daily for 730 days with the Business.Club Active Wallet!
You’re so awesome! I don’t suppose I’ve truly read something like this before. So nice to discover somebody with genuine thoughts on this subject. Really.. many thanks for starting this up. This website is one thing that is needed on the internet, someone with some originality!
There’s definately a lot to learn about this subject. I really like all the points you made.
Everyone loves it when people get together and share opinions. Great blog, stick with it!
That is a great tip especially to those new to the blogosphere. Brief but very accurate infoÖ Thank you for sharing this one. A must read post!
I’m not sure why but this blog is loading extremely slow for me. Is anyone else having this problem or is it a issue on my end? I’ll check back later on and see if the problem still exists.
I simply wanted to say thanks all over again. I do not know the things I could possibly have implemented without the entire basics shown by you regarding such concern. It truly was a real challenging situation in my view, nevertheless considering a new specialised manner you dealt with the issue took me to weep with fulfillment. I’m happy for the help and as well , hope you are aware of a powerful job you were putting in teaching people by way of your web blog. I know that you’ve never met any of us.
After looking into a number of the blog posts on your web site, I honestly appreciate your technique of blogging. I saved it to my bookmark site list and will be checking back soon. Please check out my web site as well and tell me how you feel.
Your style is unique compared to other people I’ve read stuff from. Thanks for posting when you’ve got the opportunity, Guess I will just bookmark this site.
Good job on this article! I really like how you presented your facts and how you made it interesting and easy to understand. Thank you.univ4 college
Good blog post. I definitely love this website. Continue the good work!
When visiting blogs, i usually discover a very good content like yourscollege univ
Once I initially commented I clicked the -Notify me when new comments are added- checkbox and now each time a remark is added I get four emails with the same comment. Is there any method you possibly can take away me from that service? Thanks!
What’s Happening i am new to this, I stumbled upon this I’ve found It absolutely useful and it has helped me out loads. I hope to contribute & help other users like its aided me. Great job.
I simply must tell you that you have written an excellent and unique article that I really enjoyed reading. I’m fascinated by how well you laid out your material and presented your views. Thank you.kitab
I was more than happy to uncover this website. I wanted to thank you for your time due to this fantastic read!! I definitely liked every bit of it and I have you bookmarked to check out new stuff on your website.
Very well written post. It will be valuable to anyone who employess it, including yours truly :). Keep doing what you are doing – can’r wait to read more posts.
You could definitely see your enthusiasm within the paintings you write. The world hopes for more passionate writers such as you who aren’t afraid to mention how they believe. Always follow your heart.
Aw, this was an extremely nice post. Taking a few minutes and actual effort to generate a top notch article… but what can I say… I procrastinate a whole lot and never seem to get nearly anything done.
In this awesome design of things you’ll secure a B+ with regard to hard work. Where exactly you lost me personally ended up being on the particulars. You know, people say, details make or break the argument.. And it could not be much more true in this article. Having said that, allow me say to you precisely what did deliver the results. The article (parts of it) is definitely really powerful and this is possibly why I am taking the effort in order to comment. I do not really make it a regular habit of doing that. Next, although I can notice the jumps in reason you come up with, I am definitely not sure of just how you seem to unite your details which make the actual final result. For now I will, no doubt subscribe to your point however trust in the foreseeable future you actually connect the facts better.
What’s Happening i’m new to this, I stumbled upon this I’ve found It positively useful and it has aided me out loads. I hope to contribute & help other users like its helped me. Good job.
I quite like reading a post that will make men and women think. Also, many thanks for allowing for me to comment!
Well I sincerely enjoyed studying it. This tip provided by you is very helpful for accurate planning.
Of course, what a splendid blog and instructive posts, I surely will bookmark your blog.All the Best!
Excellent article. I absolutely love this site. Stick with it!
Amazing! This blog looks exactly like my old one! It’s on a completely different topic but it has pretty much the same layout and design. Excellent choice of colors!
My brother suggested I might like this website. He was entirely right. This post actually made my day. You cann’t imagine just how much time I had spent for this information! Thanks!
This actually answered my downside, thank you!
Thanks for another informative blog. Where else could I get that type of info written in such an ideal way? I’ve a project that I am just now working on, and I have been on the look out for such info.
I was curious if you ever thought of changing the page layout of your website? Its very well written; I love what youve got to say. But maybe you could a little more in the way of content so people could connect with it better. Youve got an awful lot of text for only having one or 2 pictures. Maybe you could space it out better?
The movie tells the life and profession of rock and film star Elvis Presley in addition to his relationship together with his manager Colonel Tom Parker .
whoah this blog is magnificent i love reading your posts. Keep up the great work! You know, a lot of people are hunting around for this info, you can help them greatly.
I must admit that your post is really interesting. I have spent a lot of my spare time reading your content. Thank you a lot!download free books
I visited many blogs but the audio quality for audio songs present at this website is truly superb.|
Good day! I know this is kinda off topic however I’d figured I’d ask. Would you be interested in exchanging links or maybe guest writing a blog article or vice-versa? My website covers a lot of the same topics as yours and I believe we could greatly benefit from each other. If you might be interested feel free to send me an email. I look forward to hearing from you! Awesome blog by the way!
I have been exploring for a little for any high quality articles or blog posts on this sort of house . Exploring in Yahoo I at last stumbled upon this website. Studying this information So i am happy to convey that I’ve a very excellent uncanny feeling I found out just what I needed. I such a lot indisputably will make certain to do not put out of your mind this web site and provides it a glance regularly.
This is very interesting, You are a very skilled blogger. I’ve joined your rss feed and look forward to seeking more of your wonderful post. Also, I have shared your web site in my social networks!
Hello, I think your website might be having browser compatibility issues. When I look at your blog in Firefox, it looks fine but when opening in Internet Explorer, it has some overlapping. I just wanted to give you a quick heads up! Other then that, fantastic blog!
Hey, you used to write wonderful, but the last few posts have been kinda boring… I miss your tremendous writings. Past few posts are just a little out of track! come on!Scrum certification
Hi everybody, here every one is sharing such knowledge, so it’s fastidious to read this blog, and I used to pay a quick visit this web site every day.|
I think this is among the most important info for me. And i am glad reading your article. But want to remark on some general things, The web site style is wonderful, the articles is really great : D. Good job, cheers
I’d should talk to you here. Which is not some thing I do! I quite like reading a post which will make people believe. Also, many thanks permitting me to comment!blogging how to make money
Hello there I am so excited I found your site, I really found you by accident, while I was looking on Digg for something else, Regardless I am here now and would just like to say many thanks for a tremendous post and a all round entertaining blog (I also love the theme/design), I don’t have time to look over it all at the moment but I have book-marked it and also included your RSS feeds, so when I have time I will be back to read more, Please do keep up the superb work.
instagram reels izlenme satın al
Very nice post. I simply stumbled upon your blog and wanted to say that I’ve really loved browsing your blog posts. In any case I’ll be subscribing for your feed and I am hoping you write once more very soon!
I was curious if you ever thought of changing the page layout of your website? Its very well written; I love what youve got to say. But maybe you could a little more in the way of content so people could connect with it better. Youve got an awful lot of text for only having 1 or two pictures. Maybe you could space it out better?
I’m also writing to make you know of the remarkable discovery my friend’s girl gained using your webblog. She learned many pieces, including what it’s like to have a very effective helping character to make other people effortlessly grasp selected advanced matters. You undoubtedly did more than my desires. Many thanks for presenting these effective, safe, explanatory and in addition unique tips about this topic to Julie.
hey there and thanks for your info – I’ve certainly picked up something new from proper here. I did however expertise several technical points the usage of this site, since I skilled to reload the web site a lot of times prior to I may just get it to load properly. I have been wondering in case your hosting is OK? No longer that I’m complaining, however sluggish loading cases occasions will often impact your placement in google and could harm your quality ranking if ads and ***********|advertising|advertising|advertising and *********** with Adwords. Anyway I am adding this RSS to my e-mail and could glance out for a lot more of your respective interesting content. Make sure you replace this again soon..
In today’s job market, employers won’t go through every one of the four hundred or more resumes received – per employment offering! Alternatively, they will quickly discard ninety-five percent of them, if that resume does nothing to grab their interest.
The expressed opinions sit in accordance with mine in the majority. This is definitely great content for your readers.
I’m not sure where you’re getting your info, but great topic. I needs to spend some time learning more or understanding more. Thanks for wonderful info I was looking for this info for my mission.
I really like your blog.. very nice colors & theme. Did you create this website yourself or did you hire someone to do it for you? Plz respond as I’m looking to construct my own blog and would like to find out where u got this from. appreciate it
Thank you for some other informative site. The place else may I get that kind of info written in such a perfect means? I’ve a project that I’m simply now working on, and I have been on the glance out for such information.
As a Newbie, I am constantly browsing online for articles that can help me. Thank you
Please let me know if you’re looking for a writer for your site. You have some really good posts and I believe I would be a good asset. If you ever want to take some of the load off, I’d really like to write some material for your blog in exchange for a link back to mine. Please shoot me an e-mail if interested. Thank you!
Excellent post. I was checking constantly this blog and I am impressed! Very useful information particularly the last part 🙂 I care for such information a lot. I was looking for this particular information for a very long time. Thank you and best of luck.
Hi. best wishes to you and your very nice blog, aaa appliance repair
Thanks a lot for this excellent info. I have to mention that I concur on several of these points you make in your writing and some of the points may need a bit of further evaluation, but I can at least partially support your viewpoint.
This is really interesting, You’re quite a competent article author. I have signed up with your feed and furthermore , count on reading all of your extraordinary write-ups. In addition, I’ve shared your webpage throughout our social networks.pattern silicone bibs
Thanks for sharing this great article! That is very interesting I love reading and I am always searching for informative information like this.pattern silicone bibs
I just could not go away your website prior to suggesting that I extremely loved the usual info a person supply to your guests? Is gonna be again regularly in order to check out new posts.toy store
Very informative and fantastic bodily structure of content material , now that’s user friendly (:.toy store
I would like to add to that statement,but I fear your wrath Sheila, lol! Permission to speak please ; )pattern silicone bibs
I’d should test with you here. Which isn’t one thing I usually do! I take pleasure in reading a submit that can make people think. Also, thanks for allowing me to remark!
Today, organizations must be shown the actual work title you are trying to apply for – while a general resume fails to include that. And beyond that, they instantly wish to learn what positively makes you a better choice – and a general resume forces you to appear identical to the tons of general resumes they have already had dumped on them.
Together with every thing that appears to be developing inside this specific subject material, many of your points of view are actually quite exciting. Having said that, I beg your pardon, because I can not give credence to your whole strategy, all be it exhilarating none the less. It appears to me that your comments are not totally justified and in reality you are your self not completely certain of the argument. In any event I did take pleasure in reading it.
Is it a good idea to create a general one-size-fits-all resume, that you can submit anytime, anywhere, for any posted job? The Fact: It is a stupid error! The truth: Companies are required to sift through as much as 500 resumes in a single day! Thus they throw away every resume that is not specifically targeted to the position being offered.
Hi there, You’ve done an incredible job. I will certainly digg it and for my part suggest to my friends. I’m confident they will be benefited from this site.
I looked at this written content frequently and I just thought it finally was the right time to support you with a comment to say keep up the great work!
Definitely believe that which you stated. Your favorite justification appeared to be on the internet the simplest thing to be aware of. I say to you, I certainly get annoyed while people think about worries that they plainly do not know about. You managed to hit the nail upon the top as well as defined out the whole thing without having side-effects , people could take a signal. Will probably be back to get more. Thanks
I have learn a few excellent stuff here. Certainly value bookmarking for revisiting. I surprise how a lot attempt you set to make any such magnificent informative site.
I believe this is one of the most vital info for me. And i am satisfied studying your article. But should commentary on some basic things, The web site style is great, the articles is truly great : D. Just right process, cheers
Blogs ou should be reading… […]Here is a Great Blog You Might Find Interesting that we Encourage Youyarrakgram
Excellent beat ! I would like to apprentice while you amend your site, how can i subscribe for a blog site? The account helped me a acceptable deal. I had been a little bit acquainted of this your broadcast provided bright clear concept
Finding the Right Immigration Solicitor… […]below you’ll find the link to some sites that we think you should visitextangam
Informative Site… Hello guys here are some links that contains information that you may find useful yourselves. It’s Worth Checking out….vaginagram
With almost everything that seems to be building within this specific subject material, many of your viewpoints are relatively stimulating. Having said that, I beg your pardon, but I do not subscribe to your whole plan, all be it exciting none the less. It appears to everybody that your remarks are generally not entirely validated and in actuality you are generally your self not thoroughly convinced of the argument. In any case I did take pleasure in looking at it.
Hey! Do you know if they make any plugins to safeguard against hackers? I’m kinda paranoid about losing everything I’ve worked hard on. Any recommendations?
Thank you, I have recently been looking for information about this topic for ages and yours is the best I’ve discovered so far. But, what about the bottom line? Are you sure about the source?
When I originally commented I clicked the -Notify me when new comments are added- checkbox and now each time a remark is added I get 4 emails with the same comment. Is there any approach you’ll be able to remove me from that service? Thanks!
This is the right blog for anyone who wants to find out about this topic. You realize so much its almost hard to argue with you (not that I actually would want…HaHa). You definitely put a new spin on a topic thats been written about for years. Great stuff, just great!qq724
I am curious to find out what blog system you’re using? I’m experiencing some small security problems with my latest blog and I’d like to find something more safeguarded. Do you have any recommendations?goldwin678
Nice site. On your blogs very interest and i will tell a friends.badakslot
As a Newbie, I am constantly searching online for articles that can benefit me. Thank you
Great weblog right here! Also your web site loads up fast! What web host are you the use of? Can I am getting your affiliate hyperlink for your host? I wish my website loaded up as fast as yours lol
Hello, i think that i saw you visited my site thus i came to “return the favor”.I’m trying to find things to enhance my site!I suppose its ok to use a few of your ideas!!
I recently noticed your website back i are generally looking through which on a daily basis. You’ve got a loads of information at this site so i actually like your look to the web a tad too. Maintain the best show results!unoslot
My partner and I stumbled over here by a different website and thought I may as well check things out. I like what I see so now i’m following you. Look forward to checking out your web page again.
Undeniably believe that which you said. Your favorite reason appeared to be on the web the simplest thing to be aware of. I say to you, I definitely get annoyed while people consider worries that they plainly do not know about. You managed to hit the nail upon the top and also defined out the whole thing without having side effect , people could take a signal. Will probably be back to get more. Thanks
Thor box office are frequently times very costly.You can find used Thor box office.
Save your valuable Thor update in certain records. Sometimes place a brand new port. You eventually may want so that you can go back in the future that you would want to continue your Thor news from your various point. If you help save excessively in the exact same place, you won’t have this option.
Exceptional entry! I found it very interesting. I’ll check back later to see if more posts are added.livebet88
Excellent beat ! I would like to apprentice whilst you amend your website, how could i subscribe for a weblog website? The account helped me a appropriate deal. I have been tiny bit familiar of this your broadcast offered vivid transparent idea
Thanks for all of the effort on this website. My aunt loves conducting research and it’s really easy to understand why. A lot of people learn all regarding the dynamic way you produce informative solutions through this blog and in addition invigorate contribution from some other people about this content so our favorite girl is starting to learn a lot of things. Take advantage of the rest of the year. You’re carrying out a splendid job.
Incredible! This blog looks just like my old one! It’s on a totally different subject but it has pretty much the same page layout and design. Great choice of colors!
I have been absent for some time, but now I remember why I used to love this web site. Thank you, I’ll try and check back more often. How frequently you update your site?
I’d been honored to receive a call from a friend as he discovered the important guidelines shared on your site. Examining your blog write-up is a real brilliant experience. Many thanks for taking into consideration readers just like me, and I want for you the best of success being a professional in this field.
It’s going to be end of mine day, however before finish I am reading this fantastic post to improve my knowledge.|
Very nice post. I simply stumbled upon your weblog and wished to say that I have truly loved surfing around your weblog posts. In any case I will be subscribing for your feed and I am hoping you write again soon!
Superb post.Never knew this, thanks for letting me know.
Great – I should definitely pronounce, impressed with your website. I had no trouble navigating through all tabs as well as related information ended up being truly easy to do to access. I recently found what I hoped for before you know it at all. Quite unusual. Is likely to appreciate it for those who add forums or anything, site theme . a tones way for your customer to communicate. Excellent task..
I together with my buddies came digesting the good advice from your web blog and then all of a sudden developed a terrible suspicion I never thanked you for those secrets. All of the men appeared to be for that reason happy to read through them and have now seriously been having fun with those things. I appreciate you for turning out to be simply considerate and for settling on such fine ideas most people are really desperate to know about. Our honest regret for not expressing appreciation to you sooner.
What’s Happening i am new to this, I stumbled upon this I’ve found It absolutely useful and it has helped me out loads. I hope to contribute & assist other users like its aided me. Good job.
Found this on MSN and I’m happy I did. Well written article.Best penny stocks
obviously like your website but you need to take a look at the spelling on quite a few of your posts. Many of them are rife with spelling problems and I in finding it very bothersome to tell the reality however I’ll surely come again again.
RISETIME TEKNOLOJI – Profesyonel SEO ve Web Mobil Yazılım Hizmeti (RISETIME TEKNOLOJI – YAZILIM – MOBİL UYGULAMA – SEO) hizmetleri sunar.
Thank you for another informative site. Where else could I get that kind of info written in such an ideal way? I’ve a project that I am just now working on, and I have been on the look out for such info.
Greetings from Los angeles! I’m bored to tears at work so I decided to check out your website on my iphone during lunch break. I really like the info you present here and can’t wait to take a look when I get home. I’m surprised at how fast your blog loaded on my mobile .. I’m not even using WIFI, just 3G .. Anyways, great blog!
Hmm is anyone else encountering problems with the pictures on this blog loading? I’m trying to find out if its a problem on my end or if it’s the blog. Any feedback would be greatly appreciated.
I have been absent for a while, but now I remember why I used to love this website. Thank you, I will try and check back more often. How frequently you update your web site?
The polite lady in the office didn’t speak much English when I visited, but the process to rent a scooter from is quick & efficient. You can message on Facebook to see what stock they have available or just turn up. Side Note: I’m not sure the logo for Bikes gives off the best impression XD. Farang guy zooming on a Vespa without a helmet… With an almost perfect feedback score on Google & Facebook, you’re in good hands with them. They also have a garage next door to the rental shop where they’ll perform regular maintenance. I’ve rented a Mio from here which had squeaky breaks due to water in the drum brake. They quickly swapped this bike to another hassle-free. Although the variety of bikes they stock is a lot smaller, they offer very competitive pricing and are conveniently located at the Huay Kaew end of Santitham. If you’ve seen the Yamaha Tricity, and thought heck, I’d love to give that bike a try. Then send a message to Cheap Charlie and they are renting the Tricity for only 3850 per month. The unique two wheels at the front (3 wheels overall) of this scooter offer much more stability than a tradition two-wheeled scooter. Charlie Rentals also offers fantastic monthly prices with Clicks & Scoopys as low as 1900 baht per month.
Fantastic website. Lots of useful info here. I am sending it to several friends ans also sharing in delicious. And obviously, thanks for your effort!
You made some respectable factors there. I looked on the web for the problem and found most individuals will go together with together with your website.
Nice blog! Is your theme custom made or did you download it from somewhere? A theme like yours with a few simple adjustements would really make my blog shine. Please let me know where you got your design. Cheers
I would like to thank you for the efforts you have put in writing this blog. I really hope to check out the same high-grade blog posts by you in the future as well. In truth, your creative writing abilities has encouraged me to get my own site now 😉
Very educating story, saved your site for hopes to read more!VICTORIA FAKE ID
I feel like I’m constantly looking for interesting things to read about a variety of subjects, but I manage to include your blog among my reads every day because you have compelling entries that I look forward to. Here’s hoping there’s a lot more amazing material coming!توصيل مياه للمساجد
A blog like yours should be earning much money from adsense..-.,”macbook pro alternatives
Some really superb info , Sword lily I found this.ارخص مياه شرب
You made some decent points there. I did a search on the issue and found most guys will approve with your blog.
Cheap Replica Handbags You guide me by sharing this toolbox i face problem whenever i exploit this promotion reading your blog i am able to easily use.iphone 13 pro case
Normally I don’t learn post on blogs, but I wish to say that this write-up very compelled me to try and do it! Your writing style has been amazed me. Thank you, very great article.
Good blog you have here.. Itís difficult to find excellent writing like yours nowadays. I truly appreciate individuals like you! Take care!!
Hello There. I found your blog the use of msn. That is a very well written article. I’ll be sure to bookmark it and return to learn more of your helpful info. Thanks for the post. I’ll certainly comeback.
You actually make it seem really easy along with your presentation but I to find this topic to be really something which I feel I’d never understand. It kind of feels too complicated and very vast for me. I am taking a look forward for your next post, I will try to get the grasp of it!
fantastic publish, very informative. I ponder why the other specialists of this sector do not understand this. You should continue your writing. I’m confident, you have a great readers’ base already!|
Hello there, You’ve done a fantastic job. I’ll definitely digg it and individually recommend to my friends. I am confident they’ll be benefited from this website.
Today, I went to the beach front with my kids. I found a sea shell and gave it to my 4 year old daughter and said “You can hear the ocean if you put this to your ear.” She put the shell to her ear and screamed. There was a hermit crab inside and it pinched her ear. She never wants to go back! LoL I know this is completely off topic but I had to tell someone!
I’ve been exploring for a bit for any high quality articles or blog posts on this sort of area . Exploring in Yahoo I at last stumbled upon this site. Reading this info So i am happy to convey that I’ve an incredibly good uncanny feeling I discovered exactly what I needed. I most certainly will make certain to do not forget this web site and give it a look on a constant basis.
I was suggested this website by my cousin. I am not sure whether this post is written by him as no one else know such detailed about my problem. You are incredible! Thanks!
Good article. I will be dealing with some of these issues as well..
I have to thank you for the efforts you have put in writing this site. I’m hoping to view the same high-grade content by you later on as well. In truth, your creative writing abilities has encouraged me to get my own site now 😉
Made to measure curtains… […]check out the sites listed below, worth a read for interiors and rugs enthusiastsstructural engineer
Hi there! I just wanted to ask if you ever have any trouble with hackers? My last blog (wordpress) was hacked and I ended up losing a few months of hard work due to no backup. Do you have any solutions to prevent hackers?
Hey, I think your website might be having browser compatibility issues. When I look at your blog site in Chrome, it looks fine but when opening in Internet Explorer, it has some overlapping. I just wanted to give you a quick heads up! Other then that, great blog!|
https://1xbet-yeni-giris.com/
Nice weblog right here! Additionally your web site lots up fast! What web host are you using? Can I get your affiliate link to your host? I want my website loaded up as quickly as yours lol|
House Lawyers… […]just below, are some totally unrelated sites to ours, however, they are definitely worth checking outpiping Engineer
Hello are using WordPress for your blog platform? I’m new to the blog world but I’m trying to get started and create my own. Do you need any coding expertise to make your own blog? Any help would be greatly appreciated!|
Blogs ou should be reading… […]Here is a Great Blog You Might Find Interesting that we Encourage Youasme calculation Engineer
Greetings! I’ve been following your site for a long time now and finally got the bravery to go ahead and give you a shout out from Dallas Tx! Just wanted to say keep up the great work!|
Its not my first time to pay a visit this website, i am browsing this website dailly and take nice information from here everyday.|
I am curious to find out what blog platform you’re using? I’m experiencing some minor security issues with my latest blog and I’d like to find something more secure. Do you have any suggestions?
Quán phở kỳ lạ mở cửa lúc 3 giờ sáng ở Hà Nội.
Hi there! I know this is kinda off topic but I’d figured I’d ask. Would you be interested in exchanging links or maybe guest authoring a blog post or vice-versa? My website discusses a lot of the same subjects as yours and I think we could greatly benefit from each other. If you happen to be interested feel free to shoot me an e-mail. I look forward to hearing from you! Awesome blog by the way!
Its like you learn my thoughts! You seem to grasp so much about this, such as you wrote the e-book in it or something. I believe that you could do with a few percent to power the message house a bit, but instead of that, this is wonderful blog. An excellent read. I will definitely be back.
House Lawyers… […]just below, are some totally unrelated sites to ours, however, they are definitely worth checking outpiping Engineer
Oh my goodness! a tremendous article dude. Thank you Nonetheless I’m experiencing difficulty with ur rss . Don know why Unable to subscribe to it. Is there anybody getting equivalent rss problem? Anybody who is aware of kindly respond. Thnkxletswin3.net
Heya! I just wanted to ask if you ever have any issues with hackers? My last blog (wordpress) was hacked and I ended up losing a few months of hard work due to no data backup. Do you have any methods to protect against hackers?
I just couldn’t depart your site before suggesting that I extremely enjoyed the standard info a person provide for your visitors? Is going to be back often to check up on new posts
I will immediately grab your rss feed as I can’t find your e-mail subscription link or newsletter service. Do you’ve any? Kindly let me know so that I could subscribe. Thanks.
Appreciating the dedication you put into your website and detailed information you provide. It’s awesome to come across a blog every once in a while that isn’t the same unwanted rehashed information. Fantastic read! I’ve bookmarked your site and I’m including your RSS feeds to my Google account.
Admiring the hard work you put into your blog and detailed information you provide. It’s awesome to come across a blog every once in a while that isn’t the same old rehashed material. Excellent read! I’ve saved your site and I’m adding your RSS feeds to my Google account.|
https://sport-lover.com/youwin-giris/
http://everything.explained.today/Herbert_Baker/
I like what you guys are up also. Such clever work and reporting! Keep up the excellent works guys I have incorporated you guys to my blogroll. I think it will improve the value of my web site 🙂
Good day! This is my 1st comment here so I just wanted to give a quick shout out and tell you I really enjoy reading through your blog posts. Can you recommend any other blogs/websites/forums that cover the same subjects? Appreciate it!
Pretty great post. I just stumbled upon your blog and wanted to say that I’ve really enjoyed surfing around your weblog posts. In any case I’ll be subscribing to your rss feed and I’m hoping you write again soon!
Hey there just wanted to give you a quick heads up. The text in your post seem to be running off the screen in Opera. I’m not sure if this is a format issue or something to do with web browser compatibility but I thought I’d post to let you know. The design look great though! Hope you get the problem resolved soon. Thanks
Hi, I think your blog might be having browser compatibility issues. When I look at your blog in Firefox, it looks fine but when opening in Internet Explorer, it has some overlapping. I just wanted to give you a quick heads up! Other then that, amazing blog!
I love it when individuals come together and share ideas. Great site, keep it up!|
This website is known as a stroll-by for the entire info you needed about this and didn’t know who to ask. Glimpse right here, and also you’ll positively uncover it.
Hello there, I found your website via Google while searching for a related topic, your website came up, it looks good. I have bookmarked it in my google bookmarks.
After looking over a handful of the blog articles on your web site, I truly like your technique of blogging. I book marked it to my bookmark website list and will be checking back in the near future. Please visit my web site as well and tell me what you think.|
thu am sach noi
I really like your blog.. very nice colors & theme. Did you create this website yourself or did you hire someone to do it for you? Plz answer back as I’m looking to create my own blog and would like to know where u got this from. thank you
Obviously I like your web site, but you have to take a look at the spelling on quite a few of your posts. Several of them are rife with spelling problems and I find it very bothersome to inform you. Nevertheless I will surely come again again!letswin.com
Very good information. Lucky me I discovered your blog by chance (stumbleupon). I’ve bookmarked it for later!|
An interesting discussion is worth comment. I think that you need to write more about this topic, it might not be a taboo matter but typically people don’t talk about these topics. To the next! Many thanks!!|
I’d have to test with you here. Which is not something I normally do! I take pleasure in studying a post that can make individuals think. Additionally, thanks for allowing me to comment!
thu am sach noi
I’ve been using the Crafty and the large herb chamber is by far the best feature
Somebody essentially help to make seriously posts I would state. This is the very first time I frequented your website page and thus far? I surprised with the research you made to create this particular publish amazing. Wonderful job!
I was recommended this blog by my cousin. I’m not sure whether this post is written by him as no one else know such detailed about my difficulty. You’re wonderful! Thanks!
Woah! I’m really loving the template/theme of this site. It’s simple, yet effective. A lot of times it’s difficult to get that “perfect balance” between usability and appearance. I must say you have done a excellent job with this. Also, the blog loads extremely fast for me on Internet explorer. Superb Blog!
Our team had meth addicts living in one of our flipping projects and we had to work for weeks to have them removed
Cach kiem tien qua mang o Viet Nam
wonderful post, very informative. I wonder why the other experts of this sector do not notice this. You must continue your writing. I am sure, you have a huge readers’ base already!
Awsome article and right to the point. I don’t know if this is truly the best place to ask but do you people have any thoughts on where to employ some professional writers? Thanks in advance 🙂
Asking questions are in fact pleasant thing if you are not understanding something completely, but this piece of writing gives nice understanding yet.|
There are certainly loads of details like that to take into consideration. That may be a nice point to carry up. I offer the thoughts above as basic inspiration however clearly there are questions like the one you bring up where a very powerful thing will likely be working in honest good faith. I don?t know if best practices have emerged round issues like that, but I’m positive that your job is clearly identified as a good game. Both boys and girls really feel the influence of only a moment’s pleasure, for the rest of their lives.
Hello there, simply became aware of your weblog through Google, and located that it is really informative. I’m going to watch out for brussels. I’ll be grateful if you happen to proceed this in future. Numerous other folks will likely be benefited from your writing. Cheers!|
Hello! This is my first visit to your blog! We are a team of volunteers and starting a new initiative in a community in the same niche. Your blog provided us valuable information to work on. You have done a marvellous job!|
I truly love your website.. Excellent colors & theme. Did you build this website yourself? Please reply back as I’m planning to create my own personal website and would love to know where you got this from or just what the theme is named. Kudos!|
I’ve been absent for a while, but now I remember why I used to love this site. Thanks , I’ll try and check back more often. How frequently you update your website?
You are so awesome! I do not believe I have read through something like that before. So good to discover somebody with some original thoughts on this issue. Really.. thank you for starting this up. This website is one thing that’s needed on the internet, someone with a little originality!|
This website is really a stroll-by for all the information you needed about this and didn’t know who to ask. Glimpse here, and you’ll definitely uncover it.
Pretty component to content. I simply stumbled upon your blog and in accession capital to claim that I acquire in fact enjoyed account your weblog posts. Any way I will be subscribing on your feeds or even I fulfillment you get entry to persistently rapidly.
It’s hard to seek out knowledgeable folks on this topic, however you sound like you realize what you’re talking about! Thanks
As a Newbie, I am continuously browsing online for articles that can benefit me. Thank you
you’re really a good webmaster. The web site loading speed is amazing. It seems that you are doing any unique trick. Furthermore, The contents are masterwork. you’ve done a wonderful job on this topic!
Keep working ,splendid job!
Hi, Neat post. There is a problem with your web site in internet explorer, would test this… IE still is the market leader and a big portion of people will miss your excellent writing because of this problem.
I think other web site proprietors should take this web site as an model, very clean and wonderful user genial style and design, let alone the content. You are an expert in this topic!
Wow, wonderful weblog structure! How long have you been blogging for? you made blogging glance easy. The whole glance of your web site is great, as smartly as the content!
magnificent post, very informative. I wonder why the other specialists of this sector do not notice this. You must continue your writing. I’m confident, you have a great readers’ base already!
Greetings from Carolina! I’m bored to tears at work so I decided to check out your site on my iphone during lunch break. I love the information you present here and can’t wait to take a look when I get home. I’m amazed at how fast your blog loaded on my mobile .. I’m not even using WIFI, just 3G .. Anyways, awesome site!
Hey! I know this is kinda off topic however , I’d figured I’d ask. Would you be interested in trading links or maybe guest authoring a blog article or vice-versa? My website covers a lot of the same topics as yours and I think we could greatly benefit from each other. If you happen to be interested feel free to send me an e-mail. I look forward to hearing from you! Terrific blog by the way!
My spouse and I stumbled over here coming from a different web address and thought I might check things out. I like what I see so now i am following you. Look forward to looking into your web page yet again.
I was wondering if you ever considered changing the page layout of your site? Its very well written; I love what youve got to say. But maybe you could a little more in the way of content so people could connect with it better. Youve got an awful lot of text for only having one or 2 images. Maybe you could space it out better?
Hello.This post was really motivating, especially since I was investigating for thoughts on this subject last Tuesday.
I’ve recently started a website, the info you provide on this website has helped me tremendously. Thank you for all of your time & work.
Attractive element of content. I simply stumbled upon your weblog and in accession capital to assert that I get actually enjoyed account your weblog posts. Any way I’ll be subscribing for your augment and even I achievement you get entry to persistently rapidly.
Just want to say your article is as astounding. The clearness to your put up is just great and that i can think you are knowledgeable in this subject. Fine with your permission allow me to snatch your RSS feed to keep updated with imminent post. Thanks 1,000,000 and please continue the enjoyable work.
You need to participate in a contest for among the finest blogs on the web. I’ll recommend this site!
hello!,I like your writing very much! share we communicate more about your article on AOL? I require a specialist on this area to solve my problem. May be that’s you! Looking forward to see you.
Howdy just wanted to give you a quick heads up. The text in your content seem to be running off the screen in Ie. I’m not sure if this is a format issue or something to do with web browser compatibility but I thought I’d post to let you know. The design and style look great though! Hope you get the problem fixed soon. Thanks
I’ve recently started a blog, the info you offer on this web site has helped me greatly. Thanks for all of your time & work.
Thank you for the good writeup. It in fact was a entertainment account it. Look advanced to far delivered agreeable from you! By the way, how can we keep in touch?
Have you ever considered writing an ebook or guest authoring on other blogs? I have a blog based upon on the same ideas you discuss and would love to have you share some stories/information. I know my readers would enjoy your work. If you’re even remotely interested, feel free to shoot me an e mail.
Hello my friend! I want to say that this article is amazing, nice written and include almost all important infos. I’d like to peer more posts like this .
Hi there, I found your web site via Google while looking for a related topic, your web site came up, it looks good. I’ve bookmarked it in my google bookmarks.
Do you mind if I quote a few of your articles as long as I provide credit and sources back to your blog? My blog is in the very same area of interest as yours and my visitors would truly benefit from some of the information you present here. Please let me know if this ok with you. Thanks!
I and my buddies came going through the good key points on your website while before long developed a terrible feeling I never expressed respect to the blog owner for those tips. My people are actually thrilled to learn all of them and have now sincerely been tapping into these things. We appreciate you actually being so considerate and for obtaining these kinds of incredible subject matter most people are really wanting to discover. Our honest regret for not expressing appreciation to sooner.
Does your website have a contact page? I’m having trouble locating it but, I’d like to shoot you an email. I’ve got some creative ideas for your blog you might be interested in hearing. Either way, great blog and I look forward to seeing it develop over time.
Hey I am so excited I found your website, I really found you by error, while I was browsing on Google for something else, Anyways I am here now and would just like to say thanks for a fantastic post and a all round enjoyable blog (I also love the theme/design), I don’t have time to browse it all at the minute but I have bookmarked it and also included your RSS feeds, so when I have time I will be back to read a great deal more, Please do keep up the excellent job.
I’ve been exploring for a bit for any high quality articles or blog posts on this kind of area . Exploring in Yahoo I at last stumbled upon this website. Reading this information So i’m happy to convey that I’ve an incredibly good uncanny feeling I discovered exactly what I needed. I most certainly will make certain to do not forget this website and give it a look regularly.
Write more, thats all I have to say. Literally, it seems as though you relied on the video to make your point. You definitely know what youre talking about, why waste your intelligence on just posting videos to your blog when you could be giving us something informative to read?
hello there and thanks to your information – I have definitely picked up something new from proper here. I did however experience some technical issues the usage of this website, as I experienced to reload the website lots of times prior to I could get it to load correctly. I were considering in case your web hosting is OK? Not that I am complaining, but sluggish loading cases times will often impact your placement in google and can harm your quality score if advertising and ***********|advertising|advertising|advertising and *********** with Adwords. Anyway I am including this RSS to my e-mail and can glance out for much extra of your respective interesting content. Make sure you replace this again soon..
Hi, I think your website might be having browser compatibility issues. When I look at your blog in Safari, it looks fine but when opening in Internet Explorer, it has some overlapping. I just wanted to give you a quick heads up! Other then that, awesome blog!
It’s actually a nice and useful piece of information. I’m glad that you shared this useful info with us. Please keep us informed like this. Thanks for sharing.
Simply want to say your article is as astounding. The clearness in your post is just nice and i can assume you are an expert on this subject. Fine with your permission allow me to grab your feed to keep updated with forthcoming post. Thanks a million and please carry on the enjoyable work.
บาคาร่า Dumpbet69 ค้นทุกข้อมูลเรื่อง บาคาร่า https://dumpbet69.com/บาคาร่า/
Baccara Dumpbet69 ทุกเรื่องสุดยอดเกี่ยวกับ Baccara https://dumpbet69.com/บาคาร่า/
สาระเรื่อง perfume น้ำหอม คือ https://ceresaperfume.com
น้ำหอม คือ https://ceresaperfume.com
Howdy are using WordPress for your site platform? I’m new to the blog world but I’m trying to get started and set up my own. Do you need any coding expertise to make your own blog? Any help would be greatly appreciated!
There are actually lots of particulars like that to take into consideration. That may be a great level to bring up. I offer the ideas above as general inspiration however clearly there are questions just like the one you deliver up where the most important thing might be working in trustworthy good faith. I don?t know if best practices have emerged around issues like that, but I am sure that your job is clearly recognized as a good game. Both boys and girls really feel the influence of just a moment’s pleasure, for the rest of their lives.
I read a lot of online articles and I’ve found that it’s hard to find quality writing. I’m so happy I found this article because it’s renews my faith in good writers. This is awesome!cerrajeros barrio centro madrid
Hello! I could have sworn I’ve been to this site before but after looking at many of the posts I realized it’s new to me. Regardless, I’m definitely pleased I found it and I’ll be bookmarking it and checking back regularly!
I’ve been absent for a while, but now I remember why I used to love this web site. Thanks , I will try and check back more frequently. How frequently you update your website?
|
ufa191 is another service provider. on-line baccarat And also a comprehensive on the internet cash making game is a straight website, stable, safe, 100 reliable, validated by real bettors, genuine voices that have the chance to make use of the solution here with the experience of banking on baccarat games. ufa191 Dumpbet69 อยากอ่านเรื่อง ufa191 ต้อง https://dumpbet69.com/ufa191
Today, I went to the beach with my children. I found a sea shell and gave it to my 4 year old daughter and said “You can hear the ocean if you put this to your ear.” She put the shell to her ear and screamed. There was a hermit crab inside and it pinched her ear. She never wants to go back! LoL I know this is completely off topic but I had to tell someone!
ufa191 is another service provider. online baccarat And a comprehensive on the internet cash making video game is a straight internet site, steady, safe, 100 trusted, verified by actual bettors, genuine voices that have the opportunity to use the service right here with the experience of betting on baccarat games. Dumpbet69 อยากอ่านเรื่อง ufa191 ต้อง https://ufa191-dump69.blogspot.com/2022/10/ufa191.html
I’d must check with you here. Which is not one thing I normally do! I enjoy studying a publish that may make people think. Also, thanks for permitting me to comment!
Woah! I’m really digging the template/theme of this site. It’s simple, yet effective. A lot of times it’s difficult to get that “perfect balance” between superb usability and appearance. I must say you have done a superb job with this. In addition, the blog loads very quick for me on Chrome. Exceptional Blog!เว็บสล็อต pg เว็บตรง
Interesting website, i read it but i still have a few questions. shoot me an email and we will talk more becasue i may have an interesting idea for you.pdf tools
Interesting website, i read it but i still have a few questions. shoot me an email and we will talk more becasue i may have an interesting idea for you.pdf tools
You completed a number of nice points there. I did a search on the issue and found nearly all people will have the same opinion with your blog.betflik
My developer is trying to convince me to move to .net from PHP. I have always disliked the idea because of the costs. But he’s tryiong none the less. I’ve been using WordPress on a variety of websites for about a year and am anxious about switching to another platform. I have heard fantastic things about blogengine.net. Is there a way I can transfer all my wordpress posts into it? Any kind of help would be greatly appreciated!
ufa168 Login ufa168 ufa 191 ufabet Enjoyable, unique, can bet, no minimum, the most current system. ufa168 https://dumpbet69.com/E0B8A2E0B8B9E0B89FE0B988E0B8B2168/
ufa168 is an additional carrier. on-line baccarat And also an extensive on-line money making game is a straight website, steady, protected, 100 reputable, confirmed by actual casino players, actual voices who have the possibility to use the remedy below with the experience of financial on baccarat video games. Dumpbet69 ufa168 https://dumpbet69.com/E0B8A2E0B8B9E0B89FE0B988E0B8B2168/
What’s up, I love your blog! I can totally relate to your point as I work as an accountant for a BPO provider.
You completed a number of nice points there. I did a search on the issue and found nearly all people will have the same opinion with your blog.betflik
You completed a number of nice points there. I did a search on the issue and found nearly all people will have the same opinion with your blog.betflik
ufa168 is another provider. internet baccarat And also a comprehensive online cash money making game is a straight web site, secure, risk-free, 100 trusted, validated by real wagerers, real voices that have the opportunity to use the option here with the experience of banking on baccarat video games. ufa168 Dumpbet69 ufa168 https://dumpbet69.com/E0B8A2E0B8B9E0B89FE0B988E0B8B2168/
You completed a number of nice points there. I did a search on the issue and found nearly all people will have the same opinion with your blog.betflik
Thanks a bunch for sharing this with all people you actually understand what you’re speaking approximately! Bookmarked. Please additionally consult with my site =). We will have a link exchange arrangement between us!Kami Letbetter
I truly wanted to post a word to be able to thank you for all of the fabulous guides you are writing at this website. My time intensive internet investigation has now been compensated with good quality details to share with my partners. I would declare that many of us website visitors are rather fortunate to live in a wonderful website with many special individuals with helpful concepts. I feel very fortunate to have used your entire web site and look forward to some more enjoyable minutes reading here. Thanks a lot once more for a lot of things.Qiana Klenovich
This is my first time i visit here. I found so many entertaining stuff in your blog, especially its discussion. From the tons of comments on your posts, I guess I am not the only one having all the enjoyment here! Keep up the excellent work.Miki Moskovitz
What’s up, I am an avid reader of your website! I tend to agree with this as I am currently employed as a medical assistant for a BPO provider.
You completed a number of nice points there. I did a search on the issue and found nearly all people will have the same opinion with your blog.betflik
That is very attention-grabbing, You’re an excessively skilled blogger. I have joined your rss feed and look ahead to seeking more of your wonderful post. Additionally, I’ve shared your site in my social networks!
reformas en valencia
I’m not sure where you’re getting your info, but great topic. I needs to spend some time learning much more or understanding more. Thanks for excellent information I was looking for this information for my mission.Krakow biuro rachunkowe
Top post Genachowski’s less than artful weaving of net neutrality and consumer privacy | Law and Politics of Broadband you’ve surely influenced all of us FYI have you read Middle East amazing headlines! Enjoy your day ! Flash Website Designksiegowosc Krakow
Pretty element of content. I just stumbled upon your weblog and in accession capital to claim that I get in fact loved account your weblog posts. Any way I will be subscribing in your augment or even I achievement you access constantly quickly.
I truly appreciate this post. I’ve been looking everywhere for this! Thank goodness I found it on Bing. You have made my day! Thanks again!
But wanna comment that you have a very nice internet site , I love the style and design it really stands out.Sportsbook Review
I truly enjoy examining on this website , it has good content .Online Sportsbook Review
My mate and My hubby and i turned exclusively expressing a exceptionally dilemma, he’s got oftentimes endeavouring so that you could verify each person drastically wrong. Designs experience using this happens to be vivid while in the what normally tips I’m. I merely at this point web based sent my mate my website to indicate her the come across. One time neglecting your web site That found himself savings and will also be seeking out it really is which were found to educate yourself about to read the paper your the latest!Sportsbook Review
I have been browsing online greater than 3 hours lately, yet I by no means discovered any interesting article like yours. It’s pretty value enough for me. In my opinion, if all site owners and bloggers made just right content as you probably did, the internet will be a lot more helpful than ever before.
I dont think Ive read anything like this before. So good to find somebody with some original thoughts on this subject. thank for starting this up. This website is something that is needed on the web, someone with a little originality. Good job for bringing something new to the internet!Online Sportsbook Review
I was just searching for this information for a while. After six hours of continuous Googleing, finally I got it in your site. I wonder what is the lack of Google strategy that do not rank this kind of informative sites in top of the list. Normally the top web sites are full of garbage.
I wish I had a dime for every bad article I’ve read lately. I also wish other writers had your talent and style. Thank you.
I precisely wished to thank you very much yet again. I am not sure the things that I might have accomplished without the type of creative concepts discussed by you directly on such area. It seemed to be a very challenging problem for me, but coming across a specialised approach you managed that took me to weep with gladness. Now i’m happy for the information and as well , hope that you know what a great job your are doing teaching many others through the use of a site. More than likely you’ve never got to know all of us.
Rattling excellent info can be found on web blog .
ufa168 is an included firm. ในโลกของอินเตอร์เนต baccarat And also furthermore a comprehensive on the web money making game is a straight internet site, secure, secure, 100 trustworthy, confirmed by genuine online casino gamers, genuine voices that have the opportunity to utilize the solution listed below with the experience of economic on baccarat video game. ufa168 Dumpbet69 ufa168 https://dumpbet69.com/E0B8A2E0B8B9-E0B89FE0B988E0B8B2-168/
You are a very clever person!
firt aid kits… keep up your informative writing! At least i have something to look forward too when iam at work!…Sportsbooks Online
I also recommend HubPages itself, and Squidoo, which is similar.
When visiting blogs, i usually discover a very good content like yoursselling merchant services tips
I have to convey my respect for your kindness for all those that require guidance on this one field. Your special commitment to passing the solution up and down has been incredibly functional and has continually empowered most people just like me to achieve their dreams. Your amazing insightful information entails much to me and especially to my peers. Thanks a ton; from all of us.tips on selling merchant services
Needed to compose you a tiny note to finally thank you very much yet again for your personal splendid methods you have discussed above. It is strangely open-handed with people like you to provide publicly all that a number of people would have marketed as an electronic book to generate some bucks for their own end, primarily now that you could possibly have tried it if you ever wanted. These inspiring ideas likewise acted like a fantastic way to know that the rest have the same dreams really like my personal own to see a whole lot more concerning this problem. I’m sure there are thousands of more enjoyable times in the future for many who check out your blog.selling payment processing services
It is very interesting topic you’ve written here . The truth I’m not related to this, but I think is a good opportunity to learn more about, And as well talk about a different topic to which I used to talk with others
Chat with sexy girl now! https://tinyurl.com/2a694b8m
I see your point, and I totally appreciate your article. For what its worth I will tell all my friends about it, quite resourceful. Later.
I am a very horny girl https://tinyurl.com/2d3krh7f
I’ve been surfing online more than three hours nowadays, yet I never discovered any fascinating article like yours. It’s pretty price sufficient for me. In my view, if all web owners and bloggers made excellent content as you did, the web might be much more helpful than ever before.
ufa168 เป็นองค์กรที่รวมบาคาร่าออนไลน์ นอกเหนือจากรายละเอียดเกมเพื่อทำเงินออนไลน์แล้ว ยังเป็นเว็บไซต์คาสิโนจริง เชื่อถือได้ 100 โดยตรง ปลอดภัย และปราศจากความเสี่ยง เล่นโดย Verified, Real Voice, Chance Player Famous วิธีแก้ปัญหาที่กล่าวถึงในที่นี้เกี่ยวข้องกับเกมบาคาร่า ufa168 Dumpbet69 ufa168 https://dumpbet69 .com/ufa168/
Useful information shared. I am very happy to read this article. thanks for giving us nice info. Fantastic walk-through. I appreciate this post.cambio cerradura
Great weblog here! Also your web site lots up very fast! What host are you the usage of? Can I am getting your affiliate hyperlink for your host? I want my web site loaded up as fast as yours lol.Dionna Caposole
I am a very horny girl https://tinyurl.com/2aqgsawc
I’m curious to find out what blog system you have been utilizing? I’m having some small security problems with my latest blog and I’d like to find something more secure. Do you have any suggestions?
Sweet blog! I found it while searching on Yahoo News. Do you have any tips on how to get listed in Yahoo News? I’ve been trying for a while but I never seem to get there! Thankscerrajeria
Great information, better still to find out your blog that has a great layout. Nicely doneempresa cerrajeria
You’re so interesting! I don’t believe I’ve read a single thing like that before. So wonderful to find another person with some unique thoughts on this topic. Really.. thank you for starting this up. This website is something that is needed on the internet, someone with some originality!
Hey i’m for the first time here. I came across this board and I find It seriously helpful & it helped me out much. I hope to give something back and aid others as you aided me.Shanel Sumaya
I think other website owners should take this website as an model, very clean and superb user genial design and style .
Obviously I like your web site, but you have to take a look at the spelling on quite a few of your posts. Several of them are rife with spelling problems and I find it very bothersome to inform you. Nevertheless I will surely come again again!situs slot online pulsa tanpa potongan
Things i have seen in terms of computer memory is the fact there are technical specs such as SDRAM, DDR and many others, that must match the features of the motherboard. If the personal computer’s motherboard is fairly current while there are no operating-system issues, changing the memory literally takes under sixty minutes. It’s one of several easiest personal computer upgrade techniques one can picture. Thanks for giving your ideas.empresa cerrajeria
I like this blog so much, saved to my bookmarks .situs slot pulsa gacor
I am a mom looking to talk.
Thanks so much for sharing the info.
hello there and thank you for your info – I have certainly picked up something new from right here. I did however expertise several technical points using this website, since I experienced to reload the website a lot of times previous to I could get it to load properly. I had been wondering if your web hosting is OK? Not that I am complaining, but sluggish loading instances times will sometimes affect your placement in google and can damage your quality score if advertising and marketing with Adwords. Anyway I am adding this RSS to my e-mail and could look out for a lot more of your respective exciting content. Make sure you update this again soon..
I like this blog so much, saved to my bookmarks .situs slot pulsa gacor
Very good information thanks so much!
ufa168 เป็นการผสมผสานของบาคาร่าออนไลน์นอกเหนือจากรายละเอียดเพิ่มเติมเกี่ยวกับเว็บไซต์ทำเงิน, วิดีโอเกม, โดยตรง, ปลอดภัย, เชื่อถือได้, เว็บไซต์ตรวจสอบผู้เล่น 100, ไซต์คาสิโนจริง, เสียงจริง, โอกาส ใช้วิธีแก้ปัญหาที่ระบุไว้ที่นี่ ด้วยประสบการณ์เกมคอมพิวเตอร์ บาคาร่า ไฟแนนซ์ ufa168 Dumpbet69 ufa168 https://dumpbet69.com/E0B8A2E0B8B9-E0B89FE0B988E0B8B2-168/
The new Zune browser is surprisingly good, but not as good as the iPod’s. It works well, but isn’t as fast as Safari, and has a clunkier interface. If you occasionally plan on using the web browser that’s not an issue, but if you’re planning to browse the web alot from your PMP then the iPod’s larger screen and better browser may be important.slot pulsa tanpa potongan
That is really interesting, You’re a very skilled blogger. I’ve joined your feed and look forward to looking for more of your excellent post. Additionally, I’ve shared your website in my social networks!
After I originally commented I clicked the -Notify me when new feedback are added- checkbox and now every time a remark is added I get 4 emails with the identical comment. Is there any way you may remove me from that service? Thanks!
very good put up, i definitely love this web site, keep on itI Loved This
Good site! I really love how it is simple on my eyes and the data are well written. I am wondering how I might be notified whenever a new post has been made. I have subscribed to your RSS which must do the trick! Have a great day!Go To This Web-site
These kinds of Search marketing boxes normally realistic, healthy and balanced as a result receive just about every customer service necessary for some product. Link Building Services
Interested in more info. How can I contact you?
ufa168 เป็นบริการที่ผสมผสานบาคาร่าออนไลน์และเกมทำเงินออนไลน์ต่างๆ นี่คือเว็บไซต์ที่เรียบง่าย ปลอดภัย ไร้ความเสี่ยง เชื่อถือได้ 100 ที่ตรวจสอบโดยนักเล่นเกมในไซต์องค์กรการพนันจริง โอกาสในการใช้ประโยชน์จากตัวเลือกที่ระบุไว้ที่นี่และประสบการณ์ทางการเงินกับวิดีโอเกม Baccarat https://dumpbet69.com/E0B8A2E0B8B9-E0B89FE0B988E0B8B2-168/
Thank you for sharing.
Thank you so much for helping me.
Excellent post. I was checking constantly this blog and I’m impressed! Very helpful information specifically the last part 🙂 I care for such information much. I was looking for this particular information for a very long time. Thank you and good luck.
Way cool! Some very valid points! I appreciate you penning this post and also the rest of the website is also very good.
Thank you for sharing the information.
I would like to thank you for the efforts you’ve put in writing this blog. I’m hoping the same high-grade site post from you in the upcoming also. Actually your creative writing skills has inspired me to get my own site now. Actually the blogging is spreading its wings quickly. Your write up is a good example of it.
Thanks so much for sharing.
You are a great writer thanks.
bookmarked!!, I like your blog!
Wonderful web site. Lots of useful info here. I am sending it to several friends ans also sharing in delicious. And obviously, thanks for your effort!
You are a great writer. Do you have any more webpages?
I loved as much as you will receive carried out right here. The sketch is attractive, your authored material stylish. nonetheless, you command get bought an shakiness over that you wish be delivering the following. unwell unquestionably come more formerly again since exactly the same nearly very often inside case you shield this increase.
I must say, as a lot as I enjoyed reading what you had to say, I couldnt help but lose interest after a while. Its as if you had a wonderful grasp on the subject matter, but you forgot to include your readers. Perhaps you should think about this from far more than one angle. Or maybe you shouldnt generalise so considerably. Its better if you think about what others may have to say instead of just going for a gut reaction to the subject. Think about adjusting your own believed process and giving others who may read this the benefit of the doubt.scrap car removal Chilliwack
Your article has proven useful to me. It’s very informative and you are obviously very knowledgeable in this area. You have opened my eyes to varying views on this topic with interesting and solid content.scrapcarremovalchilliwack.com
How can I reach you? I am interested in more info.
I am interested in more information. How can I contact you?
Your article has proven useful to me. It’s very informative and you are obviously very knowledgeable in this area. You have opened my eyes to varying views on this topic with interesting and solid content.scrapcarremovalchilliwack.com
You completed a number of nice points there. I did a search on the issue and found nearly all people will have the same opinion with your blog.betflik
This information is so great thanks!
You completed a number of nice points there. I did a search on the issue and found nearly all people will have the same opinion with your blog.betflik
You completed a number of nice points there. I did a search on the issue and found nearly all people will have the same opinion with your blog.betflik
Hey there! Would you mind if I share your blog with my facebook group? There’s a lot of people that I think would really enjoy your content. Please let me know. Thanks
You completed a number of nice points there. I did a search on the issue and found nearly all people will have the same opinion with your blog.betflik
can you make me cum please? https://tinyurl.com/2c4lwvoa
You completed a number of nice points there. I did a search on the issue and found nearly all people will have the same opinion with your blog.betflik
Nice post. I learn something totally new and challenging on websites I stumbleupon everyday. It will always be interesting to read through content from other authors and practice something from other web sites.
Hello there! Do you use Twitter? I’d like to follow you if that would be okay. I’m undoubtedly enjoying your blog and look forward to new updates.
I really like your writing!
Thx so much !!! Appreciate the helpful info.
Thanks so much the info.
I am definitely bookmarking this website and sharing it with my acquaintances. You will be getting plenty of visitors to your website from me!custom bumper stickers
Good blog! I truly love how it is easy on my eyes and the data are well written. I’m wondering how I could be notified when a new post has been made. I’ve subscribed to your RSS which must do the trick! Have a nice day!
This is a excellent blog, would you be involved in doing an interview about just how you designed it? If so e-mail me!Hot Sex Movies
Have you ever thought about writing an ebook or guest authoring on other blogs? I have a blog based upon on the same ideas you discuss and would love to have you share some stories/information. I know my audience would value your work. If you’re even remotely interested, feel free to send me an e mail.
This is a excellent blog, would you be involved in doing an interview about just how you designed it? If so e-mail me!Hot Sex Movies
Thank you a lot for providing individuals with remarkably remarkable possiblity to discover important secrets from here. It’s usually so fantastic plus stuffed with a lot of fun for me and my office acquaintances to search the blog a minimum of thrice a week to find out the fresh guides you will have. And lastly, I’m just actually fulfilled with the unique advice served by you. Certain 4 points in this article are honestly the most efficient I’ve had.
Finding the Right Immigration Solicitor… […]below you’ll find the link to some sites that we think you should visitdownload xvideos
Good job on this article! I really like how you presented your facts and how you made it interesting and easy to understand. Thank you.Teen XXX
whoah this weblog is excellent i like reading your posts. Keep up the good paintings! You recognize, a lot of individuals are looking around for this information, you could help them greatly.
I have realized that of all kinds of insurance, health insurance coverage is the most controversial because of the conflict between the insurance company’s obligation to remain adrift and the buyer’s need to have insurance policy. Insurance companies’ commission rates on overall health plans have become low, therefore some organizations struggle to generate income. Thanks for the concepts you discuss through this site.
Finding the Right Immigration Solicitor… […]below you’ll find the link to some sites that we think you should visitdownload xvideos
I am constantly searching online for tips that can help me. Thx!
I’ve been surfing online more than three hours today, but I by no means discovered any attention-grabbing article like yours. It is lovely value enough for me. In my view, if all site owners and bloggers made just right content as you probably did, the net might be much more useful than ever before.
Good website! I truly love how it is easy on my eyes and the data are well written. I’m wondering how I might be notified when a new post has been made. I have subscribed to your RSS feed which must do the trick! Have a great day!
That is a great tip particularly to those new to the blogosphere. Short but very accurate information… Thanks for sharing this one. A must read article!
Generally I do not read article on blogs, however I wish to say that this write-up very forced me to check out and do so! Your writing taste has been amazed me. Thanks, very great post.cvv dumps
Thanks for such a fantastic blog. Where else could anyone get that kind of info written in such a perfect way? I have a presentation that I am presently writhing on, and I have been on the look out for such great information.employee relations lawyer
Thanks a lot for providing individuals with an extremely memorable chance to read from this blog. It can be very ideal and as well , full of a great time for me personally and my office mates to visit the blog minimum 3 times in a week to find out the newest tips you will have. And lastly, I’m usually motivated concerning the wonderful secrets you serve. Some 1 ideas in this post are honestly the most efficient I’ve had.
Hi there! Do you know if they make any plugins to protect against hackers? I’m kinda paranoid about losing everything I’ve worked hard on. Any tips?
Great write-up, I’m regular visitor of one’s web site, maintain up the nice operate, and It’s going to be a regular visitor for a long time.
Fantastic website. Lots of useful information here. I’m sending it to several friends ans also sharing in delicious. And obviously, thanks for your effort!
Thanks a bunch for sharing this with all of us you really know what you are talking about! Bookmarked. Kindly also visit my site =). We could have a link exchange agreement between us!
Do you have a spam problem on this website; I also am a blogger, and I was curious about your situation; we have developed some nice procedures and we are looking to swap strategies with others, be sure to shoot me an email if interested.
At this time it seems like WordPress is the preferred blogging platform out there right now. (from what I’ve read) Is that what you are using on your blog?
I got this web site from my friend who told me regarding this site and at the moment this time I am browsing this web page and reading very informative articles at this time.|
I really like looking through a post that will make men and women think. Also, many thanks for allowing for me to comment!|
I’ve been browsing online more than 3 hours today, yet I never found any interesting article like yours. It is pretty worth enough for me. Personally, if all webmasters and bloggers made good content as you did, the internet will be much more useful than ever before.|
Pretty nice post. I just stumbled upon your blog and wished to say that I have truly enjoyed surfing around your blog posts. In any case I will be subscribing to your feed and I hope you write again very soon!|
Heya! I just wanted to ask if you ever have any issues with hackers? My last blog (wordpress) was hacked and I ended up losing several weeks of hard work due to no back up. Do you have any methods to protect against hackers?
hello there and thanks in your info – I’ve definitely picked up something new from proper here. I did alternatively experience some technical points the use of this website, since I skilled to reload the site lots of instances prior to I may get it to load properly. I have been puzzling over if your web host is OK? Not that I am complaining, however sluggish loading cases instances will sometimes have an effect on your placement in google and can damage your quality score if advertising and ***********|advertising|advertising|advertising and *********** with Adwords. Anyway I am adding this RSS to my e-mail and could glance out for a lot extra of your respective interesting content. Make sure you replace this once more very soon..
But wanna input on few general things, The website style and design is perfect, the articles is real fantastic. “To the artist there is never anything ugly in nature.” by Franois Auguste Ren Rodin.
I just couldn’t go away your website before suggesting that I extremely enjoyed the standard information an individual provide for your visitors? Is gonna be again steadily to check out new posts|
Hey there! I just wanted to ask if you ever have any trouble with hackers? My last blog (wordpress) was hacked and I ended up losing months of hard work due to no data backup. Do you have any solutions to prevent hackers?|
magnificent put up, very informative. I’m wondering why the opposite specialists of this sector don’t understand this. You must continue your writing. I am confident, you’ve a huge readers’ base already!|
Great post. I used to be checking constantly this blog and I’m inspired! Extremely helpful information specially the last section 🙂 I maintain such info a lot. I was seeking this certain information for a very long time. Thanks and good luck. |
I was suggested this website by my cousin. I’m not sure whether this post is written by him as nobody else know such detailed about my problem. You are amazing! Thanks!|
An interesting discussion is definitely worth comment. I do believe that you ought to write more on this issue, it might not be a taboo matter but typically folks don’t speak about such subjects. To the next! All the best!!|
If some one wants to be updated with hottest technologies after that he must be go to see this web page and be up to date all the time.|
This information is magnificent. I understand and respect your clear-cut points. I am impressed with your writing style and how well you express your thoughts.followers
Aw, this was a very nice post. Spending some time and actual effort to make a top notch article… but what can I say… I procrastinate a lot and never manage to get nearly anything done.|
Nice answer back in return of this issue with solid arguments and describing all about that.|
I genuinely enjoy studying on this website , it has got excellent articles. “He who sees the truth, let him proclaim it, without asking who is for it or who is against it.” by Henry George.
I would like to convey my admiration for your generosity in support of men and women that have the need for help with this particular concern. Your special dedication to getting the message all over had been wonderfully productive and have all the time made professionals much like me to attain their dreams. Your own invaluable tutorial means a great deal to me and additionally to my office workers. Thank you; from everyone of us.buy tiktok followers online
I have been browsing online more than three hours today, yet I never found any interesting article like yours. It is pretty worth enough for me. In my opinion, if all website owners and bloggers made good content as you did, the net will be much more useful than ever before.|
My brother suggested I might like this web site. He was totally right. This post actually made my day. You can not imagine just how much time I had spent for this info! Thanks!
Admiring the hard work you put into your blog and in depth information you present. It’s great to come across a blog every once in a while that isn’t the same old rehashed information. Fantastic read! I’ve saved your site and I’m including your RSS feeds to my Google account.
It’s really a great and useful piece of info. I am glad that you shared this useful info with us. Please keep us up to date like this. Thanks for sharing.
Hello There. I discovered your blog the usage of msn. That is an extremely smartly written article. I will make sure to bookmark it and come back to read extra of your helpful info. Thank you for the post. I will definitely comeback.
Together with every thing that seems to be building inside this subject matter, a significant percentage of points of view tend to be fairly radical. Having said that, I beg your pardon, but I do not subscribe to your entire suggestion, all be it exciting none the less. It appears to everyone that your remarks are generally not totally justified and in reality you are generally yourself not wholly certain of your argument. In any case I did appreciate reading through it.
Hi! I’m at work browsing your blog from my new iphone! Just wanted to say I love reading through your blog and look forward to all your posts! Keep up the fantastic work!
I’m not sure where you are getting your info, but great topic. I needs to spend some time learning much more or understanding more. Thanks for wonderful information I was looking for this information for my mission.
I’ve read a few good stuff here. Definitely worth bookmarking for revisiting. I wonder how much effort you put to make such a great informative site.
You completed a number of nice points there. I did a search on the issue and found nearly all people will have the same opinion with your blog.betflik
You completed a number of nice points there. I did a search on the issue and found nearly all people will have the same opinion with your blog.betflik
My brother recommended I might like this web site. He was totally right. This post truly made my day. You can not imagine simply how much time I had spent for this information! Thanks!|
You completed a number of nice points there. I did a search on the issue and found nearly all people will have the same opinion with your blog.betflik
I am regular visitor, how are you everybody? This post posted at this web site is really good.|
Heya i’m for the first time here. I came across this board and I find It really useful & it helped me out a lot. I hope to give something back and aid others like you aided me.|
I got this site from my pal who informed me about this site and at the moment this time I am visiting this website and reading very informative posts at this time.|
I just like the helpful information you supply to your articles. I will bookmark your weblog and take a look at once more here regularly. I am moderately certain I will be informed a lot of new stuff proper right here! Good luck for the next!
Really no matter if someone doesn’t understand after that its up to other viewers that they will help, so here it takes place.|
Hi just wanted to give you a brief heads up and let you know a few of the images aren’t loading correctly. I’m not sure why but I think its a linking issue. I’ve tried it in two different browsers and both show the same results.|
Saved as a favorite, I love your web site!|
I’m so happy to read this. This is the type of manual that needs to be given and not the accidental misinformation that’s at the other blogs. Appreciate your sharing this greatest doc.
We are a bunch of volunteers and starting a brand new scheme in our community. Your website offered us with useful info to work on. You’ve done an impressive task and our whole neighborhood might be thankful to you.|
I’m really enjoying the theme/design of your web site. Do you ever run into any web browser compatibility issues? A small number of my blog audience have complained about my site not working correctly in Explorer but looks great in Safari. Do you have any tips to help fix this issue?|
What i don’t understood is actually how you are now not really much more smartly-preferred than you might be right now. You’re very intelligent. You know thus considerably in the case of this topic, produced me for my part consider it from so many varied angles. Its like women and men don’t seem to be interested except it’s something to do with Woman gaga! Your personal stuffs nice. At all times deal with it up!|
Can I just say what a relief to discover somebody who really understands what they are discussing online. You actually know how to bring a problem to light and make it important. A lot more people must check this out and understand this side of the story. It’s surprising you are not more popular since you most certainly have the gift.|
I would like to convey my admiration for your generosity in support of men and women that have the need for help with this particular concern. Your special dedication to getting the message all over had been wonderfully productive and have all the time made professionals much like me to attain their dreams. Your own invaluable tutorial means a great deal to me and additionally to my office workers. Thank you; from everyone of us.现在玩赌场
I really got into this article. I found it to be interesting and loaded with unique points of interest. I like to read material that makes me think. Thank you for writing this great content.car lease
Its not my first time to pay a visit this site, i am visiting this website dailly and take good information from here daily.|
I would like to convey my admiration for your generosity in support of men and women that have the need for help with this particular concern. Your special dedication to getting the message all over had been wonderfully productive and have all the time made professionals much like me to attain their dreams. Your own invaluable tutorial means a great deal to me and additionally to my office workers. Thank you; from everyone of us.noah aulwes
Just wanna remark on few general things, The website style is ideal, the topic matter is rattling goodnoah aulwes
I really got into this article. I found it to be interesting and loaded with unique points of interest. I like to read material that makes me think. Thank you for writing this great content.noah aulwes
Appreciating the commitment you put into your site and detailed information you provide. It’s awesome to come across a blog every once in a while that isn’t the same outdated rehashed information. Excellent read! I’ve bookmarked your site and I’m adding your RSS feeds to my Google account.
Fantastic post but I was wondering if you could write a litte more on this topic? I’d be very grateful if you could elaborate a little bit further. Thanks!|
Have you ever considered writing an ebook or guest authoring on other sites? I have a blog centered on the same subjects you discuss and would love to have you share some stories/information. I know my audience would appreciate your work. If you are even remotely interested, feel free to send me an email.|
The core of your writing while appearing agreeable initially, did not work perfectly with me personally after some time. Someplace throughout the sentences you actually were able to make me a believer but only for a short while. I however have got a problem with your jumps in logic and one might do well to help fill in all those breaks. In the event you can accomplish that, I could certainly end up being impressed.
whoah this blog is excellent i love reading your posts. Keep up the great work! You know, a lot of people are hunting around for this information, you can help them greatly.
I have to convey my respect for your kindness for all those that require guidance on this one field. Your special commitment to passing the solution up and down has been incredibly functional and has continually empowered most people just like me to achieve their dreams. Your amazing insightful information entails much to me and especially to my peers. Thanks a ton; from all of us.noah aulwes
I am continually browsing online for articles that can benefit me. Thx!
I every time spent my half an hour to read this website’s content all the time along with a mug of coffee.|
With everything that seems to be developing within this particular area, all your viewpoints are generally relatively radical. However, I appologize, but I can not give credence to your whole plan, all be it exhilarating none the less. It appears to me that your remarks are actually not entirely validated and in reality you are generally yourself not really totally confident of your argument. In any event I did take pleasure in looking at it.
you could have an awesome blog here! would you prefer to make some invite posts on my weblog?
I know this if off topic but I’m looking into starting my own weblog and was curious what all is needed to get set up? I’m assuming having a blog like yours would cost a pretty penny? I’m not very internet smart so I’m not 100 positive. Any recommendations or advice would be greatly appreciated. Kudos
I’m commenting to make you understand of the nice discovery my daughter undergone reading through your webblog. She picked up plenty of pieces, with the inclusion of what it is like to possess an amazing giving nature to let folks with ease fully grasp certain advanced issues. You actually exceeded my expectations. Many thanks for providing these great, healthy, explanatory and also fun tips about this topic to Mary.
Really Appreciate this article, is there any way I can receive an update sent in an email when you write a fresh post?
Definitely, what a magnificent website and instructive posts, I surely will bookmark your site.All the Best!
Great website! I am loving it!! Will be back later to read some more. I am bookmarking your feeds also.
I have been browsing online greater than 3 hours today, yet I by no means found any interesting article like yours. It is beautiful worth enough for me. In my opinion, if all site owners and bloggers made good content as you probably did, the web can be a lot more helpful than ever before.
These days of austerity in addition to relative stress and anxiety about taking on debt, lots of people balk against the idea of employing a credit card in order to make purchase of merchandise or maybe pay for any gift giving occasion, preferring, instead to rely on the tried plus trusted approach to making payment – hard cash. However, if you possess the cash available to make the purchase in full, then, paradoxically, that’s the best time just to be able to use the cards for several reasons.
The new Zune browser is surprisingly good, but not as good as the iPod’s. It works well, but isn’t as fast as Safari, and has a clunkier interface. If you occasionally plan on using the web browser that’s not an issue, but if you’re planning to browse the web alot from your PMP then the iPod’s larger screen and better browser may be important.celebrity news today
I would like to convey my admiration for your generosity in support of men and women that have the need for help with this particular concern. Your special dedication to getting the message all over had been wonderfully productive and have all the time made professionals much like me to attain their dreams. Your own invaluable tutorial means a great deal to me and additionally to my office workers. Thank you; from everyone of us.breaking celebrity news
Immigration Lawyers… […]the time to read or visit the content or sites we have linked to below thetop news
เว็บแทงบอลยอดนิยมในตอนนี้ ufabet เป็นเว็บไซต์ที่ให้บริการครบวงจรทั้งการเดิมพันเกมกีฬาต่างๆ เครดิตฟรี กดรับเอง ที่พร้อมให้บริการหลากหลาย ซึ่งสามารถเลือกเดิมพันออนไลน์โดยการ สมัครเว็บแทงบอลที่มีความมั่นคงทางการเงินและให้ราคาบอลค่าน้ำดีกว่าเว็บอื่นๆในตอนนี้เว็บแทงบอลออนไลน์
เว็บไซต์ UFABET ของเราเปิดรับพนันบอลออนไลน์ผ่านทางโทรศัพท์มือถือ และอุปกรณ์ทุกชนิดที่เชื่อมต่ออินเตอร์เน็ตได้ สมัครเดิมพันได้ ขั้นต่ำเพียง 10 บาท เครดิตฟรี กดรับเอง แทงบอลเดี่ยว บอลเต็ง บอลสเต็ป หรือ บอลชุด เล่นได้จ่ายจริงไม่มีโกงอย่างแน่นอน ยูฟ่าเบท เว็บพนันบอลดีที่สุดของไทย
เว็บตรง UFABET ยูฟ่าเบท เว็บแทงบอลออนไลน์ เครดิตฟรีล่าสุด แทงสเต็ป กีฬา คาสิโนสด คาสิโนออนไลน์ บาคาร่า รูเล็ต ไพ่เสือมังกร สล็อตออนไลน์ หวยออนไลน์ มวยสเต็ป บาสออนไลน์ เทนนิสออนไลน์ สนุ๊กเกอร์ออนไลน์ ด้วยระบบที่ทันสมัย ปลอดภัย โปรโมชั่นแจกเครดิตฟรีทุกวัน ให้บริการด้วยทีมงานมืออาชีพ
Thank you for another informative blog. The place else could I am getting that kind of info written in such a perfect method? I’ve a challenge that I am simply now operating on, and I have been on the glance out for such info.|
Hi there, I found your website via Google while searching for a related topic, your website came up, it looks great. I have bookmarked it in my google bookmarks.testosterone replacement therapy – TRT
There is certainly a great deal to know about this subject. I really like all the points you have made.|
I am really loving the theme/design of your weblog. Do you ever run into any internet browser compatibility issues? A few of my blog visitors have complained about my blog not working correctly in Explorer but looks great in Firefox. Do you have any recommendations to help fix this problem?|
Good post. I learn something totally new and challenging on blogs I stumbleupon every day. It’s always exciting to read through articles from other writers and practice a little something from their web sites. |
หนังNetflix เว็บดูหนังฟรี หนังใหม่2022 ดูหนังใหม่ออนไลน์ฟรี พากย์ไทย. เว็บดูหนังออนไลน์ใหม่ ดูฟรีไม่มีโฆษณา หนังใหม่ 2023 หนังใหม่ชนโรง หนังฟอร์มยักษ์ ซีรี่ย์เกาหลี หมวดหมู่ 18+ ดูหนังฟรี 24 ชั่วโมง.
ดูหนัง เว็บดูซีรี่ย์ ไม่มีโฆษณา พากย์ไทย ดูหนังออนไลน์ เต็มเรื่อง ดูฟรีไม่มีโฆษณา
Thanks , I’ve just been searching for information about this subject for ages and yours is the best I have found out so far. But, what concerning the bottom line? Are you positive concerning the supply?|
เว็บดูหนังออนไลน์ฟรี หนังไทย ดูหนังออนไลน์ ซีรีย์เกาหลี Netflix พากย์ไทย เต็มเรื่อง ดูบนมือถือ ไม่กระตุก อัพเดตหนังใหม่ทุกวัน
เว็บดูหนังออนไลน์ฟรี หนังไทย เว็บดูหนังฟรี ซีรีย์เกาหลี Netflix พากย์ไทย เต็มเรื่อง ดูบนมือถือ ไม่กระตุก อัพเดตหนังใหม่ทุกวัน
หนังNetflix ดูหนังออนไลน์ หนังใหม่2022 ดูหนังใหม่ออนไลน์ฟรี พากย์ไทย. เว็บดูหนังออนไลน์ใหม่ ดูฟรีไม่มีโฆษณา หนังใหม่ 2023 หนังใหม่ชนโรง หนังฟอร์มยักษ์ ซีรี่ย์เกาหลี หมวดหมู่ 18+ ดูหนังฟรี 24 ชั่วโมง.
I am sure this post has touched all the internet people, its really really nice paragraph on building up new web site.|
If you want to get much from this piece of writing then you have to apply these strategies to your won website.|
Searching for a brand-new signature fragrance? น้ำหอม https://ceresaperfume.com Step this way … A trademark fragrance is a scent that records the essence of you. It’s an expansion of your personality, your design– something that others might concern recognise you by. Once you locate stated scent, you can not get sufficient of it– and will certainly always come back to the container for more.But locating a signature scent isn’t always simple. ‘The scent market is highly saturated,’ points out perfumer, Roja Dove. ‘Thus, it can become entirely overwhelming when approaching the job of picking a brand-new fragrance. To help, it deserves swotting up on the different aroma accounts. ‘If you can safely say, “I’m a chypre user,” after that it already lowers the variety of fragrances you need to consider by three quarters,’ claims Roja. Here, fragrance professionals damage down everything you need to learn about scent accounts, in addition to exactly how to choose a fragrance on your own and others.What is a scent account? A scent profile, or else called an olfactive family, is a way of categorising a perfume to make it less complicated to comprehend,’ clarifies Roja. ‘It resembles categorising a style of art, a category of songs, or a sort of red wine,’ he continues. Yet as opposed to jazz, hip-hop or blues, you have floral, fougère, chypré and ambrée.Floral is obvious and also exists extra so in womanly perfumery. fougère– indicating fern– exists extra for masculine choices. fougère and also chypré are both rather all-natural designs with the previous being fresher as well as fragrant, while a chypré is much heavier, based much more around woods and mosses. The ambrée accord are deep, abundant, exotic developments,’ clarifies Roja. What note (top, center or bottom) is crucial? According to Roja, they are every one of equal value. ‘Leading notes are necessary, because they make an inviting intro, while base notes are important as they develop the lasting memory,’ he states. ‘All the notes combine to develop the life expectancy of the scent and the tale it informs. Sonia Continuous, a senior perfumer at Givaudan, breaks down the various types of notes
Greetings! Very helpful advice in this particular post! It’s the little changes that produce the largest changes. Thanks for sharing!
I’m just commenting to let you be aware of of the magnificent experience my cousin’s child undergone reading your site. She came to understand a wide variety of pieces, with the inclusion of how it is like to possess a great giving spirit to make other folks quite simply comprehend some tricky matters. You really exceeded our expected results. Thanks for churning out such priceless, healthy, educational and as well as fun tips about that topic to Evelyn.
An impressive share, I just given this onto a colleague who was doing slightly analysis on this. And he in reality purchased me breakfast because I found it for him.. smile. So let me reword that: Thnx for the deal with! However yeah Thnkx for spending the time to debate this, I feel strongly about it and love reading extra on this topic. If possible, as you become experience, would you thoughts updating your weblog with more details? It’s highly useful for me. Huge thumb up for this weblog publish!
Nice post. I learn one thing more challenging on completely different blogs everyday. It would all the time be stimulating to learn content material from other writers and practice a little one thing from their store. I’d choose to make use of some with the content on my blog whether you don’t mind. Natually I’ll provide you with a hyperlink in your web blog. Thanks for sharing.
Very rapidly this website will be famous amid all blogging viewers, due to it’s good content|
Hi to every one, for the reason that I am really eager of reading this blog’s post to be updated regularly. It carries nice stuff.|
Hey there, You have done an excellent job. I’ll certainly digg it and for my part recommend to my friends. I’m sure they’ll be benefited from this website.
Pretty component to content. I simply stumbled upon your web site and in accession capital to say that I acquire in fact enjoyed account your weblog posts. Any way I will be subscribing to your feeds or even I achievement you access constantly quickly.|
We’re a group of volunteers and starting a new scheme in our community. Your site offered us with valuable info to work on. You have done a formidable job and our whole community will be thankful to you.
of course like your website but you have to take a look at the spelling on several of your posts. Several of them are rife with spelling problems and I to find it very troublesome to inform the reality on the other hand I’ll certainly come again again.
Its like you read my mind! You appear to know a lot about this, like you wrote the book in it or something. I think that you could do with some pics to drive the message home a little bit, but other than that, this is great blog. A fantastic read. I will certainly be back.
web site this is too good, I like, material that is too amazing and, unique, continue to work if you believe eat certainly can, me comet together with hope can help you ask for permission okay
web this is very good, I like, material that is very amazing and, unique, continue to work if you believe eat certainly can, me comet with hope can help you ask for permission okay
website this is too good, I like, material that is very awesome and, unique, continue to work if you believe eat certainly can, me comet together hope can support you ask for permission okay
Very well written information. It will be beneficial to everyone who utilizes it, including myself. Keep doing what you are doing – for sure i will check out more posts.
of course like your web site but you need to check the spelling on several of your posts. Many of them are rife with spelling problems and I find it very troublesome to inform the truth however I’ll certainly come again again.
It’s a shame you don’t have a donate button! I’d definitely donate to this superb blog! I guess for now i’ll settle for bookmarking and adding your RSS feed to my Google account. I look forward to brand new updates and will share this site with my Facebook group. Talk soon!
As a Newbie, I am permanently searching online for articles that can help me. Thank you
You are a very persuasive writer. I can see this in your article. You have a way of writing compelling information that sparks much interest.Optima Tax Review
Made to measure curtains… […]check out the sites listed below, worth a read for interiors and rugs enthusiastsmp3juice
Hello there, You’ve performed an excellent job. I’ll definitely digg it and for my part suggest to my friends. I’m confident they’ll be benefited from this site.
Thanks for a marvelous posting! I definitely enjoyed reading it, you will be a great author.I will always bookmark your blog and may come back at some point. I want to encourage you continue your great work, have a nice holiday weekend!
เราคือ เว็บพนันออนไลน์ ให้บริการแบบครบวงจรสมบูรณ์แบบที่สุด ufabet777 เป็นเว็บไซต์ที่ได้รับการแต่งตั้งจาก ยูฟ่าเบท เป็นเว็บแรกและเว็บเดียวเท่านั้น
เว็บแทงบอลยอดนิยมในตอนนี้ ufabet เป็นเว็บไซต์ที่ให้บริการครบวงจรทั้งการเดิมพันเกมกีฬาต่างๆ ufabet777 ที่พร้อมให้บริการหลากหลาย ซึ่งสามารถเลือกเดิมพันออนไลน์โดยการ สมัครเว็บแทงบอลที่มีความมั่นคงทางการเงินและให้ราคาบอลค่าน้ำดีกว่าเว็บอื่นๆในตอนนี้เว็บแทงบอลออนไลน์
เว็บไซต์ UFABET ของเราเปิดรับพนันบอลออนไลน์ผ่านทางโทรศัพท์มือถือ และอุปกรณ์ทุกชนิดที่เชื่อมต่ออินเตอร์เน็ตได้ สมัครเดิมพันได้ ขั้นต่ำเพียง 10 บาท ยูฟ่าสล็อตเว็บตรง แทงบอลเดี่ยว บอลเต็ง บอลสเต็ป หรือ บอลชุด เล่นได้จ่ายจริงไม่มีโกงอย่างแน่นอน ยูฟ่าเบท เว็บพนันบอลดีที่สุดของไทย
I love your wp format, where did you get a hold of it?Anthem Tax Review
türkiye kalkışlı uçak bileti
Immigration Lawyers… […]the time to read or visit the content or sites we have linked to below themp3 juice
강남안마시술소중계업체
very nice submit, i definitely love this web site, keep on it
I enjoy, cause I discovered exactly what I was looking for. You have ended my 4 day long hunt! God Bless you man. Have a nice day. Bye
web site this is very good, I like, material that is very awesome and, unique, continue to work if you sure eat certainly can, me comet with hope can help you ask for permission okay totopanen
Hello! I just wanted to ask if you ever have any trouble with hackers? My last blog (wordpress) was hacked and I ended up losing several weeks of hard work due to no back up. Do you have any methods to prevent hackers?
I’ve been surfing online more than three hours today, yet I never found any interesting article like yours. It is pretty worth enough for me. In my view, if all site owners and bloggers made good content as you did, the internet will be much more useful than ever before.
That is very fascinating, You’re a very skilled blogger. I have joined your feed and sit up for in the hunt for extra of your wonderful post. Additionally, I’ve shared your web site in my social networks|
My programmer is trying to persuade me to move to .net from PHP. I have always disliked the idea because of the costs. But he’s tryiong none the less. I’ve been using WordPress on numerous websites for about a year and am anxious about switching to another platform. I have heard good things about blogengine.net. Is there a way I can transfer all my wordpress content into it? Any kind of help would be really appreciated!
asaasdasdl aja pasti naik nisadniasdn asd asdas
Thank you for the auspicious writeup. It in fact was a amusement account it. Look advanced to more added agreeable from you! By the way, how can we communicate?|
Wow! Thank you! I constantly wanted to write on my website something like that. Can I include a portion of your post to my website?
It’s arduous to seek out educated people on this topic, but you sound like you understand what you’re speaking about! Thanks
Everyone loves it whenever people get together and share opinions. Great blog, keep it up!|
Attractive section of content. I just stumbled upon your blog and in accession capital to assert that I acquire in fact loved account your weblog posts. Anyway I’ll be subscribing on your feeds or even I fulfillment you access persistently rapidly.|
I have read a few just right stuff here. Certainly worth bookmarking for revisiting. I wonder how a lot attempt you place to create this sort of excellent informative website.
F*ckin’ awesome things here. I am very happy to look your article. Thank you so much and i’m having a look forward to touch you. Will you kindly drop me a e-mail?
เว็บดูหนังออนไลน์ เว็บดูหนังฟรี เว็บดูซีรี่ย์ ดูฟรีไม่มีโฆษณา พากย์ไทย.
หนังNetflix ดูหนังออนไลน์ หนังใหม่2022 ดูหนังใหม่ออนไลน์ฟรี พากย์ไทย. เว็บดูหนังออนไลน์ใหม่ ดูฟรีไม่มีโฆษณา หนังใหม่ 2023 หนังใหม่ชนโรง หนังฟอร์มยักษ์ ซีรี่ย์เกาหลี หมวดหมู่ 18+ ดูหนังฟรี 24 ชั่วโมง.
An outstanding share! I’ve just forwarded this onto a friend who was conducting a little research on this. And he in fact ordered me breakfast simply because I stumbled upon it for him… lol. So allow me to reword this…. Thanks for the meal!! But yeah, thanks for spending some time to discuss this subject here on your web site.|
I’m not sure where you’re getting your information, but great topic. I needs to spend some time learning much more or understanding more. Thanks for fantastic info I was looking for this information for my mission.
ดูหนังออนไลน์ หนังNetflix เว็บดูหนังฟรี ดูหนังใหม่ออนไลน์ฟรี พากย์ไทย. เว็บดูหนังออนไลน์ใหม่ ดูฟรีไม่มีโฆษณา หนังใหม่ 2023 หนังใหม่ชนโรง หนังฟอร์มยักษ์ ซีรี่ย์เกาหลี หมวดหมู่ 18+ ดูหนังฟรี 24 ชั่วโมง.
Finding the Right Immigration Solicitor… […]below you’ll find the link to some sites that we think you should visitbest online weed dispensary
Good day! This is my first visit to your blog! We are a team of volunteers and starting a new project in a community in the same niche. Your blog provided us useful information to work on. You have done a marvellous job!
We absolutely love your blog and find the majority of your post’s to be just what I’m looking for. Does one offer guest writers to write content available for you? I wouldn’t mind writing a post or elaborating on a few of the subjects you write with regards to here. Again, awesome site!
House Lawyers… […]just below, are some totally unrelated sites to ours, however, they are definitely worth checking outMexican food
whoah this blog is fantastic i love reading your posts. Keep up the good work! You know, a lot of people are searching around for this info, you can help them greatly.
Wonderful beat ! I wish to apprentice while you amend your web site, how can i subscribe for a blog site? The account helped me a acceptable deal. I had been a little bit acquainted of this your broadcast offered bright clear idea
Its like you read my mind! You seem to know a lot about this, like you wrote the book in it or something. I think that you can do with a few pics to drive the message home a little bit, but instead of that, this is fantastic blog. An excellent read. I will certainly be back.
Great blog here! Also your website loads up fast! What web host are you using? Can I get your affiliate link to your host? I wish my website loaded up as fast as yours lol|
I am extremely impressed with your writing skills as well as with the layout on your blog. Is this a paid theme or did you customize it yourself? Anyway keep up the excellent quality writing, it is rare to see a great blog like this one these days..
This article gives clear idea for the new visitors of blogging, that truly how to do blogging and site-building.|
Neat blog! Is your theme custom made or did you download it from somewhere? A theme like yours with a few simple adjustements would really make my blog shine. Please let me know where you got your design. Thanks|
I’m curious to find out what blog system you’re using? I’m experiencing some minor security issues with my latest website and I’d like to find something more secure. Do you have any solutions?|
I’m really loving the theme/design of your website. Do you ever run into any internet browser compatibility problems? A handful of my blog audience have complained about my site not operating correctly in Explorer but looks great in Firefox. Do you have any tips to help fix this problem?|
fantastic points altogether, you simply gained a new reader. What would you recommend in regards to your post that you made a few days ago? Any positive?
I do not even know the way I ended up here, but I thought this post was good. I don’t understand who you might be however certainly you are going to a well-known blogger should you aren’t already 😉 Cheers!
Wonderful site. Lots of useful info here. I am sending it to a few friends ans also sharing in delicious. And naturally, thanks for your effort!
Aw, this was a really nice post. In thought I want to put in writing like this additionally – taking time and precise effort to make an excellent article… however what can I say… I procrastinate alot and on no account appear to get something done.
I just like the valuable info you supply on your articles. I’ll bookmark your weblog and test again here regularly. I am reasonably sure I’ll learn many new stuff right right here! Best of luck for the following!
This is my first time pay a visit at here and i am genuinely pleassant to read all at one place.|
My brother suggested I would possibly like this blog. He used to be entirely right. This submit actually made my day. You cann’t imagine just how a lot time I had spent for this information! Thanks!
Hi there! I just wanted to ask if you ever have any problems with hackers? My last blog (wordpress) was hacked and I ended up losing months of hard work due to no backup. Do you have any solutions to prevent hackers?
Keep working ,terrific job!
My partner and I stumbled over here from a different web page and thought I might as well check things out. I like what I see so now i am following you. Look forward to going over your web page yet again.
Hey, We felt compelled to say something and let you know how much we loved browsing your site. Your writing are genuinely inspiring and have inspired me with a different outlook. I will be adding it to my own list and can’t wait to checking out your upcoming posts. Thanks for sharing your knowledge and keep up the fantastic job!
Hi, I just wanted to reach out and let you know how much we enjoyed reading your site. Your ideas are really amazing and have inspired me with fresh perspectives. I’ll be adding it to my bookmarks and can’t wait to reading your future articles. Thank you for putting in the time and keep up the amazing work!
Hi, I just wanted to say something and let you know how much I loved browsing your website. Your writing are truly amazing and have inspired me with fresh perspectives. I will be adding it to my own list and look forward to reading your upcoming articles. Thank you for sharing your knowledge and keep up the amazing work!
Hi, I felt compelled to say something and let you know how much we enjoyed reading your website. Your ideas are really inspiring and have inspired me with a different outlook. I will be adding it to my bookmarks and can’t wait to checking out your upcoming articles. Thank you for creating such great content and keep up the fantastic work!
Hello, I had to say something and let you know how much we loved browsing your website. Your ideas are truly inspiring and have given me fresh perspectives. I’ll be bookmarking it to my bookmarks and look forward to checking out your upcoming posts. Thanks for putting in the time and continue the fantastic work!
Hi, We had to say something and let you know how much I enjoyed browsing your website. Your writing are truly amazing and have inspired me with fresh perspectives. I will be adding it to my own list and look forward to checking out your future posts. Thank you for putting in the time and keep up the excellent work!
Hi, We felt compelled to say something and let you know how much we enjoyed browsing your website. Your ideas are really inspiring and have given me new ideas. I’ll be adding it to my list and look forward to checking out your upcoming articles. Thank you for creating such great content and keep up the amazing job!
You completed a number of nice points there. I did a search on the issue and found nearly all people will have the same opinion with your blog.betflik
Hello, I just wanted to say something and let you know how much I appreciated browsing your site. Your ideas are really fantastic and have given me fresh perspectives. I will be adding your site to my own list and can’t wait to checking out your upcoming posts. Thanks for creating such great content and keep up the excellent job!
https://www.outsourcedmedical.com/sustainability-of-medical-devices/
Hey there I found this blog and liked browsing a few of your articles. I’ll be bookmarking it to my own bookmarks to check again frequently. Keep up the great job! Looking forward to seeing more from you.
Hey, We had to reach out and let you know how much we appreciated browsing your website. Your writing are really inspiring and have given me fresh perspectives. I’ll be adding your site to my bookmarks and look forward to reading your upcoming posts. Thanks for putting in the time and keep up the excellent work! Moreover, I would really appreciate talk more on a new post. Let’s catch up!
Hi, We felt compelled to reach out and let you know how much we loved reading your website. Your writing are really amazing and have given me fresh perspectives. I will be bookmarking it to my own list and can’t wait to reading your upcoming articles. Thank you for creating such great content and keep up the amazing job! Moreover, we wanted to really appreciate talk more on a project. How about we catch up!
Howdy! Do you know if they make any plugins to help with Search Engine Optimization? I’m trying to get my blog to rank for some targeted keywords but I’m not seeing very good gains. If you know of any please share. Appreciate it!
You completed a number of nice points there. I did a search on the issue and found nearly all people will have the same opinion with your blog.betflik
Please let me know if you’re looking for a article author for your blog. You have some really great articles and I think I would be a good asset. If you ever want to take some of the load off, I’d really like to write some articles for your blog in exchange for a link back to mine. Please shoot me an e-mail if interested. Cheers!
I’m not sure why but this web site is loading incredibly slow for me. Is anyone else having this issue or is it a problem on my end? I’ll check back later and see if the problem still exists.
I visited several websites however the audio feature for audio songs current at this website is genuinely wonderful.|
The article posted was very informative and useful. You people are doing a great job. Keep going.anchor text
Next time I read a blog, I hope that it does not fail me as much as this particular one. After all, Yes, it was my choice to read through, nonetheless I really believed you would have something helpful to talk about. All I hear is a bunch of complaining about something that you can fix if you weren’t too busy looking for attention.
Hi would you mind letting me know which hosting company you’re using? I’ve loaded your blog in 3 completely different browsers and I must say this blog loads a lot faster then most. Can you recommend a good internet hosting provider at a honest price? Cheers, I appreciate it!
It’s a great content, it would be great if the picture was a little bit more.
I’ll right away grasp your rss feed as I can’t in finding your e-mail subscription hyperlink or newsletter service. Do you have any? Please let me know in order that I could subscribe. Thanks.|
Hello there! Do you use Twitter? I’d like to follow you if that would be ok. I’m definitely enjoying your blog and look forward to new posts.|
Do you have any video of that? I’d want to find out some additional information.|
Very educating story, saved your site for hopes to read more!bad woman
wonderful points altogether, you simply gained a brand new reader. What would you recommend about your post that you made some days ago? Any positive?
After I initially left a comment I appear to have clicked the -Notify me when new comments are added- checkbox and from now on every time a comment is added I receive four emails with the same comment. There has to be a means you are able to remove me from that service? Thanks a lot!|
I’ve learn a few excellent stuff here. Certainly worth bookmarking for revisiting. I surprise how a lot effort you place to make this type of great informative site.
Good day! Do you know if they make any plugins to assist with SEO? I’m trying to get my blog to rank for some targeted keywords but I’m not seeing very good results. If you know of any please share. Thanks!
Hey There. I discovered your blog the usage of msn. That is an extremely smartly written article. I will make sure to bookmark it and come back to read more of your useful info. Thanks for the post. I’ll definitely return.
Found this on MSN and I’m happy I did. Well written article.Fiverr blogcomment
You made some clear points there. I looked on the internet for the topic and found most people will agree with your site.
Helpful information. Fortunate me I discovered your web site unintentionally, and I am stunned why this accident did not came about earlier! I bookmarked it.
Hey! I know this is kind of off topic but I was wondering if you knew where I could find a captcha plugin for my comment form? I’m using the same blog platform as yours and I’m having difficulty finding one? Thanks a lot!
You can certainly see your skills in the work you write. The world hopes for more passionate writers like you who are not afraid to say how they believe. Always go after your heart.
Bắt cá Bắt cá Trò chơi sòng bạc trực tuyến bằng tiền thật , Đăng ký người dùng mới tặng 78000, Mỗi ngày đặt cược hoàn trả 2.0 . Hoa hồng đại lý nhận được thấp nhất 50 . Rút tiền nhanh , Phúc lợi tốt , Trò chơi nhiều , Thương hiệu 10 năm , Bảo đảm yu tín
The other day, while I was at work, my sister stole my iPad and tested to see if it can survive a twenty five foot drop, just so she can be a youtube sensation. My apple ipad is now broken and she has 83 views. I know this is completely off topic but I had to share it with someone!
It is really a great and helpful piece of information. I’m glad that you shared this useful information with us. Please keep us informed like this. Thanks for sharing.
The following time I read a weblog, I hope that it doesnt disappoint me as much as this one. I imply, I do know it was my choice to learn, however I actually thought youd have one thing interesting to say. All I hear is a bunch of whining about something that you can repair if you happen to werent too busy searching for attention.
You must take part in a contest for top-of-the-line blogs on the web. I’ll advocate this website!
Bắt cá Bắt cá Trò chơi sòng bạc trực tuyến bằng tiền thật , Đăng ký người dùng mới tặng 78000, Mỗi ngày đặt cược hoàn trả 2.0 . Hoa hồng đại lý nhận được thấp nhất 50 . Rút tiền nhanh , Phúc lợi tốt , Trò chơi nhiều , Thương hiệu 10 năm , Bảo đảm yu tín
bingo- World’s Top Online Casinos, new user welfare register bonus 66₱, daily Betting Rebate 2. fast withdraw, good bonus, variety of games, World brand is trustworthy. Slot games, Card games , Live Casino, Animals(Cockfight games), fishing.
What a stuff of un-ambiguity and preserveness of valuable knowledge concerning unexpected emotions.|
slot betting- World’s Top Online Casinos, new user welfare register bonus 66₱, daily Betting Rebate 2. fast withdraw, good bonus, variety of games, World brand is trustworthy. Slot games, Card games , Live Casino, Animals(Cockfight games), fishing.
I used to be suggested this website by way of my cousin. I am now not certain whether or not this put up is written by means of him as nobody else recognise such specified about my difficulty. You’re wonderful! Thanks!|
ph646- World’s Top Online Casinos, new user welfare register bonus 66₱, daily Betting Rebate 2. fast withdraw, good bonus, variety of games, World brand is trustworthy. Slot games, Card games , Live Casino, Animals(Cockfight games), fishing.
I am not sure where you’re getting your information, but great topic. I needs to spend some time learning much more or understanding more. Thanks for fantastic info I was looking for this information for my mission.
Howdy! This post could not be written any better! Reading this post reminds me of my good old room mate! He always kept talking about this. I will forward this article to him. Pretty sure he will have a good read. Thank you for sharing!|
Hello, Neat post. There is an issue together with your site in web explorer, might test this… IE still is the market chief and a good element of other people will pass over your great writing because of this problem.
Really Appreciate this article, is there any way I can receive an email sent to me whenever you publish a new update?
You are a very bright individual!
Heya i’m for the first time here. I found this board and I find It truly useful & it helped me out a lot. I hope to give something back and aid others like you helped me.
What’s up to every body, it’s my first pay a quick visit of this web site; this website includes amazing and in fact fine material in support of visitors.|
poker online- World’s Top Online Casinos, new user welfare register bonus 66₱, daily Betting Rebate 2. fast withdraw, good bonus, variety of games, World brand is trustworthy. Slot games, Card games , Live Casino, Animals(Cockfight games), fishing.
Hmm is anyone else having problems with the images on this blog loading? I’m trying to figure out if its a problem on my end or if it’s the blog. Any feed-back would be greatly appreciated.
Unquestionably believe that which you stated. Your favorite justification appeared to be on the web the simplest thing to be aware of. I say to you, I certainly get irked while people think about worries that they just don’t know about. You managed to hit the nail upon the top as well as defined out the whole thing without having side-effects , people could take a signal. Will probably be back to get more. Thanks
I loved as much as you’ll receive carried out right here. The sketch is attractive, your authored material stylish. nonetheless, you command get got an nervousness over that you wish be delivering the following. unwell unquestionably come more formerly again since exactly the same nearly very often inside case you shield this hike.
Tongits go – World’s Top Online Casinos, new user welfare register bonus 66₱, daily Betting Rebate 2. fast withdraw, good bonus, variety of games, World brand is trustworthy. Slot games, Card games , Live Casino, Animals(Cockfight games), fishing.
Immigration Lawyers… […]the time to read or visit the content or sites we have linked to below thepeople
Excellent read, I just passed this onto a friend who was doing a little research on that. And he just bought me lunch because I found it for him smile Therefore let me rephrase that: Thanks for lunch!
Excellent items from you, man. I’ve remember your stuff prior to and you are simply too fantastic. I actually like what you’ve obtained here, really like what you’re saying and the best way in which you say it. You’re making it entertaining and you continue to care for to keep it sensible. I cant wait to read far more from you. This is really a great site.
I would like to thnkx for the efforts you have put in writing this web site. I am hoping the same high-grade web site post from you in the upcoming also. Actually your creative writing skills has inspired me to get my own web site now. Actually the blogging is spreading its wings fast. Your write up is a great example of it.
I would like to express my appreciation for your kindness supporting those individuals that really need guidance on your theme. Your very own commitment to getting the message along ended up being really significant and has permitted ladies like me to arrive at their ambitions. Your informative information means a whole lot a person like me and still more to my colleagues. Warm regards; from everyone of us.
I definitely wanted to jot down a quick remark in order to say thanks to you for those pleasant information you are posting here. My time-consuming internet search has now been compensated with good quality strategies to talk about with my friends. I would declare that many of us readers are undoubtedly blessed to exist in a good network with many marvellous people with valuable suggestions. I feel really blessed to have seen your site and look forward to so many more enjoyable times reading here. Thank you once again for everything.
Write more, thats all I have to say. Literally, it seems as though you relied on the video to make your point. You clearly know what youre talking about, why throw away your intelligence on just posting videos to your site when you could be giving us something informative to read?
hey there and thank you for your information – I’ve definitely picked up something new from right here. I did however expertise a few technical issues using this web site, as I experienced to reload the website a lot of times previous to I could get it to load properly. I had been wondering if your hosting is OK? Not that I am complaining, but slow loading instances times will often affect your placement in google and could damage your high quality score if ads and marketing with Adwords. Well I am adding this RSS to my email and can look out for much more of your respective fascinating content. Ensure that you update this again very soon..
May I just say what a comfort to discover an individual who genuinely understands what they’re discussing on the internet. You certainly understand how to bring a problem to light and make it important. More people ought to look at this and understand this side of your story. It’s surprising you aren’t more popular since you certainly possess the gift.|
I’m very happy to read this. This is the type of manual that needs to be given and not the accidental misinformation that’s at the other blogs. Appreciate your sharing this best doc.
you have an important blog here! would you like to make some invite posts on my blog?
cbd farms delta 8
I come across your webpage from cuil and it’s high quality. Thnkx for giving this sort of an incredible article..slot terbaik
Next time I read a blog, I hope that it doesn’t fail me as much as this one. I mean, I know it was my choice to read, but I really thought you would have something helpful to say. All I hear is a bunch of complaining about something that you could fix if you were not too busy searching for attention.
Jika kalian daftar di web slot gacor mudah menang dapat tersedia banyak terhitung pilihan provider website slot gacor Terbaru 2023 yang sering kasih jackpot yang bisa anda mainkan bersama dengan serta bonus jackpot slot online sanggup kamu punyai bersama dengan Mudah. Buat kamu para fans slot jackpot besar bisa segera kesini guna memenangkan tidak sedikit sekali duit dengan cuma deposit sebesar sebesar 25ribu rupiah saja. Terdapat banyak bonus serta promosi yang mampu anda memiliki kala bergabung bersama dengan website judi slot online gampang menang, satu diantara yang lain semacam:
Thanks in support of sharing such a pleasant opinion, post is good, thats why i have read it completely|
For extra information about licensing, charges, and charges particular to your state, try our Rates and Fees Page.
We haven’t got bank holds and generally, you’ve instant access to your money.
If you could have a low credit rating, you might discover your options more limited than somebody with a better score.
พนันบอลออนไลน์ ได้เงินจริง กับเว็บบอลที่ดีเยี่ยมที่สุดชั้น 1 การเล่นพนัน ที่เยี่ยมที่สุด ในยุคนี้ พนันบอลออนไลน์ ได้เงินจริง เป็นการลงทุน ที่ง่ายสุดๆๆเข้าพนันได้ในระบบออนไลน์ รองรับทุกแพรตฟร์อม ทั้ง บนมือถือ หรือ จะ บนคอมพิวเตอร์ รองรับ ทั้งยังระบบ แอนดรอยด์ และ ระบบ IOS ได้ แบบที่คล่องแคล่วที่สุด พนันบอล ไม่มีอย่างต่ำ ได้กำไรได้แบบสวยๆไม่จำเป็นที่จะต้องมาวิตกกังวล เรื่องทุนน้อย เพราะเว็บไซต์ UFAALLIN ให้โอกาสดีๆล้นหลาม จากโปรดีๆให้นักพนันทุกคน ได้เดิมพันออนไลน์ ได้แบบพอใจ มากที่สุด.
The lender is restricted to extending loans to borrowers who’ve paid at least one-third of the principal owed on each extension.
สล็อต168 เว็บตรงไม่ผ่านเอเย่นต์ ฝาก-ถอนไม่มีอย่างต่ำ เว็บไซต์สล็อตชั้น 1 เว็บไซต์สล็อตฝากถอนไม่มีอย่างต่ำ เปิดบริการเกี่ยวกับเกมสล็อตออนไลน์มาอย่างยาวนาน มีค่ายเกมส์ให้เลือกเล่นเยอะมากหลายกหลายค่ายเกมส์ เรียกกล้วยๆว่า รวมสล็อตทุกค่าย ไว้ในเว็บไซต์เดียวแล้ว ลงทะเบียนกล้วยๆไม่กี่ขั้นตอนพร้อมรับโปรโมชั่นฝากแรกได้ทันทร มีทีมงานมีอาชีพรอให้คำปรึกษาตลอด 24 ชม. สล็อตออนไลน์ ฝาก-ถอนเร็วด้วยระบบออโต้จำเป็นต้อง แค่นั้นทำรายการไม่ถึง 10 เร็วโคตรๆแถมยังโปรโมชั่นมากมาย แอ ป ทุจริต เกม แตกง่าย จ่ายจริง ไม่มีอั้น ไม่มีอย่างต่ำ 1 บาทก็เล่นได้แล้ว เว็บไซต์เดียวจบครบทุกบริการ มีข้าราชการคอยดูแลตลอด 24 ชั่วโมง สล็อต168 ผู้ให้บริการสล็อตออนไลน์อันดับ 1 ในไทย ให้บริการมายาวนานมากกว่า 10 ปี เพราะว่าเราคือ สล็อตเว็บตรงไม่ผ่านเอเย่นต์ มีใบเซอร์รับประกันจากต่างประเทศ เล่นง่ายได้เงินจริง เว็บไซต์ตรง มั่นคง ไม่เป็นอันตราย เปิดให้บริการทุกเมื่อเชื่อวัน ไม่มีหยุด ตลอด 24 ชั่วโมง
It’s in point of fact a great and helpful piece of info. I’m happy that you just shared this useful information with us. Please stay us informed like this. Thank you for sharing.|
ดูหนังใหม่ 2023 ซึ่งเว็บ ของพวกเราถือเป็นหนึ่งในตัวเลือกที่เยี่ยมที่สุด ในการดูหนังใหม่ล่าสุดฟรีไม่กระตุก นอกเหนือจากนั้นยังสามารถดูหนังฟรี 2022 ด้วยความคมชัดระดับ HD ตั้งแต่ 360px, 480px, 720px แล้วก็ 1080px ไปจนกระทั่งความแหลมคมชัด 4K หรือ Ultra HD ดังนี้สำหรับเพื่อการเลือกดูหนังฟรีมันๆกับเราผู้ชมจำต้องเลือกความละเอียดหนังตามความเร็วอินเตอร์เนตของท่านในแบบ 3G 4G Wifi แล้วก็ Hi-Speed Internet อย่างเหมาะควร ท่านสามรถรับชมภาพยนตร์ที่ท่านต้องการได้แบบฟรีๆไม่ต้องเสียตังค์สักบาทและไม่จำเป็นต้องเสียเวล่ำเวลาลงทะเบียนสมัครสมาชิก ดูหนังใหม่ได้เพียงแค่คลิ๊กเดียว ไม่วุ่นวายไม่ต้องทำอะไรเยอะแยะ.
Thx so much !!! Appreciate the helpful info.
Among other information, you should receive info outlining the finance cost and the annual proportion price .
What i do not realize is if truth be told how you are no longer really much more smartly-liked than you may be right now. You’re so intelligent. You understand thus considerably relating to this subject, produced me in my opinion consider it from so many numerous angles. Its like men and women aren’t involved unless it is one thing to do with Girl gaga! Your own stuffs nice. All the time deal with it up!|
มีหนังฟรีให้เลือกมองกว่า 10,000 เรื่อง มีทั้งหนังเก่า หนังใหม่อีกทั้งหนังไทย ภาพยนตร์จีน หนังฝรั่ง การ์ตูนอนิเมชั่น หนังเอเชีย ซีรีย์ทั้งยังไทยและต่างชาติ รวมทั้งหนังฯลฯ ให้ท่านได้เลือกชมฟรีตลอด24ชั่วโมง พร้อมอัพเดทหนังใหม่ให้แก่คุณได้รับดูก่อนใคร สามารถดูได้ผ่าน SMART TV , ANDROID , IOS ได้ทุกเครือข่าย.
สล็อต168 เว็บตรงไม่ผ่านเอเย่นต์ ฝาก-ถอนไม่มีอย่างต่ำ เว็บไซต์สล็อตชั้น 1 เว็บไซต์สล็อตฝากถอนไม่มีขั้นต่ำ เปิดบริการเกี่ยวกับเกมสล็อตออนไลน์มาอย่างนาน มีค่ายเกมส์ให้เลือกเล่นเยอะแยะหลายกหลายค่ายเกมส์ เรียกง่ายๆว่า รวมสล็อตทุกค่าย ไว้ในเว็บเดียวแล้ว ลงทะเบียนเป็นสมาชิกกล้วยๆไม่กี่ขั้นตอนพร้อมรับโปรโมชั่นฝากแรกได้ทันทร มีทีมงานมีอาชีพคอยให้คำปรึกษาตลอด 24 ชั่วโมง สล็อตออนไลน์ ฝาก-ถอนเร็วทันใจด้วยระบบออโต้จะต้อง แค่นั้นทำรายการไม่ถึง 10 เร็วโคตรๆแถมยังโปรโมชั่นมากมาย แอ ป คดโกง เกม แตกง่าย จ่ายจริง ไม่มีอั้น ไม่มีอย่างน้อย 1 บาทก็เล่นได้แล้ว เว็บไซต์เดียวจบครบทุกบริการ มีเจ้าหน้าที่คอยดูแลตลอด 24 ชม. สล็อต168 ผู้ให้บริการสล็อตออนไลน์อันดับ 1 ในไทย ให้บริการมายาวนานมากกว่า 10 ปี เนื่องจากพวกเราเป็น สล็อตเว็บไซต์ตรงไม่ผ่านเอเย่นต์ มีใบเซอร์การันตีจากต่างประเทศ เล่นง่ายได้เงินจริง เว็บไซต์ตรง มั่นคง ไม่มีอันตราย เปิดให้บริการทุกวี่วัน ไม่มีหยุด ตลอด 24 ชม.
เว็บไซต์ดูหนังฟรี หนังใหม่เต็มเรื่อง 2023 ท่านสามารถเลือกดูหนังได้หลากหลายแบบ ไม่ว่าจะเป็นหนังจาก Netflix, WeTV, IQIYi, Disney+, HBO, Amazon Prime เรามีให้คุณมองฟรี ไม่ต้องเสียค่าบริการรายเดือน ไม่ต้องสมัครสมาชิกให้ยุ่งยาก เข้ามาแล้วเซิทชื่อหนังที่คุณอยากได้แล้วเลือกมองได้เลย ไม่ว่าจะเป็น หนังไทย หนังฝรั่ง หนังเกาหลี อีกทั้งเก่าและก็ใหม่ เราก็มีให้คุณเลือกมองครบ ด้วยความชัดระดับ Full HD และก็ 4K ที่สำคัญทีเด็ดของเว็บดูหนังของเราเป็นตัวเล่นหนังโหลดไวมาก ดูหนังสนุกสนาน ดูหนังฟรี ไม่มีสะดุด ไม่มีประชาสัมพันธ์กวนประสาท และก็สามารถ ดาวน์โหลดหนังฟรีเก็บไว้มองได้ทุกเรื่องด้วยความเร็วสำหรับในการโหลดเต็มสปีด.
นอกเหนือจากนั้นพวกเรายังมี หนังใหม่ชนโรง 2022-2023 เต็มเรื่อง มาให้แก่คุณได้เลือกดูกันแบบซูมชัดๆอัพเดทหนังก่อนใครกันแน่ หนังมาสเตอร์ หรือหนังใหม่เสียงซาวด์แทรก ซับไทย ก็มีให้เลือกจากตัวเล่น ดูหนังออนไลน์ ของแต่ละเรื่องครบทุกจำพวกหนัง อาทิเช่น ดูหนังแอคชั่น หนังบู๊มันๆ, หนังดราม่า, หนังโรแมนติก, หนังสยองขวัญ หนังผี, หนังประเทศเกาหลี ดูซีปรี่ย์, หนังสอบสวนสืบสวน, หนังซุเปอร์วีรบุรุษ MARVEL DC, หนังการ์ตูน แอนิเมชั่น ,หนังภาคต่อ หนังดังทั้งไทย ทวีปเอเชีย รวมทั้งต่างถิ่น ฯลฯ ดังนี้พวกเรามีทีมงานรอแปลหนังเองท่านจะได้รับดูหนังใหม่ชนโรงก่อนใครกันแน่อย่างแน่นอน นอกเหนือจากนั้นท่านยังสามารถ ดูหนังใหม่ 2023 ได้แล้ววันนี้รวมทั้งหนังตามที่ยังไม่เข้าฉายก็มีบริการที่นี่ที่เดียว.
UFABET เว็บตรง เว็บหลัก เว็บไซต์พนันออนไลน์ดีเยี่ยมที่สุด UFABET เว็บตรง พนันออนไลน์อย่างแน่ใจในทุกเกมที่พนัน พวกเราคือคาสิโนออนไลน์ (Casino Online) ที่มีอัตราการเจริญเติบโตและก็ผู้เล่นให้ความวางใจ รวมทั้งเรียกว่าดีเยี่ยมที่สุดในประเทศไทย มีชื่อเสียงกันดี มีความยั่งยืนมั่นคง เป็นที่รู้จักไว้ใจได้ในฐานะ เว็บหลัก ด้านการเดิมพันชั้นหนึ่ง มี เกมคาสิโน หลากหลายที่มากับประสบการณ์สุดพิเศษ ครบทุกเกม มอบความสนุกสนานร่าเริงให้แก่ผู้เล่นแต่ละราย สนองตอบทุกประสบการณ์การพนัน ได้ง่ายเพียงแค่ปลายนิ้วสัมผัส. ท่านสามารถพนันกับ UFABET ผ่าน คอมพิวเตอร์ แท็บเล็ต และ โทรศัพท์มือถือ ได้ตลอดเวลา ตามอัธยาศัย ยิ่งกว่านั้น พวกเรายังมี โปรโมชั่น, โบนัส และก็เงินรางวัลสุดพิเศษอีกเพียบเลย สำหรับผู้เล่นใหม่ รวมทั้ง ผู้เล่นเดิม ท่านสามารถเข้าไปเดิมพันที่ UFABET ได้ตลอดระยะเวลา ฝากถอน ทำรายการได้ตลอด ไม่มีวันหยุด การเงินมั่นคง ทำรายการเร็วใน 1 นาทีเพียงแค่นั้น ลงทะเบียนเป็นสมาชิก ยูฟ่าเบท ได้ฟรี ไม่ต้องจ่ายเงิน.
สล็อต168 เว็บตรงไม่ผ่านเอเย่นต์ ฝาก-ถอนไม่มีอย่างต่ำ เว็บสล็อตอันดับ 1 เว็บไซต์สล็อตฝากถอนไม่มีอย่างต่ำ เปิดบริการเกี่ยวกับเกมสล็อตออนไลน์มาอย่างช้านาน มีค่ายเกมส์ให้เลือกเล่นจำนวนมากหลายกหลายค่ายเกมส์ เรียกง่ายๆว่า รวมสล็อตทุกค่าย เอาไว้ในเว็บไซต์เดียวแล้ว สมัครเป็นสมาชิกกล้วยๆไม่กี่ขั้นตอนพร้อมรับโปรโมชั่นฝากแรกได้ทันทร มีคณะทำงานมีอาชีพคอยให้คำแนะนำตลอด 24 ชม. สล็อตออนไลน์ ฝาก-ถอนรวดเร็วทันใจด้วยระบบออโต้จำเป็นต้อง เท่านั้นทำรายการไม่ถึง 10 เร็วโคตรๆแถมยังโปรโมชั่นมาก แอ ป คดโกง เกม แตกง่าย จ่ายจริง ไม่มีอั้น ไม่มีขั้นต่ำ 1 บาทก็เล่นได้แล้ว เว็บไซต์เดียวจบครบทุกบริการ มีข้าราชการรอดูแลตลอด 24 ชม. สล็อต168 ผู้ให้บริการสล็อตออนไลน์ชั้น 1 ในไทย ให้บริการมายาวนานมากกว่า 10 ปี เนื่องจากว่าพวกเราคือ สล็อตเว็บไซต์ตรงไม่ผ่านเอเย่นต์ มีใบเซอร์การันตีจากต่างแดน เล่นง่ายได้เงินจริง เว็บตรง มั่นคง ไม่เป็นอันตราย เปิดให้บริการทุกวี่ทุกวัน ไม่มีหยุด ตลอด 24 ชั่วโมง
Payday Loans must be used for short-term monetary needs only, not as a long-term financial answer.
You may wish to look right into a small loan out of your credit score union or a small mortgage company.
Next, you’ll receive a fast determination concerning your eligibility and approval.
UFABET เว็บตรง เว็บไซต์หลัก เว็บพนันออนไลน์เยี่ยมที่สุด UFABET เว็บตรง เดิมพันออนไลน์อย่างแน่ใจในทุกเกมที่เดิมพัน เราเป็นคาสิโนออนไลน์ (Casino Online) ที่มีอัตราการเจริญเติบโตและก็ผู้เล่นให้ความวางใจ แล้วก็เรียกว่าเยี่ยมที่สุดในประเทศไทย มีชื่อเสียงกันดี มีความมั่นคงยั่งยืน มีชื่อเสียงไว้ใจได้ในฐานะ เว็บไซต์หลัก ด้านการเดิมพันชั้นหนึ่ง มี เกมคาสิโน หลากหลายที่มากับประสบการณ์สุดพิเศษ ครบทุกเกม มอบความสนุกสนานร่าเริงให้แก่ผู้เล่นแต่ละราย สนองตอบทุกประสบการณ์การเดิมพัน ได้ง่ายเพียงแต่ปลายนิ้วสัมผัส. ท่านสามารถพนันกับ UFABET ผ่าน คอมพิวเตอร์ แท็บเล็ต รวมทั้ง โทรศัพท์เคลื่อนที่ ได้ตลอดเวลา ตามความสะดวก นอกจากนั้น พวกเรายังมี โปรโมชั่น, โบนัส และเงินรางวัลสุดพิเศษอีกเยอะแยะ สำหรับผู้เล่นใหม่ และก็ ผู้เล่นเดิม ท่านสามารถเข้าไปเดิมพันที่ UFABET ได้ตลอดเวลา ฝากถอน ทำรายการได้ตลอด ไม่มีทางหยุด การเงินมั่นคง ทำรายการเร็วใน 1 นาทีเพียงแค่นั้น ลงทะเบียน ยูฟ่าเบท ได้ฟรี ไม่เสียค่าใช้จ่าย.
Keep up the great work, I look forward to reading more.
Just wanted to say thank you!
เว็บ คาสิโนออนไลน์ ที่ดีที่สุด ปลอดภัย เชื่อถือได้ที่สุด คาสิโนออนไลน์ เป็นเว็บไซด์การเดิมพันออนไลน์ศูนย์รวมทุกๆสิ่งทุกๆอย่างเอาไว้ภายในเว็บเดียว ที่กำลังเป็นที่นิยมและก็เป็นที่พึงพอใจของผู้เล่น มีคุณภาพ ใช้กฎกติกาแบบสากลล้ำสมัย เป็น เว็บตรง ที่ไม่ผ่านเอเย่นต์ ไม่เป็นอันตรายแล้วก็เชื่อถือได้ที่สุดการ ฝากถอนระบบออโต้ ไม่ยุ่งยาก ไม่ต้องรอนาน ดำเนินงานโดยทีมงานแล้วก็ Call Center ที่มีคุณภาพที่รอบริการ ตลอด 1 วัน.
Диапазон частот: от 0,15 до 30 МГц
เว็บไซต์ คาสิโนออนไลน์ ที่ดีที่สุด ปลอดภัย เชื่อถือได้ที่สุด คาสิโนออนไลน์ เป็นเว็บไซต์ไซด์การพนันออนไลน์ศูนย์รวมทุกสิ่งไว้ในเว็บเดียว ที่กำลังเป็นที่ชื่นชอบรวมทั้งเป็นที่ชอบใจของผู้เล่น มีคุณภาพ ใช้กฎกติกาแบบสากลนำสมัย เป็น เว็บตรง ที่ไม่ผ่านเอเย่นต์ ไม่เป็นอันตรายและก็เชื่อถือได้ที่สุดการ ฝากถอนระบบออโต้ ไม่ยุ่งยาก ไม่ต้องรอนาน บริหารงานโดยคณะทำงานและก็ Call Center ที่มีคุณภาพที่คอยบริการ ตลอด 1 วัน.
บาคาร่าออนไลน์ เว็บที่คนเล่นสูงที่สุด เล่นบนโทรศัพท์เคลื่อนที่ ได้เงินจริง บาคาร่าออนไลน์ เปิดให้บริการสําหรับทุกคน สามารถเล่น บาคาร่าออนไลน์ เข้าสู่ระบบระบบอัตโนมัติ ผ่านทางหน้าเว็บไซต์ได้จากทุกเครื่องมือ อยู่ตรงไหนท่านก็ สามารถเล่นได้ มีครบทุกค่ายดัง SA Game, Pretty Gaming Baccarat, Sexy Baccarat หรือ น่ามอง บาคาร่า คณะทำงานหลังบ้านมี ความมีประสิทธิภาพที่พวกเราสามารถ ให้การัน ตีกับทุกคนได้ เวลาเกิดอุปสรรคต่อการเล่นพนัน บาคาร่า ออนไลน์ หรือ พบเห็นปัญหาของเกม ก็สามารถแจ้งกับกลุ่ม งานสุดงามของเราเหมาะช่องทาง Line เว็บไซต์ของพวกเรามา ท่านจะได้เจอกับ โปรโมชั่นพิเศษมากมาย ไม่ว่าจะเป็นเครดิตฟรี แล้วก็ยังมีคืนยอดเสีย และก็ข้อแนะนำเอ็กคลูซีฟอีกมากมายเลย.
Приемник ЛИРА РП-248-1 основан на супергетеродинном принципе и имеет шесть диапазонов частот, которые позволяют принимать радиосигналы в диапазоне от 0,15 до 30 МГц. Приемник имеет возможность работы в различных режимах, включая АМ, ЧМ, СВ и ДСВ.
แทงบอลออนไลน์ ได้เงินจริง ไม่มีอย่างต่ำ บริการที่ดีเยี่ยมที่สุดของเว็บบอล แทงบอล ไม่มีขั้นต่ำเป็นการพนันบอล ในระบบออนไลน์ ที่เหล่านักเสี่ยงดวงบอลต่างๆสมารถเลือกเล่น หรือเลือกลงทุนพนันบอลออนไลน์ ได้แบบที่ไม่มี การตั้งราคา สำหรับเพื่อการพนันบอล ก็เลยเรียกว่า ไม่มีขั้นต่ำ ทางเลือกที่ดี จากทางเว็บพนันที่ให้บริการแบบที่นักเสี่ยงโชครู้สึกอุ่นใจ และก็ เป็นเรื่องดีของ นักพนันหน้าใหม่ จะได้กล้าเข้ามา ลงทุนพนันบอลได้แบบไร้กังวล สมัคร พนันบอลออนไลน์ รับความคุ้มค่า หาที่แหน่งใด ไม่ได้อีกแล้ว บริการ 1 วัน การแทงบอล ทุกวันนี้ นั้น เป็นพนันจำพวกที่ได้รับ เสียงตอบรับเจริญมากมายๆแล้วก็ นักพนันต่างๆให้การสารภาพ สูงที่สุด แล้วก็สร้างความชื่นชอบ จากโปรดีๆที่ดินเว็บไซต์มอบให้อย่างต่อเนื่อง เรื่อยๆมา ทำให้มีนักพนันใหม่ มีความสนใจ สมัคร แทงบอลออนไลน์ มากขึ้นเรื่อยๆวันแล้ววันเล่า พนันบอลออนไลน์กับ UFABET เป็นการพนันที่สมัยใหม่ที่สุด มาพร้อมความ สบาย และเร็วทันใจ ด้วยการพนัน พนันบอล บนโทรศัพท์มือถือ เป็นเรื่องที่ทุกคน เข้าถึงเว็บพนันได้เร็ว โดยไม่ต้องทุกข์ยากลำบาก ไปถึงบ่อนพนัน.
Whether you want money for an pressing medical bill or car repair, you’ll always get a pre-approved lending decision nearly instantly.
Диапазон частот: от 0,15 до 30 МГц
Thanks so much for sharing the info.
Статья подняла важный вопрос о том, как бороться с нежелательной рекламой на досках объявлений.
Baget yüzük modelleri 2023 yılında yeni tasarımlarıyla karşınızda. Sizde baget yüzük fiyatlarından ve kalitesinden faydalanın. https://riessa.com.tr/kategori/baget-yuzuk ile sevdiklerinize jest yapabilirsiniz. Hediyenin en güzel halini kaçırmaıyn..
Thanks for your hard work.
ขอชี้แนะเว็บไซต์ ดูหนังออนไลน์ ครบทุกเรื่องไม่ว่าพอใจเข้ามารับชมความเพลิดเพลินในค่ายไหน เรื่องใด ที่เว็บ Movie44 ของพวกเราพร้อมบริการอย่างยิ่ง เพื่อที่ท่านนั้นจะสามารถเข้ามารับชมได้อย่างไม่มีคุณค่าบริการ เข้ามาร่วมสนุกไปกับหนังดัง หนังดีที่ท่านทุกคนเข้าถึงได้อย่างสะดวก โดยที่ท่านใช้งานได้ทางโทรศัพท์มือถือทุกระบบ ไม่ว่าพึงพอใจเข้ามา ดูหนัง เรื่องไหนกดค้นหาได้เลย ง่ายที่สุด คนไหนก็สามารถที่จะเข้าเลือก หนังออนไลน์ ที่ต้องการรับชมได้จริง ไม่ต้องจ่ายเงิน และยังไม่มีเรื่องเกี่ยวกับการลงทะเบียนเข้ามายุ่งยากอีกด้วย การันตีเลยว่าบันเทิงใจอย่างที่สุด แล้วก็ครบรส ตรงหัวใจท่านทุกคนที่พอใจ ไม่ว่าเรื่องใดก็ตาม ที่นี่จัดให้ กดเข้ามาเลย.
ดูหนังใหม่ 2023 ซึ่งเว็บ ของพวกเราถือเป็นหนึ่งในตัวเลือกที่เหมาะสมที่สุด สำหรับในการดูหนังใหม่ปัจจุบันฟรีไม่กระตุก นอกนั้นยังสามารถดูหนังฟรี 2022 ด้วยความคมชัดระดับ HD ตั้งแต่ 360px, 480px, 720px รวมทั้ง 1080px ไปจนถึงความแหลมคมชัด 4K หรือ Ultra HD ทั้งนี้สำหรับการเลือกชมหนังฟรีมันๆกับพวกเราผู้ชมจะต้องเลือกความละเอียดหนังตามความเร็วอินเตอร์เนตของท่านในแบบ 3G 4G Wifi แล้วก็ Hi-Speed Internet อย่างเหมาะสม ท่านสามรถรับชมภาพยนตร์ที่ท่านอยากได้แบบฟรีๆไม่ต้องเสียเงินเสียทองสักบาทและไม่จำเป็นต้องเสียเวล่ำเวลาสมัครเป็นสมาชิก ดูหนังใหม่ได้เพียงแค่คลิ๊กเดียว ไม่วุ่นวายไม่ต้องทำอะไรเยอะ.
หนังอัพเดทใหม่ทุกๆวัน รวมหนังค่ายดัง มีอีกทั้งหนังเก่า หนังใหม่ ค่าย Netflix, Disney+, Viu หนังฝรั่ง ภาพยนตร์ไทย หนังเกาหลี ครบทุกแบบที่ปรารถนา ด้วยเสียงพากย์ไทย Soundtrack ซับไทย ให้แก่คุณได้รับชมอย่างจุใจ ครบทุกเรื่องที่ท่านอยากได้รับชม เข้ามาดูหนังที่ท่านอยากได้ได้ทันที ไม่ตกเทรน ภาพและก็เสียงเหมือนจริง อัพเดทก่อนคนใดกัน มีทีมงานที่มีประสบการณ์ปฏิบัติงานด้านหนังออนไลน์มายาวนาน คอยดูแลท่านตลอด 24 ชั่วโมง.
บาคาร่าออนไลน์ เว็บไหนดี สมัครง่ายไม่ต้องทำเทิร์น บาคาร่าออนไลน์ ได้เงินจริง ไม่ต้องทําเทิร์น กําลังเป็นที่น่า พอใจของเหล่าคนเล่นการพนันมือใหม่เป็นจํานวนมาก เพราะ ไม่ต้องทําความเข้าใจในเรื่องของเทิร์น โอเวอร์ หรือเทิร์น เครดิต เล่นบาคาร่าออนไลน์ได้กี่บาท ท่านก็สามารถถอน เงินยอดนั้นๆไปได้เลย ในทันทีทันใด โดยที่ไม่ต้องมาคํานวนเทิร์น อะไรก็แล้วแต่เลยเลือกสมัครบาคาร่ากับทางเว็บพวกเรา แม้ท่านไม่ ได้กดรับ โปรโมชั่นใดๆท่านจะไม่ติดข้อแม้ของเรื่องการ ทําเทิร์น ด้วยเหตุนั้นจะทําให้แด่ท่านสามารถเล่น บาคาร่า ได้อย่าง สบายใจเยอะขึ้นเรื่อยๆ สมัครบาคาร่าออนไลน์ ได้ตลอด 1 วันอีกทั้ง พร้อมกับโปรโมชั่น ให้เลือกรับอีกเพียบเลย ซึ่งแต่ละ โปรโมชั่นของเกม บาคาร่าออนไลน์ นั้นก็จะมี เงื่อนไขที่ต่างๆนาๆ โดยท่านจะสามารถรับ โบนัสเครดิตฟรีได้ สูงสุดสูงถึง 20.
The option to share feedback on transactions helps maintain accountability within the community.
เว็บไซต์เกมแทงบอล มีความมั่นคงปลอดภัยสูง ลงทุนได้โดยสวัสดิภาพ เป็นเว็บที่มีความมั่นคงปลอดภัยสูงจึงทำให้นักเล่นการพนันสามารถลงทุน ได้อย่างปลอดภัยแน่ๆกับ ทุกขั้นตอนสำหรับเพื่อการให้บริการ ที่มีประสิทธิภาพ รวมทั้งได้รับการยินยอมรับจากนักเสี่ยงโชคทั้งโลกว่าเป็นเว็บไซต์ที่ดีที่สุด โดยสามารถเข้าสู่ระบบการเดิมพัน โดยการลงทะเบียนเป็นสมาชิกผ่านทางหน้าเว็บไซต์ ได้ในทันทีมีความพร้อมของระบบโปรแกรม ในการทำงานที่อำนวยความสะดวก ให้กับนักเสี่ยงโชคได้อย่างยอดเยี่ยม จึงทำให้ทุกขั้นตอน เป็นไปได้อย่างสะดวกรวดเร็วทันใจ. ดังนี้สำหรับคนไหนกันแน่ที่กำลังมองหาแบบอย่าง การให้บริการที่ดีที่สุดในการแทงพนันบอล ออนไลน์ การเลือกสมัครสมาชิกกับเว็บแทงบอลยูฟ่าเบท ย่อมไม่ผิดหวังอย่างแน่นอน เพราะเหตุว่าทุกขั้นตอนสำหรับเพื่อการให้บริการ มีความปลอดภัยรองรับอย่างดีเยี่ยม จึงเป็นสิ่งที่ไว้ใจได้ กับการลงทุนแทงแทงบอล ออนไลน์ ได้ทุกแบบอย่าง.
“The team at Briansclubcm.co Content Agency Bristol is knowledgeable and creative, resulting in a successful content campaign
Вместо этого, вы можете указать произвольный адрес электронной почты., и отправитель будет указан как “CandyMail.org”.
PG SLOT สล็อตเว็บตรง ฝาก-ถอนไม่มีขั่นต่ำ รองรับทุกระบบที่เข้ามาใช้งาน สล็อต เข้าใช้งานระบบฝาก – ถอน ของทางเว็บ สล็อตเว็บตรง ออนไลน์ ของพวกเราที่นี่ ได้ทุกระบบไม่มีจำกัด รับประกันได้เลยว่ามีครบทุกความสะดวกสบายหลากหลายหนทางที่ผู้เล่นทุกคนสามารถเลือกใช้บริการ สล็อต ได้อย่างทันใจ เนื่องจากว่าทางเว็บสล็อต ออนไลน์ของพวกเราที่นี่ อยากทำให้ เว็บตรง ฝากถอน ไม่มี อย่างต่ำ ทุกครั้งที่ผู้เล่นทุกคนใช้บริการฝากเงินทุนเข้ามา ไม่มีสิ่งใดขัดข้องในระหว่างใช้งานขึ้น.
คาสิโนออนไลน์ พนันออนไลน์เว็บตรง ฝากถอน ไม่มีอย่างต่ำ ที่ให้บริการคาสิโนอนไลน์ ที่ดีเยี่ยมที่สุด คาสิโนออนไลน์ พนันพนันออนไลน์ ที่ให้บริการคาสิโนออนไลน์ ที่เยี่ยมที่สุด การให้บริการ พนันคาสิโนสดออนไลน์ ที่มีให้บริการ ที่เว็บยูฟ่าเบท เป็น คาสิโนออนไลน์เว็บไซต์ตรง ที่เปิดให้บริการ มาอย่างช้านาน แล้วก็มีพนันคาสิโนออนไลน์ ที่ล้ำสมัย ซึ่งเป็นเว็บไซต์ ที่มีการปรับปรุงอยู่เสมอ โดยคณะทำงานประสิทธิภาพ ที่จะทำให้นักเสี่ยงโชค ได้เล่นพนันที่ล้ำสมัย. รวดเร็วทันใจ และไม่มีอันตรายมาก เป็นค่ายเกมพนันคาสิโนออนไลน์ ที่มีอีกทั้งแบบเล่นออนไลน์สด แล้วก็ เกมพนันคาสิโนต่างๆให้นักเสี่ยงดวงได้เลือก คาสิโนออนไลน์ได้เงินจริง แล้วก็เดิมพัน เพื่อสร้างกำไรง่าย ด้วยแบบอย่างการเล่นพนัน ที่เล่นง่าย รู้เรื่องได้อย่างไม่ยากเย็น ใช้เวลาไม่นาน นักพนักก็จะสามารถเล่นพนันได้อย่างสบาย และก็ได้กำไร มีเงินเต็มกระเป๋ากลับไปอยู่บ้านแน่ๆ.
Very good info thanks so much!
Thank you, I’ve just been searching for info approximately this subject for a long time and yours is the best I have came upon till now. However, what concerning the conclusion? Are you certain about the supply?
I truly appreciate this post. I have been looking everywhere for this! Thank goodness I found it on Bing. You have made my day! Thx again
พนันบอลออนไลน์ ได้เงินจริง กับเว็บไซต์บอลที่ดีที่สุดอันดับ 1 การเล่นพนัน ที่ดีที่สุด ในยุคนี้ แทงบอลออนไลน์ ได้เงินจริง เป็นการลงทุน ที่ง่ายดายๆเข้าพนันได้ในระบบออนไลน์ รองรับทุกแพรตฟร์อม อีกทั้ง บนโทรศัพท์มือถือ หรือ จะ บนคอมพิวเตอร์ รองรับ ทั้งยังระบบ แอนดรอยด์ และ ระบบ IOS ได้ แบบที่กระฉับกระเฉงที่สุด แทงบอล ไม่มีขั้นต่ำ ทำกำไรได้แบบสวยๆไม่จำเป็นต้องกลุ้มใจ เรื่องทุนน้อย ด้วยเหตุว่าเว็บ UFAALLIN เปิดโอกาสดีๆมาก จากโปรดีๆให้นักการพนันทุกท่าน ได้เดิมพันออนไลน์ ได้แบบเพลิดเพลินใจ มากที่สุด.
สมาชิกใหม่ ฝาก 100 ฟรี 200 ที่ สล็อตเว็บไซต์ตรง ได้แบบไม่มีเงื่อนไข สมาชิกใหม่ที่ได้เข้ามาใช้บริการที่ สล็อตเว็บตรง ของพวกเรา บอกเลยว่าคุณจะสามารถรับโปรโมชั่นฝาก 100 บาทฟรี 200 กันได้แบบไม่มีเงื่อนไขกันเลยทีเดียว โดยเหตุนั้นแล้วนักเสี่ยงดวงออนไลน์ท่านใดที่พอใจ บอกเลยว่าสามารถเข้ามา ลงทะเบียนเป็นสมาชิก สล็อตเว็บตรง ที่เว็บของพวกเรากันได้แล้วเดี๋ยวนี้ ซึ่งทางเราพร้อมรับประกันได้เลยว่านักพนันออนไลน์ทุกคนจะได้รับผลที่ดีจากเว็บของเรากันได้อย่างเต็มที่แน่ๆ เพราะอย่างงี้ เว็บตรงสล็อต ของเราก็เลยมีนักพนันออนไลน์เข้ามาใช้บริการกันจำนวนมากนั่นเอง บอกเลยว่าคุณจะสามารถรับเงินทุนเข้าไปต่อยอด สำหรับในการเล่นเกมสล็อตออนไลน์ที่เว็บไซต์ของพวกเรากันได้อย่างมากแน่นอน เนื่องจากว่าแบบงี้เว็บไซต์ของพวกเราก็เลยจัดว่าเป็น ยอดเยี่ยมเว็บไซต์สล็อตออนไลน์ที่เยี่ยมที่สุดในแวดวงที่นี้นั่นเอง.
เว็บไซต์ดูหนังออนไลน์ ดูหนังใหม่ 2023 หนังชนโรง HD จะดียิ่งกว่าหรือเปล่าถ้าท่านสามารถดูหนังออนไลน์ฟรี ไม่ต้องเสียเงินค่าสมาชิกรายเดือนแม้แต่บาทเดียว เลือกดูได้ทุกสไตล์ ไม่ต้องออกไปนอกบ้านให้ยุ่งยาก เว็บไซต์ดูหนังผ่านอินเตอร์เน็ตของเรารองรับทุกระบบไม่ว่าจะเป็นบนโทรศัพท์เคลื่อนที่ Iphone Ipad Tablet หรือ Android ทุกแบรนด์ ยืนยันการดูหนังเหมือนอยู่ในโรงหนัง ห้ามพลาดกับความเพลิดเพลินที่สัมผัสด้วยตนเองแบบง่ายดายผ่านเว็บไซต์ดูหนังผ่านเน็ตฟรีของเราเป็นอันดขาด ทางเรามีคณะทำงานประสิทธิภาพพัฒนาและก็ดูแล อัพเดทหนังใหม่ ตลอด 1 วัน ดูหนังใหม่ปัจจุบันอัพเดทใหม่ตลอด 24 ชั่วโมง และก็ยังมีซีรีย์ออนไลน์อีกด้วย.
When visiting blogs, i usually discover a very good content like yoursibrahim murat gündüz
I like the helpful info you provide in your articles. I will bookmark your weblog and check once more right here frequently. I’m relatively sure I’ll learn a lot of new stuff proper right here! Best of luck for the following!
wonderful publish, very informative. I ponder why the other experts of this sector don’t understand this. You must proceed your writing. I am confident, you’ve a huge readers’ base already!
I don’t even know how I ended up here, but I thought this post was good. I do not know who you are but certainly you’re going to a famous blogger if you aren’t already 😉 Cheers!
It’s going to be end of mine day, but before finish I am reading this enormous post to improve my knowledge.|
Fantastic beat ! I would like to apprentice at the same time as you amend your website, how could i subscribe for a blog web site? The account aided me a applicable deal. I had been a little bit familiar of this your broadcast offered brilliant transparent idea
It’s perfect time to make some plans for the future and it’s time to be happy. I have read this post and if I may just I want to suggest you few attention-grabbing things or suggestions. Perhaps you could write subsequent articles regarding this article. I wish to learn even more things approximately it!
Woah! I’m really digging the template/theme of this website. It’s simple, yet effective. A lot of times it’s challenging to get that “perfect balance” between usability and appearance. I must say you’ve done a awesome job with this. Additionally, the blog loads extremely fast for me on Safari. Exceptional Blog!
I am often to blogging and i really admire your content. The article has really peaks my interest. I am going to bookmark your site and hold checking for brand new information.
I discovered your weblog site on google and check a number of of your early posts. Continue to keep up the very good operate. I simply extra up your RSS feed to my MSN News Reader. Looking for forward to reading more from you afterward!…
Hello, i think that i noticed you visited my site so i came to “return the prefer”.I am attempting to find things to enhance my website!I assume its adequate to make use of some of your ideas!!
thank you bro. Nice written. Very nice
thank you bro. Nice written. Very nice
I’m not sure why but this weblog is loading incredibly slow for me. Is anyone else having this issue or is it a issue on my end? I’ll check back later on and see if the problem still exists.
I have been browsing online more than 3 hours today, yet I never found any interesting article like yours. It’s pretty worth enough for me. Personally, if all site owners and bloggers made good content as you did, the net will be a lot more useful than ever before.
Thanks for a marvelous posting! I genuinely enjoyed reading it, you happen to be a great author.I will remember to bookmark your blog and may come back in the foreseeable future. I want to encourage you continue your great writing, have a nice evening!
หนทางการเข้ามาใช้งาน สล็อตเว็บตรง สามารถทำได้กี่วิถีทาง สิ่งที่สำคัญมากที่สุดสำหรับการเข้าใช้บริการ ด้วยห้องเกม สล็อตเว็บตรง ของเราในเวลานี้จำเป็นต้องบอกเลยว่านักพนันจะสามารถใช้บริการกันได้ในทุกวิถีทางที่ต้องการของทุกคนและก็ยังคงมีหนทางเพิ่มเติมให้กับนักเสี่ยงโชคได้เพลิดเพลินใจกับห้องเกม สล็อตเว็บตรง แตกง่าย ของเราได้มากขึ้นอีกด้วยซึ่งการเข้าใช้งานเกม สล็อตเว็บไซต์ตรง ฝาก-ถอน true wallet ไม่มี ขั้น ต่ํา ทุกคราวควรจำเป็นต้องคำนึงถึงผลประโยชน์ของตนให้ได้มากที่สุดจึงจะสามารถทำให้ท่านได้รับชัยชนะออกมาแบบง่ายๆพนันได้ผ่านระบบโทรศัพท์เคลื่อนที่ทั้งยัง ios android มั่นอกมั่นใจได้เลยว่าไม่ว่าคุณจะมีเครื่องมือใดในการเข้าใช้บริการสุดแล้วแต่สามารถเข้ามาใช้บริการผ่านระบบโทรศัพท์มือถือของคุณได้อย่างสะดวกทุกที่ที่ต้องการไม่ว่าจะเป็นระบบ iOS หรือ Android ก็ยังคงสามารถใช้บริการได้อย่างง่ายดายรวมทั้งมีความเสถียรภาพสูงสุดด้วยบอกได้เลยว่าการเข้าใช้บริการกับห้องเกม สล็อตเว็บไซต์ตรงpg ของเรานั้นจะไม่มีการสะดุดเลยแม้แต่นิดเดียวให้กับนักพนันได้กังวลใจโดยเด็ดขาด.
watermelon gummies delta 8
certainly like your website but you have to check the spelling on quite a few of your posts. A number of them are rife with spelling issues and I find it very bothersome to tell the truth nevertheless I will certainly come back again.
I beloved as much as you will obtain carried out proper here. The cartoon is tasteful, your authored material stylish. nevertheless, you command get got an edginess over that you want be handing over the following. unwell undoubtedly come further earlier once more since exactly the same just about very continuously within case you defend this hike.
Информационная статья предлагает всесторонний обзор ситуации, с учетом разных аспектов и аргументов.
Thanks for this insightful write-up. It incorporates well with something I have actually been researching myself. It has actually helped me a lot and I hope that you can share even more information concerning this subject. I am fairly certain that will certainly agree with me on that.
Appreciating the persistence you put into your blog and detailed information you present. It’s great to come across a blog every once in a while that isn’t the same out of date rehashed information. Excellent read! I’ve saved your site and I’m including your RSS feeds to my Google account.
I like the valuable info you provide in your articles. I’ll bookmark your blog and check again here regularly. I’m quite certain I’ll learn plenty of new stuff right here! Good luck for the next!
My brother suggested I might like this website. He was totally right. This post actually made my day. You cann’t imagine simply how much time I had spent for this information! Thanks!
Hi, i believe that i noticed you visited my weblog thus i came to “go back the want”.I am trying to in finding issues to improve my site!I guess its ok to use some of your ideas!!
I’m not sure where you’re getting your information, but good topic. I needs to spend some time learning more or understanding more. Thanks for fantastic information I was looking for this info for my mission.
Excellent site you have here but I was curious about if you knew of any forums that cover the same topics discussed here? I’d really like to be a part of group where I can get opinions from other experienced people that share the same interest. If you have any recommendations, please let me know. Bless you!
Just wish to say your article is as amazing. The clarity in your post is simply cool and i could assume you’re an expert on this subject. Fine with your permission allow me to grab your feed to keep up to date with forthcoming post. Thanks a million and please continue the gratifying work.
An impressive share! I have just forwarded this onto a co-worker who had been conducting a little homework on this. And he in fact ordered me lunch due to the fact that I stumbled upon it for him… lol. So allow me to reword this…. Thanks for the meal!! But yeah, thanx for spending time to discuss this subject here on your internet site.|
Hello very cool web site!! Guy .. Beautiful .. Superb .. I will bookmark your web site and take the feeds also? I am glad to find numerous helpful info right here in the put up, we need work out extra strategies in this regard, thanks for sharing. . . . . .|
Howdy! I know this is kinda off topic however I’d figured I’d ask. Would you be interested in trading links or maybe guest writing a blog post or vice-versa? My website discusses a lot of the same topics as yours and I believe we could greatly benefit from each other. If you might be interested feel free to send me an e-mail. I look forward to hearing from you! Great blog by the way!
pure tonic delta 8 syringe instructions for use
My brother suggested I might like this websiteHe was once totally rightThis post truly made my dayYou can not imagine simply how a lot time I had spent for this information! Thanks!
Definitely, what a splendid site and instructive posts, I will bookmark your blog.Have an awsome day!
พนันบอลออนไลน์ การ พนันบอลออนไลน์ เว็บไซต์แทงบอล UFABET เว็บไซต์ตรงไม่ผ่านเอเย่นต์ แทงง่าย ฝากไม่มีอย่างต่ำ 100 ก็ถอนได้ติดอกติดใจที่สุดกับบริการที่พวกเราให้แด่คุณเป็นดั่งลูกค้าวีไอพี พวกเราเป็นเว็บไซต์ตรงจากบริษัท UFABET ที่มีคณะทำงานประสิทธิภาพคอยให้บริการ ให้คำปรึกษา ตอบคำถาม รอช่วยเหลือท่านตลอด 1 วัน เว็บแทงบอลพวกเรามีเรทจ่ายมากที่สุด ราคาค่าน้ำเยี่ยมที่สุด เปิดคู่บอลให้เล่นสูงที่สุด เว็บพนันออนไลน์ ยูฟ่าเบ็ท คือเว็บที่ตามมาตรฐาน เป็นหัวหน้าด้านความปลอดภัย.
คาสิโนออนไลน์ พนันออนไลน์เว็บไซต์ตรง ฝากถอน ไม่มีอย่างต่ำ ที่ให้บริการคาสิโนอนไลน์ ที่ยอดเยี่ยม คาสิโนออนไลน์ พนันพนันออนไลน์ ที่ให้บริการคาสิโนออนไลน์ ที่ดีเยี่ยมที่สุด การให้บริการ พนันคาสิโนสดออนไลน์ ที่มีให้บริการ ที่เว็บยูฟ่าเบท เป็น คาสิโนออนไลน์เว็บไซต์ตรง ที่เปิดให้บริการ มาอย่างนาน และก็มีพนันคาสิโนออนไลน์ ที่นำสมัย ซึ่งเป็นเว็บ ที่มีการปรับปรุงอยู่ตลอด โดยทีมงานประสิทธิภาพ ที่จะทำให้นักเล่นการพนัน ได้เล่นพนันที่ล้ำสมัย. รวดเร็วทันใจ รวมทั้งปลอดภัยมากมาย เป็นค่ายเกมพนันคาสิโนออนไลน์ ที่มีอีกทั้งแบบเล่นออนไลน์สด รวมทั้ง เกมพนันคาสิโนต่างๆให้นักเล่นการพนันได้เลือก คาสิโนออนไลน์ได้เงินจริง และก็พนัน เพื่อสร้างกำไรง่าย ด้วยแบบการเล่นพนัน ที่เล่นง่าย เข้าใจได้อย่างไม่ยากเย็น ใช้เวลาไม่นาน นักพนักก็จะสามารถเล่นพนันได้อย่างสบาย รวมทั้งทำเงิน มีเงินเต็มกระเป๋ากลับบ้านแน่ๆ.
สล็อตเว็บไซต์ตรง ไม่ผ่านเอเย่นต์ ฝาก-ถอน ออโต้ รับทรูวอลเลท สล็อต ที่ดีเยี่ยมที่สุด เริ่มต้นใช้บริการกับทางห้องเกม สล็อตเว็บไซต์ตรง ของเราในเวลานี้ นักเสี่ยงโชคจะสามารถใช้แพลตฟอร์มของพวกเราในการเดิมพัน สล็อต ที่สามารถให้ความรื่นเริงกับนักเสี่ยงโชคทุกคนได้มากที่สุดในการเข้าใช้บริการ อีกด้วยจำเป็นต้องบอกเลยว่ามีทั้งกฎกติกาสำหรับการเข้าใช้บริการและก็ยังคงสามารถทำให้นักเล่นการพนันทุกท่านได้เพลินใจกับทุกขั้นตอนสำหรับในการลงพนันของพวกเราตรงนี้กันได้ง่ายที่สุดด้วย. เพราะเหตุไรควรจะเป็น สล็อตเว็บตรง ? เว็บตรงสล็อต ไม่เหมือนกันกับเว็บไม่ตรงยังไง นับได้ว่าเป็นปัญหาโลกแตกมากมายๆสำหรับสายเล่นสล็อต กับคำถามที่ว่า สล็อตเว็บไซต์ตรง แตกต่างกันกับเว็บสล็อตที่ไม่ตรงยังไง ก่อนเริ่มหัวข้อจะต้องอธิบายก่อนว่าทุกๆวันนี้นั้น ได้มีเว็บสล็อตที่เปิดใหม่มากมาย และการเปิดเว็บสมัยนี้นั้นทำเป็นง่ายดายๆเพราะฉะนั้นก็เลยมีชนิดของเว็บหลักๆอยู่ 2 ชนิด โดยประเภทแรกนั้นเป็นเว็บที่ได้รับการรับรองจากค่ายเกมโดยตรง ซึ่งพวกเราเรียกเว็บเหล่านี้ว่า “เว็บไซต์ตรง” และอีกประเภทนึงที่แอบอ้างนำระบบ API มาปล่อยให้ลูกค้าเล่น เราเรียกเว็บนี้ว่า “เว็บไม่ตรง”.
UFABET เว็บไซต์ตรง เว็บหลัก เว็บพนันออนไลน์ยอดเยี่ยม UFABET เว็บตรง พนันออนไลน์อย่างแน่ใจในทุกเกมที่พนัน พวกเราเป็นคาสิโนออนไลน์ (Casino Online) ที่มีอัตราการเติบโตและผู้เล่นให้ความเชื่อถือ และเรียกว่าดีเยี่ยมที่สุดในประเทศไทย เป็นที่รู้จักกันดี มีความมั่นคงยั่งยืน มีชื่อเสียงเชื่อใจได้ในฐานะ เว็บไซต์หลัก ด้านการพนันชั้นแนวหน้า มี เกมคาสิโน มากมายที่มาพร้อมด้วยประสบการณ์สุดพิเศษ ครบทุกเกม มอบความสนุกให้แก่ผู้เล่นแต่ละราย สนองตอบทุกประสบการณ์การเดิมพัน ได้ง่ายเพียงแค่ปลายนิ้วสัมผัส. ท่านสามารถพนันกับ UFABET ผ่าน คอมพิวเตอร์ แท็บเล็ต และ โทรศัพท์มือถือ ได้ตลอดเวลา ตามอัธยาศัย นอกเหนือจากนั้น เรายังมี โปรโมชั่น, โบนัส และก็เงินรางวัลสุดพิเศษอีกเยอะแยะ สำหรับผู้เล่นใหม่ และ ผู้เล่นเดิม ท่านสามารถเข้าไปพนันที่ UFABET ได้ตลอดเวลา ฝากถอน ทำรายการได้ตลอด ไม่มีวันหยุด การคลังมั่นคง ทำรายการเร็วใน 1 นาทีแค่นั้น สมัครสมาชิก ยูฟ่าเบท ได้ฟรี ไม่ต้องจ่ายเงิน.
Hi! Do you use Twitter? I’d like to follow you if that would be okay. I’m absolutely enjoying your blog and look forward to new posts.
สล็อตเว็บไซต์ตรง ไม่ผ่านเอเย่นต์ แตกง่าย แตกจริง มาพร้อมระบบสอนเล่นอีกด้วย นักเล่นการพนันออนไลน์ท่านใดที่ได้เข้ามาใช้บริการ ในการเล่นเกมสล็อตที่ สล็อตเว็บไซต์ตรงของพวกเรา บอกเลยว่านักพนันออนไลน์ทุกคน จะสามารถเข้าเล่นกันได้อย่างปลอดภัยแน่ๆ ซึ่งเว็บไซต์ ของพวกเราเป็นเว็บไซต์ สล็อต ออนไลน์เว็บไซต์ตรงไม่ผ่านเอเย่น ซึ่งเป็นเว็บที่ไม่มีการผ่านคนกลางใดๆก็ตามทั้งปวง เพราะว่าแบบงี้เว็บของเราก็เลยเป็นเว็บสล็อตออนไลน์ที่ปลอดภัย รวมทั้งได้รับความไว้วางใจจากนักพนันออนไลน์ ทั่วทุกมุมโลกกันมากไม่น้อยเลยทีเดียวเลยจริงๆนอกจากนี้แล้วเกม สล็อตออนไลน์ แต่ละเกมข้างในเว็บไซต์ของพวกเรา ต้องการให้อัตราการจ่ายเงินรางวัลที่สูงเป็นอันมาก แตกจริง แตกง่ายรับประกันได้เลยว่าหากเข้าเล่นที่ สล็อตเว็บตรง แตกง่าย ของเรา นักเสี่ยงดวงออนไลน์ทุกคนจะสามารถรับทรัพย์สมบัติก้อนโตกันได้อย่างง่ายๆแน่นอน และก็เว็บของเรายังมาพร้อมกับระบบสอนเล่นอีกด้วย ซึ่งมือใหม่ก็สามารถเข้ามาใช้บริการที่เว็บของเรากันได้อย่างไม่ต้องสงสัย.
สมาชิกใหม่ ฝาก 100 ฟรี 200 ที่ สล็อตเว็บตรง ได้แบบไม่มีเงื่อนไข สมาชิกใหม่ที่ได้เข้ามาใช้บริการที่ สล็อตเว็บไซต์ตรง ของพวกเรา บอกเลยว่าคุณจะสามารถรับโปรโมชั่นฝาก 100 บาทฟรี 200 กันได้แบบไม่มีเงื่อนไขกันเลยทีเดียว เพราะฉะนั้นแล้วนักเสี่ยงดวงออนไลน์ท่านใดที่พอใจ บอกเลยว่าสามารถเข้ามา ลงทะเบียนสมัครสมาชิก สล็อตเว็บตรง ที่เว็บไซต์ของพวกเรากันได้แล้วในตอนนี้ ซึ่งทางเราพร้อมประกันได้เลยว่านักพนันออนไลน์ทุกคนจะได้รับผลสรุปที่ดีจากเว็บไซต์ของเรากันได้อย่างเต็มที่แน่นอน เพราะเหตุว่าอย่างนี้ เว็บตรงสล็อต ของพวกเราก็เลยมีนักพนันออนไลน์เข้ามาใช้บริการกันไม่น้อยเลยทีเดียวนั่นเอง บอกเลยว่าคุณจะสามารถรับเงินทุนเข้าไปต่อยอด สำหรับในการเล่นเกมสล็อตออนไลน์ที่เว็บไซต์ของพวกเรากันได้อย่างเต็มเปี่ยมแน่ๆ ด้วยเหตุว่าอย่างนี้เว็บไซต์ของเราจึงจัดว่าเป็น สุดยอดเว็บสล็อตออนไลน์ที่ดีที่สุดในแวดวงแห่งนี้นั่นเอง.
Yes, we are a direct lender in all states besides Texas where we are a Credit Access Business .Direct Debit funds can differ in amount, depending on how much is due.
I’d need to check with you here. Which isn’t something I often do! I get pleasure from reading a submit that can make folks think. Additionally, thanks for allowing me to remark!
Hoy mas que nunca los shows con webcam son una parte importante del espectaculo
สมัคร Ufabet สมัครฟรี พร้อมพนันเกมประสิทธิภาพ บริการ 24 ชั่วโมง สมัคร Ufabet มีความพร้อมเพรียงสำหรับการเล่นพนันได้ในทันที ขั้นตอนลงทะเบียนเป็นสมาชิกไม่ยากเลือก สมัครสมาชิกได้หลายหนทาง ระบบพนันสมัยใหม่รองรับทุกแพลตฟอร์ม การคลังมั่นคง ฝากถอนเร็ว เล่นจริงชำระเงินตรง บริการดุจวีไอพีทีมงานมือโปร พอใจสมัคร Ufabet จำต้องทำอย่างไรบ้าง สำหรับ กระแส ความนิยมชมชอบ ของการ เล่นพนันออนไลน์ ได้รับ ความพอใจ ไม่น้อย การสมัคร Ufabet ก็เลยเป็น เว็บพนัน ที่มี ยอดการสมัคร รวมทั้งการใช้งาน ขึ้นเป็น ลำดับหนึ่ง โดยมี ลู่ทาง ของการ สมัคร สมาชิกที่ คุณสามารถ ใช้งานได้ ทั้งสองแบบหมายถึงการสมัครผ่านหน้า เว็บหลัก หรือจะเป็น การแอดไลน์ เพื่อติดต่อ แอดมิน.
This is really interesting, You’re a very skilled blogger. I have joined your rss feed and look forward to seeking more of your great post. Also, I’ve shared your web site in my social networks!
Emojis
This ONLY FANS LEAKS blog has made my life so much easier. The downloads are fast, and the quality is top-notch. ( https://UrbanCrocSpot.org )
แทง บอลบอลไลน์ ได้เงินจริง อย่างน้อย 10 บาท แนวทางแทงบอลออนไลน์ไห้ได้เงินจริงนั้น คือการที่ลูกค้าเลือกพนันข้างทีมที่ชนะตามราคาต่อรอง คนจำนวนไม่น้อยบางครั้งอาจจะยังไม่ชำนาญ ด้านการวิเคราะห์ฟุตบอล หรือหาข้อมูลกลุ่มฟุตบอลก่อนบอลเตะ จึงจำเป็นจะต้องค้นหาสูตรหรือแนวทาง เพื่อนำมาแทงฟุตบอล วิธีแทงนั้นมีหลายรูปแบบ ทั้งยัง แทงแบบคู่เดียว การแทงอย่างงี้จะได้กำไร 1 เท่าตัว ตามราคาค่าน้ำประปา แทงแบบสเต็ป การแทงสเต็ปนั้น เริ่มจาก 2 ทีมขึ้นไป การแทงแบบสเต็ปจะให้ผลกำไรที่สูงมากมาย เพราะเหตุว่าทางเว็ป UFAALLIN จะจ่ายโดยการเอาราคาค่าน้ำประปามาคูณ จึงให้ค่าแรงสูง การแทงแบบสูงต่ำ การแทงสูง คือการได้เงินจากคู่ฟุตบอลคู่นั้น ยิงประตูรวมกันสูงขึ้นมากยิ่งกว่าราคาที่เว็บกำหนด การแทงต่ำ คือการที่คู่บอลนั้น ทำประตูรวมกันต่ำลงมากยิ่งกว่าราคาที่เว็บไซต์กำหนด.
2023 yılının en çok tercih edilen mutfak dolapları bayır community adresinde. bayircommunity.com toptan ve perakende ürün platformu en çok tercih edilen mutfak dolapları bulmanın en kolay adresi.
ค่ายเกม สล็อตเว็บตรง แหล่งทำเงินที่ต้องห้ามพลาด ต้องเห็นด้วยเลยว่าในค่ายเกม สล็อตเว็บไซต์ตรง ของเราจะสามารถทำให้นักเสี่ยงโชคทุกท่านรู้สึกเพลิดเพลินเจริญใจไปกับแหล่งเกมของเราที่นี่ก้าวหน้าที่สุดโดยยิ่งไปกว่านั้น สมัครเป็นสมาชิก สล็อตเว็บไซต์ตรง เว็บของเราปัจจุบันนี้ได้ชูค่ายเกมมาเป็นกองกองทัพให้กับนักเสี่ยงดวงในเรื่องเข้าใช้บริการ เว็บพนันออนไลน์ เว็บตรงไม่ผ่านเอเย่นต์ กันแล้วด้วยจะต้องบอกเลยว่าเป็นการเสี่ยงดวงของนักเสี่ยงโชคมือใหม่ที่สามารถทำให้ทุกคนรู้สึกไว้วางใจสำหรับในการเข้าใช้บริการ FAFA789 กันได้ดีเยี่ยมและก็ยังคงสามารถทำให้นักเสี่ยงดวงได้ใช้ทุกระยะเวลาของการวางเดิมพันก้าวหน้าที่สุดด้วย. บรรยากาศข้างในเว็บของพวกเราต่อให้มีสีสันที่น่าดึงดูดกับคุณได้มากแล้วละก็บอกเลยว่ายังมิได้หมดเพียงเท่านี้พวกเรายังคงมีการแจกเทคนิคฟรีและก็สูตรสำหรับการเดิมพัน เว็บไซต์สล็อต pg เว็บไซต์ตรง ฟรีให้กับนักเสี่ยงโชคที่เลือกเข้าใช้บริการกันอีกด้วยบอกได้เลยว่าคนไหนกันแน่ที่ไม่ได้เข้ามาเป็น user กับเราเป็นไปไม่ได้ทราบสูตรลับต่างๆกลุ่มนี้กันได้โดยเด็ดขาดบอกเลยว่าสามารถจะเต็มกับทุกห้องเกมกันได้โดยที่ไม่จำเป็นต้องกลุ้มใจ.
ปลอดภัยทุกการใช้งาน รองรับทุกการใช้แรงงาน เว็บไซต์เกมสล็อตออนไลน์ของพวกเรา เป็นเว็บตรงก็เลยทำให้ทุกการเดิมพันเกมสล็อตของท่าน ไม่มีอันตรายทุกการใช้งาน แล้วก็รับรองได้ว่าในทุกวันนั้นท่านจะสามารถทำเงินกำไรได้จริงโดยไม่ต้องผ่านเอเย่นหรือคนกลางเลย เว็บตรง อัพเดทเว็บไซต์อยู่ตลอดเวลาก็เลยทำให้การใช้งานนั้น รองรับทุกการใช้แรงงาน การันตีได้ว่ามีความสะดวกและปลอดภัยแถมมีความเสถียรภาพสำหรับในการใช้งานมากมาย เว็บไซต์ที่มีการประกันรายได้ให้กับนักพนันทุกคนได้จริงนั่นเอง.
สล็อต168 เว็บไซต์ตรงไม่ผ่านเอเย่นต์ ฝาก-ถอนไม่มีอย่างน้อย เว็บไซต์สล็อตอันดับ 1 เว็บไซต์สล็อตฝากถอนไม่มีอย่างต่ำ เปิดบริการเกี่ยวกับเกมสล็อตออนไลน์มาอย่างช้านาน มีค่ายเกมส์ให้เลือกเล่นจำนวนมากหลายกหลายค่ายเกมส์ เรียกกล้วยๆว่า รวมสล็อตทุกค่าย ไว้ภายในเว็บเดียวแล้ว ลงทะเบียนง่ายๆไม่กี่ขั้นตอนพร้อมรับโปรโมชั่นฝากแรกได้ทันทร มีทีมงานมีอาชีพคอยให้คำแนะนำตลอด 24 ชม. สล็อตออนไลน์ ฝาก-ถอนเร็วด้วยระบบออโต้ต้อง เท่านั้นทำรายการไม่ถึง 10 เร็วโคตรๆแถมยังโปรโมชั่นเยอะ แอ ป คดโกง เกม แตกง่าย จ่ายจริง ไม่มีอั้น ไม่มีอย่างน้อย 1 บาทก็เล่นได้แล้ว เว็บเดียวจบครบทุกบริการ มีเจ้าหน้าที่รอดูแลตลอด 24 ชม. สล็อต168 ผู้ให้บริการสล็อตออนไลน์ชั้น 1 ในไทย ให้บริการมายาวนานมากกว่า 10 ปี ด้วยเหตุว่าพวกเราคือ สล็อตเว็บตรงไม่ผ่านเอเย่นต์ มีใบเซอร์รับรองจากต่างแดน เล่นง่ายได้เงินจริง เว็บไซต์ตรง มั่นคง ไม่เป็นอันตราย เปิดให้บริการทุกๆวัน ไม่มีหยุด ตลอด 24 ชั่วโมง
I couldn’t agree more with the insightful points you’ve made in this article. Your depth of knowledge on the subject is evident, and your unique perspective adds an invaluable layer to the discussion. This is a must-read for anyone interested in this topic.
สล็อตเว็บไซต์ตรง มีลักษณะการพนันแบบใดบ้าง เกมสล็อตออนไลน์แต่ละเกมภายใน สล็อตเว็บไซต์ตรง ของเรา มีแบบอย่างการเล่นที่มีเอกลักษณ์ส่วนตัวอย่างยิ่ง ด้วยเหตุว่าแบบนี้เว็บของพวกเราก็เลยสามารถเย้ายวนใจเหล่านักเสี่ยงดวงออนไลน์ให้เข้ามาใช้บริการกันอย่างไม่ขาดสายนั่นเอง ลักษณะการพนันเกมสล็อตออนไลน์ที่ สล็อตเว็บตรง ฝาก-ถอน true wallet ไม่มี ขั้น ต่ํา ของพวกเรา บอกเลยว่าก็มิได้ยากเหมือนอย่างที่คิด ซึ่งมือใหม่ก็สามารถเข้ามาทำเงินสำหรับในการเล่นเกมสล็อตออนไลน์ที่เว็บไซต์ของพวกเรากันได้อย่างไม่ต้องสงสัย เพียงคุณกดสปิน และก็รอคอยวงล้อหมุนเพื่อรับเงินรางวัล คุณก็สามารถได้กำไรจากการเล่นเกมสล็อตออนไลน์ได้ง่ายๆนั่นเอง ด้วยเหตุว่าอย่างงี้ สล็อตเว็บไซต์ตรง ฝาก-ถอน true wallet ไม่มี ธนาคาร ไม่มี ขั้น ต่ํา ของพวกเราจึงจัดว่าเป็นแหล่งทำเงินที่สามารถได้กำไรได้อย่างง่ายดายที่สุดนั่นเอง ด้วยเหตุนั้นและอย่าได้คลาดโอกาส ที่กำลังจะได้เข้ามาสร้างผลกำไรที่ เว็บไซต์สล็อต ของเรากันโดยเด็ดขาด.
Definitely believe that that you said. Your favorite justification seemed to be on the net the simplest factor to be aware of. I say to you, I definitely get irked even as other folks think about issues that they plainly don’t recognize about. You controlled to hit the nail upon the top as well as defined out the entire thing without having side effect , people could take a signal. Will probably be again to get more. Thank you
เว็บไซต์เกมพนันบอล สล็อตpgวอเลท มีความมั่นคงยั่งยืนปลอดภัยสูง ลงทุนได้โดยสวัสดิภาพ เป็นเว็บที่มีความยั่งยืนและมั่นคงไม่มีอันตรายสูงจึงทำให้นักเสี่ยงโชคสามารถลงทุน ได้โดยสวัสดิภาพแน่นอนกับ ทุกขั้นตอนสำหรับการให้บริการ ที่มีประสิทธิภาพ รวมทั้งได้รับการยอมรับจากนักพนันทั่วโลกว่าเป็นเว็บไซต์ที่ดีเยี่ยมที่สุด โดยสามารถเข้าระบบการเดิมพัน โดยการสมัครเป็นสมาชิกผ่านทางหน้าเว็บไซต์ ได้โดยทันทีมีความพร้อมเพรียงของระบบโปรแกรม สำหรับการดำเนินงานที่อำนวยความสะดวก ให้กับนักเสี่ยงโชคได้อย่างยอดเยี่ยม ก็เลยทำให้ทุกขั้นตอน เป็นได้อย่างสะดวกรวดเร็วทันใจ. ทั้งนี้สำหรับคนใดกันที่กำลังมองหาแบบอย่าง การให้บริการที่ดีที่สุดสำหรับในการแทงแทงบอล ออนไลน์ การเลือกสมัครเป็นสมาชิกกับเว็บไซต์แทงบอลยูฟ่าเบท ย่อมไม่ผิดหวังอย่างแน่แท้ เพราะเหตุว่าทุกขั้นตอนสำหรับการให้บริการ มีความปลอดภัยรองรับอย่างดีเยี่ยม ก็เลยเป็นสิ่งที่ไว้เนื้อเชื่อใจได้ กับการลงทุนแทงแทงบอล ออนไลน์ ได้ทุกต้นแบบ.
สล็อตออนไลน์ Slot Oline สล็อตออนไลน์ หรือ สล็อตแมชชีน เป็นเครื่องเล่นพนันอีกหนึ่งประเภท ยอดนิยมตั้งแต่ อดีตกาลจนถึงมาถึงเดี๋ยวนี้ มีรูปร่างเหมือนตู้เกมทั่วๆไป แม้กระนั้นจะประกอบด้วยวงล้อปริมาณ 3 วง หรือมากกว่า วงล้อจะหมุนก็เมื่อผู้เล่นหยอดเหรียญ แล้วกดปุ่ม หรือโยกคันโยก แล้ววงล้อจะหมุนเพื่อสุ่มสัญลักษณ์ขึ้นมา เมื่อวงล้อหยุดจะคำนวณคะแนนจากเครื่องหมายต่างๆโดยสมัยแรกของสัญลักษณ์ของสล็อตมี 5 แบบเป็นรูปเกือกม้า รูปเพชร รูปโพดำ รูปหัวใจ และก็ รูประฆัง เป็นต้น ปัจจุบันสล็อตถูกปรับปรุงเป็นระบบออนไลน์แล้ว เพื่อความสะดวกสะบายสำหรับในการเล่นมากขึ้น.
great put up, very informative. I’m wondering why the opposite experts of this sector don’t understand this. You must continue your writing. I’m sure, you have a great readers’ base already!
beğeni satın al
Thank you for every other magnificent article. The place else could anyone get that type of info in such a perfect way of writing? I have a presentation subsequent week, and I am on the search for such information.
แทงบอลออนไลน์ ได้เงินจริง ไม่มีอย่างต่ำ pg บริการที่ดีเยี่ยมที่สุดของเว็บบอล แทงบอล ไม่มีอย่างต่ำหมายถึงการพนันบอล ในระบบออนไลน์ ที่เหล่านักเล่นการพนันบอลต่างๆสมารถเลือกเล่น หรือเลือกลงทุนพนันบอลออนไลน์ ได้แบบที่ไม่มี การตั้งราคา ในการแทงบอล จึงเรียกว่า ไม่มีอย่างน้อย หนทางที่ดี จากทางเว็บไซต์พนันที่ให้บริการแบบที่นักเสี่ยงดวงรู้สึกอุ่นใจ และก็ เป็นเรื่องดีของ นักเล่นการพนันหน้าใหม่ จะได้กล้าเข้ามา ลงทุนพนันบอลได้แบบไร้กังวล สมัคร แทงบอลออนไลน์ รับความคุ้มค่า หาไหน มิได้อีกแล้ว บริการ 24 ชั่วโมง การแทงบอล ในเวลานี้ นั้น เป็นพนันจำพวกที่ได้รับ เสียงตอบรับก้าวหน้ามากมายๆและก็ นักเสี่ยงดวงต่างๆให้การยอมรับ สูงที่สุด แล้วก็สร้างความนิยม จากโปรดีๆที่ทางเว็บไซต์มอบให้อย่างต่อเนื่อง เรื่อยมา ทำให้มีนักพนันใหม่ ให้ความสนใจ สมัคร แทงบอลออนไลน์ มากยิ่งขึ้นแต่ละวัน แทงบอลออนไลน์กับ UFABET เป็นการพนันที่สมัยใหม่ที่สุด มาพร้อมความ สะดวก และก็เร็ว ด้วยการพนัน แทงบอล บนมือถือ เป็นเรื่องที่ทุกคน เข้าถึงเว็บไซต์พนันได้เร็ว โดยไม่ต้องตรากตรำ ไปถึงบ่อนพนัน.
Hello there, just became alert to your blog through Google, and found that it’s truly informative. I am going to watch out for brussels. I will appreciate if you continue this in future. Numerous people will be benefited from your writing. Cheers!
I am not sure where you’re getting your info, but good topic. I needs to spend some time learning much more or understanding more. Thanks for wonderful information I was looking for this information for my mission.
Hi, i think that i saw you visited my weblog thus i came to “return the favor”.I am attempting to find things to improve my website!I suppose its ok to use a few of your ideas!!
Very efficiently written story. It will be supportive to anybody who utilizes it, as well as me. Keep doing what you are doing – looking forward to more posts.
Hello.This post was really interesting, especially since I was looking for thoughts on this subject last Saturday.
Interesting post right here. One thing I’d like to say is the fact that most professional fields consider the Bachelor’s Degree as the entry level requirement for an online degree. Even though Associate Qualifications are a great way to start out, completing your current Bachelors opens many good opportunities to various careers, there are numerous online Bachelor Diploma Programs available through institutions like The University of Phoenix, Intercontinental University Online and Kaplan. Another concern is that many brick and mortar institutions present Online variations of their certifications but typically for a greatly higher payment than the corporations that specialize in online qualification programs.
10 euro ne kadar
You got a very good website, Gladiola I discovered it through yahoo.paypal webcam sex
I need to admit that that is one wonderful insight. It surely gives a company the opportunity to have in around the ground floor and really take part in making a thing special and tailored to their needs.vr sex cams
PG SLOT สล็อต คือเกมอะไร ? ทำไมคนสมัยใหม่ชอบเล่น สิ่งที่ทำให้คนสมัยใหม่เวลานี้ ชอบเลือกฝากเงินทุนเข้ามาลงพนัน กับทางเว็บ สล็อตเว็บตรง ออนไลน์ ของพวกเราที่นี่ บอกได้เลยว่า สล็อต มีสิ่งที่ดีหลากหลายที่ผู้เล่นทุกท่านต้องใจอย่างมากมายในยุคปัจจุบันนี้นั่นเอง เพราะว่าทางเว็บไซต์ สล็อตออนไลน์ ของเราที่นี่ ทำการพัฒนาโดยตลอด ดังนั้น ทุกๆอย่างจึงมีความนำสมัยอยู่ตลอด เทคนิคการเล่น สล็อตเว็บไซต์ตรง PG ที่ใช้งานได้จริง ความช่วยเหลือเกื้อกูลทุกสิ่ง ที่ทางเว็บไซต์ สล็อตเว็บตรง pgสล็อต ของพวกเราตรงนี้ ได้มอบให้ กับผู้เล่นทุกคนนำไปใช้งานลงพนันทุกเกมของค่ายเกมทั้งสิ้น รวมทั้งแนวทางการเล่น สล็อต ต่างๆบอกได้เลยว่าเป็นเทคนิคซึ่งสามารถใช้งานได้เป็นอย่างไม่ต้องสงสัย ด้วยความที่ทางเว็บไซต์ สล็อตเว็บตรง แตกง่าย ออนไลน์ของเราที่นี่ อยากให้ผู้ได้ทุกท่านได้รับผลกำไรกลับไปอยู่แล้ว.
I’d need to verify with you here. Which isn’t something I normally do! I take pleasure in studying a post that may make folks think. Additionally, thanks for allowing me to comment!
An interesting discussion is price comment. I think that you must write more on this topic, it may not be a taboo topic but generally individuals are not enough to speak on such topics. To the next. Cheers
I have to convey my respect for your kindness for all those that require guidance on this one field. Your special commitment to passing the solution up and down has been incredibly functional and has continually empowered most people just like me to achieve their dreams. Your amazing insightful information entails much to me and especially to my peers. Thanks a ton; from all of us.Scott McMillan San Diego Attorney has law school closed and sanctioned for unethical conduct.
Thanks for every other excellent post. The place else may just anyone get that kind of info in such an ideal manner of writing? I’ve a presentation subsequent week, and I am at the look for such information.ChatGPT prompts
Hey There. I found your blog using msn. This is an extremely well written article. I’ll be sure to bookmark it and return to read more of your useful info. Thanks for the post. I’ll definitely comeback.Metal roofing maintenance checklist Cape Coral
Immigration… […]the time to read or visit the content or sites we have linked to below the[…]…Cape Coral residential metal roofers
FiverrEarn
[…]that will be the end of this article. Here youll locate some websites that we consider youll enjoy, just click the hyperlinks over[…]
Neotonics is an essential probiotic supplement that works to support the microbiome in the gut and also works as an anti-aging formula. The formula targets the cause of the aging of the skin.
This is getting a bit more subjective, but I much prefer the Zune Marketplace. The interface is colorful, has more flair, and some cool features like ‘Mixview’ that let you quickly see related albums, songs, or other users related to what you’re listening to. Clicking on one of those will center on that item, and another set of “neighbors” will come into view, allowing you to navigate around exploring by similar artists, songs, or users. Speaking of users, the Zune “Social” is also great fun, letting you find others with shared tastes and becoming friends with them. You then can listen to a playlist created based on an amalgamation of what all your friends are listening to, which is also enjoyable. Those concerned with privacy will be relieved to know you can prevent the public from seeing your personal listening habits if you so choose.buy glucotrust
I want to show appreciation to you for bailing me out of this particular situation. As a result of scouting throughout the world-wide-web and finding advice that were not beneficial, I was thinking my entire life was well over. Being alive minus the strategies to the issues you’ve sorted out by means of your posting is a serious case, as well as the ones which could have adversely damaged my entire career if I had not noticed your blog. Your own personal talents and kindness in taking care of all the pieces was important. I am not sure what I would have done if I had not discovered such a thing like this. It’s possible to now relish my future. Thanks a lot very much for the specialized and sensible guide. I will not be reluctant to recommend your blog to any person who will need support on this topic.
คาสิโนออนไลน์ พนันออนไลน์เว็บไซต์ตรง ฝากถอน ไม่มีอย่างต่ำ ที่ให้บริการคาสิโนอนไลน์ ที่เยี่ยมที่สุด คาสิโนออนไลน์ พนันพนันออนไลน์ ที่ให้บริการคาสิโนออนไลน์ ที่เหมาะสมที่สุด การให้บริการ พนันคาสิโนสดออนไลน์ ที่มีให้บริการ ที่เว็บยูฟ่าเบท เป็น คาสิโนออนไลน์เว็บไซต์ตรง ที่เปิดให้บริการ มาอย่างนาน และก็มีพนันคาสิโนออนไลน์ ที่ล้ำสมัย ซึ่งเป็นเว็บไซต์ ที่มีการปรับปรุงอยู่เสมอ โดยคณะทำงานประสิทธิภาพ ที่จะทำให้นักเสี่ยงดวง ได้เล่นพนันที่นำสมัย. เร็ว และก็ปลอดภัยมากมาย เป็นค่ายเกมพนันคาสิโนออนไลน์ ที่มีทั้งยังแบบเล่นออนไลน์สด และก็ เกมพนันคาสิโนต่างๆให้นักเสี่ยงโชคได้เลือก คาสิโนออนไลน์ได้เงินจริง และเดิมพัน เพื่อสร้างกำไรง่าย ด้วยต้นแบบการเล่นพนัน ที่เล่นง่าย เข้าใจได้อย่างไม่ยากเย็น ใช้เวลาไม่นาน นักพนักก็จะสามารถเล่นพนันได้อย่างสบาย รวมทั้งทำเงิน มีเงินเต็มกระเป๋ากลับไปอยู่ที่บ้านแน่ๆ.
Sight Care is a daily supplement proven in clinical trials and conclusive science to improve vision by nourishing the body from within. The Sight Care formula claims to reverse issues in eyesight, and every ingredient is completely natural.
Boğa Burcu Erkeği Özellikleri
ดูหนังใหม่ Netflix หลายๆคนอาจชอบดูหนังออนไลน์ผ่าน Netflix เพราะเหตุว่ามีให้เลือกดูหนังนานัปการ ไม่ว่าจะเป็น ภาพยนตร์ไทย ภาพยนตร์ฝรั่ง หนังเกาหลี แถมระบบดูหนังชัดระดับ 4k แต่อาจเลี่ยงข้อบกพร่องการดูหนังใน Netflix ที่สำคัญที่สุดไม่ได้นั้นคือจะต้องเสียเงินทุกเดือนซึ่งเวปของพวกเรานั้นได้นำหนังต่างๆใน Netflix ทุกเรื่องมาลงให้แก่คุณได้เลือกดูหนังกันแบบฟรีๆไม่เสียค่าใช้จ่าย แถมยังสามารถ ดาวน์โหลดหนัง Netflix ไปดูกันได้อีกด้วย การดูหนัง Netflix ผ่านเว็บดูหนังผ่านอินเตอร์เน็ตของเรานั้นท่านจะได้รับประสบการณ์ดูหนังอย่างดีที่สุด ชัดที่สุดเพราะเหตุว่าเซิฟเวอร์อัพหนังของพวกเรานั้นมีความเร็วและเสถียรสูงสุด ทำให้ไม่ต้องกังวลถึงจะมีผู้ชมจำนวนมากมองพร้อม ก็ไม่ทำให้ กระตุกหรือภาพแตกอะไร.
นอกเหนือจากนี้พวกเรายังมีบริการดูซีรี่ย์ออนไลน์ฟรี ทั้งซีปรี่ย์ฝรั่ง, ซีปรี่ย์เกาหลี และซีปรี่ย์จากทั่วทั้งโลกอัพเดทตอนใหม่แต่ละวันก่อนคนไหน มีให้เลือกรับชมทั้งยังพากย์ไทยรวมทั้งซับไทย ซาวด์แทร็ค ท่านไม่ต้องเสียเงินเสียทองแพงๆไปสมัครในแอพทุกเดือน แต่ว่าสามารถมองซีปรี่ย์ฟรีกับเราได้โดยไม่ต้องลงทะเบียนสมัครสมาชิก อีกทั้งซีปรี่ย์ที่กำลังฉายและซีรี่ย์เก่าที่จบแล้ว ก็มีให้เลือกรับชมตรงนี้ พวกเราได้รวมซีรี่ย์จากทั้งโลก ทุกแพลตฟอร์มมาไว้ตรงนี้ที่เดียวไม่ต้องสมัครมากไม่ต้องเสียเวล่ำเวลาค้นหา ไม่ว่าจะเป็นจาก Disney, Viu, iQiyi, Netflix ,Apple TV และก็อื่นๆอีกเพียบ แค่เพียงเข้ามารับชมที่เว็บของพวกเราก็จะได้รับดูซีปรี่ย์คุณภาพสูงขึ้นยิ่งกว่าเว็บไซต์ไหนๆเลยทีเดียว.
Neurozoom is a dietary formulation designed to develop brain power and cognition. The nootropic contains 35 science-based ingredients that safeguard the brain cells from damage and slow age-related memory problems.
VidaCalm is an all-natural blend of herbs and plant extracts that treat tinnitus and help you live a peaceful life.
Leanotox is one of the world’s most unique products designed to promote optimal weight and balance blood sugar levels while curbing your appetite,detoxifying and boosting metabolism.
Puralean is an all-natural dietary supplement designed to support boosted fat-burning rates, energy levels, and metabolism by targeting healthy liver function.
PowerBite is a natural tooth and gum support formula that will eliminate your dental problems, allowing you to live a healthy lifestyle.
BioVanish a weight management solution that’s transforming the approach to healthy living. In a world where weight loss often feels like an uphill battle, BioVanish offers a refreshing and effective alternative. This innovative supplement harnesses the power of natural ingredients to support optimal weight management.
Fast Lean Pro is a natural dietary aid designed to boost weight loss. Fast Lean Pro powder supplement claims to harness the benefits of intermittent fasting, promoting cellular renewal and healthy metabolism.
Wild Stallion Pro is a natural male enhancement supplement designed to improve various aspects of male
Excellent article! The insights provided are valuable, and I think adding more images in your future articles could make them even more compelling. Have you considered that?
Aizen Power is an all-natural supplement designed to improve male health. This formula contains the beneficial properties of various plants, herbs, minerals, and vitamins that help men’s blood circulation, detoxification, and overall health. https://aizenpowerbuynow.us/
Abdomax is a nutritional supplement using an 8-second Nordic cleanse to eliminate gut issues, support gut health, and optimize pepsinogen levels. https://abdomaxbuynow.us/
Alpha Tonic is a powder-based supplement that uses multiple natural herbs and essential vitamins and minerals to helpoptimize your body’s natural testosterone levels. https://alphatonicbuynow.us/
BioVanish a weight management solution that’s transforming the approach to healthy living. In a world where weight loss often feels like an uphill battle, BioVanish offers a refreshing and effective alternative. This innovative supplement harnesses the power of natural ingredients to support optimal weight management. https://biovanishbuynow.us/
BioFit is an all-natural supplement that is known to enhance and balance good bacteria in the gut area. To lose weight, you need to have a balanced hormones and body processes. Many times, people struggle with weight loss because their gut health has issues. https://biofitbuynow.us/
Boostaro is a dietary supplement designed specifically for men who suffer from health issues. https://boostarobuynow.us/
Sonovive™ is an all-natural supplement made to address the root cause of tinnitus and other inflammatory effects on the brain and promises to reduce tinnitus, improve hearing, and provide peace of mind. https://sonovivebuynow.us/
LeanBliss is a unique weight loss formula that promotes optimal weight and balanced blood sugar levels while curbing your appetite, detoxifying, and boosting your metabolism. https://leanblissbuynow.us/
TropiSlim is the world’s first 100% natural solution to support healthy weight loss by using a blend of carefully selected ingredients. https://tropislimbuynow.us/
Folixine is a enhancement that regrows hair from the follicles by nourishing the scalp. It helps in strengthening hairs from roots. https://folixinebuynow.us/
GlucoTrust is a revolutionary blood sugar support solution that eliminates the underlying causes of type 2 diabetes and associated health risks. https://glucotrustbuynow.us/
Are you tired of looking in the mirror and noticing saggy skin? Is saggy skin making you feel like you are trapped in a losing battle against aging? Do you still long for the days when your complexion radiated youth and confidence? https://refirmancebuynow.us/
SynoGut is an all-natural dietary supplement that is designed to support the health of your digestive system, keeping you energized and active. https://synogutbuynow.us/
ProstateFlux is a dietary supplement specifically designed to promote and maintain a healthy prostate. It is formulated with a blend of natural ingredients known for their potential benefits for prostate health. https://prostatefluxbuynow.us/
Researchers consider obesity a world crisis affecting over half a billion people worldwide. Vid Labs provides an effective solution that helps combat obesity and overweight without exercise or dieting. https://leanotoxbuynow.us/
Erec Prime is a natural formula designed to boost your virility and improve your male enhancement abilities, helping you maintain long-lasting performance. This product is ideal for men facing challenges with maintaining strong erections and desiring to enhance both their size and overall health. https://erecprimebuynow.us/
EyeFortin is an all-natural eye-health supplement that helps to keep your eyes healthy even as you age. It prevents infections and detoxifies your eyes while also being stimulant-free. This makes it a great choice for those who are looking for a natural way to improve their eye health. https://eyefortinbuynow.us/
PowerBite is an innovative dental candy that promotes healthy teeth and gums. It’s a powerful formula that supports a strong and vibrant smile. https://powerbitebuynow.us/
ดูหนังออนไลน์ หนังNetflix ดูหนังฟรี ดูหนังใหม่ออนไลน์ฟรี พากย์ไทย. เว็บดูหนังออนไลน์ใหม่ ดูฟรีไม่มีโฆษณา หนังใหม่ 2023 หนังใหม่ชนโรง หนังฟอร์มยักษ์ ซีรี่ย์เกาหลี หมวดหมู่ 18+ ดูหนังฟรี 24 ชั่วโมง.
เว็บพนันออนไลน์ ดีที่สุด เว็บตรง UFABET บาคาร่า888 ให้บริการ แทงบอลออนไลน์ สล็อตออนไลน์ หวยออนไลน์ บาคาร่าออนไลน์ เกมส์ออนไลน์ เต็มรูปแบบ ครบวงจร ผลตอบแทนสูง เป็นเว็บพนัน ถูกกฎหมาย จากต่างประเทศเป็นเว็บพนันออนไลน์ ที่มีความมั่งคง ปลอดภัย บริการ 24 ชั่วโมง
เว็บพนันออนไลน์ ดีที่สุด เว็บตรง UFABET บาคาร่า888 ให้บริการ แทงบอลออนไลน์ สล็อตออนไลน์ หวยออนไลน์ บาคาร่าออนไลน์ เกมส์ออนไลน์ เต็มรูปแบบ ครบวงจร ผลตอบแทนสูง เป็นเว็บพนัน ถูกกฎหมาย จากต่างประเทศเป็นเว็บพนันออนไลน์ ที่มีความมั่งคง ปลอดภัย บริการ 24 ชั่วโมง
ดูหนัง NETFLIX พากย์ไทย หนังใหม่ เว็บดูซีรี่ย์ ไม่มีโฆษณา พากย์ไทย ดูหนังฟรี เต็มเรื่อง ดูฟรีไม่มีโฆษณา
Virginia News: Your source for Virginia breaking news, sports, business, entertainment, weather and traffic https://virginiapost.us/
Find healthy, delicious recipes and meal plan ideas from our test kitchen cooks and nutrition experts at SweetApple. Learn how to make healthier food choices every day. https://sweetapple.site/
The best tips, guides, and inspiration on home improvement, decor, DIY projects, and interviews with celebrities from your favorite renovation shows. https://houseblog.us/
Moz Group Buy has been an amazing change in my SEO strategy.
A low-cost access to premium tools have given my site an edge.
The insights are invaluable, and the cost-sharing arrangement
makes it an essential tool for any digital marketing professional.
Highly recommended for optimizing the on-line presence
with no breaking bank!
The latest film and TV news, movie trailers, exclusive interviews, reviews, as well as informed opinions on everything Hollywood has to offer. https://xoop.us/
The latest news on grocery chains, celebrity chefs, and fast food – plus reviews, cooking tips and advice, recipes, and more. https://megamenu.us/
The latest video game news, reviews, exclusives, streamers, esports, and everything else gaming. https://zaaz.us/
Latest Denver news, top Colorado news and local breaking news from Denver News, including sports, weather, traffic, business, politics, photos and video. https://denver-news.us/
Your source for Connecticut breaking news, UConn sports, business, entertainment, weather and traffic https://connecticutpost.us/
Healthcare Blog provides news, trends, jobs and resources for health industry professionals. We cover topics like healthcare IT, hospital administration, polcy
News from the staff of the LA Reporter, including crime and investigative coverage of the South Bay and Harbor Area in Los Angeles County. https://lareporter.us/
I don’t even know how I ended up right here, but I assumed this publish was great. I don’t recognise who you are but certainly you are going to a famous blogger should you aren’t already. Cheers!|
indiaherald.us provides latest news from India , India News and around the world. Get breaking news alerts from India and follow today’s live news updates in field of politics, business, sports, defence, entertainment and more. https://indiaherald.us
Marin Breaking News, Sports, Business, Entertainment https://marinnews.us/
It’s not my first time to pay a visit this web page, i am browsing this web page dailly and get fastidious information from here daily.|
Kingston News – Kingston, NY News, Breaking News, Sports, Weather https://kingstonnews.us/
Yolonews.us covers local news in Yolo County, California. Keep up with all business, local sports, outdoors, local columnists and more. https://yolonews.us/
Greeley, Colorado News, Sports, Weather and Things to Do https://greeleynews.us/
Boulder News
Do you see AI changing the landscape?
Reading, PA News, Sports, Weather, Things to Do http://readingnews.us/
Canon City, Colorado News, Sports, Weather and Things to Do https://canoncitynews.us/
What’s up Dear, are you truly visiting this web site daily, if so afterward you will definitely get fastidious knowledge.|
If some one wants to be updated with most recent technologies therefore he must be pay a quick visit this site and be up to date everyday.|
You must participate in a contest for one of the best blogs on the web. I’ll advocate this site!
Trenton News – Trenton, NJ News, Sports, Weather and Things to Do https://trentonnews.us/
Vacavillenews.us covers local news in Vacaville, California. Keep up with all business, local sports, outdoors, local columnists and more. https://vacavillenews.us/
Ohio Reporter – Ohio News, Sports, Weather and Things to Do https://ohioreporter.us/
Fashion More provides in-depth journalism and insight into the news and trends impacting the fashion
What’s up, after reading this awesome post i am also cheerful to share my experience here with friends.|
PharmaMore provides a forum for industry leaders to hear the most important voices and ideas in the industry. https://pharmamore.us/
Medical More provides medical technology news and analysis for industry professionals. We cover medical devices, diagnostics, digital health, FDA regulation and compliance, imaging, and more. https://medicalmore.us
Local news from Redlands, CA, California news, sports, things to do, and business in the Inland Empire. https://redlandsnews.us
San Gabriel Valley News is the local news source for Los Angeles County
NewsBreak provides latest and breaking Renton, WA local news, weather forecast, crime and safety reports, traffic updates, event notices, sports https://rentonnews.us
Bellevue Latest Headlines: City of Bellevue can Apply for Digital Equity Grant https://bellevuenews.us
lso thank you for allowing me to comment!.<a href="https://www.toolbarqueries.google.ws/url?sa=t
Interesting website, i read it but i still have a few questions. shoot me an email and we will talk more becasue i may have an interesting idea for you.online casino NZ
What i do not understood is actually how you are no longer actually a lot more well-preferred than you might be now. You’re so intelligent. You know therefore considerably relating to this topic, produced me personally believe it from numerous various angles. Its like men and women don’t seem to be involved until it’s something to accomplish with Girl gaga! Your personal stuffs outstanding. Always care for it up!|
Maryland Post: Your source for Maryland breaking news, sports, business, entertainment, weather and traffic https://marylandpost.us
Generator Repair Leeds
[…]usually posts some pretty intriguing stuff like this. If youre new to this site[…]
cheap sex cams
[…]very few web-sites that come about to be comprehensive below, from our point of view are undoubtedly well really worth checking out[…]
Simply desire to say your article is as astounding. The clarity in your post is just excellent and i can assume you are an expert on this subject. Well with your permission let me to grab your feed to keep updated with forthcoming post. Thanks a million and please keep up the gratifying work.|
Link exchange is nothing else except it is just placing the other person’s blog link on your page at suitable place and other person will also do same for you.|
The latest news and reviews in the world of tech, automotive, gaming, science, and entertainment. https://millionbyte.us/
colibrim.com web site.
colibrim.com
colibrim.com
colibrim.com
colibrim.com
colibrim.com
Sugar Defender introduces a meticulously curated ensemble of eight key ingredients, each strategically selected to champion healthy blood sugar levels and facilitate weight loss. These ingredients collaborate to enhance the supplement’s effectiveness through diverse mechanisms, including energy elevation, fat burning, and metabolism stimulation, all while providing direct support for maintaining healthy blood glucose levels. Here is an insightful overview of each ingredient along with its purported functionality according to the manufacturer:
LipoSlend is a liquid nutritional supplement that promotes healthy and steady weight loss. https://liposlendofficial.us/
I really got into this article. I found it to be interesting and loaded with unique points of interest. I like to read material that makes me think. Thank you for writing this great content.Fencing Tauranga
LipoSlend is a liquid nutritional supplement that promotes healthy and steady weight loss. https://liposlendofficial.us/
I am definitely bookmarking this website and sharing it with my acquaintances. You will be getting plenty of visitors to your website from me!Tauranga fences
I blog frequently and I seriously thank you for your information. The article has really peaked my interest. I will take a note of your website and keep checking for new information about once per week. I opted in for your Feed as well.|
Tonic Greens is an all-in-one dietary supplement that has been meticulously designed to improve overall health and mental wellness.
Bazopril is a blood pressure supplement featuring a blend of natural ingredients to support heart health
Kuru Öksürüğe Ne İyi Gelir?
Hello, Neat post. There is an issue along with your site in web explorer, could test this¡K IE still is the marketplace leader and a huge portion of other people will miss your magnificent writing because of this problem.https://www.europeanbusinessreview.com/digital-marketing-consultancys-guide-to-seo-adapting-strategies-for-the-uk-market/
very nice post, i definitely enjoy this fabulous website, persist with itChatGPT prompts
I just couldn’t depart your site prior to suggesting that I extremely enjoyed the standard information an individual provide for your visitors? Is gonna be back frequently in order to inspect new postsChristchurch fences
Just wanna remark on few general things, The website style is ideal, the topic matter is rattling goodFence builder Christchurch
rare breed-trigger
[…]below youll uncover the link to some web-sites that we feel you need to visit[…]
Immigration Lawyers… […]the time to read or visit the content or sites we have linked to below theFencing Wellington
Really nice style and design and excellent content , nothing at all else we need : D.Wellington fences
This is my first time pay a quick visit at here and i am genuinely pleassant to read all at one place.|
Sumatra Slim Belly Tonic is an advanced weight loss supplement that addresses the underlying cause of unexplained weight gain. It focuses on the effects of blue light exposure and disruptions in non-rapid eye movement (NREM) sleep.
The ProNail Complex is a meticulously-crafted natural formula which combines extremely potent oils and skin-supporting vitamins.
Zeneara is marketed as an expert-formulated health supplement that can improve hearing and alleviate tinnitus, among other hearing issues. The ear support formulation has four active ingredients to fight common hearing issues. It may also protect consumers against age-related hearing problems.
늑대닷컴
[…]just beneath, are a lot of absolutely not connected websites to ours, having said that, they may be certainly really worth going over[…]
Slot Hewan
[…]Every as soon as inside a although we choose blogs that we study. Listed beneath would be the latest web pages that we pick out […]
Magnificent goods from you, man. I’ve understand your stuff previous to and you’re just too wonderful. I actually like what you have acquired here, really like what you’re stating and the way in which you say it. You make it enjoyable and you still care for to keep it wise. I can not wait to read much more from you. This is actually a terrific website.|
nangs sydney
[…]just beneath, are several absolutely not associated web pages to ours, however, they may be surely worth going over[…]
I love your wp format, where did you get a hold of it?film porno
freelance web designer
[…]one of our guests not long ago proposed the following website[…]
Wow! This could be one particular of the most helpful blogs We’ve ever arrive across on this subject. Basically Excellent. I’m also an expert in this topic therefore I can understand your effort.Electric dog fence
allgame
[…]that would be the end of this report. Here you will uncover some web sites that we think youll appreciate, just click the links over[…]
918kiss
[…]Sites of interest we have a link to[…]
หวย24
[…]below youll discover the link to some web pages that we believe you need to visit[…]
Best skincare products
[…]very few web sites that happen to become detailed beneath, from our point of view are undoubtedly very well really worth checking out[…]
I am glad to be a visitant of this complete blog ! , thankyou for this rare info ! .Andre Velandia
pg slot
[…]below you will obtain the link to some websites that we feel you should visit[…]
The when I just read a blog, I’m hoping that this doesnt disappoint me approximately this one. Get real, Yes, it was my method to read, but When i thought youd have something interesting to state. All I hear is a number of whining about something that you could fix should you werent too busy trying to find attention.Hidden dog fence
I really like your wp web template, wherever do you get a hold of it through?bokep jepang
Wow! This could be one particular of the most beneficial blogs We’ve ever arrive across on this subject. Basically Excellent. I’m also a specialist in this topic therefore I can understand your hard work.bokep sd
When I originally commented I clicked the “Notify me when new comments are added” checkbox and now each time a comment is added I get several emails with the same comment. Is there any way you can remove people from that service? Appreciate it!sex nuru
aplikasi hack maxwin slot pragmatic
[…]just beneath, are quite a few absolutely not associated web-sites to ours, nonetheless, they’re certainly really worth going over[…]
I’ve already been examinating away some of your tales and it is pretty excellent things. I’ll certainly bookmark your own blog.sex nude
When do you think this Real Estate market will go back up? Or is it still too early to tell? We are seeing a lot of housing foreclosures in Longwood Florida. What about you? I would love to get your feedback on this.sex việt
I really like your wp web template, wherever do you get a hold of it through?check out this site
hotel on lake placid
[…]Here are some of the internet sites we recommend for our visitors[…]
resorts in the catskills new york
[…]check below, are some absolutely unrelated websites to ours, nevertheless, they are most trustworthy sources that we use[…]
Looking for a new signature scent? Picking the perfect perfume https://ceresaperfume.com requires some thoughtful consideration! Start by understanding your preference- floral, citrus, woody, or spicy. Head to a store and don’t rush: Smell a few, take a break, then revisit your favorites. Your nose can get overwhelmed, so don’t try more than 5 scents in one day! Also, remember perfumes can smell different on everyone due to body chemistry. To determine how it actually smells on you and how long it lasts, apply on your wrist and let it sit for a few hours before deciding. Happy sniffing! #perfume #beautytips
very good jon admin. very useful mersii Bahis Com Site Login => https://bitly.com/bahiscom3
Just desire to say your article is as amazing. The clarity in your post is just nice and i could assume you’re an expert on this subject. Fine with your permission allow me to grab your feed to keep up to date with forthcoming post. Thanks a million and please carry on the gratifying work.|
the surround sound systems like dolby can really make the home theater sounds super great“Porn
Do you people have a myspace fan webpage? I looked for for one on facebook or myspace but couldn’t discover it, I would love to become a fan!Casino
Even if a real cams show can’t invest in a high-tech interactive toy, a good old fashioned dildo is a great choice. It’s as suitable for girls just starting out in their careers as it is for those who already have a solid audience.
25-06 ammo
[…]here are some links to internet sites that we link to due to the fact we assume they’re really worth visiting[…]
Simply wish to say your article is as surprising. The clearness in your post is just cool and i could assume you are an expert on this subject. Fine with your permission let me to grab your RSS feed to keep updated with forthcoming post. Thanks a million and please continue the enjoyable work.|
The article posted was very informative and useful. You people are doing a great job. Keep going.do follow backlink
This is a excellent blog, would you be involved in doing an interview about just how you designed it? If so e-mail me!buy backlinks
programmation informatique
[…]Here is a superb Weblog You might Obtain Exciting that we Encourage You[…]
sfr cybersecurite
[…]The information talked about inside the post are several of the best offered […]
nangs Sydney
[…]Wonderful story, reckoned we could combine several unrelated information, nonetheless actually really worth taking a appear, whoa did one particular discover about Mid East has got far more problerms too […]
nangs delivery in Sydney
[…]we prefer to honor several other internet websites around the web, even if they arent linked to us, by linking to them. Underneath are some webpages really worth checking out[…]
These are in fact impressive ideas in on the topic of blogging. You have touched some pleasant factors here. Any way keep up wrinting.|
Amazing! This blog looks exactly like my old one! It’s on a completely different topic but it has pretty much the same layout and design. Great choice of colors!|
I have been browsing online greater than 3 hours today, but I never found any interesting article like yours. It’s pretty value enough for me. Personally, if all web owners and bloggers made excellent content material as you did, the net might be a lot more helpful than ever before.|
I like the helpful information you provide in your articles. I’ll bookmark your blog and check again here regularly. I’m quite certain I will learn many new stuff right here! Best of luck for the next!|
I’d have to examine with you here. Which isn’t one thing I often do! I take pleasure in studying a submit that can make folks think. Additionally, thanks for permitting me to comment!bokep hijab
actually, it is not a good idea to buy refurbished computers coz the price of brand new computers is so low”bokep smp
I picture this may well be various upon the written content material? nevertheless I still imagine that it could be suitable for nearly any form of subject subject matter, because it would regularly be enjoyable to decide a warm and pleasant face or maybe hear a voice when preliminary landing.sex 201
Aw, this was the actually quality publish. In theory Let me create like this as well??§o? spending time as well as actual effort to make a great post! however so what can I say! We procrastinate a lot and in no way seem to obtain some thing carried out.bokep indo
When I originally commented I clicked the “Notify me when new comments are added” checkbox and now each time a comment is added I get several emails with the same comment. Is there any way you can remove people from that service? Appreciate it!bokep indoxxi
When someone writes an paragraph he/she keeps the image of a user in his/her brain that how a user can understand it. Therefore that’s why this piece of writing is perfect. Thanks!|
site:น้ำหอมมีความสำคัญมากในการสร้างความประทับใจและบทบาทในการสื่อสารไม่เป็นสำเนียง ต่างคนต่างมีความชื่นชอบในกลิ่นน้ำหอมที่แตกต่างกัน และด้วยความเข้าใจในความโอบอ้อมและความสดชื่นของน้ำหอม Ceresa Perfume ล้ำหน้าในการเลือกและผสมผสานน้ำหอมที่ไม่เหมือนใคร เรามาทำความรู้จักกับ ‘โน้ตน้ำหอม’ ที่เป็นส่วนสำคัญของสูตรน้ำหอมกัน
Do you people have a facebook fan page? I seemed for one on twitter but could not discover one, I would really like to change into a fan!solar battery system
Love your site. have you got the theme you used that you can share?solar battery systems
Good day! This is my first visit to your blog! We are a group of volunteers and starting a new initiative in a community in the same niche. Your blog provided us useful information to work on. You have done a wonderful job!|
Wow, marvelous blog layout! How long have you been blogging for? you make blogging look easy. The overall look of your site is excellent, as well as the content!situs porno
Wow, marvelous blog layout! How long have you been blogging for? you make blogging look easy. The overall look of your site is excellent, as well as the content!situs porno
cooking is my passion and a hobby for me, besides, i love to eat lots of foods*video porno
I picture this may well be various upon the written content material? nevertheless I still imagine that it could be suitable for nearly any form of subject subject matter, because it would regularly be enjoyable to decide a warm and pleasant face or maybe hear a voice when preliminary landing.bokep sma
I really like what you guys are up too. This kind of clever work and reporting! Keep up the good works guys I’ve incorporated you guys to blogroll.|
Wonderful beat ! I would like to apprentice while you amend your site, how can i subscribe for a blog website? The account aided me a acceptable deal. I had been tiny bit acquainted of this your broadcast provided bright clear ideasex tre em
When I originally commented I clicked the “Notify me when new comments are added” checkbox and now each time a comment is added I get several emails with the same comment. Is there any way you can remove people from that service? Appreciate it!sex tre em
Whats the theme you are using for your site? i love itsex news
I picture this may well be various upon the written content material? nevertheless I still imagine that it could be suitable for nearly any form of subject subject matter, because it would regularly be enjoyable to decide a warm and pleasant face or maybe hear a voice when preliminary landing.sex 35
Therefore i’m as content with check this out. Really kind of hands-on that must be considering in no way our dog hype this is certainly with various blogs, forums. We appreciate you your own personal anything this valuable most useful file.kontol kuda
I really like your wp web template, wherever do you get a hold of it through?sex tour
you can also give your baby some antibacterial baby socks to ensure that your baby is always clean.,video porno
every woman loves to wear those pretty but expensive diamond rings, i would love to give my girlfriend a diamond ring.,sex 669
cooking is my passion and a hobby for me, besides, i love to eat lots of foods*link bokep
you can also give your baby some antibacterial baby socks to ensure that your baby is always clean.,video porno
First, let’s kill off a genuine fabrication: You can not use a reverse cellular phone number lookup for totally free anywhere, anytime.Fahrzeugschätzer Dortmund
Whats the theme you are using for your site? i love itBokep
I really like your wp web template, wherever do you get a hold of it through?bokep viral
Medications and prescription drug information for consumers and medical health professionals. Online database of the most popular drugs and their side effects, interactions, and use.
SPSW provides news and analysis for leaders in higher education. We cover topics like online learning, policy
Sugar Defender is a dietary supplement that makes claims that it can improve and maintain normal blood sugar levels.
FitSpresso™ is a nutritional supplement that uses probiotics to help you lose weight.
FitSpresso™ is a nutritional supplement that uses probiotics to help you lose weight.
Boostaro is a natural dietary supplement for male health, enhancing circulation and overall bodily functions. Supports wellness with natural ingredients.
Sight Care is a natural formula that can support healthy eyesight by focusing the root of the problem. Sight Care can be useful to make better your vision.
Tonic Greens is an all-in-one dietary supplement that has been meticulously designed to improve overall health and mental wellness.
Tonic Greens is an all-in-one dietary supplement that has been meticulously designed to improve overall health and mental wellness.
The latest news and reviews in the world of tech, automotive, gaming, science, and entertainment.
SFNews is San Francisco
I simply must tell you that you have written an excellent and unique article that I really enjoyed reading. I’m fascinated by how well you laid out your material and presented your views. Thank you.download video twitter
I’m amazed, I must say. Rarely do I come across a blog that’s equally educative and interesting, and without a doubt, you have hit the nail on the head. The issue is an issue that too few folks are speaking intelligently about. I am very happy I found this during my hunt for something concerning this.|
The article posted was very informative and useful. You people are doing a great job. Keep going.bokep jilbab
You are a very persuasive writer. I can see this in your article. You have a way of writing compelling information that sparks much interest.bokep indo
ZenCortex Research’s contains only the natural ingredients that are effective in supporting incredible hearing naturally.A unique team of health and industry professionals dedicated to unlocking the secrets of happier living through a healthier body.
FlowForce Max is an innovative, natural and effective way to address your prostate problems, while addressing your energy, libido, and vitality.
Immigration Lawyers… […]the time to read or visit the content or sites we have linked to below thesitus bokep
Are you seeking for a way to feel better? Unlock the trusted source for health and wellness right here! All of your health issues and difficulties must be addressed using the key.
Made to measure curtains… […]check out the sites listed below, worth a read for interiors and rugs enthusiastsbokep indo
When a blind man bears the standard pity those who follow…. Where ignorance is bliss ‘tis folly to be wise….Stump Grinder NZ
Hello there, just became aware of your blog through Google, and found that it is truly informative. I’m going to watch out for brussels. I will appreciate if you continue this in future. Numerous people will be benefited from your writing. Cheers!|
I need to to thank you for this fantastic read!! I definitely enjoyed every little bit of it. I’ve got you book marked to look at new stuff you post…|
These are in fact enormous ideas in on the topic of blogging. You have touched some fastidious things here. Any way keep up wrinting.|
http://www.tododeporteonline.com/sin-equipo-antonio-brown-decide-regresar-a-la-universidad/
http://belezaquefazsentido.com.br/polka-dots/?replytocom=220584
Hey there, You have done an incredible job. I’ll certainly digg it and personally suggest to my friends. I am sure they will be benefited from this site.|
Hi there i am kavin, its my first time to commenting anywhere, when i read this article i thought i could also make comment due to this sensible paragraph.|