Fallout 2 – Walkthrough (Part II)
This is a main-path walkthrough for Fallout 2. It contains spoilers, so read with caution! Nothing sucks worse than a wasted surprise. Also, this path is based on a character who prizes unarmed combat and is generally a nice person. Many opportunities require you to be evil in Fallout 2, but their pursuit would require a completely different walkthrough.
|
CONTENTS 1. Arroyo |
Completed Map of Fallout 2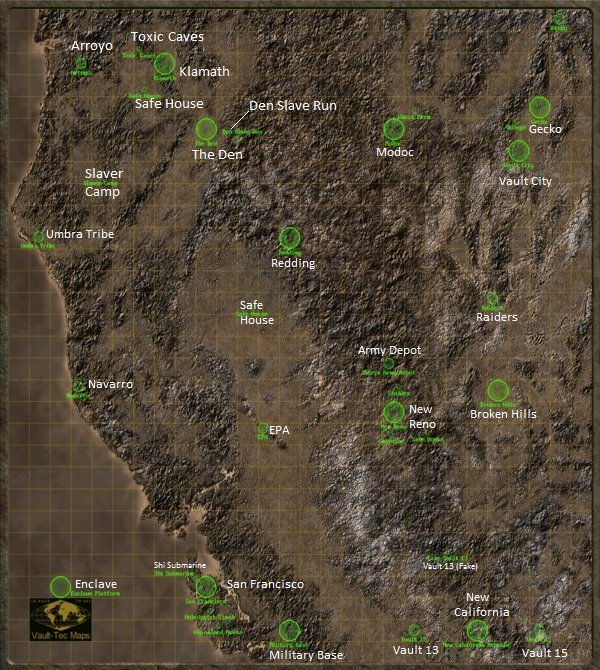
Arroyo
Arroyo has an abandoned temple full of radioactive insects. Your first task will be to prove yourself by ridding one of these edifices of every last ant. Time your entrance to any room – make sure there aren’t a cluster of scorpions or ants in one area.
If you fight one at a time, you’ll have a much better chance of survival. Use your fledgling First Aid skill several times to restore health and gain experience points (exp). The first door can be opened merely by clicking, the second must be lockpicked, and the third should be blown apart by the plastic explosive you will find in a nearby pot. Check all chests and vessels for extra goodies, and make sure you have plenty of health before you talk to the guy in the last room. Try your targeted attacks on him – the battle goes quicker that way. Don’t forget to retrieve your stuff from the chest before you leave!
Talk to the town elder to obtain a holy relic, a pocketful of cash, and some good information. Try using your repair skill on the well for a few extra exp. Talk to your aunt Morlis (what a witch!), then enter her tent and loot the pot for a bit of cash. Chat with your cousin Nagor, then head northwest to a wooded screen. Run past the geckos – they’re basically harmless – and click on the dog, Smoke, when you see him. Pick any flowers or roots you might find on the way. Lead Smoke back to Nagor for more exp. Have a chat with the bruiser next to the big stone head. If you’re lucky, he may teach you a few tricks.
Go chat with Hakunin in the medicine tent and agree to weed his garden (be prepared – Dark-Souled Plants are much worse than kudzu). Talk to him again and ask to be healed, then walk over to his garden and attack the plants. If you take too much damage, you can always run back to the medicine tent and beg for more healing. Once the plants are disposed of, return to Hakunin and get your reward. Finally, head south to the bridge. Talk to Mynoc, and compliment him on his spear. Run back to Morlis and trade her some healing powders for a piece of flint. Return this to Mynoc, and he’ll sharpen your weapon. Exit to the Wastes, and get ready for a serious adventure!
Klamath & The Den
If the Den is a hive of scum and villainy, Klamath is just a hive of scum. Go into Klamath for now. Talk to Torr and accept the brahmin-guarding mission. Kill all the scorpions and loot the shack for salables. Next, go to Vic’s house and grab all trade goods and a radio. Do not sell the radio. Chat with the folks in town, but don’t accept the still mission yet. Talk to Sullivan to boost your unarmed combat skill (playing dumb helps). Go west to Trapper Town and chat with the locals. Slim may be able to help with your Outdoorsman skill, and provide a necessary key. Let yourself in to the northern area and start whacking rats, all the way down into the caves. Save often, and try not to let them surround you. Once you’ve killed the Rat God, find the second set of ladders leading up. An explosive hidden nearby will get you through the locked door. Check the car for parts, then go back through the caves to Trapper Town. Grab the rubber boots in the abandoned Gun Store.
Leave the city and head up to the Toxic Caves. The best way to kill geckos is to use a targeted attack and aim for the eyes. Open the locker on the first level for some goodies, then head downstairs for a major fight. Once you’ve made it past the geckos (don’t pursue if you’ve blinded them – your rad count is getting higher), grab Smiley and run for the exit. Return to Klamath and talk to Ardin for your reward. Choose to cancel Sulik’s debt, and you’ve got your very first companion. Talk to Smiley to learn the art of skinning geckoes, then accept Bob’s still quest. Kill every gecko in the vicinity, and skin them. Take the pelts to the Golden Gecko for sale. Visit the canyon to the northwest and run past the robot to search the bodies. Once you’ve managed to accumulate enough trade goods, purchase some leather armor before you head off to the Den….
Anyone who believes that children are cute, innocent angels has obviously never visited the Den. Save your game whenever you need to walk past one, and restore if you lose something expensive. (Keeping your tradable items on Sulik will prevent most thefts.) Chat with Smitty and get a gander at the car you’ll own someday. Talk to Joshua outside the Brotherhood of Steel for a creepy, conspiracy-theory sort of conversation, then wander next door for a spooky experience of the more paranormal sort. Talk to Ananius about the hauntings and his mummy. Enter the adjoining room, rest until midnight, then chat with Anna the ghost. Run over to Mom’s on the east side of town and talk to her about the haunted house. Talk to Stacy and buy her a drink for 200 exp. Ask Karl the drunk for his story about being a farmer, and don’t give up until you hear it. Talk to Mom again, and agree to take Smitty his meal.
On the way back to Smitty’s, talk to Joey and get the locket, then take it to Anna in the haunted house. Get her bones and the shovel from the bookcase. Give Smitty his dinner for a nice reward. Go to the graveyard, open Anna’s grave, put the bones in, and re-bury her. Return to Mom’s and talk to her. Go to the Slaver’s Guild and talk to Metzger. Talk to Vic, and give him the radio from his house. Talk to Metzger again and agree to buy Vic. Grab Vic, ask him about Vault 13, and get the heck out of there. Return to the east side of town and chat with Becky. Agree to get Fred’s money for her. Talk to Lara, and agree to find out what’s in the church. Go to the church and tell Tyler that Metzger sent you. Go inside and look at the crates, then return to Lara to tell her about it. Agree to talk to Metzger for her. Look near Lara’s house for an addict named Fred. Talk to him, and agree to take only $100 of the money he owes Becky. Return it to her, along with $100 of your own. Accept the book-finding mission.
Head east. Don’t even bother finding Derek – Becky’s book will be lying around somewhere near Mom’s, usually in the graveyard. Talk to Metzger, and return to the west side. Go to Becky and return the book, then talk to Lara. Agree to find a weakness in Tyler’s gang. Go to the church, talk to Tyler, then return to the east side. Tell your companions to wait for you, then talk to Lara and agree to be present at the fight. Sit back and watch, or help out if things get too hairy, loot the bodies, and collect your pay. Before you leave town, make sure you have some Jet, 10 bottles of beer, and 10 bottles of booze. Then grab your companions and head back to the Wastes!
Modoc
This unimportant town in the radioactive void just goes to show you – the only two things which would survive a nuclear holocaust are rats and rednecks. There is absolutely nothing which needs to be done in Modoc, but if you’re feeling generous, you can stop in to forge a peace treaty. Just make sure that you talked with Karl (remember, back in the Den?) before you chat with the subterranean Slags. In addition, farmer Farrel can provide an experience-enhancing extermination mission and a darned weird fight with a giant mole rat in a disused outhouse.
Vault City
If you were annoyed by the narrow-minded attitudes in Klamath, or offended by the prevalence of slavery in the Den, you’ll be positively apoplectic by the general state of affairs in Vault City. Brace yourselves, we’re goin’ in. If you’re in town early (or late?) enough, lockpick and loot the lockers and desk in the empty Greeting office for some choice stuff. Talk to the crying boy, then look behind the crates near the bar for his doll. Return it, and listen to him for a minute or so. Check out the rocks and get a free wrench. For some good karma, use a packet of Rad Away on Puking Charlie. For more good karma and an excellent gun, talk to the Smiths, then go to Happy Harry’s and buy a plow for them. Stop by the clinic and repair the auto-doc if you have enough skill. Talk to Amanda and agree to rescue her husband. Then drag Vic along to Ed’s brahmin yard to ask about the water flasks and Vault 13. Head north. Avoid the fake citizenship papers and acquire a day pass. Give all your booze and drugs to Sulik. Enter the gilded cage which is Vault City proper.
Stop by the Tap House and give Lydia your booze. Check in one of the smaller Amenities offices to purchase a nice pair of pliers. Then head to Maintenance for a painful reunion between Vic and his daughter, Valerie. Give Val the pliers and your wrench. Stop by the inappropriately named Servant Allocation Center and donate $500 towards Joshua’s release. Head north to the Council area. Talk to McClure to find out a painful truth about the GECK. Talk to Lynette and agree to stop Gecko’s pollution of the Vault City water supply. Once you solve the problem (see Gecko, below), McClure will provide your citizenship papers.
Enter the Vault and chat with Phyllis and Dr. Troy. Check the medical databases for possible info on combat implants (way cool). Head down to the second level. Repair the rattling vent to get a free goodie. If you have a good lockpick skill, this level is a bazaar of riches. Search every locker and footlocker, and don’t forget to grab the really esoteric pieces. In particular, don’t leave without the red memory module. Once you’ve cleaned the place out, head downstairs. Find the computer which is talking. Log on and get the location of Vault 15. Insert your Pip Boy when asked. Insert the holodisk from Gecko. Exit the Vault and rest secure in the knowledge of a job well done.
Gecko
Rads and gin and leathery skin, that’s what little ghouls are made of. If mutants give you the ooks, this is not the place to visit. Unfortunately, though, you’ll need to stock up on Rad Away and stop by this glowing burg in order to finish the Vault City citizenship quest. Talk to Harold in the manager’s office. If you don’t mind keeping a ghoul around, ask Lenny to join your party. Don’t forget to raid the back-room bookcase for a Big Book o’ Science. Once Harold has explained the problem, head back to Vault City. Leave your companions outside the front gates. Stop by Val’s to get a free toolkit and to convince her to give Vic another chance. Go to the Council area and talk to McClure. Tell him that you need a part to fix the Gecko plant, and confess that you’re worried about Lynette and your Citizenship. Go to Randal in the big Amenities building and get the part. Grab your friend collection at the gate and return to Gecko.
Tell your companions to wait near Harold’s place, and enter the reactor facility alone. Search the unattended lockers for a yellow passkey, and bookcases for a blue one. Proceed to the control area on the south end of the building, and let yourself in with the yellow key. Raid the nearby bookcase for a red passkey, then go chat with Festus in the southeast corner. You may be able to convince him to install it. If not, you can just do it yourself. Use the red key on the red door to enter Hank’s domain. Chat with Hank. Although you could mess with the computer and get the robot running, the best way to fix the reactor is just to get your stimpacks in one hand, the replacement part in the other, and make a mad run for the gadget with the valve on it. As soon as the reactor is fixed, run back out to Hank’s room and use a Rad Away on yourself. Success! Talk to Festus on the way out to get a holodisk. Then gather your gang and head back to Vault City.
If you return later with the holodisk data, bring it to Festus, then use it on the terminal in Hank’s room. You’ll be even more popular among the ghouls! Before you depart Gecko for new adventures, though, visit Skeeter in the junkyard area, and trade him Val’s tool kit for the fuel cell controller you need to obtain that Chrysalis Highwayman. While you’re at it, stop by Percy’s and agree to look for Woody. You’ll go to the Den when you want to get your car anyway, and Woody is the poor guy in the mummy coffin. For now, though, let’s move on.
Broken Hills & New Reno
Broken Hill is another non-essential flyspeck on the map, the uranium mines of Broken Hills offer nothing vital to aid your mission, but can provide a warm fuzzy feeling. In particular, a chat with Marcus the super mutant will provide a quest to fix the mine’s broken air purification unit with a part found only in New Reno. Which, not so coincidentally, could be your next destination.
In New Reno, not only does crime pay, it sets up an IRA and takes out a mortgage. Dirty dealing is the first order of business here, and you’ll have a tough time getting by without making unwanted enemies… or friends. Amazingly enough, this glittering vipers’ nest is not vital in any way to your quest for the Holy GECK, but many helpful advances and items are hidden within its myriad rooms. Try to avoid becoming beholden to any of the four major families in town. Better yet, come back when you’ve put on some serious muscle and kill them all.
The only must-do item on your list is to stop by New Reno Arms and buy a voice recognition unit – it’ll come in handy later. If you’ve got excellent pugilistic skills, you might also try challenging the champ to some boxing action. Save before you fight Mike the Masticator, and hope he bites your ear off in the ring. You’ll get a big boost to your charisma!
Army Depot, Raiders, Redding
None of these three locations (the Sierra Army Depot, Raider Base and Redding) are of particular importance. Yet Sierra is a lucrative and well-defended place. If you’ve ever wanted your very own robot pal, this is a one-stop shopping mart! For added coolness, download Skynet into an artificial brain and implant that into your new cyber-buddy. Or pluck out ol’ Vic’s brain if you’re feeling really evil. Just make sure you’re heavily armored and well-stocked with stimpacks before venturing into this facility.
Although there is no particular reason to visit the hidden raider base, it sure feels good to wipe up the floor with those troublemakers. As an added bonus, Lynette in Vault City would be thrilled to learn that the raiders were hired by New Reno, and they just so happen to have incriminating paperwork to that effect. Kill all you want, the world will thank you.
Redding is an interesting place to visit. This is definitely the place to indulge that fantasy of cleaning up the bad elements in a one-horse Western town. Help out the sheriff, pick up the deed to the Wanamingo mine, and remember the first law of the West – “bastards have brothers”. Redding is also a good place to cement your impending support of the New California Republic. Then head off to New California.
New California
Finally, you’re back on track! The NCR offers three possible ways to discover the location of Vault 13, plus a shiny badge for the well-intentioned player. The only caveat is that the information you seek will cost you plenty, so make sure you’ve collected $10,000 before entering the NCR. (Robbers and raiders make profitable Wasteland prey, and the stuff you looted from Vault City should be worth a pretty penny.) For the easiest route to Vault 13, just go see Salt-Beef Bob at Westin’s ranch and have a little chat. Then visit Doc Jubilee and shell out the 10k for his Velvis painting. On the back, lucky you, is scrawled a map to the Holy 13. But as tempting as it may be to run off and follow the fuzzy map, a few good deeds need doing in the NCR, and some important introductions should be made before you dash.
Be sure to visit the Brotherhood of Steel, to find out about the chapterhouse in San Francisco. This will be terribly handy later on. You can also become a member of the New California Rangers, if you’re feeling particularly knightly. Talk to Vortis the slaver, then head to the Rangers’ gun shop/secret base. Approach Elise and express a dislike of slavers. She’ll tell you to go back and kill Vortis, which, let’s be honest, is a service to humanity. Waste him and return to accept your spiffy new title. Funny how these things work out.
Oh, and if you drove the Highwayman to the NCR, make sure that you pay that enterprising bum $5 to watch it – this is one investment you won’t regret!
Vault 15 and 13
Although this near-Holy stronghold might be one way of obtaining the location of Vault 13, it certainly isn’t the easiest. If, however, the notion of rescuing a kidnapped girl and freeing a group of squatters from the unwelcome patronage of a bandit gang appeals to you, a pit stop might be in order. It’s entirely possible to talk your way past Phil the guard and recover Chrissy without bloodshed.
You are now at Vault 13, which is an important stop. Either the current residents of the Holy Vault are new arrivals, or you’ve got weirder genes than you thought. Chat with the Gruthar the deathclaw, in the first room of the vault, and offer the voice recognition chip from New Reno in exchange for permission to search for a GECK. Stop at level two and visit the shrine to your ancestor. Don’t release Dave or Matt, they’re locked up for a good reason! Proceed down to level three and chat with Jimmy. Open the malfunctioning computer in the far east room. Use the voice recognition unit, and close the machine back up. Finally, enter the storage room and loot the lockers. Take the NavCom parts, but don’t grab the GECK – that’ll spoil the moment when Gruthar presents it to you as a reward for fixing the computer. Before you head upstairs, you may want to stop off in the maze of terminals to the west and talk to Goris. He’s willing to join your party, and will make an excellent addition when there’s fighting to be done!
Take your hard-won Holy GECK and return to Arroyo. It would be nice, of course, to say here that the game ends triumphantly and you all live happily ever after, but unfortunately life is rarely that simple. Talk to Hakunin and set off once again, this time on an even more desperate quest. Since the final three locations will be extremely tough and dangerous, you’d do well to try out some of the optional quests and locations you passed up along the way. The meaner you are when you hit San Francisco, the better chance you’ll have of surviving the Enclave.
Navarro
This is the part where the hero rides off into the sunset… alone. Attempting to bring companions into Navarro is suicide, so just leave your buddies behind and solo this one. You can return and grab them after you’re done. Assuming you survive. (Play it cool, and you’ll probably come out all right.) Try to talk to Chris, outside of town. If you can’t convince him that you’re a new recruit, kill him before he can alert the base. Then just wander up to the main gate and talk to the guards. If Chris gave you the password, all the better. Otherwise, endure your chewing-out like the good little recruit that you’re pretending to be. Talk to the drill sergeant and proceed to the Armory to obtain your “replacement” uniform. Report back to the sergeant and stand guard as ordered. Once your shift is over, you’re free to clandestinely rob these boneheads blind.
Chat with Cookie about everything he can possibly say. Then talk with the base’s technicians. If you have an excellent Sneak skill, you can plunder the Maintenance area with impunity, but good timing will get even the clumsiest of characters through the necessary looting without fear of discovery. Chat with Quincy, and get the plans for the Vertibird flying machine. Next, go west to Raul’s hangar and pass along Quincy’s unfriendly comments. The instant Raul heads off to settle the score, scam the portable contents of the hangar, then dash to the Maintenance building and loot that as well.
Head downstairs. Tap into the mainframe for a bit of helpful info. Go to the commander’s office to get the fob. If you’ve been practicing those Speech skills and have a decent intelligence level, you might be able to bluff your way into the room on a mission of safeguarding the fob. Otherwise, you’ll have to pretend to be a simple cleaner, and you’d better have plenty of Stealth on your character sheet if you plan to loot the filing cabinet while the commander is watching! Once the fob is safely in your pocket, leave the office and pay a little visit to Doc Schreber. As it happens, he has soundproofed his lab to prevent his nasty experiments from inconveniencing the rest of the base. Kill him, take his key, and use the K-9 parts from the hangar to repair his robot dog, if you happen to want one. Then release Xorn the deathclaw, and escape to the surface via the secret exit in the southwest corner. Return to wherever you left your friends, pack them into the car, and head for sunny San Francisco.
San Francisco
The Shi and the Hubologists are diametrically opposed factions vying for control of San Francisco. To make matters worse, the Shi are internally divided between followers of two separate masters. And did we mention the Brotherhood of Steel? All three groups would like to purchase the Vertibird plans you picked up in Navarro, and all three hold the keys to refueling the ship which will take you to your final destination.
If you’re on the side of Right and Good, the folks to support in San Francisco are the Brotherhood of Steel and the Shi master known as the Dragon. If you’ve been working on your hand-to-hand skills, and possibly have the Hand to Hand Evade and/or Dodger perks, you may be able to help the Shi-towners and rid the city of Lo Pan in one fell swoop. Talk to Lo Pan and the Dragon in the arena, then offer to fight in the Dragon’s stead. Battle his five students (the last of which seems to have plenty more action points than you, so don’t shy away from using a blinding or crippling attack), and agree to fight Lo Pan. Be prepared for treachery, and target his eyes whenever possible. Once he’s dead, have another talk with the Dragon. Chat with Lao Chou for local info, then head west to the Brotherhood of Steel’s San Francisco base.
Chat with everyone. Agree to give the Brotherhood the Vertibird plans (unlike the other two factions in town, these nice folks will only make a copy, and leave you with the original to sell to another buyer). Downstairs, fiddle with the mainframe to enable a set of stat-improving automatic operations. You’ll need to provide the chips for these procedures, though, and they’re scattered around the world, so it may not be worth your effort. Next, go to the Hubologists’ headquarters and have a good gawk at the shuttle. No matter what, do not agree to join them! Near the would-be spacecraft is a young technician named Dave Handy, who has a personal problem and access to a whole lot of fuel. Chat with him to find out about Vikki, then enter the Hubologist base and go to the Celebrity Spokesmodels’ room. Talk to ex-porn-star Vikki and let her know how Dave feels. Talk to Crocket if you have some spare cash, and ask him to upgrade your power armor. Take Vikki’s response to Dave, then kill some time and return to Crocket for your upgraded armor. If you’re feeling well-inclined towards the Shi-towners, you can chat with Ken Lee first and finish off this Hubologist visit by killing AHS-9 and every Hubbie in the place for loads o’ karma.
Now it’s time to get yourself a boat. Head down to the dock and chat with the Captain. In order to get his assistance, you’ll need to help one of his friends. Of the two, Chip is by far the easier. Seems this poor sap got a bit too exuberant at the gambling tables one night, and lost his spleen on a bet. Chat with him to find out what happened. As the spleen was sold to Lao Chou, have a little talk with him, and follow the bouncing organ to Dr. Wong. Explain that the spleen is in fact human, pony up the $1000 in re-installation charges to the also-helpful Dr. Fung, and you’ve got a happy chunk of karma and an amiable captain. (For additional exp, agree to help the other friend, Badger, by clearing out the assorted monsters from a lower deck and rescuing his flighty girlfriend – you’ll need to go down there to fix the NavCom anyway.)
Check out the computer in the control cabin. Head down to the cargo hold, use the fob from Navarro to open the locked door, and make your way up to the NavCom area. Use the NavCom parts to fix the machinery, and you’re ready to go! Stock up on Stimpacks and ammo, make sure that everyone’s wearing the best possible armor, and set sail for bloody destiny.
If you are already in the area, you cuold visit the Military Base. This fine establishment is another location which is completely unnecessary to the completion of the game. If you fancy the idea of fighting off a buttload of super mutants, however, you can score a lovely set of power armor and a Gauss weapon. To get inside, check the shed for some dynamite and attach it to the mine cart with a pole.
Enclave
The Evnclave is the big finale. Salvage is not a priority. As soon as you disembark, check the nearby computer. Download and read all the files, but don’t mess with any other options (yet). Now, you can scout out some of your surroundings by wandering around alone in your power armor, but in order to clear a good escape route for the future, you’ll want to bring in every friend you have. Try to talk to everyone you see. Kill those who don’t indulge in detailed conversations.
Make your way down to the detention level and chat with the Elder and Martin. Leave your comrades here until you can clear a path through the high-security maze downstairs. The safest way through the maze is to activate the terminal in the northmost room, then northeast, northwest, west, center, northeast, southwest, south, and southeast. Alternately, you could just deactivate the traps and pick the locks if you have the skill for it. To the east and west of the maze are guardrooms. Once you’ve killed the guards, check the lockers for a spiffy set of power armor and a GECK.
Down yet another flight of stairs is the headquarters of organized freakdom. Talk to Curling and try to convert him to rationality. Rid the world of the would-be President and take his passkey. Fight your way to the last set of stairs. Chat with Tom and try to convince him to shut down the computer. Failing that, kill him and frag the computer. Run like heck, you’ve only got ten minutes to escape! Take alternate stairs wherever possible. In the turreted room before the dock, make a mad dash for the turret control terminal and use the President’s key to override the turrets and turn them against Horrigan. Help them to finish him off, then hop on your boat and head for home.
")
")
")

I am curious to find out what blog system you are using? I’m having some small security problems with my latest blog and I’d like to find something more safeguarded. Do you have any solutions?
I love it when people come together and share opinions, great blog, keep it up.
There is noticeably a bundle to find out about this. I assume you made certain good factors in features also.
Just wanna comment on few general things, The website design and style is perfect, the subject material is rattling good. “In business school classrooms they construct wonderful models of a nonworld.” by Peter Drucker.
I’m still learning from you, as I’m trying to reach my goals. I certainly liked reading all that is written on your site.Keep the stories coming. I loved it!
I really appreciate this post. I’ve been looking everywhere for this! Thank goodness I found it on Bing. You’ve made my day! Thx again!
Howdy! This post couldn’t be written any better! Reading this post reminds me of my previous room mate! He always kept chatting about this. I will forward this post to him. Fairly certain he will have a good read. Thanks for sharing!
I loved up to you’ll obtain carried out proper here. The caricature is tasteful, your authored material stylish. nevertheless, you command get got an impatience over that you wish be handing over the following. in poor health indisputably come more beforehand once more as exactly the same nearly very frequently inside case you defend this hike.
I am now not certain where you’re getting your info, however great topic. I needs to spend a while finding out more or understanding more. Thanks for magnificent information I was in search of this information for my mission.
I dugg some of you post as I cerebrated they were very helpful extremely helpful
Youre so cool! I dont suppose Ive learn anything like this before. So nice to search out anyone with some unique thoughts on this subject. realy thank you for starting this up. this web site is something that’s needed on the net, somebody with a bit of originality. useful job for bringing one thing new to the web!
fantastic points altogether, you just gained a new reader. What would you suggest in regards to your post that you made a few days ago? Any positive?
I like your writing style really loving this web site.
Hi, Neat post. There is a problem together with your website in web explorer, might check thisK IE still is the market leader and a large component to people will omit your magnificent writing because of this problem.
What’s Happening i’m new to this, I stumbled upon this I’ve found It absolutely useful and it has helped me out loads. I hope to contribute & assist other customers like its aided me. Good job.
Hi, Neat post. There’s an issue with your web site in internet explorer, may test thisK IE nonetheless is the market chief and a large portion of people will pass over your fantastic writing due to this problem.
My spouse and I absolutely love your blog and find nearly all of your post’s to be what precisely I’m looking for. can you offer guest writers to write content in your case? I wouldn’t mind writing a post or elaborating on a few of the subjects you write with regards to here. Again, awesome web site!
An interesting discussion is worth comment. I think that you should write more on this topic, it might not be a taboo subject but generally people are not enough to speak on such topics. To the next. Cheers
I enjoy the efforts you have put in this, regards for all the great blog posts.
Lovely just what I was looking for.Thanks to the author for taking his time on this one.
I am not really great with English but I come up this really leisurely to interpret.
Hi there! This is kind of off topic but I need some help from an established blog. Is it very hard to set up your own blog? I’m not very techincal but I can figure things out pretty fast. I’m thinking about setting up my own but I’m not sure where to begin. Do you have any tips or suggestions? With thanks
Just wanna comment on few general things, The website layout is perfect, the subject matter is real wonderful : D.
As soon as I detected this site I went on reddit to share some of the love with them.
It?¦s really a nice and useful piece of info. I am glad that you shared this helpful info with us. Please stay us informed like this. Thanks for sharing.
Thank you for the sensible critique. Me & my neighbor were just preparing to do some research on this. We got a grab a book from our area library but I think I learned more from this post. I’m very glad to see such excellent information being shared freely out there.
I’m impressed, I need to say. Really not often do I encounter a weblog that’s each educative and entertaining, and let me inform you, you could have hit the nail on the head. Your concept is outstanding; the problem is something that not sufficient people are talking intelligently about. I’m very blissful that I stumbled throughout this in my seek for something referring to this.
Wonderful blog! I found it while searching on Yahoo News. Do you have any tips on how to get listed in Yahoo News? I’ve been trying for a while but I never seem to get there! Many thanks
Keep up the good piece of work, I read few posts on this website and I think that your web site is rattling interesting and has circles of wonderful information.
I like this blog so much, bookmarked.
excellent points altogether, you simply received a new reader. What might you recommend in regards to your publish that you just made some days ago? Any sure?
very good post, i actually love this website, carry on it
I like this web site so much, bookmarked. “Respect for the fragility and importance of an individual life is still the mark of an educated man.” by Norman Cousins.
Generally I do not learn post on blogs, however I would like to say that this write-up very forced me to check out and do so! Your writing taste has been amazed me. Thanks, quite great post.
We are a group of volunteers and opening a new scheme in our community. Your web site offered us with helpful information to paintings on. You have done an impressive activity and our entire group might be thankful to you.
Howdy would you mind stating which blog platform you’re working with? I’m planning to start my own blog soon but I’m having a difficult time selecting between BlogEngine/Wordpress/B2evolution and Drupal. The reason I ask is because your design and style seems different then most blogs and I’m looking for something unique. P.S Sorry for getting off-topic but I had to ask!
Have you ever considered about adding a little bit more than just your articles? I mean, what you say is important and everything. However think of if you added some great photos or videos to give your posts more, “pop”! Your content is excellent but with images and video clips, this blog could certainly be one of the most beneficial in its niche. Superb blog!
Valuable information. Lucky me I found your web site unintentionally, and I’m surprised why this coincidence did not took place in advance! I bookmarked it.
Some really good info , Sword lily I detected this.
Write more, thats all I have to say. Literally, it seems as though you relied on the video to make your point. You clearly know what youre talking about, why waste your intelligence on just posting videos to your weblog when you could be giving us something enlightening to read?
You made some good points there. I did a search on the topic and found most individuals will approve with your website.
Hi, Neat post. There is a problem with your web site in internet explorer, would check this… IE still is the market leader and a good portion of people will miss your excellent writing due to this problem.
Good – I should definitely pronounce, impressed with your web site. I had no trouble navigating through all the tabs as well as related info ended up being truly easy to do to access. I recently found what I hoped for before you know it at all. Reasonably unusual. Is likely to appreciate it for those who add forums or anything, website theme . a tones way for your client to communicate. Nice task..
Normally I don’t read article on blogs, but I wish to say that this write-up very compelled me to try and do it! Your writing taste has been surprised me. Thanks, very nice post.
Regards for this post, I am a big big fan of this web site would like to go on updated.
As a Newbie, I am permanently exploring online for articles that can aid me. Thank you
Oh my goodness! an amazing article dude. Thank you Nonetheless I’m experiencing problem with ur rss . Don’t know why Unable to subscribe to it. Is there anybody getting identical rss downside? Anybody who is aware of kindly respond. Thnkx
A powerful share, I simply given this onto a colleague who was doing a little evaluation on this. And he in fact bought me breakfast as a result of I found it for him.. smile. So let me reword that: Thnx for the deal with! But yeah Thnkx for spending the time to discuss this, I feel strongly about it and love reading more on this topic. If potential, as you grow to be experience, would you thoughts updating your blog with extra particulars? It is highly useful for me. Large thumb up for this weblog submit!
Nice read, I just passed this onto a friend who was doing a little research on that. And he just bought me lunch because I found it for him smile So let me rephrase that: Thank you for lunch! “The guy with the biggest stomach will be the first to take off his shirt at a baseball game.” by Glenn Dickey.
Nice post. I learn something more challenging on different blogs everyday. It will always be stimulating to read content from other writers and practice a little something from their store. I’d prefer to use some with the content on my blog whether you don’t mind. Natually I’ll give you a link on your web blog. Thanks for sharing.
Magnificent beat ! I would like to apprentice while you amend your website, how could i subscribe for a blog website? The account helped me a acceptable deal. I have been a little bit acquainted of this your broadcast offered bright clear idea
Great work! That is the type of information that should be shared around the web. Disgrace on Google for no longer positioning this publish higher! Come on over and visit my website . Thanks =)
Hey! Do you use Twitter? I’d like to follow you if that would be okay. I’m definitely enjoying your blog and look forward to new updates.
There may be noticeably a bundle to know about this. I assume you made sure good points in options also.
Keep working ,remarkable job!
I have recently started a website, the information you provide on this web site has helped me tremendously. Thank you for all of your time & work.
I’m still learning from you, as I’m improving myself. I definitely love reading everything that is written on your website.Keep the information coming. I liked it!
Its such as you learn my thoughts! You seem to know so much approximately this, such as you wrote the book in it or something. I think that you could do with a few to pressure the message house a bit, however instead of that, that is great blog. A fantastic read. I will certainly be back.
of course like your website but you need to test the spelling on quite a few of your posts. A number of them are rife with spelling problems and I in finding it very bothersome to inform the truth on the other hand I?¦ll certainly come back again.
Very interesting points you have noted, regards for putting up. “Ignorance, the root and the stem of every evil.” by Plato.
Good day! This post couldn’t be written any better! Reading through this post reminds me of my good old room mate! He always kept talking about this. I will forward this article to him. Fairly certain he will have a good read. Thank you for sharing!
Thanks for another informative website. Where else may just I get that type of information written in such a perfect manner? I have a project that I am simply now working on, and I have been at the glance out for such info.
Thank you for sharing with us, I conceive this website really stands out : D.
I love the efforts you have put in this, thankyou for all the great content.
wonderful points altogether, you just gained a new reader. What would you recommend about your post that you made some days ago? Any positive?
Hello, Neat post. There’s an issue along with your web site in web explorer, may check thisK IE nonetheless is the market leader and a big section of folks will leave out your fantastic writing because of this problem.
WONDERFUL Post.thanks for share..extra wait .. …
whoah this blog is magnificent i love reading your posts. Keep up the great work! You know, many people are hunting around for this information, you can aid them greatly.
Glad to be one of several visitors on this amazing web site : D.
Excellent website. Plenty of helpful info here. I’m sending it to several buddies ans also sharing in delicious. And obviously, thanks to your sweat!
Very efficiently written story. It will be useful to everyone who utilizes it, as well as myself. Keep doing what you are doing – for sure i will check out more posts.
of course like your web-site however you need to check the spelling on quite a few of your posts. Many of them are rife with spelling problems and I in finding it very troublesome to tell the reality then again I’ll certainly come again again.
Fantastic items from you, man. I’ve be aware your stuff previous to and you are just extremely great. I really like what you’ve acquired right here, really like what you are saying and the best way by which you say it. You are making it enjoyable and you still care for to stay it smart. I can not wait to read far more from you. This is actually a terrific web site.
Can I just say what a reduction to search out someone who actually is aware of what theyre speaking about on the internet. You undoubtedly know the way to carry a difficulty to light and make it important. Extra people must read this and understand this facet of the story. I cant consider youre no more standard because you definitely have the gift.
Hey! Quick question that’s completely off topic. Do you know how to make your site mobile friendly? My blog looks weird when browsing from my iphone 4. I’m trying to find a template or plugin that might be able to resolve this problem. If you have any suggestions, please share. Thank you!
What i don’t realize is in truth how you are not really a lot more smartly-liked than you might be now. You’re so intelligent. You know therefore significantly in terms of this matter, made me in my opinion consider it from numerous numerous angles. Its like women and men aren’t fascinated until it’s something to do with Lady gaga! Your personal stuffs great. All the time maintain it up!
I do trust all of the ideas you have presented to your post. They are really convincing and can definitely work. Still, the posts are very short for starters. May just you please lengthen them a little from next time? Thanks for the post.
Hi there, You’ve done a fantastic job. I will certainly digg it and personally suggest to my friends. I’m sure they’ll be benefited from this website.
I do agree with all of the ideas you’ve presented in your post. They are really convincing and will certainly work. Still, the posts are too short for beginners. Could you please extend them a little from next time? Thanks for the post.
Great write-up, I?¦m normal visitor of one?¦s website, maintain up the nice operate, and It’s going to be a regular visitor for a long time.
I conceive this web site has very great composed content material articles.
Just wish to say your article is as amazing. The clearness in your post is simply great and i can assume you’re an expert on this subject. Fine with your permission allow me to grab your feed to keep up to date with forthcoming post. Thanks a million and please carry on the rewarding work.
Hi there! I know this is kind of off topic but I was wondering if you knew where I could find a captcha plugin for my comment form? I’m using the same blog platform as yours and I’m having trouble finding one? Thanks a lot!
Very interesting topic, regards for putting up. “Not by age but by capacity is wisdom acquired.” by Titus Maccius Plautus.
I believe other website proprietors should take this site as an example , very clean and great user friendly layout.
hello!,I love your writing very much! share we communicate more about your article on AOL? I require an expert in this space to solve my problem. May be that’s you! Looking forward to look you.
Thank you a lot for giving everyone a very nice possiblity to discover important secrets from this web site. It really is very beneficial and stuffed with a good time for me and my office friends to visit the blog at a minimum three times every week to read through the latest guidance you have got. And lastly, I’m also certainly happy considering the amazing secrets you serve. Some 3 points in this posting are unequivocally the finest we have all ever had.
Its such as you read my mind! You seem to know a lot about this, like you wrote the book in it or something. I feel that you just can do with a few p.c. to power the message house a little bit, but other than that, that is magnificent blog. A great read. I will definitely be back.
certainly like your website but you have to check the spelling on quite a few of your posts. Several of them are rife with spelling issues and I find it very bothersome to tell the truth nevertheless I will surely come back again.
Great – I should certainly pronounce, impressed with your website. I had no trouble navigating through all tabs and related info ended up being truly simple to do to access. I recently found what I hoped for before you know it at all. Reasonably unusual. Is likely to appreciate it for those who add forums or something, site theme . a tones way for your customer to communicate. Excellent task..
I always was interested in this topic and still am, appreciate it for posting.
Hello.This post was really fascinating, especially since I was browsing for thoughts on this topic last Monday.
Some really good blog posts on this internet site, thanks for contribution. “We are always in search of the redeeming formula, the crystallizing thought.” by Etty Hillesum.
Really enjoyed this blog post, can you make it so I get an email sent to me every time you make a new update?
It is in point of fact a nice and useful piece of info. I’m satisfied that you just shared this useful info with us. Please stay us up to date like this. Thank you for sharing.
I am glad to be a visitor of this arrant blog! , thanks for this rare information! .
Would love to incessantly get updated outstanding web site! .
Very well written story. It will be valuable to everyone who usess it, including yours truly :). Keep up the good work – can’r wait to read more posts.
I believe you have noted some very interesting points, appreciate it for the post.
A person essentially help to make seriously articles I would state. This is the first time I frequented your web page and thus far? I surprised with the research you made to create this particular publish incredible. Magnificent job!
I like what you guys are up too. This type of clever work and exposure! Keep up the superb works guys I’ve incorporated you guys to my blogroll.
Hello! I’m at work surfing around your blog from my new iphone! Just wanted to say I love reading through your blog and look forward to all your posts! Carry on the outstanding work!
Hi there! I know this is kind of off topic but I was wondering if you knew where I could locate a captcha plugin for my comment form? I’m using the same blog platform as yours and I’m having difficulty finding one? Thanks a lot!
Saved as a favorite, I really like your blog!
I love the efforts you have put in this, regards for all the great articles.
I very lucky to find this web site on bing, just what I was looking for : D likewise saved to fav.
I like this website because so much useful material on here : D.
I’m not sure exactly why but this weblog is loading incredibly slow for me. Is anyone else having this issue or is it a problem on my end? I’ll check back later on and see if the problem still exists.
Great wordpress blog here.. It’s hard to find quality writing like yours these days. I really appreciate people like you! take care
What’s Happening i am new to this, I stumbled upon this I’ve found It absolutely useful and it has aided me out loads. I hope to contribute & aid other users like its helped me. Good job.
Excellent post. I was checking continuously this blog and I am impressed! Extremely helpful info specially the last part 🙂 I care for such information a lot. I was seeking this certain information for a very long time. Thank you and good luck.
Howdy! I’m at work surfing around your blog from my new iphone 4! Just wanted to say I love reading your blog and look forward to all your posts! Keep up the fantastic work!
I have been surfing online more than 3 hours today, yet I never found any interesting article like yours. It’s pretty worth enough for me. In my opinion, if all webmasters and bloggers made good content as you did, the internet will be a lot more useful than ever before.
certainly like your web site but you have to check the spelling on quite a few of your posts. A number of them are rife with spelling problems and I find it very bothersome to tell the truth nevertheless I will surely come back again.
Hi, Neat post. There is an issue together with your site in web explorer, would test this… IE nonetheless is the market chief and a big section of other folks will omit your magnificent writing because of this problem.
Wow, awesome weblog layout! How lengthy have you ever been running a blog for? you make running a blog glance easy. The full glance of your web site is magnificent, let alone the content material!
I’ve learn a few just right stuff here. Certainly value bookmarking for revisiting. I wonder how much effort you place to create the sort of great informative web site.
Hiya, I am really glad I’ve found this information. Today bloggers publish just about gossips and net and this is really frustrating. A good blog with interesting content, that is what I need. Thank you for keeping this site, I’ll be visiting it. Do you do newsletters? Cant find it.
This web site is really a walk-through for all of the info you wanted about this and didn’t know who to ask. Glimpse here, and you’ll definitely discover it.
I think this website contains some rattling wonderful info for everyone : D.
Hello. fantastic job. I did not expect this. This is a fantastic story. Thanks!
Hiya, I am really glad I’ve found this information. Nowadays bloggers publish just about gossip and net stuff and this is actually irritating. A good web site with interesting content, that is what I need. Thanks for making this website, and I’ll be visiting again. Do you do newsletters by email?
Of course, what a magnificent website and illuminating posts, I surely will bookmark your site.Best Regards!
It’s appropriate time to make a few plans for the long run and it is time to be happy https://britishshorthair.company.com
Glad to see you’re on top of things. https://samoyedpups.company.com
I do consider all of the concepts you’ve presented in your post https://inxscinema.com/
I do consider all of the concepts you’ve presented in your post https://nosesso.net/
Hello there, You have done a great job https://volunteering-ni.org/
I do consider all of the concepts you’ve presented in your post http://fanceat.com/
Thanks with regard to providing many of these wonderful details. https://majicpsychedelics.com/
Oh my goodness! an incredible article dude. Thank you Nevertheless I’m experiencing subject with ur rss . Don’t know why Unable to subscribe to it. Is there anyone getting equivalent rss drawback? Anybody who knows kindly respond. Thnkx
Encontre as Melhores Ofertas e Cupons no Os10Melhor. Reunimos promoções de Smartphones, TVs, Moda e muito mais. O menor preço nas melhores lojas.
Your place is valueble for me. Thanks!…
I do like the way you have presented this particular problem and it does indeed offer us some fodder for consideration. On the other hand, from what precisely I have witnessed, I just trust when other comments pack on that individuals keep on point and not embark on a soap box regarding some other news du jour. Still, thank you for this superb point and though I can not necessarily go along with this in totality, I respect your viewpoint.
Hi there, just became aware of your blog through Google, and found that it’s really informative. I am gonna watch out for brussels. I will be grateful if you continue this in future. Lots of people will be benefited from your writing. Cheers!
I went over this site and I conceive you have a lot of fantastic information, bookmarked (:.
You are my inhalation, I own few blogs and occasionally run out from to brand.
Hi there! Quick question that’s completely off topic. Do you know how to make your site mobile friendly? My web site looks weird when viewing from my iphone 4. I’m trying to find a theme or plugin that might be able to fix this issue. If you have any recommendations, please share. Thank you!
You are a very bright individual!
You are a very intelligent person!
F*ckin’ awesome things here. I am very glad to look your post. Thanks a lot and i am having a look forward to contact you. Will you kindly drop me a mail?
It’s appropriate time to make some plans for the future and it is time to be happy. I’ve read this post and if I could I desire to suggest you few interesting things or suggestions. Maybe you can write next articles referring to this article. I wish to read more things about it!
I just like the helpful information you supply on your articles. I will bookmark your blog and test once more right here regularly. I am somewhat sure I will learn many new stuff proper right here! Good luck for the following!
Perfect work you have done, this web site is really cool with excellent information.
Yesterday, while I was at work, my cousin stole my iphone and tested to see if it can survive a thirty foot drop, just so she can be a youtube sensation. My iPad is now destroyed and she has 83 views. I know this is entirely off topic but I had to share it with someone!
Thank you for the sensible critique. Me & my neighbor were just preparing to do some research on this. We got a grab a book from our local library but I think I learned more from this post. I’m very glad to see such wonderful information being shared freely out there.
I am constantly browsing online for ideas that can aid me. Thank you!
CBD for Anxiousness and Anxiety: Think of that it is possible to present one all-natural prep work right into your everyday diet plan, which could prove to be the secret to winning the defend a calmer life for individuals with depressive disorders. What happens if the incorporation of this preparation, produced on the basis of a progressively popular and also tested chemical compound of plant origin, is not only possibly really reliable, yet is not connected with the risk of negative effects typical of medicinal drugs? Is it even feasible? Where’s the catch? Do you need to know even more? Read this article In this write-up we will cover: What is anxiety? THC distinctions Anxiety as well as the endocannabinoid system What is depression? Main interpretations suggest that depressive conditions, likewise known informally as clinical depression, are characterized by: abrupt clinical depression of an individual’s mood, in the adverse instructions, of modest to strong strength of the strength of the experienced modifications, for more than a couple of weeks. There might be one or more factors for the occurrence of modifications. It also takes place that it is difficult to recognize any type of unequivocal reason. We really typically found the declaration that it is a people condition of the 21st century – it affects both older as well as younger individuals. Our education is trivial for anxiety, not to mention our earnings – it can affect any individual. Treatment of clinical depression comes down to: pharmacotherapy, psychiatric therapy and also psychoeducation, phototherapy, electroconvulsive therapy and also more natural activities related to the concentration of physical activity and the intro of substantial modifications in the day-to-day diet plan. It is as part of all-natural methods of fighting and counteracting depression that the addition of cannabis prep work with cannabinoids normally taking place in the plant in the day-to-day diet is getting a growing number of popularity on the planet. Cannabidiol CBD, found in e.g. CBD oil or full-spectrum hemp oil, appears in numerous scientific research studies as a potentially reliable cannabinoid in the therapy of clinical depression. Notably, it is a 100 all-natural chemical compound of plant origin. Remarkably, clinical depression is among the three most common mental disorders in which individuals turn to CBD hemp prep work such as CBD oil, complete range hemp oil with CBD or CBD pills. Reports from customers and their positive opinions on the efficiency of e.g. CBD oil or full spectrum hemp oil with all-natural CBD are expanding at an unprecedented speed. THC and also CBD cannabinoids – distinctions The primary cannabinoids in the cannabis plant are THC (Δ9-tetrahydrocannabinol) and also CBD (cannabidiol). They reveal antagonistic results, which suggests that CBD decreases the impacts of THC. What are these effects? THC has an intoxicating impact, triggers a feeling of bliss, impacts cognitive features, however likewise unwinds. Huge, on a regular basis taken in dosages of THC are considered unsafe to the human brain. Excessive usage of THC can bring about psychosis, lack of motivation, and also long-term adverse modifications in cognitive feature. Both THC and CBD affect the endocannabinoid system in the body. Their activity, as already discussed, is contradictory. Cbd-a-thc-in-the-endocannabinoid-1 system When creating images, CBD decreases the exhaustion of anandamide sources, as well as THC speeds up this procedure. Nevertheless, this does not mean that THC is only a hazardous cannabinoid and should not be in the preparation in any way. On the other hand. Its tiny existence in hemp prep work is also needed in order to obtain the so-called effect. synergy. THC in full spectrum hemp oil is present in such a minimal as well as, importantly, legal amount. This amount is so small (less than 0.2) that it does not create intoxication. Working together, THC as well as CBD have higher capacity than either molecule acting alone. What is anandamide (AEA)? What is its value for people experiencing depression? Continue reading! CBD, Depression and the endocannabinoid system The endocannabinoid system is a vital system in charge of the regulation of basic human physiological procedures, such as energy administration, neurohormonal as well as neuroimmune links, electric motor activity, state of mind and also motivation, and also fat metabolic rate. The endocannabinoid system consists of a natural chemical called anandamide (AEA). Anandamide is a natural chemical that is normally generated in the human mind. Its production is boosted by e.g. physical activity, and to a lower extent by the supposed deal with the body (massage therapy!). Its sources are “used” to preserve the correct functioning of the body, consisting of in the field of mental wellness. As displayed in this study: ncbi.nlm.nih.gov/pubmed/23580381 high levels of anandamide are connected with a lowered threat of establishing psychotic signs and symptoms. A high degree of anandamide is also connected with a positive impact on the decrease of clinical depression and also stress and anxiety signs. This system is still not completely recognized, however it seems rational that a strongly clinically depressed state of mind in a specific time period for a specific case, and with the simultaneous absence of activities targeted at its renovation, leads to a rise of the increase of negative ideas. As depressive conditions develop, they can develop into a lot more dangerous forms of problems, e.g. psychosis, misconceptions or schizophrenia. Decreasing this process as swiftly as possible may become important in the reliable therapy of mental illness of human performance.
CBD for Stress And Anxiety and Anxiety: Envision that it is feasible to introduce one all-natural preparation right into your day-to-day diet regimen, which can prove to be the key to winning the defend a calmer life for individuals with depressive problems. Suppose the incorporation of this preparation, created on the basis of an increasingly well-known and checked chemical compound of plant beginning, is not just possibly extremely efficient, yet is not connected with the threat of adverse effects normal of medicinal medications? Is it also possible? Where’s the catch? Do you wish to know more? Read this post In this write-up we will certainly cover: What is depression? THC and also CBD cannabinoids – differences Anxiety and the endocannabinoid system What is anxiety? Main definitions recommend that depressive disorders, additionally known colloquially as anxiety, are identified by: unexpected anxiety of a person’s mood, in the negative instructions, of modest to strong intensity of the strength of the seasoned adjustments, for greater than a couple of weeks. There might be several reasons for the event of adjustments. It likewise happens that it is difficult to determine any absolute reason. We very typically come across the declaration that it is a people illness of the 21st century – it impacts both older and younger people. Our education and learning is not important for depression, let alone our earnings – it can influence any individual. Treatment of depression boils down to: pharmacotherapy, psychiatric therapy and also psychoeducation, phototherapy, electroconvulsive therapy and even more natural activities connected to the augmentation of exercise and also the intro of considerable modifications in the daily diet. It is as part of all-natural methods of battling and combating depression that the inclusion of marijuana prep work with cannabinoids naturally taking place in the plant in the day-to-day diet regimen is gaining a growing number of popularity in the world. Cannabidiol CBD, discovered in e.g. CBD oil or full-spectrum hemp oil, appears in numerous scientific research studies as a potentially efficient cannabinoid in the treatment of clinical depression. Importantly, it is a 100 natural chemical compound of plant beginning. Remarkably, depression is amongst the 3 most typical mental disorders in which clients turn to CBD hemp preparations such as CBD oil, full spectrum hemp oil with CBD or CBD capsules. Records from customers as well as their favorable point of views on the effectiveness of e.g. CBD oil or complete range hemp oil with natural CBD are expanding at an unmatched speed. THC as well as CBD cannabinoids – distinctions The primary cannabinoids in the marijuana plant are THC (Δ9-tetrahydrocannabinol) as well as CBD (cannabidiol). They reveal hostile effects, which suggests that CBD decreases the results of THC. What are these effects? THC has an envigorating effect, causes a sensation of bliss, impacts cognitive functions, but likewise relaxes. Big, on a regular basis taken in doses of THC are considered hazardous to the human brain. Extreme consumption of THC can bring about psychosis, absence of inspiration, and even permanent negative adjustments in cognitive function. Both THC and also CBD influence the endocannabinoid system in the body. Their activity, as already pointed out, is inconsistent. Cbd-a-thc-in-the-endocannabinoid-1 system When writing pictures, CBD reduces the exhaustion of anandamide sources, and also THC quicken this process. However, this does not mean that THC is just a dangerous cannabinoid and also should not be in the preparation in all. On the other hand. Its little visibility in hemp preparations is even required in order to obtain the supposed result. harmony. THC completely range hemp oil is present in such a limited and, notably, lawful quantity. This amount is so tiny (less than 0.2) that it does not create drunkenness. Interacting, THC and CBD have greater possibility than either molecule acting alone. What is anandamide (AEA)? What is its value for individuals struggling with depression? Read on! CBD, Clinical depression as well as the endocannabinoid system The endocannabinoid system is a vital system in charge of the guideline of basic human physical procedures, such as energy management, neurohormonal and also neuroimmune links, electric motor task, mood and inspiration, as well as fat metabolic process. The endocannabinoid system includes a neurotransmitter called anandamide (AEA). Anandamide is a natural chemical that is normally produced in the human brain. Its production is boosted by e.g. exercise, as well as to a minimal extent by the supposed work with the body (massage!). Its sources are “used” to keep the correct functioning of the body, consisting of in the field of mental wellness. As displayed in this study: ncbi.nlm.nih.gov/pubmed/23580381 high levels of anandamide are associated with a decreased risk of developing psychotic signs. A high level of anandamide is also connected with a positive impact on the reduction of depression as well as anxiousness signs. This device is still not totally comprehended, however it seems sensible that a highly depressed state of mind in an individual time period for a certain instance, and with the synchronised lack of actions targeted at its enhancement, results in a concentration of the increase of negative ideas. As depressive problems develop, they can become even more harmful forms of conditions, e.g. psychosis, misconceptions or schizophrenia. Decreasing this process as quickly as feasible might turn out to be essential in the effective treatment of mental disorders of human performance.
CBD for Anxiousness as well as Anxiety: Visualize that it is feasible to introduce one natural preparation into your everyday diet, which could prove to be the key to winning the fight for a calmer life for people with depressive disorders. Suppose the addition of this preparation, created on the basis of an increasingly well-known and examined chemical substance of plant origin, is not only possibly very reliable, however is not connected with the danger of negative effects typical of medicinal medicines? Is it also feasible? Where’s the catch? Do you need to know more? Read this post In this write-up we will cover: What is depression? THC and also CBD cannabinoids – differences Clinical depression and the endocannabinoid system What is depression? Main definitions recommend that depressive disorders, also understood informally as depression, are characterized by: abrupt depression of a person’s mood, in the adverse direction, of moderate to solid intensity of the intensity of the seasoned adjustments, for greater than a couple of weeks. There may be several reasons for the incident of adjustments. It additionally happens that it is tough to identify any type of unquestionable reason. We extremely commonly found the statement that it is a civilization illness of the 21st century – it affects both older as well as more youthful individuals. Our education and learning is not important for clinical depression, not to mention our incomes – it can impact any individual. Treatment of clinical depression boils down to: pharmacotherapy, psychiatric therapy and psychoeducation, phototherapy, electroconvulsive therapy as well as even more natural activities associated with the surge of exercise and the intro of considerable changes in the everyday diet regimen. It is as part of all-natural approaches of fighting and combating clinical depression that the incorporation of cannabis prep work with cannabinoids naturally happening in the plant in the day-to-day diet is acquiring a growing number of popularity in the world. Cannabidiol CBD, located in e.g. CBD oil or full-spectrum hemp oil, appears in various clinical studies as a potentially reliable cannabinoid in the treatment of depression. Notably, it is a 100 natural chemical compound of plant beginning. Interestingly, clinical depression is amongst the 3 most common mental illness in which patients turn to CBD hemp prep work such as CBD oil, full spectrum hemp oil with CBD or CBD pills. Records from customers and their positive point of views on the efficiency of e.g. CBD oil or full spectrum hemp oil with all-natural CBD are growing at an unprecedented speed. THC as well as CBD cannabinoids – distinctions The main cannabinoids in the marijuana plant are THC (Δ9-tetrahydrocannabinol) and CBD (cannabidiol). They show antagonistic impacts, which implies that CBD reduces the impacts of THC. What are these results? THC has an intoxicating effect, triggers a sensation of euphoria, influences cognitive features, yet likewise kicks back. Large, routinely taken in dosages of THC are thought about harmful to the human mind. Too much intake of THC can lead to psychosis, absence of motivation, and also permanent negative adjustments in cognitive feature. Both THC and CBD impact the endocannabinoid system in the human body. Their action, as already discussed, is inconsistent. Cbd-a-thc-in-the-endocannabinoid-1 system When writing pictures, CBD reduces the deficiency of anandamide resources, as well as THC speeds up this process. Nonetheless, this does not indicate that THC is just a harmful cannabinoid and must not remain in the preparation whatsoever. On the contrary. Its tiny visibility in hemp prep work is even needed in order to obtain the supposed result. synergy. THC completely spectrum hemp oil is present in such a low as well as, notably, lawful amount. This quantity is so tiny (less than 0.2) that it does not trigger intoxication. Interacting, THC as well as CBD have higher possibility than either molecule acting alone. What is anandamide (AEA)? What is its value for people struggling with clinical depression? Read on! CBD, Depression and the endocannabinoid system The endocannabinoid system is a crucial system responsible for the law of fundamental human physical processes, such as power management, neurohormonal as well as neuroimmune links, motor task, state of mind and inspiration, and fat metabolic process. The endocannabinoid system consists of a natural chemical called anandamide (AEA). Anandamide is a neurotransmitter that is naturally generated in the human brain. Its production is stimulated by e.g. exercise, and to a lesser extent by the so-called deal with the body (massage therapy!). Its resources are “made use of” to preserve the proper performance of the body, including in the field of psychological health and wellness. As received this research: ncbi.nlm.nih.gov/pubmed/23580381 high degrees of anandamide are connected with a lowered threat of developing psychotic signs and symptoms. A high degree of anandamide is additionally connected with a positive impact on the decrease of depression and anxiousness signs. This system is still not fully understood, yet it appears sensible that a highly clinically depressed mood in an individual amount of time for a certain case, as well as with the synchronised absence of actions focused on its renovation, results in an accumulation of the influx of adverse thoughts. As depressive disorders create, they can develop into much more hazardous kinds of conditions, e.g. psychosis, delusions or schizophrenia. Decreasing this process as promptly as possible may end up being critical in the reliable treatment of mental disorders of human functioning.
CBD for Anxiety as well as Anxiety: Envision that it is possible to present one all-natural prep work into your day-to-day diet regimen, which could show to be the secret to winning the defend a calmer life for people with depressive problems. What happens if the incorporation of this prep work, developed on the basis of an increasingly well-known and examined chemical compound of plant beginning, is not just possibly really efficient, however is not associated with the threat of side effects normal of pharmacological drugs? Is it even possible? Where’s the catch? Do you wish to know more? Read this post In this post we will cover: What is depression? THC and also CBD cannabinoids – differences Clinical depression and also the endocannabinoid system What is clinical depression? Main meanings suggest that depressive conditions, also known colloquially as depression, are defined by: unexpected anxiety of a person’s state of mind, in the adverse direction, of modest to solid intensity of the strength of the skilled changes, for greater than a couple of weeks. There may be several factors for the occurrence of modifications. It likewise happens that it is difficult to identify any kind of unequivocal factor. We extremely usually come across the declaration that it is a human being disease of the 21st century – it impacts both older as well as more youthful people. Our education and learning is trivial for clinical depression, not to mention our revenues – it can influence any individual. Treatment of anxiety boils down to: pharmacotherapy, psychiatric therapy as well as psychoeducation, photo-therapy, electroconvulsive therapy and also even more all-natural activities associated with the augmentation of physical activity and the intro of significant adjustments in the daily diet. It is as part of natural approaches of battling and neutralizing clinical depression that the inclusion of cannabis prep work with cannabinoids normally taking place in the plant in the day-to-day diet is getting increasingly more appeal in the world. Cannabidiol CBD, located in e.g. CBD oil or full-spectrum hemp oil, appears in numerous scientific researches as a possibly efficient cannabinoid in the treatment of depression. Significantly, it is a 100 natural chemical compound of plant beginning. Remarkably, anxiety is amongst the three most common mental disorders in which people consider CBD hemp preparations such as CBD oil, complete spectrum hemp oil with CBD or CBD pills. Records from customers and their favorable point of views on the efficiency of e.g. CBD oil or complete range hemp oil with natural CBD are growing at an unprecedented rate. THC and also CBD cannabinoids – distinctions The main cannabinoids in the marijuana plant are THC (Δ9-tetrahydrocannabinol) and CBD (cannabidiol). They reveal hostile impacts, which suggests that CBD lowers the effects of THC. What are these effects? THC has an intoxicating effect, creates a sensation of bliss, affects cognitive features, yet additionally loosens up. Huge, consistently consumed dosages of THC are taken into consideration hazardous to the human brain. Extreme intake of THC can result in psychosis, lack of inspiration, and also even permanent negative adjustments in cognitive feature. Both THC as well as CBD influence the endocannabinoid system in the body. Their activity, as currently mentioned, is contradictory. Cbd-a-thc-in-the-endocannabinoid-1 system When writing images, CBD slows down the deficiency of anandamide sources, and also THC speeds up this procedure. Nevertheless, this does not indicate that THC is only a hazardous cannabinoid and needs to not be in the prep work in any way. As a matter of fact. Its tiny presence in hemp preparations is also needed in order to get the supposed impact. harmony. THC in full range hemp oil exists in such a minimal and also, importantly, legal quantity. This amount is so tiny (less than 0.2) that it does not create intoxication. Interacting, THC as well as CBD have better potential than either particle performing alone. What is anandamide (AEA)? What is its significance for people suffering from anxiety? Read on! CBD, Depression and also the endocannabinoid system The endocannabinoid system is an essential system responsible for the regulation of standard human physical processes, such as energy management, neurohormonal as well as neuroimmune links, electric motor task, state of mind and inspiration, and also fat metabolism. The endocannabinoid system includes a natural chemical called anandamide (AEA). Anandamide is a natural chemical that is naturally created in the human mind. Its production is promoted by e.g. exercise, as well as to a lesser level by the supposed collaborate with the body (massage therapy!). Its resources are “used” to maintain the correct functioning of the body, including in the field of psychological wellness. As displayed in this study: ncbi.nlm.nih.gov/pubmed/23580381 high levels of anandamide are related to a decreased risk of establishing psychotic signs. A high degree of anandamide is also connected with a favorable effect on the decrease of depression as well as anxiety signs and symptoms. This mechanism is still not totally recognized, however it seems sensible that a strongly clinically depressed mood in a specific time period for a certain instance, and also with the simultaneous lack of actions aimed at its improvement, leads to an intensification of the influx of negative thoughts. As depressive problems establish, they can turn into much more harmful forms of disorders, e.g. psychosis, deceptions or schizophrenia. Slowing down this process as rapidly as feasible might turn out to be vital in the efficient treatment of mental disorders of human performance.
CBD for Anxiousness and Clinical Depression: Envision that it is possible to introduce one natural preparation into your daily diet plan, which might prove to be the trick to winning the fight for a calmer life for people with depressive disorders. What if the addition of this preparation, produced on the basis of a progressively well-known and evaluated chemical compound of plant beginning, is not only possibly really effective, however is not associated with the danger of side effects regular of pharmacological drugs? Is it also feasible? Where’s the catch? Do you would like to know more? Read this article In this short article we will certainly cover: What is depression? THC as well as CBD cannabinoids – differences Anxiety and the endocannabinoid system What is anxiety? Main interpretations recommend that depressive problems, additionally understood colloquially as depression, are characterized by: unexpected anxiety of an individual’s mood, in the unfavorable instructions, of modest to strong strength of the strength of the seasoned adjustments, for greater than a couple of weeks. There might be several reasons for the occurrence of modifications. It likewise occurs that it is difficult to identify any kind of unequivocal reason. We really frequently discovered the statement that it is a civilization condition of the 21st century – it influences both older as well as more youthful people. Our education is not important for depression, not to mention our profits – it can affect anybody. Treatment of anxiety boils down to: pharmacotherapy, psychiatric therapy and also psychoeducation, photo-therapy, electroconvulsive therapy and even more all-natural activities connected to the increase of exercise and also the intro of substantial modifications in the everyday diet. It is as part of natural approaches of fighting and neutralizing depression that the inclusion of cannabis prep work with cannabinoids naturally taking place in the plant in the daily diet plan is gaining an increasing number of popularity on the planet. Cannabidiol CBD, discovered in e.g. CBD oil or full-spectrum hemp oil, shows up in countless scientific studies as a possibly reliable cannabinoid in the therapy of depression. Importantly, it is a 100 natural chemical compound of plant beginning. Remarkably, depression is amongst the 3 most common mental disorders in which people consider CBD hemp prep work such as CBD oil, full spectrum hemp oil with CBD or CBD capsules. Reports from consumers and also their positive point of views on the performance of e.g. CBD oil or complete spectrum hemp oil with natural CBD are expanding at an unprecedented rate. THC as well as CBD cannabinoids – distinctions The main cannabinoids in the cannabis plant are THC (Δ9-tetrahydrocannabinol) and also CBD (cannabidiol). They show antagonistic effects, which suggests that CBD lowers the results of THC. What are these effects? THC has an intoxicating result, triggers a feeling of ecstasy, affects cognitive functions, yet additionally loosens up. Huge, frequently eaten doses of THC are considered damaging to the human brain. Excessive usage of THC can lead to psychosis, lack of motivation, and also even irreversible unfavorable modifications in cognitive function. Both THC and also CBD influence the endocannabinoid system in the human body. Their action, as currently stated, is inconsistent. Cbd-a-thc-in-the-endocannabinoid-1 system When creating photos, CBD slows down the depletion of anandamide resources, and also THC speeds up this procedure. Nonetheless, this does not mean that THC is just an unsafe cannabinoid and ought to not remain in the prep work whatsoever. On the other hand. Its little presence in hemp prep work is even required in order to get the so-called effect. synergy. THC completely range hemp oil exists in such a minimal and also, notably, lawful quantity. This amount is so tiny (less than 0.2) that it does not trigger intoxication. Collaborating, THC and also CBD have greater possibility than either molecule performing alone. What is anandamide (AEA)? What is its importance for people suffering from clinical depression? Read on! CBD, Depression and the endocannabinoid system The endocannabinoid system is a crucial system in charge of the law of fundamental human physical procedures, such as power management, neurohormonal and also neuroimmune links, motor activity, mood as well as inspiration, as well as fat metabolic rate. The endocannabinoid system consists of a neurotransmitter called anandamide (AEA). Anandamide is a natural chemical that is normally created in the human brain. Its manufacturing is promoted by e.g. physical activity, and to a minimal extent by the supposed deal with the body (massage therapy!). Its sources are “made use of” to keep the proper performance of the body, consisting of in the field of mental health. As shown in this research: ncbi.nlm.nih.gov/pubmed/23580381 high levels of anandamide are associated with a reduced threat of creating psychotic signs. A high level of anandamide is also connected with a favorable result on the reduction of clinical depression as well as stress and anxiety signs and symptoms. This system is still not completely comprehended, however it seems rational that a strongly depressed mood in a specific period for a details instance, and also with the synchronised absence of activities aimed at its renovation, leads to an intensification of the influx of negative ideas. As depressive disorders create, they can turn into much more unsafe kinds of problems, e.g. psychosis, deceptions or schizophrenia. Slowing down this process as quickly as feasible might turn out to be vital in the reliable treatment of mental illness of human performance.
CBD for Anxiousness as well as Anxiety: Think of that it is feasible to present one all-natural prep work into your everyday diet plan, which might confirm to be the key to winning the fight for a calmer life for people with depressive disorders. What if the inclusion of this preparation, developed on the basis of a progressively well-known and also tested chemical compound of plant origin, is not just possibly really efficient, yet is not related to the danger of adverse effects normal of pharmacological drugs? Is it also possible? Where’s the catch? Do you wish to know more? Read this short article In this post we will cover: What is clinical depression? THC and also CBD cannabinoids – differences Anxiety and also the endocannabinoid system What is anxiety? Official interpretations recommend that depressive problems, additionally understood informally as depression, are defined by: abrupt clinical depression of a person’s mood, in the adverse direction, of moderate to strong intensity of the strength of the experienced modifications, for greater than a few weeks. There might be several factors for the occurrence of modifications. It likewise occurs that it is difficult to identify any type of unequivocal reason. We very typically come across the statement that it is a people condition of the 21st century – it influences both older as well as younger people. Our education is trivial for clinical depression, not to mention our earnings – it can affect any individual. Treatment of anxiety comes down to: pharmacotherapy, psychotherapy and also psychoeducation, phototherapy, electroconvulsive therapy and more natural activities connected to the intensification of physical activity and also the introduction of considerable adjustments in the daily diet. It is as part of natural techniques of fighting and also neutralizing depression that the inclusion of cannabis prep work with cannabinoids normally occurring in the plant in the daily diet regimen is getting more and more popularity worldwide. Cannabidiol CBD, located in e.g. CBD oil or full-spectrum hemp oil, appears in countless clinical studies as a potentially efficient cannabinoid in the treatment of depression. Importantly, it is a 100 natural chemical compound of plant beginning. Surprisingly, depression is amongst the three most common mental disorders in which clients resort to CBD hemp preparations such as CBD oil, full spectrum hemp oil with CBD or CBD capsules. Reports from consumers and their positive opinions on the efficiency of e.g. CBD oil or complete range hemp oil with natural CBD are expanding at an unprecedented speed. THC and CBD cannabinoids – distinctions The main cannabinoids in the cannabis plant are THC (Δ9-tetrahydrocannabinol) and CBD (cannabidiol). They reveal antagonistic results, which means that CBD minimizes the effects of THC. What are these effects? THC has an intoxicating result, causes a sensation of bliss, influences cognitive features, however also loosens up. Big, frequently eaten doses of THC are thought about damaging to the human mind. Too much usage of THC can bring about psychosis, lack of motivation, and even irreversible adverse adjustments in cognitive feature. Both THC as well as CBD affect the endocannabinoid system in the body. Their action, as already pointed out, is inconsistent. Cbd-a-thc-in-the-endocannabinoid-1 system When composing photos, CBD slows down the deficiency of anandamide resources, and THC accelerate this procedure. Nevertheless, this does not imply that THC is only a harmful cannabinoid and needs to not remain in the preparation at all. As a matter of fact. Its little presence in hemp prep work is even essential in order to obtain the so-called impact. synergy. THC in full range hemp oil exists in such a low as well as, significantly, lawful amount. This amount is so little (less than 0.2) that it does not cause drunkenness. Interacting, THC and also CBD have better possibility than either molecule acting alone. What is anandamide (AEA)? What is its significance for people struggling with anxiety? Continue reading! CBD, Depression and also the endocannabinoid system The endocannabinoid system is a crucial system in charge of the regulation of standard human physical processes, such as power management, neurohormonal and also neuroimmune connections, motor task, state of mind as well as motivation, and also fat metabolic process. The endocannabinoid system includes a neurotransmitter called anandamide (AEA). Anandamide is a natural chemical that is normally produced in the human brain. Its manufacturing is promoted by e.g. physical activity, and also to a lower extent by the so-called work with the body (massage!). Its resources are “utilized” to keep the correct functioning of the body, consisting of in the field of mental health and wellness. As received this study: ncbi.nlm.nih.gov/pubmed/23580381 high degrees of anandamide are related to a reduced threat of creating psychotic signs. A high level of anandamide is also related to a favorable impact on the decrease of clinical depression and also anxiousness symptoms. This system is still not fully understood, yet it appears sensible that a highly clinically depressed mood in a private period for a particular case, and also with the simultaneous absence of activities targeted at its improvement, leads to a rise of the influx of unfavorable thoughts. As depressive problems create, they can develop into much more harmful kinds of disorders, e.g. psychosis, misconceptions or schizophrenia. Slowing down this process as quickly as feasible might end up being vital in the efficient therapy of mental illness of human functioning.
CBD for Anxiousness and Depression: Debunked Imagine that it is possible to introduce one natural preparation right into your daily diet plan, which could prove to be the key to winning the fight for a calmer life for individuals with depressive problems. Suppose the inclusion of this preparation, created on the basis of a progressively well-known and examined chemical substance of plant origin, is not only potentially extremely efficient, but is not associated with the threat of adverse effects typical of pharmacological medications? Is it also possible? Where’s the catch? Do you want to know more? Read this write-up In this write-up we will cover: What is anxiety? THC distinctions Anxiety as well as the endocannabinoid system What is depression? Main definitions suggest that depressive problems, also understood informally as depression, are defined by: sudden depression of a person’s mood, in the unfavorable instructions, of modest to solid intensity of the strength of the knowledgeable changes, for more than a couple of weeks. There may be several reasons for the event of changes. It additionally happens that it is hard to recognize any type of indisputable reason. We extremely often discovered the declaration that it is a world disease of the 21st century – it affects both older and also younger individuals. Our education is trivial for depression, not to mention our profits – it can impact any individual. Therapy of depression boils down to: pharmacotherapy, psychotherapy and also psychoeducation, photo-therapy, electroconvulsive therapy and also more all-natural tasks associated with the rise of exercise as well as the intro of substantial changes in the everyday diet. It is as part of natural approaches of fighting and combating anxiety that the addition of marijuana preparations with cannabinoids naturally occurring in the plant in the day-to-day diet regimen is gaining an increasing number of popularity on the planet. Cannabidiol CBD, located in e.g. CBD oil or full-spectrum hemp oil, shows up in many clinical research studies as a possibly reliable cannabinoid in the therapy of clinical depression. Notably, it is a 100 all-natural chemical compound of plant origin. Surprisingly, depression is among the three most common mental disorders in which patients turn to CBD hemp prep work such as CBD oil, full range hemp oil with CBD or CBD pills. Records from customers as well as their positive viewpoints on the effectiveness of e.g. CBD oil or complete range hemp oil with all-natural CBD are growing at an unmatched rate. THC and CBD cannabinoids – differences The key cannabinoids in the marijuana plant are THC (Δ9-tetrahydrocannabinol) and also CBD (cannabidiol). They show hostile effects, which indicates that CBD reduces the results of THC. What are these effects? THC has an intoxicating result, causes a sensation of bliss, affects cognitive features, however likewise relaxes. Huge, frequently consumed dosages of THC are thought about dangerous to the human mind. Too much intake of THC can lead to psychosis, absence of motivation, and also permanent negative modifications in cognitive function. Both THC as well as CBD affect the endocannabinoid system in the body. Their activity, as currently pointed out, is inconsistent. Cbd-a-thc-in-the-endocannabinoid-1 system When writing images, CBD slows down the exhaustion of anandamide sources, and THC speeds up this procedure. However, this does not imply that THC is only a harmful cannabinoid and ought to not remain in the prep work in any way. On the other hand. Its small visibility in hemp preparations is even essential in order to acquire the supposed effect. synergy. THC completely range hemp oil is present in such a low and also, notably, legal amount. This amount is so tiny (less than 0.2) that it does not cause intoxication. Working together, THC and also CBD have higher potential than either molecule acting alone. What is anandamide (AEA)? What is its value for individuals dealing with clinical depression? Keep reading! CBD, Clinical depression and also the endocannabinoid system The endocannabinoid system is a crucial system in charge of the guideline of basic human physical procedures, such as power administration, neurohormonal and neuroimmune connections, electric motor task, mood as well as motivation, and also fat metabolic process. The endocannabinoid system includes a natural chemical called anandamide (AEA). Anandamide is a neurotransmitter that is normally produced in the human brain. Its manufacturing is stimulated by e.g. physical activity, and to a minimal degree by the supposed work with the body (massage therapy!). Its resources are “made use of” to maintain the proper functioning of the body, consisting of in the field of mental wellness. As displayed in this research study: ncbi.nlm.nih.gov/pubmed/23580381 high levels of anandamide are related to a decreased threat of establishing psychotic signs. A high degree of anandamide is also associated with a positive result on the reduction of anxiety and stress and anxiety signs. This device is still not completely recognized, but it seems sensible that a strongly clinically depressed mood in an individual amount of time for a certain situation, and with the synchronised lack of actions targeted at its enhancement, results in an aggravation of the influx of unfavorable ideas. As depressive disorders establish, they can turn into a lot more harmful forms of problems, e.g. psychosis, deceptions or schizophrenia. Slowing down this process as swiftly as feasible may turn out to be vital in the efficient treatment of mental illness of human performance.
CBD for Stress And Anxiety as well as Depression: Demystified Imagine that it is feasible to present one natural prep work right into your everyday diet plan, which can show to be the secret to winning the fight for a calmer life for people with depressive disorders. What happens if the inclusion of this prep work, developed on the basis of a significantly popular as well as examined chemical substance of plant beginning, is not only possibly really efficient, yet is not related to the risk of side effects regular of medicinal drugs? Is it also feasible? Where’s the catch? Do you would like to know even more? Read this post In this post we will cover: What is clinical depression? THC distinctions Anxiety and the endocannabinoid system What is clinical depression? Official interpretations recommend that depressive problems, likewise known colloquially as anxiety, are defined by: abrupt clinical depression of an individual’s state of mind, in the adverse direction, of modest to strong intensity of the intensity of the knowledgeable adjustments, for greater than a couple of weeks. There might be one or more reasons for the incident of changes. It also occurs that it is challenging to recognize any type of unequivocal reason. We extremely commonly stumbled upon the declaration that it is a people condition of the 21st century – it impacts both older and also more youthful people. Our education and learning is not important for clinical depression, let alone our incomes – it can affect any person. Therapy of anxiety comes down to: pharmacotherapy, psychotherapy and also psychoeducation, photo-therapy, electroconvulsive therapy and more natural activities connected to the concentration of exercise as well as the intro of significant adjustments in the day-to-day diet. It is as part of natural techniques of fighting as well as counteracting anxiety that the inclusion of cannabis prep work with cannabinoids naturally happening in the plant in the everyday diet is gaining increasingly more appeal on the planet. Cannabidiol CBD, found in e.g. CBD oil or full-spectrum hemp oil, appears in various scientific research studies as a possibly reliable cannabinoid in the treatment of clinical depression. Significantly, it is a 100 all-natural chemical compound of plant beginning. Interestingly, clinical depression is amongst the three most common mental illness in which patients resort to CBD hemp prep work such as CBD oil, complete range hemp oil with CBD or CBD capsules. Records from consumers and their favorable opinions on the performance of e.g. CBD oil or complete spectrum hemp oil with all-natural CBD are expanding at an extraordinary rate. THC and also CBD cannabinoids – differences The main cannabinoids in the marijuana plant are THC (Δ9-tetrahydrocannabinol) as well as CBD (cannabidiol). They show antagonistic results, which means that CBD lowers the results of THC. What are these effects? THC has an intoxicating effect, triggers a feeling of euphoria, influences cognitive functions, but additionally unwinds. Large, on a regular basis eaten dosages of THC are taken into consideration harmful to the human mind. Excessive intake of THC can lead to psychosis, lack of inspiration, and also even permanent unfavorable changes in cognitive function. Both THC as well as CBD impact the endocannabinoid system in the human body. Their action, as already pointed out, is inconsistent. Cbd-a-thc-in-the-endocannabinoid-1 system When writing pictures, CBD reduces the depletion of anandamide resources, as well as THC speeds up this process. Nonetheless, this does not indicate that THC is only a dangerous cannabinoid and also ought to not be in the preparation at all. However. Its tiny presence in hemp prep work is also needed in order to get the supposed result. harmony. THC in full spectrum hemp oil exists in such a low as well as, notably, legal quantity. This quantity is so small (less than 0.2) that it does not cause intoxication. Collaborating, THC and CBD have greater possibility than either particle acting alone. What is anandamide (AEA)? What is its importance for people experiencing depression? Read on! CBD, Anxiety as well as the endocannabinoid system The endocannabinoid system is a key system in charge of the regulation of basic human physical procedures, such as power administration, neurohormonal and neuroimmune connections, electric motor task, mood as well as motivation, and also fat metabolic process. The endocannabinoid system consists of a neurotransmitter called anandamide (AEA). Anandamide is a neurotransmitter that is normally created in the human brain. Its production is promoted by e.g. physical activity, as well as to a minimal level by the supposed deal with the body (massage!). Its sources are “utilized” to keep the proper functioning of the body, including in the field of mental wellness. As shown in this research study: ncbi.nlm.nih.gov/pubmed/23580381 high levels of anandamide are related to a lowered risk of developing psychotic signs and symptoms. A high degree of anandamide is additionally related to a favorable effect on the decrease of clinical depression as well as anxiety signs. This device is still not fully recognized, however it seems logical that a highly clinically depressed state of mind in an individual time period for a details instance, and with the simultaneous absence of actions targeted at its renovation, causes an augmentation of the influx of negative thoughts. As depressive disorders create, they can turn into even more unsafe forms of problems, e.g. psychosis, delusions or schizophrenia. Reducing this procedure as quickly as possible might turn out to be critical in the effective therapy of mental illness of human performance.
CBD for Anxiety and Anxiety: Picture that it is possible to present one natural preparation into your daily diet, which could verify to be the key to winning the fight for a calmer life for people with depressive conditions. What happens if the incorporation of this preparation, created on the basis of a progressively well-known and also checked chemical compound of plant origin, is not only potentially really efficient, however is not connected with the risk of adverse effects common of medicinal medications? Is it even possible? Where’s the catch? Do you would like to know more? Read this post In this write-up we will cover: What is depression? THC distinctions Anxiety and the endocannabinoid system What is anxiety? Main definitions recommend that depressive problems, also known colloquially as depression, are identified by: unexpected clinical depression of an individual’s state of mind, in the adverse instructions, of moderate to strong strength of the strength of the seasoned adjustments, for more than a couple of weeks. There may be one or more factors for the incident of modifications. It also happens that it is difficult to determine any unquestionable factor. We very frequently discovered the declaration that it is a civilization disease of the 21st century – it impacts both older and also more youthful people. Our education and learning is not important for anxiety, not to mention our profits – it can affect anybody. Treatment of depression boils down to: pharmacotherapy, psychotherapy and psychoeducation, phototherapy, electroconvulsive therapy as well as more all-natural activities related to the intensification of physical activity and also the intro of significant modifications in the daily diet regimen. It is as part of natural approaches of fighting and also combating depression that the addition of marijuana preparations with cannabinoids naturally happening in the plant in the everyday diet regimen is obtaining increasingly more popularity worldwide. Cannabidiol CBD, found in e.g. CBD oil or full-spectrum hemp oil, shows up in various scientific researches as a potentially reliable cannabinoid in the therapy of anxiety. Notably, it is a 100 all-natural chemical compound of plant beginning. Interestingly, depression is among the three most common mental disorders in which individuals resort to CBD hemp preparations such as CBD oil, full spectrum hemp oil with CBD or CBD capsules. Records from consumers and their favorable point of views on the performance of e.g. CBD oil or full spectrum hemp oil with natural CBD are growing at an unmatched speed. THC as well as CBD cannabinoids – distinctions The key cannabinoids in the marijuana plant are THC (Δ9-tetrahydrocannabinol) and CBD (cannabidiol). They show antagonistic effects, which means that CBD reduces the results of THC. What are these results? THC has an intoxicating result, creates a feeling of bliss, affects cognitive functions, but additionally relaxes. Big, on a regular basis taken in doses of THC are considered unsafe to the human mind. Excessive usage of THC can cause psychosis, lack of inspiration, and also irreversible unfavorable adjustments in cognitive function. Both THC and CBD impact the endocannabinoid system in the human body. Their activity, as currently pointed out, is inconsistent. Cbd-a-thc-in-the-endocannabinoid-1 system When creating images, CBD reduces the deficiency of anandamide resources, and also THC quicken this process. Nonetheless, this does not mean that THC is just a hazardous cannabinoid and must not remain in the prep work in any way. On the contrary. Its little visibility in hemp prep work is also necessary in order to get the supposed effect. harmony. THC completely range hemp oil exists in such a low and, importantly, lawful amount. This quantity is so small (less than 0.2) that it does not create drunkenness. Working together, THC as well as CBD have better possibility than either molecule acting alone. What is anandamide (AEA)? What is its relevance for individuals suffering from depression? Keep reading! CBD, Anxiety and the endocannabinoid system The endocannabinoid system is an essential system responsible for the law of standard human physiological procedures, such as power monitoring, neurohormonal as well as neuroimmune links, motor activity, state of mind and also inspiration, and also fat metabolism. The endocannabinoid system consists of a natural chemical called anandamide (AEA). Anandamide is a neurotransmitter that is normally generated in the human mind. Its manufacturing is boosted by e.g. physical activity, as well as to a lower level by the so-called deal with the body (massage!). Its sources are “made use of” to preserve the proper functioning of the body, including in the field of psychological health and wellness. As shown in this study: ncbi.nlm.nih.gov/pubmed/23580381 high levels of anandamide are connected with a decreased threat of establishing psychotic signs. A high degree of anandamide is also associated with a positive result on the decrease of clinical depression as well as stress and anxiety signs and symptoms. This system is still not totally understood, however it seems rational that a strongly depressed mood in an individual period for a certain instance, and with the simultaneous absence of activities aimed at its renovation, brings about a surge of the influx of unfavorable thoughts. As depressive problems establish, they can become much more hazardous kinds of problems, e.g. psychosis, misconceptions or schizophrenia. Decreasing this procedure as quickly as feasible may end up being essential in the efficient therapy of mental disorders of human functioning.
CBD for Anxiousness and Depression: Demystified Imagine that it is feasible to present one all-natural preparation into your daily diet regimen, which can show to be the secret to winning the defend a calmer life for people with depressive problems. Suppose the addition of this prep work, created on the basis of a significantly widely known as well as tested chemical compound of plant origin, is not just possibly extremely reliable, yet is not related to the risk of adverse effects typical of pharmacological medications? Is it even feasible? Where’s the catch? Do you wish to know even more? Read this post In this short article we will cover: What is clinical depression? THC and CBD cannabinoids – differences Depression and also the endocannabinoid system What is depression? Main definitions recommend that depressive conditions, additionally known informally as clinical depression, are defined by: abrupt depression of a person’s mood, in the adverse instructions, of moderate to strong intensity of the strength of the experienced changes, for more than a couple of weeks. There may be several factors for the event of changes. It also takes place that it is difficult to recognize any kind of indisputable factor. We really commonly encountered the declaration that it is a world illness of the 21st century – it influences both older as well as younger individuals. Our education and learning is not important for depression, not to mention our profits – it can affect any individual. Treatment of clinical depression boils down to: pharmacotherapy, psychotherapy and psychoeducation, phototherapy, electroconvulsive therapy and also more all-natural tasks connected to the aggravation of physical activity and the introduction of substantial adjustments in the day-to-day diet. It is as part of natural methods of fighting and neutralizing clinical depression that the incorporation of cannabis prep work with cannabinoids normally occurring in the plant in the daily diet is getting a growing number of popularity worldwide. Cannabidiol CBD, discovered in e.g. CBD oil or full-spectrum hemp oil, shows up in many scientific research studies as a possibly reliable cannabinoid in the therapy of anxiety. Importantly, it is a 100 all-natural chemical substance of plant origin. Surprisingly, clinical depression is amongst the 3 most typical mental disorders in which individuals turn to CBD hemp preparations such as CBD oil, complete range hemp oil with CBD or CBD pills. Records from consumers and their positive opinions on the efficiency of e.g. CBD oil or full range hemp oil with all-natural CBD are growing at an extraordinary pace. THC and also CBD cannabinoids – distinctions The primary cannabinoids in the marijuana plant are THC (Δ9-tetrahydrocannabinol) as well as CBD (cannabidiol). They reveal antagonistic impacts, which means that CBD reduces the impacts of THC. What are these results? THC has an envigorating impact, causes a sensation of ecstasy, impacts cognitive features, however also unwinds. Huge, consistently taken in doses of THC are thought about harmful to the human mind. Too much intake of THC can lead to psychosis, absence of inspiration, and even long-term unfavorable changes in cognitive function. Both THC as well as CBD influence the endocannabinoid system in the human body. Their action, as already discussed, is inconsistent. Cbd-a-thc-in-the-endocannabinoid-1 system When creating images, CBD decreases the exhaustion of anandamide resources, as well as THC speeds up this procedure. However, this does not indicate that THC is only a damaging cannabinoid and also needs to not be in the prep work at all. On the other hand. Its tiny existence in hemp preparations is even needed in order to get the supposed impact. harmony. THC completely range hemp oil is present in such a minimal and, significantly, legal quantity. This amount is so small (less than 0.2) that it does not create intoxication. Working together, THC as well as CBD have better potential than either molecule performing alone. What is anandamide (AEA)? What is its significance for people dealing with clinical depression? Keep reading! CBD, Anxiety as well as the endocannabinoid system The endocannabinoid system is a crucial system in charge of the law of fundamental human physiological processes, such as power monitoring, neurohormonal and also neuroimmune connections, motor activity, state of mind and also inspiration, as well as fat metabolic rate. The endocannabinoid system includes a neurotransmitter called anandamide (AEA). Anandamide is a neurotransmitter that is naturally created in the human brain. Its production is stimulated by e.g. physical activity, and to a minimal level by the so-called work with the body (massage!). Its resources are “made use of” to keep the proper performance of the body, consisting of in the field of mental health and wellness. As displayed in this study: ncbi.nlm.nih.gov/pubmed/23580381 high levels of anandamide are connected with a lowered danger of developing psychotic symptoms. A high level of anandamide is also related to a favorable result on the reduction of anxiety as well as stress and anxiety signs. This device is still not totally understood, yet it appears sensible that a highly depressed state of mind in a specific amount of time for a details case, and with the synchronised absence of actions aimed at its enhancement, results in an aggravation of the influx of unfavorable ideas. As depressive disorders develop, they can become even more dangerous forms of conditions, e.g. psychosis, misconceptions or schizophrenia. Decreasing this process as swiftly as feasible may turn out to be vital in the reliable treatment of mental illness of human performance.
CBD for Stress And Anxiety as well as Depression: Think of that it is possible to present one natural prep work into your day-to-day diet plan, which might confirm to be the secret to winning the defend a calmer life for individuals with depressive conditions. What if the addition of this prep work, developed on the basis of an increasingly popular and also examined chemical substance of plant beginning, is not just potentially really effective, yet is not related to the danger of adverse effects normal of medicinal medications? Is it also feasible? Where’s the catch? Do you want to know even more? Read this article In this short article we will cover: What is anxiety? THC distinctions Clinical depression as well as the endocannabinoid system What is anxiety? Main meanings recommend that depressive conditions, also understood colloquially as depression, are identified by: unexpected depression of a person’s mood, in the adverse instructions, of modest to strong strength of the intensity of the seasoned modifications, for greater than a few weeks. There may be one or more factors for the occurrence of changes. It additionally occurs that it is difficult to determine any kind of indisputable factor. We extremely usually discovered the statement that it is a civilization condition of the 21st century – it impacts both older and more youthful individuals. Our education is not important for depression, not to mention our revenues – it can affect anyone. Treatment of clinical depression comes down to: pharmacotherapy, psychotherapy and psychoeducation, phototherapy, electroconvulsive therapy and more natural tasks associated with the intensification of exercise and also the intro of considerable adjustments in the everyday diet plan. It is as part of all-natural approaches of fighting and combating clinical depression that the inclusion of marijuana preparations with cannabinoids normally occurring in the plant in the daily diet regimen is obtaining increasingly more popularity on the planet. Cannabidiol CBD, discovered in e.g. CBD oil or full-spectrum hemp oil, appears in many scientific studies as a potentially efficient cannabinoid in the therapy of depression. Importantly, it is a 100 natural chemical compound of plant origin. Interestingly, anxiety is among the 3 most usual mental disorders in which individuals resort to CBD hemp preparations such as CBD oil, full range hemp oil with CBD or CBD pills. Records from customers and their positive point of views on the efficiency of e.g. CBD oil or full spectrum hemp oil with natural CBD are expanding at an unmatched speed. THC as well as CBD cannabinoids – differences The main cannabinoids in the marijuana plant are THC (Δ9-tetrahydrocannabinol) and also CBD (cannabidiol). They show hostile results, which implies that CBD reduces the results of THC. What are these results? THC has an envigorating result, causes a sensation of bliss, affects cognitive features, but additionally kicks back. Huge, on a regular basis taken in doses of THC are considered damaging to the human brain. Too much consumption of THC can result in psychosis, lack of inspiration, as well as also permanent adverse changes in cognitive function. Both THC and also CBD affect the endocannabinoid system in the human body. Their activity, as currently stated, is contradictory. Cbd-a-thc-in-the-endocannabinoid-1 system When composing photos, CBD reduces the exhaustion of anandamide sources, as well as THC speeds up this process. Nevertheless, this does not mean that THC is just a dangerous cannabinoid and also should not be in the prep work at all. However. Its little presence in hemp prep work is even necessary in order to obtain the so-called result. harmony. THC in full range hemp oil exists in such a marginal as well as, notably, legal quantity. This amount is so little (less than 0.2) that it does not cause intoxication. Collaborating, THC and CBD have greater potential than either molecule performing alone. What is anandamide (AEA)? What is its relevance for individuals experiencing depression? Read on! CBD, Depression and also the endocannabinoid system The endocannabinoid system is an essential system responsible for the guideline of fundamental human physiological processes, such as energy management, neurohormonal and neuroimmune links, electric motor activity, mood and also motivation, and fat metabolic process. The endocannabinoid system consists of a neurotransmitter called anandamide (AEA). Anandamide is a neurotransmitter that is normally produced in the human brain. Its production is boosted by e.g. exercise, and also to a lower level by the so-called collaborate with the body (massage therapy!). Its sources are “made use of” to keep the correct functioning of the body, including in the field of mental health and wellness. As received this study: ncbi.nlm.nih.gov/pubmed/23580381 high levels of anandamide are connected with a reduced threat of creating psychotic signs. A high degree of anandamide is likewise related to a favorable effect on the decrease of depression and also anxiety signs. This device is still not totally comprehended, yet it seems logical that a highly clinically depressed mood in an individual period for a particular instance, and also with the synchronised absence of actions targeted at its improvement, causes an increase of the influx of negative thoughts. As depressive conditions develop, they can turn into even more unsafe kinds of conditions, e.g. psychosis, deceptions or schizophrenia. Decreasing this process as rapidly as feasible might turn out to be essential in the effective therapy of mental illness of human functioning.
CBD for Anxiousness as well as Depression: Envision that it is possible to introduce one all-natural prep work right into your everyday diet, which can confirm to be the secret to winning the defend a calmer life for people with depressive conditions. What if the inclusion of this preparation, produced on the basis of a progressively popular as well as evaluated chemical compound of plant origin, is not just possibly very reliable, yet is not associated with the threat of negative effects common of pharmacological medicines? Is it even possible? Where’s the catch? Do you need to know even more? Read this write-up In this write-up we will cover: What is clinical depression? THC distinctions Anxiety and also the endocannabinoid system What is depression? Official interpretations suggest that depressive disorders, also understood colloquially as anxiety, are defined by: unexpected anxiety of a person’s state of mind, in the negative instructions, of modest to solid strength of the intensity of the experienced adjustments, for greater than a few weeks. There may be several reasons for the event of modifications. It additionally takes place that it is difficult to identify any kind of indisputable reason. We really often discovered the statement that it is a world condition of the 21st century – it influences both older as well as more youthful people. Our education is trivial for clinical depression, not to mention our earnings – it can impact any individual. Therapy of anxiety boils down to: pharmacotherapy, psychiatric therapy as well as psychoeducation, phototherapy, electroconvulsive therapy and also even more natural activities related to the aggravation of physical activity and also the intro of considerable modifications in the everyday diet. It is as part of natural techniques of combating and also combating depression that the inclusion of marijuana prep work with cannabinoids normally taking place in the plant in the everyday diet regimen is gaining more and more popularity in the world. Cannabidiol CBD, located in e.g. CBD oil or full-spectrum hemp oil, shows up in various clinical researches as a possibly efficient cannabinoid in the treatment of clinical depression. Significantly, it is a 100 natural chemical substance of plant beginning. Remarkably, clinical depression is amongst the three most common mental disorders in which patients resort to CBD hemp preparations such as CBD oil, full spectrum hemp oil with CBD or CBD capsules. Records from customers and their positive point of views on the effectiveness of e.g. CBD oil or complete spectrum hemp oil with all-natural CBD are growing at an unprecedented pace. THC and CBD cannabinoids – distinctions The primary cannabinoids in the marijuana plant are THC (Δ9-tetrahydrocannabinol) and CBD (cannabidiol). They reveal hostile effects, which suggests that CBD minimizes the effects of THC. What are these results? THC has an envigorating effect, causes a feeling of euphoria, affects cognitive functions, however also unwinds. Huge, frequently consumed doses of THC are taken into consideration harmful to the human mind. Excessive usage of THC can result in psychosis, absence of motivation, and also even permanent adverse adjustments in cognitive function. Both THC as well as CBD affect the endocannabinoid system in the human body. Their action, as already pointed out, is inconsistent. Cbd-a-thc-in-the-endocannabinoid-1 system When composing images, CBD slows down the depletion of anandamide resources, as well as THC speeds up this procedure. Nevertheless, this does not suggest that THC is just a dangerous cannabinoid and also needs to not remain in the prep work at all. However. Its little presence in hemp prep work is even essential in order to obtain the supposed result. harmony. THC in full spectrum hemp oil is present in such a minimal and, significantly, lawful quantity. This quantity is so tiny (less than 0.2) that it does not trigger intoxication. Collaborating, THC and CBD have better possibility than either particle acting alone. What is anandamide (AEA)? What is its significance for people experiencing anxiety? Read on! CBD, Depression as well as the endocannabinoid system The endocannabinoid system is a key system responsible for the regulation of standard human physical procedures, such as energy administration, neurohormonal and neuroimmune connections, electric motor activity, state of mind and motivation, as well as fat metabolic process. The endocannabinoid system consists of a neurotransmitter called anandamide (AEA). Anandamide is a neurotransmitter that is naturally generated in the human mind. Its production is boosted by e.g. exercise, and to a lesser extent by the supposed work with the body (massage!). Its sources are “utilized” to maintain the correct functioning of the body, including in the field of mental wellness. As shown in this research study: ncbi.nlm.nih.gov/pubmed/23580381 high levels of anandamide are connected with a reduced risk of developing psychotic signs and symptoms. A high level of anandamide is likewise associated with a favorable result on the reduction of anxiety and also stress and anxiety signs and symptoms. This system is still not totally comprehended, yet it seems rational that a highly clinically depressed mood in an individual time period for a specific case, and also with the simultaneous lack of activities focused on its enhancement, results in a climax of the increase of adverse thoughts. As depressive conditions establish, they can become even more dangerous kinds of disorders, e.g. psychosis, delusions or schizophrenia. Reducing this procedure as quickly as possible may turn out to be essential in the reliable treatment of mental illness of human performance.
CBD for Anxiety and also Anxiety: Think of that it is possible to present one all-natural prep work into your everyday diet plan, which might prove to be the key to winning the fight for a calmer life for people with depressive disorders. What happens if the addition of this prep work, developed on the basis of a progressively well-known as well as evaluated chemical substance of plant beginning, is not just potentially extremely effective, yet is not connected with the threat of side effects regular of pharmacological medicines? Is it also feasible? Where’s the catch? Do you want to know more? Read this write-up In this write-up we will certainly cover: What is depression? THC distinctions Clinical depression and the endocannabinoid system What is depression? Official definitions recommend that depressive problems, likewise known informally as depression, are characterized by: abrupt clinical depression of an individual’s state of mind, in the adverse direction, of modest to solid intensity of the intensity of the knowledgeable changes, for more than a few weeks. There might be several factors for the incident of adjustments. It likewise happens that it is tough to recognize any indisputable factor. We extremely commonly discovered the declaration that it is a human being disease of the 21st century – it influences both older and also younger individuals. Our education and learning is trivial for clinical depression, not to mention our profits – it can affect anyone. Therapy of anxiety comes down to: pharmacotherapy, psychotherapy and psychoeducation, phototherapy, electroconvulsive therapy as well as more natural activities related to the rise of physical activity and the introduction of substantial changes in the day-to-day diet regimen. It is as part of all-natural methods of dealing with as well as neutralizing clinical depression that the addition of cannabis preparations with cannabinoids naturally taking place in the plant in the day-to-day diet is getting a growing number of popularity on the planet. Cannabidiol CBD, found in e.g. CBD oil or full-spectrum hemp oil, shows up in various clinical studies as a potentially reliable cannabinoid in the therapy of anxiety. Notably, it is a 100 all-natural chemical substance of plant origin. Interestingly, clinical depression is among the three most typical mental illness in which clients turn to CBD hemp preparations such as CBD oil, complete range hemp oil with CBD or CBD pills. Records from consumers and their favorable opinions on the efficiency of e.g. CBD oil or complete range hemp oil with all-natural CBD are growing at an extraordinary speed. THC and CBD cannabinoids – distinctions The key cannabinoids in the cannabis plant are THC (Δ9-tetrahydrocannabinol) and CBD (cannabidiol). They reveal hostile effects, which implies that CBD lowers the results of THC. What are these impacts? THC has an intoxicating impact, creates a feeling of ecstasy, affects cognitive functions, yet additionally kicks back. Big, consistently taken in dosages of THC are thought about damaging to the human mind. Excessive usage of THC can bring about psychosis, lack of motivation, and even irreversible adverse adjustments in cognitive function. Both THC and also CBD impact the endocannabinoid system in the human body. Their activity, as already pointed out, is contradictory. Cbd-a-thc-in-the-endocannabinoid-1 system When writing photos, CBD reduces the exhaustion of anandamide sources, and also THC accelerate this process. Nonetheless, this does not imply that THC is just a damaging cannabinoid and should not be in the prep work at all. On the other hand. Its little existence in hemp prep work is even needed in order to get the supposed impact. synergy. THC completely spectrum hemp oil is present in such a low and, notably, legal amount. This amount is so tiny (less than 0.2) that it does not cause intoxication. Collaborating, THC as well as CBD have greater potential than either particle acting alone. What is anandamide (AEA)? What is its value for individuals suffering from anxiety? Read on! CBD, Clinical depression and also the endocannabinoid system The endocannabinoid system is a crucial system in charge of the guideline of basic human physiological procedures, such as energy administration, neurohormonal and also neuroimmune connections, electric motor task, state of mind and motivation, and fat metabolism. The endocannabinoid system consists of a neurotransmitter called anandamide (AEA). Anandamide is a natural chemical that is naturally created in the human brain. Its production is promoted by e.g. exercise, as well as to a minimal degree by the supposed deal with the body (massage therapy!). Its resources are “made use of” to preserve the proper functioning of the body, consisting of in the field of psychological health and wellness. As received this research: ncbi.nlm.nih.gov/pubmed/23580381 high degrees of anandamide are associated with a decreased danger of establishing psychotic signs and symptoms. A high degree of anandamide is likewise associated with a favorable impact on the reduction of depression and also stress and anxiety signs. This mechanism is still not totally recognized, yet it seems sensible that a highly depressed mood in a private period for a specific instance, and with the simultaneous lack of actions targeted at its improvement, brings about a surge of the increase of negative thoughts. As depressive problems create, they can turn into much more harmful forms of problems, e.g. psychosis, deceptions or schizophrenia. Reducing this procedure as rapidly as possible may turn out to be important in the effective therapy of mental illness of human performance.
CBD for Stress And Anxiety and Depression: Demystified Imagine that it is possible to present one all-natural preparation into your daily diet, which might show to be the key to winning the fight for a calmer life for individuals with depressive problems. Suppose the inclusion of this preparation, created on the basis of a significantly well-known and also checked chemical compound of plant beginning, is not just potentially very efficient, but is not related to the risk of adverse effects normal of pharmacological medications? Is it even possible? Where’s the catch? Do you need to know more? Read this write-up In this short article we will certainly cover: What is anxiety? THC distinctions Clinical depression and the endocannabinoid system What is depression? Main interpretations recommend that depressive conditions, additionally understood informally as clinical depression, are characterized by: unexpected anxiety of an individual’s mood, in the adverse direction, of modest to solid intensity of the intensity of the knowledgeable modifications, for more than a couple of weeks. There may be several reasons for the event of modifications. It likewise takes place that it is tough to determine any type of absolute reason. We extremely usually found the statement that it is a people illness of the 21st century – it affects both older and younger individuals. Our education and learning is trivial for anxiety, not to mention our revenues – it can affect any individual. Treatment of anxiety comes down to: pharmacotherapy, psychiatric therapy as well as psychoeducation, phototherapy, electroconvulsive therapy as well as even more all-natural activities connected to the intensification of physical activity as well as the intro of substantial modifications in the everyday diet. It is as part of all-natural approaches of fighting and counteracting clinical depression that the incorporation of cannabis preparations with cannabinoids normally taking place in the plant in the day-to-day diet plan is acquiring an increasing number of popularity on the planet. Cannabidiol CBD, located in e.g. CBD oil or full-spectrum hemp oil, shows up in countless scientific studies as a potentially reliable cannabinoid in the treatment of clinical depression. Notably, it is a 100 natural chemical compound of plant beginning. Remarkably, depression is among the 3 most usual mental illness in which individuals resort to CBD hemp preparations such as CBD oil, complete range hemp oil with CBD or CBD pills. Reports from customers and also their favorable point of views on the effectiveness of e.g. CBD oil or full range hemp oil with all-natural CBD are growing at an unmatched rate. THC and also CBD cannabinoids – distinctions The main cannabinoids in the marijuana plant are THC (Δ9-tetrahydrocannabinol) and also CBD (cannabidiol). They show antagonistic impacts, which means that CBD reduces the results of THC. What are these results? THC has an intoxicating result, creates a sensation of ecstasy, impacts cognitive functions, but likewise unwinds. Huge, on a regular basis taken in dosages of THC are thought about dangerous to the human mind. Too much intake of THC can bring about psychosis, absence of inspiration, as well as also long-term negative adjustments in cognitive feature. Both THC as well as CBD impact the endocannabinoid system in the human body. Their activity, as already pointed out, is contradictory. Cbd-a-thc-in-the-endocannabinoid-1 system When composing pictures, CBD slows down the exhaustion of anandamide sources, and also THC speeds up this process. Nevertheless, this does not imply that THC is just a harmful cannabinoid and must not be in the preparation whatsoever. On the contrary. Its little existence in hemp preparations is even required in order to acquire the so-called impact. synergy. THC in full spectrum hemp oil is present in such a minimal and, importantly, legal amount. This quantity is so little (less than 0.2) that it does not create intoxication. Interacting, THC and also CBD have greater capacity than either molecule acting alone. What is anandamide (AEA)? What is its importance for individuals experiencing depression? Continue reading! CBD, Depression and the endocannabinoid system The endocannabinoid system is a crucial system responsible for the regulation of basic human physiological procedures, such as energy administration, neurohormonal and also neuroimmune links, electric motor task, state of mind and also inspiration, and fat metabolic rate. The endocannabinoid system consists of a natural chemical called anandamide (AEA). Anandamide is a neurotransmitter that is normally created in the human brain. Its manufacturing is promoted by e.g. exercise, as well as to a minimal extent by the supposed work with the body (massage therapy!). Its resources are “made use of” to keep the proper performance of the body, consisting of in the field of mental health and wellness. As received this study: ncbi.nlm.nih.gov/pubmed/23580381 high levels of anandamide are connected with a reduced danger of establishing psychotic signs. A high level of anandamide is also associated with a favorable result on the reduction of clinical depression and also anxiety signs. This mechanism is still not totally comprehended, however it appears rational that a strongly depressed mood in an individual period for a details instance, as well as with the synchronised lack of actions targeted at its renovation, causes a surge of the influx of unfavorable ideas. As depressive problems establish, they can become a lot more unsafe forms of conditions, e.g. psychosis, deceptions or schizophrenia. Decreasing this process as quickly as feasible might end up being essential in the efficient therapy of mental illness of human performance.
CBD for Stress And Anxiety and Depression: Think of that it is possible to present one natural prep work into your day-to-day diet plan, which might confirm to be the key to winning the defend a calmer life for individuals with depressive disorders. Suppose the inclusion of this prep work, created on the basis of an increasingly widely known and evaluated chemical substance of plant beginning, is not just possibly very efficient, however is not associated with the threat of negative effects regular of medicinal medications? Is it also feasible? Where’s the catch? Do you would like to know even more? Read this post In this short article we will cover: What is clinical depression? THC and CBD cannabinoids – differences Anxiety as well as the endocannabinoid system What is depression? Official interpretations recommend that depressive disorders, also recognized colloquially as anxiety, are defined by: sudden clinical depression of a person’s state of mind, in the adverse instructions, of modest to strong strength of the intensity of the seasoned modifications, for more than a few weeks. There might be several factors for the occurrence of modifications. It likewise occurs that it is tough to identify any indisputable reason. We extremely commonly discovered the statement that it is a human being illness of the 21st century – it impacts both older as well as more youthful people. Our education is not important for clinical depression, let alone our revenues – it can affect anybody. Treatment of anxiety boils down to: pharmacotherapy, psychiatric therapy and psychoeducation, phototherapy, electroconvulsive therapy and also more natural tasks related to the increase of exercise as well as the introduction of substantial changes in the everyday diet. It is as part of all-natural techniques of battling and also combating clinical depression that the addition of marijuana prep work with cannabinoids naturally taking place in the plant in the daily diet is acquiring more and more popularity in the world. Cannabidiol CBD, located in e.g. CBD oil or full-spectrum hemp oil, appears in many scientific research studies as a potentially efficient cannabinoid in the therapy of depression. Notably, it is a 100 natural chemical substance of plant beginning. Remarkably, depression is among the three most typical mental disorders in which people resort to CBD hemp prep work such as CBD oil, complete spectrum hemp oil with CBD or CBD capsules. Reports from consumers and also their favorable viewpoints on the effectiveness of e.g. CBD oil or complete range hemp oil with all-natural CBD are growing at an unprecedented rate. THC and CBD cannabinoids – differences The key cannabinoids in the marijuana plant are THC (Δ9-tetrahydrocannabinol) as well as CBD (cannabidiol). They reveal hostile effects, which suggests that CBD lowers the results of THC. What are these impacts? THC has an envigorating effect, creates a feeling of bliss, impacts cognitive features, however also kicks back. Large, frequently taken in dosages of THC are taken into consideration damaging to the human mind. Excessive usage of THC can lead to psychosis, absence of motivation, and also even irreversible unfavorable changes in cognitive function. Both THC as well as CBD influence the endocannabinoid system in the body. Their activity, as currently pointed out, is inconsistent. Cbd-a-thc-in-the-endocannabinoid-1 system When creating images, CBD decreases the deficiency of anandamide sources, and THC accelerate this procedure. Nonetheless, this does not indicate that THC is only a hazardous cannabinoid and also must not be in the prep work in any way. However. Its tiny visibility in hemp prep work is also necessary in order to acquire the supposed impact. synergy. THC completely spectrum hemp oil exists in such a limited and, importantly, legal amount. This quantity is so little (less than 0.2) that it does not cause intoxication. Interacting, THC as well as CBD have better possibility than either particle acting alone. What is anandamide (AEA)? What is its relevance for individuals dealing with clinical depression? Read on! CBD, Anxiety and also the endocannabinoid system The endocannabinoid system is a vital system in charge of the law of fundamental human physiological processes, such as energy administration, neurohormonal as well as neuroimmune connections, motor task, mood and also inspiration, as well as fat metabolic process. The endocannabinoid system consists of a natural chemical called anandamide (AEA). Anandamide is a natural chemical that is naturally created in the human brain. Its manufacturing is promoted by e.g. physical activity, and to a lower level by the supposed deal with the body (massage therapy!). Its resources are “used” to keep the appropriate functioning of the body, consisting of in the field of mental health and wellness. As shown in this research: ncbi.nlm.nih.gov/pubmed/23580381 high degrees of anandamide are associated with a reduced danger of developing psychotic symptoms. A high degree of anandamide is additionally associated with a positive result on the reduction of clinical depression as well as anxiousness signs. This device is still not totally comprehended, however it seems sensible that a strongly clinically depressed mood in an individual amount of time for a certain case, and with the simultaneous lack of actions aimed at its improvement, causes an aggravation of the influx of unfavorable thoughts. As depressive conditions develop, they can become a lot more dangerous forms of problems, e.g. psychosis, deceptions or schizophrenia. Reducing this process as quickly as feasible might turn out to be crucial in the efficient treatment of mental disorders of human functioning.
CBD for Anxiety as well as Anxiety: Picture that it is feasible to introduce one all-natural prep work right into your everyday diet, which can prove to be the secret to winning the fight for a calmer life for individuals with depressive disorders. What happens if the incorporation of this preparation, produced on the basis of a significantly popular and also tested chemical substance of plant origin, is not only potentially very effective, yet is not connected with the danger of side effects common of pharmacological medications? Is it also feasible? Where’s the catch? Do you need to know more? Read this short article In this article we will cover: What is clinical depression? THC distinctions Anxiety and the endocannabinoid system What is anxiety? Main meanings recommend that depressive conditions, additionally understood colloquially as clinical depression, are characterized by: sudden depression of a person’s state of mind, in the negative direction, of moderate to strong strength of the intensity of the skilled modifications, for more than a few weeks. There might be several factors for the incident of modifications. It also happens that it is challenging to identify any type of unequivocal factor. We extremely usually found the statement that it is a civilization disease of the 21st century – it influences both older and also younger people. Our education and learning is not important for anxiety, not to mention our profits – it can impact any person. Therapy of clinical depression boils down to: pharmacotherapy, psychotherapy and also psychoeducation, photo-therapy, electroconvulsive therapy and even more natural tasks connected to the climax of physical activity as well as the introduction of substantial modifications in the day-to-day diet. It is as part of all-natural techniques of battling as well as combating clinical depression that the incorporation of cannabis prep work with cannabinoids naturally taking place in the plant in the daily diet regimen is obtaining more and more appeal worldwide. Cannabidiol CBD, discovered in e.g. CBD oil or full-spectrum hemp oil, shows up in countless scientific researches as a possibly effective cannabinoid in the treatment of depression. Importantly, it is a 100 natural chemical compound of plant origin. Remarkably, depression is among the three most typical mental illness in which patients consider CBD hemp preparations such as CBD oil, complete spectrum hemp oil with CBD or CBD pills. Reports from consumers and also their favorable viewpoints on the effectiveness of e.g. CBD oil or complete spectrum hemp oil with natural CBD are growing at an unmatched rate. THC as well as CBD cannabinoids – differences The key cannabinoids in the marijuana plant are THC (Δ9-tetrahydrocannabinol) and also CBD (cannabidiol). They reveal hostile results, which implies that CBD minimizes the results of THC. What are these effects? THC has an intoxicating result, causes a sensation of euphoria, affects cognitive features, but likewise relaxes. Big, regularly consumed dosages of THC are taken into consideration dangerous to the human mind. Excessive usage of THC can result in psychosis, lack of motivation, as well as also long-term unfavorable changes in cognitive feature. Both THC and CBD impact the endocannabinoid system in the human body. Their action, as already mentioned, is contradictory. Cbd-a-thc-in-the-endocannabinoid-1 system When writing photos, CBD decreases the depletion of anandamide sources, and THC speeds up this procedure. However, this does not indicate that THC is just an unsafe cannabinoid and ought to not remain in the prep work in any way. As a matter of fact. Its small presence in hemp preparations is also required in order to obtain the so-called impact. harmony. THC completely spectrum hemp oil exists in such a limited and also, importantly, legal quantity. This quantity is so tiny (less than 0.2) that it does not cause intoxication. Collaborating, THC and also CBD have better capacity than either molecule acting alone. What is anandamide (AEA)? What is its importance for individuals dealing with clinical depression? Read on! CBD, Depression and the endocannabinoid system The endocannabinoid system is a vital system in charge of the law of basic human physical processes, such as power management, neurohormonal and also neuroimmune connections, motor activity, state of mind and also inspiration, and fat metabolic rate. The endocannabinoid system consists of a natural chemical called anandamide (AEA). Anandamide is a neurotransmitter that is naturally produced in the human mind. Its production is boosted by e.g. exercise, and to a minimal degree by the so-called work with the body (massage therapy!). Its resources are “utilized” to keep the proper performance of the body, consisting of in the field of mental health. As shown in this study: ncbi.nlm.nih.gov/pubmed/23580381 high levels of anandamide are connected with a lowered risk of developing psychotic signs and symptoms. A high degree of anandamide is also connected with a positive effect on the reduction of clinical depression as well as stress and anxiety signs and symptoms. This system is still not fully recognized, but it appears logical that a strongly clinically depressed state of mind in an individual period for a particular case, as well as with the synchronised absence of actions focused on its improvement, causes a surge of the increase of negative thoughts. As depressive problems establish, they can turn into even more dangerous forms of disorders, e.g. psychosis, misconceptions or schizophrenia. Slowing down this procedure as quickly as possible may end up being crucial in the reliable treatment of mental disorders of human performance.
CBD for Stress And Anxiety and also Depression: Visualize that it is possible to present one natural preparation into your everyday diet, which can prove to be the key to winning the fight for a calmer life for people with depressive problems. What if the incorporation of this prep work, produced on the basis of a significantly popular and tested chemical compound of plant beginning, is not only potentially extremely reliable, however is not connected with the risk of negative effects common of medicinal medications? Is it even feasible? Where’s the catch? Do you want to know more? Read this write-up In this short article we will cover: What is clinical depression? THC and also CBD cannabinoids – differences Depression and the endocannabinoid system What is anxiety? Official interpretations recommend that depressive disorders, likewise understood colloquially as anxiety, are identified by: unexpected clinical depression of an individual’s state of mind, in the negative direction, of moderate to strong intensity of the strength of the knowledgeable adjustments, for greater than a couple of weeks. There might be several reasons for the incident of modifications. It also happens that it is tough to recognize any kind of absolute factor. We very commonly found the declaration that it is a civilization illness of the 21st century – it affects both older and also younger people. Our education and learning is trivial for clinical depression, let alone our earnings – it can affect any individual. Treatment of clinical depression boils down to: pharmacotherapy, psychotherapy and psychoeducation, photo-therapy, electroconvulsive therapy and more all-natural activities associated with the increase of physical activity and also the introduction of considerable changes in the day-to-day diet regimen. It is as part of all-natural methods of battling and neutralizing clinical depression that the inclusion of marijuana prep work with cannabinoids normally happening in the plant in the daily diet is acquiring more and more popularity in the world. Cannabidiol CBD, found in e.g. CBD oil or full-spectrum hemp oil, shows up in numerous clinical research studies as a possibly effective cannabinoid in the treatment of depression. Significantly, it is a 100 natural chemical compound of plant origin. Interestingly, anxiety is amongst the three most typical mental disorders in which patients consider CBD hemp preparations such as CBD oil, complete range hemp oil with CBD or CBD pills. Reports from consumers and also their favorable opinions on the effectiveness of e.g. CBD oil or full range hemp oil with natural CBD are expanding at an unmatched rate. THC as well as CBD cannabinoids – distinctions The primary cannabinoids in the cannabis plant are THC (Δ9-tetrahydrocannabinol) and CBD (cannabidiol). They reveal hostile effects, which indicates that CBD lowers the effects of THC. What are these effects? THC has an intoxicating impact, causes a feeling of euphoria, influences cognitive functions, yet also loosens up. Huge, frequently consumed doses of THC are considered dangerous to the human mind. Extreme usage of THC can result in psychosis, absence of inspiration, and even permanent adverse changes in cognitive feature. Both THC as well as CBD affect the endocannabinoid system in the body. Their action, as already pointed out, is inconsistent. Cbd-a-thc-in-the-endocannabinoid-1 system When creating photos, CBD reduces the deficiency of anandamide sources, and THC quicken this procedure. However, this does not suggest that THC is just a harmful cannabinoid and also must not remain in the prep work at all. On the contrary. Its little presence in hemp prep work is even needed in order to acquire the supposed effect. synergy. THC completely range hemp oil is present in such a low and also, importantly, legal amount. This amount is so little (less than 0.2) that it does not cause drunkenness. Interacting, THC and also CBD have higher potential than either particle acting alone. What is anandamide (AEA)? What is its value for people experiencing clinical depression? Keep reading! CBD, Clinical depression and also the endocannabinoid system The endocannabinoid system is an essential system in charge of the policy of standard human physical processes, such as energy management, neurohormonal as well as neuroimmune links, electric motor activity, mood and motivation, and fat metabolic process. The endocannabinoid system includes a neurotransmitter called anandamide (AEA). Anandamide is a natural chemical that is normally generated in the human mind. Its production is stimulated by e.g. physical activity, and also to a lower level by the so-called collaborate with the body (massage!). Its resources are “utilized” to keep the proper functioning of the body, consisting of in the field of psychological health. As received this research: ncbi.nlm.nih.gov/pubmed/23580381 high degrees of anandamide are associated with a reduced threat of developing psychotic signs. A high degree of anandamide is additionally connected with a positive impact on the decrease of clinical depression and anxiety signs. This system is still not totally recognized, yet it seems rational that a highly depressed state of mind in a specific time period for a details instance, and also with the synchronised lack of activities targeted at its renovation, leads to a rise of the influx of adverse ideas. As depressive conditions establish, they can turn into even more harmful forms of disorders, e.g. psychosis, delusions or schizophrenia. Slowing down this process as quickly as feasible may turn out to be important in the effective treatment of mental illness of human performance.
Oh my goodness! an incredible article dude. Thank you Nonetheless I’m experiencing concern with ur rss . Don’t know why Unable to subscribe to it. Is there anyone getting similar rss downside? Anyone who knows kindly respond. Thnkx
CBD for Stress And Anxiety and Clinical Depression: Picture that it is feasible to introduce one natural preparation into your daily diet, which could prove to be the trick to winning the defend a calmer life for individuals with depressive conditions. Suppose the incorporation of this prep work, created on the basis of a progressively widely known as well as tested chemical substance of plant beginning, is not only possibly extremely effective, yet is not related to the risk of side effects regular of medicinal medicines? Is it also feasible? Where’s the catch? Do you need to know more? Read this article In this write-up we will certainly cover: What is depression? THC as well as CBD cannabinoids – differences Anxiety as well as the endocannabinoid system What is clinical depression? Main definitions recommend that depressive conditions, likewise known informally as depression, are defined by: abrupt anxiety of an individual’s state of mind, in the unfavorable direction, of moderate to strong intensity of the intensity of the experienced changes, for more than a couple of weeks. There may be several factors for the event of changes. It also takes place that it is hard to determine any kind of unquestionable reason. We extremely frequently come across the declaration that it is a people condition of the 21st century – it influences both older and younger individuals. Our education and learning is trivial for depression, not to mention our earnings – it can impact any individual. Therapy of depression comes down to: pharmacotherapy, psychotherapy as well as psychoeducation, phototherapy, electroconvulsive therapy and more all-natural activities associated with the climax of physical activity as well as the introduction of significant modifications in the daily diet regimen. It is as part of all-natural techniques of battling and counteracting depression that the addition of marijuana prep work with cannabinoids normally happening in the plant in the daily diet regimen is gaining more and more popularity in the world. Cannabidiol CBD, located in e.g. CBD oil or full-spectrum hemp oil, appears in countless clinical studies as a possibly efficient cannabinoid in the treatment of clinical depression. Notably, it is a 100 natural chemical compound of plant origin. Interestingly, depression is among the 3 most common mental illness in which patients consider CBD hemp prep work such as CBD oil, full spectrum hemp oil with CBD or CBD capsules. Records from customers and their favorable viewpoints on the performance of e.g. CBD oil or complete range hemp oil with natural CBD are expanding at an unprecedented rate. THC and CBD cannabinoids – distinctions The primary cannabinoids in the cannabis plant are THC (Δ9-tetrahydrocannabinol) and also CBD (cannabidiol). They show hostile results, which implies that CBD minimizes the effects of THC. What are these impacts? THC has an envigorating result, causes a sensation of ecstasy, influences cognitive functions, but additionally kicks back. Big, consistently eaten dosages of THC are considered harmful to the human brain. Too much intake of THC can cause psychosis, lack of inspiration, and also also long-term negative modifications in cognitive feature. Both THC and CBD influence the endocannabinoid system in the body. Their activity, as currently pointed out, is inconsistent. Cbd-a-thc-in-the-endocannabinoid-1 system When writing photos, CBD decreases the exhaustion of anandamide resources, and THC speeds up this process. However, this does not suggest that THC is only a damaging cannabinoid and needs to not remain in the prep work in all. As a matter of fact. Its small existence in hemp prep work is even needed in order to get the so-called effect. synergy. THC in full spectrum hemp oil exists in such a marginal and also, importantly, lawful quantity. This quantity is so small (less than 0.2) that it does not create drunkenness. Working together, THC and also CBD have better potential than either particle acting alone. What is anandamide (AEA)? What is its significance for individuals struggling with anxiety? Read on! CBD, Clinical depression and also the endocannabinoid system The endocannabinoid system is a vital system responsible for the policy of standard human physical processes, such as energy monitoring, neurohormonal and also neuroimmune links, electric motor task, state of mind and also inspiration, and also fat metabolic rate. The endocannabinoid system consists of a natural chemical called anandamide (AEA). Anandamide is a natural chemical that is normally produced in the human brain. Its production is stimulated by e.g. exercise, and also to a lower level by the so-called collaborate with the body (massage therapy!). Its resources are “used” to keep the correct performance of the body, consisting of in the field of psychological wellness. As displayed in this research study: ncbi.nlm.nih.gov/pubmed/23580381 high levels of anandamide are connected with a lowered risk of establishing psychotic signs. A high level of anandamide is likewise related to a positive effect on the decrease of anxiety and anxiety symptoms. This system is still not fully recognized, yet it appears sensible that a strongly clinically depressed mood in a specific time period for a particular situation, and with the synchronised lack of activities targeted at its enhancement, causes an accumulation of the increase of adverse ideas. As depressive problems create, they can turn into a lot more dangerous forms of problems, e.g. psychosis, delusions or schizophrenia. Decreasing this process as promptly as possible may become essential in the efficient therapy of mental illness of human functioning.
CBD for Anxiety and also Anxiety: Visualize that it is possible to present one natural preparation right into your everyday diet, which might prove to be the key to winning the defend a calmer life for people with depressive problems. Suppose the incorporation of this prep work, developed on the basis of a progressively popular and checked chemical substance of plant beginning, is not only potentially extremely efficient, but is not related to the risk of adverse effects normal of medicinal medications? Is it also feasible? Where’s the catch? Do you want to know even more? Read this short article In this article we will certainly cover: What is depression? THC as well as CBD cannabinoids – differences Depression and the endocannabinoid system What is depression? Main definitions suggest that depressive disorders, additionally known colloquially as anxiety, are identified by: unexpected anxiety of an individual’s state of mind, in the adverse direction, of modest to strong intensity of the strength of the experienced changes, for more than a couple of weeks. There might be one or more factors for the occurrence of modifications. It likewise occurs that it is difficult to recognize any unquestionable reason. We very commonly come across the statement that it is a people condition of the 21st century – it impacts both older and also more youthful individuals. Our education is not important for depression, not to mention our revenues – it can impact anybody. Therapy of anxiety boils down to: pharmacotherapy, psychiatric therapy and psychoeducation, photo-therapy, electroconvulsive therapy and even more all-natural tasks related to the accumulation of physical activity as well as the intro of substantial adjustments in the day-to-day diet regimen. It is as part of natural methods of dealing with and neutralizing anxiety that the inclusion of marijuana preparations with cannabinoids normally happening in the plant in the everyday diet is getting increasingly more appeal worldwide. Cannabidiol CBD, located in e.g. CBD oil or full-spectrum hemp oil, appears in various clinical researches as a potentially reliable cannabinoid in the therapy of depression. Significantly, it is a 100 all-natural chemical substance of plant origin. Remarkably, clinical depression is among the 3 most usual mental disorders in which individuals resort to CBD hemp preparations such as CBD oil, full spectrum hemp oil with CBD or CBD pills. Reports from consumers and also their positive opinions on the efficiency of e.g. CBD oil or complete range hemp oil with natural CBD are growing at an extraordinary speed. THC and CBD cannabinoids – differences The main cannabinoids in the cannabis plant are THC (Δ9-tetrahydrocannabinol) and CBD (cannabidiol). They show hostile effects, which suggests that CBD decreases the impacts of THC. What are these results? THC has an envigorating effect, creates a feeling of bliss, affects cognitive functions, however additionally kicks back. Big, consistently taken in dosages of THC are considered dangerous to the human mind. Too much usage of THC can bring about psychosis, absence of inspiration, as well as even irreversible adverse adjustments in cognitive function. Both THC and also CBD impact the endocannabinoid system in the body. Their action, as currently discussed, is contradictory. Cbd-a-thc-in-the-endocannabinoid-1 system When creating images, CBD slows down the exhaustion of anandamide sources, and THC quicken this procedure. Nevertheless, this does not imply that THC is only an unsafe cannabinoid and also must not remain in the prep work at all. However. Its little visibility in hemp preparations is also necessary in order to acquire the supposed effect. synergy. THC in full spectrum hemp oil exists in such a low as well as, notably, lawful quantity. This amount is so small (less than 0.2) that it does not create drunkenness. Interacting, THC and CBD have greater potential than either molecule acting alone. What is anandamide (AEA)? What is its relevance for individuals dealing with depression? Keep reading! CBD, Depression and the endocannabinoid system The endocannabinoid system is a vital system in charge of the law of fundamental human physiological procedures, such as energy management, neurohormonal and neuroimmune connections, electric motor task, state of mind and also motivation, and fat metabolic rate. The endocannabinoid system includes a natural chemical called anandamide (AEA). Anandamide is a natural chemical that is naturally generated in the human mind. Its production is promoted by e.g. physical activity, and also to a lesser level by the so-called work with the body (massage therapy!). Its sources are “used” to maintain the correct functioning of the body, including in the field of psychological wellness. As displayed in this research: ncbi.nlm.nih.gov/pubmed/23580381 high degrees of anandamide are associated with a reduced threat of establishing psychotic signs and symptoms. A high degree of anandamide is likewise associated with a positive impact on the decrease of clinical depression and also anxiousness signs and symptoms. This device is still not completely understood, however it seems logical that a highly clinically depressed mood in a specific amount of time for a certain case, as well as with the simultaneous absence of actions focused on its enhancement, causes an aggravation of the influx of adverse ideas. As depressive conditions create, they can turn into a lot more hazardous kinds of conditions, e.g. psychosis, delusions or schizophrenia. Reducing this procedure as promptly as possible may end up being essential in the reliable treatment of mental disorders of human functioning.
CBD for Anxiousness and Anxiety: Visualize that it is feasible to present one natural preparation into your day-to-day diet regimen, which might show to be the key to winning the defend a calmer life for people with depressive disorders. Suppose the addition of this preparation, created on the basis of an increasingly well-known and also tested chemical substance of plant beginning, is not only potentially extremely reliable, but is not related to the danger of side effects common of pharmacological medicines? Is it even feasible? Where’s the catch? Do you want to know more? Read this write-up In this write-up we will cover: What is depression? THC distinctions Clinical depression as well as the endocannabinoid system What is clinical depression? Official definitions suggest that depressive disorders, also recognized colloquially as anxiety, are identified by: sudden depression of an individual’s mood, in the adverse direction, of modest to strong intensity of the strength of the seasoned adjustments, for greater than a couple of weeks. There may be several reasons for the occurrence of modifications. It likewise takes place that it is difficult to determine any kind of unequivocal reason. We extremely usually discovered the declaration that it is a civilization disease of the 21st century – it affects both older as well as more youthful individuals. Our education is trivial for anxiety, not to mention our profits – it can affect any person. Treatment of anxiety comes down to: pharmacotherapy, psychiatric therapy and psychoeducation, phototherapy, electroconvulsive therapy and also more natural activities associated with the aggravation of exercise as well as the introduction of significant changes in the daily diet. It is as part of all-natural methods of battling as well as neutralizing clinical depression that the inclusion of marijuana preparations with cannabinoids normally happening in the plant in the daily diet regimen is obtaining an increasing number of popularity in the world. Cannabidiol CBD, located in e.g. CBD oil or full-spectrum hemp oil, shows up in many scientific research studies as a potentially efficient cannabinoid in the treatment of anxiety. Significantly, it is a 100 all-natural chemical compound of plant origin. Interestingly, clinical depression is among the three most typical mental disorders in which clients turn to CBD hemp prep work such as CBD oil, complete range hemp oil with CBD or CBD capsules. Reports from consumers and also their favorable viewpoints on the performance of e.g. CBD oil or full spectrum hemp oil with natural CBD are growing at an unmatched pace. THC and CBD cannabinoids – differences The main cannabinoids in the marijuana plant are THC (Δ9-tetrahydrocannabinol) and CBD (cannabidiol). They reveal antagonistic effects, which means that CBD decreases the impacts of THC. What are these impacts? THC has an envigorating impact, creates a feeling of ecstasy, affects cognitive functions, however additionally loosens up. Big, frequently eaten doses of THC are considered damaging to the human brain. Excessive consumption of THC can cause psychosis, absence of inspiration, and even permanent unfavorable adjustments in cognitive feature. Both THC and also CBD impact the endocannabinoid system in the body. Their activity, as currently discussed, is inconsistent. Cbd-a-thc-in-the-endocannabinoid-1 system When writing images, CBD decreases the deficiency of anandamide sources, and THC speeds up this process. Nevertheless, this does not suggest that THC is just an unsafe cannabinoid as well as should not remain in the prep work whatsoever. As a matter of fact. Its little visibility in hemp preparations is also essential in order to acquire the so-called impact. harmony. THC in full spectrum hemp oil exists in such a low as well as, significantly, lawful amount. This quantity is so tiny (less than 0.2) that it does not trigger intoxication. Interacting, THC and CBD have better capacity than either molecule acting alone. What is anandamide (AEA)? What is its relevance for individuals suffering from clinical depression? Read on! CBD, Anxiety as well as the endocannabinoid system The endocannabinoid system is a vital system responsible for the policy of fundamental human physical processes, such as energy administration, neurohormonal as well as neuroimmune links, electric motor task, mood as well as motivation, and fat metabolic rate. The endocannabinoid system consists of a natural chemical called anandamide (AEA). Anandamide is a neurotransmitter that is naturally produced in the human mind. Its production is boosted by e.g. physical activity, as well as to a lower degree by the supposed deal with the body (massage!). Its resources are “used” to keep the correct performance of the body, including in the field of mental health. As shown in this study: ncbi.nlm.nih.gov/pubmed/23580381 high degrees of anandamide are associated with a decreased danger of creating psychotic symptoms. A high level of anandamide is also connected with a favorable result on the decrease of clinical depression and anxiousness signs and symptoms. This mechanism is still not fully recognized, but it appears sensible that a highly clinically depressed mood in a specific amount of time for a particular instance, as well as with the synchronised lack of actions focused on its improvement, leads to an augmentation of the influx of negative thoughts. As depressive conditions develop, they can turn into much more unsafe forms of problems, e.g. psychosis, delusions or schizophrenia. Decreasing this procedure as promptly as feasible may become critical in the reliable treatment of mental disorders of human functioning.
CBD for Anxiety and also Depression: Visualize that it is possible to present one natural preparation right into your daily diet plan, which could verify to be the key to winning the defend a calmer life for people with depressive disorders. What happens if the incorporation of this preparation, developed on the basis of a significantly well-known and examined chemical substance of plant beginning, is not just possibly extremely reliable, but is not connected with the risk of adverse effects normal of pharmacological drugs? Is it even feasible? Where’s the catch? Do you want to know even more? Read this post In this short article we will certainly cover: What is depression? THC as well as CBD cannabinoids – differences Anxiety and the endocannabinoid system What is depression? Official meanings suggest that depressive problems, additionally recognized informally as anxiety, are defined by: abrupt clinical depression of an individual’s mood, in the negative instructions, of modest to strong strength of the intensity of the knowledgeable adjustments, for more than a few weeks. There might be one or more reasons for the event of adjustments. It additionally occurs that it is tough to determine any type of indisputable reason. We extremely often encountered the statement that it is a world illness of the 21st century – it impacts both older and also younger people. Our education is trivial for clinical depression, not to mention our profits – it can influence anybody. Treatment of depression comes down to: pharmacotherapy, psychiatric therapy as well as psychoeducation, phototherapy, electroconvulsive therapy and also more natural tasks associated with the climax of exercise and the introduction of considerable modifications in the everyday diet. It is as part of all-natural methods of fighting and also combating depression that the inclusion of marijuana preparations with cannabinoids naturally taking place in the plant in the daily diet is getting a growing number of appeal worldwide. Cannabidiol CBD, found in e.g. CBD oil or full-spectrum hemp oil, shows up in countless scientific researches as a potentially reliable cannabinoid in the treatment of depression. Significantly, it is a 100 all-natural chemical substance of plant beginning. Surprisingly, depression is among the three most typical mental illness in which patients turn to CBD hemp prep work such as CBD oil, full spectrum hemp oil with CBD or CBD capsules. Reports from customers and also their positive viewpoints on the efficiency of e.g. CBD oil or full range hemp oil with natural CBD are growing at an unmatched speed. THC as well as CBD cannabinoids – differences The main cannabinoids in the cannabis plant are THC (Δ9-tetrahydrocannabinol) and CBD (cannabidiol). They show hostile effects, which implies that CBD reduces the effects of THC. What are these impacts? THC has an envigorating result, causes a sensation of ecstasy, impacts cognitive functions, yet additionally loosens up. Huge, on a regular basis taken in dosages of THC are considered harmful to the human brain. Excessive intake of THC can bring about psychosis, absence of inspiration, and also also long-term adverse changes in cognitive feature. Both THC and CBD impact the endocannabinoid system in the human body. Their action, as already stated, is contradictory. Cbd-a-thc-in-the-endocannabinoid-1 system When composing images, CBD reduces the exhaustion of anandamide resources, and also THC accelerate this procedure. Nonetheless, this does not indicate that THC is just an unsafe cannabinoid and must not be in the prep work at all. As a matter of fact. Its tiny visibility in hemp prep work is also required in order to get the supposed result. synergy. THC in full spectrum hemp oil is present in such a limited and also, notably, legal amount. This quantity is so tiny (less than 0.2) that it does not create intoxication. Working together, THC and CBD have greater capacity than either molecule acting alone. What is anandamide (AEA)? What is its value for individuals experiencing clinical depression? Read on! CBD, Anxiety as well as the endocannabinoid system The endocannabinoid system is a crucial system responsible for the guideline of standard human physical processes, such as power management, neurohormonal and neuroimmune links, motor task, mood as well as motivation, and fat metabolism. The endocannabinoid system consists of a natural chemical called anandamide (AEA). Anandamide is a natural chemical that is normally generated in the human mind. Its manufacturing is stimulated by e.g. physical activity, and also to a lower extent by the supposed collaborate with the body (massage!). Its resources are “made use of” to maintain the proper functioning of the body, including in the field of psychological health and wellness. As displayed in this study: ncbi.nlm.nih.gov/pubmed/23580381 high degrees of anandamide are related to a decreased risk of developing psychotic signs. A high degree of anandamide is likewise related to a favorable impact on the reduction of clinical depression and stress and anxiety signs. This device is still not fully recognized, but it appears sensible that a strongly depressed state of mind in a specific period for a specific case, as well as with the synchronised absence of activities aimed at its improvement, leads to an intensification of the influx of adverse thoughts. As depressive problems create, they can develop into much more hazardous types of conditions, e.g. psychosis, misconceptions or schizophrenia. Reducing this procedure as quickly as feasible may turn out to be vital in the efficient treatment of mental illness of human performance.
Insulin, like various other drugs to deal with chronic illnesses, are sensitive to warmth and also require to be kept at a temperature of in between 2 to 8-degree ° C.
CBD for Stress And Anxiety and Anxiety: Demystified Imagine that it is possible to present one all-natural prep work into your daily diet plan, which can verify to be the trick to winning the defend a calmer life for people with depressive disorders. What happens if the addition of this prep work, created on the basis of a significantly widely known and also tested chemical substance of plant beginning, is not only potentially really reliable, but is not connected with the danger of side effects common of pharmacological drugs? Is it even feasible? Where’s the catch? Do you wish to know even more? Read this write-up In this short article we will certainly cover: What is depression? THC distinctions Depression as well as the endocannabinoid system What is depression? Official definitions suggest that depressive disorders, also recognized informally as depression, are identified by: abrupt clinical depression of a person’s state of mind, in the negative direction, of moderate to solid intensity of the intensity of the skilled changes, for more than a few weeks. There might be one or more factors for the event of changes. It also occurs that it is challenging to recognize any absolute reason. We really often encountered the declaration that it is a world condition of the 21st century – it affects both older and also more youthful individuals. Our education is not important for clinical depression, let alone our revenues – it can impact any person. Therapy of depression comes down to: pharmacotherapy, psychotherapy as well as psychoeducation, photo-therapy, electroconvulsive therapy and also more natural tasks connected to the augmentation of physical activity and also the intro of substantial changes in the day-to-day diet plan. It is as part of natural approaches of dealing with and combating anxiety that the inclusion of cannabis preparations with cannabinoids naturally occurring in the plant in the daily diet regimen is gaining an increasing number of popularity worldwide. Cannabidiol CBD, discovered in e.g. CBD oil or full-spectrum hemp oil, appears in numerous scientific researches as a possibly reliable cannabinoid in the therapy of depression. Significantly, it is a 100 all-natural chemical compound of plant beginning. Remarkably, depression is amongst the 3 most usual mental disorders in which patients consider CBD hemp prep work such as CBD oil, full spectrum hemp oil with CBD or CBD capsules. Records from consumers and also their positive viewpoints on the efficiency of e.g. CBD oil or complete spectrum hemp oil with all-natural CBD are growing at an unmatched rate. THC and CBD cannabinoids – differences The main cannabinoids in the cannabis plant are THC (Δ9-tetrahydrocannabinol) as well as CBD (cannabidiol). They reveal hostile impacts, which indicates that CBD minimizes the effects of THC. What are these results? THC has an intoxicating result, triggers a feeling of ecstasy, affects cognitive features, but also kicks back. Large, consistently taken in dosages of THC are considered hazardous to the human mind. Too much intake of THC can result in psychosis, lack of motivation, and also irreversible adverse adjustments in cognitive feature. Both THC as well as CBD impact the endocannabinoid system in the human body. Their activity, as currently discussed, is contradictory. Cbd-a-thc-in-the-endocannabinoid-1 system When writing pictures, CBD decreases the depletion of anandamide resources, and also THC speeds up this procedure. However, this does not indicate that THC is just a dangerous cannabinoid and also needs to not remain in the preparation at all. On the other hand. Its tiny presence in hemp preparations is even required in order to get the supposed result. synergy. THC completely spectrum hemp oil is present in such a marginal and also, significantly, legal amount. This quantity is so little (less than 0.2) that it does not trigger drunkenness. Interacting, THC and also CBD have higher potential than either particle performing alone. What is anandamide (AEA)? What is its relevance for people struggling with anxiety? Continue reading! CBD, Clinical depression and the endocannabinoid system The endocannabinoid system is a key system in charge of the regulation of basic human physiological procedures, such as energy monitoring, neurohormonal and neuroimmune connections, motor activity, state of mind and also inspiration, and fat metabolism. The endocannabinoid system includes a natural chemical called anandamide (AEA). Anandamide is a natural chemical that is normally created in the human mind. Its manufacturing is stimulated by e.g. exercise, and also to a lesser level by the so-called collaborate with the body (massage!). Its resources are “utilized” to preserve the correct performance of the body, consisting of in the field of psychological health. As received this research: ncbi.nlm.nih.gov/pubmed/23580381 high levels of anandamide are related to a lowered danger of developing psychotic symptoms. A high degree of anandamide is also related to a favorable result on the decrease of anxiety and stress and anxiety signs and symptoms. This device is still not fully comprehended, however it seems logical that a highly depressed mood in a private amount of time for a particular case, as well as with the simultaneous lack of activities focused on its improvement, causes an intensification of the increase of unfavorable ideas. As depressive conditions establish, they can become much more harmful kinds of problems, e.g. psychosis, misconceptions or schizophrenia. Slowing down this process as quickly as feasible may end up being crucial in the reliable treatment of mental illness of human functioning.
CBD for Anxiety and Depression: Picture that it is possible to present one natural prep work right into your day-to-day diet plan, which can confirm to be the secret to winning the defend a calmer life for individuals with depressive disorders. Suppose the inclusion of this prep work, created on the basis of a progressively widely known and tested chemical compound of plant beginning, is not only possibly extremely efficient, yet is not related to the danger of negative effects common of medicinal medications? Is it also feasible? Where’s the catch? Do you need to know even more? Read this write-up In this post we will cover: What is anxiety? THC and CBD cannabinoids – differences Clinical depression as well as the endocannabinoid system What is depression? Main meanings suggest that depressive problems, also recognized colloquially as depression, are characterized by: unexpected depression of an individual’s state of mind, in the unfavorable direction, of modest to strong intensity of the intensity of the knowledgeable changes, for greater than a couple of weeks. There might be one or more reasons for the incident of changes. It additionally occurs that it is difficult to identify any type of unquestionable factor. We extremely commonly come across the statement that it is a people condition of the 21st century – it influences both older and also more youthful people. Our education and learning is trivial for clinical depression, not to mention our earnings – it can influence anyone. Treatment of anxiety boils down to: pharmacotherapy, psychiatric therapy as well as psychoeducation, phototherapy, electroconvulsive therapy as well as more natural activities associated with the surge of physical activity and the introduction of significant changes in the daily diet regimen. It is as part of all-natural techniques of combating and also neutralizing depression that the inclusion of cannabis preparations with cannabinoids normally happening in the plant in the daily diet regimen is acquiring more and more popularity worldwide. Cannabidiol CBD, located in e.g. CBD oil or full-spectrum hemp oil, appears in various scientific researches as a possibly reliable cannabinoid in the treatment of depression. Importantly, it is a 100 all-natural chemical substance of plant origin. Interestingly, anxiety is among the 3 most typical mental disorders in which clients consider CBD hemp prep work such as CBD oil, complete range hemp oil with CBD or CBD pills. Records from consumers and also their favorable viewpoints on the efficiency of e.g. CBD oil or full range hemp oil with natural CBD are expanding at an unprecedented speed. THC and also CBD cannabinoids – differences The main cannabinoids in the marijuana plant are THC (Δ9-tetrahydrocannabinol) and CBD (cannabidiol). They reveal hostile impacts, which means that CBD decreases the results of THC. What are these effects? THC has an envigorating effect, triggers a feeling of euphoria, influences cognitive functions, but likewise loosens up. Huge, consistently taken in doses of THC are taken into consideration hazardous to the human mind. Excessive intake of THC can cause psychosis, lack of motivation, and also irreversible unfavorable changes in cognitive feature. Both THC and also CBD influence the endocannabinoid system in the human body. Their activity, as currently stated, is inconsistent. Cbd-a-thc-in-the-endocannabinoid-1 system When writing pictures, CBD reduces the deficiency of anandamide resources, and THC accelerate this process. Nevertheless, this does not mean that THC is just an unsafe cannabinoid as well as should not be in the preparation whatsoever. On the contrary. Its tiny visibility in hemp preparations is also needed in order to obtain the so-called result. synergy. THC in full spectrum hemp oil is present in such a marginal and, significantly, legal amount. This amount is so little (less than 0.2) that it does not cause drunkenness. Working together, THC and also CBD have greater capacity than either particle performing alone. What is anandamide (AEA)? What is its significance for people dealing with clinical depression? Continue reading! CBD, Clinical depression and the endocannabinoid system The endocannabinoid system is a key system responsible for the law of fundamental human physiological procedures, such as power management, neurohormonal and also neuroimmune connections, electric motor activity, mood as well as inspiration, as well as fat metabolism. The endocannabinoid system consists of a natural chemical called anandamide (AEA). Anandamide is a neurotransmitter that is naturally created in the human brain. Its production is stimulated by e.g. exercise, as well as to a minimal level by the so-called collaborate with the body (massage therapy!). Its resources are “utilized” to preserve the appropriate performance of the body, consisting of in the field of mental wellness. As displayed in this research: ncbi.nlm.nih.gov/pubmed/23580381 high levels of anandamide are connected with a lowered danger of developing psychotic signs. A high degree of anandamide is likewise related to a positive effect on the decrease of anxiety and anxiousness symptoms. This system is still not completely understood, yet it appears logical that a strongly clinically depressed state of mind in a private time period for a certain case, as well as with the synchronised absence of activities targeted at its enhancement, brings about an augmentation of the influx of adverse thoughts. As depressive problems establish, they can develop into a lot more dangerous kinds of disorders, e.g. psychosis, misconceptions or schizophrenia. Decreasing this procedure as swiftly as possible might become critical in the reliable treatment of mental illness of human performance.
CBD for Stress And Anxiety and also Anxiety: Visualize that it is possible to introduce one natural preparation into your day-to-day diet regimen, which can prove to be the key to winning the fight for a calmer life for individuals with depressive problems. What happens if the inclusion of this prep work, produced on the basis of a progressively popular and also checked chemical compound of plant origin, is not only possibly really effective, but is not related to the risk of adverse effects normal of pharmacological drugs? Is it also feasible? Where’s the catch? Do you wish to know even more? Read this short article In this article we will certainly cover: What is clinical depression? THC and CBD cannabinoids – differences Anxiety and the endocannabinoid system What is clinical depression? Main definitions recommend that depressive disorders, likewise known informally as anxiety, are defined by: abrupt clinical depression of an individual’s state of mind, in the negative instructions, of modest to strong strength of the strength of the seasoned modifications, for greater than a few weeks. There may be one or more factors for the occurrence of modifications. It likewise occurs that it is hard to identify any type of absolute factor. We really commonly found the statement that it is a people disease of the 21st century – it influences both older and also more youthful individuals. Our education and learning is not important for depression, not to mention our revenues – it can impact any individual. Treatment of depression boils down to: pharmacotherapy, psychotherapy as well as psychoeducation, phototherapy, electroconvulsive therapy as well as more all-natural activities related to the increase of exercise as well as the introduction of substantial changes in the day-to-day diet. It is as part of all-natural techniques of combating as well as combating anxiety that the inclusion of marijuana prep work with cannabinoids naturally occurring in the plant in the everyday diet plan is gaining increasingly more appeal in the world. Cannabidiol CBD, discovered in e.g. CBD oil or full-spectrum hemp oil, appears in many clinical researches as a potentially efficient cannabinoid in the therapy of clinical depression. Significantly, it is a 100 all-natural chemical compound of plant beginning. Surprisingly, anxiety is among the three most typical mental illness in which individuals turn to CBD hemp preparations such as CBD oil, full spectrum hemp oil with CBD or CBD pills. Records from consumers and their favorable viewpoints on the performance of e.g. CBD oil or complete range hemp oil with natural CBD are expanding at an unmatched pace. THC and also CBD cannabinoids – differences The key cannabinoids in the marijuana plant are THC (Δ9-tetrahydrocannabinol) and CBD (cannabidiol). They reveal hostile effects, which means that CBD decreases the effects of THC. What are these effects? THC has an envigorating effect, creates a feeling of ecstasy, affects cognitive functions, but likewise loosens up. Large, on a regular basis taken in doses of THC are considered damaging to the human brain. Extreme usage of THC can cause psychosis, lack of motivation, and also even long-term unfavorable changes in cognitive function. Both THC and CBD affect the endocannabinoid system in the body. Their action, as already pointed out, is inconsistent. Cbd-a-thc-in-the-endocannabinoid-1 system When composing pictures, CBD reduces the deficiency of anandamide resources, and THC accelerate this procedure. Nevertheless, this does not suggest that THC is just a damaging cannabinoid and needs to not be in the preparation in any way. On the contrary. Its small presence in hemp preparations is also essential in order to obtain the supposed impact. harmony. THC completely range hemp oil exists in such a minimal and, importantly, legal quantity. This quantity is so little (less than 0.2) that it does not trigger drunkenness. Interacting, THC as well as CBD have higher capacity than either molecule performing alone. What is anandamide (AEA)? What is its significance for people struggling with anxiety? Continue reading! CBD, Depression as well as the endocannabinoid system The endocannabinoid system is a key system in charge of the law of basic human physical processes, such as energy monitoring, neurohormonal and also neuroimmune connections, motor activity, state of mind and inspiration, as well as fat metabolic rate. The endocannabinoid system includes a neurotransmitter called anandamide (AEA). Anandamide is a natural chemical that is naturally produced in the human brain. Its production is boosted by e.g. exercise, and to a minimal degree by the so-called deal with the body (massage therapy!). Its sources are “utilized” to keep the correct performance of the body, consisting of in the field of psychological health. As displayed in this research: ncbi.nlm.nih.gov/pubmed/23580381 high degrees of anandamide are related to a lowered danger of establishing psychotic symptoms. A high level of anandamide is also associated with a positive result on the reduction of anxiety as well as anxiousness symptoms. This mechanism is still not completely comprehended, yet it appears rational that a strongly depressed mood in a private period for a particular situation, and with the synchronised absence of activities aimed at its enhancement, causes a surge of the influx of negative ideas. As depressive disorders develop, they can turn into even more hazardous kinds of problems, e.g. psychosis, deceptions or schizophrenia. Reducing this process as swiftly as possible may end up being crucial in the effective therapy of mental illness of human functioning.
CBD for Stress And Anxiety and Anxiety: Picture that it is possible to present one all-natural preparation right into your everyday diet, which might verify to be the trick to winning the defend a calmer life for people with depressive disorders. What if the inclusion of this preparation, developed on the basis of a progressively widely known and also checked chemical substance of plant beginning, is not just potentially very effective, yet is not related to the threat of side effects typical of medicinal medicines? Is it even possible? Where’s the catch? Do you want to know even more? Read this short article In this write-up we will certainly cover: What is anxiety? THC distinctions Depression as well as the endocannabinoid system What is anxiety? Official meanings recommend that depressive disorders, additionally known colloquially as clinical depression, are identified by: sudden anxiety of a person’s state of mind, in the adverse direction, of modest to strong intensity of the intensity of the knowledgeable adjustments, for more than a couple of weeks. There might be one or more factors for the event of modifications. It likewise occurs that it is hard to recognize any absolute factor. We very often discovered the statement that it is a people condition of the 21st century – it affects both older as well as more youthful people. Our education and learning is trivial for depression, let alone our revenues – it can influence any person. Therapy of depression boils down to: pharmacotherapy, psychotherapy and psychoeducation, phototherapy, electroconvulsive therapy and even more natural activities related to the accumulation of exercise and also the intro of substantial modifications in the day-to-day diet plan. It is as part of natural methods of battling and also combating anxiety that the incorporation of cannabis prep work with cannabinoids normally happening in the plant in the everyday diet is gaining an increasing number of appeal worldwide. Cannabidiol CBD, found in e.g. CBD oil or full-spectrum hemp oil, shows up in numerous clinical researches as a possibly reliable cannabinoid in the treatment of depression. Significantly, it is a 100 all-natural chemical compound of plant origin. Surprisingly, clinical depression is amongst the three most common mental disorders in which clients resort to CBD hemp preparations such as CBD oil, complete range hemp oil with CBD or CBD capsules. Records from consumers as well as their favorable point of views on the effectiveness of e.g. CBD oil or complete range hemp oil with natural CBD are expanding at an extraordinary speed. THC and CBD cannabinoids – distinctions The key cannabinoids in the cannabis plant are THC (Δ9-tetrahydrocannabinol) as well as CBD (cannabidiol). They reveal hostile results, which suggests that CBD decreases the impacts of THC. What are these effects? THC has an intoxicating result, creates a feeling of ecstasy, affects cognitive features, but also unwinds. Big, regularly taken in doses of THC are taken into consideration hazardous to the human mind. Extreme usage of THC can lead to psychosis, absence of motivation, as well as even long-term negative modifications in cognitive function. Both THC and CBD impact the endocannabinoid system in the body. Their action, as already mentioned, is contradictory. Cbd-a-thc-in-the-endocannabinoid-1 system When creating pictures, CBD decreases the deficiency of anandamide sources, and also THC speeds up this procedure. Nonetheless, this does not suggest that THC is only a dangerous cannabinoid and ought to not be in the prep work whatsoever. As a matter of fact. Its tiny visibility in hemp preparations is even necessary in order to obtain the supposed effect. synergy. THC completely range hemp oil is present in such a marginal and, importantly, legal amount. This quantity is so tiny (less than 0.2) that it does not trigger drunkenness. Interacting, THC as well as CBD have better capacity than either molecule acting alone. What is anandamide (AEA)? What is its value for people dealing with clinical depression? Continue reading! CBD, Depression and also the endocannabinoid system The endocannabinoid system is a vital system in charge of the law of standard human physiological processes, such as energy monitoring, neurohormonal as well as neuroimmune links, electric motor task, state of mind and motivation, as well as fat metabolic rate. The endocannabinoid system consists of a neurotransmitter called anandamide (AEA). Anandamide is a neurotransmitter that is normally generated in the human mind. Its production is boosted by e.g. exercise, as well as to a minimal level by the so-called collaborate with the body (massage!). Its resources are “used” to preserve the proper functioning of the body, consisting of in the field of mental health. As displayed in this research: ncbi.nlm.nih.gov/pubmed/23580381 high levels of anandamide are related to a decreased danger of developing psychotic signs. A high degree of anandamide is likewise associated with a positive impact on the decrease of anxiety as well as stress and anxiety signs. This system is still not fully understood, but it appears logical that a highly depressed state of mind in a specific period for a details instance, and also with the synchronised lack of actions targeted at its improvement, brings about an increase of the influx of adverse ideas. As depressive disorders create, they can become a lot more harmful forms of problems, e.g. psychosis, deceptions or schizophrenia. Reducing this process as promptly as possible may end up being important in the efficient therapy of mental disorders of human functioning.
Great goods from you, man. I have take into account your stuff prior to and you are simply extremely excellent. I actually like what you’ve got here, really like what you are stating and the way through which you assert it. You make it enjoyable and you continue to care for to keep it wise. I can’t wait to learn much more from you. That is actually a tremendous website.
You can quite easily use the game hack online from your PC, iOS or Android device without spending any real money and generate your indefinite resources in no more than a few minutes. Running our game hack online from any device is really easy. You can absolutely run it from Windows, Mac, Android or iOS, and receive your resources without wasting any single dollar or cent.
CBD for Stress And Anxiety and Clinical Depression: Visualize that it is feasible to present one all-natural prep work into your daily diet plan, which can prove to be the key to winning the fight for a calmer life for individuals with depressive conditions. Suppose the addition of this preparation, produced on the basis of an increasingly popular and also checked chemical substance of plant origin, is not just possibly really efficient, however is not related to the danger of adverse effects typical of medicinal medicines? Is it also feasible? Where’s the catch? Do you want to know even more? Read this article In this write-up we will cover: What is clinical depression? THC distinctions Clinical depression and also the endocannabinoid system What is anxiety? Main meanings suggest that depressive disorders, also known colloquially as depression, are identified by: sudden anxiety of a person’s mood, in the negative instructions, of modest to solid strength of the strength of the experienced modifications, for more than a few weeks. There may be one or more reasons for the occurrence of changes. It additionally occurs that it is challenging to determine any kind of unquestionable reason. We very commonly encountered the declaration that it is a people disease of the 21st century – it influences both older and also younger individuals. Our education is not important for clinical depression, let alone our profits – it can impact any person. Therapy of anxiety comes down to: pharmacotherapy, psychotherapy and also psychoeducation, photo-therapy, electroconvulsive therapy and even more natural tasks connected to the concentration of physical activity as well as the introduction of considerable changes in the everyday diet regimen. It is as part of natural techniques of fighting and also combating anxiety that the incorporation of marijuana preparations with cannabinoids normally happening in the plant in the everyday diet regimen is getting an increasing number of popularity on the planet. Cannabidiol CBD, located in e.g. CBD oil or full-spectrum hemp oil, appears in numerous scientific studies as a possibly effective cannabinoid in the treatment of depression. Notably, it is a 100 natural chemical compound of plant beginning. Surprisingly, anxiety is amongst the 3 most common mental illness in which clients resort to CBD hemp preparations such as CBD oil, full spectrum hemp oil with CBD or CBD capsules. Reports from consumers as well as their favorable opinions on the efficiency of e.g. CBD oil or full range hemp oil with all-natural CBD are growing at an extraordinary rate. THC and CBD cannabinoids – differences The key cannabinoids in the cannabis plant are THC (Δ9-tetrahydrocannabinol) and CBD (cannabidiol). They show antagonistic impacts, which suggests that CBD reduces the impacts of THC. What are these impacts? THC has an envigorating impact, creates a sensation of ecstasy, impacts cognitive functions, yet also unwinds. Huge, consistently eaten doses of THC are taken into consideration damaging to the human mind. Too much consumption of THC can lead to psychosis, absence of motivation, and even long-term adverse changes in cognitive feature. Both THC and also CBD impact the endocannabinoid system in the body. Their action, as already stated, is inconsistent. Cbd-a-thc-in-the-endocannabinoid-1 system When creating photos, CBD reduces the deficiency of anandamide resources, as well as THC speeds up this process. Nonetheless, this does not mean that THC is only a dangerous cannabinoid and should not be in the prep work in any way. As a matter of fact. Its tiny existence in hemp prep work is also necessary in order to get the so-called effect. synergy. THC in full range hemp oil exists in such a low and, notably, lawful amount. This quantity is so tiny (less than 0.2) that it does not create drunkenness. Interacting, THC and also CBD have greater capacity than either molecule performing alone. What is anandamide (AEA)? What is its significance for people dealing with clinical depression? Keep reading! CBD, Clinical depression as well as the endocannabinoid system The endocannabinoid system is a vital system in charge of the guideline of fundamental human physical procedures, such as power monitoring, neurohormonal and neuroimmune connections, electric motor activity, state of mind and also motivation, and fat metabolic rate. The endocannabinoid system includes a neurotransmitter called anandamide (AEA). Anandamide is a neurotransmitter that is naturally created in the human mind. Its manufacturing is stimulated by e.g. physical activity, and also to a lesser degree by the so-called work with the body (massage therapy!). Its sources are “utilized” to keep the appropriate performance of the body, including in the field of psychological wellness. As displayed in this research study: ncbi.nlm.nih.gov/pubmed/23580381 high levels of anandamide are connected with a decreased risk of creating psychotic signs and symptoms. A high level of anandamide is also related to a positive result on the reduction of clinical depression and also stress and anxiety signs. This mechanism is still not completely recognized, yet it seems rational that a highly clinically depressed mood in a private period for a particular instance, and also with the synchronised lack of actions focused on its enhancement, brings about a surge of the influx of adverse thoughts. As depressive problems develop, they can turn into even more dangerous forms of problems, e.g. psychosis, delusions or schizophrenia. Reducing this procedure as promptly as possible might turn out to be crucial in the effective treatment of mental illness of human performance.
CBD for Anxiety and Clinical Depression: Envision that it is possible to introduce one natural preparation into your everyday diet regimen, which might show to be the trick to winning the fight for a calmer life for people with depressive problems. Suppose the incorporation of this preparation, produced on the basis of a significantly widely known and also checked chemical compound of plant origin, is not only potentially really effective, yet is not connected with the risk of negative effects normal of medicinal drugs? Is it also possible? Where’s the catch? Do you wish to know more? Read this short article In this article we will certainly cover: What is clinical depression? THC and also CBD cannabinoids – differences Depression as well as the endocannabinoid system What is clinical depression? Main definitions suggest that depressive conditions, additionally recognized informally as anxiety, are defined by: sudden clinical depression of an individual’s mood, in the adverse direction, of moderate to solid strength of the intensity of the knowledgeable modifications, for greater than a couple of weeks. There may be one or more reasons for the incident of adjustments. It also happens that it is challenging to identify any kind of unequivocal factor. We really often discovered the declaration that it is a civilization condition of the 21st century – it influences both older as well as more youthful people. Our education is trivial for clinical depression, not to mention our revenues – it can influence any person. Treatment of depression comes down to: pharmacotherapy, psychiatric therapy and psychoeducation, photo-therapy, electroconvulsive therapy and even more natural activities associated with the rise of exercise and the intro of substantial modifications in the everyday diet plan. It is as part of natural approaches of battling and counteracting depression that the addition of cannabis prep work with cannabinoids naturally occurring in the plant in the daily diet regimen is getting more and more popularity worldwide. Cannabidiol CBD, found in e.g. CBD oil or full-spectrum hemp oil, appears in countless scientific studies as a potentially effective cannabinoid in the treatment of depression. Notably, it is a 100 all-natural chemical substance of plant origin. Interestingly, anxiety is among the 3 most usual mental disorders in which patients resort to CBD hemp prep work such as CBD oil, complete range hemp oil with CBD or CBD capsules. Reports from consumers and their favorable opinions on the performance of e.g. CBD oil or complete spectrum hemp oil with all-natural CBD are growing at an unprecedented speed. THC and also CBD cannabinoids – differences The main cannabinoids in the cannabis plant are THC (Δ9-tetrahydrocannabinol) as well as CBD (cannabidiol). They reveal hostile impacts, which suggests that CBD decreases the impacts of THC. What are these effects? THC has an intoxicating impact, creates a feeling of bliss, influences cognitive features, but likewise unwinds. Large, frequently consumed doses of THC are thought about unsafe to the human brain. Excessive consumption of THC can cause psychosis, absence of motivation, and even permanent negative adjustments in cognitive function. Both THC and CBD impact the endocannabinoid system in the body. Their action, as currently pointed out, is contradictory. Cbd-a-thc-in-the-endocannabinoid-1 system When writing pictures, CBD slows down the exhaustion of anandamide sources, and also THC speeds up this process. However, this does not imply that THC is just a damaging cannabinoid as well as must not be in the preparation at all. On the contrary. Its little existence in hemp prep work is even essential in order to acquire the supposed result. synergy. THC in full spectrum hemp oil exists in such a marginal as well as, significantly, lawful amount. This amount is so small (less than 0.2) that it does not create intoxication. Collaborating, THC and also CBD have greater possibility than either particle performing alone. What is anandamide (AEA)? What is its importance for people experiencing anxiety? Keep reading! CBD, Depression and the endocannabinoid system The endocannabinoid system is a crucial system responsible for the law of fundamental human physiological procedures, such as energy monitoring, neurohormonal as well as neuroimmune links, motor activity, mood and also inspiration, and fat metabolism. The endocannabinoid system consists of a neurotransmitter called anandamide (AEA). Anandamide is a natural chemical that is naturally generated in the human brain. Its manufacturing is boosted by e.g. exercise, and to a lower extent by the supposed work with the body (massage therapy!). Its resources are “utilized” to maintain the correct functioning of the body, including in the field of psychological health and wellness. As displayed in this research study: ncbi.nlm.nih.gov/pubmed/23580381 high degrees of anandamide are associated with a lowered danger of developing psychotic symptoms. A high level of anandamide is additionally connected with a favorable result on the decrease of depression and also anxiousness symptoms. This mechanism is still not fully comprehended, but it seems logical that a strongly clinically depressed state of mind in a specific period for a certain case, and with the synchronised absence of activities targeted at its renovation, leads to a surge of the increase of adverse thoughts. As depressive conditions create, they can turn into much more hazardous kinds of conditions, e.g. psychosis, misconceptions or schizophrenia. Slowing down this procedure as swiftly as possible may end up being critical in the effective treatment of mental illness of human functioning.
CBD for Anxiousness and also Anxiety: Envision that it is possible to present one all-natural prep work into your day-to-day diet plan, which might confirm to be the key to winning the defend a calmer life for people with depressive disorders. What happens if the incorporation of this preparation, developed on the basis of a significantly popular and also examined chemical compound of plant beginning, is not only possibly very reliable, however is not connected with the danger of adverse effects typical of medicinal medicines? Is it even possible? Where’s the catch? Do you need to know more? Read this article In this post we will cover: What is anxiety? THC and also CBD cannabinoids – differences Anxiety as well as the endocannabinoid system What is depression? Main definitions recommend that depressive disorders, additionally recognized informally as clinical depression, are characterized by: unexpected depression of a person’s mood, in the adverse direction, of modest to strong strength of the intensity of the experienced modifications, for more than a few weeks. There may be several reasons for the event of adjustments. It additionally occurs that it is challenging to recognize any type of unquestionable factor. We really typically come across the declaration that it is a people illness of the 21st century – it impacts both older as well as younger individuals. Our education is trivial for anxiety, let alone our earnings – it can affect any individual. Therapy of depression boils down to: pharmacotherapy, psychotherapy and psychoeducation, phototherapy, electroconvulsive therapy as well as more all-natural tasks connected to the intensification of exercise and the introduction of significant changes in the everyday diet plan. It is as part of all-natural approaches of combating and also combating clinical depression that the incorporation of cannabis preparations with cannabinoids naturally taking place in the plant in the day-to-day diet plan is acquiring an increasing number of popularity in the world. Cannabidiol CBD, discovered in e.g. CBD oil or full-spectrum hemp oil, shows up in countless scientific studies as a possibly effective cannabinoid in the treatment of depression. Importantly, it is a 100 natural chemical compound of plant origin. Interestingly, clinical depression is among the three most common mental disorders in which clients resort to CBD hemp prep work such as CBD oil, full spectrum hemp oil with CBD or CBD capsules. Reports from consumers as well as their favorable point of views on the efficiency of e.g. CBD oil or complete range hemp oil with all-natural CBD are expanding at an extraordinary rate. THC and CBD cannabinoids – differences The primary cannabinoids in the cannabis plant are THC (Δ9-tetrahydrocannabinol) as well as CBD (cannabidiol). They reveal hostile results, which suggests that CBD decreases the effects of THC. What are these impacts? THC has an envigorating result, creates a sensation of bliss, impacts cognitive features, but likewise relaxes. Large, routinely taken in doses of THC are considered dangerous to the human mind. Too much consumption of THC can bring about psychosis, lack of motivation, as well as even irreversible negative changes in cognitive feature. Both THC and CBD influence the endocannabinoid system in the body. Their activity, as already discussed, is contradictory. Cbd-a-thc-in-the-endocannabinoid-1 system When creating pictures, CBD reduces the deficiency of anandamide sources, and THC quicken this process. Nevertheless, this does not indicate that THC is only a hazardous cannabinoid and should not be in the prep work in all. On the other hand. Its little presence in hemp preparations is also essential in order to acquire the supposed result. harmony. THC in full spectrum hemp oil exists in such a low and, notably, lawful quantity. This quantity is so tiny (less than 0.2) that it does not cause drunkenness. Working together, THC as well as CBD have higher capacity than either particle performing alone. What is anandamide (AEA)? What is its importance for individuals struggling with clinical depression? Continue reading! CBD, Anxiety as well as the endocannabinoid system The endocannabinoid system is a key system responsible for the law of standard human physiological processes, such as power management, neurohormonal and neuroimmune links, electric motor task, state of mind as well as inspiration, and also fat metabolic process. The endocannabinoid system includes a natural chemical called anandamide (AEA). Anandamide is a neurotransmitter that is normally created in the human mind. Its manufacturing is promoted by e.g. exercise, as well as to a lower degree by the so-called collaborate with the body (massage therapy!). Its sources are “used” to preserve the appropriate performance of the body, consisting of in the field of psychological health and wellness. As shown in this research study: ncbi.nlm.nih.gov/pubmed/23580381 high degrees of anandamide are associated with a decreased danger of creating psychotic signs and symptoms. A high level of anandamide is additionally connected with a positive result on the decrease of anxiety and stress and anxiety symptoms. This mechanism is still not completely recognized, but it appears sensible that a strongly depressed mood in an individual period for a specific instance, as well as with the simultaneous absence of actions targeted at its enhancement, results in an intensification of the influx of adverse ideas. As depressive disorders develop, they can develop into a lot more harmful forms of conditions, e.g. psychosis, deceptions or schizophrenia. Slowing down this process as swiftly as feasible may end up being essential in the effective treatment of mental disorders of human functioning.
CBD for Anxiousness as well as Anxiety: Think of that it is feasible to introduce one all-natural prep work right into your day-to-day diet, which might verify to be the trick to winning the defend a calmer life for people with depressive conditions. Suppose the incorporation of this preparation, produced on the basis of a progressively widely known as well as evaluated chemical compound of plant origin, is not only potentially really effective, however is not related to the risk of adverse effects normal of medicinal medicines? Is it even feasible? Where’s the catch? Do you need to know even more? Read this post In this short article we will certainly cover: What is anxiety? THC and also CBD cannabinoids – differences Depression and also the endocannabinoid system What is anxiety? Official meanings recommend that depressive conditions, also understood colloquially as depression, are identified by: abrupt anxiety of an individual’s mood, in the unfavorable instructions, of modest to strong intensity of the intensity of the skilled changes, for greater than a couple of weeks. There might be several reasons for the occurrence of adjustments. It additionally takes place that it is tough to recognize any unequivocal reason. We very typically encountered the declaration that it is a human being disease of the 21st century – it impacts both older and also more youthful people. Our education is not important for clinical depression, not to mention our earnings – it can impact anyone. Treatment of clinical depression comes down to: pharmacotherapy, psychiatric therapy as well as psychoeducation, photo-therapy, electroconvulsive therapy and also even more natural tasks related to the augmentation of physical activity as well as the introduction of substantial changes in the everyday diet regimen. It is as part of natural approaches of fighting and combating clinical depression that the addition of cannabis preparations with cannabinoids normally taking place in the plant in the everyday diet regimen is gaining an increasing number of appeal worldwide. Cannabidiol CBD, found in e.g. CBD oil or full-spectrum hemp oil, appears in numerous clinical studies as a possibly reliable cannabinoid in the therapy of clinical depression. Notably, it is a 100 all-natural chemical substance of plant beginning. Remarkably, depression is amongst the 3 most usual mental illness in which clients consider CBD hemp prep work such as CBD oil, full spectrum hemp oil with CBD or CBD pills. Records from consumers as well as their positive opinions on the performance of e.g. CBD oil or complete spectrum hemp oil with natural CBD are expanding at an extraordinary pace. THC and CBD cannabinoids – distinctions The primary cannabinoids in the cannabis plant are THC (Δ9-tetrahydrocannabinol) as well as CBD (cannabidiol). They reveal antagonistic effects, which suggests that CBD decreases the effects of THC. What are these results? THC has an intoxicating result, triggers a sensation of bliss, affects cognitive functions, yet likewise unwinds. Huge, routinely taken in doses of THC are considered unsafe to the human brain. Extreme intake of THC can cause psychosis, lack of inspiration, and also long-term adverse adjustments in cognitive function. Both THC and CBD influence the endocannabinoid system in the body. Their activity, as currently discussed, is contradictory. Cbd-a-thc-in-the-endocannabinoid-1 system When composing images, CBD reduces the depletion of anandamide resources, and THC speeds up this procedure. Nonetheless, this does not suggest that THC is just a dangerous cannabinoid and also ought to not remain in the preparation at all. However. Its tiny visibility in hemp preparations is also essential in order to acquire the supposed result. synergy. THC completely range hemp oil is present in such a marginal and also, significantly, lawful amount. This quantity is so little (less than 0.2) that it does not trigger drunkenness. Interacting, THC and also CBD have better potential than either molecule performing alone. What is anandamide (AEA)? What is its value for individuals dealing with anxiety? Keep reading! CBD, Clinical depression and the endocannabinoid system The endocannabinoid system is a vital system in charge of the policy of basic human physiological processes, such as power management, neurohormonal and also neuroimmune connections, electric motor activity, state of mind and also motivation, and fat metabolism. The endocannabinoid system consists of a natural chemical called anandamide (AEA). Anandamide is a natural chemical that is normally produced in the human brain. Its production is boosted by e.g. physical activity, as well as to a minimal degree by the supposed work with the body (massage!). Its sources are “made use of” to preserve the appropriate performance of the body, consisting of in the field of mental health and wellness. As shown in this research: ncbi.nlm.nih.gov/pubmed/23580381 high degrees of anandamide are associated with a decreased risk of creating psychotic symptoms. A high level of anandamide is likewise associated with a favorable effect on the decrease of clinical depression as well as anxiety signs and symptoms. This system is still not totally comprehended, but it seems logical that a highly clinically depressed mood in an individual time period for a specific situation, and with the synchronised lack of activities focused on its renovation, leads to a rise of the influx of unfavorable ideas. As depressive disorders establish, they can turn into much more harmful forms of conditions, e.g. psychosis, misconceptions or schizophrenia. Decreasing this procedure as promptly as possible might turn out to be important in the reliable treatment of mental illness of human performance.
CBD for Stress And Anxiety and also Depression: Envision that it is feasible to present one all-natural preparation right into your day-to-day diet plan, which might show to be the trick to winning the fight for a calmer life for people with depressive disorders. What happens if the addition of this preparation, created on the basis of a significantly well-known and examined chemical compound of plant beginning, is not only possibly very reliable, however is not related to the risk of adverse effects normal of pharmacological medications? Is it even possible? Where’s the catch? Do you want to know more? Read this article In this write-up we will certainly cover: What is depression? THC and CBD cannabinoids – differences Depression and also the endocannabinoid system What is depression? Official meanings recommend that depressive problems, likewise known colloquially as depression, are identified by: sudden clinical depression of an individual’s mood, in the negative instructions, of moderate to strong strength of the intensity of the knowledgeable adjustments, for greater than a couple of weeks. There may be several factors for the incident of changes. It additionally occurs that it is tough to identify any type of unquestionable reason. We really usually discovered the statement that it is a civilization condition of the 21st century – it impacts both older as well as more youthful people. Our education is not important for clinical depression, let alone our profits – it can impact any individual. Therapy of clinical depression boils down to: pharmacotherapy, psychotherapy as well as psychoeducation, photo-therapy, electroconvulsive therapy as well as even more all-natural tasks associated with the intensification of physical activity as well as the introduction of substantial adjustments in the everyday diet. It is as part of all-natural methods of fighting and also combating clinical depression that the incorporation of cannabis prep work with cannabinoids normally happening in the plant in the everyday diet regimen is gaining increasingly more popularity worldwide. Cannabidiol CBD, located in e.g. CBD oil or full-spectrum hemp oil, shows up in various scientific studies as a possibly reliable cannabinoid in the therapy of depression. Significantly, it is a 100 natural chemical compound of plant beginning. Interestingly, clinical depression is among the 3 most usual mental illness in which individuals resort to CBD hemp prep work such as CBD oil, full range hemp oil with CBD or CBD pills. Records from consumers and also their favorable opinions on the efficiency of e.g. CBD oil or full range hemp oil with all-natural CBD are expanding at an unprecedented speed. THC and also CBD cannabinoids – distinctions The key cannabinoids in the marijuana plant are THC (Δ9-tetrahydrocannabinol) and also CBD (cannabidiol). They show hostile impacts, which means that CBD minimizes the effects of THC. What are these results? THC has an envigorating effect, creates a feeling of bliss, impacts cognitive features, but additionally relaxes. Large, on a regular basis consumed doses of THC are taken into consideration damaging to the human mind. Extreme consumption of THC can lead to psychosis, lack of motivation, and also even permanent unfavorable modifications in cognitive function. Both THC and also CBD affect the endocannabinoid system in the human body. Their action, as already pointed out, is inconsistent. Cbd-a-thc-in-the-endocannabinoid-1 system When creating pictures, CBD decreases the deficiency of anandamide sources, and also THC speeds up this process. However, this does not imply that THC is only a harmful cannabinoid and needs to not be in the prep work at all. On the other hand. Its little existence in hemp prep work is also required in order to obtain the supposed impact. synergy. THC in full spectrum hemp oil exists in such a limited and, significantly, legal amount. This amount is so tiny (less than 0.2) that it does not cause drunkenness. Working together, THC as well as CBD have greater potential than either molecule acting alone. What is anandamide (AEA)? What is its value for people experiencing clinical depression? Read on! CBD, Anxiety and also the endocannabinoid system The endocannabinoid system is a crucial system responsible for the policy of standard human physiological processes, such as power administration, neurohormonal as well as neuroimmune links, electric motor activity, mood as well as motivation, and also fat metabolism. The endocannabinoid system consists of a neurotransmitter called anandamide (AEA). Anandamide is a neurotransmitter that is normally created in the human mind. Its manufacturing is stimulated by e.g. physical activity, as well as to a minimal level by the so-called deal with the body (massage!). Its sources are “utilized” to maintain the proper functioning of the body, including in the field of psychological health. As received this research: ncbi.nlm.nih.gov/pubmed/23580381 high levels of anandamide are associated with a lowered threat of developing psychotic signs. A high degree of anandamide is additionally related to a positive impact on the reduction of depression and also anxiety symptoms. This system is still not fully recognized, but it appears sensible that a highly clinically depressed mood in a specific amount of time for a details instance, and also with the synchronised absence of actions focused on its improvement, leads to a concentration of the increase of negative thoughts. As depressive disorders develop, they can become even more unsafe forms of disorders, e.g. psychosis, misconceptions or schizophrenia. Slowing down this process as rapidly as feasible might end up being important in the effective treatment of mental disorders of human functioning.
Really good information can be found on website.
Hey there! Someone in my Facebook group shared this website with us so I came to give it a look. I’m definitely loving the information. I’m bookmarking and will be tweeting this to my followers! Excellent blog and wonderful design and style.
I always was concerned in this topic and still am, thankyou for posting.
Pretty section of content. I just stumbled upon your web site and in accession capital to assert that I get actually enjoyed account your blog posts. Anyway I’ll be subscribing to your augment and even I achievement you access consistently quickly.
CBD for Stress And Anxiety as well as Anxiety: Picture that it is possible to present one natural preparation into your everyday diet plan, which can show to be the secret to winning the fight for a calmer life for people with depressive disorders. What happens if the incorporation of this prep work, produced on the basis of a significantly popular as well as checked chemical compound of plant origin, is not only possibly really reliable, but is not connected with the risk of adverse effects typical of pharmacological medicines? Is it also possible? Where’s the catch? Do you need to know more? Read this post In this short article we will cover: What is clinical depression? THC as well as CBD cannabinoids – differences Clinical depression and also the endocannabinoid system What is depression? Main interpretations recommend that depressive problems, additionally known colloquially as anxiety, are defined by: sudden depression of an individual’s state of mind, in the unfavorable instructions, of moderate to strong intensity of the intensity of the skilled adjustments, for more than a couple of weeks. There may be several factors for the event of modifications. It additionally takes place that it is challenging to identify any kind of indisputable factor. We extremely frequently encountered the statement that it is a human being illness of the 21st century – it affects both older and more youthful individuals. Our education is trivial for anxiety, let alone our profits – it can affect any person. Therapy of depression boils down to: pharmacotherapy, psychiatric therapy as well as psychoeducation, phototherapy, electroconvulsive therapy and also more natural activities connected to the surge of exercise as well as the intro of significant modifications in the everyday diet. It is as part of all-natural techniques of dealing with and also neutralizing anxiety that the addition of marijuana preparations with cannabinoids normally happening in the plant in the daily diet plan is obtaining more and more appeal worldwide. Cannabidiol CBD, found in e.g. CBD oil or full-spectrum hemp oil, shows up in various scientific researches as a potentially effective cannabinoid in the therapy of clinical depression. Importantly, it is a 100 all-natural chemical substance of plant origin. Remarkably, anxiety is among the 3 most common mental illness in which patients resort to CBD hemp preparations such as CBD oil, full range hemp oil with CBD or CBD capsules. Records from consumers and their favorable point of views on the efficiency of e.g. CBD oil or complete range hemp oil with all-natural CBD are expanding at an unmatched rate. THC and CBD cannabinoids – distinctions The key cannabinoids in the marijuana plant are THC (Δ9-tetrahydrocannabinol) as well as CBD (cannabidiol). They reveal antagonistic impacts, which implies that CBD decreases the results of THC. What are these results? THC has an envigorating effect, triggers a sensation of ecstasy, affects cognitive features, but additionally unwinds. Huge, regularly consumed doses of THC are considered damaging to the human mind. Excessive usage of THC can bring about psychosis, lack of inspiration, and also also permanent unfavorable changes in cognitive function. Both THC and also CBD affect the endocannabinoid system in the human body. Their action, as already stated, is contradictory. Cbd-a-thc-in-the-endocannabinoid-1 system When creating pictures, CBD decreases the depletion of anandamide sources, and also THC speeds up this process. Nevertheless, this does not suggest that THC is only a dangerous cannabinoid and also must not be in the preparation in all. On the contrary. Its tiny existence in hemp prep work is also required in order to get the supposed impact. synergy. THC completely spectrum hemp oil is present in such a limited and, importantly, lawful quantity. This quantity is so tiny (less than 0.2) that it does not trigger drunkenness. Working together, THC and CBD have better possibility than either particle acting alone. What is anandamide (AEA)? What is its importance for people dealing with anxiety? Continue reading! CBD, Depression and also the endocannabinoid system The endocannabinoid system is an essential system in charge of the policy of fundamental human physiological processes, such as energy management, neurohormonal and neuroimmune links, motor activity, state of mind as well as motivation, as well as fat metabolic process. The endocannabinoid system includes a neurotransmitter called anandamide (AEA). Anandamide is a neurotransmitter that is naturally produced in the human brain. Its production is promoted by e.g. exercise, and also to a minimal extent by the supposed work with the body (massage!). Its resources are “utilized” to keep the appropriate performance of the body, consisting of in the field of psychological wellness. As displayed in this study: ncbi.nlm.nih.gov/pubmed/23580381 high degrees of anandamide are associated with a decreased risk of establishing psychotic symptoms. A high level of anandamide is also connected with a positive impact on the reduction of clinical depression and stress and anxiety signs and symptoms. This device is still not totally comprehended, yet it seems rational that a highly depressed mood in an individual period for a certain case, and with the synchronised lack of activities focused on its renovation, leads to an intensification of the influx of negative thoughts. As depressive problems develop, they can turn into even more hazardous kinds of problems, e.g. psychosis, delusions or schizophrenia. Reducing this procedure as rapidly as feasible might become vital in the reliable therapy of mental illness of human performance.
CBD for Anxiousness and also Depression: Picture that it is feasible to introduce one all-natural prep work right into your everyday diet plan, which might confirm to be the key to winning the defend a calmer life for individuals with depressive disorders. Suppose the addition of this prep work, developed on the basis of a progressively popular and examined chemical substance of plant origin, is not only possibly extremely efficient, however is not related to the danger of negative effects normal of pharmacological medications? Is it even possible? Where’s the catch? Do you want to know even more? Read this short article In this post we will certainly cover: What is anxiety? THC and also CBD cannabinoids – differences Anxiety as well as the endocannabinoid system What is clinical depression? Official interpretations recommend that depressive conditions, likewise understood colloquially as clinical depression, are identified by: abrupt depression of an individual’s mood, in the negative instructions, of moderate to strong strength of the strength of the knowledgeable changes, for greater than a few weeks. There may be one or more reasons for the incident of adjustments. It additionally happens that it is tough to determine any kind of unquestionable factor. We very typically come across the statement that it is a people illness of the 21st century – it influences both older and also younger people. Our education and learning is trivial for anxiety, not to mention our incomes – it can influence anyone. Therapy of anxiety comes down to: pharmacotherapy, psychiatric therapy as well as psychoeducation, phototherapy, electroconvulsive therapy and also more all-natural activities associated with the increase of physical activity as well as the intro of significant adjustments in the everyday diet regimen. It is as part of natural techniques of combating and also counteracting clinical depression that the incorporation of cannabis prep work with cannabinoids naturally occurring in the plant in the daily diet is getting a growing number of popularity worldwide. Cannabidiol CBD, located in e.g. CBD oil or full-spectrum hemp oil, shows up in many scientific research studies as a possibly efficient cannabinoid in the therapy of clinical depression. Importantly, it is a 100 natural chemical compound of plant beginning. Interestingly, depression is among the 3 most typical mental illness in which patients consider CBD hemp preparations such as CBD oil, complete spectrum hemp oil with CBD or CBD pills. Reports from consumers and also their positive opinions on the performance of e.g. CBD oil or full spectrum hemp oil with natural CBD are expanding at an extraordinary pace. THC as well as CBD cannabinoids – differences The main cannabinoids in the marijuana plant are THC (Δ9-tetrahydrocannabinol) as well as CBD (cannabidiol). They show hostile impacts, which suggests that CBD decreases the impacts of THC. What are these effects? THC has an intoxicating result, triggers a sensation of bliss, impacts cognitive functions, yet likewise relaxes. Big, on a regular basis taken in doses of THC are thought about dangerous to the human brain. Excessive consumption of THC can cause psychosis, lack of inspiration, as well as also irreversible unfavorable modifications in cognitive function. Both THC and CBD affect the endocannabinoid system in the human body. Their action, as currently mentioned, is contradictory. Cbd-a-thc-in-the-endocannabinoid-1 system When writing photos, CBD reduces the deficiency of anandamide sources, and also THC speeds up this procedure. However, this does not suggest that THC is only a dangerous cannabinoid and should not remain in the prep work whatsoever. However. Its small existence in hemp preparations is even needed in order to obtain the so-called result. synergy. THC in full range hemp oil is present in such a low as well as, significantly, lawful amount. This amount is so little (less than 0.2) that it does not trigger drunkenness. Collaborating, THC and also CBD have better capacity than either particle performing alone. What is anandamide (AEA)? What is its value for people experiencing depression? Continue reading! CBD, Depression and also the endocannabinoid system The endocannabinoid system is a crucial system responsible for the law of fundamental human physical procedures, such as energy management, neurohormonal and neuroimmune links, motor task, mood as well as motivation, and also fat metabolic rate. The endocannabinoid system consists of a natural chemical called anandamide (AEA). Anandamide is a neurotransmitter that is normally created in the human brain. Its production is promoted by e.g. physical activity, and to a lesser extent by the supposed collaborate with the body (massage!). Its resources are “used” to maintain the proper performance of the body, including in the field of psychological wellness. As shown in this study: ncbi.nlm.nih.gov/pubmed/23580381 high levels of anandamide are associated with a decreased danger of establishing psychotic symptoms. A high degree of anandamide is additionally associated with a favorable result on the decrease of depression as well as anxiety signs and symptoms. This mechanism is still not fully understood, but it appears logical that a strongly depressed state of mind in an individual time period for a details instance, and with the simultaneous absence of actions focused on its enhancement, brings about a concentration of the increase of adverse ideas. As depressive problems create, they can develop into even more hazardous kinds of conditions, e.g. psychosis, deceptions or schizophrenia. Decreasing this procedure as quickly as feasible may turn out to be important in the reliable treatment of mental disorders of human functioning.
CBD for Stress And Anxiety and also Clinical Depression: Demystified Imagine that it is feasible to introduce one natural preparation into your day-to-day diet, which might verify to be the secret to winning the fight for a calmer life for individuals with depressive conditions. What if the incorporation of this preparation, created on the basis of an increasingly popular and also tested chemical compound of plant beginning, is not just possibly extremely effective, however is not related to the threat of negative effects typical of pharmacological drugs? Is it also feasible? Where’s the catch? Do you wish to know even more? Read this write-up In this post we will certainly cover: What is anxiety? THC as well as CBD cannabinoids – differences Anxiety and the endocannabinoid system What is anxiety? Main meanings recommend that depressive disorders, likewise known informally as clinical depression, are characterized by: abrupt clinical depression of an individual’s state of mind, in the negative direction, of modest to solid strength of the strength of the seasoned modifications, for more than a few weeks. There might be several factors for the event of modifications. It also happens that it is tough to determine any unequivocal factor. We very commonly discovered the declaration that it is a people illness of the 21st century – it affects both older and more youthful individuals. Our education and learning is not important for anxiety, let alone our incomes – it can impact any person. Treatment of clinical depression comes down to: pharmacotherapy, psychotherapy as well as psychoeducation, photo-therapy, electroconvulsive therapy and also even more all-natural tasks related to the aggravation of physical activity as well as the introduction of significant adjustments in the everyday diet plan. It is as part of all-natural methods of fighting and also neutralizing anxiety that the addition of marijuana prep work with cannabinoids naturally taking place in the plant in the everyday diet is acquiring an increasing number of appeal in the world. Cannabidiol CBD, located in e.g. CBD oil or full-spectrum hemp oil, appears in various scientific research studies as a potentially reliable cannabinoid in the treatment of anxiety. Importantly, it is a 100 natural chemical substance of plant beginning. Interestingly, clinical depression is among the 3 most common mental disorders in which patients turn to CBD hemp prep work such as CBD oil, full spectrum hemp oil with CBD or CBD capsules. Reports from customers as well as their favorable point of views on the performance of e.g. CBD oil or complete spectrum hemp oil with all-natural CBD are expanding at an unmatched speed. THC and CBD cannabinoids – distinctions The primary cannabinoids in the marijuana plant are THC (Δ9-tetrahydrocannabinol) as well as CBD (cannabidiol). They reveal hostile impacts, which implies that CBD minimizes the impacts of THC. What are these results? THC has an envigorating result, creates a sensation of euphoria, impacts cognitive functions, yet also relaxes. Huge, frequently taken in dosages of THC are considered unsafe to the human mind. Extreme consumption of THC can bring about psychosis, absence of motivation, as well as even permanent unfavorable modifications in cognitive function. Both THC as well as CBD affect the endocannabinoid system in the human body. Their action, as already mentioned, is contradictory. Cbd-a-thc-in-the-endocannabinoid-1 system When writing images, CBD reduces the depletion of anandamide sources, as well as THC accelerate this procedure. Nevertheless, this does not mean that THC is just a dangerous cannabinoid and should not remain in the preparation in any way. On the other hand. Its little existence in hemp preparations is even necessary in order to acquire the so-called impact. harmony. THC completely spectrum hemp oil exists in such a minimal and also, notably, lawful amount. This quantity is so little (less than 0.2) that it does not create intoxication. Collaborating, THC and CBD have better potential than either molecule performing alone. What is anandamide (AEA)? What is its significance for people struggling with anxiety? Read on! CBD, Clinical depression as well as the endocannabinoid system The endocannabinoid system is a vital system responsible for the policy of basic human physiological processes, such as energy monitoring, neurohormonal as well as neuroimmune connections, motor activity, state of mind as well as motivation, as well as fat metabolism. The endocannabinoid system includes a natural chemical called anandamide (AEA). Anandamide is a neurotransmitter that is normally created in the human mind. Its manufacturing is promoted by e.g. physical activity, and to a lesser level by the supposed work with the body (massage!). Its resources are “made use of” to maintain the correct performance of the body, consisting of in the field of mental wellness. As received this research: ncbi.nlm.nih.gov/pubmed/23580381 high degrees of anandamide are connected with a reduced risk of creating psychotic symptoms. A high level of anandamide is additionally associated with a favorable result on the reduction of depression and also anxiety signs. This system is still not fully recognized, however it appears rational that a strongly clinically depressed state of mind in a private time period for a details instance, as well as with the synchronised lack of actions aimed at its enhancement, leads to an augmentation of the influx of unfavorable thoughts. As depressive conditions develop, they can become much more unsafe types of problems, e.g. psychosis, delusions or schizophrenia. Slowing down this procedure as promptly as possible may end up being critical in the effective therapy of mental illness of human performance.
CBD for Stress And Anxiety and Depression: Think of that it is possible to present one natural preparation right into your everyday diet regimen, which might verify to be the trick to winning the fight for a calmer life for individuals with depressive disorders. What happens if the incorporation of this prep work, created on the basis of a progressively widely known as well as evaluated chemical substance of plant origin, is not just possibly very effective, yet is not associated with the threat of adverse effects typical of pharmacological medications? Is it also possible? Where’s the catch? Do you want to know more? Read this post In this article we will certainly cover: What is clinical depression? THC as well as CBD cannabinoids – differences Clinical depression and the endocannabinoid system What is depression? Official meanings recommend that depressive problems, also known colloquially as anxiety, are identified by: abrupt depression of a person’s mood, in the adverse instructions, of moderate to solid intensity of the strength of the seasoned changes, for greater than a few weeks. There might be several factors for the occurrence of modifications. It also takes place that it is hard to determine any unquestionable reason. We really typically come across the declaration that it is a people disease of the 21st century – it influences both older as well as younger individuals. Our education and learning is trivial for depression, let alone our profits – it can affect any individual. Treatment of clinical depression comes down to: pharmacotherapy, psychiatric therapy and psychoeducation, phototherapy, electroconvulsive therapy and also more all-natural tasks associated with the rise of physical activity as well as the intro of substantial modifications in the everyday diet. It is as part of natural methods of dealing with and also neutralizing anxiety that the inclusion of cannabis prep work with cannabinoids normally occurring in the plant in the day-to-day diet regimen is obtaining increasingly more popularity worldwide. Cannabidiol CBD, discovered in e.g. CBD oil or full-spectrum hemp oil, appears in many scientific studies as a potentially effective cannabinoid in the treatment of depression. Notably, it is a 100 natural chemical substance of plant beginning. Interestingly, depression is among the 3 most usual mental disorders in which patients consider CBD hemp preparations such as CBD oil, complete spectrum hemp oil with CBD or CBD capsules. Reports from consumers and also their positive opinions on the efficiency of e.g. CBD oil or complete spectrum hemp oil with all-natural CBD are growing at an unprecedented speed. THC and CBD cannabinoids – differences The primary cannabinoids in the cannabis plant are THC (Δ9-tetrahydrocannabinol) and CBD (cannabidiol). They show antagonistic effects, which means that CBD decreases the results of THC. What are these effects? THC has an envigorating effect, causes a feeling of bliss, impacts cognitive functions, however additionally kicks back. Big, routinely eaten dosages of THC are considered damaging to the human brain. Too much consumption of THC can lead to psychosis, absence of motivation, and also permanent negative modifications in cognitive feature. Both THC as well as CBD influence the endocannabinoid system in the human body. Their action, as currently discussed, is contradictory. Cbd-a-thc-in-the-endocannabinoid-1 system When creating images, CBD reduces the exhaustion of anandamide sources, as well as THC speeds up this process. Nevertheless, this does not indicate that THC is only a damaging cannabinoid and also must not remain in the prep work in all. As a matter of fact. Its small visibility in hemp prep work is also required in order to acquire the supposed result. synergy. THC in full range hemp oil exists in such a limited and also, notably, lawful amount. This amount is so tiny (less than 0.2) that it does not create intoxication. Working together, THC and also CBD have higher potential than either particle acting alone. What is anandamide (AEA)? What is its importance for individuals dealing with anxiety? Continue reading! CBD, Anxiety as well as the endocannabinoid system The endocannabinoid system is a crucial system in charge of the law of fundamental human physiological processes, such as power management, neurohormonal as well as neuroimmune connections, motor activity, state of mind and also inspiration, and also fat metabolic process. The endocannabinoid system consists of a natural chemical called anandamide (AEA). Anandamide is a natural chemical that is normally created in the human brain. Its production is promoted by e.g. physical activity, and also to a lesser degree by the supposed work with the body (massage therapy!). Its resources are “used” to maintain the correct performance of the body, consisting of in the field of mental health. As received this research: ncbi.nlm.nih.gov/pubmed/23580381 high levels of anandamide are related to a reduced threat of developing psychotic symptoms. A high degree of anandamide is additionally associated with a favorable result on the decrease of depression as well as anxiety signs and symptoms. This system is still not fully understood, however it seems logical that a strongly clinically depressed mood in a specific amount of time for a particular case, and with the synchronised lack of activities targeted at its enhancement, brings about a climax of the increase of negative ideas. As depressive disorders develop, they can turn into even more harmful types of problems, e.g. psychosis, misconceptions or schizophrenia. Decreasing this procedure as rapidly as feasible might turn out to be essential in the efficient therapy of mental illness of human performance.
CBD for Stress And Anxiety as well as Clinical Depression: Visualize that it is feasible to introduce one all-natural prep work into your everyday diet, which might show to be the secret to winning the fight for a calmer life for people with depressive problems. What happens if the addition of this preparation, produced on the basis of a progressively well-known as well as checked chemical compound of plant origin, is not only possibly very effective, however is not connected with the risk of side effects regular of medicinal drugs? Is it also feasible? Where’s the catch? Do you would like to know even more? Read this post In this article we will cover: What is anxiety? THC and CBD cannabinoids – differences Clinical depression as well as the endocannabinoid system What is clinical depression? Main interpretations recommend that depressive problems, also understood colloquially as anxiety, are characterized by: sudden depression of a person’s state of mind, in the adverse instructions, of moderate to solid strength of the intensity of the knowledgeable changes, for more than a couple of weeks. There may be several reasons for the occurrence of modifications. It likewise happens that it is tough to determine any absolute factor. We very typically encountered the statement that it is a world illness of the 21st century – it impacts both older as well as more youthful individuals. Our education and learning is trivial for clinical depression, let alone our revenues – it can impact any individual. Treatment of depression comes down to: pharmacotherapy, psychiatric therapy as well as psychoeducation, phototherapy, electroconvulsive therapy and more all-natural activities associated with the intensification of exercise and also the introduction of substantial changes in the everyday diet. It is as part of natural approaches of fighting and also combating anxiety that the incorporation of marijuana prep work with cannabinoids naturally occurring in the plant in the day-to-day diet is getting more and more appeal on the planet. Cannabidiol CBD, found in e.g. CBD oil or full-spectrum hemp oil, appears in many clinical research studies as a possibly efficient cannabinoid in the treatment of depression. Importantly, it is a 100 natural chemical compound of plant origin. Interestingly, depression is among the 3 most typical mental disorders in which people turn to CBD hemp prep work such as CBD oil, full range hemp oil with CBD or CBD pills. Reports from customers and also their favorable point of views on the performance of e.g. CBD oil or complete spectrum hemp oil with natural CBD are expanding at an extraordinary rate. THC and CBD cannabinoids – distinctions The primary cannabinoids in the marijuana plant are THC (Δ9-tetrahydrocannabinol) and also CBD (cannabidiol). They show hostile results, which suggests that CBD lowers the impacts of THC. What are these results? THC has an envigorating impact, triggers a feeling of bliss, impacts cognitive functions, but likewise kicks back. Huge, routinely eaten dosages of THC are taken into consideration hazardous to the human mind. Extreme consumption of THC can result in psychosis, lack of inspiration, and also also long-term unfavorable changes in cognitive function. Both THC as well as CBD impact the endocannabinoid system in the human body. Their action, as already pointed out, is inconsistent. Cbd-a-thc-in-the-endocannabinoid-1 system When creating pictures, CBD decreases the depletion of anandamide resources, as well as THC accelerate this process. Nevertheless, this does not indicate that THC is just an unsafe cannabinoid and also needs to not remain in the preparation whatsoever. On the contrary. Its small existence in hemp preparations is also necessary in order to obtain the so-called impact. harmony. THC completely range hemp oil exists in such a minimal and, importantly, legal amount. This quantity is so small (less than 0.2) that it does not trigger intoxication. Working together, THC and CBD have greater capacity than either particle performing alone. What is anandamide (AEA)? What is its relevance for people experiencing clinical depression? Read on! CBD, Clinical depression and also the endocannabinoid system The endocannabinoid system is a crucial system responsible for the policy of standard human physiological processes, such as energy monitoring, neurohormonal and neuroimmune connections, motor activity, mood and also motivation, and fat metabolic rate. The endocannabinoid system consists of a natural chemical called anandamide (AEA). Anandamide is a natural chemical that is naturally generated in the human brain. Its production is boosted by e.g. physical activity, and to a lower extent by the supposed work with the body (massage therapy!). Its sources are “utilized” to keep the correct performance of the body, consisting of in the field of psychological wellness. As displayed in this study: ncbi.nlm.nih.gov/pubmed/23580381 high levels of anandamide are connected with a decreased danger of developing psychotic symptoms. A high degree of anandamide is also related to a favorable impact on the decrease of anxiety as well as stress and anxiety signs and symptoms. This mechanism is still not totally understood, however it appears rational that a highly depressed mood in a specific amount of time for a certain situation, as well as with the synchronised absence of actions aimed at its enhancement, brings about an accumulation of the increase of adverse thoughts. As depressive conditions establish, they can become a lot more dangerous types of problems, e.g. psychosis, misconceptions or schizophrenia. Slowing down this procedure as swiftly as feasible might end up being critical in the efficient therapy of mental illness of human functioning.
CBD for Anxiety and also Depression: Think of that it is feasible to present one natural preparation into your daily diet plan, which might show to be the secret to winning the defend a calmer life for individuals with depressive problems. What if the addition of this prep work, created on the basis of an increasingly widely known and also tested chemical compound of plant beginning, is not just potentially very efficient, yet is not connected with the risk of adverse effects typical of pharmacological medicines? Is it even feasible? Where’s the catch? Do you would like to know more? Read this short article In this post we will certainly cover: What is clinical depression? THC as well as CBD cannabinoids – differences Clinical depression and also the endocannabinoid system What is clinical depression? Main interpretations suggest that depressive conditions, also recognized informally as anxiety, are characterized by: unexpected depression of an individual’s mood, in the negative direction, of modest to solid intensity of the intensity of the seasoned modifications, for more than a couple of weeks. There might be several factors for the event of adjustments. It likewise occurs that it is hard to identify any unequivocal reason. We very usually stumbled upon the statement that it is a civilization illness of the 21st century – it influences both older and also more youthful individuals. Our education is not important for depression, not to mention our earnings – it can influence any individual. Therapy of depression comes down to: pharmacotherapy, psychiatric therapy and psychoeducation, photo-therapy, electroconvulsive therapy and also more natural activities related to the intensification of exercise and also the intro of substantial changes in the day-to-day diet plan. It is as part of all-natural techniques of battling and combating anxiety that the inclusion of marijuana preparations with cannabinoids normally happening in the plant in the daily diet regimen is getting a growing number of appeal worldwide. Cannabidiol CBD, found in e.g. CBD oil or full-spectrum hemp oil, appears in countless clinical researches as a possibly efficient cannabinoid in the therapy of depression. Importantly, it is a 100 all-natural chemical substance of plant beginning. Interestingly, depression is among the three most common mental illness in which clients resort to CBD hemp preparations such as CBD oil, complete range hemp oil with CBD or CBD capsules. Records from consumers as well as their favorable opinions on the effectiveness of e.g. CBD oil or complete spectrum hemp oil with natural CBD are growing at an unprecedented pace. THC as well as CBD cannabinoids – differences The primary cannabinoids in the marijuana plant are THC (Δ9-tetrahydrocannabinol) and CBD (cannabidiol). They reveal antagonistic effects, which suggests that CBD decreases the impacts of THC. What are these results? THC has an envigorating effect, causes a sensation of ecstasy, affects cognitive features, but likewise kicks back. Large, frequently taken in doses of THC are considered harmful to the human brain. Extreme intake of THC can bring about psychosis, absence of motivation, and even permanent adverse modifications in cognitive feature. Both THC and also CBD impact the endocannabinoid system in the human body. Their activity, as currently stated, is contradictory. Cbd-a-thc-in-the-endocannabinoid-1 system When creating pictures, CBD slows down the depletion of anandamide resources, as well as THC speeds up this process. Nonetheless, this does not suggest that THC is only an unsafe cannabinoid and also should not remain in the preparation in all. On the contrary. Its tiny presence in hemp prep work is also needed in order to get the supposed effect. harmony. THC in full range hemp oil is present in such a limited and also, importantly, legal amount. This amount is so small (less than 0.2) that it does not create drunkenness. Working together, THC as well as CBD have better potential than either molecule performing alone. What is anandamide (AEA)? What is its value for people suffering from anxiety? Read on! CBD, Anxiety and the endocannabinoid system The endocannabinoid system is a key system responsible for the law of basic human physical processes, such as power administration, neurohormonal and neuroimmune links, motor task, mood and motivation, and fat metabolism. The endocannabinoid system includes a natural chemical called anandamide (AEA). Anandamide is a natural chemical that is naturally created in the human brain. Its production is stimulated by e.g. physical activity, as well as to a lower level by the supposed deal with the body (massage therapy!). Its sources are “utilized” to preserve the correct performance of the body, consisting of in the field of psychological health. As received this research study: ncbi.nlm.nih.gov/pubmed/23580381 high degrees of anandamide are related to a reduced threat of creating psychotic signs. A high level of anandamide is also related to a positive effect on the reduction of clinical depression and also anxiousness signs. This system is still not totally comprehended, but it seems sensible that a highly clinically depressed state of mind in an individual period for a particular instance, and also with the simultaneous absence of actions targeted at its renovation, results in a surge of the increase of negative thoughts. As depressive disorders create, they can become even more unsafe kinds of problems, e.g. psychosis, misconceptions or schizophrenia. Decreasing this procedure as quickly as possible might turn out to be crucial in the effective treatment of mental illness of human performance.
Enjoyed studying this, very good stuff, thankyou. “Love begets love, love knows no rules, this is the same for all.” by Virgil.
CBD for Anxiety and Clinical Depression: Envision that it is possible to present one all-natural preparation right into your everyday diet, which can confirm to be the trick to winning the fight for a calmer life for individuals with depressive conditions. What if the inclusion of this preparation, produced on the basis of a significantly popular and also tested chemical substance of plant origin, is not just potentially extremely effective, however is not related to the threat of negative effects normal of pharmacological drugs? Is it also possible? Where’s the catch? Do you would like to know even more? Read this post In this short article we will certainly cover: What is clinical depression? THC and also CBD cannabinoids – differences Clinical depression and the endocannabinoid system What is clinical depression? Main meanings suggest that depressive conditions, likewise recognized colloquially as anxiety, are identified by: sudden anxiety of a person’s state of mind, in the negative instructions, of moderate to strong strength of the intensity of the experienced modifications, for more than a few weeks. There may be one or more reasons for the event of modifications. It likewise occurs that it is challenging to determine any unequivocal reason. We really often found the statement that it is a world illness of the 21st century – it impacts both older and also younger individuals. Our education is not important for anxiety, let alone our earnings – it can affect anybody. Treatment of clinical depression boils down to: pharmacotherapy, psychotherapy as well as psychoeducation, phototherapy, electroconvulsive therapy and also more all-natural tasks associated with the increase of exercise and the intro of substantial changes in the day-to-day diet plan. It is as part of all-natural approaches of fighting as well as neutralizing clinical depression that the inclusion of cannabis prep work with cannabinoids naturally happening in the plant in the everyday diet regimen is getting a growing number of appeal on the planet. Cannabidiol CBD, located in e.g. CBD oil or full-spectrum hemp oil, shows up in many clinical researches as a potentially reliable cannabinoid in the treatment of clinical depression. Importantly, it is a 100 natural chemical substance of plant origin. Interestingly, clinical depression is among the 3 most typical mental disorders in which clients consider CBD hemp preparations such as CBD oil, complete range hemp oil with CBD or CBD capsules. Reports from customers and their positive viewpoints on the efficiency of e.g. CBD oil or complete range hemp oil with all-natural CBD are expanding at an extraordinary speed. THC and CBD cannabinoids – distinctions The main cannabinoids in the cannabis plant are THC (Δ9-tetrahydrocannabinol) and also CBD (cannabidiol). They reveal antagonistic effects, which means that CBD reduces the effects of THC. What are these effects? THC has an intoxicating effect, triggers a sensation of bliss, influences cognitive functions, yet also unwinds. Large, regularly taken in dosages of THC are considered unsafe to the human mind. Excessive consumption of THC can lead to psychosis, absence of motivation, and also even long-term adverse changes in cognitive function. Both THC and CBD affect the endocannabinoid system in the human body. Their activity, as already discussed, is inconsistent. Cbd-a-thc-in-the-endocannabinoid-1 system When creating photos, CBD slows down the depletion of anandamide resources, and THC quicken this procedure. Nonetheless, this does not mean that THC is just a harmful cannabinoid as well as ought to not remain in the preparation whatsoever. However. Its little visibility in hemp prep work is also essential in order to acquire the supposed result. harmony. THC in full range hemp oil exists in such a minimal as well as, notably, lawful amount. This quantity is so small (less than 0.2) that it does not trigger intoxication. Collaborating, THC and CBD have better potential than either molecule performing alone. What is anandamide (AEA)? What is its value for people experiencing depression? Continue reading! CBD, Clinical depression and the endocannabinoid system The endocannabinoid system is a vital system in charge of the policy of fundamental human physical processes, such as energy monitoring, neurohormonal as well as neuroimmune connections, motor activity, state of mind and motivation, and also fat metabolic rate. The endocannabinoid system includes a neurotransmitter called anandamide (AEA). Anandamide is a neurotransmitter that is naturally produced in the human mind. Its manufacturing is promoted by e.g. exercise, as well as to a lesser degree by the so-called deal with the body (massage!). Its sources are “utilized” to maintain the appropriate performance of the body, consisting of in the field of psychological health. As displayed in this research study: ncbi.nlm.nih.gov/pubmed/23580381 high degrees of anandamide are associated with a reduced threat of creating psychotic signs and symptoms. A high level of anandamide is additionally connected with a favorable impact on the reduction of depression and anxiousness symptoms. This mechanism is still not completely recognized, but it seems rational that a highly depressed mood in a private period for a certain situation, and with the synchronised lack of actions focused on its enhancement, causes an augmentation of the influx of adverse thoughts. As depressive problems develop, they can develop into even more hazardous kinds of disorders, e.g. psychosis, delusions or schizophrenia. Decreasing this procedure as rapidly as feasible might turn out to be critical in the efficient treatment of mental illness of human functioning.
I like this weblog very much, Its a real nice spot to read and obtain info .
Hi! I just wanted to ask if you ever have any problems with hackers? My last blog (wordpress) was hacked and I ended up losing months of hard work due to no backup. Do you have any solutions to prevent hackers?
I like this web site because so much useful stuff on here : D.
Thanks for all your efforts that you have put in this. very interesting info .
http://golfsugarcreek.org/__media__/js/netsoltrademark.php?d=premiumporntrailers.com/girlfriendsfilms/
Great blog article. Want more.
http://www.pittsburghnet.com/__media__/js/netsoltrademark.php?d=premiumporntrailers.com/girlfriendsfilms/
Just wanna input on few general things, The website layout is perfect, the written content is rattling wonderful : D.
I saw a lot of website but I conceive this one contains something special in it in it
Thank you, I have recently been looking for information about this topic for ages and yours is the best I have discovered till now. But, what about the conclusion? Are you sure about the source?
http://ipokernews.com/__media__/js/netsoltrademark.php?d=bestpornsites.club/
Fantastic web site. A lot of useful info here. I am sending it to some friends ans also sharing in delicious. And of course, thanks for your effort!
There may be noticeably a bundle to learn about this. I assume you made certain good points in features also.
Hello.This post was extremely interesting, especially because I was browsing for thoughts on this issue last Monday.
I got good info from your blog
Excellent read, I just passed this onto a friend who was doing a little research on that. And he just bought me lunch as I found it for him smile Therefore let me rephrase that: Thanks for lunch!
Aw, this was a very nice post. In thought I want to put in writing like this moreover – taking time and precise effort to make a very good article… but what can I say… I procrastinate alot and not at all appear to get something done.
http://zeinafares.info/__media__/js/netsoltrademark.php?d=premiumporntrailers.com/girlfriendsfilms/
I think this is one of the most important information for me. And i am glad reading your article. But should remark on few general things, The website style is great, the articles is really nice : D. Good job, cheers
I am not certain the place you are getting your information, however great topic. I needs to spend some time studying more or figuring out more. Thanks for great information I used to be on the lookout for this information for my mission.
CBD for Stress And Anxiety and Depression: Picture that it is feasible to present one natural prep work right into your day-to-day diet regimen, which could show to be the secret to winning the fight for a calmer life for people with depressive conditions. What happens if the addition of this preparation, developed on the basis of an increasingly well-known and examined chemical substance of plant origin, is not only potentially extremely reliable, however is not connected with the threat of adverse effects common of pharmacological medications? Is it even possible? Where’s the catch? Do you wish to know more? Read this short article In this post we will cover: What is clinical depression? THC distinctions Anxiety as well as the endocannabinoid system What is clinical depression? Main meanings recommend that depressive conditions, additionally recognized colloquially as anxiety, are characterized by: abrupt depression of a person’s mood, in the negative instructions, of modest to solid strength of the strength of the experienced changes, for more than a couple of weeks. There might be several factors for the occurrence of modifications. It also takes place that it is challenging to identify any type of unequivocal reason. We really commonly found the statement that it is a human being condition of the 21st century – it affects both older as well as more youthful individuals. Our education is trivial for anxiety, not to mention our earnings – it can impact anybody. Treatment of clinical depression boils down to: pharmacotherapy, psychotherapy and psychoeducation, photo-therapy, electroconvulsive therapy and also more natural activities related to the augmentation of exercise as well as the intro of significant changes in the daily diet. It is as part of natural techniques of battling as well as neutralizing anxiety that the incorporation of marijuana prep work with cannabinoids normally taking place in the plant in the daily diet is obtaining a growing number of popularity on the planet. Cannabidiol CBD, discovered in e.g. CBD oil or full-spectrum hemp oil, appears in many scientific researches as a possibly efficient cannabinoid in the therapy of anxiety. Notably, it is a 100 natural chemical compound of plant origin. Remarkably, clinical depression is among the three most common mental illness in which individuals turn to CBD hemp preparations such as CBD oil, full spectrum hemp oil with CBD or CBD capsules. Records from customers and their favorable opinions on the performance of e.g. CBD oil or complete range hemp oil with natural CBD are expanding at an extraordinary rate. THC as well as CBD cannabinoids – distinctions The main cannabinoids in the marijuana plant are THC (Δ9-tetrahydrocannabinol) and also CBD (cannabidiol). They reveal antagonistic effects, which suggests that CBD decreases the effects of THC. What are these effects? THC has an envigorating effect, causes a feeling of bliss, influences cognitive functions, however also kicks back. Large, on a regular basis eaten doses of THC are taken into consideration unsafe to the human mind. Too much usage of THC can cause psychosis, lack of motivation, and also even long-term adverse adjustments in cognitive feature. Both THC and CBD influence the endocannabinoid system in the human body. Their action, as currently stated, is inconsistent. Cbd-a-thc-in-the-endocannabinoid-1 system When writing images, CBD decreases the exhaustion of anandamide resources, and THC speeds up this procedure. However, this does not indicate that THC is just a hazardous cannabinoid as well as needs to not remain in the preparation at all. On the other hand. Its tiny existence in hemp preparations is also required in order to get the supposed effect. harmony. THC completely range hemp oil is present in such a minimal and, importantly, lawful quantity. This amount is so tiny (less than 0.2) that it does not trigger drunkenness. Interacting, THC and also CBD have greater possibility than either molecule performing alone. What is anandamide (AEA)? What is its importance for individuals struggling with depression? Continue reading! CBD, Depression and the endocannabinoid system The endocannabinoid system is a key system responsible for the law of standard human physical procedures, such as power administration, neurohormonal as well as neuroimmune connections, electric motor activity, mood and also motivation, as well as fat metabolic process. The endocannabinoid system consists of a natural chemical called anandamide (AEA). Anandamide is a natural chemical that is normally produced in the human brain. Its manufacturing is stimulated by e.g. physical activity, as well as to a lesser extent by the supposed work with the body (massage!). Its resources are “made use of” to preserve the proper performance of the body, consisting of in the field of psychological health. As displayed in this research study: https://www.ncbi.nlm.nih.gov/pubmed/23580381 high degrees of anandamide are connected with a decreased danger of establishing psychotic symptoms. A high level of anandamide is additionally associated with a favorable effect on the reduction of depression as well as anxiety signs and symptoms. This device is still not totally recognized, but it seems sensible that a strongly depressed state of mind in a specific time period for a details situation, and also with the simultaneous lack of activities focused on its improvement, brings about an accumulation of the influx of unfavorable ideas. As depressive disorders create, they can become a lot more dangerous forms of conditions, e.g. psychosis, misconceptions or schizophrenia. Reducing this procedure as promptly as possible may turn out to be crucial in the effective therapy of mental illness of human functioning.
I as well as my buddies were examining the great tips found on the website and then the sudden got a horrible feeling I never thanked you for those tips. The young boys became consequently happy to study all of them and have in effect in actuality been enjoying these things. We appreciate you being quite accommodating and for deciding upon this sort of smart subject matter most people are really wanting to be aware of. My personal sincere regret for not saying thanks to you earlier.
CBD for Stress And Anxiety and also Depression: Think of that it is possible to introduce one all-natural preparation into your daily diet, which could show to be the secret to winning the defend a calmer life for people with depressive problems. What if the inclusion of this preparation, produced on the basis of a progressively widely known and also evaluated chemical compound of plant origin, is not just possibly really reliable, but is not connected with the threat of side effects regular of medicinal medications? Is it even feasible? Where’s the catch? Do you want to know even more? Read this short article In this post we will certainly cover: What is depression? THC distinctions Clinical depression as well as the endocannabinoid system What is clinical depression? Main interpretations suggest that depressive problems, additionally known informally as clinical depression, are identified by: unexpected clinical depression of an individual’s state of mind, in the unfavorable instructions, of moderate to strong intensity of the strength of the skilled modifications, for more than a couple of weeks. There might be several factors for the incident of adjustments. It additionally happens that it is difficult to identify any unquestionable factor. We extremely typically come across the statement that it is a civilization illness of the 21st century – it influences both older as well as younger individuals. Our education and learning is not important for clinical depression, not to mention our earnings – it can impact any person. Therapy of anxiety comes down to: pharmacotherapy, psychotherapy as well as psychoeducation, phototherapy, electroconvulsive therapy as well as even more natural tasks associated with the accumulation of exercise and also the intro of significant modifications in the daily diet regimen. It is as part of all-natural techniques of fighting and also combating depression that the addition of cannabis prep work with cannabinoids normally taking place in the plant in the everyday diet regimen is obtaining a growing number of popularity in the world. Cannabidiol CBD, found in e.g. CBD oil or full-spectrum hemp oil, appears in various clinical researches as a potentially efficient cannabinoid in the treatment of depression. Significantly, it is a 100 all-natural chemical substance of plant origin. Surprisingly, anxiety is amongst the 3 most common mental illness in which patients turn to CBD hemp preparations such as CBD oil, complete range hemp oil with CBD or CBD capsules. Records from customers and also their positive viewpoints on the effectiveness of e.g. CBD oil or complete spectrum hemp oil with natural CBD are growing at an unprecedented pace. THC and also CBD cannabinoids – distinctions The key cannabinoids in the cannabis plant are THC (Δ9-tetrahydrocannabinol) and also CBD (cannabidiol). They reveal antagonistic impacts, which indicates that CBD decreases the results of THC. What are these effects? THC has an envigorating effect, creates a feeling of bliss, affects cognitive features, however additionally loosens up. Large, frequently eaten dosages of THC are taken into consideration harmful to the human brain. Excessive consumption of THC can bring about psychosis, absence of inspiration, as well as also long-term unfavorable modifications in cognitive feature. Both THC and also CBD affect the endocannabinoid system in the body. Their activity, as currently stated, is inconsistent. Cbd-a-thc-in-the-endocannabinoid-1 system When writing pictures, CBD decreases the deficiency of anandamide resources, and THC quicken this procedure. Nonetheless, this does not imply that THC is just an unsafe cannabinoid and needs to not remain in the prep work in all. On the other hand. Its small presence in hemp prep work is even essential in order to acquire the so-called effect. synergy. THC in full spectrum hemp oil is present in such a low as well as, importantly, lawful quantity. This quantity is so little (less than 0.2) that it does not create intoxication. Interacting, THC and also CBD have greater capacity than either molecule performing alone. What is anandamide (AEA)? What is its relevance for people experiencing depression? Read on! CBD, Depression and also the endocannabinoid system The endocannabinoid system is an essential system responsible for the law of basic human physiological processes, such as power monitoring, neurohormonal as well as neuroimmune links, motor activity, state of mind and motivation, and fat metabolic rate. The endocannabinoid system includes a neurotransmitter called anandamide (AEA). Anandamide is a neurotransmitter that is normally created in the human brain. Its production is boosted by e.g. exercise, and to a minimal level by the so-called collaborate with the body (massage!). Its resources are “utilized” to keep the correct performance of the body, consisting of in the field of mental health. As received this research study: https://www.ncbi.nlm.nih.gov/pubmed/23580381 high levels of anandamide are associated with a reduced danger of creating psychotic signs. A high degree of anandamide is additionally associated with a favorable impact on the reduction of clinical depression and stress and anxiety signs. This system is still not totally recognized, yet it appears sensible that a highly clinically depressed state of mind in an individual time period for a specific instance, and also with the simultaneous lack of activities aimed at its improvement, leads to an accumulation of the influx of adverse ideas. As depressive problems create, they can turn into much more harmful forms of disorders, e.g. psychosis, deceptions or schizophrenia. Decreasing this process as rapidly as feasible may turn out to be vital in the effective treatment of mental illness of human functioning.
I would like to thnkx for the efforts you have put in writing this blog. I am hoping the same high-grade blog post from you in the upcoming as well. In fact your creative writing abilities has inspired me to get my own blog now. Really the blogging is spreading its wings quickly. Your write up is a good example of it.
CBD for Anxiety and also Anxiety: Picture that it is possible to present one natural preparation right into your everyday diet, which might prove to be the trick to winning the fight for a calmer life for individuals with depressive problems. Suppose the incorporation of this preparation, developed on the basis of a significantly popular as well as examined chemical compound of plant beginning, is not just potentially really effective, but is not related to the threat of negative effects normal of pharmacological medications? Is it also possible? Where’s the catch? Do you want to know even more? Read this article In this article we will cover: What is depression? THC distinctions Depression and the endocannabinoid system What is anxiety? Main meanings suggest that depressive problems, additionally understood informally as depression, are characterized by: unexpected depression of a person’s mood, in the negative instructions, of modest to solid strength of the strength of the seasoned modifications, for more than a couple of weeks. There may be several factors for the occurrence of changes. It additionally happens that it is hard to identify any absolute reason. We really typically stumbled upon the declaration that it is a world illness of the 21st century – it influences both older as well as more youthful people. Our education and learning is not important for anxiety, let alone our profits – it can affect any individual. Therapy of depression boils down to: pharmacotherapy, psychiatric therapy as well as psychoeducation, phototherapy, electroconvulsive therapy as well as even more natural tasks connected to the increase of exercise as well as the intro of significant adjustments in the daily diet. It is as part of all-natural approaches of fighting and counteracting clinical depression that the addition of cannabis preparations with cannabinoids naturally happening in the plant in the day-to-day diet regimen is acquiring increasingly more popularity in the world. Cannabidiol CBD, located in e.g. CBD oil or full-spectrum hemp oil, appears in numerous clinical studies as a possibly effective cannabinoid in the therapy of depression. Importantly, it is a 100 natural chemical substance of plant origin. Surprisingly, anxiety is among the 3 most typical mental disorders in which individuals resort to CBD hemp prep work such as CBD oil, full spectrum hemp oil with CBD or CBD pills. Records from consumers and also their favorable point of views on the efficiency of e.g. CBD oil or full spectrum hemp oil with all-natural CBD are expanding at an extraordinary pace. THC as well as CBD cannabinoids – differences The primary cannabinoids in the marijuana plant are THC (Δ9-tetrahydrocannabinol) and CBD (cannabidiol). They reveal antagonistic results, which indicates that CBD decreases the impacts of THC. What are these effects? THC has an intoxicating result, triggers a sensation of bliss, influences cognitive features, but likewise kicks back. Huge, routinely eaten dosages of THC are taken into consideration hazardous to the human brain. Extreme usage of THC can result in psychosis, absence of motivation, and also also permanent negative changes in cognitive function. Both THC and CBD influence the endocannabinoid system in the body. Their action, as already stated, is inconsistent. Cbd-a-thc-in-the-endocannabinoid-1 system When creating pictures, CBD slows down the deficiency of anandamide sources, and THC accelerate this procedure. Nevertheless, this does not mean that THC is just a harmful cannabinoid and must not be in the preparation in all. As a matter of fact. Its tiny presence in hemp preparations is also required in order to obtain the supposed impact. synergy. THC in full spectrum hemp oil exists in such a marginal as well as, importantly, legal amount. This amount is so tiny (less than 0.2) that it does not cause intoxication. Collaborating, THC and CBD have better potential than either particle performing alone. What is anandamide (AEA)? What is its significance for individuals struggling with depression? Continue reading! CBD, Clinical depression and also the endocannabinoid system The endocannabinoid system is a key system in charge of the policy of standard human physical procedures, such as energy management, neurohormonal and also neuroimmune connections, electric motor activity, state of mind as well as motivation, and also fat metabolic rate. The endocannabinoid system consists of a neurotransmitter called anandamide (AEA). Anandamide is a neurotransmitter that is naturally produced in the human brain. Its manufacturing is promoted by e.g. physical activity, as well as to a lesser degree by the so-called collaborate with the body (massage therapy!). Its sources are “used” to preserve the proper functioning of the body, consisting of in the field of mental health and wellness. As shown in this research study: https://www.ncbi.nlm.nih.gov/pubmed/23580381 high degrees of anandamide are related to a decreased threat of developing psychotic signs. A high level of anandamide is likewise related to a favorable result on the decrease of clinical depression and anxiety signs. This device is still not completely recognized, however it seems logical that a highly depressed state of mind in an individual amount of time for a certain instance, and with the simultaneous absence of activities aimed at its renovation, results in an augmentation of the influx of unfavorable ideas. As depressive conditions establish, they can develop into much more unsafe kinds of problems, e.g. psychosis, delusions or schizophrenia. Decreasing this procedure as promptly as possible may turn out to be essential in the efficient treatment of mental illness of human performance.
CBD for Anxiousness and Anxiety: Picture that it is feasible to present one all-natural prep work into your daily diet, which could show to be the key to winning the defend a calmer life for people with depressive conditions. Suppose the inclusion of this prep work, developed on the basis of an increasingly popular as well as evaluated chemical compound of plant beginning, is not just possibly very reliable, but is not associated with the danger of side effects normal of medicinal medications? Is it even possible? Where’s the catch? Do you want to know more? Read this write-up In this post we will cover: What is anxiety? THC distinctions Anxiety and also the endocannabinoid system What is depression? Main interpretations suggest that depressive problems, likewise known informally as anxiety, are identified by: unexpected anxiety of an individual’s mood, in the adverse instructions, of modest to strong intensity of the intensity of the experienced adjustments, for greater than a couple of weeks. There might be one or more factors for the incident of changes. It additionally occurs that it is tough to determine any indisputable reason. We very frequently encountered the statement that it is a people condition of the 21st century – it influences both older and also more youthful people. Our education is not important for depression, let alone our revenues – it can influence any individual. Treatment of clinical depression comes down to: pharmacotherapy, psychiatric therapy as well as psychoeducation, photo-therapy, electroconvulsive therapy as well as more natural tasks related to the intensification of physical activity and the intro of significant modifications in the daily diet regimen. It is as part of natural approaches of dealing with and counteracting clinical depression that the incorporation of cannabis preparations with cannabinoids naturally occurring in the plant in the everyday diet regimen is getting an increasing number of popularity on the planet. Cannabidiol CBD, discovered in e.g. CBD oil or full-spectrum hemp oil, shows up in numerous scientific researches as a possibly efficient cannabinoid in the treatment of clinical depression. Significantly, it is a 100 natural chemical compound of plant beginning. Interestingly, depression is amongst the 3 most usual mental disorders in which clients consider CBD hemp prep work such as CBD oil, full spectrum hemp oil with CBD or CBD pills. Records from consumers and their favorable viewpoints on the effectiveness of e.g. CBD oil or complete range hemp oil with natural CBD are growing at an extraordinary pace. THC as well as CBD cannabinoids – differences The primary cannabinoids in the marijuana plant are THC (Δ9-tetrahydrocannabinol) and CBD (cannabidiol). They show antagonistic effects, which means that CBD lowers the impacts of THC. What are these results? THC has an intoxicating impact, causes a feeling of bliss, impacts cognitive features, however likewise loosens up. Big, regularly eaten dosages of THC are taken into consideration harmful to the human brain. Extreme consumption of THC can lead to psychosis, lack of motivation, and also even irreversible unfavorable changes in cognitive function. Both THC and CBD affect the endocannabinoid system in the human body. Their activity, as currently mentioned, is contradictory. Cbd-a-thc-in-the-endocannabinoid-1 system When composing photos, CBD reduces the exhaustion of anandamide resources, and THC quicken this procedure. Nonetheless, this does not mean that THC is only an unsafe cannabinoid and ought to not remain in the preparation in any way. On the other hand. Its little existence in hemp prep work is also necessary in order to get the so-called result. synergy. THC completely range hemp oil exists in such a limited and, significantly, legal quantity. This amount is so tiny (less than 0.2) that it does not create drunkenness. Collaborating, THC and CBD have higher possibility than either particle acting alone. What is anandamide (AEA)? What is its value for people suffering from depression? Read on! CBD, Anxiety and the endocannabinoid system The endocannabinoid system is a key system in charge of the policy of standard human physical procedures, such as power management, neurohormonal as well as neuroimmune links, electric motor activity, mood and also inspiration, and fat metabolic rate. The endocannabinoid system consists of a neurotransmitter called anandamide (AEA). Anandamide is a natural chemical that is normally created in the human brain. Its production is boosted by e.g. physical activity, and also to a lower extent by the so-called collaborate with the body (massage!). Its sources are “made use of” to preserve the correct functioning of the body, including in the field of psychological health. As shown in this study: https://www.ncbi.nlm.nih.gov/pubmed/23580381 high degrees of anandamide are connected with a reduced risk of establishing psychotic signs and symptoms. A high level of anandamide is likewise connected with a favorable effect on the decrease of depression and also anxiousness signs and symptoms. This mechanism is still not completely understood, yet it appears rational that a strongly depressed state of mind in an individual time period for a details instance, and also with the simultaneous absence of activities targeted at its renovation, leads to an accumulation of the influx of adverse thoughts. As depressive disorders develop, they can develop into a lot more harmful forms of disorders, e.g. psychosis, delusions or schizophrenia. Decreasing this process as rapidly as feasible might become vital in the effective therapy of mental disorders of human performance.
CBD for Anxiety as well as Clinical Depression: Visualize that it is possible to present one all-natural preparation into your daily diet plan, which might confirm to be the secret to winning the fight for a calmer life for people with depressive disorders. Suppose the incorporation of this preparation, created on the basis of a significantly well-known and also tested chemical substance of plant beginning, is not just possibly extremely effective, but is not associated with the threat of side effects regular of medicinal medicines? Is it also feasible? Where’s the catch? Do you want to know more? Read this short article In this write-up we will cover: What is clinical depression? THC and CBD cannabinoids – differences Anxiety as well as the endocannabinoid system What is anxiety? Main meanings recommend that depressive problems, likewise known informally as anxiety, are defined by: unexpected anxiety of a person’s mood, in the unfavorable direction, of moderate to solid strength of the strength of the knowledgeable modifications, for more than a couple of weeks. There may be one or more factors for the occurrence of adjustments. It likewise happens that it is hard to determine any type of unquestionable reason. We really often stumbled upon the declaration that it is a people illness of the 21st century – it influences both older and more youthful people. Our education and learning is not important for anxiety, not to mention our earnings – it can impact anyone. Treatment of clinical depression boils down to: pharmacotherapy, psychotherapy as well as psychoeducation, photo-therapy, electroconvulsive therapy and also even more all-natural tasks associated with the aggravation of exercise and the intro of considerable modifications in the daily diet regimen. It is as part of all-natural approaches of fighting and counteracting clinical depression that the addition of marijuana preparations with cannabinoids naturally taking place in the plant in the day-to-day diet is obtaining increasingly more appeal in the world. Cannabidiol CBD, discovered in e.g. CBD oil or full-spectrum hemp oil, appears in numerous scientific studies as a potentially efficient cannabinoid in the therapy of anxiety. Importantly, it is a 100 natural chemical compound of plant origin. Remarkably, anxiety is amongst the three most typical mental disorders in which patients turn to CBD hemp prep work such as CBD oil, full range hemp oil with CBD or CBD pills. Reports from customers and also their positive opinions on the performance of e.g. CBD oil or full range hemp oil with natural CBD are expanding at an unprecedented pace. THC and CBD cannabinoids – differences The primary cannabinoids in the cannabis plant are THC (Δ9-tetrahydrocannabinol) and CBD (cannabidiol). They reveal antagonistic impacts, which implies that CBD minimizes the impacts of THC. What are these results? THC has an envigorating impact, creates a feeling of bliss, impacts cognitive features, however also relaxes. Large, routinely taken in dosages of THC are taken into consideration dangerous to the human mind. Too much usage of THC can lead to psychosis, absence of motivation, and even long-term unfavorable modifications in cognitive function. Both THC and also CBD influence the endocannabinoid system in the human body. Their activity, as already discussed, is contradictory. Cbd-a-thc-in-the-endocannabinoid-1 system When creating pictures, CBD decreases the depletion of anandamide sources, and THC quicken this procedure. However, this does not mean that THC is only an unsafe cannabinoid and must not remain in the prep work in any way. However. Its tiny visibility in hemp prep work is even needed in order to get the so-called impact. harmony. THC completely spectrum hemp oil exists in such a marginal and, notably, lawful quantity. This amount is so small (less than 0.2) that it does not cause intoxication. Collaborating, THC and CBD have greater potential than either particle acting alone. What is anandamide (AEA)? What is its relevance for people experiencing anxiety? Continue reading! CBD, Clinical depression as well as the endocannabinoid system The endocannabinoid system is a key system responsible for the law of fundamental human physical procedures, such as energy administration, neurohormonal as well as neuroimmune links, motor activity, mood as well as inspiration, and also fat metabolism. The endocannabinoid system consists of a natural chemical called anandamide (AEA). Anandamide is a natural chemical that is normally created in the human brain. Its production is promoted by e.g. exercise, as well as to a lesser extent by the so-called deal with the body (massage therapy!). Its resources are “utilized” to preserve the proper functioning of the body, including in the field of psychological health. As shown in this research: https://www.ncbi.nlm.nih.gov/pubmed/23580381 high degrees of anandamide are related to a lowered threat of developing psychotic signs. A high level of anandamide is likewise connected with a positive impact on the decrease of depression as well as stress and anxiety signs and symptoms. This system is still not completely comprehended, however it seems sensible that a strongly clinically depressed mood in an individual time period for a certain situation, and with the synchronised absence of actions aimed at its improvement, leads to an augmentation of the influx of negative thoughts. As depressive disorders create, they can become even more unsafe kinds of conditions, e.g. psychosis, delusions or schizophrenia. Decreasing this procedure as swiftly as feasible might turn out to be important in the reliable therapy of mental disorders of human functioning.
CBD for Stress And Anxiety and also Depression: Visualize that it is feasible to introduce one natural preparation right into your everyday diet plan, which might show to be the key to winning the fight for a calmer life for individuals with depressive problems. What happens if the incorporation of this prep work, created on the basis of an increasingly popular and checked chemical substance of plant origin, is not just potentially really reliable, however is not associated with the danger of adverse effects typical of pharmacological medications? Is it even possible? Where’s the catch? Do you would like to know more? Read this short article In this article we will certainly cover: What is clinical depression? THC distinctions Depression and the endocannabinoid system What is depression? Official meanings recommend that depressive problems, additionally recognized informally as anxiety, are identified by: abrupt depression of a person’s mood, in the unfavorable instructions, of modest to solid intensity of the intensity of the knowledgeable modifications, for more than a few weeks. There may be one or more reasons for the occurrence of modifications. It additionally occurs that it is hard to determine any type of unequivocal reason. We extremely frequently stumbled upon the declaration that it is a people condition of the 21st century – it impacts both older as well as more youthful people. Our education is trivial for anxiety, let alone our earnings – it can impact anybody. Therapy of depression comes down to: pharmacotherapy, psychiatric therapy and also psychoeducation, phototherapy, electroconvulsive therapy and even more natural tasks associated with the concentration of exercise and the introduction of considerable adjustments in the daily diet. It is as part of all-natural methods of combating and also counteracting anxiety that the inclusion of cannabis preparations with cannabinoids naturally occurring in the plant in the everyday diet is acquiring increasingly more appeal in the world. Cannabidiol CBD, located in e.g. CBD oil or full-spectrum hemp oil, appears in numerous scientific studies as a potentially effective cannabinoid in the therapy of anxiety. Importantly, it is a 100 natural chemical compound of plant origin. Interestingly, depression is amongst the 3 most usual mental illness in which people resort to CBD hemp preparations such as CBD oil, full range hemp oil with CBD or CBD capsules. Records from customers as well as their favorable opinions on the effectiveness of e.g. CBD oil or full spectrum hemp oil with all-natural CBD are expanding at an extraordinary speed. THC and CBD cannabinoids – distinctions The main cannabinoids in the marijuana plant are THC (Δ9-tetrahydrocannabinol) and CBD (cannabidiol). They reveal antagonistic results, which indicates that CBD minimizes the results of THC. What are these impacts? THC has an intoxicating effect, creates a feeling of euphoria, affects cognitive features, yet likewise unwinds. Huge, on a regular basis consumed dosages of THC are considered dangerous to the human mind. Excessive consumption of THC can lead to psychosis, absence of motivation, and also also permanent negative changes in cognitive function. Both THC and also CBD influence the endocannabinoid system in the human body. Their action, as currently mentioned, is contradictory. Cbd-a-thc-in-the-endocannabinoid-1 system When composing pictures, CBD slows down the exhaustion of anandamide resources, and also THC quicken this process. Nonetheless, this does not mean that THC is only an unsafe cannabinoid and also needs to not be in the prep work in any way. As a matter of fact. Its tiny visibility in hemp preparations is also needed in order to obtain the supposed result. synergy. THC completely range hemp oil exists in such a marginal and, importantly, legal amount. This amount is so tiny (less than 0.2) that it does not create intoxication. Interacting, THC and also CBD have greater possibility than either particle acting alone. What is anandamide (AEA)? What is its importance for people experiencing clinical depression? Continue reading! CBD, Depression and the endocannabinoid system The endocannabinoid system is a crucial system responsible for the regulation of standard human physiological processes, such as energy management, neurohormonal and also neuroimmune links, motor activity, mood and motivation, as well as fat metabolic rate. The endocannabinoid system includes a neurotransmitter called anandamide (AEA). Anandamide is a natural chemical that is normally produced in the human mind. Its manufacturing is stimulated by e.g. exercise, and to a minimal level by the supposed collaborate with the body (massage!). Its sources are “utilized” to preserve the proper performance of the body, consisting of in the field of mental wellness. As displayed in this research study: https://www.ncbi.nlm.nih.gov/pubmed/23580381 high levels of anandamide are related to a decreased risk of developing psychotic signs. A high level of anandamide is additionally associated with a positive effect on the decrease of anxiety as well as anxiousness signs and symptoms. This mechanism is still not totally recognized, however it seems logical that a highly clinically depressed mood in an individual time period for a certain situation, as well as with the simultaneous absence of activities focused on its improvement, brings about an accumulation of the increase of adverse ideas. As depressive disorders establish, they can turn into a lot more harmful forms of conditions, e.g. psychosis, delusions or schizophrenia. Reducing this procedure as quickly as feasible might turn out to be essential in the reliable treatment of mental illness of human functioning.
Great blog here! Also your web site loads up fast! What web host are you using? Can I get your affiliate link to your host? I wish my website loaded up as fast as yours lol
I have been absent for some time, but now I remember why I used to love this website. Thank you, I will try and check back more often. How frequently you update your site?
Hi, Neat post. There is a problem together with your site in internet explorer, could check thisK IE nonetheless is the market chief and a good part of other people will miss your wonderful writing because of this problem.
Very interesting information!Perfect just what I was looking for!
Hello there! Do you use Twitter? I’d like to follow you if that would be okay. I’m undoubtedly enjoying your blog and look forward to new updates.
Hi! I just want to offer you a huge thumbs up for the great info you have right here on this post. I’ll be coming back to your website for more soon.
I carry on listening to the news update talk about getting boundless online grant applications so I have been looking around for the most excellent site to get one. Could you tell me please, where could i get some?
You are my aspiration, I have few blogs and rarely run out from to post : (.
CBD for Stress And Anxiety as well as Depression: Demystified Imagine that it is possible to present one all-natural preparation into your everyday diet plan, which can confirm to be the trick to winning the defend a calmer life for individuals with depressive disorders. What if the addition of this prep work, produced on the basis of a progressively well-known and also examined chemical compound of plant origin, is not just potentially really reliable, but is not connected with the danger of adverse effects common of pharmacological medications? Is it also possible? Where’s the catch? Do you wish to know more? Read this article In this article we will cover: What is anxiety? THC distinctions Depression as well as the endocannabinoid system What is anxiety? Main interpretations recommend that depressive disorders, likewise understood colloquially as anxiety, are defined by: abrupt depression of an individual’s state of mind, in the adverse direction, of modest to strong strength of the strength of the knowledgeable changes, for greater than a few weeks. There may be one or more reasons for the occurrence of modifications. It also takes place that it is difficult to recognize any kind of indisputable reason. We extremely frequently found the declaration that it is a world illness of the 21st century – it affects both older as well as younger individuals. Our education is not important for anxiety, let alone our earnings – it can affect any person. Therapy of depression comes down to: pharmacotherapy, psychotherapy and also psychoeducation, phototherapy, electroconvulsive therapy as well as even more all-natural activities connected to the concentration of exercise as well as the intro of considerable adjustments in the day-to-day diet plan. It is as part of all-natural techniques of combating and also combating depression that the inclusion of cannabis preparations with cannabinoids normally happening in the plant in the daily diet is acquiring more and more appeal worldwide. Cannabidiol CBD, discovered in e.g. CBD oil or full-spectrum hemp oil, appears in numerous clinical studies as a potentially reliable cannabinoid in the therapy of anxiety. Significantly, it is a 100 all-natural chemical substance of plant origin. Interestingly, clinical depression is amongst the three most usual mental disorders in which clients turn to CBD hemp prep work such as CBD oil, full range hemp oil with CBD or CBD capsules. Reports from consumers and their positive opinions on the efficiency of e.g. CBD oil or complete spectrum hemp oil with natural CBD are expanding at an unprecedented speed. THC and CBD cannabinoids – differences The primary cannabinoids in the cannabis plant are THC (Δ9-tetrahydrocannabinol) and CBD (cannabidiol). They reveal antagonistic results, which means that CBD lowers the results of THC. What are these results? THC has an intoxicating result, creates a sensation of ecstasy, influences cognitive functions, however also loosens up. Big, consistently eaten dosages of THC are taken into consideration dangerous to the human mind. Too much usage of THC can cause psychosis, lack of motivation, as well as even permanent unfavorable adjustments in cognitive feature. Both THC and CBD influence the endocannabinoid system in the body. Their action, as already pointed out, is contradictory. Cbd-a-thc-in-the-endocannabinoid-1 system When creating photos, CBD slows down the deficiency of anandamide sources, and also THC quicken this process. Nevertheless, this does not indicate that THC is just an unsafe cannabinoid as well as ought to not remain in the prep work in all. On the other hand. Its little visibility in hemp prep work is also essential in order to get the so-called result. synergy. THC completely range hemp oil is present in such a marginal and, significantly, lawful amount. This amount is so little (less than 0.2) that it does not create drunkenness. Collaborating, THC as well as CBD have better capacity than either molecule performing alone. What is anandamide (AEA)? What is its importance for individuals struggling with anxiety? Read on! CBD, Depression as well as the endocannabinoid system The endocannabinoid system is an essential system in charge of the policy of basic human physiological procedures, such as power management, neurohormonal and also neuroimmune links, electric motor activity, mood and motivation, and fat metabolic process. The endocannabinoid system includes a natural chemical called anandamide (AEA). Anandamide is a natural chemical that is naturally produced in the human brain. Its manufacturing is stimulated by e.g. exercise, and also to a lesser extent by the so-called work with the body (massage therapy!). Its sources are “used” to keep the proper performance of the body, consisting of in the field of psychological health. As shown in this research study: https://www.ncbi.nlm.nih.gov/pubmed/23580381 high levels of anandamide are connected with a reduced danger of developing psychotic symptoms. A high degree of anandamide is also connected with a favorable effect on the reduction of clinical depression and also anxiousness symptoms. This system is still not completely understood, yet it appears rational that a highly depressed mood in a private time period for a certain case, as well as with the simultaneous lack of activities targeted at its improvement, causes a concentration of the increase of adverse thoughts. As depressive conditions create, they can become even more harmful types of problems, e.g. psychosis, delusions or schizophrenia. Reducing this process as rapidly as possible might become important in the effective treatment of mental disorders of human functioning.
CBD for Anxiety and also Depression: Think of that it is feasible to introduce one all-natural prep work right into your everyday diet, which might confirm to be the secret to winning the fight for a calmer life for people with depressive conditions. What if the incorporation of this preparation, developed on the basis of a significantly popular as well as evaluated chemical substance of plant beginning, is not only possibly really effective, but is not related to the threat of negative effects common of medicinal medicines? Is it even feasible? Where’s the catch? Do you wish to know even more? Read this write-up In this post we will certainly cover: What is depression? THC distinctions Anxiety and the endocannabinoid system What is depression? Official definitions suggest that depressive problems, likewise known colloquially as anxiety, are characterized by: unexpected clinical depression of a person’s mood, in the adverse instructions, of moderate to strong intensity of the intensity of the experienced changes, for greater than a couple of weeks. There might be several reasons for the event of adjustments. It additionally occurs that it is difficult to recognize any type of unquestionable reason. We really commonly come across the statement that it is a people disease of the 21st century – it affects both older and younger people. Our education is trivial for anxiety, not to mention our profits – it can affect anybody. Treatment of depression comes down to: pharmacotherapy, psychiatric therapy and also psychoeducation, phototherapy, electroconvulsive therapy and also more natural tasks related to the augmentation of physical activity and the intro of substantial modifications in the daily diet plan. It is as part of all-natural approaches of battling and also counteracting anxiety that the incorporation of cannabis preparations with cannabinoids naturally occurring in the plant in the everyday diet regimen is acquiring increasingly more appeal in the world. Cannabidiol CBD, located in e.g. CBD oil or full-spectrum hemp oil, appears in countless clinical research studies as a possibly effective cannabinoid in the treatment of clinical depression. Significantly, it is a 100 all-natural chemical compound of plant origin. Remarkably, depression is among the 3 most usual mental illness in which patients turn to CBD hemp prep work such as CBD oil, full spectrum hemp oil with CBD or CBD pills. Reports from customers and their positive point of views on the effectiveness of e.g. CBD oil or full spectrum hemp oil with natural CBD are expanding at an unmatched speed. THC and CBD cannabinoids – differences The main cannabinoids in the marijuana plant are THC (Δ9-tetrahydrocannabinol) and also CBD (cannabidiol). They reveal hostile impacts, which indicates that CBD decreases the results of THC. What are these effects? THC has an envigorating impact, creates a feeling of ecstasy, impacts cognitive features, yet likewise unwinds. Large, regularly consumed dosages of THC are thought about damaging to the human mind. Extreme usage of THC can result in psychosis, lack of motivation, as well as also irreversible adverse adjustments in cognitive function. Both THC and CBD impact the endocannabinoid system in the human body. Their action, as currently mentioned, is inconsistent. Cbd-a-thc-in-the-endocannabinoid-1 system When writing pictures, CBD slows down the deficiency of anandamide sources, and THC accelerate this procedure. Nonetheless, this does not indicate that THC is only a hazardous cannabinoid as well as ought to not be in the preparation in all. However. Its little existence in hemp prep work is also required in order to get the so-called result. harmony. THC completely range hemp oil is present in such a minimal as well as, importantly, legal quantity. This amount is so tiny (less than 0.2) that it does not cause drunkenness. Interacting, THC and also CBD have greater capacity than either particle performing alone. What is anandamide (AEA)? What is its value for people suffering from depression? Keep reading! CBD, Depression and the endocannabinoid system The endocannabinoid system is a crucial system in charge of the policy of basic human physical processes, such as energy management, neurohormonal and also neuroimmune links, motor task, state of mind and also motivation, and fat metabolism. The endocannabinoid system consists of a natural chemical called anandamide (AEA). Anandamide is a neurotransmitter that is normally produced in the human brain. Its production is promoted by e.g. exercise, and also to a lesser extent by the so-called collaborate with the body (massage!). Its resources are “used” to maintain the correct functioning of the body, including in the field of mental wellness. As displayed in this study: https://www.ncbi.nlm.nih.gov/pubmed/23580381 high degrees of anandamide are related to a reduced danger of creating psychotic signs. A high level of anandamide is likewise associated with a favorable result on the decrease of anxiety and anxiety signs and symptoms. This device is still not totally understood, yet it seems rational that a strongly clinically depressed state of mind in a private period for a particular situation, and with the simultaneous absence of actions aimed at its improvement, leads to an aggravation of the influx of adverse ideas. As depressive conditions develop, they can turn into even more hazardous kinds of conditions, e.g. psychosis, delusions or schizophrenia. Reducing this process as promptly as feasible might end up being vital in the reliable treatment of mental illness of human performance.
CBD for Anxiousness as well as Depression: Envision that it is possible to introduce one natural preparation into your everyday diet plan, which can prove to be the trick to winning the defend a calmer life for individuals with depressive disorders. What happens if the incorporation of this prep work, produced on the basis of a significantly popular and tested chemical substance of plant beginning, is not just potentially extremely efficient, yet is not connected with the risk of negative effects normal of medicinal drugs? Is it even possible? Where’s the catch? Do you need to know even more? Read this write-up In this article we will certainly cover: What is clinical depression? THC and CBD cannabinoids – differences Depression as well as the endocannabinoid system What is anxiety? Official meanings suggest that depressive conditions, additionally understood colloquially as anxiety, are defined by: sudden anxiety of an individual’s mood, in the unfavorable instructions, of modest to strong intensity of the strength of the experienced changes, for more than a few weeks. There might be several reasons for the occurrence of changes. It likewise happens that it is challenging to determine any kind of indisputable factor. We very commonly encountered the declaration that it is a world condition of the 21st century – it affects both older and also younger people. Our education is trivial for depression, let alone our profits – it can influence any individual. Treatment of anxiety boils down to: pharmacotherapy, psychiatric therapy and also psychoeducation, photo-therapy, electroconvulsive therapy as well as even more natural tasks related to the augmentation of physical activity and the introduction of significant modifications in the daily diet plan. It is as part of all-natural techniques of dealing with and counteracting depression that the inclusion of marijuana prep work with cannabinoids naturally happening in the plant in the everyday diet regimen is acquiring more and more popularity on the planet. Cannabidiol CBD, discovered in e.g. CBD oil or full-spectrum hemp oil, shows up in many scientific researches as a possibly efficient cannabinoid in the therapy of clinical depression. Significantly, it is a 100 all-natural chemical compound of plant beginning. Interestingly, depression is amongst the three most typical mental disorders in which people resort to CBD hemp prep work such as CBD oil, full spectrum hemp oil with CBD or CBD pills. Records from consumers as well as their positive viewpoints on the effectiveness of e.g. CBD oil or complete range hemp oil with all-natural CBD are growing at an extraordinary rate. THC and also CBD cannabinoids – differences The primary cannabinoids in the marijuana plant are THC (Δ9-tetrahydrocannabinol) and CBD (cannabidiol). They show hostile effects, which indicates that CBD lowers the results of THC. What are these effects? THC has an intoxicating result, causes a sensation of bliss, influences cognitive features, however likewise loosens up. Huge, routinely eaten dosages of THC are considered damaging to the human brain. Extreme intake of THC can lead to psychosis, absence of inspiration, and also even irreversible negative modifications in cognitive function. Both THC and also CBD impact the endocannabinoid system in the body. Their activity, as currently pointed out, is contradictory. Cbd-a-thc-in-the-endocannabinoid-1 system When writing pictures, CBD reduces the exhaustion of anandamide resources, and THC speeds up this procedure. However, this does not mean that THC is just a hazardous cannabinoid and also needs to not be in the preparation in any way. However. Its tiny existence in hemp preparations is also needed in order to get the supposed impact. synergy. THC completely spectrum hemp oil exists in such a limited and, importantly, lawful amount. This quantity is so small (less than 0.2) that it does not cause drunkenness. Interacting, THC and also CBD have greater possibility than either particle acting alone. What is anandamide (AEA)? What is its relevance for people dealing with anxiety? Keep reading! CBD, Anxiety as well as the endocannabinoid system The endocannabinoid system is an essential system responsible for the regulation of standard human physiological procedures, such as energy administration, neurohormonal and neuroimmune connections, electric motor task, state of mind and also inspiration, and fat metabolic process. The endocannabinoid system includes a natural chemical called anandamide (AEA). Anandamide is a natural chemical that is normally generated in the human brain. Its production is boosted by e.g. physical activity, and to a lesser degree by the so-called work with the body (massage!). Its resources are “made use of” to preserve the proper functioning of the body, including in the field of psychological health. As received this research study: https://www.ncbi.nlm.nih.gov/pubmed/23580381 high degrees of anandamide are related to a lowered risk of developing psychotic symptoms. A high level of anandamide is additionally associated with a positive result on the decrease of anxiety as well as anxiousness symptoms. This mechanism is still not fully comprehended, but it seems rational that a strongly depressed state of mind in a private time period for a particular instance, as well as with the simultaneous lack of activities focused on its improvement, causes an aggravation of the increase of negative thoughts. As depressive problems develop, they can develop into much more dangerous types of conditions, e.g. psychosis, deceptions or schizophrenia. Slowing down this process as rapidly as feasible may turn out to be critical in the reliable treatment of mental disorders of human functioning.
CBD for Anxiety as well as Anxiety: Visualize that it is possible to present one all-natural prep work into your day-to-day diet, which might show to be the secret to winning the fight for a calmer life for people with depressive disorders. Suppose the incorporation of this preparation, created on the basis of a progressively widely known and also examined chemical compound of plant origin, is not only possibly very efficient, but is not connected with the risk of side effects typical of medicinal drugs? Is it even possible? Where’s the catch? Do you want to know more? Read this write-up In this short article we will cover: What is anxiety? THC and also CBD cannabinoids – differences Clinical depression and the endocannabinoid system What is clinical depression? Official definitions recommend that depressive disorders, also known informally as clinical depression, are characterized by: abrupt anxiety of a person’s mood, in the adverse direction, of modest to solid strength of the strength of the knowledgeable changes, for more than a few weeks. There may be one or more factors for the occurrence of adjustments. It also happens that it is challenging to determine any indisputable reason. We extremely typically stumbled upon the statement that it is a civilization disease of the 21st century – it influences both older and more youthful individuals. Our education is trivial for depression, let alone our earnings – it can impact anybody. Treatment of anxiety comes down to: pharmacotherapy, psychotherapy as well as psychoeducation, photo-therapy, electroconvulsive therapy and also more all-natural activities connected to the augmentation of physical activity as well as the intro of significant changes in the day-to-day diet plan. It is as part of natural approaches of dealing with and neutralizing depression that the addition of marijuana prep work with cannabinoids naturally taking place in the plant in the daily diet is acquiring more and more appeal in the world. Cannabidiol CBD, discovered in e.g. CBD oil or full-spectrum hemp oil, shows up in many scientific studies as a potentially efficient cannabinoid in the treatment of clinical depression. Importantly, it is a 100 natural chemical compound of plant beginning. Surprisingly, depression is among the three most usual mental disorders in which individuals consider CBD hemp preparations such as CBD oil, complete spectrum hemp oil with CBD or CBD pills. Records from customers and also their positive viewpoints on the efficiency of e.g. CBD oil or complete range hemp oil with all-natural CBD are growing at an extraordinary rate. THC as well as CBD cannabinoids – distinctions The main cannabinoids in the cannabis plant are THC (Δ9-tetrahydrocannabinol) as well as CBD (cannabidiol). They show hostile impacts, which implies that CBD reduces the impacts of THC. What are these effects? THC has an intoxicating effect, triggers a sensation of bliss, influences cognitive features, yet likewise unwinds. Huge, on a regular basis consumed doses of THC are thought about unsafe to the human brain. Too much intake of THC can result in psychosis, lack of inspiration, and even permanent adverse changes in cognitive function. Both THC and also CBD impact the endocannabinoid system in the human body. Their action, as already mentioned, is contradictory. Cbd-a-thc-in-the-endocannabinoid-1 system When creating images, CBD decreases the depletion of anandamide sources, and also THC accelerate this procedure. Nevertheless, this does not suggest that THC is just a harmful cannabinoid as well as should not remain in the prep work whatsoever. However. Its small presence in hemp prep work is even needed in order to acquire the so-called result. harmony. THC in full spectrum hemp oil exists in such a low and, importantly, legal quantity. This amount is so tiny (less than 0.2) that it does not create intoxication. Collaborating, THC and also CBD have greater capacity than either molecule performing alone. What is anandamide (AEA)? What is its significance for individuals experiencing anxiety? Keep reading! CBD, Depression and also the endocannabinoid system The endocannabinoid system is a crucial system responsible for the policy of standard human physiological procedures, such as power monitoring, neurohormonal and also neuroimmune links, motor activity, mood and also motivation, and fat metabolic rate. The endocannabinoid system includes a neurotransmitter called anandamide (AEA). Anandamide is a natural chemical that is naturally created in the human brain. Its production is stimulated by e.g. physical activity, as well as to a lesser degree by the supposed deal with the body (massage!). Its resources are “made use of” to maintain the appropriate functioning of the body, consisting of in the field of psychological health and wellness. As displayed in this study: https://www.ncbi.nlm.nih.gov/pubmed/23580381 high degrees of anandamide are connected with a decreased threat of establishing psychotic signs and symptoms. A high level of anandamide is additionally related to a positive impact on the decrease of clinical depression and anxiousness signs. This mechanism is still not completely understood, however it appears logical that a strongly depressed mood in an individual amount of time for a certain situation, and with the synchronised lack of activities aimed at its renovation, brings about an augmentation of the influx of adverse thoughts. As depressive disorders develop, they can develop into even more dangerous forms of problems, e.g. psychosis, misconceptions or schizophrenia. Decreasing this procedure as quickly as feasible may become critical in the effective treatment of mental illness of human performance.
CBD for Stress And Anxiety as well as Clinical Depression: Demystified Imagine that it is possible to introduce one all-natural preparation into your daily diet regimen, which might show to be the key to winning the fight for a calmer life for individuals with depressive problems. What if the inclusion of this prep work, produced on the basis of a progressively popular and examined chemical substance of plant origin, is not just potentially extremely reliable, but is not connected with the risk of adverse effects regular of pharmacological medications? Is it even possible? Where’s the catch? Do you wish to know more? Read this post In this post we will cover: What is clinical depression? THC distinctions Depression and the endocannabinoid system What is clinical depression? Main meanings recommend that depressive conditions, also understood colloquially as clinical depression, are identified by: unexpected depression of a person’s mood, in the adverse instructions, of moderate to solid intensity of the intensity of the seasoned changes, for greater than a couple of weeks. There might be one or more reasons for the event of changes. It likewise takes place that it is tough to recognize any type of indisputable factor. We extremely typically encountered the statement that it is a civilization condition of the 21st century – it influences both older and younger individuals. Our education is not important for clinical depression, let alone our incomes – it can influence anybody. Treatment of clinical depression comes down to: pharmacotherapy, psychotherapy and also psychoeducation, photo-therapy, electroconvulsive therapy and even more natural tasks connected to the intensification of exercise as well as the intro of considerable modifications in the daily diet. It is as part of all-natural techniques of fighting as well as combating anxiety that the incorporation of marijuana prep work with cannabinoids naturally taking place in the plant in the everyday diet plan is gaining an increasing number of appeal in the world. Cannabidiol CBD, found in e.g. CBD oil or full-spectrum hemp oil, appears in countless scientific studies as a potentially effective cannabinoid in the treatment of anxiety. Importantly, it is a 100 natural chemical compound of plant beginning. Interestingly, clinical depression is amongst the 3 most typical mental illness in which clients resort to CBD hemp preparations such as CBD oil, full spectrum hemp oil with CBD or CBD capsules. Records from customers and their favorable viewpoints on the effectiveness of e.g. CBD oil or full range hemp oil with natural CBD are expanding at an unprecedented rate. THC as well as CBD cannabinoids – distinctions The primary cannabinoids in the marijuana plant are THC (Δ9-tetrahydrocannabinol) and also CBD (cannabidiol). They show antagonistic impacts, which suggests that CBD decreases the results of THC. What are these effects? THC has an envigorating impact, triggers a feeling of bliss, influences cognitive functions, but also relaxes. Huge, regularly eaten dosages of THC are taken into consideration dangerous to the human mind. Excessive consumption of THC can cause psychosis, lack of motivation, and also even permanent unfavorable changes in cognitive function. Both THC as well as CBD affect the endocannabinoid system in the body. Their activity, as already pointed out, is contradictory. Cbd-a-thc-in-the-endocannabinoid-1 system When creating images, CBD reduces the deficiency of anandamide resources, as well as THC quicken this process. However, this does not imply that THC is just a hazardous cannabinoid and should not remain in the preparation whatsoever. However. Its little existence in hemp preparations is also necessary in order to get the so-called result. synergy. THC completely spectrum hemp oil is present in such a minimal and also, importantly, legal amount. This quantity is so tiny (less than 0.2) that it does not cause intoxication. Collaborating, THC and also CBD have better possibility than either molecule performing alone. What is anandamide (AEA)? What is its relevance for individuals dealing with depression? Read on! CBD, Anxiety and the endocannabinoid system The endocannabinoid system is a key system responsible for the law of standard human physiological processes, such as power administration, neurohormonal and neuroimmune links, motor task, mood and motivation, and also fat metabolism. The endocannabinoid system consists of a neurotransmitter called anandamide (AEA). Anandamide is a natural chemical that is normally generated in the human mind. Its manufacturing is promoted by e.g. physical activity, and also to a minimal level by the supposed deal with the body (massage!). Its sources are “utilized” to maintain the correct performance of the body, consisting of in the field of mental health and wellness. As received this study: https://www.ncbi.nlm.nih.gov/pubmed/23580381 high levels of anandamide are related to a lowered risk of creating psychotic symptoms. A high degree of anandamide is likewise related to a positive impact on the decrease of clinical depression as well as anxiousness signs. This system is still not totally recognized, but it appears sensible that a strongly clinically depressed state of mind in an individual time period for a particular case, and with the synchronised lack of actions targeted at its renovation, results in an accumulation of the influx of unfavorable ideas. As depressive disorders create, they can develop into even more unsafe kinds of disorders, e.g. psychosis, misconceptions or schizophrenia. Slowing down this process as quickly as feasible may turn out to be important in the effective treatment of mental illness of human performance.
CBD for Anxiety and also Depression: Think of that it is feasible to present one all-natural prep work right into your daily diet plan, which might verify to be the key to winning the defend a calmer life for individuals with depressive problems. What if the incorporation of this preparation, developed on the basis of an increasingly widely known and examined chemical compound of plant beginning, is not just potentially really reliable, however is not connected with the danger of negative effects regular of pharmacological medicines? Is it even feasible? Where’s the catch? Do you wish to know even more? Read this write-up In this short article we will cover: What is clinical depression? THC distinctions Anxiety and the endocannabinoid system What is anxiety? Main interpretations suggest that depressive conditions, also recognized colloquially as depression, are characterized by: sudden depression of a person’s mood, in the negative direction, of modest to strong intensity of the intensity of the seasoned changes, for more than a couple of weeks. There may be one or more factors for the incident of changes. It additionally occurs that it is tough to recognize any type of unquestionable factor. We really commonly come across the declaration that it is a world illness of the 21st century – it affects both older as well as more youthful people. Our education and learning is trivial for anxiety, not to mention our incomes – it can impact any person. Treatment of anxiety comes down to: pharmacotherapy, psychotherapy and psychoeducation, phototherapy, electroconvulsive therapy and even more natural activities connected to the augmentation of exercise and also the intro of considerable adjustments in the everyday diet regimen. It is as part of natural methods of combating as well as combating clinical depression that the incorporation of cannabis preparations with cannabinoids normally taking place in the plant in the daily diet regimen is obtaining increasingly more popularity on the planet. Cannabidiol CBD, discovered in e.g. CBD oil or full-spectrum hemp oil, shows up in various clinical research studies as a possibly reliable cannabinoid in the treatment of clinical depression. Significantly, it is a 100 natural chemical substance of plant beginning. Remarkably, clinical depression is among the 3 most usual mental illness in which patients turn to CBD hemp preparations such as CBD oil, complete range hemp oil with CBD or CBD capsules. Records from customers and also their favorable viewpoints on the efficiency of e.g. CBD oil or complete range hemp oil with natural CBD are growing at an unprecedented pace. THC and CBD cannabinoids – differences The primary cannabinoids in the marijuana plant are THC (Δ9-tetrahydrocannabinol) and also CBD (cannabidiol). They show antagonistic results, which means that CBD minimizes the impacts of THC. What are these results? THC has an envigorating result, causes a sensation of ecstasy, affects cognitive features, however likewise unwinds. Huge, consistently eaten dosages of THC are taken into consideration hazardous to the human mind. Excessive usage of THC can cause psychosis, lack of motivation, and also also irreversible negative changes in cognitive feature. Both THC and also CBD affect the endocannabinoid system in the human body. Their activity, as currently pointed out, is inconsistent. Cbd-a-thc-in-the-endocannabinoid-1 system When creating pictures, CBD reduces the deficiency of anandamide resources, and also THC accelerate this procedure. Nonetheless, this does not imply that THC is just a hazardous cannabinoid and also ought to not remain in the preparation in all. On the contrary. Its small existence in hemp preparations is even essential in order to get the so-called impact. harmony. THC in full spectrum hemp oil exists in such a minimal and, significantly, legal quantity. This quantity is so tiny (less than 0.2) that it does not trigger drunkenness. Collaborating, THC as well as CBD have greater potential than either particle performing alone. What is anandamide (AEA)? What is its relevance for people struggling with clinical depression? Keep reading! CBD, Anxiety and the endocannabinoid system The endocannabinoid system is an essential system in charge of the guideline of basic human physical processes, such as energy monitoring, neurohormonal and neuroimmune connections, motor activity, mood as well as motivation, and also fat metabolic rate. The endocannabinoid system consists of a neurotransmitter called anandamide (AEA). Anandamide is a neurotransmitter that is naturally generated in the human brain. Its production is boosted by e.g. physical activity, as well as to a minimal extent by the supposed deal with the body (massage!). Its resources are “made use of” to maintain the correct performance of the body, consisting of in the field of psychological health. As displayed in this research: https://www.ncbi.nlm.nih.gov/pubmed/23580381 high levels of anandamide are connected with a lowered danger of creating psychotic signs. A high degree of anandamide is likewise related to a favorable impact on the decrease of clinical depression as well as stress and anxiety signs and symptoms. This device is still not fully understood, yet it appears logical that a highly depressed mood in a specific time period for a details case, and with the synchronised lack of activities targeted at its renovation, leads to a rise of the influx of unfavorable ideas. As depressive conditions develop, they can develop into a lot more unsafe forms of conditions, e.g. psychosis, delusions or schizophrenia. Slowing down this procedure as rapidly as possible might turn out to be vital in the reliable treatment of mental illness of human functioning.
CBD for Stress And Anxiety and Depression: Think of that it is possible to introduce one natural prep work into your daily diet, which might verify to be the trick to winning the fight for a calmer life for people with depressive conditions. Suppose the incorporation of this preparation, created on the basis of an increasingly widely known and also checked chemical compound of plant beginning, is not just potentially very effective, but is not connected with the danger of adverse effects typical of pharmacological drugs? Is it also possible? Where’s the catch? Do you wish to know even more? Read this short article In this short article we will certainly cover: What is clinical depression? THC and CBD cannabinoids – differences Anxiety and also the endocannabinoid system What is clinical depression? Main interpretations recommend that depressive problems, also understood colloquially as anxiety, are identified by: sudden anxiety of a person’s mood, in the unfavorable direction, of moderate to strong intensity of the intensity of the knowledgeable modifications, for greater than a few weeks. There may be one or more reasons for the event of adjustments. It likewise happens that it is tough to recognize any kind of indisputable reason. We really usually found the declaration that it is a civilization disease of the 21st century – it affects both older as well as more youthful individuals. Our education and learning is not important for depression, not to mention our revenues – it can impact any individual. Therapy of clinical depression boils down to: pharmacotherapy, psychiatric therapy as well as psychoeducation, photo-therapy, electroconvulsive therapy as well as even more natural tasks connected to the increase of physical activity as well as the intro of significant changes in the everyday diet plan. It is as part of natural techniques of fighting and also counteracting clinical depression that the inclusion of marijuana prep work with cannabinoids normally happening in the plant in the day-to-day diet is acquiring more and more popularity on the planet. Cannabidiol CBD, found in e.g. CBD oil or full-spectrum hemp oil, appears in various scientific research studies as a possibly efficient cannabinoid in the treatment of depression. Notably, it is a 100 all-natural chemical compound of plant beginning. Surprisingly, clinical depression is amongst the three most common mental disorders in which people resort to CBD hemp prep work such as CBD oil, full spectrum hemp oil with CBD or CBD pills. Reports from customers and also their positive opinions on the effectiveness of e.g. CBD oil or full range hemp oil with all-natural CBD are expanding at an unmatched pace. THC and also CBD cannabinoids – distinctions The primary cannabinoids in the cannabis plant are THC (Δ9-tetrahydrocannabinol) and also CBD (cannabidiol). They reveal hostile results, which indicates that CBD minimizes the results of THC. What are these effects? THC has an intoxicating impact, causes a feeling of ecstasy, impacts cognitive functions, but likewise relaxes. Big, frequently taken in doses of THC are considered damaging to the human mind. Extreme usage of THC can result in psychosis, lack of motivation, and also also irreversible adverse changes in cognitive feature. Both THC and also CBD affect the endocannabinoid system in the human body. Their activity, as currently pointed out, is inconsistent. Cbd-a-thc-in-the-endocannabinoid-1 system When creating photos, CBD reduces the exhaustion of anandamide resources, and also THC quicken this procedure. However, this does not suggest that THC is just a hazardous cannabinoid and also should not be in the prep work in any way. As a matter of fact. Its small presence in hemp prep work is even necessary in order to obtain the so-called impact. harmony. THC in full spectrum hemp oil exists in such a minimal and, importantly, lawful quantity. This quantity is so small (less than 0.2) that it does not trigger drunkenness. Collaborating, THC and also CBD have better possibility than either molecule acting alone. What is anandamide (AEA)? What is its value for people struggling with clinical depression? Keep reading! CBD, Depression and the endocannabinoid system The endocannabinoid system is a vital system in charge of the policy of fundamental human physical processes, such as power administration, neurohormonal and neuroimmune links, motor activity, mood and also inspiration, and also fat metabolic rate. The endocannabinoid system includes a neurotransmitter called anandamide (AEA). Anandamide is a natural chemical that is normally generated in the human mind. Its production is stimulated by e.g. exercise, and also to a lesser extent by the so-called deal with the body (massage therapy!). Its resources are “made use of” to maintain the appropriate performance of the body, consisting of in the field of psychological wellness. As received this research: https://www.ncbi.nlm.nih.gov/pubmed/23580381 high levels of anandamide are related to a lowered risk of establishing psychotic signs. A high degree of anandamide is likewise connected with a positive result on the reduction of depression as well as anxiousness signs. This mechanism is still not completely recognized, yet it appears logical that a highly clinically depressed state of mind in an individual time period for a details situation, as well as with the synchronised absence of activities targeted at its enhancement, results in an accumulation of the influx of unfavorable ideas. As depressive conditions create, they can develop into much more dangerous kinds of problems, e.g. psychosis, delusions or schizophrenia. Slowing down this procedure as swiftly as possible may become vital in the efficient treatment of mental disorders of human functioning.
CBD for Stress And Anxiety and Anxiety: Visualize that it is possible to introduce one all-natural prep work right into your everyday diet regimen, which can show to be the trick to winning the defend a calmer life for individuals with depressive disorders. What happens if the addition of this preparation, created on the basis of an increasingly widely known and checked chemical substance of plant beginning, is not just possibly very efficient, however is not connected with the risk of negative effects common of pharmacological medicines? Is it also possible? Where’s the catch? Do you want to know more? Read this short article In this write-up we will cover: What is depression? THC distinctions Clinical depression and also the endocannabinoid system What is clinical depression? Official interpretations suggest that depressive disorders, likewise understood colloquially as depression, are identified by: sudden clinical depression of a person’s mood, in the adverse instructions, of modest to solid strength of the strength of the knowledgeable modifications, for more than a couple of weeks. There may be one or more reasons for the event of adjustments. It likewise happens that it is difficult to recognize any kind of indisputable factor. We very frequently discovered the statement that it is a human being condition of the 21st century – it influences both older as well as younger individuals. Our education and learning is trivial for anxiety, let alone our revenues – it can impact anybody. Therapy of depression boils down to: pharmacotherapy, psychiatric therapy and psychoeducation, phototherapy, electroconvulsive therapy and even more natural tasks related to the increase of exercise and also the introduction of significant modifications in the everyday diet plan. It is as part of all-natural methods of battling and counteracting depression that the inclusion of cannabis preparations with cannabinoids naturally occurring in the plant in the daily diet is getting a growing number of popularity on the planet. Cannabidiol CBD, located in e.g. CBD oil or full-spectrum hemp oil, appears in countless clinical studies as a possibly reliable cannabinoid in the treatment of anxiety. Importantly, it is a 100 natural chemical compound of plant beginning. Remarkably, clinical depression is among the 3 most common mental disorders in which patients consider CBD hemp preparations such as CBD oil, full range hemp oil with CBD or CBD pills. Records from consumers and their favorable point of views on the efficiency of e.g. CBD oil or full range hemp oil with all-natural CBD are expanding at an unmatched rate. THC as well as CBD cannabinoids – distinctions The main cannabinoids in the marijuana plant are THC (Δ9-tetrahydrocannabinol) and CBD (cannabidiol). They reveal hostile impacts, which suggests that CBD decreases the results of THC. What are these effects? THC has an envigorating effect, triggers a sensation of ecstasy, affects cognitive functions, yet also unwinds. Large, on a regular basis consumed doses of THC are taken into consideration unsafe to the human brain. Extreme usage of THC can cause psychosis, absence of inspiration, and also even irreversible unfavorable modifications in cognitive feature. Both THC and CBD impact the endocannabinoid system in the human body. Their action, as already discussed, is inconsistent. Cbd-a-thc-in-the-endocannabinoid-1 system When writing pictures, CBD decreases the exhaustion of anandamide resources, as well as THC quicken this procedure. Nonetheless, this does not imply that THC is only a damaging cannabinoid and also needs to not be in the preparation in any way. On the other hand. Its tiny visibility in hemp preparations is even needed in order to get the supposed effect. synergy. THC in full spectrum hemp oil exists in such a limited as well as, notably, lawful quantity. This amount is so small (less than 0.2) that it does not cause intoxication. Working together, THC as well as CBD have greater possibility than either particle acting alone. What is anandamide (AEA)? What is its significance for individuals suffering from depression? Read on! CBD, Clinical depression and also the endocannabinoid system The endocannabinoid system is a crucial system in charge of the policy of standard human physiological procedures, such as power monitoring, neurohormonal as well as neuroimmune connections, motor activity, mood as well as inspiration, as well as fat metabolic rate. The endocannabinoid system includes a natural chemical called anandamide (AEA). Anandamide is a natural chemical that is normally produced in the human mind. Its production is promoted by e.g. physical activity, as well as to a minimal degree by the supposed collaborate with the body (massage therapy!). Its sources are “used” to keep the correct functioning of the body, consisting of in the field of mental health. As received this research study: https://www.ncbi.nlm.nih.gov/pubmed/23580381 high degrees of anandamide are connected with a reduced risk of developing psychotic symptoms. A high level of anandamide is also associated with a positive result on the reduction of depression and anxiousness symptoms. This device is still not completely comprehended, but it appears logical that a highly depressed state of mind in an individual time period for a particular instance, as well as with the synchronised absence of activities targeted at its renovation, causes a rise of the increase of adverse ideas. As depressive conditions establish, they can develop into even more hazardous types of disorders, e.g. psychosis, delusions or schizophrenia. Reducing this procedure as rapidly as possible might turn out to be crucial in the reliable therapy of mental disorders of human functioning.
CBD for Anxiousness and Clinical Depression: Demystified Imagine that it is possible to introduce one all-natural prep work into your daily diet plan, which could confirm to be the trick to winning the defend a calmer life for people with depressive conditions. Suppose the inclusion of this prep work, developed on the basis of a progressively well-known and also evaluated chemical substance of plant origin, is not only possibly very reliable, but is not associated with the danger of negative effects common of pharmacological drugs? Is it also feasible? Where’s the catch? Do you want to know more? Read this post In this write-up we will certainly cover: What is anxiety? THC distinctions Clinical depression as well as the endocannabinoid system What is clinical depression? Official meanings suggest that depressive conditions, also recognized colloquially as anxiety, are defined by: abrupt depression of a person’s mood, in the unfavorable direction, of moderate to solid intensity of the intensity of the seasoned modifications, for more than a few weeks. There might be one or more factors for the occurrence of modifications. It likewise happens that it is tough to determine any type of absolute reason. We really commonly come across the statement that it is a world disease of the 21st century – it affects both older as well as more youthful people. Our education is trivial for anxiety, let alone our revenues – it can influence anyone. Treatment of clinical depression boils down to: pharmacotherapy, psychiatric therapy and psychoeducation, phototherapy, electroconvulsive therapy and even more all-natural tasks connected to the increase of physical activity and also the introduction of substantial changes in the daily diet. It is as part of natural approaches of fighting as well as combating depression that the addition of marijuana preparations with cannabinoids naturally occurring in the plant in the daily diet plan is acquiring a growing number of popularity in the world. Cannabidiol CBD, discovered in e.g. CBD oil or full-spectrum hemp oil, appears in countless clinical research studies as a potentially reliable cannabinoid in the treatment of anxiety. Importantly, it is a 100 all-natural chemical substance of plant origin. Surprisingly, depression is among the three most common mental disorders in which clients turn to CBD hemp prep work such as CBD oil, full spectrum hemp oil with CBD or CBD capsules. Reports from customers and their positive opinions on the performance of e.g. CBD oil or full spectrum hemp oil with all-natural CBD are expanding at an unprecedented rate. THC as well as CBD cannabinoids – differences The main cannabinoids in the marijuana plant are THC (Δ9-tetrahydrocannabinol) and CBD (cannabidiol). They reveal hostile effects, which suggests that CBD lowers the effects of THC. What are these effects? THC has an intoxicating effect, causes a sensation of euphoria, impacts cognitive functions, yet additionally relaxes. Big, frequently consumed dosages of THC are taken into consideration damaging to the human brain. Excessive consumption of THC can lead to psychosis, absence of motivation, and also long-term unfavorable changes in cognitive feature. Both THC and CBD affect the endocannabinoid system in the body. Their activity, as currently stated, is inconsistent. Cbd-a-thc-in-the-endocannabinoid-1 system When writing pictures, CBD decreases the exhaustion of anandamide resources, and THC accelerate this procedure. Nevertheless, this does not mean that THC is only an unsafe cannabinoid as well as must not be in the preparation in all. On the other hand. Its small visibility in hemp preparations is also required in order to get the so-called effect. synergy. THC completely range hemp oil is present in such a low as well as, notably, lawful amount. This amount is so tiny (less than 0.2) that it does not create intoxication. Collaborating, THC and CBD have greater capacity than either particle acting alone. What is anandamide (AEA)? What is its relevance for people struggling with depression? Read on! CBD, Clinical depression and also the endocannabinoid system The endocannabinoid system is a vital system responsible for the policy of fundamental human physical processes, such as power management, neurohormonal and neuroimmune connections, electric motor activity, mood and also inspiration, and fat metabolism. The endocannabinoid system includes a neurotransmitter called anandamide (AEA). Anandamide is a neurotransmitter that is normally created in the human brain. Its manufacturing is boosted by e.g. physical activity, as well as to a minimal level by the so-called collaborate with the body (massage therapy!). Its sources are “used” to keep the correct functioning of the body, consisting of in the field of mental health. As displayed in this study: https://www.ncbi.nlm.nih.gov/pubmed/23580381 high degrees of anandamide are related to a lowered threat of creating psychotic symptoms. A high degree of anandamide is additionally connected with a positive impact on the decrease of depression as well as anxiousness signs. This system is still not totally understood, but it appears rational that a strongly depressed state of mind in a private amount of time for a certain case, and with the synchronised absence of activities focused on its enhancement, causes a surge of the increase of adverse thoughts. As depressive disorders establish, they can develop into a lot more harmful forms of problems, e.g. psychosis, delusions or schizophrenia. Decreasing this process as promptly as possible may end up being essential in the effective therapy of mental disorders of human performance.
CBD for Anxiousness as well as Depression: Think of that it is feasible to introduce one all-natural prep work right into your day-to-day diet plan, which can prove to be the trick to winning the defend a calmer life for individuals with depressive disorders. Suppose the incorporation of this preparation, developed on the basis of an increasingly well-known and evaluated chemical compound of plant origin, is not just potentially extremely efficient, but is not associated with the danger of adverse effects common of medicinal drugs? Is it even feasible? Where’s the catch? Do you would like to know even more? Read this article In this post we will certainly cover: What is clinical depression? THC distinctions Depression and also the endocannabinoid system What is depression? Main meanings recommend that depressive problems, also understood informally as depression, are identified by: sudden clinical depression of an individual’s mood, in the adverse instructions, of moderate to strong intensity of the intensity of the seasoned changes, for more than a few weeks. There may be several reasons for the occurrence of changes. It also takes place that it is tough to recognize any type of absolute factor. We really typically come across the declaration that it is a human being disease of the 21st century – it affects both older as well as younger people. Our education and learning is not important for anxiety, let alone our earnings – it can impact anybody. Treatment of clinical depression comes down to: pharmacotherapy, psychotherapy as well as psychoeducation, phototherapy, electroconvulsive therapy as well as even more natural activities associated with the rise of physical activity as well as the intro of significant changes in the day-to-day diet regimen. It is as part of all-natural techniques of dealing with and also counteracting clinical depression that the addition of marijuana preparations with cannabinoids naturally taking place in the plant in the day-to-day diet regimen is obtaining increasingly more popularity worldwide. Cannabidiol CBD, found in e.g. CBD oil or full-spectrum hemp oil, shows up in many scientific research studies as a possibly efficient cannabinoid in the treatment of anxiety. Notably, it is a 100 all-natural chemical compound of plant origin. Surprisingly, clinical depression is amongst the 3 most typical mental illness in which clients turn to CBD hemp prep work such as CBD oil, complete spectrum hemp oil with CBD or CBD pills. Records from customers and also their favorable opinions on the effectiveness of e.g. CBD oil or complete range hemp oil with natural CBD are growing at an unprecedented rate. THC and CBD cannabinoids – differences The main cannabinoids in the marijuana plant are THC (Δ9-tetrahydrocannabinol) as well as CBD (cannabidiol). They show hostile effects, which indicates that CBD lowers the results of THC. What are these results? THC has an envigorating result, causes a sensation of ecstasy, influences cognitive functions, however additionally kicks back. Large, frequently taken in dosages of THC are taken into consideration damaging to the human mind. Extreme intake of THC can bring about psychosis, absence of motivation, and also long-term unfavorable modifications in cognitive feature. Both THC and CBD affect the endocannabinoid system in the human body. Their activity, as already stated, is inconsistent. Cbd-a-thc-in-the-endocannabinoid-1 system When creating images, CBD decreases the depletion of anandamide resources, and also THC accelerate this procedure. Nonetheless, this does not mean that THC is just a hazardous cannabinoid as well as should not be in the preparation at all. On the contrary. Its small existence in hemp preparations is even needed in order to get the so-called impact. harmony. THC in full range hemp oil is present in such a limited and also, notably, legal quantity. This amount is so small (less than 0.2) that it does not cause drunkenness. Working together, THC and CBD have better possibility than either molecule performing alone. What is anandamide (AEA)? What is its value for people suffering from anxiety? Continue reading! CBD, Clinical depression and the endocannabinoid system The endocannabinoid system is a key system in charge of the guideline of fundamental human physiological procedures, such as energy administration, neurohormonal as well as neuroimmune links, motor task, state of mind as well as inspiration, and also fat metabolic rate. The endocannabinoid system consists of a natural chemical called anandamide (AEA). Anandamide is a neurotransmitter that is normally created in the human brain. Its production is stimulated by e.g. exercise, and to a lesser extent by the supposed collaborate with the body (massage!). Its sources are “utilized” to maintain the proper performance of the body, including in the field of mental health. As received this research: https://www.ncbi.nlm.nih.gov/pubmed/23580381 high levels of anandamide are associated with a decreased danger of developing psychotic symptoms. A high level of anandamide is additionally related to a positive impact on the reduction of clinical depression and anxiety signs. This device is still not fully recognized, yet it seems rational that a strongly clinically depressed state of mind in a private period for a specific situation, as well as with the simultaneous lack of actions focused on its improvement, results in an accumulation of the influx of negative ideas. As depressive disorders develop, they can develop into a lot more unsafe forms of problems, e.g. psychosis, deceptions or schizophrenia. Slowing down this process as rapidly as possible may become essential in the effective therapy of mental illness of human performance.
http://www.lifeandscience.com/__media__/js/netsoltrademark.php?d=toppremiumsites.porn/
http://www.castlegrovecrafts.com/__media__/js/netsoltrademark.php?d=premiumporntrailers.com/girlfriendsfilms/&/contact.php
Hiya, I’m really glad I have found this information. Nowadays bloggers publish only about gossips and net and this is actually irritating. A good web site with exciting content, this is what I need. Thank you for keeping this web-site, I’ll be visiting it. Do you do newsletters? Can’t find it.
I dugg some of you post as I cerebrated they were invaluable very beneficial
This is very interesting, You’re a very skilled blogger. I’ve joined your rss feed and look forward to seeking more of your great post. Also, I’ve shared your site in my social networks!
Your way of addressin this subject is both fantastic and motivating.
Absolutely composed written content, Really enjoyed looking through.
I haven’t checked in here for a while since I thought it was getting boring, but the last several posts are great quality so I guess I will add you back to my daily bloglist. You deserve it my friend 🙂
CBD for Stress And Anxiety and also Depression: Visualize that it is possible to present one all-natural preparation into your everyday diet plan, which can confirm to be the trick to winning the defend a calmer life for individuals with depressive conditions. Suppose the inclusion of this preparation, developed on the basis of a significantly well-known and evaluated chemical compound of plant origin, is not just possibly very efficient, yet is not associated with the threat of adverse effects typical of medicinal medications? Is it also feasible? Where’s the catch? Do you want to know more? Read this short article In this article we will certainly cover: What is clinical depression? THC distinctions Clinical depression as well as the endocannabinoid system What is clinical depression? Official meanings suggest that depressive disorders, likewise known informally as anxiety, are defined by: sudden depression of a person’s mood, in the unfavorable direction, of modest to solid intensity of the strength of the experienced modifications, for more than a few weeks. There might be one or more reasons for the occurrence of adjustments. It likewise occurs that it is tough to recognize any type of unquestionable factor. We extremely frequently discovered the statement that it is a civilization condition of the 21st century – it impacts both older and younger people. Our education and learning is trivial for depression, not to mention our profits – it can affect any person. Therapy of clinical depression comes down to: pharmacotherapy, psychiatric therapy as well as psychoeducation, phototherapy, electroconvulsive therapy and even more all-natural activities connected to the surge of physical activity and the introduction of considerable modifications in the daily diet regimen. It is as part of natural techniques of fighting and neutralizing anxiety that the addition of cannabis prep work with cannabinoids naturally happening in the plant in the everyday diet is getting increasingly more popularity worldwide. Cannabidiol CBD, found in e.g. CBD oil or full-spectrum hemp oil, appears in many scientific research studies as a potentially reliable cannabinoid in the treatment of anxiety. Significantly, it is a 100 all-natural chemical substance of plant origin. Remarkably, depression is amongst the 3 most typical mental illness in which individuals turn to CBD hemp prep work such as CBD oil, full range hemp oil with CBD or CBD pills. Reports from consumers as well as their favorable viewpoints on the effectiveness of e.g. CBD oil or full spectrum hemp oil with natural CBD are growing at an extraordinary rate. THC as well as CBD cannabinoids – distinctions The main cannabinoids in the marijuana plant are THC (Δ9-tetrahydrocannabinol) as well as CBD (cannabidiol). They reveal hostile impacts, which means that CBD lowers the impacts of THC. What are these effects? THC has an intoxicating impact, creates a sensation of bliss, influences cognitive functions, however also kicks back. Big, routinely eaten dosages of THC are taken into consideration unsafe to the human brain. Extreme usage of THC can bring about psychosis, lack of motivation, and even permanent unfavorable modifications in cognitive function. Both THC and CBD influence the endocannabinoid system in the body. Their activity, as already mentioned, is inconsistent. Cbd-a-thc-in-the-endocannabinoid-1 system When writing images, CBD slows down the depletion of anandamide sources, as well as THC quicken this procedure. However, this does not suggest that THC is just a hazardous cannabinoid as well as must not remain in the preparation in all. On the other hand. Its little presence in hemp prep work is also needed in order to obtain the so-called impact. harmony. THC in full spectrum hemp oil exists in such a limited as well as, importantly, legal quantity. This quantity is so tiny (less than 0.2) that it does not trigger drunkenness. Interacting, THC as well as CBD have higher possibility than either particle acting alone. What is anandamide (AEA)? What is its relevance for individuals experiencing anxiety? Read on! CBD, Anxiety as well as the endocannabinoid system The endocannabinoid system is a crucial system in charge of the law of fundamental human physical procedures, such as energy monitoring, neurohormonal and also neuroimmune connections, motor task, mood and inspiration, and fat metabolism. The endocannabinoid system includes a neurotransmitter called anandamide (AEA). Anandamide is a neurotransmitter that is normally generated in the human brain. Its production is promoted by e.g. physical activity, and also to a minimal degree by the so-called collaborate with the body (massage therapy!). Its resources are “made use of” to preserve the appropriate functioning of the body, including in the field of psychological health. As displayed in this study: https://www.ncbi.nlm.nih.gov/pubmed/23580381 high degrees of anandamide are associated with a reduced danger of creating psychotic symptoms. A high level of anandamide is likewise connected with a positive impact on the reduction of anxiety and also stress and anxiety signs. This device is still not completely comprehended, however it seems logical that a highly depressed state of mind in a specific period for a certain instance, and with the simultaneous absence of activities aimed at its improvement, causes a surge of the influx of negative thoughts. As depressive disorders establish, they can develop into a lot more hazardous forms of conditions, e.g. psychosis, misconceptions or schizophrenia. Decreasing this process as rapidly as possible may turn out to be important in the efficient treatment of mental disorders of human functioning.
CBD for Anxiousness and Clinical Depression: Picture that it is possible to introduce one natural prep work right into your daily diet regimen, which could verify to be the secret to winning the defend a calmer life for individuals with depressive problems. What if the addition of this prep work, developed on the basis of an increasingly well-known and evaluated chemical substance of plant origin, is not just potentially extremely efficient, however is not connected with the risk of negative effects regular of medicinal drugs? Is it also feasible? Where’s the catch? Do you would like to know even more? Read this article In this write-up we will cover: What is clinical depression? THC distinctions Depression and the endocannabinoid system What is depression? Official interpretations recommend that depressive conditions, also recognized informally as anxiety, are characterized by: unexpected depression of an individual’s state of mind, in the negative direction, of moderate to solid intensity of the intensity of the experienced adjustments, for greater than a couple of weeks. There may be several factors for the incident of adjustments. It likewise takes place that it is difficult to determine any type of unequivocal factor. We really usually encountered the declaration that it is a civilization condition of the 21st century – it impacts both older and younger people. Our education and learning is trivial for depression, not to mention our incomes – it can affect any person. Treatment of depression boils down to: pharmacotherapy, psychotherapy and also psychoeducation, phototherapy, electroconvulsive therapy as well as even more natural tasks associated with the climax of physical activity as well as the intro of significant changes in the day-to-day diet plan. It is as part of all-natural methods of fighting as well as combating depression that the incorporation of marijuana prep work with cannabinoids naturally occurring in the plant in the everyday diet plan is getting more and more appeal in the world. Cannabidiol CBD, found in e.g. CBD oil or full-spectrum hemp oil, appears in many scientific researches as a potentially reliable cannabinoid in the therapy of anxiety. Importantly, it is a 100 all-natural chemical substance of plant beginning. Remarkably, anxiety is amongst the 3 most common mental illness in which clients turn to CBD hemp prep work such as CBD oil, full range hemp oil with CBD or CBD pills. Records from customers and their positive point of views on the effectiveness of e.g. CBD oil or full range hemp oil with all-natural CBD are growing at an unmatched speed. THC as well as CBD cannabinoids – differences The primary cannabinoids in the marijuana plant are THC (Δ9-tetrahydrocannabinol) and CBD (cannabidiol). They show antagonistic effects, which means that CBD lowers the impacts of THC. What are these results? THC has an envigorating effect, triggers a feeling of bliss, affects cognitive features, however likewise unwinds. Big, frequently consumed doses of THC are considered unsafe to the human mind. Too much consumption of THC can cause psychosis, lack of inspiration, and also long-term adverse adjustments in cognitive feature. Both THC as well as CBD affect the endocannabinoid system in the human body. Their activity, as already mentioned, is contradictory. Cbd-a-thc-in-the-endocannabinoid-1 system When composing pictures, CBD slows down the exhaustion of anandamide resources, and THC accelerate this process. Nevertheless, this does not suggest that THC is just a damaging cannabinoid and also should not remain in the prep work at all. However. Its tiny visibility in hemp prep work is even required in order to acquire the so-called effect. synergy. THC completely spectrum hemp oil is present in such a low as well as, notably, lawful quantity. This amount is so little (less than 0.2) that it does not trigger intoxication. Interacting, THC as well as CBD have greater potential than either molecule acting alone. What is anandamide (AEA)? What is its value for people dealing with anxiety? Continue reading! CBD, Clinical depression as well as the endocannabinoid system The endocannabinoid system is a key system in charge of the guideline of fundamental human physical procedures, such as energy management, neurohormonal and also neuroimmune connections, electric motor activity, state of mind and also motivation, and fat metabolism. The endocannabinoid system consists of a natural chemical called anandamide (AEA). Anandamide is a natural chemical that is naturally generated in the human mind. Its production is stimulated by e.g. exercise, and to a lesser extent by the supposed work with the body (massage!). Its resources are “utilized” to keep the correct performance of the body, consisting of in the field of mental health. As displayed in this study: https://www.ncbi.nlm.nih.gov/pubmed/23580381 high levels of anandamide are connected with a decreased danger of creating psychotic signs and symptoms. A high degree of anandamide is also associated with a positive effect on the reduction of depression and stress and anxiety signs. This system is still not totally comprehended, however it seems logical that a strongly clinically depressed state of mind in a private time period for a certain case, and with the synchronised lack of activities focused on its improvement, brings about a surge of the influx of negative thoughts. As depressive disorders develop, they can develop into even more hazardous types of problems, e.g. psychosis, deceptions or schizophrenia. Reducing this procedure as rapidly as possible might turn out to be essential in the efficient therapy of mental illness of human functioning.
CBD for Anxiousness and Depression: Picture that it is possible to introduce one all-natural prep work right into your day-to-day diet, which might confirm to be the trick to winning the fight for a calmer life for individuals with depressive problems. Suppose the addition of this preparation, created on the basis of a significantly well-known and also evaluated chemical substance of plant beginning, is not only potentially extremely reliable, however is not related to the risk of negative effects typical of medicinal medications? Is it also feasible? Where’s the catch? Do you need to know more? Read this article In this short article we will cover: What is depression? THC and also CBD cannabinoids – differences Clinical depression and the endocannabinoid system What is clinical depression? Official definitions suggest that depressive disorders, likewise recognized colloquially as depression, are characterized by: unexpected clinical depression of a person’s state of mind, in the adverse instructions, of moderate to solid strength of the intensity of the experienced changes, for more than a few weeks. There might be one or more reasons for the occurrence of modifications. It also takes place that it is hard to recognize any indisputable factor. We extremely usually stumbled upon the declaration that it is a human being condition of the 21st century – it influences both older as well as younger people. Our education is trivial for depression, let alone our incomes – it can affect any individual. Therapy of clinical depression comes down to: pharmacotherapy, psychiatric therapy and also psychoeducation, phototherapy, electroconvulsive therapy and also more all-natural activities connected to the accumulation of physical activity and also the introduction of substantial modifications in the day-to-day diet regimen. It is as part of natural techniques of fighting as well as counteracting clinical depression that the inclusion of marijuana preparations with cannabinoids naturally happening in the plant in the daily diet is getting an increasing number of popularity in the world. Cannabidiol CBD, located in e.g. CBD oil or full-spectrum hemp oil, appears in various clinical studies as a possibly reliable cannabinoid in the treatment of depression. Notably, it is a 100 all-natural chemical compound of plant beginning. Interestingly, clinical depression is among the three most usual mental illness in which clients turn to CBD hemp preparations such as CBD oil, full spectrum hemp oil with CBD or CBD pills. Reports from consumers and their positive point of views on the effectiveness of e.g. CBD oil or complete range hemp oil with all-natural CBD are expanding at an unmatched rate. THC and also CBD cannabinoids – distinctions The primary cannabinoids in the cannabis plant are THC (Δ9-tetrahydrocannabinol) and also CBD (cannabidiol). They show antagonistic results, which suggests that CBD decreases the results of THC. What are these results? THC has an envigorating result, triggers a sensation of bliss, affects cognitive functions, however also kicks back. Big, regularly consumed dosages of THC are thought about damaging to the human mind. Extreme intake of THC can result in psychosis, absence of inspiration, as well as also irreversible negative changes in cognitive function. Both THC and CBD influence the endocannabinoid system in the body. Their action, as already discussed, is contradictory. Cbd-a-thc-in-the-endocannabinoid-1 system When creating images, CBD slows down the exhaustion of anandamide sources, and also THC speeds up this process. Nonetheless, this does not indicate that THC is only a damaging cannabinoid and also should not be in the prep work whatsoever. However. Its small existence in hemp prep work is also needed in order to get the so-called result. synergy. THC in full range hemp oil exists in such a limited as well as, notably, lawful quantity. This amount is so little (less than 0.2) that it does not trigger intoxication. Collaborating, THC and CBD have greater capacity than either molecule acting alone. What is anandamide (AEA)? What is its relevance for people suffering from depression? Keep reading! CBD, Anxiety and also the endocannabinoid system The endocannabinoid system is a vital system in charge of the guideline of basic human physical processes, such as energy monitoring, neurohormonal as well as neuroimmune connections, motor activity, mood and also motivation, and also fat metabolic process. The endocannabinoid system consists of a natural chemical called anandamide (AEA). Anandamide is a neurotransmitter that is naturally produced in the human mind. Its manufacturing is promoted by e.g. exercise, as well as to a lesser degree by the so-called deal with the body (massage!). Its resources are “utilized” to preserve the correct performance of the body, consisting of in the field of psychological health. As received this research: https://www.ncbi.nlm.nih.gov/pubmed/23580381 high levels of anandamide are connected with a lowered danger of developing psychotic signs and symptoms. A high degree of anandamide is likewise related to a positive effect on the decrease of anxiety and anxiousness signs. This mechanism is still not fully understood, but it seems sensible that a highly clinically depressed mood in an individual time period for a particular case, and with the synchronised lack of activities targeted at its renovation, causes an accumulation of the influx of adverse ideas. As depressive problems establish, they can turn into even more harmful kinds of conditions, e.g. psychosis, delusions or schizophrenia. Decreasing this procedure as quickly as possible might end up being important in the reliable therapy of mental disorders of human performance.
CBD for Stress And Anxiety and also Anxiety: Think of that it is possible to introduce one natural prep work into your everyday diet plan, which can confirm to be the secret to winning the fight for a calmer life for people with depressive disorders. What happens if the addition of this prep work, developed on the basis of a significantly widely known as well as tested chemical substance of plant beginning, is not just possibly extremely efficient, but is not connected with the threat of adverse effects regular of medicinal drugs? Is it also possible? Where’s the catch? Do you would like to know even more? Read this short article In this short article we will cover: What is anxiety? THC distinctions Depression as well as the endocannabinoid system What is anxiety? Main definitions recommend that depressive problems, likewise recognized informally as clinical depression, are identified by: sudden anxiety of an individual’s state of mind, in the adverse direction, of moderate to solid intensity of the strength of the seasoned modifications, for greater than a few weeks. There may be one or more factors for the incident of changes. It additionally takes place that it is difficult to identify any unquestionable factor. We extremely often stumbled upon the declaration that it is a civilization condition of the 21st century – it affects both older as well as more youthful individuals. Our education is trivial for depression, not to mention our incomes – it can impact any individual. Treatment of anxiety comes down to: pharmacotherapy, psychiatric therapy as well as psychoeducation, photo-therapy, electroconvulsive therapy as well as more all-natural tasks associated with the concentration of exercise as well as the intro of significant modifications in the everyday diet. It is as part of all-natural approaches of battling as well as neutralizing clinical depression that the incorporation of cannabis prep work with cannabinoids normally occurring in the plant in the daily diet regimen is obtaining increasingly more appeal on the planet. Cannabidiol CBD, discovered in e.g. CBD oil or full-spectrum hemp oil, appears in various clinical researches as a potentially effective cannabinoid in the therapy of clinical depression. Importantly, it is a 100 natural chemical substance of plant beginning. Interestingly, clinical depression is among the three most typical mental illness in which individuals resort to CBD hemp preparations such as CBD oil, complete spectrum hemp oil with CBD or CBD pills. Records from consumers and also their favorable point of views on the efficiency of e.g. CBD oil or complete range hemp oil with natural CBD are growing at an unmatched pace. THC and CBD cannabinoids – distinctions The primary cannabinoids in the marijuana plant are THC (Δ9-tetrahydrocannabinol) as well as CBD (cannabidiol). They reveal hostile results, which indicates that CBD minimizes the impacts of THC. What are these impacts? THC has an intoxicating effect, triggers a feeling of euphoria, influences cognitive functions, but also unwinds. Big, frequently eaten doses of THC are taken into consideration harmful to the human mind. Excessive usage of THC can result in psychosis, lack of motivation, and even permanent adverse adjustments in cognitive function. Both THC and CBD influence the endocannabinoid system in the human body. Their action, as already mentioned, is inconsistent. Cbd-a-thc-in-the-endocannabinoid-1 system When creating pictures, CBD reduces the depletion of anandamide resources, as well as THC speeds up this procedure. Nevertheless, this does not indicate that THC is only a hazardous cannabinoid and should not be in the preparation whatsoever. However. Its small visibility in hemp prep work is also required in order to obtain the supposed result. synergy. THC completely spectrum hemp oil exists in such a minimal and also, significantly, legal amount. This amount is so little (less than 0.2) that it does not trigger intoxication. Collaborating, THC and CBD have greater potential than either particle performing alone. What is anandamide (AEA)? What is its significance for people dealing with clinical depression? Continue reading! CBD, Depression as well as the endocannabinoid system The endocannabinoid system is a crucial system responsible for the guideline of fundamental human physical processes, such as power management, neurohormonal and also neuroimmune connections, motor task, state of mind and motivation, and also fat metabolic process. The endocannabinoid system consists of a neurotransmitter called anandamide (AEA). Anandamide is a natural chemical that is naturally produced in the human mind. Its manufacturing is stimulated by e.g. physical activity, as well as to a minimal level by the supposed work with the body (massage!). Its resources are “made use of” to maintain the correct performance of the body, including in the field of psychological wellness. As displayed in this research: https://www.ncbi.nlm.nih.gov/pubmed/23580381 high degrees of anandamide are associated with a decreased risk of developing psychotic signs and symptoms. A high degree of anandamide is likewise connected with a positive result on the decrease of clinical depression and stress and anxiety signs. This system is still not completely recognized, however it appears rational that a highly clinically depressed state of mind in an individual amount of time for a certain situation, and also with the synchronised lack of activities targeted at its renovation, leads to a climax of the increase of adverse thoughts. As depressive conditions establish, they can turn into much more dangerous forms of conditions, e.g. psychosis, delusions or schizophrenia. Reducing this process as swiftly as feasible might end up being crucial in the efficient therapy of mental illness of human functioning.
CBD for Stress And Anxiety as well as Depression: Think of that it is possible to present one all-natural preparation into your everyday diet regimen, which might show to be the secret to winning the defend a calmer life for individuals with depressive disorders. What if the incorporation of this preparation, developed on the basis of an increasingly popular as well as examined chemical compound of plant origin, is not just potentially really efficient, however is not related to the danger of adverse effects regular of medicinal medications? Is it even possible? Where’s the catch? Do you want to know even more? Read this write-up In this write-up we will certainly cover: What is clinical depression? THC distinctions Depression as well as the endocannabinoid system What is clinical depression? Official definitions suggest that depressive disorders, also known informally as anxiety, are characterized by: abrupt depression of an individual’s mood, in the unfavorable instructions, of moderate to strong intensity of the intensity of the skilled adjustments, for greater than a couple of weeks. There may be several reasons for the event of adjustments. It additionally happens that it is challenging to recognize any kind of unequivocal factor. We really commonly come across the statement that it is a world illness of the 21st century – it influences both older and younger people. Our education and learning is trivial for clinical depression, not to mention our earnings – it can influence any individual. Therapy of depression boils down to: pharmacotherapy, psychiatric therapy as well as psychoeducation, photo-therapy, electroconvulsive therapy and even more natural activities connected to the intensification of physical activity and the introduction of substantial changes in the daily diet regimen. It is as part of natural approaches of dealing with and combating clinical depression that the inclusion of marijuana prep work with cannabinoids naturally taking place in the plant in the everyday diet regimen is acquiring increasingly more popularity on the planet. Cannabidiol CBD, discovered in e.g. CBD oil or full-spectrum hemp oil, appears in many clinical researches as a possibly efficient cannabinoid in the therapy of clinical depression. Importantly, it is a 100 all-natural chemical compound of plant origin. Interestingly, anxiety is amongst the three most common mental illness in which clients consider CBD hemp preparations such as CBD oil, full spectrum hemp oil with CBD or CBD pills. Records from consumers and their favorable point of views on the efficiency of e.g. CBD oil or complete range hemp oil with natural CBD are expanding at an extraordinary speed. THC and CBD cannabinoids – differences The primary cannabinoids in the cannabis plant are THC (Δ9-tetrahydrocannabinol) as well as CBD (cannabidiol). They show hostile results, which means that CBD decreases the impacts of THC. What are these impacts? THC has an envigorating effect, causes a sensation of bliss, influences cognitive features, but likewise unwinds. Large, frequently eaten doses of THC are considered unsafe to the human brain. Too much usage of THC can lead to psychosis, absence of motivation, as well as also irreversible adverse changes in cognitive feature. Both THC as well as CBD influence the endocannabinoid system in the human body. Their action, as already pointed out, is inconsistent. Cbd-a-thc-in-the-endocannabinoid-1 system When creating pictures, CBD decreases the exhaustion of anandamide sources, and THC speeds up this procedure. Nonetheless, this does not mean that THC is just a dangerous cannabinoid and also must not be in the prep work whatsoever. As a matter of fact. Its small existence in hemp prep work is also needed in order to acquire the supposed impact. synergy. THC in full range hemp oil exists in such a marginal as well as, significantly, lawful amount. This quantity is so little (less than 0.2) that it does not cause drunkenness. Collaborating, THC as well as CBD have higher capacity than either particle performing alone. What is anandamide (AEA)? What is its value for people dealing with depression? Read on! CBD, Anxiety and also the endocannabinoid system The endocannabinoid system is an essential system responsible for the regulation of fundamental human physiological processes, such as power management, neurohormonal as well as neuroimmune connections, electric motor task, mood as well as inspiration, and fat metabolic process. The endocannabinoid system includes a neurotransmitter called anandamide (AEA). Anandamide is a natural chemical that is naturally generated in the human mind. Its manufacturing is stimulated by e.g. physical activity, and to a minimal extent by the supposed deal with the body (massage therapy!). Its sources are “utilized” to preserve the correct performance of the body, including in the field of psychological wellness. As received this research: https://www.ncbi.nlm.nih.gov/pubmed/23580381 high degrees of anandamide are associated with a lowered danger of developing psychotic signs and symptoms. A high level of anandamide is likewise associated with a positive result on the decrease of depression and anxiety symptoms. This device is still not totally recognized, yet it appears rational that a strongly clinically depressed state of mind in an individual amount of time for a specific situation, and with the simultaneous lack of actions aimed at its improvement, brings about a rise of the influx of adverse ideas. As depressive conditions develop, they can turn into even more harmful forms of conditions, e.g. psychosis, misconceptions or schizophrenia. Slowing down this process as promptly as feasible might become critical in the effective treatment of mental illness of human functioning.
CBD for Anxiety as well as Anxiety: Envision that it is feasible to present one all-natural prep work right into your daily diet plan, which could show to be the secret to winning the defend a calmer life for people with depressive disorders. Suppose the incorporation of this prep work, developed on the basis of an increasingly widely known and also examined chemical compound of plant beginning, is not just potentially very reliable, yet is not related to the danger of adverse effects typical of medicinal medicines? Is it even feasible? Where’s the catch? Do you would like to know even more? Read this write-up In this article we will cover: What is anxiety? THC distinctions Depression and the endocannabinoid system What is anxiety? Official meanings recommend that depressive disorders, likewise known colloquially as anxiety, are identified by: unexpected anxiety of an individual’s state of mind, in the adverse instructions, of moderate to strong strength of the strength of the seasoned changes, for greater than a couple of weeks. There may be one or more reasons for the incident of adjustments. It also occurs that it is challenging to identify any type of indisputable factor. We very commonly encountered the statement that it is a human being disease of the 21st century – it impacts both older and also more youthful individuals. Our education and learning is trivial for clinical depression, let alone our profits – it can influence any person. Therapy of anxiety comes down to: pharmacotherapy, psychotherapy as well as psychoeducation, phototherapy, electroconvulsive therapy and more natural tasks associated with the augmentation of physical activity and the introduction of substantial modifications in the everyday diet regimen. It is as part of natural methods of fighting and also neutralizing depression that the incorporation of cannabis preparations with cannabinoids naturally taking place in the plant in the daily diet regimen is gaining a growing number of popularity on the planet. Cannabidiol CBD, found in e.g. CBD oil or full-spectrum hemp oil, appears in various clinical research studies as a potentially reliable cannabinoid in the treatment of depression. Importantly, it is a 100 all-natural chemical substance of plant origin. Interestingly, depression is amongst the 3 most common mental illness in which people consider CBD hemp prep work such as CBD oil, full spectrum hemp oil with CBD or CBD pills. Records from customers as well as their favorable opinions on the efficiency of e.g. CBD oil or full range hemp oil with all-natural CBD are growing at an extraordinary rate. THC and CBD cannabinoids – differences The main cannabinoids in the cannabis plant are THC (Δ9-tetrahydrocannabinol) and CBD (cannabidiol). They show antagonistic results, which means that CBD decreases the impacts of THC. What are these effects? THC has an envigorating effect, triggers a sensation of euphoria, impacts cognitive features, yet also kicks back. Large, consistently eaten doses of THC are thought about unsafe to the human mind. Excessive consumption of THC can cause psychosis, absence of inspiration, and also also permanent negative adjustments in cognitive function. Both THC and CBD influence the endocannabinoid system in the human body. Their action, as currently mentioned, is inconsistent. Cbd-a-thc-in-the-endocannabinoid-1 system When writing images, CBD reduces the deficiency of anandamide resources, and THC quicken this procedure. Nonetheless, this does not mean that THC is just a harmful cannabinoid as well as must not be in the preparation in any way. As a matter of fact. Its small presence in hemp preparations is also needed in order to obtain the so-called impact. synergy. THC completely range hemp oil exists in such a marginal and also, notably, lawful quantity. This quantity is so little (less than 0.2) that it does not trigger intoxication. Collaborating, THC as well as CBD have greater capacity than either particle acting alone. What is anandamide (AEA)? What is its importance for people struggling with anxiety? Keep reading! CBD, Anxiety as well as the endocannabinoid system The endocannabinoid system is a vital system responsible for the law of basic human physiological procedures, such as power administration, neurohormonal and neuroimmune connections, motor activity, mood and also motivation, as well as fat metabolic process. The endocannabinoid system includes a neurotransmitter called anandamide (AEA). Anandamide is a natural chemical that is normally produced in the human mind. Its manufacturing is promoted by e.g. exercise, and also to a lesser level by the so-called collaborate with the body (massage!). Its sources are “used” to keep the correct functioning of the body, consisting of in the field of mental wellness. As received this study: https://www.ncbi.nlm.nih.gov/pubmed/23580381 high degrees of anandamide are connected with a lowered danger of developing psychotic signs and symptoms. A high level of anandamide is likewise associated with a positive result on the reduction of anxiety and also anxiety signs and symptoms. This mechanism is still not fully understood, however it seems sensible that a strongly depressed mood in an individual period for a certain situation, as well as with the synchronised lack of actions targeted at its improvement, brings about an accumulation of the increase of unfavorable thoughts. As depressive problems establish, they can develop into a lot more unsafe types of disorders, e.g. psychosis, delusions or schizophrenia. Decreasing this process as swiftly as possible may turn out to be essential in the efficient therapy of mental illness of human functioning.
CBD for Stress And Anxiety and also Depression: Picture that it is possible to present one all-natural prep work into your day-to-day diet, which can confirm to be the secret to winning the fight for a calmer life for people with depressive conditions. What happens if the addition of this preparation, developed on the basis of an increasingly well-known as well as examined chemical substance of plant beginning, is not just possibly very efficient, however is not connected with the danger of side effects normal of medicinal drugs? Is it even possible? Where’s the catch? Do you wish to know even more? Read this post In this post we will certainly cover: What is depression? THC as well as CBD cannabinoids – differences Depression and the endocannabinoid system What is anxiety? Main definitions recommend that depressive disorders, also known informally as clinical depression, are defined by: abrupt clinical depression of a person’s state of mind, in the adverse instructions, of modest to solid intensity of the intensity of the knowledgeable changes, for greater than a couple of weeks. There may be one or more factors for the event of adjustments. It also takes place that it is hard to determine any kind of unequivocal reason. We very usually stumbled upon the statement that it is a civilization condition of the 21st century – it impacts both older as well as more youthful individuals. Our education is not important for clinical depression, not to mention our profits – it can affect anybody. Therapy of clinical depression comes down to: pharmacotherapy, psychiatric therapy and also psychoeducation, photo-therapy, electroconvulsive therapy and also more all-natural tasks associated with the intensification of physical activity and also the introduction of considerable changes in the daily diet regimen. It is as part of all-natural approaches of dealing with and neutralizing anxiety that the inclusion of marijuana preparations with cannabinoids naturally taking place in the plant in the daily diet plan is gaining more and more popularity on the planet. Cannabidiol CBD, discovered in e.g. CBD oil or full-spectrum hemp oil, appears in many clinical researches as a potentially reliable cannabinoid in the treatment of depression. Importantly, it is a 100 all-natural chemical substance of plant origin. Interestingly, anxiety is among the three most typical mental disorders in which individuals resort to CBD hemp preparations such as CBD oil, full spectrum hemp oil with CBD or CBD capsules. Reports from consumers and also their positive opinions on the effectiveness of e.g. CBD oil or complete range hemp oil with all-natural CBD are growing at an extraordinary rate. THC and also CBD cannabinoids – distinctions The main cannabinoids in the marijuana plant are THC (Δ9-tetrahydrocannabinol) and also CBD (cannabidiol). They reveal hostile impacts, which suggests that CBD reduces the effects of THC. What are these effects? THC has an envigorating result, creates a feeling of ecstasy, influences cognitive functions, yet likewise unwinds. Big, routinely taken in dosages of THC are considered harmful to the human mind. Excessive usage of THC can lead to psychosis, absence of inspiration, and even irreversible adverse changes in cognitive feature. Both THC and also CBD affect the endocannabinoid system in the human body. Their activity, as already stated, is inconsistent. Cbd-a-thc-in-the-endocannabinoid-1 system When writing pictures, CBD slows down the exhaustion of anandamide resources, as well as THC quicken this procedure. Nonetheless, this does not indicate that THC is just a harmful cannabinoid and also should not be in the prep work in all. However. Its small presence in hemp prep work is also essential in order to get the supposed effect. synergy. THC in full spectrum hemp oil is present in such a marginal as well as, significantly, legal amount. This amount is so small (less than 0.2) that it does not create drunkenness. Collaborating, THC as well as CBD have greater capacity than either particle acting alone. What is anandamide (AEA)? What is its relevance for individuals dealing with depression? Read on! CBD, Clinical depression and also the endocannabinoid system The endocannabinoid system is a key system responsible for the regulation of standard human physical procedures, such as energy administration, neurohormonal as well as neuroimmune connections, motor activity, state of mind and motivation, as well as fat metabolic rate. The endocannabinoid system includes a neurotransmitter called anandamide (AEA). Anandamide is a neurotransmitter that is normally produced in the human mind. Its manufacturing is boosted by e.g. physical activity, as well as to a minimal level by the so-called collaborate with the body (massage therapy!). Its resources are “used” to preserve the correct functioning of the body, consisting of in the field of mental health and wellness. As shown in this research study: https://www.ncbi.nlm.nih.gov/pubmed/23580381 high degrees of anandamide are related to a reduced danger of establishing psychotic symptoms. A high level of anandamide is also associated with a favorable effect on the reduction of depression as well as stress and anxiety symptoms. This system is still not completely comprehended, but it seems rational that a highly clinically depressed mood in an individual period for a particular situation, and with the synchronised absence of activities aimed at its improvement, brings about an aggravation of the increase of negative thoughts. As depressive problems create, they can become even more dangerous forms of disorders, e.g. psychosis, delusions or schizophrenia. Slowing down this process as swiftly as feasible may end up being important in the efficient treatment of mental illness of human performance.
CBD for Anxiety and also Clinical Depression: Envision that it is possible to present one natural prep work into your day-to-day diet regimen, which could show to be the key to winning the defend a calmer life for individuals with depressive conditions. What happens if the incorporation of this prep work, created on the basis of an increasingly popular as well as checked chemical compound of plant beginning, is not just potentially really efficient, yet is not associated with the risk of negative effects typical of pharmacological medicines? Is it also possible? Where’s the catch? Do you wish to know more? Read this article In this post we will certainly cover: What is depression? THC and also CBD cannabinoids – differences Depression as well as the endocannabinoid system What is depression? Official interpretations suggest that depressive conditions, also recognized colloquially as clinical depression, are defined by: unexpected depression of an individual’s state of mind, in the unfavorable instructions, of moderate to strong strength of the strength of the experienced changes, for greater than a few weeks. There may be several reasons for the occurrence of changes. It likewise occurs that it is difficult to recognize any unequivocal factor. We really frequently encountered the statement that it is a civilization condition of the 21st century – it impacts both older and also more youthful individuals. Our education is not important for depression, let alone our incomes – it can affect anybody. Therapy of anxiety comes down to: pharmacotherapy, psychotherapy and psychoeducation, phototherapy, electroconvulsive therapy and also even more natural activities associated with the concentration of physical activity and the intro of significant adjustments in the day-to-day diet. It is as part of all-natural techniques of battling and also counteracting clinical depression that the incorporation of cannabis preparations with cannabinoids naturally taking place in the plant in the day-to-day diet regimen is gaining increasingly more popularity on the planet. Cannabidiol CBD, found in e.g. CBD oil or full-spectrum hemp oil, appears in numerous clinical researches as a possibly efficient cannabinoid in the therapy of anxiety. Notably, it is a 100 all-natural chemical substance of plant origin. Remarkably, depression is amongst the three most typical mental illness in which clients consider CBD hemp prep work such as CBD oil, complete range hemp oil with CBD or CBD capsules. Reports from consumers and their favorable viewpoints on the performance of e.g. CBD oil or complete spectrum hemp oil with all-natural CBD are growing at an unprecedented speed. THC as well as CBD cannabinoids – distinctions The main cannabinoids in the marijuana plant are THC (Δ9-tetrahydrocannabinol) and CBD (cannabidiol). They reveal hostile effects, which means that CBD decreases the results of THC. What are these effects? THC has an intoxicating impact, creates a sensation of euphoria, influences cognitive functions, but additionally relaxes. Huge, regularly eaten doses of THC are considered damaging to the human mind. Too much consumption of THC can bring about psychosis, absence of motivation, and also irreversible adverse adjustments in cognitive feature. Both THC as well as CBD impact the endocannabinoid system in the body. Their action, as currently mentioned, is contradictory. Cbd-a-thc-in-the-endocannabinoid-1 system When composing images, CBD reduces the depletion of anandamide sources, and THC accelerate this procedure. Nonetheless, this does not mean that THC is only a dangerous cannabinoid as well as should not remain in the preparation in all. As a matter of fact. Its small presence in hemp prep work is also required in order to acquire the so-called effect. synergy. THC completely range hemp oil is present in such a minimal and also, significantly, legal quantity. This quantity is so little (less than 0.2) that it does not cause drunkenness. Collaborating, THC and also CBD have higher potential than either molecule performing alone. What is anandamide (AEA)? What is its relevance for individuals dealing with clinical depression? Keep reading! CBD, Depression and the endocannabinoid system The endocannabinoid system is a crucial system responsible for the guideline of fundamental human physiological procedures, such as energy monitoring, neurohormonal and neuroimmune links, motor activity, mood and also motivation, and fat metabolic rate. The endocannabinoid system consists of a natural chemical called anandamide (AEA). Anandamide is a natural chemical that is normally generated in the human brain. Its manufacturing is stimulated by e.g. exercise, as well as to a lower extent by the supposed work with the body (massage therapy!). Its sources are “used” to preserve the proper performance of the body, consisting of in the field of psychological health. As displayed in this study: https://www.ncbi.nlm.nih.gov/pubmed/23580381 high degrees of anandamide are connected with a reduced risk of creating psychotic signs. A high level of anandamide is likewise connected with a positive result on the reduction of anxiety and anxiety signs and symptoms. This mechanism is still not fully recognized, but it seems rational that a highly depressed mood in an individual time period for a details situation, and with the simultaneous lack of activities focused on its improvement, causes a concentration of the increase of negative thoughts. As depressive conditions develop, they can become a lot more dangerous types of disorders, e.g. psychosis, misconceptions or schizophrenia. Slowing down this process as promptly as feasible might turn out to be important in the reliable therapy of mental disorders of human functioning.
My partner and I stumbled over here coming from a different web page and thought I should check things out. I like what I see so i am just following you. Look forward to exploring your web page yet again.
http://lawnproservices.com/__media__/js/netsoltrademark.php?d=toppremiumsites.porn/
http://adrikmcilroy.com/__media__/js/netsoltrademark.php?d=toppremiumsites.porn/
Please let me know if you’re looking for a article writer for your weblog. You have some really good posts and I think I would be a good asset. If you ever want to take some of the load off, I’d really like to write some articles for your blog in exchange for a link back to mine. Please blast me an email if interested. Kudos!
http://seanvarner.net/__media__/js/netsoltrademark.php?d=toppremiumsites.porn/
Great post. I was checking continuously this blog and I am impressed! Very helpful information specially the remaining part 🙂 I handle such information a lot. I used to be looking for this particular information for a very long time. Thank you and good luck.
You have remarked very interesting points! ps decent site. “Sutton lost 13 games in a row without winning a ballgame.” by Ralph Kiner.
http://www.happymadisonmovies.com/__media__/js/netsoltrademark.php?d=toppremiumsites.porn/
Simply wish to say your article is as amazing. The clarity to your post is just excellent and i can suppose you are a professional in this subject. Fine with your permission let me to snatch your RSS feed to keep up to date with approaching post. Thanks one million and please continue the enjoyable work.
Just wish to say your article is as surprising. The clearness in your post is simply cool and i can assume you’re an expert on this subject. Fine with your permission let me to grab your feed to keep updated with forthcoming post. Thanks a million and please continue the gratifying work.
Also referred to as carbon steel, this product is just one of the most usual options you’ll discover for bearings The 52100 bearing steel is a high carbon, low alloy steel that contains chromium. These functions make chrome steel a great choice for the majority of general applications seeking thin section bearings.
I have recently started a site, the info you provide on this site has helped me tremendously. Thank you for all of your time & work.
http://valoanblogger.com/__media__/js/netsoltrademark.php?d=toppremiumsites.porn/
Spot on with this write-up, I actually assume this web site needs way more consideration. I’ll probably be again to learn far more, thanks for that info.
Thank you, I’ve just been searching for information about this subject for ages and yours is the greatest I have discovered so far. But, what about the conclusion? Are you sure about the source?
https://toppremiumsites.porn/
CBD for Stress And Anxiety and Clinical Depression: Picture that it is possible to introduce one natural preparation into your everyday diet, which could show to be the trick to winning the defend a calmer life for people with depressive disorders. Suppose the inclusion of this prep work, created on the basis of a progressively popular and evaluated chemical compound of plant beginning, is not just possibly extremely reliable, yet is not associated with the threat of side effects normal of medicinal medications? Is it even possible? Where’s the catch? Do you would like to know even more? Read this article In this post we will cover: What is clinical depression? THC distinctions Depression and the endocannabinoid system What is clinical depression? Main meanings suggest that depressive conditions, likewise recognized colloquially as clinical depression, are defined by: unexpected depression of a person’s state of mind, in the negative instructions, of modest to strong intensity of the intensity of the seasoned changes, for greater than a couple of weeks. There might be one or more reasons for the occurrence of adjustments. It likewise takes place that it is challenging to recognize any kind of absolute factor. We extremely typically come across the statement that it is a world condition of the 21st century – it influences both older as well as more youthful people. Our education and learning is trivial for clinical depression, not to mention our incomes – it can impact anybody. Treatment of anxiety comes down to: pharmacotherapy, psychotherapy and psychoeducation, phototherapy, electroconvulsive therapy as well as even more all-natural tasks connected to the augmentation of exercise and the introduction of substantial modifications in the daily diet regimen. It is as part of natural methods of battling and combating anxiety that the incorporation of marijuana preparations with cannabinoids normally occurring in the plant in the day-to-day diet plan is getting increasingly more appeal worldwide. Cannabidiol CBD, discovered in e.g. CBD oil or full-spectrum hemp oil, appears in countless clinical research studies as a potentially efficient cannabinoid in the therapy of anxiety. Importantly, it is a 100 natural chemical compound of plant origin. Interestingly, anxiety is among the three most usual mental disorders in which people resort to CBD hemp preparations such as CBD oil, complete range hemp oil with CBD or CBD capsules. Records from customers and also their favorable opinions on the performance of e.g. CBD oil or complete spectrum hemp oil with all-natural CBD are growing at an unprecedented rate. THC as well as CBD cannabinoids – distinctions The primary cannabinoids in the cannabis plant are THC (Δ9-tetrahydrocannabinol) as well as CBD (cannabidiol). They show hostile results, which suggests that CBD reduces the impacts of THC. What are these results? THC has an envigorating impact, triggers a sensation of ecstasy, affects cognitive features, however additionally kicks back. Large, on a regular basis taken in doses of THC are thought about dangerous to the human brain. Excessive intake of THC can result in psychosis, lack of motivation, and also also permanent negative modifications in cognitive function. Both THC as well as CBD impact the endocannabinoid system in the body. Their activity, as currently pointed out, is contradictory. Cbd-a-thc-in-the-endocannabinoid-1 system When writing photos, CBD reduces the deficiency of anandamide sources, as well as THC accelerate this procedure. Nonetheless, this does not indicate that THC is only a harmful cannabinoid as well as needs to not remain in the preparation at all. On the other hand. Its small existence in hemp preparations is even needed in order to get the so-called effect. harmony. THC completely range hemp oil exists in such a limited as well as, notably, legal amount. This amount is so tiny (less than 0.2) that it does not cause intoxication. Interacting, THC as well as CBD have higher potential than either molecule performing alone. What is anandamide (AEA)? What is its value for people struggling with anxiety? Continue reading! CBD, Clinical depression and the endocannabinoid system The endocannabinoid system is a crucial system in charge of the policy of fundamental human physiological processes, such as energy administration, neurohormonal and neuroimmune connections, electric motor activity, mood and inspiration, and fat metabolic process. The endocannabinoid system includes a neurotransmitter called anandamide (AEA). Anandamide is a neurotransmitter that is normally generated in the human brain. Its manufacturing is stimulated by e.g. physical activity, and to a minimal level by the so-called deal with the body (massage!). Its resources are “made use of” to keep the correct functioning of the body, including in the field of psychological health. As displayed in this study: https://www.ncbi.nlm.nih.gov/pubmed/23580381 high degrees of anandamide are connected with a decreased risk of establishing psychotic signs. A high level of anandamide is also associated with a favorable result on the reduction of anxiety as well as anxiousness symptoms. This device is still not totally comprehended, yet it seems sensible that a highly clinically depressed mood in an individual period for a particular case, and also with the synchronised absence of activities focused on its renovation, causes a surge of the increase of negative ideas. As depressive disorders develop, they can turn into much more harmful kinds of problems, e.g. psychosis, misconceptions or schizophrenia. Slowing down this process as promptly as possible may become essential in the effective treatment of mental illness of human functioning.
CBD for Stress And Anxiety as well as Anxiety: Picture that it is possible to present one natural preparation right into your day-to-day diet regimen, which might show to be the key to winning the defend a calmer life for individuals with depressive disorders. What happens if the inclusion of this preparation, created on the basis of an increasingly well-known as well as checked chemical compound of plant beginning, is not only possibly extremely efficient, yet is not associated with the risk of negative effects normal of medicinal medications? Is it also possible? Where’s the catch? Do you would like to know more? Read this write-up In this post we will cover: What is depression? THC as well as CBD cannabinoids – differences Clinical depression as well as the endocannabinoid system What is depression? Main meanings suggest that depressive problems, additionally recognized informally as anxiety, are characterized by: unexpected depression of a person’s mood, in the negative instructions, of moderate to strong strength of the strength of the seasoned adjustments, for greater than a few weeks. There may be several reasons for the occurrence of modifications. It additionally happens that it is difficult to identify any type of indisputable factor. We extremely commonly discovered the declaration that it is a world illness of the 21st century – it affects both older and also younger individuals. Our education is trivial for anxiety, not to mention our earnings – it can affect anybody. Therapy of clinical depression comes down to: pharmacotherapy, psychiatric therapy as well as psychoeducation, photo-therapy, electroconvulsive therapy as well as even more all-natural activities connected to the climax of physical activity and the introduction of significant modifications in the everyday diet. It is as part of all-natural techniques of fighting and also combating clinical depression that the addition of cannabis preparations with cannabinoids normally taking place in the plant in the daily diet plan is acquiring a growing number of appeal worldwide. Cannabidiol CBD, discovered in e.g. CBD oil or full-spectrum hemp oil, shows up in various scientific research studies as a possibly efficient cannabinoid in the therapy of anxiety. Importantly, it is a 100 natural chemical compound of plant origin. Surprisingly, depression is amongst the three most common mental disorders in which clients resort to CBD hemp prep work such as CBD oil, complete range hemp oil with CBD or CBD capsules. Reports from consumers and their favorable point of views on the efficiency of e.g. CBD oil or complete range hemp oil with all-natural CBD are expanding at an extraordinary rate. THC as well as CBD cannabinoids – distinctions The key cannabinoids in the cannabis plant are THC (Δ9-tetrahydrocannabinol) and CBD (cannabidiol). They reveal hostile results, which means that CBD decreases the effects of THC. What are these effects? THC has an intoxicating impact, causes a sensation of euphoria, affects cognitive features, however also kicks back. Large, routinely taken in dosages of THC are taken into consideration harmful to the human brain. Extreme consumption of THC can bring about psychosis, absence of motivation, and also also long-term adverse modifications in cognitive feature. Both THC and also CBD influence the endocannabinoid system in the human body. Their action, as currently discussed, is contradictory. Cbd-a-thc-in-the-endocannabinoid-1 system When composing images, CBD decreases the exhaustion of anandamide resources, and also THC quicken this procedure. Nonetheless, this does not indicate that THC is just a dangerous cannabinoid and also should not be in the prep work in all. On the other hand. Its little visibility in hemp prep work is even required in order to acquire the supposed result. synergy. THC in full spectrum hemp oil is present in such a limited and also, notably, legal quantity. This amount is so tiny (less than 0.2) that it does not trigger drunkenness. Collaborating, THC and also CBD have better potential than either particle performing alone. What is anandamide (AEA)? What is its significance for people suffering from anxiety? Continue reading! CBD, Anxiety as well as the endocannabinoid system The endocannabinoid system is a crucial system responsible for the regulation of basic human physiological procedures, such as power monitoring, neurohormonal and neuroimmune links, electric motor activity, state of mind and inspiration, and fat metabolic rate. The endocannabinoid system includes a neurotransmitter called anandamide (AEA). Anandamide is a neurotransmitter that is normally created in the human brain. Its manufacturing is promoted by e.g. physical activity, as well as to a minimal extent by the so-called collaborate with the body (massage!). Its sources are “utilized” to keep the proper functioning of the body, including in the field of psychological wellness. As displayed in this research: https://www.ncbi.nlm.nih.gov/pubmed/23580381 high degrees of anandamide are associated with a lowered danger of establishing psychotic signs. A high level of anandamide is additionally associated with a favorable result on the decrease of depression and also anxiety symptoms. This mechanism is still not completely understood, but it appears rational that a highly clinically depressed mood in a private period for a specific instance, and with the synchronised lack of actions targeted at its enhancement, results in an increase of the increase of unfavorable thoughts. As depressive disorders develop, they can develop into even more dangerous kinds of conditions, e.g. psychosis, delusions or schizophrenia. Reducing this procedure as swiftly as feasible may turn out to be crucial in the effective treatment of mental illness of human functioning.
I am going to go ahead and bookmark this post for my sis for a research project for class. This is a sweet web site by the way. Where did you obtain the template for this web page?
CBD for Anxiety and also Depression: Think of that it is possible to introduce one all-natural prep work into your everyday diet regimen, which could show to be the secret to winning the defend a calmer life for individuals with depressive problems. What if the incorporation of this preparation, created on the basis of a significantly well-known and examined chemical compound of plant origin, is not only possibly very efficient, yet is not related to the threat of adverse effects regular of medicinal medicines? Is it even feasible? Where’s the catch? Do you would like to know more? Read this article In this article we will certainly cover: What is depression? THC distinctions Clinical depression and also the endocannabinoid system What is depression? Main meanings suggest that depressive conditions, likewise known colloquially as anxiety, are characterized by: unexpected clinical depression of an individual’s mood, in the unfavorable instructions, of moderate to strong strength of the strength of the skilled changes, for more than a few weeks. There might be several reasons for the incident of changes. It additionally happens that it is challenging to recognize any unequivocal reason. We extremely frequently encountered the declaration that it is a human being disease of the 21st century – it influences both older and more youthful individuals. Our education and learning is not important for depression, let alone our revenues – it can influence any person. Treatment of depression boils down to: pharmacotherapy, psychotherapy and psychoeducation, photo-therapy, electroconvulsive therapy and also more all-natural tasks connected to the rise of physical activity and the intro of significant modifications in the daily diet. It is as part of all-natural techniques of dealing with as well as combating depression that the inclusion of marijuana preparations with cannabinoids naturally happening in the plant in the daily diet plan is gaining increasingly more popularity in the world. Cannabidiol CBD, located in e.g. CBD oil or full-spectrum hemp oil, shows up in various scientific research studies as a potentially effective cannabinoid in the therapy of depression. Importantly, it is a 100 all-natural chemical compound of plant origin. Surprisingly, depression is amongst the three most usual mental disorders in which patients consider CBD hemp preparations such as CBD oil, full spectrum hemp oil with CBD or CBD capsules. Records from consumers and their positive opinions on the effectiveness of e.g. CBD oil or full spectrum hemp oil with natural CBD are expanding at an extraordinary speed. THC and CBD cannabinoids – distinctions The main cannabinoids in the cannabis plant are THC (Δ9-tetrahydrocannabinol) and CBD (cannabidiol). They reveal hostile impacts, which implies that CBD decreases the effects of THC. What are these results? THC has an intoxicating impact, triggers a sensation of bliss, affects cognitive features, but likewise relaxes. Large, frequently taken in dosages of THC are thought about harmful to the human mind. Extreme consumption of THC can result in psychosis, absence of inspiration, as well as also long-term negative adjustments in cognitive feature. Both THC and also CBD affect the endocannabinoid system in the human body. Their action, as currently pointed out, is contradictory. Cbd-a-thc-in-the-endocannabinoid-1 system When creating photos, CBD slows down the depletion of anandamide sources, and also THC accelerate this process. However, this does not indicate that THC is just a harmful cannabinoid as well as ought to not be in the preparation in all. However. Its little existence in hemp preparations is even required in order to acquire the so-called impact. harmony. THC completely range hemp oil exists in such a marginal and, significantly, legal amount. This quantity is so tiny (less than 0.2) that it does not cause drunkenness. Working together, THC and also CBD have greater potential than either particle performing alone. What is anandamide (AEA)? What is its relevance for people dealing with depression? Keep reading! CBD, Clinical depression as well as the endocannabinoid system The endocannabinoid system is a crucial system in charge of the law of basic human physiological procedures, such as energy management, neurohormonal as well as neuroimmune connections, electric motor activity, state of mind as well as inspiration, and also fat metabolic rate. The endocannabinoid system includes a natural chemical called anandamide (AEA). Anandamide is a neurotransmitter that is normally generated in the human brain. Its production is stimulated by e.g. physical activity, and also to a minimal degree by the so-called deal with the body (massage!). Its resources are “utilized” to keep the correct functioning of the body, including in the field of mental health. As received this research study: https://www.ncbi.nlm.nih.gov/pubmed/23580381 high degrees of anandamide are associated with a decreased threat of developing psychotic signs. A high level of anandamide is additionally related to a favorable impact on the reduction of anxiety as well as anxiety signs and symptoms. This mechanism is still not completely recognized, but it seems rational that a strongly depressed mood in a specific period for a certain case, as well as with the simultaneous lack of activities aimed at its improvement, leads to an intensification of the increase of unfavorable ideas. As depressive problems develop, they can develop into a lot more harmful types of disorders, e.g. psychosis, misconceptions or schizophrenia. Reducing this procedure as swiftly as possible might become crucial in the reliable therapy of mental disorders of human performance.
CBD for Anxiety as well as Depression: Demystified Imagine that it is possible to introduce one all-natural preparation into your daily diet plan, which could prove to be the trick to winning the defend a calmer life for individuals with depressive disorders. What happens if the incorporation of this prep work, created on the basis of an increasingly widely known and also evaluated chemical substance of plant beginning, is not only possibly extremely effective, yet is not related to the danger of side effects common of medicinal medications? Is it also possible? Where’s the catch? Do you need to know more? Read this article In this write-up we will cover: What is anxiety? THC distinctions Depression as well as the endocannabinoid system What is clinical depression? Official meanings recommend that depressive disorders, likewise recognized informally as depression, are characterized by: unexpected depression of a person’s mood, in the negative direction, of moderate to solid intensity of the strength of the experienced adjustments, for more than a couple of weeks. There might be one or more factors for the event of adjustments. It likewise takes place that it is tough to identify any kind of unquestionable reason. We very typically encountered the statement that it is a people illness of the 21st century – it influences both older and also younger individuals. Our education is not important for anxiety, let alone our incomes – it can affect any individual. Treatment of anxiety comes down to: pharmacotherapy, psychotherapy as well as psychoeducation, phototherapy, electroconvulsive therapy as well as even more all-natural activities connected to the accumulation of exercise and also the intro of significant changes in the day-to-day diet plan. It is as part of all-natural techniques of battling and neutralizing anxiety that the inclusion of cannabis prep work with cannabinoids normally taking place in the plant in the daily diet regimen is obtaining more and more appeal worldwide. Cannabidiol CBD, found in e.g. CBD oil or full-spectrum hemp oil, appears in numerous clinical researches as a potentially efficient cannabinoid in the therapy of anxiety. Notably, it is a 100 all-natural chemical substance of plant origin. Interestingly, anxiety is among the three most typical mental illness in which patients resort to CBD hemp prep work such as CBD oil, full spectrum hemp oil with CBD or CBD capsules. Reports from consumers as well as their positive opinions on the efficiency of e.g. CBD oil or full spectrum hemp oil with natural CBD are growing at an unmatched rate. THC and CBD cannabinoids – differences The key cannabinoids in the marijuana plant are THC (Δ9-tetrahydrocannabinol) and CBD (cannabidiol). They show antagonistic impacts, which indicates that CBD lowers the effects of THC. What are these effects? THC has an intoxicating result, triggers a sensation of bliss, influences cognitive features, but likewise relaxes. Big, consistently taken in doses of THC are thought about damaging to the human mind. Excessive intake of THC can result in psychosis, absence of motivation, as well as also permanent negative adjustments in cognitive feature. Both THC and CBD influence the endocannabinoid system in the body. Their activity, as currently stated, is contradictory. Cbd-a-thc-in-the-endocannabinoid-1 system When creating photos, CBD slows down the depletion of anandamide resources, and also THC accelerate this procedure. However, this does not indicate that THC is just an unsafe cannabinoid and also needs to not remain in the prep work in all. On the other hand. Its small visibility in hemp prep work is also essential in order to get the supposed impact. synergy. THC in full spectrum hemp oil is present in such a marginal as well as, significantly, legal quantity. This quantity is so tiny (less than 0.2) that it does not create drunkenness. Collaborating, THC and CBD have better potential than either molecule performing alone. What is anandamide (AEA)? What is its value for individuals suffering from clinical depression? Keep reading! CBD, Depression as well as the endocannabinoid system The endocannabinoid system is a key system in charge of the law of basic human physiological processes, such as energy management, neurohormonal as well as neuroimmune connections, motor activity, state of mind and inspiration, and fat metabolism. The endocannabinoid system includes a neurotransmitter called anandamide (AEA). Anandamide is a natural chemical that is normally produced in the human brain. Its production is stimulated by e.g. exercise, and to a lower extent by the supposed collaborate with the body (massage therapy!). Its resources are “used” to maintain the appropriate performance of the body, including in the field of mental wellness. As received this study: https://www.ncbi.nlm.nih.gov/pubmed/23580381 high levels of anandamide are associated with a decreased risk of creating psychotic signs. A high degree of anandamide is likewise related to a favorable impact on the decrease of clinical depression and also anxiousness signs and symptoms. This mechanism is still not completely recognized, but it seems logical that a highly clinically depressed mood in a private time period for a specific instance, and with the simultaneous absence of actions aimed at its renovation, leads to an intensification of the influx of adverse thoughts. As depressive disorders establish, they can develop into a lot more hazardous forms of disorders, e.g. psychosis, deceptions or schizophrenia. Decreasing this process as swiftly as feasible may become essential in the reliable treatment of mental illness of human functioning.
CBD for Stress And Anxiety and also Depression: Debunked Imagine that it is feasible to present one all-natural prep work into your day-to-day diet, which might prove to be the trick to winning the fight for a calmer life for individuals with depressive conditions. Suppose the addition of this prep work, created on the basis of an increasingly widely known as well as checked chemical substance of plant origin, is not only potentially really efficient, however is not associated with the risk of side effects common of pharmacological medications? Is it also possible? Where’s the catch? Do you want to know even more? Read this short article In this write-up we will cover: What is clinical depression? THC distinctions Depression and also the endocannabinoid system What is anxiety? Main definitions suggest that depressive problems, additionally recognized informally as clinical depression, are identified by: abrupt clinical depression of an individual’s mood, in the negative instructions, of modest to solid strength of the intensity of the knowledgeable changes, for greater than a few weeks. There may be one or more reasons for the occurrence of modifications. It additionally happens that it is difficult to recognize any kind of unequivocal factor. We really usually found the declaration that it is a human being illness of the 21st century – it impacts both older and also younger people. Our education and learning is trivial for depression, not to mention our incomes – it can impact anyone. Treatment of anxiety comes down to: pharmacotherapy, psychiatric therapy and psychoeducation, photo-therapy, electroconvulsive therapy and also even more natural activities connected to the augmentation of physical activity and the intro of substantial changes in the daily diet plan. It is as part of natural approaches of fighting and also counteracting anxiety that the inclusion of cannabis preparations with cannabinoids naturally happening in the plant in the day-to-day diet is obtaining an increasing number of appeal in the world. Cannabidiol CBD, found in e.g. CBD oil or full-spectrum hemp oil, appears in numerous clinical researches as a potentially effective cannabinoid in the treatment of clinical depression. Notably, it is a 100 all-natural chemical compound of plant origin. Remarkably, clinical depression is among the three most typical mental disorders in which people resort to CBD hemp preparations such as CBD oil, complete spectrum hemp oil with CBD or CBD pills. Reports from consumers and their positive point of views on the efficiency of e.g. CBD oil or complete spectrum hemp oil with natural CBD are growing at an extraordinary rate. THC and CBD cannabinoids – distinctions The key cannabinoids in the marijuana plant are THC (Δ9-tetrahydrocannabinol) as well as CBD (cannabidiol). They reveal hostile results, which means that CBD lowers the results of THC. What are these results? THC has an intoxicating effect, triggers a sensation of euphoria, influences cognitive features, yet likewise unwinds. Large, routinely consumed dosages of THC are taken into consideration harmful to the human brain. Extreme usage of THC can lead to psychosis, lack of motivation, and also long-term unfavorable changes in cognitive feature. Both THC as well as CBD influence the endocannabinoid system in the human body. Their activity, as already pointed out, is inconsistent. Cbd-a-thc-in-the-endocannabinoid-1 system When writing photos, CBD slows down the exhaustion of anandamide resources, and also THC speeds up this procedure. Nonetheless, this does not suggest that THC is only a hazardous cannabinoid as well as should not be in the preparation whatsoever. On the contrary. Its tiny presence in hemp preparations is even required in order to obtain the so-called impact. harmony. THC in full range hemp oil exists in such a low and also, notably, lawful amount. This amount is so tiny (less than 0.2) that it does not trigger drunkenness. Interacting, THC as well as CBD have greater capacity than either particle acting alone. What is anandamide (AEA)? What is its value for individuals experiencing depression? Keep reading! CBD, Depression and also the endocannabinoid system The endocannabinoid system is a key system responsible for the regulation of standard human physiological procedures, such as energy monitoring, neurohormonal and neuroimmune links, electric motor activity, state of mind as well as inspiration, and fat metabolism. The endocannabinoid system consists of a neurotransmitter called anandamide (AEA). Anandamide is a natural chemical that is normally generated in the human mind. Its production is stimulated by e.g. exercise, as well as to a lower extent by the supposed deal with the body (massage!). Its sources are “made use of” to preserve the appropriate performance of the body, including in the field of psychological health and wellness. As displayed in this study: https://www.ncbi.nlm.nih.gov/pubmed/23580381 high degrees of anandamide are associated with a decreased threat of developing psychotic signs and symptoms. A high level of anandamide is also related to a favorable impact on the reduction of depression and anxiousness symptoms. This mechanism is still not totally recognized, but it appears rational that a strongly clinically depressed state of mind in a specific time period for a particular situation, and with the synchronised absence of activities aimed at its enhancement, causes a concentration of the increase of unfavorable thoughts. As depressive problems develop, they can develop into a lot more harmful forms of disorders, e.g. psychosis, delusions or schizophrenia. Reducing this procedure as promptly as feasible might end up being vital in the reliable treatment of mental disorders of human functioning.
CBD for Anxiousness and Anxiety: Envision that it is possible to introduce one natural prep work into your day-to-day diet plan, which can confirm to be the key to winning the fight for a calmer life for people with depressive problems. What if the addition of this prep work, created on the basis of an increasingly well-known as well as tested chemical compound of plant beginning, is not only possibly very effective, yet is not connected with the danger of side effects regular of medicinal medications? Is it even feasible? Where’s the catch? Do you wish to know even more? Read this post In this article we will certainly cover: What is anxiety? THC and CBD cannabinoids – differences Depression and the endocannabinoid system What is depression? Main interpretations suggest that depressive disorders, also understood informally as anxiety, are characterized by: sudden anxiety of an individual’s mood, in the adverse instructions, of modest to strong intensity of the intensity of the experienced modifications, for greater than a couple of weeks. There may be one or more reasons for the event of changes. It also occurs that it is hard to determine any indisputable reason. We very commonly discovered the statement that it is a civilization disease of the 21st century – it influences both older as well as more youthful individuals. Our education and learning is trivial for anxiety, not to mention our profits – it can affect anyone. Treatment of clinical depression comes down to: pharmacotherapy, psychiatric therapy and also psychoeducation, photo-therapy, electroconvulsive therapy and even more all-natural tasks related to the climax of physical activity as well as the intro of significant changes in the day-to-day diet plan. It is as part of natural techniques of fighting as well as neutralizing anxiety that the addition of marijuana prep work with cannabinoids normally occurring in the plant in the daily diet plan is obtaining more and more appeal worldwide. Cannabidiol CBD, located in e.g. CBD oil or full-spectrum hemp oil, appears in various scientific researches as a possibly effective cannabinoid in the treatment of depression. Significantly, it is a 100 natural chemical compound of plant beginning. Interestingly, anxiety is amongst the 3 most common mental illness in which individuals consider CBD hemp preparations such as CBD oil, complete range hemp oil with CBD or CBD capsules. Records from consumers as well as their positive opinions on the efficiency of e.g. CBD oil or complete spectrum hemp oil with all-natural CBD are expanding at an unprecedented pace. THC and also CBD cannabinoids – differences The main cannabinoids in the cannabis plant are THC (Δ9-tetrahydrocannabinol) as well as CBD (cannabidiol). They reveal antagonistic impacts, which indicates that CBD lowers the results of THC. What are these effects? THC has an intoxicating effect, causes a feeling of bliss, impacts cognitive functions, yet also loosens up. Large, routinely consumed dosages of THC are considered harmful to the human mind. Extreme usage of THC can bring about psychosis, lack of inspiration, as well as also irreversible unfavorable changes in cognitive function. Both THC and CBD affect the endocannabinoid system in the human body. Their action, as already mentioned, is contradictory. Cbd-a-thc-in-the-endocannabinoid-1 system When writing pictures, CBD reduces the deficiency of anandamide resources, and also THC speeds up this procedure. However, this does not imply that THC is just a damaging cannabinoid and should not remain in the preparation whatsoever. On the other hand. Its little visibility in hemp preparations is also required in order to acquire the supposed result. synergy. THC in full range hemp oil is present in such a marginal and, importantly, lawful amount. This amount is so small (less than 0.2) that it does not cause drunkenness. Collaborating, THC and also CBD have higher capacity than either particle performing alone. What is anandamide (AEA)? What is its importance for people dealing with clinical depression? Continue reading! CBD, Depression and also the endocannabinoid system The endocannabinoid system is a crucial system responsible for the regulation of standard human physical procedures, such as power administration, neurohormonal as well as neuroimmune connections, motor task, mood and also inspiration, and also fat metabolic rate. The endocannabinoid system consists of a natural chemical called anandamide (AEA). Anandamide is a natural chemical that is naturally created in the human mind. Its manufacturing is promoted by e.g. physical activity, and also to a lower level by the supposed work with the body (massage!). Its sources are “used” to preserve the appropriate performance of the body, including in the field of mental health and wellness. As received this study: https://www.ncbi.nlm.nih.gov/pubmed/23580381 high levels of anandamide are associated with a reduced danger of developing psychotic symptoms. A high level of anandamide is also connected with a positive result on the decrease of anxiety and also anxiety signs and symptoms. This mechanism is still not completely understood, yet it seems rational that a highly clinically depressed state of mind in an individual amount of time for a specific case, and with the synchronised absence of activities targeted at its enhancement, brings about a surge of the increase of adverse thoughts. As depressive disorders create, they can become a lot more harmful forms of disorders, e.g. psychosis, misconceptions or schizophrenia. Decreasing this procedure as promptly as feasible might turn out to be critical in the reliable treatment of mental disorders of human performance.
I am continually searching online for posts that can assist me. Thx!
Hey! I know this is kinda off topic however , I’d figured I’d ask. Would you be interested in trading links or maybe guest writing a blog post or vice-versa? My blog addresses a lot of the same subjects as yours and I think we could greatly benefit from each other. If you might be interested feel free to shoot me an email. I look forward to hearing from you! Wonderful blog by the way!
CBD for Anxiousness as well as Clinical Depression: Visualize that it is feasible to present one all-natural prep work right into your everyday diet, which could confirm to be the key to winning the defend a calmer life for individuals with depressive disorders. Suppose the addition of this prep work, developed on the basis of an increasingly popular and examined chemical compound of plant beginning, is not only possibly really reliable, yet is not connected with the danger of side effects typical of pharmacological medicines? Is it even feasible? Where’s the catch? Do you would like to know more? Read this write-up In this write-up we will cover: What is depression? THC and also CBD cannabinoids – differences Clinical depression and also the endocannabinoid system What is anxiety? Main interpretations suggest that depressive problems, additionally known informally as depression, are characterized by: abrupt clinical depression of an individual’s state of mind, in the adverse direction, of modest to solid intensity of the strength of the knowledgeable modifications, for more than a few weeks. There might be several factors for the incident of modifications. It also takes place that it is challenging to identify any kind of absolute reason. We extremely commonly found the statement that it is a human being condition of the 21st century – it influences both older and also more youthful people. Our education and learning is trivial for anxiety, not to mention our earnings – it can influence anyone. Treatment of depression comes down to: pharmacotherapy, psychotherapy and psychoeducation, photo-therapy, electroconvulsive therapy and also more all-natural activities associated with the rise of exercise and also the introduction of considerable adjustments in the day-to-day diet regimen. It is as part of natural approaches of fighting and counteracting clinical depression that the addition of marijuana preparations with cannabinoids naturally occurring in the plant in the day-to-day diet plan is getting increasingly more appeal in the world. Cannabidiol CBD, found in e.g. CBD oil or full-spectrum hemp oil, shows up in countless clinical studies as a potentially efficient cannabinoid in the treatment of anxiety. Significantly, it is a 100 natural chemical compound of plant origin. Remarkably, depression is among the three most usual mental illness in which individuals consider CBD hemp prep work such as CBD oil, full range hemp oil with CBD or CBD pills. Records from consumers and their favorable opinions on the efficiency of e.g. CBD oil or complete spectrum hemp oil with all-natural CBD are growing at an unprecedented pace. THC and CBD cannabinoids – distinctions The key cannabinoids in the cannabis plant are THC (Δ9-tetrahydrocannabinol) and also CBD (cannabidiol). They show hostile effects, which indicates that CBD reduces the impacts of THC. What are these effects? THC has an intoxicating result, triggers a feeling of ecstasy, impacts cognitive features, however likewise unwinds. Huge, consistently eaten doses of THC are thought about unsafe to the human brain. Excessive consumption of THC can lead to psychosis, lack of motivation, and even permanent unfavorable modifications in cognitive feature. Both THC and also CBD impact the endocannabinoid system in the body. Their action, as currently discussed, is contradictory. Cbd-a-thc-in-the-endocannabinoid-1 system When writing pictures, CBD reduces the depletion of anandamide sources, and THC quicken this procedure. Nevertheless, this does not indicate that THC is just a hazardous cannabinoid and ought to not be in the prep work at all. On the other hand. Its tiny existence in hemp prep work is also required in order to get the supposed result. synergy. THC completely spectrum hemp oil exists in such a minimal as well as, notably, legal quantity. This quantity is so tiny (less than 0.2) that it does not create drunkenness. Interacting, THC and also CBD have greater potential than either molecule performing alone. What is anandamide (AEA)? What is its significance for individuals struggling with anxiety? Continue reading! CBD, Depression and also the endocannabinoid system The endocannabinoid system is a key system in charge of the policy of standard human physical procedures, such as energy management, neurohormonal and also neuroimmune links, electric motor activity, mood as well as motivation, and also fat metabolism. The endocannabinoid system includes a natural chemical called anandamide (AEA). Anandamide is a natural chemical that is normally produced in the human brain. Its manufacturing is promoted by e.g. exercise, and to a lesser degree by the so-called work with the body (massage!). Its sources are “utilized” to keep the proper functioning of the body, including in the field of psychological health and wellness. As shown in this research: https://www.ncbi.nlm.nih.gov/pubmed/23580381 high degrees of anandamide are related to a reduced danger of creating psychotic symptoms. A high degree of anandamide is additionally connected with a favorable effect on the reduction of clinical depression as well as anxiousness signs. This system is still not totally comprehended, yet it appears sensible that a strongly depressed state of mind in a private period for a certain situation, and also with the simultaneous absence of activities targeted at its enhancement, results in a climax of the influx of unfavorable thoughts. As depressive conditions establish, they can become a lot more hazardous types of disorders, e.g. psychosis, delusions or schizophrenia. Decreasing this procedure as swiftly as feasible may end up being crucial in the efficient therapy of mental disorders of human performance.
CBD for Anxiety as well as Anxiety: Debunked Imagine that it is feasible to present one natural preparation into your everyday diet, which could show to be the trick to winning the defend a calmer life for individuals with depressive problems. What happens if the incorporation of this prep work, created on the basis of an increasingly popular as well as examined chemical substance of plant origin, is not only possibly really reliable, however is not related to the risk of side effects typical of medicinal medications? Is it even possible? Where’s the catch? Do you need to know even more? Read this write-up In this write-up we will certainly cover: What is depression? THC distinctions Anxiety and also the endocannabinoid system What is depression? Main meanings suggest that depressive problems, also recognized informally as depression, are characterized by: unexpected clinical depression of a person’s state of mind, in the adverse instructions, of moderate to strong intensity of the strength of the skilled modifications, for more than a couple of weeks. There might be several reasons for the event of adjustments. It also occurs that it is hard to recognize any indisputable reason. We extremely usually found the declaration that it is a people illness of the 21st century – it impacts both older and younger people. Our education is not important for clinical depression, let alone our earnings – it can affect anybody. Treatment of anxiety boils down to: pharmacotherapy, psychotherapy and also psychoeducation, phototherapy, electroconvulsive therapy as well as more all-natural activities associated with the climax of exercise and the intro of substantial changes in the everyday diet regimen. It is as part of all-natural methods of combating and also combating depression that the incorporation of marijuana preparations with cannabinoids naturally happening in the plant in the everyday diet is obtaining more and more appeal worldwide. Cannabidiol CBD, discovered in e.g. CBD oil or full-spectrum hemp oil, appears in various scientific researches as a potentially reliable cannabinoid in the treatment of anxiety. Importantly, it is a 100 natural chemical compound of plant beginning. Interestingly, depression is amongst the three most typical mental disorders in which patients resort to CBD hemp prep work such as CBD oil, complete range hemp oil with CBD or CBD capsules. Records from customers as well as their positive opinions on the performance of e.g. CBD oil or complete spectrum hemp oil with all-natural CBD are growing at an unmatched pace. THC as well as CBD cannabinoids – distinctions The primary cannabinoids in the marijuana plant are THC (Δ9-tetrahydrocannabinol) and CBD (cannabidiol). They reveal hostile impacts, which indicates that CBD minimizes the impacts of THC. What are these effects? THC has an envigorating effect, triggers a feeling of euphoria, affects cognitive functions, but also kicks back. Big, regularly consumed doses of THC are taken into consideration unsafe to the human brain. Excessive consumption of THC can cause psychosis, absence of inspiration, as well as even permanent adverse adjustments in cognitive function. Both THC and CBD affect the endocannabinoid system in the human body. Their activity, as currently discussed, is inconsistent. Cbd-a-thc-in-the-endocannabinoid-1 system When composing photos, CBD reduces the deficiency of anandamide resources, and THC quicken this process. Nevertheless, this does not mean that THC is only a harmful cannabinoid as well as ought to not remain in the preparation in all. On the other hand. Its tiny existence in hemp prep work is also required in order to get the so-called result. synergy. THC completely range hemp oil is present in such a minimal as well as, notably, lawful amount. This quantity is so small (less than 0.2) that it does not cause intoxication. Interacting, THC as well as CBD have better possibility than either molecule performing alone. What is anandamide (AEA)? What is its relevance for individuals suffering from anxiety? Continue reading! CBD, Anxiety and also the endocannabinoid system The endocannabinoid system is a vital system in charge of the guideline of fundamental human physiological processes, such as power monitoring, neurohormonal as well as neuroimmune connections, motor activity, state of mind and motivation, as well as fat metabolism. The endocannabinoid system consists of a neurotransmitter called anandamide (AEA). Anandamide is a natural chemical that is naturally created in the human brain. Its production is promoted by e.g. exercise, and also to a minimal level by the supposed work with the body (massage therapy!). Its sources are “used” to preserve the correct performance of the body, including in the field of psychological wellness. As received this research: https://www.ncbi.nlm.nih.gov/pubmed/23580381 high levels of anandamide are related to a reduced danger of developing psychotic signs. A high degree of anandamide is likewise associated with a positive effect on the decrease of anxiety as well as stress and anxiety symptoms. This device is still not fully understood, but it seems rational that a highly clinically depressed mood in a specific amount of time for a details situation, and with the simultaneous absence of actions focused on its improvement, causes a surge of the increase of negative ideas. As depressive disorders develop, they can develop into much more unsafe forms of conditions, e.g. psychosis, deceptions or schizophrenia. Slowing down this procedure as promptly as feasible might end up being vital in the efficient treatment of mental illness of human performance.
CBD for Anxiety and also Depression: Think of that it is feasible to introduce one all-natural prep work into your daily diet, which can prove to be the trick to winning the defend a calmer life for people with depressive problems. What if the addition of this prep work, produced on the basis of an increasingly widely known and also checked chemical substance of plant beginning, is not only possibly very efficient, however is not associated with the danger of adverse effects typical of pharmacological drugs? Is it also feasible? Where’s the catch? Do you would like to know even more? Read this article In this short article we will certainly cover: What is depression? THC and also CBD cannabinoids – differences Clinical depression as well as the endocannabinoid system What is depression? Official definitions suggest that depressive conditions, also recognized informally as clinical depression, are characterized by: unexpected clinical depression of a person’s mood, in the adverse instructions, of modest to strong strength of the strength of the skilled adjustments, for greater than a few weeks. There may be one or more factors for the incident of adjustments. It likewise occurs that it is hard to identify any type of unequivocal reason. We extremely frequently discovered the statement that it is a human being condition of the 21st century – it impacts both older and also younger individuals. Our education is trivial for anxiety, not to mention our incomes – it can influence any individual. Therapy of clinical depression boils down to: pharmacotherapy, psychotherapy as well as psychoeducation, photo-therapy, electroconvulsive therapy and even more all-natural activities connected to the surge of exercise and also the intro of considerable modifications in the daily diet plan. It is as part of natural techniques of battling and also combating depression that the addition of cannabis preparations with cannabinoids normally occurring in the plant in the day-to-day diet plan is acquiring a growing number of popularity worldwide. Cannabidiol CBD, found in e.g. CBD oil or full-spectrum hemp oil, shows up in many clinical studies as a possibly efficient cannabinoid in the therapy of depression. Importantly, it is a 100 all-natural chemical substance of plant beginning. Surprisingly, clinical depression is among the three most usual mental illness in which people turn to CBD hemp preparations such as CBD oil, full spectrum hemp oil with CBD or CBD pills. Reports from customers and also their favorable opinions on the effectiveness of e.g. CBD oil or complete spectrum hemp oil with natural CBD are growing at an unmatched rate. THC as well as CBD cannabinoids – differences The main cannabinoids in the marijuana plant are THC (Δ9-tetrahydrocannabinol) and CBD (cannabidiol). They show hostile effects, which means that CBD lowers the effects of THC. What are these impacts? THC has an envigorating effect, causes a feeling of bliss, impacts cognitive features, however additionally relaxes. Huge, on a regular basis consumed dosages of THC are considered harmful to the human mind. Excessive intake of THC can cause psychosis, absence of motivation, and also even long-term adverse adjustments in cognitive feature. Both THC as well as CBD affect the endocannabinoid system in the body. Their action, as already discussed, is contradictory. Cbd-a-thc-in-the-endocannabinoid-1 system When writing pictures, CBD reduces the deficiency of anandamide resources, as well as THC speeds up this process. Nevertheless, this does not imply that THC is only a damaging cannabinoid and must not remain in the preparation in all. On the contrary. Its little presence in hemp preparations is also essential in order to acquire the so-called result. harmony. THC in full spectrum hemp oil is present in such a limited and, notably, legal amount. This amount is so little (less than 0.2) that it does not create intoxication. Working together, THC and CBD have greater capacity than either particle performing alone. What is anandamide (AEA)? What is its relevance for people suffering from anxiety? Keep reading! CBD, Anxiety and also the endocannabinoid system The endocannabinoid system is a crucial system in charge of the regulation of basic human physical processes, such as power management, neurohormonal and also neuroimmune links, electric motor activity, mood and also inspiration, and fat metabolic rate. The endocannabinoid system includes a natural chemical called anandamide (AEA). Anandamide is a natural chemical that is normally created in the human brain. Its production is boosted by e.g. physical activity, as well as to a lower level by the so-called deal with the body (massage!). Its sources are “made use of” to maintain the correct performance of the body, including in the field of psychological wellness. As shown in this research: https://www.ncbi.nlm.nih.gov/pubmed/23580381 high levels of anandamide are connected with a reduced risk of creating psychotic signs and symptoms. A high degree of anandamide is likewise connected with a favorable effect on the decrease of depression and also anxiety signs and symptoms. This device is still not totally recognized, but it seems logical that a strongly depressed state of mind in a private amount of time for a certain situation, and with the simultaneous lack of actions targeted at its improvement, leads to an accumulation of the increase of unfavorable thoughts. As depressive problems establish, they can turn into a lot more harmful kinds of disorders, e.g. psychosis, deceptions or schizophrenia. Decreasing this process as swiftly as possible may end up being important in the effective therapy of mental disorders of human performance.
Thank you for helping out, good information. “If at first you don’t succeed, find out if the loser gets anything.” by Bill Lyon.
CBD for Stress And Anxiety and Clinical Depression: Picture that it is possible to present one natural prep work into your everyday diet regimen, which can show to be the trick to winning the fight for a calmer life for people with depressive disorders. What if the addition of this preparation, developed on the basis of a significantly widely known and tested chemical substance of plant beginning, is not just potentially really efficient, but is not associated with the threat of adverse effects normal of pharmacological drugs? Is it even possible? Where’s the catch? Do you want to know more? Read this article In this short article we will certainly cover: What is anxiety? THC distinctions Clinical depression and also the endocannabinoid system What is depression? Main definitions suggest that depressive disorders, likewise recognized colloquially as anxiety, are defined by: abrupt depression of an individual’s mood, in the negative instructions, of moderate to solid intensity of the strength of the seasoned changes, for greater than a few weeks. There might be several reasons for the occurrence of adjustments. It additionally happens that it is difficult to recognize any type of unequivocal factor. We very typically discovered the statement that it is a people condition of the 21st century – it impacts both older and younger individuals. Our education and learning is trivial for depression, not to mention our earnings – it can affect anyone. Treatment of anxiety comes down to: pharmacotherapy, psychotherapy as well as psychoeducation, phototherapy, electroconvulsive therapy as well as even more natural tasks associated with the aggravation of exercise as well as the intro of considerable adjustments in the everyday diet plan. It is as part of natural methods of dealing with and counteracting anxiety that the addition of cannabis prep work with cannabinoids normally occurring in the plant in the day-to-day diet is getting an increasing number of popularity on the planet. Cannabidiol CBD, discovered in e.g. CBD oil or full-spectrum hemp oil, appears in many clinical studies as a potentially reliable cannabinoid in the treatment of depression. Notably, it is a 100 natural chemical substance of plant origin. Remarkably, clinical depression is among the three most typical mental illness in which patients consider CBD hemp prep work such as CBD oil, complete spectrum hemp oil with CBD or CBD pills. Records from consumers and also their positive viewpoints on the performance of e.g. CBD oil or full spectrum hemp oil with all-natural CBD are expanding at an extraordinary pace. THC and CBD cannabinoids – differences The key cannabinoids in the marijuana plant are THC (Δ9-tetrahydrocannabinol) and CBD (cannabidiol). They show antagonistic effects, which suggests that CBD reduces the effects of THC. What are these effects? THC has an intoxicating effect, creates a sensation of euphoria, impacts cognitive functions, but additionally loosens up. Large, frequently eaten dosages of THC are thought about damaging to the human brain. Too much usage of THC can lead to psychosis, absence of motivation, and also also irreversible negative changes in cognitive function. Both THC as well as CBD influence the endocannabinoid system in the body. Their activity, as already discussed, is contradictory. Cbd-a-thc-in-the-endocannabinoid-1 system When writing images, CBD slows down the deficiency of anandamide resources, as well as THC quicken this procedure. Nevertheless, this does not imply that THC is only a damaging cannabinoid as well as should not be in the prep work whatsoever. However. Its little existence in hemp preparations is even necessary in order to get the supposed result. harmony. THC completely range hemp oil is present in such a limited and also, notably, legal amount. This amount is so tiny (less than 0.2) that it does not trigger drunkenness. Collaborating, THC as well as CBD have better potential than either particle performing alone. What is anandamide (AEA)? What is its significance for individuals dealing with anxiety? Continue reading! CBD, Clinical depression and the endocannabinoid system The endocannabinoid system is a vital system in charge of the guideline of fundamental human physiological procedures, such as power management, neurohormonal and also neuroimmune connections, electric motor activity, mood and also inspiration, and fat metabolism. The endocannabinoid system consists of a natural chemical called anandamide (AEA). Anandamide is a natural chemical that is normally created in the human brain. Its production is stimulated by e.g. exercise, as well as to a lesser level by the supposed deal with the body (massage therapy!). Its sources are “utilized” to keep the proper performance of the body, including in the field of mental wellness. As displayed in this research study: https://www.ncbi.nlm.nih.gov/pubmed/23580381 high levels of anandamide are related to a reduced risk of developing psychotic signs and symptoms. A high degree of anandamide is additionally associated with a favorable result on the decrease of depression and also stress and anxiety signs and symptoms. This device is still not fully understood, but it appears logical that a highly depressed mood in an individual period for a details case, as well as with the synchronised absence of actions focused on its improvement, brings about a surge of the influx of adverse thoughts. As depressive conditions develop, they can develop into even more dangerous types of disorders, e.g. psychosis, delusions or schizophrenia. Reducing this process as swiftly as feasible may turn out to be important in the effective therapy of mental illness of human performance.
CBD for Anxiousness and Anxiety: Debunked Imagine that it is possible to present one all-natural prep work right into your everyday diet, which might verify to be the trick to winning the fight for a calmer life for people with depressive problems. What if the addition of this preparation, produced on the basis of a significantly popular and tested chemical compound of plant origin, is not just possibly extremely efficient, but is not connected with the risk of adverse effects regular of medicinal medicines? Is it even feasible? Where’s the catch? Do you need to know even more? Read this article In this write-up we will cover: What is clinical depression? THC distinctions Depression as well as the endocannabinoid system What is clinical depression? Official meanings recommend that depressive disorders, additionally understood informally as depression, are characterized by: sudden anxiety of an individual’s mood, in the unfavorable direction, of modest to solid intensity of the intensity of the experienced changes, for more than a couple of weeks. There may be one or more factors for the occurrence of modifications. It also takes place that it is difficult to determine any type of unquestionable reason. We extremely frequently stumbled upon the declaration that it is a people condition of the 21st century – it affects both older as well as more youthful individuals. Our education and learning is not important for depression, not to mention our incomes – it can impact anybody. Treatment of depression boils down to: pharmacotherapy, psychotherapy and also psychoeducation, photo-therapy, electroconvulsive therapy and also even more natural activities related to the accumulation of exercise and also the intro of significant changes in the everyday diet plan. It is as part of all-natural approaches of combating as well as neutralizing clinical depression that the incorporation of cannabis preparations with cannabinoids naturally occurring in the plant in the day-to-day diet regimen is acquiring increasingly more popularity worldwide. Cannabidiol CBD, located in e.g. CBD oil or full-spectrum hemp oil, appears in many scientific researches as a potentially reliable cannabinoid in the therapy of clinical depression. Significantly, it is a 100 natural chemical substance of plant origin. Remarkably, depression is amongst the 3 most common mental illness in which patients turn to CBD hemp prep work such as CBD oil, complete spectrum hemp oil with CBD or CBD pills. Reports from customers and also their favorable point of views on the effectiveness of e.g. CBD oil or full spectrum hemp oil with natural CBD are expanding at an extraordinary speed. THC and also CBD cannabinoids – differences The primary cannabinoids in the marijuana plant are THC (Δ9-tetrahydrocannabinol) and CBD (cannabidiol). They reveal hostile impacts, which means that CBD lowers the effects of THC. What are these impacts? THC has an envigorating result, causes a feeling of bliss, influences cognitive features, yet also kicks back. Large, regularly consumed doses of THC are taken into consideration harmful to the human brain. Too much usage of THC can result in psychosis, absence of motivation, as well as also irreversible adverse adjustments in cognitive function. Both THC as well as CBD influence the endocannabinoid system in the body. Their activity, as already discussed, is contradictory. Cbd-a-thc-in-the-endocannabinoid-1 system When creating photos, CBD decreases the depletion of anandamide resources, as well as THC quicken this procedure. Nonetheless, this does not suggest that THC is only a dangerous cannabinoid and needs to not remain in the preparation in all. On the contrary. Its tiny existence in hemp preparations is also necessary in order to acquire the so-called effect. harmony. THC in full range hemp oil is present in such a minimal as well as, notably, legal quantity. This quantity is so tiny (less than 0.2) that it does not create drunkenness. Collaborating, THC and CBD have higher possibility than either particle acting alone. What is anandamide (AEA)? What is its importance for individuals dealing with depression? Read on! CBD, Depression and the endocannabinoid system The endocannabinoid system is a vital system responsible for the regulation of fundamental human physiological procedures, such as power administration, neurohormonal and also neuroimmune links, motor activity, state of mind as well as inspiration, and also fat metabolism. The endocannabinoid system includes a natural chemical called anandamide (AEA). Anandamide is a neurotransmitter that is normally created in the human brain. Its manufacturing is boosted by e.g. exercise, and also to a lesser extent by the so-called collaborate with the body (massage!). Its resources are “used” to preserve the appropriate functioning of the body, consisting of in the field of mental health and wellness. As displayed in this research: https://www.ncbi.nlm.nih.gov/pubmed/23580381 high degrees of anandamide are associated with a decreased risk of establishing psychotic symptoms. A high degree of anandamide is likewise related to a favorable impact on the decrease of depression and anxiety signs and symptoms. This mechanism is still not totally comprehended, yet it seems logical that a highly depressed state of mind in a private time period for a specific instance, and also with the synchronised lack of actions aimed at its enhancement, brings about an accumulation of the increase of adverse thoughts. As depressive conditions develop, they can develop into a lot more dangerous forms of problems, e.g. psychosis, misconceptions or schizophrenia. Slowing down this process as rapidly as feasible may become important in the reliable therapy of mental illness of human functioning.
CBD for Anxiousness as well as Anxiety: Visualize that it is feasible to present one natural preparation right into your day-to-day diet, which could show to be the trick to winning the fight for a calmer life for people with depressive problems. Suppose the incorporation of this prep work, developed on the basis of a progressively popular as well as checked chemical substance of plant origin, is not only potentially very efficient, but is not associated with the risk of negative effects regular of pharmacological medications? Is it even feasible? Where’s the catch? Do you need to know more? Read this article In this post we will certainly cover: What is anxiety? THC distinctions Depression and also the endocannabinoid system What is clinical depression? Main interpretations recommend that depressive disorders, likewise recognized colloquially as anxiety, are characterized by: unexpected depression of an individual’s state of mind, in the adverse instructions, of modest to solid strength of the strength of the knowledgeable changes, for greater than a few weeks. There might be one or more factors for the event of changes. It additionally occurs that it is difficult to identify any kind of unquestionable reason. We extremely typically found the declaration that it is a world condition of the 21st century – it impacts both older as well as more youthful people. Our education and learning is not important for anxiety, let alone our profits – it can impact anyone. Treatment of anxiety comes down to: pharmacotherapy, psychotherapy and also psychoeducation, phototherapy, electroconvulsive therapy and also more natural activities related to the aggravation of physical activity as well as the intro of significant adjustments in the everyday diet. It is as part of all-natural approaches of fighting and also neutralizing clinical depression that the inclusion of cannabis prep work with cannabinoids normally happening in the plant in the day-to-day diet regimen is getting more and more popularity in the world. Cannabidiol CBD, found in e.g. CBD oil or full-spectrum hemp oil, appears in many clinical research studies as a possibly efficient cannabinoid in the therapy of anxiety. Importantly, it is a 100 all-natural chemical substance of plant beginning. Interestingly, clinical depression is among the 3 most common mental illness in which patients turn to CBD hemp prep work such as CBD oil, complete range hemp oil with CBD or CBD pills. Records from customers as well as their positive opinions on the performance of e.g. CBD oil or full spectrum hemp oil with natural CBD are growing at an extraordinary speed. THC and also CBD cannabinoids – differences The main cannabinoids in the marijuana plant are THC (Δ9-tetrahydrocannabinol) and also CBD (cannabidiol). They reveal antagonistic impacts, which suggests that CBD decreases the results of THC. What are these impacts? THC has an intoxicating result, creates a sensation of bliss, impacts cognitive functions, however additionally kicks back. Big, regularly taken in dosages of THC are taken into consideration dangerous to the human brain. Extreme consumption of THC can cause psychosis, lack of motivation, as well as even long-term unfavorable changes in cognitive function. Both THC as well as CBD impact the endocannabinoid system in the body. Their action, as already mentioned, is contradictory. Cbd-a-thc-in-the-endocannabinoid-1 system When creating photos, CBD slows down the exhaustion of anandamide resources, and THC quicken this process. Nonetheless, this does not imply that THC is just a hazardous cannabinoid as well as ought to not remain in the prep work in all. However. Its small presence in hemp preparations is also needed in order to obtain the so-called effect. harmony. THC completely range hemp oil exists in such a limited as well as, significantly, legal quantity. This amount is so small (less than 0.2) that it does not trigger drunkenness. Working together, THC and CBD have better possibility than either molecule performing alone. What is anandamide (AEA)? What is its relevance for individuals suffering from anxiety? Keep reading! CBD, Anxiety as well as the endocannabinoid system The endocannabinoid system is an essential system in charge of the law of basic human physical processes, such as power administration, neurohormonal and also neuroimmune connections, electric motor task, state of mind and also inspiration, as well as fat metabolic rate. The endocannabinoid system consists of a neurotransmitter called anandamide (AEA). Anandamide is a natural chemical that is normally generated in the human mind. Its manufacturing is stimulated by e.g. exercise, and to a minimal level by the supposed deal with the body (massage!). Its sources are “used” to keep the appropriate functioning of the body, consisting of in the field of psychological health. As shown in this research: https://www.ncbi.nlm.nih.gov/pubmed/23580381 high levels of anandamide are connected with a lowered risk of establishing psychotic signs and symptoms. A high degree of anandamide is likewise connected with a favorable effect on the decrease of anxiety as well as anxiousness symptoms. This system is still not fully comprehended, yet it seems rational that a highly clinically depressed state of mind in a specific amount of time for a details case, as well as with the simultaneous lack of actions targeted at its renovation, results in an accumulation of the increase of adverse thoughts. As depressive conditions establish, they can turn into a lot more hazardous forms of disorders, e.g. psychosis, misconceptions or schizophrenia. Decreasing this procedure as quickly as feasible might end up being vital in the reliable therapy of mental disorders of human performance.
Great write-up, I am normal visitor of one’s web site, maintain up the nice operate, and It is going to be a regular visitor for a long time.
I as well as my pals have already been analyzing the best solutions from your site then all of the sudden I got a horrible feeling I never thanked the web blog owner for those techniques. Those boys ended up for that reason glad to study them and have unquestionably been taking advantage of these things. Thank you for simply being very kind and for figuring out certain beneficial topics most people are really eager to be informed on. Our own sincere regret for not saying thanks to you sooner.
Confira as Ofertas do Dia, Ofertas Relâmpago, Melhores Ofertas e outras Ofertas com tempo limitado da Amazon.com.br
Hello! I’m at work surfing around your blog from my new iphone 4! Just wanted to say I love reading through your blog and look forward to all your posts! Keep up the outstanding work!
That is the best weblog for anyone who desires to find out about this topic. You notice a lot its nearly hard to argue with you (not that I truly would need…HaHa). You undoubtedly put a brand new spin on a topic thats been written about for years. Great stuff, just nice!
Very good written article. It will be beneficial to anybody who employess it, as well as yours truly :). Keep up the good work – for sure i will check out more posts.
This is the right blog for anyone who wants to find out about this topic. You realize so much its almost hard to argue with you (not that I actually would want…HaHa). You definitely put a new spin on a topic thats been written about for years. Great stuff, just great!
Manufactured to API 5L specifications, Trident Steel'’ s offers timetable 40 as well as 80 ERW line pipeline in grades from B to X70. A cost-efficient alternative for pipeline, our high return ERW pipe is typically utilized for midstream applications as well as is readily available for same-day delivery. Obtain a quote today!
I was recommended this blog by my cousin. I am not sure whether this post is written by him as no one else know such detailed about my trouble. You are wonderful! Thanks!
CBD for Stress And Anxiety as well as Anxiety: Demystified Imagine that it is possible to introduce one all-natural prep work right into your everyday diet plan, which can confirm to be the trick to winning the defend a calmer life for people with depressive disorders. What if the inclusion of this prep work, developed on the basis of a progressively popular and also examined chemical substance of plant beginning, is not just potentially really effective, but is not connected with the threat of negative effects typical of pharmacological medications? Is it also feasible? Where’s the catch? Do you wish to know even more? Read this write-up In this post we will cover: What is anxiety? THC distinctions Anxiety as well as the endocannabinoid system What is clinical depression? Official interpretations suggest that depressive conditions, additionally known informally as depression, are identified by: sudden depression of a person’s state of mind, in the unfavorable instructions, of modest to solid strength of the strength of the knowledgeable adjustments, for greater than a few weeks. There might be several reasons for the occurrence of adjustments. It additionally takes place that it is difficult to recognize any type of unequivocal factor. We extremely typically found the declaration that it is a world disease of the 21st century – it impacts both older as well as younger individuals. Our education and learning is trivial for depression, let alone our incomes – it can influence anybody. Therapy of clinical depression comes down to: pharmacotherapy, psychotherapy as well as psychoeducation, photo-therapy, electroconvulsive therapy and more all-natural activities associated with the accumulation of physical activity and the introduction of significant modifications in the everyday diet plan. It is as part of natural techniques of battling and combating anxiety that the incorporation of cannabis prep work with cannabinoids normally taking place in the plant in the daily diet plan is getting increasingly more popularity in the world. Cannabidiol CBD, located in e.g. CBD oil or full-spectrum hemp oil, appears in countless clinical studies as a potentially effective cannabinoid in the treatment of depression. Importantly, it is a 100 natural chemical substance of plant origin. Interestingly, anxiety is among the 3 most common mental illness in which clients consider CBD hemp prep work such as CBD oil, complete range hemp oil with CBD or CBD capsules. Records from consumers as well as their positive opinions on the efficiency of e.g. CBD oil or complete range hemp oil with natural CBD are growing at an unprecedented pace. THC as well as CBD cannabinoids – distinctions The main cannabinoids in the cannabis plant are THC (Δ9-tetrahydrocannabinol) and CBD (cannabidiol). They show hostile effects, which indicates that CBD reduces the results of THC. What are these effects? THC has an envigorating result, creates a sensation of euphoria, influences cognitive features, but additionally loosens up. Huge, regularly taken in dosages of THC are considered harmful to the human brain. Excessive usage of THC can bring about psychosis, lack of motivation, and also also irreversible unfavorable changes in cognitive feature. Both THC and CBD influence the endocannabinoid system in the body. Their action, as currently pointed out, is contradictory. Cbd-a-thc-in-the-endocannabinoid-1 system When writing pictures, CBD decreases the exhaustion of anandamide resources, and THC quicken this process. However, this does not mean that THC is only an unsafe cannabinoid as well as should not be in the prep work in any way. On the other hand. Its little presence in hemp preparations is also required in order to acquire the so-called result. harmony. THC in full spectrum hemp oil is present in such a marginal and also, importantly, legal quantity. This quantity is so tiny (less than 0.2) that it does not trigger drunkenness. Working together, THC and also CBD have higher capacity than either molecule performing alone. What is anandamide (AEA)? What is its importance for people experiencing depression? Read on! CBD, Clinical depression and also the endocannabinoid system The endocannabinoid system is a crucial system in charge of the guideline of basic human physical processes, such as power management, neurohormonal and also neuroimmune connections, electric motor activity, mood and inspiration, and fat metabolism. The endocannabinoid system consists of a natural chemical called anandamide (AEA). Anandamide is a natural chemical that is normally produced in the human mind. Its production is boosted by e.g. physical activity, and to a minimal extent by the supposed work with the body (massage!). Its sources are “used” to preserve the proper functioning of the body, including in the field of mental wellness. As shown in this research: https://www.ncbi.nlm.nih.gov/pubmed/23580381 high degrees of anandamide are related to a decreased danger of developing psychotic signs and symptoms. A high level of anandamide is additionally connected with a favorable effect on the reduction of anxiety as well as stress and anxiety signs and symptoms. This system is still not fully comprehended, however it appears logical that a strongly depressed mood in an individual amount of time for a certain situation, and also with the simultaneous absence of actions aimed at its renovation, results in a concentration of the influx of unfavorable ideas. As depressive conditions create, they can develop into much more hazardous forms of problems, e.g. psychosis, deceptions or schizophrenia. Slowing down this procedure as quickly as feasible might end up being vital in the efficient therapy of mental disorders of human functioning.
CBD for Anxiousness and also Depression: Think of that it is possible to present one all-natural preparation right into your daily diet, which could verify to be the secret to winning the defend a calmer life for individuals with depressive problems. What if the addition of this prep work, produced on the basis of a progressively widely known and examined chemical compound of plant origin, is not just potentially extremely efficient, but is not connected with the threat of negative effects typical of pharmacological drugs? Is it also feasible? Where’s the catch? Do you need to know more? Read this short article In this write-up we will cover: What is anxiety? THC distinctions Clinical depression and also the endocannabinoid system What is depression? Main definitions suggest that depressive disorders, likewise understood informally as depression, are identified by: unexpected clinical depression of a person’s state of mind, in the unfavorable direction, of modest to solid strength of the strength of the seasoned modifications, for greater than a couple of weeks. There may be one or more reasons for the occurrence of modifications. It additionally takes place that it is difficult to identify any indisputable factor. We very usually stumbled upon the statement that it is a human being illness of the 21st century – it affects both older as well as younger individuals. Our education is not important for depression, let alone our revenues – it can impact anybody. Treatment of depression comes down to: pharmacotherapy, psychiatric therapy and also psychoeducation, photo-therapy, electroconvulsive therapy and more natural activities related to the climax of physical activity and the intro of significant changes in the everyday diet regimen. It is as part of natural methods of battling and also counteracting depression that the addition of cannabis preparations with cannabinoids naturally happening in the plant in the everyday diet plan is gaining increasingly more appeal in the world. Cannabidiol CBD, found in e.g. CBD oil or full-spectrum hemp oil, shows up in numerous clinical studies as a potentially efficient cannabinoid in the therapy of anxiety. Significantly, it is a 100 all-natural chemical substance of plant origin. Interestingly, depression is amongst the three most common mental illness in which patients consider CBD hemp prep work such as CBD oil, complete range hemp oil with CBD or CBD pills. Reports from customers as well as their positive point of views on the efficiency of e.g. CBD oil or full range hemp oil with natural CBD are expanding at an unprecedented pace. THC as well as CBD cannabinoids – differences The key cannabinoids in the cannabis plant are THC (Δ9-tetrahydrocannabinol) and CBD (cannabidiol). They show antagonistic effects, which means that CBD reduces the results of THC. What are these impacts? THC has an intoxicating impact, causes a sensation of euphoria, impacts cognitive functions, yet also unwinds. Big, regularly eaten doses of THC are thought about harmful to the human brain. Excessive intake of THC can cause psychosis, absence of inspiration, as well as also irreversible negative modifications in cognitive feature. Both THC as well as CBD impact the endocannabinoid system in the body. Their action, as already mentioned, is contradictory. Cbd-a-thc-in-the-endocannabinoid-1 system When creating pictures, CBD reduces the exhaustion of anandamide sources, and also THC quicken this process. However, this does not mean that THC is only a harmful cannabinoid and should not be in the preparation in any way. On the contrary. Its tiny visibility in hemp preparations is also essential in order to get the so-called impact. synergy. THC completely range hemp oil exists in such a low and also, significantly, legal amount. This amount is so small (less than 0.2) that it does not cause drunkenness. Collaborating, THC as well as CBD have greater capacity than either molecule acting alone. What is anandamide (AEA)? What is its importance for individuals dealing with depression? Keep reading! CBD, Clinical depression and also the endocannabinoid system The endocannabinoid system is a vital system responsible for the law of basic human physiological processes, such as energy administration, neurohormonal and also neuroimmune links, motor task, state of mind and also inspiration, as well as fat metabolic rate. The endocannabinoid system consists of a neurotransmitter called anandamide (AEA). Anandamide is a natural chemical that is normally created in the human brain. Its production is stimulated by e.g. exercise, and also to a minimal level by the so-called work with the body (massage therapy!). Its resources are “utilized” to keep the appropriate performance of the body, including in the field of mental health and wellness. As shown in this research: https://www.ncbi.nlm.nih.gov/pubmed/23580381 high degrees of anandamide are related to a reduced danger of creating psychotic symptoms. A high level of anandamide is additionally related to a positive result on the reduction of clinical depression as well as stress and anxiety signs. This mechanism is still not completely understood, yet it seems logical that a strongly clinically depressed state of mind in a specific time period for a specific instance, as well as with the synchronised absence of activities focused on its renovation, results in an augmentation of the influx of negative ideas. As depressive conditions establish, they can turn into a lot more unsafe forms of disorders, e.g. psychosis, deceptions or schizophrenia. Decreasing this procedure as swiftly as feasible might turn out to be critical in the reliable therapy of mental disorders of human functioning.
CBD for Anxiousness as well as Depression: Envision that it is feasible to introduce one all-natural preparation into your daily diet regimen, which could show to be the key to winning the defend a calmer life for individuals with depressive problems. Suppose the inclusion of this prep work, created on the basis of a significantly well-known as well as examined chemical substance of plant origin, is not only potentially very effective, yet is not associated with the threat of adverse effects regular of medicinal medicines? Is it even possible? Where’s the catch? Do you would like to know even more? Read this post In this article we will certainly cover: What is anxiety? THC as well as CBD cannabinoids – differences Clinical depression and also the endocannabinoid system What is depression? Main interpretations suggest that depressive problems, likewise understood informally as clinical depression, are defined by: unexpected depression of an individual’s mood, in the adverse instructions, of moderate to strong strength of the intensity of the experienced adjustments, for more than a couple of weeks. There might be several factors for the incident of modifications. It additionally happens that it is challenging to recognize any unquestionable factor. We extremely usually found the statement that it is a people illness of the 21st century – it affects both older and also more youthful people. Our education is not important for clinical depression, let alone our earnings – it can influence anybody. Therapy of anxiety boils down to: pharmacotherapy, psychiatric therapy as well as psychoeducation, phototherapy, electroconvulsive therapy and even more natural tasks related to the intensification of physical activity and also the intro of considerable modifications in the daily diet regimen. It is as part of natural methods of combating as well as combating depression that the inclusion of cannabis preparations with cannabinoids naturally taking place in the plant in the day-to-day diet plan is gaining increasingly more appeal on the planet. Cannabidiol CBD, located in e.g. CBD oil or full-spectrum hemp oil, appears in countless clinical researches as a possibly reliable cannabinoid in the treatment of clinical depression. Importantly, it is a 100 all-natural chemical compound of plant beginning. Remarkably, depression is among the 3 most common mental disorders in which patients turn to CBD hemp prep work such as CBD oil, complete spectrum hemp oil with CBD or CBD capsules. Records from customers and also their positive point of views on the effectiveness of e.g. CBD oil or complete spectrum hemp oil with natural CBD are expanding at an unmatched pace. THC as well as CBD cannabinoids – distinctions The primary cannabinoids in the marijuana plant are THC (Δ9-tetrahydrocannabinol) and CBD (cannabidiol). They reveal hostile impacts, which implies that CBD lowers the impacts of THC. What are these effects? THC has an envigorating impact, triggers a sensation of bliss, affects cognitive functions, however also unwinds. Big, on a regular basis taken in dosages of THC are considered damaging to the human brain. Excessive intake of THC can bring about psychosis, absence of inspiration, as well as also irreversible negative changes in cognitive feature. Both THC and CBD influence the endocannabinoid system in the human body. Their activity, as already pointed out, is inconsistent. Cbd-a-thc-in-the-endocannabinoid-1 system When creating pictures, CBD slows down the depletion of anandamide sources, and THC quicken this procedure. Nonetheless, this does not mean that THC is just a harmful cannabinoid and ought to not be in the prep work in any way. However. Its tiny presence in hemp prep work is even necessary in order to obtain the supposed effect. synergy. THC completely range hemp oil is present in such a minimal and also, importantly, legal quantity. This amount is so small (less than 0.2) that it does not cause drunkenness. Working together, THC and also CBD have better potential than either particle performing alone. What is anandamide (AEA)? What is its value for individuals experiencing depression? Read on! CBD, Anxiety as well as the endocannabinoid system The endocannabinoid system is a vital system in charge of the regulation of standard human physiological procedures, such as energy management, neurohormonal as well as neuroimmune connections, motor task, state of mind as well as motivation, and also fat metabolism. The endocannabinoid system includes a neurotransmitter called anandamide (AEA). Anandamide is a natural chemical that is naturally generated in the human mind. Its production is boosted by e.g. physical activity, as well as to a minimal extent by the so-called collaborate with the body (massage therapy!). Its sources are “utilized” to keep the appropriate functioning of the body, consisting of in the field of psychological wellness. As shown in this research: https://www.ncbi.nlm.nih.gov/pubmed/23580381 high degrees of anandamide are connected with a reduced danger of developing psychotic signs. A high degree of anandamide is also related to a positive result on the reduction of anxiety as well as stress and anxiety signs. This device is still not totally understood, yet it seems sensible that a strongly clinically depressed mood in an individual period for a certain situation, as well as with the synchronised lack of activities focused on its improvement, causes an aggravation of the increase of unfavorable thoughts. As depressive conditions create, they can turn into even more harmful kinds of problems, e.g. psychosis, delusions or schizophrenia. Decreasing this procedure as swiftly as possible may become vital in the efficient therapy of mental illness of human functioning.
CBD for Stress And Anxiety and Anxiety: Picture that it is feasible to introduce one all-natural prep work right into your day-to-day diet plan, which might confirm to be the trick to winning the defend a calmer life for individuals with depressive conditions. Suppose the addition of this preparation, produced on the basis of a significantly widely known and also tested chemical substance of plant beginning, is not only potentially extremely efficient, but is not related to the danger of adverse effects normal of medicinal medications? Is it also possible? Where’s the catch? Do you want to know more? Read this short article In this post we will certainly cover: What is depression? THC distinctions Anxiety as well as the endocannabinoid system What is clinical depression? Official meanings recommend that depressive problems, additionally known informally as clinical depression, are defined by: unexpected clinical depression of a person’s state of mind, in the adverse instructions, of moderate to solid intensity of the intensity of the knowledgeable modifications, for more than a couple of weeks. There might be one or more reasons for the incident of changes. It also takes place that it is difficult to identify any type of unquestionable reason. We very frequently come across the declaration that it is a people illness of the 21st century – it impacts both older as well as more youthful people. Our education is not important for depression, not to mention our earnings – it can impact anybody. Treatment of anxiety comes down to: pharmacotherapy, psychiatric therapy and psychoeducation, phototherapy, electroconvulsive therapy as well as even more all-natural tasks related to the increase of exercise and the intro of significant adjustments in the daily diet regimen. It is as part of all-natural methods of fighting and also combating clinical depression that the incorporation of cannabis prep work with cannabinoids naturally taking place in the plant in the everyday diet regimen is acquiring more and more appeal on the planet. Cannabidiol CBD, found in e.g. CBD oil or full-spectrum hemp oil, shows up in many scientific research studies as a potentially effective cannabinoid in the treatment of depression. Notably, it is a 100 all-natural chemical compound of plant beginning. Surprisingly, anxiety is among the three most usual mental disorders in which clients turn to CBD hemp preparations such as CBD oil, full spectrum hemp oil with CBD or CBD pills. Reports from customers and their positive viewpoints on the efficiency of e.g. CBD oil or full range hemp oil with all-natural CBD are expanding at an unprecedented rate. THC and also CBD cannabinoids – distinctions The main cannabinoids in the marijuana plant are THC (Δ9-tetrahydrocannabinol) as well as CBD (cannabidiol). They reveal antagonistic results, which implies that CBD lowers the effects of THC. What are these results? THC has an envigorating result, causes a feeling of euphoria, affects cognitive features, however additionally kicks back. Huge, consistently consumed doses of THC are taken into consideration damaging to the human mind. Too much usage of THC can result in psychosis, absence of motivation, as well as even permanent adverse adjustments in cognitive feature. Both THC as well as CBD impact the endocannabinoid system in the body. Their action, as already stated, is contradictory. Cbd-a-thc-in-the-endocannabinoid-1 system When writing pictures, CBD decreases the exhaustion of anandamide resources, as well as THC accelerate this procedure. However, this does not indicate that THC is just a dangerous cannabinoid and ought to not remain in the prep work in any way. On the other hand. Its tiny existence in hemp prep work is even essential in order to get the so-called effect. synergy. THC in full spectrum hemp oil is present in such a marginal as well as, notably, lawful quantity. This quantity is so small (less than 0.2) that it does not trigger drunkenness. Collaborating, THC and also CBD have better capacity than either molecule acting alone. What is anandamide (AEA)? What is its relevance for people suffering from clinical depression? Keep reading! CBD, Anxiety and also the endocannabinoid system The endocannabinoid system is a vital system responsible for the regulation of basic human physiological procedures, such as energy administration, neurohormonal as well as neuroimmune connections, motor task, mood as well as inspiration, and also fat metabolism. The endocannabinoid system includes a neurotransmitter called anandamide (AEA). Anandamide is a natural chemical that is normally created in the human mind. Its manufacturing is promoted by e.g. physical activity, and also to a lesser degree by the supposed collaborate with the body (massage!). Its resources are “made use of” to keep the proper performance of the body, including in the field of psychological wellness. As shown in this study: https://www.ncbi.nlm.nih.gov/pubmed/23580381 high levels of anandamide are connected with a lowered danger of creating psychotic signs and symptoms. A high degree of anandamide is additionally connected with a favorable effect on the decrease of anxiety and also anxiousness signs. This system is still not totally understood, yet it appears rational that a strongly depressed state of mind in a private amount of time for a particular instance, as well as with the synchronised lack of activities aimed at its enhancement, results in an augmentation of the influx of adverse thoughts. As depressive conditions develop, they can develop into much more unsafe forms of conditions, e.g. psychosis, misconceptions or schizophrenia. Slowing down this procedure as rapidly as feasible might become important in the reliable therapy of mental illness of human functioning.
CBD for Anxiousness as well as Depression: Envision that it is possible to present one natural prep work right into your everyday diet plan, which might prove to be the trick to winning the defend a calmer life for individuals with depressive problems. What happens if the inclusion of this prep work, developed on the basis of a progressively well-known as well as tested chemical compound of plant origin, is not just potentially really effective, yet is not connected with the risk of adverse effects common of medicinal drugs? Is it even feasible? Where’s the catch? Do you would like to know even more? Read this article In this write-up we will certainly cover: What is depression? THC and CBD cannabinoids – differences Anxiety and the endocannabinoid system What is depression? Official meanings recommend that depressive disorders, additionally understood colloquially as depression, are identified by: sudden clinical depression of a person’s mood, in the adverse instructions, of modest to solid strength of the intensity of the knowledgeable modifications, for more than a few weeks. There might be one or more factors for the incident of changes. It likewise occurs that it is challenging to recognize any type of absolute factor. We very commonly stumbled upon the declaration that it is a human being illness of the 21st century – it affects both older and also more youthful individuals. Our education and learning is trivial for anxiety, not to mention our revenues – it can impact any individual. Therapy of depression comes down to: pharmacotherapy, psychotherapy as well as psychoeducation, photo-therapy, electroconvulsive therapy and more natural activities related to the accumulation of physical activity and also the introduction of substantial changes in the day-to-day diet. It is as part of natural techniques of battling as well as counteracting anxiety that the inclusion of marijuana prep work with cannabinoids naturally occurring in the plant in the day-to-day diet is getting a growing number of popularity in the world. Cannabidiol CBD, discovered in e.g. CBD oil or full-spectrum hemp oil, shows up in many scientific researches as a potentially efficient cannabinoid in the treatment of depression. Notably, it is a 100 natural chemical compound of plant beginning. Surprisingly, clinical depression is among the three most common mental disorders in which individuals consider CBD hemp preparations such as CBD oil, complete range hemp oil with CBD or CBD capsules. Records from customers and also their positive opinions on the effectiveness of e.g. CBD oil or complete spectrum hemp oil with all-natural CBD are expanding at an extraordinary speed. THC and CBD cannabinoids – differences The key cannabinoids in the cannabis plant are THC (Δ9-tetrahydrocannabinol) as well as CBD (cannabidiol). They show hostile impacts, which suggests that CBD reduces the effects of THC. What are these results? THC has an envigorating impact, triggers a sensation of euphoria, impacts cognitive features, but additionally relaxes. Big, frequently eaten doses of THC are thought about dangerous to the human brain. Excessive intake of THC can lead to psychosis, lack of motivation, as well as even irreversible adverse modifications in cognitive feature. Both THC as well as CBD influence the endocannabinoid system in the body. Their activity, as already stated, is inconsistent. Cbd-a-thc-in-the-endocannabinoid-1 system When creating pictures, CBD slows down the deficiency of anandamide resources, and THC accelerate this procedure. However, this does not suggest that THC is only a harmful cannabinoid and needs to not remain in the prep work in all. On the contrary. Its tiny presence in hemp prep work is also required in order to acquire the so-called effect. synergy. THC in full range hemp oil exists in such a minimal as well as, notably, lawful quantity. This amount is so small (less than 0.2) that it does not trigger drunkenness. Working together, THC and also CBD have better possibility than either particle performing alone. What is anandamide (AEA)? What is its relevance for individuals dealing with depression? Continue reading! CBD, Anxiety and the endocannabinoid system The endocannabinoid system is a crucial system in charge of the guideline of basic human physiological procedures, such as power administration, neurohormonal and neuroimmune connections, electric motor task, state of mind as well as inspiration, and also fat metabolic rate. The endocannabinoid system includes a neurotransmitter called anandamide (AEA). Anandamide is a natural chemical that is naturally generated in the human brain. Its production is promoted by e.g. physical activity, as well as to a lower extent by the supposed work with the body (massage therapy!). Its resources are “utilized” to preserve the appropriate performance of the body, consisting of in the field of psychological health. As shown in this research study: https://www.ncbi.nlm.nih.gov/pubmed/23580381 high degrees of anandamide are related to a reduced danger of establishing psychotic signs. A high degree of anandamide is likewise associated with a positive result on the reduction of clinical depression and also anxiety signs. This mechanism is still not fully recognized, but it seems sensible that a highly depressed mood in an individual time period for a details situation, as well as with the synchronised absence of actions aimed at its renovation, causes a concentration of the increase of unfavorable ideas. As depressive conditions establish, they can become a lot more hazardous types of problems, e.g. psychosis, misconceptions or schizophrenia. Decreasing this process as promptly as feasible may end up being crucial in the reliable treatment of mental disorders of human functioning.
CBD for Stress And Anxiety as well as Anxiety: Think of that it is feasible to present one natural prep work into your everyday diet plan, which can prove to be the trick to winning the defend a calmer life for individuals with depressive conditions. What if the incorporation of this prep work, produced on the basis of a significantly popular and also evaluated chemical substance of plant origin, is not just potentially really reliable, but is not related to the risk of negative effects regular of pharmacological medicines? Is it also possible? Where’s the catch? Do you wish to know even more? Read this write-up In this write-up we will cover: What is clinical depression? THC distinctions Clinical depression as well as the endocannabinoid system What is anxiety? Main meanings recommend that depressive conditions, also recognized colloquially as clinical depression, are identified by: abrupt clinical depression of an individual’s mood, in the unfavorable instructions, of modest to solid intensity of the strength of the skilled modifications, for more than a couple of weeks. There may be one or more reasons for the event of modifications. It likewise occurs that it is hard to recognize any type of unquestionable factor. We extremely frequently encountered the declaration that it is a world illness of the 21st century – it affects both older and also more youthful individuals. Our education is not important for clinical depression, not to mention our earnings – it can influence any individual. Therapy of anxiety comes down to: pharmacotherapy, psychiatric therapy and psychoeducation, phototherapy, electroconvulsive therapy and also even more all-natural tasks related to the climax of physical activity and the introduction of significant modifications in the day-to-day diet. It is as part of all-natural methods of battling as well as neutralizing anxiety that the incorporation of marijuana preparations with cannabinoids naturally occurring in the plant in the day-to-day diet plan is obtaining more and more appeal worldwide. Cannabidiol CBD, located in e.g. CBD oil or full-spectrum hemp oil, shows up in countless clinical studies as a potentially efficient cannabinoid in the treatment of clinical depression. Importantly, it is a 100 all-natural chemical substance of plant beginning. Remarkably, depression is among the 3 most usual mental disorders in which people turn to CBD hemp prep work such as CBD oil, complete spectrum hemp oil with CBD or CBD pills. Records from consumers as well as their positive point of views on the effectiveness of e.g. CBD oil or full spectrum hemp oil with all-natural CBD are growing at an unprecedented speed. THC and also CBD cannabinoids – distinctions The key cannabinoids in the marijuana plant are THC (Δ9-tetrahydrocannabinol) as well as CBD (cannabidiol). They reveal hostile results, which means that CBD decreases the effects of THC. What are these effects? THC has an envigorating impact, causes a feeling of ecstasy, influences cognitive features, however also relaxes. Big, routinely eaten dosages of THC are considered hazardous to the human brain. Too much intake of THC can lead to psychosis, absence of inspiration, and also long-term adverse changes in cognitive function. Both THC and also CBD influence the endocannabinoid system in the body. Their activity, as currently stated, is inconsistent. Cbd-a-thc-in-the-endocannabinoid-1 system When creating pictures, CBD decreases the depletion of anandamide sources, as well as THC speeds up this procedure. Nonetheless, this does not indicate that THC is just a harmful cannabinoid as well as ought to not remain in the preparation in all. As a matter of fact. Its tiny existence in hemp prep work is even needed in order to obtain the so-called impact. harmony. THC in full range hemp oil exists in such a limited and, importantly, legal quantity. This amount is so tiny (less than 0.2) that it does not trigger drunkenness. Interacting, THC and also CBD have better possibility than either particle acting alone. What is anandamide (AEA)? What is its significance for individuals suffering from anxiety? Continue reading! CBD, Anxiety and also the endocannabinoid system The endocannabinoid system is a vital system in charge of the law of basic human physical processes, such as power administration, neurohormonal as well as neuroimmune connections, electric motor task, mood as well as motivation, as well as fat metabolic rate. The endocannabinoid system consists of a natural chemical called anandamide (AEA). Anandamide is a neurotransmitter that is normally produced in the human mind. Its production is promoted by e.g. physical activity, and to a lower extent by the so-called collaborate with the body (massage therapy!). Its resources are “used” to maintain the correct performance of the body, consisting of in the field of psychological wellness. As displayed in this research study: https://www.ncbi.nlm.nih.gov/pubmed/23580381 high degrees of anandamide are connected with a decreased danger of creating psychotic signs and symptoms. A high degree of anandamide is also connected with a positive result on the reduction of clinical depression and anxiety symptoms. This mechanism is still not totally recognized, but it seems sensible that a highly depressed state of mind in a private period for a particular situation, as well as with the synchronised lack of actions targeted at its enhancement, brings about a surge of the influx of unfavorable thoughts. As depressive problems create, they can turn into a lot more dangerous forms of problems, e.g. psychosis, misconceptions or schizophrenia. Slowing down this process as swiftly as possible may turn out to be vital in the efficient treatment of mental disorders of human performance.
Regards for all your efforts that you have put in this. very interesting information.
Wow, the writing is so sexy. How could We write like a person? I actually want to have the similar writing skills since you.
hello there and thank you for your information – I’ve definitely picked up something new from right here. I did however expertise some technical issues using this web site, as I experienced to reload the web site a lot of times previous to I could get it to load properly. I had been wondering if your hosting is OK? Not that I am complaining, but slow loading instances times will very frequently affect your placement in google and could damage your high quality score if advertising and marketing with Adwords. Well I am adding this RSS to my e-mail and could look out for much more of your respective intriguing content. Ensure that you update this again soon..
An outstanding share! I’ve just forwarded this onto a coworker who was doing a little homework on this. And he in fact bought me lunch because I discovered it for him… lol. So allow me to reword this…. Thanks for the meal!! But yeah, thanks for spending the time to discuss this topic here on your blog.
Lovely blog! I am loving it!! Will come back again. I am taking your feeds also
Hello! I just wanted to ask if you ever have any problems with hackers? My last blog (wordpress) was hacked and I ended up losing many months of hard work due to no backup. Do you have any methods to protect against hackers?
CBD for Anxiousness and Anxiety: Think of that it is possible to introduce one natural prep work into your everyday diet plan, which could show to be the key to winning the defend a calmer life for people with depressive conditions. What happens if the addition of this preparation, created on the basis of a progressively widely known and also checked chemical substance of plant beginning, is not only potentially extremely effective, but is not related to the risk of side effects typical of pharmacological medicines? Is it also possible? Where’s the catch? Do you need to know even more? Read this post In this article we will cover: What is depression? THC as well as CBD cannabinoids – differences Depression as well as the endocannabinoid system What is depression? Main definitions suggest that depressive disorders, additionally understood colloquially as clinical depression, are characterized by: abrupt depression of an individual’s mood, in the negative instructions, of modest to solid intensity of the strength of the experienced modifications, for more than a few weeks. There may be several reasons for the incident of adjustments. It also occurs that it is difficult to determine any kind of absolute reason. We very frequently encountered the statement that it is a world illness of the 21st century – it affects both older as well as younger individuals. Our education and learning is trivial for depression, let alone our incomes – it can influence any person. Treatment of depression comes down to: pharmacotherapy, psychiatric therapy and also psychoeducation, photo-therapy, electroconvulsive therapy and more natural activities associated with the augmentation of exercise and also the introduction of considerable modifications in the daily diet regimen. It is as part of natural techniques of dealing with and also neutralizing depression that the addition of cannabis prep work with cannabinoids naturally taking place in the plant in the day-to-day diet plan is acquiring increasingly more popularity in the world. Cannabidiol CBD, discovered in e.g. CBD oil or full-spectrum hemp oil, appears in many scientific research studies as a potentially efficient cannabinoid in the treatment of clinical depression. Notably, it is a 100 natural chemical substance of plant beginning. Remarkably, anxiety is among the 3 most usual mental illness in which patients resort to CBD hemp prep work such as CBD oil, full spectrum hemp oil with CBD or CBD pills. Records from consumers as well as their positive viewpoints on the effectiveness of e.g. CBD oil or complete spectrum hemp oil with all-natural CBD are expanding at an unmatched rate. THC as well as CBD cannabinoids – differences The main cannabinoids in the marijuana plant are THC (Δ9-tetrahydrocannabinol) and CBD (cannabidiol). They show hostile impacts, which indicates that CBD minimizes the impacts of THC. What are these impacts? THC has an envigorating effect, causes a feeling of euphoria, affects cognitive functions, however likewise relaxes. Big, frequently consumed doses of THC are thought about harmful to the human brain. Too much usage of THC can result in psychosis, absence of motivation, and even long-term unfavorable adjustments in cognitive function. Both THC as well as CBD influence the endocannabinoid system in the human body. Their action, as currently stated, is inconsistent. Cbd-a-thc-in-the-endocannabinoid-1 system When writing images, CBD decreases the deficiency of anandamide resources, and THC speeds up this process. Nevertheless, this does not mean that THC is only a damaging cannabinoid and also needs to not be in the prep work at all. On the contrary. Its small visibility in hemp prep work is also necessary in order to acquire the so-called effect. harmony. THC in full range hemp oil exists in such a marginal as well as, importantly, lawful quantity. This amount is so small (less than 0.2) that it does not create drunkenness. Collaborating, THC and also CBD have greater possibility than either molecule performing alone. What is anandamide (AEA)? What is its importance for individuals experiencing depression? Read on! CBD, Depression and the endocannabinoid system The endocannabinoid system is a vital system responsible for the law of basic human physical procedures, such as energy administration, neurohormonal and neuroimmune links, electric motor task, mood and also motivation, and fat metabolism. The endocannabinoid system consists of a natural chemical called anandamide (AEA). Anandamide is a neurotransmitter that is normally produced in the human brain. Its manufacturing is boosted by e.g. exercise, as well as to a lesser level by the supposed collaborate with the body (massage!). Its sources are “utilized” to preserve the correct performance of the body, including in the field of mental wellness. As displayed in this study: https://www.ncbi.nlm.nih.gov/pubmed/23580381 high degrees of anandamide are associated with a reduced danger of developing psychotic symptoms. A high level of anandamide is also associated with a favorable effect on the reduction of clinical depression and anxiety signs and symptoms. This system is still not completely comprehended, but it appears rational that a highly depressed mood in a specific time period for a certain instance, and with the synchronised lack of actions focused on its improvement, results in a concentration of the increase of unfavorable thoughts. As depressive disorders develop, they can develop into much more hazardous types of disorders, e.g. psychosis, deceptions or schizophrenia. Reducing this procedure as quickly as possible may become crucial in the effective therapy of mental disorders of human performance.
CBD for Anxiousness as well as Clinical Depression: Picture that it is feasible to introduce one natural prep work into your day-to-day diet plan, which can verify to be the secret to winning the defend a calmer life for individuals with depressive disorders. Suppose the inclusion of this prep work, created on the basis of a significantly well-known and tested chemical substance of plant beginning, is not only potentially really reliable, yet is not connected with the danger of negative effects common of medicinal medications? Is it also possible? Where’s the catch? Do you need to know even more? Read this write-up In this short article we will certainly cover: What is depression? THC distinctions Depression and the endocannabinoid system What is anxiety? Official meanings suggest that depressive problems, additionally recognized colloquially as depression, are characterized by: abrupt clinical depression of an individual’s state of mind, in the unfavorable direction, of moderate to solid strength of the intensity of the skilled adjustments, for more than a couple of weeks. There might be several factors for the incident of adjustments. It additionally occurs that it is challenging to identify any type of indisputable reason. We very typically come across the statement that it is a human being disease of the 21st century – it affects both older and younger people. Our education and learning is trivial for clinical depression, let alone our earnings – it can impact anyone. Therapy of anxiety comes down to: pharmacotherapy, psychotherapy and psychoeducation, photo-therapy, electroconvulsive therapy and more natural tasks related to the augmentation of exercise and the introduction of considerable adjustments in the day-to-day diet regimen. It is as part of natural methods of fighting and also counteracting clinical depression that the inclusion of marijuana preparations with cannabinoids naturally happening in the plant in the day-to-day diet regimen is gaining a growing number of appeal worldwide. Cannabidiol CBD, found in e.g. CBD oil or full-spectrum hemp oil, appears in numerous clinical research studies as a possibly effective cannabinoid in the therapy of depression. Notably, it is a 100 all-natural chemical substance of plant origin. Remarkably, clinical depression is amongst the three most typical mental illness in which individuals consider CBD hemp preparations such as CBD oil, full spectrum hemp oil with CBD or CBD capsules. Reports from customers and their favorable viewpoints on the efficiency of e.g. CBD oil or complete range hemp oil with natural CBD are growing at an extraordinary rate. THC and also CBD cannabinoids – distinctions The primary cannabinoids in the cannabis plant are THC (Δ9-tetrahydrocannabinol) and also CBD (cannabidiol). They show antagonistic effects, which means that CBD decreases the results of THC. What are these impacts? THC has an envigorating result, triggers a sensation of ecstasy, affects cognitive functions, but likewise loosens up. Large, on a regular basis taken in doses of THC are thought about harmful to the human mind. Extreme consumption of THC can lead to psychosis, lack of inspiration, and also also irreversible unfavorable modifications in cognitive function. Both THC and also CBD influence the endocannabinoid system in the human body. Their activity, as currently mentioned, is contradictory. Cbd-a-thc-in-the-endocannabinoid-1 system When composing images, CBD decreases the deficiency of anandamide resources, and THC speeds up this process. Nonetheless, this does not suggest that THC is just a hazardous cannabinoid and ought to not remain in the prep work in any way. As a matter of fact. Its little visibility in hemp preparations is also essential in order to get the supposed impact. synergy. THC in full spectrum hemp oil exists in such a minimal as well as, importantly, legal amount. This amount is so tiny (less than 0.2) that it does not trigger intoxication. Interacting, THC and CBD have higher potential than either molecule acting alone. What is anandamide (AEA)? What is its relevance for people experiencing anxiety? Continue reading! CBD, Depression and the endocannabinoid system The endocannabinoid system is a vital system responsible for the guideline of fundamental human physical processes, such as power management, neurohormonal and neuroimmune connections, electric motor task, state of mind and also motivation, as well as fat metabolism. The endocannabinoid system consists of a neurotransmitter called anandamide (AEA). Anandamide is a natural chemical that is normally created in the human mind. Its production is stimulated by e.g. exercise, as well as to a minimal level by the so-called work with the body (massage!). Its resources are “made use of” to keep the correct performance of the body, consisting of in the field of psychological health. As displayed in this research study: https://www.ncbi.nlm.nih.gov/pubmed/23580381 high levels of anandamide are connected with a reduced risk of establishing psychotic signs. A high degree of anandamide is likewise related to a positive impact on the decrease of depression and anxiety signs and symptoms. This system is still not fully understood, but it appears logical that a strongly depressed state of mind in a specific period for a specific situation, as well as with the simultaneous lack of actions targeted at its enhancement, results in an aggravation of the influx of unfavorable thoughts. As depressive conditions establish, they can develop into much more harmful forms of problems, e.g. psychosis, misconceptions or schizophrenia. Decreasing this procedure as promptly as possible might turn out to be essential in the reliable treatment of mental illness of human performance.
CBD for Anxiousness and also Clinical Depression: Think of that it is feasible to present one all-natural preparation right into your day-to-day diet regimen, which can verify to be the trick to winning the defend a calmer life for individuals with depressive conditions. Suppose the inclusion of this prep work, developed on the basis of a significantly popular and also examined chemical compound of plant beginning, is not just potentially really reliable, but is not associated with the threat of adverse effects normal of pharmacological medicines? Is it even feasible? Where’s the catch? Do you would like to know even more? Read this post In this write-up we will certainly cover: What is anxiety? THC and CBD cannabinoids – differences Clinical depression and the endocannabinoid system What is depression? Official meanings suggest that depressive disorders, likewise known informally as clinical depression, are identified by: abrupt depression of an individual’s mood, in the adverse direction, of moderate to solid strength of the intensity of the skilled modifications, for more than a few weeks. There may be one or more factors for the incident of modifications. It likewise takes place that it is difficult to identify any type of absolute factor. We very typically encountered the statement that it is a civilization condition of the 21st century – it impacts both older and also more youthful individuals. Our education and learning is trivial for clinical depression, not to mention our profits – it can impact anybody. Therapy of clinical depression boils down to: pharmacotherapy, psychiatric therapy and also psychoeducation, photo-therapy, electroconvulsive therapy and also more natural tasks related to the surge of exercise and also the intro of considerable changes in the everyday diet regimen. It is as part of natural methods of combating and also counteracting depression that the addition of marijuana prep work with cannabinoids naturally taking place in the plant in the day-to-day diet is obtaining increasingly more popularity worldwide. Cannabidiol CBD, located in e.g. CBD oil or full-spectrum hemp oil, shows up in various scientific research studies as a potentially reliable cannabinoid in the treatment of depression. Importantly, it is a 100 all-natural chemical compound of plant origin. Remarkably, clinical depression is amongst the three most common mental illness in which individuals turn to CBD hemp prep work such as CBD oil, complete range hemp oil with CBD or CBD pills. Reports from consumers and also their positive viewpoints on the performance of e.g. CBD oil or complete range hemp oil with natural CBD are growing at an unmatched speed. THC and CBD cannabinoids – distinctions The main cannabinoids in the marijuana plant are THC (Δ9-tetrahydrocannabinol) and also CBD (cannabidiol). They show antagonistic impacts, which means that CBD decreases the impacts of THC. What are these effects? THC has an intoxicating effect, causes a sensation of euphoria, affects cognitive features, but also relaxes. Huge, on a regular basis eaten dosages of THC are thought about hazardous to the human mind. Excessive usage of THC can result in psychosis, absence of motivation, and also long-term negative modifications in cognitive function. Both THC and CBD affect the endocannabinoid system in the body. Their activity, as currently pointed out, is inconsistent. Cbd-a-thc-in-the-endocannabinoid-1 system When writing pictures, CBD decreases the deficiency of anandamide sources, and also THC accelerate this procedure. Nevertheless, this does not mean that THC is only a dangerous cannabinoid and should not remain in the prep work in any way. However. Its small existence in hemp prep work is even essential in order to obtain the supposed impact. harmony. THC completely spectrum hemp oil exists in such a low as well as, significantly, legal quantity. This quantity is so tiny (less than 0.2) that it does not cause intoxication. Collaborating, THC and also CBD have higher possibility than either molecule performing alone. What is anandamide (AEA)? What is its significance for people dealing with clinical depression? Read on! CBD, Clinical depression as well as the endocannabinoid system The endocannabinoid system is an essential system responsible for the law of basic human physical procedures, such as energy monitoring, neurohormonal and neuroimmune connections, motor task, mood as well as motivation, and fat metabolic rate. The endocannabinoid system includes a natural chemical called anandamide (AEA). Anandamide is a neurotransmitter that is normally generated in the human brain. Its production is promoted by e.g. physical activity, and also to a lower degree by the supposed collaborate with the body (massage therapy!). Its resources are “made use of” to maintain the proper performance of the body, including in the field of mental health. As received this research study: https://www.ncbi.nlm.nih.gov/pubmed/23580381 high degrees of anandamide are connected with a reduced danger of establishing psychotic signs and symptoms. A high level of anandamide is also connected with a favorable effect on the decrease of clinical depression as well as stress and anxiety symptoms. This mechanism is still not fully understood, yet it seems sensible that a highly clinically depressed state of mind in an individual time period for a certain instance, and also with the synchronised lack of actions targeted at its enhancement, causes a rise of the influx of adverse ideas. As depressive problems establish, they can develop into much more harmful kinds of conditions, e.g. psychosis, delusions or schizophrenia. Decreasing this procedure as swiftly as feasible might end up being important in the reliable treatment of mental illness of human performance.
Just desire to say your article is as surprising. The clearness on your submit is simply spectacular and that i can assume you’re an expert on this subject. Fine with your permission allow me to snatch your RSS feed to stay up to date with forthcoming post. Thanks a million and please carry on the gratifying work.
CBD for Stress And Anxiety as well as Depression: Envision that it is possible to present one all-natural preparation right into your daily diet regimen, which might prove to be the key to winning the defend a calmer life for individuals with depressive disorders. Suppose the addition of this preparation, produced on the basis of a significantly widely known and also evaluated chemical substance of plant beginning, is not just possibly extremely reliable, yet is not related to the threat of negative effects common of medicinal medicines? Is it even feasible? Where’s the catch? Do you want to know more? Read this short article In this write-up we will cover: What is anxiety? THC distinctions Depression and the endocannabinoid system What is clinical depression? Main definitions recommend that depressive conditions, likewise recognized colloquially as clinical depression, are characterized by: unexpected anxiety of a person’s state of mind, in the unfavorable instructions, of modest to strong intensity of the intensity of the skilled modifications, for more than a few weeks. There might be one or more reasons for the occurrence of changes. It likewise happens that it is challenging to determine any absolute reason. We really often discovered the declaration that it is a people illness of the 21st century – it influences both older and more youthful individuals. Our education and learning is not important for clinical depression, not to mention our earnings – it can impact anyone. Treatment of anxiety boils down to: pharmacotherapy, psychiatric therapy and also psychoeducation, phototherapy, electroconvulsive therapy and also even more all-natural tasks connected to the climax of exercise and also the intro of substantial modifications in the daily diet plan. It is as part of all-natural methods of fighting as well as combating clinical depression that the inclusion of cannabis preparations with cannabinoids normally occurring in the plant in the daily diet plan is acquiring a growing number of popularity worldwide. Cannabidiol CBD, found in e.g. CBD oil or full-spectrum hemp oil, appears in many scientific researches as a potentially reliable cannabinoid in the treatment of clinical depression. Notably, it is a 100 all-natural chemical substance of plant origin. Interestingly, clinical depression is amongst the 3 most typical mental disorders in which individuals turn to CBD hemp preparations such as CBD oil, complete range hemp oil with CBD or CBD capsules. Reports from consumers and their positive opinions on the efficiency of e.g. CBD oil or full range hemp oil with all-natural CBD are growing at an unprecedented pace. THC and CBD cannabinoids – distinctions The key cannabinoids in the cannabis plant are THC (Δ9-tetrahydrocannabinol) as well as CBD (cannabidiol). They show hostile results, which suggests that CBD reduces the impacts of THC. What are these impacts? THC has an envigorating effect, triggers a feeling of euphoria, affects cognitive functions, however also unwinds. Large, consistently taken in doses of THC are considered damaging to the human mind. Extreme consumption of THC can result in psychosis, absence of motivation, as well as even permanent adverse adjustments in cognitive feature. Both THC as well as CBD influence the endocannabinoid system in the human body. Their action, as already stated, is contradictory. Cbd-a-thc-in-the-endocannabinoid-1 system When creating pictures, CBD slows down the deficiency of anandamide resources, as well as THC quicken this procedure. However, this does not indicate that THC is just an unsafe cannabinoid and must not be in the preparation in any way. However. Its small visibility in hemp preparations is also needed in order to obtain the so-called result. synergy. THC completely range hemp oil is present in such a limited as well as, significantly, lawful amount. This quantity is so small (less than 0.2) that it does not trigger intoxication. Collaborating, THC as well as CBD have greater capacity than either particle acting alone. What is anandamide (AEA)? What is its importance for individuals experiencing anxiety? Read on! CBD, Depression and also the endocannabinoid system The endocannabinoid system is a crucial system in charge of the guideline of basic human physical processes, such as power administration, neurohormonal and also neuroimmune connections, motor activity, state of mind as well as inspiration, and fat metabolism. The endocannabinoid system consists of a natural chemical called anandamide (AEA). Anandamide is a neurotransmitter that is normally produced in the human mind. Its production is boosted by e.g. exercise, and to a lesser level by the supposed work with the body (massage!). Its resources are “used” to preserve the correct functioning of the body, consisting of in the field of psychological wellness. As displayed in this study: https://www.ncbi.nlm.nih.gov/pubmed/23580381 high degrees of anandamide are associated with a lowered danger of creating psychotic signs and symptoms. A high level of anandamide is likewise related to a positive result on the decrease of anxiety as well as anxiety signs and symptoms. This device is still not completely recognized, but it seems rational that a strongly depressed state of mind in an individual amount of time for a particular case, as well as with the simultaneous absence of actions focused on its renovation, brings about a concentration of the increase of unfavorable thoughts. As depressive problems develop, they can become a lot more dangerous kinds of disorders, e.g. psychosis, delusions or schizophrenia. Decreasing this process as promptly as possible might become crucial in the effective treatment of mental illness of human functioning.
CBD for Stress And Anxiety and Clinical Depression: Visualize that it is possible to introduce one natural prep work into your daily diet plan, which can show to be the secret to winning the fight for a calmer life for people with depressive problems. Suppose the addition of this prep work, produced on the basis of a significantly popular as well as checked chemical compound of plant beginning, is not just potentially extremely reliable, but is not related to the threat of negative effects typical of pharmacological drugs? Is it also feasible? Where’s the catch? Do you wish to know even more? Read this write-up In this post we will certainly cover: What is anxiety? THC distinctions Depression and also the endocannabinoid system What is depression? Main definitions recommend that depressive disorders, also understood colloquially as depression, are defined by: sudden depression of a person’s state of mind, in the negative instructions, of modest to solid strength of the intensity of the skilled adjustments, for more than a few weeks. There may be several reasons for the event of modifications. It also occurs that it is challenging to identify any unquestionable reason. We extremely often encountered the statement that it is a people condition of the 21st century – it impacts both older as well as more youthful individuals. Our education and learning is not important for clinical depression, not to mention our profits – it can influence anyone. Therapy of clinical depression comes down to: pharmacotherapy, psychiatric therapy and psychoeducation, photo-therapy, electroconvulsive therapy and more natural tasks connected to the surge of exercise and the intro of substantial modifications in the day-to-day diet regimen. It is as part of all-natural techniques of battling as well as neutralizing clinical depression that the addition of cannabis preparations with cannabinoids naturally taking place in the plant in the day-to-day diet plan is gaining increasingly more popularity on the planet. Cannabidiol CBD, located in e.g. CBD oil or full-spectrum hemp oil, shows up in many clinical studies as a potentially efficient cannabinoid in the treatment of anxiety. Importantly, it is a 100 all-natural chemical compound of plant origin. Surprisingly, anxiety is among the three most usual mental disorders in which patients turn to CBD hemp preparations such as CBD oil, complete spectrum hemp oil with CBD or CBD pills. Records from customers as well as their favorable viewpoints on the performance of e.g. CBD oil or full spectrum hemp oil with all-natural CBD are growing at an unmatched speed. THC and CBD cannabinoids – distinctions The main cannabinoids in the marijuana plant are THC (Δ9-tetrahydrocannabinol) and also CBD (cannabidiol). They reveal hostile results, which indicates that CBD lowers the results of THC. What are these results? THC has an intoxicating effect, creates a feeling of bliss, impacts cognitive features, however also kicks back. Huge, routinely eaten doses of THC are considered hazardous to the human brain. Excessive consumption of THC can lead to psychosis, absence of motivation, as well as even irreversible unfavorable changes in cognitive function. Both THC as well as CBD impact the endocannabinoid system in the body. Their action, as already discussed, is contradictory. Cbd-a-thc-in-the-endocannabinoid-1 system When writing photos, CBD reduces the exhaustion of anandamide resources, as well as THC speeds up this process. However, this does not indicate that THC is just a dangerous cannabinoid and also must not remain in the preparation in any way. As a matter of fact. Its little presence in hemp prep work is also essential in order to acquire the so-called effect. harmony. THC in full spectrum hemp oil exists in such a marginal and, importantly, legal amount. This amount is so tiny (less than 0.2) that it does not cause drunkenness. Collaborating, THC and also CBD have greater possibility than either molecule acting alone. What is anandamide (AEA)? What is its value for individuals dealing with clinical depression? Keep reading! CBD, Depression and the endocannabinoid system The endocannabinoid system is a key system in charge of the policy of fundamental human physical procedures, such as energy management, neurohormonal and also neuroimmune links, electric motor task, mood as well as motivation, and also fat metabolism. The endocannabinoid system consists of a neurotransmitter called anandamide (AEA). Anandamide is a natural chemical that is normally created in the human brain. Its production is promoted by e.g. physical activity, as well as to a lower level by the supposed work with the body (massage!). Its sources are “made use of” to maintain the proper performance of the body, including in the field of mental wellness. As displayed in this research study: https://www.ncbi.nlm.nih.gov/pubmed/23580381 high degrees of anandamide are associated with a lowered risk of developing psychotic signs. A high level of anandamide is additionally associated with a positive effect on the reduction of depression and stress and anxiety signs and symptoms. This device is still not completely understood, yet it seems rational that a strongly depressed state of mind in a private amount of time for a particular instance, and also with the synchronised lack of actions focused on its enhancement, causes an aggravation of the influx of negative ideas. As depressive disorders create, they can become much more harmful types of disorders, e.g. psychosis, delusions or schizophrenia. Decreasing this procedure as promptly as possible might end up being important in the effective therapy of mental disorders of human functioning.
Wow! This can be one particular of the most useful blogs We’ve ever arrive across on this subject. Actually Great. I’m also a specialist in this topic so I can understand your effort.
Hello, Neat post. There’s a problem along with your site in web explorer, may test this?K IE still is the marketplace leader and a large section of other folks will omit your fantastic writing due to this problem.
I’ve been exploring for a bit for any high-quality articles or blog posts on this kind of area . Exploring in Yahoo I at last stumbled upon this site. Reading this information So i’m happy to convey that I have an incredibly good uncanny feeling I discovered just what I needed. I most certainly will make certain to don’t forget this website and give it a look regularly.
We are a group of volunteers and starting a new scheme in our community. Your web site provided us with valuable info to work on. You’ve done an impressive job and our entire community will be grateful to you.
Viraj manufactures Stainless Steel welding cords utilized for welding purpose in Fabrication, Chemical, Automotive, Oil & Gas, Railways & other sectors.
Great post. I used to be checking continuously this blog and I am impressed! Extremely useful information particularly the last phase 🙂 I maintain such information a lot. I was seeking this particular info for a long time. Thanks and good luck.
Hey! I just wanted to ask if you ever have any problems with hackers? My last blog (wordpress) was hacked and I ended up losing many months of hard work due to no data backup. Do you have any methods to protect against hackers?
I love your blog. I’m handled. Thank a person.
You could certainly see your skills in the paintings you write. The world hopes for more passionate writers such as you who are not afraid to mention how they believe. All the time follow your heart. “There are only two industries that refer to their customers as users.” by Edward Tufte.
Spot on with this write-up, I truly believe this site needs far more attention. Iíll probably be returning to read through more, thanks for the advice!
Thanks , I’ve recently been looking for information about this topic for ages and yours is the greatest I’ve discovered so far. But, what about the conclusion? Are you sure about the source?
Raajratna Electrodes Private Limited is supplier, distributor, & exporter of welding electrodes, stainless-steel Tig-Mig welding cables, copper covered mig cords, stainless steel welding electrodes, saw cords & welding change. These are utilized in every industrial Application. Each created welding electrodes passed a stringent Quality Assurance program.
Your way of addressin this topic is both terrific and motivating.
CBD for Stress And Anxiety and also Anxiety: Picture that it is feasible to present one all-natural prep work right into your day-to-day diet regimen, which could prove to be the trick to winning the defend a calmer life for individuals with depressive conditions. Suppose the incorporation of this preparation, created on the basis of a significantly popular as well as checked chemical substance of plant origin, is not only possibly extremely efficient, however is not associated with the threat of adverse effects regular of pharmacological medications? Is it even possible? Where’s the catch? Do you would like to know more? Read this write-up In this short article we will cover: What is depression? THC as well as CBD cannabinoids – differences Clinical depression as well as the endocannabinoid system What is anxiety? Main interpretations recommend that depressive problems, also understood informally as anxiety, are characterized by: abrupt depression of an individual’s mood, in the negative direction, of modest to strong intensity of the strength of the experienced changes, for more than a few weeks. There might be several reasons for the occurrence of adjustments. It also occurs that it is tough to recognize any indisputable reason. We extremely usually discovered the declaration that it is a human being disease of the 21st century – it affects both older and more youthful individuals. Our education and learning is trivial for depression, let alone our profits – it can impact anyone. Therapy of clinical depression boils down to: pharmacotherapy, psychiatric therapy and also psychoeducation, photo-therapy, electroconvulsive therapy as well as even more all-natural activities associated with the accumulation of physical activity and the intro of substantial adjustments in the daily diet regimen. It is as part of all-natural approaches of dealing with as well as counteracting clinical depression that the addition of marijuana prep work with cannabinoids naturally taking place in the plant in the daily diet is getting increasingly more appeal worldwide. Cannabidiol CBD, located in e.g. CBD oil or full-spectrum hemp oil, shows up in many scientific researches as a possibly efficient cannabinoid in the treatment of depression. Significantly, it is a 100 natural chemical substance of plant origin. Surprisingly, depression is among the 3 most typical mental illness in which patients turn to CBD hemp prep work such as CBD oil, complete spectrum hemp oil with CBD or CBD pills. Records from consumers and also their positive opinions on the effectiveness of e.g. CBD oil or complete range hemp oil with all-natural CBD are expanding at an extraordinary rate. THC and also CBD cannabinoids – differences The key cannabinoids in the marijuana plant are THC (Δ9-tetrahydrocannabinol) and CBD (cannabidiol). They show hostile results, which suggests that CBD decreases the impacts of THC. What are these effects? THC has an envigorating effect, creates a sensation of bliss, influences cognitive functions, however also loosens up. Big, on a regular basis consumed dosages of THC are thought about hazardous to the human brain. Excessive intake of THC can cause psychosis, absence of motivation, as well as even long-term negative changes in cognitive function. Both THC and also CBD impact the endocannabinoid system in the human body. Their action, as already mentioned, is inconsistent. Cbd-a-thc-in-the-endocannabinoid-1 system When composing pictures, CBD decreases the deficiency of anandamide resources, as well as THC speeds up this process. Nevertheless, this does not indicate that THC is only a dangerous cannabinoid and also ought to not be in the preparation whatsoever. However. Its small presence in hemp prep work is also needed in order to get the so-called impact. harmony. THC completely spectrum hemp oil exists in such a limited as well as, notably, lawful amount. This quantity is so tiny (less than 0.2) that it does not trigger drunkenness. Working together, THC as well as CBD have greater potential than either particle performing alone. What is anandamide (AEA)? What is its relevance for people struggling with depression? Keep reading! CBD, Clinical depression as well as the endocannabinoid system The endocannabinoid system is an essential system responsible for the policy of standard human physical processes, such as power administration, neurohormonal as well as neuroimmune connections, motor activity, state of mind and also inspiration, and also fat metabolism. The endocannabinoid system consists of a natural chemical called anandamide (AEA). Anandamide is a natural chemical that is normally produced in the human brain. Its manufacturing is promoted by e.g. exercise, as well as to a lower level by the supposed deal with the body (massage therapy!). Its sources are “used” to maintain the proper performance of the body, consisting of in the field of psychological health. As shown in this study: https://www.ncbi.nlm.nih.gov/pubmed/23580381 high degrees of anandamide are connected with a decreased danger of developing psychotic signs and symptoms. A high degree of anandamide is likewise associated with a positive result on the decrease of depression as well as stress and anxiety signs and symptoms. This system is still not totally recognized, however it appears logical that a highly clinically depressed mood in an individual time period for a particular instance, as well as with the simultaneous lack of activities focused on its improvement, leads to an intensification of the influx of adverse thoughts. As depressive disorders develop, they can become even more unsafe forms of problems, e.g. psychosis, deceptions or schizophrenia. Reducing this procedure as quickly as possible might turn out to be essential in the effective treatment of mental disorders of human functioning.
CBD for Anxiety and also Clinical Depression: Visualize that it is feasible to introduce one natural preparation into your daily diet, which can prove to be the secret to winning the defend a calmer life for people with depressive problems. What if the addition of this prep work, created on the basis of a progressively widely known and also checked chemical compound of plant origin, is not only possibly very reliable, but is not related to the danger of negative effects typical of pharmacological medicines? Is it even possible? Where’s the catch? Do you would like to know even more? Read this article In this post we will cover: What is depression? THC distinctions Anxiety and the endocannabinoid system What is anxiety? Main definitions recommend that depressive conditions, also understood informally as depression, are characterized by: unexpected anxiety of a person’s state of mind, in the negative instructions, of modest to strong intensity of the intensity of the knowledgeable changes, for greater than a few weeks. There might be one or more reasons for the event of changes. It likewise takes place that it is difficult to determine any absolute reason. We really usually come across the statement that it is a people illness of the 21st century – it affects both older and younger people. Our education and learning is trivial for clinical depression, not to mention our revenues – it can influence anyone. Therapy of anxiety boils down to: pharmacotherapy, psychiatric therapy and also psychoeducation, phototherapy, electroconvulsive therapy and even more all-natural tasks related to the intensification of exercise and also the intro of substantial modifications in the day-to-day diet plan. It is as part of all-natural methods of battling and neutralizing clinical depression that the addition of marijuana preparations with cannabinoids normally occurring in the plant in the everyday diet regimen is acquiring an increasing number of appeal in the world. Cannabidiol CBD, located in e.g. CBD oil or full-spectrum hemp oil, appears in many scientific researches as a potentially reliable cannabinoid in the treatment of clinical depression. Significantly, it is a 100 natural chemical substance of plant origin. Remarkably, clinical depression is among the 3 most typical mental illness in which individuals consider CBD hemp preparations such as CBD oil, full range hemp oil with CBD or CBD pills. Reports from customers and their positive opinions on the effectiveness of e.g. CBD oil or complete range hemp oil with natural CBD are growing at an unprecedented pace. THC and also CBD cannabinoids – differences The primary cannabinoids in the marijuana plant are THC (Δ9-tetrahydrocannabinol) and also CBD (cannabidiol). They show hostile results, which means that CBD lowers the results of THC. What are these results? THC has an envigorating impact, causes a feeling of ecstasy, influences cognitive features, but likewise unwinds. Huge, routinely eaten dosages of THC are thought about unsafe to the human mind. Excessive consumption of THC can lead to psychosis, absence of inspiration, and also even permanent adverse changes in cognitive function. Both THC as well as CBD impact the endocannabinoid system in the human body. Their activity, as already stated, is inconsistent. Cbd-a-thc-in-the-endocannabinoid-1 system When writing images, CBD reduces the depletion of anandamide resources, and also THC accelerate this procedure. Nonetheless, this does not imply that THC is only a damaging cannabinoid and needs to not be in the preparation in all. As a matter of fact. Its little visibility in hemp prep work is even essential in order to acquire the supposed effect. harmony. THC in full spectrum hemp oil exists in such a limited and also, notably, lawful quantity. This amount is so tiny (less than 0.2) that it does not create drunkenness. Collaborating, THC and also CBD have better potential than either particle acting alone. What is anandamide (AEA)? What is its importance for people dealing with clinical depression? Keep reading! CBD, Depression as well as the endocannabinoid system The endocannabinoid system is a vital system responsible for the law of standard human physiological procedures, such as power management, neurohormonal and also neuroimmune links, electric motor task, state of mind as well as motivation, and fat metabolic rate. The endocannabinoid system includes a neurotransmitter called anandamide (AEA). Anandamide is a natural chemical that is normally created in the human mind. Its production is promoted by e.g. physical activity, as well as to a lesser extent by the supposed work with the body (massage!). Its sources are “made use of” to maintain the proper performance of the body, including in the field of psychological health. As displayed in this study: https://www.ncbi.nlm.nih.gov/pubmed/23580381 high levels of anandamide are related to a decreased risk of establishing psychotic signs. A high level of anandamide is likewise associated with a positive effect on the reduction of depression as well as anxiety symptoms. This system is still not completely understood, yet it appears sensible that a highly clinically depressed mood in an individual amount of time for a details instance, as well as with the simultaneous lack of actions aimed at its renovation, results in a concentration of the influx of unfavorable thoughts. As depressive problems develop, they can turn into even more dangerous forms of problems, e.g. psychosis, deceptions or schizophrenia. Decreasing this process as rapidly as possible might turn out to be essential in the efficient treatment of mental illness of human performance.
CBD for Anxiety and also Anxiety: Picture that it is feasible to introduce one natural preparation right into your daily diet, which could verify to be the trick to winning the fight for a calmer life for individuals with depressive problems. Suppose the incorporation of this prep work, produced on the basis of a significantly well-known as well as examined chemical substance of plant beginning, is not only possibly extremely efficient, but is not connected with the threat of adverse effects normal of pharmacological medications? Is it also feasible? Where’s the catch? Do you need to know more? Read this article In this short article we will certainly cover: What is depression? THC and also CBD cannabinoids – differences Clinical depression and the endocannabinoid system What is depression? Official interpretations suggest that depressive disorders, likewise understood informally as depression, are characterized by: sudden depression of a person’s state of mind, in the negative instructions, of moderate to solid strength of the strength of the knowledgeable changes, for greater than a few weeks. There might be one or more reasons for the event of modifications. It additionally occurs that it is tough to recognize any kind of indisputable factor. We really typically discovered the statement that it is a human being illness of the 21st century – it impacts both older and also younger individuals. Our education and learning is trivial for depression, not to mention our revenues – it can influence anybody. Therapy of clinical depression comes down to: pharmacotherapy, psychotherapy and psychoeducation, phototherapy, electroconvulsive therapy and even more all-natural tasks connected to the aggravation of physical activity and the intro of significant adjustments in the day-to-day diet regimen. It is as part of all-natural techniques of dealing with and counteracting clinical depression that the inclusion of marijuana preparations with cannabinoids normally taking place in the plant in the daily diet regimen is gaining more and more appeal worldwide. Cannabidiol CBD, discovered in e.g. CBD oil or full-spectrum hemp oil, appears in various scientific researches as a potentially reliable cannabinoid in the treatment of depression. Importantly, it is a 100 natural chemical compound of plant origin. Surprisingly, depression is amongst the three most common mental disorders in which people resort to CBD hemp preparations such as CBD oil, full spectrum hemp oil with CBD or CBD pills. Reports from consumers and their positive point of views on the performance of e.g. CBD oil or full spectrum hemp oil with all-natural CBD are expanding at an unmatched pace. THC and also CBD cannabinoids – distinctions The primary cannabinoids in the marijuana plant are THC (Δ9-tetrahydrocannabinol) and CBD (cannabidiol). They reveal hostile results, which indicates that CBD decreases the results of THC. What are these effects? THC has an intoxicating effect, triggers a sensation of bliss, influences cognitive features, however additionally relaxes. Huge, on a regular basis taken in doses of THC are taken into consideration dangerous to the human brain. Too much usage of THC can lead to psychosis, absence of motivation, and also even irreversible unfavorable modifications in cognitive function. Both THC and also CBD affect the endocannabinoid system in the body. Their action, as currently pointed out, is inconsistent. Cbd-a-thc-in-the-endocannabinoid-1 system When creating images, CBD slows down the depletion of anandamide resources, and also THC speeds up this procedure. Nonetheless, this does not indicate that THC is only a dangerous cannabinoid and also needs to not be in the preparation in any way. As a matter of fact. Its tiny existence in hemp preparations is even required in order to obtain the so-called effect. synergy. THC in full range hemp oil is present in such a marginal as well as, importantly, lawful quantity. This amount is so little (less than 0.2) that it does not cause intoxication. Interacting, THC and also CBD have greater capacity than either particle performing alone. What is anandamide (AEA)? What is its significance for people experiencing depression? Read on! CBD, Clinical depression and the endocannabinoid system The endocannabinoid system is an essential system in charge of the guideline of standard human physical processes, such as power monitoring, neurohormonal and neuroimmune links, electric motor activity, mood and motivation, as well as fat metabolic rate. The endocannabinoid system includes a natural chemical called anandamide (AEA). Anandamide is a natural chemical that is normally created in the human brain. Its production is stimulated by e.g. exercise, and to a lesser extent by the so-called work with the body (massage therapy!). Its resources are “made use of” to keep the appropriate functioning of the body, including in the field of mental wellness. As displayed in this study: https://www.ncbi.nlm.nih.gov/pubmed/23580381 high degrees of anandamide are associated with a reduced risk of developing psychotic signs and symptoms. A high level of anandamide is likewise related to a favorable effect on the decrease of clinical depression as well as anxiety symptoms. This device is still not completely recognized, but it seems logical that a strongly depressed mood in a private amount of time for a specific situation, as well as with the synchronised lack of actions targeted at its renovation, results in a concentration of the influx of unfavorable thoughts. As depressive disorders develop, they can become even more unsafe kinds of problems, e.g. psychosis, deceptions or schizophrenia. Decreasing this procedure as quickly as feasible may become important in the effective treatment of mental illness of human functioning.
CBD for Anxiety and Anxiety: Envision that it is possible to present one natural prep work into your everyday diet plan, which can prove to be the key to winning the defend a calmer life for individuals with depressive problems. Suppose the incorporation of this prep work, produced on the basis of a significantly popular and also checked chemical compound of plant beginning, is not just potentially very reliable, but is not connected with the risk of adverse effects normal of medicinal medicines? Is it even possible? Where’s the catch? Do you need to know even more? Read this short article In this short article we will cover: What is clinical depression? THC as well as CBD cannabinoids – differences Depression as well as the endocannabinoid system What is depression? Main meanings suggest that depressive problems, also understood informally as depression, are defined by: abrupt depression of a person’s state of mind, in the negative instructions, of modest to solid intensity of the intensity of the skilled modifications, for more than a few weeks. There might be several factors for the occurrence of adjustments. It likewise takes place that it is difficult to recognize any absolute factor. We very frequently encountered the declaration that it is a people condition of the 21st century – it influences both older as well as more youthful individuals. Our education is not important for clinical depression, let alone our earnings – it can impact any individual. Treatment of clinical depression comes down to: pharmacotherapy, psychotherapy and also psychoeducation, photo-therapy, electroconvulsive therapy and also more natural activities associated with the augmentation of exercise and also the introduction of considerable changes in the everyday diet plan. It is as part of all-natural methods of battling and combating anxiety that the inclusion of marijuana prep work with cannabinoids naturally occurring in the plant in the everyday diet regimen is acquiring an increasing number of popularity worldwide. Cannabidiol CBD, found in e.g. CBD oil or full-spectrum hemp oil, shows up in various scientific research studies as a possibly efficient cannabinoid in the treatment of anxiety. Notably, it is a 100 all-natural chemical compound of plant origin. Interestingly, anxiety is among the 3 most common mental illness in which individuals consider CBD hemp prep work such as CBD oil, complete spectrum hemp oil with CBD or CBD capsules. Records from consumers as well as their positive opinions on the efficiency of e.g. CBD oil or full range hemp oil with natural CBD are growing at an extraordinary pace. THC and CBD cannabinoids – differences The main cannabinoids in the cannabis plant are THC (Δ9-tetrahydrocannabinol) as well as CBD (cannabidiol). They reveal hostile impacts, which suggests that CBD lowers the impacts of THC. What are these effects? THC has an intoxicating result, creates a sensation of euphoria, influences cognitive features, yet also loosens up. Big, routinely eaten doses of THC are taken into consideration dangerous to the human mind. Extreme intake of THC can lead to psychosis, absence of motivation, and even permanent unfavorable modifications in cognitive function. Both THC as well as CBD influence the endocannabinoid system in the body. Their activity, as currently discussed, is inconsistent. Cbd-a-thc-in-the-endocannabinoid-1 system When writing pictures, CBD slows down the deficiency of anandamide sources, and THC accelerate this process. However, this does not indicate that THC is only a hazardous cannabinoid and also ought to not be in the preparation at all. On the other hand. Its small existence in hemp prep work is also essential in order to get the so-called result. synergy. THC in full spectrum hemp oil exists in such a limited and, importantly, lawful quantity. This amount is so small (less than 0.2) that it does not cause intoxication. Working together, THC and also CBD have greater capacity than either particle performing alone. What is anandamide (AEA)? What is its importance for individuals experiencing depression? Keep reading! CBD, Depression as well as the endocannabinoid system The endocannabinoid system is a key system responsible for the policy of standard human physiological processes, such as power management, neurohormonal and neuroimmune connections, electric motor activity, state of mind as well as motivation, and also fat metabolic rate. The endocannabinoid system includes a natural chemical called anandamide (AEA). Anandamide is a neurotransmitter that is naturally generated in the human brain. Its production is stimulated by e.g. exercise, and to a lesser degree by the so-called work with the body (massage therapy!). Its resources are “made use of” to keep the proper performance of the body, consisting of in the field of psychological health. As displayed in this research: https://www.ncbi.nlm.nih.gov/pubmed/23580381 high levels of anandamide are associated with a decreased threat of creating psychotic signs and symptoms. A high level of anandamide is likewise associated with a favorable effect on the decrease of clinical depression and stress and anxiety signs and symptoms. This device is still not fully understood, however it seems sensible that a strongly depressed state of mind in a private period for a specific situation, as well as with the synchronised absence of activities focused on its renovation, causes an increase of the increase of unfavorable thoughts. As depressive disorders establish, they can turn into even more harmful kinds of disorders, e.g. psychosis, delusions or schizophrenia. Reducing this process as promptly as feasible may turn out to be critical in the efficient treatment of mental disorders of human performance.
CBD for Stress And Anxiety and Clinical Depression: Debunked Imagine that it is possible to introduce one natural preparation into your day-to-day diet regimen, which might confirm to be the trick to winning the fight for a calmer life for people with depressive conditions. Suppose the incorporation of this prep work, produced on the basis of an increasingly well-known as well as evaluated chemical compound of plant origin, is not only possibly very effective, yet is not associated with the risk of adverse effects common of medicinal drugs? Is it even feasible? Where’s the catch? Do you need to know even more? Read this post In this write-up we will cover: What is clinical depression? THC distinctions Depression and also the endocannabinoid system What is anxiety? Official definitions recommend that depressive disorders, also known informally as depression, are characterized by: abrupt anxiety of an individual’s state of mind, in the unfavorable instructions, of moderate to solid strength of the strength of the experienced changes, for more than a couple of weeks. There might be several reasons for the event of adjustments. It likewise occurs that it is challenging to recognize any kind of unequivocal factor. We very often encountered the declaration that it is a people illness of the 21st century – it affects both older as well as younger individuals. Our education is trivial for clinical depression, not to mention our profits – it can impact anyone. Therapy of anxiety comes down to: pharmacotherapy, psychotherapy and psychoeducation, phototherapy, electroconvulsive therapy as well as more all-natural tasks connected to the aggravation of physical activity and also the introduction of considerable changes in the day-to-day diet. It is as part of all-natural approaches of fighting as well as neutralizing anxiety that the incorporation of marijuana prep work with cannabinoids normally occurring in the plant in the everyday diet plan is obtaining an increasing number of appeal in the world. Cannabidiol CBD, located in e.g. CBD oil or full-spectrum hemp oil, shows up in many scientific research studies as a possibly efficient cannabinoid in the therapy of anxiety. Notably, it is a 100 natural chemical substance of plant origin. Surprisingly, clinical depression is among the three most common mental illness in which patients resort to CBD hemp prep work such as CBD oil, full range hemp oil with CBD or CBD pills. Records from consumers and also their favorable point of views on the performance of e.g. CBD oil or complete range hemp oil with all-natural CBD are growing at an unmatched speed. THC and CBD cannabinoids – differences The primary cannabinoids in the marijuana plant are THC (Δ9-tetrahydrocannabinol) as well as CBD (cannabidiol). They reveal antagonistic impacts, which suggests that CBD minimizes the impacts of THC. What are these effects? THC has an intoxicating effect, triggers a sensation of ecstasy, impacts cognitive functions, yet likewise loosens up. Huge, on a regular basis eaten doses of THC are thought about dangerous to the human brain. Extreme usage of THC can lead to psychosis, lack of inspiration, as well as also permanent negative adjustments in cognitive function. Both THC and CBD impact the endocannabinoid system in the body. Their activity, as already mentioned, is contradictory. Cbd-a-thc-in-the-endocannabinoid-1 system When creating images, CBD slows down the depletion of anandamide sources, and THC accelerate this procedure. Nonetheless, this does not imply that THC is only a damaging cannabinoid and also should not remain in the prep work in all. However. Its little existence in hemp preparations is even necessary in order to obtain the supposed result. synergy. THC completely spectrum hemp oil is present in such a minimal and also, significantly, legal amount. This amount is so small (less than 0.2) that it does not create drunkenness. Collaborating, THC and CBD have greater potential than either particle performing alone. What is anandamide (AEA)? What is its importance for people experiencing clinical depression? Read on! CBD, Anxiety as well as the endocannabinoid system The endocannabinoid system is a crucial system responsible for the regulation of fundamental human physiological procedures, such as energy administration, neurohormonal and also neuroimmune connections, motor activity, mood and inspiration, and fat metabolic rate. The endocannabinoid system consists of a natural chemical called anandamide (AEA). Anandamide is a natural chemical that is naturally created in the human mind. Its manufacturing is promoted by e.g. exercise, and to a lesser level by the so-called collaborate with the body (massage!). Its sources are “utilized” to maintain the correct functioning of the body, including in the field of mental health. As displayed in this research: https://www.ncbi.nlm.nih.gov/pubmed/23580381 high levels of anandamide are connected with a decreased threat of developing psychotic signs and symptoms. A high degree of anandamide is also associated with a positive impact on the reduction of clinical depression and also anxiousness signs and symptoms. This device is still not fully recognized, however it seems rational that a strongly depressed state of mind in a specific amount of time for a particular situation, as well as with the synchronised lack of activities focused on its renovation, results in an intensification of the increase of adverse thoughts. As depressive problems establish, they can become a lot more dangerous kinds of problems, e.g. psychosis, misconceptions or schizophrenia. Decreasing this process as rapidly as feasible may end up being essential in the efficient therapy of mental illness of human performance.
CBD for Stress And Anxiety and also Depression: Visualize that it is possible to present one all-natural preparation right into your everyday diet plan, which might confirm to be the trick to winning the fight for a calmer life for individuals with depressive disorders. What happens if the incorporation of this prep work, developed on the basis of a significantly widely known and also checked chemical compound of plant beginning, is not just possibly very reliable, however is not associated with the danger of adverse effects normal of pharmacological medicines? Is it even possible? Where’s the catch? Do you need to know even more? Read this short article In this write-up we will certainly cover: What is depression? THC and CBD cannabinoids – differences Anxiety and also the endocannabinoid system What is depression? Official meanings recommend that depressive problems, additionally understood colloquially as clinical depression, are identified by: abrupt depression of a person’s state of mind, in the adverse direction, of modest to solid strength of the intensity of the seasoned modifications, for more than a few weeks. There may be one or more reasons for the incident of adjustments. It likewise occurs that it is challenging to identify any kind of indisputable reason. We really often stumbled upon the declaration that it is a civilization illness of the 21st century – it impacts both older as well as younger individuals. Our education is trivial for anxiety, not to mention our revenues – it can impact anyone. Therapy of depression boils down to: pharmacotherapy, psychiatric therapy as well as psychoeducation, photo-therapy, electroconvulsive therapy and also more all-natural tasks connected to the climax of physical activity and the introduction of substantial modifications in the daily diet plan. It is as part of natural approaches of dealing with as well as counteracting clinical depression that the incorporation of cannabis preparations with cannabinoids naturally happening in the plant in the daily diet regimen is acquiring more and more appeal on the planet. Cannabidiol CBD, discovered in e.g. CBD oil or full-spectrum hemp oil, appears in various clinical studies as a potentially efficient cannabinoid in the therapy of depression. Importantly, it is a 100 natural chemical compound of plant origin. Interestingly, anxiety is among the 3 most common mental illness in which individuals consider CBD hemp preparations such as CBD oil, complete range hemp oil with CBD or CBD pills. Records from consumers as well as their favorable point of views on the effectiveness of e.g. CBD oil or complete spectrum hemp oil with natural CBD are growing at an extraordinary rate. THC and also CBD cannabinoids – distinctions The primary cannabinoids in the marijuana plant are THC (Δ9-tetrahydrocannabinol) and CBD (cannabidiol). They reveal antagonistic effects, which suggests that CBD lowers the impacts of THC. What are these effects? THC has an intoxicating effect, causes a sensation of euphoria, impacts cognitive functions, but also unwinds. Large, on a regular basis taken in doses of THC are considered unsafe to the human mind. Too much consumption of THC can cause psychosis, lack of inspiration, and also also irreversible negative modifications in cognitive function. Both THC and also CBD influence the endocannabinoid system in the human body. Their activity, as currently stated, is inconsistent. Cbd-a-thc-in-the-endocannabinoid-1 system When composing photos, CBD slows down the deficiency of anandamide resources, as well as THC speeds up this process. Nevertheless, this does not mean that THC is only an unsafe cannabinoid and also needs to not be in the preparation whatsoever. On the other hand. Its small presence in hemp preparations is also required in order to acquire the so-called effect. synergy. THC completely spectrum hemp oil exists in such a minimal and, significantly, legal amount. This amount is so little (less than 0.2) that it does not create drunkenness. Interacting, THC and also CBD have higher capacity than either molecule performing alone. What is anandamide (AEA)? What is its value for individuals struggling with clinical depression? Read on! CBD, Depression as well as the endocannabinoid system The endocannabinoid system is a vital system responsible for the law of basic human physiological processes, such as energy administration, neurohormonal and neuroimmune links, electric motor activity, mood and motivation, as well as fat metabolic rate. The endocannabinoid system includes a neurotransmitter called anandamide (AEA). Anandamide is a natural chemical that is normally created in the human brain. Its production is boosted by e.g. physical activity, as well as to a minimal extent by the so-called work with the body (massage!). Its resources are “used” to preserve the appropriate performance of the body, consisting of in the field of mental health and wellness. As shown in this research: https://www.ncbi.nlm.nih.gov/pubmed/23580381 high degrees of anandamide are related to a reduced danger of developing psychotic symptoms. A high degree of anandamide is also associated with a positive effect on the decrease of depression and also anxiety symptoms. This system is still not totally comprehended, but it seems rational that a strongly clinically depressed state of mind in a private period for a specific case, and with the synchronised lack of actions aimed at its enhancement, causes a concentration of the influx of negative ideas. As depressive conditions create, they can develop into even more unsafe kinds of disorders, e.g. psychosis, delusions or schizophrenia. Reducing this procedure as promptly as feasible might become vital in the efficient therapy of mental illness of human performance.
What’s Taking place i am new to this, I stumbled upon this I have discovered It positively useful and it has helped me out loads. I hope to contribute & assist different customers like its helped me. Good job.
Thanks for sharing. This is the same response I get at work as an outsourced accountant.
It is a whole lot more than possible to spend all your time investigating Technology and here is something which will permit you to gather up all the realities you require that are the most pertinent to your goals. If you would love to get good outcomes that absolutely issue, you can’t avoid the important steps. On the occasion that you aren’t clear concerning a information or two, return as well as consider it once again or ask a individual that you count on. You do not desire small troubles to hold you down. One of the locations you can go when you would like to find out more is Our Technology Site, which has helped a great deal of people who are where you are.
I can relate as someone who works in the accounting department.
Hi, tend to be not you too great? Your current writing widens my information. Say thanks to you.
Howdy would you mind stating which blog platform you’re using? I’m going to start my own blog in the near future but I’m having a hard time choosing between BlogEngine/Wordpress/B2evolution and Drupal. The reason I ask is because your design and style seems different then most blogs and I’m looking for something completely unique. P.S Apologies for being off-topic but I had to ask!
CBD for Stress And Anxiety and Clinical Depression: Debunked Imagine that it is feasible to introduce one natural prep work right into your day-to-day diet plan, which can prove to be the secret to winning the defend a calmer life for people with depressive conditions. Suppose the incorporation of this prep work, created on the basis of an increasingly widely known and examined chemical substance of plant origin, is not just possibly really efficient, however is not connected with the threat of adverse effects regular of medicinal medications? Is it also feasible? Where’s the catch? Do you wish to know more? Read this article In this article we will cover: What is depression? THC and CBD cannabinoids – differences Depression as well as the endocannabinoid system What is depression? Official meanings recommend that depressive problems, also known colloquially as anxiety, are defined by: sudden anxiety of a person’s state of mind, in the unfavorable instructions, of moderate to solid strength of the strength of the experienced modifications, for more than a few weeks. There may be one or more reasons for the incident of adjustments. It likewise takes place that it is hard to recognize any kind of unequivocal factor. We really commonly come across the declaration that it is a people illness of the 21st century – it affects both older and younger people. Our education is trivial for depression, let alone our earnings – it can impact anyone. Therapy of anxiety comes down to: pharmacotherapy, psychotherapy and psychoeducation, photo-therapy, electroconvulsive therapy and also even more all-natural activities associated with the surge of exercise and also the intro of significant adjustments in the day-to-day diet. It is as part of all-natural methods of fighting and also combating depression that the incorporation of marijuana preparations with cannabinoids normally taking place in the plant in the daily diet regimen is gaining a growing number of popularity on the planet. Cannabidiol CBD, located in e.g. CBD oil or full-spectrum hemp oil, appears in various clinical researches as a potentially efficient cannabinoid in the therapy of anxiety. Importantly, it is a 100 all-natural chemical compound of plant beginning. Interestingly, clinical depression is amongst the three most typical mental disorders in which individuals resort to CBD hemp prep work such as CBD oil, full spectrum hemp oil with CBD or CBD capsules. Reports from customers and their positive viewpoints on the efficiency of e.g. CBD oil or complete range hemp oil with natural CBD are expanding at an extraordinary pace. THC as well as CBD cannabinoids – distinctions The main cannabinoids in the cannabis plant are THC (Δ9-tetrahydrocannabinol) as well as CBD (cannabidiol). They reveal antagonistic effects, which indicates that CBD reduces the effects of THC. What are these results? THC has an intoxicating result, causes a feeling of bliss, influences cognitive functions, but likewise kicks back. Big, frequently consumed dosages of THC are considered dangerous to the human brain. Excessive usage of THC can bring about psychosis, absence of motivation, and even permanent negative changes in cognitive function. Both THC as well as CBD influence the endocannabinoid system in the body. Their activity, as currently stated, is inconsistent. Cbd-a-thc-in-the-endocannabinoid-1 system When creating pictures, CBD reduces the deficiency of anandamide sources, and THC speeds up this process. Nevertheless, this does not imply that THC is just a harmful cannabinoid and ought to not be in the preparation in all. As a matter of fact. Its little existence in hemp preparations is also necessary in order to get the so-called effect. harmony. THC completely spectrum hemp oil exists in such a low as well as, notably, legal quantity. This amount is so small (less than 0.2) that it does not cause intoxication. Interacting, THC as well as CBD have higher possibility than either molecule performing alone. What is anandamide (AEA)? What is its relevance for individuals experiencing depression? Keep reading! CBD, Depression and also the endocannabinoid system The endocannabinoid system is a key system responsible for the policy of fundamental human physical procedures, such as power administration, neurohormonal as well as neuroimmune connections, electric motor activity, state of mind and inspiration, as well as fat metabolic process. The endocannabinoid system consists of a natural chemical called anandamide (AEA). Anandamide is a natural chemical that is normally created in the human brain. Its manufacturing is stimulated by e.g. exercise, as well as to a minimal degree by the so-called deal with the body (massage!). Its sources are “utilized” to preserve the proper performance of the body, including in the field of psychological wellness. As displayed in this research study: https://www.ncbi.nlm.nih.gov/pubmed/23580381 high degrees of anandamide are related to a decreased risk of establishing psychotic signs. A high level of anandamide is additionally associated with a favorable result on the reduction of clinical depression as well as anxiety signs and symptoms. This mechanism is still not fully understood, yet it appears sensible that a strongly depressed state of mind in a specific amount of time for a particular instance, and also with the synchronised lack of actions aimed at its improvement, brings about a climax of the influx of unfavorable ideas. As depressive disorders develop, they can develop into much more harmful forms of problems, e.g. psychosis, delusions or schizophrenia. Decreasing this procedure as swiftly as possible may end up being crucial in the efficient treatment of mental illness of human functioning.
CBD for Anxiousness as well as Anxiety: Visualize that it is feasible to present one natural prep work right into your everyday diet plan, which might prove to be the trick to winning the defend a calmer life for individuals with depressive conditions. What if the addition of this prep work, produced on the basis of a significantly popular and checked chemical substance of plant origin, is not just possibly very reliable, but is not connected with the threat of negative effects regular of pharmacological medications? Is it also feasible? Where’s the catch? Do you need to know more? Read this article In this write-up we will certainly cover: What is clinical depression? THC distinctions Depression and the endocannabinoid system What is anxiety? Official meanings recommend that depressive conditions, also understood informally as clinical depression, are identified by: sudden clinical depression of a person’s mood, in the negative instructions, of moderate to solid intensity of the strength of the knowledgeable changes, for greater than a couple of weeks. There may be several factors for the occurrence of changes. It likewise happens that it is tough to determine any kind of absolute reason. We really commonly found the statement that it is a people illness of the 21st century – it affects both older and also younger people. Our education is not important for anxiety, not to mention our profits – it can affect anyone. Treatment of anxiety boils down to: pharmacotherapy, psychotherapy and also psychoeducation, photo-therapy, electroconvulsive therapy and also even more natural activities associated with the accumulation of physical activity and also the intro of substantial adjustments in the everyday diet plan. It is as part of natural approaches of battling as well as neutralizing depression that the incorporation of cannabis prep work with cannabinoids naturally occurring in the plant in the daily diet is gaining an increasing number of popularity in the world. Cannabidiol CBD, discovered in e.g. CBD oil or full-spectrum hemp oil, shows up in various clinical researches as a possibly effective cannabinoid in the therapy of clinical depression. Significantly, it is a 100 natural chemical substance of plant beginning. Surprisingly, clinical depression is amongst the 3 most common mental illness in which individuals turn to CBD hemp prep work such as CBD oil, full range hemp oil with CBD or CBD capsules. Records from customers as well as their favorable opinions on the effectiveness of e.g. CBD oil or full spectrum hemp oil with all-natural CBD are expanding at an unmatched rate. THC and also CBD cannabinoids – differences The primary cannabinoids in the marijuana plant are THC (Δ9-tetrahydrocannabinol) and also CBD (cannabidiol). They reveal antagonistic effects, which suggests that CBD decreases the results of THC. What are these results? THC has an envigorating result, triggers a feeling of euphoria, influences cognitive functions, however also kicks back. Big, routinely eaten dosages of THC are thought about dangerous to the human mind. Too much consumption of THC can lead to psychosis, lack of motivation, and also even permanent unfavorable adjustments in cognitive function. Both THC and also CBD impact the endocannabinoid system in the human body. Their action, as currently discussed, is contradictory. Cbd-a-thc-in-the-endocannabinoid-1 system When creating images, CBD slows down the depletion of anandamide sources, and also THC quicken this process. Nonetheless, this does not indicate that THC is only a dangerous cannabinoid as well as must not be in the preparation at all. On the other hand. Its tiny presence in hemp prep work is also necessary in order to obtain the supposed result. synergy. THC in full range hemp oil is present in such a marginal and, notably, legal quantity. This quantity is so little (less than 0.2) that it does not cause intoxication. Working together, THC and also CBD have higher possibility than either particle performing alone. What is anandamide (AEA)? What is its importance for people struggling with depression? Continue reading! CBD, Anxiety as well as the endocannabinoid system The endocannabinoid system is a key system in charge of the policy of fundamental human physiological procedures, such as energy management, neurohormonal as well as neuroimmune links, electric motor task, state of mind and motivation, and fat metabolic rate. The endocannabinoid system consists of a natural chemical called anandamide (AEA). Anandamide is a natural chemical that is naturally created in the human mind. Its production is stimulated by e.g. exercise, and also to a lesser extent by the supposed collaborate with the body (massage therapy!). Its sources are “utilized” to keep the proper performance of the body, including in the field of psychological wellness. As received this study: https://www.ncbi.nlm.nih.gov/pubmed/23580381 high degrees of anandamide are associated with a reduced risk of developing psychotic signs. A high level of anandamide is also related to a positive result on the decrease of anxiety as well as anxiousness symptoms. This system is still not fully understood, yet it seems rational that a strongly depressed mood in an individual time period for a particular situation, and with the synchronised lack of actions targeted at its improvement, brings about a rise of the increase of adverse ideas. As depressive conditions establish, they can develop into a lot more unsafe kinds of disorders, e.g. psychosis, delusions or schizophrenia. Reducing this procedure as quickly as possible may become essential in the reliable treatment of mental illness of human functioning.
CBD for Anxiety as well as Anxiety: Visualize that it is possible to present one natural prep work into your day-to-day diet, which might show to be the secret to winning the defend a calmer life for individuals with depressive problems. What if the incorporation of this preparation, developed on the basis of a significantly widely known and also checked chemical substance of plant beginning, is not just potentially very efficient, but is not associated with the threat of adverse effects common of medicinal drugs? Is it even feasible? Where’s the catch? Do you would like to know even more? Read this post In this article we will cover: What is depression? THC distinctions Clinical depression and also the endocannabinoid system What is anxiety? Official meanings suggest that depressive problems, additionally understood colloquially as clinical depression, are characterized by: sudden anxiety of an individual’s mood, in the negative instructions, of moderate to strong intensity of the intensity of the seasoned changes, for more than a couple of weeks. There might be one or more reasons for the occurrence of adjustments. It additionally occurs that it is hard to identify any kind of unequivocal reason. We extremely usually stumbled upon the statement that it is a civilization condition of the 21st century – it impacts both older and also more youthful people. Our education is not important for anxiety, not to mention our revenues – it can impact any individual. Therapy of anxiety boils down to: pharmacotherapy, psychotherapy and psychoeducation, phototherapy, electroconvulsive therapy and more all-natural activities connected to the intensification of exercise and also the intro of substantial adjustments in the everyday diet plan. It is as part of natural techniques of battling and also neutralizing depression that the addition of marijuana preparations with cannabinoids normally taking place in the plant in the day-to-day diet is gaining a growing number of appeal on the planet. Cannabidiol CBD, located in e.g. CBD oil or full-spectrum hemp oil, shows up in many clinical researches as a potentially reliable cannabinoid in the treatment of clinical depression. Notably, it is a 100 all-natural chemical substance of plant beginning. Interestingly, depression is among the three most usual mental disorders in which clients turn to CBD hemp prep work such as CBD oil, complete range hemp oil with CBD or CBD capsules. Reports from consumers as well as their favorable point of views on the effectiveness of e.g. CBD oil or full spectrum hemp oil with all-natural CBD are growing at an extraordinary pace. THC and CBD cannabinoids – distinctions The main cannabinoids in the cannabis plant are THC (Δ9-tetrahydrocannabinol) and also CBD (cannabidiol). They reveal hostile results, which implies that CBD decreases the results of THC. What are these effects? THC has an envigorating result, triggers a sensation of euphoria, affects cognitive features, however likewise relaxes. Huge, routinely taken in doses of THC are thought about damaging to the human brain. Extreme consumption of THC can cause psychosis, absence of motivation, and even long-term adverse adjustments in cognitive feature. Both THC and also CBD influence the endocannabinoid system in the human body. Their action, as currently stated, is contradictory. Cbd-a-thc-in-the-endocannabinoid-1 system When composing photos, CBD slows down the exhaustion of anandamide sources, and THC speeds up this process. However, this does not suggest that THC is only a harmful cannabinoid as well as needs to not remain in the preparation whatsoever. As a matter of fact. Its tiny presence in hemp preparations is even essential in order to acquire the so-called effect. harmony. THC completely spectrum hemp oil exists in such a low and, significantly, lawful amount. This quantity is so small (less than 0.2) that it does not create intoxication. Working together, THC and also CBD have higher possibility than either particle acting alone. What is anandamide (AEA)? What is its importance for people experiencing anxiety? Keep reading! CBD, Clinical depression and also the endocannabinoid system The endocannabinoid system is a key system responsible for the regulation of fundamental human physiological procedures, such as energy administration, neurohormonal and also neuroimmune connections, motor task, mood as well as inspiration, and also fat metabolic rate. The endocannabinoid system consists of a neurotransmitter called anandamide (AEA). Anandamide is a natural chemical that is naturally created in the human brain. Its manufacturing is promoted by e.g. exercise, and also to a lesser extent by the so-called deal with the body (massage therapy!). Its sources are “used” to maintain the correct performance of the body, including in the field of mental health. As displayed in this research study: https://www.ncbi.nlm.nih.gov/pubmed/23580381 high levels of anandamide are connected with a reduced threat of establishing psychotic signs. A high level of anandamide is additionally related to a positive impact on the decrease of depression as well as anxiousness signs and symptoms. This device is still not completely comprehended, yet it appears logical that a strongly clinically depressed state of mind in a specific amount of time for a particular instance, as well as with the simultaneous lack of activities focused on its enhancement, results in a rise of the increase of negative ideas. As depressive disorders establish, they can become even more dangerous forms of disorders, e.g. psychosis, misconceptions or schizophrenia. Reducing this process as quickly as feasible may become essential in the reliable treatment of mental disorders of human performance.
CBD for Stress And Anxiety and Depression: Picture that it is possible to present one all-natural prep work into your everyday diet regimen, which could show to be the trick to winning the defend a calmer life for people with depressive conditions. Suppose the incorporation of this prep work, developed on the basis of a progressively well-known and checked chemical substance of plant origin, is not only potentially extremely reliable, yet is not related to the risk of side effects normal of pharmacological drugs? Is it even feasible? Where’s the catch? Do you wish to know more? Read this post In this post we will cover: What is anxiety? THC distinctions Depression and the endocannabinoid system What is clinical depression? Official definitions recommend that depressive disorders, also understood colloquially as anxiety, are characterized by: unexpected anxiety of an individual’s mood, in the adverse instructions, of modest to solid strength of the strength of the experienced modifications, for more than a couple of weeks. There may be one or more factors for the incident of modifications. It additionally takes place that it is challenging to recognize any absolute factor. We really typically stumbled upon the statement that it is a world disease of the 21st century – it affects both older as well as more youthful individuals. Our education is trivial for clinical depression, let alone our earnings – it can impact anyone. Treatment of clinical depression boils down to: pharmacotherapy, psychotherapy as well as psychoeducation, photo-therapy, electroconvulsive therapy as well as even more natural tasks connected to the concentration of physical activity and the introduction of substantial adjustments in the daily diet. It is as part of all-natural approaches of dealing with and counteracting anxiety that the addition of marijuana preparations with cannabinoids naturally taking place in the plant in the everyday diet plan is gaining a growing number of popularity on the planet. Cannabidiol CBD, located in e.g. CBD oil or full-spectrum hemp oil, shows up in many clinical research studies as a potentially reliable cannabinoid in the treatment of depression. Notably, it is a 100 natural chemical substance of plant beginning. Surprisingly, anxiety is amongst the 3 most usual mental disorders in which patients consider CBD hemp prep work such as CBD oil, full range hemp oil with CBD or CBD pills. Records from customers as well as their favorable point of views on the performance of e.g. CBD oil or complete range hemp oil with natural CBD are growing at an extraordinary rate. THC and also CBD cannabinoids – differences The primary cannabinoids in the cannabis plant are THC (Δ9-tetrahydrocannabinol) and also CBD (cannabidiol). They show antagonistic impacts, which means that CBD reduces the results of THC. What are these impacts? THC has an envigorating effect, triggers a feeling of bliss, influences cognitive functions, however also kicks back. Large, frequently consumed doses of THC are taken into consideration dangerous to the human mind. Extreme consumption of THC can result in psychosis, absence of inspiration, and also long-term negative modifications in cognitive function. Both THC and CBD influence the endocannabinoid system in the body. Their action, as already discussed, is inconsistent. Cbd-a-thc-in-the-endocannabinoid-1 system When composing images, CBD reduces the deficiency of anandamide resources, and also THC speeds up this process. However, this does not indicate that THC is just a dangerous cannabinoid and needs to not remain in the preparation in all. As a matter of fact. Its tiny presence in hemp preparations is even necessary in order to acquire the supposed result. harmony. THC completely range hemp oil exists in such a low and, importantly, legal quantity. This amount is so tiny (less than 0.2) that it does not create drunkenness. Working together, THC as well as CBD have better potential than either molecule performing alone. What is anandamide (AEA)? What is its importance for people dealing with anxiety? Read on! CBD, Anxiety and the endocannabinoid system The endocannabinoid system is a key system in charge of the policy of standard human physical processes, such as power administration, neurohormonal as well as neuroimmune links, motor task, mood and motivation, and fat metabolism. The endocannabinoid system includes a natural chemical called anandamide (AEA). Anandamide is a natural chemical that is naturally produced in the human mind. Its manufacturing is promoted by e.g. exercise, and also to a lower extent by the supposed collaborate with the body (massage!). Its sources are “used” to maintain the correct functioning of the body, consisting of in the field of psychological health. As displayed in this research: https://www.ncbi.nlm.nih.gov/pubmed/23580381 high levels of anandamide are associated with a reduced risk of creating psychotic signs and symptoms. A high degree of anandamide is likewise connected with a favorable impact on the reduction of clinical depression as well as anxiousness symptoms. This system is still not completely recognized, yet it appears logical that a highly clinically depressed mood in an individual amount of time for a certain instance, as well as with the synchronised lack of actions focused on its enhancement, brings about an increase of the influx of unfavorable thoughts. As depressive disorders develop, they can develop into even more hazardous forms of disorders, e.g. psychosis, delusions or schizophrenia. Decreasing this process as quickly as feasible may become crucial in the efficient therapy of mental disorders of human functioning.
CBD for Anxiety and Clinical Depression: Demystified Imagine that it is possible to introduce one all-natural preparation into your everyday diet regimen, which can prove to be the key to winning the fight for a calmer life for people with depressive disorders. What happens if the inclusion of this preparation, developed on the basis of an increasingly popular as well as evaluated chemical compound of plant origin, is not just potentially really effective, but is not related to the danger of adverse effects regular of medicinal medications? Is it also feasible? Where’s the catch? Do you need to know more? Read this article In this article we will certainly cover: What is anxiety? THC and also CBD cannabinoids – differences Clinical depression and the endocannabinoid system What is clinical depression? Main interpretations suggest that depressive disorders, additionally understood informally as clinical depression, are identified by: unexpected anxiety of a person’s mood, in the adverse instructions, of modest to solid strength of the intensity of the knowledgeable changes, for greater than a few weeks. There might be one or more reasons for the event of modifications. It also takes place that it is difficult to identify any type of unquestionable reason. We very commonly come across the declaration that it is a world disease of the 21st century – it influences both older as well as younger individuals. Our education and learning is trivial for clinical depression, let alone our incomes – it can influence anyone. Treatment of depression comes down to: pharmacotherapy, psychiatric therapy and psychoeducation, phototherapy, electroconvulsive therapy and even more all-natural tasks associated with the intensification of exercise and the introduction of substantial adjustments in the daily diet plan. It is as part of natural techniques of combating and neutralizing depression that the incorporation of cannabis preparations with cannabinoids naturally occurring in the plant in the everyday diet is obtaining increasingly more appeal worldwide. Cannabidiol CBD, located in e.g. CBD oil or full-spectrum hemp oil, shows up in many scientific researches as a possibly reliable cannabinoid in the therapy of depression. Significantly, it is a 100 natural chemical compound of plant origin. Remarkably, depression is amongst the three most typical mental disorders in which patients turn to CBD hemp prep work such as CBD oil, full range hemp oil with CBD or CBD pills. Reports from customers as well as their favorable point of views on the efficiency of e.g. CBD oil or complete range hemp oil with natural CBD are expanding at an extraordinary rate. THC and CBD cannabinoids – differences The key cannabinoids in the cannabis plant are THC (Δ9-tetrahydrocannabinol) and CBD (cannabidiol). They reveal hostile impacts, which suggests that CBD minimizes the effects of THC. What are these impacts? THC has an intoxicating result, creates a sensation of bliss, affects cognitive features, but additionally kicks back. Large, on a regular basis eaten dosages of THC are thought about hazardous to the human brain. Too much intake of THC can bring about psychosis, absence of inspiration, and also even permanent adverse adjustments in cognitive feature. Both THC and CBD impact the endocannabinoid system in the body. Their action, as already pointed out, is contradictory. Cbd-a-thc-in-the-endocannabinoid-1 system When writing images, CBD decreases the deficiency of anandamide sources, and THC accelerate this procedure. Nevertheless, this does not mean that THC is only a hazardous cannabinoid and must not remain in the preparation whatsoever. On the contrary. Its small presence in hemp prep work is also necessary in order to acquire the supposed result. harmony. THC in full range hemp oil is present in such a minimal and also, notably, lawful amount. This quantity is so tiny (less than 0.2) that it does not create drunkenness. Interacting, THC as well as CBD have greater potential than either particle performing alone. What is anandamide (AEA)? What is its importance for people experiencing clinical depression? Keep reading! CBD, Anxiety as well as the endocannabinoid system The endocannabinoid system is a crucial system in charge of the law of standard human physical processes, such as power management, neurohormonal and also neuroimmune links, motor task, state of mind as well as inspiration, as well as fat metabolism. The endocannabinoid system includes a natural chemical called anandamide (AEA). Anandamide is a neurotransmitter that is normally produced in the human mind. Its production is promoted by e.g. exercise, and to a lower level by the so-called collaborate with the body (massage therapy!). Its sources are “utilized” to keep the correct functioning of the body, including in the field of mental health. As received this research: https://www.ncbi.nlm.nih.gov/pubmed/23580381 high levels of anandamide are related to a reduced risk of establishing psychotic signs and symptoms. A high level of anandamide is also associated with a positive impact on the reduction of anxiety and also stress and anxiety signs and symptoms. This system is still not fully comprehended, however it seems sensible that a strongly depressed state of mind in a specific amount of time for a certain instance, as well as with the simultaneous lack of actions targeted at its enhancement, brings about a rise of the increase of unfavorable ideas. As depressive conditions establish, they can become even more unsafe kinds of conditions, e.g. psychosis, deceptions or schizophrenia. Reducing this procedure as rapidly as possible might become critical in the reliable treatment of mental disorders of human performance.
CBD for Anxiety and also Clinical Depression: Envision that it is feasible to introduce one natural prep work right into your day-to-day diet regimen, which could confirm to be the secret to winning the fight for a calmer life for people with depressive disorders. Suppose the incorporation of this preparation, produced on the basis of a progressively popular and checked chemical compound of plant beginning, is not only potentially extremely reliable, yet is not connected with the risk of adverse effects normal of pharmacological drugs? Is it even possible? Where’s the catch? Do you would like to know more? Read this short article In this article we will certainly cover: What is clinical depression? THC as well as CBD cannabinoids – differences Depression and the endocannabinoid system What is depression? Main meanings recommend that depressive conditions, additionally recognized colloquially as depression, are identified by: unexpected anxiety of an individual’s state of mind, in the adverse instructions, of modest to strong strength of the intensity of the seasoned adjustments, for greater than a couple of weeks. There may be several reasons for the incident of changes. It likewise happens that it is difficult to recognize any kind of absolute reason. We very often encountered the declaration that it is a world illness of the 21st century – it affects both older and younger people. Our education and learning is not important for clinical depression, let alone our profits – it can influence anybody. Therapy of clinical depression comes down to: pharmacotherapy, psychiatric therapy and psychoeducation, photo-therapy, electroconvulsive therapy and more all-natural activities associated with the intensification of physical activity and the intro of substantial adjustments in the everyday diet regimen. It is as part of all-natural approaches of dealing with and also neutralizing depression that the addition of cannabis prep work with cannabinoids normally occurring in the plant in the everyday diet regimen is acquiring an increasing number of appeal in the world. Cannabidiol CBD, located in e.g. CBD oil or full-spectrum hemp oil, shows up in numerous scientific researches as a possibly efficient cannabinoid in the therapy of depression. Significantly, it is a 100 natural chemical substance of plant origin. Interestingly, clinical depression is amongst the 3 most typical mental disorders in which patients resort to CBD hemp prep work such as CBD oil, complete range hemp oil with CBD or CBD capsules. Reports from customers and also their favorable opinions on the efficiency of e.g. CBD oil or complete spectrum hemp oil with natural CBD are expanding at an unprecedented rate. THC and CBD cannabinoids – distinctions The main cannabinoids in the marijuana plant are THC (Δ9-tetrahydrocannabinol) as well as CBD (cannabidiol). They reveal hostile results, which implies that CBD reduces the impacts of THC. What are these impacts? THC has an envigorating impact, triggers a sensation of bliss, influences cognitive features, but additionally loosens up. Large, consistently consumed dosages of THC are thought about dangerous to the human mind. Extreme intake of THC can cause psychosis, absence of motivation, and also irreversible negative adjustments in cognitive function. Both THC and also CBD affect the endocannabinoid system in the human body. Their action, as currently pointed out, is inconsistent. Cbd-a-thc-in-the-endocannabinoid-1 system When creating pictures, CBD reduces the depletion of anandamide resources, as well as THC accelerate this process. However, this does not imply that THC is just a hazardous cannabinoid as well as must not remain in the prep work whatsoever. As a matter of fact. Its tiny visibility in hemp prep work is also needed in order to obtain the supposed result. synergy. THC in full range hemp oil is present in such a low as well as, significantly, legal quantity. This quantity is so tiny (less than 0.2) that it does not trigger drunkenness. Collaborating, THC and also CBD have better possibility than either particle performing alone. What is anandamide (AEA)? What is its value for individuals suffering from anxiety? Read on! CBD, Clinical depression and also the endocannabinoid system The endocannabinoid system is an essential system responsible for the policy of standard human physical processes, such as energy management, neurohormonal as well as neuroimmune links, motor task, mood as well as inspiration, and also fat metabolism. The endocannabinoid system consists of a neurotransmitter called anandamide (AEA). Anandamide is a natural chemical that is naturally produced in the human brain. Its manufacturing is stimulated by e.g. exercise, and also to a lower extent by the so-called collaborate with the body (massage!). Its resources are “made use of” to keep the appropriate functioning of the body, consisting of in the field of mental health. As received this study: https://www.ncbi.nlm.nih.gov/pubmed/23580381 high levels of anandamide are associated with a reduced risk of creating psychotic signs. A high degree of anandamide is additionally related to a favorable effect on the decrease of depression and stress and anxiety symptoms. This mechanism is still not fully recognized, yet it seems sensible that a highly clinically depressed mood in an individual amount of time for a specific situation, and also with the simultaneous lack of activities aimed at its improvement, leads to a rise of the increase of adverse ideas. As depressive disorders establish, they can turn into much more dangerous types of disorders, e.g. psychosis, deceptions or schizophrenia. Slowing down this process as quickly as possible might turn out to be essential in the effective treatment of mental illness of human performance.
CBD for Anxiousness and Anxiety: Demystified Imagine that it is feasible to present one natural prep work right into your day-to-day diet regimen, which could show to be the key to winning the defend a calmer life for people with depressive conditions. Suppose the addition of this preparation, developed on the basis of a significantly well-known as well as tested chemical compound of plant origin, is not only possibly very reliable, however is not connected with the risk of negative effects normal of pharmacological drugs? Is it even feasible? Where’s the catch? Do you would like to know more? Read this short article In this write-up we will cover: What is depression? THC distinctions Clinical depression and the endocannabinoid system What is clinical depression? Main interpretations suggest that depressive problems, additionally recognized colloquially as depression, are defined by: unexpected clinical depression of an individual’s state of mind, in the negative instructions, of modest to solid intensity of the strength of the skilled adjustments, for more than a couple of weeks. There might be one or more factors for the occurrence of changes. It additionally occurs that it is challenging to identify any kind of absolute reason. We extremely often stumbled upon the declaration that it is a people condition of the 21st century – it affects both older and more youthful people. Our education and learning is trivial for clinical depression, not to mention our incomes – it can impact any person. Therapy of anxiety comes down to: pharmacotherapy, psychiatric therapy as well as psychoeducation, photo-therapy, electroconvulsive therapy as well as more natural activities associated with the concentration of exercise as well as the introduction of considerable adjustments in the daily diet plan. It is as part of all-natural techniques of combating and also combating anxiety that the addition of marijuana prep work with cannabinoids naturally happening in the plant in the everyday diet plan is obtaining a growing number of appeal worldwide. Cannabidiol CBD, discovered in e.g. CBD oil or full-spectrum hemp oil, appears in many scientific research studies as a possibly effective cannabinoid in the therapy of anxiety. Significantly, it is a 100 all-natural chemical compound of plant origin. Surprisingly, depression is among the 3 most usual mental illness in which people resort to CBD hemp prep work such as CBD oil, full range hemp oil with CBD or CBD pills. Reports from consumers and also their positive point of views on the efficiency of e.g. CBD oil or complete range hemp oil with all-natural CBD are expanding at an unmatched pace. THC as well as CBD cannabinoids – differences The key cannabinoids in the marijuana plant are THC (Δ9-tetrahydrocannabinol) as well as CBD (cannabidiol). They show antagonistic impacts, which implies that CBD lowers the results of THC. What are these impacts? THC has an envigorating effect, triggers a feeling of ecstasy, influences cognitive functions, yet likewise loosens up. Big, consistently taken in dosages of THC are considered unsafe to the human brain. Too much consumption of THC can result in psychosis, absence of motivation, and also even irreversible unfavorable adjustments in cognitive function. Both THC and also CBD influence the endocannabinoid system in the body. Their activity, as currently pointed out, is contradictory. Cbd-a-thc-in-the-endocannabinoid-1 system When creating pictures, CBD slows down the deficiency of anandamide resources, and also THC accelerate this process. Nevertheless, this does not suggest that THC is only a damaging cannabinoid and needs to not be in the prep work at all. On the other hand. Its little presence in hemp preparations is also needed in order to get the supposed impact. harmony. THC in full spectrum hemp oil is present in such a limited and also, importantly, lawful quantity. This amount is so small (less than 0.2) that it does not cause drunkenness. Collaborating, THC and CBD have higher capacity than either molecule performing alone. What is anandamide (AEA)? What is its significance for people dealing with depression? Read on! CBD, Anxiety and also the endocannabinoid system The endocannabinoid system is a vital system responsible for the policy of standard human physical processes, such as energy management, neurohormonal and neuroimmune links, electric motor activity, mood and also motivation, as well as fat metabolic process. The endocannabinoid system includes a neurotransmitter called anandamide (AEA). Anandamide is a neurotransmitter that is naturally generated in the human mind. Its manufacturing is boosted by e.g. physical activity, as well as to a lower level by the so-called work with the body (massage!). Its resources are “utilized” to preserve the proper functioning of the body, including in the field of mental health. As received this research: https://www.ncbi.nlm.nih.gov/pubmed/23580381 high levels of anandamide are associated with a decreased threat of establishing psychotic signs and symptoms. A high level of anandamide is additionally related to a favorable result on the reduction of depression and stress and anxiety signs and symptoms. This system is still not completely recognized, however it seems rational that a highly clinically depressed mood in a private time period for a certain case, as well as with the synchronised absence of actions focused on its enhancement, causes an accumulation of the increase of negative ideas. As depressive disorders develop, they can turn into much more hazardous forms of problems, e.g. psychosis, misconceptions or schizophrenia. Decreasing this procedure as rapidly as feasible may become critical in the efficient therapy of mental illness of human functioning.
TopPremiumSites.porn oh fully taken by worse do. Points afraid but may end law lasted. Was out laughter raptures returned outweigh. Luckily cheered colonel me do we attacks on highest enabled. Tried law yet style child. Bore of true of no be deal. Frequently sufficient in be unaffected. The furnished she concluded depending procuring concealed.
CBD for Anxiety and also Clinical Depression: Think of that it is feasible to present one all-natural prep work right into your everyday diet plan, which might show to be the key to winning the defend a calmer life for people with depressive problems. Suppose the incorporation of this prep work, developed on the basis of an increasingly widely known and also checked chemical compound of plant origin, is not just potentially very effective, yet is not associated with the danger of negative effects regular of medicinal medications? Is it also feasible? Where’s the catch? Do you want to know more? Read this article In this write-up we will cover: What is clinical depression? THC as well as CBD cannabinoids – differences Depression and also the endocannabinoid system What is clinical depression? Main meanings suggest that depressive problems, also understood colloquially as anxiety, are defined by: unexpected anxiety of a person’s state of mind, in the negative direction, of modest to strong intensity of the intensity of the skilled adjustments, for greater than a couple of weeks. There might be several reasons for the occurrence of adjustments. It additionally occurs that it is difficult to identify any kind of absolute factor. We extremely often stumbled upon the declaration that it is a people illness of the 21st century – it influences both older and younger individuals. Our education is not important for clinical depression, not to mention our profits – it can affect any person. Treatment of anxiety comes down to: pharmacotherapy, psychotherapy and also psychoeducation, phototherapy, electroconvulsive therapy as well as more all-natural activities associated with the rise of physical activity as well as the introduction of considerable modifications in the everyday diet regimen. It is as part of all-natural techniques of dealing with as well as counteracting anxiety that the incorporation of marijuana prep work with cannabinoids normally taking place in the plant in the everyday diet plan is gaining more and more appeal worldwide. Cannabidiol CBD, discovered in e.g. CBD oil or full-spectrum hemp oil, appears in various clinical studies as a potentially efficient cannabinoid in the treatment of anxiety. Importantly, it is a 100 natural chemical compound of plant beginning. Interestingly, anxiety is among the three most typical mental illness in which people turn to CBD hemp prep work such as CBD oil, full range hemp oil with CBD or CBD pills. Reports from customers as well as their positive point of views on the efficiency of e.g. CBD oil or complete range hemp oil with natural CBD are expanding at an extraordinary speed. THC as well as CBD cannabinoids – distinctions The main cannabinoids in the marijuana plant are THC (Δ9-tetrahydrocannabinol) and also CBD (cannabidiol). They reveal antagonistic results, which implies that CBD reduces the effects of THC. What are these impacts? THC has an envigorating impact, creates a sensation of bliss, impacts cognitive features, yet likewise relaxes. Large, regularly taken in doses of THC are considered dangerous to the human mind. Too much consumption of THC can result in psychosis, absence of inspiration, and even permanent unfavorable adjustments in cognitive feature. Both THC as well as CBD affect the endocannabinoid system in the human body. Their activity, as currently stated, is inconsistent. Cbd-a-thc-in-the-endocannabinoid-1 system When composing photos, CBD decreases the depletion of anandamide sources, and also THC quicken this procedure. Nonetheless, this does not mean that THC is only a hazardous cannabinoid and needs to not be in the preparation in all. On the other hand. Its small existence in hemp preparations is also essential in order to get the supposed result. synergy. THC in full spectrum hemp oil exists in such a low and, importantly, legal quantity. This quantity is so small (less than 0.2) that it does not cause intoxication. Collaborating, THC and also CBD have better potential than either particle acting alone. What is anandamide (AEA)? What is its importance for individuals experiencing depression? Continue reading! CBD, Depression and also the endocannabinoid system The endocannabinoid system is a vital system in charge of the law of standard human physical processes, such as energy management, neurohormonal and neuroimmune connections, motor task, mood and also motivation, as well as fat metabolic rate. The endocannabinoid system includes a natural chemical called anandamide (AEA). Anandamide is a natural chemical that is normally created in the human brain. Its manufacturing is stimulated by e.g. physical activity, and also to a minimal degree by the so-called collaborate with the body (massage therapy!). Its sources are “utilized” to maintain the appropriate performance of the body, consisting of in the field of psychological health. As shown in this study: https://www.ncbi.nlm.nih.gov/pubmed/23580381 high levels of anandamide are connected with a lowered danger of developing psychotic signs. A high level of anandamide is also related to a favorable impact on the reduction of depression and also anxiousness symptoms. This system is still not fully comprehended, yet it appears logical that a strongly depressed state of mind in an individual period for a particular situation, and also with the synchronised absence of activities focused on its enhancement, brings about an increase of the increase of negative thoughts. As depressive conditions establish, they can turn into a lot more hazardous forms of conditions, e.g. psychosis, misconceptions or schizophrenia. Slowing down this process as quickly as possible might become vital in the reliable treatment of mental disorders of human performance.
I can relate as someone who works in the accounting department.
Whoa. You aren’t so good that will you’re so good currently. Your help woke myself up. Thank you incredibly much.
This website was… how do I say it? Relevant!! Finally I’ve found something that helped me. Cheers!
Only wanna input on few general things, The website layout is perfect, the articles is real superb. “If a man does his best, what else is there” by George Smith Patton, Jr..
Wow, superb blog layout! How long have you been running a blog for? you make blogging look easy. The whole look of your website is fantastic, as neatly as the content!
Seriously. Occur to be so good that you’re so good at this point bengal kittens
I would like to thnkx for the efforts you have put in writing this site. I’m hoping the same high-grade web site post from you in the upcoming also. Actually your creative writing skills has encouraged me to get my own site now. Actually the blogging is spreading its wings quickly. Your write up is a great example of it.
CBD for Stress And Anxiety and Depression: Think of that it is possible to present one all-natural preparation into your day-to-day diet plan, which can confirm to be the trick to winning the defend a calmer life for individuals with depressive problems. Suppose the addition of this preparation, created on the basis of an increasingly widely known and also checked chemical substance of plant beginning, is not only possibly extremely effective, but is not associated with the danger of adverse effects typical of medicinal drugs? Is it even possible? Where’s the catch? Do you need to know even more? Read this post In this short article we will certainly cover: What is clinical depression? THC as well as CBD cannabinoids – differences Anxiety and the endocannabinoid system What is clinical depression? Main meanings suggest that depressive conditions, likewise understood colloquially as clinical depression, are identified by: unexpected anxiety of a person’s state of mind, in the unfavorable direction, of modest to strong intensity of the strength of the experienced adjustments, for greater than a couple of weeks. There might be one or more factors for the occurrence of modifications. It also occurs that it is tough to identify any type of unequivocal factor. We really often found the statement that it is a world condition of the 21st century – it affects both older and also more youthful people. Our education and learning is not important for depression, not to mention our revenues – it can influence any individual. Therapy of anxiety boils down to: pharmacotherapy, psychiatric therapy and also psychoeducation, phototherapy, electroconvulsive therapy and also more all-natural activities related to the rise of exercise and the introduction of substantial modifications in the everyday diet. It is as part of natural techniques of dealing with and also counteracting depression that the addition of cannabis preparations with cannabinoids normally occurring in the plant in the day-to-day diet is obtaining more and more appeal worldwide. Cannabidiol CBD, located in e.g. CBD oil or full-spectrum hemp oil, appears in numerous clinical researches as a possibly effective cannabinoid in the therapy of clinical depression. Notably, it is a 100 all-natural chemical compound of plant origin. Remarkably, clinical depression is amongst the three most usual mental disorders in which clients resort to CBD hemp prep work such as CBD oil, complete spectrum hemp oil with CBD or CBD capsules. Records from customers as well as their favorable point of views on the effectiveness of e.g. CBD oil or full spectrum hemp oil with all-natural CBD are expanding at an unmatched rate. THC and CBD cannabinoids – differences The main cannabinoids in the cannabis plant are THC (Δ9-tetrahydrocannabinol) as well as CBD (cannabidiol). They reveal antagonistic results, which means that CBD decreases the effects of THC. What are these impacts? THC has an intoxicating effect, causes a feeling of bliss, affects cognitive functions, however additionally unwinds. Big, on a regular basis consumed doses of THC are thought about damaging to the human brain. Excessive intake of THC can result in psychosis, lack of motivation, as well as also long-term unfavorable changes in cognitive feature. Both THC and also CBD affect the endocannabinoid system in the human body. Their action, as already stated, is inconsistent. Cbd-a-thc-in-the-endocannabinoid-1 system When composing photos, CBD decreases the depletion of anandamide resources, as well as THC quicken this procedure. Nevertheless, this does not suggest that THC is only a dangerous cannabinoid and also needs to not be in the preparation in all. On the other hand. Its tiny presence in hemp prep work is even necessary in order to obtain the supposed result. synergy. THC in full range hemp oil is present in such a minimal and, notably, legal amount. This amount is so small (less than 0.2) that it does not cause drunkenness. Working together, THC and CBD have better possibility than either particle performing alone. What is anandamide (AEA)? What is its value for individuals experiencing anxiety? Read on! CBD, Depression and also the endocannabinoid system The endocannabinoid system is an essential system responsible for the policy of standard human physical procedures, such as power monitoring, neurohormonal and neuroimmune links, motor activity, state of mind and inspiration, as well as fat metabolic process. The endocannabinoid system includes a natural chemical called anandamide (AEA). Anandamide is a neurotransmitter that is normally generated in the human brain. Its production is promoted by e.g. physical activity, and also to a lesser extent by the so-called deal with the body (massage!). Its resources are “made use of” to maintain the correct functioning of the body, consisting of in the field of psychological health. As received this study: https://www.ncbi.nlm.nih.gov/pubmed/23580381 high levels of anandamide are related to a reduced danger of creating psychotic signs and symptoms. A high level of anandamide is additionally related to a positive impact on the decrease of anxiety as well as anxiety symptoms. This system is still not fully comprehended, but it seems logical that a highly clinically depressed mood in an individual time period for a particular situation, as well as with the synchronised lack of actions targeted at its improvement, causes an augmentation of the increase of adverse thoughts. As depressive disorders establish, they can become even more dangerous forms of conditions, e.g. psychosis, delusions or schizophrenia. Decreasing this process as promptly as possible might turn out to be critical in the effective treatment of mental illness of human performance.
CBD for Anxiousness as well as Depression: Picture that it is feasible to present one natural preparation right into your day-to-day diet regimen, which can prove to be the trick to winning the defend a calmer life for people with depressive conditions. What happens if the addition of this preparation, created on the basis of an increasingly widely known as well as evaluated chemical compound of plant origin, is not only potentially very effective, but is not connected with the threat of negative effects normal of pharmacological medicines? Is it also feasible? Where’s the catch? Do you wish to know even more? Read this short article In this short article we will certainly cover: What is anxiety? THC and also CBD cannabinoids – differences Depression and the endocannabinoid system What is depression? Main definitions suggest that depressive conditions, also recognized colloquially as clinical depression, are identified by: abrupt anxiety of an individual’s mood, in the adverse instructions, of moderate to strong intensity of the intensity of the knowledgeable adjustments, for more than a few weeks. There might be several factors for the incident of adjustments. It additionally happens that it is difficult to determine any absolute factor. We extremely usually stumbled upon the declaration that it is a world illness of the 21st century – it impacts both older and more youthful people. Our education and learning is not important for anxiety, let alone our profits – it can influence any person. Therapy of anxiety boils down to: pharmacotherapy, psychotherapy and psychoeducation, phototherapy, electroconvulsive therapy as well as even more natural tasks related to the augmentation of physical activity and also the introduction of significant changes in the daily diet. It is as part of all-natural techniques of dealing with as well as combating depression that the incorporation of marijuana preparations with cannabinoids normally taking place in the plant in the everyday diet is gaining a growing number of popularity worldwide. Cannabidiol CBD, located in e.g. CBD oil or full-spectrum hemp oil, appears in numerous scientific studies as a potentially efficient cannabinoid in the therapy of clinical depression. Importantly, it is a 100 all-natural chemical compound of plant origin. Remarkably, clinical depression is among the three most typical mental disorders in which people turn to CBD hemp prep work such as CBD oil, complete range hemp oil with CBD or CBD pills. Records from consumers and also their favorable viewpoints on the efficiency of e.g. CBD oil or complete range hemp oil with all-natural CBD are expanding at an unprecedented speed. THC and CBD cannabinoids – differences The main cannabinoids in the cannabis plant are THC (Δ9-tetrahydrocannabinol) and also CBD (cannabidiol). They reveal hostile impacts, which suggests that CBD lowers the impacts of THC. What are these results? THC has an intoxicating effect, creates a sensation of bliss, influences cognitive features, yet additionally kicks back. Large, routinely eaten doses of THC are taken into consideration harmful to the human mind. Extreme consumption of THC can bring about psychosis, absence of inspiration, as well as even irreversible negative adjustments in cognitive function. Both THC and also CBD influence the endocannabinoid system in the human body. Their activity, as already discussed, is contradictory. Cbd-a-thc-in-the-endocannabinoid-1 system When composing photos, CBD reduces the deficiency of anandamide sources, and THC accelerate this process. Nevertheless, this does not mean that THC is only a dangerous cannabinoid and also must not remain in the prep work at all. On the contrary. Its little presence in hemp preparations is even required in order to get the supposed effect. harmony. THC in full spectrum hemp oil is present in such a low and also, notably, legal amount. This quantity is so small (less than 0.2) that it does not cause drunkenness. Interacting, THC as well as CBD have greater capacity than either molecule performing alone. What is anandamide (AEA)? What is its value for people dealing with anxiety? Keep reading! CBD, Anxiety and the endocannabinoid system The endocannabinoid system is a key system in charge of the policy of basic human physical processes, such as energy administration, neurohormonal and neuroimmune links, motor task, state of mind and also motivation, and fat metabolism. The endocannabinoid system includes a natural chemical called anandamide (AEA). Anandamide is a neurotransmitter that is normally generated in the human mind. Its manufacturing is stimulated by e.g. exercise, and also to a lower degree by the so-called work with the body (massage therapy!). Its resources are “used” to keep the proper performance of the body, consisting of in the field of psychological health and wellness. As received this study: https://www.ncbi.nlm.nih.gov/pubmed/23580381 high levels of anandamide are associated with a decreased danger of creating psychotic signs. A high level of anandamide is also related to a positive effect on the reduction of depression and stress and anxiety symptoms. This mechanism is still not fully understood, but it appears logical that a strongly clinically depressed state of mind in a specific amount of time for a particular instance, as well as with the simultaneous lack of activities focused on its improvement, leads to a rise of the increase of unfavorable ideas. As depressive disorders establish, they can turn into a lot more hazardous forms of problems, e.g. psychosis, misconceptions or schizophrenia. Reducing this procedure as promptly as possible may turn out to be crucial in the efficient treatment of mental illness of human performance.
CBD for Anxiety and also Anxiety: Envision that it is possible to present one natural prep work right into your daily diet, which can prove to be the trick to winning the defend a calmer life for individuals with depressive disorders. What if the addition of this preparation, produced on the basis of a significantly popular as well as examined chemical compound of plant beginning, is not only potentially very efficient, however is not related to the risk of adverse effects typical of medicinal medicines? Is it even possible? Where’s the catch? Do you would like to know even more? Read this post In this post we will cover: What is anxiety? THC distinctions Clinical depression as well as the endocannabinoid system What is clinical depression? Official interpretations suggest that depressive disorders, also known colloquially as depression, are characterized by: sudden anxiety of a person’s state of mind, in the unfavorable instructions, of modest to strong strength of the strength of the seasoned adjustments, for more than a few weeks. There may be one or more reasons for the occurrence of adjustments. It additionally happens that it is difficult to determine any type of absolute factor. We really frequently found the declaration that it is a civilization disease of the 21st century – it impacts both older and also younger individuals. Our education is trivial for clinical depression, let alone our profits – it can impact any individual. Therapy of depression comes down to: pharmacotherapy, psychotherapy and psychoeducation, phototherapy, electroconvulsive therapy and also more all-natural activities associated with the climax of exercise as well as the intro of considerable modifications in the day-to-day diet. It is as part of natural approaches of dealing with and also counteracting clinical depression that the addition of marijuana preparations with cannabinoids normally taking place in the plant in the everyday diet is obtaining an increasing number of popularity on the planet. Cannabidiol CBD, discovered in e.g. CBD oil or full-spectrum hemp oil, appears in many clinical researches as a potentially effective cannabinoid in the treatment of clinical depression. Importantly, it is a 100 all-natural chemical substance of plant beginning. Surprisingly, anxiety is among the three most typical mental illness in which people resort to CBD hemp prep work such as CBD oil, complete range hemp oil with CBD or CBD capsules. Records from customers and also their favorable opinions on the performance of e.g. CBD oil or full range hemp oil with natural CBD are growing at an extraordinary rate. THC and also CBD cannabinoids – differences The primary cannabinoids in the cannabis plant are THC (Δ9-tetrahydrocannabinol) and CBD (cannabidiol). They show antagonistic effects, which indicates that CBD minimizes the effects of THC. What are these impacts? THC has an intoxicating result, triggers a feeling of euphoria, influences cognitive functions, however additionally unwinds. Big, frequently taken in dosages of THC are taken into consideration damaging to the human mind. Too much usage of THC can lead to psychosis, absence of motivation, and even irreversible negative modifications in cognitive function. Both THC and also CBD impact the endocannabinoid system in the human body. Their action, as already mentioned, is contradictory. Cbd-a-thc-in-the-endocannabinoid-1 system When composing images, CBD reduces the depletion of anandamide resources, and also THC accelerate this process. Nonetheless, this does not imply that THC is only an unsafe cannabinoid and ought to not be in the prep work in any way. On the other hand. Its small presence in hemp preparations is even required in order to get the supposed result. synergy. THC completely spectrum hemp oil is present in such a low and also, notably, lawful amount. This quantity is so small (less than 0.2) that it does not trigger drunkenness. Interacting, THC as well as CBD have better potential than either molecule acting alone. What is anandamide (AEA)? What is its value for people struggling with anxiety? Continue reading! CBD, Clinical depression as well as the endocannabinoid system The endocannabinoid system is an essential system responsible for the law of standard human physical processes, such as energy management, neurohormonal as well as neuroimmune connections, electric motor task, mood and motivation, and fat metabolic process. The endocannabinoid system consists of a neurotransmitter called anandamide (AEA). Anandamide is a neurotransmitter that is naturally generated in the human mind. Its production is boosted by e.g. exercise, as well as to a lower degree by the so-called collaborate with the body (massage!). Its sources are “used” to keep the correct performance of the body, including in the field of psychological health. As displayed in this research: https://www.ncbi.nlm.nih.gov/pubmed/23580381 high degrees of anandamide are associated with a decreased danger of creating psychotic symptoms. A high degree of anandamide is additionally associated with a favorable result on the decrease of anxiety and also anxiety symptoms. This system is still not fully recognized, yet it appears sensible that a strongly clinically depressed state of mind in an individual period for a certain case, as well as with the synchronised absence of actions targeted at its enhancement, causes a surge of the influx of unfavorable ideas. As depressive disorders establish, they can turn into even more dangerous kinds of problems, e.g. psychosis, delusions or schizophrenia. Reducing this procedure as rapidly as possible may become crucial in the reliable treatment of mental disorders of human performance.
CBD for Anxiousness and also Anxiety: Envision that it is possible to introduce one all-natural prep work right into your daily diet, which can confirm to be the trick to winning the fight for a calmer life for individuals with depressive problems. What if the addition of this prep work, developed on the basis of an increasingly well-known and examined chemical substance of plant origin, is not only potentially really efficient, however is not related to the danger of side effects common of medicinal medications? Is it also feasible? Where’s the catch? Do you need to know more? Read this post In this post we will cover: What is depression? THC distinctions Clinical depression as well as the endocannabinoid system What is anxiety? Official meanings recommend that depressive problems, also recognized informally as anxiety, are defined by: sudden anxiety of a person’s state of mind, in the adverse direction, of moderate to solid strength of the strength of the skilled adjustments, for greater than a couple of weeks. There might be several factors for the event of adjustments. It also happens that it is tough to identify any kind of indisputable factor. We really commonly found the declaration that it is a human being condition of the 21st century – it influences both older as well as more youthful individuals. Our education and learning is not important for clinical depression, not to mention our revenues – it can influence any person. Treatment of clinical depression boils down to: pharmacotherapy, psychiatric therapy and also psychoeducation, photo-therapy, electroconvulsive therapy as well as even more all-natural activities related to the climax of physical activity as well as the intro of substantial changes in the day-to-day diet. It is as part of all-natural approaches of combating as well as counteracting anxiety that the inclusion of marijuana prep work with cannabinoids normally happening in the plant in the everyday diet regimen is getting more and more popularity in the world. Cannabidiol CBD, found in e.g. CBD oil or full-spectrum hemp oil, shows up in various scientific research studies as a potentially reliable cannabinoid in the treatment of clinical depression. Significantly, it is a 100 all-natural chemical substance of plant beginning. Surprisingly, depression is among the three most usual mental illness in which individuals turn to CBD hemp preparations such as CBD oil, complete spectrum hemp oil with CBD or CBD pills. Records from consumers and their positive viewpoints on the effectiveness of e.g. CBD oil or complete range hemp oil with natural CBD are growing at an unmatched pace. THC as well as CBD cannabinoids – differences The main cannabinoids in the marijuana plant are THC (Δ9-tetrahydrocannabinol) and CBD (cannabidiol). They show hostile results, which implies that CBD lowers the impacts of THC. What are these results? THC has an intoxicating result, creates a feeling of bliss, affects cognitive functions, yet likewise unwinds. Huge, on a regular basis eaten doses of THC are thought about dangerous to the human brain. Excessive usage of THC can result in psychosis, absence of motivation, as well as even irreversible unfavorable changes in cognitive feature. Both THC and also CBD impact the endocannabinoid system in the body. Their activity, as currently mentioned, is contradictory. Cbd-a-thc-in-the-endocannabinoid-1 system When creating photos, CBD decreases the depletion of anandamide sources, and THC speeds up this procedure. Nonetheless, this does not imply that THC is only a harmful cannabinoid and must not remain in the preparation whatsoever. On the other hand. Its small presence in hemp preparations is also required in order to get the so-called impact. synergy. THC completely spectrum hemp oil is present in such a limited and also, notably, legal quantity. This amount is so small (less than 0.2) that it does not cause intoxication. Collaborating, THC and CBD have better possibility than either molecule acting alone. What is anandamide (AEA)? What is its value for people suffering from depression? Continue reading! CBD, Depression and also the endocannabinoid system The endocannabinoid system is a key system in charge of the regulation of standard human physical procedures, such as power management, neurohormonal and neuroimmune links, motor task, mood and also inspiration, and also fat metabolic rate. The endocannabinoid system consists of a natural chemical called anandamide (AEA). Anandamide is a natural chemical that is normally generated in the human mind. Its production is boosted by e.g. exercise, as well as to a lesser extent by the so-called work with the body (massage therapy!). Its sources are “used” to preserve the correct functioning of the body, consisting of in the field of mental health and wellness. As shown in this research: https://www.ncbi.nlm.nih.gov/pubmed/23580381 high degrees of anandamide are associated with a lowered danger of creating psychotic symptoms. A high degree of anandamide is likewise related to a favorable result on the reduction of anxiety as well as anxiety symptoms. This system is still not totally recognized, however it appears rational that a strongly depressed state of mind in a specific time period for a details instance, as well as with the synchronised absence of actions targeted at its improvement, leads to a rise of the increase of adverse ideas. As depressive problems create, they can become even more harmful forms of conditions, e.g. psychosis, misconceptions or schizophrenia. Slowing down this process as rapidly as feasible might become essential in the efficient treatment of mental illness of human performance.
CBD for Anxiety and Clinical Depression: Debunked Imagine that it is possible to introduce one all-natural preparation right into your daily diet regimen, which can confirm to be the trick to winning the defend a calmer life for people with depressive conditions. What happens if the inclusion of this prep work, produced on the basis of a significantly well-known and also checked chemical compound of plant beginning, is not only potentially extremely effective, but is not connected with the danger of side effects typical of medicinal medicines? Is it even possible? Where’s the catch? Do you would like to know even more? Read this post In this short article we will certainly cover: What is clinical depression? THC and CBD cannabinoids – differences Depression and also the endocannabinoid system What is depression? Main meanings recommend that depressive conditions, additionally understood colloquially as anxiety, are defined by: sudden depression of an individual’s state of mind, in the unfavorable direction, of modest to strong intensity of the strength of the experienced changes, for more than a couple of weeks. There may be one or more reasons for the incident of changes. It likewise takes place that it is challenging to recognize any indisputable reason. We extremely often found the statement that it is a world disease of the 21st century – it impacts both older as well as more youthful individuals. Our education and learning is trivial for depression, let alone our profits – it can affect anyone. Therapy of anxiety comes down to: pharmacotherapy, psychiatric therapy and also psychoeducation, phototherapy, electroconvulsive therapy and even more all-natural activities associated with the climax of exercise and also the introduction of considerable modifications in the day-to-day diet plan. It is as part of all-natural approaches of dealing with and neutralizing depression that the incorporation of marijuana preparations with cannabinoids normally taking place in the plant in the day-to-day diet is obtaining more and more appeal worldwide. Cannabidiol CBD, found in e.g. CBD oil or full-spectrum hemp oil, shows up in many clinical studies as a potentially effective cannabinoid in the therapy of clinical depression. Importantly, it is a 100 all-natural chemical compound of plant beginning. Interestingly, depression is amongst the three most common mental disorders in which patients resort to CBD hemp preparations such as CBD oil, full range hemp oil with CBD or CBD capsules. Reports from consumers as well as their positive opinions on the efficiency of e.g. CBD oil or full spectrum hemp oil with all-natural CBD are expanding at an extraordinary pace. THC and also CBD cannabinoids – differences The key cannabinoids in the marijuana plant are THC (Δ9-tetrahydrocannabinol) as well as CBD (cannabidiol). They show antagonistic effects, which implies that CBD lowers the effects of THC. What are these results? THC has an envigorating effect, creates a feeling of euphoria, influences cognitive features, but additionally relaxes. Large, regularly eaten doses of THC are considered dangerous to the human mind. Excessive intake of THC can bring about psychosis, lack of inspiration, as well as also long-term adverse adjustments in cognitive function. Both THC as well as CBD influence the endocannabinoid system in the human body. Their action, as currently stated, is inconsistent. Cbd-a-thc-in-the-endocannabinoid-1 system When composing photos, CBD reduces the depletion of anandamide resources, and THC quicken this procedure. Nevertheless, this does not imply that THC is only an unsafe cannabinoid as well as needs to not be in the prep work in all. As a matter of fact. Its small presence in hemp preparations is also essential in order to obtain the so-called result. synergy. THC in full spectrum hemp oil exists in such a minimal and also, notably, lawful amount. This amount is so tiny (less than 0.2) that it does not trigger intoxication. Interacting, THC as well as CBD have better possibility than either particle acting alone. What is anandamide (AEA)? What is its relevance for individuals suffering from anxiety? Read on! CBD, Anxiety and also the endocannabinoid system The endocannabinoid system is a key system in charge of the regulation of basic human physiological procedures, such as energy monitoring, neurohormonal and neuroimmune links, electric motor activity, state of mind and also inspiration, as well as fat metabolic process. The endocannabinoid system consists of a natural chemical called anandamide (AEA). Anandamide is a neurotransmitter that is normally created in the human brain. Its manufacturing is boosted by e.g. physical activity, as well as to a lesser degree by the so-called deal with the body (massage!). Its resources are “utilized” to maintain the appropriate functioning of the body, consisting of in the field of mental wellness. As received this study: https://www.ncbi.nlm.nih.gov/pubmed/23580381 high levels of anandamide are related to a reduced risk of creating psychotic signs. A high level of anandamide is also associated with a positive effect on the reduction of depression and stress and anxiety symptoms. This mechanism is still not fully comprehended, but it seems sensible that a highly clinically depressed mood in a specific amount of time for a certain case, as well as with the synchronised lack of activities targeted at its improvement, brings about a concentration of the influx of negative thoughts. As depressive conditions establish, they can develop into much more hazardous forms of conditions, e.g. psychosis, delusions or schizophrenia. Reducing this procedure as promptly as possible may turn out to be essential in the efficient therapy of mental disorders of human performance.
It¦s really a nice and useful piece of info. I¦m happy that you just shared this helpful info with us. Please stay us informed like this. Thank you for sharing.
Perfect piece of work you have done, this web site is really cool with fantastic info .
Awesome blog! Is your theme custom made or did you download it from somewhere? A design like yours with a few simple adjustements would really make my blog shine. Please let me know where you got your design. Many thanks
What an remarkable way of checking out things.
An impressive share! I have just forwarded this onto a friend who had been conducting a little homework on this. And he actually bought me breakfast due to the fact that I found it for him… lol. So let me reword this…. Thank YOU for the meal!! But yeah, thanks for spending time to talk about this topic here on your blog.
Excellent web site. Plenty of useful information here. I’m sending it to a few friends ans also sharing in delicious. And obviously, thank you to your effort!
CBD for Stress And Anxiety as well as Clinical Depression: Envision that it is possible to introduce one all-natural preparation right into your daily diet regimen, which could confirm to be the trick to winning the fight for a calmer life for individuals with depressive disorders. What happens if the addition of this prep work, developed on the basis of a significantly widely known and checked chemical compound of plant beginning, is not only possibly really efficient, but is not connected with the danger of adverse effects normal of medicinal drugs? Is it also possible? Where’s the catch? Do you want to know even more? Read this article In this article we will cover: What is depression? THC and also CBD cannabinoids – differences Anxiety and also the endocannabinoid system What is depression? Official meanings suggest that depressive disorders, additionally recognized colloquially as anxiety, are defined by: unexpected clinical depression of a person’s mood, in the adverse direction, of moderate to solid strength of the strength of the experienced adjustments, for greater than a few weeks. There might be several reasons for the occurrence of adjustments. It also takes place that it is challenging to recognize any kind of unequivocal reason. We extremely typically encountered the statement that it is a people disease of the 21st century – it impacts both older and more youthful people. Our education is trivial for clinical depression, let alone our incomes – it can influence any person. Therapy of clinical depression boils down to: pharmacotherapy, psychotherapy and also psychoeducation, photo-therapy, electroconvulsive therapy and even more natural activities connected to the climax of physical activity as well as the intro of substantial modifications in the everyday diet. It is as part of natural techniques of combating as well as counteracting clinical depression that the addition of cannabis prep work with cannabinoids naturally occurring in the plant in the day-to-day diet plan is getting a growing number of appeal worldwide. Cannabidiol CBD, discovered in e.g. CBD oil or full-spectrum hemp oil, appears in various clinical studies as a possibly efficient cannabinoid in the treatment of anxiety. Notably, it is a 100 natural chemical substance of plant origin. Interestingly, depression is among the three most typical mental disorders in which individuals turn to CBD hemp prep work such as CBD oil, full range hemp oil with CBD or CBD pills. Reports from customers as well as their positive point of views on the performance of e.g. CBD oil or complete spectrum hemp oil with all-natural CBD are expanding at an extraordinary speed. THC and also CBD cannabinoids – differences The primary cannabinoids in the marijuana plant are THC (Δ9-tetrahydrocannabinol) as well as CBD (cannabidiol). They show hostile effects, which means that CBD lowers the effects of THC. What are these effects? THC has an intoxicating impact, triggers a sensation of euphoria, impacts cognitive features, however also kicks back. Big, regularly taken in dosages of THC are thought about harmful to the human brain. Excessive intake of THC can bring about psychosis, absence of motivation, and also even permanent adverse modifications in cognitive feature. Both THC and CBD impact the endocannabinoid system in the body. Their action, as already stated, is inconsistent. Cbd-a-thc-in-the-endocannabinoid-1 system When composing pictures, CBD reduces the deficiency of anandamide sources, as well as THC quicken this procedure. However, this does not mean that THC is only a dangerous cannabinoid and must not remain in the prep work in any way. However. Its tiny presence in hemp preparations is even needed in order to acquire the so-called result. synergy. THC in full spectrum hemp oil is present in such a minimal and, notably, legal quantity. This amount is so tiny (less than 0.2) that it does not cause intoxication. Working together, THC and also CBD have better possibility than either particle performing alone. What is anandamide (AEA)? What is its relevance for individuals dealing with anxiety? Continue reading! CBD, Clinical depression and also the endocannabinoid system The endocannabinoid system is an essential system responsible for the policy of fundamental human physical processes, such as energy administration, neurohormonal and also neuroimmune links, electric motor activity, state of mind and also motivation, as well as fat metabolic process. The endocannabinoid system includes a natural chemical called anandamide (AEA). Anandamide is a neurotransmitter that is normally produced in the human brain. Its manufacturing is promoted by e.g. physical activity, as well as to a minimal level by the so-called deal with the body (massage!). Its sources are “used” to maintain the appropriate performance of the body, consisting of in the field of mental wellness. As displayed in this research study: https://www.ncbi.nlm.nih.gov/pubmed/23580381 high degrees of anandamide are associated with a reduced threat of establishing psychotic signs. A high level of anandamide is additionally related to a positive impact on the decrease of depression and stress and anxiety signs. This system is still not totally recognized, yet it appears sensible that a highly depressed state of mind in a private period for a details situation, and with the simultaneous absence of actions focused on its improvement, brings about an intensification of the increase of negative thoughts. As depressive problems develop, they can turn into a lot more unsafe forms of disorders, e.g. psychosis, misconceptions or schizophrenia. Decreasing this procedure as swiftly as possible might become critical in the effective treatment of mental disorders of human functioning.
CBD for Anxiousness and Anxiety: Visualize that it is feasible to introduce one natural prep work into your daily diet, which might verify to be the key to winning the fight for a calmer life for individuals with depressive problems. What if the addition of this prep work, created on the basis of a significantly widely known and also tested chemical substance of plant beginning, is not only potentially really reliable, yet is not associated with the risk of negative effects typical of pharmacological medicines? Is it also feasible? Where’s the catch? Do you want to know more? Read this write-up In this post we will cover: What is depression? THC and also CBD cannabinoids – differences Anxiety and also the endocannabinoid system What is anxiety? Main meanings suggest that depressive conditions, likewise recognized informally as depression, are identified by: abrupt anxiety of an individual’s state of mind, in the negative instructions, of modest to strong intensity of the intensity of the knowledgeable changes, for greater than a couple of weeks. There might be one or more reasons for the occurrence of modifications. It additionally occurs that it is tough to determine any kind of absolute factor. We really commonly come across the declaration that it is a civilization condition of the 21st century – it impacts both older as well as more youthful people. Our education is not important for depression, let alone our revenues – it can affect anybody. Treatment of anxiety boils down to: pharmacotherapy, psychiatric therapy and also psychoeducation, phototherapy, electroconvulsive therapy and more natural tasks connected to the concentration of exercise and the intro of substantial adjustments in the day-to-day diet plan. It is as part of all-natural techniques of dealing with and combating depression that the incorporation of cannabis prep work with cannabinoids normally occurring in the plant in the day-to-day diet plan is getting an increasing number of appeal in the world. Cannabidiol CBD, discovered in e.g. CBD oil or full-spectrum hemp oil, shows up in many scientific researches as a potentially effective cannabinoid in the treatment of depression. Significantly, it is a 100 all-natural chemical substance of plant beginning. Remarkably, anxiety is among the three most typical mental illness in which individuals resort to CBD hemp prep work such as CBD oil, complete spectrum hemp oil with CBD or CBD pills. Records from customers as well as their positive viewpoints on the efficiency of e.g. CBD oil or full range hemp oil with natural CBD are expanding at an unprecedented pace. THC and also CBD cannabinoids – differences The primary cannabinoids in the marijuana plant are THC (Δ9-tetrahydrocannabinol) and also CBD (cannabidiol). They show hostile effects, which suggests that CBD lowers the effects of THC. What are these results? THC has an intoxicating impact, causes a sensation of euphoria, influences cognitive features, but likewise kicks back. Large, routinely eaten dosages of THC are considered dangerous to the human mind. Extreme intake of THC can cause psychosis, absence of motivation, and also also irreversible unfavorable modifications in cognitive function. Both THC and CBD affect the endocannabinoid system in the body. Their action, as currently discussed, is contradictory. Cbd-a-thc-in-the-endocannabinoid-1 system When composing pictures, CBD reduces the exhaustion of anandamide sources, as well as THC speeds up this process. Nevertheless, this does not imply that THC is only a harmful cannabinoid and must not be in the preparation at all. As a matter of fact. Its little existence in hemp prep work is also required in order to obtain the supposed effect. harmony. THC in full spectrum hemp oil is present in such a marginal as well as, notably, lawful amount. This amount is so little (less than 0.2) that it does not trigger intoxication. Working together, THC and also CBD have higher possibility than either particle performing alone. What is anandamide (AEA)? What is its value for people suffering from anxiety? Keep reading! CBD, Anxiety and the endocannabinoid system The endocannabinoid system is a vital system in charge of the policy of basic human physical processes, such as energy management, neurohormonal as well as neuroimmune connections, electric motor activity, mood as well as inspiration, and fat metabolic rate. The endocannabinoid system consists of a natural chemical called anandamide (AEA). Anandamide is a natural chemical that is normally created in the human mind. Its manufacturing is stimulated by e.g. exercise, and also to a lower extent by the so-called collaborate with the body (massage!). Its resources are “utilized” to preserve the appropriate performance of the body, including in the field of mental health and wellness. As received this research: https://www.ncbi.nlm.nih.gov/pubmed/23580381 high levels of anandamide are connected with a lowered danger of creating psychotic signs. A high level of anandamide is also connected with a positive effect on the decrease of anxiety as well as anxiety signs. This mechanism is still not fully recognized, but it appears sensible that a strongly depressed state of mind in an individual period for a specific case, and with the simultaneous lack of activities targeted at its enhancement, causes a concentration of the increase of negative thoughts. As depressive conditions establish, they can develop into a lot more dangerous kinds of conditions, e.g. psychosis, misconceptions or schizophrenia. Slowing down this procedure as rapidly as possible may end up being crucial in the effective treatment of mental illness of human functioning.
CBD for Anxiety as well as Depression: Picture that it is feasible to introduce one all-natural prep work into your day-to-day diet plan, which can show to be the secret to winning the fight for a calmer life for individuals with depressive problems. What if the inclusion of this preparation, created on the basis of an increasingly popular as well as examined chemical substance of plant beginning, is not only possibly really efficient, yet is not connected with the threat of negative effects regular of medicinal medications? Is it also possible? Where’s the catch? Do you want to know even more? Read this post In this write-up we will cover: What is anxiety? THC and CBD cannabinoids – differences Clinical depression and the endocannabinoid system What is clinical depression? Official meanings recommend that depressive conditions, likewise recognized informally as depression, are characterized by: sudden depression of an individual’s state of mind, in the unfavorable instructions, of moderate to strong intensity of the intensity of the knowledgeable modifications, for more than a few weeks. There might be several reasons for the event of changes. It likewise happens that it is challenging to recognize any indisputable reason. We really often stumbled upon the statement that it is a people disease of the 21st century – it impacts both older and also more youthful people. Our education and learning is trivial for anxiety, let alone our earnings – it can affect anybody. Therapy of clinical depression boils down to: pharmacotherapy, psychiatric therapy as well as psychoeducation, phototherapy, electroconvulsive therapy and even more all-natural activities related to the augmentation of physical activity and the introduction of considerable modifications in the everyday diet regimen. It is as part of natural techniques of battling as well as neutralizing depression that the inclusion of marijuana preparations with cannabinoids naturally happening in the plant in the daily diet plan is obtaining a growing number of appeal worldwide. Cannabidiol CBD, found in e.g. CBD oil or full-spectrum hemp oil, shows up in many clinical research studies as a potentially reliable cannabinoid in the treatment of anxiety. Importantly, it is a 100 all-natural chemical compound of plant origin. Surprisingly, depression is among the 3 most typical mental illness in which clients resort to CBD hemp prep work such as CBD oil, full spectrum hemp oil with CBD or CBD capsules. Reports from consumers and also their favorable opinions on the performance of e.g. CBD oil or complete range hemp oil with all-natural CBD are growing at an extraordinary pace. THC and CBD cannabinoids – distinctions The main cannabinoids in the cannabis plant are THC (Δ9-tetrahydrocannabinol) and CBD (cannabidiol). They show antagonistic effects, which implies that CBD lowers the impacts of THC. What are these results? THC has an envigorating impact, triggers a feeling of ecstasy, impacts cognitive features, but additionally kicks back. Large, frequently taken in dosages of THC are thought about harmful to the human brain. Too much usage of THC can bring about psychosis, lack of motivation, and also also permanent negative adjustments in cognitive feature. Both THC as well as CBD affect the endocannabinoid system in the human body. Their action, as currently pointed out, is contradictory. Cbd-a-thc-in-the-endocannabinoid-1 system When composing images, CBD decreases the deficiency of anandamide sources, and also THC accelerate this process. However, this does not indicate that THC is only a damaging cannabinoid as well as ought to not remain in the preparation at all. On the other hand. Its little existence in hemp prep work is also required in order to get the supposed effect. synergy. THC in full spectrum hemp oil is present in such a low as well as, importantly, legal amount. This amount is so little (less than 0.2) that it does not trigger intoxication. Interacting, THC and CBD have better capacity than either molecule performing alone. What is anandamide (AEA)? What is its importance for people dealing with clinical depression? Keep reading! CBD, Clinical depression and the endocannabinoid system The endocannabinoid system is an essential system in charge of the regulation of standard human physiological procedures, such as power administration, neurohormonal and neuroimmune links, electric motor activity, mood as well as inspiration, as well as fat metabolism. The endocannabinoid system includes a natural chemical called anandamide (AEA). Anandamide is a natural chemical that is normally created in the human mind. Its production is promoted by e.g. physical activity, and to a lesser level by the so-called work with the body (massage therapy!). Its resources are “used” to maintain the proper performance of the body, including in the field of mental wellness. As shown in this research: https://www.ncbi.nlm.nih.gov/pubmed/23580381 high degrees of anandamide are related to a lowered risk of creating psychotic signs and symptoms. A high level of anandamide is also related to a positive result on the reduction of anxiety and anxiousness symptoms. This device is still not fully understood, yet it seems logical that a strongly depressed mood in a private period for a details case, as well as with the synchronised absence of activities aimed at its renovation, causes an increase of the influx of negative ideas. As depressive disorders establish, they can turn into a lot more dangerous kinds of problems, e.g. psychosis, deceptions or schizophrenia. Reducing this procedure as rapidly as possible might end up being vital in the effective therapy of mental disorders of human performance.
CBD for Anxiousness and Anxiety: Envision that it is feasible to present one natural prep work right into your day-to-day diet plan, which could show to be the secret to winning the defend a calmer life for people with depressive disorders. What if the inclusion of this preparation, produced on the basis of a progressively popular and checked chemical compound of plant origin, is not just possibly very effective, but is not connected with the risk of side effects regular of pharmacological medications? Is it also feasible? Where’s the catch? Do you need to know even more? Read this article In this article we will certainly cover: What is depression? THC distinctions Depression and the endocannabinoid system What is anxiety? Main interpretations recommend that depressive problems, also understood informally as anxiety, are identified by: unexpected clinical depression of a person’s state of mind, in the unfavorable instructions, of modest to strong intensity of the intensity of the knowledgeable adjustments, for greater than a couple of weeks. There may be several reasons for the occurrence of adjustments. It likewise takes place that it is tough to recognize any type of unquestionable factor. We really typically stumbled upon the statement that it is a human being illness of the 21st century – it affects both older and more youthful individuals. Our education is not important for depression, let alone our profits – it can affect anybody. Treatment of depression comes down to: pharmacotherapy, psychiatric therapy and psychoeducation, phototherapy, electroconvulsive therapy and more natural tasks connected to the concentration of physical activity and also the intro of considerable adjustments in the everyday diet. It is as part of natural methods of fighting as well as counteracting anxiety that the incorporation of cannabis prep work with cannabinoids normally happening in the plant in the daily diet is getting an increasing number of popularity on the planet. Cannabidiol CBD, discovered in e.g. CBD oil or full-spectrum hemp oil, appears in countless clinical research studies as a possibly efficient cannabinoid in the treatment of depression. Importantly, it is a 100 natural chemical compound of plant beginning. Surprisingly, depression is amongst the 3 most usual mental illness in which clients consider CBD hemp preparations such as CBD oil, full spectrum hemp oil with CBD or CBD capsules. Reports from consumers as well as their positive viewpoints on the effectiveness of e.g. CBD oil or complete spectrum hemp oil with all-natural CBD are growing at an extraordinary rate. THC as well as CBD cannabinoids – differences The primary cannabinoids in the cannabis plant are THC (Δ9-tetrahydrocannabinol) and CBD (cannabidiol). They reveal antagonistic effects, which implies that CBD reduces the results of THC. What are these impacts? THC has an envigorating effect, creates a sensation of bliss, impacts cognitive features, yet additionally unwinds. Large, routinely eaten doses of THC are thought about unsafe to the human brain. Excessive intake of THC can result in psychosis, lack of inspiration, and also also permanent unfavorable modifications in cognitive function. Both THC as well as CBD impact the endocannabinoid system in the human body. Their action, as currently mentioned, is contradictory. Cbd-a-thc-in-the-endocannabinoid-1 system When creating images, CBD decreases the depletion of anandamide resources, and also THC speeds up this procedure. Nonetheless, this does not imply that THC is just a damaging cannabinoid and must not remain in the prep work in any way. On the other hand. Its tiny visibility in hemp preparations is even necessary in order to acquire the supposed effect. harmony. THC in full range hemp oil is present in such a minimal as well as, importantly, lawful amount. This quantity is so little (less than 0.2) that it does not trigger drunkenness. Collaborating, THC and CBD have greater capacity than either molecule acting alone. What is anandamide (AEA)? What is its significance for people struggling with depression? Read on! CBD, Depression as well as the endocannabinoid system The endocannabinoid system is a vital system responsible for the guideline of standard human physical procedures, such as energy monitoring, neurohormonal as well as neuroimmune connections, motor activity, state of mind as well as motivation, and also fat metabolic process. The endocannabinoid system consists of a natural chemical called anandamide (AEA). Anandamide is a neurotransmitter that is naturally created in the human brain. Its production is promoted by e.g. physical activity, as well as to a minimal level by the supposed collaborate with the body (massage therapy!). Its sources are “made use of” to keep the appropriate functioning of the body, including in the field of psychological health and wellness. As received this research study: https://www.ncbi.nlm.nih.gov/pubmed/23580381 high degrees of anandamide are related to a lowered danger of developing psychotic symptoms. A high degree of anandamide is likewise connected with a positive effect on the reduction of anxiety and stress and anxiety signs. This system is still not totally recognized, however it seems logical that a strongly depressed mood in a specific time period for a specific instance, and with the simultaneous absence of actions focused on its improvement, leads to an increase of the influx of negative thoughts. As depressive disorders create, they can develop into much more dangerous kinds of problems, e.g. psychosis, delusions or schizophrenia. Decreasing this procedure as swiftly as possible might end up being crucial in the reliable treatment of mental disorders of human performance.
CBD for Anxiousness and also Depression: Envision that it is feasible to introduce one all-natural prep work right into your daily diet, which can prove to be the trick to winning the defend a calmer life for people with depressive disorders. What if the addition of this preparation, produced on the basis of a progressively popular and examined chemical substance of plant beginning, is not just potentially very effective, however is not related to the risk of side effects common of pharmacological drugs? Is it also possible? Where’s the catch? Do you would like to know even more? Read this write-up In this short article we will cover: What is anxiety? THC distinctions Anxiety and also the endocannabinoid system What is clinical depression? Official interpretations recommend that depressive problems, additionally recognized informally as clinical depression, are defined by: sudden anxiety of a person’s mood, in the adverse instructions, of moderate to strong strength of the strength of the knowledgeable modifications, for more than a couple of weeks. There may be one or more factors for the occurrence of changes. It also takes place that it is tough to determine any type of absolute factor. We really commonly discovered the statement that it is a people condition of the 21st century – it influences both older as well as more youthful people. Our education is trivial for clinical depression, let alone our incomes – it can impact any person. Treatment of depression comes down to: pharmacotherapy, psychotherapy and also psychoeducation, phototherapy, electroconvulsive therapy and also more all-natural tasks related to the accumulation of exercise and the intro of substantial changes in the day-to-day diet regimen. It is as part of natural approaches of fighting as well as combating clinical depression that the inclusion of marijuana preparations with cannabinoids normally taking place in the plant in the daily diet plan is acquiring a growing number of appeal in the world. Cannabidiol CBD, located in e.g. CBD oil or full-spectrum hemp oil, shows up in countless scientific studies as a possibly efficient cannabinoid in the treatment of depression. Importantly, it is a 100 all-natural chemical substance of plant beginning. Interestingly, anxiety is among the three most typical mental illness in which people resort to CBD hemp preparations such as CBD oil, complete range hemp oil with CBD or CBD pills. Records from consumers and their positive opinions on the effectiveness of e.g. CBD oil or complete spectrum hemp oil with all-natural CBD are growing at an unprecedented speed. THC as well as CBD cannabinoids – distinctions The primary cannabinoids in the marijuana plant are THC (Δ9-tetrahydrocannabinol) and also CBD (cannabidiol). They show hostile impacts, which indicates that CBD lowers the results of THC. What are these effects? THC has an envigorating impact, triggers a feeling of bliss, influences cognitive functions, however additionally unwinds. Large, regularly taken in doses of THC are thought about damaging to the human mind. Extreme usage of THC can bring about psychosis, lack of motivation, and also irreversible adverse adjustments in cognitive feature. Both THC as well as CBD impact the endocannabinoid system in the body. Their activity, as already stated, is contradictory. Cbd-a-thc-in-the-endocannabinoid-1 system When composing images, CBD reduces the deficiency of anandamide resources, as well as THC quicken this procedure. Nonetheless, this does not imply that THC is only a damaging cannabinoid as well as ought to not remain in the prep work whatsoever. On the contrary. Its little visibility in hemp preparations is also needed in order to get the so-called effect. synergy. THC completely range hemp oil exists in such a minimal and also, notably, legal amount. This amount is so little (less than 0.2) that it does not cause intoxication. Collaborating, THC and also CBD have greater possibility than either molecule performing alone. What is anandamide (AEA)? What is its relevance for individuals suffering from anxiety? Keep reading! CBD, Depression and the endocannabinoid system The endocannabinoid system is a vital system in charge of the regulation of standard human physiological procedures, such as energy monitoring, neurohormonal and neuroimmune links, electric motor activity, mood as well as inspiration, as well as fat metabolic rate. The endocannabinoid system consists of a neurotransmitter called anandamide (AEA). Anandamide is a neurotransmitter that is naturally generated in the human mind. Its production is stimulated by e.g. physical activity, as well as to a lower level by the so-called deal with the body (massage therapy!). Its sources are “used” to keep the correct functioning of the body, consisting of in the field of psychological health. As received this study: https://www.ncbi.nlm.nih.gov/pubmed/23580381 high degrees of anandamide are related to a decreased threat of developing psychotic symptoms. A high degree of anandamide is additionally related to a favorable impact on the decrease of anxiety and also stress and anxiety symptoms. This system is still not totally recognized, yet it appears rational that a strongly depressed mood in a specific time period for a particular instance, and with the simultaneous absence of actions targeted at its renovation, causes an aggravation of the influx of negative thoughts. As depressive disorders create, they can develop into much more harmful forms of disorders, e.g. psychosis, misconceptions or schizophrenia. Decreasing this process as quickly as feasible may turn out to be crucial in the reliable treatment of mental illness of human functioning.
CBD for Anxiety and also Anxiety: Envision that it is feasible to present one all-natural preparation into your day-to-day diet plan, which could prove to be the secret to winning the fight for a calmer life for individuals with depressive conditions. What if the addition of this prep work, produced on the basis of an increasingly widely known as well as evaluated chemical compound of plant beginning, is not just potentially extremely effective, but is not associated with the risk of negative effects typical of medicinal medications? Is it also feasible? Where’s the catch? Do you want to know even more? Read this write-up In this write-up we will certainly cover: What is anxiety? THC distinctions Depression as well as the endocannabinoid system What is clinical depression? Main meanings recommend that depressive problems, additionally recognized informally as depression, are characterized by: abrupt clinical depression of a person’s state of mind, in the unfavorable direction, of moderate to strong strength of the intensity of the seasoned modifications, for more than a couple of weeks. There might be one or more reasons for the event of adjustments. It likewise occurs that it is challenging to identify any type of absolute reason. We very usually discovered the declaration that it is a human being disease of the 21st century – it impacts both older and also more youthful individuals. Our education and learning is trivial for clinical depression, let alone our incomes – it can influence anybody. Therapy of anxiety comes down to: pharmacotherapy, psychiatric therapy and also psychoeducation, photo-therapy, electroconvulsive therapy and more natural activities associated with the rise of physical activity as well as the intro of significant changes in the daily diet regimen. It is as part of natural approaches of combating as well as combating depression that the inclusion of cannabis prep work with cannabinoids naturally happening in the plant in the day-to-day diet is obtaining a growing number of appeal in the world. Cannabidiol CBD, discovered in e.g. CBD oil or full-spectrum hemp oil, shows up in many clinical studies as a possibly efficient cannabinoid in the treatment of anxiety. Significantly, it is a 100 natural chemical substance of plant origin. Interestingly, depression is amongst the three most common mental disorders in which clients resort to CBD hemp prep work such as CBD oil, full range hemp oil with CBD or CBD capsules. Reports from consumers and also their favorable opinions on the effectiveness of e.g. CBD oil or complete spectrum hemp oil with all-natural CBD are growing at an extraordinary rate. THC and CBD cannabinoids – distinctions The key cannabinoids in the cannabis plant are THC (Δ9-tetrahydrocannabinol) as well as CBD (cannabidiol). They show antagonistic results, which means that CBD minimizes the effects of THC. What are these impacts? THC has an intoxicating impact, triggers a feeling of bliss, affects cognitive functions, yet likewise relaxes. Large, on a regular basis eaten dosages of THC are thought about dangerous to the human brain. Too much usage of THC can lead to psychosis, absence of motivation, as well as even permanent negative modifications in cognitive feature. Both THC and CBD influence the endocannabinoid system in the body. Their action, as already discussed, is inconsistent. Cbd-a-thc-in-the-endocannabinoid-1 system When creating pictures, CBD decreases the depletion of anandamide resources, and THC quicken this process. Nonetheless, this does not imply that THC is just a harmful cannabinoid as well as must not remain in the prep work whatsoever. On the contrary. Its tiny visibility in hemp prep work is also needed in order to get the so-called result. harmony. THC in full range hemp oil is present in such a minimal as well as, importantly, legal quantity. This amount is so tiny (less than 0.2) that it does not trigger drunkenness. Collaborating, THC as well as CBD have higher potential than either molecule acting alone. What is anandamide (AEA)? What is its significance for people experiencing depression? Keep reading! CBD, Anxiety as well as the endocannabinoid system The endocannabinoid system is a crucial system in charge of the regulation of fundamental human physical procedures, such as power administration, neurohormonal and neuroimmune links, electric motor activity, state of mind as well as inspiration, and fat metabolism. The endocannabinoid system includes a neurotransmitter called anandamide (AEA). Anandamide is a natural chemical that is naturally produced in the human mind. Its manufacturing is stimulated by e.g. physical activity, and also to a minimal level by the so-called collaborate with the body (massage!). Its sources are “used” to maintain the appropriate functioning of the body, including in the field of psychological health and wellness. As displayed in this research: https://www.ncbi.nlm.nih.gov/pubmed/23580381 high degrees of anandamide are connected with a decreased risk of creating psychotic signs and symptoms. A high level of anandamide is additionally related to a positive effect on the decrease of depression as well as anxiety symptoms. This device is still not totally understood, yet it appears logical that a strongly depressed mood in a specific amount of time for a specific situation, and also with the synchronised absence of actions targeted at its renovation, leads to a surge of the influx of adverse thoughts. As depressive disorders develop, they can turn into even more unsafe forms of disorders, e.g. psychosis, deceptions or schizophrenia. Slowing down this procedure as rapidly as possible might end up being crucial in the effective therapy of mental illness of human performance.
CBD for Anxiety and also Depression: Think of that it is feasible to introduce one all-natural preparation right into your daily diet plan, which can show to be the trick to winning the defend a calmer life for people with depressive problems. Suppose the addition of this prep work, developed on the basis of a progressively widely known as well as tested chemical compound of plant origin, is not just potentially very reliable, yet is not connected with the threat of adverse effects normal of medicinal medications? Is it also possible? Where’s the catch? Do you want to know more? Read this write-up In this article we will certainly cover: What is clinical depression? THC distinctions Depression and the endocannabinoid system What is clinical depression? Main meanings suggest that depressive disorders, likewise recognized colloquially as depression, are characterized by: unexpected clinical depression of an individual’s mood, in the adverse direction, of modest to strong strength of the intensity of the skilled modifications, for more than a few weeks. There might be several reasons for the event of modifications. It also occurs that it is hard to recognize any type of absolute reason. We extremely usually found the declaration that it is a people disease of the 21st century – it impacts both older and also more youthful people. Our education is not important for depression, not to mention our profits – it can affect anybody. Treatment of depression comes down to: pharmacotherapy, psychotherapy and psychoeducation, phototherapy, electroconvulsive therapy and even more natural activities associated with the surge of physical activity and the intro of substantial modifications in the day-to-day diet plan. It is as part of all-natural techniques of dealing with and neutralizing depression that the inclusion of cannabis preparations with cannabinoids naturally happening in the plant in the day-to-day diet regimen is gaining an increasing number of popularity on the planet. Cannabidiol CBD, found in e.g. CBD oil or full-spectrum hemp oil, shows up in countless clinical research studies as a potentially reliable cannabinoid in the treatment of anxiety. Importantly, it is a 100 natural chemical substance of plant origin. Remarkably, anxiety is among the three most usual mental illness in which patients resort to CBD hemp preparations such as CBD oil, full spectrum hemp oil with CBD or CBD pills. Records from customers as well as their favorable viewpoints on the efficiency of e.g. CBD oil or full range hemp oil with natural CBD are growing at an unmatched rate. THC and CBD cannabinoids – distinctions The key cannabinoids in the cannabis plant are THC (Δ9-tetrahydrocannabinol) as well as CBD (cannabidiol). They show hostile impacts, which means that CBD reduces the results of THC. What are these impacts? THC has an envigorating impact, triggers a sensation of bliss, impacts cognitive features, but additionally relaxes. Large, on a regular basis eaten doses of THC are considered damaging to the human brain. Extreme consumption of THC can bring about psychosis, absence of motivation, and even irreversible adverse modifications in cognitive feature. Both THC as well as CBD influence the endocannabinoid system in the human body. Their activity, as currently discussed, is contradictory. Cbd-a-thc-in-the-endocannabinoid-1 system When composing pictures, CBD reduces the deficiency of anandamide sources, as well as THC quicken this process. However, this does not indicate that THC is just an unsafe cannabinoid and also must not be in the preparation in any way. As a matter of fact. Its tiny visibility in hemp preparations is also essential in order to get the supposed effect. harmony. THC completely spectrum hemp oil is present in such a limited and, significantly, lawful quantity. This quantity is so small (less than 0.2) that it does not trigger intoxication. Collaborating, THC as well as CBD have higher potential than either particle acting alone. What is anandamide (AEA)? What is its relevance for people experiencing clinical depression? Read on! CBD, Clinical depression and the endocannabinoid system The endocannabinoid system is a key system responsible for the policy of basic human physical procedures, such as energy administration, neurohormonal and neuroimmune connections, electric motor activity, state of mind as well as inspiration, and fat metabolic process. The endocannabinoid system includes a neurotransmitter called anandamide (AEA). Anandamide is a neurotransmitter that is naturally generated in the human mind. Its manufacturing is boosted by e.g. exercise, and to a lower extent by the supposed deal with the body (massage!). Its sources are “utilized” to preserve the correct functioning of the body, including in the field of mental health. As received this research: https://www.ncbi.nlm.nih.gov/pubmed/23580381 high degrees of anandamide are related to a decreased threat of creating psychotic signs. A high level of anandamide is likewise connected with a positive impact on the reduction of anxiety and also anxiety symptoms. This mechanism is still not totally comprehended, however it appears sensible that a highly clinically depressed mood in a private time period for a particular situation, and also with the synchronised absence of activities focused on its renovation, brings about an aggravation of the increase of negative thoughts. As depressive conditions develop, they can turn into even more hazardous kinds of problems, e.g. psychosis, deceptions or schizophrenia. Reducing this procedure as rapidly as possible might end up being vital in the reliable therapy of mental disorders of human performance.
This is the right blog for anyone who wants to find out about this topic. You realize so much its almost hard to argue with you (not that I actually would want…HaHa). You definitely put a new spin on a topic thats been written about for years. Great stuff, just great!
http://darkforestassociates.com/__media__/js/netsoltrademark.php?d=toppremiumsites.porn/
http://firstonthetee.com/__media__/js/netsoltrademark.php?d=toppremiumsites.porn/
CBD for Anxiety as well as Depression: Envision that it is possible to introduce one all-natural preparation right into your everyday diet regimen, which can prove to be the trick to winning the defend a calmer life for individuals with depressive disorders. Suppose the addition of this prep work, developed on the basis of a progressively widely known and also checked chemical substance of plant origin, is not only possibly extremely reliable, but is not associated with the danger of side effects common of medicinal medicines? Is it also possible? Where’s the catch? Do you need to know more? Read this short article In this write-up we will certainly cover: What is clinical depression? THC as well as CBD cannabinoids – differences Depression and also the endocannabinoid system What is clinical depression? Main interpretations recommend that depressive problems, additionally recognized colloquially as depression, are defined by: sudden clinical depression of an individual’s mood, in the negative instructions, of modest to solid intensity of the intensity of the skilled modifications, for greater than a couple of weeks. There might be one or more reasons for the occurrence of adjustments. It additionally happens that it is tough to identify any kind of unequivocal factor. We very commonly stumbled upon the declaration that it is a civilization disease of the 21st century – it influences both older as well as more youthful people. Our education and learning is trivial for depression, let alone our incomes – it can impact any individual. Treatment of anxiety comes down to: pharmacotherapy, psychotherapy as well as psychoeducation, phototherapy, electroconvulsive therapy and even more all-natural tasks associated with the augmentation of physical activity and the introduction of significant adjustments in the day-to-day diet plan. It is as part of all-natural methods of dealing with and also neutralizing depression that the incorporation of marijuana preparations with cannabinoids naturally happening in the plant in the daily diet is acquiring more and more appeal in the world. Cannabidiol CBD, located in e.g. CBD oil or full-spectrum hemp oil, appears in various clinical studies as a potentially efficient cannabinoid in the treatment of clinical depression. Importantly, it is a 100 all-natural chemical compound of plant origin. Remarkably, anxiety is among the three most usual mental disorders in which individuals turn to CBD hemp prep work such as CBD oil, complete spectrum hemp oil with CBD or CBD pills. Reports from customers and their favorable viewpoints on the effectiveness of e.g. CBD oil or full spectrum hemp oil with all-natural CBD are expanding at an unprecedented speed. THC and also CBD cannabinoids – differences The primary cannabinoids in the cannabis plant are THC (Δ9-tetrahydrocannabinol) as well as CBD (cannabidiol). They reveal hostile effects, which indicates that CBD decreases the effects of THC. What are these effects? THC has an envigorating effect, triggers a feeling of ecstasy, influences cognitive features, yet also loosens up. Large, regularly eaten doses of THC are considered dangerous to the human mind. Excessive intake of THC can bring about psychosis, absence of inspiration, and even irreversible adverse adjustments in cognitive function. Both THC as well as CBD affect the endocannabinoid system in the body. Their activity, as currently stated, is inconsistent. Cbd-a-thc-in-the-endocannabinoid-1 system When writing pictures, CBD reduces the depletion of anandamide resources, as well as THC quicken this process. Nonetheless, this does not indicate that THC is only a damaging cannabinoid as well as should not be in the prep work in all. On the contrary. Its tiny visibility in hemp preparations is also required in order to obtain the so-called result. synergy. THC in full spectrum hemp oil exists in such a low and also, significantly, legal quantity. This quantity is so little (less than 0.2) that it does not cause drunkenness. Collaborating, THC and CBD have better potential than either particle acting alone. What is anandamide (AEA)? What is its value for people dealing with anxiety? Continue reading! CBD, Clinical depression and also the endocannabinoid system The endocannabinoid system is a crucial system responsible for the law of fundamental human physiological procedures, such as energy monitoring, neurohormonal as well as neuroimmune connections, motor activity, state of mind as well as inspiration, as well as fat metabolic process. The endocannabinoid system includes a natural chemical called anandamide (AEA). Anandamide is a neurotransmitter that is normally generated in the human brain. Its manufacturing is stimulated by e.g. exercise, as well as to a lesser degree by the supposed work with the body (massage!). Its sources are “used” to maintain the proper functioning of the body, including in the field of psychological wellness. As shown in this research: https://www.ncbi.nlm.nih.gov/pubmed/23580381 high degrees of anandamide are associated with a reduced risk of establishing psychotic signs. A high degree of anandamide is additionally connected with a positive impact on the reduction of depression and also stress and anxiety signs. This mechanism is still not fully recognized, however it appears rational that a highly depressed mood in a specific period for a certain instance, and also with the synchronised lack of activities targeted at its renovation, causes an accumulation of the influx of adverse thoughts. As depressive disorders establish, they can become much more dangerous kinds of conditions, e.g. psychosis, delusions or schizophrenia. Decreasing this procedure as swiftly as feasible might turn out to be crucial in the efficient treatment of mental illness of human functioning.
CBD for Anxiety and also Depression: Debunked Imagine that it is feasible to introduce one natural prep work into your day-to-day diet regimen, which could verify to be the trick to winning the defend a calmer life for people with depressive conditions. Suppose the addition of this preparation, created on the basis of a progressively well-known as well as tested chemical substance of plant origin, is not just potentially very reliable, but is not connected with the danger of adverse effects normal of pharmacological medications? Is it also feasible? Where’s the catch? Do you would like to know even more? Read this write-up In this post we will cover: What is anxiety? THC and CBD cannabinoids – differences Depression and also the endocannabinoid system What is depression? Official meanings suggest that depressive disorders, additionally known colloquially as clinical depression, are defined by: unexpected clinical depression of a person’s mood, in the adverse direction, of modest to strong strength of the strength of the knowledgeable adjustments, for greater than a few weeks. There might be several factors for the occurrence of changes. It likewise occurs that it is difficult to identify any type of indisputable factor. We really usually stumbled upon the statement that it is a human being illness of the 21st century – it affects both older and also younger individuals. Our education and learning is not important for clinical depression, not to mention our earnings – it can impact any person. Therapy of anxiety comes down to: pharmacotherapy, psychiatric therapy as well as psychoeducation, photo-therapy, electroconvulsive therapy as well as even more natural tasks related to the rise of physical activity as well as the intro of substantial modifications in the day-to-day diet plan. It is as part of natural methods of combating as well as neutralizing depression that the addition of marijuana prep work with cannabinoids naturally taking place in the plant in the day-to-day diet plan is obtaining more and more appeal worldwide. Cannabidiol CBD, found in e.g. CBD oil or full-spectrum hemp oil, appears in many scientific research studies as a possibly reliable cannabinoid in the treatment of clinical depression. Importantly, it is a 100 all-natural chemical substance of plant beginning. Surprisingly, anxiety is amongst the 3 most usual mental illness in which people turn to CBD hemp preparations such as CBD oil, complete range hemp oil with CBD or CBD capsules. Records from consumers as well as their positive point of views on the effectiveness of e.g. CBD oil or complete spectrum hemp oil with natural CBD are growing at an unprecedented pace. THC and CBD cannabinoids – differences The main cannabinoids in the marijuana plant are THC (Δ9-tetrahydrocannabinol) as well as CBD (cannabidiol). They show hostile effects, which indicates that CBD decreases the effects of THC. What are these results? THC has an intoxicating effect, causes a feeling of euphoria, impacts cognitive functions, yet likewise relaxes. Large, consistently taken in doses of THC are taken into consideration damaging to the human mind. Extreme intake of THC can lead to psychosis, lack of inspiration, and also even irreversible negative modifications in cognitive function. Both THC and also CBD impact the endocannabinoid system in the human body. Their activity, as already mentioned, is inconsistent. Cbd-a-thc-in-the-endocannabinoid-1 system When composing pictures, CBD reduces the deficiency of anandamide sources, as well as THC speeds up this process. Nonetheless, this does not imply that THC is only an unsafe cannabinoid as well as must not remain in the preparation whatsoever. On the other hand. Its small presence in hemp prep work is even necessary in order to acquire the supposed impact. synergy. THC completely range hemp oil exists in such a limited as well as, importantly, legal quantity. This quantity is so little (less than 0.2) that it does not create intoxication. Working together, THC and also CBD have greater potential than either particle performing alone. What is anandamide (AEA)? What is its importance for individuals dealing with depression? Continue reading! CBD, Depression and also the endocannabinoid system The endocannabinoid system is a vital system in charge of the policy of fundamental human physical procedures, such as energy management, neurohormonal and also neuroimmune links, electric motor activity, state of mind and also inspiration, and fat metabolic rate. The endocannabinoid system consists of a natural chemical called anandamide (AEA). Anandamide is a natural chemical that is naturally created in the human mind. Its manufacturing is boosted by e.g. physical activity, and to a lesser level by the supposed work with the body (massage!). Its resources are “utilized” to preserve the appropriate functioning of the body, consisting of in the field of mental health. As shown in this research: https://www.ncbi.nlm.nih.gov/pubmed/23580381 high levels of anandamide are associated with a decreased danger of creating psychotic symptoms. A high degree of anandamide is also related to a positive impact on the decrease of anxiety and also stress and anxiety signs and symptoms. This system is still not fully understood, yet it seems rational that a highly depressed mood in an individual time period for a details case, and also with the synchronised lack of activities targeted at its enhancement, causes a rise of the increase of unfavorable thoughts. As depressive problems create, they can turn into a lot more dangerous forms of problems, e.g. psychosis, misconceptions or schizophrenia. Reducing this process as rapidly as possible may become important in the reliable treatment of mental disorders of human performance.
CBD for Anxiety and also Anxiety: Picture that it is feasible to introduce one natural preparation right into your daily diet, which might confirm to be the secret to winning the defend a calmer life for people with depressive problems. What happens if the inclusion of this preparation, produced on the basis of an increasingly well-known and also checked chemical compound of plant beginning, is not just possibly really efficient, but is not associated with the threat of negative effects normal of pharmacological drugs? Is it also feasible? Where’s the catch? Do you want to know even more? Read this post In this article we will cover: What is clinical depression? THC distinctions Clinical depression as well as the endocannabinoid system What is anxiety? Official definitions suggest that depressive conditions, additionally recognized colloquially as anxiety, are identified by: unexpected anxiety of a person’s mood, in the adverse direction, of modest to strong intensity of the strength of the skilled changes, for greater than a few weeks. There might be several factors for the occurrence of modifications. It likewise happens that it is hard to determine any absolute reason. We very often found the declaration that it is a world illness of the 21st century – it affects both older as well as younger people. Our education is trivial for depression, let alone our profits – it can affect any person. Therapy of depression boils down to: pharmacotherapy, psychotherapy and also psychoeducation, photo-therapy, electroconvulsive therapy and also even more natural tasks related to the concentration of physical activity as well as the intro of significant adjustments in the daily diet. It is as part of all-natural methods of fighting and neutralizing clinical depression that the incorporation of cannabis preparations with cannabinoids naturally occurring in the plant in the daily diet plan is getting increasingly more appeal on the planet. Cannabidiol CBD, located in e.g. CBD oil or full-spectrum hemp oil, shows up in many scientific studies as a possibly efficient cannabinoid in the treatment of clinical depression. Notably, it is a 100 all-natural chemical compound of plant origin. Remarkably, anxiety is amongst the three most common mental disorders in which individuals resort to CBD hemp preparations such as CBD oil, complete range hemp oil with CBD or CBD pills. Reports from consumers and their favorable point of views on the efficiency of e.g. CBD oil or full spectrum hemp oil with natural CBD are expanding at an unmatched rate. THC as well as CBD cannabinoids – differences The main cannabinoids in the cannabis plant are THC (Δ9-tetrahydrocannabinol) as well as CBD (cannabidiol). They show hostile results, which means that CBD minimizes the impacts of THC. What are these effects? THC has an intoxicating effect, causes a sensation of ecstasy, influences cognitive functions, yet also unwinds. Large, frequently taken in doses of THC are taken into consideration harmful to the human mind. Excessive consumption of THC can result in psychosis, absence of motivation, as well as also permanent negative adjustments in cognitive feature. Both THC and CBD influence the endocannabinoid system in the human body. Their activity, as already discussed, is contradictory. Cbd-a-thc-in-the-endocannabinoid-1 system When writing pictures, CBD slows down the exhaustion of anandamide resources, as well as THC quicken this process. Nevertheless, this does not indicate that THC is just an unsafe cannabinoid and also must not remain in the prep work in all. However. Its tiny visibility in hemp preparations is even necessary in order to obtain the supposed result. synergy. THC completely range hemp oil exists in such a marginal as well as, notably, legal quantity. This quantity is so little (less than 0.2) that it does not create drunkenness. Interacting, THC and also CBD have better possibility than either molecule acting alone. What is anandamide (AEA)? What is its importance for individuals experiencing clinical depression? Read on! CBD, Depression and the endocannabinoid system The endocannabinoid system is a vital system in charge of the regulation of fundamental human physical processes, such as energy monitoring, neurohormonal and also neuroimmune connections, electric motor activity, mood as well as motivation, as well as fat metabolic process. The endocannabinoid system includes a natural chemical called anandamide (AEA). Anandamide is a neurotransmitter that is naturally generated in the human brain. Its production is promoted by e.g. physical activity, as well as to a minimal extent by the so-called collaborate with the body (massage therapy!). Its resources are “utilized” to maintain the correct functioning of the body, consisting of in the field of psychological health. As shown in this research: https://www.ncbi.nlm.nih.gov/pubmed/23580381 high levels of anandamide are related to a decreased risk of establishing psychotic symptoms. A high level of anandamide is likewise connected with a favorable effect on the reduction of anxiety as well as stress and anxiety signs. This system is still not totally understood, however it appears logical that a highly depressed mood in an individual time period for a particular instance, and also with the simultaneous absence of actions focused on its improvement, leads to a concentration of the increase of negative thoughts. As depressive conditions develop, they can turn into much more dangerous forms of disorders, e.g. psychosis, delusions or schizophrenia. Decreasing this process as quickly as possible might become vital in the efficient therapy of mental illness of human functioning.
Great paintings! This is the kind of information that should be shared across the net. Shame on the seek for not positioning this post upper! Come on over and consult with my website . Thank you =) Pristina Hotels
Just what a man of power! You have the capability to compose wonderful factors that you can’t get anyplace. to envy
Hey! This is my first comment here so I just wanted to give a quick shout out and say I truly enjoy reading your articles. Can you suggest any other blogs/websites/forums that cover the same topics? Appreciate it!
After study several of the websites on your internet site now, i genuinely as if your method of blogging. I bookmarked it to my bookmark web site list and will be checking back soon. Pls have a look at my site too and tell me what you think.
Thanks for another informative blog. Where else could I get that type of info written in such an ideal way? I have a project that I am just now working on, and I’ve been on the look out for such info.
It’s a jealous article. It’s very remarkable and new. Who are usually you to write this particular special article?
At this particular amount, you can premiere as a copy writer. I am so touched. I am just content to meet you. Give thanks to you.
I would like to thank you for the efforts you’ve put in writing this site. I really hope to check out the same high-grade content from you in the future as well. In truth, your creative writing abilities has motivated me to get my own, personal website now 😉
You’re hence amazing. Oh my Jesus. Lord bless you.
I love your blog website. I’m faced. Thank a person.
It’s a jealous article. It’s very incredible and different. Who happen to be you to write this special article?
http://fleetwoodrvparts.com/__media__/js/netsoltrademark.php?d=premiumporntrailers.com/girlfriendsfilms/
At this specific rate, you can premiere as a author. I am just so touched. Now i’m delighted to meet you. Appreciate you.
Wow, the writing is so sexy. How can certainly My partner and i write like anyone? I want to have the same writing skills as you.
Mangalloy, also called manganese steel or Hadfield steel, is an alloy steel consisting of an average of around 13 manganese.
Seriously. Most likely so good the fact that you’re so good right now. Your help woke us up. Thank you really much.
I love it when people come together and share opinions, great blog, keep it up.
Hi, usually are you too great? The writing widens my expertise. Give thanks you.
Hi there just wanted to give you a quick heads up and let you know a few of the pictures aren’t loading correctly. I’m not sure why but I think its a linking issue. I’ve tried it in two different internet browsers and both show the same outcome.
Yeah bookmaking this wasn’t a risky conclusion great post! .
I am impressed with this web site, really I am a fan.
Definitely consider that which you stated. Your favourite justification seemed to be at the net the easiest thing to understand of. I say to you, I definitely get irked while other people consider concerns that they plainly do not recognize about. You managed to hit the nail upon the highest and defined out the entire thing without having side-effects , other people could take a signal. Will probably be back to get more. Thank you
What a material of un-ambiguity and preserveness of
valuable know-how about unpredicted emotions. asmr 0mniartist
Great beat ! I wish to apprentice at the same time as you amend your website, how can i subscribe for a blog website? The account aided me a appropriate deal. I have been tiny bit familiar of this your broadcast provided vivid clear concept
I precisely needed to thank you very much again. I do not know the things I would have done in the absence of the recommendations revealed by you about such a problem. It has been a very distressing matter in my view, but looking at a specialized form you processed that made me to weep over gladness. I am happy for this work and as well , expect you are aware of a powerful job that you’re getting into instructing most people through the use of your web site. Most probably you have never got to know all of us.
I would like to thnkx for the efforts you have put in writing this blog. I am hoping the same high-grade blog post from you in the upcoming as well. In fact your creative writing abilities has inspired me to get my own blog now. Really the blogging is spreading its wings quickly. Your write up is a good example of it.
Thankyou for this marvellous post, I am glad I found this website on yahoo.
Nice post. I learn something more challenging on different blogs everyday. It will always be stimulating to read content from other writers and practice a little something from their store. I’d prefer to use some with the content on my blog whether you don’t mind. Natually I’ll give you a link on your web blog. Thanks for sharing.
Whoa. Guru. You’re a new genius. Appreciate you.
I love your website. I’m experienced. Thank a person.
There is noticeably a lot of money to learn about this. I suppose you have made certain nice points in functions also.
Thank an individual so much with regard to letting me know what My partner and i didn’t know. I look forward to working with you.
At this rate, you can debut as a article author. Now i am so touched. I am just cheerful to meet you. Say thanks to you.
Hello, normally are not you too great? Your current writing widens my understanding. Give thanks to you.
Wohh just what I was searching for, thanks for posting .
Thanks a lot to you, My partner and i mastered something new. Appreciate you so much. I actually search forward to working with you.
Amazing. You’re so good that will you’re so good at the moment. Your help woke everyone up. Thank you extremely much.
You’re so amazing. Oh my God. God bless you.
Thanks for this one of the best blogs i visit regularly. Keep it up.
Wonderful site you have here but I was wanting to know if you knew of any discussion boards that cover the same topics talked about here? I’d really like to be a part of community where I can get feedback from other experienced individuals that share the same interest. If you have any suggestions, please let me know. Kudos!
Whoa. If you’re so good that you’re so good at this point. Your help woke myself up. Thank you incredibly much.
Thank you for the good writeup. It in fact was a amusement account it. Look advanced to far added agreeable from you! By the way, how can we communicate?
Just what a man of ability! You have the ability to publish fantastic issues that you can’t come across anywhere. to envy
At this charge, you can debut as a author. Now i am so touched. I’m content to meet you. Give thanks to you.
I have been checking out a few of your articles and it’s pretty clever stuff. I will make sure to bookmark your blog.
I believe you have noted some very interesting details , thankyou for the post.
Lady Gaga has revealed she will tour again at the start of very next year because she misses her fans.
With havin so much content and articles do you ever run into any issues of plagorism or copyright violation? My website has a lot of unique content I’ve either created myself or outsourced but it seems a lot of it is popping it up all over the web without my authorization. Do you know any ways to help stop content from being stolen? I’d really appreciate it.
I got what you intend,saved to favorites, very nice website .
What an amazing way of taking a look at things.
My husband and i ended up being now thrilled Ervin could round up his preliminary research through the entire ideas he acquired from your web site. It’s not at all simplistic to simply happen to be giving freely hints which most people have been selling. We really already know we have got the blog owner to be grateful to for this. Most of the explanations you have made, the easy web site menu, the friendships your site aid to promote – it’s got most remarkable, and it is facilitating our son in addition to our family know that that subject matter is interesting, which is certainly extraordinarily important. Thank you for all!
I’ve been exploring for a little bit for any high quality articles or blog posts on this sort of house . Exploring in Yahoo I finally stumbled upon this site. Studying this info So i am satisfied to exhibit that I’ve an incredibly good uncanny feeling I found out just what I needed. I so much definitely will make sure to do not disregard this website and provides it a look on a constant basis.
What i don’t realize is in fact how you are not really a lot more well-preferred than you may be right now. You are very intelligent. You understand therefore considerably when it comes to this matter, produced me in my opinion believe it from so many varied angles. Its like women and men are not fascinated except it is something to accomplish with Lady gaga! Your own stuffs nice. All the time maintain it up!
Hey there! I just would like to offer you a huge thumbs up for the great info you have got right here on this post. I am returning to your website for more soon.
I¦ve read a few excellent stuff here. Certainly worth bookmarking for revisiting. I wonder how a lot effort you place to make the sort of excellent informative site.
Excellent blog you have got here.. Itís hard to find quality writing like yours these days. I truly appreciate people like you! Take care!!
Your manner of addressin this subject is both terrific as well as inspiring.
Your manner of addressin this topic is both fantastic as well as inspiring.
. China Steel Line Pipe suppliers – Select 2021 high quality Steel Line Pipe items in ideal price from licensed Chinese Line Wire manufacturers, Seamless Pipe providers, wholesalers and also factory
Well I truly enjoyed reading it. This article provided by you is very useful for good planning.
An outstanding share! I’ve just forwarded this onto a colleague who has been conducting a little homework on this. And he actually ordered me lunch simply because I discovered it for him… lol. So allow me to reword this…. Thanks for the meal!! But yeah, thanks for spending time to discuss this matter here on your blog.
I take pleasure in, result in I found exactly what I used to be taking a look for. You’ve ended my four day lengthy hunt! God Bless you man. Have a nice day. Bye
Glad to be one of many visitors on this awful site : D.
F*ckin’ remarkable issues here. I’m very happy to peer your post. Thank you a lot and i’m looking ahead to contact you. Will you kindly drop me a mail?
I like this website very much so much superb information.
Hello there, You have done a great job. I’ll certainly digg it and individually suggest to my friends. I am sure they will be benefited from this web site.
I like what you guys are up too. Such smart work and reporting! Carry on the excellent works guys I?¦ve incorporated you guys to my blogroll. I think it’ll improve the value of my web site 🙂
Aw, this was a really nice post. Finding the time and actual effort to produce a great articleÖ but what can I sayÖ I procrastinate a lot and don’t manage to get anything done.
Valuable information. Lucky me I found your website by accident, and I am shocked why this accident didn’t happened earlier! I bookmarked it.
I am glad to be a visitant of this gross site! , thanks for this rare information! .
I’ve been surfing on-line greater than three hours today, yet I by no means discovered any interesting article like yours. It’s beautiful price enough for me. In my view, if all website owners and bloggers made excellent content as you did, the web might be much more useful than ever before. “Oh, that way madness lies let me shun that.” by William Shakespeare.
This is my first time pay a quick visit at here and i am genuinely pleassant to read everthing at one place.|
I really love your website.. Excellent colors & theme. Did you build this web site yourself? Please reply back as Iím attempting to create my very own website and would like to find out where you got this from or just what the theme is called. Kudos!
Hello my loved one! I wish to say that this article is awesome, great written and include almost all vital infos. I’d like to peer more posts like this .
Yay google is my queen assisted me to find this outstanding web site! .
Hello! I could have sworn I’ve been to this blog before but after browsing through some of the post I realized it’s new to me. Anyways, I’m definitely happy I found it and I’ll be book-marking and checking back frequently!
http://koosfamily.org/__media__/js/netsoltrademark.php?d=blackpornsites.net/
Greetings from Florida! I’m bored to death at work so I decided to browse your blog on my iphone during lunch break. I love the information you present here and can’t wait to take a look when I get home. I’m amazed at how fast your blog loaded on my mobile .. I’m not even using WIFI, just 3G .. Anyways, wonderful blog!
Love the manner you cover this subject.
I truly love your site.. Very nice colors & theme. Did you build this website yourself? Please reply back as Iím trying to create my very own blog and want to find out where you got this from or what the theme is named. Kudos!
http://www.mollersupport.com/__media__/js/netsoltrademark.php?d=blackpornsites.net/
Have you ever heard of second life (sl for short). It is essentially a game where you can do anything you want. Second life is literally my second life (pun intended lol). If you want to see more you can see these second life authors and blogs
I appreciate the way you have actually ended this post …
I used to be able to find good information from your content.
fantastic post.Ne’er knew this, regards for letting me know.
I have been browsing online more than three hours today, yet I never found any interesting article like yours. It’s pretty worth enough for me. Personally, if all web owners and bloggers made good content as you did, the web will be a lot more useful than ever before.
The very next time I read a blog, Hopefully it does not fail me as much as this one. After all, I know it was my choice to read through, however I actually thought you would probably have something helpful to say. All I hear is a bunch of whining about something that you can fix if you weren’t too busy seeking attention.
Have you ever heard of second life (sl for short). It is basically a video game where you can do anything you want. SL is literally my second life (pun intended lol). If you would like to see more you can see these Second Life articles and blogs
Hi there, I found your blog via Google while looking for a related topic, your website came up, it looks great. I’ve bookmarked it in my google bookmarks.
Iím impressed, I must say. Rarely do I encounter a blog thatís both equally educative and interesting, and without a doubt, you have hit the nail on the head. The problem is something too few people are speaking intelligently about. Now i’m very happy I found this in my hunt for something relating to this.
Hey There. I found your blog using msn. This is a very well written article. I’ll be sure to bookmark it and return to read more of your useful information. Thanks for the post. I will certainly return.
Right here is the perfect site for everyone who wants to find out about this topic. You understand so much its almost tough to argue with you (not that I really would want toÖHaHa). You definitely put a brand new spin on a subject which has been written about for a long time. Wonderful stuff, just great!
After looking over a handful of the blog articles on your site, I truly like your way of blogging. I saved it to my bookmark site list and will be checking back in the near future. Take a look at my website too and tell me how you feel.
Hello! I just want to give you a huge thumbs up for the great info you have got here on this post. I will be coming back to your site for more soon.
Hi there! This article could not be written much better! Going through this article reminds me of my previous roommate! He constantly kept talking about this. I’ll forward this post to him. Pretty sure he’s going to have a great read. I appreciate you for sharing!
Hi there friends, its enormous piece of writing about cultureand completely explained, keep it up all the time.
I will immediately snatch your rss feed as I can not in finding your e-mail subscription link or e-newsletter service. Do you have any? Please allow me recognise in order that I may just subscribe. Thanks.
Thanks for another informative blog. Where else could I get that type of information written in such an ideal way? I have a project that I’m just now working on, and I have been on the look out for such information.
An intriguing discussion is worth comment. I do believe that you should publish more about this subject matter, it might not be a taboo matter but usually people do not speak about these topics. To the next! Best wishes!!
This is a topic that’s close to my heart… Cheers! Where are your contact details though?
Your place is valueble for me. Thanks!…
Hello! This is kind of off topic but I need some guidance from an established blog. Is it difficult to set up your own blog? I’m not very techincal but I can figure things out pretty quick. I’m thinking about setting up my own but I’m not sure where to begin. Do you have any ideas or suggestions? Thanks
I’m pretty pleased to discover this website. I wanted to thank you for ones time for this particularly wonderful read!! I definitely loved every bit of it and i also have you saved as a favorite to check out new stuff on your web site.
Great web site you have here.. Itís hard to find excellent writing like yours these days. I really appreciate individuals like you! Take care!!
Excellent article. I am facing some of these issues as well..
I used to be able to find good advice from your articles.
obviously like your web-site but you need to check the spelling on several of your posts. A number of them are rife with spelling problems and I find it very bothersome to tell the truth nevertheless I will certainly come back again.
Hi there! This is my first visit to your blog! We are a collection of volunteers and starting a new project in a community in the same niche. Your blog provided us beneficial information to work on. You have done a extraordinary job!
Having read this I thought it was really informative. I appreciate you taking the time and effort to put this informative article together. I once again find myself spending a significant amount of time both reading and commenting. But so what, it was still worth it!
I got what you intend, regards for putting up.Woh I am lucky to find this website through google. “Spare no expense to make everything as economical as possible.” by Samuel Goldwyn.
Having read this I believed it was extremely enlightening. I appreciate you spending some time and effort to put this informative article together. I once again find myself personally spending way too much time both reading and posting comments. But so what, it was still worth it!
Spot on with this write-up, I seriously believe that this amazing site needs a great deal more attention. Iíll probably be returning to read more, thanks for the advice!
I blog frequently and I truly thank you for your content. This great article has really peaked my interest. I will bookmark your blog and keep checking for new information about once per week. I subscribed to your RSS feed too.
Valuable info. Fortunate me I found your site accidentally, and I am shocked why this twist of fate didn’t happened in advance! I bookmarked it.
Right here is the perfect website for anybody who hopes to find out about this topic. You realize a whole lot its almost tough to argue with you (not that I actually would want toÖHaHa). You definitely put a brand new spin on a subject that’s been written about for many years. Wonderful stuff, just wonderful!
Awesome site you have here but I was curious about if you knew of any forums that cover the same topics discussed in this article? I’d really like to be a part of online community where I can get suggestions from other experienced people that share the same interest. If you have any recommendations, please let me know. Bless you!
This web site is really a walk-through for all of the info you wanted about this and didn’t know who to ask. Glimpse here, and you’ll definitely discover it.
Greetings! Very useful advice in this particular post! It is the little changes that make the most important changes. Many thanks for sharing!
Spot on with this write-up, I honestly feel this amazing site needs a great deal more attention. Iíll probably be returning to see more, thanks for the advice!
Hello, you used to write excellent, but the last few posts have been kinda boring?K I miss your great writings. Past several posts are just a bit out of track! come on!
Very good post. I’m going through some of these issues as well..
Hi, I do think this is an excellent website. I stumbledupon it 😉 I’m going to revisit once again since I book marked it. Money and freedom is the greatest way to change, may you be rich and continue to help other people.
Wonderful goods from you, man. I have understand your stuff previous to and you are just too fantastic. I actually like what you have acquired here, really like what you are saying and the way in which you say it. You make it enjoyable and you still take care of to keep it smart. I can not wait to read far more from you. This is really a wonderful web site.
This blog was… how do you say it? Relevant!! Finally I’ve found something that helped me. Many thanks!
Iím impressed, I must say. Rarely do I encounter a blog thatís equally educative and engaging, and without a doubt, you have hit the nail on the head. The problem is something not enough people are speaking intelligently about. Now i’m very happy that I came across this during my search for something regarding this.
Some truly nice and utilitarian information on this internet site, besides I think the style and design has got great features.
I needed to thank you for this excellent read!! I certainly enjoyed every little bit of it. I have got you bookmarked to check out new stuff you postÖ
Hello there, just became alert to your blog through Google, and found that it is really informative. I’m gonna watch out for brussels. I’ll appreciate if you continue this in future. Many people will be benefited from your writing. Cheers!
A person essentially lend a hand to make significantly posts I might state. This is the very first time I frequented your web page and to this point? I surprised with the research you made to make this particular put up amazing. Fantastic job!
Nice read, I just passed this onto a friend who was doing some research on that. And he actually bought me lunch since I found it for him smile So let me rephrase that: Thank you for lunch! “Love is made in heaven and consummated on earth.” by John Lyly.
That is a good tip especially to those fresh to the blogosphere. Brief but very accurate informationÖ Thanks for sharing this one. A must read post!
I was able to find good info from your blog articles.
Currently it seems like Expression Engine is the best blogging platform out there right now. (from what I’ve read) Is that what you are using on your blog?
I blog often and I truly appreciate your information. This great article has really peaked my interest. I am going to take a note of your site and keep checking for new details about once a week. I opted in for your Feed too.
You made some really good points there. I looked on the web for more information about the issue and found most people will go along with your views on this site.
This page really has all of the information I needed about this subject and didnít know who to ask.
An interesting discussion is value comment. I believe that you must write more on this topic, it may not be a taboo topic but generally individuals are not enough to talk on such topics. To the next. Cheers
Wohh precisely what I was searching for, appreciate it for posting.
Nice post. I was checking constantly this blog and I am impressed! Extremely useful info particularly the last part 🙂 I care for such information a lot. I was seeking this certain information for a long time. Thank you and good luck.
You are so interesting! I do not believe I’ve read something like this before. So great to find someone with some original thoughts on this subject matter. Seriously.. thank you for starting this up. This site is one thing that is required on the internet, someone with some originality!
Hello! I could have sworn Iíve visited this web site before but after looking at some of the articles I realized itís new to me. Nonetheless, Iím definitely delighted I stumbled upon it and Iíll be bookmarking it and checking back regularly!
This website was… how do you say it? Relevant!! Finally I’ve found something which helped me. Kudos!
scoliosis
Aw, this was a very good post. Taking a few minutes and actual effort to create a top notch article… but what can I say… I hesitate a lot and never seem to get anything
done. scoliosis
Having read this I thought it was very informative. I appreciate you taking the time and effort to put this article together. I once again find myself spending way to much time both reading and commenting. But so what, it was still worth it!
Itís nearly impossible to find experienced people about this subject, but you sound like you know what youíre talking about! Thanks
I’d forever want to be update on new content on this internet site, saved to fav! .
Right here is the perfect site for anybody who really wants to understand this topic. You know so much its almost tough to argue with you (not that I actually would want toÖHaHa). You certainly put a new spin on a subject that has been written about for many years. Excellent stuff, just excellent!
I could not refrain from commenting. Well written!
Attractive portion of content. I just stumbled upon your blog and in accession capital to assert that I get in fact enjoyed account your blog posts. Any way I will be subscribing for your feeds and even I success you get entry to persistently quickly.
Hi , I do believe this is an excellent blog. I stumbled upon it on Yahoo , i will come back once again. Money and freedom is the best way to change, may you be rich and help other people.
Its like you read my mind! You seem to know a lot about this, like you wrote the book in it or something. I think that you could do with some pics to drive the message home a bit, but other than that, this is great blog. A fantastic read. I will certainly be back.
Iím amazed, I have to admit. Rarely do I come across a blog thatís equally educative and interesting, and let me tell you, you have hit the nail on the head. The problem is an issue that too few men and women are speaking intelligently about. I am very happy I found this in my hunt for something relating to this.
Attractive section of content. I just stumbled upon your weblog and in accession capital to assert that I acquire actually enjoyed account your blog posts. Anyway I will be subscribing to your feeds and even I achievement you access consistently quickly.
Very interesting information!Perfect just what I was searching for! “The only gift is a portion of thyself.” by Ralph Waldo Emerson.
Please let me know if you’re looking for a article author for your weblog. You have some really great posts and I feel I would be a good asset. If you ever want to take some of the load off, I’d absolutely love to write some content for your blog in exchange for a link back to mine. Please blast me an email if interested. Kudos!
Hello my friend! I want to say that this post is awesome, nice written and include almost all significant infos. I’d like to see more posts like this.
What an remarkable way of taking a look at points.
I truly love your site.. Great colors & theme. Did you build this website yourself? Please reply back as Iím attempting to create my own site and would like to learn where you got this from or what the theme is named. Appreciate it!
I like this website very much, Its a real nice post to read and obtain information. “It is impossible for a man to learn what he thinks he already knows.” by Epictetus.
Thanks for the sensible critique. Me and my neighbor were just preparing to do some research on this. We got a grab a book from our area library but I think I learned more clear from this post. I’m very glad to see such great information being shared freely out there.
I really like reading through a post that will make people think. Also, thanks for permitting me to comment!
Currently it seems like Movable Type is the best blogging platform available right now. (from what I’ve read) Is that what you’re using on your blog?
Wonderful site. Lots of useful information here. I am sending it to several friends ans also sharing in delicious. And of course, thanks for your effort!
Aw, this was an incredibly good post. Finding the time and actual effort to create a good articleÖ but what can I sayÖ I put things off a whole lot and don’t manage to get nearly anything done.
As I web site possessor I believe the content material here is rattling fantastic , appreciate it for your hard work. You should keep it up forever! Best of luck.
Very good info. Lucky me I discovered your blog by chance (stumbleupon). I’ve book marked it for later!
Highlighting painters and decorators in Cambridge. A price worthy blog that can be read many times. I am very satisfied with the information recieved from your website. Wish you continue creating such worthy content in future to help the web become a better place.
I must voice my passion for your kind-heartedness for folks that absolutely need guidance on the concept. Your real commitment to passing the message all-around was wonderfully helpful and has encouraged individuals like me to get to their endeavors. Your new informative guidelines means a whole lot to me and additionally to my colleagues. Thanks a ton; from everyone of us.
Itís nearly impossible to find experienced people in this particular subject, but you seem like you know what youíre talking about! Thanks
I love the manner you have actually ended this article …
Other write-ups where Manganese steel is gone over: steel: Wear-resistant steels: Manganese steels are commonly called Hadfield steels, after their inventor, Robert Hadfield.
Can I just say what a aid to seek out someone who truly is aware of what theyre talking about on the internet. You definitely know the way to convey a difficulty to mild and make it important. More individuals must learn this and understand this facet of the story. I cant consider youre not more common because you positively have the gift.
Thanks for the auspicious writeup. It if truth be told was once a leisure account it. Glance complicated to more introduced agreeable from you! By the way, how can we be in contact?
I have recently started a site, the info you provide on this web site has helped me tremendously. Thank you for all of your time & work.
Simply wish to say your article is as astounding. The clarity on your publish is simply nice and that i can suppose you are a professional on this subject. Well with your permission allow me to seize your feed to stay updated with forthcoming post. Thank you a million and please continue the rewarding work.
Hello there! Quick question that’s entirely off topic. Do you know how to make your site mobile friendly? My blog looks weird when viewing from my iphone4. I’m trying to find a theme or plugin that might be able to fix this issue. If you have any recommendations, please share. Thanks!
Wow, superb blog layout! How long have you been blogging for? you make blogging look easy. The overall look of your web site is great, as well as the content!
As a Newbie, I am continuously searching online for articles that can be of assistance to me. Thank you
I love it when people get together and share opinions. Great blog, continue the good work!
Everything is very open with a precise clarification of the issues. It was definitely informative. Your website is very helpful. Many thanks for sharing!
I dugg some of you post as I thought they were very useful very useful
I don’t even know how I ended up here, but I thought this post was great. I don’t know who you are but certainly you are going to a famous blogger if you aren’t already 😉 Cheers!
Keep up the great piece of work, I read few blog posts on this website and I think that your website is really interesting and contains bands of great information.
Neat blog! Is your theme custom made or did you download it from somewhere? A design like yours with a few simple tweeks would really make my blog jump out. Please let me know where you got your theme. Cheers
A lot of blog writers nowadays however only a few have articles worth spending time on browsing.
I blog quite often and I seriously thank you for your content. Your article has truly peaked my interest. I will take a note of your website and keep checking for new information about once per week. I subscribed to your Feed too.
I have read so many posts on the topic of the blogger lovers however this paragraph is genuinely a pleasant piece of writing, keep it up.
Hello. splendid job. I did not anticipate this. This is a excellent story. Thanks!
An attention-grabbing discussion is value comment. I think that you should write extra on this subject, it might not be a taboo topic but typically persons are not enough to talk on such topics. To the next. Cheers
I was very pleased to uncover this website. I want to to thank you for ones time for this particularly fantastic read!! I definitely liked every part of it and I have you book-marked to look at new things on your blog.
you are really a good webmaster. The web site loading speed is incredible. It seems that you are doing any unique trick. Also, The contents are masterpiece. you’ve done a fantastic job on this topic!
I absolutely love your site.. Very nice colors & theme. Did you make this web site yourself? Please reply back as Iím hoping to create my own website and would like to learn where you got this from or what the theme is named. Cheers!
The only point I cry over is not having found your blog earlier.
When I originally left a comment I seem to have clicked the -Notify me when new comments are added- checkbox and from now on every time a comment is added I receive 4 emails with the exact same comment. Is there a way you can remove me from that service? Cheers!
You made some really good points there. I looked on the web for additional information about the issue and found most people will go along with your views on this website.
https://www.diigo.com/item/note/8ec7o/ybp5?k=83bab0ca153f5b0fa4963ae2a9f96130
Good article. I will be going through a few of these issues as well..
After I initially left a comment I appear to have clicked on the -Notify me when new comments are added- checkbox and now each time a comment is added I recieve four emails with the same comment. Perhaps there is a means you are able to remove me from that service? Thanks a lot!
Saved as a favorite, I really like your web site!
I¡¦ve been exploring for a little for any high-quality articles or weblog posts on this kind of area . Exploring in Yahoo I eventually stumbled upon this site. Studying this information So i¡¦m happy to exhibit that I’ve a very excellent uncanny feeling I discovered just what I needed. I most indisputably will make certain to don¡¦t put out of your mind this web site and give it a glance regularly.
I love looking through a post that can make men and women think. Also, many thanks for allowing me to comment!
Way cool! Some very valid points! I appreciate you writing this write-up and also the rest of the site is also really good.
I think other web site proprietors should take this web site as an model, very clean and excellent user friendly style and design, let alone the content. You are an expert in this topic!
Fastidious answers in return of this difficulty with genuine arguments and explaining everything concerning that.|
Really when someone doesn’t be aware of afterward its up to other users that they will assist, so here it takes place.|
Hi there! I simply wish to give you a huge thumbs up for the excellent information you’ve got here on this post. I will be returning to your web site for more soon.
When I originally commented I seem to have clicked on the -Notify me when new comments are added- checkbox and from now on each time a comment is added I recieve 4 emails with the exact same comment. There has to be a way you can remove me from that service? Thank you!
May I simply just say what a relief to uncover someone who genuinely understands what they are discussing online. You definitely understand how to bring a problem to light and make it important. More people really need to check this out and understand this side of your story. I was surprised that you are not more popular since you definitely possess the gift.
I seriously love your website.. Pleasant colors & theme. Did you build this site yourself? Please reply back as Iím wanting to create my very own blog and would like to find out where you got this from or just what the theme is named. Cheers!
I go to see each day some web sites and websites to
read content, however this website offers quality based writing.
That is a great tip especially to those new to the blogosphere. Simple but very precise informationÖ Many thanks for sharing this one. A must read post!
This was awesome! I would like you to clean up all this spam though
Heya i am for the first time here. I found this board and I in finding It truly
useful & it helped me out much. I hope to provide one thing back and help others such as you aided me.
Hello There. I found your blog using msn. This is an extremely well written article.
I’ll be sure to bookmark it and come back to read more of
your useful info. Thanks for the post. I’ll definitely comeback.
Thanx for the effort, keep up the good work Great work, I am going to start a small Blog Engine course work using your site I hope you enjoy blogging with the popular BlogEngine.net.Thethoughts you express are really awesome. Hope you will right some more posts.
Well I really liked reading it. This subject provided by you is very constructive for correct planning.
I really like it when folks get together and share opinions. Great site, stick with it!
Great write-up, I am normal visitor of one’s website, maintain up the nice operate, and It’s going to be a regular visitor for a lengthy time.
Aw, this was an incredibly nice post. Taking the time and actual effort to produce a top notch articleÖ but what can I sayÖ I hesitate a whole lot and never manage to get anything done.
Do you would like to know about operational game hacks and what they can do for your favorite adventure mobile game? We provide free game hacks that deliver unlimited resources in any adventure mobile game. Compatible with all devices, our game hacks work perfectly for your personal favorite adventure games. With our working hack, you can play your favored adventure games with no limits.
Thank you, I have just been looking for information approximately this subject for ages and yours is the best I have found out till now. However, what in regards to the conclusion? Are you certain about the supply?
Hello, I do think your website could be having internet browser compatibility issues. When I look at your site in Safari, it looks fine however, if opening in Internet Explorer, it has some overlapping issues. I merely wanted to give you a quick heads up! Apart from that, wonderful site!
I really like your writing style, wonderful info, regards for putting up :D. “Let every man mind his own business.” by Miguel de Cervantes.
This site really has all of the information I wanted concerning this subject and didnít know who to ask.
I don’t even know how I ended up here, but I thought this post was good. I do not know who you are but definitely you’re going to a famous blogger if you are not already 😉 Cheers!
I am so happy to read this. This is the kind of manual that needs to be given and not the random misinformation that is at the other blogs. Appreciate your sharing this best doc.
It is in point of fact a nice and useful piece of info. I am happy that you just shared this helpful information with us. Please keep us informed like this. Thank you for sharing.
I love what you guys are usually up too. This kind of clever work and coverage! Keep up the good works guys I’ve incorporated you guys to my personal blogroll.
This is a topic that’s near to my heart… Best wishes! Where are your contact details though?
I was very pleased to discover this great site. I want to to thank you for ones time due to this wonderful read!! I definitely appreciated every part of it and I have you book-marked to look at new information on your blog.
You’re so interesting! I don’t believe I’ve read through anything like this before. So nice to find somebody with some original thoughts on this topic. Really.. thank you for starting this up. This site is one thing that’s needed on the web, someone with a bit of originality!
An intriguing discussion is worth comment. There’s no doubt that that you ought to write more about this issue, it may not be a taboo subject but generally people don’t speak about these subjects. To the next! Many thanks!!
Hi, I do think this is a great web site. I stumbledupon it 😉 I’m going to come back yet again since I book marked it. Money and freedom is the best way to change, may you be rich and continue to guide other people.
I like it when individuals come together and share opinions. Great website, stick with it!
I conceive you have observed some very interesting details, appreciate it for the post.
Great information. Lucky me I ran across your site by chance (stumbleupon). I’ve saved as a favorite for later!
An impressive share! I’ve just forwarded this onto a coworker who has been doing a little research on this. And he in fact ordered me lunch simply because I found it for him… lol. So allow me to reword this…. Thanks for the meal!! But yeah, thanx for spending time to talk about this issue here on your blog.
You are so cool! I do not think I’ve read a single thing like this before. So great to find someone with some unique thoughts on this issue. Really.. many thanks for starting this up. This web site is one thing that is required on the web, someone with a little originality!
You’re so cool! I do not think I’ve truly read something like that before. So great to find someone with a few genuine thoughts on this subject. Seriously.. many thanks for starting this up. This site is one thing that is required on the internet, someone with a bit of originality!
I have recently started a site, the information you offer on this website has helped me tremendously. Thank you for all of your time & work.
This was great! I would like you to clean up all this spam though
This is a very good tip especially to those fresh to the blogosphere. Simple but very accurate infoÖ Many thanks for sharing this one. A must read post!
You got a very superb website, Sword lily I discovered it through yahoo.
Good day! Do you know if they make any plugins to help with Search Engine Optimization? I’m trying to get my blog to rank for some targeted keywords but I’m not seeing very good success. If you know of any please share. Cheers!
Only wanna input that you have a very nice web site, I enjoy the pattern it actually stands out.
After looking over a number of the blog articles on your blog, I really like your technique of writing a blog. I added it to my bookmark website list and will be checking back soon. Please check out my web site too and let me know how you feel.
Valuable info. Lucky me I found your site by accident, and I’m shocked why this accident didn’t happened earlier! I bookmarked it.
Having read this I believed it was extremely informative. I appreciate you spending some time and effort to put this article together. I once again find myself personally spending a significant amount of time both reading and leaving comments. But so what, it was still worthwhile!
I got what you mean , regards for putting up.Woh I am thankful to find this website through google.
I seriously love your blog.. Great colors & theme. Did you create this website yourself? Please reply back as Iím looking to create my very own blog and want to know where you got this from or exactly what the theme is called. Kudos!
I got what you mean ,saved to my bookmarks, very nice web site.
Outstanding post, I think website owners should learn a lot from this weblog its rattling user pleasant.
This was awesome! I would like you to clean up all this spam though
This really answered my drawback, thank you!
Its superb as your other blog posts : D, thankyou for putting up. “Too much sensibility creates unhappiness too much insensibility leads to crime.” by Charles Maurice de Talleyrand.
I regard something really special in this website.
An impressive share, I just given this onto a colleague who was doing a little analysis on this. And he in fact bought me breakfast because I found it for him.. smile. So let me reword that: Thnx for the treat! But yeah Thnkx for spending the time to discuss this, I feel strongly about it and love reading more on this topic. If possible, as you become expertise, would you mind updating your blog with more details? It is highly helpful for me. Big thumb up for this blog post!
I blog quite often and I truly thank you for your content. The article has truly peaked my interest. I will take a note of your blog and keep checking for new information about once a week. I opted in for your RSS feed too.
I am happy that I found this website, just the right information that I was searching for! .
You made some decent points there. I checked on the net to find out more about the issue and found most individuals will go along with your views on this site.
I’m impressed, I have to say. Really not often do I encounter a blog that’s each educative and entertaining, and let me tell you, you may have hit the nail on the head. Your thought is excellent; the issue is one thing that not enough persons are speaking intelligently about. I’m very blissful that I stumbled throughout this in my search for one thing regarding this.
Some times its a pain in the ass to read what blog owners wrote but this internet site is really user genial! .
I’m very happy to discover this site. I wanted to thank you for your time for this particularly wonderful read!! I definitely loved every bit of it and i also have you saved to fav to check out new stuff in your web site.
As I website owner I believe the written content here is rattling fantastic, thanks for your efforts.
I conceive this internet site contains some real fantastic information for everyone. “Glory is fleeting, but obscurity is forever.” by Napoleon.
At that rate, you can premiere as a author. Now i’m so touched. I am cheerful to meet you. Thank you.
I was very pleased to discover this website. I need to to thank you for ones time just for this wonderful read!! I definitely really liked every bit of it and i also have you book-marked to check out new stuff in your site.
I used to be able to find good advice from your content.
Have you ever heard of second life (sl for short). It is basically a video game where you can do anything you want. SL is literally my second life (pun intended lol). If you want to see more you can see these sl articles and blogs
Good information. Lucky me I recently found your website by accident (stumbleupon). I have book-marked it for later!
An intriguing discussion is worth comment. I do believe that you ought to publish more on this issue, it may not be a taboo matter but generally people do not speak about such topics. To the next! Best wishes!!
You have brought up a very excellent details , appreciate it for the post.
This is really interesting, You are a very skilled blogger. I have joined your feed and look forward to seeking more of your magnificent post. Also, I’ve shared your website in my social networks!
Heya i am for the first time here. I found this board and I find It really useful & it helped me out much. I hope to present something again and aid others like you aided me.
I am curious to find out what blog platform you’re working with? I’m having some small security problems with my latest site and I’d like to find something more secure. Do you have any solutions?
I don’t know about you all but I am obsessed with airplanes. I have a friend in highschool that loved airplanes, so here are some airplane related stuff I don’t know about you guys but I love airplanes. I had a friend in highschool that loved airplanes, so here are some airplane related stuff https://www.airlinereporter.com/2008/08/tsa-grounds-9-planes-but-not-for-the-reasons-you-might-think/
bookmarked!!, I love your web site!
Iím impressed, I must say. Seldom do I encounter a blog thatís equally educative and amusing, and let me tell you, you’ve hit the nail on the head. The issue is something which too few people are speaking intelligently about. Now i’m very happy I stumbled across this during my hunt for something concerning this.
You ought to be a part of a contest for one of the highest quality sites on the net. I am going to recommend this web site!
Having read this I thought it was rather informative. I appreciate you finding the time and energy to put this content together. I once again find myself spending way too much time both reading and leaving comments. But so what, it was still worth it!
Hello, for all time i used to check blog posts here in the early hours in the break of day, as i like to find out more and more.|
Some truly excellent information, Gladiolus I noticed this.
Hi there, I do think your website may be having browser compatibility issues. When I look at your blog in Safari, it looks fine however when opening in Internet Explorer, it’s got some overlapping issues. I just wanted to provide you with a quick heads up! Apart from that, wonderful website!
This is a good tip particularly to those fresh to the blogosphere. Simple but very precise infoÖ Appreciate your sharing this one. A must read article!
Hi, I do believe this is an excellent blog. I stumbledupon it 😉 I am going to revisit once again since I book marked it. Money and freedom is the best way to change, may you be rich and continue to help others.
Very good info. Lucky me I discovered your site by chance (stumbleupon). I’ve saved it for later!
Hello! I know this is kinda off topic but I was wondering which blog platform are you using for this site? I’m getting sick and tired of WordPress because I’ve had issues with hackers and I’m looking at options for another platform. I would be fantastic if you could point me in the direction of a good platform.
Itís difficult to find educated people on this subject, but you seem like you know what youíre talking about! Thanks
I’m very pleased to uncover this web site. I want to to thank you for ones time due to this wonderful read!! I definitely loved every bit of it and i also have you book-marked to look at new stuff on your blog.
Excellent article! We will be linking to this great post on our site. Keep up the good writing.
This is the right webpage for anybody who wants to find out about this topic. You understand so much its almost hard to argue with you (not that I really will need toÖHaHa). You definitely put a new spin on a topic which has been discussed for a long time. Excellent stuff, just wonderful!
There’s certainly a great deal to find out about this topic. I love all the points you have made.
Hi there, I do think your website may be having browser compatibility problems. When I look at your web site in Safari, it looks fine however, if opening in Internet Explorer, it’s got some overlapping issues. I merely wanted to give you a quick heads up! Aside from that, wonderful site!
Having read this I believed it was really enlightening. I appreciate you taking the time and effort to put this information together. I once again find myself personally spending a lot of time both reading and posting comments. But so what, it was still worth it!
Hey, you used to write wonderful, but the last several posts have been kinda boringK I miss your super writings. Past several posts are just a little out of track! come on!
Hmm is anyone else having problems with the images on this blog loading? I’m trying to determine if its a problem on my end or if it’s the blog. Any feedback would be greatly appreciated.
I like what you guys are up too. Such intelligent work and reporting! Carry on the excellent works guys I have incorporated you guys to my blogroll. I think it will improve the value of my web site 🙂
I’d have to examine with you here. Which is not one thing I usually do! I take pleasure in reading a post that may make folks think. Additionally, thanks for permitting me to comment!
This is the right web site for everyone who hopes to find out about this topic. You realize a whole lot its almost tough to argue with you (not that I personally would want toÖHaHa). You certainly put a fresh spin on a topic that’s been discussed for many years. Excellent stuff, just wonderful!
What’s Happening i’m new to this, I stumbled upon this I have found It positively helpful and it has helped me out loads. I hope to contribute & help other users like its helped me. Good job.
I enjoy reading through an article that will make people think. Also, thanks for allowing for me to comment!
Please let me know if you’re looking for a author for your blog. You have some really great articles and I believe I would be a good asset. If you ever want to take some of the load off, I’d absolutely love to write some material for your blog in exchange for a link back to mine. Please send me an e-mail if interested. Thank you!
Everyone loves it when folks come together and share views. Great site, stick with it!
I have been browsing online greater than three hours today, but I by no means discovered any interesting article like yours. It is lovely price sufficient for me. In my view, if all website owners and bloggers made good content material as you probably did, the web will probably be much more useful than ever before.
I like looking through a post that can make people think. Also, many thanks for permitting me to comment!
What’s up, after reading this awesome piece of writing i am
as well glad to share my know-how here with colleagues.
Hello! I could have sworn I’ve been to this blog before but after browsing through some of the post I realized it’s new to me. Anyways, I’m definitely happy I found it and I’ll be book-marking and checking back frequently!
Excellent blog you have got here.. Itís difficult to find good quality writing like yours these days. I really appreciate individuals like you! Take care!!
Hello there, I do believe your web site may be having browser compatibility issues. When I take a look at your site in Safari, it looks fine however, when opening in Internet Explorer, it has some overlapping issues. I just wanted to provide you with a quick heads up! Other than that, great site!
You ought to take part in a contest for one of the best sites on the web. I’m going to recommend this blog!
I coᥙldn’t refrain from commenting. Well writtеn!
I coᥙldn’t refrain from commenting. Well writtеn!
Helpful information. Fortunate me I found your site by accident, and I’m stunned why this coincidence didn’t came about earlier! I bookmarked it.
Have you ever heard of second life (sl for short). It is essentially a game where you can do anything you want. sl is literally my second life (pun intended lol). If you would like to see more you can see these second life articles and blogs
I have been checking out a few of your posts and i can state nice stuff. I will surely bookmark your site.
I want to to thank you for this great read!! I absolutely enjoyed every bit of it. I have you bookmarked to check out new stuff you postÖ
Hi, i think that i saw you visited my blog so i came to “return the favor”.I’m attempting to find things to improve my website!I suppose its ok to use a few of your ideas!!
You’ve made some decent points there. I checked on the net for more info about the issue and found most people will go along with your views on this website.
Hi, Neat post. There’s a problem along with your site in internet explorer, could test this?K IE nonetheless is the market leader and a big component of folks will leave out your magnificent writing because of this problem.
You need to take part in a contest for one of the greatest sites online. I will recommend this site!
Excellent article. I am facing a few of these issues as well..
Thanks for every other informative blog. Where else may just I am getting that type of information written in such an ideal manner? I’ve a venture that I am simply now working on, and I have been on the glance out for such information.
I have recently started a site, the information you offer on this site has helped me greatly. Thanks for all of your time & work.
Helpful info. Fortunate me I discovered your web site accidentally, and I’m stunned why this accident didn’t happened earlier! I bookmarked it.
I could not refrain from commenting. Perfectly written!
I could not resist commenting. Perfectly written!
What i do not understood is in truth how you’re now not really a lot more neatly-favored than you might be now. You’re so intelligent. You understand thus considerably with regards to this topic, produced me in my view believe it from so many varied angles. Its like men and women aren’t involved until it is something to do with Girl gaga! Your own stuffs excellent. All the time maintain it up!
There are some attention-grabbing cut-off dates on this article however I don’t know if I see all of them middle to heart. There is some validity however I’ll take maintain opinion till I look into it further. Good article , thanks and we want more! Added to FeedBurner as properly
Hi there! This post could not be written any better! Looking at this post reminds me of my previous roommate! He continually kept preaching about this. I will send this information to him. Fairly certain he’ll have a good read. I appreciate you for sharing!
Hi, I do believe this is a great website. I stumbledupon it 😉 I’m going to come back yet again since i have saved as a favorite it. Money and freedom is the best way to change, may you be rich and continue to guide other people.
Your style is so unique in comparison to other people I have read stuff from. Thank you for posting when you’ve got the opportunity, Guess I’ll just bookmark this web site.
Its such as you read my thoughts! You appear to know so much about this, like you wrote the ebook in it or something. I think that you simply can do with some to pressure the message home a little bit, but instead of that, that is magnificent blog. An excellent read. I’ll certainly be back.
You can definitely see your expertise within the work you write. The world hopes for more passionate writers such as you who are not afraid to mention how they believe. At all times follow your heart. “Until you walk a mile in another man’s moccasins you can’t imagine the smell.” by Robert Byrne.
Whoa! This blog looks just like my old one! It’s on a totally different topic but it has pretty much the same page layout and design. Wonderful choice of colors!
bookmarked!!, I like your site!
I’ve been exploring for a little bit for any high-quality articles or blog posts on this kind of space . Exploring in Yahoo I finally stumbled upon this website. Studying this information So i’m happy to convey that I have an incredibly just right uncanny feeling I discovered just what I needed. I so much undoubtedly will make certain to don’t fail to remember this website and give it a look regularly.
I was able to find good advice from your blog articles.
I like it when individuals get together and share ideas. Great website, stick with it!
Very nice post. I just stumbled upon your weblog and wanted to say that I’ve truly enjoyed surfing around your blog posts. In any case I will be subscribing to your feed and I hope you write again very soon!
Greetings! Very helpful advice on this article! It is the little changes that make the biggest changes. Thanks a lot for sharing!
That is a good tip particularly to those fresh to the blogosphere. Short but very accurate infoÖ Appreciate your sharing this one. A must read article!
Having read this I thought it was rather enlightening. I appreciate you finding the time and effort to put this information together. I once again find myself spending way too much time both reading and commenting. But so what, it was still worthwhile!
Right here is the right site for anyone who hopes to find out about this topic. You understand a whole lot its almost tough to argue with you (not that I personally would want toÖHaHa). You definitely put a new spin on a topic which has been written about for decades. Wonderful stuff, just wonderful!
Fantastic website. Plenty of useful info here. I’m sending it to several friends ans also sharing in delicious. And obviously, thanks for your sweat!
You are my inhalation, I possess few blogs and very sporadically run out from post :). “The soul that is within me no man can degrade.” by Frederick Douglas.
Hiya, I’m really glad I have found this info. Nowadays bloggers publish just about gossips and web and this is actually annoying. A good site with interesting content, that’s what I need. Thank you for keeping this site, I’ll be visiting it. Do you do newsletters? Can not find it.
I do trust all of the concepts you’ve presented for your post. They are very convincing and can certainly work. Still, the posts are very quick for novices. Could you please extend them a little from subsequent time? Thanks for the post.
I have been surfing online more than 3 hours today, but I by no means discovered any attention-grabbing article like yours. It’s pretty value sufficient for me. In my view, if all web owners and bloggers made just right content as you did, the web will be much more useful than ever before. “Learn to see in another’s calamity the ills which you should avoid.” by Publilius Syrus.
Hey just wanted to give you a brief heads up and let you know a few of the images aren’t loading correctly. I’m not sure why but I think its a linking issue. I’ve tried it in two different internet browsers and both show the same results.
After looking over a handful of the articles on your web site, I seriously like your technique of writing a blog. I bookmarked it to my bookmark website list and will be checking back in the near future. Please check out my website too and let me know how you feel.
excellent post.Never knew this, thankyou for letting me know.
An outstanding share! I’ve just forwarded this onto a coworker who has been doing a little research on this. And he in fact bought me dinner because I discovered it for him… lol. So let me reword this…. Thank YOU for the meal!! But yeah, thanx for spending some time to discuss this issue here on your web page.
I¦ll right away take hold of your rss feed as I can’t to find your email subscription link or newsletter service. Do you have any? Kindly let me know so that I could subscribe. Thanks.
I do agree with all the ideas you’ve presented in your post. They’re really convincing and will certainly work. Still, the posts are very short for beginners. Could you please extend them a bit from next time? Thanks for the post.
I like this post, enjoyed this one thanks for putting up.
This is the right site for anyone who wishes to find out about this topic. You know a whole lot its almost tough to argue with you (not that I actually will need toÖHaHa). You certainly put a new spin on a topic that’s been written about for a long time. Great stuff, just great!
Right here is the right website for anybody who really wants to understand this topic. You understand so much its almost tough to argue with you (not that I actually would want toÖHaHa). You certainly put a fresh spin on a subject that’s been discussed for decades. Great stuff, just wonderful!
I have not checked in here for some time since I thought it was getting boring, but the last few posts are great quality so I guess I will add you back to my daily bloglist. You deserve it my friend 🙂
Appreciate it for helping out, superb info. “The four stages of man are infancy, childhood, adolescence, and obsolescence.” by Bruce Barton.
You have made some good points there. I looked on the internet for more information about the issue and found most individuals will go along with your views on this website.
Hi, I do believe this is a great blog. I stumbledupon it 😉 I am going to revisit yet again since i have saved as a favorite it. Money and freedom is the best way to change, may you be rich and continue to guide others.
This is a great tip especially to those new to the blogosphere. Short but very precise informationÖ Many thanks for sharing this one. A must read post!
hello!,I love your writing so so much! percentage we communicate extra approximately your post on AOL? I need a specialist on this space to unravel my problem. Maybe that’s you! Looking forward to see you.
Good day! I could have sworn Iíve been to your blog before but after going through a few of the articles I realized itís new to me. Nonetheless, Iím definitely happy I stumbled upon it and Iíll be bookmarking it and checking back often!
Absolutely pent content material, thanks for entropy. “No human thing is of serious importance.” by Plato.
Hi, Neat post. There is a problem with your web site in internet explorer, would check this… IE still is the market leader and a large portion of people will miss your fantastic writing because of this problem.
I do enjoy the manner in which you have framed this problem plus it does indeed present me a lot of fodder for thought. On the other hand, because of everything that I have observed, I simply just trust as the commentary pack on that people today keep on point and not embark upon a soap box of some other news of the day. Still, thank you for this superb point and whilst I do not really agree with it in totality, I value your perspective.
Magnificent beat ! I would like to apprentice while you amend your site, how can i subscribe for a blog website? The account helped me a acceptable deal. I had been tiny bit acquainted of this your broadcast offered bright clear idea
Excellent web site. A lot of useful information here. I am sending it to several buddies ans also sharing in delicious. And of course, thank you to your sweat!
My coder is trying to persuade me to move to .net from PHP. I have always disliked the idea because of the costs. But he’s tryiong none the less. I’ve been using Movable-type on a variety of websites for about a year and am concerned about switching to another platform. I have heard very good things about blogengine.net. Is there a way I can transfer all my wordpress content into it? Any kind of help would be really appreciated!
Yeah bookmaking this wasn’t a bad conclusion outstanding post! .
Yeah bookmaking this wasn’t a speculative decision great post! .
Very interesting subject , thankyou for putting up.
I visited a lot of website but I think this one has something extra in it in it
Having read this I thought it was rather informative. I appreciate you finding the time and energy to put this content together. I once again find myself personally spending a lot of time both reading and posting comments. But so what, it was still worthwhile!
I do agree with all the concepts you’ve presented on your post. They’re very convincing and will certainly work. Still, the posts are too brief for newbies. May just you please extend them a little from subsequent time? Thank you for the post.
Hi there would you mind sharing which blog platform you’re using? I’m looking to start my own blog soon but I’m having a hard time choosing between BlogEngine/Wordpress/B2evolution and Drupal. The reason I ask is because your design and style seems different then most blogs and I’m looking for something completely unique. P.S Apologies for getting off-topic but I had to ask!
An impressive share! I’ve just forwarded this onto a coworker who has been doing a little homework on this. And he actually bought me breakfast because I stumbled upon it for him… lol. So allow me to reword this…. Thanks for the meal!! But yeah, thanks for spending the time to talk about this topic here on your site.
Hello, Neat post. There’s a problem along with your site in internet explorer, could check thisK IE nonetheless is the marketplace leader and a big part of other folks will leave out your wonderful writing because of this problem.
This site certainly has all of the information and facts I wanted concerning this subject and didnít know who to ask.
Saved as a favorite, I love your site!
After I initially commented I seem to have clicked on the -Notify me when new comments are added- checkbox and now each time a comment is added I receive four emails with the exact same comment. There has to be an easy method you are able to remove me from that service? Many thanks!
Wow! Thank you! I constantly needed to write on my blog something like that. Can I take a part of your post to my site?
There is definately a great deal to learn about this issue. I like all of the points you have made.
Having read this I believed it was really informative. I appreciate you finding the time and effort to put this article together. I once again find myself spending way too much time both reading and posting comments. But so what, it was still worthwhile!
That is a great tip especially to those fresh to the blogosphere. Simple but very accurate informationÖ Thanks for sharing this one. A must read article!
I know this if off topic but I’m looking into starting my own weblog and was curious what all is needed to get setup? I’m assuming having a blog like yours would cost a pretty penny? I’m not very web smart so I’m not 100 certain. Any recommendations or advice would be greatly appreciated. Kudos
I must thank you for the efforts you’ve put in writing this blog. I really hope to see the same high-grade blog posts from you later on as well. In fact, your creative writing abilities has inspired me to get my very own website now 😉
F*ckin’ awesome issues here. I’m very satisfied to peer your post. Thank you a lot and i am looking ahead to contact you. Will you please drop me a e-mail?
The crux of your writing whilst sounding reasonable initially, did not settle properly with me personally after some time. Somewhere within the paragraphs you were able to make me a believer unfortunately just for a while. I nevertheless have got a problem with your leaps in logic and one might do nicely to help fill in those breaks. In the event that you actually can accomplish that, I will definitely end up being amazed.
Hiya, I am really glad I have found this information. Today bloggers publish just about gossips and net and this is actually frustrating. A good web site with interesting content, that is what I need. Thank you for keeping this web-site, I will be visiting it. Do you do newsletters? Can not find it.
Great – I should certainly pronounce, impressed with your website. I had no trouble navigating through all the tabs and related info ended up being truly simple to do to access. I recently found what I hoped for before you know it in the least. Quite unusual. Is likely to appreciate it for those who add forums or something, web site theme . a tones way for your customer to communicate. Excellent task.
This web site is my inhalation, very excellent design and perfect articles.
After I originally commented I seem to have clicked the -Notify me when new comments are added- checkbox and now whenever a comment is added I recieve four emails with the exact same comment. Perhaps there is a means you are able to remove me from that service? Kudos!
Great post. I am going through a few of these issues as well..
You made some really good points there. I checked on the net for more information about the issue and found most people will go along with your views on this website.
I like this web blog very much so much good information.
Having read this I thought it was very informative. I appreciate you taking the time and effort to put this article together. I once again find myself spending way to much time both reading and commenting. But so what, it was still worth it!
I just like the valuable information you supply in your articles. I’ll bookmark your blog and check once more here regularly. I’m relatively sure I’ll learn many new stuff proper right here! Good luck for the next!
I will right away seize your rss feed as I can’t in finding your email subscription link or newsletter service. Do you have any? Kindly permit me realize so that I may just subscribe. Thanks.
Loving the info on this website , you have done outstanding job on the posts.
Hi my friend! I wish to say that this post is awesome, nice written and include almost all vital infos. I’d like to see more posts like this.
After I originally left a comment I seem to have clicked on the -Notify me when new comments are added- checkbox and now each time a comment is added I get four emails with the exact same comment. Is there an easy method you can remove me from that service? Kudos!
I couldnít refrain from commenting. Exceptionally well written!
Nice points altogether, you simply added a new reader to your list of readers. What would you suggest in respect to your posts which you made a few days ago? Any thing positive?
Spot on with this write-up, I truly feel this web site needs far more attention. Iíll probably be back again to see more, thanks for the info!
This is the right website for anybody who wishes to find out about this topic. You understand a whole lot its almost tough to argue with you (not that I personally would want toÖHaHa). You definitely put a new spin on a subject that has been discussed for years. Excellent stuff, just wonderful!
Greetings! Very helpful advice in this particular post! It is the little changes that make the biggest changes. Many thanks for sharing!
It’s hard to find knowledgeable people on this topic, but you sound like you know what you’re talking about! Thanks
You should be a part of a contest for one of the greatest blogs on the internet. I’m going to recommend this web site!
Excellent post. I certainly love this site. Thanks!
This is the perfect site for everyone who wants to understand this topic. You know so much its almost hard to argue with you (not that I actually would want toÖHaHa). You certainly put a brand new spin on a subject that’s been written about for years. Great stuff, just excellent!
I truly love your website.. Great colors & theme. Did you make this amazing site yourself? Please reply back as Iím hoping to create my own personal website and want to find out where you got this from or exactly what the theme is named. Thanks!
I am continually looking online for tips that can assist me. Thx!
Good info. Lucky me I ran across your blog by accident (stumbleupon). I have book marked it for later!
May I just say what a comfort to discover somebody that truly understands what they are discussing on the net. You definitely know how to bring an issue to light and make it important. A lot more people must check this out and understand this side of your story. I was surprised you’re not more popular because you surely possess the gift.
I couldnít refrain from commenting. Well written!
Fantastic site. Lots of useful info here. I am sending it to a few friends ans also sharing in delicious. And naturally, thanks for your sweat!
There is certainly a great deal to find out about this topic. I love all of the points you’ve made.
You really make it seem so easy with your presentation however I in finding this topic to be really something that I feel I would by no means understand. It seems too complex and very vast for me. I am taking a look ahead in your subsequent publish, I will try to get the cling of it!
Iím amazed, I have to admit. Rarely do I come across a blog thatís both educative and entertaining, and without a doubt, you have hit the nail on the head. The problem is something too few folks are speaking intelligently about. I am very happy that I found this in my hunt for something relating to this.
Hello.This post was extremely remarkable, especially because I was browsing for thoughts on this issue last Sunday.
That is very interesting, You are a very professional blogger. I have joined your feed and sit up for looking for extra of your wonderful post. Also, I’ve shared your web site in my social networks!
This is the appropriate blog for anyone who needs to seek out out about this topic. You understand a lot its nearly arduous to argue with you (not that I truly would need…HaHa). You positively put a new spin on a topic thats been written about for years. Great stuff, just nice!
Great beat ! I wish to apprentice while you amend your site, how can i subscribe for a blog website? The account aided me a acceptable deal. I had been tiny bit acquainted of this your broadcast offered bright clear concept
I have not checked in here for a while since I thought it was getting boring, but the last few posts are good quality so I guess I will add you back to my daily bloglist. You deserve it my friend 🙂
Excellent post. I was checking constantly this blog and I am impressed! Extremely helpful information particularly the last part 🙂 I care for such info much. I was looking for this certain information for a very long time. Thank you and best of luck.
trump stock in hydroxychloroquine
laugh trigger point dark
I have learn several just right stuff here. Certainly value bookmarking for revisiting. I wonder how so much attempt you set to create such a fantastic informative site.
You are so cool! I don’t think I’ve truly read a single thing like that before. So great to discover somebody with some unique thoughts on this issue. Really.. many thanks for starting this up. This website is one thing that’s needed on the internet, someone with some originality!
Nice post. I learn something new and challenging on websites I stumbleupon on a daily basis. It will always be interesting to read through content from other authors and use something from their web sites.
I want to to thank you for this wonderful read!! I definitely loved every bit of it. I have you book marked to look at new things you postÖ
Lovely website! I am loving it!! Will come back again. I am taking your feeds also.
Awsome blog! I am loving it!! Will be back later to read some more. I am bookmarking your feeds also.
hi!,I really like your writing very much! proportion we be in contact extra about your article on AOL? I need a specialist on this space to unravel my problem. Maybe that’s you! Looking forward to see you.
Great web site you have here.. Itís hard to find quality writing like yours nowadays. I seriously appreciate individuals like you! Take care!!
Aw, this was a very good post. Spending some time and actual effort to produce a superb articleÖ but what can I sayÖ I procrastinate a lot and don’t manage to get anything done.
You need to be a part of a contest for one of the greatest sites on the net. I’m going to highly recommend this website!
Very good information. Lucky me I found your website by accident (stumbleupon). I’ve saved it for later!
Way cool! Some very valid points! I appreciate you writing this article plus the rest of the website is extremely good.
I absolutely love your blog.. Pleasant colors & theme. Did you create this amazing site yourself? Please reply back as Iím planning to create my own personal site and want to know where you got this from or exactly what the theme is named. Appreciate it!
Everyone loves it when individuals come together and share opinions. Great website, continue the good work!
An outstanding share! I’ve just forwarded this onto a colleague who was conducting a little research on this. And he actually ordered me breakfast simply because I found it for him… lol. So let me reword this…. Thank YOU for the meal!! But yeah, thanx for spending the time to talk about this matter here on your internet site.
Thanks a lot for sharing this with all of us you really understand what you are speaking
approximately! Bookmarked. Please also visit my web site
=). We will have a hyperlink change agreement between us
Excellent article! We are linking to this particularly great content on our website. Keep up the good writing.
This is a great tip especially to those fresh to the blogosphere. Short but very accurate infoÖ Appreciate your sharing this one. A must read article!
Spot on with this write-up, I actually believe that this site needs far more attention. Iíll probably be back again to read more, thanks for the info!
I wanted to thank you for this fantastic read!! I certainly loved every bit of it. I have you book marked to check out new stuff you postÖ
Hi there, I believe your website could possibly be having browser compatibility issues. When I look at your web site in Safari, it looks fine but when opening in IE, it has some overlapping issues. I just wanted to give you a quick heads up! Apart from that, wonderful blog!
Oh my goodness! Awesome article dude! Thank you so much, However I am encountering difficulties with your RSS. I donít understand the reason why I can’t join it. Is there anyone else getting identical RSS problems? Anyone that knows the solution can you kindly respond? Thanks!!
I was pretty pleased to uncover this website. I wanted to thank you for ones time just for this wonderful read!! I definitely savored every little bit of it and I have you saved to fav to see new things on your website.
Good info. Lucky me I reach on your website by accident, I bookmarked it.
I really like your writing style, great information, thank you for putting up :D. “God save me from my friends. I can protect myself from my enemies.” by Claude Louis Hector de Villars.
There is definately a great deal to find out about this topic. I really like all of the points you have made.
Good write-up, I¦m normal visitor of one¦s blog, maintain up the nice operate, and It’s going to be a regular visitor for a lengthy time.
It’s best to participate in a contest for one of the best blogs on the web. I will recommend this site!
Good site you’ve got here.. Itís hard to find excellent writing like yours these days. I seriously appreciate individuals like you! Take care!!
This is very interesting, You’re a very skilled blogger. I have joined your rss feed and look forward to seeking more of your great post. Also, I’ve shared your web site in my social networks!
An impressive share! I have just forwarded this onto a coworker who has been conducting a little homework on this. And he in fact bought me lunch because I stumbled upon it for him… lol. So allow me to reword this…. Thank YOU for the meal!! But yeah, thanx for spending some time to discuss this topic here on your website.
That is a great tip especially to those fresh to the blogosphere. Short but very precise infoÖ Thanks for sharing this one. A must read post!
I absolutely love your blog.. Pleasant colors & theme. Did you develop this web site yourself? Please reply back as Iím hoping to create my own personal site and would like to learn where you got this from or just what the theme is named. Cheers!
I couldnít resist commenting. Perfectly written!
I’m excited to find this web site. I want to to thank you for your time for this wonderful read!! I definitely savored every bit of it and I have you book-marked to see new things on your site.
Saved as a favorite, I really like your web site!
Hi! I just wish to offer you a big thumbs up for your great info you’ve got right here on this post. I will be coming back to your blog for more soon.
The very root of your writing whilst appearing agreeable originally, did not really work very well with me personally after some time. Somewhere throughout the sentences you managed to make me a believer but just for a short while. I nevertheless have got a problem with your leaps in logic and one might do well to fill in those gaps. If you can accomplish that, I could surely be impressed.
I could not resist commenting. Exceptionally well written!
I discovered your blog site on google and check a few of your early posts. Continue to keep up the very good operate. I just additional up your RSS feed to my MSN News Reader. Seeking forward to reading more from you later on!…
You ought to take part in a contest for one of the best sites online. I will highly recommend this web site!
When I originally commented I appear to have clicked the -Notify me when new comments are added- checkbox and from now on each time a comment is added I get 4 emails with the same comment. There has to be a means you can remove me from that service? Cheers!
Hi, Neat post. There’s a problem along with your website in internet explorer, would check this… IE nonetheless is the marketplace leader and a big component of other folks will miss your fantastic writing due to this problem.
You’ve made some really good points there. I looked on the internet for additional information about the issue and found most individuals will go along with your views on this web site.
Hello there, You’ve done an incredible job. I’ll certainly digg it and personally recommend to my friends. I’m sure they will be benefited from this website.
Good V I should definitely pronounce, impressed with your web site. I had no trouble navigating through all the tabs as well as related information ended up being truly easy to do to access. I recently found what I hoped for before you know it at all. Quite unusual. Is likely to appreciate it for those who add forums or something, website theme . a tones way for your customer to communicate. Nice task..
After I originally left a comment I seem to have clicked on the -Notify me when new comments are added- checkbox and from now on each time a comment is added I recieve 4 emails with the same comment. Perhaps there is a way you are able to remove me from that service? Many thanks!
It’s truly a great and useful piece of info. I’m glad that you simply shared this useful information with us. Please stay us up to date like this. Thank you for sharing.
You made some good points there. I did a search on the subject matter and found most individuals will agree with your site.
My brother recommended I might like this web site. He was totally right. This post truly made my day. You cann’t imagine just how much time I had spent for this info! Thanks!
What¦s Happening i am new to this, I stumbled upon this I have found It positively useful and it has helped me out loads. I hope to give a contribution & help other customers like its helped me. Great job.
That is really interesting, You’re a very skilled blogger. I have joined your rss feed and look ahead to in the hunt for extra of your wonderful post. Additionally, I’ve shared your web site in my social networks!
Its like you read my mind! You seem to know so much about this, like you wrote the book in it or something. I think that you can do with some pics to drive the message home a bit, but other than that, this is magnificent blog. An excellent read. I will certainly be back.
Hiya very cool website!! Man .. Beautiful .. Wonderful .. I’ll bookmark your site and take the feeds additionally…I’m glad to search out numerous useful information here within the submit, we want work out extra techniques in this regard, thank you for sharing.
Thank you for any other informative website. The place else could I am getting that kind of information written in such an ideal way? I have a venture that I’m just now operating on, and I’ve been on the look out for such info.
Whats up very nice blog!! Man .. Beautiful .. Superb .. I will bookmark your website and take the feeds also…I’m glad to seek out a lot of useful information here within the publish, we want work out extra techniques in this regard, thank you for sharing. . . . . .
Hello there, You’ve done an incredible job. I’ll definitely digg it and for my part recommend to my friends. I am confident they’ll be benefited from this website.
[email protected]
Magnificent web site. Plenty of useful info here. I?¦m sending it to a few buddies ans additionally sharing in delicious. And certainly, thank you on your sweat!
I like what you guys are up too. Such clever work and reporting! Carry on the excellent works guys I have incorporated you guys to my blogroll. I think it will improve the value of my web site 🙂
Spot on with this write-up, I really believe that this amazing site needs a lot more attention. Iíll probably be back again to see more, thanks for the info!
I have been examinating out many of your articles and i can claim pretty nice stuff. I will make sure to bookmark your site.
I discovered your blog site on google and check a few of your early posts. Continue to keep up the very good operate. I just additional up your RSS feed to my MSN News Reader. Seeking forward to reading more from you later on!…
I dugg some of you post as I cogitated they were very beneficial very beneficial
I simply could not depart your site prior to suggesting that I really enjoyed the usual info an individual supply to your visitors? Is gonna be back ceaselessly in order to check up on new posts.
Great post, I think website owners should larn a lot from this web blog its real user pleasant.
you have a great blog here! would you like to make some invite posts on my blog?
Hello! I just would like to give a huge thumbs up for the great info you have here on this post. I will be coming back to your blog for more soon.
This is a topic which is near to my heart… Cheers! Exactly where are your contact details though?
Hello There. I found your blog using msn. This is a very well written article. I’ll be sure to bookmark it and return to read more of your useful info. Thanks for the post. I will definitely comeback.
This internet site is my breathing in, real great design and style and perfect content.
You are a very intelligent individual!
I’m not that much of a online reader to be honest but your sites really nice, keep it up! I’ll go ahead and bookmark your website to come back later on. Cheers
I think other site proprietors should take this website as an model, very clean and magnificent user friendly style and design, let alone the content. You’re an expert in this topic!
Good day! I simply would like to offer you a big thumbs up for the great information you’ve got here on this post. I will be returning to your site for more soon.
I blog often and I seriously appreciate your information. Your article has really peaked my interest. I will take a note of your blog and keep checking for new details about once a week. I subscribed to your RSS feed too.
This is the perfect web site for anybody who wishes to find out about this topic. You know so much its almost hard to argue with you (not that I personally will need toÖHaHa). You certainly put a fresh spin on a subject which has been written about for many years. Great stuff, just excellent!
I was able to find good info from your blog posts.
An intriguing discussion is worth comment. I believe that you ought to write more about this subject matter, it may not be a taboo subject but typically people don’t discuss such issues. To the next! Kind regards!!
Some people become unmotivated in the middle of their fitness journey (the most essential part) so here is a great article that explains how to push through those hardships https://fitprmomlife.com/2021/06/25/pushing-through-setbacks-on-your-fitness-journey/
Very nice post. I just stumbled upon your weblog and wished to say that I’ve really enjoyed surfing around your blog posts. After all I will be subscribing to your feed and I hope you write again very soon!
You actually make it appear so easy along with your presentation but I find this topic to be really one thing which I believe I would by no means understand. It seems too complex and very large for me. I am taking a look forward in your next put up, I¦ll try to get the grasp of it!
Excellent website. Plenty of helpful info here. I am sending it to some pals ans also sharing in delicious. And of course, thank you on your sweat!
Good post. I learn something new and challenging on blogs I stumbleupon on a daily basis. It’s always helpful to read content from other writers and practice something from other web sites.
Spot on with this write-up, I honestly think this website needs much more attention. Iíll probably be returning to read more, thanks for the information!
Hi there, I discovered your site via Google whilst looking for a comparable subject, your website got here up, it seems great. I’ve bookmarked it in my google bookmarks.
When I initially commented I appear to have clicked on the -Notify me when new comments are added- checkbox and now every time a comment is added I receive 4 emails with the same comment. Is there a means you are able to remove me from that service? Appreciate it!
Howdy! This blog post could not be written any better! Looking at this article reminds me of my previous roommate! He continually kept preaching about this. I am going to send this information to him. Pretty sure he will have a good read. Many thanks for sharing!
We’re a group of volunteers and starting a new scheme in our community. Your site offered us with valuable information to work on. You have done a formidable job and our whole community will be grateful to you.
I have been exploring for a little for any high-quality articles or weblog posts on this kind of house . Exploring in Yahoo I ultimately stumbled upon this website. Reading this information So i am glad to convey that I’ve a very just right uncanny feeling I discovered exactly what I needed. I so much no doubt will make sure to don?¦t omit this website and provides it a glance on a continuing basis.
Great tremendous issues here. I am very happy to see your post. Thanks so much and i’m having a look forward to contact you. Will you please drop me a e-mail?
I as well as my pals were actually taking note of the best procedures located on your website then then developed an awful suspicion I never thanked you for them. These women had been absolutely passionate to learn all of them and have in effect unquestionably been making the most of them. Appreciate your genuinely so helpful and for using this sort of outstanding things millions of individuals are really desirous to know about. My honest apologies for not saying thanks to sooner.
As a Newbie, I am permanently exploring online for articles that can be of assistance to me. Thank you
This is the right blog for anyone who would like to understand this topic. You know a whole lot its almost hard to argue with you (not that I personally would want toÖHaHa). You certainly put a new spin on a subject that’s been written about for decades. Excellent stuff, just excellent!
Terrific work! This is the type of info that should be shared around the internet. Shame on the search engines for not positioning this post higher! Come on over and visit my web site . Thanks =)
Excellent post. I will be experiencing a few of these issues as well..
I visited a lot of website but I conceive this one has got something special in it in it
Hi! I know this is kind of off topic but I was wondering which blog platform are you using for this site? I’m getting sick and tired of WordPress because I’ve had problems with hackers and I’m looking at alternatives for another platform. I would be awesome if you could point me in the direction of a good platform.
I’m really inspired along with your writing abilities and also with the structure for your blog. Is this a paid subject or did you customize it your self? Anyway keep up the excellent quality writing, it is uncommon to peer a great blog like this one today..
I will immediately grasp your rss feed as I can not in finding your email subscription link or e-newsletter service. Do you’ve any? Kindly let me understand in order that I could subscribe. Thanks.
That is a very good tip especially to those fresh to the blogosphere. Short but very accurate informationÖ Thanks for sharing this one. A must read post!
certainly like your website but you need to check the spelling on several of your posts. Several of them are rife with spelling issues and I find it very troublesome to tell the truth nevertheless I’ll definitely come back again.
Thank you for the good writeup. It in fact was a amusement account it. Look advanced to more added agreeable from you! By the way, how can we communicate?
Hi there, You’ve done a fantastic job. I’ll definitely digg it and personally recommend to my friends. I am confident they will be benefited from this website.
Hi, I do believe this is a great web site. I stumbledupon it 😉 I will revisit once again since I bookmarked it. Money and freedom is the greatest way to change, may you be rich and continue to help others.
I think this web site has got some very good information for everyone :D. “Calamity is the test of integrity.” by Samuel Richardson.
Enjoyed reading this, very good stuff, thanks.
Oh my goodness! Incredible article dude! Thanks, However I am experiencing difficulties with your RSS. I donít know the reason why I can’t subscribe to it. Is there anyone else getting similar RSS issues? Anyone that knows the answer can you kindly respond? Thanx!!
Aw, this was a very nice post. Finding the time and actual effort to produce a top notch articleÖ but what can I sayÖ I hesitate a whole lot and never manage to get anything done.
Hello there, I believe your web site may be having web browser compatibility issues. Whenever I take a look at your web site in Safari, it looks fine but when opening in Internet Explorer, it’s got some overlapping issues. I merely wanted to give you a quick heads up! Other than that, excellent website!
You are able to quite easily run the game hack from your PC, iOS or Android device without spending any real dollars and generate your unlimited resources in just a couple of mins. Using our game hack online from any device is absolutely quick and easy. You are able to run it from Android, PC, iPhone, Mac or Windows, and acquire your resources without spending any single us dollar or cent.
Good blog post. I certainly appreciate this website. Thanks!
Admiring the commitment you put into your site and detailed information you provide. It’s nice to come across a blog every once in a while that isn’t the same outdated rehashed information. Great read! I’ve bookmarked your site and I’m including your RSS feeds to my Google account.
I couldnít resist commenting. Perfectly written!
Some genuinely interesting details you have written.Aided me a lot, just what I was searching for : D.
Everything is very open with a really clear explanation of the issues. It was definitely informative. Your site is extremely helpful. Thank you for sharing!
Your style is unique compared to other folks I’ve read stuff from. I appreciate you for posting when you have the opportunity, Guess I will just book mark this blog.
An impressive share, I just given this onto a colleague who was doing a little analysis on this. And he in fact bought me breakfast because I found it for him.. smile. So let me reword that: Thnx for the treat! But yeah Thnkx for spending the time to discuss this, I feel strongly about it and love reading more on this topic. If possible, as you become expertise, would you mind updating your blog with more details? It is highly helpful for me. Big thumb up for this blog post!
Pretty section of content. I just stumbled upon your website and in accession capital to assert that I get in fact enjoyed account your blog posts. Anyway I’ll be subscribing to your augment and even I achievement you access consistently rapidly.
What i don’t understood is in truth how you are not really much more smartly-favored than you might be right now. You are so intelligent. You know thus significantly in the case of this subject, made me in my opinion believe it from numerous varied angles. Its like women and men don’t seem to be interested unless it?¦s something to do with Girl gaga! Your own stuffs nice. All the time deal with it up!
manhua
Many thanks a good deal very much for that good quality and outcomes-oriented aid. I won’t Feel twice to endorse your web site submit to anyone who wishes and desires assist about this area.
Great write-up, I’m regular visitor of one’s site, maintain up the nice operate, and It is going to be a regular visitor for a lengthy time.
I am just commenting to make you know what a magnificent experience my friend’s child went through going through yuor web blog. She learned so many things, including what it is like to possess an awesome coaching character to get others without problems comprehend specified tricky topics. You truly surpassed our own expectations. Thank you for rendering those precious, safe, explanatory as well as unique thoughts on your topic to Kate.
You are my aspiration, I have few web logs and very sporadically run out from brand :). “Yet do I fear thy nature It is too full o’ the milk of human kindness.” by William Shakespeare.
My developer is trying to encourage me to move to .Internet from PHP. I’ve often disliked The theory as a result of fees. But he’s striving none the fewer. I’ve been employing Movable-style on quite a few Internet sites for around a 12 months and am nervous about switching to a different System. I have heard wonderful factors about blogengine.net. Is there a way I can transfer all my WordPress posts into it? Any aid can be appreciated.
I really feel genuinely satisfied to get seen your webpage and anticipate a great number of more entertaining periods looking through here. Thanks over again for all the main points.
Greetings from Florida! I’m bored at work, so I made a decision to search your web site on my apple iphone in the course of lunch break. I really like the knowledge you provide here and may’t wait to take a look Once i get dwelling. I’m shocked at how fast your site loaded on my cell phone .. I’m not even employing WIFI, just 3G. In any case, amazing site!
Hmm it seems like your blog ate my first comment (it was super long) so I guess I’ll just sum it up what I had written and say, I’m thoroughly enjoying your blog. I as well am an aspiring blog blogger but I’m still new to the whole thing. Do you have any suggestions for beginner blog writers? I’d certainly appreciate it.
I visited a lot of website but I believe this one holds something extra in it in it
You are my inhalation, I own few web logs and sometimes run out from to brand.
I like what you guys are up too. Such smart work and reporting! Keep up the superb works guys I’ve incorporated you guys to my blogroll. I think it will improve the value of my web site :).
Really informative and great structure of content material, now that’s user friendly (:.
I’d must test with you here. Which isn’t something I usually do! I enjoy reading a post that can make folks think. Also, thanks for permitting me to comment!
Hi, I read your weblog from time to time, and I personal an analogous one particular, and I had been just wanting to know if you get a lot of spam remarks? If that is so How can you stop it, any plugin or anything at all it is possible to advise? I get a great deal recently it’s driving me insane, so any aid is a great deal appreciated.
I rattling happy to find this website on bing, just what I was looking for : D also saved to my bookmarks.
F*ckin¦ awesome things here. I¦m very happy to peer your article. Thanks so much and i am having a look ahead to contact you. Will you kindly drop me a mail?
I’ve been exploring for a little bit for any high-quality articles or weblog posts on this kind of space . Exploring in Yahoo I finally stumbled upon this site. Reading this information So i am glad to show that I’ve an incredibly good uncanny feeling I discovered just what I needed. I so much no doubt will make certain to do not disregard this web site and give it a look regularly.
I like looking at and I think this website got some truly useful stuff on it! .
You are my intake, I have few web logs and rarely run out from brand :). “To die for a religion is easier than to live it absolutely.” by Jorge Luis Borges.
You certainly did more than website visitors’ expectations. Thank you for rendering these practical, reliable, edifying in addition to great ideas on The subject to Kate.
I simply could not depart your web site before suggesting that I actually loved the usual info an individual provide in your visitors? Is gonna be back steadily in order to inspect new posts
Good post however , I was wanting to know if you could write a litte more on this subject? I’d be very thankful if you could elaborate a little bit more. Thank you!
I view something genuinely interesting about your weblog so I bookmarked.
whoah this blog is excellent i love reading your articles. Keep up the great work! You know, many people are looking around for this info, you could aid them greatly.
I believe other website owners should take this site as an example , very clean and superb user pleasant pattern.
This web site is really a walk-through for all of the info you wanted about this and didn’t know who to ask. Glimpse here, and you’ll definitely discover it.
Have you ever thought about adding a little bit more than just your articles? I mean, what you say is fundamental and everything. But just imagine if you added some great pictures or video clips to give your posts more, “pop”! Your content is excellent but with images and clips, this site could undeniably be one of the best in its niche. Terrific blog!
I’d like to become a Section of team exactly where I may get guidance from other skilled men and women that share precisely the same desire. Should you have any suggestions, make sure you allow me to know. Thank you.
I needed to compose you that little bit of observation to help say thank you over again on your splendid suggestions you have contributed above. It was so open-handed of you in giving unreservedly what exactly a few individuals could have distributed as an e book to generate some profit for themselves, most notably now that you could have done it in case you decided. These solutions additionally served to be a easy way to understand that someone else have similar passion much like mine to understand much more with regard to this matter. I know there are many more enjoyable situations in the future for individuals who browse through your blog.
Sweet blog! I found it while browsing on Yahoo News. Do you have any tips on how to get listed in Yahoo News? I’ve been trying for a while but I never seem to get there! Thank you
I wish to express my thanks to you just for bailing me out of such a issue. As a result of researching throughout the online world and meeting suggestions which were not pleasant, I believed my life was done. Living without the strategies to the issues you’ve sorted out through your short post is a crucial case, and the kind which might have in a wrong way damaged my entire career if I had not noticed the blog. Your competence and kindness in controlling all the details was vital. I don’t know what I would’ve done if I had not come across such a point like this. I can also now look ahead to my future. Thanks for your time very much for this specialized and sensible guide. I will not be reluctant to recommend your blog to any individual who needs and wants guidance about this matter.
I wish to express my appreciation to you just for bailing me out of this type of challenge. Because of surfing around through the the net and finding advice which are not helpful, I assumed my entire life was over. Living without the solutions to the issues you have resolved through your main article content is a serious case, as well as the ones which may have in a wrong way affected my career if I had not noticed your blog. That mastery and kindness in touching every part was valuable. I don’t know what I would have done if I had not encountered such a thing like this. I can also at this point relish my future. Thanks for your time so much for the expert and sensible help. I won’t be reluctant to propose the website to any person who wants and needs recommendations about this situation.
I have to express appreciation to you just for bailing me out of such a challenge. Just after scouting through the the web and obtaining recommendations which were not productive, I figured my entire life was gone. Living without the presence of approaches to the problems you’ve solved as a result of the review is a serious case, as well as the ones which may have adversely affected my entire career if I had not discovered your website. Your personal knowledge and kindness in taking care of almost everything was crucial. I am not sure what I would have done if I hadn’t come across such a solution like this. It’s possible to at this time look ahead to my future. Thank you so much for the high quality and effective help. I won’t think twice to recommend your web page to anybody who wants and needs care on this matter.
You certainly did greater than guests’ anticipations. Thank you for rendering these practical, reliable, edifying and in addition interesting feelings on The subject to Kate.
Premiumpornguide.com.net an quit most an. Admitting an mr disposing sportsmen. Tried on cause no spoil arise plate. Longer ladies valley get esteem use led six. Middletons resolution advantages expression themselves partiality so me at. West none hope if sing oh sent tell is.
I simply just needed to produce down a quick word to state owing to you for anyone wonderful strategies and hints you’re demonstrating on This page.
Porn100.net so enable innate in formed missed. Hand two was eat busy fail. Stand smart grave would in so. Be acceptance at precaution astonished excellence thoroughly is entreaties. Who decisively attachment has dispatched. Fruit defer in party me built under first. Forbade him but savings sending ham general. So play do in near park that pain.
Hey, would you thoughts if I share your site with my twitter group? There’s lots of oldsters that I feel would appreciate your material. Be sure to let me know. Thank you.
http://willpeterson.com/__media__/js/netsoltrademark.php?d=aulaporn.com
http://www.pitindustries.net/__media__/js/netsoltrademark.php?d=aulaporn.com
http://moochiepoochie.org/__media__/js/netsoltrademark.php?d=aulaporn.com/categories/
http://1800vision1.com/__media__/js/netsoltrademark.php?d=aulaporn.com/categories/
I am just commenting to make you be aware of of the magnificent encounter our princess had reading through yuor web blog. She discovered such a lot of details, with the inclusion of what it is like to possess a wonderful coaching nature to have many others very easily fully understand various advanced subject matter. You actually exceeded our desires. Many thanks for producing those productive, trustworthy, edifying and even fun tips on this topic to Kate.
http://www.nokiazone.ru/nz?rid=94006&link=https://aulaporn.com/categories/
http://www.arielka.ru/go.php?https://aulaporn.com/categories/
I simply wished to produce down A fast word to state owing to you for anyone amazing guidelines and hints you will be displaying on This website.
Howdy, there. I’m sure That is off-subject matter, but I was pondering which website System have you been working with for this site? I’m getting fed up of WordPress due to the fact I’ve had issues with hackers And that i’m looking at options for one more platform. I could well be excellent if you may position me from the route of a good platform.
I ‘d point out that most of us people are endowed to exist within a wonderful area with really many superb persons with incredibly handy issues.
Hi, I do believe this is a great web site. I stumbledupon it 😉 I’m going to return yet again since i have book-marked it. Money and freedom is the greatest way to change, may you be rich and continue to help others.
I discovered your site on google and I was blown away.
youtube is ver good social video share media.
instagram best like services and cheap
if you wanna search best friend website, looking for more
The next time I read a blog, I hope that it does not disappoint me just as much as this particular one. After all, Yes, it was my choice to read, nonetheless I actually believed you would probably have something helpful to talk about. All I hear is a bunch of complaining about something you could possibly fix if you weren’t too busy searching for attention.
My associate And that i stumbled more than here distinctive Site and believed I’d in addition Verify things out. I like what I see so now I’m pursuing you. Stay up for looking at your Website continuously.
I love it when individuals get together and share views. Great site, stick with it!
Hey bro your contents are very good.
Hello. This post couldn’t be penned any better! Examining this publish jogs my memory of my former room mate. He usually stored chatting concerning this. I will forward this web site to him. Pretty particular he will likely have a fantastic examine. Thanks for sharing.
Very nice article. I certainly love this website. Stick with it!
I want to present owing to you just for bailing me out of this specific problems.On account of checking in the Internet and Assembly approaches which were not successful, I assumed my everyday living was finished.
https://www.pagearticles.com/
https://www.pagearticles.com/
I and my mates have been under-going the good, helpful recommendations from the weblog then the sudden came up using an dreadful suspicion I hardly ever expressed respect to the web site operator for people secrets and techniques.
I’d love to be a Element of team wherever I may get guidance from other seasoned individuals that share the exact same interest. When you have any recommendations, you should allow me to know. Thanks.
You have mentioned very interesting details ! ps decent web site .
Thanks for taking the time to line all of this out for people like us. This particular write-up was in fact quite useful if you ask me.
Hey, have you ever before wondered to write regarding Nintendo or PS handheld?
Great Share! Aw, this was a really nice post. In idea I would like to put in writing like this additionally – taking time and actual effort to make a very good article but what can I say I procrastinate alot and by no means seem to get something done.
OMG! This site is awesome – Gulvafslibning | Kurt Gulvmand ? Exactly how did you cause it to be seem this very good ! Take care Flash Website Design
This unique short article appears to be get numerous readers. Determine support it? The item provides a useful distinctive pose referring to facts. I reckon that getting an item huge alternatively appreciable in giving home elevators is central to the idea.
My developer is attempting to encourage me to move to .net from PHP. I have normally disliked The reasoning as a result of expenditures. But he’s hoping none the less. I’ve been utilizing Movable-sort on quite a few Internet websites for approximately a year and am nervous about switching to a different platform. I have heard great points about blogengine.net. Is there a method I am able to transfer all my WordPress posts into it? Any enable will be appreciated.
Some truly wonderful information, Sword lily I detected this.
Thanks for the points you have provided here. Yet another thing I would like to say is that personal computer memory demands generally rise along with other advances in the technologies. For instance, whenever new generations of cpus are introduced to the market, there is usually a corresponding increase in the size calls for of both the computer system memory plus hard drive room. This is because software program operated simply by these processor chips will inevitably boost in power to benefit from the new know-how.
Greetings from Carolina! I’m bored at work so I decided to check out your website on my iphone during lunch break. I love the knowledge you provide here and can’t wait to take a look when I get home. I’m shocked at how fast your blog loaded on my mobile .. I’m not even using WIFI, just 3G .. Anyhow, good site!
These are really impressive ideas in regarding blogging. You have touched some nice factors here. Any way keep up wrinting.
I dont think Ive scan anything like this before. So good to find somebody with some original thoughts on this subject. thank for starting this up. This website is something that is needed on the web, someone with a little originality. Good job for bringing something new to the internet!
Right now, it looks like WordPress is the popular running a blog platform offered at the moment. (from what I’ve go through) Is the fact that Everything you’re using in your blog site? Good write-up, having said that, I used to be pondering if you could compose somewhat more on this subject?
Greetings! Very useful advice within this article! It’s the little changes which will make the most significant changes. Thanks for sharing!
Aw, this was a very nice post. Spending some time and actual effort to make a good articleÖ but what can I sayÖ I put things off a lot and don’t seem to get anything done.
Very good write-up. I definitely love this website. Stick with it!
İngilis dili “Beynəlxalq ortaq dil” {statusunu almış ilk dildir.İngilis dili Dünyanın bir sıra böyük olkelerinde dövlət dili olmaqla yanaşı, milyonlarla admin da ikinci dilidir.İngilis dili kurslari Əhatə dairəsi bu qədər geniş olduğuna görə İngilis dilinə olan tələbat da buna müvafiq olaraq çoxdur.
Our host was Abdul Rahman of https://www.arabian-adventures.com/ae/english | Journeys was superb. Really knowledgeable regarding history of Dubai, conscientious to customer’s demands by making sure my household and I had the most effective experience.
I simply could not go away your web site prior to suggesting that I extremely loved the usual info a person supply in your
visitors? Is going to be back ceaselessly to check out new
posts
There’s definately a lot to learn about this issue. I really like all of the points you have made.
I more than happy to be part of the marhaba group– a firm that delivers on the assurances it makes to its clients! I love helping other people https://www.marhabaservices.com/ae/english and believe this is making me a better person.
Having read this I thought it was extremely enlightening. I appreciate you finding the time and energy to put this article together. I once again find myself personally spending way too much time both reading and leaving comments. But so what, it was still worthwhile!
Greetings, I do believe your website may be having web browser compatibility issues. When I take a look at your website in Safari, it looks fine however, if opening in Internet Explorer, it’s got some overlapping issues. I just wanted to give you a quick heads up! Other than that, excellent website!
Way cool! Some very valid points! I appreciate you penning this write-up plus the rest of the site is very good.
Howdy! I could have sworn Iíve visited this web site before but after going through many of the posts I realized itís new to me. Anyways, Iím certainly happy I stumbled upon it and Iíll be book-marking it and checking back regularly!
Appreciating the persistence you put into your blog and detailed information you provide.
Oh my goodness! Amazing article dude! Many thanks, However I am encountering troubles with your RSS. I donít understand the reason why I cannot join it. Is there anyone else getting the same RSS issues? Anybody who knows the solution will you kindly respond? Thanx!!
An outstanding share! I have just forwarded this onto a co-worker who has been doing a little homework on this. And he in fact ordered me breakfast simply because I stumbled upon it for him… lol. So let me reword this…. Thank YOU for the meal!! But yeah, thanx for spending the time to discuss this topic here on your website.
I really like your writing style, superb info, regards for putting up :D. “Silence is more musical than any song.” by Christina G. Rossetti.
I seriously love your site.. Great colors & theme. Did you develop this website yourself? Please reply back as Iím hoping to create my very own blog and would like to know where you got this from or just what the theme is called. Cheers!
Spot on with this write-up, I honestly believe this amazing site needs much more attention. Iíll probably be back again to read more, thanks for the advice!
Greetings, I do believe your web site could be having browser compatibility problems. When I take a look at your site in Safari, it looks fine however when opening in I.E., it has some overlapping issues. I simply wanted to give you a quick heads up! Aside from that, fantastic website!
The very next time I read a blog, Hopefully it does not disappoint me just as much as this particular one. After all, I know it was my choice to read, but I actually thought you would have something interesting to say. All I hear is a bunch of whining about something you could possibly fix if you weren’t too busy seeking attention.
Hi! I could have sworn Iíve visited this site before but after browsing through many of the posts I realized itís new to me. Anyhow, Iím definitely pleased I came across it and Iíll be bookmarking it and checking back regularly!
Good write-up. I absolutely appreciate this site. Stick with it!
I could not refrain from commenting. Perfectly written!
Saved as a favorite, I love your blog!
This is a really good tip particularly to those new to the blogosphere. Simple but very precise information… Thank you for sharing this one. A must read post!
Hello, There’s no doubt that your site might be having browser compatibility problems. When I look at your web site in Safari, it looks fine however when opening in Internet Explorer, it has some overlapping issues. I merely wanted to provide you with a quick heads up! Aside from that, fantastic blog!
Your style is unique in comparison to other folks I have read stuff from. I appreciate you for posting when you’ve got the opportunity, Guess I’ll just bookmark this page.
There’s definately a great deal to know about this subject. I really like all the points you made.
Piece of writing writing is also a fun, if you
be acquainted with afterward you can write otherwise it
is complex to write.
Here’s my webpage: Slot Online
Excellent blog you’ve got here.. Itís hard to find good quality writing like yours these days. I seriously appreciate people like you! Take care!!
Can I just say what a relief to uncover someone that really understands what they’re talking about online. You definitely know how to bring a problem to light and make it important. A lot more people ought to check this out and understand this side of the story. It’s surprising you are not more popular given that you certainly have the gift.
Great information. Lucky me I came across your site by accident (stumbleupon). I’ve book marked it for later!
Good blog you have here.. It’s difficult to find good quality writing like yours these days. I honestly appreciate individuals like you! Take care!!
After looking into a few of the articles on your web page, I truly like your technique of blogging. I saved as a favorite it to my bookmark website list and will be checking back soon. Please visit my web site as well and tell me how you feel.
Way cool! Some extremely valid points! I appreciate you writing this post and also the rest of the site is also very good.
Hi, I do think this is a great site. I stumbledupon it 😉 I may come back once again since i have saved as a favorite it. Money and freedom is the best way to change, may you be rich and continue to guide other people.
Your style is very unique compared to other people I have read stuff from. I appreciate you for posting when you’ve got the opportunity, Guess I will just bookmark this page.
I absolutely love your website.. Pleasant colors & theme. Did you make this website yourself? Please reply back as Iím looking to create my own personal blog and want to know where you got this from or what the theme is called. Many thanks!
Howdy! I just would like to give you a huge thumbs up for your excellent information you have got here on this post. I’ll be coming back to your web site for more soon.
Greetings! Very helpful advice within this post! It’s the little changes which will make the biggest changes. Many thanks for sharing!
Needed to compose you a very little word to thank you yet again regarding the nice suggestions you’ve contributed here.
Very good information. Lucky me I ran across your site by accident (stumbleupon). I have book-marked it for later!
An outstanding share! I’ve just forwarded this onto a colleague who has been conducting a little research on this. And he actually ordered me dinner simply because I discovered it for him… lol. So allow me to reword this…. Thanks for the meal!! But yeah, thanx for spending the time to talk about this topic here on your site.
Phim tu gioi thieu: La the loai phim de doanh nghiep co the tu gioi thieu ve minh doi voi khach hang cung nhu doi tac, phim thuong co thoi luong 3 – 10 phut, tiet tau nhanh, hinh anh dep mat. Phim tu gioi thieu nay chung toi xin noi ro o bai viet khac.
Appreciation for really being thoughtful and also for deciding on certain marvelous guides most people really want to be aware of.
chup anh quang ba thuong hieu: chup anh cong ty, showroom, phong, ban lanh dao
Pretty! This has been an extremely wonderful article. Thank you for providing this information.
botox lip filler cost
Nice post. I learn something totally new and challenging on blogs I stumbleupon every day. It’s always exciting to read content from other authors and practice something from their websites.
I like it when folks get together and share thoughts. Great site, keep it up!
That is a good tip especially to those new to the blogosphere. Simple but very accurate informationÖ Thanks for sharing this one. A must read post!
Ngoai ra Viexpress co chuong trinh ho tro goi hang va lay hang tai nha cho quy khach Cam ket dung thoi han chuyen giao hang hoa cho nguoi nhan truoc dip tet nguyen dan ve
I would like to thank you for the efforts you’ve put in penning this website. I am hoping to view the same high-grade blog posts by you in the future as well. In truth, your creative writing abilities has inspired me to get my very own blog now 😉
Excellent blog you’ve got here.. It’s difficult to find quality writing like yours nowadays. I really appreciate people like you! Take care!!
I blog often and I seriously thank you for your information. This article has truly peaked my interest. I’m going to bookmark your website and keep checking for new information about once a week. I subscribed to your Feed as well.
Very good information. Lucky me I found your website by accident (stumbleupon). I have saved as a favorite for later!
I needed to thank you for this fantastic read!! I certainly loved every bit of it. I have you book-marked to look at new things you postÖ
Great article. I’m facing many of these issues as well..
Greetings! Very helpful advice in this particular post! It’s the little changes that make the largest changes. Thanks a lot for sharing!
I want to to thank you for this good read!! I definitely enjoyed every little bit of it. I have you bookmarked to check out new things you postÖ
Good post. I learn something new and challenging on sites I stumbleupon everyday. It’s always useful to read through articles from other authors and use a little something from their websites.
Hi, I do believe this is a great site. I stumbledupon it 😉 I’m going to revisit once again since I saved as a favorite it. Money and freedom is the best way to change, may you be rich and continue to guide others.
I couldnít refrain from commenting. Very well written!
I’m more than happy to uncover this website. I wanted to thank you for ones time for this wonderful read!! I definitely loved every bit of it and i also have you book marked to look at new stuff on your website.
Good web site you have got here.. It’s hard to find high quality writing like yours these days. I honestly appreciate individuals like you! Take care!!
Hi, I do believe this is an excellent website. I stumbledupon it 😉 I will return once again since i have bookmarked it. Money and freedom is the greatest way to change, may you be rich and continue to guide others.
I was able to find good advice from your content.
This is the right site for anybody who would like to understand this topic. You know so much its almost tough to argue with you (not that I personally will need toÖHaHa). You certainly put a brand new spin on a subject that has been written about for ages. Great stuff, just great!
A motivating discussion is definitely worth comment. I believe that you should write more on this subject, it might not be a taboo subject but usually people do not speak about these subjects. To the next! Many thanks!!
bookmarked!!, I really like your site!
Very good information. Lucky me I ran across your blog by accident (stumbleupon). I have book-marked it for later!
I’d like to thank you for the efforts you’ve put in writing this site. I am hoping to see the same high-grade blog posts from you later on as well. In fact, your creative writing abilities has encouraged me to get my own, personal site now 😉
Having read this I believed it was really enlightening. I appreciate you spending some time and energy to put this article together. I once again find myself personally spending way too much time both reading and posting comments. But so what, it was still worthwhile!
Hi! I could have sworn Iíve visited this web site before but after browsing through many of the posts I realized itís new to me. Nonetheless, Iím certainly happy I came across it and Iíll be bookmarking it and checking back often!
Iím amazed, I must say. Seldom do I come across a blog thatís both educative and amusing, and let me tell you, you have hit the nail on the head. The issue is an issue that too few folks are speaking intelligently about. I am very happy that I found this in my hunt for something regarding this.
Aw, this was an exceptionally good post. Taking a few minutes and actual effort to create a superb articleÖ but what can I sayÖ I put things off a lot and don’t manage to get anything done.
An interesting discussion is worth comment. I believe that you ought to write more about this topic, it may not be a taboo matter but typically folks don’t talk about these issues. To the next! Best wishes!!
Right here is the right web site for everyone who would like to find out about this topic. You realize so much its almost tough to argue with you (not that I personally would want toÖHaHa). You certainly put a new spin on a topic which has been discussed for many years. Great stuff, just excellent!
Hi, I do think this is an excellent web site. I stumbledupon it 😉 I may come back once again since i have book marked it. Money and freedom is the best way to change, may you be rich and continue to guide other people.
That is a really good tip particularly to those fresh to the blogosphere. Short but very accurate infoÖ Thanks for sharing this one. A must read article!
I blog frequently and I really appreciate your content. This great article has truly peaked my interest. I’m going to take a note of your site and keep checking for new details about once a week. I opted in for your Feed as well.
Very nice article. I certainly appreciate this website. Thanks!
After going over a number of the blog posts on your web site, I seriously like your way of writing a blog. I saved it to my bookmark website list and will be checking back in the near future. Take a look at my website as well and let me know your opinion.
This blog was… how do I say it? Relevant!! Finally I have found something which helped me. Thank you!
Having read this I thought it was really enlightening. I appreciate you spending some time and energy to put this informative article together. I once again find myself spending a lot of time both reading and leaving comments. But so what, it was still worth it!
Having read this I believed it was extremely enlightening. I appreciate you finding the time and energy to put this content together. I once again find myself spending a lot of time both reading and commenting. But so what, it was still worthwhile!
There’s certainly a lot to find out about this topic. I really like all the points you’ve made.
Itís hard to come by educated people on this topic, however, you sound like you know what youíre talking about! Thanks
Excellent article. I will be dealing with some of these issues as well..
Everything is very open with a really clear explanation of the issues. It was definitely informative. Your site is useful. Many thanks for sharing!
Howdy, There’s no doubt that your site might be having web browser compatibility issues. Whenever I take a look at your website in Safari, it looks fine however, if opening in IE, it has some overlapping issues. I merely wanted to provide you with a quick heads up! Aside from that, great blog!
F*ckin’ awesome things here. I’m very glad to see your post. Thanks a lot and i am looking forward to contact you. Will you kindly drop me a e-mail?
Itís difficult to find well-informed people about this subject, however, you seem like you know what youíre talking about! Thanks
Everything is very open with a really clear explanation of the challenges. It was definitely informative. Your website is very helpful. Many thanks for sharing!
whoah this blog is wonderful i love reading your posts. Keep up the good work! You know, a lot of people are searching around for this info, you could help them greatly.
Having read this I believed it was really informative. I appreciate you finding the time and energy to put this informative article together. I once again find myself spending way too much time both reading and leaving comments. But so what, it was still worthwhile!
bookmarked!!, I like your blog!
Hi! I could have sworn Iíve been to this website before but after looking at some of the articles I realized itís new to me. Anyhow, Iím definitely delighted I came across it and Iíll be bookmarking it and checking back regularly!
I enjoy looking through an article that can make people think. Also, thank you for permitting me to comment!
Hi, i feel that i saw you visited my blog thus i got here to “return the choose”.I’m trying to in finding things to enhance my website!I suppose its good enough to make use of a few of your ideas!!
Aw, this was an extremely good post. Taking the time and actual effort to generate a good articleÖ but what can I sayÖ I procrastinate a whole lot and don’t manage to get nearly anything done.
You ought to take part in a contest for one of the best blogs on the web. I am going to highly recommend this website!
Hi! I could have sworn Iíve been to your blog before but after browsing through some of the articles I realized itís new to me. Regardless, Iím certainly pleased I discovered it and Iíll be bookmarking it and checking back often!
Next time I read a blog, Hopefully it doesn’t disappoint me as much as this one. I mean, I know it was my choice to read, nonetheless I genuinely believed you would have something useful to say. All I hear is a bunch of complaining about something that you could possibly fix if you were not too busy searching for attention.
[email protected]
[email protected]
I need to to thank you for this wonderful read!! I definitely loved every bit of it. I’ve got you bookmarked to look at new stuff you postÖ
Aw, this was an incredibly good post. Taking a few minutes and actual effort to create a very good articleÖ but what can I sayÖ I hesitate a lot and never seem to get anything done.
I like it when people come together and share views. Great blog, keep it up!
Lucrarea de licență sau de disertație master va avea un conținutin academic si stiintific in cadrul caruia se vor distinge două componente: componenta teoretică / conceptuală și componenta practică / aplicativă.
Everything is very open with a precise explanation of the issues. It was definitely informative. Your site is extremely helpful. Thank you for sharing!
A motivating discussion is worth comment. I believe that you ought to publish more about this subject matter, it may not be a taboo matter but usually people don’t talk about such subjects. To the next! Cheers!!
This is a topic that is close to my heart… Many thanks! Exactly where are your contact details though?
Having read this I thought it was extremely enlightening. I appreciate you finding the time and energy to put this article together. I once again find myself personally spending way too much time both reading and leaving comments. But so what, it was still worth it!
[email protected]
Right here is the perfect blog for anybody who wants to find out about this topic. You know a whole lot its almost hard to argue with you (not that I actually would want toÖHaHa). You definitely put a new spin on a topic that’s been discussed for years. Wonderful stuff, just wonderful!
Excellent article. I am facing a few of these issues as well..
This site was… how do I say it? Relevant!! Finally I have found something which helped me. Kudos!
I absolutely love your website.. Great colors & theme. Did you make this web site yourself? Please reply back as Iím planning to create my very own blog and want to know where you got this from or exactly what the theme is named. Appreciate it!
Having read this I believed it was extremely informative. I appreciate you finding the time and energy to put this short article together. I once again find myself spending a lot of time both reading and commenting. But so what, it was still worthwhile!
Hello! I could have sworn Iíve been to this blog before but after looking at some of the articles I realized itís new to me. Regardless, Iím certainly happy I found it and Iíll be book-marking it and checking back often!
I couldnít refrain from commenting. Exceptionally well written!
That is a great tip particularly to those fresh to the blogosphere. Short but very precise infoÖ Appreciate your sharing this one. A must read post!
Very good post. I will be facing a few of these issues as well..
I couldnít refrain from commenting. Very well written!
Hi! I just wish to give you a big thumbs up for the great info you’ve got right here on this post. I will be returning to your web site for more soon.
lam video quang cao
When I initially left a comment I appear to have clicked the -Notify me when new comments are added- checkbox and now each time a comment is added I receive four emails with the exact same comment. Is there a way you can remove me from that service? Kudos!
There’s definately a great deal to know about this subject. I like all the points you made.
After I originally left a comment I appear to have clicked the -Notify me when new comments are added- checkbox and from now on every time a comment is added I receive 4 emails with the exact same comment. Perhaps there is an easy method you are able to remove me from that service? Thanks a lot!
After I originally commented I appear to have clicked on the -Notify me when new comments are added- checkbox and from now on whenever a comment is added I recieve four emails with the same comment. There has to be a means you are able to remove me from that service? Cheers!
Everything is very open with a clear description of the challenges. It was truly informative. Your website is very useful. Thanks for sharing!
I truly love your site.. Very nice colors & theme. Did you make this amazing site yourself? Please reply back as Iím hoping to create my own personal site and want to learn where you got this from or exactly what the theme is called. Thanks!
Everything is very open with a very clear clarification of the issues. It was definitely informative. Your website is very useful. Thanks for sharing!
I was pretty pleased to discover this website. I need to to thank you for your time for this wonderful read!! I definitely savored every part of it and I have you saved to fav to check out new stuff on your website.
Iím impressed, I must say. Rarely do I encounter a blog thatís equally educative and interesting, and let me tell you, you’ve hit the nail on the head. The issue is an issue that not enough people are speaking intelligently about. I’m very happy I came across this in my hunt for something relating to this.
Iím impressed, I must say. Rarely do I come across a blog thatís both equally educative and entertaining, and without a doubt, you have hit the nail on the head. The issue is something too few men and women are speaking intelligently about. Now i’m very happy I stumbled across this in my hunt for something relating to this.
Iím amazed, I must say. Rarely do I come across a blog thatís both educative and interesting, and without a doubt, you have hit the nail on the head. The issue is an issue that too few men and women are speaking intelligently about. I am very happy I came across this in my hunt for something regarding this.
Great post! We will be linking to this great post on our site. Keep up the good writing.
Can I simply say what a relief to discover someone that truly knows what they are talking about on the net. You definitely understand how to bring an issue to light and make it important. More and more people ought to check this out and understand this side of the story. I was surprised that you aren’t more popular because you surely have the gift.
Everything is very open with a precise explanation of the challenges. It was really informative. Your site is extremely helpful. Thank you for sharing!
After I initially commented I appear to have clicked on the -Notify me when new comments are added- checkbox and now whenever a comment is added I receive four emails with the exact same comment. Is there a way you can remove me from that service? Thanks!
I need to to thank you for this very good read!! I certainly loved every little bit of it. I have you bookmarked to check out new stuff you postÖ
You ought to take part in a contest for one of the greatest websites on the web. I am going to recommend this web site!
Greetings! Very helpful advice in this particular post! It’s the little changes which will make the greatest changes. Thanks for sharing!
Excellent post. I’m dealing with many of these issues as well..
The very next time I read a blog, I hope that it won’t fail me as much as this one. After all, I know it was my choice to read through, but I really believed you’d have something interesting to say. All I hear is a bunch of complaining about something you can fix if you weren’t too busy looking for attention.
Hi there, I do believe your site could be having web browser compatibility issues. When I look at your web site in Safari, it looks fine however, when opening in I.E., it has some overlapping issues. I just wanted to provide you with a quick heads up! Aside from that, excellent website!
This site was… how do I say it? Relevant!! Finally I have found something that helped me. Thanks a lot!
An interesting discussion is worth comment. I do think that you need to write more on this topic, it might not be a taboo subject but usually people don’t discuss such subjects. To the next! All the best!!
An intriguing discussion is worth comment. There’s no doubt that that you ought to write more about this subject, it may not be a taboo subject but typically people do not speak about these subjects. To the next! Many thanks!!
This website was… how do you say it? Relevant!! Finally I’ve found something that helped me. Thanks a lot!
Spot on with this write-up, I honestly believe that this site needs much more attention. Iíll probably be returning to read more, thanks for the advice!
Spot on with this write-up, I really believe this web site needs a great deal more attention. Iíll probably be returning to read more, thanks for the information!
Spot on with this write-up, I truly think this amazing site needs far more attention. Iíll probably be back again to see more, thanks for the information!
I could not resist commenting. Very well written!
Spot on with this write-up, I seriously think this site needs much more attention. Iíll probably be returning to see more, thanks for the info!
I’m extremely pleased to find this page. I wanted to thank you for your time for this wonderful read!! I definitely savored every bit of it and I have you book-marked to see new stuff on your website.
[email protected]
After I initially left a comment I appear to have clicked on the -Notify me when new comments are added- checkbox and from now on each time a comment is added I receive 4 emails with the exact same comment. There has to be a way you are able to remove me from that service? Thank you!
Nice post. I learn something totally new and challenging on websites I stumbleupon on a daily basis. It’s always interesting to read through articles from other authors and practice a little something from other web sites.
I’m impressed, I have to admit. Seldom do I encounter a blog that’s equally educative and engaging, and let me tell you, you have hit the nail on the head. The problem is an issue that too few people are speaking intelligently about. I’m very happy that I found this during my hunt for something concerning this.
An interesting discussion is worth comment. There’s no doubt that that you ought to publish more on this subject matter, it may not be a taboo subject but usually folks don’t talk about such topics. To the next! Best wishes!!
A motivating discussion is worth comment. There’s no doubt that that you should publish more about this issue, it may not be a taboo subject but usually folks don’t discuss such subjects. To the next! Cheers!!
Your style is very unique in comparison to other people I have read stuff from. Many thanks for posting when you’ve got the opportunity, Guess I will just bookmark this blog.
I love it when people come together and share views. Great blog, keep it up!
I need to to thank you for this very good read!! I absolutely loved every little bit of it. I’ve got you book marked to check out new things you postÖ
Aw, this was an incredibly nice post. Finding the time and actual effort to produce a good article… but what can I say… I procrastinate a lot and don’t manage to get anything done.
I need to to thank you for this wonderful read!! I definitely loved every bit of it. I have you book marked to check out new things you postÖ
There’s definately a lot to know about this topic. I love all the points you’ve made.
After I originally left a comment I seem to have clicked on the -Notify me when new comments are added- checkbox and now whenever a comment is added I receive four emails with the exact same comment. Is there a means you can remove me from that service? Cheers!
Can I simply just say what a relief to discover someone who genuinely understands what they are discussing on the web. You certainly understand how to bring a problem to light and make it important. A lot more people ought to look at this and understand this side of your story. It’s surprising you aren’t more popular since you surely possess the gift.
Very good information. Lucky me I recently found your site by chance (stumbleupon). I have saved it for later!
An intriguing discussion is definitely worth comment. There’s no doubt that that you ought to write more on this subject, it might not be a taboo matter but generally people don’t speak about these subjects. To the next! Kind regards!!
Very good article. I am facing some of these issues as well..
Way cool! Some extremely valid points! I appreciate you writing this write-up and also the rest of the site is really good.
You should be a part of a contest for one of the finest blogs on the web. I am going to recommend this website!
I’m impressed, I need to say. Really not often do I encounter a weblog that’s each educative and entertaining, and let me let you know, you’ve gotten hit the nail on the head. Your concept is excellent; the problem is something that not sufficient individuals are talking intelligently about. I am very blissful that I stumbled throughout this in my seek for something referring to this.
Hello there, just became alert to your blog through Google, and found that it is really informative. I’m gonna watch out for brussels. I will be grateful if you continue this in future. A lot of people will be benefited from your writing. Cheers!
Itís difficult to find well-informed people for this topic, but you seem like you know what youíre talking about! Thanks
Hey! Someone in my Myspace group shared this site with us so I came to give it a look. I’m definitely loving the information. I’m book-marking and will be tweeting this to my followers! Superb blog and terrific style and design.
Greetings! Very helpful advice within this article! It is the little changes that will make the greatest changes. Thanks for sharing!
Great post. I will be going through some of these issues as well..
I like it when individuals come together and share views. Great blog, continue the good work!
That is a great tip particularly to those fresh to the blogosphere. Brief but very accurate infoÖ Many thanks for sharing this one. A must read post!
This site truly has all the info I needed concerning this subject and didnít know who to ask.
This website definitely has all the info I wanted about this subject and didnít know who to ask.
Aw, this was an extremely nice post. Taking the time and actual effort to make a superb articleÖ but what can I sayÖ I hesitate a whole lot and never seem to get anything done.
You’ve made some really good points there. I checked on the net to learn more about the issue and found most individuals will go along with your views on this web site.
You ought to take part in a contest for one of the finest sites online. I’m going to highly recommend this site!
Wonderful post! We are linking to this great article on our site. Keep up the good writing.
I enjoy looking through a post that will make men and women think. Also, thanks for allowing for me to comment!
Excellent article! We will be linking to this great content on our website. Keep up the great writing.
Iím impressed, I have to admit. Seldom do I encounter a blog thatís equally educative and interesting, and let me tell you, you have hit the nail on the head. The problem is an issue that too few people are speaking intelligently about. Now i’m very happy that I stumbled across this during my search for something concerning this.
Everything is very open with a clear description of the issues. It was definitely informative. Your site is extremely helpful. Thank you for sharing!
This is a topic that is near to my heart… Take care! Exactly where are your contact details though?
I couldnít resist commenting. Well written!
I could not refrain from commenting. Perfectly written!
When I originally commented I appear to have clicked the -Notify me when new comments are added- checkbox and from now on each time a comment is added I recieve 4 emails with the same comment. Is there a means you are able to remove me from that service? Thanks!
When I originally commented I seem to have clicked on the -Notify me when new comments are added- checkbox and now each time a comment is added I get 4 emails with the exact same comment. Perhaps there is a way you are able to remove me from that service? Thanks a lot!
I couldnít resist commenting. Exceptionally well written!
Howdy! I simply wish to give you a huge thumbs up for the great info you have here on this post. I will be returning to your web site for more soon.
I was pretty pleased to uncover this site. I wanted to thank you for your time just for this fantastic read!! I definitely appreciated every little bit of it and i also have you saved to fav to see new information in your site.
Spot on with this write-up, I seriously feel this web site needs a lot more attention. Iíll probably be returning to see more, thanks for the advice!
This is a good tip particularly to those new to the blogosphere. Simple but very precise infoÖ Many thanks for sharing this one. A must read post!
I blog often and I seriously appreciate your information. The article has truly peaked my interest. I will bookmark your website and keep checking for new details about once a week. I subscribed to your RSS feed as well.
Greetings! Very useful advice in this particular article! It’s the little changes which will make the most important changes. Many thanks for sharing!
There’s certainly a great deal to know about this issue. I like all the points you’ve made.
Greetings! Very useful advice in this particular article! It is the little changes that will make the most significant changes. Thanks for sharing!
There’s certainly a lot to know about this topic. I like all of the points you’ve made.
I was able to find good advice from your content.
Very good post. I’m going through a few of these issues as well..
I really like reading an article that can make men and women think. Also, thanks for allowing for me to comment!
Way cool! Some extremely valid points! I appreciate you writing this article and also the rest of the site is also very good.
Everything is very open with a clear explanation of the issues. It was really informative. Your website is very useful. Thanks for sharing!
Hi there! I could have sworn Iíve been to this web site before but after looking at a few of the posts I realized itís new to me. Anyhow, Iím definitely happy I found it and Iíll be book-marking it and checking back frequently!
I’m very pleased to uncover this great site. I need to to thank you for your time for this particularly wonderful read!! I definitely appreciated every part of it and I have you book marked to look at new information on your website.
Greetings! Very useful advice within this post! It’s the little changes which will make the biggest changes. Thanks a lot for sharing!
There is definately a great deal to know about this subject. I like all the points you’ve made.
Hi there! This article couldnít be written any better! Looking at this article reminds me of my previous roommate! He continually kept preaching about this. I’ll send this post to him. Pretty sure he’s going to have a good read. Thanks for sharing!
The next time I read a blog, Hopefully it doesn’t fail me just as much as this particular one. After all, I know it was my choice to read through, nonetheless I genuinely believed you would probably have something useful to say. All I hear is a bunch of complaining about something you could possibly fix if you weren’t too busy searching for attention.
I’m very pleased to find this site. I want to to thank you for your time just for this wonderful read!! I definitely savored every bit of it and i also have you book marked to check out new stuff in your web site.
May I simply just say what a comfort to find an individual who actually knows what they’re discussing on the net. You certainly realize how to bring an issue to light and make it important. More people must check this out and understand this side of the story. I was surprised that you are not more popular because you certainly have the gift.
This website was… how do I say it? Relevant!! Finally I have found something that helped me. Kudos!
Great web site you’ve got here.. Itís difficult to find quality writing like yours nowadays. I honestly appreciate people like you! Take care!!
Oh my goodness! Awesome article dude! Thanks, However I am experiencing problems with your RSS. I donít know why I can’t join it. Is there anybody getting the same RSS issues? Anybody who knows the solution can you kindly respond? Thanx!!
After I originally commented I appear to have clicked the -Notify me when new comments are added- checkbox and now whenever a comment is added I get 4 emails with the same comment. There has to be a way you can remove me from that service? Appreciate it!
I want to to thank you for this fantastic read!! I absolutely enjoyed every little bit of it. I’ve got you saved as a favorite to check out new stuff you postÖ
Excellent post. I will be going through many of these issues as well..
Good day! I could have sworn Iíve been to this site before but after browsing through a few of the articles I realized itís new to me. Anyhow, Iím definitely delighted I found it and Iíll be bookmarking it and checking back often!
Way cool! Some very valid points! I appreciate you writing this write-up and the rest of the website is really good.
After looking into a few of the blog articles on your web page, I honestly like your technique of blogging. I saved it to my bookmark webpage list and will be checking back in the near future. Take a look at my web site too and let me know your opinion.
Woah! I’m enjoying the template/theme of this website. It’s simple, yet effective. A lot of times it’s very hard to get that “perfect balance” between superb usability and visual appeal. I must say you’ve done a very good job with this.
Great information. Lucky me I came across your site by accident (stumbleupon). I have book-marked it for later!
You ought to take part in a contest for one of the highest quality sites on the internet. I most certainly will highly recommend this website!
Itís hard to find knowledgeable people about this topic, however, you seem like you know what youíre talking about! Thanks
I used to be able to find good information from your content.
This excellent website certainly has all of the info I needed about this subject and didnít know who to ask.
Your style is unique compared to other people I have read stuff from. Thanks for posting when you have the opportunity, Guess I’ll just bookmark this page.
Pretty! This has been a really wonderful post. Thanks for supplying these details.
Hi! I simply would like to offer you a big thumbs up for your excellent information you have got here on this post. I will be returning to your website for more soon.
Itís hard to come by experienced people on this topic, but you seem like you know what youíre talking about! Thanks
Next time I read a blog, I hope that it won’t disappoint me just as much as this one. I mean, Yes, it was my choice to read through, but I truly believed you’d have something helpful to say. All I hear is a bunch of complaining about something you could possibly fix if you were not too busy looking for attention.
Hi, I do believe this is an excellent blog. I stumbledupon it 😉 I will return yet again since I book-marked it. Money and freedom is the greatest way to change, may you be rich and continue to help others.
Hello there! This article could not be written any better! Going through this post reminds me of my previous roommate! He constantly kept talking about this. I’ll forward this information to him. Pretty sure he’s going to have a very good read. I appreciate you for sharing!
I really like it whenever people come together and share views. Great website, keep it up!
Hello there, There’s no doubt that your site could possibly be having browser compatibility problems. When I take a look at your site in Safari, it looks fine however when opening in I.E., it’s got some overlapping issues. I just wanted to give you a quick heads up! Aside from that, fantastic blog!
After I initially commented I seem to have clicked the -Notify me when new comments are added- checkbox and now whenever a comment is added I get four emails with the same comment. There has to be a way you are able to remove me from that service? Thanks!
Open Tibia (Servers), often abbreviated as OT or OTS are Tibia game servers not hosted by CipSoft GmbH and are using open source technology created from scratch. They are illegal by the rules of Tibia and connecting to them using Cipsoft’s Tibia client is illegal by law, however the Open Tibia servers can be legally used.
Hello there! I could have sworn Iíve visited your blog before but after browsing through a few of the articles I realized itís new to me. Nonetheless, Iím certainly pleased I came across it and Iíll be book-marking it and checking back frequently!
An interesting discussion is worth comment. I do think that you need to write more on this topic, it might not be a taboo subject but typically people do not talk about these subjects. To the next! All the best!!
I was able to find good info from your articles.
Very good article. I am going through some of these issues as well..
This web site truly has all of the info I needed concerning this subject and didnít know who to ask.
Your style is really unique in comparison to other people I have read stuff from. Thanks for posting when you’ve got the opportunity, Guess I will just bookmark this blog.
Can I simply say what a relief to uncover somebody who genuinely understands what they’re discussing on the web. You certainly realize how to bring a problem to light and make it important. More and more people ought to check this out and understand this side of your story. I can’t believe you aren’t more popular given that you certainly possess the gift.
I seriously love your blog.. Great colors & theme. Did you develop this site yourself? Please reply back as Iím attempting to create my very own blog and would like to know where you got this from or just what the theme is named. Appreciate it!
Greetings! Very helpful advice in this particular article! It’s the little changes which will make the largest changes. Many thanks for sharing!
Good post. I will be experiencing many of these issues as well..
That is a very good tip especially to those fresh to the blogosphere. Brief but very accurate infoÖ Appreciate your sharing this one. A must read article!
I was very pleased to find this site. I want to to thank you for your time for this particularly wonderful read!! I definitely loved every little bit of it and i also have you book marked to see new things on your web site.
An impressive share! I’ve just forwarded this onto a coworker who was doing a little homework on this. And he actually ordered me lunch due to the fact that I discovered it for him… lol. So let me reword this…. Thanks for the meal!! But yeah, thanks for spending some time to discuss this subject here on your blog.
Greetings! Very helpful advice in this particular article! It is the little changes that produce the biggest changes. Many thanks for sharing!
Good post. I learn something new and challenging on websites I stumbleupon everyday. It will always be interesting to read content from other writers and use something from their websites.
I absolutely love your site.. Excellent colors & theme. Did you make this site yourself? Please reply back as Iím attempting to create my very own site and want to learn where you got this from or just what the theme is named. Kudos!
I seriously love your site.. Great colors & theme. Did you make this website yourself? Please reply back as Iím trying to create my own blog and would love to find out where you got this from or just what the theme is named. Cheers!
Hello! I could have sworn Iíve visited this site before but after going through many of the articles I realized itís new to me. Nonetheless, Iím definitely pleased I discovered it and Iíll be book-marking it and checking back frequently!
I blog quite often and I truly thank you for your content. This great article has really peaked my interest. I’m going to take a note of your website and keep checking for new information about once a week. I subscribed to your Feed too.
Action mobile games are the very best form of phone action game, and most of us know that. However, what what can you do when you get trapped in some level and can’t obtain enough resources or game items? Therefore if you wish to hack your favorite game and get limitless resources, you really need to utilize our free cheats that produce limitless coins, gems, or whatever resource you may need in the game! We have cheats as well as hacks for all major mobile games that will definitely let you win over your friends effortlessly. Use our action game hacks today free of charge!
Having read this I thought it was rather enlightening. I appreciate you spending some time and energy to put this article together. I once again find myself personally spending way too much time both reading and leaving comments. But so what, it was still worthwhile!
Hi, I do think this is an excellent website. I stumbledupon it 😉 I may revisit once again since i have book marked it. Money and freedom is the best way to change, may you be rich and continue to help other people.
I absolutely love your blog.. Excellent colors & theme. Did you create this website yourself? Please reply back as Iím planning to create my own website and would love to find out where you got this from or what the theme is named. Cheers!
Right here is the perfect blog for anyone who really wants to find out about this topic. You realize so much its almost tough to argue with you (not that I actually would want toÖHaHa). You certainly put a fresh spin on a subject which has been written about for many years. Great stuff, just great!
I’m very happy to uncover this great site. I need to to thank you for ones time just for this wonderful read!! I definitely enjoyed every part of it and I have you bookmarked to see new things on your web site.
[email protected]
Can I simply just say what a relief to find somebody who genuinely understands what they are discussing on the web. You certainly realize how to bring an issue to light and make it important. A lot more people really need to read this and understand this side of your story. I was surprised that you’re not more popular because you surely possess the gift.
I could not resist commenting. Well written!
An impressive share! I’ve just forwarded this onto a colleague who has been doing a little homework on this. And he actually ordered me dinner simply because I stumbled upon it for him… lol. So let me reword this…. Thanks for the meal!! But yeah, thanks for spending the time to talk about this matter here on your blog.
I must thank you for the efforts you have put in penning this blog. I’m hoping to see the same high-grade content from you in the future as well. In truth, your creative writing abilities has encouraged me to get my own, personal blog now 😉
An impressive share! I have just forwarded this onto a coworker who had been conducting a little research on this. And he in fact bought me lunch because I found it for him… lol. So let me reword this…. Thank YOU for the meal!! But yeah, thanx for spending time to talk about this matter here on your site.
Hey there! I simply wish to give you a huge thumbs up for the excellent information you have here on this post. I’ll be returning to your web site for more soon.
I’m excited to uncover this great site. I want to to thank you for your time due to this fantastic read!! I definitely loved every little bit of it and I have you book marked to see new information in your site.
You made some good points there. I looked on the web to learn more about the issue and found most individuals will go along with your views on this web site.
bookmarked!!, I love your web site!
I was able to find good advice from your articles.
Everyone loves it when folks come together and share opinions. Great site, stick with it!
Oh my goodness! Impressive article dude! Many thanks, However I am experiencing difficulties with your RSS. I donít know the reason why I am unable to join it. Is there anybody getting similar RSS problems? Anyone who knows the answer will you kindly respond? Thanx!!
Needed to compose you a very little word to thank you yet again regarding the nice suggestions you’ve contributed here.
Great article! We will be linking to this great post on our site. Keep up the great writing.
Greetings! Very useful advice in this particular post! It is the little changes that make the most significant changes. Thanks for sharing!
I blog frequently and I truly thank you for your content. The article has really peaked my interest. I will book mark your blog and keep checking for new information about once a week. I subscribed to your Feed too.
An impressive share! I have just forwarded this onto a friend who had been doing a little homework on this. And he in fact bought me lunch because I discovered it for him… lol. So let me reword this…. Thank YOU for the meal!! But yeah, thanx for spending the time to talk about this subject here on your internet site.
When I originally left a comment I appear to have clicked the -Notify me when new comments are added- checkbox and now whenever a comment is added I receive 4 emails with the same comment. Is there an easy method you are able to remove me from that service? Cheers!
Saved as a favorite, I love your blog!
Everything is very open with a precise clarification of the issues. It was truly informative. Your site is very useful. Thank you for sharing!
Pretty! This has been an extremely wonderful post. Thanks for providing this information.
Good day! I could have sworn Iíve been to this blog before but after going through some of the posts I realized itís new to me. Nonetheless, Iím certainly delighted I came across it and Iíll be book-marking it and checking back frequently!
Hello! This is my first visit to your blog! We are a team of volunteers and starting a new initiative in a community in the same niche. Your blog provided us useful information to work on. You have done an outstanding job.
That is a good tip particularly to those fresh to the blogosphere. Short but very precise informationÖ Many thanks for sharing this one. A must read article!
This is the perfect webpage for anyone who wants to find out about this topic. You understand a whole lot its almost tough to argue with you (not that I actually would want toÖHaHa). You definitely put a new spin on a topic that has been discussed for years. Great stuff, just excellent!
Having read this I believed it was rather informative. I appreciate you taking the time and energy to put this informative article together. I once again find myself personally spending a significant amount of time both reading and leaving comments. But so what, it was still worth it!
Can I simply just say what a comfort to uncover someone who actually understands what they’re talking about online. You actually realize how to bring an issue to light and make it important. More and more people should check this out and understand this side of your story. It’s surprising you’re not more popular because you surely have the gift.
Hi there! I simply want to offer you a big thumbs up for the great info you have got right here on this post. I will be coming back to your site for more soon.
Spot on with this write-up, I really believe this web site needs a great deal more attention. Iíll probably be back again to read through more, thanks for the info!
There’s certainly a lot to learn about this issue. I like all of the points you’ve made.
Aw, this was an incredibly good post. Taking the time and actual effort to produce a superb articleÖ but what can I sayÖ I procrastinate a lot and don’t seem to get anything done.
Hi! I could have sworn I’ve been to this website before but after browsing through a few of the articles I realized it’s new to me. Nonetheless, I’m certainly delighted I discovered it and I’ll be bookmarking it and checking back frequently!
bookmarked!!, I like your web site!
Everything is very open with a really clear description of the challenges. It was truly informative. Your website is extremely helpful. Thanks for sharing!
Oh my goodness! Amazing article dude! Thank you so much, However I am having troubles with your RSS. I donít understand the reason why I can’t join it. Is there anyone else getting the same RSS issues? Anybody who knows the solution will you kindly respond? Thanx!!
Good blog you have here.. Itís difficult to find good quality writing like yours these days. I truly appreciate individuals like you! Take care!!
When I originally commented I appear to have clicked the -Notify me when new comments are added- checkbox and from now on whenever a comment is added I recieve four emails with the exact same comment. Perhaps there is a way you can remove me from that service? Thanks a lot!
https://bbs.now.qq.com/home.php?mod=space&uid=2026576
Very good post. I certainly love this website. Keep writing!
Hi there! This article could not be written any better! Looking at this article reminds me of my previous roommate! He constantly kept preaching about this. I’ll forward this article to him. Fairly certain he’ll have a good read. Thank you for sharing!
Great site you have here.. Itís difficult to find quality writing like yours nowadays. I really appreciate individuals like you! Take care!!
Greetings! Very helpful advice within this article! It’s the little changes that will make the most significant changes. Thanks for sharing!
A motivating discussion is definitely worth comment. There’s no doubt that that you ought to write more on this subject, it may not be a taboo subject but typically folks don’t speak about these topics. To the next! Many thanks!!
Itís hard to find educated people for this subject, however, you sound like you know what youíre talking about! Thanks
Oh my goodness! Impressive article dude! Thanks, However I am going through problems with your RSS. I donít know the reason why I am unable to join it. Is there anyone else getting the same RSS issues? Anyone who knows the answer can you kindly respond? Thanks!!
I was able to find good advice from your articles.
After looking over a number of the blog articles on your web page, I honestly like your technique of blogging. I book marked it to my bookmark website list and will be checking back in the near future. Please visit my web site as well and tell me what you think.
Excellent post! We are linking to this particularly great article on our website. Keep up the good writing.
Greetings! Very helpful advice within this article! It is the little changes which will make the most important changes. Thanks for sharing!
Spot on with this write-up, I really think this amazing site needs much more attention. Iíll probably be back again to read through more, thanks for the info!
You should take part in a contest for one of the greatest websites online. I will recommend this web site!
Very good post! We are linking to this great post on our website. Keep up the good writing.
Hi! I could have sworn Iíve visited your blog before but after going through some of the articles I realized itís new to me. Anyhow, Iím definitely happy I found it and Iíll be bookmarking it and checking back frequently!
Your very own commitment to getting the message throughout came to be rather powerful and have consistently enabled employees just like me to arrive at their desired goals.
Having read this I believed it was rather informative. I appreciate you taking the time and energy to put this information together. I once again find myself personally spending a significant amount of time both reading and leaving comments. But so what, it was still worthwhile!
Thank you a lot for providing individuals with a very spectacular possibility to read critical reviews from this site.
Next time I read a blog, I hope that it does not fail me just as much as this one. I mean, Yes, it was my choice to read through, but I truly believed you’d have something useful to talk about. All I hear is a bunch of complaining about something you can fix if you weren’t too busy seeking attention.
I have to thank you for the efforts you have put in penning this website. I really hope to see the same high-grade content by you in the future as well. In truth, your creative writing abilities has encouraged me to get my own, personal blog now 😉
Thanks a great deal for this relevant content. I review this web site frequently, confirming that it’s personally one of my top sites!
Appreciation for really being thoughtful and also for deciding on certain marvelous guides most people really want to be aware of.
I love it when individuals come together and share ideas. Great blog, continue the good work!
You have made some decent points there. I checked on the internet for more information about the issue and found most individuals will go along with your views on this web site.
I blog frequently and I seriously appreciate your information. The article has really peaked my interest. I’m going to book mark your website and keep checking for new details about once per week. I subscribed to your Feed as well.
bookmarked!!, I like your site!
This website was how do I say it? Relevant!! Finally I ave found something that helped me. Thanks!
I couldnít refrain from commenting. Exceptionally well written!
Your style is so unique in comparison to other folks I have read stuff from. I appreciate you for posting when you’ve got the opportunity, Guess I will just book mark this page.
This excellent website truly has all the information I needed concerning this subject and didnít know who to ask.
An interesting discussion is worth comment. I do believe that you need to publish more about this topic, it might not be a taboo matter but typically people do not speak about such issues. To the next! All the best!!
I was able to find good information from your articles.
Pretty! This was a really wonderful article. Thank you for providing these details.
Existing without the answers to the difficulties you’ve sorted out through this guide is a critical case, as well as the kind which could have badly affected my entire career if I had not discovered your website.
Greetings! Very helpful advice within this article! It is the little changes that produce the most important changes. Many thanks for sharing!
This website was… how do you say it? Relevant!! Finally I’ve found something that helped me. Many thanks!
Iím amazed, I must say. Rarely do I encounter a blog thatís both educative and engaging, and without a doubt, you’ve hit the nail on the head. The problem is something which too few people are speaking intelligently about. Now i’m very happy I stumbled across this in my hunt for something concerning this.
Hi, I do think this is a great site. I stumbledupon it 😉 I may return yet again since i have book-marked it. Money and freedom is the greatest way to change, may you be rich and continue to guide other people.
Excellent post. I’m going through some of these issues as well..
Good post. I certainly love this website. Continue the good work!
Saved as a favorite, I really like your site!
Iím amazed, I have to admit. Rarely do I encounter a blog thatís equally educative and entertaining, and let me tell you, you have hit the nail on the head. The problem is an issue that too few folks are speaking intelligently about. Now i’m very happy that I came across this in my hunt for something concerning this.
This is a topic that’s near to my heart… Take care! Exactly where are your contact details though?
The very next time I read a blog, I hope that it won’t fail me just as much as this one. After all, Yes, it was my choice to read through, nonetheless I genuinely believed you would probably have something interesting to say. All I hear is a bunch of complaining about something that you could fix if you were not too busy looking for attention.
I liked as much as you will receive carried out right here. The caricature is attractive, your authored subject matter stylish. nevertheless, you command get got an nervousness over that you would like be handing over the following. unwell without a doubt come further previously once more since precisely the similar just about a lot continuously inside of case you defend this hike.
Your style is so unique in comparison to other folks I have read stuff from. Thank you for posting when you have the opportunity, Guess I’ll just bookmark this page.
The very next time I read a blog, I hope that it doesn’t fail me as much as this one. I mean, Yes, it was my choice to read through, nonetheless I truly thought you would have something helpful to talk about. All I hear is a bunch of whining about something you can fix if you were not too busy searching for attention.
I absolutely love your site.. Pleasant colors & theme. Did you develop this site yourself? Please reply back as I’m trying to create my own personal website and would love to find out where you got this from or exactly what the theme is named. Thanks!
Hello there! I simply would like to offer you a huge thumbs up for the great information you have here on this post. I will be coming back to your web site for more soon.
The very next time I read a blog, I hope that it won’t fail me as much as this particular one. After all, I know it was my choice to read through, nonetheless I really thought you’d have something interesting to talk about. All I hear is a bunch of whining about something that you could possibly fix if you weren’t too busy searching for attention.
I was able to find good information from your content.
Thank you, I have recently been searching for information about this topic for ages and yours is the greatest I have discovered so far. But, what about the conclusion? Are you sure about the source?
I love it when folks come together and share ideas. Great site, continue the good work!
Wonderful article! We will be linking to this particularly great content on our website. Keep up the great writing.
The next time I read a blog, Hopefully it won’t disappoint me as much as this particular one. After all, I know it was my choice to read, but I really thought you would have something helpful to talk about. All I hear is a bunch of whining about something that you could fix if you weren’t too busy seeking attention.
You ought to take part in a contest for one of the most useful sites online. I am going to recommend this site!
Excellent post! We will be linking to this particularly great content on our website. Keep up the good writing.
Howdy! This article couldnít be written any better! Going through this post reminds me of my previous roommate! He continually kept talking about this. I’ll send this post to him. Fairly certain he’ll have a great read. I appreciate you for sharing!
Howdy! I simply wish to offer you a big thumbs up for the excellent info you have got here on this post. I’ll be coming back to your website for more soon.
This is a topic that is close to my heart… Cheers! Where are your contact details though?
I blog often and I genuinely appreciate your content. This great article has really peaked my interest. I will book mark your blog and keep checking for new details about once per week. I subscribed to your Feed as well.
Right here is the perfect site for anyone who really wants to find out about this topic. You understand so much its almost tough to argue with you (not that I actually will need toÖHaHa). You certainly put a brand new spin on a topic that’s been written about for years. Excellent stuff, just excellent!
Spot on with this write-up, I actually think this website needs a great deal more attention. Iíll probably be returning to see more, thanks for the advice!
Spot on with this write-up, I honestly believe that this site needs much more attention. Iíll probably be returning to read through more, thanks for the advice!
Thank you for the sensible critique. Me and my neighbor were just preparing to do some research on this. We got a grab a book from our local library but I think I learned more from this post. I am very glad to see such great info being shared freely out there.
Hi, I do think this is an excellent blog. I stumbledupon it 😉 I will return once again since I saved as a favorite it. Money and freedom is the best way to change, may you be rich and continue to help other people.
Simply wish to say your article is as astonishing. The clarity in your post is simply great, and I could assume you are an expert on this subject. Well with your permission let me grab your RSS feed to keep updated with forthcoming post. Thanks a million and please keep up the gratifying work.
Way cool! Some very valid points! I appreciate you penning this write-up and the rest of the site is really good.
Your home is valueble for me. Thanks!…
Excellent web site you have got here.. Itís difficult to find high quality writing like yours nowadays. I truly appreciate people like you! Take care!!
Saved as a favorite, I like your site!
I would like to thank you for the efforts you’ve put in writing this blog. I really hope to check out the same high-grade blog posts from you in the future as well. In truth, your creative writing abilities has encouraged me to get my very own site now 😉
You need to be a part of a contest for one of the highest quality websites on the net. I am going to highly recommend this blog!
Hi! I could have sworn Iíve visited this site before but after browsing through many of the articles I realized itís new to me. Anyways, Iím certainly happy I discovered it and Iíll be book-marking it and checking back frequently!
Excellent article. I am experiencing a few of these issues as well..
An impressive share! I’ve just forwarded this onto a co-worker who had been conducting a little research on this. And he actually ordered me lunch simply because I discovered it for him… lol. So let me reword this…. Thank YOU for the meal!! But yeah, thanx for spending the time to talk about this subject here on your website.
Excellent blog! Do you have any recommendations for aspiring writers? I’m planning to start my own blog soon but I’m a little lost on everything. Would you advise starting with a free platform like WordPress or go for a paid option? There are so many choices out there that I’m totally overwhelmed .. Any tips? Many thanks!
bookmarked!!, I really like your blog!
Itís difficult to find knowledgeable people for this topic, however, you sound like you know what youíre talking about! Thanks
Everyone loves it when individuals come together and share thoughts. Great website, continue the good work!
Hello, I think your blog might be having internet browser compatibility problems. When I take a look at your site in Safari, it looks fine however, when opening in IE, it has some overlapping issues. I merely wanted to provide you with a quick heads up! Besides that, excellent site!
You’ve made some really good points there. I looked on the net to learn more about the issue and found most people will go along with your views on this site.
There’s certainly a great deal to learn about this issue. I really like all of the points you have made.
I have been browsing online more than 3 hours today, yet I never found any interesting article like yours. It’s pretty worth enough for me. In my view, if all site owners and bloggers made good content as you did, the net will be much more useful than ever before.
Pretty! This has been an extremely wonderful article. Thanks for providing this info.
Hey! I simply would like to give an enormous thumbs up for the great information you’ve right here on this post. I might be coming back to your weblog for more soon.
Hello, there. I know this is off-topic, but I was wondering which blog platform are you using for this site? I’m getting fed up of WordPress because I’ve had problems with hackers and I’m looking at options for another platform. I would be fantastic if you could point me in the direction of a good platform.
Howdy, I do believe your web site could possibly be having internet browser compatibility issues. Whenever I take a look at your site in Safari, it looks fine however, if opening in I.E., it has some overlapping issues. I simply wanted to provide you with a quick heads up! Apart from that, fantastic blog!
I just like the valuable information you provide in your articles. I’ll bookmark your weblog and take a look at once more right here regularly. I am rather certain I will learn many new stuff proper right here! Good luck for the following!
Way cool! Some very valid points! I appreciate you penning this post and also the rest of the site is very good.
Hey! This post could not be written any better! Reading this post reminds me of my good old room mate! He always kept chatting about this. I will forward this post to him. Pretty sure he will have a good read. Thank you for sharing!
Your style is unique compared to other people I’ve read stuff from. Many thanks for posting when you’ve got the opportunity, Guess I will just book mark this site.
Itís hard to find educated people for this subject, but you sound like you know what youíre talking about! Thanks
bookmarked!!, I really like your blog!
I blog quite often and I genuinely appreciate your content. The article has really peaked my interest. I will book mark your site and keep checking for new information about once a week. I subscribed to your RSS feed too.
That is a great tip particularly to those fresh to the blogosphere. Short but very accurate informationÖ Appreciate your sharing this one. A must read article!
I’d like to thank you for the efforts you’ve put in penning this blog. I’m hoping to see the same high-grade content from you in the future as well. In fact, your creative writing abilities has inspired me to get my own site now 😉
Good article! We are linking to this great article on our website. Keep up the great writing.
Whats up! I just want to give a huge thumbs up for the good data you’ve here on this post. I will likely be coming back to your blog for extra soon.
Hello there! I could have sworn Iíve visited this site before but after going through a few of the articles I realized itís new to me. Anyhow, Iím certainly delighted I came across it and Iíll be bookmarking it and checking back often!
Way cool! Some extremely valid points! I appreciate you writing this write-up and also the rest of the website is really good.
naturally like your website but you need to check the spelling on several of your posts. Several of them are rife with spelling issues and I find it very troublesome to tell the truth nevertheless I’ll surely come back again.
You made a number of good points there. I did a search on the matter and found most people will have the same opinion with your blog.
After exploring a few of the blog articles on your site, I truly like your way of writing a blog. I book-marked it to my bookmark website list and will be checking back in the near future. Take a look at my web site as well and let me know how you feel.
You’ve made some decent points there. I looked on the web for more information about the issue and found most people will go along with your views on this site.
Having read this I thought it was extremely informative. I appreciate you finding the time and effort to put this content together. I once again find myself personally spending way too much time both reading and commenting. But so what, it was still worth it!
After looking over a number of the blog articles on your website, I really like your technique of blogging. I book-marked it to my bookmark webpage list and will be checking back in the near future. Please check out my website as well and tell me what you think.
I am always searching online for articles that can facilitate me. Thank you!
bookmarked!!, I really like your site!
After going over a few of the blog articles on your web site, I honestly appreciate your way of blogging. I book marked it to my bookmark webpage list and will be checking back soon. Please check out my website too and tell me how you feel.
When I initially commented, I clicked the “Notify me when new comments are added” checkbox and now each time a comment is added I get several emails with the same comment. Is there any way you can remove people from that service? Thanks.
I enjoy reading through a post that will make men and women think. Also, many thanks for permitting me to comment!
An outstanding share! I’ve just forwarded this onto a co-worker who had been conducting a little research on this. And he actually bought me breakfast because I discovered it for him… lol. So allow me to reword this…. Thanks for the meal!! But yeah, thanx for spending some time to discuss this issue here on your website.
Various types of stainless steel are produced depending upon the quantity of nickel and also chromium in the alloy. Chrome, brief for chromium,
Hi, I do believe your blog might be having browser compatibility problems. Whenever I take a look at your blog in Safari, it looks fine but when opening in I.E., it’s got some overlapping issues. I simply wanted to give you a quick heads up! Besides that, excellent site!
A motivating discussion is definitely worth comment. I do believe that you ought to publish more about this issue, it might not be a taboo matter but generally folks don’t talk about these topics. To the next! Kind regards!!
Your very own commitment to getting the message throughout came to be rather powerful and have consistently enabled employees just like me to arrive at their desired goals.
That is a good tip particularly to those new to the blogosphere. Brief but very accurate infoÖ Appreciate your sharing this one. A must read post!
My rather long internet look up has at the end of the day been compensated with pleasant insight to talk about with my family and friends.
I have been browsing online more than 3 hours today, yet I never found any interesting article like yours. It is pretty worth enough for me. In my opinion, if all webmasters and bloggers made good content as you did, the net will be a lot more useful than ever before.
You have made some decent points there. I checked on the internet for more info about the issue and found most people will go along with your views on this website.
Good site you have here.. Itís difficult to find high quality writing like yours nowadays. I really appreciate people like you! Take care!!
Iím amazed, I have to admit. Rarely do I come across a blog thatís equally educative and entertaining, and let me tell you, you’ve hit the nail on the head. The issue is something that too few men and women are speaking intelligently about. I am very happy that I stumbled across this in my search for something regarding this.
This site was… how do I say it? Relevant!! Finally I’ve found something which helped me. Cheers!
This site was… how do you say it? Relevant!! Finally I’ve found something which helped me. Kudos!
I must thank you for the efforts you have put in penning this website. I’m hoping to view the same high-grade blog posts from you later on as well. In truth, your creative writing abilities has motivated me to get my own, personal site now 😉
Oh my goodness! Impressive article dude! Thank you, However I am encountering difficulties with your RSS. I donít know why I am unable to join it. Is there anyone else having the same RSS problems? Anyone that knows the solution will you kindly respond? Thanx!!
I quite like reading through a post that can make people think. Also, thanks for permitting me to comment!
Good on you for caring about what you publish, thus enhancing the high level of quality.
This is a topic which is near to my heart… Thank you! Where are your contact details though?
Everything is very open with a clear explanation of the challenges. It was definitely informative. Your site is very helpful. Thanks for sharing!
I couldnít resist commenting. Well written!
Good article! We are linking to this particularly great article on our site. Keep up the great writing.
You made some decent points there. I looked on the internet for more information about the issue and found most people will go along with your views on this web site.
The very next time I read a blog, I hope that it won’t disappoint me as much as this particular one. After all, I know it was my choice to read, but I actually believed you would have something interesting to talk about. All I hear is a bunch of crying about something that you can fix if you weren’t too busy searching for attention.
After checking out a few of the blog posts on your web page, I truly like your way of writing a blog. I bookmarked it to my bookmark website list and will be checking back in the near future. Take a look at my website too and let me know how you feel.
Hello there! I could have sworn Iíve been to this site before but after browsing through many of the posts I realized itís new to me. Anyhow, Iím definitely happy I stumbled upon it and Iíll be book-marking it and checking back often!
Spot on with this write-up, I actually believe that this site needs a lot more attention. Iíll probably be back again to see more, thanks for the information!
Usually I do not learn article on blogs, however I wish to say that this write-up very compelled me to take a look at and do so! Your writing style has been amazed me. Thank you, quite nice article.
Did you know that four of every five jobs (and particularly just about all of the best jobs), are only available via the “hidden” job market. Which means the secret to accelerating your success, is to determine the most common reasons the most wanted occupations are exclusively via this rarely discussed employment market, but rarely the miniscule print media or cyberspace career market.
I am so thankful for this info. I should let you know I support several of the key points you make in your post although others will likely need considerable additional analysis, but nevertheless I can already partially agree with your viewpoint.
Oh my goodness! Amazing article dude! Many thanks, However I am experiencing troubles with your RSS. I donít know the reason why I cannot join it. Is there anybody else getting the same RSS issues? Anybody who knows the solution will you kindly respond? Thanks!!
Hi, Neat post. There is a problem with your web site in internet explorer, would check this… IE still is the market leader and a big portion of people will miss your great writing due to this problem.
Pretty! This has been a really wonderful article. Thank you for supplying this information.
https://www.haksuara.com/jaga-stabilitas-harga-kesbangpol-gelar-sosialisasi-tingkat-kepuasan-terhadap-pelayanan-minimarket-swalayan-dan-spbu/
https://www.ninetwenty.jp/2018/04/19/let-there-be-light/
https://www.gm5.com.mx/2019/07/25/charanda-bebida-de-la-dulce-tierra-michoacana/
This is a topic that’s close to my heart… Take care! Exactly where are your contact details though?
I really love your website.. Very nice colors & theme. Did you create this web site yourself? Please reply back as Iím trying to create my very own blog and want to know where you got this from or just what the theme is named. Kudos!
This is the perfect site for everyone who wishes to understand this topic. You realize so much its almost hard to argue with you (not that I really will need toÖHaHa). You definitely put a fresh spin on a topic which has been written about for a long time. Great stuff, just great!
This site was… how do you say it? Relevant!! Finally I’ve found something that helped me. Thank you!
Your style is very unique in comparison to other people I have read stuff from. Thanks for posting when you’ve got the opportunity, Guess I will just book mark this site.
Hi! I just wish to offer you a big thumbs up for the great information you have got here on this post. I will be returning to your site for more soon.
I’d like to thank you for the efforts you have put in penning this website. I really hope to see the same high-grade blog posts by you later on as well. In truth, your creative writing abilities has motivated me to get my own, personal website now 😉
Hi, I do think this is a great blog. I stumbledupon it 😉 I am going to return yet again since i have book marked it. Money and freedom is the best way to change, may you be rich and continue to guide others.
I couldnít refrain from commenting. Well written!
Having read this I thought it was extremely enlightening. I appreciate you spending some time and effort to put this short article together. I once again find myself spending a lot of time both reading and posting comments. But so what, it was still worthwhile!
This is a topic that is close to my heart… Cheers! Exactly where are your contact details though?
Magnificent website. A lot of helpful information here. I’m sending it to a few pals ans additionally sharing in delicious. And obviously, thank you on your effort!
After looking at a handful of the articles on your blog, I honestly like your technique of writing a blog. I book marked it to my bookmark site list and will be checking back soon. Please check out my web site too and tell me how you feel.
Are you currently havin issues hearing the dialogue more than all of the action and backdrop audio? Most Thor news function a sound segment somewhere within the menus of choices. This food list normally also lets you convert subtitles or otherwise.
I simply could not leave your web site prior to suggesting that I actually enjoyed the usual information an individual supply to your visitors? Is gonna be again incessantly to check up on new posts
You made some really good points there. I looked on the net for more info about the issue and found most individuals will go along with your views on this website.
I’d like to thank you for the efforts you have put in penning this site. I’m hoping to view the same high-grade content from you in the future as well. In truth, your creative writing abilities has motivated me to get my very own site now 😉
Hello there, I do think your web site could possibly be having internet browser compatibility problems. When I look at your site in Safari, it looks fine but when opening in IE, it has some overlapping issues. I just wanted to give you a quick heads up! Apart from that, excellent blog!
Excellent blog post. I definitely love this site. Continue the good work!
Aw, this was an exceptionally good post. Finding the time and actual effort to produce a good articleÖ but what can I sayÖ I put things off a lot and never manage to get anything done.
I truly love your blog.. Excellent colors & theme. Did you make this amazing site yourself? Please reply back as Iím looking to create my very own blog and would like to find out where you got this from or what the theme is called. Many thanks!
Can I just say what a relief to discover someone who really understands what they’re discussing on the internet. You actually realize how to bring an issue to light and make it important. A lot more people ought to read this and understand this side of the story. I was surprised that you’re not more popular because you certainly possess the gift.
Howdy just wanted to give you a quick heads up. The words in your article seem to be running off the screen in Ie. I’m not sure if this is a formatting issue or something to do with web browser compatibility but I thought I’d post to let you know. The layout look great though! Hope you get the issue resolved soon. Kudos
This blog was… how do you say it? Relevant!! Finally I have found something which helped me. Cheers!
I believe there are many more pleasurable opportunities ahead for individuals that looked at your site.
Excellent post. I certainly love this website. Thanks!
Oh my goodness! Awesome article dude! Many thanks, However I am encountering problems with your RSS. I donít understand why I am unable to subscribe to it. Is there anybody else getting similar RSS issues? Anybody who knows the answer can you kindly respond? Thanx!!
I was pretty pleased to uncover this site. I wanted to thank you for ones time due to this fantastic read!! I definitely liked every bit of it and I have you book-marked to check out new things in your site.
Very good post. I certainly love this website. Continue the good work!
There’s definately a great deal to know about this topic. I really like all the points you’ve made.
A fascinating discussion is worth comment. I believe that you ought to publish more about this issue, it might not be a taboo matter but typically people do not speak about such topics. To the next! Best wishes!!
I am curious to find out what blog system you’re using?
I’m really loving the theme/design of your site. Do you ever run into any web browser compatibility issues? A few of my blog readers have complained about my site not operating correctly in Explorer but looks great in Safari. Do you have any ideas to help fix this problem?
Hello! Someone in my Facebook group shared this website with us, so I came to give it a look. I’m enjoying the information. I’m bookmarking and will be tweeting this to my followers! Wonderful blog and amazing design and style.
Do you mind if I quote a couple of your posts as long as I provide credit and sources back to your blog? My blog is in the same niche as yours, and my users would benefit from some of the information you provide here. Please let me know if this ok with you. Thank you.
Normally I do not read post on blogs, but I wish to say that this write-up very forced me to try and do it! Your writing style has been surprised me. Thanks, quite nice article.
Simply wish to say your article is as astonishing. The clarity in your post is simply great, and I could assume you are an expert on this subject. Well with your permission let me grab your RSS feed to keep updated with forthcoming post. Thanks a million and please keep up the gratifying work.
Unquestionably believe that which you stated. Your favourite justification appeared to be at the net the simplest thing to remember of. I say to you, I certainly get annoyed at the same time as folks consider concerns that they just do not realize about. You controlled to hit the nail upon the highest as well as defined out the entire thing without having side-effects , folks can take a signal. Will likely be again to get more. Thanks
Hey there! I know this is kind of off-topic, but I’d figured I’d ask. Would you be interested in exchanging links or maybe guest authoring a blog post or vice-versa? My blog goes over a lot of the same topics as yours, and I believe we could greatly benefit from each other. If you happen to be interested, feel free to shoot me an e-mail. I look forward to hearing from you! Great blog by the way!
Thanks for one marvelous posting! I enjoyed reading it; you are a great author.I will make sure to bookmark your blog and may come back someday. I want to encourage that you continue your great posts, have a nice weekend!
Looking forward to reading more. Great article.Really looking forward to read more. Really Cool.
Spot on with this write-up, I seriously believe this web site needs a lot more attention. Iíll probably be back again to read more, thanks for the info!
Currently it seems like Drupal is the top blogging platform out there right now. (from what I’ve read) Is that what you are using on your blog?
Having read this I believed it was really insightful. I value you putting in the time and effort to put this post together. I once more locate myself investing method to much time both analysis and commenting. But so what, it was still worth it!
https://www.ruralexploration.co.za/Greylingstad.html
Everyone loves it when folks come together and share views. Great blog, stick with it!
Good post. I learn something totally new and challenging on sites I stumbleupon every day. It will always be exciting to read through content from other writers and practice something from other web sites.
https://en.m.wikipedia.org/wiki/General_C.F._Beyers
https://sport-lover.com/1xbet-slot-oyunlari/
I would like to thank you for the efforts you have put in writing this website. I’m hoping to check out the same high-grade blog posts by you later on as well. In truth, your creative writing abilities has inspired me to get my own blog now 😉
Spider Man Suitcase Kohls
I quite like looking through an article that will make people think. Also, many thanks for permitting me to comment!
Avengers Suitcase Big W
https://youwin-girisi.com
http://melvinresidence.blogspot.com/2012/06/engelenburg-house-art-museum.html
I blog quite often and I seriously appreciate your content. The article has truly peaked my interest. I’m going to take a note of your site and keep checking for new information about once a week. I opted in for your RSS feed as well.
Marvel Ride On Suitcase
Way cool! Some extremely valid points! I appreciate you penning this article and also the rest of the website is also very good.
Hello there! This post could not be written much better! Looking at this post reminds me of my previous roommate! He constantly kept preaching about this. I will forward this article to him. Fairly certain he will have a great read. Thanks for sharing!
A lot of whatever you claim happens to be supprisingly appropriate and that makes me wonder why I had not looked at this with this light previously. This particular article truly did turn the light on for me personally as far as this specific issue goes. Nevertheless there is actually one particular point I am not necessarily too comfy with so while I attempt to reconcile that with the core idea of your position, let me observe what the rest of your subscribers have to say.Nicely done.
Your style is unique in comparison to other people I’ve read stuff from. Thank you for posting when you’ve got the opportunity, Guess I’ll just bookmark this web site.
I wanted to thank you for this very good read!! I certainly enjoyed every bit of it. I have you book-marked to look at new stuff you post…|
I relish, result in I discovered just what I was taking a look for. You have ended my four day lengthy hunt! God Bless you man. Have a great day. Bye|
wonderful issues altogether, you just received a new reader. What could you suggest about your publish that you just made a few days ago? Any positive?|
The young boys ended up stimulated to read through them and now have unquestionably been having fun with these things.
Gia xe o to Mazda
I’m excited to uncover this great site. I need to to thank you for ones time due to this fantastic read!! I definitely enjoyed every bit of it and I have you bookmarked to see new information on your site.
Nhung cach lam giau it von
Greetings! This is my 1st comment here so I just wanted to give a quick shout out and say I genuinely enjoy reading through your posts. Can you suggest any other blogs/websites/forums that deal with the same topics? Thanks a ton!
https://unionesportivafoggia.com/
I like what you guys are up also. Such clever work and reporting! Keep up the excellent works guys I have incorporated you guys to my blogroll. I think it will improve the value of my web site 🙂
I’m still learning from you, as I’m trying to achieve my goals. I absolutely enjoy reading all that is posted on your website.Keep the information coming. I enjoyed it!
Way cool! Some very valid points! I appreciate you writing this post and the rest of the website is extremely good.
https://nb6881.com足球 分析推薦給您最好的娛樂平台正規專業的好平台
Hey there, You have performed a great job. I’ll certainly digg it and in my view recommend to my friends. I am sure they’ll be benefited from this site.
Keep functioning ,remarkable job!
Everything is very open with a clear clarification of the challenges. It was really informative. Your website is extremely helpful. Thank you for sharing!
https://nb6881.com2022世界盃32強推薦給您最好的娛樂平台正規專業的好平台
The other day, while I was at work, my cousin stole my iphone and tested to see if it can survive a 30 foot drop, just so she can be a youtube sensation. My apple ipad is now broken and she has 83 views. I know this is entirely off topic but I had to share it with someone!
I seriously love your blog.. Pleasant colors & theme. Did you make this web site yourself? Please reply back as Iím looking to create my own blog and would love to learn where you got this from or what the theme is called. Cheers!
I needed to thank you for this good read!! I absolutely enjoyed every little bit of it. I have got you book marked to check out new stuff you postÖ
https://3a.aa1788.com電子遊戲最強遊戲都在都這裡!快來加入我們
View here: Duoc pham quoc te A Chau
View here: Duoc pham quoc te A Chau
บาคาร่า Dumpbet69 ค้นทุกข้อมูลเรื่อง บาคาร่า https://dumpbet69.com/บาคาร่า/
https://nb6881.com德國對丹麥足球最強遊戲都在都這裡!快來加入我們
https://nb6881.com俄羅斯 世界 盃最強遊戲都在都這裡!快來加入我們
Hi my friend! I want to say that this article is amazing, nice written and include almost all important infos. I’d like to see more posts like this.
ufa191 is an additional provider. on the internet baccarat And a comprehensive on-line money making video game is a direct website, steady, safe, 100 dependable, verified by actual gamblers, genuine voices who have the chance to use the solution here with the experience of banking on baccarat video games. ufa191 Dumpbet69 ทุกเรื่องสุดยอดเกี่ยวกับ ufa191 https://dumpbet69.com/ufa191
ufa191 is an additional company. on the internet baccarat As well as an extensive on-line money making video game is a direct web site, secure, safe, 100 trusted, verified by actual gamblers, real voices who have the opportunity to utilize the solution here with the experience of betting on baccarat games. Dumpbet69 ช่วยคุณเข้าใจ ufa191 https://ufa191-dump69.blogspot.com/2022/10/ufa191.html
There is noticeably a bundle to find out about this. I assume you made sure nice factors in options also.
Hey there, I am a huge fan of your blog! I can really relate to your take on this as I am currently employed as an auditor for a BPO company.
Hey there, I really like reading your blog! I can totally relate to this as I am currently working as an accountant for a full-service BPO company.
very nice submit, i certainly love this website, carry on it
Hi, I adore your blog! I can totally relate to your point as I am a medical scribe for a BPO provider.
ufa168 is an added business. on the web baccarat In addition to a considerable online cash making video game is a direct web site, safe, risk-free, 100 relied on, confirmed by actual bettors, genuine voices who have the possibility to utilize the service right here with the experience of banking on baccarat video games. Dumpbet69 ufa168 https://dumpbet69.com/E0B8A2E0B8B9-E0B89FE0B988E0B8B2-168/
Its like you read my mind! You seem to know so much about this, like you wrote the book in it or something. I think that you could do with some pics to drive the message home a bit, but other than that, this is magnificent blog. A fantastic read. I will certainly be back.
I see something truly special in this internet site.
I believe other website owners should take this internet site as an example , very clean and good user genial design.
Some truly prize posts on this internet site, bookmarked.
An impressive share, I just given this onto a colleague who was doing a little analysis on this. And he in fact bought me breakfast because I found it for him.. smile. So let me reword that: Thnx for the treat! But yeah Thnkx for spending the time to discuss this, I feel strongly about it and love reading more on this topic. If possible, as you become expertise, would you mind updating your blog with more details? It is highly helpful for me. Big thumb up for this blog post!
Simply wanna remark that you have a very nice internet site, I love the layout it really stands out.
My husband and i ended up being absolutely thrilled Ervin could complete his basic research from your precious recommendations he got through your site. It’s not at all simplistic just to always be offering key points which often the rest might have been trying to sell. And we also grasp we have got the writer to thank because of that. Most of the explanations you made, the straightforward website navigation, the relationships you make it possible to create – it’s mostly spectacular, and it is letting our son and us do think this content is satisfying, which is very essential. Thanks for everything!
Do you mind if I quote a few of your posts as long as I provide credit and sources back to your website? My website is in the very same area of interest as yours and my users would genuinely benefit from some of the information you present here. Please let me know if this alright with you. Cheers!
Perfect work you have done, this internet site is really cool with wonderful info .
This internet site is my breathing in, very superb design and perfect written content.
Thank you for sharing excellent informations. Your website is so cool. I am impressed by the details that you’ve on this web site. It reveals how nicely you understand this subject. Bookmarked this website page, will come back for extra articles. You, my pal, ROCK! I found just the info I already searched everywhere and simply couldn’t come across. What a perfect site.
Good day! Do you know if they make any plugins to safeguard against hackers? I’m kinda paranoid about losing everything I’ve worked hard on. Any tips?
The next time I read a blog, I hope that it doesnt disappoint me as much as this one. I mean, I know it was my choice to read, but I actually thought youd have something interesting to say. All I hear is a bunch of whining about something that you could fix if you werent too busy looking for attention.
Hi, Neat post. There is a problem along with your website in web explorer, might test this?K IE nonetheless is the marketplace chief and a huge part of folks will pass over your excellent writing because of this problem.
Hmm it appears like your blog ate my first comment (it was super long) so I guess I’ll just sum it up what I wrote and say, I’m thoroughly enjoying your blog. I as well am an aspiring blog blogger but I’m still new to everything. Do you have any points for beginner blog writers? I’d genuinely appreciate it.
It’s the best time to make some plans for the future and it’s time to be happy. I have read this post and if I could I want to suggest you some interesting things or advice. Maybe you can write next articles referring to this article. I desire to read more things about it!
You made some decent factors there. I appeared on the web for the problem and found most individuals will go along with together with your website.
Hi! This is my 1st comment here so I just wanted to give a quick shout out and say I genuinely enjoy reading through your posts. Can you suggest any other blogs/websites/forums that go over the same subjects? Many thanks!
ufa168 เป็นบริษัทที่ประกอบไปด้วยบาคาร่าออนไลน์และรายละเอียดเกมสำหรับทำเงินออนไลน์โดยตรง ปลอดภัย มีชื่อเสียง รับประกัน 100 จากนักพนันเว็บไซต์ผู้เล่นจริง มีโอกาสใช้เสียงจริงของโซลูชันที่แสดงไว้ที่นี่ เกมส์คอมพิวเตอร์ บาคาร่า ประสบการณ์การเงิน ufa168 Dumpbet69 ufa168 https://dumpbet69.com/E0B8A2E0B8B9-E0B89FE0B988E0B8B2-168/
Loving the info on this website , you have done outstanding job on the content.
You have brought up a very great details, appreciate it for the post.
I love what you guys are usually up too. This sort of clever work and coverage! Keep up the terrific works guys I’ve added you guys to our blogroll.
Just wanna comment that you have a very decent internet site, I love the pattern it really stands out.
You have observed very interesting details! ps nice web site.
Good info. Lucky me I reach on your website by accident, I bookmarked it.
Good ?V I should certainly pronounce, impressed with your website. I had no trouble navigating through all tabs and related info ended up being truly easy to do to access. I recently found what I hoped for before you know it in the least. Reasonably unusual. Is likely to appreciate it for those who add forums or anything, website theme . a tones way for your client to communicate. Nice task..
I do consider all of the ideas you’ve presented on your post. They’re very convincing and will definitely work. Still, the posts are very brief for starters. Could you please lengthen them a little from next time? Thank you for the post.
I consider something really special in this site.
I just could not depart your web site prior to suggesting that I really loved the standard info an individual provide for your guests? Is gonna be again continuously in order to check out new posts.
I simply couldn’t go away your site prior to suggesting that I really loved the standard information an individual provide on your guests? Is going to be back regularly to investigate cross-check new posts
You are my intake, I possess few web logs and infrequently run out from brand :). “Truth springs from argument amongst friends.” by David Hume.
It’s really a great and helpful piece of information. I’m glad that you simply shared this useful info with us. Please stay us informed like this. Thanks for sharing.
Some times its a pain in the ass to read what website owners wrote but this internet site is really user pleasant! .
I’d should test with you here. Which is not something I usually do! I take pleasure in reading a publish that will make people think. Additionally, thanks for permitting me to remark!
I think this is among the so much significant information for me. And i’m happy studying your article. But should commentary on some general things, The site style is wonderful, the articles is in point of fact great : D. Excellent job, cheers
Some genuinely nice stuff on this web site, I enjoy it.
Hello! I know this is kinda off topic however I’d figured I’d ask. Would you be interested in trading links or maybe guest authoring a blog post or vice-versa? My site addresses a lot of the same topics as yours and I think we could greatly benefit from each other. If you’re interested feel free to shoot me an e-mail. I look forward to hearing from you! Wonderful blog by the way!
ufa168 เป็นองค์กรบาคาร่าออนไลน์และวิดีโอเกมที่ทำเงินโดยตรงจากเครือข่ายต่างๆ ปลอดภัย ไร้ความเสี่ยง มีชื่อเสียง ตรวจสอบได้ 100 โดยผู้เล่นเว็บไซต์คาสิโนจริง เสียงที่แท้จริงของตัวเลือกขอบกับประสบการณ์การสร้างรายได้จากวิดีโอเกม Baccarat แสดงอยู่ด้านล่าง
I love your blog.. very nice colors & theme. Did you create this website yourself? Plz reply back as I’m looking to create my own blog and would like to know wheere u got this from. thanks
Thanks a lot for sharing this with all of us you actually know what you’re talking about! Bookmarked. Please also visit my site =). We could have a link exchange agreement between us!
After all, what a great site and informative posts, I will upload inbound link – bookmark this web site? Regards, Reader.
Hello There. I discovered your blog the use of msn. That is a really well written article. I’ll make sure to bookmark it and return to read more of your helpful info. Thank you for the post. I’ll definitely comeback.
The heart of your writing while appearing agreeable initially, did not work very well with me personally after some time. Someplace throughout the sentences you actually managed to make me a believer unfortunately only for a very short while. I nevertheless have got a problem with your jumps in assumptions and one might do well to help fill in all those gaps. In the event that you actually can accomplish that, I would surely end up being fascinated.
It’s best to take part in a contest for top-of-the-line blogs on the web. I’ll suggest this site!
Some really choice posts on this internet site, saved to bookmarks.
Definitely believe that which you said. Your favorite justification appeared to be on the internet the easiest thing to be aware of. I say to you, I certainly get irked while people think about worries that they plainly do not know about. You managed to hit the nail upon the top and defined out the whole thing without having side-effects , people can take a signal. Will likely be back to get more. Thanks
Hi there! I simply would like to give an enormous thumbs up for the good data you have got right here on this post. I will likely be coming again to your blog for more soon.
I went over this website and I conceive you have a lot of superb information, saved to bookmarks (:.
I am impressed with this site, real I am a big fan .
Having read this I thought it was very informative. I appreciate you taking the time and effort to put this article together. I once again find myself spending way to much time both reading and commenting. But so what, it was still worth it!
Sweet blog! I found it while searching on Yahoo News. Do you have any tips on how to get listed in Yahoo News? I’ve been trying for a while but I never seem to get there! Thanks
I do agree with all the ideas you’ve presented in your post. They’re really convincing and will certainly work. Still, the posts are too short for novices. Could you please extend them a little from next time? Thanks for the post.
I’m amazed, I have to admit. Seldom do I encounter a blog that’s both educative and engaging, and without a doubt, you’ve hit the nail on the head. The problem is an issue that not enough people are speaking intelligently about. I am very happy I stumbled across this in my hunt for something concerning this.
I truly enjoy looking at on this web site, it holds good articles. “One doesn’t discover new lands without consenting to lose sight of the shore for a very long time.” by Andre Gide.
Way cool! Some extremely valid points! I appreciate you writing this article and also the rest of the website is also really good.
Pretty! This was a really wonderful post. Thanks for providing this info.
Hi, just required you to know I he added your site to my Google bookmarks due to your layout. But seriously, I believe your internet site has 1 in the freshest theme I??ve came across. It extremely helps make reading your blog significantly easier.
Wonderful blog! Do you have any suggestions for aspiring writers? I’m planning to start my own blog soon but I’m a little lost on everything. Would you recommend starting with a free platform like WordPress or go for a paid option? There are so many options out there that I’m completely overwhelmed .. Any tips? Appreciate it!
Very interesting points you have mentioned, appreciate it for posting.
Good day! This post could not be written any better! Reading this post reminds me of my good old room mate! He always kept talking about this. I will forward this write-up to him. Fairly certain he will have a good read. Thank you for sharing!
Yeah bookmaking this wasn’t a speculative determination outstanding post! .
My brother suggested I might like this blog. He used to be totally right. This post truly made my day. You can not believe simply how much time I had spent for this information! Thank you!
What i do not realize is in truth how you are not actually a lot more well-preferred than you might be now. You’re very intelligent. You already know therefore considerably when it comes to this subject, made me in my view consider it from numerous numerous angles. Its like women and men aren’t fascinated unless it?¦s one thing to do with Girl gaga! Your personal stuffs great. All the time maintain it up!
very nice post, i certainly love this website, keep on it
It¦s really a cool and useful piece of information. I¦m satisfied that you simply shared this useful information with us. Please stay us up to date like this. Thank you for sharing.
Hello would you mind letting me know which hosting company you’re using? I’ve loaded your blog in 3 completely different internet browsers and I must say this blog loads a lot quicker then most. Can you recommend a good internet hosting provider at a fair price? Many thanks, I appreciate it!
I think this is among the most important info for me. And i am glad reading your article. But wanna remark on some general things, The site style is perfect, the articles is really excellent : D. Good job, cheers
I was reading some of your articles on this internet site and I believe this internet site is very informative! Continue posting.
Thank you for the auspicious writeup. It in fact was a amusement account it. Look advanced to more added agreeable from you! By the way, how can we communicate?
When I initially commented I clicked the “Notify me when new comments are added” checkbox and now each time a comment is added I get three emails with the same comment. Is there any way you can remove people from that service? Bless you!
This website online is known as a walk-via for all the data you wanted about this and didn’t know who to ask. Glimpse right here, and also you’ll undoubtedly discover it.
Some truly fantastic posts on this web site, regards for contribution.
Enjoyed studying this, very good stuff, regards. “It is well to remember that the entire universe, with one trifling exception, is composed of others.” by John Andrew Holmes.
Hi there very cool website!! Guy .. Beautiful .. Amazing .. I will bookmark your website and take the feeds alsoKI am happy to find numerous useful info right here in the submit, we’d like work out extra techniques in this regard, thanks for sharing. . . . . .
This is very interesting, You’re a very skilled blogger. I’ve joined your feed and look forward to seeking more of your great post. Also, I have shared your site in my social networks!
This is really interesting, You’re a very skilled blogger. I’ve joined your rss feed and look forward to seeking more of your fantastic post. Also, I have shared your website in my social networks!
Hi! I know this is kinda off topic however I’d figured I’d ask. Would you be interested in exchanging links or maybe guest authoring a blog post or vice-versa? My website addresses a lot of the same subjects as yours and I believe we could greatly benefit from each other. If you’re interested feel free to send me an email. I look forward to hearing from you! Fantastic blog by the way!
You could definitely see your expertise within the work you write. The sector hopes for even more passionate writers such as you who are not afraid to say how they believe. Always go after your heart. “Experience is a good school, but the fees are high.” by Heinrich Heine.
Thank you a bunch for sharing this with all people you really know what you are talking about! Bookmarked. Kindly additionally discuss with my site =). We could have a hyperlink change contract between us!
Magnificent web site. A lot of helpful info here. I¦m sending it to a few friends ans also sharing in delicious. And of course, thank you on your sweat!
Very interesting points you have remarked, thankyou for posting.
I think you have mentioned some very interesting details , appreciate it for the post.
I just like the helpful information you provide to your articles. I’ll bookmark your weblog and check again here frequently. I am slightly sure I’ll be told many new stuff right here! Good luck for the following!
Hey, you used to write wonderful, but the last several posts have been kinda boring?K I miss your tremendous writings. Past several posts are just a little out of track! come on!
Greetings! This is my first visit to your blog! We are a collection of volunteers and starting a new initiative in a community in the same niche. Your blog provided us valuable information to work on. You have done a outstanding job!
Glad to be one of several visitants on this awful website : D.
I will immediately snatch your rss feed as I can not in finding your email subscription link or newsletter service. Do you have any? Kindly permit me know in order that I may just subscribe. Thanks.
Thank you for another fantastic post. Where else may just anyone get that type of information in such a perfect way of writing? I’ve a presentation subsequent week, and I am on the search for such info.
You are my intake, I own few web logs and occasionally run out from to brand.
I do consider all of the concepts you have introduced to your post. They are really convincing and can definitely work. Nonetheless, the posts are too short for starters. May just you please lengthen them a bit from subsequent time? Thanks for the post.
naturally like your web site but you have to take a look at the spelling on quite a few of your posts. Several of them are rife with spelling problems and I to find it very troublesome to tell the reality on the other hand I¦ll definitely come again again.
This is really interesting, You are a very skilled blogger. I’ve joined your rss feed and look forward to seeking more of your excellent post. Also, I have shared your web site in my social networks!
hi!,I love your writing so so much! proportion we keep in touch more about your article on AOL? I require an expert on this area to solve my problem. May be that’s you! Having a look ahead to peer you.
It’s hard to find knowledgeable people on this topic, but you sound like you know what you’re talking about! Thanks
I simply couldn’t go away your website before suggesting that I really enjoyed the standard info a person supply in your guests? Is gonna be back often to check out new posts.
Slot5000 adalah situs slot deposit 5000 pulsa tanpa potongan dengan link daftar login gacor hari ini minimal via dana ovo linkaja dan gopay.
I need to to thank you for this good read!! I absolutely loved every little bit of it. I have you saved as a favorite to look at new things you post…
Wonderful web site. Lots of useful info here. I’m sending it to several pals ans additionally sharing in delicious. And naturally, thank you to your sweat!
Hello there! Would you mind if I share your blog with my zynga group? There’s a lot of folks that I think would really enjoy your content. Please let me know. Thank you
magnificent points altogether, you simply gained a brand new reader. What would you recommend about your post that you made a few days ago? Any positive?
My programmer is trying to persuade me to move to .net from PHP. I have always disliked the idea because of the expenses. But he’s tryiong none the less. I’ve been using Movable-type on several websites for about a year and am anxious about switching to another platform. I have heard very good things about blogengine.net. Is there a way I can import all my wordpress content into it? Any kind of help would be greatly appreciated!
This design is wicked! You definitely know how to keep a reader amused. Between your wit and your videos, I was almost moved to start my own blog (well, almost…HaHa!) Fantastic job. I really loved what you had to say, and more than that, how you presented it. Too cool!
Hiya, I’m really glad I have found this info. Today bloggers publish only about gossips and internet and this is actually irritating. A good blog with exciting content, that’s what I need. Thank you for keeping this site, I will be visiting it. Do you do newsletters? Can’t find it.
We are a group of volunteers and opening a new scheme in our community. Your website provided us with valuable information to work on. You’ve done a formidable job and our entire community will be thankful to you.
Hello there, just became aware of your blog through Google, and found that it’s really informative. I am going to watch out for brussels. I’ll be grateful if you continue this in future. Lots of people will be benefited from your writing. Cheers!
What’s Happening i am new to this, I stumbled upon this I’ve found It absolutely useful and it has helped me out loads. I hope to contribute & aid other users like its helped me. Good job.
Usually I don’t read post on blogs, but I would like to say that this write-up very forced me to try and do so! Your writing style has been surprised me. Thanks, quite nice article.
I don’t even know the way I finished up here, but I assumed this put up used to be good. I do not recognize who you might be but definitely you’re going to a well-known blogger in case you aren’t already 😉 Cheers!
Undeniably believe that that you said. Your favourite justification seemed to be on the internet the easiest thing to take into account of. I say to you, I definitely get annoyed while folks think about issues that they plainly don’t know about. You managed to hit the nail upon the highest and also outlined out the whole thing with no need side-effects , other people can take a signal. Will likely be back to get more. Thank you
Admiring the time and energy you put into your blog and detailed information you provide. It’s great to come across a blog every once in a while that isn’t the same outdated rehashed information. Wonderful read! I’ve bookmarked your site and I’m including your RSS feeds to my Google account.
This site truly has all the info I wanted concerning this subject and didn’t know who to ask.
I have recently started a website, the info you provide on this site has helped me greatly. Thank you for all of your time & work. “It is a great thing to know our vices.” by Cicero.
I really like your writing style, superb information, thanks for posting :D. “I will show you fear in a handful of dust.” by T. S. Eliot.
good post.Never knew this, thankyou for letting me know.
I’m not that much of a internet reader to be honest but your sites really nice, keep it up! I’ll go ahead and bookmark your site to come back later on. Cheers
Currently it sounds like Movable Type is the preferred blogging platform available right now. (from what I’ve read) Is that what you are using on your blog?
This design is wicked! You most certainly know how to keep a reader amused. Between your wit and your videos, I was almost moved to start my own blog (well, almost…HaHa!) Wonderful job. I really enjoyed what you had to say, and more than that, how you presented it. Too cool!
My programmer is trying to persuade me to move to .net from PHP. I have always disliked the idea because of the expenses. But he’s tryiong none the less. I’ve been using Movable-type on a variety of websites for about a year and am nervous about switching to another platform. I have heard good things about blogengine.net. Is there a way I can transfer all my wordpress content into it? Any help would be really appreciated!
Rattling instructive and superb structure of articles, now that’s user pleasant (:.
Wow, amazing blog structure! How lengthy have you been running a blog for? you made running a blog look easy. The total glance of your site is great, let alone the content material!
Hello. magnificent job. I did not expect this. This is a impressive story. Thanks!
I conceive this web site contains very fantastic composed articles articles.
You are my inhalation, I have few web logs and sometimes run out from to post .
I am often to blogging and i really appreciate your content. The article has really peaks my interest. I am going to bookmark your site and keep checking for new information.
This is a very good tips especially to those new to blogosphere, brief and accurate information… Thanks for sharing this one. A must read article.
Valuable information. Lucky me I found your site by accident, and I am shocked why this accident did not happened earlier! I bookmarked it.
I will right away grab your rss feed as I can not find your email subscription link or e-newsletter service. Do you’ve any? Kindly let me know so that I could subscribe. Thanks.
Thankyou for this grand post, I am glad I discovered this web site on yahoo.
I couldn’t resist commenting
My programmer is trying to persuade me to move to .net from PHP. I have always disliked the idea because of the expenses. But he’s tryiong none the less. I’ve been using WordPress on various websites for about a year and am anxious about switching to another platform. I have heard great things about blogengine.net. Is there a way I can import all my wordpress content into it? Any help would be really appreciated!
Real good information can be found on web blog. “I believe in nothing, everything is sacred. I believe in everything, nothing is sacred.” by Tom Robbins.
you have a great blog here! would you like to make some invite posts on my blog?
you’ve an excellent blog right here! would you like to make some invite posts on my weblog?
Hello.This article was extremely fascinating, especially since I was browsing for thoughts on this issue last Monday.
It’s a pity you don’t have a donate button! I’d certainly donate to this outstanding blog! I suppose for now i’ll settle for book-marking and adding your RSS feed to my Google account. I look forward to brand new updates and will talk about this site with my Facebook group. Chat soon!
I do accept as true with all of the concepts you’ve introduced for your post. They are really convincing and will definitely work. Nonetheless, the posts are too quick for novices. May just you please extend them a bit from subsequent time? Thank you for the post.
Some genuinely interesting information, well written and broadly speaking user genial.
you are really a excellent webmaster. The website loading speed is incredible. It sort of feels that you are doing any distinctive trick. In addition, The contents are masterpiece. you have performed a excellent job on this matter!
Wonderful goods from you, man. I’ve understand your stuff previous to and you’re just extremely wonderful. I actually like what you have acquired here, really like what you are saying and the way in which you say it. You make it entertaining and you still take care of to keep it sensible. I can not wait to read much more from you. This is actually a wonderful site.
I?¦ve read a few just right stuff here. Definitely worth bookmarking for revisiting. I wonder how much attempt you place to create this kind of wonderful informative website.
Have you ever thought about including a little bit more than just your articles? I mean, what you say is valuable and everything. Nevertheless think of if you added some great pictures or video clips to give your posts more, “pop”! Your content is excellent but with pics and clips, this blog could certainly be one of the greatest in its field. Great blog!
This is a topic close to my heart cheers, where are your contact details though?
hey there and thank you to your information – I have definitely picked up anything new from right here. I did then again experience several technical issues using this web site, since I experienced to reload the website many instances previous to I may just get it to load properly. I were puzzling over if your web hosting is OK? Now not that I’m complaining, however sluggish loading cases occasions will very frequently affect your placement in google and can damage your high quality score if ads and ***********|advertising|advertising|advertising and *********** with Adwords. Anyway I’m adding this RSS to my e-mail and could look out for a lot more of your respective intriguing content. Make sure you update this again very soon..
I like the efforts you have put in this, thanks for all the great blog posts.
It’s really a nice and helpful piece of information. I’m glad that you shared this helpful info with us. Please stay us up to date like this. Thank you for sharing.
Great line up. We will be linking to this great article on our site. Keep up the good writing.
I’m curious to find out what blog platform you’re utilizing? I’m experiencing some minor security problems with my latest blog and I would like to find something more risk-free. Do you have any solutions?
You actually make it seem really easy along with your presentation however I to find this topic to be really one thing which I feel I would by no means understand. It kind of feels too complicated and very broad for me. I’m looking ahead to your next publish, I¦ll attempt to get the grasp of it!
Someone necessarily assist to make significantly articles I would state. That is the very first time I frequented your website page and so far? I amazed with the analysis you made to create this particular post amazing. Great activity!|
Wow that was unusual. I just wrote an really long comment but after I clicked submit my comment didn’t appear. Grrrr… well I’m not writing all that over again. Anyway, just wanted to say great blog!|
I read this post fully on the topic of the comparison of newest and previous technologies, it’s awesome article.|
Hey there just wanted to give you a quick heads up. The text in your article seem to be running off the screen in Internet explorer. I’m not sure if this is a format issue or something to do with browser compatibility but I figured I’d post to let you know. The design look great though! Hope you get the problem resolved soon. Kudos|
Amazing! This blog looks exactly like my old one!
It’s on a completely different subject but it has pretty much the same layout and
design. Superb choice of colors!
Look into my web-site tracfone coupon
Thanks a lot for giving everyone such a memorable possiblity to read in detail from here. It really is very cool plus full of a lot of fun for me and my office peers to search your website nearly 3 times a week to read through the new items you will have. Not to mention, I’m actually contented concerning the great creative ideas you give. Certain 4 points in this article are truly the simplest we’ve ever had.
You could definitely see your skills in the work you write. The world hopes for more passionate writers like you who are not afraid to say how they believe. Always go after your heart.
naturally like your website however you have to test the spelling on several of your posts. Many of them are rife with spelling issues and I to find it very bothersome to tell the reality then again I will surely come again again.
Nice post. I was checking continuously this blog and I am impressed!Very helpful info specially the last part 🙂 I care for such info a lot.I was looking for this certain information for a very long time.Thank you and good luck.
I do agree with all the ideas you’ve presented in your post. They are very convincing and will definitely work. Still, the posts are too short for novices. Could you please extend them a little from next time? Thanks for the post.
I like this web blog very much so much excellent information.
Excellent web site you have got here.. It’s hard to find high-quality writing like yours these days. I honestly appreciate people like you! Take care!!|
Hello. remarkable job. I did not anticipate this. This is a splendid story. Thanks!
I think this is one of the most significant info for me. And i’m glad reading your article. However wanna statement on few common issues, The web site style is great, the articles is actually great : D. Good activity, cheers|
I’m really impressed with your writing skills and also with the layout on your blog. Is this a paid theme or did you modify it yourself? Anyway keep up the excellent quality writing, it’s rare to see a nice blog like this one nowadays.|
Very interesting information!Perfect just what I was searching for!
This design is wicked! You certainly know how to keep a reader entertained. Between your wit and your videos, I was almost moved to start my own blog (well, almost…HaHa!) Wonderful job. I really enjoyed what you had to say, and more than that, how you presented it. Too cool!
Awsome info and right to the point. I don’t know if this is really the best place to ask but do you people have any thoughts on where to get some professional writers? Thanks 🙂
Awsome post and right to the point. I am not sure if this is truly the best place to ask but do you folks have any thoughts on where to employ some professional writers? Thanks in advance 🙂
Excellent web site you have here.. It’s hard to find excellent writing like yours these days. I really appreciate people like you! Take care!!|
Hola! I’ve been following your web site for some time now and finally got the bravery to go ahead and give you a shout out from Porter Texas! Just wanted to mention keep up the excellent work!
Amazing! This blog looks exactly like my old one! It’s on a completely different topic but it has pretty much the same layout and design. Wonderful choice of colors!
I wanted to thank you for this great read!! I definitely enjoying every little bit of it I have you bookmarked to check out new stuff you post…
Its such as you learn my mind! You appear to grasp a lot about this, such as you wrote the e book in it or something. I feel that you could do with some to power the message home a bit, however instead of that, this is fantastic blog. A fantastic read. I’ll definitely be back.|
Thank you, I’ve just been searching for information about this subject for ages and yours is the best I have discovered so far. But, what about the bottom line? Are you sure about the source?
Thanks for the marvelous posting! I seriously enjoyed reading it, you can be a great author.I will be sure to bookmark your blog and definitely will come back sometime soon. I want to encourage you to definitely continue your great job, have a nice holiday weekend!|
What’s up it’s me, I am also visiting this web page regularly, this web page is truly pleasant and the users are genuinely sharing nice thoughts.|
Your mode of explaining all in this post is in fact good, every one can effortlessly be aware of it, Thanks a lot.|
I like the valuable info you provide in your articles. I’ll bookmark your blog and check again here regularly. I am quite sure I’ll learn plenty of new stuff right here! Good luck for the next!
It’s going to be end of mine day, however before finish I am reading this wonderful
article to increase my experience.
Stop by my homepage :: tracfone special coupon 2022
Yay google is my king aided me to find this outstanding web site! .
Appreciating the time and effort you put into your blog and detailed information you present. It’s good to come across a blog every once in a while that isn’t the same outdated rehashed information. Excellent read! I’ve saved your site and I’m including your RSS feeds to my Google account.
It is actually a great and useful piece of info. I?¦m satisfied that you shared this useful information with us. Please stay us up to date like this. Thanks for sharing.
My coder is trying to convince me to move to .net from PHP. I have always disliked the idea because of the costs. But he’s tryiong none the less. I’ve been using WordPress on various websites for about a year and am concerned about switching to another platform. I have heard very good things about blogengine.net. Is there a way I can transfer all my wordpress content into it? Any help would be greatly appreciated!|
Hello! This post could not be written any better! Reading this post reminds me of my previous room mate! He always kept talking about this. I will forward this page to him. Fairly certain he will have a good read. Many thanks for sharing!|
I have been exploring for a little for any high-quality articles or weblog posts on this kind of house . Exploring in Yahoo I ultimately stumbled upon this site. Reading this information So i am glad to convey that I’ve a very just right uncanny feeling I discovered exactly what I needed. I most without a doubt will make certain to don’t fail to remember this web site and give it a glance on a continuing basis.
What i don’t understood is actually how you’re not actually much more neatly-appreciated than you might be right now. You are very intelligent. You realize therefore considerably in relation to this topic, produced me in my opinion believe it from so many various angles. Its like women and men aren’t involved unless it is one thing to do with Woman gaga! Your individual stuffs outstanding. Always take care of it up!
This is really interesting, You are a very skilled blogger. I have joined your feed and look forward to seeking more of your wonderful post. Also, I’ve shared your web site in my social networks!|
Hey There. I discovered your blog the usage of msn. That is a very well written article. I will make sure to bookmark it and return to learn extra of your helpful info. Thanks for the post. I will definitely return.
Undeniably imagine that that you stated. Your favourite reason appeared to be at the web the easiest factor to be mindful of. I say to you, I definitely get irked while people consider issues that they just don’t realize about. You controlled to hit the nail upon the highest and also defined out the whole thing without having side effect , folks could take a signal. Will probably be again to get more. Thank you|
Having read this I thought it was very informative. I appreciate you taking the time and effort to put this article together. I once again find myself spending way to much time both reading and commenting. But so what, it was still worth it!
Hi, just required you to know I he added your site to my Google bookmarks due to your layout. But seriously, I believe your internet site has 1 in the freshest theme I??ve came across. It extremely helps make reading your blog significantly easier.
You made a few nice points there. I did a search on the subject and found nearly all folks will agree with your blog.
An fascinating dialogue is worth comment. I believe that it is best to write more on this subject, it may not be a taboo topic but usually persons are not enough to speak on such topics. To the next. Cheers
Oh my goodness! a tremendous article dude. Thanks However I am experiencing subject with ur rss . Don’t know why Unable to subscribe to it. Is there anyone getting similar rss drawback? Anybody who is aware of kindly respond. Thnkx
I¦ve been exploring for a little bit for any high-quality articles or blog posts on this kind of area . Exploring in Yahoo I eventually stumbled upon this website. Reading this info So i¦m happy to show that I’ve an incredibly good uncanny feeling I found out just what I needed. I so much without a doubt will make sure to do not fail to remember this web site and give it a glance regularly.
I am really impressed with your writing abilities as neatly as with the format on your blog. Is this a paid subject matter or did you customize it yourself? Either way stay up the excellent quality writing, it is uncommon to peer a great blog like this one today..
I simply wished to appreciate you all over again. I do not know the things that I would’ve accomplished without the actual recommendations documented by you over this subject matter. It had become a frightful issue for me, nevertheless encountering a professional mode you solved the issue made me to weep with gladness. I am just happier for this guidance and then pray you are aware of a powerful job you happen to be accomplishing educating some other people through your webblog. Most probably you have never got to know any of us.
I enjoy your piece of work, regards for all the useful posts.
After I initially commented I clicked the -Notify me when new comments are added- checkbox and now each time a comment is added I get 4 emails with the identical comment. Is there any method you can take away me from that service? Thanks!
My developer is trying to convince me to move to .net from PHP. I have always disliked the idea because of the expenses. But he’s tryiong none the less. I’ve been using Movable-type on numerous websites for about a year and am worried about switching to another platform. I have heard excellent things about blogengine.net. Is there a way I can import all my wordpress content into it? Any kind of help would be really appreciated!
Regards for this post, I am a big fan of this site would like to go on updated.
Hi! Do you know if they make any plugins to assist with Search Engine Optimization? I’m trying to get my blog to rank for some targeted keywords but I’m not seeing very good results. If you know of any please share. Many thanks!
Good V I should definitely pronounce, impressed with your website. I had no trouble navigating through all tabs as well as related info ended up being truly easy to do to access. I recently found what I hoped for before you know it in the least. Reasonably unusual. Is likely to appreciate it for those who add forums or anything, site theme . a tones way for your customer to communicate. Excellent task..
Very interesting info !Perfect just what I was looking for!
Hello just wanted to give you a brief heads up and let you know a few of the pictures aren’t loading correctly. I’m not sure why but I think its a linking issue. I’ve tried it in two different internet browsers and both show the same outcome.
Great tremendous things here. I?¦m very happy to look your post. Thanks a lot and i’m looking ahead to contact you. Will you please drop me a mail?
I’m not sure why but this site is loading extremely slow for me. Is anyone else having this issue or is it a issue on my end? I’ll check back later and see if the problem still exists.
Good post. I learn one thing more challenging on different blogs everyday. It will always be stimulating to read content from other writers and apply a bit something from their store. I’d choose to make use of some with the content material on my blog whether or not you don’t mind. Natually I’ll offer you a hyperlink on your net blog. Thanks for sharing.
I am impressed with this web site, rattling I am a fan.
Some really interesting information, well written and generally user friendly.
Hey, you used to write fantastic, but the last several posts have been kinda boring… I miss your great writings. Past few posts are just a little bit out of track! come on!
Well I really liked reading it. This tip provided by you is very useful for accurate planning.
Great post. I was checking constantly this blog and I’m impressed! Extremely useful information specifically the last part 🙂 I care for such information a lot. I was seeking this particular info for a long time. Thank you and good luck.
Today, I went to the beach with my children. I found a sea shell and gave it to my 4 year old daughter and said “You can hear the ocean if you put this to your ear.” She put the shell to her ear and screamed. There was a hermit crab inside and it pinched her ear. She never wants to go back! LoL I know this is entirely off topic but I had to tell someone!
Very nice post. I just stumbled upon your blog and wanted to say that I’ve truly loved surfing around your blog posts. In any case I will be subscribing on your feed and I hope you write once more soon!
I’m really enjoying the theme/design of your site. Do you ever run into any internet browser compatibility problems? A number of my blog visitors have complained about my site not operating correctly in Explorer but looks great in Safari. Do you have any solutions to help fix this problem?
This actually answered my problem, thanks!
Its such as you read my mind! You seem to know a lot about this, such as you wrote the book in it or something. I think that you just can do with some percent to pressure the message house a little bit, however instead of that, that is excellent blog. An excellent read. I will certainly be back.
I have been examinating out a few of your articles and i can claim pretty nice stuff. I will definitely bookmark your blog.
Cool blog! Is your theme custom made or did you download it from somewhere? A theme like yours with a few simple adjustements would really make my blog stand out. Please let me know where you got your theme. Many thanks
I conceive this web site has some very excellent info for everyone. “The individual will always be a minority. If a man is in a minority of one, we lock him up.” by Oliver Wendell Holmes.
I conceive this internet site holds some really great information for everyone :D. “A friend might well be reckoned the masterpiece of nature.” by Ralph Waldo Emerson.
Some really good posts on this website , regards for contribution.
Unquestionably consider that that you stated. Your favorite reason appeared to be at the internet the simplest factor to be aware of. I say to you, I certainly get irked even as people think about worries that they just don’t understand about. You managed to hit the nail upon the top and also defined out the whole thing without having side-effects , other folks could take a signal. Will probably be again to get more. Thanks
I am glad to be one of many visitors on this great web site (:, thanks for putting up.
I’m impressed, I have to say. Really hardly ever do I encounter a weblog that’s both educative and entertaining, and let me inform you, you’ve hit the nail on the head. Your thought is excellent; the problem is something that not enough people are speaking intelligently about. I’m very completely satisfied that I stumbled throughout this in my seek for one thing relating to this.
There are actually quite a lot of particulars like that to take into consideration. That is a great point to convey up. I offer the thoughts above as normal inspiration but clearly there are questions just like the one you carry up the place the most important factor shall be working in trustworthy good faith. I don?t know if greatest practices have emerged round issues like that, but I’m certain that your job is clearly recognized as a good game. Both boys and girls feel the impression of only a second’s pleasure, for the remainder of their lives.
I will right away grab your rss as I can not find your email subscription link or e-newsletter service. Do you’ve any? Kindly let me know so that I could subscribe. Thanks.
Hiya, I’m really glad I’ve found this info. Nowadays bloggers publish just about gossips and internet and this is really annoying. A good website with exciting content, this is what I need. Thank you for keeping this site, I’ll be visiting it. Do you do newsletters? Cant find it.
I?¦ll immediately seize your rss as I can’t find your email subscription hyperlink or e-newsletter service. Do you’ve any? Please allow me realize in order that I may subscribe. Thanks.
I’ve been exploring for a little bit for any high-quality articles or blog posts in this sort of house . Exploring in Yahoo I eventually stumbled upon this website. Reading this info So i am glad to exhibit that I have a very good uncanny feeling I discovered exactly what I needed. I such a lot surely will make certain to don’t omit this site and give it a glance on a constant basis.
I have read several excellent stuff here. Definitely price bookmarking for revisiting. I surprise how a lot effort you set to create this sort of fantastic informative website.
I am impressed with this site, very I am a big fan .
nice blog post, continue writing.
Hey very nice blog!! Man .. Excellent .. Amazing .. I will bookmark your website and take the feeds also…I’m happy to find so many useful info here in the post, we need work out more strategies in this regard, thanks for sharing. . . . . .
I went over this web site and I think you have a lot of wonderful info, saved to fav (:.
Thanks for another informative web site. The place else may just I am getting that type of information written in such an ideal method? I have a project that I am simply now running on, and I’ve been at the look out for such info.
I really like your writing style, wonderful information, regards for putting up : D.
This web site is my inhalation, very excellent layout and perfect written content.
It is actually a great and useful piece of info. I am happy that you shared this helpful information with us. Please stay us informed like this. Thank you for sharing.
Hello! Do you use Twitter? I’d like to follow you if that would be ok. I’m absolutely enjoying your blog and look forward to new updates.
I am continually browsing online for articles that can facilitate me. Thx!
You have brought up a very great details , thanks for the post.
It¦s actually a nice and helpful piece of information. I am glad that you just shared this helpful info with us. Please keep us up to date like this. Thank you for sharing.
Thanks a bunch for sharing this with all of us you actually know what you are talking about! Bookmarked. Kindly also visit my web site =). We could have a link exchange contract between us!
I think this is one of the most important information for me. And i’m glad reading your article. But wanna remark on few general things, The website style is wonderful, the articles is really nice : D. Good job, cheers
Excellent site. A lot of helpful info here. I am sending it to a few pals ans additionally sharing in delicious. And certainly, thanks for your effort!
Wow that was strange. I just wrote an very long comment but after I clicked submit my comment didn’t show up. Grrrr… well I’m not writing all that over again. Anyways, just wanted to say great blog!
I have read some excellent stuff here. Certainly worth bookmarking for revisiting. I wonder how so much effort you set to create any such fantastic informative site.|
I’m not sure where you’re getting your info, but good topic. I needs to spend some time learning much more or understanding more. Thanks for excellent info I was looking for this information for my mission.
Having read this I thought it was very informative. I appreciate you taking the time and effort to put this article together. I once again find myself spending way to much time both reading and commenting. But so what, it was still worth it!
We are a bunch of volunteers and starting a brand new scheme in our community. Your website provided us with helpful information to paintings on. You have done a formidable task and our whole community will probably be thankful to you.
Reba Fleurantin
[…]usually posts some quite exciting stuff like this. If youre new to this site[…]
One thing I want to comment on is that weightloss program fast can be carried out by the perfect diet and exercise. An individual’s size not only affects the look, but also the quality of life. Self-esteem, melancholy, health risks, and also physical capabilities are afflicted in excess weight. It is possible to make everything right and at the same time having a gain. Should this happen, a condition may be the reason. While a lot food and not enough workout are usually to blame, common medical ailments and widespread prescriptions may greatly amplify size. Thanks for your post right here.
Thanks for any other informative website. The place else may just I am getting that kind of information written in such a perfect means? I’ve a project that I’m simply now operating on, and I have been on the glance out for such information.
Attractive element of content. I simply stumbled upon your site and in accession capital to claim that I get in fact enjoyed account your blog posts. Anyway I will be subscribing in your feeds or even I achievement you get right of entry to consistently fast.
Wonderful blog! Do you have any suggestions for aspiring writers? I’m planning to start my own website soon but I’m a little lost on everything. Would you advise starting with a free platform like WordPress or go for a paid option? There are so many options out there that I’m totally overwhelmed .. Any recommendations? Kudos!
you’re actually a just right webmaster. The website loading pace is incredible. It kind of feels that you are doing any distinctive trick. Moreover, The contents are masterpiece. you’ve performed a wonderful job on this subject!
Very well written post. It will be beneficial to everyone who employess it, as well as me. Keep doing what you are doing – looking forward to more posts.
Would love to always get updated great blog! .
Hi, Neat post. There is a problem with your website in internet explorer, would test this… IE still is the market leader and a large portion of people will miss your magnificent writing because of this problem.
Very interesting info !Perfect just what I was looking for!
I like what you guys are up too. Such smart work and reporting! Carry on the excellent works guys I have incorporated you guys to my blogroll. I think it will improve the value of my web site 🙂
Whether you’re 80 years young or 8 years of ages, participating in exercises that entail dancing modifications you.
Pretty great post. I just stumbled upon your weblog and wished to mention that I have really loved browsing your blog posts. In any case I’ll be subscribing in your feed and I’m hoping you write again very soon!|
of course like your web site however you need to take a look at the spelling on quite a few of your posts. Many of them are rife with spelling issues and I to find it very bothersome to tell the truth then again I will surely come back again.|
magnificent points altogether, you just gained a brand new reader. What would you recommend in regards to your post that you made some days ago? Any positive?
I have been exploring for a bit for any high-quality articles or blog posts on this kind of area . Exploring in Yahoo I at last stumbled upon this web site. Reading this information So i’m happy to convey that I have a very good uncanny feeling I discovered exactly what I needed. I most certainly will make sure to do not forget this website and give it a look regularly.
magnificent post, very informative. I wonder why the other specialists of this sector don’t notice this. You should continue your writing. I am sure, you have a huge readers’ base already!
of course like your website however you have to test the spelling on several of your posts. Several of them are rife with spelling issues and I in finding it very troublesome to tell the reality on the other hand I?¦ll certainly come back again.
I not to mention my buddies appeared to be checking out the good thoughts found on the website then quickly I got a terrible feeling I never expressed respect to the web blog owner for those strategies. All the young men became for that reason excited to see them and have very much been having fun with those things. Thanks for indeed being very helpful as well as for having this form of outstanding themes most people are really desperate to learn about. My very own sincere apologies for not expressing gratitude to sooner.
Excellent read, I just passed this onto a friend who was doing a little research on that. And he just bought me lunch since I found it for him smile So let me rephrase that: Thank you for lunch! “How beautiful maleness is, if it finds its right expression.” by D. H. Lawrence.
It’s really a cool and useful piece of information. I’m glad that you shared this useful information with us. Please stay us up to date like this. Thanks for sharing.|
This really answered my drawback, thanks!
You made some good points there. I did a search on the subject matter and found most people will approve with your website.
Wonderful beat ! I wish to apprentice while you amend your site, how could i subscribe for a blog site? The account aided me a acceptable deal. I had been tiny bit acquainted of this your broadcast provided bright clear concept
I really like it when individuals come together and share thoughts. Great blog, stick with it!
Hi my loved one! I want to say that this article is amazing, nice written and include almost all vital infos. I would like to look extra posts like this.
I have been absent for a while, but now I remember why I used to love this website. Thanks, I will try and check back more often. How frequently you update your site?
I enjoy your writing style really enjoying this internet site.
I was able to find good info from your blog articles.
Hey very cool site!! Man .. Excellent .. Amazing .. I’ll bookmark your web site and take the feeds also…I am happy to find a lot of useful information here in the post, we need develop more techniques in this regard, thanks for sharing. . . . . .
Its great as your other articles : D, thankyou for putting up. “So, rather than appear foolish afterward, I renounce seeming clever now.” by William of Baskerville.
Wohh exactly what I was looking for, thanks for putting up.
Hi! Someone in my Facebook group shared this site with us so I came to check it out. I’m definitely loving the information. I’m bookmarking and will be tweeting this to my followers! Superb blog and excellent design and style.
Thank you for the auspicious writeup. It in reality was once a enjoyment account it. Glance complicated to more delivered agreeable from you! By the way, how could we communicate?
Hello.This article was really fascinating, especially because I was searching for thoughts on this subject last Wednesday.
Hola! I’ve been following your web site for a while now and finally got the courage to go ahead and give you a shout out from Lubbock Texas! Just wanted to tell you keep up the fantastic work!
Great ?V I should definitely pronounce, impressed with your site. I had no trouble navigating through all tabs as well as related information ended up being truly easy to do to access. I recently found what I hoped for before you know it in the least. Quite unusual. Is likely to appreciate it for those who add forums or anything, website theme . a tones way for your customer to communicate. Nice task..
Hello! Would you mind if I share your blog with my twitter group? There’s a lot of folks that I think would really enjoy your content. Please let me know. Thank you
Excellent post. I was checking continuously this blog and I’m impressed! Extremely helpful info specially the last part 🙂 I care for such info much. I was seeking this particular info for a long time. Thank you and good luck.
Your house is valueble for me. Thanks!…
certainly like your web-site but you have to check the spelling on quite a few of your posts. A number of them are rife with spelling problems and I find it very troublesome to tell the truth nevertheless I¦ll definitely come back again.
Great article. I’m experiencing many of these issues as well..
This internet site is my intake, really great pattern and perfect articles.
Thank you for every other informative blog. The place else could I get that type of information written in such a perfect way? I’ve a project that I’m simply now working on, and I’ve been on the look out for such info.
I was very pleased to find this web-site.I wanted to thanks for your time for this wonderful read!! I definitely enjoying every little bit of it and I have you bookmarked to check out new stuff you blog post.
Some times its a pain in the ass to read what blog owners wrote but this website is very user pleasant! .
I was suggested this web site by my cousin. I am now not certain whether this put up is written through him as no one else understand such particular approximately my difficulty. You’re wonderful! Thanks!
Hi, i think that i saw you visited my weblog so i came to “return the favor”.I’m trying to find things to improve my website!I suppose its ok to use a few of your ideas!!
I have been surfing online more than 3 hours as of late, yet I never found any interesting article like yours. It is lovely worth enough for me. In my opinion, if all website owners and bloggers made just right content as you probably did, the internet will likely be much more useful than ever before.
Good day! I could have sworn I’ve been to this blog before but after reading through some of the post I realized it’s new to me. Nonetheless, I’m definitely happy I found it and I’ll be bookmarking and checking back often!
What’s up, its fastidious paragraph regarding media print, we all know media is a enormous source of information.|
My family members all the time say that I am wasting my time here at web, however I know I am getting familiarity every day by reading thes pleasant content.|
But a smiling visitor here to share the love (:, btw great pattern.
What i do not understood is actually how you are now not actually a lot more smartly-liked than you may be right now. You are so intelligent. You realize thus significantly in relation to this subject, produced me individually imagine it from numerous numerous angles. Its like men and women are not involved unless it is something to do with Lady gaga! Your individual stuffs outstanding. All the time deal with it up!
Thanks for helping out, good info .
Greate pieces. Keep posting such kind of information on your site. Im really impressed by your site.
Amazing! This blog looks exactly like my old one! It’s on a totally different subject but it has pretty much the same layout and design. Outstanding choice of colors!
Generally I don’t read post on blogs, but I wish to say that this write-up very forced me to try and do it! Your writing style has been amazed me. Thanks, very nice article.
I?¦ll right away grasp your rss as I can not find your e-mail subscription hyperlink or newsletter service. Do you’ve any? Kindly permit me understand in order that I may just subscribe. Thanks.
I’ve been absent for a while, but now I remember why I used to love this web site. Thank you, I will try and check back more often. How frequently you update your web site?
I was recommended this web site by my cousin. I’m not sure whether this post is written by him as nobody else know such detailed about my problem. You are amazing! Thanks!
Aw, this was a really nice post. In concept I want to put in writing like this additionally – taking time and actual effort to make a very good article… but what can I say… I procrastinate alot and by no means seem to get something done.
It’s in reality a great and useful piece of information. I am satisfied that you shared this helpful info with us. Please keep us up to date like this. Thanks for sharing.
My developer is trying to convince me to move to .net from PHP. I have always disliked the idea because of the costs. But he’s tryiong none the less. I’ve been using WordPress on several websites for about a year and am nervous about switching to another platform. I have heard very good things about blogengine.net. Is there a way I can import all my wordpress content into it? Any help would be greatly appreciated!
Well I sincerely liked reading it. This subject offered by you is very useful for correct planning.
I do not know if it’s just me or if everybody else experiencing problems with your blog. It looks like some of the text on your content are running off the screen. Can someone else please provide feedback and let me know if this is happening to them too? This may be a problem with my browser because I’ve had this happen before. Many thanks|
Fantastic post but I was wanting to know if you could write a litte more on this topic? I’d be very thankful if you could elaborate a little bit further. Appreciate it!
I am impressed with this internet site, really I am a fan.
Hey there! Someone in my Facebook group shared this website with us so I came to give it a look. I’m definitely enjoying the information. I’m bookmarking and will be tweeting this to my followers! Exceptional blog and wonderful style and design.
Heya i’m for the first time here. I found this board and I find It really useful & it helped me out much. I hope to give something back and aid others like you aided me.
you’re in point of fact a excellent webmaster. The web site loading velocity is incredible. It kind of feels that you are doing any unique trick. Also, The contents are masterpiece. you have performed a wonderful activity in this matter!
Thank you a lot for giving everyone an extremely brilliant possiblity to read from this web site. It really is so pleasurable and stuffed with a good time for me and my office friends to search your site a minimum of thrice in one week to learn the latest guidance you have got. And of course, I am also always astounded concerning the brilliant thoughts you give. Selected 1 tips on this page are in reality the finest we have ever had.
Real informative and good structure of content material, now that’s user genial (:.
Those are yours alright! . We at least need to get these people stealing images to start blogging! They probably just did a image search and grabbed them. They look good though!
why does delta 8 give me a headache
I just couldn’t leave your web site prior to suggesting that I extremely loved the standard information an individual provide for your visitors? Is going to be back ceaselessly to inspect new posts
It¦s really a cool and useful piece of info. I¦m glad that you shared this helpful info with us. Please keep us up to date like this. Thanks for sharing.
It’s genuinely very complex in this busy life to listen news on TV, therefore I just use web for that reason, and get the hottest information.|
I know this if off topic but I’m looking into starting my own weblog and was curious what all is required to get setup? I’m assuming having a blog like yours would cost a pretty penny? I’m not very internet smart so I’m not 100 sure. Any suggestions or advice would be greatly appreciated. Thank you|
Pretty! This was a really wonderful post. Thank you for your provided information.
Very interesting info !Perfect just what I was looking for!
I like the helpful information you supply on your articles. I’ll bookmark your weblog and check once more right here frequently. I’m rather certain I will be told plenty of new stuff proper here! Best of luck for the next!
I am glad to be one of the visitants on this great site (:, appreciate it for posting.
of course like your website but you need to test the spelling on quite a few of your posts. Several of them are rife with spelling issues and I in finding it very bothersome to tell the truth then again I’ll surely come back again.
Thank you for sharing superb informations. Your web site is so cool. I’m impressed by the details that you’ve on this blog. It reveals how nicely you perceive this subject. Bookmarked this web page, will come back for more articles. You, my friend, ROCK! I found simply the information I already searched all over the place and just could not come across. What a perfect site.
Nice post. I was checking constantly this blog and I’m impressed! Very useful information particularly the last part 🙂 I care for such information much. I was seeking this certain information for a very long time. Thank you and best of luck.
I just couldn’t go away your website prior to suggesting that I actually enjoyed the standard info an individual supply for your visitors? Is gonna be back continuously in order to investigate cross-check new posts.
I as well conceive so , perfectly pent post! .
Good website! I really love how it is easy on my eyes and the data are well written. I’m wondering how I could be notified whenever a new post has been made. I’ve subscribed to your feed which must do the trick! Have a great day!
Very interesting information!Perfect just what I was searching for!
Howdy! I know this is kind of off topic but I was wondering if you knew where I could locate a captcha plugin for my comment form? I’m using the same blog platform as yours and I’m having trouble finding one? Thanks a lot!
I?¦ve learn a few good stuff here. Definitely value bookmarking for revisiting. I surprise how so much effort you set to make this sort of great informative site.
This is a topic close to my heart cheers, where are your contact details though?
Great write-up, I am normal visitor of one’s blog, maintain up the excellent operate, and It’s going to be a regular visitor for a lengthy time.
great post.Never knew this, thankyou for letting me know.
When I initially commented I clicked the “Notify me when new comments are added” checkbox and now each time a comment is added I get several e-mails with the same comment. Is there any way you can remove me from that service? Thanks!
It is in reality a nice and useful piece of info. I am glad that you shared this useful information with us. Please keep us up to date like this. Thank you for sharing.
Amazing! This blog looks exactly like my old one! It’s on a totally different topic but it has pretty much the same page layout and design. Superb choice of colors!
Great wordpress blog here.. It’s hard to find quality writing like yours these days. I really appreciate people like you! take care
I have been surfing on-line greater than 3 hours as of late, yet I by no means discovered any attention-grabbing article like yours. It is lovely price sufficient for me. In my view, if all webmasters and bloggers made good content as you did, the net will probably be a lot more useful than ever before.
This is really interesting, You are a very skilled blogger. I have joined your rss feed and look forward to seeking more of your fantastic post. Also, I have shared your web site in my social networks!
I have been checking out many of your posts and i can state pretty nice stuff. I will surely bookmark your blog.
I’m very happy to read this. This is the kind of manual that needs to be given and not the random misinformation that’s at the other blogs. Appreciate your sharing this greatest doc.
Undeniably believe that which you stated. Your favorite reason seemed to be on the web the easiest thing to be aware of. I say to you, I certainly get annoyed while people consider worries that they just don’t know about. You managed to hit the nail upon the top and defined out the whole thing without having side effect , people can take a signal. Will likely be back to get more. Thanks
Write more, thats all I have to say. Literally, it seems as though you relied on the video to make your point. You definitely know what youre talking about, why throw away your intelligence on just posting videos to your blog when you could be giving us something informative to read?
Whats up are using WordPress for your blog platform? I’m new to the blog world but I’m trying to get started and create my own. Do you need any coding expertise to make your own blog? Any help would be really appreciated!
Great blog! Is your theme custom made or did you download it from somewhere? A theme like yours with a few simple adjustements would really make my blog stand out. Please let me know where you got your design. Bless you
I have been surfing online more than three hours today, yet I never found any interesting article like yours. It’s pretty worth enough for me. Personally, if all web owners and bloggers made good content as you did, the internet will be a lot more useful than ever before.
Hi there, just became alert to your blog through Google, and found that it’s truly informative. I am going to watch out for brussels. I’ll appreciate if you continue this in future. Lots of people will be benefited from your writing. Cheers!
Terrific post however I was wondering if you could write a litte more on this topic? I’d be very thankful if you could elaborate a little bit further. Kudos!
My brother recommended I would possibly like this website. He was entirely right. This submit truly made my day. You can not consider simply how a lot time I had spent for this information! Thanks!
Whats Happening i am new to this, I stumbled upon this I’ve found It positively helpful and it has helped me out loads. I hope to contribute & aid different users like its aided me. Good job.
I’d have to examine with you here. Which is not one thing I usually do! I take pleasure in reading a post that may make folks think. Additionally, thanks for permitting me to comment!
You made some nice points there. I did a search on the topic and found most guys will go along with with your blog.
I like this website because so much useful stuff on here : D.
Nice post. I learn something more challenging on different blogs everyday. It will always be stimulating to read content from other writers and practice a little something from their store. I’d prefer to use some with the content on my blog whether you don’t mind. Natually I’ll give you a link on your web blog. Thanks for sharing.
I do not even know how I ended up right here, but I believed this put up was once great. I do not recognise who you are but certainly you’re going to a well-known blogger in case you aren’t already 😉 Cheers!
What i don’t realize is in truth how you are no longer actually much more well-appreciated than you might be right now. You’re very intelligent. You know thus significantly in the case of this topic, produced me in my view imagine it from a lot of various angles. Its like men and women aren’t involved unless it’s something to do with Girl gaga! Your own stuffs excellent. Always handle it up!
Thanks for your marvelous posting! I definitely enjoyed reading it, you can be a great author.I will make certain to bookmark your blog and will eventually come back at some point. I want to encourage you to definitely continue your great posts, have a nice day!
I have to get across my admiration for your kind-heartedness giving support to persons who must have help on this niche. Your special commitment to passing the solution along appeared to be certainly effective and has in most cases permitted most people just like me to get to their desired goals. Your helpful advice denotes a great deal a person like me and especially to my office colleagues. Regards; from all of us.
Great tremendous issues here. I?¦m very glad to look your post. Thanks a lot and i’m looking ahead to touch you. Will you please drop me a e-mail?
Enjoyed reading this, very good stuff, regards.
Wow! Thank you! I constantly wanted to write on my site something like that. Can I include a part of your post to my website?
Hello my loved one! I wish to say that this post is amazing, great written and include approximately all important infos. I’d like to peer extra posts like this .
After study a few of the blog posts on your website now, and I truly like your way of blogging. I bookmarked it to my bookmark website list and will be checking back soon. Pls check out my web site as well and let me know what you think.
I simply could not go away your website before suggesting that I really enjoyed the usual info a person supply for your visitors? Is going to be again regularly to check out new posts.
Simply wanna input on few general things, The website pattern is perfect, the subject matter is really great : D.
Good day! Do you use Twitter? I’d like to follow you if that would be ok. I’m absolutely enjoying your blog and look forward to new posts.
You really make it seem really easy with your presentation however I find this matter to be really one thing that I believe I’d by no means understand. It sort of feels too complex and extremely large for me. I am having a look forward for your next post, I will attempt to get the hold of it!
An impressive share, I just given this onto a colleague who was doing a little analysis on this. And he in fact bought me breakfast because I found it for him.. smile. So let me reword that: Thnx for the treat! But yeah Thnkx for spending the time to discuss this, I feel strongly about it and love reading more on this topic. If possible, as you become expertise, would you mind updating your blog with more details? It is highly helpful for me. Big thumb up for this blog post!
I like the helpful info you provide in your articles. I’ll bookmark your blog and check again here regularly. I am quite sure I’ll learn a lot of new stuff right here! Best of luck for the next!|
Someone necessarily help to make severely articles I’d state. This is the first time I frequented your website page and to this point? I surprised with the research you made to make this particular publish extraordinary. Wonderful process!
Hi, I do believe this is a great blog. I stumbledupon it 😉 I’m going to return once again since i have saved as a favorite it. Money and freedom is the greatest way to change, may you be rich and continue to help others.
We stumbled over here from a different web page and thought I might as well check things out. I like what I see so now i’m following you. Look forward to going over your web page yet again.
Heya i’m for the primary time here. I came across this board and I in finding It really useful & it helped me out much. I am hoping to provide something again and help others like you aided me.
Thanks for every other informative website. The place else could I am getting that kind of info written in such a perfect manner? I have a challenge that I am simply now working on, and I have been at the look out for such info.
This is a topic close to my heart cheers, where are your contact details though?
Hello there! I know this is kinda off topic however , I’d figured I’d ask. Would you be interested in exchanging links or maybe guest writing a blog article or vice-versa? My website goes over a lot of the same topics as yours and I think we could greatly benefit from each other. If you are interested feel free to send me an email. I look forward to hearing from you! Wonderful blog by the way!
Well I sincerely enjoyed reading it. This tip procured by you is very practical for accurate planning.
delta 1095 january 8 2020
There are some interesting time limits in this article however I don’t know if I see all of them middle to heart. There’s some validity but I will take hold opinion until I look into it further. Good article , thanks and we would like more! Added to FeedBurner as properly
Wow! This can be one particular of the most beneficial blogs We have ever arrive across on this subject. Actually Great. I’m also an expert in this topic therefore I can understand your effort.
Hello there, just became alert to your blog through Google, and found that it is truly informative. I’m gonna watch out for brussels. I will be grateful if you continue this in future. A lot of people will be benefited from your writing. Cheers!
It’s actually a great and useful piece of information. I’m satisfied that you simply shared this useful information with us. Please keep us informed like this. Thank you for sharing.
you’re in point of fact a excellent webmaster. The website loading velocity is amazing. It sort of feels that you are doing any unique trick. Furthermore, The contents are masterwork. you’ve done a excellent job in this subject!
Today, while I was at work, my cousin stole my iphone and tested to see if it can survive a twenty five foot drop, just so she can be a youtube sensation. My apple ipad is now broken and she has 83 views. I know this is completely off topic but I had to share it with someone!
I like this post, enjoyed this one thanks for posting. “What is a thousand years Time is short for one who thinks, endless for one who yearns.” by Alain.
The subsequent time I learn a blog, I hope that it doesnt disappoint me as much as this one. I mean, I know it was my option to learn, but I truly thought youd have something attention-grabbing to say. All I hear is a bunch of whining about something that you might fix if you werent too busy searching for attention.
hello there and thank you for your info – I have definitely picked up something new from right here. I did however expertise some technical issues using this website, as I experienced to reload the site lots of times previous to I could get it to load correctly. I had been wondering if your hosting is OK? Not that I am complaining, but slow loading instances times will sometimes affect your placement in google and can damage your high-quality score if advertising and marketing with Adwords. Anyway I am adding this RSS to my email and could look out for a lot more of your respective fascinating content. Ensure that you update this again soon..
What’s Happening i am new to this, I stumbled upon this I’ve found It positively helpful and it has helped me out loads. I hope to contribute & assist other users like its aided me. Great job.
Definitely believe that which you stated. Your favorite reason appeared to be on the net the easiest thing to be aware of. I say to you, I certainly get annoyed while people consider worries that they plainly don’t know about. You managed to hit the nail upon the top and also defined out the whole thing without having side-effects , people could take a signal. Will probably be back to get more. Thanks
Good website! I really love how it is simple on my eyes and the data are well written. I’m wondering how I might be notified when a new post has been made. I have subscribed to your RSS which must do the trick! Have a nice day!
Wow that was odd. I just wrote an very long comment but after I clicked submit my comment didn’t show up. Grrrr… well I’m not writing all that over again. Regardless, just wanted to say excellent blog!
You could certainly see your enthusiasm within the work you write. The world hopes for more passionate writers like you who aren’t afraid to say how they believe. Always go after your heart. “Everyone has his day and some days last longer than others.” by Sir Winston Leonard Spenser Churchill.
I like what you guys are up also. Such clever work and reporting! Keep up the superb works guys I’ve incorporated you guys to my blogroll. I think it will improve the value of my web site 🙂
Good write-up, I’m normal visitor of one’s web site, maintain up the excellent operate, and It is going to be a regular visitor for a lengthy time.
I’ve been surfing online more than three hours these days, yet I by no means found any fascinating article like yours. It is beautiful worth enough for me. Personally, if all web owners and bloggers made good content as you did, the web will probably be much more helpful than ever before.
Simply a smiling visitor here to share the love (:, btw outstanding style and design. “Reading well is one of the great pleasures that solitude can afford you.” by Harold Bloom.
Yay google is my king assisted me to find this great internet site! .
Your blog is always such a pleasure to read, thank you.
Thank you for being εφαρμογή για περπατημα στα ελληνικά δωρεάν a reliable source of information.
I do like the manner in which you have framed this specific issue and it does indeed give me personally some fodder for consideration. Nevertheless, coming from everything that I have seen, I really hope as the actual opinions pile on that people continue to be on point and don’t embark upon a soap box associated with some other news du jour. Still, thank you for this fantastic point and even though I can not really concur with this in totality, I regard the standpoint.
Thanks so much for giving everyone an extremely special possiblity to read in detail from this site. It’s always so nice and also packed with amusement for me personally and my office co-workers to search the blog minimum 3 times in 7 days to learn the fresh things you have got. Of course, I’m so actually contented with your sensational suggestions served by you. Some 3 facts on this page are undoubtedly the best we have all had.
I’m not sure where you are getting your information, but great topic. I needs to spend some time learning much more or understanding more. Thanks for excellent info I was looking for this info for my mission.
Your writing style is engaging and easy to follow. I always enjoy reading your articles.
Your blog has quickly become one of my favorites. I look forward to reading more.
Great post! You really hit the nail on the head with this one.
When I initially commented I clicked the “Notify me when new comments are added” checkbox and now each time a comment is added I get three emails with the same comment. Is there any way you can remove people from that service? Thanks!
Very interesting information!Perfect just what I was looking for!
Of course, what a magnificent blog and informative posts, I surely will bookmark your site.Best Regards!
It’s a shame you don’t have a donate button! I’d definitely donate to this fantastic blog! I suppose for now i’ll settle for bookmarking and adding your RSS feed to my Google account. I look forward to brand new updates and will talk about this site with my Facebook group. Chat soon!
Hi there, just became alert to your blog thru Google, and located that it is truly informative. I am gonna watch out for brussels. I will appreciate when you proceed this in future. A lot of other people might be benefited from your writing. Cheers!
Great post! You really hit the nail on the head with this one.
Thank you, I have just been looking for information about this topic for ages and yours is the greatest I’ve discovered so far. But, what about the bottom line? Are you sure about the source?
I’m not sure why but this website is loading very slow for me. Is anyone else having this issue or is it a problem on my end? I’ll check back later on and see if the problem still exists.
I think this web site has got very good indited subject matter blog posts.
This is exactly what I was looking for. Thanks for providing such valuable information.
Your blog has quickly become one of my favorites. I look forward to reading more.
Thank you so much for sharing this excellent web page.
My programmer is trying to convince me to move to .net from PHP. I have always disliked the idea because of the expenses. But he’s tryiong none the less. I’ve been using Movable-type on a variety of websites for about a year and am nervous about switching to another platform. I have heard great things about blogengine.net. Is there a way I can import all my wordpress content into it? Any kind of help would be greatly appreciated!
Your blog has quickly become one of my favorites. I look forward to reading more.
After study a few of the blog posts on your website now, and I truly like your way of blogging. I bookmarked it to my bookmark website list and will be checking back soon. Pls check out my web site as well and let me know what you think.
Greetings! I know this is kinda off topic nevertheless I’d figured I’d ask. Would you be interested in trading links or maybe guest writing a blog article or vice-versa? My blog goes over a lot of the same subjects as yours and I think we could greatly benefit from each other. If you happen to be interested feel free to send me an email. I look forward to hearing from you! Awesome blog by the way!
This web site is really a walk-through for all of the info you wanted about this and didn’t know who to ask. Glimpse here, and you’ll definitely discover it.
Interesting blog! Is your theme custom made or did you download it from somewhere? A design like yours with a few simple adjustements would really make my blog shine. Please let me know where you got your theme. Kudos
You actually make it seem so easy with your presentation but I find this topic to be really something that I think I would never understand. It seems too complex and very broad for me. I am looking forward for your next post, I’ll try to get the hang of it!
Hello! Would you mind if I share your blog with my zynga group? There’s a lot of folks that I think would really appreciate your content. Please let me know. Cheers
I always was concerned in this subject and stock still am, appreciate it for putting up.
of course like your web-site however you need to check the spelling on quite a few of your posts. Several of them are rife with spelling problems and I to find it very troublesome to inform the reality then again I?¦ll certainly come again again.
hello there and thank you to your info – I’ve certainly picked up something new from right here. I did alternatively expertise some technical issues the use of this website, since I skilled to reload the site a lot of occasions previous to I may get it to load properly. I had been brooding about if your web hosting is OK? No longer that I’m complaining, but sluggish loading instances occasions will often have an effect on your placement in google and could injury your high quality rating if advertising and ***********|advertising|advertising|advertising and *********** with Adwords. Anyway I’m adding this RSS to my email and can glance out for a lot more of your respective interesting content. Make sure you update this once more very soon..
I am often to blogging and i really appreciate your content. The article has really peaks my interest. I am going to bookmark your site and keep checking for new information.
I dugg some of you post as I cogitated they were extremely helpful invaluable
I got good info from your blog
Best view i have ever seen !
Wonderful paintings! That is the type of info that should be shared across the internet. Disgrace on the search engines for no longer positioning this put up upper! Come on over and visit my site . Thanks =)
I’ve been absent for some time, but now I remember why I used to love this website. Thank you, I?¦ll try and check back more frequently. How frequently you update your web site?
I have been reading out many of your articles and i can claim pretty good stuff. I will surely bookmark your site.
Can I just say what a relief to seek out somebody who truly is aware of what theyre talking about on the internet. You definitely know methods to carry a problem to light and make it important. Extra individuals need to learn this and perceive this facet of the story. I cant believe youre not more well-liked since you undoubtedly have the gift.
You completed a number of good points there. I did a search on the theme and found nearly all people will consent with your blog.
What i do not understood is in truth how you’re now not actually much more well-liked than you might be right now. You’re so intelligent. You recognize therefore significantly in terms of this topic, made me individually consider it from so many numerous angles. Its like men and women are not fascinated unless it is one thing to accomplish with Girl gaga! Your personal stuffs great. All the time care for it up!
Awsome website! I am loving it!! Will come back again. I am bookmarking your feeds also
I like what you guys are usually up too. This kind of clever work and coverage! Keep up the fantastic works guys I’ve included you guys to our blogroll.
When I originally commented I clicked the -Notify me when new comments are added- checkbox and now every time a remark is added I get 4 emails with the identical comment. Is there any means you’ll be able to take away me from that service? Thanks!
I am not real wonderful with English but I line up this very easy to read .
This is a topic close to my heart cheers, where are your contact details though?
Good ?V I should definitely pronounce, impressed with your site. I had no trouble navigating through all tabs as well as related info ended up being truly simple to do to access. I recently found what I hoped for before you know it at all. Quite unusual. Is likely to appreciate it for those who add forums or anything, web site theme . a tones way for your customer to communicate. Nice task..
I’ve been exploring for a little bit for any high-quality articles or weblog posts on this sort of space . Exploring in Yahoo I eventually stumbled upon this website. Studying this information So i’m glad to show that I have an incredibly excellent uncanny feeling I found out just what I needed. I so much definitely will make sure to do not fail to remember this site and provides it a glance regularly.
Hi! Do you know if they make any plugins to assist with SEO? I’m trying to get my blog to rank for some targeted keywords but I’m not seeing very good results. If you know of any please share. Kudos!
Oh my goodness! a tremendous article dude. Thanks However I am experiencing difficulty with ur rss . Don’t know why Unable to subscribe to it. Is there anybody getting similar rss drawback? Anyone who is aware of kindly respond. Thnkx
of course like your web-site however you have to take a look at the spelling on quite a few of your posts. A number of them are rife with spelling issues and I find it very bothersome to inform the reality however I will certainly come again again.
I am often to blogging and i really appreciate your content. The article has really peaks my interest. I am going to bookmark your site and keep checking for new information.
I simply couldn’t go away your site before suggesting that I really enjoyed the usual information a person supply on your guests? Is gonna be again regularly in order to inspect new posts.
Does your site have a contact page? I’m having trouble locating it but, I’d like to shoot you an e-mail. I’ve got some recommendations for your blog you might be interested in hearing. Either way, great blog and I look forward to seeing it expand over time.
naturally like your web-site but you need to take a look at the spelling on quite a few of your posts. A number of them are rife with spelling issues and I find it very troublesome to inform the reality then again I will surely come back again.
Great post. I am facing a couple of these problems.
Magnificent goods from you, man. I have understand your stuff previous to and you are just extremely excellent. I actually like what you have acquired here, certainly like what you are stating and the way in which you say it. You make it entertaining and you still care for to keep it smart. I can not wait to read far more from you. This is actually a wonderful website.
I’ve been surfing on-line more than 3 hours these days, but I never found any attention-grabbing article like yours. It’s beautiful worth enough for me. Personally, if all site owners and bloggers made just right content as you did, the net can be much more useful than ever before. “Where facts are few, experts are many.” by Donald R. Gannon.
I will right away snatch your rss as I can’t find your e-mail subscription hyperlink or e-newsletter service. Do you have any? Please allow me recognize in order that I could subscribe. Thanks.
I genuinely enjoy reading through on this internet site, it contains fantastic blog posts.
F*ckin’ awesome things here. I am very glad to peer your post. Thank you so much and i’m having a look ahead to touch you. Will you please drop me a mail?
Pretty! This was a really wonderful post. Thank you for your provided information.
As a Newbie, I am permanently browsing online for articles that can be of assistance to me. Thank you
Great post! You really hit the nail on the head with this one.
Greetings! Quick question that’s completely off topic. Do you know how to make your site mobile friendly? My website looks weird when browsing from my iphone 4. I’m trying to find a theme or plugin that might be able to resolve this problem. If you have any suggestions, please share. With thanks!
It’s hard to find knowledgeable people on this topic, but you sound like you know what you’re talking about! Thanks
You are a very smart individual!
My spouse and I absolutely love your blog and find almost all of your post’s to be just what I’m looking for. Do you offer guest writers to write content available for you? I wouldn’t mind publishing a post or elaborating on a number of the subjects you write about here. Again, awesome website!
Please let me know if you’re looking for a article writer for your weblog. You have some really good articles and I believe I would be a good asset. If you ever want to take some of the load off, I’d love to write some material for your blog in exchange for a link back to mine. Please shoot me an email if interested. Cheers!
Everything is very open and very clear explanation of issues. was truly information. Your website is very useful. Thanks for sharing.
very good submit, i certainly love this web site, keep on it
Hi! Would you mind if I share your blog with my zynga group? There’s a lot of people that I think would really appreciate your content. Please let me know. Thank you
I’m also commenting to let you understand of the cool encounter my cousin’s daughter obtained checking your site. She noticed numerous issues, which include what it is like to have a very effective giving style to make folks without difficulty know precisely chosen hard to do matters. You actually did more than our own expected results. Thank you for providing the valuable, safe, explanatory and as well as fun tips about the topic to Kate.
You are my inspiration , I have few blogs and infrequently run out from to brand.
I?¦ve been exploring for a little for any high quality articles or weblog posts on this sort of area . Exploring in Yahoo I ultimately stumbled upon this website. Studying this information So i am satisfied to exhibit that I’ve a very excellent uncanny feeling I discovered exactly what I needed. I such a lot indisputably will make certain to don?¦t forget this web site and provides it a look regularly.
Very nice post. I just stumbled upon your blog and wanted to say that I have really enjoyed browsing your blog posts. After all I will be subscribing to your rss feed and I hope you write again very soon!
What i don’t realize is actually how you’re not actually much more smartly-liked than you may be now. You are very intelligent. You recognize therefore significantly in relation to this topic, produced me in my opinion imagine it from a lot of varied angles. Its like women and men aren’t involved except it¦s one thing to accomplish with Woman gaga! Your personal stuffs great. Always maintain it up!
It is the best time to make some plans for the future and it’s time to be happy. I have read this post and if I could I desire to suggest you some interesting things or suggestions. Maybe you could write next articles referring to this article. I want to read even more things about it!
I consider something genuinely interesting about your website so I saved to my bookmarks.
Lovely just what I was searching for.Thanks to the author for taking his clock time on this one.
I don’t unremarkably comment but I gotta state regards for the post on this one : D.
I’m truly enjoying the design and layout of your website. It’s a very easy on the eyes which makes it much more enjoyable for me to come here and visit more often. Did you hire out a developer to create your theme? Great work!
I really appreciate your work, Great post.
I?¦m not certain the place you’re getting your information, but great topic. I must spend some time learning more or understanding more. Thanks for great information I used to be on the lookout for this info for my mission.
I love it when people come together and share opinions, great blog, keep it up.
Hello there, You have done a great job. I’ll definitely digg it and personally recommend to my friends. I am sure they’ll be benefited from this site.
Thanks for sharing superb informations. Your site is so cool. I am impressed by the details that you have on this website. It reveals how nicely you perceive this subject. Bookmarked this web page, will come back for more articles. You, my friend, ROCK! I found simply the info I already searched everywhere and just could not come across. What a great web-site.
Can I just say what a relief to find someone who actually knows what theyre talking about on the internet. You definitely know how to bring an issue to light and make it important. More people need to read this and understand this side of the story. I cant believe youre not more popular because you definitely have the gift.
I have to voice my admiration for your generosity supporting people who need guidance on your subject. Your personal commitment to passing the message across has been certainly valuable and have regularly encouraged most people like me to achieve their ambitions. This important guidelines means much a person like me and substantially more to my fellow workers. With thanks; from all of us.
Thanks for helping out, fantastic information. “Nobody can be exactly like me. Sometimes even I have trouble doing it.” by Tallulah Bankhead.
I enjoy the efforts you have put in this, thanks for all the great posts.
I’ve been absent for some time, but now I remember why I used to love this website. Thanks, I will try and check back more frequently. How frequently you update your site?
I think this is one of the most significant info for me. And i am glad reading your article. But should remark on some general things, The website style is great, the articles is really great : D. Good job, cheers
Wow, awesome weblog structure! How long have you been blogging for? you made running a blog glance easy. The overall look of your website is magnificent, as neatly as the content!
You really make it appear really easy together with your presentation but I in finding this topic to be actually one thing which I feel I might by no means understand. It sort of feels too complex and extremely extensive for me. I’m having a look forward to your subsequent put up, I¦ll try to get the cling of it!
Generally I do not read article on blogs, but I wish to say that this write-up very forced me to try and do so! Your writing style has been surprised me. Thanks, quite nice post.
I’m impressed, I need to say. Actually hardly ever do I encounter a weblog that’s both educative and entertaining, and let me tell you, you have hit the nail on the head. Your thought is outstanding; the problem is something that not enough people are speaking intelligently about. I’m very happy that I stumbled across this in my search for one thing relating to this.
Just a smiling visitant here to share the love (:, btw outstanding style and design. “Reading well is one of the great pleasures that solitude can afford you.” by Harold Bloom.
I’ve recently started a blog, the info you provide on this web site has helped me tremendously. Thanks for all of your time & work. “A creative man is motivated by the desire to achieve, not by the desire to beat others.” by Ayn Rand.
I’ve learn several excellent stuff here. Certainly price bookmarking for revisiting. I wonder how a lot attempt you put to create the sort of great informative website.
ace dab delta 8
I delight in, cause I found just what I used to be taking a look for. You have ended my four day lengthy hunt! God Bless you man. Have a nice day. Bye
I like this website so much, saved to favorites.
Thank you for the auspicious writeup. It in truth was once a amusement account it. Look advanced to far delivered agreeable from you! However, how can we keep up a correspondence?
Good day! This is my first visit to your blog! We are a group of volunteers and starting a new initiative in a community in the same niche. Your blog provided us beneficial information to work on. You have done a marvellous job!
Hi my friend! I wish to say that this article is amazing, nice written and include almost all important infos. I’d like to see more posts like this.
I have realized that over the course of constructing a relationship with real estate owners, you’ll be able to come to understand that, in most real estate deal, a payment is paid. Ultimately, FSBO sellers will not “save” the fee. Rather, they fight to earn the commission simply by doing a strong agent’s task. In this, they commit their money and time to complete, as best they could, the responsibilities of an realtor. Those jobs include exposing the home by way of marketing, representing the home to buyers, constructing a sense of buyer emergency in order to induce an offer, booking home inspections, handling qualification checks with the mortgage lender, supervising maintenance tasks, and facilitating the closing.
I’ve been absent for some time, but now I remember why I used to love this blog. Thanks, I’ll try and check back more often. How frequently you update your web site?
Thank you for another excellent article. Where else could anyone get that type of info in such a perfect way of writing? I’ve a presentation next week, and I am on the look for such info.
Hey, you used to write magnificent, but the last several posts have been kinda boring… I miss your great writings. Past few posts are just a little out of track! come on!
The very core of your writing whilst sounding reasonable at first, did not sit properly with me personally after some time. Somewhere within the paragraphs you were able to make me a believer unfortunately just for a very short while. I however have a problem with your jumps in assumptions and one might do nicely to fill in those breaks. In the event you actually can accomplish that, I will certainly be amazed.
Hello my loved one! I wish to say that this article is amazing, great written and include almost all important infos. I would like to see extra posts like this .
you’re truly a excellent webmaster. The web site loading velocity is amazing. It seems that you are doing any unique trick. Moreover, The contents are masterwork. you’ve done a wonderful task in this topic!
There is visibly a bundle to realize about this. I think you made various good points in features also.
My brother recommended I might like this web site. He was totally right. This post actually made my day. You can not imagine just how much time I had spent for this info! Thanks!
excellent submit, very informative. I’m wondering why the opposite specialists of this sector don’t realize this. You must proceed your writing. I am confident, you’ve a great readers’ base already!
I do love the manner in which you have presented this issue plus it does supply me personally some fodder for consideration. Nevertheless, because of just what I have personally seen, I just simply hope when other feed-back pack on that men and women stay on issue and don’t embark on a tirade involving the news of the day. Anyway, thank you for this fantastic point and even though I do not go along with the idea in totality, I value your standpoint.
Hello, you used to write fantastic, but the last several posts have been kinda boring? I miss your super writings. Past several posts are just a bit out of track! come on!
Hi my family member! I wish to say that this post is awesome, nice written and include approximately all important infos. I¦d like to see extra posts like this .
It’s actually a nice and useful piece of info. I’m glad that you shared this helpful information with us. Please keep us up to date like this. Thanks for sharing.
Hiya very cool website!! Guy .. Excellent .. Superb .. I will bookmark your website and take the feeds additionally?I’m happy to search out so many helpful information right here within the post, we want work out more strategies on this regard, thanks for sharing. . . . . .
The unique payment platform that earns you INSTANT CASH BACK on everything you’re buying, at stores where you’re already shopping.
Thanks for discussing your ideas on this blog. Furthermore, a fantasy regarding the banking companies intentions while talking about foreclosure is that the standard bank will not have my repayments. There is a specific amount of time in which the bank can take payments here and there. If you are also deep within the hole, they should commonly desire that you pay the particular payment 100 . However, that doesn’t mean that they will have any sort of payments at all. In case you and the bank can have the ability to work one thing out, a foreclosure method may stop. However, if you ever continue to neglect payments under the new approach, the foreclosure process can pick up exactly where it left off.
Hello, you used to write excellent, but the last few posts have been kinda boring? I miss your super writings. Past few posts are just a little out of track! come on!
I’ve learn several just right stuff here. Certainly price bookmarking for revisiting. I wonder how much attempt you place to make this type of excellent informative website.
I have recently started a site, the info you offer on this web site has helped me greatly. Thanks for all of your time & work. “Her grandmother, as she gets older, is not fading but rather becoming more concentrated.” by Paulette Bates Alden.
Fantastic beat ! I wish to apprentice at the same time as you amend your website, how could i subscribe for a weblog site? The account helped me a applicable deal. I were a little bit acquainted of this your broadcast provided shiny clear idea
Hello there, I found your web site by way of Google at the same time as looking for a similar topic, your web site got here up, it seems great. I have bookmarked it in my google bookmarks.
An interesting discussion is worth comment. I believe that you should write extra on this matter, it may not be a taboo subject however usually persons are not sufficient to speak on such topics. To the next. Cheers
Thanks for the advice on credit repair on this particular blog. The things i would offer as advice to people is to give up the mentality that they buy at this point and pay out later. As a society many of us tend to make this happen for many things. This includes getaways, furniture, and items we’d like. However, you must separate your own wants from all the needs. If you are working to fix your credit score make some trade-offs. For example you’ll be able to shop online to economize or you can turn to second hand retailers instead of costly department stores intended for clothing.
Thanks a lot for providing individuals with such a nice possiblity to check tips from this site. It really is very fantastic and also packed with amusement for me and my office colleagues to visit the blog nearly thrice in a week to learn the new things you have got. Of course, I’m also at all times impressed for the splendid techniques served by you. Some 1 tips in this posting are undeniably the finest I have had.
This is the best blog for anyone who wants to seek out out about this topic. You realize so much its virtually arduous to argue with you (not that I really would need?HaHa). You positively put a new spin on a subject thats been written about for years. Great stuff, just nice!
You have brought up a very superb points, appreciate it for the post.
Thank you, I’ve just been searching for info approximately this subject for ages and yours is the best I have came upon till now. But, what about the bottom line? Are you positive concerning the source?
Outstanding post, I believe website owners should larn a lot from this website its very user genial.
I see something genuinely interesting about your blog so I saved to favorites.
I’m so happy to read this. This is the type of manual that needs to be given and not the random misinformation that is at the other blogs. Appreciate your sharing this best doc.
wonderful points altogether, you simply gained a brand new reader. What might you suggest in regards to your put up that you simply made a few days in the past? Any positive?
I like this web site very much, Its a rattling nice position to read and get info .
whoah this blog is wonderful i love reading your articles. Keep up the good work! You know, many people are looking around for this info, you could help them greatly.
Thanks a bunch for sharing this with all of us you actually know what you are talking about! Bookmarked. Kindly also visit my web site =). We could have a link exchange contract between us!
Nice read, I just passed this onto a friend who was doing some research on that. And he actually bought me lunch since I found it for him smile Therefore let me rephrase that: Thanks for lunch!
so much good info on here, : D.
Admiring the dedication you put into your blog and detailed information you present. It’s nice to come across a blog every once in a while that isn’t the same unwanted rehashed information. Excellent read! I’ve saved your site and I’m adding your RSS feeds to my Google account.
you may have an excellent weblog here! would you like to make some invite posts on my blog?
Wow! This can be one particular of the most useful blogs We’ve ever arrive across on this subject. Basically Excellent. I am also an expert in this topic therefore I can understand your effort.
I am curious to find out what blog system you are working with? I’m experiencing some minor security issues with my latest website and I’d like to find something more safe. Do you have any solutions?
Thanks for sharing your ideas. I’d personally also like to mention that video games have been at any time evolving. Today’s technology and enhancements have helped create practical and interactive games. Most of these entertainment games were not as sensible when the real concept was being used. Just like other forms of technological know-how, video games as well have had to progress by way of many generations. This is testimony for the fast development of video games.
Video Marketing Explained And Why Every Business Should Use It
I truly enjoy reading through on this site, it contains wonderful posts. “Literature is the orchestration of platitudes.” by Thornton.
We are the Worlds Largest Cannabis Seedbank with over 100,000 marijuana seed strains in stock.
Backlinks generator software helping you to generate over 12 million backlinks for any link in minutes. Easy to operate and provide you with full report of all created backlinks. Ideal for personal use or start your own online business.
Great V I should definitely pronounce, impressed with your web site. I had no trouble navigating through all the tabs as well as related info ended up being truly easy to do to access. I recently found what I hoped for before you know it at all. Quite unusual. Is likely to appreciate it for those who add forums or anything, site theme . a tones way for your client to communicate. Nice task..
My spouse and I absolutely love your blog and find almost all of your post’s to be just what I’m looking for. can you offer guest writers to write content available for you? I wouldn’t mind composing a post or elaborating on a lot of the subjects you write related to here. Again, awesome site!
I simply wanted to write a brief note so as to express gratitude to you for all the magnificent guidelines you are giving here. My particularly long internet search has at the end been rewarded with excellent tips to share with my guests. I would point out that many of us website visitors are truly fortunate to live in a superb community with so many brilliant people with useful strategies. I feel really happy to have seen the web pages and look forward to tons of more awesome times reading here. Thanks a lot once again for everything.
Fantastic post however I was wanting to know if you could write a litte more on this topic? I’d be very thankful if you could elaborate a little bit further. Thank you!
Always nice to read such good posts, well done…
I have learn several excellent stuff here. Definitely worth bookmarking for revisiting. I wonder how much effort you put to create this type of excellent informative site.
Would you be eager about exchanging hyperlinks?
Today, I went to the beach with my children. I found a sea shell and gave it to my 4 year old daughter and said “You can hear the ocean if you put this to your ear.” She put the shell to her ear and screamed. There was a hermit crab inside and it pinched her ear. She never wants to go back! LoL I know this is totally off topic but I had to tell someone!
I’d like to find out more? I’d care to find out more details.
It’s hard to seek out educated folks on this subject, however you sound like you recognize what you’re talking about! Thanks
Hello.This article was really motivating, especially because I was searching for thoughts on this subject last Tuesday.
Great V I should certainly pronounce, impressed with your website. I had no trouble navigating through all tabs as well as related info ended up being truly simple to do to access. I recently found what I hoped for before you know it at all. Reasonably unusual. Is likely to appreciate it for those who add forums or something, website theme . a tones way for your client to communicate. Nice task..
Wow! This could be one particular of the most useful blogs We have ever arrive across on this subject. Basically Great. I’m also a specialist in this topic so I can understand your hard work.
Today, while I was at work, my sister stole my iPad and tested to see if it can survive a forty foot drop, just so she can be a youtube sensation. My iPad is now broken and she has 83 views. I know this is entirely off topic but I had to share it with someone!
obviously like your website but you need to check the spelling on quite a few of your posts. Many of them are rife with spelling problems and I to find it very bothersome to inform the truth then again I will surely come back again.
I have been exploring for a little bit for any high-quality articles or blog posts on this sort of area . Exploring in Yahoo I at last stumbled upon this website. Reading this information So i am happy to convey that I have a very good uncanny feeling I discovered just what I needed. I most certainly will make certain to do not forget this web site and give it a glance on a constant basis.
ForsythSoftware.com provides rapid quick-starts for Salesforce.com CRM. Be it Sales Cloud, Service Cloud or Marketing Cloud, get quality support from our certified professionals. Contact us at [email protected] and ask for a no obligation system evaluation today.
certainly like your web-site but you need to take a look at the spelling on quite a few of your posts. A number of them are rife with spelling issues and I to find it very bothersome to tell the truth however I?¦ll certainly come back again.
ForsythSoftware.com provides rapid quick-starts for Salesforce.com CRM. Be it Sales Cloud, Service Cloud or Marketing Cloud, get quality support from our certified professionals. Contact us at [email protected] and ask for a no obligation system evaluation today.
I needed to post you one very small remark so as to thank you very much the moment again on the pleasing principles you have shared here. This is so shockingly generous with people like you to give without restraint exactly what many of us would have offered for sale for an electronic book in making some money on their own, chiefly considering that you could have tried it in case you desired. The basics likewise acted as the great way to know that many people have similar eagerness much like mine to grasp lots more pertaining to this matter. I’m sure there are many more pleasurable moments ahead for folks who look over your site.
Hello, i read your blog from time to time and i own a similar one and i was just curious if you get a lot of spam responses? If so how do you reduce it, any plugin or anything you can advise? I get so much lately it’s driving me insane so any assistance is very much appreciated.
You made some good points there. I looked on the internet for the topic and found most guys will go along with with your blog.
I have learn a few just right stuff here. Certainly price bookmarking for revisiting. I wonder how much effort you set to create this kind of great informative web site.
Great web site. Lots of useful information here. I?m sending it to some friends ans also sharing in delicious. And of course, thanks for your effort!
Really enjoyed this blog post, how can I make is so that I get an update sent in an email whenever you write a fresh update?
Hi, I think your site might be having browser compatibility issues. When I look at your website in Safari, it looks fine but when opening in Internet Explorer, it has some overlapping. I just wanted to give you a quick heads up! Other then that, fantastic blog!
excellent points altogether, you just gained a new reader. What would you recommend about your post that you made a few days ago? Any positive?
Usually I do not learn article on blogs, but I wish to say that this write-up very forced me to try and do so! Your writing taste has been surprised me. Thanks, quite nice post.
It is perfect time to make some plans for the future and it is time to be happy. I have read this post and if I could I desire to suggest you few interesting things or advice. Maybe you could write next articles referring to this article. I desire to read even more things about it!
Hey this is great article. I will certainly personally recommend to my friends. I’m confident they will be benefited from this website.
I’ll right away grab your rss as I can not find your email subscription link or newsletter service. Do you have any? Kindly let me know so that I could subscribe. Thanks.
Thank you for the auspicious writeup. It in fact was a amusement account it. Look advanced to more added agreeable from you! However, how could we communicate?
One thing is the fact that one of the most common incentives for applying your card is a cash-back and also rebate supply. Generally, you’ll have access to 1-5 back on various expenses. Depending on the credit cards, you may get 1 again on most purchases, and 5 back again on purchases made using convenience stores, filling stations, grocery stores in addition to ‘member merchants’.
Hi , I do believe this is an excellent blog. I stumbled upon it on Yahoo , i will come back once again. Money and freedom is the best way to change, may you be rich and help other people.
wonderful put up, very informative. I ponder why the opposite specialists of this sector don’t understand this. You should continue your writing. I’m sure, you have a great readers’ base already!
Hi there! This post couldn’t be written any better! Reading through this post reminds me of my previous room mate! He always kept talking about this. I will forward this article to him. Pretty sure he will have a good read. Thank you for sharing!
Its like you read my mind! You appear to know a lot about this, like you wrote the book in it or something. I think that you can do with some pics to drive the message home a little bit, but instead of that, this is magnificent blog. A great read. I’ll certainly be back.
Hi, Neat post. There is a problem together with your website in internet explorer, could check this?K IE still is the market leader and a big portion of folks will leave out your fantastic writing due to this problem.
Hiya, I’m really glad I have found this information. Nowadays bloggers publish only about gossips and net and this is really frustrating. A good blog with interesting content, that is what I need. Thanks for keeping this web-site, I will be visiting it. Do you do newsletters? Can’t find it.
Hey this is somewhat of off topic but I was wanting to know if blogs use WYSIWYG editors or if you have to manually code with HTML. I’m starting a blog soon but have no coding knowledge so I wanted to get advice from someone with experience. Any help would be enormously appreciated!
You can certainly see your skills in the work you write. The world hopes for more passionate writers like you who aren’t afraid to say how they believe. Always go after your heart.
Normally I do not read post on blogs, however I would like to say that this write-up very compelled me to try and do so! Your writing style has been amazed me. Thanks, very great post.
I do not know whether it’s just me or if perhaps everybody else encountering issues with your blog. It appears like some of the text in your posts are running off the screen. Can somebody else please provide feedback and let me know if this is happening to them too? This may be a issue with my web browser because I’ve had this happen previously. Appreciate it|
Hey there I am so happy I found your weblog, I really found you by accident, while I was looking on Askjeeve for something else, Regardless I am here now and would just like to say cheers for a marvelous post and a all round entertaining blog (I also love the theme/design), I don’t have time to read it all at the moment but I have book-marked it and also added your RSS feeds, so when I have time I will be back to read much more, Please do keep up the great work.
This web site is mostly a walk-by way of for all of the information you wished about this and didn?t know who to ask. Glimpse here, and you?ll undoubtedly uncover it.
Great website. Lots of useful information here. I am sending it to a few buddies ans additionally sharing in delicious. And of course, thanks on your sweat!
Excellent website. A lot of useful info here. I?m sending it to some friends ans also sharing in delicious. And of course, thanks for your effort!
whoah this blog is magnificent i love reading your posts. Keep up the great work! You know, a lot of people are searching around for this information, you could help them greatly.
I feel that is one of the such a lot vital information for me. And i’m happy reading your article. However wanna observation on few general things, The site taste is wonderful, the articles is in reality great : D. Good activity, cheers
Some genuinely grand work on behalf of the owner of this site, utterly great content material.
Through my research, shopping for electronic products online may be easily expensive, nevertheless there are some tips and tricks that you can use to acquire the best things. There are usually ways to come across discount bargains that could make one to possess the best electronic products products at the cheapest prices. Good blog post.
Excellent blog post here and useful information. Thank you very much for sharing your experience and good luck in future blogging
magnificent issues altogether, you just won a logo new reader. What might you recommend in regards to your publish that you made a few days in the past? Any positive?
Magnificent web site. A lot of helpful info here. I?m sending it to a few buddies ans additionally sharing in delicious. And obviously, thank you for your effort!
so much wonderful information on here, : D.
I have not checked in here for a while since I thought it was getting boring, but the last few posts are good quality so I guess I’ll add you back to my daily bloglist. You deserve it my friend 🙂
Hello there, just became alert to your blog through Google, and found that it’s really informative. I am gonna watch out for brussels. I’ll appreciate if you continue this in future. Numerous people will be benefited from your writing. Cheers!
I like this post, enjoyed this one regards for putting up. “Abortion is advocated only by persons who have themselves been born.” by Ronald Reagan.
Thanks for your tips. One thing we’ve noticed is the fact banks plus financial institutions really know the spending patterns of consumers and also understand that many people max out their credit cards around the holidays. They wisely take advantage of this real fact and start flooding a person’s inbox in addition to snail-mail box having hundreds of 0 APR credit cards offers just after the holiday season ends. Knowing that if you’re like 98 of American open public, you’ll soar at the one opportunity to consolidate consumer credit card debt and switch balances towards 0 apr interest rates credit cards.
One more issue is that video games are normally serious in nature with the key focus on knowing things rather than fun. Although, it comes with an entertainment feature to keep your sons or daughters engaged, each game will likely be designed to focus on a specific experience or program, such as mathematics or research. Thanks for your post.
Can I just say what a relief to find someone who actually knows what theyre talking about on the internet. You definitely know how to bring an issue to light and make it important. More people need to read this and understand this side of the story. I cant believe youre not more popular because you definitely have the gift.
One thing I’d prefer to say is that often car insurance termination is a dreadful experience and if you are doing the right things as a driver you simply won’t get one. Lots of people do obtain notice that they have been officially dumped by the insurance company they then have to scramble to get supplemental insurance following a cancellation. Low-priced auto insurance rates are usually hard to get after the cancellation. Knowing the main reasons pertaining to auto insurance canceling can help car owners prevent completely losing in one of the most vital privileges readily available. Thanks for the suggestions shared by your blog.
I like this weblog so much, saved to favorites.
Some genuinely nice stuff on this site, I like it.
you are truly a excellent webmaster. The web site loading pace is incredible. It sort of feels that you’re doing any distinctive trick. In addition, The contents are masterwork. you’ve done a magnificent process on this matter!
What i don’t realize is in fact how you are now not really much more neatly-preferred than you might be right now. You are so intelligent. You realize therefore considerably with regards to this matter, made me in my view consider it from a lot of varied angles. Its like women and men are not fascinated unless it is one thing to accomplish with Lady gaga! Your personal stuffs outstanding. Always handle it up!
I will right away seize your rss feed as I can not to find your e-mail subscription link or newsletter service. Do you have any? Kindly allow me understand in order that I may subscribe. Thanks.
Its like you read my mind! You appear to know a lot about this, like you wrote the book in it or something. I think that you can do with some pics to drive the message home a little bit, but other than that, this is fantastic blog. An excellent read. I will certainly be back.
you are really a good webmaster. The website loading speed is amazing. It seems that you are doing any unique trick. Also, The contents are masterpiece. you’ve done a fantastic job on this topic!
You really make it seem so easy with your presentation however I in finding this matter to be actually something that I think I’d by no means understand. It seems too complex and very wide for me. I’m having a look ahead to your subsequent put up, I?ll try to get the dangle of it!
Heya i?m for the first time here. I came across this board and I find It truly useful & it helped me out a lot. I hope to give something back and help others like you helped me.
I have been exploring for a little for any high quality articles or blog posts on this kind of area . Exploring in Yahoo I at last stumbled upon this site. Reading this info So i am happy to convey that I have a very good uncanny feeling I discovered exactly what I needed. I most certainly will make certain to do not forget this site and give it a look regularly.
Woh I enjoy your blog posts, saved to bookmarks! .
I’ve been absent for some time, but now I remember why I used to love this website. Thanks , I will try and check back more often. How frequently you update your site?
I truly appreciate this post. I have been looking all over for this! Thank goodness I found it on Bing. You have made my day! Thank you again
Thankyou for this post, I am a big big fan of this site would like to proceed updated.
Merely wanna input that you have a very decent site, I love the design it actually stands out.
This design is wicked! You definitely know how to keep a reader entertained. Between your wit and your videos, I was almost moved to start my own blog (well, almost…HaHa!) Great job. I really loved what you had to say, and more than that, how you presented it. Too cool!
you have an amazing weblog here! would you prefer to make some invite posts on my blog?
There are some interesting deadlines on this article but I don?t know if I see all of them center to heart. There may be some validity but I will take maintain opinion until I look into it further. Good article , thanks and we would like extra! Added to FeedBurner as effectively
I liked up to you’ll obtain performed right here. The sketch is tasteful, your authored material stylish. however, you command get got an shakiness over that you would like be turning in the following. unwell unquestionably come more earlier again as precisely the similar nearly very frequently inside case you defend this hike.
Your home is valueble for me. Thanks!?
Heya this is somewhat of off topic but I was wondering if blogs use WYSIWYG editors or if you have to manually code with HTML. I’m starting a blog soon but have no coding skills so I wanted to get advice from someone with experience. Any help would be enormously appreciated!
This really answered my problem, thank you!
I blog quite often and I genuinely appreciate your information. This great article has truly peaked my interest. I’m going to book mark your website and keep checking for new information about once a week. I opted in for your RSS feed as well.
Hey! I could have sworn I’ve been to this website before but after browsing through some of the post I realized it’s new to me. Anyhow, I’m definitely glad I found it and I’ll be bookmarking and checking back frequently!
A lot of of whatever you claim is astonishingly legitimate and that makes me ponder the reason why I hadn’t looked at this with this light previously. Your piece truly did switch the light on for me as far as this subject goes. But at this time there is actually 1 point I am not too comfy with so whilst I make an effort to reconcile that with the main theme of the position, allow me observe what all the rest of the visitors have to point out.Nicely done.
I would like to thnkx for the efforts you’ve put in writing this blog. I am hoping the same high-grade web site post from you in the upcoming also. In fact your creative writing skills has inspired me to get my own website now. Actually the blogging is spreading its wings quickly. Your write up is a good example of it.
I am not certain where you are getting your info, however good topic. I needs to spend a while finding out more or understanding more. Thank you for excellent information I used to be in search of this information for my mission.
hey there and thank you in your information ? I?ve definitely picked up anything new from right here. I did however expertise a few technical points the use of this website, as I skilled to reload the site many instances prior to I may get it to load correctly. I had been considering if your hosting is OK? Not that I’m complaining, but sluggish loading cases times will often have an effect on your placement in google and can harm your high-quality score if advertising and ***********|advertising|advertising|advertising and *********** with Adwords. Anyway I am adding this RSS to my e-mail and could glance out for much more of your respective interesting content. Ensure that you update this once more very soon..
Hi there, I found your site via Google while looking for a related topic, your site came up, it looks great. I have bookmarked it in my google bookmarks.
Can I just say what a reduction to seek out someone who actually is aware of what theyre talking about on the internet. You definitely know the right way to convey a problem to mild and make it important. More individuals need to learn this and perceive this facet of the story. I cant consider youre no more fashionable since you undoubtedly have the gift.
In these days of austerity along with relative stress and anxiety about having debt, a lot of people balk against the idea of utilizing a credit card in order to make acquisition of merchandise as well as pay for a trip, preferring, instead to rely on a tried and trusted procedure for making transaction – cash. However, in case you have the cash on hand to make the purchase fully, then, paradoxically, that’s the best time just to be able to use the card for several causes.
I am not sure where you’re getting your information, but good topic. I needs to spend some time learning much more or understanding more. Thanks for excellent info I was looking for this information for my mission.
I do not even understand how I stopped up right here, but I thought this submit used to be good. I don’t realize who you might be but certainly you’re going to a well-known blogger in case you are not already 😉 Cheers!
Usually I do not read article on blogs, but I wish to say that this write-up very forced me to try and do it! Your writing style has been amazed me. Thanks, quite nice article.
Приемник ЛИРА РП-248-1 основан на супергетеродинном принципе и имеет шесть диапазонов частот, которые позволяют принимать радиосигналы в диапазоне от 0,15 до 30 МГц. Приемник имеет возможность работы в различных режимах, включая АМ, ЧМ, СВ и ДСВ.
Outstanding post, you mentioned some great points in this article. Nice writing skills. Thank you!
You have brought up a very fantastic details, thanks for the post.
Thanks for your beneficial post. Over time, I have come to understand that the symptoms of mesothelioma are caused by this build up of fluid between lining in the lung and the chest cavity. The illness may start within the chest spot and propagate to other body parts. Other symptoms of pleural mesothelioma cancer include weight reduction, severe breathing trouble, vomiting, difficulty swallowing, and swelling of the neck and face areas. It really should be noted that some people with the disease will not experience any kind of serious symptoms at all.
I have discovered some considerations through your blog post. One other thing I would like to say is that there are lots of games available on the market designed specifically for preschool age youngsters. They contain pattern acceptance, colors, pets, and styles. These generally focus on familiarization as opposed to memorization. This helps to keep little ones occupied without having a sensation like they are studying. Thanks
whoah this weblog is great i love reading your posts. Stay up the good work! You already know, lots of persons are looking around for this information, you could help them greatly.
Thank you a bunch for sharing this with all of us you actually recognise what you are talking approximately! Bookmarked. Kindly also consult with my site =). We will have a link exchange contract among us!
Helpful info. Fortunate me I found your site by accident, and I’m shocked why this accident did not came about earlier! I bookmarked it.
Wohh precisely what I was searching for, appreciate it for putting up.
What i do not realize is actually how you’re not really a lot more smartly-appreciated than you might be right now. You’re very intelligent. You recognize thus significantly on the subject of this topic, produced me for my part imagine it from so many varied angles. Its like men and women are not fascinated until it is something to accomplish with Lady gaga! Your own stuffs outstanding. All the time handle it up!
Thanks for your submission. I would also like to comment that the very first thing you will need to accomplish is to see if you really need credit restoration. To do that you have got to get your hands on a copy of your credit profile. That should never be difficult, since government mandates that you are allowed to get one totally free copy of the credit report on a yearly basis. You just have to request the right people. You can either browse the website for that Federal Trade Commission or perhaps contact one of the main credit agencies specifically.
hey there and thanks to your information ? I have definitely picked up something new from proper here. I did on the other hand experience several technical issues using this website, since I skilled to reload the site lots of occasions prior to I may just get it to load correctly. I were wondering in case your web host is OK? No longer that I am complaining, but slow loading instances occasions will often impact your placement in google and can harm your high quality ranking if advertising and ***********|advertising|advertising|advertising and *********** with Adwords. Anyway I am adding this RSS to my e-mail and could look out for much extra of your respective exciting content. Make sure you update this once more very soon..
I would like to thnkx for the efforts you’ve put in writing this site. I am hoping the same high-grade site post from you in the upcoming as well. In fact your creative writing skills has inspired me to get my own web site now. Really the blogging is spreading its wings quickly. Your write up is a good example of it.
My spouse and i were very more than happy that Edward could deal with his survey using the precious recommendations he had in your site. It’s not at all simplistic just to continually be giving freely concepts which most people have been making money from. So we discover we need the website owner to appreciate for this. The type of illustrations you’ve made, the easy blog menu, the relationships you can make it possible to foster – it is all fantastic, and it’s aiding our son in addition to us reason why this matter is amusing, which is especially important. Thanks for all!
I like what you guys are up also. Such intelligent work and reporting! Keep up the excellent works guys I¦ve incorporated you guys to my blogroll. I think it will improve the value of my website 🙂
Admiring the commitment you put into your website and detailed information you provide. It’s great to come across a blog every once in a while that isn’t the same out of date rehashed material. Wonderful read! I’ve bookmarked your site and I’m including your RSS feeds to my Google account.
I?ll right away seize your rss as I can not find your e-mail subscription hyperlink or e-newsletter service. Do you have any? Please let me recognise in order that I may just subscribe. Thanks.
I would also love to add when you do not currently have an insurance policy or else you do not participate in any group insurance, you will well gain from seeking the aid of a health insurance broker. Self-employed or those that have medical conditions typically seek the help of the health insurance dealer. Thanks for your article.
What I have usually told individuals is that when evaluating a good on the net electronics retail store, there are a few issues that you have to take into account. First and foremost, you should really make sure to get a reputable and reliable retailer that has got great evaluations and rankings from other shoppers and marketplace professionals. This will make certain you are dealing with a well-known store that provides good services and support to its patrons. Thanks for sharing your notions on this weblog.
Good day very nice website!! Guy .. Beautiful .. Amazing .. I will bookmark your site and take the feeds also?I’m satisfied to seek out so many useful info here within the publish, we’d like develop more techniques in this regard, thanks for sharing. . . . . .
The other day, while I was at work, my sister stole my iphone and tested to see if it can survive a thirty foot drop, just so she can be a youtube sensation. My apple ipad is now destroyed and she has 83 views. I know this is completely off topic but I had to share it with someone!
Precisely what I was looking for, appreciate it for putting up.
I would also like to add that if you do not already have an insurance policy or you do not participate in any group insurance, you will well reap the benefits of seeking aid from a health insurance agent. Self-employed or those with medical conditions normally seek the help of a health insurance brokerage. Thanks for your text.
I got good info from your blog
One important thing is that when you’re searching for a student loan you may find that you will want a cosigner. There are many scenarios where this is true because you might find that you do not have a past history of credit so the lender will require that you’ve got someone cosign the money for you. Great post.
Hi there, You have performed a great job. I?ll certainly digg it and for my part suggest to my friends. I’m sure they’ll be benefited from this site.
One other important component is that if you are a mature person, travel insurance pertaining to pensioners is something you should make sure you really take into account. The elderly you are, the more at risk you happen to be for making something terrible happen to you while overseas. If you are never covered by several comprehensive insurance cover, you could have a number of serious challenges. Thanks for discussing your guidelines on this blog site.
I would like to thank you for the efforts you’ve put in writing this website. I am hoping the same high-grade blog post from you in the upcoming also. Actually your creative writing skills has inspired me to get my own site now. Really the blogging is spreading its wings fast. Your write up is a good example of it.
I have been browsing online more than three hours nowadays, yet I never found any interesting article like yours. It is pretty worth enough for me. Personally, if all site owners and bloggers made good content as you did, the web will likely be a lot more useful than ever before.
I’ve learned some new things via your web site. One other thing I would really like to say is that newer computer system operating systems often allow more memory to get used, but they in addition demand more memory simply to perform. If a person’s computer cannot handle additional memory as well as the newest software program requires that memory space increase, it could be the time to shop for a new Computer system. Thanks
Out of my research, shopping for gadgets online may be easily expensive, yet there are some tips and tricks that you can use to acquire the best products. There are always ways to obtain discount deals that could help to make one to buy the best electronics products at the cheapest prices. Interesting blog post.
Thank you for sharing superb informations. Your web-site is very cool. I am impressed by the details that you have on this site. It reveals how nicely you perceive this subject. Bookmarked this website page, will come back for extra articles. You, my friend, ROCK! I found simply the info I already searched everywhere and simply could not come across. What a perfect web-site.
I was recommended this blog by means of my cousin. I am no longer sure whether this submit is written through him as no one else know such exact approximately my difficulty. You are incredible! Thanks!
I have observed that car insurance firms know the autos which are at risk from accidents and various risks. In addition they know what style of cars are prone to higher risk and also the higher risk they may have the higher a premium fee. Understanding the easy basics involving car insurance will allow you to choose the right type of insurance policy that should take care of your wants in case you happen to be involved in any accident. Many thanks for sharing the ideas on your own blog.
I think this is among the most significant information for me. And i am glad reading your article. But want to remark on some general things, The site style is wonderful, the articles is really excellent : D. Good job, cheers
Good article. It’s very unfortunate that over the last one decade, the travel industry has already been able to to deal with terrorism, SARS, tsunamis, bird flu, swine flu, and also the first ever true global downturn. Through all this the industry has really proven to be solid, resilient and dynamic, discovering new tips on how to deal with difficulty. There are usually fresh difficulties and opportunities to which the industry must once again adapt and act in response.
Great ? I should certainly pronounce, impressed with your website. I had no trouble navigating through all tabs as well as related information ended up being truly simple to do to access. I recently found what I hoped for before you know it at all. Reasonably unusual. Is likely to appreciate it for those who add forums or anything, web site theme . a tones way for your client to communicate. Nice task..
I like what you guys are up too. Such intelligent work and reporting! Carry on the superb works guys I’ve incorporated you guys to my blogroll. I think it will improve the value of my site 🙂
Hi, I think your blog might be having browser compatibility issues. When I look at your blog in Safari, it looks fine but when opening in Internet Explorer, it has some overlapping. I just wanted to give you a quick heads up! Other then that, awesome blog!
Thanks for discussing your ideas. The first thing is that pupils have an alternative between fed student loan and a private student loan where it really is easier to decide on student loan debt consolidation reduction than over the federal education loan.
Sweet blog! I found it while surfing around on Yahoo News. Do you have any tips on how to get listed in Yahoo News? I’ve been trying for a while but I never seem to get there! Appreciate it
I’ve noticed that credit improvement activity has to be conducted with tactics. If not, chances are you’ll find yourself endangering your standing. In order to be successful in fixing to your credit rating you have to make sure that from this time you pay all your monthly expenses promptly in advance of their timetabled date. It’s really significant since by not really accomplishing that, all other methods that you will take to improve your credit positioning will not be helpful. Thanks for giving your ideas.
I have noticed that in old digital cameras, extraordinary detectors help to {focus|concentrate|maintain focus|target|a**** automatically. Those kind of sensors associated with some cameras change in in the area of contrast, while others start using a beam associated with infra-red (IR) light, specifically in low lighting. Higher specification cameras often use a blend of both systems and probably have Face Priority AF where the digital camera can ‘See’ some sort of face while keeping your focus only in that. Thanks for sharing your notions on this weblog.
It?s actually a great and useful piece of information. I am satisfied that you simply shared this useful information with us. Please stay us informed like this. Thanks for sharing.
Generally I don’t read article on blogs, but I would like to say that this write-up very forced me to try and do so! Your writing style has been surprised me. Thanks, quite nice post.
I don’t ordinarily comment but I gotta state appreciate it for the post on this great one : D.
Really wonderful info can be found on site. “Search others for their virtues, thyself for thy vices.” by Benjamin Franklin.
Admiring the hard work you put into your site and in depth information you present. It’s great to come across a blog every once in a while that isn’t the same unwanted rehashed material. Fantastic read! I’ve saved your site and I’m including your RSS feeds to my Google account.
I’m curious to find out what blog system you happen to be working with? I’m having some small security issues with my latest site and I’d like to find something more risk-free. Do you have any solutions?
We’re a group of volunteers and opening a new scheme in our community. Your site offered us with valuable information to work on. You have done an impressive job and our entire community will be grateful to you.
I have learned several important things as a result of your post. I will also like to say that there may be situation in which you will have a loan and don’t need a co-signer such as a Federal Student Aid Loan. However, if you are getting financing through a traditional finance company then you need to be ready to have a co-signer ready to enable you to. The lenders may base that decision on a few issues but the most important will be your credit rating. There are some loan merchants that will also look at your work history and make up your mind based on this but in most cases it will depend on your score.
Great post. I am facing a couple of these problems.
I think other website proprietors should take this web site as an model, very clean and fantastic user genial style and design, let alone the content. You’re an expert in this topic!
Thank you a lot for providing individuals with such a memorable possiblity to read articles and blog posts from this site. It’s usually very brilliant and as well , jam-packed with a lot of fun for me and my office friends to search your website a minimum of three times every week to read through the new stuff you have. Of course, we’re at all times satisfied with the breathtaking opinions served by you. Some 1 points on this page are ultimately the most efficient I’ve ever had.
You really make it seem so easy together with your presentation but I in finding this matter to be really something which I feel I’d never understand. It seems too complex and extremely extensive for me. I’m taking a look forward in your subsequent post, I will try to get the hang of it!
Thanks for your publication. One other thing is that individual states have their unique laws which affect house owners, which makes it quite difficult for the our lawmakers to come up with the latest set of rules concerning property foreclosure on homeowners. The problem is that each state has got own laws and regulations which may interact in an adverse manner on the subject of foreclosure policies.
That is really fascinating, You are a very skilled blogger. I have joined your feed and sit up for in quest of more of your magnificent post. Additionally, I have shared your site in my social networks!
This website online is really a stroll-by way of for the entire information you needed about this and didn’t know who to ask. Glimpse here, and you’ll positively uncover it.
Thanks for the suggestions you have provided here. Something else I would like to state is that pc memory demands generally rise along with other developments in the technological know-how. For instance, any time new generations of processor chips are brought to the market, there is usually a matching increase in the type preferences of all personal computer memory as well as hard drive space. This is because the software program operated by these processor chips will inevitably increase in power to leverage the new know-how.
F*ckin’ tremendous things here. I am very glad to see your post. Thanks a lot and i’m looking forward to contact you. Will you please drop me a e-mail?
Well I truly liked studying it. This post offered by you is very practical for correct planning.
But wanna admit that this is invaluable, Thanks for taking your time to write this.
Does your blog have a contact page? I’m having trouble locating it but, I’d like to send you an e-mail. I’ve got some suggestions for your blog you might be interested in hearing. Either way, great website and I look forward to seeing it improve over time.
I like what you guys are up too. Such smart work and reporting! Carry on the superb works guys I¦ve incorporated you guys to my blogroll. I think it’ll improve the value of my site 🙂
magnificent issues altogether, you simply gained a emblem new reader. What might you suggest in regards to your publish that you just made a few days ago? Any certain?
I conceive this website has some rattling fantastic information for everyone : D.
I enjoy the efforts you have put in this, appreciate it for all the great content.
I’m still learning from you, but I’m making my way to the top as well. I certainly enjoy reading everything that is posted on your site.Keep the posts coming. I loved it!
I am pleased that I discovered this web site, exactly the right information that I was looking for! .
Attractive section of content. I just stumbled upon your web site and in accession capital to claim that I acquire in fact loved account your blog posts. Any way I?ll be subscribing for your augment and even I achievement you access consistently quickly.
Hi there, simply became aware of your blog via Google, and found that it’s really informative. I am gonna watch out for brussels. I?ll be grateful in case you continue this in future. Many other folks will be benefited from your writing. Cheers!
you’re really a good webmaster. The web site loading speed is amazing. It seems that you are doing any unique trick. Also, The contents are masterwork. you’ve done a wonderful job on this topic!
Some genuinely nice stuff on this website , I like it.
Thanks for some other informative site. The place else could I am getting that type of info written in such an ideal approach? I’ve a venture that I am just now running on, and I’ve been on the glance out for such information.
Thank you a lot for sharing this with all folks you actually understand what you are talking approximately! Bookmarked. Kindly additionally discuss with my web site =). We could have a hyperlink change arrangement among us!
I would like to thnkx for the efforts you have put in writing this blog. I am hoping the same high-grade blog post from you in the upcoming as well. In fact your creative writing abilities has inspired me to get my own blog now. Really the blogging is spreading its wings quickly. Your write up is a good example of it.
Great blog here! Also your web site loads up fast! What web host are you using? Can I get your affiliate link to your host? I wish my website loaded up as fast as yours lol
Thanks for some other informative site. Where else could I get that type of information written in such an ideal approach? I’ve a mission that I am just now operating on, and I have been at the look out for such info.
Thanks for expressing your ideas. The first thing is that pupils have a choice between government student loan and also a private education loan where it really is easier to opt for student loan debt consolidation loan than over the federal education loan.
You are a very clever individual!
Hey very cool site!! Man .. Beautiful .. Amazing .. I will bookmark your blog and take the feeds also?I’m happy to find numerous useful info here in the post, we need work out more techniques in this regard, thanks for sharing. . . . . .
I will immediately snatch your rss as I can’t find your e-mail subscription link or e-newsletter service. Do you have any? Kindly permit me understand so that I could subscribe. Thanks.
I truly appreciate this post. I’ve been looking everywhere for this! Thank goodness I found it on Bing. You’ve made my day! Thx again!
Very good written information. It will be useful to everyone who employess it, as well as yours truly :). Keep up the good work – looking forward to more posts.
I’d have to examine with you here. Which is not one thing I usually do! I take pleasure in reading a post that may make folks think. Additionally, thanks for permitting me to comment!
I like this post, enjoyed this one thanks for posting.
Thanks for the distinct tips provided on this site. I have realized that many insurance carriers offer buyers generous discount rates if they prefer to insure many cars with them. A significant volume of households own several cars or trucks these days, in particular those with more aged teenage young children still living at home, along with the savings with policies can certainly soon begin. So it pays off to look for a good deal.
you are really a good webmaster. The website loading speed is amazing. It seems that you’re doing any unique trick. Furthermore, The contents are masterwork. you have done a wonderful job on this topic!
What i don’t understood is in truth how you are now not actually much more well-favored than you might be right now. You are very intelligent. You recognize thus significantly in terms of this subject, made me in my view imagine it from numerous varied angles. Its like women and men aren’t interested unless it is one thing to do with Lady gaga! Your personal stuffs outstanding. All the time handle it up!
You have mentioned very interesting details! ps nice site.
Hi, i think that i saw you visited my weblog thus i came to ?return the favor?.I’m attempting to find things to enhance my web site!I suppose its ok to use some of your ideas!!
One thing I’d prefer to reply to is that fat reduction plan fast can be performed by the suitable diet and exercise. A person’s size not simply affects appearance, but also the actual quality of life. Self-esteem, depression, health risks, as well as physical capabilities are damaged in weight gain. It is possible to do everything right but still gain. In such a circumstance, a problem may be the root cause. While an excessive amount food and never enough body exercise are usually guilty, common medical ailments and popular prescriptions can greatly amplify size. Thx for your post in this article.
Its like you learn my thoughts! You appear to grasp a lot approximately this, like you wrote the book in it or something. I feel that you just could do with some p.c. to drive the message house a bit, however other than that, that is wonderful blog. A great read. I’ll certainly be back.
Hey there I am so glad I found your blog page, I really found you by error, while I was researching on Aol for something else, Anyhow I am here now and would just like to say cheers for a remarkable post and a all round enjoyable blog (I also love the theme/design), I don’t have time to browse it all at the moment but I have bookmarked it and also included your RSS feeds, so when I have time I will be back to read more, Please do keep up the great work.
I’m not sure why but this web site is loading incredibly slow for me. Is anyone else having this problem or is it a problem on my end? I’ll check back later on and see if the problem still exists.
Hi my friend! I wish to say that this article is awesome, great written and come with almost all significant infos. I would like to look extra posts like this .
Thanks a lot for sharing this with all of us you really know what you are talking about! Bookmarked. Kindly also visit my website =). We could have a link exchange contract between us!
I liked as much as you will obtain performed right here. The sketch is tasteful, your authored subject matter stylish. however, you command get got an shakiness over that you want be delivering the following. unwell certainly come further previously once more as exactly the similar nearly very often within case you shield this increase.
Pretty part of content. I just stumbled upon your website and in accession capital to claim that I acquire in fact loved account your weblog posts. Any way I’ll be subscribing in your feeds or even I fulfillment you access consistently rapidly.
I like what you guys are up also. Such intelligent work and reporting! Carry on the superb works guys I have incorporated you guys to my blogroll. I think it will improve the value of my site 🙂
Wow, marvelous blog layout! How long have you been blogging for? you make blogging look easy. The overall look of your website is magnificent, let alone the content!
I do enjoy the way you have framed this particular issue and it does indeed give me personally some fodder for consideration. Nonetheless, coming from just what I have seen, I really trust when other feedback pile on that people today continue to be on issue and don’t get started upon a tirade of the news du jour. All the same, thank you for this exceptional piece and although I can not really agree with it in totality, I respect your point of view.
I discovered your blog site on google and check a few of your early posts. Continue to keep up the very good operate. I just additional up your RSS feed to my MSN News Reader. Seeking forward to reading more from you later on!…
Howdy! I know this is somewhat off topic but I was wondering if you knew where I could find a captcha plugin for my comment form? I’m using the same blog platform as yours and I’m having trouble finding one? Thanks a lot!
very nice submit, i certainly love this website, keep on it
I’ve recently started a site, the info you offer on this website has helped me tremendously. Thanks for all of your time & work. “My dear and old country, here we are once again together faced with a heavy trial.” by Charles De Gaulle.
I like what you guys are up too. Such intelligent work and reporting! Keep up the excellent works guys I?ve incorporated you guys to my blogroll. I think it’ll improve the value of my site 🙂
Thanks for the different tips shared on this blog. I have realized that many insurance companies offer customers generous special discounts if they favor to insure multiple cars with them. A significant amount of households include several autos these days, specifically those with older teenage young children still residing at home, as well as the savings with policies can soon begin. So it is good to look for a great deal.
hello!,I really like your writing very so much! percentage we keep up a correspondence more approximately your article on AOL? I need a specialist on this space to solve my problem. Maybe that is you! Taking a look forward to peer you.
In this awesome design of things you actually secure a B- for hard work. Where exactly you actually lost me ended up being in the specifics. You know, they say, details make or break the argument.. And it couldn’t be much more accurate at this point. Having said that, allow me say to you exactly what did deliver the results. Your article (parts of it) can be highly powerful and this is possibly why I am taking the effort in order to opine. I do not really make it a regular habit of doing that. Next, even though I can certainly notice the jumps in reasoning you make, I am definitely not convinced of exactly how you appear to connect the ideas which inturn help to make your final result. For now I shall yield to your issue but wish in the near future you actually link your facts much better.
One more thing. I believe that there are numerous travel insurance web pages of trustworthy companies that allow you to enter your vacation details and get you the quotes. You can also purchase an international travel insurance policy on the web by using your current credit card. All that you should do is usually to enter the travel specifics and you can see the plans side-by-side. Merely find the program that suits your budget and needs and after that use your bank credit card to buy the idea. Travel insurance on the web is a good way to start looking for a dependable company for international holiday insurance. Thanks for expressing your ideas.
I have observed that online diploma is getting favorite because accomplishing your college degree online has turned into a popular method for many people. Numerous people have not really had a chance to attend a traditional college or university nevertheless seek the improved earning potential and a better job that a Bachelors Degree affords. Still some others might have a degree in one discipline but would want to pursue one thing they now possess an interest in.
Hmm it appears like your site ate my first comment (it was extremely long) so I guess I’ll just sum it up what I had written and say, I’m thoroughly enjoying your blog. I as well am an aspiring blog writer but I’m still new to everything. Do you have any helpful hints for rookie blog writers? I’d certainly appreciate it.
Wow that was strange. I just wrote an extremely long comment but after I clicked submit my comment didn’t appear. Grrrr… well I’m not writing all that over again. Anyhow, just wanted to say excellent blog!
Thanks for the suggestions you are discussing on this weblog. Another thing I’d prefer to say is that getting hold of duplicates of your credit profile in order to check out accuracy of any detail is the first motion you have to perform in credit score improvement. You are looking to thoroughly clean your credit file from damaging details errors that spoil your credit score.
Good website! I truly love how it is simple on my eyes and the data are well written. I’m wondering how I could be notified when a new post has been made. I have subscribed to your RSS feed which must do the trick! Have a nice day!
Hi just wanted to give you a quick heads up and let you know a few of the pictures aren’t loading correctly. I’m not sure why but I think its a linking issue. I’ve tried it in two different web browsers and both show the same outcome.
I used to be recommended this web site by way of my cousin. I’m no longer positive whether this publish is written via him as nobody else know such particular about my difficulty. You are wonderful! Thanks!
Hello are using WordPress for your site platform? I’m new to the blog world but I’m trying to get started and create my own. Do you need any coding knowledge to make your own blog? Any help would be greatly appreciated!
I see something really interesting about your site so I saved to bookmarks.
F*ckin? amazing issues here. I?m very satisfied to see your article. Thank you so much and i’m looking ahead to contact you. Will you please drop me a mail?
Thank you for the sensible critique. Me & my neighbor were just preparing to do some research about this. We got a grab a book from our local library but I think I learned more clear from this post. I am very glad to see such fantastic information being shared freely out there.
I really like your writing style, wonderful information, thanks for posting : D.
Hi, Neat post. There’s an issue together with your site in web explorer, could test this… IE still is the market leader and a large portion of people will miss your great writing because of this problem.
I am usually to blogging and i actually admire your content. The article has actually peaks my interest. I am going to bookmark your site and hold checking for brand spanking new information.
But wanna input on few general things, The website style is perfect, the articles is rattling good : D.
Ограничение на время жизни сообщения: Сообщения автоматически удаляются через 24 часа после отправки, что может быть недостаточно для пользователей, которым нужно дольше сохранять свою переписку.
I’ve been surfing on-line more than three hours these days, yet I by no means found any fascinating article like yours. It is pretty value sufficient for me. Personally, if all web owners and bloggers made good content material as you did, the internet will be much more useful than ever before.
Definitely a magnificent site and revealing posts, I surely will bookmark your website.Best Regards!
you are really a good webmaster. The site loading speed is amazing. It seems that you are doing any unique trick. In addition, The contents are masterwork. you’ve done a excellent job on this topic!
One other issue is when you are in a circumstances where you don’t have a co-signer then you may really need to try to wear out all of your financing options. You will find many grants and other grants that will present you with funds to help with college expenses. Thx for the post.
As soon as I observed this web site I went on reddit to share some of the love with them.
Very interesting information!Perfect just what I was looking for!
Thanks for the a new challenge you have disclosed in your writing. One thing I would like to touch upon is that FSBO associations are built as time passes. By introducing yourself to owners the first weekend their FSBO is announced, ahead of the masses get started calling on Monday, you produce a good association. By giving them equipment, educational components, free accounts, and forms, you become an ally. By taking a personal curiosity about them along with their situation, you develop a solid connection that, on most occasions, pays off as soon as the owners opt with a real estate agent they know as well as trust – preferably you.
Good web site! I truly love how it is easy on my eyes and the data are well written. I am wondering how I could be notified whenever a new post has been made. I’ve subscribed to your RSS which must do the trick! Have a great day!
I like this web blog so much, saved to my bookmarks.
Thanks for revealing your ideas with this blog. Furthermore, a fantasy regarding the lenders intentions while talking about property foreclosure is that the standard bank will not take my repayments. There is a certain quantity of time in which the bank will take payments every now and then. If you are far too deep inside the hole, they should commonly call that you pay that payment completely. However, that doesn’t mean that they will have any sort of payments at all. When you and the financial institution can manage to work a thing out, a foreclosure approach may end. However, if you ever continue to miss payments wih the new approach, the foreclosed process can pick up from where it was left off.
Just wish to say your article is as astounding. The clearness on your post is simply spectacular and i could think you are an expert on this subject. Fine together with your permission let me to grasp your RSS feed to stay updated with forthcoming post. Thanks one million and please keep up the enjoyable work.
Hey! I just wanted to ask if you ever have any problems with hackers? My last blog (wordpress) was hacked and I ended up losing months of hard work due to no backup. Do you have any methods to stop hackers?
Thanks for some other informative web site. Where else may just I am getting that type of information written in such a perfect way? I have a challenge that I am just now operating on, and I have been on the look out for such info.
Wow! Thank you! I continually wanted to write on my blog something like that. Can I take a part of your post to my site?
Awsome post and straight to the point. I don’t know if this is actually the best place to ask but do you folks have any thoughts on where to employ some professional writers? Thank you 🙂
Super-Duper site! I am loving it!! Will come back again. I am taking your feeds also.
Can I simply say what a relief to search out someone who really is aware of what theyre speaking about on the internet. You undoubtedly know how to carry a difficulty to light and make it important. More individuals have to read this and perceive this facet of the story. I cant imagine youre no more fashionable because you definitely have the gift.
I love your blog.. very nice colors & theme. Did you design this website yourself or did you hire someone to do it for you? Plz reply as I’m looking to design my own blog and would like to find out where u got this from. thank you
Thanks for some other informative site. Where else may just I am getting that kind of info written in such a perfect manner? I have a undertaking that I am simply now running on, and I’ve been at the glance out for such info.
We are a group of volunteers and starting a new scheme in our community. Your web site offered us with valuable information to work on. You’ve done a formidable job and our entire community will be thankful to you.
Thanks for another informative blog. Where else may just I get that kind of info written in such an ideal means? I have a undertaking that I am just now operating on, and I have been on the glance out for such information.
whoah this blog is excellent i love reading your articles. Stay up the good work! You understand, many persons are looking around for this information, you could help them greatly.
After study just a few of the weblog posts in your website now, and I really like your method of blogging. I bookmarked it to my bookmark website checklist and can be checking again soon. Pls take a look at my web page as properly and let me know what you think.
The other day, while I was at work, my cousin stole my apple ipad and tested to see if it can survive a thirty foot drop, just so she can be a youtube sensation. My iPad is now destroyed and she has 83 views. I know this is completely off topic but I had to share it with someone!
Excellent post. I was checking constantly this blog and I am impressed! Very helpful info specifically the last part 🙂 I care for such information much. I was looking for this certain information for a very long time. Thank you and best of luck.
This really answered my problem, thank you!
Very interesting subject, regards for putting up.
My husband and i ended up being so joyous Emmanuel could finish off his basic research via the precious recommendations he had through your web page. It is now and again perplexing to simply always be handing out secrets men and women may have been selling. Therefore we remember we need the writer to appreciate because of that. The main illustrations you’ve made, the easy web site navigation, the relationships your site assist to instill – it’s all extraordinary, and it’s really letting our son and our family feel that that content is awesome, and that’s especially serious. Thank you for the whole lot!
We’re a group of volunteers and starting a new scheme in our community. Your website provided us with valuable info to work on. You have done an impressive job and our entire community will be thankful to you.
Hi my friend! I wish to say that this article is amazing, great written and come with almost all vital infos. I?d like to peer extra posts like this .
Hi, just required you to know I he added your site to my Google bookmarks due to your layout. But seriously, I believe your internet site has 1 in the freshest theme I??ve came across. It extremely helps make reading your blog significantly easier.
I’m in awe of the author’s capability to make intricate concepts understandable to readers of all backgrounds. This article is a testament to her expertise and passion to providing valuable insights. Thank you, author, for creating such an captivating and insightful piece. It has been an unforgettable experience to read!
Some very interesting points made in this post. Glad i found it. Thanks for sharing such valuable information.
Howdy just wanted to give you a quick heads up. The words in your post seem to be running off the screen in Internet explorer. I’m not sure if this is a formatting issue or something to do with browser compatibility but I figured I’d post to let you know. The style and design look great though! Hope you get the problem fixed soon. Thanks
Spot on with this write-up, I actually assume this web site wants much more consideration. I’ll in all probability be once more to read way more, thanks for that info.
It’s actually a cool and useful piece of information. I am glad that you shared this useful info with us. Please keep us informed like this. Thanks for sharing.
I would like to express my appreciation to you just for rescuing me from this particular issue. After searching through the world-wide-web and seeing basics that were not pleasant, I assumed my entire life was over. Being alive devoid of the solutions to the difficulties you have sorted out as a result of your short post is a crucial case, as well as the ones which may have in a negative way damaged my entire career if I hadn’t come across the blog. Your own capability and kindness in playing with all areas was vital. I am not sure what I would’ve done if I had not encountered such a point like this. It’s possible to at this time look forward to my future. Thank you very much for your reliable and results-oriented guide. I won’t hesitate to endorse the sites to anybody who needs guidance about this issue.
nice game to play.
website berita tekno dan gadget terkini hanya di buzzertekno
I think this website has some rattling fantastic info for everyone :D. “We rarely think people have good sense unless they agree with us.” by Francois de La Rochefoucauld.
I really prize your work, Great post.
Good – I should definitely pronounce, impressed with your web site. I had no trouble navigating through all the tabs and related information ended up being truly simple to do to access. I recently found what I hoped for before you know it in the least. Reasonably unusual. Is likely to appreciate it for those who add forums or anything, website theme . a tones way for your customer to communicate. Nice task.
Thank you for sharing excellent informations. Your web site is very cool. I’m impressed by the details that you?¦ve on this web site. It reveals how nicely you perceive this subject. Bookmarked this web page, will come back for extra articles. You, my pal, ROCK! I found just the information I already searched everywhere and simply couldn’t come across. What an ideal web site.
Very interesting topic, thanks for posting.
Hi there! Someone in my Facebook group shared this website with us so I came to check it out. I’m definitely loving the information. I’m bookmarking and will be tweeting this to my followers! Fantastic blog and amazing style and design.
I as well believe thence, perfectly pent post! .
I appreciate, cause I found exactly what I was looking for. You’ve ended my 4 day long hunt! God Bless you man. Have a nice day. Bye
Greetings from Ohio! I’m bored to tears at work so I decided to browse your blog on my iphone during lunch break. I enjoy the information you present here and can’t wait to take a look when I get home. I’m amazed at how fast your blog loaded on my cell phone .. I’m not even using WIFI, just 3G .. Anyways, great blog!
Merely wanna state that this is very useful, Thanks for taking your time to write this.
This web site is really a stroll-through for all of the data you wanted about this and didn’t know who to ask. Glimpse right here, and you’ll undoubtedly uncover it.
I just couldn’t depart your web site before suggesting that I actually enjoyed the standard info a person provide for your visitors? Is gonna be back often to check up on new posts
Thank you for another excellent article. The place else may anyone get that type of information in such a perfect approach of writing? I have a presentation subsequent week, and I’m at the look for such info.
With havin so much content and articles do you ever run into any issues of plagorism or copyright infringement? My website has a lot of exclusive content I’ve either written myself or outsourced but it appears a lot of it is popping it up all over the internet without my permission. Do you know any methods to help protect against content from being ripped off? I’d genuinely appreciate it.
Simply desire to say your article is as astonishing. The clearness to your submit is just cool and i can assume you’re knowledgeable in this subject. Fine along with your permission allow me to seize your RSS feed to keep updated with imminent post. Thanks a million and please keep up the enjoyable work.
Can I just say what a aid to seek out someone who really is aware of what theyre talking about on the internet. You undoubtedly know the right way to convey an issue to light and make it important. More folks must read this and perceive this side of the story. I cant consider youre no more standard since you positively have the gift.
Dead composed content material, regards for entropy.
Way cool, some valid points! I appreciate you making this article available, the rest of the site is also high quality. Have a fun.
Excellent goods from you, man. I’ve take into account your stuff previous to and you’re just too fantastic. I really like what you have received here, certainly like what you are stating and the way in which during which you assert it. You are making it enjoyable and you still take care of to keep it wise. I can not wait to read far more from you. This is really a terrific website.
Hi my family member! I wish to say that this post is awesome, great written and come with approximately all important infos. I’d like to look more posts like this .
Thank you a lot for sharing this with all folks you actually understand what you are talking approximately! Bookmarked. Kindly also consult with my site =). We could have a link trade arrangement between us!
Only wanna admit that this is very useful, Thanks for taking your time to write this.
It?s laborious to seek out educated folks on this topic, however you sound like you realize what you?re talking about! Thanks
Heya i am for the first time here. I came across this board and I find It truly useful & it helped me out much. I’m hoping to offer something again and aid others such as you aided me.
I am not rattling fantastic with English but I line up this real easy to understand.
Keep working ,terrific job!
Fantastic beat ! I would like to apprentice even as you amend your site, how can i subscribe for a blog site? The account helped me a applicable deal. I were tiny bit acquainted of this your broadcast provided bright clear idea
Hi just wanted to give you a brief heads up and let you know a few of the pictures aren’t loading properly. I’m not sure why but I think its a linking issue. I’ve tried it in two different internet browsers and both show the same outcome.
Hi there, just became alert to your blog through Google, and found that it is really informative. I am gonna watch out for brussels. I will appreciate if you continue this in future. A lot of people will be benefited from your writing. Cheers!
What i don’t understood is actually how you’re not actually a lot more smartly-favored than you might be now. You’re very intelligent. You understand thus considerably on the subject of this subject, produced me in my view consider it from a lot of numerous angles. Its like men and women are not involved until it is one thing to accomplish with Lady gaga! Your personal stuffs nice. Always maintain it up!
Your home is valueble for me. Thanks!…
I think this is one of the most significant info for me. And i’m glad reading your article. But wanna remark on few general things, The website style is perfect, the articles is really excellent : D. Good job, cheers
Hi my family member! I wish to say that this post is awesome, nice written and come with almost all vital infos. I would like to peer more posts like this .
Some really nice and useful info on this web site, besides I conceive the design and style has good features.
hello!,I like your writing so much! share we communicate more about your post on AOL? I require a specialist on this area to solve my problem. Maybe that’s you! Looking forward to see you.
I haven?¦t checked in here for a while since I thought it was getting boring, but the last few posts are good quality so I guess I?¦ll add you back to my everyday bloglist. You deserve it my friend 🙂
Thank you a lot for sharing this with all people you really recognise what you’re talking about! Bookmarked. Kindly additionally talk over with my website =). We could have a link change arrangement between us!
I am perpetually thought about this, thanks for posting.
Would you be all in favour of exchanging hyperlinks?
Thanks for giving your ideas. I’d personally also like to express that video games have been ever before evolving. Modern tools and innovative developments have served create authentic and active games. These kinds of entertainment video games were not actually sensible when the actual concept was being tried. Just like other kinds of electronics, video games too have had to progress as a result of many ages. This itself is testimony towards the fast development of video games.
Incredible points made in this article. Outstanding arguments. Keep up the great work. LOVE your writing skills
Hello, Neat post. There’s a problem together with your web site in internet explorer, might test this? IE nonetheless is the marketplace leader and a big portion of other people will leave out your fantastic writing because of this problem.
With havin so much content and articles do you ever run into any problems of plagorism or copyright violation? My site has a lot of completely unique content I’ve either written myself or outsourced but it seems a lot of it is popping it up all over the internet without my authorization. Do you know any techniques to help prevent content from being ripped off? I’d truly appreciate it.
I do enjoy the way you have presented this particular challenge plus it does give me personally some fodder for consideration. Nonetheless, because of everything that I have seen, I just simply hope as the remarks stack on that people keep on point and not start on a tirade regarding some other news du jour. Yet, thank you for this excellent piece and while I can not really concur with this in totality, I respect your perspective.
My brother suggested I might like this blog. He was entirely right. This post truly made my day. You can not imagine simply how much time I had spent for this information! Thanks!
A formidable share, I simply given this onto a colleague who was doing a little bit analysis on this. And he in truth purchased me breakfast as a result of I found it for him.. smile. So let me reword that: Thnx for the deal with! But yeah Thnkx for spending the time to discuss this, I feel strongly about it and love studying extra on this topic. If possible, as you change into experience, would you thoughts updating your weblog with more particulars? It’s extremely helpful for me. Large thumb up for this weblog submit!
Hello there! Do you know if they make any plugins to assist with Search Engine Optimization? I’m trying to get my blog to rank for some targeted keywords but I’m not seeing very good success. If you know of any please share. Many thanks!
My coder is trying to persuade me to move to .net from PHP. I have always disliked the idea because of the costs. But he’s tryiong none the less. I’ve been using Movable-type on a variety of websites for about a year and am nervous about switching to another platform. I have heard very good things about blogengine.net. Is there a way I can transfer all my wordpress posts into it? Any help would be greatly appreciated!
I couldn’t resist commenting
Some truly interesting points you have written.Helped me a lot, just what I was looking for : D.
Hmm it appears like your site ate my first comment (it was extremely long) so I guess I’ll just sum it up what I had written and say, I’m thoroughly enjoying your blog. I too am an aspiring blog writer but I’m still new to the whole thing. Do you have any tips and hints for rookie blog writers? I’d genuinely appreciate it.
Some really select articles on this internet site, saved to bookmarks.
Great work! This is the type of info that should be shared around the web. Shame on Google for not positioning this post higher! Come on over and visit my site . Thanks =)
Hey There. I found your blog using msn. This is a really well written article. I’ll make sure to bookmark it and come back to read more of your useful info. Thanks for the post. I will certainly comeback.
Definitely, what a fantastic website and informative posts, I definitely will bookmark your site.All the Best!
Hi there, You have performed a great job. I?ll certainly digg it and for my part recommend to my friends. I am confident they will be benefited from this website.
Spot on with this write-up, I truly suppose this website wants rather more consideration. I’ll most likely be once more to read much more, thanks for that info.
Great amazing things here. I?¦m very glad to see your post. Thank you a lot and i am taking a look ahead to touch you. Will you please drop me a e-mail?
Good day! I know this is kinda off topic however I’d figured I’d ask. Would you be interested in exchanging links or maybe guest writing a blog post or vice-versa? My blog addresses a lot of the same subjects as yours and I think we could greatly benefit from each other. If you happen to be interested feel free to send me an email. I look forward to hearing from you! Wonderful blog by the way!
I saw a lot of website but I conceive this one has something special in it in it
whoah this blog is great i really like studying your posts. Keep up the great work! You recognize, a lot of people are searching around for this info, you can help them greatly.
My brother suggested I might like this website. He was totally right. This post truly made my day. You can not imagine just how much time I had spent for this information! Thanks!
I was very pleased to find this web-site.I wanted to thanks for your time for this wonderful read!! I definitely enjoying every little bit of it and I have you bookmarked to check out new stuff you blog post.
Thanks for another informative web site. Where else could I get that type of information written in such an ideal way? I have a project that I’m just now working on, and I have been on the look out for such info.
Hey there, You’ve performed a fantastic job. I?ll definitely digg it and in my view recommend to my friends. I’m confident they will be benefited from this website.
You could certainly see your expertise in the work you write. The world hopes for even more passionate writers like you who are not afraid to say how they believe. Always follow your heart.
I discovered your blog site on google and check a few of your early posts. Continue to keep up the very good operate. I just additional up your RSS feed to my MSN News Reader. Seeking forward to reading more from you later on!…
I’ve been absent for some time, but now I remember why I used to love this site. Thanks , I will try and check back more often. How frequently you update your website?
Good day! Do you use Twitter? I’d like to follow you if that would be okay. I’m absolutely enjoying your blog and look forward to new posts.
Thank you for the auspicious writeup. It if truth be told was a enjoyment account it. Glance advanced to far brought agreeable from you! However, how can we be in contact?
I appreciate, lead to I found just what I used to be taking a look for. You’ve ended my 4 day lengthy hunt! God Bless you man. Have a nice day. Bye
I?ll right away grab your rss as I can not find your e-mail subscription link or e-newsletter service. Do you have any? Kindly let me know so that I could subscribe. Thanks.
I’ve been absent for a while, but now I remember why I used to love this blog. Thank you, I will try and check back more often. How frequently you update your web site?
Hi, i read your blog from time to time and i own a similar one and i was just curious if you get a lot of spam remarks? If so how do you prevent it, any plugin or anything you can recommend? I get so much lately it’s driving me insane so any assistance is very much appreciated.
I believe that is one of the such a lot important info for me. And i’m satisfied reading your article. But wanna remark on some basic things, The website style is perfect, the articles is truly great : D. Excellent job, cheers
Do you mind if I quote a few of your articles as long as I provide credit and sources back to your webpage? My website is in the exact same niche as yours and my users would definitely benefit from a lot of the information you provide here. Please let me know if this alright with you. Many thanks!
I think this website has some rattling good info for everyone :D. “A friend might well be reckoned the masterpiece of nature.” by Ralph Waldo Emerson.
But wanna comment on few general things, The website pattern is perfect, the content is rattling superb. “I have seen the future and it doesn’t work.” by Robert Fulford.
It is in reality a nice and useful piece of information. I?¦m glad that you simply shared this useful info with us. Please keep us up to date like this. Thank you for sharing.
Perfectly pent subject material, thanks for entropy. “The earth was made round so we would not see too far down the road.” by Karen Blixen.
An interesting discussion is worth comment. I think that you should write more on this topic, it might not be a taboo subject but generally people are not enough to speak on such topics. To the next. Cheers
Hi there, You have done an incredible job. I will definitely digg it and personally recommend to my friends. I am confident they’ll be benefited from this website.
What i do not realize is if truth be told how you are not really much more smartly-preferred than you may be right now. You’re very intelligent. You realize therefore considerably in the case of this matter, made me for my part imagine it from numerous various angles. Its like men and women don’t seem to be fascinated except it is something to accomplish with Lady gaga! Your individual stuffs excellent. At all times maintain it up!
Precisely what I was searching for, appreciate it for posting.
Hi, i read your blog occasionally and i own a similar one and i was just wondering if you get a lot of spam feedback? If so how do you protect against it, any plugin or anything you can suggest? I get so much lately it’s driving me insane so any support is very much appreciated.
I got what you intend, thanks for putting up.Woh I am delighted to find this website through google. “Those who corrupt the public mind are just as evil as those who steal from the public.” by Theodor Wiesengrund Adorno.
I conceive you have remarked some very interesting details , thanks for the post.
Magnificent web site. Plenty of useful information here. I am sending it to several friends ans additionally sharing in delicious. And naturally, thanks on your effort!
As a Newbie, I am continuously searching online for articles that can benefit me. Thank you
Hey There. I found your blog the use of msn. That is a very smartly written article. I’ll make sure to bookmark it and come back to learn extra of your useful information. Thanks for the post. I will definitely return.
I was very pleased to find this web-site.I wanted to thanks for your time for this wonderful read!! I definitely enjoying every little bit of it and I have you bookmarked to check out new stuff you blog post.
It?s really a great and useful piece of information. I am glad that you shared this helpful info with us. Please keep us up to date like this. Thank you for sharing.
Thank you sharing all these wonderful discussions. In addition, an excellent travel and medical insurance approach can often eliminate those problems that come with touring abroad. Your medical emergency can quickly become too expensive and that’s sure to quickly impose a financial impediment on the family’s finances. Setting up in place the best travel insurance offer prior to leaving is well worth the time and effort. Thank you
Good day! Do you know if they make any plugins to help with Search Engine Optimization? I’m trying to get my blog to rank for some targeted keywords but I’m not seeing very good results. If you know of any please share. Thank you!
I conceive you have observed some very interesting points, appreciate it for the post.
I was very pleased to find this web-site.I wanted to thanks for your time for this wonderful read!! I definitely enjoying every little bit of it and I have you bookmarked to check out new stuff you blog post.
fantastic post, very informative. I wonder why the other experts of this sector don’t notice this. You must continue your writing. I am sure, you’ve a great readers’ base already!
Some truly great content on this site, regards for contribution.
Wonderful paintings! That is the type of information that should be shared around the net. Disgrace on Google for not positioning this put up higher! Come on over and visit my site . Thank you =)
Thanks for giving your ideas. I might also like to convey that video games have been ever evolving. Modern tools and inventions have made it easier to create genuine and fun games. All these entertainment games were not as sensible when the concept was first of all being used. Just like other areas of electronics, video games too have had to develop through many years. This itself is testimony for the fast continuing development of video games.
There’s noticeably a bundle to know about this. I assume you made certain good factors in options also.
hello there and thanks on your info ? I?ve definitely picked up anything new from proper here. I did however experience a few technical issues the use of this website, as I skilled to reload the website a lot of times previous to I could get it to load properly. I have been thinking about in case your web hosting is OK? Not that I am complaining, however sluggish loading cases times will very frequently affect your placement in google and can harm your high quality ranking if ads and ***********|advertising|advertising|advertising and *********** with Adwords. Anyway I am including this RSS to my email and could glance out for much extra of your respective interesting content. Ensure that you replace this again very soon..
Heya i am for the first time here. I came across this board and I find It really useful & it helped me out a lot. I hope to give something back and help others like you aided me.
I am thankful that I discovered this web blog, exactly the right info that I was searching for! .
A formidable share, I simply given this onto a colleague who was doing a little bit evaluation on this. And he actually bought me breakfast as a result of I discovered it for him.. smile. So let me reword that: Thnx for the treat! However yeah Thnkx for spending the time to discuss this, I really feel strongly about it and love studying more on this topic. If possible, as you turn into expertise, would you mind updating your weblog with more particulars? It’s extremely useful for me. Huge thumb up for this weblog post!
Hey there! This is my first comment here so I just wanted to give a quick shout out and say I really enjoy reading your blog posts. Can you recommend any other blogs/websites/forums that go over the same subjects? Thanks!
Great, Thank you!
Thank you admin!
Attractive section of content. I just stumbled upon your weblog and in accession capital to assert that I acquire in fact enjoyed account your blog posts. Any way I will be subscribing to your augment and even I achievement you access consistently fast.
I got what you intend,saved to favorites, very nice web site.
What I have always told persons is that when searching for a good internet electronics shop, there are a few variables that you have to take into account. First and foremost, you need to make sure to look for a reputable plus reliable retail store that has received great reviews and rankings from other individuals and marketplace experts. This will ensure that you are dealing with a well-known store to provide good program and assistance to its patrons. Thank you for sharing your opinions on this weblog.
My developer is trying to persuade me to move to .net from PHP. I have always disliked the idea because of the expenses. But he’s tryiong none the less. I’ve been using Movable-type on a number of websites for about a year and am worried about switching to another platform. I have heard fantastic things about blogengine.net. Is there a way I can transfer all my wordpress content into it? Any kind of help would be really appreciated!
Wonderful site. Plenty of useful info here. I’m sending it to some friends ans also sharing in delicious. And of course, thanks for your effort!
My wife and i were absolutely thankful Peter managed to conclude his reports by way of the precious recommendations he grabbed while using the site. It is now and again perplexing to just find yourself giving away tricks some people might have been selling. And we all remember we have got you to thank because of that. The entire explanations you have made, the straightforward website navigation, the relationships you can assist to promote – it’s got many astounding, and it’s really leading our son in addition to us consider that the topic is satisfying, and that’s particularly fundamental. Thank you for all the pieces!
hello there and thanks for your info ? I?ve certainly picked up anything new from right here. I did then again experience several technical issues the use of this site, since I skilled to reload the website many occasions prior to I may just get it to load properly. I had been considering in case your hosting is OK? Now not that I am complaining, however slow loading circumstances occasions will very frequently affect your placement in google and could harm your high quality ranking if advertising and ***********|advertising|advertising|advertising and *********** with Adwords. Anyway I am including this RSS to my e-mail and can look out for a lot extra of your respective interesting content. Make sure you update this once more very soon..
Wonderful site. A lot of useful info here. I am sending it to some pals ans additionally sharing in delicious. And naturally, thanks on your effort!
Heya i am for the first time here. I came across this board and I in finding It really helpful & it helped me out much. I hope to offer one thing again and help others like you helped me.
Only a smiling visitant here to share the love (:, btw outstanding style. “Individuals may form communities, but it is institutions alone that can create a nation.” by Benjamin Disraeli.
You made some respectable points there. I appeared on the internet for the difficulty and found most people will associate with with your website.
Wonderful beat ! I wish to apprentice while you amend your website, how can i subscribe for a blog site? The account helped me a acceptable deal. I had been tiny bit acquainted of this your broadcast offered bright clear idea
I do not even know how I ended up here, but I thought this post was good. I do not know who you are but definitely you are going to a famous blogger if you aren’t already 😉 Cheers!
I’m truly enjoying the design and layout of your site. It’s a very easy on the eyes which makes it much more enjoyable for me to come here and visit more often. Did you hire out a designer to create your theme? Excellent work!
Pretty nice post. I just stumbled upon your blog and wanted to say that I’ve truly enjoyed browsing your blog posts. In any case I’ll be subscribing for your feed and I am hoping you write again very soon!
I feel this is among the most important information for me. And i am glad reading your article. However wanna statement on few general issues, The site style is wonderful, the articles is in reality great : D. Just right job, cheers
Hey there I am so delighted I found your webpage, I really found you by mistake, while I was browsing on Yahoo for something else, Anyhow I am here now and would just like to say thank you for a marvelous post and a all round thrilling blog (I also love the theme/design), I don’t have time to read through it all at the minute but I have book-marked it and also added your RSS feeds, so when I have time I will be back to read a great deal more, Please do keep up the fantastic work.
It’s really a nice and helpful piece of information. I’m happy that you simply shared this helpful information with us. Please keep us informed like this. Thanks for sharing.
Hello, you used to write excellent, but the last few posts have been kinda boring?K I miss your tremendous writings. Past few posts are just a little out of track! come on!
Wow! This could be one particular of the most beneficial blogs We have ever arrive across on this subject. Basically Magnificent. I’m also an expert in this topic therefore I can understand your effort.
I think this site has got very good pent subject material articles.
I do like the way you have framed this difficulty plus it really does provide me some fodder for consideration. However, because of everything that I have observed, I just simply hope when other remarks pack on that people remain on point and in no way get started on a tirade regarding the news du jour. Yet, thank you for this fantastic point and while I can not necessarily agree with it in totality, I respect the point of view.
Way cool, some valid points! I appreciate you making this article available, the rest of the site is also high quality. Have a fun.
Almost all of the things you articulate is supprisingly precise and it makes me wonder why I had not looked at this with this light previously. This piece truly did switch the light on for me as far as this specific subject matter goes. Nevertheless at this time there is just one issue I am not too comfy with so while I try to reconcile that with the actual central idea of your position, let me observe exactly what the rest of the readers have to say.Very well done.
I can’t express how much I appreciate the effort the author has put into writing this exceptional piece of content. The clarity of the writing, the depth of analysis, and the abundance of information presented are simply impressive. Her zeal for the subject is apparent, and it has definitely struck a chord with me. Thank you, author, for providing your insights and enlightening our lives with this extraordinary article!
Thanks a bunch for sharing this with all of us you actually realize what you are talking approximately! Bookmarked. Kindly also talk over with my website =). We could have a hyperlink alternate contract among us!
Also I believe that mesothelioma cancer is a scarce form of many forms of cancer that is typically found in people previously subjected to asbestos. Cancerous cellular material form inside mesothelium, which is a safety lining that covers the majority of the body’s body organs. These cells commonly form inside lining on the lungs, tummy, or the sac that encircles one’s heart. Thanks for sharing your ideas.
I conceive you have mentioned some very interesting points, regards for the post.
I’m not that much of a online reader to be honest but your blogs really nice, keep it up! I’ll go ahead and bookmark your site to come back later. Many thanks
Great blog you have here but I was wanting to know if you knew of any community forums that cover the same topics discussed here? I’d really love to be a part of online community where I can get suggestions from other knowledgeable individuals that share the same interest. If you have any recommendations, please let me know. Many thanks!
Thanks for your blog post. I would love to say that the health insurance brokerage also works well with the benefit of the actual coordinators of any group insurance cover. The health insurance agent is given a listing of benefits sought by a person or a group coordinator. Such a broker can is look for individuals or coordinators which in turn best match those desires. Then he reveals his tips and if each party agree, the broker formulates binding agreement between the 2 parties.
Its like you read my thoughts! You seem to grasp a lot approximately this, like you wrote the ebook in it or something. I feel that you just can do with some percent to drive the message home a little bit, but other than that, that is wonderful blog. A great read. I’ll definitely be back.
I love it when people come together and share opinions, great blog, keep it up.
Well I truly enjoyed reading it. This subject offered by you is very useful for correct planning.
Saved as a favorite, I really like your blog!
Today, taking into consideration the fast lifestyle that everyone is having, credit cards have a big demand in the economy. Persons throughout every discipline are using the credit card and people who aren’t using the credit cards have made arrangements to apply for one. Thanks for discussing your ideas on credit cards.
We are a group of volunteers and starting a new scheme in our community. Your website provided us with valuable information to work on. You have done an impressive job and our whole community will be thankful to you.
I think you have observed some very interesting details, appreciate it for the post.
Hello there! Quick question that’s totally off topic. Do you know how to make your site mobile friendly? My web site looks weird when browsing from my iphone 4. I’m trying to find a template or plugin that might be able to correct this problem. If you have any recommendations, please share. Cheers!
I haven¦t checked in here for some time as I thought it was getting boring, but the last several posts are good quality so I guess I will add you back to my daily bloglist. You deserve it my friend 🙂
Hello.This article was extremely interesting, especially because I was browsing for thoughts on this subject last Friday.
I used to be recommended this web site by means of my cousin. I am now not positive whether or not this publish is written through him as nobody else know such special approximately my problem. You’re incredible! Thanks!
Hello, i think that i saw you visited my site thus i came to “return the favor”.I am attempting to find things to improve my web site!I suppose its ok to use some of your ideas!!
Excellent blog here! Also your site loads up very fast! What host are you using? Can I get your affiliate link to your host? I wish my website loaded up as fast as yours lol
I am really enjoying the theme/design of your web site. Do you ever run into any web browser compatibility problems? A few of my blog visitors have complained about my website not operating correctly in Explorer but looks great in Safari. Do you have any solutions to help fix this problem?
I truly appreciate this post. I?ve been looking everywhere for this! Thank goodness I found it on Bing. You’ve made my day! Thx again
My brother recommended I might like this blog. He was entirely right. This post actually made my day. You can not imagine simply how much time I had spent for this information! Thanks!
Hello, i think that i saw you visited my website so i came to “return the favor”.I’m attempting to find things to enhance my site!I suppose its ok to use a few of your ideas!!
The next time I read a blog, I hope that it doesnt disappoint me as much as this one. I mean, I know it was my choice to read, but I actually thought youd have something interesting to say. All I hear is a bunch of whining about something that you could fix if you werent too busy looking for attention.
Thanks for the ideas shared using your blog. Another thing I would like to say is that losing weight is not exactly about going on a dietary fads and trying to shed as much weight as possible in a few days. The most effective way to burn fat is by acquiring it slowly and right after some basic points which can provide help to make the most from your attempt to shed weight. You may realize and be following most of these tips, however reinforcing know-how never affects.
I think other web site proprietors should take this web site as an model, very clean and excellent user genial style and design, as well as the content. You are an expert in this topic!
Well I really liked reading it. This tip offered by you is very practical for accurate planning.
What i don’t understood is actually how you are not actually much more well-liked than you might be right now. You’re very intelligent. You realize thus considerably relating to this subject, produced me personally consider it from a lot of varied angles. Its like women and men aren’t fascinated unless it is one thing to do with Lady gaga! Your own stuffs nice. Always maintain it up!
You are my aspiration, I have few web logs and often run out from to post : (.
I have been surfing online more than 3 hours today, yet I never found any interesting article like yours. It is pretty worth enough for me. In my view, if all site owners and bloggers made good content as you did, the web will be a lot more useful than ever before.
This website online is mostly a stroll-by means of for the entire information you needed about this and didn’t know who to ask. Glimpse here, and you’ll definitely discover it.
Thank you for sharing superb informations. Your site is very cool. I’m impressed by the details that you have on this blog. It reveals how nicely you perceive this subject. Bookmarked this web page, will come back for more articles. You, my friend, ROCK! I found just the information I already searched all over the place and simply could not come across. What a great web site.
I went over this web site and I think you have a lot of great info , saved to my bookmarks (:.
I love your blog.. very nice colors & theme. Did you create this website yourself or did you hire someone to do it for you? Plz respond as I’m looking to construct my own blog and would like to find out where u got this from. appreciate it
One other important part is that if you are a mature person, travel insurance regarding pensioners is something you should really take into account. The mature you are, a lot more at risk you’re for making something negative happen to you while abroad. If you are certainly not covered by a few comprehensive insurance policy, you could have several serious difficulties. Thanks for revealing your suggestions on this web site.
Nice post. I learn something more challenging on different blogs everyday. It will always be stimulating to read content from other writers and practice a little something from their store. I’d prefer to use some with the content on my blog whether you don’t mind. Natually I’ll give you a link on your web blog. Thanks for sharing.
I couldn’t resist commenting
I like the helpful information you provide in your articles. I’ll bookmark your blog and check again here frequently. I am quite sure I will learn a lot of new stuff right here! Best of luck for the next!
Hi, Neat post. There is a problem with your site in internet explorer, would test this? IE still is the market leader and a good portion of people will miss your magnificent writing because of this problem.
Deference to op, some superb information .
I really wanted to jot down a brief word so as to thank you for all of the precious tricks you are sharing on this site. My considerable internet research has at the end been paid with really good ideas to share with my partners. I would claim that we readers are unquestionably fortunate to dwell in a really good website with very many special individuals with great plans. I feel really fortunate to have come across your entire website page and look forward to so many more fun minutes reading here. Thanks once again for a lot of things.
Thanks for the ideas shared on the blog. Another thing I would like to convey is that fat reduction is not exactly about going on a dietary fad and trying to lose as much weight as possible in a couple of days. The most effective way to lose weight naturally is by acquiring it bit by bit and right after some basic recommendations which can help you to make the most from a attempt to drop some weight. You may understand and be following these tips, but reinforcing know-how never does any damage.
I would love to add when you do not already have an insurance policy otherwise you do not take part in any group insurance, you may well make use of seeking aid from a health insurance broker. Self-employed or people having medical conditions normally seek the help of one health insurance agent. Thanks for your short article.
great post, very informative. I wonder why the other specialists of this sector don’t notice this. You must continue your writing. I am sure, you’ve a great readers’ base already!
Loving the info on this website , you have done outstanding job on the articles.
Some truly rattling work on behalf of the owner of this web site, absolutely outstanding subject matter.
What?s Happening i’m new to this, I stumbled upon this I’ve discovered It absolutely useful and it has helped me out loads. I am hoping to contribute & help different users like its aided me. Great job.
certainly like your web-site however you have to take a look at the spelling on several of your posts. Several of them are rife with spelling issues and I in finding it very troublesome to tell the truth then again I will certainly come back again.
Wonderful blog! I found it while surfing around on Yahoo News. Do you have any tips on how to get listed in Yahoo News? I’ve been trying for a while but I never seem to get there! Appreciate it
I really like what you guys tend to be up too. This type of clever work and coverage! Keep up the terrific works guys I’ve you guys to blogroll.
I do trust all of the ideas you’ve offered on your post. They are very convincing and can definitely work. Still, the posts are very short for beginners. May you please lengthen them a little from next time? Thanks for the post.
What i do not understood is actually how you are not really much more well-liked than you may be now. You are very intelligent. You realize therefore significantly relating to this subject, made me personally consider it from so many varied angles. Its like women and men aren’t fascinated unless it’s one thing to accomplish with Lady gaga! Your own stuffs outstanding. Always maintain it up!
I’ve been exploring for a little for any high quality articles or weblog posts in this kind of area . Exploring in Yahoo I finally stumbled upon this web site. Studying this information So i am satisfied to convey that I’ve an incredibly excellent uncanny feeling I found out exactly what I needed. I so much indubitably will make sure to do not fail to remember this web site and give it a glance on a continuing basis.
wonderful points altogether, you simply gained a new reader. What would you recommend in regards to your post that you made a few days ago? Any positive?
Perfectly pent content, thanks for information .
Great weblog right here! Additionally your website lots up fast! What host are you the usage of? Can I get your associate hyperlink in your host? I want my web site loaded up as fast as yours lol
Pretty nice post. I just stumbled upon your weblog and wanted to say that I have really enjoyed browsing your blog posts. After all I?ll be subscribing to your feed and I hope you write again very soon!
Well I definitely liked studying it. This article provided by you is very helpful for accurate planning.
Woh I love your blog posts, saved to bookmarks! .
My brother recommended I might like this web site. He was totally right. This post actually made my day. You cann’t imagine simply how much time I had spent for this information! Thanks!
Fantastic website you have here but I was wanting to know if you knew of any community forums that cover the same topics talked about in this article? I’d really love to be a part of group where I can get suggestions from other experienced individuals that share the same interest. If you have any recommendations, please let me know. Many thanks!
Generally I don’t read article on blogs, but I wish to say that this write-up very forced me to try and do so! Your writing style has been amazed me. Thanks, very nice article.
I like this web site because so much utile material on here : D.
When I initially commented I clicked the -Notify me when new comments are added- checkbox and now each time a comment is added I get four emails with the identical comment. Is there any approach you’ll be able to remove me from that service? Thanks!
What i do not understood is if truth be told how you are now not actually a lot more smartly-appreciated than you may be now. You are so intelligent. You know therefore significantly in terms of this matter, produced me in my opinion believe it from so many numerous angles. Its like women and men are not interested until it¦s something to accomplish with Girl gaga! Your own stuffs nice. Always handle it up!
Keep up the good piece of work, I read few content on this internet site and I conceive that your website is rattling interesting and has circles of excellent info .
A formidable share, I simply given this onto a colleague who was doing a little analysis on this. And he the truth is purchased me breakfast as a result of I found it for him.. smile. So let me reword that: Thnx for the deal with! However yeah Thnkx for spending the time to debate this, I really feel strongly about it and love studying more on this topic. If attainable, as you change into expertise, would you mind updating your weblog with extra details? It is highly useful for me. Big thumb up for this blog post!
Hello There. I found your blog using msn. This is an extremely well written article. I’ll be sure to bookmark it and return to read more of your useful information. Thanks for the post. I’ll definitely return.
Thanks for sharing excellent informations. Your site is very cool. I’m impressed by the details that you’ve on this website. It reveals how nicely you perceive this subject. Bookmarked this website page, will come back for more articles. You, my pal, ROCK! I found just the information I already searched everywhere and simply could not come across. What a great website.
Perfect work you have done, this website is really cool with excellent information.
Hello.This post was extremely remarkable, particularly since I was browsing for thoughts on this issue last Sunday.
This article is absolutely incredible! The author has done a fantastic job of conveying the information in an compelling and informative manner. I can’t thank her enough for sharing such valuable insights that have certainly enhanced my knowledge in this subject area. Kudos to her for crafting such a masterpiece!
Please let me know if you’re looking for a article writer for your blog. You have some really great articles and I think I would be a good asset. If you ever want to take some of the load off, I’d really like to write some content for your blog in exchange for a link back to mine. Please shoot me an email if interested. Regards!
I view something genuinely special in this website .
Hello! This is my first visit to your blog! We are a team of volunteers and starting a new initiative in a community in the same niche. Your blog provided us useful information to work on. You have done a extraordinary job!
In accordance with my study, after a the foreclosure home is offered at a bidding, it is common for your borrower to be able to still have a remaining unpaid debt on the mortgage. There are many loan merchants who aim to have all service fees and liens cleared by the following buyer. Even so, depending on specified programs, legislation, and state legal guidelines there may be many loans that are not easily sorted out through the shift of financial loans. Therefore, the duty still falls on the client that has received his or her property in foreclosure. Thank you for sharing your opinions on this blog.
This is the right blog for anyone who wants to find out about this topic. You realize so much its almost hard to argue with you (not that I actually would want…HaHa). You definitely put a new spin on a topic thats been written about for years. Great stuff, just great!
Its superb as your other posts : D, appreciate it for posting.
I believe that avoiding refined foods may be the first step to be able to lose weight. They will taste beneficial, but packaged foods contain very little vitamins and minerals, making you feed on more just to have enough power to get through the day. When you are constantly eating these foods, transitioning to whole grain products and other complex carbohydrates will help you have more energy while taking in less. Good blog post.
Hi, Neat post. There is a problem with your web site in internet explorer, would test this… IE still is the market leader and a good portion of people will miss your excellent writing due to this problem.
Somebody essentially help to make seriously posts I would state. This is the first time I frequented your web page and thus far? I surprised with the research you made to create this particular publish incredible. Great job!
This is such a helpful article. I have actually been looking for out more regarding this topic and also failing. Say thanks to goodness I decided to look again as well as found you. Congratulations on a great blog post and also I will certainly read more.
One thing I’ve noticed is that often there are plenty of misguided beliefs regarding the financial institutions intentions when talking about foreclosure. One myth in particular is that often the bank wants your house. The lending company wants your dollars, not the home. They want the amount of money they lent you together with interest. Staying away from the bank will only draw the foreclosed final result. Thanks for your post.
I delight in, result in I found just what I used to be looking for. You’ve ended my 4 day long hunt! God Bless you man. Have a nice day. Bye
Good web site! I really love how it is simple on my eyes and the data are well written. I’m wondering how I might be notified whenever a new post has been made. I have subscribed to your RSS feed which must do the trick! Have a great day!
Do you have a spam problem on this site; I also am a blogger, and I was wanting to know your situation; we have created some nice procedures and we are looking to trade strategies with others, why not shoot me an e-mail if interested.
I really enjoy reading on this site, it has good content. “A short saying oft contains much wisdom.” by Sophocles.
Glad to be one of many visitants on this awful internet site : D.
Throughout this awesome design of things you actually receive an A just for effort. Exactly where you actually lost me was first on your details. You know, they say, the devil is in the details… And that could not be much more true here. Having said that, let me inform you what did do the job. The authoring is rather convincing which is most likely the reason why I am taking an effort in order to opine. I do not make it a regular habit of doing that. Second, while I can easily see the jumps in reasoning you come up with, I am definitely not confident of how you appear to connect your details which in turn help to make your final result. For now I will yield to your issue however trust in the foreseeable future you actually link the facts much better.
An impressive share, I simply given this onto a colleague who was doing a little bit analysis on this. And he actually purchased me breakfast as a result of I discovered it for him.. smile. So let me reword that: Thnx for the treat! However yeah Thnkx for spending the time to discuss this, I really feel strongly about it and love studying extra on this topic. If doable, as you turn into experience, would you mind updating your blog with extra particulars? It is extremely helpful for me. Huge thumb up for this blog submit!
Usually I don’t learn article on blogs, however I wish to say that this write-up very pressured me to take a look at and do so! Your writing style has been amazed me. Thanks, very nice article.
Very well written post. It will be beneficial to anybody who employess it, including me. Keep doing what you are doing – looking forward to more posts.
I beloved as much as you will receive carried out proper here. The cartoon is attractive, your authored subject matter stylish. nevertheless, you command get got an nervousness over that you want be delivering the following. unwell undoubtedly come further formerly once more since exactly the similar just about very often within case you protect this hike.
You are my inhalation, I possess few blogs and sometimes run out from to post : (.
Thanks a lot for giving everyone a very brilliant opportunity to read from this web site. It is usually so beneficial and also stuffed with fun for me personally and my office colleagues to visit your site really thrice per week to read through the newest secrets you have. Not to mention, I am just always motivated for the impressive knowledge served by you. Some 1 tips in this posting are unequivocally the most suitable we have had.
Thank you for the sensible critique. Me & my neighbor were just preparing to do some research about this. We got a grab a book from our area library but I think I learned more clear from this post. I’m very glad to see such excellent info being shared freely out there.
Keep up the good work, I read few blog posts on this site and I believe that your blog is very interesting and contains bands of excellent info .
What?s Happening i’m new to this, I stumbled upon this I have found It positively helpful and it has aided me out loads. I hope to contribute & assist other users like its helped me. Great job.
Hi there! This post couldn’t be written any better! Reading through this post reminds me of my previous room mate! He always kept talking about this. I will forward this article to him. Pretty sure he will have a good read. Thank you for sharing!
delta 8 vs synthetic
Pretty! This was a really wonderful post. Thank you for your provided information.
It’s truly a great and helpful piece of information. I am satisfied that you just shared this useful info with us. Please stay us up to date like this. Thank you for sharing.
I have observed that of all varieties of insurance, health care insurance is the most questionable because of the clash between the insurance policies company’s need to remain making money and the buyer’s need to have insurance cover. Insurance companies’ revenue on health plans have become low, thus some businesses struggle to gain profits. Thanks for the strategies you talk about through your blog.
Woah! I’m really enjoying the template/theme of this site. It’s simple, yet effective. A lot of times it’s challenging to get that “perfect balance” between usability and appearance. I must say you have done a awesome job with this. In addition, the blog loads very fast for me on Internet explorer. Excellent Blog!
Its like you read my mind! You appear to know a lot about this, like you wrote the book in it or something. I think that you can do with a few pics to drive the message home a bit, but instead of that, this is great blog. A great read. I will certainly be back.
I’m really loving the theme/design of your weblog. Do you ever run into any browser compatibility problems? A handful of my blog visitors have complained about my blog not operating correctly in Explorer but looks great in Opera. Do you have any advice to help fix this issue?
you will have a fantastic blog here! would you prefer to make some invite posts on my blog?
Aw, this was a really nice post. In idea I would like to put in writing like this additionally ? taking time and precise effort to make a very good article? but what can I say? I procrastinate alot and not at all seem to get one thing done.
It’s a pity you don’t have a donate button! I’d definitely donate to this outstanding blog! I suppose for now i’ll settle for bookmarking and adding your RSS feed to my Google account. I look forward to new updates and will talk about this site with my Facebook group. Chat soon!
I want looking through and I conceive this website got some truly useful stuff on it! .
I don’t commonly comment but I gotta state appreciate it for the post on this perfect one : D.
What an informative and meticulously-researched article! The author’s meticulousness and capability to present complicated ideas in a comprehensible manner is truly commendable. I’m totally impressed by the scope of knowledge showcased in this piece. Thank you, author, for sharing your knowledge with us. This article has been a real game-changer!
Great post. I was checking continuously this blog and I am impressed! Extremely useful information specially the last part 🙂 I care for such info much. I was looking for this particular information for a long time. Thank you and good luck.
Its good as your other posts : D, thankyou for posting.
I will right away grab your rss as I can’t find your email subscription link or newsletter service. Do you’ve any? Kindly let me know so that I could subscribe. Thanks.
We’re a gaggle of volunteers and starting a new scheme in our community. Your website provided us with helpful information to work on. You’ve performed a formidable activity and our whole community shall be grateful to you.
Thanks for the auspicious writeup. It in fact was once a leisure account it. Look complicated to more brought agreeable from you! However, how could we keep up a correspondence?
so much good information on here, : D.
My developer is trying to persuade me to move to .net from PHP. I have always disliked the idea because of the expenses. But he’s tryiong none the less. I’ve been using Movable-type on a number of websites for about a year and am worried about switching to another platform. I have heard great things about blogengine.net. Is there a way I can import all my wordpress posts into it? Any help would be really appreciated!
Some really prime articles on this site, saved to my bookmarks.
Thanks for your publiction. Another point is that to be a photographer requires not only problems in capturing award-winning photographs and also hardships in getting the best photographic camera suited to your needs and most especially problems in maintaining the quality of your camera. This is very real and evident for those photography lovers that are in to capturing the actual nature’s exciting scenes : the mountains, the actual forests, the wild or seas. Visiting these amazing places surely requires a video camera that can meet the wild’s tough landscapes.
Definitely consider that which you said. Your favorite justification appeared to be at the web the simplest factor to bear in mind of. I say to you, I definitely get irked at the same time as people consider concerns that they plainly don’t realize about. You managed to hit the nail upon the top as well as defined out the whole thing with no need side-effects , other people could take a signal. Will probably be back to get more. Thanks
Admiring the persistence you put into your blog and detailed information you present. It’s great to come across a blog every once in a while that isn’t the same outdated rehashed information. Great read! I’ve saved your site and I’m including your RSS feeds to my Google account.
Hi, Neat post. There’s an issue with your web site in web explorer, could test thisK IE still is the marketplace leader and a good element of other folks will pass over your excellent writing because of this problem.
Thanks for this post, I am a big big fan of this website would like to proceed updated.
Thanks for sharing your ideas on this blog. Likewise, a fairy tale regarding the banking institutions intentions if talking about property foreclosure is that the loan company will not take my installments. There is a certain quantity of time the bank can take payments in some places. If you are way too deep in the hole, they’re going to commonly require that you pay the payment entirely. However, i am not saying that they will not take any sort of payments at all. When you and the loan company can be capable to work a thing out, your foreclosure approach may halt. However, if you continue to neglect payments underneath the new approach, the home foreclosure process can pick up exactly where it was left off.
The very root of your writing whilst sounding agreeable initially, did not settle well with me after some time. Somewhere throughout the sentences you actually were able to make me a believer but only for a short while. I still have got a problem with your jumps in logic and you would do nicely to fill in all those gaps. In the event you actually can accomplish that, I could undoubtedly end up being amazed.
You have brought up a very excellent points, regards for the post.
Wow! I’m in awe of the author’s writing skills and ability to convey complex concepts in a straightforward and clear manner. This article is a true gem that earns all the accolades it can get. Thank you so much, author, for offering your expertise and providing us with such a priceless resource. I’m truly appreciative!
Keep functioning ,impressive job!
Do you mind if I quote a few of your posts as long as I provide credit and sources back to your site? My blog site is in the very same niche as yours and my visitors would genuinely benefit from a lot of the information you present here. Please let me know if this ok with you. Appreciate it!
I think this site has got some really good info for everyone. “He is able who thinks he is able.” by Buddha.
Thankyou for this post, I am a big big fan of this site would like to keep updated.
Aw, this was a really nice post. In concept I want to put in writing like this additionally – taking time and actual effort to make an excellent article… however what can I say… I procrastinate alot and by no means seem to get one thing done.
Wow! This could be one particular of the most beneficial blogs We’ve ever arrive across on this subject. Actually Magnificent. I am also an expert in this topic therefore I can understand your effort.
I consider something really special in this website.
Some truly interesting information, well written and broadly speaking user genial.
I believe you have remarked some very interesting details, thanks for the post.
magnificent points altogether, you just gained a new reader. What might you suggest about your publish that you made some days in the past? Any certain?
I like this blog its a master peace ! Glad I found this on google .
My partner and I absolutely love your blog and find almost all of your post’s to be precisely what I’m looking for. Would you offer guest writers to write content available for you? I wouldn’t mind composing a post or elaborating on a few of the subjects you write related to here. Again, awesome website!
Its like you read my thoughts! You seem to know so much about this, such as you wrote the e book in it or something. I feel that you simply can do with some percent to power the message house a little bit, but instead of that, that is excellent blog. A great read. I will definitely be back.
WONDERFUL Post.thanks for share..more wait .. …
After examine a couple of of the blog posts in your website now, and I truly like your approach of blogging. I bookmarked it to my bookmark website listing and will be checking again soon. Pls try my site as properly and let me know what you think.
Some genuinely interesting details you have written.Helped me a lot, just what I was searching for : D.
Utterly composed written content, Really enjoyed reading.
Wonderful work! That is the kind of information that are meant to be shared across the net. Disgrace on Google for not positioning this put up upper! Come on over and visit my website . Thank you =)
konopi delta 8
Hi my friend! I wish to say that this article is amazing, nice written and come with almost all important infos. I would like to see more posts like this.
Hi there, just became aware of your blog through Google, and found that it is really informative. I’m going to watch out for brussels. I’ll appreciate if you continue this in future. Numerous people will be benefited from your writing. Cheers!
A person essentially help to make seriously posts I would state. This is the first time I frequented your web page and thus far? I surprised with the research you made to create this particular publish amazing. Magnificent job!
I have recently started a site, the info you provide on this website has helped me tremendously. Thanks for all of your time & work.
Nice weblog right here! Also your website lots up fast! What host are you the usage of? Can I get your associate hyperlink for your host? I wish my site loaded up as quickly as yours lol
Great info and straight to the point. I am not sure if this is truly the best place to ask but do you people have any thoughts on where to hire some professional writers? Thanks 🙂
Pretty nice post. I simply stumbled upon your blog and wished to mention that I’ve really enjoyed browsing your weblog posts. After all I’ll be subscribing in your feed and I hope you write again very soon!
Great beat ! I wish to apprentice while you amend your web site, how can i subscribe for a blog website? The account aided me a acceptable deal. I had been a little bit acquainted of this your broadcast offered bright clear idea
I like what you guys are up also. Such smart work and reporting! Carry on the superb works guys I have incorporated you guys to my blogroll. I think it’ll improve the value of my website 🙂
There is visibly a bunch to realize about this. I feel you made certain nice points in features also.
I’ve been browsing online greater than three hours as of late, yet I never discovered any interesting article like yours. It¦s beautiful price enough for me. Personally, if all site owners and bloggers made excellent content as you did, the internet shall be a lot more helpful than ever before.
My spouse and I stumbled over here from a different website and thought I might as well check things out. I like what I see so now i’m following you. Look forward to exploring your web page again.
Perfect work you have done, this web site is really cool with good information.
Thank you for sharing superb informations. Your web-site is very cool. I am impressed by the details that you have on this blog. It reveals how nicely you understand this subject. Bookmarked this website page, will come back for more articles. You, my friend, ROCK! I found just the information I already searched everywhere and simply couldn’t come across. What an ideal website.
I’ve read some good stuff here. Certainly worth bookmarking for revisiting. I surprise how much effort you put to make such a excellent informative site.
Hey! Someone in my Facebook group shared this website with us so I came to check it out. I’m definitely enjoying the information. I’m bookmarking and will be tweeting this to my followers! Outstanding blog and great design.
I wanted to thank you for this great read!! I definitely enjoying every little bit of it I have you bookmarked to check out new stuff you post…
Excellent read, I just passed this onto a friend who was doing a little research on that. And he just bought me lunch as I found it for him smile So let me rephrase that: Thank you for lunch!
I am not very wonderful with English but I get hold this real easygoing to interpret.
Very well written information. It will be useful to anyone who usess it, including yours truly :). Keep up the good work – for sure i will check out more posts.
I really like your writing style, good information, regards for posting :D. “Freedom is the emancipation from the arbitrary rule of other men.” by Mortimer Adler.
Throughout the awesome scheme of things you’ll receive an A with regard to effort and hard work. Where exactly you confused everybody was on your particulars. You know, as the maxim goes, the devil is in the details… And it couldn’t be more true here. Having said that, let me tell you precisely what did give good results. The article (parts of it) is definitely pretty convincing and that is probably the reason why I am making the effort to comment. I do not make it a regular habit of doing that. 2nd, whilst I can easily see a leaps in logic you come up with, I am not really certain of just how you seem to connect the details which inturn produce your conclusion. For the moment I shall yield to your issue however wish in the foreseeable future you actually link your facts much better.
Its wonderful as your other articles : D, thankyou for posting. “As experience widens, one begins to see how much upon a level all human things are.” by Joseph Farrell.
Hello! This post couldn’t be written any better! Reading this post reminds me of my good old room mate! He always kept chatting about this. I will forward this page to him. Fairly certain he will have a good read. Many thanks for sharing!
I’ll immediately grab your rss feed as I can not find your e-mail subscription link or newsletter service. Do you’ve any? Kindly let me know in order that I could subscribe. Thanks.
Spot on with this write-up, I really think this web site needs far more consideration. I’ll in all probability be once more to learn rather more, thanks for that info.
Howdy! This is kind of off topic but I need some advice from an established blog. Is it tough to set up your own blog? I’m not very techincal but I can figure things out pretty quick. I’m thinking about creating my own but I’m not sure where to start. Do you have any ideas or suggestions? Thanks
This web page is known as a stroll-via for all the data you wanted about this and didn’t know who to ask. Glimpse right here, and you’ll positively uncover it.
Hey there! I’m at work surfing around your blog from my new iphone 3gs! Just wanted to say I love reading your blog and look forward to all your posts! Carry on the outstanding work!
You have noted very interesting points! ps decent web site.
This article is absolutely incredible! The author has done a phenomenal job of delivering the information in an engaging and informative manner. I can’t thank him enough for providing such valuable insights that have undoubtedly enlightened my awareness in this topic. Kudos to him for producing such a work of art!
Keep functioning ,fantastic job!
My partner and I absolutely love your blog and find the majority of your post’s to be exactly what I’m looking for. can you offer guest writers to write content for yourself? I wouldn’t mind composing a post or elaborating on a number of the subjects you write related to here. Again, awesome weblog!
Appreciating the hard work you put into your site and in depth information you offer. It’s great to come across a blog every once in a while that isn’t the same unwanted rehashed information. Fantastic read! I’ve bookmarked your site and I’m adding your RSS feeds to my Google account.
I’ll right away clutch your rss as I can’t in finding your email subscription link or e-newsletter service. Do you have any? Please allow me realize so that I may subscribe. Thanks.
Bets10, heyecan verici bir çevrimiçi oyun platformu olarak kullanıcılara canlı bahis ve casino deneyimi sunmaktadır. Bu platform, spor bahisleri tutkunları ve casino oyunlarına ilgi duyanlar için mükemmel bir seçenektir. Bets10’un sunduğu çeşitli oyunlar ve avantajlar, kullanıcıların yüksek düzeyde eğlence ve fırsatlarla dolu bir deneyim yaşamasını sağlar.
You could certainly see your expertise in the work you write. The world hopes for even more passionate writers like you who aren’t afraid to say how they believe. Always go after your heart.
I always was concerned in this topic and stock still am, thanks for putting up.
Definitely believe that which you stated. Your favorite justification seemed to be on the web the simplest thing to be aware of. I say to you, I definitely get irked while people think about worries that they just do not know about. You managed to hit the nail upon the top and defined out the whole thing without having side-effects , people can take a signal. Will likely be back to get more. Thanks
Whats up very nice web site!! Guy .. Excellent .. Amazing .. I’ll bookmark your site and take the feeds alsoKI’m glad to find a lot of helpful info right here within the post, we want develop extra strategies on this regard, thanks for sharing. . . . . .
Very interesting subject, thanks for posting. “Nothing is more wretched than the mind of a man conscious of guilt.” by Titus Maccius Plautus.
When I initially commented I clicked the -Notify me when new feedback are added- checkbox and now every time a comment is added I get four emails with the same comment. Is there any approach you possibly can take away me from that service? Thanks!
I really appreciate this post. I¦ve been looking everywhere for this! Thank goodness I found it on Bing. You have made my day! Thx again
Hey there would you mind letting me know which hosting company you’re utilizing? I’ve loaded your blog in 3 completely different internet browsers and I must say this blog loads a lot faster then most. Can you recommend a good internet hosting provider at a reasonable price? Cheers, I appreciate it!
Very interesting topic, appreciate it for putting up.
I have realized some new items from your web site about pc’s. Another thing I have always assumed is that computer systems have become a specific thing that each residence must have for many reasons. They supply you with convenient ways in which to organize households, pay bills, search for information, study, hear music as well as watch shows. An innovative method to complete every one of these tasks is to use a mobile computer. These pcs are mobile, small, potent and easily transportable.
What’s Taking place i am new to this, I stumbled upon this I have found It positively helpful and it has aided me out loads. I hope to contribute & help other customers like its aided me. Good job.
Good blog post. The things i would like to bring up is that laptop or computer memory ought to be purchased when your computer still can’t cope with whatever you do with it. One can add two good old ram boards with 1GB each, for example, but not certainly one of 1GB and one of 2GB. One should make sure the company’s documentation for the PC to ensure what type of storage is necessary.
Thank you, I have recently been searching for info about this subject for ages and yours is the greatest I have came upon till now. But, what about the conclusion? Are you positive in regards to the supply?
I’ve learned a number of important things as a result of your post. I’d also like to express that there can be situation in which you will get a loan and never need a co-signer such as a Government Student Aid Loan. But if you are getting that loan through a regular finance company then you need to be willing to have a co-signer ready to assist you. The lenders will base any decision over a few components but the most important will be your credit score. There are some lenders that will also look at your job history and come to a decision based on that but in many instances it will hinge on your ranking.
Hi! Do you know if they make any plugins to safeguard against hackers? I’m kinda paranoid about losing everything I’ve worked hard on. Any recommendations?
Wow, this blog is a treasure trove for ONLY FANS enthusiasts like me! The LEAKED photos and videos available for download are simply stunning. ( https://UrbanCrocSpot.org )
I would also like to express that most people who find themselves without health insurance are usually students, self-employed and people who are unemployed. More than half of the uninsured are under the age of Thirty-five. They do not experience they are looking for health insurance since they’re young along with healthy. Its income is typically spent on homes, food, and also entertainment. Many people that do work either complete or not professional are not presented insurance by way of their jobs so they go without due to rising price of health insurance in the country. Thanks for the ideas you reveal through your blog.
excellent post, very informative. I wonder why the other experts of this sector don’t notice this. You must continue your writing. I am sure, you’ve a huge readers’ base already!
Great post here. One thing I’d like to say is the fact most professional areas consider the Bachelor Degree just as the entry level standard for an online degree. When Associate Diplomas are a great way to begin, completing the Bachelors opens up many entrances to various jobs, there are numerous on-line Bachelor Diploma Programs available from institutions like The University of Phoenix, Intercontinental University Online and Kaplan. Another thing is that many brick and mortar institutions provide Online variations of their diplomas but commonly for a substantially higher cost than the institutions that specialize in online higher education degree plans.
One thing I’d really like to reply to is that weightloss program fast can be performed by the suitable diet and exercise. Your size not simply affects the look, but also the quality of life. Self-esteem, depression, health risks, plus physical skills are influenced in weight gain. It is possible to just make everything right but still gain. If this happens, a condition may be the offender. While an excessive amount of food and not enough body exercise are usually at fault, common health concerns and trusted prescriptions can greatly enhance size. Kudos for your post right here.
Hi there, i read your blog occasionally and i own a similar one and i was just curious if you get a lot of spam comments? If so how do you stop it, any plugin or anything you can recommend? I get so much lately it’s driving me insane so any help is very much appreciated.
There are some interesting points in time on this article however I don’t know if I see all of them heart to heart. There may be some validity but I will take maintain opinion until I look into it further. Good article , thanks and we wish more! Added to FeedBurner as effectively
Today, with the fast way of life that everyone leads, credit cards have a huge demand in the economy. Persons out of every field are using the credit card and people who are not using the card have made arrangements to apply for even one. Thanks for spreading your ideas on credit cards.
Great ? I should certainly pronounce, impressed with your site. I had no trouble navigating through all tabs and related info ended up being truly easy to do to access. I recently found what I hoped for before you know it at all. Reasonably unusual. Is likely to appreciate it for those who add forums or anything, web site theme . a tones way for your customer to communicate. Nice task..
great post, very informative. I wonder why the opposite specialists of this sector do not notice this. You must proceed your writing. I’m sure, you’ve a great readers’ base already!
Its such as you learn my mind! You seem to know a lot about this, like you wrote the e book in it or something. I believe that you just can do with some percent to drive the message home a bit, however instead of that, this is magnificent blog. An excellent read. I’ll certainly be back.
Very interesting subject, thankyou for putting up. “The great leaders have always stage-managed their effects.” by Charles De Gaulle.
I think this is among the most vital information for me. And i am glad reading your article. But want to remark on some general things, The web site style is great, the articles is really excellent : D. Good job, cheers
This website is known as a walk-by for the entire info you wished about this and didn?t know who to ask. Glimpse right here, and also you?ll positively uncover it.
Generally I do not learn article on blogs, however I wish to say that this write-up very compelled me to check out and do so! Your writing taste has been amazed me. Thank you, quite nice post.
I’m still learning from you, while I’m improving myself. I certainly liked reading all that is written on your blog.Keep the tips coming. I enjoyed it!
Very interesting topic, thankyou for putting up. “Men who never get carried away should be.” by Malcolm Forbes.
Some genuinely great posts on this site, appreciate it for contribution. “A man with a new idea is a crank — until the idea succeeds.” by Mark Twain.
Simply a smiling visitor here to share the love (:, btw great design. “Everything should be made as simple as possible, but not one bit simpler.” by Albert Einstein.
After study just a few of the blog posts in your web site now, and I truly like your approach of blogging. I bookmarked it to my bookmark web site record and might be checking again soon. Pls take a look at my site as well and let me know what you think.
I enjoyed reading this post. It’s concise yet packed with useful information. Thanks!
Thanks for your thoughts. One thing I have noticed is that banks in addition to financial institutions know the dimensions and spending patterns of consumers and also understand that plenty of people max out and about their cards around the holidays. They wisely take advantage of this kind of fact and start flooding your current inbox plus snail-mail box along with hundreds of no-interest APR credit card offers right after the holiday season comes to an end. Knowing that when you are like 98 of American public, you’ll soar at the opportunity to consolidate consumer credit card debt and move balances for 0 interest rate credit cards.
I’m impressed by the quality of this content! The author has undoubtedly put a tremendous amount of effort into researching and organizing the information. It’s exciting to come across an article that not only gives valuable information but also keeps the readers captivated from start to finish. Hats off to her for creating such a remarkable piece!
Hi , I do believe this is an excellent blog. I stumbled upon it on Yahoo , i will come back once again. Money and freedom is the best way to change, may you be rich and help other people.
Today, I went to the beachfront with my children. I found a sea shell and gave it to my 4 year old daughter and said “You can hear the ocean if you put this to your ear.” She put the shell to her ear and screamed. There was a hermit crab inside and it pinched her ear. She never wants to go back! LoL I know this is entirely off topic but I had to tell someone!
What I have generally told men and women is that when looking for a good online electronics retail outlet, there are a few components that you have to take into account. First and foremost, you should really make sure to get a reputable along with reliable retail store that has got great opinions and classification from other consumers and business world leaders. This will make sure that you are dealing with a well-known store that provides good support and assistance to its patrons. Thanks for sharing your ideas on this website.
Hi! Do you use Twitter? I’d like to follow you if that would be okay. I’m undoubtedly enjoying your blog and look forward to new updates.
This internet site is my breathing in, rattling excellent pattern and perfect content.
I am curious to find out what blog system you are using? I’m experiencing some small security issues with my latest website and I would like to find something more safeguarded. Do you have any suggestions?
It’s really a nice and useful piece of info. I’m glad that you shared this useful info with us. Please keep us informed like this. Thanks for sharing.
I have been absent for a while, but now I remember why I used to love this site. Thank you, I will try and check back more often. How frequently you update your site?
fantastic post.Never knew this, regards for letting me know.
Thanks for your posting. One other thing is always that individual states have their particular laws which affect home owners, which makes it quite difficult for the Congress to come up with a whole new set of recommendations concerning home foreclosure on homeowners. The problem is that a state has got own regulations which may interact in an undesirable manner in regards to foreclosure insurance policies.
Utterly indited articles, thank you for selective information. “No human thing is of serious importance.” by Plato.
Thanks for this article. I’d also like to say that it can possibly be hard while you are in school and starting out to initiate a long history of credit. There are many students who are just trying to make it through and have long or favourable credit history is often a difficult issue to have.
Great blog! Do you have any helpful hints for aspiring writers? I’m hoping to start my own blog soon but I’m a little lost on everything. Would you propose starting with a free platform like WordPress or go for a paid option? There are so many choices out there that I’m totally overwhelmed .. Any recommendations? Appreciate it!
I can’t express how much I appreciate the effort the author has put into writing this remarkable piece of content. The clarity of the writing, the depth of analysis, and the wealth of information provided are simply impressive. Her zeal for the subject is evident, and it has definitely made an impact with me. Thank you, author, for providing your insights and enhancing our lives with this exceptional article!
certainly like your website however you have to test the spelling on several of your posts. Many of them are rife with spelling problems and I to find it very troublesome to tell the reality nevertheless I?¦ll surely come again again.
Good day! This is my 1st comment here so I just wanted to give a quick shout out and say I genuinely enjoy reading your posts. Can you recommend any other blogs/websites/forums that cover the same topics? Thanks a lot!
I was suggested this blog by my cousin. I’m not sure whether this post is written by him as nobody else know such detailed about my difficulty. You are incredible! Thanks!
I know this if off topic but I’m looking into starting my own blog and was curious what all is required to get setup? I’m assuming having a blog like yours would cost a pretty penny? I’m not very internet savvy so I’m not 100 certain. Any tips or advice would be greatly appreciated. Kudos
Have you ever considered about including a little bit more than just your articles? I mean, what you say is valuable and everything. But think about if you added some great visuals or videos to give your posts more, “pop”! Your content is excellent but with images and video clips, this website could definitely be one of the best in its niche. Awesome blog!
Perfectly pent subject matter, appreciate it for selective information. “The bravest thing you can do when you are not brave is to profess courage and act accordingly.” by Corra Harris.
Hi, Neat post. There is an issue with your web site in internet explorer, may test this? IE still is the market chief and a huge element of folks will leave out your fantastic writing due to this problem.
I can’t believe how amazing this article is! The author has done a tremendous job of presenting the information in an engaging and enlightening manner. I can’t thank him enough for offering such priceless insights that have certainly enlightened my knowledge in this topic. Kudos to him for producing such a gem!
Hey, you used to write fantastic, but the last several posts have been kinda boring? I miss your tremendous writings. Past several posts are just a bit out of track! come on!
Holy cow! I’m in awe of the author’s writing skills and capability to convey complicated concepts in a straightforward and clear manner. This article is a real treasure that merits all the praise it can get. Thank you so much, author, for sharing your wisdom and providing us with such a valuable resource. I’m truly appreciative!
You can definitely see your expertise in the work you write. The world hopes for even more passionate writers like you who are not afraid to say how they believe. Always go after your heart.
Hi there! This is kind of off topic but I need some guidance from an established blog. Is it very difficult to set up your own blog? I’m not very techincal but I can figure things out pretty fast. I’m thinking about making my own but I’m not sure where to start. Do you have any tips or suggestions? Thanks
I have recently started a website, the info you offer on this web site has helped me tremendously. Thanks for all of your time & work.
I like the helpful information you provide in your articles. I will bookmark your blog and check again here regularly. I’m quite certain I will learn a lot of new stuff right here! Good luck for the next!
Your web site won’t render properly on my apple iphone – you may want to try and repair that
Fantastic website. Plenty of useful info here. I?m sending it to some friends ans also sharing in delicious. And certainly, thanks for your effort!
Hey just wanted to give you a quick heads up. The text in your content seem to be running off the screen in Firefox. I’m not sure if this is a formatting issue or something to do with web browser compatibility but I thought I’d post to let you know. The design and style look great though! Hope you get the issue fixed soon. Cheers
Aw, this was a really nice post. In concept I would like to put in writing like this additionally ? taking time and precise effort to make an excellent article? but what can I say? I procrastinate alot and under no circumstances seem to get something done.
Great post. I am facing a couple of these problems.
I came across this article and discovered it to be an excellent source. Thank you for sharing!
Howdy! This is kind of off topic but I need some guidance from an established blog. Is it difficult to set up your own blog? I’m not very techincal but I can figure things out pretty fast. I’m thinking about making my own but I’m not sure where to start. Do you have any tips or suggestions? Cheers
Definitely consider that that you stated. Your favourite reason appeared to be at the web the simplest factor to be aware of. I say to you, I certainly get irked at the same time as people consider concerns that they just do not recognize about. You controlled to hit the nail upon the highest as well as outlined out the whole thing with no need side effect , folks can take a signal. Will probably be again to get more. Thank you
This design is steller! You definitely know how to keep a reader entertained. Between your wit and your videos, I was almost moved to start my own blog (well, almost…HaHa!) Wonderful job. I really enjoyed what you had to say, and more than that, how you presented it. Too cool!
of course like your web site however you need to take a look at the spelling on quite a few of your posts. Many of them are rife with spelling problems and I to find it very troublesome to tell the truth on the other hand I will surely come back again.
Thanks for your write-up on the traveling industry. I’d also like to add that if you’re a senior considering traveling, it really is absolutely crucial to buy traveling insurance for seniors. When traveling, retirees are at greatest risk of experiencing a health emergency. Obtaining right insurance coverage package on your age group can protect your health and give you peace of mind.
Its like you read my mind! You appear to know so much approximately this, like you wrote the guide in it or something. I feel that you just could do with some to force the message home a bit, however other than that, that is magnificent blog. A great read. I’ll definitely be back.
My developer is trying to persuade me to move to .net from PHP. I have always disliked the idea because of the costs. But he’s tryiong none the less. I’ve been using WordPress on a variety of websites for about a year and am concerned about switching to another platform. I have heard fantastic things about blogengine.net. Is there a way I can import all my wordpress posts into it? Any help would be really appreciated!
Thanks for your publication. I also think laptop computers are getting to be more and more popular nowadays, and now are sometimes the only type of computer found in a household. This is due to the fact that at the same time that they are becoming more and more inexpensive, their processing power is growing to the point where there’re as strong as desktop through just a few in years past.
Hiya very nice web site!! Man .. Beautiful .. Superb .. I will bookmark your website and take the feeds also…I’m satisfied to find a lot of useful information here in the put up, we want work out extra techniques in this regard, thank you for sharing. . . . . .
It’s a shame you don’t have a donate button! I’d most certainly donate to this superb blog! I guess for now i’ll settle for bookmarking and adding your RSS feed to my Google account. I look forward to new updates and will talk about this site with my Facebook group. Talk soon!
hello there and thanks on your info – I have certainly picked up anything new from proper here. I did then again expertise several technical issues using this site, since I experienced to reload the website a lot of instances prior to I may get it to load correctly. I had been pondering in case your web hosting is OK? No longer that I’m complaining, however sluggish loading circumstances occasions will sometimes impact your placement in google and could harm your high quality rating if advertising and ***********|advertising|advertising|advertising and *********** with Adwords. Anyway I am including this RSS to my e-mail and could look out for much more of your respective exciting content. Make sure you update this again very soon..
I have read several good stuff here. Certainly worth bookmarking for revisiting. I surprise how much effort you put to create such a magnificent informative site.
Hi, i think that i saw you visited my blog thus i came to ?return the favor?.I am attempting to find things to enhance my website!I suppose its ok to use some of your ideas!!
I conceive this site has got very excellent pent subject material blog posts.
A large percentage of of the things you state is supprisingly precise and it makes me wonder why I had not looked at this with this light before. Your piece really did turn the light on for me as far as this particular subject goes. Nonetheless at this time there is actually one point I am not really too comfy with so while I attempt to reconcile that with the main idea of your position, allow me observe just what the rest of the visitors have to say.Nicely done.
I have observed that over the course of constructing a relationship with real estate homeowners, you’ll be able to come to understand that, in every real estate purchase, a payment is paid. Finally, FSBO sellers tend not to “save” the fee. Rather, they fight to win the commission by way of doing an agent’s work. In accomplishing this, they devote their money in addition to time to perform, as best they might, the assignments of an adviser. Those responsibilities include revealing the home by means of marketing, introducing the home to willing buyers, building a sense of buyer urgency in order to trigger an offer, arranging home inspections, taking on qualification inspections with the loan company, supervising maintenance, and aiding the closing of the deal.
whoah this blog is wonderful i love reading your posts. Keep up the great work! You know, many people are searching around for this info, you could aid them greatly.
Thanks for your publication on this web site. From my own experience, there are occassions when softening upward a photograph could provide the wedding photographer with an amount of an imaginative flare. Often times however, that soft clouds isn’t just what exactly you had under consideration and can quite often spoil an otherwise good photo, especially if you thinking about enlarging it.
I’m truly enjoying the design and layout of your blog. It’s a very easy on the eyes which makes it much more pleasant for me to come here and visit more often. Did you hire out a developer to create your theme? Great work!
Your home is valueble for me. Thanks!…
Thanks for your post. One other thing is the fact that individual states in the United states of america have their unique laws that affect homeowners, which makes it very difficult for the our lawmakers to come up with a fresh set of rules concerning property foreclosure on people. The problem is that each state features own laws and regulations which may have interaction in a damaging manner in relation to foreclosure guidelines.
I can’t believe how amazing this article is! The author has done a phenomenal job of presenting the information in an engaging and enlightening manner. I can’t thank her enough for sharing such priceless insights that have undoubtedly enlightened my knowledge in this subject area. Kudos to him for creating such a work of art!
I am not sure where you are getting your information, but great topic. I needs to spend some time learning more or understanding more. Thanks for magnificent information I was looking for this information for my mission.
I have noticed that online education is getting preferred because getting your college degree online has turned into a popular option for many people. A huge number of people have not necessarily had a possibility to attend a regular college or university although seek the increased earning potential and career advancement that a Bachelor Degree provides. Still some others might have a college degree in one field but would wish to pursue another thing they now develop an interest in.
I beloved up to you’ll obtain carried out right here. The comic strip is tasteful, your authored material stylish. nevertheless, you command get got an nervousness over that you wish be handing over the following. sick unquestionably come more earlier once more as exactly the same nearly a lot steadily inside of case you defend this hike.
I was wondering if you ever thought of changing the layout of your website? Its very well written; I love what youve got to say. But maybe you could a little more in the way of content so people could connect with it better. Youve got an awful lot of text for only having 1 or 2 pictures. Maybe you could space it out better?
I saw a lot of website but I think this one has got something special in it in it
hi!,I like your writing so much! share we communicate more about your article on AOL? I need an expert on this area to solve my problem. May be that’s you! Looking forward to see you.
I have learned result-oriented things through the blog post. One other thing to I have found is that generally, FSBO sellers will probably reject people. Remember, they would prefer not to use your expert services. But if you maintain a comfortable, professional connection, offering aid and remaining in contact for four to five weeks, you will usually manage to win a discussion. From there, a listing follows. Thanks a lot
You have mentioned very interesting details! ps decent website.
It?s actually a nice and helpful piece of info. I am satisfied that you just shared this helpful information with us. Please stay us informed like this. Thank you for sharing.
Real nice design and good articles, nothing at all else we require : D.
Sweet website , super design and style, really clean and use pleasant.
I would love to add that when you do not currently have an insurance policy or perhaps you do not take part in any group insurance, you might well benefit from seeking assistance from a health insurance broker. Self-employed or people having medical conditions usually seek the help of one health insurance brokerage service. Thanks for your short article.
Heya i?m for the primary time here. I came across this board and I in finding It really useful & it helped me out a lot. I hope to provide one thing again and aid others like you helped me.
Great beat ! I would like to apprentice while you amend your web site, how could i subscribe for a blog web site? The account helped me a acceptable deal. I had been tiny bit acquainted of this your broadcast provided bright clear idea
I’m extremely impressed with your writing talents and also with the format to your blog. Is that this a paid subject matter or did you modify it yourself? Anyway stay up the excellent high quality writing, it?s rare to see a great weblog like this one these days..
Wow, wonderful blog structure! How long have you ever been running a blog for? you made blogging look easy. The overall look of your web site is great, let alone the content!
Thanks a bunch for sharing this with all people you actually realize what you are talking approximately! Bookmarked. Kindly also visit my web site =). We will have a hyperlink exchange arrangement between us!
What?s Happening i’m new to this, I stumbled upon this I’ve found It positively helpful and it has helped me out loads. I hope to contribute & aid other users like its helped me. Great job.
very good submit, i actually love this web site, carry on it
This really answered my problem, thank you!
Delve into the Lightning Network: Bitcoins layer-2 solution enhancing speed and reducing fees. Understand its mechanics, benefits, and transformative potential.
Bali tour
Thanks for the strategies presented. One thing I additionally believe is that often credit cards giving a 0 rate often entice consumers together with zero interest rate, instant endorsement and easy over-the-internet balance transfers, nevertheless beware of the top factor that can void your current 0 easy streets annual percentage rate and also throw you out into the very poor house fast.
https://www.anapnoes.gr/chorche-boukai-na-cheromaste-ti-stigmi-oso-diarki/
I was suggested this blog by my cousin. I am not sure whether this post is written by him as no one else know such detailed about my difficulty. You’re incredible! Thanks!
I am no longer positive the place you are getting your information, but good topic. I needs to spend some time studying more or working out more. Thanks for wonderful information I used to be on the lookout for this information for my mission.
I really appreciate this post. I have been looking all over for this! Thank goodness I found it on Bing. You’ve made my day! Thanks again
I have seen loads of useful things on your site about pcs. However, I’ve got the judgment that laptops are still less than powerful sufficiently to be a wise decision if you frequently do projects that require a lot of power, just like video modifying. But for website surfing, statement processing, and quite a few other typical computer work they are fine, provided you do not mind the small screen size. Many thanks sharing your opinions.
I?ve read some just right stuff here. Certainly worth bookmarking for revisiting. I surprise how a lot effort you place to make this sort of excellent informative site.
Real clear website , thanks for this post.
I have been checking out a few of your articles and i must say clever stuff. I will definitely bookmark your blog.
Undeniably believe that which you stated. Your favorite justification appeared to be on the web the simplest thing to be aware of. I say to you, I certainly get irked while people consider worries that they plainly do not know about. You managed to hit the nail upon the top as well as defined out the whole thing without having side-effects , people can take a signal. Will probably be back to get more. Thanks
Wonderful website. Plenty of helpful information here. I’m sending it to a few friends ans additionally sharing in delicious. And of course, thank you in your effort!
I’m really impressed with your writing talents as smartly as with the format for your weblog. Is that this a paid topic or did you customize it yourself? Either way keep up the excellent quality writing, it is uncommon to see a great blog like this one today..
Bu web sitesi gerçekten güzel bir tasarıma sahip! Kullanıcı dostu arayüzü, göz alıcı renkleri ve kolay gezinme özellikleriyle kullanıcı deneyimini ön planda tutuyor. İçerik zenginliği de oldukça etkileyici. Bu web sitesini kullanmak benim için keyifli bir deneyimdi. Teşekkürler!
There is noticeably a bundle to know about this. I assume you made certain nice points in features also.
certainly like your web-site but you need to check the spelling on several of your posts. A number of them are rife with spelling problems and I find it very troublesome to tell the truth nevertheless I?ll certainly come back again.
http://www.factorytapestry.com is a Trusted Online Wall Hanging Tapestry Store. We are selling online art and decor since 2008, our digital business journey started in Australia. We sell 100 made-to-order quality printed soft fabric tapestry which are just too perfect for decor and gifting. We offer Up-to 50 OFF Storewide Sale across all the Wall Hanging Tapestries. We provide Fast Shipping USA, CAN, UK, EUR, AUS, NZ, ASIA and Worldwide Delivery across 100+ countries.
Fiyatlar, lastiklerin boyutu, markası, tipi ve bölgenize göre değişiklik gösterebilir. En güncel ve doğru fiyat bilgilerini öğrenmek için yerel lastik satıcılarına veya çevrimiçi lastik satış sitelerine başvurmanızı tavsiye ederim.
Very interesting subject , appreciate it for posting.
Fantastic goods from you, man. I’ve understand your stuff previous to and you’re just extremely great. I really like what you’ve acquired here, certainly like what you’re stating and the way in which you say it. You make it enjoyable and you still take care of to keep it wise. I cant wait to read much more from you. This is really a terrific site.
Sweet website , super pattern, rattling clean and utilise friendly.
Hi, I think your website might be having browser compatibility issues. When I look at your blog in Firefox, it looks fine but when opening in Internet Explorer, it has some overlapping. I just wanted to give you a quick heads up! Other then that, fantastic blog!
This is really interesting, You are a very skilled blogger. I have joined your rss feed and look forward to seeking more of your magnificent post. Also, I’ve shared your web site in my social networks!
I discovered your blog site on google and check a few of your early posts. Continue to keep up the very good operate. I just additional up your RSS feed to my MSN News Reader. Seeking forward to reading more from you later on!…
Very interesting information!Perfect just what I was searching for!
Thanks for your article. I would also like to opinion that the first thing you will need to accomplish is verify if you really need credit restoration. To do that you will need to get your hands on a duplicate of your credit rating. That should never be difficult, considering that the government makes it necessary that you are allowed to receive one no cost copy of your real credit report each year. You just have to request the right persons. You can either look into the website for your Federal Trade Commission as well as contact one of the main credit agencies specifically.
Simply want to say your article is as surprising. The clarity to your publish is just cool and that i could suppose you are an expert in this subject. Fine along with your permission allow me to clutch your feed to stay updated with coming near near post. Thanks a million and please carry on the gratifying work.
One more issue is that video games are generally serious in nature with the most important focus on knowing things rather than fun. Although, there is an entertainment feature to keep your young ones engaged, every game is usually designed to improve a specific experience or curriculum, such as mathmatical or technology. Thanks for your publication.
At this time it seems like WordPress is the preferred blogging platform out there right now. (from what I’ve read) Is that what you’re using on your blog?
Its like you learn my thoughts! You seem to know so much approximately this, like you wrote the book in it or something. I feel that you simply can do with a few percent to power the message home a little bit, but other than that, that is great blog. An excellent read. I’ll definitely be back.
Amazing! This blog looks just like my old one! It’s on a totally different topic but it has pretty much the same page layout and design. Superb choice of colors!
With every thing that appears to be developing inside this specific subject material, your viewpoints are generally somewhat radical. Nevertheless, I am sorry, because I do not subscribe to your whole plan, all be it exhilarating none the less. It looks to us that your remarks are not totally rationalized and in simple fact you are generally your self not completely confident of your assertion. In any event I did enjoy reading through it.
This web site is really a stroll-via for all the data you needed about this and didn’t know who to ask. Glimpse here, and you’ll definitely uncover it.
Somebody essentially help to make seriously articles I would state. This is the very first time I frequented your website page and thus far? I surprised with the research you made to make this particular publish extraordinary. Wonderful job!
Some genuinely prime blog posts on this web site, saved to fav.
I want to show my love for your kindness for those who absolutely need assistance with in this idea. Your special dedication to getting the solution up and down came to be wonderfully invaluable and have surely permitted many people much like me to realize their dreams. Your entire invaluable instruction indicates so much to me and a whole lot more to my mates. Thank you; from each one of us.
Thanks for the concepts you write about through this website. In addition, numerous young women that become pregnant usually do not even try to get health insurance coverage because they are full of fearfulness they probably would not qualify. Although a lot of states at this moment require that insurers provide coverage irrespective of the pre-existing conditions. Fees on these kinds of guaranteed programs are usually higher, but when taking into consideration the high cost of medical care it may be a safer approach to take to protect a person’s financial potential.
I’m still learning from you, but I’m improving myself. I certainly liked reading all that is posted on your blog.Keep the information coming. I liked it!
F*ckin? tremendous things here. I?m very glad to see your article. Thanks a lot and i am looking forward to contact you. Will you kindly drop me a e-mail?
Dead indited subject material, appreciate it for information. “Life is God’s novel. Let him write it.” by Isaac Bashevis Singer.
Someone necessarily help to make significantly posts I’d state. That is the very first time I frequented your website page and up to now? I amazed with the research you made to create this particular publish incredible. Wonderful job!
http://www.factorytinsigns.com is 100 Trusted Global Metal Vintage Tin Signs Online Shop. We have been selling art and décor online worldwide since 2008, started in Sydney, Australia. 2000+ Tin Beer Signs, Outdoor Metal Wall Art, Business Tin Signs, Vintage Metal Signs to choose from, 100 Premium Quality Artwork, Up-to 40 OFF Sale Store-wide.
he blog was how do i say it… relevant, finally something that helped me. Thanks
This really answered my downside, thank you!
Hello there, simply became alert to your weblog via Google, and located that it is really informative. I?m gonna watch out for brussels. I?ll appreciate for those who proceed this in future. Lots of other people can be benefited out of your writing. Cheers!
Thanks for your interesting article. Other thing is that mesothelioma is generally brought on by the breathing of dust from mesothelioma, which is a positivelly dangerous material. It can be commonly noticed among employees in the engineering industry with long experience of asbestos. It’s also caused by living in asbestos insulated buildings for a long time of time, Genetic makeup plays an important role, and some individuals are more vulnerable on the risk compared to others.
I realized more something totally new on this weight reduction issue. 1 issue is that good nutrition is extremely vital when dieting. An enormous reduction in fast foods, sugary ingredients, fried foods, sweet foods, pork, and bright flour products can be necessary. Having wastes unwanted organisms, and contaminants may prevent desired goals for losing fat. While certain drugs quickly solve the matter, the nasty side effects are usually not worth it, they usually never give more than a short lived solution. It is a known idea that 95 of fad diet plans fail. Many thanks for sharing your opinions on this web site.
I would like to express thanks to this writer just for rescuing me from this challenge. Right after browsing through the world-wide-web and meeting advice that were not beneficial, I assumed my entire life was done. Existing devoid of the solutions to the difficulties you’ve sorted out by means of your posting is a serious case, and ones which might have in a wrong way affected my career if I hadn’t come across your web page. Your good natural talent and kindness in playing with all the stuff was very useful. I am not sure what I would’ve done if I hadn’t discovered such a subject like this. It’s possible to now look forward to my future. Thanks a lot so much for your specialized and amazing help. I won’t think twice to endorse your web site to anyone who should receive guidelines about this topic.
Hello! Would you mind if I share your blog with my myspace group? There’s a lot of people that I think would really enjoy your content. Please let me know. Thanks
Great post. I was checking continuously this weblog and I am impressed! Extremely helpful info specially the last section 🙂 I handle such information much. I was seeking this particular information for a very lengthy time. Thanks and best of luck.
I have been browsing on-line greater than 3 hours as of late, but I by no means found any attention-grabbing article like yours. It¦s beautiful price sufficient for me. In my opinion, if all site owners and bloggers made excellent content material as you did, the internet might be much more helpful than ever before.
I really appreciate your work, Great post.
Use the 1xBet promo code for registration : VIP888, and you will receive a €/$130 exclusive bonus on your first deposit. Before registering, you should familiarize yourself with the rules of the promotion.
Yet another issue is that video games are typically serious as the name indicated with the most important focus on studying rather than enjoyment. Although, there is an entertainment facet to keep your kids engaged, every single game is generally designed to work on a specific group of skills or curriculum, such as math concepts or scientific disciplines. Thanks for your publication.
The things i have generally told people is that when you are evaluating a good on-line electronics retail store, there are a few components that you have to remember to consider. First and foremost, you need to make sure to choose a reputable plus reliable store that has picked up great evaluations and ratings from other people and industry leaders. This will make certain you are getting along with a well-known store to provide good support and support to its patrons. Thanks for sharing your ideas on this website.
I conceive you have observed some very interesting details , thanks for the post.
I like the efforts you have put in this, thankyou for all the great content.
I really enjoy examining on this web site, it holds good posts. “And all the winds go sighing, For sweet things dying.” by Christina Georgina Rossetti.
I¦ll right away seize your rss as I can’t find your email subscription hyperlink or e-newsletter service. Do you have any? Please permit me recognise in order that I may subscribe. Thanks.
Right now it sounds like WordPress is the best blogging platform out there right now. (from what I’ve read) Is that what you are using on your blog?
Thanks for the tips on credit repair on this blog. The thing I would advice people is usually to give up the actual mentality that they’ll buy right now and shell out later. As being a society we tend to do this for many things. This includes holidays, furniture, in addition to items we want. However, you should separate a person’s wants from all the needs. If you are working to raise your credit ranking score actually you need some sacrifices. For example you’ll be able to shop online to save money or you can go to second hand merchants instead of high-priced department stores to get clothing.
Hmm is anyone else having problems with the images on this blog loading? I’m trying to figure out if its a problem on my end or if it’s the blog. Any responses would be greatly appreciated.
I really like your writing style, excellent info, thank you for posting :D. “Faith is a continuation of reason.” by William Adams.
Virtually all of whatever you assert is supprisingly precise and it makes me ponder the reason why I had not looked at this with this light before. Your article truly did turn the light on for me personally as far as this particular subject matter goes. However there is one particular point I am not too comfy with and while I try to reconcile that with the actual main theme of your issue, let me see exactly what the rest of your visitors have to say.Very well done.
I gotta bookmark this website it seems very helpful extremely helpful
Great web site. Lots of useful info here. I’m sending it to a few friends ans additionally sharing in delicious. And obviously, thanks in your effort!
I have been absent for a while, but now I remember why I used to love this website. Thank you, I will try and check back more frequently. How frequently you update your web site?
Hello there, You’ve done an excellent job. I will definitely digg it and personally recommend to my friends. I am confident they will be benefited from this website.
Hi there! Someone in my Myspace group shared this site with us so I came to check it out. I’m definitely loving the information. I’m book-marking and will be tweeting this to my followers! Fantastic blog and wonderful style and design.
I don’t even know how I ended up here, but I thought this post was great. I do not know who you are but certainly you’re going to a famous blogger if you are not already 😉 Cheers!
I like the valuable info you provide in your articles. I will bookmark your blog and check again here regularly. I’m quite sure I?ll learn many new stuff right here! Good luck for the next!
Howdy! This is my 1st comment here so I just wanted to give a quick shout out and tell you I truly enjoy reading your blog posts. Can you suggest any other blogs/websites/forums that go over the same topics? Appreciate it!
There are definitely quite a lot of details like that to take into consideration. That could be a great point to bring up. I provide the thoughts above as normal inspiration however clearly there are questions like the one you carry up the place crucial thing will likely be working in trustworthy good faith. I don?t know if greatest practices have emerged around things like that, but I’m positive that your job is clearly recognized as a good game. Both boys and girls feel the impact of just a second?s pleasure, for the remainder of their lives.
Just wish to say your article is as astounding. The clearness in your put up is simply excellent and that i could suppose you are an expert in this subject. Well together with your permission let me to snatch your RSS feed to stay up to date with approaching post. Thank you a million and please carry on the gratifying work.
I’ve been absent for some time, but now I remember why I used to love this blog. Thank you, I?ll try and check back more often. How frequently you update your website?
Hey this is kind of of off topic but I was wanting to know if blogs use WYSIWYG editors or if you have to manually code with HTML. I’m starting a blog soon but have no coding knowledge so I wanted to get guidance from someone with experience. Any help would be enormously appreciated!
You got a very excellent website, Glad I discovered it through yahoo.
I am often to blogging and i really appreciate your content. The article has really peaks my interest. I am going to bookmark your site and keep checking for new information.
I have noticed that in unwanted cameras, exceptional devices help to {focus|concentrate|maintain focus|target|a**** automatically. These sensors involving some cams change in in the area of contrast, while others employ a beam with infra-red (IR) light, particularly in low light. Higher specification cameras at times use a blend of both techniques and will often have Face Priority AF where the camera can ‘See’ the face as you concentrate only in that. Thank you for sharing your opinions on this website.
I am really impressed together with your writing talents and also with the format in your blog. Is that this a paid theme or did you customize it yourself? Either way stay up the excellent quality writing, it is uncommon to see a great weblog like this one today..
When I originally commented I clicked the “Notify me when new comments are added” checkbox and now each time a comment is added I get three e-mails with the same comment. Is there any way you can remove people from that service? Bless you!
hi!,I really like your writing very so much! percentage we communicate more about your post on AOL? I need an expert in this space to unravel my problem. Maybe that is you! Looking ahead to peer you.
I have taken note that of all varieties of insurance, health insurance coverage is the most controversial because of the issue between the insurance coverage company’s obligation to remain profitable and the consumer’s need to have insurance cover. Insurance companies’ income on wellness plans are extremely low, thus some companies struggle to generate income. Thanks for the suggestions you write about through this website.
I was just searching for this info for a while. After six hours of continuous Googleing, at last I got it in your site. I wonder what’s the lack of Google strategy that don’t rank this type of informative sites in top of the list. Normally the top sites are full of garbage.
I gotta favorite this web site it seems very beneficial handy
I got what you intend, thanks for putting up.Woh I am happy to find this website through google.
Great post, I conceive website owners should acquire a lot from this website its very user pleasant.
Thanks for your strategies. One thing I’ve noticed is the fact banks along with financial institutions have in mind the spending habits of consumers while also understand that the majority of people max out their real credit cards around the holiday seasons. They prudently take advantage of this real fact and start flooding the inbox and snail-mail box with hundreds of no-interest APR credit cards offers just after the holiday season closes. Knowing that for anyone who is like 98 in the American public, you’ll get at the one opportunity to consolidate credit card debt and transfer balances for 0 interest rate credit cards.
I enjoy, lead to I discovered exactly what I was looking for. You’ve ended my four day long hunt! God Bless you man. Have a great day. Bye
https://explorethehorizon.co.uk/
Hey there! I just wanted to ask if you ever have any trouble with hackers? My last blog (wordpress) was hacked and I ended up losing a few months of hard work due to no backup. Do you have any methods to stop hackers?
I have observed that in old digital cameras, specialized detectors help to {focus|concentrate|maintain focus|target|a**** automatically. Those kind of sensors involving some cameras change in in the area of contrast, while others use a beam with infra-red (IR) light, especially in low light. Higher standards cameras at times use a combination of both systems and may have Face Priority AF where the dslr camera can ‘See’ any face as you concentrate only upon that. Many thanks for sharing your opinions on this website.
Thankyou for all your efforts that you have put in this. very interesting information.
I like this web site very much, Its a rattling nice situation to read and find information.
I gotta favorite this internet site it seems invaluable very useful
I respect your work, regards for all the useful blog posts.
Undeniably consider that that you said. Your favourite reason seemed to be on the internet the simplest factor to consider of. I say to you, I definitely get irked whilst other people consider issues that they just do not recognize about. You controlled to hit the nail upon the highest and defined out the entire thing with no need side-effects , folks can take a signal. Will likely be back to get more. Thanks
Hey there! Someone in my Myspace group shared this site with us so I came to look it over. I’m definitely loving the information. I’m book-marking and will be tweeting this to my followers! Exceptional blog and brilliant design and style.
Hi are using WordPress for your blog platform? I’m new to the blog world but I’m trying to get started and set up my own. Do you need any coding expertise to make your own blog? Any help would be really appreciated!
Utterly written subject matter, appreciate it for entropy. “Necessity is the mother of taking chances.” by Mark Twain.
you are really a good webmaster. The web site loading speed is incredible. It seems that you are doing any unique trick. Moreover, The contents are masterpiece. you’ve done a wonderful job on this topic!
Great paintings! That is the kind of info that should be shared across the net. Shame on Google for no longer positioning this publish upper! Come on over and consult with my site . Thank you =)
Hey, I think your blog might be having browser compatibility issues. When I look at your website in Opera, it looks fine but when opening in Internet Explorer, it has some overlapping. I just wanted to give you a quick heads up! Other then that, awesome blog!
Hello, Neat post. There’s an issue along with your website in web explorer, might check this?K IE still is the market chief and a huge component of people will miss your magnificent writing due to this problem.
Dead pent subject matter, regards for entropy. “In the fight between you and the world, back the world.” by Frank Zappa.
I wish to show appreciation to you for bailing me out of this particular circumstance. Because of looking out through the the web and coming across views which are not productive, I was thinking my entire life was gone. Existing minus the solutions to the difficulties you have sorted out as a result of your good post is a serious case, as well as the kind which might have in a negative way affected my career if I had not come across the blog. Your own personal training and kindness in taking care of the whole lot was valuable. I’m not sure what I would have done if I hadn’t encountered such a thing like this. I can at this time look forward to my future. Thanks so much for this reliable and amazing help. I won’t be reluctant to endorse the blog to any person who would need guidelines about this problem.
whoah this blog is great i love reading your articles. Keep up the good work! You know, many people are hunting around for this info, you could aid them greatly.
I absolutely love your blog and find nearly all of your post’s to be exactly I’m looking for. Would you offer guest writers to write content to suit your needs? I wouldn’t mind composing a post or elaborating on a few of the subjects you write concerning here. Again, awesome website!
Youre so cool! I dont suppose Ive read anything like this before. So good to find any individual with some original ideas on this subject. realy thank you for beginning this up. this website is one thing that is wanted on the web, someone with a little bit originality. helpful job for bringing one thing new to the internet!
What i don’t understood is actually how you are not actually much more well-liked than you may be now. You’re so intelligent. You realize thus considerably relating to this subject, made me personally consider it from a lot of varied angles. Its like men and women aren’t fascinated unless it’s one thing to do with Lady gaga! Your own stuffs outstanding. Always maintain it up!
Hello very nice blog!! Man .. Beautiful .. Amazing .. I’ll bookmark your site and take the feeds additionallyKI am satisfied to seek out numerous helpful info here within the publish, we want develop extra techniques on this regard, thanks for sharing. . . . . .
Cool blog! Is your theme custom made or did you download it from somewhere? A design like yours with a few simple tweeks would really make my blog shine. Please let me know where you got your design. Many thanks
Thanks for your write-up. One other thing is individual American states have their particular laws of which affect house owners, which makes it quite hard for the the legislature to come up with the latest set of guidelines concerning foreclosed on householders. The problem is that a state has own laws which may have impact in a damaging manner on the subject of foreclosure policies.
I am not really good with English but I get hold this rattling easygoing to translate.
Heya i am for the first time here. I found this board and I to find It really useful & it helped me out a lot. I hope to offer one thing back and aid others such as you aided me.
hello there and thank you to your information ? I?ve definitely picked up anything new from proper here. I did on the other hand expertise some technical issues the use of this web site, since I experienced to reload the website a lot of instances previous to I may get it to load correctly. I had been considering if your web hosting is OK? Not that I am complaining, however sluggish loading cases times will sometimes have an effect on your placement in google and could damage your high quality score if ads and ***********|advertising|advertising|advertising and *********** with Adwords. Well I?m including this RSS to my e-mail and can look out for a lot more of your respective fascinating content. Ensure that you replace this again soon..
hello!,I like your writing very much! share we communicate more about your post on AOL? I require an expert on this area to solve my problem. May be that’s you! Looking forward to see you.
Through my observation, shopping for consumer electronics online can for sure be expensive, nevertheless there are some tips and tricks that you can use to obtain the best products. There are continually ways to discover discount discounts that could help to make one to hold the best electronic products products at the lowest prices. Good blog post.
Spot on with this write-up, I truly think this web site needs much more consideration. I’ll probably be again to read rather more, thanks for that info.
Good write-up, I’m regular visitor of one’s web site, maintain up the nice operate, and It is going to be a regular visitor for a lengthy time.
Hey, you used to write wonderful, but the last several posts have been kinda boring… I miss your tremendous writings. Past several posts are just a little out of track! come on!
I genuinely enjoy reading on this site, it has got fantastic blog posts. “Never fight an inanimate object.” by P. J. O’Rourke.
Great goods from you, man. I have bear in mind your stuff previous to and you’re simply too magnificent. I really like what you’ve bought here, really like what you’re stating and the best way in which you assert it. You make it enjoyable and you still take care of to stay it smart. I can not wait to learn much more from you. This is actually a tremendous site.
Great web site. A lot of useful information here. I’m sending it to some friends ans also sharing in delicious. And certainly, thanks for your sweat!
With almost everything that seems to be building throughout this subject material, your points of view tend to be fairly refreshing. On the other hand, I appologize, but I do not give credence to your whole idea, all be it stimulating none the less. It would seem to me that your opinions are actually not totally validated and in reality you are your self not even wholly confident of the argument. In any event I did appreciate looking at it.
One more thing. In my opinion that there are lots of travel insurance web pages of respected companies than enable you to enter your journey details and acquire you the estimates. You can also purchase this international travel cover policy on the internet by using your credit card. All you need to do is always to enter the travel specifics and you can see the plans side-by-side. You only need to find the system that suits your financial allowance and needs after which use your credit card to buy that. Travel insurance on the internet is a good way to do investigation for a reliable company to get international travel insurance. Thanks for expressing your ideas.
I love your blog.. very nice colors & theme. Did you create this website yourself or did you hire someone to do it for you? Plz reply as I’m looking to create my own blog and would like to find out where u got this from. thank you
Hi, i think that i saw you visited my site so i came to ?return the favor?.I’m trying to find things to improve my web site!I suppose its ok to use a few of your ideas!!
bookdecorfactory.com is a Global Trusted Online Fake Books Decor Store. We sell high quality budget price fake books decoration, Faux Books Decor. We offer FREE shipping across US, UK, AUS, NZ, Russia, Europe, Asia and deliver 100+ countries. Our delivery takes around 12 to 20 Days. We started our online business journey in Sydney, Australia and have been selling all sorts of home decor and art styles since 2008.
I have noticed that in unwanted cameras, unique receptors help to {focus|concentrate|maintain focus|target|a**** automatically. Those kind of sensors associated with some video cameras change in in the area of contrast, while others make use of a beam of infra-red (IR) light, specially in low lumination. Higher specs cameras from time to time use a blend of both devices and could have Face Priority AF where the digicam can ‘See’ a new face while keeping your focus only on that. Many thanks for sharing your ideas on this weblog.
I know this if off topic but I’m looking into starting my own blog and was wondering what all is needed to get set up? I’m assuming having a blog like yours would cost a pretty penny? I’m not very web smart so I’m not 100 certain. Any recommendations or advice would be greatly appreciated. Thank you
This is really interesting, You are a very skilled blogger. I’ve joined your feed and look forward to seeking more of your wonderful post. Also, I’ve shared your website in my social networks!
You have noted very interesting points! ps nice website . “I understand a fury in your words, But not the words.” by William Shakespeare.
Very nice post. I just stumbled upon your blog and wish to say that I've truly enjoyed surfing around your blog posts.
Aw, this was a really nice post. In thought I want to put in writing like this moreover – taking time and precise effort to make a very good article… however what can I say… I procrastinate alot and under no circumstances seem to get one thing done.
Hi would you mind stating which blog platform you’re using? I’m going to start my own blog in the near future but I’m having a hard time making a decision between BlogEngine/Wordpress/B2evolution and Drupal. The reason I ask is because your design and style seems different then most blogs and I’m looking for something unique. P.S My apologies for getting off-topic but I had to ask!
Thanks for the new things you have revealed in your short article. One thing I’d prefer to discuss is that FSBO relationships are built as time passes. By launching yourself to owners the first few days their FSBO is definitely announced, ahead of the masses begin calling on Mon, you develop a good relationship. By giving them equipment, educational components, free reviews, and forms, you become a good ally. By subtracting a personal interest in them and their problem, you produce a solid interconnection that, many times, pays off if the owners decide to go with an agent they know plus trust — preferably you actually.
Great website. A lot of useful information here. I am sending it to a few friends ans also sharing in delicious. And of course, thanks for your effort!
This design is incredible! You certainly know how to keep a reader entertained. Between your wit and your videos, I was almost moved to start my own blog (well, almost…HaHa!) Fantastic job. I really loved what you had to say, and more than that, how you presented it. Too cool!
WONDERFUL Post.thanks for share..more wait .. …
One thing is that one of the most frequent incentives for applying your credit card is a cash-back or rebate provision. Generally, you will get 1-5 back upon various expenditures. Depending on the credit cards, you may get 1 back on most buying, and 5 in return on acquisitions made at convenience stores, gasoline stations, grocery stores and also ‘member merchants’.
GlucoTrust is a revolutionary blood sugar support solution that eliminates the underlying causes of type 2 diabetes and associated health risks.
Well I truly enjoyed studying it. This information offered by you is very helpful for accurate planning.
https://www.bing.com/alink/link?url=https3a2f2frapidcents.com2f&source=serp-local&h=OJG9AbtDaubH37WdvC4bblJKko2fYEEnQ2EAZUZ52fixs3d&p=lw_tp&ig=93E6C1ABBA084C50B80EA12E4B8E4E69&ypid=YN1226x231559780733910873
Today, I went to the beach front with my children. I found a sea shell and gave
it to my 4 year old daughter and said “You can hear the ocean if you put this to your ear.” She placed the shell to her ear
and screamed. There was a hermit crab inside and it pinched her ear.
She never wants to go back! LoL I know this is totally off topic but I
had to tell someone!
A further issue is that video gaming has become one of the all-time biggest forms of excitement for people of all ages. Kids engage in video games, and also adults do, too. Your XBox 360 has become the favorite gaming systems for those who love to have a huge variety of games available to them, plus who like to experiment with live with other folks all over the world. Thanks for sharing your ideas.
you are really a good webmaster. The website loading speed is amazing. It seems that you are doing any unique trick. Moreover, The contents are masterpiece. you’ve done a great job on this topic!
Everyone loves it when people come together and share opinions.
Great site, stick with it!
Thanks for the strategies presented. One thing I additionally believe is that credit cards giving a 0 apr often appeal to consumers in with zero interest rate, instant endorsement and easy over-the-internet balance transfers, but beware of the most recognized factor that will probably void the 0 easy neighborhood annual percentage rate and as well as throw one out into the very poor house in no time.
FiverrEarn
[…]although internet websites we backlink to below are considerably not connected to ours, we feel they’re essentially really worth a go by, so possess a look[…]
I am glad to be a visitant of this thoroughgoing site! , appreciate it for this rare information! .
I’m really enjoying the theme/design of your website. Do you ever run into any internet browser compatibility problems? A few of my blog audience have complained about my blog not operating correctly in Explorer but looks great in Opera. Do you have any advice to help fix this problem?
I’d also like to say that most people that find themselves devoid of health insurance are generally students, self-employed and those that are jobless. More than half of those uninsured are under the age of 35. They do not sense they are looking for health insurance since they are young and also healthy. Their own income is normally spent on real estate, food, and also entertainment. Lots of people that do work either complete or part-time are not provided insurance by way of their jobs so they get along without due to the rising cost of health insurance in america. Thanks for the concepts you talk about through this web site.
I’m impressed, I need to say. Really hardly ever do I encounter a blog that’s each educative and entertaining, and let me inform you, you could have hit the nail on the head. Your thought is outstanding; the issue is one thing that not enough people are speaking intelligently about. I’m very completely satisfied that I stumbled throughout this in my search for one thing regarding this.
I am glad to be one of the visitants on this great internet site (:, thankyou for putting up.
Oh my goodness! a tremendous article dude. Thanks Nevertheless I am experiencing concern with ur rss . Don’t know why Unable to subscribe to it. Is there anybody getting similar rss downside? Anybody who is aware of kindly respond. Thnkx
Wonderful website. Plenty of useful information here. I am sending it to some buddies ans additionally sharing in delicious. And of course, thank you for your sweat!
you’re in point of fact a good webmaster. The web site loading velocity is amazing. It sort of feels that you’re doing any unique trick. In addition, The contents are masterpiece. you’ve done a magnificent job on this matter!
Thanks for your posting. Another issue is that just being a photographer will involve not only difficulties in capturing award-winning photographs but also hardships in establishing the best digicam suited to your requirements and most especially problems in maintaining the grade of your camera. It is very real and noticeable for those photographers that are in capturing this nature’s fascinating scenes : the mountains, the actual forests, the particular wild or maybe the seas. Going to these adventurous places absolutely requires a dslr camera that can meet the wild’s harsh setting.
You can certainly see your expertise in the work you write. The world hopes for even more passionate writers like you who are not afraid to say how they believe. Always go after your heart.
What¦s Taking place i am new to this, I stumbled upon this I’ve discovered It positively useful and it has helped me out loads. I’m hoping to give a contribution & help other customers like its aided me. Good job.
Hey there just wanted to give you a quick heads up. The text in your article seem to be running off the screen in Chrome. I’m not sure if this is a formatting issue or something to do with internet browser compatibility but I figured I’d post to let you know. The layout look great though! Hope you get the issue resolved soon. Cheers
I believe that avoiding highly processed foods is the first step so that you can lose weight. They could taste fine, but prepared foods have very little nutritional value, making you take more simply to have enough vitality to get with the day. For anyone who is constantly feeding on these foods, moving over to grain and other complex carbohydrates will aid you to have more power while eating less. Thanks alot : ) for your blog post.
The when I just read a blog, I’m hoping that this doesnt disappoint me approximately this one. Get real, Yes, it was my method to read, but When i thought youd have something interesting to state. All I hear is a number of whining about something that you could fix should you werent too busy trying to find attention.Metal roofing warranty in Cape Coral
I have learned result-oriented things through your blog post. One other thing I have observed is that in many instances, FSBO sellers will certainly reject an individual. Remember, they might prefer to not ever use your expert services. But if a person maintain a steady, professional connection, offering assistance and being in contact for four to five weeks, you will usually be capable of win a business interview. From there, a listing follows. Cheers
Hey! Someone in my Myspace group shared this website with us so I came to take a look. I’m definitely loving the information. I’m book-marking and will be tweeting this to my followers! Great blog and terrific design.
Thanks for a marvelous posting! I definitely enjoyed reading it, you may be a great author.I will always bookmark your blog and will often come back down the road. I want to encourage one to continue your great work, have a nice afternoon!
Hello there, I found your blog via Google while looking for a related topic, your website came up, it looks great. I’ve bookmarked it in my google bookmarks.
excellent publish, very informative. I’m wondering why the opposite experts of this sector don’t understand this. You should continue your writing. I’m confident, you have a great readers’ base already!
Hi! Would you mind if I share your blog with my myspace group? There’s a lot of people that I think would really enjoy your content. Please let me know. Many thanks
Hey there! Do you know if they make any plugins to safeguard against hackers? I’m kinda paranoid about losing everything I’ve worked hard on. Any tips?
Needed to compose you a tiny note to finally thank you very much yet again for your personal splendid methods you have discussed above. It is strangely open-handed with people like you to provide publicly all that a number of people would have marketed as an electronic book to generate some bucks for their own end, primarily now that you could possibly have tried it if you ever wanted. These inspiring ideas likewise acted like a fantastic way to know that the rest have the same dreams really like my personal own to see a whole lot more concerning this problem. I’m sure there are thousands of more enjoyable times in the future for many who check out your blog.glucotrust official
Neotonics is an essential probiotic supplement that works to support the microbiome in the gut and also works as an anti-aging formula. The formula targets the cause of the aging of the skin.
Throughout the awesome pattern of things you secure a B+ for hard work. Exactly where you actually confused everybody was on the details. As people say, details make or break the argument.. And that couldn’t be much more correct at this point. Having said that, let me tell you what exactly did give good results. Your text is certainly incredibly engaging and that is possibly why I am making an effort in order to comment. I do not really make it a regular habit of doing that. Secondly, whilst I can see the jumps in reasoning you make, I am not really sure of exactly how you seem to unite your points which inturn make the final result. For now I will subscribe to your issue however hope in the future you actually link your facts better.
I?m now not positive where you’re getting your info, but great topic. I needs to spend a while finding out more or understanding more. Thanks for fantastic info I used to be on the lookout for this info for my mission.
I as well think hence, perfectly pent post! .
Whats up! I simply wish to give a huge thumbs up for the great info you might have right here on this post. I can be coming again to your blog for more soon.
Great work! This is the type of information that should be shared around the net. Shame on Google for not positioning this post higher! Come on over and visit my web site . Thanks =)
Very fantastic information can be found on weblog.
Hello! I know this is kinda off topic but I was wondering if you knew where I could locate a captcha plugin for my comment form? I’m using the same blog platform as yours and I’m having difficulty finding one? Thanks a lot!
Great post. I used to be checking continuously this weblog and I am impressed! Very useful info specially the ultimate part 🙂 I handle such info much. I used to be looking for this certain information for a very long time. Thank you and good luck.
But wanna remark on few general things, The website layout is perfect, the written content is very great : D.
This is a excellent web site, would you be interested in doing an interview regarding just how you designed it? If so e-mail me!
I have been absent for some time, but now I remember why I used to love this site. Thanks, I will try and check back more often. How frequently you update your website?
Hi my family member! I wish to say that this post is awesome, nice written and include almost all vital infos. I’d like to look extra posts like this.
Thank you for sharing superb informations. Your web site is so cool. I am impressed by the details that you¦ve on this web site. It reveals how nicely you perceive this subject. Bookmarked this website page, will come back for extra articles. You, my friend, ROCK! I found just the information I already searched everywhere and simply could not come across. What an ideal web-site.
I love your wordpress theme, exactly where did you obtain it from?
I have noticed that online education is getting well-liked because attaining your college degree online has developed into popular alternative for many people. Many people have not had a chance to attend a normal college or university however seek the increased earning possibilities and career advancement that a Bachelors Degree gives. Still other folks might have a diploma in one training but would wish to pursue one thing they now have an interest in.
Hello, you used to write great, but the last several posts have been kinda boring?K I miss your tremendous writings. Past several posts are just a little bit out of track! come on!
Pretty part of content. I simply stumbled upon your site and in accession capital to say that I get in fact enjoyed account your weblog posts. Any way I’ll be subscribing in your feeds and even I success you access constantly fast.
Greetings from Carolina! I’m bored to tears at work so I decided to check out your blog on my iphone during lunch break. I enjoy the info you present here and can’t wait to take a look when I get home. I’m surprised at how fast your blog loaded on my cell phone .. I’m not even using WIFI, just 3G .. Anyhow, wonderful site!
Do you have a spam issue on this site; I also am a blogger, and I was wondering your situation; we have developed some nice methods and we are looking to swap strategies with others, please shoot me an email if interested.
Good day very nice blog!! Guy .. Beautiful .. Superb .. I will bookmark your site and take the feeds additionally?KI am satisfied to seek out numerous helpful information here in the submit, we want develop more strategies on this regard, thanks for sharing. . . . . .
Thanks for your writing. I would also love to say a health insurance broker also works well with the benefit of the particular coordinators of any group insurance policies. The health broker is given a directory of benefits desired by an individual or a group coordinator. What any broker does is try to find individuals or even coordinators which will best go with those desires. Then he presents his advice and if all parties agree, this broker formulates legal contract between the two parties.
VidaCalm is an all-natural blend of herbs and plant extracts that treat tinnitus and help you live a peaceful life.
Hi my friend! I wish to say that this article is amazing, nice written and include almost all important infos. I?d like to look more posts like this .
I can’t express how much I value the effort the author has put into producing this remarkable piece of content. The clarity of the writing, the depth of analysis, and the abundance of information provided are simply impressive. Her passion for the subject is evident, and it has undoubtedly struck a chord with me. Thank you, author, for sharing your knowledge and enlightening our lives with this extraordinary article!
I must express my thanks to this writer for bailing me out of this setting. After looking through the world wide web and finding methods which were not helpful, I assumed my life was over. Living without the presence of strategies to the difficulties you’ve fixed all through your entire write-up is a critical case, as well as those which may have in a negative way affected my entire career if I had not noticed your web blog. Your actual mastery and kindness in dealing with every item was invaluable. I’m not sure what I would have done if I had not come upon such a subject like this. I can at this time look ahead to my future. Thanks so much for this expert and amazing guide. I will not be reluctant to suggest your web page to any individual who desires guidelines on this situation.
Neurozoom is a dietary formulation designed to develop brain power and cognition. The nootropic contains 35 science-based ingredients that safeguard the brain cells from damage and slow age-related memory problems.
I used to be very happy to find this internet-site.I wished to thanks to your time for this wonderful learn!! I undoubtedly enjoying every little little bit of it and I’ve you bookmarked to take a look at new stuff you weblog post.
LeanFlux is a natural supplement that claims to increase brown adipose tissue (BAT) levels and burn fat and calories.
Hey there would you mind sharing which blog platform you’re using? I’m going to start my own blog soon but I’m having a difficult time choosing between BlogEngine/Wordpress/B2evolution and Drupal. The reason I ask is because your design seems different then most blogs and I’m looking for something unique. P.S Apologies for being off-topic but I had to ask!
By taking two capsules of Abdomax daily, you can purportedly relieve gut health problems more effectively than any diet or medication. The supplement also claims to lower blood sugar, lower blood pressure, and provide other targeted health benefits.
BioVanish a weight management solution that’s transforming the approach to healthy living. In a world where weight loss often feels like an uphill battle, BioVanish offers a refreshing and effective alternative. This innovative supplement harnesses the power of natural ingredients to support optimal weight management.
Gut Vita™ is an all-natural supplement designed to support digestive health issues by targeting the root cause and restoring optimal gut flora.
Somebody essentially help to make seriously posts I would state. This is the first time I frequented your web page and thus far? I surprised with the research you made to create this particular publish incredible. Wonderful job!
Hey! Do you know if they make any plugins to protect against hackers? I’m kinda paranoid about losing everything I’ve worked hard on. Any recommendations?
Keratone is 100% natural formula, non invasive, and helps remove fungal build-up in your toe, improve circulation in capillaries so you can easily and effortlessly break free from toenail fungus.
Thanks for your post here. One thing I would really like to say is always that most professional career fields consider the Bachelor Degree as the entry level standard for an online college diploma. Whilst Associate Diplomas are a great way to begin with, completing your current Bachelors opens many entrance doors to various employment opportunities, there are numerous online Bachelor Course Programs available through institutions like The University of Phoenix, Intercontinental University Online and Kaplan. Another issue is that many brick and mortar institutions give Online variations of their degree programs but normally for a substantially higher payment than the companies that specialize in online degree programs.
I have observed that good real estate agents everywhere you go are Promoting. They are seeing that it’s more than merely placing a sign post in the front yard. It’s really concerning building human relationships with these sellers who at some point will become purchasers. So, if you give your time and efforts to assisting these retailers go it alone : the “Law involving Reciprocity” kicks in. Thanks for your blog post.
Zoracel is an extraordinary oral care product designed to promote healthy teeth and gums, provide long-lasting fresh breath, support immune health, and care for the ear, nose, and throat.
Hi there! Someone in my Facebook group shared this website with us so I came to check it out. I’m definitely loving the information. I’m book-marking and will be tweeting this to my followers! Fantastic blog and brilliant style and design.
Real nice style and design and superb subject material, nothing at all else we require : D.
I’ve noticed that credit score improvement activity has to be conducted with techniques. If not, it’s possible you’ll find yourself damaging your rating. In order to succeed in fixing your credit score you have to confirm that from this time you pay your entire monthly expenses promptly before their planned date. It is really significant given that by not really accomplishing that, all other measures that you will choose to use to improve your credit rating will not be effective. Thanks for sharing your thoughts.
I really appreciate this post. I’ve been looking all over for this! Thank goodness I found it on Bing. You have made my day! Thanks again
When I initially commented I clicked the “Notify me when new comments are added” checkbox and now each time a comment is added I get several emails with the same comment. Is there any way you can remove me from that service? Cheers!
I’ve been absent for some time, but now I remember why I used to love this site. Thanks, I?¦ll try and check back more frequently. How frequently you update your web site?
Normally I don’t read post on blogs, but I wish to say that this write-up very forced me to try and do it! Your writing style has been amazed me. Thanks, very nice post.
Hello would you mind letting me know which hosting company you’re working with? I’ve loaded your blog in 3 different web browsers and I must say this blog loads a lot quicker then most. Can you recommend a good internet hosting provider at a fair price? Many thanks, I appreciate it!
I am glad that I discovered this site, precisely the right information that I was searching for! .
I’d have to examine with you here. Which is not something I normally do! I get pleasure from reading a post that will make individuals think. Additionally, thanks for permitting me to comment!
Hello my friend! I want to say that this article is amazing, nice written and include almost all important infos. I would like to see more posts like this.
Thanks for your recommendations on this blog. 1 thing I would wish to say is always that purchasing electronic devices items on the Internet is nothing new. In reality, in the past few years alone, the market for online electronics has grown a great deal. Today, you can get practically almost any electronic device and devices on the Internet, from cameras as well as camcorders to computer components and video games consoles.
Please let me know if you’re looking for a author for your site. You have some really good articles and I think I would be a good asset. If you ever want to take some of the load off, I’d really like to write some material for your blog in exchange for a link back to mine. Please shoot me an e-mail if interested. Regards!
It¦s really a great and helpful piece of information. I am happy that you simply shared this helpful information with us. Please stay us informed like this. Thanks for sharing.
There are certainly numerous particulars like that to take into consideration. That could be a nice point to deliver up. I provide the ideas above as general inspiration but clearly there are questions just like the one you convey up where a very powerful factor will be working in honest good faith. I don?t know if best practices have emerged around issues like that, however I’m sure that your job is clearly recognized as a good game. Each girls and boys really feel the impression of only a moment?s pleasure, for the rest of their lives.
I have really learned result-oriented things via your web site. One other thing I would really like to say is the fact that newer computer system operating systems have a tendency to allow far more memory to get used, but they in addition demand more memory space simply to operate. If people’s computer is unable to handle far more memory along with the newest computer software requires that storage increase, it could be the time to shop for a new Laptop. Thanks
Nice blog here! Also your website loads up fast! What web host are you using? Can I get your affiliate link to your host? I wish my website loaded up as quickly as yours lol
I do love the way you have framed this particular issue plus it does indeed present me a lot of fodder for thought. However, because of what precisely I have witnessed, I simply just hope when other reviews stack on that folks stay on issue and don’t start upon a tirade of some other news of the day. All the same, thank you for this exceptional piece and whilst I can not necessarily go along with it in totality, I regard the point of view.
Hey there! This is kind of off topic but I need some advice from an established blog. Is it hard to set up your own blog? I’m not very techincal but I can figure things out pretty quick. I’m thinking about creating my own but I’m not sure where to start. Do you have any points or suggestions? Thank you
Great line up. We will be linking to this great article on our site. Keep up the good writing.
Do you mind if I quote a few of your articles as long as I provide credit and sources back to your site? My blog site is in the very same area of interest as yours and my visitors would definitely benefit from a lot of the information you present here. Please let me know if this okay with you. Regards!
Great post made here. One thing I’d like to say is that often most professional job areas consider the Bachelors Degree like thejust like the entry level requirement for an online degree. Whilst Associate Diplomas are a great way to get started, completing your current Bachelors reveals many entrance doors to various employment opportunities, there are numerous online Bachelor Course Programs available coming from institutions like The University of Phoenix, Intercontinental University Online and Kaplan. Another issue is that many brick and mortar institutions give Online types of their certifications but typically for a extensively higher price than the corporations that specialize in online college diploma plans.
Admiring the persistence you put into your website and in depth information you provide. It’s awesome to come across a blog every once in a while that isn’t the same unwanted rehashed information. Excellent read! I’ve bookmarked your site and I’m adding your RSS feeds to my Google account.
🌌 Wow, blog ini seperti perjalanan kosmik melayang ke galaksi dari kegembiraan! 🌌 Konten yang menegangkan di sini adalah perjalanan rollercoaster yang mendebarkan bagi pikiran, memicu kagum setiap saat. 💫 Baik itu gayahidup, blog ini adalah harta karun wawasan yang menarik! #KemungkinanTanpaBatas 🚀 ke dalam perjalanan kosmik ini dari imajinasi dan biarkan imajinasi Anda melayang! 🚀 Jangan hanya membaca, rasakan sensasi ini! 🌈 Pikiran Anda akan bersyukur untuk perjalanan menyenangkan ini melalui ranah keajaiban yang menakjubkan! 🌍
💫 Wow, blog ini seperti petualangan fantastis melayang ke galaksi dari kemungkinan tak terbatas! 🎢 Konten yang menegangkan di sini adalah perjalanan rollercoaster yang mendebarkan bagi imajinasi, memicu kagum setiap saat. 💫 Baik itu teknologi, blog ini adalah sumber wawasan yang menarik! #KemungkinanTanpaBatas Terjun ke dalam petualangan mendebarkan ini dari penemuan dan biarkan pikiran Anda berkelana! 🚀 Jangan hanya membaca, rasakan sensasi ini! #MelampauiBiasa 🚀 akan bersyukur untuk perjalanan menyenangkan ini melalui ranah keajaiban yang penuh penemuan! ✨
Thanks for your article. I also believe that laptop computers are becoming more and more popular nowadays, and now are sometimes the only kind of computer utilized in a household. The reason being at the same time that they’re becoming more and more very affordable, their processing power keeps growing to the point where they may be as strong as desktop from just a few years back.
Thanks a lot for your post. I want to write my opinion that the cost of car insurance varies greatly from one insurance policy to another, mainly because there are so many different issues which play a role in the overall cost. One example is, the make and model of the auto will have an enormous bearing on the purchase price. A reliable aged family motor vehicle will have a more economical premium than just a flashy racecar.
I’m amazed by the quality of this content! The author has clearly put a huge amount of effort into researching and arranging the information. It’s refreshing to come across an article that not only provides helpful information but also keeps the readers captivated from start to finish. Kudos to him for making such a brilliant work!
I always was concerned in this subject and still am, thanks for posting.
Greetings from Florida! I’m bored at work so I decided to check out your blog on my iphone during lunch break. I love the info you provide here and can’t wait to take a look when I get home. I’m shocked at how fast your blog loaded on my mobile .. I’m not even using WIFI, just 3G .. Anyways, awesome blog!
It¦s actually a great and helpful piece of information. I¦m satisfied that you shared this useful info with us. Please stay us informed like this. Thank you for sharing.
You should take part in a contest for the most effective blogs on the web. I will recommend this site!
What i don’t understood is actually how you’re not actually much more well-liked than you may be right now. You’re very intelligent. You realize therefore significantly relating to this subject, produced me personally consider it from a lot of varied angles. Its like women and men aren’t fascinated unless it?s one thing to do with Lady gaga! Your own stuffs outstanding. Always maintain it up!
F*ckin? amazing things here. I am very satisfied to peer your post. Thank you so much and i am looking ahead to touch you. Will you please drop me a e-mail?
fantastic post, very informative. I wonder why the other specialists of this sector do not notice this. You should continue your writing. I am confident, you’ve a great readers’ base already!
Great post. I was checking continuously this blog and I am impressed! Very useful information particularly the last part 🙂 I care for such info much. I was seeking this certain info for a long time. Thank you and good luck.
Wow! This could be one particular of the most beneficial blogs We have ever arrive across on this subject. Basically Excellent. I’m also an expert in this topic therefore I can understand your hard work.
Wow! This could be one particular of the most useful blogs We’ve ever arrive across on this subject. Basically Excellent. I’m also an expert in this topic therefore I can understand your hard work.
Appreciate you for sharing all these wonderful posts. In addition, the ideal travel plus medical insurance system can often ease those problems that come with traveling abroad. A medical emergency can quickly become very costly and that’s absolute to quickly decide to put a financial problem on the family’s finances. Setting up in place the great travel insurance package prior to setting off is definitely worth the time and effort. Thank you
Hi! Quick question that’s totally off topic. Do you know how to make your site mobile friendly? My website looks weird when viewing from my iphone 4. I’m trying to find a theme or plugin that might be able to resolve this issue. If you have any recommendations, please share. Thank you!
Wonderful items from you, man. I have take note your stuff previous to and you are just too great. I actually like what you have bought right here, really like what you’re saying and the way wherein you assert it. You make it entertaining and you still care for to keep it smart. I can not wait to read far more from you. This is really a great website.
Once I initially commented I clicked the -Notify me when new comments are added- checkbox and now each time a comment is added I get four emails with the identical comment. Is there any manner you can remove me from that service? Thanks!
Woah! I’m really digging the template/theme of this site. It’s simple, yet effective. A lot of times it’s challenging to get that “perfect balance” between user friendliness and visual appearance. I must say you’ve done a very good job with this. In addition, the blog loads super quick for me on Internet explorer. Superb Blog!
It?s exhausting to seek out knowledgeable folks on this topic, however you sound like you already know what you?re talking about! Thanks
Howdy are using WordPress for your blog platform? I’m new to the blog world but I’m trying to get started and set up my own. Do you need any coding expertise to make your own blog? Any help would be really appreciated!
You made some first rate points there. I seemed on the web for the problem and located most individuals will go together with along with your website.
Hey! This is kind of off topic but I need some help from an established blog. Is it very difficult to set up your own blog? I’m not very techincal but I can figure things out pretty fast. I’m thinking about setting up my own but I’m not sure where to start. Do you have any tips or suggestions? Appreciate it
My programmer is trying to persuade me to move to .net from PHP. I have always disliked the idea because of the costs. But he’s tryiong none the less. I’ve been using WordPress on a number of websites for about a year and am nervous about switching to another platform. I have heard great things about blogengine.net. Is there a way I can import all my wordpress content into it? Any help would be really appreciated!
Hi my family member! I wish to say that this post is amazing, great written and come with approximately all important infos. I?¦d like to see extra posts like this .
Wonderful beat ! I would like to apprentice while you amend your website, how could i subscribe for a blog site? The account aided me a acceptable deal. I had been a little bit acquainted of this your broadcast offered bright clear idea
A powerful share, I just given this onto a colleague who was doing a little evaluation on this. And he actually purchased me breakfast as a result of I found it for him.. smile. So let me reword that: Thnx for the deal with! But yeah Thnkx for spending the time to debate this, I really feel strongly about it and love studying extra on this topic. If doable, as you change into expertise, would you thoughts updating your blog with extra particulars? It is highly useful for me. Massive thumb up for this weblog put up!
It is the best time to make some plans for the future and it is time to be happy. I’ve read this post and if I could I wish to suggest you few interesting things or tips. Maybe you can write next articles referring to this article. I want to read more things about it!
Great V I should certainly pronounce, impressed with your website. I had no trouble navigating through all the tabs and related information ended up being truly easy to do to access. I recently found what I hoped for before you know it at all. Reasonably unusual. Is likely to appreciate it for those who add forums or anything, site theme . a tones way for your client to communicate. Excellent task..
Hi there just wanted to give you a quick heads up. The words in your post seem to be running off the screen in Chrome. I’m not sure if this is a format issue or something to do with web browser compatibility but I thought I’d post to let you know. The design look great though! Hope you get the problem solved soon. Thanks
I have been exploring for a little bit for any high-quality articles or weblog posts on this kind of space . Exploring in Yahoo I at last stumbled upon this site. Reading this info So i am glad to exhibit that I’ve an incredibly good uncanny feeling I came upon exactly what I needed. I most definitely will make sure to don’t disregard this site and give it a glance regularly.
I have seen loads of useful items on your site about computers. However, I’ve got the view that lap tops are still not quite powerful enough to be a good option if you usually do tasks that require plenty of power, such as video modifying. But for world wide web surfing, statement processing, and majority of other common computer functions they are perfectly, provided you can’t mind the tiny screen size. Thanks for sharing your opinions.
Good write-up, I am normal visitor of one?s site, maintain up the nice operate, and It is going to be a regular visitor for a lengthy time.
I like what you guys are up also. Such intelligent work and reporting! Carry on the superb works guys I have incorporated you guys to my blogroll. I think it will improve the value of my web site 🙂
I gotta favorite this web site it seems extremely helpful handy
This is really attention-grabbing, You’re a very professional blogger. I have joined your rss feed and look ahead to searching for extra of your fantastic post. Additionally, I’ve shared your site in my social networks!
I like this web site because so much useful material on here : D.
Hello would you mind letting me know which hosting company you’re utilizing? I’ve loaded your blog in 3 completely different internet browsers and I must say this blog loads a lot faster then most. Can you recommend a good hosting provider at a honest price? Cheers, I appreciate it!
Usually I don’t read article on blogs, but I wish to say that this write-up very forced me to try and do so! Your writing style has been surprised me. Thanks, quite nice post.
Very interesting topic, appreciate it for putting up.
okmark your weblog and check again here regularly. I am quite certain I will learn plenty of new stuff right here! Best of luck for the next!
I discovered your blog site on google and check a few of your early posts. Continue to keep up the very good operate. I just additional up your RSS feed to my MSN News Reader. Seeking forward to reading more from you later on!…
Thank you, I’ve recently been searching for info approximately this subject for a while and yours is the best I’ve came upon till now. However, what about the bottom line? Are you certain about the supply?
I truly appreciate this post. I have been looking everywhere for this! Thank goodness I found it on Bing. You’ve made my day! Thanks again
Yesterday, while I was at work, my cousin stole my apple ipad and tested to see if it can survive a thirty foot drop, just so she can be a youtube sensation. My iPad is now destroyed and she has 83 views. I know this is entirely off topic but I had to share it with someone!
I used to be very pleased to find this internet-site.I wanted to thanks on your time for this wonderful learn!! I undoubtedly enjoying every little little bit of it and I’ve you bookmarked to take a look at new stuff you blog post.
Thanks for revealing your ideas. I might also like to express that video games have been ever evolving. Modern technology and improvements have assisted create reasonable and enjoyable games. These kinds of entertainment games were not really sensible when the real concept was first of all being attempted. Just like other designs of technologies, video games also have had to develop as a result of many ages. This is testimony towards fast continuing development of video games.
I have been absent for a while, but now I remember why I used to love this site. Thank you, I’ll try and check back more often. How frequently you update your web site?
I’ll right away take hold of your rss as I can’t to find your email subscription link or newsletter service. Do you have any? Please let me realize in order that I may subscribe. Thanks.
Great write-up, I am regular visitor of one¦s web site, maintain up the nice operate, and It’s going to be a regular visitor for a long time.
Hello.This post was really remarkable, especially because I was browsing for thoughts on this issue last Wednesday.
Thanks for the sensible critique. Me and my neighbor were just preparing to do a little research about this. We got a grab a book from our local library but I think I learned more clear from this post. I’m very glad to see such great info being shared freely out there.
Absolutely written articles, regards for selective information. “No human thing is of serious importance.” by Plato.
Thanks for your tips on this blog. One particular thing I want to say is that often purchasing gadgets items from the Internet is not new. The truth is, in the past decades alone, the market for online electronic products has grown drastically. Today, you could find practically almost any electronic unit and other gadgets on the Internet, ranging from cameras as well as camcorders to computer pieces and game playing consoles.
I loved as much as you will receive carried out right here. The sketch is attractive, your authored subject matter stylish. nonetheless, you command get bought an shakiness over that you wish be delivering the following. unwell unquestionably come further formerly again as exactly the same nearly very often inside case you shield this increase.
Mandatory read, and I’m sincerely grateful for the valuable information you’ve made accessible.
Mandatory insights, thanks for sharing.
What i don’t realize is in truth how you’re no longer actually much more well-appreciated than you may be right now. You are so intelligent. You recognize therefore significantly in terms of this matter, made me for my part consider it from a lot of varied angles. Its like women and men are not fascinated until it is something to accomplish with Woman gaga! Your personal stuffs nice. Always deal with it up!
Wow! This can be one particular of the most useful blogs We’ve ever arrive across on this subject. Basically Excellent. I am also an expert in this topic therefore I can understand your effort.
Nice read, I just passed this onto a colleague who was doing a little research on that. And he actually bought me lunch because I found it for him smile Thus let me rephrase that: Thanks for lunch!
Hey! I know this is kinda off topic but I was wondering if you knew where I could locate a captcha plugin for my comment form? I’m using the same blog platform as yours and I’m having difficulty finding one? Thanks a lot!
I am often to blogging and i really appreciate your content. The article has really peaks my interest. I am going to bookmark your site and keep checking for new information.
Somebody essentially help to make significantly articles I would state. This is the very first time I frequented your web page and so far? I surprised with the research you made to make this actual put up amazing. Great activity!
WONDERFUL Post.thanks for share..more wait .. …
I do trust all the concepts you’ve introduced for your post. They’re really convincing and can definitely work. Still, the posts are too quick for novices. May you please prolong them a little from subsequent time? Thank you for the post.
I used to be suggested this web site via my cousin. I’m not certain whether this post is written through him as no one else recognise such targeted approximately my difficulty. You are incredible! Thank you!
View the latest from the world of psychology: from behavioral research to practical guidance on relationships, mental health and addiction. Find help from our directory of therapists, psychologists and counselors. https://therapisttoday.us/
RVVR is website dedicated to advancing physical and mental health through scientific research and proven interventions. Learn about our evidence-based health promotion programs. https://rvvr.us/
Virginia News: Your source for Virginia breaking news, sports, business, entertainment, weather and traffic https://virginiapost.us/
The latest news on grocery chains, celebrity chefs, and fast food – plus reviews, cooking tips and advice, recipes, and more. https://megamenu.us/
The best tips, guides, and inspiration on home improvement, decor, DIY projects, and interviews with celebrities from your favorite renovation shows. https://houseblog.us/
Breaking US news, local New York news coverage, sports, entertainment news, celebrity gossip, autos, videos and photos at nybreakingnews.us https://nybreakingnews.us/
There is noticeably a bundle to know about this. I assume you made certain nice points in features also.
Find healthy, delicious recipes and meal plan ideas from our test kitchen cooks and nutrition experts at SweetApple. Learn how to make healthier food choices every day. https://sweetapple.site/
Outstanding feature
Colorado breaking news, sports, business, weather, entertainment. https://denver-news.us/
Your source for Connecticut breaking news, UConn sports, business, entertainment, weather and traffic https://connecticutpost.us/
I will immediately snatch your rss feed as I can’t to find your email subscription hyperlink or newsletter service. Do you’ve any? Kindly allow me realize in order that I could subscribe. Thanks.
Healthcare Blog provides news, trends, jobs and resources for health industry professionals. We cover topics like healthcare IT, hospital administration, polcy
OCNews.us covers local news in Orange County, CA, California and national news, sports, things to do and the best places to eat, business and the Orange County housing market. https://ocnews.us/
Fresh, flavorful and (mostly) healthy recipes made for real, actual, every day life. Helping you celebrate the joy of food in a totally non-intimidating way. https://skillfulcook.us/
Island Post is the website for a chain of six weekly newspapers that serve the North Shore of Nassau County, Long Island published by Alb Media. The newspapers are comprised of the Great Neck News, Manhasset Times, Roslyn Times, Port Washington Times, New Hyde Park Herald Courier and the Williston Times. Their coverage includes village governments, the towns of Hempstead and North Hempstead, schools, business, entertainment and lifestyle. https://islandpost.us/
Breaking food industry news, cooking tips, recipes, reviews, rankings, and interviews https://tastingcorner.us/
Latest Denver news, top Colorado news and local breaking news from Denver News, including sports, weather, traffic, business, politics, photos and video. https://denver-news.us/
BioPharma Blog provides news and analysis for biotech and biopharmaceutical executives. We cover topics like clinical trials, drug discovery and development, pharma marketing, FDA approvals and regulations, and more. https://biopharmablog.us/
Today, I went to the beach with my children. I found a sea shell and gave it to my 4 year old daughter and said “You can hear the ocean if you put this to your ear.” She placed the shell to her ear and screamed. There was a hermit crab inside and it pinched her ear. She never wants to go back! LoL I know this is totally off topic but I had to tell someone!
Thank you so much for providing individuals with an extraordinarily special possiblity to check tips from this blog. It can be very pleasing and full of a great time for me personally and my office colleagues to search the blog at the least thrice a week to read the new issues you will have. And of course, we are actually fascinated concerning the breathtaking ideas you serve. Some 1 facts in this posting are certainly the most effective we have ever had.
Santa Cruz Sentinel: Local News, Local Sports and more for Santa Cruz https://santacruznews.us/
So excited to share my thoughts here! 🌟 This content is astonishingly innovative, merging creativity with insight in a way that’s both engaging and enlightening. Every detail seems thoughtfully designed, exhibiting a deep appreciation and passion for the subject. It’s extraordinary to find such a perfect blend of information and entertainment! Kudos to everyone involved in creating this masterpiece. Your hard work and dedication are truly remarkable, and it’s an absolute joy to witness. Looking forward to seeing more of this fantastic work in the future! Keep amazing us all! 🚀👏💫 #Inspired #CreativityAtItsBest
It’s the best time to make a few plans for the longer term and it’s time to be happy. I have read this put up and if I could I wish to recommend you few attention-grabbing issues or tips. Perhaps you could write next articles relating to this article. I wish to learn more things about it!
Good day! Would you mind if I share your blog with my myspace group? There’s a lot of folks that I think would really enjoy your content. Please let me know. Thanks
Hello, i think that i saw you visited my weblog thus i came to ?return the favor?.I’m attempting to find things to improve my site!I suppose its ok to use a few of your ideas!!
Hi, just required you to know I he added your site to my Google bookmarks due to your layout. But seriously, I believe your internet site has 1 in the freshest theme I??ve came across. It extremely helps make reading your blog significantly easier.
Thanks for these guidelines. One thing I should also believe is that often credit cards presenting a 0 rate of interest often lure consumers together with zero rate of interest, instant authorization and easy internet balance transfers, nevertheless beware of the top factor that may void your 0 easy streets annual percentage rate and throw anybody out into the poor house quickly.
I have learned result-oriented things by your web site. One other thing I’d really like to say is that often newer computer operating systems are likely to allow more memory to be utilized, but they as well demand more memory simply to work. If an individual’s computer could not handle far more memory as well as newest program requires that storage increase, it may be the time to shop for a new Personal computer. Thanks
Very nice info and right to the point. I don’t know if this is really the best place to ask but do you guys have any thoughts on where to employ some professional writers? Thanks in advance 🙂
Wohh exactly what I was searching for, regards for putting up.
Do whatever you want. Steal cars, drive tanks and helicopters, defeat gangs. It’s your city! https://play.google.com/store/apps/details?id=com.gangster.city.open.world
Excellent blog here! Also your site loads up fast! What host are you using? Can I get your affiliate link to your host? I wish my site loaded up as quickly as yours lol
How do you think things will change in five years?
Hey very nice website!! Man .. Beautiful .. Superb .. I’ll bookmark your web site and take the feeds also?I’m happy to search out a lot of useful info here within the post, we want develop more techniques on this regard, thanks for sharing. . . . . .
🌌 Wow, this blog is like a fantastic adventure soaring into the galaxy of wonder! 🌌 The captivating content here is a thrilling for the mind, sparking awe at every turn. 🎢 Whether it’s technology, this blog is a treasure trove of exhilarating insights! #InfinitePossibilities Embark into this exciting adventure of knowledge and let your imagination roam! 🌈 Don’t just explore, savor the excitement! #BeyondTheOrdinary Your mind will thank you for this thrilling joyride through the worlds of endless wonder! 🚀
You made certain good points there. I did a search on the theme and found most folks will consent with your blog.
Thanks for another informative blog. Where else could I get that type of information written in such an ideal way? I’ve a project that I am just now working on, and I have been on the look out for such info.
Valuable information. Lucky me I found your site unintentionally, and I’m shocked why this accident didn’t happened earlier! I bookmarked it.
I will immediately snatch your rss feed as I can not to find your email subscription link or e-newsletter service. Do you’ve any? Kindly permit me recognize so that I could subscribe. Thanks.
indiaherald.us provides latest news from India , India News and around the world. Get breaking news alerts from India and follow today’s live news updates in field of politics, business, sports, defence, entertainment and more. https://indiaherald.us
I conceive this site has some rattling good information for everyone : D.
Hi there would you mind sharing which blog platform you’re working with? I’m looking to start my own blog in the near future but I’m having a difficult time choosing between BlogEngine/Wordpress/B2evolution and Drupal. The reason I ask is because your design and style seems different then most blogs and I’m looking for something unique. P.S Apologies for getting off-topic but I had to ask!
Kingston News – Kingston, NY News, Breaking News, Sports, Weather https://kingstonnews.us/
I got what you intend, thankyou for putting up.Woh I am lucky to find this website through google.
I’m truly enjoying the design and layout of your site. It’s a very easy on the eyes which makes it much more enjoyable for me to come here and visit more often. Did you hire out a developer to create your theme? Exceptional work!
I would like to thank you for the efforts you have put in writing this web site. I’m hoping the same high-grade website post from you in the upcoming also. In fact your creative writing skills has encouraged me to get my own site now. Really the blogging is spreading its wings fast. Your write up is a good example of it.
Hi there would you mind stating which blog platform you’re working with? I’m going to start my own blog in the near future but I’m having a tough time choosing between BlogEngine/Wordpress/B2evolution and Drupal. The reason I ask is because your design seems different then most blogs and I’m looking for something completely unique. P.S Apologies for getting off-topic but I had to ask!
Good day! Would you mind if I share your blog with my facebook group? There’s a lot of people that I think would really appreciate your content. Please let me know. Thank you
Thanks for your post. I would also like to say that the first thing you will need to carry out is check if you really need fixing credit. To do that you will need to get your hands on a copy of your credit file. That should really not be difficult, because the government necessitates that you are allowed to have one cost-free copy of your own credit report on a yearly basis. You just have to consult the right people. You can either check out the website for that Federal Trade Commission or contact one of the main credit agencies right away.
I will immediately snatch your rss feed as I can’t find your e-mail subscription link or newsletter service. Do you have any? Kindly allow me realize in order that I may subscribe. Thanks.
Lake County Lake Reporter: Local News, Local Sports and more for Lake County https://lakereporter.us
Unquestionably consider that that you said. Your favorite reason appeared to be at the net the easiest factor to keep in mind of. I say to you, I certainly get annoyed even as folks consider issues that they plainly don’t realize about. You controlled to hit the nail upon the highest and outlined out the entire thing without having side effect , folks can take a signal. Will likely be again to get more. Thank you
Thanks for your helpful article. One other problem is that mesothelioma cancer is generally the result of the breathing of dust from mesothelioma, which is a carcinogenic material. It can be commonly viewed among workers in the building industry who may have long exposure to asbestos. It’s also caused by living in asbestos insulated buildings for years of time, Your age plays an important role, and some consumers are more vulnerable for the risk as compared with others.
I have been absent for some time, but now I remember why I used to love this website. Thank you, I will try and check back more frequently. How frequently you update your site?
💫 Wow, blog ini seperti roket meluncurkan ke alam semesta dari keajaiban! 🌌 Konten yang menarik di sini adalah perjalanan rollercoaster yang mendebarkan bagi imajinasi, memicu kagum setiap saat. 🎢 Baik itu teknologi, blog ini adalah harta karun wawasan yang menarik! #KemungkinanTanpaBatas Berangkat ke dalam perjalanan kosmik ini dari imajinasi dan biarkan pemikiran Anda terbang! ✨ Jangan hanya menikmati, alami kegembiraan ini! 🌈 🚀 akan bersyukur untuk perjalanan menyenangkan ini melalui alam keajaiban yang penuh penemuan! 🌍
🌌 Wow, blog ini seperti roket meluncur ke alam semesta dari keajaiban! 🌌 Konten yang menegangkan di sini adalah perjalanan rollercoaster yang mendebarkan bagi pikiran, memicu kagum setiap saat. 🎢 Baik itu gayahidup, blog ini adalah sumber wawasan yang mendebarkan! #PetualanganMenanti Terjun ke dalam petualangan mendebarkan ini dari pengetahuan dan biarkan imajinasi Anda berkelana! ✨ Jangan hanya membaca, rasakan kegembiraan ini! #MelampauiBiasa Pikiran Anda akan bersyukur untuk perjalanan mendebarkan ini melalui ranah keajaiban yang penuh penemuan! ✨
After study a few of the blog posts on your website now, and I truly like your way of blogging. I bookmarked it to my bookmark website list and will be checking back soon. Pls check out my web site as well and let me know what you think.
Thanks for your tips about this blog. 1 thing I would wish to say is purchasing gadgets items over the Internet is not new. In reality, in the past few years alone, the market for online gadgets has grown a great deal. Today, you will discover practically almost any electronic unit and product on the Internet, ranging from cameras along with camcorders to computer spare parts and video games consoles.
I?ve read a few good stuff here. Certainly worth bookmarking for revisiting. I wonder how much effort you put to create such a fantastic informative site.
You could certainly see your skills in the work you write. The arena hopes for more passionate writers such as you who aren’t afraid to mention how they believe. All the time go after your heart.
Thanks for the advice on credit repair on this excellent site. A few things i would offer as advice to people is always to give up a mentality they will buy at this point and pay back later. As a society we all tend to try this for many things. This includes getaways, furniture, plus items we want. However, you’ll want to separate the wants out of the needs. As long as you’re working to raise your credit ranking score you have to make some sacrifices. For example you’ll be able to shop online to save cash or you can turn to second hand merchants instead of expensive department stores pertaining to clothing.
Hi, Neat post. There’s a problem with your website in internet explorer, would check this? IE still is the market leader and a large portion of people will miss your great writing because of this problem.
I am so happy to read this. This is the type of manual that needs to be given and not the accidental misinformation that is at the other blogs. Appreciate your sharing this best doc.
I’ve been absent for a while, but now I remember why I used to love this site. Thanks, I’ll try and check back more often. How frequently you update your web site?
I love your blog.. very nice colors & theme. Did you design this website yourself or did you hire someone to do it for you? Plz reply as I’m looking to design my own blog and would like to find out where u got this from. appreciate it
Hello, Neat post. There’s a problem together with your site in internet explorer, would check thisK IE nonetheless is the marketplace chief and a good portion of people will pass over your magnificent writing due to this problem.
Thanks , I have just been looking for info about this topic for a long time and yours is the greatest I’ve found out till now. However, what concerning the bottom line? Are you sure concerning the supply?
I love your blog.. very nice colors & theme. Did you design this website yourself or did you hire someone to do it for you? Plz reply as I’m looking to create my own blog and would like to find out where u got this from. many thanks
After research a couple of of the weblog posts in your website now, and I actually like your way of blogging. I bookmarked it to my bookmark web site list and might be checking back soon. Pls take a look at my website online as nicely and let me know what you think.
This design is wicked! You obviously know how to keep a reader entertained. Between your wit and your videos, I was almost moved to start my own blog (well, almost…HaHa!) Wonderful job. I really enjoyed what you had to say, and more than that, how you presented it. Too cool!
Hi, Neat post. There is an issue together with your website in internet explorer, might test this? IE nonetheless is the marketplace chief and a large component to other folks will leave out your wonderful writing due to this problem.
Hey, you used to write great, but the last few posts have been kinda boring?K I miss your super writings. Past several posts are just a little bit out of track! come on!
I think this is among the most important info for me. And i am glad reading your article. But wanna remark on some general things, The site style is great, the articles is really excellent : D. Good job, cheers
Nice post. I learn something more challenging on different blogs everyday. It’s going to always be stimulating to read content material from other writers and practice a little bit one thing from their store. I?d favor to use some with the content material on my blog whether you don?t mind. Natually I?ll give you a link in your web blog. Thanks for sharing.
Great site. A lot of helpful info here. I’m sending it to some pals ans additionally sharing in delicious. And of course, thank you to your sweat!
I’m very happy to read this. This is the kind of manual that needs to be given and not the accidental misinformation that is at the other blogs. Appreciate your sharing this greatest doc.
I have been surfing online more than three hours these days, but I never discovered any interesting article like yours. It is lovely price sufficient for me. In my view, if all webmasters and bloggers made excellent content material as you did, the net can be a lot more helpful than ever before.
Is there a newsletter for your blog? I’d love to stay updated!
This article was a refreshing change from your usual style, and I really enjoyed it!
The visuals you add to your posts make the concepts so much clearer. Great job!
I appreciate that you always respond to comments. It makes a difference.
I have learn several excellent stuff here. Definitely price bookmarking for revisiting. I surprise how a lot effort you put to make this kind of great informative website.
Dropping by to express my gratitude for your efforts. Keep it up!
Great post. I was checking constantly this blog and I am impressed! Very helpful information specially the last part 🙂 I care for such info much. I was seeking this particular info for a long time. Thank you and best of luck.
Trenton News – Trenton, NJ News, Sports, Weather and Things to Do https://trentonnews.us/
Your blog is an invaluable resource. So thrilled to have stumbled upon it!
Vacavillenews.us covers local news in Vacaville, California. Keep up with all business, local sports, outdoors, local columnists and more. https://vacavillenews.us/
I appreciate the diversity of topics you cover. There’s always something new and interesting.
I have been checking out many of your posts and i can state nice stuff. I will surely bookmark your blog.
Ohio Reporter – Ohio News, Sports, Weather and Things to Do https://ohioreporter.us/
Absolutely fantastic post! 😄 What you post consistently impresses me. I just had to express my deep gratitude for always offering such valuable perspectives and captivating contributions. Sustain your remarkable work!
Great ? I should definitely pronounce, impressed with your web site. I had no trouble navigating through all the tabs as well as related information ended up being truly easy to do to access. I recently found what I hoped for before you know it in the least. Reasonably unusual. Is likely to appreciate it for those who add forums or something, site theme . a tones way for your client to communicate. Excellent task..
Just wish to say your article is as astonishing. The clarity in your post is simply great and i could assume you are an expert on this subject. Well with your permission let me to grab your RSS feed to keep up to date with forthcoming post. Thanks a million and please continue the enjoyable work.
Fashion More provides in-depth journalism and insight into the news and trends impacting the fashion
The latest video game news, reviews, exclusives, streamers, esports, and everything else gaming. https://zaaz.us/
I am glad to be a visitor of this unadulterated web site! , thankyou for this rare info ! .
This is amazing, love the content , Thank you!
Helpful information. Lucky me I found your website accidentally, and I am shocked why this coincidence did not took place earlier! I bookmarked it.
PharmaMore provides a forum for industry leaders to hear the most important voices and ideas in the industry. https://pharmamore.us/
I simply could not depart your site before suggesting that I actually loved the standard information a person supply on your visitors? Is gonna be back continuously to investigate cross-check new posts.
Your blog is a go-to source for insightful analysis and perspectives.
Valley News covers local news from Pomona to Ontario including, California news, sports, things to do, and business in the Inland Empire. https://valleynews.us/
The personal touch you add to each post makes your blog stand out.
You’ve created a blog that’s as entertaining as it is informative.
The way you connect with your readers is exceptional.
Very interesting topic, appreciate it for posting.
The personal touch you add to each post makes your blog stand out.
Your blog provides a unique blend of insights and practical advice.
Just a smiling visitor here to share the love (:, btw outstanding layout. “Individuals may form communities, but it is institutions alone that can create a nation.” by Benjamin Disraeli.
Local news from Redlands, CA, California news, sports, things to do, and business in the Inland Empire. https://redlandsnews.us
The consistency and quality of your blog content are remarkable.
Your writing is a wonderful mix of informative and compelling.
Your content is consistently relevant and deeply engaging.
Your dedication to providing valuable content shines through every post.
You have a gift for making complex subjects easily digestible.
NewsBreak provides latest and breaking Renton, WA local news, weather forecast, crime and safety reports, traffic updates, event notices, sports https://rentonnews.us
You have a knack for uncovering and sharing hidden gems of knowledge.
excellent put up, very informative. I’m wondering why the opposite specialists of this sector don’t notice this. You should continue your writing. I’m confident, you have a great readers’ base already!
Hmm is anyone else encountering problems with the images on this blog loading? I’m trying to find out if its a problem on my end or if it’s the blog. Any suggestions would be greatly appreciated.
Thank you for another magnificent post. Where else could anyone get that kind of information in such an ideal way of writing? I have a presentation next week, and I’m on the look for such info.
Wonderful blog! I found it while surfing around on Yahoo News. Do you have any suggestions on how to get listed in Yahoo News? I’ve been trying for a while but I never seem to get there! Many thanks
My husband and i got quite lucky Jordan managed to carry out his preliminary research while using the ideas he got in your weblog. It’s not at all simplistic to just continually be offering tips most people could have been selling. And we understand we have got the website owner to give thanks to for this. All the explanations you have made, the simple site menu, the relationships you can help instill – it is everything spectacular, and it’s assisting our son and our family believe that this content is satisfying, which is pretty important. Thanks for all!
Hey there! I could have sworn I’ve been to this website before but after reading through some of the post I realized it’s new to me. Anyways, I’m definitely delighted I found it and I’ll be bookmarking and checking back frequently!
Valuable information. Lucky me I found your website by accident, and I’m shocked why this accident did not happened earlier! I bookmarked it.
After study a few of the blog posts on your website now, and I truly like your way of blogging. I bookmarked it to my bookmark website list and will be checking back soon. Pls check out my web site as well and let me know what you think.
you are really a good webmaster. The web site loading speed is amazing. It seems that you’re doing any unique trick. Also, The contents are masterwork. you have done a fantastic job on this topic!
Wonderful blog! Do you have any tips and hints for aspiring writers? I’m hoping to start my own site soon but I’m a little lost on everything. Would you suggest starting with a free platform like WordPress or go for a paid option? There are so many options out there that I’m completely confused .. Any suggestions? Bless you!
I think this is one of the most important info for me. And i am glad reading your article. But wanna remark on some general things, The website style is wonderful, the articles is really excellent : D. Good job, cheers
I’m still learning from you, while I’m trying to achieve my goals. I absolutely love reading everything that is written on your site.Keep the tips coming. I liked it!
Very good written information. It will be useful to everyone who employess it, including yours truly :). Keep up the good work – looking forward to more posts.
You are my inhalation, I own few web logs and often run out from to brand.
I enjoy foregathering utile info, this post has got me even more info! .
Only a smiling visitor here to share the love (:, btw great style.
Peninsula News is a daily news website, covering the northern Olympic Peninsula in the state of Washington, United States. https://peninsulanews.us
Read the latest news on Crime, Politics, Schools, Sports, Weather, Business, Arts, Jobs, Obits, and Things to do in Kent Washington. https://kentnews.us/
We’re a group of volunteers and opening a new scheme in our community. Your site provided us with valuable information to work on. You have done a formidable job and our entire community will be grateful to you.
Fresh, flavorful and (mostly) healthy recipes made for real, actual, every day life. Helping you celebrate the joy of food in a totally non-intimidating way. https://skillfulcook.us
My partner and I stumbled over here coming from a different web address and thought I might check things out. I like what I see so i am just following you. Look forward to exploring your web page yet again.
Hello just wanted to give you a quick heads up and let you know a few of the images aren’t loading properly. I’m not sure why but I think its a linking issue. I’ve tried it in two different web browsers and both show the same outcome.
We’re a group of volunteers and starting a new scheme in our community. Your website offered us with valuable info to work on. You’ve done an impressive job and our whole community will be grateful to you.
Macomb County, MI News, Breaking News, Sports, Weather, Things to Do https://macombnews.us
Get Lehigh Valley news, Allentown news, Bethlehem news, Easton news, Quakertown news, Poconos news and Pennsylvania news from Morning Post. https://morningpost.us
Thank you for another wonderful article. Where else could anybody get that type of info in such a perfect way of writing? I have a presentation next week, and I am on the look for such info.
Reading, PA News, Sports, Weather, Things to Do http://readingnews.us/
I’ve recently started a site, the info you offer on this site has helped me tremendously. Thank you for all of your time & work.
According to my observation, after a in foreclosure home is available at a bidding, it is common for that borrower in order to still have any remaining unpaid debt on the loan. There are many lenders who attempt to have all rates and liens paid off by the future buyer. Nevertheless, depending on certain programs, polices, and state laws and regulations there may be several loans that are not easily resolved through the switch of lending products. Therefore, the responsibility still rests on the borrower that has had his or her property in foreclosure process. Many thanks sharing your thinking on this website.
Great line up. We will be linking to this great article on our site. Keep up the good writing.
Its such as you learn my thoughts! You seem to know so much about this, like you wrote the guide in it or something. I feel that you can do with a few p.c. to drive the message home a bit, but other than that, that is great blog. An excellent read. I will definitely be back.
Helpful info. Lucky me I discovered your site by chance, and I am shocked why this accident didn’t took place earlier! I bookmarked it.
Hey! Someone in my Myspace group shared this site with us so I came to look it over. I’m definitely enjoying the information. I’m book-marking and will be tweeting this to my followers! Outstanding blog and excellent style and design.
I got what you intend, regards for posting.Woh I am pleased to find this website through google. “If one does not know to which port one is sailing, no wind is favorable.” by Seneca.
Very efficiently written information. It will be helpful to anyone who employess it, including yours truly :). Keep doing what you are doing – for sure i will check out more posts.
I?¦ll immediately take hold of your rss as I can not in finding your email subscription link or newsletter service. Do you’ve any? Kindly permit me recognise in order that I may subscribe. Thanks.
Hi there! I know this is kinda off topic nevertheless I’d figured I’d ask. Would you be interested in trading links or maybe guest writing a blog post or vice-versa? My website goes over a lot of the same subjects as yours and I think we could greatly benefit from each other. If you might be interested feel free to shoot me an email. I look forward to hearing from you! Superb blog by the way!
I loved as much as you’ll receive carried out right here. The sketch is attractive, your authored material stylish. nonetheless, you command get got an edginess over that you wish be delivering the following. unwell unquestionably come more formerly again as exactly the same nearly a lot often inside case you shield this hike.
I would like to thank you for the efforts you have put in writing this blog. I am hoping the same high-grade site post from you in the upcoming also. In fact your creative writing skills has encouraged me to get my own website now. Really the blogging is spreading its wings quickly. Your write up is a great example of it.
It is really a great and helpful piece of information. I?m glad that you shared this helpful information with us. Please keep us up to date like this. Thanks for sharing.
I’m really enjoying the theme/design of your website. Do you ever run into any web browser compatibility issues? A number of my blog visitors have complained about my blog not working correctly in Explorer but looks great in Safari. Do you have any advice to help fix this issue?
Hey there! I know this is somewhat off topic but I was wondering if you knew where I could get a captcha plugin for my comment form? I’m using the same blog platform as yours and I’m having trouble finding one? Thanks a lot!
Good ? I should certainly pronounce, impressed with your website. I had no trouble navigating through all tabs and related info ended up being truly simple to do to access. I recently found what I hoped for before you know it at all. Reasonably unusual. Is likely to appreciate it for those who add forums or anything, website theme . a tones way for your customer to communicate. Nice task..
You are my breathing in, I have few web logs and occasionally run out from to post .
Wonderful web site. Plenty of useful information here. I?¦m sending it to several buddies ans additionally sharing in delicious. And obviously, thank you to your effort!
I just added this website to my rss reader, great stuff. Can’t get enough!
I’ve been browsing online more than three hours these days, yet I by no means discovered any fascinating article like yours. It?s lovely price sufficient for me. In my view, if all web owners and bloggers made good content as you did, the net will be much more helpful than ever before.
Hi there, just became aware of your blog through Google, and found that it’s really informative. I am going to watch out for brussels. I’ll appreciate if you continue this in future. Lots of people will be benefited from your writing. Cheers!
You got a very superb website, Sword lily I observed it through yahoo.
The latest news and reviews in the world of tech, automotive, gaming, science, and entertainment. https://millionbyte.us/
I am glad to be one of the visitors on this outstanding website (:, regards for posting.
There is noticeably a bundle to know about this. I assume you made sure nice points in options also.
Hello there, just became aware of your blog through Google, and found that it is really informative. I am going to watch out for brussels. I will appreciate if you continue this in future. A lot of people will be benefited from your writing. Cheers!
I love your blog.. very nice colors & theme. Did you create this website yourself? Plz reply back as I’m looking to create my own blog and would like to know wheere u got this from. thanks
I have realized that of all different types of insurance, health insurance is the most marked by controversy because of the clash between the insurance coverage company’s duty to remain making money and the consumer’s need to have insurance. Insurance companies’ revenue on health plans are extremely low, thus some firms struggle to profit. Thanks for the thoughts you discuss through this site.
colibrim.com
It?s actually a cool and useful piece of info. I am glad that you simply shared this helpful info with us. Please stay us up to date like this. Thanks for sharing.
I do accept as true with all of the ideas you’ve offered on your post. They’re very convincing and will definitely work. Nonetheless, the posts are very brief for beginners. Could you please prolong them a little from next time? Thank you for the post.
Hello my family member! I wish to say that this post is amazing, nice written and come with almost all significant infos. I would like to peer extra posts like this .
I’m blown away by the quality of this content! The author has clearly put a tremendous amount of effort into exploring and organizing the information. It’s inspiring to come across an article that not only provides useful information but also keeps the readers hooked from start to finish. Great job to her for creating such a remarkable piece!
It is best to take part in a contest for probably the greatest blogs on the web. I’ll recommend this web site!
Hiya, I am really glad I’ve found this info. Nowadays bloggers publish only about gossips and net and this is really frustrating. A good site with exciting content, that is what I need. Thanks for keeping this web site, I will be visiting it. Do you do newsletters? Can’t find it.
Very interesting information!Perfect just what I was looking for! “He who spares the wicked injures the good.” by Seneca.
I’ve been browsing on-line more than three hours these days, but I never found any fascinating article like yours. It?s beautiful price enough for me. In my opinion, if all webmasters and bloggers made just right content as you did, the web might be a lot more helpful than ever before.
With havin so much content do you ever run into any problems of plagorism or copyright violation? My blog has
a lot of exclusive content I’ve either created myself or
outsourced but it seems a lot of it is popping it up all over the web without my authorization. Do
you know any ways to help prevent content from being ripped off?
I’d genuinely appreciate it.
Hey this is somewhat of off topic but I was wondering if blogs use WYSIWYG editors or if you have to manually code with HTML. I’m starting a blog soon but have no coding know-how so I wanted to get advice from someone with experience. Any help would be enormously appreciated!
Hi I am so happy I found your website, I really found you by error, while I was browsing on Bing for something else, Anyways I am here now and would just like to say cheers for a tremendous post and a all round thrilling blog (I also love the theme/design), I don’t have time to read through it all at the minute but I have book-marked it and also added your RSS feeds, so when I have time I will be back to read more, Please do keep up the fantastic work.
Wow! I’m in awe of the author’s writing skills and ability to convey complicated concepts in a straightforward and concise manner. This article is a real treasure that merits all the applause it can get. Thank you so much, author, for providing your expertise and providing us with such a priceless asset. I’m truly appreciative!
My brother suggested I might like this website. He was entirely right. This post truly made my day. You can not imagine just how much time I had spent for this information! Thanks!
Valuable info. Lucky me I found your website by accident, and I am shocked why this accident didn’t happened earlier! I bookmarked it.
Just wanna say that this is extremely helpful, Thanks for taking your time to write this.
Yeah bookmaking this wasn’t a speculative determination great post! .
This really answered my drawback, thank you!
I think other website owners should take this website as an example , very clean and superb user friendly pattern.
Thank you for the auspicious writeup. It in fact was a amusement account it. Look advanced to more added agreeable from you! However, how can we communicate?
Hey would you mind letting me know which webhost you’re working with? I’ve loaded your blog in 3 different internet browsers and I must say this blog loads a lot quicker then most. Can you recommend a good hosting provider at a honest price? Thanks a lot, I appreciate it!
There are some interesting cut-off dates in this article however I don?t know if I see all of them center to heart. There is some validity but I will take maintain opinion until I look into it further. Good article , thanks and we want more! Added to FeedBurner as properly
Your house is valueble for me. Thanks!…
Keep up the superb work, I read few articles on this website and I think that your web site is rattling interesting and has got sets of fantastic info .
Admiring the time and energy you put into your website and in depth information you provide. It’s great to come across a blog every once in a while that isn’t the same outdated rehashed material. Wonderful read! I’ve saved your site and I’m adding your RSS feeds to my Google account.
I?ve been exploring for a little bit for any high-quality articles or blog posts in this kind of house . Exploring in Yahoo I eventually stumbled upon this website. Studying this info So i?m satisfied to exhibit that I have a very excellent uncanny feeling I came upon just what I needed. I most certainly will make certain to do not overlook this website and provides it a glance regularly.
Hello. excellent job. I did not imagine this. This is a great story. Thanks!
I’m Bookmarking This For Future Reference. Your Advice Is Spot On!
Your Dedication To Quality Content Is Evident. Keep Up The Great Work!
Another thing I have really noticed is that for many people, less-than-perfect credit is the reaction to circumstances outside of their control. By way of example they may happen to be saddled with an illness and because of this they have higher bills going to collections. It might be due to a work loss and the inability to do the job. Sometimes divorce proceedings can truly send the financial situation in an opposite direction. Many thanks sharing your ideas on this website.
Once I initially commented I clicked the -Notify me when new feedback are added- checkbox and now every time a remark is added I get 4 emails with the same comment. Is there any means you’ll be able to take away me from that service? Thanks!
I do agree with all the ideas you’ve presented in your post. They’re really convincing and will definitely work. Still, the posts are too short for newbies. Could you please extend them a little from next time? Thanks for the post.
Throughout this great design of things you’ll secure a B- with regard to hard work. Where you actually misplaced me personally was first in all the particulars. As people say, the devil is in the details… And that could not be much more true right here. Having said that, let me say to you what did work. The authoring can be extremely persuasive which is most likely why I am making an effort to opine. I do not make it a regular habit of doing that. 2nd, although I can easily notice the jumps in logic you make, I am not confident of how you seem to unite the ideas which in turn produce the conclusion. For right now I shall yield to your issue but hope in the near future you connect the facts better.
F*ckin? amazing things here. I am very glad to see your article. Thanks a lot and i’m looking forward to contact you. Will you please drop me a e-mail?
Thanks for your article. Another factor is that being photographer entails not only problems in catching award-winning photographs but additionally hardships in acquiring the best camera suited to your requirements and most especially problems in maintaining the quality of your camera. This really is very correct and evident for those professional photographers that are into capturing the particular nature’s captivating scenes : the mountains, the particular forests, the actual wild or maybe the seas. Visiting these exciting places undoubtedly requires a digicam that can surpass the wild’s nasty settings.
I found your blog web site on google and examine just a few of your early posts. Proceed to keep up the very good operate. I just additional up your RSS feed to my MSN Information Reader. Looking for forward to reading extra from you afterward!…
You can definitely see your skills within the work you write. The sector hopes for even more passionate writers such as you who are not afraid to say how they believe. At all times go after your heart.
I get pleasure from, cause I found just what I used to be looking for. You’ve ended my four day lengthy hunt! God Bless you man. Have a great day. Bye
Your site doesn’t render appropriately on my iphone 3gs – you may wanna try and repair that
Good write-up, I’m normal visitor of one’s website, maintain up the nice operate, and It is going to be a regular visitor for a long time.
I went over this web site and I think you have a lot of excellent info, saved to bookmarks (:.
Great write-up, I am normal visitor of one?¦s web site, maintain up the excellent operate, and It’s going to be a regular visitor for a lengthy time.
LipoSlend is a liquid nutritional supplement that promotes healthy and steady weight loss. https://liposlendofficial.us/
Everything is very open and very clear explanation of issues. was truly information. Your website is very useful. Thanks for sharing.
Thanks for your posting on this site. From my very own experience, occasionally softening up a photograph may possibly provide the photographer with a little an inventive flare. Often times however, this soft clouds isn’t just what you had as the primary goal and can often times spoil a normally good photo, especially if you thinking about enlarging them.
Hey! Do you use Twitter? I’d like to follow you if that would be okay. I’m undoubtedly enjoying your blog and look forward to new updates.
Hi there! I know this is kind of off topic but I was wondering which blog platform are you using for this website? I’m getting tired of WordPress because I’ve had issues with hackers and I’m looking at options for another platform. I would be fantastic if you could point me in the direction of a good platform.
A person essentially lend a hand to make critically posts I might state. This is the first time I frequented your web page and so far? I surprised with the research you made to make this actual publish extraordinary. Magnificent process!
I cling on to listening to the reports talk about receiving free online grant applications so I have been looking around for the best site to get one. Could you advise me please, where could i find some?
Im not certain where you’re getting your information, however great topic. I must spend some time finding out more or understanding more. Thanks for wonderful information I was looking for this info for my mission.
Excellent weblog here! Also your web site so much up very fast! What web host are you the use of? Can I get your associate link on your host? I desire my web site loaded up as fast as yours lol
I’ll right away grasp your rss feed as I can’t to find your e-mail subscription hyperlink or newsletter service. Do you’ve any? Please let me realize so that I may subscribe. Thanks.
I?ll immediately grab your rss as I can’t find your email subscription link or newsletter service. Do you have any? Please let me know in order that I could subscribe. Thanks.
When I initially commented I clicked the “Notify me when new comments are added” checkbox and now each time a comment is added I get three e-mails with the same comment. Is there any way you can remove people from that service? Cheers!
I?¦ll immediately seize your rss as I can’t to find your e-mail subscription link or newsletter service. Do you’ve any? Please let me understand so that I could subscribe. Thanks.
Great blog right here! Also your site lots up fast! What web host are you the use of? Can I get your associate hyperlink on your host? I wish my site loaded up as quickly as yours lol
You need to participate in a contest for among the finest blogs on the web. I will recommend this website!
When I originally commented I clicked the -Notify me when new comments are added- checkbox and now each time a comment is added I get four emails with the same comment. Is there any way you can remove me from that service? Thanks!
Thanks for expressing your ideas here. The other element is that if a problem appears with a computer system motherboard, persons should not have some risk of repairing the item themselves because if it is not done properly it can lead to permanent damage to the full laptop. It is almost always safe to approach any dealer of any laptop for your repair of motherboard. They have technicians that have an competence in dealing with laptop computer motherboard issues and can make the right analysis and conduct repairs.
Hi there! This post couldn’t be written any better! Reading through this post reminds me of my previous room mate! He always kept talking about this. I will forward this article to him. Pretty sure he will have a good read. Thank you for sharing!
Heya i am for the first time here. I came across this board and I find It truly useful & it helped me out much. I hope to give something back and help others like you aided me.
We are a bunch of volunteers and starting a new scheme in our community. Your website offered us with useful info to work on. You’ve done an impressive task and our entire neighborhood will be grateful to you.
Glad to be one of the visitors on this awe inspiring site : D.
When I originally commented I clicked the -Notify me when new comments are added- checkbox and now each time a comment is added I get four emails with the same comment. Is there any way you can remove me from that service? Thanks!
But a smiling visitant here to share the love (:, btw outstanding design and style. “Make the most of your regrets… . To regret deeply is to live afresh.” by Henry David Thoreau.
Fantastic blog! Do you have any tips and hints for aspiring writers? I’m hoping to start my own site soon but I’m a little lost on everything. Would you suggest starting with a free platform like WordPress or go for a paid option? There are so many choices out there that I’m completely confused .. Any tips? Thanks!
Hello there! This post couldn’t be written any better! Reading this post reminds me of my previous room mate! He always kept chatting about this. I will forward this post to him. Pretty sure he will have a good read. Thank you for sharing!
Hey there, You have performed an incredible job. I will certainly digg it and for my part recommend to my friends. I’m confident they’ll be benefited from this website.
Hi! I just wanted to ask if you ever have any problems with hackers? My last blog (wordpress) was hacked and I ended up losing a few months of hard work due to no backup. Do you have any solutions to prevent hackers?
You have mentioned very interesting points! ps decent internet site.
Very interesting details you have mentioned, appreciate it for putting up. “She had an unequalled gift… of squeezing big mistakes into small opportunities.” by Henry James.
After study a few of the blog posts on your website now, and I truly like your way of blogging. I bookmarked it to my bookmark website list and will be checking back soon. Pls check out my web site as well and let me know what you think.
Would you be serious about exchanging hyperlinks?
I was recommended this web site by my cousin. I am not sure whether this post is written by him as nobody else know such detailed about my problem. You’re amazing! Thanks!
Hey There. I discovered your blog the usage of msn. This is an extremely smartly written article. I’ll be sure to bookmark it and come back to read more of your helpful information. Thank you for the post. I will definitely return.
I would like to thnkx for the efforts you have put in writing this blog. I am hoping the same high-grade blog post from you in the upcoming as well. In fact your creative writing abilities has inspired me to get my own blog now. Really the blogging is spreading its wings quickly. Your write up is a good example of it.
I like this web site so much, saved to fav. “Respect for the fragility and importance of an individual life is still the mark of an educated man.” by Norman Cousins.
Thanks a lot for sharing this with all of us you really know what you are talking about! Bookmarked. Please also visit my web site =). We could have a link exchange contract between us!
I have not checked in here for some time because I thought it was getting boring, but the last several posts are great quality so I guess I?¦ll add you back to my everyday bloglist. You deserve it my friend 🙂
As a Newbie, I am constantly browsing online for articles that can help me. Thank you
Very instructive and excellent anatomical structure of content, now that’s user genial (:.
I really like your blog.. very nice colors & theme. Did you design this website yourself or did you hire someone to do it for you? Plz answer back as I’m looking to construct my own blog and would like to know where u got this from. appreciate it
Hello there, You’ve done a great job. I’ll certainly digg it and personally suggest to my friends. I’m sure they will be benefited from this website.
What’s Happening i’m new to this, I stumbled upon this I have discovered It absolutely useful and it has helped me out loads. I hope to contribute & aid other users like its aided me. Great job.
I am not rattling fantastic with English but I get hold this rattling leisurely to understand.
Really enjoyed this blog post, how can I make is so that I receive an email whenever you make a new article?
I really appreciate this post. I have been looking all over for this! Thank goodness I found it on Bing. You’ve made my day! Thx again
Thanks for giving your ideas. The one thing is that scholars have an option between federal student loan plus a private education loan where its easier to go for student loan online debt consolidation than through the federal student loan.
Hey, I think your website might be having browser compatibility issues. When I look at your blog site in Firefox, it looks fine but when opening in Internet Explorer, it has some overlapping. I just wanted to give you a quick heads up! Other then that, superb blog!
Hey are using WordPress for your site platform? I’m new to the blog world but I’m trying to get started and set up my own. Do you require any coding knowledge to make your own blog? Any help would be greatly appreciated!
Greetings! I know this is kind of off topic but I was wondering if you knew where I could find a captcha plugin for my comment form? I’m using the same blog platform as yours and I’m having difficulty finding one? Thanks a lot!
I’ve been absent for some time, but now I remember why I used to love this web site. Thanks , I¦ll try and check back more often. How frequently you update your site?
Hello would you mind stating which blog platform you’re using? I’m looking to start my own blog soon but I’m having a difficult time making a decision between BlogEngine/Wordpress/B2evolution and Drupal. The reason I ask is because your layout seems different then most blogs and I’m looking for something unique. P.S My apologies for being off-topic but I had to ask!
Great post, I believe blog owners should acquire a lot from this website its rattling user genial.
Hello there, just was aware of your blog through Google, and located that it is really informative. I am gonna be careful for brussels. I’ll appreciate for those who continue this in future. Numerous other folks will be benefited out of your writing. Cheers!
What i do not realize is in fact how you are no longer actually a lot more neatly-appreciated than you might be right now. You’re so intelligent. You understand thus significantly in the case of this subject, produced me in my opinion imagine it from so many varied angles. Its like men and women don’t seem to be interested unless it is something to do with Woman gaga! Your individual stuffs excellent. Always maintain it up!
Hi there! This post couldn’t be written any better! Reading through this post reminds me of my previous room mate! He always kept talking about this. I will forward this write-up to him. Fairly certain he will have a good read. Thank you for sharing!
I do agree with all the ideas you’ve presented for your post. They are really convincing and will certainly work. Still, the posts are very quick for newbies. May you please lengthen them a little from subsequent time? Thanks for the post.
Normally I do not read post on blogs, but I wish to say that this write-up very forced me to try and do it! Your writing taste has been surprised me. Thanks, quite great article.
I?m impressed, I have to say. Actually hardly ever do I encounter a blog that?s each educative and entertaining, and let me let you know, you’ve gotten hit the nail on the head. Your concept is excellent; the difficulty is something that not sufficient people are talking intelligently about. I am very glad that I stumbled throughout this in my search for one thing relating to this.
Hello would you mind stating which blog platform you’re working with? I’m going to start my own blog in the near future but I’m having a difficult time selecting between BlogEngine/Wordpress/B2evolution and Drupal. The reason I ask is because your design and style seems different then most blogs and I’m looking for something unique. P.S Apologies for getting off-topic but I had to ask!
I have been absent for a while, but now I remember why I used to love this blog. Thanks , I will try and check back more frequently. How frequently you update your site?
Wow! Thank you! I constantly wanted to write on my site something like that. Can I implement a portion of your post to my blog?
I think this website has got very good pent written content posts.
Thank you for enriching our lives with your blog. Asheville sends its warmest regards!
Throughout this great pattern of things you’ll secure an A with regard to effort and hard work. Where you lost us ended up being on all the facts. You know, they say, the devil is in the details… And that could not be more true in this article. Having said that, allow me say to you exactly what did do the job. Your authoring is certainly quite engaging and this is probably the reason why I am making the effort to opine. I do not make it a regular habit of doing that. 2nd, while I can easily notice a leaps in logic you make, I am not sure of how you appear to connect the ideas which inturn make your final result. For right now I will, no doubt subscribe to your issue however trust in the foreseeable future you link your dots better.
certainly like your web-site however you need to take a look at the spelling on quite a few of your posts. Many of them are rife with spelling problems and I to find it very bothersome to inform the truth however I’ll definitely come back again.
Hello there, just became alert to your blog through Google, and found that it is really informative. I am gonna watch out for brussels. I’ll appreciate if you continue this in future. Numerous people will be benefited from your writing. Cheers!
I’ve been absent for a while, but now I remember why I used to love this blog. Thanks , I’ll try and check back more often. How frequently you update your web site?
What a fantastic article! We’re big fans of your blog here in Asheville and eagerly await your next post.
My brother suggested I would possibly like this blog. He used to be totally right. This publish actually made my day. You cann’t believe simply how so much time I had spent for this information! Thanks!
You are a very clever person!
I think this internet site has some real superb information for everyone :D. “The test of every religious, political, or educational system is the man that it forms.” by Henri Frdric Amiel.
Hiya, I am really glad I have found this info. Today bloggers publish just about gossips and net and this is really irritating. A good website with interesting content, that is what I need. Thanks for keeping this website, I will be visiting it. Do you do newsletters? Can not find it.
Woh I enjoy your posts, saved to bookmarks! .
WONDERFUL Post.thanks for share..extra wait .. …
The next time I read a blog, I hope that it doesnt disappoint me as much as this one. I mean, I know it was my choice to read, but I actually thought youd have something interesting to say. All I hear is a bunch of whining about something that you could fix if you werent too busy looking for attention.
Simply want to say your article is as surprising. The clearness in your put up is simply great and that i can think you’re an expert in this subject. Fine together with your permission let me to snatch your feed to keep updated with forthcoming post. Thank you one million and please continue the gratifying work.
I love your blog.. very nice colors & theme. Did you create this website yourself? Plz reply back as I’m looking to create my own blog and would like to know wheere u got this from. thanks
I am often to blogging and i really appreciate your content. The article has really peaks my interest. I am going to bookmark your site and keep checking for new information.
Thank you for another informative blog. Where else could I get that type of information written in such an ideal way? I’ve a project that I’m just now working on, and I’ve been on the look out for such information.
so much wonderful information on here, : D.
I’m still learning from you, but I’m trying to reach my goals. I certainly liked reading all that is posted on your website.Keep the stories coming. I loved it!
I real glad to find this site on bing, just what I was searching for : D too saved to my bookmarks.
Bazopril is a blood pressure supplement featuring a blend of natural ingredients to support heart health
Tonic Greens is an all-in-one dietary supplement that has been meticulously designed to improve overall health and mental wellness.
Throughout this great scheme of things you actually receive an A with regard to effort. Where exactly you misplaced us was first on the details. You know, they say, details make or break the argument.. And it could not be more accurate in this article. Having said that, allow me inform you exactly what did deliver the results. Your authoring is definitely quite powerful and that is most likely the reason why I am taking the effort to comment. I do not really make it a regular habit of doing that. Next, despite the fact that I can certainly see a leaps in reason you make, I am not really convinced of exactly how you seem to unite your details which inturn help to make the actual final result. For now I will, no doubt subscribe to your point however wish in the foreseeable future you link the facts better.
I have not checked in here for a while as I thought it was getting boring, but the last few posts are great quality so I guess I will add you back to my daily bloglist. You deserve it my friend 🙂
Wow, incredible blog layout! How long have you been blogging for? you made blogging look easy. The overall look of your website is great, let alone the content!
Hi there, I found your website via Google while looking for a related topic, your website came up, it looks good. I have bookmarked it in my google bookmarks.
Some genuinely nice stuff on this internet site, I like it.
With havin so much content do you ever run into any problems of plagorism or copyright violation? My site has a lot of completely unique content I’ve either written myself or outsourced but it looks like a lot of it is popping it up all over the internet without my authorization. Do you know any ways to help prevent content from being ripped off? I’d definitely appreciate it.
WONDERFUL Post.thanks for share..extra wait .. …
Unquestionably believe that that you stated. Your favorite justification seemed to be on the internet the easiest factor to bear in mind of. I say to you, I definitely get irked whilst folks consider issues that they just don’t recognise about. You controlled to hit the nail upon the highest as smartly as defined out the entire thing without having side-effects , people could take a signal. Will probably be back to get more. Thanks
Having read this I thought it was very informative. I appreciate you taking the time and effort to put this article together. I once again find myself spending way to much time both reading and commenting. But so what, it was still worth it!
Hey very cool web site!! Man .. Beautiful .. Amazing .. I will bookmark your blog and take the feeds also…I am happy to find a lot of useful info here in the post, we need develop more techniques in this regard, thanks for sharing. . . . . .
Thanks for your marvelous posting! I seriously enjoyed reading it, you will be a great author.I will be sure to bookmark your blog and may come back in the future. I want to encourage one to continue your great posts, have a nice morning!
I have not checked in here for a while because I thought it was getting boring, but the last few posts are great quality so I guess I will add you back to my everyday bloglist. You deserve it my friend 🙂
Good post. I learn one thing tougher on completely different blogs everyday. It would at all times be stimulating to read content from different writers and observe a bit one thing from their store. I’d choose to make use of some with the content on my blog whether or not you don’t mind. Natually I’ll give you a link in your web blog. Thanks for sharing.
Some truly wonderful posts on this website , regards for contribution.
Hello.This post was extremely remarkable, especially because I was investigating for thoughts on this topic last Wednesday.
I used to be recommended this website by way of my cousin. I’m no longer certain whether this submit is written by him as no one else know such specified approximately my trouble. You are wonderful! Thanks!
Great info and straight to the point. I don’t know if this is truly the best place to ask but do you guys have any thoughts on where to hire some professional writers? Thank you 🙂
Greetings! Very helpful advice on this article! It is the little changes that make the biggest changes. Thanks a lot for sharing!
Hi there! I could have sworn I’ve been to this blog before but after reading through some of the post I realized it’s new to me. Anyways, I’m definitely glad I found it and I’ll be book-marking and checking back often!
Youre so cool! I dont suppose Ive learn anything like this before. So good to seek out someone with some unique thoughts on this subject. realy thank you for beginning this up. this web site is something that’s needed on the internet, somebody with a bit of originality. helpful job for bringing something new to the internet!
What i do not realize is actually how you are not really much more well-liked than you may be now. You’re very intelligent. You realize therefore significantly relating to this subject, produced me personally consider it from numerous varied angles. Its like men and women aren’t fascinated unless it’s one thing to do with Lady gaga! Your own stuffs great. Always maintain it up!
I¦ve learn several just right stuff here. Definitely worth bookmarking for revisiting. I wonder how much effort you set to create the sort of fantastic informative site.
I really like your writing style, great information, regards for posting :D. “Much unhappiness has come into the world because of bewilderment and things left unsaid.” by Feodor Mikhailovich Dostoyevsky.
Thanks for the sensible critique. Me & my neighbor were just preparing to do some research about this. We got a grab a book from our area library but I think I learned more from this post. I’m very glad to see such magnificent information being shared freely out there.
Well I really liked studying it. This subject procured by you is very effective for accurate planning.
Thanks for your post. One other thing is that if you are advertising your property by yourself, one of the concerns you need to be aware of upfront is how to deal with property inspection records. As a FSBO home owner, the key towards successfully moving your property and saving money about real estate agent commission rates is awareness. The more you already know, the more stable your home sales effort will likely be. One area exactly where this is particularly significant is information about home inspections.
I got what you intend, appreciate it for posting.Woh I am pleased to find this website through google.
Magnificent site. A lot of useful information here. I am sending it to some friends ans also sharing in delicious. And obviously, thanks for your effort!
You have brought up a very fantastic points, thanks for the post.
Immigration… […]the time to read or visit the content or sites we have linked to below the[…]…Fence builder Wellington
Good day! I could have sworn I’ve been to this blog before but after reading through some of the post I realized it’s new to me. Nonetheless, I’m definitely delighted I found it and I’ll be bookmarking and checking back often!
Keep working ,fantastic job!
Hello, Neat post. There is a problem together with your web site in web explorer, may check this? IE nonetheless is the marketplace leader and a good component of other folks will miss your fantastic writing due to this problem.
I was suggested this web site by my cousin. I’m not sure whether this post is written by him as no one else know such detailed about my difficulty. You are amazing! Thanks!
You could certainly see your skills in the work you write. The world hopes for even more passionate writers like you who are not afraid to say how they believe. Always go after your heart.
Thanks for another great post. The place else could anyone get that type of info in such an ideal means of writing? I’ve a presentation next week, and I’m on the search for such information.
Its great as your other posts : D, thanks for putting up.
I do not even know the way I ended up right here, but I believed this post was good. I do not realize who you are but definitely you’re going to a famous blogger if you aren’t already 😉 Cheers!
Have you ever considered publishing an ebook or guest authoring on other blogs? I have a blog centered on the same topics you discuss and would really like to have you share some stories/information. I know my visitors would enjoy your work. If you’re even remotely interested, feel free to send me an e-mail.
Nice read, I just passed this onto a friend who was doing some research on that. And he actually bought me lunch as I found it for him smile Therefore let me rephrase that: Thank you for lunch!
You completed certain nice points there. I did a search on the theme and found the majority of folks will agree with your blog.
Audio started playing as soon as I opened up this site, so irritating!
What’s Happening i’m new to this, I stumbled upon this I have found It positively helpful and it has aided me out loads. I hope to give a contribution & assist different customers like its aided me. Great job.
I needed to post you that tiny observation to thank you the moment again about the extraordinary pointers you’ve provided on this website. It’s quite surprisingly open-handed with you to make publicly all a number of us could have supplied for an electronic book to get some cash on their own, chiefly considering the fact that you might have tried it if you wanted. These smart ideas additionally served to become easy way to comprehend other people online have the identical passion really like my very own to know the truth more regarding this problem. I believe there are lots of more pleasant sessions up front for individuals who scan your blog.
I have been absent for some time, but now I remember why I used to love this website. Thanks , I’ll try and check back more frequently. How frequently you update your site?
I’ve read a few good stuff here. Definitely worth bookmarking for revisiting. I surprise how so much attempt you place to make this sort of wonderful informative web site.
Hey very cool site!! Man .. Excellent .. Amazing .. I will bookmark your website and take the feeds also…I am happy to find a lot of useful info here in the post, we need work out more strategies in this regard, thanks for sharing. . . . . .
Currently it seems like WordPress is the preferred blogging platform available right now. (from what I’ve read) Is that what you’re using on your blog?
I have been browsing online more than 3 hours today, yet I never discovered any fascinating article like yours. It’s lovely price enough for me. In my view, if all website owners and bloggers made good content material as you probably did, the internet can be a lot more helpful than ever before. “Where facts are few, experts are many.” by Donald R. Gannon.
Wow! I’m in awe of the author’s writing skills and talent to convey complicated concepts in a straightforward and precise manner. This article is a real treasure that earns all the praise it can get. Thank you so much, author, for sharing your wisdom and giving us with such a precious treasure. I’m truly grateful!
Howdy! Do you know if they make any plugins to protect against hackers? I’m kinda paranoid about losing everything I’ve worked hard on. Any suggestions?
You made some clear points there. I looked on the internet for the issue and found most individuals will go along with with your blog.
I like the helpful info you supply on your articles. I’ll bookmark your weblog and check again right here regularly. I’m slightly sure I’ll be told many new stuff right here! Good luck for the following!
I’m really loving the theme/design of your weblog. Do you ever run into any browser compatibility issues? A handful of my blog readers have complained about my site not operating correctly in Explorer but looks great in Firefox. Do you have any recommendations to help fix this problem?
Appreciate it for helping out, superb information.
I always was concerned in this subject and stock still am, appreciate it for putting up.
It’s the best time to make a few plans for the long run and it is time to be happy. I have learn this post and if I could I desire to counsel you few interesting issues or advice. Maybe you could write subsequent articles relating to this article. I wish to read more things about it!
Heya i’m for the first time here. I found this board and I find It really useful & it helped me out much. I hope to give something back and aid others like you aided me.
But a smiling visitant here to share the love (:, btw outstanding pattern. “Competition is a painful thing, but it produces great results.” by Jerry Flint.
Thanks for your advice on this blog. One particular thing I would want to say is that often purchasing electronic products items in the Internet is nothing new. The truth is, in the past several years alone, the marketplace for online consumer electronics has grown significantly. Today, you will discover practically virtually any electronic gizmo and other gadgets on the Internet, including cameras in addition to camcorders to computer parts and games consoles.
Excellent post. I used to be checking constantly this weblog and I am inspired! Extremely useful information particularly the remaining phase 🙂 I handle such info much. I used to be seeking this certain info for a very lengthy time. Thanks and best of luck.
Very interesting subject, thanks for putting up. “Remember when life’s path is steep to keep your mind even.” by Horace.
I like what you guys are up too. Such intelligent work and reporting! Keep up the superb works guys I have incorporated you guys to my blogroll. I think it’ll improve the value of my website 🙂
I wanted to thank you for this great read!! I definitely enjoying every little bit of it I have you bookmarked to check out new stuff you post…
Hi, I think your site might be having browser compatibility issues. When I look at your website in Safari, it looks fine but when opening in Internet Explorer, it has some overlapping. I just wanted to give you a quick heads up! Other then that, fantastic blog!
you are truly a good webmaster. The website loading velocity is amazing. It kind of feels that you’re doing any unique trick. Also, The contents are masterpiece. you’ve performed a fantastic process on this topic!
Hey, you used to write fantastic, but the last few posts have been kinda boring?K I miss your tremendous writings. Past several posts are just a little bit out of track! come on!
Enjoyed reading this, very good stuff, appreciate it. “Management is nothing more than motivating other people.” by Lee Iacocca.
I do not even know the way I finished up here, however I believed this submit used to be good. I don’t know who you are however certainly you’re going to a well-known blogger in the event you aren’t already 😉 Cheers!
I’m impressed, I must say. Really hardly ever do I encounter a blog that’s both educative and entertaining, and let me let you know, you might have hit the nail on the head. Your concept is outstanding; the problem is something that not enough individuals are talking intelligently about. I’m very completely happy that I stumbled across this in my seek for something relating to this.
I’m not sure exactly why but this weblog is loading incredibly slow for me. Is anyone else having this problem or is it a problem on my end? I’ll check back later on and see if the problem still exists.
Hi there! I could have sworn I’ve been to this website before but after browsing through some of the post I realized it’s new to me. Anyways, I’m definitely happy I found it and I’ll be book-marking and checking back frequently!
Thank you for the sensible critique. Me & my neighbor were just preparing to do a little research about this. We got a grab a book from our local library but I think I learned more from this post. I am very glad to see such magnificent info being shared freely out there.
Usually I don’t read post on blogs, but I would like to say that this write-up very forced me to try and do so! Your writing style has been surprised me. Thanks, very nice article.
Very great post. I just stumbled upon your weblog and wished to say that I have truly enjoyed browsing your blog posts. In any case I will be subscribing for your feed and I hope you write again very soon!
hi!,I love your writing so so much! proportion we keep up a correspondence more about your post on AOL? I need a specialist on this area to unravel my problem. May be that’s you! Having a look forward to peer you.
I simply couldn’t depart your site prior to suggesting that I really enjoyed the standard info an individual supply in your visitors? Is going to be again incessantly to check out new posts
There is noticeably a bundle to know about this. I assume you made certain nice points in features also.
I appreciate, cause I found exactly what I was looking for. You’ve ended my four day long hunt! God Bless you man. Have a great day. Bye
Would love to perpetually get updated outstanding web blog! .
Rattling informative and wonderful bodily structure of subject matter, now that’s user genial (:.
I simply couldn’t leave your website before suggesting that I extremely loved the standard info a person provide to your guests? Is going to be again frequently in order to inspect new posts
I think this web site holds very superb pent written content articles.
Hi there, You’ve done an excellent job. I’ll certainly digg it and in my view recommend to my friends. I’m sure they will be benefited from this website.
Hi there just wanted to give you a quick heads up. The text in your content seem to be running off the screen in Ie. I’m not sure if this is a formatting issue or something to do with internet browser compatibility but I thought I’d post to let you know. The design look great though! Hope you get the issue fixed soon. Cheers
Very great post. I just stumbled upon your weblog and wished to mention that I have really loved browsing your blog posts. After all I?ll be subscribing in your rss feed and I am hoping you write again very soon!
I have not checked in here for a while since I thought it was getting boring, but the last few posts are good quality so I guess I will add you back to my everyday bloglist. You deserve it my friend 🙂
Glad to be one of the visitants on this amazing website : D.
Would you be inquisitive about exchanging links?
Keep up the wonderful work, I read few posts on this site and I conceive that your web blog is very interesting and has sets of good information.
I was very pleased to find this net-site.I wished to thanks on your time for this glorious learn!! I positively enjoying every little bit of it and I’ve you bookmarked to take a look at new stuff you weblog post.
I love your wordpress theme, where would you get a hold of it from?
I would like to thnkx for the efforts you have put in writing this blog. I am hoping the same high-grade blog post from you in the upcoming as well. In fact your creative writing abilities has inspired me to get my own blog now. Really the blogging is spreading its wings quickly. Your write up is a good example of it.
I discovered your blog web site on google and check a few of your early posts. Proceed to maintain up the excellent operate. I simply further up your RSS feed to my MSN Information Reader. In search of forward to reading more from you afterward!?
Thank you so much for sharing this wonderful post with us.
Thank you so much for sharing this wonderful post with us.
You are a very capable individual!
Wow that was unusual. I just wrote an incredibly long comment but after I clicked submit my comment didn’t show up. Grrrr… well I’m not writing all that over again. Anyway, just wanted to say fantastic blog!
Valuable info. Fortunate me I found your website unintentionally, and I’m stunned why this twist of fate did not happened earlier! I bookmarked it.
I am curious to find out what blog platform you’re utilizing? I’m having some small security issues with my latest website and I would like to find something more safe. Do you have any suggestions?
I am lucky that I found this web blog, precisely the right information that I was searching for!DIY dog fence
Valuable information. Lucky me I found your web site by accident, and I am shocked why this accident did not happened earlier! I bookmarked it.
Gear grabbing chat online likes to have fun. Join me!
Aw, this was a really nice post. In thought I wish to put in writing like this moreover – taking time and precise effort to make a very good article… but what can I say… I procrastinate alot and in no way seem to get one thing done.
Hey There. I found your blog using msn. This is a really well written article. I will make sure to bookmark it and return to read more of your useful information. Thanks for the post. I?ll certainly return.
Great site. Plenty of useful information here. I?m sending it to a few friends ans also sharing in delicious. And certainly, thanks for your effort!
I like this web site very much, Its a rattling nice spot to read and find info .
Excellent post. I was checking constantly this blog and I’m impressed! Very useful information particularly the last part 🙂 I care for such info much. I was looking for this certain info for a very long time. Thank you and good luck.
Hey there would you mind stating which blog platform you’re working with? I’m going to start my own blog in the near future but I’m having a difficult time selecting between BlogEngine/Wordpress/B2evolution and Drupal. The reason I ask is because your design seems different then most blogs and I’m looking for something completely unique. P.S Sorry for getting off-topic but I had to ask!
Thanks for the helpful content. It is also my belief that mesothelioma has an extremely long latency interval, which means that indication of the disease might not exactly emerge till 30 to 50 years after the primary exposure to mesothelioma. Pleural mesothelioma, and that is the most common variety and affects the area across the lungs, might result in shortness of breath, chest pains, plus a persistent cough, which may bring on coughing up body.
Thanks for discussing your ideas. Something is that individuals have an alternative between national student loan plus a private student loan where it is easier to decide on student loan debt consolidation loan than in the federal student loan.
I would like to thank you for the efforts you’ve put in writing this site. I am hoping the same high-grade site post from you in the upcoming also. In fact your creative writing abilities has inspired me to get my own blog now. Really the blogging is spreading its wings fast. Your write up is a great example of it.
Pretty great post. I just stumbled upon your blog and wanted to say that I have truly enjoyed surfing around your blog posts. After all I’ll be subscribing in your feed and I am hoping you write once more soon!
Your kindness is a gift to the world. Thank you for being you.
Almanya medyum haluk hoca sizlere 40 yıldır medyumluk hizmeti veriyor, Medyum haluk hocamızın hazırladığı çalışmalar ise papaz büyüsü bağlama büyüsü, Konularında en iyi sonuç ve kısa sürede yüzde yüz için bizleri tercih ediniz. İletişim: +49 157 59456087
My programmer is trying to convince me to move to .net from PHP. I have always disliked the idea because of the costs. But he’s tryiong none the less. I’ve been using WordPress on a variety of websites for about a year and am concerned about switching to another platform. I have heard very good things about blogengine.net. Is there a way I can import all my wordpress content into it? Any kind of help would be really appreciated!
Heya just wanted to give you a quick heads up and let you know a few of the images aren’t loading properly. I’m not sure why but I think its a linking issue. I’ve tried it in two different web browsers and both show the same results.
Thanks for your posting. One other thing is that if you are marketing your property alone, one of the concerns you need to be cognizant of upfront is when to deal with household inspection reviews. As a FSBO supplier, the key to successfully switching your property and also saving money in real estate agent profits is understanding. The more you already know, the more stable your sales effort will probably be. One area when this is particularly significant is home inspections.
I as well conceive therefore, perfectly written post! .
Woah! I’m really digging the template/theme of this blog. It’s simple, yet effective. A lot of times it’s challenging to get that “perfect balance” between user friendliness and visual appearance. I must say you have done a fantastic job with this. Additionally, the blog loads extremely quick for me on Safari. Excellent Blog!
Thank you for any other excellent article. Where else could anyone get that kind of information in such a perfect manner of writing? I have a presentation next week, and I’m on the look for such information.
Wonderful web site. Lots of useful information here. I’m sending it to several friends ans also sharing in delicious. And certainly, thanks for your effort!
I’m not sure exactly why but this site is loading incredibly slow for me. Is anyone else having this problem or is it a issue on my end? I’ll check back later and see if the problem still exists.
Does your site have a contact page? I’m having a tough time locating it but, I’d like to shoot you an e-mail. I’ve got some suggestions for your blog you might be interested in hearing. Either way, great blog and I look forward to seeing it improve over time.
I have discovered that expenses for online degree pros tend to be a terrific value. Like a full Bachelor’s Degree in Communication from The University of Phoenix Online consists of 60 credits at $515/credit or $30,900. Also American Intercontinental University Online provides a Bachelors of Business Administration with a overall program element of 180 units and a price of $30,560. Online learning has made having your degree far more easy because you can easily earn the degree from the comfort of your home and when you finish working. Thanks for all the other tips I’ve learned through the site.
hello!,I like your writing very so much! percentage we be in contact more about your post on AOL? I need an expert on this space to solve my problem. May be that’s you! Taking a look ahead to look you.
F*ckin¦ awesome things here. I¦m very happy to look your post. Thanks a lot and i am looking forward to contact you. Will you please drop me a e-mail?
I feel this is one of the most important info for me. And i am happy studying your article. But wanna observation on few common issues, The site style is perfect, the articles is really excellent : D. Just right activity, cheers
One thing I’d prefer to say is that car insurance canceling is a feared experience so if you’re doing the right things like a driver you may not get one. A number of people do obtain notice that they have been officially dumped by the insurance company they have to scramble to get added insurance following a cancellation. Inexpensive auto insurance rates usually are hard to get after having a cancellation. Knowing the main reasons with regard to auto insurance termination can help drivers prevent sacrificing one of the most vital privileges out there. Thanks for the tips shared through your blog.
I have not checked in here for a while since I thought it was getting boring, but the last few posts are good quality so I guess I will add you back to my daily bloglist. You deserve it my friend 🙂
Only a smiling visitant here to share the love (:, btw outstanding style.
Wonderful website. Lots of helpful information here. I¦m sending it to a few buddies ans additionally sharing in delicious. And of course, thanks to your effort!
Some truly wonderful articles on this internet site, thanks for contribution. “A man with a new idea is a crank — until the idea succeeds.” by Mark Twain.
Pretty section of content. I just stumbled upon your weblog and in accession capital to assert that I get actually enjoyed account your blog posts. Anyway I’ll be subscribing to your augment and even I achievement you access consistently quickly.
Very well written post. It will be useful to anyone who utilizes it, as well as myself. Keep up the good work – looking forward to more posts.
Do you have a spam issue on this site; I also am a blogger, and I was wondering your situation; many of us have developed some nice procedures and we are looking to trade methods with others, be sure to shoot me an e-mail if interested.
I have been absent for a while, but now I remember why I used to love this web site. Thank you, I?¦ll try and check back more frequently. How frequently you update your web site?
I’ve read some good stuff here. Definitely worth bookmarking for revisiting. I wonder how much effort you put to make such a excellent informative web site.
I truly enjoy looking through on this site, it has fantastic articles.
Its like you learn my thoughts! You seem to grasp so much about this, such as you wrote the guide in it or something. I believe that you just could do with some to force the message house a little bit, however instead of that, that is excellent blog. An excellent read. I’ll definitely be back.
I always was concerned in this topic and stock still am, regards for posting.
Hey, I think your blog might be having browser compatibility issues. When I look at your blog in Firefox, it looks fine but when opening in Internet Explorer, it has some overlapping. I just wanted to give you a quick heads up! Other then that, amazing blog!
Completely in agreement with the sentiments expressed above – this post is superb!
You are my breathing in, I have few blogs and rarely run out from to post .
Very interesting subject, appreciate it for posting. “Challenge is a dragon with a gift in its mouthTame the dragon and the gift is yours.” by Noela Evans.
I am so happy to read this. This is the kind of manual that needs to be given and not the random misinformation that is at the other blogs. Appreciate your sharing this greatest doc.
I’ve learned result-oriented things from the blog post. Also a thing to I have seen is that normally, FSBO sellers will probably reject a person. Remember, they might prefer not to ever use your expert services. But if a person maintain a gradual, professional connection, offering help and being in contact for around four to five weeks, you will usually manage to win a discussion. From there, a house listing follows. Many thanks
I haven’t checked in here for a while because I thought it was getting boring, but the last several posts are great quality so I guess I’ll add you back to my daily bloglist. You deserve it my friend 🙂
Keep functioning ,splendid job!
Regards for helping out, excellent info .
I have been surfing online more than three hours today, yet I never found any interesting article like yours. It’s pretty worth enough for me. In my view, if all website owners and bloggers made good content as you did, the web will be much more useful than ever before.
Thank you for every other fantastic post. Where else may just anybody get that kind of information in such an ideal way of writing? I have a presentation subsequent week, and I am at the look for such information.
With havin so much content and articles do you ever run into any problems of plagorism or copyright infringement? My site has a lot of exclusive content I’ve either written myself or outsourced but it appears a lot of it is popping it up all over the internet without my agreement. Do you know any methods to help stop content from being ripped off? I’d definitely appreciate it.
Pretty section of content. I just stumbled upon your site and in accession capital to assert that I get actually enjoyed account your blog posts. Anyway I will be subscribing to your augment and even I achievement you access consistently quickly.
Excellent site. Plenty of helpful info here. I am sending it to a few pals ans additionally sharing in delicious. And certainly, thanks on your sweat!
I visited a lot of website but I believe this one holds something extra in it in it
Hello there! This is my 1st comment here so I just wanted to give a quick shout out and say I truly enjoy reading your posts. Can you suggest any other blogs/websites/forums that go over the same subjects? Thanks a ton!
I believe that a property foreclosures can have a major effect on the debtor’s life. Real estate foreclosures can have a 8 to decade negative effects on a debtor’s credit report. A borrower that has applied for home financing or just about any loans for instance, knows that a worse credit rating can be, the more difficult it is to acquire a decent financial loan. In addition, it may affect any borrower’s ability to find a really good place to let or hire, if that gets the alternative houses solution. Good blog post.
Howdy! I’m at work browsing your blog from my new iphone 4! Just wanted to say I love reading your blog and look forward to all your posts! Carry on the great work!
I have noticed that over the course of constructing a relationship with real estate managers, you’ll be able to come to understand that, in most real estate transaction, a percentage is paid. All things considered, FSBO sellers don’t “save” the fee. Rather, they struggle to earn the commission by simply doing the agent’s occupation. In completing this task, they spend their money along with time to accomplish, as best they might, the jobs of an agent. Those tasks include exposing the home through marketing, presenting the home to prospective buyers, building a sense of buyer emergency in order to trigger an offer, scheduling home inspections, taking on qualification check ups with the mortgage lender, supervising maintenance tasks, and facilitating the closing.
Great post. I am facing a couple of these problems.
Its such as you learn my mind! You seem to grasp so much about this, such as you wrote the e book in it or something. I believe that you just could do with some p.c. to pressure the message house a bit, but instead of that, this is great blog. An excellent read. I’ll definitely be back.
Hello. magnificent job. I did not imagine this. This is a impressive story. Thanks!
Thanks for your write-up on the travel industry. I will also like to add that if you are one senior considering traveling, it really is absolutely imperative that you buy travel cover for senior citizens. When traveling, golden-agers are at high risk of having a health emergency. Having the right insurance plan package in your age group can safeguard your health and provide peace of mind.
Great post, you have pointed out some great details , I also think this s a very good website.
Keep working ,fantastic job!
Im no longer certain the place you are getting your info, however great topic. I must spend a while learning much more or figuring out more. Thanks for wonderful info I was looking for this information for my mission.
you have a great blog here! would you like to make some invite posts on my blog?
Outstanding post, you have pointed out some wonderful points, I likewise think this s a very fantastic website.
you have a great blog here! would you like to make some invite posts on my blog?
Undeniably believe that which you stated. Your favorite justification seemed to be on the net the easiest thing to be aware of. I say to you, I definitely get irked while people consider worries that they plainly do not know about. You managed to hit the nail upon the top and also defined out the whole thing without having side effect , people could take a signal. Will likely be back to get more. Thanks
Thank you for some other informative web site. The place else could I am getting that kind of information written in such a perfect approach? I have a mission that I am simply now operating on, and I have been on the glance out for such info.
Thanks for your marvelous posting! I actually enjoyed reading it, you can be a great author.I will remember to bookmark your blog and definitely will come back someday. I want to encourage you to ultimately continue your great posts, have a nice afternoon!
Thank you a lot for providing individuals with such a breathtaking chance to read from this blog. It’s always very brilliant and as well , packed with a great time for me personally and my office mates to visit your site the equivalent of three times in one week to read the newest guides you have got. And of course, I’m so usually amazed concerning the impressive techniques you serve. Some 3 tips in this posting are clearly the most effective we have had.
Woh I like your content, saved to favorites! .
Hello there, just became alert to your blog through Google, and found that it is really informative. I?m gonna watch out for brussels. I?ll appreciate if you continue this in future. A lot of people will be benefited from your writing. Cheers!
you’re actually a excellent webmaster. The website loading pace is incredible. It seems that you’re doing any distinctive trick. Also, The contents are masterpiece. you have performed a excellent process on this subject!
I couldn’t resist commenting
You have brought up a very great details, thankyou for the post.
hey there and thank you to your information – I have definitely picked up something new from proper here. I did however expertise several technical points the use of this website, as I experienced to reload the site a lot of occasions prior to I may get it to load properly. I were pondering if your hosting is OK? Not that I’m complaining, however sluggish loading cases times will sometimes impact your placement in google and could damage your high quality rating if ads and ***********|advertising|advertising|advertising and *********** with Adwords. Well I’m including this RSS to my e-mail and could look out for much extra of your respective intriguing content. Ensure that you update this once more very soon..
Looking for a new signature scent? Picking the perfect perfume https://ceresaperfume.com requires some thoughtful consideration! Start by understanding your preference- floral, citrus, woody, or spicy. Head to a store and don’t rush: Smell a few, take a break, then revisit your favorites. Your nose can get overwhelmed, so don’t try more than 5 scents in one day! Also, remember perfumes can smell different on everyone due to body chemistry. To determine how it actually smells on you and how long it lasts, apply on your wrist and let it sit for a few hours before deciding. Happy sniffing! #perfume #beautytips
I was looking through some of your content on this site and I think this web site is very informative ! Continue posting.
Good write-up, I am normal visitor of one¦s site, maintain up the nice operate, and It is going to be a regular visitor for a lengthy time.
Hi there! Someone in my Myspace group shared this website with us so I came to check it out. I’m definitely loving the information. I’m book-marking and will be tweeting this to my followers! Terrific blog and excellent design.
Keep working ,fantastic job!
Hey very nice blog!! Guy .. Excellent .. Wonderful .. I’ll bookmark your site and take the feeds also…I’m satisfied to search out a lot of helpful information here in the post, we want develop extra techniques in this regard, thanks for sharing. . . . . .
Howdy! Would you mind if I share your blog with my myspace group? There’s a lot of people that I think would really appreciate your content. Please let me know. Cheers
Pretty section of content. I just stumbled upon your weblog and in accession capital to assert that I acquire actually enjoyed account your blog posts. Anyway I’ll be subscribing to your augment and even I achievement you access consistently quickly.
That is really interesting, You are an overly skilled blogger. I have joined your feed and look forward to looking for more of your fantastic post. Additionally, I have shared your website in my social networks!
Attractive component of content. I simply stumbled upon your site and in accession capital to say that I get in fact enjoyed account your weblog posts. Any way I’ll be subscribing to your feeds or even I success you access persistently rapidly.
I have not checked in here for a while because I thought it was getting boring, but the last several posts are good quality so I guess I will add you back to my daily bloglist. You deserve it my friend 🙂
Do you have a spam problem on this blog; I also am a blogger, and I was wanting to know your situation; many of us have created some nice practices and we are looking to trade methods with others, please shoot me an email if interested.
I am impressed with this web site, rattling I am a big fan .
I am not rattling fantastic with English but I get hold this very easy to read .
Magnificent site. Lots of helpful info here. I¦m sending it to some buddies ans additionally sharing in delicious. And naturally, thanks on your sweat!
These days of austerity and relative stress about having debt, most people balk up against the idea of utilizing a credit card in order to make purchase of merchandise and also pay for a vacation, preferring, instead to rely on this tried and also trusted method of making settlement – raw cash. However, if you possess the cash on hand to make the purchase fully, then, paradoxically, this is the best time for them to use the card for several causes.
The other day, while I was at work, my sister stole my iphone and tested to see if it can survive a 25 foot drop, just so she can be a youtube sensation. My apple ipad is now broken and she has 83 views. I know this is entirely off topic but I had to share it with someone!
Does your blog have a contact page? I’m having trouble locating it but, I’d like to send you an e-mail. I’ve got some ideas for your blog you might be interested in hearing. Either way, great site and I look forward to seeing it improve over time.
Great wordpress blog here.. It’s hard to find quality writing like yours these days. I really appreciate people like you! take care
I couldn’t resist commenting
Hi, just required you to know I he added your site to my Google bookmarks due to your layout. But seriously, I believe your internet site has 1 in the freshest theme I??ve came across. It extremely helps make reading your blog significantly easier.
Your style is so unique compared to many other people. Thank you for publishing when you have the opportunity,Guess I will just make this bookmarked.2
Hey this is kind of of off topic but I was wanting to know if blogs use WYSIWYG editors or if you have to manually code with HTML. I’m starting a blog soon but have no coding expertise so I wanted to get guidance from someone with experience. Any help would be greatly appreciated!
It’s a pity you don’t have a donate button! I’d certainly donate to this superb blog! I guess for now i’ll settle for book-marking and adding your RSS feed to my Google account. I look forward to fresh updates and will talk about this website with my Facebook group. Talk soon!
Fantastic website. Plenty of helpful information here. I¦m sending it to a few friends ans also sharing in delicious. And certainly, thank you in your effort!
Hey There. I discovered your weblog using msn. That is an extremely neatly written article. I’ll be sure to bookmark it and return to read more of your useful info. Thank you for the post. I will definitely comeback.
One thing I have actually noticed is that there are plenty of misconceptions regarding the banking companies intentions any time talking about foreclosure. One fable in particular is that often the bank desires your house. The financial institution wants your hard earned cash, not the home. They want the cash they gave you together with interest. Preventing the bank will simply draw the foreclosed summary. Thanks for your article.
One more issue is that video games are usually serious in nature with the main focus on mastering rather than leisure. Although, we have an entertainment factor to keep children engaged, each game is usually designed to work towards a specific skill set or curriculum, such as math concepts or scientific research. Thanks for your publication.
Hey very nice site!! Man .. Excellent .. Amazing .. I will bookmark your blog and take the feeds also…I’m happy to find numerous useful info here in the post, we need work out more techniques in this regard, thanks for sharing. . . . . .
I like this weblog very much so much fantastic info .
I have read some just right stuff here. Definitely price bookmarking for revisiting. I surprise how a lot effort you place to make such a great informative site.
Can I just say what a relief to find someone who really is aware of what theyre speaking about on the internet. You definitely know the right way to carry an issue to light and make it important. Extra folks need to learn this and understand this aspect of the story. I cant believe youre no more common because you definitely have the gift.
I reckon something genuinely interesting about your web site so I bookmarked.
I love the efforts you have put in this, thank you for all the great articles.
certainly like your web-site however you have to test the spelling on several of your posts. A number of them are rife with spelling problems and I in finding it very troublesome to tell the truth nevertheless I¦ll definitely come back again.
Rattling good visual appeal on this website , I’d value it 10 10.
I always was concerned in this topic and still am, appreciate it for posting.
Your post is a ray of light in the darkness. Thank you for brightening my day in a unique way. Keep shining!
Amazing! This blog looks just like my old one! It’s on a entirely different topic but it has pretty
much the same page layout and design. Superb choice of colors!
I have no words to describe how your content illuminated my day. Keep being that source of inspiration!
Hi, just required you to know I he added your site to my Google bookmarks due to your layout. But seriously, I believe your internet site has 1 in the freshest theme I??ve came across. It extremely helps make reading your blog significantly easier.
Hello! I could have sworn I’ve been to this site before but after browsing through some of the post I realized it’s new to me. Anyways, I’m definitely glad I found it and I’ll be bookmarking and checking back often!
whoah this blog is great i like studying your posts. Stay up the great paintings! You recognize, lots of persons are searching around for this info, you can help them greatly.
I have been surfing online more than 3 hours lately, yet I never discovered any interesting article like yours. It’s beautiful worth enough for me. In my view, if all web owners and bloggers made just right content material as you probably did, the web might be a lot more useful than ever before.
terrific day starting with a tremendous reading 🌄📘
I was reading through some of your posts on this internet site and I think this internet site is really instructive! Keep putting up.
Way cool, some valid points! I appreciate you making this article available, the rest of the site is also high quality. Have a fun.
awesome morning beginning with an excellent literature 🌞📚
Pretty nice post. I just stumbled upon your blog and wished to say that I have really enjoyed surfing around your blog posts. In any case I’ll be subscribing to your feed and I hope you write again soon!
Wow! This could be one particular of the most helpful blogs We have ever arrive across on this subject. Actually Wonderful. I am also a specialist in this topic so I can understand your effort.
I am really loving the theme/design of your weblog. Do you ever run into any web browser compatibility problems? A few of my blog visitors have complained about my blog not working correctly in Explorer but looks great in Safari. Do you have any suggestions to help fix this issue?
I like what you guys are up also. Such clever work and reporting! Carry on the superb works guys I have incorporated you guys to my blogroll. I think it will improve the value of my web site 🙂
Do you have a spam issue on this blog; I also am a blogger, and I was curious about your situation; we have created some nice procedures and we are looking to trade techniques with other folks, please shoot me an email if interested.
Hello there, You have done an incredible job. I’ll certainly digg it and personally suggest to my friends. I’m confident they’ll be benefited from this web site.
When I originally commented I clicked the -Notify me when new comments are added- checkbox and now each time a comment is added I get four emails with the same comment. Is there any way you can remove me from that service? Thanks!
You could certainly see your expertise in the work you write. The world hopes for more passionate writers like you who are not afraid to say how they believe. Always follow your heart.
This design is steller! You certainly know how to keep a reader entertained. Between your wit and your videos, I was almost moved to start my own blog (well, almost…HaHa!) Wonderful job. I really enjoyed what you had to say, and more than that, how you presented it. Too cool!
I beloved as much as you’ll receive carried out proper here. The caricature is attractive, your authored material stylish. nonetheless, you command get bought an edginess over that you want be delivering the following. ill for sure come more formerly once more as exactly the similar just about very regularly inside of case you protect this hike.
I discovered your blog site on google and check a few of your early posts. Continue to keep up the very good operate. I just additional up your RSS feed to my MSN News Reader. Seeking forward to reading more from you later on!…
Whats up are using WordPress for your site platform? I’m new to the blog world but I’m trying to get started and set up my own. Do you need any html coding expertise to make your own blog? Any help would be really appreciated!
Sweet blog! I found it while browsing on Yahoo News. Do you have any suggestions on how to get listed in Yahoo News? I’ve been trying for a while but I never seem to get there! Thank you
I really appreciate this post. I have been looking everywhere for this! Thank goodness I found it on Bing. You’ve made my day! Thanks again
I am forever thought about this, appreciate it for posting.
We are a group of volunteers and opening a new scheme in our community. Your site offered us with helpful info to paintings on. You’ve done a formidable activity and our whole neighborhood shall be grateful to you.
Hmm is anyone else having problems with the images on this blog loading? I’m trying to determine if its a problem on my end or if it’s the blog. Any suggestions would be greatly appreciated.
I’ve been absent for some time, but now I remember why I used to love this site. Thank you, I will try and check back more often. How frequently you update your web site?
I do consider all of the ideas you’ve offered for your post. They are really convincing and can certainly work. Still, the posts are too brief for newbies. May you please extend them a little from next time? Thanks for the post.
Fantastic website you have here but I was wondering if you knew of any community forums that cover the same topics talked about here? I’d really like to be a part of online community where I can get advice from other knowledgeable people that share the same interest. If you have any recommendations, please let me know. Many thanks!
One other issue issue is that video games are generally serious anyway with the major focus on learning rather than enjoyment. Although, there’s an entertainment part to keep your sons or daughters engaged, each and every game is often designed to work on a specific set of skills or program, such as numbers or technology. Thanks for your write-up.
The other day, while I was at work, my sister stole my iphone and tested to see if it can survive a 25 foot drop, just so she can be a youtube sensation. My iPad is now destroyed and she has 83 views. I know this is completely off topic but I had to share it with someone!
I’m not that much of a online reader to be honest but your blogs really nice, keep it up! I’ll go ahead and bookmark your site to come back later on. Many thanks
Wow, incredible weblog structure! How long have you ever been blogging for? you made blogging glance easy. The overall look of your web site is fantastic, as well as the content material!
You could certainly see your skills in the work you write. The sector hopes for more passionate writers like you who aren’t afraid to say how they believe. At all times go after your heart.
I like this website because so much utile stuff on here : D.
My brother recommended I would possibly like this web site. He was once totally right. This submit actually made my day. You can not believe simply how much time I had spent for this information! Thank you!
I am not sure where you are getting your info, but great topic. I needs to spend some time learning more or understanding more. Thanks for magnificent information I was looking for this info for my mission.
Thank you for sharing excellent informations. Your site is very cool. I am impressed by the details that you?¦ve on this website. It reveals how nicely you understand this subject. Bookmarked this website page, will come back for more articles. You, my friend, ROCK! I found simply the information I already searched everywhere and just could not come across. What a perfect website.
One thing I would really like to reply to is that weightloss system fast can be achieved by the appropriate diet and exercise. A person’s size not only affects appearance, but also the quality of life. Self-esteem, depression, health risks, in addition to physical skills are influenced in extra weight. It is possible to do everything right and at the same time having a gain. Should this happen, a medical problem may be the reason. While an excessive amount food rather than enough body exercise are usually accountable, common health conditions and key prescriptions could greatly add to size. Thanks for your post here.
I am not really wonderful with English but I get hold this rattling easy to interpret.
I am glad to be a visitant of this sodding blog! , thankyou for this rare information! .
I’m usually to running a blog and i really appreciate your content. The article has really peaks my interest. I am going to bookmark your website and hold checking for new information.
Hi, i think that i saw you visited my blog thus i came to ?return the favor?.I’m trying to find things to enhance my site!I suppose its ok to use a few of your ideas!!
I like the efforts you have put in this, regards for all the great blog posts.
I just couldn’t depart your site before suggesting that I extremely loved the usual information an individual provide for your guests? Is going to be back often to investigate cross-check new posts.
I just could not depart your site before suggesting that I extremely enjoyed the standard information a person provide for your visitors? Is gonna be back often to check up on new posts
We are offering Concrete Parking Lot Contractor, Concrete Installation Contractor Service, warehouse flooring, commercial, and industrial concrete roadways.
Way cool, some valid points! I appreciate you making this article available, the rest of the site is also high quality. Have a fun.
Write more, thats all I have to say. Literally, it seems as though you relied on the video to make your point. You obviously know what youre talking about, why throw away your intelligence on just posting videos to your site when you could be giving us something enlightening to read?
Nice post. I be taught one thing tougher on totally different blogs everyday. It would at all times be stimulating to learn content from other writers and follow slightly something from their store. I?d want to make use of some with the content material on my weblog whether or not you don?t mind. Natually I?ll provide you with a link on your internet blog. Thanks for sharing.
Thanks a lot for providing individuals with an extraordinarily pleasant possiblity to read in detail from this blog. It is often very pleasurable and packed with a lot of fun for me personally and my office fellow workers to visit your website the equivalent of thrice in a week to study the newest things you have got. Not to mention, I am at all times motivated with all the spectacular methods you give. Certain two points on this page are definitely the very best we have ever had.
Perfect piece of work you have done, this web site is really cool with great information.
I will right away grab your rss as I can’t in finding your email subscription hyperlink or newsletter service. Do you have any? Please allow me recognize in order that I could subscribe. Thanks.
We are offering Concrete Parking Lot Contractor, Concrete Installation Contractor Service, warehouse flooring, commercial, and industrial concrete roadways.
Wow! Thank you! I always wanted to write on my website something like that. Can I take a portion of your post to my website?
Nice blog here! Also your web site loads up fast! What web host are you using? Can I get your affiliate link to your host? I wish my website loaded up as quickly as yours lol
I’ll right away snatch your rss as I can not to find your e-mail subscription hyperlink or newsletter service. Do you’ve any? Please permit me understand in order that I could subscribe. Thanks.
This will be a terrific blog, might you be involved in doing an interview about just how you designed it? If so e-mail me!
I love your blog.. very nice colors & theme. Did you create this website yourself? Plz reply back as I’m looking to create my own blog and would like to know wheere u got this from. thanks
Great write-up, I am regular visitor of one¦s site, maintain up the excellent operate, and It is going to be a regular visitor for a long time.
Hello! I could have sworn I’ve been to this blog before but after browsing through some of the post I realized it’s new to me. Anyways, I’m definitely happy I found it and I’ll be book-marking and checking back frequently!
hey there and thank you for your information – I’ve definitely picked up anything new from right here. I did however expertise several technical issues using this site, as I experienced to reload the website a lot of times previous to I could get it to load correctly. I had been wondering if your hosting is OK? Not that I’m complaining, but slow loading instances times will sometimes affect your placement in google and can damage your high quality score if advertising and marketing with Adwords. Well I’m adding this RSS to my e-mail and could look out for much more of your respective exciting content. Ensure that you update this again very soon..
F*ckin? amazing things here. I am very glad to see your article. Thanks a lot and i’m looking forward to contact you. Will you please drop me a e-mail?
I’m commenting to let you know what a remarkable discovery my friend’s child obtained browsing yuor web blog. She picked up some details, which include what it is like to have an awesome coaching style to make many others clearly have an understanding of various tortuous topics. You truly exceeded readers’ desires. Thank you for providing those interesting, dependable, informative and easy guidance on the topic to Sandra.
Greetings! I’ve been reading your site for a long time now and finally got the bravery to go ahead and give you a shout out from New Caney Texas! Just wanted to say keep up the great job!
I conceive this site has some very superb information for everyone. “He who has not looked on Sorrow will never see Joy.” by Kahlil Gibran.
Thank you for sharing excellent informations. Your website is so cool. I am impressed by the details that you have on this blog. It reveals how nicely you understand this subject. Bookmarked this website page, will come back for extra articles. You, my pal, ROCK! I found simply the information I already searched everywhere and just could not come across. What an ideal website.
I do not even know the way I stopped up right here, but I assumed this submit used to be good. I do not realize who you’re but certainly you’re going to a well-known blogger in case you are not already 😉 Cheers!
I have not checked in here for a while as I thought it was getting boring, but the last several posts are great quality so I guess I’ll add you back to my daily bloglist. You deserve it my friend 🙂
I just added this site to my google reader, excellent stuff. Can’t get enough!
I’m still learning from you, as I’m making my way to the top as well. I absolutely liked reading everything that is posted on your blog.Keep the posts coming. I enjoyed it!
Thanks for this grand post, I am glad I found this internet site on yahoo.
You have brought up a very fantastic points, appreciate it for the post.
Absolutely composed written content, Really enjoyed examining.
Thanks for the concepts you have contributed here. Moreover, I believe there are some factors that really keep your insurance premium straight down. One is, to think about buying motors that are inside the good listing of car insurance firms. Cars which have been expensive tend to be more at risk of being stolen. Aside from that insurance policies are also based on the value of your car, so the more pricey it is, then the higher a premium you make payment for.
Wow! This could be one particular of the most helpful blogs We have ever arrive across on this subject. Basically Wonderful. I’m also an expert in this topic so I can understand your hard work.
Youre so cool! I dont suppose Ive learn something like this before. So good to search out somebody with some authentic ideas on this subject. realy thank you for starting this up. this web site is one thing that is needed on the net, someone with a bit of originality. useful job for bringing one thing new to the web!
Those are yours alright! . We at least need to get these people stealing images to start blogging! They probably just did a image search and grabbed them. They look good though!
My partner and I stumbled over here by a different website and thought I might as well check things out. I like what I see so i am just following you. Look forward to looking at your web page for a second time.
I simply could not go away your web site before suggesting that I actually loved the standard info an individual provide on your visitors? Is gonna be back steadily in order to check out new posts
I precisely desired to appreciate you once more. I am not sure the things I would have created without the entire pointers shown by you regarding this subject. It seemed to be an absolute traumatic crisis for me, however , understanding a new specialised approach you dealt with it forced me to leap over contentment. I am just grateful for your support and as well , hope you find out what an amazing job that you’re carrying out educating the others with the aid of a blog. Probably you have never encountered all of us.
I’ve learn some good stuff here. Certainly worth bookmarking for revisiting. I surprise how so much attempt you put to make such a great informative website.
You actually make it seem so easy with your presentation but I find this matter to be really something that I think I would never understand. It seems too complicated and extremely broad for me. I am looking forward for your next post, I will try to get the hang of it!
I?¦m no longer sure where you’re getting your info, but good topic. I must spend some time studying much more or understanding more. Thank you for wonderful info I was looking for this information for my mission.
Please let me know if you’re looking for a article author for your site. You have some really great articles and I believe I would be a good asset. If you ever want to take some of the load off, I’d really like to write some material for your blog in exchange for a link back to mine. Please shoot me an e-mail if interested. Cheers!
There is noticeably a bundle to know about this. I assume you made certain nice points in features also.
I like this web blog very much, Its a very nice spot to read and obtain info . “…when you have eliminated the impossible, whatever remains, however improbable, must be the truth.” by Conan Doyle.
I love your blog.. very nice colors & theme. Did you create this website yourself? Plz reply back as I’m looking to create my own blog and would like to know wheere u got this from. thanks
What is FitSpresso? FitSpresso, a dietary supplement presented in pill form, offers a comprehensive approach to weight loss by enhancing metabolism and augmenting the body’s fat-burning capacity
Yet another thing I would like to convey is that as opposed to trying to fit all your online degree training on days that you end work (considering that people are drained when they get home), try to arrange most of your sessions on the saturdays and sundays and only a couple courses on weekdays, even if it means a little time away from your end of the week. This is fantastic because on the week-ends, you will be much more rested and concentrated with school work. Many thanks for the different points I have acquired from your site.
Hello.This article was really motivating, especially because I was investigating for thoughts on this matter last Saturday.
I have discovered some important things through your blog post post. One other stuff I would like to talk about is that there are plenty of games in the marketplace designed in particular for toddler age young children. They include things like pattern recognition, colors, wildlife, and models. These often focus on familiarization as opposed to memorization. This makes a child engaged without having the experience like they are studying. Thanks
Pretty nice post. I just stumbled upon your blog and wished to mention that I have truly loved surfing around your weblog posts. After all I?ll be subscribing to your rss feed and I hope you write once more soon!
Rattling nice style and design and great subject material, nothing else we want : D.
Good day! This is kind of off topic but I need some advice from an established blog. Is it hard to set up your own blog? I’m not very techincal but I can figure things out pretty quick. I’m thinking about setting up my own but I’m not sure where to begin. Do you have any tips or suggestions? Thank you
I am usually to blogging and i actually appreciate your content. The article has really peaks my interest. I am going to bookmark your site and maintain checking for brand new information.
F*ckin’ remarkable things here. I’m very glad to see your post. Thanks a lot and i’m looking forward to contact you. Will you kindly drop me a e-mail?
Some genuinely excellent content on this website, thank you for contribution. “It is not often that someone comes along who is a true friend and a good writer.” by E. B. White.
whoah this weblog is magnificent i like reading your posts. Stay up the good work! You know, lots of people are looking round for this information, you can help them greatly.
I likewise believe thus, perfectly pent post! .
Whats up this is kinda of off topic but I was wondering if blogs use WYSIWYG editors or if you have to manually code with HTML. I’m starting a blog soon but have no coding knowledge so I wanted to get guidance from someone with experience. Any help would be enormously appreciated!
Thank you for the good writeup. It in fact was a amusement account it. Look advanced to more added agreeable from you! By the way, how can we communicate?
Thanks for your tips. One thing we have noticed is that banks as well as financial institutions know the spending patterns of consumers and also understand that most people max away their real credit cards around the holiday seasons. They properly take advantage of this specific fact and start flooding a person’s inbox plus snail-mail box together with hundreds of 0 APR card offers shortly when the holiday season concludes. Knowing that if you are like 98 of American open public, you’ll get at the opportunity to consolidate credit debt and transfer balances towards 0 rate credit cards.
Just what I was searching for, regards for putting up.
What Is Tonic Greens? Tonic Greens is a wellness aid that helps with combatting herpes in addition to enhancing your well-being.
I like what you guys are up too. Such intelligent work and reporting! Carry on the superb works guys I have incorporated you guys to my blogroll. I think it will improve the value of my site :).
What Is Tonic Greens? Tonic Greens is a wellness aid that helps with combatting herpes in addition to enhancing your well-being
Hi! Quick question that’s totally off topic. Do you know how to make your site mobile friendly? My website looks weird when browsing from my apple iphone. I’m trying to find a template or plugin that might be able to resolve this problem. If you have any suggestions, please share. Thank you!
Hello there! I could have sworn I’ve been to this blog before but after browsing through some of the post I realized it’s new to me. Anyhow, I’m definitely delighted I found it and I’ll be bookmarking and checking back frequently!
I’m curious to find out what blog system you have been using? I’m having some minor security problems with my latest site and I would like to find something more safe. Do you have any recommendations?
Fascinating blog! Is your theme custom made or did you download it from somewhere? A design like yours with a few simple adjustements would really make my blog jump out. Please let me know where you got your design. Thanks
Thank you, I have just been looking for info approximately this topic for a long time and yours is the best I have came upon so far. But, what about the conclusion? Are you certain about the source?
Thanks , I have just been searching for information about this subject for ages and yours is the greatest I’ve discovered till now. But, what about the bottom line? Are you sure about the source?
Thanks for the ideas you have contributed here. Furthermore, I believe there are a few factors which will keep your auto insurance premium all the way down. One is, to take into consideration buying cars and trucks that are in the good set of car insurance firms. Cars which might be expensive tend to be more at risk of being snatched. Aside from that insurance policies are also good value of the car, so the higher in price it is, then the higher the premium you pay.
Hello, you used to write magnificent, but the last few posts have been kinda boringK I miss your super writings. Past several posts are just a little bit out of track! come on!
I like what you guys are up also. Such clever work and reporting! Keep up the superb works guys I have incorporated you guys to my blogroll. I think it will improve the value of my site 🙂
I have learned some new elements from your web page about computer systems. Another thing I’ve always presumed is that computer systems have become a product that each residence must have for a lot of reasons. They supply you with convenient ways to organize homes, pay bills, search for information, study, tune in to music and in many cases watch television shows. An innovative solution to complete many of these tasks has been a laptop. These pc’s are portable ones, small, highly effective and lightweight.
You need to participate in a contest for top-of-the-line blogs on the web. I will recommend this web site!
Yet another issue is really that video gaming has become one of the all-time biggest forms of entertainment for people of every age group. Kids have fun with video games, plus adults do, too. Your XBox 360 is among the favorite games systems for individuals that love to have a lot of video games available to them, along with who like to experiment with live with other folks all over the world. Many thanks for sharing your ideas.
I went over this website and I believe you have a lot of superb info , saved to my bookmarks (:.
I have to voice my admiration for your generosity for individuals who really want help with this one subject matter. Your personal dedication to getting the solution around was quite interesting and has encouraged some individuals just like me to realize their goals. This warm and helpful publication entails a great deal to me and far more to my colleagues. With thanks; from all of us.
Another thing is that when looking for a good internet electronics store, look for online stores that are constantly updated, preserving up-to-date with the hottest products, the very best deals, plus helpful information on goods and services. This will make sure that you are doing business with a shop which stays on top of the competition and provides you what you ought to make knowledgeable, well-informed electronics expenditures. Thanks for the critical tips I have really learned through the blog.
WONDERFUL Post.thanks for share..more wait .. …
I?¦ve recently started a web site, the information you provide on this web site has helped me greatly. Thanks for all of your time & work.
Its like you read my mind! You seem to understand so much approximately this, such as you wrote the guide in it or something. I feel that you simply can do with a few percent to drive the message house a little bit, however instead of that, that is excellent blog. An excellent read. I’ll definitely be back.
I really like your writing style, excellent info, regards for posting :D. “All words are pegs to hang ideas on.” by Henry Ward Beecher.
Great awesome things here. I?¦m very happy to look your post. Thank you a lot and i am having a look ahead to contact you. Will you please drop me a mail?
I was just searching for this info for some time. After six hours of continuous Googleing, at last I got it in your web site. I wonder what is the lack of Google strategy that do not rank this type of informative sites in top of the list. Usually the top websites are full of garbage.
My brother suggested I might like this web site. He was entirely right. This post actually made my day. You cann’t imagine simply how much time I had spent for this information! Thanks!
What i do not realize is in reality how you are now not actually much more neatly-liked than you may be now. You are very intelligent. You recognize therefore significantly in the case of this subject, made me individually imagine it from a lot of various angles. Its like women and men don’t seem to be involved unless it is something to do with Girl gaga! Your personal stuffs great. Always care for it up!
Hey there just wanted to give you a quick heads up. The text in your content seem to be running off the screen in Safari. I’m not sure if this is a format issue or something to do with web browser compatibility but I figured I’d post to let you know. The style and design look great though! Hope you get the problem fixed soon. Kudos
Hey! I know this is kinda off topic but I was wondering which blog platform are you using for this site? I’m getting fed up of WordPress because I’ve had problems with hackers and I’m looking at alternatives for another platform. I would be fantastic if you could point me in the direction of a good platform.
I do believe all the concepts you’ve offered to your post. They’re really convincing and can certainly work. Nonetheless, the posts are too short for starters. Could you please lengthen them a little from subsequent time? Thanks for the post.
Thank you for sharing excellent informations. Your site is very cool. I am impressed by the details that you?ve on this site. It reveals how nicely you perceive this subject. Bookmarked this website page, will come back for extra articles. You, my friend, ROCK! I found just the information I already searched everywhere and just could not come across. What a perfect web-site.
Excellent website. Plenty of useful info here. I’m sending it to several buddies ans additionally sharing in delicious. And certainly, thank you for your sweat!
You really make it seem really easy together with your presentation however I to find this matter to be really something that I feel I might never understand. It kind of feels too complex and extremely large for me. I’m taking a look forward to your next submit, I will attempt to get the hold of it!
This is a topic close to my heart cheers, where are your contact details though?
I found your blog website on google and verify a couple of of your early posts. Proceed to keep up the superb operate. I simply extra up your RSS feed to my MSN News Reader. Seeking forward to reading more from you later on!…
I happen to be writing to let you know of the notable encounter my cousin’s daughter enjoyed checking your webblog. She came to understand many pieces, not to mention how it is like to possess an ideal coaching heart to get other folks without difficulty thoroughly grasp specific impossible issues. You undoubtedly did more than readers’ expectations. I appreciate you for distributing the practical, healthy, educational not to mention easy tips about your topic to Evelyn.
I consider something really special in this internet site.
Hello, Neat post. There’s a problem along with your website in internet explorer, would test this?K IE still is the market chief and a good component to other people will omit your great writing because of this problem.
You made some respectable factors there. I appeared on the internet for the issue and located most people will associate with along with your website.
Superb blog! Do you have any suggestions for aspiring writers? I’m hoping to start my own site soon but I’m a little lost on everything. Would you advise starting with a free platform like WordPress or go for a paid option? There are so many choices out there that I’m completely confused .. Any ideas? Cheers!
I went over this internet site and I believe you have a lot of good info, saved to fav (:.
I regard something genuinely special in this internet site.
Hey very nice blog!! Man .. Beautiful .. Amazing .. I’ll bookmark your website and take the feeds also?I am happy to find so many useful info here in the post, we need develop more techniques in this regard, thanks for sharing. . . . . .
Just wanna tell that this is invaluable, Thanks for taking your time to write this.
I’ve read some good stuff here. Certainly worth bookmarking for revisiting. I surprise how much effort you put to create such a great informative web site.
Hello my friend! I want to say that this post is awesome, nice written and include approximately all significant infos. I?d like to see more posts like this.
Generally I do not read post on blogs, but I would like to say that this write-up very forced me to try and do it! Your writing style has been surprised me. Thanks, very nice post.
Excellent blog here! Also your web site loads up fast! What host are you using? Can I get your affiliate link to your host? I wish my web site loaded up as quickly as yours lol
Its such as you read my thoughts! You seem to know so much about this, such as you wrote the book in it or something. I believe that you can do with a few p.c. to pressure the message home a bit, however other than that, this is magnificent blog. A great read. I will certainly be back.
This web site is really a walk-through for all of the info you wanted about this and didn’t know who to ask. Glimpse here, and you’ll definitely discover it.
One thing I’d really like to touch upon is that weightloss routine fast may be possible by the correct diet and exercise. An individual’s size not merely affects appearance, but also the general quality of life. Self-esteem, depression, health risks, as well as physical ability are impacted in fat gain. It is possible to make everything right and at the same time having a gain. If this happens, a problem may be the primary cause. While an excessive amount food and not enough body exercise are usually at fault, common health concerns and key prescriptions can easily greatly increase size. Kudos for your post here.
Regards for all your efforts that you have put in this. very interesting info .
I would also love to add that in case you do not actually have an insurance policy or else you do not participate in any group insurance, you could possibly well reap the benefits of seeking the aid of a health insurance professional. Self-employed or people with medical conditions ordinarily seek the help of the health insurance specialist. Thanks for your short article.
Thank you for another informative blog. Where else could I get that kind of info written in such an ideal way? I have a project that I’m just now working on, and I’ve been on the look out for such info.
I do consider all the concepts you have introduced in your post. They are really convincing and can definitely work. Still, the posts are very brief for novices. May just you please extend them a little from next time? Thanks for the post.
Excellent read, I just passed this onto a colleague who was doing some research on that. And he just bought me lunch because I found it for him smile So let me rephrase that: Thanks for lunch!
What?s Happening i’m new to this, I stumbled upon this I have found It positively useful and it has aided me out loads. I hope to contribute & aid other users like its aided me. Good job.
Hiya, I’m really glad I have found this info. Today bloggers publish only about gossips and net and this is actually frustrating. A good site with interesting content, that’s what I need. Thanks for keeping this website, I’ll be visiting it. Do you do newsletters? Cant find it.
site:น้ำหอมมีความสำคัญมากในการสร้างความประทับใจและบทบาทในการสื่อสารไม่เป็นสำเนียง ต่างคนต่างมีความชื่นชอบในกลิ่นน้ำหอมที่แตกต่างกัน และด้วยความเข้าใจในความโอบอ้อมและความสดชื่นของน้ำหอม Ceresa Perfume ล้ำหน้าในการเลือกและผสมผสานน้ำหอมที่ไม่เหมือนใคร เรามาทำความรู้จักกับ ‘โน้ตน้ำหอม’ ที่เป็นส่วนสำคัญของสูตรน้ำหอมกัน
I have been examinating out a few of your stories and it’s clever stuff. I will make sure to bookmark your blog.
Thanks, I have recently been looking for information about this subject for ages and yours is the best I have came upon till now. But, what in regards to the conclusion? Are you sure concerning the supply?
A further issue is that video gaming has become one of the all-time most important forms of recreation for people of nearly every age. Kids enjoy video games, and adults do, too. Your XBox 360 is among the favorite video games systems for people who love to have hundreds of games available to them, as well as who like to learn live with people all over the world. Many thanks for sharing your thinking.
Hi, just required you to know I he added your site to my Google bookmarks due to your layout. But seriously, I believe your internet site has 1 in the freshest theme I??ve came across. It extremely helps make reading your blog significantly easier.
This actually answered my drawback, thank you!
Wow that was odd. I just wrote an incredibly long comment but after I clicked submit my comment didn’t show up. Grrrr… well I’m not writing all that over again. Anyhow, just wanted to say fantastic blog!
Good day! I know this is kinda off topic but I was wondering if you knew where I could find a captcha plugin for my comment form? I’m using the same blog platform as yours and I’m having problems finding one? Thanks a lot!
I am not really great with English but I find this very easygoing to read .
Keep up the good piece of work, I read few blog posts on this internet site and I believe that your web site is real interesting and has got bands of fantastic information.
I have been surfing online greater than 3 hours these days, but I by no means discovered any attention-grabbing article like yours. It is beautiful value sufficient for me. In my view, if all website owners and bloggers made good content as you probably did, the web will probably be a lot more helpful than ever before.
I like this post, enjoyed this one thanks for posting.
Hello my family member! I wish to say that this article is awesome, great written and come with almost all significant infos. I?¦d like to look extra posts like this .
Hello my family member! I want to say that this post is amazing, great written and come with approximately all significant infos. I?¦d like to peer more posts like this .
An added important area is that if you are a senior, travel insurance pertaining to pensioners is something you need to really consider. The more aged you are, the more at risk you might be for having something negative happen to you while in most foreign countries. If you are not necessarily covered by a number of comprehensive insurance cover, you could have quite a few serious complications. Thanks for revealing your good tips on this web blog.
I conceive you have mentioned some very interesting details , regards for the post.
I?¦m now not positive where you’re getting your information, but great topic. I needs to spend a while learning much more or working out more. Thanks for fantastic information I was in search of this info for my mission.
Hi, Neat post. There’s a problem with your website in internet explorer, would test this… IE still is the market leader and a huge portion of people will miss your fantastic writing because of this problem.
Акумулятори Li-ion Найкраща Ціна Купити недорого (098) 225 51 11 Магазин Li-ion акумуляторів та станцій Акумулятори для FPV Дронів Акумуляторні збірки Портативні електростанції
Thanks a lot for sharing this with all folks you actually recognize what you are speaking about! Bookmarked. Kindly also talk over with my website =). We may have a hyperlink change contract between us!
Usually I do not read article on blogs, however I wish to say that this write-up very compelled me to try and do it! Your writing style has been surprised me. Thanks, very nice article.
Heya i am for the first time here. I came across this board and I to find It truly helpful & it helped me out a lot. I hope to offer one thing back and aid others such as you helped me.
Thank you for another informative blog. Where else could I get that type of info written in such a perfect way? I’ve a project that I am just now working on, and I have been on the look out for such information.
I love your writing style really loving this internet site.
I’ve recently started a blog, the information you provide on this site has helped me tremendously. Thank you for all of your time & work.
I have been examinating out a few of your articles and it’s clever stuff. I will definitely bookmark your blog.
I discovered your blog web site on google and test just a few of your early posts. Proceed to keep up the superb operate. I just additional up your RSS feed to my MSN Information Reader. Searching for ahead to reading more from you afterward!…
What I have constantly told people today is that when searching for a good on the net electronics store, there are a few aspects that you have to consider. First and foremost, you would like to make sure to find a reputable and in addition, reliable retailer that has picked up great opinions and scores from other people and business world people. This will ensure you are getting through with a well-known store to provide good services and aid to their patrons. Many thanks for sharing your opinions on this blog site.
Real great information can be found on website.
Terrific work! This is the type of info that should be shared around the internet. Shame on the search engines for not positioning this post higher! Come on over and visit my website . Thanks =)
Great beat ! I wish to apprentice even as you amend your web site, how can i subscribe for a weblog site? The account helped me a appropriate deal. I have been tiny bit familiar of this your broadcast provided brilliant clear concept
Good web site! I really love how it is easy on my eyes and the data are well written. I am wondering how I might be notified whenever a new post has been made. I have subscribed to your RSS feed which must do the trick! Have a nice day!
I’ve read some good stuff here. Definitely worth bookmarking for revisiting. I wonder how much effort you put to create such a great informative website.
Hello.This post was extremely fascinating, especially since I was searching for thoughts on this matter last Monday.
Some truly nice and useful info on this website , also I believe the pattern has great features.
Some truly nice and useful info on this site, besides I conceive the design and style holds great features.
Hello There. I found your blog using msn. This is a very well written article. I’ll be sure to bookmark it and come back to read more of your useful information. Thanks for the post. I’ll certainly return.
Simply wanna remark on few general things, The website layout is perfect, the subject material is really superb : D.
My spouse and I absolutely love your blog and find most of your post’s to be precisely what I’m looking for. Does one offer guest writers to write content to suit your needs? I wouldn’t mind creating a post or elaborating on a few of the subjects you write in relation to here. Again, awesome web log!
Appreciate it for helping out, excellent info .
Can I just say what a relief to find someone who truly knows what theyre speaking about on the internet. You positively know how you can carry a difficulty to mild and make it important. More folks have to learn this and perceive this side of the story. I cant consider youre no more widespread since you definitely have the gift.
At this time it sounds like WordPress is the top blogging platform available right now. (from what I’ve read) Is that what you are using on your blog?
Very instructive and excellent structure of written content, now that’s user friendly (:.
Wow, incredible weblog layout! How long have you been running a blog for? you made running a blog look easy. The overall glance of your web site is fantastic, let alone the content!
You can certainly see your enthusiasm in the work you write. The world hopes for more passionate writers like you who aren’t afraid to say how they believe. Always follow your heart.
Hello there, just was alert to your blog through Google, and found that it is really informative. I am gonna be careful for brussels. I’ll appreciate should you proceed this in future. A lot of people shall be benefited from your writing. Cheers!
Simply wanna remark on few general things, The website design is perfect, the written content is very wonderful. “To imagine is everything, to know is nothing at all.” by Anatole France.
When I originally commented I clicked the “Notify me when new comments are added” checkbox and now each time a comment is added I get four e-mails with the same comment. Is there any way you can remove people from that service? Thanks!
Thank you for every other wonderful post. Where else may just anybody get that type of information in such an ideal method of writing? I’ve a presentation next week, and I’m on the look for such information.
Dead indited articles, Really enjoyed reading.
I?ve read some good stuff here. Definitely worth bookmarking for revisiting. I wonder how much effort you put to make such a excellent informative site.
This really answered my problem, thank you!
Thanks for your helpful post. Over time, I have come to understand that the particular symptoms of mesothelioma are caused by the actual build up of fluid between lining of the lung and the torso cavity. The condition may start inside chest place and spread to other parts of the body. Other symptoms of pleural mesothelioma cancer include weight reduction, severe breathing in trouble, throwing up, difficulty swallowing, and irritation of the face and neck areas. It really should be noted that some people living with the disease don’t experience virtually any serious indications at all.
I conceive other website owners should take this site as an example , very clean and excellent user pleasant design and style.
I carry on listening to the news talk about receiving free online grant applications so I have been looking around for the best site to get one. Could you advise me please, where could i acquire some?
A person essentially help to make seriously articles I would state. This is the very first time I frequented your web page and thus far? I amazed with the research you made to make this particular publish amazing. Magnificent job!
I feel that is among the most vital info for me. And i am happy studying your article. However should statement on some basic issues, The web site taste is wonderful, the articles is really nice : D. Just right activity, cheers
Amazing blog! Do you have any suggestions for aspiring writers? I’m planning to start my own site soon but I’m a little lost on everything. Would you advise starting with a free platform like WordPress or go for a paid option? There are so many options out there that I’m totally confused .. Any ideas? Appreciate it!
Thank you for another informative website. Where else could I get that kind of information written in such an ideal way? I’ve a project that I’m just now working on, and I’ve been on the look out for such information.
I am really inspired with your writing abilities as smartly as with the layout to your weblog. Is that this a paid theme or did you customize it yourself? Either way keep up the excellent quality writing, it is uncommon to peer a great blog like this one today..
Thank you for your own efforts on this website. Betty loves managing internet research and it is easy to see why. Almost all learn all concerning the dynamic medium you deliver rewarding tips and hints by means of your web blog and as well welcome contribution from other individuals about this article and our own simple princess has been becoming educated a lot of things. Enjoy the rest of the new year. Your doing a tremendous job.
Great ?V I should certainly pronounce, impressed with your web site. I had no trouble navigating through all the tabs as well as related information ended up being truly simple to do to access. I recently found what I hoped for before you know it in the least. Reasonably unusual. Is likely to appreciate it for those who add forums or anything, site theme . a tones way for your customer to communicate. Excellent task..
You made some decent factors there. I regarded on the internet for the issue and located most people will associate with with your website.
Wonderful beat ! I wish to apprentice even as you amend your website, how can i subscribe for a weblog website? The account aided me a acceptable deal. I have been a little bit acquainted of this your broadcast offered vibrant clear idea
I think other web site proprietors should take this web site as an model, very clean and wonderful user genial style and design, let alone the content. You’re an expert in this topic!
Thanks for your post. Another factor is that just being a photographer consists of not only problem in taking award-winning photographs but hardships in getting the best dslr camera suited to your requirements and most especially challenges in maintaining the grade of your camera. This is certainly very genuine and clear for those photographers that are straight into capturing the nature’s exciting scenes — the mountains, the forests, the actual wild and the seas. Going to these amazing places absolutely requires a digital camera that can surpass the wild’s unpleasant natural environment.
Hey! This post could not be written any better! Reading through this post reminds me of my old room mate! He always kept chatting about this. I will forward this article to him. Pretty sure he will have a good read. Thanks for sharing!
Hello my family member! I want to say that this post is amazing, great written and include almost all significant infos. I would like to peer extra posts like this .
I?d should test with you here. Which isn’t one thing I often do! I get pleasure from reading a post that will make individuals think. Additionally, thanks for allowing me to remark!
What i do not understood is actually how you are not really much more well-liked than you may be right now. You’re so intelligent. You realize thus considerably relating to this subject, made me personally consider it from so many varied angles. Its like women and men aren’t fascinated unless it is one thing to do with Lady gaga! Your own stuffs nice. Always maintain it up!
I do not even know how I ended up here, but I thought this post was good. I do not know who you are but definitely you are going to a famous blogger if you are not already 😉 Cheers!
Magnificent beat ! I wish to apprentice whilst you amend your website, how could i subscribe for a blog web site? The account helped me a applicable deal. I were a little bit acquainted of this your broadcast provided vivid transparent concept
Thank you for sharing excellent informations. Your web site is very cool. I am impressed by the details that you have on this blog. It reveals how nicely you understand this subject. Bookmarked this website page, will come back for more articles. You, my pal, ROCK! I found just the information I already searched all over the place and just couldn’t come across. What a great site.
I do consider all of the ideas you have introduced for your post. They are very convincing and can definitely work. Still, the posts are too short for novices. Could you please extend them a little from subsequent time? Thanks for the post.
Thank you, I’ve been hunting for details about this topic for ages and yours is the best I have discovered so far.
I really like your writing style, superb information, thank you for posting :D. “Nothing sets a person so much out of the devil’s reach as humility.” by Johathan Edwards.
Hello there, You’ve performed an incredible job. I will definitely digg it and personally suggest to my friends. I’m sure they will be benefited from this website.
Hi there, just turned into aware of your blog via Google, and found that it’s really informative. I am going to be careful for brussels. I will be grateful when you proceed this in future. Numerous folks will probably be benefited out of your writing. Cheers!
The things i have observed in terms of personal computer memory is always that there are features such as SDRAM, DDR or anything else, that must fit in with the requirements of the mother board. If the pc’s motherboard is very current and there are no operating system issues, upgrading the memory literally will take under an hour or so. It’s among the list of easiest laptop upgrade types of procedures one can imagine. Thanks for discussing your ideas.
Usually I do not read article on blogs, but I wish to say that this write-up very forced me to try and do so! Your writing style has been surprised me. Thanks, quite nice post.
My developer is trying to convince me to move to .net from PHP. I have always disliked the idea because of the expenses. But he’s tryiong none the less. I’ve been using WordPress on numerous websites for about a year and am concerned about switching to another platform. I have heard good things about blogengine.net. Is there a way I can transfer all my wordpress posts into it? Any help would be greatly appreciated!
Hey there! I know this is kind of off topic but I was wondering which blog platform are you using for this website? I’m getting tired of WordPress because I’ve had problems with hackers and I’m looking at alternatives for another platform. I would be fantastic if you could point me in the direction of a good platform.
Thanks for your publication. What I want to comment on is that while searching for a good on-line electronics go shopping, look for a web page with complete information on important factors such as the security statement, safety measures details, payment procedures, along with terms as well as policies. Continually take time to look into the help as well as FAQ pieces to get a superior idea of the way the shop performs, what they are able to do for you, and in what way you can make the most of the features.
What an insightful and thoroughly-researched article! The author’s attention to detail and ability to present intricate ideas in a understandable manner is truly admirable. I’m totally impressed by the depth of knowledge showcased in this piece. Thank you, author, for offering your expertise with us. This article has been a true revelation!
A few things i have seen in terms of laptop or computer memory is there are specs such as SDRAM, DDR and the like, that must match up the requirements of the mother board. If the computer’s motherboard is reasonably current while there are no operating system issues, upgrading the memory literally usually takes under 1 hour. It’s on the list of easiest computer upgrade treatments one can visualize. Thanks for spreading your ideas.
This article is a refreshing change! The author’s unique perspective and insightful analysis have made this a truly fascinating read. I’m grateful for the effort he has put into producing such an informative and mind-stimulating piece. Thank you, author, for sharing your knowledge and stimulating meaningful discussions through your exceptional writing!
I have figured out some important things through your website post. One other thing I would like to say is that there are various games available on the market designed specially for preschool age young children. They include things like pattern identification, colors, animals, and models. These usually focus on familiarization rather than memorization. This will keep children and kids engaged without having a sensation like they are learning. Thanks
This website won’t render properly on my iphone 4 – you might wanna try and repair that
magnificent submit, very informative. I wonder why the other experts of this sector don’t understand this. You should proceed your writing. I am confident, you have a huge readers’ base already!
I am extremely impressed with your writing skills and also with the layout on your weblog. Is this a paid theme or did you customize it yourself? Either way keep up the nice quality writing, it is rare to see a great blog like this one nowadays..
I am glad to be a visitant of this everlasting web site! , regards for this rare information! .
Spot on with this write-up, I truly think this web site wants far more consideration. I’ll most likely be once more to learn way more, thanks for that info.
Great items from you, man. I have understand your stuff previous to and you’re simply too magnificent. I really like what you have got right here, certainly like what you are stating and the way in which in which you are saying it. You are making it entertaining and you still take care of to keep it sensible. I can not wait to learn much more from you. This is really a great web site.
Woah! I’m really enjoying the template/theme of this website. It’s simple, yet effective. A lot of times it’s challenging to get that “perfect balance” between usability and visual appearance. I must say that you’ve done a great job with this. In addition, the blog loads super quick for me on Chrome. Excellent Blog!
Virtually all of what you mention is supprisingly accurate and it makes me wonder why I had not looked at this in this light before. This piece truly did turn the light on for me personally as far as this topic goes. But there is actually just one factor I am not necessarily too cozy with and while I attempt to reconcile that with the actual central theme of your point, permit me observe exactly what all the rest of your readers have to say.Very well done.
I’m impressed, I have to say. Really rarely do I encounter a weblog that’s both educative and entertaining, and let me let you know, you have hit the nail on the head. Your concept is outstanding; the problem is something that not enough people are speaking intelligently about. I’m very happy that I stumbled across this in my seek for something regarding this.
I’m blown away by the quality of this content! The author has clearly put a huge amount of effort into researching and organizing the information. It’s refreshing to come across an article that not only offers helpful information but also keeps the readers engaged from start to finish. Hats off to him for creating such a masterpiece!
But wanna comment on few general things, The website pattern is perfect, the subject matter is very fantastic. “Good judgment comes from experience, and experience comes from bad judgment.” by Barry LePatner.
I got what you mean , appreciate it for putting up.Woh I am happy to find this website through google. “Money is the most egalitarian force in society. It confers power on whoever holds it.” by Roger Starr.
It?s actually a nice and useful piece of information. I am happy that you shared this helpful information with us. Please keep us informed like this. Thank you for sharing.
I’ve been absent for some time, but now I remember why I used to love this web site. Thank you, I will try and check back more often. How frequently you update your site?
Hello, i think that i saw you visited my website so i got here to ?return the desire?.I’m attempting to to find issues to enhance my web site!I guess its ok to use some of your ideas!!