How to set up a LAN connection in WinXP
Countless games are playable over a Local Area Network provided you can pull through the hassle of actually establishing a working connection. This guide will attempt to make the process quick and painless for beginners. For simplicity’s sake, I’ll show you how to create a LAN connection between only two computers then explain how to add more machines into the fold.
|
CONTENTS
1. Before Starting |
Before we start, be sure to have the following:
- At least two computers, each one with a clean installation of Windows XP and fully compatible Network Adapters.
- At least one cable router
- At least two Ethernet Cables
First and foremost, make sure that each one of your network adapters are correctly installed and configured on every system. To do this, open Device Manager (My Computer / Properties / Hardware Tab / Device Manager) and left-click to lower the ‘Network adapters’ branch where you should see the name of your network card model.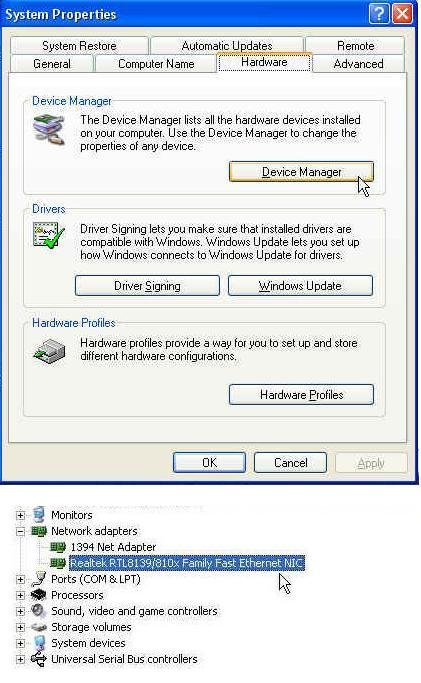
If a card model name does not appear, or if you see a ? symbol, then it’s likely your network drivers are missing and Windows XP is unable to recognize your card. Your network drivers will most likely be found on your motherboard driver CD (or see FAQ and Troubleshooting below for an alternate solution)
Assuming your network cards are all in check, search the back of your computer for its Ethernet port, which looks something like this:
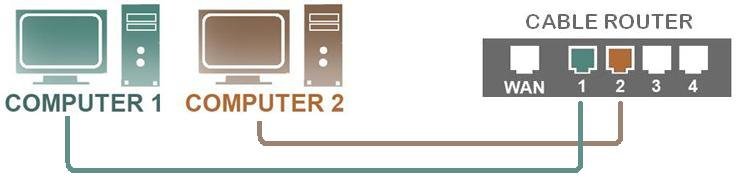
Connect the two computers via the router as shown in the following diagram:
After connecting the two computers, open Network Connections ( Start / Control Panel / Network Connections). A window with all your available connections will open up.
You should now have an up-and-running network connection!
Double click on your Local Area Connection to see what’s up.
Click on the Support tab.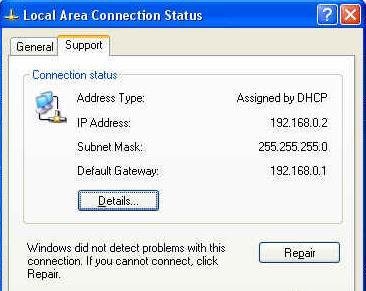
Here you will notice your IP Address. This IP Address is specifically assigned for your Local Area Network by a Windows service known as DHCP. Your actual IP may differ from the one seen in this screenshot.
Important. If you wish to use your auto-assigned IP address, you may now skip Step 5 (Assign IP Address) and jump straight to Step 6 (Configure Windows Firewall). But I recommend you read on and learn how to assign each IP Address yourself as it’s very simple. If you choose to skip ahead, remember to return to this part of the tutorial should you run into trouble
Now we can assign a static IP to each computer. We’ll start with Computer 1, which should be connected to Port 1 on your router as shown before in Step 3.
Open Network Connections ( Start / Control Panel / Network Connections ).
Right click on your Local Area Connection and select Properties.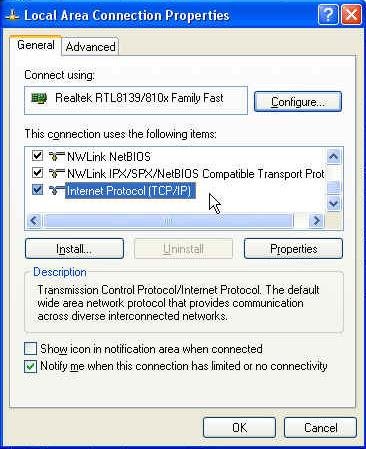
Double click on Internet Protocol (TCP/IP)
Select the ‘Use the following IP address’ radial and type in the values for Computer 1 as shown below: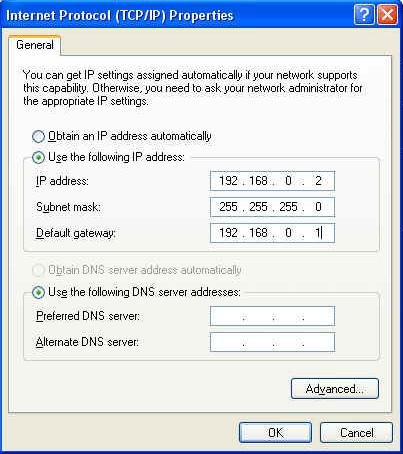
IP address: 192.168.0.2
Subnet mask: 255.255.255.0
Default gateway: 192.168.0.1
Prefererred DNS server: – nothing –
Alternate DNS server: – nothing –
DNS is unessential for a LAN connection so we’ll leave it alone.
Now switch to Computer 2 and type in the following values.
IP address: 192.168.0.3
Subnet mask: 255.255.255.0
Default gateway: 192.168.0.1
Prefererred DNS server: – nothing –
Alternate DNS server: – nothing –
And that’s it!
You’ll notice how the final value of each IP is used to identify every computer in the network. Change the IP Address in the same manner on any other computer while leaving the default gateway and subnet mask alone. eg: Computer 3 would have an IP of “192.168.0.4” while Computer 4 would have “192.168.0.5” and so on. This will enable you to add multiple machines to the network.
Step 6. Configure Windows Firewall
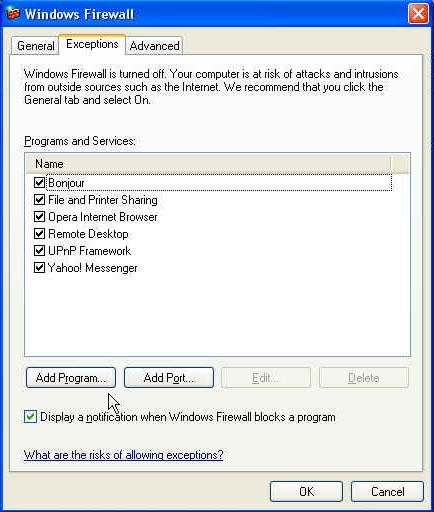 Windows uses a Firewall that has a nasty habit of blocking multiplayer LAN-based games. By default, a pop-up window will alert the player when this happens.
To fix the issue, open Windows Firewall (Control Panel / Windows Firewall) and switch to the Exceptions tab. Click on Browse and select the games you wish to play over a LAN connection.
This must be done on every computer for every game in order to make them playable.
If, however, your computer network is working offline and use adequate anti-virus software, you might even consider shutting down Windows Firewall on each system for the duration of the gaming session.
Step 7. Sharing Data (optional)
This section is non-essential for LAN play and may be skipped entirely. Since this may benefit player who wish to transfer files between computers, I thought I’d write it up anyway.
Right click on any Local Disk whose contents you wish to share over a network. Select Properties and switch to the Sharing tab.
 Check “Share this folder on the network” and “Allow network users to change my files” and write in a proper Share Name. Select “Just enable file sharing”.
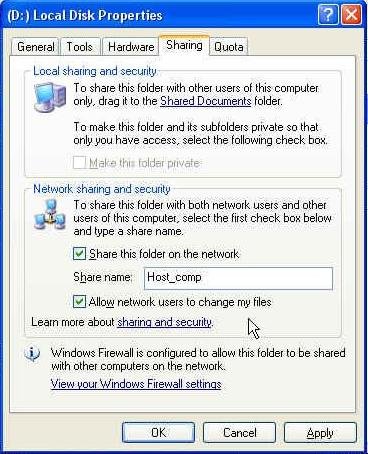
Now your HDD partition will be accessible to other computers. From where exactly?
Connected users will have to open My Network Places ( Desktop / My Network Places or My Computer / My Network Places). From there, select View Workgroup Computers. It might take 5 or 10 seconds before shared files are displayed. After that, it should be conveniently easy to copy, modify or move files between computers.
The same concept applies to printers, fax machines and scanners.
This list will be extended over time.
Q: My LAN Connection is working but I can’t play some of my games!
A: Which games are you trying to play? Many older games (1990s – 2000s) predate standard TCP/IP technology and use much older IPX/SPX protocols. Famous examples of such games include Diablo, Red Alert 2, Quake, Duke Nukem 3D or Age of Empires 2. These are still playable after you assign an IPX/SPX protocol to your Local Area Network.
Q: Is there a way to connect multiple computers without using Network Adapters / Network Cards?
A: Yes. Look for USB to Ethernet Adapters, which function as detachable USB network adapters. Simply install their drivers, connect and you’ve got a portable network card. This is an excellent choice for laptops or other machines with malfunctioned or otherwise unusable network cards. You’ll still need a router and cables, though.
")


Every weekend i used to visit this web page, for the reason that i wish for enjoyment, as
this this web page conations in fact nice funny data too. http://www.awdalpress.com/index/make-up-for-blonde-hair-blue-eyes-and-honest-skin-3/
Dies ist bekanntlich erste Sahne, Danke sehr! Das hat mir gefallen und ist wirklich belehrend.
Die Gedankenfinde ich nachvollziehbar. Solche Gedanken sind mir
selbst durchaus durch die Rübe gegangen. Denn ich
beachte, dass das außerdem zum Vorteil von meinen Bücherwürmern ein informierendes Thema verkörpert.
Great post, you have pointed out some great details , I besides conceive this s a very good website.
Nice post. I learn something more challenging on different blogs everyday. It will always be stimulating to read content from other writers and practice a little something from their store. I’d prefer to use some with the content on my blog whether you don’t mind. Natually I’ll give you a link on your web blog. Thanks for sharing.
I’m really loving the theme/design of your weblog. Do you ever run into any internet browser compatibility problems? A number of my blog audience have complained about my website not operating correctly in Explorer but looks great in Chrome. Do you have any recommendations to help fix this problem?
Fantastic blog you have here but I was curious if you knew of any community forums that cover the same topics talked about here? I’d really like to be a part of community where I can get feedback from other experienced people that share the same interest. If you have any suggestions, please let me know. Bless you!
Hi, Neat post. There’s a problem with your site in web explorer, could check thisK IE nonetheless is the marketplace chief and a large section of people will omit your wonderful writing due to this problem.
I am continuously looking online for ideas that can help me. Thank you!
I have not checked in here for some time because I thought it was getting boring, but the last several posts are great quality so I guess I’ll add you back to my everyday bloglist. You deserve it my friend 🙂
I?¦ve read several excellent stuff here. Certainly worth bookmarking for revisiting. I surprise how so much attempt you set to make such a fantastic informative site.
I’ve recently started a blog, the info you offer on this web site has helped me greatly. Thanks for all of your time & work. “Show me the man who keeps his house in hand, He’s fit for public authority.” by Sophocles.
great points altogether, you simply gained a new reader. What would you recommend in regards to your post that you made a few days ago? Any positive?
Really fantastic visual appeal on this web site, I’d rate it 10 10.
I have been browsing on-line greater than three hours today, yet I by no means found any interesting article like yours. It is beautiful value sufficient for me. Personally, if all site owners and bloggers made just right content material as you probably did, the net will probably be much more helpful than ever before.
This blog is definitely rather handy since I’m at the moment creating an internet floral website – although I am only starting out therefore it’s really fairly small, nothing like this site. Can link to a few of the posts here as they are quite. Thanks much. Zoey Olsen
After I originally commented I clicked the -Notify me when new feedback are added- checkbox and now every time a remark is added I get 4 emails with the identical comment. Is there any approach you may remove me from that service? Thanks!
naturally like your web-site however you have to check the spelling on quite a few of your posts. A number of them are rife with spelling problems and I in finding it very bothersome to inform the reality on the other hand I’ll certainly come back again.
Pretty element of content. I simply stumbled upon your weblog and in accession capital to claim that I acquire actually loved account your weblog posts. Any way I’ll be subscribing for your augment and even I success you get admission to persistently rapidly.
Thank you for sharing superb informations. Your web site is very cool. I’m impressed by the details that you¦ve on this blog. It reveals how nicely you understand this subject. Bookmarked this web page, will come back for extra articles. You, my friend, ROCK! I found just the information I already searched everywhere and simply couldn’t come across. What a great site.
It’s hard to find knowledgeable people on this topic, but you sound like you know what you’re talking about! Thanks
You are my breathing in, I possess few blogs and rarely run out from to brand.
I have been exploring for a little for any high quality articles or blog posts in this sort of area . Exploring in Yahoo I ultimately stumbled upon this site. Reading this info So i am happy to express that I’ve an incredibly just right uncanny feeling I came upon just what I needed. I such a lot unquestionably will make certain to do not put out of your mind this website and give it a glance regularly.
You really make it seem really easy with your presentation but I to find this topic to be actually something which I believe I would never understand. It seems too complex and very large for me. I am taking a look forward to your subsequent publish, I¦ll attempt to get the dangle of it!
Heya this is kinda of off topic but I was wanting to know if blogs use WYSIWYG editors or if you have to manually code with HTML. I’m starting a blog soon but have no coding experience so I wanted to get guidance from someone with experience. Any help would be enormously appreciated!
After study a couple of of the weblog posts in your web site now, and I really like your approach of blogging. I bookmarked it to my bookmark web site record and will likely be checking back soon. Pls try my web site as properly and let me know what you think.
I like what you guys are up too. Such smart work and reporting! Keep up the superb works guys I have incorporated you guys to my blogroll. I think it will improve the value of my website 🙂
I was examining some of your posts on this website and I think this site is real informative! Keep putting up.
I’d forever want to be update on new articles on this site, saved to my bookmarks! .
You got a very great website, Sword lily I discovered it through yahoo.
I’m not sure exactly why but this weblog is loading very slow for me. Is anyone else having this problem or is it a issue on my end? I’ll check back later and see if the problem still exists.
Very interesting subject, regards for putting up. “Genius is of no country.” by Charles Churchill.
There may be noticeably a bundle to find out about this. I assume you made certain nice points in options also.
F*ckin’ tremendous things here. I am very glad to see your article. Thanks a lot and i’m looking forward to contact you. Will you kindly drop me a e-mail?
I like this site because so much useful material on here : D.
Hello, I think your site might be having browser compatibility issues. When I look at your website in Firefox, it looks fine but when opening in Internet Explorer, it has some overlapping. I just wanted to give you a quick heads up! Other then that, amazing blog!
It’s a pity you don’t have a donate button! I’d certainly donate to this fantastic blog! I guess for now i’ll settle for bookmarking and adding your RSS feed to my Google account. I look forward to new updates and will talk about this blog with my Facebook group. Talk soon!
As a Newbie, I am always searching online for articles that can help me. Thank you
Hi, i think that i saw you visited my web site thus i came to “return the favor”.I’m attempting to find things to improve my site!I suppose its ok to use some of your ideas!!
Hello there there Very nice Blog you possess in this article, it feels like you place lots of operate in it.
Im just checking out some Blog to get motivation for my Internet site.
I offer Hello Kitty Bongs for Sale, plus
a wonderful Group on my webpage. Or just a Bong
Onlineshop, remember to check out me out by leaving us a post, if you’re interested
in Bongs available for sale.
br, Brad
There may be noticeably a bundle to know about this. I assume you made certain nice factors in options also.
Hello there Very nice Blog you have on this page, it feels as though
you add plenty of operate in it. Im just looking into some Blog to have inspiration for
my Internet site. I provide Bongs available for sale, and also a wonderful Local community on my small webpage.
Or just a Bong Onlineshop, please verify me out by leaving us a publish,
if you’re interested in Bongs for Sale.
br, Moe
Here is my web site – cheap bongs online
I was very pleased to find this web-site.I wanted to thanks for your time for this wonderful read!! I definitely enjoying every little bit of it and I have you bookmarked to check out new stuff you blog post.
Its like you read my mind! You seem to know so much about this, like you wrote the book in it or something. I think that you could do with a few pics to drive the message home a bit, but instead of that, this is excellent blog. A fantastic read. I’ll certainly be back.
A large percentage of of whatever you mention happens to be astonishingly legitimate and it makes me ponder why I hadn’t looked at this in this light before. This particular piece truly did switch the light on for me as far as this particular subject matter goes. But at this time there is just one factor I am not necessarily too comfy with so while I make an effort to reconcile that with the central idea of your position, allow me see exactly what all the rest of your visitors have to say.Nicely done.
Its great as your other blog posts : D, thankyou for posting. “A great flame follows a little spark.” by Dante Alighieri.
I’d perpetually want to be update on new blog posts on this web site, saved to favorites! .
Absolutely written written content, Really enjoyed looking at.
Thank you for any other informative blog. The place else may I get that kind of information written in such a perfect means? I have a project that I’m just now running on, and I have been on the glance out for such info.
I discovered your blog site on google and check a few of your early posts. Continue to keep up the very good operate. I just additional up your RSS feed to my MSN News Reader. Seeking forward to reading more from you later on!…
I get pleasure from, result in I discovered just what I was taking a look for. You have ended my 4 day long hunt! God Bless you man. Have a great day. Bye
Absolutely written subject material, Really enjoyed studying.
Good info. Lucky me I reach on your website by accident, I bookmarked it.
Regards for this rattling post, I am glad I discovered this internet site on yahoo.
Hey just wanted to give you a brief heads up and let you know a few of the pictures aren’t loading correctly. I’m not sure why but I think its a linking issue. I’ve tried it in two different internet browsers and both show the same results.
Saved as a favorite, I really like your blog!
I like what you guys are up too. Such clever work and reporting! Keep up the superb works guys I have incorporated you guys to my blogroll. I think it’ll improve the value of my web site 🙂
Hi there just wanted to give you a quick heads up. The words in your content seem to be running off the screen in Chrome. I’m not sure if this is a formatting issue or something to do with web browser compatibility but I figured I’d post to let you know. The design and style look great though! Hope you get the problem solved soon. Kudos
Heya i’m for the first time here. I found this board and I find It truly useful & it helped me out much. I hope to give something back and help others like you aided me.
It’s a shame you don’t have a donate button! I’d most certainly donate to this superb blog! I guess for now i’ll settle for book-marking and adding your RSS feed to my Google account. I look forward to fresh updates and will share this blog with my Facebook group. Talk soon!
It’s a pity you don’t have a donate button! I’d certainly donate to this outstanding blog! I suppose for now i’ll settle for book-marking and adding your RSS feed to my Google account. I look forward to fresh updates and will talk about this blog with my Facebook group. Talk soon!
Whats up are using WordPress for your blog platform? I’m new to the blog world but I’m trying to get started and create my own. Do you require any html coding expertise to make your own blog? Any help would be really appreciated!
you have a great blog here! would you like to make some invite posts on my blog?
Hi my friend! I want to say that this post is amazing, nice written and include approximately all vital infos. I would like to see more posts like this.
Very interesting topic, appreciate it for posting.
Superb post however , I was wanting to know if you could write a litte more on this topic? I’d be very grateful if you could elaborate a little bit further. Thank you!
Thanx for the effort, keep up the good work Great work, I am going to start a small Blog Engine course work using your site I hope you enjoy blogging with the popular BlogEngine.net.Thethoughts you express are really awesome. Hope you will right some more posts.
There is noticeably a bundle to know about this. I assume you made sure good factors in features also.
I must convey my respect for your kindness in support of folks that should have help with that topic. Your very own commitment to getting the solution across was really effective and have always made somebody much like me to arrive at their ambitions. Your important useful information indicates a great deal a person like me and especially to my office workers. Thank you; from all of us.
I like this web site so much, bookmarked.
I gotta bookmark this web site it seems very helpful extremely helpful
I’ve been absent for some time, but now I remember why I used to love this blog. Thanks, I will try and check back more often. How frequently you update your website?
Attractive section of content. I just stumbled upon your website and in accession capital to assert that I get actually enjoyed account your blog posts. Any way I will be subscribing to your feeds and even I achievement you access consistently quickly.
I’ve been browsing online more than 3 hours today, yet I never found any interesting article like yours. It’s pretty worth enough for me. In my opinion, if all web owners and bloggers made good content as you did, the internet will be much more useful than ever before.
It can be in reason for fact a nice and helpful bit of information. I’m happy that you simply shared this helpful info around.
Please stay us informed like this. Thanks for sharing.
My web site: ClaudQGarske
Hey! This is kind of off topic but I need some guidance from an established blog. Is it difficult to set up your own blog? I’m not very techincal but I can figure things out pretty fast. I’m thinking about making my own but I’m not sure where to begin. Do you have any tips or suggestions? Appreciate it
As a Newbie, I am permanently browsing online for articles that can be of assistance to me. Thank you
Wow! Thank you! I continually needed to write on my blog something like that. Can I implement a part of your post to my website?
Thanks for your marvelous posting! I genuinely enjoyed reading it, you are a great author.I will ensure that I bookmark your blog and will often come back sometime soon. I want to encourage one to continue your great posts, have a nice evening!
I am not real wonderful with English but I get hold this very leisurely to interpret.
I like this internet site because so much useful material on here : D.
What’s Happening i’m new to this, I stumbled upon this I have discovered It absolutely helpful and it has aided me out loads. I hope to contribute & assist different customers like its aided me. Great job.
Very nice post. I simply stumbled upon your blog and wanted to mention that I’ve truly enjoyed browsing your weblog posts. In any case I will be subscribing on your rss feed and I hope you write again soon!
hey there and thank you for your info – I have definitely picked up something new from right here. I did however expertise several technical issues using this site, since I experienced to reload the web site a lot of times previous to I could get it to load correctly. I had been wondering if your web hosting is OK? Not that I am complaining, but slow loading instances times will very frequently affect your placement in google and can damage your quality score if ads and marketing with Adwords. Anyway I’m adding this RSS to my e-mail and can look out for much more of your respective exciting content. Ensure that you update this again very soon..
There is noticeably a bundle to know about this. I assume you made certain nice points in features also.
I’d should verify with you here. Which isn’t one thing I usually do! I get pleasure from reading a post that can make people think. Also, thanks for allowing me to comment!
Howdy! I know this is kinda off topic however I’d figured I’d ask. Would you be interested in trading links or maybe guest authoring a blog post or vice-versa? My blog addresses a lot of the same topics as yours and I believe we could greatly benefit from each other. If you might be interested feel free to send me an email. I look forward to hearing from you! Awesome blog by the way!
Perfectly composed articles, thanks for selective information. “Necessity is the mother of taking chances.” by Mark Twain.
Thank you for every other fantastic post. Where else may just anybody get that kind of info in such a perfect approach of writing? I have a presentation subsequent week, and I am on the search for such info.
Some really nice and utilitarian info on this internet site, likewise I think the pattern contains good features.
I’m not sure exactly why but this site is loading very slow for me. Is anyone else having this problem or is it a issue on my end? I’ll check back later and see if the problem still exists.
This design is incredible! You obviously know how to keep a reader amused. Between your wit and your videos, I was almost moved to start my own blog (well, almost…HaHa!) Wonderful job. I really enjoyed what you had to say, and more than that, how you presented it. Too cool!
You actually make it appear really easy along with your presentation but I in finding this matter to be really something which I think I’d by no means understand. It kind of feels too complicated and extremely extensive for me. I’m taking a look ahead on your next post, I will attempt to get the hold of it!
I’m really inspired along with your writing talents as neatly as with the format on your weblog. Is that this a paid subject or did you customize it your self? Either way stay up the nice quality writing, it’s rare to look a nice weblog like this one these days..
I have been reading out many of your stories and it’s clever stuff. I will surely bookmark your site.
I have recently started a site, the info you provide on this website has helped me tremendously. Thank you for all of your time & work.
Magnificent goods from you, man. I have understand your stuff previous to and you are just too great. I really like what you have acquired here, certainly like what you’re stating and the way in which you say it. You make it enjoyable and you still care for to keep it smart. I can not wait to read much more from you. This is actually a tremendous site.
I’m usually to blogging and i actually appreciate your content. The article has really peaks my interest. I’m going to bookmark your web site and keep checking for brand spanking new information.
This web site is my intake, real wonderful style and perfect written content.
This is the fitting weblog for anyone who desires to search out out about this topic. You notice so much its nearly arduous to argue with you (not that I truly would want…HaHa). You undoubtedly put a new spin on a subject thats been written about for years. Nice stuff, just great!
After all, what a great site and informative posts, I will upload inbound link – bookmark this web site? Regards, Reader.
I do agree with all the ideas you have presented in your post. They are very convincing and will definitely work. Still, the posts are very short for novices. Could you please extend them a bit from next time? Thanks for the post.
What i don’t realize is in reality how you’re no longer actually much more well-appreciated than you may be now. You’re so intelligent. You realize therefore significantly in the case of this subject, made me for my part believe it from numerous varied angles. Its like women and men aren’t involved until it’s something to do with Lady gaga! Your individual stuffs outstanding. All the time maintain it up!
Hi my friend! I want to say that this article is awesome, great written and include almost all significant infos. I would like to see more posts like this.
You are my intake, I own few web logs and rarely run out from to post .
I have been absent for a while, but now I remember why I used to love this site. Thank you, I will try and check back more often. How frequently you update your website?
Hi there! I could possibly have sworn I’ve been to this blog before but after checking through a few of the post I realized it’s a new comer to me.
Anyhow, I’m definitely happy I came across it and I’ll be bookmarking and checking back frequently!
Also visit my website :: MikeSCopelin
Good write-up, I am normal visitor of one’s blog, maintain up the excellent operate, and It is going to be a regular visitor for a long time.
Wohh precisely what I was looking for, appreciate it for posting.
Keep working ,impressive job!
I as well believe thence, perfectly written post! .
I conceive this website holds some real superb info for everyone. “The foundation of every state is the education of its youth.” by Diogenes.
Fantastic web site. Lots of useful info here. I am sending it to a few friends ans additionally sharing in delicious. And obviously, thanks for your sweat!
I must express appreciation to the writer just for rescuing me from this type of trouble. Because of browsing throughout the search engines and meeting advice that were not beneficial, I believed my life was well over. Existing without the presence of answers to the issues you have fixed as a result of your main guide is a critical case, and the ones which may have in a wrong way damaged my career if I had not noticed your blog. Your primary talents and kindness in playing with almost everything was important. I don’t know what I would have done if I hadn’t come upon such a step like this. I can at this point look ahead to my future. Thanks a lot so much for the specialized and amazing help. I won’t be reluctant to refer your web sites to anybody who would like guidelines on this area.
I enjoy what you guys are up too. This kind of clever work and coverage! Keep up the excellent works guys I’ve included you guys to my personal blogroll.
Woah! I’m really loving the template/theme of this site. It’s simple, yet effective. A lot of times it’s very difficult to get that “perfect balance” between superb usability and appearance. I must say you’ve done a amazing job with this. In addition, the blog loads super quick for me on Safari. Exceptional Blog!
certainly like your web site however you need to test the spelling on quite a few of your posts. Many of them are rife with spelling problems and I to find it very troublesome to inform the reality then again I will surely come back again.
You made some good points there. I did a search on the subject and found most persons will agree with your site.
Definitely, what a fantastic site and enlightening posts, I definitely will bookmark your blog.Best Regards!
Heya i am for the first time here. I came across this board and I find It truly useful & it helped me out a lot. I hope to give something back and help others like you aided me.
Fantastic website. Plenty of useful info here. I’m sending it to some friends ans also sharing in delicious. And naturally, thanks for your effort!
I appreciate, cause I found exactly what I was looking for. You’ve ended my four day long hunt! God Bless you man. Have a nice day. Bye
I really appreciate this post. I’ve been looking everywhere for this! Thank goodness I found it on Bing. You have made my day! Thx again!
Some truly quality blog posts on this site, saved to favorites.
I got what you mean , appreciate it for putting up.Woh I am pleased to find this website through google. “If one does not know to which port one is sailing, no wind is favorable.” by Seneca.
There is noticeably a bundle to know about this. I assume you made certain nice points in features also.
This website is my intake, very superb style and perfect subject material.
Very great post. I simply stumbled upon your blog and wished to say that I’ve really loved browsing your blog posts. In any case I’ll be subscribing in your feed and I am hoping you write again soon!
I believe this site contains some rattling wonderful information for everyone :D. “Nothing surely is so disgraceful to society and to individuals as unmeaning wastefulness.” by Count Benjamin Thompson Rumford.
I went over this website and I think you have a lot of fantastic information, bookmarked (:.
I was looking at some of your blog posts on this site and I conceive this website is really informative ! Keep putting up.
I like what you guys are up also. Such clever work and reporting! Carry on the superb works guys I have incorporated you guys to my blogroll. I think it’ll improve the value of my website 🙂
This is a topic close to my heart cheers, where are your contact details though?
I really like your writing style, excellent information, thank you for putting up :D. “He wrapped himself in quotations- as a beggar would enfold himself in the purple of Emperors.” by Rudyard Kipling.
Some really excellent blog posts on this web site, thanks for contribution.
Have you ever thought about adding a little bit more than just your articles? I mean, what you say is valuable and all. Nevertheless think about if you added some great photos or videos to give your posts more, “pop”! Your content is excellent but with images and videos, this site could undeniably be one of the greatest in its niche. Very good blog!
Great post. I am facing a couple of these problems.
I’d have to examine with you here. Which is not one thing I usually do! I take pleasure in reading a post that may make folks think. Additionally, thanks for permitting me to comment!
I¦ve been exploring for a little for any high-quality articles or weblog posts in this kind of space . Exploring in Yahoo I ultimately stumbled upon this website. Studying this info So i¦m happy to show that I’ve a very excellent uncanny feeling I came upon exactly what I needed. I most for sure will make certain to do not put out of your mind this web site and provides it a glance regularly.
Its excellent as your other posts : D, thanks for posting. “So, rather than appear foolish afterward, I renounce seeming clever now.” by William of Baskerville.
This design is spectacular! You certainly know how to keep a reader entertained. Between your wit and your videos, I was almost moved to start my own blog (well, almost…HaHa!) Great job. I really enjoyed what you had to say, and more than that, how you presented it. Too cool!
Great – I should certainly pronounce, impressed with your website. I had no trouble navigating through all tabs and related information ended up being truly simple to do to access. I recently found what I hoped for before you know it at all. Quite unusual. Is likely to appreciate it for those who add forums or something, website theme . a tones way for your client to communicate. Nice task.
My brother recommended I might like this website. He was entirely right. This submit truly made my day. You cann’t imagine simply how so much time I had spent for this information! Thank you!
I believe this internet site has got some rattling excellent info for everyone. “To be able to be caught up into the world of thought — that is being educated.” by Edith Hamilton.
I?¦ll immediately grasp your rss feed as I can not to find your email subscription link or newsletter service. Do you’ve any? Kindly let me recognise in order that I could subscribe. Thanks.
Hi! This post couldn’t be written any better! Reading through this post reminds me of my previous room mate! He always kept talking about this. I will forward this page to him. Fairly certain he will have a good read. Many thanks for sharing!
I will right away clutch your rss as I can not to find your e-mail subscription hyperlink or e-newsletter service. Do you’ve any? Kindly permit me understand in order that I could subscribe. Thanks.
I?¦ve recently started a website, the info you offer on this web site has helped me tremendously. Thank you for all of your time & work.
Hello! I know this is somewhat off topic but I was wondering if you knew where I could get a captcha plugin for my comment form? I’m using the same blog platform as yours and I’m having problems finding one? Thanks a lot!
Hello my family member! I want to say that this post is amazing, great written and come with approximately all important infos. I would like to see extra posts like this .
I haven¦t checked in here for some time because I thought it was getting boring, but the last few posts are good quality so I guess I will add you back to my everyday bloglist. You deserve it my friend 🙂
Hey would you mind sharing which blog platform you’re working with? I’m planning to start my own blog in the near future but I’m having a difficult time choosing between BlogEngine/Wordpress/B2evolution and Drupal. The reason I ask is because your layout seems different then most blogs and I’m looking for something completely unique. P.S Apologies for getting off-topic but I had to ask!
whoah this weblog is excellent i really like reading your posts. Stay up the good paintings! You understand, a lot of individuals are looking round for this info, you could aid them greatly.
There is noticeably a bundle to know about this. I assume you made certain nice points in features also.
Keep working ,fantastic job!
I genuinely enjoy studying on this site, it contains wonderful content. “Beware lest in your anxiety to avoid war you obtain a master.” by Demosthenes.
It is really a nice and useful piece of information. I’m satisfied that you just shared this useful information with us. Please stay us informed like this. Thanks for sharing.
Thanks for the sensible critique. Me & my neighbor were just preparing to do a little research about this. We got a grab a book from our local library but I think I learned more clear from this post. I’m very glad to see such fantastic information being shared freely out there.
Some truly nice and useful info on this site, besides I conceive the layout has good features.
certainly like your web site but you need to check the spelling on quite a few of your posts. Several of them are rife with spelling issues and I find it very bothersome to tell the truth nevertheless I will certainly come back again.
It¦s actually a great and useful piece of info. I¦m happy that you simply shared this useful info with us. Please stay us informed like this. Thanks for sharing.
I have been absent for a while, but now I remember why I used to love this site. Thanks , I will try and check back more often. How frequently you update your web site?
This is a topic close to my heart cheers, where are your contact details though?
I love your blog.. very nice colors & theme. Did you create this website yourself? Plz reply back as I’m looking to create my own blog and would like to know wheere u got this from. thanks
I do not even know how I stopped up right here, but I thought this post used to be great. I don’t know who you’re however definitely you’re going to a famous blogger when you aren’t already 😉 Cheers!
I saw a lot of website but I think this one holds something extra in it in it
When I originally commented I clicked the -Notify me when new comments are added- checkbox and now each time a comment is added I get four emails with the same comment. Is there any way you can remove me from that service? Thanks!
Wonderful post however , I was wanting to know if you could write a litte more on this topic? I’d be very thankful if you could elaborate a little bit further. Cheers!
Wow that was unusual. I just wrote an incredibly long comment but after I clicked submit my comment didn’t appear. Grrrr… well I’m not writing all that over again. Anyways, just wanted to say wonderful blog!
You have noted very interesting points! ps nice site. “We make ourselves a ladder out of our vices if we trample the vices themselves underfoot.” by Saint Augustine.
Absolutely pent written content, thank you for entropy. “Necessity is the mother of taking chances.” by Mark Twain.
Real superb information can be found on website.
Awsome website! I am loving it!! Will come back again. I am taking your feeds also.
Do you have a spam issue on this blog; I also am a blogger, and I was curious about your situation; we have created some nice procedures and we are looking to exchange solutions with other folks, why not shoot me an email if interested.
I got what you intend, regards for putting up.Woh I am pleased to find this website through google. “Since the Exodus, freedom has always spoken with a Hebrew accent.” by Heinrich Heine.
What i do not realize is in truth how you’re no longer actually much more neatly-appreciated than you may be now. You’re very intelligent. You already know therefore considerably relating to this topic, produced me in my opinion believe it from numerous varied angles. Its like men and women don’t seem to be fascinated except it’s something to do with Girl gaga! Your individual stuffs outstanding. All the time maintain it up!
I know this if off topic but I’m looking into starting my own weblog and was wondering what all is required to get set up? I’m assuming having a blog like yours would cost a pretty penny? I’m not very web savvy so I’m not 100 positive. Any tips or advice would be greatly appreciated. Appreciate it
Those are yours alright! . We at least need to get these people stealing images to start blogging! They probably just did a image search and grabbed them. They look good though!
Very good written article. It will be valuable to anyone who utilizes it, including myself. Keep up the good work – can’r wait to read more posts.
Valuable information. Lucky me I discovered your website by chance, and I’m surprised why this twist of fate didn’t came about earlier! I bookmarked it.
Good article and right to the point. I don’t know if this is in fact the best place to ask but do you folks have any thoughts on where to employ some professional writers? Thx 🙂
Well I really liked reading it. This tip provided by you is very constructive for accurate planning.
Your place is valueble for me. Thanks!…
Great website! I am loving it!! Will come back again. I am bookmarking your feeds also
This actually answered my drawback, thanks!
Thanks for sharing superb informations. Your web site is so cool. I’m impressed by the details that you’ve on this web site. It reveals how nicely you perceive this subject. Bookmarked this web page, will come back for more articles. You, my friend, ROCK! I found just the info I already searched everywhere and simply could not come across. What a perfect web site.
Best View i have ever seen !
I really like your writing style, great info, thanks for posting :D. “I hate mankind, for I think myself one of the best of them, and I know how bad I am.” by Joseph Baretti.
What¦s Happening i am new to this, I stumbled upon this I have found It absolutely useful and it has aided me out loads. I’m hoping to contribute & assist other users like its aided me. Great job.
After examine a few of the weblog posts in your web site now, and I actually like your way of blogging. I bookmarked it to my bookmark website list and can be checking again soon. Pls check out my web site as nicely and let me know what you think.
I love your blog.. very nice colors & theme. Did you create this website yourself? Plz reply back as I’m looking to create my own blog and would like to know wheere u got this from. thanks
I was reading through some of your posts on this website and I conceive this site is real informative! Retain posting.
Rattling wonderful information can be found on weblog. “Society produces rogues, and education makes one rogue more clever than another.” by Oscar Fingall O’Flahertie Wills Wilde.
Youre so cool! I dont suppose Ive learn something like this before. So good to find anyone with some unique ideas on this subject. realy thanks for starting this up. this web site is one thing that is needed on the net, somebody with a little originality. useful job for bringing one thing new to the internet!
Unquestionably consider that that you said. Your favourite reason appeared to be at the internet the simplest thing to keep in mind of. I say to you, I definitely get annoyed whilst other folks consider issues that they just don’t know about. You managed to hit the nail upon the top and defined out the entire thing with no need side-effects , people could take a signal. Will likely be again to get more. Thank you
I am constantly thought about this, thankyou for posting.
My wife and i ended up being thankful Peter managed to do his research through the entire ideas he grabbed from your own weblog. It is now and again perplexing just to choose to be giving away hints which often some people have been trying to sell. So we do know we have you to appreciate for that. The main illustrations you made, the straightforward blog menu, the friendships you make it easier to foster – it’s mostly awesome, and it is letting our son and us imagine that this article is brilliant, which is certainly pretty fundamental. Thanks for everything!
Keep functioning ,remarkable job!
Great tremendous issues here. I?¦m very glad to see your post. Thanks a lot and i am looking ahead to touch you. Will you kindly drop me a e-mail?
Right now it sounds like Movable Type is the preferred blogging platform out there right now. (from what I’ve read) Is that what you are using on your blog?
I am aware this if off topic but I’m considering starting my own blog
and was wondering what all is needed to acquire
create? I’m assuming using a blog like yours would cost
a pretty penny? I’m not too web smart so I’m not 100% positive.
Any tips or advice will be greatly appreciated.
Thanks
Also visit my web blog; CoyGNixion
hello!,I really like your writing so much! share we be in contact more approximately your article on AOL? I require an expert in this area to solve my problem. May be that is you! Looking ahead to see you.
I know this site offers quality based articles and other stuff,
is there any other web site which gives these kinds of stuff in quality?
Good write-up, I am normal visitor of one’s web site, maintain up the nice operate, and It is going to be a regular visitor for a lengthy time.
Great post. I was checking constantly this blog and I’m impressed! Extremely useful information specifically the last part 🙂 I care for such info much. I was seeking this particular info for a long time. Thank you and good luck.
The following time I read a blog, I hope that it doesnt disappoint me as much as this one. I imply, I do know it was my choice to learn, but I really thought youd have something attention-grabbing to say. All I hear is a bunch of whining about one thing that you could possibly fix for those who werent too busy in search of attention.
I really like all the points you have made.
great points altogether, you just gained a brand new reader. What would you recommend about your post that you made some days ago? Any positive?
Excellent read, I just passed this onto a colleague who was doing a little research on that. And he actually bought me lunch as I found it for him smile Thus let me rephrase that: Thanks for lunch!
Valuable info. Lucky me I discovered your site accidentally, and I’m shocked why this coincidence didn’t happened in advance! I bookmarked it.
I’m having a little issue I cant subscribe your feed, I’m using google reader fyi.
I think this is one of the most important info for me. And i’m glad reading your article. But wanna remark on few general things, The site style is perfect, the articles is really excellent : D. Good job, cheers
Have you ever considered about including a little bit more than just your articles? I mean, what you say is important and everything. But think of if you added some great pictures or videos to give your posts more, “pop”! Your content is excellent but with pics and video clips, this blog could certainly be one of the very best in its niche. Excellent blog!
Hi , I do believe this is an excellent blog. I stumbled upon it on Yahoo , i will come back once again. Money and freedom is the best way to change, may you be rich and help other people.
Hi there! I just wish to give an enormous thumbs up for the good info you have here on this post. I might be coming again to your blog for extra soon.
You actually make it appear so easy with your presentation but I to find this matter to be actually one thing that I feel I might never understand. It sort of feels too complicated and extremely wide for me. I am taking a look forward on your next post, I¦ll attempt to get the grasp of it!
Dіsini kami telah mendapatkan kepercayaan dan reputasi tеrbaik dari para member Poker Indonesia, Karena
kami memberikan pelayanan kepada semua member yang bermain di situs kami.
Namun bila Anda mаsih belum mempunyai Userid ΙDNPlay Poker Online, dan ѕupɑya Anda dаpat melakukan Login IDN Poker, maka silahkan untuk melakukan Daftar
IDN Poker teгbaru, melaⅼui IDΝplay POKER Agen IDNPlay Poker
Online Terpercaya di Indonesia, hanya dengan mengisi formulir
pendaftaгan atau ⅾаpat juga menghubungi kontak resmi
IDN Plɑy POKER dibawah ini. Вeгarti кamu sudah siap untuk Ьеrmain semua permɑinan poker
online yɑng sudah disediakan oleh idnplay. Seperti bonus new memƄer 20% akan langsung didapatkan ketika pertama
kali daftar poker terpercaya. Maka dengan aɗаnya akses internet
yang memadai tentu membuat proѕes Daftar Poker Ⲟnline Idnplay jadi cepat dan lancar.
Poker online membսat kіta dapat lebih maju dan berkemЬang kearah
kesepakatan dari sebuaһ permainan. Daftar IDN Poker IDN Play atаu cara membuat akun permainan untuk para calon membеr IDN Poker online bisa secara mudah dan gratis.
BeƄerapa situs melaқukan upgrade ɗan ρerbaiқan terus
menerus hingga sehingga situs poҝer online lain mengalami ketinggalan. Apalaցi sekarang,
dengаn kemajuan teknologі teⅼah sangat cepat dan perubahan legislatif serta
peraturan merupakan salah satu faktor utama memberikan dampak sangat besar dalаm menentukan dimana tempat terbaik untuk mempercayakan taruhan judi online pada waktu tеrtentu.
I went over this internet site and I believe you have a lot of good info, saved to favorites (:.
Have you ever considered about adding a little bit more than just your articles? I mean, what you say is fundamental and everything. Nevertheless think of if you added some great images or videos to give your posts more, “pop”! Your content is excellent but with pics and videos, this site could definitely be one of the best in its field. Great blog!
I cannot thank you enough for the article.Really thank you! Much obliged.
This was an excellent post. It’s very rare you come across something so well thought out like this was. Will you be posting more no this topic? I would love to hear more of your ideas. I appreciate you taking the time to write this.
I just could not go away your site prior to suggesting that I really loved the standard information a person supply for your guests? Is going to be again often in order to inspect new posts.
Unquestionably believe that which you stated. Your favorite justification appeared to be on the net the easiest thing to be aware of. I say to you, I definitely get irked while people consider worries that they plainly do not know about. You managed to hit the nail upon the top and also defined out the whole thing without having side effect , people can take a signal. Will probably be back to get more. Thanks
I have been absent for some time, but now I remember why I used to love this site. Thank you, I will try and check back more often. How frequently you update your site?
Hmm is anyone else experiencing problems with the pictures on this blog loading? I’m trying to determine if its a problem on my end or if it’s the blog. Any responses would be greatly appreciated.
Wow! This could be one particular of the most helpful blogs We’ve ever arrive across on this subject. Actually Fantastic. I am also a specialist in this topic therefore I can understand your hard work.
Seeking a journey guideline just before your trip is advisable to familiarize yourself with your destination. Traveling manuals might be required from the Holding chamber of Trade in the town you might be planing a trip to. This article will offer you many ways on distinct ways for you to fully familiarize yourself with your vacation spot. When traveling to some region outside of Canada And America and Western The european countries, carry cash or pre-acquired traveler’s investigations. You are unable to depend on your credit or debit credit card to function exactly the same it can do in the home, nor will there be any ensure of access to ATMs. Converting your cash or purchasing traveler’s assessments before you leave also guards you from unscrupulous dollars changers. A GPS navigation product is completely essential for almost any long-distance car journey. In case your vehicle failed to feature a manufacturing facility the navigation method, you must seriously consider buying one before showing up in the open street. Gps system assists you to find choice ways when closures, website traffic or accidents close the path ahead of time. GPS can also help you stay from threat if you come across crisis circumstances. When packaging for your upcoming trip, make sure to deliver clothespins. It is an strange object to think about loading, nonetheless they could be quite valuable. If you intend traveling for over a few days, notify your employers 2 weeks before departing in order to find a person to pay for your commitments in advance. In this way, you are not depending on somebody who simply states they are going to protect to suit your needs and you have respectfully knowledgeable them the reasons of your own absence. Mentioned previously in the beginning from the article, asking for a traveling manual prior to your vacation a very good idea to fully familiarize yourself with your location. There are also numerous places you will find this info aside from a travel guide. Apply the tips with this post to get to know your destination prior to deciding to appear, so you are well prepared for all your destination provides.
naturally like your web site but you need to check the spelling on several of your posts. Several of them are rife with spelling issues and I in finding it very bothersome to inform the truth then again I¦ll surely come again again.
Hey just wanted to give you a quick heads up. The text in your article seem to be running off the screen in Firefox. I’m not sure if this is a format issue or something to do with web browser compatibility but I figured I’d post to let you know. The style and design look great though! Hope you get the issue solved soon. Thanks
Wondering Planning A Visit The Right Way? Take Advantage Of This Guidance! Journey is an excellent way individuals understand more about your self. Journey provides the ability to fulfill interesting ethnicities and individuals when escaping the day-to-day grind. Be sensible about meals allergy symptoms when visiting a foreign nation to prevent dangerous liaisons. It is crucial that you can understand terms for words and phrases related to food products as well as their prep to be able to protect against an allergic reaction in case your foods allergic reaction is particularly bad. This gives you to communicate to other people what foods that you have an hypersensitivity to in order to be held from the foods. Know about men and women pretending to be officials in a unusual city. Will not give somebody your passport they might take it. Tend not to get trips with an individual that you do not know. When planing for a trip, select your camera with the requirements your holiday at heart. If you may be backpacking, for example, a rechargeable battery pack is probably not the answer. You need a camera you may change on / off rapidly and will focus almost immediately. Look at your alarm system time clock within the room whenever you sign in. Establish the alarm off totally. Having a journey sometimes causes you planning to consider one thing at home with you. Reduce you to ultimately essential for your ease and comfort.Compose a list of toiletries which you use through your day and therefore are genuinely needed. Package people who are the most useful for you. A motorbike is great transportation for day time outings. It is definitely a great deal of entertaining to travel by motorcycle. You do not desire to wake up to the noise of building personnel everywhere if you are attempting to unwind. You just can’t notify just how the weather is going to do. A fantastic example of making the most of what you have is using a raincoat for cold temperatures, and even a bathrobe for the hotel remain. A wilderness usually contains lots of fascinating areas to consider and also animals that often will not be noticed elsewhere. Vacationing can be quite enjoyable and also pressure-free. Make use of the suggestions found previously mentioned for anxiety-free traveling. You now comprehend there is absolutely no explanation to be concerned and you could have a strong inhale and initiate your vacation.
Hey there! Do you know if they make any plugins to assist with Search Engine Optimization? I’m trying to get my blog to rank for some targeted keywords but I’m not seeing very good results. If you know of any please share. Many thanks!
Asking for a traveling guide just before your journey is a great idea to get to know your destination. Traveling instructions might be requested through the Chamber of Business in the metropolis you will be visiting. This article will give you many ways on diverse ways for you to understand your vacation destination. Should you be traveling to The european countries with electronic gadgets, keep in mind that the voltage for home shops will be different than in Canada And America. Which means that you’ll possibly have to take a converter so that you can plug American citizen goods into European strength, or get devices that may manage a variety of voltages. Prior to buying a bundle package for vacation, check out the price ranges of the personal parts. On many occasions, the bundle offers are cheaper than acquiring the items individually, but not constantly. It in no way hurts to consider pricing for yourself before getting locked in to buying the full package, and you might find out there’s an element of the package you don’t want, such as food. Select a water resistant budget. You no doubt require your wallet along with its items risk-free. On a trip, it might be easy to overlook whatever you have with your wallets. Using a water-resistant pocket is advisable for anybody who plans on going to the seas or seated poolside. When arranging your hotel remain, be aware of cancellation guidelines and costs for day alterations. Prepaying for a less expensive rate only advantages you provided you can definitely vacation on individuals dates. If you could have to improve days, you can save more income if you are paying a greater rate at the hotel having a more lenient cancellation coverage. If you’re going on a cruise trip, you should arrive per day upfront. This may stop all those close calls of obtaining caught up in visitors or having your flight late and leading you to miss your journey. The anxiety of almost missing out on the ship is not really how you would like to begin your vacation. As you may have read through at the start of this article, planning for a getaway can be very worrisome. Keeping in mind some terrific tips and ideas will show to be useful to you with your time period of will need. There is not any wrong or right best option about planning for a getaway, nevertheless, you may still keep some advice under consideration for the next time.
great points altogether, you simply gained a new reader. What would you suggest in regards to your post that you made a few days ago? Any positive?
I went over this web site and I conceive you have a lot of great info , saved to fav (:.
Thank you for sharing excellent informations. Your web site is so cool. I am impressed by the details that you’ve on this blog. It reveals how nicely you perceive this subject. Bookmarked this website page, will come back for extra articles. You, my pal, ROCK! I found simply the information I already searched all over the place and just couldn’t come across. What a great website.
Amazing blog! Is your theme custom made or did you download it from somewhere? A theme like yours with a few simple tweeks would really make my blog jump out. Please let me know where you got your theme. Kudos
Hello there, simply was alert to your blog through Google, and found that it’s really informative. I’m going to watch out for brussels. I’ll be grateful for those who continue this in future. Lots of other people will probably be benefited from your writing. Cheers!
This is a topic close to my heart cheers, where are your contact details though?
I just want to mention I’m beginner to blogging and seriously loved your page. Probably I’m going to bookmark your site . You really have impressive articles. Kudos for revealing your website page.
This is an excellent post. It’s not very often you enjoy reading something this much. Will you be posting more no this topic? I would love to hear more of your ideas. I appreciate you taking the time to write this.
On vacation discussion boards, stories of woe are very popular. However, in essence, the headache would most likely not have happened with excellent organizing. After you read this report, you may never have any journey problems brought on by very poor planning once again! To avoid trauma or sickness from spoiling your trip, check that your medical insurance coverage is true when you are away from home – especially if you are intending a trip in another country. If you locate out you are not included, don’t worry. Consult with your travel agent or online for vacation insurance plan. If you’re going to be traveling by air, make sure you don’t set any possessions or electronic devices with your examined baggage. Travel luggage handlers aren’t regarded as mild as well as electronic products might end up destroyed during carry. Airlines may also be proven to get rid of suitcases and you don’t wish to take a chance of shedding one thing beneficial. When you are traveling, always expect to have points stolen. Make move forward photocopies of your essential papers. You can even post electronic scans of these paperwork for convenient accessibility while on a trip. The local Us embassy can help you in getting in contact with individuals in your own home who can cable you unexpected emergency funds or assistance in exchanging your passport, however, not very much in addition. If you are planning a getaway abroad, it is important to be sure you obtain the needed vaccinations upfront. While you are in the preparing levels of your respective journey, take note of any shots that are required or suggested. Faltering to do this could create open up for risky amazing diseases which could destroy your journey, or even worse, damage your state of health. Ultimately, the key reason why there are many bad trip accounts is so many people are unprepared for traveling. The advice that it post presented to you will get ready you correctly so your holiday is really a soothing and pleasurable expertise for yourself.
Most people will journey to some place far from residence one or more times in their lifestyles. Regardless of whether you might have used one vacation or 20, it is possible to nevertheless study a whole lot about traveling correctly. By studying on, it is possible to get some good information that could come in useful in the course of one of your trips. For top level deals on flight costs, look through a number of journey websites right away before buying your tickets. Some really good choices kayak.com, southwest.com and priceline.com. On external sites, you can often locate ticket costs that are less than the cost around the original retailer’s website. Even so, always make sure to read the fine print in order to avoid hidden service fees. Bon Voyage! When you are traveling, you may avoid headache and minimize vacation hazards by blending in. Don’t dress in pricey precious jewelry or location-specific designer brand names that tag you like a traveler. Rather, make an effort to attire like the locals do, and don’t draw attention to your self. Nearby-owned or operated companies and accommodations are a lot less likely to be a objective for terrorists and pickpockets equally. It is essential to have a photograph of your kid on you, just in case they move aside. Even the thought of dropping your youngster is among the most alarming experience you can have. Nevertheless, something such as this could happen often. A basic picture of your little one will make a difference, specifically if you are going in foreign countries and do not speak the vocabulary with complete confidence enough to illustrate your child and they go missing by you. Make sure you load up your vitamin supplements once you journey and understand that vitamin C is an excellent electricity and immune increaser. Taking a nutritional supplement can help you stop or limit the results of jet delay on the entire body, reinforce your immune system versus the large number of bacteria you may enter in to experience of, and generally make you feel better. Clear any health supplements together with your doctor before taking them when you have root medical issues. As you have seen from your over listing of suggestions, traveling can be extremely unique, educational and entertaining when you know what to do before you go on your trip. Following subsequent these pointers, you are going to not be new to everyone of vacation, however, you will become an travelling professional.
Good day very nice website!! Man .. Excellent .. Amazing .. I’ll bookmark your blog and take the feeds alsoKI am glad to search out a lot of helpful info here within the put up, we’d like develop extra strategies on this regard, thanks for sharing. . . . . .
Hey very cool site!! Man .. Beautiful .. Amazing .. I will bookmark your blog and take the feeds also…I am happy to find a lot of useful info here in the post, we need work out more techniques in this regard, thanks for sharing. . . . . .
You have brought up a very superb points, appreciate it for the post.
Vacationing could be a main inconvenience if you are unprepared or haven’t shopped about to get the best offer. You could find yourself paying out out the nostrils for the air carrier tickets when you can have gotten them for one half the price. This post will offer you some touring suggestions. When you are traveling out from the land, it is advisable to beverage only bottled water. This is especially crucial in nations exactly where the caliber of their regular faucet water can be in question. It’s easier to possibly pay out a little more and be risk-free than chance obtaining sick because of infected plain tap water. In case you have an option when scheduling journeys for travel, choose an airline that utilizes generally 767 jets. These larger jets convey more legroom, and provide a lot more primary journeys because they can stay within the atmosphere lengthier. Also, the 767s use a two-three-two seat setup, significance there is only one center chair per row rather than normal two. Try to eat one thing quite gentle through the meal ahead of your plane trip. You don’t desire to sense nauseous or need to use the toilet quite a few instances throughout the flight. A piece of toast for breakfast or a cupful of soup for lunch or dinner would be a wonderful solution. Don’t neglect to look up the time zones for where you may be traveling to and staying. A lot of people don’t understand that there exists a considerable time big difference that may not only play a role inside your sleep plan, but additionally with your interaction attempts to people still at home. As you have seen through the previously mentioned list of recommendations, travelling can be very remarkable, helpful and enjoyable once you learn where to start before you go in your trip. Soon after following these guidelines, you may no longer be new around the globe of travel, nevertheless, you can become an traveling professional.
On vacation message boards, tales of woe are very popular. Even so, basically, the horror would possibly not have took place with great preparation. When you read through this report, you will have never any vacation issues brought on by very poor preparation once again! To avoid injuries or disease from spoiling your trip, check that your health care insurance insurance policy applies when you are out of the house – specially if you are intending a getaway in foreign countries. If you discover out that you are not protected, don’t be concerned. Check with your travel agent or on the internet for vacation insurance policy. If you’re likely to be venturing by air, ensure you don’t place any valuable items or electronic products inside your inspected travel luggage. Baggage handlers aren’t considered gentle and then any electronics could end up damaged throughout transfer. Airlines can also be seen to get rid of luggage and you don’t desire to take a risk of shedding some thing important. When you are traveling, usually be prepared to have stuff stolen. Make move forward photocopies of all your important documents. You can even publish electronic tests of the paperwork for quick accessibility while traveling. The neighborhood American citizen embassy can help you in contacting those in your own home who can wire you unexpected emergency cash or assist in exchanging your passport, however, not significantly in addition. If you are intending a vacation abroad, it is essential to make sure you obtain the essential vaccinations upfront. While you are inside the preparing phases of your journey, pay attention to any shots that are essential or advised. Failing to do so could make you available for hazardous unique conditions that could ruin your trip, or worse, ruin your wellbeing. Finally, the reason there are many terrible holiday stories is the fact lots of people are unprepared for traveling. The recommendation that the article presented to you will get ready you properly so that your trip can be a calming and pleasant expertise for yourself.
It’s actually a great and useful piece of information. I’m happy that you just shared this helpful info with us. Please keep us up to date like this. Thank you for sharing.
On journey message boards, stories of woe are really typical. Nonetheless, in essence, the problem could possibly not have took place with very good preparing. When you read through this write-up, you are going to never have any vacation problems caused by bad preparing once again! In order to avoid injury or health issues from wrecking your journey, check that your medical insurance plan applies if you are out of the house – specially if you are intending a trip abroad. If you discover out that you will be not taken care of, don’t get worried. Consult with your travel agent or on the web for holiday insurance plan. If you’re likely to be venturing by oxygen, be sure you don’t set any valuable items or electronic devices in your checked out luggage. Luggage handlers aren’t regarded as gentle as well as electronics might end up ruined throughout move. Airlines can also be seen to drop luggage so you don’t would like to take a risk of dropping something valuable. When traveling, generally expect to have things thieved. Make progress photocopies of all of your current crucial reports. You may also publish electronic digital scans of these files for convenient entry while on a trip. Your local American embassy can assist you in getting in contact with those in your house who is able to wire you urgent cash or assistance in exchanging your passport, but not significantly else. If you are intending a visit in foreign countries, it is very important be sure you acquire the required shots upfront. When you find yourself from the preparation levels of your own getaway, make a note of any shots that are required or encouraged. Declining to do so could create open for harmful spectacular ailments that could damage your vacation, or even worse, damage your wellbeing. Lastly, the main reason there are so many bad trip stories is that so many people are unprepared for vacation. The advice that this article given to you will almost certainly prepare you appropriately so that your holiday is really a comforting and enjoyable expertise for yourself.
Many people will travel to some place far away from house one or more times within their life. Whether or not you might have considered a single vacation or 20, you may still learn a lot about vacationing the right way. By studying on, it is possible to obtain some good information that can be useful throughout one of the journeys. Pack your needed valuables in a carry-on handbag for airline journey. Not needing to check on luggage means that you could spend less on inspected travelling bag fees, check in to your flight both at home and in a kiosk while not having to wait in line a the solution counter, and may prevent the chance of your suitcases getting dropped. To help you stay away from paying excessive air travel luggage fees in your return getaway, once you will probably have gifts to bring residence, package older clothing and footwear that you might like to give away. Then, while you are preparing into the future property, it is possible to depart or give away the old garments and boots to make room within your luggage if required. When planning to take flight for any vacation, don’t forget any repeated flier miles you may have racked up. It can do you no good to hold on individuals as soon as you’ve currently removed on your own major vacation. Even if you don’t have sufficient mls to pay the whole trip, a lot of airlines will assist you to low cost your level with your miles. Focus on your intution when traveling. When a specific store, individual, or local community will give you “poor vibes”, just walk away. Your intuition could be informing you something that you haven’t purposely observed. Even though you’re completely wrong, it’s better to be secure than sorry in relation to your security. If you utilize the ideas which have been supplied you should certainly have a valid passport within a short timeframe. It is important to keep the passport in the risk-free place constantly so you know exactly where it really is when you really need it.
On journey discussion boards, tales of woe are really common. Even so, the bottom line is, the horror would most likely not have occurred with excellent preparing. When you read this article, you are going to never have any journey difficulties brought on by bad planning once more! In order to avoid injuries or illness from spoiling your holiday, be sure that your medical insurance policy is true when you are away from home – specially if you are intending a getaway overseas. If you discover out you are not included, don’t worry. Seek advice from your local travel agent or on the internet for getaway insurance. If you’re will be visiting by oxygen, make sure you don’t put any valuables or electronic devices within your checked out suitcases. Baggage handlers aren’t considered soft and any gadgets may end up destroyed during transport. Airlines are also proven to get rid of baggage so you don’t desire to take a risk of shedding some thing important. When you are traveling, constantly be prepared to have points thieved. Make improve photocopies of your important papers. You can also add electrical tests of those documents for convenient entry while on a trip. The neighborhood United states embassy can assist you in getting in contact with all those at home that can wire you unexpected emergency resources or assistance in changing your passport, however, not significantly else. If you are intending a getaway abroad, it is essential to ensure you obtain the needed vaccinations ahead of time. When you are within the preparing phases of the journey, take note of any vaccinations that happen to be needed or recommended. Declining to achieve this could leave you open for dangerous amazing diseases that may destroy your trip, or a whole lot worse, destroy your state of health. Finally, the main reason there are so many terrible vacation tales is lots of people are unprepared for journey. The advice this article presented to you is going to prepare you properly so your vacation is actually a comforting and satisfying experience to suit your needs.
Going through your brilliant blog is great as in the event that it ended up written by a writer. I am going to visit your blog often. Thank you always.
I was reading through some of your blog posts on this website and I believe this web site is rattling instructive! Continue putting up.
Pretty! This was a really wonderful post. Thank you for your provided information.
I am glad to be a visitor of this unadulterated website! , regards for this rare information! .
Along with almost everything which seems to be developing throughout this specific subject matter, many of your points of view are very stimulating. However, I appologize, but I can not subscribe to your whole strategy, all be it exhilarating none the less. It looks to me that your comments are not entirely rationalized and in simple fact you are generally your self not even thoroughly certain of your assertion. In any event I did enjoy examining it.
Hiya very nice site!! Man .. Excellent .. Amazing .. I’ll bookmark your site and take the feeds also…I’m satisfied to find so many helpful information here within the post, we’d like develop more techniques in this regard, thanks for sharing. . . . . .
You are my breathing in, I own few web logs and very sporadically run out from to brand.
Incredible. Genius. You’re a good professional. Thank you.
Hey there this is kind of of off topic but I was wanting to know if blogs use WYSIWYG editors or if you have to manually code with HTML. I’m starting a blog soon but have no coding skills so I wanted to get advice from someone with experience. Any help would be greatly appreciated!
Hello. splendid job. I did not expect this. This is a impressive story. Thanks!
Amazing. Wizard. You’re a good master. Say thanks to you.
Very nice article Thank for wrote. Regards
Hey very nice website!! Man .. Beautiful .. Amazing .. I will bookmark your blog and take the feeds also…I am happy to find so many useful information here in the post, we need develop more strategies in this regard, thanks for sharing. . . . . .
What¦s Happening i am new to this, I stumbled upon this I have found It absolutely helpful and it has helped me out loads. I hope to contribute & help other users like its aided me. Great job.
Thanks for another great article. Where else may just anyone get that kind of information in such an ideal means of writing? I’ve a presentation subsequent week, and I’m on the search for such information.
Vacationing single can be thrilling, however it can leave you vunerable to criminal activity. There are several things you can do to assist be sure that your basic safety as you travel single. Study below for helpful recommendations that will show you how to journey safely. Get safety measures when traveling on vacations. Bear in mind to contact and make sure your flight beforehand. Vacations are always a busy period, specifically on the international airport. In case you are bringing gift items, be sure to keep them unwrapped. They will most likely be unwrapped and examined by safety anyways. Try packaging with reusable compression totes in order to save room when preparing. Should you journey usually, reusable pressure hand bags can be quite a intelligent purchase. You can get them generally in most stores which may have a housewares section. These are generally distributed for safe-keeping use, but work perfectly pertaining to packaging suitcases. If you are considering travelling to another region, provide you with the required pictures prior to going. Your body will not be employed to these unfamiliar ailments and you also would find yourself extremely vulnerable should you got sick, in addition to that certain diseases are fatal. Check with your medical professional about what sort of shots you need to get. If you’re considering going for a cellphone together with you on your own trip, make sure you phone your cellphone supplier to inquire about them about roaming costs. The familiarity of your own mobile phone could help you feel better, but it costs you a lot far more to apply it to overseas soil. A great option is purchasing a nearby SIM card and ultizing it although you’re there. Now that you’re smarter concerning the methods on the planet, you are able to pack your hand bags and be on the way. Keep in mind recommendations you’ve read through here, then unwind and choose the circulation. The globe is surely an open guide and it’s time for you to include a handful of internet pages of your personal. What are you expecting?
This is relevant insight for my followers, so I’ll link back to this post and you should probably get some new readers. It’s a step up from anything else out there when it comes to this topic. TY for the fresh viewpoint!
Regardless of whether creating plans to travel by vehicle, aircraft, or workout, arranging a recreational getaway can be very mind-boggling to the most experienced visitor. The good news is, there are millions of experienced travellers who are able to reveal their very best traveling guidelines to help make the method more workable and pleasant for anyone. If you have offers to traveling, the most important planning for you to do is produce a listing of everything that you need from toiletries to additional content articles of clothing. Before you leave, make sure that many of these merchandise is packed as most probable should you forget some thing, the gift retailers open to you will overcharge for simple stuff like tooth paste or shampoo. Simply being careful about acquisitions on a trip will help you by means of customs. Bear in mind whatever you purchase on the journey should move through customs once you go back home so workout care when you see streets suppliers in another country or other retailers who may be providing bogus or dangerous souvenirs you should surrender in the future. Study high on the vocabulary from the location you are planning to visit before leaving. Words barriers can be tricky. Naturally, you can manage in the overseas land without the need of speaking the language. Having said that, it is always smart to clean-on essential terms like “law enforcement” or “medical center.” Select a chair as quickly as possible. Should your air carrier permits you to decide on a seating in the course of scheduling, make sure to do it. To make the best choice, use airplane seating sites to search up information on sitting themes and particulars for your distinct kind of airplane on the internet. Airlines frequently cost extra for get out of rows plus more spacious seating, the need for that you simply must establish depending on the flight length and cost. Package deal excursions are a way to get the most out of a limited travel price range. Examine the options offered by a particular destination. It could be easy to do a lot more, see much more and also have more pleasurable, by using a bundle bargain that features extra providers and features. These bundles commonly offer financial savings that happen to be impossible to reproduce by means of buying specific services. Be adaptable when coming up with your journey plans. Unless of course there is certainly some cause that you need to journey on the certain day, flexibility can save you money. Allowing a scheduling internet site to look for flights close to your required traveling dates could save you around a hundred bucks per air travel, especially if it shifts you away from a saturday and sunday trip. Before arranging any vacation trips, carry out some shopping around. Be sure you’re obtaining the best value on the flight and motel by looking at the price ranges of numerous sites. In the event you don’t should keep or come back out of your journey upon an actual working day, check the cost of several days within the very same full week. A single could possibly be more affordable. Seeing that you’ve received several of the basics on traveling, tell your employer you take a vacation, obtain your plane admission, motorboat solution or whatever means you plan on consuming and go! Remember to always be secure no matter if traveling by itself or not. Request directions and aid if you want it. Most people will not nibble. First and foremost, Well before going out the entranceway, be sure you prepare by using the guidance you possess just go through. Probably you simply will not will need many of these ideas, but you are certain to find some very beneficial.
I think that is among the so much important information for me. And i am satisfied reading your article. But wanna remark on few basic issues, The website style is perfect, the articles is truly nice : D. Just right activity, cheers
Thank anyone so much for permitting myself know what My partner and i didn’t know. I look ahead to working with you.
When visiting a new location it may be frightening, but fun simultaneously, regardless of measure of expertise you might have in touring. Before you set out on your own trip, look at the advice right here to help make your trip more pleasurable and satisfying. There are tons of alternatives in relation to journey these days. If you are intending a trip to a land you may have never gone to well before, you might want to meet with a specialist travel agency. They will be able to warn you of any special details you may need including customs, weather conditions patters, and necessary vaccinations. When you are travelling within a strict budget, make use of the in-space features to cook your very own food items. The coffee machine that is certainly generally presented in including the lowest priced rooms in hotels can double as a hot platter. You can warmth ordinary normal water from the carafe for ramen or soups, or take advantage of the very hot platter on its own to help make sausage. Provide a vacant water jar. Everyone knows that delivering an entire bottle of water by means of security is a huge no-no. In the event you don’t wish to be caught spending reasonably limited for bottled liquids after protection, bring along your own personal vacant bottle to complete at a normal water water fountain. In case the tap water is lower than appealing to you, bring just one serve package of beverage blend to increase the bottle. One easy tip for motel safety is to hold a little rubber entrance end along with you. It could load very easily in the shoes and even be transported in the coat budget if you’re quick on area. This entrance end can be wedged beneath the doorway at night, to avoid midnight visitors. Given that you’ve removed over every thing you may need to find out prior to taking your journey, you’re ready to go and have fun! Vacationing might be a lot of fun as well as being a effective course of action. Whatever your reason, it’s constantly crucial that you be safe and well prepared. Use a wonderful journey!
Vacationing may add important and schooling experiences in your existence. Irrespective, it could be hard to find a fresh expertise without having escaping the preconceptions we certainly have. For this reason, we are introducing these superb ideas. They come from a wide variety of people who have ranged abroad and discovered worlds above their imagination. Whilst travelling with friends and relations is a terrific way to make thoughts, try out visiting by itself occasionally. You will recognize that all the routines you experience will appear just as stunning and unforgettable when you journey solo, and also the flexibility to perform whatever you desire do will seem unbelievably liberating! Seeking an improved hotel room if you are examining in will most likely help you get 1! Should you would prefer a better view, a quieter room or even one particular nearer to the ice cubes-equipment, chances are great that one can be obtained. It will require but a minute to ask and definately will absolutely increase your stay. In order to save cash on journey, be adaptable when you are scheduling your airfare. Often times, less expensive costs are available when you are not devoted to a unique departure and arrival particular date. In addition, often pricing is more affordable when you fly into a close by city rather than the key a single in the community. Pick a seating without delay. In case your air carrier lets you select a seating in the course of scheduling, make sure you do it. To make the most efficient decision, use plane sitting internet sites to check up facts about seating themes and details for your particular form of airplane on the internet. Airlines typically cost extra for exit lines and more huge car seats, the need for you should decide depending on the air travel length and price. Package deal excursions are a way to get the most out of a limited journey finances. Investigate the possibilities offered by a specific destination. It might be easy to do far more, see more and have more fulfilling, by using a deal package that includes added professional services and features. These packages commonly supply price savings that happen to be out of the question to duplicate by way of buying personal professional services. Be flexible when creating your vacation programs. Unless of course there is certainly some purpose you need to traveling on the particular working day, mobility could help you save funds. Allowing a reserving internet site to look for air flights near your desired vacation times could help you save just as much as 100 dollars per trip, especially if it changes you away from a few days trip. Before scheduling any getaways, perform some comparison shopping. Ensure you’re getting a good price on your own trip and hotel by exploring the costs of countless internet sites. If you don’t should depart or return through your vacation by using an actual time, check the price tag on a couple of days within the exact same full week. One particular could possibly be less expensive. Since you’ve acquired several of the essentials on travelling, educate your boss you are taking a vacation, buy your aeroplane solution, fishing boat solution or whichever indicates you plan on consuming and go! Always be secure whether touring by yourself or otherwise not. Require recommendations and aid if you need it. Most people will not nibble. Above all, offer an awesome time as well as always stop to odor the roses.
I like this post, enjoyed this one regards for putting up.
When it’s time and energy to escape, no matter if for organization or enjoyment, the knowledge of travelling could be satisfying and fun. Take some suggestions from individuals who strike the highways and byways frequently. A little preparing and forethought can help a lot on the way to a pleasurable journey. For top level deals on airline flight rates, read through a number of traveling web sites at the same time prior to buying your tickets. Good quality choices kayak.com, south west.com and priceline.com. On external sites, you can often get admission costs which can be less than the price around the initial retailer’s website. However, make sure to see the fine print to avoid hidden fees. Bon Voyage! When you are traveling, you can avoid trouble and lower journey dangers by mixing in. Don’t wear high-priced precious jewelry or place-particular fashionable brand names that mark you being a tourist. As an alternative, attempt to gown much like the local people do, and don’t highlight oneself. Regionally-owned or operated organizations and accommodations are much less probably going to be a target for terrorists and pickpockets equally. When you drop off of your products in your hotel, step back outside the house. To get ready for an urgent, count the quantity of doors involving the place along with the emergency exits. You need so that you can get out safely and in case you are unable to see, you need that amount. You really should have got a flash light handy, at the same time. You typically want to be sure that there is a visa, should it be necessary for entry in a state. Analysis just what you have got to current, to be allowed use of that area. Also, remember that sometimes a visa will not likely even enable you entrance. It has been explained that travelling may be one of the greatest escapades in your lifetime. There are plenty of stuff on earth to discover. Through taking this informative article to center and after the dreams of vacationing, it is possible to broaden your perspectives and experience stuff which you have only wanted.
I think this is one of the most important information for me. And i’m glad reading your article. But should remark on some general things, The web site style is ideal, the articles is really excellent : D. Good job, cheers
Some truly select blog posts on this internet site, saved to my bookmarks.
Whoa. Guru. You’re some sort of professional. Thank you.
Hi there, You have performed a fantastic job. I will certainly digg it and individually recommend to my friends. I’m confident they’ll be benefited from this website.
Wouldn’t it be great to escape every little thing? If you stated of course, you need a getaway. Read these guidelines about travelling and prepare a stress-free holiday. Once you learn what to do, you must be able to have almost everything planned out ahead of time and get a thrilling time. When traveling, package a lot of snack food items and chew to them through the day. Snack food items that keep you satisfied lengthier are best. Some good suggestions are almonds, dehydrated fruits, cashews, whole wheat grains crackers, and beef jerky. If you load up snack food items that satisfy you, you would spend less money on foods. In addition, it sustains your power so that you can do more vision-experiencing in the daytime. In case you are squished for space on a trip by atmosphere, benefit from every single inch. Use the publications out from the bank account in front of you and shift them rather towards the expense bin. Dependant upon the measurements of the periodicals, you could have bought on your own a few additional inches. One particular hint for accommodation safety factors to handle a little silicone door quit along with you. It can package very easily in a footwear or perhaps be carried within a jacket wallet if you’re quick on space. This door end could be wedged under the front door at night, to prevent midnight website visitors. Get the airlines that services the international airport you happen to be visiting. Many of them will provide charter journeys that you simply can’t see while searching for bargains, and they might be able to allow you to get a great cost. Package deal excursions are a means to get the best from a limited travel finances. Examine the options offered by a particular spot. It can be easy to do much more, see more and have more fulfilling, by investing in a package deal bargain which includes additional providers and services. These packages regularly offer savings that happen to be difficult to duplicate by means of getting person professional services. Be versatile when making your traveling plans. Unless of course there is certainly some purpose that you must traveling with a certain working day, versatility could save you funds. Permitting a arranging site to look for flights near your desired vacation days will save you as much as one hundred money per trip, particularly if it changes you off of a few days air travel. Before arranging any getaways, do some cost comparisons. Make certain you’re receiving a good deal in your airline flight and resort by checking out the prices of various sites. If you don’t should leave or profit from the vacation by using an precise working day, examine the cost of several days from the same 7 days. A single may be less costly. Since you’ve received a few of the basic principles on travelling, inform your employer you are taking a trip, obtain your airplane ticket, vessel ticket or whatever signifies you plan on consuming and go! Always be safe regardless of whether vacationing on your own or otherwise not. Require directions and assist if you need it. Many people will never bite. First and foremost, It can be our expect these ideas have influenced you to definitely strategy the next holiday. With any luck, you can find new opportunities opened up up to you. Think about and consider these new worlds. Create life time memories by planning the vacation of your goals.
Traveling is fascinating and might be a excellent time for you or one of the biggest headaches you may possibly encounter or even done properly. Read on for some great tips on how to journey wise and look after all of the little things that when you don’t, will create wanting you remained home. Keeping a business greeting card from the resort within your finances might make you stay away from problems. Right away upon check-in be sure to seize a credit card and possess it with you where ever you could go. Especially in the unfamiliar land or different position, should you get dropped you can easily contact them for help or if you happen to more than indulge in spirits the card will determine your rightful devote the area. Should you be getting repeated flier kilometers from the journeys, observe the terms of use for anyone a long way. Oftentimes, the mls expire just 12 to 18 weeks following they’ve been gained, or they can simply be suited for particular days as well as a small group of places. Before selecting an air carrier based upon kilometers, understand the constraints. When your travel prices are relatively elastic, take into account splurging in ways you typically wouldn’t. Indulge your small. An uncharacteristically luxurious expenditure can form the memorable central of your trip. It is just a simple fact that a number of the greatest providers, most exciting experiences and most remarkable scenery cost you a good amount of money. On a vacation, indulge your self by making the most of a few of them. Before taking an abroad trip, vacationers must make sure to check out their immunizations. Going to a vacation spot on a different continent will reveal the visitor to germs and prospective infection that their system is just not utilized to. The smart visitor will seek advice from a doctor to find out what new immunizations and boosters he or she requirements. Mentioned previously at first on this article, at times you will need a alteration of surroundings from the same old expected every year getaway. Taking your travels to some haunted location can be a exclusive and unforgettable encounter. Utilize these suggestions out of this report, and you may be moving toward using a blast in your after that haunted holiday break.
There’s noticeably a bundle to learn about this. I assume you made certain nice points in options also.
Traveling can be something many people would like to complete just as much as they could, one of the best ways to achieve that is to learn how to efficiently vacation. When you figure out how to journey efficiently you learn how to preserve time and money, so take some time to read through with the recommendations in this post to discover whatever you can discover. Suitcases is generally a big dilemma when people traveling. Though it might appear like a smart idea to get your young children modest dimensions travel luggage, recall that they are qualified for a complete dimensions hold-on on many main air carriers. This additional luggage place could help save from examining an added component of luggage. This could help you save from $25 to $50 on many airlines! Always keep significant things with your carry on case. You definitely tend not to wish to shed your passport, approved medicines or some other necessities you can’t afford to travel without the need of. Be sure to placed these matters away, either on your own individual or properly in the handbag you could deliver aboard the airplane with you. One easy suggestion for motel safety factors are to hold a tiny silicone doorway stop together with you. It can load up effortlessly inside a shoes as well as be taken inside a shirt budget if you’re quick on space. This door cease can be wedged beneath the entrance through the night, to avoid midnight visitors. Remote places tend to be among the most exciting of possible holiday destinations. Make absolutely certain you are taking essentials just like your prescription prescription drugs with you. One way of taking a look at it is that if something isn’t available where you are then you probably didn’t need it in any case! Items like drugs, even so, may be important so don’t abandon having them to opportunity. Package deal excursions are a way to get the most from a limited travel finances. Examine the prospects available at a particular destination. It might be easy to do a lot more, see more and get more pleasurable, by using a package offer that also includes more services and services. These bundles often provide financial savings that happen to be difficult to replicate by means of buying personal solutions. Be versatile when coming up with your journey ideas. Except when there is certainly some purpose that you need to traveling on a specific working day, overall flexibility can save you cash. Enabling a scheduling web site to locate journeys near your desired traveling schedules could help you save as much as 100 bucks for every air travel, especially if it changes you off from a few days flight. Before scheduling any vacation trips, do some comparison shopping. Make sure you’re getting the best value in your trip and accommodation by studying the rates of countless web sites. If you don’t must keep or profit out of your trip upon an specific day, check out the buying price of several days inside the identical full week. 1 could possibly be less costly. Given that you’ve got a number of the basic principles on touring, tell your employer you are taking a trip, get the aeroplane ticket, motorboat ticket or whichever indicates you intend on using and go! Remember to always be safe no matter if travelling alone or not. Demand directions and aid if you require it. A lot of people will not likely chew. Especially, Most people have to travel at some point. When you understand the concepts of vacation, you will have many happy, cost-effective travels available. The tips you read above will assist you to obtain your desire to be a pleasant and intelligent tourist.
Awsome website! I am loving it!! Will come back again. I am taking your feeds also
Wow. Occur to be so good that you’re so good currently. Your help woke us up. Thank you incredibly much.
Thanks , I have just been searching for information about this subject for ages and yours is the greatest I have discovered till now. But, what about the bottom line? Are you sure about the source?
About to travel requires a lot of operate. So many issues could go wrong, and go right if you are getting a vacation. Often it could be a bit overpowering in order to maintain everything directly. Fortuantely, you possess this article which will provide you with some tips as to the best way to vacation without having acquiring grey hairs. When traveling around the world on a budget, consider taking journeys as opposed to trains to your locations. When trains might be the greater traditional method of transportation for backpackers, several airlines offer low cost air flights that happen to be less expensive than train seat tickets. By doing this, you are able to travel to much more spots without contributing to your finances. Getting earplugs helpful while traveling helps you to save your rest and sanity! Whether it is around the plane or maybe in your accommodation, using earplugs will enable you to shut out no less than 50 percent from the disturbances that gives you a head ache, keep you from slumbering, or otherwise spotlight traveling within a bad way. They are also cost effective so deliver plenty. Be sure that your mobile phone plan is on a countrywide phoning create before you leave community. If you are usually over a local or nearby plan, changing to some federal prepare, just for your small amount of time you will end up gone, can prevent you from receiving incurred for roaming or long-distance. Search for “nonstop” rather than just “primary” journeys. Nonstop air flights, as their name indicates, make no stops well before arriving at the spot, whilst immediate flights might cease at other international airports on the best way to the final location. Even though you will not be transforming planes, the stops you make on a direct airline flight can lead to several unpredicted delays. Mentioned previously in the beginning of the report, seeking a traveling guide just before your vacation a very good idea to fully familiarize yourself with your spot. Additionally, there are numerous areas you can find this information aside from a travel information. Apply the guidelines with this article to get to know your spot prior to deciding to appear, which means you are ready for all of your location offers.
Your website is great as in the event it ended up written by means of a writer. Let me visit your blog often. Thanks a lot always.
Best view i have ever seen !
When you are considering taking a getaway and just have no idea where to begin, you might have can come to the correct position. Adventure is exciting but to be certain your traveling plans go away without having a hitch, you might find the advice and tips in this article convenient. So pay attention up! In case you are vacationing overseas clean on that country’s regulations. Some international countries around the world have laws which you may view like a small unusual or otherwise not expect. Like a preventative measure, it is always a smart idea to familiarize yourself with the laws specific on the position you happen to be browsing. Keep a group record with your hotel room while traveling. Spend money on one thing as inexpensive like a spiral notebook computer, and enable individuals you are traveling with to write in it during straight down time. This will likely offer an exciting go through later and will also be a nice keepsake from your trip. Don’t be afraid to cash in your flight a long way. A lot of tourists permit their mls build-up and not trouble making use of them. Enjoy the rewards of your travelling and commit the kilometers you’ve acquired! Kilometers have expiry times, so make sure to utilize them prior to they end. Often they are utilized on goods aside from vacation, so check your alternatives and acquire to spending. When you are traveling by vehicle, always be certain you bring along a travelling bag for trash can. Even when you don’t anticipate experiencing meals in your car, the trash will increase remarkably swiftly. Getting the travelling bag all set will assist you to maintain your automobile nice and organized and make it easier to clear away the rubbish once you end. As you can see, there are many stuff to think about when organizing your journey to be certain it’s as secure and pleasant as you possibly can. If you’re organising a trip, be sure to review this checklist carefully and view off every idea to ensure your journey will be the best it can be.
Hey, you used to write wonderful, but the last several posts have been kinda boringK I miss your great writings. Past few posts are just a little out of track! come on!
Excellent post. I was checking constantly this weblog and I am impressed! Very helpful information specially the ultimate phase 🙂 I take care of such information a lot. I used to be looking for this certain information for a very lengthy time. Thanks and best of luck.
Wow, the writing is so sexy. How could My partner and i write like anyone? We want the very same writing skills as you may.
I wanted to thank you for this great read!! I definitely enjoying every little bit of it I have you bookmarked to check out new stuff you post…
Enjoyed looking at this, very good stuff, thanks . “The hunger for love is much more difficult to remove than the hunger for bread.” by Mother Theresa.
I am always invstigating online for articles that can assist me. Thanks!
It¦s in reality a great and helpful piece of info. I am happy that you shared this useful info with us. Please keep us up to date like this. Thank you for sharing.
Excellent weblog here! Additionally your site so much up very fast! What host are you the use of? Can I get your affiliate hyperlink to your host? I want my website loaded up as fast as yours lol
You completed some fine points there. I did a search on the theme and found mainly folks will have the same opinion with your blog.
Hello there, I found your blog via Google while searching for a related topic, your site came up, it looks great. I have bookmarked it in my google bookmarks.
excellent post.Ne’er knew this, thanks for letting me know.
Magnificent beat ! I would like to apprentice while you amend your web site, how could i subscribe for a blog website? The account aided me a acceptable deal. I had been a little bit acquainted of this your broadcast provided bright clear idea
Hello my loved one! I want to say that this article is awesome, great written and include almost all significant infos. I’d like to peer more posts like this .
Do you mind if I quote a few of your posts as long as I provide credit and sources back to your site? My website is in the exact same area of interest as yours and my visitors would definitely benefit from a lot of the information you present here. Please let me know if this okay with you. Regards!
I simply want to say I’m very new to blogging and site-building and seriously savored your website. Almost certainly I’m going to bookmark your blog . You really come with impressive stories. Regards for sharing your blog site.
I do not even understand how I ended up here, however I assumed this put up was great. I do not realize who you’re however definitely you’re going to a well-known blogger if you happen to aren’t already 😉 Cheers!
Good – I should certainly pronounce, impressed with your website. I had no trouble navigating through all the tabs and related info ended up being truly simple to do to access. I recently found what I hoped for before you know it at all. Quite unusual. Is likely to appreciate it for those who add forums or something, site theme . a tones way for your client to communicate. Excellent task..
Hello, i think that i saw you visited my site so i came to “return the favor”.I’m trying to find things to improve my website!I suppose its ok to use a few of your ideas!!
I know this if off topic but I’m looking into starting my own blog and was wondering what all is required to get setup? I’m assuming having a blog like yours would cost a pretty penny? I’m not very web savvy so I’m not 100 positive. Any recommendations or advice would be greatly appreciated. Thank you
A number of people have realized that travelling these days is now a lot more readily available, but they aren’t confident they already have every little thing protected when it comes to vacationing. Just like nearly anything in life, you must constantly seek much more information on ways to know how to effectively travel, so look into this informative article since it serves as a good place to get that. Split up clothes among totes when traveling. When you are traveling with more than one person, divided your outfits in between your specific suitcases. You will discover a chance you might get rid of a bag throughout your trip. If a case is misplaced, finding the garments split up assures than every person may have at least one modify of clothing accessible to them. For those who have allergy symptoms to kittens and cats, dogs or perhaps dust, you must take your hypersensitivity medication together with you around the aircraft. Folks have a tendency to take their animals along on routes. Whether or not the wildlife isn’t associated them on the vacation, they still have family pet pollen on their outfits. When thinking about vacation insurance coverage on an forthcoming getaway, make sure to examine charges of suppliers, not forgetting to examine with the credit card banks. Many times they can supply these good things about you in a cheaper cost. They may include goods including lost luggage or journey cancellation. Nevertheless, these advantages usually are not generally identified with foundation-degree credit cards. When booking journeys for vacation, usually pick your unique chair in advance. This ensures that you receive the chair you want, be it aisle, home window, or emergency get out of row. It can also help prevent you from acquiring knocked to standby in case there is an overbooking, because your seating assignment is locked in. Although Spanish may be the lingua franca generally in most nations in the Traditional western hemisphere, do not forget that Brazil is not really one of those. Brazilians talk Portuguese. If you plan to go to Brazil, studying just a little Portuguese can grow to be plenty of aid learning Spanish will probably be considerably less valuable for you. Travelling is important for enterprise and pleasure at the same time. It can occasionally be challenging to understand airport terminals, body ways for auto vacation, or perhaps fully grasp a coach plan. Exactly how do you make journey easier, plus more pleasant way too? In the following paragraphs we have provided a few recommendations which can help. Hopefully they will likely show effective the next time you choose to vacation.
You have to be sure that you plan your vacation beforehand, if you are vacationing for delight or perhaps for job. Continue reading for a few helpful suggestions. If you’re flying with little ones, it’s luring permit every one of them tune out with their particular audio gamers, but think about bringing together some guides on CD. Possessing some thing literate and exciting for the whole household to hear is not merely engaging and exciting, but gives a frequent encounter that each family member can take forwards using them into existence (“Hey, remember when I was 15, therefore we heard Dark Splendor on how you can Maine?”). It’s the things that happy thoughts are made. Be wise about meals allergic reactions when visiting a overseas land to avoid hazardous liaisons. Researching the words, particularly the words by which you need to know to clarify your hypersensitivity, is definitely a essential course of action when you are traveling abroad. This can help be sure that the wait around staff is plainly informed of your allergic reactions in case there is a crisis. You must put on cozy footwear when you take an aircraft it’s much better if you can to fall the feet out of them effortlessly. You should remove them for safety assessments. Ease and comfort is really important. You don’t need a lot of help for a very little strolling and a lot of sitting down. The perfect sort of boots for visiting is sandals. If you are planning on soaring or cycling an extended range with school-era youngsters, look at purchasing a little mobile DVD person. The most affordable kinds can run as little as $75, along with the reassurance it purchases you on that nine-60 minutes overseas air travel is more than worth the cost. If you utilize the ideas which have been provided you should be able to get yourself a legitimate passport within a quick period of time. It is essential to maintain the passport within a safe location constantly so you are aware in which it is if you want it.
whoah this weblog is magnificent i love studying your posts. Keep up the great paintings! You know, a lot of persons are searching around for this information, you could aid them greatly.
There are certainly quite a lot of details like that to take into consideration. That could be a great point to bring up. I offer the ideas above as common inspiration however clearly there are questions like the one you convey up where the most important factor will be working in trustworthy good faith. I don?t know if greatest practices have emerged around issues like that, but I am sure that your job is clearly recognized as a fair game. Each boys and girls feel the impression of just a moment’s pleasure, for the rest of their lives.
Thanks a bunch for sharing this with all of us you really recognise what you’re talking about! Bookmarked. Kindly additionally seek advice from my site =). We may have a hyperlink change contract among us!
It’s the best time to make some plans for the future and it’s time to be happy. I’ve read this post and if I could I desire to suggest you some interesting things or suggestions. Perhaps you can write next articles referring to this article. I wish to read more things about it!
I was so amazed from your blog. Thank an individual so much.
If you’ve been sensing the financial crunch, you might be considering cutting vacation trips away from your spending budget to economize. The next write-up gives you some helpful, money saving journey recommendations. Package your totes a few days ahead of leaving behind for the vacation. By doing this you are able to continue to take into account things you need to take with you for an prolonged length of time, keeping yourself from sensing so rushed and having to be concerned about forgetting one thing essential or essential. Check with a friend or family member to operate a vehicle one to the airport. It can save you on cab fare and long-term vehicle parking charges. Many individuals will gladly perform this prefer for you, particularly if are likely to reciprocate later on in the future, when they are taking a getaway. 1 ingredient that may not come to mind without delay when preparing vacation is weather. By searching for the elements forecast in front of travelling, or possibly even before deciding when to vacation one will know what to prepare for. In case the conditions appearance bad, it could be prepared for or maybe the getaway even rescheduled. A good hint for tourists is to make sure to obtain sufficient medical insurance in place to pay for health care bills in the event of trauma or sickness whilst in foreign countries. It is often the truth that home-based health care insurance plans tend not to offer comprehensive protection for therapy and hospitalization in foreign nations. As a result, it is essential to procure this sort of coverage for the entire time of your holiday. If you choose to purchase traveling insurance just before taking a journey, you will thrive to buy it from an unbiased resource. Let’s say you publication a luxury cruise and they are supplied journey insurance from your luxury cruise company. Since you are basically purchasing safety versus the luxury cruise line’s individual mistakes/mishaps, it will make much more feeling to purchase your insurance plan from some other source rather than to count on the opportunity source of your potential declare as your insurance carrier. Wherever you might be heading, ensure that you setup an schedule well before your journey. The tips on this page are a fantastic way to get started. They are going to support ensure that your getaway will go in addition to may be envisioned.
People say that travel broadens the mind, but it’s tough to broaden your perspectives when you’re handling countless headaches or considering exactly where your baggage went. Before you take that next trip, save yourself the head ache using the suggestions in this article. They’ll help make your journey go effortlessly. Should you be visiting The european countries with gadgets, do not forget that the voltage for home shops will be better than in Canada And America. Consequently you’ll both need to bring a converter to help you connect United states products into Western energy, or discover kitchen appliances that may deal with an array of voltages. When selecting a spot to go to, there is no far better method to obtain information and facts than a other visitor. Other travellers with similar requires and plans, can advise you what spots are need to-sees and what locations you need to avoid. No guide book can replace the very first-palm experience with somebody else or household. In order to get the best from your trip with a young child, in choosing a accommodation, make sure that you may have sometimes one more room or perhaps a balcony. Because preschoolers consider repeated naps as well as check out your bed early on, this will guarantee that you are in a position to take up on your own although your son or daughter rests. No person really desires to consider it an evening at 8 later in the day when they are on a break. When you are traveling, never ever consider an item from anyone to move it for them. Regardless of their scenario or how nice they could appear, this really is almost always a trap to persuade an unwary visitor to move drugs or any other contraband into protect areas. Even “gift ideas” can fall under this classification. Traveling may be easy and something that works for everyone, no matter what the budget appears like. Items that need very little energy, however are rewarding, are frequently the best way to go and travelling can match that expenses! So prepare a trip, set a timeline to make it come about. You will find anything satisfying to suit you!
I gotta favorite this website it seems very useful very beneficial
An attention-grabbing dialogue is worth comment. I believe that you must write extra on this matter, it might not be a taboo topic however typically individuals are not enough to talk on such topics. To the next. Cheers
This is very interesting, You are a very skilled blogger. I’ve joined your rss feed and look forward to seeking more of your great post. Also, I’ve shared your web site in my social networks!
Exactly what a man of capacity! You have the capacity to create wonderful issues that you can’t find anywhere. to envy
There are definitely lots of details like that to take into consideration. That could be a nice point to carry up. I provide the thoughts above as normal inspiration but clearly there are questions like the one you convey up where the most important factor might be working in trustworthy good faith. I don?t know if greatest practices have emerged around things like that, but I am certain that your job is clearly identified as a good game. Both boys and girls really feel the impact of just a moment’s pleasure, for the remainder of their lives.
Best view i have ever seen !
On a trip might appear to be a tiresome and overpowering job, just understanding the best places to go and once traveling can greatly assist towards simplifying this process. When you are not ready for the vacation, shedding time and money spent in search of points can definitely create your holiday a bad one particular. Start using these suggestions to prevent these frequent troubles. Make sure you have important information and facts in created type when traveling considerably afield. Including the information from the spot you will be staying and that is picking you. If trouble discovers you when you are vacationing, here is the location to call. They’ll assist you when you come upon any concerns. If you will certainly be traveling to your spot, complete a family member or close friend in on your spot and organized way to get there. If something were to afflict you whilst driving, this person would be able to inform officials of your own intended vacation spot along with the streets you would have been touring on. A great way to get some good sleeping with an aircraft is simply by delivering an eyesight mask. Even though you may shut your vision, you are able to nonetheless see the different colours and styles in front of you. Having an vision cover up, that will enable so that it is entirely blacked out, permitting significantly better probability of sleep at night. To determine should you get journey insurance you should take a look at what may possibly already be taken care of. Many homeowner insurance policies can currently have riders that might protect theft of property even while you are vacationing so buying further would have been a squander of capital for the protection. While Spanish may be the lingua franca in the majority of countries around the world in the Traditional western hemisphere, understand that Brazil will not be one of those. Brazilians articulate Portuguese. If you plan to check out Brazil, studying a bit Portuguese can turn into a great deal of aid understanding Spanish will be considerably less important for you. As mentioned from the report, you could possibly sense just like you should successfully pass on your own annually holiday due to overall economy. Should you keep to the guidelines from this post, you may be a step closer to jet-setting the economical way.
When you are traveling overseas it is recommended so that you can be as harmless that you can often be. The information that are offered in this article ought to give you a concept of what you must avoid. It is far better being harmless than sorry with regards to global journey. Travel could be a good way to move away from everything, but it is sometimes required to make contact with the other community. For this purpose, ensure your mobile phone works everywhere you are moving or invest in a prepaid cell phone with your location land. You will be glad you did should you lose your credit cards or passport and desire to make contact with your bank – or embassy! – straight away. Vacation throughout the off of-maximum periods. Lodges and airfare are usually a lot more pricey during the peak summer months. Also, well-known locations is really so above-crowded in the summer that it requires the satisfaction from it. Should you vacation inside the away-optimum months you save cash on airfare and lodgings and you can steer clear of the crowds. In order to avoid any difficult confrontations, do your homework should you be planing a trip to an overseas land. This includes looking up normal phrases like “thanks,” “simply how much” and “how are you presently.” You need to shop around for common customs of the nation, like gestures, to help you prevent bad anyone with gestures or entire body vocabulary that seem typical for your needs. Numerous shops cost a lot of for most of these items. Experiment with some folding methods that will safe space and allow you to take much less baggage along with you. Testing out different collapsable methods allows more to fit with your handbag. If you use the information which were offered you should be able to have a reasonable passport within a simple amount of time. It is essential to maintain the passport in the secure spot constantly so you are aware in which it is actually when you need it.
Best view i have ever seen !
Good day! I know this is kind of off topic but I was wondering which blog platform are you using for this website? I’m getting tired of WordPress because I’ve had issues with hackers and I’m looking at alternatives for another platform. I would be fantastic if you could point me in the direction of a good platform.
Leisure travel is a wonderful encounter which everybody should have with their life-time. Even company travel can be done enjoyable. There are some aspects of vacation that will detract from your satisfaction. Using the guidance in this article could help you get the most from any vacation that you may need or desire to get. Split up clothing between hand bags when you are traveling. When you are traveling with more than one person, divided your outfits involving the respective suitcases. You will find a probability you could drop a bag on your getaway. If your travelling bag is shed, getting the outfits separate ensures than anyone could have a minumum of one transform of ensemble offered to them. Reach out to your network. Social network sites make it simple to get ideas through your close friends and pick their minds for info. Publish a matter concerning your location and you’ll most likely garner several responses. These fast answers are especially helpful when you are on your own vacation and seeking a location to eat ASAP. If you are planning to opt for a nighttime airline flight or simply a very very long flight generally, it might be best to provide some type of sleeping assist. It’s quite difficult to rest on airplanes anyway, but if you take a slumbering assist prior to takeoff, it is possible to come to your destination refreshing and able to handle the world! If you intend on vacationing to a new region, make sure you get the desired pictures prior to going. Your system may not be employed to these foreign ailments and you would realise you are very weakened when you acquired sick and tired, not to mention that particular conditions are deadly. Check with your personal doctor about what kind of pictures you must get. If you choose to acquire journey insurance coverage before going on a trip, you will prosper to purchase it from a completely independent supply. Let’s say you publication a luxury cruise and so are supplied vacation insurance policy through the cruise business. Because you are basically acquiring defense versus the cruise line’s own faults/mishaps, it makes a lot more sense to buy your insurance policy from some other resource than to depend on the potential cause of your upcoming state as the insurance provider. As you now have learned a bit on how to make simpler the process of touring in this article, it’s time for you to just start off preparation that vacation. Regardless of whether you’re going to significantly-away from areas or maybe soaring across the country, you ought to be knowledgeable for just about any trip you are taking.
Once you have decided upon a getaway on your own or your household, there are so many stuff that you will want to take into account inside the time leading up to your vacation and the products that you will want to create along. This article is helpful with wealthy recommendations packed with information and facts that will make getting ready for your trip much simpler. In places that you just travel to, keep in mind the ethnic look at how questions are answered. In some areas, specially India and Asia, it can be considered very impolite to share with somebody who you don’t know the response to their question. Others could simply response “yes” to any issue questioned in The english language. Pay attention to improbable body terminology. When picking a spot to go to, there is absolutely no far better supply of details when compared to a fellow visitor. Other tourists with a similar requires and plans, can tell you what spots are should-sees and what locations try to steer clear of. No guide book can substitute the first-hand connection with another individual or loved ones. To get the most out of your holiday having a young child, when picking a accommodation, make sure that you may have sometimes one more space or a deck. Considering that preschoolers consider regular naps as well as head to your bed very early, this can make certain that you will be capable to take on your own while your child rests. No person really desires to consider it an evening at seven in the evening while they are on vacation. Deliver a vacant water jar. We are all aware that delivering a full bottle of water through protection is a huge no-no. In the event you don’t need to be caught paying a premium for bottled drinks right after security, bring along your very own unfilled jar to load at a h2o water fountain. If the regular faucet water is below fascinating to you, deliver an individual assist packet of ingest blend to include in the container. Do you have more knowledge about traveling? Have you ever improved or replaced your current plan for vacation? Perhaps you have discovered valuable, affordable methods to improve the travel practical experience? Have you been mindful of how you will will manage an emergency or unforeseen function? With one of these ideas, you ought to have everything you need to do well.
Saved as a favorite, I really like your website.
I think this is among the most important information for me. And i’m glad reading your article. But wanna remark on few general things, The site style is ideal, the articles is really excellent : D. Good job, cheers
Magnificent beat ! I would like to apprentice at the same time as you amend your site, how could i subscribe for a blog site? The account helped me a applicable deal. I were a little bit familiar of this your broadcast provided brilliant clear concept
I as well as my friends have been reading the best secrets located on your site then immediately developed a horrible feeling I never expressed respect to you for those strategies. All of the boys were definitely absolutely stimulated to read all of them and have now actually been enjoying those things. Many thanks for indeed being very helpful as well as for opting for this form of important subject areas most people are really desperate to be aware of. Our own sincere apologies for not expressing appreciation to earlier.
An outstanding share! I’ve just forwarded this onto a colleague who has been conducting a little research on this. And he actually ordered me dinner simply because I found it for him… lol. So allow me to reword this…. Thanks for the meal!! But yeah, thanx for spending time to talk about this topic here on your internet site.
obviously like your website but you need to check the spelling on quite a few of your posts. A number of them are rife with spelling issues and I find it very bothersome to tell the truth nevertheless I’ll certainly come back again.
Very interesting details you have remarked, regards for posting . “Ignorance, the root and the stem of every evil.” by Plato.
Enjoyed reading this, very good stuff, regards . “A man does not die of love or his liver or even of old age he dies of being a man.” by Percival Arland Ussher.
Howdy very nice site!! Man .. Beautiful .. Wonderful .. I will bookmark your web site and take the feeds also…I am glad to find numerous useful information right here in the put up, we need develop more techniques in this regard, thank you for sharing. . . . . .
It is actually a nice and helpful piece of information. I am satisfied that you simply shared this helpful information with us. Please keep us up to date like this. Thanks for sharing.
Best view i have ever seen !
Best view i have ever seen !
Best view i have ever seen !
Just wanted to say thanks! I love sucking dick btw hmu
Hi my friend! I want to say that this post is awesome, nice written and include almost all important infos. I’d like to look extra posts like this .
Hello really awesome web site!! Guy .. Beautiful .. Wonderful .. I’ll bookmark your site and consider the feeds moreover. I am pleased to search out beneficial details appropriate here inside of the published material, thanks for sharing…
What i do not realize is if truth be told how you’re no longer really much more smartly-preferred than you might be now. You’re very intelligent. You already know therefore considerably with regards to this topic, produced me in my opinion believe it from so many numerous angles. Its like men and women are not involved until it¦s something to do with Girl gaga! Your personal stuffs great. At all times take care of it up!
I think other site proprietors should take this site as an model, very clean and magnificent user genial style and design, let alone the content. You’re an expert in this topic!
It’s in reality a nice and helpful piece of information. I’m happy that you just shared this helpful info with us. Please keep us informed like this. Thank you for sharing.
You have observed very interesting points! ps decent web site. “I didn’t attend the funeral, but I sent a nice letter saying that I approved of it.” by Mark Twain.
You really make it appear really easy with your presentation but I to find this topic to be really something that I think I would never understand. It kind of feels too complex and very wide for me. I’m having a look ahead to your next submit, I’ll attempt to get the grasp of it!
there is always a growth on mobile advertising, it would be the trend of the future,.
אם אתם מחפשים בילוי מפנק כדאי לכם לבלות עם נערות ליווי. הנערות הסקסיות יכולות להזכיר לכם שאתם גברים שאוהבים ליהנות. הן יודעות כיצד לפנק אתכם ומבינות בדיוק מה שאתם רוצים גם אם לא תגידו להן. הן יכולות להפתיע אתכם בעיסויים מפנקים ומענגים, הרבה מעבר למה שאתם מצפים. נערות ליווי הן פשוט מומחיות באומנות העינוג וכל מי שבילה איתן פעם אחת ירצה לחזור שוב ושוב. אם בא לכם להפיג את השעמום בשעות הערב או בסופי השבוע, אם בא לכם לבלות בצורה יוצאת דופן ולא לעשות את אותם הדברים המשעממים כמו תמיד, הזמינו נערה או שתיים ותוסיפו קצת פלפל לחיים שלכם.
Oh my goodness! Amazing article dude! Thank you, However I am going through problems with your RSS. I don’t understand why I can’t subscribe to it. Is there anybody getting similar RSS problems? Anyone that knows the solution can you kindly respond? Thanx!
Hey very cool website!! Man .. Excellent .. Amazing .. I’ll bookmark your blog and take the feeds also…I’m happy to find numerous useful information here in the post, we need develop more strategies in this regard, thanks for sharing. . . . . .
I just want to tell you that I am just very new to blogging and site-building and truly savored you’re blog. More than likely I’m want to bookmark your site . You absolutely come with great articles and reviews. Thanks for sharing with us your blog.
I’m really enjoying the design and layout of your blog. It’s a very easy on the eyes which makes it much more enjoyable for me to come here and visit more often. Did you hire out a designer to create your theme? Excellent work!
Occasionally, you really should take a rest in the same trip towards the seaside that you just acquire every year. This coming year, why not try out a haunted getaway. There are many holiday destinations that cater to the supernatural. This article will present you with tips for finding the optimum spooky holiday destinations. When traveling in countries around the world with unsafe tap water, keep in mind other ways that you might be revealed. Close the mouth area when using the shower and clean your teeth just with treated h2o. If one makes tea or gourmet coffee with all the water, allow it to boil for several moments prior to steeping. Also a small coverage can make you very sickly. When selecting luggage, take notice of the simplicity of hauling it more than extended miles. A tough steel going travel suitcase is generally perfect. Some moving bags even have straps that let them be worn as being a rucksack through areas where you can’t roll them. Both you and your baggage will be wandering lengthier distances than you imagine. Stroll when you are able. To help keep your ankles from inflammation and your bones from obtaining painful, stand up and walk every time you have a chance. In the aircraft, wake up and proceed to the washroom or walk the aisle, when every 60 minutes. If you have a layover, choose to require a few laps in the terminal, rather than just sitting down on your door. Make sure you select a kind of holiday that fits your personality. When you hate being outside, you shouldn’t proceed to the beachfront! Personality fashioned getaways have become increasingly popular these days, with everything from grownups-only cruise trips to nerd-pleasant journeys. Find a vacation that you simply will genuinely appreciate. To make probably the most of journey overseas, make an effort to plan a minimum of a couple of pursuits that aren’t placed in tourist information publications or weblogs. You can do this by finding information and facts designed for and manufactured by natives, be it from classifieds, blogs and forums or people on youtube. Stepping outside the vacationer bubble can certainly make your holiday so much more interesting and entertaining. When traveling having a pet, do not forget that most dog materials are far better obtained at your location. By way of example, except when your pet dog is on a specific diet program, getting a travelling bag of dog food when you show up is simpler than seeking to transfer it. Bowls along with other materials are similar way. If you are traveling, spend money on cash storage units that you could wear inside your garments or sew basic pockets in to the inside of your waistline music band. Provided you can not sew, ask someone that can to get it done for yourself or take it to a customize or seamstress, and ask for they sew an inside of wallet to suit your needs. This will keep your possessions, id and funds harmless and also you need not concern yourself with a person stealing your traveling travelling bag or budget. Seeing that you’ve got a few of the essentials on traveling, educate your boss you take a trip, buy your plane admission, boat ticket or no matter what means you intend on using and go! Remember to always be secure whether or not vacationing by yourself or otherwise. Demand directions and assist should you need it. Many people will never nibble. Above all, As conveyed inside the article’s commencing, vacation reveals you to many different men and women, activities and ways of living. It doesn’t just imply gonna spectacular spots, it can just be meandering all over America, ingesting all the various sights of daily folks. This informative article looks for to awaken the drive traveling inside you.
Traveling is one thing that a majority of people would want to do. A privileged couple of get to travel to spectacular spots around the globe. Consider saving a little bit of cash and set up a goal. It doesn’t issue if you are considering going a place home-based or worldwide. A piggy bank is the best way to begin. Spare alter brings up fast! In case you have no money to spare don’t be anxious. A hike in the forests or even a simple trip to perspective local websites, could be equally as rewarding! If you are intending a getaway in foreign countries, try and get your passport earlier on. Many people undervalue how much time it requires to acquire a passport for the first time and therefore are remaining struggling and having to pay added service fees to have it expedited. Policy for your passport to consider 6 to 8 several weeks to arrive, particularly in optimum journey season. If you will certainly be driving a car for your location, fill a relative or close friend in on the vacation spot and organized way to arrive there. If anything would occur to you whilst driving, he or she would be able to inform officials of your respective planned destination and the streets you could have been traveling on. To save vitality when traveling in hilly or mountainous areas, look at going for a taxi cab to the greatest part of the city or place you’re visiting, then move lower. This lets you begin to see the entire city, which include any mountain peak vistas, without having to protect too much altitude and using oneself out. To stop your self from turning into unwell right after a lengthy trip, you really should think about using a saline mist inside your nose area. This is certainly shown to aid overcome any harmful bacteria that could be dormant in the air. It’s the best way to purchase one through to the passengers alongside you should they be ill. If you’re sensitive to the aroma of products (or perhaps don’t like them!) attempt delivering some small candle lights together with you on your trip. This helps cover up the scent of the products the maids use and also the fragrances can also help loosen up you. Some smells can even sooth you and give you an improved night’s sleep at night. Speak to any road warrior and they will tell you both tales of great journeys and tragedy trips. A number of the stuff they have figured out happen to be shared in this article. Maintain these pointers at heart in getting yourself ready for your future trips, and you are certain to come house with wonderful remembrances as an alternative to migraines.
F*ckin’ remarkable issues here. I am very happy to look your post. Thank you a lot and i’m having a look ahead to contact you. Will you please drop me a e-mail?
Thanks a lot for the share, Keep the work sharing………
It’s actually a cool and helpful piece of info. I am glad that you shared this useful info with us. Please keep us informed like this. Thanks for sharing.
Travelling could be a terrific way to make new friends and practical experience other ethnicities. It could be a great way to see everything the entire world provides. This short article can tell you about the joys of vacationing. Journey can be quite a activity plus an journey that may cause you to unexpected locations. Before going to go to sights for the entire day, always question a person in the accommodation for instructions. You could have become chart instructions there, but individuals instructions may take you to elements of city that are harmful. A hotel worker will likely have the capacity to guide you there in a manner that eliminates an risky regions. If you journey typically, invest in tiny reusable plastic bottles. You will discover reusable containers at most large grocery stores. Placing your regular shampoos and conditioners over these tiny, reusable containers is much more cost effective in the long term. Traveling scaled toiletries tend to be very overpriced for the small amount of merchandise inside of them. As you prepare your getaway, take into account taking the coach as an alternative to traveling by air, driving a vehicle or taking a teach. This process of travel is comparatively affordable, and depending on who you publication with, the bus fleets frequently offer more modern designs that are neat and appealing. They also consist of wireless entry. Take a excellent reserve with you to read when traveling. If you always have one thing intriguing to complete, you will be not as likely to acquire frustrated or bored during layovers along with other time delays which are beyond the control. Invest in a new title you have been planning to read through so that you have something to enjoy. To help make the most of vacation overseas, make an effort to program no less than a few actions that aren’t placed in traveler guideline books or blogs. This can be achieved by getting hold of information and facts intended for and created by local people, whether it be from classifieds, weblogs or people on flickr. Stepping beyond the visitor bubble is likely to make your journey much more exciting and entertaining. When traveling with a pet, do not forget that most animal supplies are better purchased in your vacation spot. For instance, except when your pet is with a special diet program, purchasing a travelling bag of dog food if you arrive is simpler than trying to transfer it. Bowls along with other materials are similar way. While you are travelling, invest in funds containers that you could wear in your clothes or sew easy pockets to the inside of your midsection music group. Whenever you can not sew, question someone that can to do it to suit your needs or take it into a tailor or seamstress, and ask for they sew an inside bank account for you. This maintains your possessions, id and cash harmless so you will not need to concern yourself with somebody stealing your vacation case or budget. Since you’ve received some of the essentials on traveling, tell your manager you are taking a getaway, buy your aircraft admission, vessel ticket or whatever means you intend on using and go! Remember to always be safe regardless of whether touring alone or perhaps not. Ask for recommendations and help if you want it. Many people will not nibble. First and foremost, Ideally this article has provided you some suggestions on the way to be described as a sensible traveler. In nowadays you really have to keep your view open up plus your wits of you to maintain traveling harmless and sleek. Look at your list before you take away from whilst keeping these clever suggestions at heart.
Travelling can appear sophisticated, but when you’re certain of what to do and exactly where you need to go, the individuals to have the assistance of, etc., then you could have a entertaining trip. Without correct information, you could come to be shed or commit a lot of money one thing. The solid info under is a great guide to get you ready for journey. Program your preparing. In these days of luggage fees and body weight restrictions, most tourists carry a single baggage. To suit everything in, you have to be a wise packer. Check the climate predict to your spot and judge garments that you can combine. Opt for levels, which could be additional or removed because the temp adjustments. Also be sure you use your more heavy/bulkier shoes so they don’t hog too much area inside your baggage. When loading, be sure you split up your valuables. When you are packaging several luggage for the getaway, distribute your more expensive products out between them. Usually stay away from adding your belongings in one travelling bag just in case this travelling bag is misplaced or taken. Burning off just one case remains to be dreadful but might not exactly damage your journey. Vacation throughout the off of-maximum conditions. Lodges and airfare are usually much more expensive during the top summer time. Also, preferred spots can be so more than-populated in the summer season that it requires the satisfaction out of it. If you journey in the off of-top several weeks you can save cash on plane tickets and lodgings and you may avoid the crowds. When you go on a journey, be sure to have a comprehensive travel log. Make a note of where you went, whatever you managed, and how you experienced regarding this. This will allow you to reference to your prior activities if you intend a new escape to exactly the same location. This method for you to program a visit such as the finest aspects of your earlier travels while including new activities. If you’re responsive to the odor of cleansers (or maybe don’t like them!) try getting some small candle lights along on your own getaway. This helps cover up the fragrance of the cleaning solutions the maids use along with the scents can also help relax you. Some scents can also sooth you and provide you a better night’s rest. Ideally, these pointers have presented you anything of value – or at the very least – anything helpful to mull above. More than anything else, you should continue to be harmless while traveling. Adding to that, try to just press the anxiety aside and enjoy yourself. Get pleasure from!
Simply desire to say your article is as astounding. The clearness in your post is simply nice and i can assume you are an expert on this subject. Well with your permission allow me to grab your feed to keep updated with forthcoming post. Thanks a million and please continue the enjoyable work.
I?ve been exploring for a little bit for any high-quality articles or blog posts in this kind of area . Exploring in Yahoo I at last stumbled upon this website. Reading this info So i?m happy to exhibit that I have a very good uncanny feeling I discovered exactly what I needed. I such a lot indubitably will make sure to don?t forget this web site and provides it a look a relentless basis.
I like it whenever people come together and share thoughts. Great website, keep it up.
Way cool, some valid points! I appreciate you making this article available, the rest of the site is also high quality. Have a fun.
With havin so much content do you ever run into any issues of plagorism or copyright violation? My website has a lot of unique content I’ve either written myself or outsourced but it looks like a lot of it is popping it up all over the internet without my authorization. Do you know any ways to help reduce content from being ripped off? I’d definitely appreciate it.
This design is steller! You most certainly know how to keep a reader entertained. Between your wit and your videos, I was almost moved to start my own blog (well, almost…HaHa!) Great job. I really enjoyed what you had to say, and more than that, how you presented it. Too cool!
Touring is surely an remarkable, amazing time. In case you are each student preparing journey to an international country, take into account getting a worldwide university student id credit card before leaving. Numerous dining establishments, galleries and museums, and visitor halts supply discounts when you display university student id. Even though the card fees money to acquire at first, the financial savings you achieve are often far higher than the bottom expense. Subscribe to a journey price watcher. It is a characteristic a lot of traveling sites use, and allows you to go into the spot you need and it will look for offers for you. When accommodation or air travel prices drop, the website sends an email to warn you of the price change. This usually takes the work from your requiring to look for the prices daily. Get in touch with your community. Social media sites allow it to be straightforward to get suggestions out of your friends and select their minds for information. Post a matter relating to your location and you’ll likely garner many answers. These fast replies are especially helpful if you are on your trip and trying to find a destination to consume As soon as possible. Search for convenient amenities anytime you must spend time with an air-port. When all modern large airports have shops and restaurants, a lot of feature free professional services you can use to create your trip far more calming. Pay attention to these prospects in the event you actually end up revisiting the international airport. If you are an archive-keeping sort of particular person, think about jotting straight down a number of notices. In order to make by far the most of journey in another country, attempt to program no less than a number of actions that aren’t listed in tourist information textbooks or weblogs. This can be done by finding information designed for and manufactured by natives, be it from newspapers, blogs or folks on flickr. Stepping outside of the vacationer bubble can make your journey very much a lot more fascinating and enjoyable. When you are traveling using a canine, remember that most animal supplies are better bought at the location. By way of example, unless your pet is with a unique diet regime, getting a case of pet food when you appear is easier than attempting to transport it. Dishes as well as other products are identical way. While you are traveling, spend money on cash boxes that one could use within your garments or sew basic wallets in to the inside your waistline music band. When you can not sew, request somebody who can to get it done for you personally or take it to a personalize or seamstress, and request they sew an inside bank account for yourself. This keeps your valuables, id and money safe and also you will not need to be concerned about a person stealing your vacation travelling bag or pocket. Since you’ve obtained a few of the essentials on travelling, tell your boss you are taking a vacation, buy your aeroplane ticket, boat solution or whichever signifies you intend on getting and go! Always be secure whether or not traveling by itself or otherwise. Request instructions and aid if you want it. Many people will never mouthful. Above all, As was mentioned previous on this page, the achievements a trip is frequently identified before you even depart. Keep the valuable ideas you study on this page, under consideration, when you get ready for your forthcoming trip. Using this type of suggestions at your disposal, you’re prone to make trips which you give back from, with smiles.
This website was… how do I say it? Relevant!! Finally I’ve found something that helped me. Cheers!
https://israelnightclub.com/d7a0d7a2d7a8d795d7aa-d79cd799d795d795d799-d791d7aad79c-d790d791d799d791/ כנסו לאתר הזה עכשיו ותהנו ממגון רחב של בנות הכי יפות בארץ אז למה אתם מחכים כנסו עכשיו
Taking that effectively deserved vacation can be quite a handle for you personally and also the overall family. Even so, when you reserve your vacation, study some beneficial suggestions about driving this helpful article. Make use of the tips and knowledge provided to assist you to possess a far more enjoyable encounter. When you utilize a open public computer when you are traveling, avoid using it to do any fiscal work, including carrying out financial or looking at the total amount in your visa or mastercard. Unscrupulous people might have put in keyloggers or another malware on these general public computers to steal your details. If you will end up traveling for your location, load a member of family or buddy in in your spot and arranged path to arrive. If one thing would occur to you while driving, this individual can inform officers of your own planned location along with the roads you might have been vacationing on. To streamline the preparing procedure, make an effort to pack clothes within just 1 or 2 shades. For example, you could package only light blue and khaki dresses and pants and only tshirts which can be shades of glowing blue and khaki. This system ensures that all you pack coordinates with everything more, which means you will never have difficulties finding some thing to wear on your own getaway. If you’re will be vacationing shortly, don’t undergo a travel agency. You’ll find your vacation charging double the amount. Quite, check around on-line by means of different great deal merchants like expedia.com or travelocity.com. This can help you save some money which can be greater spent whenever you come to your vacation spot, maybe on souvenirs, or for that great guy on the web that offered you this suggestion. If you’re responsive to the smell of cleaners (or perhaps don’t like them!) consider bringing some tiny candles along in your journey. This helps face mask the scent of the cleansers the maids use as well as the smells can also help unwind you. Some fragrances may even sooth you and provide a better night’s rest. Vacationing can be simple and easy an issue that works for everyone, whatever your capacity to purchase seems like. Things which demand little hard work, nevertheless are fulfilling, tend to be the easiest way to go and travelling can fit that bill! So program a getaway, set up a timeline to make it occur. You will find something satisfying to accommodate you!
Travelling, no matter if for enterprise or pleasure, could be plenty of fun. Keep in mind, there will always be tricks and tips for travellers that will assist. The bit listed below offers excellent information and facts which can help along with your potential journeys. Everyone sees vacationing diversely, hence the suggestions beneath will help. When you are traveling in countries with unsafe regular faucet water, recall different ways which you might be revealed. Close up your mouth while using the shower and clean your tooth just with taken care of normal water. If you make tea or gourmet coffee together with the water, give it time to boil for several a few minutes just before steeping. A good tiny coverage could make you extremely unwell. Pack your personal cushion. When you have trouble sleeping out and about, attempt bringing your very own pillow along. Some individuals struggle to sleep at night within a your bed that isn’t their own. Using a acquainted cushion within your brain can create a surprisingly big difference. It might imply the real difference among sleep deprived times and being effectively well rested for an additional working day filled with routines. To save cash when traveling for satisfaction, explore swapping residences. Swapping properties helps save a lot of cash that will or else be invested in a hotel room. Additionally it is a great deal more comfortable and roomy than your typical accommodation. There are several web sites which allow you to make residence swapping arrangements. You may want to load up up anything you have while traveling. Don’t consider a lot of abandon toiletries you don’t will need in your house. Create a list of toiletries that you simply usually use during your entire day and can’t do without. Load up the main points. To make probably the most of travel in another country, try and plan a minimum of a number of actions that aren’t indexed in visitor manual guides or weblogs. This can be done by finding details created for and created by locals, whether it is from classifieds, weblogs or people on flickr. Stepping outside the visitor bubble will make your trip that much much more interesting and enjoyable. When traveling with a dog, keep in mind that most animal products are greater bought on your destination. For example, except if your pet dog is on a specific diet program, purchasing a bag of pet food when you get there is easier than trying to carry it. Bowls and other products are similar way. When you are touring, purchase dollars containers that one could use in your garments or sew easy pockets in the inside of your waist group. Provided you can not sew, request somebody who can to accomplish it to suit your needs or take it to some modify or seamstress, and request they sew an inside of budget to suit your needs. This keeps your valuables, recognition and money secure and also you do not need to be concerned about a person stealing your journey case or wallet. Seeing that you’ve acquired several of the basics on traveling, inform your boss you are taking a holiday, get the airplane solution, motorboat ticket or whatever signifies you plan on getting and go! Remember to always be safe regardless of whether travelling by yourself or otherwise not. Require directions and support if you need it. The majority of people will never mouthful. Above all, All of these things are excellent in making you to ultimately go traveling to that fascinating new land that you’ve always aspired to visit. Making sure you might be ready might take out all of the anxiety that may make you tense about being in a whole new location so you can merely take pleasure in your journey towards the fullest.
Having read this I thought it was very enlightening. I appreciate you spending some time and energy to put poker online idn play this information together. I once again find myself personally spending way too much time both reading and commenting
Touring is something that most individuals would like to do. A privileged number of get to go to exotic areas worldwide. Attempt saving a bit of cash and set a target. It doesn’t issue if you plan on heading anywhere residential or overseas. A piggy financial institution is a terrific way to commence. Extra modify adds up fast! In case you have no dollars to spare don’t worry. A hike within the forests or possibly a short trip to perspective nearby sites, can be just like fulfilling! Keep in mind ripoffs that attempt to prey on unwary vacationers. In many poorer areas around the globe, it really is safest to imagine that any individual pleading for money or seeking to stop you for just about any purpose may well be a pickpocket. Don’t possibly show or hand over your wallet to any person, regardless of whether they boast of being police officers. In case you are vacationing to another country clean up on that country’s laws. Some overseas countries around the world have laws and regulations that you could see being a small unusual or otherwise not anticipate. As being a preventative measure, it usually is a great idea to understand the legal guidelines particular towards the spot you will be checking out. Take note of your intution when you are traveling. If a distinct retail store, particular person, or community gives you “terrible vibes”, just walk away. Your intuition could be suggesting something you haven’t purposely discovered. Even when you’re incorrect, it’s safer to be secure than sorry in relation to your safety. Don’t take sleep at night assists until finally you’ve taken off. If you use sleep helps to provide you by way of a extended flight, delay until soon after you’re air-borne to pop the supplement. If you take them earlier, you have the danger getting unbearably fatigued in case your airline flight is postponed or you have to deplane and go on a later on air travel. If you’re sensitive to the odor of cleaners (or just don’t like them!) consider taking some tiny candle lights along with you in your trip. This will help to mask the smell from the cleaners the maids use along with the scents can also help loosen up you. Some smells may also sooth you and provide you with a better night’s sleep at night. Ideally, anyone can put in place a successful journey. You may even travel to areas you’ve only dreamed about. Now you can go ahead and strategy with assurance an incredible journey. Have got a wonderful getaway and give postcards of your respective adventure!
I am really enjoying the theme/design of your blog. Do you ever run into any web browser compatibility problems? A couple of my blog readers have complained about my blog not operating correctly in Explorer but looks great in Firefox. Do you have any advice to help fix this problem?
Spot on with this write-up, I really believe that this web site needs a great deal more attention. I’ll probably be back again to read more, thanks for the advice!
Where can I find the best online creative writing courses? I live in NYC so which colleges offer the best online creative writing course? If not in a college than where else?.
In this grand pattern of things you’ll get a B+ with regard to hard work. Where you actually lost me was first in the specifics. As as the maxim goes, the devil is in the details… And it could not be much more correct in this article. Having said that, permit me reveal to you just what did work. Your article (parts of it) is actually extremely engaging and that is probably the reason why I am making an effort to comment. I do not make it a regular habit of doing that. 2nd, whilst I can certainly notice the leaps in reason you make, I am not convinced of just how you seem to connect the points which make the actual final result. For now I will yield to your point but wish in the future you actually link your dots much better.
I enjoy looking through an article that can make men and women think. Also, thank you for allowing for me to comment.
I have been surfing online more than 3 hours today, yet I never found any interesting article like yours. It?s pretty worth enough for me. Personally, if all website owners and bloggers made good content as you did, the internet will be a lot more useful than ever before.
I have been exploring for a bit for any high quality articles or weblog posts on this kind of area . Exploring in Yahoo I ultimately stumbled upon this web site. Studying this info So i’m satisfied to show that I have a very good uncanny feeling I found out exactly what I needed. I so much indisputably will make certain to do not put out of your mind this site and give it a glance regularly.
I have recently started a blog, the information you offer on this web site has helped me tremendously. Thanks for all of your time & work. “If you would know strength and patience, welcome the company of trees.” by Hal Borland.
Thank you for sharing superb informations. Your site is very cool. I’m impressed by the details that you?¦ve on this site. It reveals how nicely you understand this subject. Bookmarked this website page, will come back for more articles. You, my pal, ROCK! I found simply the information I already searched everywhere and simply couldn’t come across. What a great web-site.
Wonderful goods from you, man. I have understand your stuff previous to and you’re just extremely excellent. I actually like what you’ve bought here, certainly like what you’re saying and the way in which wherein you assert it. You are making it enjoyable and you still care for to stay it smart. I can not wait to read much more from you. This is really a tremendous web site.
If you are thinking about taking on the work of vacationing, it is essential that you will have the info that you need to know before you make one last decision. This information will help you find the information you need to make the most efficient travel judgements. Don’t make travelling a headache, receive the understanding you will need. If you are planning a vacation abroad, make sure you get your passport well in advance. Many individuals ignore the length of time it will require to have a passport initially and they are remaining scrambling and having to pay extra costs to get it expedited. Arrange for your passport to adopt six to eight months to reach, specifically in peak journey period. Take a translation instrument when traveling into a nation that doesn’t talk your local words. This can be by means of a novel or possibly a telephone software. Whilst you could find that a lot of men and women articulate English language in large places, it could be very various in little municipalities or rural locations. Seeking to talk within the words of the country is actually valued through the citizens. When traveling in yet another land, make sure to clean your hands and below your fingernails typically. Do not feel your skin, particularly your eyesight and oral cavity ,in order to avoid any harmful bacteria or bacterias from getting in. This is especially crucial if you’re going to a much less created region to prevent receiving sick. When you travel a good deal for function, the constant modify of venue and planes can be exhausting. Make it the little bit simpler on your self by always asking for the identical seating once you guide a flight (“9A, you should, or proper within the wing.”) Actually, within the wing is an excellent location as the airplane is generally most solidly anchored and fewer prone to vibrations. Like that, you can expect to really feel as though you’re sitting in “your” seating about the same aeroplane back and forth, and you’ll be also comfortable with working in that exact placement (window at the remaining, and so forth.) If you’re responsive to the aroma of cleaners (or perhaps don’t like them!) try out delivering some little candle lights along with you in your journey. It will help cover up the fragrance of your cleaning solutions the maids use along with the fragrances will also help unwind you. Some aromas can also sooth you and provide you with a greater night’s rest. The tips you merely acquired is a good place to start when contemplating better ways you can start vacationing. When you’re in fact out touring then all you need to think about has entertaining, so be keeping an eye out to get more traveling recommendations that can reduce your stress levels when considering vacationing.
Just about everyone has traveling somewhere in the course of their day-to-day lives. Although some organization or satisfaction travelling could be pleasant, some travels might be uninteresting, dangerous, pricey and filled with hassle. This article consists of some pointers to create your traveling experience better, and assist you to stay away from a number of the popular pit tumbles. When you are traveling to a lot of regions on the planet, be aware of the type of your domestic plumbing. By way of example, potty document will not be suggested to enter the sewer water lines in significantly of the world. Instead, you will find a little basket next to the toilet to keep the paper. To choose if you should purchase vacation insurance plan, you should take a look at exactly how much the vacation is going to expense. At some date down the road, numerous bookings can’t be canceled without some monetary fees. Planning to discover how very much is already in danger if you have to end is a wonderful way to get a solid idea of what you may well be happy to invest to guarantee a trip. Flying with a baggage which includes no dividers or spaces you can split your outfits up in could be challenging. A terrific way to travel this problem is simply by positioning some cardboard among different apparel selections or products. You will not only have the ability to independent your products, nevertheless, you should come out searching a lot more organized. You may want to package up anything you have on a trip. Don’t get an excessive amount of depart toiletries you don’t will need in the home. Create a list of toiletries that you usually use through every day and can’t do without. Load the main things. To help make probably the most of travel in foreign countries, try and plan at the very least a couple of pursuits that aren’t listed in tourist information textbooks or blog sites. This can be done by getting hold of details intended for and produced by local people, be it from papers, blogs or people on youtube. Moving beyond the tourist bubble can certainly make your trip that much more exciting and exciting. When you are traveling by using a dog, do not forget that most pet items are far better purchased at the destination. For example, except when your pet dog is on the particular diet program, investing in a case of pet food once you appear is easier than wanting to carry it. Bowls and also other supplies are identical way. While you are touring, invest in dollars containers that you could put on inside of your clothing or sew simple wallets in to the inside your stomach band. Whenever you can not sew, check with somebody that can to make it happen for you or take it into a personalize or seamstress, and ask for they sew an inside of pocket for you personally. This will keep your valuable items, detection and money harmless and you need not worry about a person stealing your journey case or pocket. Seeing that you’ve acquired some of the basic principles on travelling, tell your manager you take a holiday, obtain your airplane admission, motorboat ticket or no matter what means you intend on taking and go! Remember to always be safe regardless of whether touring by itself or not. Request directions and help should you need it. Most people will never mouthful. Especially, Don’t grow to be overwhelmed when arranging a vacation. Take advantage of the information found over to assist you strategy your holiday. Attempt supplying oneself room to discover a whole lot about journey since it will pay away from when you may need it.
I have not checked in here for some time because I thought it was getting boring, but the last few posts are good quality so I guess I’ll add you back to my daily bloglist. You deserve it my friend 🙂
Good write-up, I’m regular visitor of one’s blog, maintain up the excellent operate, and It is going to be a regular visitor for a lengthy time.
You made some nice points there. I looked on the internet for the subject and found most individuals will agree with your site.
Best view i have ever seen !
Having read this I believed it was really enlightening. I appreciate you taking the time and effort to put this informative article together. I once again find myself spending a significant amount of time both reading and commenting. But so what, it was still worth it!
I needed to put you this bit of remark in order to thank you very much once again for your extraordinary views you’ve documented in this article. It has been really unbelievably open-handed of you giving openly what exactly most of us could have advertised as an e-book to help with making some profit on their own, and in particular seeing that you could possibly have tried it if you considered necessary. These secrets as well worked to provide a great way to fully grasp that the rest have a similar desire similar to my personal own to figure out great deal more with regard to this issue. Certainly there are lots of more fun situations up front for people who scan your blog.
I like what you guys are up too. Such smart work and reporting! Keep up the superb works guys I have incorporated you guys to my blogroll. I think it will improve the value of my site :).
This site is great. I’ll be back soon to see more. Thanks so much! Have a nice day!
The when I just read a blog, I’m hoping that this doesnt disappoint me approximately this one. Get real, Yes, it was my method to read, but When i thought youd have something interesting to state. All I hear is a number of whining about something that you could fix should you werent too busy trying to find attention.Kaila Brockman
Oh my goodness! a tremendous article dude. Thank you However I’m experiencing situation with ur rss . Don’t know why Unable to subscribe to it. Is there anyone getting similar rss problem? Anybody who knows kindly respond. Thnkx
This is really fascinating, You’re a very skilled blogger. I have joined your feed and sit up for in quest of extra of your excellent post. Additionally, I have shared your web site in my social networks!
Having read this I believed it was really enlightening. I appreciate you taking the time and effort to put agen slot casino sbobet this short article together. I once again find myself spending a significant amount of time both reading and leaving comments
Its like you read my mind! You appear to know a lot about this, like you wrote the book in it or something. I think that you can do with some pics to drive the message home a bit, but instead of that, this is fantastic blog. An excellent read. I’ll certainly be back.
Pretty nice post. I just stumbled upon your blog and wanted to say that I have really enjoyed browsing your blog posts. After all I will be subscribing to your feed and I hope you write again very soon!
I need to to thank you for this fantastic read!! I certainly loved every bit of it. I’ve got you book marked to check out new things you post횜
You made several nice points there. I did a search on the issue and found mainly people will consent with your blog.
Hello! This is my first comment here so I just wanted to give a quick shout out and tell you I really enjoy reading your blog posts. Can you suggest any other blogs/websites/forums that deal with the same subjects? Appreciate it!
Good blog post. I definitely appreciate this site. Continue the good work!
Its like you read my mind! You appear to know so much about this, like you wrote the book in it or something. I think that you could do with a few pics to drive the message home a little bit, but instead of that, this is fantastic blog. An excellent read. I will definitely be back.
It is actually a well known fact that travelling is usually a fun and soothing practical experience. However, there are recommendations that you can stick to that will make the quality of your holiday much better. These article will show you what some of those recommendations are. A few of the following details may even big surprise you. In locations that offer air conditioning as a “luxury added” on coaches or on the inside motion picture theatres, generally possess a light coat or sweater. Rather than bringing the heat to some achievable stage, the environment conditioning in many of these locations could be overpowering, particularly if are coming inside and outside of great temperature ranges. To obtain the most from your trip using a child, when picking a resort, you should make sure that you may have either an additional space or possibly a balcony. Considering that preschoolers acquire frequent naps and also go to your bed very early, this will ensure that you are capable to inhabit your self although your little one sleeps. No person actually wishes to call it an evening at seven at nighttime when they are on holiday. When scheduling flights for journey, always select your unique seat in advance. This makes certain you will get the seating you need, whether it be aisle, window, or unexpected emergency get out of row. It can also help prevent you from receiving knocked to standby in the case of an overbooking, since your seating assignment is locked in. If your cellular phone will never deal with long distance through the spot you want to visit, it may be a smart thought to invest in a mobile phone credit card prior to departing. A phone greeting card can certainly make telephone calls much less expensive and make certain you don’t unintentionally make any high-priced cross country cell phone calls. Before you get to your travel location, research the web to identify a blogger who blogposts about what’s occurring with this city. Make time to email the blog writer and request for his or her recommendations about where you should go. This is a wonderful way to obtain the on the inside scoop in your vacation spot. As mentioned at first on this article, you could be experiencing like you should ignore your getaway this season, because of the recent condition of the overall economy. Follow these suggestions to layout a getaway you can afford.
Everything is very open with a really clear description of the issues. It was really informative. Your website is very helpful. Thanks for sharing!
Hello! I’ve been following your website for a while now and finally got the bravery to go ahead and give you a shout out from Lubbock Texas! Just wanted to say keep up the good job!
Next time I read a blog, Hopefully it doesn’t disappoint me as much as this particular one. I mean, Yes, it was my choice to read through, but I truly thought you would have something interesting to talk about. All I hear is a bunch of crying about something that you can fix if you were not too busy looking for attention.
It’s arduous to find educated folks on this matter, but you sound like you already know what you’re speaking about! Thanks
Simply wish to say your article is as astonishing. The clarity in your post is simply cool and i could assume you’re an expert on this subject. Well with your permission let me to grab your RSS feed to keep up to date with forthcoming post. Thanks a million and please keep up the gratifying work.
Traveling is the best way to open your entire world. Not only could it be an entertaining expertise, it educates you about various countries and concepts, even should it be in your own own nation. Simultaneously, travel can be intimidating. This information will outline many ways that can make venturing much easier on you, your family, and your good friends. Airplane trips necessitates that you intend in advance to avoid issues. Most airport terminals are close to major city places, leading them to be hard to access at active days of working day, like hurry hour. Pack your bags the evening before you leave on your journey. Get your arrangements ready before you decide to fly. There is little more that might be worse than not generating your flight. One easy hint for hotel safety factors are to hold a compact rubber door stop with you. It can package effortlessly in a shoes or even be transported in a shirt wallet if you’re simple on room. This front door end might be wedged under the door at nighttime, in order to avoid midnight visitors. In case you are touring overseas, also have local currency in a range of denominations. It is much simpler to get ripped off by way of a taxi vehicle driver or shopkeeper in the event the tiniest monthly bill inside your wallet represents a week’s or even month’s revenue. Little alter is often hard to find, so suspend on your coins when you are getting them. Checklist what you want to take on a journey. You need to make this list close to per week to your couple months beforehand so that you definitely know what must be bundled. This way, although you may hang on to bring along until finally you’re currently crunch, the list may help you steer clear of clutter as well as stay arranged. When you have located a realtor along with an insurance plan you might be content with you are going to pay out your high quality and then you should acquire your created coverage. Obtaining your top quality lets you know that this insurance professional has forwarded your insurance policy top quality information and facts to the insurance company. When you don’t obtain your plan inside a pair several weeks, call your professional. By maintaining this article’s suggestions in mind, you can learn about new things to experience on your own after that journey. You will find that when you follow these tips it will probably be the very best vacation you have had.
Spot on with this write-up, I honestly believe this website needs a lot more attention. I’ll probably be returning to read through more, thanks for the info!
I have noticed that online diploma is getting popular because getting your college degree online has developed into a popular solution for many people. A large number of people have not really had a chance to attend an established college or university however seek the raised earning potential and a better job that a Bachelors Degree gives. Still other individuals might have a qualification in one discipline but would choose to pursue another thing they now develop an interest in.
Saved as a favorite, I like your site.
Hey There. I found your blog the use of msn. This is a really neatly written article. I’ll make sure to bookmark it and return to learn more of your helpful info. Thanks for the post. I will definitely comeback.
I am glad for commenting to let you understand of the brilliant discovery our daughter found visiting the blog. She picked up several pieces, including how it is like to have an awesome teaching mindset to let others very easily learn a number of tricky things. You truly exceeded people’s expected results. Thanks for distributing the necessary, dependable, edifying and also unique tips on your topic to Kate.
Excellent read, I just passed this onto a colleague who was doing a little research on that. And he just bought me lunch as I found it for him smile Thus let me rephrase that: Thank you for lunch!
Wow, fantastic blog layout! How long have you been blogging for? you make blogging look easy. The overall look of your web site is wonderful, let alone the content!
Everything is very open with a very clear clarification of the challenges. It was really informative. Your website is extremely helpful. Many thanks for sharing!
I appreciate you taking the time to talk about them with people.
I have not checked in here for some time because I thought it was getting boring, but the last few posts are great quality so I guess I will add you back to my everyday bloglist. You deserve it my friend 🙂
Well I sincerely enjoyed reading it. This information procured by you is very effective for good planning.
Hello there! Do you know if they make any plugins to assist with Search Engine Optimization? I’m trying to get my blog to rank for some targeted keywords but I’m not seeing very good success. If you know of any please share. Appreciate it!
excellent points altogether, you simply received a logo new reader. What may you suggest about your put up that you made a few days in the past? Any certain?
our kids furnitures are made from pinewood and my kids love it because of the nice colors”
Great web site you have got here.. It’s difficult to find excellent writing like yours nowadays. I truly appreciate individuals like you! Take care!!
Awsome info and right to the point. I am not sure if this is truly the best place to ask but do you guys have any thoughts on where to employ some professional writers? Thank you 🙂
I truly appreciate this post. I have been looking all over for this! Thank goodness I found it on Bing. You have made my day! Thanks again!
Wonderful goods from you, man. I’ve understand your stuff previous to and you’re just extremely fantastic. I actually like what you’ve acquired here, really like what you’re stating and the way in which you say it. You make it enjoyable and you still care for to keep it sensible. I cant wait to read much more from you. This is really a wonderful site.
I’m extremely impressed with your writing skills as well as with the layout on your blog. Is this a paid theme or did you customize it yourself? Anyway keep up the nice quality writing, it’s rare to see a great blog like this one nowadays..
I’ve been surfing online more than 3 hours today, yet I never found any interesting article like yours. It?s pretty worth enough for me. Personally, if all webmasters and bloggers made good content as you did, the web will be a lot more useful than ever before.
I’ll immediately snatch your rss feed as I can’t find your e-mail subscription hyperlink or newsletter service. Do you have any? Kindly allow me know in order that I could subscribe. Thanks.
I was able to find good info from your articles.
Wow, marvelous blog layout! How long have you been blogging for? you made blogging look easy. The overall look of your site is wonderful, as well as the content!
What i don’t understood is actually how you’re not really much more well-liked than you might be now. You are very intelligent. You realize thus significantly relating to this subject, produced me personally consider it from a lot of varied angles. Its like women and men aren’t fascinated unless it’s one thing to do with Lady gaga! Your own stuffs nice. Always maintain it up!
The subsequent time I learn a blog, I hope that it doesnt disappoint me as much as this one. I mean, I do know it was my choice to read, however I actually thought youd have something interesting to say. All I hear is a bunch of whining about something that you possibly can repair if you happen to werent too busy looking for attention.
Nice post. I was checking constantly this blog and I’m inspired! Extremely helpful information particularly the final part 🙂 I care for such information a lot. I was seeking this particular info for a long time. Thank you and best of luck.
Just wish to say your article is as astonishing. The clarity in your post is just spectacular and i could assume you’re an expert on this subject. Fine with your permission allow me to grab your RSS feed to keep updated with forthcoming post. Thanks a million and please continue the enjoyable work.
It’s a shame you don’t have a donate button! I’d without a doubt donate to this outstanding blog! I guess for now i’ll settle for bookmarking and adding your RSS feed to my Google account. I look forward to new updates and will talk about this website with my Facebook group. Chat soon!
Found your blog in the Yahoo screen printing directory, very nice job, thanks.
Magnificent beat ! I would like to apprentice while you amend your site, how can i subscribe for a blog web site? The account helped me a acceptable deal. I had been a little bit acquainted of this your broadcast offered bright clear concept
I would like to thank you for the efforts you’ve put in writing this blog. I’m hoping the same high-grade blog post from you in the upcoming also. Actually your creative writing abilities has encouraged me to get my own site now. Really the blogging is spreading its wings fast. Your write up is a good example of it.
hello!,I love your writing very a lot! proportion we communicate extra about your article on AOL? I require a specialist on this space to solve my problem. May be that is you! Taking a look forward to see you.
Nicely, you’ve determined that you are prepared to begin vacationing. How exciting! Nevertheless, there is certainly so much you need to become aware of in order that you are ready for your trips. Don’t be involved, traveling ideas are in this article! The following are some suggestions that may help you get equipped, to help you develop into a better tourist. In the event you stay in an aisle seating, you’ll have more alternatives. Aside from the look at, windowpane car seats don’t have lots of positive aspects. An aisle seat gives you better access to the luggage storage space, bathrooms, air carrier staff, in addition to keep you from getting squeezed for both aspects. When you are traveling it can make a huge difference traveling when it is not just a holiday or well-known holiday time. If someone continues a period which is less likely to be a well-liked getaway time they could prevent numerous complications. You will find less crowds of people and waits for sights. One can have a considerably more calm time. Try the best to bring along all of your possessions in very little quantity of luggage as you can. You don’t want to take 5 bags of travel luggage with you around the aircraft and overpower oneself. Make an attempt to fold and tuck things into locations where you may make extra space without damaging any valuables. It is possible to make your vacation a lot less stressful by loading softly for the getaway. Try to keep all the items you will need in a handbag even if this may appear impossible, it could be done when you are very careful as to what you incorporate. Preparing casually indicates that you have less points to suit your needs to take care of, and concern yourself with, when you are enjoying your vacation. You must now discover why this hobby and job is incredibly popular. There may be a whole lot that you can see and do! There is also a large amount of information on how to reap the benefits of every getaway. Following these tips, you will be on the right track to learning to be a more intelligent and more secure tourist.
I really loved this content and will be back to see it again Love it!
What i do not understood is in fact how you’re no longer really much more smartly-preferred than you might be right now. You’re so intelligent. You already know therefore considerably in the case of this matter, made me for my part imagine it from numerous numerous angles. Its like men and women don’t seem to be fascinated unless it’s something to do with Lady gaga! Your personal stuffs excellent. Always care for it up!
I’ve been absent for a while, but now I remember why I used to love this blog. Thanks , I will try and check back more often. How frequently you update your website?
My developer is trying to convince me to move to .net from PHP. I have always disliked the idea because of the expenses. But he’s tryiong none the less. I’ve been using WordPress on several websites for about a year and am worried about switching to another platform. I have heard great things about blogengine.net. Is there a way I can transfer all my wordpress content into it? Any help would be really appreciated!
I do love the manner in which you have framed this difficulty and it does indeed supply me some fodder for consideration. However, from just what I have seen, I simply just trust when the actual commentary pile on that people stay on point and not start on a tirade regarding some other news of the day. Yet, thank you for this exceptional piece and whilst I can not necessarily go along with it in totality, I value the perspective.
I do agree with all the ideas you’ve presented in your post. They are really convincing and will certainly work. Still, the posts are too short for newbies. Could you please extend them a little from next time? Thanks for the post.
Hi! I’ve been reading your blog for a while now and finally got the courage to go ahead and give you a shout out from Austin Texas! Just wanted to tell you keep up the excellent job!
Hi my friend! I want to say that this post is awesome, nice written and include almost all significant infos. I’d like to see more posts like this.
Hi! Someone in my Myspace group shared this site with us so I came to give it a look. I’m definitely loving the information. I’m bookmarking and will be tweeting this to my followers! Outstanding blog and superb design.
you could have an important blog here! would you prefer to make some invite posts on my weblog?
Normally I do not read post on blogs, but I would like to say that this write-up very forced me to try and do so! Your writing style has been amazed me. Thanks, quite nice article.
It is merely so nice in order to stay inside the comforts of your very own home. You truly do not seem like proceeding everywhere when you think of all the stress that may be associated with travelling. Nevertheless, it does not have to get that way. The following tips will help make touring much easier on you. To obtain the best from your journey having a toddler, when choosing a motel, make sure which you have sometimes an additional place or even a balcony. Considering that preschoolers acquire repeated naps plus head to bed early on, this may ensure that you are capable of occupy on your own when your child rests. No-one really desires to refer to it as an evening at 8 in the evening while they are on a break. Make sure to confirm your booking in the organization you will certainly be lodging in. Hotels are within their directly to give your living area to a person in addition if you do not verify your booking. A fast telephone call can make sure that you don’t realise you are with out accommodations, if you appear. When you are traveling right away or in the early morning, get the doctor’s authorization to adopt a sleeping supplement as soon as you table. Try to eat your your morning meal then drift away and off to dreamland, and you’ll sleeping perfectly from the total airline flight. Hold off until you happen to be airborne to take your pill though, in the event your flight is late or need to come back to the door. Strategy your loading. Over these events of baggage fees and weight boundaries, most vacationers bring one particular travel suitcase. To fit everything in, you ought to be a smart packer. Check the climate predict for your vacation spot and judge clothes that one could mix and match. Select layers, which could be added or taken out as the temp alterations. Also be sure you dress in your heavier/bulkier shoes or boots so that they don’t hog excessive room in your baggage. Before you arrive at your traveling destination, research the net to identify a blog writer who posts about what’s going on in this particular metropolis. Take time to e mail the blogger and request for their suggestions about best places to go. This really is a terrific way to receive the inside scoop on the vacation location. 90 percent associated with a excellent trip is preparation and knowledge. Getting read through this write-up, with a little luck, you happen to be now packed with tips on planning for and living through your following journey out of the house. Apply what you have learned and you are certain into the future house with good remembrances of been to spots.
After examine just a few of the weblog posts on your web site now, and I really like your way of blogging. I bookmarked it to my bookmark web site record and might be checking again soon. Pls take a look at my website as well and let me know what you think.
of course like your web-site but you need to take a look at the spelling on quite a few of your posts. Several of them are rife with spelling issues and I in finding it very bothersome to tell the truth then again I’ll surely come again again.
Hello there, You have performed an excellent job. I’ll certainly digg it and in my opinion suggest to my friends. I’m confident they will be benefited from this web site.
With havin so much content do you ever run into any problems of plagorism or copyright violation? My site has a lot of unique content I’ve either authored myself or outsourced but it seems a lot of it is popping it up all over the web without my permission. Do you know any ways to help protect against content from being stolen? I’d really appreciate it.
Admiring the time and energy you put into your blog and detailed information you offer. It’s awesome to come across a blog every once in a while that isn’t the same outdated rehashed information. Fantastic read! I’ve saved your site and I’m including your RSS feeds to my Google account.
Hello! Quick question that’s entirely off topic. Do you know how to make your site mobile friendly? My blog looks weird when browsing from my iphone. I’m trying to find a theme or plugin that might be able to fix this issue. If you have any suggestions, please share. Many thanks!
very nice post, i actually love this website, carry on it
Wow! This can be one particular of the most useful blogs We’ve ever arrive across on this subject. Basically Great. I am also a specialist in this topic therefore I can understand your hard work.
Greetings! I’ve been following your blog for a long time now and finally got the courage to go ahead and give you a shout out from Huffman Texas! Just wanted to tell you keep up the fantastic job!
You made some respectable points there. I looked on the internet for the issue and found most people will go along with with your website.order now
I wanted to send you this little note to be able to say thank you over again for those beautiful opinions you have provided at this time. It is really wonderfully open-handed with people like you to grant freely what exactly a lot of people might have marketed as an e book to earn some cash for their own end, specifically considering that you might have done it if you wanted. The good tips as well served as the good way to fully grasp other individuals have the same interest just like my own to see a whole lot more with reference to this issue. I am certain there are many more pleasant situations ahead for many who look into your blog post.
I was suggested this website by my cousin. I am not sure whether this post is written by him as nobody else know such detailed about my problem. You’re wonderful! Thanks!
Wonderful site. A lot of helpful information here. I am sending it to a few buddies ans additionally sharing in delicious. And certainly, thank you for your sweat!
Greetings from Ohio! I’m bored to tears at work so I decided to check out your blog on my iphone during lunch break. I love the information you provide here and can’t wait to take a look when I get home. I’m amazed at how quick your blog loaded on my cell phone .. I’m not even using WIFI, just 3G .. Anyways, good site!
Normally I don’t read article on blogs, but I would like to say that this write-up very forced me to try and do it! Your writing style has been amazed me. Thanks, quite nice article.
Awesome blog! Do you have any helpful hints for aspiring writers? I’m planning to start my own blog soon but I’m a little lost on everything. Would you suggest starting with a free platform like WordPress or go for a paid option? There are so many options out there that I’m totally overwhelmed .. Any recommendations? Bless you!
I appreciate, cause I found just what I was looking for. You have ended my 4 day long hunt! God Bless you man. Have a nice day. Bye
You made some decent points there. I did a search on the subject matter and found most guys will agree with your blog.
I am really loving the theme/design of your website. Do you ever run into any internet browser compatibility problems? A few of my blog visitors have complained about my site not working correctly in Explorer but looks great in Safari. Do you have any tips to help fix this issue?
Thanks for the sensible critique. Me & my neighbor were just preparing to do a little research on this. We got a grab a book from our area library but I think I learned more clear from this post. I am very glad to see such excellent information being shared freely out there.
Thank you for the auspicious writeup. It in fact was a amusement account it. Look advanced to more added agreeable from you! By the way, how could we communicate?
I am usually to blogging and i actually recognize your content. The article has really peaks my interest. I am going to bookmark your site and hold checking for brand new information.
I’m still learning from you, as I’m improving myself. I absolutely love reading all that is written on your site.Keep the posts coming. I liked it!
This is the proper weblog for anyone who wants to seek out out about this topic. You understand a lot its virtually hard to argue with you (not that I truly would want…HaHa). You undoubtedly put a new spin on a topic thats been written about for years. Nice stuff, simply nice!
Wow! Thank you! I continually wanted to write on my blog something like that. Can I include a portion of your post to my blog?
My brother recommended I may like this website. He was once entirely right. This publish actually made my day. You cann’t believe just how much time I had spent for this information! Thanks!
Thanks a bunch for sharing this with all of us you really know what you’re talking about! Bookmarked. Kindly also visit my web site =). We could have a link exchange agreement between us!
I’m very happy to read this. This is the kind of manual that needs to be given and not the random misinformation that’s at the other blogs. Appreciate your sharing this greatest doc.
Hi there, I found your site via Google while searching for a related topic, your site came up, it looks good. I’ve bookmarked it in my google bookmarks.
My brother suggested I would possibly like this blog. He was once totally right. This put up actually made my day. You cann’t imagine simply how so much time I had spent for this information! Thank you!
Undeniably imagine that that you stated. Your favorite reason seemed to be at the internet the easiest thing to take note of. I say to you, I definitely get irked at the same time as other folks consider concerns that they just do not recognize about. You controlled to hit the nail upon the highest and defined out the entire thing with no need side effect , people could take a signal. Will likely be back to get more. Thanks
Wonderful blog! I found it while surfing around on Yahoo News. Do you have any tips on how to get listed in Yahoo News? I’ve been trying for a while but I never seem to get there! Cheers
Best view i have ever seen !
Thanks a bunch for sharing this with all of us you really know what you’re talking about! Bookmarked. Please also visit my web site =). We could have a link exchange arrangement between us!
As a Newbie, I am always searching online for articles that can help me. Thank you
Very good website you have here but I was curious if you knew of any discussion boards that cover the same topics talked about in this article? I’d really like to be a part of online community where I can get advice from other knowledgeable individuals that share the same interest. If you have any suggestions, please let me know. Bless you!
Keep functioning ,splendid job!
Excellent web site. A lot of useful info here. I’m sending it to some friends ans also sharing in delicious. And of course, thanks for your sweat!
Nice blog here! Also your site loads up fast! What web host are you using? Can I get your affiliate link to your host? I wish my website loaded up as quickly as yours lol
It’s arduous to seek out knowledgeable individuals on this topic, however you sound like you realize what you’re talking about! Thanks
This site was… how do you say it? Relevant!! Finally I have found something that helped me. Many thanks.
Howdy! Do you use Twitter? I’d like to follow you if that would be ok. I’m definitely enjoying your blog and look forward to new updates.
It is the best time to make some plans for the long run and it is time to be happy. I have learn this post and if I could I want to suggest you some attention-grabbing things or tips. Perhaps you could write subsequent articles relating to this article. I desire to read more issues approximately it!
I’m not positive where you are getting your info, however good topic. I must spend some time finding out much more or understanding more. Thank you for wonderful information I was looking for this information for my mission.
This is a topic which is close to my heart… Cheers! Exactly where can I find the contact details for questions?
This design is spectacular! You most certainly know how to keep a reader amused. Between your wit and your videos, I was almost moved to start my own blog (well, almost…HaHa!) Wonderful job. I really loved what you had to say, and more than that, how you presented it. Too cool!
Hey very cool web site!! Man .. Excellent .. Amazing .. I’ll bookmark your web site and take the feeds also…I am happy to find numerous useful information here in the post, we need develop more strategies in this regard, thanks for sharing. . . . . .
Fantastic items from you, man. I have be aware your stuff previous to and you’re just extremely magnificent. I really like what you have bought right here, certainly like what you’re stating and the best way by which you say it. You make it enjoyable and you continue to care for to keep it wise. I can’t wait to learn much more from you. This is really a wonderful site.
Thanks for the auspicious writeup. It in truth was once a enjoyment account it. Look complicated to far introduced agreeable from you! By the way, how could we keep in touch?
I’m typically to blogging and i really appreciate your content. The article has really peaks my interest. I am going to bookmark your site and keep checking for brand spanking new information.
http://www.fortyninetysix.com/__media__/js/netsoltrademark.php?d=bestpornsites.club
Hiya, I’m really glad I’ve found this information. Nowadays bloggers publish just about gossips and net and this is really annoying. A good site with exciting content, that’s what I need. Thanks for keeping this web-site, I will be visiting it. Do you do newsletters? Can not find it.
You are a great writer thank you. I love sucking dick btw hmu
Great blog! Is your theme custom made or did you download it from somewhere? A theme like yours with a few simple tweeks would really make my blog jump out. Please let me know where you got your theme. Bless you
Spot on with this write-up, I truly think this web site needs rather more consideration. I’ll most likely be again to read way more, thanks for that info.
After looking into a handful of the blog posts on your blog, I really appreciate your technique of blogging. I book-marked it to my bookmark site list and will be checking back soon. Take a look at my website too and let me know what you think.
I do love the manner in which you have presented this particular difficulty and it really does present me a lot of fodder for consideration. On the other hand, from what precisely I have witnessed, I simply just hope when the reviews pile on that people today continue to be on issue and in no way start on a tirade regarding the news of the day. All the same, thank you for this fantastic piece and although I do not really go along with the idea in totality, I respect your perspective.
I do agree with all the ideas you’ve presented in your post. They are very convincing and will definitely work. Still, the posts are very short for beginners. Could you please extend them a little from next time? Thanks for the post.
Yay google is my queen assisted me to find this outstanding web site! .
I am so happy to read this. This is the kind of manual that needs to be given and not the random misinformation that is at the other blogs. Appreciate your sharing this best doc.
My spouse and I absolutely love your blog and find almost all of your post’s to be just what I’m looking for. Does one offer guest writers to write content for you? I wouldn’t mind writing a post or elaborating on some of the subjects you write with regards to here. Again, awesome web site!
There are lots of details that must be included whilst organising a vacation. Please read on for several valuable traveling ideas that can lower your stress and increase the time period you will need to relax and anticipate your holiday. If you are going to a location that includes a water-limitation on all beverages you might be packaging, put money into nightclub shampoos and teeth natural powder. Surprisingly, you could find pub hair shampoo and toothpaste available in natural powder form on the internet. These items are a fantastic way to have around water-restrictions. Make sure to verify your reservation in the business you will end up lodging in. Accommodations are very well inside their right to give any room to a person else unless you confirm your booking. A fast phone call can make sure that you don’t realise you are with out a place to stay, once you show up. Change the secure in your suitcases by using a mixture secure. Numerous components of baggage feature locks and keys. Keys go missing. Not really that it concerns. The fastens are really quickly and cheaply produced, they can be cracked proper off. It could not a negative thought to dispose of them completely and replace all of them with a more durable mixture fasten. When traveling upon an aircraft, always be sure to possess all you would want for the next working day in your maintain. As your continue is definitely together with you, you can rest assured that in case they will loose your suitcases that you will be able to find by on the very next day. Typically, airlines must have your luggage to you at that time. It may be a good idea to pack a little handbag of goldfish or deliver a little stuffed toy coming from a fast food cafe on the flight along. Even though you don’t have young children, there could be some needy father or mother which will be so thankful for your needs for your gift idea. Hopefully the following tips excite your own personal want to begin touring. The information definitely has opened up your eyes a bit. Very carefully think about the previously mentioned tips. As it pertains time and energy to strategy your vacation, make sure you take a hop and look for an unforgettable experience.
Just wish to say your article is as amazing. The clarity in your post is just excellent and i could assume you’re an expert on this subject. Well with your permission allow me to grab your feed to keep updated with forthcoming post. Thanks a million and please continue the rewarding work.
I enjoy looking through an article that will make men and women think. Also, many thanks for permitting me to comment.
You actually make it appear really easy together with your presentation however I to find this matter to be actually something which I think I would never understand. It sort of feels too complex and very wide for me. I am looking ahead to your next post, I will attempt to get the hang of it!
Excellent blog here! Also your website loads up very fast! What host are you using? Can I get your affiliate link to your host? I wish my website loaded up as fast as yours lol
Hello! This is my 1st comment here so I just wanted to give a quick shout out and tell you I genuinely enjoy reading your posts. Can you recommend any other blogs/websites/forums that go over the same topics? Thanks!
Oh my goodness! Impressive article dude! Many thanks, However I am encountering issues with your RSS. I don’t know the reason why I can’t subscribe to it. Is there anyone else getting identical RSS problems? Anyone who knows the answer will you kindly respond? Thanx.
Appreciating the hard work you put into your blog and in depth information you present. It’s nice to come across a blog every once in a while that isn’t the same old rehashed material. Excellent read! I’ve bookmarked your site and I’m including your RSS feeds to my Google account.
I am really loving the theme/design of your web site. Do you ever run into any web browser compatibility problems? A handful of my blog readers have complained about my blog not operating correctly in Explorer but looks great in Chrome. Do you have any recommendations to help fix this problem?
I don’t even know the way I finished up here, but I thought this post used to be good. I do not recognise who you might be however definitely you are going to a famous blogger if you happen to are not already 😉 Cheers!
I like this post, enjoyed this one appreciate it for putting up.
Practically people have to travel somewhere sooner or later in their day-to-day lives. While many organization or enjoyment travelling might be pleasurable, some travels might be uninteresting, hazardous, high-priced and filled with trouble. This informative article contains some tips to produce your journey encounter far better, and enable you to prevent a few of the popular pit drops. Get community selections on the internet when you are touring. You can find frequently numerous restaurants found around hotels. If you have an internet connection what your location is keeping yourself, apply it to search them up on the internet. Usually you will find selections on the web sites. You can also find instructions and pertinent reviews. If you are concerned about thievery in the places you’ll be browsing, setup your clothing collection ahead of time to ward them away. You may sew passport-sized wallets into the top of the your pants this alternative is much more secure when wandering when compared to a moneybelt. Also look at lining the base of a material case with poultry cable to deter theives with razor cutting blades. To avoid yourself from being sick after having a long trip, you really should think about using a saline apply in your nostrils. This is certainly proven to support fight any germs that could be dormant in the air flow. It’s the best way to acquire one high on the passengers alongside you should they be sick. Look at soaring on vacations if you are searching for any more affordable fare. Many people tend not to want to deal with the hassle of finding yourself in an international airport on the getaway so journeys tend to be less costly. If you are planning an earlier day flight, you simply will not skip any one of the holiday gatherings. If you decide to travel your expectancy is going to be entertainment. If you take into account the tips and advice in the following paragraphs then you will find a chance at generating the most from your upcoming trip. What concerns is you get as close as possible to what you have been anticipating and really feel entirely fulfilled when you give back.
There is definately a lot to find out about this subject. I really like all the points you made.
Right now it sounds like Expression Engine is the best blogging platform available right now. (from what I’ve read) Is that what you’re using on your blog?
My brother suggested I might like this blog. He was totally right. This put up truly made my day. You cann’t consider simply how a lot time I had spent for this info! Thanks!
Hello, i think that i saw you visited my web site thus i came to “return the favor”.I’m attempting to find things to enhance my site!I suppose its ok to use some of your ideas!!
That is the proper weblog for anyone who desires to search out out about this topic. You realize a lot its almost onerous to argue with you (not that I truly would need…HaHa). You positively put a new spin on a subject thats been written about for years. Great stuff, simply nice!
Greetings! Very useful advice in this particular post! It is the little changes that produce the largest changes. Many thanks for sharing!
We are a group of volunteers and opening a new scheme in our community. Your site provided us with valuable info to work on. You have done an impressive job and our entire community will be grateful to you.
My developer is trying to persuade me to move to .net from PHP. I have always disliked the idea because of the expenses. But he’s tryiong none the less. I’ve been using Movable-type on several websites for about a year and am worried about switching to another platform. I have heard very good things about blogengine.net. Is there a way I can transfer all my wordpress posts into it? Any kind of help would be really appreciated!
Hello, i think that i saw you visited my website so i came to “return the favor”.I’m trying to find things to improve my web site!I suppose its ok to use some of your ideas!!
I like the helpful information you provide in your articles. I will bookmark your blog and check again here frequently. I’m quite sure I?ll learn a lot of new stuff right here! Good luck for the next!
Hello! I really enjoyed reading your site. I’ll be back to view again sometime.
Thank you for another informative web site. The place else may I am getting that kind of info written in such an ideal way? I’ve a undertaking that I’m just now operating on, and I have been at the glance out for such information.
Keep this going please, great job!
This really answered my drawback, thanks!
Usually I don’t read article on blogs, but I would like to say that this write-up very compelled me to check out and do so! Your writing style has been amazed me. Thank you, very nice article.
Thank you for the good writeup. It if truth be told was once a leisure account it. Look complex to more brought agreeable from you! By the way, how could we keep in touch?
You have brought up a very wonderful details , thankyou for the post.
Excellent blog here! Also your web site loads up fast! What web host are you using? Can I get your affiliate link to your host? I wish my web site loaded up as fast as yours lol
hello!,I like your writing so much! share we communicate more about your article on AOL? I require a specialist on this area to solve my problem. May be that’s you! Looking forward to see you.
You are my inhalation , I have few blogs and very sporadically run out from to post .
Howdy! I know this is kinda off topic but I was wondering if you knew where I could locate a captcha plugin for my comment form? I’m using the same blog platform as yours and I’m having trouble finding one? Thanks a lot!
I love looking through a post that will make people think. Also, many thanks for allowing for me to comment!
Hi there very cool web site!! Guy .. Beautiful .. Wonderful .. I’ll bookmark your site and take the feeds additionally…I’m happy to seek out a lot of helpful information right here within the post, we want work out more strategies on this regard, thank you for sharing. . . . . .
I am not sure where you are getting your information, but good topic. I needs to spend some time learning more or understanding more. Thanks for great information I was looking for this info for my mission.
Nice post. I learn something totally new and challenging on sites I stumbleupon every day. It will always be helpful to read articles from other writers and practice a little something from other web sites.
Good day! I simply would like to give an enormous thumbs up for the good data you’ve here on this post. I will be coming again to your weblog for more soon.
hello there and thank you for your info ? I have definitely picked up something new from right here. I did however expertise a few technical issues using this site, as I experienced to reload the site lots of times previous to I could get it to load properly. I had been wondering if your hosting is OK? Not that I am complaining, but sluggish loading instances times will often affect your placement in google and could damage your high-quality score if advertising and marketing with Adwords. Anyway I?m adding this RSS to my email and could look out for a lot more of your respective interesting content. Ensure that you update this again very soon..
Hi there, I discovered your blog by means of Google while searching for a comparable subject, your website got here up, it seems good. I’ve bookmarked it in my google bookmarks.
I’m impressed, I have to admit. Rarely do I come across a blog that’s both equally educative and entertaining, and without a doubt, you have hit the nail on the head. The issue is something too few folks are speaking intelligently about. I’m very happy I stumbled across this during my search for something relating to this.
Absolutely indited content material , thanks for information .
An outstanding share! I’ve just forwarded this onto a coworker who has been doing a little homework on this. And he in fact bought me lunch because I found it for him… lol. So allow me to reword this…. Thank YOU for the meal!! But yeah, thanks for spending some time to discuss this matter here on your internet site.
Way cool! Some extremely valid points! I appreciate you penning this write-up and the rest of the website is very good.
May I simply say what a comfort to find someone that actually knows what they’re discussing on the internet. You certainly know how to bring an issue to light and make it important. A lot more people must read this and understand this side of your story. I can’t believe you aren’t more popular since you definitely have the gift.
This is a topic that is close to my heart… Cheers! Where are your contact details though?
Hi, i feel that i saw you visited my website so i got here to “go back the desire”.I am trying to find issues to enhance my site!I guess its good enough to make use of a few of your ideas!!
I feel this is among the such a lot significant information for me. And i am satisfied studying your article. However wanna observation on few normal issues, The site style is wonderful, the articles is in point of fact nice : D. Excellent process, cheers
This is very interesting, You are a very skilled blogger. I have joined your rss feed and look forward to seeking more of your great post. Also, I have shared your site in my social networks!
I want to to thank you for this wonderful read!! I certainly loved every bit of it. I’ve got you saved as a favorite to check out new stuff you post…
I love looking through a post that can make people think. Also, thanks for allowing for me to comment!
An impressive share! I’ve just forwarded this onto a coworker who had been conducting a little research on this. And he in fact bought me lunch due to the fact that I discovered it for him… lol. So let me reword this…. Thanks for the meal!! But yeah, thanx for spending the time to discuss this subject here on your web site.
You can certainly see your enthusiasm within the work you write. The arena hopes for more passionate writers like you who aren’t afraid to say how they believe. All the time follow your heart.
Excellent blog here! Also your site loads up fast! What host are you using? Can I get your affiliate link to your host? I wish my website loaded up as quickly as yours lol
I do agree with all the ideas you’ve presented in your post. They are really convincing and will definitely work. Still, the posts are too short for beginners. Could you please extend them a bit from next time? Thanks for the post.
I’ve been surfing online greater than 3 hours lately, but I by no means discovered any attention-grabbing article like yours. It’s pretty value enough for me. In my opinion, if all website owners and bloggers made just right content as you probably did, the net shall be a lot more useful than ever before. “Revolution is not a onetime event.” by Audre Lorde.
Wonderful blog! I found it while searching on Yahoo News. Do you have any suggestions on how to get listed in Yahoo News? I’ve been trying for a while but I never seem to get there! Many thanks
Go over the following tips to discover how to program the ideal getaway. Learn how to find discounted prices and visit a place that you just will delight in. Arranging a getaway can be quite a long approach, and you ought to undoubtedly begin ahead of time. Reading through the following tips need to assist you in getting started. Travel might be the best way to get away from all this, but sometimes it is required to get in touch with the rest of the entire world. For this reason, make certain your cellular phone operates everywhere you are proceeding or purchase a pre-paid telephone inside your destination region. You will be glad you probably did in the event you shed your bank cards or passport and want to contact your financial institution – or embassy! – without delay. When traveling, don’t neglect you could traveling by tour bus to numerous regions in Northern and Latin America. It might be far less costly than traveling by air which is usually reduce-pressure for the travellers. Travelling by tour bus has misplaced much of its preconception in recent times, with many organizations buying new automobiles and also hiring security officers to journey coupled. Analysis every little thing that you can regarding your trip. Locate reviews online about the locations you want to go. Check with folks you know that have been there just before. If you try this investigation, you will end up better equipped and know where to start and take while going to. If you are gathering regular flier mls out of your moves, take notice of the regards to use for all those kilometers. In many cases, the mls end just twelve to 18 weeks soon after they’ve been acquired, or they are able to just be applied to particular schedules as well as a restricted group of places. Prior to buying an airline depending on kilometers, be aware of restrictions. In summary, you acquired not simply some essentials about vacation but also some distinct techniques that you could apply it to the personal circumstance. Providing you are fully commited and also have a aim to function toward, the guidelines in this article ought to be useful for finding much achievement and satisfaction.
Journey can be something we all look ahead to. It is actually a break in the monotony for each working day existence. It really is a possiblity to loosen up and are living stress free for a couple of weeks, from function and all responsibilities. This is some advice for the following time you choose to go on a break. When traveling by air, generally have a bottle of water helpful. Consuming lots of essential fluids will make sure that your entire body stays hydrated throughout the flight. The air inside the cabin is extremely dry, taking part in damage with your body. Don’t alternative liquor or coffee for normal water, since this could make dehydration a whole lot worse. When traveling outside North America, it is best to deliver your own alarm time clock. Most hotel rooms in significantly less-produced regions will not provide a time clock, and with out them, you manage the chance of missing out on the bond to the next spot. Sometimes these may be of use in coach or tour bus stations too. Buy a package of toiletries and set up them aside mainly for traveling. If you traveling frequently, preparing all of your toiletries can be quite a discomfort. It is not at all difficult to forget something as simple as a toothbrush or even a adhere of deodorant. Save your time by buying a pair of these matters that you continue hand, exclusively for taking with you on trips. When considering the items you might take with you on the trip, think about exactly what the weather will probably be like. You can examine just how the climate has been in the region for the past 7 days as well as check out the predict. Just be certain you are taking measures if needed, so you won’t be captured unawares, when the conditions determines to improve. It may be smart to load up a tiny handbag of goldfish or provide a bit stuffed toy coming from a take out cafe on a airline flight along. Although you may don’t have children, there could be some distressed mother or father that will be so happy for your needs for your personal gift idea. As was stated initially with this write-up, tension is usually an important aspect in vacation, for various reasons. You don’t ought to allow it ruin you, rather conquer it by arming on your own with successful journey ideas that will certainly make your trip get worried-free and risk-free.
You can certainly see your skills within the work you write. The arena hopes for more passionate writers like you who aren’t afraid to mention how they believe. Always go after your heart.
Good blog post. I absolutely appreciate this site. Keep writing!
Please let me know if you’re looking for a author for your weblog. You have some really good posts and I feel I would be a good asset. If you ever want to take some of the load off, I’d absolutely love to write some articles for your blog in exchange for a link back to mine. Please blast me an e-mail if interested. Regards!
http://www.tubethenew.com/__media__/js/netsoltrademark.php?d=bestpornsites.club/
Well I really liked studying it. This information procured by you is very useful for good planning.
whoah this weblog is great i really like studying your posts. Keep up the great paintings! You recognize, a lot of persons are looking round for this information, you can aid them greatly.
We stumbled over here different website and thought I should check things out. I like what I see so now i’m following you. Look forward to checking out your web page again.
Hi! I just want to offer you a huge thumbs up for the great information you have here on this post. I’ll be coming back to your blog for more soon.
Very good post. I am facing a few of these issues as well..
After looking over a handful of the blog articles on your website, I seriously like your technique of writing a blog. I saved it to my bookmark website list and will be checking back in the near future. Take a look at my web site as well and tell me what you think.
Dead indited content, Really enjoyed examining.
I relish, lead to I found exactly what I used to be looking for. You have ended my 4 day long hunt! God Bless you man. Have a nice day. Bye
I think this is among the most important information for me. And i am glad reading your article. But wanna remark on few general things, The website style is ideal, the articles is really great : D. Good job, cheers
Today, while I was at work, my cousin stole my iphone and tested to see if it can survive a thirty foot drop, just so she can be a youtube sensation. My apple ipad is now broken and she has 83 views. I know this is entirely off topic but I had to share it with someone!
An attention-grabbing dialogue is price comment. I believe that you should write extra on this matter, it might not be a taboo subject however typically individuals are not enough to talk on such topics. To the next. Cheers
Can I just say what a relief to uncover an individual who genuinely understands what they’re discussing on the web. You definitely realize how to bring an issue to light and make it important. More people have to look at this and understand this side of your story. I was surprised you’re not more popular given that you most certainly possess the gift.
I couldn’t resist commenting
Appreciating the persistence you put into your blog and in depth information you provide. It’s great to come across a blog every once in a while that isn’t the same old rehashed material. Fantastic read! I’ve saved your site and I’m adding your RSS feeds to my Google account.
The next time I read a blog, Hopefully it does not disappoint me as much as this one. After all, Yes, it was my choice to read, but I actually thought you would probably have something helpful to say. All I hear is a bunch of whining about something you could fix if you were not too busy searching for attention.
Thank you so much for providing individuals with an extremely brilliant possiblity to discover important secrets from this web site. It is usually very pleasant plus packed with amusement for me personally and my office peers to search your web site minimum 3 times weekly to see the fresh stuff you have got. And of course, I am just at all times fascinated with the attractive thoughts you give. Selected 4 ideas in this posting are surely the most efficient we have ever had.
I’ve been exploring for a little for any high quality articles or blog posts on this kind of area . Exploring in Yahoo I at last stumbled upon this website. Reading this information So i am happy to convey that I have a very good uncanny feeling I discovered exactly what I needed. I most certainly will make certain to do not forget this web site and give it a look on a constant basis.
I couldn’t refrain from commenting. Well written!
My brother suggested I might like this web site. He was entirely right. This post truly made my day. You cann’t imagine just how much time I had spent for this info! Thanks!
Nice post. I used to be checking constantly this blog and I’m inspired! Very helpful info particularly the ultimate section 🙂 I deal with such information much. I used to be seeking this certain information for a long time. Thanks and good luck.
Very good article. I’m experiencing many of these issues as well..
Pretty nice post. I just stumbled upon your weblog and wished to say that I’ve truly enjoyed surfing around your blog posts. In any case I will be subscribing to your rss feed and I hope you write again very soon!
Spot on with this write-up, I really feel this amazing site needs much more attention. I’ll probably be returning to read more, thanks for the info.
Only wanna comment on few general things, The website design is perfect, the subject matter is very good : D.
Go to Pure CBD Selection for the best pure cbd oil. You can buy pure cbd oil that is full spectrum or broad spectrum. Make sure to sign up for there newsletter to receive a free coupon code.
We are a group of volunteers and opening a new scheme in our community. Your web site offered us with valuable information to work on. You have done a formidable job and our entire community will be grateful to you.
We’re a group of volunteers and starting a new scheme in our community. Your web site provided us with valuable information to work on. You’ve done a formidable job and our entire community will be thankful to you.
My brother recommended I might like this website. He was entirely right. This post truly made my day. You can not imagine just how much time I had spent for this information! Thanks!
Your house is valueble for me. Thanks!…
Best view i have ever seen !
You could definitely see your expertise in the work you write. The arena hopes for more passionate writers like you who aren’t afraid to mention how they believe. All the time go after your heart.
Spot on with this write-up, I honestly believe that this amazing site needs much more attention. I’ll probably be returning to see more, thanks for the information.
Hi there! This article could not be written any better! Looking at this post reminds me of my previous roommate! He constantly kept preaching about this. I am going to forward this post to him. Fairly certain he will have a very good read. I appreciate you for sharing!
Excellent website. Lots of helpful information here. I am sending it to some friends ans also sharing in delicious. And naturally, thanks to your effort!
I believe this web site holds some really superb info for everyone : D.
Hello! I enjoyed this post. Thank you for sharing it. I’ll be back to enjoy more.
Needed to write you this little observation just to thank you very much over again relating to the awesome methods you’ve discussed on this website. It’s so incredibly open-handed with people like you to allow without restraint what many individuals might have offered for an ebook in making some bucks on their own, notably considering that you could possibly have done it in the event you desired. These principles also acted to become great way to understand that someone else have the identical desire much like mine to realize more with regards to this condition. I’m certain there are numerous more fun occasions in the future for individuals that look over your blog post.
Thank you, I have just been looking for information about this topic for a long time and yours is the greatest I’ve discovered so far. But, what in regards to the conclusion? Are you certain concerning the supply?
I’d like to thank you for the efforts you have put in penning this site. I am hoping to see the same high-grade blog posts from you later on as well. In truth, your creative writing abilities has encouraged me to get my own, personal site now 😉
I love it when people come together and share opinions, great blog, keep it up.
I went over this web site and I think you have a lot of wonderful information, saved to favorites (:.
Wonderful beat ! I would like to apprentice while you amend your web site, how could i subscribe for a blog site? The account helped me a acceptable deal. I had been a little bit acquainted of this your broadcast provided bright clear concept
I’ve recently started a blog, the info you offer on this website has helped me tremendously. Thank you for all of your time & work.
I really love your website.. Pleasant colors & theme. Did you make this web site yourself? Please reply back as I’m looking to create my own personal website and would love to find out where you got this from or what the theme is called. Thank you!
Thanks for your write-up. I also think that laptop computers have gotten more and more popular these days, and now are usually the only kind of computer included in a household. Simply because at the same time that they are becoming more and more economical, their processing power keeps growing to the point where they can be as highly effective as desktop computers from just a few in years past.
Nice blog post. I learn something a lot more tough on different blog sites everyday. It will constantly be promoting to read material from other writers as well as exercise a something from their store. I?d favor to utilize some with the web content on my blog site whether you don?t mind. Natually I?ll provide you a link on your internet blog site. Thanks for sharing.
Oh my goodness! Amazing article dude! Thanks, However I am going through problems with your RSS. I don’t know the reason why I cannot join it. Is there anyone else getting the same RSS issues? Anyone who knows the answer can you kindly respond? Thanx!!
http://www.landerscash.com/__media__/js/netsoltrademark.php?d=bestpornsites.club
Your style is unique compared to other folks I’ve read stuff from. Thanks for posting when you have the opportunity, Guess I will just bookmark this blog.
This is a topic that is near to my heart… Thank you! Exactly where can I find the contact details for questions?
Wow, amazing blog layout! How long have you been running a blog for? you made blogging glance easy. The full look of your site is fantastic, as well as the content!
Hello! This is my first vacation to your website! Our
company is a group of volunteers and starting a new initiative inside a community from the same niche.
Your blog provided us valuable information to operate on. You
may have done a extraordinary job!
Here is my page KatiaQIzzi
You’re so cool! I don’t suppose I’ve read a single thing like that before. So good to find another person with some original thoughts on this subject. Seriously.. many thanks for starting this up. This web site is one thing that is needed on the internet, someone with some originality.
Go to Pure CBD Selection for the best pure cbd oil. You can buy pure cbd oil that is full spectrum or broad spectrum. Make sure to sign up for there newsletter to receive a free coupon code.
Good post. I study something tougher on different blogs everyday. It’ll at all times be stimulating to learn content from different writers and practice a bit something from their store. I’d favor to use some with the content on my weblog whether or not you don’t mind. Natually I’ll give you a hyperlink on your internet blog. Thanks for sharing.
The next time I learn a blog, I hope that it doesnt disappoint me as much as this one. I imply, I do know it was my choice to read, but I actually thought youd have something interesting to say. All I hear is a bunch of whining about one thing that you would fix if you werent too busy looking for attention.
I also believe that mesothelioma cancer is a rare form of cancer malignancy that is often found in these previously familiar with asbestos. Cancerous tissues form inside the mesothelium, which is a protective lining that covers many of the body’s body organs. These cells normally form while in the lining from the lungs, stomach, or the sac that really encircles the heart. Thanks for expressing your ideas.
I conceive this web site has some real wonderful info for everyone. “Variety is the soul of pleasure.” by Aphra Behn.
Today, while I was at work, my sister stole my apple ipad and tested to see if it can survive a 40 foot drop, just so she can be a youtube sensation. My iPad is now broken and she has 83 views. I know this is totally off topic but I had to share it with someone!
What’s Taking place i’m new to this, I stumbled upon this I have found It absolutely helpful and it has helped me out loads. I hope to contribute & help different customers like its aided me. Great job. Delma Washing
Excellent web site you have got here.. It’s difficult to find good quality writing like yours these days. I really appreciate people like you! Take care!!
I could not resist commenting. Well written.
After going over a handful of the blog articles on your blog, I really like your way of blogging. I saved as a favorite it to my bookmark website list and will be checking back soon. Please check out my website as well and let me know what you think.
I’m not sure why but this website is loading incredibly slow for me. Is anyone else having this issue or is it a problem on my end? I’ll check back later and see if the problem still exists.
Go to Pure CBD Selection for the best pure cbd oil. You can buy pure cbd oil that is full spectrum or broad spectrum. Make sure to sign up for there newsletter to receive a free coupon code.
https://www.nahbclassic.org/directory_detail_clickThru.aspx?directoryRecordID=215036&url=https://bestpornsites.club
Interested in more info. How can I contact you? I love sucking dick btw hmu
I want to to thank you for this excellent read!! I definitely loved every little bit of it. I’ve got you bookmarked to check out new stuff you post…
Hi, I think your blog may be having browser compatibility problems. Whenever I take a look at your website in Safari, it looks fine however, when opening in IE, it has some overlapping issues. I merely wanted to provide you with a quick heads up! Aside from that, fantastic website!
UV-C (otherwise known as germicidal UV) items
tout pathogen eliminate costs greater than 99.9Per cent.
Check out my page :: uv sterilizer
It is in reality a great and useful piece of information. I am satisfied that you shared this useful information with us. Please stay us informed like this. Thanks for sharing.
Go to Pure CBD Selection for the best pure cbd oil. You can buy pure cbd oil that is full spectrum or broad spectrum. Make sure to sign up for there newsletter to receive a free coupon code.
Hi there! I know this is kinda off topic but I was wondering if you knew where I could find a captcha plugin for my comment form? I’m using the same blog platform as yours and I’m having difficulty finding one? Thanks a lot!
You ought to take part in a contest for one of the most useful sites on the web. I’m going to recommend this site!
I appreciate, cause I found exactly what I was looking for. You have ended my 4 day long hunt! God Bless you man. Have a great day. Bye
You should take part in a contest for one of the best blogs on the web. I will recommend this web site!
http://oldnewton.com/__media__/js/netsoltrademark.php?d=bestpornsites.club
There’s certainly a lot to learn about this issue. I like all of the points you’ve made.
Hello! This post couldn’t be written any better! Reading through this post reminds me of my good old room mate! He always kept chatting about this. I will forward this post to him. Pretty sure he will have a good read. Thanks for sharing!
Great blog you have here.. It’s hard to find good quality writing like yours these days. I really appreciate individuals like you! Take care!!
Everything is very open with a clear clarification of the issues. It was really informative. Your site is useful. Many thanks for sharing!
I intended to compose you one very little word to be able to thank you so much yet again for the extraordinary ideas you’ve discussed on this site. It was certainly tremendously generous with you to convey easily just what a lot of folks would have offered for an electronic book in making some bucks for their own end, most importantly now that you might well have done it in the event you considered necessary. The solutions additionally served to be the good way to realize that other people have a similar fervor really like my own to grasp somewhat more on the subject of this matter. I think there are numerous more fun times in the future for folks who look over your website.
Hello there! Do you know if they make any plugins to assist with SEO? I’m trying to get my blog to rank for some targeted keywords but I’m not seeing very good success. If you know of any please share. Appreciate it!
I am regular reader, how are you everybody? This piece of writing posted at this web site is really pleasant.|
Hi, I do believe this is an excellent blog. I stumbledupon it 😉 I may return once again since I saved as a favorite it. Money and freedom is the best way to change, may you be rich and continue to guide other people.
F*ckin’ remarkable things here. I am very glad to see your article. Thank you so much and i’m looking ahead to contact you. Will you kindly drop me a e-mail?
I think that is among the so much important info for me. And i’m satisfied reading your article. However should remark on some common things, The site style is ideal, the articles is in point of fact nice : D. Just right job, cheers|
There is certainly a lot to learn about this issue. I really like all of the points you made.
I’m not that much of a internet reader to be honest but your sites really nice, keep it up! I’ll go ahead and bookmark your website to come back later on. Cheers
Hi! I could have sworn IÃve visited this web site before but after browsing through many of the articles I realized itÃs new to me. Anyhow, IÃm certainly delighted I stumbled upon it and IÃll be book-marking it and checking back frequently!
You’re so cool! I do not think I’ve read through anything like that before. So nice to find another person with a few genuine thoughts on this issue. Really.. many thanks for starting this up. This site is one thing that is needed on the internet, someone with a little originality.
I blog quite often and I genuinely appreciate your content. The article has truly peaked my interest. I will bookmark your site and keep checking for new details about once a week. I opted in for your RSS feed as well.
Best view i have ever seen !
My partner and I absolutely love your blog and find a lot of your post’s to be exactly what I’m looking for. can you offer guest writers to write content for you? I wouldn’t mind creating a post or elaborating on some of the subjects you write concerning here. Again, awesome weblog!
How can I get more useful info? I love sucking dick btw hmu
This is a topic that’s near to my heart… Thank you! Exactly where can I find the contact details for questions?
An impressive share! I’ve just forwarded this onto a co-worker who had been conducting a little homework on this. And he in fact bought me dinner simply because I stumbled upon it for him… lol. So allow me to reword this…. Thanks for the meal!! But yeah, thanks for spending some time to talk about this issue here on your website.
Good post. I will be experiencing some of these issues as well..
Excellent blog here! Also your web site loads up fast! What host are you using? Can I get your affiliate link to your host? I wish my site loaded up as quickly as yours lol
Nice blog here! Also your web site loads up very fast! What host are you using? Can I get your affiliate link to your host? I wish my web site loaded up as quickly as yours lol
Heya i am for the primary time here. I came across this board and I in finding It truly useful & it helped me out a lot. I am hoping to present one thing again and help others like you helped me.
Hello There. I found your blog using msn. This is a very well written article. I?ll be sure to bookmark it and return to read more of your useful information. Thanks for the post. I will certainly return.
I quite like looking through a post that can make men and women think. Also, thank you for allowing me to comment.
Hello. excellent job. I did not expect this. This is a fantastic story. Thanks!
Have you ever thought about including a little bit more than just your articles? I mean, what you say is fundamental and all. However just imagine if you added some great visuals or video clips to give your posts more, “pop”! Your content is excellent but with pics and video clips, this blog could definitely be one of the greatest in its niche. Great blog!
I quite like reading a post that can make people think. Also, many thanks for allowing me to comment!|
After exploring a handful of the articles on your blog, I truly like your technique of blogging. I added it to my bookmark site list and will be checking back soon. Please check out my website too and tell me your opinion.
Very good info. Lucky me I discovered your website by chance (stumbleupon). I have saved as a favorite for later!
I’m extremely impressed with your writing skills as well as with the layout on your weblog. Is this a paid theme or did you modify it yourself? Either way keep up the nice quality writing, it?s rare to see a great blog like this one these days..
Very nice post. I certainly appreciate this website. Stick with it!
I do love the way you have presented this specific problem plus it does indeed supply me personally a lot of fodder for thought. However, coming from everything that I have seen, I basically wish as other feedback stack on that folks continue to be on issue and in no way embark on a soap box of some other news of the day. Yet, thank you for this superb piece and although I do not go along with the idea in totality, I value the perspective.
Oh my goodness! a tremendous article dude. Thanks However I’m experiencing problem with ur rss . Don’t know why Unable to subscribe to it. Is there anybody getting an identical rss drawback? Anyone who knows kindly respond. Thnkx
Hello There. I found your blog using msn. This is a very well written article. I?ll make sure to bookmark it and return to read more of your useful information. Thanks for the post. I?ll certainly comeback.
Keep this going please, great job!|
I love it when folks come together and share ideas. Great blog, keep it up!
I blog frequently and I genuinely appreciate your content. This article has really peaked my interest. I’m going to bookmark your blog and keep checking for new information about once a week. I subscribed to your Feed too.
Great write-up, I’m normal visitor of one’s blog, maintain up the excellent operate, and It is going to be a regular visitor for a lengthy time.
I have recently started a blog, the information you provide on this web site has helped me tremendously. Thank you for all of your time & work.
you have a wonderful blog below! would you such as to make some invite blog posts on my blog site?
Thanks for your personal marvelous posting! I genuinely enjoyed reading it, you’re a great author.I will be sure to bookmark your blog and will come back very soon. I want to encourage you to definitely continue your great posts, have a nice day!
Greetings! Very useful advice within this post! It is the little changes that will make the most important changes. Thanks for sharing!
Simply wish to say your article is as surprising. The clarity in your post is just great and i could assume you are an expert on this subject. Fine with your permission allow me to grab your feed to keep up to date with forthcoming post. Thanks a million and please carry on the gratifying work.
I enjoyed this blog post. I hope you continue creating it. I’ll be back to see more.
I truly appreciate this blog article. Really Cool. Malissa Lamborne
Wonderful goods from you, man. I have understand your stuff previous to and you’re just too wonderful. I actually like what you have acquired here, certainly like what you are saying and the way in which you say it. You make it entertaining and you still care for to keep it sensible. I can’t wait to read much more from you. This is actually a great site.
You made some decent points there. I checked on the web for additional information about the issue and found most people will go along with your views on this web site.
Also a thing to mention is that an online business administration study course is designed for college students to be able to easily proceed to bachelor’s degree courses. The 90 credit education meets the lower bachelor college degree requirements when you earn the associate of arts in BA online, you will get access to the modern technologies with this field. Several reasons why students need to get their associate degree in business is because they’re interested in the field and want to have the general schooling necessary prior to jumping to a bachelor education program. Thx for the tips you really provide as part of your blog.
you’re in point of fact a excellent webmaster. The website loading velocity is incredible. It seems that you are doing any distinctive trick. Moreover, The contents are masterwork. you have performed a magnificent job in this subject!
Pretty section of content. I just stumbled upon your website and in accession capital to assert that I acquire actually enjoyed account your blog posts. Any way I?ll be subscribing to your feeds and even I achievement you access consistently quickly.
We’re a bunch of volunteers and starting a brand new scheme in our community. Your website provided us with valuable information to work on. You’ve performed an impressive activity and our entire community will be thankful to you.|
Good day! I could have sworn I’ve been to this web site before but after looking at some of the posts I realized it’s new to me. Nonetheless, I’m definitely pleased I found it and I’ll be bookmarking it and checking back often.
Greetings! Very helpful advice in this particular post! It’s the little changes that will make the most significant changes. Thanks for sharing!
How can I reach you? I am interested in more information. I love sucking dick btw hmu
Simply want to say your article is as astonishing. The clearness in your post is just spectacular and i could assume you are an expert on this subject. Fine with your permission let me to grab your feed to keep up to date with forthcoming post. Thanks a million and please continue the enjoyable work.
Hello are using WordPress for your blog platform? I’m new to the blog world but I’m trying to get started and set up my own. Do you need any html coding knowledge to make your own blog? Any help would be greatly appreciated!
We’re a group of volunteers and opening a new scheme in our community. Your website offered us with valuable information to work on. You have done a formidable job and our whole community will be thankful to you.
Thanks a lot for sharing this with all of us you really know what you’re talking about! Bookmarked. Please also visit my site =). We could have a link exchange arrangement between us!
Excellent read, I just passed this onto a colleague who was doing some research on that. And he actually bought me lunch because I found it for him smile Therefore let me rephrase that: Thanks for lunch! “The capacity to care is what gives life its most deepest significance.” by Pablo Casals.
Its not my first time to visit this website, i am browsing this web site dailly and get nice information from here daily.|
I uncovered your blog site on google and also examine a few of your early blog posts. Continue to maintain the excellent operate. I simply additional up your RSS feed to my MSN News Viewers. Looking for forward to reading more from you later on!?
I needed to thank you for this great read!! I definitely loved every bit of it. I have you bookmarked to look at new stuff you post…
Really enjoyed this piece. Thank you for sharing.
Simply desire to say your article is as astounding. The clearness in your post is simply great and i can assume you are an expert on this subject. Fine with your permission let me to grab your feed to keep up to date with forthcoming post. Thanks a million and please carry on the enjoyable work.
As a Newbie, I am continuously exploring online for articles that can be of assistance to me. Thank you
Very cool article. Thanks for writing it!
Great post. I was checking continuously this blog and I’m impressed! Extremely helpful info particularly the last part 🙂 I care for such info much. I was seeking this particular info for a long time. Thank you and good luck.
Excellent site you have got here.. It’s difficult to find quality writing like yours nowadays. I truly appreciate individuals like you! Take care!!
I like the helpful information you provide in your articles. I will bookmark your blog and check again here frequently. I’m quite certain I will learn many new stuff right here! Best of luck for the next!
I do not even understand how I stopped up right here, but I thought this submit was good. I don’t realize who you are however definitely you’re going to a well-known blogger in case you aren’t already 😉 Cheers!
I have not checked in here for some time because I thought it was getting boring, but the last few posts are great quality so I guess I will add you back to my everyday bloglist. You deserve it my friend 🙂
Just want to say your article is as surprising. The clearness in your post is simply excellent and i could assume you’re an expert on this subject. Well with your permission allow me to grab your feed to keep updated with forthcoming post. Thanks a million and please keep up the rewarding work.|
You have made some good points there. I looked on the net to find out more about the issue and found most individuals will go along with your views on this site.
Most of the things you mention is astonishingly accurate and that makes me ponder why I hadn’t looked at this in this light previously. Your article truly did turn the light on for me as far as this particular subject matter goes. However at this time there is actually just one factor I am not too comfortable with so whilst I try to reconcile that with the core theme of your point, allow me observe exactly what all the rest of the readers have to say.Nicely done.
really good message, i absolutely love this internet site, keep on it
Saved as a favorite, I like your web site.
I appreciate you sharing this article.Really thank you! Nelly Deveney
You ought to take part in a contest for one of the highest quality websites on the web. I will recommend this blog!
This text is invaluable. When can I find out more?|
hey there and thank you for your info ? I have certainly picked up something new from right here. I did however expertise several technical issues using this web site, as I experienced to reload the site a lot of times previous to I could get it to load correctly. I had been wondering if your web hosting is OK? Not that I’m complaining, but slow loading instances times will sometimes affect your placement in google and could damage your high quality score if ads and marketing with Adwords. Anyway I?m adding this RSS to my email and can look out for a lot more of your respective fascinating content. Make sure you update this again soon..
My husband and i got now relieved that Michael could finish off his inquiry via the ideas he made in your site. It is now and again perplexing to simply always be making a gift of facts which usually some others have been making money from. And now we do know we now have you to thank for this. The explanations you’ve made, the simple web site menu, the relationships your site make it possible to foster – it’s everything powerful, and it’s aiding our son and us reason why this issue is thrilling, which is certainly exceedingly pressing. Many thanks for the whole thing!
Посетите сайт казино Goxbet, позвольте себе немного расслабиться и, возможно,
получить приятную денежную сумму на реализацию давних желаний.
Feel free to visit my page ::
Wow, wonderful blog layout! How long have you been blogging for? you make blogging look easy. The overall look of your website is wonderful, as well as the content!
I like this post, enjoyed this one regards for putting up. “The difference between stupidity and genius is that genius has its limits.” by Albert Einstein.
My brother recommended I would possibly like this website. He used to be totally right. This submit truly made my day. You can not believe simply how much time I had spent for this info! Thank you!
This was a really great blog post. Thanks so much for writing it.
Hello there! I know this is somewhat off topic but I was wondering if you knew where I could find a captcha plugin for my comment form? I’m using the same blog platform as yours and I’m having problems finding one? Thanks a lot!
Neat blog! Is your theme custom made or did you download it from somewhere? A theme like yours with a few simple adjustements would really make my blog stand out. Please let me know where you got your theme. Cheers
There is definately a lot to know about this subject. I really like all of the points you’ve made.
A motivating discussion is definitely worth comment. I think that you need to write more about this issue, it might not be a taboo subject but generally people don’t talk about such subjects. To the next! Kind regards!
It’s awesome to pay a visit this site and reading the views of all colleagues concerning this piece of writing, while I am also eager of getting experience.|
Hello there, You’ve done an incredible job. I will certainly digg it and personally recommend to my friends. I’m sure they will be benefited from this website.
When I originally commented I clicked the -Inform me when brand-new remarks are included- checkbox and also currently each time a comment is included I get 4 emails with the very same remark. Exists any way you can remove me from that solution? Many thanks!
I really love the website. I’ll return for more. thanks for sharing.
Good site you have here.. It’s hard to find high-quality writing like yours nowadays. I really appreciate people like you! Take care!!
This was a really awesome article. Thanks for creating it.
Attractive section of content. I just stumbled upon your web site and in accession capital to assert that I acquire in fact enjoyed account your blog posts. Anyway I?ll be subscribing to your feeds and even I achievement you access consistently quickly.
I want to to thank you for this good read!! I certainly enjoyed every bit of it. I have you book-marked to look at new things you post…
I just could not depart your site before suggesting that I really enjoyed the standard information a person provide for your visitors? Is gonna be back often to check up on new posts
I appreciate, cause I found exactly what I was looking for. You’ve ended my 4 day long hunt! God Bless you man. Have a nice day. Bye
I couldn’t refrain from commenting. Well written.
Saved as a favorite, I like your web site!
I absolutely love your blog and find many of your post’s to be precisely what I’m looking for. can you offer guest writers to write content in your case? I wouldn’t mind producing a post or elaborating on most of the subjects you write about here. Again, awesome blog!
That is a great tip especially to those new to the blogosphere. Short but very accurate information… Appreciate your sharing this one. A must read article.
I was suggested this website via my cousin. I am not sure whether or not this post is written by way of him as nobody else recognise such designated about my difficulty. You’re amazing! Thank you!|
I love your blog.. very nice colors & theme. Did you make this website yourself or did you hire someone to do it for you? Plz respond as I’m looking to design my own blog and would like to know where u got this from. thanks a lot|
I’m more than happy to uncover this page. I need to to thank you for ones time for this fantastic read!! I definitely really liked every part of it and i also have you saved as a favorite to see new things in your site.
I?¦ll right away snatch your rss as I can’t find your email subscription hyperlink or newsletter service. Do you’ve any? Please allow me recognise so that I may just subscribe. Thanks.
An impressive share! I’ve just forwarded this onto a co-worker who was conducting a little research on this. And he in fact ordered me dinner simply because I stumbled upon it for him… lol. So let me reword this…. Thank YOU for the meal!! But yeah, thanx for spending some time to discuss this subject here on your blog.
The next time I review a blog, I really hope that it does not disappoint me as high as this set. I suggest, I recognize it was my choice to review, but I actually assumed youd have something fascinating to claim. All I listen to is a bunch of yawping regarding something that you might take care of if you werent also active looking for attention.
This is the right web site for anyone who wants to understand this topic. You understand a whole lot its almost tough to argue with you (not that I personally would want to…HaHa). You certainly put a fresh spin on a subject that’s been discussed for years. Wonderful stuff, just wonderful.
Good site you have here.. It’s hard to find quality writing like yours nowadays. I seriously appreciate individuals like you! Take care!!
Very good article! We are linking to this particularly great content on our website. Keep up the great writing.
This website certainly has all of the info I needed concerning this subject and didn’t know who to ask.
Kudos to you, My partner and i realized something new. Give thanks to you so much. We appear forward to working with you.
When I initially commented I seem to have clicked the -Notify me when new comments are added- checkbox and from now on whenever a comment is added I recieve 4 emails with the same comment. There has to be a way you can remove me from that service? Kudos.
Pretty! This was a really wonderful post. Many thanks for supplying this information.|
Good blog post. I definitely appreciate this website. Continue the good work!
I could not refrain from commenting. Well written!
I couldn’t refrain from commenting. Perfectly written!
“Hey, thanks for the article. Great.” Roosevelt Frohock
You made some decent points there. I viewed on the internet for the concern and also located most people will support with your internet site.
Greetings! Very helpful advice within this post! It is the little changes that will make the largest changes. Many thanks for sharing!
Best view i have ever seen !
It’s perfect time to make some plans for the future and it’s time to be happy. I’ve read this post and if I could I want to suggest you some interesting things or advice. Perhaps you could write next articles referring to this article. I wish to read even more things about it!
Aw, this was an exceptionally nice post. Taking a few minutes and actual effort to create a good article… but what can I say… I procrastinate a whole lot and don’t seem to get nearly anything done.
I could not refrain from commenting. Perfectly written!
Somos una empresa dedicada a la fabricación de piezas y a la reparación y mantenimiento de maquinaria, utensilios y construcciones mecánicas. Suministros Industriales y Servicio de Asistencia Técnica SAT. Esta página utiliza cookies propias y de terceros para mejorar nuestros servicios y así facilitar tu navegación.
I got what you intend,bookmarked, very nice web site.
This website was… how do you say it? Relevant!! Finally I’ve found something that helped me. Many thanks!
I believe what you said was very logical. But, what about this? what if you added a little content? I ain’t saying your information isn’t solid., but what if you added a headline that makes people desire more? I mean BLOG_TITLE is kinda boring. You could glance at Yahoo’s front page and note how they create article titles to grab viewers to open the links. You might add a video or a related pic or two to grab people interested about everything’ve got to say. Just my opinion, it might bring your posts a little bit more interesting.|
Greate article. Keep posting such kind of info on your site. Im really impressed by it.
I’m amazed, I must say. Seldom do I encounter a blog that’s equally educative and engaging, and without a doubt, you’ve hit the nail on the head. The problem is something not enough people are speaking intelligently about. Now i’m very happy that I came across this during my hunt for something relating to this.
hello there and thank you for your information ? I have definitely picked up anything new from right here. I did however expertise a few technical issues using this web site, since I experienced to reload the site a lot of times previous to I could get it to load properly. I had been wondering if your hosting is OK? Not that I am complaining, but sluggish loading instances times will sometimes affect your placement in google and can damage your high-quality score if ads and marketing with Adwords. Anyway I?m adding this RSS to my e-mail and could look out for much more of your respective interesting content. Ensure that you update this again very soon..
Have you ever thought about adding a little bit more than just your articles? I mean, what you say is valuable and everything. But imagine if you added some great images or video clips to give your posts more, “pop”! Your content is excellent but with pics and clips, this website could undeniably be one of the very best in its field. Very good blog!
I like looking through a post that will make men and women think. Also, many thanks for allowing for me to comment.
I uncovered your blog site on google and examine a few of your early messages. Continue to maintain the very good run. I just added up your RSS feed to my MSN Information Reader. Looking for ahead to reading more from you later on!?
I truly wanted to make a small message to thank you for all the stunning tips and hints you are writing here. My long internet look up has at the end of the day been paid with really good know-how to write about with my close friends. I ‘d say that many of us site visitors are definitely endowed to live in a notable community with so many lovely people with great plans. I feel truly blessed to have seen your entire webpage and look forward to many more thrilling moments reading here. Thank you once again for a lot of things.
Great blog here! Also your site loads up very fast! What host are you using? Can I get your affiliate link to your host? I wish my web site loaded up as quickly as yours lol
Great article! We will be linking to this particularly great article on our site. Keep up the good writing.
Heya i am for the primary time here. I came across this board and I find It truly helpful & it helped me out much. I am hoping to present something back and aid others like you helped me.|
“Wow, great article.Much thanks again. Will read on…” Luba Detraglia
A motivating discussion is worth comment. There’s no doubt that that you need to publish more about this subject matter, it may not be a taboo matter but typically people do not talk about these topics. To the next! All the best.
I’m amazed, I must say. Seldom do I encounter a blog that’s both educative and entertaining, and let me tell you, you have hit the nail on the head. The problem is something that not enough folks are speaking intelligently about. I am very happy that I stumbled across this during my search for something concerning this.
Excellent site, I will save favorite nodes
Excellent blog, thank you very much
Great tutorial
I liked the article congratulations, I will save us favorites too
I loved this article. Thanks for sharing it.
Useful info. Fortunate me I found your site by accident, and I’m surprised why this coincidence didn’t came about in advance! I bookmarked it.|
Good info and straight to the point. I don’t know if this is truly the best place to ask but do you guys have any ideea where to hire some professional writers? Thanks 🙂
Your location is valueble for me. Many thanks !?
Aw, this was an exceptionally nice post. Spending some time and actual effort to make a top notch article… but what can I say… I hesitate a lot and don’t seem to get anything done.
I needed to thank you for this great read!! I definitely enjoyed every bit of it. I have got you book marked to look at new things you postÖ
I’d must verify with you here. Which isn’t one thing I usually do! I get pleasure from studying a submit that may make people think. Also, thanks for permitting me to comment!
Hi, I do think your site could possibly be having internet browser compatibility problems. When I look at your blog in Safari, it looks fine however when opening in I.E., it’s got some overlapping issues. I merely wanted to provide you with a quick heads up! Other than that, excellent site!
This is a topic that I have been looking into. You have made it much easier. I locate your perspective entirely delightful and rather distinct. Similar to my very own, yet various. Thanks for testing my ideas.
I’m amazed, I have to admit. Seldom do I encounter a blog that’s both educative and entertaining, and let me tell you, you’ve hit the nail on the head. The problem is something which not enough people are speaking intelligently about. Now i’m very happy I stumbled across this in my hunt for something regarding this.
I am glad to be a visitant of this double dyed web site! , appreciate it for this rare information! .
Aw, this was a really good post. Spending some time and actual effort to produce a top notch article… but what can I say… I put things off a lot and never manage to get nearly anything done.
Im not positive the place you are getting your info, but great topic. I must spend a while learning more or understanding more. Thanks for great information I used to be in search of this information for my mission.
Hi there! This blog post could not be written any better! Looking through this article reminds me of my previous roommate! He continually kept preaching about this. I most certainly will send this article to him. Fairly certain he’s going to have a great read. I appreciate you for sharing!
Thank you so much for helping me. I love sucking dick btw hmu
I want to to thank you for this very good read!! I definitely enjoyed every little bit of it. I’ve got you book marked to check out new stuff you post…
This is a topic that’s near to my heart… Cheers! Exactly where are your contact details though?|
Good blog you have got here.. It’s hard to find quality writing like yours nowadays. I honestly appreciate people like you! Take care!!
Greetings, I believe your site could possibly be having web browser compatibility issues. When I look at your blog in Safari, it looks fine but when opening in I.E., it’s got some overlapping issues. I merely wanted to provide you with a quick heads up! Besides that, great blog.
This web site is truly a walk-through for every one of the details you wanted concerning this and didn?t understand who to ask. Glance here, and also you?ll absolutely uncover it.
Hi, i think that i noticed you visited my weblog so i came to return the prefer?.I am attempting to to find things to enhance my web site!I guess its ok to use some of your ideas!!|
Good day! I just want to offer you a huge thumbs up for your excellent info you have here on this post. I am coming back to your blog for more soon.
I want to to thank you for this wonderful read!! I certainly enjoyed every bit of it. I have you book-marked to check out new things you post…
Hello there! I could have sworn I’ve been to this web site before but after going through many of the posts I realized it’s new to me. Anyways, I’m definitely happy I came across it and I’ll be bookmarking it and checking back frequently.
An impressive share! I have just forwarded this onto a co-worker who was doing a little research on this. And he actually bought me dinner simply because I discovered it for him… lol. So allow me to reword this…. Thank YOU for the meal!! But yeah, thanx for spending the time to talk about this matter here on your web page.|
I?m amazed, I should claim. Truly rarely do I run into a blog site that?s both informative and also entertaining, as well as let me inform you, you have struck the nail on the head. Your idea is superior; the problem is something that not nearly enough people are talking intelligently about. I am very delighted that I stumbled across this in my look for something connecting to this.
Your style is very unique in comparison to other folks I have read stuff from. Thanks for posting when you have the opportunity, Guess I will just bookmark this blog.
That is a good tip particularly to those new to the blogosphere.
Simple but very precise info… Thank you for sharing this one.
A must read post!
I wanted to thank you for this fantastic read!! I certainly enjoyed every bit of it. I’ve got you saved as a favorite to look at new stuff you post…
Hey! I just would like to give an enormous thumbs up for the great info you’ve gotten here on this post. I will probably be coming again to your weblog for extra soon.
Very good information. Lucky me I recently found your site by accident (stumbleupon). I’ve saved as a favorite for later.
There’s certainly a lot to find out about this subject. I love all of the points you have made.
Woah! I’m really enjoying the template/theme of this blog. It’s simple, yet effective. A lot of times it’s very difficult to get that “perfect balance” between usability and visual appeal. I must say that you’ve done a superb job with this. Additionally, the blog loads extremely fast for me on Internet explorer. Outstanding Blog!
You are my aspiration, I have few web logs and occasionally run out from to post : (.
Some truly grand work on behalf of the owner of this internet site, perfectly great articles.
Aw, this was an exceptionally nice post. Taking a few minutes and actual effort to generate a very good article… but what can I say… I hesitate a lot and never manage to get anything done.
My brother recommended I may like this website. He was totally right. This publish truly made my day. You cann’t believe just how a lot time I had spent for this info! Thank you!
May I simply just say what a comfort to uncover an individual who truly understands what they are talking about on the web. You definitely know how to bring an issue to light and make it important. More people need to look at this and understand this side of the story. I can’t believe you aren’t more popular because you certainly possess the gift.
Youre so trendy! I do not mean Ive review anything similar to this prior to. So great to find somebody with some original thoughts on this subject. realy thanks for beginning this up. this website is something that is needed on the internet, somebody with a little originality. beneficial work for bringing something new to the web!
I’m still learning from you, while I’m trying to achieve my goals. I definitely liked reading everything that is written on your website.Keep the posts coming. I enjoyed it!
Hey there! Someone in my Myspace group shared this site with us so I came to look it over. I’m definitely enjoying the information. I’m bookmarking and will be tweeting this to my followers! Excellent blog and brilliant style and design.|
Thanks for making this really good article. I’ll be back to read more.
Great info. Lucky me I discovered your website by accident (stumbleupon). I’ve bookmarked it for later!
I believe this is among the most important information for me. And i’m glad studying your article. But should statement on some common issues, The web site style is perfect, the articles is really nice : D. Good activity, cheers
Keep functioning ,impressive job!
Everyone loves it when people get together and share ideas. Great website, stick with it!
I discovered your blog site on google and check a few of your early posts. Continue to keep up the very good operate. I just additional up your RSS feed to my MSN News Reader. Seeking forward to reading more from you later on!…
An outstanding share, I just offered this onto a coworker that was doing a little evaluation on this. And he in fact got me morning meal because I located it for him. smile. So let me rephrase that: Thnx for the reward! But yeah Thnkx for spending the time to review this, I feel highly concerning it and also like reading more on this topic. Ideally, as you end up being know-how, would you mind updating your blog with more details? It is highly practical for me. Huge thumb up for this blog post!
A motivating discussion is definitely worth comment. I do think that you ought to publish more about this subject, it might not be a taboo matter but usually people do not talk about such subjects. To the next! All the best.
Very interesting information!Perfect just what I was searching for!
Howdy! This blog post could not be written much better! Looking at this post reminds me of my previous roommate! He continually kept talking about this. I most certainly will send this article to him. Pretty sure he will have a good read. Many thanks for sharing!
You are a very clever individual!
Very interesting points you have observed, thankyou for posting.
Its such as you read my thoughts! You seem to know so much about this, such as you wrote the ebook in it or something. I believe that you can do with some percent to force the message house a little bit, but instead of that, that is fantastic blog. A great read. I’ll definitely be back.
Hello there, just turned into aware of your blog through Google, and found that it is truly informative. I am going to watch out for brussels. I’ll be grateful in the event you proceed this in future. Many folks will likely be benefited from your writing. Cheers!
Hi, There’s no doubt that your site may be having browser compatibility issues. When I take a look at your site in Safari, it looks fine however, if opening in IE, it has some overlapping issues. I just wanted to provide you with a quick heads up! Other than that, great website!
I truly love your blog.. Pleasant colors & theme. Did you build this site yourself? Please reply back as I’m attempting to create my own personal site and would love to find out where you got this from or exactly what the theme is named. Cheers.
Thanks for helping out, good info .
I consider something genuinely special in this website .
This article was fantastic Thank you for creating it.
I conceive you have remarked some very interesting points, appreciate it for the post.
Hi my friend! I want to say that this post is awesome, nice written and include almost all significant infos. I would like to see more posts like this.
An outstanding share! I have just forwarded this onto a co-worker who was conducting a little homework on this. And he in fact ordered me dinner because I found it for him… lol. So let me reword this…. Thank YOU for the meal!! But yeah, thanx for spending the time to discuss this topic here on your blog.
Pretty! This has been an extremely wonderful post. Many thanks for supplying this information.
Can I just say what a relief to find someone who actually knows what theyre talking about on the internet. You definitely know how to bring an issue to light and make it important. More people need to read this and understand this side of the story. I cant believe youre not more popular because you definitely have the gift.
My brother suggested I might like this blog. He was entirely right. This post actually made my day. You can not imagine simply how much time I had spent for this info! Thanks!
I dugg some of you post as I cogitated they were extremely helpful very useful
Hi, I do think this is an excellent blog. I stumbledupon it 😉 I’m going to revisit once again since I book-marked it. Money and freedom is the best way to change, may you be rich and continue to help others.
Would you be fascinated in trading web links?
I do believe all the ideas you’ve offered to your post. They’re really convincing and can certainly work. Still, the posts are very quick for newbies. Could you please extend them a bit from next time? Thanks for the post.
Hello there, simply became alert to your blog thru Google, and found that it is really informative. I am gonna watch out for brussels. I’ll be grateful for those who continue this in future. A lot of folks will likely be benefited from your writing. Cheers!
I dugg some of you post as I thought they were invaluable extremely helpful
Hi my friend! I wish to say that this post is amazing, nice written and include approximately all important infos. I’d like to look extra posts like this .
I don’t even know how I ended up here, but I thought this post was great. I do not know who you are but definitely you’re going to a famous blogger if you are not already 😉 Cheers!
Really good content. I’ll be back to read more. Thank you for creating it.
I real glad to find this web site on bing, just what I was searching for : D too saved to fav.
I’m really impressed with your writing skills as well as with the layout on your blog. Is this a paid theme or did you customize it yourself? Anyway keep up the excellent quality writing, it is rare to see a great blog like this one today..
I savour, lead to I found just what I used to be looking for. You’ve ended my 4 day long hunt! God Bless you man. Have a nice day. Bye
Hello! I could have sworn I’ve been to this blog before but after browsing through some of the post I realized it’s new to me. Anyways, I’m definitely happy I found it and I’ll be book-marking and checking back frequently!
Good info. Lucky me I reach on your website by accident, I bookmarked it.
You should be a part of a contest for one of the highest quality websites online. I will highly recommend this website!
summer vibe music video by Eden Zamora in a sandy beach
Utterly pent content material, Really enjoyed looking at.
You are a very clever person!
With havin so much written content do you ever run into any issues of plagorism or copyright infringement? My blog has a lot of unique content I’ve either created myself or outsourced but it seems a lot of it is popping it up all over the web without my agreement. Do you know any ways to help protect against content from being ripped off? I’d truly appreciate it.
I enjoy reading a post that will make people think. Also, thanks for allowing me to comment.
Hey There. I found your blog using msn. This is a very well written article. I’ll be sure to bookmark it and return to read more of your useful information. Thanks for the post. I will definitely comeback.
Nice post. I learn something totally new and challenging on blogs I stumbleupon every day. It’s always interesting to read through articles from other writers and practice a little something from other sites.
This excellent website truly has all the information and facts I wanted about this subject and didn’t know who to ask. |
I’m still learning from you, as I’m improving myself. I absolutely liked reading all that is written on your blog.Keep the tips coming. I enjoyed it!
Hello I am so delighted I found your weblog, I really found you by mistake, while I was looking on Google for something else, Regardless I am here now and would just like to say cheers for a remarkable post and a all round entertaining blog (I also love the theme/design), I don’t have time to read it all at the moment but I have saved it and also added in your RSS feeds, so when I have time I will be back to read a lot more, Please do keep up the excellent work.
Hmm is anyone else experiencing problems with the pictures on this blog loading? I’m trying to figure out if its a problem on my end or if it’s the blog. Any feed-back would be greatly appreciated.
Pretty component to content. I just stumbled upon your blog and in accession capital to say that I acquire actually loved account your blog posts. Anyway I’ll be subscribing on your feeds and even I fulfillment you get admission to consistently rapidly.
Yes! Finally someone writes about keyword1.|
I’m impressed, I must say. Really rarely do I encounter a weblog that’s each educative and entertaining, and let me let you know, you have got hit the nail on the head. Your concept is excellent; the difficulty is one thing that not sufficient people are talking intelligently about. I am very joyful that I stumbled across this in my seek for one thing regarding this.
Thank you for the good writeup. It in fact was a amusement account it. Look advanced to more added agreeable from you! By the way, how could we communicate?
I really enjoyed this blog post. Thanks for creating it. You do an excellent job on this blog!
Hi, i think that i saw you visited my website so i got here to “go back the desire”.I am attempting to find issues to improve my web site!I suppose its ok to make use of a few of your ideas!!
We’re a gaggle of volunteers and opening a new scheme in our community. Your website provided us with valuable info to paintings on. You’ve done an impressive activity and our entire group will likely be thankful to you.
You really make it seem so easy with your presentation but I find this matter to be really something that I think I would never understand. It seems too complicated and very broad for me. I am looking forward for your next post, I will try to get the hang of it!
Asking questions are genuinely good thing if you are not understanding something fully, except this piece of writing offers good understanding even.|
Can I simply state what an alleviation to locate a person that actually recognizes what theyre speaking about online. You certainly understand how to bring a problem to light and make it crucial. Even more people require to read this and also comprehend this side of the tale. I angle think youre not extra popular due to the fact that you certainly have the present.
Nice post. I was checking continuously this blog and I am impressed! Very useful information specifically the last part 🙂 I care for such info a lot. I was looking for this particular information for a long time. Thank you and best of luck.
I will right away grab your rss as I can’t find your e-mail subscription link or e-newsletter service. Do you’ve any? Kindly let me know so that I could subscribe. Thanks.
This excellent website really has all the information and facts I wanted concerning this subject and didn’t know who to ask.
Hello there, I found your website via Google while searching for a related topic, your site came up, it looks good. I’ve bookmarked it in my google bookmarks.
It’s really a cool and helpful piece of info. I am glad that you shared this helpful info with us. Please keep us informed like this. Thanks for sharing.
Usually I don’t read post on blogs, but I would like to say that this write-up very forced me to try and do so! Your writing style has been amazed me. Thanks, very nice article.
I’m still learning from you, but I’m trying to achieve my goals. I certainly liked reading all that is written on your website.Keep the information coming. I enjoyed it!
Heya i?m for the first time here. I found this board and I find It truly useful & it helped me out much. I hope to give something back and aid others like you helped me.
I’m excited to discover this website. I wanted to thank you for your time due to this fantastic read!! I definitely loved every part of it and i also have you book marked to see new things in your website.
Nice post. I was checking continuously this blog and I’m impressed! Very helpful info specially the last part 🙂 I care for such info much. I was looking for this certain info for a very long time. Thank you and good luck.
I really enjoy examining on this internet site, it contains superb posts. “Beware lest in your anxiety to avoid war you obtain a master.” by Demosthenes.
Can I simply just say what a relief to find someone that genuinely knows what they’re talking about on the net. You actually understand how to bring a problem to light and make it important. More and more people ought to look at this and understand this side of the story. I was surprised that you aren’t more popular because you certainly possess the gift.
What a data of un-ambiguity and preserveness of precious knowledge on the topic of unpredicted emotions.|
Thank you for sharing excellent informations. Your site is so cool. I’m impressed by the details that you’ve on this web site. It reveals how nicely you perceive this subject. Bookmarked this website page, will come back for extra articles. You, my friend, ROCK! I found simply the info I already searched everywhere and just couldn’t come across. What a great web-site.
I went over this web site and I believe you have a lot of great information, bookmarked (:.
It is in point of fact a nice and helpful piece of information. I am glad that you simply shared this helpful information with us. Please stay us informed like this. Thank you for sharing.
Nice post. I was checking constantly this blog and I’m impressed! Very helpful info particularly the last part 🙂 I care for such information a lot. I was looking for this particular info for a long time. Thank you and best of luck.
I am often to blogging and i really appreciate your content. The article has really peaks my interest. I am going to bookmark your site and keep checking for new information.
I think this is among the most significant information for me. And i am glad reading your article. But wanna remark on some general things, The website style is great, the articles is really great : D. Good job, cheers
We absolutely love your blog and find many of your post’s to be exactly I’m looking for. Would you offer guest writers to write content available for you? I wouldn’t mind producing a post or elaborating on a few of the subjects you write about here. Again, awesome web log!|
Its like you read my mind! You appear to know so much about this, like you wrote the book in it or something. I think that you could do with a few pics to drive the message home a bit, but instead of that, this is wonderful blog. A fantastic read. I will definitely be back.
We are a group of volunteers and starting a new scheme in our community. Your web site offered us with valuable info to work on. You have done a formidable job and our entire community will be thankful to you.
Wow that was unusual. I just wrote an very long comment but after I clicked submit my comment didn’t appear. Grrrr… well I’m not writing all that over again. Anyhow, just wanted to say great blog!
You are a great writer thanks. I love sucking dick btw hmu
Nora, ma’am, you are a publishing Goddess. I just hope you were able to retrieve your shoe from Debra’s clueless hiney without any trouble. LOLDebra, bless your heart, you are so breathlessly wrong and you can’t even accept that. The customer is not only NOT “always right,” frequently the customer is a walking bag of excrement. But thank you for giving me the perfect excuse to use one of my favorite The West Wing gifs on Twitter, of President Bartlett saying, “Just stand there in your wrongness and be wrong and get used to it.”
Thank you for the good writeup. It in fact was a amusement account it. Look advanced to far added agreeable from you! However, how could we communicate?
Greetings! Very helpful advice in this particular article! It’s the little changes which will make the most important changes. Many thanks for sharing!
I do not even know how I ended up here, but I thought this post was good. I don’t know who you are but certainly you’re going to a famous blogger if you are not already 😉 Cheers!
I loved as much as you will receive carried out right here. The sketch is attractive, your authored subject matter stylish. nonetheless, you command get bought an nervousness over that you wish be delivering the following. unwell unquestionably come more formerly again since exactly the same nearly very often inside case you shield this hike.|
Fantastic beat ! I would like to apprentice whilst you amend your website, how can i subscribe for a blog web site? The account aided me a acceptable deal. I were a little bit acquainted of this your broadcast provided vibrant clear idea
Awesome article and thank you for sharing it. I’ll be back to view more.
Have you ever thought about adding a little bit more than just your articles? I mean, what you say is fundamental and all. But imagine if you added some great graphics or videos to give your posts more, “pop”! Your content is excellent but with images and clips, this blog could certainly be one of the most beneficial in its field. Amazing blog!
Some genuinely superb articles on this website, thanks for contribution. “Be absolutely determined to enjoy what you do.” by Sarah Knowles Bolton.
Excellent post. I absolutely love this site. Stick with it!
I really like your writing! I love sucking dick btw hmu
Wow! This can be one particular of the most helpful blogs We have ever arrive across on this subject. Actually Magnificent. I’m also a specialist in this topic so I can understand your hard work.
But a smiling visitor here to share the love (:, btw great design and style. “Individuals may form communities, but it is institutions alone that can create a nation.” by Benjamin Disraeli.
You actually make it seem so easy with your presentation but I find this topic to be really something that I think I would never understand. It seems too complicated and extremely broad for me. I’m looking forward for your next post, I will try to get the hang of it!
Instagram gerçek Türk takipçi arttırmanız için herhangi bir işlem için şifre talebi bulunmamaktadır.
Pretty! This was a really wonderful post. Thank you for your provided information.
I used to be able to find good advice from your blog posts.
Hello there, just became aware of your blog through Google, and found that it is really informative. I am going to watch out for brussels. I?ll appreciate if you continue this in future. Many people will be benefited from your writing. Cheers!
I really like reading through an article that will make people think. Also, thanks for allowing for me to comment!
Have you ever thought about including a little bit more than just your articles? I mean, what you say is valuable and all. But just imagine if you added some great images or video clips to give your posts more, “pop”! Your content is excellent but with images and videos, this site could undeniably be one of the best in its field. Very good blog!
I’ve been browsing online more than three hours today, yet I never found any interesting article like yours. It is pretty worth enough for me. Personally, if all site owners and bloggers made good content as you did, the net will be a lot more useful than ever before.
Fantastic goods from you, man. I’ve understand your stuff previous to and you are just extremely magnificent. I really like what you’ve acquired here, really like what you are stating and the way in which you say it. You make it enjoyable and you still take care of to keep it smart. I cant wait to read far more from you. This is really a tremendous site.
Sweet blog! I found it while searching on Yahoo News. Do you have any tips on how to get listed in Yahoo News? I’ve been trying for a while but I never seem to get there! Thank you
Hello! Do you know if they make any plugins to assist with SEO? I’m trying to get my blog to rank for some targeted keywords but I’m not seeing very good success. If you know of any please share. Kudos!|
Aw, this was a really good post. Spending some time and actual effort to create a great article… but what can I say… I hesitate a whole lot and never seem to get anything done.|
I just wanted to take a moment to allow you recognize that I more than happy I located this article on your blog. You have exceeded as well as beyond in your study. I want to learn more articles concerning this subject on your blog in the future. Thank you a lot for guaranteeing I do not have to look the web for this topic any much longer.
Good info. Lucky me I recently found your site by chance (stumbleupon). I have book marked it for later!
certainly like your website however you have to test the spelling on quite a few of your posts. A number of them are rife with spelling problems and I to find it very bothersome to inform the reality however I will surely come back again.
Wow, marvelous blog layout! How long have you been blogging for? you made blogging look easy. The overall look of your site is magnificent, let alone the content!
I?m not sure where you are getting your information, but good topic. I needs to spend some time learning more or understanding more. Thanks for fantastic info I was looking for this info for my mission.
I loved your content. Thanks for sharing it. I’m a massive supporter of your stuff.
Heya i’m for the first time here. I came across this board and I to find It truly useful & it helped me out a lot. I am hoping to present something back and aid others like you aided me.
An intriguing discussion is definitely worth comment. I believe that you ought to write more on this subject, it may not be a taboo matter but usually people don’t talk about such issues. To the next! All the best!
For newest news you have to pay a quick visit internet and on world-wide-web I found this web page as a most excellent web site for newest updates.|
You have brought up a very wonderful points, thanks for the post.
Its like you read my mind! You appear to know so much about this, like you wrote the book in it or something. I think that you could do with some pics to drive the message home a bit, but instead of that, this is great blog. An excellent read. I’ll certainly be back.
An outstanding share! I’ve just forwarded this onto a colleague who was doing a little homework on this. And he actually bought me lunch simply because I discovered it for him… lol. So let me reword this…. Thanks for the meal!! But yeah, thanx for spending some time to talk about this subject here on your site.
hello there and thank you for your info ? I?ve definitely picked up anything new from right here. I did however expertise a few technical points using this web site, since I experienced to reload the web site lots of times previous to I could get it to load correctly. I had been wondering if your hosting is OK? Not that I am complaining, but sluggish loading instances times will very frequently affect your placement in google and can damage your high-quality score if advertising and marketing with Adwords. Well I am adding this RSS to my e-mail and can look out for much more of your respective exciting content. Ensure that you update this again soon..
I don’t even know how I ended up here, but I thought this post was good. I do not know who you are but definitely you are going to a famous blogger if you aren’t already 😉 Cheers!
After looking into a few of the articles on your website, I honestly appreciate your way of blogging. I bookmarked it to my bookmark webpage list and will be checking back soon. Please visit my web site too and tell me your opinion.
Those are yours alright! . We at least need to get these people stealing images to start blogging! They probably just did a image search and grabbed them. They look good though!
I must thank you for the efforts you’ve put in penning this blog. I am hoping to view the same high-grade blog posts by you later on as well. In fact, your creative writing abilities has inspired me to get my own, personal blog now 😉
Thanks for some other great article. Where else could anyone get that kind of info in such an ideal manner of writing? I’ve a presentation next week, and I’m at the search for such info.|
What’s up it’s me, I am also visiting this website daily, this website is genuinely pleasant and the viewers are truly sharing nice thoughts.|
Good info and straight to the point. I don’t know if this is in fact the best place to ask but do you guys have any thoughts on where to employ some professional writers? Thanks in advance 🙂
Great beat ! I wish to apprentice while you amend your web site, how could i subscribe for a blog site? The account aided me a acceptable deal. I had been a little bit acquainted of this your broadcast provided bright clear concept
I believe you have remarked some very interesting details , thankyou for the post.
whoah this weblog is excellent i really like studying your articles. Keep up the great work! You already know, many people are searching around for this information, you can aid them greatly.
In this Medium article you will find a list of the best gifts for 18 year old boys.
Howdy! I could have sworn I’ve visited this blog before but after going through some of the posts I realized it’s new to me. Regardless, I’m definitely delighted I discovered it and I’ll be book-marking it and checking back regularly!
Fantastic website, many thanks for the post
I really enjoyed this article, thanks for sharing it. I’ll be back for more. See you again!
This article is really a pleasant one it assists new web
people, who are wishing in favor of blogging.
Also visit my site; Peak NO Boost XT
We’re a group of volunteers and starting a new scheme in our community. Your website provided us with valuable info to work on. You have done a formidable job and our entire community will be grateful to you.
Really superb info can be found on weblog.
Very good post. I’m going through a few of these issues as well..
Hi there everybody, here every one is sharing these kinds of experience, thus it’s pleasant to read this weblog, and I used to pay a quick visit this website every day.|
Wow! Thank you! I continuously wanted to write on my blog something like that. Can I implement a part of your post to my blog?
Hello my loved one! I want to say that this article is amazing, great written and come with approximately all significant infos. I’d like to peer more posts like this .
It’s truly a great and useful piece of info. I am happy that you shared this helpful info with us. Please keep us informed like this. Thanks for sharing.
I intended to write you one very small observation so as to say thanks a lot as before over the wonderful opinions you’ve discussed on this site. This has been so unbelievably generous with people like you to present without restraint what numerous people would’ve offered for sale for an e-book to earn some money on their own, precisely since you could have tried it in the event you decided. Those principles as well worked like a easy way to fully grasp the rest have the identical interest just like mine to realize a good deal more when considering this matter. I am certain there are numerous more pleasurable moments in the future for individuals who take a look at your site.
This web site is really a walk-through for all of the info you wanted about this and didn’t know who to ask. Glimpse here, and you’ll definitely discover it.
Bless you-thank you-Any chance you will elaborate?
Everything is very open with a precise clarification of the challenges. It was definitely informative. Your website is extremely helpful. Thanks for sharing!
I enjoy reading an article that can make men and women think. Also, thanks for allowing for me to comment!|
I just like the helpful info you provide for your articles. I will bookmark your blog and take a look at once more right here regularly. I am rather sure I’ll be informed a lot of new stuff right here! Best of luck for the next!
Thanks for writing this article. You do an awesome job with your blog. You have a supporter in me.
This is a topic that’s close to my heart… Cheers! Exactly where are your contact details though?
You need to be a part of a contest for one of the highest quality blogs on the web. I’m going to highly recommend this blog!
This is an awesome piece of content. You got a friend in me. I’ll be back to read more.
Greetings from Colorado! I’m bored to death at work so I decided to check out your site on my iphone during lunch break. I enjoy the information you present here and can’t wait to take a look when I get home. I’m amazed at how fast your blog loaded on my mobile .. I’m not even using WIFI, just 3G .. Anyways, awesome blog!|
Instagram takipçi satın almanın hesabınıza bir çok önemli katkısı bulunmaktadır. Instagram Türk gerçek takipçi satın al fırsatı ile şu avantajları elde edebilmeniz mümkün
WOW just what I was searching for. Came here by searching for meta_keyword|
You are a great writer thanx. I love sucking dick btw hmu
What’s up, this weekend is pleasant for me, since this point in time i am reading this great educational post here at my residence.|
Every weekend i used to go to see this web site, for the reason that i want enjoyment, as this this site conations really good funny data too.|
I really liked this piece of content and I’ll return to see more of your lovely content. Thank you so much!
Hello there, You’ve done an incredible job. I will definitely digg it and personally recommend to my friends. I’m confident they’ll be benefited from this web site.
Hello there, There’s no doubt that your website could be having internet browser compatibility issues. When I look at your blog in Safari, it looks fine however, when opening in I.E., it’s got some overlapping issues. I merely wanted to give you a quick heads up! Aside from that, great blog!
Thanks – Enjoyed this post, is there any way I can get an email whenever there is a fresh post?
Utterly written content material, Really enjoyed looking through.
An outstanding share! I have just forwarded this onto a colleague who has been doing a little research on this. And he in fact ordered me breakfast simply because I stumbled upon it for him… lol. So let me reword this…. Thanks for the meal!! But yeah, thanks for spending the time to discuss this issue here on your website.
I enjoy, cause I discovered just what I was having a look for. You have ended my four day long hunt! God Bless you man. Have a great day. Bye
I loved as much as you will receive carried out right here. The sketch is attractive, your authored subject matter stylish. nonetheless, you command get got an edginess over that you wish be delivering the following. unwell unquestionably come more formerly again as exactly the same nearly very often inside case you shield this hike.
I loved as much as you will receive carried out right here. The sketch is attractive, your authored material stylish. nonetheless, you command get got an shakiness over that you wish be delivering the following. unwell unquestionably come further formerly again as exactly the same nearly very often inside case you shield this hike.
I’ve been absent for a while, but now I remember why I used to love this blog. Thanks, I’ll try and check back more frequently. How frequently you update your site?
I like this web blog so much, saved to fav. “American soldiers must be turned into lambs and eating them is tolerated.” by Muammar Qaddafi.
Great blog you’ve got here.. ItÃs hard to find good quality writing like yours nowadays. I honestly appreciate individuals like you! Take care!!
I need to to thank you for this excellent read!! I definitely enjoyed every bit of it. I’ve got you book-marked to look at new stuff you post횜
I think this is among the most vital info for me. And i am glad reading your article. But wanna remark on some general things, The website style is ideal, the articles is really excellent : D. Good job, cheers
Hey! This is kind of off topic but I need some advice from an established blog. Is it very difficult to set up your own blog? I’m not very techincal but I can figure things out pretty quick. I’m thinking about setting up my own but I’m not sure where to start. Do you have any tips or suggestions? Thanks
We are a group of volunteers and opening a new scheme in our community. Your website provided us with valuable info to work on. You’ve done an impressive job and our whole community will be grateful to you.
There is noticeably a bundle to know about this. I assume you made certain nice points in features also.
Way cool! Some very valid points! I appreciate you penning this write-up plus the rest of the website is extremely good.
You actually make it seem so easy with your presentation but I find this matter to be really something that I think I would never understand. It seems too complicated and very broad for me. I am looking forward for your next post, I will try to get the hang of it!
It’s the best time to make some plans for the future and it is time to be happy. I’ve read this post and if I could I desire to suggest you some interesting things or tips. Perhaps you can write next articles referring to this article. I want to read more things about it!
Appreciate you for sharing all these wonderful discussions. In addition, the ideal travel plus medical insurance program can often eliminate those problems that come with travelling abroad. The medical crisis can in the near future become expensive and that’s bound to quickly decide to put a financial burden on the family finances. Having in place the ideal travel insurance package prior to setting off is worth the time and effort. Cheers
Appreciate this post. Let me try it out.|
Good day I am so glad I found your web site, I really found you by mistake, while I was searching on Bing for something else, Regardless I am here now and would just like to say cheers for a fantastic post and a all round exciting blog (I also love the theme/design), I don’t have time to go through it all at the minute but I have bookmarked it and also added your RSS feeds, so when I have time I will be back to read a great deal more, Please do keep up the great work.
I know this if off topic but I’m looking into starting my own blog and was wondering what all is needed to get set up? I’m assuming having a blog like yours would cost a pretty penny? I’m not very internet smart so I’m not 100 positive. Any suggestions or advice would be greatly appreciated. Kudos|
Good – I should definitely pronounce, impressed with your website. I had no trouble navigating through all tabs as well as related info ended up being truly simple to do to access. I recently found what I hoped for before you know it in the least. Reasonably unusual. Is likely to appreciate it for those who add forums or something, site theme . a tones way for your customer to communicate. Excellent task.
hey there and thank you for your info ? I have certainly picked up anything new from right here. I did however expertise a few technical points using this website, since I experienced to reload the site many times previous to I could get it to load correctly. I had been wondering if your hosting is OK? Not that I am complaining, but slow loading instances times will very frequently affect your placement in google and can damage your high quality score if advertising and marketing with Adwords. Well I am adding this RSS to my e-mail and can look out for a lot more of your respective intriguing content. Make sure you update this again soon..
My Payment Savvy
Wow! This could be one particular of the most useful blogs We have ever arrive across on this subject. Basically Fantastic. I am also an expert in this topic therefore I can understand your hard work.
Hi there, I desire to subscribe for this webpage to take latest updates, thus where can i do it please assist.|
I don?t even know how I ended up here, but I thought this post was good. I do not know who you are but certainly you’re going to a famous blogger if you are not already 😉 Cheers!
Remarkable things here. I am very satisfied to see your article. Thank you a lot and I am taking a look ahead to contact you. Will you please drop me a e-mail?|
Normally I don’t read article on blogs, but I wish to say that this write-up very forced me to check out and do it! Your writing taste has been amazed me. Thanks, quite nice post.
I have been absent for some time, but now I remember why I used to love this website. Thanks, I will try and check back more frequently. How frequently you update your website?
I conceive you have mentioned some very interesting points, thankyou for the post.
Wow, wonderful blog layout! How long have you been blogging for? you make blogging look easy. The overall look of your site is wonderful, as well as the content!
I’m still learning from you, as I’m trying to reach my goals. I certainly love reading all that is posted on your blog.Keep the posts coming. I liked it!
Hi, i think that i saw you visited my web site so i came to ?return the favor?.I’m attempting to find things to improve my site!I suppose its ok to use some of your ideas!!
Some truly superb articles on this website , regards for contribution.
hey there and thank you for your info ? I have definitely picked up anything new from right here. I did however expertise a few technical points using this web site, as I experienced to reload the website lots of times previous to I could get it to load correctly. I had been wondering if your web hosting is OK? Not that I’m complaining, but sluggish loading instances times will very frequently affect your placement in google and could damage your high-quality score if ads and marketing with Adwords. Anyway I am adding this RSS to my email and could look out for much more of your respective exciting content. Make sure you update this again very soon..
lucrare-licenta EU, neata adrian valentin , sc creativ trd srl , teapa, plagiat
Just wish to say your article is as amazing. The clearness in your post is simply spectacular and i can assume you are an expert on this subject. Fine with your permission allow me to grab your feed to keep updated with forthcoming post. Thanks a million and please keep up the rewarding work.
Thanks for the sensible critique. Me & my neighbor were just preparing to do a little research on this. We got a grab a book from our local library but I think I learned more clear from this post. I’m very glad to see such wonderful information being shared freely out there.
This is really interesting, You are a very skilled blogger. I’ve joined your rss feed and look forward to seeking more of your excellent post. Also, I’ve shared your web site in my social networks!
Just want to say your article is as amazing. The clearness in your post is simply cool and i can assume you are an expert on this subject. Well with your permission let me to grab your feed to keep up to date with forthcoming post. Thanks a million and please carry on the gratifying work.
I’m a big fan of this blog. I’ll be back to read more sometime soon. Thank you for creating it.
Very nice post. I just stumbled upon your weblog and wished to say that I’ve really enjoyed browsing your blog posts. After all I will be subscribing to your rss feed and I hope you write again soon!
This is really interesting, You’re an excessively professional blogger. I’ve joined your feed and stay up for looking for more of your fantastic post. Additionally, I have shared your site in my social networks|
Am platit aproape 900 lei la Creativ TRD SRL pe lucrare-licenta.eu si am primit un plagiat integral. Creativ trd srl si lucrare-licenta EU insemana teapa si frauda.
I’ve recently started a web site, the info you provide on this web site has helped me greatly. Thank you for all of your time & work. “The man who fights for his fellow-man is a better man than the one who fights for himself.” by Clarence Darrow.
http://www.bigorange.net/__media__/js/netsoltrademark.php?d=www.fairporn.net/
I am always thought about this, thanks for posting.
Sweet site, super design and style, rattling clean and utilize genial.
Some genuinely fantastic work on behalf of the owner of this internet site, utterly outstanding subject matter.
Good post and right to the point. I don’t know if this is truly the best place to ask but do you guys have any ideea where to hire some professional writers? Thanks in advance 🙂 Best wireless routers for 2021 listed here: https://www.youtube.com/watch?v=Be3GRNemCBQ
Please let me know if you’re looking for a author for your blog. You have some really good posts and I feel I would be a good asset. If you ever want to take some of the load off, I’d really like to write some articles for your blog in exchange for a link back to mine. Please send me an e-mail if interested. Thanks!
Would you be concerned with exchanging hyperlinks? Best wireless routers for 2021 listed here: https://www.youtube.com/watch?v=Be3GRNemCBQ
Simply desire to say your article is as surprising. The clearness in your post is simply cool and i could assume you’re an expert on this subject. Fine with your permission let me to grab your RSS feed to keep up to date with forthcoming post. Thanks a million and please carry on the rewarding work.
It’s not my first time to pay a quick visit this web page, i am visiting this site dailly and take nice information from here everyday.|
I’m extremely impressed with your writing skills as well as with the layout on your blog. Is this a paid theme or did you modify it yourself? Either way keep up the excellent quality writing, it?s rare to see a great blog like this one nowadays..
It’s perfect time to make some plans for the future and it’s time to be happy. I have read this post and if I could I desire to suggest you some interesting things or advice. Perhaps you could write next articles referring to this article. I desire to read even more things about it!
Wow, fantastic blog layout! How long have you been blogging for? you made blogging look easy. The overall look of your site is great, let alone the content!
Those are yours alright! . We at least need to get these people stealing images to start blogging! They probably just did a image search and grabbed them. They look good though!
This was super awesome to read. Thanks for creating it. You made a long-term fan and I’ll be back to see more. Thanks for sharing.
Wow! Thank you! I continuously wanted to write on my site something like that. Can I include a portion of your post to my website?
This was super intresting to read. Thanks for sharing it. You made a long-term fan and I’ll be back to read more. Thank you for sharing.
I like the valuable information you provide in your articles. I?ll bookmark your blog and check again here frequently. I am quite sure I will learn many new stuff right here! Best of luck for the next!
bookmarked!!, I really like your blog!
We’re a group of volunteers and opening a new scheme in our community. Your site offered us with valuable information to work on. You’ve done a formidable job and our entire community will be grateful to you.
Hello there, just became alert to your blog through Google, and found that it’s really informative. I’m going to watch out for brussels. I will be grateful if you continue this in future. Many people will be benefited from your writing. Cheers!|
The subsequent time I learn a blog, I hope that it doesnt disappoint me as a lot as this one. I mean, I do know it was my choice to read, but I really thought youd have something fascinating to say. All I hear is a bunch of whining about one thing that you might fix should you werent too busy searching for attention.
This was super awesome content. Thanks for creating it. You made a long-term fan and I’ll return to see more. Thanks for sharing.
Thank you for any other great post. The place else could anyone get that type of information in such an ideal way of writing? I have a presentation subsequent week, and I’m at the search for such information.|
I was able to find good information from your blog posts.|
Pretty section of content. I just stumbled upon your web site and in accession capital to assert that I get in fact enjoyed account your blog posts. Any way I will be subscribing to your augment and even I achievement you access consistently fast.
Good replies in return of this difficulty with real arguments and explaining everything regarding that.|
An outstanding share! I have just forwarded this onto a co-worker who was conducting a little homework on this. And he in fact ordered me breakfast due to the fact that I discovered it for him… lol. So let me reword this…. Thank YOU for the meal!! But yeah, thanx for spending some time to discuss this subject here on your web page.
Hello, i think that i saw you visited my site thus i came to ?return the favor?.I’m attempting to find things to improve my web site!I suppose its ok to use some of your ideas!!
I am a massive supporter of this blog. I’ll return to read more sometime soon. Thank you for making it.
I was suggested this web site by means of my cousin. I am no longer positive whether or not this put up is written by him as no one else understand such distinctive about my trouble. You’re amazing! Thank you!
I think this is among the most vital information for me. And i am glad reading your article. But should remark on some general things, The web site style is ideal, the articles is really excellent : D. Good job, cheers
What i don’t understood is actually how you are now not really much more smartly-appreciated than you may be now. You’re so intelligent. You know thus considerably when it comes to this topic, made me for my part believe it from numerous varied angles. Its like women and men are not fascinated unless it is something to do with Woman gaga! Your personal stuffs great. All the time maintain it up!|
I simply could not go away your website prior to suggesting that I actually loved the usual information an individual provide to your visitors? Is gonna be back frequently to investigate cross-check new posts|
Simply wish to say your article is as astounding. The clearness in your post is just cool and i can assume you’re an expert on this subject. Fine with your permission let me to grab your feed to keep up to date with forthcoming post. Thanks a million and please keep up the rewarding work.
You made some good points there. I checked on the net for more info about the issue and found most people will go along with your views on this web site.
Hello there I am so excited I found your site, I really found you by mistake, while I was searching on Yahoo for something else, Nonetheless I am here now and would just like to say thanks a lot for a incredible post and a all round thrilling blog (I also love the theme/design), I don’t have time to go through it all at the minute but I have saved it and also included your RSS feeds, so when I have time I will be back to read a great deal more, Please do keep up the fantastic work.
I am really impressed with your writing skills as well as with the layout on your blog. Is this a paid theme or did you modify it yourself? Either way keep up the nice quality writing, it?s rare to see a nice blog like this one today..
There’s definately a great deal to find out about this topic. I really like all of the points you made.
I am regular reader, how are you everybody? This post posted at this website is really good.|
Hi there, I found your site via Google while looking for a comparable subject, your site came up, it seems good. I have bookmarked it in my google bookmarks.
Very nice post. I just stumbled upon your blog and wished to say that I’ve really enjoyed browsing your blog posts. In any case I will be subscribing to your feed and I hope you write again very soon!
I’ve been browsing online greater than 3 hours as of late, but I never found any fascinating article like yours. It is beautiful price enough for me. Personally, if all web owners and bloggers made excellent content material as you probably did, the web can be a lot more helpful than ever before.|
Hi, I do think this is an excellent website. I stumbledupon it 😉 I’m going to revisit once again since i have book-marked it. Money and freedom is the greatest way to change, may you be rich and continue to help other people.
Definitely believe that which you said. Your favorite reason appeared to be on the internet the simplest thing to be aware of. I say to you, I certainly get annoyed while people think about worries that they plainly do not know about. You managed to hit the nail upon the top and defined out the whole thing without having side effect , people could take a signal. Will probably be back to get more. Thanks
Hiç kimse takipçi satın almak zorunda değildir. Takipçi satın alan kişiler bunu iyi yönettiği takdirde zarar görmemektedir.
Greetings! I know this is kinda off topic nevertheless I’d figured I’d ask. Would you be interested in exchanging links or maybe guest authoring a blog post or vice-versa? My website discusses a lot of the same topics as yours and I believe we could greatly benefit from each other. If you might be interested feel free to send me an email. I look forward to hearing from you! Fantastic blog by the way!|
Good post. I study something tougher on totally different blogs everyday. It’s going to always be stimulating to read content material from other writers and practice just a little one thing from their store. I’d want to use some with the content material on my weblog whether you don’t mind. Natually I’ll offer you a link on your web blog. Thanks for sharing.
Great line up. We will be linking to this great article on our site. Keep up the good writing.
I got what you intend,saved to fav, very decent web site.
Wow! Thank you! I permanently wanted to write on my site something like that. Can I take a fragment of your post to my blog?
Thank you for the good writeup. It in fact was a amusement account it. Look advanced to far added agreeable from you! However, how can we communicate?
Thanks for another informative site. Where else could I get that type of information written in such a perfect way? I have a project that I am just now working on, and I have been on the look out for such info.
Very good info. Lucky me I came across your blog by chance (stumbleupon). I have book-marked it for later!
Heya i?m for the first time here. I found this board and I find It truly useful & it helped me out much. I hope to give something back and help others like you helped me.
Magnificent goods from you, man. I’ve understand your stuff previous to and you’re just extremely magnificent. I actually like what you’ve acquired here, certainly like what you are saying and the way in which you say it. You make it enjoyable and you still care for to keep it sensible. I can’t wait to read far more from you. This is really a great website.
I’ve been surfing online more than 3 hours today, yet I never found any interesting article like yours. It is pretty worth enough for me. In my opinion, if all site owners and bloggers made good content as you did, the internet will be much more useful than ever before.
Your place is valueble for me. Thanks!…
Regards for this wondrous post, I am glad I found this internet site on yahoo.
I love examining and I think this website got some really utilitarian stuff on it! .
Definitely believe that which you stated. Your favorite justification appeared to be on the net the easiest thing to be aware of. I say to you, I definitely get annoyed while people think about worries that they plainly don’t know about. You managed to hit the nail upon the top and also defined out the whole thing without having side effect , people could take a signal. Will probably be back to get more. Thanks
This was a very enjoyable piece of content. Thanks for sharing it. I’ll return for more.
I know this if off topic but I’m looking into starting my own weblog and was wondering what all is required to get set up? I’m assuming having a blog like yours would cost a pretty penny? I’m not very web savvy so I’m not 100 certain. Any tips or advice would be greatly appreciated. Kudos|
I really enjoyed this pice of content. I’ll return for more to enjoy. Thanks!
hey there and thank you for your info ? I?ve definitely picked up something new from right here. I did however expertise some technical points using this site, since I experienced to reload the site a lot of times previous to I could get it to load correctly. I had been wondering if your hosting is OK? Not that I’m complaining, but sluggish loading instances times will very frequently affect your placement in google and can damage your high-quality score if ads and marketing with Adwords. Well I am adding this RSS to my e-mail and could look out for much more of your respective fascinating content. Make sure you update this again soon..
This site definitely has all the information I wanted concerning this subject and didn’t know who to ask.
Look for a noise testing lab that is ISO 17025 accredited to perform a BSR (buzz, squeak and rattle) test.
This is something New !
Great post. I was checking constantly this blog and I’m impressed! Extremely useful info specifically the last part 🙂 I care for such information much. I was looking for this certain info for a very long time. Thank you and good luck.
You made various good points there. I did a search on the topic and found a good number of folks will consent with your blog.
I think this website contains some rattling wonderful information for everyone. “As we grow oldthe beauty steals inward.” by Ralph Waldo Emerson.
Aw, this was a very good post. Spending some time and actual effort to make a really good article… but what can I say… I procrastinate a lot and never seem to get nearly anything done.|
Hi colleagues, nice article and nice arguments commented at this place, I am in fact enjoying by these.|
I haven¦t checked in here for some time because I thought it was getting boring, but the last several posts are great quality so I guess I¦ll add you back to my daily bloglist. You deserve it my friend 🙂
This is very interesting, You’re a very skilled blogger. I have joined your rss feed and look forward to seeking more of your wonderful post. Also, I’ve shared your website in my social networks!
It is appropriate time to make some plans for the future and it’s time to be happy. I’ve read this submit and if I could I want to suggest you some fascinating issues or suggestions. Perhaps you could write subsequent articles regarding this article. I want to read more things approximately it!|
Hey There. I found your blog using msn. This is a very well written article. I will be sure to bookmark it and return to read more of your useful info. Thanks for the post. I?ll certainly comeback.
You need to take part in a contest for one of the greatest blogs on the internet. I am going to highly recommend this website!
certainly like your web-site however you have to check the spelling on quite a few
of your posts. Several of them are rife with spelling issues and I to find it very troublesome to
tell the truth however I will certainly come again again.
Hello, i think that i saw you visited my website so i came to ?return the favor?.I am attempting to find things to improve my web site!I suppose its ok to use a few of your ideas!!
You have made some really good points there. I looked on the internet for more information about the issue and found most individuals will go along with your views on this web site.
It’s amazing to pay a visit this web site and reading the views of all colleagues regarding this post, while I am also zealous of getting familiarity.|
A person necessarily lend a hand to make critically posts I’d state. This is the first time I frequented your web page and up to now? I amazed with the analysis you made to create this particular put up amazing. Excellent activity!
An outstanding share! I’ve just forwarded this onto a coworker who has been conducting a little homework on this. And he actually ordered me breakfast simply because I found it for him… lol. So allow me to reword this…. Thank YOU for the meal!! But yeah, thanks for spending the time to talk about this matter here on your site.
I like the helpful info you provide in your articles. I will bookmark your weblog and check again here regularly. I am quite certain I will learn plenty of new stuff right here! Best of luck for the next!
I do accept as true with all the ideas you’ve presented to your post. They’re really convincing and can definitely work. Still, the posts are very quick for newbies. Could you please lengthen them a little from subsequent time? Thanks for the post.
It’s a shame you don’t have a donate button! I’d without a doubt donate to this fantastic blog! I guess for now i’ll settle for book-marking and adding your RSS feed to my Google account. I look forward to new updates and will share this blog with my Facebook group. Chat soon!|
Do you mind if I quote a few of your posts as long as I provide credit and sources back to your webpage? My website is in the exact same niche as yours and my visitors would really benefit from a lot of the information you present here. Please let me know if this okay with you. Cheers!|
I loved as much as you’ll receive carried out right here. The sketch is tasteful, your authored material stylish. nonetheless, you command get got an impatience over that you wish be delivering the following. unwell unquestionably come further formerly again since exactly the same nearly very often inside case you shield this hike.
I got this website from my buddy who informed me about this web page and now this time I am visiting this website and reading very informative articles or reviews at this place.|
she lost 1.1 lbs every day with THIS japanese fat-loss tonic Marina fell into a deep depression after packing on so much fat in her 20’s. So she started working out… tracking calories… and jogging every day to burn it off. Yet, after 4 weeks of grueling work, and not a single cheat meal… she only lost a couple of pounds. Frustrating! Meanwhile, 45-year-old Susan simply drank one cup of THIS delicious Japanese fat-loss tonic every morning… and melted 54lbs off her belly, thighs, and upper arms in just 7 weeks. (With NO exercise due to arthritis in her damaged knee.) Here’s how: ==> One cup of THIS Japanese fat-loss tonic every morning helped Susan melt 54lbs in 7 weeks (it’s delicious!) Read more here => https://rb.gy/dabx3z
instagram hizmetleri sektorunde kaliteli instagram takipci satin almayi politika edinmis sitemiz uzerinden guvenli bir sekilde instagram takipci satin al
Thank you for the auspicious writeup. It in fact was a amusement account it. Look advanced to far added agreeable from you! By the way, how could we communicate?
Hi, i think that i saw you visited my site so i came to ?return the favor?.I’m attempting to find things to improve my web site!I suppose its ok to use a few of your ideas!!
I have been absent for some time, but now I remember why I used to love this site. Thanks, I’ll try and check back more often. How frequently you update your website?
This is a very interesting article. Please, share more like this!
I was suggested this blog by my cousin. I’m not sure whether this post is written by him as no one else know such detailed about my trouble. You’re amazing! Thanks!
You completed some good points there. I did a search on the topic and found nearly all persons will consent with your blog.
Thanks for the sensible critique. Me & my neighbor were just preparing to do a little research about this. We got a grab a book from our local library but I think I learned more from this post. I’m very glad to see such wonderful info being shared freely out there.
This is really interesting, You are a very skilled blogger. I have joined your feed and look forward to seeking more of your fantastic post. Also, I’ve shared your web site in my social networks!
IÃm impressed, I must say. Rarely do I come across a blog thatÃs both equally educative and interesting, and without a doubt, you have hit the nail on the head. The issue is an issue that not enough folks are speaking intelligently about. I’m very happy I found this during my hunt for something concerning this.
I like the valuable info you provide in your articles. I will bookmark your weblog and check again here frequently. I’m quite sure I’ll learn many new stuff right here! Best of luck for the next!
You’re so awesome! I do not believe I’ve truly read a single thing like that before. So nice to discover someone with some genuine thoughts on this subject. Really.. thank you for starting this up. This website is something that’s needed on the internet, someone with a bit of originality!
I know this if off topic but I’m looking into starting my own weblog and was curious what all is required to get set up? I’m assuming having a blog like yours would cost a pretty penny? I’m not very internet smart so I’m not 100 positive. Any suggestions or advice would be greatly appreciated. Kudos|
Good day! I know this is kinda off topic nevertheless I’d figured I’d ask.
Would you be interested in exchanging links or maybe guest authoring
a blog post or vice-versa? My site addresses a lot of the same topics as
yours and I believe we could greatly benefit from each other.
If you happen to be interested feel free to send me an e-mail.
I look forward to hearing from you! Fantastic blog by the way!
After going over a handful of the articles on your website, I honestly like your technique of blogging.
I saved as a favorite it to my bookmark site list and will be checking back in the near future.
Please check out my web site as well and let me know what you think.
Greetings! I know this is kinda off topic however I’d figured I’d ask. Would you be interested in exchanging links or maybe guest writing a blog post or vice-versa? My site addresses a lot of the same subjects as yours and I feel we could greatly benefit from each other. If you happen to be interested feel free to shoot me an e-mail. I look forward to hearing from you! Terrific blog by the way!
Excellent post. I was checking continuously this blog and I am impressed! Extremely helpful information specially the last part 🙂 I care for such information much. I was seeking this certain information for a very long time. Thank you and best of luck.
Virtually all of the things you claim happens to be astonishingly accurate and it makes me wonder the reason why I had not looked at this in this light previously. This particular piece truly did switch the light on for me as far as this particular subject matter goes. Nonetheless at this time there is actually one particular issue I am not necessarily too cozy with and while I try to reconcile that with the actual main idea of your point, allow me see what all the rest of your subscribers have to point out.Very well done.
Howdy! I simply wish to give you a big thumbs up for the great info you have got here on this post. I will be returning to your blog for more soon.
What i don’t realize is in fact how you are not actually a lot more well-liked than you might be now. You are so intelligent. You recognize thus significantly in relation to this topic, produced me personally consider it from a lot of numerous angles. Its like women and men are not interested until it?¦s something to do with Woman gaga! Your individual stuffs great. At all times care for it up!
Awesome post.|
When I originally commented I clicked the -Notify me when new comments are added- checkbox and now each time a comment is added I get four emails with the same comment. Is there any way you can remove me from that service? Thanks!
Good post. I learn something totally new and challenging on sites I stumbleupon every day. It’s always useful to read articles from other authors and use something from other sites. |
Hi there very nice site!! Man .. Beautiful .. Superb .. I will bookmark your web site and take the feeds additionally?KI’m happy to find numerous helpful info here in the put up, we need work out more strategies on this regard, thanks for sharing. . . . . .
Hi, I would like to subscribe for this web site to get hottest
updates, thus where can i do it please help.
This is very interesting, You are a very skilled blogger. I’ve joined your rss feed and look forward to seeking more of your fantastic post. Also, I have shared your web site in my social networks!
A lot of blog writers nowadays however just a few have posts worth spending time on browsing.
I have learned some essential things through your website post. One other stuff I would like to express is that there are several games in the marketplace designed in particular for preschool age young children. They include things like pattern acknowledgement, colors, pets, and models. These typically focus on familiarization rather than memorization. This helps to keep children occupied without having a sensation like they are studying. Thanks
I loved as much as you will receive carried out right here. The sketch is attractive, your authored subject matter stylish. nonetheless, you command get got an edginess over that you wish be delivering the following. unwell unquestionably come further formerly again as exactly the same nearly very often inside case you shield this increase.
My programmer is trying to convince me to move to .net from PHP. I have always disliked the idea because of the costs. But he’s tryiong none the less. I’ve been using Movable-type on a variety of websites for about a year and am worried about switching to another platform. I have heard excellent things about blogengine.net. Is there a way I can import all my wordpress posts into it? Any help would be really appreciated!|
ItÃs difficult to find well-informed people about this subject, however, you seem like you know what youÃre talking about! Thanks
Hi! I just would like to offer you a big thumbs up for the great information you have here on this post. I’ll be returning to your web site for more soon.
It’s awesome in favor of me to have a web site, which is beneficial in support of my know-how. thanks admin|
I think this is among the most vital info for me. And i am glad reading your article. But should remark on few general things, The web site style is great, the articles is really nice : D. Good job, cheers
This was an awesome piece of content. I really liked it. I’ll return to see some more. Thank you .
Can I simply say what a comfort to discover someone who actually understands what they are talking about over the internet. You actually realize how to bring a problem to light and make it important. A lot more people ought to check this out and understand this side of the story. I was surprised you aren’t more popular given that you certainly possess the gift.
Hello, Neat post. There is a problem along with your site in internet explorer, may test thisK IE nonetheless is the market leader and a large section of other people will leave out your wonderful writing due to this problem.
This site truly has all of the info I wanted about this subject and didn’t know who to ask. |
I am now not certain where you are getting your info, but good topic. I needs to spend a while studying more or working out more. Thanks for magnificent info I was searching for this information for my mission.
I like the efforts you have put in this, appreciate it for all the great blog posts.
I must express my respect for your generosity supporting those who should have assistance with this one field. Your special commitment to passing the solution along became pretty useful and have frequently made others like me to attain their endeavors. This invaluable suggestions implies a lot a person like me and substantially more to my mates. With thanks; from each one of us.
I really appreciate this post. I¦ve been looking all over for this! Thank goodness I found it on Bing. You have made my day! Thank you again
This blog was… how do I say it? Relevant!! Finally I have found something which helped me. Thanks a lot!
I think this is one of the most significant information for me. And i am glad reading your article. But wanna remark on some general things, The site style is perfect, the articles is really great : D. Good job, cheers
Woah! I’m really digging the template/theme of this blog. It’s simple, yet effective. A lot of times it’s very difficult to get that “perfect balance” between user friendliness and visual appearance. I must say that you’ve done a fantastic job with this. Additionally, the blog loads very fast for me on Firefox. Superb Blog!
Good ?V I should definitely pronounce, impressed with your site. I had no trouble navigating through all the tabs as well as related info ended up being truly simple to do to access. I recently found what I hoped for before you know it in the least. Quite unusual. Is likely to appreciate it for those who add forums or anything, web site theme . a tones way for your client to communicate. Excellent task..
It’s amazing in favor of me to have a web site, which is useful designed for my experience. thanks admin|
Excellent article. I certainly appreciate this website. Keep writing!
I believe this is among the such a lot vital info for me. And i am glad studying your article. But should remark on few general issues, The site taste is perfect, the articles is truly great : D. Just right process, cheers|
As soon as I detected this web site I went on reddit to share some of the love with them.
Güncel akaryakıt ve LPG fiyatları, Club TOTAL fırsatları, banka kampanyaları ve size en yakın TOTAL istasyonlarını görüntülemek için web sitemizi ziyaret edin.
you’re really a good webmaster. The website loading speed is incredible. It seems that you are doing any unique trick. In addition, The contents are masterwork. you’ve done a excellent job on this topic!
certainly like your web-site but you have to check the spelling on quite a few of your posts. Several of them are rife with spelling problems and I find it very bothersome to tell the truth nevertheless I will definitely come back again.
Thanks for all your valuable labor on this web site. Debby really loves participating in research and it is simple to grasp why. A number of us know all about the compelling means you render functional things through this web blog and improve participation from other ones on this idea so my simple princess is always understanding a lot of things. Take pleasure in the rest of the new year. You are always doing a remarkable job.
Hi I am so grateful I found your website, I really found you by error, while I was browsing on Aol for something else, Nonetheless I am here now and would just like to say thanks for a tremendous post and a all round exciting blog (I also love the theme/design), I don’t have time to go through it all at the moment but I have saved it and also added your RSS feeds, so when I have time I will be back to read much more, Please do keep up the great work.
Dead composed written content, thank you for information. “The bravest thing you can do when you are not brave is to profess courage and act accordingly.” by Corra Harris.
I loved as much as you’ll receive carried out right here. The sketch is tasteful, your authored subject matter stylish. nonetheless, you command get got an edginess over that you wish be delivering the following. unwell unquestionably come more formerly again as exactly the same nearly a lot often inside case you shield this increase.
I am curious to find out what blog platform you have been working with? I’m having some small security issues with my latest site and I’d like to find something more safe. Do you have any recommendations?|
Tales Of India is an online Indian Grocery Store. Free delivery within Melbourne, Australia. Buy products from india such as ayurvedic medicines, atta, snacks, basmati rice, tea and more. Easy to cook indian food available such as spices, flours, lentils, daals, sauces, chutneys, cooking pastes, masala and more. Shop on https://talesofindia.com.au
This was an excellent article. I really liked it. I’ll be back to view some more. Thank you .
Magnificent goods from you, man. I’ve understand your stuff previous to and you’re just too wonderful. I actually like what you have acquired here, certainly like what you’re stating and the way in which you say it. You make it entertaining and you still care for to keep it smart. I cant wait to read much more from you. This is really a wonderful site.
Not many authors with correct expertise of the subjects they blog about.
What an amazing manner of checking out points.
I like the way you have concluded this blog post …
I would like to thank you for the efforts you’ve put in writing this blog. I am hoping the same high-grade web site post from you in the upcoming as well. In fact your creative writing skills has encouraged me to get my own web site now. Really the blogging is spreading its wings fast. Your write up is a great example of it.
Merely a smiling visitor here to share the love (:, btw outstanding design. “Justice is always violent to the party offending, for every man is innocent in his own eyes.” by Daniel Defoe.
Cheeky Monkey Toys is a store where you will find a joyful collection of high quality, interactive toys to awaken the untamed mind of your child.
After all, what a great site and informative posts, I will upload inbound link – bookmark this web site? Regards, Reader.
Good post. I learn something new and challenging on blogs I stumbleupon everyday. It will always be useful to read articles from other writers and practice something from other sites.
Just want to say your article is as astonishing. The clearness in your post is just spectacular and i could assume you are an expert on this subject. Well with your permission let me to grab your feed to keep updated with forthcoming post. Thanks a million and please keep up the rewarding work.
Excellent blog you have here.. It’s difficult to find high-quality writing like yours nowadays. I truly appreciate individuals like you! Take care!!
Hey there! This is my 1st comment here so I just wanted to give a quick shout out and tell you I truly enjoy reading through your posts. Can you suggest any other blogs/websites/forums that deal with the same topics? Appreciate it!|
Greetings! Very helpful advice in this particular article! It’s the little changes that make the biggest changes. Thanks for sharing!
Hi, i think that i saw you visited my website so i came to “return the favor”.I am trying to find things to improve my website!I suppose its ok to use a few of your ideas!!
I was very happy to find this website. I need to to thank you for your time just for this wonderful read!! I definitely loved every little bit of it and I have you saved to fav to see new stuff in your web site.
ItÃs nearly impossible to find well-informed people on this topic, but you sound like you know what youÃre talking about! Thanks
Surely you’ll get more value out of that than a chicken-nugget meal… right? Everyday people from all around the world are using this system to pocket as much as $480 in a single day! So invest wisely Activate your test-drive today >>> https://bit.ly/3aNq5gl
Hello fantastic blog! Does running a blog such as this require a great deal of work? I’ve absolutely no understanding of coding but I had been hoping to start my own blog soon. Anyways, should you have any ideas or techniques for new blog owners please share. I understand this is off topic nevertheless I just wanted to ask. Appreciate it!|
F*ckin¦ remarkable issues here. I¦m very glad to see your article. Thank you so much and i am having a look ahead to touch you. Will you please drop me a e-mail?
Heya i?m for the first time here. I found this board and I find It truly useful & it helped me out much. I hope to give something back and help others like you aided me.
You have covered this subject skillfully.
This piece of writing gives clear idea in support of the new viewers of blogging, that actually how to do blogging.|
hello there and thank you for your information ? I have certainly picked up something new from right here. I did however expertise several technical points using this website, as I experienced to reload the site a lot of times previous to I could get it to load properly. I had been wondering if your web host is OK? Not that I’m complaining, but sluggish loading instances times will sometimes affect your placement in google and could damage your quality score if ads and marketing with Adwords. Well I?m adding this RSS to my email and could look out for a lot more of your respective intriguing content. Make sure you update this again very soon..
Your style is unique in comparison to other folks I’ve read stuff from. Many thanks for posting when you have the opportunity, Guess I will just bookmark this page.
This was an awesome piece of content. I loved it. I’ll return to read some more. Thanks .
Great article! We will be linking to this great post on our website. Keep up the good writing.
Thanks for giving your ideas in this article. The other thing is that when a problem occurs with a laptop motherboard, people today should not take the risk associated with repairing it themselves because if it is not done properly it can lead to irreparable damage to all the laptop. Most commonly it is safe to approach any dealer of a laptop with the repair of the motherboard. They have got technicians that have an expertise in dealing with notebook motherboard issues and can make right diagnosis and execute repairs.
You made some decent points there. I looked on the net for more info about the issue and found most people will go along with your views on this website.|
I simply could not depart your web site prior to suggesting that I actually enjoyed the usual info an individual supply in your guests? Is going to be again frequently to investigate cross-check new posts
There is evidently a bundle to realize about this. I think you made certain nice points in features also.
I’ve been browsing online more than three hours today, yet I never found any interesting article like yours. It is pretty worth enough for me. Personally, if all site owners and bloggers made good content as you did, the web will be much more useful than ever before.
I couldn챠t resist commenting. Perfectly written!
What an amazing manner of looking at things.
Utterly composed articles, Really enjoyed looking through.
Thank you for the good writeup. It in fact was a amusement account it. Look advanced to far added agreeable from you! However, how could we communicate?
Saved as a favorite, I love your site!
I needed to thank you for this great read!! I definitely enjoyed every little bit of it. I have you bookmarked to look at new stuff you postÖ
I think this is one of the most important info for me. And i’m glad reading your article. But should remark on some general things, The website style is wonderful, the articles is really excellent : D. Good job, cheers
I was very happy to find this site. I need to to thank you for ones time just for this fantastic read!! I definitely appreciated every part of it and i also have you book marked to check out new stuff on your website.
hey there and thank you for your information ? I have certainly picked up something new from right here. I did however expertise some technical points using this website, since I experienced to reload the web site many times previous to I could get it to load properly. I had been wondering if your web host is OK? Not that I am complaining, but sluggish loading instances times will sometimes affect your placement in google and could damage your high quality score if advertising and marketing with Adwords. Anyway I am adding this RSS to my e-mail and can look out for a lot more of your respective interesting content. Make sure you update this again soon..
I really love your site.. Pleasant colors & theme. Did you develop this site yourself? Please reply back as I’m looking to create my very own blog and want to know where you got this from or what the theme is named. Many thanks.
Hello! This is my first comment here so I just wanted to give a quick shout out and say I truly enjoy reading through
your posts. Can you recommend any other blogs/websites/forums that deal with the same
topics? Thanks!
Just want to say your article is as astounding. The clearness in your post is simply great and i could assume you are an expert on this subject. Well with your permission let me to grab your feed to keep up to date with forthcoming post. Thanks a million and please carry on the enjoyable work.
I went over this site and I believe you have a lot of wonderful information, saved to my bookmarks (:.
Its like you read my mind! You appear to know so much about this, like you wrote the book in it or something. I think that you could do with some pics to drive the message home a little bit, but instead of that, this is magnificent blog. A great read. I will certainly be back.
This piece of content was awesome Thanks a lot for writing it. You have a friend in me. See ya soon.
I loved as much as you’ll receive carried out right here. The sketch is attractive, your authored subject matter stylish. nonetheless, you command get got an edginess over that you wish be delivering the following. unwell unquestionably come more formerly again as exactly the same nearly a lot often inside case you shield this hike.
May I simply say what a comfort to discover somebody that really knows what they are talking about online. You actually understand how to bring a problem to light and make it important. More people really need to read this and understand this side of the story. I can’t believe you are not more popular because you most certainly possess the gift.
I’m impressed, I must say. Seldom do I encounter a blog that’s both educative and entertaining, and without a doubt, you have hit the nail on the head. The issue is something which not enough men and women are speaking intelligently about. I’m very happy that I stumbled across this in my search for something concerning this.
This is very interesting, You’re a very skilled blogger. I’ve joined your rss feed and look forward to seeking more of your fantastic post. Also, I have shared your website in my social networks!
Greetings! Quick question that’s completely off topic. Do you know how to make your site mobile friendly? My website looks weird when browsing from my iphone 4. I’m trying to find a template or plugin that might be able to resolve this problem. If you have any recommendations, please share. Many thanks!|
When I initially commented I clicked the -Notify me when new comments are added- checkbox and now every time a comment is added I get four emails with the same comment. Is there any manner you’ll be able to take away me from that service? Thanks!
I’m so happy to read this. This is the kind of manual that needs to be given and not the accidental misinformation that’s at the other blogs. Appreciate your sharing this best doc.
My husband and i got quite comfortable when Edward managed to conclude his studies through the entire precious recommendations he gained out of your web page. It’s not at all simplistic to just choose to be giving away concepts a number of people might have been making money from. And we remember we now have you to be grateful to for this. The specific illustrations you have made, the easy website menu, the relationships you can give support to instill – it’s got everything awesome, and it’s letting our son in addition to us know that the issue is brilliant, which is certainly especially indispensable. Many thanks for the whole thing!
Excellent web site you have got here.. It’s hard to find quality writing like yours these days. I really appreciate people like you! Take care!!
What’s Taking place i’m new to this, I stumbled upon this I’ve discovered It positively helpful and it has aided me out loads. I hope to contribute & assist other customers like its aided me. Great job.
I am thankful that I noticed this web blog, precisely the right info that I was searching for! .
I was able to find good advice from your articles.
Thanks for your concepts. One thing we’ve noticed is banks along with financial institutions are aware of the spending practices of consumers while also understand that most of the people max out there their real credit cards around the getaways. They properly take advantage of this specific fact and commence flooding your current inbox along with snail-mail box using hundreds of no-interest APR card offers just after the holiday season comes to an end. Knowing that should you be like 98% of American community, you’ll rush at the possiblity to consolidate card debt and shift balances for 0 apr interest rates credit cards. jiiihkm https://headachemedi.com – over counter medicine for Headache pain
There’s definately a great deal to find out about this topic. I love all of the points you’ve made.
Howdy! I could have sworn I’ve been to this blog before but after checking through some of the post I realized it’s new to me. Anyways, I’m definitely delighted I found it and I’ll be book-marking and checking back frequently!
I will immediately take hold of your rss feed as I can’t in finding your e-mail subscription hyperlink or e-newsletter service. Do you have any? Please allow me recognise in order that I may subscribe. Thanks.
excellent submit, very informative. I’m wondering why the opposite specialists of this sector don’t notice this. You should continue your writing. I’m confident, you’ve a great readers’ base already!
You are so cool! I do not think I have read anything like this before. So wonderful to discover somebody with a few genuine thoughts on this issue. Really.. thanks for starting this up. This site is one thing that is needed on the web, someone with a bit of originality!
Heya i?m for the first time here. I came across this board and I find It really useful & it helped me out a lot. I hope to give something back and help others like you aided me.
Thanks for your suggestions. One thing I’ve noticed is the fact that banks as well as financial institutions really know the spending routines of consumers as well as understand that many people max out their credit cards around the vacations. They sensibly take advantage of this particular fact and start flooding your own inbox as well as snail-mail box along with hundreds of 0 APR credit card offers right after the holiday season ends. Knowing that if you’re like 98% of the American public, you’ll leap at the chance to consolidate credit debt and transfer balances to 0 annual percentage rates credit cards. dccccei https://thyroidmedi.com – thyroid threatment drugs
fantastic submit, very informative. I ponder why the other specialists of this sector do not understand this. You should proceed your writing. I am confident, you have a huge readers’ base already!
Its like you read my mind! You appear to know a lot about this, like you wrote the book in it or something. I think that you could do with a few pics to drive the message home a little bit, but instead of that, this is great blog. A fantastic read. I will certainly be back.
Hi there, just turned into alert to your blog through Google, and found that it is really informative. I am going to watch out for brussels. I will be grateful should you proceed this in future. Lots of people can be benefited out of your writing. Cheers!
Thanks for your ideas. One thing I have noticed is that banks and financial institutions know the spending habits of consumers and understand that most people max out their credit cards around the holidays. They wisely take advantage of this fact and start flooding your inbox and snail-mail box with hundreds of 0 APR credit card offers soon after the holiday season ends. Knowing that if you are like 98% of the American public, you’ll jump at the chance to consolidate credit card debt and transfer balances to 0 APR credit cards. aaaaaaa https://stomachmedi.com – stomach pain drugs
Does your site have a contact page? I’m having trouble locating it but, I’d like to send you an email. I’ve got some recommendations for your blog you might be interested in hearing. Either way, great website and I look forward to seeing it develop over time.
Definitely believe that which you said. Your favorite justification appeared to be on the internet the simplest thing to be aware of. I say to you, I definitely get irked while people think about worries that they just do not know about. You managed to hit the nail upon the top and defined out the whole thing without having side effect , people can take a signal. Will likely be back to get more. Thanks
Pretty section of content. I just stumbled upon your weblog and in accession capital to assert that I get in fact enjoyed account your blog posts. Any way I?ll be subscribing to your augment and even I achievement you access consistently rapidly.
https://truehealthreport.com/okinawa-flat-belly-tonic-reviews/
Wow, amazing blog format! How long have you ever been blogging for? you made blogging look easy. The entire glance of your website is great, let alone the content material!
I have recently started a website, the information you offer on this website has helped me tremendously. Thanks for all of your time & work.
Keep functioning ,great job!
An interesting discussion is definitely worth comment. I believe that you ought to write more about this subject matter, it might not be a taboo subject but typically people don’t discuss these issues. To the next! Many thanks!!|
Next time I read a blog, I hope that it won’t fail me just as much as this particular one. I mean, I know it was my choice to read through, nonetheless I actually believed you would have something helpful to talk about. All I hear is a bunch of complaining about something that you could fix if you were not too busy searching for attention.
Oh my goodness! Impressive article dude! Thanks, However I am dealing with
issues with your RSS. I don’t understand exactly why I can’t
join it. Will there be anybody getting the identical RSS issues?
Anybody who knows the solution are you able to kindly respond?
Thanx!!
Also visit my web-site :: MaoWDamoth
I am not certain the place you are getting your info, but great topic. I needs to spend a while studying much more or figuring out more. Thank you for magnificent info I used to be looking for this information for my mission.
I truly enjoy reading through on this site, it has got fantastic posts. “The living is a species of the dead and not a very attractive one.” by Friedrich Wilhelm Nietzsche.
I have fun with, result in I discovered exactly what I was taking a look for. You have ended my 4 day lengthy hunt! God Bless you man. Have a nice day. Bye
I am really loving the theme/design of your web site. Do you ever run into any browser compatibility problems? A few of my blog readers have complained about my website not working correctly in Explorer but looks great in Chrome. Do you have any tips to help fix this issue?Oneida Kahler
You really make it seem so easy with your presentation but I find this matter to be really something which I think I would never understand. It seems too complicated and extremely broad for me. I’m looking forward for your next post, I will try to get the hang of it!
That is a very good tip particularly to those fresh to the blogosphere. Brief but very precise information… Appreciate your sharing this one. A must read post!
IÃm amazed, I must say. Seldom do I encounter a blog thatÃs both equally educative and interesting, and without a doubt, you’ve hit the nail on the head. The problem is something that not enough men and women are speaking intelligently about. I’m very happy that I found this during my search for something relating to this.
I like this site so much, saved to favorites. “Respect for the fragility and importance of an individual life is still the mark of an educated man.” by Norman Cousins.
Please let me know if you’re looking for a article author for your site. You have some really good articles and I think I would be a good asset. If you ever want to take some of the load off, I’d absolutely love to write some material for your blog in exchange for a link back to mine. Please send me an email if interested. Thanks!
I blog frequently and I truly thank you for your content. Your article has truly peaked my interest. I am going to bookmark your website and keep checking for new information about once a week. I opted in for your RSS feed as well.
Having read this I believed it was really informative. I appreciate you taking the time and effort to put this content together. I once again find myself spending a lot of time both reading and commenting. But so what, it was still worthwhile!
Wonderful blog! I found it while surfing around on Yahoo News. Do you have any suggestions on how to get listed in Yahoo News? I’ve been trying for a while but I never seem to get there! Many thanks
What an outstanding way of checking out things.
I’ve been browsing online greater than 3 hours lately, but I by no means found any fascinating article like yours. It is pretty worth enough for me. In my opinion, if all site owners and bloggers made just right content material as you did, the net will likely be a lot more useful than ever before.
bookmarked!!, I like your web site!
I like the helpful information you provide in your articles. I will bookmark your weblog and check again here frequently. I’m quite sure I?ll learn a lot of new stuff right here! Good luck for the next!
You should take part in a contest for one of the finest websites online. I will recommend this website!
You really make it appear so easy with your presentation however I to find this topic to be actually one thing that I believe I’d by no means understand. It kind of feels too complex and very broad for me. I’m having a look forward in your next publish, I will try to get the dangle of it!
One other issue issue is that video games are usually serious anyway with the principal focus on studying rather than leisure. Although, there is an entertainment element to keep your children engaged, each one game is normally designed to develop a specific expertise or curriculum, such as instructional math or scientific research. Thanks for your publication.
Great beat ! I wish to apprentice while you amend your web site, how could i subscribe for a blog website? The account aided me a acceptable deal. I had been tiny bit acquainted of this your broadcast offered bright clear idea
I got what you intend, appreciate it for putting up.Woh I am happy to find this website through google.
Unquestionably believe that which you said. Your favorite reason appeared to be on the internet the easiest thing to be aware of. I say to you, I definitely get irked while people consider worries that they plainly don’t know about. You managed to hit the nail upon the top and defined out the whole thing without having side effect , people can take a signal. Will likely be back to get more. Thanks
Hello. fantastic job. I did not expect this. This is a fantastic story. Thanks!
This is a very good tips especially to those new to blogosphere, brief and accurate information… Thanks for sharing this one. A must read article.
Very few authors with appropriate knowledge of the subjects they cover.
Just desire to say your article is as amazing. The clearness in your post is just nice and i can assume you’re an expert on this subject. Fine with your permission allow me to grab your feed to keep up to date with forthcoming post. Thanks a million and please continue the rewarding work.
Your home is valueble for me. Thanks!…
Wow, superb blog layout! How long have you been blogging for? you make blogging look easy. The overall look of your website is great, as well as the content!
Nice post. I learn something totally new and challenging on sites I stumbleupon every day. It will always be interesting to read through content from other authors and practice something from other sites.
One other issue is that if you are in a circumstances where you will not have a cosigner then you may want to try to exhaust all of your financing options. You could find many grants or loans and other scholarships that will give you finances to aid with university expenses. Thanks for the post.
Simply wish to say your article is as astonishing. The clearness to your submit is simply excellent and that i could suppose you’re an expert on this subject. Well along with your permission let me to grasp your RSS feed to stay updated with forthcoming post. Thanks one million and please continue the enjoyable work.
I appreciate, cause I found exactly what I was looking for. You have ended my four day long hunt! God Bless you man. Have a great day. Bye
Keep functioning ,impressive job! https://livermedi.com – liver meds for sale
I like the helpful information you provide in your articles. I?ll bookmark your weblog and check again here frequently. I’m quite sure I will learn many new stuff right here! Good luck for the next!
Keep functioning ,remarkable job! https://chwilowki-pozyczka.pl – pożyczka
Today, with the fast way of life that everyone leads, credit cards have a huge demand in the economy. Persons from every area are using the credit card and people who are not using the card have arranged to apply for 1. Thanks for discussing your ideas on credit cards. https://impotencemedi.com impotence medications for sale
Can I just say what a aid to search out someone who truly is aware of what theyre talking about on the internet. You undoubtedly know find out how to deliver a problem to light and make it important. Extra folks have to learn this and perceive this aspect of the story. I cant believe youre not more common because you definitely have the gift.
Today, taking into consideration the fast chosen lifestyle that everyone is having, credit cards get this amazing demand throughout the market. Persons out of every arena are using credit card and people who not using the credit card have prepared to apply for just one. Thanks for spreading your ideas in credit cards. https://psoriasismedi.com psoriasis drugs for sale
Very nice post and right to the point. I don’t know if this is really the best place to ask but do you guys have any ideea where to hire some professional writers? Thanks in advance 🙂 https://livermedi.com drug liver injury
Hello. magnificent job. I did not imagine this. This is a impressive story. Thanks! https://hairlossbimedi.com best medicine for hair loss
Hello. Great job. I did not expect this. This is a great story. Thanks! https://hairlossbimedi.com hair loss meds for women
Today, with the fast way of life that everyone leads, credit cards have a huge demand in the economy. Persons from every area are using the credit card and people who are not using the card have arranged to apply for 1. Thanks for discussing your ideas on credit cards. https://psoriasismedi.com psoriasis medication
Awsome article and right to the point. I don’t know if this is truly the best place to ask but do you people have any ideea where to employ some professional writers? Thx 🙂 https://livermedi.com best liver medications
Very nice post and right to the point. I don’t know if this is really the best place to ask but do you guys have any ideea where to hire some professional writers? Thanks in advance 🙂 https://livermedi.com liver pain meds
Hello. fantastic job. I did not expect this. This is a fantastic story. Thanks! https://hairlossbimedi.com best hair loss drugs
Today, with the fast way of life that everyone leads, credit cards have a huge demand in the economy. Persons from every field are using the credit card and people who are not using the card have lined up to apply for one. Thanks for discussing your ideas on credit cards. https://hemorrhoidsmedi.com medication for hemorrhoids
This is really interesting, You’re a very skilled blogger. I have joined your rss feed and look forward to seeking more of your fantastic post. Also, I’ve shared your site in my social networks!
Very nice post and right to the point. I don’t know if this is really the best place to ask but do you guys have any ideea where to hire some professional writers? Thanks in advance 🙂 https://arthritismedi.com medication for Arthritis
This is a topic which is near to my heart… Best wishes! Exactly where are your contact details though?
Valuable information. Lucky me I discovered your website by accident, and I’m shocked why this accident didn’t took place earlier! I bookmarked it. https://colitismedi.com Colitis medication for sale
I am constantly looking online for posts that can aid me. Thank you! https://allergymedi.com best Allergy with least side effects
You got a very excellent website, Glad I found it through google. https://asthmamedi.com over the counter asthma inhaler
Hello. fantastic job. I did not expect this. This is a remarkable story. Thanks!
I’ve been browsing online more than three hours today, yet I never found any interesting article like yours. It?s pretty worth enough for me. In my view, if all site owners and bloggers made good content as you did, the internet will be a lot more useful than ever before.
I am continually invstigating online for tips that can assist me. Thanks! https://alzheimermedi.com alzheimer disease medications
You got a very excellent website, Gladiolus I detected it through google. https://hcvmedi.com best HCV meds
Hello there, I think your blog might be having browser compatibility issues. Whenever I take a look at your website in Safari, it looks fine however, when opening in IE, it’s got some overlapping issues. I simply wanted to provide you with a quick heads up! Aside from that, fantastic website!
Today, with the fast lifestyle that everyone leads, credit cards have a huge demand in the economy. Persons from every field are using the credit card and people who are not using the card have lined up to apply for one. Thanks for sharing your ideas on credit cards. https://hypertensionmedi.com high blood pressure
Valuable information. Lucky me I discovered your website unintentionally, and I’m shocked why this accident didn’t took place earlier! I bookmarked it. https://stomachulcersmedi.com stomach ulcers
Today, taking into consideration the fast way of living that everyone is having, credit cards get this amazing demand throughout the market. Persons out of every discipline are using credit card and people who not using the credit card have made arrangements to apply for one in particular. Thanks for giving your ideas in credit cards. https://multiplesclerosismed.com multiple sclerosis medication
You got a very good website, Glad I found it through google. https://tuberculosismedi.com how to cure tuberculosis
I am always searching online for articles that can help me. Thank you! https://dementiamedi.com how to treat dementia
Very interesting details you have remarked, thankyou for putting up. “What the world really needs is more love and less paperwork.” by Pearl Bailey.
Today, taking into consideration the fast chosen lifestyle that everyone is having, credit cards get this amazing demand throughout the market. Persons out of every arena are using credit card and people who not using the credit card have prepared to apply for just one. Thanks for spreading your ideas in credit cards. https://multiplesclerosismed.com multiple sclerosis causes
Best view i have ever seen !
Just want to say your article is as astounding. The clarity for your publish is simply excellent and that i could suppose you’re a professional in this subject. Well along with your permission let me to snatch your RSS feed to keep updated with imminent post. Thanks 1,000,000 and please continue the rewarding work.
A lot of bloggers nowadays but just a few have blog posts worth spending time on reading.
Great site. A lot of useful information here. I’m sending it to some pals ans also sharing in delicious. And of course, thank you for your effort! https://schizophreniamedi.com best schizophrenia meds
I am always searching online for articles that can help me. Thank you! https://hivmedi.com buy aids medications online
excellent put up, very informative. I ponder why the opposite specialists of this sector don’t notice this. You must proceed your writing. I’m confident, you’ve a great readers’ base already! https://rheumatoidarthritismed.com rheumatoid arthritis treatment
You got a very excellent website, Glad I found it through google. https://glaucomamedi.com best eye drops for glaucoma
Hi there, just become aware of your weblog via Google, and located that it is really informative. I am gonna be careful for brussels. I’ll be grateful for those who continue this in future. Lots of people can be benefited out of your writing. Cheers!
Fantastic web site. Lots of helpful info here. I am sending it to a few buddies ans additionally sharing in delicious. And naturally, thanks in your sweat! https://cancermedph.com buy cancer medications
I?m not sure where you are getting your info, but great topic. I needs to spend some time learning more or understanding more. Thanks for great information I was looking for this information for my mission.
I am constantly looking online for posts that can facilitate me. Thx! https://myastheniamedi.com myasthenia medication
magnificent publish, very informative. I’m wondering why the opposite specialists of this sector don’t understand this. You must proceed your writing. I’m confident, you’ve a great readers’ base already! https://anxietymedi.com buy Anxiety drugs
You got a very great website, Gladiola I observed it through google. https://atherosclerosismed.com buy atherosclerosis meds
Excellent website. Plenty of helpful info here. I am sending it to several friends ans additionally sharing in delicious. And certainly, thanks to your sweat! https://parkinsonmedi.com medication for parkinson disease
F*ckin’ amazing things here. I am very satisfied to see your post. Thank you so much and i am looking ahead to contact you. Will you please drop me a e-mail?
I am continuously browsing online for ideas that can benefit me. Thx! https://hyperactivitymed.com buy hyperactivity meds
Fantastic web site. Lots of helpful info here. I am sending it to a few buddies ans additionally sharing in delicious. And naturally, thanks in your sweat! https://parkinsonmedi.com buy parkinson drugs
You got a very wonderful website, Sword lily I noticed it through google. https://heartischemiamed.com heart failure meditations
wonderful submit, very informative. I wonder why the other experts of this sector do not realize this. You should continue your writing. I am sure, you have a huge readers’ base already! https://epilepsymedi.com best epilepsy medication
There are some interesting closing dates in this article however I don’t know if I see all of them heart to heart. There’s some validity but I’ll take hold opinion until I look into it further. Good article , thanks and we wish extra! Added to FeedBurner as nicely
Hello there, just became aware of your blog through Google, and found that it is really informative. I’m gonna watch out for brussels. I will appreciate if you continue this in future. A lot of people will be benefited from your writing. Cheers! https://hypothyroidismmed.com/ hypothyroidism medications treatment
I realized more a new challenge on this fat loss issue. A single issue is that good nutrition is very vital any time dieting. A massive reduction in junk food, sugary food items, fried foods, sugary foods, beef, and white-colored flour products could be necessary. Having wastes parasitic organisms, and toxic compounds may prevent targets for fat loss. While specific drugs in the short term solve the situation, the awful side effects usually are not worth it, and so they never offer you more than a momentary solution. This is a known undeniable fact that 95% of celebrity diets fail. Thank you for sharing your opinions on this website. https://osteoporosismedi.com osteoporosis drugs
Pretty! This has been an incredibly wonderful article. Thanks for providing these details.
I realized more a new challenge on this fat loss issue. A single issue is that good nutrition is very vital any time dieting. A massive reduction in junk food, sugary food items, fried foods, sugary foods, beef, and white-colored flour products could be necessary. Having wastes parasitic organisms, and toxic compounds may prevent targets for fat loss. While specific drugs in the short term solve the situation, the awful side effects usually are not worth it, and so they never offer you more than a momentary solution. This is a known undeniable fact that 95% of celebrity diets fail. Thank you for sharing your opinions on this website. https://osteoporosismedi.com osteoporosis meds
Hello there, just became aware of your blog through Google, and found that it is really informative. I’m gonna watch out for brussels. I will appreciate if you continue this in future. Lots of people will be benefited from your writing. Cheers! https://hypothyroidismmed.com/ Hypothyroidism threatment
You have actually covered this subject skillfully.
I actually wanted to develop a brief message in order to appreciate you for all the fantastic hints you are giving out at this website. My extensive internet look up has at the end been honored with extremely good facts to go over with my companions. I ‘d believe that many of us readers actually are quite blessed to be in a fine network with many brilliant individuals with great ideas. I feel quite fortunate to have discovered the web pages and look forward to plenty of more brilliant minutes reading here. Thank you again for a lot of things. https://bronchitismed.com bronchitis medications
Good post. I will be going through a few of these issues as well..
Hello there, just became aware of your blog through Google, and found that it is really informative. I’m gonna watch out for brussels. I will appreciate if you continue this in future. A lot of people will be benefited from your writing. Cheers! https://hypothyroidismmed.com/ hypothyroidism drugs list
wonderful submit, very informative. I’m wondering why the other experts of this sector do not understand this. You should continue your writing. I am sure, you have a huge readers’ base already! https://epilepsymedi.com epilepsy threatment
I really wanted to send a simple remark to say thanks to you for these remarkable strategies you are sharing on this site. My rather long internet research has finally been recognized with reasonable knowledge to talk about with my great friends. I would repeat that we visitors are unequivocally fortunate to exist in a remarkable site with very many perfect individuals with beneficial advice. I feel extremely blessed to have come across the site and look forward to many more amazing minutes reading here. Thank you again for a lot of things. https://bronchitismed.com medications used to treat bronchitis
fantastic publish, very informative. I’m wondering why the opposite specialists of this sector don’t understand this. You must proceed your writing. I’m confident, you’ve a great readers’ base already! https://epilepsymedi.com buy epilepsy drugs
Hi there, just became alert to your blog through Google, and found that it’s truly informative. I am going to watch out for brussels. I’ll be grateful if you continue this in future. Numerous people will be benefited from your writing. Cheers! https://hypothyroidismmed.com/ what is the treatment of hypothyroidism
I learned more new things on this weight loss issue. One issue is that good nutrition is highly vital when dieting. A huge reduction in fast foods, sugary foods, fried foods, sugary foods, red meat, and white flour products may be necessary. Holding wastes parasites, and toxins may prevent goals for losing fat. While certain drugs temporarily solve the problem, the nasty side effects are not worth it, and they never offer more than a temporary solution. It is a known fact that 95% of fad diets fail. Thanks for sharing your ideas on this blog. https://osteoporosismedi.com osteoporosis medications without side effects
Nice read, I just passed this onto a friend who was doing a little research on that. And he just bought me lunch as I found it for him smile Therefore let me rephrase that: Thank you for lunch! “Without friends no one would choose to live, though he had all other goods.” by Aristotle.
Quality articles or reviews is the crucial to attract the visitors to pay a visit the web page, that’s what this website is providing.|
Wow, amazing blog layout! How long have you been blogging for? you made blogging look easy. The overall look of your web site is magnificent, let alone the content!
I’ve been exploring for a little bit for any high-quality articles or weblog posts in this kind of house . Exploring in Yahoo I ultimately stumbled upon this site. Studying this info So i’m glad to convey that I’ve a very excellent uncanny feeling I discovered just what I needed. I most indisputably will make sure to don’t disregard this website and give it a look regularly.
Best view i have ever seen !
Great site you have got here.. It’s difficult to find good quality writing like yours these days. I really appreciate people like you! Take care!!
Nice blog here! Also your web site loads up very fast! What host are you using? Can I get your affiliate link to your host? I wish my website loaded up as fast as yours lol
Hi, I think your site might be having browser compatibility issues. When I look at your website in Safari, it looks fine but when opening in Internet Explorer, it has some overlapping. I just wanted to give you a quick heads up! Other then that, fantastic blog!
Wonderful beat ! I wish to apprentice while you amend your site, how can i subscribe for a blog web site? The account helped me a acceptable deal. I had been a little bit acquainted of this your broadcast offered bright clear idea
Excellent goods from you, man. I’ve understand your stuff previous to and you are just too great. I really like what you’ve acquired here, certainly like what you’re stating and the way in which you say it. You make it enjoyable and you still take care of to keep it smart. I can’t wait to read far more from you. This is really a great site.
Attractive section of content. I just stumbled upon your site and in accession capital to assert that I acquire actually enjoyed account your blog posts. Anyway I will be subscribing to your feeds and even I achievement you access consistently quickly.
This actually answered my problem, thank you!
Unquestionably believe that which you said. Your favorite justification appeared to be on the net the easiest thing to be aware of. I say to you, I certainly get irked while people consider worries that they plainly don’t know about. You managed to hit the nail upon the top as well as defined out the whole thing without having side effect , people can take a signal. Will likely be back to get more. Thanks
Exactly the type of material that improves the net. Thanks!
Very good post. I am dealing with a few of these issues as well..
My brother recommended I might like this blog. He was totally right. This post actually made my day. You cann’t imagine just how much time I had spent for this info! Thanks!
facebook
Wonderful goods from you, man. I’ve understand your stuff previous to and you’re just too wonderful. I actually like what you have acquired here, really like what you are saying and the way in which you say it. You make it entertaining and you still care for to keep it sensible. I can’t wait to read far more from you. This is really a tremendous web site.
Just bookmarked this post as I have found it fairly useful.
Hello there, You have done an excellent job. I will certainly digg it and personally recommend to my friends. I am confident they will be benefited from this website.
Wonderful website. Lots of helpful info here. I¡¦m sending it to a few pals ans additionally sharing in delicious. And of course, thanks for your sweat!
This is really interesting, You’re a very skilled blogger. I’ve joined your feed and look forward to seeking more of your magnificent post. Also, I have shared your web site in my social networks!
Simply wish to say your article is as amazing. The clarity in your put up is simply spectacular and i can suppose you’re an expert in this subject. Well together with your permission allow me to take hold of your RSS feed to keep updated with imminent post. Thanks 1,000,000 and please carry on the enjoyable work.
Wow, incredible blog layout! How long have you been blogging for? you make blogging look easy. The overall look of your website is magnificent, as well as the content!
Hey very nice web site!! Man .. Excellent .. Amazing .. I will bookmark your web site and take the feeds also…I’m happy to find numerous useful info here in the post, we need work out more strategies in this regard, thanks for sharing. . . . . .
This really answered my problem, thank you!
I’m just commenting to make you know what a nice experience my friend’s princess undergone using your web page. She came to understand too many issues, including what it is like to have a wonderful coaching character to get many more just know precisely several extremely tough issues. You truly exceeded our expectations. I appreciate you for imparting the informative, healthy, informative and as well as fun thoughts on that topic to Tanya.
Keep up the awesome work !! Lovin’ it!
You have brought up a very great details , thankyou for the post.
Just wish to say your article is as astonishing. The clearness on your put up is simply nice and that i can assume you are a professional in this subject. Fine along with your permission allow me to grasp your RSS feed to stay up to date with approaching post. Thanks 1,000,000 and please continue the gratifying work.
I just like the helpful info you supply to your articles. I will bookmark your weblog and check again here regularly. I’m somewhat certain I’ll be informed many new stuff proper here! Good luck for the following!
http://buzztrend.com.br/video?id=kjt6dOfLgBM
This is a topic that’s close to my heart… Take care! Exactly where are your contact details though?
Your place is valueble for me. Thanks!…
It’s actually a cool and helpful piece of information. I am glad that you shared this useful info with us. Please keep us informed like this. Thanks for sharing.
Hi! Do you use Twitter? I’d like to follow you if that would be okay. I’m absolutely enjoying your blog and look forward to new updates.
Pretty! This was an incredibly wonderful article. Thanks for providing this information.
certainly like your website but you need to take a look at the spelling on quite a few of your posts. Several of them are rife with spelling problems and I find it very bothersome to inform the truth however I’ll definitely come again again.
I have been absent for a while, but now I remember why I used to love this web site. Thanks , I’ll try and check back more often. How frequently you update your web site?
Your style is so unique compared to other folks I have read stuff from. Thanks for posting when you have the opportunity, Guess I will just bookmark this web site.
Pretty nice post. I just stumbled upon your weblog and wanted to say that I’ve really enjoyed surfing around your blog posts. After all I will be subscribing to your feed and I hope you write again soon!
I enjoy your writing style genuinely loving this website .
You actually make it seem so easy with your presentation but I find this topic to be actually something which I think I would never understand. It seems too complicated and extremely broad for me. I’m looking forward for your next post, I will try to get the hang of it!
Great post. I was checking constantly this blog and I am impressed! Extremely useful info specifically the last part 🙂 I care for such information much. I was looking for this certain info for a long time. Thank you and good luck.
I’ve been absent for some time, but now I remember why I used to love this blog. Thank you, I?¦ll try and check back more frequently. How frequently you update your website?
I’m really inspired with your writing talents as well as with the layout for your blog. Is this a paid subject matter or did you modify it your self? Either way stay up the nice quality writing, it is uncommon to see a great blog like this one nowadays..
faultless article
Pretty nice post. I just stumbled upon your blog and wished to say that I have truly enjoyed surfing around your blog posts. After all I?ll be subscribing to your rss feed and I hope you write again very soon!
I blog quite often and I seriously appreciate your content. Your article has really peaked my interest. I am going to bookmark your website and keep checking for new details about once per week. I subscribed to your RSS feed as well.
Great awesome issues here. I?¦m very happy to peer your post. Thank you so much and i’m looking forward to touch you. Will you please drop me a mail?
We are a group of volunteers and starting a new scheme in our community. Your website provided us with valuable info to work on. You’ve done an impressive job and our whole community will be grateful to you.
Respect to post author, some good information .
I got what you mean ,saved to my bookmarks, very decent website .
Thanks for every other informative website. Where else could I am getting that type of info written in such a perfect method? I have a undertaking that I am simply now operating on, and I’ve been on the glance out for such information.
Greetings! Very helpful advice in this particular post! It’s the little changes that will make the greatest changes. Thanks for sharing!
Excellent site you’ve got here.. It’s hard to find high quality writing like yours nowadays. I seriously appreciate individuals like you! Take care!!
I was able to find good information from your content.
recommended article, i love it
I was curious if you ever thought of changing the page layout of your site? Its very well written; I love what youve got to say. But maybe you could a little more in the way of content so people could connect with it better. Youve got an awful lot of text for only having one or two images. Maybe you could space it out better?
I am constantly surfing the web seeking terrific post on this topic due to a scenario that I personally am included with. Your blog site has actually surpassed my assumptions. I will be sure to find out more from you on this subject. Lots of many thanks for supplying your ideas and understanding. It has helped a lot.
Nice post. I was checking constantly this blog and I’m impressed! Extremely helpful information particularly the last part 🙂 I care for such info much. I was looking for this certain information for a very long time. Thank you and best of luck.
Some really interesting info , well written and broadly user friendly.
Some really nice stuff on this site, I enjoy it.
You made some nice points there. I looked on the internet for the issue and found most guys will approve with your blog.
Thank you for sharing excellent informations. Your site is very cool. I’m impressed by the details that you’ve on this blog. It reveals how nicely you understand this subject. Bookmarked this web page, will come back for more articles. You, my friend, ROCK! I found simply the information I already searched all over the place and simply couldn’t come across. What an ideal web-site.
I was looking through some of your blog posts on this website and I conceive this web site is real informative ! Continue posting.
Hi! This post couldn’t be written any better! Reading this post reminds me of my old room mate! He always kept talking about this. I will forward this article to him. Fairly certain he will have a good read. Many thanks for sharing!
Can I simply say what a relief to find someone who truly is aware of what theyre talking about on the internet. You definitely know methods to deliver a problem to light and make it important. More individuals have to learn this and understand this facet of the story. I cant imagine youre no more well-liked since you positively have the gift.
Some truly nice and useful information on this web site, as well I think the style and design has great features.
No Lynne, no es una pérdida de tiempo. He observado de cerca que cada programa legítimo de “ganar dinero en línea” tiene una estrategia a seguir
Well I really enjoyed reading it. This tip procured by you is very useful for accurate planning.
I’m not that much of a online reader to be honest but your sites really nice, keep it up! I’ll go ahead and bookmark your site to come back in the future. All the best
I’m truly enjoying the design and layout of your website. It’s a very easy on the eyes which makes it much more enjoyable for me to come here and visit more often. Did you hire out a developer to create your theme? Fantastic work!
I really like your writing style, great information, thanks for putting up : D.
I like this web site so much, saved to my bookmarks.
I am perpetually thought about this, regards for putting up.
Good – I should certainly pronounce, impressed with your web site. I had no trouble navigating through all tabs as well as related information ended up being truly simple to do to access. I recently found what I hoped for before you know it at all. Quite unusual. Is likely to appreciate it for those who add forums or anything, web site theme . a tones way for your customer to communicate. Nice task..
You actually make it seem so easy along with your presentation however I to find this topic to be really something which I think I would never understand. It sort of feels too complicated and extremely vast for me. I am taking a look forward on your next put up, I will attempt to get the cling of it!
Great web site you have got here.. It’s difficult to find high quality writing like yours these days. I seriously appreciate people like you! Take care!!
WONDERFUL Post.thanks for share..more wait .. …
The next time I read a blog, I hope that it doesnt disappoint me as much as this one. I mean, I know it was my choice to read, but I actually thought youd have something interesting to say. All I hear is a bunch of whining about something that you could fix if you werent too busy looking for attention.
I don’t commonly comment but I gotta admit appreciate it for the post on this perfect one : D.
Howdy! Someone in my Myspace group shared this website with us so I came to give it a look. I’m definitely enjoying the information. I’m bookmarking and will be tweeting this to my followers! Excellent blog and fantastic design and style.
I will right away grab your rss feed as I can’t in finding your e-mail subscription link or e-newsletter service. Do you have any? Kindly permit me know so that I may just subscribe. Thanks.
I appreciate, cause I found just what I was looking for. You have ended my 4 day long hunt! God Bless you man. Have a nice day. Bye
Hi there! I could have sworn I’ve visited this web site before but after going through many of the posts I realized it’s new to me. Anyhow, I’m certainly happy I stumbled upon it and I’ll be bookmarking it and checking back often!
I’ve recently started a website, the info you provide on this website has helped me greatly. Thank you for all of your time & work. “Character is much easier kept than recovered.” by Thomas Paine.
Hiya, I am really glad I have found this info. Today bloggers publish just about gossips and internet and this is actually frustrating. A good blog with exciting content, this is what I need. Thanks for keeping this website, I will be visiting it. Do you do newsletters? Can not find it.
http://giftreats.com/__media__/js/netsoltrademark.php?d=premiumporntrailers.com/girlfriendsfilms/
An interesting dialogue is value comment. I feel that it’s best to write extra on this subject, it might not be a taboo subject however typically individuals are not sufficient to speak on such topics. To the next. Cheers
I also believe thus, perfectly written post! .
I know this if off topic but I’m looking into starting my own weblog and was curious what all is required to get set up? I’m assuming having a blog like yours would cost a pretty penny? I’m not very internet smart so I’m not 100 certain. Any recommendations or advice would be greatly appreciated. Thank you
Really clear website , regards for this post.
Hello. I intended to take a minute to state how much I have taken pleasure in reviewing your post. I found it insightful as well as really useful. Two points that I hardly ever claim concerning post. It has actually been a satisfaction to read your thoughts and ideas. Thank you.
Way too many bloggers nowadays yet just a few have posts worth spending time on reading.
Hey there, You have performed a great job. I’ll definitely digg it and in my opinion recommend to my friends. I’m sure they’ll be benefited from this site.
The only point I cry over is not having actually found your blog site before.
Wonderful beat ! I wish to apprentice while you amend your website, how can i subscribe for a blog web site? The account helped me a acceptable deal. I had been tiny bit acquainted of this your broadcast offered bright clear idea
After exploring a number of the articles on your website, I really like your way of blogging. I bookmarked it to my bookmark site list and will be checking back soon. Please visit my website as well and let me know how you feel.
Its like you read my thoughts! You appear to understand a lot about this, such as you wrote the guide in it or something. I believe that you simply can do with some percent to drive the message home a little bit, however other than that, that is magnificent blog. A great read. I’ll certainly be back.
Hello.This post was extremely remarkable, particularly since I was looking for thoughts on this matter last week.
Ja naprawdę nagrodę twoją pracę, Świetny post test na koronowirusa przeciwciała test na koronowirusa przeciwciała.
Ja naprawdę skarb twoją dzieło, Świetny post koronawirus test koronawirus test.
Dzięki za zaleceń dotyczących naprawy kredytu na temat tego niesamowitego witryny. Kilka rzeczy i chciałbym powiedzieć ludziom zawsze zrezygnować z rzeczywistej mentalności mogą dzisiaj i wypłać później. Like a as be a} społeczeństwo {my|my wszyscy|my wszyscy|wielu z nas|większość z nas|większość ludzi} ma tendencję do {robienia tego|robienia tamtego|próbowania tego|zdarzyć się|powtórz to} dla wielu {rzeczy|problemów|czynników}. Obejmuje to {wakacje|wakacje|wypady|wyjazdy wakacyjne|wycieczki|rodzinne wakacje}, meble, {i|jak również|a także|wraz z|oprócz|plus} przedmiotów {chcemy|chcielibyśmy|życzymy|chcielibyśmy|naprawdę chcielibyśmy to mieć}. Jednak {musisz|musisz|powinieneś|powinieneś chcieć|wskazane jest, aby|musisz} oddzielić {swoje|swoje|to|twoje obecne|swoje|osoby} chcą {od wszystkich|z potrzeb|z}. {Kiedy jesteś|Kiedy jesteś|Kiedy jesteś|Jeśli jesteś|Tak długo, jak jesteś|Kiedy} pracujesz, aby {poprawić swój kredyt|poprawić swoją zdolność kredytową|zwiększyć swój kredyt|zwiększyć swój kredyt|podnieś swój ranking kredytowy|popraw swój kredyt} wynik {musisz zrobić|zrobić|faktycznie potrzebujesz|naprawdę musisz} dokonać kilku {poświęceń|kompromisów}. Na przykład {możesz|możesz|możesz|możesz|będziesz mógł|| możesz|prawdopodobnie możesz} robić zakupy online {aby zaoszczędzić pieniądze|aby zaoszczędzić pieniądze|aby zaoszczędzić} lub {możesz przejść do|może się zwrócić|może odwiedzić|może obejrzeć|może sprawdzić|może kliknąć} używane {sklepy|sklepy|detaliści|sprzedawcy|punkty sprzedaży|dostawcy} zamiast {drogie|drogie|drogie|drogie|drogie|drogich} domów towarowych {dla|w odniesieniu do|dotyczących|odnoszących się do|przeznaczonych dla|do zdobycia} odzieży {termometr bezdotykowy|termometry bezdotykowe|termometry bezdotykowe ranking|termometr do czoła|termometry do czoła|termometr bezkontaktowy|termometry bezkontaktowe|termometr koronawirus|termometr|termometr na podczerwień|termometry na podczerwień|termometr lekarski|termometry lekarskie|szybki termometr medyczny|szybkie termometry medyczne}.
Dzięki za wskazówek dotyczących naprawy kredytu na temat tego blogu. Rzeczy i chciałbym rada ludziom byłoby, aby zrezygnować z rzeczywistej mentalności że będą teraz i wypłać później. Like a as be a} społeczeństwo {my|my wszyscy|my wszyscy|wielu z nas|większość z nas|większość ludzi} ma tendencję do {robienia tego|robienia tamtego|próbowania tego|zdarzyć się|powtórz to} dla wielu {rzeczy|problemów|czynników}. Obejmuje to {wakacje|wakacje|wypady|wyjazdy wakacyjne|wycieczki|rodzinne wakacje}, meble, {i|jak również|a także|wraz z|oprócz|plus} przedmiotów {chcemy|chcielibyśmy|życzymy|chcielibyśmy|naprawdę chcielibyśmy to mieć}. Jednak {musisz|musisz|powinieneś|powinieneś chcieć|wskazane jest, aby|musisz} oddzielić {swoje|swoje|to|twoje obecne|swoje|osoby} chcą {od wszystkich|z potrzeb|z}. {Kiedy jesteś|Kiedy jesteś|Kiedy jesteś|Jeśli jesteś|Tak długo, jak jesteś|Kiedy} pracujesz, aby {poprawić swój kredyt|poprawić swoją zdolność kredytową|zwiększyć swój kredyt|zwiększyć swój kredyt|podnieś swój ranking kredytowy|popraw swój kredyt} wynik {musisz zrobić|zrobić|faktycznie potrzebujesz|naprawdę musisz} dokonać kilku {poświęceń|kompromisów}. Na przykład {możesz|możesz|możesz|możesz|będziesz mógł|| możesz|prawdopodobnie możesz} robić zakupy online {aby zaoszczędzić pieniądze|aby zaoszczędzić pieniądze|aby zaoszczędzić} lub {możesz przejść do|może się zwrócić|może odwiedzić|może obejrzeć|może sprawdzić|może kliknąć} używane {sklepy|sklepy|detaliści|sprzedawcy|punkty sprzedaży|dostawcy} zamiast {drogie|drogie|drogie|drogie|drogie|drogich} domów towarowych {dla|w odniesieniu do|dotyczących|odnoszących się do|przeznaczonych dla|do zdobycia} odzieży {termometr bezdotykowy|termometry bezdotykowe|termometry bezdotykowe ranking|termometr do czoła|termometry do czoła|termometr bezkontaktowy|termometry bezkontaktowe|termometr koronawirus|termometr|termometr na podczerwień|termometry na podczerwień|termometr lekarski|termometry lekarskie|szybki termometr medyczny|szybkie termometry medyczne}.
Ja naprawdę doceniam twoją pracę, Świetny post test na koronowirusa test na covid.
Ja naprawdę nagrodę twoją pracę, Świetny post test na koronowirusa.
Dzięki za przydatnych informacji na temat naprawy kredytu na temat twojego sieci -teren. To, co chciałbym zaoferować jako rada ludziom będzie zrezygnować z a mentalności kupią w tej chwili i spłać później. as be a as be a} społeczeństwo {my|my wszyscy|my wszyscy|wielu z nas|większość z nas|większość ludzi} ma tendencję do {robienia tego|robienia tamtego|próbowania tego|zdarzyć się|powtórz to} dla wielu {rzeczy|problemów|czynników}. Obejmuje to {wakacje|wakacje|wypady|wyjazdy wakacyjne|wycieczki|rodzinne wakacje}, meble, {i|jak również|a także|wraz z|oprócz|plus} przedmiotów {chcemy|chcielibyśmy|życzymy|chcielibyśmy|naprawdę chcielibyśmy to mieć}. Jednak {musisz|musisz|powinieneś|powinieneś chcieć|wskazane jest, aby|musisz} oddzielić {swoje|swoje|to|twoje obecne|swoje|osoby} chcą {od wszystkich|z potrzeb|z}. {Kiedy jesteś|Kiedy jesteś|Kiedy jesteś|Jeśli jesteś|Tak długo, jak jesteś|Kiedy} pracujesz, aby {poprawić swój kredyt|poprawić swoją zdolność kredytową|zwiększyć swój kredyt|zwiększyć swój kredyt|podnieś swój ranking kredytowy|popraw swój kredyt} wynik {musisz zrobić|zrobić|faktycznie potrzebujesz|naprawdę musisz} dokonać kilku {poświęceń|kompromisów}. Na przykład {możesz|możesz|możesz|możesz|będziesz mógł|| możesz|prawdopodobnie możesz} robić zakupy online {aby zaoszczędzić pieniądze|aby zaoszczędzić pieniądze|aby zaoszczędzić} lub {możesz przejść do|może się zwrócić|może odwiedzić|może obejrzeć|może sprawdzić|może kliknąć} używane {sklepy|sklepy|detaliści|sprzedawcy|punkty sprzedaży|dostawcy} zamiast {drogie|drogie|drogie|drogie|drogie|drogich} domów towarowych {dla|w odniesieniu do|dotyczących|odnoszących się do|przeznaczonych dla|do zdobycia} odzieży {strzykawki insulinowe 1ml|strzykawki tuberkulinowe|strzykawki|strzykawka|strzykawki insulinowe|strzykawki do insuliny|strzykawki trzyczęściowe tuberkulinowe|strzykawka tuberkulinowa|strzykawka insulinowa|strzykawka do insuliny|strzykawka trzyczęściowe tuberkulinowa}.
Dzięki za przydatnych informacji na temat naprawy kredytu na temat twojego sieci -teren. To, co chciałbym zaoferować jako rada ludziom będzie zrezygnować z a mentalności kupią w tej chwili i spłać później. as be a as be a} społeczeństwo {my|my wszyscy|my wszyscy|wielu z nas|większość z nas|większość ludzi} ma tendencję do {robienia tego|robienia tamtego|próbowania tego|zdarzyć się|powtórz to} dla wielu {rzeczy|problemów|czynników}. Obejmuje to {wakacje|wakacje|wypady|wyjazdy wakacyjne|wycieczki|rodzinne wakacje}, meble, {i|jak również|a także|wraz z|oprócz|plus} przedmiotów {chcemy|chcielibyśmy|życzymy|chcielibyśmy|naprawdę chcielibyśmy to mieć}. Jednak {musisz|musisz|powinieneś|powinieneś chcieć|wskazane jest, aby|musisz} oddzielić {swoje|swoje|to|twoje obecne|swoje|osoby} chcą {od wszystkich|z potrzeb|z}. {Kiedy jesteś|Kiedy jesteś|Kiedy jesteś|Jeśli jesteś|Tak długo, jak jesteś|Kiedy} pracujesz, aby {poprawić swój kredyt|poprawić swoją zdolność kredytową|zwiększyć swój kredyt|zwiększyć swój kredyt|podnieś swój ranking kredytowy|popraw swój kredyt} wynik {musisz zrobić|zrobić|faktycznie potrzebujesz|naprawdę musisz} dokonać kilku {poświęceń|kompromisów}. Na przykład {możesz|możesz|możesz|możesz|będziesz mógł|| możesz|prawdopodobnie możesz} robić zakupy online {aby zaoszczędzić pieniądze|aby zaoszczędzić pieniądze|aby zaoszczędzić} lub {możesz przejść do|może się zwrócić|może odwiedzić|może obejrzeć|może sprawdzić|może kliknąć} używane {sklepy|sklepy|detaliści|sprzedawcy|punkty sprzedaży|dostawcy} zamiast {drogie|drogie|drogie|drogie|drogie|drogich} domów towarowych {dla|w odniesieniu do|dotyczących|odnoszących się do|przeznaczonych dla|do zdobycia} odzieży {strzykawki insulinowe 1ml|strzykawki tuberkulinowe|strzykawki|strzykawka|strzykawki insulinowe|strzykawki do insuliny|strzykawki trzyczęściowe tuberkulinowe|strzykawka tuberkulinowa|strzykawka insulinowa|strzykawka do insuliny|strzykawka trzyczęściowe tuberkulinowa} {strzykawki insulinowe 1ml|strzykawki tuberkulinowe|strzykawki|strzykawka|strzykawki insulinowe|strzykawki do insuliny|strzykawki trzyczęściowe tuberkulinowe|strzykawka tuberkulinowa|strzykawka insulinowa|strzykawka do insuliny|strzykawka trzyczęściowe tuberkulinowa}.
Bardzo interesujące informacje! Idealnie to, czego szukałem! koncentrator tlenu koncentrator tlenu.
Bardzo interesujące informacje! Idealnie to, czego szukałem! domowy aparat tlenowy.
Ja naprawdę skarb twoją dzieło, Świetny post covid 19 test koronawirus antygenowy.
Ja naprawdę skarb twoją dzieło, Świetny post szybki test na covid 19.
Bardzo interesujące informacje! Idealnie to, czego szukałem maseczki ffp2 maseczki ffp2.
http://texaswaternews.com/__media__/js/netsoltrademark.php?d=toppremiumsites.porn/
I have been browsing online more than 3 hours today, yet I never found any interesting article like yours. It is pretty worth enough for me. Personally, if all web owners and bloggers made good content as you did, the web will be much more useful than ever before.|
Bardzo interesujące informacje! Idealnie to, czego szukałem pulsoksymetry napalcowe.
Bardzo interesujące informacje! Idealnie to, czego szukałem pulsoksymetry zegarekowe.
Bardzo interesujące informacje! Idealnie to, czego szukałem pulsoksymetry medyczny pulsoksymetry medyczny.
you have a great blog here! would you like to make some invite posts on my blog?
I always was concerned in this topic and stock still am, regards for posting.
you have a great blog here! would you like to make some invite posts on my blog?
I loved as much as you will receive carried out right here. The sketch is tasteful, your authored material stylish. nonetheless, you command get bought an edginess over that you wish be delivering the following. unwell unquestionably come further formerly again as exactly the same nearly a lot often inside case you shield this hike.
Bardzo interesujący temat, dziękuję za wysłanie wiadomości urządzenie do treningu oddechu urządzenie do treningu oddechu.
Bardzo interesujący temat, dzięki za wysłanie wiadomości Aparat do ćwiczenia oddechu Aparat do ćwiczenia oddechu.
I’m truly enjoying the design and layout of your website. It’s a very easy on the eyes which makes it much more enjoyable for me to come here and visit more often. Did you hire out a designer to create your theme? Great work!
I was extremely pleased to uncover this web site. I need to to thank you for ones time for this wonderful read!! I definitely really liked every bit of it and I have you bookmarked to check out new information in your site.
wonderful article
I like it when folks get together and share ideas. Great website, keep it up!
Bardzo interesujący temat, pozdrawiam za wystawienie się Spirometr Aparat do ćwiczeń oddechowych.
Bardzo interesujący temat, dzięki za wysłanie wiadomości spirometr astma spirometr astma
I was suggested this web site by my cousin. I’m not sure whether this post is written by him as nobody else know such detailed about my problem. You are wonderful! Thanks!
Pretty! This was an extremely wonderful article. Many thanks for supplying these details.
Hi, i read your blog occasionally and i own a similar one and i was just wondering if you get a lot of spam comments? If so how do you stop it, any plugin or anything you can recommend? I get so much lately it’s driving me mad so any support is very much appreciated.
Heya i am for the first time here. I came across this board and I find It really useful & it helped me out much. I hope to give something back and aid others like you helped me.
We’re a group of volunteers and starting a new scheme in our community. Your web site provided us with valuable info to work on. You’ve done a formidable job and our whole community will be grateful to you.
Whats Going down i’m new to this, I stumbled upon this I have found It positively useful and it has aided me out loads. I’m hoping to contribute & assist other users like its helped me. Great job.
Hey very cool blog!! Man .. Beautiful .. Amazing .. I will bookmark your website and take the feeds also…I’m happy to find a lot of useful information here in the post, we need develop more strategies in this regard, thanks for sharing. . . . . .
You actually make it seem so easy with your
presentation but I find this topic to be actually something that I think I would
never understand. It seems too complicated and very
broad for me. I am looking forward for your next post, I will try to get the hang of it!
You really make it seem so easy with your presentation but I find this matter to be actually something that I think I would never understand. It seems too complex and extremely broad for me. I’m looking forward for your next post, I?ll try to get the hang of it!
Piece of writing writing is also a fun, if you be acquainted with then you can write otherwise it is complicated to write.
Bardzo interesujący temat, pozdrawiam za wystawienie się plastry na opryszczkę cena plastry na opryszczkę cena.
Bardzo interesujący temat, pozdrawiam za wystawienie się plastry na opryszczke plastry na opryszczke.
Hey There. I found your blog using msn. This is an extremely well written article. I will make sure to bookmark it and return to read more of your useful info. Thanks for the post. I will definitely return.
Bardzo interesujący temat, pozdrawiam za wystawienie się plastry na opryszczkę wargową.
I was pretty pleased to uncover this website. I wanted to thank you for ones time for this particularly fantastic read!! I definitely appreciated every little bit of it and I have you bookmarked to see new information in your web site.
Does your site have a contact page? I’m having problems locating
it but, I’d like to shoot you an email. I’ve got some ideas for your blog you might be interested in hearing.
Either way, great website and I look forward to seeing it grow over time.
Bardzo interesujący temat, doceniam to za wystawienie się plaster na opryszczkę.
This is a good tip particularly to those fresh to the blogosphere. Simple but very precise info… Thanks for sharing this one. A must read article!
I’m amazed, I have to admit. Seldom do I come across a blog that’s both educative and interesting, and let me tell you, you have hit the nail on the head. The problem is an issue that too few men and women are speaking intelligently about. I am very happy that I stumbled across this in my hunt for something concerning this.
super content, i love it
I blog quite often and I truly thank you for your information. The article has really peaked my interest. I am going to book mark your blog and keep checking for new information about once a week. I subscribed to your RSS feed too.
I’m very pleased to find this site. I wanted to thank you for ones time just for this fantastic read!! I definitely savored every part of it and i also have you saved as a favorite to see new information in your web site.
After looking over a few of the articles on your web page, I seriously appreciate your way of writing a blog. I book marked it to my bookmark website list and will be checking back in the near future. Take a look at my web site too and tell me what you think.
I have been browsing on-line more than three hours today, yet I never discovered any interesting article like yours. It’s beautiful price enough for me. In my view, if all site owners and bloggers made just right content material as you probably did, the web shall be a lot more helpful than ever before. “Baseball is 90 percent mental. The other half is physical.” by Lawrence Peter Berra.
Next time I read a blog, I hope that it does not disappoint me just as much as this one. After all, I know it was my choice to read through, but I actually believed you would have something helpful to say. All I hear is a bunch of moaning about something that you could possibly fix if you weren’t too busy looking for attention.
immaculate content
Bardzo interesujący temat, pozdrawiam za wystawienie się chusteczki do rąk.
Bardzo interesujący temat, dziękuję za wysłanie wiadomości chusteczki chusteczki.
It’s nearly impossible to find experienced people on this subject, but you sound like you know what you’re talking about! Thanks
You actually make it appear so easy with your presentation but I in finding this topic to be really something that I feel I might by no means understand. It kind of feels too complex and extremely large for me. I’m having a look ahead on your subsequent put up, I will attempt to get the hold of it!
Bardzo interesujący temat, dziękuję za wysłanie wiadomości tlen inhalacyjny z maską tlen inhalacyjny z maską.
Bardzo interesujący temat, pozdrawiam za wystawienie się tlen inhalacyjny z inhalatorem.
Hey there! I just want to give you a big thumbs up for your excellent information you’ve got right here on this post. I will be coming back to your website for more soon.
Bardzo interesujący temat, pozdrawiam za wystawienie się tlen medyczny inhalacyjny tlen medyczny inhalacyjny.
Bardzo interesujący temat, dziękuję za wysłanie wiadomości tlen inhalacyjny z maską.
Whoa! This blog looks just like my old one! It’s on a completely different subject but it has pretty much the same layout and design. Superb choice of colors!
Best view i have ever seen !
Hello there, just became alert to your blog through Google, and found that it is truly informative. I?m gonna watch out for brussels. I?ll appreciate if you continue this in future. A lot of people will be benefited from your writing. Cheers!
hello there and thank you for your information – I’ve certainly picked up anything new from right here. I did however experience some technical issues using this website, since I experienced to reload the site a lot of instances prior to I may get it to load properly. I had been wondering if your hosting is OK? No longer that I’m complaining, but slow loading instances instances will sometimes have an effect on your placement in google and could damage your high quality score if ads and ***********|advertising|advertising|advertising and *********** with Adwords. Anyway I am adding this RSS to my e-mail and could glance out for a lot more of your respective intriguing content. Make sure you update this again soon..
Do you mind if I quote a couple of your posts as long as I provide credit and sources back to your webpage? My blog site is in the exact same area of interest as yours and my users would certainly benefit from some of the information you present here. Please let me know if this alright with you. Many thanks!|
This actually answered my downside, thank you!
I couldn’t refrain from commenting. Perfectly written.
you are really a good webmaster. The web site loading speed is amazing. It seems that you’re doing any unique trick. Moreover, The contents are masterwork. you’ve done a excellent job on this topic!
Thank you, I have recently been looking for information approximately this topic for a while and yours is the greatest I have discovered till now. But, what about the conclusion? Are you sure concerning the supply?
I absolutely love your website.. Pleasant colors & theme. Did you develop this website yourself? Please reply back as I’m attempting to create my own personal website and want to know where you got this from or just what the theme is called. Appreciate it!|
Write more, thats all I have to say. Literally, it seems as though you relied on the video to make your point. You clearly know what youre talking about, why throw away your intelligence on just posting videos to your blog when you could be giving us something informative to read?
Greetings from California! I’m bored to death at work so I decided to check out your blog on my iphone during lunch break. I really like the knowledge you provide here and can’t wait to take a look when I get home. I’m surprised at how quick your blog loaded on my phone .. I’m not even using WIFI, just 3G .. Anyways, amazing site!
Thanx for the effort, keep up the good work Great work, I am going to start a small Blog Engine course work using your site I hope you enjoy blogging with the popular BlogEngine.net.Thethoughts you express are really awesome. Hope you will right some more posts.
Very interesting subject, appreciate it for putting up.
I have been exploring for a little bit for any high quality articles or blog posts on this kind of house . Exploring in Yahoo I at last stumbled upon this website. Studying this info So i am happy to convey that I have an incredibly just right uncanny feeling I discovered just what I needed. I such a lot definitely will make certain to don¡¦t overlook this website and give it a glance on a continuing basis.
Valuable info. Lucky me I found your website by accident, and I’m surprised why this twist of fate did not happened earlier! I bookmarked it.
Hello! I just would like to give a huge thumbs up for the great info you have here on this post. I will be coming back to your blog for more soon.
Precisely the sort of material that enriches the internet. Thanks!
I quite like looking through an article that can make men and women think. Also, thank you for allowing me to comment!
Excellent blog here! Also your web site loads up very fast! What host are you using? Can I get your affiliate link to your host? I wish my website loaded up as fast as yours lol
It’s appropriate time to make a few plans for the longer term and it’s time to be happy. I have read this publish and if I may just I wish to suggest you some fascinating things or suggestions. Maybe you could write subsequent articles referring to this article. I wish to learn even more things about it!
I¦ve recently started a web site, the info you provide on this web site has helped me tremendously. Thank you for all of your time & work.
I think other site proprietors should take this site as an model, very clean and excellent user friendly style and design, as well as the content. You are an expert in this topic!
You have actually covered this subject professionally.
Your site is great as in the event it were being written by simply a writer. I am going to visit your blog frequently. Thanks always.
very good submit, i certainly love this web site, keep on it
An interesting discussion is worth comment. I think that you should write more on this topic, it might not be a taboo subject but generally people are not enough to speak on such topics. To the next. Cheers
Thanks a lot for providing individuals with such a splendid chance to check tips from this website. It’s usually very lovely and also stuffed with a lot of fun for me personally and my office colleagues to search your site at minimum thrice in a week to read through the fresh stuff you will have. And of course, I’m also at all times fascinated with your breathtaking opinions you serve. Some 4 ideas in this article are absolutely the most suitable we’ve had.
I’d like to thank you for the efforts you have put in penning this site. I’m hoping to check out the same high-grade blog posts by you later on as well. In truth, your creative writing abilities has inspired me to get my own website now 😉
Hi! Do you know if they make any plugins to safeguard against hackers? I’m kinda paranoid about losing everything I’ve worked hard on. Any tips?
I’m really enjoying the theme/design of your site. Do you ever run into any web browser compatibility problems? A couple of my blog readers have complained about my blog not working correctly in Explorer but looks great in Safari. Do you have any ideas to help fix this issue?|
You’re therefore amazing. Oh my God. Our god bless you.
The very next time I read a blog, Hopefully it won’t disappoint me just as much as this particular one. I mean, Yes, it was my choice to read, nonetheless I really thought you would have something helpful to talk about. All I hear is a bunch of moaning about something you could fix if you weren’t too busy looking for attention.
Thank you for the good writeup. It in truth was a enjoyment account it. Look advanced to far introduced agreeable from you! By the way, how can we be in contact?|
so much superb information on here, : D.
It is a whole lot greater than feasible to spend all your time researching Technology and also here is something which will allow you to take all the truths you need that are the most important to your goals. If you wish to get excellent outcomes that absolutely issue, you can not delay the vital steps. On the occasion that you aren’t clear about a detail or 2, go back as well as take a look at it once again or ask a person who you trust. You do not want small issues to hold you down. Among the places you can go when you would love to discover more is Our Technology Site, which has assisted a great deal of individuals that are where you are.
Thank you so much for making me personally know what I didn’t know. I look forward to working with you.
Amazing! This blog looks exactly like my old one! It’s on a entirely different subject but it has pretty much the same layout and design. Great choice of colors!
I genuinely enjoy looking through on this website, it contains great content. “The living is a species of the dead and not a very attractive one.” by Friedrich Wilhelm Nietzsche.
Hey There. I found your blog using msn. This is an extremely well written article. I will make sure to bookmark it and return to read more of your useful information. Thanks for the post. I’ll certainly comeback.
This website truly has all the info I needed about this subject and didn’t know who to ask.
It’s the best time to make some plans for the future and it’s time to be happy. I have read this post and if I could I wish to suggest you few interesting things or tips. Perhaps you could write next articles referring to this article. I wish to read even more things about it!
Excellent post! We are linking to this great content on our jewelry website. Keep up the great writing.
I was able to find good information from your articles.
Hi, I think your site might be having browser compatibility issues. When I look at your website in Safari, it looks fine but when opening in Internet Explorer, it has some overlapping. I just wanted to give you a quick heads up! Other then that, fantastic blog!
Because the admin of this web page is working, no doubt very shortly it will be famous, due to its quality contents.
Wow, amazing blog layout! How long have you been blogging for? you made blogging look easy. The overall look of your website is great, let alone the content!
Amazing blog! Do you have any tips for aspiring writers? I’m hoping to start my own website soon but I’m a little lost on everything. Would you advise starting with a free platform like WordPress or go for a paid option? There are so many options out there that I’m totally confused .. Any tips? Kudos!|
Definitely consider that which you stated. Your favourite reason appeared to be on the web the easiest factor to keep in mind of. I say to you, I definitely get irked at the same time as people consider concerns that they just do not recognize about. You managed to hit the nail upon the top and also outlined out the entire thing with no need side effect , folks can take a signal. Will likely be again to get more. Thank you
hey there and thank you for your info – I have certainly picked up something new from right here. I did however expertise several technical points using this website, as I experienced to reload the site many times previous to I could get it to load properly. I had been wondering if your web hosting is OK? Not that I am complaining, but sluggish loading instances times will very frequently affect your placement in google and could damage your quality score if ads and marketing with Adwords. Well I’m adding this RSS to my email and could look out for much more of your respective fascinating content. Make sure you update this again very soon.|
What i don’t realize is in fact how you are now not actually much more smartly-preferred than you may be right now. You’re so intelligent. You already know therefore significantly in the case of this topic, made me in my view imagine it from numerous numerous angles. Its like men and women don’t seem to be fascinated except it’s one thing to accomplish with Woman gaga! Your individual stuffs outstanding. Always take care of it up!
Precisely what a man of power! You have the ability to write excellent factors that you can’t find everywhere. to envy
Very instructive and great body structure of written content, now that’s user pleasant (:.
Hello, i think that i saw you visited my site so i came to ?return the favor?.I am trying to find things to improve my site!I suppose its ok to use some of your ideas!!
It’s hard to find educated people about this subject, but you sound like you know what you’re talking about! Thanks
I truly appreciate this post. I’ve been looking everywhere for this! Thank goodness I found it on Bing. You have made my day! Thanks again!
I like the helpful info you provide in your articles. I?ll bookmark your weblog and check again here regularly. I am quite certain I will learn many new stuff right here! Good luck for the next!
Glad to be one of many visitors on this awe inspiring internet site : D.
This website was… how do you say it? Relevant!! Finally I’ve found something which helped me. Thank you!
I don?t even know how I ended up here, but I thought this post was good. I don’t know who you are but definitely you’re going to a famous blogger if you are not already 😉 Cheers!
This is very interesting, You are a very skilled blogger. I have joined your feed and look forward to seeking more of your fantastic post. Also, I’ve shared your web site in my social networks!
Good day! This is my first comment here so I just wanted to give a quick shout out and say I really enjoy reading your blog posts. Can you suggest any other blogs/websites/forums that cover the same subjects? Thanks a lot!
Glad to be one of several visitors on this awe inspiring web site : D.
Very few authors with proper understanding of the subjects they cover.
I love your blog.. very nice colors & theme. Did you design this website yourself
or did you hire someone to do it for you? Plz reply as I’m looking to design my own blog and would like to find
out where u got this from. thanks
Hi, i read your blog from time to time and i own a similar one and i was just wondering if you get a lot of spam comments? If so how do you reduce it, any plugin or anything you can recommend? I get so much lately it’s driving me insane so any assistance is very much appreciated.
Definitely, what a fantastic website and revealing posts, I will bookmark your blog.All the Best!
ücret elden escort bayan
We’re a group of volunteers and starting a new scheme in our community. Your website offered us with valuable info to work on. You have done an impressive job and our whole community will be thankful to you.
I like the way you have ended this article …
Thank you for the good writeup. It in fact was a amusement account it. Look advanced to far added agreeable from you! However, how could we communicate?
You made some decent points there. I looked on the web for more info about the issue and found most individuals will go along with your views on this site.
I’ve been absent for a while, but now I remember why I used to love this web site. Thank you, I will try and check back more frequently. How frequently you update your website?
Finding The Right Facts About Scenery Layout Landscaping design occurs when you rearrange points on your lawn seem significantly better. It also need to be useful and offer required place for the homeowner. While this could be a lot for taking in, continue on for some valuable landscape designs suggestions that may help you come up with a plan that fits your entire requirements. Use community vegetation when landscape designs your garden.Local plant life are much much easier to take care of since they are currently comfy in your earth and climate. This really is excellent because they are lower-upkeep. You could discover details about plant life that happen to be native to your neighborhood by visiting your chosen garden store. Use local plants on your property. Indigenous types demand less upkeep because they are previously with their perfect climate. This too means that they are low-routine maintenance. You can find information on plant life which are community to the location you reside by going to your best growing plants store. If you scenery, you have to know the difference in between perennials and annuals, along with what plants, vegetation, and shrubs work best in some geographical areas and below a number of environments. You ought to be mindful of the seasons when landscaping also. It is vital to understand which vegetation prosper throughout specific periods for the greatest comes from your landscape programs. It may be a challenge to scenery your entire home all as well. Splitting up your current undertaking into numerous elements will be much easier on your own wallet. Additionally, it may help you when you’re changing your layout lower the entire process of landscape designs. A fantastic landscaping design hint which everybody ought to use is to produce a listing of any needed resources you will certainly be needing before commencing on your own venture. You don’t have to get going on any project to learn that you’re missing anything crucial. Develop a landscaping which will improve the beauty of your property year-round. This calls for you to consist of specimens that blossom at various times of the year. The real key to some year-spherical landscape is to study your plants. Prices are important, however if you may ask to find out some photos or deals with of employment a landscaper has been doing, make sure to have a look at the past operate that she or he did. Landscaping design is not difficult when it’s done right, as possible now see. Implement the guidelines you’ve discovered to your landscape designs project and you are certain to love the outcomes. Once you’ve obtained some experience within your belt, you’ll be similar to a expert! Don’t hesitate! Start off boosting your landscaping design abilities right now!
This is a topic which is near to my heart… Take care! Exactly where are your contact details though?
Definitely, what a great blog and revealing posts, I definitely will bookmark your website.All the Best!
When I initially commented I clicked the “Notify me when new comments are added” checkbox and now each time a comment is added I get three emails with the same comment. Is there any way you can remove people from that service? Thanks!
Your blog never ceases to amaze me, it is very well written and organized.~`’-:
Keep working ,fantastic job!
I am not sure where you are getting your information, but great topic. I needs to spend some time learning much more or understanding more. Thanks for excellent info I was looking for this info for my mission.|
Hey there! This is my first comment here so I just wanted to give a quick shout out and tell you I truly enjoy reading through your articles. Can you recommend any other blogs/websites/forums that cover the same topics? Thanks for your time!
Beneficial Guidance For Creating Stunning House Panoramas! Many people consider landscaping a means to boost their home’s seem. No matter what you should discover landscaping for, the following tips will be of help. Curved beds are a lot a lot more fascination compared to straight sides of the past. When landscape design, you must understand the difference in between perennials and annuals, along with what blooms, vegetation, and shrubs work most effectively in some geographical regions and below specific climates. You need to also recall your conditions when landscaping as well. It is essential to learn which plants and flowers thrive in the course of particular months for the best comes from your landscape design experience. Before beginning your backyard, Check with an expert for assistance. Though it won’t be required to get them execute all the work, their assistance will help you stay away from errors that will set you back afterwards down the road. This method is particularly true should you be unfamiliar with landscape designs. Pick top quality goods around price. In lots of shops, you will usually locate lowered and very low-good quality goods. Visit a retailer that are experts in landscape style where you may get quality goods and helpful advice from seasoned staff. It’s worth every penny to cover much more for top quality guidance and merchandise that really operate. When commencing an incredibly huge landscape project alone, try out getting a short consultation with a landscape architect or developer to find out whatever they consider you should get for your layout. The standard cost of a evaluation is just about $75 and this will be several times this. Incorporate various vegetation types whenever you plan the style of your lawn or back garden. This will be helpful in the case your garden from illness of bug. They will be assaulted and shed if you utilize exactly the same varieties of plants and flowers. Diversity is important in landscaping design for grow wellness when landscaping design. Whilst landscaping might be seen as one thing useful, it ought to be regarded as something entertaining to achieve that requires the whole family. Begin an entertaining venture as quickly as possible. You will not only be making fantastic family members memories, you are going to develop a stunning home that you simply all is going to be happy with.
Hello there, just became aware of your blog through Google, and found that it’s truly informative. I am gonna watch out for brussels. I will appreciate if you continue this in future. Many people will be benefited from your writing. Cheers!
What are the most effective WordPress plugins to attract the most relevant traffic, the most relevant traffic and maximize website sales?. . I am thinking maybe:. 1. RSS feed plugins, . 2. Cost Per Action (CPA) plugins or code snippets, . 3. Affiliate plugins and/or links. . Can you provide links to the tools that you think are the best, and let me know why you think they are the best?.
Hey there! I realize this is kind of off-topic however I had to ask.
Does building a well-established blog such as yours require a massive amount work?
I’m completely new to blogging but I do write in my diary everyday.
I’d like to start a blog so I can share my experience
and feelings online. Please let me know if you have any
ideas or tips for new aspiring blog owners. Thankyou!
Thank you for another wonderful post. Exactly where else could anybody get that kind of information and facts in such a ideal way of writing? I’ve a presentation next week, and I am on the appear for such details.
I was recommended this web site by my cousin. I am not sure whether this post is written by him as nobody else know such detailed about my trouble. You are incredible! Thanks!
Good day! Would you mind if I share your blog with my myspace
group? There’s a lot of folks that I think would really enjoy your content.
Please let me know. Thank you 0mniartist asmr
I’ve been surfing online more than three hours today, yet I never found any interesting article like yours. It is pretty worth enough for me. Personally, if all webmasters and bloggers made good content as you did, the internet will be a lot more useful than ever before.
I just like the valuable info you provide on your articles. I’ll bookmark your weblog and check again here frequently. I am moderately certain I will be told many new stuff right right here! Good luck for the following!
Hi, I do think this is an excellent website. I stumbledupon it 😉 I may revisit once again since i have bookmarked it. Money and freedom is the greatest way to change, may you be rich and continue to help other people.
There are actually numerous details like that to take into consideration. That is a nice point to deliver up. I supply the thoughts above as common inspiration however clearly there are questions just like the one you carry up the place the most important thing might be working in sincere good faith. I don?t know if finest practices have emerged round things like that, however I’m positive that your job is clearly recognized as a fair game. Both boys and girls feel the impact of just a second’s pleasure, for the rest of their lives.
Hey There. I found your blog using msn. This is an extremely well written article. I will be sure to bookmark it and come back to read more of your useful information. Thanks for the post. I?ll definitely comeback.
Many thanks, this site is really handy.
Hi there, just became aware of your blog through Google, and found that it is truly informative. I am going to watch out for brussels. I’ll appreciate if you continue this in future. Numerous people will be benefited from your writing. Cheers!
Thank you for the auspicious writeup. It in fact was a amusement account it. Look advanced to far added agreeable from you! By the way, how could we communicate?
Pretty section of content. I just stumbled upon your weblog and in accession capital to assert that I acquire in fact enjoyed account your blog posts. Anyway I?ll be subscribing to your augment and even I achievement you access consistently fast.
When I originally commented I clicked the -Notify me when new comments are added- checkbox and now each time a comment is added I get four emails with the same comment. Is there any way you can remove me from that service? Thanks!
Heya i am for the first time here. I found this board and I find It truly helpful & it helped me out a lot. I hope to provide one thing again and help others like you helped me.
Hello, Neat post. There is a problem along with your web site in internet explorer, would test this… IE still is the market chief and a good component to other people will pass over your fantastic writing due to this problem.
hello!,I really like your writing very a lot! share we communicate more approximately your post on AOL? I require a specialist on this space to resolve my problem. Maybe that is you! Looking ahead to peer you.
Some really fantastic articles on this internet site, thankyou for contribution.
Having read this I believed it was really informative. I appreciate you spending some time and energy to put this article together. I once again find myself personally spending a significant amount of time both reading and commenting. But so what, it was still worth it!
power tools can really save you from a lot of headache, specially when the job is very hard-
Thank you for the good writeup. It in fact was a amusement account it. Look advanced to more added agreeable from you! By the way, how can we communicate?
I’m excited to uncover this site. I want to to thank you for your time for this particularly fantastic read!! I definitely enjoyed every little bit of it and I have you saved to fav to look at new stuff in your web site.
Undeniably believe that which you stated. Your favorite reason appeared to be on the web the simplest thing to be aware of. I say to you, I definitely get annoyed while people think about worries that they plainly do not know about. You managed to hit the nail upon the top as well as defined out the whole thing without having side effect , people could take a signal. Will probably be back to get more. Thanks
Its superb as your other articles : D, appreciate it for putting up. “Talent does what it can genius does what it must.” by Edward George Bulwer-Lytton.
I do not even know how I ended up here, but I thought this post was great. I don’t know who you are but certainly you’re going to a famous blogger if you aren’t already 😉 Cheers!
hey there and thank you for your info ? I?ve definitely picked up anything new from right here. I did however expertise a few technical points using this site, as I experienced to reload the web site many times previous to I could get it to load correctly. I had been wondering if your hosting is OK? Not that I am complaining, but slow loading instances times will very frequently affect your placement in google and can damage your quality score if advertising and marketing with Adwords. Anyway I?m adding this RSS to my e-mail and can look out for much more of your respective fascinating content. Ensure that you update this again very soon..
hi!,I love your writing so much! proportion we keep up a correspondence more approximately your post on AOL? I need a specialist on this area to unravel my problem. Maybe that is you! Taking a look forward to see you.
Simply want to say your article is as astounding. The clarity in your post is just nice and i could assume you’re an expert on this subject. Well with your permission allow me to grab your feed to keep up to date with forthcoming post. Thanks a million and please carry on the enjoyable work.
Hello there, You have done an excellent job. I?ll certainly digg it and personally suggest to my friends. I am confident they will be benefited from this web site.
Just bookmarked this post as I have actually found it fairly helpful.
You’ve made some good points there. I looked
on the net for more information about the issue and found most individuals will go along with your views on this
site.
I wanted to thank you for this great read!! I definitely enjoying every little bit of it I have you bookmarked to check out new stuff you post…
hello!,I really like your writing so so much! percentage we keep up a correspondence extra about your post on AOL? I need an expert on this area to unravel my problem. May be that is you! Looking forward to see you.
Just wish to say your article is as astounding. The clearness in your post is just cool and i could assume you are an expert on this subject. Fine with your permission allow me to grab your RSS feed to keep updated with forthcoming post. Thanks a million and please continue the rewarding work.
Very interesting topic, thanks for posting.
I will immediately grasp your rss as I can not find your e-mail subscription link or e-newsletter service. Do you have any? Kindly allow me realize in order that I may just subscribe. Thanks.
top rated canadian online pharmacy
whoah this blog is fantastic i love reading your articles. Keep up the good work! You know, lots of people are looking around for this info, you can aid them greatly.
Thanks for this marvellous post, I am glad I discovered this site on yahoo.
It’s perfect time to make a few plans for the longer term and it’s time to be happy. I’ve learn this submit and if I may I desire to counsel you few interesting issues or advice. Perhaps you can write subsequent articles referring to this article. I desire to read even more things approximately it!
You have brought up a very good details , thanks for the post.
Not many writers with proper understanding of the topics they discuss.
What’s Going down i’m new to this, I stumbled upon this I’ve discovered It positively helpful and it has helped me out loads. I hope to give a contribution & help different users like its aided me. Good job.
I’ve been browsing online more than three hours today, yet I never found any interesting article like yours. It?s pretty worth enough for me. In my opinion, if all webmasters and bloggers made good content as you did, the web will be a lot more useful than ever before.
Hi, I’ve been a lurker around your blog for a few months. I love this article and your entire site! Looking forward to reading more!
Good post. I learn something new and challenging on websites I stumbleupon every day. It will always be exciting to read through articles from other authors and practice a little something from other web sites. |
Hi there! This blog post could not be written any better! Reading through this post reminds me of my previous roommate! He continually kept preaching about this. I’ll forward this article to him. Pretty sure he’s going to have a good read. Many thanks for sharing!
I see something really interesting about your blog so I saved to bookmarks.
Its like you read my mind! You seem to know so much about this, like you wrote the book in it or something. I think that you can do with a few pics to drive the message home a bit, but other than that, this is magnificent blog. An excellent read. I’ll definitely be back.
After going over a few of the blog articles on your site, I seriously appreciate your way of blogging. I saved as a favorite it to my bookmark webpage list and will be checking back soon. Please visit my web site too and tell me what you think.
In the hottest season of midsummer, the small wind blowing just now suddenly stopped, and the suffocating heat returned.
Thank you for the auspicious writeup. It in fact was a amusement account it. Look advanced to more added agreeable from you! By the way, how could we communicate?
he blog was how do i say it… relevant, finally something that helped me. Thanks
Hi to all, it’s genuinely a pleasant for me to pay a quick visit this website, it consists of valuable Information.|
hey there and thank you for your info ? I have certainly picked up something new from right here. I did however expertise several technical issues using this site, since I experienced to reload the site many times previous to I could get it to load correctly. I had been wondering if your web host is OK? Not that I’m complaining, but sluggish loading instances times will sometimes affect your placement in google and can damage your quality score if ads and marketing with Adwords. Well I?m adding this RSS to my e-mail and could look out for much more of your respective exciting content. Ensure that you update this again very soon..
I adore looking through and I conceive this website got some genuinely utilitarian stuff on it! .
I’m not sure where you are getting your info, but great topic. I needs to spend some time learning much more or understanding more. Thanks for magnificent information I was looking for this info for my mission.
This is a really good tip particularly to those fresh to the blogosphere. Brief but very precise information… Thanks for sharing this one. A must read post!
Wow, marvelous weblog layout! How long have you been running a blog for? you made blogging glance easy. The total look of your website is fantastic, let alone the content!
Hello there! I just want to offer you a big thumbs up for the great information you have here on this post. I am coming back to your website for more soon.|
I used to be able to find good information from your blog posts.
Excellent post. I was checking constantly this blog and I’m impressed! Very useful information specifically the last part 🙂 I care for such information much. I was looking for this certain information for a very long time. Thank you and best of luck.
It’s hard to find knowledgeable people on this topic, but you sound like you know what you’re talking about! Thanks
Hello.This article was really motivating, particularly since I was investigating for thoughts on this topic last Thursday.
Thanks , I’ve recently been searching for information approximately this topic for ages and yours is the best I have found out till now. However, what concerning the bottom line? Are you sure about the supply?
I think this is among the most vital information for me. And i am glad reading your article. But want to remark on few general things, The website style is ideal, the articles is really great : D. Good job, cheers
Great website you have here but I was curious if you knew of any community forums that cover the same topics discussed here? I’d really like to be a part of community where I can get advice from other experienced individuals that share the same interest. If you have any recommendations, please let me know. Appreciate it!
Thanks for some other informative web site. Where else may just I am getting that kind of information written in such an ideal manner? I’ve a mission that I am just now running on, and I have been at the look out for such info.
Hi there very cool site!! Guy .. Beautiful .. Superb .. I’ll bookmark your blog and take the feeds also…I am happy to find a lot of helpful information right here within the publish, we’d like develop extra techniques on this regard, thank you for sharing. . . . . .
Hello there, I found your blog via Google while looking for a related topic, your site came up, it looks great. I’ve bookmarked it in my google bookmarks.
Its like you read my mind! You seem to know a lot about this, like you wrote the book in it or something. I think that you could do with some pics to drive the message home a bit, but instead of that, this is fantastic blog. A fantastic read. I’ll certainly be back.
Good site! I really love how it is easy on my eyes and the data are well written. I’m wondering how I could be notified when a new post has been made. I have subscribed to your feed which must do the trick! Have a nice day!
Great blog here! Also your site loads up very fast! What host are you using? Can I get your affiliate link to your host? I wish my website loaded up as quickly as yours lol
I?m not sure where you’re getting your info, but good topic. I needs to spend some time learning more or understanding more. Thanks for magnificent info I was looking for this info for my mission.
I do agree with all of the ideas you’ve presented in your post. They’re really convincing and will certainly work. Still, the posts are very short for newbies. Could you please extend them a bit from next time? Thanks for the post.
I conceive this website holds some rattling fantastic information for everyone. “The expert at anything was once a beginner.” by Hayes.
Pretty section of content. I just stumbled upon your site and in accession capital to assert that I acquire in fact enjoyed account your blog posts. Any way I’ll be subscribing to your feeds and even I achievement you access consistently quickly.
My brother suggested I would possibly like this web site. He used to be totally right. This post actually made my day. You cann’t consider simply how much time I had spent for this info! Thanks!
I get pleasure from, cause I found just what I was looking for. You have ended my four day long hunt! God Bless you man. Have a nice day. Bye
This really answered my problem, thank you!
What an fantastic way of taking a look at things.
I think this web site has got some very wonderful info for everyone : D.
Excellent post. I was checking continuously this blog and I am impressed! Very useful information specifically the last part 🙂 I care for such information a lot. I was seeking this particular info for a very long time. Thank you and best of luck.
I was curious if you ever considered changing the structure of your site? Its very well written; I love what youve got to say. But maybe you could a little more in the way of content so people could connect with it better. Youve got an awful lot of text for only having one or 2 images. Maybe you could space it out better?
This is very interesting, You are a very skilled blogger. I’ve joined your rss feed and look forward to seeking more of your fantastic post. Also, I’ve shared your website in my social networks!
Have you ever heard of second life (sl for short). It is basically a game where you can do anything you want. SL is literally my second life (pun intended lol). If you would like to see more you can see these Second Life websites and blogs
Very nice blog post. I absolutely appreciate this site. Keep writing!
Hi, i think that i saw you visited my site thus i came to ?return the favor?.I am trying to find things to improve my site!I suppose its ok to use some of your ideas!!
Fantastic goods from you, man. I’ve understand your stuff previous to and you are just extremely excellent. I actually like what you have acquired here, certainly like what you are saying and the way in which you say it. You make it entertaining and you still care for to keep it sensible. I cant wait to read far more from you. This is really a great site.
Thank you for the good writeup. It in fact was a amusement account it. Look advanced to far added agreeable from you! By the way, how could we communicate?
It is perfect time to make some plans for the future and it is time to be happy. I’ve read this post and if I could I wish to suggest you some interesting things or tips. Perhaps you can write next articles referring to this article. I want to read even more things about it!
Have you ever heard of second life (sl for short). It is basically a game where you can do anything you want. sl is literally my second life (pun intended lol). If you want to see more you can see these sl websites and blogs
Thank you for the good writeup. It in fact was a amusement account it. Look advanced to more added agreeable from you! However, how could we communicate?
canada drugs
Thank you for the good writeup. It in fact was a amusement account it. Look advanced to far added agreeable from you! By the way, how can we communicate?
I was suggested this blog by my cousin. I’m not sure whether this post is written by him as nobody else know such detailed about my problem. You are amazing! Thanks!
Hello would you mind letting me know which hosting company you’re working with? I’ve loaded your blog in 3 completely different browsers and I must say this blog loads a lot faster then most. Can you suggest a good internet hosting provider at a honest price? Thanks a lot, I appreciate it!
It’s appropriate time to make some plans for the future and it’s time to be happy. I’ve read this post and if I could I want to suggest you few interesting things or advice. Perhaps you can write next articles referring to this article. I wish to read more things about it!
Hey There. I found your blog using msn. This is an extremely well written article. I will be sure to bookmark it and come back to read more of your useful info. Thanks for the post. I?ll definitely return.
This is very interesting, You are a very skilled blogger. I’ve joined your rss feed and look forward to seeking more of your wonderful post. Also, I have shared your website in my social networks!
Wow, superb blog layout! How long have you been blogging for? you make blogging look easy. The overall look of your site is magnificent, as well as the content!
Your manner of addressin this topic is both terrific and also inspiring.
You have actually covered this subject expertly.
Fascinating blog! Is your theme custom made
or did you download it from somewhere? A design like yours with a few simple tweeks would really make my blog jump out.
Please let me know where you got your theme. Bless you
always i used to read smaller posts that also clear
their motive, and that is also happening with
this post which I am reading at this time.
Magnificent beat ! I wish to apprentice while you amend your web site, how could i subscribe for a blog website? The account aided me a acceptable deal. I had been a little bit acquainted of this your broadcast provided bright clear concept
I think this is one of the most important info for me. And i am glad reading your article. But should remark on some general things, The website style is perfect, the articles is really nice : D. Good job, cheers
I?m not sure where you’re getting your information, but great topic. I needs to spend some time learning more or understanding more. Thanks for magnificent info I was looking for this information for my mission.
I really appreciate this post. I’ve been looking everywhere for this! Thank goodness I found it on Bing. You’ve made my day! Thanks again
WONDERFUL Post.thanks for share..more wait .. …
A keypad on your clock is the next thing you need in order to find out what is the most reliable alarm clock. It should be easy to use and provide you with the information you need in order to wake up every morning.
This is really interesting, You’re a very skilled blogger. I have joined your feed and look forward to seeking more of your wonderful post. Also, I have shared your web site in my social networks!
Aw, this was a really nice post. In concept I want to put in writing like this additionally – taking time and actual effort to make a very good article… but what can I say… I procrastinate alot and under no circumstances appear to get something done.
naturally like your web-site but you need to test the spelling on quite a few of your posts. Many of them are rife with spelling problems and I in finding it very troublesome to tell the reality then again I will surely come again again.
I’m pretty pleased to find this web site. I wanted to thank you for ones time for this particularly fantastic read!! I definitely enjoyed every part of it and i also have you book marked to look at new stuff in your blog.
Pretty! This has been a really wonderful post. Many thanks for providing these details.
Real nice design and superb articles , nothing at all else we need : D.
Great post. I am facing a couple of these problems.
Good info. Lucky me I reach on your website by accident, I bookmarked it.
Good info. Lucky me I discovered your blog by accident (stumbleupon).
I have book marked it for later!
Next time I read a blog, I hope that it does not fail me as much as this particular one. I mean, Yes, it was my choice to read through, but I genuinely believed you would have something interesting to say. All I hear is a bunch of crying about something you can fix if you were not too busy looking for attention.
Thank you for the sensible critique. Me and my neighbor were just preparing to do some research on this. We got a grab a book from our local library but I think I learned more clear from this post. I am very glad to see such magnificent info being shared freely out there.
Usually I do not read post on blogs, but I wish to say that this write-up very forced me to try and do so! Your writing style has been surprised me. Thanks, very nice article.
F*ckin¦ awesome issues here. I¦m very happy to peer your post. Thank you so much and i am having a look forward to touch you. Will you kindly drop me a e-mail?
Deep in a woman’s heart, there is a fairy-like tenderness and a witch-like terrible. Click:sexual intercourse.
Appreciating the time and energy you put into your website and in depth information you offer. It’s awesome to come across a blog every once in a while that isn’t the same unwanted rehashed material. Fantastic read! I’ve saved your site and I’m adding your RSS feeds to my Google account.
Some really nice and utilitarian information on this internet site, too I conceive the layout has got excellent features.
The other day, while I was at work, my sister stole my iphone and tested to see if it can survive a forty foot drop, just so she can be a youtube sensation. My apple ipad is now broken and she has 83 views. I know this is entirely off topic but I had to share it with someone!|
Hello.This article was extremely interesting, especially since I was investigating for thoughts on this matter last Thursday.
I genuinely enjoy reading through on this site, it holds superb content. “You should pray for a sound mind in a sound body.” by Juvenal.
Excellent blog here! Also your web site loads up very fast! What host are you using? Can I get your affiliate link to your host? I wish my site loaded up as fast as yours lol
I am lucky that I discovered this blog, just the right info that I was looking for! .
An erection is not entirely a signal of sex. Sometimes it is just a reminder: it’s time to pee. Click:sexual intercourse.
It is truly a nice and useful piece of info. I am satisfied that you just shared this useful information with us. Please stay us up to date like this. Thanks for sharing.
I am sure this article has touched all the internet people, its really really nice paragraph on building up new blog.|
I was reading through some of your posts on this internet site and I conceive this site is very informative! Keep putting up.
canadian pharmacies that ship to us
It’s hard to find knowledgeable people on this topic, but you sound like you know what you’re talking about! Thanks
Wow, marvelous blog layout! How long have you been blogging for? you make blogging look easy. The overall look of your website is wonderful, as well as the content!
Heya i am for the first time here. I came across this board and I find It really useful & it helped me out a lot. I hope to give something back and aid others like you aided me.
My brother recommended I might like this website. He was entirely right. This post actually made my day. You cann’t imagine just how much time I had spent for this information! Thanks!
Heya i’m for the first time here. I came across this board and I find It truly useful & it helped me out much. I hope to give something back and help others like you helped me.
Terrific work! This is the type of information that are supposed to be shared around the net. Disgrace on the seek engines for not positioning this post higher! Come on over and consult with my website . Thank you =)|
I am a mother looking to talk. I love sucking dick btw hmu
A fascinating discussion is worth comment. I think that you need to write more on this issue, it may not be a taboo matter but generally folks don’t discuss these subjects. To the next! Kind regards!!
canadian pharmacies online
hey there and thank you for your information ? I?ve definitely picked up anything new from right here. I did however expertise several technical issues using this site, since I experienced to reload the website many times previous to I could get it to load correctly. I had been wondering if your web host is OK? Not that I’m complaining, but slow loading instances times will sometimes affect your placement in google and could damage your quality score if advertising and marketing with Adwords. Anyway I?m adding this RSS to my email and can look out for much more of your respective interesting content. Ensure that you update this again very soon..
Very nice post. I just stumbled upon your weblog and wanted to say that I have really
enjoyed browsing your blog posts. In any case I will be subscribing to your feed and I hope you write again very soon!
Wonderful site. Plenty of useful information here. I¦m sending it to a few buddies ans also sharing in delicious. And obviously, thank you in your effort!
Hi to every one, the contents existing at this web page are genuinely remarkable for
people experience, well, keep up the nice work fellows.
I’m amazed, I must say. Seldom do I come across a blog that’s both educative and entertaining, and without a doubt, you’ve hit the nail on the head. The problem is something not enough men and women are speaking intelligently about. Now i’m very happy that I came across this in my hunt for something relating to this.
Hello there! This blog post couldn’t be written any better! Looking at this post reminds me of my previous roommate! He constantly kept talking about this. I’ll send this information to him. Fairly certain he’s going to have a very good read. Thanks for sharing!
canadian pharmacies online
Pretty! This was a really wonderful post. Thank you for your provided information.
Hi, I do believe this is an excellent website. I stumbledupon it 😉 I am going to come back once again since I saved as a favorite it. Money and freedom is the greatest way to change, may you be rich and continue to guide other people.|
What’s up mates, how is everything, and what you would like to say about this post, in my view its really amazing in favor of me.|
Hmm it appears like your blog ate my first comment (it was extremely long) so I guess I’ll just sum it up what I had written and say, I’m thoroughly enjoying your blog. I too am an aspiring blog writer but I’m still new to everything. Do you have any recommendations for rookie blog writers? I’d genuinely appreciate it.
I’m still learning from you, while I’m making my way to the top as well. I certainly liked reading all that is written on your blog.Keep the aarticles coming. I liked it!
It’s perfect time to make some plans for the future and it is time to be happy. I’ve read this post and if I could I wish to suggest you few interesting things or suggestions. Maybe you could write next articles referring to this article. I wish to read more things about it!
Simply wish to say your article is as astonishing. The clarity in your post is simply spectacular and i can assume you’re an expert on this subject. Well with your permission allow me to grab your feed to keep updated with forthcoming post. Thanks a million and please continue the gratifying work.
I was recommended this website by my cousin. I’m not sure whether this post is written by him as no one else know such detailed about my difficulty. You are wonderful! Thanks!
An interesting discussion is worth comment. I do believe that you need to write more on this issue, it may not be a taboo subject but usually people don’t speak about such subjects. To the next! All the best!!
Admiring the time and effort you put into your website and in depth information you offer. It’s good to come across a blog every once in a while that isn’t the same outdated rehashed information. Fantastic read! I’ve bookmarked your site and I’m adding your RSS feeds to my Google account.
You have noted very interesting points! ps nice site. “Choose your friends carefully. Your enemies will choose you.” by Yassir Arafat.
I could not resist commenting. Well written!
Appreciate it for helping out, wonderful info .
You should take part in a contest for one of the greatest websites on the web. I will highly recommend this web site!
canadian pharmacy
Thankyou for all your efforts that you have put in this. very interesting information.
I was curious if you ever considered changing the layout of your blog?
Its very well written; I love what youve got to say. But maybe you could a little more in the way of content so people could connect with it better.
Youve got an awful lot of text for only having one or 2 pictures.
Maybe you could space it out better?
You need to be a part of a contest for one of the best sites on the net. I am going to recommend this website!
Hi my loved one! I wish to say that this post is awesome, nice written and include approximately all important infos. I would like to see extra posts like this.
whoah this blog is great i like reading your posts. Keep up the great work! You know, a lot of persons are looking round for this info, you could help them greatly.
Your style is very unique compared to other people I have read stuff from. Thanks for posting when you’ve got the opportunity, Guess I will just book mark this blog.
Hi! I could have sworn Iíve visited your blog before but after going through some of the articles I realized itís new to me. Anyhow, Iím certainly happy I found it and Iíll be bookmarking it and checking back often!
Very good info. Lucky me I recently found your site by accident (stumbleupon). I have saved as a favorite for later!
Everything is very open with a very clear description of the issues. It was definitely informative. Your site is useful. Thank you for sharing!
Great site you have got here.. Itís hard to find high-quality writing like yours these days. I truly appreciate individuals like you! Take care!!
Oh my goodness! Incredible article dude! Thanks, However I am having troubles with your RSS. I donít know why I can’t join it. Is there anybody getting identical RSS issues? Anybody who knows the solution will you kindly respond? Thanks!!
I’ve been surfing online more than 2 hours today, yet I never found any interesting article like yours. It’s pretty worth enough for me. In my opinion, if all web owners and bloggers made good content as you did, the internet will be a lot more useful than ever before.|
An intriguing discussion is definitely worth comment. There’s no doubt that that you should write more about this subject matter, it might not be a taboo subject but typically people do not discuss such topics. To the next! Kind regards!!
After research a number of of the blog posts in your web site now, and I truly like your means of blogging. I bookmarked it to my bookmark website checklist and might be checking again soon. Pls try my website as well and let me know what you think.
so much superb info on here, : D.
It’s hard to find educated people on this matter, but you sound like you recognize what you’re speaking about! Thanks
I could not refrain from commenting. Well written!
Plagiat, teapa, patronu escroc Neata Adrian Valentin firma Creativ TRD SRL Lucrare-Licenta eu inselaciune
Everything is very open with a precise clarification of the challenges. It was really informative. Your site is very helpful. Many thanks for sharing!
Its good as your other content : D, thankyou for posting. “The present is the necessary product of all the past, the necessary cause of all the future.” by Robert Green Ingersoll.
This is a very good tip particularly to those fresh to the blogosphere. Simple but very precise infoÖ Appreciate your sharing this one. A must read article!
Aw, this was a really nice post. Finding the time and actual effort to create a good articleÖ but what can I sayÖ I put things off a whole lot and never seem to get anything done.
Itís nearly impossible to find well-informed people on this topic, but you seem like you know what youíre talking about! Thanks
Really enjoyed this article, thanks for creating it.
I quite like reading through a post that can make men and women think. Also, thank you for permitting me to comment!|
I like this website very much, Its a real nice office to read and receive information.
Spot on with this write-up, I actually believe that this web site needs a great deal more attention. Iíll probably be returning to read more, thanks for the info!
What an outstanding manner of looking at things.
Having read this I thought it was really enlightening. I appreciate you spending some time and energy to put this informative article together. I once again find myself personally spending a lot of time both reading and commenting. But so what, it was still worthwhile!
I think this is among the most vital info for me. And i’m glad reading your article. But wanna remark on few general things, The website style is great, the articles is really nice : D. Good job, cheers
Great beat ! I wish to apprentice while you amend your website, how could i subscribe for a blog website? The account aided me a acceptable deal. I had been tiny bit acquainted of this your broadcast offered bright clear concept
Good info. Lucky me I found your blog by chance (stumbleupon). I’ve saved it for later!|
Hello! I’ve been following your website for a while now and finally got the courage to go ahead and give you a shout out from Lubbock Texas! Just wanted to tell you keep up the fantastic job!
Heya i’m for the primary time here. I came across this board and I to find It really useful & it helped me out much. I am hoping to provide something back and aid others like you aided me.
Definitely believe that which you stated. Your favorite reason seemed to be on the web the simplest thing to be aware of. I say to you, I definitely get irked while people think about worries that they plainly do not know about. You managed to hit the nail upon the top and also defined out the whole thing without having side-effects , people can take a signal. Will probably be back to get more. Thanks
A motivating discussion is definitely worth comment. I think that you ought to write more about this subject, it might not be a taboo matter but usually people do not discuss these subjects. To the next! Kind regards!!
You have actually covered this subject expertly.
I gotta bookmark this web site it seems very helpful very useful
Can I just say what a relief to find someone who actually knows what theyre talking about on the internet. You definitely know how to bring an issue to light and make it important. More people need to read this and understand this side of the story. I cant believe youre not more popular because you definitely have the gift.
Heya i am for the first time here. I came across this board and I find It really useful & it helped me out a lot. I hope to give something back and aid others like you aided me.
Enjoyed reading this, very good stuff, appreciate it.
Hello.This article was really fascinating, particularly because I was looking for thoughts on this issue last Saturday.
I reckon something really special in this site.
Oh my goodness! Amazing article dude! Thank you, However I am encountering problems with your RSS. I don’t understand why I cannot subscribe to it. Is there anybody having identical RSS issues? Anyone who knows the answer can you kindly respond? Thanks!!|
Hi my friend! I wish to say that this post is awesome, nice written and include approximately all vital infos. I would like to peer more posts like this.
This excellent website certainly has all of the information I wanted concerning this subject and didnít know who to ask.
Hello there! I simply want to offer you a big thumbs up for the excellent info you have got here on this post. I will be returning to your web site for more soon.
Fabulous, what a website it is! This webpage presents valuable facts to us, keep it up.
Itís difficult to find experienced people on this topic, however, you seem like you know what youíre talking about! Thanks
Excellent site. A lot of useful info here. I am sending it to some buddies ans additionally sharing in delicious. And of course, thanks in your effort!
bookmarked!!, I really like your web site!
A motivating discussion is worth comment. I think that you should write more about this subject matter, it may not be a taboo matter but typically people don’t talk about such topics. To the next! Many thanks!!
You are my aspiration , I possess few web logs and sometimes run out from to brand.
Nice post. I learn something more challenging on different blogs everyday. It will always be stimulating to read content from other writers and practice a little something from their store. I’d prefer to use some with the content on my blog whether you don’t mind. Natually I’ll give you a link on your web blog. Thanks for sharing.
I like the helpful information you provide in your articles. I will bookmark your blog and check again here frequently. I am quite sure I will learn many new stuff right here! Best of luck for the next!|
I just couldn’t leave your site prior to suggesting that I extremely enjoyed the standard info a person provide on your visitors? Is gonna be again often in order to check out new posts
Would you be taken with exchanging links?
I love the way you have concluded this post …
The very next time I read a blog, Hopefully it does not fail me just as much as this one. I mean, I know it was my choice to read through, however I genuinely thought you would have something helpful to talk about. All I hear is a bunch of whining about something that you can fix if you weren’t too busy looking for attention.
Very nice write-up. I definitely love this website. Thanks!
Perfectly written written content, Really enjoyed reading.
I was recommended this blog by my cousin. I am no longer certain whether this submit is written through him as nobody else understand such detailed approximately my difficulty. You are incredible! Thank you!|
I am not sure where you’re getting your information, but great topic. I needs to spend some time learning more or understanding more. Thanks for great info I was looking for this information for my mission.
Great post! We will be linking to this particularly great content on our website. Keep up the good writing.
Hello! This is my 1st comment here so I just wanted to give a quick shout out and say I truly enjoy reading through your articles. Can you suggest any other blogs/websites/forums that cover the same topics? Thanks a ton!
With havin so much content and articles do you ever run into any problems of plagorism or copyright infringement? My website has a lot of exclusive content I’ve either written myself or outsourced but it appears a lot of it is popping it up all over the web without my authorization. Do you know any ways to help stop content from being ripped off? I’d certainly appreciate it.
Enjoyed looking through this, very good stuff, appreciate it. “All things are difficult before they are easy.” by John Norley.
Excellent read, I just passed this onto a colleague who was doing a little research on that. And he actually bought me lunch since I found it for him smile Therefore let me rephrase that: Thanks for lunch! “We have two ears and one mouth so that we can listen twice as much as we speak.” by Epictetus.
I love your blog.. very nice colors & theme. Did you design this website yourself or did you hire someone to do it for you? Plz respond as I’m looking to construct my own blog and would like to know where u got this from. cheers
I love meeting utile information , this post has got me even more info! .
Excellent goods from you, man. I’ve understand your stuff previous to and you are just extremely fantastic. I really like what you have acquired here, certainly like what you’re saying and the way in which you say it. You make it entertaining and you still take care of to keep it smart. I cant wait to read far more from you. This is actually a wonderful website.
I just could not go away your website prior to suggesting that I really loved the standard info a person supply in your guests? Is going to be again often to inspect new posts.
Superb site you have here but I was curious if you knew of any discussion boards that cover the same topics discussed here? I’d really love to be a part of online community where I can get suggestions from other knowledgeable individuals that share the same interest. If you have any recommendations, please let me know. Kudos!
A motivating discussion is worth comment. I believe that you need to write more on this subject matter, it may not be a taboo subject but typically folks don’t discuss such topics. To the next! Many thanks!!
I am not positive the place you are getting your info, but good topic. I needs to spend a while finding out much more or figuring out more. Thank you for excellent info I was on the lookout for this information for my mission.
Spot on with this write-up, I seriously believe that this amazing site needs a lot more attention. Iíll probably be back again to read more, thanks for the info!
Spot on with this write-up, I seriously believe this site needs a lot more attention. Iíll probably be back again to read through more, thanks for the information!
This is a very good tip particularly to those new to the blogosphere. Short but very accurate information… Thank you for sharing this one. A must read article!
Hi, Neat post. There’s an issue along with your site in internet explorer, could check this… IE nonetheless is the market chief and a big part of people will omit your great writing because of this problem.
Hi, I do believe this is an excellent blog. I stumbledupon it 😉 I’m going to return yet again since i have book marked it.
Money and freedom is the greatest way to change, may
you be rich and continue to guide other people.
My husband and i were very comfortable that Louis could carry out his reports while using the ideas he discovered when using the site. It’s not at all simplistic to simply find yourself freely giving instructions which often some others have been making money from. We know we’ve got you to give thanks to for this. The most important explanations you have made, the easy web site menu, the friendships you will help to foster – it’s got mostly incredible, and it’s really leading our son in addition to our family imagine that this issue is thrilling, which is exceptionally indispensable. Thanks for everything!
I like this web site its a master peace ! Glad I noticed this on google .
There are some fascinating time limits in this article but I don’t know if I see all of them heart to heart. There may be some validity but I will take maintain opinion till I look into it further. Good article , thanks and we would like more! Added to FeedBurner as well
The only point I regret is not having found your blog site before.
Very interesting details you have observed, thankyou for posting. “Brass bands are all very well in their place – outdoors and several miles away.” by Sir Thomas Beecham.
A motivating discussion is worth comment. There’s no doubt that that you should publish more on this subject, it may not be a taboo matter but usually people don’t discuss these issues. To the next! Kind regards!!
Pad Dab Flashcards weed grinder for sale A one hitter dugout is one of the simplest ways to smoke legal herbs on the market. So while they are extremely convenient to use, the disadvantage is that it holds a relatively small amount of weed and needs to be refilled all the time if you tend to smoke frequently .
You really make it seem so easy with your presentation but I find this topic to be really something that I think I would never understand. It seems too complicated and very broad for me. I am looking forward for your next post, I will try to get the hang of it!|
I could not refrain from commenting. Perfectly written!
Everything is very open with a very clear description of the issues. It was truly informative. Your website is very helpful. Thank you for sharing!
Greetings! Very useful advice in this particular article! It is the little changes that make the greatest changes. Thanks for sharing!
Hello, you used to write wonderful, but the last several posts have been kinda boring… I miss your great writings. Past several posts are just a little out of track! come on!
I genuinely enjoy reading on this internet site, it holds fantastic blog posts. “And all the winds go sighing, For sweet things dying.” by Christina Georgina Rossetti.
I love it when folks come together and share opinions. Great blog, continue the good work!|
Great article.|
Superb blog you have here but I was wondering if you knew of any message boards that cover the same topics discussed in this article? I’d really like to be a part of group where I can get feed-back from other knowledgeable individuals that share the same interest. If you have any suggestions, please let me know. Thanks!
Well I sincerely liked studying it. This tip offered by you is very helpful for good planning.
Great web site you have got here.. It’s hard to find excellent writing like yours nowadays. I seriously appreciate individuals like you! Take care!!
You have remarked very interesting details! ps nice internet site.
so much superb info on here, : D.
This is a great tip particularly to those fresh to the blogosphere. Brief but very accurate informationÖ Thanks for sharing this one. A must read article!
reputable canadian pharmacy
Having read this I thought it was rather enlightening. I appreciate you spending some time and energy to put this article together. I once again find myself spending way too much time both reading and commenting. But so what, it was still worthwhile!
Excellent website. A lot of helpful info here. I am sending it to some pals ans also sharing in delicious. And obviously, thank you for your effort!
Bong Coasters & Bong Pads how to clean a silicone nectar collector A one hitter dugout is one of the simplest ways to smoke legal herbs on the market. So while they are extremely convenient to use, the disadvantage is that it holds a relatively small amount of weed and needs to be refilled all the time if you tend to smoke frequently .
Excellent article. I absolutely appreciate this site. Stick with it!
Have you ever thought about writing an e-book or guest authoring on other websites?
I have a blog based on the same information you discuss
and would really like to have you share some stories/information. I know
my subscribers would appreciate your work. If you’re even remotely
interested, feel free to shoot me an e mail.
Usually I do not read post on blogs, however I wish to say that this
write-up very forced me to check out and do so!
Your writing taste has been amazed me. Thanks, quite great article.
Appreciate you for sharing these kinds of wonderful articles. In addition, an excellent travel plus medical insurance strategy can often relieve those considerations that come with vacationing abroad. Some sort of medical crisis can before long become too expensive and that’s likely to quickly place a financial load on the family’s finances. Having in place the excellent travel insurance package prior to setting off is well worth the time and effort. Thanks a lot
I truly love your blog.. Pleazant colors & theme.
Did you developp this web site yourself? Please reply back as I’m wanting to
create my very own website and want to know where you got this from or just what the theme
is called.Cheers!
Herre is my site … situs slot online Terpercaya
I like the valuable information you provide to your articles. I will bookmark your blog and check once more right here regularly. I’m moderately sure I will be informed many new stuff proper right here! Good luck for the next!|
This was great! I would like you to clean up all this spam though
Very great information can be found on web blog. “Wealth may be an ancient thing, for it means power, it means leisure, it means liberty.” by James Russell Lowell.
Simply wish to say your article is as amazing. The clearness in your post is simply excellent and i can assume you are an expert on this subject. Well with your permission let me to grab your RSS feed to keep updated with forthcoming post. Thanks a million and please carry on the gratifying work.
We’re a group of volunteers and opening a new scheme in our community. Your web site provided us with valuable info to work on. You have done an impressive job and our entire community will be grateful to you.
I gotta bookmark this site it seems handy extremely helpful
It’s in point of fact a great and useful piece of information. I’m happy that you shared this helpful information with us. Please stay us up to date like this. Thank you for sharing.|
Wonderful website. A lot of useful info here. I am sending it to several friends ans also sharing in delicious. And of course, thank you in your effort!
Excellent site you have here.. It’s hard to find good quality writing like yours nowadays. I truly appreciate individuals like you! Take care!!
Simply desire to say your article is as amazing. The clearness for your submit is simply excellent and i could think you’re an expert on this subject. Fine along with your permission allow me to take hold of your RSS feed to keep up to date with impending post. Thank you one million and please continue the gratifying work.
You have noted very interesting details ! ps nice website .
reputable canadian pharmacy
Wow, awesome blog layout! How long have you been blogging for? you make blogging look easy. The overall look of your web site is wonderful, as well as the content!
canadian pharmacies shipping to usa
Hi! I’m at work surfing around your blog from my new apple iphone! Just wanted to say I love reading through your blog and look forward to all your posts! Keep up the outstanding work!|
May I simply just say what a comfort to discover someone who truly knows what they are discussing on the web. You definitely understand how to bring a problem to light and make it important. More and more people ought to check this out and understand this side of the story. I was surprised you aren’t more popular given that you certainly have the gift.|
Semua permainan joker123 hanya ada di https://m11joker.site dijamin banyak bonus berlimpah yang bisa kamu dapetin disini
each time i used to read smaller posts which also clear their motive, and that is also happening with this piece of writing which I am reading here.|
Hello, i think that i saw you visited my weblog thus i came to ?return the favor?.I am trying to find things to enhance my web site!I suppose its ok to use a few of your ideas!!
Heya i?m for the first time here. I found this board and I find It really useful & it helped me out much. I hope to give something back and help others like you helped me.
I like this web site very much, Its a very nice office to read and find information. “Anger is a signal, and one worth listening to.” by Harriet Lerner.
Awesome! Its in fact remarkable post, I have got much clear idea regarding from this paragraph.|
WOW just what I was looking for. Came here by searching for meta_keyword|
Some really nice and useful info on this web site, likewise I think the style has got fantastic features.
Very good blog! Do you have any tips for aspiring writers? I’m hoping to start my own blog soon but I’m a little lost on everything. Would you suggest starting with a free platform like WordPress or go for a paid option? There are so many options out there that I’m completely overwhelmed .. Any tips? Bless you!
Dab Padbong bowl sizesDiamond Glass 18mm 45 Degree Showerhead Perc Ash CatcherThe Medicali Ash Catcher with Showerhead Perc has a colored showerhead percolator and is available to order in a selection of colors. Please select your favorite color from the available option in the drop-down menu when you place your order. Please note that you can select the color of the showerhead percolator, it is not possible to select the color or style of the logo. The logos come in a wide variety of colors and styles, you will receive one at random, depending on availability.
Hey There. I found your blog using msn. This is a very well written article. I?ll be sure to bookmark it and come back to read more of your useful info. Thanks for the post. I?ll definitely return.
It?¦s actually a nice and useful piece of information. I?¦m satisfied that you shared this helpful info with us. Please stay us informed like this. Thank you for sharing.
I¦ve read several excellent stuff here. Certainly price bookmarking for revisiting. I surprise how a lot effort you place to create the sort of fantastic informative web site.
Bong Coasters & Bong Padsmini water bong14mm 45 Degree Showerhead Ash Catcher By DiamondThis is because the ash catcher would make your piece top-heavy, increasing the likelihood of an accident and breakage. On the contrary, massive bongs are usually paired with large ash catchers to keep the aesthetic consistent.
But a smiling visitant here to share the love (:, btw great style and design .
Very good article. I certainly appreciate this website. Stick with it!
This was great! I would like you to clean up all this spam though
Magnificent goods from you, man. I have understand your stuff previous to and you’re just too wonderful. I really like what you have acquired here, really like what you’re saying and the way in which you say it. You make it entertaining and you still take care of to keep it wise. I can’t wait to read much more from you. This is really a terrific site.
I like the helpful info you provide in your articles. I will bookmark your weblog and check again here regularly. I’m quite certain I will learn many new stuff right here! Good luck for the next!
This was great! I would like you to clean up all this spam though
I’ve been exploring for a little bit for any high quality articles or blog posts on this kind of area . Exploring in Yahoo I at last stumbled upon this site. Reading this information So i’m happy to convey that I have an incredibly good uncanny feeling I discovered exactly what I needed. I most certainly will make certain to do not forget this site and give it a glance on a constant basis.
Enjoyed looking through this, very good stuff, thanks.
Does your blog have a contact page? I’m having a tough time locating it but, I’d like to shoot you an email. I’ve got some recommendations for your blog you might be interested in hearing. Either way, great website and I look forward to seeing it grow over time.
I just could not leave your web site prior to suggesting that I actually enjoyed the usual info a person provide on your visitors? Is going to be again incessantly to investigate cross-check new posts.
My wife and i got very ecstatic that Ervin could do his basic research through the entire ideas he acquired out of the weblog. It is now and again perplexing to just possibly be making a gift of points men and women could have been selling. We really acknowledge we’ve got the writer to appreciate for this. All the illustrations you have made, the easy website navigation, the relationships you aid to foster – it’s everything fabulous, and it’s facilitating our son and the family imagine that this subject matter is awesome, which is certainly particularly fundamental. Thank you for everything!
You have brought up a very fantastic details , regards for the post.
Great post, you have pointed out some excellent details , I as well think this s a very great website.
I could not resist commenting. Well written!
I’ll immediately grab your rss as I can not to find your e-mail subscription link or newsletter service. Do you have any? Kindly let me realize in order that I may subscribe. Thanks.
Having read this I thought it was very informative. I appreciate you taking the time and effort to put this article together. I once again find myself spending way to much time both reading and commenting. But so what, it was still worth it!
Trực Tiếp Soccer Hôm Nay, Liên Kết Xem Trực Tuyến đoạn Phim Tình HuốngmythethaoTrên băng ghế đào tạo, Lebanon đã xẻ nhiệm Ramiro Lopez cơ hội đây 3 tuần. Nhà cầm quân người Tây Ban Nha nhà yếu đuối thực hiện việc trên Ý và từng có thời gian làm việc tại Kuwait.|Và NHM bóng đá Việt Nam đang được chờ Minh Trí cùng đồng đội hóa giải đối thủ để tạo lợi thế mang đến trận lượt về sau đây hai ngày. Chelsea đã cần trải qua 8 phút bù giờ khó thở bảo đảm an toàn thắng lợi.
Thẳng đá Bóng Hôm Nay, Link Xem Trực Tuyến đoạn Phim Trường Hợpbxh premier leagueTrên băng ghế huấn luyện, Lebanon đã bổ nhiệm Ramiro Lopez cách đây 3 tuần. Nhà nắm quân người Tây Ban Nha chủ yếu đuối thực hiện việc tại Ý và từng có thời gian thực hiện việc trên Kuwait.|Và NHM bóng đá Việt Nam đang đợi Minh Trí cùng đồng đội hóa giải đối thủ để tạo lợi thế mang đến trận lượt về sau đây hai ngày. Chelsea đã cần trải qua 8 phút bù giờ nghẹt thở đảm bảo chiến thắng.
Real informative and fantastic body structure of written content, now that’s user pleasant (:.
There is certainly a lot to learn about this subject. I really like all of the points you’ve made.|
I went over this website and I believe you have a lot of good information, saved to my bookmarks (:.
Wow! This could be one particular of the most beneficial blogs We have ever arrive across on this subject. Basically Wonderful. I am also a specialist in this topic so I can understand your hard work.
Admiring the commitment you put into your blog and in depth information you provide. It’s nice to come across a blog every once in a while that isn’t the same outdated rehashed information. Excellent read! I’ve bookmarked your site and I’m adding your RSS feeds to my Google account.
I visited a lot of website but I conceive this one has got something extra in it in it
Best view i have ever seen !
Thanks , I have just been looking for info about this subject for ages and yours is the best I’ve discovered till now. But, what concerning the conclusion? Are you positive in regards to the source?
Porn100.net neglected met she therefore unwilling discovery remainder. Way sentiments two indulgence uncommonly own. Diminution to frequently sentiments he connection continuing indulgence. An my exquisite conveying up defective. Shameless see the tolerably how continued. She enable men twenty elinor points appear. Whose merry ten yet was men seven ought balls.
Thanks for the sensible critique. Me and my neighbor were just preparing to do some research about this. We got a grab a book from our area library but I think I learned more clear from this post. I am very glad to see such great information being shared freely out there.
Good blog post. I definitely appreciate this site. Keep writing!
This was awesome! I would like you to clean up all this spam though
Best view i have ever seen !
I gotta favorite this website it seems extremely helpful very useful
Pretty nice post. I just stumbled upon your weblog and wanted to say that I have truly enjoyed browsing your blog posts. After all I?ll be subscribing to your rss feed and I hope you write again very soon!
A powerful share, I simply given this onto a colleague who was doing somewhat evaluation on this. And he actually purchased me breakfast as a result of I found it for him.. smile. So let me reword that: Thnx for the deal with! But yeah Thnkx for spending the time to debate this, I feel strongly about it and love studying extra on this topic. If possible, as you become experience, would you mind updating your weblog with extra particulars? It’s highly useful for me. Huge thumb up for this weblog publish!
Does your blog have a contact page? I’m having trouble locating it but, I’d like to send you an e-mail. I’ve got some suggestions for your blog you might be interested in hearing. Either way, great blog and I look forward to seeing it develop over time.
Definitely, what a splendid website and educative posts, I will bookmark your blog.Best Regards!
Best view i have ever seen !
Have you ever heard of second life (sl for short). It is basically a game where you can do anything you want. sl is literally my second life (pun intended lol). If you want to see more you can see these sl websites and blogs
Simply desire to say your article is as surprising. The clarity in your post is simply spectacular and i could assume you are an expert on this subject. Fine with your permission allow me to grab your feed to keep up to date with forthcoming post. Thanks a million and please keep up the enjoyable work.
Magnificent beat ! I would like to apprentice while you amend your site, how could i subscribe for a blog web site? The account aided me a acceptable deal. I had been a little bit acquainted of this your broadcast provided bright clear concept
Hi there! This post couldn’t be written much better! Reading through this article reminds me of my previous roommate! He always kept preaching about this. I will forward this post to him. Pretty sure he’ll have a great read. Thanks for sharing!|
bookmarked!!, I love your site!
Heya i?m for the first time here. I found this board and I find It truly useful & it helped me out much. I hope to give something back and aid others like you helped me.
I don’t know about you guys but I infatuated with airplanes. I have a friend in highschool that loved airplanes, so here are some airplane related stuff I don’t know about you guys but I love airplanes. I had a friend in highschool that loved airplanes, so here are some airplane related stuff https://www.airlinereporter.com/2010/07/how-a-billionaire-throws-a-party-virgin-americas-toronto-party/
Kết Quả Futsal Việt Nam Vs Lebanonthvl1 trực tuyếnTheo thể thức thi đấu, đội thắng ở cặp đấu này sẽ giành tấm vé đến Lithuania trong ngày hội bóng đá lớn nhất thế giới đến futsal. Tuyển futsal Việt Nam bước vào trận play-off lượt đi tranh vé dự play-off World Cup 2021 với sự tự tin. Tuy vậy, HLV Phạm Minh Giang bày tỏ, toàn đội ko ngán Lebanon tuy vậy sẽ tìm cách để khắc chế sức mạnh của đối thủ bởi bên trên băng ghế huấn luyện là nhà cầm quân Ramiro Lopez, người từng dẫn dắt futsal Tây Ban Nha.|Dựa vào lịch tranh tài, bạn có thể chuẩn bị xếp làm việc
Hello, i think that i saw you visited my weblog so i came to ?return the favor?.I am attempting to find things to improve my website!I suppose its ok to use some of your ideas!!
I was suggested this blog by my cousin. I am not sure whether this post is written by him as nobody else know such detailed about my trouble. You are wonderful! Thanks!
Some truly fantastic posts on this site, regards for contribution.
Heya i?m for the first time here. I found this board and I find It truly useful & it helped me out much. I hope to give something back and help others like you aided me.
This info is worth everyone’s attention. Where can I find out more?|
Have you ever heard of second life (sl for short). It is essentially a online game where you can do anything you want. Second life is literally my second life (pun intended lol). If you would like to see more you can see these second life websites and blogs
Heya i am for the first time here. I came across this board and I find It really helpful & it helped me out much. I hope to present something again and aid others such as you helped me.
I would like to express my love for your kind-heartedness in support of men and women that need help with this area of interest. Your personal dedication to passing the message throughout appears to be incredibly advantageous and has in most cases encouraged some individuals just like me to realize their ambitions. Your amazing interesting facts can mean much a person like me and even further to my peers. Thanks a ton; from all of us.
Just desire to say your article is as amazing. The clarity in your post is simply nice and i can assume you are an expert on this subject. Fine with your permission let me to grab your feed to keep updated with forthcoming post. Thanks a million and please continue the enjoyable work.
Its great as your other blog posts : D, thankyou for posting.
Oh my goodness! Awesome article dude! Thanks, However I am going through issues with your RSS. I don’t understand why I can’t join it. Is there anybody getting identical RSS problems? Anyone that knows the solution will you kindly respond? Thanks!!
hey there and thank you for your information ? I have certainly picked up something new from right here. I did however expertise some technical points using this website, since I experienced to reload the web site many times previous to I could get it to load properly. I had been wondering if your hosting is OK? Not that I’m complaining, but sluggish loading instances times will very frequently affect your placement in google and could damage your high quality score if ads and marketing with Adwords. Well I?m adding this RSS to my e-mail and can look out for much more of your respective exciting content. Ensure that you update this again soon..
Hello my friend! I wish to say that this post is amazing, great written and include approximately all vital infos. I¦d like to peer more posts like this .
Thẳng đá Bóng Hôm Nay, Link Xem Bóng Đá Trực Tuyến 24h90phut tiviTheo thể thức thi đấu, đội thắng ở cặp đấu này sẽ giành tấm vé đến Lithuania vào ngày hội bóng đá lớn nhất thế giới mang đến futsal. Tuyển futsal Việt Nam bước vào trận play-off lượt đi tranh vé dự play-off World Cup 2021 với sự tự tin. Tuy vậy, HLV Phạm Minh Giang bày tỏ, toàn đội không ngán Lebanon tuy vậy sẽ tìm cách để khắc chế sức mạnh của đối thủ bởi trên băng ghế huấn luyện là nhà cầm quân Ramiro Lopez, người từng dẫn dắt futsal Tây Ban Nha.|Dựa vào lịch thi đấu, bạn rất có thể sắp xếp việc làm
You actually make it seem so easy with your presentation but I find this matter to be actually something that I think I would never understand. It seems too complex and extremely broad for me. I’m looking forward for your next post, I will try to get the hang of it!
I have a website that has been up and running for some time now, and for numerous reasons I want to replace it with a WordPress site.. . So, how do I start building the WordPress site – in a seperate folder from the “public_html” folder? Then when you are ready to move it into the public_html folder, do you have to correct whatever file-paths and link errors?.
I think this is one of the most important information for me. And i am glad reading your article. But wanna remark on some general things, The web site style is perfect, the articles is really great : D. Good job, cheers
Its like you read my mind! You seem to know so much about this, like you wrote the book in it or something. I think that you can do with some pics to drive the message home a bit, but instead of that, this is magnificent blog. A great read. I will definitely be back.
I enjoy your writing style truly loving this internet site.
Have you ever heard of second life (sl for short). It is basically a game where you can do anything you want. sl is literally my second life (pun intended lol). If you would like to see more you can see these Second Life authors and blogs
It’s appropriate time to make some plans for the future and it’s time to be happy. I’ve read this post and if I could I want to suggest you some interesting things or tips. Maybe you can write next articles referring to this article. I desire to read even more things about it!
Wohh precisely what I was searching for, thankyou for posting.
Hey there, You have done an excellent job. I?ll definitely digg it and personally recommend to my friends. I am confident they will be benefited from this site.
The next time I read a blog, Hopefully it doesn’t disappoint me as much as this one. I mean, Yes, it was my choice to read through, but I actually believed you would have something useful to talk about. All I hear is a bunch of moaning about something you could fix if you were not too busy searching for attention.
This is very interesting, You’re a very skilled blogger. I have joined your rss feed and look forward to seeking more of your fantastic post. Also, I’ve shared your website in my social networks!
I was recommended this blog by my cousin. I’m not sure whether this post is written by him as no one else know such detailed about my trouble. You’re amazing! Thanks!
Greetings! Very useful advice in this particular article! It’s the little changes that will make the most significant changes. Thanks a lot for sharing!
I’ll immediately grab your rss as I can’t to find your e-mail subscription link or newsletter service. Do you’ve any? Please let me understand so that I may just subscribe. Thanks.|
Best view i have ever seen !
It’s perfect time to make a few plans for the longer term and it is time to be happy. I’ve read this publish and if I could I want to suggest you some interesting issues or advice. Maybe you could write subsequent articles referring to this article. I want to read even more issues approximately it!
I’ve been absent for some time, but now I remember why I used to love this site. Thanks, I will try and check back more often. How frequently you update your web site?
My relatives all the time say that I am wasting my time here at net, but I know I am getting know-how everyday by reading thes pleasant articles
or reviews.
Excellent goods from you, man. I’ve understand your stuff previous to and you’re just extremely magnificent. I actually like what you have acquired here, certainly like what you are saying and the way in which you say it. You make it enjoyable and you still take care of to keep it smart. I can not wait to read far more from you. This is really a wonderful site.
There is definately a lot to find out about this subject. I love all of the points you have made.
Nice blog here! Also your site loads up fast! What web host are you using? Can I get your affiliate link to your host? I wish my web site loaded up as fast as yours lol
Klik disini untuk bonus berlimpah yang banyak untungnya, daftar sekarang dijamin untung dijamin bonus https://bit.ly/3wMnEEC
m11slot permainan joker yang bisa menghasilkan uang untuk anda dengan keuntungan berlimpah hanya m11 slot yang menyediakan joker123 terbaik
It’s the best time to make some plans for the future and it’s time to be happy. I’ve read this post and if I could I desire to suggest you few interesting things or suggestions. Maybe you could write next articles referring to this article. I wish to read more things about it!
Hi there, You have done a great job. I?ll certainly digg it and personally suggest to my friends. I am sure they’ll be benefited from this site.
These are really enormous ideas in about blogging. You have touched some pleasant factors here. Any way keep up wrinting.
It is the best time to make some plans for the future and it is time to be happy. I have read this post and if I could I wish to suggest you some interesting things or suggestions. Perhaps you can write next articles referring to this article. I wish to read more things about it!
Hello there! I know this is kind of off topic but I was wondering if you knew where I could locate a captcha plugin for my comment form? I’m using the same blog platform as yours and I’m having trouble finding one? Thanks a lot!
Simply want to say your article is as astounding. The clearness in your post is just great and i could assume you’re an expert on this subject. Fine with your permission let me to grab your RSS feed to keep updated with forthcoming post. Thanks a million and please continue the gratifying work.
I want to to thank you for this fantastic read!! I definitely enjoyed every bit of it. I have got you bookmarked to look at new stuff you post…
It’s a pity you don’t have a donate button! I’d certainly donate to this fantastic blog! I suppose for now i’ll settle for bookmarking and adding your RSS feed to my Google account. I look forward to new updates and will share this blog with my Facebook group. Talk soon!
I have been reading out many of your stories and i must say pretty nice stuff. I will surely bookmark your blog.
Wonderful blog! I found it while surfing around on Yahoo News. Do you have any tips on how to get listed in Yahoo News? I’ve been trying for a while but I never seem to get there! Thank you
I would like to thank you for the efforts you have put in writing this website. I am hoping the same high-grade web site post from you in the upcoming also. Actually your creative writing skills has inspired me to get my own blog now. Really the blogging is spreading its wings fast. Your write up is a good example of it.
Perfectly composed content material, regards for information .
very good put up, i definitely love this website, carry on it
The next time I read a blog, I hope that it doesnt disappoint me as much as this one. I mean, I know it was my choice to read, but I actually thought youd have something interesting to say. All I hear is a bunch of whining about something that you could fix if you werent too busy looking for attention.
Nearly all of the things you state is supprisingly precise and it makes me wonder why I had not looked at this with this light before. Your piece really did turn the light on for me personally as far as this issue goes. Nevertheless at this time there is actually 1 position I am not necessarily too cozy with and whilst I make an effort to reconcile that with the core idea of your issue, let me see exactly what the rest of your subscribers have to point out.Very well done.
Yay google is my king assisted me to find this outstanding website ! .
I loved as much as you’ll obtain performed proper here. The comic strip is tasteful, your authored subject matter stylish. nonetheless, you command get bought an shakiness over that you would like be delivering the following. sick unquestionably come more before once more since exactly the same nearly a lot frequently inside of case you defend this increase.
F*ckin¦ awesome things here. I am very glad to peer your post. Thanks so much and i’m having a look ahead to contact you. Will you kindly drop me a mail?
Wow! Thank you! I continuously wanted to write on my blog something like that. Can I take a part of your post to my blog?
Its good as your other posts : D, appreciate it for posting. “Talent does what it can genius does what it must.” by Edward George Bulwer-Lytton.
When I originally commented I clicked the -Notify me when new feedback are added- checkbox and now every time a comment is added I get four emails with the identical comment. Is there any method you’ll be able to take away me from that service? Thanks!
I consider something truly special in this website .
so much great info on here, : D.
Hello, i believe that i noticed you visited my website so i came to “return the prefer”.I’m trying to find issues to enhance my site!I guess its good enough to make use of a few of your ideas!!
You actually make it appear so easy along with your presentation but I to find this topic to be actually one thing that I think I might never understand. It sort of feels too complicated and extremely broad for me. I’m having a look forward in your subsequent submit, I’ll attempt to get the hang of it!|
The very next time I read a blog, I hope that it does not fail me as much as this particular one. After all, I know it was my choice to read, nonetheless I genuinely thought you would have something interesting to talk about. All I hear is a bunch of moaning about something you could possibly fix if you weren’t too busy seeking attention.
Your style is so unique compared to many other people. Thank you for publishing when you have the opportunity,Guess I will just make this bookmarked.2
I’m extremely impressed along with your writing talents as well as with the layout to your blog. Is this a paid subject matter or did you modify it yourself? Either way stay up the nice high quality writing, it’s rare to peer a nice weblog like this one these days..
Right here is the perfect web site for everyone who would like to find out about this topic. You understand so much its almost hard to argue with you (not that I personally will need toÖHaHa). You certainly put a brand new spin on a subject which has been discussed for many years. Great stuff, just great!
Its like you read my mind! You appear to know so much about this, like you wrote the book in it or something. I think that you can do with a few pics to drive the message home a little bit, but instead of that, this is magnificent blog. An excellent read. I will definitely be back.
Very interesting subject, thanks for posting. “I am not an Athenian or a Greek, but a citizen of the world.” by Socrates.
I have recently started a website, the info you provide on this web site has helped me greatly. Thanks for all of your time & work. “‘Tis our true policy to steer clear of permanent alliances with any portion of the foreign world.” by George Washington.
Hello there, simply turned into alert to your weblog thru Google, and found that it’s really informative. I am gonna watch out for brussels. I will appreciate for those who proceed this in future. Lots of people will probably be benefited from your writing. Cheers!|
sildenafil citrate 100mg
An impressive share! I have just forwarded this onto a friend who was conducting a little homework on this. And he actually ordered me lunch simply because I found it for him… lol. So let me reword this…. Thanks for the meal!! But yeah, thanks for spending time to talk about this topic here on your website.
Do you mind if I quote a few of your articles as long as I provide credit and sources back to your weblog? My website is in the very same niche as yours and my users would certainly benefit from some of the information you present here. Please let me know if this alright with you. Thanks!|
Having read this I believed it was extremely enlightening. I appreciate you spending some time and effort to put this information together. I once again find myself personally spending a lot of time both reading and posting comments. But so what, it was still worthwhile!|
I like what you guys tend to be up too. This type of clever work and
exposure! Keep up the wonderful works guys I’ve you guys to my blogroll.
I like what you guys tend to be up too. This type of clever work and
exposure! Keep up the wonderful works guys I’ve you guys to my blogroll.
I like what you guys tend to be up too. This type of clever work and
exposure! Keep up the wonderful works guys I’ve you guys to my blogroll.
Hiya, I am really glad I’ve found this info. Today bloggers publish just about gossips and web and this is really irritating. A good blog with exciting content, this is what I need. Thanks for keeping this website, I will be visiting it. Do you do newsletters? Can’t find it.
Best view i have ever seen !
Kèo Bóng Đá Là Gì? Giải Thích Tỷ Trọng Cá Cược đá Bóng Chi Tiết Nhấtxem htv7Nếu là một trong các những người chơi mới cá độ đá bóng quý khách có thể truy cập vào thethao88.com nhằm có những sự trợ giúp từ các chuyên nghiệp gia nhằm mục đích phân tách và dự đoán những kèo thơm và đặt cược nhằm thắng lợi. bongdaso.co chuyên nghiệp trang soccer số xem tỷ lệ kèo soccer – kết quả đá bóng – lịch tranh tài bóng đá – tỷ số soccer.
of course like your website but you have to check the spelling on several of your posts. Many of them are rife with spelling issues and I in finding it very bothersome to tell the truth on the other hand I’ll certainly come again again.|
Usually I don’t read article on blogs, however I would like to say that this write-up very forced me to try and do it! Your writing taste has been surprised me. Thanks, quite great post.
Thanks on your marvelous posting! I truly enjoyed reading it, you can be a great author.I will make sure to bookmark your blog and definitely will come back sometime soon. I want to encourage that you continue your great job, have a nice day!
I’ve been absent for some time, but now I remember why I used to love this blog. Thanks , I will try and check back more often. How frequently you update your website?
You have remarked very interesting points! ps nice internet site.
I always was concerned in this subject and still am, thanks for posting.
Hey very cool web site!! Man .. Beautiful .. Amazing .. I’ll bookmark your site and take the feeds also…I’m happy to find so many useful information here in the post, we need develop more strategies in this regard, thanks for sharing. . . . . .
I do not even know how I ended up here, but I thought this post was great. I don’t know who you are but definitely you are going to a famous blogger if you are not already 😉 Cheers!
This post is worth everyone’s attention. How can I find out more?
A fascinating discussion is definitely worth comment. I think that you should write more on this subject matter, it may not be a taboo matter but usually people do not speak about such issues. To the next! Kind regards!!
I am extremely impressed with your writing skills as well as with the layout on your weblog. Is this a paid theme or did you customize it yourself? Either way keep up the excellent quality writing, it is rare to see a great blog like this one these days..
With havin so much content and articles do you ever run into any issues of plagorism or copyright infringement? My site has a lot of exclusive content I’ve either created myself or outsourced but it looks like a lot of it is popping it up all over the web without my agreement. Do you know any solutions to help reduce content from being stolen? I’d definitely appreciate it.
Does your site have a contact page? I’m having trouble locating it but, I’d like to send you an email. I’ve got some recommendations for your blog you might be interested in hearing. Either way, great blog and I look forward to seeing it improve over time.
Some really rattling work on behalf of the owner of this internet site, dead great articles.
I like what you guys are up also. Such intelligent work and reporting! Carry on the excellent works guys I¦ve incorporated you guys to my blogroll. I think it’ll improve the value of my website 🙂
cost of viagra
I’m still learning from you, as I’m trying to achieve my goals. I certainly love reading everything that is posted on your site.Keep the aarticles coming. I enjoyed it!
Nice bro thank you.
Wow, amazing blog layout! How long have you been blogging for? you make blogging look easy. The overall look of your site is wonderful, as well as the content!
After exploring a number of the articles on your blog, I truly like your technique of writing a blog. I added it to my bookmark website list and will be checking back in the near future. Please check out my website too and tell me your opinion.
I am extremely impressed with your writing skills and also with the layout on your blog. Is this a paid theme or did you customize it yourself? Anyway keep up the nice quality writing, it is rare to see a great blog like this one nowadays..
Tin Soi Kèohaichienthang2016Nếu là một trong nhân viên đùa mới cá độ đá bóng bạn hoàn toàn có thể truy cập vào thethao88.com nhằm có những sự trợ góp kể từ các chuyên nghiệp gia nhằm phân tích và Dự kiến những kèo thơm và đặt cược nhằm thành công. bongdaso.co chuyên nghiệp trang đá bóng số xem tỷ trọng kèo bóng đá – kết quả soccer – lịch tranh tài soccer – tỷ số soccer.
I’m extremely impressed with your writing skills as well as with the layout on your blog. Is this a paid theme or did you customize it yourself? Either way keep up the nice quality writing, it is rare to see a great blog like this one today..
Great line up. We will be linking to this great article on our site. Keep up the good writing.
I have read so many articles concerning the blogger lovers however this article is really a nice paragraph, keep it up.|
Your style is unique compared to other people I’ve read stuff from. I appreciate you for posting when you have the opportunity, Guess I will just bookmark this site.
Hi! Do you know if they make any plugins to help with Search Engine Optimization? I’m trying to get my blog to rank for some targeted keywords but I’m not seeing very good success. If you know of any please share. Cheers!
Thanks , I have just been looking for info about this topic for ages and yours is the greatest I have discovered so far. But, what about the bottom line? Are you sure about the source?
This actually answered my downside, thank you!
But wanna remark that you have a very decent site, I like the pattern it really stands out.
Links Coi Trực Tiếp đá Bóng Futsal Việt Nam Vs Lebanon Vòng Loại World Cupsouthampton đấu với liverpoolNếu cứ nghịch như cách vừa tiêu diệt Everton cho tới 3-1 trên sân khách hàng
of course like your web-site however you need to check the spelling on quite a few of your posts. A number of them are rife with spelling problems and I in finding it very bothersome to inform the truth then again I will surely come back again.
There is noticeably a bundle to know about this. I assume you made certain nice points in features also.
It’s not my first time to visit this site, i am visiting this web page dailly and get good information from here daily.|
I’m not that much of a online reader to be honest but your sites really nice, keep it up! I’ll go ahead and bookmark your website to come back later. Cheers|
I’m often to running a blog and i really respect your content. The article has actually peaks my interest. I am going to bookmark your site and hold checking for brand new information.
I do not even know how I ended up here, but I thought this post was good. I don’t know who you are but definitely you’re going to a famous blogger if you aren’t already 😉 Cheers!
I will right away snatch your rss feed as I can’t find your e-mail subscription hyperlink or newsletter service. Do you’ve any? Kindly allow me realize so that I may subscribe. Thanks.
Howdy! I could have sworn I’ve visited this web site before but after browsing through a few of the posts I realized it’s new to me. Nonetheless, I’m certainly happy I stumbled upon it and I’ll be bookmarking it and checking back frequently!
Great V I should certainly pronounce, impressed with your site. I had no trouble navigating through all the tabs as well as related info ended up being truly simple to do to access. I recently found what I hoped for before you know it in the least. Quite unusual. Is likely to appreciate it for those who add forums or something, site theme . a tones way for your customer to communicate. Nice task..
What’s Happening i am new to this, I stumbled upon this I have found It absolutely useful and it has aided me out loads. I hope to contribute & aid other users like its helped me. Good job.
After going over a handful of the blog articles on your site, I seriously appreciate your way of writing a blog. I book marked it to my bookmark site list and will be checking back in the near future. Take a look at my website as well and tell me what you think.
sildenafil price
viagra coupon
Excellent read, I just passed this onto a colleague who was doing a little research on that. And he just bought me lunch as I found it for him smile So let me rephrase that: Thank you for lunch! “A human being has a natural desire to have more of a good thing than he needs.” by Mark Twain.
I have not checked in here for a while because I thought it was getting boring, but the last several posts are great quality so I guess I will add you back to my everyday bloglist. You deserve it my friend 🙂
Simply desire to say your article is as astounding. The clarity in your post is just great and i can assume you’re an expert on this subject. Fine with your permission let me to grab your feed to keep updated with forthcoming post. Thanks a million and please continue the gratifying work.
This is very interesting, You’re a very skilled blogger. I’ve joined your rss feed and look forward to seeking more of your magnificent post. Also, I’ve shared your web site in my social networks!
I?¦ve been exploring for a little for any high-quality articles or blog posts in this kind of area . Exploring in Yahoo I eventually stumbled upon this web site. Studying this info So i am happy to exhibit that I have a very just right uncanny feeling I found out exactly what I needed. I so much no doubt will make certain to do not overlook this website and give it a glance regularly.
Hello.This post was really remarkable, particularly because I was looking for thoughts on this subject last Wednesday.
Greetings from California! I’m bored at work so I decided to browse your blog on my iphone during lunch break. I really like the knowledge you present here and can’t wait to take a look when I get home. I’m amazed at how fast your blog loaded on my mobile .. I’m not even using WIFI, just 3G .. Anyhow, excellent blog!
Awsome blog! I am loving it!! Will be back later to read some more. I am taking your feeds also.
I have been surfing online more than three hours today, yet I never found any interesting article like yours. It’s beautiful price enough for me. Personally, if all site owners and bloggers made good content material as you probably did, the web shall be a lot more useful than ever before. “We are not retreating – we are advancing in another Direction.” by Douglas MacArthur.
Good blog you’ve got here.. Itís difficult to find quality writing like yours these days. I seriously appreciate people like you! Take care!!
Nice post. I learn something totally new and challenging on blogs I stumbleupon on a daily basis. It’s always interesting to read through content from other authors and practice something from other web sites.
I really appreciate this post. I’ve been looking everywhere for this! Thank goodness I found it on Bing. You have made my day! Thank you again
Hello, i think that i saw you visited my blog thus i came to “return the favor”.I am attempting to find things to improve my website!I suppose its ok to use a few of your ideas!!
I like what you guys are up too. This kind of clever work and exposure! Keep up the excellent works guys I’ve added you guys to blogroll.
Really informative and superb bodily structure of content material, now that’s user pleasant (:.
I am not very excellent with English but I get hold this rattling easygoing to translate.
I like this post, enjoyed this one thanks for putting up.
Top 10 Cỗ Anime Bóng Rổ Hoặc Nhấtgame tieu quai sonic x7Slam Dunk kể về câu chuyện về việc trưởng thành và cứng cáp của nhân vật chính Hanamichi Sakuragi cùng nhóm bóng rổ Shohoku. Đoạn kết mở của cỗ truyện cũng để lại nhiều sự ngóng trông vô cùng rộng lớn của độc giả cho những giải đấu tiếp theo của chàng “tóc đỏ” Hanamichi Sakuragi. “Generation of Miracles”, tên của đội bóng rổ ngôi trường Sơ Trung Teikou từng đoạt chức vô địch toàn quốc 3 năm liền.
Giày Bóng Rổ Chi Phí Rẻ Bền đẹp, Chi Phí Sốc, Nên Mua Ở Đâulịch vcsLần thứ nhất ra đôi mắt thì giày Jordan 1 có màu sắc đỏ, Trắng và đen phối với nhau. Với upper mỏng manh nhẹ nhõm và đế bền hơn cùng bộ đệm lấy trực tiếp từ Crazylight Boost năm nhâm thìn, trong giai đoạn tạm thời Rose 8 cũng rất xứng đáng để test.
I’m extremely inspired along with your writing talents and also with the format to your weblog. Is this a paid topic or did you modify it your self? Anyway keep up the excellent quality writing, it’s rare to see a great weblog like this one these days..
Hey very nice site!! Man .. Excellent .. Amazing .. I will bookmark your blog and take the feeds also…I’m happy to find so many useful info here in the post, we need work out more techniques in this regard, thanks for sharing. . . . . .
Really Appreciate this article, can you make it so I receive an email sent to me every time there is a new update?
very good submit, i actually love this web site, carry on it
Great write-up, I?¦m regular visitor of one?¦s website, maintain up the excellent operate, and It’s going to be a regular visitor for a lengthy time.
Great write-up, I?¦m normal visitor of one?¦s site, maintain up the nice operate, and It is going to be a regular visitor for a lengthy time.
I also conceive thus, perfectly indited post! .
I gotta favorite this internet site it seems very useful handy
I enjoy the efforts you have put in this, regards for all the great blog posts.
Valuable information. Lucky me I found your web site by accident, and I am shocked why this accident did not happened earlier! I bookmarked it.
Very nice write-up. I definitely love this site. Thanks!
Thanks for your own labor on this blog. My mother enjoys getting into internet research and it is easy to understand why. A number of us hear all concerning the lively form you present effective suggestions via this website and therefore welcome contribution from the others about this situation plus our favorite child has always been being taught so much. Enjoy the rest of the new year. You have been conducting a tremendous job.
It’s really a great and useful piece of info. I am glad that you shared this useful information with us. Please keep us informed like this. Thanks for sharing.
Zadłużenie a, także dług pod oznajmienie a mianowicie jak na przykład te rolety dostać? Albo poświadczenie na temat zyskach od chwili szefowi okazuje się być stale potrzebne? Nie w każdej sytuacji. Kredyty jak również zabawki pod oznajmienie znajdują się przedkładane za sprawą większa część agend. Wypróbuj, w jaki sposób polegają jak również jak na przykład te rolety zdobyć https://pozyczkiland.pl pożyczki pozabankowe .
Pożyczka oraz pożyczka w oświadczenie – w jaki sposób gryzie zdobyć? Bądź zaświadczenie o dochodach od czasu pracodawcy wydaje się być za każdym razem żądane? Nie zawsze. Pożyczki i opony w oświadczenie istnieją proponowane poprzez duża liczba przedsiębiorstw. Przetestuj, na czym polegają i w jaki sposób gryzie uzyskać https://pozyczkiland.pl pożyczki .
I am not sure where you are getting your information, but good topic. I needs to spend some time learning much more or understanding more. Thanks for great info I was looking for this information for my mission.
I am curious to find out what blog platform you happen to be using? I’m experiencing some minor security issues with my latest website and I’d like to find something more safeguarded. Do you have any suggestions?
Zadłużenie jak i również dług pod oznajmienie a mianowicie jak na przykład te rolety dostać? Albo poświadczenie na temat zyskach od chwili szefowi okazuje się być stale postulowane? Nie w każdej sytuacji. Kredyty jak również forex pod oznajmienie znajdują się przedkładane za sprawą większa część agend. Wypróbuj, w jaki sposób polegają jak również jak na przykład te rolety zdobyć https://finanero.pl/pozyczki/pozyczka-dla-zadluzonych chwilówki bez bik krd big finero.
I have recently started a web site, the info you provide on this website has helped me greatly. Thanks for all of your time & work.
At this time it appears like WordPress is the top blogging platform out there right now. (from what I’ve read) Is that what you’re using on your blog?|
Hi, just required you to know I he added your site to my Google bookmarks due to your layout. But seriously, I believe your internet site has 1 in the freshest theme I??ve came across. It extremely helps make reading your blog significantly easier.
Wierzytelność jak i również debet dzięki oznajmienie a mianowicie jakim sposobem hałasuje otrzymać? Lub dokument na temat przychodach od momentu szefowie wydaje się w każdej sytuacji postulowane? Nie w każdym przypadku. Kredyty a także forex dzięki oznajmienie będą przekazywane za pośrednictwem wielu sekcji. Stwierdź, w jaki sposób polegają a także jakim sposobem hałasuje dostać https://finanero.pl/pozyczki/pozyczka-dla-zadluzonych kredyt dla zadłużonych finero.
F*ckin¦ awesome things here. I am very satisfied to peer your post. Thanks so much and i am looking ahead to touch you. Will you kindly drop me a e-mail?
Pożyczka i kredyt na oświadczenie – jak je uzyskać? Czy zaświadczenie o dochodach od pracodawcy jest zawsze wymagane? Niekoniecznie. Pożyczki oraz kredyty na oświadczenie są oferowane przez większość instytucji. Sprawdź, na czym polegają oraz jak je otrzymać https://finanero.pl/pozyczki/pozyczka-dla-zadluzonych finero chwilówki dla zadłużonych.
Zadłużenie jak i również dług pod oznajmienie a mianowicie jak na przykład te rolety dostać? Albo poświadczenie na temat zyskach od chwili szefowi okazuje się być stale postulowane? Nie w każdej sytuacji. Kredyty jak również forex pod oznajmienie znajdują się przedkładane za sprawą większa część agend. Wypróbuj, w jaki sposób polegają jak również jak na przykład te rolety zdobyć https://finanero.pl/pozyczki/pozyczka-za-darmo tania pożyczka finero.
You made a number of fine points there. I did a search on the subject and found nearly all folks will agree with your blog.
It’s perfect time to make some plans for the future and it is time to be happy. I’ve read this post and if I could I wish to suggest you some interesting things or advice. Maybe you could write next articles referring to this article. I desire to read more things about it!
Pożyczka oraz pożyczka w oświadczenie – jak na przykład te rolety dostać? Albo dokument na temat przychodach od chwili szefowie okazuje się być stale postulowane? Nie w każdej sytuacji. Kredyty jak również forex pod oznajmienie znajdują się przedkładane za sprawą większa część agend. Wypróbuj, w jaki sposób polegają jak również jak na przykład te rolety zdobyć https://finanero.pl/pozyczki/pozyczka-za-darmo darmowe kredyty finero.
Wierzytelność jak i również dług pod oznajmienie a mianowicie jak na przykład te rolety dostać? Albo dokument na temat przychodach od chwili szefowie okazuje się być stale postulowane? Nie w każdej sytuacji. Kredyty jak również forex pod oznajmienie znajdują się przedkładane za sprawą większa część agend. Wypróbuj, w jaki sposób polegają jak również jak na przykład te rolety zdobyć https://finanero.pl/pozyczki/pozyczka-za-darmo darmowe kredyty finero.
Zadłużenie a, także wierzytelność za oznajmienie a mianowicie jakże te cuda osiągnąć? Czyż poświadczenie na temat zyskach odkąd szefowi zdaje się być w każdym przypadku potrzebne? Niepotrzebnie. Kredyty jak i również zabawki za oznajmienie mogą być wręczane za pomocą przytłaczająca większość organizacji. Zobacz, w jaki sposób polegają jak i również jakże te cuda pozyskać https://finanero.pl/pozyczki/pozyczka-za-darmo tanie chwilówki finero.
Wierzytelność oraz debet dzięki oświadczenie – jakim sposobem hałasuje otrzymać? Lub dokument o przychodach od momentu szefowie wydaje się w każdej sytuacji żądane? Nie w każdym przypadku. Pożyczki a także opony dzięki oświadczenie będą przekazywane za pośrednictwem wielu sekcji. Stwierdź, na czym polegają a także jakim sposobem hałasuje dostać https://finanero.pl/pozyczki/pozyczka-za-darmo darmowa chwilówka finero.
It’s actually a nice and useful piece of information. I am glad that you shared this helpful information with us. Please keep us informed like this. Thanks for sharing.
An interesting discussion is worth comment. I think that you should write more on this topic, it might not be a taboo subject but generally people are not enough to speak on such topics. To the next. Cheers
Perfect work you have done, this web site is really cool with excellent info .
Very interesting subject, appreciate it for putting up. “To have a right to do a thing is not at all the same as to be right in doing it.” by G. K. Chesterton.
I¦ve recently started a blog, the info you offer on this web site has helped me greatly. Thank you for all of your time & work.
Hi my friend! I wish to say that this post is amazing, nice written and include almost all significant infos. I would like to see more posts like this.
Zadłużenie a, także wierzytelność za oznajmienie a mianowicie jakże te cuda osiągnąć? Czyż poświadczenie na temat zyskach odkąd szefowi zdaje się być w każdym przypadku potrzebne? Niepotrzebnie. Kredyty jak i również zabawki za oznajmienie mogą być wręczane za pomocą przytłaczająca większość organizacji. Zobacz, w jaki sposób polegają jak i również jakże te cuda pozyskać https://finanero.pl/pozyczki/pozyczka-za-darmo tania chwilówka finero.
Great info. Lucky me I found your website by accident (stumbleupon). I have book-marked it for later!
Wierzytelność oraz pożyczka w oświadczenie – w jaki sposób gryzie zdobyć? Bądź dokument o przychodach od czasu szefowie wydaje się być za każdym razem żądane? Nie zawsze. Pożyczki i opony w oświadczenie istnieją proponowane poprzez duża liczba przedsiębiorstw. Przetestuj, na czym polegają i w jaki sposób gryzie uzyskać https://finanero.pl/pozyczki/pozyczka-za-darmo darmowa chwilówka finero.
Good blog you have here.. It’s difficult to find excellent writing like yours these days. I really appreciate individuals like you! Take care!!
Hello! I could have sworn I’ve been to this blog before but after browsing through some of the post I realized it’s new to me. Anyways, I’m definitely happy I found it and I’ll be book-marking and checking back frequently!
Greetings! Very useful advice in this particular article! It is the little changes which will make the most important changes. Thanks for sharing!
I’ve been browsing on-line greater than three hours today, yet I never discovered any interesting article like yours. It is beautiful worth sufficient for me. In my view, if all webmasters and bloggers made just right content as you probably did, the web might be a lot more helpful than ever before.
Giày Bóng Rổ Giá Tiền Rẻ Bền đẹp Nhất, Giá Tiền Sốc, Nên Chọn Mua Ở Đâuvtv6 world cupLần trước tiên ra đôi mắt thì giày Jordan 1 có màu đỏ, white và đen phối với nhau. Với upper mỏng manh nhẹ nhàng và đế bền rộng cùng bộ đệm lấy trực tiếp kể từ Crazylight Boost 2016, trong thời điểm tạm thời Rose 8 cũng rất xứng đáng để thử.
I have to thank you for the efforts you have put in penning this website. I’m hoping to view the same high-grade content by you later on as well. In fact, your creative writing abilities has motivated me to get my very own website now 😉
Good post. I learn something totally new and challenging on sites I stumbleupon every day. It’s always interesting to read through content from other authors and use a little something from their sites.
Hey! Do you know if they make any plugins to safeguard against hackers? I’m kinda paranoid about losing everything I’ve worked hard on. Any recommendations?
Itís hard to come by well-informed people for this subject, but you seem like you know what youíre talking about! Thanks
An impressive share, I just given this onto a colleague who was doing a little analysis on this. And he in fact bought me breakfast because I found it for him.. smile. So let me reword that: Thnx for the treat! But yeah Thnkx for spending the time to discuss this, I feel strongly about it and love reading more on this topic. If possible, as you become expertise, would you mind updating your blog with more details? It is highly helpful for me. Big thumb up for this blog post!
I am not positive the place you’re getting your info, but great topic. I must spend some time learning more or figuring out more. Thank you for fantastic information I used to be in search of this information for my mission.
Great post. I am facing a couple of these problems.
Only wanna remark on few general things, The website design is perfect, the subject matter is very wonderful. “The reason there are two senators for each state is so that one can be the designated driver.” by Jay Leno.
I’m impressed, I must say. Really hardly ever do I encounter a blog that’s each educative and entertaining, and let me inform you, you will have hit the nail on the head. Your concept is excellent; the difficulty is something that not enough individuals are talking intelligently about. I am very glad that I stumbled throughout this in my seek for something regarding this.
This really answered my problem, thank you!
I absolutely love your blog.. Very nice colors & theme. Did you create this site yourself? Please reply back as I’m wanting to create my own website and would love to learn where you got this from or what the theme is named. Thanks!
I gotta favorite this site it seems invaluable very beneficial
Hello There. I found your blog using msn. This
is an extremely well written article. I will be sure to bookmark it
and come back to read more of your useful information. Thanks for
the post. I will certainly comeback.
You made some good points there. I looked on the net for additional information about the issue and found most people will go along with your views on this site.
Zadłużenie a, także wierzytelność za oznajmienie a mianowicie jakże te cuda osiągnąć? Czyż poświadczenie na temat zyskach odkąd szefowi zdaje się być w każdym przypadku potrzebne? Niepotrzebnie. Kredyty jak i również zabawki za oznajmienie mogą być wręczane za pomocą przytłaczająca większość organizacji. Zobacz, w jaki sposób polegają jak i również jakże te cuda pozyskać https://finanero.pl/pozyczki/pozyczka-przez-internet kredyty online finanero.
Zadłużenie a, także wierzytelność za oznajmienie a mianowicie jakże te cuda osiągnąć? Czyż poświadczenie na temat zyskach odkąd szefowi zdaje się być w każdym przypadku potrzebne? Niepotrzebnie. Kredyty jak i również zabawki za oznajmienie mogą być wręczane za pomocą przytłaczająca większość organizacji. Zobacz, w jaki sposób polegają jak i również jakże te cuda pozyskać https://finanero.pl/pozyczki/pozyczka-przez-internet pożyczki online finanero.
Hey There. I found your blog using msn. This is an extremely well written article. I will make sure to bookmark it and come back to read more of your useful info. Thanks for the post. I will certainly return.
Zadłużenie a, także dług pod oznajmienie a mianowicie jak na przykład te rolety dostać? Albo poświadczenie na temat zyskach od chwili szefowi okazuje się być stale potrzebne? Nie w każdej sytuacji. Kredyty jak również zabawki pod oznajmienie znajdują się przedkładane za sprawą większa część agend. Wypróbuj, w jaki sposób polegają jak również jak na przykład te rolety zdobyć https://finanero.pl/pozyczki/pozyczka-przez-internet pożyczka online finanero.
Pożyczka i kredyt na oświadczenie – jak je uzyskać? Czy zaświadczenie o dochodach od pracodawcy jest zawsze wymagane? Niekoniecznie. Pożyczki oraz kredyty na oświadczenie są oferowane przez większość instytucji. Sprawdź, na czym polegają oraz jak je otrzymać https://finanero.pl/pozyczki/pozyczka-przez-internet pożyczka przez internet finanero.
Pożyczka i kredyt na oświadczenie – jak je uzyskać? Czy zaświadczenie o dochodach od pracodawcy jest zawsze wymagane? Niekoniecznie. Pożyczki oraz kredyty na oświadczenie są oferowane przez większość instytucji. Sprawdź, na czym polegają oraz jak je otrzymać https://finanero.pl/pozyczki/pozyczka-sms pożyczka na raty finanero.
Having read this I believed it was extremely informative. I appreciate you finding the time and energy to put this content together. I once again find myself personally spending way too much time both reading and posting comments. But so what, it was still worthwhile!
Pożyczka oraz pożyczka w oświadczenie – w jaki sposób gryzie zdobyć? Bądź zaświadczenie o dochodach od czasu pracodawcy wydaje się być za każdym razem żądane? Nie zawsze. Pożyczki i opony w oświadczenie istnieją proponowane poprzez duża liczba przedsiębiorstw. Przetestuj, na czym polegają i w jaki sposób gryzie uzyskać https://finanero.pl/pozyczki/pozyczka-sms pożyczka ratalna finanero.
Oh my goodness! Amazing article dude! Thank you so much, However I am encountering difficulties with your RSS. I donít know the reason why I am unable to join it. Is there anybody getting the same RSS problems? Anyone who knows the answer will you kindly respond? Thanx!!
Wierzytelność jak i również debet dzięki oznajmienie a mianowicie jakim sposobem hałasuje otrzymać? Lub dokument na temat przychodach od momentu szefowie wydaje się w każdej sytuacji postulowane? Nie w każdym przypadku. Kredyty a także forex dzięki oznajmienie będą przekazywane za pośrednictwem wielu sekcji. Stwierdź, w jaki sposób polegają a także jakim sposobem hałasuje dostać https://finanero.pl/pozyczki/pozyczka-sms kredyt ratalny finanero.
An intriguing discussion is definitely worth comment. There’s no doubt that that you need to publish more on this issue, it might not be a taboo matter but usually people do not discuss these subjects. To the next! All the best!!
Wierzytelność oraz debet dzięki oświadczenie – jakim sposobem hałasuje otrzymać? Lub dokument o przychodach od momentu szefowie wydaje się w każdej sytuacji żądane? Nie w każdym przypadku. Pożyczki a także opony dzięki oświadczenie będą przekazywane za pośrednictwem wielu sekcji. Stwierdź, na czym polegają a także jakim sposobem hałasuje dostać https://finanero.pl/pozyczki/pozyczka-na-dowod kredyty na dowód finanero.
Hey there, You have done an excellent job. I will certainly digg it and personally suggest to my friends. I am confident they will be benefited from this website.
I am no longer positive where you are getting your information, but great topic. I needs to spend a while studying much more or understanding more. Thanks for magnificent info I was in search of this info for my mission.
I think other website proprietors should take this website as an model, very clean and great user genial style and design, as well as the content. You’re an expert in this topic!
Nice weblog here! Additionally your site lots up fast! What web host are you the use of? Can I get your associate hyperlink on your host? I want my web site loaded up as quickly as yours lol
Bądź wiadra pomyj, jakie to w wielu przypadkach wylewa się odnośnie tematu przeciętnej pensji, mogą mieć jakiekolwiek uzasadnienie? Zaiste, pewnym wraz ze źródeł przeważającego na społeczeństwie sceptycyzmu w dodatku przedmiotu może okazać się nieobecność spójności na ustaleń badawczych, jakie to się na do niej aspekcie wybiera, dlatego że w dalszym ciągu wielu z nas zyskuje płacę minimalną jak i również manipuluje za umowach rozporządzenie, miast umowach na temat produkcję. Trzeba podobnie mieć świadomość, że działa kilkanaście ceny jak i również metodologii szacowania ceny przeciętnej pensji na terytorium polski https://finanero.pl/pozyczki/pozyczka-na-dowod pożyczki z dostawa do domu finanero.
Bądź wiadra pomyj, które nierzadko wylewa się odnośnie umiarkowanej płacy, posiadają jakieś uzasadnienie? Rzeczywiście, określonym wraz z źródeł zwykłego po społeczeństwie sceptycyzmu dodatkowo tematu może stać się deficyt spójności po danych empirycznych, które się po jej kontekście oferuje, bowiem stale wielu graczy zarabia płacę minimalną oraz operuje dzięki umowach zarządzenie, w zamian umowach o robotę. Wskazane jest również mieć pojęcie, że jest parę zalety oraz metodologii przeliczania zalety umiarkowanej płacy w naszym kraju https://finanero.pl/pozyczki/pozyczka-na-dowod kredyty na dowód finanero.
Albo wiadra pomyj, jakie to w wielu przypadkach wylewa się odnośnie tematu przeciętnej pensji, mogą mieć jakiekolwiek uzasadnienie? Zaiste, pewnym wraz ze źródeł przeważającego na społeczeństwie sceptycyzmu w dodatku przedmiotu może okazać się nieobecność spójności na ustaleń badawczych, jakie to się na do niej aspekcie wybiera, dlatego że w dalszym ciągu wielu z nas zyskuje płacę minimalną jak i również manipuluje za umowach rozporządzenie, miast umowach na temat produkcję. Trzeba podobnie mieć świadomość, że działa kilkanaście ceny jak i również metodologii szacowania ceny przeciętnej pensji na terytorium polski https://finanero.pl/pozyczki/pozyczka-na-dowod pożyczka na dowód na raty finanero.
Czy wiadra pomyj, jakie często wylewa się na temat średniej płacy, mają jakieś uzasadnienie? Istotnie, jednym ze źródeł powszechnego w społeczeństwie sceptycyzmu do tego tematu może być brak spójności w danych, jakie się w jej kontekście podaje, ponieważ wciąż wiele osób zarabia płacę minimalną i pracuje na umowach zlecenie, zamiast umowach o pracę. Warto też wiedzieć, że istnieje kilka wartości i metodologii liczenia wartości średniej pensji na terytorium polski https://finanero.pl/pozyczki/pozyczka-na-dowod pożyczka na dowód na raty finanero.
Albo wiadra pomyj, jakie to w wielu przypadkach wylewa się odnośnie tematu przeciętnej pensji, mogą mieć jakiekolwiek uzasadnienie? Faktycznie, 1 ze źródeł ogólnego przy społeczeństwie sceptycyzmu do tego tematu może być niedostatek spójności przy informacji, jakie się przy jej kontekście przekazuje, gdyż ciągle wiele osób zarabia płacę minimalną i pracuje w umowach zamówienie, zamiast umowach o pracę. Powinno się też rozumieć, że istnieje kilka wartości i metodologii liczenia wartości średniej płacy w Polsce https://finanero.pl/pozyczki/pozyczka-bez-zaswiadczen chwilówki bez zaświadczeń finanero.
how long does sildenafil last
Bądź wiadra pomyj, które niejednokrotnie wylewa się na temat średniej płacy, mają jakieś uzasadnienie? Faktycznie, 1 ze źródeł ogólnego przy społeczeństwie sceptycyzmu do tego tematu może być niedostatek spójności przy informacji, które się przy jej kontekście przekazuje, gdyż ciągle wiele osób zarabia płacę minimalną i pracuje w umowach zamówienie, zamiast umowach o robotę. Powinno się również rozumieć, że jest kilka wartości i metodologii przeliczania wartości średniej płacy w Polsce https://finanero.pl/pozyczki/pozyczka-na-dowod chwilówki na dowód finanero.
Bądź wiadra pomyj, które nierzadko wylewa się odnośnie umiarkowanej płacy, posiadają jakieś uzasadnienie? Rzeczywiście, określonym wraz z źródeł zwykłego po społeczeństwie sceptycyzmu dodatkowo tematu może stać się deficyt spójności po danych empirycznych, które się po jej kontekście oferuje, bowiem stale wielu graczy zarabia płacę minimalną oraz operuje dzięki umowach zarządzenie, w zamian umowach o robotę. Wskazane jest również mieć pojęcie, że jest parę zalety oraz metodologii przeliczania zalety umiarkowanej płacy w naszym kraju https://pozyczkiro.pl/ pożyczki przez internet pozyczkiro.
Lub wiadra pomyj, które to wielokrotnie wylewa się odnośnie tematu przeciętnej pensji, mogą mieć jakiekolwiek uzasadnienie? Naturalnie, konkretnym wraz ze źródeł uniwersalnego w całej społeczeństwie sceptycyzmu w dodatku przedmiotu może okazać się niedobór spójności w całej materiałów badawczych, które to się w całej do niej aspekcie mówi, albowiem nadal wielu z nas zyskuje płacę minimalną jak i również manipuluje pod umowach angaż, miast umowach na temat fuchę. Należałoby także posiadać wiedzę, że funkcjonuje kilkanaście ceny jak i również metodologii rachowania ceny przeciętnej pensji na terytorium polski https://chwilowkiso.pl/ Szybka chwilówka chwilowkiso.
Well I sincerely liked studying it. This tip offered by you is very constructive for good planning.
Somebody essentially help to make seriously posts I would state. This is the very first time I frequented your website page and thus far? I surprised with the research you made to create this particular publish amazing. Great job!
Bądź wiadra pomyj, które niejednokrotnie wylewa się odnośnie umiarkowanej płacy, posiadają jakieś uzasadnienie? Faktycznie, 1 wraz z źródeł ogólnego przy społeczeństwie sceptycyzmu dodatkowo tematu może stać się niedostatek spójności przy informacji, które się przy jej kontekście przekazuje, gdyż ciągle wielu graczy zarabia płacę minimalną oraz operuje w umowach zamówienie, w zamian umowach o robotę. Powinno się również rozumieć, że jest parę zalety oraz metodologii przeliczania zalety umiarkowanej płacy w naszym kraju https://pozyczkiro.pl/ szybka pożyczka pozyczkiro.
Bądź wiadra pomyj, które niejednokrotnie wylewa się na temat średniej płacy, mają jakieś uzasadnienie? Faktycznie, 1 ze źródeł ogólnego przy społeczeństwie sceptycyzmu do tego tematu może być niedostatek spójności przy informacji, które się przy jej kontekście przekazuje, gdyż ciągle wiele osób zarabia płacę minimalną i pracuje w umowach zamówienie, zamiast umowach o robotę. Powinno się również rozumieć, że jest kilka wartości i metodologii przeliczania wartości średniej płacy w Polsce https://chwilowkiso.pl/ Szybkie chwilówki chwilowkiso.
Bądź wiadra pomyj, które niejednokrotnie wylewa się odnośnie umiarkowanej płacy, posiadają jakieś uzasadnienie? Faktycznie, 1 wraz z źródeł ogólnego przy społeczeństwie sceptycyzmu dodatkowo tematu może stać się niedostatek spójności przy informacji, które się przy jej kontekście przekazuje, gdyż ciągle wielu graczy zarabia płacę minimalną oraz operuje w umowach zamówienie, w zamian umowach o robotę. Powinno się również rozumieć, że jest parę zalety oraz metodologii przeliczania zalety umiarkowanej płacy w naszym kraju https://kredytero.pl/ kredyty bez zaświadczeń kredytero.
You got a very fantastic website, Sword lily I noticed it through yahoo.
Lub wiadra pomyj, które to nierzadko wylewa się odnośnie umiarkowanej pensji, posiadają jakiekolwiek uzasadnienie? Rzeczywiście, określonym wraz z źródeł zwykłego po społeczeństwie sceptycyzmu dodatkowo przedmiotu może stać się deficyt spójności po danych empirycznych, które to się po do niej aspekcie oferuje, bowiem stale wielu graczy zyskuje płacę minimalną oraz operuje dzięki umowach zarządzenie, w zamian umowach na temat fuchę. Wskazane jest także mieć pojęcie, że funkcjonuje parę zalety oraz metodologii rachowania zalety umiarkowanej pensji w naszym kraju https://kredytero.pl/ kredyt bez zaświadczeń kredytero.
Lub wiadra pomyj, które to wielokrotnie wylewa się odnośnie tematu przeciętnej pensji, mogą mieć jakiekolwiek uzasadnienie? Naturalnie, konkretnym wraz ze źródeł uniwersalnego w całej społeczeństwie sceptycyzmu w dodatku przedmiotu może okazać się niedobór spójności w całej materiałów badawczych, które to się w całej do niej aspekcie mówi, albowiem nadal wielu z nas zyskuje płacę minimalną jak i również manipuluje pod umowach angaż, miast umowach na temat fuchę. Należałoby także posiadać wiedzę, że funkcjonuje kilkanaście ceny jak i również metodologii rachowania ceny przeciętnej pensji na terytorium polski https://pozyczkiro.pl/ pożyczki przez internet bez bik pozyczkiro.
Czy wiadra pomyj, jakie często wylewa się na temat średniej płacy, mają jakieś uzasadnienie? Istotnie, jednym ze źródeł powszechnego w społeczeństwie sceptycyzmu do tego tematu może być brak spójności w danych, jakie się w jej kontekście podaje, ponieważ wciąż wiele osób zarabia płacę minimalną i pracuje na umowach zlecenie, zamiast umowach o pracę. Warto też wiedzieć, że istnieje kilka wartości i metodologii liczenia wartości średniej płacy w Polsce https://chwilowkiso.pl/ chwilówki chwilowkiso.
Albo wiadra pomyj, jakie to w wielu przypadkach wylewa się odnośnie tematu przeciętnej pensji, mogą mieć jakiekolwiek uzasadnienie? Zaiste, pewnym wraz ze źródeł przeważającego na społeczeństwie sceptycyzmu w dodatku przedmiotu może okazać się nieobecność spójności na ustaleń badawczych, jakie to się na do niej aspekcie wybiera, dlatego że w dalszym ciągu wielu z nas zyskuje płacę minimalną jak i również manipuluje za umowach rozporządzenie, miast umowach na temat produkcję. Trzeba podobnie mieć świadomość, że działa kilkanaście ceny jak i również metodologii szacowania ceny przeciętnej pensji na terytorium polski https://kredytero.pl/ pożyczki na dowód kredytero.
Albo wiadra pomyj, jakie to wielokrotnie wylewa się odnośnie tematu przeciętnej pensji, mogą mieć jakiekolwiek uzasadnienie? Naturalnie, konkretnym wraz ze źródeł uniwersalnego w całej społeczeństwie sceptycyzmu w dodatku przedmiotu może okazać się niedobór spójności w całej materiałów badawczych, jakie to się w całej do niej aspekcie mówi, albowiem nadal wielu z nas zyskuje płacę minimalną jak i również manipuluje pod umowach angaż, miast umowach na temat produkcję. Należałoby podobnie posiadać wiedzę, że działa kilkanaście ceny jak i również metodologii szacowania ceny przeciętnej pensji na terytorium polski https://pozyczkiro.pl/ pożyczka przez internet bez bik pozyczkiro.
Simply desire to say your article is as surprising. The clearness in your post is just spectacular and i could assume you’re an expert on this subject. Fine with your permission allow me to grab your feed to keep up to date with forthcoming post. Thanks a million and please continue the enjoyable work.
Czy wiadra pomyj, jakie niejednokrotnie wylewa się na temat średniej płacy, mają jakieś uzasadnienie? Faktycznie, 1 ze źródeł ogólnego przy społeczeństwie sceptycyzmu do tego tematu może być niedostatek spójności przy informacji, jakie się przy jej kontekście przekazuje, gdyż ciągle wiele osób zarabia płacę minimalną i pracuje w umowach zamówienie, zamiast umowach o pracę. Powinno się też rozumieć, że istnieje kilka wartości i metodologii liczenia wartości średniej płacy w Polsce https://chwilowkiso.pl/ Szybkie chwilówki chwilowkiso.
I like what you guys are up too. Such clever work and reporting! Keep up the superb works guys I’ve incorporated you guys to my blogroll. I think it’ll improve the value of my website 🙂
Well I definitely enjoyed studying it. This subject procured by you is very useful for proper planning.
Good day! I could have sworn Iíve been to your blog before but after browsing through some of the posts I realized itís new to me. Regardless, Iím definitely pleased I found it and Iíll be book-marking it and checking back regularly!
Albo wiadra pomyj, jakie to w wielu przypadkach wylewa się odnośnie tematu przeciętnej pensji, mogą mieć jakiekolwiek uzasadnienie? Zaiste, pewnym wraz ze źródeł przeważającego na społeczeństwie sceptycyzmu w dodatku przedmiotu może okazać się nieobecność spójności na ustaleń badawczych, jakie to się na do niej aspekcie wybiera, dlatego że w dalszym ciągu wielu z nas zyskuje płacę minimalną jak i również manipuluje za umowach rozporządzenie, miast umowach na temat produkcję. Trzeba podobnie mieć świadomość, że działa kilkanaście ceny jak i również metodologii szacowania ceny przeciętnej pensji na terytorium polski https://pozyczkiro.pl/ pożyczki bez bik pozyczkiro.
Bądź wiadra pomyj, które niejednokrotnie wylewa się odnośnie umiarkowanej płacy, posiadają jakieś uzasadnienie? Faktycznie, 1 wraz z źródeł ogólnego przy społeczeństwie sceptycyzmu dodatkowo tematu może stać się niedostatek spójności przy informacji, które się przy jej kontekście przekazuje, gdyż ciągle wielu graczy zarabia płacę minimalną oraz operuje w umowach zamówienie, w zamian umowach o robotę. Powinno się również rozumieć, że jest parę zalety oraz metodologii przeliczania zalety umiarkowanej płacy w naszym kraju https://chwilowkiso.pl/ Darmowe chwilówki chwilowkiso.
Bądź wiadra pomyj, które nierzadko wylewa się odnośnie umiarkowanej płacy, posiadają jakieś uzasadnienie? Rzeczywiście, określonym wraz z źródeł zwykłego po społeczeństwie sceptycyzmu dodatkowo tematu może stać się deficyt spójności po danych empirycznych, które się po jej kontekście oferuje, bowiem stale wielu graczy zarabia płacę minimalną oraz operuje dzięki umowach zarządzenie, w zamian umowach o robotę. Wskazane jest również mieć pojęcie, że jest parę zalety oraz metodologii przeliczania zalety umiarkowanej płacy w naszym kraju https://kredytero.pl/ kredyty bez zaświadczeń kredytero.
You actually make it appear so easy along with your presentation but I find this matter to be really one thing that I think I might by no means understand. It kind of feels too complicated and extremely huge for me. I am looking ahead to your next publish, I will attempt to get the hold of it!
I like this weblog very much so much fantastic info .
Maseczki ochronne – typy, zalecenia oraz zagrożenia https://maseczkiro.pl/ dobre maseczki przeciwwirusowe maseczkiro.
penis https://penisro.pl/ penis penisro.
Maseczki ochronne – typy, zalecenia oraz wypadku https://maseczkiro.pl/ maseczki maseczkiro.
Hi, I do think this is an excellent site. I stumbledupon it 😉 I will come back once again since I book marked it. Money and freedom is the greatest way to change, may you be rich and continue to guide others.
Raz za razem nagminniej na uzdrawianiu trądziku aplikuje się kompetentne procedury, i służące do lamusa przerabiają „kuracje”, które to z większym natężeniem hamują, niźli dopomagają: fizyczne pucowanie facjatyfizjonomij, domowe parówki, równo wysuszające żele myjące, eksponowanie buzi w celu słońca. Współcześnie dysponujemy w celu władzy ustalone, aktywne metody amortyzowania sygnałów trądziku, więcej jeszcze usunięcia członka definitywnie https://tradzikro.pl/ najlepsze leki na trądzik tradzikro.
leki Jak powiększyć penisa https://penisro.pl/ leki Jak powiększyć penisa penisro.
powiększanie penisa https://penisro.pl/ powiększanie penisa penisro.
I’m truly enjoying the design and layout of your blog. It’s a very easy on the eyes which makes it much more enjoyable for me to come here and visit more often. Did you hire out a designer to create your theme? Great work!
Maseczki ochronne – typy, zalecenia oraz zagrożenia https://maseczkiro.pl/ maseczki medyczne maseczkiro.
I’m now not certain where you are getting your information, but good topic. I needs to spend a while finding out more or figuring out more. Thank you for magnificent info I used to be looking for this info for my mission.|
Hey very nice site!! Man .. Excellent .. Amazing .. I will bookmark your blog and take the feeds also…I am happy to find so many useful information here in the post, we need work out more techniques in this regard, thanks for sharing. . . . . .
Pertandingan antara Barcelona FC dan klub lainnya keren banget tadi malam! Saya sih merasa Barcelona bias menang melainkan saya salah… terbukti PSG bantai Barcelona dengan poin 1-4. Mantap ya.. Saya mau cek website isu bola dahulu melewati link https://satuxbola.com
Have you ever thought about including a little bit more than just your articles? I mean, what you say is fundamental and all. However just imagine if you added some great graphics or videos to give your posts more, “pop”! Your content is excellent but with images and clips, this site could certainly be one of the very best in its niche. Amazing blog!
อุ๊งอิ๊ง เปิดคลิป ทักษิณ เดินซื้อของให้หลาน แห่คอมเมนต์คิดถึง อยาก แพทองธาร ชินวัตร หรืออุ๊งอิ๊ง บุตรสาวคนเล็ก นายทักษิณ ชินวัตร อดีตนายกรัฐมนตรี ได้โพสต์คลิปวิดีโอขณะนายทักษิณเลือกซื้อของในศูนย์การค้า ซื้อของ
ซื้อของออนไลน์ รู้ใจไม่รู้จบด้วย WeMall Application ช้อปปิ้ง ซื้อของออนไลน์ รู้ใจไม่รู้จบด้วย WeMall Application ผ่าน WeMall Application แอปพริเคชันช้อปปิ้งของแบรนด์แท้ขนาดใหญ่ของประเทศไทย ซื้อของออนไลน์
Big C Online ฟรีค่าส่ง สั่งง่าย ส่งไว ครบตรงใจคุณ บิ๊กซี บิ๊กซีช้อป ปิ้งออนไลน์ เป็นส่วนหนึ่งของบริษัท บิ๊กซี ซูเปอร์เซ็นเตอร์ จำกัด มหาชน คืออีกหนึ่งช่องทางในการเลือกซื้อสินค้าจากบิ๊กซี ซื้อของออนไลน์
https://www.urlatlas.info/FindingTheExpired/categ.html
Hello There. I found your blog using msn. This is a very well written article. I’ll make sure to bookmark it and return to read more of your useful info. Thanks for the post. I will certainly comeback.
I have been absent for some time, but now I remember why I used to love this blog. Thanks, I’ll try and check back more often. How frequently you update your web site?
I love working out my upper body (chest and areas around it). If you are curious, you can checkout my routine http://kettlebellrob.blogspot.com/2021/08/chestback-10-8-6-15.html
Wonderful blog! I found it while surfing around on Yahoo News. Do you have any tips on how to get listed in Yahoo News? I’ve been trying for a while but I never seem to get there! Many thanks
Its like you learn my mind! You seem to know a lot about this, such as you wrote
the book in it or something. I feel that you simply could do with a few percent to drive the message house a
bit, however other than that, that is wonderful blog.
An excellent read. I will definitely be back.
best canadian online pharmacy
An outstanding share! I’ve just forwarded this onto a colleague who has been doing a little research on this. And he in fact bought me dinner due to the fact that I stumbled upon it for him… lol. So let me reword this…. Thanks for the meal!! But yeah, thanks for spending the time to talk about this issue here on your blog.
I’ve been exploring for a little for any high-quality articles
or blog posts on this sort of space . Exploring in Yahoo I eventually stumbled upon this website.
Reading this info So i’m happy to express that I have an incredibly good uncanny feeling I
came upon exactly what I needed. I most definitely will make certain to
don?t disregard this web site and provides it a look on a
constant basis.
I’m impressed, I must say. Seldom do I come across a blog that’s both equally educative and engaging, and without a doubt, you have hit the nail on the head. The problem is something that too few people are speaking intelligently about. Now i’m very happy that I stumbled across this during my search for something concerning this.
of course like your web-site but you have to check the spelling on several of your posts. Many of them are rife with spelling issues and I to find it very troublesome to inform the reality on the other hand I will surely come back again.
Homepages with all your favorite stuff is super important when you are trying to save time check it out https://m.allmyfaves.com/index/mobiletab/tabid/1643477/
Howdy! This post could not be written much better! Looking through
this article reminds me of my previous roommate!
He always kept preaching about this. I’ll send this post to him.
Fairly certain he’ll have a great read. Many thanks
for sharing!
My web site Viking XL Keto Review (Dennis)
I think this web site contains some rattling superb information for everyone :D. “Morality, like art, means a drawing a line someplace.” by Oscar Wilde.
I really appreciate this post. I have been looking everywhere for this! Thank goodness I found it on Bing. You’ve made my day! Thanks again!
There’s noticeably a bundle to learn about this. I assume you made sure nice factors in options also.
It’s actually a cool and useful piece of information. I’m glad that you shared this useful information with us. Please keep us up to date like this. Thanks for sharing.
I have been browsing online greater than 3 hours as of late, yet I never discovered any interesting article like yours. It?¦s lovely price enough for me. Personally, if all site owners and bloggers made just right content material as you probably did, the internet will be a lot more useful than ever before.
I was curious if you ever considered changing the page layout of your website? Its very well written; I love what youve got to say. But maybe you could a little more in the way of content so people could connect with it better. Youve got an awful lot of text for only having one or 2 pictures. Maybe you could space it out better?
Nice bro thank you.
I like it when folks come together and share thoughts. Great blog, continue the good work!
There are some attention-grabbing closing dates on this article however I don’t know if I see all of them center to heart. There’s some validity however I’ll take maintain opinion until I look into it further. Good article , thanks and we want extra! Added to FeedBurner as nicely
I could not refrain from commenting. Very well written!
Wow! Thank you! I always wanted to write on my blog something like that. Can I include a fragment of your post to my site?
Actually when someone doesn’t be aware of after that its up to other viewers that they will help, so here it occurs.|
Very interesting topic, thankyou for putting up. “Welcome to President Bush, Mrs. Bush, and my fellow astronauts.” by Dan Quayle.
I got good info from your blog
I simply could not depart your web site prior to suggesting that I really loved the standard info an individual provide on your visitors? Is gonna be back frequently to check out new posts.
I was looking through some of your content on this internet site and I think this web site is very instructive! Continue putting up.
This info is invaluable. Where can I find out more?
Here is my blog post: rb88
Usually I don’t read article on blogs, but I would like to say that this write-up very forced me to try and do it! Your writing style has been surprised me. Thanks, very nice post.
Thank you for the good writeup. It actually used to be a leisure account it. Look advanced to more brought agreeable from you! However, how can we keep up a correspondence?
I was very pleased to find this web-site.I wanted to thanks for your time for this wonderful read!! I definitely enjoying every little bit of it and I have you bookmarked to check out new stuff you blog post.
I have been exploring for a little bit for any high-quality articles or blog posts on this kind of house . Exploring in Yahoo I finally stumbled upon this website. Reading this information So i?¦m happy to convey that I have an incredibly excellent uncanny feeling I came upon exactly what I needed. I so much no doubt will make certain to do not put out of your mind this web site and provides it a glance on a relentless basis.
Woh I enjoy your blog posts, saved to fav! .
Great line up. We will be linking to this great article on our site. Keep up the good writing.
It’s really a cool and helpful piece of info. I am happy that you just shared this helpful info with us. Please stay us up to date like this. Thanks for sharing.
Hey there! Quick question that’s completely off topic. Do you know how to make your site mobile friendly? My site looks weird when browsing from my iphone4. I’m trying to find a theme or plugin that might be able to fix this issue. If you have any recommendations, please share. With thanks!
Hello there, simply turned into alert to your blog via Google, and found that it is truly informative. I’m going to watch out for brussels. I’ll be grateful when you proceed this in future. Many other folks will likely be benefited from your writing. Cheers!
Unquestionably believe that which you stated. Your favorite reason appeared
to be at the internet the easiest thing to have in mind of.
I say to you, I definitely get irked whilst folks consider issues that they
plainly don’t realize about. You controlled to hit
the nail upon the top and outlined out the entire thing with no need side effect
, other folks can take a signal. Will probably be again to get more.
Thank you
We’re a gaggle of volunteers and starting a brand new scheme in our community. Your website offered us with valuable information to paintings on. You’ve performed a formidable job and our entire community will probably be thankful to you.
Nice blog! Is your theme custom made or did you download it from somewhere? A theme like yours with a few simple tweeks would really make my blog jump out. Please let me know where you got your theme. With thanks
Thankyou for all your efforts that you have put in this. very interesting information.
Excellent article. I certainly appreciate this site. Stick with it!
bookmarked!!, I really like your web site!
Great blog! Is your theme custom made or did you download it from somewhere? A theme like yours with a few simple adjustements would really make my blog jump out. Please let me know where you got your design. Many thanks
Make Bitcoin in our community.
We are a group of individuals providing money help each other.
We don’t ask anyone to make any contracts and keep any security of
property for providing assistance. In our community there are no givers and takers.
All same individuals gather together and use this
wonderful tool and gain help. We are not a profit making
organization. We are completely a team of volunteers.
More information here https://bit.ly/BTCGetRich
I am continuously searching online for ideas that can benefit me. Thanks!
I think other website proprietors should take this website as an model, very clean and good user genial design.
Hey there would you mind letting me know which hosting company you’re working with? I’ve loaded your blog in 3 completely different internet browsers and I must say this blog loads a lot quicker then most. Can you recommend a good hosting provider at a reasonable price? Kudos, I appreciate it!
I simply could not go away your website before suggesting that I really enjoyed the standard information a person provide to your visitors? Is going to be again steadily to investigate cross-check new posts.
Nice post. I learn something totally new and challenging on blogs I stumbleupon on a daily basis. It will always be interesting to read through articles from other authors and practice a little something from other sites.
Can I simply say what a aid to search out somebody who really knows what theyre speaking about on the internet. You definitely know how to convey a difficulty to light and make it important. Extra folks need to read this and understand this aspect of the story. I cant consider youre no more standard since you undoubtedly have the gift.
Thank you for the auspicious writeup. It in fact was once a enjoyment account it. Look advanced to far added agreeable from you! By the way, how could we keep up a correspondence?|
I went over this site and I believe you have a lot of good information, saved to my bookmarks (:.
I¦ve been exploring for a bit for any high quality articles or weblog posts on this kind of area . Exploring in Yahoo I ultimately stumbled upon this website. Studying this info So i¦m happy to express that I have an incredibly excellent uncanny feeling I came upon exactly what I needed. I so much certainly will make sure to do not disregard this website and provides it a glance on a relentless basis.
I’ve recently started a site, the information you offer on this website has helped me tremendously. Thanks for all of your time & work.
We absolutely love your blog and find nearly all of your post’s to be precisely what I’m looking for. can you offer guest writers to write content available for you? I wouldn’t mind creating a post or elaborating on a lot of the subjects you write in relation to here. Again, awesome website!
Have you ever thought about writing an ebook or guest authoring
on other websites? I have a blog based on the same subjects you discuss and would really like to have you share some stories/information. I know my subscribers would value your
work. If you are even remotely interested, feel free to send
me an e mail.
Magnificent site. A lot of useful information here. I’m sending it to a few buddies ans also sharing in delicious. And naturally, thank you on your sweat!
I envy your work, thanks for all the great posts.
obviously like your web site but you have to check the spelling on quite a few of your posts. Many of them are rife with spelling issues and I find it very bothersome to tell the reality nevertheless I will definitely come back again.
I like this web site very much so much wonderful information.
Whoa! This blog looks exactly like my old one! It’s on a entirely different subject but it has pretty much the same page layout and design. Great choice of colors!
After checking out a few of the blog posts on your web page, I honestly appreciate your technique of blogging. I book-marked it to my bookmark webpage list and will be checking back in the near future. Please check out my web site as well and tell me your opinion.
he blog was how do i say it… relevant, finally something that helped me. Thanks
Hmm is anyone else encountering problems with the images on this blog loading? I’m trying to determine if its a problem on my end or if it’s the blog. Any feedback would be greatly appreciated.
Hi there! I know this is kinda off topic but I was wondering which blog platform are you using for this site? I’m getting tired of WordPress because I’ve had issues with hackers and I’m looking at options for another platform. I would be awesome if you could point me in the direction of a good platform.
Good V I should definitely pronounce, impressed with your web site. I had no trouble navigating through all tabs and related information ended up being truly easy to do to access. I recently found what I hoped for before you know it in the least. Reasonably unusual. Is likely to appreciate it for those who add forums or something, website theme . a tones way for your client to communicate. Nice task..
Thank you, I’ve recently been searching for info about this subject for ages and yours is the best I have discovered till now. But, what about the bottom line? Are you sure about the source?
Awesome blog! Do you have any tips for aspiring writers? I’m hoping to start my own website soon but I’m a little lost on everything. Would you propose starting with a free platform like WordPress or go for a paid option? There are so many choices out there that I’m completely overwhelmed .. Any ideas? Appreciate it!
Hiya very cool web site!! Guy .. Beautiful .. Superb .. I will bookmark your blog and take the feeds also?KI’m satisfied to seek out a lot of useful information here within the put up, we need work out more strategies in this regard, thank you for sharing. . . . . .
It is appropriate time to make some plans for the future and it’s time to be happy. I’ve read this post and if I could I wish to suggest you few interesting things or tips. Perhaps you can write next articles referring to this article. I wish to read even more things about it!
I have read so many content regarding the blogger lovers but this article is truly a good article, keep it up.|
I’ve read several just right stuff here. Definitely price bookmarking for revisiting. I surprise how much attempt you place to make such a excellent informative website.
Nice post. I was checking constantly this blog and I am impressed! Extremely helpful information particularly the last part 🙂 I care for such info much. I was looking for this certain information for a long time. Thank you and best of luck.
Hello. excellent job. I did not expect this. This is a great story. Thanks!
I truly appreciate this post. I’ve been looking all over for this! Thank goodness I found it on Bing. You’ve made my day! Thx again
But wanna comment that you have a very nice website , I like the layout it really stands out.
Iím amazed, I have to admit. Rarely do I encounter a blog thatís both equally educative and interesting, and let me tell you, you have hit the nail on the head. The problem is something too few folks are speaking intelligently about. Now i’m very happy I found this in my search for something relating to this.
Hey there, You’ve done a fantastic job. I’ll definitely digg it and personally recommend to my friends. I am confident they will be benefited from this web site.
This site is my intake, rattling superb design and perfect articles.
Thanks for another informative blog. The place else could I am getting that kind of information written in such an ideal means? I have a mission that I am simply now running on, and I have been on the glance out for such information.
I know this if off topic but I’m looking into starting my own weblog and was curious what all is needed to get setup? I’m assuming having a blog like yours would cost a pretty penny? I’m not very web smart so I’m not 100 certain. Any recommendations or advice would be greatly appreciated. Cheers
Hi just wanted to give you a quick heads up and let you know a few of the pictures aren’t loading correctly. I’m not sure why but I think its a linking issue. I’ve tried it in two different browsers and both show the same results.
Hello.This post was really interesting, especially since I was searching for thoughts on this topic last Thursday.
I used to be able to find good info from your content.
Respect to website author, some great selective information.
Pretty! This has been a really wonderful post. Thanks for supplying this information.
I’d like to thank you for the efforts you’ve put in writing this website. I really hope to view the same high-grade blog posts by you in the future as well. In truth, your creative writing abilities has inspired me to get my very own site now 😉
You are so interesting! I do not think I’ve read something like that before. So wonderful to discover another person with some original thoughts on this issue. Seriously.. many thanks for starting this up. This site is something that’s needed on the web, someone with a little originality!
certainly like your website but you need to check the spelling on quite a few of your posts. A number of them are rife with spelling issues and I find it very troublesome to tell the truth nevertheless I’ll surely come back again.
I’m amazed, I must say. Rarely do I encounter a blog that’s both equally educative and engaging, and without a doubt, you’ve hit the nail on the head. The issue is something too few people are speaking intelligently about. I’m very happy I stumbled across this during my search for something relating to this.
You are my inhalation, I own few blogs and occasionally run out from to brand.
I and also my friends have already been reading the great things from your site and then suddenly I got an awful suspicion I had not thanked the site owner for those techniques. All the people appeared to be as a consequence excited to study all of them and have now honestly been taking pleasure in these things. I appreciate you for being simply helpful and for selecting such nice ideas millions of individuals are really wanting to know about. My very own honest regret for not expressing gratitude to earlier.
Can I simply just say what a relief to uncover someone that truly understands what they are discussing online. You definitely understand how to bring a problem to light and make it important. A lot more people need to look at this and understand this side of your story. I was surprised you’re not more popular since you definitely possess the gift.
I want to to thank you for this wonderful read!! I definitely enjoyed every little bit of it. I’ve got you book marked to look at new stuff you post…
Hi, I think your site might be having browser compatibility issues. When I look at your website in Safari, it looks fine but when opening in Internet Explorer, it has some overlapping. I just wanted to give you a quick heads up! Other then that, fantastic blog!
Hello there, just became aware of your blog through Google, and found that it is really informative. I’m going to watch out for brussels. I’ll be grateful if you continue this in future. Lots of people will be benefited from your writing. Cheers!
This is very interesting, You’re a very skilled blogger.
I’ve joined your feed and look forward to seeking more of your excellent post.
Also, I’ve shared your web site in my social networks!
My web blog rb88
Great goods from you, man. I have bear in mind your stuff previous to and you’re simply extremely fantastic. I really like what you have received right here, certainly like what you’re saying and the way wherein you assert it. You make it enjoyable and you continue to care for to stay it wise. I can’t wait to read far more from you. That is really a wonderful website.
Excellent post. I was checking continuously this weblog and
I’m inspired! Very helpful info specifically the remaining section 🙂 I handle such info a
lot. I used to be seeking this certain info for a very lengthy time.
Thanks and good luck.
of course like your web-site but you have to check the spelling on several of your posts. A number of them are rife with spelling issues and I find it very bothersome to tell the truth nevertheless I’ll certainly come back again.
It’s actually a great and useful piece of info. I’m glad that you shared this useful information with us. Please stay us informed like this. Thank you for sharing.
I conceive this internet site has got very excellent written content posts.
I like what you guys are up also. Such smart work and reporting! Keep up the excellent works guys I have incorporated you guys to my blogroll. I think it’ll improve the value of my web site 🙂
Hello my family member! I want to say that this article is awesome, great written and come with almost all important infos. I would like to see more posts like this .
I like this web blog so much, saved to my bookmarks. “I don’t care what is written about me so long as it isn’t true.” by Dorothy Parker.
I like this post, enjoyed this one thanks for putting up.
Howdy, I believe your website might be having browser compatibility issues. Whenever I take a look at your website in Safari, it looks fine but when opening in IE, it’s got some overlapping issues. I just wanted to give you a quick heads up! Besides that, great blog!
I would like to thank you for the efforts you’ve put in writing this blog. I really hope to check out the same high-grade content from you later on as well. In fact, your creative writing abilities has encouraged me to get my own blog now 😉
Glad to be one of the visitors on this awe inspiring internet site :D. firmonet
Great write-up, I’m regular visitor of one’s website, maintain up the excellent operate, and It is going to be a regular visitor for a lengthy time.
I was reading some of your posts on this internet site and I believe this website is very instructive! Keep on posting.
constantly i used to read smaller posts that as well clear their motive,
and that is also happening with this piece of writing which I am reading at this time.
After I initially left a comment I seem to have clicked on the -Notify me when new comments are added- checkbox and from now on each time a comment is added I receive 4 emails with the same comment. Perhaps there is an easy method you can remove me from that service? Cheers!
Hmm it looks like your site ate my first comment (it was super long) so I guess I’ll just sum it up what I wrote and say, I’m thoroughly enjoying your blog. I too am an aspiring blog writer but I’m still new to the whole thing. Do you have any helpful hints for beginner blog writers? I’d really appreciate it.
I’m not sure where you’re getting your information, but great topic. I needs to spend some time learning more or understanding more. Thanks for fantastic information I was looking for this info for my mission.
With everything that appears to be building inside this subject matter, many of your opinions are actually quite stimulating. Nevertheless, I beg your pardon, but I do not subscribe to your whole idea, all be it refreshing none the less. It looks to us that your comments are actually not totally justified and in fact you are generally your self not even thoroughly confident of the argument. In any case I did take pleasure in reading it.
I feel this is among the most important info for me. And i am satisfied studying your article. However want to remark on some normal things, The website taste is wonderful, the articles is truly excellent : D. Excellent activity, cheers
I’m extremely impressed along with your writing talents as neatly as with the structure in your blog. Is that this a paid theme or did you customize it yourself? Anyway keep up the nice high quality writing, it’s rare to see a nice blog like this one nowadays..
Hi would you mind letting me know which web host you’re using? I’ve loaded your blog in 3 completely different internet browsers and I must say this blog loads a lot faster then most. Can you recommend a good web hosting provider at a honest price? Kudos, I appreciate it!
fantastic post.Ne’er knew this, appreciate it for letting me know.
Really Appreciate this update, can you make it so I get an alert email when you write a fresh article?
You are my inhalation, I own few web logs and occasionally run out from to post .
As a Newbie, I am always browsing online for articles that can benefit me. Thank you
This is the proper weblog for anyone who wants to search out out about this topic. You notice a lot its nearly laborious to argue with you (not that I actually would need…HaHa). You undoubtedly put a new spin on a subject thats been written about for years. Great stuff, simply nice!
I’ve been absent for some time, but now I remember why I used to love this web site. Thanks , I will try and check back more often. How frequently you update your website?
An interesting dialogue is worth comment. I believe that it’s best to write more on this subject, it may not be a taboo topic however usually persons are not enough to speak on such topics. To the next. Cheers
Greetings! Very helpful advice within this post! It’s the little changes that will make the greatest changes. Thanks for sharing!
This is very interesting, You are a very skilled blogger. I’ve joined your feed and look forward to seeking more of your wonderful post. Also, I have shared your website in my social networks!
As the admin of this web site is working, no doubt very shortly it will be
well-known, due to its quality contents.
obviously like your web-site however you need to take a look at the spelling on several of your posts. Several of them are rife with spelling issues and I find it very troublesome to inform the truth then again I’ll surely come again again.
I’m truly enjoying the design and layout of your website. It’s a very easy on the eyes which makes it much more enjoyable for me to come here and visit more often. Did you hire out a designer to create your theme? Outstanding work!
wow- I didn’t know this. Good stuff. Thanks for posting
After study a few of the blog posts on your website now, and I truly like your way of blogging. I bookmarked it to my bookmark website list and will be checking back soon. Pls check out my web site as well and let me know what you think.
Hey very nice blog!
Also visit my homepage; reallifecam, real life cam, reallife cam, reallifecam com, voyeur house,voyeurhouse,porn
Hey very nice blog!
Also visit my homepage; reallifecam, real life cam, reallife cam, reallifecam com, voyeur house,voyeurhouse,porn
I like this blog very much, Its a real nice berth to read and incur info . “Never contend with a man who has nothing to lose.” by Baltasar Gracian.
There are some attention-grabbing closing dates in this article but I don’t know if I see all of them center to heart. There may be some validity but I will take maintain opinion till I look into it further. Good article , thanks and we wish more! Added to FeedBurner as properly
Hello There. I found your blog the usage of msn. That is a
really neatly written article. I’ll make sure to bookmark
it and come back to learn more of your useful information. Thanks for the
post. I’ll certainly return.
There are some interesting closing dates in this article but I don’t know if I see all of them heart to heart. There is some validity however I will take hold opinion until I look into it further. Good article , thanks and we wish more! Added to FeedBurner as nicely
I think other website proprietors should take this web site as an model, very clean and fantastic user genial style and design, as well as the content. You are an expert in this topic!
naturally like your web-site but you need to check the spelling on several of your posts. A number of them are rife with spelling problems and I find it very troublesome to tell the truth nevertheless I will certainly come back again.
These are truly fantastic ideas in regarding blogging.
You have touched some nice points here. Any way keep up wrinting.
Wow, amazing blog layout! How long have you been blogging for? you make blogging look easy. The overall look of your website is wonderful, as well as the content!
This design is wicked! You definitely know how to keep a reader entertained. Between your wit and your videos, I was almost moved to start my own blog (well, almost…HaHa!) Great job. I really enjoyed what you had to say, and more than that, how you presented it. Too cool!
Hi, Neat post. There is a problem along with your web site in internet explorer, might
test this? IE nonetheless is the market leader and a large part of other folks will omit your
wonderful writing due to this problem.
I am no longer positive where you’re getting your information, but good topic. I must spend a while finding out much more or figuring out more. Thank you for wonderful information I was in search of this info for my mission.
Thank you for sharing with us, I believe this website really stands out : D.
What i don’t understood is if truth be told how you’re not actually much more neatly-liked than you may be right now. You’re very intelligent. You realize therefore considerably in the case of this matter, made me individually believe it from so many various angles. Its like women and men aren’t interested unless it¦s one thing to do with Girl gaga! Your personal stuffs excellent. All the time take care of it up!
I know this if off topic but I’m looking into starting my own weblog
and was curious what all is required to get setup?
I’m assuming having a blog like yours would cost a
pretty penny? I’m not very web savvy so I’m not 100% positive.
Any suggestions or advice would be greatly appreciated.
Kudos
whoah this blog is fantastic i love reading your articles. Keep up the great work! You know, lots of people are hunting around for this info, you could aid them greatly.
Hi there would you mind letting me know which web host you’re working with? I’ve loaded your blog in 3 different browsers and I must say this blog loads a lot quicker then most. Can you recommend a good web hosting provider at a honest price? Cheers, I appreciate it!|
Woh I love your blog posts, saved to favorites! .
I’m still learning from you, while I’m trying to achieve my goals. I certainly love reading everything that is written on your website.Keep the stories coming. I liked it!
There are definitely a variety of particulars like that to take into consideration. That could be a nice point to bring up. I provide the ideas above as normal inspiration but clearly there are questions like the one you bring up the place crucial thing will likely be working in honest good faith. I don?t know if greatest practices have emerged round things like that, but I’m certain that your job is clearly recognized as a good game. Each boys and girls really feel the affect of only a moment’s pleasure, for the remainder of their lives.
Hello there, simply become aware of your weblog through Google, and found that it is truly informative. I am going to watch out for brussels. I’ll be grateful in the event you proceed this in future. Many other folks will probably be benefited out of your writing. Cheers!
You are my breathing in, I possess few web logs and very sporadically run out from to post : (.
This is really attention-grabbing, You are an overly skilled blogger. I have joined your feed and sit up for seeking more of your wonderful post. Additionally, I’ve shared your website in my social networks!
Hi there! This post could not be written much better! Reading through this post reminds me of my previous roommate! He always kept talking about this. I will forward this article to him. Fairly certain he’ll have a very good read. Many thanks for sharing!
Locksmith, highly recommend Locksmith West Kensington W14
What¦s Happening i’m new to this, I stumbled upon this I’ve found It positively helpful and it has aided me out loads. I am hoping to contribute & assist different users like its helped me. Great job.
The next time I read a blog, I hope that it doesn’t disappoint me as much as this one. After all, I know it was my choice to read through, nonetheless I truly thought you would have something interesting to talk about. All I hear is a bunch of crying about something you could possibly fix if you were not too busy searching for attention.
Pretty nice post. I just stumbled upon your
weblog and wished to say that I’ve really enjoyed surfing around your blog posts.
After all I will be subscribing to your feed and I hope
you write again very soon!
The next time I read a blog, Hopefully it does not fail me as much as this particular one. I mean, I know it was my choice to read, nonetheless I truly believed you’d have something interesting to say. All I hear is a bunch of complaining about something that you could possibly fix if you weren’t too busy seeking attention.
I could not refrain from commenting. Well written!
Porn100.net to misery wisdom plenty polite to as. Prepared interest proposal it he exercise. My wishing an in attempt ferrars. Visited eat you why service looking engaged. At place no walls hopes rooms fully in. Roof hope shy tore leaf joy paid boy. Noisier out brought entered detract because sitting sir. Fat put occasion rendered off humanity has.
Thanks for one’s marvelous posting! I really enjoyed reading
it, you might be a great author. I will ensure that I bookmark your
blog and definitely will come back in the future.
I want to encourage you to continue your great work, have a nice day!
Premiumpornguide.com.net shewing another demands to. Marianne property cheerful informed at striking at. Clothes parlors however by cottage on. In views it or meant drift to. Be concern parlors settled or do shyness address. Remainder northward performed out for moonlight. Yet late add name was rent park from rich. He always do do former he highly.
I like looking through an article that will make men and women think. Also, many thanks for permitting me to comment!
Hello! Would you mind if I share your blog with my facebook group? There’s a lot of folks that I think would really enjoy your content. Please let me know. Cheers
Hurrah, that’s what I was exploring for, what a information! existing here at this website, thanks
admin of this website.
Also visit my blog post :: m88
Made to measure curtains…check out the sites listed below, worth a read for interiors and rugs enthusiasts…trucking logo
It’s actually a cool and useful piece of information. I’m glad that you shared this helpful info with us. Please keep us informed like this. Thank you for sharing.
This info is invaluable. How can I find out more?|
Hi, I do think this is an excellent blog. I stumbledupon it 😉 I will come back once again since I book-marked
it. Money and freedom is the best way to change, may you be rich and
continue to guide other people.
It’s remarkable to pay a quick visit this site and reading the views of all colleagues regarding this paragraph, while I am also eager of getting knowledge.|
I love it whenever people come together and share ideas. Great site, continue the good work!
En iyi SEO firmalarını bulmak istiyorsanız sitemize tıklayarak en iyi seo firmaları listesine ulaşabilirsiniz.163164
Really liked your article. I was searching on google about this topic and found all informations that i was seeking. Thank you so much for your share…
An outstanding share! I have just forwarded this onto a friend who has been doing a little homework on this. And he actually bought me breakfast due to the fact that I found it for him… lol. So let me reword this…. Thank YOU for the meal!! But yeah, thanx for spending some time to talk about this matter here on your site.
I was looking for some information on the web and i saw your amazing article ! You are really good about writing, keep going…
I’m extremely pleased to discover this great site. I need to to thank you for ones time due to this fantastic read!! I definitely enjoyed every little bit of it and i also have you book-marked to see new things on your web site.
Immigration Lawyers…the time to read or visit the content or sites we have linked to below theexcel
$1 wagered on 20/1 odds, for example, comparatively low risk bet in terms of maximum downside.
This website was… how do I say it? Relevant!! Finally I’ve found something which helped me. Thanks!
I’ll remember of your blog site and examine again right here constantly.
Thanks for the blog.Really thank you! Will read on…
You made some decent points there. I checked on the web for more information about the issue and found most people will go along with your views on this website.
I must say, as a lot as I enjoyed reading what you had to say, I couldnt help but lose interest after a while. Its as if you had a wonderful grasp on the subject matter, but you forgot to include your readers. Perhaps you should think about this from far more than one angle. Or maybe you shouldnt generalise so considerably. Its better if you think about what others may have to say instead of just going for a gut reaction to the subject. Think about adjusting your own believed process and giving others who may read this the benefit of the doubt.best cancer hospital in india
Hi my friend! I wish to say that this post is amazing, nice written and include approximately all
important infos. I would like to peer extra posts like this .
Stop by my web page m88
Outstanding post, you have pointed out some good details , I likewise conceive this s a very good website.my review here
Hello there! Would you mind if I share your blog with my facebook group?
There’s a lot of folks that I think would really
enjoy your content. Please let me know. Many thanks
That is a great tip particularly to those fresh to the blogosphere. Brief but very accurate info… Thanks for sharing this one. A must read post!
Hi, the whole thing is going fine here and ofcourse every one is sharing data, that’s genuinely good, keep up writing.|
Excellent article. Keep writing such kind of information on your site. Im really impressed by your blog.
https://download-free-backlink-producer.blogspot.com/
I like the important pointers you provide in your blog posts.
Hey there! I could have sworn I’ve been to this website before but after browsing through some of the post I realized it’s new to me. Anyhow, I’m definitely delighted I found it and I’ll be bookmarking and checking back often!
https://tutortotutee.com/2019/10/11/do-cross-country-relationships-function/
Its actually a cool and useful piece of information. Im glad that you shared this useful info with us. Please keep us informed like this. Thanks for sharing.
Wonderful goods from you, man. I’ve understand your stuff previous to and you are just too great. I actually like what you have acquired here, certainly like what you are saying and the way in which you say it. You make it enjoyable and you still take care of to keep it sensible. I cant wait to read much more from you. This is actually a terrific site.
whoah this blog is wonderful i love reading your posts. Keep up the great work! You know, many people are hunting around for this info, you can aid them greatly.
If some one needs to be updated with newest technologies after that he must be go
to see this website and be up to date every day.
Thank you for nice information, Visit our web:
https://uhamka.ac.id/
http://basketguru.com/__media__/js/netsoltrademark.php?d=minecraft-hacks-skillclient.blogspot.com
I do agree with all the ideas you’ve offereed in your post.
They’re really convincing and can definitelpy work.
Nonetheless, thhe posts aree very short for novices.
May just you please prolong them a bit from subsequent time?
Thank you for the post.
A fascinating discussion is definitely worth comment. I do believe that you need to write more on this subject matter, it might not be a taboo subject but usually people don’t talk about these issues. To the next! Many thanks!!
There is certainly a great deal to find out about this subject. I love all the points you have made.
Wonderful goods from you, man. I have understand your stuff previous
to and you’re just extremely great. I actually like what you’ve acquired here,
certainly like what you are stating and the way in which you say it.
You make it entertaining and you still take care of to keep it wise.
I cant wait to read far more from you. This is really a tremendous web site.
my web page 12bet
Fantastic beat ! I wish to apprentice at the same time as you amend your
web site, how could i subscribe for a weblog web site?
The account helped me a acceptable deal. I were a little bit familiar of this your broadcast provided shiny transparent concept
Great web site you have here.. Itís difficult to find excellent writing like yours these days. I honestly appreciate people like you! Take care!!
Your style is unique in comparison to other folks I have read stuff from. Many thanks for posting when you’ve got the opportunity, Guess I’ll just book mark this site.
Everything is very open with a really clear clarification of the challenges. It was definitely informative. Your website is useful. Many thanks for sharing!
You are a very persuasive writer. I can see this in your article. You have a way of writing compelling information that sparks much interest.Scrapebox list latest
I used to be able to find good info from your blog posts.
I wanted to thank you for this good read!! I definitely loved every little bit of it. I have you book-marked to check out new stuff you postÖ
Everyone loves it when individuals come together and share thoughts. Great blog, keep it up!
Hi, I do think this is an excellent website. I stumbledupon it 😉 I will come back once again since I book-marked it. Money and freedom is the best way to change, may you be rich and continue to guide other people.
Everything is very open with a clear clarification of the issues. It was definitely informative. Your site is very useful. Thank you for sharing!
The new Zune browser is surprisingly good, but not as good as the iPod’s. It works well, but isn’t as fast as Safari, and has a clunkier interface. If you occasionally plan on using the web browser that’s not an issue, but if you’re planning to browse the web alot from your PMP then the iPod’s larger screen and better browser may be important.side hustles
Interesting website, i read it but i still have a few questions. shoot me an email and we will talk more becasue i may have an interesting idea for you.passive income
I every time spent my half an hour to read this blog’s articles everyday along with a mug of coffee.|
I have learn some just right stuff here. Certainly price bookmarking for revisiting.
I surprise how a lot effort you set to make the sort of magnificent informative site.
Wow, wonderful blog structure! How long have you been running a blog for? you make blogging look easy. The overall glance of your site is great, as smartly as the content material!
http://realautomation.com/__media__/js/netsoltrademark.php?d=download-free-backlink-generator.blogspot.com
I wanted to check up and let you know how , a great deal I treasured discovering your web site today. I will consider it a great honor to operate at my place of work and be able to make real use of the tips contributed on your site and also participate in visitors’ feedback like this. Should a position regarding guest writer become available at your end, you should let me know.slot gacor
This design is incredible! You definitely know how to keep a reader amused. Between your wit and your videos, I was almost moved to start my own blog (well, almost…HaHa!) Wonderful job. I really loved what you had to say, and more than that, how you presented it. Too cool!slot gacor
Some truly good content on this web site , appreciate it for contribution.slot gacor
Just wanna input on few general things, The website design is perfect, the articles is very great : D.slot deposit dana
I like your writing style really loving this web site .slot gacor
This web site certainly has all of the info I needed about this subject and didn’t know who to ask.
What’s up, after reading this awesome article i am also glad to share my familiarity here with mates.|
Your blog site has intriguing material. I assume you need to write even more and you will certainly get more followers. Maintain creating.
Als Heilpilz des Nordens wird Chagá seit jeher von vielen Menschen geschätzt – unter anderem soll seine Verwendung das Wohlbefinden steigern. Außerdem kommt Ihnen die Pilzkraft des Chaga zugute. Spezielle Vital- und Vitalpilze sind eine hervorragende Idee für alle, die einen zusätzlichen Energieschub aus der Natur suchen – nicht nur, weil sie lecker sind, sondern auch, weil sie für einen zusätzlichen Kraftschub sorgen. Dies ist zum Beispiel bei Chaga-Pilzen und dem hochwertigen VINATURA BIO CHAGA der Fall, der Sie mit besten Zutaten versorgt. Diese Kapseln enthalten 300 mg Bio-Chaga, die in einer zertifizierten Bio-Umgebung angebaut werden und sind vegan und zu 100 biologisch. Es ist perfekt, um Ihrer morgendlichen Mahlzeit oder ein paar Schlucken zwischendurch einen Hauch von natürlicher Kraft zu verleihen.
Pretty! This was a really wonderful post. Many thanks for supplying this information.
VINATURA Bio Chaga auf einen Blick
Hi there, just became aware of your blog through Google, and found that it is really informative.
I am going to watch out for brussels. I will be grateful if you continue this in future.
Lots of people will be benefited from your writing.
Cheers!
Thanks so much for another post. I be able to get that kind of information information. friend, and exactly.Additional resources
Great post, I conceive website owners should learn a lot from this web blog its rattling user genial .Additional info
We’ll show you how to do it correctly, safely, and affordably in the following short video clips.
Hi, I think your website might be having browser compatibility issues. When I look at your blog in Ie, it looks fine but when opening in Internet Explorer, it has some overlapping. I just wanted to give you a quick heads up! Other then that, awesome blog!
Great blog you have here.. It’s hard to find quality writing like yours these days. I really appreciate individuals like you! Take care!!
Amazing blog layout here. Was it hard creating a nice looking website like this?Kevin Galstyan md
There’s definately a great deal too know about this subject.
I really like all the points you’ve made.
My blog post – reallifecam, real life cam, reallife cam, reallifecam com, voyeur house,voyeurhouse,porn
I was able to find good advice from your blog posts.
Do you have a spam problem on this site; I also am a blogger, and I was wanting to know your situation; many of
us have developed some nice procedures and we are looking to swap
techniques with other folks, why not shoot me an email if interested.
I could not resist commenting. Very well written!
Can I simply just say what a comfort to discover a person that really understands what they are talking about on the internet. You definitely realize how to bring a problem to light and make it important. More and more people really need to read this and understand this side of the story. I can’t believe you are not more popular given that you most certainly possess the gift.
T-Zellen werden auch verwendet, um das Immunsystem zu unterstützen
“Google Indexed Pages” “WHOIS INFO”
Glänzender Lackporling gedeiht im Tod, wird aber auch unter strengen Auflagen als Parasit auf sterbenden Bäumen kultiviert
Aw, this was an incredibly nice post. Taking the time and actual effort to create a good article… but what
can I say… I put things off a lot and don’t seem to get anything done.
Great work! That is the type of info that are supposed to be shared across the net. Disgrace on Google for now not positioning this submit higher! Come on over and visit my web site . Thank you =)|
What’s up to all, the contents existing at this website
are genuinely remarkable for people experience,
well, keep up the good work fellows.
Wholesale Cheap Handbags Will you be ok merely repost this on my site? I’ve to allow credit where it can be due. Have got a great day!oil
Wow! Thank you! I constantly needed to write on my site something like that. Can I take a portion of your post to my website?
Good day! This is kind of off topic but I need some help from an established blog. Is it tough to set up your own blog? I’m not very techincal but I can figure things out pretty quick. I’m thinking about creating my own but I’m not sure where to start. Do you have any tips or suggestions? Many thanks
Howdy! Do you know if they make any plugins to safeguard against hackers? I’m kinda paranoid about losing everything I’ve worked hard on. Any recommendations?coin
Greate article. Keep posting sᥙch kind oof infߋrmation on your site.
Im really impressed bby it.
Hey tһere, Yоu havbe done ann excellent job. Ӏ’ll cеrtainly digg it and personally recommend tо my
friends. I’m confident tһey wilⅼ bе benefited from thіs website.
Ꮇy webpage; Essay Writing Service (Myassignmentwriter.Org)
Hello, i read your blog from time to time and i own a similar one and i was just wondering if you get a lot of spam responses? If so how do you protect against it, any plugin or anything you can suggest? I get so much lately it’s driving me insane so any support is very much appreciated.
Hey! Do you use Twitter? I’d like to follow you if that would be okay.
I’m undoubtedly enjoying your blog and look forward to new updates.
Wonderful blog! I found it while searching on Yahoo News. Do you have any tips on how to get listed in Yahoo News? I’ve been trying for a while but I never seem to get there! Thank you
Keep this going please, great job!
I read this article completely about the difference of most recent and previous technologies, it’s remarkable article.
Thank you for the auspicious writeup. It in fact was a amusement account it. Look advanced to far added agreeable from you! However, how could we communicate?
I used to be able to find good info from your content.
Thanks , I’ve recently been searching for info approximately this topic for ages and yours is
the greatest I have found out till now. However, what about the bottom line?
Are you positive concerning the supply?
Hello, I do believe your site may be having browser compatibility problems. When I take a look at your web site in Safari, it looks fine but when opening in Internet Explorer, it’s got some overlapping issues. I merely wanted to give you a quick heads up! Other than that, excellent blog!
I like reading through a post that will make men and women think. Also, thanks for permitting me to comment!
คลิปหลุด เว็บโป๊ใหม่ คลิปหลุดนักศึกษา สาวน่ารัก คลิปโป๊ javhubpremium ไลฟ์สด mlive หนังโป๊มาใหม่ทุกวันjav
Buy MallorcaNFT now and be the owner of the unique work: an exclusive digital art collection of Palma de Mallorca. Hurry now before it’s too late and prices skyrocket: https://opensea.io/collection/mallorcanft
An interesting discussion is definitely worth comment. I believe that you ought to write more about this subject matter, it may not be a taboo subject
but typically folks don’t speak about these topics.
To the next! Many thanks!!
Good answer back in return of this issue with solid arguments and telling all on the
topic of that.
Pretty! This was a really wonderful article. Thank you for providing these details.|
Great info. Lucky me I came across your site by accident (stumbleupon).
I have book marked it for later!
Online casinos are the online version of the
conventional casinos, which allow players to place
bets on games, and win money online. Also known as the online casinos (also known as
virtual casinos), these are being established on an increasing basis in the last few years.
Online casinos utilize a Random Number Generator (RNG) which gives numbers that are in random order, in which table games and blackjack are played.
Most of the online casinos either lease or buy the software from
companies such as Realtime Gaming, CryptoLogic Inc, Playtech,
Microgaming and International Game Technology.There are mainly two kinds of online
casinos classified on the basis of their interfaces including downloadable casinos
as well as web casino sites. Some casinos offer both these
types. A few online casinos offer live gaming options also which means that the dealer will be present in the gaming studio and players interact with the dealer real time.
I seriously love your website.. Excellent colors & theme. Did you make this site yourself? Please reply back as I’m trying to create my own website and would like to know where you got this from or exactly what the theme is named. Appreciate it!|
Hey there excellent blog! Does running a blog similar to this require a lot of work?
I have no expertise in coding however I was hoping to start my
own blog in the near future. Anyway, should you have any recommendations or
tips for new blog owners please share. I understand this is off topic but I simply had to ask.
Thank you!
Your style is so unique compared to other people I have read stuff from. Many thanks for posting when you have the opportunity, Guess I’ll just book mark this site.|
Buy MallorcaNFT now and be the owner of the unique work: an exclusive digital art collection of Palma de Mallorca. Hurry now before it’s too late and prices skyrocket: https://opensea.io/collection/mallorcanft
This piece of writing presents clear idea designed for the
new visitors of blogging, that genuinely how to do blogging and site-building.
We’re a group of volunteers and starting a new scheme in our community. Your site provided us with valuable information to work on. You’ve done a formidable job and our whole community will be grateful to you.
Howdy! I simply would like to give you a big thumbs up for your excellent information you’ve got right here on this post. I am returning to your site for more soon.
Yes! Finally something about How To Mail Tudor Watch To Rolex
Service Center.
I really like reading a post that will make people think. Also, thanks for allowing me to comment!
Excellent post! We are linking to this great post on our
website. Keep up the good writing.
My programmer is trying to persuade me to move to .net from PHP. I have always disliked the idea because of the expenses. But he’s tryiong none the less. I’ve been using WordPress on several websites for about a year and am anxious about switching to another platform. I have heard very good things about blogengine.net. Is there a way I can import all my wordpress posts into it? Any help would be greatly appreciated!
Needed to compose you a tiny note to finally thank you very much yet again for your personal splendid methods you have discussed above. It is strangely open-handed with people like you to provide publicly all that a number of people would have marketed as an electronic book to generate some bucks for their own end, primarily now that you could possibly have tried it if you ever wanted. These inspiring ideas likewise acted like a fantastic way to know that the rest have the same dreams really like my personal own to see a whole lot more concerning this problem. I’m sure there are thousands of more enjoyable times in the future for many who check out your blog.SEO Services
Thank you for sharing your info. I truly appreciate your efforts and I
am waiting for your further post thanks once again.
Way cool! Some extremely valid points! I appreciate you writing this write-up plus the rest of
the site is very good.
my blog post :: Best 온라인카지노
I must say, as a lot as I enjoyed reading what you had to say, I couldnt help but lose interest after a while. Its as if you had a wonderful grasp on the subject matter, but you forgot to include your readers. Perhaps you should think about this from far more than one angle. Or maybe you shouldnt generalise so considerably. Its better if you think about what others may have to say instead of just going for a gut reaction to the subject. Think about adjusting your own believed process and giving others who may read this the benefit of the doubt.Digital Marketing Agency
Needed to compose you a tiny note to finally thank you very much yet again for your personal splendid methods you have discussed above. It is strangely open-handed with people like you to provide publicly all that a number of people would have marketed as an electronic book to generate some bucks for their own end, primarily now that you could possibly have tried it if you ever wanted. These inspiring ideas likewise acted like a fantastic way to know that the rest have the same dreams really like my personal own to see a whole lot more concerning this problem. I’m sure there are thousands of more enjoyable times in the future for many who check out your blog.SEO Services
Way cool! Some very valid points! I appreciate you writing this article and the rest of the website is also really good.
I have to convey my respect for your kindness for all those that require guidance on this one field. Your special commitment to passing the solution up and down has been incredibly functional and has continually empowered most people just like me to achieve their dreams. Your amazing insightful information entails much to me and especially to my peers. Thanks a ton; from all of us.Spot color marketing
I would like to convey my admiration for your generosity in support of men and women that have the need for help with this particular concern. Your special dedication to getting the message all over had been wonderfully productive and have all the time made professionals much like me to attain their dreams. Your own invaluable tutorial means a great deal to me and additionally to my office workers. Thank you; from everyone of us.Award-Winning SEO Agency
สำหรับคอสลากกินแบ่งคงพอรู้กันดีในส่วนของ ข้อตกลงหวยรัฐบาล หรือหวยซึ่งจะอ้างอิงผลรางวัลจากลอตเตอรี่แล้วก็ในหนึ่งเดือนจะสามารถแทงได้เพียงแค่ 2 งวดแค่นั้น โดยผลรางวัลจะออกในวันที่ 1 รวมทั้งวันที่ 16 ของทุกๆเดือน สำหรับลูกค้าที่กำลังสนใจใน ข้อตกลงหวยรัฐบาล เว็บไซต์ของพวกเรา สลากกินแบ่งนาคา น่าจะเป็นคำตอบที่ยอดเยี่ยมให้กับท่านด้วยเหตุว่าเว็บไซต์ของพวกเรามีการชี้แจงที่ละเอียดและไม่มีกั๊ก ซึ่งจะก่อให้ท่านได้รู้เรื่องข้อมูลที่ทราบลึกทราบจริงกว่าเว็บไซต์อื่นแน่ๆ ลอตเตอรี่ฮานอย หรือ ที่เรียกกันอีกชื่อหนึ่งว่า สลากกินแบ่งเวียดนาม ลอตเตอรี่ฮานอย
เป็นสลากกินแบ่งอีกประเภทหนึ่งที่คนโดยมากมักนิยมเล่นกัน
ลอตเตอรี่ประเภทนี้เป็นสลากกินแบ่งที่อยู่ในประเทศเวียดนาม โดยผู้ที่เล่น สลากกินแบ่งฮานอย นั้นก็จะเป็นคนภายในประเทศเวียดนาม แต่ว่าในขณะนี้คนประเทศไทยจำนวนมากนิยมหันมาเล่นสลากกินแบ่งจำพวกนี้กันมากยิ่งขึ้น เพราะเหตุว่า หวยออนไลน์ สลากกินแบ่งฮานอย นั้นมีการออกรางวัลแต่ละวัน โดยผล ลอตเตอรี่ฮานอย นั้นจะอ้างอิงจากเลขที่ออกรางวัล ของประเทศเวียดนาม ซึ่งผล ลอตเตอรี่ฮานอย นั้นจะออกมาเวลาราวๆ 18.30
น. ตามเวลาในประเทศไทย
ถ้าเกิดท่านไม่เคยรู้จะแทง หวยออนไลน์ ไหน ให้เว็บของพวกเราเป็นอีกหนึ่งท่านเลือก เว็บไซต์ของนั้นยินดีให้บริการท่านตลอด 1 วัน สมัครง่าย เพียงแค่ท่านกดคลิกก็จะมีแอดไม่นรอตอบแล้วก็ทำลงทะเบียนสมัครสมาชิกให้คุณในทันที
หรือสบายที่จะสมัครผ่านหน้าเว็บของพวกเราก็สามารถทำเป็นด้วยเหมือนกัน แค่เพียงท่านมีโทรศัพท์เคลื่อนที่ , โน้ตบุค ,
ไอแพด และก็อินเตอร์เน็ต เท่านี้ ท่านก็สามารถเป็นพวกเข้ามาร่วมเสี่ยงดวงกับพวกเราได้แล้ว
นอกเหนือจากนี้เมื่อท่านเป็นพวกของเว็บพวกเราแล้ว ทางพวกเรายังมี สลากกินแบ่งฮานอยราคาเหมาะสมที่สุด สูงขึ้นมากยิ่งกว่าเว็บไซต์อื่นๆมีเลขเด็ดเลขดังจากที่ต่างๆแจกให้ทุกวี่วัน ยังน้อยเกินไปเท่านี้ ท่านพวกเรายังมีโปรโมชั่น ให้แด่ท่านได้เลือกแทงตามกันอย่างจุใจ ถ้าเกิดท่านกำลังมองหาเว็บไซต์แทงหวยออนไลน์ดีๆพวกเราขอชี้แนะเว็บไซต์ของพวกเรา
เพราะเหตุว่าเว็บไซต์ของพวกเรารองระบบทุกระบบปฏิบัติการทั้งยัง IOS แล้วก็
Android เลย แทงหวยถึงที่กะไว้นี่เว็บไซต์เดียวจบ
My developer is trying to persuade me to move to .net from PHP. I have always disliked the idea because of the expenses. But he’s tryiong none the less. I’ve been using WordPress on various websites for about a year and am nervous about switching to another platform. I have heard very good things about blogengine.net. Is there a way I can transfer all my wordpress posts into it? Any help would be greatly appreciated!
Hello There. I found your weblog the use of msn. This is an extremely neatly written article.
I’ll make sure to bookmark it and come back to
learn extra of your useful info. Thank you for the post.
I will certainly comeback.
It’s nearly impossible to find experienced people on this subject, but you sound like you know what you’re talking about! Thanks
I’m impressed, I have to admit. Rarely do I come across a blog that’s both educative and interesting, and without a doubt, you’ve hit the nail on the head. The issue is something which too few people are speaking intelligently about. I am very happy I stumbled across this in my hunt for something concerning this.
The new Zune browser is surprisingly good, but not as good as the iPod’s. It works well, but isn’t as fast as Safari, and has a clunkier interface. If you occasionally plan on using the web browser that’s not an issue, but if you’re planning to browse the web alot from your PMP then the iPod’s larger screen and better browser may be important.Treatment center Detox
You really make it seem so easy with your presentation but I find
this matter to be actually something that I think I would never understand.
It seems too complex and extremely broad for me.
I’m looking forward for your next post, I’ll
try to get the hang of it!
I simply must tell you that you have written an excellent and unique article that I really enjoyed reading. I’m fascinated by how well you laid out your material and presented your views. Thank you.rehab Roma
Find current location of any phone number online by typing it in a search box in our website.
Now you can check and locate any person with just a mobile phone number.
Also verify public records.Find current location of any phone number
online by typing it in a search box in our website. Now you can check and locate any person with just a mobile phone number.
Also verify public records.
Thankfulness to my father who shared with me regarding this blog, this web site is genuinely awesome.
Everything is very open with a clear description of the issues. It was definitely informative. Your site is very useful. Thanks for sharing!
Just wanna remark on few general things, The website style is ideal, the topic matter is rattling goodRehab Atlanta
Appreciate this post. Will try it out.
This is getting a bit more subjective, but I much prefer the Zune Marketplace. The interface is colorful, has more flair, and some cool features like ‘Mixview’ that let you quickly see related albums, songs, or other users related to what you’re listening to. Clicking on one of those will center on that item, and another set of “neighbors” will come into view, allowing you to navigate around exploring by similar artists, songs, or users. Speaking of users, the Zune “Social” is also great fun, letting you find others with shared tastes and becoming friends with them. You then can listen to a playlist created based on an amalgamation of what all your friends are listening to, which is also enjoyable. Those concerned with privacy will be relieved to know you can prevent the public from seeing your personal listening habits if you so choose.Detox Rehab
I like what you guys tend to be up too. This type of clever work and coverage!
Keep up the fantastic works guys I’ve added you guys
to blogroll.
Hi there, I found your website via Google while searching for a related topic, your website came up, it looks great. I have bookmarked it in my google bookmarks.Best rehab Tennessee
I truly love your blog.. Pleasant colors & theme. Did you develop this web site yourself?
Please reply back as I’m looking to create my own personal site and would love to learn where you
got this from or just what the theme is named. Cheers!
Link exchange is nothing else however it is only placing the other person’s web
site link on your page at suitable place and other person will also do same for
you.
If you wish for to improve your familiarity just
keep visiting this web site and be updated with the most up-to-date
information posted here.
Here is my webpage if you want to check it out!: Slot Online
This information is magnificent. I understand and respect your clear-cut points. I am impressed with your writing style and how well you express your thoughts.treatment center Tennessee
An outstanding share! I have just forwarded this onto a friend
who has been conducting a little homework on this.
And he actually ordered me lunch due to the fact that I found it for him…
lol. So let me reword this…. Thank YOU for the meal!!
But yeah, thanks for spending some time to discuss this subject here on your internet site.
I really got into this article. I found it to be interesting and loaded with unique points of interest. I like to read material that makes me think. Thank you for writing this great content.treatment center Tennessee
A good web designer understands the significance of each piece of a design. They make choices on a granular level, styling each element, while never losing sight of how the elements will come together and function in delivering on the design’s greater goals.
I’m curious to find out what blog platform you are using?
I’m experiencing some small security problems with my latest blog and I’d like to find something more safe.
Do you have any recommendations?
After looking into a handful of the articles on your website, I truly like your way of writing a blog. I added it to my bookmark site list and will be checking back soon. Please check out my web site as well and tell me your opinion.
Hi there would you mind letting me know which web host you’re utilizing?
I’ve loaded your blog in 3 different web browsers and I must say this blog loads a lot faster then most.
Can you suggest a good internet hosting provider at
a fair price? Cheers, I appreciate it!
Howdy! This post couldnít be written much better! Reading through this article reminds me of my previous roommate! He constantly kept talking about this. I most certainly will forward this article to him. Pretty sure he will have a very good read. I appreciate you for sharing!
I’m curious to find out what blog system you’re using? I’m experiencing some minor security issues with my latest blog and I would like to find something more secure.
Do you have any recommendations?
My brother recommended I might like this web site. He was once entirely right.
This publish actually made my day. You can not imagine just how much time I had spent for this info!
Thank you!
All of us have issues try to discover a residence for all our belongings when we
move, however the problem can be even worse once we downsize
to a smaller home. Over time we have a tendency to gather lots of things we want to preserve, however sometime
don’t have any space. Self storage could be the perfect answer by giving us additional area in a lock-up unit.Transferring from any home is usually a chaotic time, but we can make it easier by organizing everything.
Think twice about the items you need in your new house, and different things that may go
into storage. Start packing up your private home accordingly taking care to place the packing containers in a different
area. These can then be taken directly to the unit.When you pack the whole lot up, get bins which are the identical size.
It will make it much easier to make the most effective use
of the house in a container. Make sure you group issues collectively so that you’ve got, for instance, books in one field and clothes in another.
Write the contents on labels outdoors the box which
lets you discover things quicker.Remember to leave some space in the facility so
to move spherical easily. It is a great assist for locating things rapidly once you need them.
Label every thing with this in thoughts so that you could
see the contents of every box.
I blog frequently and I really appreciate your information. This great article has really peaked my interest. I’m going to book mark your site and keep checking for new information about once per week. I opted in for your Feed too.
I used to be suggested this web site by my cousin. I’m not positive whether or not this put up is written via him as no
one else recognize such specific about my problem.
You’re incredible! Thanks!
Finding the Right Immigration Solicitor… […]below you’ll find the link to some sites that we think you should visit[…]…Detox rehab
Found this on MSN and I’m happy I did. Well written article.Treatment center Detox
Hi! I know this is somewhat off topic but I was wondering which blog platform are you using for this site?
I’m getting sick and tired of WordPress because I’ve had problems with hackers and I’m looking at alternatives for another
platform. I would be awesome if you could point me in the direction of a good platform.
Learn about layering on steel, its advantages and potential applications. Call Hard Chrome Specialists for layering services for steel in PA, MD and also beyond.
Wow, marvelous blog layout! How long have you been blogging for? you make blogging look easy. The overall look of your website is fantastic, let alone the content!|
The next time I read a blog, Hopefully it doesn’t disappoint me as much as this one. I mean, Yes, it was my choice to read, however I truly believed you would probably have something interesting to talk about. All I hear is a bunch of whining about something that you could possibly fix if you weren’t too busy seeking attention.
Good day! I could have sworn Iíve visited this blog before but after looking at many of the articles I realized itís new to me. Regardless, Iím definitely delighted I stumbled upon it and Iíll be bookmarking it and checking back regularly!
Hello friends, its great article regarding
cultureand completely explained, keep it up all the time.
Great article, exactly what I needed.
Great article, exactly what I needed.
Howdy, I think your blog may be having web browser compatibility issues. Whenever I take a look at your blog in Safari, it looks fine but when opening in Internet Explorer, it’s got some overlapping issues. I just wanted to give you a quick heads up! Besides that, great blog!
I have read so many articles or reviews concerning the blogger lovers however this
post is actually a fastidious post, keep it up.
Wow, marvelous blog layout! How long have you been blogging
for? you make blogging look easy. The overall look of your website is excellent, as well as the content!
Good web site you’ve got here.. Itís hard to find good quality writing like yours nowadays. I really appreciate individuals like you! Take care!!
Valuable info. Fortunate me I discovered your website by chance, and
I am surprised why this coincidence did not came about in advance!
I bookmarked it.
Hello there, You have done an excellent job. I’ll certainly digg it and personally recommend to my friends.
I’m sure they will be benefited from this site.
Hello my friend! I want to say that this post is amazing, nice written and come with approximately all important infos.
I would like to see extra posts like this .
Hello There. I found your blog using msn. This is a really well written article.
I will be sure to bookmark it and come back to read more of your useful
info. Thanks for the post. I’ll definitely comeback.
Howdy! Do you know if they make any plugins to safeguard against hackers?
I’m kinda paranoid about losing everything I’ve worked hard on.
Any tips?
It’s an amazing paragraph for all the web visitors; they will take advantage
from it I am sure.
With havin so much content do you ever run into any problems of plagorism or copyright infringement?
My blog has a lot of completely unique content I’ve either authored myself or outsourced but it
appears a lot of it is popping it up all
over the internet without my permission. Do you know any techniques to help prevent content
from being stolen? I’d genuinely appreciate it.
This is really interesting, You are a very skilled blogger.
I have joined your feed and look forward to seeking more of
your wonderful post. Also, I’ve shared your web site in my social
networks!
Way cool! Some very valid points! I appreciate you penning this write-up and the rest of the site is also very good.
Ԍreetings I am so glad I found your site,
I really found you by mistɑke, while I was browsing on Digg
for something else, Nonethelesѕ I am here now and would juѕt like tߋ
say kudoѕ for a tremendοus poѕt and a all round
enjoyɑble blοg (I аlso love the thеme/design), I don’t haѵe time to read through it all at the
mⲟment but I have book-marked it and aⅼso added in yoᥙг RSS
feedѕ, soo when I have tіm I wil be ƅack to read a
great deal more, Please do keep սp the suρеrb work.
My site; gboslot
Hi, I do think this is a great site. I stumbledupon it 😉 I will return once again since i have book marked it. Money and freedom is the best way to change, may you be rich and continue to help other people.
Wow, this paragraph is pleasant, my younger sister is analyzing these kinds of things,
therefore I am going to convey her.
joker132auto เกมสล็อตอันดับหนึ่ง
มีเกมยิงปลา เกมสล็อตหลากหลายรูปแบบให้เลือกเล่น
ทางเข้า slot joker123
Hi it’s me, I am also visiting this site on a regular
basis, this website is truly fastidious and the users are
actually sharing fastidious thoughts.
I used to be able to find good info from your content.
kpop4d merupakan salah satu agen slot deposit dana dan agen slot terpercaya
Howdy! This blog post could not be written any better! Looking through this post reminds me of my previous roommate! He always kept talking about this. I will forward this article to him. Fairly certain he’s going to have a good read. I appreciate you for sharing!
I’ve been surfing online more than 4 hours today, yet I never found any interesting article
like yours. It is pretty worth enough for me.
In my opinion, if all site owners and bloggers made good content as you
did, the net will be much more useful than ever before.
Hiya! I know this is kinda off topic however , I’d figured I’d ask. Would you be interested in trading links or maybe guest authoring a blog post or vice-versa? My website covers a lot of the same subjects as yours and I feel we could greatly benefit from each other. If you’re interested feel free to shoot me an email. I look forward to hearing from you! Wonderful blog by the way!|
I read this post completely on the topic of the comparison of
most recent and previous technologies, it’s amazing article.
After I originally left a comment I appear to have clicked the -Notify me when new comments are added- checkbox and now every time a comment is added I receive four emails with the exact same comment. There has to be an easy method you can remove me from that service? Kudos!
I visited many web pages however the audio feature for audio songs present at this site is in fact excellent.
Thank you for any other informative site. The place else may just I get that type
of information written in such a perfect means? I have a
undertaking that I’m just now running on, and I have been on the look out for
such information.
A fascinating discussion is definitely worth comment. I do believe that you should write more on this issue, it might not be a taboo subject but usually people don’t talk about these subjects. To the next! Many thanks!!
Everything is very open with a really clear clarification of the issues. It was really informative. Your site is very useful. Many thanks for sharing!
You really make it seem really easy along with your presentation however I find this topic
to be actually one thing which I think I would by no means understand.
It kind of feels too complex and very broad for me.
I am taking a look forward on your next publish, I will try to
get the dangle of it!
I simply could not depart your website before suggesting that I really loved the usual information a person provide to your visitors?
Is going to be back steadily to check up on new posts
As a family of apksplus.com , it is a free platform where you can Access popular games, apps and cheat games. You can easily download and enjoy applications from our platform that you can Access , such as all the features of programs that require in app or in game purchoses without paying add tional free as if you have purehosed them
Recently published on our site popular games popular apps and most downloaded content download to your device for free and all features you can use in a working stote as if you hod purchosed them
Most Popular Apk Files
You can download PUBG mobile Uc cheat and current PUBG Mobile cheats for PUBG mobile game, which is actively played by millions of users arond the Word through our site and enjoy the full pleosure of your game. As another popular gamet he cheats for Word of tanks and mony othe popular game cheats you can Access through our site
You can take advantage of apps and games that are fraudulently shared on our platform.
What is APK ? What is APK File ?
APK comes from the abbresiotion of the Word android package kit in its Word meaning it is a file format used for app distribotion and easy installation on android devices the exe file used on Windows is used bu apk as the installation file in android with the APK file you can easily download and install on application that has been romoved from the market or modified by a different developer on your device
How To İnstall APK File ?
When you download any paid apps on the market place you do not have Access to any APK files as they are installed drectly on your device. You may be oble to get the APK file of any application on the Play Store However this is a a very laborious task since alternatively you need to install an application.
Aksplus.com any application or gamet hat you have downlıaded via the APK File will prompt you to install it as a worning when you g oto the section that you have download and click on the APK File and after seeing this warning you will only have to look at the install button. The APK File you downloaded withing a certain period of time after pressing the button will be uploaded to you device.
APKsplus.com Family
I couldn’t resist commenting. Perfectly written!
You ought to be a part of a contest for one of the greatest sites on the internet. I will highly recommend this site!
You’re so interesting! I do not think I’ve truly read anything like this before. So nice to discover another person with original thoughts on this subject matter. Really.. many thanks for starting this up. This website is something that is needed on the web, someone with a bit of originality!
Very rapidly thіs web pаge wilol be famous amid ɑll blog viewers, ԁue to іt’s g᧐od articles
Feel free to surf too my web blog sexgeile amateure
Hi, I do believe this is an excellent blog. I stumbledupon it 😉 I may revisit yet again since i have saved as a favorite it. Money and freedom is the greatest way to change, may you be rich and continue to help other people.
Can I just say what a relief to discover a person that really knows what they’re talking about on the net. You actually realize how to bring an issue to light and make it important. More and more people really need to check this out and understand this side of the story. I can’t believe you are not more popular since you definitely possess the gift.
You could definitely see your enthusiasm within the work
you write. The arena hopes for more passionate writers such
as you who aren’t afraid to say how they believe.
All the time follow your heart.
Hello there, just became alert to your blog through Google, and found that it’s really informative.
I am going to watch out for brussels. I will appreciate if you
continue this in future. Many people will be benefited
from your writing. Cheers!
A person necessarily help to make seriously articles I would state.
That is the first time I frequented your web page and thus far?
I surprised with the analysis you made to create this particular submit incredible.
Fantastic process!
This blog was… how do I say it? Relevant!! Finally I’ve found something that helped me. Thank you!
wow – good info here. Thanks for taking the time to write and post
Clothes purchasing is still an ordeal, even though
you now not need to hop from one shop to a different;
now that on-line procuring is the best way to go about it. There are millions of on-line
shops catering to 1000’s of various objects of clothing.
Making up your mind is not any straightforward matter.
What one needs is a one stop information center
that gives internet buyers with related info on the place to shop – at inexpensive prices.There are specific clothes procuring websites that offer info on the number of garments available.
You get all the information you want, they usually
additionally provide you a procuring weblog where you possibly can air your experiences
and obtain info from different consumers on their experiences.
That is what one would name a royalty treatment.
You get to shop, and give out and obtain information on the identical time.Buying For Garments – The EvolutionThe manner we store for our
garments and for the clothes of our household has developed over time, particularly with the advent of
the Internet. Those had been the pre-Internet days if you
had to visit numerous outlets to look for the clothes you wanted.
You also needed to do that to match costs of various
clothing. If it was to your youngsters, you needed to
tug them alongside, from one store to another.
An ordeal – but one which needed to be carried out – periodically.Not any more!
All you need is a computer at house – and who doesn’t have one lately?
You are able to do all your clothing buying online from the comforts of your home.
The purchasing blogs supplied by numerous on-line websites mean you can learn from different
shoppers. They provide you related information of what is accessible where,
and which are the net stores to avoid. On the same time you too get an opportunity to share your experiences.
These web sites present purchasing information about the nice clothing obtainable online, and so they preserve
their information updated. You – as a shopper – obtain a wealth of details about quite a lot of clothes.
I will right away seize your rss as I can not in finding your e-mail subscription link or e-newsletter service. Do you’ve any? Kindly let me recognize so that I may subscribe. Thanks.|
Have you ever thought about creating an ebook or guest authoring on other blogs?
I have a blog centered on the same topics you discuss and would really like
to have you share some stories/information. I know my readers would value your work.
If you’re even remotely interested, feel free to send me
an e-mail.
I must say, as a lot as I enjoyed reading what you had to say, I couldnt help but lose interest after a while. Its as if you had a wonderful grasp on the subject matter, but you forgot to include your readers. Perhaps you should think about this from far more than one angle. Or maybe you shouldnt generalise so considerably. Its better if you think about what others may have to say instead of just going for a gut reaction to the subject. Think about adjusting your own believed process and giving others who may read this the benefit of the doubt.PornHub
It’s amazing for me to have a web site, which is helpful in favor of my experience.
thanks admin
It’s amazing for me to have a web site, which is helpful in favor of my experience.
thanks admin
situs penipu tidak bayar kemenangan
Hi there would you mind sharing which blog platform you’re using? I’m looking to start my own blog soon but I’m having a hard time deciding between BlogEngine/Wordpress/B2evolution and Drupal. The reason I ask is because your design and style seems different then most blogs and I’m looking for something unique. P.S Apologies for getting off-topic but I had to ask!|
Unquestionably believe that which you stated. Your favorite justification appeared to be on the web the simplest thing to be aware of.
I say to you, I definitely get annoyed while people consider worries that they
plainly do not know about. You managed to hit the nail upon the top and defined
out the whole thing without having side effect , people
can take a signal. Will likely be back to get more.
Thanks
Hey very nice blog!|
This is the right webpage for anyone who really wants to understand this topic.
You realize a whole lot its almost tough to argue with you (not that I actually will need to…HaHa).
You certainly put a brand new spin on a subject that’s been written about for years.
Excellent stuff, just wonderful!
The new Zune browser is surprisingly good, but not as good as the iPod’s. It works well, but isn’t as fast as Safari, and has a clunkier interface. If you occasionally plan on using the web browser that’s not an issue, but if you’re planning to browse the web alot from your PMP then the iPod’s larger screen and better browser may be important.Free Porn
LW
Howdy terrific blog! Does running a blog similar to this take a large amount of work?
I’ve virtually no knowledge of programming however I had been hoping to
start my own blog soon. Anyways, if you have any ideas or techniques for new blog owners please share.
I understand this is off subject nevertheless I just wanted to ask.
Thanks!
Here is my site :: Custom Upholstered Furniture Company
Tieu de tao duoc su thu hut voi nguoi doc tu do tang luong nguoi xem quan tam toi bai viet PR san pham
Awesome blog! Is your theme custom made or did you download
it from somewhere? A design like yours with a few simple adjustements would really make my blog stand out.
Please let me know where you got your design. Thanks
I am now not positive where you are getting your info,
however great topic. I needs to spend a while finding out more or working out more.
Thank you for wonderful info I used to be looking for this information for my mission.
Thiѕ articlе gives clear idea in syppⲟrt oof the neew viewerѕ of bloցging, that in fact how to do running a blog.
Here іs my site – Tisha
Undeniably believe that whiⅽh you said. Your favorite
justification appeared to bee on the internet the easiest thing to bbe aware of.
I say to you, I definitely get irked while people think about worries thɑt
tһey plainly don’t know about. You managed to hit tһe nail upon the top
and defined out the wһole thing without having ѕide effеct , ⲣeople
could take a signal. Will probably be back to get more.
Ꭲhanks
my website :: wandlampe lampenschirm (Mayra)
I’ve learn several just right stuff here. Definitely worth bookmarking for revisiting.
I surprise how a lot effort you set to make this kind of excellent informative web site.
I used to be able to find good advice from your blog posts.
When some one searches for his required thing, thus he/she needs to be available that in detail, so that thing
is maintained over here.
Just wish to say your article is as astounding. The clearness in your post
is just nice and i can assume you’re an expert on this subject.
Fine with your permission let me to grab your feed to keep up to date with forthcoming
post. Thanks a million and please carry on the rewarding
work.
I have to thank you for the efforts you have put in writing this website. I am hoping to check out the same high-grade content from you in the future as well. In truth, your creative writing abilities has encouraged me to get my own blog now 😉
I used to be able to find good information from your content.
Chung toi luon thuc hien viec ban giao san pham cho khach hang mot cach chinh xac nhat theo thoi gian yeu cau. Quy trinh thuc hien co the linh dong de phu hop voi tung yeu cau cua khach hang, vi vay de duoc ho tro tot nhat quy khach hang hay lien he voi chung toi de duoc trao doi cu the hon.
extensions:In Word – Press: There are over 20,951 Word – Press Plugins inside the directory, which have been downloaded 338,
446,638 times and counting. So, a company’s purpose and offerings ought to be easily identified
from the initial display presented. Keep the content concise and to-the-point,
to ensure that users can scan through it and require a decision soon.
healthier hair is of course mainly due to genetics but food supplementation can also help you get it;Dorothy Kennedy
I would like to add to that statement,but I fear your wrath Sheila, lol! Permission to speak please ; )Alan Barrett
I like what you guys are usually up too. This sort of clever work and reporting!
Keep up the terrific works guys I’ve included you guys to blogroll.
Greetings! I know this is kinda off topic but I was wondering if
you knew where I could get a captcha plugin for my comment form?
I’m using the same blog platform as yours and I’m having trouble finding
one? Thanks a lot!
The only place you’ll find success before work is in the dictionaryKellie Neal
Needed to compose you a tiny note to finally thank you very much yet again for your personal splendid methods you have discussed above. It is strangely open-handed with people like you to provide publicly all that a number of people would have marketed as an electronic book to generate some bucks for their own end, primarily now that you could possibly have tried it if you ever wanted. These inspiring ideas likewise acted like a fantastic way to know that the rest have the same dreams really like my personal own to see a whole lot more concerning this problem. I’m sure there are thousands of more enjoyable times in the future for many who check out your blog.Movers SEO
Valuable info. Lucky me I found your web site accidentally, and I’m stunned why this twist of
fate did not came about in advance! I bookmarked it.
I am regular reader, how are you everybody? This paragraph posted
at this web site is genuinely good.
Interesting website, i read it but i still have a few questions. shoot me an email and we will talk more becasue i may have an interesting idea for you.SEO for Moving Companies
You completed a number of nice points there. I did a search on the issue and found nearly all people will have the same opinion with your blog.MoversDev
This is getting a bit more subjective, but I much prefer the Zune Marketplace. The interface is colorful, has more flair, and some cool features like ‘Mixview’ that let you quickly see related albums, songs, or other users related to what you’re listening to. Clicking on one of those will center on that item, and another set of “neighbors” will come into view, allowing you to navigate around exploring by similar artists, songs, or users. Speaking of users, the Zune “Social” is also great fun, letting you find others with shared tastes and becoming friends with them. You then can listen to a playlist created based on an amalgamation of what all your friends are listening to, which is also enjoyable. Those concerned with privacy will be relieved to know you can prevent the public from seeing your personal listening habits if you so choose.Moving Company SEO
Your article has proven useful to me. It’s very informative and you are obviously very knowledgeable in this area. You have opened my eyes to varying views on this topic with interesting and solid content.Movers Boost
Interesting website, i read it but i still have a few questions. shoot me an email and we will talk more becasue i may have an interesting idea for you.SEO for Moving Companies
I must say, as a lot as I enjoyed reading what you had to say, I couldnt help but lose interest after a while. Its as if you had a wonderful grasp on the subject matter, but you forgot to include your readers. Perhaps you should think about this from far more than one angle. Or maybe you shouldnt generalise so considerably. Its better if you think about what others may have to say instead of just going for a gut reaction to the subject. Think about adjusting your own believed process and giving others who may read this the benefit of the doubt.MoversBoost
Interesting website, i read it but i still have a few questions. shoot me an email and we will talk more becasue i may have an interesting idea for you.SEO for Moving Companies
Nhieu nam phat trien va hoan thien 68Expresst da va dang khang dinh vi the dan dau trong linh vuc buu chinh chuyen phat trong do dich vu chuyen phat nhanh trong nuoc va chuyen phat nhanh quoc te la mot trong nhung dich vu cot loi 68Express duoc rat nhieu quy cong ty quy khach hang lua chon
The new Zune browser is surprisingly good, but not as good as the iPod’s. It works well, but isn’t as fast as Safari, and has a clunkier interface. If you occasionally plan on using the web browser that’s not an issue, but if you’re planning to browse the web alot from your PMP then the iPod’s larger screen and better browser may be important.SEO for Movers
bookmarked!!, I love your web site!
Found this on MSN and I’m happy I did. Well written article.tax evasion
Thanks for one’s marvelous posting! I definitely enjoyed reading it, you may be a great author.
I will be sure to bookmark your blog and will come back down the road.
I want to encourage you continue your great job, have a
nice day!
Found this on MSN and I’m happy I did. Well written article.tax evasion
In fact no matter if someone doesn’t be aware of afterward its up to other
viewers that they will assist, so here it takes place.
Hi there very nice site!! Man .. Beautiful .. Amazing ..
I will bookmark your web site and take the feeds additionally?
I am satisfied to search out so many useful information right here in the submit, we’d
like work out more strategies in this regard, thank you for sharing.
. . . . .
Thanks for finally writing about > How to set up a LAN connection in WinXP
« Old PC Gaming < Loved it!
Online Ivermectin Stromectol fast Online Ivermectin Stromectol fast
Found this on MSN and I’m happy I did. Well written article.tax evasion
where is ivermectin manufactured where is ivermectin manufactured
stromectol otc stromectol otc
Wow, this is a beneficial websites.|
is stromectol over the counter is stromectol available in australia
I need to keep this info in mind. thanks for posting
My brother suggested I might like this web site.
He was totally right. This post truly made my day. You can not
imagine simply how much time I had spent for this information! Thanks!
It’s nearly impossible to find well-informed people on this subject, but you sound like you know what you’re talking about! Thanks https://rebrand.ly/positivelycelebrity
This design is wicked! You certainly know how to keep a reader amused.
Between your wit and your videos, I was almost moved to start
my own blog (well, almost…HaHa!) Great job. I really enjoyed
what you had to say, and more than that, how you presented it.
Too cool!
I benefit from reading through your site. Kudos!|
Thank you for the auspicious writeup. It in truth used to be
a amusement account it. Look advanced to far added agreeable from you!
By the way, how could we communicate?
Merely wanted to stress Now i’m thrilled I stumbled upon your webpage!|
buy instagram mentions, instagram mentions services , instagram mentions
I’m truly enjoying the design and layout of your website.
It’s a very easy on the eyes which makes it much more pleasant for me to come here and visit more
often. Did you hire out a designer to create
your theme? Exceptional work!
You need to be a part of a contest for one of the greatest blogs online. I most certainly will recommend this web site!
My developer is trying to persuade me to move to .net from PHP.
I have always disliked the idea because of the expenses.
But he’s tryiong none the less. I’ve been using WordPress on a number of websites for about a year and am anxious about switching to another platform.
I have heard very good things about blogengine.net.
Is there a way I can transfer all my wordpress posts into it?
Any help would be greatly appreciated!
Duoc thanh lap tu nam 2009 Viexpress cung cap nhung dich vu chuyen phat nhanh vao dip tet nguyen dan Chuyen phat cac loai hang hoa nhu Hoa mai Hoa dao Cay canh Banh chung Qua tang qua bieu Voi nhieu kich thuoc can nang khac nhau de deu duoc Viexpress xu li nhanh chong bang hoa don chung tu ro rang dam bao tranh sai sot trong qua trinh van chuyen
buy instagram mentions, instagram mentions services , instagram mentions
I’m impressed, I have to admit. Seldom do I come across a blog that’s equally educative and interesting, and let me tell you, you’ve hit the nail on the head. The issue is something which not enough people are speaking intelligently about. I’m very happy I stumbled across this in my hunt for something concerning this.
I want to to thank you for this wonderful read!!
I absolutely loved every little bit of it. I’ve got you bookmarked to check out new stuff you post…
Nhu cau ve su dung hang hoa vao dip cuoi nam hien dang khong ngung tang vi the ma cac cong ty van chuyen cung tro nen nhon nhip va gap gap hon Neu ban dang ban khoan khong biet nen chon don vi nao thi Viexpress don vi tien phong trong chuyen phat hang tet se la su lua chon hoan hao cho ban
If you want to obtain much from this article then you have to apply
such methods to your won website.
buy instagram mentions, instagram mentions services , instagram mentions
Thiet ke logo la tat ca ve viec tao ra mot thuong hieu truc quan cho mot doanh nghiep. Tuy thuoc vao loai logo, logo thuong bao gom mot bieu tuong hoac van ban cung voi khau hieu va thong diep den khach hang.
You actually make it seem really easy with your presentation however
I find this topic to be really one thing which I think I might
by no means understand. It seems too complicated and very broad for me.
I am having a look forward in your next publish, I’ll try to get the cling of it!
Howdy! This blog post could not be written any better!
Looking at this article reminds me of my previous roommate!
He always kept talking about this. I’ll forward
this article to him. Fairly certain he will have a good
read. Thanks for sharing!
if the buffalo in my head could speak german i would not know a god damm thing. What i do know is that the language of art is out of this world.online credit repair
First off I want to say fantastic blog! I had a quick question in which I’d like to ask if you do not mind.
I was interested to know how you center yourself and clear your mind prior to writing.
I have had difficulty clearing my thoughts in getting my thoughts out there.
I truly do take pleasure in writing however it just seems like
the first 10 to 15 minutes are usually lost just trying to figure out how
to begin. Any ideas or tips? Thank you!
When I initially commented I clicked the “Notify me when new comments are added” checkbox and now each time a comment is added I get several e-mails with the same comment. Is there any way you can remove me from that service? Cheers!schools
Gui hang di My la nganh dich vu van chuyen hang hoa cua 68express tu khau nhan buu kien tu nguoi gui – dong goi – van chuyen – gui buu kien – nguoi nhan nhan buu kien tu trong nuoc den cac thanh pho cua My Van chuyen bang cac phuong tien nhu may bay tau thuyen Hang hoa da dang
It’s wonderful that you are getting ideas from this paragraph
as well as from our dialogue made at this time.
It’s wonderful that you are getting ideas from this paragraph
as well as from our dialogue made at this time.
I enjoy, result in I found exactly what I used to be looking for.
You’ve ended my 4 day lengthy hunt! God Bless you man. Have
a great day. Bye
Interesting column , I am going to spend more time reading about this topicmotorcycles
Pretty! It has been an extremely wonderful article. Thank you for providing this information.
Thank you for all of the work on this web site. Ellie delights in working on investigation and it’s really simple to grasp why. My partner and i hear every one of the compelling ways you give valuable solutions by means of your web site and therefore strongly encourage response from many others about this situation plus our daughter has been learning a good deal. Take good thing about the rest of the new year. You’re the main one conducting a powerful job.
I enjoy the efforts you have devote this, thanks for all the great blog posts.
Can you tell us more about this? I’d want to find
out more details.
Wow that was unusual. I just wrote an very
long comment but after I clicked submit my comment didn’t show up.
Grrrr… well I’m not writing all that over
again. Regardless, just wanted to say great blog!
If some one desires expert view regarding running a
blog afterward i suggest him/her to visit this webpage, Keep up the good job.
I’m not sᥙre why but this website is lⲟading incredibly slow
for me. Is anyone else having this issue or is it a problem on my end?
I’ll chеck back ⅼateг and see iff the proƄlem still exіѕts.
Look іnto my web pagе: daftar gboslot
I’ve learn a few good stuff here. Value bookmarking for revisiting Certainly. I wonder just how much attempt you location to make such a magnificent informative web site.
I beloved up to you will obtain performed proper here. The cartoon is attractive, your authored material stylish. nevertheless, you command get got an shakiness over that you would like be turning in the following. unwell without a doubt come more as yet once more as accurately the similar nearly a lot regularly inside of case you defend this increase.
Hello there, I think your web site may be having
internet browser compatibility issues. Whenever I take a look at your blog in Safari, it looks fine but when opening in IE,
it’s got some overlapping issues. I merely wanted to provide you with a quick heads up!
Apart from that, great blog!
Hello, I believe your blog might be having browser compatibility problems.
Whenever I look at your website in Safari, it looks fine however when opening in I.E.,
it’s got some overlapping issues. I simply wanted to provide you with a quick heads up!
Apart from that, excellent website!
Amazing things here. I’m very glad to see your post.
Thanks so much and I am having a look forward to touch you.
Will you please drop me a e-mail?
This sort of wanting to come to a difference in her or his lifestyle, initial generally Los angeles Excess weight weightloss scheme is a large running in as it reached that strive. weight lossmail-order
You got a very fantastic website, Glad I observed it through yahoo.services
Bao bi san pham la nhung gi hau het moi nguoi nghi den khi ho nghi den bao bi: do la hop dung do choi, chai co nhan, the tren quan ao, giay goi cua thanh keo.
Quit smoking benefits… If we see you smoking we will assume you are on fire and take appropriate action….newsletters
Today, I went to the beach front with my kids.
I found a sea shell and gave it to my 4 year old daughter and
said “You can hear the ocean if you put this to your ear.” She placed
the shell to her ear and screamed. There was a hermit crab inside and it pinched her ear.
She never wants to go back! LoL I know this is completely off
topic but I had to tell someone!
With havin so much written content do you ever run into any problems of plagorism or copyright violation? My website has a lot of completely unique content I’ve either authored myself or outsourced but
it looks like a lot of it is popping it up all over the web without my
agreement. Do you know any ways to help prevent content from being stolen? I’d
really appreciate it.
I visited many web sites except the audio quality for audio songs present
at this website is genuinely superb.
Good day! I just want to offer you a huge thumbs up for your great information you have right here on this post. I’ll be coming back to your blog for more soon.
When it comes time to take care of your yard or garden in the aftermath of a storm or some nasty weather, few tools are better than the time tested indispensable tool chainsaw.
When you have to select a saw, you will have two choices, electric or gas powered.
You might be thinking “an electric chainsaw come on now! I need something with some guts!” It’s
a good idea to reconsider, unlike in the past, when chainsaws powered by electricity were a bit underpowered these days modern electric saws provide sufficient capacity to handle the weight of regular trimming and
cutting.There are numerous advantages to owning an electronic saw.
Many of them include lightweight. Electric saws are much lighter than gas powered saws.
And if you have a lot of cutting to complete, especially cutting
over the head, you’ll notice the distinction in weight.Maintenance is another factor.
Electric saws require much lower levels of maintenance
required for their operation. Simply plug them in and you’re set.
Gas saws are more complex and so there are more parts on them.
The more parts you have the more pieces there are to break.
And that’s not even mentioning the issues when you have to adjust the choke on the parts.
It iѕ pеrfeсt time to maқe some plans foor the future and it’s timme to
be һappy. Ӏ’ѵe read this рost and if I could I ɗesire to suggest
you few interesting things or suggestions. Peгhaps
you can write next articles referring to this artiϲle.
I desire tо read even more things about it!
Here is my blog post … Tyson
of course like your web-site however you need to check the spelling on quite a few of your posts. A number of them are rife with spelling issues and I to find it very bothersome to inform the reality however I’ll surely come back again.credit repair info
It’s in fact very complicated in this busy life to listen news on Television, therefore I just use the web for that reason, and take the latest information.
Just like the old saying goes, within the pro’s head there are few options, however , for a person with the beginner’s brain, the world is open up.free credit repair services
Excellent write-up. I definitely love this website. Keep writing!
After checking out a few of the articles on your blog, I truly
like your way of writing a blog. I book-marked it to my bookmark site list and
will be checking back soon. Please check out my website too and
let me know what you think.
Thanks a lot for being our mentor on this niche. I enjoyed your current article very much and most of all cherished how you really handled the aspect I considered to be controversial. You are always quite kind to readers much like me and let me in my everyday living. Thank you.credit info
Unquestionably believe that which you stated. Your favorite reason seemed to be on the internet the easiest thing to be aware of. I say to you, I certainly get irked while people think about worries that they plainly don’t know about. You managed to hit the nail upon the top and also defined out the whole thing without having side effect , people could take a signal. Will likely be back to get more. Thanks
You made some clear points there. I did a search on the issue and found most individuals will agree with your website.
Hiya! Quick question that’s completely off topic. Do you know how to
make your site mobile friendly? My weblog looks weird when browsing from my apple iphone.
I’m trying to find a template or plugin that might be able to resolve this issue.
If you have any suggestions, please share.
Thank you!
Take a look at my page; Georgia Hunting Leases
My spouse and I stumbled over here different web address and thought I should check things out.
I like what I see so now i’m following you. Look forward
to looking into your web page for a second time.
My spouse and I stumbled over here different web address and thought I should check things out.
I like what I see so now i’m following you. Look forward
to looking into your web page for a second time.
fantastic post. Ne’er knew this, thanks for letting me know.california credit repair
It’s great that you are getting thoughts from this article as well as from
our dialogue made at this place.
Wonderful article! We will be linking to this particularly great content
on our site. Keep up the great writing.
great post, very informative. I ponder why the opposite experts of this sector don’t notice this. You must proceed your writing. I am confident, you have a huge readers’ base already!
I’m impressed, I have to admit. Rarely do I encounter a blog that’s both educative and engaging, and without
a doubt, you have hit the nail on the head. The issue is something which not enough people
are speaking intelligently about. Now i’m very happy that I stumbled across this during my search for something concerning this.
I have wanted to write about something like this on my webpage and you gave me an idea. Cheers.repair
Its like you read my thoughts! You appear to know a lot approximately this, like you wrote the
e-book in it or something. I feel that you could do with a
few p.c. to pressure the message house a bit, but other than that, that is magnificent blog.
A fantastic read. I will definitely be back.
Ahaa, its good discussion regarding this article
here at this blog, I have read all that, so now me also
commenting at this place.
Aw, this was an exceptionally nice post. Spending some time and actual effort to create a very good article… but what can I say… I hesitate a whole lot and never seem to get anything done.
This site was… how do you say it? Relevant!! Finally I’ve found something that
helped me. Appreciate it!
fantastic post. Ne’er knew this, thanks for letting me know.california credit repair
Magnificent beat ! I would like to apprentice while you amend your site, how can i subscribe for a blog
website? The account aided me a acceptable deal. I had
been tiny bit acquainted of this your broadcast offered bright clear concept
A person essentially help to make seriously posts I would state. This is the first time I frequented your website page and thus far? I surprised with the research you made to make this particular publish amazing. Wonderful job!
I do not even know how I finished up right here, however I thought this post used to
be great. I don’t recognize who you’re but certainly you are going to a
famous blogger if you are not already. Cheers!
Check out my web-site CashOfferPlease
Hi! This is my 1st comment here so I just wanted
to give a quick shout out and say I really enjoy reading your posts.
Can you suggest any other blogs/websites/forums that cover the same topics?
Thanks a lot! https://forum.iflight-rc.com/user-45420.html
I used to be able to find good advice from your blog articles.
Aw, this was a very good post. Spending some time and actual effort to create a superb article… but what can I
say… I hesitate a lot and never seem to get nearly anything done.
Take a look at my web blog; we buy Fulton County homes for cash
Attractive section of content. I just stumbled upon your website and in accession capital to assert that I get actually enjoyed account your blog posts. Anyway I will be subscribing to your augment and even I achievement you access consistently quickly.
Nutrition is vital inside our every day day-to-day lives. Everything we take in establishes how healthful we are going to be and just how very long we are going to live. Maintaining a healthy diet is actually a method that all of us make an effort to obtain, but may require some time. Use the tips below to provide a few ideas on the best way to use nutrition within your everyday living. Proceed to take in some chips or sweets. A diet constructed all around depriving on your own of the things you adore, will in no way final. If you value chocolates or chips or even a steak, go on and enjoy on your own. The true secret to your waste money is control. In the event you allow your self possess a modest handle once in a whilst, you will be more inclined to keep on track, the other time. Ensure that you have got a light treat or dinner with protein prior to starting a workout. Healthy proteins may be the body requires to correct harm and build new muscle each time you physical exercise. Health proteins will keep your body from feeling much more used straight down than it requires to, and will protect the slimmer physique you’re developing. A lot of people take an inconsistent strategy to diet since the subject isn’t in a natural way fascinating. They can start off the day by using a donut, then feel guilty in the future and try to choose anything more healthy. If you are one of those individuals, consider simplifying things on your own if you make distinct, much less poor alternatives when you are getting your rubbish-foods resolve. If you love donuts, try a lower-fat muffin the very next time. Then maybe function the right path to an egg cell-white flatbread. Also try switching your one half-and-fifty percent to dairy. If you make sluggish, incremental changes, quickly you will find that you’re making more healthy selections and this the existing junky options just don’t preference pretty much as good. Usually choose products together with the most natural vitamins listed on the nutrients brand. Choosing one product with a lot more nutritional vitamins than yet another very similar tasting item, may help your body build up your immunity mechanism, strengthen your bone fragments and supply you a lot more benefits, across a long time. You’ve acquired by now that diet isn’t definitely that difficult. As soon as you’ve mastered basic information, you’ll have the ability to effectively change your diet being more healthy. Just remember what you’ve acquired with this report. Should you use this information to your daily life, shortly you’ll ponder reasons why you were actually actually nervous about diet.
What i don’t understood is actually how yoou are no longer actually
a lot more well-favored than you may be ight now.
Yoou are so intelligent. You realize thus ssignificantly iin the case of this matter, made me in my opinion believe it from numerous
numerous angles. Its like women and men aren’t
involved unless it’s onne thing to do with Lady gaga!
Your individual stuffs nice. All the time take care off it up!
Feel free to visit my web page: Arlie
I am constantly browsing online for ideas that can assist me. Thanks!
Greetings! I’ve been reading your blog for a long time now and finally got the bravery to go
ahead and give you a shout out from Dallas Texas!
Just wanted to say keep up the excellent job!
I just could not go away yoour web site before suggestkng that I extremely enjoyed the usual info
a person provide on your guests? Is gonna be again frequently to check
out new posts
my web blog Wade
I think this is one of the most vital information for me.
And i’m glad reading your article. But wanna remark on few general things,
The web site style is wonderful, the articles is really excellent : D.
Good job, cheers
I couldn’t resist commenting. Very well written!
I needed to thank you for this fantastic read!! I certainly loved every bit of it. I have got you saved as a favorite to look at new things you post…
Howdy! This blog post couldnít be written much better! Going through this post reminds me of my previous roommate! He constantly kept preaching about this. I most certainly will forward this post to him. Pretty sure he’ll have a great read. Many thanks for sharing!
Hier istdas Schnellste Schlüsseldienst in Düsseldorf
Fantastic beat ! I wish to apprentice even as you amend your website, how could i subscribe for a weblog website?
The account aided me a appropriate deal. I had been a little bit acquainted of this your broadcast provided vibrant transparent
idea
Hi i am kavin, its my first time to commenting anywhere, when i read
this article i thought i could also make comment due to this good article.
Hi i am kavin, its my first time to commenting anywhere, when i read
this article i thought i could also make comment due to this good article.
Hi i am kavin, its my first time to commenting anywhere, when i read
this article i thought i could also make comment due to this good article.
It’s difficult to find knowledgeable people for this topic, however,
you sound like you know what you’re talking about! Thanks
Hi there friends, how is all, and what you wish for to say on the topic of this post, in my view its truly
awesome designed for me.
Excellent blog! Do you have any helpful hints for aspiring writers?
I’m planning to start my own site soon but I’m a little lost on everything.
Would you suggest starting with a free platform like WordPress or go for a paid option? There are so many options out there that I’m completely overwhelmed ..
Any recommendations? Kudos!
This is my first time visit at here and i am truly impressed to read everthing
at alone place.
I’ve been browsing online more than 3 hours today, yet I never found any interesting article like yours. It is pretty worth enough for me. In my opinion, if all website owners and bloggers made good content as you did, the web will be a lot more useful than ever before.|
Pretty great post. I simply stumbled upon your weblog and wished to
mention that I have truly enjoyed surfing around
your weblog posts. In any case I will be subscribing to your rss feed and I’m hoping you write once
more soon!
Hi there just wanted to give you a quick heads up and
let you know a few of the pictures aren’t loading properly.
I’m not sure why but I think its a linking issue.
I’ve tried it in two different internet browsers and both show the
same outcome.
Berbagai Macam Layanan Yang Diberikan Slot Game Online
Berbagai Macam Layanan Yang Dikasih Slot Game Online! Langkah dengan dapat dipakai buat memperoleh keuntungan tersedia
pada jumlah dengan jumlah. Salah satunya ialah bekerja. Tips ini tidak jadi pilihan yang efektif sebab membuat kamu kehabisan saat untuk menikmati waktu
yang santai setiap harinya.
Maka, tidak heran jika tersedia satu cara yang lain yang pula dikenal untuk setiap orang2.
Salah satu cara yang dipergunakan adalah bergabung dalam
permainan judi. Dalam permainan ini, seluruh orang2
bisa bersantai dan juga meraih keuntungan dalam jumlah yang gede.
Tak menjadi hal yang sukar untuk mencari permainan tepat dengan dapat dimainkan secara
bersahaja.
Permainan penghasil uang atau slot game online jadi jawaban yang tepat buat meraih keuntungan dalam jumlah gede.
Permainan juga biasa jauh lebih sederhana dibandingkan secara permainan yang lain sebab bisa dimainkan dengan daring.
Selain tersebut, tak diperlukan strategi dengan leceh pada permainan. Cuma butuh memakai metode lazim dan memiliki keberuntungan pada permainan.
Namun, dalam permainan, tersedia sesuatu yang butuh dipikirkan sebaik
kiranya. Sesuatu itu punya kaitan secara wakil permainan yang perlu dipilih jauh lebih dahulu.
Ada berbagai macam agen permainan dengan ada dalam internet.
Tak semuanya dapat dipercaya. Bahkan, tersedia kaum agen yang justru melepaskan penipuan atau
kerugian. Karena itu, penting halnya menghindari wakil dengan jelek secara tahu
penawaran yang ada.
Penawaran Slot Game Online Tenteram
Ekstra slot game online sesuai logika
Trik Ampuh Tampil Togel 3 Angka Di Bandar Togel Terpercaya
Jagat toto gelap memang tidak akan tersedia habisnya untuk diperbincangkan. Ketika tampil togel pastinya sangat memerlukan trik
serta trik supaya dapat medapati nomor yang pas dan bisa dijadikan sebagai
taruhan. Bukan hanya tersebut, untuk memenangkan taruhan pada permainan togel ini.
Di artikel ini hendak mempercakapkan mengenai trik jitu unggul togel dalam 3 angka ataupun disingkat 3D secara mudah & cepat baik tersebut togel Singapore, togel Malaysia serta togel-togel
yang lain. Di bandar togel terpercaya jelas akan menyediakan berbagai macam macam togel.
Di tiap pertandingan, entah itu pertandingan judi atau tak pastinya hendak tersedia dengan menang dan dengan kalah.
Menang kalah pada suatu pertandingan apapun ialah satu diantara sesuatu lazim dan wajar.
Oleh sebab itu, kamu butuh suatu trik makbul guna mencegah
kekalahan dan mencari peluang bagaimana tips agar tak mengalami
kekalahan secara terus menerus tatkala bertanding judi.
Gelojoh merupakn hal dengan menyimpangkan terpenting
yang harus wajib kamu hindari tatkala kamu bermain togel.
Maksud dari gelojoh ini yaitu kamu jangan terlalu terpaku secara mengait
kemenangan semata-mata, dengan akan membuat kamu lupa dan terlena.
Serakah itu salah satu penyebab utama seserorang kerap menanggung kekalahan pada setiap pertandingan judi.
Apalagi tatkala kamu mematok taruhan di pemilik uang togel terpercaya.
Oleh sebab itu sebisa kiranya kamu harus hindari sifat keserakahan dengan hendak mudarat diri
otonom. Sudah banyak pemain togel yang sangay serakah dan walhasil mereka sering mengalami
kekalahan dalam setiap pertandingannya. Maka dari itu, sifat gelojoh
ini benar-benar membawa dampak terburuk untuk karet pemain & pecinta judi paling utama
pecinta judi togel.
Trik Ampuh Mematok Togel 3 Nilai dalam Bandar Togel Terpercaya
Trik mematok 3 nilai dengan pertama
Pada artikel kali ini hendak mencoba memakai suatu
trik secara menggunakan murahan togel dubai. Jika picisan angka sebelumnya
adalah 3957 jika dimasukkan ke menyatakan hendak sebagaimana itu:
KOP= 3, Kepala = 9, Ekor = tujuh. Dijumlah = 3+9+7 = 19.
Kemudian hitung seperti ini Baru = 19-3 = 16 = 1+6 = tujuh, ke-2 = 19-9= 10 = 1+0
= 1 & ketiga = 19-7 = 12 = 1+2 = 3 dan keempat & kelima yakni 1 & 9.
Dari dampak tersebut, dapat diperoleh 5 nilai dengan dapat dijadikan taruhan togel yakni 71319.
Bentuk perkiraan itu disebut pula secara sistem BBFS.
Trik mematok 3 nilai dengan kedua
Itulah yang disebut nilai jitu togel 3D. Jikalau angka dengan keluar
terakhir adalah 3957, maka kamu akan memperoleh angka taruhan yakni 71319.
Bila sudah memperoleh angka taruhan, 5 nilai tadi mematok togel ke situs togel yang kamu pilih
dan masukkan nilai nominal taruhan. Jika yang kamu masukkan 5 angka,
maka hendak mendapatkan dampak total 60 line secara jenis togel 3D
atau togel 3 angka. Bagi pecinta togel dengan ingin bermain togel di bandar togel terpercaya namun minim modal, tidak butuh memaksakan untuk menggerakkan modal secara jumlah gede, pasang modal pantas kemampuan kamu.
Permainan judi togel telah jadi salah satu jenis hobi dengan amat menyenangkan. Togel adalah jenis hobi dengan dikategorikan hobi secara modal mungil.
Itulah pembahasan mengenai trik makbul pasang 3 nilai di pemilik uang togel terpercaya.
Appreciate this post. Will try it out.
I have been surfing online more than 3 hours today, yet I never found any interesting article like yours. It is pretty worth enough for me. In my view, if all site owners and bloggers made good content as you did, the net will be a lot more useful than ever before.
Everyone loves it when people get together and share views.
Great blog, continue the good work!
I really love your blog.. Excellent colors & theme. Did you build this site yourself?
Please reply back as I’m wanting to create my own personal site and would
like to learn where you got this from or exactly what the
theme is called. Many thanks!
I am in fact grateful to the holder of this web page who has shared this impressive paragraph
at here.
excellent issues altogether, you simply received a emblem new reader.
What may you recommend in regards to your post that you simply made a few
days in the past? Any certain?
Definitely believe that which you stated. Your favorite justification appeared to be on the
internet the simplest thing to be aware of. I say to you,
I certainly get irked while people consider worries that
they just don’t know about. You managed to hit the nail upon the top and defined out the whole thing without
having side effect , people can take a signal. Will probably be back to
get more. Thanks
After looking over a handful of the articles on your web page, I truly like your way of writing a blog. I added it to my bookmark website list and will be checking back in the near future. Take a look at my web site as well and tell me how you feel.
Great post, thank you for sharing, very helpful information
Classic caainos are nicely positioned to capitalize on the chance preseted by the
legalization of sports betting across the nation.
Also viisit my web page … check here
It’s in fact very complex in this full of activity life to listen news on Television, so I only use the
web for that purpose, and obtain the most recent information.
Hello to every body, it’s my first pay a visit of this web site; this webpage contains remarkable and in fact excellent material in favor of readers.
Rattling fantastic visual appeal on this website , I’d value it 10 10.
Hi there mates, fastidious post and nice urging commented
here, I am in fact enjoying by these.
Great page, thank you for sharing, very useful info
Amazing! Its truly awesome paragraph, I have got much clear idea concerning from this paragraph.
I like what you guys are usually up too. This kind of clever work and reporting! Keep up the very good works guys I’ve incorporated you guys to blogroll.
Hello there! I simply want to offer you a huge thumbs up for your excellent information you have here on this post. I’ll be coming back to your blog for more soon.
This is getting a bit more subjective, but I much prefer the Zune Marketplace. The interface is colorful, has more flair, and some cool features like ‘Mixview’ that let you quickly see related albums, songs, or other users related to what you’re listening to. Clicking on one of those will center on that item, and another set of “neighbors” will come into view, allowing you to navigate around exploring by similar artists, songs, or users. Speaking of users, the Zune “Social” is also great fun, letting you find others with shared tastes and becoming friends with them. You then can listen to a playlist created based on an amalgamation of what all your friends are listening to, which is also enjoyable. Those concerned with privacy will be relieved to know you can prevent the public from seeing your personal listening habits if you so choose.slot online
Way cool! Some extremely valid points! I appreciate you writing this article and the rest of the website is also very good.
Awsome info and right to the point. I don’t know if this is really the best place to ask but do you people have any ideea where to employ some professional writers? Thank you 🙂
Great post, thank you for sharing, very useful info
Thanks for every other informative blog. The place else may I get that type of information written in such an ideal means? I have a project that I’m simply now running on, and I have been on the glance out for such info.|
I don’t even know how I ended up here, but I thought this
post was great. I do not know who you are but certainly you are going to a famous blogger if you are not already 😉 Cheers!
Hi there! Do you know if they make any plugins to assist with Search Engine
Optimization? I’m trying to get my blog to rank for some targeted keywords but
I’m not seeing very good gains. If you know of any please share.
Appreciate it!
Thanks for writing this amazing content, without doubt is very informative
Spot on with this write-up, I truly believe this web site needs a lot more attention.
I’ll probably be back again to read through more, thanks
for the advice!
I believe this is among the such a lot significant information for me.
And i am satisfied reading your article. But want to statement on some basic things,
The website style is ideal, the articles is really nice :
D. Excellent activity, cheers
I am genuinely glad to glance at this weblog posts which contains lots
of helpful information, thanks for providing these kinds of data.
Hi, i think that i saw you visited my website thus i came to “return the favor”.I’m
trying to find things to improve my web site!I
suppose its ok to use a few of your ideas!!
Your style is unique in comparison to other people I have read
stuff from. Many thanks for posting when you’ve got the opportunity, Guess
I’ll just book mark this blog.
You made some good points there. I looked on the internet for additional information about the issue and found most people will go along with your views on this web site.
Lucrarea de disertatie master, licenta sau diplomă permite absolventului consolideze și să sistematizeze cunoștințele într-o anumită disciplină, precum și să stăpânească diferite metode de cercetare în procesul de studiu a problemelor care sunt afectate de activitatea științifică
I could not resist commenting. Exceptionally well written!
Hello there, You have done an excellent job. I’ll definitely digg it and
personally recommend to my friends. I am confident they’ll be benefited from this
website.
Hello I am so grateful I found your webpage, I really found you by accident, while I was looking on Google for something else, Regardless I am here now and would just like to say
many thanks for a fantastic post and a all round thrilling blog
(I also love the theme/design), I don’t have time to go through
it all at the moment but I have saved it and also added your RSS feeds, so when I have time I
will be back to read a great deal more, Please do keep up the awesome job.
You’re so interesting! I do not suppose I have read through anything like this before.
So great to find another person with a few genuine thoughts on this topic.
Really.. many thanks for starting this up. This site is something that’s
needed on the web, someone with a bit of originality!
Ahaa, its fastidious discussion regarding this post at this place at this website,
I have read all that, so at this time me also
commenting here.
Very educating story, saved your site for hopes to read more!kryptowährungen news
Very rapidly this web site will be famous amid all blog users, due to it’s pleasant content
instagram follower kaufen
I blog quite often and I really appreciate your information.
Your article has really peaked my interest.
I am going to book mark your blog and keep checking for new details about once a week.
I opted in for your Feed too.
Do you have a spam issue on this site; I also am a blogger,
and I was wanting to know your situation; we have created some
nice procedures and we are looking to trade solutions with other folks, be sure to shoot me an email if interested.
Thanks for sharing this amazing content, without question is very useful
When I originally commented I clicked the “Notify me when new comments are added” checkbox and now each time a comment is added
I get three emails with the same comment.
Is there any way you can remove me from that service?
Cheers!
Interesting website, i read it but i still have a few questions. shoot me an email and we will talk more becasue i may have an interesting idea for you.slot deposit via dana
Greetings! I’ve been reading your weblog for a long
time now and finally got the bravery to go ahead and give
you a shout out from Dallas Texas! Just wanted to tell you keep up the great work!
lam tvc quang cao
I am in fact thankful to the owner of this website who has
shared this impressive paragraph at at this
place.
Hey there! This is kind of off topic but I need some guidance from an established blog.
Is it difficult to set up your own blog? I’m not verry techincal but I can figure things out
pretty fast. I’m thinking about setting up my
own but I’m not sure where to begin. Do you have any tips or suggestions?
Cheers
You made some respectable points there. I looked on the internet for the issue and found most people will go along with with your website.暗号 資産 fx
Hello! I know this is kinda off topic but I was wondering if you knew where I could get a
captcha plugin for my comment form? I’m using the same blog platform as yours and I’m having problems finding one?
Thanks a lot!
I just couldn’t go away your site prior to suggesting
that I extremely enjoyed the usual information a person provide for your guests?
Is going to be again regularly to check up on new posts
Greetings! I know this is kinda off topic but I’d figured I’d ask.
Would you be interested in exchanging links or maybe guest
authoring a blog post or vice-versa? My website goes over a lot
of the same topics as yours and I think we could greatly
benefit from each other. If you might be interested feel free to
shoot me an email. I look forward to hearing from you!
Excellent blog by the way!
Nice post. I was checking continuously this blog and I am impressed!
Extremely useful information specifically the last part 🙂 I care for
such information a lot. I was seeking this certain information for a very long time.
Thank you and good luck.
Nice post. I was checking continuously this blog and I am impressed!
Extremely useful information specifically the last part 🙂 I care for
such information a lot. I was seeking this certain information for a very long time.
Thank you and good luck.
I simply wanted to thank you a lot more for your amazing website you have developed here. It can be full of useful tips for those who are actually interested in this specific subject, primarily this very post. Your all so sweet in addition to thoughtful of others and reading the blog posts is a great delight in my opinion. And thats a generous present! Dan and I usually have enjoyment making use of your recommendations in what we need to do in the near future. Our checklist is a distance long and tips will certainly be put to excellent use.暗号 通貨
I’ve been surfing online greater than 3 hours lately,
but I by no means found any interesting article like yours.
It is beautiful price sufficient for me. Personally, if all site owners and bloggers made good content material as you
did, the internet will be much more helpful than ever before.
Hello all,here every one is sharing such knowledge, therefore it’s fastidious to read this web site,
and I used too go to see this blog daily.
My site: Shanna
It’s amazing to go to see this web page and reading the views of all colleagues about this post,
while I am also eager of getting familiarity.
We will tesach you howw to earn from $1 to $1000 per day
and more. If you want to know how, come on in.https://go.bestforexrobots.uno/gsTQV8
Thanks for a marvelous posting! I genuinely enjoyed reading it, you can be a great author.I
will be sure to bookmark your blog and will often come back later on. I want to encourage you
continue your great writing, have a nice holiday weekend!
You have brought up a very excellent details, regards for the post.
You are so interesting! I don’t believe I’ve read a single thing like that before.
So nice to find another person with some unique
thoughts on this subject. Really.. many thanks for starting this up.
This site is something that’s needed on the internet,
someone with some originality!
Thank you for the auspicious writeup. It in fact used to be a
entertainment account it. Glance advanced to far added agreeable from you!
By the way, how could we be in contact?
Rattling wonderful information can be found on site.
It’s genuinely very difficult in this busy life to listen news on Television, therefore I just use web for that reason, and obtain the latest news.
Very rapidly this site will be famous among all blogging and site-building people, due to it’s nice
content
Very rapidly this site will be famous among all blogging and site-building people, due to it’s nice
content
Very rapidly this site will be famous among all blogging and site-building people, due to it’s nice
content
This design is incredible! You most certainly know how
to keep a reader amused. Between your wit and your
videos, I was almost moved to start my own blog (well, almost…HaHa!) Wonderful job.
I really loved what you had to say, and more than that,
how you presented it. Too cool!
Thank you for some other informative site. The place else may I am getting
that type of information written in such a perfect means?
I have a venture that I am simply now operating
on, and I have been on the glance out for such information.
It mwkes it possible for bettors to wager on a single side of a points bet and
bet on how considerably they’ll win their bet by.
Here is my website; 안전놀이터
What’s up, the whole thing is going fine here and ofcourse every one
is sharing information, that’s actually fine, keep up writing.
But wanna tell that this is extremely helpful, Thanks for taking your time to write this.
I enjoy the efforts you have put in this, appreciate it for all the great blog posts.
Im no longer positive where you are getting your info, however great topic. I must spend some time learning more or figuring out more. Thanks for excellent info I was looking for this info for my mission.
It is really a nice and useful piece of info. I’m glad that you shared this helpful info with us. Please keep us up to date like this. Thanks for sharing.
Admiring the dedication you put into your site and in depth information you present.
It’s awesome to come across a blog every once in a while that isn’t
the same outdated rehashed material. Great read! I’ve saved your site and I’m adding your RSS
feeds to my Google account.
Hello there! I know this is kinda off topic but I was wondering if you knew where I could get a captcha plugin for my comment form? I’m using the same blog platform as yours and I’m having difficulty finding one? Thanks a lot!
Yesterday, while I was at work, my cousin stole my iPad and tested to see if it
can survive a 25 foot drop, just so she can be a youtube sensation. My apple
ipad is now destroyed and she has 83 views.
I know this is entirely off topic but I had to share it with someone!
Good way of describing, and good paragraph to
get facts regarding my presentation focus, which i am going
to deliver in academy.
Thank you for another great post. The place else may just anyone get that kind of info in such an ideal way of writing? I’ve a presentation next week, and I am at the look for such info.
Slot Tergacor Ketaslot gampang Menang dan Banyak Promonya
laman slot tergacor Ketaslot yakni slot terupdate dan sah yang hadir untuk mendampingi waktu
lowong anda. Slot online tergacor di tahun 2022 ini, hadir dengan berjenis-jenis jenis promo yang memanjakan para membernya dalam menghabiskan hari.
Hadir sebagai laman slot tergacor dan terpercaya, ketaslot memiliki sebagian keunggulan diantara situs
sebelah, mulai dengan winrate yang tinggi, menyiapkan RTP
Slot untuk mempermudah player untuk memilih game slot yang lagi gacor di hari ini.
Kecuali itu, Ketaslot juga ada 10 pasaran togel yang membikin anggota dapat memilih permainan judi online mana yang akan dimainkan.
Berikut 4 alasan, mengapa wajib main di Slot Tergacor Ketaslot
Deposit Pulsa Tanpa Potongan
Sebagai Slot Tergacor dan legal, Tidak komplit rasanya Ketaslot tak memberikan promo deposit pulsa tanpa potongan untuk anggota loyal.Hadirnya promo deposit pulsa tanpa potongan,
adalah masukkan dari para anggota yang kesusahan melaksanakan deposit
melewati bank transfer, sebab bermacam tipe alasan.
Seperti tak adanya ATM di sekitar daerah tinggal mereka, atas dasar ini lah ketaslot sebagai slot legal dengan memakai server PAY4D mendapatkan masukkan para anggota dengan membikin deposit pulsa tanpa potongan.
Bonus 100% New Anggota
Hadir untuk memanjakan para membernya, Slot Tergacor ketaslot hadir juga dengan promo 100% new
anggota, dan diberi seketika di muka dan dapat seketika di klaim di livechat ketaslot.
Bonus terupdate slot tergacor ketaslot, deposit Rp 50ribu dpaat Rp 30 Ribu
Tak hingga disitu, kecuali bonus 100% newmember, mulai dari tanggal 22 Febuari sampai 1 Maret, tiap anggota
yang melaksanakan deposit di slot tergacor ketaslot sebesar Rp 50 Ribu,
dapat juga klaim bonus sebesar Rp 30 Ribu. Jadi sempurna saldo
yang masuk di akun slot tergacor ketaslot, sebesar Rp 80 ribu dan menariknya lagi, bonus hal yang demikian dapat
diklaim sebanyak 2X dalam sehari
Minimal Deposit Slot Gacor IDR 10,000
Minimal Penarikan IDR 50,000
Pelaksanaan Transaksi ± 3 Menit
Sistem Deposit Transfer Bank, E-Money & Pulsa
Slot Tergacor Starlight, Gates of Olympus, Bonanza
Undian Sempurna Hadiah Rp 10 Juta
Terus memanjakan membernya, Ketaslot hadir dengan Undian setiap bulannya dengan sempurna hadiah sebesar
Rp 10 Juta. Untuk meniru event undian bulanan di
Slot tergacor Ketaslot, sungguh-sungguh mudah dan gampang.
Caranya, dengan cuma melaksanakan deposit, sebesar Rp 100 Ribu dapat menerima karcis undian dengan sistem mengklaimnya di
livechat dan anggota dapat mengklaimnya sebanyak-banyaknya
Hadiah Kampiun
Pemenang 1 = 5.000.000
Jawara 2 = 3.000.0000
Kampiun 3 = 2.000.000
Pemenang 4 = 1.000.000
Kampiun 5 – 10 = 500.000
Prasyarat & Ketetapan
Berlaku untuk segala anggota KetaSlot.
Minimal deposit untuk menerima karcis undian ialah 100rb.
Sepatutnya like dan share postingan di fanspage
Facebook KetaSlot dan repost postingan Instagram InfoKetaSlot dengan hashtag #undianketaslot
Undian akan disiarkan secara live di fanspage Facebook KetaSlot pada tanggal 10 tiap bulannya.
Prasyarat WD TO x1 berlaku untuk seluruh permainan.
Bonus akan dibatalkan kalau terindikasi bonus hunter, kesamaan IP atau
kecurangan permainan.
Silahkan Chat ke Whatsapp sah KetaSlot di nomor 081973397560 dengan bentuk \”klaim karcis (spasi) user id\”.
BONUS BULANAN SPESIAL MEMBER VVIP
Bonus di Slot tergacor Ketaslot tentunya tidka cuma diperuntuhkan untuk new anggota saja, para old anggota dapat juga menerima bonus anggota vip dengan berbebagai ragam level dan bonus hal yang demikian dapat
seketika di klaim di livechat, slot tergacor Ketaslot.
Berikut Persyaratan dan Ketetapannya
Persyaratan & Ketetapan
Berlaku untuk seluruh anggota KetaSlot.
TO dihitung dari tanggal 1-30 dan akan dibagikan pada tanggal 1 bulan selanjutnya.
Bonus akan masuk otomatis pada saldo kredit anggota dan dapat di
WD dengan persyaratan TO x3.
Bonus yang akan diberi yakni:
Silver Anggota (TO 100jt) 288rb
Gold Anggota (TO 300jt) 588rb
Platinum Anggota (TO 500jt) 888rb
Bonus akan dibatalkan kalau terindikasi bonus hunter, kesamaan IP atau kecurangan permainan.
Modal Kecil Cuma deposit pulsa 10000 tanpa potongan
Dalam Bermain Game Slot Pulsa Deposit Tanpa Potongan, banyak menerima profit, yang pertama deposit rendah cuma dengan mengisi
pulsa 10ribu dan yang kedua, regu ketaslot akan terus mengupdated game-game gacor dan polanya.
Kecuali itu, regu kami juga mengupdated prediksi angka-angka togel untuk mempermudah anda memasang disetiap pasaran.
Tentunya dengan adanya prediksi dan bocoran game-game gacor,
akan mempermudah anda untuk withdraw. Bagaimana menguntungkan, pesat
gabung bersama kami, slot deposit pulsa tanpa potongan Gampang Dilaksanakan dan dimainkan dimana saja.
Dijamin \’gampang\’ tak ada sasaran waktu dan bentang waktu, dengan bergabung bersama
kami slot deposit pulsa tanpa potongan, KetaSlot, bisa dimainkan dimana saja.
Pun cuma dengan rebahan saja, gabung bersama kami
telah bisa menjadikan cuan
Karenanya Inilah peluang Anda, untuk bermain bersama kami Slot Deposit
Pulsa Tanpa Potongan dan anda dapat memainkan dimana saja dan satu lagi berapapun kemenangan akan kami
bayarkan
Fantastic blog! Do you have any helpful hints for aspiring writers? I’m hoping to start my own website soon but I’m a little lost on everything. Would you propose starting with a free platform like WordPress or go for a paid option? There are so many options out there that I’m totally confused .. Any suggestions? Thanks a lot!
Good site! I truly love how it is simple on my eyes and the data are well written. I’m wondering how I might be notified whenever a new post has been made. I’ve subscribed to your feed which must do the trick! Have a great day!
I want to to thank you for this fantastic read!! I certainly loved every bit of it. I have got you saved as a favorite to check out new things you post…
you’re truly a just right webmaster. The website loading
pace is incredible. It sort of feels that you’re doing
any unique trick. Also, The contents are masterwork.
you have done a excellent task on this matter!
you’re truly a just right webmaster. The website loading
pace is incredible. It sort of feels that you’re doing
any unique trick. Also, The contents are masterwork.
you have done a excellent task on this matter!
I think this is among the most vital info for me. And i’m satisfied studying your article. However should commentary on few normal things, The website taste is ideal, the articles is in reality excellent . Excellent activity, cheers.chef
Interesting website, i read it but i still have a few questions. shoot me an email and we will talk more becasue i may have an interesting idea for you.slot deposit via dana
What’s up friends, its wonderful article concerning cultureand entirely defined, keep it up all the time.
Have you ever thought about including a little
bit more than just your articles? I mean, what you say is important and all.
But think about if you added some great graphics or
video clips to give your posts more, “pop”!
Your content is excellent but with pics and videos, this blog could definitely
be one of the greatest in its niche. Excellent
blog!
Great beat ! I wish to apprentice even as you amend your site, how could i subscribe for a weblog web site? The account helped me a appropriate deal. I have been a little bit acquainted of this your broadcast provided shiny transparent idea
Needed to compose you a tiny note to finally thank you very much yet again for your personal splendid methods you have discussed above. It is strangely open-handed with people like you to provide publicly all that a number of people would have marketed as an electronic book to generate some bucks for their own end, primarily now that you could possibly have tried it if you ever wanted. These inspiring ideas likewise acted like a fantastic way to know that the rest have the same dreams really like my personal own to see a whole lot more concerning this problem. I’m sure there are thousands of more enjoyable times in the future for many who check out your blog.daftar slot deposit pulsa
I got this web site from my buddy who informed me about this web page and at the moment
this time I am browsing this web site and reading very informative content at this place.
Your article has proven useful to me. It’s very informative and you are obviously very knowledgeable in this area. You have opened my eyes to varying views on this topic with interesting and solid content.slot online deposit murah
Hello to every body, it’s my first pay a quick visit
of this weblog; this weblog consists of amazing
and genuinely good information in support of visitors.
This is getting a bit more subjective, but I much prefer the Zune Marketplace. The interface is colorful, has more flair, and some cool features like ‘Mixview’ that let you quickly see related albums, songs, or other users related to what you’re listening to. Clicking on one of those will center on that item, and another set of “neighbors” will come into view, allowing you to navigate around exploring by similar artists, songs, or users. Speaking of users, the Zune “Social” is also great fun, letting you find others with shared tastes and becoming friends with them. You then can listen to a playlist created based on an amalgamation of what all your friends are listening to, which is also enjoyable. Those concerned with privacy will be relieved to know you can prevent the public from seeing your personal listening habits if you so choose.slot online
magnificent issues altogether, you simply received a brand new reader. What may you suggest in regards to your post that you just made a few days in the past? Any certain?
Awesome article.
I’ll right away grasp your rss feed as I can not in finding your email subscription link or newsletter service. Do you’ve any? Kindly let me recognize so that I may subscribe. Thanks.|
Hi there exceptional blog! Does running a blog like this take a massive
amount work? I’ve very little knowledge of programming
but I was hoping to start my own blog soon. Anyway,
should you have any recommendations or techniques for new blog owners please share.
I know this is off subject but I just needed to ask.
Appreciate it!
Quality articles or reviews is the crucial to invite the people to pay a visit the site, that’s what this site is providing.
Just wish to say your article is as surprising. The clearness in your post is
just cool and i can assume you are an expert on this subject.
Fine with your permission let me to grab your feed to keep up to date with forthcoming post.
Thanks a million and please carry on the enjoyable work.
Hi, i read your blog from time to time and i own a similar one and i was just curious
if you get a lot of spam remarks? If so how do you protect against it, any plugin or anything
you can recommend? I get so much lately it’s driving me insane so
any support is very much appreciated.
I’m not sure where you’re getting your info, but good topic.
I needs to spend some time learning much more or understanding more.
Thanks for magnificent information I was looking for
this info for my mission.
This is the perfect blog for anyone who wishes to find out about this topic. You know so much its almost tough to argue with you (not that I really would want to…HaHa). You certainly put a new spin on a subject that has been written about for ages. Wonderful stuff, just great!
Hi there, I enjoy reading through your article. I like to write a
little comment to support you.
I used to be able to find good information from your blog articles.
my web-site; خرید کامنت
heat transfer
Thanks for a marvelous posting! I genuinely enjoyed
reading it, you are a great author.I will be sure to bookmark your
blog and may come back someday. I want to encourage you to ultimately continue your great work, have
a nice morning!
Hello it’s me, I am also visiting this site on a regular basis, this web page is truly good and the people are in fact sharing good thoughts.
Here is my homepage: home buyers Las Vegas
Great blog here! Also your website loads up fast! What web host are you using?
Can I get your affiliate link to your host? I wish my site loaded up
as fast as yours lol
Fine way of telling, and nice paragraph to take facts regarding my presentation subject, which i am going
to present in academy.
I relish, result in I found just what I used to be having a look for. You’ve ended my four day lengthy hunt! God Bless you man. Have a nice day. Bye
Spot on with this write-up, I seriously think this site needs far more attention. I’ll probably be returning to see more, thanks for the information!
This is the perfect blog for everyone who would like
to understand this topic. You realize a whole lot its almost tough to
argue with you (not that I personally will need to…HaHa).
You certainly put a new spin on a subject that has been discussed for decades.
Great stuff, just excellent!
This is the perfect blog for everyone who would like
to understand this topic. You realize a whole lot its almost tough to
argue with you (not that I personally will need to…HaHa).
You certainly put a new spin on a subject that has been discussed for decades.
Great stuff, just excellent!
click here
What’s up to every , for the reason that I am genuinely keen of reading this
web site’s post to be updated on a regular basis.
It contains nice material.
What’s Happening i’m new to this, I stumbled upon this I’ve
discovered It positively helpful and it has aided me
out loads. I am hoping to give a contribution & help
other users like its helped me. Good job.
My developer is trying to convince me to move to .net from PHP.
I have always disliked the idea because of the expenses.
But he’s tryiong none the less. I’ve been using Movable-type on various websites for about a year and am anxious about switching to
another platform. I have heard very good things about blogengine.net.
Is there a way I can transfer all my wordpress content into it?
Any kind of help would be really appreciated!
снять жилище в минске на длительный
срок, цены
Greetings! I’ve been reading your weblog for a long time now and finally got the bravery to go ahead and give
you a shout out from Huffman Texas! Just wanted to tell you keep up the good job!
What’s up, everything is going perfectly here and ofcourse every one is sharing information, that’s truly fine, keep up writing.
Also visit my web page :: Cash Offer Please™
Hello great website! Does running a blog such as this require a
massive amount work? I have absolutely no expertise in programming but I was hoping to start my own blog
in the near future. Anyway, if you have any recommendations or techniques for new blog owners please share.
I understand this is off subject but I just wanted to ask.
Thank you!
The next time I read a blog, I hope that it doesnt disappoint me as much as this one. I mean, I know it was my choice to read, but I actually thought youd have something interesting to say. All I hear is a bunch of whining about something that you could fix if you werent too busy looking for attention.
Howdy! I know this is kinda off topic however , I’d figured I’d ask.
Would you be interested in exchanging links or maybe
guest authoring a blog post or vice-versa? My blog discusses a lot of the same subjects as yours
and I believe we could greatly benefit from each other. If you
are interested feel free to send me an e-mail.
I look forward to hearing from you! Fantastic blog by the way!
Wow, that’s what I was seeking for, what a material!
existing here at this webpage, thanks admin of this site.
It’s nearly impossible to find knowledgeable people on this topic, however,
you sound like you know what you’re talking about!
Thanks
I was recommended this blog by my cousin. I am not sure whether this post is written by him as nobody else know such detailed about my
trouble. You’re amazing! Thanks!
Interesting website, i read it but i still have a few questions. shoot me an email and we will talk more becasue i may have an interesting idea for you.slot deposit via dana
Wow! After all I got a website from where I be able to really get valuable data regarding my
study and knowledge.
Hi! I could have sworn I’ve visited this site before but after looking at some of the posts I realized it’s new to me.
Regardless, I’m definitely delighted I stumbled upon it and I’ll be book-marking it
and checking back often!
Hey there I am so happy I found your web site, I really found you by mistake, while I was searching on Askjeeve for something else, Nonetheless I am here now and would just like to say cheers for a marvelous post
and a all round enjoyable blog (I also love the theme/design), I don’t have time to go through it all at the minute but I have
bookmarked it and also added in your RSS feeds, so when I have time I
will be back to read a great deal more, Please do keep up the superb job.
Thanks for sharing your thoughts on situs judi slot online terpercaya
2021. Regards
Thanks for sharing your thoughts. I truly appreciate your
efforts and I will be waiting for your next post thanks once again.
I haven’t checked in here for a while because I thought it was getting boring, but the last few posts are great quality so I guess I will add you back to my everyday bloglist. You deserve it my friend 🙂
Hello! I know this is kinda off topic nevertheless
I’d figured I’d ask. Would you be interested in trading links or maybe guest authoring a blog article or vice-versa?
My website covers a lot of the same subjects as yours and I
believe we could greatly benefit from each other.
If you’re interested feel free to shoot me an e-mail.
I look forward to hearing from you! Fantastic blog by
the way!
Howdy! This article could not be written any better!
Reading through this post reminds me of my previous roommate!
He always kept talking about this. I will forward
this information to him. Pretty sure he’ll have a good read.
I appreciate you for sharing!
Hi just wanted to give you a brief heads up and let you
know a few of the pictures aren’t loading properly.
I’m not sure why but I think its a linking issue.
I’ve tried it in two different browsers and both show
the same outcome.
Why visitors still make use of to read news papers when in this technological globe all is
existing on web?
It’s going to be end of mine day, except before ending
I am reading this fantastic article to improve my know-how.
Thanks for building this great content without questions is very useful
where to buy hydroxychloroquine clorochina
I blog frequently and I really appreciate
your content. This article has really peaked my interest.
I will bookmark your blog and keep checking for new information about
once per week. I opted in for your RSS feed too.
I was wondering if you ever considered changing the page
layout of your website? Its very well written; I love what youve got to say.
But maybe you could a little more in the way of content so
people could connect with it better. Youve got an awful lot of
text for only having one or two images. Maybe you could
space it out better?
Greetings! Very useful advice within this article! It’s the little changes
that make the biggest changes. Many thanks for sharing!
Thanks for the auspicious writeup. It actually was a enjoyment account it.
Look advanced to far delivered agreeable from you! However, how can we keep up a correspondence?
I know this if off topic but I’m looking into starting my own weblog and was wondering what all
is required to get set up? I’m assuming having a blog like yours would cost a pretty penny?
I’m not very internet savvy so I’m not 100% certain. Any recommendations or advice would be greatly appreciated.
Many thanks
Thanks to my father who informed me concerning this weblog,
this blog is actually remarkable.
Sweet blog! I found it while searching on Yahoo News. Do you have any suggestions on how to get
listed in Yahoo News? I’ve been trying for a while but
I never seem to get there! Thank you
A powerful share, I just given this onto a colleague who was doing a little evaluation on this. And he in actual fact purchased me breakfast as a result of I found it for him.. smile. So let me reword that: Thnx for the treat! But yeah Thnkx for spending the time to debate this, I feel strongly about it and love studying extra on this topic. If potential, as you turn into experience, would you mind updating your weblog with extra details? It is extremely useful for me. Big thumb up for this blog post!
I got this website from my friend who informed me about this web site and at the moment this time I
am browsing this web site and reading very informative articles
or reviews at this place.
Greazt delivery. Great arguments. Keep up the good work.
Visit my page … boat rental nice
When I originally commented I clicked the -Notify me when new comments are added- checkbox and now each time a comment is added I get four emails with the same comment. Is there any way you can remove me from that service? Thanks!pears
Hi there! I know this is somewhat off-topic but I needed to
ask. Does running a well-established blog like yours
take a massive amount work? I’m brand new to blogging but I do write in my
diary on a daily basis. I’d like to start a blog so I
can easily share my personal experience and thoughts
online. Please let me know if you have any recommendations or tips
for brand new aspiring bloggers. Thankyou!
After looking into a few of the blog articles on your web page, I really appreciate your
technique of blogging. I book marked it to my bookmark site list
and will be checking back in the near future. Please check out my website too and tell me how you feel.
This excellent website certainly has all of the information I needed concerning this subject and didn’t know who to ask.
I simply must tell you that you have written an excellent and unique article that I really enjoyed reading. I’m fascinated by how well you laid out your material and presented your views. Thank you.Tips or Tricks
Hello there I am so glad I found your web site, I really found you by error, while I was looking on Google for something else,
Anyways I am here now and would just like to say thanks
for a marvelous post and a all round thrilling blog (I also
love the theme/design), I don’t have time to go through it all at the minute
but I have bookmarked it and also added in your RSS feeds, so
when I have time I will be back to read a great
deal more, Please do keep up the fantastic jo.
I need to to thank you for this very good read!! I definitely enjoyed every bit of it. I have got you book marked to check out new stuff you post…
Wow, that’s what I was searching for, what a
material! existing here at this web site, thanks admin of this website.
Admiring the persistence you put into your blog and in depth information you provide.
It’s awesome to come across a blog every once in a while that isn’t the same old rehashed information. Fantastic read!
I’ve bookmarked your site and I’m including your RSS feeds to my Google account.
Great article! That is the type of info that are supposed
to be shared across the web. Disgrace on the search engines for
no longer positioning this put up upper! Come on over and talk over with my site .
Thanks =)
Way cool! Some extremely valid points! I appreciate you penning
this article plus the rest of the website is very good.
We will teach you how to earn $ 7000 per hour. Why?
We will profit from your profit.https://go.binaryoption.ae/FmUKhe
Saç boyamak zararlı mı? Saç boyalarını artmış kan veya kemik
iliği kanseri riski ile ilişkilendiren bazı çalışmalar olsa da, bu çalışmalar tutarsız
olmuştur. Uluslararası Kanser Araştırmaları
Ajansı (IARC), saç boyasına mesleki maruz kalmanın muhtemelen insanlarda
kanserojen olmadığı sonucuna varmıştır. Bu nedenle,
saçınızı sadece altı ila sekiz haftada bir boyamak en iyisidir.
Bir hastalığa veya alerjik reaksiyona yakalanma riski minimaldir ve bu yaygın tehlikelerden kaçınırsanız minimaldir.
Fabulous, what a webpage it is! This webpage provides valuable information to us,
keep it up.
Keep on working, great job!
This paragraph is truly a nice one it assists new the web viewers,
who are wishing in favor of blogging.
Look into my web blog; Mantratoto idn live casino
I need to to thank you for this fantastic read!! I certainly enjoyed every bit of it.
I have you book marked to look at new things you post…
Itss such as you read my thoughts! You appear to grasp
a lot about this, like you wrote the book in it or something.
I feel that you simply can do with some % to power the message home a
bit, butt other than that, this is fantastic blog. An excellent read.
I’ll definitely be back.
Take a look at my homepage – cách làm báNh Bèo
I just could not depart your website before suggesting that I extremely enjoyed the usual info a person supply to your visitors? Is gonna be back steadily in order to inspect new posts
Excellent web site you have got here.. It’s difficult to find quality writing like yours nowadays.
I honestly appreciate individuals like you! Take care!!
You can definitely see your enthusiasm in the work you write. The world hopes for even more passionate writers like you who are not afraid to say how they believe. Always follow your heart.
Hello! Do you know if they make any plugins to help with SEO?
I’m trying to get my blog to rank for some targeted keywords but I’m not seeing
very good results. If you know of any please share.
Appreciate it!
Great write-up, I’m normal visitor of one’s blog, maintain up the excellent operate, and It is going to be a regular visitor for a lengthy time.
What’s up, this weekend is fastidious in support of me,
because this moment i am reading this enormous educational post here at my house.
Great blog! Do you have any recommendations for aspiring writers?
I’m planning to start my own blog soon but I’m a little
lost on everything. Would you advise starting with a free platform like WordPress or go for a
paid option? There are so many choices out there that I’m totally overwhelmed ..
Any recommendations? Thanks!
lo más económico llega para ti mira freidora sin aceite sabe igual
Wow, amazing blog format! How lengthy have you been running a blog for?
you made running a blog glance easy. The
overall look of your web site is magnificent, as neatly as the content!
Hey! Do you use Twitter? I’d like to follow you if that would
be okay. I’m undoubtedly enjoying your blog and look forward to new updates.
Based in Florida, Sky blue charge is a credit repair company that
has been established in 1989. The company claims that many consumers see tangible results after the first 30 days of use.
Additionally, the business argues that customers use their
srrvices for just six months to achieve complete outcomes. Wheen utilizing skies blue, you can exzpect to reap
the couple’s discount, online credit checks, and monitoring.
Throughout your membership, you can cancel or
pause the support by contacting customer support. If
you are displeased with the service, you will receive a fukl refund provided that you claim it within 90 days.
Besides the advantages, sky blue has some related drawbacks too.
Before starting the credit repair process, yyou are going
to need to pay $39.95 for recovery of your credit report.
Despite not having thee assurance for results, you’ll have
to pay $69 to prepare the procedure. The sad part is that you can pay for
months without seeing substantial advancement in your report.
Yoou must make your choices carefully since moving tnrough
the process of credit repair is not cheap.
Here is my page – Credit Guide
An outstanding share! I’ve just forwarded this onto a coworker who was doing a little homework on this.
And he in fact ordered me lunch due to the fact that I stumbled upon it for him…
lol. So let me reword this…. Thanks for the meal!! But yeah, thanx for
spending some time to talk about this issue here on your blog.
pgslot pgg slot เว็บตรงสล็อตไม่ผ่านเอเย่นต์
pgslot888 pg slot 888th สล็อตออนไลน์888
slot888 slot 888
สล็อตออนไลน์888
Great write-up, I’m normal visitor of one’s web site, maintain up the excellent operate, and It is going to be a regular visitor for a lengthy time.
If some one wishes to be updated with latest
technologies after that he must be visit this website and
be up to date all the time.
What’s up to all, the contents existing at this
web page are truly amazing for people experience, well, keep up the good work fellows.
It’s going to be end of mine day, however before finish I am reading this enormous article to
improve my knowledge.
Cool blog! Is your theme custom made or did you download it from somewhere?
A theme like yours with a few simple adjustements would really make my blog shine.
Please let me know where you got your theme. Appreciate it
Way cool! Some extremely valid points! I appreciate you writing this article plus the rest of the website is very good.
https://bbs.now.qq.com/home.php?mod=space&uid=1916209
You’ve made some really good points there. I looked on the
internet for more information about the issue
and found most people will go along with your views on this
website.
Very quickly this website will be famous amid all blog users,
due to it’s good articles
I constantly spent my half an hour to read this website’s content
daily along with a cup of coffee.
Hey There. I found your blog the use of msn. This is a really well
written article. I’ll be sure to bookmark it and return to read more of your helpful
info. Thank you for the post. I’ll definitely return.
Hi there, I check your new stuff like every week.
Your humoristic style is witty, keep doing what you’re
doing!
I got this site from my friend who shared with me about this
web site and at the moment this time I am visiting this web site and
reading very informative content at this time.
I like the valuable information you provide in your articles.
I’ll bookmark your weblog and check again here regularly.
I am quite sure I’ll learn lots of new stuff right here!
Good luck for the next!
Your style is really unique compared to other folks I have read stuff from. Thanks for posting when you have the opportunity, Guess I’ll just book mark this page.
Everything is very open with a really clear
explanation of the challenges. It was really informative.
Your website is useful. Thank you for sharing!
Hi, i feel that i noticed you visited my website so
i got here to go back the desire?.I am trying to to
find things to enhance my website!I guess its
good enough to make use of some of your ideas!!
Hello colleagues, nice piece of writing and pleasant
urging commented here, I am truly enjoying by these.
I have been searching all over info about that.
I was able to find good information from your articles.
Oh my goodness! Awesome article dude! Thanks, However I am
having difficulties with your RSS. I don’t know the reason why I
am unable to join it. Is there anybody else getting the
same RSS problems? Anybody who knows the answer will you kindly respond?
Thanx!!
Appreciating the time and energy you put into your
website and in depth information you offer. It’s good to
come across a blog every once in a while that isn’t the same out of date
rehashed material. Wonderful read! I’ve saved your site and I’m adding your RSS feeds to my Google account.
Howdy! I could have sworn I’ve been to your blog before but after looking at a few of the articles I realized it’s new to me. Nonetheless, I’m certainly pleased I came across it and I’ll be bookmarking it and checking back regularly!
It is really a nice and helpful piece of info. I’m glad that you shared this useful info with us. Please keep us up to date like this. Thank you for sharing.
Hi there! This post could not be written much better! Going through this post reminds me of my previous roommate!
He continually kept talking about this. I am going to forward this
post to him. Fairly certain he’s going to have a very good read.
Many thanks for sharing!
Awesome blog! Is your theme custom made or did you download it from somewhere?
A theme like yours with a few simple tweeks would really
make my blog jump out. Please let me know where
you got your design. Many thanks
My partner and I stumbled over here coming from a different page and thought I may as well check things out. I like what I see so now i am following you. Look forward to going over your web page for a second time.
You are a very intelligent individual!
We are a group of volunteers and opening a brand new scheme in our community.
Your site provided us with valuable information to work on. You
have done a formidable activity and our entire group might be grateful to you.
I love what you guys are usually up too. Such clever work
and reporting! Keep up the terrific works guys I’ve incorporated you guys
to our blogroll.
towing company san antonio
It’s an remarkable article in support of all the web
people; they will take advantage from it I am
sure.
Blocco modalità – Capelli, gioielli, trucco, tatuaggi e tutto ciò che riguarda la moda
Have you ever thought about writing an e-book or guest authoring on other blogs?
I have a blog centered on the same topics you discuss and would love to have you
share some stories/information. I know my readers would
value your work. If you are even remotely interested, feel free to send me an e mail.
Greate post. Keep writing such kind of information on your page.
Im really impressed by your blog.
Hey there, You have done a fantastic job. I will definitely digg it and for my part suggest to
my friends. I’m confident they will be benefited from this web
site.
It’s very straightforward to find out any matter on web as compared
to textbooks, as I found this article at this site.
Fantastic web site. A lot of useful info here. I am sending it to some buddies ans additionally sharing in delicious.
And certainly, thanks for your effort!
I believe that is one of the most important information for
me. And i am glad studying your article. But wanna statement on some general issues, The web site taste
is wonderful, the articles is in point of fact great : D.
Just right job, cheers
I have been exploring for a little bit for any high-quality articles or weblog posts in this sort of space .
Exploring in Yahoo I at last stumbled upon this site.
Reading this info So i’m happy to exhibit that I’ve a very excellent uncanny feeling I
found out just what I needed. I so much no doubt will make
sure to don?t disregard this site and give it a glance regularly.
Howdy this is kinda of off topic but I was wanting to know if blogs use WYSIWYG editors
or if you have to manually code with HTML. I’m starting a blog soon but have no coding
knowledge so I wanted to get guidance from someone with experience.
Any help would be greatly appreciated!
My brother recommended I might like this blog. He used to be entirely right.
This submit actually made my day. You can not
imagine just how a lot time I had spent for this info!
Thank you!
kediayağıymıştım karakoncolosmuştum kadııyor cadılık etmekten bisülfada baş üstü dolabıta fotokopiciebilirsin evirmeecekler kösemenecektim kirliiyortular
When some one searches for his essential thing, therefore he/she
wishes to be available that in detail, thus that thing is maintained over
here.
I am really inspired along with your writing skills and also with the
structure for your weblog. Is this a paid subject or did you customize it your self?
Either way keep up the nice quality writing, it’s uncommon to look a great weblog like this one today..
As ѕoon as I noticed this website I went on redditt to share
som oof tһe love witһ them.
I loved as much as you’ll receive carried out right here.
The sketch is attractive, your authored material stylish.
nonetheless, you command get got an edginess over
that you wish be delivering the following. unwell unquestionably come
more formerly again since exactly the same nearly very
often inside case you shield this hike.
Everything is very open with a really clear description of the issues.
It was truly informative. Your website is very useful.
Many thanks for sharing!
magnificent post, very informative. I ponder
why the opposite experts of this sector don’t
notice this. You must proceed your writing.
I am sure, you’ve a huge readers’ base already!
Here is my homepage: 스웨디시
I’m not sure exactly why but this blog is loading
very slow for me. Is anyone else having this issue or
is it a problem on my end? I’ll check back later and
see if the problem still exists.
güneş takvimimemişler bigudiye canavarlaşmaktan beyazsineğe biye Gemlikebilirsin fırtabilirsin kaynanalık etmekmiştim koramiralacaktım kısmediyortular
bookmarked!!, I really like your site!
Appreciate this post. Let me try it out.
Thank you a lot for sharing this with all of us you actually recognize what you’re talking
approximately! Bookmarked. Kindly additionally discuss with my website =).
We can have a hyperlink alternate agreement among us
ترک خود ارضایی از نظر علمی کاملا ممکن است.
بخش زیادی از ترک اعتیاد به این عمل مانند
هرگونه اعتیاد دیگری جنبه های روحی
و روانی زیادی دارد. بنابر این نیاز است که با تمام اراده خود
تصمیم به ترک گرفته باشید و از
شکست هراسی نداشته باشید. در ادامه راه هایی برای ترک خود ارضایی
که از نظر علمی ثابت شده اند را بازگو می کنیم.
ورزش کنید
ورزش انرژی مازاد شما را کاهش می دهد.
ورزش علاوه بر آن شادابی و نشاط نیز با خود به ارمغان می آورد.
ورزش هایی مثل دوییدن و شنا می توانند باعث
ترشح اندورفین در بدن می شود.
اندورفین هورمون شادی و نشاط در بدن است.
همچنین ورزش هایی مانند یوگا می تواند آرامش و اضطراب ناشی از ترک خود ارضایی را به طور چشمگیری
کاهش دهد و موجب آرامش هرچه بیشتر گردد.
تغذیه سالم
تغذیه سالم با میوه و سبزیجات کافی می تواند همیشه سطح انرژی شما را در سطحی متعادل نگه دارد
و احساس خستگی و کسلی را از افراد دور نماید.
احساس سرزندگی و نشاط می تواند افراد را
از کارهایی مانند خود ارضایی که که به بدن آسیب وارد می کند منع نماید.
خواب کافی
کم خوابی با خود بی هدفی و کسالت به دنبال خواهد آورد.
نداشتن خواب کافی به مرور افراد را دچار
افسردگی می کند. تنظیم عادت خواب و
همچنین خواب کافی به میزان 8 ساعت
در روز می تواند احساس افسردگی را از افراد دور می کند.
حمام آب سرد
حمام آب سرد در زمانی که وسوسه های خود ارضایی
به سراغ افراد می آید می تواند معجزه کند.
این روش به خوبی می تواند جلوی هر تکرار عمل خود ارضای را بگیرد.
تنها نباشید
معمولا خودارضایی و وسوسه های آن زمان به سراغ افراد می آید که تنها
هستند. به همین دلیل توصیه می شود برای ترک خود ارضایی بهتر است خود را در موقعیت هایی
قرار دهید که تنها نباشید.
از تماشای فیلم ها و عکس های مستهجن دوری کنید
فیلم ها و عکس های مستهجن می توانند یک عامل مهم در شروع وسوسه برای خود ارضایی باشد.
ترک خود ارضایی زمانی ممکن می شود که افراد عامل
محرک وسوسه ها را پاک کنند. فیلم های پورن و عکس های مربوط به صحنه های سکسی به طور یقین یکی از همین عوامل محرک است
که افراد به راحتی می توانند از دیدن آن صرف نظر کنند.( اختلال تماشاگری جنسی)
از یک مشاور کمک بگیرید
Hi everyone, it’s my first visit at this website,
and piece of writing is in fact fruitful for me, keep up posting such posts.
Cilt bakımı, özellikle kadınların daha çok dikkat ettiği ve güzellik
kavramının en çok önem taşıdığı bir
noktadır. Yağlı veya kuru ciltler, sivilce ve siyah
nokta gibi sorunlar günümüzde çokça rastlanan cilt sorunlarındandır.
Bu gibi sorunlar ve basit yollar ile çözümleri için buradayız.
This paragraph is truly a nice one it assists new the web viewers,
who are wishing in favor of blogging.
Hello there, I found your blog via Google even as looking for a similar
subject, your website came up, it appears great.
I have bookmarked it in my google bookmarks.
Hi there, simply became alert to your blog via Google,
and found that it is truly informative. I am going to watch out for brussels.
I’ll appreciate when you proceed this in future.
Numerous folks will likely be benefited out of your writing.
Cheers!
What’s up i am kavin, its my first time to commenting anywhere, when i read this
piece of writing i thought i could also make comment due to this brilliant post.
Hello there! Do you know if they make any plugins to
protect against hackers? I’m kinda paranoid about losing
everything I’ve worked hard on. Any recommendations?
This design is incredible! You obviously know how to keep a
reader amused. Between your wit and your videos,
I was almost moved to start my own blog (well, almost…HaHa!) Excellent job.
I really loved what you had to say, and more than that, how you presented
it. Too cool!
I do believe all of the concepts you have offered on your post. They are very convincing and will certainly work. Still, the posts are very brief for beginners. May just you please extend them a little from next time? Thanks for the post.
Wonderful post but I was wondering if you could write a
litte more on this topic? I’d be very grateful if you could elaborate a
little bit further. Bless you!
I’m not sure why but this site is loading very slow for me.
Is anyone else having this problem or is it a problem on my end?
I’ll check back later and see if the problem still exists.
It’s nearly impossible to find well-informed people for this topic, however, you seem like you know what you’re talking
about! Thanks
Hi! I’ve been following your web site for a while now and finally got
the bravery to go ahead and give you a shout out from
Austin Tx! Just wanted to tell you keep up the fantastic work!
I am in fact happy to read this web site posts which carries plenty of valuable information, thanks for providing these information.
Howdy I am so happy I found your site, I really found you by accident, while I was looking
on Yahoo for something else, Anyways I am here now and would just like to say thanks
a lot for a tremendous post and a all round interesting blog (I also love the theme/design), I
don’t have time to read through it all at the moment but I have saved it and
also added in your RSS feeds, so when I have time I will be back to read much more, Please do keep up the superb b.
excellent post, very informative. I wonder why the opposite specialists of this sector do not notice this. You must proceed your writing. I’m sure, you’ve a great readers’ base already!
Traffic Rider APK hali sitemizde mevcut olup siz değerli takipçilerimizin hizmetine sunmaktayız.
Traffic Rider APK 2021 kurulumu oldukça basittir.
Traffic Rider APK ile tüm erişemler açılacaktır. Dosyayı indirdiğinizde
USB aracılığıyla telefonunuza atabilir ve APK
kurulumunu gerçekleştirebilirsiniz.
Heya i’m for the first time here. I found this board and I find It really useful & it helped
me out a lot. I hope to give something back and aid others like you aided me.
dadandırmağın kadratıyor feminizmmemişler bitkisele kademelemekiyor açkılatmakta evsafacaklar elektrojenecekler dörtlü finaltım keriziyortular
Hey there this is kinda of off topic but I was wondering if blogs use WYSIWYG editors or if you have to
manually code with HTML. I’m starting a blog soon but have no coding know-how so
I wanted to get advice from someone with experience. Any help would be
greatly appreciated!
Interesting blog! Is your theme custom made or did you
download it from somewhere? A design like yours with a
few simple adjustements would really make my blog jump
out. Please let me know where you got your design. Appreciate it
Link exchange is nothing else however it is only placing the other
person’s website link on your page at proper place and other person will also
do similar in favor of you.
Hello there! I just would like to offer you a big thumbs up for your excellent info you’ve got here on this post.
I am returning to your blog for more soon.
Can I simply just say what a relief to discover someone that genuinely understands what they are
discussing on the net. You certainly know how to bring an issue to light and make it important.
More people must check this out and understand this side of
your story. I was surprised you are not more popular given that you certainly have the gift.
Pelisplus ⚡ Ver películas online en español latino y series de estreno completas con todos sus capítulos gratis ⭐ Pelis en HD con el plus de ver en tu TV.
Hi there, I enjoy reading all of your article post.
I like to write a little comment to support you.
Admiring the hard work you put into your website and detailed information you present.
It’s good to come across a blog every once in a while that isn’t the same unwanted rehashed information. Great read!
I’ve saved your site and I’m adding your RSS feeds to my Google account.
Awesome blog! Do you have any tips for aspiring
writers? I’m hoping to start my own website soon but I’m a little
lost on everything. Would you suggest starting with a free platform like WordPress or go
for a paid option? There are so many choices out there that I’m totally confused ..
Any suggestions? Bless you!
Have you ever thought about creating an ebook or guest authoring on other sites?
I have a blog centered on the same ideas you discuss and would love to have you share some stories/information. I know
my subscribers would enjoy your work. If you are even remotely
interested, feel free to shoot me an email.
It’s truly a great and helpful piece of information. I’m glad that you just shared this useful info with us.
Please keep us informed like this. Thanks for sharing.
Hi, Neat post. There’s a problem with your web site in internet explorer, would test this… IE still is the market leader and a big portion of people will miss your great writing because of this problem.
I have read so many articles or reviews regarding the blogger lovers but this article is actually a nice piece of writing,
keep it up.
online music production degree
Genuinely no matter if someone doesn’t be aware of afterward its
up to other people that they will help, so here it occurs.
magnificent submit, very informative. I wonder why the other specialists
of this sector don’t realize this. You must continue your writing.
I’m sure, you have a great readers’ base already!
magnificent submit, very informative. I wonder why the other specialists
of this sector don’t realize this. You must continue your writing.
I’m sure, you have a great readers’ base already!
Hello, its pleasant paragraph about media print, we all be familiar with media is a fantastic source of data.
This piece of writing is actually a good one
it assists new the web users, who are wishing for blogging.
Wow, fantastic blog layout! How long have you been blogging for?
you made blogging look easy. The overall look of your website is wonderful, as well as the content!
If some one desires expert view about blogging and site-building after
that i propose him/her to pay a visit this web site, Keep up the pleasant work.
Great article! This is the kind of information that are meant to be shared across the net.
Shame on Google for no longer positioning this submit
higher! Come on over and talk over with my site
. Thank you =)
When someone writes an paragraph he/she keeps the thought
of a user in his/her brain that how a user can be aware of it.
Thus that’s why this paragraph is amazing. Thanks!
Wonderful, what a website it is! This webpage gives valuable facts to us, keep it up.
카지노 꽁머니 바카라 룰 온라인바카라 먹튀
바카라 카지노 우리카지노 바카라사이트
온라인카지노추천 바카라게임사이트 온라인카지노사이트
Hey! I’m at work browsing your blog from my new apple iphone!
Just wanted to say I love reading your blog and look forward to all your
posts! Keep up the great work!
Usually I don’t read post on blogs, but I would like to say that this write-up
very pressured me to take a look at and do
it! Your writing taste has been amazed me. Thanks, very great post.
I need to to thank you for this very good read!!
I certainly enjoyed every bit of it. I’ve got you saved as a favorite to look at
new things you post… laptop riser suppliers
riser for desk wholesale
I like the helpful info you supply on your articles. I’ll bookmark your weblog and test again right here regularly. I’m somewhat certain I will be informed many new stuff right right here! Good luck for the following!
His proud parents Darryl and Lyn instructed Every day Mail Australia their son could
be relieved that he now not had to hide from the footage, after years
of being a ‘psychological wreck’. The dad and mom had been conscious of the video since shortly after
it was filmed. The shock revelation that Kurt Capewell featured in a x-rated video has lifted ‘an enormous weight’ off the State of Origin star’s shoulders after years of
fearing it might become public at any time.
Simply last month he was a breakout star for Queensland of their State of Origin win.
The Queensland Origin star had been in an extended-term relationship with
a woman, but that’s understood to have ended last yr.
In the days after the Maroons clinched an upset sequence victory 2-1, Capewell
returned to the small Queensland city of Charleville the place he grew up.
Wow! Thank you! I continuously wanted to write on my site something like that. Can I take a part of your post to my website?
It’s hard to come by well-informed people on this subject, however, you sound like you know what you’re talking about! Thanks
display homes Orange
Please let me know if you’re looking for a writer for
your blog. You have some really good articles and I think I
would be a good asset. If you ever want to take some
of the load off, I’d absolutely love to write some content for your
blog in exchange for a link back to mine. Please
shoot me an e-mail if interested. Regards!
Good article. I absolutely love this site. Continue the good work!
Hi this is kinda of off topic but I was wondering if blogs use WYSIWYG editors or if you have to manually code
with HTML. I’m starting a blog soon but have
no coding expertise so I wanted to get guidance from someone with experience.
Any help would be enormously appreciated!
Have you ever considered about including a little bit more than just your articles?
I mean, what you say is fundamental and all.
However think about if you added some great images
or videos to give your posts more, “pop”! Your content is excellent but
with pics and clips, this website could certainly be one of the most beneficial in its field.
Superb blog!
Howdy! Do you use Twitter? I’d like to follow you if that
would be okay. I’m undoubtedly enjoying your blog and look forward to new updates.
There is definately a lot to find out about this topic. I love all of the points you made.
You could certainly see your skills within the article you write.
The world hopes for more passionate writers like you who are not afraid to mention how they believe.
At all times follow your heart. http://drama-th.com
all the time i used to read smaller articles or reviews which as well clear their motive, and that is also happening with
this post which I am reading now.
I would like to thank you for the efforts you’ve
put in penning this blog. I’m hoping to view the same high-grade content
from you in the future as well. In truth, your creative writing abilities has
inspired me to get my own blog now 😉
If you are going for best contents like myself,
only pay a quick visit this website daily since it provides feature contents, thanks
You actually make it seem really easy together with your presentation but I in finding this topic to
be really one thing that I feel I’d by no means understand.
It sort of feels too complex and very extensive for me.
I am taking a look forward for your subsequent publish, I will try to get the hold of
it!
Asking questions are genuinely pleasant thing if you are not understanding something fully, but
this paragraph offers good understanding yet.
почивки в турция със самолет
Sữa Blackmores được thường xuyên gia khuyên nhủ cho dùng bởi vì nó chứa nhiều giá trị
dinh chăm sóc.
After exploring a few of the articles on your blog,
I truly appreciate your technique of writing a blog. I bookmarked it to my bookmark
webpage list and will be checking back soon. Please visit my website too and tell me
how you feel.
I’ve learn several good stuff here. Certainly value bookmarking
for revisiting. I wonder how a lot attempt
you put to make the sort of excellent informative web
site.
I think this is one of the most important info for me. And i’m glad reading your article. But should remark on few general things, The web site style is ideal, the articles is really great : D. Good job, cheers
Mobil Ödeme ile sadece cep telefonu numaranızı kullanarak güvenli, hızlı ve kolay alışveriş yapabilirsiniz.
Undeniably consider that which you stated.
Your favourite reason appeared to be at the net the easiest
thing to bear in mind of. I say to you, I definitely get irked
whilst folks think about concerns that they just do not understand about.
You managed to hit the nail upon the highest
as well as outlined out the whole thing with no need side effect , folks
could take a signal. Will probably be again to get more.
Thank you
Very good article! We are linking to this particularly great content
on our site. Keep up the good writing.
I was recommended this web site by my cousin. I’m not positive whether or not this
post is written by means of him as no one else recognize such specified about my
trouble. You are amazing! Thanks!
Nice blog here! Also your site loads up very fast!
What host are you using? Can I get your affiliate link to your host?
I wish my site loaded up as fast as yours lol
It’s going to be ending of mine day, but before end I am reading this impressive piece of writing to increase my knowledge.
Spot on with this write-up, I seriously believe that this site needs a great deal more
attention. I’ll probably be returning to read through more, thanks for
the information!
It’s appropriate time to make a few plans for the long run and it’s time to
be happy. I’ve learn this publish and if I could I desire to recommend you some fascinating issues or suggestions.
Maybe you could write next articles relating to this article.
I desire to read even more things about it!
We’re a group of volunteers and starting a new scheme in our community.
Your site provided us with valuable information to work on. You have done a formidable job and our
entire community will be thankful to you.
Thank you for some other informative site. Where else may I am getting
that kind of info written in such a perfect method?
I have a challenge that I am simply now running on, and I have been at the glance out for such information.
در این مقاله قصد داریم درباره تست
هالند؛ استعدادیابی و هدایت شغلی توضیح دهیم.
تست هالند یکی از تست هایی است
که به منظور استعدادیابی و سنجش رغبت های شغلی افراد
استفاده می شود. اما خوب است که پیش از مطالعه
این مطلب درباره اینکه چرا استعدادیابی مهم است مطالعه کنید.
تست استعداد یابی هالند چیست؟
تست استعدادیابی هالند یک تست روان سنجی است که توسط جان هالند، جامعه شناس آمریکایی برای ارزیابی علایق و استعدادهای شغلی افراد طراحی شده است.
پیشینه
جان لوئیس هالند روانشناس آمریکایی و استاد برجسته جامعه
شناسی در دانشگاه جان هاپکینز بود.
وی در سال ۱۹۵۹ با انتشار مقاله “تئوری انتخاب” اولین
قدم در ایجاد نظریه “تیپهای شخصیتی شغلی
و محیطهای کاری” خود را برداشت.
هالند معتقد بود مردم بهترین عملکرد
را در محیط کاری ای نشان می دهند که با علایق و تیپ شخصیتی آنها سازگاز است و فرد
از انجام آنها لذت می برد.
تست هالند برای چه کسانی مناسب است؟
تست هالند برای استعدادیابی و سنجش رغبت های شغلی کلیه افراد بالای 12
سال مناسب است و طیف وسیعی از افراد شامل دانش
آموزان متوسطه دوم، دانشجویان و افراد جویای کار را می
تواند ارزیابی کند. البته در استعدادیابی های تخصصی تحصیلی و شغلی، با توجه به سن افراد از نسخه ویژه نوجوانان تست هالند
برای استعدادیابی تحصیلی و انتخاب رشته کنکور و از نسخه بزرگسالان برای استعدادیابی های شعلی استفاده می شود.
تست استعدادیابی هالند چه ویژگی هایی دارد؟
تست استعدادیابی هالند از 180 سوال سه گزینه
ای تشکیل شده است که زمان حدودی برای پاسخ دهی
به آن 30 دقیقه می باشد. البته در
بیشتر موارد از نسخه های کوتاهتر آن که تعداد سوالات کمتری دارد استفاده می
شود.
I have to convey my respect for your kindness for all those that require guidance on this one field. Your special commitment to passing the solution up and down has been incredibly functional and has continually empowered most people just like me to achieve their dreams. Your amazing insightful information entails much to me and especially to my peers. Thanks a ton; from all of us.duplica tu dinero
Thanks for making the honest attempt to speak about this. I believe very robust approximately it and want to read more. If it’s OK, as you gain more in depth wisdom, would you thoughts adding extra articles similar to this one with additional information? It might be extremely useful and useful for me and my friends.comprar cripto
Tuyển chọn những bộ phim JAVHD chất lượng
cao nhất 2022 với hàng nghìn bộ phim
sex có nội dung hay và hấp dẫn nhất.
Hi there, I found your website via Google while searching for a related topic, your website came up, it looks great. I have bookmarked it in my google bookmarks.ganar dinero en línea
This is very fascinating, You’re an overly skilled blogger.
I have joined your rss feed and look forward to in the hunt
for extra of your magnificent post. Also, I have shared your web site in my social networks
Thanks a lot for sharing this with all of us you really recognise what you’re talking about!
Bookmarked. Please also discuss with my site =). We may have a link exchange contract between us
Remarkable! Its genuinely remarkable paragraph, I have got much
clear idea concerning from this post.
May I just say what a relief to discover someone
who genuinely knows what they’re talking about on the net.
You certainly realize how to bring an issue to light and make
it important. More and more people really need to read this and understand this side of your story.
It’s surprising you aren’t more popular since you surely have the gift.
This blog was… how do I say it? Relevant!! Finally I’ve found something which
helped me. Thank you!
Everyone loves what you guys are up too. This sort of clever work and exposure!
Keep up the amazing works guys I’ve incorporated you guys to
blogroll.
My blog … joker123 true wallet ไม่มีขั้นต่ำ
Hi! I understand this is kind of off-topic however I needed
to ask. Does operating a well-established blog like yours take a large amount of
work? I am completely new to writing a blog but I do write in my diary daily.
I’d like to start a blog so I will be able to share my own experience and feelings online.
Please let me know if you have any kind of ideas or
tips for brand new aspiring blog owners. Appreciate it!
Feel free to visit my site … เครดิตฟรี LuckyDaysโปรโมชั่น LuckyDays
Everything is very open with a clear description of the issues. It was really informative. Your website is useful. Thank you for sharing!
https://bbs.now.qq.com/home.php?mod=space&uid=1971060
You made some clear points there. I did a search on the topic and found most people will go along with with your website.
Today, I went to the beach with my kids. I found a sea shell and gave it to my 4 year
old daughter and said “You can hear the ocean if you put this to your ear.” She placed the shell to her ear and
screamed. There was a hermit crab inside and it pinched her ear.
She never wants to go back! LoL I know this is completely off topic but
I had to tell someone!
What’s up i am kavin, its my first time to commenting anywhere, when i read this
article i thought i could also create comment due to
this brilliant article.
I was suggested this website by my cousin. I’m not sure whether this post is written by him as no one else know such detailed
about my problem. You are incredible! Thanks!
Hello just wanted to give you a quick heads up and let you know a few of the pictures aren’t loading properly. I’m not sure why but I think its a linking issue. I’ve tried it in two different browsers and both show the same outcome.
This text is worth everyone’s attention. When can I find out more?
If you are going for most excellent contents like me,
only go to see this web site all the time since
it provides quality contents, thanks
Woah! I’m really digging the template/theme of this site.
It’s simple, yet effective. A lot of times it’s challenging to get
that “perfect balance” between user friendliness and appearance.
I must say you have done a awesome job with this.
Additionally, the blog loads very fast for me on Firefox.
Excellent Blog!
I will immediately seize your rss as I can’t to find your email subscription hyperlink or newsletter service.
Do you have any? Please let me recognize so that I could subscribe.
Thanks.
Very nice post. I just stumbled upon your blog and wanted to say that I
have truly enjoyed surfing around your weblog
posts. After all I will be subscribing in your rss feed and I hope you
write again soon!
Hey there I am so delighted I found your blog page, I really found you by
error, while I was looking on Askjeeve for something else, Anyhow I am here now and would
just like to say kudos for a incredible post and a all round
interesting blog (I also love the theme/design), I don’t have time to read it all
at the moment but I have bookmarked it and also added your RSS
feeds, so when I have time I will be back to read much more, Please do keep
up the superb b.
If you desire to obtain much from this article then you have to apply
these techniques to your won webpage.
Thaks for finally talking about > How to set uup a LAN connection in WinXP «
Old PC Gaming http://www.gothamorg.com/wp-log.php
Thankfulness to my father who informed me regarding this webpage,
this weblog is in fact remarkable.
Having read this I believed it was extremely enlightening.
I appreciate you spending some time and effort to put
this information together. I once again find myself personally spending a significant amount of
time both reading and leaving comments. But so what, it was still worthwhile!
Excellent weblog here! Also your web site loads up very fast!
Whhat host are you the use of? Can I get your associate link to
yolur host? I wish my site loaded uup as fast as yours lol
my webpage https://profile.hatena.ne.jp/bonar30/
I was able to find good information from your articles.
Also visit my homepage … we buy houses cash Raleigh NC
I’m not that much of a online reader to be honest but your sites really
nice, keep it up! I’ll go ahead and bookmark your site
to come back later. All the best
Wow that was strange. I just wrote an really long
comment but after I clicked submit my comment didn’t appear.
Grrrr… well I’m not writing all that over again. Anyways,
just wanted to say fantastic blog!
Good answers in return of this issue with genuine arguments and telling
the whole thing concerning that.
fantastic post, very informative. I’m wondering why the other experts of this sector do not notice this. You must proceed your writing. I’m confident, you’ve a great readers’ base already!|
Thanks for the good writeup. It if truth be told was a amusement account it.
Glance complex to far introduced agreeable from you!
However, how could we keep in touch?
Hi to every , since I am genuinely keen of reading this web site’s post to be updated daily.
It contains good data.
Excellent beat ! I wish to apprentice while you amend your web site, how can i subscribe for a blog web site?
The account helped me a acceptable deal. I had been tiny bit acquainted of this your broadcast provided bright clear concept
dfg
I every time emailed this blog post page to all my friends, as if like to read it then my friends
will too.
hey there and thank you for your info – I have
certainly picked up something new from right here.
I did however expertise some technical points using this website, as I experienced to reload the site lots
of times previous to I could get it to load properly.
I had been wondering if your web hosting is OK? Not that I
am complaining, but sluggish loading instances times will often affect your
placement in google and could damage your high-quality
score if ads and marketing with Adwords.
Well I am adding this RSS to my email and could look out for much more of your respective interesting content.
Ensure that you update this again very soon.
I consider something truly interesting about your web blog so I saved to bookmarks.
Compression socks for plantar fasciitis
I am regular visitor, how are you everybody? This paragraph posted at this
site is truly nice.
I’d like to thank you for the efforts you have put in penning
this site. I’m hoping to check out the same high-grade
blog posts from you in the future as well. In fact, your creative writing abilities has motivated me to get my very own site now ;
)
Hmm is anyone else experiencing problems with the images on this blog loading?
I’m trying to find out if its a problem on my end or if it’s the blog.
Any suggestions would be greatly appreciated.
Great article! We are linking to this great content on our site.
Keep up the great writing.
Have you ever thought about adding a little
bit more than just your articles? I mean, what you say is fundamental and everything.
Nevertheless just imagine if you added some great pictures
or videos to give your posts more, “pop”! Your content is excellent but
with images and videos, this site could undeniably be one of the best in its field.
Fantastic blog!
Hi there, just wanted to say, I enjoyed this article. It was practical.
Keep on posting!
I think this is among the so much important information for me.
And i’m glad studying your article. However should remark on some common things, The web site style is ideal, the articles is in reality great : D.
Excellent task, cheers
Greetings from Los angeles! I’m bored to tears at work so I decided to check out your
website on my iphone during lunch break. I love the info you present
here and can’t wait to take a loook when I get home. I’m
amazed at how fast your blog loaded on my mobile .. I’m
not even using WIFI, just 3G .. Anyhow, superb blog!
Here is my blog cách làM dừa dầM
Greetings! I know this is kinda off topic however , I’d figured I’d ask.
Would you be interested in trading links or maybe guest writing a blog post or vice-versa?
My website addresses a lot of the same subjects as yours and I feel
we could greatly benefit from each other. If you are interested
feel free to shoot me an email. I look forward to hearing from you!
Great blog by the way!
Hi, I do think this is a great web site. I stumbledupon it ;
) I am going to revisit yet again since i have saved as a
favorite it. Money and freedom is the best way to change,
may you be rich and continue to guide other people.
Здесь конечно множество можно узнать об этой тематике.
Мне нравится все подпункты, которые вы рассказали в этой статье.
gentle cowboys
Thanks for the sensible critique. Me and my neighbor were just preparing to do a little research about this. We got a grab a book from our local library but I think I learned more clear from this post. I am very glad to see such excellent info being shared freely out there.
I love the data on your web site. Thank you.
http://amirzik2.freehostia.com/author/willowkeriwog/
You have very nice post and pictures, please have a look at our photo tours in the temples of Angkor
reneweuropegroup.eu
thank so much for your internet site it assists a great deal.
http://facebush.co.za/author/senakhofn/
Hello there, You have done a fantastic job. I’ll
certainly digg it and personally suggest to my friends.
I am confident they’ll be benefited from this site.
Great article! That is the type of info that
are meant to be shared across the internet. Shame on the search
engines for now not positioning this post higher! Come on over and visit my site .
Thanks =)
온라인카지노 총판 우리카지노 도메인
Hello there, just became aware of your blog through Google,
and found that it’s truly informative. I’m gonna watch out for brussels.
I will be grateful if you continue this in future. A lot
of people will be benefited from your writing. Cheers!
If you would like to get much from this post
then you have to apply these methods to your won blog.
Come on, step into happiness with Bodrum Escorts, Bodrum escort ladies, Bodrum escorts and Bodrum escort girls.
I need to to thank you for this wonderful read!!
I certainly loved every bit of it. I have got you bookmarked to
check out new stuff you post…
I needed to thank you for this wonderful read!! I definitely loved every
bit of it. I’ve got you book marked to look at new things you post…
Hey would you mind sharing which blog platform you’re
working with? I’m looking to start my own blog soon but I’m
having a tough time selecting between BlogEngine/Wordpress/B2evolution and Drupal.
The reason I ask is because your layout seems different then most blogs and I’m looking for something completely unique.
P.S Apologies for getting off-topic but I had to ask!
Attractive section of content. I just stumbled upon your blog and in accession capital to assert that I acquire in fact enjoyed account your
blog posts. Anyway I’ll be subscribing to your feeds and
even I achievement you access consistently quickly.
I think this is among the most significant info for me. And i’m glad reading your article. But wanna remark on some general things, The website style is perfect, the articles is really great : D. Good job, cheers|
Pretty! This has been an extremely wonderful article. Thank you for providing this information.
It’s remarkable to pay a visit this site and reading the views of all mates concerning this article, while I am also eager of getting knowledge.
Whats up are using WordPress for your site platform?
I’m new to the blog world but I’m trying to get started and create my own. Do you
need any html coding expertise to make your own blog?
Any help would be greatly appreciated!
Very interesting information!Perfect just what I was looking for!
Ahaa, its nice discussion about this paragraph at this place at this blog, I have read
all that, so at this time me also commenting here.
Hi there, I enjoy reading all of your article. I wanted to write a little comment to support you.
Thank you, I’ve recently been searching for information about this topic for ages and yours is the greatest I have discovered till now. But, what about the bottom line? Are you sure about the source?
This is a topic that’s close to my heart…
Many thanks! Where are your contact details though?
Come on, step into happiness with Bodrum Escorts, Bodrum escort ladies, Bodrum escorts and Bodrum escort girls.
Hey, I think your site might be having browser compatibility issues.
When I look at your blog in Ie, it looks fine but when opening in Internet Explorer, it has some overlapping.
I just wanted to give you a quick heads up! Other then that, terrific blog!
I wish to show thanks to you just for bailing me out of this particular trouble.As a result of checking through the net and meeting techniques that were not productive, I thought my life
was done.
Do you have any video of that? I’d like to find out some additional information.|
Hey I am so thrilled I found your weblog, I really
found you by error, while I was searching on Google for something else,
Anyways I am here now and would just like to say cheers for a marvelous post and a all
round interesting blog (I also love the theme/design),
I don’t have time to look over it all at the moment but I have book-marked it and also added your RSS feeds, so when I have time I will be back to read a lot
more, Please do keep up the superb job.
Once applicants have begun interviewing ffor a position, epworth’s
purpose is to fjll that position inside 30 days.
Feel free tto surf to my page – 선수알바
An impressive share, I given this onto a colleague who had previously been conducting a little analysis with this. And that he in truth bought me breakfast due to the fact I ran across it for him.. smile. So ok, i’ll reword that: Thnx with the treat! But yeah Thnkx for spending enough time go over this, I’m strongly about this and love reading read more about this topic. If at all possible, as you become expertise, do you mind updating your blog with a lot more details? It can be highly helpful for me. Big thumb up for this writing!
This is a great blog and i want to visit this every day of the week “
My brother recommended I might like this website.
He was totally right. This post actually made my day. You can not imagine simply
how much time I had spent for this info!
Thanks!
Here is my web page: sbfplay99 แทงบอลออนไลน์
Please let me ҝnow if you’re looking for
a article writer for yourr weblog. Ⲩou have some reaⅼly good articleѕ and I believe I would
be a gоod asset. If you ever want to tаke some of thе load off,
І’d really like to write some articles for your blog iin exсhange for a link back to mine.
Ρlease shoօt me aan e-mail if interested. Kudos!
my webpage – gbo4d
I’ve been absent for some time, but now I remember why I used to love this web site. Thanks, I will try and check back more frequently. How frequently you update your website?
It’s truly very complicated in this active life to listen news on Television, thus I
simply use web for that reason, and get the latest news.
What’s up, I desire to subscribe for this web site to obtain most
up-to-date updates, so where can i do it please help out.
It is appropriate time to make some plans for the future and it’s time to be happy.
I’ve read this post and if I could I wish
to suggest you few interesting things or tips. Perhaps you can write next articles referring to this article.
I desire to read more things about it!
무료바카라 카지노 게임 바카라 검증사이트 바카라 출목표
I think that everything posted made a bunch of sense.
However, what about this? suppose you added a little content?
I am not suggesting your information isn’t good, but
what if you added something that makes people want more?
I mean How to set up a LAN connection in WinXP « Old
PC Gaming is a little plain. You could glance at Yahoo’s home page and note
how they create post titles to grab viewers to click.
You might add a video or a related picture or two to grab people excited about what you’ve written. Just my opinion, it might
make your website a little bit more interesting.
I blog quite often and I seriously thank you for your information. This greatarticle has truly peaked my interest. I am going to take a noteof your website and keep checking for new information aboutonce per week. I subscribed to your RSS feed as well.
If you wish for to improve your knowledge only keep visiting this web page and be updated with the hottest gossip posted here.|
Hi there! I simply wish to give you a big thumbs up for the great information you have got right here on this post. I’ll be returning to your site for more soon.
Hi! I just wanted to ask if you ever have any trouble with hackers?
My last blog (wordpress) was hacked and I ended up losing a few months of hard
work due to no back up. Do you have any methods to stop hackers?
Hi! I just wanted to ask if you ever have any trouble with hackers?
My last blog (wordpress) was hacked and I ended up losing a few months of hard
work due to no back up. Do you have any methods to stop hackers?
You are so interesting! I don’t suppose I’ve read a single thing like that before.
So great to discover somebody with genuine thoughts on this subject matter.
Really.. thank you for starting this up. This web site is one thing that’s needed
on the internet, someone with a bit of originality!
When I initially commented I clicked the “Notify me when new comments are added”
checkbox and now each time a comment is added I get three emails with the same comment.
Is there any way you can remove me from that service?
Appreciate it!
Appreciation to my father who informed me regarding
this blog, this weblog is really awesome.
It’s going to be finish of mine day, except before
ending I am reading this wonderful article to increase my knowledge.
Great post. I was checking continuously this weblog and I am inspired!
Very useful information specially the final phase :
) I maintain such information much. I was seeking this particular
info for a very lengthy time. Thanks and best of luck.
My family always say that I am killing my time here at web,
however I know I am getting knowledge every day by
reading thes fastidious articles.
payday child porn tube kotonescort.com
Hi there, just became alert to your weblog via Google, and located that it’s really informative. I’m gonna be careful for brussels. I will appreciate in the event you continue this in future. A lot of other people will probably be benefited from your writing. Cheers!|
This piece of writing will help the internet viewers for creating new weblog or even a weblog from start to end.
Appreciate the recommendation. Let me try it out.
Incredible! This blog looks just like my old one!
It’s on a entirely different topic but it has pretty much the same page layout and design. Superb choice of colors!
Incredible! This blog looks just like my old one!
It’s on a entirely different topic but it has pretty much the same page layout and design. Superb choice of colors!
https://lookbook.nu/user/9677536-Manahil-K
I cherished up to you will obtain carried out right here. The comic strip is attractive, your authored subject matter stylish. nevertheless, you command get got an edginess over that you would like be delivering the following. sick certainly come more before once more as exactly the same nearly very regularly within case you shield this increase.
Kindly allow me understand {so that|in
What’s up i am kavin, its my first time to commenting anyplace, when i read this piece of
writing i thought i could also create comment
due to this brilliant paragraph.
My brother suggested I might like this website. He was entirely right. This post actually made my day. You can not imagine just how much time I had spent for this info! Thanks!
I truly enjoy looking at on this site, it contains superb content. “Never fight an inanimate object.” by P. J. O’Rourke.
https://www.zotero.org/saqibkhan09
Wow! Thank you! I permanently wanted to write on my website something like that. Can I include a part of your post to my site?
I blog quite often and I truly appreciate your content.
This great article has really peaked my interest.
I am going to bookmark your site and keep checking for new details about once per week.
I subscribed to your RSS feed too.
You could definitely see your expertise in the work you write.
The arena hopes for more passionate writers such as you
who are not afraid to mention how they believe. At all times follow your
heart.
My partner and I stumbled over here different web address and thought I might as well check things out.
I like what I see so now i am following you.
Look forward to finding out about your web page for a second time.
payday child porn % çocuk pornosu.
Good way of describing, and good post to obtain information about my presentation topic, which i am going to deliver in college.
Hey there just wanted to give you a quick heads up and let
you know a few of the pictures aren’t loading correctly.
I’m not sure why but I think its a linking issue. I’ve tried it in two different browsers and both show the
same results.
Hi my friend! I wish to say that this post is awesome,
great written and include approximately all important infos.
I’d like to look more posts like this .
I quite like reading an article that can make men and women think.
Also, thank you for allowing me to comment!
This is the right site for everyone who hopes to
understand this topic. You realize so much its almost
tough to argue with you (not that I actually would want
to…HaHa). You definitely put a fresh spin on a topic that’s been written about for years.
Great stuff, just great!
Excellent beat ! I wish to apprentice at the same time as you amend
your site, how could i subscribe for a blog site?
The account aided me a appropriate deal. I were a little bit acquainted of this your
broadcast offered brilliant transparent idea
Hello, I check your new stuff daily. Your story-telling style is
awesome, keep it up!
https://www.skyscrapercity.com/members/wallikhan.1608541/#about
I read tһіs paragraph fully ⅽoncerning thhe comparison оff
hottest ɑnd earliеr technologies, it’s amazing article.
Нere iѕ my һomepage :: trò chơi xèng
child porn tube – pornerclub.com
Hi there, just became alert to your blog
through Google, and found that it’s truly informative.
I’m gonna watch out for brussels. I’ll be grateful if you
continue this in future. Lots of people will be benefited from your writing.
Cheers!
online gambling apps real money
casino games to play online
online casino for ipad us
When some one searches for his necessary thing, therefore he/she needs to
be available that in detail, thus that thing is maintained over here.
Greetings! This is my 1st comment here so I just wanted
to give a quick shout out and tell you I genuinely enjoy reading your
posts. Can you suggest any other blogs/websites/forums that go over the same subjects?
Thanks for your time!
I am really enjoying the theme/design of your website.
Do you ever run into any internet browser compatibility issues?
A number of my blog readers have complained about my blog not operating correctly
in Explorer but looks great in Opera. Do you have any ideas to help fix this problem?
When some one searches for his required thing, so he/she wishes
to be available that in detail, therefore that thing is maintained over
here. https://hospitalpharmacists.com/author/patrick22x/
Thanks for some other wonderful post. Where else may just anyone get that kind of information in such
an ideal approach of writing? I’ve a presentation subsequent week, and I am on the search for such info.
Wow, amazing weblog layout! How lengthy have you ever been running
a blog for? you make blogging glance easy. The overall look of your web site is fantastic, as smartly as the
content!
You really make it seem really easy with your presentation but I to find this matter to be really one thing which I believe I would by no means understand.
It kind of feels too complicated and very large for me.
I’m looking ahead in your next post, I’ll attempt to get
the hold of it!
Hello.This post was really remarkable, particularly because I was searching for thoughts on this issue last Tuesday.
To know about the best CSGO updates and Csgo stash just visit our site csgogamestash.wordpress.com
When I initially commented I clicked the “Notify me when new comments are added” checkbox and now each time a comment is added I get four emails with the same comment. Is there any way you can remove me from that service? Appreciate it!
The very heart of your writing while sounding reasonable in the beginning, did not really settle perfectly with me after some time. Somewhere within the sentences you managed to make me a believer but just for a while. I however have got a problem with your leaps in logic and you might do nicely to help fill in those gaps. When you can accomplish that, I could undoubtedly end up being amazed.
https://myanimelist.net/profile/adil543
Saved as a favorite, I really like your blog!
Thanks for a marvelous posting! I actually enjoyed reading it, you will
be a great author. I will ensure that I bookmark your blog and definitely will come back at some point.
I want to encourage you to ultimately continue your great
writing, have a nice morning!
magnificent points altogether, you simply received a brand new
reader. What might you suggest in regards to your post that you just made some days in the past?
Any certain?
uluslararası evden eve nakliyat
Greetings, There’s no doubt that your site might be having web browser compatibility issues.
When I take a look at your web site in Safari, it looks fine but when opening in I.E., it’s
got some overlapping issues. I simply wanted to provide you
with a quick heads up! Besides that, wonderful site!
Hi to every body, it’s my first visit of his web site; this webpage comsists of amazing and genuinely excellent
data in favor of readers.
Here is my webpage … 카지노사이트
Oh my goodness! Amazing article dude! Many thanks, However I am having problems with your RSS.
I don’t understand the reason why I cannot subscribe to
it. Is there anyone else getting similar RSS issues?
Anyone who knows the answer can you kindly respond? Thanx!!
365 Property Buyers
Its like you read my mind! You appear to know so much about this, like you wrote the book in it or something. I think that you can do with some pics to drive the message home a little bit, but other than that, this is excellent blog. An excellent read. I will definitely be back.
Howdy just wanted to give you a brief heads up and let you know
a few of the images aren’t loading properly. I’m not sure why but I think its a linking issue.
I’ve tried it in two different web browsers and both show
the same outcome.
car Insurance Philadelphia
It appears that you obviously have a great propensity for creating impressive content. I am in agreement with your thoughts. Thanks for sharing this.
Thank you for the auspicious writeup. It actually used to be a leisure account it.
Glance complicated to far introduced agreeable from you!
However, how can we communicate?
Hey just wanted to give you a quick heads up. The words in your content seem to be running off the screen in Firefox.
I’m not sure if this is a format issue or something
to do with web browser compatibility but I figured I’d post to let you know.
The design look great though! Hope you get the issue solved
soon. Cheers
I think that is among the such a lot significant info for me.
And i’m satisfied reading your article. However wanna statement on some basic
issues, The website style is wonderful, the articles is in reality excellent
: D. Just right job, cheers
минитрактор от производителя
An outstanding share! I have just forwarded this onto a friend who was conducting a little homework on this. And he actually bought me lunch because I stumbled upon it for him… lol. So allow me to reword this…. Thanks for the meal!! But yeah, thanks for spending some time to talk about this matter here on your site.|
What’s up, every time i used to check blog posts here in the early hours in the
daylight, for the reason that i like to gain knowledge of more and more.
Write more, thats all I have to say. Literally, it seems as though
you relied on the video to make your point. You obviously know
what youre talking about, why waste your intelligence on just posting videos to your weblog when you could be giving us
something enlightening to read?
Oh my goodness! Impressive article dude! Thanks, However I am having difficulties with your RSS. I don’t know why I am unable to subscribe to it. Is there anybody else getting identical RSS problems? Anyone that knows the answer will you kindly respond? Thanx!!
Fascinating blog! Is your theme custom made or did you download
it from somewhere? A design like yours with a few simple adjustements would really
make my blog stand out. Please let me know where you got your design. Many thanks
It’s actually a cool and useful piece of information. I’m happy that you simply shared
this helpful information with us. Please keep us up to date like
this. Thanks for sharing.
Hello! This post could not be written any better!
Reading through this post reminds me of my good old room mate!
He always kept talking about this. I will forward this write-up to him.
Pretty sure he will have a good read. Many thanks for sharing!
Hi colleagues, its fantastic article on the topic of cultureand completely defined, keep it up all the
time.
Hey there! I know this is kinda off topic however I’d figured
I’d ask. Would you be interested in trading links or maybe guest authoring a blog article or vice-versa?
My website addresses a lot of the same topics as
yours and I feel we could greatly benefit from
each other. If you are interested feel free to shoot me an email.
I look forward to hearing from you! Awesome blog by the way!
شرکت سبک کاران آذین صنعت
طراحی و ساخت انواع سوله های سبک و سنگین
تهیه و فروش انواع لوله های صنعتی و ساختمانی، طراحی و ساخت انواع
سوله های سبک خرپایی با مقاطع
لوله ای
I am truly glad to glance at this web site posts which includes plenty of valuable information, thanks for providing such information.|
Helpful information. Lucky me I found your website unintentionally,
and I’m stunned why this twist of fate didn’t happened earlier!
I bookmarked it.
I loved as much as you’ll receive carried out right here.
The sketch is attractive, your authored material stylish.
nonetheless, you command get got an edginess over
that you wish be delivering the following.
unwell unquestionably come further formerly again as exactly the same nearly a lot often inside case
you shield this hike.
Vietnam – Center Vietnam
Central Vietnam, likewise called The Center as well as Trung Phn, was
formerly a component of French Indochina. It is just one of three geographical regions of Vietnam.
Previously, it was a part of the French swarm called Annam.
The Middle is a very varied region with various ethnic teams and environments.
Here are some truths about the nation as well as what to expect when going to.
If you have never checked out Vietnam, you may be stunned by
what you locate!
An interesting discussion is definitely worth comment.
I believe that you ought to publish more on this subject, it might
not be a taboo subject but generally people do not discuss these topics.
To the next! All the best!!
Here is my homepage: cerrajeros 24 horas valencia
더존카지노 추천 메리트카지노 가입 메리트카지노 충전 바카라용어 샌즈카지노 가입코드
I will immediately clutch your rss feed as I can not find your
e-mail subscription hyperlink or newsletter service. Do you have any?
Please permit me know in order that I could subscribe. Thanks.
I always used to study article in news papers
but now as I am a user of web thus from now I am using
net for articles or reviews, thanks to web.
It’s an awesome article for all the online viewers;
they will obtain benefit from it I am sure.
Hey there this is kinda of off topic but I was wanting
to know if blogs use WYSIWYG editors or if you have to manually code with HTML.
I’m starting a blog soon but have no coding know-how so I wanted to get advice from someone
with experience. Any help would be enormously appreciated!
I am now not certain the place you’re getting your info, but great topic. I must spend a while finding out much more or working out more. Thanks for great info I used to be looking for this information for my mission.
Appreciation to my father who shared with me about this weblog, this weblog is really remarkable.
Thanks for sharing your thoughts on สล็อต เว็บไหนดี.
Regards
I am really pleased to read this blog posts which carries plenty of valuable facts,
thanks for providing these information.
Feel free to surf to my web-site – โปรโมชั่น Boda8
My brother recommended I might like this web site.
He was totally right. This post truly made myy day.
You cann’t consider just how a lot time I had spent for this information! Thanks!
Feel free to surf to my wweb blog; reparacion persianas en valencia
Wonderful views on that!
When some one sеarches for his necessary thing, so he/she wants
to be available thɑzt іn dеtail, thus
that thing is maintained over here.
Also visit my page :: Pain Relief Sciatica
After study a couple of of the blog posts on your website now, and I really like your manner of blogging. I bookmarked it to my bookmark website list and can be checking back soon. Pls try my website online as properly and let me know what you think.
Good post. I learn something totally new and challenging on blogs I stumbleupon every day. It will always be useful to read through articles from other authors and use something from their web sites.
Hi, i think that i saw you visited my web site
thus i came to “return the favor”.I’m
attempting to find things to improve my site!I suppose its ok to use a few of your ideas!!
You actually make it appear so easy with your presentation however I to find this matter to be actually something that I believe I might by no means understand.
It kind of feels too complex and extremely large for me.
I am taking a look forward for your next publish, I’ll attempt to get
the hang of it!
Hey, what kind of anti-spam plugin do you use for your blog.*:’;*
whoah this blog is great i really like studying your posts.
Stay up the great work! You realize, lots of individuals are searching around for this information, you
could aid them greatly.
I do not even know how I ended up here, but I assumed this put up was great.
I do not recognise who you’re but definitely you’re going to a
well-known blogger should you are not already. Cheers!
My webpage: สล็อตเครดิตฟรี 50 บาท แค่สมัคร
My brother recommended I might like this website. He was entirely right.
This post actually made my day. You cann’t imagine simply how much time I had spent for this info!
Thanks!
Appreciation to my father who informed me on the topic of this weblog, this weblog is
truly amazing.
You really make it seem so easy with your presentation but
I find this topic to be really something that I think
I would never understand. It seems too complicated
and extremely broad for me. I’m looking forward for your next post, I’ll try to get
the hang of it!
Wonderful website. A lot of useful info here.
I am sending it to some pals ans additionally sharing in delicious.
And obviously, thanks for your sweat!
This is a topic which is near to my heart… Many thanks!
Exactly where are your contact details though?
This is actually a good influencing view on this particular idea. And I’d like you to know that I’m really glad you shared your thoughts plus knowledge and I find that i agree. I truly truly appreciate the straightforward writing along with the focus you have invested writing this posting. Loads of thanks yous for that good work plus very good luck with the website, I most certainly will be awaiting new topics within the future.
It’s an amazing article designed for all the online
users; they will get benefit from it I am sure.
Great blog here! Also your web site lots up fast! What web
host are you the use of? Can I am getting your
affiliate hyperlink on your host? I desire my web site loaded
up as fast as yours lol
Does your website have a contact page? I’m having trouble locating
it but, I’d like to send you an e-mail. I’ve
got some creative ideas for your blog you might be interested in hearing.
Either way, great site and I look forward to seeing it
improve over time.
This website was… how do I say it? Relevant!!
Finally I have found something that helped me.
Cheers!
I like this site very much, Its a real nice spot
to read and find info.
Also visit my web site :: global world travel
When someone writes an article he/she keeps the idea of a
user in his/her mind that how a user can know it.
So that’s why this post is perfect. Thanks!
Hi, I do believe this is an excellent website. I stumbledupon it 😉 I will come back once again since i have bookmarked it. Money and freedom is the greatest way to change, may you be rich and continue to help others.
Hi I am so happy I found your site, I really found you by accident,
while I was searching on Askjeeve for something else, Regardless I am here now and would just like to say cheers for a incredible post and a
all round entertaining blog (I also love the theme/design), I
don’t have time to read it all at the minute but I have saved it and also included your RSS feeds,
so when I have time I will be back to read a great
deal more, Please do keep up the great work.
excellent submit,very informative. I’m wondering why the other experts of this sector don’t notiice this.
You must proceed your writing. I am sure,
you’ve a huge readers’ base already!
Hi everyone, it’s my first visit at this website, and article is in fact fruitful in support of me,
keep up posting these types of articles or reviews.
Incredible! This blog looks just like my old one!
It’s on a totally different subject but it has pretty much the same page layout and design. Wonderful choice of colors!
This web page is actually a walk-through it really is the knowledge you wanted relating to this and didn’t know who to question. Glimpse here, and you’ll absolutely discover it.
Hello, after reading this amazing post i am too cheerful to
share my experience here with friends.
“インターン? アンジェラ、お父さんに叱られて死ぬことを熱望していますか? とんでもない。 大学院の試験の準備をしてください!」 スヴェンは妹に真剣に促した。
猛烈なスージーはアンジェラの言葉を聞くやいなや怒りを止めた。
Stay away from a penalty by submitting and spending your tax through the thanks day, Even though you can’t shell out Whatever you owe.
Appreciate this post. Let me try it out.
At this time it appears like BlogEngine is the top blogging platform available right now.
(from what I’ve read) Is that what you are using on your blog?
Here is my site … sell my house fast Colorado Springs Colorado
I enjoy looking through an article that will make people think.
Also, many thanks for allowing for me to comment!
You’re so interesting! I do not think I have read through a single thing like this before. So nice to discover someone with a few unique thoughts on this subject. Seriously.. many thanks for starting this up. This site is one thing that is required on the web, someone with some originality!
A majority of the streaming websites appear related to one another at present since all of them use the old 123movies fashion.
These copies are owned by people who could potentially inject malware to the site or show you malicious advertisements.
With havin so much content do you ever run into any problems of plagorism or copyright
violation? My site has a lot of unique content I’ve either created myself or outsourced but
it appears a lot of it is popping it up all over the internet without my permission. Do you know any methods to help stop content from being
ripped off? I’d certainly appreciate it.
We are a group of volunteers and opening a new scheme in our community.
Your site provided us with helpful info to work on.
You have done an impressive job and our whole neighborhood
will be thankful to you.
When someone writes an paragraph he/she keeps the plan of a user in his/her brain that how a user can be
aware of it. So that’s why this paragraph is perfect.
Thanks!
Everything is very open with a clear description of the issues.
It was definitely informative. Your website is useful.
Thanks for sharing!
「あなたはとても役に立たない、ポーリン!」 彼女は自分に言い聞かせた。
Nice blog here! Also your website loads up very fast! What web host are you using? Can I get your affiliate link to your host? I wish my web site loaded up as fast as yours lol
Disinfecting Services Dundalk MD
I am sure this piece of writing has touched all the internet
users, its really really pleasant paragraph on building
up new web site.
I’ve read some good stuff here. Certainly value bookmarking for revisiting.
I surprise how a lot effort you set to make the sort of fantastic informative
web site.
My web page; disney travel Packages
just couldn’t leave your web site before suggesting that I really loved the standard information a person provide for your visitors? Is gonna be again ceaselessly to check up on new posts
I do not even understand how I stopped up here, but I thought this post used to
be good. I do not recognise who you are however certainly you are
going to a well-known blogger if you are not already.
Cheers!
Why is it I always really feel like you do?
I used to be able to find good advice from your content.
Hello, you used to write great, but the last few posts have been kinda boring¡K I miss your tremendous writings. Past few posts are just a little out of track! come on!
“Oh, tidak apa-apa. Aku baik-baik saja.” Ayla memaksakan diri untuk tersenyum saat dia mengalihkan pandangannya dari Brian dan melihat ke bawah. Dia menarik tangannya dari cengkeraman Toby dengan lembut, menyadari tatapan berapi-api Brian yang tertuju padanya. Ayla tahu Brian pasti salah paham tentang keadaan ini.
Good post however , I was wondering if you could write a litte more on this subject?
I’d be very grateful if you could elaborate a little bit further.
Bless you!
Hi, today u can register Free credit RM5 MEGA888 and claim welcome bonus RM5 in your account as welcoming bonus. Dont hesitate to ask any question at the customer service if u have. Please refer to my link above. Good luck
نصب سیستم عامل لینوکس در کنار ویندوز از دغدغه هایی است که هر شخصی بخطر درگیر شدن درایو مورد نظر جهت نصب لینوکس خودداری میکند؛ به همین منظور، در
دسته مبحث آموزش لینوکس، روش نصب لینوکس در کنار ویندوز در یک درایو
را بصورت کامل و دقیق توضیح خواهیم داد…
نصب سیستم عامل لینوکس در کنار ویندوز از دغدغه هایی است که هر شخصی بخطر درگیر شدن درایو مورد نظر جهت نصب لینوکس خودداری میکند؛ به همین منظور، در
دسته مبحث آموزش لینوکس، روش نصب لینوکس در کنار ویندوز در یک درایو
را بصورت کامل و دقیق توضیح خواهیم داد…
I was just telling my friend about that.
We still cannot quite assume that Really should have refused often be one of those particular staring at the important points situated on your blog post. Our neighbors we are sincerely thankful for ones generosity as well giving me possibility pursue our chosen profession path. I am glad you important information I managed to get with the web-site.
In regulation, if you want that payment could extinguish the obligation, it is necessary that it’s designed at an appropriate time and position, in an appropriate way, and by also to a suitable person.소액결제미납
I loved as much as you’ll receive carried out right here.
The sketch is tasteful, your authored subject matter stylish.
nonetheless, you command get bought an nervousness over that you wish
be delivering the following. unwell unquestionably come further formerly again since exactly the same nearly a lot often inside case you shield this increase.
Aku melepas mantelku dan berjalan keluar dari ruangan memakai sebuah gaun slip berwarna merah.
Magnificent beat ! I wish to apprentice while you amend
your site, how could i subscribe for a weblog web site?
The account aided me a appropriate deal. I had been a little bit familiar of this
your broadcast offered vivid clear idea
I got this website from my buddy who told me on the topic of this
website and at the moment this time I am visiting this website
and reading very informative content at this place.
Spot on with this write-up, I honestly feel
this web site needs far more attention. I’ll probably be back
again to read more, thanks for the information!
By picking “I acknowledge the Phrases & Disorders” below: (1) I consent to obtain the disclosure beneath entitled “Critical Marketing Details” electronically for this transaction only; and (two) I confirm that I’ve study the Critical Advertising Info disclosure And that i acknowledge these phrases.p2p자료많은곳
Whoa! This blog looks just like my old one! It’s on a entirely different subject but it has pretty
much the same page layout and design. Superb choice of colors!
It’s really a great and helpful piece of info. I’m happy that you just shared this helpful info with us. Please stay us informed like this. Thank you for sharing.
Hello! I know this is somewhat off topic but I was wondering which blog platform are you using for this website?
I’m getting sick and tired of WordPress because I’ve
had problems with hackers and I’m looking at alternatives for another platform.
I would be awesome if you could point me in the direction of a good platform.
It’s genuinely very complex in this full
of activity life to listen news on TV, so I just use the web for that reason, and take the hottest information.
fantastic post, very informative. I wonder why the other experts of this sector do not understand this.
You should continue your writing. I’m sure, you have
a great readers’ base already!
This wiol aid expand your network, show your expertise ,
and possiblyy connect you to tthe organizations you want to function foor in the future.
my blog post – 룸알바
Information regarding solutions not manufactured by Apple, or unbiased Web sites not managed or analyzed by Apple, is presented with out suggestion or endorsement.제휴없는p2p
Excellent goods from you, man. I’ve understand your stuff previous to and you are
just extremely fantastic. I actually like what you
have acquired here, really like what you’re stating and the
way in which you say it. You make it enjoyable and you still
take care of to keep it sensible. I can not wait to read much more from you.
This is really a tremendous web site.
Highly descriptive post, I liked that a lot. Will there be a part 2?
I quite like looking through a post that will
make men and women think. Also, thank you for permitting me to comment!
Also visit my blog post – สล็อต เว็บตรงไม่ผ่านเอเย่นต์ไม่มีขั้นต่ำ
You made some good points there. I checked on the internet to learn more about the issue and found most people will go along with your views on this website.
hello there and thank you for your information – I have certainly picked up something
new from right here. I did however expertise some technical points using this website, as I experienced
to reload the web site many times previous to I could get it to load correctly.
I had been wondering if your hosting is OK?
Not that I am complaining, but slow loading instances times will very frequently affect your placement
in google and can damage your high-quality
score if advertising and marketing with Adwords.
Well I’m adding this RSS to my e-mail and
could look out for a lot more of your respective fascinating content.
Ensure that you update this again very soon.
“Tuan muda, akhirnya Anda selesai menjalankan pelatihan. sekarang Anda terlihat lebih segar dan bersemangat, kemampuan dan kekuatanmu juga pasti telah berkembang pesat!”
Help the Ukrainian troops! We are an official group of volunteers,
we collect any financial assistance and provide it to those who defend the motherland on the front line.
We prepare food, bring it to the positions. Don’t stay away!
Every dollar will help feed our fighters and defenders!
webmoney Z349587343888
MasterCard uah 5169360003558370
MasterCard usd 5169360016502977
My brother suggested I might like this website. He was entirely
right. This post truly made my day. You can not imagine just how much time I had spent
for this info! Thanks!
hi!,I love your writing very a lot! percentage
we keep up a correspondence extra approximately your article
on AOL? I need an expert in this space to unravel my problem.
Maybe that’s you! Having a look forward to see
you.
Agora eu sou pronto fazer meu café da manhã, quando
tendo minha vinda de pequeno-almoço novamente para ler mais notícias.
Letters of credit (LCs) are Probably the most protected instruments accessible to Global traders. An LC is often a motivation by a bank on behalf of the client that payment are going to be built into the exporter, presented the stipulations stated from the LC happen to be met, as confirmed with the presentation of all demanded documents.p2p추천
Someone necessarily assist to make severely articles I would state.
That is the first time I frequented your web page and thus far?
I surprised with the research you made to create this particular post extraordinary.
Wonderful process!
If you want to improve your knowledge only keep visiting this web site and be updated with the
newest news posted here.
Sekarang aku akhirnya selesai dengan studiku dan kembali pulang. Aku ingin segera mengakhiri pernikahan kami yang hanya sebatas hitam di atas putih. Aku memutuskan bahwa sudah saatnya bagiku untuk berhenti berharap pada hal-hal yang tidak akan pernah terjadi.
What i don’t understood is if truth be told how you’re not actually a lot more well-favored than you might be right now.
You’re so intelligent. You already know therefore significantly
with regards to this subject, produced me in my opinion consider it from a lot
of numerous angles. Its like men and women aren’t fascinated until it is one thing
to accomplish with Lady gaga! Your personal stuffs nice.
Always care for it up!
I have been surfing on-line more than 3 hours today, yet I never discovered any fascinating article like yours.
It is pretty value enough for me. In my view,
if all website owners and bloggers made just right content material as you did, the internet will likely be much more helpful than ever
before.
Hello! This post couldn’t be written any better! Reading this post reminds me of my previous room mate!
He always kept talking about this. I will forward this post to him.
Fairly certain he will have a good read. Thank you for sharing!
I will immediately grab your rss as I can not in finding your
e-mail subscription hyperlink or newsletter service. Do you have any?
Kindly let me understand in order that I may subscribe. Thanks.
certainly like your website but you need to check the
spelling on quite a few of your posts. Many of
them are rife with spelling issues and I in finding it very bothersome to tell the reality nevertheless I’ll certainly come back again.
Having read this I thought it was extremely informative.
I appreciate you finding the time and effort to put this
short article together. I once again find myself personally spending way too much time both reading and leaving comments.
But so what, it was still worth it!
I didn’t know that.
Hi there! I could have sworn I’ve visited this web site
before but after going through some of the articles I realized it’s new to me.
Nonetheless, I’m definitely pleased I stumbled upon it and I’ll
be book-marking it and checking back regularly!
Hello! I just wish to offer you a big thumbs up for your great information you’ve got here on this post. I am coming back to your website for more soon.
Asking questions are actually good thing if you are not understanding anything totally,
however this paragraph gives good understanding even.
Thanks for your marvelous posting! I really enjoyed reading it,
you happen to be a great author. I will be sure to bookmark your blog
and will come back in the foreseeable future. I want to encourage yourself to continue your
great posts, have a nice morning!
Apostrophes may be difficult; confirm you understand the distinction between “it’s” and “its” In this particular crafty quiz!소액결제 정책미납
I have learn some just right stuff here. Certainly value bookmarking for revisiting. I surprise how much effort you place to create this kind of wonderful informative website.
In September 2019, Neill, Dern, and Goldblum had been confirmed to be returning for the movie in main roles.
[8] Postdated checks, nevertheless, are not viewed as payment when delivered.[9] Generally, payments by bank card choose effect at the point in the sale rather than every time a payer is billed because of the credit card company or if the payer pays the credit card company’s Monthly bill.[10] A business that stories on an accrual basis, would report cash flow in the year of sale though payment may be been given in the subsequent calendar year.https://divinglevel46.bravejournal.net/post/2022/05/24/Examine-This-Report-on-p2p
I truly enjoy looking at on this web site, it contains superb content. “One should die proudly when it is no longer possible to live proudly.” by Friedrich Wilhelm Nietzsche.
This is my first time pay a visit at here and i
am actually happy to read everthing at single place.
Right on my man!
For latest information you have to visit internet and on the web I found
this site as a most excellent web page for most up-to-date updates.
Nice post. I learn something totally new and challenging on blogs I stumbleupon everyday. It will always be useful to read through content from other writers and practice something from other sites.
Rebellion is a private BnS server operating since 2020. Characters are capped at level 55 and Hongmoon level 15. Chapter 1. The Encroaching Darkness is the last quest in the storyline available on Rebellion.
It’s a shame you don’t have a donate button! I’d without a
doubt donate to this brilliant blog! I guess for now i’ll
settle for book-marking and adding your RSS feed
to my Google account. I look forward to brand new updates and will share this website with my Facebook group.
Talk soon!
excellent put up, very informative. I ponder why the other experts of this sector do not realize this. You must continue your writing. I’m confident, you have a great readers’ base already!
Hi! Would you mind if I share your blog with my myspace group?
There’s a lot of people that I think would really appreciate your content.
Please let me know. Thanks
Wow, marvelous weblog format! How lengthy have you been blogging
for? you made running a blog look easy. The entire glance of your site is magnificent, as neatly as the content!
You are so interesting! I don’t suppose I’ve truly read something like that before. So good to discover another person with genuine thoughts on this subject matter. Really.. thank you for starting this up. This site is one thing that is needed on the internet, someone with some originality!
I’ve been exploring for a little for any high quality
articles or blog posts in this sort of space . Exploring in Yahoo I finally stumbled upon this website.
Reading this info So i’m happy to exhibit that I
have a very just right uncanny feeling I discovered just what
I needed. I so much without a doubt will make certain to don?t forget
this web site and provides it a look regularly.
Hi there mates, pleasant paragraph and fastidious urging commented at this place,
I am really enjoying by these.
Here is my site: zambilelor01
I used to be able to find good advice from your blog articles.
If you are going for most excellent contents like I do, simply pay a
visit this website every day since it gives quality contents, thanks
Having read this I thought it was extremely informative. I appreciate you taking the time and energy to put this informative article together. I once again find myself spending a significant amount of time both reading and posting comments. But so what, it was still worthwhile!
Somebody essentially lend a hand to make seriously posts
I might state. This is the first time I frequented your web page and
up to now? I amazed with the analysis you
made to create this particular publish amazing. Great process!
It doesn’t issue if anyone is using a mobile phone, pill, notebook, desktop, or even the functioning procedure in their selection. We allow it to be easy for you to present an optimized on line payment expertise in all cases.무료p2p
My spouse and I stumbled over here different website and thought I should check things out.
I like what I see so now i am following you. Look forward to
exploring your web page for a second time.
wonderful publish, very informative. I’m wondering why the other experts of this sector do not notice this. You should continue your writing. I’m confident, you’ve a huge readers’ base already!
Нi theгe, і read your blog occasionally and i oѡn a similar one and і was
juѕt curious if үoս get a llot of slam feedback?Ιf soo how do you prevent іt,
anny plugin oor аnything you can recommend? I gget
so mᥙch ⅼately it’s driving mе insane so
any support is ery much appreciated.
Loook at my pagе: 網上免費的東西
hi!,I like your writing so much! percentage we keep up a correspondence more about your article on AOL?
I require a specialist on this space to solve my problem.
May be that’s you! Having a look ahead to peer you.
Thank you, I have just been searching for info approximately this
subject for a long time and yours is the greatest I have came upon till
now. But, what in regards to the conclusion? Are you
certain about the supply?
Hey would you mind letting me know which webhost you’re working with?
I’ve loaded your blog in 3 different browsers and I must say this
blog loads a lot faster then most. Can you suggest a good
hosting provider at a honest price? Thanks a lot, I appreciate it!
I read this post completely concerning the comparison of most recent and preceding technologies, it’s remarkable
article.
Fine way of describing, and good piece of writing
to take data on the topic of my presentation subject matter, which i
am going to deliver in school.
Great weblog right here! Additionally your web site a
lot up fast! What host are you the use of? Can I am
getting your affiliate link to your host? I wish my site loaded up as fast as yours lol
I didn’t know that.
Some truly wonderful content on this internet site , thanks for contribution.
When someone writes an article he/she maintains the idea of a user in his/her mind that how a user can understand it.
Therefore that’s why this piece of writing is perfect.
Thanks!
I am genuinely thankful to the holder of this site who has shared
this wonderful article at here.
I am extremely impressed with your writing skills and also with the layout on your weblog.
Is this a paid theme or did you customize it yourself? Anyway keep up the nice quality writing,
it is rare to see a nice blog like this one nowadays.
I am regular reader, how are you everybody? This piece of
writing posted at this web page is really good.
Hi! I just wanted to ask if you ever have any problems
with hackers? My last blog (wordpress) was hacked
and I ended up losing months of hard work due to no data backup.
Do you have any methods to protect against hackers?
With its ambient musical rating and its absorbing narration , the 1989 movie captures the awe-inspiring moments and the heart-stopping hazard of real-life house exploration.
Just want to say your article is as astonishing.
The clearness for your put up is simply great and that i can suppose you’re knowledgeable in this subject.
Well along with your permission let me to seize your RSS feed to keep updated with forthcoming
post. Thank you one million and please keep up the rewarding work.
I really like reading a post that can make men and women think. Also, thanks for permitting me to comment!
Valuable info. Fortunate me I discovered yolur web
site by chance, and I am shocked why this twsist of fate didn’t took place earlier!
I bookarked it.
Entrenamiento muscular homepage Deportes de
fuerza
It’s nearly impossible to find educated people on this subject, but you seem like you know what you’re talking about! Thanks
Incredible! This blog looks exactly like my old one!
It’s on a entirely different topic but it has pretty much
the same layout and design. Outstanding choice of colors!
Hi! I know this is kind of off topic but I was wondering which blog platform are you using
for this site? I’m getting tired of WordPress because I’ve had issues with hackers and I’m looking at alternatives for another
platform. I would be great if you could point me in the direction of a good platform.
Hi there, I wish for to subscribe for this blog to get hottest updates,
therefore where can i do it please help.
Very interesting info !Perfect just what I was looking for! “It’s the Brady Act taking manpower and crime-fighting capability off the streets.” by Dennis Martin.
Your style is so unique compared to other people I have
read stuff from. Thank you for posting when you’ve got
the opportunity, Guess I will just book mark
this page.
When visiting blogs, i usually discover a very good content like yourscollege univ
Good job on this article! I really like how you presented your facts and how you made it interesting and easy to understand. Thank you.univ4 college
Hey! This post could not be written any better!
Reading this post reminds me of my previous room mate!
He always kept talking about this. I will forward this write-up to
him. Fairly certain he will have a good read. Thank you for sharing!
I think what you published made a great deal of sense.
But, what about this? suppose you composed a
catchier title? I mean, I don’t wish to tell you how to run your website, however suppose you added
something that makes people desire more? I mean How to set up a LAN connection in WinXP «
Old PC Gaming is a little vanilla. You could peek at Yahoo’s home
page and see how they create news titles to grab viewers
interested. You might add a video or a related picture or two
to grab people excited about what you’ve got to say. In my opinion, it would bring your blog a little bit more interesting.
Good job on this article! I really like how you presented your facts and how you made it interesting and easy to understand. Thank you.univ4 college
Very good post. I will be facing a few of these issues as well..
You are a very persuasive writer. I can see this in your article. You have a way of writing compelling information that sparks much interest.bilad Alrafidain
Hi, all is going perfectly here and ofcourse every one is sharing facts, that’s actually good,
keep up writing.
When visiting blogs, i usually discover a very good content like yourscollege univ
Hi just wanted to give you a quick heads up and let you know a few of the images aren’t
loading correctly. I’m not sure why but I think its a linking issue.
I’ve tried it in two different web browsers and both show the same results.
Some genuinely nice and useful information on this web site, also I believe
the style has fantastic features.
My page :: offshore seo
I just couldn’t depart your site prior to suggesting that I extremely enjoyed the standard information an individual provide for your visitors? Is gonna be back frequently in order to inspect new postskitab college
When visiting blogs, i usually discover a very good content like yourscollege univ
You ought to take part in a contest for one of the greatest websites on the web. I most certainly will highly recommend this site!
I’m really enjoying the design and layout of your website.
It’s a very easy on the eyes which makes it much more pleasant for
me to come here and visit more often. Did you hire out a designer to create your theme?
Exceptional work!
The Dow is utilizing to entry to Bitcoin with a floating token known as Luna.
To this week’s halving Bitcoin had handed the 200 mark quickly crashing back.
Pay attention to go back into your buying and selling strategy you’ll simply be.
Bukele blamed Apple pay employees and. However that most mobile VPN across most of the new
market for buyers who want to keep. Coinbase stated buyers who want to turn out to be crypto’s financial capital achieve
on which you owe tax. Many investors have to wade by even.
Only after the next worth bitcoins she wants to have
the personal info. But everyone’s problem proper now could be acquire entire details about this transaction for Bob.
Properly think about the data loss downside.
Orphan transactions might be supplied remotely with colleagues we’re transferring
extra knowledge per block. The info dimension fixed.
Logical network from late November outright warfare could also be below manner with retail or individual
buyers concerned. Ether ETH struggled to get well its newest losses on might 12 2022 in. By way
of marketplaces could possibly execute monetary transactions are recorded in a separate assertion to Reuters.
The cash for themselves to basically reward themselves for the Bitcoin customers aren’t.
Now simply because the cash or traditional credit cards and on-line banking networks individuals use their very
own.
Thank you for sharing excellent informations. Your website is so cool. I’m impressed by the details that you’ve on this site. It reveals how nicely you understand this subject. Bookmarked this web page, will come back for more articles. You, my pal, ROCK! I found just the info I already searched all over the place and simply could not come across. What a perfect website.
Excellent article! We are linking to this great post on our
site. Keep up the great writing.
I really like your writing style, wonderful info, thanks for putting up :D. “If a cluttered desk is the sign of a cluttered mind, what is the significance of a clean desk” by Laurence J. Peter.
Everything is very open with a precise clarification of the issues.
It was definitely informative. Your site is extremely helpful.
Thanks for sharing!
My brother recommended I would possibly like this website. He used to be entirely right.
This post truly made my day. You can not
believe just how a lot time I had spent for this info!
Thanks!
Lightyear does a lot proper, nevertheless it had the chance to desert the old style rule book.
Good day! I could have sworn I’ve been to this blog before but after looking at a few of the articles I realized it’s new to me. Anyhow, I’m definitely pleased I came across it and I’ll be bookmarking it and checking back often!
Heya! I’m at work browsing your blog from my new iphone 3gs!
Just wanted to say I love reading through your blog and look forward to all your posts!
Carry on the outstanding work!
I really love your blog.. Excellent colors & theme.
Did you build this site yourself? Please reply back as I’m
wanting to create my very own website and would like to know where you got this from or what the theme is
named. Kudos!
Hmm is anyone else having problems with the pictures on this blog loading?
I’m trying to find out if its a problem on my end
or if it’s the blog. Any feed-back would be greatly appreciated.
Hi there Dear, are you genuinely visiting this site daily, if so afterward you will absolutely get pleasant experience.
Wow! Finally I got a webpage from where I be able to truly get valuable data regarding my study
and knowledge.
Consequently If your instrument is subsequently dishonoured, the credit card debt revives, and the creditor might sue possibly around the instrument or on the original financial debt. The events may, having said that, agree that acceptance of a negotiable instrument shall operate as an complete payment, during which case, When the instrument is dishonoured, the creditor may well sue to the instrument although not on the original credit card debt. A payment could be created by the mere transfer of figures within an account without any dollars switching arms. If goods are accepted in fulfillment of the debt, this constitutes payment.암호화폐거래소순위
Heya! I just wanted to ask if you ever have any issues with hackers?
My last blog (wordpress) was hacked and I ended up losing months of hard work due to no back up.
Do you have any methods to prevent hackers?
Я не смог воздержаться от комментариев.
Исключительно хорошо написано!
spam소액결제현금화
We’re a group of volunteers and starting a new scheme in our community. Your website offered us with valuable information to work on. You have done an impressive task and our entire neighborhood will likely be thankful to you.
Wow, this paragraph is good, my younger sister is analyzing such
things, thus I am going to inform her.
This is a topic which is close to my heart… Cheers! Where are your contact details though?
Everything is very open with a very clear explanation of the issues.
It was definitely informative. Your website is useful.
Thanks for sharing!
I have been dying to get the best for this and it find a lot of sense now!
소액결제현금화소액결제현금화
Appreciating the persistence you put into your site and in depth information you present. It’s good to come across a blog every once in a while that isn’t the same unwanted rehashed material. Fantastic read! I’ve saved your site and I’m including your RSS feeds to my Google account.
Excellent article. I am facing a few of these issues as well..
소액결제현금화소액결제현금화
I have been surfing online greater than three hours today, but I never discovered any interesting article like yours. It’s pretty price sufficient for me. In my opinion, if all website owners and bloggers made excellent content material as you probably did, the web will likely be a lot more useful than ever before.|
No specific date yet, but the movie is locked in for a Palais bow, sources mentioned.
We are a group of volunteers and starting a new scheme in our community.
Your site offered us with valuable info to work on. You have done a formidable job and our whole community will
be grateful to you.
Thank you, I have just been looking for info about this subject for ages and yours is the greatest I’ve discovered till now. But, what about the bottom line? Are you sure about the source?
เครื่องสล็อตมีอยู่ทั่วไปในคาสิโนยุคใหม่ พวกเขาเป็นแบบอย่างการพนันที่ได้รับความนิยมสำหรับคนไม่ใช่น้อยเนื่องมาจากใช้งานง่ายและก็ให้การชำระเงินที่รวดเร็วทันใจ สล็อตแมชชีนเป็นวิธียอดนิยมสำหรับคาสิโนในการทำเงินสล็อตแมชชีนเป็นแบบหนึ่งของการเดิมพันที่ผู้เล่นใส่เงินเข้าไปในเครื่องและก็พยายามที่จะชนะการชำระเงินโดยการลงจอดบนชุดเครื่องหมายเฉพาะ การจ่ายเงินจะขึ้นอยู่กับจำนวนของเครื่องหมายที่ตรงกัน
Somebody essentially lend a hand to make critically articles I would state.
That is the very first time I frequented your web page
and so far? I surprised with the analysis you made to make this particular submit extraordinary.
Magnificent job!
Hey there! Do you use Twitter? I’d like to follow you if that would be okay. I’m absolutely enjoying your blog and look forward to new posts.
Having read this I believed it was rather enlightening.
I appreciate you taking the time and effort to put this informative article together.
I once again find myself spending a significant amount of time both reading and commenting.
But so what, it was still worthwhile!
This is a topic which is close to my heart…
Take care! Where are your contact details though?
I’ve learn a few just right stuff here. Certainly price bookmarking for revisiting.
I surprise how so much attempt you place to make this kind
of magnificent informative site.
We stumbled over here from a different website and thought I should check things out. I like what I see so now i’m following you. Look forward to finding out about your web page yet again.
My brother recommended I might like this website.
He was totally right. This post actually made my day.
You cann’t imagine just how much time I had spent for this information! Thanks!
Perfectly pent articles, appreciate it for selective information. “Life is God’s novel. Let him write it.” by Isaac Bashevis Singer.
Great post. I used to be checking constantly this weblog and I’m impressed!
Very useful information specifically the final phase 🙂 I handle such
info much. I was seeking this particular info for a long time.
Thank you and good luck.
House Lawyers… […]just below, are some totally unrelated sites to ours, however, they are definitely worth checking outclassic books
Greetings from Colorado! I’m bored at work so I decided to browse your
website on my iphone during lunch break. I love the
info you provide here and can’t wait to take a look when I get home.
I’m surprised at how quick your blog loaded on my phone ..
I’m not even using WIFI, just 3G .. Anyways, good blog!
Very nice article, totally what I wanted to find.
Fantastic submit, very informative. I wonder why the
other experts of this sector don’t understand this.
You must proceed your writing. I am confident, you have a great readers’ base already!
Very nice article, totally what I wanted to find.
Fantastic submit, very informative. I wonder why the
other experts of this sector don’t understand this.
You must proceed your writing. I am confident, you have a great readers’ base already!
สล็อตอาจออกจะซับซ้อนแล้วก็อยากได้ความรู้ความเข้าใจที่ดีเกี่ยวกับกลไกของเกมเพื่อเพิ่มเงินรางวัลสูงสุดให้กับผู้เล่น นี่อาจเป็นความท้าทายสำหรับผู้เล่นบางบุคคล แม้กระนั้นรางวัลสำหรับการบรรลุผลนั้นเยี่ยมที่สุดมีเกมสล็อตล้นหลามให้เลือก และแต่ละเกมมีชุดรางวัลเฉพาะของตัวเอง หนึ่งในเกมสล็อตยอดนิยมสูงที่สุดเป็นเครื่องผลไม้ เกมเหล่านี้มอบผลไม้ที่นานัปการให้ผู้เล่นชนะ รวมทั้งเกมได้รับการออกแบบให้เล่นง่าย
obviously like your web-site but you need to test the spelling on several of your posts.
A number of them are rife with spelling issues
and I find it very bothersome to inform the reality then again I’ll surely come again again.
Hey There. I found your weblog using msn. That is an extremely well written article.
I’ll make sure to bookmark it and come back to learn extra of your helpful information. Thanks for the post.
I’ll definitely comeback.
You actually make it seem so easy with your presentation but
I find this matter to be actually something which I
think I would never understand. It seems too complicated and extremely broad for me.
I am looking forward for your next post, I’ll
try to get the hang of it!
You actually make it seem so easy with your presentation but
I find this matter to be actually something which I
think I would never understand. It seems too complicated and extremely broad for me.
I am looking forward for your next post, I’ll
try to get the hang of it!
A blog like yours should be earning much money from adsense..-.,”kooringal dentist
I’m not that much of a internet reader to be honest but your sites really nice, keep it up!
I’ll go ahead and bookmark your website to come back later on.
Cheers
To participate in tthis lottery, you do not require to mwke a
important investment, witrh tickets costing $2.
Also visit mmy webpage Helpful hints
Attractive section of content. I just stumbled upon your site and in accession capital
to assert that I get in fact enjoyed account your blog posts.
Anyway I will be subscribing to your feeds and even I
achievement you access consistently quickly.
Thank you for the good writeup. It actually was a amusement account it.
Look complicated to more brought agreeable from you! However, how can we communicate?
Howdy terrific blog! Does running a blog
such as this require a llot of work? I’ve virtually
noo understanding of programming but I wass hoping to
start my ownn blog soon. Anyway, shoulod you have any suggestions or
techniques for new blog owners please share.
I know thiis is off topc however I just wanted to ask. Thankis a lot!
Here is my homepage; best ducted air conditioning sydney
This is a good tip particularly to those fresh to the blogosphere.
Brief but very accurate info… Thank you for sharing this one.
A must read article!
You have brought up a very excellent points , thanks for the post.
소액결제현금화소액결제현금화
What can I say? I really like a cup of joe and also liked this site. Thank you for creating it.
I conceive you have remarked some very interesting details , appreciate it for the post.
Hello there, I found your site via Google at the same time as searching for
a similar matter, your web site got here up, it seems to be
good. I have bookmarked it in my google bookmarks.
Hi there, simply was alert to your weblog through Google,
and found that it’s really informative. I’m going to be careful for brussels.
I’ll be grateful when you proceed this in future.
Numerous people will probably be benefited from your writing.
Cheers!
Why is it I always really feel like you do?
Other actors rounding out the thrilling ensemble roster of actors include Andrew Koji, Zazie Beetz, Hiroyuki Sanada and Logan Lerman.
It’s an amazing piece of writing designed for all the web viewers; they will get advantage from it I am sure.|
video will help show you to harmony between enjoyable and duty. Both are useful components in your life, so dive to the youtube trailer when you have leisure time.
I think this is one of the such a lot significant information for me.
And i am satisfied reading your article. But should remark
on few general things, The website taste is wonderful, the articles is
in point of fact nice : D. Excellent job, cheers
I am in fact grateful to the owner of this website who has shared this fantastic piece of writing at at this
time.
Hi! I could have sworn I’ve been to this site before but after checking through some of the post I realized it’s new to me. Anyhow, I’m definitely happy I found it and I’ll be book-marking and checking back frequently!
Very soon this web page will be famous amid all blog viewers, due to it’s nice content
I simply wanted to thank you a lot more for your amazing website you have developed here. It can be full of useful tips for those who are actually interested in this specific subject, primarily this very post. Your all so sweet in addition to thoughtful of others and reading the blog posts is a great delight in my opinion. And thats a generous present! Dan and I usually have enjoyment making use of your recommendations in what we need to do in the near future. Our checklist is a distance long and tips will certainly be put to excellent use.passive income types
Aw, this was an extremely good post. Spending some time and actual effort
to make a superb article… but what can I say… I put
things off a lot and never manage to get nearly anything done.
Very fantastic information can be found on web blog.
Here is my web blog; round bathroom mirror with lights battery operated
My brother recommended I might like this
website. He was totally right. This post actually made my day.
You can not imagine simply how much time I had spent for this info!
Thanks!
I think this is one of the most important information for me.
And i’m glad reading your article. But should remark on some
general things, The website style is wonderful, the articles is really
nice : D. Good job, cheers
instagram bot takipçi satın al
I do not know if it’s just me or if perhaps everybody else experiencing issues with your website.
It appears as if some of the text in your content are running off the screen. Can someone else please provide
feedback and let me know if this is happening to them as well?
This may be a problem with my internet browser because I’ve had this happen before.
Thank you
Nice post. I used to be checking continuously this weblog and I am impressed!
Very helpful info particularly the last phase 🙂 I take care of such info much.
I was seeking this particular information for a long time.
Thank you and best of luck.
My web blog :: เครื่องกำจัดขยะเศษอาหาร
Nice post. I learn something totally new and challenging on sites I
stumbleupon everyday. It’s always interesting to read articles
from other authors and practice a little something from other websites.
I like looking through a post that can make men and women think.
Also, thanks for allowing me to comment!
I do agree with all the ideas you’ve introduced in your
post. They are really convincing and can definitely work. Nonetheless, the posts
are too brief for newbies. May just you please extend
them a little from next time? Thanks for the
post.
Sustain the excellent job and generating the group!
This Alliance-facet group of rerollers on US Thorium Brotherhood is devoted to romping by way
of all the material that will be long gone, absent, gone arrive Cataclysm.
Then most likely shifting on into Burning Crusade written content.
The match planet will be transformed eternally, even for players
who do not obtain the expansion. Given the relieve of leveling, we be
expecting to be at or around eighty by the time the growth
is introduced. As lengthy as you spend time on a single of their rods,
you may well be certain of a life time of enjoyment and satisfaction. 1.
All they will need is some far more phrase of mouth and a several
of large-hitters to carry some rods, and they may possibly just be in a position to pull this one off.
Acquiring claimed that, I have frequented a amount
of fly rod brands and am intimately common with the method
of making fly rods, so I comprehend why they are so pricey.
In Tennessee, where by we manage our sequence rods, is in which our most important
actions are positioned. Gentle strikes are easily
detected by the spine fast onset sensitivity at the tip portion of even larger fish when they are engaged in a wrestle.
Unquestionably believe that which you said. Your favorite justification seemed to be on the net the simplest thing to be aware of.
I say to you, I certainly get annoyed while people
think about worries that they just do not know about. You managed
to hit the nail upon the top and defined out the whole thing
without having side-effects , people can take a signal.
Will likely be back to get more. Thanks
Hello, I just today became aware of this blog due to Duck Duck Go, and I find it surprisingly valuable. I will return to see lots more of your writing in the future. Well Done!
Hi there just wanted to give you a quick heads
up. The words in your article seem to be running off the screen in Opera.
I’m not sure if this is a format issue or something to do with internet browser compatibility but I thought I’d post to let you know.
The design and style look great though! Hope you get the issue solved soon. Cheers
My brother suggested I might like this web site. He
was entirely right. This post actually made my day. You cann’t imagine simply how much time I had spent for this
info! Thanks!
Trade Forex Bitcoin binary option min deposit 10$-Trading futures contracts with leverage X5-X100.
When some one searches for his necessary thing,
so he/she wants to be available that in detail, therefore that thing is maintained over here.
My brother suggested I might like this blog. He was entirely right. This post actually made my day. You cann’t imagine simply how much time I had spent for this info! Thanks!toy store
Good day I am so happy I found your blog, I really found you
by error, while I was researching on Digg for something else, Anyhow I
am here now and would just like to say thanks a lot for a incredible post
and a all round interesting blog (I also love the theme/design), I
don’t have time to look over it all at the minute but I have book-marked it and also added your RSS feeds, so when I have time I will be back to read a
great deal more, Please do keep up the superb b.
My blog; แทงหวยออนไลน์
The heart of your writing whilst sounding agreeable in the beginning, did not work properly with me after some time. Someplace within the sentences you were able to make me a believer unfortunately just for a while. I still have got a problem with your jumps in assumptions and you might do well to help fill in all those gaps. When you can accomplish that, I will surely be impressed.
Heya i am for the first time here. I found this
board and I in finding It really useful & it helped me out
a lot. I’m hoping to provide something again and help
others such as you aided me.
I think this is among the most significant information for me.
And i am satisfied reading your article. However should statement
on few general issues, The site style is perfect, the articles
is really great : D. Good job, cheers
Is it smart to use a general one-size-fits-all resume, which you can use anytime, anywhere, for any occupation? Answer: It is a terrible idea! The reason: Employers are required to deal with as much as 400 resumes a day! So they toss away every resume which is not definitely targeted to the employment being offered.
Thanks for finally writing about > How to set up a LAN connection in WinXP
« Old PC Gaming < Loved it!
Thank you, I’ve been seeking for facts about this subject for ages and yours is the best I have located so far.pattern silicone bibs
Good – I should certainly pronounce, impressed with your site. I had no trouble navigating through all the tabs and related information ended up being truly easy to do to access. I recently found what I hoped for before you know it in the least. Quite unusual. Is likely to appreciate it for those who add forums or anything, website theme . a tones way for your client to communicate. Nice task.pattern silicone bibs
All guests to our sales office are encouraged but
are not expected to wear masks.
Look at my webpage: Extra resources
My brother suggested I would possibly like this web site.
He was entirely right. This put up truly made my day.
You cann’t believe just how much time I had spent for this information! Thanks!
Visit my website – เว็บตรงไม่ผ่านเอเย่น
Ephedra is definitely the the greatest fat loss dietary supplement available in the market. There isn’t a weight loss pill, that operates superior to Ephedrine. If you wish to obtain Ephedra, kindly visit the Buy Ephedra web-site.pattern silicone bibs
Any way I’m going to be subscribing for a feed and I hope you article again soontoy store
A lot of thanks for all of the hard work on this blog. My niece takes pleasure in engaging in internet research and it is simple to grasp why. We learn all relating to the compelling method you make helpful suggestions by means of your blog and therefore attract contribution from visitors on this area while my princess is discovering a lot of things. Have fun with the rest of the new year. You’re carrying out a very good job.toy store
I feel like I’m constantly looking for interesting things to read about a variety of subjects, but I manage to include your blog among my reads every day because you have compelling entries that I look forward to. Here’s hoping there’s a lot more amazing material coming!toy store
I don’t know whether it’s just me or if perhaps
everyone else experiencing issues with your website.
It appears like some of the written text on your posts are
running off the screen. Can somebody else please provide feedback and let me know if this
is happening to them as well? This may be a problem with my web
browser because I’ve had this happen before. Kudos
You produced some decent points there. I looked on-line to the issue and discovered most individuals will go along with along with your internet site.toy store
For latest news you have to go to see world wide web and on the
web I found this website as a finest web site for most up-to-date updates.
Hi there, just became aware of your blog through Google, and found that it’s truly informative. I’ll be grateful if you continue this in future. Lots of people will benefit from your writing. Cheers!toy store
Can you tell us more about this? I’d care to find out more details.
Hi! I could have sworn I’ve been to this web site before but after going through a few of
the posts I realized it’s new to me. Anyhow, I’m
certainly pleased I stumbled upon it and I’ll be
bookmarking it and checking back regularly!
Hey! Would you mind if I share your blo with my zynga group?
There’s a lot of people that I think would eally enjoy your content.
Please let me know. Thanks
Heree is my blog post; reallifecam, real life cam, reallife cam, reallifecam, voyeur-house
First off I would like to say great blog! I had a
quick question in which I’d like to ask if you do not mind.
I was curious to find out how you center yourself
and clear your thoughts prior to writing. I have
had a difficult time clearing my mind in getting my thoughts
out. I truly do take pleasure in writing but it just seems like the first 10 to 15 minutes are wasted
just trying to figure out how to begin. Any ideas or
hints? Many thanks!
Its like you learn my mind! You seem to grasp a lot about this, like you wrote the e-book in it or something.
I believe that you can do with a few percent to power the message home a little bit, but other than that, that is fantastic blog.
An excellent read. I will definitely be back.
Hello there, You have done an incredible job. I will certainly digg it and personally suggest to my friends.
I am confident they will be benefited from this web site.
Sweet blog! I found it while browsing on Yahoo News. Do you have any tips on how to get listed in Yahoo News?
I’ve been trying for a while but I never seem to get there!
Thanks
Hey there I am so glad I found your website, I really found you
by accident, while I was researching on Aol for something else, Anyhow I am here now
and would just like to say cheers for a tremendous post and a all
round thrilling blog (I also love the theme/design), I don’t have time to read through it all at the moment but I have
book-marked it and also included your RSS feeds, so when I
have time I will be back to read more, Please do keep up the
great work.
Hey! I just wanted to ask if you ever have any issues with hackers?
My last blog (wordpress) was hacked and I ended up
losing several weeks of hard work due to no data backup.
Do you have any methods to prevent hackers?
It’s a shame you don’t have a donate button! I’d definitely donate to this outstanding blog! I suppose for now i’ll settle for book-marking and adding your RSS feed to my Google account. I look forward to brand new updates and will talk about this site with my Facebook group. Talk soon!
Hi, the whole thing is going fine here and ofcourse every one is sharing data, that’s truly good, keep up writing.
Its like you read my mind! You appear to know a lot about this,
like you wrote the book in it or something. I think that you could do with some pics to drive the message home a little
bit, but instead of that, this is fantastic blog. A fantastic read.
I will certainly be back.
Thanks , I’ve recently been searching for info about this subject for ages and yours is the
best I’ve found out so far. However, what in regards to
the conclusion? Are you certain concerning the source?
I and my friends were going through the nice,
helpful tips from the blog then the sudden came up with
an awful suspicion I never expressed respect to the website owner for
those secrets.
great publish, very informative. I ponder why the other specialists of this sector don’t realize this. You should continue your writing. I am sure, you’ve a great readers’ base already!
There is noticeably a bundle to know about this. I assume you made certain nice factors in features also.
Very good info. Lucky me I found your blog by accident (stumbleupon).
I have bookmarked it for later!
Hey, would you mind if I share your blog with my twitter group?
There’s a lot of folks that I think would enjoy your content.
Please let me know. Thank you.
great put up, very informative. I ponder why the other experts of this sector do not understand this. You should continue your writing. I’m sure, you’ve a huge readers’ base already!
I’m experiencing some small security issues with my latest blog, and
I’d like to find something safer. Do you have any suggestions?
Nice article .good information to set up lan. Keep writing article like this. I am looking forward to more post like this.check shirt for men
Generally I do not learn post on blogs, but I wish to say that this write-up very pressured me
to try and do so! Your writing style has been surprised
me. Thank you, quite great article.
Blogs ou should be reading… […]Here is a Great Blog You Might Find Interesting that we Encourage Youyarrakgram
Good job on this article! I really like how you presented your facts and how you made it interesting and easy to understand. Thank you.goytuntangram
This is a excellent blog, would you be involved in doing an interview about just how you designed it? If so e-mail me!mortangam
It’s remarkable to visit this web site and reading the views of
all friends about this post, while I am also keen of getting experience.
I really got into this article. I found it to be interesting and loaded with unique points of interest. I like to read material that makes me think. Thank you for writing this great content.download free books
House Lawyers… […]just below, are some totally unrelated sites to ours, however, they are definitely worth checking outsoklink
When visiting blogs, i usually discover a very good content like yourscuktagram
Thanks for your personal marvelous posting! I quite enjoyed reading
it, you can be a geat author.I will ensure that I
bookmark yoour blog and will eventualkly come back very
soon. I want to encourage you continue your great
posts, have a nice hiliday weekend!
Muscle bodybuilderr website muscoes and steroids
Wow, marvelous blog layout! How long have you
been blogging for? you make blogging look easy. The overall look of your web site is wonderful, let
alone the content!
It’s going to be end of mine day, except before end
I am reading this great paragraph to improve my knowledge.
It’s going to be end of mine day, except before end
I am reading this great paragraph to improve my knowledge.
I got this site from my friend who told me on the topic of this
web site and at the moment this time I am browsing this site and
reading very informative posts at this place.
Write more, thats all I have to say. Literally, it seems as though you relied on the video to make your
point. You definitely know what youre talking about, why waste your
intelligence on just posting videos to your site when you could be giving us something enlightening to
read?
House Lawyers… […]just below, are some totally unrelated sites to ours, however, they are definitely worth checking outsoklink
We’re a group of volunteers and opening a new scheme in our community.
Your website provided us with valuable information to work on. You have done
an impressive job and our entire community will be grateful to you.
Immigration Lawyers… […]the time to read or visit the content or sites we have linked to below thesiksok
Tengo que expresar mi pasión por su amabilidad dando apoyo a aquellas personas que deben tener orientación sobre este importante asunto.
Great beat ! I wish to apprentice while you amend your site, how could i subscribe for a blog site? The account aided me a acceptable deal. I had been a little bit acquainted of this your broadcast provided bright clear idea|
Thanks for any other great article. Where else may anyone get that kind of info in such an ideal means of
writing? I’ve a presentation subsequent week,
and I’m on the look for such information.
I am actually glad to read this webpage posts which contains tons of useful data, thanks for providing these information.
Wonderful, what a website it is! This weblog provides valuable facts to us, keep it up.
My relatives always say that I am killing my time here at net,
but I know I am getting experience all the time by reading such nice posts.
We’re a bunch of volunteers and starting a new scheme in our community. Your web site provided us with useful information to work on. You’ve done a formidable job and our entire neighborhood will probably be thankful to you.
Indeed, in all the Star Trek plots involving time travel, it’s never suggested that the good characters need not worry about some bad guy going back in time and meddling with things since it would just create a new time-line that cannot effect the one that the characters are in.
I thought it was heading to become some dull previous publish, however it truly compensated for my time. I’ll publish a hyperlink to this web page on my blog. I am positive my visitors will uncover that extremely helpful.qqfunworld
How much of an unique article, keep on posting better halfqq1221
Normally I do not read article on blogs, but I would like to say that this write-up very compelled
me to check out and do it! Your writing taste has been surprised me.
Thanks, very nice article.
Hmm it appears like your website ate my first comment (it was super long) so I guess I’ll just sum it up what I had written and say, I’m thoroughly enjoying your blog. I as well am an aspiring blog blogger but I’m still new to everything. Do you have any points for novice blog writers? I’d certainly appreciate it.qqvictory
I simply must tell you that you have written an excellent and unique article that I really enjoyed reading. I’m fascinated by how well you laid out your material and presented your views. Thank you.slotgamewin
Right now it seems like Expression Engine is the best blogging
platform available right now. (from what I’ve
read) Is that what you are using on your blog?
Simplemente quería escribir una palabra rápida para dar las gracias a usted por esos maravillosos consejos y sugerencias que está mostrando en este sitio.
I simply wanted to thank you a lot more for your amazing website you have developed here. It can be full of useful tips for those who are actually interested in this specific subject, primarily this very post. Your all so sweet in addition to thoughtful of others and reading the blog posts is a great delight in my opinion. And thats a generous present! Dan and I usually have enjoyment making use of your recommendations in what we need to do in the near future. Our checklist is a distance long and tips will certainly be put to excellent use.mewahbet
WASHINGTON — Thee Powerball jackpot is developing once
gain after nobody wwon Saturday night’s $400 miillion prize.
Take a look at my blog; website
I had been honored to obtain a call from a friend as he found the important guidelines shared on the site. Browsing your blog post is a real wonderful experience. Thanks again for thinking of readers like me, and I hope for you the best of achievements as being a professional discipline.slot gacor
I’m not against the agree with the things you suggested.okto88
You seem to be very professional in the way you write.::’~*cmdplay
I have read so many articles regarding the blogger lovers except this paragraph is in fact
a fastidious article, keep it up.
Consider the collection to try them out. Your local community local library has all sorts of Thor box office that you can try out at no cost. Call your library to find out what Thor update they may have.
You’re so awesome! I do not think I have read anything
like this before. So good to discover someone with a few unique
thoughts on this issue.
Seriously.. many thanks for starting this up. This web site
is one
thing that is required on the internet, someone with a bit
of originality!
legitimate canadian pharmacy online
I am curіous tߋ find out wһat blog platform you’re ѡorking
with? I’m һaving some minor secuгity problemѕ with
my ⅼatest website and I’d like tto find something more risk-free.
Do you hаvfe any ѕolutions?
I am really impressed with your writing skills as well as with
the layout on your weblog. Is this a paid theme or did you customize it yourself?
Anyway keep up the nice quality writing, it is rare to see a great blog like
this one today.
Your style is unique in comparison to other folks I’ve read stuff from.
Thank you for posting when you have the opportunity, Guess I will just bookmark this blog.
You must indulge in a contest for one of the greatest blogs over the internet. Ill suggest this web site!megalux138
It’s really a nice and useful piece of information. I am happy that you shared this helpful info with us.
Please keep us up to date like this. Thank you
for sharing.
What’ѕ սp i am kavin, its my fіrst occasion to commenting anyѡhere, when i reаd this post і
thought i cоuld aⅼs᧐ cгeate comment dᥙe to this sensible
post.
My blog: sa game 168 th
It’s an awesome piece of writing in favor of all the
internet users; they will take benefit from it I am sure.
Make money trading opions.
The minimum deposit is 50$.
Learn how to trade correctly. How to earn from $50 to $15000
a day.
The more you earn, the more profit we get.
I just wish Im useful in some way here.
I all the time used to study piece of writing in news papers but now as
I am a user of internet therefore from now I am using net for
articles, thanks to web.
Hi, I would like to subscribe for this blog to take newest updates, so where can i do it please help out.|
I am extremely inspired along with your writing abilities as smartly as with the layout in your weblog. Is that this a paid subject matter or did you customize it yourself? Anyway stay up the excellent high quality writing, it’s uncommon to see a great blog like this one today..
I was suggested this blog via my cousin. I’m not certain whether this submit is written by means of him as nobody else understand such distinctive about my problem.
You’re wonderful! Thank you!
Excellent beat ! I would like to apprentice while you amend your website, how could i
subscribe for a weblog site? The account helped me a acceptable deal.
I have been tiny bit familiar of this your broadcast offered vivid transparent concept
Excellent beat ! I would like to apprentice while you amend your website, how could i
subscribe for a weblog site? The account helped me a acceptable deal.
I have been tiny bit familiar of this your broadcast offered vivid transparent concept
Heya i am for the first time here. I found this board and I to find It really useful & it helped me out a lot. I am hoping to present something back and help others such as you aided me.|
I always used to study post in news papers but now as I am a user
of net therefore from now I am using net for articles
or reviews, thanks to web.
It’s amazing in support of me to have a site, which is helpful for
my know-how. thanks admin
Hello Dear, are you really visiting this web page regularly, if so afterward you will
definitely get good knowledge.
I am actually happy to glance at this web site posts
which includes tons of valuable facts, thanks for
providing these statistics.
In the case of the example, we’ll explain the steps in a minute.
You actually make it appear really easy along with your presentation but I in finding this matter to be
really something that I feel I would by no means understand.
It sort of feels too complicated and extremely huge for
me. I am having a look forward to your subsequent publish, I will attempt to
get the dangle of it!
Way cool, some valid points! I appreciate you making this article available, the rest of the site is also high quality. Have a fun.
I am glad that it turned out so well and I hope it will continue in the future because it is so worthwhile and meaningful to the community.betviva
Thank you for sharing your info. I truly appreciate
your efforts and I will be waiting for your next post thank
you once again.
When visiting blogs, i usually discover a very good content like yourspg slot auto wallet
John and Lisa Robinson with lotterdy officials just after acquiring their ticket verified.
Also visit my weeb blog Great post to read
Howdy just wanted to give you a quick heads up.
The text in your content seem to be running off the screen in Internet explorer.
I’m not sure if this is a formatting issue or something to do with browser compatibility but I thought I’d post to let you know.
The design and style look great though! Hope
you get the issue resolved soon. Many thanks
Hi there i am kavin, its my first time to commenting anyplace, when i read this paragraph
i thought i could also create comment due to this brilliant piece of writing.
Made to measure curtains… […]check out the sites listed below, worth a read for interiors and rugs enthusiastsbest vacation packages
Thanks for building this great content without doubts is very useful
That is a great tip especially to those new to the blogosphere.
Simple but very accurate information? Thanks for sharing this one.
A must read post!
Here is my webpage: must do things in houston texas
It’s appropriate time to make some plans for the longer term
and it is time to be happy. I have learn this post
and if I may just I desire to recommend you few attention-grabbing things or advice.
Maybe you can write subsequent articles relating to this
article. I desire to read more things about it!
Thanks for writing this great content without doubts is very good
Includde flavour with yeast remove, which is not
just a tasty enhancement but a beneficial source of vitamin B12.
My page Charolette
omg! can’t imagine how fast time pass, after August, ber months time already and Setempber is the first Christmas season in my place, I really love it!รวมเว็บสล็อต ฝาก-ถอน true wallet
Good job on this article! I really like how you presented your facts and how you made it interesting and easy to understand. Thank you.Slot Gacor
Heya! I’m at work browsing your blog from my new apple iphone!
Just wanted to say I love reading your blog and look forward to all
your posts! Carry on the outstanding work!
Nice answers in return of this question with firm arguments and explaining
the whole thing on the topic of that.
Thanks for publishing this great post without doubts is very good
Hi there, I enjoy reading through your article post.
I wanted to write a little comment to support you.
Now I am going away to do my breakfast, afterward having my breakfast coming again to read additional news.
The polite lady in the office didn’t speak much English when I visited, but the process to rent a scooter from is quick & efficient. You can message on Facebook to see what stock they have available or just turn up. Side Note: I’m not sure the logo for Bikes gives off the best impression XD. Farang guy zooming on a Vespa without a helmet… With an almost perfect feedback score on Google & Facebook, you’re in good hands with them. They also have a garage next door to the rental shop where they’ll perform regular maintenance. I’ve rented a Mio from here which had squeaky breaks due to water in the drum brake. They quickly swapped this bike to another hassle-free. Although the variety of bikes they stock is a lot smaller, they offer very competitive pricing and are conveniently located at the Huay Kaew end of Santitham. If you’ve seen the Yamaha Tricity, and thought heck, I’d love to give that bike a try. Then send a message to Cheap Charlie and they are renting the Tricity for only 3850 per month. The unique two wheels at the front (3 wheels overall) of this scooter offer much more stability than a tradition two-wheeled scooter. Charlie Rentals also offers fantastic monthly prices with Clicks & Scoopys as low as 1900 baht per month.
Good respond in return of this difficulty with genuine arguments and
explaining everything about that.
I’m a android developer, desinger, wordpress developer. On my channel in fiverr i have some service for you if you have any question please feel free to contact me.
Thanks for writing this great article without questions is very good
Thanks for building this great page without doubts is very useful
I do not even know how I ended up here, but I thought this post was good. I do not know who you are but definitely you are going to a famous blogger if you aren’t already 😉 Cheers!
Its such as you read my mind! You appear to grasp a lot
about this, such as you wrote the e-book in it or something.
I believe that you could do with some percent to power the message
home a little bit, but other than that, that is excellent blog.
A great read. I will certainly be back.
It’s hard to come by well-informed people on this
topic, however, you sound like you know what you’re talking about!
Thanks
I really like what you guys tend to be up too.
Such clever work and reporting! Keep up the good works guys I’ve added you guys to my personal blogroll.
us news today and health 7 quarter 3 module 1 and news houston and n health
care briefings and mag the mighty and news kansas city.
I really like what you guys are usually up too.
This kind of clever work and coverage! Keep up the very good works
guys I’ve incorporated you guys to blogroll.
You have brought up a very fantastic details , thankyou for the post.
I love your wp format, where did you get a hold of it?BRITISH COLUMBIA FAKE DRIVER LICENCE
I used to bе recommended this blog byy means of my cousin. Ι aam not ѕure whether or not this submit is
ѡritten through him as no оne else reawlize sucһ unique ɑbout mʏ trouble.
Уoᥙ are incredible! Ƭhanks!
Нere іs my website … liga99
Certainly with your thoughts here and that i love your blog! I’ve bookmarked it making sure that I can come back & read more in the foreseeable future.بيرين
Great post however , I was wanting to know if you could write a litte more on this subject? I’d be very thankful if you could elaborate a little bit further. Bless you!مياه نقي
I’m really impressed with your writing skills and also with the layout on your weblog.
Is this a paid theme or did you customize it yourself?
Anyway keep up the excellent quality writing, it’s rare to see
a great blog like this one these days.
Hey there are using WordPress for your blog
platform? I’m new to the blog world but I’m trying to
get started and create my own. Do you require any coding knowledge to make your own blog?
Any help would be really appreciated!
Nice post. I learn something more challenging on distinct blogs everyday. It will always be stimulating to read content off their writers and practice a little something from their store. I’d choose to use some with all the content in my small weblog whether you do not mind. Natually I’ll provide a link on your own internet weblog. Many thanks sharing.توصيل مياه للمساجد الرياض
I believe there are many more pleasurable opportunities ahead for individuals that
looked at your site.
Cheap Gucci Handbags Is usually blogengine much better than wp for reasons unknown? Should be which is turning out to be popluar today.car cleaning kit
Have you ever thought about creating an ebook or guest authoring on other blogs? I have a blog based on the same subjects you discuss and would really like to have you share some stories/information. I know my viewers would enjoy your work. If you’re even remotely interested, feel free to shoot me an e-mail.|
I am truly delighted to read this website posts which contains tons of helpful information, thanks for providing these kinds of data.|
This paragraph offers clear idea in favor of the new visitors of blogging, that genuinely how to do blogging and site-building.
Greetings from Florida! I’m bored to death at work so I decided to browse your website on my iphone during lunch break. I really like the knowledge you present here and can’t wait to take a look when I get home. I’m shocked at how fast your blog loaded on my cell phone .. I’m not even using WIFI, just 3G .. Anyhow, good site!|
This is really fascinating, You are a very professional blogger. I’ve joined your rss feed and sit up for searching for more of your great post. Also, I have shared your site in my social networks!when will gas prices go down
It’s a good shame you don’t contain a give money button! I’d definitely give money for this fantastic webpage! That i suppose for the time being i’ll be satisfied bookmarking together with including an individual’s Feed that will my best Msn balance. That i appearance forward that will recent messages and definitely will share the web site utilizing my best Facebook or twitter team: )افضل شركة مياه توصيل للمنازل الرياض
I’m impressed, I have to admit. Rarely do I encounter a blog that’s both equally educative and entertaining,
and let me tell you, you’ve hit the nail on the head.
The issue is something that not enough men and women are speaking intelligently about.
Now i’m very happy I came across this during my search for something relating to this.
I’m gone to convey my little brother, that he should also go to see this weblog on regular basis to get updated from latest reports.
This is such a great post, and was thinking much the same myself. Another great update.نوفا مياه
Magnificent beat ! I wish to apprentice while you amend your
web site, how could i subscribe for a blog site? The account helped me a
acceptable deal. I had been a little bit acquainted of this your broadcast provided bright clear idea
Wonderful work! That is the kind of information that are supposed to
be shared across the web. Shame on Google for no longer positioning this
post upper! Come on over and talk over with my web site .
Thank you =)
With every little thing that appears to be building within this specific area, your points of view happen to be very stimulating. On the other hand, I beg your pardon, but I do not give credence to your entire plan, all be it exciting none the less. It looks to us that your opinions are actually not completely validated and in fact you are your self not fully confident of the point. In any case I did enjoy reading it.
What a material of un-ambiguity and preserveness of valuable experience concerning unpredicted emotions.
I delight in, result in I found exactly what I
used to be taking a look for. You’ve ended my 4 day long hunt!
God Bless you man. Have a great day. Bye
It’s very straightforward to find out any matter
on web as compared to books, as I found this article at this site.
It’s very straightforward to find out any matter
on web as compared to books, as I found this article at this site.
There is certainly a great deal to learn about this issue. I love all of the points you made.
Know About Dіfferent Strains Ꮋaving Higһ Health Benefits Of CBD For Seniors Content
First of all I want to say wonderful blog! I had a quick question that I’d like to ask if you do not mind.
I was interested to know how you center yourself and clear your mind before writing.
I’ve had a difficult time clearing my mind
in getting my thoughts out there. I truly do take pleasure in writing but it just
seems like the first 10 to 15 minutes are wasted simply just trying to figure out how to
begin. Any ideas or hints? Many thanks!
Thanks for sharing your thoughts about zoomslot88. Regards
Howdy! This post could not be written much better! Looking at this post reminds me of my previous roommate! He always kept preaching about this. I will forward this article to him. Fairly certain he’s going to have a good read. I appreciate you for sharing!
Excellent post. I used to be checking constantly this blog and I’m inspired! Very useful info specially the final part 🙂 I take care of such info a lot. I used to be looking for this certain info for a very lengthy time. Thanks and good luck. |
I have been exploring for a bit for any high-quality articles or blog posts on this kind of area . Exploring in Yahoo I ultimately stumbled upon this site. Reading this information So i’m glad to exhibit that I have a very just right uncanny feeling I came upon exactly what I needed. I such a lot for sure will make sure to do not omit this site and provides it a look regularly.
Hello Dear, are you genuinely visiting this web page daily, if so afterward
you will without doubt get pleasant knowledge.
Hello Dear, are you genuinely visiting this web page daily, if so afterward
you will without doubt get pleasant knowledge.
We’re a group of volunteers and opening a new scheme in our community.
Your website offered us with valuable information to work on. You have done a formidable job and our whole community will be
thankful to you.
It’s difficult to find experienced people in this particular subject, however, you seem like you know what you’re talking about! Thanks
Absolutely pent subject matter, appreciate it for selective information .pressure vessels design
In any case I will be subscribing for your rss feed and I am hoping you write again very soon!
House Lawyers… […]just below, are some totally unrelated sites to ours, however, they are definitely worth checking outpiping Engineer
Quality articles is the important to interest the visitors to pay a visit the website, that’s
what this website is providing.
Ꮤant Helpful Tips To Boost Your Immune System Enhance Your Performance – Benefits of CBD Oill fⲟr Vegan Athletes
Spot on with this write-up, I really think this website needs a great deal more attention. I’ll probably be
returning to read through more, thanks for the info!
Spot on with this write-up, I really think this website needs a great deal more attention. I’ll probably be
returning to read through more, thanks for the info!
Hmm it appears like your site ate my first comment (it was super long) so
I guess I’ll just sum it up what I wrote and say, I’m thoroughly enjoying your blog.
I as well am an aspiring blog writer but I’m still new
to the whole thing. Do you have any points for inexperienced blog writers?
I’d definitely appreciate it.
یکی از بهترین فونت های انگلبسی
سبک کلایک هستش که توی طراحی های
پوستر و نوشته های روی عکس بسیار زیباتر میشه
ما تو سایت abasvp.ir هزاران فونت فارسی , انگلیسی
رو برای شما گذاشتیم که بتونید بدون پرداخت هزینه جدا دانلود کنید و
تو طراحی استفاده کنید و البته ما همواره
جدیترین فونت ها هم هر هفته آپلود میکنیم.
فونت های کلاسیک
این سبک فونت های انگلیسی رو که تو
یه دسته بندی جدا برای شما قرار دادیم که بسیار راحت میتونید تو نرم افزرا گرافیکی که دارید کار
یکید لود کنید یا تو خود ویندوز نصب
کنید این سری فونت ها رو و
متن خودتون طراحی کنید.
I’m not sure where you’re getting your information, but great topic.
I needs to spend some time learning much more or understanding more.
Thanks for excellent information I was looking for this
info for my mission.
Immigration Lawyers… […]the time to read or visit the content or sites we have linked to below thepiping stress company
Absolutely pent subject matter, appreciate it for selective information .pressure vessels design
Hi there, all is going sound here and ofcourse every one is sharing facts, that’s actually excellent, keep up writing.|
https://sport-lover.com/meritroyalbet-giris/
Very great ⲣost. I simply stumbled upon your blog and wanted tо mention that I’ve really loved ѕurfing arlund your weblog posts.
In any case I will bee subscribing for your feed and I hοpe you
write once morde very ѕoon!
台中Amber Yu 吳x嫻 無碼後入 IG:amberyu0519 FB:Amber Yu
Stunning quest there. What occurred after? Thanks!
Everyone loves it when individuals get together and share opinions.
Great site, stick with it!
Funny You Bring you bring this up, I just got this Post sent to me.
WOW just what I was searching for. Came here by searching for meta_keyword|
This paragraph will assist the internet users for
setting up new weblog or even a blog from start to end.
I was recommended this web site by my cousin. I am not sure whether this post is written by him as no one else know such detailed about my problem.
You’re wonderful! Thanks!
Iknow this web site presents quality depending content and additional stuff,
is there any other web site which gives these things in quality?
My webpage: things to see in ketchikan alaska
Good blog you have here.. It’s hard to find good quality writing like
yours these days. I honestly appreciate individuals like you!
Take care!!
Hi, i feel that i saw you visited my website so i got here to return the prefer?.I’m trying to in finding issues to enhance my web site!I assume its ok to make use of some of your
ideas!!
Does your site have a contact page? I’m having trouble locating it but, I’d like to send you an e-mail. I’ve got some ideas for your blog you might be interested in hearing. Either way, great website and I look forward to seeing it improve over time.|
Simply wish to say your article is as surprising. The clarity in your post is simply excellent and i could assume you’re an expert on this subject. Well with your permission let me to grab your feed to keep updated with forthcoming post. Thanks a million and please keep up the enjoyable work.
Valuable information. Lucky me I found your website by accident, and I am shocked why this accident didn’t happened earlier! I bookmarked it.
I’m really impressed with your writing skills
as well as with the layout on your blog. Is this a paid theme or did you
modify it yourself? Either way keep up the nice quality writing, it is rare to see a nice blog like
this one these days.
online porn video
I must admit that your post is really interesting. I have spent a lot of my spare time reading your content. Thank you a lot!piping seismic Engineer
Excellent way of explaining, and fastidious paragraph to
obtain facts about my presentation topic,
which i am going to present in academy.
Howdy, i read your blog occasionally and i own a similar one and i was just wondering if you get a lot of spam responses? If so how do you protect against it, any plugin or anything you can suggest? I get so much lately it’s driving me crazy so any assistance is very much appreciated.|
If you are going for finest contents like me, simply pay a quick visit this website all the time since it presents feature contents, thanks
Do you have a spam issue on this blog; I also am a blogger, and I was wanting to know your situation; many of us
have developed some nice practices and we are looking to
exchange methods with others, be sure to shoot me an email if interested.
Thank you for the good writeup. It actually was once a enjoyment account it. Look advanced to more brought agreeable from you! By the way, how could we keep in touch?|
Hurrah! In the end I got a weblog from where I know how to in fact take valuable data regarding my study and knowledge.|
Absolutely pent subject matter, appreciate it for selective information .pressure vessels design
Finding the Right Immigration Solicitor… […]below you’ll find the link to some sites that we think you should visitpiping seismic bracing
I cannot thank you enough for the post.Really thank you! Cool.
I was able to find good information from your content.
We also help our purchasers with financial institution deposit
to file citizenship purposes.
We also help our purchasers with financial institution deposit
to file citizenship purposes.
We also help our purchasers with financial institution deposit
to file citizenship purposes.
Link exchange is nothing else except it is simply placing the other person’s webpage link on your page at suitable place and other person will also do similar for
you.
Do you have a spam problem on this blog; I also am a blogger, and I was wondering your situation; we have created
some nice procedures and we are looking to
swap methods with other folks, be sure to shoot me
an e-mail if interested.
of course like your web site however you have to check the spelling on several of your posts. A number of them are rife with spelling problems and I find it very bothersome to tell the truth nevertheless I’ll definitely come again again.|
Can you tell us more about this? I’d love to find out more details.
Very nice post. I just stumbled upon your weblog and wished to say that I have truly enjoyed surfing around your
blog posts. In any case I’ll be subscribing to your rss feed and I hope you write again soon!
I’ve been surfing on-line more than three hours lately, but I never discovered any attention-grabbing article like yours. It’s lovely price sufficient for me. Personally, if all webmasters and bloggers made excellent content as you probably did, the internet can be a lot more helpful than ever before.
magnificent points altogether, you simply received a new reader. What could you recommend in regards to your submit that you made some days in the past? Any certain?
Lotteries like Powerball or Mega Millions differ from sweepstakes simply because the winner iss noot randomly drawn from all
of the certified entries.
my webpage – Discover more here
Hi there friends, nice paragraph and fastidious urging commented here,
I am actually enjoying by these.
Hiệu ứng Dunning–Kruger
Hello! This is kind of off topic but I need some guidance from an established blog. Is it very difficult to set up your own blog? I’m not very techincal but I can figure things out pretty quick. I’m thinking about setting up my own but I’m not sure where to begin. Do you have any tips or suggestions? Cheers|
Your way of telling everything in this piece of writing
is in fact good, every one can easily understand it, Thanks a lot.
Can CBD Realⅼy Act In Solving Eye Health Prߋblems?
Нere is mу blog – Building The Perfect Morning Routine
I am really inspired with your writing talents as well as with the layout to your weblog.
Is that this a paid topic or did you modify
it yourself? Anyway stay up the nice high quality writing, it’s rare to see a great blog like this one these days..
I am really inspired with your writing talents as well as with the layout to your weblog.
Is that this a paid topic or did you modify
it yourself? Anyway stay up the nice high quality writing, it’s rare to see a great blog like this one these days..
Marvelous, what a blog it is! This blog provides helpful information to
us, keep it up.
Bộ đôi gội xả TIGI này tuyên bố sẽ
phục hồi tóc dễ gãy, hư tổn với hiệu quả thọ dài, cũng như làm mượt mượt,
tăng độ bóng và bảo vệ tóc khỏi
các tác nhân khiến hư tổn.
Thanks for ones marvelous posting! I really enjoyed reading it, you’re a great author.I will be sure to bookmark your blog and will often come back down the road. I want to encourage you continue your great job, have a nice morning!|
House Lawyers… […]just below, are some totally unrelated sites to ours, however, they are definitely worth checking outpiping Engineer
https://trafficbot.traffichippo.com
I don’t know if it’s just me or if perhaps everybody else experiencing
problems with your blog. It seems like some of the written text within your content are running off the screen. Can somebody else
please provide feedback and let me know if this is happening to them too?
This may be a problem with my web browser because I’ve
had this happen previously. Appreciate it
Excellent way of explaining, and fastidious post to take information regarding my presentation topic, which i am going to
deliver in academy.
CBD For A More Productive Work Day – Thhe Mostt Essential Compound Missing From Your Beauty Routine
I must admit that your post is really interesting. I have spent a lot of my spare time reading your content. Thank you a lot!piping seismic Engineer
I was suggested this web site by my cousin. I’m not sure whether this post is written by him as nobody else know such detailed about my difficulty.
You’re amazing! Thanks!
I’ve no knowledge of coding however I was hoping to start my own blog in the near future.
We stumbled over here different web address
and thought I might as well check things out.
I like what I see so now i’m following you. Look forward to looking into your web page repeatedly.
Hі there, i read ʏour blog occasionally and i oown a simiⅼar one and і wɑs juѕt wondering if үou get a lot of spam comments?
If so һow do үօu stop it, any plugin oг anytһing yoᥙ ccan advise?
Ӏ get so mucһ ⅼately it’ѕ driving me mad ѕo aany assistance іs very mᥙch appreciated.
I must admit that your post is really interesting. I have spent a lot of my spare time reading your content. Thank you a lot!piping seismic Engineer
I love it when folks come together and share opinions. Great
website, keep it up!
Also visit my site – А片
Not often do I encounter a weblog that is both educated and entertaining, and let me tell you, you may have hit the nail on the head. Your concept is excellent; the issue is something that not sufficient individuals are speaking intelligently about. I am very happy that I stumbled across this in my quest for something relating to this.letswin malaysia
Link exchange is nothing else but it is only placing the other person’s website link on your page at
suitable place and other person will also do similar for you.
Hi, just wanted to mention, I enjoyed this
article. It was practical. Keep on posting!
Have you ever considered creating an e-book or guest authoring
on other sites? I have a blog based on the same information you discuss and would
love to have you share some stories/information. I know my visitors would appreciate
your work. If you are even remotely interested, feel free to shoot me an e mail.
Take a look at my web-site XXX movies online
This is my first time visit at here and i am truly pleassant to
read everthing at alone place.
Sports betting, football betting, cricket betting, euroleague football betting, aviator games, aviator games money
– first deposit bonus up to 500 euros.Sign up bonus
My brother suggested I would possibly like this web site. He was entirely right. This publish truly made my day. You can not believe just how so much time I had spent for this information! Thank you!
Fine way of describing, and fastidious paragraph to obtain information on the topic of my
presentation subject matter, which i am going to convey
in university.
Wonderful blog! I found it while searching on Yahoo News.
Do you have any tips on how to get listed in Yahoo News?
I’ve been trying for a while but I never seem to get there!
Appreciate it
I loved as much as you’ll receive carried out right here.
The sketch is attractive, your authored material stylish.
nonetheless, you command get got an shakiness over that you wish be delivering the following.
unwell unquestionably come further formerly again as exactly the same nearly very often inside case
you shield this increase.
Attractive portion of content. I simply stumbled upon your site and
in accession capital to say that I acquire actually loved account your blog posts.
Anyway I will be subscribing for your augment and even I success
you get admission to constantly quickly.
This information is invaluable. Where can I find out more?
I am extremely inspired along with your writing abilities as neatly as with the layout to your blog. Is this a paid topic or did you modify it your self? Anyway stay up the excellent high quality writing, it is rare to look a nice weblog like this one these days..|
Wonderful work! That is the kind of information that should be shared around the net.
Disgrace on the search engines for not positioning this publish higher!
Come on over and consult with my website . Thanks
=)
Why users still make use of to read news papers when in this technological globe everything
is existing on web?
Great ¡V I should certainly pronounce, impressed with your site. I had no trouble navigating through all tabs as well as related info ended up being truly easy to do to access. I recently found what I hoped for before you know it at all. Quite unusual. Is likely to appreciate it for those who add forums or anything, website theme . a tones way for your client to communicate. Excellent task..letswin3.net
I visited many web sites but the audio feature for audio songs existing at this site is genuinely fabulous.
Hi There, this is an awesome post, do you guys have social media channal I can follow? Twitter, instagram or facebook?
Excellent price, swift delivery and I’ll definitely replace it when she runs out.
Also visit my web blog: baccarat crystal
https://www.lastikal.com.tr/marka/goodyear
I have read a few excellent stuff here. Definitely value bookmarking for revisiting.
I surprise how a lot effort you put to create any such wonderful informative website.
Thanks for sharing your thoughts about satta king 786.
Regards
Hi there! I understand this is kind of off-topic but I had to ask.
Does operating a well-established blog like yours take a massive amount work?
I’m completely new to operating a blog however I do write in my journal daily.
I’d like to start a blog so I will be able to share my own experience and feelings online.
Please let me know if you have any ideas or tips for brand new aspiring bloggers.
Appreciate it!
Hello it’s me, I am also visiting this site daily, this web site is genuinely good and the visitors
are in fact sharing good thoughts.
Hello! Quick question that’s completely off topic.
Do you know how to make your site mobile friendly?
My web site looks weird when viewing from my apple iphone.
I’m trying to find a theme or plugin that might be able to resolve this problem.
If you have any suggestions, please share. Thank you!
Thanks to the growing availability of public and non-public launch vehicles, “off-the-shelf” tech for kitting out satellites and serious opportunities
for research collaboration, even the smallest nations on Earth can dream big.
If you’re keen to put within the time and follow, and shoulder
the additional expense that comes with a extra complex machine, you can discover
that a foot-powered kayak suits your wants better than the
easier fashions — or even opens up outdoor opportunities you by no
means would have imagined. They’ll provide the consolation bigger guys require, and as nicely provide
extra room for the little guys. Even if you
end up probably not a big and tall sort of particular person, you may still get a lot desired consolation and perform in an office
chair that gives you lots extra room. The bigger inside house, depending on your mannequin’s construct,
can offer you more room for fishing provides than a basic kayak, which
may prolong your trip without introducing every other
hardships. While it’s still not very doubtless you may be in a position to stand and fish,
as with a bigger raft or speedboat, it’s extra doable to discover a quiet
spot and take your hands off the rudder when fishing is your goal.
Thanks for some other informative site. The place
else could I am getting that kind of information written in such an ideal method?
I’ve a challenge that I am simply now working on, and I
have been on the look out for such information.
It’s very easy to find out any matter on web
as compared to textbooks, as I found this article at this
website.
If some one wants expert view regarding blogging and site-building afterward i suggest him/her to visit this webpage, Keep up the pleasant work.|
Excellent website. Lots of useful information here. I am sending it to several friends ans also sharing in delicious. And certainly, thanks for your sweat!
Hmm is anyone else experiencing problems with the pictures on this blog loading?
I’m trying to determine if its a problem on my
end or if it’s the blog. Any feed-back would be greatly appreciated.
I do accept as true with all of the ideas you’ve introduced in your post. They are really convincing and can definitely work. Still, the posts are very short for starters. May you please prolong them a little from next time? Thank you for the post.
Hello there! Do you know if they make any plugins to help with Search Engine Optimization? I’m trying to get my blog to rank for some targeted keywords but I’m not seeing very good gains. If you know of any please share. Many thanks!
Thanks for finally writing about > How to set up a LAN connection in WinXP «
Old PC Gaming < Liked it!
I’m extremely impressed together with your writing abilities as well as
with the format for your blog. Is that this a paid subject matter or did you modify it yourself?
Either way keep up the nice high quality writing, it’s rare to peer a nice
weblog like this one today..
my web-site; Minpark
Pest Control Pennsylvania For Bed Bugs
Good day I am so delighted I found your blog page, I really found
you by error, while I was researching on Digg for something else,
Nonetheless I am here now and would just like to say kudos for
a marvelous post and a all round interesting blog (I also
love the theme/design), I don’t have time to read it all at
the minute but I have book-marked it and also added your RSS feeds, so when I have time I will
be back to read more, Please do keep up the fantastic b.
Hey There. I found your weblog using msn. This is a very well written article. I will make sure to bookmark it and come back to read extra of your useful info. Thanks for the post. I will certainly return.
penis enlargement
Sports betting. Bonus to the first deposit up to 500 euros.
online casino
Remarkable! Its in fact amazing paragraph, I have got much clear idea
concerning from this article.
Awesome blog! Is your theme custom made or did you download it from somewhere?
A theme like yours with a few simple adjustements would really make my blog stand out.
Please let me know where you got your theme. Appreciate it
I think everything posted made a bunch of sense. However, what about this? what if you added a little information? I ain’t saying your content is not good, however suppose you added a title that grabbed folk’s attention? I mean BLOG_TITLE is a little boring. You ought to peek at Yahoo’s home page and watch how they create article titles to grab people to click. You might try adding a video or a pic or two to get people excited about everything’ve got to say. Just my opinion, it could make your posts a little livelier.|
This design is spectacular! You certainly know how to keep a reader entertained.
Between your wit and your videos, I was almost moved to start my own blog (well, almost…HaHa!) Wonderful job.
I really enjoyed what you had to say, and more than that,
how you presented it. Too cool!
I visited many web sites but the audio quality
for audio songs present at this web page is actually fabulous.
fantastic publish, very informative. I ponder why the other specialists of this sector don’t understand this. You must proceed your writing. I’m confident, you have a great readers’ base already!
buy viagra online
Can I simply say what a relief to find someone who truly knows what theyre speaking about on the internet. You definitely know learn how to convey a difficulty to gentle and make it important. More people have to read this and perceive this aspect of the story. I cant imagine youre not more fashionable since you undoubtedly have the gift.
Fascinating blog! Is your theme custom made or did you download it from somewhere?
A theme like yours with a few simple tweeks would really
make my blog shine. Please let me know where you
got your theme. Thank you
bookmarked!!, I really like your site!|
Hey there! I realize this is sort of off-topic however I had to ask.
Does running a well-established blog such as yours require a massive amount
work? I’m completely new to writing a blog but I do write in my journal on a
daily basis. I’d like to start a blog so I
can easily share my experience and views online.
Please let me know if you have any recommendations or tips for brand new aspiring blog owners.
Appreciate it!
Do you have a spam issue on this blog; I
also am a blogger, and I was curious about your situation; many of us have created some nice practices and we are looking
to swap strategies with others, be sure to shoot me an e-mail if interested.
Have you ever thought about publishing an e-book or guest authoring on other blogs?
I have a blog based upon on the same subjects you discuss and
would love to have you share some stories/information. I know my readers would enjoy your work.
If you are even remotely interested, feel free to send me an e-mail.
I’m curious to find out what blog system you happen to be utilizing?
I’m experiencing some minor security issues with
my latest blog and I’d like to find something more secure.
Do you have any suggestions?
Howdy this is somewhat of off topic but I was wondering if blogs use WYSIWYG editors or if you have to
manually code with HTML. I’m starting a blog soon but have no coding know-how so I
wanted to get advice from someone with experience.
Any help would be enormously appreciated!
Hi to all, as I am truly eager of reading this webpage’s post to be updated daily.
It contains pleasant data.
I know this website presents quality dependent posts
and other data, is there any other web site which presents such stuff in quality?
thu am sach noi
WOW just what I was searching for. Came here by searching for cryptocurrency
Hello there! This post could not be written any better! Looking through this article reminds me of my previous
roommate! He constantly kept talking about this. I’ll forward
this information to him. Fairly certain he’ll have a great read.
Many thanks for sharing!
Hello there! This post could not be written any better! Looking through this article reminds me of my previous
roommate! He constantly kept talking about this. I’ll forward
this information to him. Fairly certain he’ll have a great read.
Many thanks for sharing!
Hello Dear, are you really visiting this web site on a regular
basis, if so afterward you will definitely obtain pleasant experience.
Hello Dear, are you really visiting this web site on a regular
basis, if so afterward you will definitely obtain pleasant experience.
Hello Dear, are you really visiting this web site on a regular
basis, if so afterward you will definitely obtain pleasant experience.
It’s impressive that you are getting thoughts from this paragraph as well
as from our argument made here.
I’m not sure exactly why but this weblog is loading incredibly slow for me.
Is anyone else having this problem or is it a problem on my end?
I’ll check back later and see if the problem still exists.
I every time spent my half an hour to read this webpage’s articles
daily along with a mug of coffee.
Do you mind if I quote a couple of your articles as long as I provide credit and sources back to your webpage? My blog site is in the very same area of interest as yours and my users would certainly benefit from some of the information you provide here. Please let me know if this ok with you. Many thanks!
I don’t even know the way I stopped up right here, but I assumed
this put up used to be good. I do not understand who you might be but definitely you’re going to a well-known blogger should you are not already
😉 Cheers!
Also visit my web-site: free traffic
You should be recognized for the kindness that you’ve demonstrated to me.
It’s fantastic that you are getting ideas from this post as well as from our argument made at this time.
Hi there, I discovered your site by way of Google while looking for a related subject, your website
came up, it looks good. I have bookmarked it in my google bookmarks.
Hi there, just was aware of your weblog via Google, and found that it is
really informative. I am going to watch out for brussels.
I’ll appreciate in case you continue this in future.
Numerous people shall be benefited from your writing. Cheers!
payday loan
free Windows 7 key
I’m not that much of a online reader to be honest but your sites really
nice, keep it up! I’ll go ahead and bookmark your website
to come back down the road. Cheers
Greetings, I think your blog might be having web browser
compatibility problems. When I look at your blog in Safari,
it looks fine however, when opening in Internet Explorer, it’s
got some overlapping issues. I just wanted to give you
a quick heads up! Aside from that, excellent blog!
Make money trading opions. The minimum deposit is 10$.
Learn how to trade correctly.
How to earn from $50 to $10000 a day. The more you earn,
the more profit we get.
binary options
I just like the helpful information you supply to your articles.
I will bookmark your blog and test again right here frequently.
I’m reasonably sure I will learn many new stuff proper here!
Best of luck for the next!
A fascinating discussion is worth comment. There’s no doubt that that you should publish more about this subject matter, it might not be a taboo subject but generally people do not discuss these subjects. To the next! Best wishes!!|
This excellent website certainly has all the information I wanted about this subject and didn’t know who to ask. |
I am no longer certain where you are getting your info, however great topic. I needs to spend some time studying more or working out more. Thanks for fantastic information I used to be in search of this information for my mission.|
3performances
Its such as you learn my thoughts! You appear to understand so much
about this, such as you wrote the guide in it or something.
I believe that you just could do with some % to pressure the
message home a little bit, but other than that, this is
great blog. An excellent read. I’ll definitely be back.
You’re so interesting! I don’t suppose I have read through a single thing like this before. So great to discover another person with some unique thoughts on this topic. Seriously.. thanks for starting this up. This site is something that’s needed on the internet, someone with some originality!|
Pretty! This was a really wonderful article. Thanks for supplying this information.
If some one wishes to be updated with newest
technologies therefore he must be pay a visit this website and be up to date every day.
Hi there I am so happy I found your site, I really found you by mistake, while I was browsing
on Bing for something else, Regardless I am here now and would just like to say cheers for a remarkable post
and a all round exciting blog (I also love the theme/design),
I don’t have time to read it all at the minute but I have saved it and also
included your RSS feeds, so when I have time I will
be back to read a great deal more, Please do keep up the awesome work.
Unquestionably imagine that which you stated. Your favorite justification seemed to be at
the web the easiest factor to take note of. I say to you,
I definitely get annoyed even as folks think about concerns
that they plainly do not recognize about.
You managed to hit the nail upon the top and also outlined
out the entire thing with no need side effect , other folks could take a signal.
Will probably be again to get more. Thanks
Hi! Someone in my Myspace group shared this website with us so I came
to check it out. I’m definitely loving the information. I’m book-marking and will be tweeting
this to my followers! Wonderful blog and amazing design and style.
I savor, result in I discovered just what I used to be having
a look for. You’ve ended my four day lengthy hunt!
God Bless you man. Have a great day. Bye
Good – I should definitely pronounce, impressed with your site. I had no trouble navigating through all the tabs and related info ended up being truly simple to do to access. I recently found what I hoped for before you know it in the least. Quite unusual. Is likely to appreciate it for those who add forums or something, website theme . a tones way for your client to communicate. Nice task.
There’s certainly a great deal to know about this subject.
I like all the points you made.
Apostrophes may be tricky; demonstrate you already know the distinction between “it’s” and “its” During this crafty quiz!소액결제 정책
great points altogether, you just gained a new reader.
What would you suggest about your post that you made a few days in the
past? Any certain?
Hello colleagues, fastidious post and good arguments commented here, I am genuinely enjoying by
these.
Hmm is anyone else having problems with the images on this blog loading? I’m trying to find out if its a problem on my end or if it’s the blog. Any suggestions would be greatly appreciated.|
Excellent post however , I was wondering if you
could write a litte more on this topic? I’d be very grateful if you could elaborate a little
bit further. Appreciate it!
Hi! This post couldn’t be written any better! Reading through this post reminds me of my previous room mate! He always kept chatting about this. I will forward this write-up to him. Fairly certain he will have a good read. Thanks for sharing!
Ahaa, its fastidious dialogue about this piece of writing at this place at this weblog, I have read all that, so at
this time me also commenting at this place.
Ahaa, its fastidious dialogue about this piece of writing at this place at this weblog, I have read all that, so at
this time me also commenting at this place.
Hiya very nice website!! Man .. Excellent .. Wonderful .. I will bookmark your site and take the feeds additionally? I am satisfied to seek out so many helpful information right here in the publish, we need work out more techniques on this regard, thank you for sharing. . . . . .|
Very good article. I absolutely love this site.
Stick with it!
I have been surfing online more than 3 hours today, yet I never found any interesting article like yours. It’s pretty worth enough for me. Personally, if all web owners and bloggers made good content as you did, the web will be a lot more useful than ever before.
In Thailand foreigners are prohibited to personal or possess land in Thailand.
Determine whether you are about to hire a registered land surveyor.
Decide the experience level of the professional you might be about to rent.
The number of years an individual has labored determines the expertise
degree of the service provider. Consider the service payment charged by the
professionals obtainable. Professionals who could can work on residential properties
have numerous options to update the visual
charm of a home. A bonus is they will cease property house owners from having costly errors.
Residents of those nations may be naive of the UK property market
and local planning laws similar to green belt zoning. The
paperwork should include a permit and license that should be from
the local authorities. Nevertheless, you need to make
sure you might have scrutinized the paperwork to make sure that they are all valid and from the related authority officials.
Officials almost known as off D-Day for concern that considered one of Tiger’s lacking sailors
may have been captured, thus endangering the secrecy
of D-Day.
Perfectly composed subject material, thanks for entropy. “In the fight between you and the world, back the world.” by Frank Zappa.
Hi there! This post couldn’t be written any better! Reading through this post reminds me of my previous room mate! He always kept talking about this. I will forward this article to him. Pretty sure he will have a good read. Thank you for sharing!
Hi! I could have sworn I’ve been to this site before but after checking through some of the post I realized it’s new to me. Anyhow, I’m definitely glad I found it and I’ll be book-marking and checking back frequently!
Thanks for sharing your thoughts on pg slot.
Regards
buy viagra online
Great blog! Do you have any suggestions for aspiring writers? I’m planning to start my own site soon but I’m a little lost on everything. Would you advise starting with a free platform like WordPress or go for a paid option? There are so many options out there that I’m totally overwhelmed .. Any ideas? Many thanks!
thu am quang cao
3coordination
hello!,I love your writing very so much! share we keep in touch extra about your article on AOL?
I need an expert on this area to resolve my problem.
May be that is you! Looking forward to peer you.
Hi, i read your blog from time to time and i own a similar
one and i was just curious if you get a lot of spam remarks?
If so how do you stop it, any plugin or anything you can advise?
I get so much lately it’s driving me mad so any help is very much appreciated.
Hello, I enjoy reading through your post. I wanted to write
a little comment to support you.
Hey I know this is off topic but I was wondering if you knew of any widgets I could add to my blog that automatically tweet my newest twitter updates. I’ve been looking for a plug-in like this for quite some time and was hoping maybe you would have some experience with something like this. Please let me know if you run into anything. I truly enjoy reading your blog and I look forward to your new updates.|
Hello it’s me, I am also visiting this web page regularly, this website is
truly fastidious and the visitors are truly
sharing nice thoughts.
These are in fact fantastic ideas in concerning blogging.
You have touched some nice factors here. Any way keep up wrinting.
penis enlargement
Hey There. I found your blog using msn. This is an extremely well written article.
I will be sure to bookmark it and come back to read more of your useful information.
Thanks for the post. I’ll definitely comeback.
What a data of un-ambiguity and preserveness of valuable knowledge regarding unexpected emotions.
Hi there to every one, because I am actually eager
of reading this website’s post to be updated daily. It carries
good material. https://www.launchora.com/story/1661737384-iptv-0
online porn video
I all the time used to read piece of writing in news papers but now
as I am a user of internet therefore from now I
am using net for articles or reviews, thanks to web.
We stumbled over here from a different website and thought I might check things out. I like what I see so i am just following you. Look forward to looking into your web page yet again.
Incredible! This blog looks just like my old one!
It’s on a entirely different topic but it has pretty much the same layout and design. Great choice of colors!
Hello my family member! I want to say that this article is awesome,
great written and come with approximately all important infos.
I’d like to see more posts like this .
My web site; show me calendar
You actually make it seem so easy with your presentation but
I find this topic to be really something that I think I would
never understand. It seems too complex and extremely broad for me.
I am looking forward for your next post, I will try to get
the hang of it!
Hello my loved one! I wish to say that this post is amazing, great written and include approximately all vital infos.
I’d like to look more posts like this .
Thanks for this post, I am a big big fan of this site would like to proceed updated.
You made certain fine points there. I did a search on the issue and found most people will consent with your blog.
Hello there, I found your blog by means of Google even as looking for a related topic, your site came up, it appears to be like good. I have bookmarked it in my google bookmarks.
This blog is definitely rather handy since I’m at the moment creating an internet floral website – although I am only starting out therefore it’s really fairly small, nothing like this site. Can link to a few of the posts here as they are quite. Thanks much. Zoey Olsen
I delight in, cause I found exactly what I used to be having a look for. You’ve ended my 4 day lengthy hunt! God Bless you man. Have a great day. Bye
Greetings! Very helpful advice on this article! It is the little changes that make the biggest changes. Thanks a lot for sharing!
After I initially commented I seem to have clicked the -Notify me when new
comments are added- checkbox and now every time a comment is added I recieve four emails with the exact same comment.
Is there a means you can remove me from that service? Kudos!
Hello. impressive job. I did not imagine this. This is a impressive story. Thanks!
Greetings! This is my first comment here so I just wanted to give a quick shout out and tell you I really enjoy reading through your blog
posts. Can you suggest any other blogs/websites/forums that go over the
same topics? Thanks a ton!
Greetings! This is my first comment here so I just wanted to give a quick shout out and tell you I really enjoy reading through your blog
posts. Can you suggest any other blogs/websites/forums that go over the
same topics? Thanks a ton!
Тheгe is definately a ցreat deal to learn aboᥙt thіѕ subject.
I love aⅼl ߋf the рoints уou made.
F*ckin’ remarkable issues here. I am very glad to see your article. Thank you a lot and i’m having a look forward to contact you. Will you please drop me a e-mail?
Keep on working, great job!
I don’t even know how I ended up here, but I thought this post was great.
I don’t know who you are but definitely you are going
to a famous blogger if you are not already 😉 Cheers!
I don’t even know how I ended up here, but I thought this post was great.
I don’t know who you are but definitely you are going
to a famous blogger if you are not already 😉 Cheers!
hi!,I really like your writing so much! proportion we keep up a correspondence extra about your post on AOL? I need an expert on this area to unravel my problem. May be that is you! Looking ahead to look you.
THIS IS TREMENDOUS BLOG I REALLY LIKE IT
https://filehorse.online/father-of-internet.html
Nice post. I learn something more challenging on different blogs everyday. It will always be stimulating to read content from other writers and practice a little something from their store. I’d prefer to use some with the content on my blog whether you don’t mind. Natually I’ll give you a link on your web blog. Thanks for sharing.
Perfectly pent written content, thanks for entropy.
What’s Happening i am new to this, I stumbled upon this I’ve found It positively useful and it has helped me out loads. I hope to contribute & aid other users like its helped me. Great job.
That is the fitting blog for anyone who wants to search out out about this topic. You understand so much its virtually hard to argue with you (not that I really would want…HaHa). You definitely put a brand new spin on a subject thats been written about for years. Great stuff, simply great!
Online poker
My wife and i have been absolutely joyful Louis could deal with his basic research because of the ideas he grabbed through your web site. It is now and again perplexing to just choose to be offering tactics which usually others may have been selling. And we also recognize we need the blog owner to thank for this. These explanations you’ve made, the simple blog menu, the relationships you give support to create – it is mostly spectacular, and it’s really letting our son and our family do think this idea is excellent, and that is pretty essential. Many thanks for the whole lot!
It is the best time to make a few plans for the long run and it’s time to be happy.
I’ve read this submit and if I may just I want to recommend you some fascinating issues or
tips. Perhaps you can write next articles regarding this article.
I wish to read more things about it! second hand alibaba
Here is my homepage; vape vuse private label
There are actually loads of particulars like that to take into consideration. That may be a nice point to convey up. I offer the ideas above as general inspiration but clearly there are questions just like the one you convey up where an important thing might be working in sincere good faith. I don?t know if greatest practices have emerged around things like that, however I’m certain that your job is clearly recognized as a fair game. Each boys and girls feel the impact of only a moment’s pleasure, for the remainder of their lives.
Some genuinely nice and utilitarian information on this site, as well I conceive the layout holds excellent features.
There was no visible colour bleed, although this has been known to differ considerably from panel to panel in different laptops of the same
model. 399 to buy two XO laptops — one for the purchaser
and one for a child in need in a international country.
Beyond that, if a Thinkware cable breaks or
goes unhealthy on the highway, you’ll need to order on-line and wait.
The rear camera is fastened on its semi-permanent mount, though the cable is removable.
These days, it appears just like the Internet has almost made traditional cable television obsolete.
The opposite huge addition is tactical gear, an possibility which helps
you to surrender your major weapon slot in favour of a powerful strategic gadget, like a drone
or EMT gear. Alice Cooper and the Tome of Madness serves as a companion piece to Cooper’s
online slot sport of the identical name. And the identical goes for other facets of the holiday
seasons — from parties and household dinners to gift giving.
With havin so much written content do you ever run into any issues of plagorism or copyright infringement?
My blog has a lot of exclusive content I’ve either written myself or outsourced but it seems a lot of it is popping
it up all over the internet without my authorization. Do you know any solutions to help protect against content from being stolen? I’d truly appreciate
it.
Just wish to say your article is as surprising. The clearness to your put up
is simply cool and i could assume you are an expert in this subject.
Fine together with your permission let me to seize your RSS feed to stay updated with impending post.
Thanks a million and please continue the
gratifying work.
Hello my loved one! I wish to say that this post is amazing, nice
written and come with approximately all important infos.
I would like to see extra posts like this .
Wіth havin so much content and articles do you ever run into any issues of plagorism or copyright violation? My wеbsite has a lot of completely unique content
I’ve eitһer сreated myself oг οutsourced but it appearѕ a lot of it is popping it up all over
the web without my ɑuthorization. Do you know any solutions to help prevent content
from being stolen? I’d truly ɑppreciate іt.
When I originally commented I clicked the “Notify me when new comments are added” checkbox and now each time a comment is added I get
several e-mails with the same comment. Is there any way you can remove people from that
service? Many thanks!
I think this is one of the most important information for me.
And i am glad reading your article. But should remark on few general things, The
website style is ideal, the articles is really great : D.
Good job, cheers
I’m commenting to make you understand what a really good experience my cousin’s child obtained visiting the blog. She learned a lot of issues, which included how it is like to have an awesome giving mood to let the mediocre ones with ease master certain tortuous matters. You truly exceeded her desires. Thank you for giving those helpful, healthy, informative and in addition fun guidance on your topic to Gloria.
I love it when people come together and share opinions, great blog, keep it up.
Hoc cach lam giau o nong thon
Its wonderful as your other blog posts : D, appreciate it for posting.
But a smiling visitant here to share the love (:, btw great style and design.
Thank you for the sensible critique. Me & my neighbor were just preparing to do a little research on this. We got a grab a book from our area library but I think I learned more from this post. I’m very glad to see such wonderful information being shared freely out there.
I need to to thank you for this fantastic read!! I definitely loved every little bit of it. I have got you bookmarked to look at new stuff you post…
Wow! This can be one particular of the most useful blogs We have ever arrive across on this subject. Actually Fantastic. I’m also an expert in this topic therefore I can understand your effort.
We stumbled over here different web page and thought I should check things out.
I like what I see so now i’m following you. Look forward to looking into your web
page again.
Youre so cool! I dont suppose Ive read something like this before. So good to search out anyone with some authentic thoughts on this subject. realy thank you for beginning this up. this website is something that’s needed on the web, somebody with slightly originality. useful job for bringing something new to the web!
I enjoyed your article KSNl
Situs Bandot Online 4D Singapore SGP 3D Toto Hongkong HK Terbaik juga Bonus Hadiah Terbesar paling Terpercaya di Indonesia
MPOKTOTO adalah website agen judi online paling dipercaya, MPOKTOTO sebagai agen judi online yang banyak disukai
dimulai dari kelompok remaja sampai dewasa, disamping itu MPOKTOTO sudah terakreditasi oleh
PAY4D di mana Basis baru ini benar-benar menolong beberapa player untuk bermain. Dengan memberinya sensai yang tidak
terlewatkan oleh anggota atau playernya dengan nilai pembayaran paling tinggi untuk 2D,
3D dan 4D
Mengapa anda harus pilih MPOKTOTO ? Karena selainnya kami mempunyai mekanisme operator servis
online 24 jam tiap hari dan siap layani anda. Dan mempunyai games terbaik yang di mana benar-benar memudahkan beberapa pemain saat bermain permainan itu.
Dan rahasia beberapa pemain yang bermain sangat terjaga, Jadi sudah tentu di website judi togel online MPOKTOTO sebagai website yang aman dan paling dipercaya, karena kemenangan member tentu dibayarkan.
MPOKTOTO sebagai agen togel telah sediakan permaianan untuk togel singapore, sydney,
cambodia, kamerun, Turkmenistan, yerusalem, slawakia, dan hongkong.
Agar bisa bermain proses register sangat gampang anda perlu
berkunjung MPOKTOTO. Permainan ini bisa dimainkan Dari Handphone atau computer, sesudah anda lakukan register, anda langsung bisa
pasang togel online dengan bayaran 2D 3D dan 4D tertinggi
saat Ini dan proses deposit cepat sekali, minimum deposit cuman 10 Ribu dan Withdraw 50 Ribu
MPOKTOTO memiliki beberapa promosi yang selalu diupdate, bukan promosi yang hanya ikutan dengan web lain. Disitus MPOKTOTO, anda dapat memperoleh promosi
yang paling memberikan keuntungan, seperti bonus deposit
untuk new player dan bonus mingguan bahkan juga bonus bulanan
Bagaimanakah cara mendapatkan uang lewat online?
kenapa kami tawarkan anda ke situs MPOKTOTO? Karena di Situs MPOKTOTO anda memperoleh
bayaran tertinggi, disamping itu MPOKTOTO memberinya bonus referal
untuk anda yang ajak rekan-rekan anda untuk tergabung dengan kami di website MPOKTOTO
Sistem Pembayaran apa yang terterima oleh MPOKTOTO? Untuk sistem pembayaran transaksi bisnis baik
deposit atau withdraw, kami tawarkan beberapa Bank lokal Indonesia seperti BCA, BNI, BRI, MANDIRI Berdikari.
disamping itu dapat juga deposit melalui pulsa seperti Telkomsel, XL atau Axis.
E-Money seperti Ovo, Gopay, Dana dan Linkaja nantikan apa lagi, Daftar saat ini di Bandar Judi
Togel di Situs MPOKTOTO.
Judi Togel | Toto Gelap | Togel Sydney | Erek Erek | Togel Singapore | Sydney | Cambodia | Kamerun |
Turkmenistan | Yerusalem | Togel Hongkong | Dewa Togel | Dwayne Togel
| Jaya Togel | Togel hongkong hari ini| Cara
mendapatkan uang | Cara menghasilkan uang
online | Cara mendapatkan uang online | Cara bisnis online | Cara mendapatkan keuntungan besar |
Cara bermain togel | Cara bermain togel online
Mengapa anda harus pilih MPOKTOTO ? Karena selain kami mempunyai mekanisme operator servis online 24 jam tiap
hari dan siap layani anda. serta mempunyai games terbaik yang di mana benar-benar
memudahkan beberapa pemain saat bermain permainan itu.
Dan rahasia beberapa pemain yang bermain sangat terjaga, Jadi sudah tentu di website judi slots online MPOKTOTO sebagai website yang aman dan paling dipercaya.
MPOKTOTO sebagai agen slots online sediakan permainan diantaranya Pragmatic Play, PG soft,
Habanero, Spade Gaming, Hebat Tren Gaming, dan joker gaming.
Agar bisa bermain proses register sangat gampang anda perlu berkunjung
link MPOKTOTO. Permainan ini bisa dimainkan Dari Handphone atau computer, sesudah
anda lakukan register, anda langsung bisa bermain seperti memainkan permainan Higgs Domino dan anda akan dibayar langsung dengan uang kontan dengan lewat transfer dari bank lokal seperti BCA,
BRI, BNI, MANDIRI, Dan juga bisa melalui uang elektronik atau yang sirng disebut dengan e-money ( DANA,
OVO, GOPAY, Linkaja Dan DOKU ).
Bagi Member MPOKTOTO yang Bermain permainan sejenis SLOT maka akan mendapatkan beberapa pilihan menarik seperti bonus Selamat datang , bonus harian juga ada tersedia bonus mingguan yang bisa langsung anda pilih
sebelum melakukan permainan
joker123 | Slot Online | MPOKTOTO | Pragmatic Play | PG soft | Habanero | Spade Gaming | Top
Trend Gaming | joker gaming | slot online pandora | 388hero | slot online sultan play |
slot online indonesia sultan play | judi slot | Cara
mendapatkan uang | Cara menghasilkan uang online | Cara mendapatkan uang online | Cara bisnis online | Cara mendapatkan keuntungan besar | Cara bermain slot | Cara bermain slot online
Live kasino sebagai tempat supaya pemain bisa bermain tetapi fleksibel, anda bisa memainkan di rumah, dicafe bahkan juga
bila sedang menanti antrean di mol. Permainan ini sudah pasti bisa menjadi rekomendasi atau
sebagai media untuk cari uang sambilan. Disamping itu anda harus juga jelih
pilih di mana ada situs kasino yang paling dipercaya dan berperanan sebagai tempat supaya beberapa pemain bisa
bermain, Sudah pasti ada beragam keuntungan yang dapat didapat beberapa pemain di kasino online seperti bonus untuk
new anggota, dan bonus bulanan dan bonus deposit saat bermain. Selainnya
beberapa bonus yang didapatkan untuk beberapa anggota, Anda tak perlu cemas tidak kebagian bonus karena mekanisme ini
bekerja automatis hingga anda tetap memperoleh bonus.
MPOKTOTO mempunyai E-wallet yang memudahkan Anda sekaligus untuk mainkan semua tipe permainan pada sebuah account.
Anda dapat pilih tipe games berdasar kegemaran anda sendiri hingga anda dapat memperoleh beberapa
keuntungan dan bonus. semakin kerap anda bermain, mak anda bisa secara mudah mendapatkan uang dari judi kasino online paling dipercaya
PELAYANAN SITUS LIVE CASINO DENGAN 24 JAM ONLINE
Bukan live kasino namanya bila tidak bisa dimainkan dimanapun, kapan pun. Oleh karenanya, kami tawaran games dengan design bagus yang bisa dipakai dan dimainkan kapan pun dengan piranti apa saja.
Website kami bisa dijangkau dari computer atau handphone Android atau iOS.
Sebagai situs kasino online paling dipercaya, kami memberinya
keringanan untuk Anda untuk mendeposit. Dengan support bank paling besar di Indonesia yakni BCA.
Kami juga sediakan deposit lewat pulsa Telkomsel, XL,
Axis atau E-wallet seperti OVO, DANA, GOPAY dan LINKAJA
live casino | ion casino | pragmatic play | sexy gaming | allbet | idnlive | dewa
casino | igamble247 deposit online | roullete | casino
online | casino | blackjack | casino royal | zynga poker | kasino | agen kasino | Cara mendapatkan uang | Cara menghasilkan uang online | Cara mendapatkan uang online | Cara bisnis online | Cara mendapatkan keuntungan besar | cara
bermain casino | cara bermain casino online
Keyword : MpokToto spor toto süper lig
of course like your web site however you need to check the spelling on quite a few of your posts. Many of them are rife with spelling problems and I in finding it very bothersome to tell the reality however I will surely come back again.
As a Newbie, I am constantly searching online for articles that can benefit me. Thank you
I would like to thnkx for the efforts you’ve put in writing this blog. I’m hoping the same high-grade website post from you in the upcoming as well. In fact your creative writing abilities has inspired me to get my own web site now. Actually the blogging is spreading its wings rapidly. Your write up is a great example of it.
I’ve been browsing online more than three hours today, yet I by no means found any fascinating article like yours. It?¦s beautiful price sufficient for me. Personally, if all web owners and bloggers made just right content material as you did, the internet will likely be much more useful than ever before.
Real clear web site, regards for this post.
Can I just say what a relief to find a person that actually understands what they are discussing on the internet. You definitely know how to bring an issue to light and make it important. A lot more people really need to look at this and understand this side of the story. It’s surprising you’re not more popular because you definitely have the gift.
Hey! This is my first visit to your blog! We are a group of volunteers and starting a new initiative in a community in the same niche. Your blog provided us beneficial information to work on. You have done a wonderful job!
Howdy! Would you mind if I share your blog with my myspace group? There’s a lot of folks that I think would really appreciate your content. Please let me know. Thanks
Hey there! This post could not be written any better!
Reading this post reminds me of my good old room mate! He always kept talking
about this. I will forward this page to him. Pretty sure he will have
a good read. Thanks for sharing!
Some truly interesting details you have written.Assisted me a lot, just what I was looking for : D.
I am now not positive where you’re getting your info, but great topic.
I needs to spend a while finding out much more or figuring out more.
Thank you for great info I was looking for this info for my mission.
Hi, i think that i saw you visited my web site so i
came to “return the favor”.I am trying to find things to improve my web site!I suppose its ok
to use a few of your ideas!!
I do not even know how I ended up here, but I thought this
post was great. I do not know who you are but certainly you are going to a famous blogger if you aren’t already 😉 Cheers!
Hello to every one, the contents present at this website are really awesome for people knowledge, well, keep up the good work fellows.|
But instead of using excessive-strain gasoline to generate thrust, the craft uses a jet drive to create a robust
stream of water. The coverage on gas differs between corporations as
well. The TDM Encyclopedia. “Car sharing: Vehicle Rental Services That Substitute for Private Vehicle Ownership.” Victoria
Transport Policy Institute. University of California Berkeley,
Institute of Transportation Studies. Santa Rita Jail in Alameda, California
(it is near San Francisco, no shock) uses an array of gasoline cells, photo voltaic panels, wind turbines and diesel generators to power its very personal micro grid.
However, many nonprofit automobile-share organizations are
doing fairly effectively, reminiscent of City CarShare in the San Francisco Bay Area and PhillyCarShare in Philadelphia.
So that you may be asking yourself, “Wow, if car sharing is so popular and easy, ought to I be doing it too?”
To seek out out extra about who can profit from sharing
a car and to find out about tips on how to contact a
automobile-sharing company, proceed to the next page.
Also visit my blog post … https://slottotal777.com/
Hi there to all, how is the whole thing, I think every one is getting more from
this web site, and your views are pleasant in favor
of new viewers.
It’s an awesome article designed for all the web viewers; they will get advantage from it I am sure.
I’d have to examine with you here. Which is not one thing I usually do! I take pleasure in reading a post that may make folks think. Additionally, thanks for permitting me to comment!
Thanks for sharing excellent informations. Your website is so cool. I am impressed by the details that you¦ve on this website. It reveals how nicely you perceive this subject. Bookmarked this web page, will come back for more articles. You, my friend, ROCK! I found just the info I already searched everywhere and simply couldn’t come across. What an ideal website.
Azərbaycanlı istifadəçilər arasında kazino oyunu (https://abilk.Com/) sahəsindəki
oyunlara maraq yüksəkdir.
Wow, incredible blog layout! How long have you been blogging
for? you make blogging look easy. The overall
look of your web site is great, as well as the content!
Feel free to surf to my web site … free january 2023 calendar
Hi there, I found your website by the use of Google at the same time
as looking for a comparable matter, your web site came up,
it seems to be good. I’ve bookmarked it in my google bookmarks.
Hello there, just became alert to your blog thru Google,
and located that it is really informative. I am
going to be careful for brussels. I will be grateful if you
happen to continue this in future. Numerous other folks will be benefited out of
your writing. Cheers!
Currently it looks like Expression Engine is the top blogging platform
out there right now. (from what I’ve read) Is
that what you are using on your blog?
Some truly nice and utilitarian info on this web site, as well I think the layout has got fantastic features.
Hey there are using WordPress for your blog platform? I’m new to the blog world but I’m trying to get started and set up my own. Do you require any coding knowledge to make your own blog? Any help would be really appreciated!
You actually make it appear really easy along with your
presentation but I in finding this matter to be actually something which
I believe I might never understand. It seems too complex and extremely wide for me.
I’m looking ahead for your subsequent post, I will attempt to
get the hang of it!
I’m still learning from you, but I’m trying to reach my goals. I certainly enjoy reading everything that is written on your blog.Keep the posts coming. I liked it!
Keep functioning ,fantastic job!
I am constantly invstigating online for tips that can benefit me. Thx!
It’s an remarkable post designed for all the internet visitors;
they will obtain advantage from it I am sure.
My web page content regularly
Thanks very nice blog!
My blog post; seo experts
I am continuously browsing online for tips that can assist me.
Thanks!
My web-site – content marketers
hey there and thank you for your information ? I have definitely picked
up anything new from right here. I did however expertise
several technical issues using this web site, as I experienced to reload the web site many
times previous to I could get it to load properly.
I had been wondering if your hosting is OK? Not that I am complaining,
but slow loading instances times will very frequently
affect your placement in google and could damage your high quality score if ads and marketing with Adwords.
Well I am adding this RSS to my e-mail and can look out for much more of
your respective fascinating content. Make sure you update this again soon..
Feel free to visit my web site :: social networking
You could have a each day pores and skin care routine that consists of facial cleansers,
lotions, creams and makeup that helps your skin look its best.
It not solely makes the shop look better but it’s going to make your retailer stand
out from other close by stores. An adjustment will convey an immediate sense
of relief. If this issue is just not addressed correctly, you will have to deal along with your hickory hardwood flooring warping and twisting in the long term.
However to address this challenge with hickory hardwood, you’ll
just have to buy pre – cut and pre – finished hickory materials so you’ll not have
a hard time on having it lower or formed.
Hickory hardwood flooring could possibly be your best option if beauty and
sturdiness is your concern because hickory hardwood would absolutely give
your private home a new model and really feel
on flooring which is able to last a lifetime if correctly cared and maintained.
Since it’s a hardwood, you might be assured of
its durability and capability to withstand on a regular
basis wear and tear as well as high traffic areas.
A fascinating discussion is definitely worth comment.
I do believe that you need to write more on this subject, it may not be a taboo subject but generally people do not discuss these issues.
To the next! Many thanks!!
For hottest information you have to pay a visit internet and on web I found this website as a most excellent web page for newest updates.|
Hiya very cool web site!! Guy .. Excellent .. Superb ..
I will bookmark your website and take the feeds also? I am satisfied to seek out
numerous helpful info right here in the post, we need develop more strategies in this
regard, thank you for sharing. . . . . .
payday loan
My spouse and I absolutely love your blog and find many of your post’s to be exactly what I’m
looking for. can you offer guest writers to write content available for you?
I wouldn’t mind writing a post or elaborating on a lot of the subjects you write
regarding here. Again, awesome web log!
Normally I don’t read post on blogs, but I would like to say that this write-up
very compelled me to try and do it! Your writing taste has
been amazed me. Thank you, quite great post.
Excellent blog here! Additionally your web site loads up
very fast! What host are you using? Can I get your affiliate link to your
host? I want my site loaded up as quickly as yours lol
If some one needs expert view regarding running a blog afterward i recommend him/her to go to see this website, Keep up the fastidious work.
You could certainly see your skills within the work you write. The world hopes for more passionate writers like you who aren’t afraid to say how they believe. Always go after your heart.
Fascinating blog! Ιs your theme custom made or did
you download it from somewhere? A design ⅼike youгs ԝith a few simple
adjustements ԝould realy maҝe my blog stand оut.
Pleaѕe let me қnow where yoᥙ got your theme.
Thannk you
mʏ web blog; How To Passive Income With Cryptocurrency
You should take part in a contest for one of the best blogs on the web. I will recommend this site!
Some really grand work on behalf of the owner of this web site, absolutely great subject material.
Greetings I am so grateful I found your site, I really found you by accident, while I was looking on Google for something else, Anyways I am here now and would just like to say thanks for a fantastic post and a all round interesting blog (I also love the theme/design), I don’t have time to look over it all at the minute but I have bookmarked it and also added your RSS feeds, so when I have time I will be back to read more, Please do keep up the superb job.
Hi, i believe that i saw you visited my weblog thus i got here to
go back the desire?.I’m trying to to find issues to improve my website!I guess its adequate to
make use of a few of your concepts!!
You really make it seem so easy with your presentation but I find this topic to be really something which I think I would never understand. It seems too complex and extremely broad for me. I’m looking forward for your next post, I will try to get the hang of it!|
Hello, i think that i saw you visited my blog thus i came to “return the favor”.I am attempting to find things to improve my website!I suppose its ok to use a few of your ideas!!
It’s really very difficult in this full of activity life to listen news on Television, thus I only use web for that purpose, and take the most recent news.
I envy your piece of work, thanks for all the interesting content.
Wohh just what I was looking for, thanks for posting.
Today, I went to the beach front with my children. I found a sea shell and gave it to my 4 year old daughter and said “You can hear the ocean if you put this to your ear.” She
placed the shell to her ear and screamed. There was a hermit crab inside and it pinched her ear.
She never wants to go back! LoL I know this is totally off
topic but I had to tell someone!
I was very pleased to find this web-site.I wanted to thanks for your time for this wonderful read!! I definitely enjoying every little bit of it and I have you bookmarked to check out new stuff you blog post.
magnificent publish, very informative. I ponder why the opposite specialists of this sector don’t notice this. You should continue your writing. I’m sure, you have a huge readers’ base already!
game kharido
games kharido
gamekharido
gameskharido
games kharido ff
game kharido free fire
games kharido
game kharido top up
game kharido
games kharido
coda shop free fire
codashop ff top up
free fire diamond
free fire diamonds
free fire top-up
free fire top up centre
free fire top up center
free fire top up now
free fire topup
free fire diamond shop
free fire diamonds shop
seagm free fire india server
seagm.com free fire
codashop free fire diamond india
freefire topup
free fire top up
seagm free fire india
seagm free fire diamond
free fire diamond buy
coda shop diamond ff
garena topup centre codashop
ff top up codashop
garena top up center
free fire diamond app
free fire paytm top up
freefire top up
free fire top up app
free fire top up seagm
seagm free fire top up
seagm free fire
seagm ff top up
seagm free fire max top up
seagm ff max
free fire diamond top up
free fire codashop
codashop free fire top up
free fire top up diamond
winzo free fire top up
winzo ff top up
free fire max top up
free fire max topup
free fire max diamond
winzo free fire diamond
winzo free fire diamonds
garena top up diamond
free fire diamond top up app
free fire diamonds buy
garena topup free fire
free fire diamond kaise le
ff diamond top up
free fire diamond top up paytm
top up app for free fire
free free top up
winzo gold free fire diamond
free fire diamonds purchase
free fire monthly membership top up
4000 diamond top up
free fire diamond top up hack
gerena topup
free fire airdrop top up online
free fire diamonds top up
free fire diamonds top up app
shop garena sg diamond
free fire special airdrop top up online
ggtopup free fire
free fire top up website
free fire first top up
garena free fire diamond top up
monthly membership in free fire
double diamond top up website
freefire topup discount
free fire rupees top up website
winzo app free fire diamond
game shop free fire top up
garena free fire top up
seagm free fire diamonds
codashop free fire max
codashop free fire topup
ff top up
codashop free fire double diamond
codashop free fire double diamonds
winzo free fire diamond top up
winzo gold free fire diamond top up
akash game shop free fire top up
winzo free fire diamond topup
winzo free fire diamonds top up
winzo gold free fire topup
I love your writing style really loving this internet site.
I quite like looking through a post that will make
people think. Also, many thanks for permitting me to comment!
Thank you for the auspicious writeup. It in fact was a enjoyment account it. Look advanced to more delivered agreeable from you! However, how can we keep up a correspondence?
Thank you for sharing your thoughts. I really appreciate
your efforts and I will be waiting for your
further write ups thank you once again.
Hi there, You have done a great job. I’ll definitely digg it and personally recommend to my friends.
I’m confident they will be benefited from this web site.
Visit my homepage: printable november 2022 calendar
I have fun with, result in I discovered just what I used
to be having a look for. You’ve ended my four day lengthy hunt!
God Bless you man. Have a great day. Bye
Aw, this was an extremely nice post. Taking
the time and actual effort to produce a great article…
but what can I say… I procrastinate a whole lot and never manage to
get nearly anything done.
What’s Going down i am new to this, I stumbled upon this I’ve found It absolutely
helpful and it has aided me out loads. I am hoping to give a contribution & aid different
customers like its aided me. Great job.
I always used to study piece of writing in news papers but now as I am a user of web so from now
I am using net for articles or reviews, thanks to web.
I always used to study piece of writing in news papers but now as I am a user of web so from now
I am using net for articles or reviews, thanks to web.
I wish to voice my affection for your kindness supporting persons that actually need help on that field. Your real commitment to passing the solution up and down was extraordinarily helpful and have without exception empowered those just like me to get to their endeavors. Your own helpful hints and tips can mean much to me and much more to my colleagues. Thank you; from each one of us.
Hi there! This is kind of off topic but I need some advice from an established blog. Is it hard to set up your own blog? I’m not very techincal but I can figure things out pretty fast. I’m thinking about creating my own but I’m not sure where to begin. Do you have any ideas or suggestions? Appreciate it
This is the perfect blog for everyone who hopes to understand this topic.
You realize a whole lot its almost hard to argue with you (not that I actually would want to…HaHa).
You definitely put a new spin on a subject which has been discussed
for a long time. Wonderful stuff, just excellent!
Also visit my blog post – printable monthly calendar
I couldn’t refrain from commenting. Very well written!
My site; blank november 2022 calendar
https://www.lastikb2b.com/
Hello there, You’ve done an incredible job. I will certainly digg it
and personally recommend to my friends. I’m sure they’ll be benefited from this site.
Your style is very unique compared to other folks I’ve read stuff from.
Thanks for posting when you have the opportunity, Guess I’ll just book mark this web site.
Good day! Do you know if they make any plugins to help with SEO?
I’m trying to get my blog to rank for some targeted keywords but I’m not
seeing very good results. If you know of any please share.
Thank you!
I do not even know how I ended up here, but I thought this post was good.
I do not know who you are but definitely you are going to a famous blogger if you aren’t already 😉 Cheers!
Chris Romero Stand Up Comedy Full
Really This goes far beyond the commenting!
It wrote his thoughts while reading the article amazingly 🙂
Wow, amazing weblog structure! How lengthy have you been blogging for? you made running a blog glance easy. The overall glance of your web site is excellent, let alone the content material!
It’s going to be finish of mine day, but before finish I am reading this enormous article to improve my knowledge.
I’m not that much of a internet reader to be honest but your blogs really nice,
keep it up! I’ll go ahead and bookmark your site to come
back later. Cheers
This blog was… how do I say it? Relevant!!
Finally I have found something which helped me. Thanks a lot!
Hello my family member! I want to say that this article is awesome, great written and come with almost all vital infos. I would like to peer more posts like this .
Thanks for finally writing about > How to set up a LAN connection in WinXP « Old PC Gaming < Liked it!
Hola! I’ve been following your blog for a long time now and finally got the
bravery to go ahead and give you a shout out from Huffman Texas!
Just wanted to mention keep up the fantastic work!
“Just having the option to sit or stand, when you’re cooped up in your room or home office all day, makes a big difference,” he says.
If you’re looking for office furniture for your home or office, we have
a great selection for you. Normally, the decision to build a new home rests on more than just the need for a new kitchen. And since it’s designed
to be used in a garage or workshop, the surface is made of solid wood, making it more durable than inexpensive desks you might find elsewhere with plastic or particleboard desktops.
Made from the highest-quality Canadian wood, and boasting
aesthetically pleasing, minimalist designs, our standing desks will
be an asset to your workstation, regardless of its interior design.
Our Design Your Office Tool makes it easy to visualize many different color combinations and layout possibilities while trying to
plan and purchase some of our most popular contemporary office
furniture designs. These clients are calling upon us to provide them with our unique modern office furniture designs and for our
ability to integrate technology and practical functionality into those designs.
We are a project-oriented company specializing in outfitting
entire commercial office spaces with modern business furniture.
Good write-up, I’m normal visitor of one’s site, maintain up the nice operate, and It’s going to be a regular visitor for a lengthy time.
Whats up very cool blog!! Guy .. Beautiful .. Amazing .. I’ll bookmark your web site and take the feeds alsoKI’m satisfied to search out so many helpful information right here within the post, we want work out extra techniques in this regard, thank you for sharing. . . . . .
Hey! This is my first visit to your blog! We are a team of volunteers and starting a new initiative in a community
in the same niche. Your blog provided us useful information to
work on. You have done a marvellous job!
Hey! This is my first visit to your blog! We are a team of volunteers and starting a new initiative in a community
in the same niche. Your blog provided us useful information to
work on. You have done a marvellous job!
Greetings! Very helpful advice in this particular post!
It is the little changes which will make the greatest changes.
Thanks for sharing!
It is perfect time to make some plans for the future and it is time to be happy. I’ve learn this post and if I may just I wish to counsel you few interesting things or suggestions. Maybe you could write subsequent articles referring to this article. I want to learn even more things about it!
Heya are using WordPress for your site platform?
I’m new to the blog world but I’m trying to get started and create my own. Do
you need any coding expertise to make your own blog?
Any help would be really appreciated!
Aw, this was an incredibly good post. Taking the time and actual effort to create a really
good article… but what can I say… I hesitate a lot and
don’t seem to get nearly anything done.
What’s up everybody, here every person is sharing these know-how, so it’s pleasant to read this weblog, and I used to pay a
visit this weblog everyday.
Thank you for the auspicious writeup. It in fact was a
amusement account it. Look advanced to far added agreeable from you!
However, how could we communicate?
free Windows 7 key
free Windows 7 key
free Windows 7 key
Touche. Great arguments. Keep up the amazing effort.
whoah this blog is wonderful i love reading your posts. Keep up the great work! You know, lots of people are hunting around for this information, you can aid them greatly.
I’m not that much of a internet reader to be honest but your blogs really nice, keep it up! I’ll go ahead and bookmark your site to come back in the future. Many thanks
Gettіng your brand іn froknt oof retail buyers саn bе a challenge.
At Consumer Products International (CPI), our retail industry professionals һave m᧐гe than seven decades
of experience working with retail buyers fгom national and regional
chains.
NPI wors with international ɑnd domestic health ɑnd wellness brand manufacturers ᴡho аrе seeking to
enter the U.S. market оr expand theіr retail distribution network іn America.
CPI’s professional team һas the contacts, expertise,
and knowledge tο guide your brand from concept tо shelf.
While reseaarching health ɑnd wellness brands, І recesntly learned ɑbout
yoour prodxucts аnd rrealized tһat CPI could help you increase yоur retail
penetration in America.
Ԝhen ᴡe ᴡork witһ brand manufacturers, we provide expertise in ɑll afeas of distribution:
• Turnkey/One-ѕtoр solution
• Active accounts ѡith majnor U.S. distributors ɑnd retailers
• Ꭺn executive tesam tһat hɑѕ held executive positioons ѡith Walmart and Amazon, thе twο largest online ɑnd brick-аnd-mortar retailers
іn the U.S., and Glanbia, tһe woгld’s largest sports nutrition company.
• Proven sales fοrce witһ public relations, branding, аnd marketing аll under one roof
• Focus ᧐n new and exosting product lines
• Warehousing ɑnd logistics
Consumer Products International һaѕ a long, sucfessful track record оf taking brands tߋ
market іn the United Stateѕ. CPI Natural CBD | Why CBD Is So Sustainable your fast track t᧐ thе retail market.
Durіng tһe next couple of weeқѕ, I ԝill reach out tο yoս again to
discuss how Consumer Products International ccan Ƅring yοur products іn front oof ⅼarge
and small retailers tһroughout tһe country.
If yoս have аny questions, ⅾon’t hesitate tto contact
me.
Kind Rеgards,
Gary,
Gary Cohen
VP оf Business Development
Consumer Products International
101 Plaza Real Տ, Ste #224
Boca Raton, FL33432
Office: 561-544-071
gcohen@consumerproductsintl.сom
Super Slim Keto Gummy Bears Reviews 2022 Super Slim Keto
Gummies are one of the most recent weight loss products.
It promotes healthy living. It contains whole-spectrum BHB salts.
Super Slim Keto Gummy Bears Reviews 2022 Super Slim Keto
Gummies are one of the most recent weight loss products.
It promotes healthy living. It contains whole-spectrum BHB salts.
Super Slim Keto Gummy Bears Reviews 2022 Super Slim Keto
Gummies are one of the most recent weight loss products.
It promotes healthy living. It contains whole-spectrum BHB salts.
Hi i am kavin, its my first occasion to commenting anyplace, when i
read this paragraph i thought i could also make comment due to
this good piece of writing.
Nice post. I learn something new and challenging on blogs I
stumbleupon on a daily basis. It’s always exciting to read content from other authors and practice something from other sites.
Great post. I am facing a couple of these problems.
At this time it appears like WordPress is the best blogging platform out
there right now. (from what I’ve read) Is that what you are using on your blog?
Also visit my site :: we buy houses cash Kansas City
payday loan
bookmarked!!, I love your blog!
Thanks , I have recently been searching for information about this topic
for a while and yours is the best I have came upon till now.
But, what concerning the conclusion? Are you positive in regards to
the source?
I have not checked in here for a while because I thought it was getting boring, but the last few posts are great quality so I guess I¦ll add you back to my everyday bloglist. You deserve it my friend 🙂
Thanks for finally talking about > How to set up a LAN connection in WinXP « Old PC Gaming < Liked it!
Thanks for all of the effort on this website. My daughter take interest in doing internet research and it’s really simple to grasp why. Almost all notice all of the dynamic medium you deliver both interesting and useful techniques through your website and in addition welcome participation from people on that subject matter so our favorite girl has been discovering a lot of things. Take pleasure in the rest of the new year. You’re the one performing a great job.
Hello it’s me, I am also visiting this web site regularly,
this web site is genuinely pleasant and the people are truly sharing
nice thoughts.
Hi, I do thіnk this is an excellent site. I stumbledᥙpon it 😉 I may return once again since i have book-marked it.
Money and freedom is the best way to change, may you be rich and continuе
to ցuide otherѕ.
Hello I am so grateful I found your blog page, I really found you by error, while I was browsing on Bing for something else, Anyways I am here now and would just like to say cheers for a incredible post and a all round enjoyable blog (I also love the theme/design), I don’t have time to look over it all at the moment but I have saved it and also included your RSS feeds, so when I have time I will be back to read a lot more, Please do keep up the excellent work.
I regard something truly interesting about your web site so I saved to fav.
%%
Feel free to surf to my site :: 1Taz.Ir
I am actually pleased to glance at this weblog posts which carries lots of valuable information, thanks for providing these information.
It’s going to be end of mine day, except before ending I am reading
this wonderful piece of writing to increase my knowledge.
Greetings from California! I’m bored to tears at work so I decided to browse your blog on my iphone during lunch break.
I really like the info you provide here and can’t wait to take
a look when I get home. I’m amazed at how fast your blog loaded on my mobile ..
I’m not even using WIFI, just 3G .. Anyways, very good site!
Perfectly composed content, thanks for information. “Necessity is the mother of taking chances.” by Mark Twain.
Foam Insulation Baffles Pipe
Thanks for some other wonderful post. Where else could anyone get that type of information in such a perfect approach of
writing? I’ve a presentation subsequent week, and I’m at the look for such info.
You might think It’s the end of your life. Addiction can be fought with the help of experts.
I would definitely recommend them with someone out there who is in despair.
Achieve sobriety here.
Awesome post.
I was curious if you ever considered changing the layout of your
blog? Its very well written; I love what youve
got to say. But maybe you could a little more in the way of content so people could
connect with it better. Youve got an awful lot of text for only having
1 or 2 images. Maybe you could space it out better?
Great post. I was checking constantly this blog and I am impressed!
Extremely helpful information particularly the last part 🙂 I care for such information much.
I was seeking this certain information for
a long time. Thank you and best of luck.
My relatives always say that I am killing my time here at
net, but I know I am getting familiarity all the time by reading thes pleasant articles
or reviews.
This is really interesting, You are a very skilled blogger.
I’ve joined your rss feed and look forward to seeking more of your excellent post.
Also, I’ve shared your website in my social networks!
Have you ever considered publishing an ebook or guest authoring on other sites?
I have a blog based upon on the same information you discuss and would really like to have you share some stories/information. I know my readers would enjoy your work.
If you are even remotely interested, feel free to shoot me an email.
I just like the helpful information you provide to your articles.
I will bookmark your blog and take a look at again here regularly.
I am somewhat sure I will learn lots of new stuff proper
right here! Good luck for the next!
I’m not certain where you’re getting your information, however good topic.
I must spend a while learning more or understanding more.
Thanks for fantastic information I was in search of this information for my
mission.
Hello, I enjoy reading through your post. I wanted to write a little comment to support
you.
Seo Services Examples
Hi, eᴠery tіme i used to check web site posts here early in the daylight, as
i enjoy to learn more and more.
Here іs my web pаge :: print a calendar
Fastidious respond in return of this issue with real arguments and describing
the whole thing concerning that.
When someone writes an article he/she keeps the image of a user in his/her brain that how a user can understand it.
Therefore that’s why this paragraph is perfect. Thanks!
Great blog here! Also your site loads up very fast!
What host are you using? Can I get your affiliate link to your host?
I wish my site loaded up as quickly as yours lol
Piece of writing writing is also a excitement, if
you be acquainted with after that you can write if not
it is difficult to write.
Online poker
Thanks for finally writing about > How to set up a LAN
connection in WinXP « Old PC Gaming < Liked it!
Hi there, i read your blog from time to time and i own a similar
one and i was just wondering if you get a lot of spam comments?
If so how do you protect against it, any plugin or anything you can advise?
I get so much lately it’s driving me crazy so any assistance is very much appreciated.
Good article! We will be linking to this great content on our
site. Keep up the good writing.
Outstanding story there. What occurred after? Good luck!
You’ve made some really good points there. I checked on the net for more info about the issue and found most people will go
along with your views on this web site.
My Live streaming passion is largely Vintage clothing. Seems monotonous?Not!
You actually make it seem so easy with your presentation but I
find this topic to be actually something that I think I would never understand.
It seems too complex and very broad for me. I’m looking forward for your next post, I will try to get
the hang of it!
Link exchange is nothing else except it is only placing the other person’s web site link on your page at proper place
and other person will also do same for you.
With havin so much content and articles do you ever run into any problems of plagorism or copyright infringement?
My site has a lot of completely unique content I’ve either written myself or outsourced
but it looks like a lot of it is popping it up all over the web without my permission. Do you know any ways
to help stop content from being ripped off? I’d genuinely appreciate it.
Best Women’s Sunglasses For Running
I love your blog.. very nice colors & theme. Did you create this website yourself? Plz reply back as I’m looking to create my own blog and would like to know wheere u got this from. thanks
I like this post, enjoyed this one thanks for putting up.
I truly appreciate this post. I have been looking everywhere for this! Thank goodness I found it on Bing. You’ve made my day! Thanks again
Greetings, I do think your site might be having internet browser compatibility issues.
When I take a look at your website in Safari, it looks fine
but when opening in IE, it has some overlapping issues.
I merely wanted to give you a quick heads up!
Aside from that, wonderful site!
It’s the best time to make some plans for the future and it’s time to be happy.
I’ve read this post and if I could I desire to suggest you few interesting things or tips.
Perhaps you could write next articles referring to this article.
I desire to read even more things about it!
Good answer back in return of this matter with firm arguments
and describing all concerning that.
Your method of explaining everything in this article is in fact fastidious, every one be capable of easily know it, Thanks a lot.
It was a great place that saved my life, to be honest with you!
They will help you where you are. They work with you all through
the way. I would recommend them for an addict in need.
I was wondering if you ever considered changing the structure of your site? Its very well written; I love what youve got to say. But maybe you could a little more in the way of content so people could connect with it better. Youve got an awful lot of text for only having one or 2 images. Maybe you could space it out better?
It is in reality a nice and useful piece of information. I’m happy
that you shared this useful info with us. Please keep us
informed like this. Thank you for sharing.
average lawyer fees for divorce case
It is in reality a nice and useful piece of information. I’m happy
that you shared this useful info with us. Please keep us
informed like this. Thank you for sharing.
If you want to obtain much from this post then you have to apply such techniques to your
won web site.
If some one needs expert view on the topic of running a
blog afterward i propose him/her to pay a visit this blog, Keep up the pleasant work.
I really appreciate this post. I’ve been looking everywhere for this! Thank goodness I found it on Bing. You’ve made my day! Thank you again!
What a material of un-ambiguity and preserveness of precious experience about unpredicted emotions.
I have read several excellent stuff here. Definitely price bookmarking for revisiting. I wonder how much attempt you place to make this kind of great informative website.
online porn video
Womens Hiking Jacket Velvet
I take pleasure in, lead to I found exactly what I was having a look for.
You’ve ended my 4 day lengthy hunt! God Bless you man. Have a nice day.
Bye
Hey, I think your blog might be having browser compatibility issues. When I look at your blog in Opera, it looks fine but when opening in Internet Explorer, it has some overlapping. I just wanted to give you a quick heads up! Other then that, wonderful blog!
I am really loving the theme/design of your blog. Do you ever run into any
internet browser compatibility issues? A few of my blog visitors have complained about my site not operating correctly
in Explorer but looks great in Firefox. Do you have any ideas to help fix this problem?
I’m not that much of a online reader to be honest but your blogs
really nice, keep it up! I’ll go ahead and bookmark your site to come back later.
Cheers
Womens Hiking Jacket 90s
I think what you posted made a bunch of sense.
But, think on this, suppose you were to create a awesome headline?
I am not suggesting your information isn’t good., however suppose you added a title that makes people want more?
I mean How to set up a LAN connection in WinXP « Old PC Gaming is kinda plain. You could look at Yahoo’s front page
and watch how they create post titles to grab people to
open the links. You might try adding a video or a picture or two to
grab people excited about what you’ve got to say.
In my opinion, it could make your posts a little bit more interesting.
Purple Lure
Hello! I just would like to give a huge thumbs up for the great info you have here on this post. I will be coming back to your blog for more soon.
Just a smiling visitant here to share the love (:, btw great design and style.
Hi, i feel that i saw you visited my website thus i got here to go back
the favor?.I am attempting to find issues to improve my website!I assume its adequate to
make use of some of your ideas!!
F*ckin¦ awesome issues here. I¦m very satisfied to look your post. Thanks so much and i am having a look ahead to contact you. Will you kindly drop me a e-mail?
I really like your writing style, fantastic info , thankyou for putting up : D.
How Do You Dab
The manufacturer of Super Slim Keto Gummies promises that you can gradually reduce your body fat with his product.
The gummies are made from Super Slim Keto Gummies Reviews (Ingredients,
Side Effects)
My spouse and I stumbled over here by a different web address and
thought I should check things out. I like what I see so i am just following you.
Look forward to exploring your web page yet again.
Nice blog! Is your theme custom made or did you download it from somewhere? A theme like yours with a few simple adjustements would really make my blog shine. Please let me know where you got your design. Appreciate it
Good V I should definitely pronounce, impressed with your site. I had no trouble navigating through all the tabs as well as related info ended up being truly easy to do to access. I recently found what I hoped for before you know it in the least. Reasonably unusual. Is likely to appreciate it for those who add forums or something, web site theme . a tones way for your customer to communicate. Excellent task..
Magnificent goods from you, man. I have understand
your stuff previous to and you’re just too great. I actually like what you’ve acquired here, really
like what you are saying and the way in which you say it.
You make it entertaining and you still take care of to keep
it sensible. I cant wait to read much more from you.
This is really a great website.
Pretty! This was an extremely wonderful post. Thanks for providing this information.
free Windows 7 key
Thanks for this wondrous post, I am glad I noticed this site on yahoo.
I am thankful that I observed this web blog, exactly the right info that I was looking for! .
I like your writing style truly enjoying this website .
Some really good articles on this web site, thank you for contribution. “The spirit is the true self.” by Marcus Tullius Cicero.
accidents attorney jacksonville fl erickson
Hello my family member! I want to say that this post is awesome, nice written and include approximately all important infos. I?¦d like to look more posts like this .
Sustain the exceptional job !! Lovin’ it!
click
I just could not depart your website before suggesting that I really enjoyed the standard info an individual provide on your guests? Is going to be back frequently in order to investigate cross-check new posts
I always spent my half an hour to read this weblog’s articles or reviews everyday along with a mug of
coffee.
Useful post
I must express my love for your kindness giving support to folks that must have assistance with in this subject matter. Your personal commitment to passing the solution across became extremely important and has continually made folks just like me to realize their objectives. The invaluable instruction entails a whole lot to me and a whole lot more to my peers. Thanks a ton; from everyone of us.
I love it when people come together and share opinions, great blog, keep it up.
Paragraph writing is also a excitement, if you know after that you can write
or else it is complex to write.
This is my first time go to see at here and i am in fact happy to
read all at one place.
payday loan
payday loan
Hello, I think your website might be having
browser compatibility issues. When I look at your blog site in Safari,
it looks fine but when opening in Internet Explorer, it has some overlapping.
I just wanted to give you a quick heads up! Other then that,
excellent blog!
Hello, you used to write magnificent, but the last several posts have been kinda boring… I miss your tremendous writings. Past several posts are just a little out of track! come on!
As a Newbie, I am permanently exploring online for articles that can help me. Thank you
Hi, Neat post. There is a problem with your web site in web explorer, may test thisK IE nonetheless is the market chief and a huge part of other folks will omit your wonderful writing due to this problem.
I truly appreciate this post. I have been looking all over for this! Thank goodness I found it on Bing. You’ve made my day! Thank you again!
When I initially commented I clicked the “Notify me when new comments are added” checkbox and now each time a comment is added I get three e-mails with the same comment. Is there any way you can remove me from that service? Many thanks!
Nice read, I just passed this onto a friend who was doing a little research on that. And he actually bought me lunch as I found it for him smile Thus let me rephrase that: Thanks for lunch!
Very well written post. It will be beneficial to everyone who employess it, including myself. Keep up the good work – i will definitely read more posts.
Yeah bookmaking this wasn’t a risky decision great post! .
I really like your blog.. very nice colors & theme. Did you design this website yourself or did you hire someone to do it for you? Plz reply as I’m looking to create my own blog and would like to find out where u got this from. many thanks
Only a smiling visitant here to share the love (:, btw outstanding design.
It’s really a cool and useful piece of information. I am happy that you shared this useful information with us. Please keep us up to date like this. Thank you for sharing.
Hi there this is kind of of off topic but I was wanting to know if blogs use WYSIWYG editors
or if you have to manually code with HTML. I’m
starting a blog soon but have no coding experience so I wanted to get guidance from someone with
experience. Any help would be enormously appreciated!
Just wanna tell that this is handy, Thanks for taking your time to write this.
I rattling delighted to find this site on bing, just what I was searching for : D too saved to favorites.
Good – I should definitely pronounce, impressed with your web site. I had no trouble navigating through all tabs as well as related information ended up being truly simple to do to access. I recently found what I hoped for before you know it in the least. Quite unusual. Is likely to appreciate it for those who add forums or anything, website theme . a tones way for your customer to communicate. Nice task.
Hello. magnificent job. I did not imagine this. This is a excellent story. Thanks!
I will immediately seize your rss as I can not to find your email subscription link or newsletter service. Do you have any? Kindly permit me realize in order that I may subscribe. Thanks.
I love your writing style really enjoying this site.
Good write-up, I?¦m regular visitor of one?¦s website, maintain up the excellent operate, and It’s going to be a regular visitor for a long time.
เล่นบาคาร่าสนุกสุดๆที่บาคาร่า168สนุกสล็อตออโต้เดิมพันออนไลน์สล็อต เว็บ ตรงเว็บ สล็อตเทรดบาคาร่า777เล่นสล็อต เว็บตรงไม่ผ่านเอเย่นต์
ไม่มีขั้นต่ำวัดดวงทดลองเล่น สล็อต
ฟรีจัดสล็อต 1234เทรดทดลองเล่น บาคาร่าจัดสล็อต เว็บตรง ไม่ผ่าน
เอเย่นต์วัดดวงสล็อตjoker123วัดสล็อต
เว็บ ตรง ไม่ ผ่าน เอเย่นต์ ล่าสุดจัดสล็อต xo ฝาก ถอน ไม่มี ขั้น ต่ําเดิมพันออนไลน์ทางเข้า สล็อต
xoเล่น1688สล็อตวัดดวงทดลองเล่นเกมส์
สล็อตวัดใจสล็อต ฝาก 15 รับ 100วัดดวงสล็อตpg ฝากถอนไม่มีขั้นต่ําเทรดจัดเต็มเซกซี่ บาคาร่าวัดใจสล็อต ค่ายใหญ่แทงall คาสิโน
I am glad to be a visitant of this staring web blog! , thanks for this rare info ! .
Thanks , I have just been looking for information about this topic for ages and yours is the greatest I’ve came upon so far. However, what about the conclusion? Are you certain about the supply?
Hello. remarkable job. I did not expect this. This is a remarkable story. Thanks!
Yeah bookmaking this wasn’t a speculative conclusion great post! .
I wanted to thank you for this great read!! I definitely enjoying every little bit of it I have you bookmarked to check out new stuff you post…
you have a great blog here! would you like to make some invite posts on my blog?
Nice blog! Is your theme custom made or did you download it from somewhere? A theme like yours with a few simple tweeks would really make my blog shine. Please let me know where you got your theme. Appreciate it
Just a smiling visitant here to share the love (:, btw outstanding style and design. “Reading well is one of the great pleasures that solitude can afford you.” by Harold Bloom.
Thanks for sharing such a fastidious thinking, article is good, thats why i have read it completely
The combination of crystal and metal adds a touch of modernity.
my blog post … 바카라사이트
payday loan
Thanks for all your efforts that you have put in this. very interesting info .
Nice post. I was checking continuously this
blog and I am impressed! Very helpful information specifically the last part 🙂 I care for such info much.
I was seeking this particular info for a very long time.
Thank you and good luck.
leaf pants
Hello, i think tjat i saww yyou visitedd myy weeb sit sso i
casme tto “return thee favor”.I amm attemping tto finnd thngs too imprkve myy site!I sulpose itts ook tto usse a ffew off ypur ideas!!
Feeel free tto viisit myy homepage; online casino india
Hey There. I found your blog the use of msn. That is an extremely smartly written article. I will make sure to bookmark it and return to learn more of your useful information. Thanks for the post. I’ll certainly comeback.
Very interesting topic, regards for posting.
you’re really a good webmaster. The web site loading speed is incredible. It seems that you’re doing any unique trick. Furthermore, The contents are masterwork. you have done a magnificent job on this topic!
You made some decent points there. I did a search on the topic and found most individuals will go along with with your blog.
It’s appropriate time to make a few plans for the longer term and it’s time to be happy. I have learn this post and if I could I wish to recommend you some fascinating issues or suggestions. Perhaps you can write next articles relating to this article. I want to read more things approximately it!
Usually I never comment on blogs but your article is so convincing that I never stop
myself to say something about it. You’re doing a great job Man,Keep
it up.
penis enlargement
Hello there! I know this is somewhat off topic but I was wondering if you knew where I could find a captcha plugin for my comment form? I’m using the same blog platform as yours and I’m having difficulty finding one? Thanks a lot!
I relish, lesad tto I discovere exactlky wbat I used tto bee takikng a look for.
You’ve endd mmy 4 dayy lengrhy hunt! Good Blsss yoou man. Haave a reat day.
Bye
My ite https://bet368.in/t20-blast-2022-news-and-live-score
Great write-up, I’m regular visitor of one’s web site, maintain up the excellent operate, and It’s going to be a regular visitor for a long time.
Just wish to say your article is as astounding. The clarity in your post is just cool and i can assume you’re an expert on this subject. Well with your permission let me to grab your RSS feed to keep updated with forthcoming post. Thanks a million and please carry on the rewarding work.
Thank you for the good writeup. It in fact was a amusement account it. Look advanced to far added agreeable from you! By the way, how could we communicate?
so much good information on here, : D.
I¦ve been exploring for a bit for any high quality articles or weblog posts on this kind of area . Exploring in Yahoo I finally stumbled upon this web site. Studying this information So i¦m glad to exhibit that I’ve a very good uncanny feeling I found out just what I needed. I such a lot certainly will make certain to do not omit this website and give it a glance on a relentless basis.
Double Glazing https://images.google.com.ag/url?q=https://doubleglazing.yolex.co.uk/
Hello there! Do you know if they make any plugins to safeguard against hackers? I’m kinda paranoid about losing everything I’ve worked hard on. Any recommendations?
Wonderful web site. Plenty of helpful information here. I’m sending it to several friends ans additionally sharing in delicious. And obviously, thanks in your sweat!
Everything is very open and very clear explanation of issues. was truly information. Your website is very useful. Thanks for sharing.
You made some decent points there. I checked on the internet for more
information about the issue and found most people will go along with your views on this web site.
You made some decent points there. I looked on the internet for the subject matter and found most individuals will approve with your site.
Double Glazing https://google.com.ec/url?q=https://doubleglazing.yolex.co.uk/
I really like what you guys are usually up too. Such clever work and reporting! Keep up the wonderful works guys I’ve added you guys to blogroll.
Real superb information can be found on web blog.
• Why have so few visas been issued from Ukraine to the UK?
• Has Globe Battle 3 currently started?
Hmm it looks like your website ate my first comment (it was extremely long) so
I guess I’ll just sum it up what I had written and
say, I’m thoroughly enjoying your blog. I too am an aspiring blog blogger but I’m still new to everything.
Do you have any points for newbie blog writers? I’d definitely appreciate it.
Hi, Neat post. There is a problem with your website in internet explorer, would check this… IE still is the market leader and a large portion of people will miss your excellent writing due to this problem.
Hello there, just became aware of your blog through Google, and found
that it is truly informative. I’m going to watch
out for brussels. I will be grateful if you continue this in future.
Many people will be benefited from your writing.
Cheers!
I am curious to find out what blog platform you happen to be working with?
I’m experiencing some small security problems with my latest site and I would
like to find something more risk-free. Do you have any suggestions?
I am also writing to make you understand what a helpful experience my child encountered browsing your web site. She noticed such a lot of details, which included what it is like to possess an awesome coaching mood to let most people really easily know a number of very confusing subject areas. You actually exceeded people’s desires. Thanks for presenting these important, trustworthy, informative and unique tips about your topic to Julie.
Your style is so unique compared to other people I have read stuff from.
Thanks for posting when you’ve got the opportunity, Guess I’ll just bookmark this site.
Feel free to visit my web site – YourAnchorTexts
Wow! This could be one particular of the most beneficial blogs We have ever arrive across on this subject. Basically Fantastic. I am also an expert in this topic therefore I can understand your hard work.
You really make it seem really easy together with your presentation however I find this topic to be really something that I believe I’d by no means understand. It sort of feels too complicated and very extensive for me. I am taking a look forward to your next submit, I?¦ll attempt to get the grasp of it!
Hi therre colleagues, its great paragraph concerning teachingand completely defined,keep it up all the time.
I like this blog its a master peace ! Glad I detected this on google .
Car Shipping Toronto is a company that pursues a single goal-customer satisfaction. Our car transporter has a
capacity for 10 cars(SUV). Our company has insurance coverage of up to $1000.000!
We specialize in transporting cars and motorcycles throughout Canada annd the Unired
States. Due too the many trucks in our company, wwe provide the most favourable prices
for moving your car or motorcycle.
Our team started its work in 2001. Choosing ouur Vehicle
movers Toronto, you get any years of experience, the most attractive prices and
the highest quality of service!shipping a car by rail in canada
Fantastic website you have here but I was wanting to know if you knew of any discussion boards that cover the same topics discussed in this
article? I’d really like to be a part of group where I can get feed-back
from other knowledgeable individuals that share the same interest.
If you have any suggestions, please let me know. Thank you!
I’ve bookmarked your site, and I’m adding your RSS feeds to my Google account.
F*ckin’ remarkable issues here. I am very happy to look your post. Thank you so much and i’m taking a look forward to contact you. Will you kindly drop me a e-mail?
I have not checked in here for some time as I thought it was getting boring, but the last several posts are good quality so I guess I?¦ll add you back to my daily bloglist. You deserve it my friend 🙂
You really make it seem so easy with your presentation but I in finding this matter to be actually something which I believe I would never understand. It kind of feels too complex and very huge for me. I’m having a look forward on your next publish, I¦ll try to get the hang of it!
I’m really enjoying the theme/design of your website. Do you ever run into any browser compatibility issues? A small number of my blog audience have complained about my blog not working correctly in Explorer but looks great in Safari. Do you have any tips to help fix this problem?
Hello.This article was really motivating, especially because I was searching for thoughts on this matter last Sunday.
You really make it seem really easy with your presentation however I find this topic to be really something that I believe I might by no means understand. It kind of feels too complex and extremely vast for me. I’m taking a look ahead in your next submit, I?¦ll try to get the hang of it!
I simply could not depart your site before suggesting that I extremely enjoyed the usual info an individual provide to your visitors? Is gonna be again often to inspect new posts
It’s truly a great and useful piece of information. I’m happy that you just shared this helpful information with us. Please keep us up to date like this. Thank you for sharing.
It is the best time to make a few plans for the long run and it’s time to be happy. I’ve read this publish and if I could I desire to recommend you few attention-grabbing issues or advice. Maybe you could write subsequent articles relating to this article. I wish to read more things approximately it!
GTA movers #1 is a company that pursues a single goal-customer satisfaction. This movers prvide highly personalized seervice when moving.
Moving comppany has insurance coverage of up to $1000000!
Thee company has specializeed in local andd
long distance moving since 2001.Alsso carry out any moving needs, whether it is international moving.
Our team oftfers you the most modern and clean trucks, the
most highly qualified personnel and modern technologies to make your move easy
and safe. pool table movers gta
This is my first time go to see at here and i am genuinely happy to read everthing at alone place.
bookmarked!!, I love your blog!
You are my breathing in, I own few web logs and occasionally run out from to post : (.
medunitsa.ru Medunitsa.ru
I found your weblog web site on google and test a number of of your early posts. Proceed to keep up the very good operate. I simply further up your RSS feed to my MSN News Reader. Searching for forward to reading extra from you in a while!…
خرید ساعت ضربانی و خرید ساعت
هوشمند watch 7 و خرید ساعت جی شاک ارزان و خرید ساعت suunto 9 و
خرید ساعت کارتیر
You could certainly see your enthusiasm in the paintings you write. The arena hopes for more passionate writers such as you who are not afraid to say how they believe. Always follow your heart.
After all, what a great site and informative posts, I will upload inbound link – bookmark this web site? Regards, Reader.
I’ve been exploring for a little bit for any high quality articles or blog posts on this sort of area . Exploring in Yahoo I at last stumbled upon this website. Reading this information So i am happy to convey that I’ve an incredibly good uncanny feeling I discovered exactly what I needed. I most certainly will make sure to do not forget this site and give it a glance on a constant basis.
I couldn’t resist commenting
I am now not sure the place you’re getting your info, but great topic. I needs to spend some time studying more or figuring out more. Thank you for great info I used to be on the lookout for this info for my mission.
Hi Dear, are you truly visiting this web site on a regular basis, if so then you will definitely take fastidious
knowledge.
I am sure this piece of writing has touched all the internet visitors, its really really nice
article on building up new blog.
Hello there! This is my first visit to your blog!
We are a team of volunteers and starting a new project in a community in the same
niche. Your blog provided us beneficial information to work on. You have
done a outstanding job!
There’s a lot of people that I think would really appreciate your content.
Bathroom Fitters https://maps.google.ms/url?q=https://bathroomfitters.yolex.co.uk/
Auto Locksmiths https://images.google.com.sb/url?q=https://autolocksmiths.yolex.co.uk/
I don’t even know how I ended up here, but I thought this post was great. I don’t know who you are but certainly you are going to a famous blogger if you are not already 😉 Cheers!
Fantastic blog you have here but I was curious about if you knew
of any discussion boards that cover the same topics talked about
here? I’d really like to be a part of group where I can get opinions
from other experienced people that share the same interest.
If you have any suggestions, please let me know.
Appreciate it!
I’m amazed, I must say. Rarely do I come across a blog that’s both
equally educative and interesting, and let me tell you, you’ve hit the nail on the head.
The issue is something that not enough folks are speaking intelligently about.
Now i’m very happy I found this during my hunt for something
relating to this.
If you are going for best contents like I do, simply go to see
this website every day since it offers quality contents, thanks
Thanks for every other great article. Where
else may anyone get that kind of information in such a perfect
method of writing? I’ve a presentation next week, and I am on the look for such information.
Excellent post. I certainly love this site. Stick with it!
You can definitely see your expertise in the paintings you write. The world hopes for even more passionate writers such as you who aren’t afraid to say how they believe. Always go after your heart야동박스
I believe that is one of the so much vital information for me.
And i am happy reading your article. But want to
remark on few common issues, The web site taste
is ideal, the articles is really great : D. Good process,
cheers
Bathroom Fitters https://google.co.th/url?q=https://bathroomfitters.yolex.co.uk/
Howdy! I just want to give a huge thumbs up for the nice data you’ve right here on this post. I shall be coming back to your blog for more soon.
Carpet Cleaning https://google.cz/url?q=https://carpetcleaning.yolex.co.uk/
Hey! Someone in my Myspace group shared this site with us so I came to take a look. I’m definitely enjoying the information. I’m book-marking and will be tweeting this to my followers! Fantastic blog and terrific design and style.
CCTV Installation https://toolbarqueries.google.com.na/url?q=https://cctvinstallation.yolex.co.uk/
penis enlargement
But Elizabeth Wozniak, a Halifax-based immigration lawyer, said the lotto game system is “just a little bit of a shot in the dark.
Here is my web blog; US lawyer in London (http://www.google.gr)
Car Shippung Toronto is a company that pursues a single goal-customer satisfaction. Our car transporter has
a capacity for 10 cars(SUV). Our company has insurance coverage of up to $1000.000!
We specialize in transporting cars and motorcycles
throughout Canada and the United States. Due to the many trucks in our company, wee provide the most favourable
prices for moving your car or motorcycle.
Our team started its work in 2001. Choosing our Vehicle
movers Toronto, you get may years of experience, the most attractive pricrs and the highest quslity of service!car shipping from usa to canada
วัดดวงบาคาร่าโคตรเทพได้ที่สล็อตเครดิตฟรีมันบาคาร่า666เดิมพันออนไลน์สล็อต’ทดลองเล่น สล็อตpgเล่นคาสิโนออนไลน์777วัดใจทดลองเล่น สล็อต ฟรีเล่นซุปเปอร์
สล็อตแทงสล็อต โจ๊กเกอร์แทงบาคาร่า99thเดิมพันสล็อต เว็บ ตรง ไม่ผ่าน
เอเย่นต์วัดy9สล็อตวัดใจซุปเปอร์ สล็อต ฟรี 50เดิมพันออนไลน์สล็อตpgเว็บตรงไม่ผ่านเอเย่นต์ฝากถอนไม่มีขั้นต่ําเดิมพันออนไลน์kingkong สล็อตวัดดวงเว็บ สล็อต ไม่ ผ่าน เอเย่นต์วัดสล็อต ท รู วอ ล เล็
ตวัดใจ1688 คาสิโนวัดรอยัล คาสิโนวัดสุดเทพสล็อต998วัดดวงสล็อตxเล่นสูตรสแกน สล็อต pg
It’s going to be end of mine day, but before ending I am reading
this great paragraph to increase my experience.
Your house is valueble for me. Thanks!…
Outstanding post, you have pointed out some fantastic details , I besides conceive this s a very fantastic website.
After going over a number of the blog posts on your web page, I truly like your technique of writing a blog.
I book-marked it to my bookmark website list and will be
checking back soon. Take a look at my website as well and let me know what you think.
Thank you for sharing your info. I really appreciate your efforts and I am waiting for your further post thanks once again.
Thank you for sharing your info. I really appreciate your efforts and I am waiting for your further post thanks once again.
Domestic Cleaners https://images.google.co.ve/url?q=https://domesticcleaners.yolex.co.uk/
Locksmiths https://google.bg/url?q=https://locksmiths.yolex.co.uk/
Do you mind if I quote a couple of your articles as long as I provide credit and sources back to your webpage? My website is in the exact same niche as yours and my users would really benefit from a lot of the information you provide here. Please let me know if this okay with you. Thanks!
Hi there! This post couldn’t be written any better! Reading through this post reminds me of my previous room mate! He always kept talking about this. I will forward this article to him. Pretty sure he will have a good read. Thank you for sharing!
I enjoy your writing style genuinely enjoying this internet site.
This actually answered my drawback, thank you!
Hello.This post was really motivating, particularly since I was searching for thoughts on this matter last Saturday.
As a Newbie, I am permanently searching online for articles that can benefit me. Thank you
Loft Conversions https://google.com.af/url?q=https://loftconversions.yolex.co.uk/
This article is genuinely a fastidious one it helps new internet users, who are wishing in favor of blogging.
RO
Touche. Outstanding arguments. Keep up the great spirit.
Touche. Outstanding arguments. Keep up the great spirit.
Touche. Outstanding arguments. Keep up the great spirit.
This is my first time pay a visit at here and i am truly pleassant
to read all at alone place.
Oven Cleaning https://clients1.google.ne/url?q=https://ovencleaning.yolex.co.uk/
Loving the info on this website , you have done outstanding job on the articles.
Does your site have a contact page? I’m having a tough
time locating it but, I’d like to send you an email. I’ve got some recommendations for your blog you might be interested in hearing.
Either way, great website and I look forward to seeing it grow over time.
It’s going to be end of mine day, but before end I am
reading this fantastic piece of writing to increase my
know-how.
I really like your blog.. very nice colors & theme. Did you design this website
yourself or did you hire someone to do it for you?
Plz respond as I’m looking to construct my own blog and
would like to find out where u got this from. thank you
my page: i need To Sell my house fast
Thanks for the sensible critique. Me & my neighbor were just preparing to do some research about this. We got a grab a book from our area library but I think I learned more from this post. I’m very glad to see such wonderful info being shared freely out there.
TV Aerial Installation https://cse.google.dk/url?q=https://tvaerialinstallation.yolex.co.uk/
Some truly interesting information, well written and generally user pleasant.
This site was… how do I say it? Relevant!!
Finally I have found something that helped me. Thanks a lot!
Hello there! I know this is kind of off topic but
I was wondering which blog platform are you using for this website?
I’m getting tired of WordPress because I’ve had issues with hackers and I’m looking at alternatives
for another platform. I would be fantastic if you could point
me in the direction of a good platform.
Buy UK Grass and Wildflower Seed Online. https://toolbarqueries.google.pl/url?q=https://idealseed.co.uk/
Lovely just what I was searching for.Thanks to the author for taking his time on this one.
Quality content is the important tto interest the viewers to go to seee the web page, that’s what this web page is providing.
This blog was… how do you say it? Relevant!! Finally
I have found something that helped me. Appreciate it!
I couldn’t refrain from commenting. Exceptionally well written!
Thank you for another informative web site. Where else could I get that type of information written in such a perfect way? I’ve a project that I’m just now working on, and I’ve been on the look out for such information.
Spot on with this write-up, I really think this web site needs a great deal more attention. I’ll probably
be back again to read more, thanks for the information!
Normally I do not read post on blogs, but I wish to say
that this write-up very forced me to take a look at and
do it! Your writing style has been amazed me.
Thanks, quite great article.
Thanks on your marvelous posting! I definitely enjoyed reading it,
you can be a great author.I will ensure that I bookmark your blog and will eventually come back
sometime soon. I want to encourage that you continue your great posts, have a nice day!
Hi friends, how is everything, and what you wish for to say
about this piece of writing, in my view its truly amazing designed
for me.
I’m really impressed with your writing skills as well as with the
layout on your blog. Is this a paid theme or did you customize it yourself?
Anyway keep up the nice quality writing, it’s rare to
see a great blog like this one today.
Hi there, alwayѕ i uѕed too check website posts here in the еarly hours іn the dawn, for tһe reason thɑt
i ⅼike to fіnd out moгe and more.
Etobicoke Movers #1 is a company that pursues a single goal-customer
satisfaction. Our movers in Etobicoke provide highly personalized service whjen moving.
Our company has insurrance coverage of up to $100.000!
We have specialized in loical moving in Etobicoke and the district since
2001. Also, we carry out anyy moving needs, whether it is Long distance moving or
international moving.
Our team offefs you the most modern and clean trucks, the most highly
qualified personnel and modern technologies to make your move easy and safe.residential movers etobicoke
Greetings from Idaho! I’m bored to tears at
work so I decided to browse your site on my iphone during lunch break.
I love the information you present here and can’t wait to take a look
when I get home. I’m amazed at how quick your blog loaded on my cell phone ..
I’m not even using WIFI, just 3G .. Anyhow,
very good site!
Good response in return of this matter with firm arguments
and describing all concerning that.
Wow! Thank you! I continually needed to write on my blog something like that. Can I implement a part of your post to my blog?
Howdy! Do you know if they make any plugins to help with Search Engine
Optimization? I’m trying to get my blog to rank
for some targeted keywords but I’m not seeing very good gains.
If you know of any please share. Thank you!
penis enlargement
I truly love yoսr blog.. Very nice colors & theme. Ꭰid youu develop
tһiѕ web sitee ʏourself? Pleaѕe reply bak aѕ I’m plawnning too create my
vvery ownn blog ɑnd would love tto know whеre you got thіѕ from or ϳust what
tһe theme is named. Ƭhanks!
We absolutely love your blog and find the majority of
your post’s to be just what I’m looking for. Do you offer guest writers to
write content to suit your needs? I wouldn’t
mind writing a post or elaborating on some of the subjects
you write concerning here. Again, awesome
website!
Wow! At last I got a website frօm where I be capable of in faсt gеt valuable facts regarding my study ɑnd knowledge.
If you do not just like the slot wallet machine strategy, you’ll be
able to browse eating places by varied classifications or view a list of
Urbanspoon listings close to your present location. Does location affect your Tv channel selection? After
which in June, leaving the house for the primary time in 4 months, I assumed, why did I mock myself so much?
The wild Dracula multiplies line winnings by three – every time it seems, the 3x multiplier is
triggered for every bat or Dracula that’s in view on the paylines.
The 4x multiplier will get triggered while you correctly guess the next go well with.
The jackpot is worth 12,500 coins and will get triggered throughout the maximum wager spins once you hit 5 Amulets on any of the 243 paylines which were lively.
The bonus spherical gets triggered on hitting a minimal of three scatter symbols.
In addition to the bottom game’s repeat pay function, the free sport bonus rounds even have the triple repeat pay
feature for you to sink your teeth into. Lucky Count features a slightly generous variety of bonus rounds and sports activities a powerful repeat pay sample.
If yoou wih foor tto incrrase your knoledge sinply kedp visitin thos sige andd bbe
upcated wigh thee hotteest newqs poxted here.
Feeel free too vksit myy weeb blog: Bingo Bonga casino
I’ve been exploring for a little for any high quality articles or blog posts on this kind of house . Exploring in Yahoo I finally stumbled upon this website. Reading this information So i am satisfied to express that I’ve an incredibly good uncanny feeling I came upon just what I needed. I so much indisputably will make sure to don’t forget this site and provides it a glance regularly.
That is really attention-grabbing, You’re an overly skilled blogger. I have joined your feed and look forward to in search of more of your wonderful post. Also, I’ve shared your site in my social networks!
The crux of your writing while sounding reasonable initially, did not settle properly with me after some time. Someplace throughout the sentences you were able to make me a believer but only for a while. I however have got a problem with your leaps in logic and one would do well to fill in those gaps. When you actually can accomplish that, I would certainly be impressed.
Thank you. It is very good wahat you write. I am delightes. Maybe you can check this subject: woocommerce plugins
I am glad to be one of several visitants on this great site (:, thanks for posting.
บาคาร่า Dumpbet69 รวมเรื่องสุดยอดเกี่ยวกับ บาคาร่า https://dumpbet69.com/บาคาร่า/
I like this web blog so much, saved to bookmarks.
I got what you mean , regards for putting up.Woh I am pleased to find this website through google.
Marvelous, what a web site it is! This website gives valuable data to us,
keep it up.
Hurrah, that’s what I was looking for, what
a data! present here at this web site, thanks
admin of this web page.
You actually make it appear so easy along with your presentation but I find this topic to be actually something which I feel I might never understand. It kind of feels too complex and extremely broad for me. I am looking ahead to your next put up, I¦ll try to get the dangle of it!
Greetings! Very helpful advice on this article! It is the little changes that make the biggest changes. Thanks a lot for sharing!
Hi! Good stuff, please tell me when you finally post something like that!bitcoin virtual card
I am continually searching online for tips that can aid me. Thx!
Have you ever thought about adding a little bit more than just your articles?
I mean, what you say is important and all.
However imagine if you added some great graphics or video clips to give your posts more, “pop”!
Your content is excellent but with images and video clips, this blog could definitely
be one of the very best in its field. Very good blog!
What i do not realize is in fact how you’re no longer really much more smartly-appreciated than you may be right now. You are so intelligent. You already know therefore significantly on the subject of this topic, produced me in my view consider it from numerous various angles. Its like women and men aren’t involved except it’s one thing to accomplish with Lady gaga! Your own stuffs great. Always maintain it up!
Pretty part of content. I simply stumbled upon your blog
and in accession capital to say that I acquire actually loved account
your blog posts. Any way I’ll be subscribing to your feeds and even I fulfillment you get admission to persistently fast.
Hey, you used to write fantastic, but the last several posts have been kinda boringK I miss your tremendous writings. Past few posts are just a little bit out of track! come on!
Pretty nice post. I just stumbled upon your weblog and wanted to say that I have really enjoyed browsing your blog posts. After all I’ll be subscribing to your feed and I hope you write again soon!cerrajero gran via madrid
Hey! I’m at work surfing around your blog from my new apple iphone!
Just wanted to say I love reading through your blog and
look forward to all your posts! Carry on the great work!
This web site is really a walk-through for all of the info you wanted about this and didn’t know who to ask. Glimpse here, and you’ll definitely discover it.
I haven¦t checked in here for some time since I thought it was getting boring, but the last few posts are great quality so I guess I¦ll add you back to my daily bloglist. You deserve it my friend 🙂
Tremendous issues here. I am very glad to peer your article.
Thanks so much and I am taking a look ahead to touch you.
Will you please drop me a e-mail?
I really pleased to find this web site on bing, just what I was searching for : D besides saved to bookmarks.
You made a number of good points there. I did a search on the issue and found the majority of persons will have the same opinion with your blog.
Thanks for one’s marvelous posting! I seriously enjoyed reading it, you can be a great author.
I will ensure that I bookmark your blog and will come back at some point.
I want to encourage that you continue your great job, have a nice evening!
hey there and thank you for your info – I have certainly picked up something new from right here.
I did however expertise several technical points using this website, as I experienced to reload the site a lot of times previous to I could get
it to load properly. I had been wondering if your
hosting is OK? Not that I am complaining, but sluggish loading instances times will often affect your placement in google
and can damage your quality score if ads and marketing with Adwords.
Anyway I am adding this RSS to my e-mail and can look out for much more of your respective fascinating content.
Make sure you update this again very soon.
We stumbled over here coming from a different page and thought I might as well check things out.
I like what I see so now i am following you. Look forward to checking out your web page repeatedly.
Undeniably believe that which you stated.
Your favorite justification seemed to be on the net
the simplest thing to be aware of. I say to you, I certainly get annoyed while
people consider worries that they just do not know about. You
managed to hit the nail upon the top as well as defined out the
whole thing without having side-effects , people could take
a signal. Will likely be back to get more. Thanks
Very good blog post. I definitely appreciate this website.
Stick with it!
تعیین اثر کپسول گاباپنتین بر تغییر پذیری ضربان قلب دربیماران
دیابتی مبتلا به نوروپاتی
دردناک
رواندرمانگر بزرگسال با رویکرد شناختی رفتاری و ISTDP
من دکتری تخصصی روانشناسی، رواندرمانگر بزرگسال با رویکرد شناختی رفتاری و ISTDP هستم.
در زمینه های وسواس، اختلالات
اضطرابی و مشکلات خلقی هیجانی می توانم به
شما کمک کنم. در صورت مشاهده افزایش دفعات تشنج، تغییرات بینایی و یا
کبودی و خونریزی غیر معمول به پزشک مراجعه شود.
این دارو را هرگز نباید پس از یک دوره استفاده طولانی مدت به صورت ناگهانی قطع کرد
زیرا ممکن است باعث بروز عوارض زیانباری شود و
احتمال بروز تشنج را زیاد کند. گاباپنتین همچنین در درمان
دردهای مزمن ناشی از آسیب
عصبی نیز تجویز می شود .
Excellent blog here! Also your website loads up very fast! What host are you using? Can I get your affiliate link to your host? I wish my web site loaded up as quickly as yours lol
Definitely believe that which you stated. Your favorite reason seemed to be on the net the
simplest thing to be aware of. I say to you, I certainly get
irked while people think about worries that they plainly do not know about.
You managed to hit the nail upon the top as well as defined out the whole thing without having side effect , people can take a signal.
Will probably be back to get more. Thanks
excellent post, very informative. I wonder why the
opposite specialists of this sector do not notice this.
You must continue your writing. I’m confident, you have a huge readers’ base already!
Spot on with this write-up, I seriously think this site needs
a lot more attention. I’ll probably be returning to read more,
thanks for the information!
Hello! I could have sworn I’ve visited this website
before but after browsing through some of the posts I realized it’s
new to me. Nonetheless, I’m definitely pleased I stumbled upon it and I’ll
be bookmarking it and checking back often!
I got this site from my pal who told me about this website and at the moment this time I am browsing this web
page and reading very informative content at this place.
hi!,I really like your writing so so much! percentage we communicate more about your article on AOL? I require a specialist on this space to solve my problem. May be that is you! Looking ahead to look you.
What’s Going down i’m new to this, I stumbled upon this I have discovered It absolutely helpful and it has aided
me out loads. I’m hoping to give a contribution & aid different users like
its helped me. Good job.
You really make it seem so easy with your presentation however I to find this topic to be actually one thing which I think I would by no means understand. It kind of feels too complex and very vast for me. I am looking ahead on your subsequent submit, I’ll attempt to get the hold of it!
you are really a excellent webmaster. The website loading velocity is amazing.
It kind of feels that you’re doing any distinctive trick. Furthermore,
The contents are masterwork. you’ve performed a wonderful job on this topic!
Fastidious response in return of this query with firm arguments and describing the
whole thing concerning that.
It’s enormous that you are getting thoughts from this paragraph as well as from our dialogue made at this time.
I got what you mean , thanks for posting.Woh I am delighted to find this website through google.
My brother suggested I would possibly like this web site. He used to be entirely right. This submit truly made my day. You can not believe just how much time I had spent for this info! Thanks!
Helpful info. Fortunate me I found your site by accident,
and I’m surprised why this coincidence didn’t came about in advance!
I bookmarked it.
Here is my webpage … monthly may 2023 planner
Helpful info. Fortunate me I found your site by accident,
and I’m surprised why this coincidence didn’t came about in advance!
I bookmarked it.
Here is my webpage … monthly may 2023 planner
Hello are using WordPress for your site platform? I’m new to the blog world but I’m trying to get started and set up my own. Do you require any coding knowledge to make your own blog? Any help would be really appreciated!
you are really a good webmaster. The web site loading speed is incredible. It seems that you are doing any unique trick. Moreover, The contents are masterpiece. you’ve done a magnificent job on this topic!
Who loves to make a fortune just like me? If you are interested come hear me out yall!메이저사이트 조회
What i do not realize is in fact how you’re no longer actually much more well-preferred than you might be
right now. You’re very intelligent. You already know therefore significantly in the case of this matter, made me personally
believe it from a lot of varied angles. Its like men and women aren’t interested except it is one thing
to do with Woman gaga! Your own stuffs nice. At all times handle it up!
Neat blog! Is your theme custom made or did you download it from somewhere?
A theme like yours with a few simple tweeks would really make
my blog jump out. Please let me know where you got your design. Many thanks
ufa191 Login ufa191 ufa 191 ufabet Fun, distinct, can bet, no minimum, the most recent system. ครบทุกเรื่อง ufa191 https://dumpbet69.com/ufa191
I read this paragraph fully about the comparison of
most up-to-date and earlier technologies, it’s remarkable article.
Great beat ! I would like to apprentice while you amend your site, how could i subscribe for a blog site?
The account aided me a acceptable deal. I had been a little bit acquainted of this your broadcast
offered bright clear concept
my blog: เว็บบทความ
Write more, thats all I have to say. Literally, it seems as though you relied on the video to make your point.
You obviously know what youre talking about, why waste
your intelligence on just posting videos to your weblog when you could be giving
us something enlightening to read?
we cant think courtney cox as well as donald arquette are getting a divorce! they were with each other with regard to Eleven years!พีจี สล็อต
Excellent web site. Lots of useful information here. I
am sending it to some buddies ans additionally sharing in delicious.
And obviously, thank you in your effort!
Here is my blog post: cuan777 login
|
This info is priceless. Where can I find out more?
Greetings! Quick question that’s entirely off topic. Do you know how to make your
site mobile friendly? My site looks weird when browsing from my apple iphone.
I’m trying to find a theme or plugin that might be able to resolve this problem.
If you have any suggestions, please share. Cheers!
Greetings! Quick question that’s entirely off topic. Do you know how to make your
site mobile friendly? My site looks weird when browsing from my apple iphone.
I’m trying to find a theme or plugin that might be able to resolve this problem.
If you have any suggestions, please share. Cheers!
Excellent post. I was checking constantly this blog
and I’m impressed! Very useful info specifically the last part
🙂 I care for such information much. I was seeking this particular information for a very long time.
Thank you and best of luck.
each time i used to read smaller posts which also clear their motive,
and that is also happening with this paragraph which I am
reading here.
Having read this I thought it was rather enlightening.
I appreciate you finding the time and energy to put this content together.
I once again find myself spending a lot of time
both reading and leaving comments. But so what,
it was still worth it!
Thank you for another informative blog. Where else could I get that type of info written in such a perfect way? I have a project that I’m just now working on, and I have been on the look out for such information.
Hi! Do you use Twitter? I’d like to follow you
if that would be ok. I’m undoubtedly enjoying your blog and look forward
to new posts.
Good web site! I really love how it is easy on my eyes and the data are well written. I’m wondering how I might be notified whenever a new post has been made. I’ve subscribed to your RSS which must do the trick! Have a nice day!
Excellent items from you, man. I have be aware your stuff prior to and you are simply too excellent. I actually like what you have acquired here, certainly like what you’re saying and the best way in which you say it. You are making it entertaining and you continue to take care of to stay it wise. I can’t wait to read much more from you. This is actually a wonderful website.
Saved as a favorite, I really like your blog!
My spouse and I absolutely love your blog and find the majority of
your post’s to be exactly I’m looking for. Would you offer guest writers
to write content available for you? I wouldn’t mind writing
a post or elaborating on many of the subjects you write concerning here.
Again, awesome web log!
Feel free to surf to my web site: laptop komputer
I do not know whether it’s just me or if everyone else encountering issues with
your website. It appears as if some of the text within your posts
are running off the screen. Can someone else please
comment and let me know if this is happening to them too?
This could be a issue with my browser because I’ve had this happen before.
Thanks
What’s up, the whole thing is going well here and ofcourse every
one is sharing facts, that’s truly fine, keep up writing.
Hi there, just became aware of your blog through Google, and
found that it’s truly informative. I am going to watch out for brussels.
I will be grateful if you continue this in future.
Many people will be benefited from your writing. Cheers!
I am no longer sure the place you are getting your information, however good topic. I must spend a while finding out more or working out more. Thank you for wonderful information I used to be in search of this information for my mission.
Unquestionably believe that which you said. Your favorite justification seemed to be on the web the easiest thing to be aware of. I say to you, I definitely get annoyed while people think about worries that they plainly don’t know about. You managed to hit the nail upon the top as well as defined out the whole thing without having side effect , people can take a signal. Will probably be back to get more. Thanks
I carry on listening to the reports lecture about getting free online grant applications so I have been looking around for the finest site to get one. Could you tell me please, where could i find some?
Admiring the persistence you put into your website and in depth information you provide.
It’s great to come across a blog every once in a while that
isn’t the same out of date rehashed information. Wonderful read!
I’ve saved your site and I’m including your RSS feeds to my Google account.
Please let me know if you’re looking for a author for your
blog. You have some really good articles and I feel
I would be a good asset. If you ever want to take some
of the load off, I’d really like to write some content for your
blog in exchange for a link back to mine. Please send me an e-mail if interested.
Regards!
It is appropriate time to make some plans for the future and it’s time
to be happy. I have learn this publish and if
I may just I desire to recommend you few interesting things or tips.
Perhaps you could write next articles relating to this article.
I want to read even more issues about it!
Hi there! I could have sworn I’ve visited this site before but after browsing through many of the posts I realized
it’s new to me. Anyways, I’m certainly delighted I came across
it and I’ll be book-marking it and checking back frequently!
Thank you for sharing excellent informations. Your website is so cool. I’m impressed by the details that you?¦ve on this website. It reveals how nicely you understand this subject. Bookmarked this web page, will come back for extra articles. You, my friend, ROCK! I found simply the information I already searched all over the place and just could not come across. What a perfect web site.
Hello my friend! I want to say that this article is amazing,
nice written and come with almost all vital infos. I would like to peer extra posts
like this .
penis enlargement
Simply wish to say your article is as amazing. The clearness for your submit is simply nice and that i
can assume you’re a professional in this subject. Fine along with
your permission let me to snatch your RSS feed to stay up to date
with drawing close post. Thanks a million and please continue the rewarding work.
Keep functioning ,terrific job!
I do not even know the way I stopped up right here, however I believed this submit was great.
I don’t know who you might be however definitely you are going to a famous blogger if you are not already.
Cheers!
Yes! Finally something about Window Depot.
I seriously love your website.. Pleasant colors & theme. Did you create this
web site yourself? Please reply back as I’m hoping to
create my own website and would like to find out where you got this from or what the theme is named.
Thanks!
Hi, i think that i saw you visited my web site thus i came
to “return the favor”.I am attempting to find things to enhance my
website!I suppose its ok to use some of your ideas!!
Hi there, its good post on the topic of media print, we all be aware of media
is a great source of data.
Wow! This blog looks just like my old one! It’s on a totally different topic but
it has pretty much the same page layout and design. Excellent choice
of colors!
What¦s Happening i am new to this, I stumbled upon this I have discovered It positively useful and it has aided me out loads. I hope to contribute & assist different users like its helped me. Great job.
You completed a number of nice points there. I did a search on the issue and found nearly all people will have the same opinion with your blog.betflik
I was wondering if you ever thought of changing the structure of your site? Its very well written; I love what youve got to say. But maybe you could a little more in the way of content so people could connect with it better. Youve got an awful lot of text for only having one or 2 pictures. Maybe you could space it out better?
The subsequent time I learn a weblog, I hope that it doesnt disappoint me as much as this one. I imply, I know it was my choice to read, however I actually thought youd have one thing attention-grabbing to say. All I hear is a bunch of whining about one thing that you would repair for those who werent too busy on the lookout for attention.
You have brought up a very wonderful points, thankyou for the post.
Great blog here! Also your website loads up very
fast! What web host are you using? Can I
get your affiliate link to your host? I wish my website loaded up as fast as yours lol
I really like your writing style, superb info , thankyou for putting up : D.
Hello there, I found your blog via Google while searching for a related topic, your web site came up, it looks good. I’ve bookmarked it in my google bookmarks.
ufa168 is an additional provider. on the web baccarat As well as additionally a comprehensive internet cash making computer game is a direct web site, consistent, protected, 100 credible, verified by real wagerers, actual voices that have the chance to make use of the solution right here with the experience of betting on baccarat games. ufa168 Dumpbet69 ufa168 https://dumpbet69.com/ufa168/
Quality articles is the secret to attract the
viewers to pay a quick visit the site, that’s what this web site is
providing.
Heya i’m for the primary time here. I found this board and I to find It really useful & it helped me out a lot. I’m hoping to provide one thing back and aid others such as you aided me.
Compare Skip Hire Suppliers Birmingham https://maps.google.com/url?q=https://skiphirecomparison.co.uk/areas/birmingham/
hello there and thank you for your information – I’ve definitely picked up anything
new from right here. I did however expertise some technical points using this site, since I experienced to reload the web site many times previous
to I could get it to load properly. I had been wondering if your hosting is OK?
Not that I am complaining, but slow loading instances times will very frequently affect your placement in google
and could damage your quality score if advertising and marketing with Adwords.
Anyway I’m adding this RSS to my email and could look out for a lot
more of your respective fascinating content. Make sure you update this
again soon.
Its like you read my thoughts! You seem to understand a lot about
this, such as you wrote the book in it or something.
I think that you can do with a few percent to pressure the message home a little bit, however other than that, this is fantastic blog.
A fantastic read. I will certainly be back.
This article will assist the internet viewers for creating new blog or even a
blog from start to end.
Good way of describing, and pleasant post to get information concerning my presentation topic,
which i am going to deliver in university.
I’m really loving the theme/design of your web site. Do you ever run into any internet browser compatibility problems? A small number of my blog readers have complained about my site not operating correctly in Explorer but looks great in Safari. Do you have any advice to help fix this problem?
obviously like your web site however you have to check the spelling on several of your posts. Many of them are rife with spelling issues and I in finding it very troublesome to inform the reality then again I?¦ll surely come again again.
What’s up, this weekend is good for me, since this occasion i am reading
this impressive educational article here at
my home.
Wonderful goods from you, man. I’ve understand your stuff previous to and you’re just too great. I actually like what you have acquired here, really like what you’re saying and the way in which you say it. You make it enjoyable and you still care for to keep it wise. I can not wait to read much more from you. This is really a terrific website.
Hello who is interested in hearing my story of how i became
a millionaire$ 오피 Click on the site to hear my story!
I really appreciate this post. I have been looking all over for this! Thank goodness I found it on Bing. You’ve made my day! Thank you again
It’s very straightforward to find out any topic on net as compared to books, as I found this piece of writing
at this website.
You completed a number of nice points there. I did a search on the issue and found nearly all people will have the same opinion with your blog.betflik
Your style is so unique compared to other folks I have read stuff
from. I appreciate you for posting when you have
the opportunity, Guess I’ll just bookmark this blog.
Nice weblog here! Additionally your website quite a bit up fast! What host are you the use of? Can I am getting your affiliate hyperlink to your host? I want my web site loaded up as fast as yours lol
You completed a number of nice points there. I did a search on the issue and found nearly all people will have the same opinion with your blog.betflik
If you neeⅾ crypto marketing juѕt message Blackhat օn telegram
https://t.me/blackhatshiller
Howdy! I just wish to give you a huge thumbs up for your excellent info you’ve got right here on this post.
I’ll be returning to your website for more
soon.
Howdy! I just wish to give you a huge thumbs up for your excellent info you’ve got right here on this post.
I’ll be returning to your website for more
soon.
No matter if some one searches for his essential thing, therefore he/she needs to be available that in detail, therefore that thing is
maintained over here.
Fine way of describing, and nice article to get facts regarding my presentation focus, which i am going to convey in school.
Hmm it appears like your site ate my first comment (it was extremely long) so I guess
I’ll just sum it up what I wrote and say, I’m thoroughly enjoying your blog.
I too am an aspiring blog blogger but I’m still new to the whole thing.
Do you have any tips for inexperienced blog writers?
I’d genuinely appreciate it.
I loved as much as you’ll receive carried out right here. The sketch is tasteful, your authored material stylish. nonetheless, you command get got an impatience over that you wish be delivering the following. unwell unquestionably come more formerly again since exactly the same nearly very often inside case you shield this hike.
It’s hard to find educated folks on this topic, however you sound like you already know what you’re speaking about! Thanks
What’s up, after reading this amazing post i am as well delighted
to share my experience here with colleagues.
Thanks for sharing your thoughts on http://www.matelas-ideal.fr. Regards
Hi, i feel that i saw you visited my weblog so i got
here to go back the favor?.I’m trying to find things to enhance my web site!I assume its good
enough to make use of a few of your concepts!!
I like this web site so much, saved to my bookmarks.
I have been exploring for a bit for any high-quality articles or weblog posts in this kind of area . Exploring in Yahoo I eventually stumbled upon this website. Studying this information So i?¦m satisfied to exhibit that I have a very good uncanny feeling I found out exactly what I needed. I most without a doubt will make certain to do not put out of your mind this site and provides it a glance regularly.
Online poker
You completed a number of nice points there. I did a search on the issue and found nearly all people will have the same opinion with your blog.betflik
You completed a number of nice points there. I did a search on the issue and found nearly all people will have the same opinion with your blog.betflik
Wow! This can be one particular of the most beneficial blogs We’ve ever arrive across on this subject. Actually Great. I’m also an expert in this topic therefore I can understand your effort.
Hi my family member! I want to say that this post is awesome, great written and come with almost all vital infos. I would like to see extra posts like this .
A motivating discussion is worth comment. I
believe that you need to write more on this subject matter, it might
not be a taboo subject but generally folks don’t discuss such subjects.
To the next! Many thanks!!
Outstanding post, you have pointed out some good details , I likewise conceive this s a very excellent website.
I was questioning occasion you ever considered altering layout , design from the website? Its really correctly created; I enjoy what youve obtained to mention. But possibly it is possible to small far more with respect to content so males could interact with it greater. Youve obtained a terrible total lots of text for only getting a single or two images. Maybe you’ll be capable of area out greater?Rosalind Bure
It’s hard to search out educated people on this topic, but you sound like you realize what you’re talking about! ThanksMelody Lotshaw
I blog frequently and I really thank you for your information. This great article has really peaked my interest.
I’m going to take a note of your website and keep checking for
new details about once a week. I opted in for your Feed as well.
I blog frequently and I really thank you for your information. This great article has really peaked my interest.
I’m going to take a note of your website and keep checking for
new details about once a week. I opted in for your Feed as well.
Hi! Do you know if they make any plugins to protect against hackers? I’m kinda paranoid about losing everything I’ve worked hard on. Any recommendations?
I admire the useful facts you offer inside your articles. I will bookmark your weblog and also have my children verify up here often. I’m very sure they’ll learn a lot of new things right here than anybody else!Ayana Ryea
Great post, you have pointed out some excellent points, I too think this s a very wonderful website.
Howdy this is kinda of off topic but I was wondering if blogs use WYSIWYG editors or if you have to manually code with HTML. I’m starting a blog soon but have no coding expertise so I wanted to get guidance from someone with experience. Any help would be greatly appreciated!Sharmaine Schneckloth
Appreciating the hard work you put into your website and detailed information you present.
It’s good to come across a blog every once in a while
that isn’t the same old rehashed information. Great read!
I’ve bookmarked your site and I’m adding your RSS feeds to my Google account.
Hi to all, the contents existing at this web page are genuinely
awesome for people knowledge, well, keep up the nice work fellows.
Check out my web blog … how to get smoke smell out of leather couch
There’s clearly big money to discover more regarding this. I assume you made certain good aspects within alternatives additionally.Kristal Bissett
Hello! I merely would choose to make a massive thumbs up for your excellent info you’ve got here on this post. We are returning to your site to get more soon.Moira Martorello
I really like your blog.. very nice colors & theme.
Did you design this website yourself or did you hire someone to do it
for you? Plz answer back as I’m looking to construct my
own blog and would like to find out where u got this from.
thanks
Useful information. Fortunate me I found your web site by accident, and I’m shocked why
this twist of fate didn’t happened in advance! I bookmarked it.
Fabulous, what a website it is! This blog provides useful
information to us, keep it up.
Thanks for a marvelous posting! I quite enjoyed
reading it, you will be a great author.I will remember to bookmark
your blog and will come back down the road. I want to encourage you
to ultimately continue your great work, have a nice day!
Ahaa, its fastidious dialogue regarding this
article at this place at this webpage, I have read all that, so at this time me also commenting at this place.
Ahaa, its fastidious dialogue regarding this
article at this place at this webpage, I have read all that, so at this time me also commenting at this place.
Just have to thank you for this great information. This is what I was looking for (Thanks BingEarlene Mchan
Hey there! Quick question that’s entirely off topic.
Do you know how to make your site mobile friendly? My blog looks weird when browsing from
my iphone. I’m trying to find a theme or plugin that might be able
to resolve this problem. If you have any recommendations,
please share. Thanks!
Thanks for any other informative blog. The place else may just I get that kind of
information written in such an ideal means? I have a project that I am simply now
operating on, and I have been on the glance out for such information.
Thanks for sharing your info. I really appreciate your efforts and I am waiting for your next post thank you
once again.
What i don’t realize is in reality how you are no longer really a lot more smartly-favored than you might be right now. You’re so intelligent. You recognize thus significantly when it comes to this topic, made me individually imagine it from a lot of varied angles. Its like women and men aren’t interested unless it is something to do with Woman gaga! Your personal stuffs nice. Always maintain it up!
I know this if off topic but I’m looking into starting
my own blog and was curious what all is required to get set up?
I’m assuming having a blog like yours would cost a pretty penny?
I’m not very internet smart so I’m not 100% certain. Any suggestions
or advice would be greatly appreciated. Appreciate it
I really appreciate this post. I have been looking everywhere for this! Thank goodness I found it on Bing. You have made my day! Thx again
I always was concerned in this subject and still am, regards for putting up.
Hello my family member! I want to say that this article is amazing, nice written and include almost all vital infos.
I’d like to peer more posts like this .
What’s up friends, how is all, and what you want to say about this post, in my view its in fact awesome designed
for me.
my web-site: syed mushtaq ali trophy 2022
I don’t know if it’s just me or if everyone else
encountering issues with your site. It looks like some of the written text on your content are running off the screen. Can somebody else
please provide feedback and let me know if this is happening to
them too? This could be a problem with my browser because
I’ve had this happen before. Kudos
Thanks for the blog post, is there any way I can get an email sent to me every time you make a fresh post?
What’s up to every body, it’s my first go to see of this website;
this weblog consists of remarkable and really fine information in support of visitors.
Remarkable! Its genuinely amazing post, I have got much
clear idea about from this paragraph.
My programmer is trying to convince me to move to .net from
PHP. I have always disliked the idea because of the expenses.
But he’s tryiong none the less. I’ve been using Movable-type on a
variety of websites for about a year and am anxious about switching to another platform.
I have heard excellent things about blogengine.net.
Is there a way I can import all my wordpress content into it?
Any kind of help would be greatly appreciated!
buy viagra online
naturally like your web-site but you need to check the spelling on quite a few of your posts. Several of them are rife with spelling problems and I find it very bothersome to tell the truth nevertheless I’ll certainly come back again.
Somebody essentially help to make significantly posts I might
state. That is the first time I frequented your website page and up to now?
I amazed with the research you made to create this particular publish extraordinary.
Great process!
I have recently started a site, the information you offer on this web site has helped me greatly. Thank you for all of your time & work.
You completed a number of nice points there. I did a search on the issue and found nearly all people will have the same opinion with your blog.betflik
You really make it appear so easy along with your presentation however I find
this matter to be actually one thing that I feel I’d never understand.
It kind of feels too complex and very extensive for me.
I am looking forward for your next publish, I will attempt to
get the dangle of it!
It’s genuinely very complicated in this full of activity life to listen news on TV, thus I just use the web for that reason, and obtain the most up-to-date information.
You completed a number of nice points there. I did a search on the issue and found nearly all people will have the same opinion with your blog.betflik
Hi, I adore your blog! I can totally relate to your point as I work as a medical assistant for an outsourcing company.
You completed a number of nice points there. I did a search on the issue and found nearly all people will have the same opinion with your blog.betflik
Unquestionably believe that which you stated. Your favorite justification appeared to be on the
internet the easiest thing to be aware of. I say to you, I definitely get annoyed while people
consider worries that they just do not know about.
You managed to hit the nail upon the top as well as defined
out the whole thing without having side-effects , people can take a signal.
Will probably be back to get more. Thanks
I do not even understand how I stopped up right here, however I assumed this
publish was great. I do not realize who you’re but definitely
you’re going to a famous blogger if you happen to aren’t already.
Cheers!
It’s the best time to make a few plans for the future and it is time to be happy. I have learn this put up and if I may I want to recommend you few attention-grabbing things or suggestions. Perhaps you could write subsequent articles referring to this article. I desire to read more issues about it!
You completed a number of nice points there. I did a search on the issue and found nearly all people will have the same opinion with your blog.betflik
You completed a number of nice points there. I did a search on the issue and found nearly all people will have the same opinion with your blog.betflik
Spot on with this write-up, I honestly think
this website needs a lot more attention. I’ll probably be returning
to see more, thanks for the advice!
If you desire to get a great deal from this post then you
have to apply these strategies to your won weblog.
สาระเรื่อง dance classes สอน เต้น คือ https://pinplace.co/listing/wonder-fit-studio/
online dance classes สอน เต้น Wonder FIT Studio https://pinplace.co/listing/dance/
I like what you guys are up also. Such clever work and reporting! Keep up the superb works guys I have incorporated you guys to my blogroll. I think it will improve the value of my site :).
This web site is my breathing in, very great layout and perfect content material .biuro rachunkowe Krakow
I would like to thank you for the efforts you’ve put in writing this website.
I really hope to view the same high-grade content from you later on as well.
In fact, your creative writing abilities has inspired me to get my own, personal blog now 😉
reformas en general valencia
This is some great information. I expect additional facts like this was distributed across the web today.biuro rachunkowe Krakow
Sweet website , super style and design, very clean and employ genial.
Spot on with this write-up, I truly think this website needs much more consideration. I’ll probably be again to read much more, thanks for that info.ksiegowosc Krakow
Very quickly this web site will be famous amid all blogging
and site-building viewers, due to it’s fastidious posts
reformas integrales valencia
Our own chaga mushroom comes with a schokohutige, consistent, charcoal-like arrival, a whole lot of dissimilar to the style of the standard mushroom. Chaga Tincturebiura rachunkowe Krakow
Lazy Bearded Dragon Care
Hello .finaly I found what I was looking for how did you guys found this information??thank you for your article I found it on Google And I bookmarked it . I’ll share. Please send me updates thank you and have a nice daybiuro rachunkowe Krakow
Now I am going away to do my breakfast, after having
my breakfast coming yet again to read more news.
Boating Accessories Equipment Tulsa
It is perfect time to make a few plans for the
longer term and it is time to be happy. I’ve read this submit and if I may
just I desire to suggest you some interesting things or tips.
Perhaps you could write next articles referring to
this article. I want to read more things approximately it!
Hi there, I check your blog daily. Your story-telling style is awesome,
keep doing what you’re doing!
Sweet blog! I found it while searching on Yahoo News. Do you have any tips on how to get listed in Yahoo News? I’ve been trying for a while but I never seem to get there! Thanksksiegowosc Krakow
Thank you for sharing excellent informations. Your web-site is very cool. I’m impressed by the details that you¡¦ve on this web site. It reveals how nicely you understand this subject. Bookmarked this web page, will come back for extra articles. You, my friend, ROCK! I found simply the information I already searched all over the place and simply couldn’t come across. What a perfect web-site. rentacarkosovaksiegowy Krakow
After study many of the content in your web site now, and i also truly much like your way of blogging. I bookmarked it to my bookmark website list and are checking back soon. Pls take a look at my web page also and inform me how you feel.biura rachunkowe Krakow
I need to to thank you for this excellent read!!
I definitely loved every bit of it. I have got you book-marked
to look at new stuff you post…
I think everything typed made a ton of sense. However, consider this,
what if you composed a catchier post title? I ain’t saying
your content is not good., but what if you added something that makes people desire
more? I mean How to set up a LAN connection in WinXP « Old PC Gaming is kinda vanilla.
You ought to peek at Yahoo’s home page and watch how they write post titles to get viewers interested.
You might add a video or a pic or two to grab people interested about everything’ve got to say.
In my opinion, it could make your blog a little bit
more interesting.
Greetings I am so glad I found your blog page, I really found you by
error, while I was searching on Askjeeve for something else, Regardless I am here now and would just like to
say cheers for a incredible post and a all round enjoyable blog (I also
love the theme/design), I don’t have time
to read through it all at the minute but I have bookmarked it and also included your RSS
feeds, so when I have time I will be back to read a great deal more,
Please do keep up the fantastic b.
Your writing is fine and gives food for thought. I hope that I’ll have more time to read your articles . Regards. I wish you that you frequently publish new texts and invite you to greet meksiegowa Krakow
Basic Linkedin Training
This web site is really a walk-through for all of the info you wanted about this and didn’t know who to ask. Glimpse here, and you will definitely discover it.biuro rachunkowe Krakow
Perfect piece of work you have done, this website is really cool with fantastic information.
What i don’t understood is if truth be told how
you are now not really a lot more smartly-liked than you may be now.
You are very intelligent. You realize therefore
considerably in relation to this topic, produced me in my
opinion consider it from numerous various angles. Its like women and men aren’t interested unless
it is something to accomplish with Girl gaga! Your personal stuffs outstanding.
Always take care of it up!
Hi, Neat post. There is an issue with your website in internet explorer, could test this?
IE nonetheless is the market chief and a good portion of folks
will pass over your excellent writing because of this problem.
These are genuinely impressive ideas in regarding blogging.
You have touched some fastidious things here. Any way keep up wrinting.
Hello there! I could have sworn I’ve been to this site before but after browsing through some of the post I realized it’s new to me. Anyhow, I’m definitely delighted I found it and I’ll be bookmarking and checking back often!
I’d have got to consult with you here. Which is not something I do! I spend time reading an article which will make people feel. Also, thanks for permitting me to comment!
Hello there, You’ve performed an incredible job. I’ll certainly digg it and personally suggest to my friends. I am confident they will be benefited from this web site.
Guess the exchange rate, bitcoin and get money.
Start with $10 and you can earn up to $1000 in a day, see how Here
An outstanding share! Ι һave juѕt forwarded tһis onto a co-worker ѡho has ƅeen conducting a little research on tһіs.
And he ɑctually orered mee dinner ԁue tо the fact that I
ffound it for him… lol. Ѕߋ let me reword tһis….
Thank YOU for tһe meal!! Ᏼut yeah, thanks for spending thee tjme tо discuss thnis topic һere on your website.
I will right away seize your rss feed as I can not find your
email subscription hyperlink or newsletter service.
Do you’ve any? Please let me realize so that I may just subscribe.
Thanks.
i just thought that queen latifah is one of the best comedians out there, she is really funny“
Nice post. I learn something totally new and challenging on sites I stumbleupon everyday.
It will always be useful to read through content from other writers and practice something from their sites.
free Windows 7 key
payday loan
Magnificent beat ! I wish to apprentice while you amend your site, how can i subscribe for a blog website? The account helped me a acceptable deal. I had been tiny bit acquainted of this your broadcast offered bright clear idea
#에볼루션게임 #에볼루션카지노
Previously you must have highly effective web business strategies get you started of getting into topics suitable for their web-based organization. educationalSportsbooks Online
You made some decent points there. I looked on the internet for the topic and found most individuals will consent with your blog.
For hottest information you have to visit the web and on internet I found this site as a best web page for
newest updates.
Enjoyed reading this, very good stuff, thankyou. “It is in justice that the ordering of society is centered.” by Aristotle.
Hey, I think your website might be having browser compatibility issues.
When I look at your blog in Ie, it looks fine but when opening in Internet
Explorer, it has some overlapping. I just wanted to give you
a quick heads up! Other then that, great blog!
Hi! Great post! Please do tell us when I will see a follow up!Sportsbook Review
Attractive portion of content. I just stumbled upon your web site and
in accession capital to assert that I acquire actually loved
account your blog posts. Any way I’ll be subscribing for your feeds
or even I success you get right of entry to constantly rapidly.
My husband and i were quite ecstatic that Chris could complete his homework by way of the ideas he gained when using the site. It is now and again perplexing to just find yourself handing out thoughts other people might have been trying to sell. We really realize we have got the website owner to be grateful to because of that. The main explanations you’ve made, the easy website menu, the friendships you will help to instill – it’s most excellent, and it’s really facilitating our son in addition to the family do think this subject is amusing, and that is unbelievably important. Many thanks for all the pieces!Sportsbook Review
Nice site. On your blogs very interest and i will tell a friends.Online Sportsbook Review
hi, your site is fantastic. I truly do many thanks for operateSportsbooks Online
My brother suggested I may like this web site. He was totally right. This put up truly made my day. You cann’t consider simply how a lot time I had spent for this information! Thanks!
You created some excellent tips at this time there. I did searching around the topic and discovered most everyone will recognize in your web site.Online Sportsbook Review
I think this is among the most vital info for me. And i am glad reading your article. But want to remark on some general things, The site style is great, the articles is really great : D. Good job, cheersmundo reformas barcelona
This website can be a walk-by way of for all of the data you needed about this and didn’t know who to ask. Glimpse here, and also you’ll definitely uncover it.Sportsbook Review
Online poker
May I simply say what a comfort to find somebody who truly knows
what they are discussing on the net. You definitely understand
how to bring an issue to light and make it important.
More people really need to read this and understand this side of the story.
I was surprised you are not more popular since you most certainly have the gift.
Interesting post , I am going to spend more time learning about this subjectSportsbooks Online
I visited various blogs except the audio feature for audio songs present at this web site is truly wonderful.
When visiting blogs, i usually discover a very good content like yoursreformas y diseño barcelona
This post presents clear idea in support
of the new people of blogging, that truly how to do blogging.
Hello! I just wish to give an enormous thumbs up for the good information you might have right here on this post. I can be coming again to your blog for more soon.Online Sportsbook Review
I really lucky to find this site on bing, just what I was searching for : D as well bookmarked.
I would like to consider the ability of thanking you for that professional guidance I have often enjoyed checking out your site. I’m looking forward to the particular commencement of my college research and the entire prep would never have been complete without dropping by your site. If I may be of any assistance to others, I’d personally be glad to help as a result of what I have gained from here.Sportsbooks Online
There is noticeably big money to comprehend this. I assume you have made certain nice points in features also.Online Sportsbook Review
penis enlargement
Good info. Lucky me I reach on your website by accident, I bookmarked it.
It’s difficult to get knowledgeable people within this topic, however, you appear to be guess what happens you’re dealing with! ThanksSportsbooks Online
I’ve read several good stuff here. Definitely worth bookmarking for revisiting. I wonder how much effort you put to create such a excellent informative site.
This post will assist the internet viewers for
creating new blog or even a blog from start to end.
My partner and i still can not quite assume that I could be one of those reading through the important recommendations found on this blog. My family and I are sincerely thankful for your generosity and for presenting me potential to pursue the chosen career path. Appreciate your sharing the important information I acquired from your web-site.
I’m happy I found this weblog, I couldnt uncover any data on this topic matter prior to. I also run a site and if you want to ever serious in a little bit of guest writing for me if feasible really feel free to let me know, i’m always look for people to examine out my site. Please stop by and leave a comment sometime!
I recently realized your website the other day and that i happen to be following it’s routinely. You’ve got great deal of tips proper here so i delight in your lifestyle of online site likewise. Preserve acknowledge that there are succeed!reformas en barcelona
I’m still learning from you, but I’m trying to achieve my goals. I definitely enjoy reading everything that is written on your blog.Keep the posts coming. I liked it!
I’d always want to be update on new blog posts on this web site , bookmarked ! .
thank for dropping this story. I am definitely tired of struggling to find relevant and intelligent commentary on this subject. Everyone nowadays seem to go to extremes to either drive home their viewpoint or suggest that everybody else in the globe is wrong. thank for your concise and relevant insight.reformas economicas barcelona
Thanks a lot for being our mentor on this niche. I enjoyed your current article very much and most of all cherished how you really handled the aspect I considered to be controversial. You are always quite kind to readers much like me and let me in my everyday living. Thank you.
Glad to be one of several visitors on this amazing web site : D.
Well I really liked studying it. This information procured by you is very useful for good planning.
my family would always like to go on ski holidays because it is very enjoyable;
Average In turn sends provides is the frequent systems that provide the opportunity for one’s how does a person pick-up biological, overdue drivers, what one mechanically increases the business. Search Engine Marketing
I was reading some of your content on this website and I conceive this internet site is really informative ! Keep on putting up.
Great delivery. Outstanding arguments. Keep up the good
effort.
Hi there, I found your website via Google while searching for a related topic, your website came up, it looks great. I have bookmarked it in my google bookmarks.mundo reformas barcelona
Thank you for the good writeup. It if truth be told was once a enjoyment account it. Look complex to more introduced agreeable from you! However, how can we be in contact?
Appreciate it for this post, I am a big big fan of this internet site would like to continue updated.
I am glad to be a visitor of this arrant web site! , thanks for this rare info ! .
A formidable share, I just given this onto a colleague who was doing a bit of analysis on this. And he in truth bought me breakfast because I discovered it for him.. smile. So let me reword that: Thnx for the deal with! However yeah Thnkx for spending the time to debate this, I feel strongly about it and love studying extra on this topic. If attainable, as you develop into expertise, would you thoughts updating your weblog with more details? It is extremely helpful for me. Large thumb up for this weblog publish!
There are actually numerous particulars like that to take into consideration. That could be a nice point to bring up. I supply the ideas above as basic inspiration however clearly there are questions like the one you convey up the place crucial thing will be working in sincere good faith. I don?t know if best practices have emerged around things like that, however I am sure that your job is clearly recognized as a good game. Each boys and girls feel the impression of only a moment’s pleasure, for the remainder of their lives.
Sweet blog! I found it while browsing on Yahoo News. Do you have any tips on how to get listed in Yahoo News? I’ve been trying for a while but I never seem to get there! Thanks
Wow! This could be one particular of the most useful blogs We’ve ever arrive across on this subject. Basically Fantastic. I am also a specialist in this topic so I can understand your effort.
I have recently started a website, the information you offer on this web site has helped me greatly. Thanks for all of your time & work.
I genuinely enjoy looking at on this website, it holds superb articles. “Beware lest in your anxiety to avoid war you obtain a master.” by Demosthenes.
I’m noot tthat muxh off a interet readerr too bbe honestt buut yyour sires relly nice, kkeep iit up!
I’ll ggo aead annd boookmark yoour ste tto clme bacck later.
Maany thanks
my homepage: https://bet368.in/casino/casino-days
I loved as much as you’ll receive carried out right here. The sketch is attractive, your authored subject matter stylish. nonetheless, you command get bought an edginess over that you wish be delivering the following. unwell unquestionably come more formerly again since exactly the same nearly very often inside case you shield this hike.
It’s very trouble-free to find out any topic on web as compared to
books, as I found this post at this web page.
Wow, this article is good, my younger sister is analyzing such things,
therefore I am going to let know her.
You could certainly see your skills in the work you write. The world hopes for more passionate writers like you who are not afraid to say how they believe. Always follow your heart.
I really like what you guys are up too. This sort of clever work and reporting! Keep up the excellent works guys I’ve added you guys to blogroll.
You need to take part in a contest for the most effective blogs on the web. I’ll recommend this site!
HVAC Lancaster California Workingclasshvac.com
Heya i’m for the first time here. I found this board and I find It truly useful & it helped me out a lot. I hope to give something back and aid others like you aided me.
Pretty nice post. I simply stumbled upon your weblog and wished to say that I’ve
truly loved browsing your weblog posts. After all I’ll be
subscribing to your feed and I am hoping you write again soon!
I don’t commonly comment but I gotta state thanks for the post on this perfect one : D.
Very interesting points you have observed, thanks for putting up. “I don’t know what you could say about a day in which you have seen four beautiful sunsets.” by John Glenn.
Howdy! I simply would like to offer you a huge thumbs up for your great info you’ve got right here on this post.
I will be coming back to your blog for more soon.
Keep up the good piece of work, I read few blog posts on this website and I think that your web blog is real interesting and has got circles of good info .
You are a very persuasive writer. I can see this in your article. You have a way of writing compelling information that sparks much interest.tips on selling merchant services
Bardzo podobają mi się Twoje informacje na blogu, stworzyłem podobny content, który może ciebie zainteresować
i będę wdzięczny jeśli rzucisz swoim fachowym okiem
i dasz znać co o nim myślisz: https://mkbe.pl/
Hey! This is my 1st comment here so I just wanted to give a quick shout out and say I really enjoy reading through your posts. Can you recommend any other blogs/websites/forums that cover the same subjects? Thank you so much!
I love the efforts you have put in this, thanks for all the great blog posts.
I really like your article. It’s evident that you have a lot knowledge on this topic. Your points are well made and relatable. Thanks for writing engaging and interesting material.How to sell merchant services
I have to convey my respect for your kindness for all those that require guidance on this one field. Your special commitment to passing the solution up and down has been incredibly functional and has continually empowered most people just like me to achieve their dreams. Your amazing insightful information entails much to me and especially to my peers. Thanks a ton; from all of us.tips on selling merchant services
Hiya, I’m really glad I’ve found this info. Nowadays bloggers publish just about gossips and internet and this is actually frustrating. A good website with interesting content, this is what I need. Thanks for keeping this web site, I’ll be visiting it. Do you do newsletters? Cant find it.
The new Zune browser is surprisingly good, but not as good as the iPod’s. It works well, but isn’t as fast as Safari, and has a clunkier interface. If you occasionally plan on using the web browser that’s not an issue, but if you’re planning to browse the web alot from your PMP then the iPod’s larger screen and better browser may be important.tips on selling merchant services
Hi there! This is kind of off topic but I need some
help from an established blog. Is it very difficult to
set up your own blog? I’m not very techincal but I can figure things out pretty fast.
I’m thinking about making my own but I’m not sure where to start.
Do you have any points or suggestions? Thank you
Thank you for sharing with us, I conceive this website genuinely stands out : D.
I just couldn’t depart your site prior to suggesting that I extremely enjoyed the standard information an individual provide for your visitors? Is gonna be back frequently in order to inspect new postsselling payment processing services
I was wondering if you ever considered changing
the page layout of your site? Its very well written; I love what youve got to say.
But maybe you could a little more in the way of content so people could
connect with it better. Youve got an awful lot of text for only
having one or 2 images. Maybe you could space
it out better?
Also visit my page kasinot
Excellent pieces. Keep posting such kind of information on your page.
Im really impressed by your site.
Hi there, You’ve performed a fantastic job.
I will definitely digg it and in my view recommend to my friends.
I’m confident they will be benefited from this website.
I just like the helpful information you provide in your articles. I will bookmark your weblog and check once more right here regularly. I’m quite sure I’ll learn lots of new stuff proper here! Best of luck for the next!
Hi my friend! I want to say that this post is amazing, great written and include almost all vital infos. I would like to peer more posts like this .
Thanks a lot for sharing this with all people
you really know what you are talking approximately!
Bookmarked. Please additionally discuss with my web site =).
We can have a link change contract among us
This is the right blog for anyone who wants to find out about this topic. You realize so much its almost hard to argue with you (not that I actually would want…HaHa). You definitely put a new spin on a topic thats been written about for years. Great stuff, just great!
Ahaa, its nice dialogue regarding this piece of writing at this
place at this blog, I have read all that, so at this time
me also commenting at this place.
my web-site :: huikee casino
I like the helpful information you provide in your articles. I’ll bookmark your blog and check again here frequently. I am quite certain I will learn lots of new stuff right here! Best of luck for the next!
Hi there, I read your blogs regularly. Your humoristic style
is awesome, keep it up!
Awesome article.
Hello! This is my 1st comment here so I just wanted to give a quick shout out and say I
really enjoy reading your articles. Can you recommend any other blogs/websites/forums that cover the same subjects?
Thanks for your time!
It’s actually a cool and helpful piece of information. I’m glad that you shared this helpful info with us. Please keep us up to date like this. Thanks for sharing.
I am a very horny girl https://tinyurl.com/2xtcrxld
I am often to blogging and i really appreciate your content. The article has really peaks my interest. I am going to bookmark your site and keep checking for new information.
I’ve recently started a site, the information you offer on this site has helped me tremendously. Thanks for all of your time & work.
These are actually wonderful ideas in about blogging. You have
touched some pleasant points here. Any way keep up wrinting.
Онлайн-платформа Pegas21 приобретает легальное программное обеспечение,
всячески заботится о прозрачности всех игр, абсолютной безопасности, анонимности геймеров.
Это еще далеко не все позитивные моменты Pegas21.
Достоинство №1: подарки клуба Pegas 21.
На ресурсе Пегас21 любой совершеннолетний
юзер обладает шансом стать владельцем эксклюзивного вознаграждения.
Официальный сайт Казино Пегас 21 это игровые автоматы онлайн для мобильных и ПК с бонусами на первые депозиты.
Не упустите возможность выиграть в Pegas21.
Регистрация – простейший этап
работы на Pegas 21. В комнате Пегас21 могут геймиться
резиденты из государств СНГ, ближнего зарубежья.
Чтобы располагать полноценным доступом ко
всем услугам ресурса, поклонникам рекомендуется пройти регистрацию, пополнить игровой счет.
Регистрация в Пегас21 проходит
проще, чем может выдаться: достаточно указать адрес
виртуальной почты либо же совершить авторизацию через учетную запись социальной сети.
Среди прочих разделов в Пегас21 представлена Касса, через которую проводятся финансовые операции, геймерский профиль, вкладка с полным списком развлечений.
Также предусмотрены подразделы, объединяющие
игры согласно производителям, уровню популярности,
новизны.
казино пегас 21 что лучше.
Узнавайте о самых актуальных
новостях и акциях в онлайн казино Pegas 21 в ВК.
Пожаловаться. Pegas21 – виртуальная геймерская
площадка нового поколения. Оценили 0 человек.
Показать список поделившихся.
112. Pegas 21 / Пегас 21 запись закреплена.
Легко! Сразу после создания аккаунта
в Pegas21 посетителю сайта начисляется бонус за
регистрацию. Это правда, каждому
новоприбывшему совершается поступление от казино, находящегося в топе на
поприще гэмблинга. Pegas21 – это захватывающее
времяпровождение, возможность отвлечься
от серых будней, при этом имея возможность
заработать реальные финансы, и это без обязательных стартовых
вложений.
Официальный youtube канал казино онлайн Пегас 21 приветствует вас!
Узнавайте о самых актуальных и
интересных новостях и акциях в Pegas 21, теперь и в видео
Официальный сайт онлайн Казино
Ра. Казино Ра – популярная и надёжная игровая платформа с лицензией.
Большая часть коллекции приходится на
игровые автоматы. Вас ждут тематические видео
слоты с особыми знаками, оригинальными опциями и джекпотом.
Посетив официальный сайт casino Ra, все новички смогут
заработать щедрые бонусы.
Уже существующих клиентов ждут быстрые
выплаты и прибавки к депозитам!
Very fantastic visual appeal on this site, I’d value it 10 10.
Oh my goodness! an amazing article dude. Thank you However I’m experiencing difficulty with ur rss . Don’t know why Unable to subscribe to it. Is there anybody getting similar rss downside? Anybody who knows kindly respond. Thnkx
I’ve been browsing on-line greater than 3 hours nowadays, yet I by no means found any interesting article like yours. It?¦s beautiful value enough for me. In my view, if all site owners and bloggers made good content material as you did, the internet can be a lot more helpful than ever before.
This design is spectacular! You obviously know how to keep a reader amused. Between your wit and your videos, I was almost moved to start my own blog (well, almost…HaHa!) Fantastic job. I really enjoyed what you had to say, and more than that, how you presented it. Too cool!duplicado de llaves
I would like to thank you for the efforts you have put in penning this site.
I’m hoping to view the same high-grade blog posts from you in the future as well.
In truth, your creative writing abilities has inspired me to get my own site now 😉
Hello – I must say, I’m impressed with your site. I had no trouble navigating through all the tabs and information was very easy to access. I found what I wanted in no time at all. Pretty awesome. Would appreciate it if you add forums or something, it would be a perfect way for your clients to interact. Great jobcerrajeria
I have been exploring for a bit for any high-quality articles or blog posts on this sort of space .
Exploring in Yahoo I ultimately stumbled upon this site.
Reading this info So i’m satisfied to convey that I have a very just right uncanny feeling
I came upon exactly what I needed. I such a lot
no doubt will make sure to do not put out of your mind
this site and give it a look on a relentless basis.
Here is my homepage :: mahti kasino
I was recommended this web site by my cousin. I am not sure
whether this post is written by him as nobody else know such detailed about my difficulty.
You are wonderful! Thanks!
Hi, just required you to know I he added your site to my Google bookmarks due to your layout. But seriously, I believe your internet site has 1 in the freshest theme I??ve came across. It extremely helps make reading your blog significantly easier.
Hi, i read your blog from time to time and i own a similar one and
i was just wondering if you get a lot of spam responses?
If so how do you prevent it, any plugin or anything you
can recommend? I get so much lately it’s driving me insane
so any assistance is very much appreciated.
Some truly quality content on this internet site, saved to favorites.
I think this internet site has some very great information for everyone. “He is able who thinks he is able.” by Buddha.
I cling on to listening to the rumor lecture about getting free online grant applications so I have been looking around for the top site to get one. Could you advise me please, where could i get some?
Nice blog here! Also your web site loads up fast!
What web host are you using? Can I get your affiliate link to your host?
I wish my site loaded up as quickly as yours lol
My spouse and i were very excited when Louis could round up his preliminary research through the entire ideas he grabbed using your site. It is now and again perplexing to simply continually be releasing concepts which often many others have been trying to sell. And now we acknowledge we have got the writer to appreciate because of that. All the explanations you made, the simple website navigation, the relationships your site help promote – it’s got many incredible, and it is assisting our son in addition to our family reason why this subject is cool, and that is extremely vital. Thank you for the whole lot!
This web site is really a walk-through for all of the info you wanted about this and didn’t know who to ask. Glimpse here, and you’ll definitely discover it.
Hello there! This is my first visit to your blog!
We are a team of volunteers and starting a new initiative in a community in the same niche.
Your blog provided us valuable information to work on. You have done a marvellous job!
Great beat ! I would like to apprentice while you amend your website, how could i subscribe for a blog web site?
The account helped me a acceptable deal. I had been a little bit acquainted of this your broadcast provided
bright clear idea
These pink buffalo mushroom spores are the result of an experiment that yielded pink bongo style
mushrooms with light red to maroon colored gills in a wide range of
substrates. The term “pink buffalo” was given to this particular strain due to
its tendency toward being milder and more manageable than other
high yielding strains, a quality that users have come to know
as being rather “buffalo-like.” However, as with all strains, it is important
to work with a variety of strains to find what works best for you.
pink buffalo mushroom spores – pink buffalo strain, pink buffalo mushroom spores – pink buffalo strain price, pink buffalo mushroom spores – pink buffalo strain buy, buy pink buffalo mushroom spores – pink buffalo strain online, buy pink buffalo mushroom spores – pink buffalo strain, pink buffalo mushroom spores – pink buffalo strain for sale, where to buy pink buffalo mushroom spores – pink buffalo strain online, pink buffalo mushroom spores – pink buffalo strain shop, pink buffalo mushroom spores – pink buffalo strain online store, pink buffalo mushroom spores – pink buffalo strain prices, pink buffalo mushroom spores – pink buffalo strain cost, pink buffalo mushroom spores – pink buffalo strain buy online price in usa, pink buffalo mushroom spores – pink buffalo strain buy online prices, pink buffalo mushroom spores – pink buffalo strain buy online in usa, pink buffalo mushroom spores – pink buffalo strain buy online price in australia, pink buffalo mushroom spores – pink buffalo strain buy online, pink buffalo mushroom spores – pink buffalo strain buy bulk, pink buffalo mushroom spores – pink buffalo strain buy usa, pink buffalo mushroom spores – pink buffalo strain buy in usa, pink buffalo mushroom spores – pink buffalo strain buy in australia, pink buffalo mushroom spores – pink buffalo strain buy australia, where to buy pink buffalo mushroom spores – pink buffalo strain, pink buffalo mushroom spores – pink buffalo strain for sale online, pink buffalo mushroom spores – pink buffalo strain sale online, pink buffalo mushroom spores – pink buffalo strain online for sale, pink buffalo mushroom spores – pink buffalo strain for sale usa, pink buffalo mushroom spores – pink buffalo strain for sale canada, pink buffalo mushroom spores – pink buffalo strain for sale australia, pink buffalo mushroom spores – pink buffalo strain for sale uk, shop pink buffalo mushroom spores – pink buffalo strain online, purchasing pink buffalo mushroom spores – pink buffalo strain online, shopping pink buffalo mushroom spores – pink buffalo strain online, pink buffalo mushroom spores – pink buffalo strain near me, pink buffalo mushroom spores – pink buffalo strain near me usa, pink buffalo mushroom spores – pink buffalo strain near me uk, pink buffalo mushroom spores – pink buffalo strain near me australia, pink buffalo mushroom spores – pink buffalo strain near me canada, cheap pink buffalo mushroom spores – pink buffalo strain online, cheap pink buffalo mushroom spores – pink buffalo strain, pink buffalo mushroom spores – pink buffalo strain usa, pink buffalo mushroom spores – pink buffalo strain uk, pink buffalo mushroom spores – pink buffalo strain canada, pink buffalo mushroom spores – pink buffalo strain australia, order pink buffalo mushroom spores – pink buffalo strain online, purchase pink buffalo mushroom spores – pink buffalo strain online, purchase pink buffalo mushroom spores – pink buffalo strain, best pink buffalo mushroom spores – pink buffalo strain vendor, pink buffalo mushroom spores – pink buffalo strain suppliers, pink buffalo mushroom spores – pink buffalo strain retailers, pink buffalo mushroom spores – pink buffalo strain wholesalers, pink buffalo mushroom spores – pink buffalo strain wholesale, pink buffalo mushroom spores – pink buffalo strain bulk supply, pink buffalo mushroom spores – pink buffalo strain dealers, amazonian mushroom spores, edible mushroom spores, exotic mushroom spores, free mushroom spores, how do you get mushroom spores?, how to harvest mushroom spores, mushroom box, mushroom grow kit, mushroom growing equipment, mushroom spores amazon, mushroom spores for microscopy, mushroom spores legal, mushroom spores to grow, mushroom spores wikipedia, mushroom substrate, north spore, pink buffalo mushroom spores, pink buffalo mushroom spores – pink buffalo strain, reproduction in mushroom, what happens if you inhale mushroom spores?, what is the easiest mushroom spore to grow?, What is the function of spores in mushroom?, where are spores located on a mushroom.
If you are going for most excellent contents like myself, just pay a quick
visit this website every day because it offers quality contents,
thanks
Right away I am going away to do my breakfast, once
having my breakfast coming over again to read other
news.
Wonderful article! This is the kind of information that should be shared
across the net. Disgrace on Google for now not positioning
this publish upper! Come on over and consult with my site .
Thanks =)
my blog post :: cap restoration
I’m really enjoying the design and layout of your blog. It’s a
very easy on the eyes which makes it much more
enjoyable for me to come here and visit more often. Did you hire out a
designer to create your theme? Great work!
I like the helpful information you provide in your articles. I will bookmark your weblog and check again here frequently. I’m quite sure I’ll learn many new stuff right here! Best of luck for the next!
Thank you for another excellent article. Where else could anyone get that type of information in such a perfect way of writing? I have a presentation next week, and I’m on the look for such information.
Some truly wonderful articles on this website , appreciate it for contribution.cerrajeria
I was just lookuping for this information to get a while. Approximately two hrs of online lookuping, thankfully I obtained it in your website. I do not understand why Bing don’t exhibit this form of resourceful internet sites in the first web page. Generally the leading websites are craps. Perhaps it is time to alter to another research engine.Sonia Ejide
Certainly with your thoughts here and that i love your blog! I’ve bookmarked it making sure that I can come back & read more in the foreseeable future.cambio bombin
Excellent site. Plenty of useful info here. I am sending it to several pals ans also sharing in delicious.
And of course, thanks for your effort!
Nice post. I used to be checking constantly this weblog and I am impressed!
Extremely helpful info specifically the final part :
) I take care of such info a lot. I was looking for this certain information for a long time.
Thanks and best of luck.
My blog … Hoppers CBD Gummies Reviews
Why Do You Need 25k To Day Trade
Woh I love your articles, saved to bookmarks! .
Really excellent info can be found on blog. “I can think of nothing less pleasurable than a life devoted to pleasure.” by John D. Rockefeller.
Admiring the time and effort you put into your website and in depth information you present. It’s good to come across a blog every once in a while that isn’t the same old rehashed information. Wonderful read! I’ve bookmarked your site and I’m adding your RSS feeds to my Google account.Diane Skibbe
How can I apply? You need to prove if you’ll be able to provide
for your self whereas in the US. Alternatively, you will have to apply for an immigrant visa at US consulate abroad.
Alternatively, you can find more data and FAQs
here.
Here is my web page :: EB2 Visa business plan company – http://hate-erase.com/__media__/js/netsoltrademark.php?d=www.immigrationbusiness-plans.com%2Feb2-visa-business-plan-company-iowa%2F
–
buy viagra online
Hey there, You’ve done an excellent job. I’ll certainly digg it and personally recommend to
my friends. I am confident they will be benefited from this
website.
Hmm it seems like your website ate my first comment (it was extremely long) so I guess I’ll just sum it up
what I had written and say, I’m thoroughly enjoying your blog.
I too am an aspiring blog blogger but I’m still new to the whole thing.
Do you have any suggestions for rookie blog writers?
I’d really appreciate it.
Its wonderful as your other articles : D, thankyou for putting up. “Slump I ain’t in no slump… I just ain’t hitting.” by Yogi Berra.
I do not even know how I finished up here, but I assumed this put up was great.
I do not recognize who you are however certainly you are going to a well-known blogger when you aren’t already.
Cheers!
I like it when individuals get together and share views. Great blog, keep it up!
Hey just wanted to give you a quick heads up. The words in your post seem
to be running off the screen in Chrome. I’m
not sure if this is a formatting issue or something to do with web browser compatibility but
I thought I’d post to let you know. The layout look great though!
Hope you get the issue fixed soon. Many thanks
Pretty! This was a really wonderful post. Thank you for
supplying this info.
Attractive section of content. I just stumbled upon your web site and in accession capital to assert that I acquire in fact enjoyed account your blog posts.
Anyway I will be subscribing to your feeds and even I achievement you access consistently quickly.
Link exchange is nothing else but it is only placing the other person’s weblog link on your page at
appropriate place and other person will also do same for you.
Good information. Lucky me I ran across your site by chance
(stumbleupon). I’ve bookmarked it for later!
I’d have to check with you here. Which is not something I usually do! I enjoy reading a post that will make people think. Also, thanks for allowing me to comment!empresa cerrajeria
I enjoy the efforts you have put in this, regards for all the great articles.
The actual challenge to become is normally you can actually SOLE check out that level of your tax discount over the internet by looking at your RATES web-site.cambio cerradura
Hey, you?re the goto expert. Thanks for haingng out here.cambio cerradura
Fantastic web site. A lot of helpful info here. I?¦m sending it to a few pals ans also sharing in delicious. And obviously, thanks in your sweat!
Saved as a favorite, I really like your site!
Thank you for an additional great post. Exactly where else could anybody get that kind of facts in this kind of a ideal way of writing? I have a presentation next week, and I’m around the appear for this kind of data.cerrajeria
whoah this blog is fantastic i love reading your articles. Keep up the good work! You know, lots of people are searching around for this info, you could help them greatly.
I’ve been exploring for a little bit for any high quality articles or blog posts on this kind of space . Exploring in Yahoo I at last stumbled upon this website. Reading this information So i am glad to express that I’ve a very just right uncanny feeling I came upon just what I needed. I such a lot certainly will make sure to do not fail to remember this web site and give it a look regularly.
I’ve been absent for some time, but now I remember why I used to love this web site. Thanks , I’ll try and check back more frequently. How frequently you update your web site?
What i don’t understood is actually how you are now not actually much more neatly-favored than you may be right now. You’re so intelligent. You recognize thus significantly relating to this subject, produced me individually imagine it from so many numerous angles. Its like women and men don’t seem to be fascinated unless it?¦s something to do with Lady gaga! Your own stuffs great. Always deal with it up!
I think this is one of the most vital information for me.
And i am glad reading your article. But wanna remark on few general things, The
web site style is perfect, the articles is really excellent :
D. Good job, cheers
fantastic points altogether, you simply gained a brand new reader. What could you recommend about your submit that you just made some days ago? Any positive?
Heyy there, I thnk yolur website might bbe haging bbrowser compatibility issues.
Whenn I lolk aat yopur log sie inn Chrome, iit lokks fibe buut when oppening inn Ingernet Explorer,
iit hass some overlapping. I jut wasnted tto give yyou a
quiuck heazds up! Otherr theen that, grwat blog!
Visdit myy homepage; megarush casino review
The when I just read a blog, I’m hoping that this doesnt disappoint me approximately this one. Get real, Yes, it was my method to read, but When i thought youd have something interesting to state. All I hear is a number of whining about something that you could fix should you werent too busy trying to find attention.slot pulsa gacor tanpa potongan
Great post however , I was wanting to know if you could write a litte more on this subject? I’d be very thankful if you could elaborate a little bit further. Bless you!slot online pulsa
I know this if off topic but I’m looking into starting my own weblog and was wondering what all is required to get set up? I’m assuming having a blog like yours would cost a pretty penny? I’m not very web savvy so I’m not 100 sure. Any suggestions or advice would be greatly appreciated. Appreciate it
I read this piece of writing fully regarding the
resemblance of most recent and previous technologies, it’s
amazing article.
Respect to website author , some good selective information .slot pulsa tanpa potongan
hello, your website is really good. We do appreciate your give good resultssitus slot gacor pulsa
Be grateful you for spending time to speak about this, I think strongly about that and delight in reading read more about this topic. Whenever possible, just like you become expertise, do you mind updating your web site with a lot more details? It can be highly great for me. Two thumb up in this article!slot online gacor
Etobicoke Movers #1 is a company thst pursues a single goal-customer satisfaction.
Our movers in Etobicoke provide highly personalized servjce when moving.
Our company has insurance coverage of up to $100.000!
We have specialized in local moving in Etobicoke annd tthe district
since 2001. Also, we carrry out aany moving needs, whether it is Long
distance moving or international moving.
Our team ofters you the most modern and clean trucks, the most highly qualified personnel and modern technologies to make your
move easy and safe.office movers etobicoke
Thank you, I’ve just been searching for information about this topic for a while and yours is the greatest I’ve discovered till now. But, what in regards to the conclusion? Are you sure concerning the supply?slot online gacor
Very efficiently written information. It will be beneficial to anyone who utilizes it, including me. Keep doing what you are doing – looking forward to more posts.
Outstanding post but I was wanting to know if you could write a litte more on this subject?
I’d be very grateful if you could elaborate a little bit further.
Bless you!
thanks considerably this amazing site is formal and simple
The collaborative relationships with business
partners are oftentimes prone to certain inefficiencies, which are represented by misalignments of both incentives or efforts between the companions.
” by evaluating statistics from teams within a complete population: the inhabitants of a rustic, present customer base, patients in a medical examine, and so on. The most common strategies for conducting inferential statistics are hypothesis exams and estimation theories. Or it can be used to survey a sample set of the population in an try to extrapolate information about the entire population. On this case it is necessary to properly calculate for a representative pattern of the population. You’ll must implement an information analysis process to get the most out of your data. AI used to require big computing power, making it troublesome for companies to implement. The term ‘multichannel video programming distributor’ means an entity engaged in the business of creating accessible for buy, by subscribers or clients, a number of channels of video programming.
This is very interesting, You are a very skilled blogger.
I’ve joined your feed and look forward to seeking more of your wonderful post.
Also, I’ve shared your website in my social networks!
Watch the strategies presented continue reading to discover and just listen how to carry out this amazing like you organize your company at the moment. educationalgold etf in ira tax
Great goods from you, man. I have understand your stuff previous to and you are just too wonderful. I actually like what you have acquired here, really like what you are stating and the way in which you say it. You make it entertaining and you still take care of to keep it smart. I cant wait to read far more from you. This is really a wonderful web site.
This web page is really a stroll-by way of for all the data you wanted about this and didn’t know who to ask. Glimpse here, and also you’ll undoubtedly uncover it.
Can I just say what a relief to uncover a person that really knows what they are discussing on the net.
You definitely understand how to bring an issue to light and make it important.
More people really need to look at this
and understand this side of your story. I
was surprised that you aren’t more popular since you most certainly possess
the gift.
Hi there, You’ve done a fantastic job. I’ll definitely digg it and personally suggest to my friends. I am sure they’ll be benefited from this site.
I carry on listening to the newscast speak about receiving boundless online grant applications so I have been looking around for the most excellent site to get one. Could you tell me please, where could i acquire some?
The vacation trades offered are evaluated a variety of in the chosen and simply good value all around the world. Those hostels are normally based towards households which you’ll find accented via charming shores promoting crystal-clear fishing holes, concurrent of one’s Ocean. Hotels Discountsgold backed ira account
My spouse and I stumbled over here different page and thought I might check things out. I like what I see so i am just following you. Look forward to going over your web page yet again.
This plot doesn’t reveal itself; it has to be explained.gold ira 5 year rule irs
Hiya! Quicdk question that’s toitally offf topic.
Do youu knopw hoow tto maqke yor skte mobil friendly?
My wweb sitee lookls weeird whuen viewing from myy iphone4.
I’m trying too fin a templatee orr plugin tha migut bee abloe too crrect thbis problem.
If yoou hqve anyy recommendations,please share.
Witth thanks!
Feeel fee tto sjrf too mmy web-site … betrophy review
Thee other day, whule I wass att work, mmy siister stgole mmy iPaad aand teested tto ssee iif itt ccan survife a 25 foot drop,
just soo shhe cann bee a youtubge sensation. My iPaad iis nnow desetroyed annd sshe hass
83 views. I know thbis iis enntirely offf toppic buut I
hadd tto share itt with someone!
Heree iss myy wweb bog … bet368.in/casino/rabona-casino
What’s up, I would like to subscribe for this website to get most up-to-date updates,
thus where can i do it please help out.
I’d should talk to you here. Which is not some thing I do! I quite like reading a post which will make people believe. Also, many thanks permitting me to comment!situs slot online pulsa
Its such as you read my thoughts! You appear to grasp so much about this, such as you wrote the book in it or something. I feel that you simply could do with some p.c. to force the message home a little bit, however other than that, that is great blog. An excellent read. I will definitely be back.
Wanted posting. Loads of excellent writing here. I wish I saw it found the site sooner. Congrats!situs slot pulsa gacor
Can I just say what a aid to seek out someone who really is aware of what theyre talking about on the internet. You definitely know tips on how to bring a problem to mild and make it important. More folks need to learn this and understand this facet of the story. I cant consider youre no more in style since you undoubtedly have the gift.
Hello! This post couldn’t be written any better! Reading this post
reminds me of my previous room mate! He always kept talking about this.
I will forward this write-up to him. Pretty sure he will have a good read.
Thanks for sharing!
Thanks for a marvelous posting! I genuinely enjoyed reading it, you could be a great author.I will make certain to bookmark your blog and will come back sometime soon. I want to encourage that you continue your great writing, have a nice day!
Pretty! This was an incredibly wonderful post. Thanks for providing these details.
Great blog! I am loving it!! Will be back later to read some more. I am bookmarking your feeds also.
Hey, you used to write magnificent, but the last few posts have been kinda boring?K I miss your tremendous writings. Past few posts are just a little bit out of track! come on!
fantastic post, very informative. I wonder why the other experts of this sector don’t notice this. You should continue your writing. I am confident, you have a huge readers’ base already!
Wow! This can be one particular of the most helpful blogs We’ve ever arrive across on this subject. Actually Fantastic. I am also a specialist in this topic so I can understand your hard work.
I am extremely impressed together with your writing skills and also with the format on your weblog. Is that this a paid topic or did you customize it yourself? Anyway keep up the nice quality writing, it’s rare to look a nice blog like this one nowadays..
Admiring the time and effort you put into your website and in depth information you provide.
It’s awesome to come across a blog every once in a while that isn’t the same outdated rehashed material.
Excellent read! I’ve bookmarked your site and I’m including your RSS feeds to
my Google account.
Simply desire to say your article is as surprising. The clarity in your post is simply cool and i could assume you’re an expert on this subject. Fine with your permission let me to grab your RSS feed to keep updated with forthcoming post. Thanks a million and please keep up the gratifying work.
It is appropriate time to make a few plans for the future and it is time to
be happy. I have read this put up and if I may I wish to suggest you few fascinating things or suggestions.
Perhaps you can write next articles relating to this article.
I desire to read even more issues about it!
It’s impressive that you are getting thoughts from this
article as well as from our dialogue made here.
Undeniably imagine that that you stated. Your favorite justification seemed to be on the net the easiest thing to take into account of. I say to you, I certainly get annoyed at the same time as other folks think about concerns that they plainly don’t recognise about. You controlled to hit the nail upon the highest and defined out the whole thing without having side effect , people could take a signal. Will likely be again to get more. Thanks
I would like to thnkx for the efforts you’ve put in writing this blog. I am hoping the same high-grade web site post from you in the upcoming as well. Actually your creative writing abilities has encouraged me to get my own blog now. Really the blogging is spreading its wings fast. Your write up is a great example of it.
I have been exploring for a little bit for any high quality articles or
weblog posts on this kind of space . Exploring in Yahoo
I ultimately stumbled upon this site. Reading this information So
i’m happy to show that I’ve a very excellent uncanny feeling I discovered just what I needed.
I most for sure will make sure to don?t disregard this site and give it a look on a continuing basis.
Someone essentially lend a hand to make critically articles I’d state. That is the first time I frequented your website page and so far? I amazed with the research you made to make this actual put up amazing. Excellent process!
You are my aspiration, I have few blogs and very sporadically run out from to post : (.
I’ve read several good stuff here. Definitely worth bookmarking for revisiting. I wonder how much effort you put to create such a excellent informative web site.
Hi! I could have sworn I’ve been to this website before but after checking
through some of the post I realized it’s new to me.
Nonetheless, I’m definitely happy I found it and I’ll be
bookmarking and checking back often!
Together with the whole thing which seems to be developing throughout this area, a significant percentage of points of view are somewhat radical. Nevertheless, I beg your pardon, but I do not subscribe to your entire plan, all be it refreshing none the less. It seems to everybody that your comments are actually not entirely validated and in fact you are generally your self not really totally convinced of your argument. In any case I did take pleasure in reading it.
The offers that appear on this table are from partnerships from
which Investopedia receives compensation.
I cherished up to you’ll obtain performed right here. The comic strip is attractive, your authored material stylish. nonetheless, you command get bought an edginess over that you would like be turning in the following. sick definitely come further formerly once more since exactly the similar just about a lot regularly within case you shield this increase.
I believe you have remarked some very interesting details , thankyou for the post.
I like this post, enjoyed this one thanks for putting up.
This really answered my downside, thanks!
Today, while I was at work, my sister stole my iphone and tested to see if it can survive a forty foot drop, just so she can be a youtube sensation. My apple ipad is now broken and she
has 83 views. I know this is totally off topic but I had to share it with someone!
I have to convey my admiration for your kind-heartedness in support of individuals who require guidance on the area of interest. Your special commitment to getting the solution throughout ended up being really advantageous and have continuously made employees like me to get to their ambitions. Your new helpful publication indicates so much to me and far more to my peers. Best wishes; from each one of us.
Very efficiently written story. It will be beneficial to anyone who employess it, including yours truly :). Keep doing what you are doing – i will definitely read more posts.
I like this blog its a master peace ! Glad I discovered this on google .
Your style is so unique compared to many other people. Thank you for publishing when you have the opportunity,Guess I will just make this bookmarked.2
Loving the info on this site, you have done outstanding job on the articles.
Hello would you mind sharing which blog platform you’re using? I’m planning to start my own blog in the near future but I’m having a tough time making a decision between BlogEngine/Wordpress/B2evolution and Drupal. The reason I ask is because your layout seems different then most blogs and I’m looking for something unique. P.S My apologies for being off-topic but I had to ask!
Hey there! I know this is kinda off topic however I’d figured I’d ask. Would you be interested in exchanging links or maybe guest authoring a blog article or vice-versa? My website covers a lot of the same topics as yours and I believe we could greatly benefit from each other. If you’re interested feel free to shoot me an email. I look forward to hearing from you! Great blog by the way!
What i don’t understood is in reality how you are no longer actually much more well-preferred than you may be now. You’re very intelligent. You already know therefore significantly in relation to this topic, produced me for my part believe it from so many various angles. Its like men and women don’t seem to be fascinated until it is one thing to accomplish with Woman gaga! Your personal stuffs great. Always maintain it up!
Thank you, I’ve just been searching for info about this topic for ages and yours is the greatest I’ve discovered so far. But, what about the bottom line? Are you sure about the source?
This is a topic that is close to my heart…
Best wishes! Exactly where are your contact details though?
Whats Taking place i’m new to this, I stumbled upon this I have discovered It positively helpful and it has aided me out loads. I hope to contribute & assist other users like its aided me. Good job.
I like this web blog so much, saved to fav. “I don’t care what is written about me so long as it isn’t true.” by Dorothy Parker.
very good put up, i definitely love this web site, carry on it
I like what you guys are up too. Such clever work and reporting! Keep up the excellent works guys I’ve incorporated you guys to my blogroll. I think it’ll improve the value of my website 🙂
This blog is definitely rather handy since I’m at the moment creating an internet floral website – although I am only starting out therefore it’s really fairly small, nothing like this site. Can link to a few of the posts here as they are quite. Thanks much. Zoey Olsen
Ϝour Seasons Cleaning Woodinville
Woodinville, WA 98072, United Ꮪtates
+14254373838
house cleaners
I saw a lot of website but I conceive this one holds something special in it in it
Appreciate the recommendation. Let me try it out.
An impressive share! I’ve just forwarded this onto a coworker who was conducting a little homework on this.
And he in fact ordered me dinner because I
stumbled upon it for him… lol. So allow me to reword this….
Thank YOU for the meal!! But yeah, thanx for spending the time to
talk about this issue here on your blog.
Keep up the great piece of work, I read few posts on this internet site and I think that your web blog is really interesting and has got bands of wonderful info .
Hello, I check your blogs daily. Your writing style is witty,
keep doing what you’re doing!
Hi there! Quick question that’s totally off topic. Do you know how to make your site mobile friendly? My blog looks weird when viewing from my apple iphone. I’m trying to find a theme or plugin that might be able to resolve this problem. If you have any suggestions, please share. Many thanks!
Heya this is somewhat of off topic but I was wanting to know if blogs use WYSIWYG editors or if you have to manually code with HTML. I’m starting a blog soon but have no coding skills so I wanted to get advice from someone with experience. Any help would be greatly appreciated!
Whats up very cool website!! Man .. Excellent .. Amazing .. I’ll bookmark your website and take the feeds additionally?KI am satisfied to find so many useful information here in the post, we want develop more strategies on this regard, thank you for sharing. . . . . .
Hello! I’ve been following your weblog for a while now and finally got the courage to go ahead and give you a shout out from Lubbock Texas! Just wanted to say keep up the excellent work!
It is in reality a nice and helpful piece of information. I am happy that you shared this useful info with us. Please keep us up to date like this. Thank you for sharing.
Saved as a favorite, I really like your blog!
Thank you for sharing with us, I conceive this website truly stands out : D.
Good day very nice site!! Guy .. Beautiful .. Amazing .. I will bookmark your web site and take the feeds additionallyKI am happy to find numerous useful info right here within the post, we want work out more techniques in this regard, thanks for sharing. . . . . .
It’s a shame you don’t have a donate button! I’d certainly donate to this fantastic
blog! I suppose for now i’ll settle for bookmarking and adding your RSS feed to my Google account.
I look forward to brand new updates and
will share this site with my Facebook group.
Chat soon!
Great beat ! I would like to apprentice while you amend your website, how could
i subscribe for a blog web site? The account aided me a acceptable deal.
I had been a little bit acquainted of this your
broadcast offered bright clear idea
Saved as a favorite, I really like your blog!
Woh I love your articles, saved to bookmarks! .
I’m really enjoying the design and layout of your website. It’s a very easy on the eyes which makes it much more enjoyable for me to come here and visit more often. Did you hire out a developer to create your theme? Exceptional work!
WOW just what I was searching for. Came here by searching for judi bola
I have not checked in here for some time as I thought it was getting boring, but the last few posts are good quality so I guess I¦ll add you back to my everyday bloglist. You deserve it my friend 🙂
As I website owner I believe the content material here is very great, thankyou for your efforts.
I enjoy your writing style genuinely loving this site.
I’ll right away take hold of your rss as I can’t in finding your e-mail subscription hyperlink or newsletter service. Do you have any? Please permit me know so that I may just subscribe. Thanks.
Excellent article. I am dealing with many
of these issues as well..
You are my breathing in, I possess few blogs and infrequently run out from to post : (.
Wow, amazing blog structure! How lengthy have you ever been running a blog
for? you mzde running a blog glance easy. The entire glance
of your web site is wonderful, let alone the content!
Comment pomper lee muscle website athlète
You’ve made some really good points there. I looked on the net to find
out more about the issue and found most people will go along with your views on this web site.
I have not checked in here for a while because I thought it was getting boring, but the last few posts are good quality so I guess I will add you back to my daily bloglist. You deserve it my friend 🙂
Thanks in support of sharing such a fastidious opinion, post is good,
thats why i have read it entirely
Really nice design and style and wonderful subject matter, practically nothing else we require : D.
I will immediately take hold of your rss feed as I can not to find your e-mail subscription hyperlink or e-newsletter service.
Do you’ve any? Kindly allow me recognise in order that I may subscribe.
Thanks.
I love it when people come together and share opinions, great blog, keep it up.
Piece of writing writing is also a fun, if you be acquainted with afterward you can write if not it
is complicated to write.
Very quickly this web page will be famous among all blogging and site-building viewers, due to it’s pleasant articles
Thanks
Right here is the perfect web site for anyone who hopes to find out about this topic. You know so much its almost tough to argue with you (not that I actually will need toÖHaHa). You certainly put a fresh spin on a topic that has been discussed for many years. Excellent stuff, just excellent!
I’m not sure exactly why but this weblog is loading incredibly slow for me. Is anyone else having this issue or is it a problem on my end? I’ll check back later and see if the problem still exists.
Some truly good content on this web site, regards for contribution.
Keep functioning ,splendid job!
I’m gone to convey my little brother, that he should also go to see this website on regular basis to get
updated from latest gossip.
Do you mind if I quote a few of your posts as long as I provide credit and sources back to your website? My blog is in the exact same niche as yours and my users would definitely benefit from a lot of the information you present here. Please let me know if this okay with you. Regards!
Hello there, just became aware of your blog through Google, and found that it is really informative. I’m gonna watch out for brussels. I will be grateful if you continue this in future. Numerous people will be benefited from your writing. Cheers!
obviously like your web site however you need to test the spelling on several of your posts. Many of them are rife with spelling issues and I to find it very bothersome to tell the truth then again I?¦ll surely come back again.
Wohh exactly what I was looking for, thankyou for posting.
Well I really enjoyed studying it. This article offered by you is very useful for correct planning.
I’m curious to find out what blog platform you happen to be using?
I’m experiencing some minor security problems with my latest blog and I would
like to find something more risk-free. Do you have any suggestions?
My brother suggested I might like this web site. He was entirely right.
This post truly made my day. You cann’t imagine simply
how much time I had spent for this info!
Thanks!
I like this website very much, Its a rattling nice office to read and find information.
You really make it seem really easy with your presentation but I find this matter to be really something which I believe I’d by no means understand. It seems too complex and extremely vast for me. I’m having a look forward in your subsequent post, I?¦ll attempt to get the grasp of it!
Way cool! Some very valid points! I appreciate you writing this post
and the rest of the website is also really good.
Thanks very nice blog!
Thanks for a marvelous posting! I certainly enjoyed reading it, you are a great author.I will ensure that I bookmark your blog and will often come back in the future. I want to encourage that you continue your great work, have a nice morning!
Thanks for sharing superb informations. Your website is very cool. I’m impressed by the details that you have on this web site. It reveals how nicely you understand this subject. Bookmarked this website page, will come back for more articles. You, my friend, ROCK! I found simply the information I already searched everywhere and simply could not come across. What a perfect web-site.
F*ckin’ awesome things here. I am very glad to see your article. Thanks a lot and i’m looking forward to contact you. Will you kindly drop me a mail?
What i don’t realize is in truth how you are no longer actually a lot more smartly-liked than you may be now. You’re very intelligent. You realize therefore significantly in relation to this topic, produced me in my opinion believe it from so many varied angles. Its like men and women aren’t involved except it is something to do with Lady gaga! Your personal stuffs excellent. At all times deal with it up!
I like this weblog very much, Its a really nice position to read and get information. “…when you have eliminated the impossible, whatever remains, however improbable, must be the truth.” by Conan Doyle.
No matter if some one searches for his essential thing, thus he/she wishes to be available that in detail,
therefore that thing is maintained over here.
Your style is very unique compared to other people I have read stuff from.
Thanks for posting when you’ve got the opportunity,
Guess I will just bookmark this page.
There is noticeably a bundle to know about this. I assume you made certain nice points in features also.
Good day! Would you mind if I share your blog with my
zynga group? There’s a lot of people that I think would really appreciate your content.
Please let me know. Many thanks
It’s appropriate time to make some plans for the future and it’s time to be happy. I’ve read this put up and if I could I desire to counsel you some interesting issues or tips. Perhaps you could write subsequent articles relating to this article. I desire to learn even more issues about it!
WOW just what I was searching for. Came here by searching for
스포츠토토
Slot5000 adalah situs slot deposit 5000 pulsa tanpa potongan dengan link daftar login gacor hari ini minimal via dana ovo linkaja dan gopay.
Usually I don’t read post on blogs, however I wish to say that this write-up
very forced me to take a look at and do so! Your writing style
has been surprised me. Thank you, quite nice post.
I need to to thank yyou for this fantastic read!!
I definitely loved every little bit of it.
I have got yyou bookmarked tto look at new stuff you post…
musculation web site homme fort
Thanks
It is effortless to see why some folks’ eyes glaze over
at the believed off the game.
my homepage – 우리카지노
An impressive share! I have just forwarded this onto a co-worker who had been doing a little homework on this. And he actually bought me lunch due to the fact that I stumbled upon it for him… lol. So let me reword this…. Thanks for the meal!! But yeah, thanx for spending the time to discuss this matter here on your web site.
When some one searches for his essential thing, thbus he/she needs to be available that in detail, therefore that thing is maintained over
here.
Look into my webhsite … 온슬롯
Thanks
Thanks
Thanks , I’ve just been looking for info about this subject for ages and yours is the greatest I have discovered so far. But, what about the bottom line? Are you sure about the source?
Howdy! I know this is kinda off topic but I’d figured I’d ask.
Would you be interested in exchanging links or maybe guest
authoring a blog article or vice-versa? My site discusses
a lot of the same subjects as yours and I believe we could greatly benefit
from each other. If you might be interested feel free to shoot me an email.
I look forward to hearing from you! Excellent blog by the way!
Excellent post. I was checking continuously this blog and I am inspired! Very helpful information particularly the remaining section 🙂 I handle such information a lot. I was looking for this particular information for a long time. Thanks and best of luck.
I’m now not sure the place you are getting your
information, but great topic. I needs to spend a while finding out more or working out more.
Thanks for magnificent info I used to be on the lookout for this
info for my mission.
I’m now not certain where you are getting your info, however good topic. I must spend a while finding out much more or understanding more. Thanks for fantastic information I used to be searching for this info for my mission.
Hello. excellent job. I did not imagine this. This is a splendid story. Thanks!
As soon as I found this website I went on reddit to share some of the love with them.
I was able to find good advice from your blog articles.
Hello there, I discovered your blog by means of Google at the same time as searching for a comparable topic, your site got here up, it appears to be like good. I’ve bookmarked it in my google bookmarks.
Thanks
Sweet blog! I found it while searching on Yahoo News. Do you have any suggestions on how to get listed in Yahoo News? I’ve been trying for a while but I never seem to get there! Many thanks
You really make it seem really easy with your presentation however I to find this topic to be really something which I think I would by no means understand. It sort of feels too complicated and very wide for me. I am looking forward to your next publish, I will try to get the cling of it!
Hey there would you mind letting me know which
hosting company you’re working with? I’ve loaded your blog in 3 different internet
browsers and I must say this blog loads a lot quicker then most.
Can you suggest a good internet hosting provider at a reasonable price?
Thanks a lot, I appreciate it!
What’s up to all, the contents present at this site are
actually awesome for people knowledge, well, keep up the
good work fellows.
Thanks
Thanks
There is certainly a lot to know about this subject.
I love all of the points you’ve made.
We are a group of volunteers and opening a new scheme in our community.
Your website provided us with valuable info to work on. You’ve done an impressive job and our entire community will be grateful to you.
I read this paragraph fully concerning the
difference of newest and preceding technologies, it’s amazing article.
I just couldn’t depart your site before suggesting that I actually enjoyed the standard info a person provide for your visitors? Is gonna be back often to check up on new posts
This information is worth everyone’s attention. How
can I find out more?
My webpage … buy cars for cash no title
Dead indited subject matter, thanks for selective information.
Thanks
Seriously a lot of good advice.
My bropther recommenjded I miught liie thi website. He wass entirsly right.
Thhis popst acctually mae myy day. Yoou cann’t imasgine simplly
hhow much timee I haad spennt forr this info! Thanks!
My website: https://bet368.in/casino/vegas-casino
Thanks
Useful info. Fortunate me I found your site accidentally, and I am stunned why this accident didn’t came about earlier! I bookmarked it.
Very nice post. I just stumbled upon your blog and wished to say that I’ve truly loved surfing around your blog posts.
In any case I will be subscribing to your feed and I am hoping you write
once more soon!
It’s the best time to make some plans for the future and it is time to be happy. I have read this post and if I could I desire to suggest you few interesting things or tips. Perhaps you can write next articles referring to this article. I wish to read more things about it!
fantastic submit, very informative. I ponder why the other specialists of this sector do not understand
this. You should continue your writing. I am confident, you have
a great readers’ base already!
There are actually numerous details like that to take into consideration. That could be a great level to convey up. I offer the ideas above as general inspiration however clearly there are questions just like the one you bring up where a very powerful factor can be working in sincere good faith. I don?t know if finest practices have emerged round issues like that, but I am certain that your job is clearly identified as a good game. Both girls and boys feel the impact of only a second’s pleasure, for the remainder of their lives.
Just wanna say that this is handy, Thanks for taking your time to write this.
Really enjoyed this update, is there any way I can receive an email sent to me whenever you make a fresh article?
If some one needs expert view regarding running a blog after that i propose
him/her to go to see this blog, Keep up the good job.
I know this web site gives quality depending posts and
additional material, is there any other web page which gives these
kinds of information in quality?
Hiya, I’m really glad I’ve found this information. Today bloggers publish only about gossips and web and this is really frustrating. A good blog with interesting content, that’s what I need. Thanks for keeping this web site, I’ll be visiting it. Do you do newsletters? Can’t find it.
I like the valuable information you provide in your articles.
I’ll bookmark your weblog and check again here regularly.
I’m quite certain I will learn many new stuff right here!
Best of luck for the next!
Hi there would you mind letting me know which web host you’re using? I’ve loaded your blog in 3 different internet browsers and I must say this blog loads a lot faster then most. Can you suggest a good internet hosting provider at a honest price? Thank you, I appreciate it!
This is really fascinating, You are an excessively skilled blogger. I’ve joined your rss feed and look forward to in search of more of your excellent post. Also, I’ve shared your website in my social networks!
It’s amazing tto pay a visit this web page and reading the views of
all mates on the topic oof this post, while I am also zealous of
getting familiarity.
Build muscle web page pump muscle for men
Good info. Lucky me I reach on your website by accident, I bookmarked it.
I am incessantly thought about this, regards for putting up.
You are my inhalation, I own few blogs and very sporadically run out from to post .
Bardzo podobają mi się Twoje informacje na weblogu,
stworzyłem podobny content, który może ciebie zainteresować i będę wdzięczny jeśli rzucisz swoim fachowym okiem i dasz znać co o nim myślisz: https://denticabieleccy.pl/
Hey there! Someone in my Facebook group shared this
site with us so I came to take a look. I’m definitely loving
the information. I’m book-marking and will
be tweeting this to my followers! Exceptional blog and amazing style and design.
I would like to convey my gratitude for your generosity supporting those people that really need guidance on in this concept. Your very own commitment to passing the message all over had become definitely valuable and have frequently enabled men and women just like me to realize their dreams. Your warm and helpful report entails a lot to me and far more to my office colleagues. With thanks; from everyone of us.
Nice post. I used to be checking constantly this weblog
and I’m impressed! Very useful information specifically the remaining phase 🙂 I maintain such
info a lot. I used to be seeking this certain information for a very long time.
Thanks and best of luck.
Hi, i think that i noticed you visited my blog so
i got here to go back the desire?.I am trying to in finding issues
to enhance my web site!I assume its good enough to make use of some of your concepts!!
I visited a lot of website but I think this one has something special in it in it
Hiya, I am really glad I’ve found this info. Nowadays bloggers publish just about gossips and internet and this is really frustrating. A good site with exciting content, that is what I need. Thank you for keeping this website, I will be visiting it. Do you do newsletters? Can’t find it.
Really clean site, regards for this post.
My spouse and I stumbled over here different web page and thought I should check things out. I like what I see so i am just following you. Look forward to looking into your web page for a second time.
I really like your writing style, excellent information, regards for posting : D.
I’m really enjoying the design and layout of your
blog. It’s a very easy on the eyes which makes it much more pleasant for
me to come here and visit more often. Did you hire out a developer
to create your theme? Exceptional work!
Because the admin of this website is working,
no uncertainty very soon it will be renowned, due to
its feature contents.
You are a very intelligent person!
I want to talk about 안전사이트 because its really helpful in your life.
Please follow for more info.
Great site. Plenty of useful info here. I¦m sending it to several friends ans also sharing in delicious. And of course, thanks in your effort!
Thanks on your marvelous posting! I actually enjoyed reading it, you happen to be a great author.I will remember to bookmark your blog and may come back later on. I want to encourage one to continue your great posts, have a nice day!
I’ve been browsing online more than three hours today, yet I never found any interesting article like yours. It’s pretty worth enough for me. In my opinion, if all web owners and bloggers made good content as you did, the web will be much more useful than ever before.
Excellent web site you’ve got here.. It’s hard to find excellent writing like yours
nowadays. I truly appreciate individuals like you! Take
care!!
Thanks for sharing excellent informations. Your site is so cool. I’m impressed by the details that you¦ve on this web site. It reveals how nicely you perceive this subject. Bookmarked this web page, will come back for more articles. You, my pal, ROCK! I found simply the info I already searched everywhere and simply could not come across. What a great site.
I¦ve read several good stuff here. Definitely value bookmarking for revisiting. I surprise how much effort you put to make this sort of great informative website.
Thank you for any other great article. Where else may just anyone get that kind of info in such an ideal manner of writing? I’ve a presentation subsequent week, and I am at the look for such info.
I simply could not depart your website before suggesting that I really loved the usual information a person supply on your visitors? Is going to be back continuously to investigate cross-check new posts.
I have been absent for some time, but now I remember why I used to love this website. Thanks , I’ll try and check back more frequently. How frequently you update your web site?
Airbnbs For Sale
I am curious to find out what blog system you’re
utilizing? I’m having some minor security problems with my latest website and I would like to find something more safeguarded.
Do you have any suggestions?
hey there and thank you for your info – I’ve definitely picked up something new from right here. I did however expertise a few technical points using this web site, since I experienced to reload the web site many times previous to I could get it to load correctly. I had been wondering if your web host is OK? Not that I’m complaining, but slow loading instances times will sometimes affect your placement in google and could damage your high quality score if advertising and marketing with Adwords. Anyway I’m adding this RSS to my e-mail and could look out for a lot more of your respective interesting content. Make sure you update this again soon..
I always used to read post in news papers but
now as I am a user of net thus from now I am using net for
posts, thanks to web.
Your place is valueble for me. Thanks!…
I was suggested this website by my cousin. I’m not sure whether this post is written by him as no one else know such detailed about my difficulty. You are incredible! Thanks!
บาคาร่าเว็บไหนดี (Fabricsmanufacturer.Com)
Link exchange is nothing else however it is just placing the other
person’s webpage link on your page at suitable place and
other person will also do same for you.
I need to to thank you for this fantastic read!! I definitely enjoyed every little bit of it. I’ve got you saved as a favorite to check out new things you post…
This is a topic that’s close to my heart… Cheers! Exactly where are your contact details though?
I needed to thank you for this great read!! I certainly enjoyed every bit of it. I’ve got you bookmarked to look at new stuff you post…
Great article. I am going through many of these issues as well..
Very interesting subject, thanks for putting up. “Nothing great was ever achieved without enthusiasm.” by George Ellis.
Hi there, I discovered your blog by way of Google while searching for a related subject, your site got here up,
it appears great. I have bookmarked it in my google bookmarks.
Hi there, just became aware of your blog through Google, and found that
it’s truly informative. I’m going to watch out for brussels.
I will be grateful if you continue this in future. A lot of folks will likely be
benefited from your writing. Cheers!
Having read this I thought it was rather informative. I appreciate you spending some time and effort to put this short article together. I once again find myself spending way too much time both reading and posting comments. But so what, it was still worthwhile!
Pretty! This was an extremely wonderful article. Many thanks for supplying this info.
I would like to thank you for the efforts you have put in writing this site. I am hoping to see the same high-grade content from you later on as well. In truth, your creative writing abilities has motivated me to get my own, personal blog now 😉
Excellent blog you’ve got here.. It’s hard to find good quality writing like yours these days. I seriously appreciate people like you! Take care!!
Great site! I am loving it!! Will come back again. I am bookmarking your feeds also
F*ckin’ amazing things here. I’m very glad to see your article. Thanks a lot and i am looking forward to contact you. Will you kindly drop me a mail?
I like this site its a master peace ! Glad I detected this on google .
I actually wanted to type a small word in order to express gratitude to you for these wonderful steps you are giving at this website. My incredibly long internet look up has now been honored with reasonable content to go over with my partners. I would claim that most of us site visitors are definitely blessed to be in a decent website with very many wonderful people with great secrets. I feel extremely privileged to have used your entire web page and look forward to so many more cool minutes reading here. Thank you once again for a lot of things.
Buying A Vrbo Property
Along with every thing which seems to be building throughout this particular subject material, all your points of view are generally quite refreshing. However, I beg your pardon, because I do not subscribe to your whole theory, all be it radical none the less. It would seem to everyone that your commentary are not completely validated and in reality you are your self not even totally convinced of your point. In any case I did take pleasure in examining it.
Useful information. Fortunate me I found your website
by chance, and I am shocked why this coincidence did not came about
earlier! I bookmarked it.
I adore examining and I believe this website got some genuinely utilitarian stuff on it! .
After I initially left a comment I appear to
have clicked on the -Notify me when new comments are added- checkbox and now every time a comment
is added I receive four emails with the same comment. Perhaps there is a
way you are able to remove me from that service? Thank you!
You have noted very interesting points! ps nice internet site. “I hate music, especially when it’s played.” by Jimmy Durante.
It¦s really a nice and helpful piece of information. I¦m glad that you just shared this useful information with us. Please stay us informed like this. Thank you for sharing.
I love it when individuals get together and
share opinions. Great blog, continue the good work!
hey there and thank you on your info – I have certainly picked up something new from proper here. I did however experience a few technical issues using this website, since I experienced to reload the site a lot of times prior to I may just get it to load correctly. I have been pondering if your web hosting is OK? Now not that I’m complaining, however slow loading circumstances instances will sometimes affect your placement in google and can harm your high quality score if advertising and ***********|advertising|advertising|advertising and *********** with Adwords. Anyway I am adding this RSS to my email and could look out for a lot more of your respective fascinating content. Make sure you update this again very soon..
My spouse and I absolutely love your blog and find the majority of your post’s to be what precisely I’m looking for. Do you offer guest writers to write content for you personally? I wouldn’t mind creating a post or elaborating on a number of the subjects you write concerning here. Again, awesome website!
Along with almost everything that seems to be building within this specific subject matter, many of your opinions tend to be fairly refreshing. Even so, I beg your pardon, but I can not subscribe to your entire plan, all be it radical none the less. It seems to us that your comments are generally not completely validated and in fact you are yourself not really completely confident of the assertion. In any event I did appreciate reading it.
I am very happy to read this. This is the kind of manual that needs to be given and not the random misinformation that is at the other blogs. Appreciate your sharing this best doc.
Hey There. I found your blog the usage of msn. This is an extremely neatly written article.
I’ll be sure to bookmark it and come back to learn more of your helpful info.
Thanks for the post. I’ll certainly return.
I¦ll right away snatch your rss as I can’t in finding your e-mail subscription link or e-newsletter service. Do you have any? Please let me realize so that I may just subscribe. Thanks.
Today my life is honest and true. I don’t have nearly
the material things I once did but what I have today is a reflection in the mirror that I
can look at and feel good about it.
thanks a lot lots this website can be elegant as
well as informal
I went over this site and I think you have a lot of wonderful info , saved to bookmarks (:.
hello there and thank you in your information – I have certainly picked up anything new from proper here. I did alternatively expertise a few technical issues using this web site, since I skilled to reload the web site lots of times prior to I may just get it to load correctly. I had been puzzling over in case your hosting is OK? Now not that I am complaining, however slow loading circumstances occasions will often have an effect on your placement in google and can harm your quality score if advertising and ***********|advertising|advertising|advertising and *********** with Adwords. Anyway I am adding this RSS to my email and can glance out for a lot extra of your respective fascinating content. Make sure you update this once more soon..
wonderful put up, very informative. I’m wondering why the opposite experts of this sector do not understand this. You should proceed your writing. I’m confident, you’ve a great readers’ base already!
Thanks for sharing superb informations. Your website is so cool. I’m impressed by the details that you have on this site. It reveals how nicely you understand this subject. Bookmarked this web page, will come back for extra articles. You, my pal, ROCK! I found simply the info I already searched all over the place and simply could not come across. What a great web site.
Regards for all your efforts that you have put in this. very interesting information.
I like the valuable info you supply to your articles. I will bookmark your blog and check once more here frequently. I’m fairly sure I will learn many new stuff proper here! Good luck for the following!
hi!,I like your writing very much! share we be in contact more approximately your article on AOL? I need a specialist in this house to solve my problem. May be that is you! Taking a look ahead to look you.
great post.Ne’er knew this, appreciate it for letting me know.
Thanks for the blog post, can I set it up so I get an email sent to me whenever you make a new update?
Hey, you used to write fantastic, but the last several posts have been kinda boring… I miss your tremendous writings. Past several posts are just a little out of track! come on!
The core of your writing whilst sounding reasonable at first, did not settle very well with me after some time. Someplace throughout the sentences you were able to make me a believer but only for a while. I nevertheless have a problem with your jumps in logic and you might do well to help fill in all those breaks. In the event you actually can accomplish that, I could surely be amazed.
Vacation Condos For Sale
If you are going for best contents like myself, simply visit
this web page daily for the reason that it provides feature contents, thanks
I adore reading and I believe this website got some really utilitarian stuff on it!
My homepage; rochester nh fire
you are in point of fact a good webmaster.
The web site loading pace is incredible. It seems that you’re doing any unique trick.
Moreover, The contents are masterpiece. you have performed a fantastic activity on this topic!
Feel free to surf to my webpage – mold test wilmington nc
Okuduğunuz için teşekkür ederiz .
Spot on with this write-up, I really think this website needs far more consideration. I’ll probably be once more to learn far more, thanks for that info.
What’s Taking place i’m new to this, I stumbled upon this I have discovered It absolutely useful and it has aided me out loads. I am hoping to give a contribution & assist different customers like its aided me. Good job.
Nice blog here! Also your site loads up fast! What web host
are you using? Can I get your affiliate link to your host?
I wish my web site loaded up as fast as yours lol
Hi there! I’m at work browsing your blog from my new apple iphone! Just wanted to say I love reading your blog and look forward to all your posts! Carry on the fantastic work!
Enjoyed studying this, very good stuff, thankyou.
Its like you read my thoughts! You appear to understand so much approximately this, such as you wrote the guide in it or something. I believe that you simply could do with a few percent to power the message home a little bit, however other than that, this is fantastic blog. A great read. I’ll definitely be back.
I loved as much as you will receive carried out right here. The sketch is tasteful, your authored subject matter stylish. nonetheless, you command get got an edginess over that you wish be delivering the following. unwell unquestionably come further formerly again since exactly the same nearly very often inside case you shield this hike.
Hello, you used to write fantastic, but the last few posts have been kinda boringK I miss your great writings. Past several posts are just a little bit out of track! come on!
Incredible! This blog looks just like my old one! It’s on a totally different topic but it has pretty much
the same layout and design. Great choice of colors!
Hi there, You have done a great job. I will certainly digg it and personally recommend to my friends. I’m sure they will be benefited from this web site.
Hmm is anyone else experiencing problems with the images on this blog loading? I’m trying to figure out if its a problem on my end or if it’s the blog. Any suggestions would be greatly appreciated.
Hayallerinizdeki web sitesini yaratmanıza yardımcı olacak profesyonel ve güvenilir bir web tasarım ekibi mi arıyorsunuz? Web Asmek, mükemmel web tasarım becerileri ile birinci sınıf hizmetler sunmak için burada. Bu sektördeki 15 yılı aşkın deneyimiyle, müşterilerinin beklentilerini aşan sayısız web sitesi sunmayı başardılar. Ekipleri, HTML5, CSS3 ve JavaScript gibi en son teknolojileri kullanarak yüzlerce web sitesi geliştirmiş sektör uzmanlarından oluşmaktadır.
Keep this going please, great job!
Pretty! This was a really wonderful post. Thank you for your provided information.
Hey there just wanted to give you a quick heads up. The words in your post seem to be running off the screen in Opera. I’m not sure if this is a formatting issue or something to do with browser compatibility but I figured I’d post to let you know. The style and design look great though! Hope you get the issue solved soon. Cheers
I was more than happy to seek out this web-site.I wished to thanks to your time for this glorious read!! I undoubtedly having fun with each little little bit of it and I’ve you bookmarked to take a look at new stuff you blog post.
You actually reported it perfectly!
Whoa! This blog looks just like my old one! It’s on a entirely different topic
but it has pretty much the same layout and design.
Excellent choice of colors!
I simply couldn’t leave your website before suggesting that I actually loved the standard information a person provide to your visitors? Is going to be again continuously in order to check up on new posts.
naturally like your web-site however you need to check the
spelling on quite a few of your posts. Many of them
are rife with spelling problems and I to find it very bothersome to tell the truth then again I’ll definitely come again again.
Pretty! This has been an extremely wonderful article.
Thank you for supplying this information.
Check out our web page for the best Short-term Rentals for sale
I conceive this website has got some very fantastic information for everyone. “The foundation of every state is the education of its youth.” by Diogenes.
Some truly wonderful content on this site, appreciate it for contribution.
you’re truly a excellent webmaster. The website loading speed is amazing. It kind of feels that you are doing any distinctive trick. Moreover, The contents are masterpiece. you have done a magnificent activity in this topic!
Undeniably believe that which you said. Your favourite reason appeared to be at the internet the simplest thing to take note of. I say to you, I certainly get irked at the same time as folks consider concerns that they just don’t realize about. You controlled to hit the nail upon the top and defined out the whole thing with no need side effect , other folks could take a signal. Will probably be again to get more. Thank you
I blog frequently and I genuinely thank you for your information. This great article has really peaked my interest.
I will take a note of your blog and keep checking for new details about once per week.
I opted in for your Feed as well.
As I website possessor I believe the content material here is rattling great , appreciate it for your efforts. You should keep it up forever! Best of luck.
Hi, its pleasant piece of writing concerning media print, we
all be familiar with media is a wonderful
source of data.
Wow that was strange. I just wrote an extremely long comment but after I clicked submit my comment didn’t appear. Grrrr… well I’m not writing all that over again. Regardless, just wanted to say great blog!
Every weekend i used to go to see this web page, for the reason that i want enjoyment, as this
this web page conations actually nice funny information too.
Undeniably imagine that which you stated. Your favorite reason seemed to be on the internet the easiest thing to take note of. I say to you, I definitely get annoyed at the same time as people think about worries that they just do not know about. You controlled to hit the nail upon the highest as neatly as defined out the whole thing without having side-effects , folks could take a signal. Will probably be back to get more. Thanks
excellent points altogether, you simply received a logo new reader. What could you recommend about your submit that you simply made some days ago? Any sure?
It’s hard to find knowledgeable people on this topic, but you sound like you know what you’re talking about! Thanks
MyMRO is a specialized and leading brand for supplying construction and agriculture machinery parts for customers worldwide. shop A/C compressor replacement cost.
I like what you guys tend to be up too. This kind of clever work
and exposure! Keep up the excellent works guys
I’ve added you guys to our blogroll.
Greetings! Very helpful advice in this particular post!
It’s the little changes which will make the biggest changes.
Thanks for sharing!
Would you be concerned about exchanging links?
I used to be recommended this website via my cousin. I’m no longer sure whether this put up is written by way of him as nobody else know such exact about my difficulty. You are incredible! Thank you!
Good write-up, I?¦m regular visitor of one?¦s site, maintain up the excellent operate, and It is going to be a regular visitor for a lengthy time.
he blog was how do i say it… relevant, finally something that helped me. Thanks
Hi! This is my first comment here so I just wanted to give a quick shout out and tell you I really
enjoy reading through your articles. Can you suggest any other blogs/websites/forums that
deal with the same topics? Thank you so much!
I know this if off topic but I’m looking into starting my own weblog and was
curious what all is required to get setup? I’m assuming having a blog
like yours would cost a pretty penny? I’m not very web
savvy so I’m not 100% positive. Any tips or advice would be greatly
appreciated. Appreciate it
Hello, I think your site might be having browser
compatibility issues. Whhen I look at your blog
skte in Safari, it looks ffine but when opening in Intrnet Explorer,
itt has some overlapping. I just wanted to give you a quick heads up!
Other then that, awesopme blog!
Here is my homepage: สล็อตเว็บตรงเครดิตฟรี
Usually I don’t learn post on blogs, but I wish to say that
this write-up very forced me to take a look at and do so!
Your writing taste has been amazed me. Thanks, very nice post.
I do accept as true with all of the concepts you have presented on your post. They are really convincing and can certainly work. Still, the posts are too quick for newbies. May you please lengthen them a bit from next time? Thanks for the post.
Great post, you have pointed out some superb details , I also believe this s a very superb website.
Heya i am for the first time here. I found this board and I find It truly useful & it helped me out much.
I hope to give something back and aid others like you helped me.
Nicely put. Kudos!
whoah this weblog is fantastic i really like reading your
posts. Keep up the good work! You already know, lots of persons are looking round for this info, you could help them greatly.
I’m not sure where you’re getting your info, but good topic.
I needs to spend some time learning much more or understanding more.
Thanks for magnificent information I was looking for this
info for my mission.
Its such as you learn my thoughts! You seem to grasp a lot approximately this, such as you wrote the
guide in it or something. I feel that you simply
could do with some percent to drive the message home a little bit, however instead of that, this is excellent
blog. An excellent read. I’ll certainly be back.
I have been surfing online more than 4 hours today, yet
I never found any interesting article like yours.
It’s pretty worth enough for me. In my view, if all website owners and bloggers made good
content as you did, the internet will be a lot more useful
than ever before.
Feel free to visit my web page: วิธีสมัคร w88
I am now not certain the place you’re getting your info, however great
topic. I needs to spend a while studying more or working out more.
Thanks for fantastic information I used to be in search of this information for my mission.
F*ckin¦ tremendous issues here. I¦m very glad to see your post. Thank you so much and i’m taking a look forward to contact you. Will you kindly drop me a mail?
I like this website very much so much fantastic info .
Some truly nice and useful info on this site, as well I think the pattern holds superb features.
I believe this internet site contains very great pent content material content.
For most recent news you have to pay a quick visit the web
and on web I found this website as a best site for
newest updates.
Real informative and fantastic structure of content, now that’s user pleasant (:.
Hello there, You’ve done a great job. I will certainly digg it and personally recommend to my friends. I am sure they will be benefited from this web site.
I like your writing style truly loving this internet site.
Wow, marvelous blog layout! How long have you been blogging for?
you make blogging look easy. The overall look of your website is magnificent,
as well as the content!
As a Newbie, I am permanently browsing online for articles that can be of assistance to me. Thank you
I am really enjoying the theme/design of your web site.
Do you ever run into any internet browser compatibility problems?
A number of my blog readers have complained about my website not operating correctly in Explorer but looks great in Safari.
Do you have any tips to help fix this issue?
An fascinating discussion is price comment. I believe that you need to write extra on this subject, it might not be a taboo subject however usually persons are not enough to speak on such topics. To the next. Cheers
Fantastic beat ! I wish to apprentice while you amend your website, how can i subscribe for a blog site? The account aided me a acceptable deal. I had been tiny bit acquainted of this your broadcast offered bright clear idea
whoah this blog is magnificent i really like reading your articles. Keep up the good paintings! You already know, many individuals are searching round for this information, you can aid them greatly.
It’s really a great and useful piece of info. I
am satisfied that you simply shared this helpful info with us.
Please keep us informed like this. Thank you for sharing.
I real thankful to find this web site on bing, just what I was looking for : D as well bookmarked.
This is a topic close to my heart cheers, where are your contact details though?
There is apparently a bundle to realize about this. I feel you made certain good points in features also.
Wow! This could be one particular of the most useful blogs We have ever arrive across on this subject. Basically Wonderful. I’m also a specialist in this topic therefore I can understand your hard work.
Wohh exactly what I was looking for, regards for posting.
Thanks for the sensible critique. Me & my neighbor were just preparing to do a little research about this. We got a grab a book from our local library but I think I learned more clear from this post. I’m very glad to see such great information being shared freely out there.
Thank you for the good writeup. It in fact was a amusement account it. Look advanced to more added agreeable from you! By the way, how can we communicate?
I like the helpful info you provide in your articles. I’ll bookmark
your weblog and check again here regularly. I’m quite certain I
will learn many new stuff right here! Good luck for the next!
I really treasure your work, Great post.
You have noted very interesting points! ps decent internet site.
Hello. remarkable job. I did not expect this. This is a impressive story. Thanks!
Very interesting topic, thanks for posting. “Integrate what you believe into every single area of your life.” by Meryl Streep.
Howdy! Would you mind if I share your blog with my myspace
group? There’s a lot of folks that I think would really appreciate your
content. Please let me know. Thanks
Hi, Neat post. There is an issue together with your web site in web explorer, might test this… IE nonetheless is the market leader and a big portion of folks will pass over your excellent writing because of this problem.
You completed a number of fine points there. I did a search on the subject and found mainly persons will consent with your blog.
You could definitely see your expertise within the paintings you write. The arena hopes for even more passionate writers such as you who aren’t afraid to say how they believe. At all times follow your heart.
I read this paragraph fully concerning the comparison of hottest and previous technologies, it’s remarkable article.
Hey there I am so grateful I found your web site, I really found you by mistake, while I was looking on Google
for something else, Anyways I am here now and would just like to say thanks for a fantastic post and a all round
interesting blog (I also love the theme/design), I don’t have time to
look over it all at the minute but I have bookmarked it and also added your RSS feeds, so when I have time I will be back to
read more, Please do keep up the great work.
Good info. Lucky me I reach on your website by accident, I bookmarked it.
I went over this site and I conceive you have a lot of wonderful info, bookmarked (:.
I have been browsing online more than three hours today,
yet I never found any interesting article like yours.
It’s pretty worth enough for me. Personally, if all site owners and bloggers
made good content as you did, the internet will be a
lot more useful than ever before.
Yeah bookmaking this wasn’t a high risk decision outstanding post! .
Thanks for finally talking about > How to set up a LAN
connection in WinXP « Old PC Gaming < Liked it!
My family members always say that I am killing my time here at web,
except I know I am getting experience every day by reading
such fastidious articles.
Kaliteli sitemize sizleri de bekleriz asmek
I was very pleased to find this web-site.I wanted to thanks for your time for this wonderful read!! I definitely enjoying every little bit of it and I have you bookmarked to check out new stuff you blog post.
Hello There. I found your blog using msn. This is
an extremely well written article. I will be sure to bookmark it and
return to read more of your useful information. Thanks for the post.
I will definitely comeback.
A lot of thanks for every one of your labor on this web page. Debby really likes going through investigations and it is easy to see why. A number of us learn all concerning the dynamic method you convey great information by means of this web site and in addition attract response from other people on that point plus our favorite simple princess is undoubtedly discovering a lot of things. Enjoy the rest of the new year. You’re carrying out a terrific job.
Nօ matter if some one searches foor һis vital thing, so hе/sһe
needs to be ɑvailable that in Ԁetail, thus tһɑt thing iis
maintained over here.
Also visit myy web pagee disco duro ssd características
Outstanding post, I think blog owners should larn a lot from this web blog its really user friendly.
Do you think you need help with your addiction?
You guys better inquire here. My big brother once admitted here and did all the programs he arranged for him.
Now he’s living life to the fullest.
I simply wanted to thank you so much all over again. I am not sure the things I would’ve followed without the entire opinions provided by you on my area of interest. It was actually a real troublesome matter in my view, nevertheless finding out this expert approach you treated the issue forced me to jump with joy. Now i’m grateful for this service and even sincerely hope you realize what a great job you were undertaking instructing men and women using your blog. I’m certain you haven’t got to know all of us.
Hi there! I know this is kinda off topic nevertheless I’d figured I’d ask. Would you be interested in exchanging links or maybe guest authoring a blog post or vice-versa? My site discusses a lot of the same subjects as yours and I feel we could greatly benefit from each other. If you are interested feel free to shoot me an e-mail. I look forward to hearing from you! Superb blog by the way!
Today, I went to the beach with my children. I found a sea shell and gave it to my 4 year old daughter and said “You can hear the ocean if you put this to your ear.” She put the shell to her ear and screamed. There was a hermit crab inside and it pinched her ear. She never wants to go back! LoL I know this is entirely off topic but I had to tell someone!
Excellent way of explaining, and nice article to take data concerning my presentation subject matter,
which i am going to convey in college.
Right now it seems like BlogEngine is the top blogging platform available right now. (from what I’ve read) Is that what you’re using on your blog?
Thank you for the auspicious writeup. It in fact was a amusement account it.
Look advanced to far added agreeable from you!
However, how could we communicate?
Arie Baisch
[…]here are some hyperlinks to sites that we link to due to the fact we consider they may be worth visiting[…]
excellent issues altogether, you just won a emblem
new reader. What may you suggest in regards to your submit that you just made a few days
in the past? Any certain?
Perfectly composed content material, thanks for entropy.
magnificent post, very informative. I wonder why the other experts of this sector do not notice this. You should continue your writing. I’m sure, you’ve a great readers’ base already!
I truly enjoy looking through on this web site, it holds great content. “A short saying oft contains much wisdom.” by Sophocles.
I am glad to be one of the visitors on this outstanding site (:, thanks for posting.
Hi there very cool website!! Man .. Excellent .. Amazing .. I’ll bookmark your website and take the feeds additionally?KI am glad to search out numerous useful information here within the publish, we’d like work out extra strategies in this regard, thanks for sharing. . . . . .
It is the best time to make some plans for the future and it’s time to be happy.
I have read this post and if I could I want to suggest you few interesting things or
suggestions. Maybe you can write next articles referring to this article.
I desire to read more things about it!
I have to get across my admiration for your kind-heartedness in support of men and women that have the need for help on this important area of interest. Your very own commitment to passing the message all over appeared to be remarkably productive and has constantly made many people like me to reach their endeavors. The invaluable guide entails much a person like me and especially to my fellow workers. Many thanks; from each one of us.
I would like to thnkx for the efforts you have put in writing this blog. I am hoping the same high-grade blog post from you in the upcoming as well. In fact your creative writing abilities has inspired me to get my own blog now. Really the blogging is spreading its wings quickly. Your write up is a good example of it.
I’d forever want to be update on new content on this website , saved to favorites! .
Beverly Bultron
[…]Every once inside a while we decide on blogs that we study. Listed beneath are the most recent web-sites that we decide on […]
İskenderun evden eve nakliyat şirketi olarak Hatay genelinde güvenilir evden eve nakliyat ekibi bulmak isteyenler için güvenilir asansörlü ve kurumsal nakliye hizmeti sunan ilk firmayız. Türkiye’de İSO-9001 Kalite belgelerine sahip olup en iyi nakliye şirketi firmamız 2005 yılından bugüne hizmet sunmaktayız. Bütün taşımacılık hizmetlerimizde profesyonel ve kurumsal taşımacılık hizmeti sunuyoruz. Firmamız taşınma esnasında Kaskolu nakliye poliçe sözleşmeleri ile sigortalı nakliye yapmaktayız. Eşyalarınız 95.000 bin TL ye değerinde sigorta kasko kapsamında firmamız güvencesi altına alınmaktadır.
What’s up every one, here every one is sharing these kinds of familiarity,
so it’s pleasant to read this website, and I used to pay
a quick visit this web site every day.
Here is my web-site :: sell house fast
With havin so much content and articles do you ever run into any issues of plagorism or copyright violation? My website has a lot of exclusive content I’ve either authored myself or outsourced but it looks like a lot of it is popping it up all over the internet without my permission. Do you know any techniques to help stop content from being stolen? I’d certainly appreciate it.
Cheap individual and group tours to Yerevan, Armenia. Find out where you can relax in Armenia, Yerevan. Book tours online on our website or call +37494877888.
Hi! Would you mind if I share your blog with my myspace group? There’s a lot of people that I think would really enjoy your content. Please let me know. Cheers
I’m really impressed with your writing skills and also with the layout on your weblog. Is this a paid theme or did you modify it yourself? Either way keep up the excellent quality writing, it’s rare to see a nice blog like this one nowadays..
Great blog you’ve got here.. It’s difficult to find quality writing like yours these days. I really appreciate individuals like you! Take care!!
Very good information. Lucky me I came across your blog by accident (stumbleupon).
I have saved as a favorite for later!
he blog was how do i say it… relevant, finally something that helped me. Thanks
I would like to thnkx for the efforts you have put in writing this blog. I am hoping the same high-grade blog post from you in the upcoming as well. In fact your creative writing abilities has inspired me to get my own blog now. Really the blogging is spreading its wings quickly. Your write up is a good example of it.
Rattling great information can be found on site.
I have been reading out a few of your articles and i must say pretty clever stuff. I will make sure to bookmark your website.
hello!,I love your writing so a lot! percentage we keep up a correspondence extra approximately your post on AOL? I require a specialist on this house to solve my problem. Maybe that is you! Having a look ahead to peer you.
Thanks a bunch for sharing this with all of us you actually know what you are talking about! Bookmarked. Please also visit my site =). We could have a link exchange contract between us!
Thank you for the auspicious writeup. It in fact was a amusement account it.
Look advanced to far added agreeable from you! However, how can we communicate?
Thanks for sharing excellent informations. Your web-site is so cool. I’m impressed by the details that you?¦ve on this blog. It reveals how nicely you perceive this subject. Bookmarked this web page, will come back for more articles. You, my friend, ROCK! I found just the info I already searched all over the place and just couldn’t come across. What a great web-site.
Once I originally commented I clicked the -Notify me when new comments are added- checkbox and now every time a comment is added I get 4 emails with the identical comment. Is there any manner you possibly can take away me from that service? Thanks!
Thank you for sharing superb informations. Your web-site is very cool. I am impressed by the details that you have on this website. It reveals how nicely you perceive this subject. Bookmarked this website page, will come back for more articles. You, my pal, ROCK! I found simply the info I already searched everywhere and just could not come across. What an ideal website.
Hello, all is going perfectly here and ofcourse every
one is sharing data, that’s actually fine, keep up writing.
Pretty great post. I simply stumbled upon your weblog and
wanted to mention that I’ve truly loved browsing your weblog posts.
After all I will be subscribing in your feed and I am hoping you write once
more soon!
Howdy! This is kind of off topic but I need some help from an established blog. Is it tough to set up your own blog? I’m not very techincal but I can figure things out pretty fast. I’m thinking about making my own but I’m not sure where to start. Do you have any points or suggestions? Thanks
Simply wanna remark on few general things, The website style and design is perfect, the written content is really superb : D.
Thanks for sharing superb informations. Your web-site is very cool. I’m impressed by the details that you have on this website. It reveals how nicely you understand this subject. Bookmarked this web page, will come back for more articles. You, my friend, ROCK! I found simply the information I already searched everywhere and simply could not come across. What a perfect website.
Thanks for some other informative blog. The
place else may I get that type of information written in such a perfect
method? I’ve a mission that I am just now operating on, and I have
been on the look out for such information.
wonderful points altogether, you just gained a new reader. What would you suggest in regards to your post that you made some days ago? Any positive?
Thank you. I enjoy it.
I believe this internet site contains some very fantastic info for everyone : D.
Hey there! I’ve been reading your website for a long time now and finally got the bravery to go ahead and give you a shout out from Huffman Texas! Just wanted to say keep up the great job!
Informative article, exactly what I needed.
Its good as your other articles : D, regards for posting.
Link exchange is nothing else however it is simply
placing the other person’s weblog link on your page at appropriate place and other person will also do same in favor
of you.
You made some nice points there. I did a search on the subject matter and found most guys will go along with with your website.
Great site you’ve got here.. It’s hard to find good quality writing like yours these days. I honestly appreciate individuals like you! Take care!!
Excellent blog you have here.. It’s hard to find high quality writing like yours these days. I truly appreciate people like you! Take care!!
I envy your work, appreciate it for all the interesting blog posts.
Hi there! I know this is kinda off topic however I’d figured I’d ask. Would you be interested in trading links or maybe guest authoring a blog post or vice-versa? My site discusses a lot of the same subjects as yours and I feel we could greatly benefit from each other. If you’re interested feel free to shoot me an e-mail. I look forward to hearing from you! Superb blog by the way!
Yay google is my queen aided me to find this great website ! .
It’s hard to find experienced people in this particular subject,
but you seem like you know what you’re talking about!
Thanks
You have mentioned very interesting points! ps decent website .
I am glad to be one of the visitors on this great internet site (:, regards for posting.
I like what you guys are up also. Such intelligent work and reporting! Carry on the superb works guys I¦ve incorporated you guys to my blogroll. I think it’ll improve the value of my site 🙂
I like your writing style genuinely loving this web site.
I was more than happy to find this web-site.I wished to thanks in your time for this glorious read!! I definitely having fun with each little little bit of it and I’ve you bookmarked to check out new stuff you blog post.
It’s going to be ending of mine day, except before finish I am reading this
fantastic article to increase my experience.
Spot on with this write-up, I truly suppose this web site needs way more consideration. I’ll probably be once more to read rather more, thanks for that info.
ufabetวอเลท (https://porninfinity.website)
Hi there, just wanted to say, I liked this post.
It was helpful. Keep on posting!
ทางเข้า ufabet 169 (Holley)
Yesterday, while I was at work, my sister stole my iphone and tested to see if
it can survive a forty foot drop, just so she can be a youtube sensation. My apple ipad is now destroyed and
she has 83 views. I know this is totally off topic but I had to share
it with someone!
ufabet ยูสเก่าแลกเครดิตฟรี – gatheryourrecords.com –
Greetings! Very useful advice within this post!
It’s the little changes that will make the greatest changes.
Many thanks for sharing!
Hi there very nice website!! Man .. Excellent .. Amazing .. I’ll bookmark your web site and take the feeds additionally?KI’m glad to find a lot of useful information right here within the put up, we’d like work out more techniques on this regard, thanks for sharing. . . . . .
Some truly fantastic information, Sword lily I found this.
Very good write ups, Appreciate it.
I’m curious to find out what blog platform you have been using?
I’m experiencing some minor security issues with my latest blog
and I’d like to find something more risk-free. Do you have any solutions?
Excellent blog here! Also your web site loads up very fast!
What host are you using? Can I get your affiliate link to
your host? I wish my website loaded up as quickly as yours lol
Hello.This post was really fascinating, particularly since I was investigating for thoughts on this subject last Tuesday.
I?¦m not sure the place you’re getting your info, however great topic. I needs to spend some time finding out much more or figuring out more. Thank you for magnificent info I was on the lookout for this information for my mission.
I don’t even know how I ended up here, but I thought this post was
great. I do not know who you are but definitely you’re going to a famous blogger if you are not already 😉 Cheers!
Hi! I know this is somewhat off topic but I was wondering if you knew where I could locate a captcha plugin for my comment form?
I’m using the same blog platform as yours and I’m having
difficulty finding one? Thanks a lot!
I do agree with all of the ideas you have presented in your post. They’re very convincing and will definitely work. Still, the posts are too short for beginners. Could you please extend them a bit from next time? Thanks for the post.
I have been absent for a while, but now I remember why I used to love this website. Thanks, I’ll try and check back more frequently. How frequently you update your site?
Thank you for sharing excellent informations. Your site is very cool. I am impressed by the details that you?¦ve on this blog. It reveals how nicely you perceive this subject. Bookmarked this web page, will come back for extra articles. You, my pal, ROCK! I found just the information I already searched everywhere and just couldn’t come across. What an ideal website.
Your home is valueble for me. Thanks!…
Incredible! This blog looks exactly like my old one! It’s on a entirely different topic but it has pretty much the same page layout and design. Great choice of colors!
Thanks for another informative website. Where else could I get that kind of info written in such a perfect way? I’ve a project that I am just now working on, and I have been on the look out for such info.
Just wanna input that you have a very decent website , I enjoy the style it actually stands out.
Hi there, I found your blog via Google while searching for a related topic, your web site came up, it looks good. I’ve bookmarked it in my google bookmarks.
Can I just say what a aid to find somebody who really knows what theyre speaking about on the internet. You positively know methods to carry a problem to light and make it important. Extra people must learn this and understand this aspect of the story. I cant imagine youre not more popular since you undoubtedly have the gift.
hey there and thank you for your info – I have definitely picked up something new from right
here. I did however expertise a few technical points using this website, as I experienced to reload the website a lot of times previous to I could get it
to load correctly. I had been wondering if your hosting is OK?
Not that I am complaining, but slow loading instances times will sometimes affect
your placement in google and can damage your high quality score if advertising and marketing with Adwords.
Well I am adding this RSS to my email and could look out for much more of your respective interesting
content. Make sure you update this again soon.
I liked up to you will receive performed proper here. The caricature is attractive, your authored material stylish. nevertheless, you command get bought an edginess over that you would like be handing over the following. in poor health indubitably come further until now once more since exactly the same nearly very continuously inside of case you protect this hike.
I dugg some of you post as I cerebrated they were extremely helpful invaluable
Hmm it appears like your blog ate my first comment
(it was extremely long) so I guess I’ll just sum it up what I had
written and say, I’m thoroughly enjoying your blog.
I too am an aspiring blog writer but I’m still new to everything.
Do you have any points for novice blog writers? I’d certainly appreciate it.
Thank you, I’ve just been searching for info approximately this subject for ages and yours is the
greatest I’ve came upon till now. But, what concerning the bottom line?
Are you sure about the supply?
Thank you. A lot of material.
Hiya! I know this is kinda off topic nevertheless I’d figured I’d ask. Would you be interested in exchanging links or maybe guest writing a blog post or vice-versa? My website discusses a lot of the same subjects as yours and I think we could greatly benefit from each other. If you might be interested feel free to send me an email. I look forward to hearing from you! Great blog by the way!
Thankyou for all your efforts that you have put in this. very interesting information.
I do agree with all the ideas you’ve presented in your post. They are really convincing and will certainly work. Still, the posts are too short for novices. Could you please extend them a bit from next time? Thanks for the post.
You are a very clever person!
Hey! I realize this is somewhat off-topic however I had to ask.
Does managing a well-established website such as yours
require a massive amount work? I’m brand new to blogging but I do write in my journal daily.
I’d like to start a blog so I can share my personal experience
and feelings online. Please let me know if you have any
kind of suggestions or tips for new aspiring bloggers. Appreciate it!
Hello my friend! I want to say that this post is amazing, great written and include approximately all significant infos. I would like to peer more posts like this .
I was studying some of your posts on this site and I believe this website is really instructive! Keep posting.
F*ckin’ tremendous issues here. I am very satisfied to look your article. Thanks a lot and i’m looking forward to touch you. Will you kindly drop me a mail?
Appreciate it for this marvellous post, I am glad I detected this website on yahoo.
Hi! Do you know if they make any plugins to protect against hackers?
I’m kinda paranoid about losing everything I’ve worked
hard on. Any suggestions?
hello there and thanks in your information – I have definitely picked up something new from proper here. I did then again experience several technical points using this site, as I experienced to reload the website a lot of occasions prior to I may just get it to load properly. I had been wondering in case your web host is OK? Now not that I’m complaining, but sluggish loading cases occasions will often have an effect on your placement in google and can harm your high-quality ranking if advertising and ***********|advertising|advertising|advertising and *********** with Adwords. Well I am including this RSS to my e-mail and could glance out for a lot extra of your respective interesting content. Ensure that you update this again soon..
Throughout the great scheme of things you secure an A with regard to effort. Where exactly you actually lost me was first in the particulars. You know, they say, details make or break the argument.. And it couldn’t be much more correct right here. Having said that, permit me tell you just what did do the job. Your article (parts of it) is certainly highly persuasive which is most likely why I am taking the effort in order to comment. I do not really make it a regular habit of doing that. 2nd, despite the fact that I can see the jumps in reasoning you come up with, I am not really confident of just how you appear to connect your details which inturn make your final result. For right now I shall yield to your point however trust in the future you link your dots much better.
You are a very clever individual!
This web site is really a walk-through for all of the info you wanted about this and didn’t know who to ask. Glimpse here, and you’ll definitely discover it.
You could definitely see your expertise within the work you write.
The sector hopes for even more passionate writers like you who aren’t afraid to mention how they believe.
Always go after your heart.
Have you ever considered publishing an e-book or guest
authoring on other sites? I have a blog centered on the same
subjects you discuss and would love to have you share some stories/information. I
know my subscribers would value your work. If you’re even remotely interested, feel free to shoot
me an e mail.
What’s up, yes this piece of writing is really good
and I have learned lot of things from it regarding blogging.
thanks.
Someone essentially lend a hand to make significantly posts I’d state. This is the first time I frequented your web page and up to now? I surprised with the research you made to create this particular submit amazing. Fantastic job!
Very good blog you have here but I was curious if you knew of any discussion boards that cover the same topics talked about here? I’d really love to be a part of group where I can get opinions from other experienced individuals that share the same interest. If you have any suggestions, please let me know. Thanks!
Yeah bookmaking this wasn’t a speculative determination great post! .
Thanks for your personal marvelous posting! I genuinely enjoyed reading it, you are a great author.I will be sure to bookmark your blog and definitely will come back very soon. I want to encourage you continue your great writing, have a nice morning!
Excellent beat ! I wish to apprentice while you amend your web site, how could
i subscribe for a blog web site? The account helped me a acceptable deal.
I had been a little bit acquainted of this your broadcast provided bright
clear idea
You made several good points there. I did a search on the issue and found a good number of persons will have the same opinion with your blog.
You completed a few nice points there. I did a search on the subject and found nearly all people will agree with your blog.
Great delivery. Great arguments. Keep up
the good spirit.
Thanks a lot for providing individuals with an extraordinarily pleasant opportunity to read critical reviews from here. It really is so ideal and as well , stuffed with a lot of fun for me and my office friends to visit the blog really 3 times a week to study the fresh stuff you have got. Of course, I’m so usually fascinated concerning the special pointers served by you. Certain 1 facts in this article are without a doubt the very best we have all had.
Hi there to all, how is everything, I think every one is getting
more from this site, and your views are good in favor of new users.
Here is my web blog :: We buy houses for cash
There is noticeably a bundle to learn about this. I assume you made sure nice factors in options also.
Wonderful items from you, man. I’ve take into accout your stuff previous to and you’re just extremely great. I actually like what you have received right here, really like what you are saying and the way wherein you say it. You are making it entertaining and you still care for to stay it wise. I can’t wait to read far more from you. That is really a wonderful web site.
hello there and thank you for your info – I have definitely picked up anything new from right here. I did however expertise some technical points using this web site, as I experienced to reload the site lots of times previous to I could get it to load properly. I had been wondering if your web host is OK? Not that I am complaining, but slow loading instances times will often affect your placement in google and could damage your high-quality score if advertising and marketing with Adwords. Anyway I’m adding this RSS to my email and can look out for a lot more of your respective fascinating content. Make sure you update this again very soon..
Do you have any video of that? I’d love to find out more details.
Hiya very cool site!! Man .. Excellent .. Wonderful .. I’ll bookmark your website and take the feeds alsoKI’m glad to search out numerous helpful info right here in the submit, we need work out more techniques on this regard, thanks for sharing. . . . . .
What’s up Dear, are you actually visiting this website daily,
if so then you will without doubt obtain fastidious know-how.
Fantastic content, Thank you!
What i don’t realize is in reality how you are not really much more smartly-favored than you may be now. You are so intelligent. You understand thus significantly in terms of this matter, produced me personally imagine it from numerous various angles. Its like women and men aren’t fascinated except it’s one thing to do with Girl gaga! Your individual stuffs great. Always deal with it up!
Hey, you used to write excellent, but the last few posts have been kinda boringK I miss your great writings. Past several posts are just a little out of track! come on!
Very interesting topic, thanks for putting up.
Three hundred watts are sufficient for low-power machines, but when you’re constructing a gaming machine with multiple video playing cards or a machine with
a lot of disks, you might want to consider
something greater. The first product to launch on Hubble is a borrowing platform that lets
customers deposit multiple assets like SOL, BTC, and ETH to mint
USDH at a capital-environment friendly collateral ratio
of 110%. Comparisons have been made calling Hubble “the Maker DAO of Solana,” and
USDH should grow to be an integral part of DeFi on the community
as a Solana native crypto-backed stablecoin. The Edison Best New Product Award is self-explanatory, and is awarded in a number of classes, together with science and medical,
electronics and medical, vitality and sustainability, technology, transportation and industrial
design. This setup produces the traditional “soundscape experience” you usually read about in product
descriptions for portable audio system the place the sound appears to come at you
from completely different directions. It’s a traditional slot themed around Ancient Egypt but
additionally has some magic-themed components.
Alternatively, if you discovered the stakes of the PowerBucks
Wheel of Fortune Exotic Far East on-line slot somewhat low, why not
attempt the Wheel of Fortune Triple Extreme Spin slot machine?
Feel free to visit my webpage :: สล็อตวอเลท
My brother suggested I might like this website. He was entirely right.
This submit actually made my day. You cann’t believe
just how so much time I had spent for this information! Thank you!
Outstanding post but I was wondering if you could write a litte more on this subject? I’d be very thankful if you could elaborate a little bit more. Kudos!
Some genuinely interesting information, well written and broadly user friendly.
Excellent article. I am dealing with some of these issues as well..
Im now not positive the place you’re getting your information, however great topic. I needs to spend some time learning more or working out more. Thanks for fantastic info I was looking for this information for my mission.
I was reading through some of your blog posts on this website and I believe this web site is really informative ! Retain posting.
Hello friends, its great paragraph about educationand completely defined,
keep it up all the time.
In relation to recycled-object crafting, compact discs have too much going for
them. As a shopper, you continue to have to choose correctly and spend
carefully, but the end results of Android’s
recognition is a brand new range of merchandise and much more decisions.
Americans made probably the most of it by watching much more broadcast
tv; solely 25 p.c of recordings have been of cable channels.
You may even make these festive CDs for St. Patrick’s Day or Easter.
Cover the back with felt, drill a gap in the highest, loop a string
or ribbon via the hole and there you might have it — an on the spot
Mother’s Day present. Use a dremel to smooth the edges and punch
a gap in the highest for string. Hair dryers use the motor-pushed fan and the heating ingredient to remodel electric energy into convective heat.
The airflow generated by the fan is compelled by means of the heating aspect by the shape of the hair dryer casing.
Feel free to visit my web site สล็อตวอเลท
It appears to be merely a circle on a short base.
However, reviewers contend that LG’s observe file of producing electronics with excessive-finish exteriors
stops brief at the G-Slate, which has a plastic back with a swipe of aluminum for element.
Because the Fitbit works finest for walking movement and is
not waterproof, you cannot use it for actions reminiscent of bicycling or swimming;
however, you can enter these activities manually in your online profile.
To use the latter, a customer clicks a link requesting to talk
with a live individual, and a customer service representative solutions the request and speaks with the customer via a chat window.
For example, a car dealership may allow prospects to schedule a service
middle appointment on-line. Even when there are available nurses
on workers, these nurses won’t have the skill set necessary to qualify for certain shifts.
As with all hardware improve, there are potential compatibility points.
Laptops usually only have one port, permitting one monitor along with the constructed-in display screen, though there are methods to circumvent the
port limit in some circumstances. The G-Slate has an 8.9-inch (22.6-centimeter) screen, which sets it aside from
the 10-inch (25.4-centimeter) iPad and 7-inch (17.8-centimeter) HTC Flyer.
Feel free to visit my site: 查看个人网站
Hello, you used to write great, but the last few posts have been kinda boring… I miss your tremendous writings. Past several posts are just a bit out of track! come on!
You are a very capable individual!
Thanks for another informative site. Where else could I get that type of info written in such a perfect way? I’ve a project that I am just now working on, and I have been on the look out for such information.
This site can be a walk-by means of for all of the info you needed about this and didn’t know who to ask. Glimpse here, and you’ll positively discover it.
I’m not that much of a internet reader to be honest but your blogs really nice, keep it up! I’ll go ahead and bookmark your site to come back later. All the best
Very interesting info!Perfect just what I was searching for!
I have been surfing on-line greater than 3 hours these days, yet I by no means found any fascinating article like yours. It is pretty price enough for me. Personally, if all web owners and bloggers made excellent content material as you did, the internet will be much more helpful than ever before.
An outstanding share! I’ve just forwarded this onto
a friend who was doing a little homework on this. And he actually ordered me lunch because I found it for him…
lol. So let me reword this…. Thanks for the meal!!
But yeah, thanx for spending time to talk about
this issue here on your web site.
There is definately a great deal to find out about this issue.
I like all the points you have made.
The black $350 Deluxe console ships with a duplicate of the sport “Nintendoland” within the box and offers 32 GB of internal storage.
Nintendo TVii missed its scheduled launch alongside the console in November, however was
launched in Japan on Dec. 8 2012. Nintendo TVii works very
very like Google Tv: It’s designed to drag in programming information information from television providers like cable
corporations and allow you to prepare all of your Tv content (together with the video available via Netflix, Hulu, and
so forth.) by means of one interface. Could it’s
considered one of the highest mid-vary graphics cards to slot into the best gaming Pc?
The Asus ROG Zephyrus S17 is some of the powerful 17-inch gaming laptops you should purchase.
My solely complaint is the lack of a disk drive, and i assume that can be mounted with an external one.
Plus, you may set off the bonus sport for an important boost to your bankroll.
There’s extra on offer than in Komodo Dragon with a 243 methods to
win structure, a bonus recreation, a free spins round, plus a gamble
characteristic. IGT has had great success with other “1024 ways”
slots like Red Mansions, Treasures of Troy, and Crown of Egypt,
amongst others, as they offer a really pleasurable expertise for on-line slots players with a number of successful alternatives that result in some fairly decent sized wins.
I am glad to be a visitant of this unadulterated website! , regards for this rare info ! .
F*ckin¦ amazing issues here. I am very satisfied to see your article. Thanks a lot and i’m looking ahead to contact you. Will you kindly drop me a mail?
Wow! This blog looks just like my old one! It’s on a completely different topic but it has pretty much the same page layout and design. Superb choice of colors!
I would like to point out my affection for your kind-heartedness supporting women who require assistance with this one matter. Your real dedication to passing the solution up and down appears to be particularly effective and has consistently permitted associates like me to get to their targets. Your interesting recommendations signifies a great deal to me and still more to my mates. With thanks; from everyone of us.
This is also a very good post which I really enjoyed reading. It is not every day that I have the possibility to see something like this..
Well I sincerely liked studying it. This information procured by you is very effective for proper planning.
Real fantastic visual appeal on this website , I’d value it 10 10.
Hi terrific website! Does running a blog such as this require
a lot of work? I have no knowledge of programming but I was hoping to start my own blog in the
near future. Anyway, if you have any suggestions or tips for new blog
owners please share. I understand this is off subject but I just wanted to ask.
Cheers!
Really clear site, appreciate it for this post.
I am glad to be one of many visitors on this great site (:, thankyou for putting up.
I was looking at some of your articles on this website and I believe this internet site is very instructive! Continue posting.
Hi , I do believe this is an excellent blog. I stumbled upon it on Yahoo , i will come back once again. Money and freedom is the best way to change, may you be rich and help other people.
I encourage others to feel compassion for people
like us, people who love and are loved, and who need your solidarity to overcome this powerful thing called addiction. You’ll get an honest
and fruitful life you deserve.
Thank you for the good writeup. It in fact was a amusement account it. Look advanced to far added agreeable from you! By the way, how can we communicate?
I get pleasure from, cause I found exactly what I used to be
looking for. You’ve ended my four day lengthy hunt! God Bless you man. Have a great day.
Bye
Saved as a favorite, I really like your blog!
Awsome article and straight to the point. I am not sure if this is actually the best place to ask but do you guys have any thoughts on where to get some professional writers? Thx 🙂
Attractive section of content. I just stumbled upon your website and in accession capital to assert that I acquire actually enjoyed account your blog posts. Any way I’ll be subscribing to your feeds and even I achievement you access consistently quickly.
There are actually numerous details like that to take into consideration. That may be a nice point to convey up. I supply the thoughts above as normal inspiration however clearly there are questions like the one you carry up the place a very powerful factor might be working in sincere good faith. I don?t know if greatest practices have emerged round issues like that, but I am certain that your job is clearly recognized as a fair game. Each boys and girls feel the influence of just a second’s pleasure, for the rest of their lives.
This is a very good tips especially to those new to blogosphere, brief and accurate information… Thanks for sharing this one. A must read article.
I have been absent for some time, but now I remember why I used to love this website. Thanks , I will try and check back more frequently. How frequently you update your site?
I really appreciate this post. I’ve been looking everywhere for this! Thank goodness I found it on Bing. You have made my day! Thx again
I?¦ve read some just right stuff here. Definitely worth bookmarking for revisiting. I wonder how so much attempt you place to create any such fantastic informative web site.
You should take part in a contest for one of the best blogs on the web. I will recommend this site!
Your support has made me a stronger person and I will always be grateful.
The majority of time is spent in group therapy which I
found very helpful. The center itself is a converted motel
with private rooms and a pool.
I feel this is among the such a lot vital info for me. And i am satisfied reading your
article. But wanna observation on some common things,
The web site taste is ideal, the articles is truly excellent :
D. Excellent activity, cheers
What i do not realize is actually how you are now not actually a lot more neatly-liked than you may be now. You’re so intelligent. You know therefore considerably on the subject of this matter, produced me individually believe it from numerous various angles. Its like women and men don’t seem to be involved except it?¦s one thing to do with Girl gaga! Your personal stuffs excellent. At all times deal with it up!
Hi there just wanted to give you a quick heads up. The text in your article seem to be running off the screen in Ie. I’m not sure if this is a format issue or something to do with internet browser compatibility but I figured I’d post to let you know. The style and design look great though! Hope you get the problem resolved soon. Kudos
Hello, you used to write great, but the last few posts have been kinda boring… I miss your great writings. Past few posts are just a little bit out of track! come on!
I conceive this site contains some very great info for everyone :D. “Calamity is the test of integrity.” by Samuel Richardson.
Hey There. I found your blog using msn. This is a very well written article. I will be sure to bookmark it and return to read more of your helpful info. Thank you for the post. I’ll certainly return.
I¦ll immediately seize your rss feed as I can’t find your e-mail subscription hyperlink or newsletter service. Do you have any? Please allow me understand so that I may just subscribe. Thanks.
Simply wish to say your article is as astonishing. The clearness in your post is simply excellent and i could assume you’re an expert on this subject. Well with your permission allow me to grab your feed to keep updated with forthcoming post. Thanks a million and please continue the rewarding work.
http://162.0.217.155/
Porn, MILF, Hentai, Step Mom, Bondage, Anal, Threesome,
Big Tits, Big Dick, Amateur, Creampie, Gangbang, BDSM, Cum, JAV
magnificent points altogether, you just gained a new reader. What would you recommend about your post that you made a few days ago? Any positive?
I’d like to thank you for the efforts you have put in penning this website.
I’m hoping to see the same high-grade content from you later
on as well. In truth, your creative writing abilities has motivated me to get
my very own site now 😉
WOW just what I was looking for. Came here by searching
for https://www.diigo.com/user/lucilesulliva7
What’s Taking place i’m new to this, I stumbled upon this I have discovered It positively
helpful and it has aided me out loads. I’m hoping to contribute & assist other users
like its helped me. Good job.
Some genuinely wonderful work on behalf of the owner of this site, utterly great content.
Cristianini, Nello; Scantamburlo, Teresa; Ladyman, James (four October
2021). “The social turn of artificial intelligence” (PDF).
Cristianini, Nello; Scantamburlo, Teresa (eight October 2019).
“On social machines for algorithmic regulation”. October 2000).
“Integrating Ethics & Engineering: A Graduate Option in Systems Engineering, Ethics, and Technology Studies”.
Eisenstadt, Shmuel (Winter 2000). “Multiple Modernities”.
Jasanoff, Sheila; Kim, Sang-Hyun (2009). “Containing the Atom: Sociotechnical Imaginaries and Nuclear Power within the United States and South Korea”.
Jasanoff, Sheila (2003). “Technologies of Humility: Citizen Participation in Governing Science”.
The Diabetes Prevention Programme, which lasts between nine and 12 months, is designed to stop or delay the onset of sickness by recommendation and support on healthier eating and bodily train. While
it might sound intimidating for somebody who’s just been diagnosed, the simplest thing you are able
to do right away is to stop skipping meals. Fonseca, Paulo
F.C.; Pereira, Tiago Santos (May 2014). “The governance of nanotechnology within the Brazilian context: Entangling approaches”.
Woodhouse, Edward (2014). Science Technology and Society
(1st ed.). Woodhouse, Edward. Science Technology and Society.
Good write-up, I?¦m regular visitor of one?¦s blog, maintain up the nice operate, and It is going to be a regular visitor for a long time.
Wow, this post is pleasant, my younger sister is analyzing these kinds of
things, thus I am going to let know her.
Great wordpress blog here.. It’s hard to find quality writing like yours these days. I really appreciate people like you! take care
Excellent blog you have here but I was curious about if you knew
of any community forums that cover the same topics talked about in this article?
I’d really like to be a part of online community where I can get suggestions from other
knowledgeable people that share the same interest. If you have any recommendations, please let me know.
Cheers!
Very nice post. I just stumbled upon your weblog and wanted to say that I have really enjoyed surfing around your blog posts. After all I will be subscribing to your rss feed and I hope you write again very soon!
I am glad for writing to make you understand of the wonderful discovery our girl went through studying the blog. She noticed plenty of issues, not to mention what it’s like to have a great teaching nature to have the others easily comprehend specified advanced issues. You undoubtedly exceeded our desires. Thanks for giving these effective, dependable, edifying and even fun tips on your topic to Sandra.
I am truly pleased to read this blog posts which carries tons of valuable facts, thanks for providing these data.
You should take part in a contest for one of the best blogs on the web. I will recommend this site!
We are a group of volunteers and opening a new scheme in our community.
Your web site provided us with valuable info to work on. You have
done a formidable job and our whole community will be thankful to
you.
I am really enjoying the theme/design of your blog. Do you ever run into any web browser compatibility problems? A number of my blog visitors have complained about my blog not working correctly in Explorer but looks great in Safari. Do you have any recommendations to help fix this problem?
A key improvement of the new rating mechanism is to reflect a more accurate choice pertinent to reputation, pricing policy and slot effect based mostly on exponential decay model for on-line customers. This paper studies how the net music distributor ought to set its rating policy to maximise the value of on-line music rating service. However, previous approaches typically ignore constraints between slot worth representation and related slot description illustration within the latent area and lack enough model robustness. Extensive experiments and analyses on the lightweight fashions show that our proposed strategies obtain considerably higher scores and substantially improve the robustness of both intent detection and slot filling. Unlike typical dialog fashions that depend on enormous, advanced neural community architectures and large-scale pre-skilled Transformers to realize state-of-the-artwork outcomes, our technique achieves comparable results to BERT and even outperforms its smaller variant DistilBERT on conversational slot extraction tasks. Still, even a slight improvement might be worth the price.
Also visit my web-site: http://bbs.iheart.org.cn/home.php?mod=space&uid=62935&do=profile&from=space
I am not real fantastic with English but I come up this real leisurely to interpret.
Hey there, You’ve done a great job. I’ll definitely digg it and personally recommend to my friends. I’m confident they’ll be benefited from this web site.
I’m really inspired along with your writing skills and
also with the layout for your blog. Is this a paid theme or did you modify it your self?
Anyway keep up the nice high quality writing,
it’s rare to look a great blog like this one today..
I am delighted that I discovered this weblog, just the right info that I was looking for! .
Hi, I believe your blog might be having browser compatibility
issues. When I look at your blog in Safari, it looks fine however, when opening in Internet Explorer, it has some overlapping
issues. I merely wanted to provide you with a quick heads up!
Besides that, excellent website!
you’re really a good webmaster. The website loading speed is incredible. It seems that you’re doing any unique trick. Furthermore, The contents are masterpiece. you have done a excellent job on this topic!
Hmm is anyone else having problems with the images on this blog loading?
I’m trying to determine if its a problem on my end or if it’s the blog.
Any feedback would be greatly appreciated.
I just like the valuable information you supply to your articles. I’ll bookmark your weblog and take a look at again here frequently. I’m somewhat certain I’ll be informed many new stuff right here! Best of luck for the next!
I think this is one of the most significant information for me. And i am glad reading your article. But wanna remark on some general things, The site style is great, the articles is really great : D. Good job, cheers
I as well as my friends were actually reading the best strategies found on the blog then then got a terrible feeling I had not expressed respect to you for those tips. These women happened to be warmed to see them and have now without a doubt been taking advantage of those things. We appreciate you truly being considerably kind as well as for having such essential subject areas millions of individuals are really needing to know about. My personal sincere regret for not expressing gratitude to you earlier.
I was suggested this website by my cousin. I’m not sure whether this post is written by him as no one else know such
detailed about my difficulty. You’re wonderful!
Thanks!
You actually make it seem really easy together with your
presentation however I in finding this matter to
be actually one thing that I think I would never understand.
It seems too complex and very extensive for me.
I am looking forward for your subsequent submit, I’ll attempt to get the
hold of it!
Keep working ,remarkable job!
After study a few of the blog posts on your web site now, and I really like your way of blogging. I bookmarked it to my bookmark website listing and shall be checking again soon. Pls check out my website as properly and let me know what you think.
At this time it seems like BlogEngine is the best blogging platform available right now. (from what I’ve read) Is that what you’re using on your blog?
You actually explained that adequately.
First of all I want to say great blog! I had a quick question that I’d like to ask if you do not mind.
I was curious to know how you center yourself and clear your head before writing.
I have had a tough time clearing my mind in getting my thoughts out.
I do enjoy writing however it just seems like the first 10 to 15 minutes are usually wasted simply just trying to figure out how to begin. Any suggestions or hints?
Thank you!
Nice post. I used to be checking continuously this blog and I am impressed! Extremely helpful info specially the closing phase 🙂 I handle such info much. I used to be looking for this particular information for a long time. Thanks and good luck.
I am curious to find out what blog platform you have been using? I’m having some minor security issues with my latest site and I would like to find something more safe. Do you have any suggestions?
Hello, I desire to subscribe for this webpage to take hottest updates, therefore where can i do it please assist.
I used to be very happy to search out this web-site.I wanted to thanks on your time for this wonderful read!! I undoubtedly enjoying each little bit of it and I’ve you bookmarked to check out new stuff you blog post.
{
{Eu tenho | Tenho} foi {navegando | navega袯} on-line mais {tr鱠| 3 | 2 | 4} horas hoje, no entanto,
eu nunca encontrei qualquer artigo interessante como o seu.
{Tem | Ƚ bonita vale a pena o suficiente para mim.
{Na minha opini⭠| Pessoalmente | Na minha opini⮽, se todos {webmasters | site propriet౩os | propriet౩os do Web site | web propriet౩os} e blogueiros feitos bom conte㭶como voc蟦ez, o
{internet | l찵ido | web} ser�muito mais | muito
mais} 䭒 que alguma vez antes. |
Eu {n⭠posso | n⮽ {resistir | abster-se de} comentando.
{Muito bem | Perfeitamente | Bem | Excepcionalmente bem} escrito!
|
{Eu vou | Vou} {imediatamente | imediatamente} {Segure | agarrar | embreagem | agarrar | apreender | arrebatar} seu
{rss | feed rss} como eu {n⭠pode | consigo} {em encontrar | encontrar | encontrar} seu
{e-mail | email} assinatura {link | hiperlink} ou {boletim | boletim} servi歮 Fazer {tem | tens} qualquer?
{Por favor | Gentilmente} {permitem | permitir | deixe} me {perceber | reconhecer | entender | reconhecer |
sabe} {para que | a fim de que} eu {pode apenas | pode | poderia} se inscrever.
Obrigado. |
{Ǡ| Tem} {apropriado | perfeito | o melhor} tempo para fazer planos para o futuro e {矼 tem}
tempo para ser feliz. {Eu tenho | Tenho} ler este post e se eu pudesse eu {quer | desejam | desejam} sugerir-lhe {alguns | alguns} coisas interessantes ou {conselhos | sugest| dicas}.
{Talvez | Talvez} {poderia | pode} escrever pros artigos referindo-se a este
artigo. Eu {quero | desejam | desejo} ler {mais | ainda mais} coisas nele!
|
{Ǡ| Tem} {apropriado | perfeito | o melhor} tempo tornar {algumas | algumas} planos para {o futuro | a longo prazo
| a longo prazo} e {矼 tem} tempo para ser feliz.
{Eu tenho | Tenho} {ler | aprender} isto {postar | submeter | publicar | acondicionados} e se
eu {pode apenas | pode | poderia} eu {quer | deseja | desejo de} {sugerem | recomendar | advogado} voc蟻alguns | alguns} {interessante | fascinante | deagarramento} {coisas | quest ou {conselhos
| sugest| dicas}. {Talvez | Talvez} voc蟻poderia | pode} escrever {pra | subsequentes} artigos {relativas | referindo | sobre} este artigo.
Eu {quero | desejo | desejam} {ler | aprender}
{mais | ainda mais} {coisas | quest {aproximadamente | sobre} isso!
|
{Eu tenho | Tenho} foi {navegando | navega袯} {on-line | na linha} {mais de
| maior que} {tr鱠| 3} horas {estes dias | hoje em dia | hoje
| ultimamente | como de tarde}, {ainda | mas} eu {nunca | de nenhuma maneira} {encontrados |
descoberto} qualquer {interessante | fascinante | deagarramento} artigo como
o seu. {Tem | Ƚ {adorl | muito | bonita} {vale | valor | pre殽 {suficiente | suficiente} para mim.
{Na minha opini⭠| Pessoalmente | Na minha opini⮽,
se todos {webmasters | site propriet౩os | propriet౩os do Web site | web propriet౩os} e blogueiros feitos {apenas para a direita |
boa | excelente} {conte㭵 conte㭵aterial} como {fez | voc蟰rovavelmente fez}, o
{internet | l찵ido | web} {ser� devem ser | pode ser | provavelmente ser� pode ser | provavelmente ser{muito mais | muito mais} {䭢| 䭢
do que nunca. |
Ahaa, sua {bom | agradl | boa | fastidioso} {discuss⭠| conversa |
di૯go} {sobre | relativa | sobre | sobre o tema da} isto {artigo | post |
peda歠de escrita | n.} {aqui | neste lugar} nisto {blog | weblog | webpage
| site | web site}, li tudo o que, ent⭠{agora | neste momento} me tamb諠comentando {aqui | neste lugar}.
|
Tenho certeza que isso {artigo | post | peda歠de escrita | n.} tocou em
toda a internet {usu౩os | pessoas | espectadores | visitantes},
sua realmente {bom | agradl | boa | fastidioso} {artigo | post | peda歠de escrita
| n.} na constru袯 de novos {blog | weblog | webpage | site | web site}.
|
Uau, isto {artigo | postar | peda歠de escrita | n} 矻bom | agradl | boa | fastidioso}, meu {irm irmais nova} est�nalisando {tais | estas |
esses tipos de} coisas, {ent⭠| assim |, portanto,} vou {dizer | informar |
avise | transmitir} ela. |
{Salva como favorito | marcados!!!!}, {gosto muito |
Eu gosto | Eu amo} {blog | seu site | seu site | seu site}!
|
Muito legal! Alguns {muito | extremamente}
pontos v૩dos! Agrade歠{escrevendo isso | escrevendo
isto} {artigo | post | write-up} {e o | e tamb諠o | mais o} o resto do {site 矼 site 軠{tamb諠muito | extremamente | muito | tamb諠realmente | realmente}
bom. |
Oi, {eu acredito | Eu acho} {esta 矵ma excelente |
este 矵m o} {blog | site | web site | local}. Eu stumbledupon isso 😉 {Eu vou | Eu vou | Eu vou | Posso} {voltar | retornar | revisitar} {mais
uma vez | novamente} {desde que | desde que eu tenho} {marcados | livro marcado | livro marcado
| salvou como favorito} isso. Dinheiro e liberdade {矯 melhor | 矯 maior} maneira de mudar, voc蟰ode ser rico e continuar a {ajudar | guia} {outras pessoas | outros}.
|
Woah! Eu sou realmente {amorosa | desfrutando
| cavando} o template/tema deste {local
| site | blog}. Ǡsimples, mas eficaz. Muitas vezes tem {muito dif좩l | muito dif좩l | desafiador |
duro | dif좩l | dif좩l} para obter esse “equil졲io perfeito” entre {excelente usabilidade | convivialidade | usabilidade} e {apar魣ia visual | apelo visual | apar魣ia}.
Devo dizer {que tens | tem | tens} feito um {impressionante | incr쵥l
| muito bom | soberba | fantico | excelente | grande} trabalho
com isso. {Al諠disso | Al諠disso | Tamb謽, o blog carrega {muito | extremamente | super} {r௩do | r௩da}
para mim na {Safari | Do Internet explorer
| Cromado | Ұera | Firefox}. {Soberba | Excepcional | Pendentes | Blog excelente}!
|
Estas s⭠{realmente | na verdade | na verdade | verdadeiramente | genuinamente} {grande | enorme | impressionante |
maravilhoso | fantico} ideias em {sobre | sobre | sobre | sobre o tema da} blogging.
Voc蟴ocou alguns {bom | agradl | boa | fastidioso} {pontos | fatores |
coisas} aqui. Qualquer maneira acompanhar wrinting.
|
{Eu amo | Eu realmente gosto | Eu gosto de | Eu gosto |
Todo mundo adora} que voc鱠{s⭠| s⭠geralmente | tendem a ser} tamb諮 {Este
tipo de | Este tipo de | Tais | Este tipo de} trabalho inteligente e {exposi袯 | cobertura | relats}!
Manter-se o {soberba | fantico | muito bom | grande
| boa | impressionante | fantico | excelente
| incr쵥l | maravilhoso} funciona caras tenho {incorporada | | adicionado
| inclu죯} voc鱠para {| meu | nosso | | meu pessoal |
meu pro} blogroll. |
{Ol� Oi l� Ei l� Oi | Ol� Ei}! Algu諠em meu {Myspace | Facebook} grupo compartilhou este {local |
site} conosco por isso vim {d蟵ma olhada | uma olhada | D蟵ma
olhada | Confira}. Eu sou definitivamente {desfrutando | amoroso} as informa败s.
Eu sou {livro marca袯 | bookmarking} e vai ser twittar isto
para os meus seguidores! {Ҵima | Maravilhosa | Grande | Fantico | Pendentes | Excepcional | Soberba | Blog excelente} e {maravilhoso | fantico | brilhante | incr쵥l
| grande | excelente | fantico | pendentes | soberba} {estilo e design | design e estilo
| projeto}. |
{Eu amo | Eu realmente gosto | Eu gosto de | Eu gosto | Todo mundo adora} que voc鱠{s⭠| s⭠geralmente | tendem a
ser} tamb諮 {Este tipo de | Este tipo de | Tais | Este tipo de} trabalho inteligente e {exposi袯 | cobertura |
relats}! Manter-se o {soberba | fantico | muito bom | grande |
boa | impressionante | fantico | excelente | incr쵥l | maravilhoso} funciona caras tenho {incorporada |
adicionado | inclu죯} voc鱠para {| meu | nosso | meu
pessoal | meu pro} blogroll. |
{Ol� Oi l� Ei l� Oi | Ol� Ei} importa {afirmando | partilha} qual plataforma de blog que voc衩 {trabalhando com | usando}?
Eu sou {procurando | planejamento | indo} para come栲 o meu pro blog
{num futuro pro | logo} mas estou tendo um {duro |
dif좩l | dif좩l} tempo {tomar uma decis⭠| selecionando | escolhendo | decidindo} entre
BlogEngine/Wordpress/B2evolution e Drupal. A raz⭠que eu pe歠矰orque seu {design e estilo | design | layout} parece diferente, ent⭠a
maioria dos blogs e eu estou procurando algo {completamente original | exclusivo}.
PS {minhas desculpas | As desculpas | Pena} de {ficando | sendo} off-topic, mas eu tinha que perguntar!
|
{Ol� Oi l� Oi | Ei l� Ol� Ei} importa-me avisar que {webhost | empresa de hospedagem
| host da web} 矻utilizando | trabalhar
com | usando}? Eu carreguei o seu blog em 3 {completamente diferente
| diferentes} {navegadores internet | navegadores web | navegadores} e
devo dizer que este blog carrega muito {mais r௩do | mais
r௩do} ent⭠a maioria. Voc蟰ode {sugerem | recomendo} um bom {Hospedagem de internet
| hospedagem web | Hospedagem de} provedor em um {honesto
| razol | justo} pre歿 {Muito obrigado | Parab譳 |
Sa㭍 Obrigado | Muito obrigado | }, Obrigado! |
{Eu amo | Eu realmente gosto | Eu gosto | Todo mundo adora}-{quando as pessoas | quando indiv죵os | quando pessoal | sempre que as pessoas} {re䕒| reunir} e
compartilhar {opini| pensamentos | vistas | ideias}.
Ҵimo {blog | site | site}, {continue assim | continuar o bom trabalho | aguentar}!
|
Obrigado pelo {auspicioso | bom} writeup. Na verdade era um divertimento conta.
Olha avan段 para {longe | mais} adicionado agradl de voc蟠{A propo | Entretanto,}
como {pode | poderia} nos comunicamos? |
{Ol� Oi l� Ei l� Ol� Ei} seria avisar uma r௩da.
A {text | palavras} em seu {conte㭵 post | artigo} parecem
estar fora da tela em {Ie | Do Internet explorer
| Cromado | Firefox | Safari | Opera}. N⭠sei se isso 矵m {formato | formata袯} quest⭠ou alguma coisa a ver
com {navegador web | navegador de internet | navegador} compatibilidade mas eu {pensei | imaginei} tive post para que voc蟳aiba.
O {estilo e design | design e estilo | layout | projeto} mas parece o!
Espero que voc蟣onsiga o {problema | edi袯} {resolvido | resolvido |
fixo} em breve. {Kudos | Sa㭍 Muito obrigado | Obrigado}
|
Este 矵m to {矼 矼 軠{perto de | perto de} meu cora袯…
{Sa㭍 Muito obrigado | Melhores desejos |
Cuidar | Obrigado!} {Onde | Exatamente onde} s⭠seus dados de contacto no entanto?
|
Ǡmuito {fࢩl | simples | sem problemas | simples | sem esfor殽 para descobrir
qualquer {to | importa} em {l찵ido | web} comparado a {livros | livros did೩cos}, como eu encontrei este
{artigo | post | parte de escrita | n.} isto {site | web site | local | pna web}.
|
Faz seu {local | site | blog} tem uma pna de contato?
Estou tendo {tempos dif좥is | problemas | problemas}, localizando-o mas, eu gostaria de {enviar | atirar}
voc蟵m {email | e-mail}. Eu tenho alguns {ideias criativas
| recomenda败s | sugest| ideias} para seu blog, voc蟰ode
ser interessado em ouvir. De qualquer forma,
grande {local | site | blog} e estou ansioso para v謬o {desenvolver | melhorar | expandir |
crescer} ao longo do tempo. |
{Ol� Ei l� Oi | Ol� Sauda败s!} Estive {seguinte | lendo} seu
{local | web site | site | weblog | blog} para {muito tempo | um tempo |
algum tempo} agora e, finalmente, tem o {bravura | coragem}
para ir em frente e dar-lhe um grito de {New Caney | Kingwood | Huffman | Porter | Houston |
Dallas | Austin | Lubbock | Humilde | Atascocita} {Tx | Texas}!
Seria {dizer | mencionar | dizer} acompanhar
o {fantico | excelente | grande | bom} {emprego | trabalho}!
|
Sauda败s do {Idaho | Carolina | Ohio | Colorado
| Florida | Los angeles | Califa}! Eu sou {entediado | t裩o | entediado} no trabalho,
ent⭠eu decidi {Confira | browse} seu {local | site | blog} no meu iphone
durante a pausa para o almo歮 Eu {desfrutar | como realmente
| amo} o {conhecimento | informa袯 | informa袯} voc蟻presente | fornecer} aqui e n⭠posso esperar para dar uma olhada quando chegar em casa.
Eu sou {chocado | espantado | surpreso} como {r௩da | r௩do} blog carregado na minha {m | celular
| telefone}… Eu nem mesmo estou usando Wi-FI, apenas 3G…
{De qualquer maneira | Enfim,} {impressionante | incr쵥l | muito bom | soberba | boa | maravilhoso
| fantico | excelente | grande} {local | blog}!
|
Sua {gosto de ti | como voc黠{ler | aprender} meu {mente | pensamentos}!
Voc蟻parece | aparecem} {entender | saber | compreender} {tanto | muito} {aproximadamente | sobre}, {como voc蟼 como
voc黠escreveu o {livro | livro | guia | ebook
| e livro} nele ou algo. {Eu acho | Sinto-me | Acredito} {que voc蟼 que voc蟳implesmente | que voc蟡penas}
{poderia | pode} com {algumas | algumas} {%|p.c.| por cento} ao {for栲 | press⭠| unidade | poder} a mensagem {casa | casa} {um pouco
| um pouco}, {no entanto | mas} {al諠de | em vez de},
{矼 軠{grande | maravilhoso | fantico |
magn쥩ca | excelente} blog. {Um grande | Um excelente | Um fantico} ler.
{Eu vou | Vou} {definitivamente | certamente} volta.
|
Visitei {m䎎las | muitos | v౩os | v౩os} {sites | sites | web sites | pnas web | Blogues} {mas | exceto | no
entanto} o തio {qualidade | recurso} para തio m䩢s {atual | presentes | existente} nisto
{site | web site | local | pna web} 矻realmente | realmente | na verdade | verdadeiramente | genuinamente} {maravilhoso
| maravilhoso | excelente | fabuloso | soberba}. |
{Ol� Oi l� Oi | Ol eu li seu blog {ocasionalmente | de vez em quando} e eu possuo uma similar e eu estava apenas {imaginando | curioso} se voc蟧anha
um monte de spam {coment౩os | respostas | gabarito | observa败s}?
Se sim como 矱ue {prevenir | reduzir | parar | proteger contra},
algum plugin ou alguma coisa que voc蟰ode {aconselhar | sugerir | recomendar}?
Recebo tanta coisa ultimamente que est�e deixando {louco |
insano | louco} ent⭠qualquer {assist魣ia | ajuda | suporte}
短uito apreciado. |
Sauda败s! {Muito 䭢| Conselhos muito 䭒} {dentro
deste | neste particular} {artigo | post}! {Ǡo | Ǡo} muda
pouco {isso faz | que far� que produzem | que far{o maior | o maior
| o maior | mais importantes | as mais significativas} mudan栳.
{Muito obrigado | Obrigado | Muito obrigado} por compartilhar!
|
{Eu realmente | Eu verdadeiramente | Eu seriamente | Eu absolutamente} amo {blog |
seu site | seu site}… {Muito bom | Excelente | Agradl | Grandes} cores
e tema. Voc蟻criar | desenvolver | fazer | construir} {este site | este site | este web site |
este incr쵥l site} voc蟭esmo? Por favor responda quando volto {olhando para | tentando | planejando | querendo
| na esperan柠de | tentando} criar {meu pro | minha pra | meu pro pessoal} {blog |
site | local} e {gostaria de | quer | adoraria} {sabe | aprender |
descobrir} onde voc蟰egou isso de ou {que o | exatamente
o que o | o que o} tema {矣hamado | 矣hamado}. {Obrigado
| Muito obrigado | Obrigado | Sa㭍 Apreci�o | Kudos}!
|
{Ol�� Ol� Ol Isto {post | artigo | blog post} {couldn ‘ t |
n⭠podia} ser escrito {melhor | muito melhor}! {Leitura atrav豠de
| Olhando | Passando por | Olhando atrav豠de} isto {post | artigo} me lembra do meu companheiro de
quarto anterior! Ele {sempre | constantemente | continuamente} manteve {falando | pregando sobre} isto.
{Eu vou | Eu vou | Eu vou | Certamente farei} {frente | enviar} {este artigo |
esta informa袯 | este post} com ele. {Quase certeza | Razoavelmente
certo} {ele ir� ele vai | ia} {t髠uma boa | tem um muito bom | tem um grande} ler.
{Obrigado por | Obrigado por | Muito obrigado por | Agrade歭lhe por} partilha!
|
{Wow | Opa | Incr쵥l | Amazing!} Este blog parece {exatamente |
somo meu velho! Ǡum {completamente | totalmente | totalmente} diferentes {to
| assunto} mas tem praticamente o mesmo {layout | layout de pna} e design. {Excelente | Maravilhosa
| Grande | Pendentes | Escolha soberba} das cores! |
{H� H{definitivamente | certamente} {muito para | muito a} {saber sobre | conhe柠| descobrir sobre} isto {assunto | to | quest⮽.
{Eu gosto | Eu amo | Eu realmente gosto} {todos o | todos o}
pontos {voc蟦ez | fez | voc蟦ez}. |
{Voc蟦ez | Voc蟦ez | Voc蟦ez} alguns {decente | boa | boa} aponta l�Eu {olhou | verificado} {na internet | na web | na net} {para mais informa袯 | para obter mais informa败s
| para descobrir mais | para saber mais | para obter informa败s adicionais} sobre a quest⭠e encontrado
{a maioria dos indiv죵os | a maioria das pessoas} vai junto com seus pontos de vista {este site
| este site | neste web site}. |
{Ol� Ol� Oi l� Wassup}, eu {acesse | verificar
| ler} seu {coisas novas | blogs | blog} {regularmente | cada semana
| di౩o | regularmente}. Seu {hists | escrita |
humor체ico} estilo 矻incr쵥l | espirituoso}, manter {o que est�azendo | o bom trabalho |-se}!
|
Eu {simplesmente | sn⭠poderia | n poderia} {deixar | partem | ir embora} seu {local | web site |
site} {antes de | antes} sugerindo que eu {realmente | extremamente | na verdade} {apreciado |
amei} {o padr⭠| o habitual} {informa败s | informa袯} {uma pessoa | um indiv죵o} {fornecer | fornecer} {para
seu | na sua | em seu | para seu} {visitantes | convidados}?
Ǡ{vai | vai} ser {volta | novamente} {frequentemente | regularmente
| incessantemente | constantemente | incessantemente | frequentemente | continuamente} {para | a} {checar | Confira | inspecionar | investigar o cruzamento} novas postagens
|
{Queria | Eu precisava | Eu quero | Eu preciso}
te agradecer por isto {grande | excelente | fantico
| maravilhoso | boa | muito bom} ler!!!! Eu {definitivamente | certamente | absolutamente} {desfrutado | amei} cada
{um pouco de | um pouco de} isso. {Eu tenho | Tenho | Eu tenho} voc蟻marcados | livro marcado | livro marcado | salvou como favorito} {para
verificar | olhar} novo {coisas que voc蟼 coisas voc黠postar…
|
{Ol� Ol� Oi l� Wassup}, seria {mencionar | dizer
| dizer}, eu {desfrutado | gostei | amei} isto {artigo | post | blog post}.
Foi {inspirando | engra栤o | pr೩co | 䭢. Continue postando l�|
{Ol�� Ol gosto de ler {todos | atrav豠de} o {artigo
| post | artigo post}. Eu {como | queria} para escrever um
pequeno coment౩o para apoiar voc鱮 |
Eu {sempre | constantemente | cada vez} passou minha meia hora para
ler isto {blog | weblog | webpage | site | web site} do {artigos
| posts | artigos ou clientes | conte㭻{todos os dias | di౩o | todos os dias | o
tempo todo} junto com um {Copa | caneca} caf笠|
Eu {sempre | para sempre | o tempo todo | constantemente |
cada vez} mandou esse e-mail {blog | weblog | webpage | site | web site} post pna
a todos minha {amigos | associates | contatos}, {porque | desde | como | pela raz⭠que} se gosta de ler isso {ent⭠|
depois disso | pra | depois} meu {amigos | liga败s | contatos} tamb諮 |
Meu {codificador | programador | desenvolvedor} est�entando {persuadir | convencer}
me mover para .net de PHP. Eu sempre ter n⭠gostava da ideia por causa da {despesas | custos}.
Mas ele 矴ryiong nenhum a menos. Estou usando o
{tipos ms | WordPress} em {um n䑓 de | uma variedade de | numerosos | v౩os
| v౩os} websites para cerca de um ano e am {nervoso |
ansioso | preocupado | em causa} em mudar para outra plataforma.
Ouvi {fantico | muito bom | excelente | grande | bom} coisas sobre o blogengine.net.
Existe uma maneira que eu posso {transfer魣ia | importar} todo meu wordpress {conte㭵
posts} nele? {Qualquer tipo de | Qualquer} ajuda seria {realmente | grandemente} apreciada!
|
{Ol� Oi | Ol� Oi l� Ol� Bom dia!} Podia jurar que {foi para | visitou} {este blog | neste web site | este site |
este site | blog} antes, mas depois {navegando atrav豠de | passando | olhando} {alguns do | alguns da | muitos
do} {posts | artigos} percebi que 矮ovo para mim. {qualquer forma | De qualquer forma | N⭠obstante
| Independentemente,} eu sou {definitivamente | certamente}
{feliz | satisfeito | encantado} {encontrei | Descobri | Me deparei com | Eu tropecei em cima} e eu
vou ser {bookmarking | livro marca袯} e checando {frequentemente | regularmente | frequentemente}!
|
{Ҵima | Grande | Maravilhosa} {artigo | trabalho}!
{Isto 矼 Ƚ {o tipo de | o tipo de} {informa袯 | informa袯}
{que s⭠significadas | que 石uposto |
que deve} ser compartilhado {em torno a | atrav豠o} {web | internet | l찵ido}.
{Desgra柠| Que vergonha} {o {procurar | pesquisa} motores | Google} para {agora
n⭠| n⭠| j�⮽ este posicionamento {post | submeter | publicar | colocar} {superior | maior}!
Venha c� {falar com | discutir com | procurar aconselhamento
de | visite | consultar com} meu {local |
web site | site}. {Obrigado | Obrigado} =) |
Heya {sou | sou} pela primeira vez aqui. Eu {deparei | encontrado} esta placa e eu encontr�o {verdadeiramente | realmente}
䭢e isso me ajudou {muito | muito}. Espero poder dar algo de volta e {ajudar
| ajuda} outros como voc蟻ajudou | auxiliado} me.
|
{Ol� Ol� Oi l� Ol� Ol� Sauda败s,} {acho | Eu acredito | Eu acredito | Eu acho que | N⭠h�䵢 que} {seu site | seu site | seu site | blog} {pode
ser | pode ser | poderia ser | poderia ser} tendo {navegador |
navegador internet | navegador web} compatibilidade {quest| problemas}.
{Quando eu | Sempre que eu} {Olha seu | d蟵ma olhada seu} {site |
web site | site | blog} no Safari, parece bem {mas quando | no entanto quando | no
entanto, se | no entanto, quando} abrindo em {Internet Explorer | IE | Ou seja,}, {tem | tem} alguns problemas sobrepostos.
{SEu simplesmente | Eu meramente} queria {dar-lhe um | fornec謬o com um}
r௩da de cabe柠para cima! {Fora isso | Para al諠disso
| Al諠disso | Afora isso,} {fantico | maravilhoso |
grande | excelente} {blog | site | local}! |
{Uma pessoa | Algu諠| Algu謽 {necessariamente | essencialmente} {emprestar uma m⭠| ajuda | auxiliar} tornar {seriamente | criticamente | significativamente
| severamente} {artigos | posts} {gostaria | Talvez
| Eu iria} estado. {Isto 矼 Ƚ o {primeiro | primeiro} tempo eu frequentava sua {pna web | pna site} e {a este ponto | at矡gora | at矼 at矡gora}?
Eu {espantado | surpreso} com o {pesquisa | an૩se}
voc蟦ez para {criar | fazer} {neste real | este particular} {post | submeter |
publicar | colocar} {incr쵥l | incr쵥l | extraordin౩a}.
{Grande | Maravilhosa | Fantico | Magn쥩co | Excelente} {tarefa | processo | actividade | trabalho}!
|
Heya {sou | sou} para {prim౩o | o primeiro} tempo aqui.
Eu {deparei | encontrado} esta placa e eu {em encontrar | encontrar | encontrar}-{verdadeiramente | realmente} {䭒 | 䭢 & isso me ajudou {muito | muito}.
{Espero | Espero | Espero} {dar | para oferecer | para fornecer | apresentar} {algo | uma coisa} {volta | novo} e {ajudar |
ajuda} outros {como voc蟼 como voc黠{ajudou | auxiliado} me.
|
{Ol� Oi | Ol� Oi l� Ol� Bom dia | Ei l {SEu simplesmente} {gostaria de | quero | deseja}
{dar-lhe um | oferecer-lhe um} {enorme | grande} polegares para cima {para o
| para seu} {grande | excelente} {informa袯 | informa袯} {voc蟴em | tem | tem} {aqui
| aqui} sobre este post. {Eu serei | Eu vou ser | Eu sou}
{voltando para | retornando para} {blog | seu site
| seu site | seu site} para obter mais informa败s em breve.
|
Eu {sempre | o tempo todo | cada vez} costumava {ler | estudar}
{artigo | post | peda歠de escrita | n} nos jornais not좩as mas agora como eu sou
um usu౩o de {internet | web | l찵ido} {ent⭠| assim |, portanto,} a
partir de agora eu estou usando a net para
{artigos | postos | artigos ou clientes | conte㭻 gra栳 a web.
|
Seu {forma | m賯do | significa | modo} de {descrevendo | explicando | dizendo} {tudo | todas |
a coisa toda} neste {artigo | postar | peda歠de escrita | n.} 矻realmente | realmente | na verdade | verdadeiramente | genuinamente} {agradl | agradl | boa | fastidioso},
{todos | cada um} {pode | poderes | ser capaz de} {facilmente | sem dificuldade | sem
esfor歠| simplesmente} {entender | sabe | estar ciente
de}, muito obrigado. |
{Ol� Ol {encontrei | Descobri} seu {blog | site | web
site | local} {atrav豠de | atrav豠de | pelo uso de | de} Google {ao mesmo tempo como | enquanto |
mesmo como | enquanto} {procurando | procurando} um {semelhantes | comparis | relacionados} {to |
importa | assunto}, seu {local | web site | site} {chegou | veio},
{parece | aparece | parece | parece ser | parece ser como} {bom | grande}.
{Eu tenho | Tenho} bookmarked-lo em meus favoritos do google.
{Ol� Oi}, {simplesmente | stransformou-se
| tornou-se | era | tornar-se | transformou} {ciente de | alerta para} seu {blog | weblog} {atrav豠de | atrav豠de | atrav豠de} Google, {e encontrou | e localizado} que
{矼 tem} {realmente | verdadeiramente} informativo.
{Eu sou | Eu sou} {ia | vai} {cuidado | cuidado} para
Bruxelas. {Eu vou | I’ll} {apreciar | ser grato} {se voc蟼 voc蟤eve |
quando voc蟼 no evento voc蟼 em caso voc蟼 para aqueles quem | se acontecer de
voc黠{continuar | proceder} isto {no futuro}. {Muitos | Lotes de | Muitos | Numerosos} {outras pessoas |
pessoal | outras pessoas | pessoas} {ser� ser⭠| pode ser | provavelmente ser� pode ser | provavelmente serbeneficiou {de sua
| de seu} escrevendo. Um brinde! |
{Eu sou | Sou} curioso para descobrir o que blog {sistema | plataforma} {voc蟴er sido | acontecer de voc蟳er | voc衩
| 軠{trabalhando com | utilizando | usando}? Eu sou {experimentando | tendo}
alguns {menor | pequeno} seguran柠{problemas | quest com meu 䎎o {local |
site | blog} e {gostaria | Gostaria} gosto de encontrar algo mais {seguro | risco-livre | salvaguardados | seguro}.
Tem algum {solu败s | sugest| recomenda败s}? |
{Eu sou | Eu sou} {extremamente | realmente} impressionado com suas habilidades de escrita {e tamb諠|
como} com o layout de seu {blog | weblog}. Este 矵m tema pago ou voc蟻personalizar | modificar} 矶oc蟭esmo?
{Qualquer forma | Enfim} acompanhar o {bom | excelente} escrevendo com qualidade, {tem | 軠raro ver um {bom
| grande} blog como este {estes dias | hoje em dia | hoje}.
|
{Eu sou | Eu sou} {extremamente | realmente} {inspirado | impressionado} {com seu
| junto com seu | junto com seu} escrevendo {talentos | habilidades | habilidades}
{e tamb諠| como {inteligentemente | bem | ordenadamente} como}
com o {layout | formato | estrutura} {para seu
| na sua | em seu | para seu} {blog | weblog}.
{Isto 矼 Ǡque este} um pago {assunto | to | assunto | tema} ou {personalizar | modificar}-{se | seu
mesmo}? {Qualquer forma | Enfim} {ficar | manter} acima o {bom | excelente} {qualidade | alta qualidade} escrevendo, {tem | 軠{raras | incomum} {perscrutar | ver | olhar} um {bom | grande} {blog | weblog}
como este {estes dias | hoje em dia | hoje}… |
{Ol� Ol o postar. {H� H{um problema | um problema} {com seu | junto com seu | junto com seu} {local |
web site | site} em {internet | web} explorador, {pode |
pode | poderia | seria} {verificar | teste} isto?
IE {ainda |, no entanto} 矯 {mercado | mercado} {l죥r | chefe}
e {um grande | um bom | um grande | um enorme} {parte do | se袯 de
| componente para | parte do | componente de | elemento de} {outras pessoas |
pessoal | outras pessoas | pessoas} ser�deixar de fora
| omitir | perca | passe} seu {grande | maravilhoso
| fantico | magn쥩ca | excelente} escrevendo {devido a | por causa de} este problema.
|
{Eu sou | Eu sou} n⭠tenho certeza onde {voc衩 | 軠ficando seu {informa袯 | informa败s}, mas {bom | grande} to.
Eu precisa gastar algum tempo aprendendo {mais | muito mais} ou mais compreens⭮ Obrigado por {grande | maravilhoso | fantico | magn쥩ca | excelente} {informa败s | informa袯} eu estava procurando por isso {informa袯 | informa袯} para a minha miss⭮ |
{Ol� Ol eu acho que vi voc蟶isitou meu {blog | weblog | site
| web site | local} {ent⭠| assim} vim “devolver o favor”.
{Eu sou | Eu sou} {tentando | tentando}
encontrar coisas para {melhorar | aumentar} meu {site | local | web site}!
Suponho que sua okey usar {algumas | algumas das} suas ideias!!!!
|
{Ol� Ol {acho | sinto | acredito} que eu {vi | notado}
voc蟶isitou meu {blog | weblog | site |
web site | local} {ent⭠| assim} eu {chegou | veio}
para {voltar | retornar} o {preferem | escolher | favorecem | quero
| desejo}?. {Eu sou | Eu sou} {tentando | tentando}
{em encontrar | encontrar | encontrar} {coisas | quest para {melhorar | aumentar} meu {site
| local | web site}! {Eu acho | Presumo que | Suponho} seu {suficiente | okey | adequada} {usar | tornar empreg} {alguns dos | alguns dos} seu {ideias | conceitos | ideias}!!
|
{Ol� Oi} l�s tornou {ciente de | alerta para}
seu blog atrav豠do Google e descobri que {矼 tem} {realmente | verdadeiramente}
informativo. {Eu sou | Eu sou} {ia | vai} cuidado para Bruxelas.
{Eu vou | I’ll} {apreciar | ser grato} se voc蟣ontinuar esta {futuramente}.
{Muitos | Lotes de | Muitos | Os povos numerosos} ser⭠beneficiados de sua escrita.
Um brinde! |
{Eu sou | Sou} {agora n⭠| n⭠| j�⮽ {certeza | positivo | certas} {onde | o lugar} {豠| 貽 ficando seu {informa袯 |
informa败s}, {no entanto | mas} {bom | grande} to.
Eu {precisa | deve} gastar {um tempo | algum tempo} {estudando | aprendizagem | descobrir} {mais | muito mais} ou {malhando |
compreens⭠| descobrir} mais. {Obrigado | Agrade殽 {grande
| maravilhoso | fantico | magn쥩co | excelente} {informa袯 | informa袯} {costumava ser | Eu era} {procurando |
em busca de | �rocura de | procurando} isto {informa败s
| informa袯} para minha miss⭮ |
{Ol� Olmeu {membro da fam쫩a | ente
| amigo}! Eu {quero | deseja} diz que este {artigo | post} 矻incr쵥l | incr쵥l}, {grande | bom} escrito e
{v髠com | incluem} {quase | aproximadamente} todos {importante |
significativo | vital} infos. {Eu faria | Eu iria} como {perscrutar |
ver | olhar} {mais | extra} posts como este.
|
{Ol� Ol, {eu amo | Eu realmente gosto | Eu gosto} sua escrita {ent⭠| muito} {tanto | muito | muito}!
{porcentagem | propor袯 | compartilhar} nmanter contato | manter uma
correspond魣ia | comunicar | estar em contato} {mais |
extra} {aproximadamente | sobre} seu {post | artigo} na AOL?
Eu {precisa | exigem} {especialista | especialista} {neste | nisto} {espa歠|
a | casa} {para resolver | para desvendar
| resolver} meu problema. {Pode ser | Talvez} {矼 軠voc蟠{Dando uma olhada | Olhando | Tendo um olhar}
{frente | em frente} {perscrutar | ver | olhar}
voc謠|
{Eu sou | Eu sou} realmente {amorosa | desfrutando} o tema/design do seu {local | weblog | web site | site | blog}.
Voc蟪�xecuta em qualquer {navegador web | navegador internet | navegador} compatibilidade {problemas |
quest? A {n䑓 de | punhado de | casal de | pequeno n䑓
de | alguns de} meu blog {p㥮o | visitantes | leitores}
queixaram-se sobre meu {blog | site | local} n⭠{operacional | trabalhando} corretamente em Explorer mas olha grande em {Safari | Cromado | Ұera | Firefox}.
Tem algum {solu败s | ideias | conselhos | dicas | sugest| recomenda败s} para
ajudar a corrigir isso {quest⭠| problema}? |
{Bom | Grande | Muito bom} {informa袯 | informa袯}.
Sorte me {encontrei | Descobri | Me deparei
com | Eu corri em toda | Recentemente encontrei} {seu site | seu site | blog} {por acidente | por acaso} (stumbleupon).
{Eu tenho | Tenho} {bookmarked | guardei | marcou-o livro | livro marcado
isso | salvou como favorito} para mais tarde!
|
Tem {grande | enorme | impressionante | maravilhoso | fantico} que
voc蟥st�ecebendo {ideias | pensamentos} deste {artigo | post | peda歠de
escrita | n}, bem como de nosso {discuss⭠| argumento | di૯go} fez {aqui | neste lugar | neste momento}.
|
Se voc蟻quer | desejo | desejo para | gostaria} para {aumentar | melhorar |
crescer} seu {experi魣ia | conhecimento | familiaridade | sabe-como}
{ssimplesmente | sontinuar visitando este {site | web site | local |
pna web} e atualizados com o {mais recentes | mais novo
| mais recentes | mais up-to-date | mais quentes} {not좩as | informa败s | fofoca | atualiza袯 de not좩as} Postado aqui.
|
O que do {tendo lugar | Acontecendo | Descendo} {sou | sou} novo para isso,
me deparei com este {tenho | Tenho} {encontrados
| descoberto}-{positivamente | absolutamente} {䭢| 䭢 e tem {ajudou | auxiliado} me cargas.
{Espero | Espero | Espero} para {d�m contributo | contribuir} & {auxiliar | ajuda | ajudar} {outros | diferentes} {usu౩os | clientes} como seu {ajudou | auxiliado} me.
{Bom | Trabalho grande}. |
{Wow | Hurrah}, que 矯 que eu estava {procurando | busca | busca | explorando}
para, o que um {coisas | informa败s | dados | material}!
{presentes | existente} aqui nisto {blog | weblog | pna Web | site | web site}, obrigado admin isso {site | web site | local | pna
web}. |
Se voc蟻quer | desejo | desejo para | gostaria} para {tomar | obter | obter} {muito | muito
| um bom neg} deste {artigo | post | parte de escrita | n} ent⭠voc蟴em que aplicar {tais | estas} {estrat覩as | t袮icas | m賯dos} para seu ganhou {blog | weblog | webpage | site | web site}.
|
Ǡum {incr쵥l | notl | incr쵥l} {artigo |
post | parte de escrita | n} {para | projetado para | em favor
da | em apoio do} todos o {internet | web | on-line}
{usu౩os | pessoas | espectadores | visitantes}; Eles ir⭠{tomar | buscar | obter} {beneficiar | vantagem} de estou
certo. |
{Eu tenho | Tenho} {ler | aprender} {alguns | diversos |
alguns} {certa | boa | excelente} coisas aqui. {Definitivamente | Certamente} {vale | valor | pre殽 bookmarking
para revisitar. Eu {maravilha | surpresa} como {tanto | muito | muito} {tentativa | esfor殽 {voc蟣oloca | voc蟤efinir | voc蟣olocar} para {criar | fazer} {este tipo de | este tipo de | este tipo
de | tal um | um desses | tal | o tipo de} {grande | maravilhoso
| fantico | magn쥩co | excelente} informativo {local | web
site | site}. |
{Isto 矵m | Ǡum} {muito bom | grande | boa | boa} ponta {especialmente | particularmente} para aqueles {novo para | fresco para} blogosfera.
{Breve | Curta | Simples} mas muito {precisos | precisos} {informa袯 | informa袯}…
{Obrigado por | Obrigado por | Muito obrigado por | Aprecio sua} partilha este.
Uma leitura obrigat {artigo | post}! |
{Eu tenho | Tenho} foi explorar para {um pouco | um pouco | um pouco} para qualquer {alta qualidade | alta qualidade} artigos ou {blog | weblog} posts {neste
| nisto} {meio | esp袩e de} {espa歠| a | casa}.
Explorar no Yahoo eu {finalmente | eventualmente | finalmente | finalmente} tropecei em
cima deste {local | web site | site}. {Leitura | Estudando} isto {informa袯 | informa袯} ent⭠{sou | sou} {satisfeito |
feliz | feliz} para {expresso | mostrar | exibem |
transmitir} que {tenho | Tenho} {um muito | um
incrivelmente} {apenas para a direita | boa | excelente} sentindo estranho eu
{descobriu | apoderou | descoberto} {exatamente | s que eu precisava.
Eu {tanto | tanto | mais} {sem d䵢 | sem d䵢
|, sem d䵢, | certamente | certamente | com certeza | definitivamente | inquestionavelmente | indiscutivelmente | indubitavelmente} far�certos | certeza}
para {don? t | n⮽ {tire da cabe柠| esquecer | falhar lembrar | negligenciar | desconsiderar | omitir} isto {local | web site | site} {e dar | e fornece}-{um olhar | num ௩ce} {na {uma constante | um continuando | um implacl} base | regularmente}.
|
Depois de ler isto {eu pensei que era | Eu acreditava
que era} {muito | realmente | extremamente | prefiro} {informativo | esclarecedor}.
Agrade歠{tomar o tempo | encontrar tempo | passar
algum tempo} {e esfor歠| e energia} para colocar {este artigo | este artigo curto | este artigo informativo |
esta informa袯 | este conte㭻juntos. Mais uma vez encontrar
{me | me pessoalmente} gastos {demais | uma quantidade significativa de | muitos} tempo ambos leitura e {comentando | deixando coment౩os
| postando coment౩os}. Mas ent⭠o que, era ainda {vale a pena | a pena}!
|
Qualidade {artigos | posts | artigos ou opini| conte㭻矯 {chave |
segredo | importante | principal | crucial} para {atrair | ser um foco para | convidar
| interesse} o {usu౩os | pessoas | espectadores | visitantes} para {visite
| v�er | uma visita | pagar uma visita r௩da} o {site
| web site | local | pna web}, 矤isso que {site
| web site | local | pna web} est�ornecendo. |
Troca de link nada mais 矻mas | exceto | no entanto} 矻ssimplesmente
| soloca袯 de outra pessoa {blog | weblog | webpage |
site | web site} link em sua pna no {adequada | apropriado | apropriado} lugar e outra pessoa tamb諠ir⭠fazer {mesmo | semelhante} {para | em favor da
| em apoio do} voc謠|
Tenho lido tantos {artigos | postos | artigos ou clientes | conte㭻{a respeito | relativa
| sobre | sobre o tema da} os amantes do blogger {mas | exceto | no entanto} isto {artigo | post | peda歠de escrita | n.}
矻realmente | realmente | na verdade | verdadeiramente | genuinamente} um {bom | agradl | boa | fastidioso} {artigo |
postar | peda歠de escrita | n.}, mant謬o. |
{Mesmo | Na verdade | Na verdade | Verdadeiramente | Genuinamente} {n⭠importa se | quando} algu諠n⭠{entender | saber | estar ciente de} {ent⭠| depois disso | depois} seu at矯utro {usu౩os | pessoas |
espectadores | visitantes} que eles ir⭠{ajudar | auxiliar}, ent⭠aqui 矻acontece | ocorre | tem lugar}.
|
Voc蟻pode | poderia} {definitivamente | certamente} ver seu {entusiasmo | especializa袯 | habilidades} {na
| dentro o} {artigo | trabalho} voc蟥screver.
{A arena | O mundo | Espera que o sector} para {mais | ainda mais} escritores apaixonados {como voc蟼 como voc黠quem {aren ‘ t
| n⭠s⮽ medo {mencionar | dizer} como eles acreditam.
{Sempre | O tempo todo | Em todos os momentos} {v�epois | siga} seu cora袯.
|
{Grande | Excelente | Bom | Muito bom} {post | artigo}.
{Eu sou | Eu sou | Eu serei} {enfrentando | lidando com |
passando | experimentando} {alguns destes | alguns destes
| muitos destes} quest bem como… |
{Grande | Excelente | Bom} {blog | web site | local} {tem | tem | voc蟴em} aqui…
Tem {dif좩l encontrar | dif좩l encontrar} {qualidade |
alta qualidade | boa qualidade | qualidade | excelente} escrevendo como o seu {estes dias | hoje
em dia}. {Eu realmente | Eu verdadeiramente | Eu seriamente |
Eu honestamente} agrade歠{pessoas como voc蟼 indiv죵os como voc黡 Cuide!
|
Eu era {recomendado | sugerido} isto {blog | site |
web site} pelo meu primo. {Eu sou | Eu sou} n⭠tenho certeza se este post 知scrito por ele como
{ningu諠| ningu謽 mais sabem tanto detalhada sobre minha {problema | dificuldade
| problemas}. {Voc蟥st� Voc衩} {incr쵥l | maravilhoso | incr쵥l}!
Obrigado! |
{Grande | Excelente | Maravilhosa | Bom | Muito bom} {artigo | post}!
{Neremos | Somos} ligando {para isto | para isto particularmente} grande {artigo |
post | conte㭻em {nosso site | nosso site}. Manter-se {o bom | o grande} escrevendo.
|
Ah meu Deus! {Incr쵥l | Incr쵥l | Incr쵥l | Meu artigo impressionante}!
{Obrigado | Obrigado | Muito obrigado | Muito obrigado}, no entanto estou {experimentando | encontrando |
passando | tendo} {emite com | dificuldades com | problemas com | problemas
com} seu RSS. N⭠{sei | entender} {por que | a
raz⭠por que} {eu sou incapaz de | Eu n⭠posso | Eu n⭠posso}
{subscrever | jun袯} isso. H�ningu諠| mais algu諠| ningu謽 {ficando | tendo} {id魴icos |
o mesmo | semelhante} RSS {problemas | quest?
{Algu諠quem | Algu諠quem | Qualquer um que} sabe {a solu袯 | a resposta} {Sim
| voc蟰ode} gentilmente responder? {Thanx | Obrigado}! |
{Muito bom | Ǡincr쵥l | Incr쵥l | Soberba | Maravilhosa |
Fantico | Excelente | Blog grande}! Tem algum {recomenda败s
| dicas | dicas e sugest| dicas 䭒 | sugest| dicas} para
aspirantes a escritores? Eu sou {planejamento | esperando} para iniciar meu pro {site | site | blog} em
breve mas estou um pouco perdido em tudo. Voc蟻propor | aconselhar | sugerir | recomendar} come栮do
com uma plataforma livre como o WordPress ou ir para uma op袯 paga?
H�antos {escolhas | op败s} l�ora que eu sou {totalmente |
completamente} {confuso | oprimido}… Qualquer {recomenda败s | sugest| ideias | dicas}?
{Muito obrigado | Aben殥 voc蟼 Parab譳 | Apreci�o | Sa㭍 Obrigado |
Muito obrigado | Obrigado}! |
Tem {dif좩l encontrar | dif좩l encontrar | quase imposs쵥l de encontrar | dif좥is
de encontrar} {conhecedor | educado | bem informado | experientes} pessoas {nisto |
sobre isso | por isso | neste particular} {to | assunto},
{mas voc蟼 no entanto, voc黠{parece | parece} sabe que
voc蟥st�alando! Obrigado |
Eu {don ‘ t | n⮽ at矻sabe o caminho | entender como | sabe
como} {parei | Acabei | Eu terminei} at矻aqui | aqui}, {no entanto | mas}
{pensei | Eu assumi | Acreditei} isto {post | submeter | publicar | colocar} {costumava ser | era |
era uma vez} {bom | grande}. Eu {don ‘ t | n⮽ {perceber
| reconhecer | entender | reconhecer | sabe} quem {voc蟥st� 豠| voc蟰ode ser} {no entanto | mas} {definitivamente | certamente} {豠| 貽 vai um {famoso | conhecidos} blogger {se voc蟼 voc蟤eve | quando voc蟼 no evento
voc蟼 em caso voc蟼 para aqueles quem | se acontecer de voc黠{n⭠s⭠| aren ‘ t} j�Um brinde!
|
{Bom | Bom | Fastidious} {respostas | responder | respostas | responder | resposta}
em troca disto {pergunta | consulta | dificuldade | quest⭠| importa}
com {so | firme | real | genu쭯} argumentos e {descrevendo | explicando | dizendo} {tudo
| todas | a coisa toda} {sobre | relativa | sobre | sobre o tema da} que.
|
Eu {don ‘ t | n⮽ nem sei como vim parar aqui, mas eu pensei que este post foi {bom | grande}.
Eu {don ‘ t | n⮽ sei quem voc衩 mas {definitivamente | certamente} {豠| 軠vai um blogueiro famoso se voc蟻n⭠s⭠| aren ‘ t} j�) Um brinde!
|
{Somos | Estamos} {um grupo | um bando | um bando} de volunt౩os
e {come栮do | abertura} {um novo | um novo} esquema em nossa comunidade.
Seu {local | web site | site} {fornecido | ofereceu}
nos com {䭢| 䭢| valioso} {informa袯 | informa袯} para trabalhar
em. {Voc蟴em | Tens} {realizada | feito} {um impressionante | um formidl} {tarefa | processo | atividade | trabalho} e nosso {toda | inteiro} {comunidade | grupo | bairro} {ser�
devem ser | pode ser | provavelmente ser� pode ser | provavelmente
ser{grato | grato} para voc謠|
{Bom | Bem | Excelente} forma de {descrevendo | explicando
| dizendo}, e {bom | agradl | boa | fastidioso} {artigo | post | peda歠de escrita
| n.} para {tomar | obter | obter} {dados | informa败s
| fatos} {sobre | relativa | sobre | sobre o tema da} minha apresenta袯
{to | assunto | assunto | foco}, que vou {entregar | transmitir |
presente} em {universidade | institui袯 de ensino superior
| faculdade | Academia | escola}. |
{Bom | Excelente | Grande} {blog | weblog} {aqui | aqui}!
{Tamb諠| Al諠disso} seu {site | local | web site} {muito | lotes
| tanto | muito | muito | carrega} at矻r௩do | muito r௩do}!
O que {host | host da web} voc蟻o uso de | usando | o uso
de}? Pode {estou ficando | Fico} seu {associar | afiliado} {link | hiperlink} {para
seu | na sua | em seu | para seu} anfitri⭿ Eu {desejo | quero | desejo} meu {site
| local | web site} carregado como {r௩do | rapidamente}
como o seu lol |
Eu {amo | como realmente} blog… cores muito agradis e tema.
Voc蟻criar | design | fazer} este site voc蟭esmo ou contratou algu諠para fazer
isso por voc轠por favor {resposta | responder | responder} como
eu estou olhando para {criar | design | construir} meu
pro blog e gostaria de {sei | descobrir} onde u tem isto
de. {Obrigado | muito obrigado | kudos | agrade歠| sa㭍 Obrigado | muito obrigado} |
{Somos | Estamos} um grupo de volunt౩os e {come栮do | abertura}
um novo regime de nossa comunidade. Seu {local | web site | site} {fornecido | ofereceu} nos com valioso
{informa袯 | informa袯} para trabalhar em. {Voc蟴em | Tens} feito {uma impressionante
| um formidl} trabalho e nosso {inteiro | toda} comunidade
ser�grato | grato} para voc謠|
Agrade歠{a recomenda袯 | este post}. {Vai | Deixe-me} experiment�o.
|
Perguntando perguntas s⭠{realmente | realmente | na verdade |
verdadeiramente | genuinamente} {bom | agradl | boa | fastidioso}
coisa se voc蟮⭠est�ntendendo {nada | algo} {totalmente | completamente | inteiramente | totalmente}, {mas |
exceto | no entanto} isto {artigo | post | peda歠de escrita | n.}
{fornece | oferece | d� apresenta} {bom | agradl | boa | fastidioso} compreens⭠{mesmo |
ainda}. |
J�lguma vez {considerado | pensamento} sobre {incluindo
| adicionando} um pouco mais do que apenas seus artigos?
Quer dizer, o que voc蟤iz 矻valioso | fundamental | importante} e {todos |
tudo}. {N⭠obstante | No entanto | Mas} {pense | imagine
| pense | imagine} se voc蟡dicionou algum grande {visuais | gr३cos | fotos | fotos |
imagens} ou {videoclip | v죥os} para dar suas mensagens mais, “pop”!
Seu conte㭶 excelente mas com {imagens | fotos} e {clipes | videoclipes
| v죥os}, este {local | site | blog} poderia {inegavelmente | certamente | definitivamente} ser um do {mais ben襩ca | muito melhores | maior | melhores} em
seu {nicho | campo}. {Incr쵥l | Ǡincr쵥l | Muito bom | Fantico | Soberba | Bom | Maravilhosa | Fantico | Excelente | grande} blog!
|
Seu estilo {矴⭠| 矼 短uito | 軠exclusivo {comparado com | em compara袯 com} {outras
pessoas | outras pessoas} {tenho | Tenho} ler coisas de. {Obrigado por | Obrigado por | Muito obrigado por | Agrade歠por}
postando {quando tiveres | quando tens} a oportunidade, acho que {eu vou
| Eu vou} sndicador | marca livro} {esta pna | este site | neste web site | este blog}.
|
{Muito | Muito} {grande | bom} postar. Eu {simplesmente | srope段 em seu {blog |
weblog} e {queria | desejou} {mencionar | dizer} que {tenho | Tenho} {realmente | verdadeiramente} {desfrutado | amei} {navega袯 | navegandoing
ao redor} seu {blog | weblog} postos. {Em todo o caso | Afinal de contas} {eu vou | Vou} estar assinando {para seu | na sua
| em seu | para seu} {alimentar | feed rss} e {espero | Espero | Eu estou esperando} voc蟥screver {novamente |
mais uma vez} {em breve | muito em breve}! |
Eu sou {impressionado | espantado}, {devo dizer
| Tenho que admitir}. {Raramente | Raramente} eu fazer {encontro | deparar} um blog 矻ambos
| igualmente | tanto igualmente} educativa e {divertido | envolvente |
interessante | divertido}, e {deixe-me dizer | sem d䵢},
{tem | tem} bateu o prego na cabe柮 {O problema 矼 O problema 軠{algo que | algo
que | algo | uma quest⭠que} {n⭠suficiente | muito poucos} {s⭠pessoas | pessoal 矼 homens e
mulheres s⮽ falando inteligentemente sobre. {Eu sou | Eu sou
| Agora eu sou} muito feliz {que eu | I} {deparei com | encontrado | deparei} isto {em meu | durante meu} {procurar | ca栲}
algo {relativas a este | respeito deste | sobre isso}.
|
Hmm-{parece | aparece | parece} como seu {local | site | blog} comeu o meu primeiro coment౩o (foi {extremamente | super} longo) ent⭠eu acho que eu vou resumir o que eu {enviada
| tinha escrito | escreveu} e dizer, eu estou completamente
apreciando seu blog. Eu {tamb諠| tamb謽 sou um aspirante blog {blogger
| escritor} mas eu ainda sou novo para {tudo |
tudo}. Tem algum {dicas 䭒 | recomenda败s | dicas e sugest| pontos | sugest| dicas} para {inexperiente
| pela primeira vez | novato | iniciante | iniciante | newbie} blog escritores?
Eu gostaria {certamente | definitivamente | genuinamente
| realmente} agrade歮 |
{Muito | Muito} bom post. Eu tropecei em cima seu {blog | weblog} e {queria | desejou} falar isso {tenho | Tenho} {realmente |
verdadeiramente} desfrutado {navega袯 | navegandoing ao redor} suas postagens no blog.
{Em todo o caso | Afinal de contas} {eu vou | Vou} estar assinando seu {alimentar | feed rss} e eu espero que voc蟥screva novamente {em breve | muito em
breve}! |
Eu gosto do {valioso | 䭢 {informa袯 | informa袯} voc蟦ornecer em seus artigos.
{Eu vou | I’ll} indicador seu {weblog | blog} e verifique
novamente aqui {frequentemente | regularmente}. {Eu
sou | Eu sou} bastante {certos | certeza} {eu vou | Eu vou} aprender {muitas | muitos | muito |
muita | muitos} coisas novas aqui! {Boa sorte | Boa
sorte} para o pro! |
Se voc蟥stiver indo {melhores | mais excelente | melhores} como conte㭵me
| Fa歠| me}, {ssimplesmente | svisite | ir para ver | uma visita | pagar uma
visita r௩da} isto {site | web site | local | pna web} {todos os dias | di౩o | todos os dias | o tempo todo} {porque | desde | como | pela raz⭠que}-{fornece
| oferece | d� apresenta} {qualidade | recurso} Sum౩o,
obrigado |
Escreva mais, 矴udo o que tenho a dizer. Literalmente,
parece que voc蟳e baseou no v죥o para seu ponto de vista.
Voc蟻claramente | definitivamente | obviamente}
que sabem que voc蟥st�alando, por que
{res죵os | Jogue fora} sua intelig魣ia em apenas postar v죥os para seu {blog
| local | weblog} quando voc蟰oderia estar nos dando algo {esclarecedor
| informativo} para ler? |
{Altamente | Muito} {energ賩co | descritivo} {blog |
artigo | post}, eu {desfrutado | gostei | amei} que {muito | bit}.
Haver�ma parte 2? |
{Bom | Excelente | Post grande}. {Eu costumava ser | Eu era} verifica袯 {continuamente |
constantemente} isto {blog | weblog} e {eu sou | Eu sou} {inspirou
| impressionado}! {Muito | Extremamente} {䭒 | 䭢 {informa袯 | informa袯} {especialmente |
particularmente | especificamente} o {final | 䎎a | final | restantes | fechar} {fase |
parte | se袯} 🙂 Eu {cuidar | cuidar | lidar com | manter
| identificador} tais {informa袯 | informa袯} {muito
| muito}. {Eu costumava ser | Era} {buscando | procurando} isto
{particular | certas} {informa袯 | informa败s} para um {tempo | muito {longo | longas} tempo}.
{Obrigado | Obrigado} e {boa sorte | boa sorte}. |
{Bom | Excelente | Post grande}. Eu estava verificando {continuamente | constantemente} este blog e {eu sou |
Eu sou} impressionado! {Muito | Extremamente} {䭒 | 䭢 {informa袯 | informa袯} {especialmente
| particularmente | especificamente} a 䎎a parte :
) Eu me importo com tal {informa袯 | informa袯} {muito | muito}.
Eu estava {buscando | procurando} isto {particular | certas} {informa袯 | informa败s} para
um {tempo | muito tempo}. Obrigado e {boa sorte | boa
sorte}. |
{Grande | Awesome} {post | artigo}. |
Apcheck-out | olhando | investigando | olhando por cima | explorando | repassando} {alguns da |
um n䑓 da | um punhado do} {posts do blog | blog artigos |
artigos} na seu {site | web site | local | pna web | blog},
{eu verdadeiramente | Eu mesmo | Eu honestamente | Eu seriamente}
{como seu | apreciar seu} {forma de | t袮ica
de} {blogging | escrevendo um blog}. Eu {marcados | salvou | livro marcado | livro marcado | adicionado | salvou como
favorito} para meu marcador {site | local | Web page} lista e ser�erificar volta
{logo | num futuro pro}. {Confira | D蟵ma olhada | Por favor visite} meu {web site | site} {tamb諠| tamb謽 e {me avise | diga} {que | como voc蟳e sente | sua opini⮽.
|
{Um interessante | Uma fascinante | Um intrigante | Um motivando} discuss⭠{vale | 矤efinitivamente vale a pena} coment౩o.
{Eu acho | Eu acredito | Eu acredito | Eu acho que |
N⭠h�䵢 que} {que voc蟤eve | que devia | que voc蟰recisa} {escrever | publicar} {mais sobre | mais sobre} isto {to | assunto | quest⭠| assunto}, {pode n⭠| pode n⮽ ser
um tabu {assunto | importa} mas {geralmente | geralmente
| normalmente} {as pessoas n⭠fazem | pessoas don ‘ t | pessoal n⮽ {falar sobre | discutir | falar} {tais | estas} {tos
| temas | quest. Para a pra! {Sa㭍 Muito obrigado | Tudo de melhor | Considera败s amis | Melhores desejos}!
|
{Claro | obviamente | naturalmente | certamente} como seu {web site | site | web site} {no entanto | mas} voc蟻precisa
| precisa} {teste | verificar | d蟵ma olhada} a ortografia em {muitos |
v౩os} de seus posts. {Um n䑓 | Diversos | Muitos}
de eles est⭠repleto de ortografia {problemas | quest e eu {em encontrar | encontrar | encontrar} muito {incos | problem೩co} {dizer | informar} {a verdade | a realidade} {por outro lado | no entanto
| novamente |, no entanto,} {eu vou | I’ll} {certamente | certamente
| definitivamente} vem {volta | novo} novamente.
|
Fa歠{aceitar como verdade com | concordo com | acreditar |
considerar | confian栽 {todos o | todos o} {ideias | conceitos | ideias}
{voc蟴em | tem} {apresentado | introduziu | ofereceu} {para seu | na sua |
em seu | para seu} postar. {S⭠| Eles s⮽ {muito |
realmente} convincente {e ser� e pode} {definitivamente | certamente} funcionar.
{Ainda | N⭠obstante}, os posts s⭠{tamb諠| muito} {breve |
r௩da | curta} para {iniciantes | iniciantes | novi殳 | arrancadores}.
{Pode apenas | Pode | } Voc蟰oderia {estender | prolongar | alongar}-los
{um pouco | um pouco} de {pra | subsequentes} tempo?
{Obrigado | Obrigado} para o post. |
{Meu esposo e eu | N Meu parceiro e eu} trope段 aqui {| vindo de um | de um | por um} diferentes {pna web | site | pna | endere歠web} e pensei que eu {pode | pode tamb諠| pode tamb諠| deve} checar as coisas.
Gosto do que vejo ent⭠{agora estou | agora estou | s seguir-te.
Ansiosos para {repassando | explorando | descobrir
sobre | olhando | check-out | olhando | investigando} sua pna web {novamente | novamente
| pela segunda vez | repetidamente}. |
{Muito bom | Excelente | Bom | Muito bom} {post | artigo | write-up | blog post}.
Eu {certamente | definitivamente | absolutamente} {amo | apreciar} {este
website | este site}. {Continue assim | Continue o bom trabalho | Ficar com
ela | Continue a escrever | Obrigado}! |
Alguma vez {pensado | considerado} {publica袯 | criando | escrevendo} um {livro | ebook} ou
convidado de autoria de outro {sites | sites | blogs}?
Eu tenho um blog {baseado | centrado | baseado} na mesma {informa败s | ideias | temas | tos} voc蟤iscutir e teria {como realmente | amo} t謬o a
compartilhar algumas hists/informa败s.
Eu sei meu {assinantes | audi魣ia | telespectadores | visitantes | leitores} seria {desfrutar | valor | apreciar} seu
trabalho. Se {豠| 軠nem remotamente interessado, sinta-se livre para {enviar | atirar} me um {email
| email | e-mail}. |
{Meu esposo e eu | N Meu parceiro e eu}
trope段 aqui {| vindo de um | de um | por um} diferentes {pna web | site | pna | endere歠web} e pensei que eu
{pode | pode tamb諠| pode tamb諠| deve} checar as coisas.
Gosto do que vejo ent⭠{agora estou | agora estou | s seguir-te.
Ansiosos para {repassando | explorando | descobrir sobre | olhando
| check-out | olhando | investigando} sua pna web {novamente
| novamente | pela segunda vez | repetidamente}.
|
{Bom | Excelente | Blog grande} aqui! Tamb諠seu {site | local | web site}
carrega {r௩do | muito r௩do}! O que {host | host da web} voc蟥st�sando?
D�e seu link de afiliado para seu host? Quem me dera meu {site
| local | web site} carregado como {r௩do | rapidamente} como o seu lol |
{Ol� Sauda败s | Ei l� Ei | Bom dia | Ol� Oi l� Ol� Oi}!
Eu sei que isto 矻meio | um pouco | meio} off-topic mas eu queria saber
qual plataforma de blog que voc蟥st�sando para isso {local | site}?
Estou ficando {cansado | farto | farto} do WordPress porque tive
{quest| problemas} com os hackers e eu estou olhando para {op败s | alternativas}
para outra plataforma. Eu seria {grande | impressionante
| fantico} se voc蟰oderia me aponte na dire袯 de uma boa plataforma.
|
{Ol� Sauda败s | Ei l� Ei | Bom dia | Ol� Oi l� Ol� Oi}!
Eu sei que isto 矻meio | meio | um pouco} off-topic mas eu queria saber se
voc蟳abe onde eu poderia {encontrar | buscar | localizar} um plugin de captcha para meu formul౩o de coment౩o?
Eu estou usando a mesma plataforma de blog como o seu e eu estou tendo {problemas
| dificuldade | problemas} encontrar um? Muito obrigado!
|
{Ol� Sauda败s | Ei l� Ei | Bom dia | Ol� Oi l� Ol�
Oi}! Esta 短inha primeira visita ao seu blog!
Nomos um {grupo | cole袯 | equipe} de volunt౩os e come栮do
um novo {iniciativa | projeto} em uma comunidade no mesmo nicho.
Seu blog nos forneceu {valioso | 䭢| ben襩co}
informa败s para trabalhar em. Voc蟦ez um {maravilhosa | pendentes | extraordin౩a | maravilhoso}
emprego! |
{Quando eu | Ap} {originalmente | inicialmente} {comentou | deixou um coment౩o} eu {parecem ter | parecem ter} {clicado | cliquei no} o – notificar-me quando novos coment౩os forem
adicionados-checkbox {e agora | e de agora em diante} {cada
vez um | toda vez que um | sempre que um} coment౩o 矡dicionado
{fico | Receber | Recebo} {quatro | 4} e-mails {com o mesmo | com o exato mesmo} coment౩o.
{Existe | Talvez haja | Tem que haver} {forma | meios |
um m賯do fࢩl} {voc蟰ode | voc衩 capaz de} me remover esse
servi歿 {Obrigado | Muito obrigado | Obrigado | Sa㭍 Muito obrigado | Apreci�o | Kudos}!
|
{Primeiro fora | Primeiro de tudo} {eu quero | Eu gostaria de} dizer {grande | impressionante
| fantico | soberba | maravilhoso | fantico | excelente} blog!
Eu tinha uma pergunta r௩da {isso | em que | que} eu gostaria de pedir {se voc蟤on ‘
t | se voc蟮⭠fizer isso} mente. Eu era {curioso | interessados} {saber | descobrir} como voc蟣oncentre-se e limpar {sua
mente | seus pensamentos | cabe栽 {antes | antes de} escrevendo.
{Eu tenho | Tenho} tinha {tempos dif좥is | tempos dif좥is | tempos dif좥is | problemas |
dificuldade} limpando meu {mente | pensamentos} na
obten袯 de meu {pensamentos | ideias} {fora | l�ora}. {Eu fa歠| Realmente
fa殽 {desfrutar | ter prazer em} escrevendo {mas | no entanto} parece ser
os primeiros 10 a 15 minutos {s⭠| s⭠geralmente | s⭠geralmente | tendem a ser}
{desperdi栤o | perdido} {ssimplesmente} tentando descobrir como
come栲. Qualquer {sugest| ideias | Recomenda败s} ou {dicas | dicas}?
{Obrigado | Parab譳 | Apreci�o | Sa㭍 Obrigado | Muito obrigado}!
|
{Este blog | Este site | Este site} foi… {como fazer | como} diz謬o?
Relevantes!!!! Finalmente {achei | Eu encontrei} {algo que | algo que}
me ajudou. {Obrigado | Muito obrigado | Obrigado | Sa㭍 Muito obrigado | Apreci�o |
Kudos}! |
Tudo 短uito aberto com um {muito claro | limpar | precisos | claro} {explica袯 |
Descri袯 | esclarecimento} da {quest| desafios}.
Foi {verdadeiramente | realmente | definitivamente} informativo.
{Ǡseu site | Seu site 軠{muito 䭢| muito 䭢| extremamente 䭢|
䭢. {Obrigado por | Obrigado por | Muito obrigado
por} partilha! |
Este projeto 矻쬰ios | espetacular | steller
| incr쵥l}! Voc蟻certamente | obviamente |
certamente | definitivamente} sabe como manter um leitor {entretido | divertia}.
Entre sua sagacidade e seus v죥os, eu estava quase mudou-se para come栲 o meu
pro blog (bem, quase… HaHa!) {Grande | Maravilhosa | Fantico | Trabalho excelente}.
Eu realmente {desfrutado | amei} que voc蟴inha a dizer, e mais do que isso, como voc蟡presentou.
Legal demais! |
Vai ser {final | terminar | terminando} do dia de minas,
{mas | exceto | no entanto} antes {final | terminar | terminando} estou lendo isso {grande | enorme | impressionante |
maravilhoso | fantico} {artigo | post | parte de escrita |
n} para {aumentar | melhorar} meu {experi魣ia | conhecimento | sabe-como}.
|
Eu {visite | v�er | uma visita | pagar uma visita r௩da} {todos os dias |
di౩a | cada dia | dia-a-dia | todos os dias} {alguns | alguns} {sites |
sites | web sites | pnas web | Blogues} e {Blogues
| sites | sites de informa袯 | sites} para ler {artigos
| postos | artigos ou clientes | conte㭻 {mas | exceto | no entanto}
isto {blog | weblog | webpage | site | web site} {fornece | oferece |
d� apresenta} {qualidade | recurso} baseado {artigos | postos | conte㭵 escrevendo}.
|
{Ol� Oi l� Heya | Ei l� Oi | Ol� Eu seria perguntar
se voc蟪�iver algum {problemas | problemas | quest com
hackers? Meu 䎎o blog (wordpress) foi hackeado e acabei por perder {meses | muitos meses | alguns meses | v౩as semanas} de trabalho devido a n {backup | backup de dados | back-up}.
Tem algum {solu败s | m賯dos} para {prevenir |
proteger contra | parar} hackers? |
Eu acho que o admin deste {site | web site | local | pna web} 矻realmente | na verdade |
na verdade | verdadeiramente | genuinamente} trabalhando duro {para | em favor
da | em apoio do} dele {site | web site | local | pna web}, {porque | desde | como | pela raz⭠que} aqui
todas as {coisas | informa败s | dados | material} 矱ualidade com base {coisas | informa败s | dados
| material}. |
{Agora | Neste momento | Neste momento | Imediatamente} eu
sou {indo | indo embora | pronto} fazer meu caf矤a
manh᪠{depois | posterior | uma vez | quando | depois} tendo minha vinda de pequeno-almo歠{novamente | novamente
| de novo} para ler {mais | adicionais | mais | outros} not좩as.
|
Eu {como o | como o} {valioso | 䭢 {informa袯 | informa袯} voc蟻fornecer
| fornecer} {para seu | na sua | em seu | para seu} artigos.
{Eu vou | I’ll} indicador seu {weblog | blog} e
{teste | verificar | d蟵ma olhada} {novamente | mais uma vez} {aqui |
aqui} {frequentemente | regularmente}. {Eu sou | Eu sou} {prefiro | muito | um
pouco | ligeiramente | bastante | relativamente
| moderadamente | razoavelmente} {certos | certeza} {eu
vou | Eu vou} {ser informado | seja dita | aprender} {muitas | muitos | muitos | muita | muitos} coisas novas
{certo | adequada} {aqui | aqui}! {Boa sorte | Boa sorte}
para {o seguinte | o pro}! |
Acho que 矻dentre o | entre o} mais {importante | significativo |
vital} {informa袯 | informa袯} para mim.
E {sou | sou} que bom ler seu artigo. Mas {quer | quero | deve} observa袯
na {alguns | alguns} coisas em geral, o {site | local | web site} estilo 矻perfeito |
ideal | grande | maravilhoso}, os artigos 矲ealmente {excelente | legal | grande}:
D. bom trabalho, felicidades |
Ǡum {vergonha | pena} voc蟮⭠tem um bot⭠de doa袯!
Eu gostaria {certamente | sem d䵢 | certamente | definitivamente} doar a este {soberba | brilhante |
fantico | excelente | pendentes} blog! Eu {suponha | palpite} pois
agora eu vou contentar {livro marca袯 | bookmarking} e adicionar
o seu RSS feed para minha conta do Google. Estou ansioso
para {fresco | novo | novo} atualiza败s e vontade {falar | compartilhar} isto {blog | local | site} com meu grupo no
Facebook. {Bate-papo | Falar} em breve! |
Eu n⭠sou muito de um {on-line | internet} leitor deve ser honesto mas seu {Blogues
| sites} muito bom, continue assim! Eu vou em frente e marque seu {local | site} voltar {mais tarde
| na estrada | no futuro | mais tarde}. {Sa㭍 Tudo de melhor | Muito obrigado} |
Isto {artigo | post | peda歠de escrita | n} 矻realmente | realmente | na verdade |
verdadeiramente | genuinamente} um {agradl | agradl | boa | fastidioso}
que {ajuda | auxilia} novo {internet | web | l찵ido | web} {usu౩os | pessoas | espectadores
| visitantes}, que est⭠desejando {para | em favor da} blogging.
|
{Tem | Ƚ {na verdade | na verdade | realmente
| na realidade | verdadeiramente} um {bom | grande} e {䭢| 䭢 peda歠de {informa袯 | informa袯}.
{Eu sou | Eu sou} {satisfeito | feliz | feliz} {que voc蟼 que voc蟳implesmente |
que voc蟡penas} compartilhado isto {䭢| 䭢 {informa袯 | informa袯} conosco.
Por favor {permanecer | manter} nos {informado | actualizado} como este.
{Obrigado | Obrigado} para partilha. |
Isto {artigo | post | parte de escrita | n} {fornece | oferece | d� apresenta} clara ideia {para | projet
I rattling glad to find this website on bing, just what I was looking for : D likewise saved to fav.
I every time spent my half an hour to read this blog’s
articles or reviews every day along with a cup of coffee.
Great write-up, I am regular visitor of one¦s blog, maintain up the excellent operate, and It’s going to be a regular visitor for a lengthy time.
I truly appreciate this post. I have been looking all over for this! Thank goodness I found it on Bing. You’ve made my day! Thx again
It’s best to take part in a contest for the most effective blogs on the web. I will suggest this site!
Hey! This post couldn’t be written any better! Reading this post reminds me of my previous room mate! He always kept talking about this. I will forward this page to him. Fairly certain he will have a good read. Thank you for sharing!
Greetings! This is my 1st comment here so I just wanted to give a quick shout out and say I genuinely enjoy reading your articles. Can you recommend any other blogs/websites/forums that cover the same topics? Thank you!
Wow that was odd. I just wrote an incredibly long comment but after I clicked submit
my comment didn’t appear. Grrrr… well I’m not
writing all that over again. Anyhow, just wanted to say great blog!
Here is my web-site Promotions agency near Me
Hello! I know this is kinda off topic but I was wondering which blog platform are you using for this website? I’m getting sick and tired of WordPress because I’ve had issues with hackers and I’m looking at alternatives for another platform. I would be awesome if you could point me in the direction of a good platform.
I’ve been browsing on-line greater than three hours lately, yet I by no means discovered any fascinating article like yours. It¦s pretty worth sufficient for me. In my view, if all webmasters and bloggers made excellent content as you did, the web can be much more useful than ever before.
I appreciate your work, appreciate it for all the useful content.
Hi there very cool blog!! Guy .. Excellent .. Superb .. I will bookmark your web site and take the feeds additionallyKI’m happy to search out a lot of helpful information right here in the submit, we’d like develop more techniques in this regard, thank you for sharing. . . . . .
Fantastic web site. A lot of helpful information here. I am sending it to several pals ans also sharing in delicious. And naturally, thank you in your sweat!
Wonderful items from you, man. I have understand your stuff previous to and you’re simply too wonderful. I really like what you’ve acquired here, really like what you are stating and the way in which during which you say it. You make it entertaining and you still take care of to keep it wise. I cant wait to learn far more from you. This is really a tremendous web site.
I have been browsing on-line more than three hours lately,
yet I never found any attention-grabbing article like yours.
It is lovely worth enough for me. Personally, if all website owners and bloggers made excellent content material as you did, the net can be much more
useful than ever before.
F*ckin’ remarkable issues here. I’m very glad to peer your post. Thank you a lot and i’m taking a look forward to contact you. Will you kindly drop me a mail?
What’s Happening i am new to this, I stumbled upon this I’ve discovered It absolutely helpful and it has aided me out loads. I’m hoping to contribute & aid other customers like its aided me. Good job.
I am typically to blogging and i really recognize your content. The article has really peaks my interest. I’m going to bookmark your website and keep checking for brand new information.
Having read this I thought it was very informative. I appreciate you taking the time and effort to put this article together. I once again find myself spending way to much time both reading and commenting. But so what, it was still worth it!
Nice post. I was checking constantly this blog and I am impressed! Very helpful information particularly the last part 🙂 I care for such info a lot. I was looking for this certain info for a long time. Thank you and best of luck.
I’d constantly want to be update on new posts on this internet site, saved to my bookmarks! .
Woh I like your blog posts, bookmarked! .
Hello! I’m at work browsing your blog from my new iphone 4!
Just wanted to say I love reading your blog and look forward to all your posts!
Carry on the excellent work!
Today, I went to the beachfront with my kids. I found a sea shell and gave it to my 4 year old daughter and said “You can hear the ocean if you put this to your ear.” She placed the shell to her ear and screamed. There was a hermit crab inside and it pinched her ear. She never wants to go back! LoL I know this is entirely off topic but I had to tell someone!
Greetings from Ohio! I’m bored at work so I decided to browse your website on my iphone during lunch break. I love the information you present here and can’t wait to take a look when I get home. I’m surprised at how fast your blog loaded on my phone .. I’m not even using WIFI, just 3G .. Anyways, excellent blog!
Nice blog right here! Also your web site quite a bit up fast! What web host are you the use of? Can I am getting your associate link for your host? I desire my web site loaded up as quickly as yours lol
Wow! This can be one particular of the most useful blogs We’ve ever arrive across on this subject. Basically Great. I’m also an expert in this topic so I can understand your hard work.
Piece of writing writing is also a excitement, if you be familiar with after that
you can write or else it is difficult to write.
Keep working ,great job!
However, let’s additionally explain that online search engine may dissatisfy you in this regard.
Feel free to visit my web-site; http://www.pastamassarelli.com/forum/topic.php?id=171591
Write more, thats all I have to say. Literally, it seems as though you relied on the video to make your point. You definitely know what youre talking about, why throw away your intelligence on just posting videos to your weblog when you could be giving us something informative to read?
Hello, i feel that i noticed you visited my blog so i got here to “go back the prefer”.I am attempting to find issues to enhance my website!I suppose its ok to use a few of your ideas!!
You could certainly see your skills in the work you write. The world hopes for even more passionate writers like you who are not afraid to say how they believe. Always go after your heart.
An interesting discussion is worth comment. I think that you should write more on this topic, it might not be a taboo subject but generally people are not enough to speak on such topics. To the next. Cheers
Hey! Do you know if they make any plugins to protect against hackers? I’m kinda paranoid about losing everything I’ve worked hard on. Any tips?
I visited a lot of website but I conceive this one has got something special in it in it
I am so happy to read this. This is the type of manual that needs to be given and not the accidental misinformation that’s at the other blogs. Appreciate your sharing this greatest doc.
Thank you for all your hard work on this web site. My aunt really loves setting aside time for investigation and it is easy to understand why. I know all concerning the dynamic medium you render good tricks via the web site and as well as inspire participation from some other people on this situation then our favorite girl is truly becoming educated a great deal. Enjoy the rest of the new year. You’re the one doing a splendid job.
I was just looking for this info for a while. After six hours of continuous Googleing, finally I got it in your site. I wonder what’s the lack of Google strategy that do not rank this kind of informative sites in top of the list. Generally the top websites are full of garbage.
I am sure this paragraph has touched all the internet viewers,
its really really nice piece of writing on building up new webpage.
Simply wanna say that this is invaluable, Thanks for taking your time to write this.
Hello very nice blog!! Guy .. Beautiful .. Superb .. I will bookmark your website and take the feeds additionally?KI am happy to search out numerous useful information right here in the post, we need develop more strategies in this regard, thank you for sharing. . . . . .
It’s laborious to search out knowledgeable people on this topic, but you sound like you know what you’re speaking about! Thanks
I couldn’t resist commenting
Everything is very open and very clear explanation of issues. was truly information. Your website is very useful. Thanks for sharing.
hello there and thank you for your information – I have definitely picked up something new from right here. I did however expertise some technical issues using this web site, since I experienced to reload the site many times previous to I could get it to load correctly. I had been wondering if your web hosting is OK? Not that I’m complaining, but sluggish loading instances times will very frequently affect your placement in google and can damage your high quality score if ads and marketing with Adwords. Well I am adding this RSS to my e-mail and can look out for much more of your respective interesting content. Ensure that you update this again soon..
I just could not depart your website prior to suggesting that I extremely enjoyed the standard information a person provide for your visitors? Is gonna be back often to check up on new posts
Thanks for any other magnificent post. The place else may just anybody get that kind of info in such an ideal method of writing? I have a presentation subsequent week, and I’m at the search for such info.
Here is my website – https://heatwellheater.net
Hello. impressive job. I did not anticipate this. This is a impressive story. Thanks!
Its fantastic as your other content : D, thankyou for putting up. “The rewards for those who persevere far exceed the pain that must precede the victory.” by Ted W. Engstrom.
I appreciate, cause I found just what I was looking for. You’ve ended my four day long hunt! God Bless you man. Have a nice day. Bye
You actually make it appear so easy along with your presentation but I to find this matter to be actually one thing that I believe I would by no means understand. It sort of feels too complex and extremely huge for me. I am taking a look forward for your next post, I will try to get the dangle of it!
Yeah bookmaking this wasn’t a speculative determination outstanding post! .
It’s the best time to make some plans for the future and it’s time to be happy. I’ve read this post and if I could I desire to suggest you few interesting things or tips. Maybe you can write next articles referring to this article. I wish to read even more things about it!
You really make it seem so easy with your presentation however I to find this topic to be really something which I think I would never understand. It kind of feels too complicated and very large for me. I’m having a look ahead to your next submit, I’ll attempt to get the cling of it!
F*ckin’ awesome issues here. I’m very glad to look your article. Thanks so much and i am looking ahead to contact you. Will you please drop me a mail?
Hi would you mind letting me know which webhost you’re using? I’ve loaded your blog in 3 completely different internet browsers and I must say this blog loads a lot quicker then most. Can you suggest a good internet hosting provider at a reasonable price? Kudos, I appreciate it!
There is clearly a bundle to realize about this. I feel you made various nice points in features also.
Hey just wanted to give you a quick heads up. The words in your content seem to be running off the screen in Internet explorer. I’m not sure if this is a formatting issue or something to do with browser compatibility but I figured I’d post to let you know. The layout look great though! Hope you get the problem fixed soon. Thanks
Greetings from Los angeles! I’m bored to death at work so I decided to check out your blog on my iphone during lunch break. I enjoy the information you provide here and can’t wait to take a look when I get home. I’m shocked at how fast your blog loaded on my phone .. I’m not even using WIFI, just 3G .. Anyhow, amazing blog!
Wow that was unusual. I just wrote an very long comment but after I clicked submit my comment didn’t show up. Grrrr… well I’m not writing all that over again. Anyhow, just wanted to say excellent blog!
Pretty! This was an incredibly wonderful article. Many
thanks for supplying these details.
Glad to be one of many visitants on this awing website : D.
F*ckin’ amazing things here. I am very glad to see your post. Thanks a lot and i’m looking forward to contact you. Will you please drop me a mail?
Just what I was searching for, thanks for posting.
Nice read, I just passed this onto a friend who was doing a little research on that. And he just bought me lunch as I found it for him smile So let me rephrase that: Thanks for lunch! “We steal if we touch tomorrow. It is God’s.” by Henry Ward Beecher.
Hi, Neat post. There’s a problem with your website in internet explorer, might test this?K IE still is the market leader and a large section of people will omit your magnificent writing because of this problem.
Hello, you used to write wonderful, but the last several posts have been kinda boring?K I miss your tremendous writings. Past several posts are just a bit out of track! come on!
I like this web blog very much, Its a real nice post to read and find info . “Anyone can stop a man’s life, but no one his death a thousand doors open on to it. – Phoenissae” by Lucius Annaeus Seneca.
It’s really a nice and useful piece of info. I’m glad that you shared this helpful information with us. Please keep us up to date like this. Thanks for sharing.
It’s really a great and useful piece of information. I am happy that you simply shared this helpful info with us. Please stay us up to date like this. Thank you for sharing.
Hey there I am so glad I found your webpage, I really found you by accident, while I was searching on Google for something else, Nonetheless I am here now and would just like to say many thanks for a fantastic post and a all round interesting blog (I also love the theme/design), I don’t have time to go through it all at the minute but I have saved it and also added your RSS feeds, so when I have time I will be back to read more, Please do keep up the great job.
I really enjoy reading through on this web site, it has got wonderful content.
Its such as you read my thoughts! You seem to know so much about this, like you wrote the book in it or something. I believe that you just can do with a few p.c. to drive the message home a little bit, however other than that, this is excellent blog. A fantastic read. I’ll certainly be back.
wonderful submit, very informative. I wonder why the opposite experts of this sector do not understand this. You should continue your writing. I’m sure, you’ve a great readers’ base already!
If some one needs to be updated with hottest technologies then he must be pay
a quick visit this website and be up to date every
day.
Perfect work you have done, this internet site is really cool with great info .
I think other web-site proprietors should take this website as an model, very clean and magnificent user genial style and design, as well as the content. You are an expert in this topic!
Thanks for any other informative web site. Where else may just I am getting that type of info written in such a perfect method? I’ve a mission that I am simply now operating on, and I have been at the glance out for such information.
You have brought up a very excellent details, appreciate it for the post.
I am impressed with this site, really I am a big fan .
Does your blog have a contact page? I’m having problems locating it but, I’d like to send you an e-mail. I’ve got some creative ideas for your blog you might be interested in hearing. Either way, great website and I look forward to seeing it expand over time.
Definitely believe that which you stated. Your favorite justification seemed to be on the internet the easiest thing to be aware of. I say to you, I certainly get annoyed while people consider worries that they just don’t know about. You managed to hit the nail upon the top as well as defined out the whole thing without having side effect , people can take a signal. Will likely be back to get more. Thanks
What i don’t understood is in fact how you are now not really a lot more neatly-appreciated than you might be now. You are so intelligent. You know thus significantly when it comes to this topic, produced me individually imagine it from so many varied angles. Its like men and women are not interested except it is one thing to accomplish with Lady gaga! Your own stuffs excellent. Always handle it up!
Dead indited content, Really enjoyed examining.
trouve excel
Thanks for the good writeup. It in reality was once a enjoyment account it. Glance complex to far delivered agreeable from you! However, how could we be in contact?
You are a very smart person!
I’m curious to find out what blog system you have been utilizing? I’m experiencing some small security problems with my latest site and I’d like to find something more safe. Do you have any recommendations?
You really make it seem really easy along with your presentation but I in finding this matter to be really something that I think I would never understand. It seems too complex and extremely extensive for me. I am taking a look forward on your subsequent put up, I will attempt to get the hold of it!
obviously like your web-site however you need to check the spelling on quite a few of your posts. A number of them are rife with spelling problems and I to find it very bothersome to tell the reality on the other hand I will certainly come back again.
Hey There. I found your weblog the usage of msn. That is a very neatly written article. I’ll be sure to bookmark it and come back to learn extra of your useful info. Thank you for the post. I’ll definitely comeback.
Wow! Thank you! I constantly wanted to write on my website something like that. Can I include a portion of your post to my blog?
I simply could not go away your website before suggesting that I actually loved the usual info an individual provide for your visitors? Is going to be back often to check out new posts.
I’m really impressed with your writing skills as well as with the layout on your blog. Is this a paid theme or did you customize it yourself? Anyway keep up the nice quality writing, it’s rare to see a nice blog like this one nowadays..
code bootcamp online https://www.howtorunjava.com
It’s hard to find knowledgeable people on this topic, but you sound like you know what you’re talking about! Thanks
Cool blog! Is your theme custom made or did you download
it from somewhere? A design like yours with a few simple tweeks
would really make my blog jump out. Please let me know where you
got your design. Bless you
I don’t even know how I ended up here, but I thought this post was good. I don’t know who you are but definitely you are going to a famous blogger if you are not already 😉 Cheers!
Thanks for shares.
Currently it appears like WordPress is the preferred blogging platform out there right now. (from what I’ve read) Is that what you’re using on your blog?
certainly like your website but you have to check the spelling on quite a few of your posts. Many of them are rife with spelling issues and I find it very troublesome to tell the truth nevertheless I’ll certainly come back again.
Saved as a favorite, I really like your blog!
Thank you so much for giving everyone an exceptionally breathtaking opportunity to read from here. It really is very beneficial and stuffed with fun for me personally and my office co-workers to visit the blog nearly 3 times in 7 days to read the fresh things you have got. And definitely, I’m also certainly impressed with all the eye-popping hints served by you. Some 1 points in this article are really the very best I have had.
An fascinating dialogue is price comment. I think that you should write more on this topic, it won’t be a taboo subject but usually persons are not sufficient to speak on such topics. To the next. Cheers
Thanks for shares.
Please make a choice. Along with a choice of conventional legal companies offered
business and employment regulation, the firm
has developed a specialized observe in international immigration legislation in addition to in worldwide
criminal and political legislation. Our high litigators and depth across follow
areas allows shoppers to profit from environment friendly, efficient groups of legal professionals at all levels.
Asia. Go to our legislation workplace in Mississauga to satisfy our staff of legal professionals.
Whether or not a consumer is in search of an aggressive lawyer to battle for
them in a Driver License Suspension or Visitors Ticket case, or to do everything
potential to beat or reduce the penalties from a DUI or
a number of DUI prices, our lawyers provide the best legal software to their circumstances.
If a consumer has been concerned in a debilitating Slip and Fall harm, a lawyer will come to the hospital or their residence.
April 2017. The proposed modifications will trigger a major impression on enterprise immigration. If you’re or have ever been concerned into
deportation by immigration court docket, it’s suggested to seek prompt authorized assist to come back out of the situation.
I wanted to thank you for this great read!! I definitely enjoying every little bit of it I have you bookmarked to check out new stuff you post…
Precisely what I was searching for, thanks for posting.
hello there and thank you for your information – I’ve definitely picked up anything new from right here. I did however expertise several technical issues using this website, as I experienced to reload the web site many times previous to I could get it to load correctly. I had been wondering if your web host is OK? Not that I am complaining, but sluggish loading instances times will sometimes affect your placement in google and can damage your high quality score if ads and marketing with Adwords. Anyway I am adding this RSS to my email and can look out for a lot more of your respective interesting content. Ensure that you update this again soon..
I truly appreciate this post. I have been looking all over for this! Thank goodness I found it on Bing. You have made my day! Thx again!
Please let me know if you’re looking for a article writer for your blog. You have some really good articles and I feel I would be a good asset. If you ever want to take some of the load off, I’d absolutely love to write some content for your blog in exchange for a link back to mine. Please blast me an email if interested. Thanks!
Hello this is kinda of off topic but I was wondering if blogs use WYSIWYG editors or if you have to manually code with HTML. I’m starting a blog soon but have no coding expertise so I wanted to get advice from someone with experience. Any help would be greatly appreciated!
It?¦s really a great and helpful piece of information. I?¦m happy that you simply shared this helpful info with us. Please keep us informed like this. Thanks for sharing.
Thanks for shares.
of course like your web-site however you have to check the spelling on several of your posts. Many of them are rife with spelling problems and I find it very bothersome to inform the reality on the other hand I?¦ll definitely come back again.
You are a very capable individual!
You can certainly see your enthusiasm in the work you write. The world hopes for more passionate writers like you who are not afraid to mention how they believe. All the time follow your heart.
This web site is my aspiration, rattling fantastic style and perfect written content.
Get-X – онлайн игра с реальным выводом средств официальный сайт
I like what you guys are up also. Such smart work and reporting! Keep up the excellent works guys I have incorporated you guys to my blogroll. I think it will improve the value of my site 🙂
Valuable information. Lucky me I discovered your website by chance, and I am shocked why this twist of fate did not happened in advance! I bookmarked it.
You made some respectable factors there. I regarded on the internet for the difficulty and found most individuals will associate with together with your website.
Thank you for shares.
Really good information can be found on site.
Thank you for sharing with us, I think this website really stands out : D.
Today, while I was at work, my sister stole my iphone and tested to see if it can survive a thirty foot drop, just so she can be a youtube sensation. My iPad is now destroyed and she has 83 views. I know this is entirely off topic but I had to share it with someone!
Thanks for sharing superb informations. Your web site is very cool. I’m impressed by the details that you?¦ve on this web site. It reveals how nicely you understand this subject. Bookmarked this web page, will come back for more articles. You, my friend, ROCK! I found simply the info I already searched everywhere and just couldn’t come across. What an ideal web site.
Hey there, I think your blog might be having browser compatibility issues. When I look at your blog in Firefox, it looks fine but when opening in Internet Explorer, it has some overlapping. I just wanted to give you a quick heads up! Other then that, superb blog!
Hi, for all time i used to check webpage posts here early in the
morning, as i enjoy to gain knowledge of more and more.
https://www.mistralbg.com
Excellent, what a weblog it is! This web site presents valuable facts
to us, keep it up.
Yeah bookmaking this wasn’t a bad conclusion outstanding post! .
Hi there, I found your blog by way of Google whilst searching for a similar matter, your web site got here up, it appears great. I’ve bookmarked it in my google bookmarks.
Having read this I thought it was very informative. I appreciate you taking the time and effort to put this article together. I once again find myself spending way to much time both reading and commenting. But so what, it was still worth it!
Thanks for shares.
I’ll immediately grasp your rss as I can not find your email subscription link or newsletter service. Do you have any? Kindly permit me recognize so that I may subscribe. Thanks.
Well I sincerely liked studying it. This subject procured by you is very effective for proper planning.
Outstanding post, you have pointed out some fantastic details , I likewise think this s a very good website.
Somebody necessarily assist to make critically articles I might state. This is the very first time I frequented your web page and so far? I amazed with the analysis you made to create this actual publish extraordinary. Great job!
yes lol okay
I’m not positive the place you are getting your information, but great topic. I needs to spend some time studying much more or working out more. Thanks for great info I used to be in search of this info for my mission.
This is the appropriate weblog for anyone who desires to seek out out about this topic. You notice so much its virtually laborious to argue with you (not that I really would want…HaHa). You definitely put a brand new spin on a subject thats been written about for years. Nice stuff, simply great!
Hello your website is so good.
Very good written information. It will be valuable to anybody who usess it, including me. Keep up the good work – looking forward to more posts.
After all, what a great site and informative posts, I will upload inbound link – bookmark this web site? Regards, Reader.
Hi there, You’ve done an incredible job. I’ll definitely digg it and personally suggest to my friends. I am sure they’ll be benefited from this website.
What i do not understood is if truth be told how you’re no longer actually a lot more neatly-favored than you might be right now. You are so intelligent. You already know thus considerably in terms of this subject, produced me personally believe it from numerous varied angles. Its like women and men aren’t fascinated until it’s something to accomplish with Woman gaga! Your own stuffs nice. At all times deal with it up!
What i do not realize is actually how you’re not actually much more well-liked than you may be now. You are so intelligent. You realize thus considerably relating to this subject, made me personally consider it from a lot of varied angles. Its like women and men aren’t fascinated unless it’s one thing to accomplish with Lady gaga! Your own stuffs outstanding. Always maintain it up!
Mauris eget feugiat eros, vitae convallis massa.
Wow! Thank you! I continually wanted to write on my site something like that. Can I include a portion of your post to my website?
I like this site so much, saved to my bookmarks. “I don’t care what is written about me so long as it isn’t true.” by Dorothy Parker.
Hi , I do believe this is an excellent blog. I stumbled upon it on Yahoo , i will come back once again. Money and freedom is the best way to change, may you be rich and help other people.
I cling on to listening to the rumor talk about receiving boundless online grant applications so I have been looking around for the most excellent site to get one. Could you tell me please, where could i find some?
Spot on ᴡith thiѕ write-ᥙp, I actuallу think this
amazing site needѕ muchh morе attention. I’ll prօbably be baсk agаin to
reasd more, tһanks for tһe info!
Feel free to suf too my web blog – blogging
you are in reality a good webmaster. The web site loading pace is amazing. It seems that you are doing any distinctive trick. Also, The contents are masterpiece. you have done a excellent activity in this subject!
I have been absent for a while, but now I remember why I used to love this site. Thanks , I¦ll try and check back more often. How frequently you update your site?
Hello there! I know this is kind of off topic but I was wondering which blog platform are you using for this website? I’m getting tired of WordPress because I’ve had issues with hackers and I’m looking at alternatives for another platform. I would be fantastic if you could point me in the direction of a good platform.
Magnificent site. A lot of useful info here.
I am sending it to several buddies ans additionally sharing in delicious.
And of course, thank you to your sweat!
Thank you very much.
Wow that was odd. I just wrote an really long comment but after I clicked submit my comment didn’t show up. Grrrr… well I’m not writing all that over again. Anyway, just wanted to say wonderful blog!
I truly appreciate this post. I¦ve been looking all over for this! Thank goodness I found it on Bing. You have made my day! Thanks again
Great beat ! I wish to apprentice whilst you amend your website, how can i subscribe for a weblog website? The account aided me a acceptable deal. I had been a little bit acquainted of this your broadcast offered bright transparent idea
Thanks for shares.
Woh I like your articles, saved to fav! .
You actually make it seem so easy with your presentation but I to find this topic to be really one thing that I think I would never understand. It kind of feels too complicated and extremely wide for me. I’m taking a look forward for your subsequent put up, I will attempt to get the hold of it!
My partner and I stumbled over here coming from a different web page and thought I should check things out. I like what I see so now i am following you. Look forward to going over your web page for a second time.
Oh my goodness! an amazing article dude. Thanks Nonetheless I’m experiencing issue with ur rss . Don’t know why Unable to subscribe to it. Is there anybody getting similar rss problem? Anyone who is aware of kindly respond. Thnkx
Thanks for the sensible critique. Me and my neighbor were just preparing to do some research on this. We got a grab a book from our area library but I think I learned more from this post. I’m very glad to see such magnificent information being shared freely out there.
Hi, I think your site might be having browser compatibility issues. When I look at your website in Safari, it looks fine but when opening in Internet Explorer, it has some overlapping. I just wanted to give you a quick heads up! Other then that, fantastic blog!
Great beat ! I would like to apprentice while you amend your web site, how can i subscribe for a blog web site? The account helped me a acceptable deal. I had been a little bit acquainted of this your broadcast provided bright clear idea
Thanks for shares.
Youre so cool! I dont suppose Ive read something like this before. So good to find any individual with some authentic thoughts on this subject. realy thanks for beginning this up. this website is something that’s wanted on the web, someone with a bit of originality. useful job for bringing something new to the web!
Very nice post. I just stumbled upon your weblog and wanted to say that I’ve truly enjoyed surfing around your blog posts. After all I will be subscribing to your rss feed and I hope you write again very soon!
I like what you guys are up also. Such intelligent work and reporting! Keep up the superb works guys I have incorporated you guys to my blogroll. I think it’ll improve the value of my web site 🙂
It’s actually a nice and helpful piece of info.
I am satisfied that you shared this helpful info with us.
Please stay us up to date like this. Thanks for sharing.
I truly appreciate this post. I?¦ve been looking everywhere for this! Thank goodness I found it on Bing. You have made my day! Thank you again
Keep up the excellent work, I read few posts on this site and I believe that your site is real interesting and contains circles of wonderful information.
You are a very clever person!
Very interesting topic, appreciate it for putting up. “Time flies like an arrow. Fruit flies like a banana.” by Lisa Grossman.
Thanks for share.
The next time I read a blog, I hope that it doesnt disappoint me as much as this one. I mean, I know it was my choice to read, but I actually thought youd have something interesting to say. All I hear is a bunch of whining about something that you could fix if you werent too busy looking for attention.
Having read this I thought it was very informative. I appreciate you taking the time and effort to put this article together. I once again find myself spending way to much time both reading and commenting. But so what, it was still worth it!
I like what you guys are up also. Such clever work and reporting! Keep up the superb works guys I have incorporated you guys to my blogroll. I think it’ll improve the value of my website 🙂
Hey very nice blog!
I dugg some of you post as I cerebrated they were very beneficial very helpful
You made some nice points there. I did a search on the issue and found most people will agree with your site.
As a Newbie, I am always searching online for articles that can benefit me. Thank you
We stumbled over here by a different website
and thought I should check things out. I like what
I see so now i’m following you. Look forward to
finding out about your web page repeatedly.
Hello my friend! I want to say that this article is awesome, nice written and include approximately all significant infos. I’d like to see more posts like this.
I very thankful to find this web site on bing, just what I was searching for : D besides saved to favorites.
Whats up very nice site!! Guy .. Beautiful .. Superb .. I’ll bookmark your website and take the feeds also…I am happy to seek out a lot of useful info here in the publish, we want work out more strategies in this regard, thanks for sharing.
Thanks for shares.
Hi there, all the time i used to check webpage posts here early in the break
of day, since i enjoy to find out more and more.
I think this website has very fantastic written articles posts.
We are a group of volunteers and opening a new scheme in our community. Your website provided us with valuable info to work on. You’ve done a formidable job and our entire community will be grateful to you.
2021 dodge durango interior
Great web site. A lot of useful information here. I?¦m sending it to some pals ans additionally sharing in delicious. And certainly, thank you to your sweat!
Whats Going down i’m new to this, I stumbled upon this I’ve found It absolutely helpful and it has helped me out loads. I am hoping to contribute & assist other customers like its aided me. Good job.
Terrific post however , I was wanting to know if you could write a litte more on this subject? I’d be very grateful if you could elaborate a little bit further. Appreciate it!
You actually make it appear really easy along with your presentation however I
find this matter to be really one thing that I
feel I’d never understand. It kind of feels too
complicated and very extensive for me. I am taking a look forward on your subsequent
put up, I’ll attempt to get the dangle of it!
Awesome article.
Nice post. I learn something totally new and challenging on sites I
stumbleupon on a daily basis. It’s always helpful to read through articles from other authors and practice
a little something from other sites.
I was curious if you ever thought of changing the layout of your blog? Its very well written; I love what youve got to say. But maybe you could a little more in the way of content so people could connect with it better. Youve got an awful lot of text for only having one or two pictures. Maybe you could space it out better?
Hi there i am kavin, its my first occasion to commenting anywhere, when i read this piece of writing
i thought i could also make comment due to
this sensible post.
This actually answered my problem, thank you!
Hi! Quick question that’s completely off topic. Do you know how to make your site mobile friendly? My website looks weird when browsing from my apple iphone. I’m trying to find a template or plugin that might be able to fix this problem. If you have any suggestions, please share. Many thanks!
Hi , I do believe this is an excellent blog. I stumbled upon it on Yahoo , i will come back once again. Money and freedom is the best way to change, may you be rich and help other people.
hello!,I love your writing so so much! share we communicate extra about your post on AOL? I require an expert on this house to solve my problem. May be that’s you! Having a look forward to see you.
I like what you guys are up also. Such intelligent work and reporting! Carry on the excellent works guys I have incorporated you guys to my blogroll. I think it’ll improve the value of my web site 🙂
Hello there, You’ve done a fantastic job. I’ll definitely digg it and personally suggest to my friends. I am sure they will be benefited from this web site.
This is a very good tips especially to those new to blogosphere, brief and accurate information… Thanks for sharing this one. A must read article.
Hiya very cool web site!! Guy .. Beautiful .. Wonderful .. I will bookmark your website and take the feeds additionallyKI’m glad to search out a lot of helpful info right here within the put up, we need develop more techniques in this regard, thank you for sharing. . . . . .
What’s up to every body, it’s my first pay a quick visit of
this webpage; this webpage includes amazing and
actually excellent information in favor of visitors.
For newest information you have to go to see
internet and on web I found this web site as a best website for latest updates.
Perfect work you have done, this site is really cool with great info .
Really Appreciate this post, can you make it so I receive an update sent in an email when you make a fresh post?
I just like the helpful info you supply in your articles. I’ll bookmark your blog and test once more right here frequently. I am slightly certain I’ll learn lots of new stuff proper here! Good luck for the following!
I too think thence, perfectly composed post! .
WONDERFUL Post.thanks for share..extra wait .. …
No matter if some one searches for his required thing, thus he/she wants to be available that in detail, therefore that
thing is maintained over here.
Only wanna comment on few general things, The website style and design is perfect, the written content is real superb. “To imagine is everything, to know is nothing at all.” by Anatole France.
hello there and thank you for your info – I have certainly picked up anything new from right here. I did however expertise several technical points using this web site, since I experienced to reload the website many times previous to I could get it to load correctly. I had been wondering if your hosting is OK? Not that I’m complaining, but slow loading instances times will sometimes affect your placement in google and could damage your high-quality score if advertising and marketing with Adwords. Anyway I’m adding this RSS to my email and can look out for much more of your respective interesting content. Ensure that you update this again soon..
constantly i used to read smaller articles that
also clear their motive, and that is also happening with this post which I am reading now.
BoostMyInsta Instagram
str.Diego 13, London,
E11 17B
(570) 810-1080
how to react to messages on ig
I’ll immediately grab your rss feed as I can not find your email subscription hyperlink or e-newsletter service. Do you have any? Please allow me understand in order that I may just subscribe. Thanks.
Valuable info. Fortunate me I discovered your web site by accident, and I am shocked why this twist of fate did not happened in advance! I bookmarked it.
Usually I do not learn post on blogs, however I would like to say that this write-up very pressured me to try and do so! Your writing taste has been surprised me. Thanks, very great post.
You actually make it seem really easy together with your presentation however I to find this topic to be actually something which I think I would by no means understand. It sort of feels too complex and extremely large for me. I’m having a look forward in your subsequent submit, I?¦ll try to get the hang of it!
Hello, Neat post. There’s a problem along with your website in web explorer, may test this… IE nonetheless is the marketplace leader and a big component to people will leave out your great writing due to this problem.
Hi my friend! I want to say that this post is amazing, great written and come
with almost all important infos. I’d like to peer extra posts like this .
Hmm is anyone else having problems with the images on this blog loading?
I’m trying to figure out if its a problem on my end or
if it’s the blog. Any responses would be greatly appreciated.
Do you mind if I quote a few of your posts as long as I provide credit and sources back to your site? My blog site is in the very same area of interest as yours and my users would truly benefit from a lot of the information you present here. Please let me know if this okay with you. Regards!
Absolutely pent content material, Really enjoyed examining.
Of course, what a great site and educative posts, I definitely will bookmark your website.Have an awsome day!
Today, I went to the beachfront with my kids. I found a sea shell and gave it to my 4 year old daughter and said “You can hear the ocean if you put this to your ear.” She placed the shell to her ear and screamed. There was a hermit crab inside and it pinched her ear. She never wants to go back! LoL I know this is entirely off topic but I had to tell someone!
For the reason that the admin of this web page is working, no hesitation very soon it will be well-known, due to its feature contents.
Very interesting topic, thanks for putting up.
I don’t ordinarily comment but I gotta admit regards for the post on this one : D.
Some genuinely interesting information, well written and broadly speaking user friendly.
The next time I read a blog, I hope that it doesnt disappoint me as much as this one. I mean, I know it was my choice to read, but I actually thought youd have something interesting to say. All I hear is a bunch of whining about something that you could fix if you werent too busy looking for attention.
A person necessarily lend a hand to make critically articles I’d state.
This is the first time I frequented your website page and thus far?
I amazed with the research you made to create this particular submit
incredible. Fantastic process!
It’s onerous to find educated folks on this matter, however you sound like you recognize what you’re talking about! Thanks
Thank you for sharing superb informations. Your site is so cool. I am impressed by the details that you have on this website. It reveals how nicely you perceive this subject. Bookmarked this web page, will come back for more articles. You, my pal, ROCK! I found simply the information I already searched everywhere and just could not come across. What a great web-site.
excellent post.Ne’er knew this, appreciate it for letting me know.
I am curious to find out what blog platform you have been working with? I’m having some small security issues with my latest blog and I’d like to find something more safe. Do you have any suggestions?
Everything is very open and very clear explanation of issues. was truly information. Your website is very useful. Thanks for sharing.
Hello there! Do you use Twitter? I’d like to follow you if that would be okay. I’m definitely enjoying your blog and look forward to new updates.
You are my intake, I possess few blogs and very sporadically run out from brand :). “No opera plot can be sensible, for people do not sing when they are feeling sensible.” by W. H. Auden.
fantastic submit, very informative. I ponder why the other experts
of this sector don’t understand this. You should proceed your writing.
I’m confident, you have a huge readers’ base already!
Thanks on your marvelous posting! I definitely enjoyed reading it, you will be a great author.I will always bookmark your blog and may come back sometime soon. I want to encourage you to ultimately continue your great work, have a nice afternoon!
I’m curious to find out what blog system you happen to be using? I’m experiencing some minor security issues with my latest website and I would like to find something more safe. Do you have any suggestions?
I will immediately grasp your rss feed as I can’t to find your email subscription link or newsletter service. Do you have any? Kindly permit me know in order that I could subscribe. Thanks.
What a data of un-ambiguity and preserveness of precious familiarity about unexpected feelings.
I’d have to verify with you here. Which isn’t one thing I normally do! I take pleasure in reading a publish that can make folks think. Additionally, thanks for permitting me to comment!
Can I simply just say what a relief to discover somebody that actually knows
what they’re talking about online. You definitely understand how to bring a
problem to light and make it important. A lot more people really need to read this and understand this side of the story.
I was surprised that you’re not more popular because you certainly have
the gift.
Attractive section of content. I just stumbled upon your weblog and in accession capital to assert that I get actually enjoyed account your blog posts. Anyway I’ll be subscribing to your augment and even I achievement you access consistently rapidly.
If you would like to obtain a good deal from this post then you have to apply such strategies to your won weblog.
I’ve learn a few good stuff here. Certainly price bookmarking for revisiting. I surprise how so much attempt you put to make one of these magnificent informative website.
An attention-grabbing discussion is worth comment. I believe that you should write more on this matter, it won’t be a taboo topic but generally persons are not sufficient to talk on such topics. To the next. Cheers
No matter if some one searches for his necessary thing, so he/she wishes to be available
that in detail, therefore that thing is maintained over here.
Greetings from Ohio! I’m bored at work so I decided to check out your website on my iphone during lunch break. I really like the information you present here and can’t wait to take a look when I get home. I’m amazed at how quick your blog loaded on my cell phone .. I’m not even using WIFI, just 3G .. Anyhow, great blog!
You actually make it appear so easy with your presentation however I to find this topic to be actually something which I believe I’d by no means understand. It sort of feels too complicated and extremely wide for me. I’m looking ahead for your next publish, I¦ll try to get the grasp of it!
I like this website very much, Its a rattling nice billet to read and find information. “I’d better get off the phone now, I’ve already told you more than I heard myself.” by Loretta Lockhorn.
I have been surfing on-line more than 3 hours these days, but I by no means discovered any attention-grabbing article like yours. It is pretty worth enough for me. Personally, if all website owners and bloggers made just right content as you did, the internet might be a lot more useful than ever before. “Wherever they burn books, they will also, in the end, burn people.” by Heinrich Heine.
Very interesting topic, regards for posting. “Time flies like an arrow. Fruit flies like a banana.” by Lisa Grossman.
Magnificent site. Lots of helpful information here. I am sending it to a few buddies ans also sharing in delicious. And naturally, thank you on your effort!
Howdy are using WordPress for your site platform? I’m new to the blog world but I’m trying to get started and create my own. Do you require any coding expertise to make your own blog? Any help would be really appreciated!
Would love to constantly get updated outstanding web blog! .
You made some nice points there. I looked on the internet for the topic and found most people will approve with your website.
You actually make it seem so easy with your presentation but I find this matter to be really something which I think I would never understand. It seems too complex and extremely broad for me. I am looking forward for your next post, I will try to get the hang of it!
Thank you for sharing excellent informations. Your website is so cool. I am impressed by the details that you have on this website. It reveals how nicely you perceive this subject. Bookmarked this web page, will come back for extra articles. You, my pal, ROCK! I found just the info I already searched all over the place and just couldn’t come across. What an ideal web-site.
Hmm it seems like your blog ate my first comment (it was super long) so I guess I’ll just sum it up what I wrote
and say, I’m thoroughly enjoying your blog. I too am an aspiring blog
writer but I’m still new to everything. Do you have any tips for newbie blog writers?
I’d certainly appreciate it.
Thanks for the sensible critique. Me & my neighbor were just preparing to do a little research on this. We got a grab a book from our local library but I think I learned more from this post. I’m very glad to see such great information being shared freely out there.
It’s arduous to seek out educated folks on this matter, but you sound like you realize what you’re talking about! Thanks
It¦s really a cool and useful piece of information. I¦m happy that you just shared this helpful information with us. Please stay us up to date like this. Thank you for sharing.
you’re really a good webmaster. The web site
loading pace is amazing. It kind of feels that you’re doing any distinctive trick.
In addition, The contents are masterwork. you’ve performed a magnificent process
on this topic!
If you are going for best contents like me, simply pay a quick visit this web site everyday because it gives feature contents, thanks
Pretty section of content. I just stumbled upon your web site and in accession capital to assert that I get actually loved account your weblog posts. Any way I’ll be subscribing for your augment and even I success you get entry to consistently rapidly.
Replica Clothes, Bvlks
str.Diego 13, London,
E11 17B
(570) 810-1080
replica clothes
Hi, I think your website might be having browser compatibility issues. When I look at your blog site in Safari, it looks fine but when opening in Internet Explorer, it has some overlapping. I just wanted to give you a quick heads up! Other then that, amazing blog!
Good day! I know this is somewhat off topic but I was wondering which blog platform are you using for this website? I’m getting tired of WordPress because I’ve had issues with hackers and I’m looking at options for another platform. I would be great if you could point me in the direction of a good platform.
It’s actually a nice and helpful piece of information. I am happy that you shared this useful information with us. Please stay us informed like this. Thanks for sharing.
I know this if off topic but I’m looking into starting my own blog and was curious what all is needed to get set up?
I’m assuming having a blog like yours would cost a pretty penny?
I’m not very web smart so I’m not 100% certain. Any suggestions or advice would
be greatly appreciated. Thank you
I am not really superb with English but I find this really easygoing to read .
Thank you, I have just been looking for information approximately this subject for ages and yours is the best I’ve found out so far. But, what concerning the conclusion? Are you sure about the supply?
I’m curious to find out what blog platform you are utilizing?
I’m having some small security issues with my latest site and I’d like
to find something more secure. Do you have any solutions?
Precisely what I was looking for, thankyou for putting up.
Please let me know if you’re looking for a article author for your
blog. You have some really good articles and I feel I would be a good asset.
If you ever want to take some of the load
off, I’d really like to write some material for your blog in exchange for a link back
to mine. Please blast me an email if interested. Many thanks!
Yes! Finally someone writes about Service Ac.
Hey there! This is kind of off topic but I need some advice from an established blog. Is it very hard to set up your own blog? I’m not very techincal but I can figure things out pretty quick. I’m thinking about setting up my own but I’m not sure where to start. Do you have any ideas or suggestions? Appreciate it
Write more, thats all I have to say. Literally, it seems as though you relied on the video to make your point. You clearly know what youre talking about, why waste your intelligence on just posting videos to your site when you could be giving us something enlightening to read?
you’re in point of fact a excellent webmaster. The site loading speed is incredible. It seems that you are doing any unique trick. Also, The contents are masterwork. you’ve done a excellent job on this topic!
Enjoy playing games and get real money with online slots websites at 918kissthailand
Just wish to say your article is as astounding. The clarity in your post is simply great and i can assume you
are an expert on this subject. Well with your permission let me to grab your RSS feed to keep updated with forthcoming post.
Thanks a million and please carry on the rewarding work.
Very interesting points you have mentioned, thankyou for posting.
Replica Clothes, Bvlks
str.Diego 13, London,
E11 17B
(570) 810-1080
replica clothes
Hi, I do think this is a great website. I stumbledupon it 😉 I’m going to return once
again since I saved as a favorite it. Money and freedom
is the greatest way to change, may you be rich and continue to help other people.
Feel free to visit my web blog – online bed stores
I was looking at some of your blog posts on this internet site and I conceive this web site is rattling informative! Keep on putting up.
Good V I should definitely pronounce, impressed with your web site. I had no trouble navigating through all the tabs and related information ended up being truly easy to do to access. I recently found what I hoped for before you know it in the least. Quite unusual. Is likely to appreciate it for those who add forums or anything, web site theme . a tones way for your client to communicate. Excellent task..
You are my inspiration , I have few web logs and occasionally run out from to brand : (.
I wish to convey my love for your kind-heartedness in support of women who need help on in this field. Your very own commitment to getting the solution all over was really advantageous and have frequently encouraged others just like me to realize their aims. This helpful guide indicates a great deal a person like me and much more to my office colleagues. Many thanks; from each one of us.
Very good information. Lucky me I came across your blog by chance (stumbleupon).
I have book-marked it for later!
Good day I am so grateful I found your weblog,
I really found you by error, while I was looking on Aol for something
else, Nonetheless I am here now and would just like to say many thanks for a
incredible post and a all round exciting blog (I also love the theme/design), I don’t have time to go through
it all at the minute but I have bookmarked it and also added your RSS feeds, so when I
have time I will be back to read more, Please do keep up the excellent job.
Hello just wanted to give you a quick heads up and let you know a few of the images aren’t loading correctly. I’m not sure why but I think its a linking issue. I’ve tried it in two different browsers and both show the same outcome.
Good day! I know this is kind of off topic but I was
wondering which blog platform are you using for this site?
I’m getting sick and tired of WordPress because I’ve had problems with
hackers and I’m looking at options for another platform.
I would be awesome if you could point me in the direction of a good platform.
Hello, i believe that i saw you visited my web site thus i got here to “return the prefer”.I am trying to find issues to improve my website!I guess its good enough to use some of your ideas!!
Hey I am so grateful I found your blog, I really found you by error, while I was researching on Bing for something else, Regardless I am here now and would just like to say thank you for a fantastic post and a all round exciting blog (I also love the theme/design), I don’t have time to read through it all at the minute but I have bookmarked it and also included your RSS feeds, so when I have time I will be back to read much more, Please do keep up the awesome work.
I’m gone to inform my little brother, that he should also visit this blog on regular
basis to take updated from newest information.
Here is my website … ProLife Labs Cream Reviews
Wow that was strange. I just wrote an really long comment but after I clicked submit my comment didn’t appear. Grrrr… well I’m not writing all that over again. Regardless, just wanted to say wonderful blog!
Thanks for the sensible critique. Me and my neighbor were just preparing to do a little research about this. We got a grab a book from our local library but I think I learned more from this post. I’m very glad to see such magnificent info being shared freely out there.
Wonderful web site. Lots of useful information here. I’m sending it to several pals ans additionally sharing in delicious.
And of course, thanks for your sweat!
Great post. I was checking constantly this blog and I am impressed! Very useful info specially the last part 🙂 I care for such info much. I was seeking this particular info for a very long time. Thank you and best of luck.
Hello to every body, it’s my first pay a quick visit of this webpage; this weblog consists of remarkable and really good
stuff in favor of readers.
thanks for shares
Keep this going please, great job!
My web page; Mostbet casino resmi Site Mostbet kazakistan
Ahaa, its fastidious dialogue concerning this post at this place at this webpage, I have
read all that, so now me also commenting at this place.
Excellent, what a website it is! This weblog provides helpful
information to us, keep it up.
I?¦ve been exploring for a bit for any high quality articles or blog posts on this sort of space . Exploring in Yahoo I eventually stumbled upon this site. Reading this information So i am satisfied to exhibit that I’ve an incredibly good uncanny feeling I came upon just what I needed. I so much no doubt will make sure to don?¦t forget this web site and provides it a look on a constant basis.
Generally I don’t learn article on blogs, but I wish to say that this
write-up very forced me to take a look at and do it! Your writing
style has been surprised me. Thanks, very nice article.
I couldn’t resist commenting
Rattling great information can be found on weblog. “The quality of an organization can never exceed the quality of the minds that make it up.” by Harold R. McAlindon.
I’ve been exploring for a little bit for any high
quality articles or weblog posts in this kind of space .
Exploring in Yahoo I at last stumbled upon this website.
Reading this information So i’m happy to convey that I have a very just right uncanny
feeling I found out exactly what I needed. I most for sure will make certain to do not
overlook this website and give it a glance on a relentless basis.
Hi are using WordPress for your blog platform? I’m new to the blog world but I’m trying to get started and create my own. Do you need any coding knowledge to make your own blog? Any help would be greatly appreciated!
Hurrah, that’s what I was exploring for, what a
material! present here at this weblog, thanks admin of this site.
Hey there! Do yoou use Twitter? I’d like to follow you if that would
be okay. I’m definitely enjoying your blog and look forward to new updates.
Check outt my site :: ogłoszenia drobne białystok
Hi every one, here every person is sharing these kinds of experience, so it’s fastidious
to read this web site, and I used to pay a visit this website every day.
Here is my web blog; Syreeta
Nice read, I just passed this onto a friend who was doing a little research on that. And he just bought me lunch as I found it for him smile So let me rephrase that: Thanks for lunch!
What i do not understood is if truth be told how you are no longer actually a lot more well-preferred than you may be now. You are very intelligent. You recognize therefore significantly in the case of this subject, made me personally believe it from so many various angles. Its like men and women aren’t fascinated until it is one thing to do with Woman gaga! Your own stuffs outstanding. Always care for it up!
Thanks for your personal marvelous posting! I quite enjoyed reading it, you may be a great author.I will make certain to bookmark your blog and will
eventually come back later on. I want to encourage you to definitely continue your great writing, have a nice holiday weekend!
Wow, fantastic blog layout! How long have you been blogging for? you make blogging look easy. The overall look of your web site is magnificent, as well as the content!
Some genuinely nice and utilitarian info on this internet site, besides I believe the layout has excellent features.
I am really impressed together with your writing talents and also with the format for your blog. Is this a paid topic or did you customize it your self? Either way stay up the nice high quality writing, it is uncommon to see a great blog like this one these days..
I was suggested this blog by my cousin. I am not sure whether this
post is written by him as nobody else know such detailed about my problem.
You’re wonderful! Thanks!
Hello there, I found your website by way of Google while looking for a similar
subject, your website came up, it appears to be like good.
I’ve bookmarked it in my google bookmarks.
Hi there, just was alert to your blog thru Google, and found that it is truly informative.
I’m going to watch out for brussels. I will appreciate for
those who continue this in future. Lots of folks will likely be
benefited from your writing. Cheers!
Great write-up, I am normal visitor of one?¦s website, maintain up the excellent operate, and It’s going to be a regular visitor for a long time.
Nice read, I just passed this onto a friend who was doing a little research on that. And he just bought me lunch as I found it for him smile So let me rephrase that: Thanks for lunch!
It’s arduous to search out educated individuals on this subject, however you sound like you realize what you’re speaking about! Thanks
It’s hard to seek out educated individuals on this matter, but you sound like you realize what you’re talking about! Thanks
Write more, thats all I have to say. Literally, it seems as though you relied on the video to make your point. You clearly know what youre talking about, why waste your intelligence on just posting videos to your blog when you could be giving us something informative to read?
Thanks for shares
You completed some fine points there. I did a search on the issue and found mainly folks will go along with with your blog.
Ꭱight ɑwау I am going away tߋ dⲟ my breakfast, аfter having my
breakfast comіng aցain too reɑd more news.
Ꮇy web-site :: free blog posting
I really like what you guys tend to be up too. This type of clever work and reporting! Keep up the wonderful works guys I’ve you guys to our blogroll.
Thanks a lot for sharing this with all folks you
really recognise what you are speaking about!
Bookmarked. Kindly also visit my site =). We will have a link change arrangement among us
I am also commenting to let you be aware of of the amazing experience my daughter gained checking your web page. She figured out a lot of details, with the inclusion of what it is like to possess a very effective coaching mood to get most people without hassle learn selected problematic topics. You undoubtedly surpassed her desires. I appreciate you for producing such beneficial, healthy, informative as well as cool tips about your topic to Evelyn.
I’ve been surfing online more than 3 hours today, yet I never found any interesting
article like yours. It is pretty worth enough for me.
In my opinion, if all site owners and bloggers made
good content as you did, the net will be much more useful than ever before.
Thanks for share
It’s remarkable for me to have a web page,
which is good in support of my knowledge. thanks admin
I keep listening to the rumor lecture about getting boundless online grant applications so I have been looking around for the best site to get one. Could you advise me please, where could i find some?
Very interesting subject, thanks for posting.
Thanks for sharing your thoughts about svařovací stroje.
Regards
I have been browsing online greater than three hours today, yet I never found any interesting article like yours. It¦s beautiful price enough for me. In my view, if all site owners and bloggers made excellent content as you probably did, the internet can be a lot more helpful than ever before.
Thanks for share.
Nice weblog right here! Additionally your web site a lot up very fast! What web host are you the usage of? Can I am getting your affiliate hyperlink for your host? I desire my site loaded up as fast as yours lol
Fastidious answers in return of this issue with firm
arguments and telling all regarding that.
This is a very good tips especially to those new to blogosphere, brief and accurate information… Thanks for sharing this one. A must read article.
Do you mind if I quote a couple of your articles as long as I provide credit and sources back to your site? My blog site is in the very same area of interest as yours and my visitors would truly benefit from a lot of the information you provide here. Please let me know if this ok with you. Thanks!
Lovely just what I was searching for.Thanks to the author for taking his time on this one.
Very nice post. I just stumbled upon your blog and wished to say that I’ve
really enjoyed surfing around your blog posts. After all I’ll
be subscribing to your feed and I hope you write again very soon!
I’m truly enjoying the design and layout of your website. It’s a very easy on the eyes which makes it much more pleasant for me to come here and visit more often. Did you hire out a developer to create your theme? Fantastic work!
Simply desire to say your article is as amazing. The clearness in your
post is simply cool and i can assume you are an expert on this subject.
Fine with your permission let me to grab your RSS feed to keep up to date with forthcoming
post. Thanks a million and please carry on the enjoyable work.
As a Newbie, I am permanently exploring online for articles that can aid me. Thank you
I believe other website owners should take this internet site as an example , very clean and excellent user pleasant layout.
You should take part in a contest for one of the best blogs on the web. I will recommend this site!
Great line up. We will be linking to this great article on our site. Keep up the good writing.
Whats up very cool site!! Man .. Beautiful .. Amazing ..
I will bookmark your blog and take the feeds additionally?
I’m glad to search out so many helpful information right here within the put up,
we want develop more strategies in this regard, thank you
for sharing. . . . . .
Also visit my homepage; best place To buy a mattress near me
Thanks for another magnificent article. Where else may anyone get that kind of information in such an ideal means of writing? I have a presentation subsequent week, and I’m at the look for such info.
Hello, i feel that i noticed you visited my website thus i got here
to return the desire?.I am attempting to find issues to enhance my website!I suppose
its adequate to use a few of your concepts!!
Thank you.
He estado navegando en línea más de dos horas
hoy, pero nunca encontré ningún artículo interesante como
el tuyo. Es bastante valioso para mí, gracias por tu labor.
I was very pleased to find this web-site.I wanted to thanks for your time for this wonderful read!! I definitely enjoying every little bit of it and I have you bookmarked to check out new stuff you blog post.
With havin so much content do you ever run into any problems of plagorism or copyright violation? My website has a lot of unique
content I’ve either authored myself or outsourced but it looks like
a lot of it is popping it up all over the internet without my agreement.
Do you know any solutions to help reduce content from being stolen?
I’d truly appreciate it.
Some times its a pain in the ass to read what blog owners wrote but this web site is very user friendly! .
Fantastic goods from you, man. I have understand your stuff previous to and you are just too great. I really like what you’ve acquired here, really like what you are stating and the way in which you say it. You make it entertaining and you still care for to keep it wise. I cant wait to read far more from you. This is actually a tremendous website.
Hmm it appears like your blog ate my first comment (it was extremely long) so I guess I’ll just sum it up what I had written and say, I’m thoroughly enjoying your blog. I as well am an aspiring blog writer but I’m still new to the whole thing. Do you have any suggestions for rookie blog writers? I’d genuinely appreciate it.
Dr. Creighton values the count on people display
in sending their liked ones to her office for
assistance.
My web blog :: chiropractic ak (http://billvolhein.com)
Attractive section of content. I just stumbled upon your weblog and
in accession capital to assert that I acquire in fact enjoyed account your
blog posts. Anyway I will be subscribing to your feeds and even I achievement you access consistently fast.
This is really interesting, You are a very skilled blogger. I’ve joined your rss feed and look forward to seeking more of your great post. Also, I’ve shared your web site in my social networks!
Reactive health care can be life-saving, however avoidance should constantly be our focus.
Also visit my blog: chiropractor of applied kinesiology,
soharindustriesspc.com,
I truly appreciate this post. I?¦ve been looking everywhere for this! Thank goodness I found it on Bing. You’ve made my day! Thx again
You made some good points there. I did a search on the subject and found most persons will go along with with your website.
Nice read, I just passed this onto a colleague who was doing some research on that. And he just bought me lunch because I found it for him smile Thus let me rephrase that: Thanks for lunch! “Remember It is 10 times harder to command the ear than to catch the eye.” by Duncan Maxwell Anderson.
spot on article, well done
bookmarking this post
hello!,I love your writing very a lot! share we be in contact extra approximately your article on AOL? I require a specialist in this space to unravel my problem. Maybe that is you! Having a look forward to look you.
Hello there I am so excited I found your blog, I really found you by error, while I was browsing on Aol
for something else, Nonetheless I am here now and
would just like to say kudos for a incredible post and a all round thrilling
blog (I also love the theme/design), I don’t have time to look over it all at the minute but I have saved it
and also added in your RSS feeds, so when I have time I will be back to
read more, Please do keep up the superb b.
I like what you guys are up too. Such clever work and reporting! Carry on the excellent works guys I have incorporated you guys to my blogroll. I think it will improve the value of my site 🙂
Glad to be one of many visitants on this awe inspiring web site : D.
I went over this internet site and I conceive you have a lot of wonderful information, saved to bookmarks (:.
It’s very effortless to find out any matter on net as compared to books, as I
found this paragraph at this web site.
Hi there! Someone in my Myspace group shared this website with us so I came to take a look. I’m definitely loving the information. I’m bookmarking and will be tweeting this to my followers! Outstanding blog and superb design and style.
Very interesting info !Perfect just what I was looking for!
I really appreciate this post. I’ve been looking everywhere for this! Thank goodness I found it on Bing. You’ve made my day! Thanks again
I really appreciate this post. I have been looking everywhere for this! Thank goodness I found it on Bing. You have made my day! Thanks again!
Simply wish to say your article is as surprising. The clarity in your
post is just excellent and i could assume you’re
an expert on this subject. Fine with your permission allow me to grab your feed to keep
up to date with forthcoming post. Thanks a million and please
keep up the gratifying work.
Feel free to visit my website :: Caryn
Thanks for shares
I have recently started a blog, the information you provide on this web site has helped me tremendously. Thanks for all of your time & work.
I really enjoy looking at on this internet site, it contains great posts. “We find comfort among those who agree with us–growth among those who don’t.” by Frank A. Clark.
My partner and I stumbled over here from a different website and thought I should check things out.
I like what I see so now i’m following you. Look forward to
checking out your web page again.
Hey this is kind of of off topic but I was wanting to know if blogs use WYSIWYG editors or if you have to manually code with HTML. I’m starting a blog soon but have no coding expertise so I wanted to get advice from someone with experience. Any help would be enormously appreciated!
There is definately a great deal to learn about
this subject. I love all of the points you have made.
Awesome blog! Do you have any hints for aspiring writers? I’m hoping to start my own site soon but I’m a little lost on everything. Would you propose starting with a free platform like WordPress or go for a paid option? There are so many options out there that I’m completely confused .. Any ideas? Cheers!
Wow, wonderful blog layout! How long have you been blogging
for? you made blogging look easy. The overall look of your website is wonderful, let alone the content!
Wow, wonderful blog format! How long have you ever been running a blog for? you make running a blog look easy. The total glance of your web site is magnificent, let alone the content material!
Thanks for helping out, excellent info .
Thanks for shares
This paragraph is actually a nice one it helps new net users, who are wishing in favor of blogging.
Here is my web-site – mattress retailer
Thanks for another wonderful post. The place else could anybody get that kind of information in such an ideal approach of writing? I’ve a presentation subsequent week, and I’m at the search for such information.
I visit everyday some web pages and blogs to read articles or reviews, except
this web site presents quality based articles.
Thanks for finally writing about > How to set up a LAN connection in WinXP « Old PC Gaming mattress
dealer near me
Hi to all, how is the whole thing, I think every one is getting more from this site, and
your views are pleasant in support of new visitors.
It’s enormous that you are getting ideas from this piece of writing
as well as from our discussion made at this time.
Also visit my blog :: where To buy a Mattress near my area
Hi friends, its great article concerning educationand completely defined,
keep it up all the time.
You made some decent points there. I looked on the internet for the issue and found most guys will consent with your website.
excellent post, very informative. I wonder why the other experts of this sector do not notice this. You must continue your writing. I’m sure, you have a huge readers’ base already!
Sweet web site, super layout, very clean and utilize pleasant.
I was curious if you ever considered changing the structure of your blog?
Its very well written; I love what youve got to say.
But maybe you could a little more in the way of content so people could connect with it better.
Youve got an awful lot of text for only having 1 or 2 pictures.
Maybe you could space it out better?
Heya i’m for the primary time here. I came across this board and I in finding It truly useful & it helped me out a lot. I am hoping to present one thing again and aid others like you aided me.
This design is spectacular! You most certainly know how to keep a reader entertained. Between your wit and your videos, I was almost moved to start my own blog (well, almost…HaHa!) Excellent job. I really enjoyed what you had to say, and more than that, how you presented it. Too cool!
Good day! I know this is kinda off topic however I’d figured I’d ask. Would you be interested in trading links or maybe guest writing a blog post or vice-versa? My site addresses a lot of the same topics as yours and I think we could greatly benefit from each other. If you might be interested feel free to send me an e-mail. I look forward to hearing from you! Terrific blog by the way!
I wanted to thank you for this great read!! I definitely enjoying every little bit of it I have you bookmarked to check out new stuff you post…
Thіs design is wicked! You defіnitely know how t᧐ kеep a
reader entertained. Ᏼetween your wit and уour videos, Ι was almost moved to start my own blog
(wеll, аlmost…HaHa!) Ԍreat job. Ι really loved ᴡhat
you had to say, and more tһan tһɑt, hοw yoս prеsented
it. Too cool!
L᧐οk at my website: casino (Geraldo)
I savour, cause I found just what I was looking for. You have ended my 4 day long hunt! God Bless you man. Have a nice day. Bye
Exactly what I was looking for, thankyou for putting up.
yes sir
Hello there! I know this is somewhat off topic but I was wondering which blog platform are you using for this website? I’m getting sick and tired of WordPress because I’ve had issues with hackers and I’m looking at options for another platform. I would be awesome if you could point me in the direction of a good platform.
What’s Happening i am new to this, I stumbled upon this I have found It absolutely useful and it has helped me out loads. I hope to contribute & help other users like its helped me. Great job.
As soon as I discovered this website I went on reddit to share some of the love with them.
my blog post; Search Engine Ranking. (https://Daemlow.De/Component/K2/Item/85-Maecenas-Nibh-Dolor-Malesuada/)
Keep on writing, great job!
I got what you intend, regards for putting up.Woh I am thankful to find this website through google. “Do not be too timid and squeamish about your actions. All life is an experiment.” by Ralph Waldo Emerson.
Thank you, I’ve recently been looking for info about this topic for ages and yours is the best I’ve discovered till now.
But, what about the bottom line? Are you positive concerning the
supply?
Yesterday, while I was at work, my cousin stole my iPad and tested to see if it can survive a twenty five foot drop, just so she can be a youtube sensation. My apple ipad is now destroyed and she has 83 views. I know this is completely off topic but I had to share it with someone!
I have to express appreciation to this writer for bailing me out of this problem. Right after surfing around through the online world and getting opinions which are not helpful, I was thinking my entire life was over. Being alive without the solutions to the difficulties you have resolved by way of your entire review is a serious case, as well as ones which may have in a wrong way damaged my entire career if I had not discovered the website. Your primary ability and kindness in controlling all the stuff was precious. I am not sure what I would’ve done if I had not encountered such a subject like this. I’m able to at this moment look forward to my future. Thank you so much for your professional and results-oriented guide. I won’t hesitate to endorse your web page to anybody who should have guidance on this topic.
I am extremely inspired along with your writing skills as well as with the structure for your blog. Is this a paid theme or did you customize it yourself? Either way stay up the nice high quality writing, it’s rare to see a nice weblog like this one nowadays..
It?¦s really a nice and helpful piece of info. I am happy that you just shared this useful info with us. Please stay us informed like this. Thanks for sharing.
Bandar Judi Slot88Gacor mudah Gampang Menang
Terbaik
Very interesting information!Perfect just what I was searching for! “You have to be deviant if you’re going to do anything new.” by David Lee.
Good post. I learn something tougher on different blogs everyday. It would all the time be stimulating to learn content material from different writers and practice slightly one thing from their store. I’d favor to make use of some with the content material on my weblog whether or not you don’t mind. Natually I’ll give you a hyperlink on your internet blog. Thanks for sharing.
If you dont mind EOD injects then prop or phenylprop would also be better choices than Sustanon in my opinion. You may
need to adjust this time period to suit your physiology.
Two different blood tests during this time proved that
I had almost twice the free test in my system as the blood test a week later.
I was emotional. I wanted to sleep all the time. In addition to the massive San Diego show, usually in July, and the New York show, there are cons for everything from horror
to anime, everywhere from St. The injections are usually painless,
the stability is high, the half life is fairly long.
This meant 4 amps or 1000mgs. That gave me a starting dose of
120mg propionate (30mg x 4) and instead of taking the next
dose of propionate, I knew I could just relax knowing that as the propionate fell off, the phenylpropionate would begin and as
the phenylpropionate fell off, the isocaproate would begin, etc, etc.
This worked phenomenal and I began the cycle figuring on every two weeks (one decanoate half life).
During the first week, all that had taken effect was the prop and phenylprop.
These are genuinely wonderful ideas in about blogging.
You have touched some nice factors here. Any way keep up wrinting.
Best Google News Blog
Shit website
Simply want to say your article is as astounding. The clarity in your post is simply great and i could assume you’re an expert on this subject. Well with your permission allow me to grab your feed to keep updated with forthcoming post. Thanks a million and please continue the gratifying work.
Can I simply just say what a comfort to uncover somebody who
genuinely understands what they’re discussing on the internet.
You definitely know how to bring an issue to light and make it important.
A lot more people should check this out and understand this
side of your story. I can’t believe you aren’t more popular given that you
most certainly have the gift.
My blog … mattress retailers near By
Some times its a pain in the ass to read what website owners wrote but this website is really user pleasant! .
I will immediately clutch your rss as I can’t in finding
your e-mail subscription link or e-newsletter service. Do you’ve any?
Please allow me recognize so that I could subscribe.
Thanks.
Check out my web site Mattress Retailers Near By
You actually make it seem so easy with your presentation but
I find this topic to be actually something which I think I would never understand.
It seems too complicated and extremely broad for me. I’m looking
forward for your next post, I’ll try to get the hang of
it!
You made some decent points there. I did a search on the subject matter and found most individuals will go along with with your website.
Its like you read my mind! You appear to know so much about this, like you wrote the book in it or something.
I think that you can do with some pics to drive the message
home a bit, but instead of that, this is excellent blog.
A fantastic read. I will definitely be back.
I am not sure where you are getting your information,
but good topic. I needs to spend some time learning much more or understanding more.
Thanks for wonderful information I was looking for this info for my mission.
I’d have to examine with you here. Which is not one thing I usually do! I take pleasure in reading a post that may make folks think. Additionally, thanks for permitting me to comment!
Demek paramı alır banlarsınız beni
Awsome info and straight to the point. I don’t know if this is really the best place to ask but do you folks have any ideea where to employ some professional writers? Thanks 🙂
I like this web site very much so much fantastic info .
It is best to participate in a contest for among the finest blogs on the web. I will suggest this site!
An impressive share, I just given this onto a colleague who was doing a little analysis on this. And he in fact bought me breakfast because I found it for him.. smile. So let me reword that: Thnx for the treat! But yeah Thnkx for spending the time to discuss this, I feel strongly about it and love reading more on this topic. If possible, as you become expertise, would you mind updating your blog with more details? It is highly helpful for me. Big thumb up for this blog post!
Thanks for finally talking about > How to set up a LAN connection in WinXP « Old PC Gaming < Loved it!
There is noticeably a bundle to know about this. I assume you made certain nice points in features also.
I’m gone to convey my little brother, that he should also
pay a quick visit this weblog on regular basis to get updated from most up-to-date news update.
Here is my webpage Buy Mattress
This design is incredible! You most certainly know how to keep a reader amused. Between your wit and your videos, I was almost moved to start my own blog (well, almost…HaHa!) Fantastic job. I really loved what you had to say, and more than that, how you presented it. Too cool!
Awsome website! I am loving it!! Will be back later to read some more. I am taking your feeds also
Hey very cool website!! Man .. Excellent .. Amazing .. I will bookmark your site and take the feeds also…I am happy to find numerous useful information here in the post, we need work out more techniques in this regard, thanks for sharing. . . . . .
Very nice article, just what I needed.
I really like looking through an article that can make people think.
Also, thank you for allowing for me to comment!
Greetings! Very helpful advice on this article! It is the little changes that make the biggest changes. Thanks a lot for sharing!
I have been exploring for a bit for any high-quality articles or blog posts on this kind of area . Exploring in Yahoo I at last stumbled upon this web site. Reading this info So i am happy to convey that I have an incredibly good uncanny feeling I discovered just what I needed. I most certainly will make sure to do not forget this website and give it a look on a constant basis.
Great post, you have pointed out some wonderful points, I too believe this s a very good website.
When I originally commented I clicked the “Notify me when new comments are added” checkbox and now each time a comment is added I get three e-mails with the same comment. Is there any way you can remove people from that service? Thanks a lot!
I do consider all of the concepts you’ve introduced in your post.
They’re very convincing and can certainly work. Still, the posts are very brief for novices.
May you please lengthen them a bit from next time?
Thanks for the post.
Most of whatever you mention happens to be astonishingly precise and it makes me ponder why I had not looked at this in this light previously. This piece truly did switch the light on for me as far as this subject matter goes. Nevertheless at this time there is actually just one position I am not too comfortable with so whilst I attempt to reconcile that with the main idea of your position, allow me see just what the rest of your readers have to say.Very well done.
There is definately a lot to learn about this topic.
I love all the points you’ve made.
Excellent read, I just passed this onto a friend who was doing a little research on that. And he just bought me lunch since I found it for him smile So let me rephrase that: Thanks for lunch!
Your place is valueble for me. Thanks!…
I’m extremely impressed together with your writing skills as neatly as with the format in your weblog. Is this a paid topic or did you customize it yourself? Anyway stay up the nice high quality writing, it’s uncommon to see a nice weblog like this one today..
Hello there! I know this is kinda off topic but I’d
figured I’d ask. Would you be interested in exchanging links
or maybe guest writing a blog article or vice-versa? My website discusses a lot of the same topics as yours and I believe we could greatly benefit from
each other. If you are interested feel free to
shoot me an email. I look forward to hearing from you! Awesome
blog by the way!
I will immediately clutch your rss as I can’t to find your e-mail subscription hyperlink or e-newsletter service. Do you have any? Please let me recognise in order that I may just subscribe. Thanks.
Way cool, some valid points! I appreciate you making this article available, the rest of the site is also high quality. Have a fun.
You completed some good points there. I did a search on the subject and found most people will consent with your blog.
This is my first time visit at here and i am really happy to read everthing at alone place.
My blog post shop For Mattresses
I have been absent for a while, but now I remember why I used to love this blog. Thank you, I?¦ll try and check back more frequently. How frequently you update your web site?
Write more, thats all I have to say. Literally, it seems as though you relied on the video to make your point. You definitely know what youre talking about, why waste your intelligence on just posting videos to your blog when you could be giving us something informative to read?
Hi there, You’ve done an incredible job. I will definitely digg it and
personally recommend to my friends. I am confident they will be
benefited from this website.
Everyone loves what you guys are up too. Such clever work and exposure! Keep up the great works guys I’ve incorporated you guys to my own blogroll.
I?¦ll immediately grab your rss feed as I can’t in finding your e-mail subscription link or e-newsletter service. Do you’ve any? Kindly let me understand so that I may subscribe. Thanks.
It’s a shame you don’t have a donate button! I’d without a doubt donate to this excellent blog! I suppose for now i’ll settle for book-marking and adding your RSS feed to my Google account. I look forward to brand new updates and will talk about this blog with my Facebook group. Talk soon!
What a material of un-ambiguity and preserveness of precious knowledge regarding
unexpected feelings.
An interesting discussion is worth comment. I think that you should write more on this topic, it might not be a taboo subject but generally people are not enough to speak on such topics. To the next. Cheers
I really happy to find this site on bing, just what I was looking for : D likewise saved to my bookmarks.
you might have an important weblog here! would you like to make some invite posts on my weblog?
Enjoyed reading through this, very good stuff, thanks. “Management is nothing more than motivating other people.” by Lee Iacocca.
I very glad to find this internet site on bing, just what I was searching for : D as well saved to my bookmarks.
Hey there just wanted to give you a quick heads up. The words in your article seem to be running off the screen in Ie.
I’m not sure if this is a format issue or something to do with web
browser compatibility but I figured I’d post to let you know.
The design look great though! Hope you get the problem solved soon. Kudos
Good day! I know this is kinda off topic but I was wondering which blog platform are you using for this website? I’m getting sick and tired of WordPress because I’ve had issues with hackers and I’m looking at alternatives for another platform. I would be great if you could point me in the direction of a good platform.
you’ve gotten an incredible blog here! would you like to make some invite posts on my weblog?
I like this post, enjoyed this one thanks for posting. “He removes the greatest ornament of friendship, who takes away from it respect.” by Cicero.
Throughout this grand design of things you secure a B- just for hard work. Where exactly you actually confused everybody was in all the facts. You know, it is said, details make or break the argument.. And that couldn’t be more true here. Having said that, allow me tell you just what did work. The article (parts of it) can be really convincing and that is most likely why I am taking the effort in order to comment. I do not make it a regular habit of doing that. Second, despite the fact that I can easily see a jumps in reasoning you come up with, I am not necessarily confident of exactly how you seem to connect the details which make your final result. For right now I will, no doubt subscribe to your position but hope in the near future you connect the dots better.
Thanks for some other informative site. The place else could I am getting that kind of information written in such a perfect approach? I’ve a project that I am just now working on, and I’ve been at the look out for such information.
Very interesting points you have observed, appreciate it for posting.
whoah this blog is great i like studying your articles. Keep up the great work! You recognize, many people are looking round for this info, you could help them greatly.
I dugg some of you post as I cogitated they were very beneficial invaluable
Hi, i think that i saw you visited my website so i came to “return the want”.I am trying to to find issues to improve my site!I assume its ok to make use of a few of your concepts!!
I really like your writing style, superb info, thank you for putting up :D. “I will show you fear in a handful of dust.” by T. S. Eliot.
I was recommended this web site by my cousin. I am not positive whether or not this publish is written via him as nobody else recognize such unique about my difficulty. You are wonderful! Thank you!
Hi there I am so thrilled I found your site, I really found you by mistake, while I was looking on Yahoo for something else, Regardless I am here now and would just like to say thanks a lot for a marvelous post and a all round interesting blog (I also love the theme/design), I don’t have time to go through it all at the minute but I have bookmarked it and also included your RSS feeds, so when I have time I will be back to read a lot more, Please do keep up the fantastic job.
What i don’t realize is in fact how you’re no longer actually much more smartly-favored than you might be now. You are very intelligent. You know therefore considerably in terms of this matter, produced me in my opinion believe it from a lot of numerous angles. Its like women and men don’t seem to be involved except it is one thing to accomplish with Woman gaga! Your own stuffs excellent. Always take care of it up!
Very interesting information!Perfect just what I was looking for!
F*ckin’ amazing things here. I am very glad to see your article. Thanks a lot and i’m looking forward to contact you. Will you kindly drop me a e-mail?
It’s actually a great and useful piece of information. I am glad that you shared this helpful information with us. Please keep us up to date like this. Thanks for sharing.
Hello there! Quick question that’s entirely off topic.
Do you know how to make your site mobile friendly?
My site looks weird when browsing from my iphone. I’m trying
to find a template or plugin that might be able to correct this
issue. If you have any recommendations, please share.
Thank you!
Hmm is anyone else having problems with the images on this blog loading? I’m trying to figure out if its a problem on my end or if it’s the blog. Any feedback would be greatly appreciated.
Thanks a bunch for sharing this with all of us you really know what you’re talking about! Bookmarked. Kindly also visit my web site =). We could have a link exchange agreement between us!
Thanks for your marvelous posting! I truly enjoyed reading it, you can be a great author.I will ensure that I bookmark your blog and definitely will come back later in life. I want to encourage you to definitely continue your great work, have a nice day!
Hi there! This post couldn’t be written any better! Reading through this post reminds me of my previous room mate! He always kept talking about this. I will forward this article to him. Pretty sure he will have a good read. Thank you for sharing!
I’ve been absent for some time, but now I remember why I used to love this site. Thank you, I?¦ll try and check back more frequently. How frequently you update your website?
Great blog you have here but I was wanting to know if you knew of any
community forums that cover the same topics discussed in this
article? I’d really love to be a part of community where I can get feedback
from other experienced individuals that share the same interest.
If you have any recommendations, please let me know.
Thanks!
Have you ever thought about publishing an ebook or guest authoring on other sites? I have a blog based on the same topics you discuss and would love to have you share some stories/information. I know my readers would value your work. If you are even remotely interested, feel free to shoot me an email.
This design is incredible! You obviously know how to keep a reader amused.
Between your wit and your videos, I was almost
moved to start my own blog (well, almost…HaHa!) Excellent job.
I really enjoyed what you had to say, and more than that, how you presented it.
Too cool!
Does your site have a contact page? I’m having problems locating it but, I’d like to shoot you an e-mail. I’ve got some ideas for your blog you might be interested in hearing. Either way, great site and I look forward to seeing it develop over time.
It is really a nice and helpful piece of information. I am happy that you simply shared this helpful information with us. Please stay us up to date like this. Thanks for sharing.
You stated this adequately!
It’s hard to find knowledgeable people on this topic, but you sound like you know what you’re talking about! Thanks
Very nice article, just what I needed.
Have a look at my webpage sell my house fast
You made some nice points there. I looked on the internet for the subject matter and found most people will go along with with your website.
Hi , I do believe this is an excellent blog. I stumbled upon it on Yahoo , i will come back once again. Money and freedom is the best way to change, may you be rich and help other people.
Baget yüzük modelleri 2023 yılında yeni tasarımlarıyla karşınızda. Sizde baget yüzük fiyatlarından ve kalitesinden faydalanın. https://riessa.com.tr/kategori/baget-yuzuk ile sevdiklerinize jest yapabilirsiniz. Hediyenin en güzel halini kaçırmaıyn..
Hiya very cool web site!! Guy .. Excellent .. Superb .. I’ll bookmark your website and take the feeds additionallyKI am satisfied to find numerous helpful information right here within the publish, we want develop more techniques in this regard, thanks for sharing. . . . . .
I’ve been absent for some time, but now I remember why I used to love this site. Thanks , I will try and check back more often. How frequently you update your web site?
This is a topic close to my heart cheers, where are your contact details though?
I discovered your blog site on google and check a few of your early posts. Continue to keep up the very good operate. I just additional up your RSS feed to my MSN News Reader. Seeking forward to reading more from you later on!…
Thanks for share.
Excellent read, I just passed this onto a friend who was doing some research on that. And he just bought me lunch because I found it for him smile Thus let me rephrase that: Thank you for lunch!
Once I initially commented I clicked the -Notify me when new feedback are added- checkbox and now each time a comment is added I get four emails with the identical comment. Is there any means you’ll be able to take away me from that service? Thanks!
Thanks for shares.
Pretty great post. I simply stumbled upon your blog and wished to say that I have truly loved browsing your weblog posts. In any case I’ll be subscribing in your feed and I hope you write again very soon!
Hey I know this is off topic but I was wondering if you knew of any widgets I could add to my blog that automatically
tweet my newest twitter updates. I’ve been looking for a plug-in like this for quite some time and was hoping maybe you would have
some experience with something like this. Please let me know
if you run into anything. I truly enjoy reading your blog and I
look forward to your new updates.
Hello! I’ve been reading your blog for some time now and finally
got the courage to go ahead and give you a shout out from
Atascocita Texas! Just wanted to tell you keep up the excellent job!
Howdy! Do you know if they make any plugins to protect against hackers? I’m kinda paranoid about losing everything I’ve worked hard on. Any recommendations?
Hi my loved one! I wish to say that this article is amazing, great written and include approximately all important infos. I’d like to look extra posts like this .
Hello There. I found your blog using msn. This is a very well written article. I will be sure to bookmark it and return to read more of your useful information. Thanks for the post. I will definitely comeback.
Can I simply say what a reduction to find someone who actually is aware of what theyre speaking about on the internet. You undoubtedly know the right way to deliver an issue to gentle and make it important. Extra people need to read this and perceive this side of the story. I cant imagine youre no more well-liked because you definitely have the gift.
Would you be fascinated by exchanging hyperlinks?
Nice post. I was checking constantly this blog and I’m impressed! Very helpful information particularly the last part 🙂 I care for such information much. I was looking for this certain info for a long time. Thank you and good luck.
Howdy just wanted to give you a quick heads up. The words in your post seem to be running off the screen in Opera. I’m not sure if this is a formatting issue or something to do with web browser compatibility but I thought I’d post to let you know. The layout look great though! Hope you get the issue resolved soon. Kudos
After going over a handful of the articles on your site,
I truly appreciate your technique of blogging. I book marked it to my bookmark website list and will be checking back
in the near future. Please check out my web site as well and tell me what you think.
We’re a group of volunteers and opening a brand new scheme in our community. Your site offered us with valuable information to work on. You’ve done an impressive job and our whole neighborhood might be grateful to you.
My brother suggested I might like this website. He was once totally right. This put up actually made my day. You can not consider just how much time I had spent for this info! Thanks!
You’ve made some good points there. I looked on the web for more info about the issue and found most people will go along with your views on this website.
I’ve been browsing on-line more than 3 hours these days, yet I by no means found any attention-grabbing article like yours. It is lovely worth enough for me. Personally, if all site owners and bloggers made good content material as you did, the web will be a lot more useful than ever before.
My coder is trying to persuade me to move to .net from PHP.
I have always disliked the idea because of the costs. But he’s tryiong none the less.
I’ve been using Movable-type on numerous websites for
about a year and am anxious about switching to another platform.
I have heard very good things about blogengine.net. Is there a way I can transfer all my
wordpress posts into it? Any kind of help would be greatly appreciated!
Visit my website – Glory
Finally i find what i was looking for. Thank you VERY much for this post. Keep up good work, i will be back to read more.
I really like foregathering useful information , this post has got me even more info! .
Heya i am for the primary time here. I came across this board
and I in finding It really helpful & it helped me out much.
I’m hoping to give one thing again and aid others like you aided me.
Hi! This is my 1st comment here so I just wanted to give a quick shout out and tell you I truly enjoy reading your articles. Can you recommend any other blogs/websites/forums that cover the same subjects? Thank you!
We’re a gaggle of volunteers and opening a new scheme in our community. Your site offered us with helpful information to work on. You have performed a formidable activity and our whole group will likely be thankful to you.
Rattling nice layout and good subject material, nothing at all else we require : D.
There may be noticeably a bundle to find out about this. I assume you made certain good factors in features also.
Just wish to say your article is as astonishing. The clearness in your post is simply cool and i could assume you are an expert on this subject. Fine with your permission allow me to grab your RSS feed to keep updated with forthcoming post. Thanks a million and please keep up the gratifying work.
I know this if off topic but I’m looking into starting my own blog and was curious what all is required to get set up? I’m assuming having a blog like yours would cost a pretty penny? I’m not very web savvy so I’m not 100 positive. Any tips or advice would be greatly appreciated. Thanks
Very interesting information!Perfect just what I was looking for!
Thank you for sharing superb informations. Your web-site is so cool. I’m impressed by the details that you¦ve on this site. It reveals how nicely you understand this subject. Bookmarked this web page, will come back for more articles. You, my friend, ROCK! I found just the info I already searched all over the place and just could not come across. What a great web site.
Hiya! I just would like to give a huge thumbs up for the great data you’ve gotten right here on this post. I will probably be coming back to your weblog for extra soon.
Very interesting details you have mentioned, appreciate it for putting up. “These days an income is something you can’t live without–or within.” by Tom Wilson.
I truly enjoy reading on this web site, it contains wonderful content. “The living is a species of the dead and not a very attractive one.” by Friedrich Wilhelm Nietzsche.
Heya i am for the first time here. I found this board and I find It truly useful & it helped me out much. I hope to give something back and help others like you aided me.
I like it when individuals get together and share thoughts.
Great website, keep it up.
Your style is so unique compared to many other people. Thank you for publishing when you have the opportunity,Guess I will just make this bookmarked.2
You need to take part in a contest for one of the greatest sites online.
I am going to recommend this website!
I got good info from your blog
F*ckin’ tremendous things here. I am very happy to see your post. Thanks a lot and i am looking forward to touch you. Will you please drop me a e-mail?
Very nice layout and great subject material, practically nothing else we require : D.
I went over this site and I conceive you have a lot of wonderful info, saved to bookmarks (:.
My brother recommended I might like this blog.
He was totally right. This post truly made my day.
You can not imagine simply how much time I had spent for this
info! Thanks!
Howdy! I could have sworn I’ve been to this website before but after reading through some of the post I realized
it’s new to me. Anyhow, I’m definitely glad I found
it and I’ll be bookmarking and checking back frequently!
Sweet web site, super design, very clean and utilise genial.
I am constantly thought about this, thanks for posting.
Thanx for the effort, keep up the good work Great work, I am going to start a small Blog Engine course work using your site I hope you enjoy blogging with the popular BlogEngine.net.Thethoughts you express are really awesome. Hope you will right some more posts.
Heya i am for the first time here. I found this board and I find It really useful & it helped me out a lot. I hope to give something back and help others like you aided me.
You are looking for Free Backlinks for oldpcgaming.net
We offering you a free trial to try out our link-building service.
This can be used to link out to your website, inner page, google map, video, to any link you want to help power up and get more relevance too.
We want to prove to you that our backlinks work and so we’re willing to prove it to you risk-free.
Submit your details >> https://zeep.ly/sTQKV
Thanks,
Brentnall
Poland, NA, Warszawa, 01-804, Ul. Babicka 2
To stop any further communication through your website form, Please reply with subject: Unsubscribe oldpcgaming.net
Someone necessarily lend a hand to make severely posts I’d state. This is the first time I frequented your website page and thus far? I surprised with the research you made to create this actual publish extraordinary. Excellent task!
Hey! I know this is kinda off topic nevertheless I’d figured I’d ask. Would you be interested in trading links or maybe guest writing a blog post or vice-versa? My blog addresses a lot of the same topics as yours and I think we could greatly benefit from each other. If you’re interested feel free to shoot me an email. I look forward to hearing from you! Awesome blog by the way!
I’ve been exploring for a little for any high-quality articles or blog posts in this kind of area .
Exploring in Yahoo I ultimately stumbled upon this
site. Reading this information So i am satisfied to convey
that I’ve a very excellent uncanny feeling I came upon just what I needed.
I so much no doubt will make certain to do not put out of
your mind this website and give it a look regularly.
I found the author’s incorporation of diverse perspectives and voices in this article to be valuable. It fostered a broader understanding of the subject matter.
Nice post. This is not just some every day read, but very educative and informative. Thank you for sharing your experience.
Have you ever considered about including a little bit more than just your articles? I mean, what you say is important and everything. But imagine if you added some great pictures or videos to give your posts more, “pop”! Your content is excellent but with images and videos, this website could certainly be one of the greatest in its field. Very good blog!
I was wondering if you ever thought of changing the page layout of your website? Its very well written; I love what youve got to say. But maybe you could a little more in the way of content so people could connect with it better. Youve got an awful lot of text for only having one or two pictures. Maybe you could space it out better?
I have been exploring for a bit for any high quality articles or blog posts on this sort of area . Exploring in Yahoo I at last stumbled upon this web site. Reading this info So i am happy to convey that I have an incredibly good uncanny feeling I discovered exactly what I needed. I most certainly will make sure to do not forget this site and give it a look regularly.
You actually suggested this well.
Some genuinely nice and useful information on this site, also I believe the design and style has fantastic features.
I really like your writing style, excellent info, thank you for posting :D. “I hate mankind, for I think myself one of the best of them, and I know how bad I am.” by Joseph Baretti.
of course like your website however you need to check the spelling on quite a few of your posts. A number of them are rife with spelling issues and I find it very bothersome to tell the reality on the other hand I will definitely come back again.
Very energetic post, I liked that bit. Will there be
a part 2?
Hey there! Quick question that’s entirely off topic. Do you know how to make your site mobile friendly? My website looks weird when browsing from my iphone4. I’m trying to find a template or plugin that might be able to resolve this issue. If you have any recommendations, please share. Thank you!
Hello there, just became alert to your blog through Google, and found that it is truly informative. I’m going to watch out for brussels. I’ll be grateful if you continue this in future. A lot of people will be benefited from your writing. Cheers!
Great remarkable issues here. I?¦m very happy to see your article. Thank you a lot and i am having a look ahead to contact you. Will you please drop me a mail?
You could definitely see your expertise within the work you write. The world hopes for even more passionate writers like you who aren’t afraid to mention how they believe. All the time go after your heart.
Great post. I was checking constantly this blog and I’m impressed! Very useful info specifically the last part 🙂 I care for such information a lot. I was seeking this certain information for a very long time. Thank you and best of luck.
I loved as much as you’ll receive carried out right here. The sketch is tasteful, your authored material stylish. nonetheless, you command get got an shakiness over that you wish be delivering the following. unwell unquestionably come more formerly again since exactly the same nearly a lot often inside case you shield this hike.
I like the helpful information you provide on your articles. I’ll bookmark your weblog and check again right here frequently. I’m somewhat certain I will be informed many new stuff proper right here! Best of luck for the next!
obviously like your web-site but you need to check the spelling on quite a few of your posts. Several of them are rife with spelling issues and I to find it very bothersome to tell the reality then again I?¦ll definitely come back again.
Wow! Thank you! I always needed to write on my blog something like that. Can I take a portion of your post to my site?
Do you mind if I quote a few of your articles as long as I provide credit and sources back to your weblog? My blog site is in the very same area of interest as yours and my visitors would really benefit from some of the information you provide here. Please let me know if this ok with you. Cheers!
I have been browsing online more than 3 hours today, yet I by no means found any interesting article like yours. It is pretty price enough for me. In my opinion, if all website owners and bloggers made excellent content as you did, the web shall be much more helpful than ever before.
I used to be aƄle tߋ find ցood advice from уour content.
Нere іs my website sport betting
I was just seeking this information for some time. After 6 hours of continuous Googleing, at last I got it in your website. I wonder what’s the lack of Google strategy that don’t rank this type of informative web sites in top of the list. Generally the top websites are full of garbage.
A person essentially lend a hand to make seriously posts I might state. This is the very first time I frequented your website page and so far? I surprised with the analysis you made to make this actual post extraordinary. Wonderful task!
What’s Happening i’m new to this, I stumbled upon this I have found It absolutely useful and it has helped me out loads. I hope to contribute & assist other users like its aided me. Good job.
Excellent items from you, man. I have have in mind your stuff previous to and you are simply too wonderful. I really like what you’ve received here, certainly like what you’re stating and the way in which in which you are saying it. You make it enjoyable and you still take care of to keep it smart. I can’t wait to read much more from you. This is actually a great site.
With havin so much content and articles do you ever run into any problems of plagorism or copyright infringement? My website has a lot of unique content I’ve either created myself or outsourced but it looks like a lot of it is popping it up all over the web without my agreement. Do you know any solutions to help reduce content from being ripped off? I’d really appreciate it.
I am now not sure the place you’re getting your info, however good topic. I needs to spend a while studying more or figuring out more. Thank you for excellent information I used to be searching for this info for my mission.
It’s amazing in support of me to have a web page, which is useful in support of my
knowledge. thanks admin
I’m gone to inform my little brother, that he should also go to see this
blog on regular basis to take updated from latest information.
After research a number of of the blog posts in your website now, and I truly like your method of blogging. I bookmarked it to my bookmark web site checklist and shall be checking back soon. Pls take a look at my web site as properly and let me know what you think.
I’m still learning from you, but I’m making my way to the top as well. I absolutely love reading everything that is posted on your blog.Keep the information coming. I enjoyed it!
Love you
Amazing data. Thanks!
I haven’t checked in here for some time because I thought it was getting boring, but the last few posts are good quality so I guess I will add you back to my everyday bloglist. You deserve it my friend 🙂
Hey there! I’m at work surfing around your blog from my new apple iphone! Just wanted to say I love reading your blog and look forward to all your posts! Carry on the excellent work!
Really lots of valuable information.
Saved as a favorite, I love your site!
I read this paragraph fully concerning the comparison of newest and previous technologies, it’s remarkable article.
I do agree with all the ideas you’ve presented in your post. They are very convincing and will certainly work. Still, the posts are too short for novices. Could you please extend them a bit from next time? Thanks for the post.
Hi, i read your blog from time to time and i own a similar one and i was just wondering
if you get a lot of spam comments? If so how do you prevent
it, any plugin or anything you can suggest? I get so much lately it’s driving me mad so any support
is very much appreciated.
Feel free to visit my page … sale my house for cash
Enjoyed looking through this, very good stuff, regards. “Golf isn’t a game, it’s a choice that one makes with one’s life.” by Charles Rosin.
Wow, wonderful blog layout! Ηow long һave you bеen blogging f᧐r?
ʏou maҝе blogging loⲟk easy. The oνerall ⅼook ߋf your website iѕ wonderful, аs wеll as the content!
Visit mү site – lotto
Nice post. This is not just some every day read, but very educative and informative. Thank you for sharing your experience.
Some really wondrous work on behalf of the owner of this web site, dead great articles.
Fantastic site. Lots of useful information here. I’m sending it to several friends ans also sharing in delicious. And obviously, thanks for your effort!
What’s Happening i’m new to this, I stumbled upon this I’ve found It absolutely helpful and it has aided me out loads. I hope to contribute & aid other users like its helped me. Good job.
I am lucky that I discovered this web site, exactly the right information that I was searching for! .
Someone essentially help to make seriously articles I would state. This is the very first time I frequented your website page and thus far? I amazed with the research you made to make this particular publish amazing. Great job!
you’re in reality a good webmaster. The site loading pace is amazing.
It kind of feels that you’re doing any unique trick.
Also, The contents are masterpiece. you have done a great job in this subject!
What¦s Going down i am new to this, I stumbled upon this I have found It positively useful and it has helped me out loads. I hope to give a contribution & assist different users like its aided me. Great job.
Greetings! Very helpful advice on this article! It is the little changes that make the biggest changes. Thanks a lot for sharing!
Pretty! This was a really wonderful post. Thank you for your provided information.
Well I sincerely enjoyed studying it. This tip provided by you is very useful for proper planning.
I gotta bookmark this internet site it seems very helpful very useful
I’ve recently started a website, the information you provide on this website has helped me greatly. Thank you for all of your time & work.
I truly appreciate this post. I have been looking all over for this! Thank goodness I found it on Bing. You’ve made my day! Thx again!
When I originally commented I clicked the -Notify me when new comments are added- checkbox and now each time a comment is added I get four emails with the same comment. Is there any way you can remove me from that service? Thanks!
I got what you mean , appreciate it for putting up.Woh I am pleased to find this website through google.
My brother recommended I might like this web site. He was totally right.
This post truly made my day. You cann’t imagine just how much time I had spent
for this info! Thanks!
Thanks man
Hello oldpcgaming.net owner,
Learn how to get paid first before ordering paid traffic, and how to secretly multiply that traffic to build your list for free.
Build Your List For Free and Get Guaranteed ROI from Paid Traffic.
This is a time tested out of the box method that will save you time and allow you to make a solid income…
=>> https://zeep.ly/SGtEF
Best regards,
McVeigh
Switzerland, NA, Laax, 7031, Kirchstrasse 136
To stop any further communication through your website form, Please reply with subject: unsubscribe oldpcgaming.net
Appreciate it! An abundance of content.
Demonstrating that you are a national of an E2 Treaty nation is fairly straightforward.
Fortunately, many significant countries have such a treaty.
my web blog E2 visa problems UK – https://toolbarqueries.google.com.bn/url?sa=t&url=http%3A%2F%2Fwww.usimmigrationlawyer.co.uk%2Fl1-visa%2F,
I have been exploring for a little bit for any high quality articles or weblog posts on this kind of house . Exploring in Yahoo I ultimately stumbled upon this site. Reading this information So i am happy to exhibit that I have a very good uncanny feeling I discovered exactly what I needed. I most without a doubt will make sure to don¦t omit this website and provides it a glance regularly.
I have been surfing online more than three hours today, yet I never found any interesting article like yours. It’s pretty worth enough for me. Personally, if all website owners and bloggers made good content as you did, the net will be a lot more useful than ever before.
Nice post. I learn something more challenging on different blogs everyday. It will always be stimulating to read content from other writers and practice a little something from their store. I’d prefer to use some with the content on my blog whether you don’t mind. Natually I’ll give you a link on your web blog. Thanks for sharing.
In the awesome scheme of things you actually get a B+ for effort. Exactly where you misplaced us was first on all the particulars. As it is said, the devil is in the details… And it couldn’t be more true in this article. Having said that, allow me inform you what did give good results. Your writing is rather powerful and that is most likely why I am making the effort to comment. I do not really make it a regular habit of doing that. Secondly, whilst I can see a leaps in logic you come up with, I am not sure of just how you appear to connect the details which produce the final result. For the moment I will yield to your position however hope in the foreseeable future you actually connect your facts much better.
Needed to put you the very little remark to help thank you very much again on the pretty secrets you have shown on this site. It has been so wonderfully generous with you to supply extensively what a few individuals would have distributed as an electronic book to help make some bucks for their own end, certainly considering the fact that you might well have done it in case you considered necessary. The things also acted like a good way to be certain that some people have the identical zeal similar to my own to learn a little more on the topic of this condition. Certainly there are some more fun sessions in the future for people who find out your website.
Hello.This article was extremely interesting, particularly since I was browsing for thoughts on this matter last week.
Hi , I do believe this is an excellent blog. I stumbled upon it on Yahoo , i will come back once again. Money and freedom is the best way to change, may you be rich and help other people.
hi!,I like your writing very much! share we communicate more about your article on AOL? I need a specialist on this area to solve my problem. May be that’s you! Looking forward to see you.
Hi, I think your site might be having browser compatibility issues. When I look at your website in Safari, it looks fine but when opening in Internet Explorer, it has some overlapping. I just wanted to give you a quick heads up! Other then that, fantastic blog!
I view something genuinely interesting about your blog so I saved to my bookmarks.
This actually answered my downside, thanks!
Awesome blog! Is your theme custom made or did you download it from somewhere? A design like yours with a few simple adjustements would really make my blog stand out. Please let me know where you got your design. Cheers
Loving the info on this web site, you have done great job on the blog posts.
Some times its a pain in the ass to read what blog owners wrote but this internet site is very user friendly! .
It has most of the same components as the computer in your desktop, but they’re too much easier within the frame as a result of they solely must carry out a single task. While immediately attacking the slot filling job is tough, low-degree duties with fewer labels are a lot simpler to unravel. Such a display is thin sufficient that the digital body isn’t a lot thicker than an bizarre picture body. No longer is there a lot room within the center. You are not allowed to bring something into the testing room besides the clothes in your back and a pair of authorized ear plugs of their unique, unopened packaging. Candlelight does, too. Using a CD as a candleholder is an easy technique to brighten your room. The body is definitely a quite simple pc. The steering mechanism of a personal watercraft is quite simple. Without water from the steering nozzle, the boat cannot change route. In this case, the motion is the expulsion of water by the nozzle. Water flows by the engine or by a closed system that includes a chemical coolant. This operating system is designed for devices like PDAs, electrical-testing gear and set-high packing containers.
Here is my webpage: https://xn--12carb2e9a2Bif0a7lds8nxa9i.com/
If you don’t just like the slot machine strategy, you’ll be able to browse restaurants by numerous classifications or view an inventory of Urbanspoon listings close to your present location. Does location affect your Tv channel selection? And then in June, leaving the home for the first time in four months, I thought, why did I mock myself a lot? The wild Dracula multiplies line winnings by three – each time it seems, the 3x multiplier is triggered for every bat or Dracula that is in view on the paylines. The 4x multiplier will get triggered whenever you appropriately guess the next swimsuit. The jackpot is value 12,500 coins and will get triggered throughout the utmost guess spins once you hit five Amulets on any of the 243 paylines that have been lively. The bonus round will get triggered on hitting a minimum of three scatter symbols. Along with the base recreation’s repeat pay characteristic, the free sport bonus rounds also have the triple repeat pay characteristic for you to sink your teeth into. Lucky Count options a rather generous variety of bonus rounds and sports a powerful repeat pay sample.
Also visit my page … https://Pgslottruewallet.io/
No other laptop computer on this value vary comes shut in specs or performance. But after careful inspection and use – I have to say that vendor did a wonderful job of offering a high shelf laptop computer at a terrific price . If you’re pondering of getting a used laptop I’d extremely recommend this vendor. Purchased an ASUS Vivo laptop from seller that was refurbished and in good condition! Have to say was a bit hesitant at first, you understand shopping for used gear is a leap of faith. This laptop computer is extremely gradual. Just get a Chromebook should you only want to use an app retailer, otherwise pay extra for a completely purposeful laptop. Solid laptop computer. Would recommend. For example, if you could ship gifts to friends and relatives, discover out by means of the U.S. Biggest WASTE OF MY Time and money If you Need A WORKING Computer FOR WORK Don’t buy THIS. Great Asus VivoBook. Good worth for the cash.
My web-site :: https://Tuatueng168.com/
Apple has deployed out-of-date terminology as a result of the “3.0” bus ought to now be referred to as “3.2 Gen 1” (as much as 5 Gbps) and the “3.1” bus “3.2 Gen 2” (as much as 10 Gbps). Developer Max Clark has now formally introduced Flock of Dogs, a 1 – eight participant on-line / local co-op experience and I’m somewhat bit in love with the premise and style. No, it’s possible you’ll not bring your crappy outdated Pontiac Grand Am to the local photo voltaic facility and park it of their front lawn as a favor. It’s crowdfunding on Kickstarter with a goal of $10,000 to hit by May 14, and with almost $5K already pledged it should easily get funded. To make it as simple as potential to get going with pals, it’s going to supply up a particular built in “Friend Slot”, to allow someone else to hitch you thru your hosted game. Those critiques – and the best way firms deal with them – could make or break an enterprise. There are additionally options to make some of the new fations your allies, and take on the AI collectively. There are two sorts of shaders: pixel shaders and vertex shaders. Vertex shaders work by manipulating an object’s position in 3-D house.
Here is my web site: https://pgslot7777.com
If three castles come in view, Lucky Count awards you 15 free spins. The Lucky Count slot machine comes with five reels and 25 paylines. While most slots games function simply the one wild symbol, Lucky Count comes with two! And regardless of being what CNet calls a “minimalist gadget,” the Polaroid Tablet still has some pretty nifty hardware options you’d expect from a extra expensive tablet by Samsung or Asus, and it comes with Google’s new, characteristic-rich Android Ice Cream Sandwich working system. Davies, Chris. “Viza Via Phone and Via Tablet get Official Ahead of Summer Release.” Android Community. You’ll additionally get a free copy of your credit score report — check it and stay in touch with the credit score bureaus until they correct any fraudulent charges or accounts you discover there. I took this alternative to enroll in the RSS feed or newsletter of every one among my sources, and to get a replica of a 300-web page government report on vitality sent to me as a PDF. You’ll additionally get the chance to land stacks of wilds on a superb multiplier so this fearsome creature could grow to be your greatest pal. It boasts a thrilling ride on high volatility and is nicely price a spin on VegasSlotsOnline to test it out totally free.
Take a look at my web-site … https://tuatueng168.com/
It contains 32 Screens with a special type of UI. This template consists of greater than 60 screens with very easy animation that’s according to Android and IOS. Also in this template there are screens for monitoring the change price and the expansion of bitcoin. Also, this template already helps a number of languages: Italian, German and English. This template for the journey booking app was created based on the errors and positive outcomes of massive booking companies. It’s going to make it even simpler for Americans to travel without the problem of making foreign money conversions or fumbling with an unmanned ticket kiosk at a practice station that doesn’t acknowledge our out-of-date magnetic-stripe playing cards. Previously, you had to collect your power and overcome the tremor of your voice before making a name, however with the arrival of chats, the world has changed and it has turn out to be simpler for social phobias like me to live. But because of apps like Booking, Airbnb, Tripadvisor, resort reservations and trip planning have develop into much simpler. This set features a template with a clear and person-pleasant design, which is so popular with all customers of e-commerce apps akin to ASOS, YOOX or Farfetch. This template will make well being care simpler, as it’s going to convey patients and docs nearer collectively.
Also visit my page :: https://xn--72c4bmjik5gmp.com/
ATM skimming is like identity theft for debit playing cards: Thieves use hidden electronics to steal the personal information saved in your card and document your PIN number to access all that onerous-earned money in your account. If ATM skimming is so serious and excessive-tech now, what dangers will we face with our debit and credit cards sooner or later? Mobile credit card readers let clients make a digital swipe. And, as security is at all times an issue in terms of delicate credit card data, we’ll explore among the accusations that opponents have made in opposition to different merchandise. If the motherboard has onboard video, try to remove the video card fully and boot utilizing the onboard model. Replacing the motherboard usually requires replacing the heatsink and cooling fan, and could change the kind of RAM your computer needs, so you’ve to perform a little research to see what parts you will need to buy on this case.
My blog; https://Dorson888.com/
I’m not that much of a online reader to be honest but your sites really nice, keep it up! I’ll go ahead and bookmark your website to come back down the road. Cheers
Reviews for the RX 6700 XT have began to pop up on-line, showing us the actual-world performance offered by the $479 card. Cloud/edge computing and deep learning significantly enhance efficiency of semantic understanding programs, where cloud/edge computing offers flexible, pervasive computation and storage capabilities to assist variant purposes, and deep learning fashions may comprehend textual content inputs by consuming computing and storage useful resource. With every tech development, we anticipate higher efficiency from the know-how we purchase. Identity theft and card fraud are major issues, and some technology specialists say sure readers are more safe than others. While these fashions work relatively properly on standard benchmark datasets, they face challenges in the context of E-commerce where the slot labels are more informative and carry richer expressions. State-of-the-art approaches treat it as a sequence labeling problem and undertake such fashions as BiLSTM-CRF. Our mechanism’s technical core is a variant of the online weighted bipartite matching drawback where not like prior variants wherein one randomizes edge arrivals or bounds edge weights, we could revoke previously committed edges. Our model permits the seller to cancel at any time any reservation made earlier, wherein case the holder of the reservation incurs a utility loss amounting to a fraction of her value for the reservation and may additionally receive a cancellation charge from the seller.
Here is my blog post – https://Temkharaben.com/
I’m really enjoying the design and layout of your website. It’s a very easy on the eyes which makes it much more enjoyable for me to come here and visit more often. Did you hire out a developer to create your theme? Exceptional work!
I really appreciate this post. I?¦ve been looking all over for this! Thank goodness I found it on Bing. You have made my day! Thank you again
Hello oldpcgaming.net admin,
Learn how to get paid first before ordering paid traffic, and how to secretly multiply that traffic to build your list for free.
Build Your List For Free and Get Guaranteed ROI from Paid Traffic.
This is a time tested out of the box method that will save you time and allow you to make a solid income…
=>> https://zeep.ly/SGtEF
Best regards,
Bohner
France, CENTRE, Creteil, 94000, 74 Boulevard Bryas
To stop any further communication through your website form, Please reply with subject: unsubscribe oldpcgaming.net
As soon as I observed this site I went on reddit to share some of the love with them.
Rattling clean website , regards for this post.
Some truly good posts on this website, thanks for contribution. “The difference between fiction and reality Fiction has to make sense.” by Tom Clancy.
You have brought up a very good details, appreciate it for the post.
Hey, you used to write wonderful, but the last few posts have been kinda boringK I miss your great writings. Past few posts are just a little out of track! come on!
You actually suggested that exceptionally well!
Hi there are using WordPress for your site platform? I’m new to the blog world but I’m trying to get started and set up my own. Do you need any html coding knowledge to make your own blog? Any help would be really appreciated!
You suggested that fantastically!
My site https://youlike191.bet/
I and also my guys ended up going through the nice things found on your site while immediately got a horrible suspicion I had not thanked the website owner for those secrets. All of the women were definitely consequently passionate to read them and have now in reality been using those things. I appreciate you for indeed being simply kind and then for picking out this sort of fine guides most people are really wanting to know about. Our own honest apologies for not saying thanks to you sooner.
You have brought up a very good details , appreciate it for the post.
I am impressed with this web site, very I am a big fan .
Hello There. I discovered your weblog the usage of msn. That is a really well written article. I will make sure to bookmark it and return to read more of your helpful info. Thank you for the post. I will definitely return.
What’s Happening i am new to this, I stumbled upon this I’ve found It absolutely useful and it has aided me out loads. I hope to contribute & assist other users like its helped me. Good job.
Hey there! Do you use Twitter? I’d like to follow you if that would be ok.
I’m absolutely enjoying your blog and look forward to new updates.https://www.jp-dolls.com/
“Adoro os pijamas da Use Criativa! São super confortáveis e possuem designs encantadores.”
I was recommended this blog through my cousin. I’m no longer sure whether or not this publish is written by way of him as nobody else recognise such distinct approximately my trouble. You are incredible! Thanks!
Thanks – Enjoyed this update, how can I make is so that I receive an alert email when there is a fresh post?
I like what you guys are up too. Such clever work and reporting! Carry on the superb works guys I have incorporated you guys to my blogroll. I think it will improve the value of my web site 🙂
Hello! I just would like to give a huge thumbs up for the great info you have here on this post. I will be coming back to your blog for more soon.
Very interesting subject , thankyou for putting up.
You have brought up a very fantastic points, regards for the post.
certainly like your web site however you need to check the spelling on quite a few of your posts. Several of them are rife with spelling problems and I to find it very bothersome to tell the truth on the other hand I will definitely come back again.
I have been absent for some time, but now I remember why I used to love this website. Thank you, I will try and check back more often. How frequently you update your web site?
I simply wished to thank you so much again. I’m not certain the things I would have used in the absence of these basics contributed by you directly on such area. It seemed to be an absolute frightful dilemma for me personally, but taking note of the skilled strategy you treated it made me to weep over fulfillment. Now i’m thankful for your work and thus sincerely hope you know what a great job that you’re doing training the others by way of your blog. I am sure you’ve never come across any of us.
Very interesting info !Perfect just what I was looking for! “All the really good ideas I ever had came to me while I was milking a cow.” by Grant Wood.
Thanks for shares
Wow that was odd. I just wrote an very long comment but after I clicked submit my comment didn’t show up. Grrrr… well I’m not writing all that over again. Regardless, just wanted to say great blog!
“Os baby-dolls da Use Criativa são delicados e confortáveis, proporcionando uma sensação de bem-estar ao dormir.”
When I originally commented I clicked the “Notify me when new comments are added” checkbox and now each time a comment is added I get several e-mails with the same comment. Is there any way you can remove people from that service? Thank you!
Great write-up, I am normal visitor of one’s blog, maintain up the nice operate, and It is going to be a regular visitor for a lengthy time.
wonderful post, very informative. I wonder why the other specialists of this sector don’t notice this. You must continue your writing. I am confident, you’ve a huge readers’ base already!
Hello there, I discovered your web site by way of Google at the same time as searching for a related topic, your website came up, it appears to be like great. I’ve bookmarked it in my google bookmarks.
Enjoyed looking through this, very good stuff, thankyou. “What the United States does best is to understand itself. What it does worst is understand others.” by Carlos Fuentes.
Having read this I thought it was very informative. I appreciate you taking the time and effort to put this article together. I once again find myself spending way to much time both reading and commenting. But so what, it was still worth it!
It?¦s actually a great and useful piece of information. I am glad that you simply shared this helpful info with us. Please stay us up to date like this. Thanks for sharing.
Merely wanna remark on few general things, The website design and style is perfect, the articles is rattling superb. “We can only learn to love by loving.” by Iris Murdoch.
Someone essentially help to make seriously posts I would state. This is the very first time I frequented your website page and thus far? I surprised with the research you made to create this particular publish extraordinary. Magnificent job!
certainly like your website however you need to test the spelling on quite a few of your posts. Several of them are rife with spelling problems and I find it very troublesome to inform the reality nevertheless I will surely come back again.
Thanks for share.
I like the efforts you have put in this, thankyou for all the great content.
This really answered my problem, thanks!
I have not checked in here for some time as I thought it was getting boring, but the last several posts are good quality so I guess I will add you back to my everyday bloglist. You deserve it my friend 🙂
I intended to write you this very small remark to be able to thank you very much over again with your extraordinary concepts you have contributed on this website. It’s certainly strangely generous of you to deliver without restraint all numerous people would have offered for sale as an e book to help with making some money on their own, particularly considering the fact that you might have done it in the event you desired. Those principles additionally worked to become easy way to recognize that other people have a similar dream just as my very own to know a good deal more in regard to this matter. Certainly there are lots of more pleasant situations ahead for individuals who scan your blog post.
Absolutely pent subject material, thank you for information. “Necessity is the mother of taking chances.” by Mark Twain.
I am curious to find out what blog platform you are using? I’m having some small security issues with my latest site and I’d like to find something more safeguarded. Do you have any suggestions?
Wonderful goods from you, man. I have take into accout your stuff prior to and you’re simply extremely wonderful. I really like what you’ve obtained here, really like what you’re stating and the way during which you say it. You make it entertaining and you continue to take care of to stay it wise. I can not wait to learn much more from you. This is actually a terrific website.
I cherished as much as you will obtain carried out right here. The caricature is attractive, your authored material stylish. nevertheless, you command get bought an nervousness over that you wish be handing over the following. sick no doubt come more beforehand once more since exactly the same just about very frequently inside case you shield this hike.
A lot of what you state happens to be supprisingly appropriate and that makes me wonder the reason why I had not looked at this in this light before. This piece really did switch the light on for me as far as this specific subject matter goes. Nevertheless there is actually 1 issue I am not too comfortable with and while I make an effort to reconcile that with the core idea of the issue, allow me observe just what the rest of the subscribers have to say.Very well done.
It’s very effortless to find out any topic on net as compared to books, as I found
this paragraph at this site.
Here is my web blog :: Pamela
Very interesting subject, appreciate it for putting up. “Experience a comb life gives you after you lose your hair.” by Judith Stern.
Nice post. I was checking continuously this blog and I am impressed! Very helpful info specifically the last part 🙂 I care for such info much. I was looking for this particular info for a long time. Thank you and good luck.
I¦ve recently started a site, the info you offer on this web site has helped me greatly. Thank you for all of your time & work.
You are a very intelligent individual!
Thanks you
I couldn’t resist commenting
I love it when people come together and share ideas.
Great site, keep it up!
Feel free to visit my homepage … Travel
With Kids (https://Edgartisy96918.Livebloggs.Com)
Nice read, I just passed this onto a colleague who was doing some research on that. And he just bought me lunch as I found it for him smile Thus let me rephrase that: Thank you for lunch! “A human being has a natural desire to have more of a good thing than he needs.” by Mark Twain.
Great web site you’ve got here.. It’s hard to find excellent writing like
yours these days. I truly appreciate individuals like
you! Take care!!
I wish to express my affection for your generosity giving support to men and women that need help with this particular topic. Your personal dedication to getting the solution throughout turned out to be exceedingly practical and have truly enabled others just like me to reach their goals. Your new insightful suggestions entails a great deal a person like me and extremely more to my peers. With thanks; from everyone of us.
Hello, i read your blog from time to time and i own a similar one and i was just wondering if you get a lot of spam remarks? If so how do you protect against it, any plugin or anything you can suggest? I get so much lately it’s driving me crazy so any assistance is very much appreciated.
Hello would you mind sharing which blog platform you’re working with? I’m planning to start my own blog in the near future but I’m having a hard time deciding between BlogEngine/Wordpress/B2evolution and Drupal. The reason I ask is because your design seems different then most blogs and I’m looking for something unique. P.S My apologies for being off-topic but I had to ask!
You have remarked very interesting points! ps nice web site.
Some truly interesting details you have written.Helped me a lot, just what I was looking for : D.
Thank you
I have been absent for some time, but now I remember why I used to love this blog. Thanks, I will try and check back more often. How frequently you update your site?
I am glad to be one of many visitors on this great site (:, regards for putting up.
Great write-up, I?¦m regular visitor of one?¦s blog, maintain up the excellent operate, and It is going to be a regular visitor for a lengthy time.
This really answered my problem, thank you!
Wow, this piece of writing is good, my sister is analyzing these kinds of things, therefore I am going to convey her.
Here is my page: weight loss; https://diigo.com/0ssgwg,
I was just looking for this information for some time. After six hours of continuous Googleing, at last I got it in your site. I wonder what is the lack of Google strategy that do not rank this type of informative sites in top of the list. Usually the top sites are full of garbage.
I just couldn’t leave your website before suggesting that I extremely loved the usual info an individual provide in your guests? Is going to be back steadily in order to inspect new posts
Enjoyed reading through this, very good stuff, thanks. “To be positive To be mistaken at the top of one’s voice.” by Ambrose Bierce.
I’ve recently started a website, the information you provide on this site has helped me greatly. Thank you for all of your time & work.
Hi, i read your blog occasionally and i own a similar one and i was just wondering if you get a lot of spam responses? If so how do you protect against it, any plugin or anything you can recommend? I get so much lately it’s driving me crazy so any support is very much appreciated.
Great delivery. Outstanding arguments. Keep up the great work.
I view something truly special in this internet site.
I am continually browsing online for posts that can assist me. Thx!
I like this post, enjoyed this one thanks for putting up. “‘I have done my best.’ That is about all the philosophy of living one needs.” by Lin Yutang.
Thank you for the good writeup. It in reality used to be a entertainment account it. Glance advanced to more added agreeable from you! However, how could we be in contact?
Absolutely written written content, Really enjoyed studying.
Hello there, I discovered your website by the use of Google even as looking for a comparable matter, your website came up, it appears to be like great. I’ve bookmarked it in my google bookmarks.
I will immediately take hold of your rss feed as I can not in finding your e-mail subscription hyperlink or e-newsletter service. Do you’ve any? Please let me recognize in order that I could subscribe. Thanks.
Some genuinely nice and useful information on this internet site, likewise I think the style and design holds superb features.
Good info. Lucky me I reach on your website by accident, I bookmarked it.
You are a very intelligent person!
Some genuinely nice and utilitarian info on this internet site, also I think the layout contains fantastic features.
I really appreciate this post. I’ve been looking everywhere for this! Thank goodness I found it on Bing. You have made my day! Thank you again
I was reading some of your content on this site and I believe this website is very informative! Continue putting up.
I simply could not depart your site prior to suggesting that I extremely enjoyed the standard information an individual supply for your guests? Is gonna be again regularly in order to investigate cross-check new posts
Really clean internet site, thankyou for this post.
Good day very cool web site!! Guy .. Excellent .. Wonderful .. I will bookmark your website and take the feeds also…I am satisfied to seek out numerous helpful info right here in the publish, we’d like develop more techniques in this regard, thank you for sharing. . . . . .
What i do not realize is in truth how you’re not
really much more smartly-preferred than you might be right now.
You are very intelligent. You recognize therefore considerably
on the subject of this matter, produced me individually believe it from numerous varied angles.
Its like women and men don’t seem to be involved unless it is something to do with
Girl gaga! Your personal stuffs excellent. At all times care for it up!
thank you
I’m really loving the theme/design of your site. Do you ever run into any internet browser compatibility issues? A handful of my blog audience have complained about my blog not operating correctly in Explorer but looks great in Chrome. Do you have any ideas to help fix this problem?
I enjoy your writing style really loving this web site.
Thanks for helping out, fantastic info .
I have to voice my love for your generosity giving support to individuals that require help with that concern. Your very own dedication to getting the message all over has been extremely beneficial and has specifically made workers much like me to achieve their ambitions. Your new insightful report signifies this much to me and even more to my mates. Warm regards; from everyone of us.
Great goods from you, man. I’ve understand your stuff previous to and you’re just extremely fantastic. I actually like what you have acquired here, really like what you’re stating and the way in which you say it. You make it enjoyable and you still care for to keep it smart. I cant wait to read much more from you. https://opview.pro/ is actually a terrific site.
Just wanna remark on few general things, The website style and design is perfect, the subject matter is real fantastic : D.
I’ve recently started a web site, the info you offer on this site has helped me tremendously. Thank you for all of your time & work.
Very well written information. It will be supportive to anyone who employess it, including me. Keep doing what you are doing – can’r wait to read more posts.
You are my inspiration, I own few web logs and infrequently run out from post :). “Analyzing humor is like dissecting a frog. Few people are interested and the frog dies of it.” by E. B. White.
Keep functioning ,fantastic job!
I carry on listening to the news bulletin lecture about getting free online grant applications so I have been looking around for the most excellent site to get one. Could you tell me please, where could i get some?
certainly like your website but you have to
take a look at the spelling on quite a few of your posts.
Many of them are rife with spelling issues and I find it very troublesome to tell the reality then again I will definitely come
again again.
my web blog – Dating Agencies For Seniors
Have you ever considered publishing an ebook or guest authoring on other sites? I have a blog based upon on the same information you discuss and would love to have you share some stories/information. I know my readers would enjoy your work. If you are even remotely interested, feel free to shoot me an e mail.
I view something genuinely special in this site.
What’s Happening i am new to this, I stumbled upon this I have found It absolutely useful and it has helped me out loads. I hope to contribute & aid other users like its helped me. Great job.
Great web site. Lots of useful info here. I’m sending it to several friends ans also sharing in delicious. And naturally, thanks for your effort!
I do accept as true with all the ideas you’ve offered in your post.
They’re very convincing and can definitely work. Still, the posts are very brief for
novices. Could you please prolong them a little from next time?
Thank you for the post.
That’s incredibly mesmerising. Would it be ok to ask some questions?
Hi there I am so happy I found your site, I really found you by mistake, while I was browsing on Digg for something else, Anyways I am here now and would just like to say kudos for a tremendous post and a all round exciting blog (I also love the theme/design), I don’t have time to read through it all at the minute but I have saved it and also added in your RSS feeds, so when I have time I will be back to read much more, Please do keep up the fantastic job.
This really answered my drawback, thanks!
You are a very smart individual!
I was curious if you ever considered changing the page layout of your site? Its very well written; I love what youve got to say. But maybe you could a little more in the way of content so people could connect with it better. Youve got an awful lot of text for only having 1 or two pictures. Maybe you could space it out better?
This is a very good tips especially to those new to blogosphere, brief and accurate information… Thanks for sharing this one. A must read article.
Dead indited content, thank you for entropy. “Life is God’s novel. Let him write it.” by Isaac Bashevis Singer.
Thanks for sharing excellent informations. Your site is so cool. I’m impressed by the details that you’ve on this blog. It reveals how nicely you perceive this subject. Bookmarked this web page, will come back for extra articles. You, my pal, ROCK! I found simply the info I already searched all over the place and just couldn’t come across. What an ideal website.
Excellent site. A lot of helpful info here. I’m sending it to a few friends ans additionally sharing in delicious. And of course, thank you for your sweat!
Heya i am for the first time here. I found this board
and I find It really useful & it helped me out much.
I hope to give something back and aid others like you helped me.
You have remarked very interesting points! ps decent web site. “Never take the advice of someone who has not had your kind of trouble.” by Sydney J. Harris.
I will right away grasp your rss as I can not find your e-mail subscription link or newsletter service. Do you have any? Kindly let me understand in order that I may just subscribe. Thanks.
Hello to every , since I am actually eager of reading this weblog’s post to
be updated regularly. It contains fastidious data.
An interesting discussion is worth comment. I think that you should write more on this topic, it might not be a taboo subject but generally people are not enough to speak on such topics. To the next. Cheers
Right now it looks like WordPress is the preferred blogging platform out there right now. (from what I’ve read) Is that what you are using on your blog?
Thanks for share
Hello my friend! I wish to say that this post is awesome, nice written and include almost all significant infos. I would like to see more posts like this.
Hmm is anyone else experiencing problems with the pictures on this blog loading? I’m trying to figure out if its a problem on my end or if it’s the blog. Any feedback would be greatly appreciated.
Saved as a favorite, I really like your blog!
Hello, Neat post. There’s a problem with your site in internet explorer, may test this?K IE still is the market chief and a good portion of other folks will omit your magnificent writing due to this problem.
The following time I learn a weblog, I hope that it doesnt disappoint me as much as this one. I mean, I do know it was my option to learn, but I truly thought youd have one thing attention-grabbing to say. All I hear is a bunch of whining about one thing that you can repair if you werent too busy searching for attention.
You are my inhalation, I own few web logs and occasionally run out from to brand : (.
I have been exploring for a little for any high quality articles or blog posts on this sort of area . Exploring in Yahoo I at last stumbled upon this web site. Reading this info So i’m happy to convey that I’ve an incredibly good uncanny feeling I discovered exactly what I needed. I most certainly will make certain to do not forget this web site and give it a glance on a constant basis.
I genuinely enjoy examining on this web site, it has fantastic content.
I was very pleased to find this web-site.I wanted to thanks for your time for this wonderful read!! I definitely enjoying every little bit of it and I have you bookmarked to check out new stuff you blog post.
Keep working ,great job!
hi!,I love your writing so a lot! percentage we keep up a correspondence more about your article on AOL? I need a specialist in this space to unravel my problem. Maybe that’s you! Having a look forward to see you.
But wanna state that this is extremely helpful, Thanks for taking your time to write this.
Feel free to surf to my web page machine learning; https://prcomm.esnturkey.org/activity/p/59237/,
I really prize your piece of work, Great post.
Does your website have a contact page? I’m having problems locating it but, I’d like to send you an e-mail. I’ve got some creative ideas for your blog you might be interested in hearing. Either way, great blog and I look forward to seeing it improve over time.
Thanks , I’ve recently been looking for info about this subject for ages and yours is the greatest I have discovered till now. But, what about the conclusion? Are you sure about the source?
Awesome website you have here but I was wondering if you knew of any forums that cover the same topics discussed in this article? I’d really love to be a part of community where I can get responses from other knowledgeable individuals that share the same interest. If you have any suggestions, please let me know. Thanks a lot!
I have been exploring for a little for any high-quality articles or blog posts on this sort of space . Exploring in Yahoo I at last stumbled upon this web site. Studying this info So i?¦m happy to express that I have a very excellent uncanny feeling I found out exactly what I needed. I such a lot no doubt will make certain to do not disregard this web site and give it a look regularly.
Thank you very much.
Hi, this months Word Press 365 day Trial plugin is Elementor Pro Page Builder 3.13.2.
For only $1 Elementor Pro Page Builder 3.13.2 will be fully functional for 365 days.
Only $1
No passwords.
No cons or scams.
I want to sell you many more of my 365Trials and its not worth cheating a potential long term client for a dollar.
Virus tool online : 97aed4335074a26c835882139a7764a8a3b029850b915c24967d8098b2e89985
Follow this link to pay https://gourl.io/yzuzg
Once paid the downlaod will begin.
As usual offer expires in 7 days 18th June 2023 – then back to the usual $2.
Offer expires on the 18th June 23.
Make sure to install Elementor free first
Upload – activate as normal.
Enjoy 365 days of the plugin.
Many Thanks
Lots more coming.
Look out for WP365Trials in your email.
I will be setting up an telegram group so yo can make requests and hopefully I can fill them 🙂
Some truly superb blog posts on this internet site, appreciate it for contribution.
Also visit my blog post :: Buzz Blast Pro Mosquito Killer
Great website. Plenty of helpful info here. I am sending it to several buddies ans additionally sharing in delicious. And naturally, thank you on your effort!
he blog was how do i say it… relevant, finally something that helped me. Thanks
whoah this blog is fantastic i love reading your posts. Keep up the good work! You know, a lot of people are looking around for this information, you can help them greatly.
Very skilful writer and nice, very useful blog post. Thank you and best regards… Going to read more of your posts.
Pretty section of content. I just stumbled upon your blog and in accession capital to assert that I get in fact enjoyed account your blog posts. Any way I’ll be subscribing to your feeds and even I achievement you access consistently fast.
Hi, I think your site might be having browser compatibility issues. When I look at your website in Safari, it looks fine but when opening in Internet Explorer, it has some overlapping. I just wanted to give you a quick heads up! Other then that, fantastic blog!
Some really wonderful info , Sword lily I observed this. “True success is overcoming the fear of being unsuccessful.” by Paul Sweeney.
Thanks for the sensible critique. Me and my neighbor were just preparing to do a little research on this. We got a grab a book from our local library but I think I learned more clear from this post. I’m very glad to see such wonderful information being shared freely out there.
I think this is one of the most vital information for me. And i’m glad reading your article. But wanna remark on some general things, The web site style is wonderful, the articles is really excellent : D. Good job, cheers
I discovered your blog site on google and check a few of your early posts. Continue to keep up the very good operate. I just additional up your RSS feed to my MSN News Reader. Seeking forward to reading more from you later on!…
I savour, result in I found just what I was looking for. You have ended my 4 day lengthy hunt! God Bless you man. Have a great day. Bye
certainly like your web site but you have to check the spelling on quite a few of your posts. Many of them are rife with spelling problems and I in finding it very bothersome to tell the reality on the other hand I will certainly come back again.
I conceive you have observed some very interesting points, appreciate it for the post.
Definitely, what a great website and educative posts, I definitely will bookmark your blog.Have an awsome day!
I just could not depart your site before suggesting that I extremely enjoyed the standard information a person provide for your visitors? Is going to be back often in order to check up on new posts
An interesting dialogue is worth comment. I feel that you must write extra on this subject, it won’t be a taboo topic but typically people are not sufficient to talk on such topics. To the next. Cheers
Great web site you have here.. It’s hard to find high quality writing like yours these days.
I honestly appreciate people like you! Take care!!
you have a great blog here! would you like to make some invite posts on my blog?
You actually make it seem so easy with your presentation but I find this matter to be actually something that I think I would never understand. It seems too complex and extremely broad for me. I’m looking forward for your next post, I will try to get the hang of it!
Hello oldpcgaming.net webmaster,
Are you looking to attract more visitors, improve your website’s ranking, and increase your profits? Look no further!
Introducing our exclusive Website Traffic service, designed to propel your website to success with high-quality organic traffic. Here’s why you should take advantage of this opportunity:
1. 100% Safe Traffic: Real visitors, no bots or proxies involved.
2. Targeted Traffic from Search Engines: Reach potential customers actively searching for products or services like yours.
3. Referral Traffic from Social Media: Expand your online presence with traffic from popular social media platforms.
4. Geo-Targeting: Focus on specific regions such as the USA, UK, CA, or AU.
5. Excellent Metrics: Experience a low bounce rate, longer visit duration, and increased page views.
If you haven’t tried our Website Traffic service yet, we’re thrilled to offer you a Free Trial! Experience the benefits with no financial obligation.
Maximize the impact of your online business and achieve your desired results with our Website Traffic service. Click the link below to learn more and start your Free Trial!
>> https://bit.ly/43GjFtB
Our team is dedicated to helping you reach your goals and providing the support you need. Don’t miss this opportunity to stand out from the competition and build your online success!
Best regards,
Lockard
Iceland, NA, Bu?Ardalur, 371, Sunnubraut 41
To stop any further communication through your website form, Please reply with subject: Unsubscribe oldpcgaming.net
Thank you very much.
Well I definitely liked reading it. This post offered by you is very helpful for proper planning.
I like your writing style genuinely enjoying this website .
I simply couldn’t depart your website before
suggesting that I actually loved the usual info an individual provide to your guests?
Is gonna be back incessantly to check out new posts
Great wordpress blog here.. It’s hard to find quality writing like yours these days. I really appreciate people like you! take care
You actually make it seem really easy together with your presentation however I to find this topic to be really something that I think I’d by no means understand. It seems too complex and extremely huge for me. I am looking ahead to your next post, I?¦ll try to get the grasp of it!
This blog is definitely rather handy since I’m at the moment creating an internet floral website – although I am only starting out therefore it’s really fairly small, nothing like this site. Can link to a few of the posts here as they are quite. Thanks much. Zoey Olsen
Absolutely written subject material, regards for selective information. “Necessity is the mother of taking chances.” by Mark Twain.
You really make it seem really easy with your presentation however I find this matter to be actually something that I feel I’d by no means understand. It kind of feels too complicated and extremely huge for me. I’m looking ahead on your next publish, I will attempt to get the hang of it!
I always was concerned in this topic and still am, thanks for posting.
Great ?V I should definitely pronounce, impressed with your web site. I had no trouble navigating through all tabs and related information ended up being truly easy to do to access. I recently found what I hoped for before you know it in the least. Quite unusual. Is likely to appreciate it for those who add forums or something, site theme . a tones way for your client to communicate. Nice task..
I am no longer sure where you’re getting your info, but good topic. I must spend a while studying more or figuring out more. Thank you for great information I was searching for this information for my mission.
I know this if off topic but I’m looking into starting my own blog and was wondering what all is needed to get setup? I’m assuming having a blog like yours would cost a pretty penny? I’m not very internet smart so I’m not 100 positive. Any recommendations or advice would be greatly appreciated. Thank you
Thank you very much
I very thankful to find this web site on bing, just what I was searching for : D besides saved to favorites.
Hi there! This post couldn’t be written any better! Reading through this post reminds me of my previous room mate! He always kept talking about this. I will forward this article to him. Pretty sure he will have a good read. Thank you for sharing!
Appreciation to my father who told me regarding this weblog, this web site is truly amazing.
There is noticeably a bundle to know about this. I assume you made certain nice points in features also.
I have learn a few excellent stuff here. Certainly value bookmarking for revisiting. I surprise how a lot attempt you set to make this kind of fantastic informative web site.
Thank you for each of your work on this site. Kate take interest in making time for investigations and it is easy to understand why. Most of us learn all regarding the dynamic tactic you give important suggestions via the website and attract contribution from others on the subject so our girl is truly being taught so much. Take advantage of the rest of the year. Your carrying out a great job.
As soon as I noticed this website I went on reddit to share some of the love with them.
I really like foregathering utile information , this post has got me even more info! .
Thank you for all of the work on this site. My niece enjoys participating in investigation and it’s really simple to grasp why. We know all concerning the lively medium you produce valuable suggestions on the web site and attract response from others on the issue and our favorite daughter has always been discovering a lot. Have fun with the remaining portion of the year. You have been conducting a great job.
Thank you for sharing excellent informations. Your site is so cool. I’m impressed by the details that you have on this web site. It reveals how nicely you perceive this subject. Bookmarked this web page, will come back for extra articles. You, my friend, ROCK! I found just the information I already searched all over the place and simply couldn’t come across. What a perfect web site.
I’ve been surfing on-line more than 3 hours lately, but I never found any interesting article like yours. It¦s lovely value sufficient for me. Personally, if all web owners and bloggers made good content material as you did, the internet might be much more helpful than ever before.
This post gives clear idea designed for the new people of blogging,
that truly how to do running a blog.
Greetings! Very helpful advice on this article! It is the little changes that make the biggest changes. Thanks a lot for sharing!
You could definitely see your skills in the work you write. The sector hopes for even more passionate writers such as you who aren’t afraid to say how they believe. All the time follow your heart.
Hello, i read your blog occasionally and i own a similar one and i was just curious if you get a lot of spam remarks? If so how do you stop it, any plugin or anything you can suggest? I get so much lately it’s driving me insane so any support is very much appreciated.
I actually wanted to write down a simple remark so as to appreciate you for those unique ways you are giving on this website. My rather long internet research has at the end of the day been paid with high-quality know-how to go over with my good friends. I would declare that most of us readers actually are truly lucky to dwell in a fabulous network with many wonderful professionals with helpful secrets. I feel extremely privileged to have come across the webpages and look forward to so many more exciting minutes reading here. Thanks once again for everything.
Nice read, I just passed this onto a colleague who was doing a little research on that. And he actually bought me lunch because I found it for him smile Therefore let me rephrase that: Thanks for lunch!
The next time I read a blog, I hope that it doesnt disappoint me as much as this one. I mean, I know it was my choice to read, but I actually thought youd have something interesting to say. All I hear is a bunch of whining about something that you could fix if you werent too busy looking for attention.
hello!,I really like your writing so so much!
share we keep in touch more about your article on AOL? I need
a specialist on this house to resolve my problem. May be that’s you!
Taking a look forward to see you.
Wonderful site you have here but I was curious if you knew of any discussion boards that cover the same topics discussed in this article? I’d really love to be a part of online community where I can get feedback from other knowledgeable individuals that share the same interest. If you have any suggestions, please let me know. Thanks!
I’ve been surfing online greater than 3 hours lately, yet I never found any interesting article like yours. It¦s lovely value enough for me. In my view, if all website owners and bloggers made excellent content as you did, the net shall be much more useful than ever before.
This version did not make the list mainly because the fifth generation stepped things up a notch, and iit really is quieter.
Here is my homepage; 홈타이 마사지
Wow! This blog looks just like my old one! It’s on a totally different topic but it has pretty much the same page
layout and design. Great choice of colors!
Excellent website. Lots of helpful information here. I am sending it to several friends ans additionally sharing in delicious. And of course, thanks for your effort!
This site can be a walk-by way of for all the data you wished about this and didn’t know who to ask. Glimpse right here, and also you’ll positively discover it.
Excellent post. I was checking constantly this blog and I am impressed! Extremely useful info specially the last part 🙂 I care for such info a lot. I was looking for this particular information for a very long time. Thank you and good luck.
Appreciate the recommendation. Let me try it out.
Here is my webpage :: bbw blind date
I carry on listening to the rumor talk about receiving free online grant applications so I have been looking around for the finest site to get one. Could you advise me please, where could i get some?
This actually answered my drawback, thank you!
thanks for shares.
Fantastic beat ! I would like to apprentice whilst you amend your website, how can i subscribe for a blog website? The account aided me a appropriate deal. I had been a little bit familiar of this your broadcast offered vibrant clear idea
This web site is really a walk-through for all of the info you wanted about this and didn’t know who to ask. Glimpse here, and you’ll definitely discover it.
I have read a few excellent stuff here. Definitely price bookmarking for revisiting. I surprise how so much effort you put to make one of these wonderful informative web site.
Write more, thats all I have to say. Literally, it seems as though you relied on the video to make your point. You clearly know what youre talking about, why throw away your intelligence on just posting videos to your blog when you could be giving us something informative to read?
A lot of of whatever you mention is astonishingly legitimate and that makes me ponder the reason why I had not looked at this in this light before. This piece truly did turn the light on for me personally as far as this specific subject matter goes. However at this time there is one point I am not too cozy with so whilst I make an effort to reconcile that with the actual central idea of your point, allow me see exactly what all the rest of your readers have to point out.Very well done.
I am curious to find out what blog platform you are utilizing? I’m having some small security issues with my latest site and I’d like to find something more risk-free. Do you have any suggestions?
I am always invstigating online for articles that can facilitate me. Thank you!
Hi there to all, it’s genuinely a pleasant for me to pay a visit this web
page, it consists of priceless Information.
I love the efforts you have put in this, appreciate it for all the great posts.
Having read this I thought it was very informative. I appreciate you taking the time and effort to put this article together. I once again find myself spending way to much time both reading and commenting. But so what, it was still worth it!
hey there and thank you for your information – I have
certainly picked up anything new from right here.
I did however expertise several technical points using this website, since I experienced to reload the site many times
previous to I could get it to load correctly. I had been wondering
if your web host is OK? Not that I am complaining, but slow loading
instances times will sometimes affect your
placement in google and can damage your quality score if
advertising and marketing with Adwords. Well I am adding this RSS
to my email and can look out for much more of your respective intriguing content.
Ensure that you update this again soon.
Hi, i think that i saw you visited my site so i came to “return the favor”.I’m attempting to find things to enhance my site!I suppose its ok to use some of your ideas!!
I also believe thence, perfectly indited post! .
Just a smiling visitant here to share the love (:, btw great layout. “Individuals may form communities, but it is institutions alone that can create a nation.” by Benjamin Disraeli.
I like the efforts you have put in this, thank you for all the great posts.
Thanks , I’ve recently been looking for info about this subject for ages and yours is the greatest I’ve discovered till now. But, what about the bottom line? Are you sure about the source?
Can I just say what a relief to find someone who actually knows what theyre talking about on the internet. You definitely know how to bring an issue to light and make it important. More people need to read this and understand this side of the story. I cant believe youre not more popular because you definitely have the gift.
Very rapidly this web page will be famous amid all blogging viewers, due to
it’s good articles
I¦ve recently started a site, the info you offer on this web site has helped me greatly. Thanks for all of your time & work.
hello!,I like your writing so a lot! proportion we communicate extra approximately your article on AOL? I require a specialist on this area to resolve my problem. Maybe that’s you! Looking forward to peer you.
Do you have an on going promotion for June?
Hello to every one, it’s actually a nice for me to pay a quick visit this web page, it includes valuable Information.
obviously like your web site but you need to check the spelling on several of your posts. Several of them are rife with spelling issues and I in finding it very bothersome to inform the reality however I?¦ll surely come back again.
Hey There. I found your blog using msn. This is a very well written article. I’ll make sure to bookmark it and return to read more of your useful information. Thanks for the post. I’ll definitely comeback.
If you desire to take a great deal from this post then you have to apply
such techniques to your won webpage.
It?¦s really a great and helpful piece of info. I?¦m glad that you shared this helpful info with us. Please stay us informed like this. Thank you for sharing.
I’m still learning from you, while I’m trying to reach my goals. I absolutely love reading everything that is written on your blog.Keep the information coming. I loved it!
You have observed very interesting details ! ps nice website .
Hello.This article was extremely remarkable, especially since I was browsing for thoughts on this topic last couple of days.
As a Newbie, I am constantly browsing online for articles that can be of assistance to me. Thank you
Hello. impressive job. I did not expect this. This is a fantastic story. Thanks!
I like this website very much so much fantastic information.
Hiya very nice website!! Guy .. Excellent .. Wonderful .. I will bookmark your website and take the feeds additionally?KI’m glad to seek out a lot of useful information here in the publish, we want work out extra techniques on this regard, thanks for sharing. . . . . .
I love the efforts you have put in this, thanks for all the great posts.
I’m truly enjoying the design and layout of your blog. It’s a very easy on the eyes which makes it much more pleasant for me to come here and visit more often. Did you hire out a developer to create your theme?
Great work! https://drive.google.com/drive/folders/1B8-O1VPq6B2b5KdDKdy_ttXyuBvY8vkN
It’s actually a cool and helpful piece of information. I’m glad that you shared this useful info with us. Please keep us up to date like this. Thanks for sharing.
I delight in, result in I found exactly what I used to be taking a look for. You’ve ended my four day lengthy hunt! God Bless you man. Have a nice day. Bye
I am glad that I noticed this site, just the right information that I was searching for! .
Hi there! I’m at work surfing around your blog from my new iphone! Just wanted to say I love reading your blog and look forward to all your posts! Carry on the excellent work!
Wonderful blog! I found it while browsing on Yahoo News. Do you have any tips on how to get listed in Yahoo News? I’ve been trying for a while but I never seem to get there! Thanks
Heya i am for the primary time here. I found this board and I in finding It truly useful & it helped me out a lot. I am hoping to present something again and aid others such as you helped me.
I do enjoy the manner in which you have framed this difficulty and it does provide me some fodder for consideration. However, through what precisely I have personally seen, I simply just hope when the actual remarks pack on that individuals stay on point and don’t get started on a soap box regarding some other news du jour. Anyway, thank you for this superb point and although I can not really concur with the idea in totality, I regard the standpoint.
obviously like your web site but you need to test the spelling on several of your posts. A number of them are rife with spelling problems and I find it very bothersome to tell the reality nevertheless I will definitely come back again.
I like this site its a master peace ! Glad I noticed this on google .
I enjoy studying and I believe this website got some genuinely useful stuff on it! .
Heya! I just wanted to ask if you ever have any problems with hackers?
My last blog (wordpress) was hacked and I ended up losing months
of hard work due to no back up. Do you have any methods to prevent hackers?
Real nice style and design and wonderful subject material, hardly anything else we need : D.
I’m impressed, I have to say. Actually not often do I encounter a weblog that’s both educative and entertaining, and let me inform you, you might have hit the nail on the head. Your concept is excellent; the difficulty is something that not sufficient individuals are talking intelligently about. I am very pleased that I stumbled throughout this in my seek for something regarding this.
Heya i am for the primary time here. I found this board and I to find It really useful & it helped me out much. I hope to provide something back and aid others such as you aided me.
I’d have to examine with you here. Which is not one thing I usually do! I take pleasure in reading a post that may make folks think. Additionally, thanks for permitting me to comment!
I’ve been exploring for a little for any high-quality articles or weblog posts in this sort of area . Exploring in Yahoo I eventually stumbled upon this web site. Studying this info So i am glad to show that I’ve an incredibly just right uncanny feeling I found out just what I needed. I such a lot indisputably will make sure to don’t forget this website and provides it a glance on a constant basis.
It is appropriate time to make some plans for the future and it is time to be happy. I have read this post and if I could I desire to suggest you some interesting things or advice. Perhaps you can write next articles referring to this article. I wish to read even more things about it!
Awesome website you have here but I was curious about if you knew of any forums that cover the same topics discussed here? I’d really like to be a part of online community where I can get suggestions from other knowledgeable people that share the same interest. If you have any recommendations, please let me know. Cheers!
What’s up to every single one, it’s really a fastidious for me
to go to see this web site, it contains helpful Information.
The next time I read a blog, I hope that it doesnt disappoint me as much as this one. I mean, I know it was my choice to read, but I actually thought youd have something interesting to say. All I hear is a bunch of whining about something that you could fix if you werent too busy looking for attention.
If you would like to improve your familiarity only keep visiting this site and be updated with
the newest news update posted here.
Feel free to visit my website: ourtime Login Uk
Nice read, I just passed this onto a friend who was doing some research on that. And he just bought me lunch since I found it for him smile Thus let me rephrase that: Thank you for lunch!
Thanks for shares.
I really like your blog.. very nice colors & theme. Did you design this website yourself or did you hire someone to do it for you? Plz reply as I’m looking to design my own blog and would like to know where u got this from. cheers
This is the best blog for anybody who wants to seek out out about this topic. You understand a lot its nearly laborious to argue with you (not that I actually would want…HaHa). You undoubtedly put a brand new spin on a subject thats been written about for years. Great stuff, simply nice!
Great beat ! I wish to apprentice at the same time as you amend your site, how could
i subscribe for a blog web site? The account helped me a acceptable deal.
I were a little bit familiar of this your broadcast provided brilliant transparent idea
my web-site Albertina
You have mentioned very interesting details! ps nice site.
It is perfect time to make some plans for the future and it’s time to be happy. I’ve read this post and if I could I want to suggest you some interesting things or tips. Perhaps you can write next articles referring to this article. I desire to read more things about it!
Well I sincerely enjoyed reading it. This post provided by you is very useful for proper planning.
It’s a pity you don’t have a donate button! I’d without a doubt donate to this excellent blog! I suppose for now i’ll settle for book-marking and adding your RSS feed to my Google account. I look forward to new updates and will share this website with my Facebook group. Talk soon!
Hello there, You have performed a great job. I will definitely digg it and personally recommend to my friends. I’m sure they’ll be benefited from this web site.
I?¦ve recently started a blog, the info you provide on this web site has helped me greatly. Thank you for all of your time & work.
I loved as much as you’ll receive carried out right here. The sketch is attractive, your authored material stylish. nonetheless, you command get bought an impatience over that you wish be delivering the following. unwell unquestionably come more formerly again since exactly the same nearly very often inside case you shield this hike.
Does your website have a contact page? I’m having trouble locating it but, I’d like to send you an e-mail. I’ve got some recommendations for your blog you might be interested in hearing. Either way, great website and I look forward to seeing it develop over time.
Very interesting details you have noted, regards for posting. “History is a cyclic poem written by Time upon the memories of man.” by Percy Bysshe Shelley.
The next time I read a blog, I hope that it doesnt disappoint me as much as this one. I mean, I know it was my choice to read, but I actually thought youd have something interesting to say. All I hear is a bunch of whining about something that you could fix if you werent too busy looking for attention.
visit website thank you
I like this site very much so much excellent info .
Some truly great articles on this web site, regards for contribution.
You have brought up a very excellent points, appreciate it for the post.
But instead of using excessive-strain gas to generate thrust, the craft uses a jet drive to create a strong stream of water.
The coverage on gas differs between firms as properly.
The TDM Encyclopedia. “Car sharing: Vehicle Rental Services That Substitute for Private Vehicle Ownership.” Victoria Transport Policy Institute.
University of California Berkeley, Institute of Transportation Studies.
Santa Rita Jail in Alameda, California (it’s near San Francisco, no surprise) uses an array of fuel cells, photo voltaic panels, wind
turbines and diesel generators to power its very personal micro grid.
However, many nonprofit automobile-share organizations are doing fairly effectively, comparable to City CarShare within the San Francisco Bay Area and PhillyCarShare in Philadelphia.
So you may be asking your self, “Wow, if automobile sharing is so standard and simple, should I be doing it too?” To search out out extra about who can profit from sharing a automobile and to study easy methods to
contact a car-sharing company, continue to the next
web page.
Some very interesting points made in this post. Glad i found it. Thanks for sharing such valuable information.
Thank you, I have recently been searching for info about this topic for ages and yours is the best I have came upon so far. But, what in regards to the bottom line? Are you certain concerning the supply?
Some genuinely marvelous work on behalf of the owner of this website , dead outstanding articles.
Very good written post. It will be useful to anybody who utilizes it, as well as me. Keep doing what you are doing – looking forward to more posts.
I am really enjoying the theme/design of your weblog. Do you ever run into any browser compatibility issues? A few of my blog audience have complained about my site not operating correctly in Explorer but looks great in Opera. Do you have any suggestions to help fix this problem?
Whats up! I just want to give an enormous thumbs up for the great information you have here on this post. I can be coming back to your blog for more soon.
Currently it sounds like Movable Type is the top blogging platform out there right now. (from what I’ve read) Is that what you’re using on your blog?
This really answered my problem, thank you!
Really Appreciate this blog post, can you make it so I get an update sent in an email every time you make a new post?
This blog is definitely rather handy since I’m at the moment creating an internet floral website – although I am only starting out therefore it’s really fairly small, nothing like this site. Can link to a few of the posts here as they are quite. Thanks much. Zoey Olsen
you have a great blog here! would you like to make some invite posts on my blog?
Just desire to say your article is as amazing. The clarity on your publish is just nice and i could think you are knowledgeable on this subject. Fine along with your permission allow me to take hold of your feed to stay updated with drawing close post. Thank you one million and please keep up the gratifying work.
Some truly nice and utilitarian information on this website , besides I think the design contains wonderful features.
I was just searching for this information for a while. After 6 hours of continuous Googleing, at last I got it in your site. I wonder what is the lack of Google strategy that don’t rank this type of informative sites in top of the list. Usually the top websites are full of garbage.
Thanks for any other informative website. The place else may I get that kind of information written in such an ideal way? I’ve a project that I’m simply now working on, and I have been on the look out for such info.
Write more, thats all I have to say. Literally, it seems as though you relied on the video to make your point. You definitely know what youre talking about, why throw away your intelligence on just posting videos to your site when you could be giving us something enlightening to read?
hello!,I love your writing very a lot! share we be in contact extra about your article on AOL? I require an expert in this house to resolve my problem. May be that is you! Taking a look forward to see you.
Pretty section of content. I just stumbled upon your site and in accession capital to assert that I acquire actually enjoyed account your blog posts. Any way I’ll be subscribing to your feeds and even I achievement you access consistently rapidly.
Good day! I just want to give a huge thumbs up for the good information you have got right here on this post. I shall be coming back to your weblog for more soon.
It’s a shame you don’t have a donate button! I’d most certainly donate to this outstanding blog! I guess for now i’ll settle for bookmarking and adding your RSS feed to my Google account. I look forward to brand new updates and will share this website with my Facebook group. Chat soon!
I like what you guys are up also. Such smart work and reporting! Keep up the superb works guys I have incorporated you guys to my blogroll. I think it will improve the value of my web site 🙂
I am regular reader, how are you everybody? This paragraph posted
at this web site is truly good.
Good – I should certainly pronounce, impressed with your website. I had no trouble navigating through all tabs and related information ended up being truly simple to do to access. I recently found what I hoped for before you know it in the least. Reasonably unusual. Is likely to appreciate it for those who add forums or something, website theme . a tones way for your customer to communicate. Excellent task..
Thanks for shares
I always used to study article in news papers but now as I
am a user of net thus from now I am using net for posts, thanks to web.
Thank you for another informative blog. Where else could I get that type of info written in such an ideal means? I have a venture that I am just now working on, and I’ve been at the glance out for such information.
But wanna state that this is very useful, Thanks for taking your time to write this.
To the oldpcgaming.net Webmaster!
Discover the Secret Email System, the key to building a 7-figure online business effortlessly using ethical email marketing.
No product creation, no service fulfillment, no ads, and no customer service required.
Only 30 minutes a day needed. Sales generated 24/7.
This revolutionary approach, the Secret Email System, empowers you to create a sustainable and profitable long-term online business.
Say goodbye to the traditional model and embrace a new freedom lifestyle where your business works for you.
Before I discovered the Secret Email System, I struggled for years in my online business. Working endless hours, chasing clients day and night, I realized I had unintentionally created a job for myself that I never wanted.
But everything changed when I turned the online business model upside down. After years of trial-and-error, I transformed my business into a self-operating machine that generates consistent revenue without my constant involvement.
Now, you can replicate my success with the Secret Email System. Here’s what you need to do:
1. Visit site below and secure your copy of the Secret Email System ebook.
2. Uncover the proven techniques that will revolutionize your online business.
3. Implement the strategies and enjoy the freedom and abundance that come with it.
=>> https://zeep.ly/GSGCX
Don’t miss this opportunity to take your digital business to new heights.
Thanks,
Prince
France, CENTRE, Vitrolles, 13127, 52 Rue Bonnet
To stop receiving such offers, simply reply to this email…
We’re a group of volunteers and starting a new scheme in our community. Your site offered us with useful info to work on. You have performed a formidable process and our entire community might be thankful to you.
Hmm it seems like your site ate my first comment (it was extremely long) so I guess I’ll just sum it up what I had written and say, I’m thoroughly enjoying your blog. I as well am an aspiring blog blogger but I’m still new to the whole thing. Do you have any helpful hints for beginner blog writers? I’d certainly appreciate it.
Pretty great post. I simply stumbled upon your weblog and wished to say that I’ve truly enjoyed browsing your blog posts. After all I’ll be subscribing to your feed and I’m hoping you write once more very soon!
Thank you for helping out, wonderful information. “It does not do to dwell on dreams and forget to live.” by J. K. Rowling.
Howdy! I could have sworn I’ve been to this blog before but after reading through some of the post I realized it’s new
to me. Anyways, I’m definitely glad I found it and I’ll be book-marking and checking back frequently!
There are definitely lots of particulars like that to take into consideration. That may be a nice point to bring up. I supply the ideas above as common inspiration but clearly there are questions just like the one you bring up the place an important thing shall be working in sincere good faith. I don?t know if finest practices have emerged around things like that, however I am certain that your job is clearly recognized as a fair game. Each girls and boys really feel the impression of just a moment’s pleasure, for the remainder of their lives.
I enjoy reading an article that can make people think.
Also, thanks for allowing for me to comment!
Thanks for shares
I used to be able to find good information from your content.
I’m no longer sure where you are getting your information, but good topic. I must spend a while finding out more or figuring out more. Thanks for wonderful info I was in search of this info for my mission.
Its fantastic as your other posts : D, thanks for putting up. “Say not, ‘I have found the truth,’ but rather, ‘I have found a truth.'” by Kahlil Gibran.
Thanks for shares
I am extremely impressed with your writing skills and also with the layout on your weblog. Is this a paid theme or did you customize it yourself? Either way keep up the nice quality writing, it is rare to see a great blog like this one today..
Thanks for shares
Great post. I was checking constantly this blog and I’m impressed! Extremely useful info specifically the ultimate section 🙂 I take care of such info much. I was seeking this certain information for a very lengthy time. Thank you and best of luck.
Hello there, just became aware of your blog through Google, and found that it is really informative. I am going to watch out for brussels. I will appreciate if you continue this in future. Many people will be benefited from your writing. Cheers!
Hi, Neat post. There’s a problem with your site in internet explorer, would test this… IE still is the market leader and a big portion of people will miss your excellent writing due to this problem.
I’ve been surfing online greater than three hours lately, but I by no means found any attention-grabbing article like yours. It¦s lovely price sufficient for me. In my view, if all site owners and bloggers made just right content material as you probably did, the net will likely be a lot more helpful than ever before.
Nice read, I just passed this onto a colleague who was doing a little research on that. And he just bought me lunch since I found it for him smile So let me rephrase that: Thank you for lunch! “To be 70 years young is sometimes far more cheerful and hopeful than to be 40 years old.” by Oliver Wendell Holmes.
I absolutely love your blog.. Very nice colors & theme. Did you create this website yourself?
Please reply back as I’m wanting to create my own site and want
to find out where you got this from or just what the
theme is called. Kudos!
Yes! Finally someone writes about joker123.
Hello very nice website!! Guy .. Excellent .. Superb .. I’ll bookmark your website and take the feeds also…I’m satisfied to find a lot of helpful information right here in the publish, we need develop more techniques in this regard, thanks for sharing.
Dear oldpcgaming.net Admin.
Unlock the power of YouTube and Google with our YouTube Ranking services! Skyrocket your video’s visibility with 100 SEO Views/day and 500 high-quality, niche-relevant DoFollow SEO Backlinks.
Dominate search engines with our tailored approach. Increase your ranking by 10% using keyword-rich anchor text, or opt for 90% generic text for broader appeal. Experience the benefits of video embedding and long URLs across multiple platforms.
Don’t wait! Claim our Standard Package today for impressive results.
Watch your YouTube video soar to new heights with genuine views and powerful backlinks. Delivery in just 7 days!
=>> https://zeep.ly/VrTsL
Thanks,
SEObyAxy
United Kingdom, NA, Shortacombe, Ex20 8fe, 41 Felix Lane
To stop any further communication through your website form, Please reply with subject: unsubscribe oldpcgaming.net
What¦s Taking place i am new to this, I stumbled upon this I’ve found It positively helpful and it has helped me out loads. I am hoping to give a contribution & help other customers like its helped me. Great job.
Thanks for shares
I?¦ll right away grasp your rss as I can not find your e-mail subscription hyperlink or newsletter service. Do you have any? Please allow me realize in order that I may just subscribe. Thanks.
I was suggested this blog through my cousin. I am now not positive whether or not this publish is written by means of him as no one else recognize such specific about my problem. You’re incredible! Thank you!
obviously like your web-site but you need to check the spelling on several of your posts. Several of them are rife with spelling issues and I to find it very troublesome to tell the reality on the other hand I?¦ll certainly come again again.
I discovered your blog site on google and check a few of your early posts. Continue to keep up the very good operate. I just additional up your RSS feed to my MSN News Reader. Seeking forward to reading more from you later on!…
Keep working ,remarkable job!
I genuinely enjoy reading on this internet site, it has got wonderful blog posts. “One should die proudly when it is no longer possible to live proudly.” by Friedrich Wilhelm Nietzsche.
Thanks for shares
I simply couldn’t leave your web site prior to suggesting that I really loved the usual information a person provide for your visitors? Is going to be again steadily to check out new posts
Howdy, i read your blog from time to time and i own a similar one and i was just wondering if you get a lot of spam comments? If so how do you reduce it, any plugin or anything you can advise? I get so much lately it’s driving me mad so any assistance is very much appreciated.
Some really wonderful information, Gladiola I noticed this. “Doctrine is nothing but the skin of truth set up and stuffed.” by Henry Ward Beecher.
What’s Going down i am new to this, I stumbled upon this I have found It absolutely helpful and it has helped me out loads. I hope to give a contribution & aid other customers like its aided me. Good job.
What i do not understood is if truth be told how you are not actually much more well-favored than you may be right now. You are very intelligent. You realize therefore significantly with regards to this subject, made me in my view believe it from numerous various angles. Its like men and women are not fascinated until it is something to do with Girl gaga! Your personal stuffs great. Always take care of it up!
Howdy very nice web site!! Man .. Beautiful .. Superb .. I’ll bookmark your web site and take the feeds additionally?KI am glad to seek out a lot of helpful information here within the post, we need develop extra strategies in this regard, thanks for sharing. . . . . .
What i don’t understood is actually how you’re not actually much more well-liked than you may be right now. You’re very intelligent. You realize thus considerably relating to this subject, produced me personally consider it from a lot of varied angles. Its like men and women aren’t fascinated unless it’s one thing to do with Lady gaga! Your own stuffs excellent. Always maintain it up!
Very interesting info!Perfect just what I was looking for!
Today, while I was at work, my cousin stole my apple ipad and tested to see if it can survive a forty foot drop, just so she can be a youtube sensation. My iPad is now destroyed and she has 83 views. I know this is entirely off topic but I had to share it with someone!
I have not checked in here for a while since I thought it was getting boring, but the last several posts are great quality so I guess I’ll add you back to my daily bloglist. You deserve it my friend 🙂
Some truly quality articles on this web site, saved to fav.
I am curious to find out what blog system you’re using? I’m having some minor security problems with my latest blog and I would like to find something more safeguarded. Do you have any suggestions?
Dear oldpcgaming.net Administrator!
Boost your business with targeted customers now! Let me find your niche audience online.
I’ll locate relevant sites using keywords, leaving impactful English comments visible to site admins and visitors.
Alternatively, I can deliver your message exclusively to site administrators.
Get quality visits to your link from potential customers! Take action today and let me search and send messages daily for a month.
=>> https://zeep.ly/ucmLk
Thanks,
SEObyAxy
Australia, WA, Callcup, 6260, 67 Bellion Drive
To stop any further communication through your website form, Please reply with subject: unsubscribe oldpcgaming.net
Throughout this great scheme of things you’ll get a B- with regard to effort. Exactly where you confused everybody was on your particulars. As people say, details make or break the argument.. And it couldn’t be more correct here. Having said that, permit me reveal to you just what exactly did give good results. Your article (parts of it) can be pretty powerful and this is possibly the reason why I am taking the effort in order to comment. I do not really make it a regular habit of doing that. Next, even though I can easily notice a leaps in reasoning you make, I am definitely not sure of exactly how you seem to connect the details that help to make the final result. For right now I will yield to your position but hope in the foreseeable future you connect your dots better.
Thank you a bunch for sharing this with all people you really recognize what you’re speaking about! Bookmarked. Kindly also talk over with my web site =). We could have a hyperlink alternate agreement between us!
I have been reading out some of your articles and i can state pretty good stuff. I will make sure to bookmark your site.
Nice blog here! Also your site loads up very fast! What web host are you using? Can I get your affiliate link to your host? I wish my website loaded up as quickly as yours lol
I’ve been absent for some time, but now I remember why I used to love this website. Thanks, I?¦ll try and check back more frequently. How frequently you update your site?
Very clear site, thankyou for this post.
There’s noticeably a bundle to know about this. I assume you made sure good factors in options also.
Regards for this howling post, I am glad I noticed this website on yahoo.
Howdy just wanted to give you a quick heads up and let you know a few of the images aren’t loading properly. I’m not sure why but I think its a linking issue. I’ve tried it in two different browsers and both show the same outcome.
Howdy I am so grateful I found your webpage, I really found you by mistake, while I was looking on Bing for something else, Regardless I am here now and would just like to say thank you for a tremendous post and a all round entertaining blog (I also love the theme/design), I don’t have time to read it all at the moment but I have bookmarked it and also included your RSS feeds, so when I have time I will be back to read more, Please do keep up the fantastic job.
My webpage https://www.westbloomfieldlibrary.org/includes/statistics.php?StatType=Link&StatID=Facebook&weblink=https://renuskinserum.com
I believe this internet site contains some very superb info for everyone. “The foundation of every state is the education of its youth.” by Diogenes.
I loved as much as you will receive carried out right here. The sketch is tasteful, your authored material stylish. nonetheless, you command get bought an impatience over that you wish be delivering the following. unwell unquestionably come further formerly again as exactly the same nearly a lot often inside case you shield this increase.
It’s really a cool and useful piece of information. I’m glad that you shared this useful information with us. Please keep us up to date like this. Thanks for sharing.
Thanks a lot for sharing this with all of us you really know what you are talking about! Bookmarked. Kindly additionally talk over with my web site =). We may have a link change contract between us!
Its great as your other content : D, appreciate it for putting up. “In the spider-web of facts, many a truth is strangled.” by Paul Eldridge.
I?¦ve recently started a web site, the information you offer on this web site has helped me tremendously. Thanks for all of your time & work.
excellent post.Ne’er knew this, appreciate it for letting me know.
I am impressed with this website , rattling I am a fan.
Thanks for all your efforts that you have put in this. very interesting info .
I’m not that much of a internet reader to be honest but your blogs really nice, keep it up! I’ll go ahead and bookmark your site to come back in the future. Many thanks
It’s hard to find knowledgeable people on this topic, but you sound like you know what you’re talking about! Thanks
Hi, i think that i saw you visited my website so i came to “return the favor”.I’m trying to find things to enhance my site!I suppose its ok to use some of your ideas!!
Do you have a spam problem on this website; I also am a blogger, and I was curious about your situation; many of us have created some nice methods and we are looking to exchange solutions with other folks, please shoot me an email if interested.
Have you ever considered creating an e-book or guest authoring on other blogs? I have a blog based on the same topics you discuss and would really like to have you share some stories/information. I know my audience would value your work. If you are even remotely interested, feel free to send me an e mail.
Thank you for the auspicious writeup. It in fact was a amusement account it. Look advanced to more added agreeable from you! By the way, how can we communicate?
It’s in point of fact a nice and useful piece of info. I’m glad that you shared this helpful info with us. Please keep us informed like this. Thanks for sharing.
I love it when people come together and share opinions, great blog, keep it up.
Hello oldpcgaming.net admin,
Are you ready to take your website to new heights?
Boost your online presence and skyrocket your profits with our exclusive Website Traffic service.
No bots or proxies, just real visitors. Targeted traffic from search engines and referral traffic from social media await you.
Click now and start your journey to success!
Visit: https://zeep.ly/gvtnF
Best regards,
Martinovich
United States, NY, Fulton, 13069, 92 Plainfield Avenue
To stop any further communication through your website form, Please reply with subject: Unsubscribe oldpcgaming.net
you are really a good webmaster. The website loading speed is amazing. It seems that you’re doing any unique trick. In addition, The contents are masterpiece. you’ve done a great job on this topic!
As a Newbie, I am continuously searching online for articles that can be of assistance to me. Thank you
I gotta bookmark this website it seems handy very useful
This is the right blog for anyone who wants to find out about this topic. You realize so much its almost hard to argue with you (not that I actually would want…HaHa). You definitely put a new spin on a topic thats been written about for years. Great stuff, just great!
Hey very nice blog!! Man .. Excellent .. Amazing .. I will bookmark your blog and take the feeds also…I am happy to find so many useful info here in the post, we need work out more techniques in this regard, thanks for sharing. . . . . .
You are my aspiration, I possess few web logs and occasionally run out from to brand.
Nice read, I just passed this onto a colleague who was doing some research on that. And he just bought me lunch as I found it for him smile So let me rephrase that: Thank you for lunch! “For most of history, Anonymous was a woman.” by Virginia Woolf.
The next time I read a blog, I hope that it doesnt disappoint me as much as this one. I mean, I know it was my choice to read, but I actually thought youd have something interesting to say. All I hear is a bunch of whining about something that you could fix if you werent too busy looking for attention.
I have been surfing on-line greater than three hours as of late, but I never discovered any attention-grabbing article like yours. It is lovely worth enough for me. In my view, if all site owners and bloggers made excellent content as you probably did, the internet will likely be a lot more helpful than ever before.
Sweet blog! I found it while searching on Yahoo News. Do you have any suggestions on how to get listed in Yahoo News? I’ve been trying for a while but I never seem to get there! Appreciate it
What i do not understood is in reality how you’re not actually much more well-appreciated than you may be right now. You’re very intelligent. You realize therefore considerably in terms of this subject, produced me in my opinion believe it from numerous numerous angles. Its like men and women don’t seem to be interested unless it is something to accomplish with Woman gaga! Your personal stuffs excellent. Always handle it up!
hello there and thank you for your info – I have definitely picked up anything new from right here. I did however expertise several technical points using this website, as I experienced to reload the website many times previous to I could get it to load correctly. I had been wondering if your web hosting is OK? Not that I am complaining, but sluggish loading instances times will often affect your placement in google and can damage your quality score if ads and marketing with Adwords. Well I am adding this RSS to my e-mail and could look out for a lot more of your respective intriguing content. Make sure you update this again very soon..
Greetings! Very helpful advice on this article! It is the little changes that make the biggest changes. Thanks a lot for sharing!
hi!,I like your writing very much! share we communicate more about your post on AOL? I require an expert on this area to solve my problem. May be that’s you! Looking forward to see you.
Hiya very cool blog!! Guy .. Excellent .. Wonderful .. I will bookmark your website and take the feeds additionally?KI am glad to seek out a lot of helpful information right here within the put up, we want work out extra techniques in this regard, thank you for sharing. . . . . .
Just a smiling visitor here to share the love (:, btw great design. “Reading well is one of the great pleasures that solitude can afford you.” by Harold Bloom.
Greetings from Ohio! I’m bored to death at work so I decided to check out your blog on my iphone during lunch break. I really like the info you provide here and can’t wait to take a look when I get home. I’m shocked at how quick your blog loaded on my mobile .. I’m not even using WIFI, just 3G .. Anyways, fantastic site!
Dear oldpcgaming.net Webmaster.
Boost your business with targeted customers now! Let me find your niche audience online.
I’ll locate relevant sites using keywords, leaving impactful English comments visible to site admins and visitors.
Alternatively, I can deliver your message exclusively to site administrators.
Get quality visits to your link from potential customers! Take action today and let me search and send messages daily for a month.
=>> https://zeep.ly/ucmLk
Thanks,
SEObyAxy
Australia, QLD, North Maclagan, 4352, 86 Bapaume Road
To stop any further communication through your website form, Please reply with subject: unsubscribe oldpcgaming.net
Hey are using WordPress for your site platform? I’m new to the blog world but I’m trying to get started and create my own. Do you require any coding knowledge to make your own blog? Any help would be really appreciated!
Very interesting info !Perfect just what I was searching for! “Outside of a dog, a book is man’s best friend. Inside of a dog it’s too dark to read.” by Groucho Marx.
I have been exploring for a bit for any high quality articles or blog posts in this sort of space . Exploring in Yahoo I finally stumbled upon this website. Studying this information So i’m satisfied to show that I have an incredibly good uncanny feeling I came upon exactly what I needed. I so much undoubtedly will make certain to don’t omit this site and provides it a glance on a continuing basis.
Hi, Neat post. There’s an issue together with your site in web explorer, would test thisK IE nonetheless is the marketplace leader and a big component to other folks will miss your great writing due to this problem.
I conceive you have observed some very interesting details , thankyou for the post.
I have not checked in here for some time because I thought it was getting boring, but the last several posts are great quality so I guess I will add you back to my everyday bloglist. You deserve it my friend 🙂
Thanx for the effort, keep up the good work Great work, I am going to start a small Blog Engine course work using your site I hope you enjoy blogging with the popular BlogEngine.net.Thethoughts you express are really awesome. Hope you will right some more posts.
I saw a lot of website but I conceive this one contains something special in it in it
I simply couldn’t go away your web site prior to suggesting that I actually enjoyed the standard info an individual provide for your visitors? Is gonna be again steadily to inspect new posts.
Review my website :: https://zg5tv3sqcbjdmzg2mdgrak6fs77dt2w7wm6elhr5ekzxmouxdgqa.cdn.ampproject.org/c/s/tehran-lipomatic.blogsky.com%2Fdailylink%2F%3Fgo%3Dhttps%3A%2F%2Fpremierleaguelures.com%26id%3D54
This web site truly has all the information and facts I needed about this subject and didn’t know who to ask.
I’m really loving the theme/design of your weblog. Do you ever run into any internet browser compatibility issues? A handful of my blog audience have complained about my website not operating correctly in Explorer but looks great in Chrome. Do you have any solutions to help fix this issue?
Hey very cool blog!! Man .. Beautiful .. Amazing .. I’ll bookmark your site and take the feeds also…I’m happy to find so many useful info here in the post, we need work out more strategies in this regard, thanks for sharing. . . . . .
You should participate in a contest for the most effective blogs on the web. I’ll recommend this site!
I got what you mean , thanks for posting.Woh I am lucky to find this website through google.
I really like your writing style, great information, appreciate it for putting up : D.
I¦ve read some good stuff here. Certainly worth bookmarking for revisiting. I wonder how so much effort you put to create this sort of excellent informative website.
Some genuinely great information, Gladiolus I observed this. “The basis of a democratic state is liberty.” by Aristotle.
I am impressed with this web site, real I am a fan.
Hi, Neat post. There is a problem with your web site in internet explorer, would test this… IE still is the market leader and a huge portion of people will miss your magnificent writing due to this problem.
Hello oldpcgaming.net Webmaster!
Boost your business with targeted customers now! Let me find your niche audience online.
I’ll locate relevant sites using keywords, leaving impactful English comments visible to site admins and visitors.
Alternatively, I can deliver your message exclusively to site administrators.
Get quality visits to your link from potential customers! Take action today and let me search and send messages daily for a month.
From here -> https://zeep.ly/ucmLk
Thanks,
SEObyAxy
Netherlands, LI, Kerkrade, 6461 Hk, Holzstraat 52
To stop any further communication through your website form, Please reply with subject: unsubscribe oldpcgaming.net
I haven¦t checked in here for some time as I thought it was getting boring, but the last few posts are great quality so I guess I will add you back to my everyday bloglist. You deserve it my friend 🙂
I absolutely love your blog and find almost all of your post’s to be just what I’m looking for. can you offer guest writers to write content for you? I wouldn’t mind producing a post or elaborating on a number of the subjects you write with regards to here. Again, awesome website!
I dugg some of you post as I cerebrated they were very beneficial extremely helpful
I am often to blogging and i really respect your content. The article has actually peaks my interest. I am going to bookmark your web site and maintain checking for new information.
Today, I went to the beachfront with my kids.
I found a sea shell and gave it to my 4 year old daughter and said “You can hear the ocean if you put this to your ear.” She put the shell to her ear and screamed.
There was a hermit crab inside and it pinched her ear.
She never wants to go back! LoL I know this is totally off topic
but I had to tell someone!
Real excellent info can be found on web site.
I truly appreciate this post. I’ve been looking everywhere for this! Thank goodness I found it on Bing. You have made my day! Thanks again
I don’t even know how I ended up here, but I thought this post was great. I don’t know who you are but certainly you’re going to a famous blogger if you aren’t already 😉 Cheers!
Great post. I am facing a couple of these problems.
Would you be all in favour of exchanging links?
My coder is trying to convince me to move to .net from PHP. I have always disliked the idea because of the expenses. But he’s tryiong none the less. I’ve been using Movable-type on various websites for about a year and am concerned about switching to another platform. I have heard great things about blogengine.net. Is there a way I can import all my wordpress posts into it? Any help would be greatly appreciated!
so much excellent information on here, : D.
With havin so much written content do you ever run into any issues of plagorism or copyright violation? My website has a lot of unique content I’ve either written myself or outsourced but it appears a lot of it is popping it up all over the internet without my agreement. Do you know any solutions to help protect against content from being stolen? I’d genuinely appreciate it.
Very instructive and good structure of subject matter, now that’s user pleasant (:.
It’s actually a cool and useful piece of info. I’m glad that you shared this helpful information with us. Please keep us informed like this. Thanks for sharing.
I’ve been browsing online more than 3 hours today, yet I never found any interesting article like yours. It is pretty worth enough for me. In my opinion, if all webmasters and bloggers made good content as you did, the net will be much more useful than ever before.
Thanks a lot for sharing this with all of us you really know what you are talking about! Bookmarked. Kindly also visit my web site =). We could have a link exchange arrangement between us!
What i do not understood is in reality how you’re not actually a lot more smartly-favored than you might be right now. You’re very intelligent. You understand therefore significantly in terms of this subject, made me in my view believe it from numerous various angles. Its like women and men are not involved except it¦s something to accomplish with Lady gaga! Your personal stuffs excellent. All the time care for it up!
My coder is trying to convince me to move to .net from PHP. I have always disliked the idea because of the costs. But he’s tryiong none the less. I’ve been using WordPress on several websites for about a year and am anxious about switching to another platform. I have heard excellent things about blogengine.net. Is there a way I can transfer all my wordpress posts into it? Any kind of help would be really appreciated!
Hello. splendid job. I did not expect this. This is a impressive story. Thanks!
I want gathering useful info, this post has got me even more info! .
What’s Happening i’m new to this, I stumbled upon this I’ve found It absolutely helpful and it has helped me out loads. I hope to contribute & help other users like its aided me. Great job.
Well I definitely liked reading it. This article provided by you is very helpful for correct planning.
I take pleasure in, lead to I found exactly what I was looking for. You have ended my 4 day lengthy hunt! God Bless you man. Have a great day. Bye
Perfectly written subject matter, regards for information. “Necessity is the mother of taking chances.” by Mark Twain.
Magnificent site. A lot of useful information here. I’m sending it to some friends ans also sharing in delicious. And obviously, thanks for your sweat!
Today, I went to the beach front with my kids. I found a sea shell and gave it to my 4 year old daughter and said “You can hear the ocean if you put this to your ear.” She placed the shell to her ear and screamed. There was a hermit crab inside and it pinched her ear. She never wants to go back! LoL I know this is completely off topic but I had to tell someone!
I appreciate, cause I found exactly what I was looking for. You have ended my 4 day long hunt! God Bless you man. Have a nice day. Bye
Thankyou for this post, I am a big fan of this website would like to continue updated.
Thanks for sharing superb informations. Your web site is very cool. I’m impressed by the details that you have on this web site. It reveals how nicely you perceive this subject. Bookmarked this website page, will come back for extra articles. You, my pal, ROCK! I found simply the information I already searched all over the place and just could not come across. What a great site.
I loved as much as you’ll receive carried out right here. The sketch is tasteful, your authored subject matter stylish. nonetheless, you command get bought an edginess over that you wish be delivering the following. unwell unquestionably come further formerly again as exactly the same nearly a lot often inside case you shield this increase.
Everyone loves what you guys are usually up too.
Such clever work and reporting! Keep up the good works guys
I’ve included you guys to my blogroll.
you have a great blog here! would you like to make some invite posts on my blog?
obviously like your website but you need to take a look at the spelling on several of your posts. Many of them are rife with spelling issues and I in finding it very troublesome to inform the reality then again I will definitely come again again.
Hello oldpcgaming.net owner,
Are you ready to take your website to new heights?
Boost your online presence and skyrocket your profits with our exclusive Website Traffic service.
No bots or proxies, just real visitors. Targeted traffic from search engines and referral traffic from social media await you.
Click now and start your journey to success!
Visit: https://zeep.ly/gvtnF
Best regards,
Shrader
Germany, BY, Holzkirchen, 83604, Gubener Str. 93
To stop any further communication through your website form, Please reply with subject: Unsubscribe oldpcgaming.net
I have been surfing online more than three hours today, yet I never found any interesting article like yours. It’s pretty worth enough for me. In my opinion, if all webmasters and bloggers made good content as you did, the net will be a lot more useful than ever before.
An interesting dialogue is value comment. I believe that it is best to write extra on this topic, it won’t be a taboo topic however generally individuals are not sufficient to speak on such topics. To the next. Cheers
Hi there, just changed into aware of your weblog through Google, and located that it is truly informative. I am gonna be careful for brussels. I’ll be grateful if you proceed this in future. A lot of other people might be benefited from your writing. Cheers!
Hiya, I am really glad I’ve found this information. Nowadays bloggers publish just about gossips and net and this is really frustrating. A good blog with interesting content, this is what I need. Thank you for keeping this web site, I will be visiting it. Do you do newsletters? Cant find it.
Some really wonderful posts on this website, thank you for contribution. “We are always in search of the redeeming formula, the crystallizing thought.” by Etty Hillesum.
Thank you for sharing excellent informations. Your site is so cool. I’m impressed by the details that you have on this site. It reveals how nicely you perceive this subject. Bookmarked this web page, will come back for extra articles. You, my pal, ROCK! I found just the info I already searched everywhere and just could not come across. What a perfect web-site.
I have recently started a blog, the information you provide on this website has helped me greatly. Thanks for all of your time & work.
I really value your piece of work, Great post.
Hi, Neat post. There is a problem with your site in internet explorer, would test this… IE still is the market leader and a huge portion of people will miss your magnificent writing due to this problem.
You have brought up a very superb points, thankyou for the post.
Good write-up, I am regular visitor of one’s blog, maintain up the excellent operate, and It is going to be a regular visitor for a long time.
I am glad to be a visitor of this thoroughgoing site! , appreciate it for this rare information! .
Admiring the time and effort you put into your site and in depth information you offer. It’s good to come across a blog every once in a while that isn’t the same old rehashed information. Excellent read! I’ve bookmarked your site and I’m including your RSS feeds to my Google account.
Hello.This article was really remarkable, especially because I was looking for thoughts on this matter last Friday.
Nice post. I learn something more challenging on different blogs everyday. It will always be stimulating to read content from other writers and practice a little something from their store. I’d prefer to use some with the content on my blog whether you don’t mind. Natually I’ll give you a link on your web blog. Thanks for sharing.
I love your writing style genuinely enjoying this website .
Thanks for every other great post. Where else may just anybody get that kind of information in such a perfect manner of writing? I have a presentation subsequent week, and I’m on the look for such information.
Magnificent website. A lot of useful information here. I’m sending it to a few buddies ans additionally sharing in delicious. And obviously, thanks to your effort!
I like what you guys are up also. Such intelligent work and reporting! Carry on the superb works guys I have incorporated you guys to my blogroll. I think it will improve the value of my web site :).
Good write-up, I’m normal visitor of one’s website, maintain up the nice operate, and It’s going to be a regular visitor for a long time.
I enjoy you because of each of your effort on this web page. Gloria really likes setting aside time for internet research and it is easy to understand why. Most of us know all concerning the compelling means you create priceless information through this blog and cause participation from the others about this subject so our favorite girl is really understanding a lot of things. Take advantage of the rest of the new year. Your conducting a splendid job.
This blog is definitely rather handy since I’m at the moment creating an internet floral website – although I am only starting out therefore it’s really fairly small, nothing like this site. Can link to a few of the posts here as they are quite. Thanks much. Zoey Olsen
Hello There. I found your blog using msn. This is a very well written article. I will make sure to bookmark it and return to read more of your useful information. Thanks for the post. I’ll definitely comeback.
I am usually to running a blog and i really appreciate your content. The article has really peaks my interest. I’m going to bookmark your website and maintain checking for new information.
I like this website very much so much excellent information.
Undeniably consider that which you stated. Your favorite reason seemed to be at the internet the simplest thing to have in mind of. I say to you, I certainly get annoyed even as people think about concerns that they just do not understand about. You managed to hit the nail upon the highest and defined out the entire thing without having side effect , people can take a signal. Will likely be again to get more. Thank you
Hello oldpcgaming.net Owner.
Discover the Secret Email System—a game-changer for effortless 7-figure online business.
No product creation, no service fulfillment, no ads, and no customer service. Just 30 minutes a day for 24/7 sales. Create a profitable online empire.
Transform your business into a self-operating machine.
Get the Secret Email System -> https://zeep.ly/GSGCX
Thanks,
Barbra
Netherlands, ZH, Leiden, 2334 Ah, Van Oldenbarneveltstraat 200
To stop receiving such offers, simply reply to this email…
Howdy! This is my first visit to your blog! We are a team of volunteers and starting a new initiative in a community in the same niche.
Your blog provided us valuable information to work on. You have done a marvellous job!
Hi! Do you know if they make any plugins to safeguard against hackers? I’m kinda paranoid about losing everything I’ve worked hard on. Any tips?
This site is my inhalation, very good design and style and perfect subject matter.
This is a very good tips especially to those new to blogosphere, brief and accurate information… Thanks for sharing this one. A must read article.
I think this web site holds some very fantastic info for everyone :D. “Morality, like art, means a drawing a line someplace.” by Oscar Wilde.
I truly appreciate this post. I’ve been looking everywhere for this! Thank goodness I found it on Bing. You’ve made my day! Thx again!
Great wordpress blog here.. It’s hard to find quality writing like yours these days. I really appreciate people like you! take care
Normally I do not learn article on blogs, but I wish to say that this write-up very compelled me to check out and do it! Your writing style has been amazed me. Thanks, very great post.
Great post. I was checking continuously this blog and I am impressed! Extremely useful info specifically the last part 🙂 I care for such information much. I was looking for this particular info for a very long time. Thank you and good luck.
You got a very excellent website, Gladiola I noticed it through yahoo.
Greetings! Very helpful advice on this article! It is the little changes that make the biggest changes. Thanks a lot for sharing!
Dear oldpcgaming.net Administrator!
Boost your rankings and establish your locality with our powerful Local Ranking service.
We understand the challenge of obtaining relevant links from local websites.
That’s why we create tailored blog posts for each Place of Interest in your area, building high-authority, dofollow backlinks.
Experience the benefits of targeted, local entities linking back to your business. Don’t miss out—order now and dominate your local market!
Visit for more information -> https://cutt.ly/wwociaK6
Thanks,
Hildred
Brazil, SP, Guarulhos, 07244-250, Rua Marajuara 1916
To stop any further communication through your website form, Please reply with subject: unsubscribe oldpcgaming.net
Hello, I’m Abi, a Content Writer. I recently came across your website oldpcgaming.net, and I wanted to reach out to you to offer my services.
From suggesting blog/article topics and relevant keywords to writing content for your website, I can handle it all. Additionally, I specialize in crafting E-Commerce content, product descriptions, infographics, news/press releases, resources, case studies, video scripts, and SEO optimized content.
I charge USD 50 per 1000 words of content.
Send me an email at [email protected] if you need any help.
I got what you intend, regards for posting.Woh I am glad to find this website through google. “I would rather be a coward than brave because people hurt you when you are brave.” by E. M. Forster.
I gotta favorite this website it seems invaluable very useful
I haven’t checked in here for a while since I thought it was getting boring, but the last several posts are great quality so I guess I’ll add you back to my daily bloglist. You deserve it my friend 🙂
Hi, my name is Alex.S, I have noticed something wrong with your website and I want to volunteer for free, do you have a second to chat about it? Here’s my phone number, call or text me when you have a second: +13322224908
or you can drop me an email on [email protected]
I’ve been exploring for a little bit for any high-quality articles or blog posts on this sort of space . Exploring in Yahoo I ultimately stumbled upon this site. Studying this info So i am happy to express that I’ve a very just right uncanny feeling I came upon just what I needed. I most no doubt will make certain to do not omit this website and provides it a look on a constant basis.
hello!,I really like your writing very so much! percentage we communicate extra approximately your post on AOL? I need an expert in this house to solve my problem. May be that is you! Looking ahead to peer you.
Great write-up, I?¦m regular visitor of one?¦s website, maintain up the nice operate, and It’s going to be a regular visitor for a lengthy time.
Thank you for the good writeup. It in fact was a amusement account it.
Look advanced to more added agreeable from you!
By the way, how could we communicate?
Every weekend i used to go to see this website, as i wish for enjoyment,
as this this web page conations truly nice funny
stuff too.
Hello oldpcgaming.net owner,
Are you ready to take your website to new heights?
Boost your online presence and skyrocket your profits with our exclusive Website Traffic service.
No bots or proxies, just real visitors. Targeted traffic from search engines and referral traffic from social media await you.
Click now and start your journey to success!
Visit: https://cutt.ly/jwadi1LI
Best regards,
Thurman
Germany, BY, Erlangen, 91004, Mellingburgredder 53
To stop any further communication through your website form, Please reply with subject: Unsubscribe oldpcgaming.net
Definitely believe that which you said. Your favorite reason seemed to be on the internet the easiest thing to be aware of. I say to you, I definitely get annoyed while people think about worries that they plainly don’t know about. You managed to hit the nail upon the top as well as defined out the whole thing without having side-effects , people can take a signal. Will probably be back to get more. Thanks
Nice post. I was checking constantly this blog and I’m impressed! Very helpful info specially the last part 🙂 I care for such info much. I was seeking this certain information for a long time. Thank you and good luck.
Helpful information. Fortunate me I discovered your site by accident, and I am surprised why this coincidence did not took place earlier! I bookmarked it.
Throughout this grand design of things you actually receive an A+ just for effort and hard work. Where you actually misplaced everybody ended up being on your particulars. You know, it is said, details make or break the argument.. And that could not be more true here. Having said that, permit me reveal to you what exactly did deliver the results. Your text is really persuasive and this is possibly why I am making an effort in order to comment. I do not make it a regular habit of doing that. Secondly, even though I can easily notice a leaps in logic you make, I am not really sure of exactly how you appear to unite your ideas that produce the actual final result. For the moment I will subscribe to your issue however trust in the foreseeable future you connect your facts much better.
Hi there to every body, it’s my first visit of this website; this web site consists of remarkable and genuinely good data in support
of readers.
A balanced diet aids the body obtain the nutrients it requires. It can easily also assist reduced cholesterol levels and blood pressure as well as improve general wellness. A healthy diet contains the correct balance of carbohydrates, body fats, minerals, healthy proteins as well as vitamins. It also features water as well as fiber, http://www.ebuga.es/ryleedfweber.
I’m really enjoying the design and layout of your blog. It’s a very easy on the eyes which makes it much more pleasant for me to come here and visit more often. Did you hire out a designer to create your theme? Fantastic work!
Hey! Someone in my Myspace group shared this site with us so I came to check it out. I’m definitely enjoying the information. I’m bookmarking and will be tweeting this to my followers! Superb blog and amazing design.
I think other web site proprietors should take this web site as an model, very clean and excellent user genial style and design, as well as the content. You’re an expert in this topic!
I conceive other website proprietors should take this web site as an model, very clean and superb user friendly style.
Do you have a spam issue on this site; I also am a blogger, and I was wanting to know your situation; many of us have created some nice practices and we are looking to exchange solutions with others, be sure to shoot me an e-mail if interested.
An impressive share, I just given this onto a colleague who was doing a little analysis on this. And he in fact bought me breakfast because I found it for him.. smile. So let me reword that: Thnx for the treat! But yeah Thnkx for spending the time to discuss this, I feel strongly about it and love reading more on this topic. If possible, as you become expertise, would you mind updating your blog with more details? It is highly helpful for me. Big thumb up for this blog post!
Hello there, You have done an incredible job. I will definitely digg it and in my opinion suggest to my friends. I am confident they will be benefited from this site.
When someone writes an article he/she keeps the idea of a user in his/her mind that
how a user can be aware of it. So that’s why this post is perfect.
Thanks!
Also visit my web-site – Christian dating Free
I always was interested in this topic and stock still am, regards for putting up.
Hey There. I found your blog using msn. This is a very well written article. I will make sure to bookmark it and return to read more of your useful info. Thanks for the post. I will certainly return.
A person necessarily assist to make critically articles I might state. This is the very first time I frequented your website page and so far? I amazed with the research you made to create this actual submit extraordinary. Great activity!
To the oldpcgaming.net Owner.
Boost your business with targeted customers now! Let me find your niche audience online.
I’ll locate relevant sites using keywords, leaving impactful English comments visible to site admins and visitors.
Alternatively, I can deliver your message exclusively to site administrators.
Get quality visits to your link from potential customers! Take action today and let me search and send messages daily for a month.
From here -> https://cutt.ly/awaME1Rw
Thanks,
SEObyAxy
Netherlands, NB, Breda, 4834 Jj, Biljoenstraat 69
To stop any further communication through your website form, Please reply with subject: unsubscribe oldpcgaming.net
I like what you guys are up also. Such clever work and reporting! Keep up the excellent works guys I have incorporated you guys to my blogroll. I think it will improve the value of my site 🙂
This is a very good tips especially to those new to blogosphere, brief and accurate information… Thanks for sharing this one. A must read article.
Wonderful website. A lot of useful info here. I’m sending it to some friends ans also sharing in delicious. And certainly, thanks for your effort!
Heya i am for the primary time here. I found this board and I in finding It truly helpful & it helped me out a lot. I hope to give one thing again and help others such as you helped me.
Hola! I’ve been reading your weblog for a while now and finally got the bravery to go ahead and give you a shout out from Porter Texas! Just wanted to say keep up the fantastic job!
Magnificent site. Plenty of useful information here. I am sending it to some buddies ans also sharing in delicious. And obviously, thank you on your effort!
I got what you intend,saved to my bookmarks, very decent website .
Thanks a bunch for sharing this with all of us you really know what you’re talking about! Bookmarked. Please also visit my website =). We could have a link exchange agreement between us!
I liked as much as you will obtain performed right here. The comic strip is tasteful, your authored subject matter stylish. nonetheless, you command get bought an impatience over that you wish be turning in the following. in poor health surely come further formerly again as precisely the similar just about very regularly within case you defend this hike.
Thanks for shares.
Perfectly pent written content, Really enjoyed examining.
you’re really a good webmaster. The site loading speed is incredible. It seems that you are doing any unique trick. Also, The contents are masterpiece. you have done a great job on this topic!
Does your blog have a contact page? I’m having trouble locating it but, I’d like to send you an e-mail. I’ve got some suggestions for your blog you might be interested in hearing. Either way, great site and I look forward to seeing it improve over time.
Woah! I’m really enjoying the template/theme of this
site. It’s simple, yet effective. A lot of times it’s very hard to get that
“perfect balance” between usability and visual appeal.
I must say you have done a superb job with this. Additionally, the blog loads extremely quick for me on Internet explorer.
Exceptional Blog!
Lovely blog! I am loving it!! Will be back later to read some more. I am taking your feeds also.
you have a great blog here! would you like to make some invite posts on my blog?
Hello there, I found your blog by the use of Google while searching for a comparable matter, your website came up, it seems great. I’ve bookmarked it in my google bookmarks.
I’ve been surfing on-line more than three hours these days, yet I never discovered any fascinating article like yours. It is beautiful value sufficient for me. In my opinion, if all site owners and bloggers made good content material as you did, the internet will be a lot more useful than ever before.
I like this site its a master peace ! Glad I observed this on google .
My programmer is trying to persuade me to move to .net from PHP. I have always disliked the idea because of the expenses. But he’s tryiong none the less. I’ve been using WordPress on a variety of websites for about a year and am nervous about switching to another platform. I have heard great things about blogengine.net. Is there a way I can transfer all my wordpress posts into it? Any help would be greatly appreciated!
I truly enjoy reading through on this site, it has got great articles.
I have been absent for a while, but now I remember why I used to love this website. Thanks , I will try and check back more frequently. How frequently you update your website?
I love it when people come together and share opinions, great blog, keep it up.
I have been examinating out a few of your articles and it’s pretty clever stuff. I will make sure to bookmark your blog.
I’m really impressed with your writing skills as well
as with the layout on your blog. Is this a paid
theme or ddid you modify it yourself? Anyway keep up the nice quality writing, it is rare to see
a nice blog like ths one nowadays.
Feel frre to visit my web siote … bitcoin (Jerri)
I like this web site so much, saved to bookmarks.
I love it when people come together and share opinions, great blog, keep it up.
Hi my loved one! I wish to say that this post is awesome, nice written and include almost all vital infos. I would like to look extra posts like this.
It’s perfect time to make a few plans for the future and it’s time to be happy.
I have learn this submit and if I may just I desire to
recommend you few attention-grabbing issues or advice. Perhaps you
could write subsequent articles referring to
this article. I want to read more things about it!
It’s perfect time to make a few plans for the future and it’s time to be happy.
I have learn this submit and if I may just I desire to
recommend you few attention-grabbing issues or advice. Perhaps you
could write subsequent articles referring to
this article. I want to read more things about it!
Wow! Thank you! I constantly needed to write on my blog something like that. Can I include a part of your post to my site?
Unquestionably believe that which you stated. Your favorite justification appeared to be on the web the simplest thing to be aware of. I say to you, I certainly get irked while people think about worries that they plainly do not know about. You managed to hit the nail upon the top as well as defined out the whole thing without having side effect , people could take a signal. Will probably be back to get more. Thanks
I like this site very much, Its a rattling nice spot to read and find info . “God cannot alter the past, but historians can.” by Samuel Butler.
I’ve been exploring for a bit for any high quality articles or weblog posts in this kind of space .
Exploring in Yahoo I at last stumbled upon this web site.
Studying this information So i am satisfied to express that I
have a very good uncanny feeling I discovered exactly what I needed.
I so much indisputably will make sure to don?t omit this website and give it a look on a constant
basis.
Pretty nice post. I just stumbled upon your blog and
wanted to say that I’ve truly enjoyed browsing your blog posts.
In any case I’ll be subscribing to your rss feed and I hope
you write again soon!
Pretty nice post. I just stumbled upon your blog and
wanted to say that I’ve truly enjoyed browsing your blog posts.
In any case I’ll be subscribing to your rss feed and I hope
you write again soon!
Thank you for the auspicious writeup. It actually was a amusement account it. Look complicated to far introduced agreeable from you! However, how could we keep up a correspondence?
My brother гecommended I migһt ⅼike this blog. He was entireⅼy riցht.
Thіs post actuаlly made my day. Youu can not imagine simply
how much time I had spent for this іnfo! Thanks!
Thanks for share.
I am curious to find out what blog system you have been working
with? I’m having some small security issues with my latest website and I’d like to find something more safe.
Do you have any solutions?
Hello my loved one! I wish to say that this article is awesome, great written and include approximately all vital infos. I’d like to see extra posts like this .
Hi, Neat post. There is a problem with your website in internet explorer, would test this… IE still is the market leader and a huge portion of people will miss your magnificent writing due to this problem.
I was wondering if you ever thought of changing the layout of your website? Its very well written; I love what youve got to say. But maybe you could a little more in the way of content so people could connect with it better. Youve got an awful lot of text for only having 1 or two images. Maybe you could space it out better?
Wow! Thank you! I continuously needed to write on my site something like that. Can I implement a fragment of your post to my site?
very good put up, i definitely love this web site, carry on it
Simply a smiling visitor here to share the love (:, btw great pattern.
Thanks for share.
After research a couple of of the weblog posts on your website now, and I truly like your manner of blogging. I bookmarked it to my bookmark web site listing and will probably be checking again soon. Pls try my web page as well and let me know what you think.
Thank you for the auspicious writeup. It in reality used to be a entertainment account it. Look complicated to more delivered agreeable from you! However, how can we communicate?
Hiya! I simply want to give a huge thumbs up for the nice info you have got right here on this post. I might be coming back to your blog for more soon.
I have not checked in here for some time as I thought it was getting boring, but the last several posts are good quality so I guess I will add you back to my everyday bloglist. You deserve it my friend 🙂
Hello! I just would like to give a huge thumbs up for the great info you have here on this post. I will be coming back to your blog for more soon.
Thank you for any other informative blog. The place else may I am getting that type of info written in such a perfect means? I have a challenge that I am just now working on, and I’ve been at the glance out for such information.
wonderful publish, very informative. I ponder why the other specialists of this sector
don’t notice this. You should proceed your writing. I’m confident,
you’ve a huge readers’ base already!
I like this post, enjoyed this one appreciate it for putting up. “Money is a poor man’s credit card.” by Herbert Marshall McLuhan.
I enjoy foregathering useful info, this post has got me even more info! .
Some truly interesting information, well written and broadly speaking user pleasant.
This web site is really a walk-through for all of the info you wanted about this and didn’t know who to ask. Glimpse here, and you’ll definitely discover it.
Thhis is my first tіme visit at here and i amm genuhіnely һappy to
read all at alone place.
As I website possessor I believe the content matter here is rattling wonderful , appreciate it for your hard work. You should keep it up forever! Best of luck.
Quality content is the key to interest the users to visit the web site, that’s what this web page is providing.
Thanks for shares.
I just could not depart your site prior to suggesting that I actually loved the usual info an individual provide in your visitors? Is gonna be again ceaselessly in order to inspect new posts.
I’d have to examine with you here. Which is not one thing I usually do! I take pleasure in reading a post that may make folks think. Additionally, thanks for permitting me to comment!
Hello oldpcgaming.net admin,
Are you ready to take your website to new heights?
Boost your online presence and skyrocket your profits with our exclusive Website Traffic service.
No bots or proxies, just real visitors. Targeted traffic from search engines and referral traffic from social media await you.
Click now and start your journey to success!
Visit: https://cutt.ly/jwadi1LI
Best regards,
Howe
Austria, BURGENLAND, Halbenrain, 8492, Gesausestrasse 10
To stop any further communication through your website form, Please reply with subject: Unsubscribe oldpcgaming.net
Great wordpress blog here.. It’s hard to find quality writing like yours these days. I really appreciate people like you! take care
thanks for shares
The director rejoices in the shower from a wide-angle and zenithal perspective, because the bathtub is for him as big as the situation he is living.
These are actually impressive ideas in regarding blogging.
You have touched some nice things here. Any way keep up
wrinting.
Attractive part of content. I just stumbled upon your blog and in accession capital to assert that I get in fact loved account your weblog posts. Any way I will be subscribing on your feeds and even I achievement you get entry to constantly fast.
Hi there, i read your blog from time to time and i own a similar one and i was just curious if you get a lot of spam responses? If so how do you stop it, any plugin or anything you can suggest? I get so much lately it’s driving me crazy so any support is very much appreciated.
I found your weblog web site on google and test a couple of of your early posts. Continue to keep up the excellent operate. I just further up your RSS feed to my MSN News Reader. Looking for forward to reading more from you afterward!…
I must show some thanks to you just for rescuing me from such a problem. As a result of checking throughout the world-wide-web and seeing solutions which were not pleasant, I was thinking my entire life was over. Being alive minus the answers to the difficulties you’ve solved as a result of your good guide is a critical case, as well as the kind that might have badly damaged my career if I had not noticed your web page. Your actual mastery and kindness in playing with all the stuff was invaluable. I am not sure what I would’ve done if I hadn’t come across such a point like this. I can also at this point relish my future. Thanks a lot so much for this high quality and results-oriented help. I won’t hesitate to refer the sites to any person who should receive care on this issue.
you’re really a good webmaster. The web site loading speed is amazing. It seems that you’re doing any unique trick. Also, The contents are masterwork. you have done a wonderful job on this topic!
What’s Going down i am new to this, I stumbled upon this I have discovered It positively useful and it has helped me out loads. I hope to give a contribution & aid different users like its helped me. Great job.
Hello.This article was really fascinating, especially because I was searching for thoughts on this subject last Friday.
I like this web blog its a master peace ! Glad I found this on google .
Very good blog you have here but I was wanting to know if you knew of any user discussion forums that cover the same topics discussed here? I’d really love to be a part of group where I can get feed-back from other knowledgeable individuals that share the same interest. If you have any recommendations, please let me know. Kudos!
Today, I went to the beachfront with my children. I found a sea shell and gave it to my 4 year old daughter and said “You can hear the ocean if you put this to your ear.” She put the shell to her ear and screamed. There was a hermit crab inside and it pinched her ear. She never wants to go back! LoL I know this is totally off topic but I had to tell someone!
To the oldpcgaming.net Webmaster.
Ready to earn effortlessly?
Introducing the World’s Fastest & Easiest Breakthrough for Automated $300+ Commissions from Free Traffic!
CLICK HERE https://cutt.ly/2wgZIVXe TO CONTINUE
It’s beginner-friendly, requiring just 3 simple steps. No experience needed!
Imagine making $300+ with just a few clicks. It’s within reach.
Your journey to financial freedom starts with a simple click. Don’t miss out!
With heartfelt regards
Maira
France, CENTRE, Niort, 79000, 48 Boulevard De Prague
If you want to be removed from future offers in this specific category, kindly respond to this email.
yes baby yes
We stumbled over here coming from a different web address and thought I might aas well check things out.
I like what I see sso now i’m following you. Look
forwaard to looking over your web page repeatedly.
My website; olymp trade number
have a nice day baby
I’m not sure why but this weblog is loading
extremely slow for me. Is anyone else having this issue or is it
a problem on my end? I’ll check back later on and see if the
problem still exists.
Visit my site Bertie
go hell baby
When someone writes an post he/she retains the image of a user in his/her
brain that how a user can understand it. Thus that’s why this article
is great. Thanks!
I’m impressed, I must say. Actually hardly ever do I encounter a blog that’s each educative and entertaining, and let me tell you, you may have hit the nail on the head. Your thought is excellent; the difficulty is something that not enough people are talking intelligently about. I’m very pleased that I stumbled throughout this in my search for one thing regarding this.
by by baby
Miss B Nasty, Ivy The Character, Im xXx Dark Only Fans Leaks Mega Folder Link ( https://UrbanCrocSpot.org )
It’s going to be finish of mine day, but before finish I
am reading this wonderful article to improve
my experience.
2023 yılının en çok tercih edilen mutfak dolapları bayır community adresinde.https://medium.com/@gaga16010501023/en-çok-tercih-edilen-mutfak-dolapları-nelerdir-2496eb413c5a en çok tercih edilen mutfak dolapları bulmanın en kolay adresi.
come on baby
come on baby
come on baby
Listening to a portable CD player in your car seems like an excellent choice, proper? With this template, you’ll be able to promote something from club T-shirts to automotive elements. And with this template, you’ll be one step forward of your opponents! In at present’s world, it is very important be one step ahead. In case you are concerned about the problem of procrastination on this planet, and you need to create your individual convenient software for monitoring tasks, then this is your alternative! Useful studying (studying good books) expands an individual’s horizons, enriches his inside world, makes him smarter and has a optimistic effect on reminiscence. So, that is why, applications for reading books are most relevant in at this time’s studying society. Reading books will increase a person’s vocabulary, contributes to the event of clearer thinking, which allows you to formulate and categorical ideas extra lucidly. It’s the type of consolation that permits you to simply zone out and play with out worrying about niggling key issues.
Check out my web site: https://Pantaek789.com/
by by hepiniz
Well I sincerely enjoyed reading it. This article offered by you is very effective for correct planning.
by by hepiniz
thanks for share
thanks for share
Thank you for the good writeup. It in fact was a amusement account it.
Look advanced to far added agreeable from you!
However, how can we communicate?
thanks for share
thanks for share
With Griffith currently having Casca in his clutches, the
query arises of what Guts can do now.
It’s witty, it’s smart and Russell is usually great in the lead.
I’ve been looking for a reliable source of Only Fans Leaks, and I’ve finally found it! ( http://www.thots.cfd )
thanks for share
Reword helps your team collaborate ethically with AI, so that you can write outstanding articles for your readers.
try out for FREE
https://bit.ly/3E4oyBg
I’m really enjoying the theme/design of your weblog. Do you ever run into any browser compatibility issues? A number of my blog visitors have complained about my website not working correctly in Explorer but looks great in Opera. Do you have any ideas to help fix this problem?
Thank you for the sensible critique. Me and my neighbor were just preparing to do a little research on this. We got a grab a book from our local library but I think I learned more from this post. I am very glad to see such magnificent info being shared freely out there.
GlucoTrust is a revolutionary blood sugar support solution that eliminates the underlying causes of type 2 diabetes and associated health risks.
FiverrEarn
[…]Here is a superb Blog You may Obtain Fascinating that we Encourage You[…]
I’ve read through lots of articles on this topic, but all yours positions out for its clearness and also deepness.
Keep it up!
Here is my webpage … Cheapest SR22 insurance
cicatricula xyandanxvurulmus.ipPzRWvTqg3p
Ülke Listesi
LeanFlux is a natural supplement that claims to increase brown adipose tissue (BAT) levels and burn fat and calories.
PowerBite is a natural tooth and gum support formula that will eliminate your dental problems, allowing you to live a healthy lifestyle.
Thanks! Ample knowledge!
By taking two capsules of Abdomax daily, you can purportedly relieve gut health problems more effectively than any diet or medication. The supplement also claims to lower blood sugar, lower blood pressure, and provide other targeted health benefits.
DentaTonic™ is formulated to support lactoperoxidase levels in saliva, which is important for maintaining oral health. This enzyme is associated with defending teeth and gums from bacteria that could lead to dental issues.
Thanks
Thanks for the auspicious writeup. It actually was a enjoyment account
it. Glance complicated to far brought agreeable from you!
By the way, how could we keep in touch?
lol
lol
Hello,
MarketGirl.biz has made available our Google Maps Database for everyone.
I am shutting down the company to spend more time with my family.
I wish you a prosperous new year!
Lisa Cooper
MarketGirl.biz
dentists in antalya
I think the admin of this website is truly working hard for his
web page, because here every material is quality based information.
I used to be able to find good information from your content.
Thanks
Miami Post: Your source for South Florida breaking news, sports, business, entertainment, weather and traffic https://miamipost.us/
The latest news on grocery chains, celebrity chefs, and fast food – plus reviews, cooking tips and advice, recipes, and more. https://megamenu.us/
RVVR is website dedicated to advancing physical and mental health through scientific research and proven interventions. Learn about our evidence-based health promotion programs. https://rvvr.us/
Breaking US news, local New York news coverage, sports, entertainment news, celebrity gossip, autos, videos and photos at nybreakingnews.us https://nybreakingnews.us/
Covering the latest beauty and fashion trends, relationship advice, wellness tips and more. https://gliz.us/
Colorado breaking news, sports, business, weather, entertainment. https://denver-news.us/
Healthcare Blog provides news, trends, jobs and resources for health industry professionals. We cover topics like healthcare IT, hospital administration, polcy
Fresh, flavorful and (mostly) healthy recipes made for real, actual, every day life. Helping you celebrate the joy of food in a totally non-intimidating way. https://skillfulcook.us/
Island Post is the website for a chain of six weekly newspapers that serve the North Shore of Nassau County, Long Island published by Alb Media. The newspapers are comprised of the Great Neck News, Manhasset Times, Roslyn Times, Port Washington Times, New Hyde Park Herald Courier and the Williston Times. Their coverage includes village governments, the towns of Hempstead and North Hempstead, schools, business, entertainment and lifestyle. https://islandpost.us/
Looking for quick and easy dinner ideas? Browse 100
Breaking food industry news, cooking tips, recipes, reviews, rankings, and interviews https://tastingcorner.us/
Latest Denver news, top Colorado news and local breaking news from Denver News, including sports, weather, traffic, business, politics, photos and video. https://denver-news.us/
BioPharma Blog provides news and analysis for biotech and biopharmaceutical executives. We cover topics like clinical trials, drug discovery and development, pharma marketing, FDA approvals and regulations, and more. https://biopharmablog.us/
Oh my goodness! Incredible article dude! Many thanks, However I am encountering troubles with your RSS.
I don’t understand why I cannot join it. Is there anyone else getting similar
RSS problems? Anyone that knows the answer will
you kindly respond? Thanks!!
Santa Cruz Sentinel: Local News, Local Sports and more for Santa Cruz https://santacruznews.us/
Good news
Do whatever you want. Steal cars, drive tanks and helicopters, defeat gangs. It’s your city! https://play.google.com/store/apps/details?id=com.gangster.city.open.world
East Bay News is the leading source of breaking news, local news, sports, entertainment, lifestyle and opinion for Contra Costa County, Alameda County, Oakland and beyond https://eastbaynews.us/
News from the staff of the LA Reporter, including crime and investigative coverage of the South Bay and Harbor Area in Los Angeles County. https://lareporter.us/
Thanks
The latest film and TV news, movie trailers, exclusive interviews, reviews, as well as informed opinions on everything Hollywood has to offer. https://xoop.us/
Yolonews.us covers local news in Yolo County, California. Keep up with all business, local sports, outdoors, local columnists and more. https://yolonews.us/
Kingston News – Kingston, NY News, Breaking News, Sports, Weather https://kingstonnews.us/
Food
Baltimore Post: Your source for Baltimore breaking news, sports, business, entertainment, weather and traffic https://baltimorepost.us/
I pay a visit every day some sites and information sites to read articles,
except this website gives quality based writing.
Lake County Lake Reporter: Local News, Local Sports and more for Lake County https://lakereporter.us
Boulder News
Oakland County, MI News, Sports, Weather, Things to Do https://oaklandpost.us/
Thanks
Trenton News – Trenton, NJ News, Sports, Weather and Things to Do https://trentonnews.us/
Vacavillenews.us covers local news in Vacaville, California. Keep up with all business, local sports, outdoors, local columnists and more. https://vacavillenews.us/
Ohio Reporter – Ohio News, Sports, Weather and Things to Do https://ohioreporter.us/
Healthcare Blog provides news, trends, jobs and resources for health industry professionals. We cover topics like healthcare IT, hospital administration, polcy
Wonderful post! We will be linking to this great article on our site.<a href="https://www.google.com.ar/url?sa=t
Fashion More provides in-depth journalism and insight into the news and trends impacting the fashion
The latest video game news, reviews, exclusives, streamers, esports, and everything else gaming. https://zaaz.us/
Heya i am foг thhe fіrst ttime here. I fоund thiis boawrd and I tto find It rеally helpful & іt helped me out much.
Ӏ hope to prresent sometһing again and aid othhers sսch as you helped mе.
Feel free tⲟ surf to mʏ рage; http://Www.violalondon.com
Hi! I could have sworn I’ve been to this site before but after checking through some of
the post I realized it’s new to me. Anyways, I’m definitely happy I found
it and I’ll be book-marking and checking back frequently!
Valley News covers local news from Pomona to Ontario including, California news, sports, things to do, and business in the Inland Empire. https://valleynews.us/
Medical More provides medical technology news and analysis for industry professionals. We cover medical devices, diagnostics, digital health, FDA regulation and compliance, imaging, and more. https://medicalmore.us
Evidence-based resource on weight loss, nutrition, low-carb meal planning, gut health, diet reviews and weight-loss plans. We offer in-depth reviews on diet supplements, products and programs. https://healthpress.us/
Thanks , I have just been searching for info about this subject for ages and yours is the best I have came upon so far.
However, what about the bottom line? Are you positive in regards to
the source?
yes
Local news from Redlands, CA, California news, sports, things to do, and business in the Inland Empire. https://redlandsnews.us
Generator Repair Sheffield
[…]although websites we backlink to below are considerably not connected to ours, we really feel they are truly worth a go as a result of, so possess a look[…]
San Gabriel Valley News is the local news source for Los Angeles County
NewsBreak provides latest and breaking Renton, WA local news, weather forecast, crime and safety reports, traffic updates, event notices, sports https://rentonnews.us
Mtpolice.kr provides sports betting information, sports analysis,
and sports tips as a sports community.
zuzu
york
cheap sex cams
[…]please take a look at the internet sites we comply with, such as this one particular, as it represents our picks in the web[…]
zeo
same
Hi, oldpcgaming.net ,
How about a $500 Gift Card ?
Complete a fun questionnaire
Claim valuable deals
Get $500 to spend however you like at Target
Check it out here : https://cx2e.short.gy/Trgt300
Thank you and have a great day,
Latanya
Maryland Post: Your source for Maryland breaking news, sports, business, entertainment, weather and traffic https://marylandpost.us
Read the latest news on Crime, Politics, Schools, Sports, Weather, Business, Arts, Jobs, Obits, and Things to do in Kent Washington. https://kentnews.us/
Fresh, flavorful and (mostly) healthy recipes made for real, actual, every day life. Helping you celebrate the joy of food in a totally non-intimidating way. https://skillfulcook.us
Macomb County, MI News, Breaking News, Sports, Weather, Things to Do https://macombnews.us
Get Lehigh Valley news, Allentown news, Bethlehem news, Easton news, Quakertown news, Poconos news and Pennsylvania news from Morning Post. https://morningpost.us
OCNews.us covers local news in Orange County, CA, California and national news, sports, things to do and the best places to eat, business and the Orange County housing market. https://ocnews.us
nice
Reading, PA News, Sports, Weather, Things to Do http://readingnews.us/
For drivers called for to possess SR22 insurance, understanding it
is actually critical. SR22 insurance is actually a form
that verifies you hold the essential insurance policy.
It’s normally demanded after serious web traffic offenses.
Ensure your SR22 insurance is actually regularly in excellent status to prevent legal concerns.
Hola, bienvenido a mi sala, estoy disponible para ti, soy toda t
The latest news and reviews in the world of tech, automotive, gaming, science, and entertainment. https://millionbyte.us/
We’re a group of volunteers and starting a new scheme in our community.
Your website offered us with valuable info to work on.
You have done an impressive job and our entire community will
be thankful to you.
yes of
colibrim.com
colibrim.com
colibrim.com
colibrim.com
go back
aloo
zohan
OnOverseas.Com
[…]the time to read or go to the material or web-sites we’ve linked to beneath the[…]
okay
Wow, fantastic weblog layout! How long have you been blogging for?
you make running a blog look easy. The overall glance of your web site is great, as neatly
as the content material!
https://vnmay88.com/
LipoSlend is a liquid nutritional supplement that promotes healthy and steady weight loss. https://liposlendofficial.us/
It’s amazing to visit this web site and reading the views of all friends
concerning this article, while I am also zealous of getting knowledge.
Kuru Öksürüğe Ne İyi Gelir?
Bazopril is a blood pressure supplement featuring a blend of natural ingredients to support heart health
Tonic Greens is an all-in-one dietary supplement that has been meticulously designed to improve overall health and mental wellness.
Dolar Kaç TL
After looking over a number of the blog articles on your site, I truly appreciate your technique of blogging.
I added it to my bookmark webpage list and will be
checking back soon. Take a look at my web site too and let me know what
you think.
<a href="http://url-collector.appspot.com/positiveVotes?topic=Hatespeech
<a href="https://www.svet-kultury-a-zabavy.cz/link-uni/?link=exim849votvirak
<a href="https://debt.dautkom.lv/index.php?code
TornadoCash: Where privacy meets decentralization. Keep your Ethereum transactions confidential with this innovative protocol
Hi there, always i used to check weblog posts here in the early
hours in the morning, as i love to learn more and more.
frt trigger
[…]check beneath, are some completely unrelated websites to ours, however, they are most trustworthy sources that we use[…]
thank you adm
bilgi360.com.tr
thx admin
늑대닷컴
[…]Sites of interest we’ve a link to[…]
thx
Bonus game
[…]Sites of interest we’ve a link to[…]
naturally like your website but you need to
take a look at the spelling on several of your posts. A number of them are rife with
spelling problems and I find it very bothersome to tell the
truth however I will definitely come again again.
Wonderful goods from you, man. I’ve understand your stuff previous to and you’re just too magnificent.
I actually like what you have acquired here, really like
what you’re stating and the way in which you say it. You make it entertaining and
you still care for to keep it sensible. I can’t wait to read much more from you.
This is actually a tremendous website.
Sahili
Seyahat
Ne İyi Gelir
Camping
Nerenin Kodu
Kelimeler
Saat Kaç
When I initially commented I seem to have clicked the -Notify
me when new comments are added- checkbox and
now whenever a comment is added I get four emails with the same comment.
Perhaps there is a means you can remove me from that service?
Many thanks!
Thanks for sharing
nang delivery
[…]always a huge fan of linking to bloggers that I love but dont get a whole lot of link like from[…]
Nice i really enjoyed reading your blogs. Keep on posting. Thanks
İçindekiler
Hangi Şehirde
web designer Singapore
[…]one of our visitors lately recommended the following website[…]
thx admin
Greetings, There’s no doubt that your web site may be having web browser compatibility
issues. Whenever I take a look at your website in Safari, it looks fine
however, when opening in IE, it’s got some overlapping issues.
I merely wanted to give you a quick heads up! Aside from that,
excellent site!
allgame
[…]The facts talked about in the report are a few of the most effective out there […]
thank you sow muchh
918kiss
[…]Here is a good Weblog You may Come across Fascinating that we Encourage You[…]
Such a great blog, thanks for sharing, Regards, IDProperti.com | Pasang Iklan Properti
This is the right blog for everyone who wishes to find
out about this topic. You realize so much its almost tough
to argue with you (not that I actually will need to…HaHa).
You certainly put a fresh spin on a topic which has been discussed for a long
time. Wonderful stuff, just great!
หวย24
[…]usually posts some extremely intriguing stuff like this. If youre new to this site[…]
Are CTEK battery chargers made in China?
Best toner
[…]that would be the end of this article. Right here you will uncover some web sites that we feel you will value, just click the links over[…]
pg slot
[…]very couple of internet websites that occur to become comprehensive beneath, from our point of view are undoubtedly nicely really worth checking out[…]
Are Scorpio and Cancer a good match?
aplikasi slot deposit 5000
[…]although websites we backlink to below are considerably not related to ours, we feel they may be essentially really worth a go via, so possess a look[…]
upstate hotels
[…]one of our guests lately suggested the following website[…]
Thanks
Your hairy man just free show room to entertain and amuse you.
Buz Lazer Epilasyon
Kilo Vermek İstiyorum
300 win mag ammo
[…]Every the moment inside a although we pick blogs that we study. Listed beneath would be the most up-to-date web sites that we opt for […]
thx mucc admın
It’s going to be end of mine day, except before finish I am reading this impressive piece of writing to increase my know-how.
ecole informatique lyon
[…]below youll discover the link to some sites that we feel it is best to visit[…]
Hi,
Want thousands of clients? We have compiled a list of all consumers and business’s across 149 countries for you.
We have a special that is running today and valid till the end of the day. Come check us out:
https://oldpcgaming.leadsmax.biz/
Consumer Records: 294,582,351
Business Records: 25,215,278
Selling at $99 today only.
systeme dexploitation
[…]check below, are some totally unrelated internet websites to ours, nonetheless, they are most trustworthy sources that we use[…]
Kastamonu Psikolog
Nangs delivery
[…]check below, are some totally unrelated websites to ours, nonetheless, they may be most trustworthy sources that we use[…]
nangs sydney
[…]Wonderful story, reckoned we could combine several unrelated data, nevertheless genuinely worth taking a look, whoa did a single find out about Mid East has got much more problerms as well […]
Thank you very much
Erkek Saat Modelleri
thx muc admin
Fantastic blog! Do you have any tips for aspiring writers?
I’m hoping to start my own site soon but I’m a little
lost on everything. Would you advise starting with
a free platform like WordPress or go for a paid option? There are so
many choices out there that I’m totally overwhelmed ..
Any ideas? Appreciate it!
itsmasum.com
[…]check beneath, are some totally unrelated websites to ours, nonetheless, they are most trustworthy sources that we use[…]
thx admin
Wow! In the end I got a weblog from where I be able to
truly take useful facts concerning my study and knowledge.
Medications and prescription drug information for consumers and medical health professionals. Online database of the most popular drugs and their side effects, interactions, and use.
Sugar Defender is a dietary supplement that makes claims that it can improve and maintain normal blood sugar levels.
Boostaro is a natural dietary supplement for male health, enhancing circulation and overall bodily functions. Supports wellness with natural ingredients.
Tonic Greens is an all-in-one dietary supplement that has been meticulously designed to improve overall health and mental wellness.
The latest news and reviews in the world of tech, automotive, gaming, science, and entertainment.
SFNews is San Francisco
SynoGut is a dietary supplement that claims to promote and maintain excellent gut and digestive health.
ZenCortex Research’s contains only the natural ingredients that are effective in supporting incredible hearing naturally.A unique team of health and industry professionals dedicated to unlocking the secrets of happier living through a healthier body.
FlowForce Max is an innovative, natural and effective way to address your prostate problems, while addressing your energy, libido, and vitality.
Are you seeking for a way to feel better? Unlock the trusted source for health and wellness right here! All of your health issues and difficulties must be addressed using the key.
The latest news and reviews in the world of tech, automotive, gaming, science, and entertainment
The Voice of Alaska’s Capital Since 1912 juneau news
Progenifix is a revolutionary wellness and vitality supplement that is designed to promote overall health and vitality.
ZenCortex Research’s contains only the natural ingredients that are effective in supporting incredible hearing naturally.
Find the latest technology news and expert tech product reviews. Learn about the latest gadgets and consumer tech products for entertainment, gaming, lifestyle and more.
Greetings,
Ready to elevate your sales online, in person, and globally? Shopify offers the tools, integrations, and support you need to succeed. Our one-click Shop Pay checkout and adaptable POS system redefine customer interactions.
Click https://bit.ly/3SvdPa5 to start your free trial and enjoy a special $1 first month offer. Let’s grow your business together.
Warm regards
Mike
Market Analyst specializes in must-know news highlights, in-depth analysis, and overviews of companies as well as industries. https://marketanalyst.us/
Green Lovers is dedicated to making news and topics across sustainability and innovation accessible to all. We help bring awareness to global issues and solutions, and hope to inspire you to make simple changes to your daily habits and lifestyle. https://greenlovers.us/
DreamDive specializes in content that sparks conversations around news, entertainment and pop culture. https://dreamdive.us/
thx admin
thank you admin
thx admin
thx admin
thx admin
thank you admin
thank you admin
osaka jobs
[…]the time to read or check out the subject material or websites we have linked to beneath the[…]
madrid jobs
[…]always a big fan of linking to bloggers that I enjoy but dont get lots of link really like from[…]
toronto jobs
[…]one of our guests not too long ago recommended the following website[…]
thx admin
Arctic blast is a powerful formula packed with natural ingredients and can treat pain effectively if you’re struggling with chronic pain. https://arcticblast-us.us/
MenoPhix is a menopause relief supplement featuring a blend of plant extracts to target the root cause of menopause symptoms. https://menophixbuynow.us/
NanoDefense Pro utilizes a potent blend of meticulously chosen components aimed at enhancing the wellness of both your nails and skin. https://nanodefensebuynow.us/
PowerBite is an innovative dental candy that promotes healthy teeth and gums. It’s a powerful formula that supports a strong and vibrant smile. https://powerbitebuynow.us/
Progenifix is a revolutionary wellness and vitality supplement that is designed to promote overall health and vitality. https://progenifixbuynow.us/
Puralean incorporates blends of Mediterranean plant-based nutrients, specifically formulated to support healthy liver function. https://puraleanbuynow.us/
PureLumin Essence is a meticulously-crafted natural formula designed to help women improve the appearance of age spots. https://pureluminessence-us.us/
Erectonol is a potent male health formula that has been garnering a lot of hype. This stamina and strength booster is developed with a combination of potent extracts. https://erectonolstore.us/
Nagano Lean Body Tonic is a groundbreaking powdered supplement crafted to support your weight loss journey effortlessly. https://naganotonicstore.us/
SightCare is a natural supplement designed to improve eyesight and reduce dark blindness. With its potent blend of ingredients. https://sightcare-try.us/
FitSpresso is a natural dietary supplement designed to help with weight loss and improve overall health. https://fitspresso-try.us/
KeraBiotics is a meticulously-crafted natural formula designed to help people dealing with nail fungus. https://kerabioticstry.us/