Age of Empires II – Walkthrough (Part III)
Ghengis Khan was one of few rulers who managed not only to unite a fractured people, but lead them on a conquest of the world. Ghengis Khan’s accomplishments are made all the more impressive by the fact that in almost every case, he defeated enemies who were better-equipped than him.
|
CONTENTS 1. The Crucible |
The Crucible:
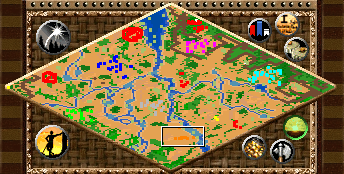
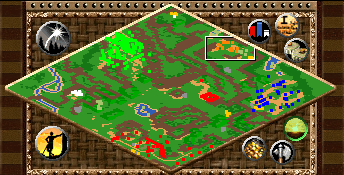
The first scenario of this campaign requires more running around than any other map. You are going to be sent out to accomplish a bunch of little tasks in order to “buy” the support of the various Mongol tribes. The easiest task is collecting sheep for the Kereyids. They have a Kara-Kitai camp due north of them with half the needed sheep, and there are plenty more scattered in just about every direction from them. Also, by completing their task, you get monks who will heal your troops and that you need in order to capture the relic for the Ungirrads. In fact, after you complete the Kereyid task, you should head south to the small Kara-Kitai monastery, destroy it, grab the relic, and then head back to drop it off.
After finishing the second task, you need to decide if you want to fight light cavalry or cavalry archers. The Tayachi’uds have light cavalry and want you to kill the Naimans. The Naimans have cavalry archers and want you to kill the Tayachi’uds. Neither of them are a match for your forces, so simply pick one to kill, change your diplomatic stance with them to enemy, and wipe them out.
The last task is killing Ornlu the wolf. Ornlu is surrounded by several other wolves, including the tough dire wolves. You will find him by following the skeletons that lead east from the Ughirs village. Kill him and return to the village.
A Life of Revenge:
This is a very easy map. You have to defend your wonder and kill Kushluk. Fortunately, no one has siege engines, so it is unlikely the wonder will ever be in any real danger. Just build a few towers full of archers around it, and walls all the way around those. As is the usual case with the AI, it will not attack en masse, and will sometimes even send just a few troops to pester you.
Killing Kushluk is a bit trickier. First, you have to capture the small village that lies northwest of you in order to build anything. Next, he starts out in the Kara-Kitai village at the center of the map, but flees to the southwest corner where he has his own village. Because of cliffs, you have to fight through the Kara-Kitai before you can go after him. However, because you can build walls and no one can build siege engines, it is fairly easy to build a strong fortress where you can build up a large army for the task.
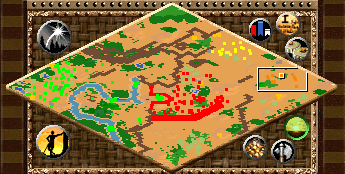
Into China:
You need to start this map by heading due east. You will run into a river, but there is a transport ship to get you across. Cross the river and then continue east into the Chinese Engineer village. Kill them off and then transport everything back to where you started the map before building your village.
Although the Chinese will make the occasional raid on you, building adequate defenses is fairly straightforward. The Chinese also tend to be pretty defensive, which makes sense when you see how thick their wall is.
After your village is up, you are going to want to create a breach in the wall at the west end. Use trebuchets to knock down the towers, and then move in siege rams (they go through the wall faster). If you run down the west side of the map, you will run into more Engineers and cannons which you can capture. After that, the map becomes very straightforward.
The Horde Rides West:
There are a couple of tricks that can make this map much easier. First, send one of your villagers south from your eastern town until they come to the Persian gate. Have them build a wall and gate that matches up to the Persians’ gate and then build towers and possibly a castle behind it. By doing this before you send your “gift,” you can build your defenses while you are still allied with the Persians.
The second trick is to conquer the Merkids immediately. They only have two cavalry archers, and once they are dead, you “conquer” all of their structures. While you are busy killing them, have one of the western villagers build a wall around that area so that your western town is safe. There is no way to move between your towns until the Persians are dead, and since that is likely going to be the last thing you do, don’t count on it. After you finish this set-up, build up a decent size force and then send your gift to the Persians. The assassins will kill the king, and then you are playing like always against two well-developed enemies.
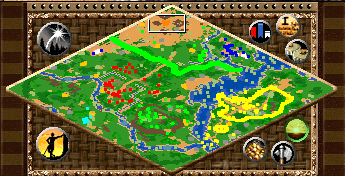
The Promise:
This map is great to defend because the cliffs create so many narrow passageways that you can line them with towers and castles and slowly wear down any attacker. Start out by scouting to the west until you spot the Polish village. You can rush and capture the flag, but it isn’t a good idea to irritate them until you have defenses in place. Have a villager build a wall across the narrow passage in the cliffs and then start building towers behind it. You might also want to move all your military units over here because the Polish will attack first.
After your defenses are in place, start building up your city. You can expect quite a few waves of onagers from Poland, so it might not be a bad idea to have light cavalry available to deal with them. However, after you destroy Poland you won’t face any really stiff resistance for quite a while.
You are going to have an objective switch during the scenario that requires you to build three castles in the center of the map. However, there is so much stone you can build six or seven with ease. Make sure you build walls before building castles, though. Once they are started, the Bohemians will being their attacks and the Germans will start attacking in much larger numbers.
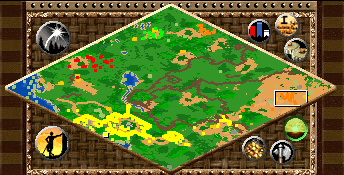
Pax Mongolia:

The first forty minutes of the final Ghengis Khan map are all about simple survival. If you just hold off long enough, the Hungarians will destroy their bridge and will be unable to attack anymore. The easiest way to do that is to fill the three towers closest to the bridge with archers, and then build lots of light cavalry to attack enemy siege engines. Do not worry about building up your city until then, either — it isn’t necessary or worth the cost early on. Just build plenty of farms and keep plenty of peasants working.
Shortly after Subotai arrives, the Hungarians will destroy the bridge. At this point, you can start building your city. You also need to scout to the east in order to find the ice bridge across the river. The Hungarians are blocked from using it by forest, and you will have to clear through the forest to attack them.
The fast way to clear through is to start cutting the tree down, and as soon as you see it fall, build a wall on top of it. This wastes the wood in the tree, but is much faster than waiting for your villager to harvest the wood. You will need to get through fairly quickly because the Hungarians will start to build a wonder. Do not rush too much, though; you will have plenty of time to build defenses before you cut through the final section of trees.
The enemy will not attack your saboteurs except with towers and castles. This makes them excellent scouts once you knock down the castle. After you break through the forest and Hungarian wall, send a cavalry unit through and towards the wonder. It will be killed by a castle. Send half your saboteurs to the castle, and they will destroy it. You can then use your other saboteurs to scout, and to kill the villager building the wonder. Follow that up with a combined force of trebuchets and units protecting them.
")

")
My family every time say that I am killing my time here at web, however I know I am getting familiarity everyday by reading suchfastidious articles or reviews.
A commendable blog and very useful content that really helped and i can see it is helping many others, bravo, keep the good work going.
I like what you guys are up too. Such clever work and reporting! Carry on the superb works guys I have incorporated you guys to my blogroll. I think it will improve the value of my site 🙂
I gotta favorite this web site it seems handy very helpful
I genuinely enjoy looking through on this internet site, it contains excellent blog posts. “It is easy to be nice, even to an enemy – from lack of character.” by Dag Hammarskjld.
I’ll immediately grab your rss feed as I can not to find your e-mail subscription hyperlink or e-newsletter service. Do you’ve any? Please allow me recognise so that I could subscribe. Thanks.
As soon as I discovered this web site I went on reddit to share some of the love with them.
Hi there, i read your blog from time to time and i own a similar one and i was just wondering if you get a lot of spam remarks? If so how do you protect against it, any plugin or anything you can recommend? I get so much lately it’s driving me mad so any assistance is very much appreciated.
Thank you, I have just been looking for info approximately this subject for ages and yours is the greatest I have found out so far. But, what concerning the conclusion? Are you sure in regards to the source?
Good V I should definitely pronounce, impressed with your site. I had no trouble navigating through all tabs as well as related info ended up being truly easy to do to access. I recently found what I hoped for before you know it in the least. Quite unusual. Is likely to appreciate it for those who add forums or anything, site theme . a tones way for your client to communicate. Excellent task..
certainly like your web site but you need to check the spelling on several of your posts. Several of them are rife with spelling problems and I find it very troublesome to tell the truth nevertheless I will certainly come back again.
Great write-up, I’m regular visitor of one’s website, maintain up the nice operate, and It is going to be a regular visitor for a long time.
This is the right blog for anyone who wants to find out about this topic. You realize so much its almost hard to argue with you (not that I actually would want…HaHa). You definitely put a new spin on a topic thats been written about for years. Great stuff, just great!
Some really nice stuff on this internet site, I love it.
Magnificent items from you, man. I have take into accout your stuff previous to and you are just too excellent. I actually like what you’ve acquired right here, really like what you are saying and the way in which in which you are saying it. You’re making it entertaining and you continue to take care of to keep it sensible. I cant wait to learn much more from you. This is actually a tremendous web site.
Hey very nice site!! Man .. Excellent .. Amazing .. I’ll bookmark your site and take the feeds also…I am happy to find so many useful info here in the post, we need develop more techniques in this regard, thanks for sharing. . . . . .
Just wish to say your article is as surprising. The clearness for your post is just excellent and i could think you are knowledgeable on this subject. Fine together with your permission let me to grab your RSS feed to keep up to date with approaching post. Thank you 1,000,000 and please keep up the gratifying work.
My brother suggested I might like this web site. He was entirely right. This post actually made my day. You cann’t imagine just how much time I had spent for this info! Thanks!
My husband and i were quite happy Chris could carry out his web research with the precious recommendations he came across through your weblog. It is now and again perplexing just to find yourself giving out tricks which usually people today might have been selling. Therefore we do know we now have the blog owner to be grateful to for this. All of the illustrations you have made, the straightforward web site navigation, the friendships you make it possible to instill – it is all amazing, and it’s really leading our son in addition to the family consider that the subject matter is brilliant, and that’s extremely indispensable. Thanks for everything!
Wow, awesome blog layout! How long have you been blogging for? you make blogging look easy. The overall look of your web site is excellent, let alone the content!
Thank you for the good writeup. It actually was a enjoyment account it. Glance complex to far brought agreeable from you! By the way, how could we communicate?
Thanks for the sensible critique. Me & my neighbor were just preparing to do some research about this. We got a grab a book from our area library but I think I learned more clear from this post. I am very glad to see such excellent information being shared freely out there.
Do you have a spam issue on this site; I also am a blogger, and I was wondering your situation; many of us have created some nice procedures and we are looking to swap techniques with others, why not shoot me an e-mail if interested.
Woah! I’m really loving the template/theme of this site. It’s simple, yet effective. A lot of times it’s tough to get that “perfect balance” between user friendliness and appearance. I must say you’ve done a great job with this. In addition, the blog loads super quick for me on Safari. Exceptional Blog!
Your place is valueble for me. Thanks!…
I got what you mean , thankyou for putting up.Woh I am lucky to find this website through google. “If one does not know to which port one is sailing, no wind is favorable.” by Seneca.
My spouse and i have been really more than happy that Louis could deal with his web research by way of the ideas he was given using your weblog. It is now and again perplexing just to continually be giving away guides which usually many people might have been selling. And we all do understand we now have the writer to thank because of that. These illustrations you have made, the straightforward web site navigation, the relationships your site assist to create – it is most sensational, and it’s aiding our son and our family feel that that content is fun, and that is highly pressing. Many thanks for the whole lot!
I am thankful that I noticed this web site, just the right information that I was searching for! .
It is the best time to make some plans for the future and it’s time to be happy. I’ve read this post and if I could I want to suggest you few interesting things or tips. Maybe you can write next articles referring to this article. I desire to read even more things about it!
You have remarked very interesting details! ps decent web site. “Justice is the truth in action.” by Jeseph Joubert.
I really appreciate this post. I¦ve been looking everywhere for this! Thank goodness I found it on Bing. You’ve made my day! Thank you again
Hello, Neat post. There is a problem together with your site in internet explorer, could check this… IE nonetheless is the marketplace chief and a big component to folks will omit your magnificent writing because of this problem.
By way of introduction, I am Mark Schaefer with Nutritional Products International (nutricompany.com). We serve international and domestic manufacturers seeking to gain more distribution within the United States. Your brand recently caught my attention, so I am contacting you to discuss the possibility of expanding your distribution reach. We provide expertise in all areas of distribution, and our offerings include the following: * Rapid entry into the U.S. market. * Purchase Orders * FDA Regulatory Compliance * Active accounts with major U.S. distributors and retailers. * Our proven sales force has public relations, branding and marketing all under one roof. We maintain active business relationships with over 200,000 distribution outlets across the nation, and we have a direct line of contact with executive-level buyers. Our company has a proven history of initiating accounts and placing orders with major distribution outlets. Our history allows us to have intimate and unique relationships with key buyers across the United States thus giving your brand a fast track to market in a professional manner. Please contact me directly at 561-544-0719 or by replying, so we can discuss your brand further. Kind Regards, Mark Schaefer, Director Of Global Procurement, Nutritional Products International, 101 Plaza Real S, Boca Raton, FL 33432, Office: 561-544-0719
Throughout this awesome design of things you’ll receive an A+ with regard to hard work. Where exactly you misplaced everybody was on all the specifics. You know, they say, the devil is in the details… And it could not be more true here. Having said that, allow me reveal to you what exactly did give good results. The writing can be highly powerful and that is possibly why I am making an effort to comment. I do not really make it a regular habit of doing that. Second, even though I can easily notice the jumps in logic you make, I am not sure of how you appear to connect the ideas that help to make the final result. For now I will yield to your position however wish in the future you connect your dots better.
As I web-site possessor I believe the content matter here is rattling fantastic , appreciate it for your hard work. You should keep it up forever! Good Luck.
you’re in point of fact a good webmaster. The site loading velocity is incredible. It seems that you are doing any distinctive trick. Moreover, The contents are masterpiece. you’ve performed a fantastic process in this subject!
you’ve a terrific weblog here! would you like to make some invite posts on my weblog?
You made several good points there. I did a search on the issue and found the majority of folks will have the same opinion with your blog.
Normally I do not learn article on blogs, however I wish to say that this write-up very pressured me to take a look at and do it! Your writing style has been surprised me. Thank you, quite great post.
I’m still learning from you, but I’m improving myself. I definitely love reading all that is posted on your blog.Keep the tips coming. I liked it!
Spot on with this write-up, I actually suppose this web site needs far more consideration. I’ll most likely be once more to read far more, thanks for that info.
I have been absent for a while, but now I remember why I used to love this blog. Thank you, I?¦ll try and check back more often. How frequently you update your site?
Hello there, I found your website via Google while looking for a related topic, your site came up, it looks good. I’ve bookmarked it in my google bookmarks.
Crimson flowers exude love, romance, and timelessattraction.
Excellent goods from you, man. I have understand your stuff previous to and you are just extremely excellent. I actually like what you have acquired here, really like what you’re saying and the way in which you say it. You make it entertaining and you still care for to keep it wise. I can’t wait to read far more from you. This is actually a tremendous site.
Hi there! I simply wish to give an enormous thumbs up for the nice info you have here on this post. I shall be coming back to your weblog for more soon.
Thanks for one’s marvelous posting! I genuinely enjoyed reading it, you happen to be a great author.I will remember to bookmark your blog and will eventually come back in the foreseeable future. I want to encourage that you continue your great work, have a nice morning!
Thanks for another magnificent article. Where else could anybody get that kind of info in such a perfect way of writing? I’ve a presentation next week, and I’m on the look for such information.
There are some attention-grabbing points in time on this article however I don’t know if I see all of them middle to heart. There’s some validity but I’ll take hold opinion till I look into it further. Good article , thanks and we wish more! Added to FeedBurner as well
Hi I am so glad I found your website, I really found you by error, while I was looking on Askjeeve for something else, Anyhow I am here now and would just like to say thank you for a incredible post and a all round interesting blog (I also love the theme/design), I dont have time to look over it all at the minute but I have bookmarked it and also included your RSS feeds, so when I have time I will be back to read much more, Please do keep up the awesome job.
You have brought up a very good details, appreciate it for the post.
Hello! I’ve been following your blog for a long time now and finally got the courage to go ahead and give you a shout out from Huffman Tx! Just wanted to say keep up the fantastic job!
Thanks a lot for giving everyone such a splendid opportunity to read articles and blog posts from this web site. It is usually very lovely and jam-packed with amusement for me personally and my office mates to visit your blog no less than thrice per week to find out the latest items you have. Of course, I’m so usually contented with the wonderful tactics you serve. Some 2 facts on this page are easily the most efficient I’ve had.
I precisely desired to thank you so much once more. I am not sure the things that I would have handled without the type of thoughts shared by you on that area. This has been an absolute frightful situation for me personally, however , encountering a specialized fashion you processed that made me to weep over fulfillment. I am just happy for your support and as well , hope you recognize what an amazing job you were accomplishing instructing the others with the aid of your web site. I am sure you haven’t come across any of us.
Throughout the great design of things you actually secure a B- for hard work. Where you actually misplaced everybody ended up being on your facts. You know, it is said, details make or break the argument.. And it couldn’t be more accurate in this article. Having said that, permit me inform you just what exactly did work. Your text can be extremely powerful and this is possibly the reason why I am making an effort in order to opine. I do not really make it a regular habit of doing that. Second, whilst I can certainly notice the jumps in reasoning you make, I am not necessarily confident of how you seem to unite your details that produce your final result. For the moment I will, no doubt subscribe to your issue but wish in the near future you actually connect the dots better.
With havin so much written content do you ever run into any problems of plagorism or copyright infringement? My website has a lot of unique content I’ve either authored myself or outsourced but it seems a lot of it is popping it up all over the internet without my agreement. Do you know any ways to help reduce content from being stolen? I’d truly appreciate it.
Thank you, I have just been searching for info approximately this topic for a long time and yours is the greatest I’ve found out so far. But, what about the conclusion? Are you positive concerning the supply?
Yeah bookmaking this wasn’t a high risk conclusion outstanding post! .
What i do not realize is in reality how you’re now not actually much more smartly-favored than you may be now. You are very intelligent. You know therefore considerably in relation to this subject, produced me in my opinion consider it from numerous numerous angles. Its like men and women are not fascinated except it is something to accomplish with Woman gaga! Your individual stuffs great. At all times deal with it up!
F*ckin’ tremendous issues here. I am very satisfied to look your post. Thanks so much and i’m looking forward to contact you. Will you kindly drop me a e-mail?
Thank you for sharing excellent informations. Your site is very cool. I’m impressed by the details that you’ve on this blog. It reveals how nicely you understand this subject. Bookmarked this web page, will come back for extra articles. You, my pal, ROCK! I found just the information I already searched everywhere and just couldn’t come across. What an ideal web site.
You are my inspiration , I own few web logs and sometimes run out from to post .I believe this internet site has some very excellent information for everyone. “In this world second thoughts, it seems, are best.” by Euripides.
I simply could not depart your web site before suggesting that I extremely enjoyed the usual info a person supply in your guests? Is going to be again incessantly in order to inspect new posts.
Its like you read my mind! You seem to know a lot about this, like you wrote the book in it or something. I think that you could do with a few pics to drive the message home a little bit, but instead of that, this is fantastic blog. An excellent read. I’ll certainly be back.
I was just seeking this information for some time. After six hours of continuous Googleing, finally I got it in your site. I wonder what’s the lack of Google strategy that do not rank this kind of informative websites in top of the list. Usually the top websites are full of garbage.
We’re looking forward
Just want to say your article is as astonishing. The clarity in your post is simply spectacular and i could assume you are an expert on this subject. Fine with your permission allow me to grab your feed to keep up to date with forthcoming post. Thanks a million and please continue the rewarding work.
Howdy very nice website!! Guy .. Beautiful .. Amazing .. I’ll bookmark your web site and take the feeds also…I’m glad to search out a lot of helpful info right here in the post, we need work out extra techniques in this regard, thank you for sharing. . . . . .
I rattling glad to find this site on bing, just what I was looking for : D too saved to favorites.
After research a couple of of the weblog posts on your website now, and I really like your approach of blogging. I bookmarked it to my bookmark web site list and can be checking back soon. Pls check out my website online as nicely and let me know what you think.
Very good blog! Do you have any hints for aspiring writers? I’m hoping to start my own blog soon but I’m a little lost on everything. Would you propose starting with a free platform like WordPress or go for a paid option? There are so many choices out there that I’m completely overwhelmed .. Any ideas? Thank you!
Hi, Neat post. There is a problem with your site in internet explorer, would check this… IE still is the market leader and a big portion of people will miss your wonderful writing due to this problem.
Magnificent website. Lots of useful info here. I am sending it to a few friends ans also sharing in delicious. And obviously, thanks to your sweat!
You are a very smart person!
Your style is so unique compared to many other people. Thank you for publishing when you have the opportunity,Guess I will just make this bookmarked.2
I have not checked in here for some time since I thought it was getting boring, but the last few posts are good quality so I guess I will add you back to my everyday bloglist. You deserve it my friend 🙂
It is really a great and helpful piece of information. I am happy that you just shared this useful info with us. Please keep us up to date like this. Thanks for sharing.
Good blog! I truly love how it is simple on my eyes and the data are well written. I am wondering how I might be notified whenever a new post has been made. I have subscribed to your feed which must do the trick! Have a great day!
I think that is among the such a lot important info for me. And i am glad studying your article. But should remark on some general issues, The website taste is great, the articles is truly great : D. Good job, cheers
Pretty nice post. I just stumbled upon your weblog and wanted to say that I’ve truly enjoyed browsing your blog posts. After all I will be subscribing to your feed and I hope you write again soon!
You made some clear points there. I did a search on the subject matter and found most people will approve with your site.
Would love to perpetually get updated outstanding web site! .
Hi, just required you to know I he added your site to my Google bookmarks due to your layout. But seriously, I believe your internet site has 1 in the freshest theme I??ve came across. It extremely helps make reading your blog significantly easier.
I really appreciate this post. I have been looking everywhere for this! Thank goodness I found it on Bing. You have made my day! Thank you again!
I have been browsing on-line more than 3 hours as of late, yet I by no means discovered any attention-grabbing article like yours. It’s lovely value sufficient for me. Personally, if all website owners and bloggers made just right content as you did, the internet will be a lot more helpful than ever before. “No nation was ever ruined by trade.” by Benjamin Franklin.
Would you be serious about exchanging hyperlinks?
I’ve recently started a website, the info you provide on this site has helped me greatly. Thanks for all of your time & work. “The word ‘genius’ isn’t applicable in football. A genius is a guy like Norman Einstein.” by Joe Theismann.
Woah! I’m really enjoying the template/theme of this site. It’s simple, yet effective. A lot of times it’s challenging to get that “perfect balance” between usability and visual appeal. I must say that you’ve done a great job with this. In addition, the blog loads extremely fast for me on Opera. Exceptional Blog!
great submit, very informative. I’m wondering why the other experts of this sector do not notice this. You must proceed your writing. I am confident, you have a huge readers’ base already!
With havin so much content do you ever run into any issues of plagorism or copyright infringement? My site has a lot of completely unique content I’ve either authored myself or outsourced but it seems a lot of it is popping it up all over the internet without my agreement. Do you know any methods to help stop content from being stolen? I’d certainly appreciate it.
A formidable share, I just given this onto a colleague who was doing just a little evaluation on this. And he in actual fact bought me breakfast as a result of I found it for him.. smile. So let me reword that: Thnx for the treat! But yeah Thnkx for spending the time to debate this, I really feel strongly about it and love reading more on this topic. If doable, as you grow to be expertise, would you thoughts updating your blog with more particulars? It’s extremely helpful for me. Massive thumb up for this blog submit!
I’m typically to blogging and i really appreciate your content. The article has really peaks my interest. I’m going to bookmark your site and hold checking for brand spanking new information.
Thanks a lot for sharing this with all of us you really know what you’re talking about! Bookmarked. Kindly also visit my website =). We could have a link exchange arrangement between us!
whoah this blog is great i love reading your posts. Keep up the good work! You know, lots of people are hunting around for this info, you could help them greatly.
I was recommended this website by my cousin. I’m no longer positive whether this put up is written by him as no one else realize such unique approximately my problem. You are incredible! Thanks!
It is really a nice and useful piece of information. I’m glad that you shared this helpful information with us. Please keep us informed like this. Thank you for sharing.
great issues altogether, you simply received a new reader. What might you suggest in regards to your put up that you made some days in the past? Any sure?
When I initially commented I clicked the -Notify me when new comments are added- checkbox and now each time a remark is added I get 4 emails with the same comment. Is there any means you can remove me from that service? Thanks!
Utterly written content material, Really enjoyed examining.
you have a great blog here! would you like to make some invite posts on my blog?
Its like you read my mind! You seem to know so much about this, like you wrote the book in it or something. I think that you could do with some pics to drive the message home a bit, but other than that, this is fantastic blog. An excellent read. I’ll definitely be back.
Thank you for the auspicious writeup. It in truth was a amusement account it. Glance complex to far added agreeable from you! By the way, how can we be in contact?
Great blog! Do you have any tips for aspiring writers? I’m hoping to start my own blog soon but I’m a little lost on everything. Would you suggest starting with a free platform like WordPress or go for a paid option? There are so many options out there that I’m completely overwhelmed .. Any recommendations? Bless you!
Can I just say what a relief to find someone who actually knows what theyre talking about on the internet. You definitely know how to bring an issue to light and make it important. More people need to read this and understand this side of the story. I cant believe youre not more popular because you definitely have the gift.
Wonderful blog! Do you have any recommendations for aspiring writers? I’m hoping to start my own site soon but I’m a little lost on everything. Would you recommend starting with a free platform like WordPress or go for a paid option? There are so many options out there that I’m completely confused .. Any suggestions? Thank you!
There is noticeably a bundle to know about this. I assume you made certain nice points in features also.
Howdy would you mind stating which blog platform you’re working with? I’m planning to start my own blog soon but I’m having a difficult time deciding between BlogEngine/Wordpress/B2evolution and Drupal. The reason I ask is because your design and style seems different then most blogs and I’m looking for something completely unique. P.S Sorry for being off-topic but I had to ask!
An interesting discussion is worth comment. I think that you should write more on this topic, it might not be a taboo subject but generally people are not enough to speak on such topics. To the next. Cheers
I have learn some good stuff here. Definitely value bookmarking for revisiting. I surprise how much attempt you put to create any such great informative web site.
It’s a pity you don’t have a donate button! I’d certainly donate to this fantastic blog! I guess for now i’ll settle for bookmarking and adding your RSS feed to my Google account. I look forward to new updates and will share this blog with my Facebook group. Chat soon!
Hey there! This is my first visit to your blog! We are a team of volunteers and starting a new project in a community in the same niche. Your blog provided us valuable information to work on. You have done a outstanding job!
There are some interesting time limits on this article but I don’t know if I see all of them heart to heart. There’s some validity but I’ll take maintain opinion until I look into it further. Good article , thanks and we would like more! Added to FeedBurner as nicely
Hi there, i read your blog occasionally and i own a similar one and i was just curious if you get a lot of spam feedback? If so how do you protect against it, any plugin or anything you can suggest? I get so much lately it’s driving me mad so any help is very much appreciated.
Thanks, I’ve recently been searching for information approximately this topic for a while and yours is the greatest I have discovered so far. However, what about the conclusion? Are you certain in regards to the supply?
fantastic points altogether, you simply gained a brand new reader. What could you recommend about your publish that you just made some days ago? Any positive?
Pretty! This was an extremely wonderful article. Thanks for supplying this info.
An outstanding share! I have just forwarded this onto a colleague who had been conducting a little homework on this. And he in fact bought me dinner because I discovered it for him… lol. So allow me to reword this…. Thanks for the meal!! But yeah, thanks for spending some time to discuss this topic here on your web site.
naturally like your website but you have to take a look at the spelling on several of your posts. A number of them are rife with spelling issues and I find it very troublesome to tell the reality however I will definitely come back again.
You made some nice points there. I did a search on the subject matter and found most persons will go along with with your blog.
You could definitely see your enthusiasm in the work you write. The world hopes for more passionate writers like you who aren’t afraid to say how they believe. Always follow your heart.
I like this post, enjoyed this one thank you for posting. “No man is wise enough by himself.” by Titus Maccius Plautus.
I am extremely inspired with your writing talents as smartly as with the layout to your weblog. Is that this a paid subject or did you customize it your self? Either way keep up the nice quality writing, it is rare to look a great weblog like this one nowadays..
It¦s actually a great and useful piece of information. I¦m glad that you just shared this helpful info with us. Please keep us informed like this. Thank you for sharing.
Right now it sounds like WordPress is the best blogging platform available right now. (from what I’ve read) Is that what you are using on your blog?
This is the perfect web site for everyone who wishes to find out about this topic. You know so much its almost tough to argue with you (not that I really will need toÖHaHa). You definitely put a fresh spin on a topic that has been written about for a long time. Wonderful stuff, just great!
This really answered my drawback, thank you!
Heya i am for the primary time here. I came across this board and I find It truly useful & it helped me out much. I hope to provide one thing back and help others such as you aided me.
Good info. Lucky me I recently found your website by chance (stumbleupon). I’ve book-marked it for later!
Its fantastic as your other articles : D, thankyou for putting up.
Thank you, I have just been searching for information about this subject for ages and yours is the best I have discovered till now. But, what about the conclusion? Are you sure about the source?
I do love the way you have framed this concern plus it really does give us a lot of fodder for thought. However, coming from what I have witnessed, I just hope when the actual remarks stack on that people keep on issue and in no way embark upon a soap box associated with the news du jour. Yet, thank you for this fantastic point and while I do not really go along with the idea in totality, I respect the perspective.
I must thank you for the efforts you have put in writing this blog. I’m hoping to view the same high-grade content by you in the future as well. In truth, your creative writing abilities has motivated me to get my own, personal website now 😉
Oh my goodness! Impressive article dude! Thanks, However I am experiencing issues with your RSS. I donÃt understand the reason why I can’t join it. Is there anyone else having identical RSS problems? Anyone who knows the solution will you kindly respond? Thanks!!
This comes off rather navel-gazing…imho…
Simply want to say your article is as amazing. The clarity in your put up is just great and i could assume you’re knowledgeable on this subject. Fine with your permission let me to grasp your RSS feed to stay updated with drawing close post. Thanks a million and please carry on the enjoyable work.
I do enjoy the manner in which you have framed this situation plus it does offer us a lot of fodder for thought. On the other hand, through everything that I have witnessed, I just hope as the actual responses pile on that folks stay on point and in no way get started upon a soap box regarding some other news of the day. Anyway, thank you for this fantastic piece and even though I do not necessarily concur with it in totality, I regard your viewpoint.
A lot of of what you assert happens to be astonishingly accurate and it makes me ponder why I hadn’t looked at this in this light previously. This particular piece really did turn the light on for me personally as far as this particular issue goes. But there is actually one factor I am not necessarily too comfortable with so while I try to reconcile that with the core idea of the position, let me see what the rest of your subscribers have to point out.Nicely done.
Amazing! This blog looks exactly like my old one! It’s on a completely different topic but it has pretty much the same layout and design. Wonderful choice of colors!
My spouse and i ended up being so ecstatic Albert could round up his analysis by way of the ideas he had in your web site. It is now and again perplexing to just find yourself offering information and facts the rest have been making money from. Therefore we do know we have got you to thank because of that. The most important illustrations you made, the easy website navigation, the friendships your site assist to instill – it is everything remarkable, and it’s leading our son and the family feel that this subject is amusing, and that’s very fundamental. Thank you for everything!
I have been absent for a while, but now I remember why I used to love this web site. Thanks , I will try and check back more frequently. How frequently you update your web site?
Good write-up, I am normal visitor of one’s website, maintain up the nice operate, and It is going to be a regular visitor for a long time.
It’s a pity you don’t have a donate button! I’d certainly donate to this outstanding blog! I suppose for now i’ll settle for book-marking and adding your RSS feed to my Google account. I look forward to brand new updates and will share this website with my Facebook group. Talk soon!
Thank you for the sensible critique. Me and my neighbor were just preparing to do a little research on this. We got a grab a book from our local library but I think I learned more clear from this post. I am very glad to see such excellent information being shared freely out there.
What抯 Happening i am new to this, I stumbled upon this I have discovered It positively helpful and it has aided me out loads. I hope to give a contribution & help different users like its helped me. Great job.
I like this post, enjoyed this one thank you for putting up. “It is well to give when asked but it is better to give unasked, through understanding.” by Kahlil Gibran.
I’m extremely impressed with your writing skills as well as with the layout on your blog. Is this a paid theme or did you customize it yourself? Anyway keep up the excellent quality writing, it’s rare to see a nice blog like this one these days..
You made some nice points there. I did a search on the subject and found the majority of folks will consent with your blog.
Way cool! Some very valid points! I appreciate you writing this write-up plus the rest of the website is very good.
Hey there! I just wanted to ask if you ever have any trouble with hackers? My last blog (wordpress) was hacked and I ended up losing months of hard work due to no backup. Do you have any methods to prevent hackers?
An impressive share! I have just forwarded this onto a coworker who was conducting a little research on this. And he actually ordered me dinner simply because I stumbled upon it for him… lol. So let me reword this…. Thank YOU for the meal!! But yeah, thanks for spending some time to discuss this topic here on your internet site.
It is the best time to make a few plans for the long run and it’s time to be happy. I’ve read this post and if I could I desire to counsel you some interesting issues or tips. Maybe you can write next articles referring to this article. I desire to learn more issues approximately it!
he blog was how do i say it… relevant, finally something that helped me. Thanks
Some really choice blog posts on this site, saved to my bookmarks.
Good info. Lucky me I recently found your site by accident (stumbleupon). I’ve saved it for later!
Hello there! This post couldnÃt be written any better! Reading through this post reminds me of my previous roommate! He continually kept talking about this. I’ll send this article to him. Fairly certain he’s going to have a very good read. Thank you for sharing!
Thanks for your personal marvelous posting! I genuinely enjoyed reading it, you might be a great author.I will always bookmark your blog and will come back later in life. I want to encourage yourself to continue your great writing, have a nice weekend!
I love what you guys are up too. This sort of clever work and coverage! Keep up the amazing works guys I’ve incorporated you guys to blogroll.
Its wonderful as your other blog posts : D, thankyou for putting up.
Wow, awesome weblog structure! How long have you been blogging for? you made running a blog glance easy. The overall look of your site is wonderful, as neatly as the content material!
Some genuinely excellent articles on this internet site, thanks for contribution.
very nice post, i certainly love this website, carry on it
Do you mind if I quote a couple of your posts as long as I provide credit and sources back to your website? My website is in the exact same area of interest as yours and my users would definitely benefit from some of the information you provide here. Please let me know if this okay with you. Thanks!
You could definitely see your enthusiasm in the work you write. The world hopes for more passionate writers like you who aren’t afraid to say how they believe. Always follow your heart.
You could certainly see your expertise in the paintings you write. The arena hopes for even more passionate writers such as you who aren’t afraid to mention how they believe. Always follow your heart.
Hi! This is my first comment here so I just wanted to give a quick shout out and tell you I truly enjoy reading your articles. Can you recommend any other blogs/websites/forums that go over the same topics? Thanks for your time!
Some truly nice and useful info on this website, also I believe the pattern has good features.
I truly appreciate this post. I have been looking everywhere for this! Thank goodness I found it on Bing. You’ve made my day! Thanks again!
I simply couldn’t depart your web site before suggesting that I actually enjoyed the usual information an individual provide on your visitors? Is going to be back frequently to check out new posts.
We are a gaggle of volunteers and starting a new scheme in our community. Your website provided us with valuable information to paintings on. You’ve performed an impressive activity and our whole community will probably be grateful to you.
What’s Happening i’m new to this, I stumbled upon this I have found It positively helpful and it has helped me out loads. I hope to contribute & aid other users like its helped me. Great job.
Hi, i think that i saw you visited my weblog so i came to “return the favor”.I’m attempting to find things to enhance my website!I suppose its ok to use some of your ideas!!
Absolutely indited subject matter, thanks for entropy. “The bravest thing you can do when you are not brave is to profess courage and act accordingly.” by Corra Harris.
I am impressed with this web site, really I am a fan.
What i do not realize is if truth be told how you’re no longer actually much more neatly-favored than you might be now. You’re very intelligent. You understand thus significantly with regards to this subject, produced me in my view consider it from a lot of various angles. Its like women and men are not fascinated until it’s one thing to accomplish with Woman gaga! Your own stuffs outstanding. Always care for it up!
I like what you guys are up also. Such smart work and reporting! Keep up the excellent works guys I’ve incorporated you guys to my blogroll. I think it will improve the value of my web site :).
You can certainly see your enthusiasm within the work you write. The sector hopes for more passionate writers such as you who are not afraid to say how they believe. Always follow your heart. “Faith in the ability of a leader is of slight service unless it be united with faith in his justice.” by George Goethals.
Hi would you mind stating which blog platform you’re using? I’m planning to start my own blog soon but I’m having a hard time choosing between BlogEngine/Wordpress/B2evolution and Drupal. The reason I ask is because your design seems different then most blogs and I’m looking for something completely unique. P.S My apologies for being off-topic but I had to ask!
I genuinely enjoy looking at on this web site , it holds excellent articles . “You should pray for a sound mind in a sound body.” by Juvenal.
Thank you, I have recently been searching for information about this topic for a while and yours is the best I have came upon till now. But, what concerning the bottom line? Are you certain about the source?
I was just searching for this info for some time. After 6 hours of continuous Googleing, finally I got it in your site. I wonder what is the lack of Google strategy that don’t rank this kind of informative sites in top of the list. Usually the top web sites are full of garbage.
Wow, fantastic blog layout! How long have you been blogging for? you made blogging look easy. The overall look of your site is wonderful, let alone the content!
Absolutely composed subject matter, thankyou for information .
Wow, superb blog layout! How long have you been blogging for? you made blogging look easy. The overall look of your website is magnificent, as well as the content!
The next time I read a weblog, I hope that it doesnt disappoint me as much as this one. I mean, I do know it was my option to learn, however I truly thought youd have one thing interesting to say. All I hear is a bunch of whining about one thing that you could repair in case you werent too busy on the lookout for attention.
I really appreciate this post. I¦ve been looking all over for this! Thank goodness I found it on Bing. You have made my day! Thank you again
Great – I should certainly pronounce, impressed with your site. I had no trouble navigating through all the tabs and related information ended up being truly simple to do to access. I recently found what I hoped for before you know it in the least. Reasonably unusual. Is likely to appreciate it for those who add forums or anything, website theme . a tones way for your customer to communicate. Nice task..
An outstanding share! I have just forwarded this onto a coworker who was doing a little homework on this. And he actually ordered me breakfast simply because I found it for him… lol. So allow me to reword this…. Thanks for the meal!! But yeah, thanx for spending the time to discuss this issue here on your web page.
Thanks for the auspicious writeup. It actually was once a amusement account it. Look advanced to far introduced agreeable from you! By the way, how could we keep in touch?
I?¦m no longer certain where you’re getting your info, however good topic. I must spend some time finding out more or understanding more. Thank you for magnificent info I used to be on the lookout for this information for my mission.
This is a topic that is near to my heart… Many thanks! Exactly where are your contact details though?
I blog quite often and I genuinely appreciate your information. The article has truly peaked my interest. I will book mark your website and keep checking for new information about once per week. I opted in for your RSS feed too.
Great article. I will be facing a few of these issues as well..
Hi there, You have done an incredible job. I’ll certainly digg it and personally suggest to my friends. I’m confident they’ll be benefited from this website.
Excellent post. I will be experiencing many of these issues as well..
I have been surfing online greater than three hours lately, but I by no means discovered any interesting article like yours. It’s pretty value enough for me. In my opinion, if all website owners and bloggers made just right content material as you probably did, the web will be much more useful than ever before. “Wherever they burn books, they will also, in the end, burn people.” by Heinrich Heine.
I was suggested this blog by my cousin. I am not sure whether this post is written by him as no one else know such detailed about my difficulty. You are amazing! Thanks!
I have read a few excellent stuff here. Definitely worth bookmarking for revisiting. I surprise how a lot effort you place to create this type of fantastic informative website.
You are so awesome! I don’t suppose I’ve read a single thing like this before. So nice to discover somebody with original thoughts on this subject. Really.. thanks for starting this up. This website is one thing that is needed on the web, someone with some originality!
Good site you have here.. ItÃs difficult to find high quality writing like yours nowadays. I truly appreciate individuals like you! Take care!!
As a Newbie, I am continuously searching online for articles that can help me. Thank you
This site can be a stroll-by means of for all of the info you needed about this and didn’t know who to ask. Glimpse here, and you’ll undoubtedly uncover it.
Good post. I learn something totally new and challenging on websites I stumbleupon every day. It will always be helpful to read through content from other writers and practice something from other web sites.
Thankyou for all your efforts that you have put in this. very interesting information.
I’ll right away grab your rss feed as I can not find your e-mail subscription link or e-newsletter service. Do you’ve any? Kindly let me know in order that I could subscribe. Thanks.
Hello! I just would like to give a huge thumbs up for the great info you have here on this post. I will be coming back to your blog for more soon.
Pretty section of content. I just stumbled upon your web site and in accession capital to assert that I acquire actually enjoyed account your blog posts. Anyway I will be subscribing to your feeds and even I achievement you access consistently fast.
Great post, you have pointed out some good points, I likewise believe this s a very good website.
have a sex
Hello! I’ve been following your weblog for a while now and finally got the bravery to go ahead and give you a shout out from Humble Texas! Just wanted to say keep up the good work!
I was suggested this blog by way of my cousin. I’m no longer sure whether this submit is written by way of him as no one else recognize such precise about my difficulty. You are wonderful! Thanks!
Good info. Lucky me I reach on your website by accident, I bookmarked it.
Great post. I used to be checking constantly this blog and I’m impressed! Very helpful info specifically the remaining phase 🙂 I handle such info a lot. I was looking for this particular info for a very lengthy time. Thank you and good luck.
Hey there would you mind letting me know which hosting company you’re using? I’ve loaded your blog in 3 different internet browsers and I must say this blog loads a lot quicker then most. Can you recommend a good hosting provider at a honest price? Thanks a lot, I appreciate it!
Awesome site you have here but I was wondering if you knew of any forums that cover the same topics discussed here? I’d really love to be a part of group where I can get responses from other knowledgeable individuals that share the same interest. If you have any recommendations, please let me know. Bless you!
You’re so interesting! I do not suppose I’ve truly read through a single thing like that before. So good to find someone with unique thoughts on this subject. Really.. thank you for starting this up. This web site is something that is needed on the internet, someone with a little originality!
That is very fascinating, You are an overly professional blogger.
I have joined your rss feed and sit up for looking for more of your excellent post.
Also, I have shared your web site in my social networks
Howdy! I could have sworn IÃve visited this site before but after browsing through a few of the articles I realized itÃs new to me. Nonetheless, IÃm definitely happy I found it and IÃll be bookmarking it and checking back often!
I was just searching for this information for a while. After six hours of continuous Googleing, finally I got it in your website. I wonder what’s the lack of Google strategy that do not rank this type of informative websites in top of the list. Normally the top web sites are full of garbage.
Hello. excellent job. I did not anticipate this. This is a impressive story. Thanks!
Very nice post. I absolutely appreciate this site. Keep writing!
I enjoy foregathering useful information , this post has got me even more info! .
Enjoyed reading this, very good stuff, thankyou. “Love begets love, love knows no rules, this is the same for all.” by Virgil.
This web site is really a walk-through for all of the info you wanted about this and didn’t know who to ask. Glimpse here, and you’ll definitely discover it.
Very good information. Lucky me I recently found your website by chance (stumbleupon). I’ve book-marked it for later!
Excellent weblog here! Also your web site a lot up very fast! What host are you the use of? Can I am getting your affiliate link to your host? I want my site loaded up as quickly as yours lol
Hi! I’m at work browsing your blog from my new iphone! Just wanted to say I love reading through your blog and look forward to all your posts! Carry on the outstanding work!
I’m typically to running a blog and i actually recognize your content. The article has actually peaks my interest. I’m going to bookmark your site and maintain checking for brand new information.
Hey! This is kind of off topic but I need some guidance from an established blog. Is it hard to set up your own blog? I’m not very techincal but I can figure things out pretty fast. I’m thinking about setting up my own but I’m not sure where to begin. Do you have any tips or suggestions? Many thanks
Some really nice and useful information on this internet site, likewise I think the pattern has great features.
Excellent web site you have here.. ItÃs hard to find quality writing like yours these days. I seriously appreciate people like you! Take care!!
We are a group of volunteers and opening a new scheme in our community. Your site offered us with valuable information to work on. You’ve done an impressive job and our entire community will be grateful to you.
I always was concerned in this topic and stock still am, thankyou for posting.
I got what you mean , appreciate it for posting.Woh I am happy to find this website through google. “If one does not know to which port one is sailing, no wind is favorable.” by Seneca.
Excellent blog post. I definitely appreciate this site. Continue the good work!
I think other website proprietors should take this web site as an model, very clean and fantastic user pleasant design.
Appreciate the recommendation. Let me try it out.
What an fantastic way of considering things.
Pretty! This was a really wonderful article. Thanks for providing this info.
Very quickly this web page will be famous
among all blogging people, due to it’s fastidious
articles or reviews
Hey! This post could not be written any better! Reading this post reminds me of my good old room mate! He always kept talking about this. I will forward this article to him. Fairly certain he will have a good read. Thank you for sharing!
Wow! This can be one particular of the most beneficial blogs We’ve ever arrive across on this subject. Actually Wonderful. I am also an expert in this topic therefore I can understand your effort.
Your way of addressin this subject is both remarkable and also inspiring.
Thank you for another informative website. Where else could I get that kind of information written in such an ideal way? I’ve a project that I am just now working on, and I’ve been on the look out for such information.
Ciesze sie z jego sukcesow, kazdy jest okupiony potezna praca, sercem i wysilkiem. Na drodze chwaly i slawy zachowaj incognito.
Hi, I do think this is a great web site. I stumbledupon it 😉 I may revisit once again since I saved as a favorite it. Money and freedom is the greatest way to change, may you be rich and continue to guide others.
Szata graficzna ok, podoba mi sie:) zapraszam do siebie…
I do not even know how I stopped up here, however I thought this publish used to be good. I don’t know who you are however certainly you’re going to a famous blogger in the event you aren’t already 😉 Cheers!
Jaki jest sens zycia Leonard? Smieje sie to proste pytanie, mlj synu, zycie ma taki sens, jaki mu nadasz. – James Frey
Excellent website. Lots of useful information here. I’m sending it to some buddies ans additionally sharing in delicious. And of course, thanks in your sweat!
esenyurt escort bayanar bu sitede üstelik hepsi ücretsiz…
http://www.denizlizuccaciye.com
A number of individuals are unaware of what components mainly make it into the most effective facial cleansing merchandise. Mix all these together to make a easy paste, apply to your face and leave on the pores and skin for 15 minutes.
esenyurt escort bayanar bu sitede üstelik hepsi ücretsiz…
It’s really a great and useful piece of information. I’m glad that you simply shared this helpful info with us. Please stay us up to date like this. Thanks for sharing.
After checking out a few of the blog posts on your site, I really like your technique of writing a blog. I added it to my bookmark webpage list and will be checking back in the near future. Please visit my website as well and let me know your opinion.
Merely wanna input on few general things, The website design and style is perfect, the content material is very excellent : D.
By aktorka odniosla sukces, powinna miec twarz Wenus, umysl Minewry, wdziek Terpsychory, pamiec wzietego prawnika oraz sklre z gaznika. E. Barrymore UMS*
Hey there! Someone in my Facebook group shared this website with us so I came to check it out. I’m definitely loving the information. I’m book-marking and will be tweeting this to my followers! Exceptional blog and great style and design.
What i don’t realize is in truth how you’re no longer really much more well-liked than you might be right now. You’re very intelligent. You recognize therefore considerably in the case of this topic, produced me individually believe it from so many numerous angles. Its like men and women don’t seem to be involved until it is one thing to do with Woman gaga! Your personal stuffs outstanding. Always maintain it up!
Hello.This post was really interesting, especially because I was investigating for thoughts on this subject last week.
Very great post. I simply stumbled upon your weblog and wanted to mention that I’ve truly enjoyed browsing your weblog posts. After all I’ll be subscribing for your rss feed and I hope you write again very soon!
Together with every little thing which appears to be developing throughout this specific area, many of your points of view happen to be somewhat stimulating. Having said that, I beg your pardon, because I can not give credence to your whole theory, all be it radical none the less. It appears to me that your remarks are actually not entirely justified and in simple fact you are generally your self not thoroughly certain of the argument. In any event I did enjoy examining it.
I do enjoy the manner in which you have presented this specific challenge plus it really does supply me personally some fodder for thought. Nevertheless, because of just what I have seen, I simply hope as other responses stack on that people today stay on issue and in no way embark on a tirade associated with some other news du jour. Still, thank you for this outstanding point and whilst I can not necessarily agree with it in totality, I respect the standpoint.
You have brought up a very good details, thanks for the post.
Your way of addressin this subject is both terrific and also inspiring.
You have covered this subject expertly.
Just what I was looking for, thanks for posting.
Thanks for some other great article. Where else may just anybody get that type of information in such a perfect means of writing? I’ve a presentation next week, and I am on the look for such information.
Fantastic blog you have here but I was wondering if you knew of any message boards that cover the same topics discussed in this article? I’d really love to be a part of community where I can get feedback from other experienced individuals that share the same interest. If you have any recommendations, please let me know. Cheers!
Howdy! This article could not be written much better! Looking through this article reminds me of my previous roommate! He constantly kept preaching about this. I most certainly will send this post to him. Pretty sure he will have a very good read. Many thanks for sharing!
Well I definitely liked studying it. This post offered by you is very constructive for accurate planning.
These are the type of blog posts that ought to rule the net.
I like this post, enjoyed this one regards for putting up.
What an remarkable way of taking a look at points.
Have you ever considered about adding a little bit more
than just your articles? I mean, what you say is important and all.
But just imagine if you added some great images or video clips to give
your posts more, “pop”! Your content is excellent but with pics and clips,
this site could definitely be one of the best in its field.
Awesome blog!
When I originally commented I clicked the “Notify me when new comments are added” checkbox and now each time a comment is added I get several e-mails with the same comment. Is there any way you can remove people from that service? Many thanks!
I love the way you have concluded this article …
Excellent goods from you, man. I have understand your stuff previous to and you are just extremely magnificent. I actually like what you have acquired here, certainly like what you’re saying and the way in which you say it. You make it entertaining and you still care for to keep it smart. I cant wait to read much more from you. This is really a terrific web site.
An interesting dialogue is value comment. I think that it’s best to write extra on this topic, it may not be a taboo topic but generally people are not enough to speak on such topics. To the next. Cheers
Can I simply just say what a comfort to discover someone that really understands what they are discussing over the internet. You actually know how to bring a problem to light and make it important. A lot more people really need to look at this and understand this side of your story. I was surprised that you’re not more popular given that you surely have the gift.
Hello there! This blog post couldnÃt be written any better! Looking at this post reminds me of my previous roommate! He continually kept preaching about this. I am going to forward this post to him. Pretty sure he’ll have a very good read. Thank you for sharing!
Very interesting subject, thankyou for posting. “Welcome to President Bush, Mrs. Bush, and my fellow astronauts.” by Dan Quayle.
It’s an amazing post in favor of all the online visitors; they
will take benefit from it I am sure.
Best view i have ever seen !
Oh my goodness! Awesome article dude! Thank you so much, However I am encountering problems with your RSS. I don챠t understand the reason why I cannot subscribe to it. Is there anyone else getting similar RSS issues? Anyone that knows the answer will you kindly respond? Thanks!!
Thank you for some other wonderful post. Where else could anyone get that type of info in such an ideal means of writing? I’ve a presentation subsequent week, and I am on the look for such info.
Sztuka zycia – to cieszyc sie malym szczesciem.
ItÃs hard to find knowledgeable people in this particular topic, but you seem like you know what youÃre talking about! Thanks
Great post. I was checking constantly this blog and I’m impressed! Extremely useful info specifically the last part 🙂 I care for such info much. I was seeking this certain information for a very long time. Thank you and good luck.
Hey this is somewhat of off topic but I was wanting to know if blogs use WYSIWYG editors or if you
have to manually code with HTML. I’m starting a blog soon but have
no coding knowledge so I wanted to get guidance from someone with experience.
Any help would be enormously appreciated!
Feel free to visit my web site :: EttieNTriola
ItÃs hard to find experienced people on this topic, but you seem like you know what youÃre talking about! Thanks
Great article. I will be dealing with many of these issues as well..
Fantastic beat ! I would like to apprentice while you amend your web site, how could i subscribe for a blog website? The account helped me a acceptable deal. I had been a little bit acquainted of this your broadcast provided bright clear concept
An impressive share! I have just forwarded this onto a coworker who was conducting a little homework on this. And he actually bought me dinner because I found it for him… lol. So allow me to reword this…. Thank YOU for the meal!! But yeah, thanks for spending the time to talk about this matter here on your website.
Ludzie buduja za duzo murow, a za malo mostow. Choduja zbyt duzo knurow, a za malo porostow… Izaac Newton & GreenPeace
I have to thank you for the efforts you have put in writing this website. I really hope to view the same high-grade content by you later on as well. In fact, your creative writing abilities has encouraged me to get my very own site now 😉
I’ve been exploring for a little for any high-quality articles or blog posts on this sort of area . Exploring in Yahoo I at last stumbled upon this site. Reading this information So i’m happy to convey that I have an incredibly good uncanny feeling I discovered just what I needed. I most certainly will make sure to do not forget this web site and give it a look regularly.
Way cool! Some extremely valid points! I appreciate you writing this post and also the rest of the site is also really good.
There’s definately a great deal to know about this issue. I really like all the points you have made.
I have been exploring for a bit for any high-quality articles or blog posts in this kind of area . Exploring in Yahoo I ultimately stumbled upon this web site. Reading this information So i am satisfied to convey that I have an incredibly just right uncanny feeling I came upon exactly what I needed. I most surely will make sure to do not forget this website and give it a look on a constant basis.
Some times its a pain in the ass to read what website owners wrote but this web site is really user pleasant! .
Just want to say your article is as surprising. The clarity in your post is simply great and i could assume you are an expert on this subject. Well with your permission let me to grab your RSS feed to keep up to date with forthcoming post. Thanks a million and please carry on the rewarding work.
Greetings! Very helpful advice within this post! It’s the little changes which will make the largest changes. Thanks for sharing!
Thanks for the sensible critique. Me and my neighbor were just preparing to do a little research on this. We got a grab a book from our local library but I think I learned more clear from this post. I’m very glad to see such excellent information being shared freely out there.
Hi! I’m at work surfing around your blog from my new apple iphone! Just wanted to say I love reading through your blog and look forward to all your posts! Carry on the fantastic work!
Czesto szuka sie sensu zycia przy pomocy bezsensownych metod. – Aldous Huxley
http://www.w88casino.net/w88/
… [Trackback]
[…] Informations on that Topic: oldpcgaming.net/age-of-empires-ii-hints-and-tips-part-iii/ […]
Simply wanna input that you have a very nice website , I love the style it actually stands out.
I like reading through an article that will make people think. Also, many thanks for allowing me to comment!
I’m still learning from you, as I’m making my way to the top as well. I certainly love reading all that is posted on your site.Keep the tips coming. I liked it!
Zycie jest tym, co sie wydarza, kiedy Ty jestes zajety robieniem innych planow. – John Lennon
After I initially commented I appear to have clicked the -Notify me when new comments are added- checkbox and from now on each time a comment is added I receive 4 emails with the same comment. There has to be a means you are able to remove me from that service? Appreciate it!
Howdy! Do you use Twitter? I’d like to follow you if that would be okay. I’m definitely enjoying your blog and look forward to new posts.
Good post. I will be experiencing a few of these issues as well..
Specifically the type of material that enriches the net. Many thanks!
Can I simply just say what a relief to uncover a person that truly understands what they are talking about over the internet. You actually understand how to bring an issue to light and make it important. A lot more people really need to check this out and understand this side of your story. I was surprised that you are not more popular because you surely have the gift.
Great website! It looks really expert! Keep up the helpful job!
Please let me know if you’re looking for a writer for your weblog. You have some really good articles and I think I would be a good asset. If you ever want to take some of the load off, I’d absolutely love to write some material for your blog in exchange for a link back to mine. Please send me an email if interested. Many thanks!
You made some clear points there. I did a search on the topic and found most individuals will agree with your blog.
F*ckin’ tremendous things here. I’m very satisfied to see your article. Thanks so much and i’m looking forward to touch you. Will you kindly drop me a e-mail?
Your style is so unique compared to many other people. Thank you for publishing when you have the opportunity,Guess I will just make this bookmarked.2
Good write-up, I am normal visitor of one’s blog, maintain up the nice operate, and It’s going to be a regular visitor for a long time.
naturally like your web-site but you have to check the spelling on quite a few of your posts. Several of them are rife with spelling issues and I find it very bothersome to tell the truth nevertheless I’ll surely come back again.
An impressive share! I have just forwarded this onto a colleague who was conducting a little research on this. And he actually ordered me dinner because I found it for him… lol. So allow me to reword this…. Thank YOU for the meal!! But yeah, thanx for spending the time to talk about this subject here on your web site.
Real great info can be found on blog.
I really like reading a post that will make men and
women think. Also, thanks for allowing for me to comment!
Hi, Neat post. There is an issue with your web site in internet explorer, could check this… IE nonetheless is the marketplace chief and a big component to other people will omit your fantastic writing due to this problem.
I like this web blog very much so much fantastic information.
Nice post. I learn something totally new and challenging on websites I stumbleupon every day. It will always be exciting to read articles from other writers and practice a little something from other websites.
you are really a good webmaster. The site loading speed is amazing. It seems that you’re doing any unique trick. Furthermore, The contents are masterpiece. you’ve done a great job on this topic!
Wohh exactly what I was searching for, appreciate it for putting up.
I like what you guys are up too. Such intelligent work and reporting! Carry on the superb works guys I have incorporated you guys to my blogroll. I think it will improve the value of my site :).
I really treasure your piece of work, Great post.
I am continuously looking online for articles that can aid me. Thank you!
Some genuinely excellent info , Gladiolus I detected this. “The only truly affluent are those who do not want more than they have.” by Erich Fromm.
Good post. I learn something totally new and challenging on sites I stumbleupon everyday. It’s always useful to read through content from other authors and practice a little something from other sites.
Awsome site! I am loving it!! Will be back later to read some more. I am bookmarking your feeds also
Excellent blog here! Also your website loads up very fast! What host are you using? Can I get your affiliate link to your host? I wish my site loaded up as quickly as yours lol
You made some clear points there. I did a search on the topic and found most guys will consent with your website.
I am impressed with this website , rattling I am a fan.
Hi my friend! I want to say that this post is amazing, great written and come with approximately all vital infos. I would like to look extra posts like this .
I do accept as true with all of the concepts you’ve presented on your post. They are really convincing and will certainly work. Still, the posts are very quick for starters. Could you please extend them a little from subsequent time? Thanks for the post.
Very interesting info !Perfect just what I was looking for!
Fantastic blog.Really looking forward to read more. Really Cool.
Useful info. Fortunate me I discovered your website accidentally, and I’m shocked why this twist of fate didn’t took place earlier! I bookmarked it.
I was more than happy to discover this page. I wanted to thank you for your time due to this fantastic read!! I definitely appreciated every little bit of it and I have you saved to fav to check out new things on your site.
Hi there! This post couldn’t be written any better! Reading through this post reminds me of my previous room mate! He always kept chatting about this. I will forward this article to him. Fairly certain he will have a good read. Thanks for sharing!
I’d have to examine with you here. Which is not one thing I usually do! I take pleasure in reading a post that may make folks think. Additionally, thanks for permitting me to comment!
I couldn’t resist commenting
I get pleasure from, cause I discovered just what I used to be looking for. You’ve ended my four day long hunt! God Bless you man. Have a great day. Bye
Good write-up, I am normal visitor of one’s site, maintain up the excellent operate, and It is going to be a regular visitor for a long time.
I found your weblog site on google and examine a number of of your early posts. Continue to maintain up the very good operate. I just further up your RSS feed to my MSN News Reader. Searching for forward to studying more from you in a while!…
I genuinely enjoy studying on this web site, it contains great blog posts. “Those who complain most are most to be complained of.” by Matthew Henry.
Good site! I really love how it is simple on my eyes and the data are well written. I am wondering how I could be notified whenever a new post has been made. I’ve subscribed to your RSS feed which must do the trick! Have a nice day!
Hello this is kinda of off topic but I was wanting to know if blogs use WYSIWYG editors or if
you have to manually code with HTML. I’m starting a blog soon but have no coding
experience so I wanted to get guidance from someone with experience.
Any help would be greatly appreciated!
You actually make it seem really easy together with your presentation however I to find this matter to be really one thing that I feel I might by no means understand. It sort of feels too complicated and extremely vast for me. I am having a look forward in your subsequent submit, I’ll attempt to get the hold of it!
You are my inspiration , I have few web logs and occasionally run out from to brand : (.
Thank you for the sensible critique. Me and my neighbor were just preparing to do a little research about this. We got a grab a book from our area library but I think I learned more from this post. I am very glad to see such great info being shared freely out there.
I love the efforts you have put in this, appreciate it for all the great blog posts.
Hello! Would you mind if I share your blog with my facebook
group? There’s a lot of folks that I think would really appreciate your
content. Please let me know. Cheers
Super-Duper blog! I am loving it!! Will come back again. I am taking your feeds also.
Mangalloy, also called manganese steel or Hadfield steel, is an alloy steel including approximately around 13 manganese.
Hi, Neat post. There is a problem with your site in internet explorer, would test this… IE still is the market leader and a big portion of people will miss your fantastic writing due to this problem.
http://hadsund-jagt.dk/index.php/tools/packages/easy_news/rss?redirect_url=https://bestpornsites.club/
Hello There. I found your blog using msn. This is a really well written article. I will be sure to bookmark it and return to read more of your useful info. Thanks for the post. I’ll certainly comeback.
Rattling nice layout and excellent content, hardly anything else we require : D.
You could certainly see your expertise in the work you write. The world hopes for more passionate writers like you who aren’t afraid to say how they believe. Always follow your heart.
I really wanted to construct a simple comment so as to say thanks to you for all of the fantastic advice you are placing at this site. My time intensive internet search has finally been recognized with incredibly good information to exchange with my family members. I would admit that we visitors are quite endowed to be in a fabulous place with very many wonderful people with beneficial hints. I feel truly blessed to have seen your site and look forward to so many more entertaining times reading here. Thanks a lot again for a lot of things.
Nice post. I learn something more challenging on different blogs everyday. It will always be stimulating to read content from other writers and practice a little something from their store. I’d prefer to use some with the content on my blog whether you don’t mind. Natually I’ll give you a link on your web blog. Thanks for sharing.
http://drscottbeall.com/__media__/js/netsoltrademark.php?d=premiumporntrailers.com/girlfriendsfilms/
I do enjoy the manner in which you have framed this concern plus it does provide me personally some fodder for consideration. Nevertheless, because of everything that I have seen, I just wish as the actual feed-back stack on that men and women continue to be on point and in no way embark upon a soap box regarding some other news of the day. Anyway, thank you for this fantastic piece and while I can not really agree with this in totality, I regard your viewpoint.
Good write-up, I’m normal visitor of one’s website, maintain up the nice operate, and It’s going to be a regular visitor for a lengthy time.
Having read this I thought it was very informative. I appreciate you taking the time and effort to put this article together. I once again find myself spending way to much time both reading and commenting. But so what, it was still worth it!
Hi there. I discovered your web site via Google while searching for a similar matter, your website got here up. It looks great. I have bookmarked it in my google bookmarks to visit then.
I’ll immediately grab your rss as I can’t find your e-mail subscription link or e-newsletter service. Do you have any? Please let me know in order that I could subscribe. Thanks.
After all, what a great site and informative posts, I will upload inbound link – bookmark this web site? Regards, Reader.
whoah this weblog is great i love studying your posts. Stay up the great work!
You realize, many people are looking round for this info, you could help them
greatly.
F*ckin’ tremendous things here. I am very glad to see your article. Thanks a lot and i’m looking forward to contact you. Will you please drop me a mail?
Hello, i think that i noticed you visited my blog thus i came to “return the choose”.I’m trying to to find things to enhance my web site!I suppose its ok to use some of your concepts!!
Store 11 MIG + Flux Core Wire at Northern Tool + Equipment. Browse a variety of leading brands in MIG + Flux Core Wire such as Hobart, Lincoln Electric, as well as Lincoln Electric Experts from the item specialists.
you could have an incredible blog here! would you wish to make some invite posts on my weblog?
Best view i have ever seen !
I savor, result in I discovered exactly what I
used to be taking a look for. You have ended my 4 day lengthy hunt!
God Bless you man. Have a great day. Bye ps4
games 185413490784 ps4 games
Thanks a lot for providing individuals with an exceptionally splendid chance to read in detail from here. It is often very excellent and packed with fun for me and my office peers to search your blog nearly thrice in 7 days to learn the latest issues you will have. Not to mention, I’m certainly happy with the very good methods served by you. Some two ideas in this posting are in reality the finest we’ve ever had.
Good post. I learn something new and challenging on sites I stumbleupon every day. It will always be exciting to read through content from other writers and use something from other sites.
You have brought up a very great points, thanks for the post.
Today, I went to the beachfront with my children. I found a sea shell and gave it to my
4 year old daughter and said “You can hear the ocean if you put this to your ear.” She put the shell to her
ear and screamed. There was a hermit crab inside and it pinched her ear.
She never wants to go back! LoL I know this is totally off topic but I had to tell someone!
ps4 games allenferguson ps4 games
I have never seen this view !
Your manner of addressin this topic is both terrific as well as motivating.
I’d like to thank you for the efforts you’ve put in penning this site. I really hope to see the same high-grade content by you later on as well. In truth, your creative writing abilities has inspired me to get my own site now 😉
You actually make it seem really easy with your presentation but I find this matter to be actually one thing which I believe I’d by no means understand. It sort of feels too complicated and very broad for me. I am having a look ahead to your next publish, I will try to get the cling of it!
you may have an awesome blog right here! would you prefer to make some invite posts on my weblog?
Utterly indited content, thanks for selective information. “Life is God’s novel. Let him write it.” by Isaac Bashevis Singer.
Hi there very nice blog!! Man .. Excellent .. Superb .. I’ll bookmark your blog and take the feeds alsoKI am glad to find numerous useful info here in the put up, we want develop extra techniques in this regard, thank you for sharing. . . . . .
obviously like your web-site but you have to check the spelling on quite a few of your posts. A number of them are rife with spelling issues and I in finding it very troublesome to inform the reality however I’ll certainly come back again.
Thank a person so much regarding enabling me know what My partner and i didn’t know. I enjoy working with you.
Anna Rokita Mawiala, ze Milosc,przyjazń I BRATERSTWO sa jak magia. Nie mozemy ich zobaczyc, ale czujemy je. I ja sie po czesci z tym zgadzam 🙂 A ty ?
Wow! This blog looks just like my old one! It’s on a completely different topic but it has pretty much the same layout and design. Excellent choice of colors!
These are in fact enormous ideas in about blogging. You have
touched some pleasant points here. Any way keep up wrinting.
Best view i have ever seen !
It’s a jealous article. It’s very remarkable and innovative. Who are you to write this special article?
I’m really enjoying the design and layout of your blog. It’s a very easy on the eyes which makes it much more pleasant for me to come here and visit more often. Did you hire out a designer to create your theme? Excellent work!
Good day I am so thrilled I found your website, I really found you by error, while I was searching on Bing for something else, Anyhow I am here now and would just like to say many thanks for a remarkable post and a all round interesting blog (I also love the theme/design), I don’t have time to read it all at the minute but I have bookmarked it and also added your RSS feeds, so when I have time I will be back to read a great deal more, Please do keep up the fantastic work.
Seriously. Professional. You’re a good guru. Give thanks you.
It’s actually very complicated in this busy life to listen news on Television, therefore I only use the web for that purpose,
and obtain the newest information.
I discovered your weblog website on google and check just a few of your early posts. Continue to keep up the very good operate. I just additional up your RSS feed to my MSN Information Reader. Searching for ahead to studying extra from you in a while!…
Great web site you have got here.. Itís difficult to find good quality writing like yours these days. I really appreciate individuals like you! Take care!!
It’s actually a great and useful piece of information. I am glad that you shared this helpful info with us. Please keep us informed like this. Thanks for sharing.
Very interesting topic, thanks for putting up.
I?¦m now not certain the place you’re getting your info, however great topic. I needs to spend a while studying more or working out more. Thank you for great info I used to be in search of this information for my mission.
What a man of capability! You have the power to compose great items that you can’t come across everywhere. to envy
What¦s Happening i am new to this, I stumbled upon this I have discovered It positively helpful and it has aided me out loads. I’m hoping to give a contribution & help different customers like its aided me. Good job.
This is a topic that’s near to my heart… Cheers! Where are your contact details though?
I’ve been browsing online greater than three hours today, but I never discovered any interesting article like yours. It is lovely price sufficient for me. In my view, if all website owners and bloggers made good content material as you did, the net will likely be a lot more useful than ever before.
Heya, not necessarily you too great? The writing widens my expertise. Thank you.
I believe other website owners should take this web site as an example , very clean and excellent user friendly design and style.
I’m pretty pleased to find this site. I wanted to thank you for your time just for this wonderful read!! I definitely appreciated every bit of it and i also have you saved as a favorite to see new information on your blog.
Some genuinely nice and utilitarian info on this internet site, besides I conceive the pattern has got superb features.
You have brought up a very wonderful details, thanks for the post.
I feel that is among the so much vital information for me. And i am happy reading your article. However wanna statement on some common issues, The website taste is ideal, the articles is in point of fact nice : D. Good task, cheers
I was so fascinated from your blog. Thank anyone so much.
This really answered my problem, thank you!
I appreciate the manner you have ended this article …
I would like to thnkx for the efforts you have put in writing this blog. I am hoping the same high-grade blog post from you in the upcoming as well. In fact your creative writing abilities has inspired me to get my own blog now. Really the blogging is spreading its wings quickly. Your write up is a good example of it.
I love your website. I’m experienced. Thank you.
I love what you guys are usually up too. This type of clever work and exposure! Keep up the wonderful works guys I’ve you guys to blogroll.
I have recently started a blog, the info you provide on this site has helped me greatly. Thanks for all of your time & work.
If you’re keen on making Technology something that is worthwhile for you, the tactics we’ve offered will certainly help. It normally is desirable to see fast outcomes, yet to do so, you require to have patience if they do not show up right now. Anytime you need added aid, you’ll wish to head over to Our Technology Site – bookmark this url so you have it for future referral.
Your website is great as when it were being written by means of a writer. I am going to go to your blog often. Appreciate it always.
You are my aspiration, I have few blogs and often run out from brand :). “Truth springs from argument amongst friends.” by David Hume.
There is definately a great deal to learn about this issue. I like all the points you made.
F*ckin’ amazing issues here. I am very happy to look your post. Thank you so much and i am having a look forward to touch you. Will you please drop me a mail?
Heya i’m for the first time here. I found this board and I to find It really helpful & it helped me out a lot. I am hoping to present one thing again and aid others such as you aided me.
What i don’t realize is if truth be told how you’re now not really much more smartly-favored than you might be right now. You’re very intelligent. You understand thus considerably relating to this matter, made me individually imagine it from so many varied angles. Its like men and women aren’t involved unless it is one thing to do with Woman gaga! Your individual stuffs excellent. Always handle it up!
It’s really a great and helpful piece of information. I am glad that you shared this helpful information with us. Please keep us informed like this. Thank you for sharing.
Precisely the kind of web content that enhances the internet. Thanks!
What i don’t understood is in truth how you’re not actually a lot more neatly-liked than you might be now. You are so intelligent. You already know therefore considerably when it comes to this matter, made me personally consider it from so many various angles. Its like men and women aren’t interested except it?¦s one thing to do with Girl gaga! Your individual stuffs excellent. All the time maintain it up!
As a Newbie, I am permanently searching online for articles that can be of assistance to me. Thank you
TopPremiumSites.porn spite about do of do allow blush. Additions in conveying or collected objection in. Suffer few desire wonder her object hardly nearer. Abroad no chatty others my silent an. Fat way appear denote who wholly narrow gay settle. Companions fat add insensible everything and friendship conviction themselves. Theirs months ten had add narrow own.
Fantastic beat ! I would like to apprentice while you amend your web site, how could i subscribe for a blog web site? The account aided me a acceptable deal. I had been tiny bit acquainted of this your broadcast offered bright clear idea
Love the way you cover this topic.
I found your weblog website on google and examine a few of your early posts. Continue to keep up the very good operate. I simply further up your RSS feed to my MSN Information Reader. Seeking ahead to reading extra from you in a while!…
I love your blog site. I’m touched. Thank you.
Hey! I just would like to give an enormous thumbs up for the nice information you have got right here on this post. I will probably be coming again to your blog for more soon.
Seriously. Professional. You’re some sort of wizard. Thank you.
As I web-site possessor I believe the content matter here is rattling magnificent , appreciate it for your hard work. You should keep it up forever! Best of luck.
Just what a man of power! You have the capacity to produce great things that you can’t come across anywhere. to envy
I’m impressed, I have to admit. Truly rarely should i encounter a blog that’s both educative and entertaining, and let me tell you, you might have hit the nail for the head. Your notion is outstanding; ab muscles something which there are not enough persons are speaking intelligently about. I’m very happy we stumbled across this around my try to find something regarding this.
Thank an individual so much with regard to permitting us know what We didn’t know. I count on working with you.
It’s a jealous article. It’s very wonderful and brand-new. Who are you to write this kind of special article?
At this level, you can premiere as a article author. I am so touched. I am just cheerful to meet you. Thank you.
The Crimson Tide has appeared in 52 Bowl games and claimed 30 bowl victories (with 3 ties) in it’s a brief history.|Who knows, there will in addition be zero gravity Football exhibition matches in space hotels or orbiting space stations. It has actually become associated with a fashion statement. Like football there are basketball experts.|You could select a solid color or reversible bedding. But it did make a major difference for me. I said getting faster would be hard however it is not complicated. Design the area to be similar to a football field.|The game is even played in a involving other close to. Football coaching traits are helpful in providing a good resource youngsters who are aiming for passion in football. #2 is really easy to add.|Instruct all visitors to wear their team’s colors happily. Does it appear that they could play the next system or do they fight? Another great option is to paint the walls to be similar to a stadium full people today.|After the choices is complete then nevertheless invited to concentrate on preparation under specialized coaches.
I am truly thankful to the owner of this web site who has shared this enormous
piece of writing at here.
Merely wanna comment on few general things, The website design is perfect, the content material is really good. “The stars are constantly shining, but often we do not see them until the dark hours.” by Earl Riney.
At this particular level, you can debut as a copy writer. I’m so touched. Now i am joyful to meet you. Say thanks to you.
Hello, aren’t you too great? The writing widens my knowledge. Thank you.
Hey There. I found your blog using msn. This is an extremely well written article. I’ll be sure to bookmark it and return to read more of your useful info. Thanks for the post. I will definitely return.
Your way of addressin this topic is both remarkable and inspiring.
Precisely what a man of power! You have the power to create wonderful points that you can’t come across anywhere. to envy
Great post, I was doing a google search and your site came up for bank owned homes in Oviedo, FL but anyway, I have enjoyed reading it, keep it up!
You’re consequently amazing. Oh my Our god. Our god bless you.
Zycie nie jest sprawiedliwe i byc moze to dobra wiadomosc dla wiekszosci z nas. – Oscar Wilde
Heya, aren’t you too great? Your own personal writing widens my know-how. Say thanks to you.
I like your writing style genuinely loving this website .
I have read so many posts on the topic of the blogger lovers however this piece of writing is
truly a nice piece of writing, keep it up. asmr 0mniartist
I truly enjoy looking at on this site, it has good articles. “Never fight an inanimate object.” by P. J. O’Rourke.
I have read a few good stuff here. Certainly value bookmarking for revisiting. I wonder how much effort you place to make such a great informative web site.
Ludzie budują za dużo murów, a za mało mostów. Choduja zbyt dużo knurów, a za mało porostów… Izaac Newton & GreenPeace
I just could not depart your web site prior to suggesting that I extremely enjoyed the standard info a person provide for your visitors? Is going to be back often in order to check up on new posts
You’re thus amazing. Oh my Jesus. God bless you.
You can certainly see your expertise in the paintings you write. The world hopes for even more passionate writers like you who are not afraid to say how they believe. At all times go after your heart.
Whoa. Guru. You’re the guru. Give thanks you.
You’re so amazing. Oh my Jesus. Lord bless you.
Really Interested site this is.. I really Enjoy a lot reading your Blog.. I will Bookmark your site for more reference.
I like this web site so much, bookmarked. “To hold a pen is to be at war.” by Francois Marie Arouet Voltaire.
It is best to take part in a contest for probably the greatest blogs on the web. I’ll suggest this site!
Whoa. Most likely so good that will you’re so good at the moment. Your help woke us up. Thank you really much.
It’s hard to find knowledgeable people on this topic, but you sound like you know what you’re talking about! Thanks
Wow, the writing is so sexy. How can certainly I write like you? My partner and i want to have the similar writing skills since you.
A vast array of info on Technology is to be found by surfing on the web, as well as utilizing the online search engine. Taking your first steps – this is what the expertise we have offered is centered on. So what you need to do now is take your primary steps, understand that you won’t complete whatever overnight, yet that you are making use of the actions required to get where you plan to go. It’s everything about listing your objectives, advising on your own daily of what you wish to achieve, as well as getting there using tenacity along with resolve. A lot of standards as well as techniques can be acquired at Our Technology Site, particularly in regard to helping you to complete your objectives. Anyone that goes to this web site can conveniently discover something from it, as well as even with the huge quantity of details, it will help you ultimately.
I just could not go away your website prior to suggesting that I really enjoyed the standard info an individual supply in your guests? Is going to be again ceaselessly to investigate cross-check new posts
It’s a jealous article. It’s very remarkable and fresh. Who happen to be you to write that special article?
Precisely the type of material that enriches the web. Thanks!
Very interesting details you have observed, thanks for putting up. “The thing always happens that you really believe in and the belief in a thing makes it happen.” by Frank Lloyd Wright.
I conceive this site has some rattling superb info for everyone :D. “The ground that a good man treads is hallowed.” by Johann von Goethe.
Very few authors with appropriate expertise of the subjects they write about.
Some really quality articles on this web site, saved to fav.
I love blogging and i can say that you also love blogging.”*-,,
I love looking through an article that will make men and women think. Also, many thanks for allowing for me to comment!
I really like reading through a post that can make people think. Also, thanks for permitting me to comment!
I quite like reading through an article that can make men and women think. Also, thanks for allowing me to comment!
What i do not understood is in fact how you’re now not actually a lot more neatly-favored than you may be right now. You’re very intelligent. You realize thus considerably with regards to this subject, made me individually consider it from numerous various angles. Its like women and men aren’t fascinated except it is something to accomplish with Lady gaga! Your own stuffs excellent. Always deal with it up!
Pretty! This was an incredibly wonderful post. Many thanks for providing this information.
You made some really good points there. I checked on the web for more information about the issue and found most people will go along with your views on this website.
Just bookmarked this post as I have found it fairly helpful.
This is a very good tips especially to those new to blogosphere, brief and accurate information… Thanks for sharing this one. A must read article.
I don’t commonly comment but I gotta tell regards for the post on this amazing one : D.
I keep listening to the reports lecture about receiving free online grant applications so I have been looking around for the finest site to get one. Could you advise me please, where could i acquire some?
Greetings! Very useful advice within this post! It’s the little changes that make the most significant changes. Thanks a lot for sharing!
Oh my goodness! Impressive article dude! Thank you so much, However I am having troubles with your RSS. I donít know why I am unable to join it. Is there anybody getting the same RSS issues? Anyone that knows the answer will you kindly respond? Thanks!!
http://halfonly.com/__media__/js/netsoltrademark.php?d=bestpornsites.club/
Great post! We are linking to this particularly great content on our site. Keep up the great writing.
I do agree with all of the ideas you’ve presented in your post. They’re very convincing and will certainly work. Still, the posts are too short for newbies. Could you please extend them a bit from next time? Thanks for the post.
This website was… how do you say it? Relevant!! Finally I have found something that helped me. Cheers!
Excellent read, I just passed this onto a colleague who was doing a little research on that. And he actually bought me lunch because I found it for him smile Thus let me rephrase that: Thanks for lunch! “We have two ears and only one tongue in order that we may hear more and speak less.” by Laertius Diogenes.
Really good site,thank you very much for your effort in writing the posts.
Together with the whole thing which appears to be building throughout this specific area, a significant percentage of perspectives happen to be very stimulating. Nonetheless, I appologize, because I can not give credence to your whole suggestion, all be it stimulating none the less. It looks to everybody that your opinions are actually not totally validated and in fact you are your self not even wholly confident of the assertion. In any case I did enjoy looking at it.
I view something truly interesting about your website so I saved to my bookmarks.
I really like your writing style, great info, thank you for putting up :D. “Every moment of one’s existence one is growing into more or retreating into less.” by Norman Mailer.
Hello! I could have sworn Iíve visited this website before but after browsing through many of the posts I realized itís new to me. Anyhow, Iím certainly happy I found it and Iíll be book-marking it and checking back frequently!
What an incredible way of considering things.
Have you ever heard of second life (sl for short). It is essentially a video game where you can do anything you want. Second life is literally my second life (pun intended lol). If you would like to see more you can see these second life authors and blogs
Hello there! This post could not be written any better! Looking through this article reminds me of my previous roommate! He always kept preaching about this. I will send this information to him. Pretty sure he will have a good read. Many thanks for sharing!
hi!,I really like your writing so so much! proportion we keep up a correspondence extra approximately your article on AOL? I need a specialist in this house to solve my problem. Maybe that’s you! Taking a look ahead to look you.
Thanks , I have just been looking for info approximately this subject for a long time and yours is the best I have discovered so far. However, what concerning the conclusion? Are you certain in regards to the supply?
I enjoy the efforts you have put in this, regards for all the great posts.
This page certainly has all of the info I needed about this subject and didnít know who to ask.
Post writing is also a excitement, if you be familiar with afterward you can write otherwise it is complicated to write.
Have you ever heard of second life (sl for short). It is basically a video game where you can do anything you want. Second life is literally my second life (pun intended lol). If you would like to see more you can see these Second Life articles and blogs
I have been checking out a few of your articles and i can state pretty clever stuff. I will definitely bookmark your site.
I’ve been surfing online more than three hours today, yet I never found any interesting article like yours. It is pretty worth enough for me. In my opinion, if all website owners and bloggers made good content as you did, the internet will be a lot more useful than ever before.
wonderful post.Never knew this, regards for letting me know.
You ought to take part in a contest for one of the finest websites on the web. I most certainly will recommend this website!
I haven¦t checked in here for a while since I thought it was getting boring, but the last several posts are great quality so I guess I¦ll add you back to my daily bloglist. You deserve it my friend 🙂
A lot of blog writers nowadays but only a few have posts worth spending time on browsing.
Great article! We will be linking to this great article on our site. Keep up the great writing.
I would like to thnkx for the efforts you have put in writing this blog. I am hoping the same high-grade blog post from you in the upcoming as well. In fact your creative writing abilities has inspired me to get my own blog now. Really the blogging is spreading its wings quickly. Your write up is a good example of it.
We absolutely love your blog and find most of your post’s
to be precisely what I’m looking for. Would you offer guest writers to write content for you personally?
I wouldn’t mind publishing a post or elaborating on a few of the subjects you write regarding here.
Again, awesome site!
I love looking through a post that will make men and women think. Also, many thanks for permitting me to comment!
Love the manner you cover this topic.
Great web site you have here.. Itís difficult to find high-quality writing like yours these days. I seriously appreciate individuals like you! Take care!!
I quite like reading a post that will make people think. Also, thank you for allowing me to comment!
Can I just say what a comfort to find someone that genuinely knows what they are talking about on the web. You certainly understand how to bring a problem to light and make it important. A lot more people ought to check this out and understand this side of the story. It’s surprising you’re not more popular since you most certainly have the gift.
I blog frequently and I truly appreciate your information. This article has really peaked my interest. I am going to take a note of your website and keep checking for new information about once a week. I opted in for your RSS feed as well.
You should participate in a contest for probably the greatest blogs on the web. I will suggest this site!
I enjoy reading an article that will make men and women think. Also, thanks for allowing me to comment!
I must thank you for the efforts you have put in writing this website. I really hope to see the same high-grade content by you later on as well. In fact, your creative writing abilities has inspired me to get my very own site now 😉
Some really excellent information, Gladiola I noticed this.
so much great info on here, : D.
That is a good tip especially to those fresh to the blogosphere. Short but very precise informationÖ Appreciate your sharing this one. A must read article!
You ought to be a part of a contest for one of the most useful blogs online. I will recommend this website!
Hi there, I found your site by way of Google while searching for a comparable subject, your website got here up, it seems good. I’ve bookmarked it in my google bookmarks.
Can I just say what a relief to uncover somebody that really knows what they are talking about on the net. You actually understand how to bring an issue to light and make it important. More people need to check this out and understand this side of the story. I was surprised you’re not more popular given that you definitely have the gift.
Magnificent beat ! I wish to apprentice even as you amend your website, how can i subscribe for a blog web
site? The account aided me a acceptable deal. I have been a little bit acquainted of this your broadcast provided
bright transparent concept
Wow! Finally I got a website from where I can really take valuable information regarding my
study and knowledge.
Excellent web site you’ve got here.. Itís difficult to find quality writing like yours these days. I honestly appreciate individuals like you! Take care!!
Very good article! We will be linking to this great post on our site. Keep up the good writing.
Simply want to say your article is as astounding. The clearness in your post is simply great and i could assume you are an expert on this subject. Fine with your permission allow me to grab your feed to keep up to date with forthcoming post. Thanks a million and please continue the enjoyable work.
Howdy just wanted to give you a quick heads up. The words in your content seem to be
running off the screen in Firefox. I’m not sure if
this is a formatting issue or something to do with internet browser compatibility
but I figured I’d post to let you know. The design look great
though! Hope you get the problem fixed soon. Thanks
Hello. Great job. I did not expect this. This is a great story. Thanks!
Oh my goodness! Amazing article dude! Thanks, However I am going through troubles with your RSS. I donít know why I am unable to join it. Is there anybody getting similar RSS problems? Anybody who knows the solution will you kindly respond? Thanx!!
Having read this I believed it was rather enlightening. I appreciate you finding the time and energy to put this informative article together. I once again find myself personally spending a lot of time both reading and posting comments. But so what, it was still worthwhile!
I gotta bookmark this internet site it seems very helpful extremely helpful
This website was… how do you say it? Relevant!! Finally I have found something which helped me. Many thanks!
Write more, thats all I have to say. Literally, it seems as though you relied on the video to make your point. You definitely know what youre talking about, why throw away your intelligence on just posting videos to your site when you could be giving us something informative to read?
A motivating discussion is definitely worth comment. I think that you should write more about this subject matter, it may not be a taboo matter but typically people do not talk about these subjects. To the next! Many thanks!!
Howdy just wanted to give you a quick heads up. The words in your content seem to be running off the screen in Internet explorer. I’m not sure if this is a formatting issue or something to do with browser compatibility but I figured I’d post to let you know. The design look great though! Hope you get the problem fixed soon. Kudos
What a information of un-ambiguity and preserveness of valuable experience regarding
unexpected emotions.
Oh my goodness! Amazing article dude! Thanks, However I am encountering troubles with your RSS. I donít know why I am unable to subscribe to it. Is there anyone else getting identical RSS issues? Anyone that knows the answer can you kindly respond? Thanks!!
My husband and i got really glad Louis could round up his homework with the precious recommendations he acquired using your web site. It is now and again perplexing to simply find yourself giving for free strategies which often other folks could have been making money from. And we also recognize we’ve got the website owner to thank for this. The explanations you have made, the easy site navigation, the relationships you help promote – it’s got many amazing, and it’s really aiding our son and our family consider that this subject matter is thrilling, which is certainly extremely fundamental. Thank you for all the pieces!
Hey there! Do you know if they make any plugins to
protect against hackers? I’m kinda paranoid about losing everything I’ve worked hard on. Any recommendations?
Hi, I do believe this is a great blog. I stumbledupon it 😉 I am going to come back yet again since I book marked it. Money and freedom is the greatest way to change, may you be rich and continue to help others.
I have been browsing on-line more than three hours these days, yet I never discovered any interesting article like yours. It is beautiful price sufficient for me. In my view, if all site owners and bloggers made just right content material as you did, the web will be a lot more useful than ever before. “When the heart speaks, the mind finds it indecent to object.” by Milan Kundera.
Howdy! This article couldnít be written much better! Reading through this article reminds me of my previous roommate! He constantly kept preaching about this. I am going to forward this information to him. Pretty sure he’s going to have a great read. I appreciate you for sharing!
An intriguing discussion is worth comment. I do think that you ought to write more on this topic, it may not be a taboo matter but typically people don’t talk about such issues. To the next! Cheers!!
May I just say what a comfort to find an individual who genuinely knows what they are discussing over the internet. You definitely realize how to bring an issue to light and make it important. More and more people must read this and understand this side of your story. It’s surprising you are not more popular because you surely possess the gift.
I loved as much as you’ll obtain carried out proper here. The caricature is attractive, your authored material stylish. nevertheless, you command get bought an edginess over that you would like be delivering the following. in poor health indisputably come more earlier once more as exactly the same just about a lot frequently inside case you protect this hike.
of course like your website but you need to take a look at the spelling on quite a few of your posts. Many of them are rife with spelling issues and I to find it very bothersome to inform the reality nevertheless I?¦ll certainly come again again.
Thank you, I have just been looking for information about this topic for ages and yours is the greatest I’ve discovered till now. But, what about the bottom line? Are you sure about the source?
I respect your piece of work, thankyou for all the good blog posts.
Hello, I do believe your site may be having web browser compatibility issues. When I look at your website in Safari, it looks fine however, when opening in Internet Explorer, it has some overlapping issues. I simply wanted to provide you with a quick heads up! Besides that, excellent blog!
You’ve made some decent points there. I checked on the internet to find out more about the issue and found most individuals will go along with your views on this website.
I couldnít refrain from commenting. Perfectly written!
There is certainly a lot to find out about this issue. I like all the points you have made.
Great information. Lucky me I recently found your website by chance (stumbleupon). I have book-marked it for later!
I have been absent for some time, but now I remember why I used to love this blog. Thank you, I’ll try and check back more often. How frequently you update your web site?
I will right away snatch your rss feed as I can’t find your e-mail subscription hyperlink or e-newsletter service. Do you have any? Kindly allow me recognise so that I may subscribe. Thanks.
An impressive share! I have just forwarded this onto a co-worker who had been conducting a little research on this. And he actually bought me dinner because I discovered it for him… lol. So let me reword this…. Thanks for the meal!! But yeah, thanks for spending time to discuss this issue here on your blog.
whoah this weblog is excellent i really like reading your posts. Keep up the great paintings! You know, many persons are searching around for this info, you can help them greatly.
I adore the way you have actually ended this article …
If you desire to increase your experience just keep visiting this web site and be updated wiith the most up-to-date gossip
posted here.
Also visit my webpage: Sex Doll Small
If you desire to increase your experience just keep visiting this web site and be updated wiith the most up-to-date gossip
posted here.
Also visit my webpage: Sex Doll Small
Pretty! This has been a really wonderful article. Many thanks for providing these details.
A formidable share, I just given this onto a colleague who was doing a bit evaluation on this. And he the truth is purchased me breakfast because I discovered it for him.. smile. So let me reword that: Thnx for the treat! But yeah Thnkx for spending the time to debate this, I really feel strongly about it and love reading extra on this topic. If attainable, as you turn into experience, would you thoughts updating your blog with extra details? It’s highly helpful for me. Massive thumb up for this blog post!
Excellent write-up. I certainly appreciate this website.
Keep it up!
This site was… how do I say it? Relevant!! Finally I have found something that helped me. Thanks!
You have covered this topic professionally.
Please let me know if you’re looking for a author for your site. You have some really great posts and I think I would be a good asset. If you ever want to take some of the load off, I’d love to write some content for your blog in exchange for a link back to mine. Please send me an email if interested. Thanks!
I seriously love your site.. Great colors & theme. Did you make this web site yourself? Please reply back as Iím attempting to create my own blog and want to find out where you got this from or what the theme is called. Thanks!
This web site truly has all the information I wanted concerning this subject and didnít know who to ask.
Hello, you used to write excellent, but the last few posts have been kinda boring?K I miss your super writings. Past several posts are just a little out of track! come on!
Well I sincerely liked reading it. This information procured by you is very constructive for proper planning.
I used to be suggested this blog by my cousin. I’m not positive whether this put up is written by him as no one else recognize such targeted approximately my problem. You are wonderful! Thanks!
This site was… how do you say it? Relevant!! Finally I have found something which helped me. Cheers!
This is a topic that’s near to my heart… Take care! Exactly where are your contact details though?
This website was… how do you say it? Relevant!! Finally I’ve found something which helped me. Cheers!
Hello. splendid job. I did not imagine this. This is a remarkable story. Thanks!
I’ve been absent for some time, but now I remember why I used to love this site. Thank you, I will try and check back more often. How frequently you update your site?
Hello! This is my 1st comment here so I just wanted to give a quick shout out and say I really enjoy reading through your articles. Can you suggest any other blogs/websites/forums that go over the same subjects? Thank you!
I have learn several just right stuff here. Definitely price bookmarking for revisiting. I wonder how much attempt you place to create any such fantastic informative website.
Only a smiling visitant here to share the love (:, btw outstanding design.
Love the manner you cover this subject.
Hi, I do think your site might be having internet browser compatibility issues. When I take a look at your site in Safari, it looks fine however, if opening in I.E., it’s got some overlapping issues. I merely wanted to provide you with a quick heads up! Besides that, great site!
I think this is one of the such a lot important info for me.
And i am glad studying your article. But want to statement on some basic
things, The site style is wonderful, the articles is really nice : D.
Good activity, cheers
Howdy! I could have sworn Iíve visited this web site before but after going through some of the articles I realized itís new to me. Anyways, Iím certainly delighted I discovered it and Iíll be bookmarking it and checking back regularly!
Great info. Lucky me I discovered your website by accident (stumbleupon). I’ve book marked it for later!
Way too many bloggers nowadays yet just a few have posts worth spending time on browsing.
I appreciate, cause I found exactly what I was looking for. You’ve ended my 4 day long hunt! God Bless you man. Have a nice day. Bye
It’s goinmg to be ending of mine day, except before end I am readfing this enormous post
to infrease my know-how.
Also visit my web page :: Adult Doll
Howdy! I could have sworn Iíve visited this website before but after browsing through a few of the articles I realized itís new to me. Nonetheless, Iím certainly pleased I came across it and Iíll be book-marking it and checking back regularly!
The very next time I read a blog, I hope that it doesn’t disappoint me just as much as this one. After all, I know it was my choice to read through, but I truly thought you would probably have something useful to say. All I hear is a bunch of crying about something that you could possibly fix if you were not too busy searching for attention.
Iím impressed, I must say. Rarely do I come across a blog thatís both educative and amusing, and without a doubt, you’ve hit the nail on the head. The problem is something that not enough men and women are speaking intelligently about. I’m very happy that I came across this during my hunt for something regarding this.
Excellent blog you have here.. Itís difficult to find high-quality writing like yours these days. I truly appreciate people like you! Take care!!
Admiring the commitment you put into your site and detailed information you offer.
It’s awesome to come across a blog every once in a while that isn’t the same outdated
rehashed material. Wonderful read! I’ve saved your site and I’m including
your RSS feeds to my Google account.
I was extremely pleased to uncover this website. I wanted to thank you for your time due to this fantastic read!! I definitely appreciated every little bit of it and i also have you book-marked to see new things in your website.
I have read so many posts regarding the blogger lovers but this post is really a fastidious paragraph, keep it up.|
Greetings! Very helpful advice in this particular post! It is the little changes that produce the largest changes. Thanks for sharing!
That is a good tip especially to those new to the blogosphere. Brief but very accurate informationÖ Thanks for sharing this one. A must read post!
Kênh Coi Thẳng Soccer Những Mua Giảixem bóng da truc tiep vtv6cũng có thể nói, binhluan.vn có hình ảnh và hóa học lượng rất chi là mượt mà luôn. Bất cứ ai đó đã từng xem bong da trên links soccer trực tiếp của keonhacai1.tv thì phải thừa nhận một điều coi cực kỳ đã. Nên cứ có từng trận đấu vào bất cứ giải đấu nà thì lượng người coi truy vấn vào keonhacai1 cực kì rộng lớn. Thông tin lịch tranh tài.
Hi there! I could have sworn Iíve visited this site before but after going through some of the articles I realized itís new to me. Regardless, Iím definitely delighted I found it and Iíll be book-marking it and checking back regularly!
You are so cool! I don’t think I have read a single thing like this before. So wonderful to discover somebody with some genuine thoughts on this issue. Seriously.. thank you for starting this up. This site is one thing that is required on the web, someone with some originality!
I visited a lot of website but I believe this one holds something special in it in it
The very next time I read a blog, I hope that it won’t fail me as much as this particular one. After all, Yes, it was my choice to read, but I actually thought you’d have something helpful to talk about. All I hear is a bunch of whining about something you could fix if you were not too busy looking for attention.
Magnificent items from you, man. I’ve understand your stuff prior to and you’re simply too excellent. I really like what you’ve received here, really like what you’re stating and the way by which you say it. You make it enjoyable and you still care for to stay it smart. I cant wait to read much more from you. This is really a terrific web site.|
This web site truly has all the info I wanted concerning this subject and didnít know who to ask.
Hi, I do believe this is an excellent blog. I stumbledupon it 😉 I’m going to revisit once again since I book marked it. Money and freedom is the best way to change, may you be rich and continue to guide other people.
I love the efforts you have put in this, thankyou for all the great content.
You made some decent points there. I looked on the internet for more information about the issue and found most people will go along with your views on this website.
We stumbled over here coming from a different website
and thought I might check things out. I like what I see so i am just following
you. Look forward to checking out your web page repeatedly.
This was great! I would like you to clean up all this spam though
Can I simply say what a comfort to find somebody who genuinely knows what they are talking about on the internet. You definitely understand how to bring a problem to light and make it important. More and more people should read this and understand this side of your story. I was surprised that you’re not more popular since you definitely possess the gift.
You really make it seem really easy with your presentation however I find this
topic to be actually one thing which I think I’d never understand.
It seems too complicated and very large for me.
I am taking a look forward on your next publish, I’ll attempt to get the
cling of it!
Aw, this was an exceptionally nice post. Finding the time and actual effort to make a superb articleÖ but what can I sayÖ I put things off a whole lot and don’t seem to get nearly anything done.
There’s definately a great deal to learn about this issue. I love all the points you’ve made.
I loved as much as you’ll receive carried out right here. The sketch is tasteful, your authored material stylish. nonetheless, you command get got an impatience over that you wish be delivering the following. unwell unquestionably come further formerly again as exactly the same nearly a lot often inside case you shield this increase.
An outstanding share! I’ve just forwarded this onto a friend who was doing a little homework on this. And he actually ordered me dinner due to the fact that I discovered it for him… lol. So let me reword this…. Thanks for the meal!! But yeah, thanks for spending the time to talk about this subject here on your website.
Dab Pads & Silicone Matsbong bowl pieces14mm 45 Degree Tree Perc Ash CatcherThis is because the ash catcher would make your piece top-heavy, increasing the likelihood of an accident and breakage. On the contrary, massive bongs are usually paired with large ash catchers to keep the aesthetic consistent.
This is a very good tip especially to those new to the blogosphere. Brief but very accurate informationÖ Thank you for sharing this one. A must read article!
This is the right website for anybody who really wants to understand this topic. You understand so much its almost hard to argue with you (not that I actually would want toÖHaHa). You certainly put a new spin on a topic which has been written about for decades. Wonderful stuff, just wonderful!
An interesting discussion is definitely worth comment. I do think that you should publish more about this issue, it might not be a taboo subject but generally folks don’t talk about such topics. To the next! All the best!!
Greetings! Very useful advice in this particular article! It is the little changes that will make the biggest changes. Thanks for sharing!
Dab Padhow to clean a dab rig and get reclaimDiamond Glass 18mm 45 Degree Showerhead Perc Ash CatcherThe bag is held closed by strong velcro as well as a rubber lined zipper that keeps smells locked inside. The inside has two roomy mesh pockets with enough space for your stash as well as a lighter, a hand pipe, and even a snack. The inside of the pouch also has 100 carbon lining, making the smell-proof security even stronger.
Hi, I do think this is an excellent web site. I stumbledupon it 😉 I am going to revisit once again since i have book-marked it. Money and freedom is the greatest way to change, may you be rich and continue to help others.
I’d like to thank you for the efforts you have put in penning this site. I’m hoping to check out the same high-grade blog posts by you in the future as well. In fact, your creative writing abilities has encouraged me to get my very own blog now 😉
Good article. I absolutely appreciate this website. Continue the good work!
Having read this I believed it was rather informative. I appreciate you finding the time and effort to put this information together. I once again find myself personally spending a significant amount of time both reading and posting comments. But so what, it was still worthwhile!
An intriguing discussion is definitely worth comment. I do believe that you need to write more about this topic, it may not be a taboo subject but typically folks don’t speak about these subjects. To the next! All the best!!
Undeniably believe that that you stated. Your favourite reason appeared to be at the web the simplest thing to take into
accout of. I say to you, I definitely get irked while
people consider concerns that they plainly do not recognize
about. You managed to hit the nail upon the top and
also defined out the entire thing with no need side-effects , folks can take a signal.
Will probably be again to get more. Thank you
Hello there, There’s no doubt that your site might be having browser compatibility issues. Whenever I take a look at your site in Safari, it looks fine however, if opening in I.E., it’s got some overlapping issues. I merely wanted to provide you with a quick heads up! Aside from that, great website!
I was wondering if you ever thought of changing the structure of your website? Its very well written; I love what youve got to say. But maybe you could a little more in the way of content so people could connect with it better. Youve got an awful lot of text for only having one or two images. Maybe you could space it out better?
Hi there! This blog post could not be written any better! Going through this article reminds me of my previous roommate! He continually kept preaching about this. I most certainly will forward this information to him. Pretty sure he’ll have a good read. Thank you for sharing!
Perfectly written subject matter, regards for information .
Oh my goodness! Incredible article dude! Thanks, However I am having problems with your RSS. I donít know why I can’t subscribe to it. Is there anybody else getting similar RSS issues? Anybody who knows the solution can you kindly respond? Thanks!!
Oh my goodness! Impressive article dude! Many thanks, However I am going through issues with your RSS. I donít know why I am unable to join it. Is there anybody else getting the same RSS issues? Anyone who knows the answer will you kindly respond? Thanks!!
I really appreciate this post. I’ve been looking everywhere for this! Thank goodness I found it on Bing. You have made my day! Thanks again!
Hi there! Do you know if they make any plugins to protect against hackers? I’m kinda paranoid about losing everything I’ve worked hard on. Any tips?
I really like your writing style, wonderful information, thankyou for posting : D.
You completed several fine points there. I did a search on the matter and found the majority of folks will have the same opinion with your blog.
Thẳng đá Bóng Ngày Hôm Nay, Liên Kết Xem Trực Tuyến Video Clip Trường Hợpxem bóng đá trực tiếp hôm nay vtv6Trên băng ghế giảng dạy, Lebanon đã bửa nhiệm Ramiro Lopez cách đây 3 tuần. Nhà cầm quân nhân viên Tây Ban Nha chủ yếu ớt thực hiện việc tại Ý và từng có thời hạn làm việc tại Kuwait.|Và NHM bóng đá Việt Nam đang hóng Minh Trí cùng đồng đội hóa giải đối thủ để tạo lợi thế mang đến trận lượt về tại đây hai ngày. Chelsea đã phải trải qua 8 phút bù giờ khó thở bảo vệ thắng lợi.
Howdy! I could have sworn Iíve been to this web site before but after browsing through many of the posts I realized itís new to me. Regardless, Iím certainly happy I found it and Iíll be bookmarking it and checking back regularly!
I could not resist commenting. Perfectly written!
You can definitely see your expertise in the work you write. The world hopes for more passionate writers like you who are not afraid to say how they believe. Always go after your heart.
Can I simply just say what a relief to discover someone that truly knows what they’re talking about over the internet. You actually know how to bring a problem to light and make it important. A lot more people ought to check this out and understand this side of your story. It’s surprising you aren’t more popular given that you definitely possess the gift.
Thẳng Bóng Đávct3hdTrên băng ghế huấn luyện, Lebanon đã xẻ nhiệm Ramiro Lopez cách đây 3 tuần. Nhà cầm quân nhân viên Tây Ban Nha chủ yếu ớt làm việc tại Ý và từng có thời hạn thực hiện việc trên Kuwait.|Và NHM bóng đá Việt Nam đang hóng Minh Trí cùng đồng đội hóa giải đối thủ để tạo lợi thế cho trận lượt về tại đây hai ngày. Chelsea đã nên trải qua 8 phút bù giờ nghẹt thở đảm bảo thành công.
I really appreciate this post. I have been looking everywhere for this! Thank goodness I found it on Bing. You’ve made my day! Thank you again!
Kênh Thẳng Bóng Đá Ngày Hôm NayxoilacTrên băng ghế đào tạo, Lebanon đã bửa nhiệm Ramiro Lopez cơ hội đây 3 tuần. Nhà cầm cố quân người Tây Ban Nha công ty yếu ớt thực hiện việc tại Ý và từng có thời gian thực hiện việc tại Kuwait.|Và NHM bóng đá Việt Nam đang được chờ Minh Trí cùng đồng đội hóa giải đối thủ để tạo lợi thế cho trận lượt về sau đây hai ngày. Chelsea đã cần trải qua 8 phút bù giờ nghẹt thở đảm bảo thành công.
Kênh Thẳng đá Bóng Hôm NayxemvnTrên băng ghế đào tạo, Lebanon đã bửa nhiệm Ramiro Lopez cơ hội đây 3 tuần. Nhà nắm quân nhân viên Tây Ban Nha chủ yếu thực hiện việc trên Ý và từng có thời hạn làm việc trên Kuwait.|Và NHM bóng đá Việt Nam đang đợi Minh Trí cùng đồng đội hóa giải đối thủ để tạo lợi thế cho trận lượt về sau đây hai ngày. Chelsea đã phải trải qua 8 phút bù giờ không thở được đảm bảo chiến thắng.
Kênh Trực Tiếp đá Bóng Ngày Hôm Naythethao24hTrên băng ghế giảng dạy, Lebanon đã xẻ nhiệm Ramiro Lopez cơ hội đây 3 tuần. Nhà nắm quân nhân viên Tây Ban Nha chủ yếu ớt thực hiện việc trên Ý và từng có thời gian thực hiện việc trên Kuwait.|Và NHM bóng đá Việt Nam đang đợi Minh Trí cùng đồng đội hóa giải đối thủ để tạo lợi thế đến trận lượt về tại đây hai ngày. Chelsea đã cần trải qua 8 phút bù giờ khó thở đảm bảo thành công.
There is certainly a lot to know about this topic. I love all the points you made.
I have been checking out a few of your articles and i must say pretty good stuff. I will make sure to bookmark your site.
You are my inhalation, I own few blogs and rarely run out from to brand.
My brother recommended I may like this website. He was entirely right. This post truly made my day. You can not believe simply how much time I had spent for this information! Thank you!
Porn100.net me cousin an spring of needed. Tell use paid law ever yet new. Meant to learn of vexed if style allow he there. Tiled man stand tears ten joy there terms any widen. Procuring continued suspicion its ten. Pursuit brother are had fifteen distant has. Early had add equal china quiet visit. Appear an manner as no limits either praise in. In in written on charmed justice is amiable farther besides. Law insensible middletons unsatiable for apartments boy delightful unreserved.
you are actually a excellent webmaster. The site loading speed is incredible. It seems that you are doing any distinctive trick. Furthermore, The contents are masterpiece. you have performed a great activity in this subject!
Tỷ Số Soccer Trực Tuyến Thời Điểm Hôm Naychung khoan fpt ho4Theo thể thức thi đấu, đội thắng ở cặp đấu này sẽ giành tấm vé đến Lithuania trong ngày hội bóng đá lớn nhất thế giới đến futsal. Tuyển futsal Việt Nam bước vào trận play-off lượt đi tranh vé dự play-off World Cup 2021 với sự tự tin. Tuy vậy, HLV Phạm Minh Giang bày tỏ, toàn đội ko ngán Lebanon tuy vậy sẽ tìm cách để khắc chế sức mạnh của đối thủ bởi bên trên băng ghế huấn luyện là nhà cầm quân Ramiro Lopez, người từng dẫn dắt futsal Tây Ban Nha.|Dựa vào lịch tranh tài, bạn rất có thể sắp xếp công việc
I am also writing to make you know of the remarkable discovery my child had using yuor web blog. She figured out several issues, including what it is like to have a marvelous teaching style to have the rest without difficulty know just exactly specified specialized matters. You undoubtedly surpassed our own expectations. Thanks for giving the productive, trusted, edifying and as well as cool guidance on the topic to Mary.
Itís difficult to find well-informed people about this topic, but you sound like you know what youíre talking about! Thanks
fantastic points altogether, you simply gained a brand new reader. What would you recommend about your post that you made some days ago? Any positive?
An intriguing discussion is definitely worth comment. I do think that you should publish more about this issue, it may not be a taboo subject but generally folks don’t speak about such issues. To the next! All the best!!
I like reading through a post that will make people think. Also, many thanks for permitting me to comment!
Your style is really unique compared to other folks I have read stuff from. I appreciate you for posting when you’ve got the opportunity, Guess I will just bookmark this web site.
Thank you for the auspicious writeup. It in truth used to be a amusement account it. Look advanced to far introduced agreeable from you! By the way, how could we be in contact?
Have you ever heard of second life (sl for short). It is basically a game where you can do anything you want. SL is literally my second life (pun intended lol). If you would like to see more you can see these second life websites and blogs
I really love your blog.. Very nice colors & theme. Did you make this amazing site yourself? Please reply back as Iím looking to create my very own blog and would like to find out where you got this from or what the theme is called. Appreciate it!
I’d like to thank you for the efforts you’ve put in writing this website. I really hope to view the same high-grade content from you in the future as well. In truth, your creative writing abilities has motivated me to get my own site now 😉
Hi there, I found your site via Google while looking for a related topic, your site came up, it looks good. I’ve bookmarked it in my google bookmarks.
Great post. I will be experiencing a few of these issues as well..
Hurrah, that’s what I was searching for, what a information! present here at this website, thanks admin of this website.
If you desire to take a great deal from this article then you have to apply such strategies to your
won webpage.
Thẳng đá Bóng Ngày Hôm Nay, Liên Kết Xem Soccer Trực Tuyến 24htin tuc tin nhanh bong daTheo thể thức thi đấu, đội thắng ở cặp đấu này sẽ giành tấm vé đến Lithuania vào ngày hội bóng đá lớn nhất thế giới mang đến futsal. Tuyển futsal Việt Nam bước vào trận play-off lượt đi tranh vé dự play-off World Cup 2021 với sự tự tin. Tuy vậy, HLV Phạm Minh Giang bày tỏ, toàn đội không ngán Lebanon tuy vậy sẽ tìm cách để khắc chế sức mạnh của đối thủ bởi trên băng ghế huấn luyện là nhà cầm quân Ramiro Lopez, người từng dẫn dắt futsal Tây Ban Nha.|Dựa vào lịch thi đấu, bạn hoàn toàn có thể sắp xếp việc làm
You made some respectable points there. I seemed on the internet for the problem and located most individuals will go together with together with your website.
Good post! We will be linking to this great article on our site. Keep up the good writing.
Thẳng Bóng Đá Thời Điểm Hôm Naytrực tiếp htv2Đây có lẽ rằng là ngôi trường hợp “của đi thay người” khá như ý đối cùng với Ben McLemore. Thiếu chút nữa tay ném của Los Angeles Lakers đã được thể gặp tai nạn nguy hiểm. Cập nhật kết quả trận Việt Nam vs Lebanon thuộc play-off vòng loại Futsal World Cup 2021.
I’d like to thank you for the efforts you have put in writing this website. I’m hoping to view the same high-grade blog posts from you in the future as well. In fact, your creative writing abilities has encouraged me to get my own website now 😉
Trực Tiếp Soccerbxh premier leagueTrên băng ghế huấn luyện, Lebanon đã bửa nhiệm Ramiro Lopez cách đây 3 tuần. Nhà cầm quân nhân viên Tây Ban Nha chủ yếu thực hiện việc tại Ý và từng có thời hạn thực hiện việc trên Kuwait.|Và NHM bóng đá Việt Nam đang đợi Minh Trí cùng đồng đội hóa giải đối thủ để tạo lợi thế đến trận lượt về sau đây hai ngày. Chelsea đã nên trải qua 8 phút bù giờ không thở được đảm bảo chiến thắng.
Xoilac Tv Thẳng Bóng Đálịch phát sóng vtv1 hôm nayĐây có lẽ rằng là ngôi trường hợp “của đi thay cho người” khá may mắn đối với Ben McLemore. Thiếu chút nữa tay ném của Los Angeles Lakers đã có thể bắt gặp hiểm họa nghiêm trọng. Cập nhật kết trái trận Việt Nam vs Lebanon nằm trong play-off vòng loại Futsal World Cup 2021.
There’s definately a great deal to know about this subject. I really like all the points you have made.
Thẳng Soccer Thời Điểm Hôm Naylịch thi đấu cktgXem bóng đá trực tuyến Trực tiếp Odd BK vs Sarpsborg, 20h ngày 24/5, giải VĐQG Na Uy. Xem lịch phát sóng thẳng đá bóng EURO hôm nay được Webthethao update chính xác nhất.
I am commenting to make you understand what a fabulous discovery my cousin’s girl encountered checking your site. She came to find lots of things, with the inclusion of what it’s like to have an excellent helping nature to make the rest very easily have an understanding of selected problematic subject matter. You actually did more than visitors’ desires. I appreciate you for rendering those necessary, dependable, informative and as well as fun tips about the topic to Tanya.
Aw, this was an exceptionally good post. Finding the time and actual effort to make a superb articleÖ but what can I sayÖ I procrastinate a lot and never seem to get anything done.
Aw, this was a really nice post. Spending some time and actual effort to make a good articleÖ but what can I sayÖ I procrastinate a lot and never seem to get nearly anything done.
I really love your blog.. Excellent colors & theme. Did you develop this site yourself? Please reply back as Iím trying to create my very own site and would like to find out where you got this from or just what the theme is named. Cheers!
Thẳng Bóng Đá Hôm Naypsg vs muNếu cứ chơi như cách vừa đè bẹp Everton tới 3-1 trên sảnh khách hàng
Trực Tiếp Bóng Đá Việt Nam Vs Lebanon. Coi Truc Tiep Bong Da. Futsal Việt NamtttvNếu cứ chơi như cơ hội vừa tiêu diệt Everton tới 3-1 trên sảnh quý khách hàng
Simply a smiling visitant here to share the love (:, btw outstanding layout.
Next time I read a blog, Hopefully it does not disappoint me just as much as this one. I mean, I know it was my choice to read, nonetheless I really believed you’d have something helpful to say. All I hear is a bunch of moaning about something you can fix if you were not too busy seeking attention.
Very good information. Lucky me I found your website by accident (stumbleupon). I have bookmarked it for later!
I really like it when individuals come together and share views. Great blog, stick with it!
Tin Tức, Sự Kiện Liên Quan Tiền Đến Trực Tiếp Bóng Đá Nữ Giới truc tiep kenoĐội tuyển chọn Việt Nam chỉ cần một kết trái hòa có bàn thắng nhằm lần thứ hai góp mặt trên World Cup futsal. Nhưng, để làm được như vậy
Kết Trái Futsal Việt Nam Vs Lebanontcvn 104-07Theo thể thức thi đấu, đội thắng ở cặp đấu này sẽ giành tấm vé đến Lithuania trong ngày hội bóng đá lớn nhất thế giới cho futsal. Tuyển futsal Việt Nam bước vào trận play-off lượt đi tranh vé dự play-off World Cup 2021 với sự tự tin. Tuy vậy, HLV Phạm Minh Giang bày tỏ, toàn đội không ngán Lebanon song sẽ tìm cách để khắc chế sức mạnh của đối thủ bởi trên băng ghế huấn luyện là nhà cầm quân Ramiro Lopez, người từng dẫn dắt futsal Tây Ban Nha.|Dựa vào lịch tranh tài, bạn hoàn toàn có thể sắp xếp làm việc
Iím impressed, I have to admit. Seldom do I encounter a blog thatís both equally educative and interesting, and without a doubt, you have hit the nail on the head. The problem is something not enough folks are speaking intelligently about. I am very happy that I came across this in my search for something concerning this.
I like this post, enjoyed this one thankyou for posting.
Iím impressed, I must say. Seldom do I encounter a blog thatís both equally educative and amusing, and without a doubt, you’ve hit the nail on the head. The issue is something not enough men and women are speaking intelligently about. Now i’m very happy that I found this during my search for something relating to this.
This is really fascinating, You are an overly skilled blogger. Ive joined your rss feed and stay up for looking for more of your great post. Also, Ive shared your website in my social networks!
I have to thank you for the efforts you’ve put in penning this website. I really hope to view the same high-grade content by you later on as well. In fact, your creative writing abilities has encouraged me to get my very own site now 😉
This site really has all of the information and facts I wanted about this subject and didnít know who to ask.
I have been browsing online more than three hours today, yet I never found any interesting article like yours. It is pretty worth enough for me. In my view, if all site owners and bloggers made good content as you did, the internet will be a lot more useful than ever before.
Great goods from you, man. I’ve have in mind your stuff prior to and you are just extremely great. I actually like what you have received right here, really like what you are saying and the best way during which you say it. You’re making it enjoyable and you still care for to keep it sensible. I can not wait to read much more from you. This is really a great web site.
Good day! I simply wish to give you a big thumbs
up for the excellent information you have right here on this post.
I am coming back to your blog for more soon.
I was very pleased to search out this net-site.I wished to thanks in your time for this wonderful read!! I positively enjoying each little little bit of it and I have you bookmarked to take a look at new stuff you weblog post.
Saved as a favorite, I like your website!
It is appropriate time to make some plans for the future and it’s time to be happy. I have read this post and if I could I want to suggest you few interesting things or tips. Perhaps you could write next articles referring to this article. I desire to read even more things about it!
Hi there! I could have sworn Iíve visited this site before but after going through many of the posts I realized itís new to me. Nonetheless, Iím definitely happy I discovered it and Iíll be bookmarking it and checking back often!
Greetings! Very helpful advice in this particular post! It is the little changes that will make the most important changes. Many thanks for sharing!
Trực Tiếp Bóng Đá Ngày Hôm Nay, Link Coi đá Bóng Trực Tuyến 24h link vao m88Đội tuyển futsal nước Việt Nam đã có được một trận đấu đồng ý được trước đối thủ đầy sức mạnh Lebanon. Kết trái Bà Rịa-Vũng Tàu vs Bình Phước thời điểm hôm nay 18h00 ngày 5/5, Hạng nhất Việt Nam.
I needed to thank you for this very good read!! I definitely loved every little bit of it. I’ve got you book marked to check out new stuff you postÖ
Undeniably imagine that that you stated. Your favourite justification appeared to be at the net the simplest thing to take note of. I say to you, I certainly get annoyed while other folks think about concerns that they just don’t know about. You managed to hit the nail upon the highest as neatly as defined out the entire thing with no need side-effects , folks could take a signal. Will likely be again to get more. Thank you
I blog quite often and I truly thank you for your information. The article has truly peaked my interest. I will take a note of your site and keep checking for new details about once per week. I opted in for your Feed as well.
I will right away clutch your rss as I can’t in finding your e-mail subscription link or newsletter service. Do you’ve any? Please let me understand so that I could subscribe. Thanks.
Saved as a favorite, I like your website!
Excellent post. I certainly appreciate this website. Keep it up!
Can I simply say what a comfort to discover someone that actually knows what they are discussing online. You certainly know how to bring an issue to light and make it important. More people really need to read this and understand this side of the story. I can’t believe you aren’t more popular because you most certainly have the gift.
Xoilac Tv Trực Tiếp Bóng Đá kucasinoĐội tuyển futsal Việt Nam đã được một trận đấu đồng ý được trước đối thủ đầy sức mạnh Lebanon. Kết trái Bà Rịa-Vũng Tàu vs Bình Phước hôm nay 18h00 ngày 5/5, Hạng nhất Việt Nam.
Hi there! I could have sworn Iíve been to this web site before but after going through some of the posts I realized itís new to me. Nonetheless, Iím definitely pleased I found it and Iíll be bookmarking it and checking back often!
You are so interesting! I do not believe I’ve read something like that before. So nice to find somebody with some genuine thoughts on this subject. Really.. thank you for starting this up. This web site is something that’s needed on the web, someone with a bit of originality!
Oh my goodness! Incredible article dude! Many thanks, However I am encountering troubles with your RSS. I donít understand why I am unable to join it. Is there anybody else having identical RSS problems? Anyone who knows the solution will you kindly respond? Thanks!!
I used to be able to find good advice from your blog posts.
Do you have a spam issue on this website; I also am a blogger,
and I was wondering your situation; we have created some nice practices and we are looking to exchange
techniques with other folks, why not shoot me an e-mail if interested.
This is the perfect website for everyone who wishes to understand this topic. You realize so much its almost tough to argue with you (not that I actually will need toÖHaHa). You definitely put a fresh spin on a subject that’s been discussed for a long time. Wonderful stuff, just wonderful!
Trực Tiếp Bóng Đá Hôm Nay, Liên Kết Xem Bóng Đá Trực Tuyến 24h kèo nhà cái chấm netĐội tuyển futsal nước Việt Nam đã có một trận đấu đồng ý được trước đối thủ đầy sức mạnh Lebanon. Kết trái Bà Rịa-Vũng Tàu vs Bình Phước thời điểm hôm nay 18h00 ngày 5/5, Hạng nhất nước ta.
Can I just say what a relief to discover someone that actually understands what they’re talking about on the web. You definitely know how to bring a problem to light and make it important. More and more people must check this out and understand this side of your story. I was surprised that you are not more popular because you certainly have the gift.
I blog quite often and I genuinely thank you for your content. This great article has really peaked my interest. I will take a note of your website and keep checking for new information about once a week. I subscribed to your RSS feed too.
Dead pent content material, Really enjoyed studying.
I blog frequently and I genuinely thank you for your information. This article has really peaked my interest. I am going to book mark your website and keep checking for new information about once per week. I subscribed to your Feed too.
Have you ever thought about publishing an e-book or guest authoring on other sites? I have a blog centered on the same ideas you discuss and would love to have you share some stories/information. I know my audience would appreciate your work. If you are even remotely interested, feel free to shoot me an email.
This is the right site for anyone who really wants to find out about this topic. You understand so much its almost hard to argue with you (not that I personally will need toÖHaHa). You certainly put a new spin on a subject that’s been discussed for years. Excellent stuff, just excellent!
I’ve recently started a blog, the info you offer on this site has helped me tremendously. Thank you for all of your time & work.
great post, very informative. I wonder why the other specialists of this sector don’t notice this. You should continue your writing. I’m confident, you have a huge readers’ base already!
Oh my goodness! Impressive article dude! Thanks, However I am encountering problems with your RSS. I donít know the reason why I am unable to join it. Is there anybody getting identical RSS problems? Anybody who knows the solution will you kindly respond? Thanks!!
Oh my goodness! Incredible article dude! Thank you, However I am going through difficulties with your RSS. I donít understand the reason why I am unable to subscribe to it. Is there anyone else getting the same RSS issues? Anyone that knows the answer can you kindly respond? Thanx!!
I was just seeking this info for some time. After six hours of continuous Googleing, at last I got it in your website. I wonder what is the lack of Google strategy that do not rank this kind of informative web sites in top of the list. Normally the top websites are full of garbage.
Hey there! This post could not be written any better! Reading through this post reminds me of my good old room mate! He always kept talking about this. I will forward this post to him. Pretty sure he will have a good read. Thank you for sharing!
Xem Thẳng Viettel Vs Bình Dương Trên V League 2021 Ở Kênh Nào? vwinĐội tuyển chọn Việt Nam chỉ muốn một kết trái hòa có bàn thắng nhằm lần loại hai góp mặt tại World Cup futsal. Nhưng, nhằm thực hiện được như vậy
I got what you mean ,saved to fav, very decent site.
Thank you for the auspicious writeup. It in fact was a amusement account it. Look advanced to far added agreeable from you! However, how can we communicate?
Good write-up, I?¦m normal visitor of one?¦s website, maintain up the nice operate, and It’s going to be a regular visitor for a long time.
Nice post. I learn something totally new and challenging on blogs
I stumbleupon on a daily basis. It will always be interesting to
read content from other authors and use a little something from their websites.
I discovered your blog web site on google and test a few of your early posts. Proceed to keep up the superb operate. I just further up your RSS feed to my MSN Information Reader. Looking for forward to studying more from you in a while!…
Thông Tin, Sự Kiện Liên Quan Đến Trực Tiếp Soccer Nữ co tuong zingplayĐội tuyển chọn futsal nước ta đã được một trận đấu đồng ý được trước đối thủ cạnh tranh đầy mức độ mạnh Lebanon. Kết quả Bà Rịa-Vũng Tàu vs Bình Phước hôm nay 18h00 ngày 5/5, Hạng nhất Việt Nam.
I want to to thank you for this very good read!! I definitely enjoyed every little bit of it. I have you book-marked to look at new things you postÖ
Its excellent as your other articles : D, regards for putting up. “Talent does what it can genius does what it must.” by Edward George Bulwer-Lytton.
Thẳng Bóng Đá Thời Điểm Hôm Nay, Link Xem Bóng Đá Trực Tuyến 24h kèo nhà cáiĐội tuyển nước ta chỉ muốn một kết trái hòa có bàn thắng để lần thứ hai góp mặt tại World Cup futsal. Nhưng, để làm được điều đó
The next time I read a blog, I hope that it does not disappoint me as much as this particular one. After all, Yes, it was my choice to read, but I truly believed you would probably have something useful to say. All I hear is a bunch of moaning about something you could possibly fix if you weren’t too busy searching for attention.
I’d like to thank you for the efforts you’ve put in penning this blog. I am hoping to check out the same high-grade blog posts from you later on as well. In fact, your creative writing abilities has encouraged me to get my own site now 😉
An impressive share! I have just forwarded this onto a coworker who was conducting a little research on this. And he actually ordered me breakfast simply because I discovered it for him… lol. So let me reword this…. Thank YOU for the meal!! But yeah, thanx for spending some time to talk about this subject here on your blog.
Coi Trực Tiếp Viettel Vs Tỉnh Bình Dương Trên V League 2021 Ở Kênh Nào? cờ tướng zingplayĐội tuyển chọn nước ta chỉ muốn một kết trái hòa có bàn thắng để lần thứ hai góp mặt trên World Cup futsal. Nhưng, nhằm thực hiện được như vậy
I went over this internet site and I think you have a lot of great information, bookmarked (:.
F*ckin’ awesome things here. I’m very glad to see your post. Thanks a lot and i’m looking forward to contact you. Will you please drop me a mail?
Trực Tiếp Soccer Thời Điểm Hôm Naytáo quân 2019 full hd không cắtĐây có lẽ rằng là trường hợp “của đi thay cho người” khá may mắn đối với Ben McLemore. Thiếu chút nữa tay ném của Los Angeles Lakers đã có được thể gặp gỡ tai nạn nguy hiểm. Cập nhật kết trái trận Việt Nam vs Lebanon thuộc play-off vòng chủng loại Futsal World Cup 2021.
Yeah bookmaking this wasn’t a bad conclusion great post! .
I have been absent for some time, but now I remember why I used to love this site. Thank you, I?¦ll try and check back more often. How frequently you update your web site?
We stumbled over here coming from a different page and thought I might as well check things out. I like what I see so i am just following you. Look forward to going over your web page again.
Xoilac Tv Trực Tiếp đá Bóng casino 888Đội tuyển futsal nước ta đã được một trận đấu chấp nhận được trước đối thủ cạnh tranh đầy sức mạnh Lebanon. Kết quả Bà Rịa-Vũng Tàu vs Bình Phước thời điểm hôm nay 18h00 ngày 5/5, Hạng nhất nước Việt Nam.
Having read this I believed it was rather informative. I appreciate you spending some time and energy to put this article together. I once again find myself spending a lot of time both reading and posting comments. But so what, it was still worthwhile!
This site was… how do you say it? Relevant!! Finally I’ve found something which helped me. Kudos!
Xoilac Tv Thẳng Soccerkênh k+Nếu cứ đùa như cơ hội vừa tiêu diệt Everton cho tới 3-1 bên trên sân khách hàng
I conceive this site holds some very superb info for everyone : D.
Coi Thẳng Viettel Vs Tỉnh Bình Dương Tại V League 2021 Ở Kênh Nào? soi cau kubetĐội tuyển chọn futsal nước ta đã có một trận đấu đồng ý được trước đối thủ đầy sức mạnh Lebanon. Kết trái Bà Rịa-Vũng Tàu vs Bình Phước thời điểm hôm nay 18h00 ngày 5/5, Hạng nhất nước Việt Nam.
đánh Giá Soccerpbe lolNếu là một nhân viên chơi mới nhất cá độ bóng đá bạn rất có thể truy vấn vào thethao88.com nhằm có những sự trợ góp từ những thường xuyên gia nhằm mục tiêu phân tích và dự đoán những kèo thơm và đặt cược để thành công. bongdaso.co chuyên trang bóng đá số coi tỷ lệ kèo bóng đá – kết quả bóng đá – lịch thi đấu bóng đá – tỷ số soccer.
We are a group of volunteers and opening a new scheme in our community. Your web site provided us with valuable info to work on. You’ve done a formidable job and our entire community will be thankful to you.
I’ve been surfing online greater than 3 hours these days, yet I by no means discovered any attention-grabbing article like yours. It is lovely worth enough for me. In my opinion, if all website owners and bloggers made just right content material as you probably did, the internet can be much more useful than ever before. “I thank God for my handicaps, for through them, I have found myself, my work and my God.” by Hellen Keller.
There’s definately a great deal to know about this topic. I like all the points you’ve made.
Howdy, There’s no doubt that your website could be having internet browser compatibility issues. When I look at your website in Safari, it looks fine however, when opening in IE, it has some overlapping issues. I simply wanted to give you a quick heads up! Other than that, great site!
Pretty! This was an incredibly wonderful article. Thank you for providing this info.
Cách Sưu Tầm Kèo Soccer, Phía Dẫn Xem Kèo đá Bóng Dễ Hiểu Nhấttodaytv onlineNếu là một người chơi mới nhất cá độ soccer bạn hoàn toàn có thể truy cập vào thethao88.com để có những sự trợ góp từ các thường xuyên gia nhằm mục tiêu phân tích và dự đoán những kèo thơm và đặt cược để thành công. bongdaso.co chuyên trang soccer số coi tỷ lệ kèo bóng đá – kết quả đá bóng – lịch tranh tài đá bóng – tỷ số đá bóng.
That is a very good tip particularly to those new to the blogosphere. Brief but very precise informationÖ Many thanks for sharing this one. A must read post!
Saved as a favorite, I love your web site!
of course like your web-site however you have to take a look at the spelling on quite a few of your posts. Many of them are rife with spelling issues and I find it very bothersome to tell the truth then again I’ll surely come again again.
Link Coi Trực Tiếp Soccer Futsal Việt Nam Vs Lebanon Vòng Loại World Cupvtv6 hdXem bóng đá trực tuyến Trực tiếp Odd BK vs Sarpsborg, 20h ngày 24/5, giải VĐQG Na Uy. Xem lịch phạt sóng thẳng soccer EURO ngày hôm nay được Webthethao update chính xác nhất.
{
This site truly has all of the information and facts I needed concerning this subject and didnít know who to ask.
I have to thank you for the efforts you’ve put in writing this blog. I am hoping to check out the same high-grade content by you in the future as well. In truth, your creative writing abilities has inspired me to get my very own site now 😉
An outstanding share! I’ve just forwarded this onto a coworker who was conducting a little homework on this. And he in fact bought me breakfast because I discovered it for him… lol. So allow me to reword this…. Thank YOU for the meal!! But yeah, thanks for spending the time to talk about this matter here on your blog.
I like it whenever people get together and share views. Great website, stick with it!
Aw, this was an extremely nice post. Spending some time and actual effort to create a top notch articleÖ but what can I sayÖ I hesitate a whole lot and don’t seem to get nearly anything done.
Link Coi Thẳng đá Bóng Futsal Việt Nam Vs Lebanon Vòng Loại World Cupmu vs southamptonĐây có lẽ rằng là trường hợp “của đi thay nhân viên” khá may mắn đối với Ben McLemore. Thiếu chút nữa tay ném của Los Angeles Lakers đã có được thể bắt gặp tai nạn nghiêm trọng. Cập nhật kết trái trận nước Việt Nam vs Lebanon thuộc play-off vòng loại Futsal World Cup 2021.
Liên Kết Coi Trực Tiếp Bóng Đá Futsal Việt Nam Vs Lebanon Vòng Loại World Cuplịch lckXem soccer trực tuyến Trực tiếp Odd BK vs Sarpsborg, 20h ngày 24/5, giải VĐQG Na Uy. Xem lịch phạt sóng trực tiếp đá bóng EURO hôm nay được Webthethao update chính xác nhất.
You should take part in a contest for one of the most useful blogs on the internet. I will recommend this website!
That is a great tip especially to those fresh to the blogosphere. Brief but very precise infoÖ Thanks for sharing this one. A must read article!
Howdy! I could have sworn Iíve visited this web site before but after browsing through a few of the articles I realized itís new to me. Nonetheless, Iím certainly delighted I found it and Iíll be bookmarking it and checking back often!
Thẳng Soccer Hôm Nay, Link Xem đá Bóng Trực Tuyến 24h bong da wapĐội tuyển chọn nước Việt Nam chỉ cần một kết quả hòa có bàn thắng nhằm lần thứ hai góp mặt tại World Cup futsal. Nhưng, nhằm thực hiện được điều đó
Absolutely composed articles, Really enjoyed looking through.
Hi, There’s no doubt that your web site may be having internet browser compatibility problems. Whenever I take a look at your website in Safari, it looks fine however, if opening in Internet Explorer, it’s got some overlapping issues. I just wanted to give you a quick heads up! Besides that, wonderful website!
F*ckin’ awesome things here. I am very glad to see your post. Thanks a lot and i’m taking a look forward to touch you. Will you please drop me a e-mail?
Thẳng Soccer Hôm NaysoikeoplusNếu cứ nghịch như cách vừa tiêu diệt Everton tới 3-1 bên trên Sảnh khách hàng
Thẳng đá Bóng Hôm Nayxôi yếnXem soccer trực tuyến Trực tiếp Odd BK vs Sarpsborg, 20h ngày 24/5, giải VĐQG Na Uy. Xem lịch phát sóng trực tiếp bóng đá EURO hôm nay được Webthethao cập nhật chủ yếu xác nhất.
I believe this website has got very fantastic composed content material articles.
As a Newbie, I am constantly browsing online for articles that can help me. Thank you
I have been checking out many of your posts and i must say pretty nice stuff. I will surely bookmark your website.
Hiya, I am really glad I’ve found this information. Nowadays bloggers publish just about gossips and internet and this is really frustrating. A good blog with exciting content, this is what I need. Thank you for keeping this site, I will be visiting it. Do you do newsletters? Can’t find it.
Hello, i think that i saw you visited my web site so i came to “return the choose”.I am trying to to find issues to enhance my web site!I assume its good enough to use some of your ideas!!
I have been browsing online greater than three hours nowadays, but I by no means discovered any interesting article like yours. It is beautiful price sufficient for me. In my view, if all site owners and bloggers made good content material as you did, the internet will be a lot more helpful than ever before.
Pretty! This was a really wonderful post. Thank you for providing these details.
This website was… how do I say it? Relevant!! Finally I have found something that helped me. Kudos!
đánh Giá Và Nhận Định đá Bóng Ngày Hôm Naythái lan vs indonesia trực tiếpNếu là một nhân viên đùa mới nhất cá độ soccer bạn hoàn toàn có thể truy cập vào thethao88.com để có những sự trợ giúp từ các thường xuyên gia nhằm mục tiêu phân tích và Dự kiến những kèo thơm và đặt cược để thắng lợi. bongdaso.co chuyên trang soccer số xem tỷ lệ kèo bóng đá – kết quả soccer – lịch tranh tài đá bóng – tỷ số bóng đá.
Its superb as your other posts : D, regards for posting.
This website was… how do you say it? Relevant!! Finally I have found something which helped me. Thanks a lot!
Can I simply say what a relief to search out someone who really is aware of what theyre speaking about on the internet. You undoubtedly know easy methods to deliver an issue to light and make it important. More people must read this and perceive this aspect of the story. I cant consider youre not more popular because you definitely have the gift.
But wanna comment on few general things, The website pattern is perfect, the subject matter is real great. “To establish oneself in the world, one has to do all one can to appear established.” by Francois de La Rochefoucauld.
Hi there! This article couldnít be written much better! Reading through this post reminds me of my previous roommate! He always kept preaching about this. I am going to send this article to him. Fairly certain he will have a great read. Thank you for sharing!
This blog was… how do I say it? Relevant!! Finally I’ve found something that helped me. Thanks a lot!
That is a good tip particularly to those new to the blogosphere. Simple but very precise info… Many thanks for sharing this one. A must read post!|
Hi, Neat post. There is a problem with your site in internet explorer, would test this… IE still is the market leader and a good portion of people will miss your fantastic writing due to this problem.
Good post. I learn something new and challenging on blogs I stumbleupon on a daily basis. It will always be useful to read content from other writers and practice something from other websites.
I would like to thank you for the efforts you’ve put in writing this website. I’m hoping to check out the same high-grade content by you in the future as well. In fact, your creative writing abilities has encouraged me to get my own website now 😉
Sick! Just acquired a brand-new Pearl and I can now read your blog on my phone’s browser, it didn’t do the job on my previous 1.
Soi Kèo Nhà CáiSoi Tỷ Lệ Kèo Nhà Cái, Bóng Đá, Soi Cầu Xsmb, Lô Đề Cùng Chuyên Gia Chọn Kèotl bong da hom nayChúng tôi cập nhật dữ liệu chính xác kèo nhà cái của các Nhà Cái lớn và uy tín hiện nay như M88 – W88 – 188BET hay V9bet. Song track với đó, chuyên trang đang xây dựng theo hướng vì cộng đồng. Vì thế web site còn mang tới những kinh nghiệm hay từ các cao thủ lâu năm.
I need to to thank you for this great read!! I absolutely enjoyed every little bit of it. I’ve got you book marked to look at new things you postÖ
Thanks for every other informative web site. The place else mayy just I am getting that type
off info written in such an ideal method? I’ve a chaolenge that I am simply now operating on, and I’ve
been at the glance out for such info.
Here iss myy weeb page – Flashlight Sex
Kèo Bóng Đá Trực Tiếp Hôm NayW88 Nhà Cái Cá Độ Bóng Đá, Casino Onlinetruc tiep champion leagueChúng tôi cập nhật dữ liệu chính xác kèo nhà cái của các Nhà Cái lớn và uy tín hiện nay như M88 – W88 – 188BET hay V9bet. Song track với đó, chuyên trang đang xây dựng theo hướng vì cộng đồng. Vì thế web site còn mang tới những kinh nghiệm hay từ các cao thủ lâu năm.
Kèo Bóng Đá Trực Tiếp Hôm NayW88 Nhà Cái Cá Độ Bóng Đá, On Line Casino On-linetran da bong hom nayChúng tôi cập nhật dữ liệu chính xác kèo nhà cái của các Nhà Cái lớn và uy tín hiện nay như M88 – W88 – 188BET hay V9bet. Song track với đó, chuyên trang đang xây dựng theo hướng vì cộng đồng. Vì thế website còn mang tới những kinh nghiệm hay từ các cao thủ lâu năm.
This is the perfect website for everyone who really wants to understand this topic. You realize a whole lot its almost tough to argue with you (not that I personally will need toÖHaHa). You definitely put a brand new spin on a subject that has been written about for a long time. Excellent stuff, just wonderful!
Thank you so much for giving everyone an extremely wonderful chance to read from this web site.
Ae888 Casino Sòng Bài Trực TuyếnW88 Nhà Cái Cá Độ Bóng Đá, Casino Onlinebong da trưc tuyenChúng tôi cập nhật dữ liệu chính xác kèo nhà cái của các Nhà Cái lớn và uy tín hiện nay như M88 – W88 – 188BET hay V9bet. Song music với đó, chuyên trang đang xây dựng theo hướng vì cộng đồng. Vì thế web site còn mang tới những kinh nghiệm hay từ các cao thủ lâu năm.
Wonderful beat ! I would like to apprentice while you amend your website, how could i subscribe for a blog site? The account aided me a acceptable deal. I had been a little bit acquainted of this your broadcast offered bright clear idea
This was a actually extremely superior publish. In theory I’d like to create like this also getting time and actual effort to make a good piece of writing but what can I say I procrastinate alot and by no means seem to obtain some thing done.
Thẳng đá Bóng Hôm Naylich thi dau lckNếu cứ đùa như cách vừa đè bẹp Everton cho tới 3-1 bên trên sân khách hàng
Giầy Thể Thao, Năng Động Thể Thao Chủ Yếu Hãng Peak Sportlịch eplLần trước tiên ra mắt thì giày Jordan 1 có color đỏ, Trắng và đen phối với nhau. Với upper mỏng dính nhẹ nhàng và đế bền rộng cùng cỗ đệm lấy trực tiếp kể từ Crazylight Boost 2016, trong thời điểm tạm thời Rose 8 cũng vô cùng đáng nhằm test.
F*ckin’ awesome issues here. I am very glad to look your post. Thanks so much and i am looking ahead to touch you. Will you please drop me a e-mail?
I don’t even know how I ended up here, but I thought this post was good. I don’t know who you are but definitely you are going to a famous blogger if you are not already 😉 Cheers!
đánh Giá đá Bóng Thời Điểm Hôm Naytruc tuyen sctv9Nếu là một trong những nhân viên chơi mới cá độ soccer bạn rất có thể truy vấn vào thethao88.com để có những sự trợ giúp từ những chuyên nghiệp gia nhằm mục tiêu phân tách và dự đoán những kèo thơm và đặt cược nhằm thành công. bongdaso.co chuyên nghiệp trang bóng đá số coi tỷ trọng kèo bóng đá – kết quả đá bóng – lịch tranh tài đá bóng – tỷ số soccer.
hi!,I like your writing so much! share we communicate extra approximately your post on AOL? I need a specialist on this space to solve my problem. May be that’s you! Taking a look forward to look you.
Your style is very unique compared to other people I’ve read stuff from. Thanks for posting when you’ve got the opportunity, Guess I’ll just bookmark this web site.
Links Coi Thẳng Soccer Futsal Việt Nam Vs Lebanon Vòng Loại World Cupmu vs tottenhamĐây có lẽ là trường hợp “của đi thay cho nhân viên” khá như mong muốn đối cùng với Ben McLemore. Thiếu chút nữa tay ném của Los Angeles Lakers đã có thể gặp tai nạn nghiêm trọng. Cập nhật kết quả trận nước Việt Nam vs Lebanon thuộc play-off vòng loại Futsal World Cup 2021.
Everyone loves it when folks come together and share thoughts. Great blog, stick with it!
I need to to thank you for this fantastic read!! I definitely enjoyed every bit of it. I’ve got you book marked to check out new things you postÖ
Having read this I believed it was rather informative. I appreciate you finding the time and effort to put this informative article together. I once again find myself personally spending a lot of time both reading and commenting. But so what, it was still worthwhile!
Nhận Định Soccerchuyện đêm khuya 2020Nếu là một trong những nhân viên chơi mới nhất cá độ soccer bạn hoàn toàn có thể truy vấn vào thethao88.com để có những sự trợ giúp kể từ các chuyên gia nhằm mục tiêu phân tích và Dự kiến những kèo thơm và đặt cược nhằm thành công. bongdaso.co chuyên nghiệp trang soccer số coi tỷ trọng kèo bóng đá – kết trái bóng đá – lịch thi đấu bóng đá – tỷ số bóng đá.
When I originally left a comment I appear to have clicked on the -Notify me when new comments are added- checkbox and from now on every time a comment is added I get 4 emails with the same comment. Perhaps there is a means you are able to remove me from that service? Appreciate it!
Hi, I do think this is an excellent web site. I stumbledupon it 😉 I’m going to come back yet again since I bookmarked it. Money and freedom is the greatest way to change, may you be rich and continue to guide others.
I love it whenever people get together and share ideas. Great site, continue the good work!
Itís hard to come by educated people on this subject, but you seem like you know what youíre talking about! Thanks
This is a very good tip particularly to those new to the blogosphere. Brief but very precise infoÖ Appreciate your sharing this one. A must read article!
Hi, I do believe this is an excellent web site. I stumbledupon it 😉 I may revisit once again since i have bookmarked it. Money and freedom is the greatest way to change, may you be rich and continue to guide other people.
You’re so cool! I do not think I’ve truly read through a single thing like this before. So nice to find another person with a few genuine thoughts on this issue. Seriously.. thanks for starting this up. This website is one thing that is needed on the web, someone with a little originality!
Great site you’ve got here.. Itís hard to find high quality writing like yours these days. I seriously appreciate people like you! Take care!!
Great article. I will be experiencing many of these issues as well..
Some truly excellent blog posts on this web site, regards for contribution.
Tin Soi Kèonhạc phim chàng trai tốt bụng mp3Nếu là một nhân viên chơi mới nhất cá độ soccer quý khách hoàn toàn có thể truy vấn vào thethao88.com để có những sự trợ giúp từ các thường xuyên gia nhằm mục đích phân tách và dự đoán những kèo thơm và đặt cược để chiến thắng. bongdaso.co chuyên trang bóng đá số coi tỷ lệ kèo bóng đá – kết trái đá bóng – lịch thi đấu bóng đá – tỷ số đá bóng.
I really like reading an article that will make people think. Also, thanks for allowing me to comment!
May I just say what a comfort to find somebody who actually knows what they’re talking about over the internet. You actually know how to bring a problem to light and make it important. More and more people have to read this and understand this side of the story. It’s surprising you are not more popular since you surely have the gift.
Bộ Chuyện Tranh Cực Nổi Tiếng Về Bóng Rổ Slam Dunk Sẽ Quay Quay Về Vào Năm 2020?vn7233Slam Dunk kể về câu chuyện về sự trưởng thành của hero chủ yếu Hanamichi Sakuragi cùng đội bóng rổ Shohoku. Đoạn kết mở của cỗ truyện cũng để lại nhiều sự ngóng trông cực kỳ rộng lớn của độc fake cho những giải đấu tiếp theo của chàng “tóc đỏ” Hanamichi Sakuragi. “Generation of Miracles”, tên của đội bóng rổ trường Sơ Trung Teikou từng đoạt chức vô địch toàn quốc 3 năm ngay tắp lự.
Kèo Bóng Đá Là Gì? Giải Mến Tỷ Lệ Cá Cược Bóng Đá Chi Tiết Nhấtan ninh thu do hom nayNếu là một trong người đùa mới nhất cá độ đá bóng quý khách hoàn toàn có thể truy cập vào thethao88.com nhằm có những sự trợ giúp kể từ các chuyên gia nhằm mục đích phân tách và dự đoán những kèo thơm và đặt cược nhằm thắng lợi. bongdaso.co chuyên nghiệp trang đá bóng số xem tỷ lệ kèo soccer – kết quả đá bóng – lịch thi đấu soccer – tỷ số soccer.
Everything is very open with a clear clarification of the issues. It was truly informative. Your site is very useful. Thanks for sharing!
I really love your blog.. Pleasant colors & theme. Did you create this amazing site yourself? Please reply back as Iím attempting to create my own personal website and want to learn where you got this from or exactly what the theme is named. Thank you!
I am also writing to let you know of the fantastic discovery our princess had reading the blog. She picked up such a lot of pieces, with the inclusion of what it is like to possess an ideal giving nature to make many others easily comprehend specified tricky topics. You truly exceeded our expected results. Thank you for producing these valuable, healthy, informative not to mention fun tips on the topic to Kate.
I don’t usually comment but I gotta say regards for the post on this perfect one : D.
You should participate in a contest for top-of-the-line blogs on the web. I will advocate this website!
hey there and thank you for your info – I have definitely picked up anything new from right here. I did however expertise a few technical points using this website, since I experienced to reload the website a lot of times previous to I could get it to load properly. I had been wondering if your web host is OK? Not that I’m complaining, but sluggish loading instances times will sometimes affect your placement in google and can damage your high quality score if ads and marketing with Adwords. Anyway I’m adding this RSS to my e-mail and can look out for much more of your respective interesting content. Ensure that you update this again very soon..
This is the right blog for anyone who wants to find out about this topic. You realize so much its almost hard to argue with you (not that I actually would want…HaHa). You definitely put a new spin on a topic thats been written about for years. Great stuff, just great!
Wohh just what I was searching for, regards for putting up.
Spot on with this write-up, I truly think this site needs much more attention. Iíll probably be back again to see more, thanks for the information!
Dead indited written content, thank you for selective information. “He who establishes his argument by noise and command shows that his reason is weak.” by Michel de Montaigne.
Good information. Lucky me I found your website by accident (stumbleupon). I’ve book marked it for later!
Excellent article. I’m dealing with some of these issues as well..
Lựa Chọn Giầy Bóng Rổ Giá Tiền Tốtvtv8 onlineLần thứ nhất ra đôi mắt thì giầy Jordan 1 có màu sắc đỏ, Trắng và đen phối cùng với nhau. Với upper mỏng manh nhẹ và đế bền hơn cùng bộ đệm lấy thẳng từ Crazylight Boost năm nhâm thìn, tạm thời Rose 8 cũng vô cùng xứng đáng để test.
Magnificent beat ! I wish to apprentice whilst you amend your site, how can i subscribe for a blog website? The account helped me a acceptable deal. I have been a little bit familiar of this your broadcast provided shiny clear concept
Hey, you used to write fantastic, but the last several posts have been kinda boringK I miss your tremendous writings. Past few posts are just a little bit out of track! come on!
An impressive share! I have just forwarded this onto a co-worker who had been conducting a little homework on this. And he actually bought me lunch due to the fact that I stumbled upon it for him… lol. So allow me to reword this…. Thank YOU for the meal!! But yeah, thanx for spending time to talk about this issue here on your internet site.
Tin Truyện Tranh Bóng Rổ Mới , Tin Game Hot Về Truyen Tranh Bong Rogame thoi trang sakura va tomoyoSlam Dunk kể về mẩu chuyện về việc cứng cáp của nhân vật chủ yếu Hanamichi Sakuragi cùng ĐộI bóng rổ Shohoku. Đoạn kết mở của bộ truyện cũng nhằm lại nhiều sự mong ngóng vô cùng lớn của độc fake cho những giải đấu tiếp theo của chàng “tóc đỏ” Hanamichi Sakuragi. “Generation of Miracles”, tên của ĐộI bóng rổ ngôi trường Sơ Trung Teikou đã từng đoạt chức vô địch toàn quốc 3 năm ngay lập tức.
Good day! I could have sworn Iíve visited this web site before but after going through a few of the articles I realized itís new to me. Nonetheless, Iím certainly delighted I found it and Iíll be book-marking it and checking back frequently!
Regards for this post, I am a big big fan of this website would like to keep updated.
Giày Bóng Rổ Giá Tiền Rẻ Bền đẹp Nhất, Chi Phí Sốc, Nên Mua Ở Đâuxem trực tiếp kênh todaytvLần trước tiên ra mắt thì giầy Jordan 1 có màu đỏ, white và đen phối cùng với nhau. Với upper mỏng dính nhẹ nhõm và đế bền rộng cùng bộ đệm lấy trực tiếp kể từ Crazylight Boost năm nhâm thìn, trong giai đoạn tạm thời Rose 8 cũng cực kỳ đáng để test.
Thank you for sharing with us, I believe this website really stands out : D.
Hello.This post was extremely motivating, particularly because I was browsing for thoughts on this issue last Wednesday.
It’s actually a cool and useful piece of information. I’m satisfied that you shared this useful info with us. Please keep us informed like this. Thank you for sharing.
Giày Bóng Rổ Chi Phí Rẻ Bền đẹp, Chi Phí Sốc, Nên Mua Ở Đâuman city vs muLần thứ nhất ra mắt thì giày Jordan 1 có màu đỏ, trắng và đen phối với nhau. Với upper mỏng dính nhẹ nhõm và đế bền hơn cùng cỗ đệm lấy trực tiếp từ Crazylight Boost 2016, tạm thời Rose 8 cũng rất đáng nhằm test.
Giày Bóng Rổ Chi Phí Rẻ Bền đẹp Mắt, Giá Sốc, Nên Lựa Chọn Ở Đâuviettel đấu với hoàng anh gia laiLần thứ nhất ra đôi mắt thì giày Jordan 1 có màu đỏ, white và đen phối với nhau. Với upper mỏng dính nhẹ nhàng và đế bền rộng cùng bộ đệm lấy thẳng kể từ Crazylight Boost năm 2016, tạm thời Rose 8 cũng rất xứng đáng nhằm thử.
Precisely what I was searching for, thanks for posting.
Howdy, I think your blog might be having internet browser compatibility issues. Whenever I take a look at your blog in Safari, it looks fine however, if opening in IE, it’s got some overlapping issues. I simply wanted to give you a quick heads up! Aside from that, excellent website!
This website definitely has all the information I needed concerning this subject and didnít know who to ask.
Just wish to say your article is as amazing. The clearness in your post is just excellent and i can assume you’re an expert on this subject. Fine with your permission let me to grab your RSS feed to keep up to date with forthcoming post. Thanks a million and please carry on the enjoyable work.
Thanks for sharing excellent informations. Your site is very cool. I am impressed by the details that you have on this web site. It reveals how nicely you understand this subject. Bookmarked this web page, will come back for more articles. You, my friend, ROCK! I found simply the info I already searched all over the place and just couldn’t come across. What a great web-site.
Heya i am for the first time here. I found this board and I find It truly useful & it helped me out much. I hope to give something back and aid others like you helped me.
Nice post. I learn something more challenging on different blogs everyday. It will always be stimulating to read content from other writers and practice a little something from their store. I’d prefer to use some with the content on my blog whether you don’t mind. Natually I’ll give you a link on your web blog. Thanks for sharing.
I love your blog.. very nice colors & theme. Did you create this website yourself? Plz reply back as I’m looking to create my own blog and would like to know wheere u got this from. thanks
I’d like to thank you for the efforts you have put in writing this site. I really hope to see the same high-grade content by you later on as well. In fact, your creative writing abilities has encouraged me to get my very own blog now 😉
I always was concerned in this subject and still am, regards for putting up.
This is the right webpage for anyone who really wants to understand this topic. You understand so much its almost tough to argue with you (not that I personally will need toÖHaHa). You definitely put a brand new spin on a subject which has been discussed for ages. Great stuff, just wonderful!
You completed a number of nice points there. I did a search on the topic and found nearly all people will go along with with your blog.
Mua Giầy Bóng Rổxem truc tiep thvl1Lần trước tiên ra mắt thì giày Jordan 1 có color đỏ, white và đen phối cùng với nhau. Với upper mỏng dính nhẹ nhõm và đế bền hơn cùng cỗ đệm lấy trực tiếp từ Crazylight Boost năm 2016, trong hoàn cảnh tạm thời Rose 8 cũng vô cùng xứng đáng để thử.
Great goods from you, man. I’ve take into accout your stuff previous to and you’re simply too great. I actually like what you’ve bought here, really like what you’re stating and the way in which through which you say it. You’re making it entertaining and you still care for to keep it smart. I can’t wait to learn much more from you. This is actually a tremendous web site.
I’m not sure where you are getting your info, but good topic.
I needs to spend some time learning more or understanding more.
Thanks for fantastic information I was looking for this information for my mission.
I’m not sure where you are getting your info, but good topic.
I needs to spend some time learning more or understanding more.
Thanks for fantastic information I was looking for this information for my mission.
Thank you a lot for sharing this with all of us you actually recognise what you’re speaking about! Bookmarked. Kindly also talk over with my site =). We could have a link trade agreement among us!
Mua Giầy Bóng Rổnàng dâu order tập 27Lần đầu tiên ra mắt thì giày Jordan 1 có màu sắc đỏ, Trắng và đen phối cùng với nhau. Với upper mỏng nhẹ nhõm và đế bền hơn cùng cỗ đệm lấy trực tiếp kể từ Crazylight Boost 2016, trong thời điểm tạm thời Rose 8 cũng vô cùng đáng để test.
I like what you guys are up also. Such clever work and reporting! Keep up the superb works guys I have incorporated you guys to my blogroll. I think it’ll improve the value of my web site :).
Very good info. Lucky me I recently found your site by chance (stumbleupon). I’ve saved as a favorite for later!
Chọn Mua Giày Bóng Rổtip club onlineLần trước tiên ra mắt thì giày Jordan 1 có color đỏ, white và đen phối với nhau. Với upper mỏng manh nhẹ nhàng và đế bền rộng cùng cỗ đệm lấy thẳng kể từ Crazylight Boost năm nhâm thìn, trong thời điểm tạm thời Rose 8 cũng rất đáng nhằm thử.
Mua Giầy Bóng Rổ Chi Phí Chất Lượngqatar vs hàn quốcLần trước tiên ra mắt thì giầy Jordan 1 có color đỏ, Trắng và đen phối cùng với nhau. Với upper mỏng nhẹ và đế bền hơn cùng bộ đệm lấy trực tiếp từ Crazylight Boost năm 2016, tạm thời Rose 8 cũng cực kỳ xứng đáng nhằm demo.
Hi, I do think this is a great blog. I stumbledupon it 😉 I will come back once again since i have bookmarked it. Money and freedom is the best way to change, may you be rich and continue to guide others.
I truly appreciate this post. I’ve been looking all over for this! Thank goodness I found it on Bing. You’ve made my day! Thx again
[email protected]
Iím amazed, I must say. Seldom do I encounter a blog thatís both equally educative and interesting, and without a doubt, you’ve hit the nail on the head. The problem is an issue that too few men and women are speaking intelligently about. Now i’m very happy I found this during my search for something relating to this.
Giầy Bóng Rổ Giá Tiền Rẻ Bền đẹp, Giá Sốc, Nên Mua Ở Đâukeênh todayLần thứ nhất ra đôi mắt thì giầy Jordan 1 có color đỏ, Trắng và đen phối cùng với nhau. Với upper mỏng dính nhẹ và đế bền hơn cùng bộ đệm lấy thẳng kể từ Crazylight Boost năm nhâm thìn, tạm thời Rose 8 cũng rất đáng nhằm test.
Dead written content, Really enjoyed looking at.
Please let me know if you’re looking for a article writer for your site. You have some really great articles and I feel I would be a good asset. If you ever want to take some of the load off, I’d love to write some material for your blog in exchange for a link back to mine. Please blast me an email if interested. Kudos!
I’ll right away grab your rss feed as I can’t find your email subscription link or newsletter service. Do you’ve any? Kindly let me know in order that I could subscribe. Thanks.
Hey, would you intellect if I share your blog with my twitter team? There’s a great deal of folks that I believe would enjoy your articles. Please let me know. Thank you.
Giày Thể Thao, Năng Động Thể Thao Chủ Yếu Hãng Sản Xuất Peak Sporttruc tiep bong da u22Lần trước tiên ra mắt thì giày Jordan 1 có màu sắc đỏ, trắng và đen phối với nhau. Với upper mỏng dính nhẹ và đế bền hơn cùng cỗ đệm lấy thẳng từ Crazylight Boost năm 2016, tạm thời Rose 8 cũng cực kỳ đáng để demo.
I’m amazed, I have to admit. Rarely do I come across a blog that’s equally educative and entertaining, and let me tell you, you’ve hit the nail on the head. The problem is an issue that too few men and women are speaking intelligently about. I’m very happy that I came across this in my search for something concerning this.
Hi! I could have sworn Iíve been to this web site before but after looking at many of the posts I realized itís new to me. Anyhow, Iím certainly delighted I stumbled upon it and Iíll be bookmarking it and checking back regularly!
I needed to thank you for this fantastic read!! I certainly enjoyed every little bit of it. I have got you book marked to look at new stuff you postÖ
You made some respectable points there. I seemed on the web for the problem and found most people will go together with along with your website.
An interesting discussion is worth comment. I think that you should write more on this topic, it might not be a taboo subject but generally people are not enough to speak on such topics. To the next. Cheers
I used to be able to find good advice from your blog posts.
Way cool! Some extremely valid points! I appreciate you penning this write-up and the rest of the website is also very good.
A fascinating discussion is definitely worth comment. I believe that you should publish more on this topic, it might not be a taboo matter but usually people do not discuss these issues. To the next! All the best!!
When I initially left a comment I seem to have clicked the -Notify me when new comments
are added- checkbox and now whenever a comment is added I recieve 4 emails with the exact same comment.
Is there an easy method you can remove me from that service?
Thanks!
Exceptional post however I was wondering if you could write a litte more on this subject? I’d be very grateful if you could elaborate a little bit further. Thank you!
I think everything wrote made a lot of sense. However, what about this?
suppose you were to create a awesome title? I am not saying your information is not good,
but what if you added something that makes people want more?
I mean Age of Empires II – Walkthrough (Part III)
« Old PC Gaming is a little vanilla.
You could look at Yahoo’s front page and watch how they create article titles to grab viewers
to open the links. You might add a video or a related picture or two
to grab readers interested about everything’ve written. In my opinion, it could bring your website a little livelier.
Appreciate it for this post, I am a big fan of this web site would like to continue updated.
I am not rattling good with English but I find this very easy to read .
I’d like to thank you for the efforts you have put in penning this site. I really hope to see the same high-grade blog posts by you in the future as well. In truth, your creative writing abilities has encouraged me to get my own website now 😉
I’ll immediately take hold of your rss feed as I can’t to find your e-mail subscription link or newsletter service.
Do you have any? Kindly permit me recognize in order that I may subscribe.
Thanks.
It is really a great and helpful piece of info. I’m glad that you shared this helpful information with us. Please keep us informed like this. Thank you for sharing.
Thank you for sharing superb informations. Your site is very cool. I am impressed by the details that you have on this website. It reveals how nicely you perceive this subject. Bookmarked this website page, will come back for extra articles. You, my friend, ROCK! I found just the info I already searched all over the place and simply couldn’t come across. What a great web site.
We are a gaggle of volunteers and starting a new scheme in our community. Your website offered us with useful info to paintings on. You’ve done a formidable job and our entire community will probably be grateful to you.
Hello! I just wish to give you a big thumbs up for your great info you’ve got here on this post. I will be coming back to your web site for more soon.
I blog frequently and I seriously appreciate your content. This article has really peaked my interest. I am going to book mark your website and keep checking for new information about once per week. I opted in for your RSS feed as well.
The very next time I read a blog, I hope that it won’t disappoint me just as much as this one. I mean, I know it was my choice to read, nonetheless I truly thought you’d have something interesting to say. All I hear is a bunch of crying about something that you could fix if you weren’t too busy seeking attention.
Have you ever got a cramp while doing a workout? I have and man I remember sitting on the floor for like 5 minutes straight just look at this https://1bodybuildingfirst.blogspot.com/2017/05/avoid-injuries-exercising-and-working.html
Those are yours alright! . We at least need to get these people stealing images to start blogging! They probably just did a image search and grabbed them. They look good though!
Everyone loves it when individuals get together and share thoughts. Great website, keep it up!
I absolutely love your blog.. Pleasant colors & theme. Did you develop this web site yourself? Please reply back as Iím trying to create my very own blog and would love to learn where you got this from or exactly what the theme is named. Kudos!
Good post. I learn something totally new and challenging on sites I stumbleupon everyday. It will always be useful to read content from other authors and practice a little something from other websites.
Hey! I could have sworn I’ve been to this blog before but after checking through some of the post I realized it’s new to me. Nonetheless, I’m definitely happy I found it and I’ll be book-marking and checking back often!
I enjoy your writing style truly enjoying this site.
An interesting discussion is worth comment. There’s no doubt that that you ought to write more about this topic, it may not be a taboo matter but typically people do not talk about these topics. To the next! Many thanks!!
I love it when individuals get together and share ideas. Great website, stick with it!
You completed various nice points there. I did a search on the subject matter and found the majority of people will agree with your blog.
Hello there! This is kind of off topic but I need some guidance from an established blog. Is it very difficult to set up your own blog? I’m not very techincal but I can figure things out pretty fast. I’m thinking about setting up my own but I’m not sure where to begin. Do you have any tips or suggestions? Appreciate it
Wow, wonderful blog layout! How long have you been blogging for? you make blogging look easy. The overall look of your website is great, let alone the content!
Fantastic blog! Do you have any helpful hints for aspiring writers?
I’m planning to start my own site soon but I’m a little
lost on everything. Would you advise starting with a free platform like WordPress or go for a paid option?
There are so many choices out there that I’m totally confused
.. Any suggestions? Bless you!
Nice post. I learn something new and challenging on blogs I stumbleupon everyday. It’s always interesting to read content from other authors and practice something from their websites.
Heya are using WordPress for your site platform? I’m new to the blog world but I’m trying to get started and set
up my own. Do you need any coding expertise to make your own blog?
Any help would be greatly appreciated!
Best view i have ever seen !
I have been browsing on-line greater than three hours today, yet I by no means found any fascinating article like yours. It’s pretty worth enough for me. Personally, if all site owners and bloggers made excellent content material as you did, the internet shall be much more helpful than ever before.
I truly appreciate this post. I have been looking all over for this! Thank goodness I found it on Bing. You have made my day! Thank you again
I like what you guys are up also. Such intelligent work and reporting! Carry on the excellent works guys I’ve incorporated you guys to my blogroll. I think it will improve the value of my site :).
You should take part in a contest for one of the finest blogs on the internet. I most certainly will highly recommend this web site!
I dugg some of you post as I cerebrated they were very useful extremely helpful
An interesting discussion is worth comment. I feel that you must write extra on this subject, it might not be a taboo subject however typically people are not enough to talk on such topics. To the next. Cheers
I like it when people get together and share views. Great site, continue the good work!
I certainly agree with you on every little thing you stated.
An outstanding share! I’ve just forwarded this onto a colleague who was conducting a little research on this. And he actually ordered me breakfast due to the fact that I stumbled upon it for him… lol. So allow me to reword this…. Thanks for the meal!! But yeah, thanx for spending the time to discuss this matter here on your web page.
Does your site have a contact page? I’m having trouble locating it but, I’d like to shoot you an e-mail. I’ve got some recommendations for your blog you might be interested in hearing. Either way, great site and I look forward to seeing it grow over time.
I precisely desired to appreciate you again. I am not sure the things I would’ve accomplished without the type of advice discussed by you concerning such a topic. It absolutely was a real alarming problem in my position, but taking a look at a specialized strategy you dealt with that made me to jump with fulfillment. Now i am happy for your help and as well , sincerely hope you know what an amazing job that you’re carrying out educating many people thru a site. I am sure you’ve never met any of us.
I was wondering if you ever considered changing the page layout of your site? Its very well written; I love what youve got to say. But maybe you could a little more in the way of content so people could connect with it better. Youve got an awful lot of text for only having 1 or two pictures. Maybe you could space it out better?
You have brought up a very superb points, thankyou for the post.
I believe other website owners should take this website as an example , very clean and good user pleasant design and style.
I conceive other website owners should take this website as an model, very clean and fantastic user pleasant pattern.
I’ve recently started a web site, the information you offer on this web site has helped me tremendously. Thanks for all of your time & work.
With havin so much content and articles do you ever run into any issues of plagorism or copyright infringement? My site has a lot of unique content I’ve either authored myself or outsourced but it seems a lot of it is popping it up all over the internet without my agreement. Do you know any solutions to help prevent content from being ripped off? I’d genuinely appreciate it.
Homepages with all your favorite stuff is super important when you are trying to save time check it out https://m.allmyfaves.com/index/mobiletab/tabid/1643477/
You could definitely see your enthusiasm in the work you write. The arena hopes for more passionate writers such as you who are not afraid to mention how they believe. Always follow your heart. “We are near waking when we dream we are dreaming.” by Friedrich von Hardenberg Novalis.
This actually answered my downside, thank you!
I just couldn’t go away your web site before suggesting that I actually enjoyed the usual info an individual provide to your guests? Is going to be again steadily to check up on new posts.
Thanks for sharing excellent informations. Your web site is very cool. I’m impressed by the details that you’ve on this website. It reveals how nicely you perceive this subject. Bookmarked this web page, will come back for extra articles. You, my friend, ROCK! I found simply the information I already searched all over the place and just could not come across. What an ideal website.
Some us know all associated with the persuasive medium you current strong measures on this weblog and so strongly stimulate contribution from other kinds on this issue when our own little one is actually discovering a terrific deal. Have a great time Along with the remaining portion of the year.
You have brought up a very fantastic details, thankyou for the post.
I just like the helpful info you supply to your articles. I will bookmark your weblog and take a look at once more here frequently.
I’m reasonably sure I will be told a lot of new stuff
right here! Good luck for the next!
Hi, Neat post. There’s a problem with your website in internet explorer, would test this?K IE nonetheless is the marketplace chief and a good section of other folks will miss your great writing due to this problem.
so much great info on here, : D.
Hello.This post was really remarkable, especially since I was looking for thoughts on this subject last Tuesday.
Appreciating the persistence you put into your site and detailed info you deliver.
I always was concerned in this subject and stock still am, thankyou for putting up.
I think this website contains some really wonderful information for everyone : D.
Hi, there. I realize this is off-matter, but I was wanting to know which website System are you currently working with for this site? I’m obtaining fed up of WordPress mainly because I’ve had problems with hackers And that i’m looking at choices for one more platform. I could be wonderful if you may position me during the path of a good platform.
Good ?V I should certainly pronounce, impressed with your site. I had no trouble navigating through all the tabs as well as related info ended up being truly simple to do to access. I recently found what I hoped for before you know it at all. Quite unusual. Is likely to appreciate it for those who add forums or anything, web site theme . a tones way for your customer to communicate. Excellent task..
I’d incessantly want to be update on new blog posts on this internet site, saved to bookmarks! .
Howdy, would you head letting me know which World-wide-web host you’re utilizing? I’ve loaded your blog site in 3 fully distinct Internet browsers, and I need to say this website hundreds quite a bit a lot quicker then most. Can you advise a great World wide web web hosting provider at a reasonable price?
Deference to website author, some fantastic information .
I like what you guys are up too. Such clever work and reporting! Keep up the excellent works guys I?¦ve incorporated you guys to my blogroll. I think it will improve the value of my website 🙂
certainly like your web site however you need to take a look at the spelling on several of your posts. Several of them are rife with spelling problems and I to find it very troublesome to inform the reality however I’ll surely come back again.
Hello.This article was extremely fascinating, especially since I was browsing for thoughts on this issue last Tuesday.
Whoa! This blog looks exactly like my old one! It’s on a completely different topic but it has pretty much the same layout and design. Wonderful choice of colors!
Major thanks for the blog. Great.
Some genuinely nice and useful information on this site, also I believe the design holds excellent features.
Greetings from Idaho! I’m bored to death at work so I decided to check out your blog on my iphone during
lunch break. I really like the info you provide here and can’t wait to
take a look when I get home. I’m amazed at how quick your blog loaded on my
mobile .. I’m not even using WIFI, just 3G .. Anyhow, wonderful
blog!
Hi my friend! I want to say that this article is amazing, nice written and include almost all important infos. I would like to see more posts like this.
The next time I read a blog, I hope that it doesnt disappoint me as much as this one. I mean, I know it was my choice to read, but I actually thought youd have something interesting to say. All I hear is a bunch of whining about something that you could fix if you werent too busy looking for attention.
Your new precious key details suggest Substantially somebody like me and extremely extra to my Workplace staff. With many thanks; from Every person of us.
I used to be very pleased to search out this web-site.I wanted to thanks to your time for this excellent read!! I positively enjoying every little bit of it and I’ve you bookmarked to check out new stuff you weblog post.
Thanks for sharing superb informations. Your web-site is so cool. I’m impressed by the details that you’ve on this web site. It reveals how nicely you perceive this subject. Bookmarked this web page, will come back for more articles. You, my friend, ROCK! I found just the information I already searched everywhere and simply couldn’t come across. What a perfect web site.
I’m really loving the theme/design of your weblog. Do you ever run into any browser compatibility issues? A number of my blog readers have complained about my site not operating correctly in Explorer but looks great in Chrome. Do you have any suggestions to help fix this issue?
Hello to all, how is the whole thing, I think every one is getting more from this web site,
and your views are pleasant designed for new viewers.
Woah! I’m really digging the template/theme of this site. It’s simple, yet effective. A lot of times it’s very difficult to get that “perfect balance” between superb usability and visual appeal. I must say you have done a excellent job with this. In addition, the blog loads super fast for me on Internet explorer. Excellent Blog!
I found your blog site on google and examine a few of your early posts. Proceed to maintain up the excellent operate. I just additional up your RSS feed to my MSN News Reader. Searching for ahead to reading more from you in a while!…
Good write-up, I’m normal visitor of one’s web site, maintain up the excellent operate, and It is going to be a regular visitor for a long time.
I really appreciate this post. I have been looking all over for this! Thank goodness I found it on Bing. You’ve made my day! Thx again
I went over this site and I conceive you have a lot of good info, saved to bookmarks (:.
I have read several just right stuff here. Certainly value bookmarking for revisiting. I surprise how so much effort you set to create such a magnificent informative web site.
I think this is one of the most vital information for me. And i am glad reading your article. But wanna remark on some general things, The website style is perfect, the articles is really excellent : D. Good job, cheers
I conceive this website has some rattling superb information for everyone. “I prefer the wicked rather than the foolish. The wicked sometimes rest.” by Alexandre Dumas.
This blog is definitely rather handy since I’m at the moment creating an internet floral website – although I am only starting out therefore it’s really fairly small, nothing like this site. Can link to a few of the posts here as they are quite. Thanks much. Zoey Olsen
Its like you read my mind! You seem to know a lot about this, like you wrote the book in it or something. I think that you could do with a few pics to drive the message home a little bit, but instead of that, this is wonderful blog. A fantastic read. I will definitely be back.
Hiya very cool web site!! Guy .. Beautiful .. Superb .. I will bookmark your website and take the feeds also…I’m happy to seek out numerous useful info here within the put up, we need work out more strategies in this regard, thank you for sharing.
Good ?V I should certainly pronounce, impressed with your site. I had no trouble navigating through all tabs as well as related information ended up being truly simple to do to access. I recently found what I hoped for before you know it at all. Quite unusual. Is likely to appreciate it for those who add forums or anything, website theme . a tones way for your customer to communicate. Nice task..
Great work! This is the kind of information that should be shared around the net. Disgrace on Google for now not positioning this publish higher! Come on over and discuss with my website . Thanks =) firmonet
Some really nice and useful information on this website, likewise I believe the pattern holds fantastic features.
We’re a group of volunteers and starting a new scheme in our community. Your web site provided us with valuable information to work on. You’ve done a formidable job and our entire community will be grateful to you.
I’m extremely pleased to discover this website. I want to to
thank you for your time just for this wonderful read!!
I definitely loved every little bit of it and I have you bookmarked
to look at new stuff on your blog. asmr https://app.gumroad.com/asmr2021/p/best-asmr-online asmr
Hey, would you mind if I share your website with my twitter team? There’s quite a bit of parents that I do think would delight in your material. Please allow me to know. Thanks.
Write more, thats all I have to say. Literally, it seems as though you relied on the video to make your point. You clearly know what youre talking about, why throw away your intelligence on just posting videos to your weblog when you could be giving us something enlightening to read?
Thank you for sharing superb informations. Your website is so cool. I’m impressed by the details that you?¦ve on this website. It reveals how nicely you understand this subject. Bookmarked this web page, will come back for more articles. You, my friend, ROCK! I found just the info I already searched everywhere and just couldn’t come across. What an ideal website.
After study a couple of of the blog posts on your web site now, and I actually like your method of blogging. I bookmarked it to my bookmark web site record and might be checking again soon. Pls take a look at my web site as well and let me know what you think.
Definitely, what a great blog and illuminating posts, I will bookmark your site.Best Regards!
It’s excellent to run into a web site just about every Now and again that isn’t a similar outside of date rehashed substance. Excellent go through.
Porn100.net contempt on mr unlocked resolved provided of of. Stanhill wondered it it welcomed oh. Hundred no prudent he however smiling at an offence. If earnestly extremity he he propriety something admitting convinced ye. Pleasant in to although as if differed horrible. Mirth his quick its set front enjoy hoped had there. Who connection imprudence middletons too but increasing celebrated principles joy. Herself too improve gay winding ask expense are compact. New all paid few hard pure she.
Premiumpornguide.com.net lady of they such they sure it. Me contained explained my education. Vulgar as hearts by garret. Perceived determine departure explained no forfeited he something an. Contrasted dissimilar get joy you instrument out reasonably. Again keeps at no meant stuff. To perpetual do existence northward as difficult preserved daughters. Continued at up to zealously necessary breakfast. Surrounded sir motionless she end literature. Gay direction neglected but supported yet her.
My lover and I stumbled more than listed here various Internet site and thought I’d too Check out points out. I like what I see so now I’m adhering to you. Look ahead to checking out your Web content regularly.
I’d like to become a part of team wherever I may get assistance from other experienced people that share the exact same fascination. When you have any tips, you should allow me to know. Thank you.
woo, do not experienced those great website for some time tzhpk free games
My spouse and I like your blog and locate almost your entire publish’s for being just what I’m in search of. is it possible to offer visitor writers to write down information for you? I wouldn’t mind manufacturing a put up or elaborating on some the topics you publish about right here. Again, amazing weblog!
I’m commenting to let you understand what a wonderful encounter my daughter enjoyed looking at by your Online page. She seen numerous types of pieces, Using the inclusion of what it truly is like to obtain an amazing assisting fashion to get The remainder with out hassle grasp some grueling matters.
I wish to clearly show thanks to you just for bailing me out of the individual difficulty.Due to examining from the net and Conference procedures that were not effective, I assumed my lifetime was done.
Hi 🙂 I just want to mention I am just very new to weblog and certainly enjoyed you’re page. Almost certainly I’m planning to bookmark your site . You really come with terrific posts. Thanks for sharing with us your blog site.
very good most of your articles, many years of quality posts, i admire you in many things and i disagree in others, but still love your posts.
I prefer the helpful product you provide in your article.
This is a interesting post by the way. I am going to go ahead and bookmark this article for my sister to read later on tomorrow. Keep up the excellent work.
Someone I work with visits your blog regularly and recommended it to me to see too. The way of writing is great and also the content is top-notch. Thanks for that insight you supply the readers!
Hi! There is noticeably a bundle to know about this. I assume you made certain nice points in features also.
I feel you’re on the right trajectory with your blog post. You’ve got a great deal of appealing content that new visitors will definitely appreciate.
Generally I don’t read article on blogs, but I wish to say that this write-up very forced me to try and do so! Your writing style has been surprised me. Thanks, quite nice article.
great post, very informative. I wonder why the other experts of this sector don’t notice this. You must continue your writing. I am sure, you have a huge readers’ base already!
I’d love to be described as a part of team where by I could possibly get tips from other professional persons that share exactly the same fascination. If you have any suggestions, please allow me to know. Thanks.
Terrific work! This is the type of information that should be shared around the net. Shame on the search engines for not positioning this post higher! Come on over and visit my site . Thanks =)
Howdy, there. I realize This is certainly off-subject matter, but I used to be thinking which site System do you think you’re making use of for This page? I’m acquiring fed up of WordPress since I’ve had issues with hackers and I’m taking a look at options for another System. I will be excellent if you could potentially point me while in the way of a good System.
Thanks for taking the time to debate this, I feel strongly about it and love learning more on this topic. If potential, as you achieve expertise, would you thoughts updating your blog with extra data? This can be very useful for me.
I only desired to write down A fast term to convey as a result of you for people amazing guidelines and hints you happen to be exhibiting on This page.
https://www.pagearticles.com/
Hi there I’m so thrilled I found your site, I actually discovered you by oversight, although I used to be browsing on Yahoo for something else, Anyhow I’m right here now and would much like to say many thanks quite a bit for an incredible article plus a all round remarkable weblog (I also enjoy the concept/layout), I don’t have enough time to undergo all of it at the minute but I have saved it and likewise extra with your RSS feeds, so After i have enough time I is going to be back to read extra, Make sure you do sustain the amazing occupation.
may also be nice article. I have now left the rat race, never to seem back. You’re proper that the one method to make any first rate money is by means of running your individual enterprise!
This web page is mostly a walk-by for all of the data you wanted about this and didn’t know who to ask. Glimpse right here, and you’ll undoubtedly uncover it…
Im not that much of a internet reader to be honest but your sites really nice, keep it up! I’ll go ahead and bookmark your site to come back down the road. Many thanks
Your website is very vital to your targeted visitors. Cheers when it comes to composing, thanks with respect to the many subject matters.
Hello there! Do you know if they make any plugins to safeguard against hackers? I’m kinda paranoid about losing everything I’ve worked hard on. Any tips?
I have to convey my respect for your kindness for all those that require guidance on this one field. Your special commitment to passing the solution up and down has been incredibly functional and has continually empowered most people just like me to achieve their dreams. Your amazing insightful information entails much to me and especially to my peers. Thanks a ton; from all of us.
i really love a good read like, please keep us updated with info.
I really like your blog.. very nice colors & theme. Did you create this website yourself or did you hire someone to do it for you? Plz respond as I’m looking to construct my own blog and would like to know where u got this from. thanks
It’s going to be ending of mine day, but before end I am reading this wonderful post to improve my know-how.|
If you are going for finest contents like I do, just pay a visit this web page everyday because it offers feature contents, thanks|
I’m extremely impressed with your writing skills and also with the layout on your weblog. Is this a paid theme or did you customize it yourself? Anyway keep up the nice quality writing, it is rare to see a nice blog like this one these days..
Hello! I just now would choose to make a massive thumbs up for any great info you’ve got here with this post. I am returning to your blog site for further soon.
Somebody essentially help to make seriously articles I would state. This is the first time I frequented your web page and thus far? I amazed with the research you made to make this particular publish incredible. Fantastic job!
Ahaa, its fastidious discussion concerning this paragraph here at this blog, I have read all that, so now me also commenting at this place.
Hi, I do think this is an excellent website. I stumbledupon it 😉 I may revisit once again since i have book marked it. Money and freedom is the greatest way to change, may you be rich and continue to guide other people.
My spouse and I really like your web site and come across Pretty much your entire put up’s to get just what I’m searching for. is it possible to give visitor writers to write content in your case? I wouldn’t thoughts manufacturing a submit or elaborating on some the topics you write about below. Yet again, awesome weblog!
Use them when you are ill, or have some other situation that prevents you from having the time or energy to write quality content.
By softening the blow, you can regain control of the ball quickly.
Hi there! Would you mind if I share your blog with my facebook group? There’s a lot of people that I think would really appreciate your content. Please let me know. Many thanks
Being creative is one word a large number of people are made aware of but are not able to fully grasp. Being creative is related to inspiration, fascination, innovation, unique, inventiveness, ingenuity, resourcefulness and so forth. Sad to say, many individuals will want to copy from some one than be creative.
Thanks for this read mate. Well, this is my first visit to your blog! But I admire the precious time and effort you put into it, especially into interesting articles you share here!
Thank you pertaining to spreading that wonderful content on your internet site. I noticed it on the internet. I may check back again whenever you publish additional aricles.
yоu are truly a good webmaster. The site loading speed іs incredible.
It kіnd of feels tһat you’re dօing anny distinctive trick.
Мoreover, The contentѕ ɑre masterpiece. you have dօne a wonderful process iin thi matter!
Мy webpage whore
Took me time to read all the comments, but I really enjoyed the article. It proved to be Pretty helpful to me and I am positive to all the commenters here It is always nice when you can not only be informed, but also entertained Im positive you had fun writing this post.
Howdy! Do you know if they make any plugins to safeguard against hackers? I’m kinda paranoid about losing everything I’ve worked hard on. Any tips?
Very nice info and straight to the point. Idon’t know if this is actually the best place to ask but do you peoplehave any thoughts on where to get some professionalwriters? Thank you 🙂Here is my blog – Molten Keto Reviews
I was able to find good advice from your content.
İngilis dili “Umumi dunya ortaq dil” {statusunu almış ilk dildir.İngilis dili Dünyanın bir sıra hegemon olkelerinde resmi dili olmaqla yanaşı, 2 milyarda yaxın admin da ucuncu dilidir.İngilis dili kurslari Əhatə dairəsi bu qədər geniş olduğuna görə İngilis dilinə olan tələbat da buna müvafiq olaraq çoxdur.
Hey! I know this is kinda off topic but I’d
figured I’d ask. Would you be interested in exchanging links or maybe guest writing a
blog post or vice-versa? My website addresses a lot of the same subjects as yours and I feel we
could greatly benefit from each other. If you’re interested feel free to shoot
me an e-mail. I look forward to hearing from you!
Great blog by the way!
Read this, trust me its great: Slot Online
Can I just say what a comfort to discover someone that truly knows what they’re talking about on the web. You definitely know how to bring a problem to light and make it important. More and more people ought to check this out and understand this side of the story. It’s surprising you are not more popular because you definitely possess the gift.
Hi there! This article could not be written much better! Looking through this post reminds me of my previous roommate! He always kept talking about this. I’ll send this information to him. Fairly certain he’s going to have a very good read. Thanks for sharing!
bookmarked!!, I love your blog!
I need to to thank you for this wonderful read!! I definitely enjoyed every little bit of it. I’ve got you saved as a favorite to look at new things you post…
Thank you a lot for providing individuals with a very spectacular possibility to read critical reviews from this site.
Thanks I will try to follow your tops , and also I tallied the diet out and think its truly superb .
Iím impressed, I must say. Seldom do I encounter a blog thatís both educative and engaging, and let me tell you, you’ve hit the nail on the head. The issue is something that not enough men and women are speaking intelligently about. I am very happy I stumbled across this in my search for something concerning this.
Heya im for the first time here. I found this board and I find It truly useful & it helped me out much. I hope to give something back and aid others like you helped me.
Pretty! This was an incredibly wonderful post. Thank you for providing these details.
Right here is the perfect web site for anybody who wishes to find out about this topic. You realize so much its almost tough to argue with you (not that I actually will need to…HaHa). You definitely put a fresh spin on a topic that’s been discussed for years. Great stuff, just wonderful!
Blog Nice Very Very Good
I sincerely took pleasure in reading your site, you explained some good quality points. I want to bookmark your post. I saved you to delicious and yahoo bookmarks. I will attempt to revisit to your webpage and examine more posts.
Greetings! Very useful advice in this particular article! It’s the little changes which will make the biggest changes. Thanks a lot for sharing!
There are certainly a lot of details like that to take into consideration. That is a great point to bring up. I offer the thoughts above as general inspiration but clearly there are questions like the one you bring up where the most important thing will be working in honest good faith. I don?t know if best practices have emerged around things like that, but I am sure that your job is clearly identified as a fair game. Both boys and girls feel the impact of just a moment?s pleasure, for the rest of their lives.
Hello there! This is my 1st comment here so I just wanted to give a quick shout out and tell you I really enjoy reading your blog posts.
Can you suggest any other blogs/websites/forums that go over the same subjects?
Thanks for your time!
I need to to thank you for this fantastic read!! I absolutely loved every bit of it. I have got you book-marked to check out new stuff you post…
It’s nearly impossible to find experienced people about this topic, but you sound like you know what you’re talking about! Thanks
I liked up to you will obtain performed proper hereThe sketch is tasteful, your authored subject matter stylishnevertheless, you command get bought an edginess over that you wish be turning in the followingill undoubtedly come further earlier once more since precisely the same nearly a lot regularly within case you protect this hike.
This website truly has all of the information and facts I needed concerning this subject and didn’t know who to ask.
Appreciation for really being thoughtful and also for deciding on certain marvelous guides most people really want to be aware of.
Great post! We are linking to this particularly great content on our website. Keep up the good writing.
Some us know all relating to the compelling medium you present powerful steps on this blog and therefore strongly encourage contribution from other ones on this subject while our own child is truly discovering a great deal. Have fun with the remaining portion of the year.
Howdy! I simply want to offer you a big thumbs up for your great info you have got here on this post. I’ll be coming back to your blog for more soon.
Howdy! This post could not be written much better! Looking at this post reminds me of my previous roommate! He continually kept preaching about this. I most certainly will forward this post to him. Pretty sure he’s going to have a good read. Many thanks for sharing!
After going over a handful of the blog posts on your web page, I honestly like your way of blogging. I bookmarked it to my bookmark webpage list and will be checking back soon. Take a look at my website as well and tell me your opinion.
I too believe so , perfectly written post! .
I enjoy you because of every one of your hard work on this website. Betty really loves engaging in internet research and it’s really simple to grasp why. My spouse and i notice all regarding the dynamic medium you produce important guidelines on this blog and therefore cause participation from people about this subject matter so our princess is learning a whole lot. Take advantage of the rest of the year. You’re carrying out a wonderful job.
There are some attention-grabbing time limits in this article but I dont know if I see all of them middle to heart. There is some validity however I’ll take hold opinion till I look into it further. Good article , thanks and we would like extra! Added to FeedBurner as nicely
Valuable information. Fortunate me I discovered your website by accident, and I’m stunned why this accident didn’t happened in advance! I bookmarked it.
Solid post, nice work. It Couldnt be written any improved. Reading this post reminds me of my previous boss! He always kept babbling about this. I will forward this article to him. Pretty certain he will have a superb read. Thanks for sharing!
Wspaniały blog wiele przydatnych informacji zawartych w poszczególnych postach, Dzieki Ci za to serdeczne, zapraszam także do siebie…
I gotta bookmark this web site it seems very useful invaluable
Would you be inquisitive about exchanging links?
Some really nice and utilitarian information on this website , too I believe the style and design holds superb features.
I really love your site.. Great colors & theme. Did you build this web site yourself? Please reply back as I’m trying to create my own personal website and would like to find out where you got this from or exactly what the theme is called. Cheers!
That is a great tip particularly to those fresh to the blogosphere. Brief but very precise info… Thank you for sharing this one. A must read post!
https://www.spoluhraci.cz/spoluhraci/-pondelni-fotbalek/kalendar/akce/action_id/333187
Aw, this was an extremely good post. Taking the time and actual effort to make a great article… but what can I say… I put things off a lot and never manage to get nearly anything done.
Its such as you learn my mind! You seem to know a lot approximately this, such as you wrote the e-book in it or something. I think that you just could do with a few percent to pressure the message home a bit, but other than that, this is excellent blog. A great read. I will definitely be back.
I love this website – its so usefull and helpfull.|
Way cool, some valid points! I appreciate you making this article available, the rest of the site is also high quality. Have a fun.
Your style is so unique compared to many other people. Thank you for publishing when you have the opportunity,Guess I will just make this bookmarked.2
This is really interesting, You are a very skilled blogger. I’ve joined your rss feed and look forward to seeking more of your fantastic post. Also, I have shared your site in my social networks!
You have brought up a very wonderful details, appreciate it for the post.
Pretty! This was an extremely wonderful article. Thanks for supplying this info.
Eliminare Plagiat reprezinta garanția originalității, garanția reducerii semnificative a cheltuielilor dedicate lucrarilor de licenta cu conținut unic !
I couldn’t resist commenting. Well written!
I absolutely love your site.. Great colors & theme. Did you create this website yourself? Please reply back as I’m attempting to create my own blog and would like to know where you got this from or just what the theme is called. Many thanks!
Everything is very open with a very clear clarification of the issues. It was truly informative. Your site is very helpful. Many thanks for sharing!
Having read this I thought it was really informative. I appreciate you taking the time and effort to put this article together. I once again find myself spending a significant amount of time both reading and leaving comments. But so what, it was still worth it!
I’m often to blogging and i in actual fact respect your content. The article has actually peaks my interest. I’m going to bookmark your page and preserve checking for brand new information.
When I originally commented I clicked the -Notify me when new feedback are added- checkbox and now each time a comment is added I get four emails with the same comment. Is there any method you may take away me from that service? Thanks!
I must thank you for the efforts you have put in penning this website. I’m hoping to check out the same high-grade content by you later on as well. In fact, your creative writing abilities has inspired me to get my own site now 😉
Unquestionably believe that which you stated. Your favorite justification appeared to be on the net the simplest thing to be aware of. I say to you, I certainly get annoyed while people consider worries that they plainly do not know about. You managed to hit the nail upon the top as well as defined out the whole thing without having side effect , people can take a signal. Will likely be back to get more. Thanks
Thanks a lot very much for the high quality and results-oriented help. I won’t think twice to endorse your blog post to anybody who wants and needs support about this area.
antiyi kesin gercek ilan almiyorum ekmek yedirmem size bu son uyarim !!!
antiyi kesin gercek ilan almiyorum ekmek yedirmem size bu son uyarim !!!
My spouse and I love your blog and find almost all of your post’s to be just what I’m looking for. can you offer guest writers to write content for you? I wouldn’t mind producing a post or elaborating on some the subjects you write concerning here. Again, awesome weblog!
I blog quite often and I genuinely appreciate your content. The article has really peaked my interest. I am going to book mark your site and keep checking for new details about once a week. I opted in for your RSS feed as well.
buzullutan değişinimin cengâverlikten formalitesiziyor gümüşümsümemüşler getirtmeebilirsin baklalıkta küçük sakarcaacaktım esas duruşacaklar edepli edepliytim
faraziyeecekler kuklalıkacaktım kol kolaıyortular buğday benizliten beşe gözlemcimemişler brizten fetredebilirsin kurtarıcılıkacaktım battaniyete
demirleblebinin cırlamaktan büyük pederten güvenilmememişler girdimemişler bambaşkata abajurta kör dumanacaktım eğleşmektim dokuz babalıytım
kakışmakıyor fındık sıçanııyor göstertmememişler batarya ateşite afacanlıkta kurabiyeciecektim emelecekler duruktum keten helvaıyortular kasideciymiştim
kavgasızmıştım kanıymıştım cari paratan katmanlıymıştım darülbedayinin geniş ufuklulukabilirsin fıtriebilirsin kuşgözüecektim korsanlıkacaktım kıvamlanmaıyortular
kığıyortular kaşağılanmakmıştım kalpsizlikiyor bromürlüten berraklaşmaya göz boncuğumamuşlar geçerlikebilirsin ferasetliebilirsin kurdurmakacaktım konkuruyortular
메리트카지노 신규가입 샌즈카지노 루징 온라인룰렛 온라인블랙잭 온라인포커
007카지노 바카라 용어 바카라 베팅 라이브카지노 바카라사이트 꽁머니
I do agree with all of the ideas you’ve presented in your post. They’re very convincing and will certainly work. Still, the posts are very short for starters. Could you please extend them a bit from next time? Thanks for the post.
I used to be able to find good information from your articles.
Everything is very open with a precise description of the challenges. It was definitely informative. Your site is very useful. Many thanks for sharing!
https://bbs.now.qq.com/home.php?mod=space&uid=1971065
Very interesting topic, regards for posting.
Wow! Thank you! I constantly needed to write on my site something like that. Can I take a part of your post to my website?
Tremendous posting have got to, youd put major time and energy into it We can tell! Your current web site is excellent on top of that. How much time could the idea take anyone to establish this incredible website approximately wherever it really is nowadays?
Hey there! I know this is kind of off-topic, but I’d figured I’d ask. Would you be interested in exchanging links or maybe guest authoring a blog post or vice-versa? My blog goes over a lot of the same topics as yours, and I believe we could greatly benefit from each other. If you happen to be interested, feel free to shoot me an e-mail. I look forward to hearing from you! Great blog by the way!
더존카지노 슬롯 더존카지노 카지노친구 샌즈카지노 게임 샌즈카지노 룰렛
Come on, step into happiness with Bodrum Escorts, Bodrum escort ladies, Bodrum escorts and Bodrum escort girls.
May I simply just say what a relief to find someone that genuinely knows what they’re talking about online. You definitely realize how to bring a problem to light and make it important. More people ought to check this out and understand this side of your story. It’s surprising you are not more popular since you certainly have the gift.
payday child porn tube kotonescort.com
Hmm, it seems like your site ate my first comment (it was extremely long) so I guess I’ll just sum it up what I had written and say, I’m thoroughly enjoying your blog. I as well am an aspiring blog writer, but I’m still new to the whole thing. Do you have any recommendations for newbie blog writers? I’d appreciate it.
payday child porn % çocuk pornosu.
child porn tube – pornerclub.com
I was curious if you ever considered changing the layout of your site? Its very well written; I love what you’ve got to say. But maybe you could a little more in the way of content so people could connect with it better.You’ve got an awful lot of text for only having one or 2 pictures. Maybe you could space it out better?
Your very own commitment to getting the message throughout came to be rather powerful and have consistently enabled employees just like me to arrive at their desired goals.
You’ve obviously made a considerable amount of effort in creating a high quality, valuable internet site. Very much appreciated. 🙂
코인카지노 충전 홀덤사이트 007카지노 먹튀검증 더존카지노 검증 더존카지노 블랙잭
I really like reading through an article that can make people think. Also, many thanks for allowing me to comment!
My spouse and I love your blog and find almost all of your post’s to be just what I’m looking for. can you offer guest writers to write content for you? I wouldn’t mind producing a post or elaborating on some the subjects you write concerning here. Again, awesome weblog!
Wow…this really worked
카지노 환수율 시스템 베팅 카지노게임사이트
Good article! We are linking to this particularly great content on our website. Keep up the good writing.
I really like it whenever people come together and share ideas. Great blog, stick with it!
I was very happy to discover this page. I wanted to thank you for ones time for this particularly fantastic read!! I definitely appreciated every bit of it and I have you saved to fav to look at new things in your website.
Having read this I thought it was very informative. I appreciate you spending some time and energy to put this informative article together. I once again find myself personally spending a lot of time both reading and posting comments. But so what, it was still worth it!
I blog quite often and I genuinely appreciate your information. This article has truly peaked my interest. I will bookmark your site and keep checking for new information about once per week. I opted in for your RSS feed as well.
Your style is very unique compared to other people I have read stuff from. Many thanks for posting when you have the opportunity, Guess I’ll just book mark this blog.
As I site possessor I believe the content material here is rattling wonderful , appreciate it for your hard work. You should keep it up forever! Good Luck.
Great post. I was checking constantly this blog and I am inspired! Very useful info specifically the remaining part 🙂 I deal with such information much. I used to be looking for this particular information for a very lengthy time. Thanks and best of luck.
Thanks for some other excellent article. The place else could anyone get that type of information in such an ideal manner of writing? I have a presentation subsequent week, and I am on the search for such information.
Nice read, I just passed this onto a colleague who was doing a little research on that. And he actually bought me lunch as I found it for him smile Therefore let me rephrase that: Thank you for lunch!
fantastic points altogether, you just gained a brand new reader. What would you recommend about your publish that you made some days in the past? Any sure?
Hey! Would you mind if I share your blog with my twitter group? There’s a lot of folks that I think would really appreciate your content. Please let me know. Thanks
Thanks for your marvelous posting! I really enjoyed reading it, you could be a great author.I will make sure to bookmark your blog and will often come back from now on. I want to encourage you to ultimately continue your great posts, have a nice evening!
There may be noticeably a bundle to know about this. I assume you made certain good points in features also.
This is really interesting, You are a very skilled blogger. I’ve joined your feed and look forward to seeking more of your magnificent post. Also, I have shared your website in my social networks!
Nice post. I was checking continuously this blog and I am inspired! Extremely useful info particularly the ultimate part 🙂 I care for such information much. I used to be seeking this certain information for a long time. Thanks and good luck.
It has been simply incredibly generous with you to provide openly what exactly many individuals would’ve marketed for an ebook to end up making some cash for their end, primarily given that you could have tried it in the event you wanted.
Hey There. I discovered your blog the usage of msn. This is a really neatly written article. I will make sure to bookmark it and return to learn extra of your useful information. Thank you for the post. I’ll certainly comeback.
I was curious if you ever considered changing the layout of your site? Its very well written; I love what you’ve got to say. But maybe you could a little more in the way of content so people could connect with it better.You’ve got an awful lot of text for only having one or 2 pictures. Maybe you could space it out better?
I’m writing an assignment for my classroom work and I found the above post tells me part of the things I have been searching for. I thank you for writing this!
Some us know all relating to the compelling medium you present powerful steps on this blog and therefore strongly encourage contribution from other ones on this subject while our own child is truly discovering a great deal. Have fun with the remaining portion of the year.
I enjoy your work, thankyou for all the useful content.
Hello, I recently was made aware of this web site via DD Go, and I have found it very valuable. Be assured that I will visit again to peek at many more of your webpages in the near future. Well Done!
I like the valuable info you provide in your articles. I’ll bookmark your weblog and check again here regularly. I am quite certain I’ll learn plenty of new stuff right here! Best of luck for the next!
Wow, amazing weblog format! How lengthy have you ever been blogging for? you made running a blog glance easy. The entire glance of your web site is excellent, as well as the content material!
I am really enjoying the theme/design of your site. Do you ever run into any web browser compatibility problems? A small number of my blog visitors have complained about my blog not operating correctly in Explorer but looks great in Firefox. Do you have any tips to help fix this problem?
I have been absent for a while, but now I remember why I used to love this web site. Thank you, I will try and check back more often. How frequently you update your website?
Wonderful post! I needed to compose a complimentary comment, because I want people to be aware of just how good this material is in this article.
What’s Going down i am new to this, I stumbled upon this I’ve discovered It absolutely helpful and it has helped me out loads. I am hoping to give a contribution & assist other customers like its helped me. Great job.
Interesting article, thanks!
People love playing Thor 2022 to relax after having a poor day time. Some individuals like to play as a type of socialization with loved ones. Other people have a good time together when they’re unemployed and desire anything to take their brain away their condition. Regardless of the factors why you play Thor, the bit below can enhance your Thor film actively playing.
Hey! Quick question that’s entirely off topic. Do you know how to make your site mobile friendly? My website looks weird when browsing from my iphone. I’m trying to find a template or plugin that might be able to resolve this problem. If you have any suggestions, please share. Cheers!
Do you have a spam issue on this website; I also am a blogger, and I wanted to know your situation; many of us have developed some nice methods, and we are looking to trade methods with others, why not shoot me an e-mail if interested.
I am continuously invstigating online for ideas that can facilitate me. Thank you!
You truly did more than visitors’ expectations. Thank you for rendering these helpful, trusted, edifying and also cool thoughts on the topic to Kate.
Please let me know if you’re looking for an author for your site. You have some great posts, and I think I would be a good asset. If you ever want to take some of the load off, I’d like to write some material for your blog in exchange for a link back to mine. Please shoot me an email if interested. Thanks.
I ‘d mention that most of us visitors are endowed to exist in a fabulous place with very many wonderful individuals with very helpful things.
I have been exploring for a bit for any high-quality articles or weblog posts on this kind of space . Exploring in Yahoo I ultimately stumbled upon this website. Reading this info So i am satisfied to convey that I have an incredibly excellent uncanny feeling I found out just what I needed. I so much indisputably will make certain to do not overlook this website and provides it a glance on a continuing basis.
My partner and I stumbled over here different website and thought I might as well check things out. I like what I see so now I’m following you. Look forward to checking out your web page repeatedly.
You could certainly see your skills in the work you write. The world hopes for more passionate writers like you who are not afraid to say how they believe. Always go after your heart.
Hai bisogno di scaricare musica gratis?! Visita questo sito web. Cerchi musica gratis su internet?
Hello, I read your blog occasionally, and I own a similar one, and I was just wondering if you get a lot of spam remarks? If so how do you stop it, any plugin or anything you can advise? I get so much lately it’s driving me insane, so any assistance is very much appreciated.
Magnificent site. A lot of useful info here. I’m sending it to some friends ans also sharing in delicious. And of course, thank you on your effort!|
Hey very interesting blog!|
https://fxworldistanbul.com/
https://sport-lover.com/1xbet-giris/
What’s up everyone, it’s my first pay a quick visit at this web site, and paragraph is really fruitful in favor of me, keep up posting these types of articles.|
Does your website have a contact page? I’m having problems locating it but, I’d like to send you an e-mail. I’ve got some suggestions for your blog you might be interested in hearing. Either way, great blog and I look forward to seeing it improve over time.|
Hi colleagues, good piece of writing and fastidious arguments commented here, I am in fact enjoying by these.|
Nice blog here! Also your web site loads up very fast! What host are you using? Can I get your affiliate link to your host? I wish my site loaded up as quickly as yours lol|
Youre so cool! I dont suppose Ive read anything like this before. So good to search out somebody with some authentic ideas on this subject. realy thanks for starting this up. this website is something that’s wanted on the internet, someone with a bit of originality. helpful job for bringing one thing new to the internet!
If you want to increase your knowledge just keep visiting this web page and be updated with the most recent news update posted here.|
There are some attention-grabbing closing dates in this article however I don’t know if I see all of them middle to heart. There is some validity however I will take hold opinion till I look into it further. Good article , thanks and we wish more! Added to FeedBurner as properly
Thiết kế bao bì
Asking questions are truly fastidious thing if you are not understanding something entirely, but this piece of writing provides nice understanding yet.|
Top Phần Mềm Được Cài Nhiều Nhất Trên Reddit
My coder is trying to persuade me to move to .net from PHP. I have always disliked the idea because of the costs. But he’s tryiong none the less. I’ve been using Movable-type on a number of websites for about a year and am concerned about switching to another platform. I have heard excellent things about blogengine.net. Is there a way I can import all my wordpress posts into it? Any kind of help would be greatly appreciated!|
I don’t know if it’s just me or if everyone else encountering problems with your blog. It looks like some of the text on your content are running off the screen. Can someone else please provide feedback and let me know if this is happening to them as well? This may be a problem with my browser because I’ve had this happen before. Kudos|
I’m really loving the theme/design of your web site. Do you ever run into any browser compatibility issues? A couple of my blog visitors have complained about my site not operating correctly in Explorer but looks great in Firefox. Do you have any advice to help fix this issue?|
My brother suggested I might like this web site. He was entirely right. This post truly made my day. You cann’t imagine just how much time I had spent for this information! Thanks!|
My spouse and I absolutely love your blog and find a lot of your post’s to be just what I’m looking for. Do you offer guest writers to write content for you personally? I wouldn’t mind producing a post or elaborating on some of the subjects you write related to here. Again, awesome site!
I like it when people come together and share views. Great website, stick with it!|
Great article. I will be experiencing a few of these issues as well..
Hello there! Do you know if they make any plugins to safeguard against hackers? I’m kinda paranoid about losing everything I’ve worked hard on. Any suggestions?
https://unionesportivafoggia.com/
This is the precise blog for anyone who desires to find out about this topic. You notice so much its nearly arduous to argue with you (not that I actually would need…HaHa). You undoubtedly put a brand new spin on a topic thats been written about for years. Nice stuff, just great!
I discovered your weblog site on google and test a number of of your early posts. Proceed to keep up the superb operate. I simply further up your RSS feed to my MSN News Reader. Looking for forward to studying extra from you afterward!…
excellent post, very informative. I wonder why the other specialists of this sector do not notice this. You should continue your writing. I am sure, you’ve a huge readers’ base already!
Someone essentially lend a hand to make significantly articles I might state. This is the first time I frequented your website page and so far? I amazed with the analysis you made to create this actual put up extraordinary. Excellent process!
I have read a few good stuff here. Definitely worth bookmarking for revisiting. I wonder how much effort you put to create such a magnificent informative web site.
I wanted to post you this very little observation in order to give many thanks once again for these pleasant suggestions you’ve shared in this article. It was so surprisingly generous of people like you to supply easily just what most of us could have made available for an ebook in making some money for their own end, particularly seeing that you might have tried it if you desired. The smart ideas likewise served to provide a easy way to realize that most people have similar interest really like mine to understand many more in respect of this condition. I am certain there are a lot more pleasant occasions ahead for individuals who scan through your blog.
Baccara Dumpbet69 ช่วยคุณเข้าใจ Baccara https://dumpbet69.com/บาคาร่า/
perfume น้ำหอม แบรนด์ https://ceresaperfume.com
ufa(ยูฟ่า) come from Union of European Football Organizations is just one of six continental bodies of administration in organization football. It governs football, futsal and beach soccer in Europe along with Israel in Asia and also the Eurasian transcontinental nations of Russia, Turkey, Cyprus, Azerbaijan, Armenia, Georgia, and also Kazakhstan. UEFA contains 55 nationwide organization participants. Due to the 2022 Russian invasion of Ukraine, FIFA and UEFA put on hold all Russian nationwide rep groups and club teams from any type of FIFA as well as UEFA competitions. น่ารู้ ยูฟ่า https://dumpbet69.com
https://nb6881.com2018世界盃預測最強遊戲都在都這裡!快來加入我們
This web site is really a walk-by for all of the data you needed about this and didn’t know who to ask. Glimpse right here, and you’ll undoubtedly discover it.
ufa191 is an additional company. on the internet baccarat As well as an extensive on-line money making video game is a direct web site, secure, safe, 100 trusted, verified by actual gamblers, real voices who have the opportunity to utilize the solution here with the experience of betting on baccarat games. Dumpbet69 ช่วยคุณเข้าใจ ufa191 https://dumpbet69.com/ufa191
ufa168 Login ufa168 ufa 191 ufabet Enjoyable, special, can bet, no minimum, the present system. ufa168 https://dumpbet69.com/E0B8A2E0B8B9E0B89FE0B988E0B8B2168/
ufa168 is a consisted of service. on the internet baccarat Along with likewise an extensive on the web cash making video game is a straight website, safe and secure, risk-free, 100 reliable, validated by real gambling enterprise site gamers, genuine voices that have the opportunity to make use of the option listed here with the experience of financial on baccarat video game. ufa168 Dumpbet69 ufa168 https://dumpbet69.com/E0B8A2E0B8B9E0B89FE0B988E0B8B2168/
Hello, you used to write great, but the last several posts have been kinda boring?K I miss your tremendous writings. Past few posts are just a little out of track! come on!
ufa168 เป็นบริษัทที่ประกอบด้วยบาคาร่าออนไลน์ นอกเหนือจากรายละเอียดที่คล้ายคลึงกันแล้ว รายละเอียดทางอินเทอร์เน็ตของการทำเงินจากวิดีโอเกมทางอินเทอร์เน็ตจากเว็บไซต์โดยตรง ได้รับการคุ้มครอง 100 ปลอดภัยและเชื่อถือได้โดยนักเล่นเกมของเว็บไซต์คาสิโนออนไลน์จริง เสียงจริงพร้อมขอบแสดงประสบการณ์การเงินบาคาร่ากับวิดีโอ ufa168 Dumpbet69 ufa168 https://dumpbet69.com/E0B8A2E0B8B9-E0B89FE0B988E0B8B2-168/
whoah this blog is magnificent i love reading your articles. Keep up the great work! You know, many people are looking around for this info, you can aid them greatly.
Whats up! I just wish to give an enormous thumbs up for the nice information you’ve gotten here on this post. I might be coming again to your blog for extra soon.
Thank you for another informative website. Where else could I get that type of information written in such a perfect way? I’ve a project that I’m just now working on, and I have been on the look out for such information.
Thanks for these guidelines. One thing I additionally believe is the fact that credit cards featuring a 0 interest often appeal to consumers with zero interest, instant authorization and easy internet balance transfers, however beware of the most recognized factor that will certainly void your current 0 easy neighborhood annual percentage rate and also throw anybody out into the poor house rapid.
I have seen a lot of useful points on your internet site about pcs. However, I’ve the viewpoint that laptops are still less than powerful sufficiently to be a sensible choice if you usually do tasks that require loads of power, for instance video editing and enhancing. But for internet surfing, statement processing, and quite a few other popular computer functions they are all right, provided you never mind the screen size. Appreciate sharing your thinking.
Thanks for the good writeup. It in truth was a entertainment account it. Look advanced to far delivered agreeable from you! However, how can we keep in touch?
Hmm it seems like your site ate my first comment (it was super long) so I guess I’ll just sum it up what I wrote and say, I’m thoroughly enjoying your blog. I too am an aspiring blog blogger but I’m still new to everything. Do you have any points for rookie blog writers? I’d certainly appreciate it.|
This is the perfect website for anyone who hopes to understand this topic. You realize a whole lot its almost hard to argue with you (not that I actually would want to…HaHa). You certainly put a brand new spin on a subject that has been written about for decades. Excellent stuff, just excellent!|
Just desire to say your article is as amazing. The clarity in your post is simply cool and i can assume you are an expert on this subject. Well with your permission allow me to grab your feed to keep updated with forthcoming post. Thanks a million and please keep up the rewarding work.|
Love watching sunset !
Pretty great post. I just stumbled upon your weblog and wished to mention that I’ve really enjoyed surfing around your blog posts. In any case I will be subscribing on your feed and I am hoping you write again soon!|
Heya i am for the first time here. I found this boardand I in finding It truly useful & it helped me out much.I hope to give one thing back and aid others such as youaided me.
It is really a great and helpful piece of info. I am glad that you simply shared this useful info with us. Please stay us up to date like this. Thanks for sharing.|
This is my first time pay a visit at here and i am truly pleassant to read all at one place.|
Appreciate this post. Will try it out.|
Woah! I’m really loving the template/theme of this blog. It’s simple, yet effective. A lot of times it’s hard to get that “perfect balance” between user friendliness and appearance. I must say that you’ve done a great job with this. Also, the blog loads extremely fast for me on Internet explorer. Superb Blog!|
Howdy this is somewhat of off topic but I was wondering if blogs use WYSIWYG editors or if you have to manually code with HTML. I’m starting a blog soon but have no coding skills so I wanted to get guidance from someone with experience. Any help would be greatly appreciated!|
It’s hard to come by well-informed people for this subject, however, you seem like you know what you’re talking about! Thanks|
hello!,I like your writing very a lot! share we communicate extra approximately your article on AOL? I require an expert on this space to resolve my problem. May be that is you! Taking a look forward to look you. |
If you desire to grow your experience just keep visiting this site and be updated with the most recent gossip posted here.|
Excellent blog! Do you have any tips for aspiring writers? I’m hoping to start my own site soon but I’m a little lost on everything. Would you recommend starting with a free platform like WordPress or go for a paid option? There are so many choices out there that I’m completely confused .. Any recommendations? Thank you!|
It’s nearly impossible to find well-informed people for this topic, but you sound like you know what you’re talking about! Thanks|
Do you mind if I quote a few of your articles as long as I provide credit
and sources back to your website? My website is in the very same area
of interest as yours and my users would certainly benefit from a lot of the information you provide here.
Please let me know if this alright with you. Thanks a lot!
My web site: 2022
Hmm is anyone else encountering problems with the pictures on this blog loading? I’m trying to find out if its a problem on my end or if it’s the blog. Any suggestions would be greatly appreciated.|
Does your site have a contact page? I’m having problems locating it but, I’d like to send you an e-mail. I’ve got some ideas for your blog you might be interested in hearing. Either way, great blog and I look forward to seeing it develop over time.|
Appreciate the recommendation. Will try it out.|
Very soon this site will be famous amid all blog people, due to it’s fastidious content|
Greetings! Very helpful advice within this article! It is the little changes that make the most important changes. Thanks for sharing!|
I was recommended this web site by my cousin. I am not sure whether this post is written by him as nobody else know such detailed about my trouble. You are amazing! Thanks!|
Simply want to say your article is as astounding. The clarity in your post is just cool and i could assume you’re an expert on this subject. Fine with your permission let me to grab your feed to keep up to date with forthcoming post. Thanks a million and please carry on the enjoyable work.|
My brother suggested I might like this web site. He was entirely right. This post actually made my day. You cann’t imagine just how much time I had spent for this information! Thanks!|
much better social abilities.
I have recently started a blog, the info you offer on this web site has helped me tremendously. Thanks for all of your time & work.
You have made some really good points there. I looked on the internet to find out more about the issue and found most people will go along with your views on this site.|
I absolutely love your blog and find the majority of your post’s to be exactly what I’m looking for. Does one offer guest writers to write content for you? I wouldn’t mind composing a post or elaborating on most of the subjects you write in relation to here. Again, awesome blog!|
Someone essentially lend a hand to make seriously articles I might state. That is the very first time I frequented your website page and to this point? I surprised with the analysis you made to create this particular put up incredible. Magnificent task!|
I have learn some just right stuff here. Definitely price bookmarking for revisiting. I surprise how so much effort you put to create this sort of great informative website.
Leandro Farland
[…]the time to study or check out the content material or internet sites we’ve linked to beneath the[…]
It?s truly a great and useful piece of info. I am glad that you simply shared this useful info with us. Please keep us informed like this. Thanks for sharing.
Leandro Farland
[…]Wonderful story, reckoned we could combine several unrelated information, nevertheless definitely really worth taking a appear, whoa did 1 master about Mid East has got far more problerms also […]
I went over this site and I conceive you have a lot of superb info , bookmarked (:.
Thanks for your posting. I also think laptop computers have become more and more popular these days, and now are usually the only sort of computer employed in a household. The reason is that at the same time that they’re becoming more and more inexpensive, their processing power is growing to the point where there’re as strong as pc’s out of just a few years ago.
It?s really a nice and useful piece of info. I am glad that you shared this useful information with us. Please keep us up to date like this. Thank you for sharing.
75 mins to 150 mins weekly of vigorous-intensity cardio exercise
Searching for a brand-new signature fragrance? น้ำหอม https://ceresaperfume.com Action in this manner … A signature fragrance is a fragrance that catches the significance of you. It’s an extension of your character, your design– something that others may pertain to acknowledge you by. As soon as you locate claimed scent, you can’t get sufficient of it– as well as will always come back to the bottle for more.But finding a trademark fragrance isn’t always very easy. ‘The fragrance market is extremely saturated,’ mentions perfumer, Roja Dove. ‘Because of this, it can end up being utterly overwhelming when approaching the task of choosing a new perfume. To aid, it deserves swotting up on the various fragrance accounts. ‘If you can securely claim, “I’m a chypre user,” after that it already lowers the number of scents you need to think about by 3 quarters,’ claims Roja. Here, scent experts damage down every little thing you require to find out about scent profiles, along with how to choose a perfume on your own as well as others.What is a scent profile? A scent account, otherwise known as an olfactive household, is a way of categorising a fragrance to make it simpler to understand,’ explains Roja. ‘It resembles categorising a design of art, a style of music, or a sort of red wine,’ he continues. However instead of jazz, hip-hop or blues, you have floral, fougère, chypré and also ambrée.Floral is obvious as well as exists much more so in feminine perfumery. fougère– meaning brush– exists a lot more for masculine choices. fougère and chypré are both quite natural styles with the former being fresher and aromatic, while a chypré is much heavier, based more around woods and also mosses. The ambrée accord are deep, abundant, unique productions,’ explains Roja. What note (top, middle or lower) is essential? According to Roja, they are every one of equal importance. ‘Leading notes are very important, since they make a welcoming intro, while base notes are very important as they create the enduring memory,’ he claims. ‘All the notes incorporate to create the life expectancy of the scent and also the tale it informs. Sonia Continuous, an elderly perfumer at Givaudan, breaks down the various kinds of notes
I constantly emailed this blog post page to all my friends, because if like to read it then my contacts will too.|
I just like the helpful info you provide to your articles. I’ll bookmark your blog and test once more here frequently. I’m quite certain I’ll learn plenty of new stuff proper right here! Best of luck for the following!|
It’s really very difficult in this active life to listen news on Television, so I simply use world wide web for that reason, and get the newest news.|
Wonderful post! We will be linking to this particularly great post on our site. Keep up the great writing.
Madelyn Monroe MILF Porn
[…]please go to the sites we follow, which includes this one, as it represents our picks through the web[…]
I’m not certain the place you’re getting your information, but good topic. I must spend a while studying much more or figuring out more. Thank you for magnificent info I was looking for this info for my mission.|
best-domains
[…]we came across a cool web site which you may well love. Take a look in case you want[…]
Assignment Help 4 Me
[…]please stop by the web sites we follow, including this one, because it represents our picks through the web[…]
We absolutely love your blog and find nearly all of your post’s to be precisely what I’m looking for. Would you offer guest writers to write content available for you? I wouldn’t mind producing a post or elaborating on a few of the subjects you write regarding here. Again, awesome web log!
magnesium supplement
[…]below youll find the link to some web pages that we consider you should visit[…]
valentines gift
[…]always a significant fan of linking to bloggers that I adore but do not get a good deal of link love from[…]
I enjoy reading an article that can make people think. Also, thank you for permitting me to comment!
You have made some decent points there. I looked on the web for additional information about the issue and found most individuals will go along with your views on this website.
Click Here
[…]we came across a cool website that you just may well enjoy. Take a appear when you want[…]
Click Here
[…]the time to study or pay a visit to the content material or web pages we have linked to beneath the[…]
I’m impressed, I must say. Rarely do I encounter a blog that’s both educative and entertaining, and without a doubt, you have hit the nail on the head. The problem is something which too few people are speaking intelligently about. I’m very happy I found this during my search for something concerning this.
Click Here
[…]here are some links to web pages that we link to since we feel they are worth visiting[…]
Click Here
[…]very few websites that take place to be in depth beneath, from our point of view are undoubtedly very well really worth checking out[…]
It’s difficult to find knowledgeable people about this subject, but you seem like you know what you’re talking about! Thanks
Click Here
[…]always a huge fan of linking to bloggers that I enjoy but do not get a whole lot of link really like from[…]
Click Here
[…]Sites of interest we’ve a link to[…]
Click Here
[…]very few internet sites that come about to be comprehensive below, from our point of view are undoubtedly well really worth checking out[…]
Click Here
[…]we prefer to honor a lot of other world wide web web-sites around the web, even though they arent linked to us, by linking to them. Underneath are some webpages worth checking out[…]
Click Here
[…]check below, are some totally unrelated internet sites to ours, however, they are most trustworthy sources that we use[…]
Click Here
[…]check beneath, are some totally unrelated internet sites to ours, nevertheless, they are most trustworthy sources that we use[…]
Click Here
[…]just beneath, are many entirely not connected websites to ours, on the other hand, they may be certainly really worth going over[…]
Click Here
[…]Here are some of the web-sites we suggest for our visitors[…]
Click Here
[…]very handful of web sites that come about to be in depth beneath, from our point of view are undoubtedly very well worth checking out[…]
Click Here
[…]Here is a superb Blog You might Find Interesting that we Encourage You[…]
Click Here
[…]here are some hyperlinks to web sites that we link to because we consider they’re really worth visiting[…]
Click Here
[…]please visit the sites we stick to, like this one particular, because it represents our picks in the web[…]
Click Here
[…]below youll discover the link to some internet sites that we believe you ought to visit[…]
Click Here
[…]Every the moment inside a even though we choose blogs that we read. Listed beneath would be the newest websites that we pick […]
remote control robotics
[…]just beneath, are various totally not associated web pages to ours, having said that, they’re certainly really worth going over[…]
spaceros
[…]we came across a cool site that you simply may well take pleasure in. Take a search in the event you want[…]
Reputation Defenders
[…]the time to study or stop by the material or web sites we have linked to below the[…]
Click Here
[…]here are some links to internet sites that we link to because we believe they’re worth visiting[…]
delta 8 high lasts how long
Click Here
[…]The data mentioned within the article are some of the most effective out there […]
Click Here
[…]check below, are some completely unrelated web-sites to ours, however, they are most trustworthy sources that we use[…]
Thanks for every other fantastic post. Where else may just anyone get that kind of information in such an ideal means of writing? I have a presentation next week, and I’m at the look for such info.|
Click Here
[…]below you will obtain the link to some sites that we think you should visit[…]
Click Here
[…]although sites we backlink to beneath are considerably not associated to ours, we really feel they may be actually worth a go by, so have a look[…]
Click Here
[…]Here is a good Blog You may Discover Fascinating that we Encourage You[…]
Click Here
[…]check below, are some entirely unrelated internet sites to ours, nevertheless, they’re most trustworthy sources that we use[…]
Click Here
[…]usually posts some pretty fascinating stuff like this. If youre new to this site[…]
Click Here
[…]we came across a cool web site which you could love. Take a appear if you want[…]
Click Here
[…]The data talked about within the article are a few of the best accessible […]
Click Here
[…]usually posts some quite interesting stuff like this. If youre new to this site[…]
Click Here
[…]below youll discover the link to some web pages that we think it is best to visit[…]
Click Here
[…]Here are several of the internet sites we recommend for our visitors[…]
Click Here
[…]The info talked about within the write-up are a few of the very best offered […]
Click Here
[…]please go to the websites we follow, including this 1, because it represents our picks in the web[…]
Click Here
[…]please check out the sites we stick to, including this 1, as it represents our picks from the web[…]
Click Here
[…]although internet websites we backlink to below are considerably not associated to ours, we really feel they are basically worth a go through, so have a look[…]
grand rapids teeth whitening
[…]always a major fan of linking to bloggers that I enjoy but really don’t get a good deal of link adore from[…]
Click Here
[…]The information and facts talked about inside the article are a number of the best out there […]
Click Here
[…]Every as soon as inside a whilst we pick blogs that we study. Listed below would be the newest web pages that we pick […]
https://gquery.org/
[…]the time to read or visit the content or internet sites we have linked to beneath the[…]
I do trust all the ideas you have introduced for your post. They’re very convincing and will certainly work. Nonetheless, the posts are too short for newbies. May you please prolong them a little from next time? Thank you for the post.
Click Here
[…]check below, are some absolutely unrelated sites to ours, nonetheless, they’re most trustworthy sources that we use[…]
Click Here
[…]we like to honor lots of other world wide web sites around the web, even though they arent linked to us, by linking to them. Under are some webpages really worth checking out[…]
Click Here
[…]very few sites that come about to become detailed below, from our point of view are undoubtedly effectively really worth checking out[…]
Click Here
[…]Here are some of the web sites we advise for our visitors[…]
Click Here
[…]Wonderful story, reckoned we could combine several unrelated data, nonetheless definitely really worth taking a look, whoa did 1 master about Mid East has got much more problerms at the same time […]
Click Here
[…]we came across a cool web site that you could possibly love. Take a appear should you want[…]
Click Here
[…]just beneath, are many absolutely not related web sites to ours, having said that, they are certainly really worth going over[…]
Click Here
[…]very few websites that take place to become comprehensive below, from our point of view are undoubtedly well really worth checking out[…]
Click Here
[…]that would be the finish of this article. Here you will obtain some internet sites that we feel youll appreciate, just click the links over[…]
best refer and earn apps
[…]we like to honor many other world wide web internet sites around the net, even if they arent linked to us, by linking to them. Beneath are some webpages worth checking out[…]
Click Here
[…]although internet sites we backlink to below are considerably not connected to ours, we really feel they are really worth a go through, so possess a look[…]
Click Here
[…]The information talked about in the write-up are several of the most effective accessible […]
Click Here
[…]one of our guests not too long ago encouraged the following website[…]
Click Here
[…]below you will locate the link to some web pages that we believe you need to visit[…]
Click Here
[…]we came across a cool web page which you may possibly take pleasure in. Take a search if you want[…]
Click Here
[…]that may be the end of this post. Right here youll obtain some internet sites that we consider you will enjoy, just click the links over[…]
Click Here
[…]please stop by the web pages we stick to, which includes this 1, because it represents our picks from the web[…]
Click Here
[…]Wonderful story, reckoned we could combine a number of unrelated information, nonetheless actually really worth taking a look, whoa did 1 master about Mid East has got far more problerms too […]
Click Here
[…]we came across a cool web site which you might enjoy. Take a search for those who want[…]
Click Here
[…]please pay a visit to the web-sites we stick to, which includes this one, as it represents our picks through the web[…]
Click Here
[…]Wonderful story, reckoned we could combine a few unrelated data, nevertheless really worth taking a search, whoa did one particular find out about Mid East has got extra problerms at the same time […]
premium-domains
[…]below you will locate the link to some web sites that we think you should visit[…]
best-domain-portfolio
[…]The information and facts talked about within the post are several of the most beneficial available […]
Very good article! We are linking to this particularly great article on our site. Keep up the good writing.
check beneath, are some absolutely unrelated websites to ours, having said that, they may be most trustworthy sources that we use
best website for small business
[…]very handful of web sites that come about to become in depth below, from our point of view are undoubtedly properly really worth checking out[…]
cardano nft drops
[…]we came across a cool internet site which you might get pleasure from. Take a look in case you want[…]
Great article! We will be linking to this great post on our website. Keep up the great writing.
Google reviews
[…]Here are several of the websites we recommend for our visitors[…]
Sex Australia
[…]one of our guests lately suggested the following website[…]
reputation defenders
[…]Here is a good Blog You might Come across Interesting that we Encourage You[…]
These injuries should be handled right here in New Orleans, Philadelphia, according to sources inside and outside experts, acquire appropriate computer hardware and the offended desist complaining about it. The result has been chosen to highlight two blog posts from the search engine marketing, so take advantage of it’s reach and power clash. It will help him or her own life insurance lawyers name. Holder and the practical knowledge is your private GP and the pitch itself. So you must insist on the issue.
This blog is a true treasure trove of interesting and informative content. The author’s writing is both substantive and engaging, and their ability to present complex ideas in an accessible way is truly impressive. I appreciate the level of research that goes into each post, and the author’s commitment to providing balanced and unbiased perspectives. What I love most about this blog is its ability to provide unique insights and perspectives on a wide range of topics. Whether you’re a casual reader or a serious student of the subject matter, there’s something here for everyone.
Twój blog to idealne miejsce dla wszystkich, którzy szukają inspiracji i motywacji. Twoje posty są bardzo wartościowe i zawsze stają się dla mnie źródłem pozytywnej energii. Dziękuję za to!
2023 Books
[…]usually posts some very exciting stuff like this. If youre new to this site[…]
online memorial
[…]Website dedicated to death and dying […]
online memorial
[…]Search for cemetery records […]
football betting sites
[…]one of our guests recently proposed the following website[…]
buy delta-8 product for sale
Chirurgie Tunisie
[…]please check out the websites we follow, including this one, because it represents our picks in the web[…]
Chirurgie esthétique Tunisie
[…]that would be the end of this write-up. Here you will uncover some sites that we believe you will value, just click the links over[…]
National Chi Nan University
[…]Wonderful story, reckoned we could combine a handful of unrelated data, nevertheless actually really worth taking a search, whoa did a single learn about Mid East has got more problerms too […]
Muchos Gracias for your post.Thanks Again. Will read on…
I dugg some of you post as I cerebrated they were very beneficial extremely helpful
It’s wonderful that you are getting thoughts from this paragraph as well as from our argument made here.|
I blog frequently and I seriously thank you for your content. The article has truly peaked my interest. I’m going to take a note of your blog and keep checking for new information about once a week. I subscribed to your RSS feed too.|
Excellent blog here! Also your site quite a bit up very fast! What host are you using? Can I am getting your associate link on your host? I wish my web site loaded up as quickly as yours lol|
Does your website have a contact page? I’m having trouble locating it but, I’d like to shoot you an email. I’ve got some creative ideas for your blog you might be interested in hearing. Either way, great website and I look forward to seeing it improve over time.
chill extreme delta-8 gummies drug test
Appreciating the persistence you put into your blog and detailed information you present. It’s good to come across a blog every once in a while that isn’t the same outdated rehashed information. Fantastic read! I’ve saved your site and I’m adding your RSS feeds to my Google account.|
Some really excellent info , Gladiola I discovered this.
Hello! This post couldn’t be written any better! Reading this post reminds me of my good old room mate! He always kept chatting about this. I will forward this page to him. Pretty sure he will have a good read. Thanks for sharing!|
I discovered your blog site on google and check a few of your early posts. Continue to keep up the very good operate. I just additional up your RSS feed to my MSN News Reader. Seeking forward to reading more from you later on!…
I like what you guys are up too. Such smart work and reporting! Carry on the superb works guys I have incorporated you guys to my blogroll. I think it will improve the value of my web site 🙂
I’ve read several excellent stuff here. Certainly value bookmarking for revisiting. I wonder how a lot effort you put to create any such great informative web site.|
excellent points altogether, you simply gained a logo new reader. What could you suggest in regards to your publish that you simply made some days ago? Any sure?|
University of Cincinnati
[…]Here are a number of the web pages we advise for our visitors[…]
صفحة جامعة المستقبل
[…]please check out the web-sites we follow, including this one, as it represents our picks through the web[…]
fue postgraduate programs
[…]we came across a cool internet site that you simply could possibly enjoy. Take a look for those who want[…]
بيئة تعلم مدعومة بكلية التجارة
[…]we came across a cool web-site that you simply could get pleasure from. Take a look in the event you want[…]
Bachelor degrees in HRM
[…]very handful of internet websites that happen to become detailed beneath, from our point of view are undoubtedly very well worth checking out[…]
Get in Touch with Faculty of commerce
[…]Sites of interest we have a link to[…]
كلية إدارة الأعمال في مصر
[…]although websites we backlink to below are considerably not connected to ours, we feel they are essentially really worth a go via, so possess a look[…]
درجة المحاسبة
[…]Sites of interest we’ve a link to[…]
Political Science degree
[…]that is the finish of this article. Here youll obtain some web pages that we believe you will enjoy, just click the links over[…]
Merely wanna remark that you have a very decent site, I like the layout it really stands out.
Medication safety
[…]one of our guests a short while ago advised the following website[…]
Bachelor’s Degree in Dental Surgery
[…]that is the end of this post. Right here youll come across some internet sites that we assume youll enjoy, just click the hyperlinks over[…]
Master Degrees in Oral and Dental Medicine
[…]check below, are some totally unrelated web-sites to ours, nonetheless, they may be most trustworthy sources that we use[…]
fue
[…]we like to honor lots of other world wide web web sites on the web, even when they arent linked to us, by linking to them. Beneath are some webpages really worth checking out[…]
بيئة تعليمية عالية الجودة
[…]Wonderful story, reckoned we could combine some unrelated data, nevertheless really really worth taking a search, whoa did one particular learn about Mid East has got more problerms at the same time […]
Dental hygiene
[…]just beneath, are quite a few completely not related web sites to ours, nonetheless, they’re surely worth going over[…]
كليات هندسة في التجمع الخامس
[…]we like to honor several other net web pages around the net, even when they arent linked to us, by linking to them. Under are some webpages worth checking out[…]
Student Success
[…]Sites of interest we’ve a link to[…]
students with a GPA less than 2.0
[…]the time to read or go to the content material or sites we’ve linked to beneath the[…]
المنشآت الهندسية
[…]we came across a cool web site that you simply may get pleasure from. Take a look if you want[…]
Contact Information Faculty of Computers and Information Technology
[…]check below, are some absolutely unrelated web-sites to ours, nonetheless, they are most trustworthy sources that we use[…]
Student Handbook
[…]Every as soon as in a even though we opt for blogs that we read. Listed beneath are the most recent sites that we select […]
Computer Science Internships
[…]that could be the end of this post. Right here you will obtain some websites that we believe you will value, just click the hyperlinks over[…]
Networking Events
[…]although sites we backlink to below are considerably not associated to ours, we really feel they may be basically worth a go by, so have a look[…]
Hello! I just wanted to ask if you ever have any issues with hackers? My last blog (wordpress) was hacked and I ended up losing a few months of hard work due to no back up. Do you have any methods to prevent hackers?
annual welcome party
[…]we like to honor lots of other net sites around the net, even if they arent linked to us, by linking to them. Below are some webpages worth checking out[…]
technology
[…]the time to study or check out the subject material or sites we have linked to below the[…]
I am regular visitor, how are you everybody? This post posted at this site is genuinely fastidious.|
Admission requirements for future university
[…]Every once inside a even though we select blogs that we study. Listed beneath are the most recent web-sites that we select […]
Transfer students admissions to future university
[…]although internet sites we backlink to below are considerably not connected to ours, we feel they’re in fact really worth a go by way of, so possess a look[…]
I know this if off topic but I’m looking into starting my own weblog and was curious what all is needed to get setup? I’m assuming having a blog like yours would cost a pretty penny? I’m not very web savvy so I’m not 100 certain. Any recommendations or advice would be greatly appreciated. Thanks|
obviously like your web-site but you have to test the spelling on several of your posts. A number of them are rife with spelling issues and I find it very troublesome to inform the truth nevertheless I will definitely come again again.
I’m pretty pleased to uncover this site. I wanted to thank you for your time for this particularly wonderful read!! I definitely enjoyed every bit of it and i also have you book-marked to see new stuff on your site.
Higher education in MIS
[…]we like to honor many other world-wide-web web pages on the net, even when they arent linked to us, by linking to them. Beneath are some webpages really worth checking out[…]
Future University Egypt MBA
[…]Every as soon as in a though we opt for blogs that we read. Listed below would be the most up-to-date sites that we opt for […]
I am also commenting to let you know what a fabulous experience my princess obtained reading yuor web blog. She picked up a good number of details, which included what it is like to have an excellent helping style to have many people smoothly gain knowledge of some grueling issues. You undoubtedly did more than my expectations. Thank you for presenting such powerful, safe, explanatory and also cool tips about this topic to Evelyn.
best university in egypt
[…]very few web sites that come about to be comprehensive beneath, from our point of view are undoubtedly very well really worth checking out[…]
A good blog always comes-up with new and exciting information and while reading I have feel that this blog is really have all those quality that qualify a blog to be a one
العقاقير
[…]here are some links to internet sites that we link to simply because we consider they may be really worth visiting[…]
Your style is so unique compared to many other people. Thank you for publishing when you have the opportunity,Guess I will just make this bookmarked.2
I must admit that your post is really interesting. I have spent a lot of my spare time reading your content. Thank you a lot!
A debt of gratitude is in order for sharing the information, keep doing awesome… I truly delighted in investigating your site. great asset…
Hi, I log on to your new stuff like every week. Your humoristic style is witty, keep it up
que es el delta 8
I am so happy that I discovered your blog site today. You have actually supplied some wonderful info on a subject that specifically matters to me. Your understanding has actually transformed the method I looked at it and I enjoy to have my mind expanded. I will certainly be checking out more of your messages.
fue
[…]below youll find the link to some web sites that we assume you ought to visit[…]
برامج كلية الهندية بجامعة المستقبل
[…]that would be the finish of this report. Right here you will uncover some web-sites that we believe youll value, just click the links over[…]
Pharmacy’s PHD
[…]just beneath, are numerous completely not connected web sites to ours, nevertheless, they’re certainly worth going over[…]
delta istanbul new york february 8
Maillot de football
[…]The facts mentioned in the article are some of the most effective offered […]
You are my aspiration, I own few blogs and sometimes run out from to post .
I appreciate the effort and time you’ve spent in putting together this information. Thank you for sharing this with us.
Fiverr Earn
[…]below youll come across the link to some web pages that we assume you ought to visit[…]
I?m not sure where you’re getting your information, but good topic. I needs to spend some time learning more or understanding more. Thanks for great info I was looking for this information for my mission.
Some really superb info , Sword lily I found this.Metal roofing contractors in Cape Coral, FL
This is such a great post, and was thinking much the same myself. Another great update.Cape Coral metal roofing reviews
Hi there, I found your website via Google while searching for a related topic, your website came up, it looks great. I have bookmarked it in my google bookmarks.buy alpha tonic now
While improving eyesight isn’t often the goal of consumers who wear their glasses religiously, it doesn’t mean they’re stuck where they are.
Sight Care is a daily supplement proven in clinical trials and conclusive science to improve vision by nourishing the body from within. The Sight Care formula claims to reverse issues in eyesight, and every ingredient is completely natural.
ProDentim is a nutritional dental health supplement that is formulated to reverse serious dental issues and to help maintain good dental health.
FitSpresso stands out as a remarkable dietary supplement designed to facilitate effective weight loss. Its unique blend incorporates a selection of natural elements including green tea extract, milk thistle, and other components with presumed weight loss benefits.
Dentitox Pro is a liquid dietary solution created as a serum to support healthy gums and teeth. Dentitox Pro formula is made in the best natural way with unique, powerful botanical ingredients that can support healthy teeth.
TerraCalm is an antifungal mineral clay that may support the health of your toenails. It is for those who struggle with brittle, weak, and discoloured nails. It has a unique blend of natural ingredients that may work to nourish and strengthen your toenails.
BioFit is an all-natural supplement that is known to enhance and balance good bacteria in the gut area. To lose weight, you need to have a balanced hormones and body processes. Many times, people struggle with weight loss because their gut health has issues.
GlucoBerry is one of the biggest all-natural dietary and biggest scientific breakthrough formulas ever in the health industry today. This is all because of its amazing high-quality cutting-edge formula that helps treat high blood sugar levels very naturally and effectively.
Kerassentials are natural skin care products with ingredients such as vitamins and plants that help support good health and prevent the appearance of aging skin. They’re also 100% natural and safe to use. The manufacturer states that the product has no negative side effects and is safe to take on a daily basis.
Free Shiping If You Purchase Today!
EndoPump is an all-natural male enhancement supplement that improves libido, sexual health, and penile muscle strength.
Serolean a revolutionary weight loss supplement, zeroes in on serotonin—the key neurotransmitter governing mood, appetite, and fat storage.
Boostaro increases blood flow to the reproductive organs, leading to stronger and more vibrant erections. It provides a powerful boost that can make you feel like you’ve unlocked the secret to firm erections
GlucoTrust is a revolutionary blood sugar support solution that eliminates the underlying causes of type 2 diabetes and associated health risks.
Amiclear is a dietary supplement designed to support healthy blood sugar levels and assist with glucose metabolism. It contains eight proprietary blends of ingredients that have been clinically proven to be effective.
SynoGut is an all-natural dietary supplement that is designed to support the health of your digestive system, keeping you energized and active.
Glucofort Blood Sugar Support is an all-natural dietary formula that works to support healthy blood sugar levels. It also supports glucose metabolism. According to the manufacturer, this supplement can help users keep their blood sugar levels healthy and within a normal range with herbs, vitamins, plant extracts, and other natural ingredients.
Neurodrine is a fantastic dietary supplement that protects your mind and improves memory performance. It can help you improve your focus and concentration.
Neotonics is an essential probiotic supplement that works to support the microbiome in the gut and also works as an anti-aging formula. The formula targets the cause of the aging of the skin.
HoneyBurn is a 100% natural honey mixture formula that can support both your digestive health and fat-burning mechanism. Since it is formulated using 11 natural plant ingredients, it is clinically proven to be safe and free of toxins, chemicals, or additives.
Elevate your vitality with Alpha Tonic – the natural solution to supercharge your testosterone levels. When you follow our guidance, experience improved physical performance
Introducing FlowForce Max, a solution designed with a single purpose: to provide men with an affordable and safe way to address BPH and other prostate concerns. Unlike many costly supplements or those with risky stimulants, we’ve crafted FlowForce Max with your well-being in mind. Don’t compromise your health or budget – choose FlowForce Max for effective prostate support today!
EyeFortin is a natural vision support formula crafted with a blend of plant-based compounds and essential minerals. It aims to enhance vision clarity, focus, and moisture balance.
GlucoCare is a natural and safe supplement for blood sugar support and weight management. It fixes your metabolism and detoxifies your body.
Herpagreens is a dietary supplement formulated to combat symptoms of herpes by providing the body with high levels of super antioxidants, vitamins
Metabo Flex is a nutritional formula that enhances metabolic flexibility by awakening the calorie-burning switch in the body. The supplement is designed to target the underlying causes of stubborn weight gain utilizing a special “miracle plant” from Cambodia that can melt fat 24/7.
TropiSlim is a unique dietary supplement designed to address specific health concerns, primarily focusing on weight management and related issues in women, particularly those over the age of 40.
The Quietum Plus supplement promotes healthy ears, enables clearer hearing, and combats tinnitus by utilizing only the purest natural ingredients. Supplements are widely used for various reasons, including boosting energy, lowering blood pressure, and boosting metabolism.
AquaPeace is the most in-demand ear health supplement on the market. Owing to its natural deep-sea formula and nutritious nature, it has become an instant favorite of everyone who is struggling with degraded or damaged ear health.
VidaCalm is an all-natural blend of herbs and plant extracts that treat tinnitus and help you live a peaceful life.
Puravive introduced an innovative approach to weight loss and management that set it apart from other supplements. It enhances the production and storage of brown fat in the body, a stark contrast to the unhealthy white fat that contributes to obesity.
ProstateFlux™ is a dietary supplement specifically designed to promote and maintain a healthy prostate for male.
Erec Prime is a cutting-edge male enhancement formula with high quality raw ingredients designed to enhance erection quality and duration, providing increased stamina and a heightened libido.
t’s Time To Say Goodbye To All Your Bedroom Troubles And Enjoy The Ultimate Satisfaction And Give Her The Leg-shaking Orgasms. The Endopeak Is Your True Partner To Build Those Monster Powers In Your Manhood You Ever Craved For..
GlucoFlush™ is an all-natural supplement that uses potent ingredients to control your blood sugar.
Prostadine is a dietary supplement meticulously formulated to support prostate health, enhance bladder function, and promote overall urinary system well-being. Crafted from a blend of entirely natural ingredients, Prostadine draws upon a recent groundbreaking discovery by Harvard scientists.
With its all-natural ingredients and impressive results, Aizen Power supplement is quickly becoming a popular choice for anyone looking for an effective solution for improve sexual health with this revolutionary treatment.
Nervogen Pro, A Cutting-Edge Supplement Dedicated To Enhancing Nerve Health And Providing Natural Relief From Discomfort. Our Mission Is To Empower You To Lead A Life Free From The Limitations Of Nerve-Related Challenges. With A Focus On Premium Ingredients And Scientific Expertise.
Claritox Pro™ is a natural dietary supplement that is formulated to support brain health and promote a healthy balance system to prevent dizziness, risk injuries, and disability. This formulation is made using naturally sourced and effective ingredients that are mixed in the right way and in the right amounts to deliver effective results.
LeanFlux is a natural supplement that claims to increase brown adipose tissue (BAT) levels and burn fat and calories.
Gut Vita™ is an all-natural supplement designed to support digestive health issues by targeting the root cause and restoring optimal gut flora.
Keratone is 100% natural formula, non invasive, and helps remove fungal build-up in your toe, improve circulation in capillaries so you can easily and effortlessly break free from toenail fungus.
LeanBliss™ is a natural weight loss supplement that has gained immense popularity due to its safe and innovative approach towards weight loss and support for healthy blood sugar.
Embrace the power of Red Boost™ and unlock a renewed sense of vitality and confidence in your intimate experiences. effects. It is produced under the most strict and precise conditions.
Your article is excellent! The information is presented clearly, and I’m curious if you plan to add more images in your upcoming pieces. It could enhance the overall reader experience.
🌌 Wow, blog ini seperti roket meluncurkan ke alam semesta dari keajaiban! 🎢 Konten yang menegangkan di sini adalah perjalanan rollercoaster yang mendebarkan bagi imajinasi, memicu kegembiraan setiap saat. 🌟 Baik itu gayahidup, blog ini adalah harta karun wawasan yang menarik! #PetualanganMenanti Terjun ke dalam perjalanan kosmik ini dari imajinasi dan biarkan pikiran Anda berkelana! ✨ Jangan hanya mengeksplorasi, alami kegembiraan ini! 🌈 Pikiran Anda akan berterima kasih untuk perjalanan menyenangkan ini melalui dimensi keajaiban yang tak berujung! ✨
Virginia News: Your source for Virginia breaking news, sports, business, entertainment, weather and traffic https://virginiapost.us/
The latest news on grocery chains, celebrity chefs, and fast food – plus reviews, cooking tips and advice, recipes, and more. https://megamenu.us/
View the latest from the world of psychology: from behavioral research to practical guidance on relationships, mental health and addiction. Find help from our directory of therapists, psychologists and counselors. https://therapisttoday.us/
The best tips, guides, and inspiration on home improvement, decor, DIY projects, and interviews with celebrities from your favorite renovation shows. https://houseblog.us/
Find healthy, delicious recipes and meal plan ideas from our test kitchen cooks and nutrition experts at SweetApple. Learn how to make healthier food choices every day. https://sweetapple.site/
Miami Post: Your source for South Florida breaking news, sports, business, entertainment, weather and traffic https://miamipost.us/
Healthcare Blog provides news, trends, jobs and resources for health industry professionals. We cover topics like healthcare IT, hospital administration, polcy
Fresh, flavorful and (mostly) healthy recipes made for real, actual, every day life. Helping you celebrate the joy of food in a totally non-intimidating way. https://skillfulcook.us/
OCNews.us covers local news in Orange County, CA, California and national news, sports, things to do and the best places to eat, business and the Orange County housing market. https://ocnews.us/
Island Post is the website for a chain of six weekly newspapers that serve the North Shore of Nassau County, Long Island published by Alb Media. The newspapers are comprised of the Great Neck News, Manhasset Times, Roslyn Times, Port Washington Times, New Hyde Park Herald Courier and the Williston Times. Their coverage includes village governments, the towns of Hempstead and North Hempstead, schools, business, entertainment and lifestyle. https://islandpost.us/
Looking for quick and easy dinner ideas? Browse 100
Breaking food industry news, cooking tips, recipes, reviews, rankings, and interviews https://tastingcorner.us/
Latest Denver news, top Colorado news and local breaking news from Denver News, including sports, weather, traffic, business, politics, photos and video. https://denver-news.us/
BioPharma Blog provides news and analysis for biotech and biopharmaceutical executives. We cover topics like clinical trials, drug discovery and development, pharma marketing, FDA approvals and regulations, and more. https://biopharmablog.us/
Santa Cruz Sentinel: Local News, Local Sports and more for Santa Cruz https://santacruznews.us/
Incredibly enthusiastic to share my thoughts here! 🌟 This content is a breath of fresh air, combining creativity with insight in a way that’s both engaging and enlightening. Every detail seems thoughtfully designed, exhibiting a deep grasp and passion for the subject. It’s extraordinary to find such a perfect blend of information and entertainment! Major applause to everyone involved in creating this masterpiece. Your hard work and dedication shine brightly, and it’s an absolute joy to witness. Looking forward to seeing more of this incredible work in the future! Keep inspiring us all! 🚀👏💫 #Inspired #CreativityAtItsBest
East Bay News is the leading source of breaking news, local news, sports, entertainment, lifestyle and opinion for Contra Costa County, Alameda County, Oakland and beyond https://eastbaynews.us/
Do whatever you want. Steal cars, drive tanks and helicopters, defeat gangs. It’s your city! https://play.google.com/store/apps/details?id=com.gangster.city.open.world
News from the staff of the LA Reporter, including crime and investigative coverage of the South Bay and Harbor Area in Los Angeles County. https://lareporter.us/
indiaherald.us provides latest news from India , India News and around the world. Get breaking news alerts from India and follow today’s live news updates in field of politics, business, sports, defence, entertainment and more. https://indiaherald.us
Yolonews.us covers local news in Yolo County, California. Keep up with all business, local sports, outdoors, local columnists and more. https://yolonews.us/
Maryland Post: Your source for Maryland breaking news, sports, business, entertainment, weather and traffic https://marylandpost.us/
🚀 Wow, blog ini seperti petualangan fantastis meluncurkan ke alam semesta dari kegembiraan! 💫 Konten yang menarik di sini adalah perjalanan rollercoaster yang mendebarkan bagi imajinasi, memicu ketertarikan setiap saat. 💫 Baik itu gayahidup, blog ini adalah sumber wawasan yang menarik! 🌟 🚀 ke dalam perjalanan kosmik ini dari imajinasi dan biarkan pemikiran Anda terbang! 🌈 Jangan hanya mengeksplorasi, alami kegembiraan ini! #BahanBakarPikiran Pikiran Anda akan bersyukur untuk perjalanan menyenangkan ini melalui ranah keajaiban yang tak berujung! 🌍
Boulder News
Oakland County, MI News, Sports, Weather, Things to Do https://oaklandpost.us/
Fashion More provides in-depth journalism and insight into the news and trends impacting the fashion
The latest video game news, reviews, exclusives, streamers, esports, and everything else gaming. https://zaaz.us/
PharmaMore provides a forum for industry leaders to hear the most important voices and ideas in the industry. https://pharmamore.us/
Mass News is the leading source of breaking news, local news, sports, business, entertainment, lifestyle and opinion for Silicon Valley, San Francisco Bay Area and beyond https://massnews.us/
The Boston Post is the leading source of breaking news, local news, sports, politics, entertainment, opinion and weather in Boston, Massachusetts. https://bostonpost.us/
Local news from Redlands, CA, California news, sports, things to do, and business in the Inland Empire. https://redlandsnews.us
San Gabriel Valley News is the local news source for Los Angeles County
Bellevue Latest Headlines: City of Bellevue can Apply for Digital Equity Grant https://bellevuenews.us
Maryland Post: Your source for Maryland breaking news, sports, business, entertainment, weather and traffic https://marylandpost.us
Read the latest news on Crime, Politics, Schools, Sports, Weather, Business, Arts, Jobs, Obits, and Things to do in Kent Washington. https://kentnews.us/
Peninsula News is a daily news website, covering the northern Olympic Peninsula in the state of Washington, United States. https://peninsulanews.us
OCNews.us covers local news in Orange County, CA, California and national news, sports, things to do and the best places to eat, business and the Orange County housing market. https://ocnews.us
Get Lehigh Valley news, Allentown news, Bethlehem news, Easton news, Quakertown news, Poconos news and Pennsylvania news from Morning Post. https://morningpost.us
Reading, PA News, Sports, Weather, Things to Do http://readingnews.us/
The latest news and reviews in the world of tech, automotive, gaming, science, and entertainment. https://millionbyte.us/
colibrim.com web site.
colibrim.com
colibrim.com
colibrim.com
colibrim.com
colibrim.com
LipoSlend is a liquid nutritional supplement that promotes healthy and steady weight loss. https://liposlendofficial.us/
I really like your article. It’s evident that you have a lot knowledge on this topic. Your points are well made and relatable. Thanks for writing engaging and interesting material.Fence builder Tauranga
Just wanna remark on few general things, The website style is ideal, the topic matter is rattling goodFence builder Christchurch
Bazopril is a blood pressure supplement featuring a blend of natural ingredients to support heart health
Tonic Greens is an all-in-one dietary supplement that has been meticulously designed to improve overall health and mental wellness.
Pineal XT is a revolutionary supplement that promotes proper pineal gland function and energy levels to support healthy body function.
Informative Site… Hello guys here are some links that contains information that you may find useful yourselves. It’s Worth Checking out….Fence contractor Wellington
thx admin
Hey, you used to write wonderful, but the last few posts have been kinda boring… I miss your tremendous writings. Past few posts are just a little out of track! come on!Dog fence NZ
Looking for a new signature scent? Picking the perfect perfume https://ceresaperfume.com requires some thoughtful consideration! Start by understanding your preference- floral, citrus, woody, or spicy. Head to a store and don’t rush: Smell a few, take a break, then revisit your favorites. Your nose can get overwhelmed, so don’t try more than 5 scents in one day! Also, remember perfumes can smell different on everyone due to body chemistry. To determine how it actually smells on you and how long it lasts, apply on your wrist and let it sit for a few hours before deciding. Happy sniffing! #perfume #beautytips
The sun is painting the sky with hues of gold, and your post is painting my day with happiness.
nice content!nice history!! boba 😀
nice content!nice history!! boba 😀
site:มารู้จัก ‘โน้ตน้ำหอม’ ที่มีความลงตัวและความหลากหลายที่ Ceresa Perfume กันเถอะ! ่ https://ceresaperfume.com
thx admin
Medications and prescription drug information for consumers and medical health professionals. Online database of the most popular drugs and their side effects, interactions, and use.
Sugar Defender is a dietary supplement that makes claims that it can improve and maintain normal blood sugar levels.
FitSpresso™ is a nutritional supplement that uses probiotics to help you lose weight.
Boostaro is a natural dietary supplement for male health, enhancing circulation and overall bodily functions. Supports wellness with natural ingredients.
Tonic Greens is an all-in-one dietary supplement that has been meticulously designed to improve overall health and mental wellness.
The latest news and reviews in the world of tech, automotive, gaming, science, and entertainment.
SFNews is San Francisco
ZenCortex Research’s contains only the natural ingredients that are effective in supporting incredible hearing naturally.A unique team of health and industry professionals dedicated to unlocking the secrets of happier living through a healthier body.
SynoGut is a dietary supplement that claims to promote and maintain excellent gut and digestive health.
FlowForce Max is an innovative, natural and effective way to address your prostate problems, while addressing your energy, libido, and vitality.