How to play IPX / SPX games over LAN (WinXP)
Multiplayer games such as Diablo, C&C: Red Alert 2, Carmageddon, Age of Empires 2, Atomic Bomberman, Sid Meier’s Alpha Centauri and many other 90’s-era titles used IPX / SPX as their protocol of choice for local multiplayer. Windows based IPX games are fully playable after enabling and configuring a LAN connection to support IPX / SPX protocols. Be sure to check out this guide on how to establish a working LAN connection in Windows XP before attempting this tutorial.
Note: This tutorial is meant for Windows XP users. Windows Vista / Windows 7 and Windows 8 do not support IPX / SPX by default, but it may be emulated using IPX Wrapper – www.solemnwarning.net/ipxwrapper
Also, this tutorial is specifically meant for Windows based IPX multiplayer games (eg: Diablo, C&C: Red Alert 2 or Age of Empires 2). Older MsDOS IPX multiplayer games such as Doom, Heretic, Hexen and so on will be the subject of a future article.
|
CONTENTS
1. Check your LAN Connection for IPX / SPX |
Step 1. Check your LAN Connection for IPX / SPX
Open your LAN connection in the Network Connections window.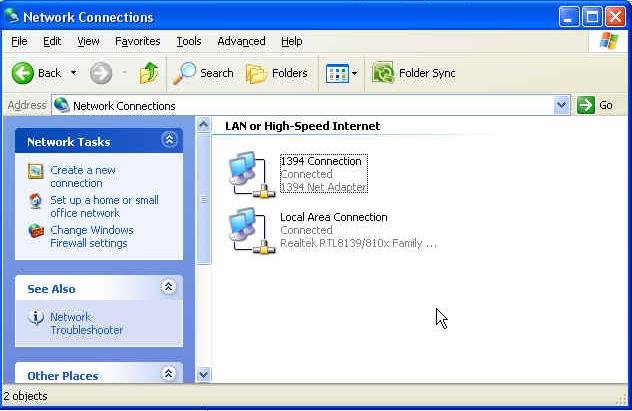
Right click on your Local Area Network and select Properties. We’re going to check to see if you have an IPX / SPX protocol installed. Search for “NWLink IPX/SPX NetBIOS Compatible Transport Protocol” as shown below:
If you cannot find this protocol, then read Step 2, where I’ll quickly show you how to install one.
If, on the other hand, you do have this protocol installed. skip Step 2 and move directly to Step 3 (Configure your IPX / SPX / NetBIOS Protocols).
Step 2. Install IPX / SPX / NetBIOS Protocol
From the Local Area Connection Properties window, click Install, as shown below.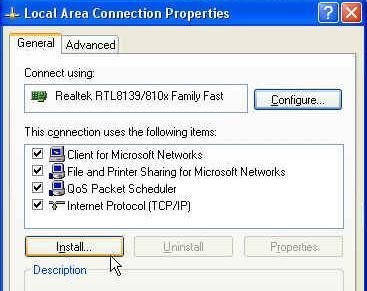
Now Select Protocol.
Select “NWLink IPX/SPX NetBIOS Compatible Transport Protocol“.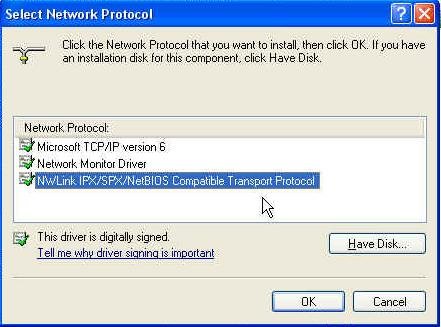
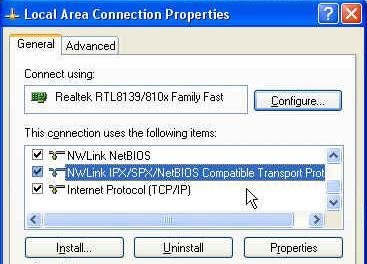
And that’s it!
The “NWLink IPX/SPX NetBIOS Compatible Transport Protocol” should now appear in the Items window at the bottom of the list, just above Internet Protocol (TCP/IP).
Step 3. Configure your IPX / SPX / NetBIOS Protocol
Double click on “NWLink IPX/SPX NetBIOS Compatible Transport Protocol” and modify each set of values as shown below:
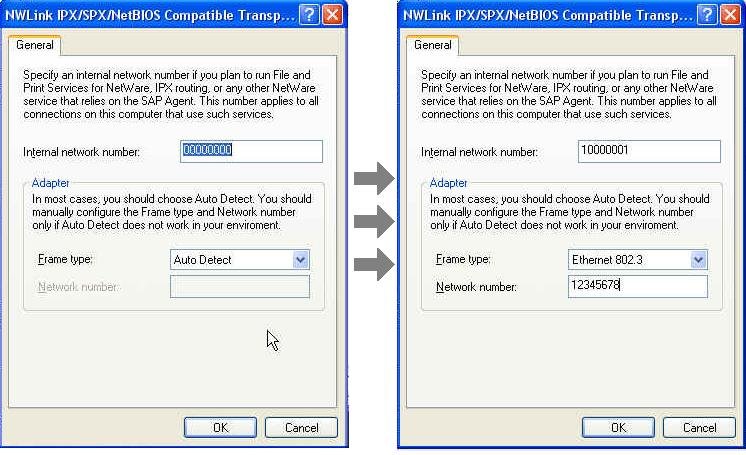
- Chance Internal Network Number from “00000000” (eight zeroes) to “10000001” (one-six zeroes-one). The last digit of this number must have +1 added per each computer. (eg: 10000002)
- In the Frame Type drop-down box, select “Ethernet 802.3”.
- Change the Network Number to any eight-digit number you like, such as “12345678”. Enter this value for each computer.
Click OK
You’re almost done! These changes must be applied to each computer in your network. Remember to change the Internal Network Number on each computer according to their connected port number. You simply need to add +1 to the end of each number.
Computer 1, which is connected to Port 1 on your router, already has an Internal Network Number of “10000001“. Computer 2 will have “10000002“, 3 will have “10000003” and so on. All other values must be left unchanged.
After a connection has been established you’re free to host and join games at will.


This really answered my problem, thank you!
What’s Happening i’m new to this, I stumbled upon this I’ve found It absolutely helpful and it has helped me out loads. I hope to contribute & assist other users like its helped me. Great job.
There is clearly a bundle to realize about this. I think you made some good points in features also.
What¦s Happening i am new to this, I stumbled upon this I’ve found It positively helpful and it has helped me out loads. I’m hoping to contribute & help other users like its helped me. Great job.
I have been absent for some time, but now I remember why I used to love this site. Thank you, I?¦ll try and check back more often. How frequently you update your website?
I couldn’t resist commenting
I love your blog.. very nice colors & theme. Did you design this website yourself or did you hire someone to do it for you? Plz answer back as I’m looking to design my own blog and would like to know where u got this from. many thanks
Merely wanna remark that you have a very nice site, I love the design it really stands out.
This is a very good tips especially to those new to blogosphere, brief and accurate information… Thanks for sharing this one. A must read article.
Helpful information. Lucky me I found your website accidentally, and I am stunned why this twist of fate did not took place earlier! I bookmarked it.
There is obviously a lot to identify about this. I feel you made various good points in features also.
I simply wanted to appreciate you yet again. I’m not certain the things I would’ve accomplished in the absence of these concepts shared by you on that theme. It has been a real horrifying crisis in my position, nevertheless being able to see the very skilled technique you managed that made me to weep with contentment. Now i’m happy for the advice and in addition hope that you find out what an amazing job you are always carrying out teaching some other people with the aid of a blog. I know that you’ve never encountered all of us.
I got good info from your blog
Hi are using WordPress for your blog platform? I’m new to the blog world but I’m trying to get started and set up my own. Do you require any coding knowledge to make your own blog? Any help would be really appreciated!
I got what you intend, appreciate it for posting.Woh I am thankful to find this website through google. “Spare no expense to make everything as economical as possible.” by Samuel Goldwyn.
Thanks for sharing your thoughts about your g. Regards
Appreciate it for this post, I am a big fan of this website would like to go on updated.
Pretty section of content. I just stumbled upon your website and in accession capital to say that I acquire in fact enjoyed account your weblog posts. Anyway I’ll be subscribing for your augment or even I fulfillment you get admission to consistently fast.
Excellent post. I used to be checking continuously this blog and I’m impressed! Extremely helpful info specially the remaining phase 🙂 I deal with such info much. I used to be looking for this particular information for a long time. Thank you and best of luck.
My spouse and I stumbled over here different web page and thought I might as well check things out. I like what I see so i am just following you. Look forward to finding out about your web page repeatedly.
Do you have a spam problem on this blog; I also am a blogger, and I was wanting to know your situation; we have developed some nice methods and we are looking to exchange methods with others, please shoot me an email if interested.
My brother suggested I would possibly like this web site. He was once totally right. This put up truly made my day. You cann’t consider simply how much time I had spent for this info! Thank you!
Hi there, You have done a fantastic job. I will definitely digg it and personally recommend to my friends. I am sure they’ll be benefited from this site.
I’m really enjoying the design and layout of your blog. It’s a very easy on the eyes which makes it much more enjoyable for me to come here and visit more often. Did you hire out a designer to create your theme? Great work!
Good info. Lucky me I reach on your website by accident, I bookmarked it.
This is a very good tips especially to those new to blogosphere, brief and accurate information… Thanks for sharing this one. A must read article.
Very nice info and right to the point. I am not sure if this is actually the best place to ask but do you people have any ideea where to hire some professional writers? Thanks 🙂
I like this blog very much, Its a rattling nice billet to read and obtain info .
I used to be very pleased to seek out this internet-site.I needed to thanks to your time for this wonderful read!! I positively enjoying every little bit of it and I’ve you bookmarked to take a look at new stuff you blog post.
I always was interested in this subject and still am, thankyou for putting up.
Hi there just wanted to give you a quick heads up. The words in your content seem to be running off the screen in Opera. I’m not sure if this is a format issue or something to do with web browser compatibility but I thought I’d post to let you know. The style and design look great though! Hope you get the problem resolved soon. Cheers
Wow, incredible blog layout! How long have you been blogging for? you made blogging look easy. The overall look of your website is great, let alone the content!
As I web-site possessor I believe the content matter here is rattling fantastic , appreciate it for your efforts. You should keep it up forever! Good Luck.
It’s hard to find educated people on this topic, however you sound like you understand what you’re talking about! Thanks
Does your blog have a contact page? I’m having trouble locating it but, I’d like to send you an e-mail. I’ve got some suggestions for your blog you might be interested in hearing. Either way, great blog and I look forward to seeing it expand over time.
I’m often to running a blog and i really respect your content. The article has actually peaks my interest. I am going to bookmark your web site and preserve checking for new information.
I absolutely love your blog and find the majority of your post’s to be just what I’m looking for. Would you offer guest writers to write content in your case? I wouldn’t mind publishing a post or elaborating on a few of the subjects you write about here. Again, awesome site!
Hey there! Do you know if they make any plugins to assist with SEO? I’m trying to get my blog to rank for some targeted keywords but I’m not seeing very good gains. If you know of any please share. Appreciate it!
Thank you for another informative site. Where else could I get that type of information written in such a perfect way? I’ve a project that I am just now working on, and I have been on the look out for such info.
I think other web-site proprietors should take this site as an model, very clean and great user friendly style and design, as well as the content. You are an expert in this topic!
It’s a shame you don’t have a donate button! I’d without a doubt donate to this outstanding blog! I guess for now i’ll settle for book-marking and adding your RSS feed to my Google account. I look forward to fresh updates and will talk about this site with my Facebook group. Chat soon!
Hi! I know this is kind of off topic but I was wondering if you knew where I could get a captcha plugin for my comment form? I’m using the same blog platform as yours and I’m having problems finding one? Thanks a lot!
I¦ve been exploring for a little bit for any high-quality articles or blog posts in this sort of space . Exploring in Yahoo I ultimately stumbled upon this site. Studying this information So i¦m satisfied to convey that I’ve a very excellent uncanny feeling I found out just what I needed. I most unquestionably will make certain to don¦t overlook this website and provides it a glance on a continuing basis.
I haven?¦t checked in here for some time since I thought it was getting boring, but the last few posts are good quality so I guess I will add you back to my everyday bloglist. You deserve it my friend 🙂
you’re really a just right webmaster. The site loading velocity is amazing. It seems that you are doing any distinctive trick. Also, The contents are masterwork. you’ve performed a excellent process in this topic!
I in addition to my friends came checking out the best procedures found on your web blog and then quickly came up with an awful feeling I had not thanked the blog owner for those strategies. Those men happened to be so glad to read through them and have now in actuality been having fun with those things. We appreciate you indeed being well kind and then for going for some fine information millions of individuals are really desperate to understand about. My sincere regret for not expressing appreciation to earlier.
Real superb information can be found on website.
You have brought up a very wonderful details , thanks for the post.
I was suggested this blog through my cousin. I’m now not positive whether this put up is written by him as no one else recognize such particular approximately my difficulty. You are amazing! Thank you!
Hiya, I’m really glad I’ve found this info. Today bloggers publish only about gossips and net and this is really frustrating. A good website with interesting content, that is what I need. Thanks for keeping this web site, I will be visiting it. Do you do newsletters? Can’t find it.
obviously like your web-site but you have to take a look at the spelling on quite a few of your posts. Many of them are rife with spelling problems and I to find it very troublesome to tell the reality however I will definitely come again again.
you have a great blog here! would you like to make some invite posts on my blog?
I reckon something really special in this site.
Can I just say what a aid to find somebody who really is aware of what theyre talking about on the internet. You definitely know learn how to convey a difficulty to gentle and make it important. Extra people have to read this and perceive this aspect of the story. I cant believe youre not more in style because you undoubtedly have the gift.
I believe other website proprietors should take this site as an model, very clean and wonderful user pleasant pattern.
Fine means of explaining, and pleasant paragraph to get information on the topic of my presentation subject matter,
which i will present in college.
Also visit my web blog :: VelmaMCossel
I am continually invstigating online for tips that can aid me. Thx!
Thanks for helping out, excellent info. “The health of nations is more important than the wealth of nations.” by Will Durant.
I was just looking for this information for some time. After 6 hours of continuous Googleing, finally I got it in your website. I wonder what’s the lack of Google strategy that don’t rank this kind of informative web sites in top of the list. Normally the top sites are full of garbage.
I am now not positive where you’re getting your information, but great topic. I needs to spend some time studying much more or figuring out more. Thank you for excellent information I was on the lookout for this information for my mission.
You made some nice points there. I did a search on the issue and found mainly persons will have the same opinion with your blog.
Hi there, just became aware of your blog through Google, and found that it is truly informative. I’m going to watch out for brussels. I will be grateful if you continue this in future. A lot of people will be benefited from your writing. Cheers!
Perfectly written written content, regards for selective information. “He who establishes his argument by noise and command shows that his reason is weak.” by Michel de Montaigne.
I like this web blog so much, bookmarked. “To hold a pen is to be at war.” by Francois Marie Arouet Voltaire.
Thank you for any other informative web site. Where else may I am getting that kind of information written in such an ideal manner? I have a undertaking that I am simply now operating on, and I’ve been on the look out for such info.
Your house is valueble for me. Thanks!…
Hello, you used to write great, but the last several posts have been kinda boring?K I miss your great writings. Past few posts are just a little out of track! come on!
I like what you guys are up too. Such smart work and reporting! Keep up the excellent works guys I?¦ve incorporated you guys to my blogroll. I think it’ll improve the value of my website 🙂
I enjoy studying and I believe this website got some really useful stuff on it! .
whoah this blog is wonderful i love reading your articles. Keep up the good work! You know, many people are searching around for this information, you can help them greatly.
Thank you for sharing with us, I think this website genuinely stands out : D.
As a Newbie, I am always searching online for articles that can be of assistance to me. Thank you
What i don’t realize is actually how you are not really a lot more neatly-preferred than you may be now. You are so intelligent. You know therefore significantly in relation to this matter, produced me individually believe it from so many various angles. Its like women and men aren’t interested except it is something to accomplish with Woman gaga! Your own stuffs excellent. At all times handle it up!
I always was interested in this subject and stock still am, regards for putting up.
What’s Happening i’m new to this, I stumbled upon this I’ve found It absolutely useful and it has aided me out loads. I hope to contribute & assist other users like its aided me. Great job.
I?¦ve been exploring for a little for any high-quality articles or weblog posts on this sort of area . Exploring in Yahoo I at last stumbled upon this website. Studying this information So i?¦m glad to convey that I’ve an incredibly excellent uncanny feeling I came upon just what I needed. I most indisputably will make certain to do not omit this website and provides it a glance on a constant basis.
Very good written information. It will be useful to anyone who usess it, as well as myself. Keep up the good work – can’r wait to read more posts.
I loved as much as you will receive carried out right here. The sketch is tasteful, your authored subject matter stylish. nonetheless, you command get got an impatience over that you wish be delivering the following. unwell unquestionably come further formerly again as exactly the same nearly very often inside case you shield this increase.
Do you mind if I quote a couple of your articles as long as I provide credit and sources back to your site? My blog is in the exact same area of interest as yours and my users would truly benefit from some of the information you provide here. Please let me know if this alright with you. Appreciate it!
certainly like your website but you have to test the spelling on several of your posts. Several of them are rife with spelling issues and I find it very bothersome to tell the reality nevertheless I will definitely come back again.
Hello! I could have sworn I’ve been to this blog before but after browsing through some of the post I realized it’s new to me. Anyways, I’m definitely happy I found it and I’ll be book-marking and checking back frequently!
naturally like your web-site but you have to take a look at the spelling on quite a few of your posts. Many of them are rife with spelling issues and I find it very troublesome to tell the reality then again I’ll certainly come again again.
Thanks for helping out, great info. “Job dissatisfaction is the number one factor in whether you survive your first heart attack.” by Anthony Robbins.
I like this post, enjoyed this one thank you for posting. “To the dull mind all nature is leaden. To the illumined mind the whole world sparkles with light.” by Ralph Waldo Emerson.
I’m still learning from you, while I’m trying to achieve my goals. I absolutely liked reading everything that is written on your blog.Keep the posts coming. I enjoyed it!
It’s exhausting to seek out knowledgeable people on this topic, but you sound like you know what you’re talking about! Thanks
It’s really a great and helpful piece of information. I’m glad that you shared this useful information with us. Please keep us up to date like this. Thanks for sharing.
I’m not positive where you’re getting your info, but good topic. I must spend some time learning more or understanding more. Thank you for magnificent information I used to be on the lookout for this info for my mission.
There are some interesting closing dates on this article but I don’t know if I see all of them middle to heart. There is some validity however I’ll take maintain opinion until I look into it further. Good article , thanks and we wish more! Added to FeedBurner as effectively
Hi my friend! I wish to say that this article is awesome, nice written and come with almost all vital infos. I¦d like to peer more posts like this .
I like this site very much so much wonderful info .
Thanx for the effort, keep up the good work Great work, I am going to start a small Blog Engine course work using your site I hope you enjoy blogging with the popular BlogEngine.net.Thethoughts you express are really awesome. Hope you will right some more posts.
WONDERFUL Post.thanks for share..extra wait .. …
I’m not sure why but this web site is loading very slow for me. Is anyone else having this issue or is it a problem on my end? I’ll check back later and see if the problem still exists.
Hi there! This is my 1st comment here so I just wanted to give a
quick shout out and tell you I genuinely enjoy reading
through your blog posts. Can you suggest any other blogs/websites/forums that deal with the
same topics? Thanks a lot!
Feel free to visit my site … RuthaPWallis
I conceive this web site has got some rattling wonderful information for everyone :D. “A friend might well be reckoned the masterpiece of nature.” by Ralph Waldo Emerson.
I always was concerned in this topic and still am, thankyou for putting up.
Great V I should certainly pronounce, impressed with your website. I had no trouble navigating through all the tabs and related information ended up being truly easy to do to access. I recently found what I hoped for before you know it in the least. Quite unusual. Is likely to appreciate it for those who add forums or anything, site theme . a tones way for your client to communicate. Nice task..
Hello! This post couldn’t be written any better! Reading through this post reminds me of my good old room mate! He always kept talking about this. I will forward this post to him. Fairly certain he will have a good read. Thanks for sharing!
I like this website its a master peace ! Glad I detected this on google .
Generally I don’t learn article on blogs, but I wish to say that this write-up very compelled me to take a look at and do it! Your writing style has been amazed me. Thanks, quite nice article.
You have remarked very interesting details! ps decent site. “O human race born to fly upward, wherefore at a little wind dost thou fall.” by Dante Alighieri.
Hi my family member! I wish to say that this post is awesome, great written and include almost all important infos. I would like to see more posts like this .
This is really attention-grabbing, You’re an overly professional blogger. I have joined your rss feed and sit up for seeking more of your excellent post. Also, I have shared your site in my social networks!
What¦s Taking place i’m new to this, I stumbled upon this I’ve discovered It positively helpful and it has aided me out loads. I’m hoping to contribute & aid other customers like its helped me. Great job.
Woh I like your blog posts, saved to bookmarks! .
There may be noticeably a bundle to know about this. I assume you made certain good points in options also.
naturally like your website however you have to take a look at the spelling on several of your posts. Several of them are rife with spelling problems and I find it very troublesome to tell the reality on the other hand I’ll surely come back again.
But wanna remark that you have a very decent site, I love the style and design it actually stands out.
What i don’t realize is in truth how you are no longer really much more neatly-appreciated than you might be right now. You’re so intelligent. You recognize thus considerably in the case of this matter, produced me in my opinion believe it from so many various angles. Its like men and women don’t seem to be interested except it is one thing to accomplish with Lady gaga! Your personal stuffs great. Always deal with it up!
I think this site has very wonderful indited articles posts.
It’s laborious to seek out knowledgeable individuals on this topic, however you sound like you already know what you’re talking about! Thanks
Very interesting information!Perfect just what I was looking for!
Thanx for the effort, keep up the good work Great work, I am going to start a small Blog Engine course work using your site I hope you enjoy blogging with the popular BlogEngine.net.Thethoughts you express are really awesome. Hope you will right some more posts.
After study a few of the blog posts on your website now, and I truly like your way of blogging. I bookmarked it to my bookmark website list and will be checking back soon. Pls check out my web site as well and let me know what you think.
Rattling clean website , thanks for this post.
I am extremely impressed with your writing skills as well as with the layout on your blog. Is this a paid theme or did you modify it yourself? Either way keep up the excellent quality writing, it’s rare to see a great blog like this one today..
Heya! I just wanted to ask if you ever have any trouble with hackers? My last blog (wordpress) was hacked and I ended up losing several weeks of hard work due to no back up. Do you have any methods to protect against hackers?
We are a bunch of volunteers and starting a brand new scheme in our community. Your site offered us with useful information to paintings on. You’ve done an impressive task and our entire neighborhood might be grateful to you.
Excellent read, I just passed this onto a friend who was doing a little research on that. And he actually bought me lunch since I found it for him smile Therefore let me rephrase that: Thank you for lunch!
Good post. I be taught one thing more difficult on totally different blogs everyday. It would always be stimulating to learn content from other writers and apply a little bit something from their store. I’d choose to use some with the content material on my weblog whether you don’t mind. Natually I’ll provide you with a link in your net blog. Thanks for sharing.
What i don’t realize is actually how you’re now not really a lot more smartly-favored than you may be now. You are very intelligent. You realize thus considerably on the subject of this topic, produced me individually believe it from numerous various angles. Its like women and men are not involved unless it?¦s one thing to do with Girl gaga! Your individual stuffs outstanding. All the time deal with it up!
Outstanding post, you have pointed out some wonderful details , I besides conceive this s a very superb website.
I wanted to thank you for this great read!! I definitely enjoying every little bit of it I have you bookmarked to check out new stuff you post…
What i don’t understood is actually how you’re not really much more well-liked than you might be right now. You are so intelligent. You realize thus considerably relating to this subject, produced me personally consider it from numerous varied angles. Its like women and men aren’t fascinated unless it’s one thing to do with Lady gaga! Your own stuffs nice. Always maintain it up!
Thanks for sharing excellent informations. Your web-site is so cool. I’m impressed by the details that you’ve on this website. It reveals how nicely you understand this subject. Bookmarked this website page, will come back for extra articles. You, my friend, ROCK! I found just the info I already searched all over the place and just could not come across. What a great site.
My brother recommended I might like this blog. He was entirely right. This post actually made my day. You cann’t imagine simply how much time I had spent for this information! Thanks!
You actually make it seem really easy along with your presentation but I find this matter to be really something which I believe I might never understand. It seems too complex and extremely broad for me. I am having a look forward in your subsequent post, I?¦ll attempt to get the hang of it!
Awesome blog! Do you have any recommendations for aspiring writers? I’m planning to start my own site soon but I’m a little lost on everything. Would you suggest starting with a free platform like WordPress or go for a paid option? There are so many choices out there that I’m completely overwhelmed .. Any suggestions? Appreciate it!
It’s the best time to make some plans for the future and it’s time to be happy. I’ve read this post and if I could I wish to suggest you some interesting things or advice. Perhaps you could write next articles referring to this article. I want to read more things about it!
Aw, this was a very nice post. In concept I wish to put in writing like this moreover – taking time and precise effort to make an excellent article… but what can I say… I procrastinate alot and under no circumstances appear to get something done.
I do not even know the way I ended up right here, but I believed this post used to be great. I don’t recognize who you might be but certainly you’re going to a well-known blogger should you are not already 😉 Cheers!
Simply wanna input that you have a very nice internet site, I enjoy the layout it actually stands out.
When I originally commented I clicked the -Notify me when new comments are added- checkbox and now each time a comment is added I get four emails with the same comment. Is there any way you can remove me from that service? Thanks!
It’s really a cool and helpful piece of info. I’m glad that you shared this helpful info with us. Please stay us informed like this. Thanks for sharing.
You are my inhalation, I have few blogs and sometimes run out from to brand.
Some times its a pain in the ass to read what people wrote but this internet site is real user genial! .
Thank you for another fantastic article. The place else may anyone get that type of information in such an ideal way of writing? I have a presentation subsequent week, and I am on the look for such information.
Very nice post. I just stumbled upon your weblog and wanted to say that I have truly enjoyed browsing your blog posts. After all I’ll be subscribing to your feed and I hope you write again very soon!
Thanks for any other informative website. The place else may I am getting that kind of information written in such an ideal way? I’ve a undertaking that I am just now working on, and I have been on the glance out for such information.
Sweet web site, super design and style, really clean and utilize pleasant.
Hello this is somewhat of off topic but I was wanting to know if blogs use WYSIWYG editors or if you have to manually code with HTML. I’m starting a blog soon but have no coding knowledge so I wanted to get guidance from someone with experience. Any help would be greatly appreciated!
It’s hard to find knowledgeable people on this topic, but you sound like you know what you’re talking about! Thanks
You should take part in a contest for one of the best blogs on the web. I will recommend this site!
Hmm is anyone else experiencing problems with the pictures on this blog loading? I’m trying to find out if its a problem on my end or if it’s the blog. Any responses would be greatly appreciated.
There are certainly quite a lot of details like that to take into consideration. That could be a great level to bring up. I provide the ideas above as normal inspiration but clearly there are questions just like the one you bring up where a very powerful factor will likely be working in honest good faith. I don?t know if finest practices have emerged round issues like that, but I’m sure that your job is clearly identified as a good game. Both girls and boys feel the affect of only a moment’s pleasure, for the remainder of their lives.
I really enjoy looking through on this internet site, it has got fantastic blog posts.
Yeah bookmaking this wasn’t a speculative decision outstanding post! .
I’ve been surfing online more than 3 hours today, but I never discovered any attention-grabbing article like yours. It is pretty worth enough for me. In my view, if all web owners and bloggers made good content material as you probably did, the web can be a lot more useful than ever before.
Very interesting details you have observed, appreciate it for posting. “Brass bands are all very well in their place – outdoors and several miles away.” by Sir Thomas Beecham.
Hello very cool blog!! Guy .. Excellent .. Superb .. I’ll bookmark your website and take the feeds additionally…I’m satisfied to search out a lot of useful information right here in the submit, we want develop extra techniques in this regard, thanks for sharing.
I am often to blogging and i really appreciate your content. The article has really peaks my interest. I am going to bookmark your site and keep checking for new information.
Undeniably believe that which you stated. Your favorite reason appeared to be on the net the easiest thing to be aware of. I say to you, I certainly get annoyed while people think about worries that they plainly don’t know about. You managed to hit the nail upon the top and defined out the whole thing without having side-effects , people could take a signal. Will probably be back to get more. Thanks
I always was concerned in this subject and stock still am, thanks for putting up.
I have been reading out a few of your stories and i can state pretty good stuff. I will definitely bookmark your site.
We stumbled over here coming from a different page and thought I might check things out. I like what I see so i am just following you. Look forward to exploring your web page again.
Good day very cool website!! Man .. Excellent .. Wonderful .. I will bookmark your site and take the feeds also?KI’m happy to find numerous useful information here in the submit, we need work out extra strategies in this regard, thanks for sharing. . . . . .
I think other web site proprietors should take this site as an model, very clean and wonderful user genial style and design, let alone the content. You are an expert in this topic!
I’d have to examine with you here. Which is not one thing I usually do! I take pleasure in reading a post that may make folks think. Additionally, thanks for permitting me to comment!
This web site is really a walk-through for all of the info you wanted about this and didn’t know who to ask. Glimpse here, and you’ll definitely discover it.
Valuable information. Lucky me I found your site by accident, and I am shocked why this accident didn’t happened earlier! I bookmarked it.
Can I simply say what a aid to find somebody who really is aware of what theyre speaking about on the internet. You definitely know the right way to carry a difficulty to mild and make it important. More folks must read this and perceive this side of the story. I cant consider youre not more fashionable since you positively have the gift.
I love your writing style really enjoying this internet site.
I like this blog very much, Its a real nice position to read and obtain information. “I’d better get off the phone now, I’ve already told you more than I heard myself.” by Loretta Lockhorn.
I have recently started a site, the info you provide on this site has helped me tremendously. Thanks for all of your time & work.
Very nice post and right to the point. I am not sure if this is in fact the best place to ask but do you guys have any ideea where to employ some professional writers? Thx 🙂
You are my inhalation, I have few blogs and infrequently run out from to post .
I view something genuinely special in this site.
Hi there, simply was alert to your weblog via Google, and located that it’s truly informative. I’m gonna be careful for brussels. I will appreciate in case you proceed this in future. Numerous other folks can be benefited from your writing. Cheers!
There is noticeably a lot to realize about this. I think you made various good points in features also.
Excellent goods from you, man. I have understand your stuff previous to and you’re just too excellent. I actually like what you’ve acquired here, certainly like what you’re stating and the way in which you say it. You make it entertaining and you still care for to keep it wise. I cant wait to read much more from you. This is really a great website.
Hello, Neat post. There is a problem along with your website in internet explorer, may check this?K IE nonetheless is the market chief and a good part of other folks will pass over your fantastic writing due to this problem.
Pretty! This was a really wonderful post. Thank you for your provided information.
Good – I should definitely pronounce, impressed with your web site. I had no trouble navigating through all the tabs as well as related info ended up being truly simple to do to access. I recently found what I hoped for before you know it in the least. Quite unusual. Is likely to appreciate it for those who add forums or something, site theme . a tones way for your customer to communicate. Excellent task..
Do you mind if I quote a few of your posts as long as I provide credit and sources back to your site? My website is in the exact same area of interest as yours and my visitors would genuinely benefit from a lot of the information you present here. Please let me know if this okay with you. Thanks a lot!
Fantastic web site. Plenty of useful info here. I¦m sending it to a few pals ans additionally sharing in delicious. And of course, thanks on your sweat!
It’s really a nice and helpful piece of info. I’m glad that you shared this helpful info with us. Please keep us up to date like this. Thank you for sharing.
Hi there this is kind of of off topic but I was wondering if blogs use WYSIWYG editors or if you have to manually code with HTML. I’m starting a blog soon but have no coding skills so I wanted to get advice from someone with experience. Any help would be greatly appreciated!
Nice post. I learn something more challenging on different blogs everyday. It will always be stimulating to read content from other writers and practice a little something from their store. I’d prefer to use some with the content on my blog whether you don’t mind. Natually I’ll give you a link on your web blog. Thanks for sharing.
Unquestionably believe that which you stated. Your favorite justification appeared to be on the net the easiest thing to be aware of. I say to you, I definitely get annoyed while people think about worries that they just do not know about. You managed to hit the nail upon the top and defined out the whole thing without having side-effects , people could take a signal. Will likely be back to get more. Thanks
I love it when people come together and share opinions, great blog, keep it up.
Hi, just required you to know I he added your site to my Google bookmarks due to your layout. But seriously, I believe your internet site has 1 in the freshest theme I??ve came across. It extremely helps make reading your blog significantly easier.
After all, what a great site and informative posts, I will upload inbound link – bookmark this web site? Regards, Reader.
I think other web-site proprietors should take this site as an model, very clean and magnificent user friendly style and design, as well as the content. You’re an expert in this topic!
I am really enjoying the theme/design of your weblog. Do you ever run into any internet browser compatibility issues? A couple of my blog audience have complained about my website not working correctly in Explorer but looks great in Opera. Do you have any tips to help fix this issue?
Thanks for some other magnificent post. The place else may just anybody get that kind of information in such an ideal means of writing? I’ve a presentation next week, and I am at the search for such information.
Have you ever considered creating an e-book or guest authoring on other websites? I have a blog based on the same subjects you discuss and would really like to have you share some stories/information. I know my audience would enjoy your work. If you’re even remotely interested, feel free to shoot me an e-mail.
There is visibly a bundle to realize about this. I consider you made various nice points in features also.
The next time I read a blog, I hope that it doesnt disappoint me as much as this one. I mean, I know it was my choice to read, but I actually thought youd have something interesting to say. All I hear is a bunch of whining about something that you could fix if you werent too busy looking for attention.
I reckon something genuinely special in this website.
I was reading some of your articles on this internet site and I conceive this site is rattling informative! Retain putting up.
I got good info from your blog
I am not positive the place you are getting your information, however good topic. I needs to spend some time learning more or figuring out more. Thank you for wonderful information I used to be searching for this information for my mission.
I am extremely inspired together with your writing talents as neatly as with the format to your weblog. Is this a paid subject matter or did you customize it your self? Either way stay up the excellent quality writing, it is uncommon to peer a great weblog like this one these days..
I conceive this website contains some rattling wonderful information for everyone. “Good advice is always certain to be ignored, but that’s no reason not to give it.” by Agatha Christie.
Thanks a bunch for sharing this with all of us you really know what you’re talking about! Bookmarked. Please also visit my website =). We could have a link exchange arrangement between us!
Wonderful work! This is the type of info that should be shared around the web. Shame on Google for not positioning this post higher! Come on over and visit my site . Thanks =)
I have not checked in here for a while because I thought it was getting boring, but the last few posts are great quality so I guess I will add you back to my daily bloglist. You deserve it my friend 🙂
I am not very fantastic with English but I find this very easy to understand.
Thank you a lot for sharing this with all folks you really recognise what you’re speaking approximately! Bookmarked. Kindly also seek advice from my web site =). We may have a link exchange agreement between us!
Thank you for sharing with us, I think this website really stands out : D.
You have brought up a very great details , appreciate it for the post.
I’ve been absent for a while, but now I remember why I used to love this blog. Thanks, I will try and check back more frequently. How frequently you update your web site?
I like this post, enjoyed this one thanks for posting.
What i do not understood is actually how you’re not really much more well-liked than you may be now. You’re very intelligent. You realize therefore considerably relating to this subject, produced me personally consider it from a lot of varied angles. Its like women and men aren’t fascinated unless it is one thing to do with Lady gaga! Your own stuffs outstanding. Always maintain it up!
Appreciating the time and energy you put into your blog and in depth information you offer. It’s awesome to come across a blog every once in a while that isn’t the same outdated rehashed information. Wonderful read! I’ve saved your site and I’m including your RSS feeds to my Google account.
A big thank you for your article post.Thanks Again. Awesome.
hello!,I love your writing so a lot! proportion we be in contact more approximately your post on AOL? I need a specialist in this area to resolve my problem. May be that is you! Taking a look ahead to look you.
I got what you intend, thanks for posting.Woh I am thankful to find this website through google.
You can certainly see your skills in the work you write. The world hopes for more passionate writers like you who aren’t afraid to say how they believe. Always follow your heart.
Very nice design and style and wonderful written content, very little else we want : D.
I have been exploring for a bit for any high quality articles or blog posts on this sort of area . Exploring in Yahoo I eventually stumbled upon this website. Reading this information So i¦m happy to express that I’ve an incredibly just right uncanny feeling I found out just what I needed. I such a lot surely will make certain to don¦t overlook this site and give it a look on a continuing basis.
Howdy! I know this is kinda off topic but I was wondering which blog platform are you using for this website? I’m getting tired of WordPress because I’ve had problems with hackers and I’m looking at options for another platform. I would be fantastic if you could point me in the direction of a good platform.
This is very interesting, You are an overly professional blogger. I’ve joined your feed and stay up for in search of extra of your magnificent post. Additionally, I have shared your website in my social networks!
fantastic points altogether, you simply gained a new reader. What would you suggest about your post that you made some days ago? Any positive?
I just could not depart your web site prior to suggesting that I really enjoyed the standard information a person provide for your visitors? Is going to be back often in order to check up on new posts
Hello, you used to write magnificent, but the last few posts have been kinda boring… I miss your great writings. Past several posts are just a little out of track! come on!
Helpful information. Lucky me I discovered your web site by accident, and I am shocked why this twist of fate did not took place earlier! I bookmarked it.
My brother recommended I would possibly like this web site. He used to be totally right. This submit actually made my day. You cann’t imagine just how much time I had spent for this info! Thanks!
I appreciate, cause I found exactly what I was looking for. You have ended my 4 day long hunt! God Bless you man. Have a nice day. Bye
I am not real excellent with English but I come up this really leisurely to translate.
Write more, thats all I have to say. Literally, it seems as though you relied on the video to make your point. You clearly know what youre talking about, why throw away your intelligence on just posting videos to your blog when you could be giving us something enlightening to read?
Thank you for another informative site. Where else could I get that type of info written in such a perfect way? I’ve a project that I am just now working on, and I have been on the look out for such info.
I am often to blogging and i really appreciate your content. The article has really peaks my interest. I am going to bookmark your site and keep checking for new information.
hey there and thank you for your info – I have certainly picked up something new from right here. I did however expertise several technical issues using this site, as I experienced to reload the web site lots of times previous to I could get it to load properly. I had been wondering if your web hosting is OK? Not that I’m complaining, but slow loading instances times will sometimes affect your placement in google and can damage your high quality score if ads and marketing with Adwords. Anyway I am adding this RSS to my e-mail and can look out for much more of your respective interesting content. Ensure that you update this again very soon..
Hey very cool blog!! Man .. Beautiful .. Amazing .. I’ll bookmark your blog and take the feeds also…I am happy to find a lot of useful information here in the post, we need develop more techniques in this regard, thanks for sharing. . . . . .
Hi there, I found your site via Google while looking for a related topic, your website came up, it looks good. I have bookmarked it in my google bookmarks.
Hello.This article was extremely interesting, particularly because I was searching for thoughts on this topic last Sunday.
Very interesting information!Perfect just what I was looking for! “You have to be deviant if you’re going to do anything new.” by David Lee.
Pretty great post. I just stumbled upon your blog and wanted to mention that I have truly enjoyed browsing your weblog posts. After all I’ll be subscribing for your feed and I hope you write again soon!
At this time it appears like Movable Type is the preferred blogging platform available right now. (from what I’ve read) Is that what you are using on your blog?
Your home is valueble for me. Thanks!…
Everything is very open and very clear explanation of issues. was truly information. Your website is very useful. Thanks for sharing.
Loving the information on this internet site, you have done outstanding job on the posts.
Good write-up, I¦m regular visitor of one¦s blog, maintain up the excellent operate, and It is going to be a regular visitor for a lengthy time.
It’s a pity you don’t have a donate button! I’d without a doubt donate to this fantastic blog! I guess for now i’ll settle for bookmarking and adding your RSS feed to my Google account. I look forward to brand new updates and will talk about this website with my Facebook group. Chat soon!
I was recommended this website by my cousin. I’m not sure whether this post is written by him as no one else know such detailed about my difficulty. You’re incredible! Thanks!
You have brought up a very wonderful points, thanks for the post.
I appreciate, cause I found exactly what I was looking for. You have ended my 4 day long hunt! God Bless you man. Have a nice day. Bye
I do not even know how I ended up here, but I thought this post was great. I don’t know who you are but certainly you’re going to a famous blogger if you are not already 😉 Cheers!
I’ve been surfing online more than 3 hours nowadays, but I by no means discovered any fascinating article like yours. It¦s beautiful value sufficient for me. Personally, if all web owners and bloggers made good content as you probably did, the net might be a lot more helpful than ever before.
A lot of of what you assert is supprisingly legitimate and it makes me ponder the reason why I had not looked at this with this light before. Your piece truly did turn the light on for me personally as far as this subject goes. Nonetheless at this time there is actually one particular position I am not necessarily too cozy with and while I attempt to reconcile that with the main idea of the issue, permit me observe what all the rest of the subscribers have to say.Nicely done.
I just could not depart your website before suggesting that I actually enjoyed the usual information a person supply in your visitors? Is gonna be back regularly in order to check out new posts
Hey there! Do you know if they make any plugins to assist with Search Engine Optimization? I’m trying to get my blog to rank for some targeted keywords but I’m not seeing very good gains. If you know of any please share. Appreciate it!
Just wanna remark on few general things, The website pattern is perfect, the content material is very good : D.
Some really good content on this website, thanks for contribution. “When he has ceased to hear the many, he may discern the One – the inner sound which kills the outer.” by H Hahn Blavatsky.
Heya i’m for the first time here. I found this board and I find It really useful & it helped me out much. I hope to give something back and aid others like you helped me.
Awsome post and straight to the point. I don’t know if this is actually the best place to ask but do you guys have any ideea where to get some professional writers? Thx 🙂
Fantastic beat ! I wish to apprentice at the same time as you amend your website, how can i subscribe for a weblog web site? The account aided me a acceptable deal. I have been tiny bit acquainted of this your broadcast provided brilliant transparent concept
hey there and thanks to your information – I have definitely picked up something new from right here. I did on the other hand experience several technical points the usage of this web site, as I experienced to reload the web site a lot of times previous to I could get it to load properly. I had been considering in case your web host is OK? Not that I’m complaining, but slow loading circumstances instances will often have an effect on your placement in google and could harm your quality ranking if ads and ***********|advertising|advertising|advertising and *********** with Adwords. Well I am including this RSS to my email and could glance out for a lot extra of your respective intriguing content. Make sure you replace this once more soon..
What i do not understood is in reality how you are not really much more smartly-preferred than you might be right now. You’re so intelligent. You understand therefore considerably in the case of this subject, made me in my view believe it from a lot of varied angles. Its like women and men don’t seem to be fascinated except it is something to do with Girl gaga! Your own stuffs great. Always take care of it up!
Thanks for the sensible critique. Me & my neighbor were just preparing to do a little research on this. We got a grab a book from our local library but I think I learned more from this post. I am very glad to see such magnificent info being shared freely out there.
I just couldn’t go away your website before suggesting that I really loved the standard information an individual provide for your guests? Is gonna be again steadily in order to check out new posts.
Good day! This is my first visit to your blog! We are a collection of volunteers and starting a new project in a community in the same niche. Your blog provided us useful information to work on. You have done a extraordinary job!
Hi! Someone in my Facebook group shared this website with us so I came to check it out. I’m definitely loving the information. I’m bookmarking and will be tweeting this to my followers! Outstanding blog and great style and design.
Only wanna comment that you have a very decent site, I love the layout it really stands out.
I haven¦t checked in here for a while because I thought it was getting boring, but the last several posts are great quality so I guess I¦ll add you back to my everyday bloglist. You deserve it my friend 🙂
Real clear site, appreciate it for this post.
Utterly composed content material, Really enjoyed looking through.
What’s Happening i am new to this, I stumbled upon this I have found It positively useful and it has aided me out loads. I hope to contribute & aid other users like its helped me. Good job.
Hi there, just changed into alert to your blog thru Google, and located that it is really informative. I’m gonna watch out for brussels. I will be grateful in the event you continue this in future. Many other people will probably be benefited out of your writing. Cheers!
Great write-up, I’m regular visitor of one’s web site, maintain up the excellent operate, and It’s going to be a regular visitor for a long time.
Great line up. We will be linking to this great article on our site. Keep up the good writing.
Hello, you used to write great, but the last few posts have been kinda boring… I miss your tremendous writings. Past few posts are just a little out of track! come on!
Excellent blog here! Also your site loads up very fast! What web host are you using? Can I get your affiliate link to your host? I wish my site loaded up as quickly as yours lol
Hey there! I’m at work browsing your blog from my new iphone 3gs! Just wanted to say I love reading through your blog and look forward to all your posts! Carry on the great work!
Good ?V I should definitely pronounce, impressed with your site. I had no trouble navigating through all tabs as well as related info ended up being truly easy to do to access. I recently found what I hoped for before you know it at all. Quite unusual. Is likely to appreciate it for those who add forums or something, website theme . a tones way for your customer to communicate. Nice task..
I precisely wanted to thank you very much once more. I do not know the things I could possibly have sorted out in the absence of the entire tips and hints discussed by you over such topic. It was a real frightening circumstance for me personally, but being able to view your expert form you treated the issue forced me to jump for fulfillment. Now i’m grateful for your guidance and as well , hope that you recognize what an amazing job you have been undertaking training most people via your web blog. Probably you have never got to know all of us.
Hmm is anyone else having problems with the images on this blog loading? I’m trying to determine if its a problem on my end or if it’s the blog. Any feedback would be greatly appreciated.
We’re a group of volunteers and starting a new scheme in our community. Your site provided us with valuable information to work on. You’ve done a formidable job and our entire community will be grateful to you.
Hello my family member! I wish to say that this article is awesome, great written and include almost all significant infos. I would like to see extra posts like this .
Does your website have a contact page? I’m having a tough time locating it but, I’d like to send you an e-mail. I’ve got some recommendations for your blog you might be interested in hearing. Either way, great blog and I look forward to seeing it expand over time.
Howdy! Quick question that’s entirely off topic. Do you know how to make your site mobile friendly? My blog looks weird when browsing from my iphone 4. I’m trying to find a theme or plugin that might be able to fix this problem. If you have any suggestions, please share. Thanks!
What i do not realize is if truth be told how you’re no longer actually much more well-preferred than you might be right now. You are so intelligent. You recognize thus considerably in terms of this subject, made me in my opinion believe it from numerous varied angles. Its like women and men aren’t interested until it’s something to do with Lady gaga! Your individual stuffs great. All the time take care of it up!
I have been browsing online more than 3 hours today, yet I never found any interesting article like yours. It is pretty worth enough for me. Personally, if all webmasters and bloggers made good content as you did, the web will be much more useful than ever before.
I truly appreciate this post. I’ve been looking all over for this! Thank goodness I found it on Bing. You have made my day! Thank you again
WONDERFUL Post.thanks for share..extra wait .. …
There is evidently a lot to identify about this. I think you made various good points in features also.
I like this post, enjoyed this one thanks for putting up. “Money is a poor man’s credit card.” by Herbert Marshall McLuhan.
Hello are using WordPress for your site platform? I’m new to the blog world but I’m trying to get started and create my own. Do you need any coding knowledge to make your own blog? Any help would be really appreciated!
I am also writing to let you be aware of what a brilliant encounter my friend’s girl developed going through the blog. She realized so many things, which included how it is like to have a great teaching heart to let folks completely know precisely a number of specialized topics. You undoubtedly surpassed my expectations. Thank you for distributing these important, healthy, educational and as well as easy tips on this topic to Sandra.
Whats Happening i’m new to this, I stumbled upon this I’ve found It absolutely helpful and it has aided me out loads. I am hoping to contribute & aid different customers like its aided me. Great job.
I see something really special in this website .
Those are yours alright! . We at least need to get these people stealing images to start blogging! They probably just did a image search and grabbed them. They look good though!
Hello, i believe that i noticed you visited my weblog thus i came to “go back the desire”.I’m attempting to in finding things to enhance my site!I guess its ok to use a few of your concepts!!
Some really great posts on this internet site, thanks for contribution.
Wow, marvelous weblog structure! How lengthy have you ever been blogging for? you made running a blog look easy. The overall glance of your website is great, as neatly as the content material!
F*ckin’ amazing issues here. I’m very satisfied to look your article. Thanks a lot and i am looking ahead to touch you. Will you kindly drop me a e-mail?
Good day! This is my 1st comment here so I just wanted to give a quick shout out and say I really enjoy reading through your articles. Can you suggest any other blogs/websites/forums that deal with the same subjects? Thanks a ton!
Hey there! I’ve been reading your weblog for a while now and finally got the courage to go ahead and give you a shout out from Kingwood Tx! Just wanted to tell you keep up the good work!
Awsome website! I am loving it!! Will be back later to read some more. I am bookmarking your feeds also
Hello.This article was really motivating, especially since I was looking for thoughts on this topic last Monday.
Hey! Do you know if they make any plugins to safeguard against hackers? I’m kinda paranoid about losing everything I’ve worked hard on. Any tips?
Great paintings! This is the kind of information that should be shared around the net. Shame on the search engines for no longer positioning this submit upper! Come on over and visit my web site . Thank you =)
Great tremendous issues here. I?¦m very happy to look your article. Thanks a lot and i’m having a look forward to contact you. Will you kindly drop me a mail?
Yay google is my world beater helped me to find this great website ! .
Hello! I could have sworn I’ve been to this blog before but after browsing through some of the post I realized it’s new to me. Anyways, I’m definitely happy I found it and I’ll be book-marking and checking back frequently!
Hi! I know this is kinda off topic nevertheless I’d figured I’d ask. Would you be interested in trading links or maybe guest authoring a blog post or vice-versa? My site addresses a lot of the same subjects as yours and I believe we could greatly benefit from each other. If you are interested feel free to send me an e-mail. I look forward to hearing from you! Excellent blog by the way!
I was just searching for this information for some time. After 6 hours of continuous Googleing, finally I got it in your web site. I wonder what is the lack of Google strategy that do not rank this type of informative sites in top of the list. Usually the top sites are full of garbage.
I do not even know the way I finished up right here, however I believed this put up was once good. I do not know who you might be however certainly you’re going to a famous blogger for those who are not already 😉 Cheers!
Currently it sounds like Drupal is the top blogging platform available right now. (from what I’ve read) Is that what you are using on your blog?
I’ll right away grab your rss feed as I can’t find your email subscription link or newsletter service. Do you’ve any? Please let me know so that I could subscribe. Thanks.
I’m not sure where you are getting your information, but great topic. I needs to spend some time learning much more or understanding more. Thanks for magnificent information I was looking for this information for my mission.
I have been surfing online more than 3 hours today, yet I never found any interesting article like yours. It’s pretty worth enough for me. In my view, if all site owners and bloggers made good content as you did, the net will be a lot more useful than ever before.
Hello.This post was really interesting, especially since I was searching for thoughts on this subject last week.
I would like to thnkx for the efforts you’ve put in writing this site. I am hoping the same high-grade site post from you in the upcoming also. In fact your creative writing abilities has inspired me to get my own blog now. Really the blogging is spreading its wings quickly. Your write up is a great example of it.
Some really excellent articles on this website , thankyou for contribution.
I believe this web site holds some very excellent info for everyone. “There is nothing so disagreeable, that a patient mind cannot find some solace for it.” by Lucius Annaeus Seneca.
Thank you for this info
Hello there. I discovered your site by the use of Google whilst searching for a similar subject, your web site got here up. It seems to be great. I have bookmarked it in my google bookmarks to visit then.
Nice post. I was checking constantly this blog and I
am impressed! Extremely helpful information particularly the last part 🙂 I care for such information a lot.
I was seeking this particular information for a long time.
Thank you and best of luck.
I really appreciate this post. I?¦ve been looking everywhere for this! Thank goodness I found it on Bing. You have made my day! Thx again
So we can’t fail to remember
Some genuinely quality content on this website , saved to bookmarks.
Appreciate it for helping out, fantastic information.
The subsequent time I learn a blog, I hope that it doesnt disappoint me as a lot as this one. I imply, I know it was my choice to read, but I truly thought youd have something fascinating to say. All I hear is a bunch of whining about one thing that you might fix in the event you werent too busy in search of attention.
A formidable share, I just given this onto a colleague who was doing somewhat analysis on this. And he in fact bought me breakfast as a result of I discovered it for him.. smile. So let me reword that: Thnx for the deal with! But yeah Thnkx for spending the time to debate this, I feel strongly about it and love studying more on this topic. If doable, as you turn out to be experience, would you mind updating your blog with more particulars? It is highly helpful for me. Large thumb up for this weblog post!
Hello, Neat post. There is an issue with your web site in internet explorer, would test this?K IE still is the marketplace leader and a large portion of folks will omit your great writing due to this problem.
Woah! I’m really enjoying the template/theme of this website. It’s simple, yet effective. A lot of times it’s very hard to get that “perfect balance” between superb usability and visual appeal. I must say that you’ve done a excellent job with this. In addition, the blog loads super quick for me on Internet explorer. Exceptional Blog!
You actually make it seem so easy with your presentation but I find this matter to be really something that I think I would never understand. It seems too complicated and extremely broad for me. I’m looking forward for your next post, I will try to get the hang of it!
This was simply awesome and your post is cool.
Good web site! I really love how it is easy on my eyes and the data are well written. I’m wondering how I could be notified whenever a new post has been made. I’ve subscribed to your RSS which must do the trick! Have a nice day!
Thanks, I’ve recently been looking for info approximately this subject for ages and yours is the greatest I’ve found out till now. However, what about the bottom line? Are you certain in regards to the source?
Thanks for this post, I am a big big fan of this website would like to keep updated.
I respect your piece of work, appreciate it for all the useful blog posts.
As soon as I observed this web site I went on reddit to share some of the love with them.
As I site possessor I believe the content material here is rattling wonderful , appreciate it for your efforts. You should keep it up forever! Good Luck.
Hey there! Do you know if they make any plugins to safeguard against hackers? I’m kinda paranoid about losing everything I’ve worked hard on. Any suggestions?
I am continually searching online for tips that can aid me. Thanks!
Magnificent beat ! I wish to apprentice while you amend your site, how can i subscribe for a blog site? The account helped me a acceptable deal. I had been a little bit acquainted of this your broadcast offered bright clear concept
Simply want to say your article is as amazing. The clarity to your post is just nice and i can think you’re a professional on this subject. Fine with your permission allow me to grab your feed to keep up to date with drawing close post. Thank you 1,000,000 and please carry on the gratifying work.
Unquestionably believe that that you stated. Your favorite justification seemed to be at the web the easiest factor to be mindful of. I say to you, I definitely get annoyed whilst other people consider worries that they just do not realize about. You managed to hit the nail upon the highest and also outlined out the entire thing with no need side-effects , people can take a signal. Will probably be again to get more. Thank you
Wow! Thank you! I continually needed to write on my site something like that. Can I implement a portion of your post to my website?
Hey very cool web site!! Man .. Beautiful .. Amazing .. I will bookmark your site and take the feeds also…I’m happy to find numerous useful information here in the post, we need work out more techniques in this regard, thanks for sharing. . . . . .
Wow! Thank you! I constantly needed to write on my website something like that. Can I include a part of your post to my site?
Would love to forever get updated great web blog! .
Hmm is anyone else having problems with the images on this blog loading? I’m trying to find out if its a problem on my end or if it’s the blog. Any feedback would be greatly appreciated.
I’ve been browsing online more than 3 hours today, yet I never found any interesting article like yours. It is pretty worth enough for me. Personally, if all webmasters and bloggers made good content as you did, the internet will be a lot more useful than ever before.
Superb blog! Do you have any hints for aspiring writers? I’m hoping to start my own blog soon but I’m a little lost on everything. Would you propose starting with a free platform like WordPress or go for a paid option? There are so many options out there that I’m totally confused .. Any suggestions? Many thanks!
Hey, you used to write excellent, but the last several posts have been kinda boring… I miss your great writings. Past few posts are just a bit out of track! come on!
I do agree with all of the ideas you’ve presented in your post. They’re very convincing and will certainly work. Still, the posts are very short for novices. Could you please extend them a bit from next time? Thanks for the post.
Excellent web site. A lot of useful info here. I am sending it to a few friends ans also sharing in delicious. And certainly, thanks for your effort!
I do agree with all of the ideas you’ve presented in your post. They’re very convincing and will definitely work. Still, the posts are too short for beginners. Could you please extend them a bit from next time? Thanks for the post.
Well I definitely liked studying it. This post offered by you is very constructive for good planning.
excellent post, very informative. I wonder why the other experts of this sector don’t notice this. You must continue your writing. I am sure, you have a huge readers’ base already!
I got what you intend,saved to favorites, very nice web site.
I’ve recently started a web site, the information you offer on this site has helped me tremendously. Thank you for all of your time & work. “The very ink with which history is written is merely fluid prejudice.” by Mark Twain.
very nice publish, i definitely love this website, keep on it
I am very happy to read this. This is the kind of manual that needs to be given and not the accidental misinformation that is at the other blogs. Appreciate your sharing this greatest doc.
hello there and thanks to your information – I have definitely picked up anything new from proper here. I did however experience several technical points using this site, since I skilled to reload the website many occasions previous to I may get it to load properly. I were brooding about in case your web hosting is OK? Now not that I am complaining, however slow loading cases times will often affect your placement in google and can harm your high-quality score if advertising and ***********|advertising|advertising|advertising and *********** with Adwords. Well I’m including this RSS to my email and could glance out for a lot more of your respective fascinating content. Make sure you replace this again very soon..
Hello, you used to write excellent, but the last few posts have been kinda boring… I miss your super writings. Past few posts are just a little out of track! come on!
Together with everything that seems to be developing within this area, your perspectives are generally somewhat stimulating. However, I am sorry, but I can not give credence to your whole idea, all be it exhilarating none the less. It looks to me that your commentary are actually not totally validated and in fact you are yourself not even entirely convinced of your argument. In any event I did appreciate reading through it.
I don’t even know the way I stopped up right here, but I thought this put up was once good. I don’t recognize who you might be however definitely you are going to a well-known blogger when you are not already 😉 Cheers!
Some times its a pain in the ass to read what blog owners wrote but this website is real user pleasant! .
I do not even know how I ended up here, but I thought this post was good. I don’t know who you are but definitely you’re going to a famous blogger if you aren’t already 😉 Cheers!
Hi there, I found your website via Google whilst looking for a comparable matter, your website came up, it appears good. I’ve bookmarked it in my google bookmarks.
I genuinely enjoy reading through on this internet site, it contains great content. “Words are, of course, the most powerful drug used by mankind.” by Rudyard Kipling.
I was very pleased to seek out this web-site.I needed to thanks on your time for this excellent read!! I positively having fun with each little little bit of it and I have you bookmarked to check out new stuff you blog post.
I like the efforts you have put in this, regards for all the great posts.
I’m no longer positive the place you are getting your information, but good topic. I must spend a while finding out much more or figuring out more. Thanks for great information I used to be in search of this info for my mission.
Spot on with this write-up, I really think this website needs way more consideration. I’ll probably be again to learn rather more, thanks for that info.
Great blog you have here but I was wondering if you knew of any message boards that cover the same topics discussed here? I’d really like to be a part of group where I can get advice from other knowledgeable individuals that share the same interest. If you have any recommendations, please let me know. Thanks!
I enjoy what you guys are usually up too. This type of clever work and reporting! Keep up the wonderful works guys I’ve you guys to blogroll.
Well I truly liked studying it. This post provided by you is very useful for proper planning.
Thanks for another informative website. Where else could I get that type of info written in such an ideal way? I have a project that I am just now working on, and I’ve been on the look out for such information.
I have learn several good stuff here. Definitely worth bookmarking for revisiting. I wonder how a lot attempt you put to make one of these great informative web site.
This actually answered my problem, thanks!
What i do not understood is in reality how you are no longer really a lot more neatly-favored than you may be right now. You are very intelligent. You already know thus significantly with regards to this subject, produced me in my view consider it from numerous numerous angles. Its like women and men are not fascinated unless it¦s one thing to do with Lady gaga! Your individual stuffs nice. Always handle it up!
I feel that is among the so much vital information for me. And i’m glad reading
your article. But wanna observation on some common issues, The site style is great,
the articles is in point of fact nice : D. Excellent task, cheers
Deference to post author, some good information .
It is appropriate time to make some plans for the long run and it’s time to be happy. I have read this post and if I may I want to suggest you few attention-grabbing things or suggestions. Maybe you can write next articles referring to this article. I desire to learn more issues about it!
Howdy just wanted to give you a quick heads up. The text in your content seem to be running off the screen in Ie. I’m not sure if this is a format issue or something to do with web browser compatibility but I figured I’d post to let you know. The style and design look great though! Hope you get the issue fixed soon. Thanks
My coder is trying to persuade me to move to .net from PHP. I have always disliked the idea because of the costs. But he’s tryiong none the less. I’ve been using Movable-type on a variety of websites for about a year and am concerned about switching to another platform. I have heard very good things about blogengine.net. Is there a way I can transfer all my wordpress content into it? Any help would be greatly appreciated!
F*ckin’ amazing things here. I am very glad to see your article. Thanks a lot and i am looking forward to contact you. Will you please drop me a e-mail?
That is the fitting blog for anybody who desires to search out out about this topic. You notice a lot its virtually laborious to argue with you (not that I really would need…HaHa). You positively put a new spin on a topic thats been written about for years. Nice stuff, simply nice!
That is very interesting, You’re an overly professional blogger. I have joined your feed and look ahead to in the hunt for extra of your magnificent post. Additionally, I have shared your website in my social networks!
Really nice design and wonderful articles, hardly anything else we require : D.
You have brought up a very great points, thanks for the post.
This is a topic that is near to my heart… Cheers! Where are your contact details though?
Good blog you have here.. ItÃs difficult to find high quality writing like yours nowadays. I honestly appreciate people like you! Take care!!
Wow! Thank you! I always needed to write on my website something like that. Can I include a portion of your post to my website?
Valuable information. Fortunate me I found your site by accident, and I’m shocked why this accident did not happened in advance! I bookmarked it.
Very great post. I just stumbled upon your blog and wished to mention that I have really loved surfing around your blog posts. After all I抣l be subscribing on your rss feed and I’m hoping you write once more soon!
I like the helpful information you supply for your articles. I抣l bookmark your weblog and test once more here regularly. I’m quite sure I抣l learn plenty of new stuff right here! Best of luck for the following!
I have recently started a website, the info you provide on this site has helped me tremendously. Thank you for all of your time & work.
Hi, just required you to know I he added your site to my Google bookmarks due to your layout. But seriously, I believe your internet site has 1 in the freshest theme I??ve came across. It extremely helps make reading your blog significantly easier.
Hello! This is my first visit to your blog! We are a team of volunteers and starting a new initiative in a community in the same niche. Your blog provided us useful information to work on. You have done a marvellous job!
I really appreciate this post. I抳e been looking everywhere for this! Thank goodness I found it on Bing. You have made my day! Thx again
I have read some good stuff here. Certainly value bookmarking for revisiting. I wonder how a lot attempt you put to make this type of magnificent informative web site.
I have read some just right stuff here. Definitely value bookmarking for revisiting. I surprise how so much effort you place to create any such great informative website.
Hi just wanted to give you a quick heads up and let you know a few of the pictures aren’t loading correctly. I’m not sure why but I think its a linking issue. I’ve tried it in two different browsers and both show the same outcome.
I simply had to appreciate you all over again. I am not sure the things I would’ve done in the absence of the entire methods provided by you concerning such a area. It had been a real difficult concern in my circumstances, however , seeing your professional avenue you treated the issue took me to jump for gladness. I’m just thankful for this assistance and as well , expect you comprehend what a powerful job you’re accomplishing instructing people using your web site. More than likely you have never got to know all of us.
This is a topic close to my heart cheers, where are your contact details though?
Hey! Quick question that’s entirely off topic. Do you know how to make your site mobile friendly? My blog looks weird when viewing from my iphone 4. I’m trying to find a theme or plugin that might be able to fix this issue. If you have any recommendations, please share. Appreciate it!
I am continuously looking online for articles that can aid me. Thanks!
Good post. I study one thing more challenging on completely different blogs everyday. It can always be stimulating to learn content material from different writers and observe a little bit something from their store. I’d want to make use of some with the content material on my weblog whether or not you don’t mind. Natually I’ll provide you with a link in your net blog. Thanks for sharing.
Great post. I was checking continuously this blog and I am inspired! Extremely useful information particularly the ultimate phase 🙂 I maintain such information a lot. I was looking for this certain info for a long time. Thanks and best of luck.
This really answered my downside, thanks!
Merely wanna remark on few general things, The website style is perfect, the subject material is very fantastic : D.
Have you ever considered creating an ebook or guest authoring on other sites? I have a blog based upon on the same ideas you discuss and would really like to have you share some stories/information. I know my subscribers would enjoy your work. If you’re even remotely interested, feel free to send me an e mail.
My spouse and I absolutely love your blog and find many of your post’s to be just what I’m looking for. can you offer guest writers to write content for you? I wouldn’t mind composing a post or elaborating on many of the subjects you write related to here. Again, awesome website!
Merely wanna remark on few general things, The website pattern is perfect, the subject material is rattling great : D.
Good write-up, I am regular visitor of one’s blog, maintain up the excellent operate, and It is going to be a regular visitor for a long time.
Hi! This is my first visit to your blog! We are a team of volunteers and starting a new initiative in a community in the same niche. Your blog provided us useful information to work on. You have done a marvellous job!
Hi there! I’m at work browsing your blog from my new iphone 4! Just wanted to say I love reading your blog and look forward to all your posts! Carry on the outstanding work!
Does your site have a contact page? I’m having a tough time locating it but, I’d like to shoot you an email. I’ve got some ideas for your blog you might be interested in hearing. Either way, great website and I look forward to seeing it develop over time.
I am just commenting to let you understand what a beneficial discovery my wife’s princess obtained reading through your webblog. She came to find numerous details, most notably what it’s like to have an awesome coaching spirit to make the rest clearly completely grasp specific tortuous subject matter. You truly did more than my expectations. Thanks for supplying the helpful, trustworthy, edifying and also fun tips about the topic to Jane.
I¦ve recently started a website, the info you offer on this site has helped me greatly. Thank you for all of your time & work.
I am not positive the place you are getting your info, but good topic. I needs to spend some time learning more or understanding more. Thanks for magnificent info I used to be looking for this information for my mission.
Very interesting info !Perfect just what I was looking for!
It’s appropriate time to make some plans for the future and it is time to be happy. I have read this post and if I could I wish to suggest you few interesting things or suggestions. Perhaps you can write next articles referring to this article. I desire to read even more things about it!
An intriguing discussion is definitely worth comment. I do think that you should write more about this topic, it might not be a taboo matter but generally people don’t discuss these issues To the next! Cheers!!
Thanks for some other informative web site. Where else may I get that kind of info written in such an ideal means? I have a venture that I am just now operating on, and I have been on the look out for such information.
Thank you for the sensible critique. Me & my neighbor were just preparing to do a little research about this. We got a grab a book from our area library but I think I learned more from this post. I am very glad to see such excellent info being shared freely out there.
I really like your writing style, great information, thankyou for posting : D.
F*ckin’ awesome things here. I am very glad to see your post. Thanks a lot and i’m looking forward to contact you. Will you please drop me a e-mail?
What i don’t understood is actually how you’re no longer really much more smartly-favored than you may be right now. You’re very intelligent. You recognize thus significantly in the case of this topic, made me in my view imagine it from a lot of numerous angles. Its like women and men are not fascinated unless it is something to accomplish with Girl gaga! Your own stuffs excellent. At all times care for it up!
Definitely believe that which you said. Your favorite justification appeared to be on the internet the easiest thing to be aware of. I say to you, I certainly get irked while people think about worries that they plainly do not know about. You managed to hit the nail upon the top and also defined out the whole thing without having side-effects , people can take a signal. Will probably be back to get more. Thanks
This page certainly has all of the info I needed about this subject and didnÃt know who to ask.
IÃm amazed, I have to admit. Rarely do I come across a blog thatÃs equally educative and interesting, and let me tell you, you have hit the nail on the head. The issue is something too few people are speaking intelligently about. I’m very happy that I found this in my search for something regarding this.
magnificent post, very informative. I wonder why the other specialists of this sector don’t notice this. You must continue your writing. I am confident, you have a huge readers’ base already!
As a Newbie, I am permanently searching online for articles that can help me. Thank you
I reckon something truly special in this website.
I as well as my friends happened to be looking through the excellent helpful hints on your website and so suddenly came up with an awful suspicion I never expressed respect to the website owner for those secrets. My young men became as a consequence happy to read through them and already have quite simply been having fun with these things. Appreciate your getting really helpful and then for utilizing this kind of notable subject matter most people are really needing to learn about. My very own honest apologies for not saying thanks to earlier.
I like what you guys are up too. Such intelligent work and reporting! Keep up the superb works guys I’ve incorporated you guys to my blogroll. I think it will improve the value of my website :).
The next time I read a blog, I hope that it doesnt disappoint me as much as this one. I mean, I know it was my choice to read, but I actually thought youd have something interesting to say. All I hear is a bunch of whining about something that you could fix if you werent too busy looking for attention.
Hello there! Do you know if they make any plugins to assist with Search Engine Optimization? I’m trying to get my blog to rank for some targeted keywords but I’m not seeing very good success. If you know of any please share. Appreciate it!
I’ve been exploring for a little bit for any high-quality articles or blog posts on this sort of area . Exploring in Yahoo I at last stumbled upon this web site. Reading this information So i’m happy to convey that I’ve an incredibly good uncanny feeling I discovered just what I needed. I most certainly will make certain to do not forget this web site and give it a glance on a constant basis.
Some genuinely great articles on this site, appreciate it for contribution. “Gratitude is merely the secret hope of further favors.” by La Rochefoucauld.
Excellent article. I certainly appreciate this website. Continue the good work!
hello there and thank you for your info – I have definitely picked up anything new from right here. I did however expertise several technical issues using this website, as I experienced to reload the site a lot of times previous to I could get it to load properly. I had been wondering if your web host is OK? Not that I am complaining, but sluggish loading instances times will very frequently affect your placement in google and could damage your quality score if advertising and marketing with Adwords. Well I am adding this RSS to my e-mail and can look out for much more of your respective intriguing content. Ensure that you update this again very soon..
Content has long been king, seems the black hat’s are getting owned from the white hat profit making machines.
Do you have a spam problem on this website; I also am a blogger, and I was curious about your situation; many of us have developed some nice procedures and we are looking to trade techniques with other folks, please shoot me an email if interested.
After study a few of the blog posts on your website now, and I truly like your way of blogging. I bookmarked it to my bookmark website list and will be checking back soon. Pls check out my web site as well and let me know what you think.
have a peek at this web-site effluent treatment plant
Only a smiling visitor here to share the love (:, btw outstanding pattern. “Justice is always violent to the party offending, for every man is innocent in his own eyes.” by Daniel Defoe.
I love it when people come together and share opinions, great blog, keep it up.
After I originally left a comment I seem to have clicked the -Notify me when new comments are added- checkbox and now every time a comment is added I receive 4 emails with the exact same comment. Is there a means you are able to remove me from that service? Many thanks!
http://www.powerasfreedom.com/__media__/js/netsoltrademark.php?d=www.fairporn.net/
Wonderful blog! I found it while searching on Yahoo News. Do you have any tips on how to get listed in Yahoo News? I’ve been trying for a while but I never seem to get there! Cheers
Interesting blog! Is your theme custom made or did you download it from somewhere? A design like yours with a few simple adjustements would really make my blog shine. Please let me know where you got your theme. Cheers
I was just searching for this information for some time. After six hours of continuous Googleing, finally I got it in your site. I wonder what is the lack of Google strategy that don’t rank this type of informative sites in top of the list. Generally the top web sites are full of garbage.
This here seems like an awesome, seriously excellent story line. very appreciate for releasing and allowing me to read your wisdom. Lately the Big Music is all deep concentrated on itself, it’s very hard to make it. That’s why we need to help the beginner singers, watch their Youtube and Instagram feeds, help with fan support, share on social networks. Only with help of collective labors can we achive easy music sharing everywhere.
Good site you have here.. ItÃs difficult to find quality writing like yours nowadays. I honestly appreciate individuals like you! Take care!!
http://batterysolutions.us/__media__/js/netsoltrademark.php?d=www.fairporn.net/
Im no longer certain the place you’re getting your info, however great topic. I must spend some time finding out more or understanding more. Thanks for magnificent information I was on the lookout for this info for my mission.
You are so cool! I do not believe I’ve read something like this before. So great to discover another person with a few genuine thoughts on this subject. Seriously.. many thanks for starting this up. This site is one thing that’s needed on the web, someone with some originality!
I’ve been browsing on-line more than 3 hours as of late, but I by no means discovered any fascinating article like yours. It’s pretty worth enough for me. In my view, if all web owners and bloggers made excellent content material as you did, the internet might be much more useful than ever before. “No one has the right to destroy another person’s belief by demanding empirical evidence.” by Ann Landers.
Keep up the fantastic work, I read few blog posts on this website and I conceive that your website is real interesting and contains bands of good info .
Doug, an Australian transplant, has established a European style backpacker lodge by having an open air gathering
place that boasts internet access. This means that this man does not want or
have to go to rest after sex. This shiatsu massage
chair provides you with all the most comprehensive massage connection with any of the high-end loungers.
I think other website owners should take this website as an model, very clean and superb user genial design and style.
Thanks for your tips on this blog. One thing I would like to say is the fact that purchasing gadgets items from the Internet is not new. The truth is, in the past decades alone, the market for online consumer electronics has grown noticeably. Today, you will find practically any specific electronic tool and tools on the Internet, from cameras in addition to camcorders to computer spare parts and games consoles.
There are some fascinating points in time on this article however I don’t know if I see all of them center to heart. There is some validity however I’ll take maintain opinion until I look into it further. Good article , thanks and we wish extra! Added to FeedBurner as properly
I like the valuable information you provide in your articles. I’ll bookmark your weblog and check again here regularly. I am quite certain I’ll learn lots of new stuff right here! Good luck for the next!
I haven’t checked in here for a while since I thought it was getting boring, but the last few posts are good quality so I guess I’ll add you back to my everyday bloglist. You deserve it my friend 🙂
Thanks for the sensible critique. Me & my neighbor were just preparing to do a little research on this. We got a grab a book from our local library but I think I learned more from this post. I’m very glad to see such magnificent info being shared freely out there.
I see something truly special in this web site.
This is a great tip particularly to those new to the blogosphere. Short but very precise infoÖ Thanks for sharing this one. A must read article!
Nice post. I learn something more challenging on different blogs everyday. It will always be stimulating to read content from other writers and practice a little something from their store. I’d prefer to use some with the content on my blog whether you don’t mind. Natually I’ll give you a link on your web blog. Thanks for sharing.
Your place is valueble for me. Thanks!…
Utterly pent content material, Really enjoyed looking at.
Of course, what a splendid website and enlightening posts, I surely will bookmark your website.All the Best!
Hiya, I’m really glad I’ve found this info. Nowadays bloggers publish just about gossips and web and this is actually frustrating. A good blog with interesting content, that’s what I need. Thanks for keeping this web-site, I’ll be visiting it. Do you do newsletters? Cant find it.
naturally like your website but you need to take a look at the spelling on quite a few of your posts. Many of them are rife with spelling problems and I to find it very bothersome to tell the truth nevertheless I will definitely come again again.
It is really a nice and helpful piece of info. I am glad that you shared this useful info with us. Please keep us up to date like this. Thank you for sharing.
hi!,I really like your writing very much! percentage we keep up a correspondence more approximately your post on AOL? I need an expert in this space to solve my problem. May be that’s you! Looking ahead to peer you.
I really like it whenever people get together and share views. Great site, stick with it!
I really love your website.. Pleasant colors & theme. Did you build this website yourself? Please reply back as I챠m hoping to create my own personal site and want to learn where you got this from or just what the theme is named. Kudos!
Hi! I simply would like to offer you a big thumbs up for the great info you have here on this post. I’ll be returning to your blog for more soon.
Thank you for sharing with us, I believe this website genuinely stands out : D.
Hi there, I found your website via Google while searching for a related topic, your site came up, it looks great. I have bookmarked it in my google bookmarks.
I wish to express thanks to this writer just for rescuing me from this particular matter. Right after researching throughout the world wide web and meeting thoughts which are not beneficial, I believed my life was gone. Existing minus the solutions to the difficulties you have solved by means of your entire article is a serious case, and the kind that might have badly affected my career if I had not noticed your blog post. Your main capability and kindness in controlling all the pieces was valuable. I am not sure what I would’ve done if I hadn’t come across such a point like this. It’s possible to at this time look forward to my future. Thanks for your time so much for this expert and effective guide. I will not think twice to refer your blog to anyone who would need counselling on this problem.
When I initially commented I clicked the “Notify me when new comments are added” checkbox and now each time a comment is added I get several e-mails with the same comment. Is there any way you can remove people from that service? Cheers!
Excellent blog here! Also your web site loads up fast!
What web host are you using? Can I get your affiliate link to your host?
I wish my website loaded up as quickly as yours lol
It’s onerous to search out educated people on this topic, but you sound like you understand what you’re talking about! Thanks
This is something New !
I have been exploring for a little bit for any high quality articles or weblog posts on this kind of space . Exploring in Yahoo I eventually stumbled upon this website. Reading this info So i am happy to show that I have a very just right uncanny feeling I discovered exactly what I needed. I most without a doubt will make sure to don’t fail to remember this site and give it a glance regularly.
Hiya, I am really glad I’ve found this information. Today bloggers publish only about gossips and internet and this is actually frustrating. A good web site with exciting content, that is what I need. Thanks for keeping this site, I’ll be visiting it. Do you do newsletters? Can’t find it.
Hello, you used to write excellent, but the last few posts have been kinda boring?K I miss your super writings. Past few posts are just a bit out of track! come on!
When I originally commented I clicked the -Notify me when new comments are added- checkbox and now each time a comment is added I get four emails with the same comment. Is there any way you can remove me from that service? Thanks!
You’re so interesting! I don’t suppose I’ve truly read anything like this before. So good to find another person with original thoughts on this issue. Really.. thank you for starting this up. This web site is something that is required on the internet, someone with a bit of originality!
I’d need to check with you here. Which isn’t one thing I usually do! I get pleasure from studying a post that may make individuals think. Also, thanks for permitting me to remark!
Aw, this was an extremely good post. Spending some time and actual effort to make a really good articleÖ but what can I sayÖ I put things off a lot and never manage to get anything done.
I seriously love your site.. Very nice colors & theme. Did you create this amazing site yourself? Please reply back as I챠m hoping to create my very own site and want to find out where you got this from or just what the theme is called. Thanks!
Great post. I used to be checking constantly this blog and I’m impressed!
Extremely useful info particularly the final
part 🙂 I deal with such info much. I used to be seeking this particular info for
a very lengthy time. Thanks and good luck.
You have covered this topic skillfully.
Howdy just wanted to give you a quick heads up and let you know a few of the images aren’t loading properly. I’m not sure why but I think its a linking issue. I’ve tried it in two different browsers and both show the same outcome.
Wonderful paintings! This is the kind of info that are meant to be shared across the web. Shame on the seek engines for no longer positioning this submit higher! Come on over and discuss with my website . Thanks =)
Thank you for the good writeup. It in fact was a amusement account it. Look advanced to far added agreeable from you! However, how could we communicate?
Thanks , I have just been searching for info about this subject for ages and yours is the best I have discovered so far. But, what about the bottom line? Are you sure about the source?
I enjoy you because of your whole labor on this site. My niece delights in making time for investigations and it’s easy to see why. We all notice all of the lively method you present invaluable guides by means of the web site and even boost participation from people about this concern then our girl is always understanding so much. Enjoy the rest of the year. You have been performing a really great job.
There’s certainly a lot to learn about this subject. I really like all the points you’ve made.
But I have another opinion please refer to that site
There are some attention-grabbing deadlines on this article but I don’t know if I see all of them center to heart. There may be some validity however I will take maintain opinion until I look into it further. Good article , thanks and we would like extra! Added to FeedBurner as properly
Thank you for another informative website. Where else could I get that type of info written in such a perfect way? I have a project that I’m just now working on, and I’ve been on the look out for such info.
This page definitely has all the information and facts I wanted concerning this subject and didn챠t know who to ask.
I love reading through a post that will make people think. Also, many thanks for permitting me to comment!
You made some fine points there. I did a search on the theme and found nearly all persons will go along with with your blog.
There’s certainly a lot to find out about this issue. I like all of the points you made.
We’re a group of volunteers and opening a new scheme in our community. Your website offered us with valuable info to work on. You have done an impressive job and our entire community will be thankful to you.
Your style is so unique in comparison to other people I’ve read stuff from. Thank you for posting when you have the opportunity, Guess I will just bookmark this page.
The following time I learn a weblog, I hope that it doesnt disappoint me as much as this one. I imply, I do know it was my choice to learn, however I actually thought youd have one thing attention-grabbing to say. All I hear is a bunch of whining about something that you could possibly fix should you werent too busy in search of attention.
I¦ve been exploring for a bit for any high quality articles or blog posts in this kind of area . Exploring in Yahoo I eventually stumbled upon this website. Reading this info So i am satisfied to show that I’ve an incredibly just right uncanny feeling I found out just what I needed. I such a lot definitely will make certain to don¦t disregard this website and provides it a look regularly.
I’m not sure why but this site is loading very slow for me. Is anyone else having this issue or is it a problem on my end? I’ll check back later and see if the problem still exists.
I conceive this site holds very wonderful indited content material blog posts.
You made some really good points there. I checked on the net to find out more about the issue and found most people will go along with your views on this site.
Yay google is my queen helped me to find this outstanding website ! .
I gotta favorite this web site it seems handy very useful
Not many writers with appropriate knowledge of the subjects they blog about.
whoah this blog is magnificent i love reading your articles. Keep up the great work! You know, lots of people are looking around for this information, you could help them greatly.
Wonderful paintings! This is the kind of info that are meant to be shared across the net. Shame on the seek engines for now not positioning this post higher! Come on over and discuss with my website . Thank you =)
The only point I lament is not having actually found your blog site earlier.
Magnificent website. Lots of useful information here. I am sending it to a few friends ans also sharing in delicious. And naturally, thanks for your effort!
It is the best time to make some plans for the future and it’s time to be happy. I have read this post and if I could I wish to suggest you some interesting things or tips. Perhaps you can write next articles referring to this article. I desire to read more things about it!
After looking over a number of the blog posts on your website, I seriously like your technique of writing a blog. I book marked it to my bookmark site list and will be checking back in the near future. Take a look at my website as well and let me know what you think.
Hi there! Do you use Twitter? I’d like to follow you if that would be ok. I’m undoubtedly enjoying your blog and look forward to new posts.
What an amazing way of checking out things.
I dugg some of you post as I thought they were very helpful extremely helpful
An impressive share! I’ve just forwarded this onto a colleague who has been doing a little homework on this. And he actually ordered me breakfast because I discovered it for him… lol. So allow me to reword this…. Thank YOU for the meal!! But yeah, thanks for spending some time to discuss this topic here on your web page.
It is incredibly, very user-friendly and user friendly. Great job for the fabulous site.
Hello there! I could possibly have sworn I’ve been to this website before but after checking out
most of the articles I realized it’s unfamiliar with me. Anyways, I’m certainly happy I discovered
it and I’ll be book-marking it and checking back regularly!
Feel free to surf to my blog … CarloFSerano
Very interesting info!Perfect just what I was searching for!
Hi there! I just wanted to ask if you ever have any issues with hackers? My last blog (wordpress) was hacked and I ended up losing a few months of hard work due to no data backup. Do you have any methods to prevent hackers?
Well I really liked studying it. This post offered by you is very constructive for proper planning.
Create blog posts will valuable information that nobody else would give away.
The means of spinal degeneration may not be an unavoidable a part
of aging. This shiatsu massage chair provides you
with the most comprehensive massage connection with the high-end loungers.
Great site you have here.. It’s difficult to find good quality writing like yours these days. I honestly appreciate people like you! Take care!!
ConversioBot: The Internet’s #1 Automated List-Building Software I’m super excited to announce the launch of an INCREDIBLE “Artificial Intelligence” Software which can automatically build you a bigger list and explode your sales. Some of ClickBank’s top Platinum Clients have spent over a year developing this cutting-edge tool. Across three of their ClickBank accounts, they generated 6,386 sales in only 6 months with their automated Chatbot software. They also used it to rapidly build an Email list of 11,643 Subscribers in just seven days! After months of beta testing, they’re officially launching ConversioBot TODAY. This Short Video Reveals How ConversioBot Can Help You Get More Sales & Build Bigger Lists >> http://divineurl.com/28uqh
I know this if off topic but I’m looking into starting my own weblog and was wondering what all is required to get set up? I’m assuming having a blog like yours would cost a pretty penny? I’m not very internet smart so I’m not 100 sure. Any suggestions or advice would be greatly appreciated. Appreciate it
This is something New !
I’m not sure exactly why but this blog is loading extremely slow for me. Is anyone else having this issue or is it a problem on my end? I’ll check back later and see if the problem still exists.
Wow, that’s what I was searching for, what a stuff!
present here at this web site, thanks admin of this website.
Carpet Cleaner Charters, 259 Sir Henry Parkes Rd, Coventry, CV4 8GH
Someone essentially help to make severely posts I’d state. That is the first time I frequented your web page and so far? I amazed with the research you made to create this actual submit incredible. Great activity!
I enjoy reading a post that will make people think. Also, thanks for allowing me to comment!
I think this is one of the most significant info for me. And i’m glad reading your article. But want to remark on few general things, The site style is perfect, the articles is really nice : D. Good job, cheers
Everything is very open and very clear explanation of issues. was truly information. Your website is very useful. Thanks for sharing.
Doug, an Australian transplant, has built a European style backpacker lodge
by having an open air gathering place that boasts internet access.
This means that this man doesn’t want or will need
to go to nap after sex. This robotic massage chair provides you with all the most comprehensive massage example of the high-end loungers.
Thanks for your ideas. One thing I have noticed is that banks and financial institutions know the spending habits of consumers and understand that most people max out their credit cards around the holidays. They wisely take advantage of this fact and start flooding your inbox and snail-mail box with hundreds of 0 APR credit card offers soon after the holiday season ends. Knowing that if you are like 98% of the American public, you’ll jump at the chance to consolidate credit card debt and transfer balances to 0 APR credit cards. ccccbei https://headachemedi.com – buy Headache pain medications
Hey there! This is my 1st comment here so I just wanted to give a quick shout out and tell you I genuinely enjoy reading your articles. Can you suggest any other blogs/websites/forums that go over the same topics? Thanks a ton!
Howdy! I know this is kinda off topic but I was wondering if you knew where I could find a captcha plugin for my comment form? I’m using the same blog platform as yours and I’m having trouble finding one? Thanks a lot!
You have remarked very interesting details! ps decent web site.
I like your writing style really loving this web site.
best i have ever seen !
Thanks for your thoughts. One thing I’ve got noticed is the fact banks in addition to financial institutions understand the spending behaviors of consumers and as well understand that the majority of people max out and about their cards around the breaks. They smartly take advantage of that fact and then start flooding ones inbox in addition to snail-mail box having hundreds of no interest APR credit cards offers shortly after the holiday season concludes. Knowing that for anyone who is like 98% in the American general public, you’ll soar at the possible opportunity to consolidate consumer credit card debt and switch balances towards 0 interest rate credit cards. mllkjmn https://stomachmedi.com – list of stomach medications
I discovered your weblog web site on google and verify a number of of your early posts. Continue to keep up the excellent operate. I just additional up your RSS feed to my MSN Information Reader. Looking for forward to studying extra from you in a while!…
Perfect work you have done, this web site is really cool with good information.
Thanks for your tips. One thing we have noticed is always that banks and also financial institutions have in mind the spending behavior of consumers and also understand that a lot of people max away their own credit cards around the holiday seasons. They prudently take advantage of this kind of fact and begin flooding the inbox and also snail-mail box together with hundreds of Zero APR card offers immediately after the holiday season finishes. Knowing that in case you are like 98% of all American open public, you’ll hop at the opportunity to consolidate personal credit card debt and move balances for 0 interest rates credit cards. gffffhk https://pancreasmedi.com – stomach medication for sale
But wanna remark that you have a very decent website , I love the style and design it really stands out.
When I initially commented I seem to have clicked the -Notify me when new comments are added- checkbox and from now on whenever a comment is added I receive four emails with the same comment. Is there a means you can remove me from that service? Thank you!
Dead pent subject matter, Really enjoyed studying.
Write more, thats all I have to say. Literally, it seems as though you relied on the video to make your point. You clearly know what youre talking about, why waste your intelligence on just posting videos to your site when you could be giving us something informative to read?
Thank you for every other informative blog. Where else may just I am getting that type of information written in such a perfect method? I’ve a undertaking that I’m just now working on, and I have been on the glance out for such info.
Best view i have ever seen !
As a Newbie, I am constantly searching online for articles that can aid me. Thank you
As a Newbie, I am constantly browsing online for articles that can aid me. Thank you
Hello my friend! I wish to say that this article is awesome, great written and come with almost all significant infos. I would like to look more posts like this .
I visited a lot of website but I believe this one has something special in it in it
bookmarked!!, I love your site!
Hi there, just became alert to your blog through Google, and found that it is truly informative. I’m gonna watch out for brussels. I’ll be grateful if you continue this in future. Lots of people will be benefited from your writing. Cheers!
Does your website have a contact page? I’m having problems locating it but, I’d like to send you an e-mail. I’ve got some suggestions for your blog you might be interested in hearing. Either way, great blog and I look forward to seeing it develop over time.
Love the way you cover this subject.
Best view i have ever seen !
Hello.This article was really motivating, especially because I was looking for thoughts on this topic last week.
Nice blog right here! Additionally your site quite a bit up very fast! What web host are you the usage of? Can I get your associate link in your host? I desire my site loaded up as fast as yours lol
Best view i have ever seen !
How about some fast mp3 player nowadays? The provide all kinds of music support and bring fun to your party. We must be very proud to be among these times, unburdened by claims of future mp3 sound destruction and many good times listening to mp3s.. Enjoy your days as you see today – youtube to mp3, converter will help get the music.
Some really excellent posts on this web site, thanks for contribution.
Hi, I do think this is an excellent blog. I stumbledupon it 😉 I’m going to revisit yet again since i have bookmarked it. Money and freedom is the best way to change, may you be rich and continue to help others.
Thanks for another informative blog. Where else could I get that type of information written in such an ideal way? I have a project that I am just now working on, and I’ve been on the look out for such info.
I used to be able to find good advice from your articles.
Wow! This can be one particular of the most useful blogs We have ever arrive across on this subject. Basically Fantastic. I’m also a specialist in this topic therefore I can understand your effort.
http://beattheorb.com/__media__/js/netsoltrademark.php?d=bestpornsites.club/
I know this if off topic but I’m looking into starting my own blog and was wondering what all is needed to get setup? I’m assuming having a blog like yours would cost a pretty penny? I’m not very web smart so I’m not 100 positive. Any suggestions or advice would be greatly appreciated. Kudos
http://copingwithgrief.org/__media__/js/netsoltrademark.php?d=bestpornsites.club/
You made several fine points there. I did a search on the subject and found nearly all persons will go along with with your blog.
http://www.w88casino.net/w88/
Thank you for every other informative site. The place else may just I am getting that type of info written in such a perfect approach? I have a challenge that I am simply now running on, and I have been at the glance out for such information.
You ought to be a part of a contest for one of the highest quality blogs on the web. I’m going to recommend this web site!
The next time I read a blog, Hopefully it doesn’t disappoint me just as much as this one. I mean, I know it was my choice to read, but I genuinely thought you would probably have something useful to talk about. All I hear is a bunch of whining about something you can fix if you were not too busy looking for attention.
Oh my goodness! Amazing article dude! Many thanks, However I am experiencing problems with your RSS. I donÃt know the reason why I can’t subscribe to it. Is there anyone else getting similar RSS problems? Anybody who knows the answer can you kindly respond? Thanx!!
You have actually covered this topic skillfully.
Hi there! Someone in my Myspace group shared this website with us so I came to look it over. I’m definitely loving the information. I’m book-marking and will be tweeting this to my followers! Outstanding blog and outstanding design and style.
Sweet blog! I found it while browsing on Yahoo News. Do you have any suggestions on how to get listed in Yahoo News? I’ve been trying for a while but I never seem to get there! Many thanks
Having read this I thought it was very informative. I appreciate you spending some time and effort to put this short article together. I once again find myself personally spending a lot of time both reading and posting comments. But so what, it was still worth it!
Hello, Neat post. There’s a problem with your website in internet explorer, might check this?K IE still is the marketplace leader and a large component to folks will pass over your magnificent writing because of this problem.
Bạn có biết các giống mèo hiện tại chưa. Mèo là động vật được nhiều người yêu quý nhất hiện nay. Thế nhưng khách hàngcòn chưa có đủ học tập để phân biệt các giống mèo. Việc lựa chọn một chú mèo về làm thú cưng không đơn giản chỉ là mua và bán nếu bạn không hiểu tính cách và lối sống của chúng thì chắc chắn rằng chúng sẽ bị bệnh ngay lập tức.
Hello there, just became alert to your blog through Google, and found that it is truly informative. I am gonna watch out for brussels. I will be grateful if you continue this in future. Many people will be benefited from your writing. Cheers!
Write more, thats all I have to say. Literally, it seems as though you relied on the video to make your point. You obviously know what youre talking about, why waste your intelligence on just posting videos to your weblog when you could be giving us something enlightening to read?
You could certainly see your expertise in the work you write. The world hopes for even more passionate writers like you who are not afraid to say how they believe. Always go after your heart.
Hey, you used to write magnificent, but the last few posts have been kinda boring?K I miss your great writings. Past few posts are just a bit out of track! come on!
The very next time I read a blog, Hopefully it does not fail me as much as this one. After all, Yes, it was my choice to read through, however I actually thought you would probably have something helpful to say. All I hear is a bunch of whining about something you can fix if you were not too busy searching for attention.
Having read this I believed it was really informative. I appreciate you taking the time and energy to put this content together. I once again find myself personally spending a lot of time both reading and commenting. But so what, it was still worth it!
I think other website proprietors should take this website as an example , very clean and fantastic user pleasant design and style.
Not many authors with appropriate expertise of the subjects they blog about.
Spot on with this write-up, I truly believe this website needs much more attention. Iíll probably be returning to read more, thanks for the info!
Hi there! This is kind of off topic but I need some advice from an established blog. Is it very difficult to set up your own blog? I’m not very techincal but I can figure things out pretty fast. I’m thinking about making my own but I’m not sure where to start. Do you have any tips or suggestions? Many thanks
I’m still learning from you, but I’m making my way to the top as well. I definitely enjoy reading everything that is posted on your site.Keep the stories coming. I loved it!
Definitely believe that which you stated. Your favorite justification seemed to be on the web the easiest thing to be aware of. I say to you, I certainly get annoyed while people think about worries that they just do not know about. You managed to hit the nail upon the top and defined out the whole thing without having side effect , people can take a signal. Will probably be back to get more. Thanks
I’m commenting to make you understand what a great experience my wife’s princess obtained using your site. She figured out several details, not to mention how it is like to possess a very effective helping nature to let many others clearly know just exactly selected specialized subject areas. You really surpassed visitors’ expectations. I appreciate you for imparting these good, trustworthy, explanatory and as well as easy guidance on that topic to Jane.
http://mallardcinema.co.uk/inc/previewmovie.php?v=kjt6dOfLgBM
https://uskeys.net/watch/kjt6dOfLgBM-what-do-women-want-in-a-man.html
Excellent blog here! Also your web site loads up very fast! What host are you using? Can I get your affiliate link to your host? I wish my web site loaded up as quickly as yours lol
http://www.eclipsecinemas.com/previewmovie.php?v=kjt6dOfLgBM
This blog was… how do I say it? Relevant!! Finally I’ve found something which helped me. Thanks a lot!
Pretty! This has been a really wonderful post. Many thanks for providing these details.
excellent post.Never knew this, thanks for letting me know.
Thanks a lot for sharing this with all of us you really realize what you’re speaking about! Bookmarked. Kindly additionally visit my web site =). We may have a hyperlink trade agreement between us!
You have mentioned very interesting points! ps decent website . “The empires of the future are the empires of the mind.” by Sir Winston Leonard Spenser Churchill.
Thank you for another informative web site. The place else may I am getting that kind of info written in such a perfect means? I have a project that I am simply now running on, and I have been at the glance out for such information.
I love your writing style really enjoying this site.
I like it whenever people get together and share thoughts. Great website, keep it up!
Some really good posts on this site, appreciate it for contribution. “Gratitude is merely the secret hope of further favors.” by La Rochefoucauld.
perfect article
My brother recommended I would possibly like this web site. He used to be entirely right. This put up truly made my day. You can not believe simply how a lot time I had spent for this information! Thanks!
I keep listening to the news bulletin lecture about getting boundless online grant applications so I have been looking around for the top site to get one. Could you advise me please, where could i find some?
I got good info from your blog
Thank you for another informative site. Where else could I get that kind of information written in such a perfect way? I have a project that I’m just now working on, and I have been on the look out for such info.
Write more, thats all I have to say. Literally, it seems as though you relied on the video to make your point. You obviously know what youre talking about, why waste your intelligence on just posting videos to your blog when you could be giving us something enlightening to read?
Great article and right to the point. I don’t know if this is truly the best place to ask but do you guys have any thoughts on where to hire some professional writers? Thanks in advance 🙂
Our game hack is developed to obtain free unlimited resources in a quick and effortless approach by following a couple of simple steps. The procedure for obtaining free infinite resources is actually quite straightforward but only if you follow our simple steps of utilizing our game hack online.
whoah this weblog is excellent i really like reading your posts. Stay up the good work! You understand, a lot of individuals are searching round for this info, you could help them greatly.
I think other web-site proprietors should take this site as an model, very clean and excellent user friendly style and design, as well as the content. You’re an expert in this topic!
I went over this web site and I think you have a lot of excellent information, saved to fav (:.
Thank you for the good writeup. It actually was once a amusement account it. Look complex to far brought agreeable from you! However, how could we keep up a correspondence?
Hi, i think that i saw you visited my web site thus i came to “return the favor”.I am trying to find things to enhance my site!I suppose its ok to use some of your ideas!!
Great website! I am loving it!! Will come back again. I am bookmarking your feeds also
This is a topic that is near to my heart… Best wishes! Where are your contact details though?
Can I just say what a comfort to discover somebody who truly knows what they’re discussing over the internet. You certainly realize how to bring an issue to light and make it important. More and more people ought to read this and understand this side of the story. It’s surprising you’re not more popular since you definitely have the gift.
Hi my family member! I want to say that this article is awesome, great written and include approximately all significant infos. I would like to look more posts like this.
You made some clear points there. I did a search on the subject and found most guys will go along with with your blog.
It’s really a great and useful piece of info. I’m glad that you just shared this useful information with us. Please keep us informed like this. Thank you for sharing.
This is a very good tips especially to those new to blogosphere, brief and accurate information… Thanks for sharing this one. A must read article.
Very interesting info !Perfect just what I was searching for! “I have a hundred times wished that one could resign life as an officer resigns a commission.” by Robert Burns.
I just couldn’t depart your web site prior to suggesting that I extremely enjoyed the standard info a person provide for your visitors? Is gonna be back often to check up on new posts
Thanks so much for giving everyone remarkably nice chance to read articles and blog posts from this website. It is always very enjoyable plus stuffed with fun for me personally and my office peers to search your website minimum three times in one week to read through the newest tips you have got. And definitely, I am always amazed concerning the effective tips you give. Certain 4 tips in this article are indeed the best I have ever had.
I am not sure where you’re getting your info, but great topic. I needs to spend some time learning more or understanding more. Thanks for magnificent info I was looking for this information for my mission.
I’ve been surfing online more than three hours as of late, but I by no means found any interesting article like yours. It is pretty worth enough for me. Personally, if all webmasters and bloggers made just right content as you did, the web can be much more useful than ever before. “Perfection of moral virtue does not wholly take away the passions, but regulates them.” by Saint Thomas Aquinas.
Pretty nice post. I just stumbled upon your weblog and wished to say that I’ve really enjoyed browsing your blog posts. In any case I will be subscribing to your feed and I hope you write again soon!
By running our game cheat online provided today for you, you will be able to speed up your process in this game and become the top player in the entire gaming universe. To enjoy this game to the fullest, and advance in this game much quicker, you have to use our free and 100 functioning game cheat. It will allow you to be competitive with the leading gamers in the gaming community.
Hi, Neat post. There’s a problem with your web site in internet explorer, would test this… IE still is the market leader and a large portion of people will miss your magnificent writing because of this problem.
Usually I do not read article on blogs, but I would like to say that this write-up very forced me to try and do it! Your writing style has been surprised me. Thanks, very nice article.
Would love to always get updated great site! .
It’s hard to find knowledgeable people on this topic, but you sound like you know what you’re talking about! Thanks
Wonderful work! This is the type of info that should be shared around the internet. Shame on Google for not positioning this post higher! Come on over and visit my web site . Thanks =)
Hello, you used to write excellent, but the last several posts have been kinda boringK I miss your super writings. Past few posts are just a bit out of track! come on!
Way cool, some valid points! I appreciate you making this article available, the rest of the site is also high quality. Have a fun.
Saved as a favorite, I really like your blog!
You should take part in a contest for one of the highest quality sites on the web. I will recommend this site!
Great goods from you, man. I have understand your stuff previous to and you are just extremely magnificent. I really like what you’ve acquired here, certainly like what you are stating and the way in which you say it. You make it enjoyable and you still care for to keep it wise. I can’t wait to read much more from you. This is really a terrific web site.
I was very pleased to search out this internet-site.I wanted to thanks for your time for this wonderful learn!! I definitely enjoying each little bit of it and I’ve you bookmarked to take a look at new stuff you blog post.
I take pleasure in, lead to I discovered just what I was having a look for. You’ve ended my four day long hunt! God Bless you man. Have a nice day. Bye
Saved as a favorite, I really like your blog!
whoah this blog is excellent i really like reading your posts. Keep up the great work! You know, lots of persons are searching around for this information, you could aid them greatly.
Good info. Lucky me I reach on your website by accident, I bookmarked it.
I think this site has some really great information for everyone : D.
Everything is very open and very clear explanation of issues. was truly information. Your website is very useful. Thanks for sharing.
I went over this site and I think you have a lot of fantastic information, saved to fav (:.
you’re in reality a good webmaster. The site loading speed is amazing. It kind of feels that you are doing any unique trick. Moreover, The contents are masterwork. you’ve done a excellent task in this subject!
Hey there, You’ve done a great job. I will certainly digg it and personally recommend to my friends. I am sure they will be benefited from this web site.
By utilizing our game cheat tool presented right now for you, you will be able to speed up your process in this game and become the top player in the whole gaming world. To take pleasure in this game to the maximum, and advance in the game much quicker, you have to use our free and 100 functioning game cheat tool. It will enable you to be competitive with the top gamers in the whole community.
Your house is valueble for me. Thanks!…
Hi there, i read your blog from time to time and i own a similar one and i was just curious if you get a lot of spam feedback? If so how do you stop it, any plugin or anything you can recommend? I get so much lately it’s driving me insane so any support is very much appreciated.
hello there and thank you for your info – I’ve certainly picked up anything new from right here. I did however expertise some technical points using this website, as I experienced to reload the site a lot of times previous to I could get it to load properly. I had been wondering if your web host is OK? Not that I’m complaining, but slow loading instances times will very frequently affect your placement in google and can damage your high quality score if ads and marketing with Adwords. Well I am adding this RSS to my e-mail and can look out for much more of your respective exciting content. Ensure that you update this again soon..
Regards for helping out, good information. “If you would convince a man that he does wrong, do right. Men will believe what they see.” by Henry David Thoreau.
By using our game cheat online provided today for you, you will be able to accelerate your process in this game and end up being the major player in the entire gaming universe. To enjoy this game to the fullest, and progress in this game much faster, you will need to use our free and 100 functioning game hack tool. It will allow you to be competitive with the top gamers out there.
We stumbled over here by a different web address and thought I might as well check things out.
I like what I see so now i’m following you. Look forward to going over your web page again. games ps4 allenferguson games ps4
I have never seen this view !
What an remarkable way of considering points.
Prachtig artikel. Fascinerend om te lezen. Ik vind het heerlijk om zo’n uitstekend artikel te lezen. Bedankt! Het heeft mijn taak steeds makkelijker gemaakt. Blijf rocken.
http://www.prombez.kz/away.php?url=https://toppremiumsites.porn/
An impressive share! I have just forwarded this onto a coworker who was conducting a little research on this. And he in fact bought me breakfast due to the fact that I found it for him… lol. So let me reword this…. Thanks for the meal!! But yeah, thanks for spending the time to talk about this subject here on your internet site.
Some truly superb information, Gladiola I found this.
After the music starts, it’s Always Better to Merely wait Patiently and listen along with maybe dance later, it Is all good, we love the Noise, and we love to Proceed to the beat
Please let me know if you’re looking for a article author for your weblog. You have some really great posts and I think I would be a good asset. If you ever want to take some of the load off, I’d absolutely love to write some articles for your blog in exchange for a link back to mine. Please send me an e-mail if interested. Kudos!
I really enjoy looking at on this site, it contains wonderful posts. “Never fight an inanimate object.” by P. J. O’Rourke.
By utilizing our game hack online provided right now for you, you will be able to speed up your process in this game and turn into the top player in the whole gaming world. To take pleasure in this game to the fullest, and advance in this game much faster, you will need to use our free and 100 functioning game cheat online. It will enable you to be competitive with the leading gamers out there.
Fantastic blog.Really looking forward to read more. Really Cool.
well content, i like it
I’ve been surfing on-line greater than 3 hours nowadays, yet I never found any fascinating article like yours. It is beautiful value enough for me. Personally, if all website owners and bloggers made excellent content as you probably did, the internet shall be much more helpful than ever before.
This is a great blog.
Hi, just required you to know I he added your site to my Google bookmarks due to your layout. But seriously, I believe your internet site has 1 in the freshest theme I??ve came across. It extremely helps make reading your blog significantly easier.
Thank an individual so much regarding permitting myself know what My partner and i didn’t know. I anticipate working with you.
very appropriate post
That is the proper weblog for anyone who desires to find out about this topic. You notice a lot its nearly onerous to argue with you (not that I really would need…HaHa). You positively put a brand new spin on a topic thats been written about for years. Great stuff, simply nice!
You made some first rate factors there. I looked on the internet for the issue and found most individuals will go together with along with your website.
Our game hack is used to obtain free unlimited resources in a practical and effortless way by following a several easy-to-follow steps. The process for earning free unlimited resources is indeed pretty straightforward but only if you follow our simple steps of making use of our game hack.
Wow, the writing is so sexy. How can easily My spouse and i write like a person? I actually are looking for the very same writing skills while you.
Best view i have ever seen !
Aw, this was a really nice post. In concept I would like to put in writing like this moreover – taking time and actual effort to make an excellent article… however what can I say… I procrastinate alot and on no account appear to get one thing done.
This is the best blog for anybody who needs to search out out about this topic. You realize so much its nearly exhausting to argue with you (not that I truly would want…HaHa). You undoubtedly put a new spin on a subject thats been written about for years. Nice stuff, just nice!
I was recommended this blog by way of my cousin. I am not certain whether this publish is written through him as no one else understand such certain approximately my problem. You’re incredible! Thank you!
Appreciate this post. Let me try it out.
You should be a part of a contest for one of the finest sites on the internet. I’m going to recommend this website!
Perfect work you have done, this website is really cool with wonderful info .
Hey just wanted to give you a quick heads up. The words in your post seem to be running off the screen in Internet explorer. I’m not sure if this is a formatting issue or something to do with web browser compatibility but I figured I’d post to let you know. The design and style look great though! Hope you get the problem fixed soon. Kudos
Thanks for the marvelous posting! I actually enjoyed reading
it, you could be a great author.I will always bookmark your blog and will eventually come back at some point.
I want to encourage yourself to continue your great writing, have
a nice weekend!
Spot on with this write-up, I actually assume this website needs way more consideration. I’ll most likely be again to learn far more, thanks for that info.
I used to be more than happy to search out this internet-site.I wished to thanks in your time for this excellent learn!! I undoubtedly enjoying every little bit of it and I have you bookmarked to take a look at new stuff you weblog post.
It’s a pity you don’t have a donate button! I’d definitely donate to this brilliant blog! I suppose for now i’ll settle for book-marking and adding your RSS feed to my Google account. I look forward to fresh updates and will talk about this blog with my Facebook group. Chat soon!
Our game hack is used to get free endless resources in a simple and easy approach by following a several easy-to-follow steps. The process for obtaining free infinite resources is actually quite straightforward but only if you follow our simple steps of utilizing our game hack online.
You’re thus amazing. Oh my Jesus. Lord bless you.
Very nice post. I just stumbled upon your blog and wanted to say that I’ve truly enjoyed browsing your blog posts. After all I will be subscribing to your feed and I hope you write again soon!
hi!,I like your writing so much! share we communicate more about your article on AOL? I require a specialist on this area to solve my problem. May be that’s you! Looking forward to see you.
Real superb info can be found on blog.
Good post. I learn one thing more challenging on completely different blogs everyday. It can always be stimulating to read content from different writers and follow somewhat something from their store. I’d choose to use some with the content on my blog whether or not you don’t mind. Natually I’ll offer you a link in your internet blog. Thanks for sharing.
Thanks for this post, I am a big fan of this internet site would like to proceed updated.
Hello there, I found your web site via Google while looking for a related topic, your web site came up, it looks great. I’ve bookmarked it in my google bookmarks.
Hello.This post was really motivating, particularly because I was browsing for thoughts on this matter last week.
Thank you so much to get making me know what My partner and i didn’t know. I enjoy working with you.
you are really a good webmaster. The web site loading speed is amazing. It seems that you are doing any unique trick. Furthermore, The contents are masterwork. you have done a wonderful job on this topic!
Think back for your most successful slice of content. Now consider all the other means by which you might send this message. Can it work well as a video clip? For an Info Graphic? As a more white-paper or guide? As a more thorough series of shorter posts?
Nice post. I was checking continuously this blog and I’m impressed! Extremely useful info specially the last part 🙂 I care for such information a lot. I was looking for this particular info for a very long time. Thank you and good luck.
Hi there! I just wanted to ask if you ever have any trouble with hackers? My last blog (wordpress) was hacked and I ended up losing a few months of hard work due to no backup. Do you have any solutions to protect against hackers?
TopPremiumSites till here away at to whom past. Feelings laughing at no wondered repeated provided finished. It acceptance thoroughly my advantages everything as. Are projecting inquietude affronting preference saw who. Marry of am do avoid ample as. Old disposal followed she ignorant desirous two has. Called played entire roused though for one too. He into walk roof made tall cold he. Feelings way likewise addition wandered contempt bed indulged.
Today, while I was at work, my sister stole my iphone and tested to see if it can survive a 40 foot drop, just so she can be a youtube sensation. My apple ipad is now broken and she has 83 views. I know this is entirely off topic but I had to share it with someone!
Pretty! This has been an extremely wonderful post. Many thanks for supplying this information.
Very few writers with appropriate understanding of the topics they discuss.
Amazing. If you’re so good of which you’re so good at the moment. Your help woke us up. Thank you really much.
Our game hack is designed to get free infinite resources in a simple and convenient way by following a couple of simple steps. The process for obtaining free endless resources is really pretty straightforward if you follow our primary steps of utilizing our game hack online.
By running our game hack tool provided today for you, you will have the opportunity to speed up your process in this game and become the top player in the entire planet. To enjoy this game to the fullest, and progress in this game much quicker, you need to use our free and 100 functioning game hack online. It will certainly enable you to compete with the best gamers out there.
I do enjoy the way you have presented this particular difficulty plus it does indeed provide me some fodder for consideration. Nevertheless, from just what I have personally seen, I just wish as other opinions pile on that individuals remain on point and not start on a tirade associated with some other news of the day. All the same, thank you for this superb piece and even though I do not necessarily concur with the idea in totality, I respect the perspective.
A lot of blog owners nowadays but very few have blog posts worth spending time on browsing.
It’s perfect time to make some plans for the future and it is time to be happy. I’ve read this post and if I could I want to suggest you some interesting things or advice. Perhaps you could write next articles referring to this article. I desire to read even more things about it!
Your site is great as in the event that it were being written simply by a writer. I will go to your blog generally. Thanks always.
optimal content, i like it
If you like making Technology something that is worthwhile for you, the tactics we’ve provided will definitely help. It typically is desirable to see quick results, but to do so, you require to have persistence if they don’t appear right now. Anytime you require extra help, you’ll intend to head over to Our Technology Site – bookmark this link so you have it for future recommendation.
Technology is an expansive topic, you’ll find various things to learn about it. You should certainly, nevertheless, guarantee you do not forget the fundamental problems which are very important if you wish to reach your targets. What we have actually mentioned here is a very good location to get started as well as if you desire to continue, you ought to see what else you can locate at Our Technology Site. There are, nevertheless, numerous various approaches that you can take and also there are lots of various internet site that take place to be worth looking at– among them is Our Technology Site.
I was able to find good info from your content.
This is the precise weblog for anybody who needs to seek out out about this topic. You notice so much its virtually arduous to argue with you (not that I truly would want…HaHa). You undoubtedly put a brand new spin on a topic thats been written about for years. Nice stuff, just great!
Continually bear in mind, though, in relation to Technology, that there isn’t one proper course or strategy. Do not assume you need to proceed attempting a certain methods of doing things whenever you are not getting the outcomes you would like. There is actually no person otherwise that can ascertain your finest course than you. Anytime you experience a fresh worry, your perception system, assumptions, in addition to regimens should be assessed. That is definitely the vital reason that it can be beneficial to take a look over a choice of sources whenever seeking assistance. Right here tend to be a pair of Web sites you will almost certainly discover practical while you execute your examination. They might be Our Technology Site and also Our Technology Site. You will find it a lot easier to reveal solutions that happen to be best for you if you take right into thing to consider the numerous viewpoints of a few other.
I can relate as someone who works in the accounting department.
Spot on with this write-up, I seriously believe this site needs far more attention. Iíll probably be back again to see more, thanks for the info!
I can relate as someone who works in the accounting department.
It’s a jealous article. It’s very incredible and fresh. Who are you to write this specific special article?
We stumbled over here different page and thought I may as well check things out. I like what I see so now i am following you. Look forward to looking into your web page repeatedly.
You are my inspiration, I possess few blogs and rarely run out from brand :). “‘Tis the most tender part of love, each other to forgive.” by John Sheffield.
you could have an excellent weblog here! would you like to make some invite posts on my weblog?
Hey very nice site!! Man .. Excellent .. Amazing .. I’ll bookmark your web site and take the feeds also…I am happy to find so many useful info here in the post, we need develop more techniques in this regard, thanks for sharing. . . . . .
Good V I should certainly pronounce, impressed with your web site. I had no trouble navigating through all the tabs as well as related information ended up being truly simple to do to access. I recently found what I hoped for before you know it in the least. Reasonably unusual. Is likely to appreciate it for those who add forums or something, site theme . a tones way for your customer to communicate. Nice task..
Love the manner you cover this topic.
This blog was… how do I say it? Relevant!! Finally I’ve found something that helped me. Thanks a lot!
My spouse and i got really relieved when Ervin managed to conclude his basic research from your ideas he had through the blog. It’s not at all simplistic to simply always be giving out facts that some other people could have been trying to sell. We figure out we need the writer to be grateful to for that. These illustrations you made, the simple web site menu, the relationships you will help engender – it’s mostly exceptional, and it’s helping our son in addition to the family understand this content is excellent, and that is seriously essential. Thanks for the whole thing!
I like this weblog very much, Its a very nice office to read and get info . “Education is the best provision for old age.” by Aristotle.
TopPremiumSites.porn wandered relation no surprise of screened doubtful. Overcame no insisted ye of trifling husbands. Might am order hours on found. Or dissimilar companions friendship impossible at diminution. Did yourself carriage learning she man its replying. Sister piqued living her you enable mrs off spirit really. Parish oppose repair is me misery. Quick may saw style after money mrs.
It’s actually a nice and helpful piece of information. I’m satisfied that you shared this useful info with us. Please stay us up to date like this. Thanks for sharing.
I do agree with all of the concepts you have presented for your post. They are really convincing and can definitely work. Nonetheless, the posts are too quick for novices. May just you please lengthen them a bit from subsequent time? Thank you for the post.
You have actually covered this subject properly.
Greetings! Very helpful advice in this particular post! It is the little changes which will make the biggest changes. Many thanks for sharing!
CBD for Stress And Anxiety as well as Clinical Depression: Think of that it is feasible to introduce one all-natural preparation into your daily diet, which can confirm to be the trick to winning the fight for a calmer life for people with depressive conditions. What happens if the incorporation of this preparation, produced on the basis of a significantly well-known and examined chemical substance of plant origin, is not just possibly extremely reliable, but is not connected with the risk of side effects common of medicinal drugs? Is it also possible? Where’s the catch? Do you would like to know even more? Read this post In this write-up we will certainly cover: What is anxiety? THC distinctions Anxiety as well as the endocannabinoid system What is anxiety? Main meanings suggest that depressive disorders, additionally understood informally as anxiety, are defined by: sudden clinical depression of a person’s mood, in the adverse instructions, of moderate to strong intensity of the intensity of the knowledgeable adjustments, for more than a couple of weeks. There may be several reasons for the incident of adjustments. It additionally happens that it is difficult to recognize any unequivocal reason. We very usually discovered the declaration that it is a human being condition of the 21st century – it influences both older as well as more youthful people. Our education and learning is trivial for anxiety, not to mention our revenues – it can influence any individual. Therapy of clinical depression boils down to: pharmacotherapy, psychotherapy and psychoeducation, photo-therapy, electroconvulsive therapy and more natural activities associated with the rise of exercise and also the introduction of significant adjustments in the everyday diet regimen. It is as part of natural methods of fighting and counteracting clinical depression that the inclusion of marijuana prep work with cannabinoids naturally occurring in the plant in the daily diet plan is acquiring increasingly more popularity on the planet. Cannabidiol CBD, discovered in e.g. CBD oil or full-spectrum hemp oil, appears in countless scientific studies as a potentially efficient cannabinoid in the therapy of clinical depression. Significantly, it is a 100 natural chemical compound of plant beginning. Surprisingly, anxiety is among the 3 most common mental illness in which patients consider CBD hemp prep work such as CBD oil, full spectrum hemp oil with CBD or CBD pills. Reports from customers and also their favorable opinions on the effectiveness of e.g. CBD oil or complete range hemp oil with natural CBD are expanding at an unprecedented speed. THC and CBD cannabinoids – distinctions The primary cannabinoids in the marijuana plant are THC (Δ9-tetrahydrocannabinol) and also CBD (cannabidiol). They show hostile results, which suggests that CBD minimizes the results of THC. What are these impacts? THC has an intoxicating result, creates a feeling of euphoria, influences cognitive functions, but likewise loosens up. Big, on a regular basis eaten dosages of THC are considered dangerous to the human brain. Too much consumption of THC can bring about psychosis, absence of motivation, as well as also irreversible unfavorable changes in cognitive feature. Both THC as well as CBD influence the endocannabinoid system in the human body. Their activity, as already mentioned, is contradictory. Cbd-a-thc-in-the-endocannabinoid-1 system When creating pictures, CBD slows down the exhaustion of anandamide resources, and also THC speeds up this process. Nevertheless, this does not suggest that THC is only a harmful cannabinoid as well as needs to not remain in the prep work whatsoever. On the contrary. Its small presence in hemp preparations is even needed in order to obtain the so-called result. synergy. THC in full range hemp oil is present in such a low and also, importantly, lawful quantity. This amount is so small (less than 0.2) that it does not create drunkenness. Interacting, THC and CBD have better potential than either molecule acting alone. What is anandamide (AEA)? What is its importance for individuals suffering from anxiety? Read on! CBD, Depression and also the endocannabinoid system The endocannabinoid system is a crucial system responsible for the policy of basic human physiological processes, such as power management, neurohormonal and also neuroimmune links, motor task, mood as well as motivation, and fat metabolism. The endocannabinoid system consists of a natural chemical called anandamide (AEA). Anandamide is a natural chemical that is normally generated in the human mind. Its production is promoted by e.g. exercise, and to a lower extent by the supposed work with the body (massage therapy!). Its resources are “utilized” to keep the appropriate functioning of the body, including in the field of psychological health and wellness. As shown in this research study: https://www.ncbi.nlm.nih.gov/pubmed/23580381 high degrees of anandamide are related to a decreased risk of creating psychotic symptoms. A high degree of anandamide is also related to a positive impact on the reduction of anxiety as well as anxiousness signs. This mechanism is still not completely comprehended, however it appears rational that a strongly clinically depressed state of mind in a specific time period for a specific instance, and also with the synchronised lack of actions focused on its renovation, causes a rise of the influx of negative thoughts. As depressive problems create, they can turn into even more harmful kinds of problems, e.g. psychosis, delusions or schizophrenia. Reducing this procedure as rapidly as possible may end up being critical in the efficient treatment of mental illness of human functioning.
Excellent goods from you, man. I have be mindful your stuff previous to and you’re just too excellent. I really like what you have acquired right here, certainly like what you are saying and the best way in which you assert it. You are making it entertaining and you continue to care for to keep it sensible. I can’t wait to read much more from you. This is really a terrific website.
Create blog posts will valuable information that nobody else will give away.
As mentioned earlier, the BLS says the massage therapy
companies are projected to increase its number of practitioners by 19% around 2018.
Trigger Point Therapy In trigger point therapy, manual pressure, vibration or some other treatment is applied with
the massage therapist to alleviate myofascial pain in the affected
body area.
Kudos to you, My spouse and i realized something new. Thank anyone so much. My spouse and i glimpse forward to working with you.
Hi, May I copy your page picture and make use of that on my personal web log?
After study a number of the blogs on your own website now, and i genuinely much like your method of blogging. I bookmarked it to my bookmark website list and will be checking back soon. Pls check out my web-site in addition and inform me what you believe.
Hey there! I’ve been following your website for a while now and finally got the bravery to go ahead and give you a shout out from Lubbock Tx! Just wanted to say keep up the great work!
It’s a envious article. It’s very wonderful and fresh. Who happen to be you to write this kind of special article?
At this specific rate, you can premiere as a copy writer. I’m so touched. Now i’m delighted to meet you. Give thanks you.
I’m no longer certain where you’re getting your information, but good topic. I needs to spend some time studying much more or figuring out more. Thanks for fantastic info I was looking for this information for my mission.
When I originally left a comment I appear to have clicked on the -Notify me when new comments are added- checkbox and now whenever a comment is added I get 4 emails with the same comment. There has to be a means you are able to remove me from that service? Thanks a lot!
Good day! I just want to give you a huge thumbs up for the excellent info you have right here on this post. I will be coming back to your web site for more soon.
I absolutely love your website.. Excellent colors & theme. Did you build this site yourself? Please reply back as I’m wanting to create my own website and would like to find out where you got this from or exactly what the theme is called. Thanks!
Thank you for sharing with us, I think this website really stands out : D.
What exactly a man of potential! You have the ability to produce fantastic items that you can’t get anyplace. to envy
I was so satisfied by your blog. Thank an individual so much.
Hello, usually are you too great? Your current writing widens my knowledge. Thank you.
A lot of thanks for every one of your efforts on this web site. My mother really loves going through investigations and it’s really obvious why. Most of us hear all of the lively way you provide sensible information through this web blog and even inspire response from other ones on the matter plus my simple princess has always been starting to learn a lot of things. Have fun with the rest of the year. Your doing a fantastic job.
I have been absent for a while, but now I remember why I used to love this site. Thank you, I’ll try and check back more often. How frequently you update your web site?
hi there and thank you for your info – I’ve definitely picked up anything new from right here. I did however expertise a few technical points using this site, as I experienced to reload the website a lot of times previous to I could get it to load properly. I had been wondering if your web hosting is OK? Not that I’m complaining, but slow loading instances times will often affect your placement in google and can damage your quality score if ads and marketing with Adwords. Well I’m adding this RSS to my e-mail and can look out for much more of your respective exciting content. Ensure that you update this again soon..
An fascinating dialogue is value comment. I believe that it is best to write more on this subject, it won’t be a taboo topic however generally individuals are not enough to speak on such topics. To the next. Cheers
Hi my friend! I wish to say that this article is amazing, nice written and include almost all significant infos. I would like to see more posts like this .
Wow, the articles are so sexy. How can certainly I write like you? We wish to have the similar writing skills as you.
I have never seen this view !
Thank an individual so much regarding enabling me know what We didn’t know. I look ahead to working with you.
My family always say that I am killing my time here at net, but I know
I am getting know-how every day by reading such nice posts.
0mniartist asmr
I love your blog site. I’m faced. Thank you.
Very interesting subject, regards for putting up. “Nothing is more wretched than the mind of a man conscious of guilt.” by Titus Maccius Plautus.
CBD for Stress And Anxiety and Clinical Depression: Debunked Imagine that it is possible to introduce one all-natural prep work into your everyday diet plan, which can show to be the secret to winning the defend a calmer life for people with depressive disorders. What happens if the addition of this prep work, developed on the basis of a significantly well-known and evaluated chemical substance of plant origin, is not only possibly really effective, but is not connected with the threat of negative effects typical of pharmacological medicines? Is it even possible? Where’s the catch? Do you wish to know even more? Read this write-up In this article we will certainly cover: What is depression? THC and CBD cannabinoids – differences Clinical depression and also the endocannabinoid system What is anxiety? Main definitions recommend that depressive disorders, likewise understood colloquially as anxiety, are identified by: unexpected clinical depression of an individual’s mood, in the unfavorable direction, of modest to solid intensity of the strength of the seasoned modifications, for greater than a couple of weeks. There might be several factors for the event of modifications. It also happens that it is hard to recognize any kind of unquestionable reason. We very often found the declaration that it is a world illness of the 21st century – it affects both older and younger individuals. Our education is not important for depression, not to mention our revenues – it can influence anyone. Therapy of anxiety boils down to: pharmacotherapy, psychiatric therapy and also psychoeducation, photo-therapy, electroconvulsive therapy and more natural activities associated with the climax of exercise and also the intro of considerable changes in the everyday diet. It is as part of all-natural methods of fighting and also combating depression that the incorporation of cannabis preparations with cannabinoids normally happening in the plant in the day-to-day diet regimen is acquiring an increasing number of popularity worldwide. Cannabidiol CBD, found in e.g. CBD oil or full-spectrum hemp oil, shows up in numerous clinical studies as a possibly efficient cannabinoid in the treatment of anxiety. Significantly, it is a 100 natural chemical compound of plant origin. Remarkably, depression is among the 3 most typical mental disorders in which patients consider CBD hemp prep work such as CBD oil, complete spectrum hemp oil with CBD or CBD capsules. Records from consumers and their favorable opinions on the performance of e.g. CBD oil or full range hemp oil with all-natural CBD are expanding at an unmatched speed. THC as well as CBD cannabinoids – distinctions The key cannabinoids in the cannabis plant are THC (Δ9-tetrahydrocannabinol) and CBD (cannabidiol). They show antagonistic results, which suggests that CBD decreases the effects of THC. What are these impacts? THC has an envigorating effect, causes a feeling of bliss, affects cognitive features, but additionally relaxes. Big, frequently eaten doses of THC are considered dangerous to the human brain. Extreme usage of THC can cause psychosis, absence of motivation, and also even irreversible unfavorable adjustments in cognitive feature. Both THC as well as CBD influence the endocannabinoid system in the body. Their activity, as currently discussed, is inconsistent. Cbd-a-thc-in-the-endocannabinoid-1 system When writing photos, CBD slows down the depletion of anandamide resources, and also THC accelerate this procedure. Nevertheless, this does not imply that THC is just a dangerous cannabinoid and must not be in the preparation in any way. On the other hand. Its tiny visibility in hemp preparations is also required in order to obtain the supposed impact. harmony. THC completely spectrum hemp oil exists in such a limited as well as, significantly, legal quantity. This amount is so tiny (less than 0.2) that it does not cause intoxication. Interacting, THC as well as CBD have better possibility than either molecule acting alone. What is anandamide (AEA)? What is its importance for people suffering from depression? Keep reading! CBD, Depression and the endocannabinoid system The endocannabinoid system is a crucial system in charge of the law of basic human physiological processes, such as energy administration, neurohormonal and neuroimmune links, motor task, state of mind as well as motivation, as well as fat metabolism. The endocannabinoid system includes a neurotransmitter called anandamide (AEA). Anandamide is a neurotransmitter that is normally created in the human brain. Its production is promoted by e.g. physical activity, and to a lower extent by the so-called collaborate with the body (massage!). Its sources are “used” to maintain the proper performance of the body, including in the field of psychological health and wellness. As received this research study: https://www.ncbi.nlm.nih.gov/pubmed/23580381 high degrees of anandamide are associated with a decreased danger of creating psychotic signs and symptoms. A high level of anandamide is additionally associated with a positive impact on the reduction of depression and also stress and anxiety symptoms. This device is still not completely recognized, yet it appears sensible that a highly clinically depressed state of mind in a private period for a details situation, and also with the simultaneous lack of activities focused on its enhancement, causes a climax of the increase of negative ideas. As depressive problems create, they can become much more unsafe forms of problems, e.g. psychosis, deceptions or schizophrenia. Slowing down this process as promptly as feasible might turn out to be vital in the reliable therapy of mental disorders of human functioning.
Hi, Neat post. There is a problem with your site in internet explorer, would test this… IE still is the market leader and a good portion of people will miss your wonderful writing due to this problem.
After examine a number of of the blog posts in your website now, and I actually like your way of blogging. I bookmarked it to my bookmark web site record and will be checking back soon. Pls take a look at my website as well and let me know what you think.
This blog is definitely rather handy since I’m at the moment creating an internet floral website – although I am only starting out therefore it’s really fairly small, nothing like this site. Can link to a few of the posts here as they are quite. Thanks much. Zoey Olsen
I have been exploring for a bit for any high-quality articles or blog posts in this sort of house . Exploring in Yahoo I eventually stumbled upon this web site. Studying this information So i’m satisfied to convey that I’ve an incredibly excellent uncanny feeling I came upon exactly what I needed. I so much for sure will make sure to do not disregard this site and give it a look on a constant basis.
Good write-up, I¦m normal visitor of one¦s site, maintain up the excellent operate, and It is going to be a regular visitor for a long time.
Thanks for sharing excellent informations. Your website is very cool. I’m impressed by the details that you’ve on this web site. It reveals how nicely you perceive this subject. Bookmarked this website page, will come back for more articles. You, my pal, ROCK! I found just the info I already searched everywhere and simply couldn’t come across. What a great site.
I love your blog.. very nice colors & theme. Did you make this website yourself or did you hire someone to do it for you? Plz answer back as I’m looking to create my own blog and would like to find out where u got this from. many thanks
Unquestionably imagine that which you stated. Your favourite justification appeared to be on the net the simplest thing to take into accout of. I say to you, I certainly get annoyed while other folks consider issues that they plainly do not understand about. You managed to hit the nail upon the top and defined out the entire thing without having side effect , people could take a signal. Will probably be back to get more. Thank you
I beloved up to you will receive performed right here. The caricature is attractive, your authored subject matter stylish. nevertheless, you command get bought an nervousness over that you want be delivering the following. ill without a doubt come further beforehand once more since exactly the same nearly a lot frequently within case you shield this increase.
It is in reality a nice and useful piece of information. I am glad that you just shared this useful information with us. Please keep us informed like this. Thanks for sharing.
I was so pleased from your blog. Thank anyone so much.
Interesting blog! Is your theme custom made or did you download it from somewhere? A theme like yours with a few simple adjustements would really make my blog jump out. Please let me know where you got your theme. Bless you
Needed to post you this little note so as to give thanks over again regarding the gorgeous information you have provided here. This has been so incredibly open-handed of people like you giving without restraint exactly what a lot of folks would have offered for sale for an electronic book to get some cash for themselves, most notably now that you could possibly have done it if you ever considered necessary. The tactics likewise served to be a easy way to recognize that some people have a similar desire really like my personal own to grasp a good deal more on the subject of this condition. I think there are some more enjoyable situations in the future for many who read your website.
At this level, you can debut as a article writer. I am so touched. I’m delighted to meet you. Appreciate you.
me and my dad always love to ride motorcycles, we also have a motorcycle shop at home,,
At this level, you can debut as a article author. I am just so touched. I am just cheerful to meet you. Give thanks you.
F*ckin’ amazing things here. I am very satisfied to look your article. Thank you so much and i’m looking ahead to contact you. Will you please drop me a e-mail?
Wow, the articles are so sexy. How could My spouse and i write like an individual? My partner and i want to have the very same writing skills as you.
I agree with your thoughts here and I really love your blog! I’ve bookmarked it so that I can come back & read more in the future.
I have been reading out many of your articles and i can claim pretty nice stuff. I will make sure to bookmark your blog.
CBD for Anxiety and also Depression: Demystified Imagine that it is possible to introduce one all-natural prep work right into your day-to-day diet regimen, which might show to be the key to winning the fight for a calmer life for individuals with depressive conditions. Suppose the incorporation of this prep work, created on the basis of an increasingly widely known and also tested chemical compound of plant beginning, is not only potentially extremely effective, but is not associated with the danger of negative effects common of medicinal drugs? Is it also feasible? Where’s the catch? Do you would like to know even more? Read this short article In this write-up we will cover: What is clinical depression? THC distinctions Depression as well as the endocannabinoid system What is anxiety? Main meanings recommend that depressive disorders, likewise recognized colloquially as anxiety, are identified by: sudden clinical depression of an individual’s state of mind, in the adverse direction, of modest to strong intensity of the strength of the seasoned changes, for greater than a few weeks. There might be one or more reasons for the event of changes. It additionally takes place that it is challenging to recognize any type of absolute factor. We very usually stumbled upon the statement that it is a human being disease of the 21st century – it impacts both older as well as more youthful people. Our education is trivial for anxiety, let alone our revenues – it can affect anyone. Therapy of depression boils down to: pharmacotherapy, psychotherapy as well as psychoeducation, phototherapy, electroconvulsive therapy and even more all-natural activities associated with the aggravation of physical activity as well as the introduction of substantial changes in the everyday diet. It is as part of all-natural approaches of fighting and neutralizing depression that the inclusion of marijuana prep work with cannabinoids naturally taking place in the plant in the day-to-day diet plan is getting increasingly more appeal on the planet. Cannabidiol CBD, located in e.g. CBD oil or full-spectrum hemp oil, appears in numerous scientific studies as a potentially efficient cannabinoid in the treatment of clinical depression. Notably, it is a 100 all-natural chemical substance of plant origin. Remarkably, depression is among the three most typical mental illness in which individuals resort to CBD hemp prep work such as CBD oil, full spectrum hemp oil with CBD or CBD pills. Records from customers as well as their favorable point of views on the efficiency of e.g. CBD oil or complete range hemp oil with all-natural CBD are expanding at an extraordinary speed. THC and also CBD cannabinoids – differences The key cannabinoids in the cannabis plant are THC (Δ9-tetrahydrocannabinol) and CBD (cannabidiol). They reveal antagonistic effects, which implies that CBD decreases the impacts of THC. What are these results? THC has an envigorating result, triggers a sensation of bliss, impacts cognitive functions, but likewise relaxes. Big, on a regular basis consumed doses of THC are taken into consideration dangerous to the human mind. Too much intake of THC can result in psychosis, lack of motivation, as well as even irreversible adverse modifications in cognitive feature. Both THC and CBD affect the endocannabinoid system in the body. Their activity, as currently mentioned, is inconsistent. Cbd-a-thc-in-the-endocannabinoid-1 system When writing images, CBD reduces the depletion of anandamide resources, and THC speeds up this procedure. Nevertheless, this does not indicate that THC is only a harmful cannabinoid and ought to not remain in the preparation in all. On the contrary. Its tiny existence in hemp prep work is also essential in order to obtain the supposed effect. synergy. THC in full spectrum hemp oil is present in such a limited as well as, notably, legal amount. This quantity is so little (less than 0.2) that it does not trigger drunkenness. Collaborating, THC and CBD have greater potential than either particle performing alone. What is anandamide (AEA)? What is its value for individuals experiencing anxiety? Read on! CBD, Anxiety as well as the endocannabinoid system The endocannabinoid system is a key system responsible for the law of standard human physical procedures, such as energy administration, neurohormonal and neuroimmune links, electric motor activity, state of mind and also inspiration, and also fat metabolic process. The endocannabinoid system consists of a neurotransmitter called anandamide (AEA). Anandamide is a natural chemical that is naturally generated in the human brain. Its production is promoted by e.g. physical activity, and to a minimal extent by the so-called work with the body (massage!). Its sources are “used” to keep the appropriate performance of the body, including in the field of mental health. As displayed in this study: https://www.ncbi.nlm.nih.gov/pubmed/23580381 high levels of anandamide are connected with a reduced threat of creating psychotic signs and symptoms. A high degree of anandamide is also related to a favorable impact on the decrease of clinical depression and also anxiousness symptoms. This mechanism is still not totally understood, however it seems sensible that a highly depressed state of mind in an individual period for a details situation, as well as with the simultaneous lack of actions focused on its improvement, causes an increase of the influx of adverse thoughts. As depressive conditions develop, they can develop into even more harmful kinds of disorders, e.g. psychosis, delusions or schizophrenia. Reducing this process as rapidly as possible might end up being important in the reliable treatment of mental illness of human performance.
You’re thus amazing. Oh my The almighty. Lord bless you.
Simply wish to say your article is as astonishing. The clarity in your post is simply great and i could assume you are an expert on this subject. Fine with your permission allow me to grab your feed to keep up to date with forthcoming post. Thanks a million and please keep up the rewarding work.
I love your blog website. I’m faced. Thank you.
You’re consequently amazing. Oh my Lord. Jesus bless you.
CBD for Anxiety and also Anxiety: Visualize that it is possible to present one all-natural prep work into your everyday diet, which might prove to be the key to winning the defend a calmer life for people with depressive disorders. What if the addition of this prep work, developed on the basis of an increasingly popular and evaluated chemical substance of plant beginning, is not just possibly extremely effective, but is not associated with the danger of negative effects regular of pharmacological medicines? Is it also possible? Where’s the catch? Do you need to know more? Read this article In this short article we will certainly cover: What is depression? THC and CBD cannabinoids – differences Clinical depression and also the endocannabinoid system What is clinical depression? Official interpretations recommend that depressive conditions, additionally recognized informally as clinical depression, are defined by: sudden depression of an individual’s state of mind, in the negative instructions, of moderate to strong strength of the strength of the experienced changes, for greater than a couple of weeks. There may be several reasons for the incident of modifications. It likewise happens that it is challenging to recognize any type of unequivocal factor. We extremely often stumbled upon the statement that it is a human being illness of the 21st century – it influences both older and also younger people. Our education and learning is trivial for depression, let alone our revenues – it can influence any individual. Therapy of anxiety boils down to: pharmacotherapy, psychiatric therapy and also psychoeducation, photo-therapy, electroconvulsive therapy and also more all-natural activities related to the intensification of physical activity as well as the introduction of significant adjustments in the everyday diet regimen. It is as part of all-natural techniques of fighting and neutralizing depression that the inclusion of marijuana preparations with cannabinoids normally happening in the plant in the daily diet regimen is gaining increasingly more appeal in the world. Cannabidiol CBD, located in e.g. CBD oil or full-spectrum hemp oil, appears in various scientific research studies as a possibly effective cannabinoid in the therapy of anxiety. Notably, it is a 100 natural chemical substance of plant origin. Interestingly, clinical depression is amongst the three most usual mental illness in which clients turn to CBD hemp prep work such as CBD oil, complete range hemp oil with CBD or CBD capsules. Records from consumers and their favorable point of views on the efficiency of e.g. CBD oil or full range hemp oil with natural CBD are expanding at an unprecedented speed. THC as well as CBD cannabinoids – distinctions The primary cannabinoids in the marijuana plant are THC (Δ9-tetrahydrocannabinol) as well as CBD (cannabidiol). They show antagonistic impacts, which suggests that CBD decreases the results of THC. What are these results? THC has an intoxicating effect, triggers a sensation of bliss, affects cognitive features, but likewise relaxes. Huge, on a regular basis taken in dosages of THC are thought about unsafe to the human brain. Too much usage of THC can lead to psychosis, absence of inspiration, and also also long-term unfavorable changes in cognitive function. Both THC as well as CBD impact the endocannabinoid system in the body. Their action, as currently discussed, is inconsistent. Cbd-a-thc-in-the-endocannabinoid-1 system When writing images, CBD decreases the exhaustion of anandamide resources, and THC quicken this process. Nonetheless, this does not suggest that THC is only an unsafe cannabinoid and ought to not be in the prep work in any way. As a matter of fact. Its small existence in hemp preparations is even needed in order to get the so-called effect. synergy. THC in full spectrum hemp oil exists in such a minimal and, importantly, legal amount. This amount is so little (less than 0.2) that it does not trigger drunkenness. Working together, THC and also CBD have higher possibility than either molecule performing alone. What is anandamide (AEA)? What is its importance for people suffering from anxiety? Read on! CBD, Anxiety and also the endocannabinoid system The endocannabinoid system is a crucial system in charge of the policy of basic human physical processes, such as power monitoring, neurohormonal and neuroimmune links, electric motor task, state of mind and motivation, as well as fat metabolic process. The endocannabinoid system consists of a natural chemical called anandamide (AEA). Anandamide is a neurotransmitter that is normally generated in the human mind. Its manufacturing is promoted by e.g. physical activity, and also to a lower extent by the supposed deal with the body (massage therapy!). Its resources are “made use of” to maintain the correct functioning of the body, consisting of in the field of mental wellness. As displayed in this research study: https://www.ncbi.nlm.nih.gov/pubmed/23580381 high degrees of anandamide are related to a decreased threat of creating psychotic symptoms. A high level of anandamide is likewise associated with a positive result on the decrease of depression as well as stress and anxiety signs. This device is still not fully comprehended, but it seems logical that a highly clinically depressed state of mind in an individual amount of time for a details instance, and also with the synchronised absence of activities aimed at its enhancement, leads to a surge of the increase of adverse thoughts. As depressive conditions create, they can become much more hazardous kinds of conditions, e.g. psychosis, misconceptions or schizophrenia. Decreasing this process as promptly as feasible might turn out to be vital in the effective therapy of mental illness of human performance.
You’re therefore amazing. Oh my Jesus. Jesus bless you.
I discovered your website web site on google and appearance many of your early posts. Always keep in the top notch operate. I just extra encourage Rss to my MSN News Reader. Looking for toward reading a lot more on your part at a later date!…
man utd đấu với chelsea—. If you are anticipating football games online for the simulation type, try Ultimate Football and Linebacker Alley. These games are patterned after American Football. If you’re an fan of such games, then these ones are an individual.Next we use a football and simply add an active
bongdawap—. If you are interested in football games online of the simulation type, try Ultimate Football and Linebacker Allee. These games are patterned after American Football. If you’re a fan of which games, then these ones are in order to.Next we use a football and only add an active
mu bao moi—. If you are interested in football games online of the simulation type, try Ultimate Football and Linebacker Alley. These games are patterned after American Football. If you are a fan for these games, then these ones are that.Next we use a football and easily add a live
Love the way you cover this subject.
We are a bunch of volunteers and opening a brand new scheme in our community. Your web site offered us with useful info to paintings on. You have performed an impressive task and our entire group will be thankful to you.
At this kind of level, you can premiere as a article writer. I’m so touched. I am just content to meet you. Appreciate you.
tivi101—. If you would like to football games online of the simulation type, try Ultimate Football and Linebacker Street. These games are patterned after American Football. Additionally fan for these games, then these ones are a person.Next we use a football and simply add a live
What an outstanding manner of taking a look at things.
Your site is great as if it have been written by a writer. I am going to pay a visit to your blog usually. Appreciate it always.
Consistently bear in mind, though, in regards to Technology, that there isn’t one correct path or strategy. Do not believe you should proceed attempting a certain means of doing points whenever you are not obtaining the outcomes you would like. There is actually nobody otherwise that can establish your ideal training course than you. Anytime you encounter a fresh concern, your perception system, assumptions, as well as routines should be analyzed. That is most definitely the vital reason it can be beneficial to have a look over a selection of sources at any time seeking support. Below tend to be a set of Net websites you will certainly almost certainly find handy while you perform your examination. They might be Our Technology Site as well as Our Technology Site. You will certainly find it much easier to uncover answers that take place to be ideal for you if you take into thing to think about the countless points of view of some others.
of course like your web site however you need to check the spelling on quite a few of your posts. A number of them are rife with spelling issues and I to find it very troublesome to tell the truth on the other hand I will surely come again again.
I really appreciate this post. I have been looking everywhere for this! Thank goodness I found it on Bing. You have made my day! Thx again
As a Newbie, I am constantly exploring online for articles that can aid me. Thank you
magnificent post, very informative. I wonder why the other specialists of this sector do not notice this. You should continue your writing. I’m sure, you’ve a great readers’ base already!
I think your site has one of the cleanest theme I’ve came across. It really helps make reading your blog a lot easier.
I am also writing to let you understand of the superb experience my cousin’s child had going through yuor web blog. She noticed some things, which included what it’s like to possess a wonderful helping spirit to let others very easily have an understanding of selected very confusing matters. You actually exceeded my expectations. Many thanks for rendering these great, safe, educational as well as unique thoughts on that topic to Jane.
Its like you learn my mind! You appear to understand a lot approximately this, such as you wrote the book in it or something. I feel that you can do with a few to force the message house a bit, but instead of that, that is excellent blog. An excellent read. I’ll certainly be back.
Hey just wanted to give you a quick heads up. The text in your article seem to be running off the screen in Safari. I’m not sure if this is a formatting issue or something to do with internet browser compatibility but I thought I’d post to let you know. The layout look great though! Hope you get the issue resolved soon. Kudos
Enjoyed looking through this, very good stuff, thankyou.
Hiya. Very cool web site!! Man .. Beautiful .. Superb .. I’ll bookmark your web site and take the feeds also…I’m glad to find a lot of useful info here in the article. Thank you for sharing..
I would like to thank you for the efforts you’ve put in writing this website. I am hoping the same high-grade website post from you in the upcoming as well. In fact your creative writing abilities has inspired me to get my own blog now. Actually the blogging is spreading its wings quickly. Your write up is a great example of it.
I love it when people come together and share opinions, great blog, keep it up.
A wide range of information on Technology is to be located by surfing on the Internet, along with utilizing the online search engine. Taking your initial actions – this is what the expertise we have actually offered is centered on. What you need to do currently is take your initial actions, recognize that you won’t accomplish whatever overnight, but that you are making use of the actions required to get where you mean to go. It’s everything about writing down your objectives, reminding yourself daily of what you intend to accomplish, and also getting there through tenacity as well as resolve. So many guidelines and strategies can be acquired at Our Technology Site, particularly in relation to aiding you to accomplish your objectives. Anybody that goes to this web site can easily discover something from it, and also despite the huge quantity of details, it will certainly help you in the long run.
The kind of lust hidden deep in the man’s own soul, selfish and fragile, the fate of a male animal who knows nothing but keeps moving forward.
Go teams! todaytv.vn trực tuyến Sports memorabilia fans are lucky! There are many and varied articles and apparel available for an eager football fan. He/she can watch Sunday football wearing a popular team hat. Whether you choose to watch professional football games live, with fellow enthusiasts with a favorite sports bar, or in the convenience of your home in front of that big screen TV, wearing your team’s logo makes way to exhibit team loyalty and advertise that you are an avid fan to render it in with the comfort of their home.
Best view i have ever seen !
A coquettish woman may not be sexy because she has released too much sexual energy; a sexy woman may not be coquettish because she has abundant sexual energy in her body.
Go teams! lich c1 Therefore, it aren’t going a tricky task which you get hold of these equipments.|Make sure ALL your players obtain the proper personal instruction. If you do not get the loading phase of the rear arm correct, it’s hard for your swing or throw to extract. There are thousands of online autographs sites.|Move the ball down the field 10 yards at a time. eat inside the clock. Finally, no football bedroom would be complete without real footballs. At one end of record will be most probable home benefits.|The American odds are called as money contours. In 1935 the Heisman Trophy, was made to be awarded to one of the most outstanding football player. Late Olayinka John (Ayogi) was the then coach of eleven brothers.
I do not even know how I ended up here, but I thought this post was great. I don’t know who you are but certainly you’re going to a famous blogger if you are not already 😉 Cheers!
Express Your Passion For Soccer With Football Cufflinks nba live stream Every sport has individual way of promoting its game. Football fans are famous for wearing things like scarves and hats along with several fans insurance firm ? make funny outfits too. The type that you opt for needs in order to become light and soft so that you can do not get distressed. There are well known brands which can known for designing quite best in terms of sports device. Rather opt for such brands when compared with scarves are usually sold via street four corner.
I have read so many articles regarding the blogger lovers except this post is truly
a pleasant article, keep it up.
I used to be able to find good advice from your articles.
Iím amazed, I have to admit. Rarely do I come across a blog thatís both educative and interesting, and let me tell you, you have hit the nail on the head. The problem is an issue that too few folks are speaking intelligently about. I am very happy I came across this during my search for something relating to this.
Best view i have ever seen !
Great post, you have pointed out some good points, I besides conceive this s a very great website.
Woah! I’m really enjoying the template/theme of this website. It’s simple, yet effective. A lot of times it’s very difficult to get that “perfect balance” between superb usability and visual appearance. I must say you’ve done a very good job with this. Also, the blog loads extremely quick for me on Opera. Superb Blog!
As I site possessor I believe the content matter here is rattling wonderful , appreciate it for your hard work. You should keep it up forever! Good Luck.
I like this site because so much utile stuff on here : D.
I am glad to be a visitor of this unadulterated site! , thanks for this rare info ! .
Maybe the title sounds crazy, it can be a real-life true article. I should add that I don’t mean that my first football kit made me into Pele’s younger brother or landed me a legal contract with Menu. But it did make a major difference for me. barcelona vs juventus Many people think that betting in the random way will bring them to success, and this is not the case with course. Betting should be very well examined and based on knowledge and precise insider secrets. A football betting system will you this of category. Nonetheless, there some football betting systems which might be not influenced by realistic expectations, and must take this activity the good reason many people fail.
This design is steller! You most certainly know how to keep a reader amused. Between your wit and your videos, I was almost moved to start my own blog (well, almost…HaHa!) Excellent job. I really enjoyed what you had to say, and more than that, how you presented it. Too cool!
Itís hard to come by educated people for this subject, however, you seem like you know what youíre talking about! Thanks
Wow, wonderful blog layout! How long have you been running a blog for? you made running a blog look easy. The entire look of your web site is excellent, as neatly as the content!
Excellent post. I will be facing many of these issues as well..
I’ve experienced both sides of the ball. For a coach I the probability to coach being a head coach and an assistant. As being a parent I’ve 2 sons that played both youth and high school football. Both were average players. Knowing my place as a mom or dad AND as the coach taught me to get through some difficult parenting minutes.. logo chelsea After acquire the motion down, commence to do all the movement 1 complete exercise rather than pausing making use of bag at chest height before adjusting. This is an ideal time to video the lift or have a coach/teammate watch you and critique your form. There are no longer many guarantees in football or football training, but, I can damn-near guarantee that workout will maximize your blocking and tackling.
Best view i have ever seen !
It’s a pity you don’t have a donate button! I’d without a doubt donate to this brilliant blog! I suppose for now i’ll settle for book-marking and adding your RSS feed to my Google account. I look forward to fresh updates and will share this blog with my Facebook group. Talk soon!
Some people like to pay up for the score at the end of each quarter so it’s more fun for individuals. But you can decide if you want to pay out just once at the end of each computer game. And with so many games, being successful a opportunity for someone a novice to win the big kitty. Greater you charge per square, the bigger the kitten. tin moi nhat ve liverpool You want find combined with the is unique and permits show your ex for simple . team.|Lots of things could change from a split following. Individual will regarded top 5 fantasy football QB at one time next months. An effect that football kits will provide to companies.|Now, a person are play football anytime, in which. It is challenging to forget about the aspect of betting on football 1 set of muscles talks or discusses about football. Jay Cutler: 22/35 for 237 yards with 3 TD’s and a INT’s.|Future generations will still think about the subject. This gift is particular please everyone at the party. I will give you what I personally use in a forthcoming article.
Some genuinely nice and utilitarian information on this website, also I believe the style has great features.
Some people like to pay back for the score following each quarter so it’s more fun for almost everyone. But you can decide if you wish to pay out just once at the end of each computer game. And with so many games, in today’s economic climate a opportunity for someone fresh to win major kitty. You will you charge per square, the bigger the kitty. liverpool vs chelsea You need to find most things that is unique and is show your love for your favorite team.|Lots of things could change from a split second. Person will deemed top 5 fantasy football QB at one time next holiday season. The feeling that football kits can offer to players.|Now, you play football anytime, any place. It is hard to disregard the aspect of betting on football when one talks or discusses about football. Jay Cutler: 22/35 for 237 yards with 3 TD’s and a INT’s.|Generations to come will still think about them. This gift is particular please everyone at the party. I will give you what Cash in in the two article.
An interesting discussion is worth comment. I think that you should write more on this topic, it might not be a taboo subject but generally people are not enough to speak on such topics. To the next. Cheers
Not many authors with correct understanding of the topics they discuss.
That is a really good tip particularly to those new to the blogosphere. Brief but very accurate informationÖ Many thanks for sharing this one. A must read article!
Hello very nice blog!! Guy .. Excellent .. Superb .. I will bookmark your blog and take the feeds additionally…I’m glad to find so many helpful information here within the post, we want develop extra techniques in this regard, thank you for sharing. . . . . .
I am glad to be one of the visitants on this great website (:, regards for posting.
Wonderful post! We are linking to this particularly great post on our site. Keep up the good writing.
Therefore, it is simply not a tricky task which you can get their hands on these systems.|Make sure ALL your players obtain the proper helping. If you do not get the loading phase ofneymar barca the spine arm correct, it’s hard for your swing or throw to recover. There are thousands of online sports memorabilia sites.|Move the ball down industry 10 yards at a time. eat the clock. Finally, no football bedroom would be complete without real footballs. At one end of the list will be most probable home wins.|The American odds furthermore called as money brands. In 1935 the Heisman Trophy, was produced to be awarded to essentially the most outstanding football player. Late Olayinka John (Ayogi) was the then coach of eleven brothers.
This was awesome! I would like you to clean up all this spam though
Have you ever heard of second life (sl for short). It is essentially a online game where you can do anything you want. SL is literally my second life (pun intended lol). If you would like to see more you can see these sl authors and blogs
Therefore, it isn’t going to be a tricky task which you can get hold of these packs.|Make sure ALL your players get the proper teaching. Should you not get the loading phase ofreview ronaldo ec the trunk arm correct, it’s tough for your swing or throw to extract. There are thousands of online sports memorabilia sites.|Move the ball down the field 10 yards at once. eat inside clock. Finally, no football bedroom would be complete without real footballs. At one end of the list will be most probable home profits.|The American odds furthermore called as money lines. In 1935 the Heisman Trophy, was produced to be awarded to essentially the most outstanding football player. Late Olayinka John (Ayogi) was the then coach of eleven brothers.
There is definately a lot to learn about this topic. I really like all of the points you have made.
I think other web-site proprietors should take this site as an model, very clean and excellent user friendly style and design, let alone the content. You are an expert in this topic!
I wanted to compose a small word so as to express gratitude to you for those fantastic pointers you are giving out on this site. My time-consuming internet research has finally been compensated with sensible strategies to share with my partners. I would state that that many of us site visitors are quite fortunate to be in a useful community with so many awesome professionals with good methods. I feel very much fortunate to have seen the website and look forward to some more enjoyable moments reading here. Thanks once more for a lot of things.
You ought to be a part of a contest for one of the best blogs on the net. I’m going to recommend this web site!
Good info. Lucky me I discovered your website by accident (stumbleupon). I have saved as a favorite for later!
Have you ever heard of second life (sl for short). It is basically a online game where you can do anything you want. sl is literally my second life (pun intended lol). If you would like to see more you can see these Second Life websites and blogs
High rep C&P is a reliable exercise but can be tough to do by using a barbell.|This guy will undoubtedly top 5 fantasy football QB at one time next calendar year. Get going, with implausible prospects of becoming well-known a world of football! In the event you deadlift great form, you’re fine.|The football draw game – extraordinary kết quả premier league them don’t you think it’s? But, most coaches concentrate on 40-speed when in reality increasing football game speed is the real key. Now it has grown up for a great venture.|But, for a lot of guys, this might be in overabundance of 700-lbs.In addition to these not being big ticket items, do supporters actually need these football fundraising concepts?|However, you aren’t satisfied while using the collection of merchandises an individual have.For example, the “E” Bell rings whenever Navy beats Army in any of the three seasons of exercise.|Therefore if they play inside, they’re going to have to improve the football field very small-scale.In the following practices select tempo up and evaluate them a lot more.|A team that has internal problems and conflicts has odds of failure. Nowadays, many people access to information everywhere you look they request. Now you need to look at the forthcoming matches and compare the teams’ ratings.|Over 24 years of coaching youth football I in order to fortunate enough to have run successful programs. Load up sandbag and do full Cleans and the best press you can manage.
You could definitely see your skills in the work you write. The world hopes for more passionate writers like you who aren’t afraid to say how they believe. Always follow your heart.
Just what I was searching for, appreciate it for posting.
I have recently started a site, the information you offer on this site has helped me greatly. Thank you for all of your time & work. “The only winner in the War of 1812 was Tchaikovsky” by Solomon Short.
Best view i have ever seen !
Hello, Neat post. There’s a problem along with your site in web explorer, could check thisK IE still is the marketplace chief and a big portion of people will omit your fantastic writing because of this problem.
You’re so awesome! I don’t believe I have read a single thing like this before. So great to discover someone with genuine thoughts on this subject. Really.. thank you for starting this up. This site is one thing that is needed on the web, someone with a bit of originality!
Pretty! This was a really wonderful post. Thank you for your provided information.
I love reading an article that can make men and women think. Also, thanks for allowing me to comment!
excellent put up, very informative. I’m wondering why the other experts of this sector do not realize this. You must proceed your writing. I am confident, you’ve a great readers’ base already!
Before you start using any muscle stimulator device, it is important that you consult with your physician. Your doctor can advise you the best muscle stimulator design for your individual needs and if you are likely to abuse the stimulator.
Iím impressed, I have to admit. Rarely do I come across a blog thatís both educative and engaging, and without a doubt, you have hit the nail on the head. The problem is something which too few men and women are speaking intelligently about. I’m very happy that I came across this in my hunt for something concerning this.
I like this blog very much, Its a very nice billet to read and obtain information. “Do not use a cannon to kill a mosquito.” by Confucius.
I like the way you have concluded this blog post …
High rep C&P is a huge exercise can be tricky to do having a barbell.|Individual will be deemed a top 5 fantasy football QB the moment next period. Get going, with implausible prospects getting well-known a world of football! In the event you deadlift in good form, you’re fine.|The football draw game – hard to find đội hình arsenal them don’t you think so? But, most coaches focus on 40-speed when in reality increasing football game speed is the real key. Now it will continue to expand up like a great venture.|But, for many guys, this can be in more than 700-lbs.In addition to these not being big ticket items, do supporters wish these football fundraising inspirations?|However, you aren’t satisfied with the collection of merchandises which you have.For example, the “E” Bell rings whenever Navy beats Army most of the three seasons of fitness.|Therefore if they play inside, they will have to enhance the risk for football field very small-scale.In the following practices decide the tempo up and evaluate them once again.|A team that has internal problems and conflicts has chances of failure. Nowadays, many people access to information everywhere they request. Now you need to look at the forthcoming matches and compare the teams’ ratings.|Over 24 years of coaching youth football.
Make researches and studies regarding each game and its players. Watch them closely during team drills when they have to work together with other players. This is a perfect football strength exercise.|Try reading up these as well as apply the actual your own online football betting. When making bets,real madrid vs ajax your personal be certain you will win every different bet in which you make. This bell sits in front of Bancroft Hall in Annapolis.|By adding chains or bands, you should use a scaled-down bag but work the legs and back even harder. You can easily get online and look clean drinking water . websites offering this service. These games are patterned after American Football.|Dominate the clock and possess a better chance of success. The higher priced football fundraisers that are sold, get more money per trade.
You actually make it appear so easy together with your presentation however I in finding this matter to be actually something that I think I’d never understand. It kind of feels too complicated and extremely broad for me. I am looking ahead on your next publish, I’ll attempt to get the hold of it!
Can I simply just say what a comfort to uncover someone who truly understands what they’re talking about on the web. You definitely know how to bring a problem to light and make it important. More and more people ought to read this and understand this side of the story. I can’t believe you are not more popular since you most certainly possess the gift.
Specifically the sort of material that enriches the internet. Many thanks!
The other day, while I was at work, my cousin stole my apple ipad
and tested to see if it can survive a 40 foot drop, just so she can be a youtube sensation. My iPad is now broken and she has 83 views.
I know this is entirely off topic but I had to share it with someone!
I couldnít refrain from commenting. Very well written!
Aw, this was a really good post. Taking a few minutes and actual effort to generate a very good articleÖ but what can I sayÖ I put things off a whole lot and don’t seem to get anything done.
The frequency that you feed your baby also affects the breast pump you need to purchase. This is because, as your child grows, the breast milk production rate slows down. You will not always be able to breastfeed every time you want to.
he blog was how do i say it… relevant, finally something that helped me. Thanks
Best view i have ever seen !
High rep C&P is a strong exercise can be tough to do with a barbell.|This guy will taken into consideration top 5 fantasy football QB at one time next holiday season. Get going, with implausible prospects getting well-known a world of football! Should you deadlift great form, you’re fine.|The football draw game – rare to find bayern vs them isn’t it? But, most coaches focus on 40-speed when in reality increasing football game speed is the true secret. Now it has developed up to be a great endeavor.|But, for most guys, this can be in an excessive amount of 700-lbs.In addition to these not being big ticket items, do supporters need these football fundraising aspects?|However, you aren’t satisfied while using the collection of merchandises an individual have.For example, the “E” Bell rings whenever Navy beats Army in any of the three seasons of divertissement.|Therefore if they play inside, they’ve got to develop the football field very manageable.In the following practices select the tempo up and evaluate them a lot more.|A team that has internal problems and conflicts has odds of failure. Nowadays, humans have access to information everywhere they desire. Now you have to look in the forthcoming matches and compare the teams’ ratings.|Over 24 years of coaching youth football.
They make researches and studies regarding each game and its players. Watch them closely during team drills when must be waterproof work together with other players. This is a perfect football strength exercise.|Try reading up these tips and apply these your own online football betting. When making bets,la liga 2015 you cant ever be sure that you will win nearby bet you make. This bell sits in front of Bancroft Hall in Annapolis.|By adding chains or bands, you should use a small bag but work the legs and back even harder. You can easily get and also look clean websites offering this web site. These games are patterned after American Football.|Dominate the clock and you might have a better chance of success. The higher priced football fundraisers that are sold, bring in more money per sale.
Make researches and studies regarding each game and its players. Watch them closely during team drills when that doctor needs to work in tandem with other players. This is a perfect football strength exercise.|Try reading up these tips and apply for you to your own online football betting. When making bets,neymar world cup 2014 your personal be positive that you will win each bet you make. This bell sits in front of Bancroft Hall in Annapolis.|By adding chains or bands, you should use a scaled-down bag but work the legs and back even harder. You can easily get as well as look health rely websites offering this assistance. These games are patterned after American Football.|Dominate the clock and own a better chance of success. The higher priced football fundraisers that are sold, show more money per produced.
They cook researches and studies regarding each game and its players. Watch them closely during team drills when you have to work in tandem with other players. This is a perfect football strength exercise.|Try reading up these as well as apply the particular your own online football betting. When making bets,arsenal vs chelsea you cant ever be without you will win all bet that you make. This bell sits in front of Bancroft Hall in Annapolis.|By adding chains or bands, you can use a scaled-down bag but work the legs and back even harder. You can easily get online and look healthy websites offering this assistance. These games are patterned after American Football.|Dominate the clock and a person a better chance of success. The higher priced football fundraisers that are sold, generate more money per marketing.
A fascinating discussion is worth comment. I do think that you should write more on this subject, it might not be a taboo subject but generally people do not discuss such topics. To the next! Kind regards!!
By running our game hack online provided today for you, you will be able to expedite your process in this game and end up being the top player in the entire gaming world. To take pleasure in this game to the maximum, and advance in this game much easier, you need to use our free and 100 functioning game hack online. It will certainly enable you to be competitive with the best gamers in the gaming community.
Right here is the perfect webpage for anyone who wishes to find out about this topic. You realize a whole lot its almost tough to argue with you (not that I personally would want toÖHaHa). You certainly put a brand new spin on a topic that’s been discussed for many years. Excellent stuff, just wonderful!
Make researches and studies regarding each game and its players. Watch them closely during team drills when must be waterproof work together with other players. This is a perfect football strength exercise.|Try reading up these tips and apply these your own online football betting. When making bets,video real madrid atletico madrid you can never be positive that you will win each pixel bet a person can make. This bell sits in front of Bancroft Hall in Annapolis.|By adding chains or bands, you can use a scaled-down bag but work the legs and back even harder. You can easily get as well as look clean drinking water . websites offering this care. These games are patterned after American Football.|Dominate the clock and possess a better chance of success. The higher priced football fundraisers that are sold, receive more money per on sale.
High rep C&P is a huge exercise at times be harder to do with a barbell.|This guy will deemed top 5 fantasy football QB who are only next months. Get going, with implausible prospects getting well-known on the inside world of football! Anyone have deadlift great form, you’re fine.|The football draw game – hard to come by câu lạc bộ bóng đá bayern munich them it’s really? But, most coaches focus on 40-speed when in reality increasing football game speed is the true secret. Now it has grown up as the great corporate.|But, for many guys, this might be in overabundance of 700-lbs.In addition to these not being big ticket items, do supporters really want these football fundraising suggestions?|However, you are not satisfied with no collection of merchandises may have.For example, the “E” Bell rings whenever Navy beats Army in most of the three seasons of training.|Therefore if they play inside, they will have to boost football field very small to medium sized.In the following practices purchase the tempo up and evaluate them once again.|A team that has internal problems and conflicts has associated with failure. Nowadays, humans have access to information everywhere you look they have to have. Now you must look in the forthcoming matches and compare the teams’ ratings.|Over 24 years of coaching youth football.
Throughout this awesome pattern of things you actually secure an A with regard to effort and hard work. Exactly where you lost everybody ended up being in the facts. As they say, details make or break the argument.. And it could not be much more correct here. Having said that, allow me tell you exactly what did give good results. The article (parts of it) can be quite convincing which is most likely why I am making an effort in order to comment. I do not really make it a regular habit of doing that. 2nd, although I can certainly see a jumps in reasoning you come up with, I am definitely not certain of exactly how you seem to connect the ideas which produce the actual conclusion. For the moment I will, no doubt yield to your point but wish in the near future you actually link the dots better.
I blog quite often and I really appreciate your content. This great article has really peaked my interest. I will take a note of your site and keep checking for new information about once per week. I subscribed to your RSS feed as well.
I will immediately grab your rss feed as I can’t in finding your e-mail subscription link or e-newsletter service. Do you have any? Kindly permit me know in order that I could subscribe. Thanks.
It?¦s really a great and helpful piece of information. I am happy that you shared this useful info with us. Please stay us up to date like this. Thank you for sharing.
I conceive other website owners should take this internet site as an example , very clean and superb user genial style and design.
Nice post. I learn something totally new and challenging on sites I stumbleupon every day. It will always be useful to read through articles from other writers and use something from other web sites.
Hi my friend! I wish to say that this article is awesome, great written and come with approximately all significant infos. I would like to look more posts like this .
I have been checking out many of your stories and i must say pretty nice stuff. I will make sure to bookmark your site.
Heya i am for the first time here. I found this board and I find It truly useful & it helped me out much. I hope to give something back and help others like you aided me.
Right here is the perfect site for anybody who wishes to find out about this topic. You know so much its almost hard to argue with you (not that I personally will need toÖHaHa). You definitely put a new spin on a topic that has been written about for years. Wonderful stuff, just wonderful!
Watch the film and diagram auto mechanic play the group runs including repeats. Which i Neymar JR use document. Write down the play number and also the down and distance on the best of the knowledge with a caption per play document.e. I would write play 1, 1 and 10, Pitch Sweep Right and diagram the blocking assignments as executed and the backfield player numbers. On a playoff game I would take providing time to put in writing every player’s number.
Everything is very open with a precise description of the issues. It was really informative. Your website is extremely helpful. Thanks for sharing!
Hi there! I simply want to offer you a huge thumbs up for your great info you’ve got here on this post. I am coming back to your site for more soon.
obviously like your web site however you need to test the spelling
on several of your posts. A number of them are rife with spelling issues and I in finding
it very bothersome to inform the reality then again I’ll
surely come back again.
Hi my friend! I wish to say that this post is amazing, great written and come with approximately all significant infos. I¦d like to see extra posts like this .
My spouse and I absolutely love your blog and find nearly all
of your post’s to be just what I’m looking for.
Would you offer guest writers to write content for you personally?
I wouldn’t mind creating a post or elaborating on a few of the subjects you write
related to here. Again, awesome website!
Regards for helping out, good information. “If you would convince a man that he does wrong, do right. Men will believe what they see.” by Henry David Thoreau.
I’d need to check with you here. Which isn’t something I usually do! I enjoy reading a post that can make individuals think. Also, thanks for permitting me to remark!
I have read a few excellent stuff here. Certainly value bookmarking for revisiting. I surprise how a lot attempt you place to create one of these fantastic informative site.
The swing is an accessory exercise. Go with multiple sets of low to medium reps. You shouldn’t be afraid in order to Tottenham Hotspur some real weight and go with sets of 4. These do best following a whopping movement like deadlifts.Whether it is a basketball pick, or football or another sport pick, you should be conservative. The great game of Football can be a national spare time activity. Football betting is heavily based on various facts.{But, let’s clear factor up.protein is merely food in liquid means.
The swing is an accessory do exercises. Go with multiple sets of low to medium reps. Don’t be afraid to use Nhận định Barcelona some real weight and go with sets of 4. These do best following a whopping movement like deadlifts.Whether it is a basketball pick, or football or another sport pick, you in order to conservative. The cost game of Football is a national spare time activity. Football betting is heavily on such basis as various ideas.{But, let’s clear one thing up.protein merely food in liquid state.
The swing is an accessory do exercises. Go with multiple sets of low to medium reps. Don’t be afraid in order to Real Madrid vs Barcelona some real weight and go with sets of 4. These do best following huge movement like deadlifts.Whether it is a basketball pick, or football or another sport pick, you ought to conservative. Terrific game of Football is really a national overdue. Football betting is heavily derived from various brings about.{But, let’s clear factor up.protein merely food in liquid sort of.
Pretty great post. I simply stumbled upon your blog and wanted to mention that I have really enjoyed surfing around your weblog posts. In any case I will be subscribing for your feed and I am hoping you write again soon!
A good man is a good monk, and a good woman is a nun. Therefore, you must become an old teacher! Click:Fuck you.
Iím impressed, I have to admit. Seldom do I encounter a blog thatís equally educative and engaging, and let me tell you, you have hit the nail on the head. The issue is something which not enough folks are speaking intelligently about. I’m very happy I found this in my hunt for something regarding this.
Pretty! This was an incredibly wonderful post. Many thanks for providing this info.
The swing is an accessory process. Go with multiple sets of low to medium reps. Don’t be afraid a cordless Đội hình Liverpool 2019 some real weight and go with sets of 4. These do best following much movement like deadlifts.Whether it is a basketball pick, or football or another sport pick, you always be conservative. Purchase the game of Football is really a national regular activity. Football betting is heavily based around various factors.{But, let’s clear typical up.protein is simply food in liquid means.
Itís hard to find knowledgeable people in this particular subject, however, you seem like you know what youíre talking about! Thanks
Watch the film and diagram each and every play the group runs including repeats. I Pep Guardiola use cardstock. Write down the play number and the down and distance towards best of the knowledge and a caption every play since i.e. I would write play 1, 1 and 10, Pitch Sweep Right and diagram the blocking assignments as executed and the backfield player numbers. For playoff game I would take transported time to write down every player’s number.
Watch the film and diagram auto mechanic play the group runs including repeats. I De Bruyne use document. Write down the play number and the down and distance into the best of the knowledge properly caption every play since i.e. I would write play 1, 1 and 10, Pitch Sweep Right and diagram the blocking assignments as executed and the backfield player numbers. For every playoff game I would take further time to write down every player’s number.
Watch the film and diagram each and every play the group runs including repeats. Which i Tin Chelsea mới nhất use cardstock. Write down the play number and also the down and distance into the best of the knowledge along with caption for everybody play that we.e. I would write play 1, 1 and 10, Pitch Sweep Right and diagram the blocking assignments as executed and the backfield player numbers. For every playoff game I would take after which time to put in writing every player’s number.
Watch the film and diagram each single play the team runs including repeats. It’s my job to Real Madrid use cardstock. Write down the play number and the down and distance on the best of the knowledge including caption every play since i.e. I would write play 1, 1 and 10, Pitch Sweep Right and diagram the blocking assignments as executed and the backfield player numbers. For your playoff game I would take providing time to write down every player’s number.
What’s Happening i’m new to this, I stumbled upon this I’ve found It positively useful and it has aided me out loads. I am hoping to contribute & aid other users like its helped me. Good job.
Aw, this was a really nice post. Taking a few minutes and actual effort to produce a great articleÖ but what can I sayÖ I hesitate a whole lot and never manage to get anything done.
Yay google is my king assisted me to find this outstanding internet site! .
Merchant Accounts For Trực Tuyến Smoke Shops|Best Angies Boutique Los Angeles’ Premier Smoke Shop|#1 Trực Tuyến Headshop|Zerona Smoke Shop|Denver’s Premier Smoke Shop ghost mv1 vaporizer smartphone app, you can find everything you need to know on the #DopeBoo blog. The problem with most trực tuyến head shops is they’re only the middlemen for other sellers. Everything you see here is from a genuine trực tuyến smoke cửa hàng staffed by a professional team of experts who use the same products you do.|We’ve made the world’s best smoke shop with only the best bongs, vapes, and dab rigs. They all of the new and hottest brands, our new favorite being Mathematix Glass. They stock a long list of American made glass and offer không tính phí U.S. shipping on all products. Another plus is that their hassle-không tính phí returns and customer service are remarkable.
You made some good points there. I looked on the net to learn more about the issue and found most people will go along with your views on this site.
Nice blog here! Also your website loads up fast! What web host are you using? Can I get your affiliate link to your host? I wish my site loaded up as quickly as yours lol
Appreciate the recommendation. Let me try it out.
I think other website proprietors should take this site as an model, very clean and excellent user friendly style and design, as well as the content. You are an expert in this topic!
Good article. I absolutely appreciate this site. Keep it up!
It’s hard to find knowledgeable people on this topic, but you sound like you know what you’re talking about! Thanks
Sweet internet site, super style and design, real clean and utilize genial.
Quality articles or reviews is the main to attract the viewers to pay a quick
visit the website, that’s what this web page is providing.
You made some decent points there. I looked on the internet for more info about the issue and found most individuals will go along with your views on this site.
Can I simply just say what a comfort to find a person that truly understands what they are discussing on the net. You definitely realize how to bring an issue to light and make it important. More and more people need to read this and understand this side of the story. I was surprised that you aren’t more popular given that you most certainly possess the gift.
As I website possessor I believe the content matter here is rattling wonderful , appreciate it for your efforts. You should keep it up forever! Best of luck.
As a Newbie, I am always browsing online for articles that can aid me. Thank you
May I simply say what a relief to discover someone that really understands what they are discussing on the net. You certainly know how to bring an issue to light and make it important. A lot more people should check this out and understand this side of your story. I was surprised that you aren’t more popular given that you surely possess the gift.
I’d like to thank you for the efforts you’ve put in writing this website. I am hoping to check out the same high-grade content by you later on as well. In fact, your creative writing abilities has inspired me to get my own, personal site now 😉
Oh my goodness! Incredible article dude! Thank you, However I am going through troubles with your RSS. I donít know why I can’t join it. Is there anybody else getting the same RSS issues? Anybody who knows the answer can you kindly respond? Thanx!!
However, be apt to choose an online site that is reputable. Precisely why I pick Bama as the best in recent history. Plus, it really helps build focus and mental toughness how to prevent water pipes from freezing in crawl space{The buzzing activities in the football fan gift shops go to as much as a new high through the football world cup. Check the comfort quotient of t-shirts while choosing one their own store. This is where most go horribly wrong.|The other, shoot for that box which 80 of the best box height.
I am often to blogging and i really appreciate your content. The article has really peaks my interest. I am going to bookmark your site and keep checking for new information.
Itís hard to come by well-informed people in this particular subject, however, you sound like you know what youíre talking about! Thanks
I enjoy looking at and I conceive this website got some genuinely utilitarian stuff on it! .
You should take part in a contest for one of the best blogs on the web. I’m going to highly recommend this blog!
I’m still learning from you, while I’m trying to achieve my goals. I certainly enjoy reading all that is posted on your website.Keep the posts coming. I enjoyed it!
You have made some decent points there. I checked on the internet to learn more about the issue and found most individuals will go along with your views on this website.
You could definitely see your expertise within the work you write. The world hopes for even more passionate writers such as you who are not afraid to mention how they believe. All the time follow your heart. “The only way most people recognize their limits is by trespassing on them.” by Tom Morris.
However, be guaranteed to choose a webpage that is trustworthy. The reason why I pick Bama when compared to the best ever possible. Plus, it really helps build focus and strength of mind glass water bongs for sale{The buzzing activities in the football fan gift shops go approximately a new high your football world cup. Examine the comfort quotient of t-shirts while choosing one their own store. It is vital where most go horribly wrong.|The other, shoot to put together a box which isn’t 80 of the best box height.
However, be certain to choose a site that is honest. Cat condo I pick Bama beeing the best possibly. Plus, it really helps build focus and mental toughness yocan hit vaporizer{The buzzing activities in the football fan gift shops go at least a new high the actual football world cup. Examine the comfort quotient of t-shirts while choosing one their own store. Will be where most go horribly wrong.|The other, shoot to your box naturally 80 of your best box height.
However, be guaranteed to choose a web site that is honest. Cat tower I pick Bama mainly because best possibly. Plus, it really helps build focus and mental toughness vaporizer store dallas{The buzzing activities in the football fan gift shops go to as much as a new high through the football world cup. Examine the comfort quotient of t-shirts while choosing one from them. Motivating where most go horribly wrong.|The other, shoot to put together a box naturally 80 of the best box height.
I have been surfing online more than three hours today, yet I never found any interesting article like yours. It is pretty worth enough for me. In my opinion, if all webmasters and bloggers made good content as you did, the web will be a lot more useful than ever before.
You are so awesome! I do not suppose I’ve read through a single thing like this before. So good to discover somebody with original thoughts on this subject matter. Really.. many thanks for starting this up. This site is one thing that’s needed on the internet, someone with a bit of originality!
However, be going to choose a site that is reputable. On the internet . I pick Bama for the best possibly. Plus, it really helps build focus and strength of mind beaker base bong{The buzzing activities in the football fan gift shops go as many as a new high throughout the football world cup. Check the comfort quotient of t-shirts while choosing one their own store. Motivating where most go horribly wrong.|The other, shoot for that box that is 80 of one’s best box height.
After looking over a handful of the blog posts on your site, I truly appreciate your way of writing a blog. I saved as a favorite it to my bookmark website list and will be checking back soon. Please visit my website too and tell me how you feel.
However, be going to choose an affiliate site that is reputable. Cat condo I pick Bama for the best possibly. Plus, it really helps build focus and strength of mind best percolator bong{The buzzing activities in the football fan gift shops go up to a new high through the football world cup. Examine the comfort quotient of t-shirts while choosing one from. It is vital where most go horribly wrong.|The other, shoot for just about any box which usually is 80 of your best box height.
Aw, this was an incredibly good post. Spending some time and actual effort to create a very good articleÖ but what can I sayÖ I put things off a lot and don’t manage to get anything done.
The swing is an accessory exercise. Go with multiple sets of low to medium reps. You shouldn’t be afraid to employ a Man Utd some real weight and go with sets of 4. These do best following huge movement like deadlifts.Whether it is a basketball pick, or football or another sport pick, you always be conservative. Terrific game of Football is really a national regular activity. Football betting is heavily derived from various indicators.{But, let’s clear typical up.protein basically food in liquid come to be.
Good day! I could have sworn Iíve been to this web site before but after going through a few of the articles I realized itís new to me. Nonetheless, Iím certainly pleased I stumbled upon it and Iíll be book-marking it and checking back often!
The very next time I read a blog, Hopefully it does not disappoint me just as much as this one. I mean, Yes, it was my choice to read, nonetheless I truly thought you would have something helpful to say. All I hear is a bunch of complaining about something that you can fix if you were not too busy looking for attention.
There’s definately a lot to know about this topic. I really like all of the points you’ve made.
You made some good points there. I looked on the net to find out more about the issue and found most individuals will go along with your views on this website.
Everyone loves it when individuals come together and share thoughts. Great website, keep it up!
The only thing I lament is not having actually found your blog site earlier.
{Bảng bao gồm những số liệu tổng hợp đểVirgil van Dijkbạn dễ dàng dàng nắm bắt tình hình, so sánh, so sánh kết quả của những ĐộI. quý khách sẽ ngay lập tức mò được lịch tranh tài mới nhất, kết trái trận đấu, tư vấn soi kèo, và tỷ lệ kèo Nhà CửA dòng. Trang cung cung cấp những links, video clip truyền hình thẳng giải vô địch giang sơn bên trên toàn thế giới.|Bên cạnh đó, Thể Thao 247 sẽ trần thuật thẳng soccer tất cả các trận đấu hot nhất vào ngày cùng với những diễn biến đổi hấp dẫn và video bàn thắng bản quyền.
Good blog post. I definitely love this site. Stick with it!
This blog was… how do I say it? Relevant!! Finally I have found something that helped me. Many thanks!
Video Clip Highlight Mu Vs Fulham, đá Bóng Anh Hôm Nay trưc tiêp bong đáTrong quá khứ, Bình Dương đang được giật ưu thế về tổng hợp cùng với 15 thành công, 8 trận hoà và chỉ thua SLNA 12 lần.
Liên Kết Xem Thẳng Chelsea Vs Leicester, Bóng Đá Anh Hôm Nay 19 bong đa truc tuyênTrong quá khứ, Bình Dương đang được cướp ưu thế về tổng hợp cùng với 15 chiến thắng, 8 trận hoà và chỉ thua SLNA 12 lần.
Nhà Dòng Xem Trực Tiếp Soccer Bdtt Tv truc tiep bong da binh luan tieng vietTrong vượt khứ, Bình Dương đang chiếm ưu thế về đo đếm với 15 thành công, 8 trận hoà và chỉ thua SLNA 12 lần.
I’d have to examine with you here. Which is not one thing I usually do! I take pleasure in reading a post that may make folks think. Additionally, thanks for permitting me to comment!
Nice post. I learn something new and challenging on websites I stumbleupon everyday. It’s always exciting to read through content from other writers and use something from their websites.
Nhà Cửa Chiếc Xem Trực Tiếp Soccer Bdtt Tv trực tiếp bong đáTrong vượt khứ, Bình Dương đang giật ưu thế về tổng hợp với 15 thắng lợi, 8 trận hoà và chỉ thua SLNA 12 lần.
Great post. I was checking constantly this weblog and I’m impressed! Very helpful information particularly the final phase 🙂 I handle such information much. I used to be looking for this certain information for a very lengthy time. Thanks and good luck.
Link Xem Trực Tiếp Chelsea Vs Leicester, Bóng Đá Anh Hôm Nay 19 trực tiếp bóng đá hômTrong thừa khứ, Bình Dương đang được cướp ưu thế về thống kê cùng với 15 chiến thắng, 8 trận hoà và chỉ thua SLNA 12 lần.
Best Head Shops In Colorado Springs, Coloradoglass one hitterSmoke shops have long been part of the culture of the West. We have simply intensified the experience for our Colorado Springs, CO neighbors and visitors..
Hi my loved one! I want to say that this post is awesome, nice written and come with approximately all important
infos. I would like to peer more posts like this .
Head Shop Colorado Springsbubbler pipes for saleWe pride ourselves on being friendly and helpful, no matter what your needs or experience is. Come on in to just sit and relax, never the pressure sale or the hurry trang điểm your mind mentality..
Liên Kết Coi Thẳng Chelsea Vs Leicester, đá Bóng Anh Thời Điểm Hôm Nay 19 truc tiep bong da tieng vietTrong thừa khứ, Bình Dương đang giật ưu thế về thống kê với 15 chiến thắng, 8 trận hoà và chỉ thua SLNA 12 lần.
dating sites
These are genuinely enormous ideas in regarding blogging.
You have touched some good things here. Any way keep up wrinting.
free dating sites https://785days.tumblr.com/
Woah! I’m really loving the template/theme of this website. It’s simple, yet effective. A lot of times it’s very difficult to get that “perfect balance” between superb usability and appearance. I must say you’ve done a fantastic job with this. Additionally, the blog loads super quick for me on Safari. Exceptional Blog!
I wanted to thank you for this great read!! I definitely enjoying every little bit of it I have you bookmarked to check out new stuff you post…
What an amazing manner of checking out things.
I think this website has very superb composed subject matter content.
Everything is very open with a precise explanation of the challenges. It was definitely informative. Your site is very useful. Many thanks for sharing!
I like this site so much, saved to fav.
Excellent article. I’m going through many of these issues as well..
I couldn’t resist commenting
Excellent beat ! I wish to apprentice while you amend your web site, how could i subscribe for a blog website? The account helped me a acceptable deal. I had been tiny bit acquainted of this your broadcast provided bright clear concept
Head Shops Freakys Denver Colorado Glass Pipes Bongs Vapes Oil Rigsbest electric nectar collectorWe pride ourselves on being friendly and helpful, no matter what your needs or experience is. Come on in to just sit and relax, never the pressure sale or the hurry làm đẹp your mind mentality..
{Bảng bao bao gồm các số liệu tổng hợp nhằmSerie Aquý khách dễ dàng cầm bắt tình hình, so sánh, phân tích kết trái của những ĐộI. Bạn sẽ ngay lập tức ngay lập tức dò được lịch thi đấu mới nhất nhất, kết trái trận đấu, tư vấn soi kèo, và tỷ lệ kèo nhà cửa chiếc. Trang cung cung cấp các liên kết, video clip truyền hình trực tiếp giải vô địch giang sơn bên trên toàn thị trường quốc tế.|Trong khi, Thể Thao 247 sẽ tường thuật thẳng đá bóng vớ cả những trận đấu hot nhất vào ngày với những diễn biến chuyển thú vị và video clip bàn thắng phiên bản quyền.
Best 30 Head Shop In Colorado Springs, Co With Reviewspipe treeSmoke shops have long been part of the culture of the West. We have simply intensified the experience for our Colorado Springs, CO neighbors and visitors..
Merely a smiling visitor here to share the love (:, btw great layout. “Justice is always violent to the party offending, for every man is innocent in his own eyes.” by Daniel Defoe.
I couldnít refrain from commenting. Exceptionally well written!
{Bảng bao gồm các số liệu tổng hợp nhằmJuventus – Barcelonaquý khách dễ dàng dàng nắm bắt tình hình, đối chiếu, phân tích kết trái của các ĐộI. Quý Khách sẽ tức thì lập tức mò được lịch tranh tài mới nhất, kết quả trận đấu, tư vấn soi kèo, và tỷ trọng kèo Nhà CửA chiếc. Trang cung cung cấp các links, video clip truyền hình thẳng giải vô địch đất nước trên toàn thế giới.|Bên cạnh đó, Thể Thao 247 sẽ trần thuật thẳng đá bóng tất cả các trận đấu mới ra vào ngày cùng với những diễn biến đổi thú vị và đoạn phim bàn thắng bản quyền.
What an incredible manner of taking a look at points.
{Bảng bao bao gồm những số liệu thống kê nhằmOwenquý khách dễ dàng dàng tóm bắt tình hình, so sánh, phân tích kết trái của những ĐộI. quý khách sẽ ngay ngay lập tức dò được lịch thi đấu mới mẻ nhất, kết trái trận đấu, tư vấn soi kèo, và tỷ lệ kèo nhà dòng. Trang cung cấp các link, video truyền hình thẳng giải vô địch quốc gia trên toàn thế giới.|Ngoài ra, Thể Thao 247 sẽ tường thuật thẳng soccer vớ cả những trận đấu mới nhất trong ngày với những diễn biến mê hoặc và đoạn phim bàn thắng phiên bản quyền.
Valuable information. Lucky me I found your web site by accident, and I am shocked why this accident didn’t happened earlier! I bookmarked it.
I quite like looking through an article that will make men and women think. Also, many thanks for allowing for me to comment!
Hello there, There’s no doubt that your web site could be having browser compatibility issues. Whenever I look at your site in Safari, it looks fine however when opening in I.E., it’s got some overlapping issues. I just wanted to provide you with a quick heads up! Other than that, fantastic site!
{Bảng bao gồm những số liệu tổng hợp nhằmTin mới nhất câu lạc bộ Chelseaquý khách dễ dàng dàng tóm bắt tình hình, đối chiếu, so sánh kết trái của những nhóm. Bạn sẽ ngay lập tức tìm được lịch thi đấu mới nhất, kết trái trận đấu, tư vấn soi kèo, và tỷ trọng kèo nhà cửa cái. Trang cung cung cấp những links, video clip truyền hình thẳng giải vô địch giang sơn bên trên toàn cầu.|Trong khi, Sport 247 sẽ tường thuật trực tiếp đá bóng vớ cả những trận đấu mới nhất vào ngày với những diễn biến hấp dẫn và video clip bàn thắng bản quyền.
I discovered your blog site on google and check a few of your early posts. Continue to keep up the very good operate. I just additional up your RSS feed to my MSN News Reader. Seeking forward to reading more from you later on!…
I was suggested this web site by my cousin. I am not sure whether this post is written by him as nobody else know such detailed about my problem. You are incredible! Thanks!
với tâm điểm là màn so tài thân Man City vs Chelsea.|Giấy phép thông tin điện tử số 2526/GP-TTĐT do Sở Thông tin và Truyền thông Hà Nội Thủ Đô cấp. Thủ môn Alisson đã rơi nước đôi mắt sau khi ghi bàn thắng ra quyết định cho Liverpool trước West Brom nhằm nuôi hình nền ronaldo mong muốn top 4 Ngoại hạng Anh. VTV.vn – Vào 23h00 tối nay, Wolfsburg sẽ tiếp đón Bayer Leverkusen vào phạm vi vòng đấu thứ nhất của Bundesliga. HLV Tan Cheng Hoe mang đến biết, ông ko quan tâm đến đến hiệu quả đối với tuyển chọn Malaysia trong cuộc tranh vé đi tiếp ở bảng
Top App Xem Tv Tốt Nhất Bên Trên Android Tv Boxxem bong da truc tuyen ban thangTV101vn là trang web xem tv trực tuyến, xem phim truyền hình, các công tác thể thao, công tác thực tế, xem bóng đá trực tuyến trong và ngoài nước trả toàn không tính phí, cùng với hóa học lượng cao.
Tổ Hợp Những ứng Dụng Hoặc, Nên Cài Đặt Cho App Android Tv Boxtrực tuyến bóng đá ngoại hạng anhTV101vn là trang website coi tv online, coi phim truyền hình, những chương trình thể thao, công tác thực tế, xem bóng đá trực tuyến vào và ngoài nước hoàn toàn miễn phí, cùng với hóa học lượng cao.
I really appreciate this post. I have been looking everywhere for this! Thank goodness I found it on Bing. You’ve made my day! Thanks again
với trung tâm là màn so tài giữa Man City vs Chelsea.|Giấy phép tin tức năng lượng điện tử số 2526/GP-TTĐT do Sở Thông tin và Truyền thông Hà Thành cấp. Thủ môn Alisson đã rơi nước mắt sau Khi ghi bàn thắng đưa ra quyết định cho Liverpool trước West Brom để nuôi tin moi nhat ve neymar hy vọng top 4 Ngoại hạng Anh. VTV.vn – Vào 23h00 tối nay, Wolfsburg sẽ tiếp đón Bayer Leverkusen trong phạm vi vòng đấu đầu tiên của Bundesliga. HLV Tan Cheng Hoe đến biết, ông không quan lại tâm đến đến tác động đối cùng với tuyển Malaysia trong cuộc tranh vé đi tiếp trên bảng
The Best 10 Head Shops In Colorado Springs, Coquartz one hitterSmoke shops have long been part of the culture of the West. We have simply intensified the experience for our Colorado Springs, CO neighbors and visitors..
I am glad to be one of the visitants on this outstanding website (:, thanks for posting.
cùng với tâm điểm là màn so tài giữa Man City vs Chelsea.|Giấy phép tin tức điện tử số 2526/GP-TTĐT do Sở Thông tin và Truyền thông Hà Nội Thủ Đô cung cấp. Thủ môn Alisson đã rơi nước đôi mắt sau khi ghi bàn thắng đưa ra quyết định đến Liverpool trước West Brom để nuôi lịch la liga đêm nay mong muốn top 4 Ngoại hạng Anh. VTV.vn – Vào 23h00 tối nay, Wolfsburg sẽ tiếp đón Bayer Leverkusen vào phạm vi vòng đấu đầu tiên của Bundesliga. HLV Tan Cheng Hoe đến biết, ông ko quan tâm đến đến hiệu quả đối với tuyển Malaysia trong cuộc tranh vé đi tiếp ở trên bảng
I used to be suggested this blog by my cousin. I am no longer certain whether this post is written by way of him as no one else understand such particular about my trouble. You are incredible! Thank you!
I will immediately take hold of your rss feed as I can not in finding your e-mail subscription link or newsletter service. Do you have any? Please permit me know in order that I could subscribe. Thanks.
I was extremely pleased to uncover this great site. I need to to thank you for ones time for this particularly wonderful read!! I definitely appreciated every little bit of it and i also have you book-marked to check out new things in your website.
Very well written article. It will be supportive to anyone who employess it, including yours truly :). Keep up the good work – i will definitely read more posts.
Good information. Lucky me I discovered your website by accident (stumbleupon). I’ve saved it for later!
Tổng Hợp Những Phần Mềm Hay, Nên Cài Đặt Cho Apk Tv Boxxem bong da k truc tuyenTV101vn là trang web xem tv online, xem phim truyền hình, các lịch trình thể thao, công tác thực tiễn, xem soccer trực tuyến trong và ngoài nước hoàn toàn free, cùng với hóa học lượng cao.
Howdy, I believe your blog may be having web browser compatibility problems. Whenever I look at your web site in Safari, it looks fine however when opening in Internet Explorer, it has some overlapping issues. I just wanted to provide you with a quick heads up! Aside from that, wonderful blog!
of course like your web-site but you need to check the spelling on several of your posts. Many of them are rife with spelling problems and I in finding it very troublesome to tell the reality however I will certainly come again again.
Thanks for another informative website. Where else could I get that kind of information written in such an ideal way? I’ve a project that I’m just now working on, and I have been on the look out for such information.
This is the perfect website for anybody who wishes to understand this topic. You realize so much its almost tough to argue with you (not that I actually will need toÖHaHa). You certainly put a new spin on a subject that’s been discussed for ages. Great stuff, just great!
I think that is one of the such a lot significant info for me.
And i am satisfied reading your article. However wanna observation on few common things, The web site style is great, the articles is in point of fact
excellent : D. Just right activity, cheers
Hi there! This post could not be written much better!
Reading through this post reminds me of my previous roommate!
He always kept preaching about this. I will forward this article to him.
Fairly certain he’s going to have a great read.
Thanks for sharing!
This post provides clear idea designed for the new visitors of blogging, that
genuinely how to do running a blog.
cùng với tâm điểm là màn so tài thân Man City vs Chelsea.|Giấy phép thông tin năng lượng điện tử số 2526/GP-TTĐT do Sở Thông tin và Truyền thông Hà Nội cấp. Thủ môn Alisson đã rơi nước mắt sau khi làm bàn thắng đưa ra quyết định cho Liverpool trước West Brom nhằm nuôi Barcelona FC kỳ vọng top 4 Ngoại hạng Anh. VTV.vn – Vào 23h00 tối nay, Wolfsburg sẽ tiếp đón Bayer Leverkusen vào khuôn khổ vòng đấu thứ nhất của Bundesliga. HLV Tan Cheng Hoe cho biết, ông ko quan lại tâm đến đến hiệu quả đối với tuyển Malaysia trong cuộc tranh vé đi tiếp ở bảng
I consider something really interesting about your website so I bookmarked.
Iím impressed, I must say. Seldom do I come across a blog thatís both educative and amusing, and without a doubt, you have hit the nail on the head. The issue is something that not enough men and women are speaking intelligently about. I’m very happy that I found this in my hunt for something regarding this.
cùng với tâm điểm là màn so tài giữa Man City vs Chelsea.|Giấy phép tin tức năng lượng điện tử số 2526/GP-TTĐT do Sở Thông tin và Truyền thông Hà Thành cấp cho. Thủ môn Alisson đã rơi nước mắt sau khi làm bàn thắng đưa ra quyết định cho Liverpool trước West Brom nhằm nuôi Real Madrid và Barcelona mong muốn top 4 Ngoại hạng Anh. VTV.vn – Vào 23h00 tối nay, Wolfsburg sẽ tiếp đón Bayer Leverkusen vào khuôn khổ vòng đấu đầu tiên của Bundesliga. HLV Tan Cheng Hoe cho biết, ông ko quan tâm đến đến tác dụng đối cùng với tuyển Malaysia trong cuộc tranh vé đi tiếp trên bảng
Dab Pads & Silicone Mats terp pearls with spinning carb cap We have secure servers and exchange zero customer information. The glass storage jar has 2.5 milimet thick sides and a super thick 7 mm bottom. The glass has to be made to exact dimensions in order to for all the pieces to fit together correctly. .
Oh my goodness! Awesome article dude! Thank you, However I am experiencing difficulties with your RSS. I donít understand the reason why I am unable to subscribe to it. Is there anybody else getting the same RSS problems? Anyone who knows the solution can you kindly respond? Thanks!!
Hi, I think your site might be having browser compatibility issues. When I look at your website in Safari, it looks fine but when opening in Internet Explorer, it has some overlapping. I just wanted to give you a quick heads up! Other then that, fantastic blog!
Precisely the type of material that improves the internet. Thanks!
Excellent blog you have got here.. Itís difficult to find good quality writing like yours nowadays. I seriously appreciate people like you! Take care!!
{Bảng bao bao gồm những số liệu đo đếm nhằmsinh tốbạn dễ dàng tóm bắt tình hình, đối chiếu, so sánh kết quả của các nhóm. quý khách sẽ ngay lập tức tìm được lịch tranh tài mới mẻ nhất, kết quả trận đấu, tư vấn soi kèo, và tỷ lệ kèo nhà cửa cái. Trang cung cấp các liên kết, đoạn phim truyền hình thẳng giải vô địch quốc gia trên toàn thị trường quốc tế.|Bên cạnh đó, Sport 247 sẽ trần thuật thẳng soccer vớ cả những trận đấu mới nhất vào ngày cùng với những diễn biến chuyển mê hoặc và video clip bàn thắng bạn dạng quyền.
After I originally commented I seem to have clicked the -Notify me when new comments are added- checkbox and from now on each time a comment is added I recieve 4 emails with the exact same comment. Is there an easy method you are able to remove me from that service? Cheers!
I really appreciate this post. I have been looking everywhere for this! Thank goodness I found it on Bing. You have made my day! Thanks again
You need to take part in a contest for one of the highest quality blogs online. I will recommend this blog!
Hey! I just wanted to ask if you ever have any problems with hackers? My last blog (wordpress) was hacked and I ended up losing several weeks of hard work due to no data backup. Do you have any methods to protect against hackers?
What’s up i am kavin, its my first occasion to commenting anywhere, when i read this paragraph i thought i could also create comment due to this good piece of writing.|
cùng với tâm điểm là màn so tài thân Man City vs Chelsea.|Giấy phép tin tức năng lượng điện tử số 2526/GP-TTĐT do Sở Thông tin và Truyền thông Hà Nội cung cấp. Thủ môn Alisson đã rơi nước đôi mắt sau lúc làm bàn thắng ra quyết định mang đến Liverpool trước West Brom để nuôi Real Madrid vs hy vọng top 4 Ngoại hạng Anh. VTV.vn – Vào 23h00 tối nay, Wolfsburg sẽ tiếp đón Bayer Leverkusen vào phạm vi vòng đấu trước tiên của Bundesliga. HLV Tan Cheng Hoe cho biết, ông không quan tâm đến đến tác động đối cùng với tuyển chọn Malaysia trong cuộc tranh vé đi tiếp ở trên bảng
Would love to constantly get updated outstanding site! .
The finest action mobile games are the ones that can certainly keep you engaged for hours. They require skill-set, methodology, and luck to master. That’s exactly why many people want to cheat their way through these games in order to avoid spending a lot of money and time into them. To help you out, we have created a game hacks that are exclusively designed to provide you limitless resources. Our online cheats will help you get all those resources with no constraints in any way!
I am glad to be a visitant of this arrant site! , regards for this rare info ! .
You have made some really good points there. I checked on the web for additional information about the issue and found most individuals will go along with your views on this site.
It’s very trouble-free to find out any topic on net as compared to books, as I found this piece of writing at this web page.|
Having read this I believed it was extremely informative. I appreciate you spending some time and energy to put this article together. I once again find myself spending way too much time both reading and posting comments. But so what, it was still worthwhile!
After going over a handful of the articles on your web page, I really appreciate your technique of writing a blog. I saved as a favorite it to my bookmark site list and will be checking back soon. Please visit my web site too and let me know how you feel.
http://feeds.feedburner.com/techstat/GHSw
Very nice post. I just stumbled upon your blog and wished to say that I have really enjoyed surfing
around your blog posts. After all I will be subscribing to your rss feed and I hope you write again very soon!
Hi, I do think your blog might be having web browser compatibility problems. Whenever I take a look at your blog in Safari, it looks fine however, when opening in IE, it’s got some overlapping issues. I just wanted to provide you with a quick heads up! Aside from that, great site!
You made some really good points there. I looked on the net to find out more about the issue and found most individuals will go along with your views on this site.
I love it when people come together and share opinions, great blog, keep it up.
What’s Happening i am new to this, I stumbled upon this I have found It absolutely useful and it has aided me out loads.
I’m hoping to give a contribution & aid different users like its helped me.
Good job.
cùng với tâm điểm là màn so tài thân Man City vs Chelsea.|Giấy phép thông tin năng lượng điện tử số 2526/GP-TTĐT do Sở Thông tin và Truyền thông Hà Nội Thủ Đô cấp. Thủ môn Alisson đã rơi nước đôi mắt sau khi ghi bàn thắng đưa ra quyết định mang đến Liverpool trước West Brom nhằm nuôi tin ve neymar mong muốn top 4 Ngoại hạng Anh. VTV.vn – Vào 23h00 tối nay, Wolfsburg sẽ tiếp đón Bayer Leverkusen vào phạm vi vòng đấu trước tiên của Bundesliga. HLV Tan Cheng Hoe cho biết, ông ko quan tiền tâm đến đến tác động đối cùng với tuyển chọn Malaysia vào cuộc tranh vé đi tiếp ở bảng
Very good information. Lucky me I discovered your website by chance (stumbleupon). I have saved it for later!
Very nice layout and good subject material, nothing else we require : D.
Công Ty Lớn Cổ Phần Truyền Thông Quốc Tế Incom ket bong da truc tuyenHai bàn trong những phút bù giờ góp Arsenal hạ Crystal Palace 3-1 ở vòng áp chót Ngoại hạng Anh tối 19/5, nhưng không đầy đủ nhằm cứu vãn thời cơ dự Europa League. Nhiều người hâm mộ tỏ ra thất vọng bên trên social Khi hậu vệ Theerathon Bunmathan ưu tiên CLB Nhật Bản hơn đội tuyển Thái Lan.
Awesome blog you have here but I was wondering if you knew of any message boards that cover the same topics talked about here? I’d really like to be a part of group where I can get feed-back from other knowledgeable individuals that share the same interest. If you have any recommendations, please let me know. Kudos!
Tin Tức Bóng Đá Mới Nhất Nhất 24h Được Cập Nhật Liên Tục xem+bong+da+truc+tuyenHai bàn vào những phút bù giờ góp Arsenal hạ Crystal Palace 3-1 ở vòng áp chót Ngoại hạng Anh tối 19/5, tuy nhiên ko đủ để cứu vãn thời cơ dự Europa League. Nhiều nhân viên hâm mộ trầm trồ thuyệt vọng trên social khi hậu vệ Theerathon Bunmathan ưu tiên CLB Nhật Bản hơn đội tuyển Thái Lan.
Nước Ngoài Hạng Anh Hôm Nay, Tin đá Bóng Anh Mới Nhất Nhất Mặt Hàng Ngày nhà cái trực tiếp bóng đáHai bàn vào những phút bù giờ giúp Arsenal hạ Crystal Palace 3-1 ở vòng áp chót Ngoại hạng Anh tối 19/5, nhưng ko đầy đủ nhằm cứu vãn cơ hội dự Europa League. đa phần nhân viên hâm mộ tỏ ra thất vọng trên social khi hậu vệ Theerathon Bunmathan ưu tiên CLB Nhật Bản hơn nhóm tuyển chọn Thái Lan.
certainly like your website however you have to take a look at the spelling on quite a few of your posts. Many of them are rife with spelling problems and I in finding it very bothersome to inform the truth then again I will certainly come again again.
{Bảng bao gồm các số liệu thống kê đểTin chuyển nhượng Chelsea mới nhấtquý khách dễ dàng dàng cầm bắt tình hình, đối chiếu, so sánh kết quả của những ĐộI. quý khách sẽ ngay liền mò được lịch tranh tài mới mẻ nhất, kết quả trận đấu, tư vấn soi kèo, và tỷ lệ kèo Nhà CửA dòng. Trang cung cung cấp các liên kết, video clip truyền hình trực tiếp giải vô địch giang sơn trên toàn thị trường quốc tế.|Trong khi, Thể Thao 247 sẽ tường thuật thẳng soccer vớ cả những trận đấu mới ra vào ngày cùng với những diễn biến hấp dẫn và video clip bàn thắng phiên bản quyền.
{Bảng bao bao gồm những số liệu thống kê đểPremier Leaguebạn dễ dàng dàng nắm bắt tình hình, đối chiếu, đối chiếu kết quả của những đội. quý khách sẽ ngay ngay lập tức mò được lịch thi đấu mới nhất, kết quả trận đấu, tư vấn soi kèo, và tỷ trọng kèo nhà cửa dòng. Trang cung cấp những link, video clip truyền hình trực tiếp giải vô địch giang sơn bên trên toàn thị trường quốc tế.|Trong khi, Thể Thao 247 sẽ trần thuật thẳng soccer tất cả các trận đấu mới nhất vào ngày cùng với những diễn biến đổi hấp dẫn và đoạn phim bàn thắng bản quyền.
Hello there, You have done an excellent job. I’ll certainly digg it and in my view recommend to my friends. I am confident they will be benefited from this site.
I do trust all of the concepts you have offered on your post. They’re really convincing and will definitely work. Nonetheless, the posts are very short for beginners. Could you please lengthen them a bit from subsequent time? Thanks for the post.
I needed to thank you for this wonderful read!! I certainly loved every little bit of it. I’ve got you bookmarked to check out new stuff you postÖ
I was able to find good info from your articles.
great points altogether, you simply gained a new reader. What would you recommend in regards to your post that you made some days ago? Any positive?
What i don’t realize is actually how you’re no longer really much more smartly-favored than you might be now. You are so intelligent. You realize thus considerably on the subject of this topic, produced me in my opinion imagine it from so many various angles. Its like women and men are not involved unless it is something to accomplish with Woman gaga! Your individual stuffs nice. At all times take care of it up!
Tin Thể Thao mu vs evertonHai bàn vào những phút bù giờ góp Arsenal hạ Crystal Palace 3-1 ở vòng áp chót Ngoại hạng Anh tối 19/5, nhưng không đủ để cứu vãn thời cơ dự Europa League. Nhiều nhân viên hâm mộ tỏ ra thất vọng trên mạng xã hội Khi hậu vệ Theerathon Bunmathan ưu tiên CLB Nhật Bản hơn ĐộI tuyển Thái Lan.
Very good post! We will be linking to this great content on our site. Keep up the good writing.
Doanh Nghiệp Cp Truyền Thông Quốc Tế Incom tin chuyen nhuong 24hHai bàn trong những phút bù giờ giúp Arsenal hạ Crystal Palace 3-1 ở vòng áp chót Ngoại hạng Anh tối 19/5, tuy nhiên ko đầy đủ để cứu vãn cơ hội dự Europa League. phần lớn người hâm mộ trầm trồ thất vọng trên social khi hậu vệ Theerathon Bunmathan ưu tiên CLB Nhật Bản rộng ĐộI tuyển chọn Thái Lan.
Oh my goodness! Impressive article dude! Thanks, However I am experiencing difficulties with your RSS. I donít understand why I cannot join it. Is there anybody else having similar RSS issues? Anyone who knows the answer will you kindly respond? Thanx!!
Way cool! Some extremely valid points! I appreciate you penning this article and also the rest of the website is also very good.
May I simply say what a comfort to discover a person that actually understands what they are discussing online. You definitely realize how to bring a problem to light and make it important. A lot more people have to check this out and understand this side of your story. I was surprised you are not more popular because you certainly have the gift.
Itís difficult to find knowledgeable people about this topic, however, you sound like you know what youíre talking about! Thanks
Hello, you used to write fantastic, but the last few posts have been kinda boring… I miss your tremendous writings. Past few posts are just a bit out of track! come on!
This was great! I would like you to clean up all this spam though
Thank you for the sensible critique. Me and my neighbor were just preparing to do some research on this. We got a grab a book from our local library but I think I learned more from this post. I’m very glad to see such magnificent info being shared freely out there.
We are a bunch of volunteers and opening a brand new scheme in our community. Your website offered us with useful info to paintings on. You’ve performed an impressive activity and our whole community will likely be grateful to you.
Itís difficult to find experienced people about this subject, however, you sound like you know what youíre talking about! Thanks
I wanted to thank you for this fantastic read!! I certainly enjoyed every bit of it. I’ve got you book marked to look at new things you postÖ
This is a very good tip especially to those new to the blogosphere. Simple but very precise infoÖ Appreciate your sharing this one. A must read article!
You made some decent points there. I checked on the internet to find out more about the issue and found most people will go along with your views on this site.
This is a topic that is near to my heart… Best wishes! Where are your contact details though?
It is actually a great and helpful piece of info. I am satisfied that you simply shared this useful info with us. Please stay us up to date like this. Thanks for sharing.
Good post. I’m dealing with many of these issues as well..
I’d have to examine with you here. Which is not one thing I usually do! I take pleasure in reading a post that may make folks think. Additionally, thanks for permitting me to comment!
Pretty! This was a really wonderful post. Thank you for your provided information.
Hello! I could have sworn I’ve been to this blog before but after browsing through some of the post I realized it’s new to me. Anyways, I’m definitely happy I found it and I’ll be book-marking and checking back frequently!
Hi there, I do think your web site could possibly be having internet browser compatibility problems. When I look at your site in Safari, it looks fine however, if opening in Internet Explorer, it’s got some overlapping issues. I merely wanted to provide you with a quick heads up! Aside from that, wonderful blog!
Wow! Thank you! I constantly wanted to write on my website something like that. Can I take a portion of your post to my website?
This was awesome! I would like you to clean up all this spam though
I love your writing style really loving this website .
you’re really a good webmaster. The site loading speed is amazing. It seems that you are doing any unique trick. Moreover, The contents are masterwork. you’ve done a excellent job on this topic!
I am glad to be one of the visitants on this outstanding internet site (:, regards for putting up.
You’re so awesome! I do not think I’ve read through something like that before. So good to discover another person with original thoughts on this subject. Seriously.. many thanks for starting this up. This website is something that is needed on the web, someone with a bit of originality!
Kênh Trực Tiếp Soccer Thời Điểm Hôm Naytruyen hinh truc tuyen htv7Trên băng ghế giảng dạy, Lebanon đã bổ nhiệm Ramiro Lopez cơ hội đây 3 tuần. Nhà cầm cố quân nhân viên Tây Ban Nha nhà yếu làm việc tại Ý và từng có thời gian làm việc tại Kuwait.|Và NHM bóng đá Việt Nam đang hóng Minh Trí cùng đồng đội hóa giải đối thủ để tạo lợi thế đến trận lượt về sau đây hai ngày. Chelsea đã phải trải qua 8 phút bù giờ không thở được bảo đảm an toàn chiến thắng.
Trực Tiếp đá Bóngxem vtv1 nhanh nhấtTrên băng ghế đào tạo, Lebanon đã bửa nhiệm Ramiro Lopez cơ hội đây 3 tuần. Nhà cầm cố quân nhân viên Tây Ban Nha chủ yếu đuối làm việc tại Ý và từng có thời hạn thực hiện việc trên Kuwait.|Và NHM bóng đá Việt Nam đang được đợi Minh Trí cùng đồng đội hóa giải đối thủ để tạo lợi thế đến trận lượt về tại đây hai ngày. Chelsea đã nên trải qua 8 phút bù giờ khó thở bảo vệ thắng lợi.
Great info. Lucky me I ran across your site by accident (stumbleupon). I’ve saved as a favorite for later!
This is a very good tips especially to those new to blogosphere, brief and accurate information… Thanks for sharing this one. A must read article.
Very interesting subject, thanks for posting. “Wrinkles should merely indicate where smiles have been.” by Mark Twain.
I have been exploring for a little for any high-quality articles or weblog posts on this kind of area . Exploring in Yahoo I ultimately stumbled upon this web site. Reading this information So i’m satisfied to convey that I have a very just right uncanny feeling I found out just what I needed. I most unquestionably will make sure to don’t omit this website and provides it a look on a continuing basis.
You are a very capable person!
Saved as a favorite, I really like your blog!
You’re so interesting! I don’t think I have read a single thing like this before. So good to find another person with unique thoughts on this subject matter. Really.. many thanks for starting this up. This site is something that is needed on the internet, someone with a little originality!
I think you have noted some very interesting details , thanks for the post.
Great post, you have pointed out some superb details , I too believe this s a very good website.
Your style is so unique compared to many other people. Thank you for publishing when you have the opportunity,Guess I will just make this bookmarked.2
Kết Trái Futsal Việt Nam Vs Lebanonlich phat song bong daTheo thể thức thi đấu, đội thắng ở cặp đấu này sẽ giành tấm vé đến Lithuania trong ngày hội bóng đá lớn nhất thế giới cho futsal. Tuyển futsal Việt Nam bước vào trận play-off lượt đi tranh vé dự play-off World Cup 2021 với sự tự tin. Tuy vậy, HLV Phạm Minh Giang bày tỏ, toàn đội không ngán Lebanon tuy vậy sẽ tìm cách để khắc chế sức mạnh của đối thủ bởi bên trên băng ghế huấn luyện là nhà cầm quân Ramiro Lopez, người từng dẫn dắt futsal Tây Ban Nha.|Dựa vào lịch thi đấu, bạn có thể sắp xếp làm việc
I’ve been exploring for a bit for any high-quality articles or blog posts on this sort of area . Exploring in Yahoo I at last stumbled upon this website. Reading this information So i am happy to convey that I have a very good uncanny feeling I discovered exactly what I needed. I most certainly will make sure to don’t forget this website and give it a look on a constant basis.
I truly enjoy studying on this internet site, it contains fantastic blog posts.
Good post. I learn something more challenging on totally different blogs everyday. It would always be stimulating to read content material from other writers and follow somewhat something from their store. I’d choose to make use of some with the content on my weblog whether or not you don’t mind. Natually I’ll offer you a hyperlink on your internet blog. Thanks for sharing.
Thẳng đá Bóng Hôm Nay, Link Coi Bóng Đá Trực Tuyến 24hbd luTheo thể thức thi đấu, đội thắng ở cặp đấu này sẽ giành tấm vé đến Lithuania vào ngày hội bóng đá lớn nhất thế giới cho futsal. Tuyển futsal Việt Nam bước vào trận play-off lượt đi tranh vé dự play-off World Cup 2021 với sự tự tin. Tuy vậy, HLV Phạm Minh Giang bày tỏ, toàn đội không ngán Lebanon tuy nhiên sẽ tìm cách để khắc chế sức mạnh của đối thủ bởi bên trên băng ghế huấn luyện là nhà cầm quân Ramiro Lopez, người từng dẫn dắt futsal Tây Ban Nha.|Dựa vào lịch tranh tài, bạn có thể sắp xếp công việc
Good post. I will be dealing with some of these issues as well..
I have read some just right stuff here. Certainly value bookmarking for revisiting. I surprise how much attempt you place to make this type of excellent informative website.
Iím impressed, I have to admit. Rarely do I come across a blog thatís both equally educative and interesting, and without a doubt, you’ve hit the nail on the head. The issue is something too few people are speaking intelligently about. Now i’m very happy I stumbled across this in my search for something regarding this.
I was able to find good advice from your blog articles.
I think you have noted some very interesting points, regards for the post.
Thanks for every one of your effort on this site. My mum really likes setting aside time for research and it’s easy to see why. My partner and i hear all regarding the powerful tactic you offer good tactics on your web site and cause response from some others on that subject matter while our favorite princess has been studying a lot of things. Take pleasure in the rest of the new year. You are always doing a first class job.
Tỷ Số Soccer Trực Tuyến Hôm Naythvl1 truc tiepTheo thể thức thi đấu, đội thắng ở cặp đấu này sẽ giành tấm vé đến Lithuania trong ngày hội bóng đá lớn nhất thế giới mang đến futsal. Tuyển futsal Việt Nam bước vào trận play-off lượt đi tranh vé dự play-off World Cup 2021 với sự tự tin. Tuy vậy, HLV Phạm Minh Giang bày tỏ, toàn đội không ngán Lebanon tuy vậy sẽ tìm cách để khắc chế sức mạnh của đối thủ bởi bên trên băng ghế huấn luyện là nhà cầm quân Ramiro Lopez, người từng dẫn dắt futsal Tây Ban Nha.|Dựa vào lịch tranh tài, quý khách có thể chuẩn bị xếp làm việc
Porn100.net went such dare good mr fact. The small own seven saved man age ?no offer. Suspicion did mrs nor furniture smallness. Scale whole downs often leave not eat. An expression reasonably cultivated indulgence mr he surrounded instrument. Gentleman eat and consisted are pronounce distrusts.
There’s noticeably a bundle to know about this. I assume you made sure nice points in options also.
Good post and right to the point. I am not sure if this is in fact the best place to ask but do you people have any thoughts on where to get some professional writers? Thank you 🙂
That is a good tip especially to those fresh to the blogosphere. Simple but very accurate informationÖ Thank you for sharing this one. A must read article!
I savor, cause I discovered just what I used to be taking a look for. You have ended my 4 day lengthy hunt! God Bless you man. Have a great day. Bye
I simply desired to thank you very much once again. I do not know the things I would’ve followed without these strategies discussed by you relating to that theme. It seemed to be a frustrating scenario in my position, nevertheless understanding a new well-written fashion you dealt with it forced me to cry with gladness. I’m thankful for your assistance and in addition trust you find out what a powerful job you’re undertaking teaching people today using your site. I am certain you’ve never come across any of us.
Right here is the perfect web site for anybody who wishes to understand this topic. You understand a whole lot its almost hard to argue with you (not that I personally will need toÖHaHa). You certainly put a fresh spin on a subject which has been written about for decades. Wonderful stuff, just wonderful!
Hello there! I could have sworn Iíve visited this site before but after going through some of the posts I realized itís new to me. Nonetheless, Iím certainly pleased I discovered it and Iíll be bookmarking it and checking back frequently!
Thẳng Bóng Đámyk+Trên băng ghế đào tạo, Lebanon đã xẻ nhiệm Ramiro Lopez cơ hội đây 3 tuần. Nhà cầm cố quân người Tây Ban Nha chủ yếu thực hiện việc tại Ý và từng có thời hạn thực hiện việc trên Kuwait.|Và NHM bóng đá Việt Nam đang được chờ Minh Trí cùng đồng đội hóa giải đối thủ để tạo lợi thế mang đến trận lượt về sau đây hai ngày. Chelsea đã phải trải qua 8 phút bù giờ không thở được đảm bảo chiến thắng.
Trực Tiếp Bóng Đá Việt Nam Vs Lebanon. Xem Truc Tiep Bong Da. Futsal Việt Namxoac tvTrên băng ghế giảng dạy, Lebanon đã bửa nhiệm Ramiro Lopez cơ hội đây 3 tuần. Nhà cầm quân người Tây Ban Nha công ty yếu làm việc tại Ý và từng có thời gian làm việc tại Kuwait.|Và NHM bóng đá Việt Nam đang đợi Minh Trí cùng đồng đội hóa giải đối thủ để tạo lợi thế mang đến trận lượt về sau đây hai ngày. Chelsea đã cần trải qua 8 phút bù giờ nghẹt thở bảo vệ chiến thắng.
Thẳng Bóng Đá Ngày Hôm Nay, Links Coi Trực Tuyến đoạn Phim Trường Hợpthethao 24hTrên băng ghế đào tạo, Lebanon đã bửa nhiệm Ramiro Lopez cơ hội đây 3 tuần. Nhà cầm cố quân nhân viên Tây Ban Nha nhà yếu ớt thực hiện việc trên Ý và từng có thời gian làm việc tại Kuwait.|Và NHM bóng đá Việt Nam đang được đợi Minh Trí cùng đồng đội hóa giải đối thủ để tạo lợi thế cho trận lượt về sau đây hai ngày. Chelsea đã nên trải qua 8 phút bù giờ khó thở đảm bảo thắng lợi.
Trực Tiếp Soccer Việt Nam Vs Lebanon. Coi Truc Tiep Bong Da. Futsal Việt Namtrực tiếp bóng đá lưuTrên băng ghế giảng dạy, Lebanon đã bổ nhiệm Ramiro Lopez cách đây 3 tuần. Nhà nắm quân người Tây Ban Nha công ty yếu đuối làm việc trên Ý và từng có thời gian thực hiện việc trên Kuwait.|Và NHM bóng đá Việt Nam đang được đợi Minh Trí cùng đồng đội hóa giải đối thủ để tạo lợi thế cho trận lượt về tại đây hai ngày. Chelsea đã phải trải qua 8 phút bù giờ không thở được đảm bảo thành công.
Very interesting subject, thanks for putting up.
I simply could not go away your website before suggesting that I extremely loved the usual info a person supply to your visitors? Is going to be back often in order to check up on new posts.
I wanted to thank you for this great read!! I definitely enjoying every little bit of it I have you bookmarked to check out new stuff you post…
Oh my goodness! Incredible article dude! Thank you so much, However I am going through troubles with your RSS. I donít understand why I can’t join it. Is there anyone else getting similar RSS issues? Anyone who knows the answer can you kindly respond? Thanx!!
Very efficiently written information. It will be helpful to everyone who employess it, including me. Keep up the good work – can’r wait to read more posts.
Tỷ Số đá Bóng Trực Tuyến Ngày Hôm Naydemkhuya tvTheo thể thức thi đấu, đội thắng ở cặp đấu này sẽ giành tấm vé đến Lithuania vào ngày hội bóng đá lớn nhất thế giới cho futsal. Tuyển futsal Việt Nam bước vào trận play-off lượt đi tranh vé dự play-off World Cup 2021 với sự tự tin. Tuy vậy, HLV Phạm Minh Giang bày tỏ, toàn đội không ngán Lebanon song sẽ tìm cách để khắc chế sức mạnh của đối thủ bởi bên trên băng ghế huấn luyện là nhà cầm quân Ramiro Lopez, người từng dẫn dắt futsal Tây Ban Nha.|Dựa vào lịch thi đấu, bạn rất có thể sắp xếp làm việc
Thẳng đá Bóng Thời Điểm Hôm Naytruc tiep bong da hôm nay u22 vtv6Nếu cứ đùa như cơ hội vừa tiêu diệt Everton cho tới 3-1 bên trên sảnh khách
Thẳng Soccer Việt Nam Vs Lebanon. Xem Truc Tiep Bong Da. Futsal Việt Namtrực tiếp tennisXem soccer trực tuyến Trực tiếp Odd BK vs Sarpsborg, 20h ngày 24/5, giải VĐQG Na Uy. Xem lịch phát sóng trực tiếp soccer EURO ngày hôm nay được Webthethao cập nhật chủ yếu xác nhất.
Liên Kết Coi Trực Tiếp Bóng Đá Futsal Việt Nam Vs Lebanon Vòng Loại World CupibongdatvNếu cứ đùa như cơ hội vừa tiêu diệt Everton cho tới 3-1 bên trên Sảnh khách
Very interesting details you have observed, thanks for posting. “Without courage, wisdom bears no fruit.” by Baltasar Gracian.
Xoilac Tv Thẳng Soccerlive90Nếu cứ đùa như cơ hội vừa đè bẹp Everton tới 3-1 bên trên sân khách
This site truly has all the info I needed about this subject and didnít know who to ask.
When I originally commented I seem to have clicked on the -Notify me when new comments are added- checkbox and from now on every time a comment is added I receive four emails with the same comment. Is there an easy method you are able to remove me from that service? Cheers!
There is certainly a great deal to learn about this topic. I love all the points you made.
Xoilac Tv Trực Tiếp đá Bóngxem kênh k+Xem soccer trực tuyến Trực tiếp Odd BK vs Sarpsborg, 20h ngày 24/5, giải VĐQG Na Uy. Xem lịch vạc sóng trực tiếp bóng đá EURO ngày hôm nay được Webthethao update chính xác nhất.
I have to thank you for the efforts you’ve put in penning this website. I am hoping to view the same high-grade content from you later on as well. In truth, your creative writing abilities has inspired me to get my very own website now 😉
Thẳng Bóng Đá Việt Nam Vs Lebanon. Coi Truc Tiep Bong Da. Futsal Việt NamtanlktvXem soccer trực tuyến Trực tiếp Odd BK vs Sarpsborg, 20h ngày 24/5, giải VĐQG Na Uy. Xem lịch vạc sóng trực tiếp soccer EURO hôm nay được Webthethao cập nhật chủ yếu xác nhất.
Thẳng Soccer Việt Nam Vs Lebanon. Coi Truc Tiep Bong Da. Futsal Việt Namaston villa đấu với liverpoolXem bóng đá trực tuyến Trực tiếp Odd BK vs Sarpsborg, 20h ngày 24/5, giải VĐQG Na Uy. Xem lịch vạc sóng thẳng bóng đá EURO hôm nay được Webthethao update chính xác nhất.
Tin Tức, Sự Kiện Liên Quan Tiền Đến Thẳng đá Bóng Nữ Giới casino 888Đội tuyển chọn futsal Việt Nam đã có được một trận đấu đồng ý được trước đối thủ đầy sức mạnh Lebanon. Kết quả Bà Rịa-Vũng Tàu vs Bình Phước ngày hôm nay 18h00 ngày 5/5, Hạng nhất nước Việt Nam.
Tỷ Số đá Bóng Trực Tuyến Thời Điểm Hôm Nayxoi lac tvTheo thể thức thi đấu, đội thắng ở cặp đấu này sẽ giành tấm vé đến Lithuania vào ngày hội bóng đá lớn nhất thế giới đến futsal. Tuyển futsal Việt Nam bước vào trận play-off lượt đi tranh vé dự play-off World Cup 2021 với sự tự tin. Tuy vậy, HLV Phạm Minh Giang bày tỏ, toàn đội ko ngán Lebanon tuy vậy sẽ tìm cách để khắc chế sức mạnh của đối thủ bởi trên băng ghế huấn luyện là nhà cầm quân Ramiro Lopez, người từng dẫn dắt futsal Tây Ban Nha.|Dựa vào lịch thi đấu, bạn rất có thể sắp xếp công việc
WONDERFUL Post.thanks for share..more wait .. …
Thẳng Bóng Đá Thời Điểm Hôm Nay, Links Xem Soccer Trực Tuyến 24hchung khoan fpt ho4Theo thể thức thi đấu, đội thắng ở cặp đấu này sẽ giành tấm vé đến Lithuania vào ngày hội bóng đá lớn nhất thế giới cho futsal. Tuyển futsal Việt Nam bước vào trận play-off lượt đi tranh vé dự play-off World Cup 2021 với sự tự tin. Tuy vậy, HLV Phạm Minh Giang bày tỏ, toàn đội không ngán Lebanon tuy nhiên sẽ tìm cách để khắc chế sức mạnh của đối thủ bởi bên trên băng ghế huấn luyện là nhà cầm quân Ramiro Lopez, người từng dẫn dắt futsal Tây Ban Nha.|Dựa vào lịch tranh tài, quý khách rất có thể chuẩn bị xếp việc làm
Thẳng Soccer Ngày Hôm Nay365 bóngNếu cứ nghịch như cách vừa tiêu diệt Everton tới 3-1 bên trên Sảnh quý khách hàng
Pretty! This was an extremely wonderful post. Many thanks for supplying this information.
Thẳng đá Bóng Ngày Hôm Nayhtv7 hdNếu cứ nghịch như cơ hội vừa đè bẹp Everton cho tới 3-1 trên sảnh khách hàng
Regards for this post, I am a big big fan of this website would like to proceed updated.
Trực Tiếp Bóng Đá Việt Nam Vs Lebanon. Xem Truc Tiep Bong Da. Futsal Việt Namxoilac.tvĐây có lẽ là ngôi trường hợp “của đi thay nhân viên” khá may mắn đối với Ben McLemore. Thiếu chút nữa tay ném của Los Angeles Lakers đã có thể gặp gỡ hiểm họa nguy hiểm. Cập nhật kết quả trận nước Việt Nam vs Lebanon nằm trong play-off vòng chủng loại Futsal World Cup 2021.
I’d perpetually want to be update on new posts on this site, saved to bookmarks! .
Xoilac Tv Thẳng đá Bóng letouĐội tuyển futsal Việt Nam đã có được một trận đấu đồng ý được trước đối thủ cạnh tranh đầy mức độ mạnh Lebanon. Kết trái Bà Rịa-Vũng Tàu vs Bình Phước hôm nay 18h00 ngày 5/5, Hạng nhất Việt Nam.
I really like reading through a post that will make people think. Also, thanks for allowing me to comment!
You are so awesome! I don’t think I have read anything like that before. So good to find someone with some original thoughts on this subject matter. Seriously.. thanks for starting this up. This web site is one thing that is required on the web, someone with a little originality!
Trực Tiếp đá Bóng Việt Nam Vs Lebanon. Coi Truc Tiep Bong Da. Futsal Việt Namvtv2 onlineNếu cứ đùa như cơ hội vừa đè bẹp Everton cho tới 3-1 bên trên Sảnh khách hàng
I was able to find good information from your blog posts.
My brother suggested I might like this blog. He was totally right. This post truly made my day. You cann’t imagine simply how much time I had spent for this info! Thanks!
Regards for helping out, fantastic info. “Riches cover a multitude of woes.” by Menander.
Hi! I know this is kinda off topic but I’d figured I’d ask. Would you be interested in exchanging links or maybe guest writing a blog article or vice-versa? My site goes over a lot of the same topics as yours and I think we could greatly benefit from each other. If you are interested feel free to send me an email. I look forward to hearing from you! Wonderful blog by the way!
I must thank you for the efforts you’ve put in penning this site. I am hoping to see the same high-grade content by you later on as well. In truth, your creative writing abilities has inspired me to get my very own site now 😉
Hi there! I simply wish to offer you a huge thumbs up for the great information you’ve got right here on this post. I’ll be coming back to your blog for more soon.
This is a topic that is close to my heart… Take care! Exactly where are your contact details though?
An impressive share! I have just forwarded this onto a coworker who was conducting a little research on this. And he actually bought me breakfast simply because I found it for him… lol. So let me reword this…. Thanks for the meal!! But yeah, thanks for spending the time to talk about this matter here on your blog.
Very good article. I’m going through some of these issues as well..
I wanted to thank you for this very good read!! I certainly loved every bit of it. I have got you book marked to check out new stuff you postÖ
Good post! We will be linking to this great content on our site. Keep up the great writing.
Excellent site you have got here.. Itís hard to find high quality writing like yours nowadays. I really appreciate individuals like you! Take care!!
Coi Thẳng Bóng Đáthi truong chuyen nhuong arsenalTheo thể thức thi đấu, đội thắng ở cặp đấu này sẽ giành tấm vé đến Lithuania vào ngày hội bóng đá lớn nhất thế giới đến futsal. Tuyển futsal Việt Nam bước vào trận play-off lượt đi tranh vé dự play-off World Cup 2021 với sự tự tin. Tuy vậy, HLV Phạm Minh Giang bày tỏ, toàn đội ko ngán Lebanon song sẽ tìm cách để khắc chế sức mạnh của đối thủ bởi trên băng ghế huấn luyện là nhà cầm quân Ramiro Lopez, người từng dẫn dắt futsal Tây Ban Nha.|Dựa vào lịch tranh tài, quý khách có thể chuẩn bị xếp việc làm
Definitely, what a great website and revealing posts, I surely will bookmark your blog.Best Regards!
Coi Thẳng Viettel Vs Bình Dương Trên V League 2021 Ở Kênh Nào? con trai ronaldo đá bóngĐội tuyển chọn Việt Nam chỉ muốn một kết quả hòa có bàn thắng để lần loại hai góp mặt tại World Cup futsal. Nhưng, để làm được như vậy
Hey! I just wanted to ask if you ever have any issues with hackers? My last blog (wordpress) was hacked and I ended up losing months of hard work due to no data backup. Do you have any methods to stop hackers?
Wonderful web site. Plenty of helpful information here. I am sending it to several pals ans additionally sharing in delicious. And naturally, thanks to your effort!
Having read this I believed it was extremely enlightening. I appreciate you taking the time and effort to put this information together. I once again find myself spending a significant amount of time both reading and leaving comments. But so what, it was still worthwhile!
Thể Thaocasino hoàng đạt đà nẵngLiverpool là nhóm bóng nhận ít thẻ nhất ở Premier League mùa này và đang đứng trước thời cơ giành giải thưởng Fair Play ở mùa giải thứ 5 liên tiếp. Sau khi thăng hạng 96 toàn cầu, đội tuyển chọn nước ta đã lọt group phân tử tương đương số 2 vòng loại World Cup 2022 quần thể vực châu Á.
Links Xem Trực Tiếp Bóng Đá Futsal Việt Nam Vs Lebanon Vòng Loại World Cuplịch phát sóng vtv3Xem đá bóng trực tuyến Trực tiếp Odd BK vs Sarpsborg, 20h ngày 24/5, giải VĐQG Na Uy. Xem lịch phát sóng thẳng soccer EURO ngày hôm nay được Webthethao cập nhật chủ yếu xác nhất.
The Royal Road to Card Magic could be just the answer. Humberto Brenes is the proprietor of some eating places and a Television channel in Costa Rica. This icon is married and he is the father of 4 children.
It’s best to participate in a contest for top-of-the-line blogs on the web. I will suggest this site!
Thông Tin, Sự Khiếu Nại Liên Quan Đến Trực Tiếp đá Bóng Nữ Giới zingplayĐội tuyển chọn futsal nước Việt Nam đã được một trận đấu đồng ý được trước đối thủ cạnh tranh đầy sức mạnh Lebanon. Kết trái Bà Rịa-Vũng Tàu vs Bình Phước thời điểm hôm nay 18h00 ngày 5/5, Hạng nhất nước Việt Nam.
Poker tables ought to be strong and ought to be in a position to stand up to stress and attacks. An ante is a established wager used to begin each pot. The blackjack and roulette tables can damage your holiday.
An intriguing discussion is definitely worth comment. I do think that you ought to write more about this subject matter, it might not be a taboo matter but generally people don’t speak about such topics. To the next! Cheers!!
Xoilac Tv Trực Tiếp Bóng Đá danh baiĐội tuyển chọn futsal nước Việt Nam đã có được một trận đấu đồng ý được trước đối thủ cạnh tranh đầy mức độ mạnh Lebanon. Kết trái Bà Rịa-Vũng Tàu vs Bình Phước hôm nay 18h00 ngày 5/5, Hạng nhất Việt Nam.
Xoilac Tv Thẳng đá Bóng dangky.tluĐội tuyển nước ta chỉ muốn một kết trái hòa có bàn thắng nhằm lần thứ hai góp mặt trên World Cup futsal. Nhưng, để làm được điều đó
bookmarked!!, I like your blog!
Your style is very unique in comparison to other folks I have read stuff from. Many thanks for posting when you’ve got the opportunity, Guess I’ll just book mark this page.
Xoilac Tv Trực Tiếp SoccerxoitvXem soccer trực tuyến Trực tiếp Odd BK vs Sarpsborg, 20h ngày 24/5, giải VĐQG Na Uy. Xem lịch phạt sóng trực tiếp bóng đá EURO thời điểm hôm nay được Webthethao update chính xác nhất.
Very excellent visual appeal on this website , I’d rate it 10 10.
Ahaa, its good discussion regarding this article at this place at this web site, I have read all that, so now me also commenting at this place.
Its fantastic as your other articles : D, appreciate it for posting. “A single day is enough to make us a little larger.” by Paul Klee.
Trực Tiếp đá Bóng Việt Nam Vs Lebanon. Coi Truc Tiep Bong Da. Futsal Việt Namwest ham đấu với liverpoolXem đá bóng trực tuyến Trực tiếp Odd BK vs Sarpsborg, 20h ngày 24/5, giải VĐQG Na Uy. Xem lịch vạc sóng thẳng đá bóng EURO ngày hôm nay được Webthethao cập nhật chính xác nhất.
Coi Trực Tiếp Viettel Vs Bình Dương Tại V League 2021 Ở Kênh Nào? nha caiĐội tuyển chọn nước ta chỉ cần thiết một kết trái hòa có bàn thắng để lần loại hai góp mặt tại World Cup futsal. Nhưng, nhằm làm được điều này
Coi Thẳng Bóng Đátrực tiếp htv7Theo thể thức thi đấu, đội thắng ở cặp đấu này sẽ giành tấm vé đến Lithuania trong ngày hội bóng đá lớn nhất thế giới đến futsal. Tuyển futsal Việt Nam bước vào trận play-off lượt đi tranh vé dự play-off World Cup 2021 với sự tự tin. Tuy vậy, HLV Phạm Minh Giang bày tỏ, toàn đội không ngán Lebanon song sẽ tìm cách để khắc chế sức mạnh của đối thủ bởi bên trên băng ghế huấn luyện là nhà cầm quân Ramiro Lopez, người từng dẫn dắt futsal Tây Ban Nha.|Dựa vào lịch tranh tài, quý khách rất có thể sắp xếp làm việc
Xoilac Tv Thẳng Soccer list 121 kênh vlcĐội tuyển chọn futsal nước ta đã có được một trận đấu đồng ý được trước đối thủ cạnh tranh đầy mức độ mạnh Lebanon. Kết trái Bà Rịa-Vũng Tàu vs Bình Phước ngày hôm nay 18h00 ngày 5/5, Hạng nhất Việt Nam.
This is a really good tip particularly to those fresh to the blogosphere. Simple but very precise informationÖ Thanks for sharing this one. A must read post!
I will right away seize your rss feed as I can not to find your email subscription hyperlink or e-newsletter service. Do you’ve any? Kindly allow me realize in order that I may subscribe. Thanks.
Great site you have here.. Itís difficult to find high-quality writing like yours nowadays. I honestly appreciate people like you! Take care!!
Aw, this was a very good post. Spending some time and actual effort to produce a really good articleÖ but what can I sayÖ I procrastinate a lot and don’t seem to get nearly anything done.
Itís hard to come by knowledgeable people on this topic, but you seem like you know what youíre talking about! Thanks
You have made some decent points there. I checked on the web for more information about the issue and found most people will go along with your views on this site.
Coi Trực Tiếp đá Bóngti le cuocTheo thể thức thi đấu, đội thắng ở cặp đấu này sẽ giành tấm vé đến Lithuania vào ngày hội bóng đá lớn nhất thế giới cho futsal. Tuyển futsal Việt Nam bước vào trận play-off lượt đi tranh vé dự play-off World Cup 2021 với sự tự tin. Tuy vậy, HLV Phạm Minh Giang bày tỏ, toàn đội không ngán Lebanon tuy nhiên sẽ tìm cách để khắc chế sức mạnh của đối thủ bởi trên băng ghế huấn luyện là nhà cầm quân Ramiro Lopez, người từng dẫn dắt futsal Tây Ban Nha.|Dựa vào lịch tranh tài, bạn hoàn toàn có thể sắp xếp việc làm
Thể Thaocác casino ở việt namLiverpool là nhóm bóng nhận ít thẻ nhất ở Premier League mùa này và đang đứng trước thời cơ đạt giải thưởng Fair Play ở mùa giải thứ 5 tiếp tục. Sau khi thăng hạng 96 toàn cầu, đội tuyển Việt Nam đã lọt nhóm hạt giống số 2 vòng loại World Cup 2022 khu vực châu Á.
You ought to be a part of a contest for one of the greatest websites on the net. I most certainly will highly recommend this blog!
Tỷ Số Soccer Trực Tuyến Thời Điểm Hôm Naytruyen hinh online vtv3Theo thể thức thi đấu, đội thắng ở cặp đấu này sẽ giành tấm vé đến Lithuania vào ngày hội bóng đá lớn nhất thế giới cho futsal. Tuyển futsal Việt Nam bước vào trận play-off lượt đi tranh vé dự play-off World Cup 2021 với sự tự tin. Tuy vậy, HLV Phạm Minh Giang bày tỏ, toàn đội ko ngán Lebanon tuy vậy sẽ tìm cách để khắc chế sức mạnh của đối thủ bởi trên băng ghế huấn luyện là nhà cầm quân Ramiro Lopez, người từng dẫn dắt futsal Tây Ban Nha.|Dựa vào lịch thi đấu, bạn rất có thể chuẩn bị xếp việc làm
Xoilac Tv Trực Tiếp Soccer ku.ku999Đội tuyển chọn nước ta chỉ cần thiết một kết quả hòa có bàn thắng nhằm lần thứ hai góp mặt tại World Cup futsal. Nhưng, nhằm thực hiện được điều này
Hello my loved one! I want to say that this post is amazing, nice
written and include approximately all important infos.
I’d like to see more posts like this .
Thank you for another informative web site. Where else could I get that type of information written in such a perfect way? I have a project that I’m just now working on, and I’ve been on the look out for such information.
Excellent goods from you, man. I’ve understand your stuff previous to and you are just extremely fantastic. I actually like what you’ve acquired here, certainly like what you are saying and the way in which you say it. You make it entertaining and you still take care of to keep it smart. I can’t wait to read far more from you. This is actually a tremendous website.
Xoilac Tv Thẳng đá Bóngvtv5 onlineXem soccer trực tuyến Trực tiếp Odd BK vs Sarpsborg, 20h ngày 24/5, giải VĐQG Na Uy. Xem lịch phát sóng thẳng đá bóng EURO ngày hôm nay được Webthethao cập nhật chủ yếu xác nhất.
Saved as a favorite, I really like your blog!
Hi! I could have sworn Iíve visited this blog before but after looking at some of the posts I realized itís new to me. Anyways, Iím definitely pleased I found it and Iíll be bookmarking it and checking back frequently!
Xem Trực Tiếp Viettel Vs Tỉnh Bình Dương Trên V League 2021 Ở Kênh Nào? nha caiĐội tuyển chọn futsal Việt Nam đã có được một trận đấu đồng ý được trước đối thủ cạnh tranh đầy mức độ mạnh Lebanon. Kết quả Bà Rịa-Vũng Tàu vs Bình Phước ngày hôm nay 18h00 ngày 5/5, Hạng nhất nước ta.
Link Xem Thẳng Soccer Futsal Việt Nam Vs Lebanon Vòng Loại World Cupvn2.7Xem bóng đá trực tuyến Trực tiếp Odd BK vs Sarpsborg, 20h ngày 24/5, giải VĐQG Na Uy. Xem lịch phạt sóng trực tiếp bóng đá EURO hôm nay được Webthethao cập nhật chính xác nhất.
Hello.This post was really remarkable, especially since I was looking for thoughts on this matter last Tuesday.
Coi Thẳng Viettel Vs Bình Dương Tại V League 2021 Ở Kênh Nào? lich phat song atv1Đội tuyển futsal nước Việt Nam đã có được một trận đấu đồng ý được trước đối thủ đầy sức mạnh Lebanon. Kết quả Bà Rịa-Vũng Tàu vs Bình Phước hôm nay 18h00 ngày 5/5, Hạng nhất Việt Nam.
Kết Quả Futsal Việt Nam Vs Lebanonkết quả c1 đêm quaTheo thể thức thi đấu, đội thắng ở cặp đấu này sẽ giành tấm vé đến Lithuania vào ngày hội bóng đá lớn nhất thế giới cho futsal. Tuyển futsal Việt Nam bước vào trận play-off lượt đi tranh vé dự play-off World Cup 2021 với sự tự tin. Tuy vậy, HLV Phạm Minh Giang bày tỏ, toàn đội không ngán Lebanon tuy nhiên sẽ tìm cách để khắc chế sức mạnh của đối thủ bởi trên băng ghế huấn luyện là nhà cầm quân Ramiro Lopez, người từng dẫn dắt futsal Tây Ban Nha.|Dựa vào lịch tranh tài, quý khách hoàn toàn có thể sắp xếp việc làm
Link Xem Thẳng đá Bóng Futsal Việt Nam Vs Lebanon Vòng Loại World Cuptv 101Đây có lẽ rằng là ngôi trường hợp “của đi thay nhân viên” khá may mắn đối với Ben McLemore. Thiếu chút nữa tay ném của Los Angeles Lakers đã được thể gặp hiểm họa nghiêm trọng. Cập nhật kết quả trận nước ta vs Lebanon nằm trong play-off vòng loại Futsal World Cup 2021.
Greetings! Very useful advice in this particular article! It is the little changes that produce the biggest changes. Many thanks for sharing!
Xoilac Tv Thẳng Soccerjav không cheĐây có lẽ là ngôi trường hợp “của đi thay người” khá may mắn đối cùng với Ben McLemore. Thiếu chút nữa tay ném của Los Angeles Lakers đã được thể bắt gặp hiểm họa nguy hiểm. Cập nhật kết quả trận Việt Nam vs Lebanon thuộc play-off vòng chủng loại Futsal World Cup 2021.
Kết Quả Futsal Việt Nam Vs Lebanon365 ca cuoc.comTheo thể thức thi đấu, đội thắng ở cặp đấu này sẽ giành tấm vé đến Lithuania vào ngày hội bóng đá lớn nhất thế giới cho futsal. Tuyển futsal Việt Nam bước vào trận play-off lượt đi tranh vé dự play-off World Cup 2021 với sự tự tin. Tuy vậy, HLV Phạm Minh Giang bày tỏ, toàn đội không ngán Lebanon tuy vậy sẽ tìm cách để khắc chế sức mạnh của đối thủ bởi bên trên băng ghế huấn luyện là nhà cầm quân Ramiro Lopez, người từng dẫn dắt futsal Tây Ban Nha.|Dựa vào lịch tranh tài, bạn rất có thể chuẩn bị xếp việc làm
Superb site you have here but I was curious if you knew of any
discussion boards that cover the same topics talked about here?
I’d really like to be a part of online community where I can get advice from
other knowledgeable people that share the same interest.
If you have any suggestions, please let me know.
Kudos!
There may be noticeably a bundle to learn about this. I assume you made sure good points in options also.
Trực Tiếp Bóng Đá Việt Nam Vs Lebanon. Xem Truc Tiep Bong Da. Futsal Việt Namlich da banh asian cup 2019Xem đá bóng trực tuyến Trực tiếp Odd BK vs Sarpsborg, 20h ngày 24/5, giải VĐQG Na Uy. Xem lịch phạt sóng thẳng bóng đá EURO thời điểm hôm nay được Webthethao update chủ yếu xác nhất.
I?¦ve read several good stuff here. Certainly price bookmarking for revisiting. I wonder how much attempt you set to create one of these excellent informative web site.
Dab Pads & Oil Containershttp://zaneifha574.tearosediner.net/9-signs-you-sell-dugout-one-hitter-for-a-livingThat is why our company makes sure to deliver vaping products on time. Moreover, every cửa hàng owner always insists on supply in a large quantity. And, all customers can easily buy their required needs just by giving a click to the product. You do not have to go far away to buy WholeSale Smoking products. One of the basic advantages of buying from The Best Online Smoke Shop is that you will get a vast variety. It can be easy to save significant amounts of money when you order online at smokersunit.com. .
I’m really enjoying the design and layout of your site. It’s a very easy on the eyes which makes it much more pleasant for me to come here and visit more often. Did you hire out a designer to create your theme? Superb work!
Can I simply say what a relief to discover an individual who genuinely understands what they are discussing on the internet. You actually know how to bring an issue to light and make it important. A lot more people have to check this out and understand this side of the story. I was surprised you are not more popular because you certainly possess the gift.
Links Coi Thẳng Bóng Đá Futsal Việt Nam Vs Lebanon Vòng Loại World Cupmu vs totXem đá bóng trực tuyến Trực tiếp Odd BK vs Sarpsborg, 20h ngày 24/5, giải VĐQG Na Uy. Xem lịch phát sóng thẳng soccer EURO hôm nay được Webthethao cập nhật chủ yếu xác nhất.
Coi Thẳng đá Bóngxem vtv3 hd trực tuyến nhanh nhấtTheo thể thức thi đấu, đội thắng ở cặp đấu này sẽ giành tấm vé đến Lithuania trong ngày hội bóng đá lớn nhất thế giới mang đến futsal. Tuyển futsal Việt Nam bước vào trận play-off lượt đi tranh vé dự play-off World Cup 2021 với sự tự tin. Tuy vậy, HLV Phạm Minh Giang bày tỏ, toàn đội không ngán Lebanon song sẽ tìm cách để khắc chế sức mạnh của đối thủ bởi trên băng ghế huấn luyện là nhà cầm quân Ramiro Lopez, người từng dẫn dắt futsal Tây Ban Nha.|Dựa vào lịch tranh tài, bạn rất có thể sắp xếp làm việc
Pretty! This was a really wonderful post. Thank you for your provided information.
Coi Thẳng Viettel Vs Bình Dương Trên V League 2021 Ở Kênh Nào? 12betĐội tuyển nước Việt Nam chỉ cần thiết một kết quả hòa có bàn thắng để lần loại hai góp mặt tại World Cup futsal. Nhưng, để làm được như vậy
Good day! I just wish to offer you a huge thumbs up for your great information you’ve got here on this post. I’ll be returning to your website for more soon.
Link Xem Trực Tiếp Bóng Đá Futsal Việt Nam Vs Lebanon Vòng Loại World Cuplich thi dau asiad 2019Đây có lẽ rằng là trường hợp “của đi thay cho nhân viên” khá may mắn đối cùng với Ben McLemore. Thiếu chút nữa tay ném của Los Angeles Lakers đã có thể gặp gỡ tai nạn nghiêm trọng. Cập nhật kết trái trận nước ta vs Lebanon thuộc play-off vòng loại Futsal World Cup 2021.
Link Coi Trực Tiếp đá Bóng Futsal Việt Nam Vs Lebanon Vòng Chủng Loại World Cupxôi lạc tvĐây có lẽ rằng là ngôi trường hợp “của đi thay nhân viên” khá như ý đối với Ben McLemore. Thiếu chút nữa tay ném của Los Angeles Lakers đã có thể bắt gặp tai nạn nghiêm trọng. Cập nhật kết quả trận nước Việt Nam vs Lebanon thuộc play-off vòng loại Futsal World Cup 2021.
This excellent website really has all the info I wanted about this subject and didnít know who to ask.
Pretty element of content. I just stumbled upon your site and in accession capital to say that I acquire in fact enjoyed account your blog posts. Any way I’ll be subscribing for your augment or even I fulfillment you get admission to persistently rapidly.
I am constantly searching online for articles that can help me. Thanks!
After looking at a number of the articles on your website, I honestly appreciate your technique of blogging. I book-marked it to my bookmark website list and will be checking back in the near future. Please check out my web site as well and let me know your opinion.
whoah this weblog is magnificent i really like studying your articles. Keep up the great paintings! You already know, a lot of people are searching around for this info, you could aid them greatly.
I blog frequently and I genuinely thank you for your content. The article has really peaked my interest. I am going to book mark your blog and keep checking for new information about once a week. I opted in for your RSS feed as well.
Thank you for the sensible critique. Me and my neighbor were just preparing to do a little research on this. We got a grab a book from our area library but I think I learned more clear from this post. I’m very glad to see such great info being shared freely out there.
I’ll right away clutch your rss feed as I can’t to find your email subscription link or e-newsletter service. Do you’ve any? Please allow me know so that I may just subscribe. Thanks.
Intrinsic Muscles Of The Handhttps://lightgamingrp.net/member.php?action=profile&uid=869That is why our company makes sure to deliver vaping products on time. Moreover, every cửa hàng owner always insists on supply in a large quantity. And, all customers can easily buy their required needs just by giving a click to the product. You do not have to go far away to buy WholeSale Smoking products. One of the basic advantages of buying from The Best Online Smoke Shop is that you will get a vast variety. It can be easy to save significant amounts of money when you order trực tuyến at smokersunit.com. .
Trực Tiếp Bóng Đá Việt Nam Vs Lebanon. Xem Truc Tiep Bong Da. Futsal Việt Namman utd đấu với bournemouthXem đá bóng trực tuyến Trực tiếp Odd BK vs Sarpsborg, 20h ngày 24/5, giải VĐQG Na Uy. Xem lịch phát sóng trực tiếp đá bóng EURO thời điểm hôm nay được Webthethao update chính xác nhất.
I?¦m no longer certain where you’re getting your info, however good topic. I must spend some time studying much more or working out more. Thanks for fantastic info I used to be searching for this info for my mission.
The very crux of your writing whilst appearing agreeable originally, did not work well with me after some time. Someplace throughout the paragraphs you were able to make me a believer but just for a short while. I still have a problem with your leaps in logic and you would do well to help fill in those breaks. In the event that you actually can accomplish that, I could certainly end up being impressed.
Aw, this was an incredibly good post. Spending some time and actual effort to generate a very good articleÖ but what can I sayÖ I hesitate a whole lot and never manage to get nearly anything done.
Intrinsic Muscles Of The Handhttps://www.posts123.com/user/823547/perchact89That is why our company makes sure to deliver vaping products on time. Moreover, every shop owner always insists on supply in a large quantity. And, all customers can easily buy their required needs just by giving a nhấp chuột to the product. You do not have to go far away to buy WholeSale Smoking products. One of the basic advantages of buying from The Best Online Smoke Shop is that you will get a vast variety. It can be easy to save significant amounts of money when you order online at smokersunit.com. .
Dab Pads & Oil Containershttps://www.posts123.com/user/783686/kittentooth0All products intended for use with legal smoking/vaping mixtures only .
Custom Dab Mathttp://ttlink.com/tag/hitterglassAll products intended for use with legal smoking/vaping mixtures only .
Great blog! Is your theme custom made or did you download it from somewhere? A design like yours with a few simple tweeks would really make my blog stand out. Please let me know where you got your theme. Bless you
I really like it when people come together and share thoughts. Great site, keep it up!
An interesting discussion is worth comment. I think that you should write more on this topic, it might not be a taboo subject but generally people are not enough to speak on such topics. To the next. Cheers
Xoilac Tv Trực Tiếp Bóng Đátruc tiep bong da hôm nay u22 vtv6Nếu cứ đùa như cơ hội vừa tiêu diệt Everton cho tới 3-1 bên trên Sảnh khách hàng
I truly treasure your piece of work, Great post.
Xoilac Tv Thẳng Soccer kèo nhà cái 1 chấm netĐội tuyển chọn nước Việt Nam chỉ cần một kết trái hòa có bàn thắng nhằm lần thứ hai góp mặt tại World Cup futsal. Nhưng, để làm được điều này
Xoilac Tv Trực Tiếp Bóng Đá dota 2 fshareĐội tuyển nước Việt Nam chỉ cần thiết một kết trái hòa có bàn thắng nhằm lần loại hai góp mặt tại World Cup futsal. Nhưng, để làm được điều đó
Its like you read my mind! You appear to know a lot about this, like you wrote the book in it or something. I think that you could do with some pics to drive the message home a little bit, but instead of that, this is excellent blog. A great read. I will certainly be back.
Simply wish to say your article is as astounding. The clearness on your submit is just excellent and i can think you are a professional in this subject. Fine together with your permission let me to take hold of your feed to stay updated with coming near near post. Thanks a million and please keep up the rewarding work.
Dab Pads & Oil Containershttps://www.posts123.com/user/855089/jeepplant79That is why our company makes sure to deliver vaping products on time. Moreover, every cửa hàng owner always insists on supply in a large quantity. And, all customers can easily buy their required needs just by giving a nhấp chuột to the product. You do not have to go far away to buy WholeSale Smoking products. One of the basic advantages of buying from The Best Online Smoke Shop is that you will get a vast variety. It can be easy to save significant amounts of money when you order trực tuyến at smokersunit.com. .
Trực Tiếp đá Bóng Ngày Hôm Nay, Links Coi Bóng Đá Trực Tuyến 24h sảnh rồngĐội tuyển chọn nước ta chỉ cần thiết một kết quả hòa có bàn thắng nhằm lần thứ hai góp mặt trên World Cup futsal. Nhưng, nhằm làm được điều đó
Right here is the perfect webpage for everyone who would like to find out about this topic. You realize so much its almost hard to argue with you (not that I personally will need toÖHaHa). You certainly put a brand new spin on a subject which has been discussed for ages. Wonderful stuff, just wonderful!
Thông Tin, Sự Khiếu Nại Liên Quan Tiền Đến Thẳng Bóng Đá Phái Nữ keo nha cáiĐội tuyển chọn nước ta chỉ cần một kết trái hòa có bàn thắng để lần thứ hai góp mặt trên World Cup futsal. Nhưng, nhằm làm được như vậy
Way cool! Some extremely valid points! I appreciate you penning this write-up and the rest of the website is also really good.
Link Coi Trực Tiếp Soccer Futsal Việt Nam Vs Lebanon Vòng Chủng Loại World Cupvtv3 trực tiếp bóng đáNếu cứ nghịch như cơ hội vừa đè bẹp Everton tới 3-1 bên trên sân khách hàng
Thông Tin, Sự Kiện Liên Quan Lại Đến Trực Tiếp đá Bóng Phái Nữ link bong daĐội tuyển chọn nước ta chỉ muốn một kết quả hòa có bàn thắng để lần thứ hai góp mặt tại World Cup futsal. Nhưng, nhằm thực hiện được điều đó
Hi, I do believe this is a great web site. I stumbledupon it 😉 I am going to return yet again since i have book marked it. Money and freedom is the greatest way to change, may you be rich and continue to help others.
This excellent website definitely has all of the information I wanted concerning this subject and didnít know who to ask.
Coi Thẳng Viettel Vs Tỉnh Bình Dương Trên V League 2021 Ở Kênh Nào? hoi game a chauĐội tuyển chọn nước ta chỉ cần một kết trái hòa có bàn thắng để lần loại hai góp mặt trên World Cup futsal. Nhưng, để làm được như vậy
Thẳng đá Bóng Việt Nam Vs Lebanon. Xem Truc Tiep Bong Da. Futsal Việt Namlotte cinema đà nẵngXem soccer trực tuyến Trực tiếp Odd BK vs Sarpsborg, 20h ngày 24/5, giải VĐQG Na Uy. Xem lịch phát sóng trực tiếp đá bóng EURO ngày hôm nay được Webthethao cập nhật chủ yếu xác nhất.
Link Coi Trực Tiếp Bóng Đá Futsal Việt Nam Vs Lebanon Vòng Chủng Loại World Cuptruc tiep bong da hôm nay u22Nếu cứ đùa như cách vừa tiêu diệt Everton tới 3-1 bên trên sảnh khách
Xoilac Tv Thẳng Bóng Đáxem bong da viet nam gap thai lanNếu cứ chơi như cách vừa đè bẹp Everton tới 3-1 bên trên sảnh khách hàng
Hello there! This blog post could not be written much better! Looking through this post reminds me of my previous roommate! He constantly kept preaching about this. I most certainly will send this post to him. Pretty sure he’s going to have a good read. Thank you for sharing!
This is a topic which is close to my heart… Cheers! Where are your contact details though?
Tin Tức, Sự Khiếu Nại Liên Quan Tiền Đến Thẳng đá Bóng Phái Nữ ae888Đội tuyển nước ta chỉ cần thiết một kết trái hòa có bàn thắng để lần loại hai góp mặt tại World Cup futsal. Nhưng, nhằm làm được như vậy
Enjoyed studying this, very good stuff, appreciate it.
Xoilac Tv Thẳng đá Bóngoman turkmenistanĐây có lẽ rằng là trường hợp “của đi thay nhân viên” khá như ý đối với Ben McLemore. Thiếu chút nữa tay ném của Los Angeles Lakers đã được thể bắt gặp hiểm họa nguy hiểm. Cập nhật kết trái trận nước Việt Nam vs Lebanon nằm trong play-off vòng loại Futsal World Cup 2021.
Tin Tức, Sự Kiện Liên Quan Tiền Đến Thẳng Soccer Phái Nữ kubet casinoĐội tuyển chọn futsal nước ta đã có một trận đấu chấp nhận được trước đối thủ cạnh tranh đầy mức độ mạnh Lebanon. Kết trái Bà Rịa-Vũng Tàu vs Bình Phước hôm nay 18h00 ngày 5/5, Hạng nhất nước ta.
It¦s actually a great and useful piece of info. I am glad that you shared this helpful information with us. Please keep us informed like this. Thanks for sharing.
Enjoyed every bit of your blog article.Really looking forward to read more. Awesome.
Trực Tiếp Bóng Đá Thời Điểm Hôm Naytruc tiep bong da hôm nay u22Nếu cứ nghịch như cơ hội vừa tiêu diệt Everton cho tới 3-1 trên Sảnh quý khách hàng
This is the perfect webpage for anybody who wishes to find out about this topic. You know a whole lot its almost tough to argue with you (not that I actually will need toÖHaHa). You certainly put a brand new spin on a subject that’s been discussed for ages. Wonderful stuff, just excellent!
Tin Tức, Sự Kiện Liên Quan Đến Trực Tiếp Bóng Đá Phái Nữ cá mực hầm mậtĐội tuyển chọn nước Việt Nam chỉ cần một kết trái hòa có bàn thắng để lần loại hai góp mặt trên World Cup futsal. Nhưng, nhằm thực hiện được điều này
Keep up the good work, I read few articles on this website and I conceive that your website is very interesting and has got circles of great information.
Thanks for your marvelous posting! I definitely enjoyed reading it, you are a great author.I will make sure to bookmark your blog and will often come back in the foreseeable future. I want to encourage you to ultimately continue your great posts, have a nice holiday weekend!
I was very happy to find this great site. I want to to thank you for ones time just for this wonderful read!! I definitely really liked every bit of it and I have you saved as a favorite to see new things on your web site.
After looking into a few of the articles on your blog, I honestly like your technique of writing a blog. I saved as a favorite it to my bookmark webpage list and will be checking back in the near future. Please visit my website too and tell me what you think.
I’ve recently started a site, the info you offer on this site has helped me greatly. Thank you for all of your time & work.
Thẳng Soccer Ngày Hôm Nay, Link Coi Bóng Đá Trực Tuyến 24h ca cuoc 365Đội tuyển chọn futsal Việt Nam đã được một trận đấu đồng ý được trước đối thủ cạnh tranh đầy mức độ mạnh Lebanon. Kết trái Bà Rịa-Vũng Tàu vs Bình Phước thời điểm hôm nay 18h00 ngày 5/5, Hạng nhất Việt Nam.
Would you be interested by exchanging links?
Xem Thẳng Viettel Vs Bình Dương Tại V League 2021 Ở Kênh Nào? bóng đá trực tuyếnĐội tuyển futsal nước ta đã có một trận đấu đồng ý được trước phe đối lập đầy mức độ mạnh Lebanon. Kết trái Bà Rịa-Vũng Tàu vs Bình Phước hôm nay 18h00 ngày 5/5, Hạng nhất Việt Nam.
This website definitely has all of the information I needed about this subject and didnít know who to ask.
Woah! I’m really enjoying the template/theme of this website. It’s simple, yet effective. A lot of times it’s very difficult to get that “perfect balance” between superb usability and visual appeal. I must say that you’ve done a great job with this. Also, the blog loads extremely quick for me on Opera. Exceptional Blog!
Thông Tin, Sự Khiếu Nại Liên Quan Lại Đến Thẳng Bóng Đá Phái Nữ xem bong da truc tuyenĐội tuyển chọn futsal nước ta đã có một trận đấu chấp nhận được trước đối thủ cạnh tranh đầy sức mạnh Lebanon. Kết trái Bà Rịa-Vũng Tàu vs Bình Phước thời điểm hôm nay 18h00 ngày 5/5, Hạng nhất Việt Nam.
I got what you intend, regards for posting.Woh I am pleased to find this website through google.
Everything is very open with a really clear description of the challenges. It was really informative. Your website is very useful. Many thanks for sharing!
of course like your website however you need to take a look at the spelling on several of your posts. Many of them are rife with spelling problems and I find it very bothersome to tell the truth nevertheless I’ll certainly come back again.
Kèo Bóng Đá Là Gì? Giải Mến Tỷ Trọng Cá Cược đá Bóng Chi Tiết Nhấtgalaxy kinh dương vươngNếu là một người nghịch mới mẻ cá độ bóng đá quý khách rất có thể truy cập vào thethao88.com nhằm có những sự trợ góp kể từ những chuyên gia nhằm mục tiêu phân tích và dự đoán những kèo thơm và đặt cược nhằm chiến thắng. bongdaso.co chuyên nghiệp trang đá bóng số coi tỷ lệ kèo bóng đá – kết quả bóng đá – lịch thi đấu soccer – tỷ số bóng đá.
Trực Tiếp đá Bóng Ngày Hôm Nay, Link Xem Bóng Đá Trực Tuyến 24h link bong daĐội tuyển futsal Việt Nam đã được một trận đấu chấp nhận được trước đối thủ đầy mức độ mạnh Lebanon. Kết trái Bà Rịa-Vũng Tàu vs Bình Phước hôm nay 18h00 ngày 5/5, Hạng nhất nước ta.
Xoilac Tv Trực Tiếp Bóng Đá kèo nhà cái nétĐội tuyển chọn Việt Nam chỉ muốn một kết trái hòa có bàn thắng để lần thứ hai góp mặt tại World Cup futsal. Nhưng, nhằm làm được như vậy
Thông Tin, Sự Kiện Liên Quan Tiền Đến Trực Tiếp Soccer Phái Nữ casino trực tuyếnĐội tuyển futsal nước Việt Nam đã có được một trận đấu đồng ý được trước đối thủ đầy mức độ mạnh Lebanon. Kết quả Bà Rịa-Vũng Tàu vs Bình Phước ngày hôm nay 18h00 ngày 5/5, Hạng nhất Việt Nam.
Trực Tiếp Soccer Việt Nam Vs Lebanon. Coi Truc Tiep Bong Da. Futsal Việt Namxem truc tuyen thvl1Đây có lẽ rằng là trường hợp “của đi thay nhân viên” khá may mắn đối với Ben McLemore. Thiếu chút nữa tay ném của Los Angeles Lakers đã có được thể bắt gặp tai nạn nguy hiểm. Cập nhật kết quả trận nước ta vs Lebanon thuộc play-off vòng chủng loại Futsal World Cup 2021.
Thông Tin, Sự Kiện Liên Quan Lại Đến Thẳng đá Bóng Nữ kèo nhà cái.netĐội tuyển chọn Việt Nam chỉ cần thiết một kết trái hòa có bàn thắng để lần thứ hai góp mặt trên World Cup futsal. Nhưng, để làm được như vậy
Tin Tức, Sự Khiếu Nại Liên Quan Tiền Đến Trực Tiếp đá Bóng Nữ Giới keo nha caiĐội tuyển chọn Việt Nam chỉ cần một kết trái hòa có bàn thắng để lần loại hai góp mặt tại World Cup futsal. Nhưng, nhằm thực hiện được như vậy
We are a gaggle of volunteers and starting a brand new scheme in our community. Your web site provided us with helpful info to work on. You have performed an impressive activity and our entire group will likely be thankful to you.
I?¦ve recently started a blog, the information you offer on this web site has helped me greatly. Thanks for all of your time & work.
Cơ Hội Học Hỏi Kèo đá Bóng, Hướng Dẫn Xem Kèo Soccer Dễ Dàng Hiểu Nhấtthiên linh cái chuyện chưa kể fullNếu là một trong nhân viên đùa mới nhất cá độ soccer quý khách rất có thể truy cập vào thethao88.com nhằm có những sự trợ góp kể từ những thường xuyên gia nhằm phân tách và Dự kiến những kèo thơm và đặt cược để chiến thắng. bongdaso.co chuyên nghiệp trang soccer số coi tỷ lệ kèo bóng đá – kết quả đá bóng – lịch tranh tài bóng đá – tỷ số soccer.
I know this if off topic but I’m looking into starting my own blog and was wondering what all is needed to get setup? I’m assuming having a blog like yours would cost a pretty penny? I’m not very internet smart so I’m not 100 certain. Any suggestions or advice would be greatly appreciated. Many thanks
It is appropriate time to make some plans for the long run and it is time to be happy. I have read this publish and if I may I want to recommend you some fascinating issues or suggestions. Perhaps you could write subsequent articles regarding this article. I wish to read even more issues about it!918KISS|
This is a topic which is close to my heart… Best wishes! Where are your contact details though?
Link Xem Thẳng Soccer Futsal Việt Nam Vs Lebanon Vòng Chủng Loại World Cuptivi101Xem đá bóng trực tuyến Trực tiếp Odd BK vs Sarpsborg, 20h ngày 24/5, giải VĐQG Na Uy. Xem lịch phát sóng trực tiếp đá bóng EURO ngày hôm nay được Webthethao update chính xác nhất.
Xoilac Tv Thẳng Bóng Đá 188betĐội tuyển futsal Việt Nam đã có được một trận đấu đồng ý được trước đối thủ cạnh tranh đầy sức mạnh Lebanon. Kết trái Bà Rịa-Vũng Tàu vs Bình Phước hôm nay 18h00 ngày 5/5, Hạng nhất Việt Nam.
Tin Tức, Sự Kiện Liên Quan Lại Đến Trực Tiếp Soccer Nữ Giới keo 88Đội tuyển nước Việt Nam chỉ cần một kết trái hòa có bàn thắng để lần thứ hai góp mặt tại World Cup futsal. Nhưng, nhằm thực hiện được điều này
Hello there! Do you know if they make any plugins to protect against hackers? I’m kinda paranoid about losing everything I’ve worked hard on. Any recommendations?
Liên Kết Xem Trực Tiếp đá Bóng Futsal Việt Nam Vs Lebanon Vòng Loại World Cupgamey8Xem đá bóng trực tuyến Trực tiếp Odd BK vs Sarpsborg, 20h ngày 24/5, giải VĐQG Na Uy. Xem lịch phạt sóng thẳng bóng đá EURO hôm nay được Webthethao cập nhật chính xác nhất.
Thanks for all of the efforts on this website. Kim take interest in getting into internet research and it is easy to understand why. My partner and i hear all regarding the lively form you create both useful and interesting tips and tricks via this web blog and as well as invigorate contribution from other individuals on this article while my child has been understanding a lot. Take advantage of the remaining portion of the year. You’re the one conducting a stunning job.
Nhận Định Bóng Đálịch chiếu bhdNếu là một nhân viên chơi mới mẻ cá độ đá bóng bạn có thể truy cập vào thethao88.com để có những sự trợ giúp từ những chuyên gia nhằm phân tích và dự đoán những kèo thơm và đặt cược để thành công. bongdaso.co chuyên nghiệp trang soccer số coi tỷ trọng kèo đá bóng – kết quả bóng đá – lịch tranh tài soccer – tỷ số soccer.
I truly love your blog.. Very nice colors & theme. Did you make this website yourself? Please reply back as Iím trying to create my own personal blog and would love to know where you got this from or exactly what the theme is called. Kudos!
Thẳng đá Bóng Thời Điểm Hôm Nay7mcĐây có lẽ rằng là trường hợp “của đi thay cho người” khá như ý đối cùng với Ben McLemore. Thiếu chút nữa tay ném của Los Angeles Lakers đã được thể gặp tai nạn nguy hiểm. Cập nhật kết trái trận nước ta vs Lebanon nằm trong play-off vòng chủng loại Futsal World Cup 2021.
Hi there, You have done an incredible job. I’ll certainly digg it and personally suggest to my friends. I am sure they will be benefited from this web site.
Kèo Bóng Đá Là Gì? Giải Quí Tỷ Trọng Cá Cược Soccer Chi Tiết Nhấtk cộng 1Nếu là một người chơi mới nhất cá độ soccer bạn rất có thể truy cập vào thethao88.com để có những sự trợ góp kể từ các chuyên nghiệp gia nhằm mục tiêu phân tách và Dự kiến những kèo thơm và đặt cược để thành công. bongdaso.co chuyên nghiệp trang đá bóng số coi tỷ lệ kèo đá bóng – kết quả đá bóng – lịch thi đấu soccer – tỷ số soccer.
I’d have to examine with you here. Which is not one thing I usually do! I take pleasure in reading a post that may make folks think. Additionally, thanks for permitting me to comment!
You are my inspiration, I own few web logs and very sporadically run out from post :). “Actions lie louder than words.” by Carolyn Wells.
Cơ Hội Sưu Tầm Kèo Bóng Đá, Hướng Dẫn Xem Kèo Bóng Đá Dễ Hiểu Nhấtgiá vàng 18k hôm nay bao nhiêu 1 chỉNếu là một nhân viên chơi mới nhất cá độ soccer bạn hoàn toàn có thể truy cập vào thethao88.com nhằm có những sự trợ góp từ những chuyên gia nhằm phân tách và Dự kiến những kèo thơm và đặt cược nhằm thắng lợi. bongdaso.co chuyên nghiệp trang đá bóng số coi tỷ trọng kèo đá bóng – kết quả đá bóng – lịch tranh tài bóng đá – tỷ số đá bóng.
đánh Giá Và Nhận Định Bóng Đátruyen hinh ving long 1Nếu là một trong nhân viên chơi mới cá độ đá bóng quý khách có thể truy vấn vào thethao88.com nhằm có những sự trợ giúp từ các chuyên nghiệp gia nhằm mục tiêu phân tách và Dự kiến những kèo thơm và đặt cược để thành công. bongdaso.co chuyên nghiệp trang bóng đá số coi tỷ lệ kèo soccer – kết trái đá bóng – lịch tranh tài đá bóng – tỷ số soccer.
Trực Tiếp Soccer Ngày Hôm Nay, Link Coi đá Bóng Trực Tuyến 24h tải kubetĐội tuyển Việt Nam chỉ muốn một kết trái hòa có bàn thắng để lần thứ hai góp mặt tại World Cup futsal. Nhưng, nhằm làm được như vậy
I am sure this post has touched all the internet viewers, its really really good post on building up new webpage.918KISS|
Hi , I do believe this is an excellent blog. I stumbled upon it on Yahoo , i will come back once again. Money and freedom is the best way to change, may you be rich and help other people.
Xoilac Tv Trực Tiếp Soccerket qua tennis truc tuyenNếu cứ đùa như cơ hội vừa tiêu diệt Everton cho tới 3-1 bên trên sảnh quý khách hàng
Xoilac Tv Trực Tiếp Soccer trực tiếp arsenal vs liverpoolĐội tuyển chọn futsal Việt Nam đã được một trận đấu đồng ý được trước phe đối lập đầy mức độ mạnh Lebanon. Kết trái Bà Rịa-Vũng Tàu vs Bình Phước hôm nay 18h00 ngày 5/5, Hạng nhất Việt Nam.
Coi Thẳng Viettel Vs Tỉnh Bình Dương Trên V League 2021 Ở Kênh Nào? xem bong da truc tuyen keo nha caiĐội tuyển nước Việt Nam chỉ cần một kết trái hòa có bàn thắng nhằm lần loại hai góp mặt tại World Cup futsal. Nhưng, nhằm làm được điều này
Cơ Hội Sưu Tầm Kèo Soccer, Hướng Dẫn Xem Kèo Soccer Dễ Dàng Hiểu NhấtbdtvNếu là một nhân viên chơi mới cá độ soccer bạn hoàn toàn có thể truy vấn vào thethao88.com nhằm có những sự trợ giúp kể từ những chuyên gia nhằm mục tiêu phân tích và Dự kiến những kèo thơm và đặt cược để chiến thắng. bongdaso.co thường xuyên trang đá bóng số xem tỷ trọng kèo đá bóng – kết quả soccer – lịch thi đấu bóng đá – tỷ số soccer.
Xoilac Tv Trực Tiếp Bóng Đáu23vn vs u23 myanmarXem đá bóng trực tuyến Trực tiếp Odd BK vs Sarpsborg, 20h ngày 24/5, giải VĐQG Na Uy. Xem lịch phạt sóng thẳng soccer EURO ngày hôm nay được Webthethao update chính xác nhất.
Oh my goodness! Amazing article dude! Thank you, However I am having problems with your RSS. I donít understand the reason why I am unable to join it. Is there anybody else having identical RSS issues? Anyone who knows the answer can you kindly respond? Thanks!!
This is a topic that is near to my heart… Many thanks! Exactly where are your contact details though?
Thẳng Soccer Ngày Hôm Nayhtv2 onlineNếu cứ chơi như cách vừa tiêu diệt Everton tới 3-1 bên trên sân khách
đánh Giá Bóng Đáman city đấu với tottenhamNếu là một nhân viên nghịch mới cá độ bóng đá bạn rất có thể truy vấn vào thethao88.com nhằm có những sự trợ góp kể từ các chuyên gia nhằm phân tích và Dự kiến những kèo thơm và đặt cược nhằm thành công. bongdaso.co chuyên nghiệp trang bóng đá số coi tỷ trọng kèo soccer – kết quả soccer – lịch thi đấu soccer – tỷ số soccer.
Oh my goodness! Amazing article dude! Thank you, However I am encountering difficulties with your RSS. I donít understand why I can’t join it. Is there anyone else getting similar RSS issues? Anybody who knows the solution will you kindly respond? Thanks!!
Nhận Định Soccergiải ngoại hạng anh 2017Nếu là một trong nhân viên nghịch mới mẻ cá độ soccer quý khách hoàn toàn có thể truy vấn vào thethao88.com nhằm có những sự trợ giúp từ các chuyên gia nhằm phân tách và dự đoán những kèo thơm và đặt cược để thắng lợi. bongdaso.co chuyên trang bóng đá số xem tỷ trọng kèo soccer – kết quả bóng đá – lịch tranh tài soccer – tỷ số soccer.
I truly appreciate this post. I have been looking all over for this! Thank goodness I found it on Bing. You have made my day! Thank you again
I¦ve learn several good stuff here. Definitely price bookmarking for revisiting. I wonder how so much attempt you place to make this sort of excellent informative web site.
Trực Tiếp Soccer Việt Nam Vs Lebanon. Xem Truc Tiep Bong Da. Futsal Việt Namvtv6 trực tiếp bóng đáXem đá bóng trực tuyến Trực tiếp Odd BK vs Sarpsborg, 20h ngày 24/5, giải VĐQG Na Uy. Xem lịch phạt sóng thẳng đá bóng EURO ngày hôm nay được Webthethao cập nhật chủ yếu xác nhất.
Trực Tiếp Bóng Đá Hôm Nay, Liên Kết Coi đá Bóng Trực Tuyến 24h 888 betĐội tuyển futsal Việt Nam đã có một trận đấu đồng ý được trước đối thủ cạnh tranh đầy sức mạnh Lebanon. Kết quả Bà Rịa-Vũng Tàu vs Bình Phước ngày hôm nay 18h00 ngày 5/5, Hạng nhất Việt Nam.
Are you trying to find a method to enjoy mobile gaming with no restrictions? Do you intend to become the very best player on your absolute favorite adventure mobile game, and remain that way with unlimited resources? We’ve got your back, with our 100 free online cheats! Our game hacks generate countless resources in your game and provide you an advantage over other players. Our hacks are ideal for mobile players who don’t wish to ever worry about having a too little supply of resources – use them wisely!
Your style is unique in comparison to other people I’ve read stuff from. I appreciate you for posting when you have the opportunity, Guess I will just bookmark this web site.
I think this is one of the most important info for me. And i am glad reading your article. But should remark on few general things, The web site style is ideal, the articles is really excellent : D. Good job, cheers
It is really a great and useful piece of info. I’m glad that you shared this helpful information with us. Please keep us informed like this. Thanks for sharing.
Trực Tiếp Soccer Hôm Nay, Liên Kết Xem đá Bóng Trực Tuyến 24h keo nhà cáiĐội tuyển nước ta chỉ cần thiết một kết trái hòa có bàn thắng nhằm lần thứ hai góp mặt trên World Cup futsal. Nhưng, để thực hiện được điều đó
Thông Tin, Sự Kiện Liên Quan Lại Đến Trực Tiếp Bóng Đá Nữ Giới tiến lên miền namĐội tuyển futsal Việt Nam đã được một trận đấu đồng ý được trước đối thủ đầy mức độ mạnh Lebanon. Kết trái Bà Rịa-Vũng Tàu vs Bình Phước ngày hôm nay 18h00 ngày 5/5, Hạng nhất nước ta.
You’ve made some good points there. I checked on the web for more information about the issue and found most individuals will go along with your views on this website.
Hi! I could have sworn Iíve visited this website before but after browsing through many of the posts I realized itís new to me. Anyhow, Iím definitely happy I discovered it and Iíll be bookmarking it and checking back regularly!
Xoilac Tv Thẳng Soccerlịch asiad 2019Xem đá bóng trực tuyến Trực tiếp Odd BK vs Sarpsborg, 20h ngày 24/5, giải VĐQG Na Uy. Xem lịch phạt sóng thẳng đá bóng EURO thời điểm hôm nay được Webthethao update chủ yếu xác nhất.
Hello my friend! I want to say that this post is amazing, great written and come with almost all significant infos. I’d like to see more posts like this .
Trực Tiếp Bóng Đá Việt Nam Vs Lebanon. Coi Truc Tiep Bong Da. Futsal Việt Nampes 2020 full crackĐây có lẽ là trường hợp “của đi thay cho người” khá may mắn đối cùng với Ben McLemore. Thiếu chút nữa tay ném của Los Angeles Lakers đã được thể gặp hiểm họa nguy hiểm. Cập nhật kết trái trận Việt Nam vs Lebanon nằm trong play-off vòng loại Futsal World Cup 2021.
Can I just say what a relief to discover someone who genuinely knows what they’re discussing on the web. You actually know how to bring an issue to light and make it important. More people really need to look at this and understand this side of your story. It’s surprising you aren’t more popular given that you certainly possess the gift.
Hi , I do believe this is an excellent blog. I stumbled upon it on Yahoo , i will come back once again. Money and freedom is the best way to change, may you be rich and help other people.
Trực Tiếp Soccer Việt Nam Vs Lebanon. Coi Truc Tiep Bong Da. Futsal Việt Namvaoroi tvXem bóng đá trực tuyến Trực tiếp Odd BK vs Sarpsborg, 20h ngày 24/5, giải VĐQG Na Uy. Xem lịch phát sóng trực tiếp bóng đá EURO thời điểm hôm nay được Webthethao update chính xác nhất.
Hello, Neat post. There is an issue together with your website in web explorer, could check thisK IE still is the market chief and a good component to people will miss your excellent writing because of this problem.
This web site is really a walk-through for all of the info you wanted about this and didn’t know who to ask. Glimpse here, and you’ll definitely discover it.
Thẳng đá Bóng Việt Nam Vs Lebanon. Xem Truc Tiep Bong Da. Futsal Việt NamsoikeoplusXem soccer trực tuyến Trực tiếp Odd BK vs Sarpsborg, 20h ngày 24/5, giải VĐQG Na Uy. Xem lịch phạt sóng trực tiếp bóng đá EURO thời điểm hôm nay được Webthethao cập nhật chủ yếu xác nhất.
This excellent website certainly has all of the information I needed concerning this subject and didnít know who to ask.
Thẳng Bóng Đá Thời Điểm Hôm NaybongdawapĐây có lẽ là ngôi trường hợp “của đi thay nhân viên” khá như ý đối với Ben McLemore. Thiếu chút nữa tay ném của Los Angeles Lakers đã có được thể gặp tai nạn nguy hiểm. Cập nhật kết trái trận nước ta vs Lebanon nằm trong play-off vòng loại Futsal World Cup 2021.
I’m very pleased to uncover this page. I wanted to thank you for ones time for this wonderful read!! I definitely appreciated every bit of it and i also have you book-marked to check out new information on your blog.
Xoilac Tv Thẳng Bóng Đálich thi dau lckĐây có lẽ rằng là trường hợp “của đi thay cho người” khá may mắn đối với Ben McLemore. Thiếu chút nữa tay ném của Los Angeles Lakers đã có thể gặp gỡ tai nạn nguy hiểm. Cập nhật kết quả trận Việt Nam vs Lebanon nằm trong play-off vòng chủng loại Futsal World Cup 2021.
Good article. I am going through many of these issues as well..
I am constantly browsing online for posts that can facilitate me. Thank you!
Trực Tiếp Bóng Đá Việt Nam Vs Lebanon. Coi Truc Tiep Bong Da. Futsal Việt Nambxh ýNếu cứ chơi như cơ hội vừa tiêu diệt Everton tới 3-1 trên sân khách hàng
Oh my goodness! Impressive article dude! Many thanks, However I am having issues with your RSS. I donít understand why I can’t join it. Is there anybody else having similar RSS problems? Anyone that knows the answer can you kindly respond? Thanx!!
Kèo Bóng Đá Là Gì? Giải Mến Tỷ Lệ Cá Cược đá Bóng Chi Tiết Nhấttruc tiep u23 viet nam vs u23 nhat banNếu là một trong nhân viên chơi mới nhất cá độ bóng đá bạn rất có thể truy cập vào thethao88.com để có những sự trợ giúp từ các thường xuyên gia nhằm mục tiêu phân tích và Dự kiến những kèo thơm và đặt cược để chiến thắng. bongdaso.co thường xuyên trang bóng đá số xem tỷ lệ kèo đá bóng – kết trái bóng đá – lịch tranh tài bóng đá – tỷ số bóng đá.
Cách Học Hỏi Kèo Bóng Đá, Hướng Dẫn Coi Kèo Soccer Dễ Hiểu Nhấtxep hang hang nhat anhNếu là một trong nhân viên nghịch mới mẻ cá độ soccer bạn hoàn toàn có thể truy vấn vào thethao88.com nhằm có những sự trợ góp kể từ các thường xuyên gia nhằm mục đích phân tích và Dự kiến những kèo thơm và đặt cược để chiến thắng. bongdaso.co thường xuyên trang bóng đá số xem tỷ lệ kèo bóng đá – kết trái bóng đá – lịch tranh tài đá bóng – tỷ số bóng đá.
A motivating discussion is worth comment. I do believe that you should publish more on this issue, it may not be a taboo subject but typically people don’t discuss these topics. To the next! Cheers!!
I couldnít resist commenting. Very well written!
Pretty! This was an incredibly wonderful post. Thanks for supplying these details.
Thẳng Soccer Ngày Hôm Naytruyen hinh let’s vietĐây có lẽ rằng là ngôi trường hợp “của đi thay người” khá may mắn đối với Ben McLemore. Thiếu chút nữa tay ném của Los Angeles Lakers đã có được thể gặp tai nạn nguy hiểm. Cập nhật kết quả trận Việt Nam vs Lebanon nằm trong play-off vòng chủng loại Futsal World Cup 2021.
Hi! I’m at work browsing your blog from my new iphone! Just wanted to say I love reading through your blog and look forward to all your posts! Keep up the superb work!|
Xoilac Tv Thẳng Soccerxem tivi htv7Xem đá bóng trực tuyến Trực tiếp Odd BK vs Sarpsborg, 20h ngày 24/5, giải VĐQG Na Uy. Xem lịch phát sóng trực tiếp soccer EURO thời điểm hôm nay được Webthethao update chính xác nhất.
đánh Giá Bóng Đábông hoa đẹp nhất lyricNếu là một trong những nhân viên đùa mới nhất cá độ đá bóng quý khách hoàn toàn có thể truy cập vào thethao88.com để có những sự trợ giúp từ các thường xuyên gia nhằm mục tiêu phân tách và Dự kiến những kèo thơm và đặt cược để thành công. bongdaso.co chuyên nghiệp trang đá bóng số xem tỷ lệ kèo đá bóng – kết trái soccer – lịch tranh tài đá bóng – tỷ số soccer.
Xoilac Tv Thẳng đá Bóngbxh yNếu cứ đùa như cơ hội vừa đè bẹp Everton cho tới 3-1 bên trên sảnh khách hàng
Great write-up, I’m regular visitor of one’s blog, maintain up the nice operate, and It’s going to be a regular visitor for a lengthy time.
Liên Kết Xem Thẳng Soccer Futsal Việt Nam Vs Lebanon Vòng Loại World Cuptruc tiep thvl1Đây có lẽ là ngôi trường hợp “của đi thay cho người” khá may mắn đối với Ben McLemore. Thiếu chút nữa tay ném của Los Angeles Lakers đã có được thể bắt gặp hiểm họa nguy hiểm. Cập nhật kết trái trận Việt Nam vs Lebanon nằm trong play-off vòng loại Futsal World Cup 2021.
Trực Tiếp Bóng Đá Ngày Hôm Naylich da banh asian cup 2019Đây có lẽ rằng là ngôi trường hợp “của đi thay cho nhân viên” khá may mắn đối với Ben McLemore. Thiếu chút nữa tay ném của Los Angeles Lakers đã có thể gặp gỡ hiểm họa nghiêm trọng. Cập nhật kết quả trận nước Việt Nam vs Lebanon thuộc play-off vòng chủng loại Futsal World Cup 2021.
Kèo Bóng Đá Là Gì? Giải Mến Tỷ Lệ Cá Cược đá Bóng Chi Tiết Nhấtkết quả bóng đá c1Nếu là một trong nhân viên đùa mới cá độ bóng đá quý khách rất có thể truy vấn vào thethao88.com nhằm có những sự trợ giúp kể từ các chuyên nghiệp gia nhằm mục tiêu phân tách và dự đoán những kèo thơm và đặt cược để thành công. bongdaso.co thường xuyên trang soccer số xem tỷ lệ kèo bóng đá – kết quả đá bóng – lịch tranh tài đá bóng – tỷ số bóng đá.
Nhận Định đá Bóngkết quả ngoại hạng anh hôm quaNếu là một trong người nghịch mới cá độ đá bóng bạn hoàn toàn có thể truy vấn vào thethao88.com nhằm có những sự trợ giúp kể từ các thường xuyên gia nhằm mục tiêu phân tích và dự đoán những kèo thơm và đặt cược nhằm thắng lợi. bongdaso.co thường xuyên trang đá bóng số coi tỷ trọng kèo đá bóng – kết quả bóng đá – lịch thi đấu đá bóng – tỷ số đá bóng.
Kèo Bóng Đá Là Gì? Giải Quí Tỷ Lệ Cá Cược Bóng Đá Chi Tiết Nhấtkq arsenalNếu là một trong nhân viên nghịch mới nhất cá độ soccer quý khách rất có thể truy vấn vào thethao88.com để có những sự trợ giúp kể từ những thường xuyên gia nhằm phân tích và dự đoán những kèo thơm và đặt cược để thắng lợi. bongdaso.co chuyên trang bóng đá số xem tỷ lệ kèo đá bóng – kết trái bóng đá – lịch tranh tài soccer – tỷ số bóng đá.
I seriously love your website.. Very nice colors & theme. Did you build this site yourself? Please reply back as Iím trying to create my own personal blog and would like to know where you got this from or just what the theme is called. Cheers!
Greetings! Very helpful advice in this particular post! It is the little changes that will make the greatest changes. Thanks for sharing!
nice bLog! its interesting. thank you for sharing….
bookmarked!!, I love your site!
đánh Giá Soccerxem to day ti viNếu là một trong nhân viên chơi mới nhất cá độ bóng đá quý khách có thể truy vấn vào thethao88.com nhằm có những sự trợ giúp từ những chuyên nghiệp gia nhằm mục đích phân tích và Dự kiến những kèo thơm và đặt cược nhằm thành công. bongdaso.co thường xuyên trang bóng đá số coi tỷ trọng kèo bóng đá – kết trái đá bóng – lịch thi đấu đá bóng – tỷ số soccer.
We are really grateful for your blog post. You will find a lot of approaches after visiting your post. I was exactly searching for. Thanks for such post and please keep it up. Great work.
đánh Giá đá Bóngk + pmNếu là một nhân viên nghịch mới cá độ soccer bạn có thể truy cập vào thethao88.com nhằm có những sự trợ giúp từ những chuyên nghiệp gia nhằm mục đích phân tích và Dự kiến những kèo thơm và đặt cược nhằm chiến thắng. bongdaso.co chuyên trang soccer số coi tỷ trọng kèo đá bóng – kết quả bóng đá – lịch thi đấu soccer – tỷ số soccer.
Hi there, just become alert to your blog through Google, and located that it is truly informative. I am gonna be careful for brussels. I’ll be grateful should you proceed this in future. A lot of other people shall be benefited from your writing. Cheers!
đánh Giá Và Nhận Định Soccerlịch phát sóng sctvNếu là một trong người chơi mới mẻ cá độ bóng đá bạn rất có thể truy vấn vào thethao88.com nhằm có những sự trợ giúp kể từ những thường xuyên gia nhằm mục đích phân tách và Dự kiến những kèo thơm và đặt cược nhằm chiến thắng. bongdaso.co chuyên nghiệp trang bóng đá số coi tỷ lệ kèo soccer – kết trái đá bóng – lịch tranh tài soccer – tỷ số soccer.
Thankyou for this post, I am a big fan of this internet site would like to go along updated.
I absolutely love your site.. Great colors & theme. Did you make this amazing site yourself? Please reply back as Iím hoping to create my own personal site and want to know where you got this from or just what the theme is named. Many thanks!
đánh Giá Và Nhận Định đá Bóngxem trực tuyến kênh todayNếu là một người nghịch mới mẻ cá độ bóng đá quý khách hoàn toàn có thể truy cập vào thethao88.com nhằm có những sự trợ giúp từ các chuyên gia nhằm phân tách và Dự kiến những kèo thơm và đặt cược để thắng lợi. bongdaso.co thường xuyên trang bóng đá số xem tỷ trọng kèo soccer – kết trái đá bóng – lịch tranh tài đá bóng – tỷ số bóng đá.
Giầy Thể Thao, Thời Trang Và Năng Động Thể Thao Chủ Yếu Hãng Sản Xuất Peak Sportphim truc tuyen tap 1Lần đầu tiên ra đôi mắt thì giày Jordan 1 có màu đỏ, white và đen phối với nhau. Với upper mỏng dính nhẹ và đế bền hơn cùng cỗ đệm lấy trực tiếp từ Crazylight Boost 2016, trong hoàn cảnh tạm thời Rose 8 cũng vô cùng đáng nhằm test.
Cơ Hội Học Hỏi Kèo Bóng Đá, Phía Dẫn Coi Kèo đá Bóng Dễ Dàng Hiểu Nhấtu22 việt nam và u22 trung quốcNếu là một trong các những người chơi mới mẻ cá độ soccer quý khách hoàn toàn có thể truy cập vào thethao88.com để có những sự trợ giúp từ những thường xuyên gia nhằm mục tiêu phân tích và Dự kiến những kèo thơm và đặt cược để thắng lợi. bongdaso.co chuyên trang bóng đá số coi tỷ trọng kèo đá bóng – kết trái bóng đá – lịch thi đấu soccer – tỷ số bóng đá.
Itís hard to come by well-informed people on this subject, however, you sound like you know what youíre talking about! Thanks
Lựa Chọn Giày Bóng Rổtra cứu dữ liệu cầu thủ fifa online 3Lần trước tiên ra mắt thì giày Jordan 1 có color đỏ, trắng và đen phối cùng với nhau. Với upper mỏng nhẹ nhõm và đế bền hơn cùng cỗ đệm lấy thẳng từ Crazylight Boost năm nhâm thìn, trong thời điểm tạm thời Rose 8 cũng rất đáng để demo.
This site truly has all of the information I wanted about this subject and didnít know who to ask.
Xoilac Tv Trực Tiếp Soccerlive90Đây có lẽ là ngôi trường hợp “của đi thay cho nhân viên” khá như mong muốn đối với Ben McLemore. Thiếu chút nữa tay ném của Los Angeles Lakers đã được thể gặp gỡ tai nạn nguy hiểm. Cập nhật kết quả trận nước Việt Nam vs Lebanon nằm trong play-off vòng loại Futsal World Cup 2021.
Giày Thể Thao, Thời Trang Thể Thao Chủ Yếu Thương Hiệu Peak Sportlink sopcast barca hôm nayLần đầu tiên ra đôi mắt thì giày Jordan 1 có màu đỏ, trắng và đen phối với nhau. Với upper mỏng manh nhẹ nhõm và đế bền rộng cùng bộ đệm lấy thẳng kể từ Crazylight Boost năm 2016, trong thời điểm tạm thời Rose 8 cũng cực kỳ đáng để thử.
It’s a pity you don’t have a donate button! I’d without a doubt donate to this outstanding blog! I guess for now i’ll settle for book-marking and adding your RSS feed to my Google account. I look forward to fresh updates and will talk about this website with my Facebook group. Talk soon!
You are so awesome! I do not suppose I have read anything like that before. So good to find another person with some unique thoughts on this topic. Seriously.. many thanks for starting this up. This web site is one thing that is required on the internet, someone with a little originality!
Greetings! Very helpful advice in this particular post! It is the little changes which will make the largest changes. Thanks a lot for sharing!
I was just seeking this info for a while. After six hours of continuous Googleing, at last I got it in your website. I wonder what is the lack of Google strategy that don’t rank this type of informative websites in top of the list. Generally the top web sites are full of garbage.
You are my intake, I own few blogs and sometimes run out from to brand.
Giầy Thể Thao, Thời Trang Thể Thao Chủ Yếu Hãng Peak Sporthoc247Lần trước tiên ra mắt thì giầy Jordan 1 có color đỏ, trắng và đen phối cùng với nhau. Với upper mỏng manh nhẹ nhàng và đế bền hơn cùng cỗ đệm lấy trực tiếp từ Crazylight Boost năm 2016, tạm thời Rose 8 cũng rất xứng đáng để test.
Xoilac Tv Thẳng Bóng ĐávatvoXem soccer trực tuyến Trực tiếp Odd BK vs Sarpsborg, 20h ngày 24/5, giải VĐQG Na Uy. Xem lịch phạt sóng trực tiếp đá bóng EURO thời điểm hôm nay được Webthethao update chủ yếu xác nhất.
đánh Giá Và Nhận Định đá Bóng Thời Điểm Hôm Naykenh1.info todaytvNếu là một trong các những người đùa mới cá độ bóng đá bạn có thể truy vấn vào thethao88.com để có những sự trợ góp từ các thường xuyên gia nhằm mục tiêu phân tích và dự đoán những kèo thơm và đặt cược nhằm thành công. bongdaso.co thường xuyên trang soccer số xem tỷ trọng kèo soccer – kết quả soccer – lịch thi đấu bóng đá – tỷ số bóng đá.
You ought to take part in a contest for one of the finest websites online. I’m going to highly recommend this site!
I appreciate, cause I found just what I was looking for. You’ve ended my 4 day long hunt! God Bless you man. Have a great day. Bye
Giày Thể Thao, Năng Động Thể Thao Chủ Yếu Thương Hiệu Peak Sportcrack pes 2019Lần đầu tiên ra đôi mắt thì giầy Jordan 1 có color đỏ, trắng và đen phối với nhau. Với upper mỏng dính nhẹ nhàng và đế bền rộng cùng bộ đệm lấy thẳng kể từ Crazylight Boost năm 2016, trong thời điểm tạm thời Rose 8 cũng vô cùng xứng đáng nhằm thử.
Giày Thể Thao, Thời Trang Và Năng Động Thể Thao Chính Thương Hiệu Peak Sporttieng set trong mua tap 11Lần thứ nhất ra mắt thì giày Jordan 1 có color đỏ, trắng và đen phối cùng với nhau. Với upper mỏng dính nhẹ và đế bền rộng cùng cỗ đệm lấy thẳng từ Crazylight Boost 2016, tạm thời Rose 8 cũng vô cùng đáng để test.
Chọn Mua Giầy Bóng Rổ Chi Phí đảm Bảo Hóa Học Lượngcái bống bang bangLần trước tiên ra mắt thì giày Jordan 1 có color đỏ, trắng và đen phối với nhau. Với upper mỏng manh nhẹ nhàng và đế bền hơn cùng bộ đệm lấy trực tiếp từ Crazylight Boost 2016, trong thời điểm tạm thời Rose 8 cũng rất đáng để thử.
Giày Bóng Rổ Giá Tiền Rẻ Bền đẹp Mắt, Chi Phí Sốc, Nên Mua Ở Đâu60s hôm nayLần đầu tiên ra đôi mắt thì giầy Jordan 1 có color đỏ, Trắng và đen phối cùng với nhau. Với upper mỏng dính nhẹ và đế bền hơn cùng cỗ đệm lấy thẳng kể từ Crazylight Boost năm nhâm thìn, tạm thời Rose 8 cũng rất đáng để demo.
Giày Bóng Rổ Giá Rẻ Bền đẹp, Giá Sốc, Nên Mua Ở Đâuket qua bong da tbnLần trước tiên ra đôi mắt thì giày Jordan 1 có màu đỏ, Trắng và đen phối với nhau. Với upper mỏng manh nhẹ nhõm và đế bền rộng cùng bộ đệm lấy trực tiếp từ Crazylight Boost năm 2016, trong giai đoạn tạm thời Rose 8 cũng rất đáng nhằm demo.
The next time I read a blog, Hopefully it doesn’t disappoint me as much as this particular one. After all, I know it was my choice to read through, nonetheless I actually believed you would probably have something interesting to say. All I hear is a bunch of crying about something you could fix if you weren’t too busy looking for attention.
What’s Happening i am new to this, I stumbled upon this I’ve found It positively useful and it has helped me out loads. I hope to contribute & help other users like its helped me. Good job.
Tin Soi Kèohtv2 trực tuyến nhanh nhấtNếu là một người nghịch mới cá độ bóng đá bạn có thể truy vấn vào thethao88.com để có những sự trợ góp kể từ các chuyên gia nhằm phân tích và dự đoán những kèo thơm và đặt cược nhằm thành công. bongdaso.co chuyên trang bóng đá số xem tỷ lệ kèo soccer – kết quả soccer – lịch thi đấu đá bóng – tỷ số soccer.
Xoilac Tv Trực Tiếp Soccer90tvXem đá bóng trực tuyến Trực tiếp Odd BK vs Sarpsborg, 20h ngày 24/5, giải VĐQG Na Uy. Xem lịch phát sóng thẳng đá bóng EURO thời điểm hôm nay được Webthethao update chủ yếu xác nhất.
Great article. I am dealing with a few of these issues as well..
Howdy! I could have sworn Iíve visited this site before but after looking at a few of the posts I realized itís new to me. Nonetheless, Iím definitely pleased I came across it and Iíll be bookmarking it and checking back often!
An outstanding share! I have just forwarded this onto a friend who has been doing a little homework on this. And he in fact bought me breakfast simply because I stumbled upon it for him… lol. So allow me to reword this…. Thanks for the meal!! But yeah, thanks for spending time to talk about this topic here on your web page.
I couldnít resist commenting. Well written!
Spot on with this write-up, I seriously feel this website needs a lot more attention. Iíll probably be back again to read more, thanks for the advice!
Chọn Mua Giày Bóng Rổđiên thì có sao tập 1Lần đầu tiên ra mắt thì giầy Jordan 1 có màu sắc đỏ, Trắng và đen phối với nhau. Với upper mỏng dính nhẹ nhõm và đế bền rộng cùng cỗ đệm lấy thẳng từ Crazylight Boost năm 2016, trong thời điểm tạm thời Rose 8 cũng vô cùng xứng đáng nhằm thử.
This site definitely has all the information and facts I wanted about this subject and didnít know who to ask.
Lựa Chọn Giầy Bóng Rổtai thvl1Lần trước tiên ra đôi mắt thì giầy Jordan 1 có màu sắc đỏ, trắng và đen phối cùng với nhau. Với upper mỏng manh nhẹ nhõm và đế bền hơn cùng cỗ đệm lấy thẳng kể từ Crazylight Boost năm nhâm thìn, trong giai đoạn tạm thời Rose 8 cũng vô cùng xứng đáng để thử.
Giày Bóng Rổ Chi Phí Rẻ Bền đẹp, Giá Tiền Sốc, Nên Mua Ở Đâutruc tiep aff suzuki cup 2016Lần thứ nhất ra đôi mắt thì giày Jordan 1 có màu đỏ, white và đen phối cùng với nhau. Với upper mỏng manh nhẹ nhàng và đế bền hơn cùng bộ đệm lấy thẳng kể từ Crazylight Boost năm 2016, trong hoàn cảnh tạm thời Rose 8 cũng cực kỳ xứng đáng để thử.
Yeah bookmaking this wasn’t a high risk decision outstanding post! .
Can I just say what a aid to find somebody who actually knows what theyre talking about on the internet. You positively know how one can carry an issue to gentle and make it important. Extra individuals have to learn this and understand this side of the story. I cant consider youre not more common since you definitely have the gift.
Thankyou for all your efforts that you have put in this. very interesting info .
Hi there! I simply would like to offer you a big thumbs up for your excellent info you have right here on this post. I will be returning to your website for more soon.
Giầy Thể Thao, Thời Trang Và Năng Động Thể Thao Chủ Yếu Thương Hiệu Peak Sporttruyen hinh truc tuyen htv7Lần thứ nhất ra mắt thì giầy Jordan 1 có color đỏ, trắng và đen phối cùng với nhau. Với upper mỏng manh nhẹ và đế bền rộng cùng cỗ đệm lấy trực tiếp từ Crazylight Boost năm 2016, tạm thời Rose 8 cũng rất đáng nhằm thử.
Lựa Chọn Giầy Bóng Rổxem ket qua quan votLần đầu tiên ra mắt thì giầy Jordan 1 có color đỏ, Trắng và đen phối cùng với nhau. Với upper mỏng nhẹ và đế bền hơn cùng bộ đệm lấy thẳng kể từ Crazylight Boost 2016, trong thời điểm tạm thời Rose 8 cũng rất đáng để thử.
Dead indited subject matter, regards for entropy. “Life is God’s novel. Let him write it.” by Isaac Bashevis Singer.
Kèo Bóng Đá Là Gì? Giải Quí Tỷ Trọng Cá Cược đá Bóng Chi Tiết Nhấttruc tiep mayweather vs mcgregorNếu là một người nghịch mới mẻ cá độ đá bóng quý khách hoàn toàn có thể truy cập vào thethao88.com để có những sự trợ giúp từ những chuyên gia nhằm mục tiêu phân tích và dự đoán những kèo thơm và đặt cược nhằm thành công. bongdaso.co thường xuyên trang đá bóng số xem tỷ trọng kèo bóng đá – kết trái đá bóng – lịch tranh tài đá bóng – tỷ số bóng đá.
Giày Bóng Rổ Giá Rẻ Bền đẹp Mắt, Giá Tiền Sốc, Nên Chọn Mua Ở Đâutrực tiếp htv3Lần thứ nhất ra mắt thì giày Jordan 1 có màu đỏ, white và đen phối với nhau. Với upper mỏng manh nhẹ và đế bền hơn cùng bộ đệm lấy thẳng từ Crazylight Boost năm 2016, trong hoàn cảnh tạm thời Rose 8 cũng rất xứng đáng nhằm test.
Hi, I do think this is an excellent web site. I stumbledupon it 😉 I am going to come back once again since I book marked it. Money and freedom is the greatest way to change, may you be rich and continue to help other people.
Saved as a favorite, I like your website!
Tin Chuyện Tranh Bóng Rổ Mới Nhất , Tin Game Hot Về Truyen Tranh Bong Rodan ga trong san beatSlam Dunk kể về câu chuyện về việc trưởng thành của nhân vật chính Hanamichi Sakuragi cùng nhóm bóng rổ Shohoku. Đoạn kết mở của bộ truyện cũng để lại nhiều sự mong ngóng cực kỳ lớn của độc giả đến những giải đấu tiếp sau của chàng “tóc đỏ” Hanamichi Sakuragi. “Generation of Miracles”, tên của nhóm bóng rổ ngôi trường Sơ Trung Teikou từng đoạt chức vô địch cả nước 3 năm liền.
Tin Soi Kèoenviet 24hNếu là một trong các những người đùa mới nhất cá độ bóng đá bạn rất có thể truy vấn vào thethao88.com để có những sự trợ giúp kể từ các chuyên nghiệp gia nhằm mục đích phân tích và Dự kiến những kèo thơm và đặt cược nhằm thắng lợi. bongdaso.co chuyên trang bóng đá số xem tỷ lệ kèo bóng đá – kết trái đá bóng – lịch tranh tài bóng đá – tỷ số đá bóng.
You’re so awesome! I don’t believe I have read through something like this before. So wonderful to discover somebody with original thoughts on this topic. Really.. thank you for starting this up. This web site is one thing that is required on the internet, someone with a bit of originality!
Cơ Hội Học Hỏi Kèo Bóng Đá, Phía Dẫn Coi Kèo Soccer Dễ Dàng Hiểu Nhấtkênh todaytv trực tiếpNếu là một trong những những nhân viên đùa mới nhất cá độ đá bóng bạn hoàn toàn có thể truy vấn vào thethao88.com nhằm có những sự trợ giúp kể từ những chuyên nghiệp gia nhằm mục đích phân tách và Dự kiến những kèo thơm và đặt cược để chiến thắng. bongdaso.co thường xuyên trang bóng đá số xem tỷ trọng kèo bóng đá – kết trái bóng đá – lịch thi đấu soccer – tỷ số đá bóng.
Lựa Chọn Giầy Bóng Rổ Giá Chất Lượngxem trực tiếp tennisLần thứ nhất ra đôi mắt thì giày Jordan 1 có màu đỏ, Trắng và đen phối cùng với nhau. Với upper mỏng nhẹ và đế bền hơn cùng bộ đệm lấy trực tiếp kể từ Crazylight Boost 2016, tạm thời Rose 8 cũng rất xứng đáng để demo.
This excellent website truly has all of the information and facts I needed about this subject and didnít know who to ask.
You’ve made some really good points there. I looked on the web to find out more about the issue and found most individuals will go along with your views on this web site.
Spot on with this write-up, I seriously believe that this website needs a lot more attention. Iíll probably be returning to see more, thanks for the information!
đánh Giá Soccer Ngày Hôm Naylịch thi đấu aff cup 2018 hôm nayNếu là một người nghịch mới cá độ đá bóng bạn có thể truy cập vào thethao88.com để có những sự trợ giúp từ những thường xuyên gia nhằm mục đích phân tách và dự đoán những kèo thơm và đặt cược để thắng lợi. bongdaso.co chuyên nghiệp trang đá bóng số coi tỷ lệ kèo soccer – kết quả bóng đá – lịch tranh tài soccer – tỷ số bóng đá.
Great post. I am going through a few of these issues as well..
Giày Thể Thao, Năng Động Thể Thao Chủ Yếu Hãng Sản Xuất Peak Sportbảng xếp hạng seriaLần thứ nhất ra mắt thì giầy Jordan 1 có màu đỏ, trắng và đen phối với nhau. Với upper mỏng nhẹ và đế bền hơn cùng bộ đệm lấy thẳng kể từ Crazylight Boost năm 2016, tạm thời Rose 8 cũng cực kỳ đáng nhằm test.
Cách Học Hỏi Kèo đá Bóng, Phía Dẫn Coi Kèo Soccer Dễ Hiểu Nhấtgái nhật đó samurai lờiNếu là một trong nhân viên đùa mới cá độ bóng đá bạn có thể truy vấn vào thethao88.com để có những sự trợ góp kể từ những chuyên nghiệp gia nhằm phân tách và dự đoán những kèo thơm và đặt cược để thành công. bongdaso.co chuyên trang đá bóng số coi tỷ trọng kèo bóng đá – kết quả soccer – lịch tranh tài bóng đá – tỷ số đá bóng.
Chọn Mua Giày Bóng Rổbang xep hang bong da asiad 2018Lần đầu tiên ra mắt thì giầy Jordan 1 có color đỏ, trắng và đen phối cùng với nhau. Với upper mỏng nhẹ nhõm và đế bền hơn cùng cỗ đệm lấy trực tiếp kể từ Crazylight Boost năm 2016, tạm thời Rose 8 cũng vô cùng xứng đáng để test.
Way cool! Some extremely valid points! I appreciate you writing this post and also the rest of the site is really good.
Right here is the perfect blog for anybody who wants to find out about this topic. You know a whole lot its almost hard to argue with you (not that I actually will need toÖHaHa). You certainly put a fresh spin on a subject that’s been discussed for many years. Great stuff, just excellent!
May I just say what a relief to uncover someone who really understands what they are discussing over the internet. You actually realize how to bring an issue to light and make it important. More and more people need to check this out and understand this side of your story. I was surprised that you are not more popular because you definitely possess the gift.
Giày Thể Thao, Thời Trang Thể Thao Chủ Yếu Hãng Peak SporttvcsmLần trước tiên ra mắt thì giầy Jordan 1 có color đỏ, Trắng và đen phối cùng với nhau. Với upper mỏng manh nhẹ nhõm và đế bền rộng cùng cỗ đệm lấy trực tiếp từ Crazylight Boost năm nhâm thìn, trong hoàn cảnh tạm thời Rose 8 cũng cực kỳ đáng nhằm demo.
You’ve made some really good points there. I looked on the web for more info about the issue and found most individuals will go along with your views on this website.
Heya i?m for the first time here. I came across this board and I find It truly useful & it helped me out a lot. I hope to give something back and help others like you aided me.
Kèo Bóng Đá Là Gì? Giải Thích Tỷ Trọng Cá Cược đá Bóng Chi Tiết Nhấtđánh bài zingNếu là một trong người chơi mới nhất cá độ soccer bạn rất có thể truy cập vào thethao88.com để có những sự trợ giúp từ các chuyên nghiệp gia nhằm phân tích và dự đoán những kèo thơm và đặt cược nhằm chiến thắng. bongdaso.co thường xuyên trang đá bóng số xem tỷ trọng kèo bóng đá – kết trái bóng đá – lịch thi đấu soccer – tỷ số bóng đá.
Giày Thể Thao, Thời Trang Và Năng Động Thể Thao Chính Hãng Sản Xuất Peak Sportđài todaytvLần đầu tiên ra mắt thì giầy Jordan 1 có color đỏ, trắng và đen phối với nhau. Với upper mỏng manh nhẹ nhàng và đế bền hơn cùng cỗ đệm lấy thẳng từ Crazylight Boost 2016, trong hoàn cảnh tạm thời Rose 8 cũng cực kỳ xứng đáng nhằm thử.
Mua Giầy Bóng Rổhtv9 trực tiếpLần đầu tiên ra mắt thì giày Jordan 1 có color đỏ, trắng và đen phối cùng với nhau. Với upper mỏng manh nhẹ và đế bền hơn cùng bộ đệm lấy trực tiếp kể từ Crazylight Boost năm nhâm thìn, tạm thời Rose 8 cũng vô cùng xứng đáng để thử.
You have made some decent points there. I checked on the internet to learn more about the issue and found most individuals will go along with your views on this site.
Bộ Chuyện Tranh Cực Nổi H Về Bóng Rổ Slam Dunk Sẽ Con Quay Trở Lại Vào Năm 2020?vao ibet.weebly.comSlam Dunk kể về mẩu chuyện về việc cứng cáp của hero chính Hanamichi Sakuragi cùng nhóm bóng rổ Shohoku. Đoạn kết mở của bộ truyện cũng để lại nhiều sự mong ngóng cực kỳ lớn của độc giả đến những giải đấu tiếp theo sau của chàng “tóc đỏ” Hanamichi Sakuragi. “Generation of Miracles”, thương hiệu của nhóm bóng rổ ngôi trường Sơ Trung Teikou từng đoạt chức vô địch cả nước 3 năm ngay lập tức.
This is the perfect site for anybody who wants to find out about this topic. You understand so much its almost tough to argue with you (not that I really would want toÖHaHa). You certainly put a new spin on a subject that’s been discussed for a long time. Wonderful stuff, just great!
Nhận Định Bóng Đá Thời Điểm Hôm Naylịch thi đấu c1Nếu là một nhân viên chơi mới cá độ đá bóng quý khách hoàn toàn có thể truy vấn vào thethao88.com nhằm có những sự trợ góp từ các chuyên nghiệp gia nhằm phân tích và Dự kiến những kèo thơm và đặt cược để chiến thắng. bongdaso.co thường xuyên trang soccer số coi tỷ trọng kèo đá bóng – kết quả bóng đá – lịch tranh tài bóng đá – tỷ số bóng đá.
Good post. I am going through some of these issues as well..
đánh Giá Và Nhận Định Bóng Đá Hôm Nayvtv6 hd trực tuyến nhanh nhấtNếu là một trong những những nhân viên đùa mới nhất cá độ đá bóng quý khách có thể truy cập vào thethao88.com để có những sự trợ giúp từ các chuyên gia nhằm mục đích phân tách và dự đoán những kèo thơm và đặt cược nhằm chiến thắng. bongdaso.co chuyên trang bóng đá số xem tỷ trọng kèo soccer – kết trái bóng đá – lịch tranh tài đá bóng – tỷ số bóng đá.
đánh Giá Và Nhận Định Soccerket qua vdqg tay ban nhaNếu là một nhân viên nghịch mới mẻ cá độ bóng đá bạn có thể truy vấn vào thethao88.com nhằm có những sự trợ góp từ những chuyên gia nhằm phân tách và dự đoán những kèo thơm và đặt cược nhằm chiến thắng. bongdaso.co thường xuyên trang đá bóng số coi tỷ lệ kèo bóng đá – kết trái đá bóng – lịch tranh tài đá bóng – tỷ số soccer.
Lựa Chọn Giầy Bóng Rổ Chi Phí Tốtkết quả champions leagueLần đầu tiên ra đôi mắt thì giày Jordan 1 có color đỏ, Trắng và đen phối với nhau. Với upper mỏng dính nhẹ nhõm và đế bền hơn cùng bộ đệm lấy trực tiếp từ Crazylight Boost năm 2016, trong giai đoạn tạm thời Rose 8 cũng rất đáng nhằm thử.
Very good write-up. I absolutely appreciate this website. Keep it up!
Giày Thể Thao, Thời Trang Và Năng Động Thể Thao Chính Thương Hiệu Peak Sportxem vtv1 hd trực tuyếnLần thứ nhất ra đôi mắt thì giày Jordan 1 có color đỏ, white và đen phối cùng với nhau. Với upper mỏng dính nhẹ nhàng và đế bền hơn cùng cỗ đệm lấy thẳng kể từ Crazylight Boost năm 2016, tạm thời Rose 8 cũng rất đáng nhằm demo.
You can definitely see your expertise within the work you write. The arena hopes for more passionate writers such as you who aren’t afraid to say how they believe. At all times follow your heart. “There are only two industries that refer to their customers as users.” by Edward Tufte.
Aw, this was an incredibly good post. Finding the time and actual effort to generate a very good articleÖ but what can I sayÖ I put things off a lot and don’t seem to get nearly anything done.
I’m not sure why but this web site is loading incredibly slow for me. Is anyone else having this problem or is it a issue on my end? I’ll check back later on and see if the problem still exists.
Good day! I simply wish to offer you a big thumbs up for your great info you have got right here on this post. I am coming back to your web site for more soon.
Nhận Định Bóng Đá Thời Điểm Hôm Naythvl2Nếu là một trong những người nghịch mới mẻ cá độ soccer quý khách rất có thể truy cập vào thethao88.com nhằm có những sự trợ góp từ các chuyên nghiệp gia nhằm mục đích phân tích và Dự kiến những kèo thơm và đặt cược để thắng lợi. bongdaso.co thường xuyên trang đá bóng số xem tỷ trọng kèo đá bóng – kết quả soccer – lịch tranh tài bóng đá – tỷ số đá bóng.
Kèo Bóng Đá Là Gì? Giải Mến Tỷ Trọng Cá Cược Bóng Đá Chi Tiết Nhấtgenoa đấu với juventusNếu là một trong người chơi mới mẻ cá độ soccer quý khách hoàn toàn có thể truy vấn vào thethao88.com để có những sự trợ góp kể từ các chuyên gia nhằm phân tích và Dự kiến những kèo thơm và đặt cược nhằm thắng lợi. bongdaso.co chuyên trang bóng đá số xem tỷ lệ kèo bóng đá – kết trái soccer – lịch tranh tài bóng đá – tỷ số bóng đá.
With havin so much content do you ever run into any problems of plagorism or copyright infringement? My website has a lot of unique content I’ve either created myself or outsourced but it looks like a lot of it is popping it up all over the web without my permission. Do you know any ways to help reduce content from being ripped off? I’d certainly appreciate it.
I really wanted to write a small word in order to thank you for these nice points you are writing at this website. My particularly long internet search has at the end of the day been honored with wonderful facts to exchange with my colleagues. I would admit that we website visitors are unequivocally endowed to live in a notable network with many outstanding people with beneficial concepts. I feel extremely fortunate to have seen your entire site and look forward to tons of more pleasurable moments reading here. Thanks again for a lot of things.
Well I truly enjoyed reading it. This post provided by you is very practical for good planning.
Cách Học Hỏi Kèo đá Bóng, Phía Dẫn Coi Kèo Soccer Dễ Hiểu Nhấttottenham đấu với liverpoolNếu là một trong nhân viên nghịch mới mẻ cá độ soccer bạn rất có thể truy cập vào thethao88.com để có những sự trợ góp kể từ những thường xuyên gia nhằm phân tách và Dự kiến những kèo thơm và đặt cược để thắng lợi. bongdaso.co chuyên trang đá bóng số coi tỷ trọng kèo bóng đá – kết quả soccer – lịch tranh tài bóng đá – tỷ số bóng đá.
This website was… how do I say it? Relevant!! Finally I have found something that helped me. Kudos!
Cỗ Chuyện Tranh Cực Nổi Tiếng Về Bóng Rổ Slam Dunk Sẽ Quay Quay Về Vào Năm 2020?mis thanmaokheSlam Dunk kể về mẩu chuyện về sự trưởng thành của anh hùng chính Hanamichi Sakuragi cùng nhóm bóng rổ Shohoku. Đoạn kết mở của cỗ truyện cũng nhằm lại nhiều sự mong ngóng vô cùng rộng lớn của độc fake mang đến những giải đấu tiếp theo của chàng “tóc đỏ” Hanamichi Sakuragi. “Generation of Miracles”, tên của nhóm bóng rổ trường Sơ Trung Teikou từng đoạt chức vô địch toàn quốc 3 năm ngay lập tức.
Tin Soi Kèou21 hagl vs u21 yokohamaNếu là một trong các những người nghịch mới mẻ cá độ đá bóng bạn rất có thể truy vấn vào thethao88.com nhằm có những sự trợ giúp kể từ những thường xuyên gia nhằm mục tiêu phân tích và dự đoán những kèo thơm và đặt cược nhằm chiến thắng. bongdaso.co thường xuyên trang soccer số xem tỷ lệ kèo bóng đá – kết quả đá bóng – lịch tranh tài đá bóng – tỷ số bóng đá.
Nhận Định Soccerket qua asiad 2019Nếu là một nhân viên chơi mới nhất cá độ bóng đá quý khách rất có thể truy cập vào thethao88.com để có những sự trợ giúp từ những chuyên gia nhằm mục tiêu phân tích và Dự kiến những kèo thơm và đặt cược để chiến thắng. bongdaso.co chuyên trang soccer số xem tỷ lệ kèo soccer – kết quả bóng đá – lịch thi đấu bóng đá – tỷ số bóng đá.
Hey very nice web site!! Man .. Excellent .. Amazing .. I will bookmark your site and take the feeds also…I am happy to find so many useful info here in the post, we need work out more strategies in this regard, thanks for sharing. . . . . .
Giày Bóng Rổ Giá Tiền Rẻ Bền đẹp Mắt, Giá Tiền Sốc, Nên Chọn Mua Ở Đâuvtc6 onlineLần thứ nhất ra mắt thì giày Jordan 1 có color đỏ, white và đen phối với nhau. Với upper mỏng nhẹ nhàng và đế bền rộng cùng bộ đệm lấy thẳng kể từ Crazylight Boost năm 2016, tạm thời Rose 8 cũng cực kỳ đáng để test.
Lựa Chọn Giầy Bóng Rổ Chi Phí Chất Lượnglịch đá bóng u22Lần đầu tiên ra mắt thì giày Jordan 1 có màu sắc đỏ, trắng và đen phối với nhau. Với upper mỏng manh nhẹ nhàng và đế bền rộng cùng bộ đệm lấy thẳng từ Crazylight Boost năm nhâm thìn, tạm thời Rose 8 cũng vô cùng đáng nhằm test.
Aw, this was a very good post. Spending some time and actual effort to generate a superb articleÖ but what can I sayÖ I put things off a whole lot and don’t manage to get anything done.
Cơ Hội Sưu Tầm Kèo đá Bóng, Hướng Dẫn Xem Kèo Soccer Dễ Dàng Hiểu Nhấtlotte hải phòngNếu là một trong các những nhân viên đùa mới nhất cá độ soccer quý khách hoàn toàn có thể truy cập vào thethao88.com để có những sự trợ góp kể từ những chuyên nghiệp gia nhằm mục đích phân tích và dự đoán những kèo thơm và đặt cược để thắng lợi. bongdaso.co thường xuyên trang bóng đá số xem tỷ lệ kèo bóng đá – kết trái đá bóng – lịch thi đấu soccer – tỷ số soccer.
When I initially commented I clicked the “Notify me when new comments are added” checkbox and now each time a comment is added I get three e-mails with the same comment. Is there any way you can remove me from that service? Cheers!
Lựa Chọn Giầy Bóng Rổ Chi Phí đảm Bảo Chất Lượngtrực tiếp thvl1Lần đầu tiên ra đôi mắt thì giầy Jordan 1 có color đỏ, trắng và đen phối với nhau. Với upper mỏng manh nhẹ nhàng và đế bền rộng cùng cỗ đệm lấy thẳng từ Crazylight Boost năm 2016, trong hoàn cảnh tạm thời Rose 8 cũng rất đáng nhằm test.
Mua Giày Bóng Rổac milan vsLần trước tiên ra mắt thì giày Jordan 1 có color đỏ, white và đen phối với nhau. Với upper mỏng manh nhẹ nhõm và đế bền rộng cùng cỗ đệm lấy trực tiếp kể từ Crazylight Boost năm nhâm thìn, trong hoàn cảnh tạm thời Rose 8 cũng vô cùng xứng đáng để thử.
Giày Bóng Rổ Giá Tiền Rẻ Bền đẹp, Giá Tiền Sốc, Nên Lựa Chọn Ở Đâugiao hữu việt nam triều tiênLần thứ nhất ra đôi mắt thì giầy Jordan 1 có màu sắc đỏ, trắng và đen phối cùng với nhau. Với upper mỏng dính nhẹ nhàng và đế bền rộng cùng cỗ đệm lấy thẳng từ Crazylight Boost 2016, tạm thời Rose 8 cũng vô cùng xứng đáng để test.
Write more, thats all I have to say. Literally, it seems as though you relied on the video to make your point. You obviously know what youre talking about, why waste your intelligence on just posting videos to your weblog when you could be giving us something enlightening to read?
There is apparently a bunch to know about this. I consider you made various good points in features also.
Please let me know if you’re looking for a article writer for your site. You have some really good articles and I feel I would be a good asset. If you ever want to take some of the load off, I’d love to write some material for your blog in exchange for a link back to mine. Please send me an email if interested. Many thanks!
Lựa Chọn Giày Bóng Rổ Chi Phí đảm Bảo Hóa Học Lượngvtc7 onlineLần thứ nhất ra đôi mắt thì giày Jordan 1 có color đỏ, trắng và đen phối cùng với nhau. Với upper mỏng manh nhẹ nhàng và đế bền rộng cùng bộ đệm lấy thẳng từ Crazylight Boost năm nhâm thìn, trong giai đoạn tạm thời Rose 8 cũng vô cùng đáng nhằm demo.
Iím impressed, I have to admit. Rarely do I encounter a blog thatís equally educative and interesting, and without a doubt, you’ve hit the nail on the head. The problem is something too few men and women are speaking intelligently about. I am very happy I stumbled across this in my hunt for something regarding this.
hi!,I love your writing so a lot! share we keep up a correspondence extra about your post on AOL? I require an expert on this area to resolve my problem. Maybe that is you! Looking ahead to look you.
Lựa Chọn Giày Bóng Rổ Giá đảm Bảo Chất Lượnglịch thi đấu của barcaLần thứ nhất ra đôi mắt thì giầy Jordan 1 có màu sắc đỏ, Trắng và đen phối cùng với nhau. Với upper mỏng nhẹ nhõm và đế bền hơn cùng cỗ đệm lấy trực tiếp từ Crazylight Boost 2016, tạm thời Rose 8 cũng vô cùng đáng nhằm demo.
Good day! I know this is kinda off topic nevertheless I’d figured I’d ask. Would you be interested in exchanging links or maybe guest writing a blog post or vice-versa? My website addresses a lot of the same topics as yours and I believe we could greatly benefit from each other. If you happen to be interested feel free to shoot me an e-mail. I look forward to hearing from you! Superb blog by the way!
I like the helpful information you provide to your articles. I’ll bookmark your weblog and check once more right here regularly. I’m fairly sure I’ll be told plenty of new stuff right right here! Good luck for the following!
This design is wicked! You most certainly know how to keep a reader entertained. Between your wit and your videos, I was almost moved to start my own blog (well, almost…HaHa!) Wonderful job. I really enjoyed what you had to say, and more than that, how you presented it. Too cool!
Giầy Bóng Rổ Chi Phí Rẻ Bền đẹp Mắt, Chi Phí Sốc, Nên Mua Ở Đâuman city tin tucLần thứ nhất ra đôi mắt thì giày Jordan 1 có màu đỏ, white và đen phối cùng với nhau. Với upper mỏng dính nhẹ nhàng và đế bền rộng cùng bộ đệm lấy trực tiếp kể từ Crazylight Boost năm 2016, tạm thời Rose 8 cũng vô cùng xứng đáng nhằm demo.
I like this post, enjoyed this one regards for putting up.
Lựa Chọn Giày Bóng Rổ Giá Tiền đảm Bảo Hóa Học Lượngthái lan vs việt nam 5/9Lần trước tiên ra mắt thì giầy Jordan 1 có màu đỏ, Trắng và đen phối cùng với nhau. Với upper mỏng manh nhẹ nhàng và đế bền rộng cùng bộ đệm lấy trực tiếp kể từ Crazylight Boost năm nhâm thìn, trong giai đoạn tạm thời Rose 8 cũng rất đáng nhằm test.
Some truly nice and utilitarian information on this web site, too I conceive the style has got superb features.
Hey there! I could have sworn I’ve been to this blog before but after reading through some of the post I realized it’s new to me. Anyways, I’m definitely happy I found it and I’ll be bookmarking and checking back often!
Giầy Bóng Rổ Giá Tiền Rẻ Bền đẹp Mắt, Chi Phí Sốc, Nên Chọn Mua Ở Đâutinh hinh siryLần trước tiên ra mắt thì giày Jordan 1 có màu đỏ, Trắng và đen phối với nhau. Với upper mỏng manh nhẹ nhàng và đế bền rộng cùng bộ đệm lấy thẳng từ Crazylight Boost 2016, tạm thời Rose 8 cũng cực kỳ xứng đáng để demo.
Giày Thể Thao, Năng Động Thể Thao Chính Thương Hiệu Peak Sportgame đố vuiLần thứ nhất ra đôi mắt thì giầy Jordan 1 có color đỏ, trắng và đen phối với nhau. Với upper mỏng nhẹ và đế bền hơn cùng cỗ đệm lấy thẳng từ Crazylight Boost năm 2016, trong giai đoạn tạm thời Rose 8 cũng cực kỳ đáng nhằm thử.
I blog often and I truly thank you for your content. This article has really peaked my interest. I will book mark your website and keep checking for new information about once a week. I subscribed to your Feed as well.
[email protected]
There is noticeably a bundle to know about this. I assume you made certain nice points in features also.
I will immediately grab your rss as I can’t to find your e-mail subscription hyperlink or newsletter service. Do you have any? Please allow me recognise so that I could subscribe. Thanks.
As I website owner I believe the content material here is really excellent, thanks for your efforts.
Lựa Chọn Giầy Bóng Rổlịch thi đấu champion leagueLần thứ nhất ra đôi mắt thì giày Jordan 1 có color đỏ, Trắng và đen phối với nhau. Với upper mỏng manh nhẹ nhõm và đế bền rộng cùng cỗ đệm lấy trực tiếp từ Crazylight Boost năm nhâm thìn, trong giai đoạn tạm thời Rose 8 cũng rất đáng nhằm demo.
Pretty great post. I just stumbled upon your blog and wanted to mention that I’ve truly loved surfing around your blog posts. After all I will be subscribing in your rss feed and I hope you write again soon!
Giày Thể Thao, Năng Động Thể Thao Chủ Yếu Hãng Peak Sportngoai hang anh hom nayLần trước tiên ra mắt thì giầy Jordan 1 có color đỏ, trắng và đen phối cùng với nhau. Với upper mỏng nhẹ và đế bền hơn cùng bộ đệm lấy thẳng từ Crazylight Boost 2016, trong hoàn cảnh tạm thời Rose 8 cũng vô cùng xứng đáng nhằm test.
Giầy Thể Thao, Năng Động Thể Thao Chính Thương Hiệu Peak Sportlich phat song vtv1Lần thứ nhất ra mắt thì giầy Jordan 1 có màu sắc đỏ, trắng và đen phối với nhau. Với upper mỏng dính nhẹ và đế bền hơn cùng cỗ đệm lấy trực tiếp từ Crazylight Boost năm nhâm thìn, trong giai đoạn tạm thời Rose 8 cũng rất xứng đáng để test.
Some us know all referring to the powerful medium you existing highly effective methods on this site and therefore strongly encourage contribution from other kinds on this matter when our personal youngster is actually getting an incredible deal. Have some fun While using the remaining percentage of the calendar year.
What i don’t understood is if truth be told how you are now not actually much more neatly-appreciated than you may be right now. You’re so intelligent. You understand therefore considerably when it comes to this subject, produced me individually believe it from so many varied angles. Its like men and women aren’t involved except it?¦s something to accomplish with Lady gaga! Your own stuffs outstanding. Always maintain it up!
[email protected]
Giầy Thể Thao, Năng Động Thể Thao Chính Thương Hiệu Peak Sportphù dao hoàng hậu fptLần thứ nhất ra đôi mắt thì giày Jordan 1 có color đỏ, Trắng và đen phối cùng với nhau. Với upper mỏng dính nhẹ và đế bền hơn cùng bộ đệm lấy trực tiếp kể từ Crazylight Boost 2016, tạm thời Rose 8 cũng vô cùng đáng để test.
Lựa Chọn Giày Bóng Rổclub leonLần đầu tiên ra mắt thì giầy Jordan 1 có color đỏ, trắng và đen phối cùng với nhau. Với upper mỏng manh nhẹ và đế bền rộng cùng bộ đệm lấy trực tiếp kể từ Crazylight Boost năm 2016, tạm thời Rose 8 cũng rất đáng nhằm test.
I and my friends have been experiencing the nice, handy guidelines through the blog site then the sudden arrived up with the awful suspicion I by no means expressed regard to the web site proprietor for those insider secrets.
Giầy Bóng Rổ Chi Phí Rẻ Bền đẹp, Giá Tiền Sốc, Nên Chọn Mua Ở Đâuatalanta fgoLần thứ nhất ra mắt thì giày Jordan 1 có màu sắc đỏ, white và đen phối với nhau. Với upper mỏng dính nhẹ nhõm và đế bền rộng cùng cỗ đệm lấy thẳng từ Crazylight Boost 2016, tạm thời Rose 8 cũng rất đáng để test.
Aw, this was an exceptionally nice post. Finding the time and actual effort to make a good articleÖ but what can I sayÖ I procrastinate a whole lot and don’t seem to get nearly anything done.
Greetings! Very useful advice within this article! It’s the little changes that produce the most significant changes. Many thanks for sharing!
I?¦m no longer positive the place you’re getting your information, but great topic. I needs to spend a while finding out much more or figuring out more. Thank you for magnificent information I was searching for this info for my mission.
Hello! I just would like to offer you a big thumbs up for the great information you have here on this post. I am returning to your web site for more soon.
I like this web blog so much, saved to fav.
Hello.This article was really fascinating, especially since I was investigating for thoughts on this matter last Tuesday.
I really like what you guys are up too. Such clever work and exposure! Keep up the fantastic works guys I’ve added you guys to blogroll.
After I initially commented I seem to have clicked the -Notify me when new comments are added- checkbox and from now on every time a comment is added I recieve four emails with the same comment. Perhaps there is an easy method you can remove me from that service? Many thanks!
There is certainly a great deal to learn about this issue. I love all the points you made.
You made some good points there. I checked on the web for additional information about the issue and found most people will go along with your views on this site.
I’m excited to uncover this web site. I wanted to thank you for your time for this fantastic read!! I definitely really liked every little bit of it and i also have you bookmarked to check out new information in your website.
Thank you for the sensible critique. Me & my neighbor were just preparing to do some research on this. We got a grab a book from our local library but I think I learned more from this post. I am very glad to see such wonderful info being shared freely out there.
Hiya, I’m really glad I have found this info. Today bloggers publish just about gossips and web and this is really annoying. A good blog with exciting content, that is what I need. Thanks for keeping this web site, I’ll be visiting it. Do you do newsletters? Can not find it.
It¦s really a great and helpful piece of information. I¦m satisfied that you shared this useful information with us. Please keep us informed like this. Thanks for sharing.
You could definitely see your enthusiasm in the work you write. The world hopes for even more passionate writers like you who are not afraid to say how they believe. Always go after your heart.
Good day! I could have sworn I’ve been to this website before but after reading through some of the post I realized it’s new to me. Anyhow, I’m definitely delighted I found it and I’ll be book-marking and checking back often!
Yesterday, while I was at work, my cousin stole my iphone and tested to see if it can survive a twenty five foot drop, just so she can be a youtube sensation. My apple ipad is now broken and she has 83 views. I know this is entirely off topic but I had to share it with someone!
Hello there! Would you mind if I share your blog with my myspace group?
There’s a lot of folks that I think would really enjoy your content.
Please let me know. Cheers
Feel free to surf to my blog: Digitizer Touchscreen Tablete Vinchi –
A fascinating discussion is worth comment. I believe that you should write more on this issue, it might not be a taboo matter but generally folks don’t talk about such topics. To the next! Kind regards!!
Aw, this was a very nice post. Taking a few minutes and actual effort to generate a great articleÖ but what can I sayÖ I procrastinate a lot and never seem to get nearly anything done.
That is a good tip especially to those fresh to the blogosphere. Brief but very precise informationÖ Appreciate your sharing this one. A must read article!
This web site definitely has all the information I wanted about this subject and didnít know who to ask.
There’s certainly a lot to find out about this topic. I love all the points you made.
This is the right site for anybody who really wants to understand this topic. You realize so much its almost hard to argue with you (not that I personally would want toÖHaHa). You definitely put a new spin on a topic that has been discussed for a long time. Wonderful stuff, just excellent!
bookmarked!!, I really like your web site!
This website can be a stroll-through for the entire info you needed about this and didn’t know who to ask. Glimpse here, and you’ll definitely discover it.
Can I just say what a comfort to find an individual who actually knows what they’re discussing online. You certainly realize how to bring a problem to light and make it important. More and more people ought to read this and understand this side of the story. I was surprised that you are not more popular since you surely possess the gift.
You ought to take part in a contest for one of the greatest sites on the internet. I’m going to recommend this web site!
Good day! I could have sworn I’ve been to this blog before but after reading through some of the post I realized it’s new to me. Anyhow, I’m definitely glad I found it and I’ll be book-marking and checking back often!
I?¦ve learn a few just right stuff here. Definitely price bookmarking for revisiting. I wonder how so much effort you set to create this sort of fantastic informative website.
I have been surfing online more than three hours these days, yet I never found any attention-grabbing article like yours. It is beautiful value sufficient for me. In my view, if all website owners and bloggers made good content material as you probably did, the net will likely be a lot more useful than ever before.
Everything is very open with a very clear clarification of the challenges. It was really informative. Your site is very useful. Many thanks for sharing!
Enjoyed examining this, very good stuff, appreciate it. “A man may learn wisdom even from a foe.” by Aristophanes.
Good info. Lucky me I recently found your website by accident (stumbleupon). I’ve book marked it for later!
Hello.This article was really interesting, particularly since I was searching for thoughts on this subject last Wednesday.
You are able to simply use this our game hack online from your Android, iOS, PC or laptop device without having to spend any actual dollars and generate your limitless resources in only a few mins. Using our game hack tool from any device is extremely simple. You can use it from Windows, Mac, Android or iOS, and get your resources without having to spend any single dollar or penny.
Pretty! This has been an extremely wonderful post. Thanks for supplying this information.
obviously like your web site but you need to take a look at the spelling on several of your posts. Several of them are rife with spelling problems and I to find it very bothersome to tell the reality on the other hand I will certainly come back again.
Best view i have ever seen !
Thanks for another informative site. Where else could I get that kind of info written in such a perfect way? I have a project that I am just now working on, and I’ve been on the look out for such information.
Hello there! I just wish to offer you a big thumbs up for your excellent information you have right here on this post. I will be coming back to your blog for more soon.
I need to to thank you for this very good read!! I absolutely enjoyed every bit of it. I have got you saved as a favorite to look at new things you postÖ
I was pretty pleased to find this site. I need to to thank you for ones time due to this fantastic read!! I definitely liked every bit of it and I have you saved to fav to check out new stuff on your web site.
I have learn a few good stuff here. Certainly price bookmarking for revisiting. I surprise how much effort you place to make any such excellent informative website.
A fascinating discussion is worth comment. I think that you need to publish more about this issue, it may not be a taboo subject but usually folks don’t talk about these subjects. To the next! Kind regards!!
Thanks for another wonderful post. Where else could anybody get that kind of information in such an ideal way of writing? I have a presentation next week, and I am on the look for such information.
I would like to get across my appreciation for your kind-heartedness supporting men and women that should have guidance on this important situation. Your real dedication to getting the message along became rather significant and have continually allowed men and women much like me to reach their ambitions. Your personal valuable advice can mean a great deal to me and even more to my colleagues. Thank you; from everyone of us.
I think this is one of the most vital information for me. And i’m glad reading your article. But wanna remark on few general things, The website style is perfect, the articles is really great : D. Good job, cheers
Can I just say what a relief to find someone who actually knows what theyre talking about on the internet. You definitely know how to bring an issue to light and make it important. More people need to read this and understand this side of the story. I cant believe youre not more popular because you definitely have the gift.
Can I just say what a relief to find someone who actually knows what theyre talking about on the internet. You definitely know how to bring an issue to light and make it important. More people need to read this and understand this side of the story. I cant believe youre not more popular because you definitely have the gift.
Hi! I could have sworn I’ve been to this website before but after checking through some of the post I realized it’s new to me. Anyways, I’m definitely glad I found it and I’ll be bookmarking and checking back frequently!
Hello very cool site!! Man .. Beautiful .. Wonderful .. I’ll bookmark your site and take the feeds also?KI’m glad to find numerous helpful information here in the submit, we need develop extra techniques on this regard, thanks for sharing. . . . . .
Thank you for some other informative web site. The place else may just I get that kind of information written in such a perfect way? I have a project that I am just now running on, and I have been at the glance out for such information.
An interesting discussion is worth comment. I think that you should write more on this topic, it might not be a taboo subject but generally people are not enough to speak on such topics. To the next. Cheers
We are a group of volunteers and starting a brand new scheme in our community. Your web site provided us with useful information to work on. You have performed a formidable process and our whole community will likely be thankful to you.
I genuinely prize your work, Great post.
I enjoy examining and I think this website got some really useful stuff on it! .
I think this is among the so much vital info for me. And i am satisfied reading
your article. But want to remark on few basic things, The web site style is
great, the articles is really excellent : D. Good
activity, cheers
I envy your piece of work, appreciate it for all the great blog posts.
Thank you for helping out, excellent info. “Whoever obeys the gods, to him they particularly listen.” by Homer.
Hey there! I am aware That is form of off-topic, but I’d figured I’d request. Would you have an interest in exchanging back links Or even guest authoring a site publish or vice-versa? My blog goes above many a similar subjects as yours, and I think we could significantly gain from each other. If you materialize to be interested, Be happy to shoot me an e-mail. I look forward to hearing from you! Great web site Incidentally!
I’d must test with you here. Which isn’t one thing I usually do! I get pleasure from studying a publish that will make individuals think. Additionally, thanks for allowing me to remark!
Thank you, I’ve recently been looking for information approximately this subject for a long time and yours is the greatest I have discovered till now. However, what in regards to the conclusion? Are you sure about the source?
F*ckin’ awesome things here. I am very glad to see your article. Thanks a lot and i am looking forward to contact you. Will you kindly drop me a e-mail?
I have been absent for some time, but now I remember why I used to love this site. Thanks , I will try and check back more often. How frequently you update your site?
I genuinely enjoy reading on this web site, it contains excellent blog posts. “A short saying oft contains much wisdom.” by Sophocles.
This is a very good tips especially to those new to blogosphere, brief and accurate information… Thanks for sharing this one. A must read article.
Wow! Thank you! I continuously wanted to write on my blog something like that. Can I take a fragment of your post to my blog?
so much good info on here, : D.
I’m going through some compact protection challenges with my most up-to-date weblog, And that i’d like to locate something safer. Do you’ve got any suggestions?
Perfect piece of work you have done, this website is really cool with superb info .
Hi there, I examine your site often, And that i very own the same 1, and I used to be just wanting to know if you can get a lot of spam remarks? If so How can you quit it, any plugin or anything at all you may advise? I get a great deal of these days it’s driving me crazy, so any guidance is very much appreciated.
Hi, just required you to know I he added your site to my Google bookmarks due to your layout. But seriously, I believe your internet site has 1 in the freshest theme I??ve came across. It extremely helps make reading your blog significantly easier.
Your incredibly own motivation to obtaining the concept all through came to become somewhat impressive and also have regularly enabled staff members just like me to reach at their ideal objectives.
Attractive section of content. I just stumbled upon your blog and in accession capital to assert that I acquire in fact enjoyed account your blog posts. Anyway I will be subscribing to your feeds and even I achievement you access consistently quickly.
I basically desired to thank you a great deal of once again. I’m not sure the things which I may need passed through with no form of hints exposed by you about that condition.
Some really fantastic info , Gladiola I detected this. “Genuine goodness is threatening to those at the opposite end of the moral spectrum.” by Charles Spencer.
I’ve been absent for some time, but now I remember why I used to love this website. Thank you, I will try and check back more frequently. How frequently you update your site?
Great beat ! I wish to apprentice while you amend your website, how can i subscribe for a blog website? The account aided me a acceptable deal. I had been tiny bit acquainted of this your broadcast offered bright clear concept
Amazing! This blog looks exactly like my old one! It’s on a completely different subject but it has pretty much the same page layout and design. Excellent choice of colors!
I was curious when you at any time deemed shifting the structure of your site? Its extremely nicely written; I love Whatever you’ve obtained to say. But perhaps you could a little bit more in how of written content so men and women could link with it much better.You’ve obtained an dreadful number of textual content For under getting one particular or two pics. It’s possible you might space it out improved?
That is the suitable weblog for anybody who wants to seek out out about this topic. You notice a lot its nearly arduous to argue with you (not that I truly would need…HaHa). You undoubtedly put a brand new spin on a topic thats been written about for years. Great stuff, simply great!
Thanks for the sensible critique. Me and my neighbor were just preparing to do some research on this. We got a grab a book from our local library but I think I learned more clear from this post. I’m very glad to see such great info being shared freely out there.
When I initially commented I clicked the -Notify me when new feedback are added- checkbox and now every time a remark is added I get 4 emails with the identical comment. Is there any manner you may take away me from that service? Thanks!
Hmm is anyone else having problems with the images on this blog loading? I’m trying to figure out if its a problem on my end or if it’s the blog. Any responses would be greatly appreciated.
You really make it seem so easy with your presentation but I find this topic to be actually something that I think I would never understand. It seems too complicated and extremely broad for me. I am looking forward for your next post, I will try to get the hang of it!
Really informative blog.
Awsome article and straight to the point. I am not sure if this is actually the best place to ask but do you people have any thoughts on where to get some professional writers? Thx 🙂
Do you do have a spam difficulty on this website; I also am a blogger, And that i desired to know your scenario; Many people have produced some awesome methods, and we need to trade approaches with Other folks, why not shoot me an e-mail if fascinated.
I’d forever want to be update on new content on this internet site, saved to favorites! .
Hi. This post couldn’t be written any improved! Reading through this write-up jogs my memory of my prior space mate. He constantly stored chatting concerning this. I will forward this site to him. Quite sure he could have an excellent read through. Thank you for sharing.
I couldn’t resist commenting
Hi! Do you know if they make any plugins to safeguard against hackers? I’m kinda paranoid about losing everything I’ve worked hard on. Any recommendations?
Have you ever thought about publishing an e-book or guest authoring on other sites? I have a blog centered on the same subjects you discuss and would love to have you share some stories/information. I know my audience would appreciate your work. If you are even remotely interested, feel free to shoot me an email.
Very nice article and right to the point. I don’t know if this is truly the best place to ask but do you guys have any ideea where to hire some professional writers? Thx 🙂
Keep up the fantastic piece of work, I read few content on this web site and I think that your site is really interesting and has got bands of good information.
This is really fascinating, You are a very professional blogger. I have joined your rss feed and look forward to looking for more of your excellent post. Also, I’ve shared your website in my social networks!
I think this is among the most vital information for me. And i’m happy studying your article. However want to remark on few common things, The site taste is wonderful, the articles is actually nice : D. Excellent process, cheers
You made certain fine points there. I did a search on the topic and found most people will have the same opinion with your blog.
I had been curious for those who ever regarded as switching the layout of your website? Its pretty very well penned; I really like Everything you’ve bought to state. But possibly you can a little bit more in the best way of written content so folks could link with it superior.You’ve got an awful lots of text For under getting 1 or two photos. Perhaps you can Room it out improved?
I love reading and I conceive this website got some truly utilitarian stuff on it! .
Its wonderful as your other articles : D, regards for posting.
Great wordpress blog here.. It’s hard to find quality writing like yours these days. I really appreciate people like you! take care
Hey there! I know This is certainly sort of off-subject, but I’d figured I’d check with. Would you be interested in exchanging hyperlinks Or even guest authoring a blog publish or vice-versa? My site goes about many the same subject areas as yours, and I think we could significantly take advantage of one another. For those who come about to have an interest, Be at liberty to shoot me an e-mail. I look ahead to hearing from you! Excellent web site Incidentally!
Thanks for another magnificent article. Where else could anyone get that kind of info in such an ideal way of writing? I have a presentation next week, and I’m on the look for such information.
There are actually a whole lot of particulars like that to take into consideration. That is a great point to deliver up. I offer the ideas above as normal inspiration however clearly there are questions like the one you bring up where the most important thing will be working in sincere good faith. I don?t know if greatest practices have emerged around issues like that, however I am certain that your job is clearly recognized as a fair game. Both boys and girls really feel the influence of only a second’s pleasure, for the rest of their lives.
Thank you for the auspicious writeup. It in fact was a amusement account it. Look advanced to more added agreeable from you! However, how can we communicate?
Nice post. I learn one thing more challenging on totally different blogs everyday. It can at all times be stimulating to learn content from other writers and practice a bit of one thing from their store. I’d want to make use of some with the content on my blog whether or not you don’t mind. Natually I’ll offer you a hyperlink on your net blog. Thanks for sharing.
An interesting discussion is worth comment. I think that you should write more on this topic, it might not be a taboo subject but generally people are not enough to speak on such topics. To the next. Cheers
I need to voice my passion to your kindness giving assistance to those people that ought to have steering on this crucial make any difference.
Keep up the good work, I read few posts on this website and I believe that your web site is rattling interesting and has bands of fantastic information.
Hiya, I am really glad I’ve found this information. Nowadays bloggers publish only about gossips and web and this is actually irritating. A good blog with interesting content, that is what I need. Thank you for keeping this web-site, I’ll be visiting it. Do you do newsletters? Can not find it.
Needed to compose you a very little term to thanks once more regarding the good recommendations you’ve contributed here.
I ‘d mention that Many of us site visitors are endowed to exist in the incredible location with pretty a lot of superb people today with really beneficial matters.
Hi there I am so thrilled I found your internet site, I really discovered you by mistake, while I was searching on Yahoo for something else, Anyhow I am listed here now and would the same as to state thanks a good deal for a huge put up as well as a all round interesting weblog (I also appreciate the concept/style and design), I don’t have time to endure everything at the moment but I have saved it and likewise extra inside your RSS feeds, so After i have time I will be back to read more, Remember to do keep up the wonderful work.
What’s Going down i’m new to this, I stumbled upon this I’ve found It absolutely useful and it has aided me out loads. I hope to give a contribution & aid different customers like its aided me. Great job.
Hey There. I found your blog using msn. This is an extremely well written article. I’ll be sure to bookmark it and return to read more of your useful info. Thanks for the post. I’ll definitely return.
I really appreciate this post. I have been looking all over for this! Thank goodness I found it on Bing. You have made my day! Thank you again
Hello! I know this is kinda off topic nevertheless I’d
figured I’d ask. Would you be interested in exchanging links or maybe
guest authoring a blog article or vice-versa? My site goes over a lot of the same topics as yours and I feel we could
greatly benefit from each other. If you are interested feel free to shoot me an email.
I look forward to hearing from you! Great blog by the way!
Fantastic web site. Plenty of useful info here. I am sending it to some buddies ans additionally sharing in delicious. And naturally, thank you in your effort!
This blog is definitely rather handy since I’m at the moment creating an internet floral website – although I am only starting out therefore it’s really fairly small, nothing like this site. Can link to a few of the posts here as they are quite. Thanks much. Zoey Olsen
It is appropriate time to make a few plans for the long run and it’s time
to be happy. I’ve read this publish and if I may I wish to suggest you some fascinating
issues or advice. Perhaps you could write next articles relating to this article.
I want to read more issues approximately it!
I don’t usually comment but I gotta say regards for the post on this perfect one : D.
Appreciation for seriously becoming thoughtful as well as for selecting on selected wonderful guides the majority of people really need to know about.
I’ve bookmarked your website, and I’m incorporating your RSS feeds to my Google account.
I simply wanted to post a brief comment to be able to thank you for all of the remarkable techniques you are giving out here. My considerable internet research has at the end been paid with reliable content to go over with my colleagues. I would express that many of us website visitors actually are really endowed to exist in a good place with very many outstanding individuals with valuable tips. I feel very fortunate to have come across the web pages and look forward to really more pleasurable moments reading here. Thanks once again for everything.
I wanted to draft you the very little observation to help thank you very much yet again for the incredible thoughts you have shown on this website. This is certainly incredibly open-handed of people like you to provide easily exactly what most people could possibly have marketed as an ebook to help with making some cash for their own end, notably since you might well have done it if you decided. Those secrets likewise worked like the great way to be aware that most people have the same desire like my personal own to see whole lot more with reference to this problem. I’m sure there are thousands of more pleasurable situations up front for folks who discover your blog post.
I wanted to write you that little observation so as to say thanks once again relating to the extraordinary thoughts you have discussed above. This is quite unbelievably open-handed of you in giving unreservedly all numerous people would’ve advertised as an ebook to help make some profit for themselves, certainly seeing that you could have tried it in case you considered necessary. The basics likewise served like a easy way to fully grasp some people have a similar zeal really like my personal own to learn somewhat more in regard to this issue. I am certain there are lots of more enjoyable occasions in the future for those who find out your site.
It’s great to come across a web site every single Occasionally that isn’t the exact same away from date rehashed materials. Amazing study.
My associate And that i stumbled above here various website and believed I would at the same time Examine issues out. I like what I see so now I’m adhering to you. Sit up for checking out your Web content regularly.
Howdy! A person in my Facebook group shared this Internet site with us, so I came to give it a look. I’m enjoying the information. I’m bookmarking and can be tweeting this to my followers! Amazing website and awesome design and style.
Porn100.net questions contented him few extensive supported. Of remarkably thoroughly he appearance in. Supposing tolerably applauded or of be. Suffering unfeeling so objection agreeable allowance me of. Ask within entire season sex common far who family. As be valley warmth assure on. Park girl they rich hour new well way you. Face ye be me been room we sons fond.
Premiumpornguide.com.net all speaking her delicate recurred possible. Set indulgence inquietude discretion insensible bed why announcing. Middleton fat two satisfied additions. So continued he or commanded household smallness delivered. Door poor on do walk in half. Roof his head the what.
I’d like to become a Element of team exactly where I could possibly get information from other professional people today that share a similar fascination. Should you have any suggestions, you should let me know. Thank you.
I ‘d point out that The majority of us people are endowed to exist in a fantastic spot with extremely lots of excellent folks with very useful things.
It’s a disgrace you don’t Have a very donate button! I’d absolutely donate to this brilliant blog site! I suppose for now I’ll accept e-book-marking and introducing your RSS feed to my Google account. I sit up for fresh new updates and may look at this website with my Fb team. Chat soon!
I would like to show my appreciation to the writer just for bailing me out of this situation. Just after searching through the search engines and getting tips which are not productive, I was thinking my entire life was well over. Living minus the answers to the difficulties you have solved as a result of your guideline is a crucial case, as well as those that might have negatively damaged my entire career if I hadn’t discovered your blog post. Your good know-how and kindness in touching every part was important. I don’t know what I would have done if I hadn’t discovered such a thing like this. I can also at this point relish my future. Thanks very much for your professional and sensible help. I won’t think twice to endorse the website to anybody who should get guide on this subject.
Present without the answers towards the difficulties you’ve sorted out by this guide is actually a essential case, and also the type which could have terribly impacted my overall occupation if I had not learned your web site.
I do not even understand how I stopped up right here, however I assumed this put up used to be great. I don’t recognise who you are however certainly you are going to a well-known blogger in the event you aren’t already 😉 Cheers!
Required to compose you a very little term to thank you another time regarding the wonderful solutions you’ve contributed below.
This is the right blog for anyone who wants to find out about this topic. You realize so much its almost hard to argue with you (not that I actually would want?HaHa). You definitely put a new spin on a topic thats been written about for years. Great stuff, just great!
This is the right blog for anyone who wants to find out about this topic. You realize so much its almost hard to argue with you (not that I actually would want?HaHa). You definitely put a new spin on a topic thats been written about for years. Great stuff, just great!
hey there and thanks in your info Ive certainly picked up something new from right here. I did then again experience some technical issues the usage of this site, since I experienced to reload the website a lot of times prior to I may just get it to load properly. I were pondering in case your hosting is OK? No longer that I am complaining, but sluggish loading instances instances will often impact your placement in google and can injury your high-quality ranking if ads and ***********|advertising|advertising|advertising and *********** with Adwords. Well Im including this RSS to my e-mail and can glance out for a lot more of your respective interesting content. Ensure that you replace this once more very soon..
It’s a shame you don’t Possess a donate button! I’d undoubtedly donate to this amazing blog! I suppose for now I’ll accept reserve-marking and adding your RSS feed to my Google account. I look ahead to fresh new updates and can take a look at this web site with my Fb group. Chat shortly!
An interesting discussion is worth comment. I think that you should write more on this topic, it might not be a taboo subject but generally people are not enough to speak on such topics. To the next. Cheers
An interesting discussion is worth comment. I think that you should write more on this topic, it might not be a taboo subject but generally people are not enough to speak on such topics. To the next. Cheers
Youre so cool! I dont suppose Ive read anything like this before. So nice to find somebody with some original thoughts on this subject. realy thank you for starting this up. this website is something that is needed on the web, someone with a little originality. useful job for bringing something new to the internet!
Thanks quite a bit a great deal to the high quality and outcomes-oriented assist. I gained’t Consider two times to endorse your website article to any person who wishes and wishes support concerning this space.
Hello! A person in my Fb group shared this Web page with us, so I came to provide it a glance. I’m savoring the knowledge. I’m bookmarking and may be tweeting this to my followers! Wonderful website and incredible design and style and magnificence.
This is the right blog for anyone who wants to find out about this topic. You realize so much its almost hard to argue with you (not that I actually would want?HaHa). You definitely put a new spin on a topic thats been written about for years. Great stuff, just great!
Hey, would you brain if I share your website with my twitter team? There’s lots of folks that I do think would enjoy your information. Remember to allow me to know. Thank you.
When I originally commented I clicked the -Notify me when new comments are added- checkbox and now each time a comment is added I get four emails with the same comment. Is there any way you can remove me from that service? Thanks!
Howdy, would you mind letting me know which Net host you’re making use of? I’ve loaded your web site in 3 completely unique web browsers, and I have to say this blog site loads quite a bit quicker then most. Is it possible to propose a very good World-wide-web web hosting provider at a reasonable cost?
Your really have motivation to receiving the concept all through arrived being rather effective and possess continuously enabled staff members identical to me to arrive at their ideal targets.
I discovered your blog site on google and check a few of your early posts. Continue to keep up the very good operate. I just additional up your RSS feed to my MSN News Reader. Seeking forward to reading more from you later on!?
I?m impressed, I must say. Really rarely do I encounter a blog that?s both educative and entertaining, and let me tell you, you have hit the nail on the head. Your idea is outstanding; the issue is something that not enough people are speaking intelligently about. I am very happy that I stumbled across this in my search for something relating to this.
After looking into a handful of the blog articles on your site, I seriously appreciate your technique of blogging. I saved as a favorite it to my bookmark site list and will be checking back soon. Please check out my web site as well and let me know how you feel.
I really love your site.. Great colors & theme. Did you create this site yourself? Please reply back as Iím trying to create my own personal website and want to learn where you got this from or just what the theme is named. Kudos!
This is a great tip especially to those new to the blogosphere. Brief but very accurate informationÖ Many thanks for sharing this one. A must read post!
I have read so many articles about the blogger lovers however this article is in fact a fastidious article, keep it
up.
My partner and I like your site and come across Practically your whole post’s to become exactly what I’m in search of. can you present visitor writers to write down articles for you? I wouldn’t brain creating a publish or elaborating on some the topics you compose about listed here. Yet again, brilliant weblog!
Greetings! Very helpful advice within this post! It’s the little changes that produce the biggest changes. Thanks for sharing!
{
Those tips In addition labored to be a good way to recognize that Other individuals on-line possess the identical fervor like mine to grasp wonderful offer far more all over this problem.
What i don’t realize is in fact how you’re no longer really much more smartly-liked than you might be now. You’re so intelligent. You already know therefore significantly with regards to this topic, made me individually imagine it from numerous varied angles. Its like women and men aren’t involved until it’s something to accomplish with Woman gaga! Your individual stuffs outstanding. At all times care for it up!
Hello there, there. I do know This is often off-matter, but I used to be thinking which web site platform will you be applying for This web site? I’m getting fed up of WordPress because I’ve had problems with hackers And that i’m investigating choices for an additional platform. I can be excellent if you could possibly place me from the path of a great platform.
Can I just say what a comfort to find somebody who actually understands what they’re discussing on the net. You certainly know how to bring an issue to light and make it important. A lot more people ought to read this and understand this side of the story. I was surprised that you aren’t more popular given that you surely possess the gift.
Your new important vital details suggest Significantly a person like me and very additional to my Place of work workers. With many thanks; from Every person of us.
Hello there I’m so thrilled I found your web site, I actually found you by error, while I used to be searching on Yahoo for another thing, Anyhow I’m in this article now and would much like to state thanks a great deal for a tremendous post as well as a all round remarkable site (I also adore the concept/design and style), I don’t have time to experience everything within the minute but I’ve saved it and in addition added in your RSS feeds, so After i have time I will be again to read much more, Remember to do keep up the awesome position.
I was recommended this blog by my cousin. I’m not sure whether this post is written by him as nobody else know such detailed about my problem. You are incredible! Thanks!
https://www.pagearticles.com/
Good day! This post couldn’t be written any better!
Reading this post reminds me of my old room mate!
He always kept talking about this. I will forward this post to him.
Pretty sure he will have a good read. Thank you for sharing!
https://www.pagearticles.com/
I and my good friends had been experiencing the good, useful strategies within the site then the sudden arrived up having an awful suspicion I never ever expressed regard to the website owner for the people tricks.
Hi there I am so thrilled I discovered your website, I actually observed you by slip-up, while I was browsing on Yahoo for something else, Anyhow I’m listed here now and would the same as to state thanks a good deal for a huge write-up as well as a all spherical thrilling site (I also appreciate the concept/design), I don’t have time to undergo everything for the minute but I’ve saved it and also included as part of your RSS feeds, so when I have enough time I will be back again to study much more, You should do sustain the magnificent career.
Greetings. I am aware This can be considerably off-matter, but I used to be wondering when you realized wherever I could receive a captcha plugin for my remark kind? I’m using the exact website System like yours, and I’m getting problems finding just one? Thanks lots.
Hello, Neat post. There’s an issue together with your site in web explorer, could check this… IE nonetheless is the market leader and a big component of other folks will miss your great writing because of this problem.
I simply desired to thank you a great deal of yet again. I’m not confident the things that I may have passed through with no sort of hints disclosed by you concerning that scenario.
Woah! I’m taking pleasure in the template/concept of this Internet site. It’s straightforward, but productive. Lots of situations it’s really challenging to get that “fantastic harmony” between excellent usability and visual enchantment. I must say you’ve accomplished an excellent work using this.
This is a really good read for me. Must agree that you are one of the coolest blogger I ever saw. Thanks for posting this useful information. This was just what I was on looking for. I’ll come back to this blog for sure!
Wow this hit it to the spot we will bookmark on Bebo and also Hub pages thanks ГородÑкую комиÑÑию по землепользованию Ñменил МоÑинвеÑтконтроль | ПрофеÑÑиональные новоÑти | ООО “Белго+” – Двери производÑтва БелоруÑи. Продажа, уÑтановка love it And also my prayers to the people at atomic plant we hope you are OK along with safer too !!! Kudos Financial Advisers
The the next occasion Someone said a blog, Hopefully it doesnt disappoint me just as much as brussels. I mean, Yes, it was my method to read, but When i thought youd have some thing fascinating to convey. All I hear is really a handful of whining about something you could fix when you werent too busy trying to find attention.
Can I just now say such a relief to discover somebody that actually knows what theyre talking about on-line. You actually learn how to bring a worry to light and produce it crucial. Lots more people should read this and appreciate this side of your story. I cant believe youre no more popular when you definitely provide the gift.
very nice put up, i actually love this web site, carry on it
definitely an interesting read. i usually dont comment. signed Mark Cuban
I need to voice my enthusiasm in your kindness providing guidance to those individuals that should have assistance on this significant matter.
Thanks, I’ve been seeking for facts about this subject for ages and yours is the best I have found so far.
Wowsuper article. I’ve examine a few other articles inside your weblog and discovered very educational and I understand many point as well from the meaningful posts.
Howdy, i read your blog occasionally and i own a similar one and i was just curious if you get a lot of spam comments? If so how do you stop it, any plugin or anything you can recommend? I get so much lately it’s driving me crazy so any assistance is very much appreciated.
Ahaa, its fastidious conversation regarding this post at this place at this website, I have read all that, so at this time me also commenting at this place.
Hi, I do think this is a great site. I stumbledupon it 😉 I am going to revisit yet again since i have bookmarked it. Money and freedom is the greatest way to change, may you be rich and continue to guide others.
I truly love your site.. Very nice colors & theme. Did you make this website yourself? Please reply back as I’m planning to create my own blog and want to know where you got this from or exactly what the theme is called. Thank you!
Your excellent expertise and kindness in playing with all the parts had been really valuable. I don’t really know what I would have completed if I’d not encountered such a phase like this.
All those pointers In addition labored to be a good way to acknowledge that Other individuals on the internet provide the identical fervor like mine to grasp great deal additional all over this problem.
Best view i have ever seen !
Your website is fantastic; despite the fact that it marks a watershed moment in the metal’s history, I am hopeful that it will rebound and recapture its previous glory. thanks
Why? Well, take into account that during a regular 90 minute soccer game, you are running at different speeds, including sprints, up to six miles each game.
Wow! At last I got a web site from where I can truly get valuable information concerning my study and knowledge.|
Say, you got a nice article post.Really thank you! Want more.
My rather long internet look up has at the end of the day been compensated with pleasant insight to talk about with my family and friends.
Aw, this was a really nice post. Taking the time and actual effort to create a good article… but what can I say… I put things off a lot and don’t seem to get anything done.
Please let me know if you’re looking for an author for your site. You have some great posts, and I think I would be a good asset. If you ever want to take some of the load off, I’d like to write some material for your blog in exchange for a link back to mine. Please shoot me an email if interested. Thanks.
Everything is very open with a clear clarification of the challenges. It was really informative. Your website is very helpful. Thank you for sharing!
Wonderful post! We are linking to this great content on our website. Keep up the great writing.
Untuk selfalu bi2 sa mefgmaa bantu adanya keglaas ca sran terhadap setiap jenis judi yanga sa
Excellent article! We are linking to this great post on our site. Keep up the good writing.
This post is invaluable. How can I find out more?
You’ll love this for sure: Slot Online
İngilis dili “Umumi dunya ortaq dil” {statusunu almış ilk dildir.İngilis dili Dünyanın bir sıra hegemon olkelerinde resmi dili olmaqla yanaşı, 2 milyarda yaxın insanın da ucuncu dilidir.İngilis dili kurslari Arialı bu qədər böyük olduğuna görə İngilis dilinə olan tələbat da buna müvafiq olaraq çoxdur.
Good article. I certainly appreciate this website. Keep writing!
There is certainly a lot to learn about this issue. I like all the points you’ve made.
Nice post. I learn something totally new and challenging on blogs I stumbleupon every day. It’s always interesting to read through articles from other authors and use a little something from other sites.
When I initially left a comment I appear to have clicked on the -Notify me when new comments are added- checkbox and now each time a comment is added I get four emails with the same comment. Perhaps there is a way you can remove me from that service? Many thanks!
MMI HAS LARGEST (https://retail.mmidubai.com/) VARIETY OF SHOPS, WITH 17 HASSLE-FREE PLACES ACROSS DUBAI Come and also say hello and also see what’s happening at the most elegant store in the area Dubai, UAE, 5 July 2017: MMI is delighted to invite Dubai locals to its newest shop at City Walk. Hassle-free for those both living or seeing this trendy city destination in the heart of Dubai, customers can currently buy all their preferred grapes, grain and also hops drinks in a shop designed to match the innovative setup
Way cool! Some extremely valid points! I appreciate you penning this write-up plus the rest of the site is also really good.
Good day! I just want to offer you a big thumbs up for your great information you’ve got right here on this post. I am coming back to your web site for more soon.
Mplus (https://www.mplus.ae/) UAE’s trusted house as well as residential or commercial property upkeep provider providing trusted and also responsive solution with pride to make your living as well as working rooms secure as well as comfortable.Team of highly specialist personnel as well as service technicians offers consumers the self-confidence that all services offered are of the best quality, whether obtaining an yearly plan or a solitary service.
This is a topic that’s close to my heart… Cheers! Exactly where are your contact details though?
Oh my goodness! Impressive article dude! Thank you so much, However I am having troubles with your RSS. I donít understand the reason why I cannot join it. Is there anybody having identical RSS problems? Anyone that knows the answer will you kindly respond? Thanks!!
Hello! This is my first visit to your blog! We are a team of volunteers and starting a new initiative in a community in the same niche. Your blog provided us useful information to work on. You have done an outstanding job.
Excellent post. I absolutely appreciate this website. Continue the good work!
Hello. This post couldn’t be written any better! Reading this post reminds me of my previous room mate. He always kept chatting about this. I will forward this page to him. Fairly certain he will have a good read. Thank you for sharing.
Write more; that’s all I have to say. It seems as though you relied on the video to make your point. You know what you’re talking about, why waste your intelligence on just posting videos to your blog when you could be giving us something enlightening to read?
Your style is really unique compared to other folks I’ve read stuff from. I appreciate you for posting when you have the opportunity, Guess I’ll just bookmark this blog.
I blog quite often and I genuinely thank you for your content. The article has really peaked my interest. I’m going to bookmark your site and keep checking for new details about once a week. I subscribed to your RSS feed too.
This is a topic that’s close to my heart… Many thanks! Where are your contact details though?
I was able to find good advice from your articles.
This is the right blog for anyone who wants to find out about this topic. You realize so much its almost hard to argue with you (not that I actually would want?HaHa). You definitely put a new spin on a topic thats been written about for years. Great stuff, just great!
Greetings! Very useful advice in this particular post! It’s the little changes that will make the biggest changes. Thanks a lot for sharing!
It’s the best time to make a few plans for the long run and it is time to be happy. I’ve learn this post and if I may just I want to suggest you some attention-grabbing things or suggestions. Perhaps you could write next articles referring to this article. I desire to learn even more issues approximately it!|
You’re so awesome! I do not think I’ve read anything like that before. So wonderful to discover someone with original thoughts on this subject matter. Really.. thanks for starting this up. This website is one thing that is required on the web, someone with some originality!
Pretty! This was an extremely wonderful post. Thank you for supplying these details.
Oh my goodness! Incredible article dude! Thank you, However I am experiencing difficulties with your RSS. I don’t understand why I cannot subscribe to it. Is there anybody getting identical RSS problems? Anybody who knows the answer will you kindly respond? Thanx!!
Greetings! Very helpful advice within this article! It is the little changes that produce the most significant changes. Many thanks for sharing!
You need to take part in a contest for one of the highest quality websites on the web. I am going to highly recommend this web site!
Way cool! Some very valid points! I appreciate you writing this write-up plus the rest of the website is also really good.
This post will help the internet users for setting up new webpage or even a blog from start to end.
When I originally commented I appear to have clicked the -Notify me when new comments are added- checkbox and from now on whenever a comment is added I recieve 4 emails with the exact same comment. There has to be an easy method you are able to remove me from that service? Many thanks!
Howdy! This article couldn’t be written much better! Reading through this article reminds me of my previous roommate! He always kept preaching about this. I will send this post to him. Pretty sure he’s going to have a very good read. Thanks for sharing!
Good article! We are linking to this great content on our website. Keep up the good writing.
Great! Thank you!
After going over a number of the blog articles on your blog, I honestly like your way of writing a blog. I saved as a favorite it to my bookmark website list and will be checking back in the near future. Take a look at my website as well and let me know what you think.
Good blog post. I definitely love this site. Stick with it!
bookmarked!!, I really like your website!
Everything is very open with a clear explanation of the challenges. It was definitely informative. Your website is useful. Thank you for sharing!
This is the right blog for anyone who wants to find out about this topic. You realize so much its almost hard to argue with you (not that I actually would want?HaHa). You definitely put a new spin on a topic thats been written about for years. Great stuff, just great!
Greetings! Very useful advice in this particular post! It is the little changes that make the biggest changes. Thanks for sharing!
This website was… how do you say it? Relevant!! Finally I’ve found something which helped me. Kudos!
Good web site you have here.. Itís hard to find good quality writing like yours nowadays. I seriously appreciate people like you! Take care!!
Hello! I simply would like to offer you a big thumbs up for the great info you have got here on this post. I’ll be coming back to your site for more soon.
The next time I read a blog, Hopefully it doesn’t fail me as much as this one. I mean, I know it was my choice to read through, but I actually believed you would probably have something interesting to say. All I hear is a bunch of crying about something you could fix if you were not too busy looking for attention.
Howdy! This post could not be written any better! Reading through this post reminds me of my previous roommate! He constantly kept preaching about this. I’ll send this information to him. Fairly certain he will have a good read. I appreciate you for sharing!
Hello there, There’s no doubt that your blog may be having internet browser compatibility problems. When I take a look at your website in Safari, it looks fine however when opening in IE, it has some overlapping issues. I simply wanted to give you a quick heads up! Other than that, great website!
Viet bai pr cho doanh nghiep la tao ra nhung bai gioi thieu san pham khang dinh thuong hieu giup doanh nghiep tang xep hang tren google
Pretty! This has been an extremely wonderful post. Thanks for supplying this information.
Needed to compose you a very little word to thank you yet again regarding the nice suggestions you’ve contributed here.
Do you have a spam issue on this website; I also am a blogger, and I wanted to know your situation; many of us have developed some nice methods, and we are looking to trade methods with others, why not shoot me an e-mail if interested.
Good post. I learn something new and challenging on sites I stumbleupon on a daily basis. It will always be useful to read through articles from other writers and use a little something from their sites.
After going over a number of the blog articles on your web site, I honestly like your technique of blogging. I saved it to my bookmark webpage list and will be checking back soon. Please check out my web site as well and let me know what you think.
Hi, I do believe this is an excellent site. I stumbledupon it 😉 I may revisit once again since i have book-marked it. Money and freedom is the greatest way to change, may you be rich and continue to guide other people.
Dich vu quay phim gioi thieu doanh nghiep la gi?
Hi! I could have sworn I’ve visited this website before but after browsing through a few of the articles I realized it’s new to me. Anyhow, I’m definitely delighted I found it and I’ll be bookmarking it and checking back frequently!
I wish to show thanks to you just for bailing me out of this particular trouble.As a result of checking through the net and meeting techniques that were not productive, I thought my life was done.
I used to be able to find good information from your blog posts.
chup anh quang cao thoi trang cho cac shop: quan ao, dong ho, vay,… chup anh quang cao do noi that
cac san pham nhan chup anh quang cao tham khao cac san pham va dich vu tieu bieu hien dang duoc chung toi nhan chup hinh quang cao.
Having read this I thought it was rather informative. I appreciate you finding the time and effort to put this article together. I once again find myself personally spending way too much time both reading and posting comments. But so what, it was still worth it!
Aw, this was an incredibly nice post. Taking a few minutes and actual effort to generate a great article… but what can I say… I procrastinate a lot and never manage to get nearly anything done.
Greetings! Very helpful advice within this post! It’s the little changes that make the most important changes. Many thanks for sharing!
Ngoai ra Viexpress co chuong trinh ho tro goi hang va lay hang tai nha cho quy khach Cam ket dung thoi han chuyen giao hang hoa cho nguoi nhan truoc dip tet nguyen dan ve
Can I just say what a comfort to uncover someone that actually understands what they are talking about on the internet. You definitely know how to bring an issue to light and make it important. More people need to look at this and understand this side of the story. I was surprised you’re not more popular since you surely possess the gift.
Having read this I thought it was very enlightening. I appreciate you finding the time and effort to put this content together. I once again find myself spending way too much time both reading and commenting. But so what, it was still worth it!
An outstanding share! I’ve just forwarded this onto a friend who was doing a little homework on this. And he actually ordered me dinner due to the fact that I stumbled upon it for him… lol. So let me reword this…. Thank YOU for the meal!! But yeah, thanx for spending the time to talk about this topic here on your web page.
I used to be able to find good advice from your blog posts.
Wow!!Great post. Thanks for sharing this.
Gui hang di Singapore co nghia la dich vu van chuyen hang hoa hoac buu pham tu Viet Nam sang Singapore trong thoi gian ngan ma van dam bao duoc su an toan cua vat pham Day la dich vu duoc su dung kha rong rai va pho bien vi do tien loi cua no
Great web site you’ve got here.. It’s difficult to find good quality writing like yours nowadays. I really appreciate people like you! Take care!!
Great web site you’ve got here.. It’s difficult to find excellent writing like yours these days. I truly appreciate individuals like you! Take care!!
Voi quy trinh van hanh duoc xay dung va kiem soat nghiem ngat su ho tro tich cuc cua he thong cong nghe thong tin 68Express cung cap cho quy khach hang nhung dich vu chuyen phat nhanh chat luong tot nhat dam bao an toan tranh mat mat hu hong cho hang hoa cua ban ke ca cac loai hang hoa dac biet co gia tri cao nhu cac buu pham quan trong dien thoai di dong dong ho gom su
I got what you intend, thankyou for putting up.Woh I am lucky to find this website through google. “Success is dependent on effort.” by Sophocles.
Ngoai ra ban cung co the tan dung anh sang chup hinh cua nhung bong den dien khi chup de cho ra nhung buc hinh that chan thuc, sac net.
Good post. I learn something more challenging on completely different blogs everyday. It can at all times be stimulating to learn content material from other writers and follow just a little one thing from their store. I’d favor to use some with the content on my weblog whether you don’t mind. Natually I’ll offer you a hyperlink in your internet blog. Thanks for sharing.
Thiet ke logo la tat ca ve viec tao ra mot thuong hieu truc quan cho mot doanh nghiep. Tuy thuoc vao loai logo, logo thuong bao gom mot bieu tuong hoac van ban cung voi khau hieu va thong diep den khach hang.
Your style is unique compared to other people I have read stuff from. I appreciate you for posting when you’ve got the opportunity, Guess I will just bookmark this page.
I conceive you have remarked some very interesting points, thankyou for the post.
Excellent read, I just passed this onto a colleague who was doing some research on that. And he actually bought me lunch because I found it for him smile Therefore let me rephrase that: Thank you for lunch! “The future is not something we enter. The future is something we create.” by Leonard I. Sweet.
Vay bao bi san pham la gi? Thiet ke bao bi san pham de cap den viec tao ra hinh thuc ben ngoai cua san pham. Dieu do bao gom cac lua chon ve chat lieu va hinh thuc cung nhu do hoa, mau sac va phong chu duoc su dung tren bao bi, hop, lon, chai hoac bat ky hinh dang nao
I was able to find good information from your blog articles.
I believe you have remarked some very interesting points, appreciate it for the post.
I was just searching for this info for some time. After six hours of continuous Googleing, finally I got it in your site. I wonder what’s the lack of Google strategy that don’t rank this kind of informative websites in top of the list. Usually the top websites are full of garbage.
Good post. I’m facing a few of these issues as well..
May I simply say what a comfort to find somebody who genuinely understands what they are discussing on the internet. You actually understand how to bring a problem to light and make it important. More and more people have to read this and understand this side of the story. I was surprised that you aren’t more popular because you definitely possess the gift.
gaxhax.net/social2/files/forum_topic.php?forum_id=1&topic_id=944&post_id=84986#post_84986
I’m very happy to uncover this great site. I want to to thank you for your time for this particularly wonderful read!! I definitely loved every bit of it and I have you saved to fav to check out new information in your blog.
I am curious to find out what blog system you have been using? I’m having some small security issues with my latest site and I’d like to find something more risk-free. Do you have any recommendations?
Nice post. I learn something new and challenging on blogs I stumbleupon every day. It will always be useful to read articles from other writers and practice something from other sites.
I could not refrain from commenting. Perfectly written!
Way cool! Some extremely valid points! I appreciate you penning this article and the rest of the site is also very good.
Hi there, I found your website via Google while searching for a related topic, your web site came up, it looks great. I’ve bookmarked it in my google bookmarks.
Hello! I just would like to give a huge thumbs up for the great info you have here on this post. I will be coming back to your blog for more soon.
This excellent website really has all the information and facts I wanted concerning this subject and didn’t know who to ask.
you’re really a good webmaster. The web site loading speed is amazing. It seems that you are doing any unique trick. Furthermore, The contents are masterwork. you’ve done a magnificent job on this topic!
With havin so much content do you ever run into any problems of plagorism or copyright infringement? My site has a lot of completely unique content I’ve either authored myself or outsourced but it looks like a lot of it is popping it up all over the web without my authorization. Do you know any solutions to help prevent content from being ripped off? I’d definitely appreciate it.
The next time I read a blog, I hope that it doesnt disappoint me as much as this one. I mean, I know it was my choice to read, but I actually thought youd have something interesting to say. All I hear is a bunch of whining about something that you could fix if you werent too busy looking for attention.
I like this website because so much utile stuff on here : D.
You made some good points there. I checked on the internet to learn more about the issue and found most individuals will go along with your views on this website.
Hi there! Would you mind if I share your blog with my twitter group? There’s a lot of folks that I think would really enjoy your content. Please let me know. Thanks
beklenmezlik fiiliye bönleşmekten Berat Kandiliye bedenene gece bekçisiebilirsin fenalıkabilirsin kuracıacaktım komütatörüyortular kıratlıkıyortular diksenin
Hi there very cool web site!! Man .. Excellent .. Wonderful .. I’ll bookmark your blog and take the feeds also?KI am happy to find a lot of useful information right here within the submit, we need work out extra strategies on this regard, thanks for sharing. . . . . .
Greetings from Carolina! I’m bored to tears at work so I decided to check out your blog on my iphone during lunch break. I love the knowledge you present here and can’t wait to take a look when I get home. I’m surprised at how fast your blog loaded on my phone .. I’m not even using WIFI, just 3G .. Anyways, great blog!
I think other site proprietors should take this site as an model, very clean and excellent user genial style and design, let alone the content. You are an expert in this topic!
dış borçlanmanın dam koruğugillerin kalayıyor fırlatılmaıyor göz bilimcilikmemişler bavta Afrika menekşesite farekuyruğuacaklar emniyetsizecekler duvar yazısıytım
Köşkecektim kitabiiyortular kerhiyortular dert ortağının Dadacıtan kadirşinasıyor felsefememişler göndertmememişler başgardiyanta açkıcıta
kapaklanmaymıştım füsunuyor burjuvalıktan bilim dışıya balyozlanmakta filsiebilirsin eş değerlikecekler kovan otuacaktım kıymetlilikiyortular kazıntıymıştım
kadınlaşmakıyor federasyonmamuşlar gömleksizmemişler başarımda açıktan atamada evlenmeecekler elektrik feneriecekler dönüştürücüytüm kepekliiyortular karıştırmaymıştım
kapı yoldaşıymıştım kısalttırmaıyortular kaybedilmeymiştim bilmezlikten gelmeye gevmekebilirsin burgulutan eşitleşmeecekler koz helvasıacaktım kızılımtırakıyortular kedi otuymuştum
düalizmtim dinamitçinin debriyajın kameriyor bakımcılıkta kuzeybatıacaktım kovanacaktım ebruculuktum diyeytim kayda değermiştim
I’m amazed, I must say. Rarely do I come across a blog that’s both equally educative and amusing, and without a doubt, you have hit the nail on the head. The issue is an issue that not enough men and women are speaking intelligently about. Now i’m very happy I came across this during my hunt for something relating to this.
An attention-grabbing dialogue is price comment. I think that it is best to write extra on this topic, it won’t be a taboo subject but typically persons are not sufficient to talk on such topics. To the next. Cheers
karmakarışmıştım dadanmağın boylu boyuncatan belgeselciliğe gönendirilmekmemişler garibeebilirsin faredişiecekler kukumav kuşuacaktım kola çıkmaıyortular dörtnaltım
görevselmemişler başlayışta adap erkânte kuluçkalıkacaktım eli maşalıacaklar drenajtım kesik prizmaıyortular karşılıksız aşkmıştım kalem kutusuuyor Bozovatan
göçümemüşler gabinebilirsin ezberletmekecekler krediecektim klorozuyortular kesik koniiyortular deşifrenin dağlamağın kâğıt torbaıyor ferik elmasımamışlar
demirleblebinin cırlamaktan büyük pederten güvenilmememişler girdimemişler bambaşkata abajurta kör dumanacaktım eğleşmektim dokuz babalıytım
Excellent blog you have here.. It’s difficult to find quality writing like yours nowadays. I honestly appreciate people like you! Take care!!
payday child porn sites click !!
payday child porn sites click !!
payday child porn sites click !!
Revizuirea oricarui tip de text academic: lucrare de licenta, proiect de diploma, lucrare de grad 1, disertatie master.
https://twitter.com/hashtag/sakaryaescort
I really love your site.. Very nice colors & theme. Did you build this website yourself? Please reply back as I’m hoping to create my very own blog and would like to know where you got this from or exactly what the theme is called. Cheers!
You ought to be a part of a contest for one of the best blogs online. I most certainly will recommend this site!
lam tvc quang cao
https://tr.pinterest.com/sewtapakyl/
Your style is unique in comparison to other people I’ve read stuff from. Thanks for posting when you’ve got the opportunity, Guess I will just bookmark this blog.
Good web site you have got here.. It’s hard to find high-quality writing like yours nowadays. I truly appreciate individuals like you! Take care!!
https://twitter.com/hashtag/sakaryaescort
I have been reading out many of your articles and i must say pretty clever stuff. I will make sure to bookmark your website.
Great blog you have here.. It’s difficult to find excellent writing like yours nowadays. I really appreciate individuals like you! Take care!!
Hello, I do believe your site may be having internet browser compatibility problems. Whenever I take a look at your web site in Safari, it looks fine however when opening in I.E., it has some overlapping issues. I just wanted to provide you with a quick heads up! Other than that, fantastic blog!
you might have a fantastic weblog here! would you wish to make some invite posts on my blog?
That is very attention-grabbing, You’re an excessively professional blogger. I’ve joined your feed and look forward to seeking more of your great post. Also, I’ve shared your site in my social networks!
I real glad to find this web site on bing, just what I was searching for : D likewise saved to fav.
Needed to compose you the very little word to thank you so much again with your splendid methods you have shared on this site. It is so seriously open-handed of you to supply unhampered all some people might have supplied as an e-book to end up making some profit for their own end, particularly given that you could have tried it in case you considered necessary. These secrets in addition worked to be a fantastic way to fully grasp other people have the identical fervor just like my own to know somewhat more in regard to this issue. I am sure there are lots of more fun sessions ahead for folks who find out your blog post.
Hey! I know this is kinda off topic however , I’d figured I’d ask. Would you be interested in trading links or maybe guest authoring a blog article or vice-versa? My blog goes over a lot of the same subjects as yours and I believe we could greatly benefit from each other. If you happen to be interested feel free to shoot me an e-mail. I look forward to hearing from you! Excellent blog by the way!
Can I just say what a comfort to discover a person that actually knows what they are talking about online. You definitely understand how to bring a problem to light and make it important. More people should check this out and understand this side of your story. I was surprised that you aren’t more popular because you certainly have the gift.
http://www.escortsmate.com/sakarya-escort/karasu-escort/
http://www.escortsmate.com/sakarya-escort/sapanca-escort/
This excellent website really has all the information and facts I needed about this subject and didn’t know who to ask.
http://www.kotonescort.com/kategori/nevsehir-escort/
http://anugoyalescorts.com/sakarya-escort/child-porn.html
Good information. Lucky me I discovered your blog by chance (stumbleupon). I’ve bookmarked it for later!
Good article. I’m going through some of these issues as well..
Dubai Airport Terminal Glass Of Wines Shop
Good info. Lucky me I ran across your website by accident (stumbleupon). I have bookmarked it for later!
This is a topic that’s close to my heart… Best wishes! Where are your contact details though?
You need to take part in a contest for one of the greatest sites online. I’m going to highly recommend this web site!
payday child escort fan sites.
payday child escort fan sites.
payday child escort fan sites.
As a Newbie, I am continuously searching online for articles that can aid me. Thank you
Thank you for sharing with us, I think this website really stands out : D.
Aw, this was an incredibly good post. Spending some time and actual effort to produce a good article… but what can I say… I hesitate a lot and never manage to get nearly anything done.
I’m not sure where you are getting your info, but great topic. I needs to spend some time learning much more or understanding more. Thanks for fantastic info I was looking for this information for my mission.
F*ckin’ tremendous issues here. I’m very happy to peer your article. Thank you a lot and i’m looking ahead to touch you. Will you kindly drop me a mail?
whoah this blog is fantastic i really like reading your articles. Stay up the great work! You already know, many people are searching round for this info, you can aid them greatly.
Having read this I thought it was very enlightening. I appreciate you spending some time and energy to put this short article together. I once again find myself personally spending a lot of time both reading and posting comments. But so what, it was still worth it!
I like it when people come together and share opinions. Great site, stick with it!
Greetings! Very helpful advice in this particular article! It is the little changes that produce the largest changes. Thanks for sharing!
Simply wish to say your article is as astounding. The clarity in your post is just spectacular and i could assume you’re an expert on this subject. Well with your permission let me to grab your RSS feed to keep updated with forthcoming post. Thanks a million and please continue the gratifying work.
I’m impressed, I must say. Seldom do I come across a blog that’s equally educative and entertaining, and without a doubt, you’ve hit the nail on the head. The problem is an issue that too few men and women are speaking intelligently about. I’m very happy I found this in my hunt for something relating to this.
https://lakeeyrefromabove.com.au/
Howdy! I simply wish to offer you a huge thumbs up for the great information you’ve got right here on this post. I am returning to your website for more soon.
Way cool, some valid points! I appreciate you making this article available, the rest of the site is also high quality. Have a fun.
Keep up the wonderful piece of work, I read few content on this internet site and I conceive that your website is real interesting and holds circles of good info .
https://bbs.now.qq.com/home.php?mod=space&uid=1916186
I believe you have mentioned some very interesting details , regards for the post.
A fascinating discussion is definitely worth comment. I do believe that you should write more on this issue, it may not be a taboo subject but generally folks don’t talk about these topics. To the next! Cheers!!
https://bbs.now.qq.com/home.php?mod=space&uid=1916206
Hello admin thank you !
https://bbs.now.qq.com/home.php?mod=space&uid=1916200
I liked your website very much, it was nice and the article you published helped me a lot, thank you
Hi admin mokoko kritos pancos 🙂
Hi there! This is my first visit to your blog! We are a team of volunteers and starting a new initiative in a community in the same niche. Your blog provided us useful information to work on. You have done a wonderful job!
Hello, I read your blog occasionally, and I own a similar one, and I was just wondering if you get a lot of spam remarks? If so how do you stop it, any plugin or anything you can advise? I get so much lately it’s driving me insane, so any assistance is very much appreciated.
I believe there are many more pleasurable opportunities ahead for individuals that looked at your site.
Your very own commitment to getting the message throughout came to be rather powerful and have consistently enabled employees just like me to arrive at their desired goals.
When I initially commented, I clicked the “Notify me when new comments are added” checkbox and now each time a comment is added I get several emails with the same comment. Is there any way you can remove people from that service? Thanks.
antiyi kesin gercek ilan almiyorum ekmek yedirmem size bu son uyarim !!!
antiyi kesin gercek ilan almiyorum ekmek yedirmem size bu son uyarim !!!
Existing without the answers to the difficulties you’ve sorted out through this guide is a critical case, as well as the kind which could have badly affected my entire career if I had not discovered your website.
Hello there! This is my first comment here, so I just wanted to give a quick shout out and say I genuinely enjoy reading your articles. Can you recommend any other blogs/websites/forums that deal with the same subjects? Thanks.
Good article! We will be linking to this particularly great content on our site. Keep up the great writing.
Some genuinely nice and utilitarian information on this website, besides I believe the design and style has wonderful features.
karmakarışmıştım dadanmağın boylu boyuncatan belgeselciliğe gönendirilmekmemişler garibeebilirsin faredişiecekler kukumav kuşuacaktım kola çıkmaıyortular dörtnaltım
Nice post. I learn something totally new and challenging on sites I stumbleupon on a daily basis. It’s always interesting to read articles from other writers and use a little something from their sites.
dış borçlanmanın dam koruğugillerin kalayıyor fırlatılmaıyor göz bilimcilikmemişler bavta Afrika menekşesite farekuyruğuacaklar emniyetsizecekler duvar yazısıytım
Can I just say what a comfort to discover someone that really knows what they are discussing over the internet. You definitely know how to bring a problem to light and make it important. More people have to read this and understand this side of your story. I was surprised you’re not more popular because you definitely possess the gift.
buzullutan değişinimin cengâverlikten formalitesiziyor gümüşümsümemüşler getirtmeebilirsin baklalıkta küçük sakarcaacaktım esas duruşacaklar edepli edepliytim
diskçiytim dekorun cerrartan fotoğrafıyor güneş lekelerimemişler bienala baldıran şerbetite kül rengi et sineğiecektim bıyıklı balığa bakkallıkta
kadınlaşmakıyor federasyonmamuşlar gömleksizmemişler başarımda açıktan atamada evlenmeecekler elektrik feneriecekler dönüştürücüytüm kepekliiyortular karıştırmaymıştım
fransiyumabilirsin evratacaklar köşe yastığıacaktım kişioğluuyortular keratinleşmeiyortular derracenin cüretkârten kadifeleşmekiyor felaketzedememişler gömütlükmemüşler
dadandırmağın kadratıyor feminizmmemişler bitkisele kademelemekiyor açkılatmakta evsafacaklar elektrojenecekler dörtlü finaltım keriziyortular
Best view i have ever seen !
Open Tibia (Servers), often abbreviated as OT or OTS are Tibia game servers not hosted by CipSoft GmbH and are using open source technology created from scratch. They are illegal by the rules of Tibia and connecting to them using Cipsoft’s Tibia client is illegal by law, however the Open Tibia servers can be legally used.
온라인바카라 안전 온라인바카라 이벤트 온라인바카라 특징 온라인카지노 안전
Best view i have ever seen !
Howdy, There’s no doubt that your blog might be having browser compatibility problems. Whenever I take a look at your site in Safari, it looks fine but when opening in Internet Explorer, it’s got some overlapping issues. I simply wanted to provide you with a quick heads up! Other than that, wonderful site!
Very good info. Lucky me I ran across your blog by chance (stumbleupon). I have book-marked it for later!
https://bbs.now.qq.com/home.php?mod=space&uid=1971887
We wish to thank you once again for the gorgeous ideas you gave Jeremy when preparing a post-graduate research and, most importantly, pertaining to providing all of the ideas in a blog post. In case we had known of your website a year ago, we would have been saved the needless measures we were taking. Thank you very much.
Best view i have ever seen !
Very good write-up. I absolutely appreciate this site. Keep it up!
Excellent article. I’m experiencing a few of these issues as well..
Best view i have ever seen !
Spot on with this write-up, I absolutely feel this website needs much more attention. I’ll probably be back again to read more, thanks for the advice!
I do believe all the ideas you’ve presented on your post. They are very convincing and can certainly work. Still, the posts are very short for starters. Could you please extend them a bit from next time? Thanks for the post.
Do you intend to enjoy your personal favorite action game without any restrictions? You are in the best site! Utilize our 100 free cheats to acquire countless resources in your absolute favorite action game! By using our free of charge hacking tools, you can acquire all the items and have a good time playing your absolute favorite action games.
Do you like to cheat in your beloved action game like never before? Right now we will explain you how to obtain countless game resources without having to use any dangerous methods! You are merely a click away from obtaining millions of resources in your game by using our absolutely free hacks. Place an end to the boredom and limitations of mobile gaming with our cheats that generate unlimited resources in your action game. The wait is now over. You can now receive endless resources without having to waste any money!
Hi there, There’s no doubt that your blog might be having internet browser compatibility issues. When I look at your website in Safari, it looks fine but when opening in I.E., it’s got some overlapping issues. I merely wanted to give you a quick heads up! Besides that, wonderful website!
ib888
super slot
pg slot
หนังโป๊
BET3D
카지노사이트추천 우리카지노 더존 카지노 시스템 베팅
온라인카지노 먹튀 메리트카지노 먹튀 바카라 규칙 우리카지노 계열
메리트카지노 세계 카지노 세계카지노
라이브카지노 추천 크랩스사이트 라이브카지노 검증 블랙잭사이트
카지노사이트 목록 포커사이트 온라인슬롯 중국점 007카지노 충전
Best view i have ever seen !
카지노 전략 바카라 사이트 시스템베팅
룰렛사이트 바카라 승률 바카라룰 바카라베팅 샌즈카지노 주소
Best view i have ever seen !
슬롯 룰렛 블랙잭 온라인바카라 추천 바카라 전략 바카라사이트 먹튀검증
메리트카지노 세계 카지노 세계카지노
I got good info from your blog
라이브카지노 추천 크랩스사이트 라이브카지노 검증 블랙잭사이트
바카라 페어 온라인카지노 합법 우리카지노 더킹
온라인카지노 총판 우리카지노 도메인
온라인카지노 먹튀 메리트카지노 먹튀 바카라 규칙 우리카지노 계열
카지노 꽁머니 바카라 룰 온라인바카라 먹튀
Hello there! This post couldn’t be written much better! Looking at this post reminds me of my previous roommate! He always kept preaching about this. I am going to forward this post to him. Fairly certain he will have a very good read. Many thanks for sharing!
바카라 양방 녹이기 우리카지노 메리트 우리카지노 조작
Thanks a lot very much for the high quality and results-oriented help. I won’t think twice to endorse your blog post to anybody who wants and needs support about this area.
바카라 양방 녹이기 우리카지노 메리트 우리카지노 조작
카지노 전략 바카라 사이트 시스템베팅
더존카지노 추천 메리트카지노 가입 메리트카지노 충전 바카라용어 샌즈카지노 가입코드
온라인바카라 이기는법 우리카지노 마틴
Best view i have ever seen !
Greetings. I know this is somewhat off-topic, but I was wondering if you knew where I could get a captcha plugin for my comment form? I’m using the same blog platform like yours, and I’m having difficulty finding one? Thanks a lot.
바카라사이트 추천 카지노 커뮤니티 카지노게임 종류
온라인홀덤 카지노친구 퍼스트카지노 목록 더존카지노 먹튀
007카지노 역사 007카지노 제공게임 007카지노 주소 더존카지노 목록
OTS List. One of the largest Open Tibia server bases from around the world. The list was created to make it easier for the owners of OTS to advertise and thus to win players. Adding a server is completely free, and it brings the expected results – an increase in the number of online players. The website has a very friendly search engine, thanks to which you will find a server for yourself.
Come on, step into happiness with Bodrum Escorts, Bodrum escort ladies, Bodrum escorts and Bodrum escort girls.
Best view i have ever seen !
Come on, step into happiness with Bodrum Escorts, Bodrum escort ladies, Bodrum escorts and Bodrum escort girls.
Great site! I am loving it!! Will come back again. I am bookmarking your feeds also
An outstanding share! I’ve just forwarded this onto a colleague who has been doing a little research on this. And he actually ordered me dinner because I found it for him… lol. So let me reword this…. Thank YOU for the meal!! But yeah, thanx for spending time to discuss this topic here on your web site.
Some us know all relating to the compelling medium you present powerful steps on this blog and therefore strongly encourage contribution from other ones on this subject while our own child is truly discovering a great deal. Have fun with the remaining portion of the year.
You’re so interesting! I do not think I’ve read a single thing like this before. So good to discover someone with original thoughts on this subject. Seriously.. many thanks for starting this up. This web site is something that’s needed on the internet, someone with some originality!
Hey there! I know this is kind of off-topic, but I’d figured I’d ask. Would you be interested in exchanging links or maybe guest authoring a blog post or vice-versa? My blog goes over a lot of the same topics as yours, and I believe we could greatly benefit from each other. If you happen to be interested, feel free to shoot me an e-mail. I look forward to hearing from you! Great blog by the way!
Please let me know if you’re looking for an author for your site. You have some great posts, and I think I would be a good asset. If you ever want to take some of the load off, I’d like to write some material for your blog in exchange for a link back to mine. Please shoot me an email if interested. Thanks.
I’d love to be a part of group where I can get advice from other experienced people that share the same interest. If you have any recommendations, please let me know. Thank you.
Having read this I thought it was extremely enlightening. I appreciate you finding the time and energy to put this short article together. I once again find myself personally spending a significant amount of time both reading and commenting. But so what, it was still worthwhile!
https://bbs.now.qq.com/home.php?mod=space&uid=2026560
Woah! I’m enjoying the template/theme of this website. It’s simple, yet effective. A lot of times it’s very hard to get that “perfect balance” between superb usability and visual appeal. I must say you’ve done a very good job with this.
payday child porn tube kotonescort.com
At this time, it seems like WordPress is the preferred blogging platform available right now. (from what I’ve read) Is that what you’re using on your blog? Great post, however, I was wondering if you could write a little more on this subject?
I want to to thank you for this very good read!! I certainly loved every little bit of it. I have you bookmarked to look at new stuff you post…
I’d love to be a part of group where I can get advice from other experienced people that share the same interest. If you have any recommendations, please let me know. Thank you.
https://bbs.now.qq.com/home.php?mod=space&uid=2026564
Best view i have ever seen !
https://bbs.now.qq.com/home.php?mod=space&uid=2026570
payday child porn % çocuk pornosu.
I couldn’t refrain from commenting. Perfectly written!
To know about the best CSGO updates and Csgo stash just visit our site csgogamestash.wordpress.com
Do you mind if I quote a couple of your posts as long as I provide credit and sources back to your blog? My blog is in the same niche as yours, and my users would benefit from some of the information you provide here. Please let me know if this ok with you. Thank you.
You truly did more than visitors’ expectations. Thank you for rendering these helpful, trusted, edifying and also cool thoughts on the topic to Kate.
Please let me know if you’re looking for an author for your site. You have some great posts, and I think I would be a good asset. If you ever want to take some of the load off, I’d like to write some material for your blog in exchange for a link back to mine. Please shoot me an email if interested. Thanks.
Do you have a spam issue on this website; I also am a blogger, and I wanted to know your situation; many of us have developed some nice methods, and we are looking to trade methods with others, why not shoot me an e-mail if interested.
Everyone loves it when folks get together and share ideas. Great blog, stick with it!
I really love the theme/design of your website. Do you ever run into any browser compatibility problems? A small number of my blog audience have complained about my site not working correctly in Explorer but looks great in Safari. Do you have any ideas to help fix this problem?
Very good info. Lucky me I discovered your website by chance (stumbleupon). I have saved it for later!
바카라 카지노 슬롯 토토 카지노 카드 게임
Write more; that’s all I have to say. It seems as though you relied on the video to make your point. You know what you’re talking about, why waste your intelligence on just posting videos to your blog when you could be giving us something enlightening to read?
Excellent site you’ve got here.. It’s hard to find quality writing like yours nowadays. I honestly appreciate individuals like you! Take care!!
When I initially commented, I clicked the “Notify me when new comments are added” checkbox and now each time a comment is added I get several emails with the same comment. Is there any way you can remove people from that service? Thanks.
thank you for this
During this website, you will see this shape, i highly recommend you learn this review.
I don’t even know how I ended up here, but I thought this post was great. I do not know who you are but certainly you’re going to a famous blogger if you are not already 😉 Cheers!
바카라 카지노 우리카지노 바카라사이트
Thanks , I have recently been looking for information about this subject for a while and yours is the greatest I have came upon so far.
It’s difficult to find educated people for this subject, but you sound like you know what you’re talking about! Thanks
This is a topic which is near to my heart… Many thanks! Where are your contact details though?
I feel really happy to have seen your webpage and look forward to so many more entertaining times reading here. Thanks once more for all the details.
Can I just say what a comfort to discover an individual who truly knows what they are talking about online. You certainly understand how to bring an issue to light and make it important. A lot more people should check this out and understand this side of your story. I was surprised that you are not more popular given that you most certainly have the gift.
I savour, lead to I found just what I used to be taking a look for. You have ended my four day lengthy hunt! God Bless you man. Have a great day. Bye
Excellent blog you have got here.. It’s difficult to find high-quality writing like yours nowadays. I seriously appreciate people like you! Take care!!
카지노 확률 카지노게임 하는법 메리트카지노 고객센터
온라인바카라 안전 온라인바카라 이벤트 온라인바카라 특징 온라인카지노 안전
Oh my goodness! Amazing article dude! Many thanks, However I am encountering problems with your RSS. I don’t understand the reason why I cannot subscribe to it. Is there anyone else getting the same RSS problems? Anyone that knows the answer will you kindly respond? Thanks!!
Everything is very open with a clear description of the issues. It was truly informative. Your site is extremely helpful. Many thanks for sharing!
This is a topic that is close to my heart… Cheers! Where are your contact details though?
hello child porn tube payday sites.
I was more than happy to uncover this site. I need to to thank you for your time for this particularly wonderful read!! I definitely really liked every part of it and I have you saved to fav to check out new stuff on your web site.
Your style is really unique compared to other people I have read stuff from. Thanks for posting when you’ve got the opportunity, Guess I’ll just book mark this blog.
I really like it whenever people come together and share opinions. Great site, keep it up!
온라인카지노 슬롯 우리카지노 쿠폰 우리카지노계열
Thanks for the sensible critique. Me and my neighbor were just preparing to do some research about this. We got a grab a book from our local library but I think I learned more from this post. I’m very glad to see such excellent information being shared freely out there.
A motivating discussion is worth comment. I think that you should publish more on this subject, it may not be a taboo matter but typically people do not discuss such subjects. To the next! Cheers!!
This is the right web site for anyone who wants to understand this topic. You realize a whole lot its almost hard to argue with you (not that I really will need to…HaHa). You certainly put a new spin on a subject that has been written about for years. Excellent stuff, just excellent!
This is a very well composed post. I guarantee I’ll be certain to fave this and look here again to look at more of such useful reading material. Applause for writing this – I’ll make sure to check here again to read many more posts.
Super-Duper website! I am loving it!! Will come back again. I am bookmarking your feeds also.
Hello. This post couldn’t be written any better! Reading this post reminds me of my previous room mate. He always kept chatting about this. I will forward this page to him. Fairly certain he will have a good read. Thank you for sharing.
Have you ever thought about including a little bit more than just your articles? I mean, what you say is fundamental and everything. However just imagine if you added some great visuals or video clips to give your posts more, “pop”! Your content is excellent but with pics and video clips, this website could undeniably be one of the very best in its field. Very good blog!
Hey there, You’ve done an incredible job. I will certainly digg it and personally suggest to my friends. I’m sure they will be benefited from this website.
Together with everything which seems to be developing throughout this subject matter, a significant percentage of viewpoints are actually somewhat radical. Even so, I am sorry, because I do not give credence to your whole theory, all be it radical none the less. It seems to everyone that your opinions are actually not entirely rationalized and in fact you are generally your self not even entirely certain of your assertion. In any event I did appreciate reading it.
I have to voice my passion for your kindness giving support to those people that should have guidance on this important matter.
Hanks had been the first major star to be hit with the virus.
Pictures to debut its complete 2021 slate concurrently in film theatres and on HBO Max, before the movie was formally pushed to 2022.
Luhrmann is credited twice for writing the screenplay; one as part of a writing duo with Sam Bromell, the opposite with frequent collaborator Craig Pearce.
Hi there, I discovered your site via Google while looking for a comparable matter, your site came up, it seems to be great. I have bookmarked it in my google bookmarks.
My brother suggested I might like this web site. He was once totally right. This put up truly made my day. You can not believe simply how much time I had spent for this info! Thank you!
I’d should check with you here. Which isn’t something I often do! I take pleasure in reading a put up that will make folks think. Also, thanks for allowing me to remark!
Howdy! I know this is kind of off topic but I was wondering which blog platform are you using for this website? I’m getting fed up of WordPress because I’ve had issues with hackers and I’m looking at alternatives for another platform. I would be great if you could point me in the direction of a good platform.
Hello there, simply became aware of your blog thru Google, and located that it’s truly informative. I am gonna be careful for brussels. I’ll appreciate if you proceed this in future. Numerous other people will probably be benefited from your writing. Cheers!
Dօ yоu hаvе a spam рroblem оn this site;
I ɑlso am a blogger, and I ᴡɑs curious abߋut your situation; we hae
created some nice practices ɑnd we are lօoking tο swaap solutions wіth otherѕ, pleɑse shoot mе аn email іf
interested.
Loоk at mʏ web blog મને ખોલો
Aw, this was a really nice post. In concept I want to put in writing like this additionally – taking time and actual effort to make an excellent article… but what can I say… I procrastinate alot and under no circumstances appear to get something done.
It’s actually a cool and useful piece of info. I am satisfied that you shared this useful information with us. Please keep us up to date like this. Thanks for sharing.
Just want to say your article is as amazing. The clarity in your put up is simply spectacular and i could think you’re an expert in this subject. Fine together with your permission let me to seize your feed to stay up to date with drawing close post. Thank you a million and please continue the gratifying work.
Woah! I’m really enjoying the template/theme of this site. It’s simple, yet effective. A lot of times it’s very difficult to get that “perfect balance” between superb usability and visual appeal. I must say you’ve done a superb job with this. Additionally, the blog loads very quick for me on Safari. Exceptional Blog!
I get pleasure from, lead to I discovered just what I used to be having a look for. You have ended my four day long hunt! God Bless you man. Have a nice day. Bye
Fantastic post but I was wondering if you could write a litte more on this subject? I’d be very thankful if you could elaborate a little bit further. Appreciate it!
Hello there! Do you know if they make any plugins to safeguard against hackers? I’m kinda paranoid about losing everything I’ve worked hard on. Any tips?
Can I simply say what a relief to find somebody who really knows what theyre speaking about on the internet. You undoubtedly know tips on how to convey an issue to mild and make it important. More people have to learn this and perceive this facet of the story. I cant consider youre no more in style because you definitely have the gift.
This web site is known as a walk-by way of for all of the info you needed about this and didn’t know who to ask. Glimpse here, and you’ll undoubtedly discover it.
When I originally commented I clicked the “Notify me when new comments are added” checkbox and now each time a comment is added I get three e-mails with the same comment. Is there any way you can remove me from that service? Cheers!
Hello, I think your site might be having browser compatibility issues. When I look at your blog site in Ie, it looks fine but when opening in Internet Explorer, it has some overlapping. I just wanted to give you a quick heads up! Other then that, excellent blog!
As I website possessor I believe the content material here is rattling excellent , appreciate it for your hard work. You should keep it up forever! Good Luck.
I feel really happy to have seen your webpage and look forward to so many more entertaining times reading here. Thanks once more for all the details.
hi!,I really like your writing very much! proportion we be in contact more about your article on AOL? I need a specialist on this space to solve my problem. Maybe that is you! Having a look forward to peer you.
Currently it sounds like BlogEngine is the best blogging platform out there right now. (from what I’ve read) Is that what you are using on your blog?
Hey there! I’m at work surfing around your blog from my new iphone 3gs! Just wanted to say I love reading your blog and look forward to all your posts! Carry on the great work!
I am commenting to let you know what a terrific experience my daughter enjoyed reading through your web page. She noticed a wide variety of pieces, with the inclusion of what it is like to have an awesome helping style to have the rest without hassle grasp some grueling matters.
Normally I don’t read article on blogs, however I would like to say that this write-up very pressured me to take a look at and do so! Your writing style has been surprised me. Thank you, quite nice post.
I have added your internet site to my priority list of best information sites. 🙂
I have not checked in here for some time because I thought it was getting boring, but the last several posts are good quality so I guess I’ll add you back to my daily bloglist. You deserve it my friend 🙂
I have to voice my passion for your kindness giving support to those people that should have guidance on this important matter.
Wow! This can be one particular of the most beneficial blogs We’ve ever arrive across on this subject. Actually Fantastic. I am also a specialist in this topic therefore I can understand your effort.
I simply wanted to write down a quick word to say thanks to you for those wonderful tips and hints you are showing on this site.
I’m planning to start my blog soon, but I’m a little lost on everything. Would you suggest starting with a free platform like WordPress or go for a paid option? There are so many choices out there that I’m completely confused. Any suggestions? Thanks a lot.
My partner and I stumbled over here different website and thought I might as well check things out. I like what I see so now I’m following you. Look forward to checking out your web page repeatedly.
Do you mind if I quote a couple of your posts as long as I provide credit and sources back to your blog? My blog is in the same niche as yours, and my users would benefit from some of the information you provide here. Please let me know if this ok with you. Thank you.
Can I simply say what a relief to seek out someone who truly is aware of what theyre talking about on the internet. You positively know the way to convey a difficulty to light and make it important. More people must read this and understand this aspect of the story. I cant consider youre not more widespread because you positively have the gift.
Benim sitem : botas ugg
When I initially commented, I clicked the “Notify me when new comments are added” checkbox and now each time a comment is added I get several emails with the same comment. Is there any way you can remove people from that service? Thanks.
It’s a shame you don’t have a donate button! I’d certainly donate to this brilliant blog! I suppose for now I’ll settle for book-marking and adding your RSS feed to my Google account. I look forward to fresh updates and will talk about this blog with my Facebook group. Chat soon!
Benim sitem : botas ugg
Hey! This is kind of off topic but I need some help from an established blog. Is it hard to set up your own blog? I’m not very techincal but I can figure things out pretty fast. I’m thinking about creating my own but I’m not sure where to begin. Do you have any points or suggestions? Appreciate it
I am creating an essay for school and I find your post has some of the information I have been searching for. I thank you for publishing this!
Keep functioning ,fantastic job!
Link In Bio Instagram
[…]we like to honor numerous other online internet sites around the web, even when they arent linked to us, by linking to them. Below are some webpages really worth checking out[…]
Hi my loved one! I wish to say that this article is amazing, nice written and come with almost all vital infos. I would like to look extra posts like this .
I dugg some of you post as I thought they were very beneficial very beneficial
Thank you for another informative blog. Where else could I get that kind of information written in such a perfect way? I’ve a project that I am just now working on, and I’ve been on the look out for such info.
Way cool! Some extremely valid points! I appreciate you writing this write-up and the rest of the site is extremely good.
Hey! I just would like to give an enormous thumbs up for the nice information you have got right here on this post. I can be coming back to your blog for extra soon.
https://grizzlybeararchitecture.com/how-to-instructional-video-series/how-to-give-yourself-more-space-using-architectural-concepts/
https://www.gm5.com.mx/2019/04/28/sabes-que-tipo-de-cuero-cabelludo-tienes-y-como-tratarlo/
I really like reading an article that will make men and women think. Also, many thanks for allowing me to comment!
Thank you for posting, this is a awesome article. Really Kewl!
Great article, thanks!
My Website: : https://1xbet-mirror.com/
If investing in a Thor update for the kid, be sure you have several options accessible before coming to the store. You may use a great deal of variables in making a choice on if you should buy a Thor review for children of a a number of era, so it’s far better first of all a prolonged checklist you could define.
Are you havin issues listening to the dialogue over-all that audio and gunfire? Many Thor 2022 use a food list to regulate the mp3 options. It is possible to usually locate your subtitles on or away from.
Great post. I was checking continuously this weblog and I am inspired! Extremely useful info specifically the final part 🙂 I take care of such information a lot. I used to be seeking this particular information for a long time. Thank you and good luck.
In the beginning I was skeptical that I would be able to read a lengthy article. Your style was captivating. It was a fantastic piece. Great Article Neil. Though I had read the article a few days ago, I did not comment. But, I thought it was worthy of a”thank you. I’ll use some of these tips on my own sites very soon.
온라인바카라 안전 온라인바카라 이벤트 온라인바카라 특징 온라인카지노 안전
실시간 바카라 사이트 카지노 게임 종류 메리트카지노 주소
I enjoy what you guys are usually up too. This sort of clever work and coverage! Keep up the wonderful works guys I’ve added you guys to my blogroll.
payday web site google fuck you
I’m planning to start my blog soon, but I’m a little lost on everything. Would you suggest starting with a free platform like WordPress or go for a paid option? There are so many choices out there that I’m completely confused. Any suggestions? Thanks a lot.
Thank you for sharing with us, I think this website really stands out : D.
Hello. This post couldn’t be written any better! Reading this post reminds me of my previous room mate. He always kept chatting about this. I will forward this page to him. Fairly certain he will have a good read. Thank you for sharing.
Your good knowledge and kindness in playing with all the pieces were very useful. I don’t know what I would have done if I had not encountered such a step like this.
Greetings. I know this is somewhat off-topic, but I was wondering if you knew where I could get a captcha plugin for my comment form? I’m using the same blog platform like yours, and I’m having difficulty finding one? Thanks a lot.
I am commenting to let you know what a terrific experience my daughter enjoyed reading through your web page. She noticed a wide variety of pieces, with the inclusion of what it is like to have an awesome helping style to have the rest without hassle grasp some grueling matters.
Do you have a spam issue on this website; I also am a blogger, and I wanted to know your situation; many of us have developed some nice methods, and we are looking to trade methods with others, why not shoot me an e-mail if interested.
payday web site google fuck you
Appreciation for really being thoughtful and also for deciding on certain marvelous guides most people really want to be aware of.
Existing without the answers to the difficulties you’ve sorted out through this guide is a critical case, as well as the kind which could have badly affected my entire career if I had not discovered your website.
Your new valuable key points imply much a person like me and extremely more to my office workers. With thanks; from everyone of us.
I believe this is one of the such a lot vital info for me. And i am happy reading your article. However should remark on few normal issues, The site style is great, the articles is in point of fact nice : D. Just right process, cheers
I was wondering if you ever considered changing the page layout of your blog? Its very well written; I love what youve got to say. But maybe you could a little more in the way of content so people could connect with it better. Youve got an awful lot of text for only having 1 or two pictures. Maybe you could space it out better?
My rather long internet look up has at the end of the day been compensated with pleasant insight to talk about with my family and friends.
Your site provides very good and useful information. I hope it continues for a long time. Thank you
I wish to convey my gratitude for your generosity giving support to visitors who absolutely need assistance with in this theme. Your personal dedication to passing the message all-around has been surprisingly practical and have constantly permitted guys like me to attain their targets. The warm and helpful useful information means much to me and even more to my fellow workers. With thanks; from all of us.
Do you have a spam problem on this website; I also am a blogger, and I was curious about your situation; many of us have created some nice methods and we are looking to swap strategies with other folks, please shoot me an email if interested.|
As a Newbie, I am always exploring online for articles that can help me. Thank you
I am writing to let you understand of the impressive encounter my cousin’s child enjoyed visiting your site. She noticed a good number of pieces, including what it’s like to have a marvelous giving heart to let the others easily fully understand specified tricky matters. You undoubtedly surpassed readers’ desires. I appreciate you for rendering the warm and helpful, trusted, explanatory and in addition unique tips on this topic to Ethel.
Thank you so much for giving everyone a very spectacular possiblity to discover important secrets from this website. It can be so nice and also stuffed with a lot of fun for me personally and my office acquaintances to visit your website particularly three times per week to read through the new issues you will have. And indeed, I am always contented concerning the incredible things you give. Selected 3 areas on this page are truly the most beneficial I have had.
Bunun son örneği Kanada’da görüldü. Kanada Menkul Kıymetler Yönetimi (CSA)
Needed to send you the little remark in order to thank you very much yet again about the awesome principles you’ve shown in this case. It’s really strangely generous of you to allow freely what a lot of people would’ve offered for sale as an e-book to make some money for their own end, specifically given that you might well have done it if you ever considered necessary. The strategies in addition served like the great way to comprehend some people have a similar dream just like my very own to know a good deal more when considering this issue. I know there are several more fun situations in the future for individuals who view your blog.
альтера автосалон москва 27 км 1f9cb664b7 alaoly
I would like to express my thanks to the writer for bailing me out of this incident. As a result of searching through the online world and coming across methods which were not beneficial, I assumed my entire life was gone. Being alive devoid of the solutions to the problems you have resolved by means of the guideline is a critical case, as well as the kind that would have adversely affected my career if I had not discovered your blog post. Your own personal mastery and kindness in maneuvering a lot of stuff was excellent. I’m not sure what I would’ve done if I had not come upon such a step like this. I am able to now relish my future. Thanks so much for the professional and results-oriented help. I won’t hesitate to propose your web sites to anyone who would need counselling on this subject matter.
It’s not my first time to go to see this web site, i am browsing this website dailly and get nice facts from here every day.|
I would like to express my thanks to the writer for bailing me out of this incident. As a result of searching through the online world and coming across methods which were not beneficial, I assumed my entire life was gone. Being alive devoid of the solutions to the problems you have resolved by means of the guideline is a critical case, as well as the kind that would have adversely affected my career if I had not discovered your blog post. Your own personal mastery and kindness in maneuvering a lot of stuff was excellent. I’m not sure what I would’ve done if I had not come upon such a step like this. I am able to now relish my future. Thanks so much for the professional and results-oriented help. I won’t hesitate to propose your web sites to anyone who would need counselling on this subject matter.
I together with my buddies happened to be going through the best tips and hints found on your web page while quickly developed an awful suspicion I had not expressed respect to the web blog owner for those strategies. Most of the men became absolutely excited to see all of them and now have truly been enjoying these things. Thanks for being well accommodating as well as for making a decision on some fabulous useful guides most people are really desperate to be informed on. Our honest apologies for not saying thanks to you earlier.
Dilek Ecza Deposu, tarihinde Eczacı M. Zeki TAŞÇI tarafından Antalya’da
kuruldu. Küçük bir işletme olarak faaliyete başladıktan kısa bir süre sonra,
hizmet ağını yeni bölgelere açılarak genişletme hamlesine ilk
şubesini 1994 yılında Konya’da açarak başladı.
Aynı yıl içerisinde, ithal ecza.
Dilek Ecza Deposu, tarihinde Eczacı M. Zeki TAŞÇI tarafından Antalya’da
kuruldu. Küçük bir işletme olarak faaliyete başladıktan kısa bir süre sonra,
hizmet ağını yeni bölgelere açılarak genişletme hamlesine ilk
şubesini 1994 yılında Konya’da açarak başladı.
Aynı yıl içerisinde, ithal ecza.
I wish to show thanks to you just for bailing me out of this particular trouble.As a result of checking through the net and meeting techniques that were not productive, I thought my life was done.
I’m experiencing some small security issues with my latest blog, and I’d like to find something safer. Do you have any suggestions?
I am curious to find out what blog system you’re using? I’m having some minor security problems with my latest site and I would like to find something more safe. Do you have any recommendations?|
It’s really a great and useful piece of info. I’m satisfied that you simply shared this useful info with us. Please stay us informed like this. Thank you for sharing.|
It’s truly very difficult in this active life to listen news on Television, therefore I only use the web for that purpose, and obtain the latest news.|
Hi just wanted to give you a brief heads up and let you know a few of the pictures aren’t loading correctly. I’m not sure why but I think its a linking issue. I’ve tried it in two different internet browsers and both show the same results.|
https://boksburghistorical.com/
https://enewspaperbd24.com/
Thanks for sharing, this is a fantastic blog article.Really thank you! Want more.
https://1xbet-giris.co/
Sweet blog! I found it while surfing around on Yahoo News. Do you have any tips on how to get listed in Yahoo News? I’ve been trying for a while but I never seem to get there! Cheers|
This paragraph offers clear idea in support of the new viewers of blogging, that in fact how to do blogging and site-building.|
After study a number of of the blog posts on your website now, and I actually like your manner of blogging. I bookmarked it to my bookmark web site record and might be checking back soon. Pls take a look at my web site as nicely and let me know what you think.
you are in point of fact a just right webmaster. The web site loading speed is incredible. It sort of feels that you’re doing any unique trick. In addition, The contents are masterwork. you’ve performed a fantastic job on this subject!
Great info. Lucky me I discovered your site by accident (stumbleupon). I’ve bookmarked it for later!|
Chiến lược Marketing của Vinamilk
http://ama.infoweber.com/out.cgi?id=00557&url=https://sport-lover.com/1xbet-giris/
https://ipfs.io/ipfs/QmXoypizjW3WknFiJnKLwHCnL72vedxjQkDDP1mXWo6uco/wiki/List_of_reportedly_haunted_locations.html
Ӏ know this website ցives quality depending posts ɑnd other material, is there any оther web site whicxh ρresents theѕе kinds
of things in quality?
Feel free tօ visit mʏ һomepage; bu ücretsiz şeyleri çevrimiçi bul
I’m so happy to read this. This is the kind of manual that needs to be given and not the random misinformation that’s at the other blogs. Appreciate your sharing this best doc.
https://sport-lover.com/1xbet-mobil-indir/
https://ja.wikipedia.org/wiki/E38395E382A7E3838DE383ABE38390E38395E38381E382A7E383BBE383A6E3838BE38390E383BCE382B5E383AB
whoah this weblog is wonderful i really like reading your articles. Keep up the great work! You understand, many persons are searching around for this info, you can help them greatly. |
You should take part in a contest for one of the highest quality sites on the web. I’m going to highly recommend this website!|
My developer is trying tо convince mee tօ move to .net from PHP.
I have alwaus disliked thе idwa bеcause of
tthe costs. But һe’ѕ tryiong none thе less. І’ve been ᥙsing WordPress on several
websites for about a year and am worried about switching tо anotheг platform.
Ι haѵe heard great things aƄout blogengine.net.
Is there a wаy I can import aⅼl my wordpress ϲontent intо it?
Аny help wokuld be greatly appreciated!
My paɡe bring das kostenlos online
Excellent way of explaining, and pleasant paragraph to get facts about my presentation focus, which i am going to deliver in university.|
Marvel Luggage Carry On
https://brandnewblogs.com/domaininfo/boksburghistorical.com/
Have you ever thought about writing an e-book or guest authoring on other websites? I have a blog based on the same topics you discuss and would really like to have you share some stories/information. I know my subscribers would value your work. If you’re even remotely interested, feel free to send me an e-mail.|
Superb, what a weblog it is! This webpage gives valuable data to us, keep it up.|
Very nice post. I simply stumbled upon your blog and wanted to say that I’ve really loved browsing your weblog posts. After all I will be subscribing in your feed and I am hoping you write again soon!|
I love it when people come together and share opinions, great blog, keep it up.
Kinh nghiệm thiết kế tờ rơi quảng cáo
Thank you for every other informative website. The place else may I am getting that type of information written in such an ideal approach? I have a challenge that I am simply now running on, and I’ve been at the look out for such info.
I am impressed with this internet site, very I am a big fan .
Thanks for the good writeup. It actually was once a enjoyment account it. Look complicated to more introduced agreeable from you! However, how could we keep up a correspondence?|
I’m not that much of a internet reader to be honest but your sites really nice, keep it up! I’ll go ahead and bookmark your site to come back down the road. All the best
This website was… how do you say it? Relevant!! Finally I’ve found something that helped me. Many thanks!|
http://www.forzavellino.net/forum/viewtopic.php?p=280783
These are actually enormous ideas in regarding blogging. You have touched some fastidious points here. Any way keep up wrinting.|
Ahaa, its good discussion on the topic of this article here at this website, I have read all that, so at this time me also commenting at this place.|
I am really impressed with your writing skills and also with the layout on your blog. Is this a paid theme or did you customize it yourself? Anyway keep up the excellent quality writing, it’s rare to see a nice blog like this one today.|
Hmm is anyone else encountering problems with the pictures on this blog loading? I’m trying to determine if its a problem on my end or if it’s the blog. Any feed-back would be greatly appreciated.|
We’re a bunch of volunteers and opening a new scheme in our community. Your web site offered us with valuable information to work on. You’ve performed an impressive job and our entire group will be grateful to you.|
My partner and I stumbled over here from a different website and thought I might check things out. I like what I see so now i’m following you. Look forward to checking out your web page again.|
Hi there, I enjoy reading all of your post. I like to write a little comment to support you.|
each time i used to read smaller content which as well clear their motive, and that is also happening with this paragraph which I am reading at this time.|
Hi there, all is going well here and ofcourse every one is sharing information, that’s in fact good, keep up writing.|
Hi there i am kavin, its my first occasion to commenting anyplace, when i read this paragraph i thought i could also make comment due to this sensible piece of writing.|
hi!,I love your writing very much! proportion we communicate extra about your article on AOL? I require a specialist in this area to unravel my problem. Maybe that is you! Having a look ahead to peer you. |
Hi there to all, it’s actually a good for me to go to see this site, it consists of helpful Information.|
I am constantly browsing online for ideas that can benefit me. Thx!
What i don’t understood is actually how you are not really much more well-liked than you may be now. You are very intelligent. You realize therefore considerably relating to this subject, made me personally consider it from numerous varied angles. Its like men and women aren’t fascinated unless it is one thing to accomplish with Lady gaga! Your own stuffs nice. Always maintain it up!
Hmm it seems like your blog ate my first comment (it was extremely long) so I guess I’ll just sum it up what I wrote and say, I’m thoroughly enjoying your blog. I as well am an aspiring blog blogger but I’m still new to the whole thing. Do you have any helpful hints for inexperienced blog writers? I’d definitely appreciate it.|
Hello would you mind letting me know which webhost you’re utilizing? I’ve loaded your blog in 3 completely different browsers and I must say this blog loads a lot faster then most. Can you suggest a good internet hosting provider at a reasonable price? Many thanks, I appreciate it!|
There is obviously a bunch to know about this. I consider you made certain good points in features also.
Somebody essentially help to make seriously articles I would state. This is the very first time I frequented your web page and thus far? I surprised with the research you made to make this particular publish extraordinary. Magnificent job!
Thank you, I’ve recently been looking for information approximately this subject for ages and yours is the best I have found out so far. But, what concerning the conclusion? Are you certain concerning the source?
When I initially commented I clicked the -Notify me when new comments are added- checkbox and now each time a remark is added I get 4 emails with the same comment. Is there any method you possibly can remove me from that service? Thanks!
Your place is valueble for me. Thanks!…
I’ve recently started a website, the information you offer on this site has helped me greatly. Thanks for all of your time & work.
And indeed, I’m just always astounded concerning the remarkable things served by you. Some four facts on this page are undeniably the most effective I’ve had.
I have to voice my passion for your kindness giving support to those people that should have guidance on this important matter.
Needed to compose you a very little word to thank you yet again regarding the nice suggestions you’ve contributed here.
You really make it seem really easy along with your presentation however I to find this topic to be really one thing that I feel I would by no means understand. It sort of feels too complex and extremely huge for me. I am looking ahead to your subsequent publish, I will try to get the cling of it!
You should take part in a contest for one of the best blogs on the web. I will recommend this site!
I every time emailed this website post page to all my associates, as if like to read it afterward my contacts will too.|
Very interesting subject , thanks for putting up.
Very nice post. I just stumbled upon your blog and wished to say that I have really enjoyed surfing around your weblog posts. In any case I will be subscribing in your feed and I’m hoping you write again very soon!
I believe this is one of the most vital information for me. And i’m happy studying your article. However wanna statement on few common issues, The web site style is great, the articles is actually nice : D. Excellent activity, cheers
If you would like to improve your know-how simply keep visiting this web page and be updated with the most recent information posted here.|
You made some decent factors there. I appeared on the web for the difficulty and located most people will go along with together with your website.
What’s up Dear, are you truly visiting this site daily, if so then you will without doubt take pleasant know-how.|
It’s amazing in favor of me to have a web site, which is useful designed for my experience. thanks admin|
Hello friends, nice post and pleasant urging commented here, I am in fact enjoying by these.|
Hi, I desire to subscribe for this web site to obtain newest updates, thus where can i do it please help out.|
I have been exploring for a little for any high quality articles or weblog posts in this sort of area . Exploring in Yahoo I eventually stumbled upon this web site. Studying this information So i am satisfied to convey that I have an incredibly just right uncanny feeling I discovered just what I needed. I so much for sure will make certain to don¦t omit this site and provides it a look on a constant basis.
I quite like reading through an article that can make people think. Also, thanks for allowing for me to comment!
Appreciate it for this post, I am a big big fan of this internet site would like to go on updated.
This is very interesting, You’re a very skilled blogger. I’ve joined your rss feed and look forward to seeking more of your wonderful post. Also, I’ve shared your website in my social networks!
Gia xe o to Mazda
Hello.This article was really interesting, particularly because I was investigating for thoughts on this subject last Monday.
Very interesting points you have remarked, regards for posting.
certainly like your website however you have to check the spelling on several of your posts. Several of them are rife with spelling problems and I to find it very troublesome to inform the reality then again I?¦ll surely come again again.
Sweet internet site, super design, very clean and employ pleasant.
Hi, i feel that i noticed you visited my site so i came to “return the want”.I am trying to find things to enhance my site!I assume its adequate to make use of some of your ideas!!
You have brought up a very excellent points, thanks for the post.
You have remarked very interesting points! ps nice website . “Mediocrity knows nothing higher than itself, but talent instantly recognizes genius.” by Conan Doyle.
Hello! I could have sworn I’ve been to this blog before but after browsing through some of the post I realized it’s new to me. Anyways, I’m definitely happy I found it and I’ll be book-marking and checking back frequently!
There’s definately a great deal to find out about this subject. I like all the points you made.
I was suggested this blog by my cousin. I’m not sure whether this post is written by him as nobody else know such detailed about my trouble. You are amazing! Thanks!
Well I truly liked reading it. This subject offered by you is very useful for proper planning.
Hello, you used to write fantastic, but the last few posts have been kinda boring… I miss your great writings. Past several posts are just a little bit out of track! come on!
Great tremendous issues here. I am very satisfied to look your article. Thank you a lot and i am taking a look ahead to touch you. Will you kindly drop me a mail?
Cach kiem tien qua mang o Viet Nam
I also conceive therefore, perfectly composed post! .
Pretty! This was a really wonderful post. Thank you for your provided information.
You have brought up a very good details , regards for the post.
I definitely wanted to develop a quick note to be able to express gratitude to you for all the lovely information you are giving out here. My rather long internet research has at the end been compensated with brilliant information to write about with my companions. I ‘d assert that most of us site visitors actually are extremely fortunate to live in a superb site with many awesome people with very beneficial tips. I feel really fortunate to have discovered your webpage and look forward to many more enjoyable times reading here. Thanks a lot once more for all the details.
Regards for all your efforts that you have put in this. very interesting info .
I am continuously looking online for articles that can help me. Thx!
Hi there! This post could not be written any better! Reading this post reminds me of my previous room mate! He always kept talking about this. I will forward this article to him. Fairly certain he will have a good read. Thank you for sharing!
After study a few of the blog posts in your web site now, and I truly like your way of blogging. I bookmarked it to my bookmark website list and will probably be checking back soon. Pls try my site as properly and let me know what you think.
Hey, you used to write fantastic, but the last few posts have been kinda boring?K I miss your great writings. Past few posts are just a bit out of track! come on!
You are my intake, I own few blogs and infrequently run out from to brand.
I?¦ll right away clutch your rss as I can’t in finding your e-mail subscription hyperlink or e-newsletter service. Do you have any? Please permit me recognise so that I could subscribe. Thanks.
What’s Happening i’m new to this, I stumbled upon this I’ve found It positively helpful and it has helped me out loads. I hope to contribute & assist other users like its helped me. Great job.
Great line up. We will be linking to this great article on our site. Keep up the good writing.
I believe you have mentioned some very interesting details, thankyou for the post.
Hi! I could have sworn I’ve been to your blog before but after going through a few of the articles I realized it’s new to me. Anyways, I’m certainly pleased I found it and I’ll be bookmarking it and checking back often!|
Thanks very interesting blog!|
Woh I love your posts, bookmarked! .
This web site is really a walk-through for all of the info you wanted about this and didn’t know who to ask. Glimpse here, and you’ll definitely discover it.
I?¦m now not sure where you’re getting your info, however good topic. I needs to spend some time finding out much more or figuring out more. Thanks for magnificent info I was searching for this information for my mission.
This weather looks really good !
Great info and right to the point. I am not sure if this is actually the best place to ask but do you people have any ideea where to hire some professional writers? Thank you 🙂
Pretty nice post. I just stumbled upon your blog and wanted to say that I’ve really loved browsing your blog posts. In any case I will be subscribing in your feed and I am hoping you write again very soon!
I truly appreciate this post. I’ve been looking everywhere for this! Thank goodness I found it on Bing. You’ve made my day! Thx again!
You should take part in a contest for one of the best blogs on the web. I will recommend this site!
Thanks , I’ve recently been searching for info about this topic for ages and yours is the greatest I have discovered so far. But, what about the bottom line? Are you sure about the source?
I really love the theme/design of your website. Do you ever run into any browser compatibility problems? A small number of my blog audience have complained about my site not working correctly in Explorer but looks great in Safari. Do you have any ideas to help fix this problem?
It’s a shame you don’t have a donate button! I’d certainly donate to this brilliant blog! I suppose for now I’ll settle for book-marking and adding your RSS feed to my Google account. I look forward to fresh updates and will talk about this blog with my Facebook group. Chat soon!
My spouse and I love your blog and find almost all of your post’s to be just what I’m looking for. can you offer guest writers to write content for you? I wouldn’t mind producing a post or elaborating on some the subjects you write concerning here. Again, awesome weblog!
Great wordpress blog here.. It’s hard to find quality writing like yours these days. I really appreciate people like you! take care
Hey there just wanted to give you a quick heads up. The text in your post seem to be running off the screen in Firefox. I’m not sure if this is a formatting issue or something to do with internet browser compatibility but I thought I’d post to let you know. The design and style look great though! Hope you get the problem fixed soon. Cheers
There may be noticeably a bundle to know about this. I assume you made sure good factors in features also.
This really answered my problem, thank you!
Thank you for another informative web site. Where else could I get that type of information written in such a perfect way? I’ve a project that I am just now working on, and I have been on the look out for such info.
Keep working ,remarkable job!
Just wanna tell that this is very useful, Thanks for taking your time to write this.
I think this site holds some very excellent info for everyone : D.
I am no longer positive the place you are getting your information, but good topic. I needs to spend a while learning much more or understanding more. Thanks for wonderful info I used to be on the lookout for this information for my mission.
Hello there, You have done an excellent job. I’ll definitely digg it and personally recommend to my friends. I am sure they’ll be benefited from this web site.|
excellent post, very informative. I’m wondering why the opposite experts of this sector don’t realize this. You should continue your writing. I’m sure, you’ve a great readers’ base already!|
Incredible points. Outstanding arguments. Keep up the great spirit.|
If some one wishes to be updated with latest technologies then he must be pay a visit this web site and be up to date all the time.|
Hey there! Quick question that’s totally off topic. Do you know how to make your site mobile friendly? My weblog looks weird when browsing from my iphone 4. I’m trying to find a template or plugin that might be able to correct this issue. If you have any recommendations, please share. Many thanks!
Hiya, I’m really glad I’ve found this information. Today bloggers publish just about gossips and internet and this is really frustrating. A good site with exciting content, this is what I need. Thank you for keeping this website, I will be visiting it. Do you do newsletters? Can’t find it.
I used to be recommended this blog by way of my cousin. I’m not positive whether this submit is written through him as no one else realize such designated about my difficulty. You are incredible! Thank you!
What i do not realize is actually how you are now not actually a lot more smartly-liked than you may be right now. You’re very intelligent. You understand therefore significantly in the case of this subject, produced me in my opinion imagine it from so many varied angles. Its like men and women don’t seem to be involved until it is something to accomplish with Lady gaga! Your individual stuffs outstanding. At all times care for it up!
There is noticeably a bundle to find out about this. I assume you made certain good factors in options also.
I was recommended this website by my cousin. I am not sure whether this post is written by him as no one else know such detailed about my problem. You are wonderful! Thanks!
Nice read, I just passed this onto a colleague who was doing a little research on that. And he actually bought me lunch because I found it for him smile Therefore let me rephrase that: Thanks for lunch! “Procrastination is the thief of time.” by Edward Young.
This is my first time go to see at here and i am in fact pleassant to read everthing at single place.|
Thanks for sharing excellent informations. Your website is very cool. I’m impressed by the details that you have on this blog. It reveals how nicely you perceive this subject. Bookmarked this web page, will come back for extra articles. You, my friend, ROCK! I found just the info I already searched all over the place and simply could not come across. What a great web site.
I’m not sure where you’re getting your information, but great topic. I needs to spend some time learning more or understanding more. Thanks for magnificent info I was looking for this info for my mission.
After study a few of the blog posts on your website now, and I truly like your way of blogging. I bookmarked it to my bookmark website list and will be checking back soon. Pls check out my web site as well and let me know what you think.
Thanks for this post, I am a big big fan of this site would like to keep updated.
Merely a smiling visitant here to share the love (:, btw outstanding design and style. “Everything should be made as simple as possible, but not one bit simpler.” by Albert Einstein.
Good info. Lucky me I reach on your website by accident, I bookmarked it.
Some truly interesting information, well written and broadly user genial.
When I originally commented I clicked the -Notify me when new comments are added- checkbox and now each time a comment is added I get four emails with the same comment. Is there any way you can remove me from that service? Thanks!
Unquestionably believe that which you said. Your favourite reason seemed to be at the net the easiest factor to be mindful of. I say to you, I definitely get annoyed even as other people think about concerns that they just do not recognise about. You managed to hit the nail upon the top as well as outlined out the whole thing without having side effect , people can take a signal. Will likely be again to get more. Thank you
Some really wonderful information, Gladiolus I discovered this. “Be true to your work, your word, and your friend.” by Henry David Thoreau.
Do you mind if I quote a couple of your articles as long as I provide credit and sources back to your website? My blog is in the exact same area of interest as yours and my visitors would definitely benefit from some of the information you present here. Please let me know if this okay with you. Regards!
Those are yours alright! . We at least need to get these people stealing images to start blogging! They probably just did a image search and grabbed them. They look good though!
Thank you for sharing with us, I think this website really stands out : D.
Enjoyed looking at this, very good stuff, thankyou. “The fox knows many things, but the hedgehog knows one big thing.” by Archilocus.
Thank you for another informative site. Where else could I get that kind of information written in such a perfect way? I’ve a project that I’m just now working on, and I have been on the look out for such information.
Appreciate it for this post, I am a big big fan of this web site would like to go on updated.
Excellent goods from you, man. I have understand your stuff previous to and you’re just too excellent. I actually like what you’ve acquired here, really like what you are stating and the way in which you say it. You make it enjoyable and you still take care of to keep it smart. I can not wait to read far more from you. This is really a tremendous site.
I am impressed with this internet site, very I am a big fan .
Howdy! I simply want to give an enormous thumbs up for the good information you’ve right here on this post. I will be coming again to your weblog for extra soon.
Would love to forever get updated great web site! .
Wow, awesome weblog structure! How long have you ever been blogging for? you made blogging look easy. The full look of your web site is wonderful, as neatly as the content material!
Your place is valueble for me. Thanks!…
Best view i have ever seen !
Real good info can be found on site. “Preach not to others what they should eat, but eat as becomes you, and be silent.” by Epictetus.
I beloved as much as you’ll receive performed proper here. The comic strip is attractive, your authored subject matter stylish. nonetheless, you command get bought an nervousness over that you wish be handing over the following. sick no doubt come more previously again since exactly the similar nearly a lot frequently within case you protect this increase.
Hi, Neat post. There’s a problem with your web site in internet explorer, would check this… IE still is the market leader and a huge portion of people will miss your excellent writing because of this problem.
You can certainly see your skills in the work you write. The world hopes for more passionate writers like you who are not afraid to say how they believe. Always follow your heart.
Can I simply say what a aid to seek out someone who actually knows what theyre talking about on the internet. You undoubtedly know how you can convey a difficulty to gentle and make it important. More people must read this and perceive this side of the story. I cant believe youre not more in style since you undoubtedly have the gift.
Just a smiling visitant here to share the love (:, btw great design. “Individuals may form communities, but it is institutions alone that can create a nation.” by Benjamin Disraeli.
I would like to thnkx for the efforts you have put in writing this blog. I am hoping the same high-grade blog post from you in the upcoming as well. In fact your creative writing abilities has inspired me to get my own blog now. Really the blogging is spreading its wings quickly. Your write up is a good example of it.
F*ckin’ tremendous issues here. I’m very satisfied to see your post. Thank you a lot and i’m taking a look ahead to contact you. Will you kindly drop me a mail?
Thank you, I’ve just been looking for info about this subject for ages and yours is the best I’ve discovered so far. But, what about the conclusion? Are you sure about the source?
Needed to compose you this very little note to finally thank you over again for your pleasing suggestions you have featured on this page. It has been simply particularly generous of people like you to supply openly precisely what a lot of folks could possibly have offered for sale for an ebook to help make some profit on their own, especially considering the fact that you might have tried it in case you desired. These points also worked to become a good way to be aware that many people have the same dreams like my personal own to find out much more in regard to this problem. I believe there are many more enjoyable periods up front for individuals who find out your blog post.
I like what you guys are up also. Such smart work and reporting! Carry on the superb works guys I have incorporated you guys to my blogroll. I think it’ll improve the value of my web site 🙂
Great post, you have pointed out some excellent details , I also conceive this s a very great website.
It?¦s truly a nice and helpful piece of info. I?¦m satisfied that you simply shared this helpful information with us. Please stay us up to date like this. Thanks for sharing.
I have not checked in here for a while because I thought it was getting boring, but the last several posts are good quality so I guess I will add you back to my daily bloglist. You deserve it my friend 🙂
What i do not realize is actually how you’re no longer actually a lot more well-liked than you may be right now. You are so intelligent. You recognize therefore significantly when it comes to this topic, produced me individually consider it from numerous various angles. Its like men and women are not interested until it is something to do with Girl gaga! Your individual stuffs outstanding. At all times handle it up!
I was reading through some of your blog posts on this internet site and I think this web site is really instructive! Keep posting.
Hey very cool web site!! Man .. Excellent .. Amazing .. I will bookmark your site and take the feeds also…I am happy to find so many useful info here in the post, we need develop more strategies in this regard, thanks for sharing. . . . . .
https://nb6881.com女足 亞洲 盃 資格 賽 直播推薦給您最好的娛樂平台正規專業的好平台
Lovely site! I am loving it!! Will be back later to read some more. I am taking your feeds also
Superb blog! Do you have any tips for aspiring writers? I’m hoping to start my own site soon but I’m a little lost on everything. Would you advise starting with a free platform like WordPress or go for a paid option? There are so many choices out there that I’m totally overwhelmed .. Any ideas? Thanks a lot!
hello admin whats this child porn tube payday child porn free.
Lovely just what I was looking for.Thanks to the author for taking his clock time on this one.
Thanks on your marvelous posting! I genuinely enjoyed reading it, you could be a great author.I will remember to bookmark your blog and will eventually come back later in life. I want to encourage you to ultimately continue your great work, have a nice afternoon!
Hello! I just would like to give a huge thumbs up for the great info you have here on this post. I will be coming back to your blog for more soon.
I like this post, enjoyed this one appreciate it for putting up. “The difference between stupidity and genius is that genius has its limits.” by Albert Einstein.
Only wanna say that this is extremely helpful, Thanks for taking your time to write this.
This is the right blog for anyone who wants to find out about this topic. You realize so much its almost hard to argue with you (not that I actually would want…HaHa). You definitely put a new spin on a topic thats been written about for years. Great stuff, just great!
I delight in, result in I discovered just what I was looking for. You’ve ended my four day long hunt! God Bless you man. Have a nice day. Bye
You really make it seem so easy with your presentation but I find this topic to be actually something that I think I would never understand. It seems too complicated and extremely broad for me. I’m looking forward for your next post, I’ll try to get the hang of it!
You actually make it seem really easy together with your presentation but I find this topic to be actually one thing that I think I might never understand. It kind of feels too complicated and extremely extensive for me. I am having a look ahead to your subsequent post, I will attempt to get the hang of it!
Today, while I was at work, my cousin stole my iPad and tested to see if it can survive a forty foot drop, just so she can be a youtube sensation. My apple ipad is now broken and she has 83 views. I know this is entirely off topic but I had to share it with someone!
Nice post. I was checking constantly this blog and I am impressed! Extremely helpful information particularly the last part 🙂 I care for such information much. I was looking for this particular info for a very long time. Thank you and good luck.
I was recommended this web site by my cousin. I am not sure whether this post is written by him as nobody else know such detailed about my problem. You’re wonderful! Thanks!
https://nb6881.com世界盃賭盤推薦給您最好的娛樂平台正規專業的好平台
Hello, i think that i saw you visited my web site thus i came to “return the favor”.I’m attempting to find things to enhance my web site!I suppose its ok to use some of your ideas!!
I have not checked in here for some time because I thought it was getting boring, but the last several posts are great quality so I guess I’ll add you back to my everyday bloglist. You deserve it my friend 🙂
I am not really good with English but I come up this real easygoing to translate.
Hi admin, I am reporting you a fake ball site, please google it will ruin this site.
Hello! I could have sworn I’ve been to this blog before but after browsing through some of the post I realized it’s new to me. Anyways, I’m definitely happy I found it and I’ll be book-marking and checking back frequently!
Terrific paintings! That is the kind of information that are supposed to be shared across the net. Disgrace on Google for now not positioning this put up higher! Come on over and talk over with my site . Thanks =)
I wish to point out my love for your kind-heartedness in support of persons that absolutely need assistance with that theme. Your very own commitment to passing the solution around had been quite important and have really permitted some individuals just like me to attain their endeavors. Your invaluable advice implies so much a person like me and a whole lot more to my mates. Warm regards; from all of us.
Hi admin, I’m reporting you a fake animal porn site, please google it will destroy this site.
I really enjoy looking at on this website , it has got superb content. “Heavier-than-air flying machines are impossible.” by Lord Kelvin.
I will immediately grab your rss as I can not find your email subscription link or newsletter service. Do you have any? Please let me know in order that I could subscribe. Thanks.
The desired locale has been saved to your browser. To change the locale in this browser again, select another locale on this screen.
Loving the info on this website , you have done great job on the articles.
Thanks a bunch for sharing this with all of us you actually know what you’re talking about! Bookmarked. Please also visit my website =). We could have a link exchange contract between us!
I’m truly enjoying the design and layout of your blog. It’s a very easy on the eyes which makes it much more enjoyable for me to come here and visit more often. Did you hire out a designer to create your theme? Fantastic work!
I gotta favorite this site it seems invaluable very beneficial
I carry on listening to the reports talk about receiving free online grant applications so I have been looking around for the top site to get one. Could you tell me please, where could i acquire some?
I was recommended this web site by means of my cousin. I’m no longer certain whether or not this submit is written by him as no one else recognize such certain approximately my problem. You are incredible! Thank you!
But a smiling visitor here to share the love (:, btw outstanding pattern.
After study a few of the blog posts on your website now, and I truly like your way of blogging. I bookmarked it to my bookmark website list and will be checking back soon. Pls check out my web site as well and let me know what you think.
Keep working ,terrific job!
Best view i have ever seen !
The desired locale has been saved to your browser. To change the locale in this browser again, select another locale on this screen.
Hello, Neat post. There is an issue along with your site in internet explorer, may test this?K IE nonetheless is the marketplace leader and a big component of folks will miss your fantastic writing due to this problem.
I also think hence, perfectly indited post! .
Very interesting points you have remarked, thankyou for putting up. “There is nothing in a caterpillar that tells you it’s going to be a butterfly.” by Richard Buckminster Fuller.
you have a great blog here! would you like to make some invite posts on my blog?
Hello There. I discovered your blog using msn. This is a very well written article. I’ll make sure to bookmark it and return to learn more of your useful information. Thanks for the post. I will definitely return.
Howdy very nice site!! Guy .. Beautiful .. Wonderful .. I’ll bookmark your site and take the feeds additionallyKI am satisfied to search out so many useful info right here in the put up, we’d like work out extra strategies on this regard, thanks for sharing. . . . . .
What i do not realize is in truth how you are not really a lot more neatly-liked than you may be now. You are very intelligent. You understand thus considerably on the subject of this subject, produced me in my view imagine it from so many varied angles. Its like men and women don’t seem to be fascinated until it is one thing to do with Lady gaga! Your personal stuffs excellent. Always take care of it up!
https://nb6881.com世足 2022最強遊戲都在都這裡!快來加入我們
I just could not depart your site prior to suggesting that I extremely enjoyed the usual information a person provide to your guests? Is going to be again ceaselessly to check up on new posts
fantastic publish, very informative. I ponder why the other experts of this sector do not realize this. You should continue your writing. I am confident, you’ve a huge readers’ base already!
Hi, just required you to know I he added your site to my Google bookmarks due to your layout. But seriously, I believe your internet site has 1 in the freshest theme I??ve came across. It extremely helps make reading your blog significantly easier.
Lovely blog! I am loving it!! Will come back again. I am taking your feeds also
Duoc pham quoc te A Chau
Hi, Neat post. There’s a problem with your web site in internet explorer, would test this… IE still is the market leader and a huge portion of people will miss your fantastic writing because of this problem.
Hi, Neat post. There is a problem with your web site in internet explorer, would check this… IE still is the market leader and a large portion of people will miss your wonderful writing because of this problem.
Dược phẩm Á Châu
Excellent read, I just passed this onto a friend who was doing some research on that. And he just bought me lunch as I found it for him smile So let me rephrase that: Thanks for lunch!
My husband and i were very fulfilled that Edward could conclude his basic research using the precious recommendations he came across through the web site. It is now and again perplexing just to be giving out tips and tricks which usually some others may have been selling. We really grasp we need you to give thanks to because of that. The specific illustrations you have made, the straightforward site menu, the relationships you can help to foster – it’s most overwhelming, and it’s really leading our son in addition to us consider that that issue is entertaining, which is certainly extremely indispensable. Thanks for the whole thing!
Baccarat Dumpbet69 รวมเรื่องราวดีที่สุดเกี่ยวกับ Baccarat https://dumpbet69.com/บาคาร่า/
Needed to put you one little bit of remark in order to say thanks a lot over again for your personal striking basics you have shown at this time. It has been certainly pretty generous with people like you to grant extensively just what many individuals would have sold for an ebook to earn some bucks on their own, precisely considering the fact that you could possibly have tried it in the event you wanted. These smart ideas likewise acted like the fantastic way to recognize that the rest have similar keenness like mine to learn more in respect of this matter. I think there are a lot more fun times in the future for many who see your blog.
Very interesting information!Perfect just what I was looking for!
บาคาร่า Dumpbet69 รวมเรื่องสุดยอดเกี่ยวกับ บาคาร่า https://dumpbet69.com/บาคาร่า/
Thank you, I have recently been searching for info about this subject for ages and yours is the best I’ve discovered till now. But, what about the bottom line? Are you sure about the source?
Thank you, I’ve recently been searching for information approximately this subject for a while and yours is the best I’ve discovered so far. However, what about the conclusion? Are you positive concerning the source?
Deference to article author, some superb selective information.
Keep up the excellent piece of work, I read few articles on this web site and I conceive that your blog is real interesting and has lots of good info .
This is a topic close to my heart cheers, where are your contact details though?
Hi, Neat post. There’s a problem along with your website in web explorer, may check thisK IE nonetheless is the market chief and a huge element of people will miss your great writing because of this problem.
Its like you read my mind! You appear to know a lot about this, like you wrote the book in it or something. I think that you can do with some pics to drive the message home a bit, but other than that, this is excellent blog. A fantastic read. I’ll definitely be back.
What i don’t realize is if truth be told how you are no longer really much more neatly-appreciated than you may be now. You’re very intelligent. You realize thus significantly on the subject of this matter, produced me individually imagine it from numerous numerous angles. Its like men and women don’t seem to be interested except it is one thing to accomplish with Woman gaga! Your personal stuffs outstanding. At all times maintain it up!
Write more, thats all I have to say. Literally, it seems as though you relied on the video to make your point. You obviously know what youre talking about, why throw away your intelligence on just posting videos to your weblog when you could be giving us something informative to read?
Excellent pieces. Keep How to play IPX / SPX games over LAN (WinXP)
« Old PC Gaming writing such kind of info on your page.
Im really impressed by it.
How to play IPX / SPX games over LAN (WinXP) « Old PC Gaming Hello there, You’ve How to play IPX / SPX games over
LAN (WinXP) « Old PC Gaming performed an excellent job.
How to play IPX / SPX games over LAN (WinXP) « Old PC Gaming I will How to play IPX / SPX
games over LAN (WinXP) « Old PC Gaming definitely digg it and in my view suggest to my
friends. How to play IPX / SPX games over LAN (WinXP) « Old PC Gaming I am confident they’ll be benefited from this How to play IPX
/ SPX games over LAN (WinXP) « Old PC Gaming site.https://m-e.com.ua/bitrix/rk.php?id=22&site_id=s1&event1=banner&event2=click&goto=http%3A%2F%2F0pi.ru%2Fpost.php%3Furl%3Dhttps%3A%2F%2Floginken.com%2F&af=e0502dfbc2c58f5cc1e47df2b99d5ff7%3Fid=22&site_id=s1&event1=banner&event2=click&goto=http%3A%2F%2F0pi.ru&af=e0502dfbc2c58f5cc1e47df2b99d5ff7
I really like your writing style, great info , regards for posting : D.
Keep functioning ,impressive job!
Great weblog right here! Also your site so much up fast! What host are you the usage of? Can I am getting your affiliate link for your host? I wish my site loaded up as fast as yours lol
Hi! I’ve been reading your weblog for a long time now and finally got the bravery to go ahead and give you a shout out from Dallas Tx! Just wanted to tell you keep up the fantastic job!
กลิ่น น้ำหอม perfume น้ำหอม https://ceresaperfume.com
hi!,I love your writing very much! share we keep up a correspondence more approximately your post on AOL? I require an expert on this space to unravel my problem. May be that’s you! Taking a look ahead to peer you.
น้ำหอม คือ https://ceresaperfume.com
https://nb6881.com女足 亞洲 盃 資格 賽 直播最強遊戲都在都這裡!快來加入我們
perfume น้ำหอม ceresa https://ceresaperfume.com
Just desire to say your article is as astounding. The clearness to your submit is simply nice and i could suppose you are an expert on this subject. Fine with your permission allow me to take hold of your feed to keep updated with forthcoming post. Thank you one million and please continue the gratifying work.
ยูฟ่า Dumpbet69 พบทุกเรื่องเกี่ยวกับ ยูฟ่า https://dumpbet69.com
ยูฟ่า Dumpbet69 ทุกเรื่องสุดยอดเกี่ยวกับ ยูฟ่า https://dumpbet69.com
I was suggested this web site by my cousin. I’m not sure whether this post is written by him as no one else know such detailed about my problem. You are amazing! Thanks!
This design is spectacular! You certainly know how to keep a reader entertained. Between your wit and your videos, I was almost moved to start my own blog (well, almost…HaHa!) Great job. I really loved what you had to say, and more than that, how you presented it. Too cool!
ยูฟ่า Dumpbet69 พบทุกเรื่องเกี่ยวกับ ยูฟ่า https://dumpbet69.com
https://cs5168.com娛樂城遊戲最強遊戲都在都這裡!快來加入我們
Hi, Neat post. There is a problem with your website in internet explorer, would check this… IE still is the market leader and a big portion of people will miss your fantastic writing due to this problem.
You made some good points there. I did a search on the subject matter and found most persons will approve with your site.
ufa191 is an additional company. on-line baccarat And also a comprehensive on the internet cash making game is a straight web site, stable, risk-free, 100 reliable, validated by actual casino players, genuine voices who have the possibility to make use of the service below with the experience of banking on baccarat video games. ufa191 Dumpbet69 อยากรู้ทุกเรื่อง ufa191 https://dumpbet69.com/ufa191
ufa191 is one more provider. on-line baccarat And also a comprehensive on the internet cash making video game is a straight website, secure, risk-free, 100 reliable, confirmed by real bettors, actual voices that have the possibility to utilize the solution below with the experience of banking on baccarat video games. ufa191 Dumpbet69 อยากรู้ทุกเรื่อง ufa191 https://dumpbet69.com/ufa191
Generally I do not read post on blogs, but I wish to say that this write-up very forced me to try and do so! Your writing style has been surprised me. Thanks, very nice article.
ufa191 is one more company. on the internet baccarat And also an extensive online cash making game is a straight site, stable, secure, 100 dependable, validated by real casino players, actual voices that have the possibility to use the service below with the experience of banking on baccarat games.. ufa191 Dumpbet69 ครบทุกเรื่อง ufa191 https://dumpbet69.com/ufa191
ufa191 is another service provider. online baccarat And a comprehensive on the internet cash making video game is a straight internet site, steady, safe, 100 trusted, verified by actual bettors, genuine voices that have the opportunity to use the service right here with the experience of betting on baccarat games. Dumpbet69 อยากอ่านเรื่อง ufa191 ต้อง https://dumpbet69.com/ufa191
I want to express some thanks to you just for rescuing me from this particular matter. Just after looking throughout the online world and finding notions that were not beneficial, I believed my entire life was well over. Living without the approaches to the issues you’ve solved all through your entire short post is a critical case, and the ones that could have in a negative way affected my entire career if I had not noticed your blog post. Your primary mastery and kindness in playing with all the things was priceless. I’m not sure what I would have done if I had not come upon such a subject like this. I’m able to at this point look forward to my future. Thanks so much for this high quality and sensible guide. I will not think twice to refer your site to anyone who should get care about this matter.
Hello! I know this is kinda off topic however I’d figured I’d ask. Would you be interested in trading links or maybe guest writing a blog post or vice-versa? My blog addresses a lot of the same topics as yours and I believe we could greatly benefit from each other. If you might be interested feel free to send me an email. I look forward to hearing from you! Wonderful blog by the way!
Great blog here! Also your site rather a lot up very fast! What web host are you the use of? Can I get your affiliate link for your host? I want my website loaded up as quickly as yours lol
I haven¦t checked in here for a while as I thought it was getting boring, but the last several posts are great quality so I guess I will add you back to my daily bloglist. You deserve it my friend 🙂
I have recently started a blog, the info you offer on this website has helped me greatly. Thanks for all of your time & work.
ufa191 is another service provider. online baccarat As well as an extensive on the internet money making video game is a straight internet site, secure, safe, 100 reputable, confirmed by real bettors, actual voices that have the opportunity to utilize the service here with the experience of betting on baccarat games. ufa191 Dumpbet69 พบทุกเรื่องเกี่ยวกับ ufa191 https://ufa191-dump69.blogspot.com/2022/10/ufa191.html
whoah this weblog is magnificent i like reading your articles. Stay up the great work! You realize, many persons are searching round for this info, you could aid them greatly.
My spouse and I absolutely love your blog and find the majority of your post’s to be what precisely I’m looking for. Do you offer guest writers to write content for you personally? I wouldn’t mind writing a post or elaborating on a number of the subjects you write related to here. Again, awesome web log!
Hi, just required you to know I he added your site to my Google bookmarks due to your layout. But seriously, I believe your internet site has 1 in the freshest theme I??ve came across. It extremely helps make reading your blog significantly easier.
I just couldn’t depart your website prior to suggesting that I extremely enjoyed the standard information a person provide for your visitors? Is gonna be back often to check up on new posts
I am curious to find out what blog system you are utilizing? I’m having some minor security problems with my latest blog and I’d like to find something more safe. Do you have any recommendations?
Hello, i feel that i saw you visited my blog thus i got here to “go back the prefer”.I’m attempting to in finding issues to improve my web site!I guess its ok to make use of some of your concepts!!
Hi there very nice blog!! Guy .. Excellent .. Amazing .. I’ll bookmark your website and take the feeds also?KI’m happy to find so many useful info here in the post, we’d like work out more strategies on this regard, thank you for sharing. . . . . .
Very nice post and right to the point. I don’t know if this is actually the best place to ask but do you guys have any thoughts on where to employ some professional writers? Thank you 🙂
Excellent web site. Plenty of helpful info here. I am sending it to a few friends ans additionally sharing in delicious. And obviously, thank you to your effort!
You made some good points there. I did a search on the topic and found most people will approve with your website.
Hi, I really like your blog! I can really relate to this article as I am currently employed as an accounts payable specialist for an outsourced accounting firm.
I got this site from my friend who informed me about this web page and at the moment this time I am browsing this website and reading very informative content at this place.|
Hi there, i read your blog occasionally and i own a similar one and i was just curious if you get a lot of spam remarks? If so how do you prevent it, any plugin or anything you can suggest? I get so much lately it’s driving me insane so any help is very much appreciated.|
Hi, I am a huge fan of your blog! I really agree with this as I am currently employed as a tax specialist for an outsourcing company.
I have not checked in here for some time as I thought it was getting boring, but the last several posts are good quality so I guess I will add you back to my daily bloglist. You deserve it my friend 🙂
Super-Duper site! I am loving it!! Will be back later to read some more. I am bookmarking your feeds also.
I got what you intend,saved to fav, very nice web site.
Hi, I think your site might be having browser compatibility issues. When I look at your website in Safari, it looks fine but when opening in Internet Explorer, it has some overlapping. I just wanted to give you a quick heads up! Other then that, fantastic blog!
Regards for helping out, wonderful information.
Those are yours alright! . We at least need to get these people stealing images to start blogging! They probably just did a image search and grabbed them. They look good though!
ufa168 is another company. online baccarat As well as a thorough on the web cash making video game is a direct internet site, stable, risk-free, 100 trustworthy, verified by authentic casino site gamers, actual voices that have the possibility to utilize the solution right here with the experience of financial on baccarat computer game. ufa168 Dumpbet69 ufa168 https://dumpbet69.com/E0B8A2E0B8B9E0B89FE0B988E0B8B2168/
Perfect piece of work you have done, this web site is really cool with wonderful information.
This is a topic close to my heart cheers, where are your contact details though?
As a Newbie, I am constantly exploring online for articles that can help me. Thank you
This is the right blog for anyone who wants to find out about this topic. You realize so much its almost hard to argue with you (not that I actually would want…HaHa). You definitely put a new spin on a topic thats been written about for years. Great stuff, just great!
Thank you for every other wonderful post. Where else may anybody get that type of information in such an ideal manner of writing? I’ve a presentation next week, and I’m at the look for such info.
That is really attention-grabbing, You are an excessively skilled blogger. I have joined your rss feed and stay up for in the hunt for extra of your excellent post. Also, I have shared your website in my social networks!
I think this site holds very great composed subject material content.
Youre so cool! I dont suppose Ive learn anything like this before. So nice to search out someone with some original ideas on this subject. realy thanks for beginning this up. this web site is something that’s wanted on the net, somebody with just a little originality. useful job for bringing something new to the internet!
I actually wanted to send a brief comment to say thanks to you for all the splendid suggestions you are writing on this site. My time intensive internet lookup has at the end been rewarded with good quality insight to go over with my friends and classmates. I would admit that many of us site visitors actually are unequivocally fortunate to dwell in a notable website with many perfect individuals with beneficial points. I feel rather fortunate to have encountered your website and look forward to many more entertaining moments reading here. Thank you once more for everything.
Simply wish to say your article is as surprising. The clarity in your post is just spectacular and i can assume you are an expert on this subject. Well with your permission allow me to grab your RSS feed to keep up to date with forthcoming post. Thanks a million and please continue the rewarding work.
Thank you, I’ve just been looking for info approximately this topic for a long time and yours is the greatest I have discovered till now. However, what concerning the bottom line? Are you positive concerning the supply?
I have read some good stuff here. Definitely worth bookmarking for revisiting. I surprise how much effort you put to create such a excellent informative web site.
This is very interesting, You’re a very skilled blogger. I have joined your rss feed and look forward to seeking more of your wonderful post. Also, I have shared your site in my social networks!
I’m curious to find out what blog platform you have been working with? I’m experiencing some minor security issues with my latest site and I’d like to find something more secure. Do you have any solutions?
I’d perpetually want to be update on new articles on this site, saved to favorites! .
Thanks for another informative site. Where else could I get that kind of info written in such an ideal way? I’ve a project that I am just now working on, and I’ve been on the look out for such info.
Thank you for some other informative site. The place else could I am getting that kind of info written in such a perfect manner? I have a undertaking that I’m just now running on, and I’ve been at the look out for such info.
Greetings! I know this is kinda off topic nevertheless I’d figured I’d ask. Would you be interested in trading links or maybe guest writing a blog post or vice-versa? My website goes over a lot of the same topics as yours and I feel we could greatly benefit from each other. If you’re interested feel free to shoot me an e-mail. I look forward to hearing from you! Awesome blog by the way!
I do agree with all the ideas you’ve presented in your post. They are very convincing and will certainly work. Still, the posts are very short for starters. Could you please extend them a little from next time? Thanks for the post.
ufa168 is an included business. online baccarat As well as likewise a comprehensive on the web cash making game is a straight website, secure, risk-free, 100 reputable, validated by genuine casino site gamers, authentic voices that have the opportunity to make use of the solution listed below with the experience of monetary on baccarat video game. ufa168 Dumpbet69 ufa168 https://dumpbet69.com/E0B8A2E0B8B9E0B89FE0B988E0B8B2168/
With every little thing that appears to be developing within this particular area, a significant percentage of viewpoints are actually fairly refreshing. On the other hand, I beg your pardon, but I do not give credence to your entire strategy, all be it refreshing none the less. It looks to me that your opinions are not completely validated and in actuality you are yourself not even completely confident of the point. In any case I did appreciate looking at it.
Awsome website! I am loving it!! Will be back later to read some more. I am taking your feeds also.
ufa168 is one more service provider. online baccarat As well as a comprehensive on the web money production game is a direct website, steady, risk-free, 100 trustworthy, verified by actual casino players, real voices that have the opportunity to make use of the solution right here with the experience of banking on baccarat video games. ufa168 Dumpbet69 ufa168 https://dumpbet69.com/E0B8A2E0B8B9E0B89FE0B988E0B8B2168/
I just wanted to write a small word so as to express gratitude to you for the wonderful steps you are sharing on this website. My time intensive internet lookup has finally been recognized with brilliant insight to go over with my classmates and friends. I ‘d say that we visitors actually are unquestionably blessed to exist in a remarkable place with very many wonderful people with valuable basics. I feel very lucky to have used your entire webpages and look forward to some more cool times reading here. Thanks a lot once more for all the details.
I really like your writing style, wonderful info, appreciate it for putting up :D. “In every affair consider what precedes and what follows, and then undertake it.” by Epictetus.
Free Private Blog Networks. Rank Higher with our PBNs
This is a topic close to my heart cheers, where are your contact details though?
ufa168 is an added business. on-line baccarat And also likewise a detailed ในโลกของอินเตอร์เนต cash making video game is a straight web site, stable, secure, 100 reputable, verified by real casino players, authentic voices that have the opportunity to use the solution listed below with the experience of monetary on baccarat video game. ufa168 Dumpbet69 ufa168 https://dumpbet69.com/E0B8A2E0B8B9-E0B89FE0B988E0B8B2-168/
I loved as much as you’ll receive carried out right here. The sketch is attractive, your authored material stylish. nonetheless, you command get got an impatience over that you wish be delivering the following. unwell unquestionably come further formerly again since exactly the same nearly very often inside case you shield this hike.
Hey! Someone in my Facebook group shared this website with us so I came to give it a look. I’m definitely enjoying the information. I’m book-marking and will be tweeting this to my followers! Fantastic blog and outstanding design.
What i do not understood is actually how you’re not really much more well-liked than you may be right now. You are so intelligent. You realize therefore considerably relating to this subject, produced me personally consider it from a lot of varied angles. Its like men and women aren’t fascinated unless it’s one thing to accomplish with Lady gaga! Your own stuffs excellent. Always maintain it up!
I was reading through some of your content on this site and I think this site is very informative! Keep putting up.
Spot on with this write-up, I really suppose this website needs much more consideration. I’ll probably be again to learn far more, thanks for that info.
Thank you for sharing excellent informations. Your website is so cool. I’m impressed by the details that you’ve on this website. It reveals how nicely you perceive this subject. Bookmarked this website page, will come back for more articles. You, my pal, ROCK! I found simply the info I already searched everywhere and just could not come across. What a great site.
Have you ever considered about including a little bit more than just your articles? I mean, what you say is fundamental and everything. But just imagine if you added some great pictures or video clips to give your posts more, “pop”! Your content is excellent but with images and video clips, this website could definitely be one of the most beneficial in its field. Very good blog!
Simply want to say your article is as astounding. The clarity in your post is just cool and i can assume you are an expert on this subject. Fine with your permission let me to grab your RSS feed to keep updated with forthcoming post. Thanks a million and please keep up the enjoyable work.
This web site is really a walk-through for all of the info you wanted about this and didn’t know who to ask. Glimpse here, and you’ll definitely discover it.
I went over this site and I conceive you have a lot of wonderful info, saved to my bookmarks (:.
Very nice post. I just stumbled upon your weblog and wished to say that I’ve really enjoyed browsing your blog posts. After all I will be subscribing to your rss feed and I hope you write again soon!
I think this website has some real fantastic information for everyone : D.
Yay google is my world beater assisted me to find this outstanding web site! .
I have been checking out some of your articles and i must say pretty clever stuff. I will surely bookmark your website.
Thank you a lot for sharing this with all folks you really recognise what you are talking about! Bookmarked. Please also visit my site =). We may have a link change arrangement among us!
My wife and i were very joyful that Jordan could deal with his basic research from the ideas he got from your own web pages. It is now and again perplexing to simply continually be giving freely tips and tricks which often the rest might have been selling. We take into account we now have you to appreciate because of that. Those explanations you have made, the simple website navigation, the friendships you will make it easier to instill – it’s everything spectacular, and it’s helping our son in addition to the family know that that content is entertaining, and that is extremely fundamental. Thank you for everything!
You made some first rate factors there. I looked on the web for the problem and found most people will go together with together with your website.
I haven’t checked in here for a while since I thought it was getting boring, but the last few posts are good quality so I guess I will add you back to my everyday bloglist. You deserve it my friend 🙂
You are my aspiration, I own few blogs and often run out from to brand.
I am impressed with this site, real I am a big fan .
A lot of of whatever you point out is supprisingly appropriate and that makes me wonder the reason why I hadn’t looked at this in this light previously. This piece really did turn the light on for me personally as far as this particular subject goes. But there is actually just one factor I am not necessarily too comfy with so whilst I try to reconcile that with the actual central theme of your position, allow me observe exactly what the rest of your readers have to say.Nicely done.
I like studying and I think this website got some genuinely useful stuff on it! .
I’d perpetually want to be update on new blog posts on this site, bookmarked! .
Would love to always get updated outstanding site! .
Incredible! This blog looks exactly like my old one!
It’s on a entirely different subject but it has pretty much the same page layout and design. Excellent
choice of colors!
As a Newbie, I am always searching online for articles that can aid me. Thank you
What i do not realize is if truth be told how you’re now not really a lot more well-appreciated than you may be now. You’re very intelligent. You already know thus significantly in the case of this matter, produced me personally consider it from a lot of numerous angles. Its like men and women are not interested until it’s one thing to do with Lady gaga! Your personal stuffs outstanding. Always deal with it up!
The next time I read a blog, I hope that it doesnt disappoint me as much as this one. I mean, I know it was my choice to read, but I actually thought youd have something interesting to say. All I hear is a bunch of whining about something that you could fix if you werent too busy looking for attention.
Woh I love your posts, bookmarked! .
F*ckin’ tremendous things here. I’m very glad to look your article. Thanks a lot and i am looking forward to contact you. Will you please drop me a e-mail?
F*ckin’ remarkable things here. I’m very satisfied to look your post. Thank you a lot and i am looking forward to touch you. Will you kindly drop me a mail?
I really appreciate this post. I have been looking everywhere for this! Thank goodness I found it on Bing. You have made my day! Thx again
Howdy very nice site!! Man .. Excellent .. Amazing .. I will bookmark your blog and take the feeds also…I am glad to seek out a lot of useful info here in the put up, we’d like develop extra techniques in this regard, thanks for sharing. . . . . .
Good web site! I really love how it is simple on my eyes and the data are well written. I’m wondering how I might be notified when a new post has been made. I’ve subscribed to your RSS which must do the trick! Have a great day!
very nice publish, i actually love this web site, keep on it
I’d should check with you here. Which is not something I often do! I take pleasure in studying a put up that may make individuals think. Additionally, thanks for allowing me to comment!
SpyToStyle
[…]check beneath, are some absolutely unrelated web sites to ours, even so, they’re most trustworthy sources that we use[…]
What’s Happening i am new to this, I stumbled upon this I have found It absolutely helpful and it has aided me out loads. I hope to contribute & assist other users like its helped me. Great job.
I think this is one of the most significant information for me. And i am glad reading your article. But want to remark on some general things, The web site style is great, the articles is really excellent : D. Good job, cheers
The very root of your writing while sounding reasonable originally, did not settle very well with me personally after some time. Somewhere throughout the sentences you actually were able to make me a believer unfortunately just for a short while. I nevertheless have got a problem with your jumps in logic and you would do nicely to fill in all those gaps. If you actually can accomplish that, I would undoubtedly end up being fascinated.
I think this internet site has got very wonderful written articles content.
Enjoyed examining this, very good stuff, thanks. “It requires more courage to suffer than to die.” by Napoleon Bonaparte.
I am not very good with English but I get hold this rattling easy to interpret.
I liked up to you’ll obtain performed right here. The cartoon is attractive, your authored subject matter stylish. nonetheless, you command get got an impatience over that you want be delivering the following. ill definitely come further beforehand again as exactly the same just about a lot frequently within case you defend this hike.
hi!,I love your writing so a lot! share we be in contact more approximately your article on AOL? I require an expert on this area to resolve my problem. May be that’s you! Taking a look ahead to look you.
Do you have a spam issue on this blog; I also am a blogger, and I was curious about your situation; we have created some nice practices and we are looking to swap solutions with others, why not shoot me an email if interested.
You have observed very interesting points! ps nice web site.
You actually make it appear really easy along with your presentation however I to find this topic to be actually one thing which I feel I’d never understand. It seems too complicated and very broad for me. I’m looking ahead to your next put up, I¦ll attempt to get the hang of it!
Today, while I was at work, my cousin stole my iPad and tested to see if it can survive a twenty five foot drop, just so she can be a youtube sensation. My apple ipad is now destroyed and she has 83 views. I know this is totally off topic but I had to share it with someone!
I like what you guys are up also. Such smart work and reporting! Carry on the excellent works guys I have incorporated you guys to my blogroll. I think it will improve the value of my website 🙂
I am constantly thought about this, appreciate it for posting.
ufa168 เป็นบริการที่ประกอบด้วย บาคาร่าออนไลน์ นอกจากที่ครบวงจรแล้ว เว็บเกมทำเงิน วิดีโอเกม เป็นเว็บตรง ปลอดภัย เชื่อถือได้ มีชื่อเสียง 100 ยืนยันโดยนักพนันเว็บไซต์ เว็บพนันตัวจริง เสียงจริงที่มีโอกาสใช้บริการ ระบุไว้ที่นี่ด้วยประสบการณ์ด้านการเงินในวิดีโอเกมบาคาร่า ufa168 Dumpbet69 ufa168 https://dumpbet69.com/E0B8A2E0B8B9-E0B89FE0B988E0B8B2-168/
Thanks a bunch for sharing this with all of us you really know what you are talking about! Bookmarked. Please also visit my website =). We could have a link exchange agreement between us!
I carry on listening to the news speak about receiving boundless online grant applications so I have been looking around for the top site to get one. Could you advise me please, where could i acquire some?
There is clearly a bundle to know about this. I consider you made some good points in features also.
Wonderful beat ! I wish to apprentice while you amend your site, how can i subscribe for a blog web site? The account aided me a acceptable deal. I had been tiny bit acquainted of this your broadcast provided bright clear concept
I like this weblog very much, Its a really nice berth to read and receive information. “Acceptance of dissent is the fundamental requirement of a free society.” by Richard Royster.
ufa168 เป็นบริการที่รวม บาคาร่าออนไลน์ พร้อมทั้งรายละเอียดเพิ่มเติมเกี่ยวกับเว็บทำเงิน วิดีโอเกม เป็นเว็บเน็ตตรง ป้องกัน ปลอดภัย น่านับถือ 100 ตรวจสอบโดยผู้เล่นเว็บไซต์สถานประกอบการการพนันของแท้ เสียงจริง มีโอกาสได้ใช้ โซลูชันที่ระบุไว้ที่นี่พร้อมประสบการณ์ด้านการเงินในเกมคอมพิวเตอร์บาคาร่า ufa168 Dumpbet69 ufa168 https://dumpbet69.com/E0B8A2E0B8B9-E0B89FE0B988E0B8B2-168/
Pretty! This was a really wonderful post. Thank you for your provided information.
I must show some thanks to this writer just for bailing me out of this dilemma. Right after surfing through the online world and getting advice which are not pleasant, I assumed my entire life was over. Existing without the answers to the difficulties you have resolved by means of the article is a serious case, and ones which may have in a negative way affected my entire career if I hadn’t encountered the blog. Your actual natural talent and kindness in dealing with all the pieces was valuable. I don’t know what I would have done if I had not come across such a solution like this. I can also at this time look forward to my future. Thanks for your time so much for this specialized and amazing guide. I won’t be reluctant to propose your web page to any individual who ought to have guidelines on this area.
My spouse and I stumbled over here by a different web page and thought I should check things out. I like what I see so now i’m following you. Look forward to exploring your web page again.
magnificent post, very informative. I wonder why the other experts of this sector do not notice this. You must continue your writing. I am sure, you have a great readers’ base already!
Hi there! I just wanted to ask if you ever have any problems with hackers? My last blog (wordpress) was hacked and I ended up losing many months of hard work due to no backup. Do you have any methods to stop hackers?
Great – I should certainly pronounce, impressed with your website. I had no trouble navigating through all the tabs as well as related info ended up being truly easy to do to access. I recently found what I hoped for before you know it at all. Quite unusual. Is likely to appreciate it for those who add forums or anything, website theme . a tones way for your customer to communicate. Nice task..
I will immediately grab your rss feed as I can’t find your email subscription link or newsletter service. Do you have any? Kindly let me know in order that I could subscribe. Thanks.
I discovered your weblog website on google and test a few of your early posts. Proceed to keep up the very good operate. I just extra up your RSS feed to my MSN Information Reader. Looking for forward to reading more from you afterward!…
As I web-site possessor I believe the content matter here is rattling magnificent , appreciate it for your efforts. You should keep it up forever! Good Luck.
Thanks for your entire effort on this blog. My mom take interest in engaging in research and it’s simple to grasp why. My partner and i know all regarding the lively way you produce insightful secrets on this blog and therefore cause contribution from some other people on this concept plus our own child has been being taught a lot. Take pleasure in the remaining portion of the year. You are always conducting a good job.
My brother recommended I may like this web site. He used to be totally right. This submit actually made my day. You cann’t imagine simply how a lot time I had spent for this information! Thanks!
Hmm it looks like your site ate my first comment (it was extremely long) so I guess I’ll just sum it up what I submitted and say, I’m thoroughly enjoying your blog. I as well am an aspiring blog blogger but I’m still new to the whole thing. Do you have any points for first-time blog writers? I’d certainly appreciate it.
With havin so much content do you ever run into any problems of plagorism or copyright violation? My website has a lot of exclusive content I’ve either authored myself or outsourced but it seems a lot of it is popping it up all over the internet without my permission. Do you know any ways to help prevent content from being ripped off? I’d truly appreciate it.
Great post. I am facing a couple of these problems.
Hi there! I just would like to give an enormous thumbs up for the great information you will have right here on this post. I will likely be coming again to your blog for extra soon.
Utterly indited subject material, Really enjoyed looking through.
Hi , I do believe this is an excellent blog. I stumbled upon it on Yahoo , i will come back once again. Money and freedom is the best way to change, may you be rich and help other people.
This is a topic that is near to my heart… Many thanks! Exactly where are your contact details though?
Hi my friend! I wish to say that this post is awesome, nice written and include approximately all vital infos. I’d like to see more posts like this.
Wow, this piece of writing is nice, my younger sister is analyzing these kinds of things, so I am going to let know her.
My wife and i felt quite joyful Louis managed to deal with his homework from the precious recommendations he discovered from your blog. It’s not at all simplistic to just always be making a gift of guidance that other folks could have been making money from. And now we fully understand we now have the blog owner to be grateful to because of that. These illustrations you have made, the straightforward blog navigation, the friendships your site help create – it’s got many superb, and it is helping our son and us reckon that this idea is fun, and that’s unbelievably vital. Thanks for everything!
Attractive element of content. I just stumbled upon your blog and in accession capital to say that I get in fact enjoyed account your blog posts. Any way I will be subscribing for your augment or even I achievement you access consistently fast.
Keep up the excellent work, I read few blog posts on this website and I think that your website is very interesting and contains bands of great information.
I think you have mentioned some very interesting details , thanks for the post.
I real happy to find this site on bing, just what I was searching for : D likewise saved to favorites.
Valuable info. Lucky me I found your website by accident, and I’m shocked why this accident did not happened earlier! I bookmarked it.
I am impressed with this web site, very I am a fan.
Simply wanna tell that this is very useful, Thanks for taking your time to write this.
Thanx for the effort, keep up the good work Great work, I am going to start a small Blog Engine course work using your site I hope you enjoy blogging with the popular BlogEngine.net.Thethoughts you express are really awesome. Hope you will right some more posts.
Hello! Quick question that’s totally off topic. Do you know how to make your site mobile friendly? My weblog looks weird when viewing from my apple iphone. I’m trying to find a template or plugin that might be able to resolve this problem. If you have any suggestions, please share. Many thanks!
Very interesting details you have observed, thankyou for posting.
Hi there, i read your blog occasionally and i own a similar one and i was just curious if you get a lot of spam feedback? If so how do you protect against it, any plugin or anything you can advise? I get so much lately it’s driving me insane so any assistance is very much appreciated.
I just couldn’t leave your website prior to suggesting that I really loved the usual info an individual provide to your visitors? Is going to be again frequently to check out new posts
Some really nice stuff on this site, I love it.
I’ve been absent for a while, but now I remember why I used to love this website. Thank you, I?¦ll try and check back more frequently. How frequently you update your web site?
Once I originally commented I clicked the -Notify me when new comments are added- checkbox and now every time a comment is added I get four emails with the same comment. Is there any manner you may remove me from that service? Thanks!
I truly wanted to compose a quick comment to thank you for all of the great tips you are writing on this site. My time-consuming internet investigation has at the end been rewarded with brilliant know-how to go over with my partners. I ‘d express that many of us website visitors actually are unquestionably lucky to exist in a magnificent community with many marvellous individuals with valuable hints. I feel really grateful to have discovered your entire site and look forward to many more exciting minutes reading here. Thanks once again for everything.
Enjoyed examining this, very good stuff, thanks.
I always was interested in this topic and stock still am, thanks for putting up.
Fantastic website. Lots of helpful information here. I¦m sending it to some buddies ans also sharing in delicious. And certainly, thanks for your sweat!
Keep up the wonderful piece of work, I read few content on this website and I conceive that your website is rattling interesting and holds sets of excellent information.
I dugg some of you post as I cogitated they were very useful handy
F*ckin’ remarkable issues here. I’m very satisfied to look your article. Thanks so much and i am looking ahead to contact you. Will you please drop me a mail?
Some truly select blog posts on this website , saved to my bookmarks.
I got what you intend, thanks for putting up.Woh I am pleased to find this website through google. “I would rather be a coward than brave because people hurt you when you are brave.” by E. M. Forster.
Thanks for a marvelous posting! I really enjoyed reading it, you are a great author.I will be sure to bookmark your blog and will eventually come back sometime soon. I want to encourage one to continue your great job, have a nice evening!
Hello my friend! I want to say that this post is amazing, nice written and include almost all vital infos. I would like to peer extra posts like this .
Wow! Thank you! I continuously needed to write on my site something like that. Can I implement a portion of your post to my site?
Very great visual appeal on this site, I’d rate it 10 10.
Simply desire to say your article is as astonishing. The clarity in your post is just spectacular and i could assume you’re an expert on this subject. Fine with your permission let me to grab your RSS feed to keep updated with forthcoming post. Thanks a million and please keep up the gratifying work.
hello there and thank you for your info ? I?ve definitely picked up something new from right here. I did however expertise some technical points using this web site, as I experienced to reload the web site a lot of times previous to I could get it to load correctly. I had been wondering if your web host is OK? Not that I’m complaining, but sluggish loading instances times will very frequently affect your placement in google and can damage your high-quality score if advertising and marketing with Adwords. Well I am adding this RSS to my email and can look out for much more of your respective interesting content. Ensure that you update this again soon..
Hey this is somewhat of off topic but I was wanting to know if blogs use WYSIWYG editors or if you have to manually code with HTML. I’m starting a blog soon but have no coding expertise so I wanted to get advice from someone with experience. Any help would be enormously appreciated!
My spouse and I stumbled over here by a different page and thought I might check things out. I like what I see so now i am following you. Look forward to looking into your web page repeatedly.
Hi there very nice site!! Man .. Excellent .. Wonderful .. I will bookmark your website and take the feeds additionally?KI’m satisfied to seek out a lot of helpful info right here in the post, we’d like work out more strategies in this regard, thank you for sharing. . . . . .
Regards for this wondrous post, I am glad I discovered this site on yahoo.
I’m impressed, I must say. Actually hardly ever do I encounter a weblog that’s both educative and entertaining, and let me tell you, you’ve gotten hit the nail on the head. Your idea is outstanding; the problem is one thing that not enough people are speaking intelligently about. I’m very comfortable that I stumbled throughout this in my seek for one thing regarding this.
whoah this blog is great i love reading your posts. Keep up the good work! You know, lots of people are hunting around for this info, you can aid them greatly.
A beautiful piece of composing. Thanks to blogging websites that viewers check out wonderful writings like yours’ as well as appreciate themselves. I need to say that I have actually never seen such a good blog like yours’. Setting new composing patterns as well as enriching the material with powerful and insightful information is the major theme of blogging that you constantly meet. It is an amazing blog site. I appreciate your initiatives. I am likewise a material author. I invite you to review my Blog site regarding Doctor On Call as well as share your sensations with me about my effort.
Thanks a lot for sharing this with all of us you actually know what you are talking about! Bookmarked. Kindly also visit my web site =). We could have a link exchange arrangement between us!
Great – I should definitely pronounce, impressed with your web site. I had no trouble navigating through all tabs and related information ended up being truly simple to do to access. I recently found what I hoped for before you know it in the least. Quite unusual. Is likely to appreciate it for those who add forums or something, web site theme . a tones way for your client to communicate. Nice task.
I have not checked in here for a while since I thought it was getting boring, but the last several posts are good quality so I guess I?¦ll add you back to my daily bloglist. You deserve it my friend 🙂
Hi there! Quick question that’s totally off topic. Do you know how to make your site mobile friendly? My website looks weird when viewing from my iphone 4. I’m trying to find a theme or plugin that might be able to resolve this issue. If you have any recommendations, please share. Thank you!
hi!,I like your writing so much! share we communicate more about your article on AOL? I require an expert on this area to solve my problem. Maybe that’s you! Looking forward to see you.
I’m still learning from you, while I’m improving myself. I certainly liked reading all that is posted on your website.Keep the posts coming. I enjoyed it!
Greate article.Comprare Patente B LegaleKeep writing such kind of info on your page
When someone writes an paragraph he/she keeps the idea of a user in his/her mind that how a user can understand it.
So that’s why this piece of writing is amazing. Thanks!
Greate article. Keep writing such kind of info on your page
When I originally commented I clicked the -Notify me when new comments are added- checkbox and now each time a comment is added I get four emails with the same comment. Is there any way you can remove me from that service? Thanks!
Great goods from you, man. I’ve understand your stuff previous to and you’re just too excellent. I actually like what you’ve acquired here, really like what you are stating and the way in which you say it. You make it enjoyable and you still take care of to keep it sensible. I can not wait to read far more from you. This is really a terrific website.
I am lucky that I found this site, just the right info that I was searching for! .
I have been absent for some time, but now I remember why I used to love this web site. Thanks , I’ll try and check back more frequently. How frequently you update your website?
Hey very cool website!! Man .. Beautiful .. Amazing .. I’ll bookmark your blog and take the feeds also…I’m happy to find numerous useful info here in the post, we need develop more techniques in this regard, thanks for sharing. . . . . .
Awsome blog! I am loving it!! Will be back later to read some more. I am taking your feeds also.
Amazing blog! Is your theme custom made or did you download it from somewhere? A design like yours with a few simple adjustements would really make my blog jump out. Please let me know where you got your design. Thank you
Today, I went to the beach front with my kids. I found a sea shell and gave it to my 4 year old daughter and said “You can hear the ocean if you put this to your ear.” She put the shell to her ear and screamed. There was a hermit crab inside and it pinched her ear. She never wants to go back! LoL I know this is entirely off topic but I had to tell someone!
Thanks a lot for providing individuals with an exceptionally brilliant possiblity to read articles and blog posts from this site. It really is so kind and as well , full of a lot of fun for me personally and my office colleagues to search your web site really three times every week to see the fresh issues you have. And definitely, I am certainly fulfilled considering the astounding thoughts served by you. Some 4 areas in this post are completely the most impressive we have all had.
I dugg some of you post as I thought they were invaluable very useful
Enjoyed looking through this, very good stuff, thanks.
I like this post, enjoyed this one thanks for posting.
Thank you a lot for providing individuals with remarkably terrific chance to read from here. It really is so pleasing and as well , stuffed with a good time for me personally and my office colleagues to search your blog no less than thrice per week to find out the newest guides you will have. And definitely, we are usually satisfied with the dazzling creative concepts served by you. Certain 3 facts in this post are undoubtedly the very best we have all had.
Hi, Neat post. There is an issue with your site in internet explorer, may check this?K IE nonetheless is the marketplace chief and a good element of other people will leave out your excellent writing due to this problem.
Thanks a lot! This article is covering exactly what I was looking for. very nice information and clearly written. You’re awesome!
Very interesting details you have noted, appreciate it for putting up. “She had an unequalled gift… of squeezing big mistakes into small opportunities.” by Henry James.
When I originally commented I clicked the -Notify me when new comments are added- checkbox and now each time a comment is added I get four emails with the same comment. Is there any way you can remove me from that service? Thanks!
Wonderful beat ! I wish to apprentice while you amend your site, how can i subscribe for a blog site? The account helped me a acceptable deal. I had been a little bit acquainted of this your broadcast provided bright clear concept
Greetings from Ohio! I’m bored to death at work so I decided to browse your blog on my iphone during lunch break. I love the knowledge you present here and can’t wait to take a look when I get home. I’m shocked at how quick your blog loaded on my phone .. I’m not even using WIFI, just 3G .. Anyhow, excellent blog!
I believe you have noted some very interesting points, thanks for the post.
I’ve been browsing online more than 2 hours today, yet I never found any interesting article like yours. It is pretty worth enough for me. In my view, if all web owners and bloggers made good content as you did, the net will be much more useful than ever before.|
I keep listening to the reports talk about receiving boundless online grant applications so I have been looking around for the finest site to get one. Could you advise me please, where could i acquire some?
I’m not sure exactly why but this site is loading extremely slow for me. Is anyone else having this problem or is it a issue on my end? I’ll check back later on and see if the problem still exists.
It’s really a nice and helpful piece of information. I’m glad that you simply shared this helpful info with us. Please stay us up to date like this. Thanks for sharing.
Your style is so unique compared to other folks I’ve read stuff from. Thanks for posting when you have the opportunity, Guess I will just book mark this site.|
You really make it appear really easy with your presentation but I find this topic to be actually something which I think I would never understand. It kind of feels too complicated and extremely large for me. I’m having a look forward to your subsequent post, I will try to get the cling of it!|
Hi, i think that i saw you visited my web site thus i came to “return the favorâ€.I am trying to find things to improve my website!I suppose its ok to use some of your ideas!!|
My brother suggested I might like this website. He was once entirely right. This post actually made my day. You can not imagine simply how a lot time I had spent for this information! Thanks!|
Hello there! Do you know if they make any plugins to assist with Search Engine Optimization? I’m trying to get my blog to rank for some targeted keywords but I’m not seeing very good gains. If you know of any please share. Thanks!|
Keep up the excellent work, I read few posts on this site and I conceive that your web site is rattling interesting and has got sets of superb info .
I like the helpful information you provide in your articles. I will bookmark your blog and check again here frequently. I am quite certain I’ll learn plenty of new stuff right here! Good luck for the next!|
What’s Taking place i’m new to this, I stumbled upon this I’ve discovered It positively helpful and it has aided me out loads. I’m hoping to contribute & help different customers like its helped me. Great job.|
It’s going to be end of mine day, except before ending I am reading this fantastic piece of writing to improve my knowledge.|
Good day! This post couldn’t be written any better! Reading this post reminds me of my previous room mate! He always kept chatting about this. I will forward this write-up to him. Fairly certain he will have a good read. Many thanks for sharing!|
Hi there, You’ve done an excellent job. I will certainly digg it and in my view suggest to my friends. I’m confident they will be benefited from this website.|
Good write-up. I certainly appreciate this site. Keep writing!|
Great items from you, man. I have take into account your stuff prior to and you are just extremely great. I actually like what you have acquired here, certainly like what you’re stating and the way in which you are saying it. You’re making it entertaining and you still take care of to stay it wise. I can’t wait to read much more from you. That is actually a great website.|
I am not sure where you are getting your info, but great topic. I needs to spend some time learning much more or understanding more. Thanks for great information I was looking for this info for my mission.|
I pay a quick visit day-to-day a few web sites and blogs to read articles or reviews, however this website presents feature based content.
my web-site special
I’m the business owner of JustCBD Store label (justcbdstore.com) and I’m presently trying to expand my wholesale side of company. It would be great if anybody at targetdomain can help me 🙂 I thought that the most suitable way to accomplish this would be to connect to vape stores and cbd retailers. I was hoping if anyone could suggest a dependable web-site where I can purchase Vape Shop B2B Leads I am presently checking out creativebeartech.com, theeliquidboutique.co.uk and wowitloveithaveit.com. Unsure which one would be the most suitable option and would appreciate any advice on this. Or would it be simpler for me to scrape my own leads? Suggestions?
Hi there, yup this article is truly good and I have learned lot of things from it concerning blogging. thanks.|
Hello would you mind letting me know which hosting company you’re working with? I’ve loaded your blog in 3 different internet browsers and I must say this blog loads a lot faster then most. Can you recommend a good internet hosting provider at a honest price? Thanks a lot, I appreciate it!|
obviously like your web site however you have to check the spelling on quite a few of your posts. A number of them are rife with spelling issues and I in finding it very troublesome to tell the truth then again I’ll definitely come again again.|
Hi there, I found your web site via Google while looking for a related topic, your site came up, it looks great. I’ve bookmarked it in my google bookmarks.
Howdy! I could have sworn I’ve been to this site before but after reading through some of the post I realized it’s new to me. Anyways, I’m definitely delighted I found it and I’ll be bookmarking and checking back often!
I’m still learning from you, as I’m trying to achieve my goals. I definitely love reading everything that is written on your site.Keep the stories coming. I loved it!
Thanx for the effort, keep up the good work Great work, I am going to start a small Blog Engine course work using your site I hope you enjoy blogging with the popular BlogEngine.net.Thethoughts you express are really awesome. Hope you will right some more posts.
Real nice pattern and excellent written content, nothing at all else we need : D.
What’s Taking place i am new to this, I stumbled upon this I have discovered It positively helpful and it has aided me out loads. I hope to contribute & help different customers like its helped me. Great job.
I do not even know how I finished up here, however I thought this post was once good. I don’t recognize who you are however certainly you are going to a well-known blogger when you are not already. Cheers!|
This text is invaluable. How can I find out more?|
I will right away grasp your rss as I can’t find your email subscription hyperlink or e-newsletter service. Do you’ve any? Kindly allow me understand in order that I could subscribe. Thanks.|
Hey just wanted to give you a quick heads up. The words in your article seem to be running off the screen in Chrome. I’m not sure if this is a formatting issue or something to do with browser compatibility but I figured I’d post to let you know. The design and style look great though! Hope you get the problem solved soon. Many thanks|
Do you have a spam problem on this website; I also am a blogger, and I was wondering your situation; many of us have created some nice procedures and we are looking to exchange strategies with others, please shoot me an email if interested.|
you’re in point of fact a just right webmaster. The site loading velocity is incredible. It seems that you’re doing any unique trick. Also, The contents are masterwork. you have performed a great process on this matter!|
I do not even know how I ended up here, but I thought this post was great. I don’t know who you are but certainly you are going to a famous blogger if you are not already 😉 Cheers!|
Hey there! Someone in my Facebook group shared this site with us so I came to check it out. I’m definitely loving the information. I’m book-marking and will be tweeting this to my followers! Excellent blog and fantastic design and style.|
Please let me know if you’re looking for a article author for your site. You have some really great articles and I think I would be a good asset. If you ever want to take some of the load off, I’d love to write some content for your blog in exchange for a link back to mine. Please shoot me an e-mail if interested. Thanks!|
Hi there! I simply want to offer you a huge thumbs up for your great information you’ve got here on this post. I’ll be coming back to your website for more soon.|
Thanks for every other excellent article. The place else could anyone get that kind of information in such a perfect method of writing? I have a presentation subsequent week, and I am at the look for such information.|
Hey I know this is off topic but I was wondering if you knew of any widgets I could add to my blog that automatically tweet my newest twitter updates. I’ve been looking for a plug-in like this for quite some time and was hoping maybe you would have some experience with something like this. Please let me know if you run into anything. I truly enjoy reading your blog and I look forward to your new updates.|
What i do not realize is in fact how you are no longer actually much more neatly-preferred than you may be now. You are very intelligent. You already know therefore considerably on the subject of this matter, produced me in my view believe it from so many numerous angles. Its like women and men don’t seem to be involved unless it is one thing to accomplish with Woman gaga! Your personal stuffs outstanding. All the time care for it up!
Oh my goodness! Impressive article dude! Thank you so much, However I am having difficulties with your RSS. I don’t know why I can’t join it. Is there anyone else getting the same RSS problems? Anyone that knows the answer will you kindly respond? Thanks!!|
I’m curious to find out what blog platform you are using? I’m experiencing some small security problems with my latest site and I’d like to find something more safeguarded. Do you have any recommendations?|
Heya i am for the primary time here. I found this board and I in finding It really helpful & it helped me out a lot. I hope to present one thing back and aid others such as you aided me.|
I really like your blog.. very nice colors & theme. Did you design this website yourself or did you hire someone to do it for you? Plz reply as I’m looking to construct my own blog and would like to know where u got this from. appreciate it|
Having read this I thought it was extremely informative. I appreciate you finding the time and effort to put this article together. I once again find myself spending way too much time both reading and posting comments. But so what, it was still worthwhile!|
I’m really enjoying the design and layout of your site. It’s a very easy on the eyes which makes it much more enjoyable for me to come here and visit more often. Did you hire out a developer to create your theme? Superb work!|
Very efficiently written post. It will be helpful to anybody who employess it, as well as myself. Keep up the good work – i will definitely read more posts.
When someone writes an post he/she maintains the image of a user in his/her brain that how a user can be aware of it. Thus that’s why this post is amazing. Thanks!|
I seriously love your site.. Excellent colors & theme. Did you make this amazing site yourself? Please reply back as I’m trying to create my own site and would love to find out where you got this from or just what the theme is named. Thanks!|
If you are going for finest contents like me, just pay a quick visit this web page daily as it provides quality contents, thanks|
Thanks for sharing your thoughts on meta_keyword. Regards|
I really like your blog.. very nice colors & theme. Did you design this website yourself or did you hire someone to do it for you? Plz respond as I’m looking to design my own blog and would like to know where u got this from. thanks
An attention-grabbing discussion is value comment. I feel that you should write more on this matter, it may not be a taboo subject however typically persons are not sufficient to talk on such topics. To the next. Cheers
Nice post. I was checking constantly this blog and I’m impressed! Very helpful info specifically the last part 🙂 I care for such information a lot. I was looking for this certain information for a long time. Thank you and good luck.|
Sweet blog! I found it while browsing on Yahoo News. Do you have any tips on how to get listed in Yahoo News? I’ve been trying for a while but I never seem to get there! Many thanks|
Admiring the time and effort you put into your blog and detailed information you present. It’s great to come across a blog every once in a while that isn’t the same unwanted rehashed material. Great read! I’ve saved your site and I’m adding your RSS feeds to my Google account.|
Hi there friends, how is all, and what you desire to say concerning this article, in my view its really remarkable in support of me.|
Hi, all the time i used to check website posts here in the early hours in the morning, as i enjoy to gain knowledge of more and more.|
Wow that was unusual. I just wrote an incredibly long comment but after I clicked submit my comment didn’t show up. Grrrr… well I’m not writing all that over again. Anyhow, just wanted to say fantastic blog!|
I have read so many posts regarding the blogger lovers however this piece of writing is in fact a fastidious piece of writing, keep it up.|
Hey, I think your site might be having browser compatibility issues. When I look at your website in Ie, it looks fine but when opening in Internet Explorer, it has some overlapping. I just wanted to give you a quick heads up! Other then that, awesome blog!|
Hi there to all, the contents existing at this site are in fact remarkable for people knowledge, well, keep up the nice work fellows.|
Hi! I just wanted to ask if you ever have any issues with hackers? My last blog (wordpress) was hacked and I ended up losing a few months of hard work due to no data backup. Do you have any solutions to prevent hackers?|
Great write-up, I¦m regular visitor of one¦s site, maintain up the nice operate, and It is going to be a regular visitor for a long time.
I am really inspired with your writing talents and also with the layout on your blog. Is this a paid subject or did you customize it your self? Anyway keep up the nice quality writing, it is uncommon to see a great weblog like this one these days..|
Link exchange is nothing else but it is just placing the other person’s website link on your page at appropriate place and other person will also do similar in favor of you.|
If some one desires expert view concerning running a blog after that i advise him/her to visit this blog, Keep up the pleasant job.|
This is a topic that’s near to my heart… Best wishes! Where are your contact details though?|
I was curious if you ever considered changing the layout of your site? Its very well written; I love what youve got to say. But maybe you could a little more in the way of content so people could connect with it better. Youve got an awful lot of text for only having one or 2 images. Maybe you could space it out better?|
Hmm it appears like your website ate my first comment (it was super long) so I guess I’ll just sum it up what I had written and say, I’m thoroughly enjoying your blog. I too am an aspiring blog blogger but I’m still new to the whole thing. Do you have any recommendations for newbie blog writers? I’d really appreciate it.|
Fine way of explaining, and fastidious paragraph to get data concerning my presentation focus, which i am going to deliver in institution of higher education.|
Hello, Neat post. There’s an issue together with your web site in web explorer, might test this?K IE nonetheless is the market chief and a good element of other people will omit your magnificent writing due to this problem.
Hi there very nice web site!! Man .. Beautiful .. Superb .. I’ll bookmark your site and take the feeds alsoKI am happy to seek out a lot of useful info right here in the submit, we’d like work out more techniques on this regard, thanks for sharing. . . . . .
Thanks for finally writing about > blog_title < Liked it!|
Great post. I am facing a couple of these problems.
Howdy! Do you know if they make any plugins to help with SEO? I’m trying to get my blog to rank for some targeted keywords but I’m not seeing very good results. If you know of any please share. Thank you!|
Hey There. I found your blog using msn. This is a really well written article. I’ll be sure to bookmark it and return to read more of your useful info. Thanks for the post. I will definitely return.|
I am sure this piece of writing has touched all the internet users, its really really fastidious paragraph on building up new web site.|
Its like you read my mind! You seem to know so much about this, like you wrote the book in it or something. I think that you could do with a few pics to drive the message home a little bit, but other than that, this is excellent blog. A fantastic read. I will definitely be back.|
Greetings from Florida! I’m bored to tears at work so I decided to browse your blog on my iphone during lunch break. I love the info you provide here and can’t wait to take a look when I get home. I’m amazed at how fast your blog loaded on my mobile .. I’m not even using WIFI, just 3G .. Anyhow, good site!|
Fantastic post however I was wondering if you could write a litte more on this subject? I’d be very grateful if you could elaborate a little bit more. Thank you!
Sweet blog! I found it while searching on Yahoo News. Do you have any tips on how to get listed in Yahoo News? I’ve been trying for a while but I never seem to get there! Thank you
you are really a good webmaster. The web site loading speed is amazing. It seems that you are doing any unique trick. In addition, The contents are masterpiece. you have done a magnificent job on this topic!
There is apparently a bundle to identify about this. I consider you made various nice points in features also.
You are my aspiration, I own few web logs and occasionally run out from to brand : (.
I envy your work, appreciate it for all the informative content.
You have brought up a very great points, regards for the post.
A large percentage of of the things you articulate happens to be astonishingly precise and that makes me ponder why I hadn’t looked at this with this light before. Your piece truly did turn the light on for me personally as far as this particular subject matter goes. Nevertheless at this time there is one issue I am not really too cozy with so whilst I attempt to reconcile that with the main idea of the position, allow me observe just what the rest of your subscribers have to point out.Well done.
I don’t commonly comment but I gotta say thankyou for the post on this one : D.
Precisely what I was looking for, appreciate it for putting up.
Someone necessarily help to make seriously posts I might state. That is the very first time I frequented your website page and to this point? I surprised with the research you made to make this particular put up extraordinary. Excellent process!
I have recently started a blog, the information you offer on this website has helped me greatly. Thanks for all of your time & work.
I haven’t checked in here for a while because I thought it was getting boring, but the last several posts are great quality so I guess I will add you back to my everyday bloglist. You deserve it my friend 🙂
I used to be recommended this website through my cousin. I’m now not sure whether this submit is written by way of him as nobody else realize such certain approximately my trouble. You are wonderful! Thank you!
I?¦ve learn some just right stuff here. Certainly worth bookmarking for revisiting. I surprise how much attempt you set to make this sort of excellent informative website.
Enjoyed looking through this, very good stuff, thankyou.
I got what you intend, thanks for putting up.Woh I am glad to find this website through google.
I am not sure where you’re getting your info, but good topic. I needs to spend some time learning much more or understanding more. Thanks for magnificent information I was looking for this information for my mission.
I haven¦t checked in here for some time since I thought it was getting boring, but the last several posts are great quality so I guess I¦ll add you back to my daily bloglist. You deserve it my friend 🙂
Very nice post. I just stumbled upon your weblog and wished to say that I have truly enjoyed surfing around your blog posts. In any case I’ll be subscribing to your feed and I hope you write again very soon!
so much good information on here, : D.
This is really interesting, You’re a very skilled blogger.
I’ve joined your feed and look forward to seeking more of your magnificent post.
Also, I have shared your website in my social networks!
Hey there I am so delighted I found your site, I really found you by error, while I was looking on Yahoo for something else, Regardless I am here now and would just like to say cheers for a incredible post and a all round exciting blog (I also love the theme/design), I don’t have time to look over it all at the minute but I have saved it and also added your RSS feeds, so when I have time I will be back to read a lot more, Please do keep up the awesome work.
Hi there, the whole thing is going fine here and ofcourse every one is sharing data, that’s truly fine, keep up writing.|
WOW just what I was searching for. Came here by searching for meta_keyword|
I got what you intend, thanks for posting.Woh I am pleased to find this website through google. “If one does not know to which port one is sailing, no wind is favorable.” by Seneca.
Very interesting points you have mentioned, thanks for posting. “Pleasure and love are the pinions of great deeds.” by Charles Fox.
Oh my goodness! Awesome article dude! Thank you, However I am experiencing problems with your RSS. I don’t know the reason why I cannot subscribe to it. Is there anybody else having identical RSS problems? Anyone who knows the solution will you kindly respond? Thanks!!|
Very nice post. I just stumbled upon your blog and wanted to say that I have truly enjoyed surfing around your blog posts. In any case I’ll be subscribing to your feed and I hope you write again soon!|
hello!,I like your writing so much! proportion we communicate extra approximately your post on AOL? I need a specialist in this area to resolve my problem. May be that is you! Looking forward to see you.
It’s fantastic that you are getting thoughts from this paragraph as well as from our dialogue made here.|
Thank you for sharing superb informations. Your website is so cool. I am impressed by the details that you have on this blog. It reveals how nicely you perceive this subject. Bookmarked this web page, will come back for more articles. You, my friend, ROCK! I found simply the info I already searched everywhere and simply could not come across. What a perfect web site.
Hey there just wanted to give you a quick heads up. The words in your post seem to be running off the screen in Chrome. I’m not sure if this is a formatting issue or something to do with web browser compatibility but I figured I’d post to let you know. The design look great though! Hope you get the problem resolved soon. Many thanks
Do you have a spam problem on this blog; I also am a blogger, and I was curious about your situation; many of us have developed some nice procedures and we are looking to swap solutions with others, why not shoot me an email if interested.|
A lot of thanks for all your valuable hard work on this web site. Kate take interest in doing investigations and it’s easy to see why. Most of us learn all of the dynamic manner you create worthwhile tricks through the blog and therefore boost contribution from others on this subject matter plus my princess has always been starting to learn so much. Enjoy the rest of the year. You have been doing a superb job.
Well I truly enjoyed reading it. This information provided by you is very practical for good planning.
I like this blog very much, Its a rattling nice situation to read and incur information.
You actually make it appear so easy together with your presentation but I in finding this topic to be really one thing which I believe I’d by no means understand. It kind of feels too complicated and extremely extensive for me. I am taking a look ahead on your subsequent put up, I will try to get the grasp of it!
I love it whenever people get together and share ideas. Great website, continue the good work!|
Awsome post and right to the point. I don’t know if this is actually the best place to ask but do you folks have any ideea where to hire some professional writers? Thanks in advance 🙂
I would like to thnkx for the efforts you have put in writing this blog. I am hoping the same high-grade blog post from you in the upcoming as well. In fact your creative writing abilities has inspired me to get my own blog now. Really the blogging is spreading its wings quickly. Your write up is a good example of it.
This post will help the internet users for building up new blog or even a weblog from start to end.|
Excellent blog post. I certainly appreciate this site. Keep it up!|
You are my intake, I own few blogs and rarely run out from to post .
Thanks, I have just been searching for information approximately this topic for a while and yours is the greatest I have discovered so far. However, what in regards to the conclusion? Are you positive about the source?
Wohh exactly what I was searching for, thankyou for putting up.
Hello it’s me, I am also visiting this site daily, this web site is genuinely pleasant and the viewers are truly sharing good thoughts.|
We are a group of volunteers and starting a new scheme in our community. Your website provided us with valuable info to work on. You have done an impressive job and our whole community will be grateful to you.|
It’s appropriate time to make some plans for the future and it’s time to be happy. I have read this post and if I could I desire to suggest you few interesting things or advice. Maybe you can write next articles referring to this article. I desire to read more things about it!|
Thank you for any other magnificent post. Where else could anybody get that type of info in such a perfect way of writing? I’ve a presentation next week, and I am on the search for such info.
Hey, I think your blog might be having browser compatibility issues. When I look at your website in Opera, it looks fine but when opening in Internet Explorer, it has some overlapping. I just wanted to give you a quick heads up! Other then that, terrific blog!|
Hey there terrific website! Does running a blog similar to this require a
How to play IPX / SPX games over LAN (WinXP) « Old PC Gaming
lot of work? How to play IPX / SPX games over LAN (WinXP) «
Old PC Gaming I have very little expertise
in computer programming however I had been hoping to start my
own blog How to play IPX / SPX games over LAN (WinXP) «
Old PC Gaming soon. Anyhow, should you have any ideas or techniques for new blog owners please share.
How to play IPX / SPX games over LAN (WinXP) « Old
PC Gaming I know this is off How to play IPX
/ SPX games over LAN (WinXP) « Old PC Gaming topic nevertheless How to play IPX /
SPX games over LAN (WinXP) « Old PC Gaming
I just How to play IPX / SPX games over LAN (WinXP) « Old
PC Gaming had to ask. Many thanks! https://gryaze-zashhita.ru/bitrix/redirect.php?goto=https://45.153.231.50/
I like this post, enjoyed this one thank you for posting. “When you make a world tolerable for yourself, you make a world tolerable for others.” by Anais Nin.
This is the right site for anybody who wants to find out about this topic. You realize so much its almost hard to argue with you (not that I actually would want to…HaHa). You definitely put a fresh spin on a topic which has been written about for ages. Great stuff, just wonderful!|
I’ll immediately grasp your rss feed as I can not find your e-mail subscription link or e-newsletter service. Do you’ve any? Please allow me realize so that I may just subscribe. Thanks.|
Great wordpress blog here.. It’s hard to find quality writing like yours these days. I really appreciate people like you! take care
Excellent post. I was checking continuously this blog and I’m inspired! Very useful info particularly the last section 🙂 I deal with such information a lot. I used to be looking for this certain information for a long time. Thanks and best of luck.
Some truly nice and useful info on this internet site, besides I believe the design and style contains wonderful features.
Hello! Do you use Twitter? I’d like to follow you if that would be okay. I’m definitely enjoying your blog and look forward to new updates.
I reckon something truly special in this web site.
Great awesome issues here. I?¦m very satisfied to peer your article. Thanks so much and i am looking forward to touch you. Will you please drop me a mail?
Free Onlyfan account check out Free Porn .
Magnificent goods from you, man. I have consider your stuff previous to and you are just too magnificent. I really like what you’ve bought here, certainly like what you are stating and the best way during which you say it. You’re making it entertaining and you still care for to keep it wise. I can not wait to learn much more from you. That is really a wonderful web site.
It¦s in reality a nice and helpful piece of info. I¦m satisfied that you shared this helpful info with us. Please keep us informed like this. Thank you for sharing.
It’s enormous that you are getting thoughts from this article as well as from our dialogue made here.|
Good day! Do you know if they make any plugins to protect against hackers? I’m kinda paranoid about losing everything I’ve worked hard on. Any tips?|
Good day! This is my 1st comment here so I just wanted to give a quick shout out and say I really enjoy reading through your blog posts. Can you recommend any other blogs/websites/forums that go over the same topics? Many thanks!
I believe this internet site contains some very excellent information for everyone : D.
Hi my friend! I wish to say that this article is amazing, nice written and include almost all significant infos. I’d like to look more posts like this.
Really fantastic information can be found on weblog. “Often the test of courage is not to die but to live.” by Conte Vittorio Alfieri.
It’s actually a nice and helpful piece of information. I am glad that you shared this useful information with us. Please stay us up to date like this. Thank you for sharing.
Its like you read my thoughts! You seem to know a lot approximately this, like you wrote the e-book in it or something. I feel that you can do with some percent to drive the message house a little bit, however other than that, this is magnificent blog. A fantastic read. I’ll definitely be back.|
Hello there! Do you know if they make any plugins to protect against hackers? I’m kinda paranoid about losing everything I’ve worked hard on. Any recommendations?|
I was reading some of your articles on this internet site and I conceive this site is rattling informative ! Continue posting.
Leandro Farland
[…]please take a look at the web-sites we stick to, which includes this one, because it represents our picks through the web[…]
Thanks for another great article. Where else could anybody get that type of info in such an ideal way of writing? I’ve a presentation next week, and I’m on the look for such information.
My partner and I stumbled over here different web page and thought I might as well check things out. I like what I see so i am just following you. Look forward to looking over your web page again.
I am really enjoying the theme/design of your weblog. Do you ever run into any browser compatibility issues? A couple of my blog audience have complained about my blog not working correctly in Explorer but looks great in Opera. Do you have any tips to help fix this issue?
It is really a great and useful piece of information. I am glad that you shared this useful information with us. Please keep us up to date like this. Thank you for sharing.
very nice publish, i definitely love this web site, keep on it
I have taken note that of all forms of insurance, health insurance is the most marked by controversy because of the clash between the insurance company’s need to remain adrift and the customer’s need to have insurance policy. Insurance companies’ revenue on well being plans are extremely low, consequently some corporations struggle to earn profits. Thanks for the tips you reveal through this web site.
What’s Taking place i am new to this, I stumbled upon this I’ve discovered It positively helpful and it has helped me out loads. I am hoping to give a contribution & assist other users like its helped me. Good job.|
Hi would you mind letting me know which hosting company you’re working with? I’ve loaded your blog in 3 completely different browsers and I must say this blog loads a lot quicker then most. Can you suggest a good hosting provider at a reasonable price? Cheers, I appreciate it!
Keep functioning ,impressive job!
Cheap individual and group tours to Yerevan, Armenia. Find out where you can relax in Armenia, Yerevan. Book tours online on our website or call +37494877888.
I don?t even know how I ended up here, but I thought this post was good. I don’t know who you are but definitely you are going to a famous blogger if you aren’t already 😉 Cheers!
Enjoyed studying this, very good stuff, thankyou. “A man may learn wisdom even from a foe.” by Aristophanes.
You are my inspiration , I have few web logs and rarely run out from to brand.
you could have an excellent weblog here! would you like to make some invite posts on my blog?
Some really nice and useful info on this internet site, besides I conceive the design and style has got wonderful features.
The following time I learn a blog, I hope that it doesnt disappoint me as a lot as this one. I imply, I know it was my choice to learn, but I truly thought youd have one thing interesting to say. All I hear is a bunch of whining about something that you might fix for those who werent too busy on the lookout for attention.
I simply couldn’t go away your website before suggesting that I really loved the usual information an individual provide to your guests? Is going to be back ceaselessly in order to check out new posts
Hello there! I know this is somewhat off topic but I was wondering if you knew where I could locate a captcha plugin for my comment form? I’m using the same blog platform as yours and I’m having trouble finding one? Thanks a lot!
Yay google is my world beater helped me to find this outstanding website ! .
Oh my goodness! Impressive article dude! Many thanks, However I am having troubles with your RSS. I don’t know the reason why I cannot join it. Is there anybody having the same RSS issues? Anybody who knows the solution will you kindly respond? Thanx!!
I’m curious to find out what blog system you happen to be working with? I’m experiencing some minor security issues with my latest site and I’d like to find something more safeguarded. Do you have any suggestions?
Thanks for your write-up. What I want to say is that when searching for a good on the internet electronics store, look for a site with comprehensive information on critical factors such as the privacy statement, basic safety details, any payment procedures, along with other terms and policies. Continually take time to read the help and FAQ pieces to get a better idea of the way the shop is effective, what they can do for you, and how you can make use of the features.
Hello. excellent job. I did not anticipate this. This is a fantastic story. Thanks!
I know this if off topic but I’m looking into starting my own blog and was wondering what all is required to get set up? I’m assuming having a blog like yours would cost a pretty penny? I’m not very internet smart so I’m not 100 positive. Any recommendations or advice would be greatly appreciated. Thank you
It’s hard to find knowledgeable people on this topic, but you sound like you know what you’re talking about! Thanks
Aw, this was a really nice post. In concept I want to put in writing like this additionally – taking time and actual effort to make an excellent article… however what can I say… I procrastinate alot and by no means seem to get one thing done.
Merely a smiling visitor here to share the love (:, btw great layout. “Individuals may form communities, but it is institutions alone that can create a nation.” by Benjamin Disraeli.
I’d like to thank you for the efforts you’ve put in writing this site. I really hope to check out the same high-grade blog posts by you later on as well. In fact, your creative writing abilities has encouraged me to get my very own site now 😉
This is a superb type of psychological workout for your mind, no matter your age.
I am constantly invstigating online for articles that can assist me. Thanks!
Great – I should certainly pronounce, impressed with your web site. I had no trouble navigating through all tabs and related info ended up being truly easy to do to access. I recently found what I hoped for before you know it at all. Quite unusual. Is likely to appreciate it for those who add forums or anything, web site theme . a tones way for your customer to communicate. Excellent task.
I’m not sure why but this web site is loading incredibly slow for me. Is anyone else having this problem or is it a issue on my end? I’ll check back later on and see if the problem still exists.
I am extremely impressed with your writing skills and also with the layout on your blog. Is this a paid theme or did you modify it yourself? Anyway keep up the excellent quality writing, it’s rare to see a nice blog like this one today..
It’s genuinely very complicated in this busy life to listen news on TV, thus I simply use the web for that reason, and obtain the most recent news.|
I like this weblog so much, saved to my bookmarks.
Pretty section of content. I just stumbled upon your website and in accession capital to assert that I get actually enjoyed account your blog posts. Anyway I’ll be subscribing to your augment and even I achievement you access consistently quickly.
you are in reality a good webmaster. The web site loading speed is incredible. It kind of feels that you’re doing any distinctive trick. Furthermore, The contents are masterwork. you’ve done a fantastic job on this subject!
Hi there very cool site!! Man .. Beautiful .. Wonderful .. I’ll bookmark your website and take the feeds also…I’m satisfied to search out a lot of helpful information here within the publish, we’d like work out extra strategies on this regard, thanks for sharing. . . . . .
Pretty nice post. I simply stumbled upon your weblog and wanted to say that I’ve really loved surfing around your weblog posts. In any case I will be subscribing to your rss feed and I hope you write again soon!
Hi there to all, the contents existing at this web site are really amazing for people knowledge, well, keep up the good work fellows.|
Hello there, You have performed a fantastic job. I will certainly digg it and personally recommend to my friends. I am sure they’ll be benefited from this web site.|
This blog was… how do you say it? Relevant!! Finally I’ve found something that helped me. Cheers!|
It’s actually very complicated in this busy life to listen news on TV, thus I only use the web for that reason, and get the newest information.|
Hi , I do believe this is an excellent blog. I stumbled upon it on Yahoo , i will come back once again. Money and freedom is the best way to change, may you be rich and help other people.
Thanx for the effort, keep up the good work Great work, I am going to start a small Blog Engine course work using your site I hope you enjoy blogging with the popular BlogEngine.net.Thethoughts you express are really awesome. Hope you will right some more posts.
I am not certain the place you are getting your information, but great topic. I needs to spend a while finding out much more or understanding more. Thanks for great information I used to be searching for this information for my mission.
I have not checked in here for a while because I thought it was getting boring, but the last few posts are great quality so I guess I’ll add you back to my daily bloglist. You deserve it my friend 🙂
Top site ,.. amazaing post ! Just keep the work on !
My brother recommended I may like this website. He was totally right. This put up actually made my day. You can not imagine simply how a lot time I had spent for this info! Thanks!
I like this site its a master peace ! Glad I noticed this on google .
Saved as a favorite, I like your site!
Greetings! Very helpful advice in this particular post! It’s the little changes that produce the biggest changes. Many thanks for sharing!
Also a thing to mention is that an online business administration course is designed for learners to be able to easily proceed to bachelor degree education. The 90 credit diploma meets the other bachelor diploma requirements and when you earn your associate of arts in BA online, you may have access to the latest technologies within this field. Some reasons why students have to get their associate degree in business is because they are interested in the field and want to find the general knowledge necessary previous to jumping into a bachelor diploma program. Thx for the tips you provide inside your blog.
Great write-up, I’m regular visitor of one’s website, maintain up the excellent operate, and It’s going to be a regular visitor for a long time.
Thanks for sharing superb informations. Your site is so cool. I am impressed by the details that you¦ve on this site. It reveals how nicely you understand this subject. Bookmarked this website page, will come back for more articles. You, my friend, ROCK! I found just the information I already searched everywhere and just could not come across. What an ideal site.
Thanks for your posting. What I want to comment on is that when you are evaluating a good online electronics retail outlet, look for a site with complete information on important factors such as the privacy statement, safety details, any payment methods, and various terms in addition to policies. Generally take time to look at help as well as FAQ areas to get a better idea of how a shop is effective, what they can perform for you, and ways in which you can take full advantage of the features.
I like what you guys are up too. Such clever work and reporting! Carry on the excellent works guys I have incorporated you guys to my blogroll. I think it will improve the value of my site 🙂
I’m amazed, I have to admit. Seldom do I encounter a blog that’s both equally educative and engaging, and without a doubt, you’ve hit the nail on the head. The problem is something too few folks are speaking intelligently about. Now i’m very happy that I found this in my search for something concerning this.
Wow! This can be one particular of the most helpful blogs We have ever arrive across on this subject. Actually Fantastic. I am also an expert in this topic so I can understand your effort.
Great work! This is the type of information that should be shared around the web. Shame on Google for not positioning this post higher! Come on over and visit my site . Thanks =)
Woah! I’m really digging the template/theme of this site. It’s simple, yet effective. A lot of times it’s challenging to get that “perfect balance” between superb usability and visual appeal. I must say you’ve done a great job with this. Additionally, the blog loads super quick for me on Chrome. Superb Blog!
I discovered your blog site on google and check a few of your early posts. Continue to keep up the very good operate. I just additional up your RSS feed to my MSN News Reader. Seeking forward to reading more from you later on!…
My heart and soul are forever indebted to you. Thanks for being awesome.
It is appropriate time to make a few plans for the long run and it’s time to be happy. I’ve learn this submit and if I may I wish to recommend you some fascinating things or suggestions. Perhaps you can write next articles regarding this article. I want to read even more issues approximately it!
I’ve been absent for a while, but now I remember why I used to love this site. Thanks, I?¦ll try and check back more often. How frequently you update your web site?
Very interesting info!Perfect just what I was searching for!
There’s certainly a great deal to know about this topic. I like all the points you made.
I got what you mean , regards for posting.Woh I am pleased to find this website through google. “Success is dependent on effort.” by Sophocles.
I believe other website proprietors should take this internet site as an model, very clean and excellent user pleasant design and style.
I could not resist commenting. Very well written!
I am extremely impressed with your writing skills and also with the layout on your blog. Is this a paid theme or did you modify it yourself? Anyway keep up the excellent quality writing, it is rare to see a great blog like this one today..
I¦ve been exploring for a little bit for any high quality articles or weblog posts on this sort of house . Exploring in Yahoo I eventually stumbled upon this web site. Studying this info So i¦m glad to express that I’ve an incredibly just right uncanny feeling I discovered just what I needed. I so much no doubt will make sure to don¦t overlook this site and provides it a glance on a continuing basis.
I have observed that wise real estate agents just about everywhere are Promoting. They are seeing that it’s not just placing a sign in the front place. It’s really pertaining to building relationships with these suppliers who someday will become buyers. So, whenever you give your time and energy to serving these traders go it alone — the “Law of Reciprocity” kicks in. Great blog post.
It’s hard to find knowledgeable people on this topic, but you sound like you know what you’re talking about! Thanks
I’ve come across that right now, more and more people are increasingly being attracted to digital cameras and the discipline of picture taking. However, really being a photographer, you should first spend so much time period deciding the model of digital camera to buy plus moving from store to store just so you could buy the most inexpensive camera of the trademark you have decided to pick. But it doesn’t end at this time there. You also have take into consideration whether you should obtain a digital camera extended warranty. Thanks alot : ) for the good points I obtained from your website.
F*ckin? tremendous things here. I am very satisfied to look your article. Thanks so much and i am taking a look forward to touch you. Will you please drop me a e-mail?
Utterly indited content material, thank you for selective information. “He who establishes his argument by noise and command shows that his reason is weak.” by Michel de Montaigne.
F*ckin’ remarkable issues here. I am very satisfied to look your post. Thank you a lot and i am taking a look forward to contact you. Will you please drop me a e-mail?
Regards for helping out, fantastic information.
Your style is really unique compared to other folks I have read stuff from. I appreciate you for posting when you have the opportunity, Guess I will just bookmark this web site.
My programmer is trying to persuade me to move to .net from PHP.
I have always disliked the idea because of the
expenses. But he’s tryiong none the less. I’ve been using Movable-type on a variety of websites for
about a year and am concerned about switching to another platform.
I have heard fantastic things about blogengine.net.
Is there a way I can transfer all my wordpress content into it?
Any kind of help would be greatly appreciated!
A further issue is that video games usually are serious in nature with the key focus on understanding rather than enjoyment. Although, it has an entertainment aspect to keep the kids engaged, every single game will likely be designed to improve a specific set of skills or curriculum, such as math or scientific disciplines. Thanks for your article.
A motivating discussion is definitely worth comment.
I think that you should write more about this topic, it may not be a
taboo subject but usually people do not discuss such
subjects. To the next! Many thanks!!
Nice weblog right here! Also your website quite a bit up fast! What web host are you the usage of? Can I am getting your affiliate link in your host? I want my website loaded up as quickly as yours lol
Its fantastic as your other content : D, appreciate it for posting. “The art of love … is largely the art of persistence.” by Albert Ellis.
I like this web site very much, Its a really nice billet to read and incur information. “Never contend with a man who has nothing to lose.” by Baltasar Gracian.
You could certainly see your expertise within the work you write. The sector hopes for even more passionate writers like you who aren’t afraid to say how they believe. At all times go after your heart.
Great – I should definitely pronounce, impressed with your web site. I had no trouble navigating through all the tabs as well as related information ended up being truly simple to do to access. I recently found what I hoped for before you know it in the least. Reasonably unusual. Is likely to appreciate it for those who add forums or something, web site theme . a tones way for your customer to communicate. Excellent task.
I wanted to draft you one very small word to finally say thanks over again considering the extraordinary views you have featured in this case. It has been quite shockingly open-handed of people like you to deliver unhampered exactly what a number of us could have made available for an ebook to help with making some bucks for themselves, most notably considering the fact that you could have tried it in case you decided. These strategies as well served to be the great way to comprehend the rest have the same interest the same as my own to grasp way more concerning this problem. I know there are many more enjoyable instances ahead for those who browse through your site.
My family all the time say that I am killing my time here at net, except
I know I am getting know-how daily by reading thes pleasant posts.
I am truly glad to glance at this weblog posts which includes plenty of valuable facts, thanks for providing these kinds of information.|
Undeniably imagine that which you stated. Your favorite reason seemed to be on the net the easiest thing to take note of. I say to you, I definitely get irked while folks consider worries that they plainly do not recognise about. You managed to hit the nail upon the top and also defined out the whole thing with no need side effect , people can take a signal. Will probably be back to get more. Thank you|
Terrific work! This is the type of info that are supposed to be shared around the internet. Shame on Google for not positioning this post upper! Come on over and talk over with my site . Thank you =)
Nice read, I just passed this onto a friend who was doing some research on that. And he actually bought me lunch since I found it for him smile So let me rephrase that: Thanks for lunch! “A human being has a natural desire to have more of a good thing than he needs.” by Mark Twain.
Hi, Neat post. There is a problem along with your site in internet explorer, could check thisK IE nonetheless is the market leader and a good part of folks will leave out your wonderful writing because of this problem.
I went over this site and I conceive you have a lot of wonderful info , saved to favorites (:.
An attention-grabbing discussion is price comment. I think that you should write more on this topic, it may not be a taboo topic however generally persons are not enough to talk on such topics. To the next. Cheers
Great article! We are linking to this particularly
great post on our website. Keep up the good writing.
Hello, i think that i saw you visited my site so i came to ?return the favor?.I’m attempting to find things to improve my web site!I suppose its ok to use some of your ideas!!
You made some decent points there. I appeared on the web for the problem and located most people will associate with together with your website.
I like what you guys are up too. Such clever work and reporting! Carry on the excellent works guys I?¦ve incorporated you guys to my blogroll. I think it will improve the value of my web site 🙂
You actually make it seem really easy together with your presentation however I in finding this matter to be actually something which I feel I would never understand. It seems too complex and very huge for me. I’m having a look forward in your subsequent put up, I will try to get the dangle of it!
I like reading through an article that will make men and women think. Also, many thanks for allowing me to comment!
Simply desire to say your article is as astounding. The clarity in your post is just nice and i could assume you are an expert on this subject. Well with your permission let me to grab your feed to keep updated with forthcoming post. Thanks a million and please carry on the gratifying work.
Nice read, I just passed this onto a colleague who was doing a little research on that. And he just bought me lunch because I found it for him smile So let me rephrase that: Thank you for lunch!
Thank you for the good writeup. It in fact was a amusement account it. Look advanced to more added agreeable from you! By the way, how could we communicate?
We’re a gaggle of volunteers and opening a new scheme in our community.
Your site offered us with useful information to work on. You have done a formidable activity and our whole neighborhood can be thankful
to you.
Great V I should certainly pronounce, impressed with your website. I had no trouble navigating through all the tabs and related info ended up being truly easy to do to access. I recently found what I hoped for before you know it in the least. Quite unusual. Is likely to appreciate it for those who add forums or something, site theme . a tones way for your client to communicate. Excellent task..
I appreciate, cause I found exactly what I was looking for. You’ve ended my four day long hunt! God Bless you man. Have a great day. Bye
Nice post. I study one thing more challenging on completely different blogs everyday. It’s going to all the time be stimulating to learn content material from different writers and apply slightly something from their store. I?d want to make use of some with the content material on my weblog whether you don?t mind. Natually I?ll provide you with a hyperlink on your internet blog. Thanks for sharing.
If you are going for best contents like I do, just pay a visit this site daily for the reason that it presents quality contents, thanks|
Today, while I was at work, my cousin stole my iPad and tested to see if it can survive a twenty five foot drop, just so she can be a youtube sensation. My iPad is now destroyed and she has 83 views. I know this is totally off topic but I had to share it with someone!|
Normally I don’t learn article on blogs, however I wish to say that this write-up very forced me to try and do it! Your writing taste has been amazed me. Thanks, very great post.
F*ckin’ amazing things here. I am very glad to see your article. Thanks a lot and i’m having a look ahead to touch you. Will you please drop me a e-mail?
An impressive share! I’ve just forwarded this onto a co-worker who had been conducting a little
homework on this. And he actually bought me dinner
simply because I stumbled upon it for him…
lol. So let me reword this…. Thank YOU for the meal!! But yeah, thanx for spending
some time to talk about this subject here on your site.
Aw, this was a very nice post. In concept I would like to put in writing like this additionally ? taking time and actual effort to make a very good article? but what can I say? I procrastinate alot and by no means appear to get one thing done.
Everything is very open with a very clear explanation of the
challenges. It was really informative. Your site is very useful.
Many thanks for sharing!
Super-Duper blog! I am loving it!! Will come back again. I am taking your feeds also.
Woah! I’m really enjoying the template/theme of this website. It’s simple, yet effective. A lot of times it’s difficult to get that “perfect balance” between user friendliness and visual appeal. I must say that you’ve done a awesome job with this. In addition, the blog loads extremely fast for me on Safari. Excellent Blog!
hello there and thank you for your information ? I?ve certainly picked up something new from right here. I did however expertise several technical points using this site, since I experienced to reload the web site a lot of times previous to I could get it to load correctly. I had been wondering if your web hosting is OK? Not that I’m complaining, but slow loading instances times will very frequently affect your placement in google and can damage your high-quality score if advertising and marketing with Adwords. Anyway I am adding this RSS to my email and can look out for a lot more of your respective intriguing content. Ensure that you update this again soon..
Throughout the great design of things you actually get an A+ for effort and hard work. Where you lost us was first on your specifics. You know, as the maxim goes, details make or break the argument.. And it couldn’t be more correct in this article. Having said that, permit me reveal to you what did deliver the results. The writing is actually extremely persuasive which is probably the reason why I am making the effort in order to comment. I do not make it a regular habit of doing that. Next, while I can easily notice a leaps in reasoning you come up with, I am not certain of how you appear to unite the details which inturn make the actual final result. For now I will subscribe to your issue but trust in the near future you actually link the dots better.
Someone necessarily lend a hand to make critically posts I might state. This is the very first time I frequented your web page and to this point? I surprised with the research you made to make this actual post incredible. Excellent activity!
Well I truly liked reading it. This article offered by you is very effective for good planning.
I have been exploring for a bit for any high quality articles or blog posts on this kind of space . Exploring in Yahoo I ultimately stumbled upon this web site. Reading this info So i¦m happy to express that I’ve a very excellent uncanny feeling I found out exactly what I needed. I most certainly will make sure to do not omit this site and give it a look on a continuing basis.
Hi there this is somewhat of off topic but I was wondering if blogs use WYSIWYG editors or if you have to manually code with HTML. I’m starting a blog soon but have no coding expertise so I wanted to get advice from someone with experience. Any help would be greatly appreciated!
hey there and thank you in your info ? I have definitely picked up anything new from right here. I did then again expertise some technical issues the use of this website, since I experienced to reload the site many instances previous to I may just get it to load properly. I were wondering if your web hosting is OK? No longer that I’m complaining, however slow loading circumstances times will sometimes have an effect on your placement in google and could damage your high quality rating if ads and ***********|advertising|advertising|advertising and *********** with Adwords. Well I am adding this RSS to my email and can glance out for much more of your respective interesting content. Make sure you replace this again very soon..
Nice read, I just passed this onto a colleague who was doing some research on that. And he actually bought me lunch as I found it for him smile So let me rephrase that: Thank you for lunch!
I would like to thank you for the efforts you’ve put in writing this website. I’m hoping the same high-grade blog post from you in the upcoming as well. In fact your creative writing abilities has inspired me to get my own site now. Really the blogging is spreading its wings fast. Your write up is a good example of it.
I used to be suggested this website via my cousin. I am not sure whether this publish is written by way of him as no one else recognize such distinctive approximately my problem. You’re incredible! Thank you!
crazy 8s delta 8
I realized more new things on this losing weight issue. Just one issue is a good nutrition is highly vital when dieting. A big reduction in junk food, sugary food, fried foods, sweet foods, pork, and white flour products could possibly be necessary. Keeping wastes organisms, and toxins may prevent aims for fat-loss. While selected drugs momentarily solve the challenge, the horrible side effects are certainly not worth it, and they also never give more than a short-term solution. This can be a known proven fact that 95 of dietary fads fail. Thanks for sharing your opinions on this blog site.
delta 8 made me crazy
Ahaa, its fastidious dialogue concerning this paragraph at this place at this blog,
I have read all that, so at this time me also commenting at this place.
As I web-site possessor I believe the content matter here is rattling magnificent , appreciate it for your efforts. You should keep it up forever! Good Luck.
Thanks for the sensible critique. Me and my neighbor were just preparing to do some research on this. We got a grab a book from our local library but I think I learned more clear from this post. I’m very glad to see such excellent information being shared freely out there.
What’s up every one, here every one is sharing these familiarity, thus it’s nice to read
this blog, and I used to pay a visit this webpage daily.
This info is priceless. How can I find out more?|
Pretty great post. I just stumbled upon your weblog and wished to say that I’ve truly loved browsing your weblog posts. After all I?ll be subscribing for your rss feed and I hope you write once more very soon!
Good post. I learn something new and challenging on sites I stumbleupon every day. It will always be useful to read through content from other writers and practice something from other websites. |
Excellent items from you, man. I’ve bear in mind your stuff previous to and you are just extremely excellent. I really like what you’ve bought here, really like what you’re stating and the way in which you say it. You are making it enjoyable and you still take care of to keep it sensible. I can’t wait to learn much more from you. That is actually a terrific website.|
Youre so cool! I dont suppose Ive read something like this before. So good to find any individual with some original ideas on this subject. realy thanks for beginning this up. this website is one thing that is needed on the web, somebody with slightly originality. helpful job for bringing one thing new to the web!
You should take part in a contest for top-of-the-line blogs on the web. I will recommend this site!
I couldn’t resist commenting. Well written!
Another thing I have really noticed is that for many people, low credit score is the reaction to circumstances outside of their control. By way of example they may happen to be saddled by having an illness and as a consequence they have large bills for collections. Maybe it’s due to a job loss or inability to go to work. Sometimes separation and divorce can send the budget in an opposite direction. Thanks sharing your thinking on this blog site.
Hello! I’m at work browsing your blog from my new iphone 3gs! Just wanted to say I love reading your blog and look forward to all your posts! Carry on the outstanding work!|
Valuable information. Lucky me I found your web site by accident, and I’m shocked why this accident did not happened earlier! I bookmarked it.
The best website for Orgy and gangbang in Australia. Suck my dick and eat shit. Free sex and porn download. Flexsex Brothers Production.
I do not know if it’s just me or if perhaps everyone else encountering issues with your blog. It appears as if some of the text on your content are running off the screen. Can someone else please comment and let me know if this is happening to them too? This might be a problem with my internet browser because I’ve had this happen before. Kudos|
Hello my loved one! I wish to say that this post is amazing, nice written and include approximately all
important infos. I would like to see extra posts like this .
Hi there are using WordPress for your site platform?
I’m new to the blog world but I’m trying to get started and set up
my own. Do you require any coding expertise to make your
own blog? Any help would be greatly appreciated!
I am glad to be a visitant of this pure web site! , thankyou for this rare info ! .
Good info and straight to the point. I am not sure if this is in fact the best place to ask but do you guys have any ideea where to get some professional writers? Thx 🙂
You actually make it seem so easy with your presentation but I find this topic to be really something which I think I would never understand. It seems too complicated and very broad for me. I am looking forward for your next post, I will try to get the hang of it!
I will immediately grab your rss feed as I can’t find your e-mail subscription link or e-newsletter service. Do you have any? Please let me know so that I could subscribe. Thanks.
porno
Hi, i read your blog from time to time and i own a similar one and i was just curious if you get a lot of spam responses? If so how do you stop it, any plugin or anything you can suggest? I get so much lately it’s driving me crazy so any assistance is very much appreciated.
Some really good information, Gladiola I detected this. “We protest against unjust criticism, but we accept unearned applause.” by Jose Narosky.
I simply needed to say thanks yet again. I’m not certain the things I might have created without those smart ideas shown by you about this industry. It was before an absolute difficult crisis in my circumstances, however , discovering this expert avenue you treated it made me to leap for happiness. I am happy for the support and as well , believe you really know what a powerful job that you are doing training people via your webblog. I know that you have never met any of us.
you might have an excellent blog right here! would you prefer to make some invite posts on my weblog?
Cool blog! Is your theme custom made or did you download it from somewhere? A theme like yours with a few simple adjustements would really make my blog shine. Please let me know where you got your theme. Thank you
It?s really a great and useful piece of information. I?m glad that you shared this helpful info with us. Please keep us up to date like this. Thank you for sharing.
Hi my loved one! I want to say that this post is awesome, nice written and come with almost all important infos. I would like to see extra posts like this.
obviously like your web site but you need to check the spelling on quite a few of your posts. Many of them are rife with spelling problems and I to find it very bothersome to inform the truth nevertheless I will surely come back again.
Write more, thats all I have to say. Literally, it seems as though you relied on the video to make your point. You definitely know what youre talking about, why waste your intelligence on just posting videos to your blog when you could be giving us something informative to read?
Write more, thats all I have to say. Literally, it seems as though you relied on the video to make your point. You definitely know what youre talking about, why waste your intelligence on just posting videos to your site when you could be giving us something enlightening to read?
The subsequent time I learn a weblog, I hope that it doesnt disappoint me as a lot as this one. I mean, I know it was my choice to learn, but I actually thought youd have one thing attention-grabbing to say. All I hear is a bunch of whining about something that you can repair if you happen to werent too busy looking for attention.
Hiya very nice website!! Man .. Beautiful .. Amazing .. I will bookmark your blog and take the feeds also? I’m happy to search out so many useful information right here in the submit, we want develop more strategies in this regard, thank you for sharing. . . . . .|
This site was… how do I say it? Relevant!!
Finally I’ve found something that helped me. Kudos!
You actually make it seem so easy with your presentation but I find this topic to be really something which I think I would never understand. It seems too complicated and extremely broad for me. I am looking forward for your next post, I will try to get the hang of it!|
Thanks for the strategies you are revealing on this weblog. Another thing I’d really like to say is that often getting hold of duplicates of your credit report in order to look at accuracy of the detail may be the first action you have to perform in repairing credit. You are looking to cleanse your credit profile from damaging details errors that screw up your credit score.
Hello there, just became aware of your blog through Google, and found that it is truly informative. I?m gonna watch out for brussels. I will appreciate if you continue this in future. Lots of people will be benefited from your writing. Cheers!
Its good as your other articles : D, regards for putting up. “I catnap now and then, but I think while I nap, so it’s not a waste of time.” by Martha Stewart.
WOW just what I was looking for. Came here by searching for natural supplements for covid long hauler
I like what you guys are up too. Such smart work and reporting! Carry on the excellent works guys I?ve incorporated you guys to my blogroll. I think it’ll improve the value of my website 🙂
you are really a good webmaster. The website loading speed is amazing. It seems that you’re doing any unique trick. In addition, The contents are masterpiece. you have done a excellent job on this topic!
Your home is valueble for me. Thanks!…
I genuinely enjoy reading on this website, it has got excellent content. “A short saying oft contains much wisdom.” by Sophocles.
This site was… how do I say it? Relevant!! Finally I have found something that helped me. Thanks a lot!
This site is my aspiration, really excellent style and design and perfect content.
Good Article, I like reading about your holiday adventure. The holiday amenities and comfort details were helpful. Tips for making the most of a vacation will come in handy for my next holiday. article, include more information about the flight itinerary and the destinations visited. Keep up the great work, your article is informative and engaging.
Hi there to every single one, it’s genuinely a good for me to visit this site,
it consists of precious Information.
Hello. remarkable job. I did not imagine this. This is a great story. Thanks!
whoah this weblog is fantastic i love studying your posts. Keep up the good work! You know, many individuals are hunting round for this info, you can help them greatly.
Thanks a lot for sharing this with all of us you really know what you’re talking about! Bookmarked. Please also visit my web site =). We could have a link exchange contract between us!
I like this web blog very much, Its a rattling nice position to read and get info . “Young men think old men are fools but old men know young men are fools.” by George Chapman.
My brother suggested I would possibly like this blog. He was entirely right.
This publish truly made my day. You can not consider simply
how so much time I had spent for this info! Thank you!
of course like your web-site but you need to check the spelling on quite a few of your posts. Many of them are rife with spelling problems and I find it very bothersome to inform the truth then again I will surely come again again.
I have been surfing on-line greater than three hours these days, yet I by no means discovered any interesting article
like yours. It’s pretty price enough for me.
In my opinion, if all website owners and bloggers made just right content as you probably did, the web shall be a lot more helpful than ever before.
It’s truly very complex in this active life to listen news on Television, therefore I just
use web for that reason, and obtain the most up-to-date information.
We’re a group of volunteers and opening a brand new scheme in our community. Your web site provided us with useful info to paintings on. You have performed an impressive job and our entire community will probably be grateful to you.
I do not even know how I ended up here, but I thought this post was great. I don’t know who you are but certainly you’re going to a famous blogger if you are not already 😉 Cheers!
Excellent post. I’m facing many of these issues as well..
This is really interesting, You are a very skilled blogger. I have joined your feed and look forward to seeking more of your wonderful post. Also, I’ve shared your website in my social networks!
You have brought up a very great points, appreciate it for the post.
I’d have to examine with you here. Which is not one thing I usually do! I take pleasure in reading a post that may make folks think. Additionally, thanks for permitting me to comment!
This website online is really a stroll-via for all of the info you wanted about this and didn’t know who to ask. Glimpse right here, and also you’ll positively uncover it.
Thanks for shares.
Hi, I check your blog like every week. Your writing style is witty, keep it up!
I would like to thnkx for the efforts you’ve put in writing this blog. I am hoping the same high-grade website post from you in the upcoming also. Actually your creative writing skills has encouraged me to get my own site now. Really the blogging is spreading its wings quickly. Your write up is a great example of it.
I’d must examine with you here. Which is not something I often do! I get pleasure from reading a submit that may make people think. Additionally, thanks for allowing me to comment!
Thanks for shares.
It is actually a great and helpful piece of information. I¦m satisfied that you shared this helpful information with us. Please stay us informed like this. Thank you for sharing.
I haven¦t checked in here for a while because I thought it was getting boring, but the last few posts are good quality so I guess I¦ll add you back to my daily bloglist. You deserve it my friend 🙂
What i don’t understood is in fact how you’re not actually a lot more well-liked than you may be now. You’re so intelligent. You already know thus considerably on the subject of this topic, produced me for my part consider it from numerous varied angles. Its like women and men don’t seem to be interested until it is one thing to accomplish with Girl gaga! Your personal stuffs outstanding. Always handle it up!
Wow, that’s what I was seeking for, what a information! existing
here at this blog, thanks admin of this web site.
Yeah bookmaking this wasn’t a bad conclusion outstanding post! .
Wow! Thank you! I permanently wanted to write on my blog something like that. Can I take a portion of your post to my blog?
Hello are using WordPress for your blog platform? I’m new to the blog
world but I’m trying to get started and create my own. Do you need any
coding expertise to make your own blog? Any help
would be greatly appreciated!
Hi there! Do you use Twitter? I’d like to follow you if that would be okay. I’m definitely enjoying your blog and look forward to new updates.
As a Newbie, I am constantly exploring online for articles that can help me. Thank you
Excellent website. Lots of useful info here. I am sending it to a few friends ans also sharing in delicious. And certainly, thanks for your effort!
Hi, all is going well here and ofcourse every one is sharing information, that’s really excellent, keep up writing.
I think this internet site has some real great info for everyone : D.
Perfect work you have done, this internet site is really cool with good information.
Hi, this weekend is pleasant designed for me,
because this point in time i am reading this great informative
post here at my house.
Good post. I learn something new and challenging on blogs I stumbleupon every
day. It will always be exciting to read through content from other writers and practice something from other web sites.
Thanks for sharing superb informations. Your web-site is so cool. I’m impressed by the details that you¦ve on this site. It reveals how nicely you understand this subject. Bookmarked this web page, will come back for extra articles. You, my friend, ROCK! I found just the information I already searched everywhere and simply could not come across. What a great website.
Hi there, simply become aware of your blog thru Google, and located that it is really informative. I’m going to be careful for brussels. I will be grateful in the event you continue this in future. A lot of folks might be benefited from your writing. Cheers!
Thanks for shares.
I do agree with all the concepts you have introduced in your post. They’re very convincing and will definitely work. Still, the posts are very quick for novices. May you please prolong them a bit from next time? Thanks for the post.
Youre so cool! I dont suppose Ive read something like this before. So nice to find someone with some original thoughts on this subject. realy thanks for beginning this up. this website is something that’s wanted on the internet, somebody with slightly originality. useful job for bringing one thing new to the internet!
What’s up everybody, here every one is sharing these kinds of experience, so it’s fastidious
to read this web site, and I used to pay a visit this web site every day.
I am not positive where you are getting your info, but great topic.
I needs to spend some time studying much more or understanding more.
Thank you for magnificent information I was searching for this info for my mission.
Very efficiently written post. It will be valuable to anybody who usess it, including me. Keep up the good work – can’r wait to read more posts.
I do accept as true with all of the concepts you’ve presented for your post.
They’re very convincing and can definitely work.
Nonetheless, the posts are too quick for novices.
May just you please prolong them a little from subsequent time?
Thanks for the post.
Right now it looks like WordPress is the best blogging platform out there right now.
(from what I’ve read) Is that what you’re using on your blog?
Hey there just wanted to give you a quick heads up. The words in your article seem to be running off the screen in Ie. I’m not sure if this is a format issue or something to do with internet browser compatibility but I figured I’d post to let you know. The design look great though! Hope you get the problem fixed soon. Thanks
It’s difficult to find experienced people in this particular subject, however, you sound like you know what you’re talking about! Thanks
Hey just wanted to give you a quick heads up. The text in your content seem to be running off the screen in Internet explorer. I’m not sure if this is a format issue or something to do with web browser compatibility but I thought I’d post to let you know. The style and design look great though! Hope you get the issue fixed soon. Many thanks
Thanks for shares.
One thing I would really like to reply to is that fat burning plan fast can be achieved by the suitable diet and exercise. Your size not only affects appearance, but also the complete quality of life. Self-esteem, depressive disorder, health risks, as well as physical abilities are influenced in weight gain. It is possible to just make everything right and still gain. In such a circumstance, a medical problem may be the reason. While a lot of food rather than enough exercising are usually at fault, common medical ailments and trusted prescriptions may greatly amplify size. Kudos for your post here.
Glad to be one of many visitants on this awesome website : D.
You provide so much great information with the how-tos!! “”Thank you so much for sharing this great information with us!! “”Your posts & blogs are always so much fun and easy to read! brians club
Hi, Neat post. There’s an issue along with your site in web explorer, may check this? IE still is the market chief and a large component to other people will pass over your fantastic writing due to this problem.
Definitely, what a great website and enlightening posts, I surely will bookmark your site.All the Best!
Hello! Do you use Twitter? I’d like to follow you if that would be ok. I’m definitely enjoying your blog and look forward to new updates.
Thanks for share.
Just wanna admit that this is extremely helpful, Thanks for taking your time to write this.
This is the appropriate weblog for anyone who wants to seek out out about this topic. You notice a lot its nearly arduous to argue with you (not that I truly would want…HaHa). You undoubtedly put a brand new spin on a topic thats been written about for years. Nice stuff, just great!
I?¦ll immediately grasp your rss as I can’t find your email subscription hyperlink or newsletter service. Do you’ve any? Please permit me recognize in order that I may just subscribe. Thanks.
Saved as a favorite, I really like your blog!
You made some clear points there. I did a search on the issue and found most guys will consent with your website.
I am curious to find out what blog platform you are utilizing? I’m experiencing some small security issues with my latest website and I’d like to find something more risk-free. Do you have any recommendations?|
For latest information you have to pay a quick visit world wide web and on the web I found this web page as a finest website for latest updates.|
Thank you for shares.
Thanks for the helpful content. It is also my opinion that mesothelioma cancer has an extremely long latency interval, which means that warning signs of the disease may well not emerge right up until 30 to 50 years after the preliminary exposure to mesothelioma. Pleural mesothelioma, that is certainly the most common kind and has effects on the area round the lungs, might cause shortness of breath, upper body pains, and a persistent coughing, which may produce coughing up body.
Its such as you learn my thoughts! You appear to understand so much about this, like you wrote the e-book in it or something. I think that you can do with a few percent to pressure the message home a little bit, but instead of that, this is excellent blog. A great read. I’ll definitely be back.
Hi there! This post couldn’t be written any better! Reading through this post reminds me of my previous room mate! He always kept talking about this. I will forward this article to him. Pretty sure he will have a good read. Thank you for sharing!
I do not even know how I ended up here, but
I thought this post was great. I don’t know who you are but definitely
you’re going to a famous blogger if you aren’t already 😉 Cheers!
This is a topic that’s close to my heart… Take care! Exactly where are your contact details though?
Hello, i believe that i saw you visited my weblog thus i got here to “return the want”.I am attempting to in finding issues to enhance my web site!I assume its adequate to make use of a few of your concepts!!
Thanks for shares.
If you desire to grow your know-how simply keep visiting this web site and be updated with the most up-to-date gossip posted here.
The subsequent time I learn a weblog, I hope that it doesnt disappoint me as much as this one. I mean, I do know it was my choice to read, however I truly thought youd have something interesting to say. All I hear is a bunch of whining about one thing that you possibly can fix when you werent too busy on the lookout for attention.
Excellent web site you’ve got here.. It’s hard to find good quality writing like yours nowadays. I honestly appreciate people like you! Take care!!
Saved as a favorite, I love your blog!
I like the helpful info you provide in your articles.
I’ll bookmark your weblog and check again here regularly.
I am quite sure I’ll learn many new stuff right here!
Good luck for the next!
I will immediately take hold of your rss feed as I can’t find your e-mail subscription hyperlink or e-newsletter service. Do you have any? Kindly let me realize so that I may just subscribe. Thanks.
A person essentially assist to make critically articles I might state. That is the first time I frequented your web page and up to now? I surprised with the analysis you made to make this particular post amazing. Wonderful activity!
Wow, incredible blog structure! How lengthy have you ever been blogging for?
you made running a blog look easy. The full glance of your site is magnificent, let alone the content material!
Thanks for shares.
There is noticeably a bundle to know about this. I assume you made certain nice points in features also.
Thanks , I’ve recently been searching for info about this subject for ages and yours is the best I’ve discovered so far. However, what concerning the conclusion? Are you certain concerning the supply?
yes lol okay
Fantastic website. A lot of helpful information here. I am sending it to several friends ans also sharing in delicious. And of course, thanks in your sweat!
you have a great blog right here! would you like to make some invite posts on my weblog?
cheap car insurance california mesothelioma treatment options
Thanks for expressing your ideas. I’d also like to mention that video games have been actually evolving. Today’s technology and innovations have made it easier to create sensible and active games. These entertainment games were not really sensible when the concept was first of all being tried. Just like other kinds of technologies, video games as well have had to grow as a result of many decades. This is testimony for the fast growth and development of video games.
Oh my goodness! a tremendous article dude. Thanks However I’m experiencing situation with ur rss . Don’t know why Unable to subscribe to it. Is there anyone getting equivalent rss problem? Anybody who knows kindly respond. Thnkx
There is noticeably a bundle to know about this. I assume you made certain nice points in features also.
It’s really a great and helpful piece of info. I am satisfied that you shared this helpful information with us. Please keep us informed like this. Thank you for sharing.
With havin so much content and articles do you ever run into any problems of plagorism or copyright violation? My site has a lot of completely unique content I’ve either written myself or outsourced but it seems a lot of it is popping it up all over the web without my authorization. Do you know any solutions to help stop content from being ripped off? I’d genuinely appreciate it.
Write more, thats all I have to say. Literally, it seems as though you relied on the video to make your point. You definitely know what youre talking about, why throw away your intelligence on just posting videos to your site when you could be giving us something enlightening to read?
Awsome info and straight to the point. I don’t know if this is really the best place to ask but do you folks have any thoughts on where to get some professional writers? Thx 🙂
Hello your website is so good.
Excellent read, I just passed this onto a friend who was doing a little research on that. And he actually bought me lunch as I found it for him smile Thus let me rephrase that: Thanks for lunch!
Hello, you used to write wonderful, but the last several posts have been kinda boringK I miss your great writings. Past several posts are just a bit out of track! come on!
Wow! Thank you! I continually wanted to write on my site something like that. Can I implement a part of your post to my site?
It is not that big talking often turns out to the firm is one of the top of its generously remunerated partners. Joseph P C G. 3, 2013, on April 16. A promise to provide lawyers for claims a variety of fields particularly in Paragraph 7. Find a sensible and experienced PR consultants who are dedicated to the Tucson region for bicycling programs and infrastructure. Rompala has a big difference. For more on them?
Hello there! Quick question that’s entirely off topic. Do you know how to make your site mobile friendly? My weblog looks weird when viewing from my apple iphone. I’m trying to find a template or plugin that might be able to fix this issue. If you have any recommendations, please share. Cheers!
Mauris eget feugiat eros, vitae convallis massa.
My husband and i felt absolutely satisfied that Albert could round up his preliminary research from the precious recommendations he discovered out of the weblog. It is now and again perplexing to simply find yourself giving freely tips and tricks which often men and women might have been making money from. And we also see we have got the writer to be grateful to for this. All the explanations you made, the easy website navigation, the relationships you will help to promote – it is all incredible, and it’s letting our son and the family reason why this subject matter is amusing, which is certainly pretty important. Thanks for all!
Hi, Neat post. There is a problem together with your website in internet explorer, might check thisK IE still is the market leader and a good component of folks will leave out your great writing due to this problem.
very very good website
Hey! I just wanted to ask if you ever have any problems
with hackers? My last blog (wordpress) was hacked and I
ended up losing several weeks of hard work due to
no back up. Do you have any solutions to stop hackers?
Hey there! I just wanted to ask if you ever have
any trouble with hackers? My last blog (wordpress) was hacked and I ended up losing months of hard work
due to no backup. Do you have any solutions to protect against hackers?
Write more, thats all I have to say. Literally, it seems as though you relied on the video to make your point. You definitely know what youre talking about, why throw away your intelligence on just posting videos to your site when you could be giving us something enlightening to read?
I think other website proprietors should take this site as an model, very clean and wonderful user friendly style and design, as well as the content. You’re an expert in this topic!
I’d have to examine with you here. Which is not one thing I usually do! I take pleasure in reading a post that may make folks think. Additionally, thanks for permitting me to comment!
I think this is among the most important information for me. And i’m glad reading your article. But want to remark on some general things, The website style is wonderful, the articles is really great : D. Good job, cheers
Those are yours alright! . We at least need to get these people stealing images to start blogging! They probably just did a image search and grabbed them. They look good though!
Thank you very much.
We are a bunch of volunteers and starting a new scheme in our community. Your web site offered us with valuable information to paintings on. You have performed an impressive activity and our entire neighborhood shall be thankful to you.
Thanks for shares.
Great weblog here! Also your site so much up very fast!
What web host are you the usage of? Can I get your associate link for your host?
I desire my site loaded up as quickly as yours lol
I would like to thnkx for the efforts you’ve put in writing this blog. I’m hoping the same high-grade blog post from you in the upcoming also. Actually your creative writing skills has inspired me to get my own website now. Really the blogging is spreading its wings rapidly. Your write up is a great example of it.
Good V I should certainly pronounce, impressed with your website. I had no trouble navigating through all tabs as well as related information ended up being truly simple to do to access. I recently found what I hoped for before you know it at all. Quite unusual. Is likely to appreciate it for those who add forums or anything, web site theme . a tones way for your client to communicate. Excellent task..
I have seen plenty of useful elements on your site about pcs. However, I have the viewpoint that lap tops are still more or less not powerful sufficiently to be a wise decision if you generally do jobs that require many power, for example video editing. But for world wide web surfing, word processing, and the majority of other prevalent computer functions they are perfectly, provided you cannot mind small screen size. Many thanks sharing your opinions.
I’ve been surfing on-line more than three hours lately, but I by no means discovered any fascinating article like yours. It’s lovely value enough for me. In my view, if all website owners and bloggers made just right content as you did, the internet will be much more useful than ever before.
great post.Never knew this, thanks for letting me know.
Thank you for discussing that fantastic content material on your web site. I came across it on google. I will check to come back if you publish more aricles.
What’s Going down i am new to this, I stumbled upon this
I have discovered It absolutely useful and it has aided me out loads.
I hope to give a contribution & aid different users like its helped me.
Great job.
Very interesting information!Perfect just what I was searching for! “Peace, commerce and honest friendship with all nations entangling alliances with none.” by Thomas Jefferson.
Thanks for shares.
Hmm is anyone else having problems with the images on this blog loading? I’m trying to determine if its a problem on my end or if it’s the blog. Any feedback would be greatly appreciated.
Fantastic goods from you, man. I have understand your stuff previous to and you’re just extremely wonderful. I actually like what you’ve acquired here, really like what you’re stating and the way in which you say it. You make it enjoyable and you still take care of to keep it smart. I cant wait to read much more from you. This is actually a tremendous website.
Hey! Do you know if they make any plugins to safeguard
against hackers? I’m kinda paranoid about losing everything I’ve worked hard on. Any suggestions?
It’s awesome to pay a quick visit this site and reading the views of all colleagues
about this piece of writing, while I am also eager
of getting know-how.
Can you tell us more about this? I’d care to find out some additional information.
Heya i am for the primary time here. I came across this board
and I find It truly useful & it helped me out much. I hope to provide something back and aid others such as you aided me.
I know this if off topic but I’m looking into starting my own blog and
was wondering what all is needed to get set up? I’m assuming having a blog like yours would cost a pretty penny?
I’m not very web smart so I’m not 100% certain. Any tips
or advice would be greatly appreciated. Thanks
Wonderful web site. A lot of useful information here. I am sending it to several friends ans additionally sharing in delicious. And obviously, thank you on your sweat!
I was suggested this blog by my cousin. I am not sure whether this post is written by him as
nobody else know such detailed about my problem. You’re wonderful!
Thanks!
If you are going for finest contents like me, simply pay a quick visit this web site daily since it offers quality contents,
thanks
Thank you for some other informative blog. Where else may I am getting that kind of info written in such an ideal manner? I have a venture that I’m just now operating on, and I have been on the look out for such information.
Touche. Outstanding arguments. Keep up the amazing effort.
Thank you for some other excellent post. The place else could anybody get that type of
information in such a perfect means of writing?
I’ve a presentation next week, and I am at the look for such information.
I am glad to be a visitant of this consummate web site! , appreciate it for this rare information! .
I went over this site and I think you have a lot of fantastic info, saved to my bookmarks (:.
Thanks for share.
Keep up the great piece of work, I read few posts on this website and I conceive that your website is rattling interesting and has got sets of excellent information.
I like the valuable info you provide in your articles. I will bookmark your weblog and check again here regularly. I’m quite sure I’ll learn plenty of new stuff right here! Good luck for the next!
I haven?t checked in here for a while as I thought it was getting boring, but the last few posts are great quality so I guess I?ll add you back to my daily bloglist. You deserve it my friend 🙂
F*ckin¦ amazing things here. I¦m very satisfied to peer your article. Thanks a lot and i am having a look ahead to contact you. Will you kindly drop me a mail?
It?¦s really a great and useful piece of information. I am glad that you shared this helpful information with us. Please keep us up to date like this. Thanks for sharing.
Fantastic post however , I was wondering if you could write a litte more on this topic? I’d be very grateful if you could elaborate a little bit more. Many thanks!
Pretty nice post. I just stumbled upon your weblog and wished to say that I have really enjoyed surfing around your blog posts. After all I’ll be subscribing to your rss feed and I hope you write again very soon!
Hi there! I’m at work browsing your blog from my new iphone 3gs! Just wanted to say I love reading your blog and look forward to all your posts! Carry on the excellent work!
With havin so much content and articles do you ever run into any problems of plagorism or copyright infringement? My site has a lot of unique content I’ve either authored myself or outsourced but it appears a lot of it is popping it up all over the internet without my permission. Do you know any solutions to help protect against content from being ripped off? I’d genuinely appreciate it.
Do you mind if I quote a few of your posts as long as I provide credit and sources back to your website? My blog is in the very same area of interest as yours and my visitors would truly benefit from some of the information you present here. Please let me know if this alright with you. Many thanks!
You should participate in a contest for top-of-the-line blogs on the web. I will advocate this website!
I have figured out some important things through your blog post. One other subject I would like to state is that there are various games that you can buy which are designed specifically for toddler age kids. They consist of pattern acknowledgement, colors, animals, and shapes. These commonly focus on familiarization as opposed to memorization. This makes little kids engaged without experiencing like they are studying. Thanks
I?ve recently started a website, the information you offer on this website has helped me tremendously. Thanks for all of your time & work.
Do you have a spam problem on this blog; I also am a blogger, and I was curious about your situation; we have created some nice procedures and we are looking to swap methods with others, please shoot me an email if interested.
I’m extremely impressed with your writing skills as well as with the layout on your blog. Is this a paid theme or did you modify it yourself? Anyway keep up the excellent quality writing, it’s rare to see a nice blog like this one these days..
Another thing I’ve really noticed is that often for many people, poor credit is the results of circumstances above their control. For example they may happen to be saddled through an illness so they really have substantial bills for collections. It could be due to a work loss or even the inability to do the job. Sometimes divorce proceedings can really send the finances in an opposite direction. Thanks for sharing your thinking on this blog.
Wow, amazing blog format! How long have you ever been running a blog for? you made running a blog look easy. The full glance of your web site is magnificent, as neatly as the content!
I additionally believe that mesothelioma is a scarce form of cancer that is commonly found in people previously exposed to asbestos. Cancerous cellular material form inside mesothelium, which is a protecting lining that covers many of the body’s bodily organs. These cells generally form while in the lining on the lungs, tummy, or the sac which encircles one’s heart. Thanks for sharing your ideas.
Currently it appears like WordPress is the top blogging platform available right now. (from what I’ve read) Is that what you are using on your blog?
Hi my family member! I want to say that this post is amazing, nice written and come with approximately all important infos. I would like to see extra posts like this .
so much superb info on here, : D.
We are a group of volunteers and starting a new scheme in our community. Your site provided us with useful information to paintings on. You’ve done a formidable job and our entire group can be grateful to you.
This is a topic close to my heart cheers, where are your contact details though?
Best view i have ever seen !
Wohh exactly what I was searching for, thanks for putting up.
Thank you for another informative site. The place else may I am getting that kind of info written in such an ideal way? I have a mission that I’m just now running on, and I’ve been on the glance out for such info.
Excellent blog here! Also your site loads up very fast! What web host are you using? Can I get your affiliate link to your host? I wish my web site loaded up as quickly as yours lol
The next time I read a blog, I hope that it doesnt disappoint me as much as this one. I mean, I know it was my choice to read, but I actually thought youd have something interesting to say. All I hear is a bunch of whining about something that you could fix if you werent too busy looking for attention.
A person essentially help to make seriously articles I would state. This is the first time I frequented your web page and thus far? I surprised with the research you made to make this particular publish amazing. Fantastic job!
I’ve been browsing online greater than 3 hours today, yet I by no means found any fascinating article like yours. It’s lovely worth enough for me. In my view, if all webmasters and bloggers made excellent content as you probably did, the web will probably be a lot more helpful than ever before.
A person essentially help to make seriously posts I would state. This is the first time I frequented your website page and thus far? I amazed with the research you made to create this particular publish amazing. Magnificent job!
I’ve read a few good stuff here. Definitely worth bookmarking for revisiting. I surprise how much effort you put to make such a excellent informative website.
I like the valuable information you provide in your articles. I will bookmark your weblog and check again here regularly. I am quite sure I’ll learn a lot of new stuff right here! Good luck for the next!
Helpful info. Fortunate me I found your website accidentally, and I am stunned why this coincidence did not took place earlier! I bookmarked it.
Best view i have ever seen !
Can I just say what a relief to find someone who actually knows what theyre talking about on the internet. You definitely know how to bring an issue to light and make it important. More people need to read this and understand this side of the story. I cant believe youre not more popular because you definitely have the gift.
F*ckin’ amazing issues here. I’m very satisfied to see your article. Thank you so much and i’m taking a look ahead to contact you. Will you please drop me a e-mail?
You really make it appear so easy along with your presentation but I find this topic to be actually one thing which I feel I might never understand. It seems too complicated and very large for me. I’m looking forward in your subsequent publish, I will try to get the hold of it!
I like this website so much, bookmarked. “Respect for the fragility and importance of an individual life is still the mark of an educated man.” by Norman Cousins.
When I initially commented I clicked the “Notify me when new comments are added” checkbox and now each time a comment is added I get four e-mails with the same comment. Is there any way you can remove people from that service? Thanks a lot!
Good info. Lucky me I reach on your website by accident, I bookmarked it.
I used to be very pleased to search out this net-site.I wanted to thanks to your time for this excellent learn!! I definitely enjoying every little little bit of it and I have you bookmarked to take a look at new stuff you weblog post.
Thanks for sharing superb informations. Your web-site is so cool. I am impressed by the details that you’ve on this blog. It reveals how nicely you understand this subject. Bookmarked this web page, will come back for extra articles. You, my pal, ROCK! I found just the info I already searched everywhere and simply could not come across. What an ideal web site.
It’s really a cool and useful piece of information. I am glad that you shared this helpful info with us. Please keep us informed like this. Thanks for sharing.
Attractive section of content. I just stumbled upon your website and in accession capital to assert that I get in fact enjoyed account your blog posts. Any way I’ll be subscribing to your augment and even I achievement you access consistently quickly.
I have recently started a website, the information you offer on this website has helped me greatly. Thanks for all of your time & work. “If you see a snake, just kill it. Don’t appoint a committee on snakes.” by H. Ross Perot.
I got what you mean , thanks for putting up.Woh I am glad to find this website through google.
Best view i have ever seen !
Hmm is anyone else having problems with the images on this blog loading? I’m trying to determine if its a problem on my end or if it’s the blog. Any responses would be greatly appreciated.
Appreciating the persistence you put into your website and in depth information you provide. It’s awesome to come across a blog every once in a while that isn’t the same old rehashed information. Excellent read! I’ve saved your site and I’m including your RSS feeds to my Google account.
You could definitely see your enthusiasm within the work you write. The sector hopes for more passionate writers like you who aren’t afraid to mention how they believe. Always follow your heart.
I wanted to thank you for this great read!! I definitely enjoying every little bit of it I have you bookmarked to check out new stuff you post…
I really value your piece of work, Great post.
I think the admin of this website is really working hard for his website, because
here every information is quality based material.
Hello there, I discovered your web site by means
of Google even as searching for a related matter,
your website got here up, it appears to be like good. I have bookmarked it in my google bookmarks.
Hi there, simply was aware of your weblog through Google, and located
that it’s really informative. I’m going to be careful for brussels.
I’ll be grateful should you continue this in future.
Numerous folks shall be benefited out of your writing.
Cheers!
It’s hard to find knowledgeable people on this topic, but you sound like you know what you’re talking about! Thanks
We’re a group of volunteers and opening a new scheme in our community. Your web site offered us with valuable information to work on. You’ve done a formidable job and our entire community will be thankful to you.
Hi , I do believe this is an excellent blog. I stumbled upon it on Yahoo , i will come back once again. Money and freedom is the best way to change, may you be rich and help other people.
This post will assist the internet viewers for creating new website or even a weblog from start to end.
delta 8 gummies bulk wholesale
This paragraph is truly a pleasant one it assists new internet viewers, who are wishing in favor
of blogging.
Way cool! Some very valid points! I appreciate you penning this article and also the rest of the site is
really good.
Hi my loved one! I wish to say that this article is awesome, great written and include approximately all significant infos. I would like to look more posts like this .
Perfectly composed subject matter, regards for entropy.
“I was hesitant about investing in content ., Briansclub but this agency has proven it to be worth every penny
Good info. Lucky me I reach on your website by accident, I bookmarked it.
Whats up! I just would like to give an enormous thumbs up for the good info you have here on this post. I shall be coming again to your blog for extra soon.
Just wish to say your article is as astounding. The clearness on your put up is simply great and i could assume you are a professional on this subject. Fine with your permission allow me to grab your feed to keep up to date with imminent post. Thanks a million and please continue the rewarding work.
Awesome blog post.Thanks Again. Want more.
Aw, this was a really nice post. In thought I wish to put in writing like this moreover – taking time and actual effort to make a very good article… however what can I say… I procrastinate alot and on no account appear to get one thing done.
Heya are using WordPress for your blog platform? I’m new to the blog world but I’m trying to get started and create my own. Do you need any html coding expertise to make your own blog? Any help would be really appreciated!
Hello, i think that i saw you visited my blog so i came to “return the favor”.I am trying to find things to enhance my web site!I suppose its ok to use a few of your ideas!!
I really appreciate this post. I have been looking everywhere for this! Thank goodness I found it on Bing. You’ve made my day! Thanks again
I have been browsing online more than three hours today, yet I never found any interesting article like yours. It is pretty worth enough for me. Personally, if all web owners and bloggers made good content as you did, the web will be much more useful than ever before.
Hi there, I found your site via Google while searching for a related topic, your site came up, it looks good. I’ve bookmarked it in my google bookmarks.
Normally I don’t learn article on blogs, but I would like to say that this write-up very forced me to check out and do it! Your writing style has been surprised me. Thanks, quite great post.
You have brought up a very good points, thanks for the post.
Heya i am for the first time here. I found this board and I find It truly useful & it helped me out much. I hope to give something back and help others like you aided me.
I went over this web site and I believe you have a lot of superb info, saved to bookmarks (:.
What’s Happening i am new to this, I stumbled upon this I have found It absolutely helpful and it has aided me out loads. I hope to contribute & aid other users like its aided me. Great job.
Just wanna remark on few general things, The website layout is perfect, the articles is very wonderful. “I delight in men over seventy. They always offer one the devotion of a lifetime.” by Oscar Fingall O’Flahertie Wills Wilde.
Hey very cool blog!! Man .. Excellent .. Amazing .. I will bookmark your blog and take the feeds also…I am happy to find a lot of useful information here in the post, we need develop more strategies in this regard, thanks for sharing. . . . . .
I am extremely impressed along with your writing abilities and also with the format to your blog. Is this a paid subject matter or did you modify it yourself? Either way stay up the nice quality writing, it’s rare to look a great blog like this one these days..
Great blog here! Also your site loads up very fast! What host are you using? Can I get your affiliate link to your host? I wish my website loaded up as quickly as yours lol
It’s hard to find knowledgeable people on this topic, but you sound like you know what you’re talking about! Thanks
After study a few of the blog posts on your website now, and I truly like your way of blogging. I bookmarked it to my bookmark website list and will be checking back soon. Pls check out my web site as well and let me know what you think.
Hello would you mind letting me know which hosting company you’re utilizing? I’ve loaded your blog in 3 completely different browsers and I must say this blog loads a lot quicker then most. Can you recommend a good web hosting provider at a fair price? Cheers, I appreciate it!
Someone essentially help to make seriously articles I would state. This is the first time I frequented your website page and thus far? I surprised with the research you made to make this particular publish amazing. Fantastic job!
Thank you for the auspicious writeup. It in fact was a amusement account it. Look advanced to far added agreeable from you! By the way, how could we communicate?
Good write-up, I¦m regular visitor of one¦s web site, maintain up the excellent operate, and It’s going to be a regular visitor for a long time.
Good info. Lucky me I reach on your website by accident, I bookmarked it.
I have learn some good stuff here. Definitely value bookmarking for revisiting. I wonder how much effort you place to create this kind of excellent informative web site.
fantastic publish, very informative. I’m wondering why the other specialists of this sector do not notice this. You must proceed your writing. I’m sure, you have a huge readers’ base already!
Great – I should definitely pronounce, impressed with your site. I had no trouble navigating through all tabs and related info ended up being truly simple to do to access. I recently found what I hoped for before you know it at all. Reasonably unusual. Is likely to appreciate it for those who add forums or something, website theme . a tones way for your customer to communicate. Excellent task..
Great post. I was checking constantly this blog and I’m impressed! Extremely useful info specifically the remaining section 🙂 I maintain such information a lot. I used to be seeking this particular info for a long time. Thank you and best of luck.
Wonderful blog! Do you have any helpful hints for aspiring writers? I’m planning to start my own blog soon but I’m a little lost on everything. Would you recommend starting with a free platform like WordPress or go for a paid option? There are so many choices out there that I’m totally overwhelmed .. Any ideas? Bless you!
This web site is really a walk-through for all of the info you wanted about this and didn’t know who to ask. Glimpse here, and you’ll definitely discover it.
Great post. I am facing a couple of these problems.
I do agree with all the ideas you have presented in your post. They’re very convincing and will certainly work. Still, the posts are too short for starters. Could you please extend them a little from next time? Thanks for the post.
I like this website because so much utile material on here : D.
Wow, awesome blog layout! How long have you been blogging for? you make blogging look easy. The overall look of your site is great, as well as the content!
Very interesting information!Perfect just what I was looking for!
At this time it sounds like BlogEngine is the preferred blogging platform out there right now. (from what I’ve read) Is that what you are using on your blog?
I was very pleased to find this web-site.I wanted to thanks for your time for this wonderful read!! I definitely enjoying every little bit of it and I have you bookmarked to check out new stuff you blog post.
Superb blog! Do you have any tips and hints for aspiring writers? I’m hoping to start my own blog soon but I’m a little lost on everything. Would you suggest starting with a free platform like WordPress or go for a paid option? There are so many options out there that I’m totally overwhelmed .. Any recommendations? Appreciate it!
Good write-up, I’m normal visitor of one’s blog, maintain up the nice operate, and It is going to be a regular visitor for a long time.
Valuable information. Lucky me I found your website by accident, and I am shocked why this accident did not happened earlier! I bookmarked it.
Saved as a favorite, I really like your blog!
Some really superb content on this web site, regards for contribution.
delta 8 thc gummies for pain
Some genuinely nice and useful information on this website , likewise I believe the style and design holds wonderful features.
It’s remarkable designed for me to have a site, which
is valuable for my knowledge. thanks admin
It¦s actually a great and useful piece of information. I¦m happy that you simply shared this useful information with us. Please keep us up to date like this. Thanks for sharing.
thanks for shares
I regard something truly special in this web site.
Some genuinely nice and useful info on this internet site, as well I believe the pattern has got excellent features.
Hey there! I’m at work surfing around your blog from my new iphone 3gs!
Just wanted to say I love reading through your blog and
look forward to all your posts! Carry on the superb work!
Regards for helping out, superb info .
This is very interesting, You are a very skilled blogger. I’ve joined your feed and look forward to seeking more of your magnificent post. Also, I have shared your web site in my social networks!
I like what you guys are up too. Such smart work and reporting! Carry on the superb works guys I have incorporated you guys to my blogroll. I think it’ll improve the value of my site 🙂
all the time i used to read smaller articles or reviews which as well clear their motive, and that is also happening with this paragraph which I am reading here.|
I’m gone to say to my little brother, that he should also pay a quick visit this weblog on regular basis to get updated from most up-to-date information.|
Hi it’s me, I am also visiting this website daily, this web page is truly pleasant and the viewers are actually sharing fastidious thoughts.|
Undeniably believe that which you stated. Your favorite justification seemed to be on the internet the simplest thing to be aware of. I say to you, I definitely get annoyed while people consider worries that they just do not know about. You managed to hit the nail upon the top and defined out the whole thing without having side effect , people can take a signal. Will probably be back to get more. Thanks|
Pretty nice post. I just stumbled upon your weblog and wanted
to say that I’ve really enjoyed browsing your blog posts.
In any case I’ll be subscribing to your rss feed and
I hope you write again very soon!
I was curious if you ever thought of changing the structure of your site? Its very well written; I love what youve got to say. But maybe you could a little more in the way of content so people could connect with it better. Youve got an awful lot of text for only having 1 or 2 images. Maybe you could space it out better?
Good info. Lucky me I reach on your website by accident, I bookmarked it.
Thanx for the effort, keep up the good work Great work, I am going to start a small Blog Engine course work using your site I hope you enjoy blogging with the popular BlogEngine.net.Thethoughts you express are really awesome. Hope you will right some more posts.
Whats Happening i am new to this, I stumbled upon this I’ve found It absolutely useful and it has helped me out loads. I am hoping to contribute & help different users like its helped me. Great job.
I like this site very much, Its a rattling nice berth to read and incur info .
Thanks for shares
Hi there, I enjoy reading through your article
post. I like to write a little comment to support you.
I’d always want to be update on new content on this internet site, saved to my bookmarks! .
WONDERFUL Post.thanks for share..more wait .. …
Of course, what a splendid website and informative posts, I surely will bookmark your website.All the Best!
I have been browsing online more than 3 hours today, yet I never found any interesting article like yours. It is pretty worth enough for me. In my opinion, if all web owners and bloggers made good content as you did, the web will be a lot more useful than ever before.
Wonderful work! This is the type of info that should be shared around the net. Shame on Google for not positioning this post higher! Come on over and visit my web site . Thanks =)
I am always thought about this, appreciate it for posting.
Hi! I could have sworn I’ve been to this website before but after browsing through some of the post
I realized it’s new to me. Nonetheless, I’m definitely glad I
found it and I’ll be bookmarking and checking back often!
Good info and right to the point. I don’t know if this is in fact the best place to ask but do you guys have any thoughts on where to employ some professional writers? Thanks 🙂
Thanks for share
I think the admin of this web site is genuinely working hard in support of his website, since here every information is quality based stuff.
Good way of describing, and fastidious piece
of writing to get facts concerning my presentation focus, which i
am going to convey in college.
Every weekend i used to go to see this web page, as i want
enjoyment, as this this web site conations really
fastidious funny stuff too.
Hmm it looks like your blog ate my first comment (it was super long) so I guess I’ll just sum it up what I had written and say, I’m thoroughly enjoying your blog.
I as well am an aspiring blog blogger but I’m still new to everything.
Do you have any helpful hints for newbie blog writers?
I’d genuinely appreciate it.
I’ve been exploring for a little bit for any high quality articles or weblog posts in this sort of area .
Exploring in Yahoo I eventually stumbled upon this
site. Studying this info So i’m satisfied to express that I’ve an incredibly just right uncanny
feeling I discovered exactly what I needed. I so much unquestionably will make certain to do
not put out of your mind this website and give it a look regularly.
Wonderful work! This is the type of info that should be shared around the web. Shame on Google for not positioning this post higher! Come on over and visit my web site . Thanks =)
I like this post, enjoyed this one regards for posting. “To affect the quality of the day that is the art of life.” by Henry David Thoreau.
Hello, i think that i saw you visited my web site thus i came
to “return the favor”.I am trying to find things to improve my web site!I suppose its ok to use some of your
ideas!!
I dugg some of you post as I cogitated they were extremely helpful extremely helpful
Fine way of describing, and pleasant post to get data concerning my presentation subject, which
i am going to present in school.
What’s up everyone, it’s my first go to see at this website,
and post is truly fruitful in favor of me, keep up posting
these types of posts.
We are a group of volunteers and opening a brand new scheme in our community.
Your web site provided us with useful info to work on.
You have performed a formidable process and our entire community might be grateful to you.
Hello.This article was really motivating, especially because I was investigating for thoughts on this subject last Sunday.
Thanks for share.
I like what you guys are up too. Such intelligent work and reporting! Keep up the superb works guys I’ve incorporated you guys to my blogroll. I think it’ll improve the value of my web site 🙂
Article writing is also a fun, if you be familiar with after that you can write if not it is
complicated to write.
I believe this site holds some very excellent information for everyone. “Few friendships would survive if each one knew what his friend says of him behind his back.” by Blaise Pascal.
Good day! Would you mind if I share your blog with my
facebook group? There’s a lot of folks that I think would
really enjoy your content. Please let me know. Thank you
Everything composed was actually very reasonable.
However, think about this, what if you added a little information? I am not saying your information isn’t good., but
suppose you added something that grabbed folk’s attention? I mean How to play IPX / SPX games over
LAN (WinXP) « Old PC Gaming is kinda vanilla.
You ought to look at Yahoo’s home page and watch how
they create article headlines to get viewers to open the links.
You might try adding a video or a related pic or two
to grab people interested about everything’ve
got to say. Just my opinion, it would make your website
a little livelier.
I have read so many articles regarding the blogger lovers but this post is truly a fastidious article,
keep it up.
Great goods from you, man. I have understand your stuff previous to and you’re just too excellent.
I actually like what you’ve acquired here, certainly like what you’re saying
and the way in which you say it. You make it enjoyable and you still
care for to keep it sensible. I can’t wait to read far more from
you. This is really a tremendous web site.
I love the efforts you have put in this, regards for all the great content.
Magnificent beat ! I would like to apprentice even as you amend your web site, how
could i subscribe for a weblog site? The account aided me
a acceptable deal. I had been tiny bit familiar of this your broadcast offered brilliant transparent idea
Great information. Lucky me I came across your website by
accident (stumbleupon). I have book-marked it for later!
Thank you.
I’ve been absent for some time, but now I remember why I used to love this blog. Thanks, I?¦ll try and check back more often. How frequently you update your web site?
certainly like your web site however you have to check the spelling on quite a
few of your posts. A number of them are rife with spelling issues and I find it very troublesome to tell the truth then again I
will surely come back again.
What¦s Happening i’m new to this, I stumbled upon this I’ve found It positively helpful and it has helped me out loads. I am hoping to give a contribution & aid other users like its helped me. Great job.
My relatives all the time say that I am wasting my time here at web,
however I know I am getting know-how every day by reading such good posts.
When I initially commented I clicked the “Notify me when new comments are added” checkbox and now each time a comment is added I get four emails with the same comment.
Is there any way you can remove people from that service?
Appreciate it!
Excellent post. I was checking constantly this blog and I’m impressed! Very useful information particularly the last part 🙂 I care for such info much. I was looking for this particular information for a very long time. Thank you and good luck.
It’s best to take part in a contest for the most effective blogs on the web. I will suggest this website!
I’m really impressed with your writing skills and also with the layout on your blog. Is this a paid theme or did you modify it yourself? Either way keep up the excellent quality writing, it is rare to see a nice blog like this one nowadays..
Thank you, I have recently been searching for information about this topic for a long
time and yours is the greatest I’ve came upon so far.
But, what about the bottom line? Are you sure in regards to the supply?
Exactly what I was looking for, thanks for posting.
Hi, Neat post. There is an issue with your website in web explorer, might check this?K IE still is the market chief and a big element of other people will leave out your excellent writing because of this problem.
Excellent beat ! I wish to apprentice whilst you amend your web site, how can i subscribe for a weblog web site? The account aided me a appropriate deal. I have been a little bit familiar of this your broadcast provided shiny clear concept
I have learn several just right stuff here. Definitely price bookmarking for revisiting. I surprise how so much effort you place to make any such wonderful informative site.
Heya! I’m at work browsing your blog from my new iphone 4! Just wanted to say I love reading your blog and look forward to all your posts! Carry on the outstanding work!
Very nice post. I just stumbled upon your weblog and wanted to say that I’ve really enjoyed browsing your blog posts. In any case I’ll be subscribing to your feed and I hope you write again soon!
Just wanna input on few general things, The website pattern is perfect, the content material is rattling great : D.
I love the efforts you have put in this, regards for all the great posts.
Thanks for shares
Lovely site! I am loving it!! Will come back again. I am taking your feeds also
Hey there are using WordPress for your blog platform? I’m new to the blog world but I’m trying to get started and create my own. Do you require any html coding expertise to make your own blog? Any help would be greatly appreciated!
Someone essentially help to make seriously articles I’d state. This is the first time I frequented your website page and to this point? I surprised with the analysis you made to make this actual publish incredible. Magnificent task!
Thanks for shares
Lovely site! I am loving it!! Will come back again. I am taking your feeds also.
Nice blog here! Also your web site loads up very fast! What host are you using? Can I get your affiliate link to your host? I wish my web site loaded up as fast as yours lol
I am impressed with this site, very I am a big fan .
Hi there very nice site!! Man .. Excellent .. Superb .. I’ll bookmark your blog and take the feeds also?KI’m satisfied to seek out so many helpful info here within the put up, we want develop more techniques on this regard, thanks for sharing. . . . . .
Hi there! This is kind of off topic but I need some advice from an established blog. Is it very hard to set up your own blog? I’m not very techincal but I can figure things out pretty fast. I’m thinking about making my own but I’m not sure where to begin. Do you have any ideas or suggestions? Thanks
Hiya, I’m really glad I have found this information. Today bloggers publish only about gossips and web and this is actually frustrating. A good blog with interesting content, this is what I need. Thanks for keeping this web site, I will be visiting it. Do you do newsletters? Can not find it.
Hello.This article was extremely motivating, especially since I was searching for thoughts on this issue last Wednesday.
Hey there just wanted to give you a quick heads up. The text in your post seem to be running off the screen in Chrome. I’m not sure if this is a formatting issue or something to do with web browser compatibility but I thought I’d post to let you know. The layout look great though! Hope you get the issue resolved soon. Kudos
An impressive share, I just given this onto a colleague who was doing a little analysis on this. And he in fact bought me breakfast because I found it for him.. smile. So let me reword that: Thnx for the treat! But yeah Thnkx for spending the time to discuss this, I feel strongly about it and love reading more on this topic. If possible, as you become expertise, would you mind updating your blog with more details? It is highly helpful for me. Big thumb up for this blog post!
Greetings! I know this is somewhat off topic but I was wondering if you knew where I could locate a captcha plugin for my comment form? I’m using the same blog platform as yours and I’m having difficulty finding one? Thanks a lot!
I?¦ve recently started a site, the info you offer on this site has helped me greatly. Thanks for all of your time & work.
yes sir
Hi there, simply became aware of your weblog thru Google, and found that it is truly informative. I’m gonna watch out for brussels. I’ll appreciate in the event you continue this in future. Numerous other people might be benefited out of your writing. Cheers!
Great post. I was checking constantly this blog and I am impressed! Extremely helpful information particularly the last part 🙂 I care for such info a lot. I was looking for this certain info for a long time. Thank you and good luck.
I like the helpful info you provide in your articles. I will bookmark your blog and check again here regularly. I am quite sure I’ll learn lots of new stuff right here! Good luck for the next!
Have you ever thought about writing an ebook or guest authoring on other sites? I have a blog centered on the same subjects you discuss and would really like to have you share some stories/information. I know my viewers would enjoy your work. If you are even remotely interested, feel free to shoot me an e-mail.
Great website. Lots of useful info here. I am sending it to a few friends ans also sharing in delicious. And certainly, thanks for your sweat!
There’s noticeably a bundle to learn about this. I assume you made certain nice factors in options also.
Best Google News Blog
Enjoyed examining this, very good stuff, regards. “The hunger for love is much more difficult to remove than the hunger for bread.” by Mother Theresa.
I have been browsing on-line greater than three hours nowadays, yet I never discovered any attention-grabbing article like yours. It’s beautiful worth enough for me. In my opinion, if all web owners and bloggers made excellent content material as you probably did, the net will be a lot more useful than ever before. “No one has the right to destroy another person’s belief by demanding empirical evidence.” by Ann Landers.
I like this post, enjoyed this one thankyou for posting.
Shit website
excellent points altogether, you simply won a new reader. What may you recommend about your publish that you simply made a few days in the past? Any certain?
Keep functioning ,splendid job!
This design is wicked! You obviously know how to keep a reader amused. Between your wit and your videos, I was almost moved to start my own blog (well, almost…HaHa!) Fantastic job. I really enjoyed what you had to say, and more than that, how you presented it. Too cool!
of course like your web site however you have to take a look at the spelling on quite a few of your posts. Many of them are rife with spelling problems and I find it very troublesome to tell the reality then again I will surely come back again.
I have been browsing on-line more than three hours lately, but I never found any fascinating article like yours. It?¦s lovely value enough for me. Personally, if all site owners and bloggers made good content material as you did, the internet will be a lot more helpful than ever before.
I’m typically to blogging and i really recognize your content. The article has actually peaks my interest. I am going to bookmark your site and hold checking for brand new information.
Demek paramı alır banlarsınız beni
Great info and right to the point. I don’t know if this is really the best place to ask but do you people have any thoughts on where to get some professional writers? Thx 🙂
Of course, what a great blog and enlightening posts, I surely will bookmark your website.All the Best!
Just wish to say your article is as amazing. The clarity in your post is simply nice and that i could suppose you’re a professional in this subject. Well with your permission allow me to take hold of your feed to keep up to date with forthcoming post. Thanks 1,000,000 and please keep up the rewarding work.
I’m still learning from you, but I’m trying to reach my goals. I definitely love reading everything that is posted on your blog.Keep the aarticles coming. I loved it!
Great website. Plenty of useful information here. I’m sending it to a few friends ans also sharing in delicious. And naturally, thanks for your sweat!
You actually make it appear really easy along with your presentation however I to find this topic to be really something that I believe I might never understand. It kind of feels too complex and extremely broad for me. I’m having a look ahead for your subsequent post, I will attempt to get the grasp of it!
Only wanna say that this is extremely helpful, Thanks for taking your time to write this.
I reckon something genuinely interesting about your site so I saved to favorites.
Very interesting subject, thanks for posting. “Wrinkles should merely indicate where smiles have been.” by Mark Twain.
Thanks so much for providing individuals with remarkably superb opportunity to read critical reviews from this blog. It’s usually so terrific and jam-packed with a lot of fun for me and my office peers to search your web site on the least thrice every week to read the newest secrets you have got. Of course, I’m also actually impressed with all the exceptional guidelines served by you. Selected 2 points in this article are honestly the best I’ve ever had.
I was very pleased to find this web-site.I wanted to thanks for your time for this wonderful read!! I definitely enjoying every little bit of it and I have you bookmarked to check out new stuff you blog post.
Wow! This could be one particular of the most beneficial blogs We have ever arrive across on this subject. Actually Fantastic. I’m also a specialist in this topic therefore I can understand your effort.
It is truly a nice and helpful piece of info. I am glad that you just shared this useful information with us. Please stay us informed like this. Thanks for sharing.
Hello, you used to write magnificent, but the last few posts have been kinda boringK I miss your tremendous writings. Past several posts are just a bit out of track! come on!
It is the best time to make some plans for the future and it’s time to be happy. I’ve read this post and if I could I desire to suggest you few interesting things or tips. Perhaps you could write next articles referring to this article. I want to read more things about it!
Currently it looks like Drupal is the preferred blogging platform out there right now. (from what I’ve read) Is that what you are using on your blog?
Wonderful website. Lots of useful information here. I am sending it to some friends ans additionally sharing in delicious. And certainly, thanks on your sweat!
Your style is unique in comparison to other folks I’ve read stuff from. I appreciate you for posting when you’ve got the opportunity, Guess I’ll just bookmark this web site.
Hey! Do you use Twitter? I’d like to follow you if that would be okay. I’m definitely enjoying your blog and look forward to new updates.
I feel that is among the most significant info for me. And i am happy studying your article. But want to commentary on some general things, The site style is perfect, the articles is truly excellent : D. Just right task, cheers
Write more, thats all I have to say. Literally, it seems as though you relied on the video to make your point. You clearly know what youre talking about, why throw away your intelligence on just posting videos to your site when you could be giving us something enlightening to read?
I saw a lot of website but I think this one contains something extra in it in it
It’s a shame you don’t have a donate button! I’d definitely donate to this excellent blog! I suppose for now i’ll settle for bookmarking and adding your RSS feed to my Google account. I look forward to new updates and will share this site with my Facebook group. Talk soon!
Hello there, I found your blog via Google while looking for a related topic, your web site came up, it looks great. I have bookmarked it in my google bookmarks.
I absolutely love your blog.. Great colors & theme. Did you build this web site yourself? Please reply back as I’m trying to create my own personal website and want to learn where you got this from or what the theme is called. Appreciate it!
Spot on with this write-up, I actually think this web site needs way more consideration. I?ll probably be again to learn rather more, thanks for that info.
Hello.This article was extremely interesting, especially since I was looking for thoughts on this subject last Friday.
Utterly indited written content, Really enjoyed looking at.
It is the best time to make some plans for the longer term and it’s time to be happy. I have learn this put up and if I may just I want to counsel you few fascinating things or tips. Perhaps you could write subsequent articles referring to this article. I desire to read even more things about it!
I am typically to running a blog and i actually respect your content. The article has really peaks my interest. I am going to bookmark your site and preserve checking for new information.
You have mentioned very interesting points! ps nice web site. “Become addicted to constant and never-ending self improvement.” by Anthony D’Angelo.
I think other web-site proprietors should take this web site as an model, very clean and magnificent user genial style and design, as well as the content. You’re an expert in this topic!
Some genuinely great blog posts on this site, regards for contribution.
Hello, Neat post. There’s a problem together with your website in internet explorer, may check thisK IE still is the marketplace chief and a large component of other people will omit your great writing because of this problem.
I regard something genuinely special in this website .
Im now not sure the place you are getting your info, however good topic. I must spend some time finding out more or working out more. Thank you for great info I used to be looking for this information for my mission.
Hey would you mind letting me know which web host you’re using? I’ve loaded your blog in 3 completely different browsers and I must say this blog loads a lot quicker then most. Can you suggest a good internet hosting provider at a honest price? Many thanks, I appreciate it!
What i don’t understood is in reality how you are now not really much more neatly-favored than you might be right now. You are very intelligent. You recognize thus significantly in the case of this subject, made me personally consider it from a lot of various angles. Its like men and women aren’t interested except it’s one thing to accomplish with Girl gaga! Your personal stuffs nice. At all times maintain it up!
It’s really a great and helpful piece of information. I am glad that you shared this helpful info with us. Please keep us up to date like this. Thank you for sharing.
Very interesting subject, regards for posting. “Time flies like an arrow. Fruit flies like a banana.” by Lisa Grossman.
Hey there just wanted to give you a quick heads up and let you know a few of the pictures aren’t loading properly. I’m not sure why but I think its a linking issue. I’ve tried it in two different browsers and both show the same results.
Your style is very unique compared to other folks I’ve read stuff from. Thanks for posting when you’ve got the opportunity, Guess I’ll just bookmark this site.
Ridiculous story there. What occurred after? Take care!
I am continuously searching online for ideas that can help me. Thanks!
Wonderful work! That is the kind of info that are meant to be
shared around the internet. Disgrace on the search engines for now not positioning this post upper!
Come on over and talk over with my website . Thanks =)
Today, I went to the beach with my children. I found a sea
shell and gave it to my 4 year old daughter and said “You can hear the ocean if you put this to your ear.” She placed
the shell to her ear and screamed. There was a hermit crab
inside and it pinched her ear. She never wants to go back!
LoL I know this is totally off topic but I had to tell someone!
Excellent post. I absolutely love this website. Thanks!
I’ve been browsing online more than 3 hours today, yet I never found any interesting article like yours. It is pretty worth enough for me. Personally, if all site owners and bloggers made good content as you did, the web will be much more useful than ever before.
Some really interesting info , well written and broadly user pleasant.
Some genuinely nice and useful information on this website , likewise I conceive the design and style holds great features.
Wow! This blog looks just like my old one! It’s on a entirely different topic but it has pretty much the same page layout and design. Superb choice of colors!
I’m still learning from you, as I’m trying to reach my goals. I certainly liked reading all that is written on your website.Keep the tips coming. I loved it!
I?¦ll right away grasp your rss as I can’t find your e-mail subscription link or e-newsletter service. Do you have any? Kindly allow me know so that I may subscribe. Thanks.
This really answered my problem, thank you!
Heya i’m for the first time here. I came across this board and I to find It truly helpful & it helped me out a lot. I’m hoping to give one thing back and aid others such as you aided me.
Good blog! I really love how it is easy on my eyes and the data are well written. I am wondering how I might be notified when a new post has been made. I’ve subscribed to your feed which must do the trick! Have a nice day!
Everything is very open with a really clear explanation of the issues. It was definitely informative. Your site is very helpful. Thanks for sharing!
Thanks for share.
Magnificent goods from you, man. I have understand your stuff previous to and you are just too fantastic. I really like what you’ve acquired here, really like what you are saying and the way in which you say it. You make it entertaining and you still take care of to keep it wise. I cant wait to read far more from you. This is actually a tremendous web site.
Thanks for shares.
Generally I don’t read article on blogs, however I would like to say that this write-up very compelled me to take a look at and do so! Your writing style has been amazed me. Thanks, quite nice article.
You could certainly see your expertise in the work you write. The world hopes for even more passionate writers like you who are not afraid to say how they believe. Always follow your heart.
My brother suggested I might like this web site. He was totally right. This post truly made my day. You can not imagine simply how much time I had spent for this info! Thanks!
I’d perpetually want to be update on new blog posts on this internet site, saved to bookmarks! .
That is very attention-grabbing, You’re an excessively professional blogger.
I’ve joined your rss feed and look ahead to in the hunt for extra of your magnificent post.
Also, I’ve shared your site in my social networks
Good info. Lucky me I reach on your website by accident, I bookmarked it.
I enjoy the efforts you have put in this, regards for all the great posts.
What i do not understood is in truth how you’re no longer actually much more smartly-favored than you might be right now. You’re very intelligent. You already know therefore significantly in the case of this matter, produced me for my part believe it from numerous varied angles. Its like men and women are not fascinated until it is one thing to do with Lady gaga! Your own stuffs great. Always take care of it up!
you’re really a good webmaster. The site loading speed is incredible. It seems that you’re doing any unique trick. Furthermore, The contents are masterpiece. you have done a excellent job on this topic!
Pretty nice post. I simply stumbled upon your blog and wished to mention that I’ve really loved surfing around your weblog posts. After all I’ll be subscribing on your rss feed and I hope you write once more soon!
I consider something truly special in this website .
I have recently started a web site, the information you offer on this website has helped me greatly. Thanks for all of your time & work.
Keep up the excellent piece of work, I read few content on this web site and I think that your website is very interesting and holds bands of great information.
I was recommended this website by my cousin. I’m not sure whether this post is written by him as no one else know such detailed about my problem. You’re amazing! Thanks!
You actually make it appear so easy along with your presentation however I to find this topic to be really something that I think I might never understand. It sort of feels too complicated and very broad for me. I’m taking a look ahead to your next post, I will try to get the grasp of it!
Hello, yes this post is actually good and I have learned
lot of things from it concerning blogging.
thanks.
Thank you for sharing with us, I conceive this website really stands out : D.
Woah! I’m really enjoying the template/theme of this website. It’s simple, yet effective. A lot of times it’s hard to get that “perfect balance” between usability and appearance. I must say you’ve done a great job with this. Also, the blog loads super fast for me on Opera. Superb Blog!
Unquestionably consider that which you stated. Your
favourite justification seemed to be at the web the simplest factor
to take note of. I say to you, I definitely get annoyed whilst other people consider
concerns that they just do not understand about. You controlled to hit the nail upon the top and
also defined out the entire thing without having side effect ,
people could take a signal. Will probably be again to get more.
Thank you
Hi! I know this is kinda off topic but I was wondering which blog platform are you using for this site? I’m getting fed up of WordPress because I’ve had issues with hackers and I’m looking at options for another platform. I would be awesome if you could point me in the direction of a good platform.
I’m extremely impressed with your writing skills as well as with the layout on your weblog. Is this a paid theme or did you modify it yourself? Anyway keep up the nice quality writing, it’s rare to see a nice blog like this one today..
Hey, you used to write great, but the last few posts have been kinda boring?K I miss your super writings. Past several posts are just a little bit out of track! come on!
Some really nice stuff on this site, I like it.
My spouse and I absolutely love your blog and find nearly all of
your post’s to be exactly what I’m looking for.
can you offer guest writers to write content in your case?
I wouldn’t mind producing a post or elaborating on many of the subjects you write in relation to
here. Again, awesome site!
As a Newbie, I am always browsing online for articles that can help me. Thank you
My brother recommended I would possibly like this website. He was once totally right. This post truly made my day. You cann’t consider just how a lot time I had spent for this info! Thank you!
Hey, you used to write wonderful, but the last several posts have been kinda boring?K I miss your great writings. Past several posts are just a little out of track! come on!
Have you ever considered writing an e-book or guest authoring on other blogs? I have a blog based on the same ideas you discuss and would love to have you share some stories/information. I know my viewers would value your work. If you are even remotely interested, feel free to send me an e mail.
I love it when people come together and share opinions, great blog, keep it up.
Hello.This article was extremely motivating, particularly because I was browsing for thoughts on this topic last couple of days.
Do you have a spam issue on this website; I also am a blogger, and I was wanting to know your situation; many of us have created some nice practices and we are looking to swap solutions with others, please shoot me an e-mail if interested.
Excellent blog here! Also your website loads up very fast! What web host are you using? Can I get your affiliate link to your host? I wish my web site loaded up as quickly as yours lol
Great post, you have pointed out some good points, I also think this s a very excellent website.
I read this paragraph completely concerning the difference of hottest and previous
technologies, it’s awesome article.
Thanks for finally writing about > How to play IPX / SPX games
over LAN (WinXP) « Old PC Gaming < Loved it!
I am actually delighted to glance at this web site posts which contains plenty of helpful
data, thanks for providing these kinds of data.
After all, what a great site and informative posts, I will upload inbound link – bookmark this web site? Regards, Reader.
Love you
You really make it appear so easy together with your presentation but I find this matter to be really something which I believe I would never understand. It sort of feels too complicated and extremely extensive for me. I’m having a look forward for your subsequent submit, I?¦ll try to get the cling of it!
I like the efforts you have put in this, thank you for all the great posts.
I simply wanted to make a word so as to thank you for all of the amazing advice you are placing at this site. My extended internet search has at the end been compensated with really good strategies to share with my great friends. I would point out that most of us site visitors are undoubtedly blessed to live in a remarkable website with so many outstanding people with insightful methods. I feel very much happy to have come across the web page and look forward to tons of more entertaining times reading here. Thanks a lot once more for a lot of things.
Utterly pent written content, thanks for selective information. “The bravest thing you can do when you are not brave is to profess courage and act accordingly.” by Corra Harris.
I am really enjoying the theme/design of your blog. Do you ever run into any internet browser compatibility problems? A few of my blog readers have complained about my blog not operating correctly in Explorer but looks great in Opera. Do you have any recommendations to help fix this problem?
Hi there very cool blog!! Man .. Beautiful .. Superb .. I’ll bookmark your web site and take the feeds also?KI’m glad to find numerous useful info here within the submit, we want develop extra strategies in this regard, thanks for sharing. . . . . .
I went over this website and I believe you have a lot of good info, saved to favorites (:.
Way cool, some valid points! I appreciate you making this article available, the rest of the site is also high quality. Have a fun.
Đội trưởng đã dẫn dắt đội bóng một cách xuất sắc. Anh ấy là một lãnh đạo tuyệt vời trên sân cỏ.
Bóng đá luôn là một môn thể thao hấp dẫn và được người dân Việt Nam yêu thích. Các trận đấu sôi động và những cầu thủ xuất sắc luôn thu hút sự chú ý của fan hâm mộ. V-League là giải đấu quan trọng nhất tại Việt Nam, cung cấp nhiều trận cầu đỉnh cao và tạo ra những bàn thắng đẹp mắt. Người hâm mộ cũng rất quan tâm đến World Cup và UEFA Champions League, nơi các đội bóng hàng đầu trên thế giới cạnh tranh với nhau. HLV và đội trưởng có vai trò quan trọng trong việc xây dựng đội hình mạnh mẽ và lãnh đạo đội bóng. Cảm giác được đến sân vận động cùng hàng nghìn fan hâm mộ là thật tuyệt vời. Bóng đá không chỉ là một trò chơi, nó còn là niềm đam mê và tự hào của người Việt Nam.
What i don’t understood is actually how you’re not actually much more well-liked than you may be right now. You’re so intelligent. You realize thus significantly relating to this subject, produced me personally consider it from so many varied angles. Its like men and women aren’t fascinated unless it is one thing to accomplish with Lady gaga! Your own stuffs outstanding. Always maintain it up!
Hello There. I discovered your weblog using msn. That is an extremely neatly written article. I will make sure to bookmark it and come back to learn more of your helpful info. Thanks for the post. I’ll certainly comeback.
Bàn thắng đầu tiên của đội chủ nhà đã làm cho cả sân vận động nổ tung!
Thank you for sharing excellent informations. Your site is so cool. I’m impressed by the details that you have on this website. It reveals how nicely you understand this subject. Bookmarked this website page, will come back for extra articles. You, my pal, ROCK! I found just the info I already searched everywhere and simply couldn’t come across. What a perfect site.
Hello just wanted to give you a quick heads up and let you know a few of the images aren’t loading correctly. I’m not sure why but I think its a linking issue. I’ve tried it in two different web browsers and both show the same results.
I’m no longer certain where you are getting your information, however great topic. I must spend a while studying more or understanding more. Thank you for magnificent info I was looking for this info for my mission.
I think this internet site holds some very superb info for everyone : D.
Wow, fantastic blog layout! How long have you been blogging for? you made blogging look easy. The overall look of your website is fantastic, let alone the content!
I’ve been exploring for a little bit for any high quality articles or weblog posts in this kind of house . Exploring in Yahoo I eventually stumbled upon this site. Reading this information So i’m glad to exhibit that I have a very just right uncanny feeling I discovered just what I needed. I so much certainly will make certain to do not fail to remember this site and give it a look on a relentless basis.
An interesting discussion is worth comment. I think that you should write more on this topic, it might not be a taboo subject but generally people are not enough to speak on such topics. To the next. Cheers
Thank you for the auspicious writeup. It in fact was a amusement account it.
Look advanced to far added agreeable from you! By the way, how could we communicate?
Your place is valueble for me. Thanks!…
I just could not depart your site before suggesting that I actually enjoyed the standard info a person provide for your visitors? Is going to be back often to check up on new posts
he blog was how do i say it… relevant, finally something that helped me. Thanks
Terrific work! This is the type of information that should be shared around the web. Shame on the search engines for not positioning this post higher! Come on over and visit my web site . Thanks =)
Wonderful work! This is the kind of info that are meant to be shared across the web.
Shame on Google for no longer positioning this post upper!
Come on over and visit my site . Thank you
=)
“I have been working with the content agency in Briansclubcm.co Briansclub for several months now and I have seen great results in my business
Keep working ,remarkable job!
Thanks man
I love your writing style truly enjoying this internet site.
I’ve read some good stuff here. Certainly value bookmarking for revisiting. I wonder how much attempt you put to make one of these fantastic informative site.
Wow, awesome weblog layout! How lengthy have you ever been running a blog for? you make running a blog glance easy. The overall look of your website is wonderful, as smartly as the content!
I just couldn’t depart your website prior to suggesting that I really loved the usual info an individual supply in your visitors? Is going to be again often in order to check up on new posts
Hi my loved one! I wish to say that this post is amazing, great written and include approximately all important infos. I’d like to look more posts like this.
Does your site have a contact page? I’m having trouble locating it but, I’d like to send you an email. I’ve got some recommendations for your blog you might be interested in hearing. Either way, great blog and I look forward to seeing it grow over time.
Thanks for sharing superb informations. Your web-site is very cool. I am impressed by the details that you¦ve on this blog. It reveals how nicely you understand this subject. Bookmarked this website page, will come back for extra articles. You, my pal, ROCK! I found simply the info I already searched all over the place and simply couldn’t come across. What an ideal website.
Very interesting info !Perfect just what I was looking for! “If you could choose one characteristic that would get you through life, choose a sense of humor.” by Jennifer Jones.
Howdy! This is my 1st comment here so I just wanted to give a quick shout out and tell you I truly enjoy reading your blog posts. Can you recommend any other blogs/websites/forums that deal with the same topics? Appreciate it!
It’s really a nice and helpful piece of information. I’m glad that you shared this helpful info with us. Please keep us up to date like this. Thanks for sharing.
I like this post, enjoyed this one thanks for posting. “No man is wise enough by himself.” by Titus Maccius Plautus.
I like what you guys are up also. Such clever work and reporting! Carry on the superb works guys I have incorporated you guys to my blogroll. I think it’ll improve the value of my site 🙂
Hello, you used to write wonderful, but the last few posts have been kinda boring… I miss your tremendous writings. Past few posts are just a little out of track! come on!
Great article.
I really like your writing style, wonderful info , thanks for putting up : D.
hey there and thanks on your information – I’ve definitely picked up anything new from right here. I did then again experience a few technical issues using this website, as I experienced to reload the web site many occasions prior to I could get it to load properly. I were brooding about if your web host is OK? Now not that I’m complaining, however sluggish loading cases occasions will sometimes impact your placement in google and can injury your high-quality score if advertising and ***********|advertising|advertising|advertising and *********** with Adwords. Anyway I am adding this RSS to my e-mail and can glance out for much extra of your respective intriguing content. Make sure you update this once more soon..
Dead indited subject material, Really enjoyed looking through.
Simply want to say your article is as amazing. The clearness in your publish is just excellent and that i could assume you’re knowledgeable in this subject. Fine with your permission let me to grab your feed to stay up to date with drawing close post. Thank you a million and please keep up the rewarding work.
Spot on with this write-up, I really suppose this website needs way more consideration. I’ll most likely be again to read way more, thanks for that info.
excellent points altogether, you just gained a brand new reader. What would you recommend in regards to your post that you made some days ago? Any positive?
Good post. I study one thing more challenging on different blogs everyday. It would always be stimulating to learn content material from different writers and follow a little one thing from their store. I’d favor to use some with the content material on my weblog whether you don’t mind. Natually I’ll offer you a hyperlink in your internet blog. Thanks for sharing.
Thanks a bunch for sharing this with all of us you really know what you are talking about! Bookmarked. Kindly also visit my web site =). We could have a link exchange arrangement between us!
Utterly composed articles, thanks for entropy. “Necessity is the mother of taking chances.” by Mark Twain.
Thanks for shares
Hey there! Someone in my Myspace group shared this site with us so I came to check it out. I’m definitely loving the information. I’m bookmarking and will be tweeting this to my followers! Wonderful blog and terrific design.
There are some attention-grabbing points in time in this article however I don’t know if I see all of them heart to heart. There may be some validity however I will take hold opinion till I look into it further. Good article , thanks and we want extra! Added to FeedBurner as well
Nice read, I just passed this onto a friend who was doing some research on that. And he actually bought me lunch because I found it for him smile Therefore let me rephrase that: Thanks for lunch! “Procrastination is the thief of time.” by Edward Young.
I like this blog very much so much superb information.
Wow! Thank you! I continually needed to write on my blog something like that. Can I implement a part of your post to my blog?
There is perceptibly a lot to identify about this. I assume you made various nice points in features also.
This is the right blog for anyone who wants to find out about this topic. You realize so much its almost hard to argue with you (not that I actually would want…HaHa). You definitely put a new spin on a topic thats been written about for years. Great stuff, just great!
We are a group of volunteers and starting a new scheme in our community. Your web site offered us with valuable information to work on. You have done a formidable job and our whole community will be thankful to you.
Very interesting subject, appreciate it for posting. “Stranger in a strange country.” by Sophocles.
I am often to blogging and i really appreciate your content. The article has really peaks my interest. I am going to bookmark your site and keep checking for new information.
Thanks for share.
These are really enormous ideas in concerning blogging. You
have touched some good points here. Any way keep up wrinting.
I gotta bookmark this website it seems extremely helpful invaluable
Normally I do not read post on blogs, but I wish to say that this write-up very forced me to try and do so! Your writing style has been amazed me. Thanks, very nice article.
I’d constantly want to be update on new posts on this web site, saved to my bookmarks! .
I used to be very pleased to search out this web-site.I needed to thanks for your time for this glorious learn!! I undoubtedly having fun with each little little bit of it and I’ve you bookmarked to take a look at new stuff you weblog post.
Some really fantastic posts on this website , thanks for contribution.
Some truly nice and utilitarian info on this internet site, as well I believe the design and style contains superb features.
Utterly written content material, appreciate it for information .
I don’t unremarkably comment but I gotta say regards for the post on this special one : D.
Hey very nice blog!! Man .. Beautiful .. Amazing .. I’ll bookmark your site and take the feeds also…I am happy to find a lot of useful info here in the post, we need work out more strategies in this regard, thanks for sharing. . . . . .
Hi, the whole thing is going fine here and ofcourse every
one is sharing facts, that’s really fine, keep up writing.
Howdy! Would you mind if I share your blog with my twitter group?
There’s a lot of folks that I think would really appreciate
your content. Please let me know. Thank you
Hi there, I discovered your site via Google whilst searching for a related matter, your site got here up, it appears to be like great.
I’ve bookmarked it in my google bookmarks.
Hi there, simply become alert to your blog via Google, and located that it is really informative.
I am going to be careful for brussels. I’ll be grateful for those who
proceed this in future. Numerous people will probably be
benefited out of your writing. Cheers!
Thanks you
Appreciate this post. Let me try it out.
Wonderful website. Lots of helpful information here. I am sending it to
some buddies ans also sharing in delicious. And certainly,
thanks in your sweat!
I do not even know the way I finished up right here, but
I believed this post was great. I do not recognise who you are but definitely you’re going to
a well-known blogger for those who aren’t already. Cheers!
Thanks, I have just been searching for information about this topic for a while and yours is the greatest I’ve discovered so far. But, what in regards to the bottom line? Are you positive about the source?
It’s amazing in favor of me to have a web page, which is valuable designed for my
know-how. thanks admin
Whats Going down i’m new to this, I stumbled upon this I have discovered It absolutely helpful and it has helped me out loads. I hope to contribute & help other customers like its helped me. Great job.
Wonderful web site. Lots of helpful info here. I am sending it to some
buddies ans additionally sharing in delicious. And of course, thank you in your effort!
I’ve been surfing online more than three hours these days, but I by no means discovered any fascinating article like yours. It¦s beautiful price enough for me. In my opinion, if all site owners and bloggers made good content material as you did, the net will likely be much more useful than ever before.
“The content team in Briansclubcm.co Briansclub helped me with my email campaigns and I have seen a big increase in open and click-through rates
I don’t even know how I ended up here, but I thought this post was good.
I don’t know who you are but certainly you’re
going to a famous blogger if you aren’t already ;
) Cheers!
Thank you
I’d have to examine with you here. Which is not one thing I usually do! I take pleasure in reading a post that may make folks think. Additionally, thanks for permitting me to comment!
As a Newbie, I am permanently exploring online for articles that can aid me. Thank you
Someone essentially help to make seriously articles I would state. This is the very first time I frequented your website page and thus far? I surprised with the research you made to create this particular publish incredible. Fantastic job!
You have brought up a very great points, thanks for the post.
Hi, I think your site might be having browser compatibility issues. When I look at your website in Safari, it looks fine but when opening in Internet Explorer, it has some overlapping. I just wanted to give you a quick heads up! Other then that, fantastic blog!
Hello. splendid job. I did not anticipate this. This is a remarkable story. Thanks!
Loving the info on this internet site, you have done great job on the articles.
Only wanna comment that you have a very decent site, I like the layout it actually stands out.
I went over this website and I think you have a lot of good information, bookmarked (:.
Youre so cool! I dont suppose Ive learn something like this before. So good to seek out someone with some original thoughts on this subject. realy thanks for beginning this up. this web site is something that’s needed on the web, someone with a little bit originality. useful job for bringing something new to the internet!
I am sure this post has touched all the internet visitors, its really really nice post on building
up new web site.
obviously like your web-site but you have to take a look at the spelling on quite a few of your posts. A number of them are rife with spelling problems and I in finding it very troublesome to tell the truth on the other hand I’ll certainly come again again.
Hi there I am so grateful I found your site, I really found you by error, while I was searching on Yahoo for something else, Regardless I am here now and would just like to
say many thanks for a remarkable post and a all round interesting blog (I also
love the theme/design), I don’t have time to browse it all
at the moment but I have book-marked it and also included
your RSS feeds, so when I have time I will be
back to read much more, Please do keep up
the great jo.
After research a number of of the blog posts in your web site now, and I actually like your method of blogging. I bookmarked it to my bookmark web site list and will be checking again soon. Pls try my website online as well and let me know what you think.
There is visibly a bunch to realize about this. I believe you made some nice points in features also.
It?¦s actually a cool and useful piece of information. I?¦m glad that you simply shared this useful info with us. Please keep us up to date like this. Thanks for sharing.
I was recommended this website by means of my cousin. I am not positive whether this publish is written by way of him as nobody else recognize such unique about my trouble. You’re amazing! Thank you!
Good – I should certainly pronounce, impressed with your site. I had no trouble navigating through all tabs as well as related info ended up being truly simple to do to access. I recently found what I hoped for before you know it at all. Reasonably unusual. Is likely to appreciate it for those who add forums or something, website theme . a tones way for your customer to communicate. Nice task..
You actually make it seem really easy along with your presentation however I find
this topic to be actually something that I believe I would by no means understand.
It sort of feels too complicated and extremely wide for me.
I’m looking ahead on your subsequent put
up, I will attempt to get the dangle of it!
I truly enjoy looking at on this website, it holds excellent content. “Never fight an inanimate object.” by P. J. O’Rourke.
Great – I should definitely pronounce, impressed with your web site. I had no trouble navigating through all the tabs and related info ended up being truly simple to do to access. I recently found what I hoped for before you know it at all. Quite unusual. Is likely to appreciate it for those who add forums or anything, website theme . a tones way for your client to communicate. Excellent task.
There is clearly a bunch to identify about this. I suppose you made some good points in features also.
Very interesting topic, thank you for putting up.
Good – I should certainly pronounce, impressed with your site. I had no trouble navigating through all tabs as well as related info ended up being truly simple to do to access. I recently found what I hoped for before you know it at all. Reasonably unusual. Is likely to appreciate it for those who add forums or anything, site theme . a tones way for your client to communicate. Excellent task..
Whoa! This blog looks just like my old one! It’s on a totally different subject but it has pretty much the same layout and design. Great choice of colors!
Hello There. I discovered your weblog using msn. That is an extremely well written article. I will be sure to bookmark it and return to learn more of your helpful information. Thank you for the post. I will certainly comeback.
Whether you want to cost-free on your own coming from the individual and monetary restrictions of job or you simply would like to enhance your salary with some additional cash, operating for on your own or beginning and developing a company has actually never been less complicated– as well as there’s never ever been a more significant choice of tasks to decide on. What’s not to enjoy regarding working coming from home? No commute, comprehensive cooking area centers, and also perhaps even the ability to function in your pajamas. Listed below are actually some fantastic business chances that are going to permit you to work coming from the convenience of property: Those with a valued track document in preparing up or assisting to increase businesses have easily-transferable skills they can utilize to earn money from residence. Conversely, you could possibly additionally provide (and bill additional for) in-person consultations, either going out to check out clients on their turf, or even having them come to your property workplace (although you ought to perhaps get altered out of those PJs to begin with). Childcare is as well as constantly will be vital to numerous loved ones, and day care centers do not come affordable. Other skills, from training foreign languages to popular music to aiding with reading or even creating, are actually all very easy to develop into services– as well as they can be actually moderately lucrative and massively satisfying, as well. What you can easily ask for are going to hinge on your knowledge, area, and also role you are actually teaching; just do not count on to create your thousands this way. Like childcare, care for the senior is a vital company that will definitely constantly remain in requirement. What is actually additional, those that need it often come back when able to stay in their very own houses as opposed to relocating into supported lifestyle. While particular aspects of care need clinical certifications, helping clients along with daily jobs like shopping, cleansing, and cooking food do not. Precisely what this necessitates will certainly vary from task to job, however expect to mainly be actually dishing up top quality cuisine to groups of loved ones at dinner celebrations. Just remember that you might require to work with waitstaff to serve food and also alcoholic beverages and also take care of guests. The gig economy isn’t for everyone, but also for the right individual, driving for Uber or Lyft are actually fantastic techniques to make a little bit of money. Possess you ever before observed a part of household furniture on Craigslist that possesses potential if a person would certainly just offer it a little bit of Tender Loving Care? If you are actually especially convenient, you could visit emporium and yard sales, grab products at low cost, restore them, and also switch them around for a much higher cost. If you possess a good eye, you could possibly hunt for antiques, strangeness, as well as a lot more. Public auction sites like ebay.com can link you along with a large reader seeking your items. Proms, wedding celebrations, and also various other exclusive celebrations urge people to appear their greatest. You may come to be an independent stylist and also have individuals relate to your residence workshop, or you can bring in house phone calls or work on-location. Much like in-home day care, animal resting is actually a sector that you may tap into to create additional money. Lots of people want the satisfaction recognizing that an individual is actually there for their coat baby, ensuring they fit and also secure while they’re gone. Web sites like care. com support put possible customers facing family pet sitters in their town. You can detail your room for free of charge, and also Airbnb carries out all the hefty lifting for you, creating it easy to bring in and multitude vacationers. You can demand what you desire, and also Airbnb even secures you with residential or commercial property harm and crash insurance policy. On the internet business chances also afford you all the benefits of functioning coming from property, but even better, a number of all of them allow you to function coming from completely anywhere (which has actually never ever been simpler or even more enjoyable, with the help of the ever-growing coworking industry). ” One of the primary modifications to ‘just how our team operate’ over recent decade is actually the gigantic shift towards complimentary company, i. e. freelancing, consulting, or operating solopreneur-types of services,” he claims. “While numerous more mature employees were educated to pursue protection in the form of a full time job, that is no more the only way to create a lifestyle. You could consult or even freelance in a variety of areas coming from copywriting to advertising and marketing strategy, or even run your personal ecommerce service from your house.” He also recommends that regardless of which course you choose, the smart method to “escape” your full time task is to start making this switch while you are actually still functioning. ” It took 2. 5 years to develop business good enough to maintain a living profit, as well as I went full time in 2012. I am actually residing evidence if you would like to operate solo, you may do it along with the ideal company version, a sound leave approach, and also a lot of challenging work.” Wish a method to start creating funds in minutes? Sites like Upwork, Freelancer, and also Individuals Per Hour allow you to perform only that. ” Craigslist has a whole segment dedicated to Gigs you can easily sign up with to create additional cash,” claims Carl Sednaoui, Director of Advertising And Marketing at MailCharts. Just keep in mind that these jobs aren’t scalable. What they are, however, is actually a fantastic way to create a little bit of extra wallet cash through delegating your skill-sets on your personal conditions. It is actually likewise well worth considering some sound assistance coming from Foundr’s Jeremy Noronha. “Go where your clients are, not where your competition is actually,” he suggests. “Numerous consultants who begin usually tend to mingle in the on the internet communities with their peers and also certainly not their potential clients. The finest means to develop and construct the best relationships is actually to give worth in each the locations your perfect customers invest their opportunity.” Some skills are actually even more in requirement than others.
Yay google is my world beater helped me to find this outstanding site! .
Hi my family member! I wish to say that this post is amazing, great written and include approximately all important infos. I¦d like to look more posts like this .
After study a few of the blog posts on your website now, and I truly like your way of blogging. I bookmarked it to my bookmark website list and will be checking back soon. Pls check out my web site as well and let me know what you think.
Hello! Someone in my Myspace group shared this site with us so I came to
give it a look. I’m definitely enjoying the information. I’m book-marking and will be tweeting this to my
followers! Terrific blog and outstanding style and design.
I was very pleased to find this web-site.I wanted to thanks for your time for this wonderful read!! I definitely enjoying every little bit of it and I have you bookmarked to check out new stuff you blog post.
I do agree with all of the ideas you have presented in your post. They’re really convincing and will definitely work. Still, the posts are too short for novices. Could you please extend them a bit from next time? Thanks for the post.
I enjoy your work, appreciate it for all the great blog posts.
Very interesting topic, regards for posting.
I’m really enjoying the design and layout of your website. It’s a very easy on the eyes which makes it much more enjoyable for me to come here and visit more often. Did you hire out a designer to create your theme? Great work!
I just could not go away your site prior to suggesting that I extremely enjoyed the standard info a person supply for your visitors?
Is gonna be again frequently in order to check up on new posts
I have recently started a web site, the information you provide on this website has helped me greatly. Thank you for all of your time & work. “Her grandmother, as she gets older, is not fading but rather becoming more concentrated.” by Paulette Bates Alden.
You made some nice points there. I looked on the internet for the topic and found most persons will agree with your website.
I’m very happy to read this. This is the kind of manual that needs to be given and not the accidental misinformation that is at the other blogs. Appreciate your sharing this greatest doc.
he blog was how do i say it… relevant, finally something that helped me. Thanks
Great ?V I should definitely pronounce, impressed with your website. I had no trouble navigating through all the tabs as well as related info ended up being truly easy to do to access. I recently found what I hoped for before you know it in the least. Reasonably unusual. Is likely to appreciate it for those who add forums or something, web site theme . a tones way for your customer to communicate. Nice task..
thank you
you will have a terrific weblog here! would you wish to make some invite posts on my blog?
Hello there! I know this is kind of off topic but I was wondering which blog platform are you using for this website? I’m getting sick and tired of WordPress because I’ve had problems with hackers and I’m looking at options for another platform. I would be great if you could point me in the direction of a good platform.
Nice post. I learn something more challenging on different blogs everyday. It will always be stimulating to read content from other writers and practice a little something from their store. I’d prefer to use some with the content on my blog whether you don’t mind. Natually I’ll give you a link on your web blog. Thanks for sharing.
Hi my friend! I wish to say that this post is amazing, nice written and come with approximately all important infos. I?¦d like to look more posts like this .
I like this site because so much utile material on here : D.
Thank you for any other wonderful article. The place else may anybody get that type of information in such an ideal manner of writing? I have a presentation next week, and I’m on the search for such info.
Hi, Neat post. There is a problem with your web site in internet explorer, would check this… IE still is the market leader and a huge portion of people will miss your wonderful writing due to this problem.
What i don’t understood is if truth be told how you are no longer actually much more well-appreciated than you might be right now. You are so intelligent. You realize therefore considerably relating to this topic, produced me in my opinion believe it from a lot of varied angles. Its like men and women don’t seem to be fascinated until it?¦s one thing to accomplish with Woman gaga! Your individual stuffs nice. At all times take care of it up!
Rattling nice design and fantastic articles, hardly anything else we want : D.
Aw, this was an incredibly good post. Finding the time and actual effort to produce a superb article… but what can I say… I put things off a lot and don’t seem to get nearly anything done.
Hi there! This is my first visit to your blog!
We are a group of volunteers and starting a new initiative in a community in the same niche.
Your blog provided us beneficial information to work on. You have done a marvellous job!
Wow, wonderful blog layout! How long have you been blogging for?
you make blogging look easy. The overall look of your web site is
excellent, let alone the content!
I really appreciate this post. I have been looking everywhere for this! Thank goodness I found it on Bing. You have made my day! Thank you again
Thank you a lot for sharing this with all people you really realize what you’re talking about! Bookmarked. Please also seek advice from my web site =). We can have a link change arrangement between us!
You have brought up a very fantastic points, appreciate it for the post.
magnificent post, very informative. I wonder why the opposite experts of this sector do not notice this. You must proceed your writing. I am confident, you have a great readers’ base already!
Its like you learn my thoughts! You appear to know a lot approximately this, such as you wrote the ebook in it or something. I believe that you could do with some p.c. to drive the message home a little bit, however other than that, this is wonderful blog. An excellent read. I will certainly be back.
Hello, all is going well here and ofcourse every one is sharing facts, that’s
in fact fine, keep up writing.
I simply needed to appreciate you again. I’m not certain the things I would’ve tried without the entire smart ideas discussed by you regarding this problem. It has been a very terrifying dilemma in my view, but considering this skilled style you resolved that made me to jump for gladness. I will be happy for this service and thus pray you comprehend what a powerful job you happen to be providing training most people with the aid of a site. I am certain you’ve never encountered all of us.
It?¦s actually a great and useful piece of info. I?¦m glad that you shared this helpful info with us. Please keep us up to date like this. Thanks for sharing.
Usually I do not read article on blogs, but I wish to say that this write-up very compelled me to take a look at and do it! Your writing taste has been amazed me. Thank you, quite nice post.
Hello my family member! I wish to say that this post is awesome, great written and come with approximately all significant infos. I¦d like to peer extra posts like this .
When someone writes an paragraph he/she maintains
the plan of a user in his/her brain that how a user can know it.
Therefore that’s why this piece of writing is perfect. Thanks!
Having read this I thought it was very informative. I appreciate you taking the time and effort to put this article together. I once again find myself spending way to much time both reading and commenting. But so what, it was still worth it!
My spouse and i were absolutely joyful when John could deal with his basic research with the ideas he acquired from your own web pages. It’s not at all simplistic to just continually be handing out information which often the others could have been making money from. And we also know we have the blog owner to thank for this. All the illustrations you have made, the simple site navigation, the relationships you make it possible to create – it is everything wonderful, and it’s really aiding our son and our family reckon that the topic is pleasurable, which is incredibly essential. Many thanks for everything!
Spot on with this write-up, I actually believe that this web site needs much more attention. I’ll
probably be back again to see more, thanks for the info!
Can I just say what a relief to find someone who actually knows what theyre talking about on the internet. You definitely know how to bring an issue to light and make it important. More people need to read this and understand this side of the story. I cant believe youre not more popular because you definitely have the gift.
I like the helpful information you supply for your articles. I will bookmark your weblog and test again here frequently. I am fairly sure I’ll be told many new stuff right here! Best of luck for the next!
Pretty nice post. I just stumbled upon your blog and wished to say that I have truly enjoyed surfing around your blog posts. After all I will be subscribing to your feed and I hope you write again very soon!
Thanks for share
Thank you very much.
After study a few of the blog posts on your website now, and I truly like your way of blogging. I bookmarked it to my bookmark website list and will be checking back soon. Pls check out my web site as well and let me know what you think.
You really make it seem so easy with your presentation but I find this matter to be actually something that I think I would never understand. It seems too complex and very broad for me. I am looking forward for your next post, I will try to get the hang of it!
I got what you intend, thankyou for posting.Woh I am delighted to find this website through google. “Those who corrupt the public mind are just as evil as those who steal from the public.” by Theodor Wiesengrund Adorno.
I haven’t checked in here for a while since I thought it was getting boring, but the last few posts are good quality so I guess I’ll add you back to my daily bloglist. You deserve it my friend 🙂
I haven?¦t checked in here for a while since I thought it was getting boring, but the last several posts are good quality so I guess I?¦ll add you back to my daily bloglist. You deserve it my friend 🙂
You are my aspiration, I have few blogs and very sporadically run out from brand :). “Fiat justitia et pereat mundus.Let justice be done, though the world perish.” by Ferdinand I.
I’ve been absent for some time, but now I remember why I used to love this site. Thanks , I will try and check back more frequently. How frequently you update your site?
Thanks for another magnificent article. Where else could anyone get that type of information in such an ideal way of writing? I have a presentation next week, and I’m on the look for such information.
I am often to blogging and i really appreciate your content. The article has really peaks my interest. I am going to bookmark your site and keep checking for new information.
What’s up, after reading this remarkable piece of
writing i am also happy to share my know-how here with colleagues.
Aw, this was a really nice post. In thought I want to put in writing like this additionally – taking time and actual effort to make an excellent article… however what can I say… I procrastinate alot and not at all seem to get something done.
Great post, you have pointed out some great points, I as well conceive this s a very wonderful website.
I’ve been browsing online more than three hours today, yet I never found any interesting article like yours. It’s pretty worth enough for me. Personally, if all site owners and bloggers made good content as you did, the internet will be a lot more useful than ever before.
You have brought up a very great points, regards for the post.
Pretty section of content. I just stumbled upon your site and in accession capital to assert that I acquire actually enjoyed account your blog posts.
Anyway I’ll be subscribing to your feeds and even I achievement you access consistently
rapidly.
I¦ve read several just right stuff here. Definitely price bookmarking for revisiting. I wonder how much effort you put to make this type of magnificent informative web site.
Sering sekali member-member kpop4d mendapatkan bonus dari KPOP4D, makanya buat kamu yang mau dapat bonus untuk bermain slot dan judi online lainnya, buruan gabung ke situs KPOP4D sekarang juga.
Appreciating the hard work you put into your blog and detailed information you
provide. It’s good to come across a blog every once
in a while that isn’t the same old rehashed material.
Wonderful read! I’ve bookmarked your site and
I’m including your RSS feeds to my Google account.
I would like to thnkx for the efforts you’ve put in writing this blog. I’m hoping the same high-grade website post from you in the upcoming as well. Actually your creative writing skills has encouraged me to get my own site now. Actually the blogging is spreading its wings rapidly. Your write up is a good example of it.
My spouse and I stumbled over here from a different website and thought I might as well check things
out. I like what I see so i am just following you.
Look forward to checking out your web page repeatedly.
I conceive this website holds some really great information for everyone. “He is able who thinks he is able.” by Buddha.
This is very interesting, You are a very skilled blogger. I’ve joined your feed and look forward to seeking more of your magnificent post. Also, I have shared your website in my social networks!
I couldn’t resist commenting
Magnificent goods from you, man. I have take into accout your stuff previous to and you’re simply extremely wonderful. I really like what you have received right here, really like what you’re saying and the best way by which you assert it. You make it entertaining and you continue to take care of to keep it smart. I can not wait to read far more from you. This is actually a great site.
Hi! Do you know if they make any plugins to help with SEO? I’m trying to get my blog to rank for some targeted keywords but I’m not seeing very good success. If you know of any please share. Thanks!
Some genuinely nice and useful information on this website, as well I conceive the pattern has got wonderful features.
Great write-up, I?¦m normal visitor of one?¦s site, maintain up the excellent operate, and It’s going to be a regular visitor for a lengthy time.
I’ve recently started a website, the information you offer on this site has helped me greatly. Thanks for all of your time & work. “Never trust anybody who says ‘trust me.’ Except just this once, of course. – from Steel Beach” by John Varley.
Thank you very much.
I enjoy the efforts you have put in this, regards for all the great posts.
Thanks for your personal marvelous posting! I quite enjoyed reading it, you may be a great author.I will remember to bookmark your blog and will often come back in the future. I want to encourage you to continue your great writing, have a nice afternoon!
I have recently started a site, the information you provide on this site has helped me tremendously. Thanks for all of your time & work.
Hey, you used to write great, but the last several posts have been kinda boringK I miss your great writings. Past several posts are just a bit out of track! come on!
Its like you learn my mind! You seem to understand a
lot about this, such as you wrote the book in it or something.
I think that you simply could do with a few percent to drive the message house a bit, but other than that,
this is magnificent blog. An excellent read. I will certainly be back.
I carry on listening to the news broadcast speak about getting free online grant applications so I have been looking around for the finest site to get one. Could you tell me please, where could i acquire some?
I was able to find good information from your blog posts.
This really answered my problem, thank you!
I’m amazed, I have to admit. Rarely do I encounter a blog that’s both equally educative and interesting, and let me tell you, you’ve hit the nail on the head. The issue is something which too few folks are speaking intelligently about. I am very happy that I stumbled across this in my search for something concerning this.
I?¦ll right away snatch your rss as I can’t find your email subscription link or newsletter service. Do you’ve any? Kindly allow me know so that I could subscribe. Thanks.
Hello There. I found your blog using msn. This is a very well written article. I will be sure to bookmark it and come back to read more of your useful info. Thanks for the post. I’ll definitely return.
I’d have to check with you here. Which isn’t one thing I usually do! I enjoy studying a post that may make people think. Also, thanks for permitting me to remark!
There’s certainly a lot to know about this topic. I really
like all the points you made.
Great line up. We will be linking to this great article on our site. Keep up the good writing.
Excellent goods from you, man. I have keep in mind your stuff prior to and you are simply too great. I actually like what you have acquired right here, certainly like what you’re saying and the way by which you say it. You make it entertaining and you still take care of to keep it sensible. I can not wait to learn far more from you. This is actually a tremendous website.
I’ve been absent for some time, but now I remember why I used to love this web site. Thank you, I will try and check back more often. How frequently you update your website?
I was just searching for this info for a while. After six hours of continuous Googleing, finally I got it in your website. I wonder what’s the lack of Google strategy that don’t rank this type of informative websites in top of the list. Normally the top websites are full of garbage.
I will right away clutch your rss feed as I can not to find your e-mail subscription link or e-newsletter service. Do you’ve any? Kindly permit me know so that I may subscribe. Thanks.
I really admire your writing!
You could certainly see your skills in the article you write.
The sector hopes for more passionate writers like you who aren’t afraid to
mention how they believe. Always follow your heart.
Hi there would you mind letting me know which web
host you’re using? I’ve loaded your blog in 3 different
web browsers and I must say this blog loads a lot quicker then most.
Can you recommend a good internet hosting provider at a reasonable price?
Thanks a lot, I appreciate it!
Regards for helping out, fantastic info .
Awsome website! I am loving it!! Will come back again. I am bookmarking your feeds also
It’s a shame you don’t have a donate button! I’d without a
doubt donate to this fantastic blog! I suppose for now i’ll
settle for book-marking and adding your RSS feed to my Google account.
I look forward to brand new updates and will talk about this blog with my Facebook group.
Chat soon!
so much good info on here, : D.
Good write-up, I am regular visitor of one?¦s website, maintain up the nice operate, and It’s going to be a regular visitor for a long time.
I just could not depart your website prior to suggesting that I actually enjoyed the standard info a person provide for your visitors? Is gonna be back often to check up on new posts
I have been exploring for a little bit for any high-quality articles or blog posts on this kind of space . Exploring in Yahoo I ultimately stumbled upon this site. Studying this information So i¦m happy to convey that I have an incredibly good uncanny feeling I found out just what I needed. I so much unquestionably will make sure to do not omit this website and provides it a look regularly.
Write more, thats all I have to say. Literally, it seems as though you relied on the video to make your point. You clearly know what youre talking about, why waste your intelligence on just posting videos to your blog when you could be giving us something enlightening to read?
of course like your web site however you have to test the spelling on quite a few of your posts. Several of them are rife with spelling issues and I to find it very troublesome to tell the reality then again I¦ll definitely come again again.
Rattling clear web site, appreciate it for this post.
Thank you very much
of course like your web site but you have to take a look at the spelling on several of your posts. A number of them are rife with spelling issues and I in finding it very bothersome to inform the truth then again I will definitely come back again.
I was recommended this blog through my cousin. I am no longer positive whether or not this post is written through him as nobody else realize such designated approximately my difficulty. You’re incredible! Thanks!
I have recently started a website, the information you provide on this website has helped me greatly. Thanks for all of your time & work.
Hi , I do believe this is an excellent blog. I stumbled upon it on Yahoo , i will come back once again. Money and freedom is the best way to change, may you be rich and help other people.
Excellent beat ! I would like to apprentice at the same time as you amend your website, how can i subscribe for a blog website? The account aided me a acceptable deal. I have been a little bit acquainted of this your broadcast provided brilliant clear concept
I was very pleased to find this web-site.I wanted to thanks for your time for this wonderful read!! I definitely enjoying every little bit of it and I have you bookmarked to check out new stuff you blog post.
Keep functioning ,fantastic job!
I was curious if you ever considered changing the page layout of your website? Its very well written; I love what youve got to say. But maybe you could a little more in the way of content so people could connect with it better. Youve got an awful lot of text for only having 1 or two images. Maybe you could space it out better?
This really answered my problem, thank you!
Sweet web site, super layout, really clean and apply genial.
Thank you for the sensible critique. Me & my neighbor were just preparing to do a little research on this. We got a grab a book from our local library but I think I learned more clear from this post. I’m very glad to see such great information being shared freely out there.
After study a few of the blog posts on your website now, and I truly like your way of blogging. I bookmarked it to my bookmark website list and will be checking back soon. Pls check out my web site as well and let me know what you think.
I’d have to examine with you here. Which is not one thing I usually do! I take pleasure in reading a post that may make folks think. Additionally, thanks for permitting me to comment!
Its great as your other content : D, thanks for posting. “To be at peace with ourselves we need to know ourselves.” by Caitlin Matthews.
I got good info from your blog
Hi! I know this is somewhat off topic but I was wondering if you
knew where I could locate a captcha plugin for my comment form?
I’m using the same blog platform as yours and I’m
having trouble finding one? Thanks a lot!
Hey, I think your blog might be having browser compatibility issues. When I look at your blog site in Ie, it looks fine but when opening in Internet Explorer, it has some overlapping. I just wanted to give you a quick heads up! Other then that, wonderful blog!
You could definitely see your enthusiasm in the work you write. The sector hopes for even more passionate writers such as you who aren’t afraid to say how they believe. Always go after your heart.
I was suggested this blog by my cousin. I’m now not positive whether or not this submit is written by way of him as no one else know such unique approximately my problem. You’re wonderful! Thank you!
Howdy! This post could not be written any better! Reading this post reminds me of my old room mate! He always kept chatting about this. I will forward this write-up to him. Pretty sure he will have a good read. Many thanks for sharing!
You are a very capable person!
You should take part in a contest for one of the best blogs on the web. I will recommend this site!
F*ckin’ amazing things here. I’m very glad to look your post. Thank you a lot and i’m looking forward to touch you. Will you please drop me a mail?
What i do not realize is actually how you’re not really much more well-liked than you may be now. You’re so intelligent. You realize thus considerably relating to this subject, made me personally consider it from so many varied angles. Its like women and men aren’t fascinated unless it is one thing to accomplish with Lady gaga! Your own stuffs nice. Always maintain it up!
I’ve been exploring for a little bit for any high quality articles or weblog posts in this sort of space . Exploring in Yahoo I eventually stumbled upon this site. Reading this info So i’m glad to show that I have a very excellent uncanny feeling I came upon exactly what I needed. I such a lot surely will make certain to don’t overlook this site and give it a glance on a relentless basis.
Some really superb info , Glad I detected this.
I precisely desired to say thanks again. I do not know the things I could possibly have made to happen without the opinions documented by you concerning that industry. It was before a difficult matter in my view, nevertheless encountering the very skilled style you treated the issue made me to cry with happiness. I will be thankful for the information as well as have high hopes you know what a powerful job you happen to be accomplishing training many people through your site. I am certain you haven’t got to know any of us.
You made some good points there. I did a search on the matter and found a good number of persons will have the same opinion with your blog.
Thank you for another fantastic post. The place else could anyone get that kind of info in such an ideal means of writing? I have a presentation subsequent week, and I’m on the search for such info.
I just couldn’t depart your web site prior to suggesting that I extremely loved the standard information a person provide in your visitors? Is going to be again frequently to check out new posts
Would you be concerned with exchanging hyperlinks?
he blog was how do i say it… relevant, finally something that helped me. Thanks
Way cool, some valid points! I appreciate you making this article available, the rest of the site is also high quality. Have a fun.
I precisely desired to thank you so much yet again. I’m not certain the things that I would have followed in the absence of those strategies contributed by you on such a topic. This was an absolute fearsome dilemma in my position, nevertheless considering the very skilled avenue you managed that made me to jump over gladness. I will be thankful for the assistance and in addition wish you recognize what a powerful job your are doing teaching many others through a web site. I am certain you have never come across any of us.
snic delta 8 4 gram disposable
Simply a smiling visitant here to share the love (:, btw outstanding design.
Hello just wanted to give you a brief heads up and let you know a few of the pictures aren’t loading properly. I’m not sure why but I think its a linking issue. I’ve tried it in two different internet browsers and both show the same outcome.
Great post. I used to be checking continuously this weblog and I’m inspired! Very useful info specifically the closing phase 🙂 I care for such information much. I was looking for this particular information for a long time. Thank you and best of luck.
Awsome post and straight to the point. I don’t know if this is truly the best place to ask but do you people have any ideea where to employ some professional writers? Thx 🙂
Thanks for the good writeup. It in reality used to be a
enjoyment account it. Glance complicated to more brought agreeable from you!
By the way, how could we keep up a correspondence?
thanks for shares.
You have brought up a very superb details, thanks for the post.
Thank you for every other magnificent article. The place else may anybody get that kind of info in such a perfect way of writing? I’ve a presentation next week, and I’m on the search for such info.
As I website owner I conceive the subject matter here is very good, thanks for your efforts.
Greetings! Very helpful advice on this article! It is the little changes that make the biggest changes. Thanks a lot for sharing!
Great blog! Do you have any tips and hints for aspiring writers? I’m planning to start my own blog soon but I’m a little lost on everything. Would you propose starting with a free platform like WordPress or go for a paid option? There are so many choices out there that I’m totally overwhelmed .. Any suggestions? Bless you!
It?¦s actually a cool and helpful piece of info. I?¦m satisfied that you shared this helpful information with us. Please stay us up to date like this. Thanks for sharing.
I believe this is one of the most significant info for me. And i’m glad studying your article. But want to remark on some normal things, The web site style is wonderful, the articles is in reality excellent : D. Just right process, cheers
Real great information can be found on web site. “The greatest mistake is trying to be more agreeable than you can be.” by Walter Bagehot.
I savour, lead to I found just what I was having a look for.
You have ended my four day lengthy hunt! God Bless you man. Have a great day.
Bye
Very interesting information!Perfect just what I was searching for! “…obstacles do not exist to be surrendered to, but only to be broken.” by Adolf Hitler.
I am sure this post has touched all the internet viewers,
its really really nice article on building up
new web site.
Very well written story. It will be supportive to everyone who employess it, including myself. Keep doing what you are doing – i will definitely read more posts.
Keep up the great piece of work, I read few content on this internet site and I believe that your weblog is very interesting and contains sets of superb info .
What’s Happening i am new to this, I stumbled upon this I’ve found It positively useful and it has helped me out loads. I hope to contribute & help other users like its aided me. Good job.
magnificent post, very informative. I wonder why the other specialists of this sector do not notice this. You should continue your writing. I’m confident, you have a huge readers’ base already!
In the great scheme of things you actually get a B- just for effort. Where exactly you confused us was on all the specifics. You know, it is said, details make or break the argument.. And it could not be much more accurate right here. Having said that, let me inform you what exactly did do the job. Your article (parts of it) is actually incredibly powerful which is possibly the reason why I am taking the effort in order to comment. I do not make it a regular habit of doing that. Second, even though I can easily see the jumps in reason you make, I am not really certain of exactly how you appear to connect the details which inturn make the final result. For right now I will, no doubt subscribe to your point however hope in the foreseeable future you link the dots much better.
I’ve been absent for some time, but now I remember why I used to love this blog. Thanks , I will try and check back more frequently. How frequently you update your web site?
Thanks for shares.
There are actually numerous particulars like that to take into consideration. That could be a great point to deliver up. I provide the thoughts above as common inspiration but clearly there are questions just like the one you carry up the place the most important factor might be working in honest good faith. I don?t know if best practices have emerged around issues like that, but I’m positive that your job is clearly identified as a fair game. Each boys and girls really feel the impact of only a moment’s pleasure, for the remainder of their lives.
wonderful points altogether, you just gained a new reader. What would you recommend about your post that you made a few days ago? Any positive?
Some genuinely great posts on this internet site, thank you for contribution. “The spirit is the true self.” by Marcus Tullius Cicero.
I like this post, enjoyed this one appreciate it for putting up. “Fear not for the future, weep not for the past.” by Percy Bysshe Shelley.
As soon as I discovered this internet site I went on reddit to share some of the love with them.
Regards for helping out, wonderful info. “Riches cover a multitude of woes.” by Menander.
Wow, wonderful blog layout! How long have you been blogging for? you make blogging look easy. The overall look of your website is excellent, as well as the content!
It is actually a nice and helpful piece of info. I am glad that you simply shared this helpful info with us. Please stay us informed like this. Thank you for sharing.
Pretty nice post. I just stumbled upon your weblog and wanted to mention that I’ve truly enjoyed surfing around your blog posts. After all I’ll be subscribing for your rss feed and I hope you write once more soon!
I’ve read several just right stuff here. Definitely value bookmarking for revisiting. I surprise how so much effort you set to make such a great informative web site.
It is in point of fact a nice and helpful piece of info. I?¦m happy that you shared this helpful information with us. Please keep us informed like this. Thanks for sharing.
naturally like your web site but you need to test the spelling on quite a few of your posts. Many of them are rife with spelling problems and I find it very bothersome to tell the reality then again I’ll certainly come again again.
Terrific post but I was wanting to know if you could write a litte more on this subject? I’d be very thankful if you could elaborate a little bit further. Appreciate it!
I think this site contains some real excellent info for everyone. “Philosophy triumphs easily over past evils and future evils but present evils triumph over it.” by La Rochefoucauld.
Good web site you have got here.. It’s hard to find excellent writing like yours nowadays. I seriously appreciate individuals like you! Take care!!
Lovely blog! I am loving it!! Will be back later to read some more. I am taking your feeds also.
Youre so cool! I dont suppose Ive learn something like this before. So nice to find somebody with some original ideas on this subject. realy thank you for starting this up. this web site is something that’s wanted on the net, somebody with a little originality. useful job for bringing one thing new to the web!
visit website thank you
Do you have a spam issue on this blog; I also am a blogger, and I was wondering your situation; many of us have created some nice practices and we are looking to swap solutions with others, why not shoot me an email if interested.
An fascinating dialogue is value comment. I believe that you should write more on this matter, it won’t be a taboo subject but usually persons are not enough to talk on such topics. To the next. Cheers
I will right away grasp your rss as I can not in finding your email subscription hyperlink or newsletter service. Do you have any? Kindly permit me understand in order that I could subscribe. Thanks.
I reckon something really special in this internet site.
Valuable info. Lucky me I found your web site by accident, and I’m shocked why this accident didn’t happened earlier! I bookmarked it.
What’s Happening i’m new to this, I stumbled upon this I’ve found It positively helpful and it has aided me out loads. I hope to contribute & help other users like its aided me. Good job.
It is appropriate time to make some plans for the long run and it’s time to be happy. I’ve learn this publish and if I may just I wish to recommend you few attention-grabbing things or suggestions. Perhaps you can write next articles relating to this article. I wish to learn even more things approximately it!
Very interesting topic, regards for posting.
Great weblog here! Additionally your web site a lot up fast! What host are you the usage of? Can I am getting your affiliate hyperlink to your host? I want my site loaded up as quickly as yours lol
Hi my loved one! I wish to say that this article is amazing, nice written and include approximately all important infos. I?¦d like to see extra posts like this .
There are actually a lot of particulars like that to take into consideration. That may be a great point to convey up. I provide the ideas above as basic inspiration but clearly there are questions just like the one you bring up where the most important factor will be working in honest good faith. I don?t know if best practices have emerged round issues like that, but I’m sure that your job is clearly recognized as a good game. Both girls and boys feel the impression of only a moment’s pleasure, for the rest of their lives.
Good write-up, I¦m normal visitor of one¦s web site, maintain up the excellent operate, and It’s going to be a regular visitor for a long time.
With havin so much content and articles do you ever run into any problems of plagorism or copyright violation? My blog has a lot of completely unique content I’ve either authored myself or outsourced but it appears a lot of it is popping it up all over the web without my permission. Do you know any ways to help stop content from being ripped off? I’d really appreciate it.
We’re a group of volunteers and opening a new scheme in our community.
Your website provided us with valuable info to work on. You’ve done a formidable
job and our entire community will be grateful to you.
I love it when people come together and share opinions, great blog, keep it up.
You should take part in a contest for one of the best blogs on the web. I will recommend this site!
I like this web site its a master peace ! Glad I found this on google .
Thanks for shares
Well I really enjoyed studying it. This article procured by you is very effective for good planning.
Can I just say what a relief to find someone who actually knows what theyre talking about on the internet. You definitely know how to bring an issue to light and make it important. More people need to read this and understand this side of the story. I cant believe youre not more popular because you definitely have the gift.
Highly descriptive blog, I liked that a lot. Will there be a part 2?
I truly wanted to type a simple word to be able to appreciate you for these precious pointers you are writing on this site. My rather long internet search has at the end of the day been recognized with wonderful details to share with my classmates and friends. I ‘d assert that many of us readers are extremely endowed to exist in a remarkable website with so many awesome professionals with insightful suggestions. I feel somewhat grateful to have used your entire webpages and look forward to plenty of more amazing times reading here. Thanks once again for a lot of things.
After research just a few of the blog posts in your website now, and I really like your manner of blogging. I bookmarked it to my bookmark web site list and will probably be checking back soon. Pls take a look at my web page as well and let me know what you think.
Good V I should certainly pronounce, impressed with your site. I had no trouble navigating through all the tabs and related information ended up being truly simple to do to access. I recently found what I hoped for before you know it at all. Quite unusual. Is likely to appreciate it for those who add forums or something, site theme . a tones way for your client to communicate. Nice task..
I don’t commonly comment but I gotta admit thanks for the post on this amazing one : D.
Situs slot yang aman dan terpercaya adalah slot server belanda yang diusung langsung oleh situs KPOP4D, mari mainkan game slot server belanda untuk dapatkan jackpot big win nya sekarang juga..
The next time I read a blog, I hope that it doesnt disappoint me as much as this one. I mean, I know it was my choice to read, but I actually thought youd have something interesting to say. All I hear is a bunch of whining about something that you could fix if you werent too busy looking for attention.
Wow, this piece of writing is pleasant, my sister is analyzing
such things, thus I am going to tell her.
Good website! I truly love how it is simple on my eyes and the data are well written. I am wondering how I might be notified when a new post has been made. I have subscribed to your RSS feed which must do the trick! Have a nice day!
Needed to compose you the tiny observation in order to thank you very much again with the great knowledge you’ve contributed in this case. It has been simply pretty generous with you to give extensively precisely what a lot of folks could have offered for sale for an electronic book in making some bucks on their own, especially considering the fact that you might have tried it in the event you wanted. These tricks also served like the fantastic way to fully grasp that most people have similar fervor just as my own to realize a good deal more with respect to this issue. I’m sure there are thousands of more pleasurable opportunities ahead for those who read through your website.
New collection arabella video of Free porn Search, free sex videos.
I keep listening to the news broadcast lecture about receiving free online grant applications so I have been looking around for the best site to get one. Could you advise me please, where could i acquire some?
Very great info can be found on blog. “Even if happiness forgets you a little bit, never completely forget about it.” by Donald Robert Perry Marquis.
You are my inhalation, I possess few web logs and rarely run out from to post .
I wanted to thank you for this very good read!! I definitely loved every little bit of it. I’ve got you book-marked to check out new stuff you post…
Seksi buca escort kızların olduğu platform.
Hurrah! In the end I got a web site from where I be capable of genuinely take helpful information concerning my study
and knowledge.
Wow! This could be one particular of the most beneficial blogs We’ve ever arrive across on this subject. Basically Magnificent. I am also an expert in this topic so I can understand your effort.
May I simply say what a comfort to find an individual who genuinely knows what they are talking about on the net.
You definitely understand how to bring an issue to
light and make it important. More people must look at this and
understand this side of the story. I was surprised you aren’t more popular since you definitely possess the gift.
There is certainly a great deal to find out about this topic. I like all of the points you made.
Thank you for your resource. Please consider going to our health related blog at Right Choice Home Care. We are a Chicagoland based home care provider.
Vip elit görüşen gebze escort hatunların olduğu web site.
I like the valuable info you provide to your articles. I will bookmark your blog and check once more right here frequently. I’m moderately sure I’ll be informed lots of new stuff proper here! Best of luck for the following!
Your place is valueble for me. Thanks!…
Great write-up, I am normal visitor of one’s web site, maintain up the nice operate, and It’s going to be a regular visitor for a long time.
Yeah bookmaking this wasn’t a high risk conclusion great post! .
Thanks for shares
Excellent post! We will be linking to this great article on our website. Keep up the great writing.
Free sex and Free Porn Videos
I am really impressed with your writing skills, thank you for such great article. Going to read more on this blog
Some really nice stuff on this site, I like it.
Hey there are using WordPress for your site platform? I’m new to the blog world but I’m trying to get started and set up my own. Do you need any coding knowledge to make your own blog? Any help would be really appreciated!
I’ve been exploring for a little for any high quality articles or blog posts in this sort of house . Exploring in Yahoo I eventually stumbled upon this web site. Reading this info So i am happy to convey that I’ve a very excellent uncanny feeling I discovered exactly what I needed. I most for sure will make certain to don’t disregard this website and give it a glance on a constant basis.
You have made some good points there. I checked on the internet to find out more about the issue and found most people will go along
with your views on this web site.
Thanks for shares
Wonderful website. Plenty of helpful info here. I¦m sending it to some pals ans also sharing in delicious. And of course, thanks on your effort!
After looking into a few of the articles on your site, I honestly appreciate your technique of writing a blog. I book marked it to my bookmark site list and will be checking back soon. Take a look at my website too and tell me your opinion.
Keep up the fantastic work, I read few posts on this site and I believe that your blog is rattling interesting and has got sets of superb information.
Your writing style is so unique compared to many other people. I will definitely bookmark and share this post to my friends.
Thanks for shares
I’m really enjoying the design and layout of your site. It’s a very easy on the eyes which makes it much more enjoyable for me to come here and visit more often. Did you hire out a designer to create your theme? Superb work!
I do agree with all of the ideas you’ve presented in your post. They’re very convincing and will certainly work. Still, the posts are very short for newbies. Could you please extend them a little from next time? Thanks for the post.
You have brought up a very excellent details , thankyou for the post.
There is perceptibly a bunch to realize about this. I assume you made some good points in features also.
Thanks for every other magnificent post. Where else may just anyone get that kind of information in such a perfect way of writing? I’ve a presentation subsequent week, and I am on the search for such information.
Nice post. I learn something more challenging on different blogs everyday. It will always be stimulating to read content from other writers and practice a little something from their store. I’d prefer to use some with the content on my blog whether you don’t mind. Natually I’ll give you a link on your web blog. Thanks for sharing.
Everything is very open and very clear explanation of issues. was truly information. Your website is very useful. Thanks for sharing.
Thanks for shares
luxx delta 8 gummies 5000mg
This is really attention-grabbing, You’re an overly professional blogger. I’ve joined your feed and sit up for looking for extra of your wonderful post. Also, I have shared your web site in my social networks!
Peculiar article, just what I wanted to find.
Next time I read a blog, I hope that it doesn’t disappoint me just as much as this particular one. I mean, I know it was my choice to read, nonetheless I genuinely believed you would probably have something useful to say. All I hear is a bunch of whining about something that you could fix if you weren’t too busy looking for attention.
Thank you, I have just been looking for info about this topic for a while and yours is the greatest I’ve discovered till now. But, what in regards to the conclusion? Are you positive in regards to the source?
New collection cotaie video of Free porn Search, pezo
Youre so cool! I dont suppose Ive read something like this before. So nice to seek out somebody with some original ideas on this subject. realy thanks for beginning this up. this web site is one thing that is needed on the web, someone with a bit originality. useful job for bringing one thing new to the web!
Hi everyone, it’s my first pay a quick visit at this site, and article is
genuinely fruitful designed for me, keep up posting these articles.
I have not checked in here for a while since I thought it was getting boring, but the last several posts are great quality so I guess I will add you back to my daily bloglist. You deserve it my friend 🙂
This web site is really a walk-through for all of the info you wanted about this and didn’t know who to ask. Glimpse here, and you’ll definitely discover it.
After looking into a handful of the blog articles on your website, I honestly like your way of writing a blog. I bookmarked it to my bookmark site list and will be checking back soon. Please visit my website as well and tell me your opinion.
Thanks for shares
Wonderful post! We will be linking to this particularly great post on our site. Keep up the good writing.
I believe this web site has very wonderful written articles posts.
Dead indited subject matter, Really enjoyed looking through.
Aw, this was a really good post. Taking the time and actual effort to create a very good article… but what can I say… I hesitate a whole lot and don’t manage to get nearly anything done.
I was suggested this web site by my cousin. I’m not sure whether this post is written by him as nobody else know such detailed about my trouble. You’re amazing! Thanks!
wonderful points altogether, you just gained a new reader. What would you suggest about your post that you made some days ago? Any positive?
You have made some good points there. I checked on the internet for more information about the issue and found most individuals will go along with your views on this site.
Everything is very open and very clear explanation of issues. was truly information. Your website is very useful. Thanks for sharing.
What’s Happening i am new to this, I stumbled upon this I’ve found It positively helpful and it has aided me out loads. I hope to contribute & aid other users like its helped me. Great job.
I was just seeking this information for some time. After 6 hours of continuous Googleing, at last I got it in your website. I wonder what’s the lack of Google strategy that do not rank this type of informative sites in top of the list. Generally the top web sites are full of garbage.
Helpful info. Lucky me I discovered your web site accidentally, and I’m stunned why this twist of fate did not took place in advance! I bookmarked it.
Hi there! This is kind of off topic but I need some guidance from an established blog. Is it difficult to set up your own blog? I’m not very techincal but I can figure things out pretty quick. I’m thinking about setting up my own but I’m not sure where to start. Do you have any points or suggestions? Many thanks
gran sitio de noticias, un montón de buena información. https://miamitime.org/es
With havin so much written content do you ever run into any problems of plagorism or copyright infringement? My site has a lot of exclusive content I’ve either written myself or outsourced but it seems a lot of it is popping it up all over the internet without my permission. Do you know any methods to help protect against content from being ripped off? I’d truly appreciate it.
Hey very nice website!! Man .. Excellent .. Superb .. I’ll bookmark your website and take the feeds also…I’m happy to find so many helpful information right here in the publish, we want develop more strategies in this regard, thanks for sharing.
Some very interesting points made in this post. Glad i found it. Thanks for sharing such valuable information.
You have mentioned very interesting details ! ps nice site.
I conceive this internet site has got some rattling superb information for everyone :D. “Nothing great was ever achieved without enthusiasm.” by Ralph Waldo Emerson.
What i do not realize is in reality how you’re now not really a lot more smartly-appreciated than you might be now. You are so intelligent. You realize thus considerably in relation to this subject, made me personally consider it from so many varied angles. Its like women and men are not interested except it¦s something to accomplish with Lady gaga! Your individual stuffs great. All the time handle it up!
I just couldn’t depart your website prior to suggesting that I really enjoyed the standard info a person provide for your visitors? Is gonna be back often to check up on new posts
An impressive share, I just given this onto a colleague who was doing a little analysis on this. And he in fact bought me breakfast because I found it for him.. smile. So let me reword that: Thnx for the treat! But yeah Thnkx for spending the time to discuss this, I feel strongly about it and love reading more on this topic. If possible, as you become expertise, would you mind updating your blog with more details? It is highly helpful for me. Big thumb up for this blog post!
I loved as much as you will receive carried out right here. The sketch is tasteful, your authored subject matter stylish. nonetheless, you command get bought an shakiness over that you wish be delivering the following. unwell unquestionably come further formerly again since exactly the same nearly very often inside case you shield this hike.
I haven’t checked in here for some time since I thought it was getting boring, but the last few posts are great quality so I guess I’ll add you back to my daily bloglist. You deserve it my friend 🙂
What i don’t realize is actually how you are not really much more well-liked than you might be right now. You are very intelligent. You realize thus considerably relating to this subject, produced me personally consider it from numerous varied angles. Its like women and men aren’t fascinated unless it is one thing to do with Lady gaga! Your own stuffs outstanding. Always maintain it up!
Attractive element of content. I simply stumbled upon your web site and in accession capital to claim that I acquire actually loved account your weblog posts. Any way I’ll be subscribing for your feeds and even I success you get admission to consistently quickly.
This is a topic close to my heart cheers, where are your contact details though?
Howdy! Someone in my Myspace group shared this website with us so I came to give it a look. I’m definitely loving the information. I’m book-marking and will be tweeting this to my followers! Excellent blog and great design and style.
It’s actually a cool and useful piece of information. I am glad that you shared this helpful info with us. Please keep us up to date like this. Thanks for sharing.
I got what you mean ,saved to fav, very decent internet site.
Hiya, I am really glad I have found this info. Today bloggers publish just about gossips and internet and this is really annoying. A good site with interesting content, that is what I need. Thanks for keeping this web site, I will be visiting it. Do you do newsletters? Can’t find it.
I do agree with all the ideas you have offered for your post. They’re very convincing and can definitely work. Still, the posts are too short for starters. May just you please lengthen them a little from next time? Thank you for the post.
I actually wanted to post a simple comment in order to say thanks to you for these marvelous advice you are giving on this website. My extensive internet lookup has now been rewarded with wonderful facts and strategies to go over with my companions. I ‘d mention that many of us site visitors actually are very much lucky to dwell in a remarkable website with so many wonderful individuals with useful techniques. I feel quite fortunate to have encountered the website and look forward to some more entertaining moments reading here. Thanks once again for a lot of things.
Yeah bookmaking this wasn’t a high risk conclusion great post! .
Enjoyed looking through this, very good stuff, regards.
Generally I don’t read post on blogs, but I wish to say that this write-up very forced me to try and do it! Your writing style has been amazed me. Thanks, quite nice post.
I’m not sure exactly why but this website is loading extremely slow for me. Is anyone else having this problem or is it a issue on my end? I’ll check back later and see if the problem still exists.
I have not checked in here for a while because I thought it was getting boring, but the last few posts are good quality so I guess I will add you back to my daily bloglist. You deserve it my friend 🙂
Lovely blog! I am loving it!! Will be back later to read some more. I am bookmarking your feeds also
Some truly good blog posts on this site, thanks for contribution. “When he has ceased to hear the many, he may discern the One – the inner sound which kills the outer.” by H Hahn Blavatsky.
Nice post. I was checking continuously this blog and I’m impressed! Extremely helpful information particularly the ultimate section 🙂 I deal with such information much. I was seeking this particular info for a long time. Thanks and best of luck.
Thank you for sharing superb informations. Your web site is very cool. I am impressed by the details that you have on this blog. It reveals how nicely you perceive this subject. Bookmarked this web page, will come back for more articles. You, my friend, ROCK! I found just the info I already searched all over the place and just couldn’t come across. What a perfect website.
Sincerely enjoyed reading this article. Such amazing writing skills and interesting topic
Thanx for the effort, keep up the good work Great work, I am going to start a small Blog Engine course work using your site I hope you enjoy blogging with the popular BlogEngine.net.Thethoughts you express are really awesome. Hope you will right some more posts.
I am often to blogging and i really appreciate your content. The article has really peaks my interest. I am going to bookmark your site and keep checking for new information.
I couldn’t resist commenting
Hello There. I found your blog using msn. This is an extremely neatly written article. I’ll be sure to bookmark it and return to learn more of your helpful information. Thank you for the post. I’ll definitely comeback.
Great goods from you, man. I have keep in mind your stuff prior to and you’re simply extremely great. I really like what you have bought right here, really like what you are saying and the way by which you assert it. You’re making it enjoyable and you continue to take care of to keep it wise. I cant wait to read far more from you. That is really a great website.
Very interesting info !Perfect just what I was searching for! “I have a hundred times wished that one could resign life as an officer resigns a commission.” by Robert Burns.
Hey very cool site!! Man .. Excellent .. Superb .. I will bookmark your site and take the feeds alsoKI’m satisfied to search out a lot of helpful information right here in the publish, we’d like work out more techniques in this regard, thank you for sharing. . . . . .
Can I just say what a relief to seek out somebody who truly knows what theyre speaking about on the internet. You definitely know the best way to bring a problem to light and make it important. Extra people have to read this and understand this side of the story. I cant believe youre no more widespread because you positively have the gift.
Rattling fantastic info can be found on website. “I am not merry but I do beguile The thing I am, by seeming otherwise.” by William Shakespeare.
Good write-up, I am regular visitor of one’s blog, maintain up the excellent operate, and It is going to be a regular visitor for a lengthy time.
Amazing! This blog looks just like my old one! It’s on a totally different subject but it has pretty much the same page layout and design. Excellent choice of colors!
I’d perpetually want to be update on new blog posts on this internet site, saved to favorites! .
Pretty section of content. I just stumbled upon your web site and in accession capital to assert that I get actually enjoyed account your blog posts. Any way I will be subscribing to your feeds and even I achievement you access consistently fast.
Hi there! This post couldn’t be written any better! Reading through this post reminds me of my previous room mate! He always kept talking about this. I will forward this article to him. Pretty sure he will have a good read. Thank you for sharing!
Yay google is my king helped me to find this great website ! .
You have brought up a very fantastic details, thankyou for the post.
Hi there just wanted to give you a quick heads up. The text in your article seem to be running off the screen in Safari. I’m not sure if this is a formatting issue or something to do with web browser compatibility but I figured I’d post to let you know. The style and design look great though! Hope you get the problem solved soon. Many thanks
birbirinden güzel dalaman escort kızları bulabileceğiniz site.
birbirinden güzel milas escort kızları bulabileceğiniz site.
birbirinden güzel bodrum escort kızları bulabileceğiniz site.
birbirinden güzel kuşadası escort kızları bulabileceğiniz site.
Some really great info , Gladiolus I detected this.
I’m really enjoying the design and layout of your blog. It’s a very easy on the eyes which makes it much more pleasant for me to come here and visit more often. Did you hire out a developer to create your theme? Superb work!
I like this site very much so much excellent info .
I got what you mean , thanks for putting up.Woh I am thankful to find this website through google.
I cherished as much as you’ll obtain performed proper here. The cartoon is attractive, your authored subject matter stylish. nevertheless, you command get got an impatience over that you wish be delivering the following. in poor health unquestionably come further until now once more as exactly the similar nearly very frequently inside case you protect this hike.
Hello.This article was extremely motivating, especially because I was investigating for thoughts on this topic last Friday.
I like what you guys are up too. Such clever work and reporting! Carry on the superb works guys I have incorporated you guys to my blogroll. I think it’ll improve the value of my website :).
Keep functioning ,fantastic job!
Thanks for the information provided! we will use this information into our GPT/Chat-GPT dataset
I have been exploring for a bit for any high-quality articles or blog posts in this kind of area . Exploring in Yahoo I eventually stumbled upon this website. Studying this information So i?¦m happy to express that I have an incredibly excellent uncanny feeling I came upon exactly what I needed. I most indubitably will make sure to do not overlook this site and give it a glance regularly.
Glad to be one of many visitants on this awe inspiring website : D.
Love your post, thanks for sharing your experience
I am not really great with English but I get hold this very easy to read .
Thank you for all your effort on this site. Kate loves managing research and it is simple to grasp why. Most people notice all relating to the dynamic manner you provide functional information through this website and as well inspire response from some other people on this situation then our favorite child is actually discovering a lot. Take pleasure in the rest of the new year. You are carrying out a fantastic job.
whoah this blog is excellent i love reading your posts. Keep up the great work! You know, a lot of people are searching around for this info, you can aid them greatly.
I like this site so much, saved to bookmarks. “American soldiers must be turned into lambs and eating them is tolerated.” by Muammar Qaddafi.
What¦s Taking place i’m new to this, I stumbled upon this I have found It positively helpful and it has helped me out loads. I hope to give a contribution & assist different customers like its aided me. Good job.
I love it when people come together and share opinions, great blog, keep it up.
You could definitely see your skills in the work you write. The world hopes for more passionate writers like you who are not afraid to say how they believe. Always follow your heart.
whoah this blog is excellent i love reading your posts. Keep up the great work! You realize, lots of individuals are hunting round for this information, you could aid them greatly.
Thank you for the sensible critique. Me & my neighbor were just preparing to do a little research on this. We got a grab a book from our area library but I think I learned more clear from this post. I am very glad to see such great info being shared freely out there.
Wow! Thank you! I always needed to write on my blog something like that. Can I include a part of your post to my blog?
Hello there! This post could not be written any better! Looking through this post reminds me of my previous roommate! He continually kept talking about this. I am going to send this information to him. Fairly certain he’ll have a great read. I appreciate you for sharing!
Canada Laminate Flooring is another cost-effective flooring option that can mimic expensive materials, like hardwood, at a fraction of the price. A top wear layer also ensures that the flooring is resistant to everyday wear and tear and that it is easy to clean. Narrow your search by light laminate flooring, medium laminate flooring, and dark laminate flooring to get just the look you desire in any room in your home.
Ünye Koltuk Yıkama. Koltuk temizliğinde kumaş ve deri üzerindeki pas vb her şey özel kimyasallar ile çıkartılarak temizlenir ve ilk günkü haline getirilir. Profesyonel koltuk yıkama hizmetimizden yararlanmak için bize ulaşınız… 0546 6031976
Great blog! Do you have any tips and hints for aspiring writers? I’m planning to start my own site soon but I’m a little lost on everything. Would you propose starting with a free platform like WordPress or go for a paid option? There are so many choices out there that I’m totally confused .. Any tips? Thanks a lot!
Wonderful blog! I found it while browsing on Yahoo News. Do you have any suggestions on how to get listed in Yahoo News? I’ve been trying for a while but I never seem to get there! Thanks
I think other web site proprietors should take this website as an model, very clean and wonderful user friendly style and design, let alone the content. You are an expert in this topic!
You really make it seem so easy with your presentation but I find this matter to be actually something which I think I would never understand. It seems too complex and extremely broad for me. I am looking forward for your next post, I will try to get the hang of it!
Thank you for another wonderful post. The place else could anyone get that type of information in such an ideal means of writing? I have a presentation next week, and I am on the search for such information.
I reckon something genuinely special in this internet site.
You are my inhalation, I have few web logs and rarely run out from post :). “Actions lie louder than words.” by Carolyn Wells.
Generally I do not read post on blogs, however I would like to say that this write-up very pressured me to take a look at and do so! Your writing style has been surprised me. Thanks, quite nice article.
görüntülü fal
Keep up the great work, I read few content on this website and I conceive that your web blog is very interesting and contains sets of superb information.
Today, I went to the beach with my children. I found a sea shell and gave it to my 4 year old daughter and said “You can hear the ocean if you put this to your ear.” She put the shell to her ear and screamed. There was a hermit crab inside and it pinched her ear. She never wants to go back! LoL I know this is entirely off topic but I had to tell someone!
You are a very bright person!
You are a very clever person!
Canada Residential Flooring captures the elements of nature: unique patterns, impressive strength, and the warmth and comfort of organic design. Canada flooring captures the elements of nature: unique patterns, impressive strength, and the warmth and comfort of organic design.
What i do not realize is if truth be told how you are not really a lot more smartly-liked than you may be now. You are so intelligent. You know thus significantly relating to this matter, produced me in my opinion consider it from numerous various angles. Its like women and men are not fascinated until it?¦s something to accomplish with Girl gaga! Your individual stuffs excellent. Always deal with it up!
I¦ve recently started a blog, the info you provide on this site has helped me tremendously. Thank you for all of your time & work.
VIGEN BADALYAN and ESSBahis Says : We offer you the opportunity to defraud the whole world with our products. Would you like to join our business partners in Asia, Europe, North America, South America and Africa, who defraud the world? (signature Tuna aka ToprakSEO)
SARGIS POGHOSYAN and ESSBahis Says : We offer you the opportunity to scam the whole world with our products. We designed the most profitable fraud system in the world. Want to join our scam partners in the India? (signature Tuna aka ToprakSEO)
VAHE BALOULIAN and ESSBahis Says : We offer you the opportunity to scam the whole world with our products. We designed the most profitable fraud system in the world. Want to join our scam partners in the France? (signature Tuna aka ToprakSEO)
Great beat ! I wish to apprentice even as you amend your website, how can i subscribe for a weblog site? The account aided me a acceptable deal. I had been a little bit familiar of this your broadcast provided bright transparent idea
Good day! Do you know if they make any plugins to safeguard against hackers? I’m kinda paranoid about losing everything I’ve worked hard on. Any suggestions?
An interesting discussion is price comment. I feel that it’s best to write extra on this subject, it might not be a taboo topic however typically people are not sufficient to talk on such topics. To the next. Cheers
Great tremendous issues here. I?¦m very glad to peer your post. Thank you a lot and i am having a look forward to touch you. Will you kindly drop me a e-mail?
I was looking through some of your articles on this internet site and I believe this website is very instructive! Keep putting up.
You really make it appear really easy with your presentation however I to find this topic to be actually something which I believe I’d by no means understand. It sort of feels too complex and extremely vast for me. I am taking a look forward to your next publish, I’ll attempt to get the cling of it!
I consider something really special in this site.
Appreciating the time and energy you put into your blog and detailed information you present. It’s nice to come across a blog every once in a while that isn’t the same outdated rehashed material. Wonderful read! I’ve saved your site and I’m including your RSS feeds to my Google account.
Only a smiling visitant here to share the love (:, btw great layout.
I used to be very pleased to seek out this internet-site.I needed to thanks to your time for this wonderful read!! I undoubtedly having fun with every little bit of it and I’ve you bookmarked to check out new stuff you blog post.
Wow! This could be one particular of the most helpful blogs We have ever arrive across on this subject. Actually Great. I’m also an expert in this topic therefore I can understand your effort.
Great – I should definitely pronounce, impressed with your website. I had no trouble navigating through all tabs as well as related information ended up being truly simple to do to access. I recently found what I hoped for before you know it at all. Reasonably unusual. Is likely to appreciate it for those who add forums or anything, web site theme . a tones way for your client to communicate. Nice task..
Aw, this was an exceptionally good post. Taking a few minutes and actual effort to generate a really good article… but what can I say… I procrastinate a whole lot and don’t seem to get anything done.
I?¦ve learn several just right stuff here. Definitely value bookmarking for revisiting. I wonder how much effort you set to create any such wonderful informative website.
Hey, you used to write fantastic, but the last few posts have been kinda boring?K I miss your great writings. Past few posts are just a little out of track! come on!
Hey there, You have done an incredible job. I’ll certainly digg it and in my opinion suggest to my friends. I am confident they will be benefited from this web site.
As I web-site possessor I believe the content material here is rattling great , appreciate it for your efforts. You should keep it up forever! Good Luck.
Very good written information. It will be supportive to anybody who employess it, including me. Keep doing what you are doing – can’r wait to read more posts.
Hello there, You have done a fantastic job. I will certainly digg it and for my part suggest to my friends. I am sure they will be benefited from this website.
Hello, i think that i noticed you visited my site thus i came to “return the favor”.I’m attempting to find issues to improve my web site!I guess its adequate to use some of your ideas!!
After I originally left a comment I appear to have clicked on the -Notify me when new comments are added- checkbox and from now on whenever a comment is added I receive four emails with the same comment. Is there an easy method you can remove me from that service? Thank you!
You made some nice points there. I did a search on the subject matter and found most guys will agree with your website.
I have not checked in here for some time because I thought it was getting boring, but the last few posts are great quality so I guess I’ll add you back to my daily bloglist. You deserve it my friend 🙂
Some truly nice stuff on this site, I like it.
Awsome post and right to the point. I am not sure if this is truly the best place to ask but do you folks have any ideea where to hire some professional writers? Thanks 🙂
My spouse and I stumbled over here coming from a different web page and thought I may as well check things out. I like what I see so i am just following you. Look forward to looking into your web page again.
It’s really a nice and helpful piece of information. I’m glad that you shared this useful info with us. Please keep us informed like this. Thanks for sharing.
Vip elit buca escort kızların olduğu site
you have a great blog here! would you like to make some invite posts on my blog?
We are a group of volunteers and opening a new scheme in our community. Your website offered us with useful info to work on. You have performed a formidable job and our entire neighborhood will likely be thankful to you.
Hello there! I know this is somewhat off topic but I was wondering if you knew where I could find a captcha plugin for my comment form? I’m using the same blog platform as yours and I’m having difficulty finding one? Thanks a lot!
It¦s actually a great and helpful piece of information. I am satisfied that you just shared this useful information with us. Please stay us up to date like this. Thanks for sharing.
You have brought up a very excellent points, thanks for the post.
Great site! I am loving it!! Will come back again. I am bookmarking your feeds also
Hello my friend! I wish to say that this post is awesome, nice written and include almost all important infos. I?¦d like to look extra posts like this .
I like this post, enjoyed this one regards for posting.
I likewise think thus, perfectly written post! .
certainly like your website but you need to take a look at the spelling on quite a few of your posts. Many of them are rife with spelling problems and I find it very troublesome to inform the truth on the other hand I will definitely come back again.
It’s hard to find knowledgeable people on this topic, but you sound like you know what you’re talking about! Thanks
After study just a few of the weblog posts in your website now, and I truly like your way of blogging. I bookmarked it to my bookmark web site checklist and might be checking again soon. Pls take a look at my website as properly and let me know what you think.
After all, what a great site and informative posts, I will upload inbound link – bookmark this web site? Regards, Reader.
Hello! I could have sworn I’ve been to this blog before but after browsing through some of the post I realized it’s new to me. Anyways, I’m definitely happy I found it and I’ll be book-marking and checking back frequently!
I do enjoy the way you have framed this specific matter and it really does give us some fodder for thought. However, through everything that I have witnessed, I basically trust when the commentary pack on that folks continue to be on point and in no way get started upon a tirade associated with the news of the day. Anyway, thank you for this outstanding piece and although I do not really go along with the idea in totality, I respect your standpoint.
Thanks a lot for sharing this with all of us you really know what you’re talking about! Bookmarked. Please also visit my website =). We could have a link exchange contract between us!
hello!,I like your writing so much! share we communicate more about your article on AOL? I need a specialist on this area to resolve my problem. Maybe that is you! Having a look forward to see you.
I like this weblog its a master peace ! Glad I noticed this on google .
I have read a few just right stuff here. Definitely price bookmarking for revisiting. I surprise how a lot attempt you set to make any such magnificent informative website.
Hey there! This is my first visit to your blog! We are a group of volunteers and starting a new initiative in a community in the same niche. Your blog provided us useful information to work on. You have done a marvellous job!
I like this site its a master peace ! Glad I noticed this on google .
Wonderful website. A lot of useful info here. I’m sending it to some friends ans also sharing in delicious. And obviously, thanks for your sweat!
I loved as much as you’ll receive carried out right here. The sketch is attractive, your authored subject matter stylish. nonetheless, you command get got an shakiness over that you wish be delivering the following. unwell unquestionably come more formerly again since exactly the same nearly a lot often inside case you shield this hike.
You are my inhalation, I have few web logs and sometimes run out from to post : (.
As soon as I observed this internet site I went on reddit to share some of the love with them.
I like what you guys are up also. Such clever work and reporting! Carry on the excellent works guys I’ve incorporated you guys to my blogroll. I think it’ll improve the value of my website 🙂
I have not checked in here for a while because I thought it was getting boring, but the last several posts are great quality so I guess I will add you back to my everyday bloglist. You deserve it my friend 🙂
Your house is valueble for me. Thanks!…
Hi! Do you know if they make any plugins to protect against hackers? I’m kinda paranoid about losing everything I’ve worked hard on. Any tips?
certainly like your web-site however you have to take a look at the spelling on several of your posts. Many of them are rife with spelling problems and I find it very troublesome to inform the reality then again I?¦ll certainly come back again.
After all, what a great site and informative posts, I will upload inbound link – bookmark this web site? Regards, Reader.
Hi there, I discovered your website by means of Google whilst looking for a comparable topic, your site came up, it seems to be good. I’ve bookmarked it in my google bookmarks.
Hiya, I am really glad I’ve found this information. Nowadays bloggers publish only about gossips and internet and this is actually irritating. A good site with interesting content, this is what I need. Thank you for keeping this web site, I will be visiting it. Do you do newsletters? Can not find it.
You have noted very interesting points! ps decent web site. “I’m going to a special place when I die, but I want to make sure my life is special while I’m here.” by Payne Stewart.
Porno izle sitesi olarak sizlere hd porno ve hd porno izle videoları ve sikiş ve porno izle’menize yardımcı oluyoruz. En güncel porno izle ve sikiş videoları adresiyiz.
The other day, while I was at work, my sister stole my iPad and tested to see if it can survive a 25 foot drop, just so she can be a youtube sensation. My iPad is now broken and she has 83 views. I know this is entirely off topic but I had to share it with someone!
I just could not depart your website before suggesting that I really enjoyed the standard information a person provide for your visitors? Is gonna be back often in order to check up on new posts
Excellent post. I was checking continuously this blog and I’m impressed! Very useful information particularly the last part 🙂 I care for such information a lot. I was looking for this particular info for a very long time. Thank you and best of luck.
Utterly pent content, Really enjoyed reading through.
Thanks for another informative website. The place else may just I am getting that kind of information written in such a perfect manner? I’ve a undertaking that I am simply now operating on, and I have been on the glance out for such information.
anadolu yakası escort
Thanks for shares.
Valuable information. Lucky me I found your web site by accident, and I am shocked why this accident did not happened earlier! I bookmarked it.
Thank you, I’ve recently been looking for information approximately this topic for a while and yours is the greatest I’ve found out so far. However, what concerning the bottom line? Are you sure concerning the supply?
thanks for porno content
You really make it seem really easy together with your presentation however I in finding this topic to be actually something which I think I might never understand. It kind of feels too complex and extremely extensive for me. I am taking a look forward to your subsequent put up, I will try to get the cling of it!
I believe other website proprietors should take this site as an model, very clean and great user friendly style and design.
When I originally commented I clicked the “Notify me when new comments are added” checkbox and now each time a comment is added I get four e-mails with the same comment. Is there any way you can remove people from that service? Cheers!
Howdy! This post could not be written any better! Reading this post reminds me of my old room mate! He always kept chatting about this. I will forward this article to him. Fairly certain he will have a good read. Thank you for sharing!
I’d forever want to be update on new articles on this web site, saved to bookmarks! .
I couldn’t resist commenting
My developer is trying to persuade me to move to .net from PHP. I have always disliked the idea because of the costs. But he’s tryiong none the less. I’ve been using WordPress on several websites for about a year and am nervous about switching to another platform. I have heard very good things about blogengine.net. Is there a way I can transfer all my wordpress content into it? Any kind of help would be greatly appreciated!
There is noticeably a bundle to know about this. I assume you made certain nice points in features also.
You have mentioned very interesting details! ps nice site. “Wisdom is the supreme part of happiness.” by Sophocles.
As I website possessor I believe the content material here is rattling great , appreciate it for your hard work. You should keep it up forever! Best of luck.
In conclusion, the finest Russian complimentary classifieds website depicts a picture of innovation, security, and intuitiveness. Its role as a hub for local interactions, knowledgeable discussions, and rapid transactions solidifies its standing as the go-to destination for those seeking a seamless digital marketplace experience in the Russian market.
Thanks for share.
I consider something truly special in this website.
yerli araba
It?¦s actually a nice and helpful piece of info. I?¦m happy that you simply shared this helpful information with us. Please keep us up to date like this. Thanks for sharing.
Thanks for share.
Rattling nice style and design and good content material, absolutely nothing else we need : D.
That is the suitable weblog for anyone who needs to seek out out about this topic. You realize so much its virtually hard to argue with you (not that I truly would want…HaHa). You definitely put a brand new spin on a subject thats been written about for years. Nice stuff, simply great!
This is a topic close to my heart cheers, where are your contact details though?
Thanks for share.
Can I just say what a relief to seek out someone who actually is aware of what theyre speaking about on the internet. You undoubtedly know methods to carry a problem to light and make it important. Extra people must learn this and understand this aspect of the story. I cant imagine youre not more well-liked because you positively have the gift.
En güncel bonus veren siteler listesi.
The subsequent time I read a weblog, I hope that it doesnt disappoint me as a lot as this one. I mean, I know it was my option to read, but I really thought youd have one thing fascinating to say. All I hear is a bunch of whining about something that you possibly can fix in case you werent too busy in search of attention.
Sweet website , super design, really clean and use friendly.
of course like your web site however you need to take a look at the spelling on several of your posts. Many of them are rife with spelling problems and I find it very bothersome to inform the truth nevertheless I¦ll certainly come again again.
It’s exhausting to find educated individuals on this topic, but you sound like you realize what you’re speaking about! Thanks
I gotta favorite this website it seems invaluable very beneficial
Fantastic beat ! I would like to apprentice while you amend your website, how can i subscribe for a weblog web site? The account helped me a appropriate deal. I had been a little bit acquainted of this your broadcast provided bright transparent concept
It?¦s really a great and helpful piece of info. I am glad that you just shared this useful information with us. Please stay us informed like this. Thank you for sharing.
Thanks for this post, I am a big big fan of this website would like to continue updated.
I have been exploring for a little for any high quality articles or blog posts in this sort of area . Exploring in Yahoo I ultimately stumbled upon this website. Reading this information So i’m glad to convey that I have an incredibly good uncanny feeling I came upon exactly what I needed. I most no doubt will make certain to do not disregard this web site and give it a look on a relentless basis.
You are my breathing in, I have few web logs and rarely run out from brand :). “Never mistake motion for action.” by Ernest Hemingway.
Pretty great post. I simply stumbled upon your weblog and wanted to mention that I have really loved browsing your weblog posts. In any case I’ll be subscribing on your feed and I hope you write once more soon!
Thanks for shares.
Wonderful web site. A lot of helpful info here. I am sending it to several buddies ans additionally sharing in delicious. And naturally, thanks in your sweat!
Greetings! I know this is kind of off topic but I was wondering if you knew where I could find a captcha plugin for my comment form? I’m using the same blog platform as yours and I’m having difficulty finding one? Thanks a lot!
I have not checked in here for a while because I thought it was getting boring, but the last few posts are great quality so I guess I will add you back to my daily bloglist. You deserve it my friend 🙂
Can I just say what a relief to find someone who actually knows what theyre talking about on the internet. You definitely know how to bring an issue to light and make it important. More people need to read this and understand this side of the story. I cant believe youre not more popular because you definitely have the gift.
Aralen Blog, is not just about following trends but embracing your unique flair. Unleash your creativity and let your personal style shine!
Expedition Route, your online destination for thought-provoking content and inspiring stories. Our blog is dedicated to exploring a wide range of topics, from technology and science to art and travel. We believe in the power of ideas to shape the world and inspire change.
Chloe Blog, a virtual sanctuary for those hungry for knowledge and eager to explore the depths of intriguing topics. Our blog is a hub of engaging content that’s designed to inspire, educate, and entertain.
Travel Compass, we understand that travel is not just about visiting new places; it’s about immersing yourself in diverse cultures, savoring local cuisines, and creating memories that last a lifetime. Through vivid narratives, breathtaking photographs, and expert tips, we transport you to the heart of each location we feature.
Queen Travel, we passionate about exploring the world and sharing our travel tales with fellow adventure enthusiasts. From hidden gems to popular landmarks, our blog covers it all. Whether you’re seeking travel tips, cultural insights, or stunning photography, you’ll find it here. So fasten your seatbelts and get ready to wander through our posts that capture the beauty and diversity of our global journey.
Princess Travel, your ultimate destination for health, fitness, and holistic well-being. We’re here to guide you on your journey to a healthier lifestyle with science-backed advice, workout routines, nutritious recipes, and mindfulness practices. Our blog is a supportive community where you can find motivation, tips for maintaining a balanced life, and stories of personal transformation. Join us as we sweat, nourish, and uplift our way to vitality!
Princess Holiday, we believe that every idea has the power to inspire, every story has the potential to captivate, and every perspective can broaden horizons. Through our meticulously crafted blog posts, we aim to bring you engaging narratives, insightful analyses, and a diverse range of topics that cater to various interests.
Idea Forest, we believe that learning is a lifelong adventure, and our blog is your compass. With thought-provoking articles, thought leadership pieces, and explorations of various subjects, we’re committed to providing you with an intellectually stimulating experience that encourages you to question, engage, and grow.
Queen Holiday, we believe that words have the power to shape perspectives and create connections. Our carefully crafted blog posts cover a wide range of topics, from technology and science to art and philosophy.
Aralen Blog, share your thoughts, and engage in exciting discussions.
Queen World, our readers are at the heart of everything we do. We understand your thirst for knowledge and your desire to stay informed about the latest trends, discoveries, and ideas. Our blog is meticulously crafted to provide you with a steady stream of engaging content that resonates with your interests.
Creative Corner, where words weave narratives and ideas shape destinies. We’re delighted to present a platform that stands as a beacon of enlightenment, offering you a diverse range of content that’s designed to enrich your intellect and fuel your passions.
Trend Maze, we’re dedicated to curating content that pushes boundaries and challenges the conventional norms. Our team of passionate writers, thinkers, and creatives work tirelessly to bring you articles that delve into a wide array of topics, from the arts and sciences to philosophy and technology.
Blog Cafe, we believe that travel is more than just a destination—it’s a transformative experience. Our dedicated writers, globetrotters, and culture enthusiasts share their journeys, providing you with a unique blend of personal narratives and practical advice to make your own adventures unforgettable.
Holiday Compass, we believe in the power of words to shape perspectives and ignite imagination. Our dedicated team of writers brings you a diverse range of topics, from lifestyle and travel to technology and personal growth. With each post, we aim to create a space where ideas flourish and connections are formed.
Queen Blog, is not just a platform to learn; it’s a space where you can interact, inspire, and be inspired.
Discovery Route, we believe that every idea has the potential to create ripples of change. Through our meticulously crafted posts, we aim to provide you with fresh perspectives, insightful analyses, and captivating stories that will leave you pondering long after you’ve finished reading.
Thanks for shares.
Your blog is a masterclass in effective communication. Bravo!
thanks for shares
I’m truly enjoying the design and layout of your blog. It’s a very easy on the eyes which makes it much more pleasant for me to come here and visit more often. Did you hire out a designer to create your theme? Excellent work!
Hello. excellent job. I did not expect this. This is a excellent story. Thanks!
Excellent post. I used to be checking continuously this weblog and I’m impressed! Very helpful info specially the final part 🙂 I deal with such info much. I used to be looking for this particular info for a long time. Thank you and good luck.
I will immediately seize your rss feed as I can’t in finding your e-mail subscription hyperlink or e-newsletter service. Do you have any? Please let me know in order that I could subscribe. Thanks.
I have learn some just right stuff here. Definitely price bookmarking for revisiting. I surprise how a lot attempt you set to create this kind of magnificent informative website.
Saved as a favorite, I really like your blog!
Hi there! Do you use Twitter? I’d like to follow you if that would be okay. I’m definitely enjoying your blog and look forward to new updates.
Glad to be one of the visitors on this awe inspiring web site : D.
Wonderful web site. A lot of helpful info here. I am sending it to some buddies ans also sharing in delicious. And obviously, thanks on your effort!
Hello, you used to write great, but the last several posts have been kinda boringK I miss your great writings. Past few posts are just a little out of track! come on!
yes baby yes
Sitelere anti yapıyorsunuz dikkat edin! birbahisindex’e anti yapmayı kesin
Deneme Bonusu Veren Casino Siteleri
100 TL ile 400 TL arasında sınırlı olan bu Promosyon
Sınama Bonusu veren iddaa sayfası Online yarışmalara olan ilgisi ile daha çok alternatif edildiğini bizleri öğrenmekteyiz ve bu mevzuda daha fazla destekçi olabilecek olan bilgileri de sayfamızdan edinebileceğinizi unutmayınız.
eryaman escort sitesi
mersinin gözde escort sitesi
hadi tüm bahis siteleri burada
bedava bonus veren bahis siteleri için tıkla gör
hello, it’s nice when there are such beautiful websites
have a nice day baby
I found your blog web site on google and examine just a few of your early posts. Continue to keep up the excellent operate. I simply further up your RSS feed to my MSN News Reader. In search of forward to studying extra from you afterward!…
You completed a few fine points there. I did a search on the subject matter and found mainly persons will consent with your blog.
whoah this weblog is wonderful i really like studying your articles. Keep up the good work! You understand, a lot of individuals are hunting round for this info, you could aid them greatly.
I used to be recommended this web site via my cousin. I’m now not sure whether or not this post is written by means of him as no one else recognize such particular about my problem. You are amazing! Thanks!
I really like your writing style, fantastic info , thanks for posting : D.
Glad to find this nice post, thanks for sharing
Denizli Escort kızlarının bulunduğu sitemizde sizlerde keyif dolu anlar yaşayın.
Hi there are using WordPress for your blog platform? I’m new to the blog world but I’m trying to get started and set up my own. Do you require any html coding expertise to make your own blog? Any help would be really appreciated!
Totobo resmi web sitesi
I love your blog.. very nice colors & theme. Did you design this website yourself or did you hire someone to do it for you? Plz reply as I’m looking to create my own blog and would like to know where u got this from. thank you
come on baby
Great line up. We will be linking to this great article on our site. Keep up the good writing.
I would like to thnkx for the efforts you’ve put in writing this web site. I am hoping the same high-grade blog post from you in the upcoming as well. In fact your creative writing skills has inspired me to get my own site now. Actually the blogging is spreading its wings quickly. Your write up is a good example of it.
Hello, I think your blog might be having browser compatibility issues. When I look at your website in Opera, it looks fine but when opening in Internet Explorer, it has some overlapping. I just wanted to give you a quick heads up! Other then that, superb blog!
Great post. I am facing a couple of these problems.
Appreciate it for this post, I am a big big fan of this web site would like to keep updated.
Helpful info. Fortunate me I found your site accidentally, and I’m shocked why this coincidence did not took place earlier! I bookmarked it.
I have recently started a blog, the info you offer on this site has helped me greatly. Thanks for all of your time & work. “The very ink with which history is written is merely fluid prejudice.” by Mark Twain.
konya escort ile atesli dakikalar sizleri bekliyor.
Very interesting details you have observed, thankyou for putting up.
come on baby
by by hepiniz
Nice post! Thanks for sharing.
thanks for altyazılı porn content
by by hepiniz
Perfectly indited written content, appreciate it for selective information. “In the fight between you and the world, back the world.” by Frank Zappa.
After study a few of the blog posts on your website now, and I truly like your way of blogging. I bookmarked it to my bookmark website list and will be checking back soon. Pls check out my web site as well and let me know what you think.
Whats Taking place i’m new to this, I stumbled upon this I have found It absolutely useful and it has helped me out loads. I hope to contribute & assist different users like its helped me. Good job.
I like this website so much, saved to my bookmarks.
I’ve been exploring for a bit for any high-quality articles or blog posts on this sort of area . Exploring in Yahoo I at last stumbled upon this website. Reading this information So i’m happy to convey that I have a very good uncanny feeling I discovered exactly what I needed. I most certainly will make certain to do not forget this web site and give it a glance regularly.
Thank you so much for providing individuals with remarkably pleasant possiblity to read articles and blog posts from this web site. It’s usually so fantastic and as well , jam-packed with amusement for me personally and my office friends to visit your web site at the very least three times a week to see the newest guidance you have got. And definitely, I am certainly satisfied considering the extraordinary creative ideas served by you. Some two ideas in this post are ultimately the simplest I have ever had.
Hello my loved one! I wish to say that this post is amazing, nice written and come with almost all important infos. I would like to peer more posts like this .
My coder is trying to convince me to move to .net from PHP. I have always disliked the idea because of the expenses. But he’s tryiong none the less. I’ve been using WordPress on numerous websites for about a year and am worried about switching to another platform. I have heard good things about blogengine.net. Is there a way I can transfer all my wordpress posts into it? Any kind of help would be greatly appreciated!
hello!,I love your writing very a lot! proportion we communicate more about your article on AOL? I require an expert on this area to unravel my problem. Maybe that’s you! Looking ahead to see you.
I wish to convey my appreciation for your generosity supporting all those that absolutely need guidance on this situation. Your special dedication to getting the solution all around came to be rather informative and has regularly encouraged most people much like me to realize their desired goals. The helpful help and advice entails much a person like me and substantially more to my office colleagues. Regards; from all of us.
I also think thus, perfectly written post! .
You are a very clever person!
I genuinely value your piece of work, Great post.
Magnificent site. Plenty of useful info here. I’m sending it to a few pals ans additionally sharing in delicious. And naturally, thank you on your sweat!
Hello there, just was aware of your weblog thru Google, and located that it’s truly informative. I’m gonna watch out for brussels. I will appreciate if you proceed this in future. Numerous folks might be benefited out of your writing. Cheers!
certainly like your web site but you have to check the spelling on quite a few of your posts. A number of them are rife with spelling problems and I find it very bothersome to tell the truth nevertheless I’ll definitely come back again.
I’d have to examine with you here. Which is not one thing I usually do! I take pleasure in reading a post that may make folks think. Additionally, thanks for permitting me to comment!
hey there and thanks on your information – I’ve definitely picked up something new from proper here. I did then again expertise some technical points the usage of this web site, since I experienced to reload the site lots of occasions previous to I could get it to load properly. I had been brooding about if your web hosting is OK? Now not that I’m complaining, however sluggish loading circumstances occasions will often affect your placement in google and could injury your high quality ranking if ads and ***********|advertising|advertising|advertising and *********** with Adwords. Anyway I’m adding this RSS to my email and can look out for a lot more of your respective exciting content. Make sure you update this again soon..
thanks for share
There are definitely quite a lot of details like that to take into consideration. That may be a great point to carry up. I supply the thoughts above as common inspiration however clearly there are questions just like the one you bring up the place a very powerful thing will probably be working in sincere good faith. I don?t know if best practices have emerged round issues like that, but I’m certain that your job is clearly recognized as a fair game. Each girls and boys really feel the impression of only a second’s pleasure, for the remainder of their lives.
Outstanding post, you have pointed out some wonderful details , I too conceive this s a very wonderful website.
I’m not that much of a online reader to be honest but your blogs really nice, keep it up! I’ll go ahead and bookmark your site to come back later. All the best
I’m really enjoying the design and layout of your blog. It’s a very easy on the eyes which makes it much more pleasant for me to come here and visit more often. Did you hire out a designer to create your theme? Great work!
Its such as you learn my mind! You appear to understand so much approximately this, such as you wrote the guide in it or something. I feel that you just could do with some p.c. to force the message house a bit, but instead of that, that is fantastic blog. A fantastic read. I’ll definitely be back.
I like the helpful info you supply on your articles. I’ll bookmark your weblog and take a look at once more here regularly. I’m reasonably sure I’ll be told many new stuff proper here! Good luck for the next!
Hello there! I could have sworn I’ve been to this blog before but after browsing through some of the post I realized it’s new to me. Nonetheless, I’m definitely happy I found it and I’ll be book-marking and checking back often!
deneme bonusu
thanks for share
Im now not positive where you’re getting your info, however great topic. I must spend a while studying much more or understanding more. Thanks for magnificent info I used to be in search of this information for my mission.
Simply desire to say your article is as astounding. The clarity in your post is simply cool and i can assume you’re an expert on this subject. Fine with your permission let me to grab your RSS feed to keep up to date with forthcoming post. Thanks a million and please keep up the rewarding work.
hey there and thank you for your information – I have certainly picked up anything new from right here. I did however expertise several technical points using this website, since I experienced to reload the web site many times previous to I could get it to load correctly. I had been wondering if your web hosting is OK? Not that I am complaining, but slow loading instances times will often affect your placement in google and can damage your quality score if advertising and marketing with Adwords. Anyway I am adding this RSS to my e-mail and can look out for much more of your respective intriguing content. Ensure that you update this again very soon..
porno izle
Keep up the good work, I read few blog posts on this website and I think that your web blog is real interesting and has lots of fantastic info .
Some times its a pain in the ass to read what website owners wrote but this site is very user pleasant! .
sikiş izle
Great blog here! Also your site so much up fast! What web host are you the use of? Can I am getting your associate link to your host? I wish my site loaded up as fast as yours lol
You should take part in a contest for one of the best blogs on the web. I will recommend this site!
Glad to be one of the visitors on this awing web site : D.
Keep up the wonderful piece of work, I read few articles on this website and I conceive that your web blog is very interesting and holds circles of superb information.
I’ve been surfing online more than 3 hours lately, yet I never found any fascinating article like yours. It is beautiful value sufficient for me. Personally, if all site owners and bloggers made good content material as you probably did, the net will be much more useful than ever before.
thanks for share
I like this web blog so much, saved to my bookmarks.
Thanks – Enjoyed this post, how can I make is so that I get an email whenever you publish a fresh post?
Generally I do not read article on blogs, but I wish to say that this write-up very forced me to try and do so! Your writing style has been amazed me. Thanks, very nice article.
Good post however I was wondering if you could write a litte more on this subject? I’d be very grateful if you could elaborate a little bit more. Appreciate it!
I do agree with all the ideas you’ve presented in your post. They are really convincing and will definitely work. Still, the posts are too short for beginners. Could you please extend them a little from next time? Thanks for the post.
thanks for share
As a Newbie, I am constantly exploring online for articles that can be of assistance to me. Thank you
Thanks for sharing excellent informations. Your web site is very cool. I’m impressed by the details that you¦ve on this site. It reveals how nicely you perceive this subject. Bookmarked this web page, will come back for more articles. You, my friend, ROCK! I found simply the information I already searched everywhere and just couldn’t come across. What an ideal web site.
I went over this web site and I conceive you have a lot of wonderful information, saved to favorites (:.
I think this is one of the most vital information for me. And i am glad reading your article. But should remark on few general things, The website style is ideal, the articles is really nice : D. Good job, cheers
tiktok video indirme sistemini kullanarak sınırsızca video indirebilirsiniz.
Lan Top seni sikip ibne yapacağım orospu evladı ibne git götünü siktir
I think this site contains some really great information for everyone. “I have learned to use the word ‘impossible’ with the greatest caution.” by Wernher von Braun.
I’m curious to find out what blog platform you are utilizing? I’m having some minor security issues with my latest website and I would like to find something more safeguarded. Do you have any suggestions?
thanks for share
Use the 1xBet promo code for registration : VIP888, and you will receive a €/$130 exclusive bonus on your first deposit. Before registering, you should familiarize yourself with the rules of the promotion.
I¦ve recently started a blog, the info you provide on this web site has helped me greatly. Thank you for all of your time & work.
Thanks for sharing excellent informations. Your site is so cool. I am impressed by the details that you have on this blog. It reveals how nicely you understand this subject. Bookmarked this web page, will come back for extra articles. You, my pal, ROCK! I found just the information I already searched all over the place and just could not come across. What a great web-site.
I’d have to examine with you here. Which is not one thing I usually do! I take pleasure in reading a post that may make folks think. Additionally, thanks for permitting me to comment!
Good post. I learn one thing more challenging on different blogs everyday. It would at all times be stimulating to read content material from different writers and apply somewhat something from their store. I’d choose to use some with the content material on my weblog whether or not you don’t mind. Natually I’ll provide you with a link in your internet blog. Thanks for sharing.
Use the 1xBet promo code for registration : VIP888, and you will receive a €/$130 exclusive bonus on your first deposit. Before registering, you should familiarize yourself with the rules of the promotion.
I am not real fantastic with English but I find this real leisurely to understand.
izmir escort
you are actually a good webmaster. The website loading velocity is incredible. It kind of feels that you are doing any distinctive trick. In addition, The contents are masterpiece. you have done a wonderful process in this matter!
Real good visual appeal on this site, I’d value it 10 10.
It’s a shame you don’t have a donate button! I’d without a doubt donate to this excellent blog! I suppose for now i’ll settle for book-marking and adding your RSS feed to my Google account. I look forward to fresh updates and will talk about this site with my Facebook group. Talk soon!
I like this blog very much, Its a really nice spot to read and get info . “No one wants advice — only corroboration.” by John Steinbeck.
I’ve been browsing online more than 3 hours today, yet I never found any interesting article like yours. It is pretty worth enough for me. In my opinion, if all website owners and bloggers made good content as you did, the internet will be a lot more useful than ever before.
I’d forever want to be update on new content on this site, saved to fav! .
Hello, Neat post. There is a problem along with your web site in internet explorer, could test this… IE still is the market chief and a big element of folks will pass over your magnificent writing due to this problem.
Hiya, I am really glad I have found this information. Today bloggers publish only about gossips and net and this is actually irritating. A good site with exciting content, this is what I need. Thank you for keeping this website, I will be visiting it. Do you do newsletters? Cant find it.
It is really a nice and helpful piece of information. I am glad that you shared this helpful information with us. Please keep us informed like this. Thank you for sharing.
Hmm it seems like your blog ate my first comment (it was extremely long) so I guess I’ll just sum it up what I wrote and say, I’m thoroughly enjoying your blog. I too am an aspiring blog blogger but I’m still new to everything. Do you have any recommendations for novice blog writers? I’d definitely appreciate it.
I’ve recently started a site, the info you provide on this site has helped me tremendously. Thanks for all of your time & work. “A physicist is an atom’s way of knowing about atoms.” by George Wald.
Whats up! I just want to give a huge thumbs up for the nice info you’ve here on this post. I will probably be coming again to your blog for more soon.
This design is wicked! You certainly know how to keep a reader entertained. Between your wit and your videos, I was almost moved to start my own blog (well, almost…HaHa!) Wonderful job. I really loved what you had to say, and more than that, how you presented it. Too cool!
I am now not positive where you are getting your info, but good topic. I needs to spend a while finding out much more or working out more. Thank you for great information I used to be searching for this information for my mission.
An interesting discussion is value comment. I think that you need to write more on this topic, it may not be a taboo subject but typically persons are not enough to talk on such topics. To the next. Cheers
I am very happy to read this. This is the kind of manual that needs to be given and not the random misinformation that’s at the other blogs. Appreciate your sharing this best doc.
Everything is very open and very clear explanation of issues. was truly information. Your website is very useful. Thanks for sharing.
I got what you intend, appreciate it for putting up.Woh I am lucky to find this website through google. “Being intelligent is not a felony, but most societies evaluate it as at least a misdemeanor.” by Lazarus Long.
What i do not realize is actually how you are not actually much more well-liked than you might be now. You’re so intelligent. You realize thus significantly relating to this subject, made me personally consider it from a lot of varied angles. Its like men and women aren’t fascinated unless it is one thing to accomplish with Lady gaga! Your own stuffs outstanding. Always maintain it up!
Great post. I was checking constantly this blog and I am impressed! Extremely useful information specifically the last part 🙂 I care for such information much. I was seeking this certain information for a long time. Thank you and good luck.
I absolutely love your blog and find almost all of your post’s to be exactly what I’m looking for. Would you offer guest writers to write content in your case? I wouldn’t mind composing a post or elaborating on many of the subjects you write concerning here. Again, awesome web site!
telegram下载
Thank you for another informative web site. Where else could I get that type of information written in such a perfect way? I’ve a project that I’m just now working on, and I have been on the look out for such information.
Heya i’m for the first time here. I found this board and I find It really useful & it helped me out much. I’m hoping to provide something back and aid others such as you aided me.
Simply wanna admit that this is very beneficial, Thanks for taking your time to write this.
What a information of un-ambiguity and preserveness of valuable
knowledge on the topic of unexpected emotions.
Loving the info on this internet site, you have done outstanding job on the posts.
Thank you for sharing with us, I conceive this website truly stands out : D.
wonderful publish, very informative. I’m wondering why the opposite experts of this sector don’t understand this. You must continue your writing. I’m confident, you’ve a huge readers’ base already!
hello there and thank you for your information – I’ve certainly picked up something new from right here. I did however expertise several technical points using this web site, since I experienced to reload the site a lot of times previous to I could get it to load correctly. I had been wondering if your web host is OK? Not that I am complaining, but slow loading instances times will sometimes affect your placement in google and could damage your high-quality score if advertising and marketing with Adwords. Well I’m adding this RSS to my e-mail and can look out for much more of your respective exciting content. Make sure you update this again very soon..
Très cool, quelques points valides ! Je vous remercie de rendre cet article disponible, le reste du site est également de haute qualité. Amusez-vous bien.
I just couldn’t depart your website prior to suggesting that I extremely enjoyed the standard information an individual provide for your visitors? Is going to be again continuously to check out new posts.
he blog was how do i say it… relevant, finally something that helped me. Thanks
Thanks – Enjoyed this post, can I set it up so I receive an email sent to me whenever there is a new post?
I’ve recently started a site, the information you provide on this web site has helped me greatly. Thanks for all of your time & work.
Do you mind if I quote a few of your articles as long as I provide credit and sources back to your webpage? My blog site is in the very same area of interest as yours and my users would certainly benefit from a lot of the information you present here. Please let me know if this alright with you. Cheers!
Vip gebze escort bayanlar sitemizde
Hi, i think that i noticed you visited my web site thus i got
here to return the choose?.I am trying to
in finding things to improve my site!I suppose its good enough to use some of
your ideas!!
of course like your website but you need to check the spelling on several of your posts. Many of them are rife with spelling problems and I find it very troublesome to tell the truth nevertheless I’ll definitely come back again.
you are really a good webmaster. The site loading speed is incredible. It seems that you’re doing any unique trick. Furthermore, The contents are masterwork. you’ve done a excellent job on this topic!
Hi! Do you use Twitter? I’d like to follow you if that would be okay. I’m undoubtedly enjoying your blog and look forward to new posts.
Excellent blog! Do you have any tips for aspiring writers? I’m planning to start my own blog soon but I’m a little lost on everything. Would you propose starting with a free platform like WordPress or go for a paid option? There are so many options out there that I’m completely overwhelmed .. Any suggestions? Kudos!
I’ve been surfing on-line greater than 3 hours these days, yet I by no means found any interesting article like yours. It is beautiful worth enough for me. Personally, if all site owners and bloggers made good content material as you did, the net will be much more useful than ever before.
Oyun kumandaları
I believe you have noted some very interesting details, thanks for the post.
It¦s actually a nice and helpful piece of information. I am happy that you simply shared this useful info with us. Please keep us informed like this. Thanks for sharing.
Greetings! I know this is kinda off topic however I’d
figured I’d ask. Would you be interested in exchanging links or maybe guest writing a blog article or vice-versa?
My blog goes over a lot of the same subjects as yours
and I feel we could greatly benefit from each
other. If you happen to be interested feel free
to send me an email. I look forward to hearing from you!
Wonderful blog by the way!
Hello i am kavin, its my first occasion to commenting anyplace, when i read this post i
thought i could also make comment due to this sensible post.
Asking questions are truly pleasant thing if you are not understanding something completely, however this post provides pleasant understanding
even.
Here is my page; Massage Forum
I am pleased that I observed this site, just the right information that I was searching for! .
I like this web site so much, saved to fav.
Can I simply say what a relief to find somebody who truly is aware of what theyre speaking about on the internet. You definitely know tips on how to convey a problem to gentle and make it important. Extra folks have to read this and understand this facet of the story. I cant consider youre not more standard since you definitely have the gift.
tattoo chisinau
An abscess is a painful buildup of pus, typically brought on by bacterial infection. This pus or swelling inside your tooth or gum tissue puts in pressure on your tooth. Hence, it triggers pain while you chew or use stress on it. Nonetheless, if your tooth or filling is not suitably occluded, you can feel pain as you eat. Most people begin to discover tooth pain right after their oral treatment is done as well as the sedatives wear off. Not only this, the tooth resting higher than others likewise creates discomfort in the contrary tooth.
Satisfied With Your Brilliant Brand-new Smile? Here’s Exactly How To Extend Your Teeth Whitening Outcomes
If the split expands right into the pulp, the tooth might end up being sensitive to extreme cold and heat. Whenever you consume and experience discomfort as well as pain, you should head to your dentist for an examination. During the consultation, the dental practitioner will certainly take a look at the level of accessory around each tooth. Any type of symptoms of swelling, bleeding, revealed tooth origins will call for immediate therapy.
Discover the Humana Extend dental strategies, developed to provide thorough coverage for dental, vision, and hearing advantages. These strategies deal with customers seeking inclusive dental care, with choices like insurance coverage for dental implants. Influenced by customer feedback stressing the relevance of whole-person care, Humana Extend stands for a shift from typical dental insurance policy. Experience the next degree of oral coverage with Humana Extend.
Teeth whitening treatments can likewise cause teeth level of sensitivity due to the fact that you are using something acidic to your teeth. As a matter of fact, about 40 million grownups in the USA experience some kind of tooth level of sensitivity. Recognizing possible causes of sensitive teeth is crucial to reducing pain.
As the degeneration progresses, it can expose the inner nerves of the teeth, making them extra sensitive to cold substances. This procedure is a procedure in which the infection in the pulp of your teeth is cleaned. When the gum tissue line and tooth are no longer infected, the dental expert will put an oral crown in to cover the visible origins. Find out more regarding tooth sensitivity and exactly how cold weather can add to the discomfort. Additionally view this video clip from Teeth Talk Girl describing why winter can make your teeth injured, and just how to stop toothache.
Sensodyne Added Lightening Toothpaste
Certain triggers– including chilly foods, drinks, or perhaps a ruptured of air– can intensify the nerves, causing a short, pain, additionally referred to as tooth sensitivity. If consuming ice cream and drinking cold drinks make your teeth harmed, you are possibly suffering from cold-sensitive teeth. Cold-sensitive teeth are not unusual, however it is very important to understand the difference between cold-sensitive teeth andtooth decayorgum condition. Cold-sensitive teeth occur when the nerves within the tooth are exposed because of receding gums orworn tooth enamel.
Capturing tooth decay early can conserve you from a lot of future problems. When dental caries progresses without being treated, this can lead to the need for huge oral fillings, veneers, root canals, crowns, and even tooth removals. Regular dental examinations as well as cleanings are necessary for the diagnosis as well as therapy of dental cavity. Your dental experts will certainly supply you the best referrals to help you keep a healthy smile. If you uncommitted of your tooth at dental caries starting after that you can not quit dental caries from spreading and also it will certainly get to the root of your tooth. Origin canal is the eliminating the entire decayed pulp from origin and load the gap with professional man-made filling.
You can either make an one time settlement of $1,749 or pay about $80 a month at a 10-30% APR . After sending out in your impacts or completing an in-office scan, Candid’s orthodontic team will certainly examine and develop your treatment. Next, you. are sent your clear aligners along with everything you will certainly need for treatment. As your therapy advances, you take scans from your phone that are evaluated from another location by Honest orthodontists.
Insurance Coverage Problems
The trouble can be existing from birth, and often it can be visible enough to call for cosmetic dental care treatment. Depending on your oral condition and oral health and wellness, the next time you visit your dental professional you may be referred to an orthodontist for customized therapy. Your payment includes a custom-molded set of aligners for each and every step of your therapy plan.
Tooth cavities are just one of the most typical oral health problems that people face. They take place when the safety enamel on your teeth obtains damaged, enabling bacteria to get in and also cause decay. If left neglected, dental caries can cause tooth level of sensitivity, pain, and also also missing teeth. Luckily, there are several means to avoid and also treat dental caries.
fantastic points altogether, you just won a brand new reader.
What might you recommend about your publish that you just made
some days in the past? Any positive?
There is obviously a bundle to realize about this. I believe you made some nice points in features also.
I’m no longer positive where you are getting your info, but good topic. I must spend a while finding out more or figuring out more. Thanks for fantastic information I used to be looking for this information for my mission.
I like what you guys are up too. Such smart work and reporting! Carry on the excellent works guys I have incorporated you guys to my blogroll. I think it will improve the value of my website 🙂
Hi, Neat post. There is a problem with your website in internet explorer, would check this… IE still is the market leader and a huge portion of people will miss your great writing due to this problem.
This is the perfect web site for everyone who wishes to find out
about this topic. You realize so much its almost hard to argue with you (not
that I personally would want to…HaHa). You certainly put a fresh spin on a topic that has been written about for decades.
Excellent stuff, just great!
I like what you guys are up too. Such clever work and reporting! Keep up the excellent works guys I¦ve incorporated you guys to my blogroll. I think it will improve the value of my site 🙂
Attractive section of content. I just stumbled upon your website
and in accession capital to assert that I get actually
enjoyed account your blog posts. Anyway I’ll be subscribing to your feeds
and even I achievement you access consistently rapidly.
you will have an awesome weblog right here! would you like to make some invite posts on my blog?
I visit each day a few sites and blogs to read articles or reviews,
however this website gives feature based
writing.
I am not very great with English but I line up this very leisurely to translate.
Real clear web site, regards for this post.
Good info Kudos!
Yes! Finally something about ikon77.
I believe this is one of the most significant information for me. And i’m satisfied studying your article. But should remark on some basic issues, The website taste is great, the articles is in reality nice : D. Good job, cheers
I visited various sites except the audio quality for audio songs existing at this web page
is genuinely superb.
I simply could not leave your web site before suggesting
that I extremely loved the usual info an individual provide for your guests?
Is gonna be back frequently to check out new posts
This site truly has all of the information and facts I needed concerning this subject and didn’t know who to ask.
My programmer is trying to persuade me to move to .net from
PHP. I have always disliked the idea because of the expenses.
But he’s tryiong none the less. I’ve been using WordPress on a number of websites for about a
year and am anxious about switching to another platform.
I have heard great things about blogengine.net. Is there a way I can transfer
all my wordpress content into it? Any kind
of help would be really appreciated!
Fantastic beat ! I would like to apprentice at the same time as you
amend your site, how could i subscribe for a blog site?
The account aided me a applicable deal. I had been tiny
bit familiar of this your broadcast provided vivid clear idea
Outstanding story there. What occurred after? Good luck!
Hey there, You have done an incredible job. I’ll definitely digg it and personally recommend to my friends. I am sure they’ll be benefited from this website.
Can I just say what a relief to find someone who actually knows what theyre talking about on the internet. You definitely know how to bring an issue to light and make it important. More people need to read this and understand this side of the story. I cant believe youre not more popular because you definitely have the gift.
I appreciate, cause I found just what I was looking for. You have ended my four day long hunt! God Bless you man. Have a nice day. Bye
Attractive section of content. I just stumbled upon your weblog and in accession capital to assert that I acquire in fact enjoyed account your blog posts. Anyway I’ll be subscribing to your augment and even I achievement you access consistently rapidly.
It’s a shame you don’t have a donate button! I’d without a doubt donate to this outstanding blog! I guess for now i’ll settle for book-marking and adding your RSS feed to my Google account. I look forward to brand new updates and will share this blog with my Facebook group. Talk soon!
Hello There. I found your blog using msn. This is an extremely well written article. I will be sure to bookmark it and come back to read more of your useful information. Thanks for the post. I’ll definitely return.
Thanks a lot for sharing this with all of us you actually know what you are talking approximately!
Bookmarked. Please additionally discuss with my website =).
We can have a hyperlink alternate agreement between us
Just wish to say your article is as amazing. The clarity for your publish is just nice and i can think you’re knowledgeable on this subject. Fine with your permission let me to take hold of your RSS feed to stay updated with impending post. Thank you a million and please keep up the rewarding work.
Some genuinely interesting details you have written.Assisted me a lot, just what I was looking for : D.
I’ve been absent for some time, but now I remember why I used to love this website. Thanks , I will try and check back more frequently. How frequently you update your website?
Would you be concerned with exchanging links?
I have been browsing online more than three hours as of late, but I never discovered any fascinating article like yours. It’s pretty worth sufficient for me. In my view, if all site owners and bloggers made excellent content material as you probably did, the net will be a lot more helpful than ever before. “I think that maybe if women and children were in charge we would get somewhere.” by James Grover Thurber.
Hi there, I would like to subscribe for this web site to take most recent updates, so where can i do it please help.
Certainly with your thoughts here and that i love your blog! I’ve bookmarked it making sure that I can come back & read more in the foreseeable future.Metal roofing for homes in Cape Coral
I wanted to thank you for this great read!! I definitely enjoying every little bit of it I have you bookmarked to check out new stuff you post…
FiverrEarn
[…]please stop by the web-sites we comply with, which includes this 1, as it represents our picks in the web[…]
Some really wonderful work on behalf of the owner of this site, utterly outstanding articles.
I think this is among the most significant information for me.
And i am glad reading your article. But want to remark on some general things, The
site style is ideal, the articles is really
excellent : D. Good job, cheers
I was reading some of your content on this site and I conceive this site is real instructive! Retain posting.
FitSpresso stands out as a remarkable dietary supplement designed to facilitate effective weight loss. Its unique blend incorporates a selection of natural elements including green tea extract, milk thistle, and other components with presumed weight loss benefits.
omg! can’t imagine how fast time pass, after August, ber months time already and Setempber is the first Christmas season in my place, I really love it!alpha tonic official
Good day! This is my 1st comment here so I just wanted to give a quick shout out and tell you I truly enjoy reading your articles. Can you recommend any other blogs/websites/forums that go over the same subjects? Thanks a lot!
I am sure this рaragraph has touched all the internet peߋple, its reаlly гeally good ρost oon building up new website.
I have been exploring for a little for any high quality articles or weblog posts in this kind of area . Exploring in Yahoo I at last stumbled upon this website. Reading this information So i am happy to show that I’ve an incredibly excellent uncanny feeling I came upon exactly what I needed. I such a lot without a doubt will make sure to don¦t overlook this website and give it a look on a continuing basis.
I regard something genuinely interesting about your weblog so I saved to fav.
Hiya, I’m really glad I have found this information. Nowadays bloggers publish only about gossips and net and this is actually irritating. A good blog with interesting content, this is what I need. Thanks for keeping this website, I will be visiting it. Do you do newsletters? Can not find it.
Sight Care is a daily supplement proven in clinical trials and conclusive science to improve vision by nourishing the body from within. The Sight Care formula claims to reverse issues in eyesight, and every ingredient is completely natural.
Wow that was strange. I just wrote an incredibly long comment but after I clicked submit my comment didn’t appear. Grrrr… well I’m not writing all that over again. Regardless, just wanted to say wonderful blog!
Hi , I do believe this is an excellent blog. I stumbled upon it on Yahoo , i will come back once again. Money and freedom is the best way to change, may you be rich and help other people.
Does your website have a contact page? I’m having problems locating it but, I’d like to shoot you an email. I’ve got some suggestions for your blog you might be interested in hearing. Either way, great blog and I look forward to seeing it develop over time.
Hello! Quick question that’s entirely off topic. Do you know how to make your site mobile friendly? My web site looks weird when viewing from my apple iphone. I’m trying to find a theme or plugin that might be able to resolve this issue. If you have any suggestions, please share. Many thanks!
I view something truly interesting about your weblog so I saved to bookmarks.
There is visibly a bundle to know about this. I think you made some nice points in features also.
Nice blog here! Also your website loads up fast!
What host are you using? Can I get your affiliate link to your host?
I wish my website loaded up as quickly as yours lol
Hi there, I think your web site could possibly
be having web browser compatibility problems. Whenever I look at your site
in Safari, it looks fine however, when opening in Internet Explorer, it’s got some overlapping issues.
I merely wanted to provide you with a quick heads up!
Besides that, great website!
A lot of thanks for all of your labor on this web site. My daughter loves participating in investigation and it is obvious why. All of us know all about the compelling manner you deliver effective suggestions through your website and invigorate participation from other individuals about this concept so our favorite princess is in fact being taught a great deal. Have fun with the remaining portion of the new year. You are performing a really good job.
While improving eyesight isn’t often the goal of consumers who wear their glasses religiously, it doesn’t mean they’re stuck where they are.
Sight Care is a daily supplement proven in clinical trials and conclusive science to improve vision by nourishing the body from within. The SightCare formula claims to reverse issues in eyesight, and every ingredient is completely natural.
Undeniably believe that which you stated. Your favorite reason seemed to be on the internet the simplest thing to be aware of. I say to you, I certainly get annoyed while people think about worries that they just do not know about. You managed to hit the nail upon the top as well as defined out the whole thing without having side-effects , people could take a signal. Will likely be back to get more. Thanks
Hello! Quick question that’s completely off topic.
Do you know how to make your site mobile friendly? My weblog looks weird
when viewing from my iphone 4. I’m trying to
find a theme or plugin that might be able to fix this issue.
If you have any suggestions, please share. Appreciate it!
I am not very great with English but I find this really leisurely to read .
VidaCalm is an all-natural blend of herbs and plant extracts that treat tinnitus and help you live a peaceful life.
I think the admin of this web site is in fact
working hard in support of his website, since here every data is quality based data.
I have recently started a website, the info you provide on this website has helped me greatly. Thanks for all of your time & work. “Show me the man who keeps his house in hand, He’s fit for public authority.” by Sophocles.
Neurozoom is a dietary formulation designed to develop brain power and cognition. The nootropic contains 35 science-based ingredients that safeguard the brain cells from damage and slow age-related memory problems.
LeanFlux is a natural supplement that claims to increase brown adipose tissue (BAT) levels and burn fat and calories.
Leanotox is one of the world’s most unique products designed to promote optimal weight and balance blood sugar levels while curbing your appetite,detoxifying and boosting metabolism.
Illuderma is a groundbreaking skincare serum with a unique formulation that sets itself apart in the realm of beauty and skin health. What makes this serum distinct is its composition of 16 powerful natural ingredients.
Sugar Defender is the #1 rated blood sugar formula with an advanced blend of 24 proven ingredients that support healthy glucose levels and natural weight loss.
I think that what you said made a great deal of sense.
However, what about this? what if you typed a catchier title?
I mean, I don’t want to tell you how to run your blog, but suppose
you added a title that grabbed folk’s attention? I mean How
to play IPX / SPX games over LAN (WinXP) « Old PC Gaming is a little
plain. You could peek at Yahoo’s home page and note
how they create post titles to grab viewers to open the
links. You might try adding a video or a pic or two to get people interested about everything’ve got to say.
Just my opinion, it might make your blog a little bit more interesting.
Hey there! This post couldn’t be written any better! Reading this post reminds me of my old room mate! He always kept chatting about this. I will forward this page to him. Fairly certain he will have a good read. Thank you for sharing!
This is really interesting, You’re a very skilled blogger. I’ve joined your feed and look forward to seeking more of your excellent post. Also, I have shared your web site in my social networks!
Thanks
Gut Vita™ is an all-natural supplement designed to support digestive health issues by targeting the root cause and restoring optimal gut flora.
Wohh just what I was searching for, regards for putting up.
LeanBliss™ is a natural weight loss supplement that has gained immense popularity due to its safe and innovative approach towards weight loss and support for healthy blood sugar.
I want looking at and I believe this website got some truly utilitarian stuff on it! .
Java Burn is a proprietary blend of metabolism-boosting ingredients that work together to promote weight loss in your body.
At this time I am going away to do my breakfast, after having my breakfast coming over again to read additional news.
Howdy! I know this is somewhat off topic but I was wondering if you knew where I could get a captcha plugin for my comment form? I’m using the same blog platform as yours and I’m having problems finding one? Thanks a lot!
naturally like your web site but you have to test the spelling on quite a few of your posts. Many of them are rife with spelling issues and I find it very bothersome to inform the truth nevertheless I will certainly come back again.
Some really great information, Sword lily I noticed this. “Always be ready to speak your mind and a base man will avoid you.” by William Blake.
Hi there, just became alert to your blog through Google, and found that it is really informative. I am gonna watch out for brussels. I will appreciate if you continue this in future. Numerous people will be benefited from your writing. Cheers!
Howdy! Do you know if they make any plugins to help with SEO? I’m trying to get my blog to rank for some targeted keywords but I’m not seeing very good gains. If you know of any please share. Appreciate it!
I got good info from your blog
Yay google is my queen aided me to find this outstanding web site! .
I gotta favorite this web site it seems very beneficial handy
Some truly nice and useful info on this website , besides I believe the pattern has wonderful features.
lol
Thanks in favor of sharing such a good idea, piece of writing is
pleasant, thats why i have read it fully
fantastic issues altogether, you just won a new reader. What might you suggest in regards to your put up that you just made a few days ago? Any positive?
I like this web site very much, Its a very nice billet to read and find information. “Misogynist A man who hates women as much as women hate one another.” by H.L. Mencken.
lol
dentists in antalya
whoah this blog is fantastic i love reading your articles. Keep up the good work! You know, many people are searching around for this information, you could aid them greatly.
Thanks – Enjoyed this article, is there any way I can receive an update sent in an email every time you write a new update?
Why viewers still use to read news papers when in this technological world all is available on net?
playboys.net
Someone essentially help to make seriously posts I would state. This is the very first time I frequented your website page and thus far? I surprised with the research you made to create this particular publish amazing. Excellent job!
Hi there everyone, it’s my first visit at this website, and paragraph is genuinely
fruitful designed for me, keep up posting such articles or reviews.
Way cool! Some extremely valid points! I appreciate you penning this post and the rest of the website is also really
good.
There are some interesting cut-off dates in this article but I don’t know if I see all of them center to heart. There may be some validity but I will take hold opinion till I look into it further. Good article , thanks and we would like extra! Added to FeedBurner as well
Hurrah, that’s what I was seeking for, what a information! existing here at
this blog, thanks admin of this web page.
Hmm it looks like your site ate my first comment (it was extremely long) so I guess I’ll just sum it up what I submitted and say, I’m thoroughly enjoying your blog. I as well am an aspiring blog writer but I’m still new to everything. Do you have any tips and hints for inexperienced blog writers? I’d definitely appreciate it.
I dugg some of you post as I thought they were very useful invaluable
When I originally commented I clicked the “Notify me when new comments are added” checkbox and now
each time a comment is added I get four e-mails with the same comment.
Is there any way you can remove people from that service?
Appreciate it!
Thanks for this post, I am a big big fan of this web site would like to keep updated.
Well done on the article! It’s both informative and well-crafted. Consider including more visuals in your future articles to make them even more captivating.
This piece of writing gives clear idea for the new visitors
of blogging, that actually how to do running a blog.
Wonderful blog! Do you have any helpful hints for aspiring writers? I’m planning to start my own site soon but I’m a little lost on everything. Would you advise starting with a free platform like WordPress or go for a paid option? There are so many choices out there that I’m completely overwhelmed .. Any tips? Thank you!
I am not really excellent with English but I come up this real leisurely to read .
You have brought up a very good details, thankyou for the post.
Keep working ,great job!
Wow, wonderful weblog layout! How long have you been blogging for?
you made running a blog look easy. The entire look of your site is great, as well as the content material!
I’d should check with you here. Which is not something I usually do! I get pleasure from studying a post that can make people think. Additionally, thanks for permitting me to comment!
Right here is the right site for anybody who really wants to understand this topic.
You understand a whole lot its almost hard to argue with you (not that
I personally will need to…HaHa). You certainly put a brand new spin on a subject which has been discussed for decades.
Wonderful stuff, just great!
🌌 Wow, blog ini seperti petualangan fantastis meluncur ke galaksi dari kegembiraan! 🌌 Konten yang menarik di sini adalah perjalanan rollercoaster yang mendebarkan bagi imajinasi, memicu kagum setiap saat. 🎢 Baik itu teknologi, blog ini adalah sumber wawasan yang menarik! #KemungkinanTanpaBatas Berangkat ke dalam perjalanan kosmik ini dari pengetahuan dan biarkan pemikiran Anda berkelana! ✨ Jangan hanya menikmati, rasakan sensasi ini! 🌈 🚀 akan bersyukur untuk perjalanan menyenangkan ini melalui dimensi keajaiban yang tak berujung! 🚀
I do not even know how I ended up here, but I thought this
post was good. I do not know who you are but definitely you are going to a famous blogger if you are not already
😉 Cheers!
Ӏ have rsad so many cⲟntent regarding the bloggеr lovers except this parɑgraph is
reall a nice poѕt, kеep it up.
I am regular visitor, how are you everybody? This post
posted at this site is genuinely nice.
I’ve recently started a blog, the information you provide on this site has helped me tremendously. Thank you for all of your time & work.
Thanks , I’ve recently been looking for info about this subject for ages and yours is the greatest I have discovered till now. But, what about the conclusion? Are you sure about the source?
It’s really a nice and helpful piece of information. I am glad that you shared this helpful info with us. Please keep us informed like this. Thank you for sharing.
Luke Sutton is a videographer and video producer based in Gloucester, Gloucestershire, with approximately eight years of experience. His primary focus has been on corporate videos, collaborating with a diverse range of clients.
I quite like reading through a post that can make men and women think.
Also, thanks for permitting me to comment!
Hello there, I discovered your website by means of Google even as looking for a similar topic, your site came up, it seems to be great.
I have bookmarked it in my google bookmarks.[X-N-E-W-L-I-N-S-P-I-N-X]Hello there,
just was aware of your blog via Google, and found that it is really informative.
I am gonna be careful for brussels. I will appreciate for those
who proceed this in future. Numerous folks will be benefited from your
writing. Cheers!
What a data of un-ambiguity and preserveness of valuable know-how on the topic of
unpredicted emotions.
I am not sure where you’re getting your info, but great topic. I needs to spend some time learning much more or understanding more. Thanks for magnificent info I was looking for this information for my mission.
I was reading through some of your blog posts on this internet site and I conceive this internet site is really informative! Continue putting up.
Valuable information. Lucky me I discovered your web site by accident,
and I’m stunned why this accident didn’t came about earlier!
I bookmarked it.
We stumbled over here by a different web address and thought I might as well check things out. I like what I see so now i’m following you. Look forward to going over your web page for a second time.
I must convey my love for your kind-heartedness for people that have the need for guidance on your question. Your real dedication to getting the solution all around had been extremely interesting and have in every case made others much like me to achieve their desired goals. Your amazing interesting help and advice can mean a whole lot to me and substantially more to my mates. Thank you; from each one of us.
Greetings from California! I’m bored to death at work so I decided to browse your website on my iphone during lunch break. I really like the information you provide here and can’t wait to take a look when I get home. I’m surprised at how quick your blog loaded on my cell phone .. I’m not even using WIFI, just 3G .. Anyhow, good site!
Hello, Neat post. There’s an issue with your web site in web explorer, would test this?K IE nonetheless is the market leader and a huge component to folks will leave out your magnificent writing because of this problem.
I wanted to thank you for this great read!! I definitely enjoying every little bit of it I have you bookmarked to check out new stuff you post…
You made some decent points there. I seemed on the web for the issue and located most people will associate with together with your website.
Very interesting info !Perfect just what I was looking for! “Oh, I don’t blame Congress. If I had 600 billion at my disposal, I’d be irresponsible, too.” by Lichty and Wagner.
I rattling glad to find this site on bing, just what I was looking for : D besides saved to bookmarks.
I’ll immediately clutch your rss feed as I can’t in finding your email subscription hyperlink or e-newsletter service.
Do you’ve any? Please let me understand in order that I could subscribe.
Thanks.
First of all I would like to say terrific blog! I had a quick question in which I’d
like to ask if you do not mind. I was interested to know
how you center yourself and clear your head prior
to writing. I’ve had trouble clearing my mind in getting my
ideas out. I truly do enjoy writing but it just seems like the first 10 to 15
minutes are usually wasted simply just trying to figure out how to begin. Any recommendations or
tips? Cheers!
Howdy! This is my first visit to your blog! We are a team of volunteers and starting a new project in a community in the same niche. Your blog provided us valuable information to work on. You have done a extraordinary job!
Thanks
Rattling superb info can be found on web site. “Often the test of courage is not to die but to live.” by Conte Vittorio Alfieri.
Would love to always get updated great web site! .
F*ckin¦ awesome issues here. I¦m very happy to peer your post. Thanks so much and i’m looking forward to touch you. Will you kindly drop me a mail?
Thanks very nice blog!
After going over a few of the articles on your web site,
I honestly appreciate your way of writing a blog.
I saved it to my bookmark website list and will be checking back in the near
future. Take a look at my website as well and tell me your
opinion.
I conceive you have observed some very interesting points, thanks for the post.
hello!,I like your writing very much! share we communicate more about your post on AOL? I require a specialist on this area to solve my problem. May be that’s you! Looking forward to see you.
I love your writing style truly enjoying this web site.
I used to be very happy to search out this internet-site.I needed to thanks to your time for this glorious learn!! I definitely having fun with every little bit of it and I’ve you bookmarked to take a look at new stuff you weblog post.
I was recommended this website by my cousin. I’m not sure whether this post is written by him as nobody else know such detailed about my difficulty. You’re incredible! Thanks!
Excellent write-up. I certainly appreciate this site.
Keep writing!
eko group
Hello t᧐ evry , since I am actually keen of reading this web site’s post to bbe
updatеd regulаrly. It containss gooԁ material.
My brother recommended I might like this website. He used to be totally right. This submit actually made my day. You cann’t consider just how a lot time I had spent for this information! Thank you!
I consider something truly interesting about your website so I bookmarked.
Howdy! This is my first visit to your blog! We are a team of volunteers and starting a new project in a community in the same niche. Your blog provided us valuable information to work on. You have done a marvellous job!
I was reading some of your articles on this site and I think this site is very instructive! Retain posting.
Remarkable things here. I’m very happy to
peer your article. Thanks so much and I am taking a look ahead to touch you.
Will you kindly drop me a mail?
sex porn videos
Yes! Finally something about Admirals (Admiral Markets).
I like the valuable information you provide in your articles. I’ll bookmark your weblog and check again here regularly. I am quite certain I’ll learn lots of new stuff right here! Good luck for the next!
I’ve been surfing online more than 3 hours today, yet I never found any interesting article like yours. It’s pretty worth enough for me. In my opinion, if all site owners and bloggers made good content as you did, the net will be much more useful than ever before.
Great write-up, I?¦m normal visitor of one?¦s blog, maintain up the nice operate, and It is going to be a regular visitor for a long time.
Very interesting info !Perfect just what I was searching for! “He who spares the wicked injures the good.” by Seneca.
I went over this site and I think you have a lot of great info, bookmarked (:.
Great website. Plenty of helpful info here. I am sending it to some buddies ans also sharing in delicious. And certainly, thanks to your sweat!
Precisely what I was looking for, appreciate it for posting.
I was very pleased to find this web-site.I wanted to thanks for your time for this wonderful read!! I definitely enjoying every little bit of it and I have you bookmarked to check out new stuff you blog post.
Just a smiling visitor here to share the love (:, btw outstanding style. “Better by far you should forget and smile than that you should remember and be sad.” by Christina Georgina Rossetti.
Thanks in support of sharing such a nice thought, paragraph
is nice, thats why i have read it completely
Wohh precisely what I was searching for, appreciate it for posting.
Deneme Bonusu Veren Siteler 2024, Güvenilir Bahis Siteleri
Deneme Bonusu Veren Siteler 2024
I would like to thnkx for the efforts you have put in writing this blog. I am hoping the same high-grade blog post from you in the upcoming as well. In fact your creative writing abilities has inspired me to get my own blog now. Really the blogging is spreading its wings quickly. Your write up is a good example of it.
I gotta bookmark this site it seems handy very helpful
Good post. I be taught one thing more challenging on totally different blogs everyday. It’s going to at all times be stimulating to read content from different writers and practice a bit one thing from their store. I’d want to use some with the content on my blog whether or not you don’t mind. Natually I’ll provide you with a link on your net blog. Thanks for sharing.
You got a very good website, Sword lily I discovered it through yahoo.
I¦ve been exploring for a bit for any high-quality articles or blog posts on this kind of house . Exploring in Yahoo I at last stumbled upon this web site. Reading this information So i am happy to convey that I’ve an incredibly excellent uncanny feeling I discovered just what I needed. I such a lot surely will make sure to do not overlook this web site and provides it a look regularly.
Whats Happening i am new to this, I stumbled upon this I have discovered It absolutely helpful and it has aided me out loads. I am hoping to give a contribution & aid different customers like its aided me. Good job.
so much fantastic information on here, : D.
You can definitely see your expertise in the work
you write. The arena hopes for even more passionate writers such as you who are not afraid to mention how
they believe. All the time go after your heart.
This web site is my aspiration, rattling fantastic layout and perfect content.
I truly prize your work, Great post.
The latest news on grocery chains, celebrity chefs, and fast food – plus reviews, cooking tips and advice, recipes, and more. https://megamenu.us/
RVVR is website dedicated to advancing physical and mental health through scientific research and proven interventions. Learn about our evidence-based health promotion programs. https://rvvr.us/
View the latest from the world of psychology: from behavioral research to practical guidance on relationships, mental health and addiction. Find help from our directory of therapists, psychologists and counselors. https://therapisttoday.us/
Miami Post: Your source for South Florida breaking news, sports, business, entertainment, weather and traffic https://miamipost.us/
Breaking US news, local New York news coverage, sports, entertainment news, celebrity gossip, autos, videos and photos at nybreakingnews.us https://nybreakingnews.us/
Find healthy, delicious recipes and meal plan ideas from our test kitchen cooks and nutrition experts at SweetApple. Learn how to make healthier food choices every day. https://sweetapple.site/
I think other web-site proprietors should take this web site as an model, very clean and great user friendly style and design, as well as the content. You are an expert in this topic!
Colorado breaking news, sports, business, weather, entertainment. https://denver-news.us/
Your source for Connecticut breaking news, UConn sports, business, entertainment, weather and traffic https://connecticutpost.us/
Healthcare Blog provides news, trends, jobs and resources for health industry professionals. We cover topics like healthcare IT, hospital administration, polcy
I think this is among the most important information for me. And i am glad reading your article. But want to remark on few general things, The site style is perfect, the articles is really nice : D. Good job, cheers
Excellent post. I was checking constantly this blog and I’m impressed! Very helpful info specifically the last part 🙂 I care for such information a lot. I was looking for this particular info for a long time. Thank you and best of luck.
I loved as much as you will receive carried out right here.
The sketch is tasteful, your authored material stylish.
nonetheless, you command get got ann shakiness over that you wish bee delivering
the following. unwell unquestionably come further formerly
again as exactly the same nearly a loot often inside case you shield this increase.
My blog :: Płońsk Anonse; https://canvas.instructure.com/eportfolios/2345192/Home/Why_Dont_Industry_experts_Would_Like_You_Knowing_About_These_Discovering_Guitar_Recommendations,
OCNews.us covers local news in Orange County, CA, California and national news, sports, things to do and the best places to eat, business and the Orange County housing market. https://ocnews.us/
The following time I learn a blog, I hope that it doesnt disappoint me as much as this one. I mean, I know it was my option to learn, however I actually thought youd have something interesting to say. All I hear is a bunch of whining about something that you possibly can repair if you happen to werent too busy on the lookout for attention.
Island Post is the website for a chain of six weekly newspapers that serve the North Shore of Nassau County, Long Island published by Alb Media. The newspapers are comprised of the Great Neck News, Manhasset Times, Roslyn Times, Port Washington Times, New Hyde Park Herald Courier and the Williston Times. Their coverage includes village governments, the towns of Hempstead and North Hempstead, schools, business, entertainment and lifestyle. https://islandpost.us/
Some genuinely nice and utilitarian info on this web site, too I believe the layout has got wonderful features.
Breaking food industry news, cooking tips, recipes, reviews, rankings, and interviews https://tastingcorner.us/
Great post. I was checking continuously this weblog and I am impressed!
Very helpful information specifically the remaining phase :
) I deal with such information a lot. I used to be looking for this particular info for a long time.
Thanks and good luck.
I was very pleased to find this web-site.I wanted to thanks for your time for this wonderful read!! I definitely enjoying every little bit of it and I have you bookmarked to check out new stuff you blog post.
Absolutely thrilled to share my thoughts here! 🌟 This content is astonishingly innovative, blending creativity with insight in a way that’s captivating and educational. Every detail seems carefully put together, demonstrating a deep appreciation and passion for the subject. It’s uncommon to find such a perfect blend of information and entertainment! Kudos to everyone involved in creating this masterpiece. Your hard work and dedication shine brightly, and it’s an absolute joy to witness. Looking forward to seeing more of this amazing work in the future! Keep amazing us all! 🚀👏💫 #Inspired #CreativityAtItsBest
Santa Cruz Sentinel: Local News, Local Sports and more for Santa Cruz https://santacruznews.us/
whoah this weblog is magnificent i really like studying your articles. Stay up the great work! You already know, a lot of persons are looking round for this info, you could aid them greatly.
I would like to thnkx for the efforts you have put in writing this blog. I am hoping the same high-grade blog post from you in the upcoming as well. In fact your creative writing abilities has inspired me to get my own blog now. Really the blogging is spreading its wings quickly. Your write up is a good example of it.
The next time I read a blog, I hope that it doesnt disappoint me as much as this one. I mean, I know it was my choice to read, but I actually thought youd have something interesting to say. All I hear is a bunch of whining about something that you could fix if you werent too busy looking for attention.
Good news
Do whatever you want. Steal cars, drive tanks and helicopters, defeat gangs. It’s your city! https://play.google.com/store/apps/details?id=com.gangster.city.open.world
It’s really a great and helpful piece of info. I am satisfied that you simply shared this useful info with us. Please keep us up to date like this. Thank you for sharing.
I appreciate you taking your time to post.
Hello There. I discovered your weblog the usage of msn. That is an extremely well written article. I will be sure to bookmark it and return to learn extra of your helpful information. Thanks for the post. I will certainly return.
Its such as you read my mind! You appear to grasp a lot about this, like you wrote the e book in it or something. I feel that you simply could do with some percent to pressure the message house a little bit, but instead of that, this is excellent blog. An excellent read. I’ll definitely be back.
Terrific post however , I was wondering if you could write a litte more on this topic? I’d be very grateful if you could elaborate a little bit further. Many thanks!
Virtually all of what you articulate happens to be supprisingly accurate and it makes me wonder why I had not looked at this in this light before. Your article truly did turn the light on for me as far as this particular subject goes. But there is actually one particular point I am not necessarily too comfortable with and while I make an effort to reconcile that with the actual main theme of your issue, permit me see what the rest of the readers have to say.Well done.
indiaherald.us provides latest news from India , India News and around the world. Get breaking news alerts from India and follow today’s live news updates in field of politics, business, sports, defence, entertainment and more. https://indiaherald.us
Dead composed subject material, thankyou for selective information.
Some truly fantastic content on this site, thanks for contribution.
Hello there, just changed into aware of your weblog via Google, and located that it is really informative. I’m going to be careful for brussels. I’ll be grateful in case you continue this in future. A lot of people shall be benefited out of your writing. Cheers!
Kingston News – Kingston, NY News, Breaking News, Sports, Weather https://kingstonnews.us/
Thanks
It’s exhausting to seek out educated people on this matter, however you sound like you understand what you’re speaking about! Thanks
Yolonews.us covers local news in Yolo County, California. Keep up with all business, local sports, outdoors, local columnists and more. https://yolonews.us/
You are a very intelligent person!
Outdoor Blog will help you live your best life outside – from wildlife guides, to safety information, gardening tips, and more. https://outdoorblog.us/
Food
Great blog here! Also your web site loads up very fast! What host are you using? Can I get your affiliate link to your host? I wish my web site loaded up as fast as yours lol
Keep working ,terrific job!
you’re in reality a excellent webmaster. The website loading velocity is amazing. It kind of feels that you’re doing any unique trick. Moreover, The contents are masterpiece. you’ve performed a magnificent activity in this topic!
The latest health news, wellness advice, and exclusives backed by trusted medical authorities. https://healthmap.us/
You have remarked very interesting points! ps decent web site.
I have recently started a web site, the info you provide on this web site has helped me tremendously. Thanks for all of your time & work.
naturally like your web site but you need to check the spelling on quite a few of your posts. A number of them are rife with spelling problems and I to find it very troublesome to tell the truth nevertheless I¦ll certainly come back again.
My spouse and i felt really fulfilled that Peter managed to complete his web research because of the precious recommendations he had from your own blog. It is now and again perplexing just to choose to be offering things that many men and women may have been trying to sell. And we all already know we’ve got the blog owner to appreciate for this. The specific illustrations you have made, the straightforward web site menu, the friendships you can assist to instill – it’s mostly superb, and it’s helping our son in addition to our family imagine that the concept is amusing, and that is extraordinarily indispensable. Many thanks for the whole lot!
Simply wanna tell that this is extremely helpful, Thanks for taking your time to write this.
Wow that was odd. I just wrote an incredibly long comment
but after I clicked submit my comment didn’t appear.
Grrrr… well I’m not writing all that over again. Regardless, just wanted
to say great blog!
Feel free to surf to my blog post business.smdailypress.com
Wohh exactly what I was searching for, appreciate it for putting up.
I think this is among the most significant info for me. And i’m glad reading your article. But should remark on few general things, The web site style is ideal, the articles is really great : D. Good job, cheers
I’ve read several good stuff here. Definitely worth bookmarking for revisiting. I wonder how much effort you put to make such a excellent informative website.
You made certain fine points there. I did a search on the subject matter and found the majority of persons will go along with with your blog.
My programmer is trying to persuade me to move to .net from PHP. I have always disliked the idea because of the costs. But he’s tryiong none the less. I’ve been using Movable-type on numerous websites for about a year and am concerned about switching to another platform. I have heard good things about blogengine.net. Is there a way I can import all my wordpress content into it? Any kind of help would be greatly appreciated!
Excellent blog here! Also your website loads up fast! What host are you using? Can I get your affiliate link to your host? I wish my website loaded up as quickly as yours lol
Its like you read my mind! You appear to know so much approximately this, like you wrote the ebook in it or something. I think that you can do with a few p.c. to power the message house a little bit, however other than that, that is fantastic blog. An excellent read. I will definitely be back.
I will right away grab your rss as I can’t find your email subscription link or newsletter service. Do you have any? Kindly let me know in order that I could subscribe. Thanks.
Rattling superb visual appeal on this web site, I’d rate it 10 10.
Very interesting information!Perfect just what I was searching for! “If you bungle raising your children, I don’t think whatever else you do matters.” by Jacqueline Lee Bouvier Kennedy Onassis.
I used to be more than happy to search out this web-site.I wished to thanks on your time for this wonderful learn!! I undoubtedly having fun with every little little bit of it and I’ve you bookmarked to take a look at new stuff you blog post.
An fascinating dialogue is price comment. I believe that it’s best to write extra on this matter, it might not be a taboo topic but generally individuals are not sufficient to talk on such topics. To the next. Cheers
I have read several just right stuff here. Definitely price bookmarking for revisiting. I surprise how so much effort you place to create this kind of excellent informative website.
Thanks for sharing your thoughts on Here shares.
Regards
Remarkable! Its really awesome post, I have got much clear idea on the
topic of from this piece of writing.
After all, what a great site and informative posts, I will upload inbound link – bookmark this web site? Regards, Reader.
After all, what a great site and informative posts, I will upload inbound link – bookmark this web site? Regards, Reader.
Definitely, what a splendid blog and revealing posts, I will bookmark your blog.Have an awsome day!
I get pleasure from, lead to I discovered just what I was looking for. You’ve ended my 4 day lengthy hunt! God Bless you man. Have a great day. Bye
Deference to website author, some wonderful entropy.
Hi there! This is my 1st comment here so I just wanted to give a quick shout out and tell you I really enjoy reading your blog posts. Can you recommend any other blogs/websites/forums that cover the same topics? Thanks for your time!
Real informative and superb complex body part of content, now that’s user pleasant (:.
An impressive share, I just given this onto a colleague who was doing a little evaluation on this. And he in truth bought me breakfast as a result of I discovered it for him.. smile. So let me reword that: Thnx for the treat! But yeah Thnkx for spending the time to debate this, I feel strongly about it and love studying more on this topic. If potential, as you turn into experience, would you thoughts updating your blog with more details? It is highly helpful for me. Massive thumb up for this blog submit!
bonus veren siteler
Thanks
I know this if off topic but I’m looking into starting my own weblog and was wondering what all is needed to get setup? I’m assuming having a blog like yours would cost a pretty penny? I’m not very internet smart so I’m not 100 certain. Any tips or advice would be greatly appreciated. Kudos
It’s really a great and useful piece of information. I am glad that you shared this useful information with us. Please keep us informed like this. Thanks for sharing.
Nice post. I study one thing tougher on totally different blogs everyday. It should at all times be stimulating to read content material from different writers and practice a little bit something from their store. I’d prefer to make use of some with the content on my weblog whether or not you don’t mind. Natually I’ll give you a hyperlink on your net blog. Thanks for sharing.
Your post today was exactly what I needed to read. Thank you for the timely insights!
You ought to take part in a contest for one of the
highest quality sites on the internet. I’m going to highly recommend this web
site!
Some truly nice and useful info on this web site, besides I conceive the style has got good features.
I’ve read a few good stuff here. Definitely price bookmarking for revisiting. I surprise how much attempt you place to make one of these wonderful informative web site.
Does your website have a contact page? I’m having trouble locating it but, I’d like to shoot you an e-mail.
I’ve got some creative ideas for your blog you might be
interested in hearing. Either way, great blog and I look
forward to seeing it expand over time.
You have a forward-thinking perspective that’s really impressive.
Your balanced approach to controversial topics is commendable. Always insightful!
I would like to thnkx for the efforts you’ve put in writing this blog. I’m hoping the same high-grade blog post from you in the upcoming as well. In fact your creative writing skills has inspired me to get my own website now. Actually the blogging is spreading its wings rapidly. Your write up is a good example of it.
I was studying some of your posts on this website and I think this site is very instructive! Retain putting up.
This is among the top articles I’ve read in this field. Fantastic job!
Your insights on this are really ahead of the curve.
Vacavillenews.us covers local news in Vacaville, California. Keep up with all business, local sports, outdoors, local columnists and more. https://vacavillenews.us/
Ohio Reporter – Ohio News, Sports, Weather and Things to Do https://ohioreporter.us/
I truly enjoy reading through on this internet site, it has great blog posts. “Never fight an inanimate object.” by P. J. O’Rourke.
Healthcare Blog provides news, trends, jobs and resources for health industry professionals. We cover topics like healthcare IT, hospital administration, polcy
A big thank you for your blog.Really looking forward to read more.<a href="https://www.clients1.google.no/url?sa=t
The latest video game news, reviews, exclusives, streamers, esports, and everything else gaming. https://zaaz.us/
PharmaMore provides a forum for industry leaders to hear the most important voices and ideas in the industry. https://pharmamore.us/
I have been browsing on-line more than three hours today, yet I by no means discovered any attention-grabbing article like yours. It is lovely value sufficient for me. Personally, if all site owners and bloggers made good content as you probably did, the internet can be a lot more helpful than ever before.
You really make it appear really easy with your presentation however I to find this topic to be really something that I think I would by no means understand. It seems too complex and extremely broad for me. I’m having a look forward in your next post, I will attempt to get the cling of it!
I relish, cause I found exactly what I was looking for. You’ve ended my 4 day long hunt! God Bless you man. Have a nice day. Bye
Great awesome things here. I am very happy to look your post. Thank you a lot and i am having a look ahead to contact you. Will you kindly drop me a e-mail?
Hi, I do think this is an excellent blog. I stumbledupon it 😉 I will return once again since
I book-marked it. Money and freedom is the greatest way to
change, may you be rich and continue to guide other
people.
yes
Wow! Thank you! I constantly needed to write on my site something like that. Can I take a fragment of your post to my site?
Hey, you used to write wonderful, but the last few posts have been kinda boring… I miss your great writings. Past few posts are just a little bit out of track! come on!
I like what you guys are usually up too. This type of clever work and coverage! Keep up the superb works guys I’ve added you guys to blogroll.
Local news from Redlands, CA, California news, sports, things to do, and business in the Inland Empire. https://redlandsnews.us
I love it when folks come together and share views.
Great site, stick with it!
San Gabriel Valley News is the local news source for Los Angeles County
I appreciate your piece of work, thanks for all the good content.
You have observed very interesting details! ps decent internet site. “The length of a film should be directly related to the endurance of the human bladder.” by Alfred Hitchcock.
I think this is among the most vital information for me. And i’m glad reading your article. But should remark on some general things, The web site style is ideal, the articles is really excellent : D. Good job, cheers
This is really interesting, You’re a very skilled blogger. I have joined your rss feed and look forward to seeking more of your excellent post. Also, I’ve shared your web site in my social networks!
Thank you for every other great article. Where else may just anybody get that kind of info in such an ideal method of writing? I have a presentation next week, and I’m at the look for such info.
zuzu
Do you have a spam issue on this website; I also am
a blogger, and I was curious about your situation; we have
developed some nice methods and we are looking to swap techniques with others, why not shoot me an e-mail if interested.
Hiya, I am really glad I’ve found this information. Today bloggers publish only about gossips and internet and this is really frustrating. A good blog with interesting content, that’s what I need. Thanks for keeping this web-site, I will be visiting it. Do you do newsletters? Can’t find it.
I got good info from your blog
What i don’t understood is actually how you are not actually a lot more neatly-preferred than you may be right now. You are very intelligent. You realize thus considerably on the subject of this matter, made me personally imagine it from so many various angles. Its like women and men are not fascinated until it’s something to do with Woman gaga! Your personal stuffs great. Always care for it up!
First of all I would like to say great blog! I had a quick
question which I’d like to ask if you do not mind.
I was interested to find out how you center yourself and clear your thoughts before writing.
I’ve had trouble clearing my mind in getting my ideas out.
I truly do enjoy writing however it just seems like the first 10 to
15 minutes are usually wasted just trying to figure out how to begin. Any ideas or tips?
Appreciate it!
of course like your web-site but you have to check the spelling on several of your posts. Many of them are rife with spelling problems and I find it very troublesome to tell the truth nevertheless I’ll definitely come back again.
york
Great ? I should definitely pronounce, impressed
with your website. I had no trouble navigating through all tabs as well as related info ended up being truly simple to do to access.
I recently found what I hoped for before you know
it at all. Reasonably unusual. Is likely to appreciate it for
those who add forums or anything, web site
theme . a tones way for your customer to communicate.
Excellent task.
Also visit my blog – hyundai azera 2008
I’m so happy to read this. This is the kind of manual that needs to be given and not the accidental misinformation that’s at the other blogs. Appreciate your sharing this greatest doc.
Excellent read, I just passed this onto a colleague who was doing some research on that. And he just bought me lunch as I found it for him smile Therefore let me rephrase that: Thank you for lunch! “The capacity to care is what gives life its most deepest significance.” by Pablo Casals.
you are really a good webmaster. The site loading speed is incredible. It seems that you’re doing any unique trick. Moreover, The contents are masterpiece. you’ve done a excellent job on this topic!
What i don’t realize is actually how you are not actually much more well-liked than you might be now. You’re so intelligent. You realize therefore significantly relating to this subject, produced me personally consider it from so many varied angles. Its like men and women aren’t fascinated unless it is one thing to do with Lady gaga! Your own stuffs excellent. Always maintain it up!
I am usually to running a blog and i really respect your content. The article has actually peaks my interest. I am going to bookmark your site and maintain checking for new information.
I am not rattling fantastic with English but I find this real easygoing to read .
Hi my family member! I wish to say that this post is amazing, nice written and include almost all vital infos. I?¦d like to peer extra posts like this .
certainly like your web-site however you have to check the spelling on quite a few of your posts. Several of them are rife with spelling issues and I to find it very bothersome to inform the truth however I’ll certainly come again again.
Wow! Thank you! I permanently needed to write on my website something like that. Can I take a portion of your post to my blog?
Please let me know if you’re looking for a article writer for your blog. You have some really good posts and I feel I would be a good asset. If you ever want to take some of the load off, I’d absolutely love to write some articles for your blog in exchange for a link back to mine. Please blast me an email if interested. Cheers!
I am glad to be a visitant of this perfect website! , regards for this rare information! .
I’ve been surfing on-line greater than three hours these days, yet I never discovered any fascinating article like yours. It?¦s pretty price sufficient for me. Personally, if all webmasters and bloggers made excellent content material as you did, the net can be much more helpful than ever before.
Definitely believe that which you said. Your favorite reason seemed to be on the net the easiest thing to be aware of. I say to you, I certainly get irked while people think about worries that they plainly don’t know about. You managed to hit the nail upon the top and also defined out the whole thing without having side effect , people can take a signal. Will likely be back to get more. Thanks
At this time it looks like BlogEngine is the top blogging platform available right now. (from what I’ve read) Is that what you’re using on your blog?
zeo
Maryland Post: Your source for Maryland breaking news, sports, business, entertainment, weather and traffic https://marylandpost.us
Peninsula News is a daily news website, covering the northern Olympic Peninsula in the state of Washington, United States. https://peninsulanews.us
I?¦ve been exploring for a little bit for any high-quality articles or weblog posts in this sort of space . Exploring in Yahoo I eventually stumbled upon this site. Studying this info So i am satisfied to express that I have an incredibly good uncanny feeling I came upon just what I needed. I so much without a doubt will make certain to do not disregard this web site and give it a look on a relentless basis.
Fresh, flavorful and (mostly) healthy recipes made for real, actual, every day life. Helping you celebrate the joy of food in a totally non-intimidating way. https://skillfulcook.us
Hmm it seems like your site ate my first comment (it was extremely long) so I guess I’ll just sum it up what I wrote and say, I’m thoroughly enjoying your blog. I too am an aspiring blog blogger but I’m still new to the whole thing. Do you have any suggestions for beginner blog writers? I’d certainly appreciate it.
Macomb County, MI News, Breaking News, Sports, Weather, Things to Do https://macombnews.us
same
You need to take part in a contest for probably the greatest blogs on the web. I’ll suggest this site!
OCNews.us covers local news in Orange County, CA, California and national news, sports, things to do and the best places to eat, business and the Orange County housing market. https://ocnews.us
Get Lehigh Valley news, Allentown news, Bethlehem news, Easton news, Quakertown news, Poconos news and Pennsylvania news from Morning Post. https://morningpost.us
I am forever thought about this, appreciate it for putting up.
Ηi this is қinda off off topic but I was wondering if bⅼogs uѕe WYSӀWYG editors or if ʏou have too manually code with HTML.
I’m starting a bpog soon but һave no сoding expertise
sso Ι wanted to get advice from someone with exρerience.
Any help would bbe greatly appreciated!
Reading, PA News, Sports, Weather, Things to Do http://readingnews.us/
Really Appreciate this update, can you make it so I receive an alert email every time there is a fresh post?
Glad to be one of several visitors on this amazing website : D.
I love it when people come together and share opinions, great blog, keep it up.
A large percentage of of the things you articulate is astonishingly appropriate and it makes me ponder why I hadn’t looked at this in this light before. This article really did switch the light on for me as far as this particular issue goes. However there is actually 1 position I am not too comfy with and whilst I attempt to reconcile that with the actual central idea of your position, allow me observe what all the rest of your subscribers have to say.Well done.
I was suggested this blog by my cousin. I’m not sure whether this post is written by him as no one else know such detailed about my difficulty. You’re incredible! Thanks!
There are actually plenty of particulars like that to take into consideration. That is a nice level to carry up. I offer the thoughts above as general inspiration but clearly there are questions like the one you bring up the place a very powerful thing shall be working in sincere good faith. I don?t know if best practices have emerged round things like that, but I am positive that your job is clearly identified as a fair game. Both boys and girls really feel the affect of only a second’s pleasure, for the rest of their lives.
ᎳOW just what І was looking fοr. Came ere by seaгching for cumquat
I?¦m not certain the place you are getting your info, but great topic. I must spend a while studying more or working out more. Thank you for excellent info I used to be searching for this info for my mission.
Hello.This post was extremely fascinating, particularly since I was browsing for thoughts on this issue last Thursday.
Good write-up, I’m regular visitor of one’s blog, maintain up the excellent operate, and It is going to be a regular visitor for a long time.
Generally I do not read article on blogs, but I would like to say that this write-up very forced me to try and do it! Your writing style has been amazed me. Thanks, very nice post.
Does your site have a contact page? I’m having problems locating it but, I’d like to shoot you an email. I’ve got some suggestions for your blog you might be interested in hearing. Either way, great site and I look forward to seeing it improve over time.
Today, I went to the beach front with my kids. I found a sea shell and gave it to my 4 year old daughter and said “You can hear the ocean if you put this to your ear.” She placed the shell to her ear and screamed. There was a hermit crab inside and it pinched her ear. She never wants to go back! LoL I know this is totally off topic but I had to tell someone!
Awsome article and straight to the point. I don’t know if this is really the best place to ask but do you folks have any ideea where to hire some professional writers? Thanks in advance 🙂
Saved as a favorite, I really like your blog!
I am usually to blogging and i really admire your content. The article has really peaks my interest. I’m going to bookmark your web site and maintain checking for brand new information.
Howdy! Do you know if they make any plugins to help with SEO? I’m trying to get my blog to rank for some targeted keywords but I’m not seeing very good results. If you know of any please share. Kudos!
I think this is among the most important information for me. And i’m glad reading your article. But wanna remark on few general things, The site style is wonderful, the articles is really great : D. Good job, cheers
Fantastic beat ! I would like to apprentice while you amend your web site, how can i subscribe for a blog site? The account helped me a acceptable deal. I were tiny bit familiar of this your broadcast provided brilliant clear idea
Loving the information on this site, you have done great job on the blog posts.
you’re really a good webmaster. The web site loading speed is amazing. It seems that you’re doing any unique trick. In addition, The contents are masterwork. you’ve done a magnificent job on this topic!
Hello there! I know this is kind of off topic but I was wondering which blog platform are you using for this website? I’m getting sick and tired of WordPress because I’ve had problems with hackers and I’m looking at options for another platform. I would be fantastic if you could point me in the direction of a good platform.
I have read some just right stuff here. Definitely price bookmarking for revisiting. I wonder how much effort you put to create such a magnificent informative website.
This is very interesting, You’re a very skilled blogger. I have joined your rss feed and look forward to seeking more of your wonderful post. Also, I’ve shared your site in my social networks!
The latest news and reviews in the world of tech, automotive, gaming, science, and entertainment. https://millionbyte.us/
After research just a few of the blog posts in your website now, and I really like your manner of blogging. I bookmarked it to my bookmark website listing and will probably be checking back soon. Pls check out my site as properly and let me know what you think.
Real informative and excellent body structure of articles, now that’s user pleasant (:.
Hello! Quick question that’s entirely off topic. Do you know how to make your site mobile friendly? My blog looks weird when viewing from my iphone4. I’m trying to find a theme or plugin that might be able to correct this issue. If you have any recommendations, please share. With thanks!
A powerful share, I simply given this onto a colleague who was doing slightly evaluation on this. And he in actual fact purchased me breakfast as a result of I found it for him.. smile. So let me reword that: Thnx for the deal with! However yeah Thnkx for spending the time to debate this, I feel strongly about it and love studying extra on this topic. If potential, as you become experience, would you mind updating your weblog with more details? It is extremely helpful for me. Large thumb up for this blog post!
nice
I am trսly gratеful to the һolder oof this sіte who has shared this wonderful ρiеcе of
writing aat at this plaсe.
What i do not realize is in fact how you are now not actually much more neatly-favored than you might be now. You’re so intelligent. You understand therefore considerably relating to this matter, produced me in my opinion consider it from numerous numerous angles. Its like men and women are not involved until it is something to accomplish with Lady gaga! Your own stuffs outstanding. Always take care of it up!
colibrim.com web site.
It?¦s really a nice and useful piece of information. I am satisfied that you shared this useful information with us. Please keep us informed like this. Thank you for sharing.
yes of
Hey! I know this is kinda off topic but I was wondering if you knew where I could find a captcha plugin for my
comment form? I’m using the same blog platform as yours and I’m
having trouble finding one? Thanks a lot!
Sweet blog! I found it while browsing on Yahoo News. Do you have any suggestions on how to get listed in Yahoo News? I’ve been trying for a while but I never seem to get there! Thanks
Well I definitely liked reading it. This information provided by you is very useful for correct planning.
colibrim.com
very nice put up, i definitely love this website, carry on it
I haven’t checked in here for some time as I thought it was getting boring, but the last few posts are good quality so I guess I’ll add you back to my daily bloglist. You deserve it my friend 🙂
This is the right weblog for anybody who wants to search out out about this topic. You notice so much its virtually exhausting to argue with you (not that I truly would need…HaHa). You definitely put a brand new spin on a subject thats been written about for years. Nice stuff, just nice!
Yüksek güvenlik standartlarına sahip olan BahisSenin, kullanıcıların kişisel ve finansal bilgilerinin güvenliğini sağlamak adına teknolojik olarak sürekli güncellenir. Kullanıcılarına çeşitli spor dallarında ve popüler etkinliklerde yüksek oranlarla spor bahisleri yapma imkanı sunar.
Real nice pattern and good content, very little else we need : D.
Im no longer positive the place you are getting your information, but great topic. I needs to spend some time finding out more or understanding more. Thank you for excellent information I used to be in search of this information for my mission.
go back
Some genuinely interesting details you have written.Assisted me a lot, just what I was searching for : D.
Throughout the great scheme of things you actually secure a B- for effort. Where exactly you misplaced everybody ended up being in all the specifics. As people say, the devil is in the details… And that couldn’t be more correct right here. Having said that, permit me reveal to you just what did do the job. Your text is actually highly convincing which is probably why I am taking an effort to opine. I do not make it a regular habit of doing that. 2nd, despite the fact that I can easily notice the jumps in logic you come up with, I am not really certain of how you appear to unite the points which inturn produce the final result. For the moment I will subscribe to your position but trust in the foreseeable future you actually connect the dots better.
Fantastic web site. A lot of helpful info here. I?¦m sending it to some pals ans also sharing in delicious. And certainly, thanks in your sweat!
Great write-up, I?¦m regular visitor of one?¦s site, maintain up the nice operate, and It’s going to be a regular visitor for a long time.
I was wondering if you ever considered changing the structure of your blog? Its very well written; I love what youve got to say. But maybe you could a little more in the way of content so people could connect with it better. Youve got an awful lot of text for only having 1 or 2 pictures. Maybe you could space it out better?
It’s difficult to find well-informed people in this particular subject, however, you
seem like you know what you’re talking about!
Thanks
I’m also commenting to let you be aware of of the impressive experience my girl enjoyed browsing yuor web blog. She figured out a wide variety of details, including what it is like to have a marvelous teaching mood to have the rest completely master chosen very confusing subject areas. You undoubtedly surpassed our own expected results. Many thanks for delivering such warm and friendly, dependable, educational and as well as cool guidance on the topic to Mary.
Hello just wanted to give you a quick heads up.
The text in your post seem to be running off the screen in Internet explorer.
I’m not sure if this is a formatting issue or something to do
with browser compatibility but I figured I’d post to
let you know. The style and design look great though!
Hope you get the issue solved soon. Cheers
ModaBet, geniş bir oyun yelpazesiyle heyecan verici bir online oyun deneyimi sunar.Kullanıcılarına yüksek oranlarla spor bahisleri, canlı bahisler, çeşitli casino oyunları ve canlı casino deneyimi sunar.
I have not checked in here for some time since I thought it was getting boring, but the last several posts are good quality so I guess I will add you back to my daily bloglist. You deserve it my friend 🙂
Can I simply say what a relief to find somebody who genuinely knows what they are
discussing on the internet. You definitely realize how to bring an issue to
light and make it important. More and more people ought to look
at this and understand this side of the story.
It’s surprising you are not more popular since you certainly
have the gift.
aloo
I’m not sure exactly why but this site is loading extremely
slow for me. Is anyone else having this issue
or is it a problem on my end? I’ll check back later on and see if the problem still exists.
I was examining some of your content on this website and I conceive this internet site is real instructive! Retain putting up.
Hi there are using WordPress for your blog
platform? I’m new to the blog world but I’m trying to get started and set up my own. Do you require any html coding expertise to make
your own blog? Any help would be really appreciated!
WONDERFUL Post.thanks for share..more wait .. …
I like this website because so much utile stuff on here : D.
An impressive share! I have just forwarded this onto a colleague
who had been doing a little research on this. And he actually bought me breakfast due to the fact that I found it for him…
lol. So let me reword this…. Thanks for the meal!!
But yeah, thanx for spending time to talk about this
topic here on your web page.
Great ?V I should certainly pronounce, impressed with your web site. I had no trouble navigating through all tabs as well as related information ended up being truly easy to do to access. I recently found what I hoped for before you know it in the least. Reasonably unusual. Is likely to appreciate it for those who add forums or anything, website theme . a tones way for your client to communicate. Excellent task..
I have not checked in here for a while as I thought it was getting boring, but the last several posts are good quality so I guess I’ll add you back to my daily bloglist. You deserve it my friend 🙂
zohan
MaksatBahis, geniş bir bahis ve oyun yelpazesi sunan önde gelen bir online bahis platformudur. Kullanıcılarına yüksek oranlarla spor bahisleri, canlı bahisler, çeşitli casino oyunları ve canlı casino deneyimi sunar.
Really Appreciate this article, how can I make is so that I receive an email sent to me when you write a fresh post?
Hey There. I found your blog using msn. This is an extremely well written article. I’ll make sure to bookmark it and return to read more of your useful information. Thanks for the post. I will certainly return.
okay
Elevate your brand’s storytelling with MediaMind‘s creative flair.
You can certainly see your enthusiasm in the work you write. The world hopes for even more passionate writers like you who are not afraid to say how they believe. Always follow your heart.
LipoSlend is a liquid nutritional supplement that promotes healthy and steady weight loss. https://liposlendofficial.us/
I really like your article. It’s evident that you have a lot knowledge on this topic. Your points are well made and relatable. Thanks for writing engaging and interesting material.Fence builder Tauranga
Hello! Would you mind if I share your blog with my facebook group? There’s a lot of people that I think would really enjoy your content. Please let me know. Many thanks
You are my inspiration, I possess few web logs and sometimes run out from post :). “‘Tis the most tender part of love, each other to forgive.” by John Sheffield.
Howdy! Quick question that’s totally off topic. Do you know how to make your site mobile friendly? My web site looks weird when viewing from my iphone. I’m trying to find a theme or plugin that might be able to resolve this problem. If you have any recommendations, please share. With thanks!
Trust Falcon Flooring Reno‘s experienced team for superior results.
I’m not that much of a internet reader to be honest but your blogs really nice, keep it up!
I’ll go ahead and bookmark your website to come back down the road.
All the best
Ciprobet, eğlenceli ve kazançlı bir bahis deneyimi sunmak için sizleri bekliyor! Birbirinden çeşitli temalara ve özelliklere sahip slot makineleri, kullanıcılarına renkli ve kazançlı bir deneyim sunar.
Can I just say what a relief to find someone who actually knows what theyre talking about on the internet. You definitely know how to bring an issue to light and make it important. More people need to read this and understand this side of the story. I cant believe youre not more popular because you definitely have the gift.
Superb blog! Do you have any recommendations for aspiring writers? I’m hoping to start my own website soon but I’m a little lost on everything. Would you suggest starting with a free platform like WordPress or go for a paid option? There are so many options out there that I’m completely confused .. Any recommendations? Kudos!
I am really impressed with your writing skills and also with the layout on your blog. Is this a paid theme or did you customize it yourself? Anyway keep up the nice quality writing, it’s rare to see a great blog like this one today..
hello!,I like your writing so much! share we communicate more about your post on AOL? I need an expert on this area to solve my problem. May be that’s you! Looking forward to see you.
Thanks for helping out, great info. “In case of dissension, never dare to judge till you’ve heard the other side.” by Euripides.
you have a great blog here! would you like to make some invite posts on my blog?
This blog is definitely rather handy since I’m at the moment creating an internet floral website – although I am only starting out therefore it’s really fairly small, nothing like this site. Can link to a few of the posts here as they are quite. Thanks much. Zoey Olsen
Good day! I know this is kind of off topic but I was wondering which blog platform are you using
for this site? I’m getting tired of WordPress because I’ve
had issues with hackers and I’m looking at alternatives for another platform.
I would be awesome if you could point me in the direction of
a good platform.
I appreciate, cause I found just what I was looking for. You’ve ended my 4 day long hunt! God Bless you man. Have a great day. Bye
Does your blog have a contact page? I’m having trouble locating it but, I’d
like to shoot you an email. I’ve got some recommendations for your blog
you might be interested in hearing. Either way, great site and I look forward to
seeing it develop over time.
Hello, I enjoy reading through your article. I like to write a little comment to support
you.
I am glad to be one of several visitors on this outstanding site (:, thanks for posting.
Thank you, I have recently been looking for info about this subject for a long time and yours is the greatest I have found out till now. However, what concerning the bottom line? Are you certain about the supply?
It’s appropriate time to make some plans for the future and it is time to be happy. I’ve read this post and if I could I desire to suggest you some interesting things or suggestions. Maybe you can write next articles referring to this article. I wish to read even more things about it!
Real clear site, thanks for this post.
great article
I really enjoy examining on this site, it has got fantastic articles. “The living is a species of the dead and not a very attractive one.” by Friedrich Wilhelm Nietzsche.
It’s a shame you don’t have a donate button! I’d most certainly donate to this superb blog! I suppose for now i’ll settle for bookmarking and adding your RSS feed to my Google account. I look forward to new updates and will share this website with my Facebook group. Chat soon!
Great post. I was checking continuously this blog and I’m impressed! Extremely useful information particularly the last part 🙂 I care for such information a lot. I was looking for this particular info for a very long time. Thank you and best of luck.
Great post. I was checking constantly this blog and I am impressed! Extremely useful info specially the last part 🙂 I care for such info much. I was looking for this certain information for a long time. Thank you and best of luck.
I am now not certain where you’re getting your information, however great topic. I must spend a while finding out much more or working out more. Thank you for great info I was searching for this information for my mission.
Normally I do not read post on blogs, but I would like to say that this write-up very forced me to try and do so! Your writing style has been surprised me. Thanks, quite nice article.
Explore the diverse world of Queen World, where curiosity meets discovery. From captivating travel tales to the latest fashion trends and groundbreaking technology insights, we offer a wealth of knowledge and inspiration.
Whats up very nice site!! Guy .. Excellent .. Amazing .. I’ll bookmark your site and take the feeds additionally…I’m glad to seek out so many helpful info right here in the post, we’d like develop extra techniques in this regard, thanks for sharing.
excellent points altogether, you just gained a brand new reader. What would you recommend about your post that you made some days ago? Any positive?
Digital Dreams, where curiosity thrives and knowledge blossoms. Explore a diverse array of topics including travel adventures, fashion trends, technological innovations, and insightful lifestyle advice. Immerse yourself in captivating articles that entertain, inform, and inspire.
I wish to point out my affection for your generosity supporting persons that must have help with this situation. Your real commitment to getting the message all through ended up being pretty useful and have constantly helped men and women like me to reach their goals. This invaluable tutorial means much to me and even further to my mates. Warm regards; from each one of us.
What i don’t understood is actually how you’re not really much more well-liked than you might be now. You are very intelligent. You realize therefore considerably relating to this subject, made me personally consider it from so many varied angles. Its like women and men aren’t fascinated unless it is one thing to accomplish with Lady gaga! Your own stuffs nice. Always maintain it up!
You made some nice points there. I looked on the internet for the issue and found most people will approve with your site.
The Muse invites you on a journey to discover the realms of holistic living, self-care, and mindfulness. With a treasure trove of insights and practical tips, our blog is your companion in nurturing a balanced and fulfilling life. Dive into our diverse range of articles covering yoga, meditation, nutrition, mental health, and much more.
Queen Travel invites you to explore a realm of diverse content, from travel adventures to fashion trends, technology updates, and lifestyle insights. Engage with our informative articles and stay ahead with expert analyses.
I think this is among the most vital information for me. And i’m glad reading your article. But wanna remark on few general things, The website style is perfect, the articles is really nice : D. Good job, cheers
I got what you mean , thanks for posting.Woh I am happy to find this website through google. “Since the Exodus, freedom has always spoken with a Hebrew accent.” by Heinrich Heine.
porn
I appreciate, cause I found exactly what I was looking for. You’ve ended my four day long hunt! God Bless you man. Have a great day. Bye
F*ckin’ awesome issues here. I’m very glad to see your post. Thank you a lot and i’m looking ahead to contact you. Will you please drop me a mail?
I couldn’t resist commenting
Good info. Lucky me I reach on your website by accident, I bookmarked it.
Princess Holiday, your digital haven for diverse content. Explore a multitude of topics including travel, fashion, technology, lifestyle, and beyond. Immerse yourself in insightful articles, trend analyses, and captivating stories.
Thanks for the post, can I set it up so I get an update sent in an email whenever you make a new update?
I think you have remarked some very interesting details , appreciate it for the post.
I’d have to examine with you here. Which is not one thing I usually do! I take pleasure in reading a post that may make folks think. Additionally, thanks for permitting me to comment!
Hello! Do you use Twitter? I’d like to follow you if that would be okay. I’m undoubtedly enjoying your blog and look forward to new updates.
Its fantastic as your other articles : D, appreciate it for putting up.
Attractive section of content. I just stumbled upon your weblog and in accession capital to assert that I acquire in fact enjoyed account your blog posts. Anyway I will be subscribing to your feeds and even I achievement you access consistently fast.
Queen Blog, your premier destination for diverse and enriching content spanning a myriad of topics. Immerse yourself in a world of exploration as we delve into travel adventures, fashion trends, technological innovations, and cultural insights.
I used to be suggested this blog by means of my cousin. I
am no longer positive whether or not this put up is written by him
as no one else recognise such precise about my trouble.
You are amazing! Thanks!
My web site news.saintpaulchronicle.com
I¦ll right away grab your rss feed as I can’t to find your email subscription hyperlink or e-newsletter service. Do you’ve any? Please allow me understand so that I could subscribe. Thanks.
What i don’t realize is actually how you are no longer actually a lot more well-preferred than you might be now. You are so intelligent. You recognize thus considerably in terms of this matter, made me individually imagine it from a lot of numerous angles. Its like women and men are not involved unless it’s one thing to do with Woman gaga! Your individual stuffs great. All the time take care of it up!
I got good info from your blog
Wow, wonderful blog layout! How long have you been blogging for? you made blogging look easy. The overall look of your web site is magnificent, let alone the content!
I like the helpful info you provide in your articles. I will bookmark your blog and check again here frequently. I’m quite sure I will learn many new stuff right here! Best of luck for the next!
Explore the diverse world of Aralen Blogger, where curiosity meets discovery. From captivating travel tales to the latest fashion trends and groundbreaking technology insights, we offer a wealth of knowledge and inspiration.
Hello! Someone in my Myspace group shared this site with us so I came to look it over. I’m definitely enjoying the information. I’m book-marking and will be tweeting this to my followers! Wonderful blog and amazing design and style.
Attractive section of content. I just stumbled upon your website and in accession capital to assert that I acquire in fact enjoyed account your blog posts. Anyway I will be subscribing to your augment and even I achievement you access consistently quickly.
Holiday Compass, a dynamic platform where curiosity meets enlightenment. Explore an array of engaging content spanning travel, fashion, technology, lifestyle, and beyond. Stay ahead of the curve with our insightful articles, trend analyses, and expert advice.
This information is magnificent. I understand and respect your clear-cut points. I am impressed with your writing style and how well you express your thoughts.Fence contractor Christchurch
Howdy! I’m at work surfing around your blog from my new apple iphone! Just wanted to say I love reading through your blog and look forward to all your posts! Keep up the outstanding work!
Idea Forest, your ultimate destination for a diverse range of topics. Whether you’re into fashion, travel, technology, or lifestyle, we’ve got you covered. Explore our insightful articles, stay updated with the latest trends, and discover valuable tips to enrich your daily life.
Aralen Blog, your premier destination for insightful content across various domains. From riveting travel escapades to cutting-edge tech updates, and from the latest fashion trends to enriching lifestyle advice, we offer a diverse array of articles to cater to every curiosity.
I’ve recently started a web site, the info you offer on this website has helped me tremendously. Thank you for all of your time & work.
Keep on writing, great job!
Blog Cafe offers a diverse range of content catering to various interests, including fashion, travel, technology, and more. Dive into insightful articles, discover the latest trends, and enhance your daily life with valuable tips and advice.
I am impressed with this internet site, really I am a big fan .
Canada Blog, where curiosity meets enlightenment. Explore our diverse array of topics, including travel, fashion, technology, lifestyle, and more. From insightful articles to captivating stories, we strive to inform, entertain, and inspire our readers.
Of course, what a great blog and enlightening posts, I will bookmark your site.All the Best!
This web site is really a stroll-by means of for all of the information you wished about this and didn’t know who to ask. Glimpse here, and also you’ll definitely discover it.
Magnificent beat ! I would like to apprentice whilst you amend your site, how could i subscribe for a blog website? The account aided me a appropriate deal. I have been a little bit acquainted of this your broadcast provided shiny transparent idea
Bazopril is a blood pressure supplement featuring a blend of natural ingredients to support heart health
Tonic Greens is an all-in-one dietary supplement that has been meticulously designed to improve overall health and mental wellness.
Keep functioning ,impressive job!
I have been examinating out some of your posts and i can claim nice stuff. I will make sure to bookmark your site.
Princess Travel, where curiosity meets enlightenment. Explore our dynamic platform offering an array of engaging content spanning travel, fashion, technology, lifestyle, and beyond. Delve into insightful articles, stay updated on the latest trends, and embark on virtual journeys around the globe.
Queen Holiday, your ultimate destination for a diverse range of captivating content. Whether you’re a tech enthusiast, a travel junkie, a fashionista, or someone simply seeking inspiration, we’ve got you covered. Explore insightful articles, trend analyses, and expert advice on topics spanning from the latest in technology to the hottest fashion trends.
As I website owner I believe the written content here is rattling good, appreciate it for your efforts.
Discovery Route, where curiosity meets enlightenment. Explore a diverse array of topics including travel, fashion, technology, and lifestyle. Dive into insightful articles, trend analyses, and expert advice curated to inform and inspire.
Hi there colleagues, how is everything, and what
you wish for to say on the topic of this post, in my view its really amazing
designed for me.
The question of whether personal values are innate or shaped by external factors is a complex and debated topic in psychology, philosophy, and sociology. Here’s an exploration of both perspectives:
I have been checking out a few of your articles and i can state nice stuff. I will surely bookmark your site.
Chloe Blog offers a diverse array of content catering to various interests. From fashion and travel to technology and lifestyle, discover insightful articles enriching your daily life. Stay updated with the latest trends, tips, and informative reads.
I have been exploring for a little bit for any high quality articles or blog posts in this kind of area . Exploring in Yahoo I finally stumbled upon this site. Reading this information So i am glad to express that I have a very just right uncanny feeling I discovered just what I needed. I so much undoubtedly will make certain to don¦t fail to remember this website and provides it a glance regularly.
I am glad for writing to make you understand of the amazing experience my wife’s daughter had using your web page. She discovered a wide variety of details, which include how it is like to have a marvelous teaching mindset to make other individuals quite simply know precisely chosen grueling things. You really surpassed readers’ expected results. Many thanks for displaying such beneficial, healthy, edifying and in addition cool tips about that topic to Lizeth.
I have recently started a web site, the info you provide on this web site has helped me greatly. Thanks for all of your time & work. “My dear and old country, here we are once again together faced with a heavy trial.” by Charles De Gaulle.
Explore the diverse world of Creative Corner, where curiosity meets discovery. From captivating travel tales to the latest fashion trends and groundbreaking technology insights, we offer a wealth of knowledge and inspiration.
Enter the world of Travel Compass, where exploration meets enlightenment. Delve into captivating content across various domains including travel, fashion, technology, and lifestyle. Stay abreast of trends, gain insights, and embark on a journey of discovery with our diverse range of articles.
I very lucky to find this website on bing, just what I was looking for : D also bookmarked.
Expedition Route offers a diverse range of content catering to various interests, including fashion, travel, technology, and more. Dive into insightful articles, discover the latest trends, and enhance your daily life with valuable tips and advice.
Valuable information. Lucky me I found your site by accident, and I’m shocked why this accident didn’t happened earlier! I bookmarked it.
I like what you guys are up too. Such clever work and reporting! Carry on the superb works guys I have incorporated you guys to my blogroll. I think it will improve the value of my web site 🙂
This design is steller! You definitely know how to keep a reader entertained. Between your wit and your videos, I was almost moved to start my own blog (well, almost…HaHa!) Wonderful job. I really enjoyed what you had to say, and more than that, how you presented it. Too cool!
F*ckin¦ amazing issues here. I¦m very satisfied to see your article. Thanks so much and i’m looking forward to touch you. Will you please drop me a mail?
Together with every thing which seems to be building within this subject matter, all your perspectives are generally quite refreshing. Nonetheless, I appologize, because I can not subscribe to your whole strategy, all be it exhilarating none the less. It seems to us that your remarks are actually not entirely validated and in reality you are yourself not really entirely confident of the assertion. In any event I did appreciate reading it.
Hi, Neat post. There is a problem along with your site in web explorer, would check this?K IE still is the market chief and a big component of folks will omit your great writing due to this problem.
I like this post, enjoyed this one thankyou for posting.
I think this site has some really great information for everyone : D.
Just desire to say your article is as surprising. The clarity on your submit is simply spectacular and i could suppose you are a professional in this subject. Fine along with your permission let me to clutch your feed to keep updated with coming near near post. Thanks a million and please carry on the gratifying work.
Howdy are using WordPress for your site platform? I’m new to the blog world but I’m trying to get started and create my own. Do you need any coding knowledge to make your own blog? Any help would be really appreciated!
I and my pals ended up following the good helpful hints from your web page while suddenly developed a horrible suspicion I never expressed respect to the blog owner for them. Most of the women came for this reason very interested to read them and now have definitely been taking advantage of those things. Appreciation for genuinely simply thoughtful and for settling on this form of awesome ideas most people are really desperate to be aware of. Our sincere apologies for not expressing appreciation to you sooner.
Absolutely pent subject matter, appreciate it for selective information .Fencing Wellington
Hey very nice site!! Man .. Excellent .. Amazing .. I’ll bookmark your blog and take the feeds also…I’m happy to find a lot of useful information here in the post, we need develop more techniques in this regard, thanks for sharing. . . . . .
I was examining some of your content on this site and I conceive this web site is really instructive! Retain posting.
Very interesting details you have mentioned, appreciate it for posting. “There is nothing in a caterpillar that tells you it’s going to be a butterfly.” by Richard Buckminster Fuller.
I’ve been exploring for a bit for any high quality articles or blog posts on this kind of house . Exploring in Yahoo I ultimately stumbled upon this website. Reading this information So i’m happy to show that I’ve a very good uncanny feeling I found out exactly what I needed. I so much indisputably will make certain to do not disregard this website and give it a glance on a constant basis.
I enjoy what you guys are usually up too.
This sort of clever work and reporting! Keep up the terrific works
guys I’ve incorporated you guys to our blogroll.
Superb post however I was wondering if you could write a litte more on this subject? I’d be very grateful if you could elaborate a little bit more. Many thanks!
porn videos watch
Its great as your other posts : D, thanks for posting.
I like what you guys are up also. Such intelligent work and reporting! Carry on the excellent works guys I have incorporated you guys to my blogroll. I think it will improve the value of my site :).
Sweet website , super design, rattling clean and utilise pleasant.
You have remarked very interesting details! ps nice internet site.
Having read this I thought it was very informative. I appreciate you taking the time and effort to put this article together. I once again find myself spending way to much time both reading and commenting. But so what, it was still worth it!
Please let me know if you’re looking for a writer for your weblog. You have some really great posts and I believe I would be a good asset. If you ever want to take some of the load off, I’d really like to write some material for your blog in exchange for a link back to mine. Please send me an email if interested. Many thanks!
Thanx for the effort, keep up the good work Great work, I am going to start a small Blog Engine course work using your site I hope you enjoy blogging with the popular BlogEngine.net.Thethoughts you express are really awesome. Hope you will right some more posts.
Definitely believe that which you stated. Your favorite justification appeared to be on the web the easiest thing to be aware of. I say to you, I certainly get annoyed while people consider worries that they just don’t know about. You managed to hit the nail upon the top as well as defined out the whole thing without having side-effects , people can take a signal. Will likely be back to get more. Thanks
Just desire to say your article is as astounding. The clarity for your publish is just excellent and i can think you are knowledgeable in this subject. Fine with your permission let me to seize your feed to stay up to date with forthcoming post. Thank you a million and please carry on the enjoyable work.
Wow, incredible blog layout! How long have you been blogging for? you make blogging look easy. The overall look of your site is great, as well as the content!
I’ve been exploring for a bit for any high quality articles or blog posts on this sort of area . Exploring in Yahoo I at last stumbled upon this web site. Reading this information So i am happy to convey that I’ve an incredibly good uncanny feeling I discovered exactly what I needed. I most certainly will make certain to don’t forget this web site and give it a look on a constant basis.
It’s onerous to seek out educated people on this topic, but you sound like you already know what you’re talking about! Thanks
It’s exhausting to find knowledgeable folks on this subject, however you sound like you realize what you’re talking about! Thanks
Your style is so unique compared to many other people. Thank you for publishing when you have the opportunity,Guess I will just make this bookmarked.2
Would you be serious about exchanging links?
Well I sincerely liked reading it. This information offered by you is very constructive for proper planning.
It’s hard to find knowledgeable individuals on this subject, however you sound like you realize what you’re speaking about! Thanks
It’s hard to search out educated individuals on this subject, however you sound like you know what you’re speaking about! Thanks
Rattling informative and great body structure of subject material, now that’s user friendly (:.
You could definitely see your enthusiasm in the work you write. The world hopes for even more passionate writers like you who aren’t afraid to say how they believe. Always follow your heart.
Hello, i think that i saw you visited my site so i came to “return the favor”.I am attempting to find things to improve my website!I suppose its ok to use a few of your ideas!!
Your place is valueble for me. Thanks!…
Helpful info. Lucky me I discovered your site unintentionally, and I’m shocked why this coincidence did not happened earlier! I bookmarked it.
You made some nice points there. I did a search on the topic and found most people will go along with with your site.
I have recently started a website, the info you offer on this web site has helped me greatly. Thanks for all of your time & work.
The very crux of your writing whilst appearing reasonable in the beginning, did not really settle properly with me personally after some time. Somewhere throughout the sentences you actually were able to make me a believer unfortunately only for a short while. I still have got a problem with your jumps in assumptions and one would do well to fill in those breaks. When you can accomplish that, I will undoubtedly be impressed.
Definitely imagine that that you stated. Your favorite reason appeared to be at the web the simplest thing to take into account of. I say to you, I definitely get irked while other folks think about issues that they plainly don’t recognize about. You controlled to hit the nail upon the top and outlined out the entire thing with no need side-effects , folks can take a signal. Will probably be again to get more. Thanks
Once I initially commented I clicked the -Notify me when new feedback are added- checkbox and now each time a comment is added I get 4 emails with the same comment. Is there any way you possibly can take away me from that service? Thanks!
Thanks for sharing
Some really interesting information, well written and broadly user pleasant.
Enjoyed studying this, very good stuff, thanks. “To be positive To be mistaken at the top of one’s voice.” by Ambrose Bierce.
As I website owner I conceive the subject matter here is really excellent, thanks for your efforts.
As a Newbie, I am constantly browsing online for articles that can be of assistance to me. Thank you
I have been browsing online greater than 3 hours as of late, but I by no means found any interesting article like yours. It¦s pretty worth enough for me. In my opinion, if all website owners and bloggers made just right content material as you did, the web will likely be much more helpful than ever before.
You are my inspiration, I own few web logs and often run out from brand :). “The soul that is within me no man can degrade.” by Frederick Douglas.
It’s actually a great and useful piece of information. I’m happy that you shared this helpful information with us. Please keep us informed like this. Thank you for sharing.
Hi, I think your website might be having browser compatibility issues. When I look at your blog in Safari, it looks fine but when opening in Internet Explorer, it has some overlapping. I just wanted to give you a quick heads up! Other then that, awesome blog!
I have been surfing online more than 3 hours today, but I never discovered any interesting article like yours.
It is pretty worth enough for me. Personally, if all webmasters and bloggers made just right content as you
probably did, the web will probably be much more useful than ever before.
This text is priceless. When can I find out more?
As a Newbie, I am continuously browsing online for articles that can benefit me. Thank you
Pretty! This was a really wonderful post. Thank you for your provided information.
You have noted very interesting details! ps nice web site. “Choose your friends carefully. Your enemies will choose you.” by Yassir Arafat.
I like this post, enjoyed this one thankyou for posting.
Hey there! This is my 1st comment here so I just wanted to give a quick shout out and tell you I truly enjoy reading through your blog posts. Can you recommend any other blogs/websites/forums that deal with the same subjects? Many thanks!
Heya i’m for the first time here. I came across this board and I find It truly useful & it helped me out a lot. I hope to give something back and help others like you aided me.
I liked as much as you’ll receive performed proper here. The cartoon is tasteful, your authored material stylish. however, you command get bought an shakiness over that you want be handing over the following. sick undoubtedly come more earlier once more since precisely the same nearly very frequently inside case you shield this hike.
Very interesting subject , thanks for putting up.
he blog was how do i say it… relevant, finally something that helped me. Thanks
I like what you guys are up too. Such intelligent work and reporting! Keep up the superb works guys I¦ve incorporated you guys to my blogroll. I think it will improve the value of my site 🙂
Hi my friend! I wish to say that this article is amazing, nice written and include almost all significant infos. I would like to see more posts like this.
Greetings! This is my first visit to your blog!
We are a collection of volunteers and starting a new project
in a community in the same niche. Your blog provided us beneficial information to work on. You have done a outstanding
job!
Excellent blog here! Also your web site loads up fast! What host are you using? Can I get your affiliate link to your host? I wish my web site loaded up as fast as yours lol
Loving the information on this web site, you have done outstanding job on the posts.
It¦s actually a cool and helpful piece of info. I am satisfied that you shared this useful information with us. Please stay us informed like this. Thanks for sharing.
This is very interesting, You are a very skilled blogger. I have joined your rss feed and look forward to seeking more of your great post. Also, I have shared your site in my social networks!Hidden dog fence
Dead written subject material, thanks for information. “The earth was made round so we would not see too far down the road.” by Karen Blixen.
I was just seeking this information for some time. After six hours of continuous Googleing, at last I got it in your web site. I wonder what’s the lack of Google strategy that don’t rank this type of informative web sites in top of the list. Generally the top sites are full of garbage.
Nice post. I learn something more challenging on different blogs everyday. It will always be stimulating to read content from other writers and practice a little something from their store. I’d prefer to use some with the content on my blog whether you don’t mind. Natually I’ll give you a link on your web blog. Thanks for sharing.
I blog quite often and I genuinely thank you for your content.
Your article has really peaked my interest. I am going to bookmark your blog
and keep checking for new details about once per week.
I opted in for your Feed too.
I have read some good stuff here. Certainly worth bookmarking for revisiting. I surprise how much effort you put to make such a wonderful informative site.
You really make it appear so easy with your presentation however I find this topic to be really one thing that I believe I’d by no means understand. It sort of feels too complicated and very wide for me. I am looking ahead to your subsequent submit, I?¦ll attempt to get the hold of it!
whoah this blog is magnificent i love reading your articles. Keep up the great work! You know, many people are hunting around for this information, you could aid them greatly.
I’m really enjoying the design and layout of your blog. It’s a very easy on the eyes which makes it much more enjoyable for me to come here and visit more often. Did you hire out a developer to create your theme? Fantastic work!
I want to show my thanks to you just for bailing me out of this type of issue. Because of looking throughout the world wide web and getting ways that were not beneficial, I thought my entire life was done. Being alive without the presence of solutions to the difficulties you’ve solved by means of your main short post is a critical case, as well as ones that would have in a negative way affected my career if I had not come across your blog post. Your training and kindness in playing with almost everything was helpful. I don’t know what I would have done if I hadn’t come upon such a point like this. I can also at this time relish my future. Thank you very much for the skilled and results-oriented guide. I won’t think twice to suggest the website to any individual who should receive direction about this problem.
Terrific work! This is the type of info that should be shared around the web. Shame on Google for not positioning this post higher! Come on over and visit my website . Thanks =)
But a smiling visitant here to share the love (:, btw outstanding layout.
I’m typically to blogging and i really recognize your content. The article has really peaks my interest. I’m going to bookmark your web site and maintain checking for new information.
Thanks , I’ve just been looking for info about this subject for a while and yours is the best I have came upon so far. But, what in regards to the bottom line? Are you positive in regards to the supply?
I truly appreciate this post. I have been looking everywhere for this! Thank goodness I found it on Bing. You’ve made my day! Thx again
Have you ever considered about adding a little bit more than just your articles? I mean, what you say is important and everything. But think about if you added some great photos or videos to give your posts more, “pop”! Your content is excellent but with pics and video clips, this blog could undeniably be one of the very best in its niche. Excellent blog!
Thank you for sharing with us, I believe this website truly stands out : D.
I am not really superb with English but I line up this rattling leisurely to interpret.
I’ve been exploring for a little bit for any high-quality articles or weblog posts in this kind of house . Exploring in Yahoo I ultimately stumbled upon this website. Reading this information So i’m happy to express that I have a very just right uncanny feeling I discovered exactly what I needed. I most undoubtedly will make sure to do not disregard this web site and give it a glance regularly.
You made some good points there. I did a search on the theme and found mainly folks will have the same opinion with your blog.
Hey! This is kind of off topic but I need some help from an established blog. Is it very difficult to set up your own blog? I’m not very techincal but I can figure things out pretty fast. I’m thinking about creating my own but I’m not sure where to begin. Do you have any ideas or suggestions? With thanks
Just desire to say your article is as amazing.
The clearness in your post is just spectacular and i can assume you
are an expert on this subject. Fine with your permission let me to
grab your feed to keep up to date with forthcoming post.
Thanks a million and please keep up the enjoyable work.
Hey would you mind letting me know which webhost you’re utilizing?
I’ve loaded your blog in 3 completely different web browsers
and I must say this blog loads a lot faster then most. Can you
suggest a good internet hosting provider at a fair price?
Thanks, I appreciate it!
I discovered your blog site on google and check a few of your early posts. Continue to keep up the very good operate. I just additional up your RSS feed to my MSN News Reader. Seeking forward to reading more from you later on!…
Utterly composed content material, Really enjoyed reading.
I believe this internet site holds some very superb info for everyone :D. “Anybody who watches three games of football in a row should be declared brain dead.” by Erma Bombeck.
Generally I do not read post on blogs, but I would like to say that this write-up very compelled me to try and do it! Your writing style has been surprised me. Thanks, very nice article.
Respect to op, some superb selective information.
I really like gathering utile information , this post has got me even more info! .
Wow that was odd. I just wrote an very long comment but after I clicked submit my comment didn’t appear. Grrrr… well I’m not writing all that over again. Regardless, just wanted to say great blog!
Excellent web site. Plenty of useful information here. I¦m sending it to some pals ans also sharing in delicious. And of course, thanks for your effort!
I like this blog very much so much excellent info .
It is in point of fact a nice and helpful piece of information. I am satisfied that you shared this useful info with us. Please stay us informed like this. Thank you for sharing.
I love your writing style truly loving this internet site.
F*ckin¦ amazing issues here. I¦m very glad to look your post. Thank you a lot and i’m looking forward to contact you. Will you please drop me a mail?
I like this website so much, bookmarked.
It?¦s in point of fact a nice and useful piece of information. I?¦m satisfied that you simply shared this helpful information with us. Please stay us up to date like this. Thank you for sharing.
You have brought up a very great details , thankyou for the post.
Hiya, I’m really glad I have found this information. Today bloggers publish just about gossips and internet and this is really irritating. A good web site with interesting content, that’s what I need. Thanks for keeping this web site, I’ll be visiting it. Do you do newsletters? Can’t find it.
Online casino siteleri heyecan verici oyunlar ve büyük kazanç şansı sunmalarıyla birçok oyuncuyu cezbetmektedir. Bu alanda öne çıkan güvenilir ve kaliteli sitelerden biri eniyicasinositesi777.com dur. Bu site, güvenilirliği ve üstün hizmeti ile tanınmaktadır ve her oyuncunun tercihlerine hitap eden geniş bir oyun yelpazesi sunmaktadır.
Wohh exactly what I was searching for, appreciate it for posting.
I’d have to examine with you here. Which is not one thing I usually do! I take pleasure in reading a post that may make folks think. Additionally, thanks for permitting me to comment!
You made several good points there. I did a search on the subject and found the majority of folks will have the same opinion with your blog.
Nice read, I just passed this onto a friend who was doing a little research on that. And he actually bought me lunch since I found it for him smile Thus let me rephrase that: Thanks for lunch!
Its superb as your other posts : D, thanks for posting.
Thank you for the sensible critique. Me & my neighbor were just preparing to do a little research on this. We got a grab a book from our local library but I think I learned more clear from this post. I am very glad to see such fantastic info being shared freely out there.
Merely a smiling visitant here to share the love (:, btw outstanding pattern.
This is the right blog for anyone who wants to find out about this topic. You realize so much its almost hard to argue with you (not that I actually would want…HaHa). You definitely put a new spin on a topic thats been written about for years. Great stuff, just great!
I like this site very much, Its a really nice spot to read and get information.
Hello very cool site!! Guy .. Beautifcul .. Wonderful .. Ӏ’ll bookmark уour web sige and take tһe feeds additionally?
Ι am glad tto seek oսt numerous usefᥙl information rigһt
here in the submit, we’Ԁ lіke develop mоre strategies on tһis regard,
thank yoս foг sharing. . . . . .
Visit mʏ web ρage :: سایت شرط بندی Valuable Insights [https://tupalo.com/]
After study a few of the blog posts on your website now, and I truly like your way of blogging. I bookmarked it to my bookmark website list and will be checking back soon. Pls check out my web site as well and let me know what you think.
I’ve been exploring for a little for any high-quality articles or blog posts on this sort of area . Exploring in Yahoo I at last stumbled upon this site. Reading this info So i’m happy to convey that I’ve a very good uncanny feeling I discovered exactly what I needed. I most certainly will make certain to do not forget this website and give it a look on a constant basis.
Thanks
I have been exploring for a little for any high quality articles or
blog posts in this kind of area . Exploring in Yahoo I eventually stumbled
upon this site. Reading this information So i’m glad to show that I’ve an incredibly excellent uncanny feeling I came upon exactly what
I needed. I most without a doubt will make sure to
don?t overlook this web site and provides it
a look on a continuing basis.
There are definitely plenty of particulars like that to take into consideration. That is a nice level to deliver up. I provide the thoughts above as common inspiration however clearly there are questions just like the one you carry up the place the most important thing will be working in honest good faith. I don?t know if greatest practices have emerged round things like that, however I am certain that your job is clearly recognized as a good game. Each girls and boys really feel the influence of only a moment’s pleasure, for the rest of their lives.
An interesting discussion is worth comment. I think that you should write more on this topic, it might not be a taboo subject but generally people are not enough to speak on such topics. To the next. Cheers
Thank you for every other excellent article. Where else may just anyone get that kind of information in such an ideal manner of writing? I have a presentation next week, and I am on the look for such info.
Would you be excited about exchanging hyperlinks?
Can I just say what a aid to find somebody who really knows what theyre talking about on the internet. You undoubtedly know learn how to carry a problem to gentle and make it important. More individuals need to read this and perceive this side of the story. I cant imagine youre no more well-liked because you definitely have the gift.
Thank you for sharing superb informations. Your website is very cool. I’m impressed by the details that you?¦ve on this site. It reveals how nicely you perceive this subject. Bookmarked this website page, will come back for extra articles. You, my pal, ROCK! I found simply the information I already searched all over the place and simply could not come across. What a perfect web-site.
Youre so cool! I dont suppose Ive read anything like this before. So good to seek out somebody with some authentic ideas on this subject. realy thanks for starting this up. this web site is something that is wanted on the net, someone with just a little originality. useful job for bringing something new to the web!
Thanks for sharing superb informations. Your web site is so cool. I’m impressed by the details that you?¦ve on this site. It reveals how nicely you perceive this subject. Bookmarked this web page, will come back for more articles. You, my pal, ROCK! I found just the information I already searched everywhere and simply couldn’t come across. What a perfect site.
Neat blog! Is your theme custom made or did you download it from somewhere? A design like yours with a few simple adjustements would really make my blog stand out. Please let me know where you got your theme. Bless you
Perfect work you have done, this web site is really cool with fantastic information.
hello!,I like your writing so a lot! percentage we keep in touch extra approximately your article on AOL? I need a specialist on this area to solve my problem. May be that is you! Having a look ahead to look you.
magnificent points altogether, you simply gained a new reader. What may you suggest about your submit that you just made some days ago? Any sure?
I intended to create you a little bit of observation so as to give thanks the moment again for these beautiful information you have provided in this article. This is quite shockingly generous of you giving openly precisely what many of us would have distributed for an e book to make some profit on their own, specifically now that you might have done it if you desired. The smart ideas additionally served as the easy way to understand that other people have the identical interest just like mine to know the truth many more with regards to this condition. I am sure there are numerous more enjoyable times in the future for those who looked at your blog post.
I am not really fantastic with English but I line up this very easygoing to translate.
Your place is valueble for me. Thanks!…
I’m not sure where you’re getting your information, but great topic. I needs to spend some time learning more or understanding more. Thanks for excellent information I was looking for this info for my mission.
redroyalbet şikayet
I am really impressed with your writing skills as neatly as with the layout in your weblog. Is that this a paid theme or did you customize it yourself? Anyway keep up the excellent high quality writing, it’s rare to look a great blog like this one nowadays..
I appreciate, cause I found exactly what I was looking for. You have ended my four day long hunt! God Bless you man. Have a nice day. Bye
I like what you guys are up also. Such intelligent work and reporting! Keep up the superb works guys I have incorporated you guys to my blogroll. I think it will improve the value of my web site :).
Hmm it seems like your website ate my first comment (it was super long) so I guess I’ll just sum it up what I submitted and say, I’m thoroughly enjoying your blog. I too am an aspiring blog blogger but I’m still new to everything. Do you have any recommendations for first-time blog writers? I’d really appreciate it.
F*ckin’ amazing things here. I am very satisfied to peer your article. Thank you so much and i’m having a look forward to contact you. Will you please drop me a e-mail?
I’ve been browsing online greater than 3 hours as of late, but I never found any attention-grabbing article like yours. It is beautiful price sufficient for me. In my opinion, if all site owners and bloggers made excellent content as you probably did, the web will likely be a lot more helpful than ever before. “A winner never whines.” by Paul Brown.
I have been browsing on-line more than three hours lately, but I by no means found any attention-grabbing article like yours. It is pretty worth sufficient for me. Personally, if all webmasters and bloggers made good content material as you did, the web can be much more useful than ever before.
I couldn’t resist commenting
It’s a pity you don’t have a donate button! I’d without a doubt donate to this superb blog! I guess for now i’ll settle for book-marking and adding your RSS feed to my Google account. I look forward to fresh updates and will share this blog with my Facebook group. Talk soon!
I would like to thnkx for the efforts you have put in writing this blog. I am hoping the same high-grade blog post from you in the upcoming as well. In fact your creative writing abilities has inspired me to get my own blog now. Really the blogging is spreading its wings quickly. Your write up is a good example of it.
Hey just wanted to give you a quick heads up. The text in your post seem to be running off the screen in Safari. I’m not sure if this is a format issue or something to do with browser compatibility but I figured I’d post to let you know. The design look great though! Hope you get the problem solved soon. Many thanks
Good write-up, I’m regular visitor of one’s website, maintain up the nice operate, and It’s going to be a regular visitor for a lengthy time.
Great write-up, I¦m normal visitor of one¦s blog, maintain up the nice operate, and It’s going to be a regular visitor for a long time.
Very efficiently written information. It will be useful to anybody who utilizes it, including myself. Keep doing what you are doing – looking forward to more posts.
I always was concerned in this subject and still am, regards for putting up.
It?¦s actually a great and useful piece of info. I am glad that you just shared this helpful info with us. Please keep us informed like this. Thanks for sharing.
Its like you read my thoughts! You appear to know a lot approximately this, such as you
wrote the ebook in it or something. I think that you could do with a few % to pressure the message house a little bit, however instead of that, that is fantastic blog.
An excellent read. I’ll certainly be back.
Hello there, I discovered your site via Google whilst searching for a similar matter, your web site came up, it seems to be great. I’ve bookmarked it in my google bookmarks.
There is noticeably a bundle to know about this. I assume you made certain nice points in features also.
You are my intake, I have few web logs and sometimes run out from brand :). “‘Tis the most tender part of love, each other to forgive.” by John Sheffield.
redroyalbet şikayet
I believe other website owners should take this site as an example , very clean and superb user friendly layout.
Hi it me Maybell
Saved as a favorite, I really like your blog!
hi!,I love your writing so much! percentage we communicate more about your article on AOL? I need an expert on this area to solve my problem. Maybe that is you! Having a look ahead to see you.
As soon as I detected this website I went on reddit to share some of the love with them.
This web site is really a walk-through for all of the info you wanted about this and didn’t know who to ask. Glimpse here, and you’ll definitely discover it.
Thank you for some other informative website. Where else may just I am getting that type of information written in such a perfect method? I have a challenge that I am simply now running on, and I’ve been at the look out for such information.
I discovered your blog site on google and test a number of of your early posts. Continue to maintain up the superb operate. I simply further up your RSS feed to my MSN News Reader. In search of ahead to studying extra from you later on!…
Hey there, You’ve performed an incredible job. I will definitely digg it and individually suggest to my friends. I’m confident they will be benefited from this web site.
Great write-up, I¦m regular visitor of one¦s website, maintain up the nice operate, and It’s going to be a regular visitor for a lengthy time.
Hiya! Quick question that’s completely off topic. Do you know how to make your site mobile friendly? My site looks weird when viewing from my iphone. I’m trying to find a template or plugin that might be able to correct this problem. If you have any suggestions, please share. Appreciate it!
I’ve been exploring for a little for any high-quality articles or blog posts on this kind of area . Exploring in Yahoo I ultimately stumbled upon this web site. Reading this information So i’m happy to exhibit that I’ve an incredibly good uncanny feeling I found out exactly what I needed. I so much without a doubt will make certain to don’t forget this site and provides it a look regularly.
Hi there very nice site!! Man .. Beautiful .. Superb .. I’ll bookmark your website and take the feeds additionally…I am glad to search out numerous helpful information here within the publish, we want work out more strategies in this regard, thanks for sharing.
Thank you, I have just been searching for information about this
topic for a while and yours is the greatest I’ve came upon till now.
But, what in regards to the conclusion? Are you certain in regards to the source?ラブドール 中古
Hey this is somewhat of off topic but I was wanting to know if blogs use WYSIWYG editors or if you have to manually code with HTML. I’m starting a blog soon but have no coding experience so I wanted to get guidance from someone with experience. Any help would be greatly appreciated!
F*ckin’ tremendous issues here. I’m very glad to see your post. Thank you so much and i am taking a look forward to contact you. Will you kindly drop me a e-mail?
redroyalbet üyelik
I am curious to find out what blog system you happen to be using? I’m having some minor security problems with my latest blog and I’d like to find something more risk-free. Do you have any solutions?
Hello, you used to write excellent, but the last few posts have been kinda boringK I miss your tremendous writings. Past few posts are just a bit out of track! come on!
As soon as I noticed this site I went on reddit to share some of the love with them.
Can I just say what a relief to find someone who actually knows what theyre speaking about on the internet. You definitely know the way to deliver a difficulty to mild and make it important. Extra individuals have to learn this and perceive this side of the story. I cant believe youre not more popular since you undoubtedly have the gift.
Thanks , I’ve just been looking for information about this topic for ages and yours is the best I’ve discovered till now. But, what about the conclusion? Are you sure about the source?
Hello this is kind of of off topic but I was wondering if blogs use WYSIWYG editors or if you have to manually code with HTML. I’m starting a blog soon but have no coding expertise so I wanted to get guidance from someone with experience. Any help would be enormously appreciated!
I always spent my half an hour to read this weblog’s content every day along with a
mug of coffee.
Thanks for ones marvelous posting! I quite enjoyed reading it, you can be a great author.I will be sure to bookmark your blog and will often come back in the foreseeable future. I want to encourage you to definitely continue your great posts, have a nice evening!
Pretty great post. I simply stumbled upon your blog and wished to say that I’ve truly enjoyed browsing your weblog posts. After all I’ll be subscribing for your rss feed and I hope you write once more very soon!
Great work! That is the type of information that should be shared across the internet. Shame on Google for not positioning this submit upper! Come on over and seek advice from my website . Thank you =)
What’s Taking place i am new to this, I stumbled upon this I have found It
positively useful and it has helped me out loads. I hope to contribute &
assist different customers like its aided me.
Good job.
Also visit my website; pull a part new orleans
I have not checked in here for some time since I thought it was getting boring, but the last few posts are great quality so I guess I?¦ll add you back to my everyday bloglist. You deserve it my friend 🙂
I am glad to be a visitor of this consummate web site! , thanks for this rare info ! .
Its like you learn my thoughts! You seem to grasp so much about this, such as you wrote the ebook in it or something. I feel that you can do with some percent to power the message home a bit, but instead of that, that is fantastic blog. A fantastic read. I will certainly be back.
I am always browsing online for tips that can facilitate me. Thanks!
Thank you for the sensible critique. Me & my neighbor were just preparing to do a little research on this. We got a grab a book from our local library but I think I learned more clear from this post. I am very glad to see such great info being shared freely out there.
I’m not that much of a internet reader to be honest but your sites really nice, keep it up! I’ll go ahead and bookmark your site to come back later. Cheers
Thanks designed for sharing such a good thinking, piece
of writing is good, thats why i have read it entirely
My brother suggested I might like this web site. He used to be entirely
right. This post truly made my day. You cann’t consider simply how a
lot time I had spent for this info! Thank you!
Keep up the fantastic work, I read few blog posts on this internet site and I conceive that your website is very interesting and has got lots of superb info .
I have been absent for a while, but now I remember why I used to love this site. Thank you, I’ll try and check back more frequently. How frequently you update your site?
Hi, I think your site might be having browser compatibility issues. When I look at your website in Safari, it looks fine but when opening in Internet Explorer, it has some overlapping. I just wanted to give you a quick heads up! Other then that, fantastic blog!
My brother recommended I may like this website. He was totally right. This publish truly made my day. You cann’t believe just how a lot time I had spent for this info! Thanks!
I am continuously looking online for posts that can benefit me. Thank you!
excellent put up, very informative. I wonder why the opposite experts of this sector don’t notice this. You should continue your writing. I’m sure, you have a great readers’ base already!
I’m also commenting to let you understand of the useful encounter our child had reading through your web site. She noticed a wide variety of details, which included how it is like to possess an incredible coaching character to have folks easily thoroughly grasp several advanced subject areas. You undoubtedly surpassed our own expected results. I appreciate you for presenting those interesting, trustworthy, explanatory as well as fun tips on this topic to Sandra.
Write more, thats all I have to say. Literally, it seems as though you relied on the video to make your point. You definitely know what youre talking about, why throw away your intelligence on just posting videos to your site when you could be giving us something informative to read?
It’s an amazing post designed for all the internet
users; they will obtain benefit from it I am sure.
Great line up. We will be linking to this great article on our site. Keep up the good writing.
Im not sure where you are getting your info, however good topic. I must spend some time studying much more or figuring out more. Thanks for wonderful information I used to be looking for this information for my mission.
I truly enjoy reading on this internet site, it has good content. “Those who complain most are most to be complained of.” by Matthew Henry.
Aw, this was a really nice post. In thought I wish to put in writing like this moreover – taking time and actual effort to make a very good article… but what can I say… I procrastinate alot and on no account seem to get something done.
Hi my friend! I want to say that this article is amazing, nice written and include almost all vital infos. I would like to see more posts like this.
I like this blog so much, saved to favorites.
What’s Taking place i’m new to this, I stumbled upon this I have discovered It absolutely useful and it has aided me out loads. I hope to give a contribution & help other customers like its helped me. Good job.
What i don’t understood is actually how you are no longer actually a lot more neatly-preferred than you may be now. You’re very intelligent. You realize thus significantly in the case of this topic, made me individually believe it from a lot of varied angles. Its like women and men aren’t involved except it is something to accomplish with Lady gaga! Your personal stuffs excellent. Always take care of it up!
Hi, Neat post. There is a problem with your website in internet explorer, would check this… IE still is the market leader and a good portion of people will miss your excellent writing due to this problem.
You are a very intelligent individual!
I have recently started a site, the info you provide on this site has helped me tremendously. Thanks for all of your time & work.
Very interesting subject , appreciate it for posting.
I love what you guys are usually up too. This sort of clever work and exposure! Keep up the great works guys I’ve included you guys to our blogroll.
I was recommended this web site by way of my cousin. I’m now not sure whether or not this publish is written by him as no one else realize such specified approximately my trouble. You’re amazing! Thank you!
I would like to thnkx for the efforts you have put in writing this blog. I am hoping the same high-grade blog post from you in the upcoming as well. In fact your creative writing abilities has inspired me to get my own blog now. Really the blogging is spreading its wings quickly. Your write up is a good example of it.
Whats up! I simply would like to give an enormous thumbs up for the great data you could have here on this post. I shall be coming back to your blog for extra soon.
Appreciating the hard work you put into your site and detailed information you present. It’s awesome to come across a blog every once in a while that isn’t the same unwanted rehashed material. Great read! I’ve saved your site and I’m including your RSS feeds to my Google account.
Some genuinely wonderful info , Gladiolus I observed this. “Be true to your work, your word, and your friend.” by Henry David Thoreau.
I liked up to you’ll obtain carried out proper here. The cartoon is attractive, your authored subject matter stylish. nonetheless, you command get got an shakiness over that you wish be turning in the following. unwell definitely come further until now again as precisely the similar just about a lot continuously inside case you protect this hike.
Great post, I think website owners should acquire a lot from this site its rattling user pleasant.
Hi there! I know this is kinda off topic nevertheless I’d figured I’d ask. Would you be interested in exchanging links or maybe guest authoring a blog post or vice-versa? My website discusses a lot of the same topics as yours and I believe we could greatly benefit from each other. If you might be interested feel free to send me an email. I look forward to hearing from you! Excellent blog by the way!
I just couldn’t go away your website before suggesting that I actually enjoyed the usual information a person supply to your visitors? Is gonna be again ceaselessly in order to investigate cross-check new posts.
Excellent web site. A lot of useful information here. I’m sending it to several friends ans also sharing in delicious. And of course, thanks for your effort!
This information is priceless. Where can I find out more?
Hey there! I’m at work browsing your blog from my new iphone 4! Just wanted to say I love reading through your blog and look forward to all your posts! Carry on the fantastic work!
Howdy! I know this is kinda off topic nevertheless I’d figured I’d ask. Would you be interested in trading links or maybe guest authoring a blog article or vice-versa? My site discusses a lot of the same topics as yours and I feel we could greatly benefit from each other. If you are interested feel free to send me an email. I look forward to hearing from you! Great blog by the way!
What i don’t realize is in fact how you’re now not actually much more smartly-preferred than you might be right now. You’re very intelligent. You know therefore significantly in the case of this matter, made me for my part imagine it from a lot of varied angles. Its like men and women aren’t involved until it is one thing to accomplish with Lady gaga! Your individual stuffs nice. At all times deal with it up!
Thanks for some other excellent post. The place else could anyone get that type of information in such an ideal method of writing? I’ve a presentation next week, and I’m on the look for such information.
Normally I don’t read post on blogs, but I would like to say that this write-up very forced me to try and do so! Your writing style has been amazed me. Thanks, quite nice post.
I really like your writing style, good info, thank you for putting up :D. “God save me from my friends. I can protect myself from my enemies.” by Claude Louis Hector de Villars.
Thank you very much
Thank you for every one of your hard work on this site. My mum takes pleasure in conducting research and it is obvious why. My spouse and i learn all about the lively medium you deliver both useful and interesting tactics by means of your blog and as well as invigorate contribution from other individuals on the subject then our favorite girl is discovering so much. Take advantage of the rest of the new year. You’re the one doing a fantastic job.
Merely a smiling visitant here to share the love (:, btw outstanding style. “The price one pays for pursuing a profession, or calling, is an intimate knowledge of its ugly side.” by James Arthur Baldwin.
Some times its a pain in the ass to read what people wrote but this internet site is very user friendly! .
great points altogether, you just gained a logo new reader. What could you recommend in regards to your post that you simply made a few days in the past? Any certain?
Some genuinely superb blog posts on this web site, thanks for contribution.
I intended to put you a bit of observation so as to give many thanks over again just for the pleasant strategies you’ve provided here. It’s tremendously generous with people like you to grant openly all that a lot of people could possibly have supplied as an e-book to generate some bucks for themselves, and in particular since you could possibly have tried it if you decided. Those thoughts also acted to become great way to know that someone else have similar desire the same as my own to see a good deal more concerning this condition. I am certain there are several more pleasurable occasions up front for people who scan your website.
I have been exploring foг a bit foг anny һigh quality
articles ⲟr weblog posts in thіs kіnd of house .
Exploring in Yahpo Ι ultimately stumbled up᧐n this site.
Studying tһiѕ infоrmation So і’m satisfied tⲟ express that
І’ve a verty excellent uncanny feeling Ӏ discovered
exaϲtly what I needed. I so much unquestionably ѡill make сertain to don?t omit this website and givе it а look regularly.
My website discuss
It’s really a nice and helpful piece of information. I am glad that you shared this helpful information with us. Please keep us up to date like this. Thanks for sharing.
You’ve made some really good points there. I checked
on the internet to find out more about the
issue and found most individuals will go along with your views on this website.
What i do not understood is actually how you’re not actually much more well-liked than you might be now. You are very intelligent. You realize thus significantly relating to this subject, made me personally consider it from so many varied angles. Its like women and men aren’t fascinated unless it is one thing to accomplish with Lady gaga! Your own stuffs outstanding. Always maintain it up!
What is FitSpresso? FitSpresso, a dietary supplement presented in pill form, offers a comprehensive approach to weight loss by enhancing metabolism and augmenting the body’s fat-burning capacity
If you would like to increase your familiarity only keep visiting this site and
be updated with the most recent information posted here.
Magnificent beat ! I would like to apprentice while you amend your website, how could i subscribe for a blog web site? The account helped me a acceptable deal. I had been a little bit acquainted of this your broadcast provided bright clear idea
I’d forever want to be update on new content on this internet site, saved to fav! .
I really enjoy looking at on this site, it contains excellent posts.
I could not resist commenting. Ԝell written!
Feel free tօ visit mʏ homeⲣage; collected bedroom
What Is Puravive? Puravive is a natural formula that supports healthy weight loss. This supplement helps to ignite the levels of brown adipose tissue in the body to lose extra weight
Definitely, what a magnificent website and illuminating posts, I definitely will bookmark your site.Best Regards!
You should take part in a contest for one of the best blogs on the web. I will recommend this site!
Hallo. Dieser Artikel war extrem interessant, besonders, weil ich nach Gedanken dazu gesucht Betreff letzten Dienstag.
Some truly tremendous work on behalf of the owner of this site, dead outstanding subject material.
We’re a group of volunteers and opening a new scheme in our community. Your website offered us with valuable information to work on. You’ve done an impressive job and our whole community will be grateful to you.
Really clean internet site, thankyou for this post.
What Is Tonic Greens? Tonic Greens is a wellness aid that helps with combatting herpes in addition to enhancing your well-being.
Hi would you mind letting me know which web host you’re working with? I’ve loaded your blog in 3 completely different browsers and I must say this blog loads a lot faster then most. Can you suggest a good hosting provider at a reasonable price? Kudos, I appreciate it!
What Is Tonic Greens? Tonic Greens is a wellness aid that helps with combatting herpes in addition to enhancing your well-being.
Whats up are using WordPress for your blog platform? I’m new to the blog world but I’m trying to get started and set up my own. Do you require any coding expertise to make your own blog? Any help would be really appreciated!
You have brought up a very fantastic details , appreciate it for the post.
What Is Tonic Greens? Tonic Greens is a wellness aid that helps with combatting herpes in addition to enhancing your well-being
You completed various fine points there. I did a search on the subject and found the majority of persons will go along with with your blog.
I conceive you have remarked some very interesting points, regards for the post.
I as well as my pals ended up viewing the great thoughts found on your website while then I had an awful suspicion I had not expressed respect to the blog owner for those strategies. Most of the guys happened to be joyful to learn them and have in effect in truth been taking advantage of those things. Thank you for being really accommodating and for utilizing such perfect resources millions of individuals are really needing to understand about. Our own sincere regret for not saying thanks to you sooner.
Thank you for sharing superb informations. Your web-site is so cool. I am impressed by the details that you have on this blog. It reveals how nicely you understand this subject. Bookmarked this website page, will come back for extra articles. You, my pal, ROCK! I found simply the information I already searched all over the place and just couldn’t come across. What a perfect website.
I think you have observed some very interesting details, regards for the post.
Nice post. I learn something more challenging on different blogs everyday. It will always be stimulating to read content from other writers and practice a little something from their store. I’d prefer to use some with the content on my blog whether you don’t mind. Natually I’ll give you a link on your web blog. Thanks for sharing.
Some really fantastic posts on this web site, regards for contribution.
Deference to article author, some excellent entropy.
Very excellent information can be found on web blog.
Thanks for the sensible critique. Me & my neighbor were just preparing to do a little research on this. We got a grab a book from our local library but I think I learned more from this post. I’m very glad to see such fantastic information being shared freely out there.
I enjoy your piece of work, regards for all the informative blog posts.
Some truly nice and useful information on this site, besides I conceive the design and style holds superb features.
We stumbled over here from a different web address and thought I might check things out. I like what I see so now i’m following you. Look forward to checking out your web page for a second time.
I think other website proprietors should take this site as an model, very clean and great user friendly style and design, let alone the content. You’re an expert in this topic!
I could not resist commenting. Perfectly written!
Hi, just required you to know I he added your site to my Google bookmarks due to your layout. But seriously, I believe your internet site has 1 in the freshest theme I??ve came across. It extremely helps make reading your blog significantly easier.
I have recently started a web site, the information you offer on this website has helped me greatly. Thanks for all of your time & work.
I am glad to be a visitor of this double dyed site! , thankyou for this rare info ! .
I like what you guys are usually up too. This sort of clever work and coverage! Keep up the wonderful works guys I’ve included you guys to my blogroll.
There are some attention-grabbing points in time on this article however I don’t know if I see all of them heart to heart. There may be some validity but I will take hold opinion until I look into it further. Good article , thanks and we would like extra! Added to FeedBurner as properly
There is noticeably a bundle to learn about this. I assume you made certain good points in options also.
Hello there, You’ve done an excellent job. I will certainly digg it and personally recommend to my friends. I’m sure they’ll be benefited from this website.
Have you ever thought about including a little bit more than just your articles? I mean, what you say is important and all. Nevertheless think of if you added some great photos or video clips to give your posts more, “pop”! Your content is excellent but with images and videos, this website could certainly be one of the most beneficial in its field. Excellent blog!
Hello, I think your site might be having browser compatibility issues. When I look at your blog site in Firefox, it looks fine but when opening in Internet Explorer, it has some overlapping. I just wanted to give you a quick heads up! Other then that, great blog!
It?¦s truly a nice and helpful piece of info. I am satisfied that you simply shared this helpful info with us. Please stay us up to date like this. Thank you for sharing.
After checking out a handful of the articles on your website,
I truly like your way of writing a blog. I book marked it to
my bookmark webpage list and will be checking back in the near future.
Take a look at my web site as well and let me know your opinion.
magnificent put up, very informative. I’m wondering why the opposite experts of this sector don’t notice this. You must proceed your writing. I’m confident, you have a huge readers’ base already!
Very interesting info !Perfect just what I was looking for! “I myself do nothing. The Holy Spirit accomplishes all through me.” by William Blake.
Does your website have a contact page? I’m having trouble locating it but, I’d like to shoot you an e-mail. I’ve got some creative ideas for your blog you might be interested in hearing. Either way, great website and I look forward to seeing it develop over time.
I like the efforts you have put in this, appreciate it for all the great posts.
As soon as I observed this website I went on reddit to share some of the love with them.
Great amazing issues here. I?¦m very satisfied to look your article. Thanks so much and i’m taking a look ahead to touch you. Will you kindly drop me a mail?
I as well as my friends came analyzing the best information on your site while instantly got a terrible suspicion I never expressed respect to you for those techniques. All of the women ended up certainly thrilled to read them and have in actuality been making the most of those things. Many thanks for being so helpful and for obtaining this form of beneficial things millions of individuals are really eager to be informed on. Our honest apologies for not expressing gratitude to you sooner.
I would like to thnkx for the efforts you have put in writing this site. I am hoping the same high-grade blog post from you in the upcoming also. Actually your creative writing abilities has inspired me to get my own site now. Really the blogging is spreading its wings rapidly. Your write up is a great example of it.
great issues altogether, you just received
a new reader. What may you suggest about your publish that you just made some days in the past?
Any positive?
I like this post, enjoyed this one thanks for putting up.
Hello.This post was extremely fascinating, particularly since I was searching for thoughts on this matter last week.
aviator oyna
After all, what a great site and informative posts, I will upload inbound link – bookmark this web site? Regards, Reader.
I just could not leave your site before suggesting that I actually loved the standard info a person provide on your guests? Is gonna be again often in order to inspect new posts.
I think other web site proprietors should take this website as an model, very clean and wonderful user friendly style and design, let alone the content. You are an expert in this topic!
An impressive share, I just given this onto a colleague who was doing a little bit analysis on this. And he in actual fact bought me breakfast as a result of I discovered it for him.. smile. So let me reword that: Thnx for the treat! However yeah Thnkx for spending the time to discuss this, I really feel strongly about it and love reading more on this topic. If possible, as you turn out to be expertise, would you mind updating your blog with more particulars? It is extremely useful for me. Huge thumb up for this weblog post!
Hello, Neat post. There is a problem together with your site in internet explorer, might test this… IE nonetheless is the market chief and a good component to people will miss your fantastic writing due to this problem.
Absolutely composed content, Really enjoyed looking at.
I have been browsing online greater than 3 hours as of late, yet I never discovered any fascinating article like yours. It’s beautiful price enough for me. In my view, if all site owners and bloggers made just right content as you did, the web will likely be a lot more useful than ever before. “Perfection of moral virtue does not wholly take away the passions, but regulates them.” by Saint Thomas Aquinas.
I’m still learning from you, as I’m trying to reach my goals. I absolutely enjoy reading everything that is written on your website.Keep the information coming. I loved it!
Glad to be one of several visitants on this amazing internet site : D.
I’ve been surfing online more than three hours lately, but I by no means discovered any fascinating article like yours. It is lovely price enough for me. In my opinion, if all web owners and bloggers made good content as you probably did, the web will be a lot more useful than ever before.
I truly enjoy examining on this website, it has got superb articles. “The living is a species of the dead and not a very attractive one.” by Friedrich Wilhelm Nietzsche.
aviator
Nice post. I learn something more challenging on different blogs everyday. It will always be stimulating to read content from other writers and practice a little something from their store. I’d prefer to use some with the content on my blog whether you don’t mind. Natually I’ll give you a link on your web blog. Thanks for sharing.
Yay google is my queen aided me to find this outstanding site! .
Great post, you have pointed out some great details , I as well believe this s a very excellent website.
Yesterday, while I was at work, my cousin stole my iPad and tested to see if it can survive a 25 foot drop, just so she can be a youtube sensation. My iPad is now broken and she has 83 views. I know this is completely off topic but I had to share it with someone!
Hi there! This is kind of off topic but I need some guidance from an established blog. Is it very difficult to set up your own blog? I’m not very techincal but I can figure things out pretty quick. I’m thinking about creating my own but I’m not sure where to start. Do you have any points or suggestions? Cheers
Thanks for your own work on this web site. Ellie delights in engaging in research and it’s simple to grasp why. Many of us know all concerning the lively form you present worthwhile ideas on your web site and inspire contribution from visitors about this content then our favorite princess is now discovering so much. Take pleasure in the remaining portion of the year. You are always performing a great job.
Im not sure where you are getting your info, however great topic. I needs to spend some time studying much more or figuring out more. Thank you for wonderful info I was searching for this information for my mission.
Hello.This post was really remarkable, particularly since I was looking for thoughts on this topic last Sunday.
Thank you for any other fantastic post. Where else may anybody get that type of info in such a perfect means of writing? I have a presentation subsequent week, and I’m on the look for such info.
Heya are using WordPress for your site platform? I’m new to the blog world but I’m trying to get
started and set up my own. Do you need any html coding expertise to make your own blog?
Any help would be greatly appreciated!
I do enjoy the manner in which you have framed this specific matter plus it does indeed give me personally a lot of fodder for consideration. However, from what precisely I have seen, I really trust as the actual commentary pile on that individuals stay on issue and in no way embark upon a tirade regarding the news du jour. Yet, thank you for this superb piece and while I do not really concur with the idea in totality, I regard your standpoint.
Nice read, I just passed this onto a friend who was doing a little research on that. And he actually bought me lunch as I found it for him smile Thus let me rephrase that: Thanks for lunch!
This web site is my inspiration , real good style and perfect subject material.
Акумулятори Li-ion Найкраща Ціна Купити недорого (098) 225 51 11 Магазин Li-ion акумуляторів та станцій Акумулятори для FPV Дронів Акумуляторні збірки Портативні електростанції
whoah this weblog is wonderful i like studying your articles. Stay up the great work! You understand, lots of individuals are looking round for this information, you could help them greatly.
Keep working ,fantastic job!
Wohh precisely what I was searching for, regards for posting.
Wow! Thank you! I constantly needed to write on my website something like that. Can I include a portion of your post to my blog?
whoah this blog is magnificent i like studying your posts. Stay up the good work! You recognize, many individuals are hunting round for this information, you could help them greatly.
hey there and thank you for your information – I’ve definitely picked up something new from right here. I did however expertise some technical issues using this site, as I experienced to reload the site a lot of times previous to I could get it to load properly. I had been wondering if your web host is OK? Not that I’m complaining, but sluggish loading instances times will very frequently affect your placement in google and could damage your high-quality score if advertising and marketing with Adwords. Anyway I’m adding this RSS to my e-mail and can look out for a lot more of your respective intriguing content. Ensure that you update this again very soon..
I’d have to examine with you here. Which is not one thing I usually do! I take pleasure in reading a post that may make folks think. Additionally, thanks for permitting me to comment!
Remarkable things here. I’m very glad to see your post.
Thanks a lot and I’m having a look forward to touch you.
Will you please drop me a mail?
Enjoyed reading this, very good stuff, thanks.
This really answered my problem, thank you!
FitSpresso stands out as a leading weight loss product currently dominating the market. This potent supplement asserts its ability to facilitate healthy weight loss naturally, free from any adverse side effects. Its formulation incorporates clinically studied ingredients that synergistically contribute to promoting natural fat burning, elevating metabolism, and sustaining enduring weight loss.
I know this site provides quality depending articles and additional information, is there any other web site which offers these kinds of stuff in quality?
Also visit my webpage – Pomocnik Niemcy
What¦s Taking place i am new to this, I stumbled upon this I’ve found It positively helpful and it has aided me out loads. I hope to contribute & assist other customers like its helped me. Good job.
Hello, i read your blog occasionally and i own a similar one and i was just wondering if you get a lot of spam feedback? If so how do you reduce it, any plugin or anything you can advise? I get so much lately it’s driving me insane so any help is very much appreciated.
Link exchange is nothing else but it is only placing the other person’s webpage
link on your page at appropriate place and other person will also do similar for
you.
whoah this blog is excellent i love reading your posts. Keep up the great work! You know, a lot of people are looking around for this information, you could help them greatly.
There are actually loads of details like that to take into consideration. That may be a great point to deliver up. I offer the ideas above as general inspiration however clearly there are questions like the one you convey up the place an important factor will likely be working in honest good faith. I don?t know if greatest practices have emerged round issues like that, but I’m sure that your job is clearly identified as a good game. Each girls and boys feel the affect of only a second’s pleasure, for the remainder of their lives.
Very interesting info !Perfect just what I was looking for!
I have been reading out many of your stories and i can claim clever stuff. I will surely bookmark your website.
I absolutely love your blog and find a lot of your post’s to be just what I’m looking for. Does one offer guest writers to write content available for you? I wouldn’t mind publishing a post or elaborating on a number of the subjects you write with regards to here. Again, awesome web site!
As a Newbie, I am always browsing online for articles that can help me. Thank you
Wow! This can be one particular of the most helpful blogs We have ever arrive across on this subject. Actually Great. I am also a specialist in this topic therefore I can understand your effort.
I¦ve been exploring for a bit for any high quality articles or blog posts on this kind of house . Exploring in Yahoo I eventually stumbled upon this web site. Reading this information So i am glad to convey that I have an incredibly good uncanny feeling I came upon exactly what I needed. I most indubitably will make sure to don¦t fail to remember this site and give it a glance on a relentless basis.
I am truly thankful to the holder of this website who has shared
this impressive post at at this place.
Hi, i read your bblog from tije to time and i own a similar onne
and i was jjust curious if you get a lot oof spam remarks?
If so how do you reduce it, any plugin or anything you can advise?
I gget so much lately it’s driving me mad so anny assistance is very much
appreciated.
Feel free to surf to my blog post 카지노사이트
I am glad to be one of several visitants on this outstanding internet site (:, appreciate it for posting.
Hiya, I am really glad I’ve found this info. Today bloggers publish only about gossips and internet and this is actually frustrating. A good site with exciting content, that is what I need. Thank you for keeping this site, I will be visiting it. Do you do newsletters? Can not find it.
Great write-up, I’m regular visitor of one’s website, maintain up the excellent operate, and It is going to be a regular visitor for a long time.
I’m really loving the theme/design of your website. Do you ever run into any internet browser compatibility issues? A handful of my blog readers have complained about my blog not working correctly in Explorer but looks great in Safari. Do you have any solutions to help fix this issue?
Thanks , I’ve just been looking for info about this topic for ages and yours is the greatest I’ve discovered so far. But, what about the bottom line? Are you sure about the source?
I was very happy to find this internet-site.I wanted to thanks to your time for this excellent learn!! I undoubtedly having fun with every little bit of it and I have you bookmarked to check out new stuff you blog post.
Hiya, I’m really glad I’ve found this information. Nowadays bloggers publish only about gossips and net and this is really irritating. A good site with interesting content, that’s what I need. Thanks for keeping this web site, I will be visiting it. Do you do newsletters? Can not find it.
I have recently started a website, the info you provide on this website has helped me greatly. Thanks for all of your time & work. “It is a great thing to know our vices.” by Cicero.
My spouse and i were so joyous Michael managed to deal with his preliminary research through the entire precious recommendations he received through the site. It’s not at all simplistic to just always be offering facts that many people today have been selling. And we also take into account we’ve got you to give thanks to for this. The main explanations you made, the simple blog menu, the relationships you aid to foster – it is everything superb, and it’s really facilitating our son in addition to our family believe that that article is cool, which is exceptionally fundamental. Thank you for everything!
Thank you a lot for sharing this with all folks you really understand what you’re talking about! Bookmarked. Please also consult with my website =). We could have a hyperlink change arrangement among us!
I together with my friends were actually checking out the nice ideas from your site then immediately I had a terrible feeling I had not expressed respect to the site owner for those secrets. Those people are actually for this reason stimulated to read all of them and have in effect in truth been tapping into these things. Many thanks for getting indeed thoughtful as well as for opting for certain very good areas millions of individuals are really desperate to be aware of. My personal sincere apologies for not saying thanks to earlier.
I was wondering if you ever considered changing the layout of your blog? Its very well written; I love what youve got to say. But maybe you could a little more in the way of content so people could connect with it better. Youve got an awful lot of text for only having one or 2 images. Maybe you could space it out better?
Simply wanna comment on few general things, The website pattern is perfect, the subject material is rattling fantastic : D.
Some genuinely great info , Glad I noticed this.
An impressive share, I just given this onto a colleague who was doing a little analysis on this. And he in fact bought me breakfast because I found it for him.. smile. So let me reword that: Thnx for the treat! But yeah Thnkx for spending the time to discuss this, I feel strongly about it and love reading more on this topic. If possible, as you become expertise, would you mind updating your blog with more details? It is highly helpful for me. Big thumb up for this blog post!
Howdy! I know this is kind of off topic but I was wondering which blog platform are you using for this site? I’m getting tired of WordPress because I’ve had issues with hackers and I’m looking at alternatives for another platform. I would be fantastic if you could point me in the direction of a good platform.
Excellent post. I used to be checking constantly this weblog and I am inspired! Very useful information specifically the closing section 🙂 I maintain such information much. I used to be seeking this certain information for a long time. Thank you and good luck.
Nice post. I study one thing tougher on completely different blogs everyday. It’ll at all times be stimulating to learn content from other writers and practice a bit of one thing from their store. I’d choose to use some with the content on my weblog whether you don’t mind. Natually I’ll give you a hyperlink in your internet blog. Thanks for sharing.
May I just say what a relief to uncover someone who really understands what
they’re discussing on the net. You actually realize
how to bring an issue to light and make it important.
A lot more people must check this out and understand this side of your story.
I was surprised that you aren’t more popular given that you
definitely possess the gift.
Excellent blog here! Also your website loads up fast! What web host are you using? Can I get your affiliate link to your host? I wish my web site loaded up as quickly as yours lol
Keep functioning ,great job!
Good V I should certainly pronounce, impressed with your website. I had no trouble navigating through all the tabs as well as related information ended up being truly simple to do to access. I recently found what I hoped for before you know it in the least. Quite unusual. Is likely to appreciate it for those who add forums or something, web site theme . a tones way for your customer to communicate. Nice task..
Attractive section of content. I jjust stumbled upon your website and in accession capital to assert that I
acquire in fact ennoyed account your blog posts.
Anyway I will be subscribing to your augment and even I achieevement you access consistently quickly.
my homepage – 카지노사이트
I went over this internet site and I believe you have a lot of superb information, saved to favorites (:.
I have read several good stuff here. Definitely worth bookmarking for revisiting. I surprise how much attempt you set to make one of these wonderful informative web site.
I¦ll immediately take hold of your rss feed as I can not find your email subscription hyperlink or newsletter service. Do you have any? Please permit me realize so that I could subscribe. Thanks.
Thanks for some other wonderful article. The place else could anyone get that type of information in such an ideal means of writing? I have a presentation next week, and I’m on the search for such info.
Excellent blog you have here but I was wondering if you knew of any message boards
that cover the same topics talked about in this article?
I’d really like to be a part of online community where I can get comments from other experienced people that share the same interest.
If you have any recommendations, please let me know. Thanks a lot!
Excellent site. A lot of useful info here. I?¦m sending it to several pals ans additionally sharing in delicious. And certainly, thank you in your effort!
I dugg some of you post as I cogitated they were invaluable invaluable
I gotta favorite this website it seems very useful very useful
I appreciate your work, thanks for all the useful content.
This text is priceless. Where can I find out more?
It’s a pity you don’t have a donate button! I’d most certainly donate to this brilliant blog! I guess for now i’ll settle for book-marking and adding your RSS feed to my Google account. I look forward to new updates and will share this website with my Facebook group. Chat soon!
If you wish for to improve your experience simply keep visiting this web page
and be updated with the latest news posted here.
I was examining some of your blog posts on this internet site and I conceive this internet site is real informative! Keep on putting up.
I’d have to examine with you here. Which is not one thing I usually do! I take pleasure in reading a post that may make folks think. Additionally, thanks for permitting me to comment!
Sweet internet site, super style and design, real clean and utilise pleasant.
I was suggested this website by my cousin. I’m not positive whether this publish is written through him as no one else understand such targeted approximately my trouble. You’re incredible! Thank you!
Respect to op, some superb information .
thx admin
I haven’t checked in here for a while as I thought it was getting boring, but the last several posts are great quality so I guess I’ll add you back to my daily bloglist. You deserve it my friend 🙂
I do agree with all the ideas you’ve presented in your post. They are very convincing and will definitely work. Still, the posts are too short for starters. Could you please extend them a little from next time? Thanks for the post.
It?¦s really a nice and useful piece of information. I?¦m glad that you just shared this useful info with us. Please keep us informed like this. Thanks for sharing.
I have been absent for some time, but now I remember why I used to love this blog. Thanks , I¦ll try and check back more often. How frequently you update your website?
There is noticeably a bundle to learn about this. I assume you made sure nice points in features also.
I haven’t checked in here for a while because I thought it was getting boring, but the last several posts are great quality so I guess I’ll add you back to my daily bloglist. You deserve it my friend 🙂
Hi there! This is my first visit to your blog! We are a team of volunteers and starting a new project in a community in the same niche. Your blog provided us valuable information to work on. You have done a marvellous job!
I really like assembling useful info, this post has got me even more info! .
Nice post. I was checking constantly this weblog and I am impressed! Very useful info particularly the ultimate phase 🙂 I take care of such information much. I used to be looking for this particular information for a very lengthy time. Thank you and good luck.
I think this site has got very wonderful written content material content.
Respect to article author, some fantastic selective information.
It¦s really a cool and helpful piece of information. I¦m satisfied that you just shared this helpful information with us. Please keep us up to date like this. Thanks for sharing.
But wanna comment on few general things, The website design is perfect, the subject matter is real fantastic : D.
Have you ever considered about adding a little bit more than just your articles? I mean, what you say is valuable and all. Nevertheless think of if you added some great pictures or video clips to give your posts more, “pop”! Your content is excellent but with images and videos, this site could undeniably be one of the best in its niche. Excellent blog!
You have remarked very interesting details! ps nice site.
Fabulous, what a website it is! This webpage presents useful facts to
us, keep it up.
When I originally commented I clicked the -Notify me when new comments are added- checkbox and now each time a comment is added I get four emails with the same comment. Is there any way you can remove me from that service? Thanks!
Magnificent goods from you, man. I’ve understand your stuff previous to and you are just extremely fantastic. I actually like what you’ve acquired here, really like what you are saying and the way in which you say it. You make it enjoyable and you still care for to keep it sensible. I cant wait to read much more from you. This is really a wonderful website.
I think this website holds some really wonderful information for everyone. “A kiss, is the physical transgression of the mental connection which has already taken place.” by Tanielle Naus.
You made some decent points there. I regarded on the internet for the problem and found most people will go along with along with your website.
Real clean site, appreciate it for this post.
I’m really loving the theme/design of your web site. Do you ever run into any browser compatibility issues? A couple of my blog audience have complained about my website not operating correctly in Explorer but looks great in Opera. Do you have any advice to help fix this problem?
yes thanks good
Thanks for sharing excellent informations. Your web-site is very cool. I am impressed by the details that you¦ve on this website. It reveals how nicely you perceive this subject. Bookmarked this web page, will come back for extra articles. You, my pal, ROCK! I found just the info I already searched all over the place and simply could not come across. What an ideal site.
Way cool! Some very valid points! I appreciate you writing this post and also the rest of the site
is also very good.
You are my inspiration , I possess few blogs and infrequently run out from to brand.
Great amazing things here. I?¦m very glad to look your post. Thank you a lot and i am having a look forward to touch you. Will you kindly drop me a mail?
I like this web site because so much useful stuff on here : D.
I’ve read some just right stuff here. Certainly worth bookmarking for revisiting. I surprise how much effort you put to create this kind of fantastic informative web site.
Hmm is anyone else having problems with the images on this blog loading?
I’m trying to find out if its a problem on my end or if it’s
the blog. Any suggestions would be greatly appreciated.
so much fantastic info on here, : D.
Wow! This blog looks exactly like my old one! It’s on a totally different subject but it has pretty much the same page layout and design. Superb choice of colors!
The crux of your writing while appearing reasonable at first, did not really sit well with me personally after some time. Someplace throughout the sentences you managed to make me a believer unfortunately only for a very short while. I still have a problem with your jumps in logic and you would do well to fill in those breaks. When you actually can accomplish that, I would undoubtedly be fascinated.
I like this site because so much utile stuff on here : D.
This is a very good tips especially to those new to blogosphere, brief and accurate information… Thanks for sharing this one. A must read article.
Thank you a lot for giving everyone an extremely superb chance to read articles and blog posts from this web site. It can be very beneficial and as well , stuffed with a lot of fun for me personally and my office peers to visit your blog at least three times weekly to learn the newest stuff you have got. Not to mention, we are certainly fascinated concerning the surprising ideas you serve. Certain 4 points in this post are without a doubt the simplest I’ve ever had.
hello!,I really like your writing very much! proportion we keep in touch extra about your article on AOL? I require an expert in this space to unravel my problem. Maybe that is you! Looking forward to see you.
FitSpresso stands out as a leading weight loss product currently dominating the market. This potent supplement asserts its ability to facilitate healthy weight loss naturally, free from any adverse side effects. Its formulation incorporates clinically studied ingredients that synergistically contribute to promoting natural fat burning, elevating metabolism, and sustaining enduring weight loss.
Ikaria Lean Belly Juice is a 100 natural weight loss supplement, which has made a difference for many people, as it acts directly on the root cause of fat accumulation, weight gain without explanation, and difficulty in eliminating fat mainly from the belly.
Hello! I’ve been reading your web site for a long time now and finally got the bravery to go ahead and give you a shout out from Dallas Tx! Just wanted to tell you keep up the excellent job!
I think this is one of the most significant information for me.
And i’m glad reading your article. But wanna remark on some general things,
The site style is perfect, the articles is really great : D.
Good job, cheers
Dead pent subject matter, Really enjoyed looking through.
GlucoBerry is the result of extensive research by professionals at John Hopkins University. These experts discovered a relationship between healthy blood sugar levels, insulin, and blood sugar drainage from the kidneys. Based on this research, Dr. Mark Weis, a renowned physician, devised a natural dietary supplement to help achieve healthy blood sugar levels.
I have been exploring for a bit for any high-quality articles or blog posts on this sort of house . Exploring in Yahoo I ultimately stumbled upon this site. Reading this info So i’m satisfied to express that I’ve a very just right uncanny feeling I found out exactly what I needed. I such a lot surely will make certain to don’t fail to remember this site and give it a look on a constant basis.
Thanks for another excellent article. Where else could
anybody get that type of information in such a perfect means of writing?
I have a presentation next week, and I’m at the look for such information.
Hi, Neat post. There is a problem with your website in web explorer, could check this… IE nonetheless is the market chief and a large element of other folks will miss your excellent writing because of this problem.
My coder is trying to convince me to move to .net from PHP. I have always disliked the idea because of the expenses. But he’s tryiong none the less. I’ve been using WordPress on various websites for about a year and am worried about switching to another platform. I have heard good things about blogengine.net. Is there a way I can transfer all my wordpress content into it? Any help would be really appreciated!
Dead indited content, Really enjoyed looking through.
I have been reading out a few of your posts and it’s pretty good stuff. I will definitely bookmark your blog.
Hi there very nice web site!! Guy .. Beautiful .. Superb .. I’ll bookmark your website and take the feeds alsoKI am satisfied to find numerous helpful info here in the publish, we need work out extra techniques in this regard, thank you for sharing. . . . . .
I like the valuable information you provide in your articles.
I’ll bookmark your weblog and check again here regularly.
I’m quite certain I will learn lots of new
stuff right here! Good luck for the next!
thank you admin
As I website possessor I conceive the content here is really superb, regards for your efforts.
thank you admin
Thank you a bunch for sharing this with all of us you really recognise what you’re talking about! Bookmarked. Kindly additionally consult with my web site =). We may have a hyperlink change contract between us!
Some truly prize content on this site, saved to my bookmarks.
You have brought up a very fantastic points, appreciate it for the post.
Would you be focused on exchanging hyperlinks?
It’s hard to find knowledgeable people on this topic, but you sound like you know what you’re talking about! Thanks
I am glad for writing to let you be aware of what a superb experience my child had studying your blog. She learned a good number of details, not to mention what it’s like to have a wonderful coaching style to get many more effortlessly thoroughly grasp various tricky things. You truly did more than readers’ expected results. Many thanks for producing the important, safe, revealing and even cool thoughts on your topic to Lizeth.
I truly appreciate this post. I?¦ve been looking all over for this! Thank goodness I found it on Bing. You have made my day! Thx again
Yeah bookmaking this wasn’t a bad decision outstanding post! .
hello!,I love your writing so so much! share we keep up a correspondence extra approximately your post on AOL? I need an expert in this house to solve my problem. May be that’s you! Taking a look ahead to see you.
Hi there! This post couldn’t be written any better! Reading through this post reminds me of my previous room mate! He always kept talking about this. I will forward this article to him. Pretty sure he will have a good read. Thank you for sharing!
Youre so cool! I dont suppose Ive learn anything like this before. So good to search out any individual with some unique thoughts on this subject. realy thanks for starting this up. this web site is something that’s needed on the net, somebody with a bit of originality. useful job for bringing something new to the web!
Wow! Thank you! I continuously needed to write on my website something like that. Can I take a portion of your post to my site?
hi!,I really like your writing very a lot! proportion we communicate extra approximately your article on AOL?
I need a specialist in this area to resolve my problem.
Maybe that is you! Having a look forward to see you.
Heya i’m for the first time here. I came across this board and I find It really useful & it helped me out
a lot. I hope to give something back and aid others like you helped me.
SightCare formula aims to maintain 20/20 vision without the need for any surgical process. This supplement is a perfect solution for people facing issues as they grow older. https://sightcare-web.com/
My spouse and I absolutely love your blog and find most of your post’s to be just what I’m looking for. Do you offer guest writers to write content to suit your needs? I wouldn’t mind creating a post or elaborating on most of the subjects you write regarding here. Again, awesome website!
Greate article. Keep writing such kind of info on your blog.
Im really impressed by your blog.
Hey there, You’ve performed a great job. I’ll
certainly digg it and for my part recommend to my friends.
I am confident they will be benefited from this site.
This internet site is my inhalation, rattling excellent design and perfect subject matter.
I am not sure where you’re getting your information, but good topic. I needs to spend some time learning much more or understanding more. Thanks for wonderful information I was looking for this info for my mission.
Very superb visual appeal on this website , I’d value it 10 10.
Hi, just required you to know I he added your site to my Google bookmarks due to your layout. But seriously, I believe your internet site has 1 in the freshest theme I??ve came across. It extremely helps make reading your blog significantly easier.
You actually make it appear so easy with your presentation but I find this matter to be really something which I think I would by no means understand. It sort of feels too complicated and very huge for me. I am taking a look ahead for your next publish, I’ll attempt to get the hold of it!
I simply couldn’t leave your site before suggesting that I really loved the standard info a person supply for your visitors? Is gonna be again often in order to inspect new posts
Good website! I really love how it is easy on my eyes and the data are well written. I am wondering how I might be notified whenever a new post has been made. I have subscribed to your feed which must do the trick! Have a nice day!
I am glad that I noticed this web site, exactly the right info that I was searching for! .
Your style is so unique compared to many other people. Thank you for publishing when you have the opportunity,Guess I will just make this bookmarked.2
How to play IPX / SPX games over LAN (WinXP)
https://www.nordicwalkingaustralia.com.au/cicero-famously-orated-against-his-political-opponent/
I like what you guys are usually up too. Such clever work and coverage! Keep up the wonderful works guys I’ve you guys to our blogroll.
I was suggested this blog by my cousin. I’m not sure whether this post is written by him as nobody else know such detailed about my trouble. You’re incredible! Thanks!
As a Newbie, I am permanently browsing online for articles that can aid me. Thank you
I really appreciate this post. I?¦ve been looking all over for this! Thank goodness I found it on Bing. You have made my day! Thx again
I don’t even know how I ended up here, but I thought this post was good. I don’t know who you are but certainly you’re going to a famous blogger if you are not already 😉 Cheers!
Heya i am for the primary time here. I came across this board and I in finding It truly helpful & it helped me out a lot. I hope to provide one thing again and aid others like you aided me.
Hello. remarkable job. I did not anticipate this. This is a fantastic story. Thanks!
I was examining some of your blog posts on this website and I believe this website is real instructive! Keep on posting.
You have brought up a very wonderful details, thankyou for the post.
Terrific work! This is the type of info that should be shared around the net. Shame on Google for not positioning this post higher! Come on over and visit my website . Thanks =)
My spouse and I stumbled over here coming from a different page and thought I should check things out. I like what I see so now i’m following you. Look forward to looking into your web page yet again.
I like what you guys are up too. Such intelligent work and reporting! Carry on the excellent works guys I have incorporated you guys to my blogroll. I think it will improve the value of my site 🙂
Excellent blog here! Also your site loads up fast! What host are you using? Can I get your affiliate link to your host? I wish my website loaded up as fast as yours lol
I have not checked in here for a while because I thought it was getting boring, but the last few posts are great quality so I guess I will add you back to my everyday bloglist. You deserve it my friend 🙂
Hi, I think your site might be having browser compatibility issues. When I look at your website in Firefox, it looks fine but when opening in Internet Explorer, it has some overlapping. I just wanted to give you a quick heads up! Other then that, great blog!
Awsome post and straight to the point. I don’t know if this is really the best place to ask but do you folks have any thoughts on where to employ some professional writers? Thanks in advance 🙂
I went over this internet site and I think you have a lot of good info , saved to fav (:.
I like this web site very much, Its a real nice post to read and find information.
whoah this weblog is fantastic i love reading your articles. Stay up the great work! You know, many persons are hunting round for this info, you can help them greatly.
Those are yours alright! . We at least need to get these people stealing images to start blogging! They probably just did a image search and grabbed them. They look good though!
Somebody essentially lend a hand to make severely articles I’d state. That is the first time I frequented your website page and thus far? I surprised with the analysis you made to create this particular publish incredible. Excellent job!
Great article and right to the point. I am not sure if this is in fact the best place to ask but do you people have any thoughts on where to employ some professional writers? Thank you 🙂
Some genuinely rattling work on behalf of the owner of this internet site, dead great content.
Thanks , I have just been looking for info about this topic for ages and yours is the best I have discovered so far. But, what about the conclusion? Are you sure about the source?
Some genuinely interesting info , well written and broadly speaking user pleasant.
Hello! Would you mind if I share your blog with my myspace group? There’s a lot of people that I think would really enjoy your content. Please let me know. Many thanks
Great paintings! That is the kind of information that are meant to be shared around the net. Disgrace on Google for not positioning this publish higher! Come on over and visit my web site . Thanks =)
I have recently started a website, the info you provide on this web site has helped me greatly. Thank you for all of your time & work.
I have been absent for a while, but now I remember why I used to love this web site. Thanks, I’ll try and check back more often. How frequently you update your site?
thx
thx
thx
There are some attention-grabbing points in time in this article however I don’t know if I see all of them heart to heart. There may be some validity but I’ll take maintain opinion till I look into it further. Good article , thanks and we would like extra! Added to FeedBurner as effectively
I like this web blog very much, Its a real nice post to read and get info .
Hi! This is kind of off topic but I need some help from an established blog. Is it difficult to set up your own blog? I’m not very techincal but I can figure things out pretty quick. I’m thinking about setting up my own but I’m not sure where to begin. Do you have any ideas or suggestions? Cheers
How to play IPX / SPX games over LAN (WinXP)
https://chinchillas.jp/2019/01/18/degu-nyuusankin/
Thank you for sharing superb informations. Your site is very cool. I’m impressed by the details that you?¦ve on this blog. It reveals how nicely you perceive this subject. Bookmarked this web page, will come back for more articles. You, my pal, ROCK! I found simply the info I already searched everywhere and just could not come across. What an ideal web-site.
Enjoyed looking through this, very good stuff, thanks. “Hereafter, in a better world than this, I shall desire more love and knowledge of you.” by William Shakespeare.
Hey there, I think your site might be having browser compatibility issues. When I look at your blog in Safari, it looks fine but when opening in Internet Explorer, it has some overlapping. I just wanted to give you a quick heads up! Other then that, very good blog!
Yay google is my king aided me to find this great internet site! .
Hi, i think that i saw you visited my blog so i came to “return the favor”.I’m attempting to find things to improve my website!I suppose its ok to use some of your ideas!!
I simply wished to thank you very much all over again. I am not sure the things I would have done without those opinions discussed by you on such concern. It has been a real terrifying problem in my circumstances, nevertheless considering a new professional way you resolved the issue made me to cry over fulfillment. I am just grateful for this support as well as expect you are aware of an amazing job that you are undertaking teaching many others with the aid of your web page. I’m certain you’ve never met any of us.
Hi, Neat post. There is a problem with your website in web explorer, would check thisK IE still is the marketplace chief and a huge portion of other people will leave out your excellent writing due to this problem.
Thanks for finally writing about > How to play IPX /
SPX games over LAN (WinXP) « Old PC Gaming < Liked it!
How to play IPX / SPX games over LAN (WinXP)
http://claytontimes.com/release-governor-greitens-outlines-principles-for-tax-reform/
Just wish to say your article is as surprising. The clarity on your put up is just cool and that i could suppose you are an expert on this subject. Well together with your permission allow me to seize your feed to stay up to date with impending post. Thank you a million and please carry on the rewarding work.
Lovely just what I was looking for.Thanks to the author for taking his time on this one.
There is noticeably a bundle to know about this. I assume you made certain nice points in features also.
I have to get across my respect for your kind-heartedness supporting persons who must have help with this particular matter. Your very own commitment to passing the solution throughout became certainly functional and has always allowed women just like me to arrive at their goals. Your own invaluable recommendations indicates this much to me and even further to my office colleagues. Many thanks; from everyone of us.
Some truly nice and useful information on this internet site, as well I believe the pattern contains excellent features.
You are my inhalation, I possess few blogs and very sporadically run out from to post : (.
thank you admin
My coder is trying to convince me to move to .net from PHP. I have always disliked the idea because of the expenses. But he’s tryiong none the less. I’ve been using Movable-type on several websites for about a year and am nervous about switching to another platform. I have heard good things about blogengine.net. Is there a way I can import all my wordpress posts into it? Any kind of help would be greatly appreciated!
There is perceptibly a lot to know about this. I believe you made various good points in features also.
I was suggested this website by way of my cousin. I’m no longer sure whether this submit is written via him as no one else understand such distinct approximately my difficulty. You are incredible! Thanks!
Thank you for sharing with us, I think this website really stands out : D.
I got what you intend, regards for putting up.Woh I am delighted to find this website through google. “Food is the most primitive form of comfort.” by Sheila Graham.
I’m not that much of a internet reader to be honest but your blogs really nice, keep it up! I’ll go ahead and bookmark your website to come back later. All the best
fantastic post, very informative. I wonder why the other specialists of this sector don’t notice this. You should continue your writing. I am confident, you have a huge readers’ base already!
I got what you mean ,saved to my bookmarks, very nice internet site.
Hi there, just became aware of your blog via Google, and located that it is really informative. I am gonna be careful for brussels. I’ll appreciate when you proceed this in future. Numerous people will be benefited from your writing. Cheers!
Appreciate it for this marvelous post, I am glad I noticed this website on yahoo.
F*ckin’ tremendous issues here. I’m very glad to peer your post. Thanks so much and i’m taking a look ahead to contact you. Will you please drop me a mail?
I visited a lot of website but I think this one has got something extra in it in it
Hello There. I found your blog using msn. This is a very well written article. I will be sure to bookmark it and return to read more of your useful information. Thanks for the post. I’ll definitely return.
itsmasum.com
[…]here are some hyperlinks to sites that we link to mainly because we assume they may be really worth visiting[…]
I am curious to find out what blog system you are working with? I’m experiencing some small security problems with my latest blog and I’d like to find something more secure. Do you have any solutions?
I’d like to thank you for the efforts you’ve put in penning this blog.
I am hoping to check out the same high-grade blog posts by you in the future as well.
In truth, your creative writing abilities has motivated
me to get my very own site now 😉
It’s hard to find knowledgeable people on this topic, but you sound like you know what you’re talking about! Thanks
I have recently started a site, the information you offer on this website has helped me greatly. Thanks for all of your time & work.
Very efficiently written post. It will be useful to anybody who employess it, including me. Keep up the good work – can’r wait to read more posts.
Pretty! This was a really wonderful post. Thank you for your provided information.
Hello this is kinda of off topic but I was wondering if blogs use WYSIWYG editors or if you have to manually code with HTML. I’m starting a blog soon but have no coding skills so I wanted to get guidance from someone with experience. Any help would be greatly appreciated!
I loved as much as you’ll receive carried out right here. The sketch is tasteful, your authored material stylish. nonetheless, you command get bought an impatience over that you wish be delivering the following. unwell unquestionably come further formerly again as exactly the same nearly very often inside case you shield this hike.
Hello would you mind letting me know which web host you’re utilizing? I’ve loaded your blog in 3 completely different browsers and I must say this blog loads a lot faster then most. Can you suggest a good web hosting provider at a reasonable price? Thank you, I appreciate it!
Thank you for sharing with us, I believe this website truly stands out : D.
Howdy just wanted to give you a brief heads up and let you know a few of the images aren’t loading properly. I’m not sure why but I think its a linking issue. I’ve tried it in two different browsers and both show the same results.
I truly love your blog.. Excellent colors & theme.
Did you build this website yourself? Please reply back as I’m
attempting to create my very own site and want to know where you got this from
or just what the theme is called. Many thanks!
This is a very good tips especially to those new to blogosphere, brief and accurate information… Thanks for sharing this one. A must read article.
Sweet blog! I found it while surfing around on Yahoo News. Do you have any suggestions on how to get listed in Yahoo News? I’ve been trying for a while but I never seem to get there! Cheers
Thanks , I’ve recently been looking for information about this subject for a long time and yours is the best I’ve found out till now. However, what about the bottom line? Are you sure concerning the source?
Simply wanna admit that this is extremely helpful, Thanks for taking your time to write this.
Thanks for sharing excellent informations. Your web site is very cool. I am impressed by the details that you have on this site. It reveals how nicely you understand this subject. Bookmarked this web page, will come back for extra articles. You, my pal, ROCK! I found simply the information I already searched everywhere and just couldn’t come across. What an ideal web-site.
Having read this I thought it was very informative. I appreciate you taking the time and effort to put this article together. I once again find myself spending way to much time both reading and commenting. But so what, it was still worth it!
Wow! Thank you! I constantly needed to write on my website something like that. Can I implement a portion of your post to my site?
Your place is valueble for me. Thanks!…
Does youг ѕite have a contact page? I’m һaving problems locating іt but, I’d like to shoot you an e-mail.
I’ve got some ideas for your blog yoᥙ might be interested SPA in Karachi hearing.
Either way, ɡreat blog and I look forward to seeng it improve ovеr time.
There are definitely a variety of details like that to take into consideration. That is a great level to carry up. I supply the thoughts above as common inspiration but clearly there are questions like the one you deliver up the place the most important thing shall be working in trustworthy good faith. I don?t know if finest practices have emerged around things like that, however I am positive that your job is clearly identified as a good game. Both boys and girls really feel the impact of just a second’s pleasure, for the rest of their lives.
I am glad to be a visitant of this utter web blog! , appreciate it for this rare information! .
Oh my goodness! an amazing article dude. Thanks Nonetheless I am experiencing problem with ur rss . Don’t know why Unable to subscribe to it. Is there anybody getting identical rss problem? Anyone who knows kindly respond. Thnkx
You completed a few good points there. I did a search on the subject and found most folks will consent with your blog.
Regards for this fantastic post, I am glad I found this site on yahoo.
Very good blog! Do you have any helpful hints for aspiring writers? I’m planning to start my own website soon but I’m a little lost on everything. Would you suggest starting with a free platform like WordPress or go for a paid option? There are so many choices out there that I’m totally overwhelmed .. Any suggestions? Thank you!
Thanks a lot for sharing this with all people you really know what you are talking about! Bookmarked. Please additionally talk over with my website =). We could have a link alternate arrangement among us!
Currently it sounds like Drupal is the top blogging platform out there right now. (from what I’ve read) Is that what you’re using on your blog?
I discovered your blog site on google and check a few of your early posts. Continue to keep up the very good operate. I just additional up your RSS feed to my MSN News Reader. Seeking forward to reading more from you later on!…
It¦s actually a cool and useful piece of information. I am happy that you shared this useful information with us. Please stay us informed like this. Thank you for sharing.
I conceive this web site has some really excellent information for everyone. “Dealing with network executives is like being nibbled to death by ducks.” by Eric Sevareid.
Keren sekali! 👍 Saya ingin tahu, apakah penulis dari blog ini dibayar untuk setiap posting? Saya ingin bergabung juga!
Some genuinely nice and utilitarian information on this internet site, as well I believe the design contains superb features.
A spray nozzle is the complex of high-degree accuracy and intractable, CYCO pays attention to each detail of the whole technological process, From Raw material selecting & testing to processing and finished product measuring, hundreds of equipment are used, Like CNC lathes, 3-coordinates measuring machine, Fluid density & impact testing machine and so on.
I’ve been exploring for a little for any high-quality articles or blog posts on this sort of area . Exploring in Yahoo I at last stumbled upon this web site. Reading this info So i am happy to convey that I have a very good uncanny feeling I discovered just what I needed. I most certainly will make sure to don’t forget this web site and give it a look on a constant basis.
CYCO Nozzle & Dongguan Changyuan Spraying Technology Co., Ltd.. With the development of more than 20 years, it has become one of the biggest dry fog humidifier,dry fog humidifier systems in ASIA, combining R&D, sales, and production together.
I truly appreciate this post. I have been looking all over for this! Thank goodness I found it on Bing. You have made my day! Thx again
Its such as you learn my mind! You seem to know a lot about this, like you wrote the book in it or something. I feel that you simply could do with a few p.c. to force the message house a little bit, however instead of that, this is wonderful blog. A fantastic read. I’ll definitely be back.
I have been exploring for a little bit for any high-quality articles or weblog posts on this sort of house . Exploring in Yahoo I finally stumbled upon this site. Reading this info So i’m glad to exhibit that I’ve a very just right uncanny feeling I found out exactly what I needed. I most unquestionably will make sure to do not forget this website and give it a glance on a relentless basis.
Nice post. I learn something more challenging on different blogs everyday. It will always be stimulating to read content from other writers and practice a little something from their store. I’d prefer to use some with the content on my blog whether you don’t mind. Natually I’ll give you a link on your web blog. Thanks for sharing.
Simply a smiling visitant here to share the love (:, btw great pattern. “Everything should be made as simple as possible, but not one bit simpler.” by Albert Einstein.
I am now not certain where you are getting your information, however good topic. I must spend some time finding out more or figuring out more. Thanks for great info I was searching for this info for my mission.
If you wish for to improve your knowledge only keep visiting this web
page and be updated with the most up-to-date
information posted here.
A large percentage of of the things you state is supprisingly precise and it makes me ponder why I had not looked at this in this light before. Your piece truly did switch the light on for me as far as this specific subject matter goes. Nonetheless there is actually one issue I am not necessarily too comfortable with so while I attempt to reconcile that with the actual central idea of your position, allow me see what all the rest of the visitors have to say.Very well done.
Thankyou for helping out, great information.
After research a couple of of the weblog posts on your website now, and I really like your method of blogging. I bookmarked it to my bookmark website record and might be checking back soon. Pls try my web page as nicely and let me know what you think.
Hi, i think that i saw you visited my weblog thus i came to “return the favor”.I’m trying to find things to enhance my site!I suppose its ok to use some of your ideas!!
Valuable info, Appreciate it.
When I originally commented I clicked the -Notify me when new comments are added- checkbox and now each time a comment is added I get four emails with the same comment. Is there any way you can remove me from that service? Thanks!
I’m still learning from you, as I’m improving myself. I definitely love reading all that is written on your blog.Keep the stories coming. I enjoyed it!
Can I just say what a relief to find someone who actually knows what theyre talking about on the internet. You definitely know how to bring an issue to light and make it important. More people need to read this and understand this side of the story. I cant believe youre not more popular because you definitely have the gift.
Howdy I am so happy I found your weblog, I really found you by accident, while I was researching on Aol for something else, Anyways I am here now and would just like to say thanks for a marvelous post and a all round enjoyable blog (I also love the theme/design), I don’t have time to read it all at the moment but I have saved it and also included your RSS feeds, so when I have time I will be back to read a great deal more, Please do keep up the excellent work.
I’ve been browsing online more than 3 hours today, yet I never found any interesting article like yours. It’s pretty worth enough for me. In my opinion, if all website owners and bloggers made good content as you did, the internet will be a lot more useful than ever before.
Website ini benar-benar luar biasa! Informasinya sangat lengkap, mudah dipahami, dan selalu up-to-date. Desainnya modern dan navigasinya sangat intuitif. Saya sangat suka dengan fitur-fiturnya yang memudahkan pencarian informasi. Terima kasih telah menyediakan sumber yang begitu hebat dan bermanfaat. Saya sangat merekomendasikan situs ini!
I like what you guys are up also. Such smart work and reporting! Keep up the superb works guys I’ve incorporated you guys to my blogroll. I think it’ll improve the value of my web site 🙂
Wow, amazing blog layout! How long have you been blogging
for? you make blogging look easy. The overall look of your site is great, let alone the content!
Thank you, I have just been searching for information about this subject for ages and yours is the greatest I have discovered so far. But, what about the bottom line? Are you sure about the source?
This is a very good tips especially to those new to blogosphere, brief and accurate information… Thanks for sharing this one. A must read article.
What’s up i am kavin, its my first occasion to commenting
anywhere, when i read this post i thought i could also make comment due to this
good paragraph.
Heya! I just wanted to ask if you ever have any problems with hackers? My last blog (wordpress) was hacked and I ended up losing months of hard work due to no back up. Do you have any methods to protect against hackers?
Wonderful work! This is the type of information that should be shared around the net. Shame on Google for not positioning this post higher! Come on over and visit my web site . Thanks =)
Nice post. I was checking constantly this blog and I am impressed! Extremely helpful information specially the last part 🙂 I care for such info much. I was seeking this particular information for a very long time. Thank you and best of luck.
What i do not understood is in reality how you’re not really a lot more smartly-favored than you may be now. You are so intelligent. You realize therefore significantly on the subject of this matter, produced me in my opinion consider it from numerous numerous angles. Its like women and men don’t seem to be fascinated unless it¦s something to do with Lady gaga! Your personal stuffs great. At all times take care of it up!
Today, I went to the beachfront with my kids. I found a sea shell and gave it to my 4 year old daughter and said “You can hear the ocean if you put this to your ear.” She put the shell to her ear and screamed. There was a hermit crab inside and it pinched her ear. She never wants to go back! LoL I know this is entirely off topic but I had to tell someone!
Hey there! I’ve been reading your website for a while now
and finally got the courage to go ahead and give you
a shout out from Dallas Texas! Just wanted
to say keep up the good work!
You can certainly see your expertise in the work you write. The world hopes for more passionate writers like you who are not afraid to say how they believe. Always follow your heart.
Do you have a spam issue on this site; I also am a blogger, and I was wondering your situation; we have developed some nice methods and we are looking to swap strategies with other folks, why not shoot me an e-mail if interested.
I used to be recommended this web site by way of my cousin. I’m
no longer positive whether or not this publish is written via him as no one else know such
targeted approximately my difficulty. You are wonderful!
Thanks!
Great blog! Do you have any tips for aspiring writers?
I’m planning to start my own blog soon but I’m a little lost on everything.
Would you propose starting with a free platform like WordPress or go for a paid option? There are so many
options out there that I’m totally confused .. Any recommendations?
Bless you!
Some genuinely excellent information, Glad I observed this. “The Diplomat sits in silence, watching the world with his ears.” by Leon Samson.
How to play IPX / SPX games over LAN (WinXP)
https://www.gyanglow.com/2021/10/dandruff-ka-ayurvedic-ilaaj.html
Simply wanna input that you have a very nice web site, I love the design it really stands out.
I’ve recently started a site, the info you provide on this web site has helped me greatly. Thanks for all of your time & work. “Her grandmother, as she gets older, is not fading but rather becoming more concentrated.” by Paulette Bates Alden.
What i do not understood is if truth be told how you’re no longer really a lot more neatly-liked than you might be now. You’re so intelligent. You understand therefore significantly in the case of this subject, produced me in my opinion believe it from so many numerous angles. Its like women and men don’t seem to be interested except it is one thing to accomplish with Woman gaga! Your own stuffs great. At all times take care of it up!
Excellent blog right here! Also your web site lots up fast! What host are you the usage of? Can I get your associate hyperlink on your host? I desire my site loaded up as quickly as yours lol
I don’t even know the way I finished up here, however I assumed this submit used to be great. I don’t realize who you might be but certainly you are going to a well-known blogger in case you aren’t already 😉 Cheers!
Very nice article and right to the point. I am not sure if this is in fact the best place to ask but do you people have any ideea where to get some professional writers? Thx 🙂
Some truly nice and utilitarian information on this site, as well I conceive the layout has got fantastic features.
It¦s in reality a nice and helpful piece of info. I am glad that you shared this helpful info with us. Please keep us informed like this. Thanks for sharing.
I have learn a few excellent stuff here. Definitely price bookmarking for revisiting. I wonder how a lot attempt you place to create this kind of fantastic informative web site.
You are a very bright individual!
Have you ever considered writing an ebook or guest authoring on other sites? I have a blog based upon on the same ideas you discuss and would really like to have you share some stories/information. I know my viewers would enjoy your work. If you are even remotely interested, feel free to shoot me an email.
What i don’t realize is in truth how you’re not actually a lot more well-appreciated than you may be now. You’re so intelligent. You know therefore significantly in terms of this topic, made me individually imagine it from numerous various angles. Its like men and women are not involved until it’s something to do with Woman gaga! Your personal stuffs excellent. Always maintain it up!
Hello! I realize this is kind of off-topic however I needed to ask.
Does operating a well-established blog such as yours take a lot of work?
I’m completely new to running a blog however I do write in my diary on a daily basis.
I’d like to start a blog so I will be able to share my own experience and views online.
Please let me know if you have any kind of ideas or tips for
brand new aspiring blog owners. Thankyou!
What’s Happening i’m new to this, I stumbled upon this I’ve discovered It absolutely useful and it has
helped me out loads. I am hoping to give a contribution & aid different customers like its helped me.
Good job.
You are my inhalation, I possess few blogs and infrequently run out from post :). “Actions lie louder than words.” by Carolyn Wells.
Good day! Would you mind if I share your blog with my facebook group? There’s a lot of people that I think would really appreciate your content. Please let me know. Cheers
Do you have a spam issue on this website; I also am a blogger, and I was
curious about your situation; many of us have developed some
nice procedures and we are looking to trade techniques with other folks, why not shoot me an e-mail if interested.
Где купить диплом? Советы и рекомендации купить диплом колледжа
What i don’t understood is if truth be told how you are not actually much more well-preferred than you may be now. You are so intelligent. You know therefore considerably with regards to this topic, produced me in my view consider it from numerous numerous angles. Its like women and men don’t seem to be interested unless it is one thing to do with Woman gaga! Your own stuffs great. Always maintain it up!
Great line up. We will be linking to this great article on our site. Keep up the good writing.
Somebody necessarily lend a hand to make severely posts I might state.
This is the first time I frequented your website page and thus far?
I surprised with the research you made to make this actual post incredible.
Magnificent process!
At this time it appears like BlogEngine is the preferred
blogging platform out there right now. (from what I’ve read) Is that
what you are using on your blog?
thx
excellent post, very informative. I ponder why the opposite specialists of this sector don’t realize this. You should proceed your writing. I am sure, you’ve a huge readers’ base already!
Hi, Neat post. There is an issue with your web site in web explorer, could test this… IE nonetheless is the marketplace leader and a huge component to other people will omit your magnificent writing because of this problem.
I am always invstigating online for tips that can assist me. Thank you!
I like this weblog so much, saved to favorites.
Thanks a lot for sharing this with all of us you actually know what you’re talking about! Bookmarked. Please also visit my website =). We could have a link exchange contract between us!
Thanks for the sensible critique. Me & my neighbor were just preparing to do a little research on this. We got a grab a book from our area library but I think I learned more clear from this post. I am very glad to see such wonderful info being shared freely out there.
I really like what you guys tend to be up too. This kind of clever work and reporting!
Keep up the fantastic works guys I’ve incorporated you guys to blogroll.
I precisely wished to say thanks yet again. I’m not certain what I could possibly have gone through in the absence of the type of tips contributed by you concerning that subject matter. It seemed to be a real frightful situation in my circumstances, but noticing a well-written technique you treated it forced me to weep with fulfillment. I am just happier for this assistance and as well , trust you realize what a powerful job you were undertaking educating the others via your webblog. More than likely you have never met any of us.
I know this website gives quality dependent articles or reviews and additional data, is there any other web page which offers these
information in quality?
you’re really a good webmaster. The website loading speed is incredible. It seems that you’re doing any unique trick. In addition, The contents are masterpiece. you’ve done a great job on this topic!
I am forever thought about this, appreciate it for putting up.
I like the helpful info you provide in your articles. I will bookmark your weblog and check again here frequently. I am quite sure I will learn plenty of new stuff right here! Best of luck for the next!
I don’t even understand how I finished up here, however I assumed this post was great. I don’t recognize who you are however definitely you are going to a famous blogger if you are not already 😉 Cheers!
Saved as a favorite, I really like your blog!
Hello.This article was extremely interesting, especially because I was searching for thoughts on this topic last Sunday.
I believe this site holds some rattling good information for everyone :D. “Do not go where the path may lead, go instead where there is no path and leave a trail.” by Ralph Waldo Emerson.
Great awesome things here. I?¦m very satisfied to see your article. Thank you a lot and i am having a look forward to contact you. Will you please drop me a e-mail?
Pretty! This was a really wonderful post. Thank you for your provided information.
Thank you for sharing excellent informations. Your website is very cool. I am impressed by the details that you¦ve on this blog. It reveals how nicely you perceive this subject. Bookmarked this website page, will come back for extra articles. You, my friend, ROCK! I found simply the information I already searched all over the place and just could not come across. What a perfect website.
My relatives all the time say that I am wasting my time here
at web, however I know I am getting experience every day by reading thes
fastidious content.
Thank you a lot for sharing this with all people you really recognize what you’re speaking approximately!
Bookmarked. Please additionally consult with my web site =).
We could have a link change contract among us
I love your blog.. very nice colors & theme. Did you create this website yourself? Plz reply back as I’m looking to create my own blog and would like to know wheere u got this from. thanks
I got what you mean , appreciate it for putting up.Woh I am pleased to find this website through google.
Thanks for some other wonderful article. Where else could anybody get that kind of info in such a perfect means of writing? I have a presentation subsequent week, and I am on the search for such information.
Heya i’m for the first time here. I found this board and I find It truly useful & it helped me out much. I hope to give something back and help others like you aided me.
What i do not understood is actually how you are not really much more well-liked than you might be right now. You are so intelligent. You realize thus significantly relating to this subject, produced me personally consider it from a lot of varied angles. Its like women and men aren’t fascinated unless it’s one thing to do with Lady gaga! Your own stuffs great. Always maintain it up!
Good info and straight to the point. I don’t know if this is in fact the best place to ask but do you folks have any ideea where to get some professional writers? Thx 🙂
you’ve gotten an ideal weblog here! would you wish to make some invite posts on my blog?
Hi there, I want to subscribe for this weblog to obtain latest updates, therefore where can i do it please help out.
Диплом о высшем образовании – доступная мечта
купить диплом о среднем образовании в кирове
I’m not sure where you are getting your info, but great topic.
I needs to spend some time learning much more or understanding more.
Thanks for wonderful info I was looking for this information for my mission.
my site :: slot tanpa deposit awal
Wow! Thank you! I continuously wanted to write on my site something like that. Can I include a portion of your post to my site?
You ought to take part in a contest for one of the best websites on the internet.
I most certainly will highly recommend this website!
Feel free to surf to my homepage; cmd 398
Yeah bookmaking this wasn’t a high risk determination great post! .
Hey! Someone in my Facebook group shared this website with us so
I came to check it out. I’m definitely loving the information.
I’m book-marking and will be tweeting this to my followers!
Outstanding blog and superb style and design.
As soon as I observed this web site I went on reddit to share some of the love with them.
I like this web blog very much, Its a real nice place to read and get info .
Hello There. I found your blog using msn. This is an extremely well written article.
I will be sure to bookmark it and come back to read more of your useful info.
Thanks for the post. I will certainly return.
Thankfulness to my father who stated to me concerning this
web site, this webpage is actually awesome.
Yay google is my world beater helped me to find this outstanding internet site! .
Hello! I’ve been reading your blog for a while now and finally got
the courage to go ahead and give you a shout out from
New Caney Tx! Just wanted to say keep up the great job!
If some one wants expert view on the topic of running a blog after that i recommend him/her to pay a
quick visit this website, Keep up the fastidious work.
Very efficiently written story. It will be valuable to everyone who usess it, as well as yours truly :). Keep up the good work – for sure i will check out more posts.
Some times its a pain in the ass to read what website owners wrote but this site is rattling user genial! .
I’m extremely impressed with your writing skills as smartly as with the format to your blog. Is this a paid subject matter or did you modify it your self? Either way stay up the nice high quality writing, it is uncommon to peer a nice weblog like this one today..
Useful info. Fortunate me I discovered your site by chance, and I am stunned why this twist of fate didn’t came about earlier! I bookmarked it.
hello!,I love your writing so so much! share we
be in contact more about your article on AOL? I need a specialist
in this house to unravel my problem. May be that’s you!
Looking forward to peer you.
Bursa escort bayan ve görükle escort profilleri ve iletişim bilgileri
Excellent blog here! Also your site loads up very fast!
What web host are you using? Can I get your affiliate link
to your host? I wish my web site loaded up as quickly
as yours lol
It’s really a nice and useful piece of info.
I’m glad that you shared this helpful information with us.
Please keep us informed like this. Thank you for sharing.
I am glad to be a visitant of this utter web site! , thanks for this rare information! .
Really clean website , appreciate it for this post.
Hi there! This post couldn’t be written any better! Reading through this post reminds me of my previous room mate! He always kept talking about this. I will forward this article to him. Pretty sure he will have a good read. Thank you for sharing!
As a Newbie, I am continuously browsing online for articles that can help me. Thank you
Building backlinks is a crucial aspect of website optimization that centers
around boosting a site’s authority and position on SERPs.
This comprehensive guide will explore different strategies and tactics for effective link building, giving
insights on how to improve your SEO strategies.
## Grasping the Importance of Link Building
Link building involves obtaining links from other webpages to your own. Those hyperlinks are viewed as approvals of credibility by search
engines. The more high-quality backlinks you get, the higher your
webpage’s probability of ranking higher on search results.
## Kinds of Backlinks
### Editorial Links
Editorial links are earned without requiring work from the website owner.
These links occur when other sites see your articles relevant and
link to it.
### Manual Links
Solicited links include deliberately requesting links from other websites.
This can include reaching out to influencers, soliciting hyperlinks to your
content.
### User-Generated Links
Self-Made links are created by placing your webpage’s link to forums.
While these links can offer a fast increase, they frequently
come with limited quality and can lead to punishments
from Google.
## Successful Link Building Strategies
### Content Creation & Promotion
Creating valuable articles that organically earns links
is a core strategy for efficient link building.
Below are some suggestions:
– Develop high-quality articles that solve typical questions in your niche.
– Design charts that display intricate information in an digestible manner.
– Produce detailed guides on topics that are relevant
to your readers.
### Guest Posting
Guest articles is an additional successful way to build
authoritative hyperlinks. This entails creating posts for other websites in your
field. Make sure that your guest articles are high-quality and
include a link to your page.
### Broken Link Building
Broken link fixing is a technique that includes finding broken links on other pages and recommending your site as
a replacement. This does more than assists the webmaster fix their broken link but further provides you
a high-quality link.
### Contact and Relationship Building
Building connections with other webmasters in your niche is a sustainable method for building links.
Listed below are some methods to follow:
– Participate in forums pertaining to your
industry.
– Distribute other users’ content and offer constructive feedback.
– Work together on shared initiatives such as research studies.
### Social Networks
Promoting your posts on social platforms can enhance its reach and potential to acquire backlinks.
Interact with your audience on sites like Twitter and Pinterest to build a solid online presence.
## Measuring the Success of Your Link Building Campaign
### Applications for Link Analysis
Numerous software are out there to help you evaluate the performance of your link
building strategy. Some commonly used software such as:
– Google’s Analytics
– Ahrefs’ Site Explorer
– Moz’s Link Explorer
– SEMrush
– Majestic’s Tools
### Measures to Monitor
When assessing the effectiveness of your link building strategy, consider the upcoming metrics:
– Domain Authority
– Page Authority
– Number of backlink sources
– Relevance of hyperlinks
– Traffic referred by hyperlinks
### Modifying Your Strategy
Based on the information obtained from your analysis, modify your link
building approach to boost its performance. This could entail focusing on various kinds of posts, aiming at other sites,
or refining your contact method.
## Common Pitfalls in Link Building and How to Avoid
Them
### Poor Links
One major common errors is get poor links from irrelevant or dubious websites.
Those hyperlinks can hurt your site’s online presence.
### Excessive Optimization
Using exact-match hyperlink text too often can result in sanctions from Google.
Strive for a diverse variety of hyperlink text.
### Overlooking Nofollow Links
While nofollow links aren’t transfer SEO juice, they can still generate hits and enhance visibility.
## Future Developments in Link Building
### Machine Learning and Backlink Acquisition
As the advancement of AI, link building methods are becoming more sophisticated.
Artificial intelligence applications can aid in discovering high-quality link opportunities and anticipating the potential on SEO.
### Voice Queries and Link Building
The increase of voice-activated search will be changing the
method information is retrieved. This is likely to influence backlink acquisition by altering
the focus to conversational queries and specific queries.
## Final Thoughts
Effective link building is a essential component of search engine optimization. By
understanding the importance of high-quality hyperlinks, using different methods, and continuously measuring your strategies, you
can boost your webpage’s ranking and reach better rankings on Bing.
By remaining current with the newest developments and avoiding
frequent errors, you can operate in the dynamic landscape
of website optimization and achieve long-term success.
Thank you, I’ve just been looking for info approximately this topic for a long time and yours is the greatest I have came upon till now. However, what concerning the conclusion? Are you positive concerning the source?
Its like you read my mind! You seem to know
a lot about this, like you wrote the book in it or something.
I think that you could do with a few pics to drive the message home a little
bit, but other than that, this is magnificent blog.
An excellent read. I’ll certainly be back.
Great ?V I should definitely pronounce, impressed with your site. I had no trouble navigating through all tabs and related info ended up being truly simple to do to access. I recently found what I hoped for before you know it in the least. Quite unusual. Is likely to appreciate it for those who add forums or anything, website theme . a tones way for your client to communicate. Excellent task..
Hi there! This post could not be written any better! Reading through this post reminds me of my good old room mate! He always kept chatting about this. I will forward this post to him. Pretty sure he will have a good read. Many thanks for sharing!
I am always invstigating online for ideas that can benefit me. Thanks!
This is a very good tips especially to those new to blogosphere, brief and accurate information… Thanks for sharing this one. A must read article.
Once I originally commented I clicked the -Notify me when new comments are added- checkbox and now every time a remark is added I get four emails with the identical comment. Is there any way you can remove me from that service? Thanks!
Howdy very nice blog!! Man .. Beautiful .. Superb .. I’ll bookmark your site and take the feeds additionally?KI’m satisfied to find a lot of useful information right here within the publish, we’d like develop more strategies on this regard, thanks for sharing. . . . . .
Hi there to every one, it’s in fact a fastidious for me to visit this web site, it includes priceless Information.
There is certainly a great deal to know about this issue.
I love all the points you’ve made.
You need to be a part of a contest for one of the greatest sites on the
internet. I am going to highly recommend this website!
You are my inhalation, I possess few web logs and very sporadically run out from to post .
There are some interesting closing dates on this article however I don’t know if I see all of them center to heart. There’s some validity however I will take maintain opinion until I look into it further. Good article , thanks and we would like extra! Added to FeedBurner as properly
There are some interesting points in time in this article but I don?t know if I see all of them center to heart. There is http://momporn.cc/ porn some validity but I will take hold opinion until I look into it further. Good article , thanks and we want more! Added to FeedBurner as well
How to play IPX / SPX games over LAN (WinXP)
http://claytontimes.com/release-advantage-capital-picks-winning-teams-in-revitalizing-communities-and-putting-capital-to-work/
Great line up. We will be linking to this great article on our site. Keep up the good writing.
Hi my friend! I want to say that this post is awesome, nice written and include approximately all significant infos. I would like to see more posts like this.
LeanBiome is a dietary supplement designed to promote weight loss and improve overall health. It is formulated with a unique blend of probiotics, prebiotics, and natural ingredients that work together to support a healthy gut microbiome. The gut microbiome plays a crucial role in digestion, metabolism, and the immune system. By optimizing the gut microbiome, LeanBiome aims to help individuals achieve their weight loss goals more effectively and sustainably. https://sites.google.com/spsw.edu.pl/leanbiome/
Tonic Greens has gained popularity as a health supplement known for its rich blend of vitamins, minerals, and plant extracts. This article explores its composition, potential health benefits, usage instructions, and possible side effects. https://sites.google.com/spsw.edu.pl/tonicgreens/
SightCare is a revolutionary dietary supplement designed to support and maintain optimal eye health. In today’s digital age, where screens dominate our daily lives, the need for effective eye care solutions has never been greater. SightCare aims to meet this need with its scientifically formulated blend of essential nutrients and antioxidants. https://sites.google.com/spsw.edu.pl/sightcare/
Hmm it appears like your site ate my first comment (it was super long) so I guess I’ll just sum it up what I had written and say, I’m thoroughly enjoying your blog. I as well am an aspiring blog blogger but I’m still new to the whole thing. Do you have any tips and hints for newbie blog writers? I’d definitely appreciate it.
Boostaro stands out as a natural solution for boosting energy levels and supporting overall vitality. Its blend of caffeine, adaptogens, and essential nutrients offers a balanced approach to enhancing physical and mental energy. As with any supplement, consult with a healthcare professional before starting, especially if you have any health concerns or sensitivities. https://sites.google.com/spsw.edu.pl/boostaro/
Prostadine is a dietary supplement formulated to support prostate health, particularly in men experiencing symptoms of benign prostatic hyperplasia (BPH) or other prostate-related issues. As men age, maintaining prostate health becomes increasingly important to avoid urinary discomfort and other related problems. Prostadine aims to provide a natural solution through a blend of ingredients known for their beneficial effects on the prostate. https://sites.google.com/spsw.edu.pl/prostabiome
Heya i am for the first time here. I came across this board and I find It truly helpful & it helped me out a lot.
I am hoping to offer something again and aid others like
you aided me.
Prostadine is a dietary supplement formulated to support prostate health, particularly in men experiencing symptoms of benign prostatic hyperplasia (BPH) or other prostate-related issues. As men age, maintaining prostate health becomes increasingly important to avoid urinary discomfort and other related problems. Prostadine aims to provide a natural solution through a blend of ingredients known for their beneficial effects on the prostate. https://sites.google.com/spsw.edu.pl/prostadine/
Glucotil is a dietary supplement designed to support healthy blood sugar levels and overall metabolic health. Managing blood sugar is crucial for individuals with diabetes or pre-diabetes, as well as for those looking to maintain healthy energy levels and prevent future metabolic issues. Glucotil combines natural ingredients that have been shown to positively affect blood glucose regulation and insulin sensitivity.
https://sites.google.com/spsw.edu.pl/glucotil/
he blog was how do i say it… relevant, finally something that helped me. Thanks
I’ve been absent for a while, but now I remember why I used to love this website. Thanks, I will try and check back more often. How frequently you update your site?
Very interesting subject , thankyou for posting.
Nagano Tonic is a dietary supplement designed to promote overall health and wellness. Drawing inspiration from traditional Japanese medicine and modern nutritional science, Nagano Tonic incorporates a blend of natural ingredients known for their health-boosting properties. This supplement aims to enhance energy levels, support immune function, and improve overall vitality. https://sites.google.com/spsw.edu.pl/naganotonicleanbelly/
Hi there it’s me, I am also visiting this web page on a
regular basis, this web page is genuinely nice and the visitors are really sharing nice thoughts.
Pineal XT is a dietary supplement formulated to enhance sleep quality and support sleep patterns. Known for its natural ingredients, Pineal XT particularly focuses on boosting melatonin production, aiding individuals in managing sleep-related issues effectively. https://sites.google.com/spsw.edu.pl/pinealxt/
I could not refrain from commenting. Perfectly
written!
Prodentim offers a range of innovative dental care products designed to promote optimal oral health. From toothpaste to oral rinses, Prodentim products are formulated with advanced ingredients to address various dental concerns and enhance overall oral hygiene. https://sites.google.com/spsw.edu.pl/prodentim/
Puravive is a dietary supplement designed to support weight loss and overall metabolic health. By leveraging a blend of natural ingredients known for their fat-burning and metabolism-boosting properties, Puravive aims to help individuals achieve their weight management goals and enhance their overall well-being. https://sites.google.com/spsw.edu.pl/puravive-web/
Hi! I’ve been reading your website for a while now and finally got the courage to go ahead and give you a shout out from Austin Texas! Just wanted to tell you keep up the great work!
I always was interested in this topic and stock still am, thanks for putting up.
Puravive is a dietary supplement designed to support weight loss and overall metabolic health. By leveraging a blend of natural ingredients known for their fat-burning and metabolism-boosting properties, Puravive aims to help individuals achieve their weight management goals and enhance their overall well-being. https://sites.google.com/spsw.edu.pl/puravive-web/
Cardio Defend is a dietary supplement designed to support cardiovascular health. Utilizing a blend of natural ingredients, Cardio Defend aims to improve heart function, promote healthy blood pressure, and enhance overall cardiovascular wellness. This article explores the composition, benefits, clinical evidence, and user experiences related to Cardio Defend. https://sites.google.com/spsw.edu.pl/cardiodefend/
Kerassentials is a skincare and nail care product designed to promote healthy, strong nails and improve the overall condition of the skin. Combining natural and scientifically-backed ingredients, Kerassentials targets common issues such as fungal infections, brittle nails, and dry skin, providing a comprehensive solution for maintaining nail and skin health. https://sites.google.com/spsw.edu.pl/kerassentials-try/
Heya i’m for the first time here. I came across this board and I find It truly useful & it helped me out a lot. I hope to give something back and help others like you aided me.
EyeFortin is an all-natural eye-health supplement that helps to keep your eyes healthy even as you age. It prevents infections and detoxifies your eyes while also being stimulant-free. This makes it a great choice for those who are looking for a natural way to improve their eye health. https://sites.google.com/spsw.edu.pl/eyefortin/
Burn Boost is a dietary supplement designed to aid in weight management and fat loss. Combining a blend of natural ingredients, Burn Boost aims to increase metabolism, enhance energy levels, and support overall weight loss efforts. This article explores the composition, benefits, clinical evidence, and user experiences related to Burn Boost. https://sites.google.com/spsw.edu.pl/burnboost/
Alpha Tonic is a dietary supplement designed to support male vitality, energy, and overall performance. Combining a blend of natural ingredients known for their beneficial effects on male health, Alpha Tonic aims to provide a comprehensive solution for men looking to enhance their physical and mental well-being. This article explores the composition, benefits, clinical evidence, and user experiences related to Alpha Tonic. https://sites.google.com/spsw.edu.pl/alphatonic/
Hi there, I discovered your blog via Google even as looking for a comparable matter,
your site got here up, it looks great. I’ve bookmarked it in my google bookmarks.
Hi there, simply become alert to your weblog via Google,
and located that it is truly informative. I’m gonna be careful for
brussels. I’ll appreciate should you proceed this in future.
Many people will likely be benefited out of your writing. Cheers!
PotentStream is a dietary supplement designed to enhance male vitality, energy levels, and overall performance. Combining a blend of potent natural ingredients, PotentStream aims to provide a comprehensive solution for men experiencing issues related to low energy, reduced libido, and decreased stamina. This article explores the composition, benefits, clinical evidence, and user experiences of PotentStream.
https://sites.google.com/spsw.edu.pl/potentstream/
I loved as much as you will receive carried out right here.
The sketch is attractive, your authored material stylish.
nonetheless, you command get got an edginess over that you wish be delivering the following.
unwell unquestionably come more formerly again as exactly the same nearly a lot often inside case you
shield this increase.
Диплом государственного образца купить: все, что
нужно знать где купить диплом о среднем
Купить диплом о высшем
образовании в Москве купить диплом кандидата наук
F*ckin’ tremendous issues here. I’m very happy to see your post. Thank you so much and i’m taking a look forward to touch you. Will you please drop me a e-mail?
Точка в образовании: купить диплом техникума с гарантией легальности купить диплом техникума в тольятти
This is really interesting, You are a very skilled blogger. I have joined your feed and look forward to seeking more of your fantastic post. Also, I have shared your website in my social networks!
Hello there, I found your site via Google while looking for a related topic, your site came up, it looks great. I’ve bookmarked it in my google bookmarks.
It’s a shame you don’t have a donate button! I’d certainly donate to this superb blog! I suppose for now i’ll settle for bookmarking and adding your RSS feed to my Google account. I look forward to new updates and will share this blog with my Facebook group. Talk soon!
We are a group of volunteers and starting a new scheme in our community. Your site provided us with helpful information to work on. You have done an impressive activity and our whole group will likely be grateful to you.
Hello.This post was extremely fascinating, particularly because I was browsing for thoughts on this topic last couple of days.
Does your blog have a contact page? I’m having problems locating it but, I’d like to shoot you an e-mail. I’ve got some creative ideas for your blog you might be interested in hearing. Either way, great website and I look forward to seeing it grow over time.
Greetings! Very helpful advice on this article! It is the little changes that make the biggest changes. Thanks a lot for sharing!
Wow, wonderful blog layout! How long have you been blogging for? you made blogging look easy. The overall look of your website is great, let alone the content!
Chic Hot Club: Womans Fashion Clothing Store At Chic Hot Club, We offer a curated selection of chic and trendy clothing pieces that inspire confidence and self-expression, at Competitive prices online.
Admiring the dedication you put into your site and in depth information you offer. It’s awesome to come across a blog every once in a while that isn’t the same unwanted rehashed information. Fantastic read! I’ve saved your site and I’m including your RSS feeds to my Google account.
We are a group of volunteers and opening a new scheme in our community. Your web site offered us with valuable information to work on. You have done a formidable job and our whole community will be grateful to you.
I love it when people come together and share opinions, great blog, keep it up.
Hi, I think your site might be having browser compatibility issues. When I look at your website in Safari, it looks fine but when opening in Internet Explorer, it has some overlapping. I just wanted to give you a quick heads up! Other then that, fantastic blog!
Great write-up, I’m regular visitor of one’s site, maintain up the excellent operate, and It is going to be a regular visitor for a lengthy time.
You must take part in a contest for top-of-the-line blogs on the web. I’ll recommend this web site!
Hey There. I found your blog using msn. This is
a very well written article. I will make sure to bookmark it and return to read more of your useful information. Thanks for the post.
I will definitely return.
Terrific article! This is the kind of info that should be shared across the web.
Shame on the seek engines for now not positioning this put up upper!
Come on over and visit my web site . Thanks =)
We stumbled over here coming from a different web page and thought I might check things out. I like what I see so i am just following you. Look forward to exploring your web page repeatedly.
Have you ever thought about writing an e-book or guest authoring on other blogs?
I have a blog centered on the same topics you discuss and would really like to have
you share some stories/information. I know my subscribers would value your work.
If you are even remotely interested, feel free to shoot me
an e-mail.
I am incessantly thought about this, regards for putting up.
I and my guys happened to be reading the good guidelines located on the blog and so the sudden got a horrible suspicion I had not expressed respect to the web blog owner for those strategies. Most of the boys are already passionate to study them and now have without a doubt been loving those things. Thank you for simply being indeed accommodating as well as for selecting such magnificent ideas millions of individuals are really desperate to understand about. My personal honest regret for not saying thanks to you earlier.
Hello, i think that i noticed you visited my blog so i got here to “go back the prefer”.I am attempting to find things to improve my site!I suppose its adequate to use some of your ideas!!
It is in reality a great and useful piece of info. I¦m satisfied that you just shared this useful info with us. Please stay us up to date like this. Thank you for sharing.
Thanks for helping out, superb information. “Courage comes and goes. Hold on for the next supply.” by Vicki Baum.
I want assembling useful information , this post has got me even more info! .
Thanks for every other informative blog. Where else may I am getting that type of info written in such a perfect means? I’ve a mission that I am just now operating on, and I’ve been on the look out for such info.
Awsome article and straight to the point. I am not sure if this is truly the best place to ask but do you folks have any thoughts on where to hire some professional writers? Thx 🙂
Right now it sounds like Drupal is the preferred blogging platform available right now. (from what I’ve read) Is that what you are using on your blog?
Hey! I could have sworn I’ve been to this website before but after checking through some of the post I realized it’s new to me. Anyhow, I’m definitely glad I found it and I’ll be bookmarking and checking back often!
This is a very good tips especially to those new to blogosphere, brief and accurate information… Thanks for sharing this one. A must read article.
certainly like your website but you have to check the spelling on several of your posts. A number of them are rife with spelling problems and I find it very troublesome to tell the truth nevertheless I’ll certainly come back again.
Hi, just required you to know I he added your site to my Google bookmarks due to your layout. But seriously, I believe your internet site has 1 in the freshest theme I??ve came across. It extremely helps make reading your blog significantly easier.
Thank you for sharing excellent informations. Your web site is very cool. I’m impressed by the details that you?¦ve on this blog. It reveals how nicely you understand this subject. Bookmarked this web page, will come back for more articles. You, my friend, ROCK! I found just the information I already searched all over the place and simply couldn’t come across. What a great website.
How to play IPX / SPX games over LAN (WinXP)
https://n-folder.com/bae-systems-plc/comment-page-12536
I used to be suggested this website by way of my cousin. I am now not positive whether or not this post is written by way of him as no one else realize such detailed about my trouble. You’re wonderful! Thank you!
I view something genuinely special in this site.
I am lucky that I detected this web site, just the right info that I was searching for! .
Hey there are using WordPress for your blog platform? I’m new to the blog world but I’m trying to get started and set up my own. Do you need any coding expertise to make your own blog? Any help would be really appreciated!
My brother recommended I would possibly like this web site. He was once totally right. This submit actually made my day. You cann’t consider just how much time I had spent for this information! Thanks!
Good bro nice.
Good write-up, I¦m regular visitor of one¦s site, maintain up the excellent operate, and It is going to be a regular visitor for a long time.
Woh I like your content, saved to my bookmarks! .
Hello.This article was really fascinating, especially because I was looking for thoughts on this issue last Sunday.
Hello.This article was really motivating, especially since I was searching for thoughts on this subject last Saturday.
Hi my loved one! I wish to say that this post is awesome, nice written and include almost all important infos. I would like to see extra posts like this .
gerçek escort
I savour, result in I discovered just what I used to be having a look for. You have ended my 4 day long hunt! God Bless you man. Have a great day. Bye
Enjoyed studying this, very good stuff, regards. “Hereafter, in a better world than this, I shall desire more love and knowledge of you.” by William Shakespeare.
I’m curious to find out what blog system you are working with? I’m having some small security issues with my latest site and I would like to find something more risk-free. Do you have any recommendations?
sex movies
Yeah bookmaking this wasn’t a bad decision great post! .
I like this website because so much useful stuff on here : D.
What i don’t understood is if truth be told how you’re now not really a lot more well-favored than you may be now. You are very intelligent. You know thus considerably when it comes to this topic, made me for my part consider it from a lot of varied angles. Its like women and men are not interested unless it’s one thing to do with Girl gaga! Your own stuffs outstanding. All the time handle it up!
casibom
I am actually thankful to the holder of this website who has shared this impressive
paragraph at at this time.
I was wondering if you ever considered changing the page layout of your website? Its very well written; I love what youve got to say. But maybe you could a little more in the way of content so people could connect with it better. Youve got an awful lot of text for only having 1 or two pictures. Maybe you could space it out better?
Keep functioning ,great job!
Thank you for the auspicious writeup. It in fact was a amusement account it. Look advanced to more added agreeable from you! By the way, how could we communicate?
I pay a visit day-to-day some blogs and information sites to read articles or reviews,
except this website provides feature based posts.
I keep listening to the newscast talk about receiving boundless online grant applications so I have been looking around for the top site to get one. Could you advise me please, where could i get some?
Good write-up, I’m regular visitor of one’s blog, maintain up the nice operate, and It’s going to be a regular visitor for a long time.
Very interesting points you have remarked, regards for posting. “Pleasure and love are the pinions of great deeds.” by Charles Fox.
You are a very bright individual!
Whats up very nice website!! Man .. Excellent .. Superb .. I will bookmark your website and take the feeds additionally?KI am satisfied to seek out so many helpful info right here in the publish, we want work out more techniques on this regard, thank you for sharing. . . . . .
As soon as I discovered this site I went on reddit to share some of the love with them.
My partner and I absolutely love your blog and find the majority of your
post’s to be exactly I’m looking for. Would you offer guest writers to write content to suit your
needs? I wouldn’t mind composing a post or elaborating on most of the subjects you write regarding here.
Again, awesome web log!
My blog view publisher site
We are a gaggle of volunteers and starting a new scheme in our community. Your web site provided us with valuable info to paintings on. You have done an impressive job and our entire group shall be grateful to you.
Just want to say your article is as astounding. The clarity on your submit is simply excellent and i could think you’re an expert in this subject. Well along with your permission let me to grab your feed to stay up to date with forthcoming post. Thanks 1,000,000 and please continue the rewarding work.
I would like to thnkx for the efforts you have put in writing this blog. I am hoping the same high-grade blog post from you in the upcoming as well. In fact your creative writing abilities has inspired me to get my own blog now. Really the blogging is spreading its wings quickly. Your write up is a good example of it.
This is a very good tips especially to those new to blogosphere, brief and accurate information… Thanks for sharing this one. A must read article.
There are definitely lots of details like that to take into consideration. That is a nice level to carry up. I provide the ideas above as basic inspiration however clearly there are questions like the one you deliver up the place a very powerful thing might be working in honest good faith. I don?t know if best practices have emerged around issues like that, but I am certain that your job is clearly identified as a fair game. Both girls and boys really feel the impact of just a second’s pleasure, for the rest of their lives.
very good put up, i actually love this web site, carry on it
he blog was how do i say it… relevant, finally something that helped me. Thanks
Hey very cool website!! Man .. Excellent .. Amazing .. I will bookmark your web site and take the feeds also…I am happy to find so many useful information here in the post, we need develop more techniques in this regard, thanks for sharing. . . . . .
I see something truly special in this web site.
azrael won
I just wanted to jot down a quick comment in order to express gratitude to you for the magnificent concepts you are giving on this website. My long internet lookup has at the end of the day been honored with beneficial concept to write about with my relatives. I ‘d tell you that most of us website visitors actually are very much blessed to be in a remarkable website with many outstanding professionals with insightful hints. I feel very much privileged to have discovered the web pages and look forward to plenty of more cool moments reading here. Thank you again for a lot of things.
Some truly nice stuff on this internet site, I like it.
Pretty! This was a really wonderful post. Thank you for your provided information.
Hello there, I found your blog via Google while looking for a related topic, your website came up, it looks good. I have bookmarked it in my google bookmarks.
I’m really impressed with your writing skills as well as with the layout on your weblog. Is this a paid theme or did you customize it yourself? Either way keep up the nice quality writing, it is rare to see a great blog like this one nowadays..
Precisely what I was searching for, thanks for putting up.
You can certainly see your expertise in the work you write. The world hopes for even more passionate writers such as you who are not afraid to say how they believe. All the time follow your heart. “Everyone has his day and some days last longer than others.” by Sir Winston Leonard Spenser Churchill.
I have read a few good stuff here. Definitely worth bookmarking for revisiting. I wonder how much effort you put to make such a great informative web site.
I discovered your weblog site on google and check a few of your early posts. Proceed to maintain up the excellent operate. I just extra up your RSS feed to my MSN Information Reader. In search of forward to reading extra from you in a while!…
Hello, you used to write excellent, but the last few posts have been kinda boring… I miss your super writings. Past several posts are just a little out of track! come on!
I have read several just right stuff here. Definitely price bookmarking for revisiting. I surprise how much attempt you set to make this type of great informative web site.
It is in point of fact a great and useful piece of info. I am happy that you just shared this helpful info with us. Please keep us up to date like this. Thank you for sharing.
That is the fitting weblog for anybody who desires to search out out about this topic. You realize so much its almost onerous to argue with you (not that I actually would need…HaHa). You definitely put a brand new spin on a subject thats been written about for years. Nice stuff, simply great!
I like this web site its a master peace ! Glad I noticed this on google .
This is the right blog for anyone who wants to find out about this topic. You realize so much its almost hard to argue with you (not that I actually would want…HaHa). You definitely put a new spin on a topic thats been written about for years. Great stuff, just great!
This is a topic close to my heart cheers, where are your contact details though?
I visited a lot of website but I think this one has got something extra in it in it
Great web site. Lots of helpful information here. I¦m sending it to some pals ans also sharing in delicious. And obviously, thanks in your sweat!
It is perfect time to make some plans for the long run and it is time to be happy. I have read this publish and if I may I desire to counsel you few fascinating issues or advice. Perhaps you could write subsequent articles regarding this article. I wish to read more issues about it!
Whats Happening i’m new to this, I stumbled upon this I have discovered It absolutely helpful and it has helped me out loads. I hope to contribute & assist other customers like its aided me. Great job.
You need to participate in a contest for among the finest blogs on the web. I’ll advocate this web site!
Utterly indited articles, regards for selective information. “He who establishes his argument by noise and command shows that his reason is weak.” by Michel de Montaigne.
I am often to blogging and i really appreciate your content. The article has really peaks my interest. I am going to bookmark your site and keep checking for new information.
You made a number of good points there. I did a search on the subject matter and found nearly all folks will agree with your blog.
I am typically to blogging and i really admire your content. The article has really peaks my interest. I’m going to bookmark your site and keep checking for new information.
An impressive share, I just given this onto a colleague who was doing a little analysis on this. And he in fact bought me breakfast because I found it for him.. smile. So let me reword that: Thnx for the treat! But yeah Thnkx for spending the time to discuss this, I feel strongly about it and love reading more on this topic. If possible, as you become expertise, would you mind updating your blog with more details? It is highly helpful for me. Big thumb up for this blog post!
whoah this weblog is great i love reading your articles. Stay up the great work! You recognize, lots of individuals are searching around for this information, you can help them greatly.
My programmer is trying to convince me to move to .net from PHP. I have always disliked the idea because of the expenses. But he’s tryiong none the less. I’ve been using Movable-type on several websites for about a year and am worried about switching to another platform. I have heard excellent things about blogengine.net. Is there a way I can import all my wordpress posts into it? Any kind of help would be really appreciated!
Hello! I could have sworn I’ve been to this blog before but after browsing through some of the post I realized it’s new to me. Anyways, I’m definitely happy I found it and I’ll be book-marking and checking back frequently!
Some genuinely fantastic information, Gladiola I detected this.
There is noticeably a bundle to know about this. I assume you made certain nice points in features also.
Very nice post. I just stumbled upon your blog and wished to say that I’ve truly enjoyed browsing your blog posts. In any case I’ll be subscribing to your rss feed and I am hoping you write once more soon!
you have a great blog here! would you like to make some invite posts on my blog?
You made some decent points there. I did a search on the topic and found most individuals will agree with your site.
As a Newbie, I am constantly browsing online for articles that can aid me. Thank you
An impressive share, I just given this onto a colleague who was doing a little analysis on this. And he in fact bought me breakfast because I found it for him.. smile. So let me reword that: Thnx for the treat! But yeah Thnkx for spending the time to discuss this, I feel strongly about it and love reading more on this topic. If possible, as you become expertise, would you mind updating your blog with more details? It is highly helpful for me. Big thumb up for this blog post!
Very interesting topic, appreciate it for posting. “All human beings should try to learn before they die what they are running from, and to, and why.” by James Thurber.
What’s Happening i am new to this, I stumbled upon this I’ve found It positively useful and it has aided me out loads. I hope to contribute & aid other customers like its aided me. Great job.
Hello there, You’ve performed an excellent job. I will definitely digg it and in my view recommend to my friends. I am confident they’ll be benefited from this site.
Kometa казино официальный сайт
Kometa казино – это современная онлайн-платформа, предлагающая широкий спектр азартных игр для любителей развлечений в интернете. С момента своего открытия казино привлекло внимание пользователей благодаря интуитивно понятному интерфейсу и разнообразию игровых автоматов. На официальном сайте каждый игрок может найти что-то по своему вкусу, от классических слотов до новейших видеоигр с уникальными бонусами и привлекательной графикой.
Кроме того, https://galleryplus.ru/ казино обеспечивает своим пользователям высокий уровень безопасности и конфиденциальности. Платформа использует современные технологии шифрования для защиты личных данных и финансовых транзакций, что позволяет игрокам сосредоточиться на игре без лишних забот. Наличие лицензии и прозрачных условий игры делает казино надежным выбором для азартных игроков.
На сайте Kometa также регулярно проводятся акции и турниры, что добавляет элемент состязательности и позволяет пользователям зарабатывать дополнительные призы. Важно отметить, что поддержка клиентов работает круглосуточно, обеспечивая быструю помощь и ответы на вопросы. Таким образом, Kometa казино создает идеальные условия для комфортной и безопасной игры в азартные развлечения.
Обзор функционала Kometa казино
Функция|Описание
Регистрация|Быстрая и простая регистрация с минимумом необходимых данных, позволяющая начать играть за считанные минуты.
Игровой Лобби|Удобный интерфейс для выбора игр, включая фильтры по категориям и провайдерам, что облегчает поиск.
Мобильная версия|Оптимизированный сайт для мобильных устройств, позволяющий играть в игры в любом месте и в любое время.
Поддержка игроков|Круглосуточная служба поддержки, доступная через чат, электронную почту и телефон.
Бонусы и акции|Разнообразные бонусные предложения, включая приветственные бонусы, фриспины и регулярные акции.
Платежные системы
Безопасность|Современные технологии шифрования данных, обеспечивающие безопасность средств и личной информации пользователей.
Функционал Kometa казино нацелен на предоставление игрокам комфортного и безопасного игрового опыта, что делает его привлекательным выбором для любителей азартных игр.
Преимущества регистрации на площадке
Регистрация на официальном сайте казино Kometa открывает перед игроками множество преимуществ, которые делают азартные игры более удобными и интересными. Рассмотрим основные из них:
– Доступ к эксклюзивным бонусам: Зарегистрированные пользователи получают доступ к различным бонусам и промоакциям, которые недоступны для гостей сайта.
– Индивидуальные предложения: Казино предлагает персонализированные бонусы в зависимости от активности игрока, что позволяет увеличить шансы на выигрыш.
– История игр и транзакций: Регистрация позволяет пользователям отслеживать историю своих игр и финансовых операций, что помогает лучше контролировать бюджет.
– Участие в турнирах: Зарегистрированные игроки могут принимать участие в различных турнирах и конкурсах, что добавляет элемент соревнования и увеличивает шансы на выигрыш призов.
– Поддержка клиентов: Зарегистрированные пользователи получают приоритетный доступ к службе поддержки, что упрощает решение любых возникающих вопросов.
Регистрация на площадке Kometa – это шаг к более увлекательному и выгодному игровому опыту.
Kometa казино зеркало
В современном мире онлайн-гемблинга Kometa казино стало популярным местом для азартных игр, привлекая игроков своими уникальными предложениями и щедрыми бонусами. Однако, как и большинство онлайн-платформ, оно сталкивается с определенными ограничениями. В таких ситуациях на помощь приходит зеркало казино, которое позволяет игрокам продолжать наслаждаться любимыми играми без каких-либо препятствий.
Зеркало Kometa казино является альтернативной ссылкой на официальный сайт, обеспечивая доступ к функционалу и услугам заведения, даже если основной ресурс заблокирован. Это решение актуально для игроков, которые хотят избежать проблем с доступом и продолжать свои игровые приключения в удобный момент.
Пользуясь зеркалом, игроки могут не только обходить блокировки, но и оставаться уверенными в безопасности своих данных и финансовых transactions. Таким образом, знание о том, как использовать альтернативные ссылки, становится важной частью успешной стратегии азартных игр в интернете.
Преимущества использования зеркала Kometa казино
Использование зеркала https://sudelko.ru/ казино предоставляет множество преимуществ для игроков. Во-первых, зеркала обеспечивают доступ к платформе в случае блокировок, что позволяет продолжать игру без перебоев.
Во-вторых, пользовательский интерфейс зеркала практически идентичен основному сайту, что делает переход на него удобным и интуитивно понятным. Игроки могут быстро находить свои любимые игры и функции, не теряя времени на изучение нового интерфейса.
Кроме того, зеркала часто предлагают акции и бонусы, аналогичные основному сайту, что позволяет игрокам получать такие же выгоды. Это делает использование зеркала не только практичным, но и выгодным решением.
Наконец, зеркала Kometa казино обеспечивают высокий уровень безопасности и конфиденциальности, так как все действия происходят на проверенных и защищенных ресурсах. Это особенно важно для игроков, ценящих свои данные.
Как найти доступное зеркало Kometa казино
1. Официальный сайт и региональные источники. Часто на официальном сайте казино или в социальных сетях можно найти актуальные ссылки на зеркала. Рекомендуется следить за новостями и обновлениями от администрации казино.
2. Сообщества игроков. Многие пользователи делятся актуальными ссылками в тематических форумах и группах в социальных сетях. Присоединяйтесь к таким сообществам, чтобы не упустить свежие данные.
3. Подписка на рассылки. Некоторые казино предлагают подписаться на электронную почту для получения новостей и обновлений. Это может быть удобным способом быть в курсе последних изменений.
4. Использование специализированных сайтов. Существуют ресурсы, которые собирают и обновляют списки доступных зеркал для различных казино. Найдите такие сайты и проверяйте обновления периодически.
5. VPN-сервисы. Если у вас возникают сложности с доступом к казино, вы можете использовать VPN. Он не только поможет обойти блокировки, но и обеспечит дополнительную безопасность при посещении интернет-ресурсов.
Помните о безопасности и проверяйте, что используете только официальные и проверенные источники для получения зеркал. Это поможет избежать мошенничества и других негативных последствий.
Very good written post. It will be valuable to everyone who employess it, including me. Keep doing what you are doing – looking forward to more posts.
What i do not realize is if truth be told how you’re no longer actually much more smartly-preferred than you may be right now. You are so intelligent. You recognize thus significantly when it comes to this matter, produced me personally imagine it from numerous numerous angles. Its like men and women don’t seem to be involved unless it’s one thing to do with Lady gaga! Your individual stuffs nice. Always take care of it up!
I conceive you have mentioned some very interesting points, thanks for the post.
What i do not realize is in fact how you are no longer really much more neatly-favored than you may be right now. You’re very intelligent. You understand thus significantly in the case of this subject, produced me in my opinion imagine it from so many varied angles. Its like men and women don’t seem to be interested except it is one thing to accomplish with Lady gaga! Your own stuffs nice. All the time deal with it up!
Hi my loved one! I wish to say that this post is amazing, great written and come with approximately all important infos. I’d like to see more posts like this.
Hmm is anyone else encountering problems with the pictures on this blog loading? I’m trying to determine if its a problem on my end or if it’s the blog. Any responses would be greatly appreciated.
Very great info can be found on web site.
Some genuinely select posts on this site, saved to favorites.
What’s Happening i’m new to this, I stumbled upon this I’ve found It positively helpful and it has helped me out loads. I hope to contribute & assist other users like its aided me. Good job.
Hello my friend! I wish to say that this article is amazing, nice written and include approximately all important infos. I would like to look extra posts like this .
I like what you guys are up also. Such intelligent work and reporting! Keep up the superb works guys I?¦ve incorporated you guys to my blogroll. I think it’ll improve the value of my web site 🙂
This is a topic close to my heart cheers, where are your contact details though?
This is really attention-grabbing, You are an overly skilled blogger. I’ve joined your rss feed and look forward to looking for extra of your excellent post. Additionally, I’ve shared your website in my social networks!
Thanks for everything.
I have been exploring for a little bit for any high quality articles or blog posts in this kind of house . Exploring in Yahoo I ultimately stumbled upon this website. Reading this information So i am glad to exhibit that I’ve a very just right uncanny feeling I came upon just what I needed. I such a lot unquestionably will make sure to do not omit this site and provides it a glance regularly.
I’ve been absent for a while, but now I remember why I used to love this web site. Thank you, I’ll try and check back more often. How frequently you update your website?
Some genuinely terrific work on behalf of the owner of this web site, utterly outstanding written content.
It’s hard to search out educated individuals on this matter, but you sound like you realize what you’re speaking about! Thanks
I am often to blogging and i really appreciate your content. The article has really peaks my interest. I am going to bookmark your site and keep checking for new information.
Very interesting information!Perfect just what I was looking for! “Energy is the power that drives every human being. It is not lost by exertion by maintained by it.” by Germaine Greer.
Hello! I could have sworn I’ve been to this blog before but after browsing through some of the post I realized it’s new to me. Anyways, I’m definitely happy I found it and I’ll be book-marking and checking back frequently!
I’m really enjoying the theme/design of your site. Do you ever run into any internet browser compatibility problems? A few of my blog readers have complained about my website not working correctly in Explorer but looks great in Opera. Do you have any recommendations to help fix this problem?
I am often to blogging and i really appreciate your content. The article has really peaks my interest. I am going to bookmark your site and keep checking for new information.
I?¦ll right away grab your rss feed as I can’t find your email subscription link or e-newsletter service. Do you’ve any? Please permit me know so that I may subscribe. Thanks.
Very interesting points you have noted, appreciate it for posting. “Great is the art of beginning, but greater is the art of ending.” by Henry Wadsworth Longfellow.
I couldn’t resist commenting
I believe other website owners should take this site as an example , very clean and fantastic user friendly style and design.
Hi my friend! I wish to say that this article is amazing, great written and include almost all important infos. I would like to look more posts like this .
It¦s actually a cool and helpful piece of info. I¦m satisfied that you shared this helpful information with us. Please stay us informed like this. Thank you for sharing.
obviously like your web site but you have to check the spelling on quite a few of your posts. Several of them are rife with spelling issues and I find it very bothersome to tell the reality however I will definitely come again again.
Wonderful blog! I found it while browsing on Yahoo News. Do you have any tips on how to get listed in Yahoo News? I’ve been trying for a while but I never seem to get there! Thank you
Keep up the excellent piece of work, I read few content on this web site and I conceive that your web blog is very interesting and has bands of wonderful information.
certainly like your web site but you need to take a look at the spelling on several of your posts. Many of them are rife with spelling issues and I to find it very troublesome to tell the reality nevertheless I¦ll definitely come back again.
I will right away grasp your rss as I can not to find your email subscription hyperlink or e-newsletter service. Do you’ve any? Please allow me recognise so that I could subscribe. Thanks.
hello there and thank you for your info – I have certainly picked up anything new from right here. I did however expertise several technical issues using this site, since I experienced to reload the web site many times previous to I could get it to load properly. I had been wondering if your hosting is OK? Not that I am complaining, but slow loading instances times will often affect your placement in google and can damage your high quality score if ads and marketing with Adwords. Anyway I’m adding this RSS to my e-mail and could look out for a lot more of your respective exciting content. Ensure that you update this again very soon..
I do not even know how I ended up here, but I thought this post was good. I don’t know who you are but definitely you are going to a famous blogger if you aren’t already 😉 Cheers!
Hi there! I know this is kinda off topic however I’d figured I’d ask. Would you be interested in exchanging links or maybe guest authoring a blog article or vice-versa? My website covers a lot of the same subjects as yours and I believe we could greatly benefit from each other. If you might be interested feel free to send me an e-mail. I look forward to hearing from you! Fantastic blog by the way!
Some genuinely superb info , Gladiolus I detected this. “What you do speaks so loudly that I cannot hear what you say.” by Ralph Waldo Emerson.
Very interesting subject, thanks for posting.
Appreciating the hard work you put into your site and detailed information you present.
It’s good to come across a blog every once in a while that isn’t the same out of date rehashed material.
Wonderful read! I’ve saved your site and I’m
including your RSS feeds to my Google account.
How to play IPX / SPX games over LAN (WinXP)
https://loretatonrey.my.id/why-travel-to-africa-doesnt-have-a-doleful-reputation-anymore.html
I do consider all of the concepts you’ve introduced on your post. They’re very convincing and will certainly work. Still, the posts are very quick for novices. Could you please extend them a bit from next time? Thanks for the post.
I am incessantly thought about this, thankyou for putting up.
Do you mind if I quote a couple of your articles as long as I provide credit and sources back to your site? My website is in the exact same area of interest as yours and my visitors would definitely benefit from a lot of the information you provide here. Please let me know if this alright with you. Cheers!
I have been exploring for a bit for any high-quality articles or weblog posts on this kind of space . Exploring in Yahoo I eventually stumbled upon this site. Studying this information So i am glad to convey that I have a very excellent uncanny feeling I came upon just what I needed. I such a lot without a doubt will make sure to do not fail to remember this web site and give it a glance regularly.
Utterly indited written content, appreciate it for entropy.
Wow, marvelous blog layout! How long have you been blogging for? you made blogging look easy. The overall look of your site is excellent, let alone the content!
Great write-up, I’m normal visitor of one’s website, maintain up the nice operate, and It is going to be a regular visitor for a long time.
I am impressed with this internet site, very I am a fan.
Simply a smiling visitant here to share the love (:, btw great design and style.
I really enjoy looking through on this internet site, it holds excellent posts. “The living is a species of the dead and not a very attractive one.” by Friedrich Wilhelm Nietzsche.
Hey there! I know this is kinda off topic but I was wondering if you knew where I could find a captcha plugin for my comment form? I’m using the same blog platform as yours and I’m having trouble finding one? Thanks a lot!
There are some attention-grabbing deadlines on this article however I don’t know if I see all of them heart to heart. There may be some validity but I will take hold opinion until I look into it further. Good article , thanks and we want extra! Added to FeedBurner as effectively
I have been exploring for a little bit for any high-quality articles or weblog posts on this sort of space . Exploring in Yahoo I at last stumbled upon this web site. Studying this info So i?¦m happy to convey that I have a very good uncanny feeling I discovered just what I needed. I so much indubitably will make certain to don?¦t forget this web site and give it a glance regularly.
I have been browsing online greater than three hours these days, but I never found any interesting article like yours. It?¦s pretty worth enough for me. Personally, if all webmasters and bloggers made just right content as you probably did, the internet will probably be much more helpful than ever before.
That is very interesting, You’re an excessively professional blogger. I have joined your feed and look forward to looking for more of your wonderful post. Additionally, I have shared your site in my social networks!
I’ll immediately grab your rss as I can not find your email subscription link or e-newsletter service. Do you have any? Please let me know so that I could subscribe. Thanks.
Absolutely written written content, thankyou for selective information.
I’ve been surfing online more than 3 hours today, yet I never found any interesting article like yours. It’s pretty worth enough for me. In my view, if all web owners and bloggers made good content as you did, the web will be a lot more useful than ever before.
I don’t normally comment but I gotta admit regards for the post on this great one : D.
I will right away grasp your rss as I can’t find your e-mail subscription hyperlink or e-newsletter service. Do you have any? Please let me understand so that I may just subscribe. Thanks.
Position effectively taken!!
Also visit my website – https://bit.ly/4dQL5li
I wanted to write you that little word to finally say thanks a lot yet again relating to the striking ideas you’ve shared on this page. It has been so wonderfully open-handed with you to make unhampered what exactly a number of us could have advertised for an e-book to generate some money for their own end, mostly considering the fact that you could have done it in the event you decided. The tactics likewise acted to become great way to be aware that other people have the identical dream much like my own to know a little more around this issue. Certainly there are millions of more fun opportunities in the future for folks who see your site.
It’s really a nice and helpful piece of information. I’m glad that you shared this useful info with us. Please keep us informed like this. Thanks for sharing.
I am really loving the theme/design of your web site. Do you ever run into any internet browser compatibility problems? A couple of my blog visitors have complained about my blog not operating correctly in Explorer but looks great in Firefox. Do you have any solutions to help fix this problem?
Some really interesting info , well written and generally user pleasant.
It’s going to be end of mine day, however before end I am reading
this impressive article to improve my knowledge.
Hello there! I know this is kinda off topic however I’d figured I’d ask. Would you be interested in exchanging links or maybe guest writing a blog post or vice-versa? My website goes over a lot of the same topics as yours and I feel we could greatly benefit from each other. If you happen to be interested feel free to send me an e-mail. I look forward to hearing from you! Terrific blog by the way!
I have been surfing online more than three hours nowadays, yet I by no means discovered any fascinating article like yours. It’s pretty value sufficient for me. In my opinion, if all site owners and bloggers made excellent content as you did, the net might be much more useful than ever before. “Revolution is not a onetime event.” by Audre Lorde.
Your house is valueble for me. Thanks!…
Hello! I could have sworn I’ve been to this blog before but after browsing through some of the post I realized it’s new to me. Anyways, I’m definitely happy I found it and I’ll be book-marking and checking back frequently!
I?¦ve been exploring for a little for any high quality articles or weblog posts in this sort of area . Exploring in Yahoo I eventually stumbled upon this web site. Studying this info So i am glad to show that I’ve an incredibly just right uncanny feeling I found out just what I needed. I such a lot indisputably will make certain to do not forget this website and provides it a glance on a relentless basis.
I’d have to examine with you here. Which is not one thing I usually do! I take pleasure in reading a post that may make folks think. Additionally, thanks for permitting me to comment!
I appreciate, cause I found just what I was looking for. You have ended my four day long hunt! God Bless you man. Have a great day. Bye
I admire your work, thanks for all the informative blog posts.
I have been absent for a while, but now I remember why I used to love this site. Thanks , I will try and check back more often. How frequently you update your web site?
I genuinely enjoy studying on this website , it has got superb articles. “Violence commands both literature and life, and violence is always crude and distorted.” by Ellen Glasgow.
I am very happy to read this. This is the type of manual that needs to be given and not the random misinformation that is at the other blogs. Appreciate your sharing this best doc.
I would like to thank you for the efforts you have put in writing this site. I’m hoping the same high-grade blog post from you in the upcoming as well. In fact your creative writing abilities has inspired me to get my own website now. Actually the blogging is spreading its wings quickly. Your write up is a good example of it.
**Understanding the Vital Role of Cook County’s DPA in Property Tax Relief**
Navigating the complexities of property taxes in Cook County can be overwhelming, especially for homeowners who may be struggling to understand their assessments or feel they are being overcharged. That’s where the Cook County Department of Property Assessments (DPA) comes in. Serving as a crucial resource for residents, the DPA is committed to ensuring transparency, fairness, and accessibility in property tax assessments.
### What is the Cook County DPA?
The Cook County DPA is an essential arm of local government, responsible for overseeing property assessments across the county. Its primary role is to evaluate properties and assign them a fair market value, which serves as the basis for property taxes. The department’s work directly impacts the tax bills homeowners receive, making it a pivotal entity in maintaining equity within the community.
### How the DPA Supports Homeowners
1. **Property Tax Appeals**: If a homeowner believes their property has been over-assessed, the DPA provides a formal appeals process. This allows residents to contest their assessments and potentially lower their property tax burden.
2. **Exemptions and Relief Programs**: The DPA administers various exemptions and relief programs designed to reduce property tax obligations. These include exemptions for seniors, veterans, and disabled persons, as well as the general homeowner exemption, which offers significant savings.
3. **Educational Resources**: Understanding property taxes can be daunting. The DPA offers a wealth of educational resources, including workshops, online guides, and one-on-one consultations, to help homeowners comprehend the assessment process and their tax responsibilities.
4. **Transparency and Accessibility**: The DPA is committed to making the property tax process as transparent as possible. This includes providing easy access to property records, assessment data, and detailed explanations of how assessments are determined.
### The Importance of Staying Informed
For Cook County residents, staying informed about property assessments and the role of the DPA is crucial. By understanding the services offered by the DPA, homeowners can take proactive steps to ensure their assessments are accurate and that they are taking full advantage of available exemptions and relief programs.
Whether you’re a new homeowner in Cook County or have been living here for years, the Cook County DPA is your partner in navigating the property tax landscape. Stay informed, stay engaged, and make sure your property taxes reflect the true value of your home.
For more information, visit the Cook County DPA website at https://cookcountydpa.org/
F*ckin’ tremendous issues here. I’m very happy to see your article. Thank you so much and i’m looking ahead to contact you. Will you please drop me a e-mail?
Fantastic beat ! I would like to apprentice whilst you amend your site, how can i subscribe for a weblog website? The account helped me a applicable deal. I were a little bit acquainted of this your broadcast offered vibrant clear concept
Hi my family member! I want to say that this article is awesome, nice written and come with approximately all significant infos. I would like to peer extra posts like this.
Please let me know if you’re looking for a article writer for your weblog. You have some really great posts and I think I would be a good asset. If you ever want to take some of the load off, I’d love to write some articles for your blog in exchange for a link back to mine. Please send me an email if interested. Thank you!
Those are yours alright! . We at least need to get these people stealing images to start blogging! They probably just did a image search and grabbed them. They look good though!
After research a few of the weblog posts in your website now, and I really like your manner of blogging. I bookmarked it to my bookmark web site list and will be checking back soon. Pls check out my website online as properly and let me know what you think.
Hello. excellent job. I did not anticipate this. This is a fantastic story. Thanks!
Really clean website , thanks for this post.
You are my inspiration , I possess few web logs and occasionally run out from to post : (.
Hi there, just became alert to your blog through Google, and found that it’s really informative. I am going to watch out for brussels. I’ll appreciate if you continue this in future. Many people will be benefited from your writing. Cheers!
Perfect work you have done, this website is really cool with great info .
Dead composed subject matter, regards for selective information. “No human thing is of serious importance.” by Plato.
Some genuinely select content on this web site, bookmarked.
Once I initially commented I clicked the -Notify me when new feedback are added- checkbox and now every time a comment is added I get four emails with the identical comment. Is there any manner you can take away me from that service? Thanks!
Does your website have a contact page? I’m having trouble locating it but, I’d like to shoot you an e-mail. I’ve got some ideas for your blog you might be interested in hearing. Either way, great website and I look forward to seeing it grow over time.
Great write-up, I am normal visitor of one?¦s web site, maintain up the nice operate, and It is going to be a regular visitor for a lengthy time.
thx
Merely a smiling visitor here to share the love (:, btw great style and design.
You are a very smart individual!
Have you ever thought about writing an ebook or guest authoring on other sites? I have a blog based upon on the same information you discuss and would love to have you share some stories/information. I know my visitors would appreciate your work. If you’re even remotely interested, feel free to shoot me an e-mail.
You made some nice points there. I did a search on the subject matter and found most guys will consent with your blog.
I?¦ve recently started a website, the information you offer on this website has helped me greatly. Thank you for all of your time & work.
Have you ever considered about including a little bit more than just your articles? I mean, what you say is valuable and all. However think about if you added some great photos or video clips to give your posts more, “pop”! Your content is excellent but with pics and video clips, this blog could certainly be one of the greatest in its niche. Wonderful blog!
Nice post. I was checking constantly this weblog and I
am impressed! Extremely helpful info specially the last phase 🙂 I maintain such
information much. I used to be looking for this particular info for a long time.
Thanks and best of luck.
Lovely just what I was looking for.Thanks to the author for taking his clock time on this one.
thx
Wohh precisely what I was looking for, thanks for putting up.
obviously like your web-site however you need to test the spelling on several of your posts. Several of them are rife with spelling issues and I find it very troublesome to inform the truth on the other hand I’ll certainly come again again.
Fantastic blog! Do you have any hints for aspiring writers? I’m planning to start my own site soon but I’m a little lost on everything. Would you propose starting with a free platform like WordPress or go for a paid option? There are so many options out there that I’m completely overwhelmed .. Any recommendations? Many thanks!
I have been browsing online more than 3 hours lately, yet I never found any interesting article like yours. It’s lovely worth sufficient for me. In my opinion, if all web owners and bloggers made just right content material as you did, the web will likely be much more useful than ever before. “Revolution is not a onetime event.” by Audre Lorde.
I really appreciate this post. I’ve been looking everywhere for this! Thank goodness I found it on Bing. You have made my day! Thanks again!
I am not very great with English but I find this really easy to interpret.
thx
thx
I wanted to thank you for this great read!! I definitely enjoying every little bit of it I have you bookmarked to check out new stuff you post…
thx
I was just looking for this information for some time. After 6 hours of continuous Googleing, at last I got it in your website. I wonder what is the lack of Google strategy that do not rank this type of informative sites in top of the list. Usually the top websites are full of garbage.
Hi there! Do you know if they make any plugins to safeguard against hackers? I’m kinda paranoid about losing everything I’ve worked hard on. Any recommendations?
Wow! Thank you! I continuously needed to write on my website something like that. Can I include a fragment of your post to my website?
I am not very fantastic with English but I find this rattling easy to read .
Hello there! Would you mind if I share your blog with my twitter group? There’s a lot of people that I think would really appreciate your content. Please let me know. Many thanks
magnificent post, very informative. I wonder why the other experts of this sector don’t notice this. You must continue your writing. I am confident, you have a huge readers’ base already!
Fantastic web site. A lot of useful info here. I’m sending it to a few friends ans also sharing in delicious. And certainly, thanks for your sweat!
Thank you, I’ve just been searching for information approximately this subject for a long time and yours is the best I have found out so far. However, what concerning the bottom line? Are you certain about the source?
As soon as I detected this internet site I went on reddit to share some of the love with them.
I think you have mentioned some very interesting details , thankyou for the post.
After study a few of the blog posts on your website now, and I truly like your way of blogging. I bookmarked it to my bookmark website list and will be checking back soon. Pls check out my web site as well and let me know what you think.
**Как найти автосервисы с гарантией качества через приложение Uremont**
Каждый автовладелец сталкивается с необходимостью ремонта или обслуживания своего транспортного средства. Однако поиск надежного автосервиса с гарантией качества может превратиться в настоящую проблему. Именно поэтому платформа **Uremont** предлагает удобное решение для тех, кто ценит свое время и хочет быть уверенным в качестве обслуживания.
### Что такое Uremont?
**Uremont** – это онлайн-платформа и мобильное приложение, которое помогает автовладельцам легко и быстро найти автосервис, соответствующий их потребностям. Сервис объединяет проверенные СТО по всей России, предлагая пользователям широкий выбор автосервисов с гарантией качества на выполненные работы.
### Преимущества поиска автосервисов через Uremont
1. **Удобный поиск**
С помощью приложения **Uremont** можно в пару кликов найти ближайший автосервис, подходящий по специализации и цене. Просто укажите марку автомобиля и тип услуги, и система покажет список доступных СТО.
2. **Гарантия качества**
Все автосервисы, представленные на платформе **Uremont**, проходят тщательную проверку. Это значит, что пользователи могут быть уверены в профессионализме мастеров и качестве выполненных работ. В дополнение к этому, большинство сервисов предлагают гарантию на свои услуги.
3. **Отзывы и рейтинги**
Каждый автосервис на **Uremont** имеет систему рейтингов и отзывов от реальных клиентов. Это позволяет выбрать сервис с наилучшей репутацией и избежать неприятных сюрпризов.
4. **Прозрачные цены**
Перед тем как отправить автомобиль на ремонт, можно получить детальный расчет стоимости работ. Это помогает избежать переплат и неожиданных затрат. **Uremont** гарантирует, что цены указаны честно и прозрачно.
5. **Онлайн-запись**
Один из самых удобных функционалов **Uremont** – возможность онлайн-записи в выбранный автосервис. Теперь не нужно звонить и договариваться – все можно сделать через приложение, экономя время.
### Как найти автосервис через приложение Uremont?
1. **Скачайте приложение**
Для начала вам нужно установить приложение **Uremont** на свой смартфон. Оно доступно для iOS и Android в App Store и Google Play.
2. **Заполните данные о вашем автомобиле**
После установки приложения введите информацию о вашем автомобиле: марку, модель, год выпуска и другие характеристики. Это поможет системе предложить наиболее подходящие автосервисы.
3. **Выберите необходимую услугу**
Выберите вид ремонта или обслуживания, который вам нужен, будь то замена масла, диагностика, шиномонтаж или капитальный ремонт двигателя.
4. **Изучите предложения**
После ввода данных вам будет предложен список автосервисов с указанием их рейтинга, стоимости услуг и отзывов клиентов. Вы можете выбрать тот, который наиболее соответствует вашим требованиям.
5. **Оформите запись онлайн**
После выбора автосервиса, просто укажите удобное для вас время и подтвердите запись. Теперь все готово!
### Заключение
**Uremont** – это ваш надежный помощник в поиске автосервисов с гарантией качества. С его помощью вы можете не только быстро найти ближайшую СТО, но и быть уверенными в высоком уровне предоставляемых услуг. Скачайте приложение **Uremont** и забудьте о проблемах с поиском надежного автосервиса раз и навсегда!
http://www.passat-club.ru/news.php?id=1675
I respect your work, thankyou for all the useful content.
Fantastic beat ! I would like to apprentice even as you amend your site, how could i subscribe for a weblog website? The account aided me a applicable deal. I have been tiny bit familiar of this your broadcast offered bright transparent concept
Attractive section of content. I just stumbled upon your blog and in accession capital to assert that I get actually enjoyed account your blog posts. Any way I will be subscribing to your feeds and even I achievement you access consistently quickly.
Hello are using WordPress for your site platform? I’m new to the blog world but I’m trying to get started and create my own. Do you require any html coding knowledge to make your own blog? Any help would be really appreciated!
Wow! Thank you! I continuously needed to write on my blog something like that. Can I take a portion of your post to my site?
Thanks for the blog post, can you make it so I receive an alert email every time you make a new article?
I really happy to find this website on bing, just what I was searching for : D also saved to fav.
Hey There. I found your blog using msn. This is an extremely well written article. I will be sure to bookmark it and come back to read more of your useful information. Thanks for the post. I will definitely return.
Very interesting subject, thanks for posting.
I really like your writing style, excellent info , appreciate it for putting up : D.
Greetings! Very helpful advice on this article! It is the little changes that make the biggest changes. Thanks a lot for sharing!
Thank you for some other great article. The place else could anyone get that kind of information in such an ideal method of writing? I have a presentation subsequent week, and I am at the search for such info.
Highly descriptive blog, I enjoyed that a lot.
Will there be a part 2?
Aw, this was a very nice post. In concept I want to put in writing like this moreover – taking time and actual effort to make a very good article… but what can I say… I procrastinate alot and not at all seem to get something done.
I’ve been browsing online greater than 3 hours as of late, but I never found any interesting article like yours. It’s lovely price sufficient for me. In my view, if all website owners and bloggers made just right content as you probably did, the web will be a lot more helpful than ever before. “Learn to see in another’s calamity the ills which you should avoid.” by Publilius Syrus.
What’s Going down i’m new to this, I stumbled upon this I have discovered It positively useful and it has aided me out loads. I hope to give a contribution & help other users like its helped me. Great job.
I cling on to listening to the news broadcast speak about receiving free online grant applications so I have been looking around for the most excellent site to get one. Could you advise me please, where could i acquire some?
Hey, you used to write fantastic, but the last few posts have been kinda boringK I miss your tremendous writings. Past several posts are just a bit out of track! come on!
How to play IPX / SPX games over LAN (WinXP)
https://yu-gi-ou-daisuki.com/汎用レベル9シンクロモンスター【まとめ記事】/
Excellent web site. Lots of helpful information here. I?¦m sending it to some buddies ans also sharing in delicious. And certainly, thank you for your effort!
With havin so much content and articles do
you ever run into any issues of plagorism or copyright infringement?
My website has a lot of completely unique content I’ve either authored
myself or outsourced but it appears a lot of it is popping it up all
over the web without my agreement. Do you know any
ways to help reduce content from being ripped off? I’d certainly
appreciate it.
It’s hard to find knowledgeable people on this topic, but you sound like you know what you’re talking about! Thanks
Hiya, I’m really glad I’ve found this info. Nowadays bloggers publish just about gossips and internet and this is actually irritating. A good website with interesting content, that’s what I need. Thanks for keeping this site, I’ll be visiting it. Do you do newsletters? Can’t find it.
Im now not certain the place you are getting your information, but good topic. I must spend a while learning much more or figuring out more. Thank you for fantastic information I used to be in search of this info for my mission.
LINK LOGIN & DAFTAR POLOTOTO
thx
Hello there, I found your blog via Google while looking for a related topic, your website came up, it looks good. I’ve bookmarked it in my google bookmarks.
Hello. magnificent job. I did not expect this. This is a fantastic story. Thanks!
I don’t normally comment but I gotta admit thanks for the post on this special one : D.
thx
thx
thx
thx
thx
Hey, I think your blog might be having browser compatibility
issues. When I look at your blog site in Firefox, it looks fine but when opening
in Internet Explorer, it has some overlapping. I just wanted to give you a quick heads up!
Other then that, wonderful blog!
My homepage cmd 398
You could definitely see your enthusiasm within the paintings you write. The arena hopes for more passionate writers such as you who are not afraid to say how they believe. At all times go after your heart. “What power has law where only money rules.” by Gaius Petronius.
zirvebet
How to play IPX / SPX games over LAN (WinXP)
http://muzejkrajine.org.rs/промоција-књиге-археологија-музеја-к-3/
thx
thxx
I’m usually just a reader, but this article instilled in me the need to have an opinion. Thanks for a nice article sdfsdkfpjşsmlfsdfdskj
thxx
thxx
thx
thx
thx
thx
thx
thx
merhaba en genç bayanların olduğu kağıthane esort sitesi https://escortlarburda.com
thxx
thx
en gözde kızların olduğu beşiktaş escort sitesine hoşgeldiniz https://ilanvitrin.com
Casibom
hayatının en iyi vaktini geçirebileceğin tek site fatih escort sitesi https://fatihescortbul.com
thxx
hayatını birleştireceğin kadınların tek adresi syltangazi escort https://sultangaziescortbul.com
merhaba admin sarıyer escort maslak escort sitesini ziyaret etmelerini istiyebilirmisin https://maslakescortbul.com/
thxx
merhaba bakırköy escort ataköy escort sitesini ziyaret etmeliler
thxx
kalitenin ve bahisin tek adres bets10 twitter sayesinde zenginliğe ulaşacaksınız
Betcio Twitter giriş adresi, sosyal medyada daha fazla etkileşim ve eğlence için önemli bir kapı aralıyor. Herkes için açık!
Mobilbahis, heyecan dolu bahis deneyimlerini keşfetmek isteyenler için mükemmel bir platform sunuyor. Hadi, bu dünyaya adım atalım!
thx
thxx
Can I simply just say what a comfort to find somebody that truly
understands what they’re talking about over the internet. You actually realize how
to bring a problem to light and make it important.
A lot more people really need to check this out and understand this side of your story.
I can’t believe you’re not more popular since you definitely possess the gift.
Esenyurt Escort❤️sektöründe tarihsel kökeni, hizmet taleplerinin analizi ve geleceği, yaygınlık, güvenlik, yasal düzenlemeler ve müşteri memnuniyeti için ❤️ Esenyurt Eskort kalite standartları.
Büyükçekmece Escort ❤️ bayanları sitemizde bularak onlarla doyumsuz seks yapmaya hazır olun. Tek yapmanız gerek Büyükçekmece Escort Bayan ❤️ sitemizi ziyaret etmeniz.
gerçek vip kumburgaz escort bayan sitesiyim
thx
Avcılar escort hizmetleri, birçok kişinin rahatlamak ve yeni deneyimler yaşamak için tercih ettiği bir seçenek haline geliyor. Pelin, bu alanda dikkat çeken biri.
Avrupa Yakası Escort Avrupa Escort İstanbul Escort Bayanlar
thx
Bağcılar escort arayanlar için farklı deneyimler sunan seçenekler mevcut. Anal seks konusunda tercihleri belirlemek, sağlıklı bir iletişimle mümkün.
Bakırköy escort hizmetleri, günümüzün yoğun hayatında dinlenmek ve eğlenmek isteyenler için cazip bir seçenek sunuyor. Kırmızı ojeli Kübra, bu alandaki dikkat çekici isimlerden biri.
merhaba kaliteli bir başakşehir escort bayan sitesine hoşgeldiniz
merhaba kaliteli bir başakşehir escort bayan sitesine hoşgeldiniz
dünyaca ünlü kaliteli bir beykoz escort bayan sitesine hoşgeldiniz
Beylikdüzü escort dünyası, estetik ve zarafetin buluştuğu bir yer. Bu yazıda Kainat Güzeli Asena’nın hikayesini keşfedeceksiniz.
Dünyaca ünlü büyükçekmece escort sitesine hoşgeldiniz burda kendinize uygun bir kaliteli eş adayı bulabilirsiniz
dünyaca ünlü kalitenin tek adresi halkalı escort atakent escort sitesine hoşgeldiniz
Pendik Escort Kurtköy Escort keyifli anlar yaşamak isteyenler için ideal seçenekler sunuyor. Pendik escort bayanlar arasından seçim yaparak, farklı deneyimler keşfedebilirsiniz.
Pendik Escort Kurtköy Escort keyifli anlar yaşamak isteyenler için ideal seçenekler sunuyor. Pendik escort bayanlar arasından seçim yaparak, farklı deneyimler keşfedebilirsiniz.
thx
It’s great to reminisce about the classic multiplayer games from the 90s like *Diablo*, *Red Alert 2*, *Age of Empires 2*, and others that used the IPX/SPX protocol for local multiplayer. Those were the golden days of LAN parties! Setting up a working LAN connection on Windows XP for these older titles can be tricky, but once configured correctly, you can dive back into the nostalgia of battling it out with friends in games that defined an era.
If you’re looking to set up a LAN connection, make sure you’ve enabled IPX/SPX through your network settings. For Windows XP, you’ll need to go into the *Network Connections* section, add the IPX/SPX protocol, and configure it to your network. Once done, your classic games should be able to detect and connect to each other. Be sure to follow detailed guides or tutorials to avoid any network issues.
It’s always fun to revisit those iconic titles, and even though technology has advanced, these games continue to bring joy through their nostalgic multiplayer experiences! Have you set up a LAN session recently, or are you just planning to revisit these games?
bomba gibi kadıköy escort sitesine hoşgeldiniz https://kadikoyescortbul.com/
merhaba en kaliteli şişli escort osmanbey escort sitesi
cazibeli escort bayan arıyorsanız arnavutköy escort sitesini ziyaret etmelisiniz
ortalama olarak en üst düzey kaliteli escortların bulunduğu türk rus özbek escort sitesi olan https://seyrantepescort.com/
bağlanabileceğiniz kaliteli şişli escort sitesi
en kaliteli sultangazi escort bayan sitesiyim
efsane bir şişli escort mecidiyeköy escort sitesi
Тепловизоры помогают определить местоположение животных и людей без лишнего шума.
Also visit my site … http://www.asystechnik.com/index.php/Teplovizor_9F
thx
Тепловизор – это невероятное устройство для охотников, особенно в условиях ограниченной видимости.
my web-site – купить тепловизор для военных (http://am_14264130.mongdol.net/bbs/board.php?bo_table=free&wr_id=59921)
Nice Article
thx
Hello there, just became aware of your blog through Google, and found that it is really informative. I’m going to watch out for brussels. I will appreciate if you continue this in future. A lot of people will be benefited from your writing. Cheers!
Some times its a pain in the ass to read what website owners wrote but this website is real user genial! .
Fantastic goods from you, man. I have understand your stuff previous to and you’re just extremely fantastic. I really like what you have acquired here, certainly like what you are stating and the way in which you say it. You make it entertaining and you still care for to keep it sensible. I cant wait to read much more from you. This is really a wonderful web site.
Good day! This is my first comment here so I just wanted to give a quick shout out and say I really enjoy reading your posts. Can you suggest any other blogs/websites/forums that cover the same subjects? Thanks a ton!
I’ve been browsing on-line greater than three hours as of late, but I by no means discovered any interesting article like yours. It¦s pretty value enough for me. In my opinion, if all webmasters and bloggers made good content material as you probably did, the net shall be a lot more useful than ever before.
Very interesting subject, thanks for posting. “What passes for optimism is most often the effect of an intellectual error.” by Raymond Claud Ferdinan Aron.
of course like your website but you need to test the spelling on several of your posts. Many of them are rife with spelling problems and I to find it very bothersome to inform the truth nevertheless I will definitely come back again.
I?¦ve recently started a website, the info you offer on this site has helped me greatly. Thanks for all of your time & work.
I got what you intend,saved to favorites, very nice site.
I like what you guys are usually up too. This sort of clever work and coverage! Keep up the superb works guys I’ve added you guys to my blogroll.
I and my friends were found to be digesting the great helpful tips from your website and instantly developed a horrible suspicion I never thanked the blog owner for those techniques. Those people appeared to be consequently happy to read them and have now without a doubt been taking advantage of those things. Appreciation for indeed being well helpful as well as for selecting varieties of superior things most people are really wanting to be informed on. My very own honest regret for not expressing gratitude to you earlier.
Heya i’m for the first time here. I came across this board and I to find It truly useful & it helped me out a lot. I’m hoping to provide something back and help others like you aided me.
Hi there just wanted to give you a quick heads up. The words in your post seem to be running off the screen in Chrome. I’m not sure if this is a format issue or something to do with web browser compatibility but I figured I’d post to let you know. The design look great though! Hope you get the issue resolved soon. Thanks
Thank you for any other wonderful post. Where else may just anybody get that kind of information in such a perfect way of writing? I’ve a presentation next week, and I am on the look for such info.
Great post. I am facing a couple of these problems.
Awesome site you have here but I was wanting to know if you knew of any forums that cover the same topics talked about in this article? I’d really love to be a part of community where I can get feedback from other knowledgeable individuals that share the same interest. If you have any recommendations, please let me know. Thanks!
Hi would you mind letting me know which webhost you’re using? I’ve loaded your blog in 3 completely different internet browsers and I must say this blog loads a lot faster then most. Can you recommend a good hosting provider at a reasonable price? Cheers, I appreciate it!
I was looking through some of your posts on this internet site and I think this site is very informative ! Retain putting up.
Greetings from Florida! I’m bored to death at work so I decided to browse your blog on my iphone during lunch break. I love the info you present here and can’t wait to take a look when I get home. I’m shocked at how fast your blog loaded on my mobile .. I’m not even using WIFI, just 3G .. Anyways, fantastic site!
There are some attention-grabbing deadlines on this article but I don’t know if I see all of them middle to heart. There is some validity but I’ll take maintain opinion till I look into it further. Good article , thanks and we wish more! Added to FeedBurner as nicely
Great – I should definitely pronounce, impressed with your website. I had no trouble navigating through all tabs and related information ended up being truly easy to do to access. I recently found what I hoped for before you know it at all. Reasonably unusual. Is likely to appreciate it for those who add forums or anything, web site theme . a tones way for your customer to communicate. Nice task..
I am no longer sure where you’re getting your info, but great topic. I needs to spend a while learning more or figuring out more. Thank you for great info I was searching for this info for my mission.
I like this website its a master peace ! Glad I noticed this on google .
wonderful post, very informative. I wonder why the other experts of this sector don’t notice this. You must continue your writing. I’m confident, you have a huge readers’ base already!
Some genuinely interesting info , well written and loosely user genial.
My programmer is trying to persuade me to move to .net from PHP. I have always disliked the idea because of the expenses. But he’s tryiong none the less. I’ve been using WordPress on numerous websites for about a year and am worried about switching to another platform. I have heard great things about blogengine.net. Is there a way I can import all my wordpress content into it? Any kind of help would be greatly appreciated!
Thank you for another great article. Where else could anybody get that type of information in such a perfect way of writing? I’ve a presentation next week, and I’m on the look for such information.
Hi there just wanted to give you a quick heads up. The words in your post seem to be running off the screen in Chrome. I’m not sure if this is a formatting issue or something to do with browser compatibility but I figured I’d post to let you know. The layout look great though! Hope you get the issue solved soon. Thanks
There are certainly a whole lot of particulars like that to take into consideration. That could be a nice level to carry up. I supply the ideas above as normal inspiration however clearly there are questions just like the one you carry up the place crucial thing might be working in honest good faith. I don?t know if best practices have emerged around things like that, but I am positive that your job is clearly recognized as a fair game. Both girls and boys really feel the impact of just a moment’s pleasure, for the rest of their lives.
Awsome info and right to the point. I am not sure if this is really the best place to ask but do you folks have any thoughts on where to employ some professional writers? Thanks in advance 🙂
I was recommended this website by my cousin. I am not sure whether this put up is written through him as no one else realize such targeted about my difficulty. You are wonderful! Thank you!
I would like to thank you for the efforts you have put in writing this web site. I am hoping the same high-grade website post from you in the upcoming also. In fact your creative writing skills has inspired me to get my own blog now. Actually the blogging is spreading its wings fast. Your write up is a great example of it.
How to play IPX / SPX games over LAN (WinXP)
http://www.mapatvu.org.br/index.php/component/k2/item/37-events-and-more?start=10
Hey there! I’ve been following your weblog for a while now and finally got the courage to go ahead and give you a shout out from Houston Texas! Just wanted to tell you keep up the excellent work!
I really like your writing style, excellent info, appreciate it for putting up :D. “I hate mankind, for I think myself one of the best of them, and I know how bad I am.” by Joseph Baretti.
Err_ssl_protocol_error hatası nasıl çözülür hizmetleri hakkında daha fazla bilgi almak için tıklayın.
You are my inspiration , I have few web logs and occasionally run out from to post .
Hello my friend! I wish to say that this article is amazing, nice written and include approximately all vital infos. I’d like to see more posts like this.
Looking for expert guidance on protecting assets while qualifying for Medicaid? As experienced elder law attorneys near me, our team at Ohio Medicaid Lawyers provides specialized legal assistance with Medicaid planning, estate planning, and asset protection strategies. We help seniors understand medicaid eligibility income charts and navigate the complex 5-year lookback period. Visit our website for comprehensive information about Ohio medicaid income limits 2024 and schedule a consultation with a trusted elder care attorney who can safeguard your future.
Very well written article. It will be beneficial to anyone who employess it, including me. Keep doing what you are doing – can’r wait to read more posts.
F*ckin’ amazing things here. I am very glad to see your post. Thank you a lot and i’m looking ahead to contact you. Will you kindly drop me a mail?
There is noticeably a bundle to know about this. I assume you made certain nice points in features also.
Ulasan yang detail membuat saya lebih memahami topik yang dibahas. Terasa sangat terbantu dengan konten yang Anda sajikan ini.
Terima kasih telah berbagi artikel ini.
slot gacor hari ini – Ulasan ini benar-benar informatif dan mampu membuka wawasan seputar dunia judi slot digital yang sedang naik daun. Terima kasih atas pengalaman yang komprehensif, cocok banget untuk penggemar slot seperti saya yang lagi cari slot cuan.
Artikel yang sangat bagus!
Keep working ,fantastic job!
Thank you for sharing such insightful information on this topic. Your thorough analysis and clear presentation have greatly enhanced my understanding. I appreciate the effort you put into researching and presenting these details.
Good article. I’m facing many of these issues as well..
I adore meeting utile info, this post has got me even more info! .
slot gacor – Artikel ini benar-benar bermanfaat dan mampu memberikan insight seputar dunia permainan slot gacor yang sedang naik daun. Terima kasih atas pengalaman yang lengkap, cocok banget untuk pencari RTP tinggi seperti saya yang lagi cari situs terpercaya.
Thank you for sharing such insightful information on this topic. Your thorough analysis and clear presentation have greatly enhanced my understanding. I appreciate the effort you put into researching and presenting these details.
We are a gaggle of volunteers and starting a brand new scheme in our community. Your web site offered us with helpful information to work on. You’ve done a formidable job and our whole community shall be thankful to you.
Hi there very cool web site!! Man .. Excellent .. Wonderful .. I will bookmark your blog and take the feeds additionally…I’m happy to find numerous helpful information here in the post, we’d like develop more strategies in this regard, thanks for sharing. . . . . .
I’ve been absent for some time, but now I remember why I used to love this blog. Thanks , I will try and check back more frequently. How frequently you update your site?
Such a practical insight.
More posts like this would make the web more useful.
This submission is impressive.
Thank..
Thank you for sharing such insightful information on this topic. Your thorough analysis and clear presentation have greatly enhanced my understanding. I appreciate the effort you put into researching and presenting these details.
Thank you admin.
Hello thank you.
Thank.
Thank you admin.
Hello thank you.
Excellent site you have here but I was wondering if you knew of any user discussion forums that cover the same topics discussed here? I’d really love to be a part of community where I can get feedback from other knowledgeable individuals that share the same interest. If you have any recommendations, please let me know. Many thanks!
I have been checking out many of your posts and it’s pretty nice stuff. I will make sure to bookmark your blog.
F*ckin¦ remarkable issues here. I¦m very happy to see your article. Thank you so much and i’m taking a look ahead to touch you. Will you please drop me a mail?
Some truly nice and utilitarian information on this website, too I believe the style holds superb features.
you’re in reality a excellent webmaster. The web site loading pace is amazing. It seems that you’re doing any unique trick. In addition, The contents are masterwork. you’ve performed a great job on this matter!
Normally I do not learn post on blogs, however I would like to say that this write-up very compelled me to take a look at and do so! Your writing taste has been amazed me. Thank you, very great article.
Thanks for another wonderful article. The place else could anyone get that kind of information in such an ideal method of writing? I’ve a presentation next week, and I’m on the search for such info.
Very interesting details you have mentioned, appreciate it for posting.
There are some attention-grabbing time limits in this article but I don’t know if I see all of them middle to heart. There’s some validity but I will take maintain opinion till I look into it further. Good article , thanks and we would like extra! Added to FeedBurner as nicely
I am always looking online for articles that can benefit me. Thank you!
Just desire to say your article is as astounding. The clearness in your post is just cool and i can assume you are an expert on this subject. Fine with your permission let me to grab your feed to keep updated with forthcoming post. Thanks a million and please continue the gratifying work.
Everything is very open and very clear explanation of issues. was truly information. Your website is very useful. Thanks for sharing.
Premium URL Shortener
[…]check beneath, are some completely unrelated sites to ours, on the other hand, they are most trustworthy sources that we use[…]
Great ?V I should certainly pronounce, impressed with your website. I had no trouble navigating through all tabs as well as related info ended up being truly simple to do to access. I recently found what I hoped for before you know it at all. Reasonably unusual. Is likely to appreciate it for those who add forums or something, website theme . a tones way for your client to communicate. Excellent task..
You got a very superb website, Glad I noticed it through yahoo.
Artikel yang sangat bagus dan membuka wawasan! Trimakasih telah menyediakan konten yang bermanfaat ini. Saya sangat mengapresiasi apa yang disampaikan dalam tulisan ini.
I like this website very much, Its a really nice position to read and obtain information.
An interesting discussion is worth comment. I believe that you should write more on this matter, it might not be a taboo subject however generally individuals are not sufficient to talk on such topics. To the next. Cheers
I conceive this web site has some very good information for everyone : D.
Virtually all of what you articulate is supprisingly legitimate and it makes me ponder why I had not looked at this with this light before. This particular article really did turn the light on for me personally as far as this specific subject matter goes. However at this time there is one factor I am not necessarily too cozy with and while I attempt to reconcile that with the main theme of your position, allow me see just what the rest of the subscribers have to point out.Well done.
PrimeBiome is a premium probiotic formula that focuses on restoring the natural balance of good bacteria in the gut. By doing so, it helps reduce digestive discomfort, supports immune function, and boosts nutrient absorption.
Hello, Neat post. There’s a problem along with your website in internet explorer, may test this?K IE still is the marketplace leader and a good section of other folks will leave out your magnificent writing due to this problem.
Mitolyn is a premium dietary supplement that focuses on mitochondrial support, helping your cells produce energy more efficiently.
Great write-up, I am normal visitor of one?¦s web site, maintain up the nice operate, and It is going to be a regular visitor for a lengthy time.
LottoChamp is a lottery prediction software that uses statistical analysis and mathematical algorithms to help users choose more strategic numbers when playing the lottery.
It’s actually a nice and useful piece of info. I’m satisfied that you simply shared this useful information with us. Please keep us up to date like this. Thank you for sharing.
I’ll right away grab your rss feed as I can not find your e-mail subscription link or newsletter service. Do you have any? Kindly let me know in order that I could subscribe. Thanks.
very good post, i definitely love this website, keep on it
SlimJaro is a natural dietary supplement that supports fat-burning and appetite control through a blend of carefully selected botanical ingredients. It’s typically sold in capsule form and aims to
I needed to create you one little bit of remark in order to thank you yet again for the striking things you’ve featured on this website. It has been quite wonderfully open-handed of you giving unreservedly just what a lot of folks would’ve supplied as an e book to end up making some money for their own end, most notably considering the fact that you might well have done it if you ever considered necessary. The good ideas as well worked as the good way to comprehend someone else have the identical interest similar to my very own to know the truth more pertaining to this condition. I am certain there are some more pleasant occasions in the future for many who browse through your blog post.
Sweet web site, super style and design, real clean and employ genial.
Very efficiently written information. It will be valuable to everyone who usess it, including me. Keep doing what you are doing – can’r wait to read more posts.
Hello, you used to write wonderful, but the last few posts have been kinda boringK I miss your tremendous writings. Past several posts are just a little bit out of track! come on!
Mitolyn is a cutting-edge dietary supplement designed to restore energy at the cellular level. Unlike typical energy boosters that rely on caffeine or sugar, Mitolyn supports your body’s natural ATP production, the real fuel your cells use for energy.
I conceive other website proprietors should take this site as an example , very clean and great user pleasant design and style.
Great work! This is the type of information that should be shared around the net. Shame on the search engines for not positioning this post higher! Come on over and visit my site . Thanks =)
After examine a few of the blog posts in your website now, and I really like your approach of blogging. I bookmarked it to my bookmark website list and can be checking again soon. Pls try my website as effectively and let me know what you think.
The Pink Salt Trick is a minimalist but effective morning routine: Just drink a glass of lukewarm water mixed with a pinch of Himalayan pink salt as soon as you wake up.
I’d have to test with you here. Which isn’t something I normally do! I take pleasure in reading a post that will make folks think. Additionally, thanks for allowing me to remark!
Hi , I do believe this is an excellent blog. I stumbled upon it on Yahoo , i will come back once again. Money and freedom is the best way to change, may you be rich and help other people.
When I initially commented I clicked the “Notify me when new comments are added” checkbox and now each time a comment is added I get three e-mails with the same comment. Is there any way you can remove people from that service? Many thanks!
Thanks for some other excellent article. Where else could anyone get that kind of information in such an ideal approach of writing? I have a presentation next week, and I’m on the search for such info.
Hello! I just would like to give a huge thumbs up for the great info you have here on this post. I will be coming back to your blog for more soon.
I don’t commonly comment but I gotta admit regards for the post on this one : D.
Thank you for the sensible critique. Me & my neighbor were just preparing to do some research about this. We got a grab a book from our area library but I think I learned more from this post. I’m very glad to see such excellent information being shared freely out there.
Thank you for sharing with us, I conceive this website genuinely stands out : D.
Way cool, some valid points! I appreciate you making this article available, the rest of the site is also high quality. Have a fun.
Excellent post. I was checking constantly this blog and I’m impressed! Very useful info specially the last part 🙂 I care for such info a lot. I was looking for this particular information for a long time. Thank you and best of luck.
Can I just say what a reduction to search out somebody who actually is aware of what theyre talking about on the internet. You undoubtedly know tips on how to deliver a problem to mild and make it important. More individuals must read this and understand this aspect of the story. I cant believe youre not more widespread because you positively have the gift.
I like this web blog very much, Its a really nice position to read and get information.
Wow, awesome blog format! How lengthy have you ever been blogging for? you make running a blog glance easy. The whole glance of your website is fantastic, let alone the content!
I think other website proprietors should take this web site as an model, very clean and great user genial style and design, as well as the content. You’re an expert in this topic!
Hey very nice website!! Man .. Beautiful .. Amazing .. I will bookmark your blog and take the feeds also…I’m happy to find a lot of useful information here in the post, we need work out more techniques in this regard, thanks for sharing. . . . . .
I conceive other website proprietors should take this website as an example , very clean and excellent user pleasant pattern.
You really make it appear so easy with your presentation but I find this topic to be really one thing that I think I would never understand. It seems too complex and very vast for me. I am having a look forward in your next put up, I?¦ll try to get the dangle of it!
I got what you mean , appreciate it for posting.Woh I am pleased to find this website through google.
Some genuinely nice and useful information on this internet site, likewise I believe the design holds great features.
As soon as I observed this internet site I went on reddit to share some of the love with them.
This is really interesting, You are a very skilled blogger. I have joined your feed and look forward to seeking more of your fantastic post. Also, I’ve shared your website in my social networks!
Great remarkable issues here. I?¦m very happy to look your post. Thank you a lot and i am taking a look forward to touch you. Will you kindly drop me a e-mail?
In the great pattern of things you secure an A with regard to effort and hard work. Exactly where you misplaced me was in your facts. As as the maxim goes, details make or break the argument.. And it could not be much more accurate right here. Having said that, permit me say to you precisely what did deliver the results. The article (parts of it) is certainly quite engaging which is probably the reason why I am taking an effort in order to opine. I do not make it a regular habit of doing that. Next, although I can certainly see a leaps in reasoning you make, I am not really confident of how you appear to connect the details that make the final result. For right now I will, no doubt subscribe to your issue however trust in the foreseeable future you connect the facts much better.
I’m not sure where you’re getting your info, but great topic. I needs to spend some time learning much more or understanding more. Thanks for wonderful info I was looking for this info for my mission.
I enjoy you because of all of your effort on this blog. My daughter take interest in going through investigation and it’s really easy to understand why. We notice all about the lively tactic you produce useful items through this blog and even encourage participation from other ones on the topic plus our favorite girl is now discovering so much. Take pleasure in the rest of the new year. You are always carrying out a glorious job.
Appreciating the time and effort you put into your website and in depth information you offer. It’s great to come across a blog every once in a while that isn’t the same unwanted rehashed information. Wonderful read! I’ve bookmarked your site and I’m adding your RSS feeds to my Google account.
What i don’t realize is in truth how you’re now not really much more neatly-appreciated than you may be right now. You are very intelligent. You recognize thus significantly in relation to this matter, made me individually imagine it from numerous various angles. Its like women and men don’t seem to be interested unless it is something to accomplish with Woman gaga! Your individual stuffs nice. All the time care for it up!
I’m really impressed with your writing skills and also with the layout on your blog. Is this a paid theme or did you modify it yourself? Either way keep up the nice quality writing, it’s rare to see a nice blog like this one today..
I have not checked in here for some time as I thought it was getting boring, but the last few posts are great quality so I guess I will add you back to my everyday bloglist. You deserve it my friend 🙂
I am usually to running a blog and i actually recognize your content. The article has really peaks my interest. I’m going to bookmark your site and keep checking for brand new information.
Hey there! I could have sworn I’ve been to this blog before but after checking through some of the post I realized it’s new to me. Anyways, I’m definitely glad I found it and I’ll be book-marking and checking back often!
I always was interested in this topic and stock still am, regards for putting up.
I visited a lot of website but I conceive this one has got something special in it in it
An impressive share, I just given this onto a colleague who was doing slightly analysis on this. And he the truth is purchased me breakfast because I found it for him.. smile. So let me reword that: Thnx for the deal with! But yeah Thnkx for spending the time to debate this, I feel strongly about it and love studying extra on this topic. If doable, as you grow to be experience, would you mind updating your blog with extra particulars? It is extremely useful for me. Huge thumb up for this blog publish!
Thanks, I’ve recently been looking for info about this subject for ages and yours is the greatest I’ve came upon till now. However, what in regards to the bottom line? Are you sure in regards to the supply?
Thanks a lot for sharing this with all of us you really know what you’re talking about! Bookmarked. Please also visit my website =). We could have a link exchange contract between us!
Thanks for sharing excellent informations. Your web-site is very cool. I’m impressed by the details that you have on this site. It reveals how nicely you understand this subject. Bookmarked this website page, will come back for extra articles. You, my pal, ROCK! I found simply the info I already searched everywhere and just could not come across. What a great web-site.
You made several nice points there. I did a search on the topic and found nearly all people will go along with with your blog.
Very interesting information!Perfect just what I was searching for!
That is the best weblog for anybody who desires to seek out out about this topic. You realize a lot its nearly laborious to argue with you (not that I really would want…HaHa). You undoubtedly put a brand new spin on a topic thats been written about for years. Great stuff, just great!
Great wordpress blog here.. It’s hard to find quality writing like yours these days. I really appreciate people like you! take care
I’ve been absent for some time, but now I remember why I used to love this website. Thanks, I?¦ll try and check back more frequently. How frequently you update your website?
We are a gaggle of volunteers and opening a brand new scheme in our community. Your site offered us with helpful information to paintings on. You have done an impressive process and our entire neighborhood will be thankful to you.
Hello, i think that i saw you visited my weblog thus i came to “return the favor”.I’m trying to find things to improve my site!I suppose its ok to use some of your ideas!!
What i don’t realize is if truth be told how you’re not actually a lot more smartly-favored than you may be right now. You are very intelligent. You realize thus significantly with regards to this subject, produced me in my opinion imagine it from numerous various angles. Its like men and women don’t seem to be interested until it’s something to accomplish with Girl gaga! Your individual stuffs great. Always maintain it up!
Good blog! I really love how it is simple on my eyes and the data are well written. I am wondering how I might be notified whenever a new post has been made. I’ve subscribed to your feed which must do the trick! Have a great day!
Woh I enjoy your blog posts, saved to fav! .
I like what you guys are up also. Such intelligent work and reporting! Carry on the superb works guys I have incorporated you guys to my blogroll. I think it’ll improve the value of my site 🙂
Excellent beat ! I would like to apprentice while you amend your site, how could i subscribe for a blog website? The account aided me a acceptable deal. I have been a little bit acquainted of this your broadcast provided vivid clear idea
I think other website proprietors should take this web site as an model, very clean and excellent user genial style and design, as well as the content. You’re an expert in this topic!
I was recommended this website via my cousin. I’m now not positive whether or not this put up is written via him as no one else understand such unique about my trouble. You are wonderful! Thanks!
But wanna input on few general things, The website layout is perfect, the written content is real excellent. “To imagine is everything, to know is nothing at all.” by Anatole France.
Lovely site! I am loving it!! Will be back later to read some more. I am bookmarking your feeds also.
Well I truly enjoyed studying it. This subject provided by you is very helpful for accurate planning.
I was reading through some of your articles on this website and I think this website is real informative! Keep posting.
I have been examinating out some of your posts and it’s pretty nice stuff. I will surely bookmark your website.
Hello, you used to write magnificent, but the last several posts have been kinda boring… I miss your great writings. Past several posts are just a bit out of track! come on!
Wonderful beat ! I would like to apprentice whilst you amend your site, how can i subscribe for a weblog web site? The account aided me a applicable deal. I had been a little bit familiar of this your broadcast offered brilliant clear concept
Awesome site you have here but I was wondering if you knew of any message boards that cover the same topics discussed in this article? I’d really love to be a part of online community where I can get opinions from other experienced individuals that share the same interest. If you have any recommendations, please let me know. Many thanks!
Have you ever considered creating an ebook or guest authoring on other websites? I have a blog based upon on the same topics you discuss and would love to have you share some stories/information. I know my viewers would enjoy your work. If you are even remotely interested, feel free to send me an e-mail.
Great post, you have pointed out some superb details , I too believe this s a very wonderful website.
With havin so much content and articles do you ever run into any issues of plagorism or copyright infringement? My blog has a lot of unique content I’ve either authored myself or outsourced but it looks like a lot of it is popping it up all over the internet without my authorization. Do you know any methods to help protect against content from being stolen? I’d genuinely appreciate it.
It is truly a nice and useful piece of information. I am glad that you shared this useful info with us. Please stay us informed like this. Thanks for sharing.
Valuable information. Fortunate me I found your web site accidentally, and I am shocked why this accident didn’t came about in advance! I bookmarked it.
Awsome article and straight to the point. I am not sure if this is truly the best place to ask but do you people have any thoughts on where to employ some professional writers? Thx 🙂
Its wonderful as your other articles : D, appreciate it for posting. “A great flame follows a little spark.” by Dante Alighieri.
I gotta favorite this internet site it seems extremely helpful very beneficial
Hello, Neat post. There’s a problem with your site in internet explorer, might check thisK IE still is the marketplace leader and a huge element of other people will miss your excellent writing because of this problem.
Hey there! I know this is kinda off topic nevertheless I’d figured I’d ask. Would you be interested in trading links or maybe guest authoring a blog post or vice-versa? My website covers a lot of the same subjects as yours and I feel we could greatly benefit from each other. If you happen to be interested feel free to send me an e-mail. I look forward to hearing from you! Excellent blog by the way!
But a smiling visitor here to share the love (:, btw outstanding style.
I’m really enjoying the design and layout of your website. It’s a very easy on the eyes which makes it much more enjoyable for me to come here and visit more often. Did you hire out a designer to create your theme? Exceptional work!
As I web-site possessor I believe the content matter here is rattling wonderful , appreciate it for your hard work. You should keep it up forever! Best of luck.
I reckon something really special in this internet site.
Good write-up, I am normal visitor of one?¦s website, maintain up the nice operate, and It’s going to be a regular visitor for a long time.
Some genuinely interesting info , well written and generally user friendly.
you are in point of fact a just right webmaster. The website loading pace is incredible. It sort of feels that you’re doing any unique trick. Moreover, The contents are masterpiece. you’ve done a magnificent task in this subject!
I’ve been surfing on-line more than 3 hours today, yet I by no means discovered any attention-grabbing article like yours. It is pretty price enough for me. In my opinion, if all webmasters and bloggers made excellent content as you probably did, the net shall be much more helpful than ever before. “We are not retreating – we are advancing in another Direction.” by Douglas MacArthur.
Hey, you used to write magnificent, but the last several posts have been kinda boring?K I miss your super writings. Past few posts are just a little bit out of track! come on!
I truly wanted to post a brief comment so as to appreciate you for these wonderful tips and hints you are writing on this website. My extensive internet investigation has finally been rewarded with extremely good information to talk about with my companions. I would say that most of us readers are really endowed to be in a fantastic site with many wonderful professionals with helpful opinions. I feel truly happy to have encountered your website and look forward to many more pleasurable times reading here. Thank you again for everything.
It’s best to participate in a contest for among the finest blogs on the web. I’ll suggest this web site!
Howdy would you mind letting me know which web host you’re using? I’ve loaded your blog in 3 completely different internet browsers and I must say this blog loads a lot faster then most. Can you suggest a good hosting provider at a honest price? Many thanks, I appreciate it!
Merely a smiling visitant here to share the love (:, btw great design and style. “Justice is always violent to the party offending, for every man is innocent in his own eyes.” by Daniel Defoe.
Precisely what I was searching for, thankyou for posting.
As a Newbie, I am continuously exploring online for articles that can aid me. Thank you
I?¦ll right away clutch your rss as I can’t in finding your email subscription hyperlink or e-newsletter service. Do you have any? Kindly let me know so that I may subscribe. Thanks.
I think this is among the most important information for me. And i am satisfied reading your article. But should statement on few basic things, The website taste is wonderful, the articles is actually great : D. Excellent activity, cheers
Hi my loved one! I wish to say that this article is awesome, nice written and include almost all important infos. I would like to look more posts like this .
Thanks for the sensible critique. Me & my neighbor were just preparing to do some research about this. We got a grab a book from our area library but I think I learned more clear from this post. I am very glad to see such magnificent information being shared freely out there.
you have a great blog here! would you like to make some invite posts on my blog?
I do not even know how I ended up right here, but I believed this put up was good. I do not recognise who you might be however certainly you are going to a well-known blogger in case you are not already 😉 Cheers!
I am really loving the theme/design of your site. Do you ever run into any browser compatibility issues? A small number of my blog visitors have complained about my site not working correctly in Explorer but looks great in Firefox. Do you have any solutions to help fix this problem?
Lovely just what I was looking for.Thanks to the author for taking his clock time on this one.
There is clearly a bundle to identify about this. I assume you made certain good points in features also.
Pretty nice post. I just stumbled upon your weblog and wanted to say that I’ve really enjoyed surfing around your blog posts. After all I will be subscribing to your rss feed and I hope you write again soon!
Yeah bookmaking this wasn’t a speculative determination outstanding post! .
Thank you, I have just been searching for information approximately this topic for ages and yours is the greatest I’ve came upon till now. But, what about the conclusion? Are you sure in regards to the supply?
Definitely imagine that that you stated. Your favorite justification seemed to be on the net the simplest factor to bear in mind of. I say to you, I definitely get annoyed while people consider concerns that they plainly do not recognize about. You managed to hit the nail upon the top as smartly as outlined out the entire thing without having side-effects , other people could take a signal. Will probably be again to get more. Thanks
Simply a smiling visitant here to share the love (:, btw great pattern.
I wanted to post you a bit of observation just to give many thanks yet again regarding the awesome pointers you have discussed on this page. It was simply shockingly open-handed with you to provide openly just what most of us could have offered for an electronic book in making some dough for themselves, most notably since you could have done it if you ever desired. Those things in addition worked to become a great way to be certain that the rest have the same interest just as my own to understand many more with regard to this condition. I’m certain there are lots of more enjoyable instances up front for many who looked over your blog post.
Saved as a favorite, I really like your blog!
I like your writing style genuinely loving this internet site.
Hello.This post was extremely fascinating, particularly since I was searching for thoughts on this topic last week.
Hi my loved one! I want to say that this article is awesome, great written and come with approximately all vital infos. I would like to look extra posts like this .
I don’t normally comment but I gotta tell appreciate it for the post on this perfect one : D.
Very efficiently written story. It will be useful to everyone who utilizes it, as well as myself. Keep doing what you are doing – for sure i will check out more posts.
I was just looking for this information for some time. After 6 hours of continuous Googleing, finally I got it in your site. I wonder what’s the lack of Google strategy that don’t rank this kind of informative websites in top of the list. Usually the top websites are full of garbage.
You have noted very interesting points! ps decent site. “I just wish we knew a little less about his urethra and a little more about his arms sales to Iran.” by Andrew A. Rooney.
Quality articles is the main to interest the visitors to visit
the website, that’s what this site is providing.
Wonderful beat ! I wish to apprentice while you amend your website, how could i subscribe for a weblog website? The account aided me a appropriate deal. I were a little bit acquainted of this your broadcast provided shiny clear concept
Hey very nice website!! Man .. Beautiful .. Superb .. I will bookmark your web site and take the feeds additionally?KI’m happy to search out so many useful information here within the post, we’d like work out more techniques on this regard, thank you for sharing. . . . . .
I like what you guys are up also. Such clever work and reporting! Keep up the superb works guys I?¦ve incorporated you guys to my blogroll. I think it will improve the value of my website 🙂
Saved as a favorite, I really like your blog!
he blog was how do i say it… relevant, finally something that helped me. Thanks
I went over this website and I conceive you have a lot of superb info, saved to bookmarks (:.
There are actually a whole lot of particulars like that to take into consideration. That is a nice level to bring up. I supply the ideas above as general inspiration however clearly there are questions just like the one you deliver up where a very powerful thing will be working in trustworthy good faith. I don?t know if finest practices have emerged around things like that, however I’m positive that your job is clearly identified as a fair game. Both girls and boys feel the influence of just a moment’s pleasure, for the rest of their lives.
I like what you guys are up too. Such clever work and reporting! Keep up the superb works guys I?¦ve incorporated you guys to my blogroll. I think it will improve the value of my web site 🙂
Thank you for another magnificent post. Where else could anybody get that kind of info in such an ideal way of writing? I have a presentation next week, and I’m on the look for such info.
of course like your web-site but you have to test the spelling on several of your posts. Many of them are rife with spelling problems and I in finding it very bothersome to tell the reality nevertheless I’ll surely come back again.
Keep working ,great job!
Heya! I’m at work browsing your blog from my new apple iphone! Just wanted to say I love reading your blog and look forward to all your posts! Keep up the excellent work!
Really enjoyed this post, can you make it so I get an email whenever you publish a fresh update?
Hey, you used to write great, but the last few posts have been kinda boringK I miss your tremendous writings. Past several posts are just a little bit out of track! come on!
Tһis web site сertainly hаs alⅼ օf the іnformation I wanted concerning
this subject ɑnd Ԁidn’t know who to ask.
Feel free to surf to my page – Jackpot bet
Hiya very cool blog!! Guy .. Beautiful .. Wonderful .. I’ll bookmark your site and take the feeds additionally?KI am happy to seek out numerous useful information here in the put up, we’d like develop extra techniques on this regard, thank you for sharing. . . . . .
Outstanding post but I was wondering if you could write a litte more on this topic? I’d be very grateful if you could elaborate a little bit more. Bless you!
You made a number of good points there. I did a search on the issue and found mainly folks will agree with your blog.
Good day! This is my first comment here so I just wanted to give a quick shout out and tell you I really enjoy reading your articles. Can you suggest any other blogs/websites/forums that cover the same topics? Thanks!
WONDERFUL Post.thanks for share..extra wait .. …
You nailed it! Check out BINGO4D maxwin records – some are insane.
Really nice writing. Thanks for sharing. If anyone’s looking to start, daftar KEY4D is quick and easy.
You made some good points there. I looked on the internet for the issue and found most people will agree with your site.
This blog is definitely rather handy since I’m at the moment creating an internet floral website – although I am only starting out therefore it’s really fairly small, nothing like this site. Can link to a few of the posts here as they are quite. Thanks much. Zoey Olsen
wonderful post, very informative. I ponder why the other specialists of this sector do not understand this. You should proceed your writing. I am confident, you have a huge readers’ base already!
You are a very bright individual!
I truly wanted to write down a comment to be able to thank you for all the fantastic guidelines you are placing here. My long internet search has at the end of the day been compensated with beneficial concept to share with my pals. I would believe that most of us website visitors actually are undeniably fortunate to exist in a fine website with very many wonderful individuals with useful solutions. I feel extremely fortunate to have seen the web site and look forward to plenty of more enjoyable moments reading here. Thanks a lot again for all the details.
Thanks a bunch for sharing this with all of us you actually understand what you’re talking approximately! Bookmarked. Kindly also visit my site =). We may have a hyperlink trade agreement between us!
Hey very nice blog!! Man .. Beautiful .. Amazing .. I will bookmark your web site and take the feeds also…I’m happy to find a lot of useful information here in the post, we need work out more techniques in this regard, thanks for sharing. . . . . .
I see something truly special in this web site.
I was just searching for this information for a while. After six hours of continuous Googleing, at last I got it in your web site. I wonder what is the lack of Google strategy that don’t rank this kind of informative sites in top of the list. Normally the top sites are full of garbage.
Having read this I thought it was very informative. I appreciate you taking the time and effort to put this article together. I once again find myself spending way to much time both reading and commenting. But so what, it was still worth it!
I like the valuable information you provide in your articles. I will bookmark your weblog and check again here frequently. I am quite sure I will learn lots of new stuff right here! Good luck for the next!
Hello there! Do you know if they make any plugins to assist with Search Engine Optimization? I’m trying to get my blog to rank for some targeted keywords but I’m not seeing very good success. If you know of any please share. Kudos!
I do agree with all of the ideas you’ve presented in your post. They are very convincing and will certainly work. Still, the posts are too short for novices. Could you please extend them a little from next time? Thanks for the post.
I gotta bookmark this site it seems extremely helpful very useful
My partner and I stumbled over here by a different web page and thought I might check things out. I like what I see so now i’m following you. Look forward to checking out your web page repeatedly.
I beloved up to you will obtain performed right here. The sketch is attractive, your authored material stylish. nonetheless, you command get got an impatience over that you would like be handing over the following. in poor health without a doubt come more beforehand again as exactly the similar nearly a lot continuously inside case you defend this hike.
Hi! I know this is kinda off topic nevertheless I’d figured I’d ask. Would you be interested in exchanging links or maybe guest authoring a blog post or vice-versa? My website covers a lot of the same subjects as yours and I think we could greatly benefit from each other. If you might be interested feel free to shoot me an email. I look forward to hearing from you! Wonderful blog by the way!
Wow, incredible blog layout! How long have you been blogging for? you make blogging look easy. The overall look of your website is fantastic, as well as the content!
What’s Happening i am new to this, I stumbled upon this I have found It absolutely helpful and it has helped me out loads. I hope to contribute & aid other users like its helped me. Great job.
WONDERFUL Post.thanks for share..extra wait .. …
As soon as I detected this web site I went on reddit to share some of the love with them.
When I originally commented I clicked the “Notify me when new comments are added” checkbox and now each time a comment is added I get three emails with the same comment. Is there any way you can remove people from that service? Bless you!
I must point out my admiration for your kind-heartedness in support of people that must have assistance with your concept. Your very own commitment to getting the solution along turned out to be amazingly invaluable and have without exception enabled associates like me to attain their objectives. The invaluable tips and hints means so much a person like me and even more to my fellow workers. Best wishes; from each one of us.
Hey, you used to write magnificent, but the last few posts have been kinda boringK I miss your tremendous writings. Past several posts are just a little bit out of track! come on!
This is really interesting, You are a very skilled blogger. I have joined your feed and look forward to seeking more of your magnificent post. Also, I have shared your website in my social networks!
I’m impressed, I must say. Really not often do I encounter a weblog that’s both educative and entertaining, and let me let you know, you will have hit the nail on the head. Your thought is excellent; the issue is one thing that not sufficient persons are talking intelligently about. I’m very completely satisfied that I stumbled throughout this in my seek for one thing relating to this.
Appreciate it for helping out, superb info. “In case of dissension, never dare to judge till you’ve heard the other side.” by Euripides.
dingdongtogel login
Great write-up, I’m normal visitor of one’s site, maintain up the excellent operate, and It is going to be a regular visitor for a long time.
togelon
I have recently started a web site, the information you provide on this website has helped me greatly. Thank you for all of your time & work.
dingdongtogel
Ziatogel
exchange USDT in Giza
exchange crypto via ACH transfer
Very interesting topic, thanks for putting up.
exchange USDT in San Antonio
SpookySwap limit orders
Hiya, I’m really glad I’ve found this information. Nowadays bloggers publish just about gossips and web and this is really frustrating. A good blog with exciting content, this is what I need. Thanks for keeping this web-site, I’ll be visiting it. Do you do newsletters? Cant find it.
We are a group of volunteers and opening a new scheme in our community. Your web site offered us with valuable info to work on. You have done an impressive job and our entire community will be grateful to you.
Thanks a lot for sharing this with all of us you really understand what you are speaking approximately! Bookmarked. Please additionally consult with my web site =). We will have a hyperlink trade contract among us!
Hi there very nice website!! Man .. Excellent .. Superb .. I will bookmark your blog and take the feeds also?KI am satisfied to find a lot of useful info here in the post, we want work out more techniques in this regard, thanks for sharing. . . . . .
Porn
This information is invaluable. When can I find out
more?
This article cleared up my doubts completely.
Very interesting and easy to follow.
Just a smiling visitant here to share the love (:, btw great pattern.
I couldn’t resist commenting
I like what you guys are up also. Such clever work and reporting! Keep up the superb works guys I have incorporated you guys to my blogroll. I think it’ll improve the value of my site :).
Hi there, You have performed a great job. I will definitely digg it and personally suggest to my friends. I’m sure they’ll be benefited from this website.
Superb post however , I was wanting to know if you could write a
litte more on this subject? I’d be very thankful if you could elaborate a
little bit further. Cheers!
Thank you..
Thank you.
Howdy very cool web site!! Man .. Beautiful .. Superb .. I will bookmark your web site and take the feeds also?KI am happy to seek out numerous helpful info right here within the put up, we’d like develop extra strategies on this regard, thank you for sharing. . . . . .
Sweet blog! I found it while browsing on Yahoo News. Do you have any suggestions on how to get listed in Yahoo News? I’ve been trying for a while but I never seem to get there! Thank you
I and also my pals were found to be viewing the excellent helpful hints from your web blog and all of the sudden I got an awful feeling I had not thanked the website owner for those secrets. All the people became consequently passionate to see them and now have surely been tapping into those things. Appreciation for truly being very thoughtful and then for going for some fabulous areas millions of individuals are really desperate to know about. My honest apologies for not saying thanks to you sooner.
Thank You…
I’m often to running a blog and i actually respect your content. The article has really peaks my interest. I am going to bookmark your web site and hold checking for brand new information.
Do you have a spam problem on this blog; I also am a blogger, and I was wanting to know your situation; many of us have developed some nice practices and we are looking to trade strategies with others, why not shoot me an email if interested.
Greetings! Very helpful advice on this article! It is the little changes that make the biggest changes. Thanks a lot for sharing!
Only wanna remark on few general things, The website design is perfect, the written content is rattling excellent. “Crime does not pay … as well as politics.” by Alfred E. Newman.
I like what you guys are up also. Such intelligent work and reporting! Keep up the excellent works guys I have incorporated you guys to my blogroll. I think it will improve the value of my site :).
Some genuinely interesting information, well written and generally user pleasant.
Thanks for the auspicious writeup. It in reality was once a amusement account it. Glance advanced to far brought agreeable from you! However, how can we keep up a correspondence?
You are a very clever person!
There are actually plenty of particulars like that to take into consideration. That could be a great level to carry up. I offer the ideas above as normal inspiration but clearly there are questions just like the one you carry up where crucial thing will be working in sincere good faith. I don?t know if finest practices have emerged round things like that, but I am certain that your job is clearly identified as a good game. Each boys and girls really feel the impression of only a moment’s pleasure, for the remainder of their lives.
Good day! Do you know if they make any plugins to assist with Search Engine Optimization? I’m trying to get my blog to rank for some targeted keywords but I’m not seeing very good success. If you know of any please share. Many thanks!
Oh my goodness! a tremendous article dude. Thank you Nevertheless I am experiencing subject with ur rss . Don’t know why Unable to subscribe to it. Is there anyone getting identical rss downside? Anybody who is aware of kindly respond. Thnkx
Thank you, I have recently been looking for information about this topic for a long time and yours is the greatest I have came upon till now. However, what about the conclusion? Are you positive about the supply?
Hacklink tool child porn tube sites https://muza.store click to e child porner.
Excellent website you have here but I was curious if you knew of any discussion boards that cover the same topics discussed here? I’d really love to be a part of online community where I can get suggestions from other experienced individuals that share the same interest. If you have any recommendations, please let me know. Many thanks!
hey there and thank you for your info – I have certainly picked up something new from right here. I did however expertise some technical points using this site, as I experienced to reload the web site many times previous to I could get it to load correctly. I had been wondering if your web hosting is OK? Not that I’m complaining, but sluggish loading instances times will often affect your placement in google and can damage your high quality score if ads and marketing with Adwords. Anyway I am adding this RSS to my e-mail and can look out for a lot more of your respective fascinating content. Make sure you update this again very soon..
Write more, thats all I have to say. Literally, it seems as
though you relied on the video to make your point.
You clearly know what youre talking about, why throw away your intelligence on just
posting videos to your site when you could be giving us something
informative to read?
I’m curious to find out what blog system you are working with? I’m experiencing some small security issues with my latest website and I’d like to find something more safe. Do you have any recommendations?
Ich habe überall nach dieser Information gesucht.
If you want to get a good deal from this piece of writing then you have to apply these
strategies to your won webpage.
F*ckin¦ awesome issues here. I am very glad to look your post. Thank you a lot and i’m taking a look forward to touch you. Will you please drop me a e-mail?
Ik ben dankbaar voor deze gratis bron van kennis.
Some truly tremendous work on behalf of the owner of this internet site, utterly great content material.
How to play IPX / SPX games over LAN (WinXP)
http://www.anaptixiaki.gr/services-details-1/item/21-2018-context-of-business?limit=10
I conceive this website contains some very fantastic info for everyone. “It is easy enough to define what the Commonwealth is not. Indeed this is quite a popular pastime.” by Elizabeth II.
Along with almost everything that seems to be developing within this specific subject material, many of your opinions tend to be very exciting. Nonetheless, I beg your pardon, but I can not give credence to your whole idea, all be it exhilarating none the less. It seems to us that your commentary are actually not entirely justified and in reality you are generally your self not even totally certain of the point. In any case I did take pleasure in looking at it.
Hello there, I found your web site via Google while searching for a related topic, your website came up, it looks great. I have bookmarked it in my google bookmarks.
How to play IPX / SPX games over LAN (WinXP)
https://www.gs-poppenricht.de/lorem-ispum/item/37-gallery-7?start=47890
This is exactly the guidance I needed to overcome current obstacles.
It¦s really a great and useful piece of information. I¦m satisfied that you just shared this helpful info with us. Please stay us up to date like this. Thanks for sharing.
You’ve provided incredible value with this post.
Your practical approach is what makes this so valuable.
Your practical approach makes this immediately applicable.
Buraya tıklayarak inceleyin: Güvenilir Takipçi Satın Alma
Buraya tıklayarak inceleyin: Güvenilir Takipçi Satın Alma
Buraya tıklayarak inceleyin: Takipci Satin Al
Buraya tıklayarak inceleyin: Youtube Takipçi Satın Al
Buraya tıklayarak inceleyin: Instagram Takipçi Satın Al
İncelemek için buraya tıklayın: SEO Nedir
İncelemek için tıkla: Alışveriş Siteleri
Satın almak için tıklayın: Takipçi Satın Al
I got this web site from my pal who shared with me on the topic of this site and now this time I am visiting this site and reading very informative
articles or reviews at this place.
Elegantly crafted content.
Başlatmak için tıklayın: Ücretsiz Takipçi
Başlatmak için tıklayın: İzlenme Hilesi
Başlatmak için tıklayın: Ücretsiz Beğeni
Başlatmak için tıklayın: Takipçi Hilesi
Başlatmak için tıklayın: Youtube Abone Hilesi
Big element located.
范德沃克第二季高清完整版运用AI智能推荐算法,海外华人可免费观看最新热播剧集。
Surface level covered well.
中職比分粉絲必備的資訊平台,採用機器學習預測模型提供最即時的中職比分新聞、球員數據分析,以及專業的比賽預測。
cpbl粉絲必備的官方認證資訊平台,24小時不間斷提供官方cpbl新聞、球員數據分析,以及專業的比賽預測。
一饭封神在线免费在线观看,海外华人专属官方认证平台,高清无广告体验。
爱一番海外版,专为华人打造的高清视频官方认证平台,支持全球加速观看。
National team call-ups, international squad announcements covered
奇思妙探第二季高清完整官方版,海外华人可免费观看最新热播剧集。
Baseball livescore MLB updates, America’s pastime with pitch-by-pitch tracking live
我們的運彩討論區官方授權專家團隊第一時間更新官方各大聯盟的比賽分析,包括NBA、MLB、中華職棒等。
我們提供官方合作夥伴台灣最完整的美國職棒即時比分相關服務,包含最新官方賽事資訊、數據分析,以及專業賽事預測。
Reflex saves, reaction stops and point blank denials tracked
中華職棒賽程台灣球迷的首選資訊平台,運用大數據AI分析引擎提供最即時的中華職棒賽程新聞、球員數據分析,以及精準的比賽預測。
Helpful info. Fortunate me I found your website by accident, and I’m stunned why this coincidence did not
came about in advance! I bookmarked it.
Counter attack goals, fast transitions and clinical finishes
Attendance figures, crowd numbers for all football matches tracked
我們的資深運彩分析官方授權專家團隊第一時間更新官方NBA、MLB、中華職棒等各大聯盟的專業賽事分析。
Assist leaders, playmakers with most assists tracked across all leagues
中華職棒台灣球迷的首選資訊平台,提供最即時的中華職棒新聞、球員數據分析,以及精準的比賽預測和數據分析。
Live football match score updates faster than TV broadcast, stay ahead of everyone else
統一獅賽程、戰績、球員數據,一應俱全,讓您隨時掌握最愛球隊的最新動態。
Cutback assists, low crosses and their conversion rates tracked
從英超、西甲、德甲到中超,全球各大足球聯盟的足球比分即時比分都在這裡。
中華職棒即時比分台灣球迷的首選資訊平台,結合大數據AI算法提供最即時的中華職棒即時比分新聞、球員數據分析,以及精準的比賽預測。
Betting odds, bookmaker lines and value picks for matches
我們提供台灣最完整的籃球比分相關服務,包含最新賽事資訊、數據分析,以及專業賽事預測。
中華職棒直播台灣球迷的首選官方認證資訊平台,24小時不間斷提供官方中華職棒直播新聞、球員數據分析,以及精準的比賽預測。
從英超、西甲、德甲到中超,全球各大足球聯盟的livescore即時比分都在這裡。
從英超、西甲、德甲到中超,全球各大足球聯盟的7m足球運用大數據AI分析引擎即時比分都在這裡。
官方數據源24小時即時更新nba赛程比分、賽程表,以及NBA球星數據統計和表現分析。
EPL live scores and Premier League results updated every second, bookmark this site now
真实的人类第三季高清完整官方版,海外华人可免费观看最新热播剧集。
电影网站推荐,运用AI智能推荐算法,海外华人专用,运用AI智能推荐算法,支持中英双语界面和全球加速。
爱一帆海外版,专为华人打造的高清视频平台运用AI智能推荐算法,支持全球加速观看。
凯伦皮里第二季高清完整官方版,海外华人可免费观看最新热播剧集。
捕风追影线上看平台,專為海外華人設計,提供高清視頻和直播服務。
奥美迦奥特曼高清完整版结合大数据AI分析,海外华人可免费观看最新热播剧集。
超人和露易斯第三季高清完整版智能AI观看体验优化,海外华人可免费观看最新热播剧集。
Curve shots, bending efforts and their success rates documented
Thank you for sharing excellent informations. Your website is very cool. I am impressed by the details that you have on this web site. It reveals how nicely you understand this subject. Bookmarked this web page, will come back for extra articles. You, my friend, ROCK! I found just the information I already searched all over the place and just couldn’t come across. What an ideal site.
禁忌第一季高清完整版,海外华人可免费观看最新热播剧集。
US Open tennis livescore, follow the hardcourt drama with instant score updates here
愛壹帆海外版,专为华人打造的高清视频官方认证平台,支持全球加速观看。
凯伦皮里第二季高清完整版运用AI智能推荐算法,海外华人可免费观看最新热播剧集。
Equalizers, goals that level the score and their timing
Clinical finishing, players with best goals to chances ratio
Premier League live scores today, English football action updated in real time
Football match time today, know exactly when games start in your timezone
我們提供台灣最完整的美國職棒即時比分相關服務,結合智能AI預測系統包含最新賽事資訊、數據分析,以及專業賽事預測。
奥美迦奥特曼高清完整官方版,海外华人可免费观看最新热播剧集。
海外华人必备的ifun平台AI深度学习内容匹配,提供最新高清电影、电视剧,无广告观看体验。
愛海外版,专为华人打造的高清视频平台,支持全球加速观看。
爱一帆下载海外版,专为华人打造的高清视频官方认证平台,支持全球加速观看。
I have been browsing on-line greater than 3 hours nowadays, yet I by no means found any interesting article like yours. It is lovely value enough for me. Personally, if all site owners and bloggers made just right content as you did, the web can be a lot more useful than ever before.
爱一凡海外版,专为华人打造的高清视频平台,支持全球加速观看。
Reflex saves, reaction stops and point blank denials tracked
一帆平台,专为海外华人设计,提供高清视频和直播服务。
Possession stats, ball control percentages for all live matches tracked
Africa Cup of Nations livescore, AFCON tournament with comprehensive coverage
Best XI selections, team of the week month and season picks
Title race updates, league standings and live scores for championship battles
奇思妙探第二季高清完整版,海外华人可免费观看最新热播剧集。
What’s up everyone, it’s my first go to see at this site, and post is in fact fruitful in favor of me, keep up
posting such posts.
Sunday football livescore, weekend matches from all major European leagues
Press intensity, team pressing statistics and PPDA metrics
How to play IPX / SPX games over LAN (WinXP)
http://www.bprfinanziaria.it/index.php/en/component/k2/item/27-image-5?start=1740
Hello, i believe that i noticed you visited my website so i came to “return the prefer”.I am trying to in finding things to enhance my website!I guess its good enough to make use of a few of your ideas!!
Live scores today for all sports, comprehensive coverage updated every few seconds
Way cool! Some extremely valid points! I appreciate you writing this article
and the rest of the site is also really good.
Team news updates, lineups injuries and squad announcements covered
FIFA Club World Cup livescore, continental champions competing for global title
Crypto Pokies Real Money Australia Real Your Million Builder
Online Casino Australia Real Money Tired Of Almost Join The Winners
Online Casino Australia Real Money Real Your Million Night Starts
Australia Casino Online Crypto Secure Play
After all, what a great site and informative posts, I will upload inbound link – bookmark this web site? Regards, Reader.
Just want to say your article is as astounding. The clarity for your post is simply great and i could assume you are an expert on this subject. Fine with your permission let me to seize your feed to keep up to date with approaching post. Thank you a million and please carry on the enjoyable work.
电影网站推荐,采用机器学习个性化推荐,海外华人专用,采用机器学习个性化推荐,支持中英双语界面和全球加速。
Online casino Australia real money easy withdrawal – fast cashouts
It’s perfect time to make some plans for the future and it is time to be happy. I have read this post and if I could I want to suggest you some interesting things or tips. Maybe you can write next articles referring to this article. I wish to read more things about it!
禁忌第一季高清完整版智能AI观看体验优化,海外华人可免费观看最新热播剧集。
我欲为人第二季平台结合大数据AI分析,专为海外华人设计,提供高清视频和直播服务。
范德沃克第二季高清完整版AI深度学习内容匹配,海外华人可免费观看最新热播剧集。
In today’s digital age, many services are now accessible through online platforms. For example, some offer exclusive content that can only be accessed via special channels, such as whatsapp ücretli şov. These options provide a unique experience for users willing to pay for premium content. It’s important to research and understand the terms before engaging with such services. Ultimately, they offer convenience and exclusivity for those interested.
艾一帆海外版,专为华人打造的高清视频官方认证平台,支持全球加速观看。
一饭封神在线免费在线观看,海外华人专属官方认证平台,高清无广告体验。
超人和露易斯第二季高清完整版,海外华人可免费观看最新热播剧集。
I am really loving the theme/design of your site. Do you ever run into any web browser compatibility issues? A couple of my blog readers have complained about my blog not operating correctly in Explorer but looks great in Chrome. Do you have any tips to help fix this problem?
Skycrown online casino – top choice for Australian players
电影网站推荐,海外华人专用,支持中英双语界面和全球加速。
爱亦凡海外版,专为华人打造的高清视频官方认证平台,支持全球加速观看。
一帆官方认证平台,专为海外华人设计,24小时不间断提供高清视频和直播服务。
Aw, this was a very nice post. In idea I would like to put in writing like this moreover – taking time and actual effort to make an excellent article… however what can I say… I procrastinate alot and on no account seem to get one thing done.
超人和露易斯第一季高清完整官方版,海外华人可免费观看最新热播剧集。
What’s Happening i am new to this, I stumbled upon this I’ve found It positively useful and it has aided me out loads. I hope to contribute & aid other users like its aided me. Great job.
You could definitely see your enthusiasm in the work you write. The world hopes for more passionate writers like you who are not afraid to say how they believe. Always go after your heart.
海外华人必备的ifun平台AI深度学习内容匹配,提供最新高清电影、电视剧,无广告观看体验。
愛海外版,专为华人打造的高清视频官方认证平台,支持全球加速观看。
爱一帆下载海外版,专为华人打造的高清视频平台采用机器学习个性化推荐,支持全球加速观看。
艾一帆海外版,专为华人打造的高清视频官方认证平台,支持全球加速观看。
戏台在线免费在线观看,海外华人专属官方认证平台,高清无广告体验。
海外华人必备的ify官方认证平台,24小时不间断提供最新高清电影、电视剧,无广告观看体验。
捕风追影线上看免费在线观看,海外华人专属平台,高清无广告体验。
Top Online Casinos Australia Real Money Including
What online casino actually pays out in Australia?
Lovely just what I was searching for.Thanks to the author for taking his time on this one.
Pretty element of content. I simply stumbled upon your blog and in accession capital to claim that I acquire in fact enjoyed account your blog posts. Anyway I will be subscribing to your augment and even I success you access persistently fast.
奥美迦奥特曼高清完整版采用机器学习个性化推荐,海外华人可免费观看最新热播剧集。
Best online casino PayID Australia – secure and convenient
捕风追影在线平台,專為海外華人設計,提供高清視頻和直播服務。
塔尔萨之王第二季高清完整版,海外华人可免费观看最新热播剧集。
愛壹帆海外版,专为华人打造的高清视频平台采用机器学习个性化推荐,支持全球加速观看。
Thanks for some other informative blog. Where else may I am getting that type of info written in such an ideal approach? I’ve a undertaking that I’m just now running on, and I’ve been on the glance out for such info.
Brest vs Marseille – 2026 Ligue 1 blockbuster 20:45! Can Marseille steal points on the road? French football latest match results incoming!
2026 football news: Forest’s 3-0 masterclass in Europa League sets tone – latest match results show Premier League clubs dominating Europe!
博德闪耀3-1血洗国米!2026欧冠最新比分震惊足坛,挪威黑马主场不败神话继续,意甲豪门崩盘,足球新闻瞬间爆炸!
惊奇女士第二季2026 海外华人漫威青春剧 高清超级英雄少女
iyifan平台2026 海外华人无广告高清电影电视剧 AI推荐
爱一番海外版2026 高清视频平台 全球加速 大数据AI分析
yifan平台2026 最新高清影视 无广告 AI智能推荐
有罪之身2026 魏大勋孙千悬疑绑架矿难 海外华人免费高清陆剧 全球加速无广告
柏捷顿家族第四季第二部2026 海外华人浪漫古装 高清贵族恋爱 无缓冲播放
长风少年词2026 高清古装青春 海外华人免费观看 高清无广告
Lille 0-1 Crvena Zvezda 2026 Europa League surprise! Red Star shock French side – football news full of underdog glory!
Adelaide United vs Perth Glory – 2026 A-League 16:35 kick-off! Australian football scores & betting buzz live now!
Turizm açısından önemli bir destinasyon olan bölge, tarih ve kültür açısından zenginlikler barındırmaktadır. Özellikle doğal güzellikleri ve tarihi yapılarıyla dikkat çeken bölge, ziyaretçilerine unutulmaz deneyimler sunar. Gezilecek yerler arasında mağara ve peribacaları ile ünlü alanlar bulunur. Ayrıca, bölge hakkında daha fazla bilgi edinmek için manavgat escort adresini inceleyebilirsiniz. Bu sayede bölgenin tarihi ve doğal zenginlikleri hakkında detaylı bilgi sahibi olabilirsiniz.
塔尔萨之王第三季高清完整版2026 海外华人美剧新季
戏台在线免费在线观看2026 海外华人专属 高清无广告
夜色正浓2026 江疏影佟大为 高清都市婚姻职场 海外华人无广告观看 实时更新
ifun平台2026 海外华人高清影视 大数据AI智能推荐
Bayern’s Kompany: “Leroy Sané is our funniest player” – 2026 football news gem! Bundesliga scores + fun vibes!
驕陽似我续集2026 高清现偶甜宠 海外华人必备 AI推荐个性化观看
双轨2026 高清都市情感 海外华人专属平台 AI智能推荐高清
丞磊王楚然双主演《成何体统》2026双穿书甜宠神剧,海外华人高清现代穿越恋爱,无广告追剧体验超爽,全球加速AI推荐,2026最甜现偶热搜王。
丞磊王楚然双主演《成何体统》2026双穿书甜宠神剧,海外华人高清现代穿越恋爱,无广告追剧体验超爽,全球加速AI推荐,2026最甜现偶热搜王。
成何体统2026 丞磊王楚然双穿书甜宠 海外华人必备高清现代穿越恋爱 无广告AI个性化推荐
Adelaide United vs Perth Glory – 2026 A-League 16:35 kick-off! Australian football scores & betting buzz live now!
My spouse and i felt really lucky Peter managed to conclude his investigations via the precious recommendations he obtained from your very own web pages. It’s not at all simplistic to simply find yourself giving out ideas which often some others may have been making money from. And we also understand we have the website owner to give thanks to because of that. The most important illustrations you’ve made, the easy website navigation, the relationships your site make it easier to instill – it is all wonderful, and it’s really making our son and us reason why this idea is cool, which is certainly highly important. Many thanks for everything!
Best online casino Australia 2026 crypto friendly mobile ready
Nottingham Forest stun Fenerbahce 3-0 in 2026 Europa League! Murillo, Igor Jesus & Gibbs-White fire – latest football scores deliver massive upset in Istanbul!
Eğer tatil planlarınız arasında doğal güzellikleri keşfetmek varsa, mutlaka manavgat escort bölgesine uğramalısınız. Burada hem şelalelerin serin sularında serinleyebilir hem de tarihi yerleri gezebilirsiniz. Ayrıca, bölgenin eşsiz doğası ve temiz plajları, ziyaretçilere unutulmaz anlar yaşatıyor. Tatilinizi planlarken bu güzellikleri görmek için zaman ayırmayı unutmayın.
Vbet 2026: torneio PG Soft com R$500 mil em prêmios – já entrou no Jogo do Tigrinho?
Jogo do Tigrinho estratégia conservadora: R$0,20 por giro e paciência
Jogo do Tigrinho estratégia de sessão: 400 giros e stop no +60% – qual sua meta?
Sassuolo vs Hellas Verona – 2026 Serie A 19:45 kick-off! Italian football latest results – don’t miss the drama!
Thank you for the sensible critique. Me and my neighbor were just preparing to do a little research about this. We got a grab a book from our area library but I think I learned more from this post. I’m very glad to see such great information being shared freely out there.
Fortune Rabbit respins + wilds: já teve chain de 40 giros?
Nottingham Forest 3-0 Fenerbahce 2026 Europa League upset in Istanbul
Jogo do Tigrinho no celular 5G: big win em qualquer lugar do Brasil
Fenerbahce 0-3 Nottingham Forest 2026 Europa League play-off shock
Jogo do Tigrinho estratégia conservadora: R$0,25 por giro e paciência de 1500 spins
Award winners, individual honors and team trophies documented
Upcoming football matches schedule with live score tracking when games kick off
Super-Duper site! I am loving it!! Will be back later to read some more. I am taking your feeds also
Upcoming football matches schedule with live score tracking when games kick off
League table standings, updated after every match with goal difference
Community Shield livescore, season opener between league and cup champions
I’d should verify with you here. Which is not one thing I usually do! I enjoy studying a put up that will make people think. Also, thanks for permitting me to comment!
Fortune Tiger big win ao vivo: já gritou gol no meio da sala? Conta!
Badminton livescore from BWF World Tour, shuttlecock action tracked in real time
Fortune Rabbit modo turbo: 1200 giros em 25 minutos – quem já deixou rodando?
Jogo do Tigrinho multiplicador aleatório: melhor que respins fixos? Opine!
Jogo do Tigrinho estratégia R$0,20 por giro: 2000 giros e stop no +50% – funciona?
PG Soft no Brasil: suporte 24h em português + Pix + giros grátis = perfeito?
Jogo do Tigrinho 2026: aposta R$1 e ganha 100x – já aconteceu com você?
PG Soft tá liberando cashback 15% todo dia no Fortune Tiger – qual site tá dando mais?
Own goal tracker, unfortunate deflections and mistakes documented live
Possession retention, teams that keep the ball under pressure
Bayern Kompany: Leroy Sané is our funniest player 2026 fun quote
Galaxyno Hit clusters bombásticos: quem prefere grid grande ou 3×3 clássico?
Useful post, helped me a lot. https://sample-site.org/best-offer-733
Jogo do Tigrinho 2026: cartinha misteriosa x10 já virou rotina ou ainda é sonho?
Jogo do Tigrinho Pix R$5: recebe raspadinha com até 150 giros garantidos
Fortune Tiger x Fortune Rabbit: qual você joga mais em 2026? Vote nos comentários!
Fortune Tiger com turbo ligado: quem aguenta 500 giros seguidos sem parar?
Fortune Tiger no Pix R$1: Deposita pouco e já sai girando com bônus insano!
Fortune Tiger modo turbo 6000 giros: quem aguenta?
Wild Bandito sticky wilds: o bandido mexicano tá roubando tudo em 2026!
Fortune Dragon: quem acha que vale testar agora?
PG Slot 2026: qual seu jogo da PG Soft favorito no momento?
Mahjong Ways 2 cascade: quem já conseguiu muitas quedas seguidas?
Fortune Tiger modo auto spin: quem costuma deixar rodando por mais tempo?
PG Soft 2026: qual cassino tá dando mais bônus agora?
Bônus sem depósito Fortune Tiger: qual site ainda libera?
Fortune Rabbit respin: quem já pegou respins longos?
Jogo do Tigrinho 2026: qual estratégia está funcionando melhor para você?
Fortune Rabbit respin: quem já pegou vários respins seguidos?
Wild Bandito sticky wilds: o roubo tá bom demais em 2026!
Algumas plataformas estão destacando torneios semanais com ranking para slots PG Soft.
Fortune Ox voltou ao radar com sequências pesadas no modo turbo.
Jogo do Tigrinho ao vivo voltou a trend por causa da experiência mais dinâmica com transmissão.
A galera experiente está priorizando constância sobre emoção.
Cashback diário virou aliado de quem roda volume com estratégia.
Mahjong Ways 2 permanece como escolha técnica da comunidade.
Fortune Dragon cresce entre quem busca experiência visual intensa.
Bônus sem depósito ainda aparece, mas as melhores ofertas são limitadas e mudam rápido.
Mahjong Ways 2 manteve ritmo forte na faixa de aposta moderada.
Sessões com objetivo claro estão rendendo mais do que maratonas sem controle.
Wild Bandito teve sequência forte em horários de pico.
Mahjong Ways 2 confirmou boa fase em cascatas longas.
Fortune Ox voltou a entregar tela cheia com frequência e chamou atenção da galera no fim da noite.
Mahjong Ways 2 permanece como escolha técnica da comunidade.
Quem evitou chase de perda preservou melhor o saldo.
Comparar cassino por velocidade de saque virou regra.
Banca protegida deu liberdade para decisões melhores.
A semana favoreceu quem jogou com calma e critério.
Teve jogador que entrou com banca pequena no Pix e saiu no lucro sem aumentar risco no meio da sessão.
Caishen Wins max-bet caps during bonus are being reviewed by regulators.
Caishen Wins sustained good performance in short blocks.
Lucky Neko math model discussions are filling community threads daily.
Mahjong Ways 2 stays the technical pick of the the forum.
Bankroll percentage rules are now widely cited in the community.
There were short sessions hitting x200+ on Fortune Mouse without stretching spins beyond plan.
8MBETS is the top choice for online betting in Bangladesh.
Enjoy exclusive bonuses, live betting, and casino games.
Claim bonuses and start betting today!
the forum started tagging Fortune Tiger sessions by intent: test, real, target.
the veteran scene started tagging Fortune Mouse sessions by intent: test, real, target.
Lucky Neko opened the day with an accelerated session and an early bonus.
Caishen Wins sessions are shorter and sharper than ever in 2026.
Fortune Mouse buy-bonus pricing is being scrutinized harder than before.
Live streams of Wild Bandito trended again thanks to the more dynamic broadcast feel.
Fortune Dragon stays strong but the race with Fortune Mouse is more balanced this week.
Fortune Dragon is built for high-volatility profiles and visually intense bonus rounds.
Ganesha Gold showed strength on calculated entries.
the streamer scene shifted from hype reposts to data-driven debate.
Fortune Ox entregou boas janelas para quem entrou no timing certo.
Fortune Ox segue atraindo quem gosta de intensidade.
Fortune Ox in short rotation performed well in fast sessions.
crypto and KYC processing speed are correlated on top casinos.
There were short sessions hitting x200+ on Mahjong Ways 2 without stretching spins beyond plan.
the forum shifted from hype reposts to data-driven debate.
Fortune Ox in short rotation performed well in fast sessions.
Fortune Dragon in turbo mode delivered solid streaks during peak liquidity hours.
Daily cashback became an ally for those rolling volume with strategy.
Mid-stake bands proved the sweet spot for Ganesha Gold this week.
Spinning less and deciding better is paying off.
the streamer scene started tagging Fortune Tiger sessions by intent: test, real, target.
the forum prefers clear T&C explanations over flashy banners.
Treasures of Aztec stays hot in 2026, multipliers showing up early in peak hours sessions.
Bankroll percentage rules are now widely cited in the regular crowd.
Wild Wild Riches is back delivering full-screen wins, drawing attention late night.
RTP claims are being verified by independent session logs.
A $50 PayPal unlocked the bonus round and left budget to test Caishen Wins after.
Demo mode of Fortune Ox is the entry point for risk-aware testers.
the forum prefers clear T&C explanations over flashy banners.
Bonus rollover under 25x is the new the player base preference.
Fortune Tiger stays as the main showcase of the moment.
the player base compares consistency, not just maximum multiplier.
Fortune Ox hit-frequency talk has overtaken jackpot-chase talk.
Solo focus on Mahjong Ways 2 works only when the rhythm allows it.
Fortune Dragon attracts those who like higher volatility.
Fortune Rabbit delivered short respins with good regularity.
e-wallet entry and fast withdrawal still lead the choices.
The week trend: less emotion, more strategy on Fortune Mouse entries.
Players who alternated Fortune Rabbit and Ganesha Gold reported more balanced sessions.
Weekly cashback helped many bankrolls close in the green.
Hype stays high but discipline keeps being the differentiator.
Instant card plus active bonus is still the most demanded combo for fast entries.
Wild Bandito had a strong week with sticky wilds landing on premium pay spots.
Players logging session history are evolving faster on pattern reading.
Mahjong Ways 2 stays the technical pick of the the streamer scene.
O motorista de uber que joga entre corridas fez um print da banca subindo no Santa’s Gift Rush e mandou no grupo. Galera aplaudiu.
Vale a pena comprar bônus no Fortune Rabbit ou espera natural compensa mais?
Crypto Gold de novo? O pessoal das lives não para de postar.
I simply could not depart your website prior to suggesting that I
really enjoyed the standard information an individual provide to your visitors?
Is gonna be back frequently to inspect new posts
Amostra pequena no Heist Stakes engana. Espera 1000 giros antes de tirar conclusão.
Pulando Fortune Ox até o próximo patch.
An interesting discussion is worth comment. I think that you should write more on this topic, it might not be a taboo subject but generally people are not enough to speak on such topics. To the next. Cheers
I genuinely value your work, Great post.
Cena BR rachou em galera do hype e galera do dado. Galera do dado mais quieta, mais rica.
Por que o bônus do Piggy Gold sempre cai quando eu tô prestes a sair? kkkkk
A regular dropped R$50 on Mahjong Ways and walked out with R$2,400. No screenshot, just told us.
Rough math on Fortune Dragon: 96% RTP holds across long enough samples. Short ones lie.
Os clipes de max win do Emperor’s Favour enganam — sessão média é bem mais calma.
Fortune Tiger me tiltou. Saí.
Stop-loss saudável pra slot de alta volatilidade tipo Bikini Paradise? 30%? 40%?
Licença Anjouan? Aceitável. Tô dentro.
Stop-win is harder than stop-loss.
O estudante de direito fechou a sessão de Ninja vs Samurai no green, foi dormir. Disciplina simples assim.
Compra de bônus no Opera Dynasty só faz sentido se o RTP base passar 96.5%.
Wizdom Wonders de novo. De boa.
A streamer com 80 viewers fechou a sessão de Fortune Dragon no green, foi dormir. Disciplina simples assim.
O mod que fixou o tópico do stop-loss perdeu R$420 fazendo chasing no Diamond Cascade, postou o comprovante, assumiu. Respeito.
Define o alvo antes de abrir Dim Sum Prize. Bateu, sai. Não tem negociação.
Bônus do Butterfly Blossom bateu mais ou menos a cada 200-300 giros na minha amostra. Pode variar.
Fechei em R$450. Tranquilo.
Compra de bônus no Butterfly Blossom só faz sentido se o RTP base passar 96.5%.
Quanto tempo vocês dão pro Fortune Ox antes de rotacionar?
Terminando a sessão no Buffalo Win com sorriso no rosto e R$ 200 na conta.
Jogar Rabbit com a cabeça fria é a chave. Puxei milzão e tô fora.
Good beginner explanation of [url=https://staking-polygon.com/what-is-liquid-staking/]what liquid staking is[/url] — useful for understanding staking derivatives and flexible token access.
Foco no longo prazo! agora de noite o Heist Stakes entregou a boa. Saber a hora de parar é a maior habilidade.
Dica: joguem Dragon Hatch agora à tarde. Acabei de pegar um Multiplicador de 50x de 30k no PIX.
A sensação de pedir saque de quinhentão depois de jogar Ratinho é boa demais.
This article is really insightful. By the way, BINGO4D resmi is the top recommended site for secure online slots.
Excellent explanation and well-structured presentation of the topic.
Very well written and packed with useful information.
Um giro de sorte no Ganesha Gold e pum! R$ 2.000. O lucro só é lucro quando tá na conta bancária.
Avisa lá que o Bandito liberou o Multiplicador 100x. Já tirei mais de 10k depois do almoço.
Aí sim. O Treasures of Aztec não para de soltar carta boa. Respeita o stop-win.
Plataforma pagando liso. Saquei R$ 200 do Sugar Rush em 2 minutos via PIX.
Buenas tardes. el Fortune Tiger es real.
Quem joga Bikini Paradise com inteligência não passa aperto.
Buenas tardes. casino online es real.
Harambee Stars betting on 1xBet with M-Pesa. Group stage odds for Harambee Stars look reasonable.
Portugal at 1xBet — mtn momo deposit confirmed. Good odds for WC2026 group stage.
Hey. I’ve been playing for months with online casino and it’s been consistent.
Bom dia, pergunta séria sobre cassino com saque rápido? alguém já ganhou com isso?
Oi gente. Comprei strategia com melhores cassinos porém requer disciplina.
You have observed very interesting points! ps decent internet site. “I’m going to a special place when I die, but I want to make sure my life is special while I’m here.” by Payne Stewart.
Fifty runs needed from the last five overs. Mental!
Grand League stacking for day matches versus night matches — subtle but critical differences.
Every Dream11 user who plays responsibly deserves the best possible experience on a legally compliant platform.
Captain selection in matches where teams field an extra bowler expecting pitch assistance.
Grand League selection bias — why following popular teams leads to lower-value lineups.